AMSY-5, AMSY-6 System Verification SysVeri
36
file: SysVeri1504, page 1/36 Tel: +49 8178 9674-400 Copyright © 2015, Vallen Systeme GmbH email: [email protected] Fax: +49 8178 9674-444 Schäftlarner Weg 26a, 82057 Icking, (Munich), Germany http://www.vallen.de Vallen SysVeri AMSY-5, AMSY-6 System Verification Software User’s Manual Document released in April 2015
Transcript of AMSY-5, AMSY-6 System Verification SysVeri

file: SysVeri1504, page 1/36 Tel: +49 8178 9674-400 Copyright © 2015, Vallen Systeme GmbH email: [email protected] Fax: +49 8178 9674-444 Schäftlarner Weg 26a, 82057 Icking, (Munich), Germany http://www.vallen.de
Vallen SysVeri AMSY-5, AMSY-6 System Verification Software
User’s Manual
Document released in April 2015

Vallen SysVeri – Software for automated AE System Verification
file: SysVeri1504 page 2/36 Tel: +49 8178 9674-400 Copyright © 2015, Vallen Systeme GmbH email: [email protected] Fax: +49 8178 9674-444 Schäftlarner Weg 26a, 82057 Icking, (Munich), Germany http://www.vallen.de
Contents:
1 Purpose ..................................................................................................................................................... 3 2 Requirements ........................................................................................................................................... 4 3 Overview ................................................................................................................................................... 6
3.1 System Verification .............................................................................................................................. 6 3.2 Channel Verification (ASIP-2 or ASIPP) ............................................................................................. 6
4 Basic Procedure for an AE-Channel Verification ................................................................................. 7 5 Hardware Set-up for the automated AE-System Verification .............................................................. 8 6 Software Component Interactions for the automated System and Channel Verification ................ 8
6.1 VeriStimulator ...................................................................................................................................... 9 6.2 Acquisition ........................................................................................................................................... 9 6.3 VeriAnalyzer ........................................................................................................................................ 9
7 AE Test Signals and Result Examples ................................................................................................ 10 7.1 Single Dirac Pulse ............................................................................................................................. 10 7.2 Rectangular-shaped burst ................................................................................................................. 10 7.3 Listing example for the duration variation test................................................................................... 11 7.4 Deviation diagram example for the duration variation test (Test #3) ................................................ 11 7.5 Dirac Pulse Series ............................................................................................................................. 11 7.6 Sine-square-shaped burst ................................................................................................................. 12 7.7 Data example: Frequency and rise time response ........................................................................... 12 7.8 Data example: Amplitude variation, amplitude and energy response ............................................... 13 7.9 Calibration Pulse Response .............................................................................................................. 14 7.10 Continuous sine wave ....................................................................................................................... 14 7.11 Example of a Channel Verification Report ........................................................................................ 15 7.12 Example of a System Verification Report .......................................................................................... 16
8 Templates ............................................................................................................................................... 17 8.1 Template for configuration file VeriCfg.doc ....................................................................................... 17 8.2 Sys.Template.doc and ASIPP.Template.doc .................................................................................... 18 8.3 Customize Templates ........................................................................................................................ 18
9 Installation .............................................................................................................................................. 18 9.1 Drivers for ET2 SysVeri-Adapter (part of SysVeri-Cset-USB) .......................................................... 19
10 SysVeri Step by Step ............................................................................................................................. 19 10.1 Reference Board ............................................................................................................................... 19 10.2 Connections ...................................................................................................................................... 19 10.3 Starting VeriStimulator ...................................................................................................................... 20
10.3.1 Vallen VeriStimulator ........................................................................................................... 20 10.3.2 Make Veri-Folder and create Veri-Files............................................................................... 21
10.4 Edit Configuration File ....................................................................................................................... 21 10.4.1 Configuration Report for more than 42 channels ................................................................ 23
10.5 System Verification ............................................................................................................................ 24 10.5.1 Step 1: PAx, Flags ............................................................................................................... 24 10.5.2 Step 2: Pulser of AMSY-6 ................................................................................................... 25 10.5.3 Step 2: Pulser of AMSY-5 ................................................................................................... 27
10.6 Channel Verification .......................................................................................................................... 29 10.6.1 Step 1: Test@Freq .............................................................................................................. 30 10.6.2 Step 2: 2nd Filter ................................................................................................................... 32 10.6.3 Step 3: Pulse through verification ........................................................................................ 33
10.7 Data Analysis for SysVeri .................................................................................................................. 33 11 Verification Statistics and Pattern Lists .............................................................................................. 34 12 Verification of Transient Recorder ....................................................................................................... 35 13 Vallen VeriStimulator in Manual Mode. ................................................................................................ 35
13.1 Type of function ................................................................................................................................. 36 13.2 Burst Mode Settings .......................................................................................................................... 36
Vallen SysVeri – Software for automated AE System Verification
file: SysVeri1504 page 3/36 Tel: +49 8178 9674-400 Copyright © 2015, Vallen Systeme GmbH email: [email protected] Fax: +49 8178 9674-444 Schäftlarner Weg 26a, 82057 Icking, (Munich), Germany http://www.vallen.de
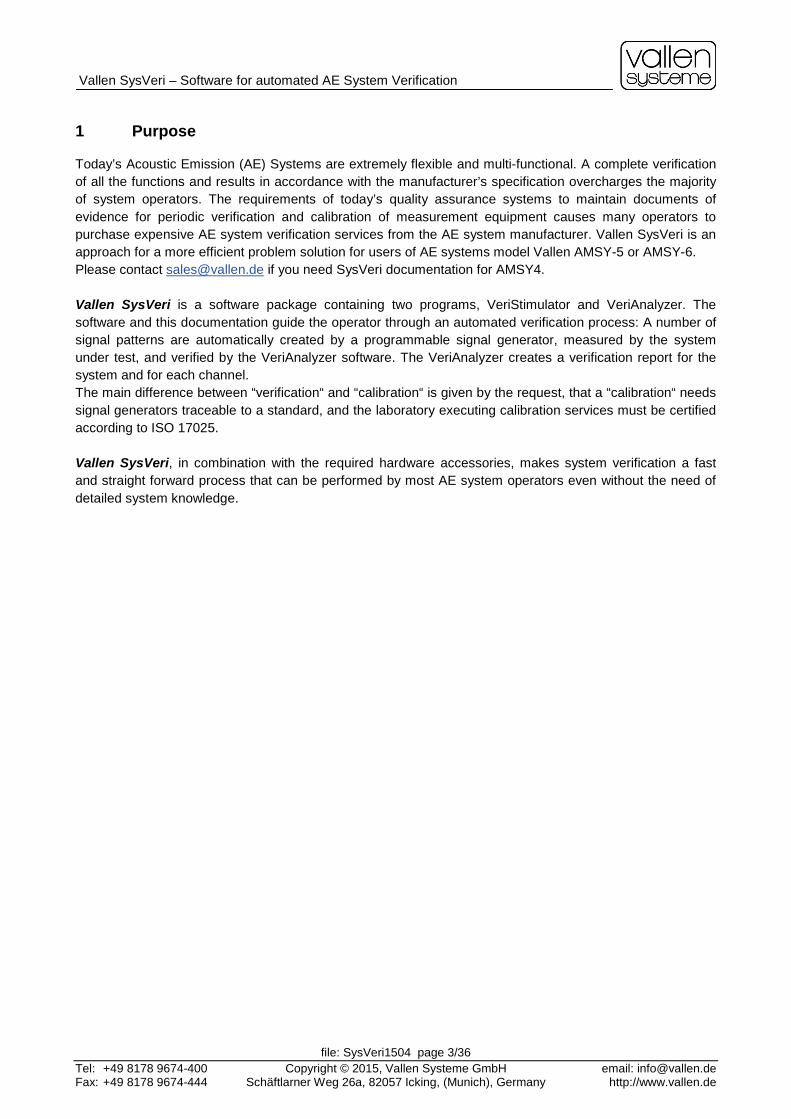
1 Purpose
Today’s Acoustic Emission (AE) Systems are extremely flexible and multi-functional. A complete verification of all the functions and results in accordance with the manufacturer’s specification overcharges the majority of system operators. The requirements of today’s quality assurance systems to maintain documents of evidence for periodic verification and calibration of measurement equipment causes many operators to purchase expensive AE system verification services from the AE system manufacturer. Vallen SysVeri is an approach for a more efficient problem solution for users of AE systems model Vallen AMSY-5 or AMSY-6. Please contact [email protected] if you need SysVeri documentation for AMSY4. Vallen SysVeri is a software package containing two programs, VeriStimulator and VeriAnalyzer. The software and this documentation guide the operator through an automated verification process: A number of signal patterns are automatically created by a programmable signal generator, measured by the system under test, and verified by the VeriAnalyzer software. The VeriAnalyzer creates a verification report for the system and for each channel. The main difference between “verification“ and “calibration“ is given by the request, that a “calibration“ needs signal generators traceable to a standard, and the laboratory executing calibration services must be certified according to ISO 17025. Vallen SysVeri, in combination with the required hardware accessories, makes system verification a fast and straight forward process that can be performed by most AE system operators even without the need of detailed system knowledge.

Vallen SysVeri – Software for automated AE System Verification
file: SysVeri1504 page 4/36 Tel: +49 8178 9674-400 Copyright © 2015, Vallen Systeme GmbH email: [email protected] Fax: +49 8178 9674-444 Schäftlarner Weg 26a, 82057 Icking, (Munich), Germany http://www.vallen.de
2 Requirements
SysVeri requires a fully operational AE system model AMSY-5 or AMSY-6. The PC must have the following software installed: • Microsoft Word • Vallen AE-Suite software release for AMSY-6 R2011.0303 or later, for AMSY-5 R2005.1125 or later with
software Key ‘SysVeri’ enabled. If function generator Keysight 335xxB family is used, R2014.0414 or later is required. If special adapter SysVeri-Cset-USB is used, R2013.0509 or later is required. For more information please see further below.
For system verification, the following is also required: • A programmable DC-calibrator with RS232 cable (CbD in Figure 2) to stimulate the parametric inputs.
SysVeri-software supports control of model “Martel M2000” over RS232. Software also supports the use of any manually controlled DC-Calibrator, e.g Fluke 715 from Fluke or MIVC222-HPII from Martel. Required accuracy: 0,015% at 10V, output range: 0 to +10V.
• BNC cable, BNC-T-connectors and adapter for the calibrator output (usually 4mm banana sockets) to connect the DC-output voltage of the DC-calibrator to all parametric inputs in parallel.
• An already verified Reference Board (verified with AE-channel verification) to measure the calibration pulse: a) ASIP-2/A or ASIP-2/S board (with software releases higher than R2008.0815), or b) ASIPP board with dummy high-pass (HP4-dum) and dummy low-pass (TP4-dum) filter module.
For AE-channel verification the following is also required: • A programmable Arbitrary Function Generator, to stimulate programmed waveforms of AE bursts.
SysVeri-software supports control of model o Keysight (former Agilent) 335xxB family (for models 33509B/33510B the optional arbitrary
waveform must be available) over Ethernet or USB. Support of these models since SW Release R2014.0414. Hint for ASIPP (single channel signal pre-processing board, not supported with AMSY-6) users: for verification of AMSY-5 with ASIPP boards you have to use software-release R2012.0509.x (last release supporting ASIPP boards) or earlier. To be able to use the new Keysight 335xxB family in this case, you have to use SysVeri programs VeriStimulator and VeriAnalyzer (veristim.exe and veriana.exe from directory C:\Vallen\SysVeri) from release R2014.0414 or later. For this purpose the exe-files and the file VeriDefault.pridb are copied from R2014.0414 or later to C:\Vallen\SysVeri. This has no impact on normal acquisition because these files are only used for system verification. Please contact the sales team ([email protected]) in case you need more information or support in this case.
o “Keysight (former Agilent) 33220A” over Ethernet or USB, o “Keysight (former Agilent) 33120A” over RS232
• An appropriate cable to connect function generator with PC (USB, Ethernet, or RS232), cable “CbF” in Figure 2.
• With ASIP-2: DC-Bloc1: DC-Blocker for blocking the DC voltage supplied by the channel to protect the function generator
• A BNC cable to connect the function generator output (over a DC-Blocker for ASIP-2 verification) to the AC-input of one AE channel at a time.

Vallen SysVeri – Software for automated AE System Verification
file: SysVeri1504 page 5/36 Tel: +49 8178 9674-400 Copyright © 2015, Vallen Systeme GmbH email: [email protected] Fax: +49 8178 9674-444 Schäftlarner Weg 26a, 82057 Icking, (Munich), Germany http://www.vallen.de
Further on an endtest adapter and cable set SysVeri-CSet or SysVeri-CSet-USB is needed to connect alarm- resp. externals interface of AMSY with computer. The PC must offer a sufficient number of free USB / Ethernet/ LPTx / RS232 ports to control
• the Sysveri-Adapter ET1 (LPT interface) or ET2 (USB interface), • the Martel DC Calibrator (RS232) and • the function generator (USB, Ethernet, or RS232).
If two RS232 devices are to be used and there is only one free RS232 port, SysVeri can be used with very few restrictions. Requirements for using SysVeri-Cset-USB (USB interface) Vallen AE-Suite software release R2013.0809 or later is needed. With this software release the single channel ASIPP boards are no more supported. For verification of AMSY-5 with ASIPP boards you have to use software-release R2012.0509.x (last release supporting ASIPP boards) or earlier. Only the specific SysVeri programs VeriStimulator and VeriAnalyzer (veristim.exe and veriana.exe from directory C:\Vallen\SysVeri) are used from release R2013.0509 or later. For this purpose the exe-files and the file VeriDefault.pridb are copied from R2013.0509 or later to C:\Vallen\SysVeri. This has no impact on normal acquisition because these files are only used for system verification. Please contact the sales team ([email protected]) in case you need more information. Note on using ET1 (LPT interface) LPT1 (parallel port of computer) is only needed if SysVeri adapter ET1 is used. In case you still use an old printer using the LPT interface for connection to computer and the computer offers only one LPT interface: since the ET1 is only needed during data acquisition one can use the LPT interface first for the ET1 and later on for the printer to print our verification reports. Reconfiguration/disabling of printer driver might be necessary while ET1 is used. In case of problems/questions please contact the sales team ([email protected]). If there is no LPT1 interface (parallel port) on your computer you can use as alternative the end test adapter ET2 which uses the USB interface of the computer.
The interconnection of the following parts can be seen in Figure 2 Abbr: Description: ET1: SysVeri-Adapter “ET1” using LPT interface; we offer as alternative ET2 adapter using the USB
interface because LPT interface is often no more available on new computers. ET2: SysVeri-Adapter ET2, using USB interface, including USB cable for connection to computer.
This is an alternative to ET1 introduced in year 2014. CbP: Printer cable (Sub-D-25-male to Sub-D-25-male), only needed for ET1 for connection ET1 to
computer. CbE: Cable to connect ET1 resp. ET2 with externals connector of AMSY.
In case of ET1: 16-pole flat female to SUB-D-15-female. In case of ET2: 26-pole flat female to SUB-D-15-female (one cable for CbE and CbA).
CbA: Cable to connect ET1 resp. ET2 with alarm connector of AMSY. In case of ET1: 10-pole flat female to SUB-D-9-male. In case of ET2: 26-pole flat female to SUB-D-9-male (one cable for CbE and CbA).
CbD: cable to connect the DC calibrator Martel M200x with the RS232 of the control PC CbF: cable to connect the function generator with the control PC, either RS232 or USB or Ethernet SysVeri-Cset
Cable set for SysVeri, consists of ET1 + CbP + CbA + CbE + 1,5m BNC. The BNC cable is needed to connect function generator with ASIP-channel.
SysVeri-Cset-USB
SysVeri-adapter ET2 and Cable set for SysVeri (AMSY-5, AMSY-6 system verification) to allow control of AMSY-5/6 external- and alarm-interface over USB. Consists of ET2, CbA/CbE cable, USB cable, 1,5 m BNC cable. The 1,5 m BNC cable is used to connect ASIP-2 board with function generator. Requires software release R2013.0809 or later (see previous section for more information).

Vallen SysVeri – Software for automated AE System Verification
file: SysVeri1504 page 6/36 Tel: +49 8178 9674-400 Copyright © 2015, Vallen Systeme GmbH email: [email protected] Fax: +49 8178 9674-444 Schäftlarner Weg 26a, 82057 Icking, (Munich), Germany http://www.vallen.de
3 Overview
System Verification by using Vallen SysVeri is grouped into the following steps: AE system verification, and AE-channel verification.
3.1 System Verification
This step comprises the following verifications: Front panel - LEDs, external in-/outputs and parametric flags for “Alarm“, “Warning“, “SP0“, and
“SP1“. Front panel - LED, external input and parametric flag for “Record Disable“. Measurement accuracy of external parameter inputs PA0 to PAx, x depends on system configuration
and will be in range 1 to 7. Amplitude of calibration pulser, under manual and software control.
3.2 Channel Verification (ASIP-2 or ASIPP)
This step comprises the following verifications: Channel internal timing parameters “Duration Discrimination Time”, “Rearm Time”; The burst-parameters amplitude, rise-time, duration, counts, energy, cascaded hits, cascaded
counts, cascaded energy; The time driven parameters RMS, floating threshold.

Vallen SysVeri – Software for automated AE System Verification
file: SysVeri1504 page 7/36 Tel: +49 8178 9674-400 Copyright © 2015, Vallen Systeme GmbH email: [email protected] Fax: +49 8178 9674-444 Schäftlarner Weg 26a, 82057 Icking, (Munich), Germany http://www.vallen.de
4 Basic Procedure for an AE-Channel Verification
Figure 1 illustrates the basic procedure for a manually performed AE channel verification: There must be a predefined list of test patterns to be verified. A stimulus, usually an AE calibrator, must be set to create the predefined test patterns, step by step. Each pattern is fed into the equipment under verification, which converts the test signal to results. The operator reads the results, records them in a report and checks whether or not they meet the acceptance criteria. Then the next test pattern will be processed until the list is completed. Finally, the channel will be accepted, if all results meet the acceptance criteria, otherwise it will be rejected and needs repair or at least re-adjustment. The automated AE-channel verification, as well as the verification of other parts of the system, will basically follow the same procedure.
Figure 1: Basic Procedure for AE Channel Verification

file: SysVeri1504, page 8/36 Tel: +49 8178 9674-400 Copyright © 2015, Vallen Systeme GmbH email: [email protected] Fax: +49 8178 9674-444 Schäftlarner Weg 26a, 82057 Icking, (Munich), Germany http://www.vallen.de
5 Hardware Set-up for the automated AE-System Verification
Figure 2: SysVeri - Hardware Setup for an automated AE-System Verification Figure 2 shows the hardware setup for an automated AE-system verification. The PC controls the AE-system as usual. In case of AMSY-6 the connection to PC is done with an USB-cable, in case of AMSY-5 over a PCI-interface board (ASyC). For the channel verification, the PC also controls an arbitrary function generator (see chapter “2 Requirements” for supported models) to generate the pre-defined AE test patterns. The PC controls AE-system inputs for data recording control, for a parametric counter and for additional I/O signals, over an ET1 or ET2 Adapter. For the verification of the parametric inputs, a DC-calibrator is controlled over a RS232 serial interface. Attention: to protect the function generator against possible 28V DC output voltage of the AE-channel a DC-blocker should be used (one DC-blocker DC-bloc1 comes with each AMSY-6 delivery in the handbook).
6 Software Component Interactions for the automated System and Channel Verification
The SysVeri software package consists of the programs VeriStimulator and VeriAnalyzer. VeriStimulator guides the operator through the data acquisition step where certain test signals are generated and recorded by the AMSY under test using the normal Vallen acquisition program. After the data acquisition step VeriAnalyzer compares the measured data with expected values and generates reports.
Arbitrary Function
Generator
Keysight e.g.
33511B/ 33220A
Adapter ET1 or ET2
AMSY-5 or AMSY-6
Alarm Connector for digital I/O: (Alarm, Warning,…)
Externals Connector: Parametric Counter, digitally
controlled
Analog parametric inputs
AE-channels: ASIP-2
DC Calibrator
Martel
M2000A
CbF
CBL1 (AMSY-5) or USB (AMSY-6)
CbA
CbE
BNC
CbP (ET1) or USB (ET2)
CbD
Personal Computer / Laptop
LPT1 / USB / Ethernet / RS232 ASyC / USB RS232
BNC
DC-blocker recommended to protect function generator

Vallen SysVeri – Software for automated AE System Verification
file: SysVeri1504 page 9/36 Tel: +49 8178 9674-400 Copyright © 2015, Vallen Systeme GmbH email: [email protected] Fax: +49 8178 9674-444 Schäftlarner Weg 26a, 82057 Icking, (Munich), Germany http://www.vallen.de
VeriStimulator(SW)
DC-calibrator(automatic or
manual control)
Function Generator
Controltest pattern
AMSY
Control: PCDT to identify test stepDigital I/O to enable/disable recording
PRIDB / VAC-File(Acquisition
settings)
VallenAcquisition
(SW)Generate
Channel setup, pulser setup, start measurement, control pulser
Template for configuration report
(edit manually)
PRIDB/VAC-Fileof system verif.
(data-file)
PRIDB/VAC-Fileof channel verif.
(data-file)
Connect to parametric inputs
ControlVoltage
DataAcquisit.
VeriAnalyzer (SW)(Compare data with
expected values)
System Verification Report
Channel Verification Report
DataAnalysis
Generate
Connect to chan. with DC-blocker
Figure 3: software structure The figure above visualizes the software components (marked in yellow) used for system and channel verification together with their main interfaces. They are described in more detail in next sections. 6.1 VeriStimulator
This program controls the DC-calibrator, the arbitrary function generator and the parametric counter. The DC-Calibrator stimulates the analog inputs for external parameters, the function generator generates predefined test patterns, and the parametric counter identifies each test pattern on the data file for later analysis. The program guides the operator in a step to step approach to make the needed connections and settings in the acquisition software.
6.2 Acquisition
This is the normal data acquisition program, which controls the AE system, receives the measured data and stores it on hard disk. It doesn’t know that it is used in a verification mode. It performs as usual. This is possible due to the identification of each test pattern by a unique parametric counter value stimulated by VeriStimulator.
6.3 VeriAnalyzer
This program is called after all pattern stimulation for all parametric inputs and all AE channels have been completed. It reads the acquired data from hard disk, identifies each pattern by the parametric counter data and checks whether or not the measurements meet the acceptance criteria. It creates an easy readable system report and one report page per AE-channel.

Vallen SysVeri – Software for automated AE System Verification
file: SysVeri1504 page 10/36 Tel: +49 8178 9674-400 Copyright © 2015, Vallen Systeme GmbH email: [email protected] Fax: +49 8178 9674-444 Schäftlarner Weg 26a, 82057 Icking, (Munich), Germany http://www.vallen.de
7 AE Test Signals and Result Examples
This chapter gives technical details like the used test patterns and background information about the verification procedure. The automated verification process uses the following kinds of test signals which are stimulated by the arbitrary function generator under software control:
7.1 Single Dirac Pulse
This is a sharp pulse (Figure 4), used to trigger a hit for passing administrative information (in the parametric counter PCTD) to the VeriAnalyzer software. Due to the wideband characteristics of a pulse, it will pass each frequency filter installed in the AE channel. Such pulses are used To indicate the data format (version id) of
VeriStimulator, To open or close a certain test series (e.g. the
variation of a certain AE parameter).
Figure 4: Dirac Pulse, 50ns width (at 50% amp.)
See set 633 in Figure 7. PCTD=18 initiates a series of duration varied hits. PCTD=2 closes the series, PCTD=70 to 86 point into a “should be” table of durations for this verification step.
Figure 5: ASIPP response (95-850kHz) to Dirac Pulse input. Left in time domain, right the FFT. Rectangular-shaped burst Used to vary Duration and to check the parameters Duration, Energy, Counts. Problems: Settling behavior with overshoot at the beginning, and the ring-down behavior at the end (see Figure 6) influence the AE parameters Peak Amplitude, Risetime, Duration, Energy, Counts. Needs some intelligent correction.
Figure 6: : ASIPP response (95-850kHz) to rectangular shaped sine wave burst.

Vallen SysVeri – Software for automated AE System Verification
file: SysVeri1504 page 11/36 Tel: +49 8178 9674-400 Copyright © 2015, Vallen Systeme GmbH email: [email protected] Fax: +49 8178 9674-444 Schäftlarner Weg 26a, 82057 Icking, (Munich), Germany http://www.vallen.de
7.2 Listing example for the duration variation test
Id DSET CHAN PCTD A R D E CNTS Comment: [dB] [µs] [µs] [eu] Ht 633 1 18 81,0 1,2 42,8 885E01 5 Dirac: Open Ht 744 1 70 61,4 9,0 225,4 106E02 43 Testptrn #1 Ht 817 1 72 61,4 9,0 449,6 219E02 88 Testptrn #2 Ht 891 1 74 61,4 9,0 919,6 462E02 182 Testptrn #3 Ht 971 1 76 61,4 9,0 1919,2 979E02 382 Testptrn #4 Ht 1053 1 78 61,4 9,0 4024,0 207E03 802 Testptrn #5 Ht 1126 1 80 61,4 9,0 8483,2 437E03 1695 Testptrn #6 Ht 1199 1 82 61,4 9,0 17907,2 925E03 3580 Testptrn #7 Ht 1290 1 84 61,1 9,0 37836,8 195E04 7568 Testptrn #8 Ht 1362 1 86 61,4 9,0 80000,0 413E04 16000 Testptrn #9 Ht 1492 1 2 75,0 1,2 36,4 220E01 4 Dirac: Close Figure 7: Listing of a test with duration variations (initiated by PCTD=18 and closed by PCTD=2) see signal 3.1 above. PCTD = parametric counter digitally controlled. Each PCTD value identifies a test signal and the corresponding “should be” results
7.3 Deviation diagram example for the duration variation test (Test #3)
The verification report shows a number of ”Deviation Diagrams”, which contain graphical and numerical results. Test 3: Duration variation: Frequency: 200KHz Test 3 passed
Dur-deviation [%] vs. D [µs] max.: 0,9% (Offset 20.2 µs) allowed: 5,0%
Eny-deviation [%] vs E [eu] max.: 0,1% (Offset -28,6 eu) allowed: 5.0%
Cts deviation [%] vs. Cts max: 0.0% (% above1) Offset: 2 Cts allowed: 5.0%
Figure 8: Results in Figure 7 shown in three ”deviation” diagrams.
The horizontal position of each dot in a diagram represents a ”should be” value, and the vertical position represents the deviation of the measured value from a ”should be” value, in percent or dB as given in the legend. The meaning of each diagram (axis results) and some additional numerical values are shown in different parts of the legend. The ”Offsets” indicated in the legends of Figure 8 were determined by the deviation of the first (shortest) measured signal from the ”should be” values and applied to all 9 signals to correct the influence of the settling behavior and ring down effects.
7.4 Dirac Pulse Series
Series of short pulses are used to check duration discrimination and rearm timing (internal time parameters).
Figure 9: Response to a series of Dirac Pulses

Vallen SysVeri – Software for automated AE System Verification
file: SysVeri1504 page 12/36 Tel: +49 8178 9674-400 Copyright © 2015, Vallen Systeme GmbH email: [email protected] Fax: +49 8178 9674-444 Schäftlarner Weg 26a, 82057 Icking, (Munich), Germany http://www.vallen.de
7.5 Sine-square-shaped burst
This is a sine wave burst in an envelope of a sine-square shape (Figure 10). This burst consist of 48 samples/sinewave and 41 sine waves for the burst, this gives a sequence of 1968 samples for the complete test signal. These sine-square-shaped test signals are used with frequency variation at a fixed amplitude to measure Frequency response (no need for transient recorder), Rise-time response; and with amplitude variation at fixed frequency to measure Peak amplitude response (linearity) Energy response (squared or non-squared).
Figure 10: Response to a sine-square-shaped burst. The impurities in the FFT (above 220kHz, right diagram) are produced by the function generator but do not disturb the results.
7.6 Data example: Frequency and rise time response
Figure 11 shows results of test #4, where test signals of different frequencies (sine-square-shaped) were used. The upper diagram shows dBAE values over the frequency. Above the diagram, the software reports the 3db bandwidth limits. The lower diagram shows the rise time-deviation vs. rise time (the measured vs. the should be values) of those signals that were measured with an amplitude above maximum – 1dB. Since the rise time is defined as the time from first threshold crossing to peak amplitude detection, and the sine-square shaped test signal begins very smoothly, noise may contribute to some uncertainty of the exact time of the 1st threshold crossing. As can be seen in Figure 10, the peak time is also difficult to determine. Due to these inherent uncertainties, a deviation of 10% for the rise time is shown as the allowed tolerance.
Test 4: Frequency Response Hi: 94,3- 8
A[dB] vs. f [kHz], HP: 095kHz, Hi-Flt-Pts:26, min: 5
Risetime deviation [%] vs R [µs] (Amax-1dB) max: 2,9% (% above: 2,0µs) R(shouldbe) = 19/f allowed: 10,0% Figure 11: Results of frequency variation: Frequency response and rise time deviation
Vallen SysVeri – Software for automated AE System Verification
file: SysVeri1504 page 13/36 Tel: +49 8178 9674-400 Copyright © 2015, Vallen Systeme GmbH email: [email protected] Fax: +49 8178 9674-444 Schäftlarner Weg 26a, 82057 Icking, (Munich), Germany http://www.vallen.de
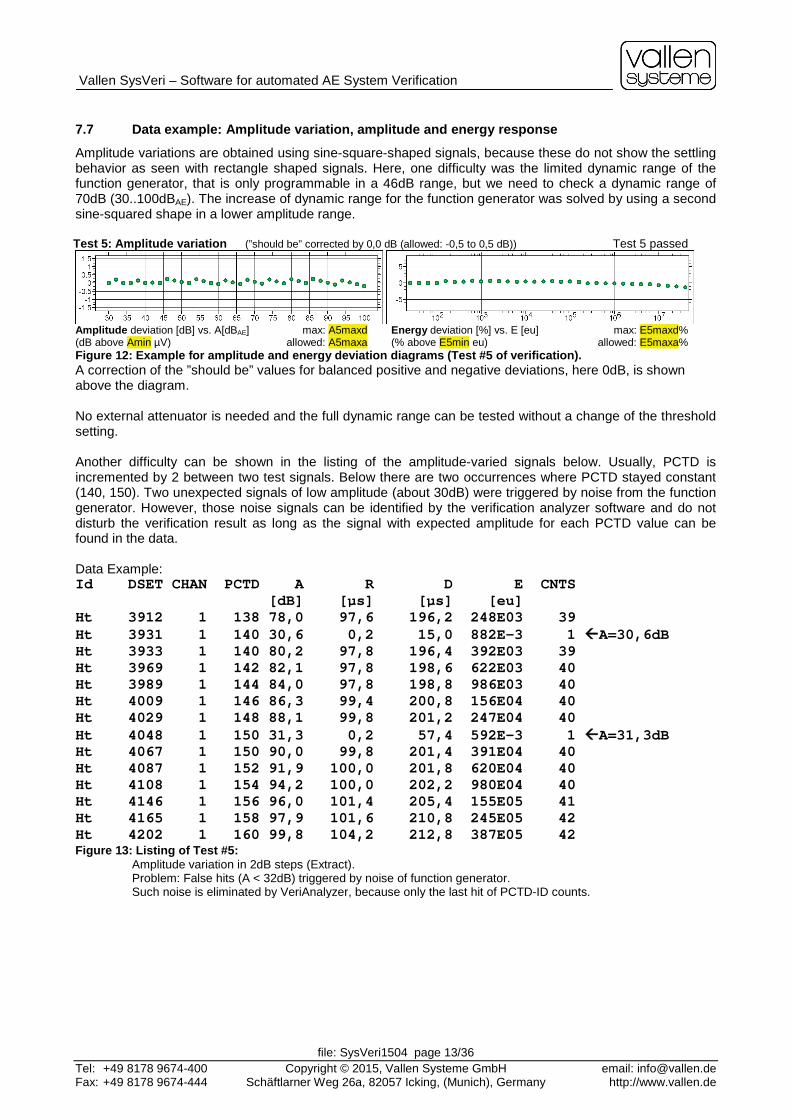
7.7 Data example: Amplitude variation, amplitude and energy response
Amplitude variations are obtained using sine-square-shaped signals, because these do not show the settling behavior as seen with rectangle shaped signals. Here, one difficulty was the limited dynamic range of the function generator, that is only programmable in a 46dB range, but we need to check a dynamic range of 70dB (30..100dBAE). The increase of dynamic range for the function generator was solved by using a second sine-squared shape in a lower amplitude range. Test 5: Amplitude variation (”should be” corrected by 0,0 dB (allowed: -0,5 to 0,5 dB)) Test 5 passed
Amplitude deviation [dB] vs. A[dBAE] max: A5maxd (dB above Amin µV) allowed: A5maxa
Energy deviation [%] vs. E [eu] max: E5maxd% (% above E5min eu) allowed: E5maxa%
Figure 12: Example for amplitude and energy deviation diagrams (Test #5 of verification). A correction of the ”should be” values for balanced positive and negative deviations, here 0dB, is shown above the diagram. No external attenuator is needed and the full dynamic range can be tested without a change of the threshold setting. Another difficulty can be shown in the listing of the amplitude-varied signals below. Usually, PCTD is incremented by 2 between two test signals. Below there are two occurrences where PCTD stayed constant (140, 150). Two unexpected signals of low amplitude (about 30dB) were triggered by noise from the function generator. However, those noise signals can be identified by the verification analyzer software and do not disturb the verification result as long as the signal with expected amplitude for each PCTD value can be found in the data. Data Example: Id DSET CHAN PCTD A R D E CNTS [dB] [µs] [µs] [eu] Ht 3912 1 138 78,0 97,6 196,2 248E03 39 Ht 3931 1 140 30,6 0,2 15,0 882E-3 1 A=30,6dB Ht 3933 1 140 80,2 97,8 196,4 392E03 39 Ht 3969 1 142 82,1 97,8 198,6 622E03 40 Ht 3989 1 144 84,0 97,8 198,8 986E03 40 Ht 4009 1 146 86,3 99,4 200,8 156E04 40 Ht 4029 1 148 88,1 99,8 201,2 247E04 40 Ht 4048 1 150 31,3 0,2 57,4 592E-3 1 A=31,3dB Ht 4067 1 150 90,0 99,8 201,4 391E04 40 Ht 4087 1 152 91,9 100,0 201,8 620E04 40 Ht 4108 1 154 94,2 100,0 202,2 980E04 40 Ht 4146 1 156 96,0 101,4 205,4 155E05 41 Ht 4165 1 158 97,9 101,6 210,8 245E05 42 Ht 4202 1 160 99,8 104,2 212,8 387E05 42 Figure 13: Listing of Test #5:
Amplitude variation in 2dB steps (Extract). Problem: False hits (A < 32dB) triggered by noise of function generator. Such noise is eliminated by VeriAnalyzer, because only the last hit of PCTD-ID counts.

Vallen SysVeri – Software for automated AE System Verification
file: SysVeri1504 page 14/36 Tel: +49 8178 9674-400 Copyright © 2015, Vallen Systeme GmbH email: [email protected] Fax: +49 8178 9674-444 Schäftlarner Weg 26a, 82057 Icking, (Munich), Germany http://www.vallen.de
Figure 14: Calibration Pulse Response Figure 15: Continuous sine wave
7.8 Calibration Pulse Response
This test signal (Figure 14 shows the response) comes from the system internal calibration pulse generator and is only used to check whether the calibration pulse works as expected. There is no accuracy check required, because the pulse signal is checked by using a Reference Board (see section 3.1) during the system verification run. A Reference Board is needed because the filter configuration of the ASIP board can have a big influence on the measured calibration pulse amplitude.
7.9 Continuous sine wave
This test signal (Figure 15) is used to verify the accuracy of background noise measurement and the floating threshold behavior. Due to the limited dynamic range of the function generator, 300µVRMS is the lowest level that can be verified. Test 6: RMSS and Floating Threshold (continuous signal) (corrected as with Test 5) Test 6 passed
RMSS deviation [%] vs. RMSS [µV] max: 1,4% (% above 2,0 µV) allowed: 5,0%
Floating Threshold deviation [dB] vs THR[dBAE] max: 0,3 (dB above 1,0 µV) TNR:4,2 allowed: 1,0
Figure 16: Result of verification of background noise and floating threshold behavior (Test #6)
Vallen SysVeri – Software for automated AE System Verification
file: SysVeri1504 page 15/36 Tel: +49 8178 9674-400 Copyright © 2015, Vallen Systeme GmbH email: [email protected] Fax: +49 8178 9674-444 Schäftlarner Weg 26a, 82057 Icking, (Munich), Germany http://www.vallen.de
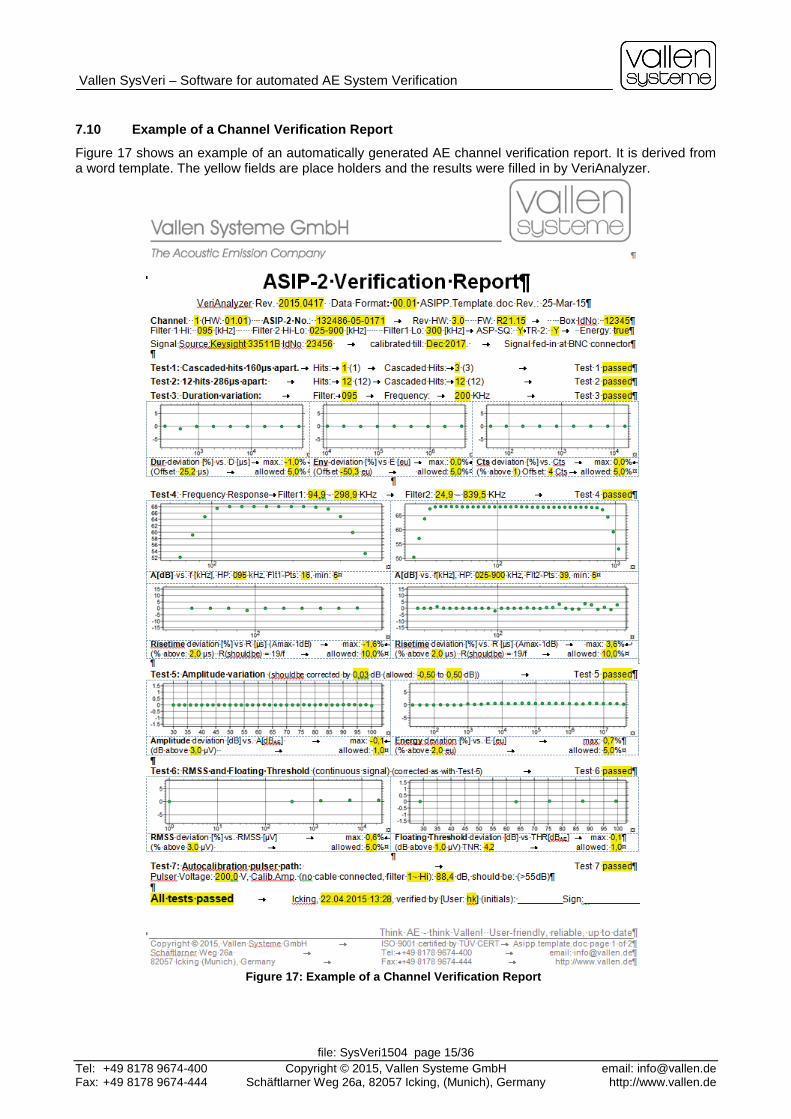
7.10 Example of a Channel Verification Report
Figure 17 shows an example of an automatically generated AE channel verification report. It is derived from a word template. The yellow fields are place holders and the results were filled in by VeriAnalyzer.
Figure 17: Example of a Channel Verification Report

Vallen SysVeri – Software for automated AE System Verification
file: SysVeri1504 page 16/36 Tel: +49 8178 9674-400 Copyright © 2015, Vallen Systeme GmbH email: [email protected] Fax: +49 8178 9674-444 Schäftlarner Weg 26a, 82057 Icking, (Munich), Germany http://www.vallen.de
7.11 Example of a System Verification Report
Figure 18: Example of a System Verification Report

Vallen SysVeri – Software for automated AE System Verification
file: SysVeri1504 page 17/36 Tel: +49 8178 9674-400 Copyright © 2015, Vallen Systeme GmbH email: [email protected] Fax: +49 8178 9674-444 Schäftlarner Weg 26a, 82057 Icking, (Munich), Germany http://www.vallen.de
After measuring the calibration pulse by using a Reference Board, the correct operation and routing of the 4 signals at the alarm connector (Alarm, Warning, SP0, SP1) are verified. Then VeriStimulator controls a programmable DC-Calibrator (model Martel M2000) to generate accurate DC voltages that are fed into all parametric inputs in parallel. The green circles in the diagrams above indicate the deviation of the measured from the ‘should be’ values. The red squares indicate the peak-peak noise for each PA channel.
8 Templates
SysVeri interacts with a number of predefined Microsoft Word templates that are described hereafter. These templates are installed in subdirectory c:\vallen\SysVeri by the Vallen AE-Suite installation program.
8.1 Template for configuration file VeriCfg.doc
The template VeriCfg.doc resides on the application folder c:\vallen\SysVeri and is copied to a user defined project folder and named by VeriStimulator when pressing the button “Create Veri-files …”. The operator must then fill-in the details of his test-configuration. VeriCfg.doc is used as a SOURCE for VeriAnalyzer. It contains all configuration information relevant for the verification process, such as: the type, ID number, and current address of the AE system boxes in which the AE channels are
installed for verification , The number of parametric inputs to be verified, The address of the Reference Board (see para 3.1) to be used for pulser verification the identification and recalibration dates of the used test signal generators,
and for each AE channel: the ID number and current address of each AE channel plug-in, the channel’s hardware and firmware revision, the installed options (transient recorder, for ASIPP squarer and bandwidth limits of the frequency
filters).
Figure 19: Extract of a Configuration Report (VeriCfg.doc) Filled in by the operator with details about the devices used for test signal generation, the configuration of the system and the channels under verification.

Vallen SysVeri – Software for automated AE System Verification
file: SysVeri1504 page 18/36 Tel: +49 8178 9674-400 Copyright © 2015, Vallen Systeme GmbH email: [email protected] Fax: +49 8178 9674-444 Schäftlarner Weg 26a, 82057 Icking, (Munich), Germany http://www.vallen.de
Details, such as HW (hardware revision) and FW (firmware revision) can be taken from the Vallen Systeme Configuration Sheet that comes with each system or from the software tool HW Reporter which you find on the Vallen Control Panel.
8.2 Sys.Template.doc and ASIPP.Template.doc
Sys.Template.doc is a Word file used by “VeriAnalyzer” for the generation of the System Verification Report. ASIPP.Template.doc is used for channel report generation (ASIPP as well as ASIP-2). The templates are installed in c:\vallen\SysVeri.
8.3 Customize Templates
Sys.Template.doc and ASIPP.Template.doc contain text marks and/or diagram place holders where VeriAnalyzer inserts results in numerical or graphical presentation. The Vallen header/footer and company logo can be replaced by that of the company performing the verification: make a backup of ASIPP.Template.doc from c:\vallen\SysVeri\ open a new, empty Word document, insert the desired header/footer and make sure (page format)
there is at least 17cm free width and 24,5cm free height for printouts. open C:\vallen\SysVeri\ASIPP.Template.doc and copy the body beginning with "Verification
Report..." till "Sign___" into the new document. finally replace ASIPP.Template.doc in c:\vallen\SysVeri\ by the new document.
Then reports will be created with user-defined header/footer. None of the files should be write-protected.
9 Installation
IMPORTANT ! If you have modified templates (Sys.Template.doc, ASIPP.Template.doc, see 8.3): make a backup BEFORE starting a new installation because the existing templates are deleted during installation. After installing the software please make a backup of ASIPP.Template.doc from c:\vallen\SysVeri\ open your modified template (from backup). open C:\vallen\SysVeri\ASIPP.Template.doc and copy the body beginning with "Verification
Report..." till "Sign___" into your modified template. finally replace ASIPP.Template.doc in c:\vallen\SysVeri\ by the new document.
Vallen SysVeri is automatically installed with the Vallen AE Suite Software. The operation needs the SysVeri key enabled on the user’s KeyFile. VeriStimulator and VeriAnalyzer can be started from the Vallen Control Panel, Tab “Verification Tools”. If the function generator shall be controlled over an USB interface, the Keysight (former Agilent) VISA drivers must be installed. Model 33220 and 335xx can alternatively be controlled over Network, and Model 33120 can be controlled over RS232, both without a need to install the VISA drivers. The IP Address of the function generator can be obtained from its menu.
Each time VeriStimulator starts and finds a supported function generator, you will see the window in Figure 20. This is a reminder, that for the first time of using such a function generator, three waveforms must be loaded into the function generator’s non-volatile memory. Click on each of the three blue items “Upload…” on the left side of the VeriStimulator menu (see
Figure 21). This is only needed once per function generator, or, when one has overwritten one of the waveforms by another one. The Martel DC Calibrator Model M2000 can only be controlled over RS232.
Figure 20: Reminder that waveforms must be loaded.

Vallen SysVeri – Software for automated AE System Verification
file: SysVeri1504 page 19/36 Tel: +49 8178 9674-400 Copyright © 2015, Vallen Systeme GmbH email: [email protected] Fax: +49 8178 9674-444 Schäftlarner Weg 26a, 82057 Icking, (Munich), Germany http://www.vallen.de
VeriStimulator searches for both, the function generator and the DC Calibrator on all available interfaces. For offline use of SysVeri, no function generator and no DC Calibrator is needed.
9.1 Drivers for ET2 SysVeri-Adapter (part of SysVeri-Cset-USB)
After Installation of the Vallen AE-Suite software the driver is located in c:\vallen\drivers\ET2. The driver must be installed once manually: please plug in the ET2 to an USB port of your computer with installed Vallen AE Suite. When the new hardware is detected you are usually prompted to automatically search for a driver or to specify the driver location. Select to specify the driver location and in the following dialog browse to the folder (c:\vallen\drivers\ET2) containing the driver. In case you are not prompted for a driver when connecting the SysVeri-Cset-USB please check in the Windows device manager for an “other device”/”ET2 Adapter”. In this case right-click on the unknown device and select the option to install the driver and select the path to the driver as c:\vallen\drivers\ET2. After installation of the driver the “ET2 Adapter” should show up as an USB-controller.
10 SysVeri Step by Step
10.1 Reference Board
A reference board is needed for verification of the pulser (second step of the System Verification). As reference board you can use one of your normal ASIP-2/ASIPP boards which was already verified by the channel verification.
ASIP-2 as reference board In case of an ASIP-2 as reference board make sure that it is installed in the last system box as last board. Alternatively you can choose the last installed ASIP-2 in the last system box. Set one of its channels filters to 25-850kHz.
ASIPP as reference board In case of an ASIPP, the HP – (high pass) and TP (low pass) filter have to be replaced by dummy filters. The reference board shall be installed in the last system box (last with respect to linking of the system boxes). If all slots are occupied by boards to be verified, remove the last board and replace it with the reference board. After the pulser step of the System Verification, before the operator starts the board verification, the reference board can be removed and the initial board reinstalled. (System must be powered down before a board is removed or installed). In case you use an extra ASIP-2 reference board and not one of your normal ASIP-2 boards: As every board must be configured to a unique channel number, make sure the channel number of the reference board is unique in the AMSY-5 respectively AMSY-6 system box.
10.2 Connections
• If you use SysVeri Adapter ET2: connect ET2 with USB-cable to computer. If you use SysVeri Adapter ET1: connect ET1 with cable CbP to parallel port of computer (LPT1 port).
• Connect ET1/ET2 external cable (CbE) to AMSY-6/-5 master unit’s external connector at the rear. • Connect ET1/ET2 Alarm cable (CbA) to AMSY master unit’s Alarm connector at the rear. • Connect DC calibrator (serial interface) to PC if you use a remote controlled Martel DC calibrator. • Connect Function generator (serial interface or USB or network) to PC.
If the only free serial interface is occupied by the DC calibrator and you want to connect the function generator also by serial interface: System Verification can be done without function generator and Channel Verification can be done without DC-calibrator. Only one of them needs to be connected at a time.
Connecting several AMSY-chassis:
• AMSY-5: Connect all AMSY-5 boxes by using the foreseen cables CBL1-1.5 (PC to 1st AMSY5-box; length: 1.5m, CBL1-0.7 from box to box; length: 0.7m). The Pulse-BNC connectors of all boxes must be connected in parallel by using BNC cables and BNC-T-pieces. Make sure that the switch settings on rear panel of master/slave units are correct (master unit: switch 5 and 6 set to on; slave units: switch 5 and 6 set to off).

Vallen SysVeri – Software for automated AE System Verification
file: SysVeri1504 page 20/36 Tel: +49 8178 9674-400 Copyright © 2015, Vallen Systeme GmbH email: [email protected] Fax: +49 8178 9674-444 Schäftlarner Weg 26a, 82057 Icking, (Munich), Germany http://www.vallen.de
• AMSY-6: Please see AMSY-6 Operation Manual, chapter “Multi chassis setup” on how to connect several AMSY-6 chassis in case you want to test several chassis as one system.
10.3 Starting VeriStimulator
In the VeriUtilities tab of the Vallen Control Panel start the VeriStimulator and follow the step-by-step instructions below. After starting the VeriStimulartor it checks for the function generator which can be connected via serial interface, network or USB interface. Choose your type of interface and continue with “Start”. “Cancel” will skip the hardware detection.
10.3.1 Vallen VeriStimulator
The VeriStimulator main window is shown below. To the left hand side you find the group “Function Generator”. In the center of the window you find two tabs “Automatic Tests” and “Manual Control”. During the automated test routine you will only need the “Automatic Tests” tab.
Figure 21: Vallen VeriStimulator
Vallen SysVeri – Software for automated AE System Verification
file: SysVeri1504 page 21/36 Tel: +49 8178 9674-400 Copyright © 2015, Vallen Systeme GmbH email: [email protected] Fax: +49 8178 9674-444 Schäftlarner Weg 26a, 82057 Icking, (Munich), Germany http://www.vallen.de
Function Generator The commands in the group “Function Generator” let you control the function generator.
Command Description
Detect Now! Starts the hardware detection of the function generator. It is the same routine when you start the VeriStimulator
Upload: HiAmp These four commands let you upload the signals which are used during the verification steps. Please upload these signals when you are using the function generator for the very first time, or when the internal (non-volatile) memory of the function generator has been erased or used to store other signals.
Upload: LoAmp
Upload: Dirac
Upload: LowSin
List arb. functions Lists the functions/signals that are in the function generator´s memory
Delete all Deletes the memory of the function generator
Self Test Performs a self test
Error Messages Lists all the error messages of the function generator Automatic Test This tab is explained in great detail in the following sections. The buttons in “System Verification” and “Channel Verification” group guide you through a semi-automated process of verifying your AE-System. In the “Parameters” group you can specify the parameters for the SysVeri procedure. Manual Control In chapter 13 you can find out more about running the VeriStimulator in Manual Control mode.
10.3.2 Make Veri-Folder and create Veri-Files
To create the Veri-files click the button “Create Veri-files…”. First create the “Veri-Folder” in which all working files and results of the verification are stored; e.g. “D:\SysVeri\Identifier\” and specify a file name. This step creates a set of files, including • newname.pridb: acquisition settings (or newname.vac for releases up to R2012.0509.x) • newname.VAE: VisualAE settings • newname.Cfg.doc: configuration file
10.4 Edit Configuration File
The configuration file *.cfg.doc is needed by the VeryAnalyzer and serves as input for this program to analyze the data and generate the reports. Start Word and open “NewName.cfg.doc” (as created in VeriStimulator in your project directory). The file contains three groups of information to be entered (see also Figure 19): Group 1: Information about the used signal sources: Signal Source used for PAx Input Stimulation: Martel M2000 IdNo: 12345 calibrated till: 31.12.2016 Signal Source used for Channel-Verification: Keysight 33511B IdNo: 12345 calibrated till: 31.12.2016 Important: the yellow fields indicate text to be transferred to the verification reports. To change such a text, double click on the yellow field. This opens a menu where you can change the text in item “Standard text”. Do not delete such a yellow field; this would cause improper function of the VeriAnalyzer software.
Vallen SysVeri – Software for automated AE System Verification
file: SysVeri1504 page 22/36 Tel: +49 8178 9674-400 Copyright © 2015, Vallen Systeme GmbH email: [email protected] Fax: +49 8178 9674-444 Schäftlarner Weg 26a, 82057 Icking, (Munich), Germany http://www.vallen.de
Group 2: Information about the system box(es), parametric channels and the Reference Board.
System Box Type IdNo Address (UD1)
No of PA-Channels Ref. ASIP-2 Id Ref. ASIP-2 Channel Nr.
*A1 (Master) *B1 *C1 *D1 (*E1) (*F1) *A2 *B2 *C2 (*D2) (*E2) (*F2)
Up to four system boxes can be specified, one box per line. Field *A1 must indicate the master, which is the box with the lowest address (chassis address set by rotary switch (AMSY-6) or DIP-switch (AMSY-5) at the rear of the chassis. Additional boxes shall be defined in the sequence of their chassis address. Parametric inputs of the first box are mapped to PA0-PAx, where X is equal to “*D1-1”. With AMSY-5, parametric inputs in the second box are mapped to PAy-PAz. Where y corresponds to *D1 and z to ”*D1+*D2-1”, etc., up to PA7. If less than 4 boxes are used for verification, the corresponding lines must be empty or not present. The following information shall be entered into the fields:
*Ax Type of system box: e.g. AMSY-5 M6/M6-2, M16/M16-2, M37/M37-2 or AMSY-6 MB2, MB6, MB19. An extension unit, such as AMSY-5-E20/E20-2 or AMSY-6 EB21 can only be entered for *A2, *A3 or *A4.
*Bx the Id-number of the system box (see label on rear panel) *Cx the chassis address of the system box is configured on the rear panel. For AMSY-5 this is done by a
slide switch: a value between 01 and 14. For AMSY-6 this is done by a rotating switch with value 1 to 9. Note: The box with lowest chassis address must be configured as Master box and all others as extension box. If switch setting is wrong, software will point that out to the operator. *Cx must be entered in increasing sequence. (*C4>*C3, *C3>*C2, *C2>*C1).
*Dx the number of parametric inputs in the box, usually 0, 2, 4 or 8. The fields D2 to D4 are considered up to a total number of 8.
Example: *D1 = 4, *D2 = *D3 = *D4 = 2 (4 par. inputs in box 1, 2 each in box 2-4). This will cause the following mapping of parametric inputs:
Box PA channels built in PA mapping in data file *A1 (Master) PA0-3 PA0-3 *A2 PA0-1 PA4-5 *A3 PA0-1 PA6-7 *A4 PA0-1 Not available
*Ex a number or string that identifies the Reference Board. (see section 3.1) It is only used to verify the
calibration pulse. If multiple boxes are used, it must be installed in the box that is farthest away from the master box. Three of the fields E1 to E4 and three of F1 to F4 must be empty, only the field belonging to the last box must contain this information. If all channel slots of the last box are occupied by normal boards, the board in the last slot must be exchanged against the Reference Board for the system verification part. The normal board can be reinstalled before the channel verification part.
*Fx the logical channel number assigned to the Reference Board: a value between 1 and 252. The user may remap any hardware address (consisting of the channel address and the chassis address) to any logical channel number between 1 and 252. (In Vallen Acquisition program, in step hardware detection select “Edit mode” to assign channel numbers.)
Group 3: ASIP-2 table: Information about the installed ASIP-2.
ASIP-2 Ch-No.
Test-No. / Vallen ID
Revision ASP-SQ
O K
TR-2 (Y/N)
O K
Filter 1 high
Filter 2 high-low
Filter 1 low
Rem. Veri- fied HW FW
1 123456-01-0001 3.0 R21.17 Y Y 095 025-850 300 /A 2 123456-01-0001 3.0 R21.17 Y Y 095 025-850 300 /A *A *B *C *D *E *F *G *H *I

Vallen SysVeri – Software for automated AE System Verification
file: SysVeri1504 page 23/36 Tel: +49 8178 9674-400 Copyright © 2015, Vallen Systeme GmbH email: [email protected] Fax: +49 8178 9674-444 Schäftlarner Weg 26a, 82057 Icking, (Munich), Germany http://www.vallen.de
The table above shows default values. They have to be replaced with the actual data for the installed ASIP-2. You can take these values from the configuration report that came with the system at time of delivery or you can use a report generated with the utility “Hardware Reporter” (you find this tool in the Vallen Control Panel, tab ‘Utilities’) to obtain needed parameters without plugging out the board. The meaning of fields *A to *I are described below: *A Channel number *B Vallen ID identifying the board
ASIP-2: this is a number on a white label on the board. It can be read out with the Hardware Reporter. ASIPP (single channel board, only supported in AMSY-5, not in AMSY-6): a hand written number on the board itself, remove the board to read that number (for safety cautions see your AMSY-5 Manual, section ‘AMSY-5 Service Manual’)
*C Hardware Revision (of ASIPP or digital board of ASIP2) is given on the Configuration Sheet that was shipped with the system (within the System User’s Manual) or can be obtained with the Hardware Reporter.
*D Firmware Revision (of FPGA): can be obtained with the tool Hardware Reporter. *E ASP-SQ: if true energy is provided. Only relevant for ASIPP: N if no squarer installed, Y if squarer is
installed. This information is shown during the hardware detection phase of Acquisition. For ASIP-2 please use “Y”.
*F transient recorder module installed: “N” if no TR-(transient recorder) module is installed, “Y” if TR-module is installed. To be seen in the Hardware Detection of Acquisition or the Hardware Reporter.
*G The cut-off frequency (-3dB) of the high pass 1 in kHz. For ASIP-2 set to 095. *H The cut-off frequency (-3dB) of the high-pass 2 in kHz. For ASIP-2 set to 025-850. *I The cut-off frequency (-3dB) of the low-pass module in kHz. For ASIP-2 set to 300.
Note for ASIPP boards: The cut-off frequency in the configuration report is that of the filter module. Since the ASIPP frequency response slightly decreases towards higher frequencies, it is normal that the cutoff frequency reported in the Verification Report is lower than that reported for the filter module.
The empty fields have no influence on the verification. The configuration report is read by the VeriAnalyzer program when all verification data have been acquired. It might be useful to make a hardcopy; you will need to know some contents later.
10.4.1 Configuration Report for more than 42 channels
The ASIP-2 table of the configuration report defines rows for up to 42 channels. You can add more rows in case you want to generate reports for more than 42 channels. Alternatively you can use a second configuration file listing the channels above 42. With older versions of Microsoft Word (before Microsoft Office 2007) we observed sometimes problems (resource limitation of Word) when generating reports with VeriAnalyzer for more than 32 channels at once. In this case you can use several configuration reports each listing up to 32 channels. The split of the configuration report has only influence on the data analysis step with VeriAnalyzer. Data acquisition for system verification (VeriStimulator) can be done in one step for all your channels.

Vallen SysVeri – Software for automated AE System Verification
file: SysVeri1504 page 24/36 Tel: +49 8178 9674-400 Copyright © 2015, Vallen Systeme GmbH email: [email protected] Fax: +49 8178 9674-444 Schäftlarner Weg 26a, 82057 Icking, (Munich), Germany http://www.vallen.de
10.5 System Verification
The System Verification checks the PAx channels, the I/O flags and the Pulser. Remark for AMSY-6: the parametric inputs of the AMSY-6 have high impedance. To avoid the possibility that electromagnetic interference will disturb the measurement the shield potential of the parametric source (i.e. the DC-calibrator) shall be connected to a low impedance reference potential at source side Therefore please connect the Minus-Output of your Martel M2000 with an additional cable with ground, e.g. to the ground connector at the rear of the AMSY-6.
10.5.1 Step 1: PAx, Flags
If a M200x DC calibrator is connected via serial interface select option 1 and continue. If you have a manually controlled DC calibrator select option 2 and continue.
Connect all PAx channels in parallel to the DC calibrator. Run the Acquisition program. Select a new pridb-file (resp. vac-file) and store it in the same folder you created during the “Create Veri-files…” step (we recommend file name of type filename.sys.pridb). Confirm the creation of a new file. For the settings browse to the folder containing the pridb-file (or vac-file for older releases) created during the step “Create Veri-Files…” and select it. Make sure that the PAx ranges are set to 10V: for AMSY-6 this should be automatically the case since this is set in the template pridb-file. For AMSY-5 please set the PAx range switches on the front panel accordingly. Make sure that the record control switches are in “enable” position.
AMSY-6:
AMSY-5:

Vallen SysVeri – Software for automated AE System Verification
file: SysVeri1504 page 25/36 Tel: +49 8178 9674-400 Copyright © 2015, Vallen Systeme GmbH email: [email protected] Fax: +49 8178 9674-444 Schäftlarner Weg 26a, 82057 Icking, (Munich), Germany http://www.vallen.de
In a next step the IO flags will be checked automatically.
The first voltage that has to be applied is -10V! In case of the M200x one has to reverse polarity in order to get -10V. The PAx verification will run automatically until 0V is reached. Then you are prompted to provide positive voltage. To do so reverse polarity again. If you are using a manually controlled DC calibrator, change the DC settings according to the instructions given in the pop up window.
10.5.2 Step 2: Pulser of AMSY-6
For AMSY-5 see next chapter. Steps in VeriStimulator / Info given by VeriStimulator
Vallen Acquisition program with AMSY-6 connected:
Start System Verification/Step2: Pulser
Set the frequency filter settings of your reference ASIP-2 board to 25-850 kHz (Acquisition Parameter Setup). (see chapter 10.1 for information about reference board)

Vallen SysVeri – Software for automated AE System Verification
file: SysVeri1504 page 26/36 Tel: +49 8178 9674-400 Copyright © 2015, Vallen Systeme GmbH email: [email protected] Fax: +49 8178 9674-444 Schäftlarner Weg 26a, 82057 Icking, (Munich), Germany http://www.vallen.de
Steps in VeriStimulator / Info given by VeriStimulator
Vallen Acquisition program with AMSY-6 connected:
Open the Audio/Pulse Control (“DAC online control”) by clicking on the “Other” button.
and set the Pulse amplitude to maximum (450V):
The Audio output parameters play no role for automatic verification. For Item 6 select single channel with reference channel (e.g. 4 in screenshot below) and click “Start Pulsing”:
Set pulse amplitude in “DAC online control” to minimum before clicking “next” in the VeriStimulator.
Set pulse amplitude in “DAC online control” to 200V. You can use the “move left”/”move right” keys to position exactly after selecting the ruler with the mouse.
Just stop pulsing in acquisition program.

Vallen SysVeri – Software for automated AE System Verification
file: SysVeri1504 page 27/36 Tel: +49 8178 9674-400 Copyright © 2015, Vallen Systeme GmbH email: [email protected] Fax: +49 8178 9674-444 Schäftlarner Weg 26a, 82057 Icking, (Munich), Germany http://www.vallen.de
10.5.3 Step 2: Pulser of AMSY-5
For this test you need the aforementioned (section 10.1) reference board. For the instructions about the reference board see section 10.1. Please select the correct filter settings for an ASIP-2 Reference Board (25-850kHz) or the dummy filters for an ASIPP board
Follow the instructions of the pop up window and make sure that the SF board switches and knobs are set correctly. The “Amp.” knob has to be turned all the way to the right. The “Amp.”-switch has to be set to local and the “Calib.” Switch has to be set to off.
In the “Hardware Detection Results & Channel Configuration” dialog select an input device for the reference channel such as the ”AEP3-34dB-prog” or the “AEP4-34dB” or the “VS-150RIC (34dB)”. All these devices have an impedance of 50 Ohm and a gain of 34dB. In acquisition start “Single Channel” pulsing and select the reference channel to send pulses.

Vallen SysVeri – Software for automated AE System Verification
file: SysVeri1504 page 28/36 Tel: +49 8178 9674-400 Copyright © 2015, Vallen Systeme GmbH email: [email protected] Fax: +49 8178 9674-444 Schäftlarner Weg 26a, 82057 Icking, (Munich), Germany http://www.vallen.de
Every time the pulser amplitude settings are changed, there is a delay of 20 seconds before the measurement is done. This lets the amplitude of the pulse settle.
Next the minimum Amplitude of the pulser is verified. Turn the front panel knob “Amp.” all the way to the left and continue.
In the last step of the pulser verification the amplitude settings are controlled by software. Set the “Amp.” switch to remote (“Rem.”) and continue.

Vallen SysVeri – Software for automated AE System Verification
file: SysVeri1504 page 29/36 Tel: +49 8178 9674-400 Copyright © 2015, Vallen Systeme GmbH email: [email protected] Fax: +49 8178 9674-444 Schäftlarner Weg 26a, 82057 Icking, (Munich), Germany http://www.vallen.de
Stop the pulsing in the Acquisition program after completion of the pulser verification
10.6 Channel Verification
If you installed a reference board for the Pulser test, remove it now. If the reference board was installed in place of an ordinary board you can put the original board back in again. If your serial interface is occupied by the DC calibrator and you need such an interface to control the function generator you can unplug the DC calibrator. It is not needed for the channel verification procedure. Before you start the channel verification, create a new vac-file. To do so stop the acquisition and select a new pridb-file (older releases vac-file) and store it in the same folder you previously created (we recommend file name of type filename.asip.pridb). Confirm the creation of a new file. For the AE-channel settings browse to the folder containing the pridb-file (resp. vac-file) created during the step “Create Veri-Files…” and select it. Please also make sure that you selected an input device such as the “AEP4-34dB” the “VS-150RIC (34dB)”. All these devices have an impedance of 50 Ohm and a gain of 34dB. Make sure that in the VeriStimulator”Automatic Test” tabParameters group, the
“Working frequency” is set to a value well in between the high- and low pass filter (200kHz) RMS delay is set to 0 and Counter delay is set to 0
Check of audio control: during the channel verification you can set the “Audio” switch to the channel that is verified. During the data acquisition the noise will vary. You can adjust the volume and sensitivity per software for AMSY-6:

Vallen SysVeri – Software for automated AE System Verification
file: SysVeri1504 page 30/36 Tel: +49 8178 9674-400 Copyright © 2015, Vallen Systeme GmbH email: [email protected] Fax: +49 8178 9674-444 Schäftlarner Weg 26a, 82057 Icking, (Munich), Germany http://www.vallen.de
Please note that for high sensitivity you have to move the upper ruler to the right. The chassis MB2 does not have a built-in loudspeaker. Instead you can connect passive stereo loudspeakers to the speaker connector at the rear. Please do not change the pulse amplitude value of 200V because this value is needed for “Pulse through verification step” later on. For AMSY-5 please use the according knobs at the SF-module to adjust sensitivity and volume.
10.6.1 Step 1: Test@Freq
The working frequency has to be set well in between the interval specified by the filter settings in the AE-channel, e.g. to 200kHz for a 95-300kHz band pass filter. ASIP-2 only: Select filter 95-300kHz ASIPP only (not for AMSY-6): Select filter 1-Hi.

Vallen SysVeri – Software for automated AE System Verification
file: SysVeri1504 page 31/36 Tel: +49 8178 9674-400 Copyright © 2015, Vallen Systeme GmbH email: [email protected] Fax: +49 8178 9674-444 Schäftlarner Weg 26a, 82057 Icking, (Munich), Germany http://www.vallen.de
ASIP-2 only: It is VERY IMPORTANT to use the DC-Bloc1. Otherwise the function generator will be damaged! ASIPP only (not for AMSY-6): Use the AC-Input and make sure that “Impedance” switch is set to 50Ohm.
The test sequence runs automatically.
After completion of each channel you are prompted to connect the function generator to the next AE-channel. Click “Done” to finish this verification step.

Vallen SysVeri – Software for automated AE System Verification
file: SysVeri1504 page 32/36 Tel: +49 8178 9674-400 Copyright © 2015, Vallen Systeme GmbH email: [email protected] Fax: +49 8178 9674-444 Schäftlarner Weg 26a, 82057 Icking, (Munich), Germany http://www.vallen.de
10.6.2 Step 2: 2nd Filter
In order to test the 2nd filter, stop the Acquisition and enter the AE-Channel Settings. ASIP-2 only: Select filter 25-850kHz ASIPP only: Select filter “2-Lo”. Start acquisition again and make sure that Record Control switches are on enable.
It is VERY IMPORTANT to use the DC-Bloc1. Otherwise the function generator will be damaged! Use the AC-Input in case of an ASIPP board. For ASIPP boards make sure that “Impedance” switch is set to 50Ohm.
No user action is required during this test.

Vallen SysVeri – Software for automated AE System Verification
file: SysVeri1504 page 33/36 Tel: +49 8178 9674-400 Copyright © 2015, Vallen Systeme GmbH email: [email protected] Fax: +49 8178 9674-444 Schäftlarner Weg 26a, 82057 Icking, (Munich), Germany http://www.vallen.de
10.6.3 Step 3: Pulse through verification
This step checks whether the calibration pass works as expected.
Stop the acquisition and change the AE-channel filter settings. ASIP-2 only: Select filter 95-300kHz ASIPP only: Select filter 1-Hi The front panel switch “Amp.” has to be in position “Rem.” (remote) Step 3 is not applicable and not shown for AMSY-6
Start the pulsing in acquisition: Single cycle. The test ends after the last channel completed pulsing. Click “Done” to finish this step of the SysVeri and to return to the VeriStimulator.
10.7 Data Analysis for SysVeri
Start Vallen VeriAnalyzer (VeriAna.exe) from Vallen Control-Panel/Veri-Utilities. The menu in Figure 22 appears. In frame “Configuration file” browse to the Veri-Folder and select ‘filename.cfg.doc’. In frame “Primary Data File for System Verification” browse to ‘filename.sys.pridb’. In frame “Primary Data File for ASIPP Verification” browse to ‘filename.asp.pridb’. Click on “System Start” to create the System Report. When processed, store the file on ‘filename.sys.doc’ and print it. Check and sign it. An example of the system verification report you find in chapter 7.11.

Vallen SysVeri – Software for automated AE System Verification
file: SysVeri1504 page 34/36 Tel: +49 8178 9674-400 Copyright © 2015, Vallen Systeme GmbH email: [email protected] Fax: +49 8178 9674-444 Schäftlarner Weg 26a, 82057 Icking, (Munich), Germany http://www.vallen.de
Click on “ASIPP Start” to create one page ASIPP-Report per channel. When processed, store the file on filename.ASP.doc and print it. Check and sign it. An example of an ASIP verification report you find in chapter 0.
Figure 22: VeriAnalyzer Menu
11 Verification Statistics and Pattern Lists
Vallen VeriAnalyzer gathers the results of all verifications in two files that reside in c:\vallen\SysVeri\. File Sys.inc.txt contains results of system verifications, File ASIPP.inc.txt contains results of ASIPP verifications. These are text files that can easily be imported into an EXCEL sheet and used for e.g. statistical purposes. During the data analysis, VeriAnalyzer creates two pattern list files in txt format in the Veri-Folder: filename.sys.txt contains the list of patterns checked during system verification, and filename.asp.txt contains the list of patterns checked during ASIPP verification.

Vallen SysVeri – Software for automated AE System Verification
file: SysVeri1504 page 35/36 Tel: +49 8178 9674-400 Copyright © 2015, Vallen Systeme GmbH email: [email protected] Fax: +49 8178 9674-444 Schäftlarner Weg 26a, 82057 Icking, (Munich), Germany http://www.vallen.de
12 Verification of Transient Recorder
For the transient recorder verification the Vallen AMSY-5/AMSY-6 software package includes the TR-Tester software that can be started from Vallen-Control-Panel, Tab Veri-Utilities. This program is almost identical to Vallen Acquisition program, uses the same routines with the following essential changes: Instead of ADC data, a sequence of predefined patterns is stored in the transient recorder hardware
with each trigger of a channel (trigger by threshold crossing as usual) Instead of storing the data on file, the hardware generated patterns are compared by the software
and in case of any deviation, an error is reported. Acquisition settings are program defined and change with test progress. All sampling rates and all
record lengths are tested in a predefined sequence. • • The program setup is self explaining and easy to use.
13 Vallen VeriStimulator in Manual Mode.
The VeriStimulator and arbitrary function generator can also be used in a manual mode. The operator can vary amplitude, frequency, and the envelope function of a burst. It is also possible to create short pulses down to 50ns width and pulse trains (e.g. N pulses in distance of t µs) to verify system response in such situations.
Figure 23: VeriStimulator in Tab Manual Control

Vallen SysVeri – Software for automated AE System Verification
file: SysVeri1504 page 36/36 Tel: +49 8178 9674-400 Copyright © 2015, Vallen Systeme GmbH email: [email protected] Fax: +49 8178 9674-444 Schäftlarner Weg 26a, 82057 Icking, (Munich), Germany http://www.vallen.de
13.1 Type of function
The selection box next to “Type of function” offers eight alternatives: Sine wave, Square wave, Triangle wave , Ramp wave, Noise, Dirac, Sin2-HiAmp, Sin2-LoAmp. The first 5 alternatives are hard coded in the function generator. The last three refer to the special waveforms loaded into the non-volatile memory of the function generator by VeriStimulator. With the function “Dirac” a sharp and short pulse of 50ns or greater can be produced. With function “Sin2-HiAmp” the sine-square modulated sine wave of Figure 10 can be produced. The amplitude range is 50mV to 10Vpp at 50R. Sin2-LoAmp generates the same function but 26dB less in amplitude than what is entered in the amplitude field.
13.2 Burst Mode Settings
The selection box next to “Burst Mode” offers three alternatives: Continuous, Burst (FG), Burst (SW). Select continuous mode for a continuous sine wave, square wave, triangle wave, ramp wave, or for continuous noise. Burst example: A rectangle gated burst of 1ms duration and 200kHz frequency: Select “Sine wave” and “Burst (FG)”. In field “cycles/burst” enter the duration of the burst in number of full waves (cycles). At a frequency of 200kHz, a cycle lasts 5µs. For a burst of 1 ms, define 200 cycles per burst. When the check box “Endless” is NOT checked, the function generator produces one burst per click on “Trigger Now”. For a periodic repetition of bursts, enter the desired burst period and check “endless” and click once “Trigger Now”. For a periodic trigger of the Sine-square modulated sine wave of Figure 10, or the Dirac pulse, select the mode “Burst (SW)”. SW means that the periodic trigger is generated by software. Click on “Trigger Now” to trigger one burst. Check “Endless” to produce periodic bursts in the defined burst period. Burst (SW) supports a minimum burst period of about 1 second.