The Key to Metal Bumping (Panel Beating, Auto Body Repair Bible)

Santa Fe CoverINSTALLATION GUIDE
7-01-09
Whatever the weather, you can enjoy the
sophisticated charm of a lattice cover. The Santa
Fe Package combines the solid roof construction of
the Snap-N-LockTM Insulated Panel with beautiful
Southwest lattice accents and exposed rafter
tails. For maximum protection from the elements,
run the panels the entire length of the roof. To
provide shade and allow refreshing breezes to pass
through, extend the solid roof only partway.w w w . a l u m a w o o d . n e t
AlumawoodTM Newport with MAXX PanelTM
Installation Guide
Whatever the weather, you can enjoy your outdoor living space with a sense of security. The AluamwoodTM Newport with MAXX PanelTM package combines the elegant charm of an AlumawoodTM Newport patio structure with the strength of the patented Snap-N-LockTM Insulated Panel.

Santa Fe Cover Installation Guide
- 1 -
1
2
3
5
6
4
7
8
9
123456789
101112131415
Existing Fascia or Structure3” Wall HeaderRafter Bracket2” x 6” Side RafterValance Fascia3” Snap-N-Lock™ Insulated Panel3” Extruded GutterRafter TailRafter End: Mitered, Beveled, Corbel, Scalloped
2” x 6” Fascia Cover3x8 BeamTop Post Bracket3x3 Post2” x 6” Post PlateBottom Post Bracket
11
12
13
14
15
10

Santa Fe Cover Installation Guide
- 2 -
Optional: Apply caulk at top of header, if enough room is available.
Caulk
Optional: Apply caulk at top of header, if enough room is available.
Caulk
Optional: Apply caulk at top of header, if enough room is available.
Caulk
Optional: Apply caulk at top of header, if enough room is available.
Caulk
Optional: Apply caulk at top of header, if enough room is available.
Caulk
Optional: Apply caulk at top of header, if enough room is available.
Caulk
Optional: Apply caulk at top of header, if enough room is available.
Caulk
Optional: Apply caulk at top of header, if enough room is available.
Caulk
Optional: Apply caulk at top of header, if enough room is available.
Caulk
1. Install Wall Header
A. Select mounting area on wall. Snap a level chalkline along the wall to locate the bottom of the wall header. Remember, for proper drainage, the panels must be installed at a minimum 1/2” slope per foot of projection.
B. Cut wall header to length. Level extrusion and mark position.
C. Run two beads of caulking along the back surface of the box header where it will meet the existing building or fascia board. Extruded header is recommended for maximum strength.
D. Position the header against the existing building and secure into place using two #10 x 1-1/2” hex head screws every 12” on center. If attached to 1” fascia board, use two #10 x 2” hex head screws in place of #10 x 1-1/2” screws at all rafter tails. If attached to a masonry wall, the header should be fastened with one 1/4” diameter masonry anchor every 16” on center. If enough room, apply a heavy bead of caulking along the top of the header to insure a water tight seal.
House
House
Mobile Home

Santa Fe Cover Installation Guide
- 3 -
2. Post Bracket Installation and Post Attachment
A. Posts should be plumb and bottom cut off if necessary to adjust the pitch of the panels for proper drainage and, at the same time, to adjust the header so that it is level from end to end. (Recommended roof pitch is 1/2” for each 1 foot of panel length.)
B. With the posts cut to length, plumb them again and mark the slab attachment. The anchors should be at least 4”away from the edge of the slab or expansion joint and 30” away from any crack. Two 3/8” holes should be drilled through the post brackets and corresponding holes 2-1/2” deep into the slab. Attach the brackets to the slab using the concrete anchors and hammering them into the concrete making sure not to damage the threads.
C. Next, fit each post onto its bracket and fasten with four #14 x 3/4” painted sheetmetal or self-drilling screws.
Anchor Bolts
Level
PostBracket
Post
#14x3/4” screws
a. Drill 3/8” hole with the masonry bit at least 3” deep.
b. Clean hole by blowing out debris.
c. Drive the concrete anchor bolt far enough into hole so that at least six threads are below the surface. Do not damage threads.
d. Tighten to 7 foot lbs. with a torque wrench or 2 to 3 turns from finger tight position to achieve the proper anchor setting.
3. Install Beam
A. Set the 3x8 beam on top of the posts. Make sure the seam side is up and lines up with the wall hanger on the ledger board.
B. Level the beam.C. Attach the post to the beam using
the bracket as shown.#14x3/4”
screws
#14x3/4” screws
Wall Header
Chalkline
Slab

Santa Fe Cover Installation Guide
- 4 -
4. Install Sideplates on Posts
Note: Sideplates should be stuffed with foam.A. Place the sideplate so that it is centered on
the post. Measure 12” from the bottom of the sideplates and drill a 5/8” hole through one side and the foam, making sure not to puncture the other side or dent the sideplate.
B. Place a #14 x 3/4” sheetmetal screws through the sideplate into the post.
C. Measure and mark up 24” on center. Drill a 5/8” hole.
D. Use a level to make sure the sideplate is centered on the post and plumb.
E. Place a #14 x 3/4” sheetmetal screws through the remaining holes.
F. Drill four holes into the sideplates as done previously but for the header/sideplate attachment. (As shown)
G. Place a #14 x 3/4” sheetmetal screws into the four holes.
H. Place the 5/8” plugs into the holes.I. Repeat these steps on the opposite side and
for all remaining posts.
5/8” Dia. Holes
Level
5/8” Dia. Holes
2”x6.5” Side Plate w/
Foam Insert
3x8 Beam

Santa Fe Cover Installation Guide
- 5 -
Slab
FemaleStart with female side facing the outward perimeter of structure.
Header - #8 hex head tek screws
Leave the fastener closest to male side at front untightened so next panel will snap properly.
Male (push from this side)
5. Install Snap-N-Lock™ Panels
A. Place the first panel into position with the female side facing the outward perimeter of the structure. To avoid scratches on the interior side you have two options:
1.) Roof panels can be lifted over the wall sections top side down, and then turned over when in position.
2.) Cardboard end caps or carpet pieces can be draped over the top channel, so that the panels don’t brush against the metal surface. Check the panel for proper depth in the header and square up to support walls.
B. Fasten panel to the top and bottom of the box header with #8 x 9/16” Tek screws 8” on center.
C. The front and side walls are fastened using a special #10 hex head sheetmetal screw. These should be placed 8” on center on the front wall and at least every 24” on the side walls. The sheetmetal screws should be used in conjunction with a 1/4” x 1-1/2” aluminum washer with neoprene backer. When going into wood framing a 1/4” x 6” lag can be substituted. Fasten the starter panel on the side wall and the outside corner only. Note: The panel must be free on male edge to snap properly, and screws should not be placed within 4” of panel seam.
D. Run a bead of sealant/adhesive down the top channel of the male side in the sealant reservoir, making sure there are no air bubbles/pockets. We recommend using Solar Seal 900.
E. Insert the second panel into the header in a level position with the starter panel, using proper handling techniques to avoid scratches.
F. Position panel. Bump panel together until it snaps, bumping from header to overhang. Panels should be snapped together fairly soon after caulking is applied to reservoir. Wipe down top seam of panel to smooth caulk.
G. Repeat with each new panel until finished. The last panel should be squared off on the male side prior to installing to accept valance. Then fasten remaining #10 screws or 1/4” bolts to final side wall and outside corner. (If panels need cleaned, use soap and water.)
H. After all roof panels are installed, run a bead of sealant where the top edge of the wall header meets the panel.
Santa Fe Cover Installation Guide
- 6 -
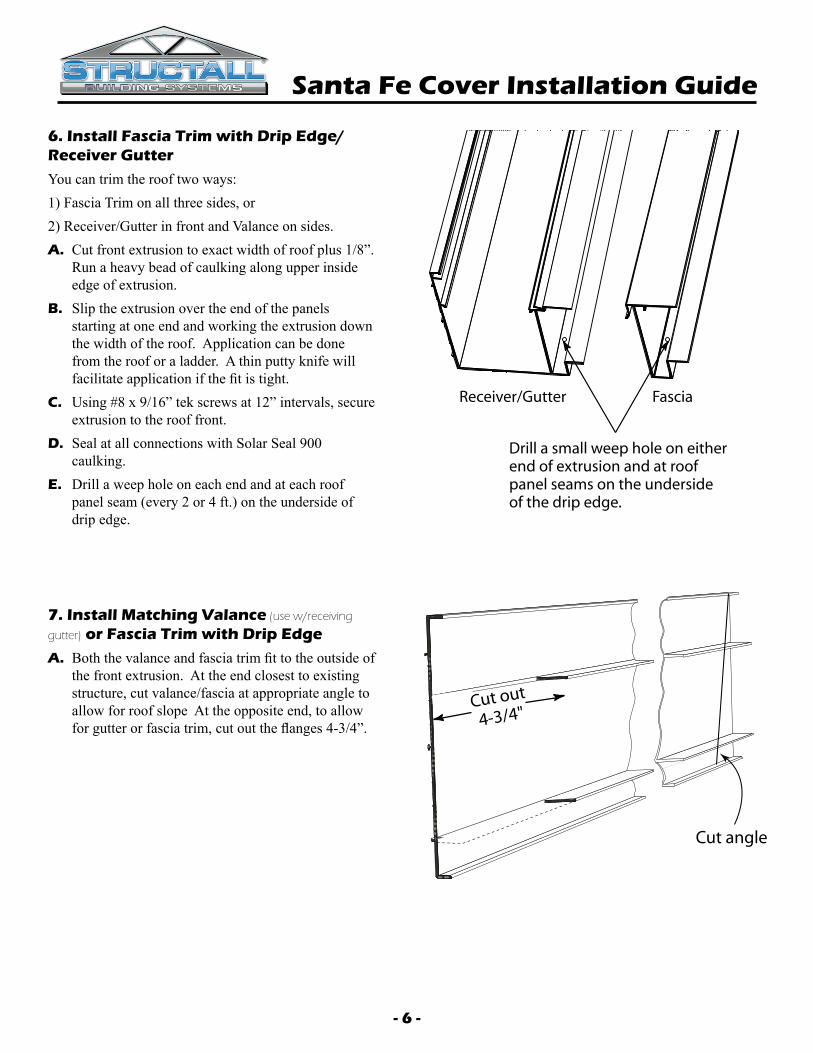
6. Install Fascia Trim with Drip Edge/Receiver Gutter
You can trim the roof two ways: 1) Fascia Trim on all three sides, or 2) Receiver/Gutter in front and Valance on sides. A. Cut front extrusion to exact width of roof plus 1/8”.
Run a heavy bead of caulking along upper inside edge of extrusion.
B. Slip the extrusion over the end of the panels starting at one end and working the extrusion down the width of the roof. Application can be done from the roof or a ladder. A thin putty knife will facilitate application if the fit is tight.
C. Using #8 x 9/16” tek screws at 12” intervals, secure extrusion to the roof front.
D. Seal at all connections with Solar Seal 900 caulking.
E. Drill a weep hole on each end and at each roof panel seam (every 2 or 4 ft.) on the underside of drip edge.
7. Install Matching Valance (use w/receiving
gutter) or Fascia Trim with Drip Edge
A. Both the valance and fascia trim fit to the outside of the front extrusion. At the end closest to existing structure, cut valance/fascia at appropriate angle to allow for roof slope At the opposite end, to allow for gutter or fascia trim, cut out the flanges 4-3/4”.
FIG. 17
Receiver/Gutter Fascia
Drill a small weep hole on either end of extrusion and at roof panel seams on the underside of the drip edge.
FIG. 18
Cut out
4-3/4"
Cut angle

Santa Fe Cover Installation Guide
- 7 -
8. Install Alumawood Trim
Note: This step is non-structural and may be modified.A. Drill several 5/8” holes in one of the 2”x 6” Rafters and attach to the side fascia. This rafter should extend
past the side fascia to the desired projection. Repeat for the other side.B. Cut one of the 2”x 6” rafters so it fits snugly between the two side rafters. Attach to the Fascia Gutter.C. Attach Rafter Brackets at 24” on center to the front of the front rafter. Use two #10 sheetmetal screws.D. Attach Rafter Tails to the rafter brackets. Use four #10 sheetmetal screws.
9. Install Downspouts
A. Cut two 1” diameter holes in the bottom of the Gutter Fascia. This should be close to an end post.
B. Place the downspout flange over the hole and fasten with #8 x 1/2” sheetmetal screws.
C. Insert the downspout elbow into one end of the downspout tube and fasten from the sides with #8 x 1/2” sheetmetal screws.
D. Hold the downspout assembly in place to check for proper length and cut as required.
E. Slip the upper end of the downspout flange and fasten from the two sides with #8 x 1/2” sheetmetal screws.
F. Attach the downspout tube to the post with the strap. Fasten on two sides with #8 x 1/2” sheetmetal screws.
Rafter Bracket
Side Rafter Rafter Tail
Fascia Cover
Rafter Bracket
Rafter Bracket

Santa Fe Cover Installation Guide
- 8 -
10. Final Sealing Procedures
A. Due to the advanced design of the Snap-N-Lock™ panel, it is almost impossible for the panel seams to leak. As in any aluminum roof structure, the most critical point is where the header meets the support wall. For best results counterflashing should be used. If structure has no drip edge, use a flexible flashing such as Flex-Seal.
B. To insure a water tight seam, caulk under edge of counterflashing that rests on roof and secure with a #8 x 1/2” screw at 6” intervals.
C. Use Solar Seal 900 to seal exposed screws and bolt heads. Make sure to completely cover the washers, because of the depression formed when tightening the panels down. Water can sit around the washers and create a problem. Apply caulking along all roof panel connections, outside along all wall module connections to existing structure and along outside edge of base channel.
Optional Upgrade: Provide the homeowner a more long-term, low-maintenance solution to leaks, by also covering panel connections at header, fascia and gutter; and panel seams with Flex-Seal. The tape remains flexible, while moving with the varying metals of the panel and extrusion as they expand and contract. No fishmouths will form and the bond will remain unaffected. The aluminum backing provides superior UV protection. It also enables the tape to conform to irregular surfaces for a weather-tight seal.
11. Final Steps After Roof Installation
A. Secure top channel and base channel to wall panels on interior and exterior. Use #8 x 9/16” tek screws every 16” on center, with two at edge of each module at mullion. If using the adjustable top cap, raise upper assembly until plumb with roof line and secure.
“L” shaped brakeform counterflashing tucked behind drip edge. Caulk and secure in front.
Panel
Drip Edge
“L” shaped brakeform counterflashing tucked behind drip edge.
Caulk and secure in front.
DripEdge
Panel
“L” shaped brakeform counterflashing tucked behind drip edge.
Caulk and secure in front.
Drip Edge
Panel
House
House
Mobile Home

Santa Fe Cover Installation Guide
- 9 -

Santa Fe Cover Installation Guide
- 10 -9

Santa Fe Cover Installation Guide
- 11 -10