Alchemex for MYOB EXO - sagedl.com Started/MYOB EXO Getting... · Learning Services | MYOB EXO...
38
Learning Services | MYOB EXO Getting Started Guide 1 | LOGIN PROPERTIES ......................................................................................... 2 STANDARD REPORTS AVAILABLE .......................................................................... 5 ACCESSING THE ALCHEMEX FOR MYOB EXO BUSINESS REPORTS .................................... 11 REPORT MANAGER TOOLBAR ............................................................................. 12 RUNNING A REPORT ....................................................................................... 13 COPYING, PASTING AND RENAMING REPORTS ......................................................... 16 CREATING AND LINKING A REPORT ...................................................................... 19 ADDING & CREATING A NEW REPORT ................................................................... 23 ALCHEMEX FOR MYOB EXO BUSINESS REPORT PROPERTIES .......................................... 26 Adding Additional Columns............................................................................... 28 Moving and Deleting Columns............................................................................ 29 EXPORTING REPORTS...................................................................................... 30 IMPORTING REPORTS ...................................................................................... 33 SECURITY MANAGER ....................................................................................... 36 GETTING SUPPORT ........................................................................................ 37 Alchemex for MYOB EXO Getting Started Guide
Transcript of Alchemex for MYOB EXO - sagedl.com Started/MYOB EXO Getting... · Learning Services | MYOB EXO...
Learning Services | MYOB EXO Getting Started Guide
1 |
LOGIN PROPERTIES ......................................................................................... 2
STANDARD REPORTS AVAILABLE .......................................................................... 5
ACCESSING THE ALCHEMEX FOR MYOB EXO BUSINESS REPORTS .................................... 11
REPORT MANAGER TOOLBAR ............................................................................. 12
RUNNING A REPORT ....................................................................................... 13
COPYING, PASTING AND RENAMING REPORTS ......................................................... 16
CREATING AND LINKING A REPORT ...................................................................... 19
ADDING & CREATING A NEW REPORT ................................................................... 23
ALCHEMEX FOR MYOB EXO BUSINESS REPORT PROPERTIES .......................................... 26
Adding Additional Columns ............................................................................... 28
Moving and Deleting Columns ............................................................................ 29
EXPORTING REPORTS ...................................................................................... 30
IMPORTING REPORTS ...................................................................................... 33
SECURITY MANAGER ....................................................................................... 36
GETTING SUPPORT ........................................................................................ 37
Alchemex for MYOB EXO
Getting Started Guide

Learning Services | MYOB EXO Getting Started Guide
2 |
LOGIN PROPERTIES
MYOB EXO Business Database Details
Server – The Name of the MsSQL server engine on which your MYOB Exo Business Database is running.
Database – the name of the MYOB EXO Business database on the server
User Name – the username for the Database
Password – the password for the Database

Learning Services | MYOB EXO Getting Started Guide
3 |
Then select the Report Repository Tab

Learning Services | MYOB EXO Getting Started Guide
4 |
Report Repository Details
The Report Repository is a folder or file that your Metadata and your templates are back up
to. It is imperative that you back up your Metadata repository and your templates.
The backup file is a windows cabinet file (CAB) that will contain your Alchemex SVD and your
report Excel templates files.
To restore files from a backup open the windows cabinet file in windows explorer and extract
the Alchemex.svd file to its original location and the XLT files to the Templates folder.
Learning Services | MYOB EXO Getting Started Guide
5 |
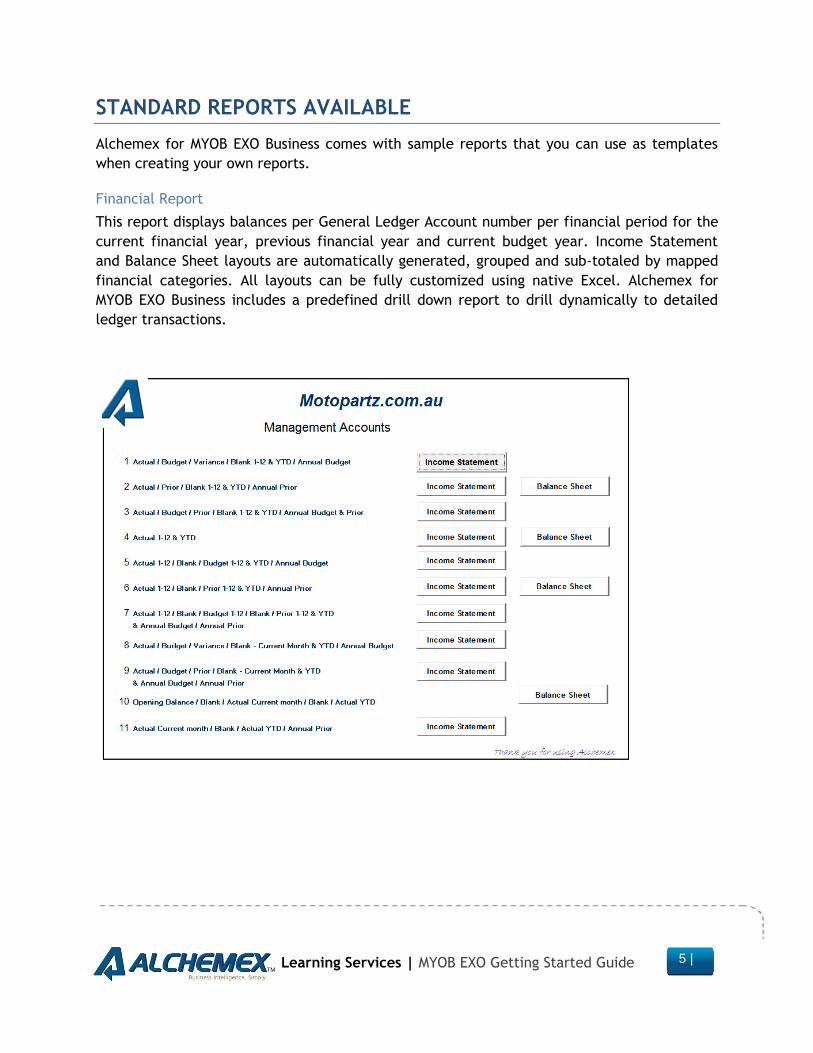
STANDARD REPORTS AVAILABLE
Alchemex for MYOB EXO Business comes with sample reports that you can use as templates
when creating your own reports.
Financial Report
This report displays balances per General Ledger Account number per financial period for the
current financial year, previous financial year and current budget year. Income Statement
and Balance Sheet layouts are automatically generated, grouped and sub-totaled by mapped
financial categories. All layouts can be fully customized using native Excel. Alchemex for
MYOB EXO Business includes a predefined drill down report to drill dynamically to detailed
ledger transactions.

Learning Services | MYOB EXO Getting Started Guide
6 |
Dashboard Analysis
Summarized display of Company Financials, Top Customers, Top Salespersons, Top and
Bottom Products and Sales over various periods. Graphs are included.

Learning Services | MYOB EXO Getting Started Guide
7 |
Income Statement
Balance Sheet
Learning Services | MYOB EXO Getting Started Guide
8 |
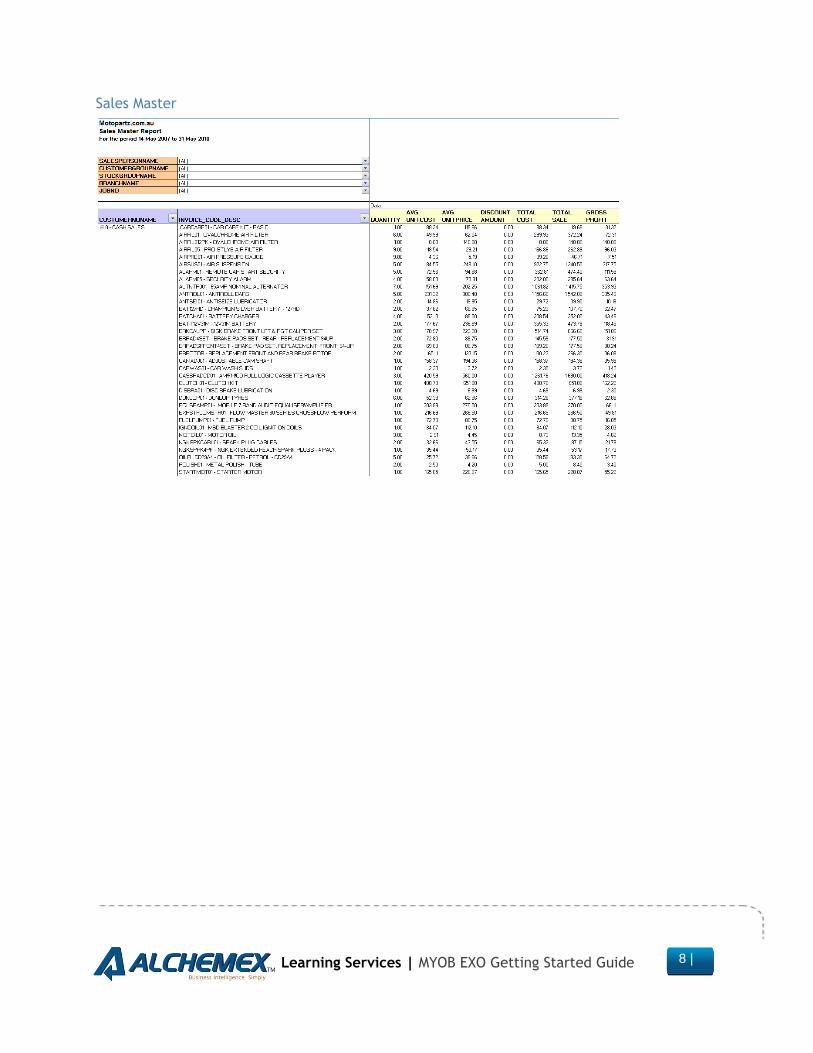
Sales Master

Learning Services | MYOB EXO Getting Started Guide
9 |
Inventory Master
Learning Services | MYOB EXO Getting Started Guide
10 |
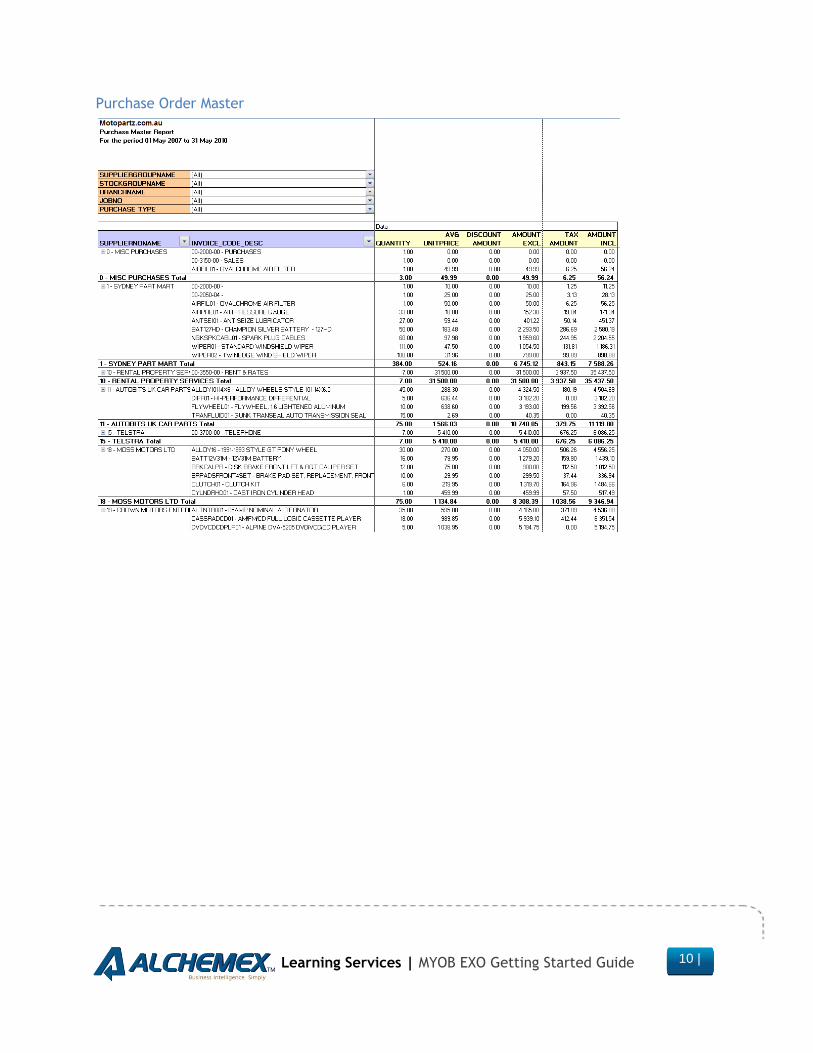
Purchase Order Master
Learning Services | MYOB EXO Getting Started Guide
11 |
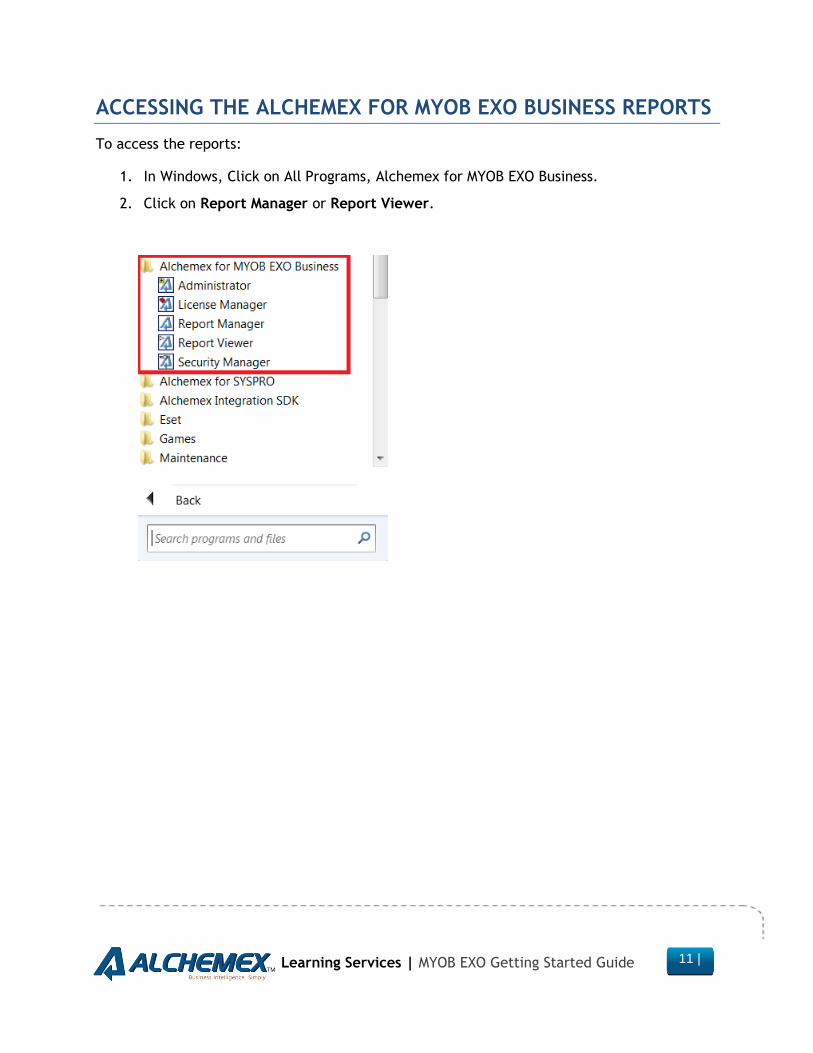
ACCESSING THE ALCHEMEX FOR MYOB EXO BUSINESS REPORTS
To access the reports:
1. In Windows, Click on All Programs, Alchemex for MYOB EXO Business.
2. Click on Report Manager or Report Viewer.

Learning Services | MYOB EXO Getting Started Guide
12 |
REPORT MANAGER TOOLBAR
The Report Manager Toolbar has various Icons:
Icon Name Description
Add Add Enables the user to add new folders and reports.
Delete Delete Enables the user to delete their selection.
Properties Properties Displays context specific object properties.
Refresh Refresh Refreshes on screen properties of the selected object
Copy Copy Copies the selected object to the clipboard
Paste Paste Pastes an object from the clipboard into the selected
object
Move To Move To Moves a connection or a container
Check/Test
Check/Test Use this to check that a report satisfies minimum
requirements to function correctly. Minimum requirements are
that at least one Column is selected and that if a template has
been assigned to the report then that the template exists.
Run Runs a report.
Run Sample
Run Sample Runs a report using just a sample of the data
(sample size is specified by the user). Useful when designing
and testing reports that are data intensive.
Create template Create Template Enables the user to create a template for the
current report from an open Excel workbook
Un-link Template Unlink Template Enables the user to unlink a template from
the current report
Design Design Allows the user to design a report by opening its
template in Excel for modification
Lock Locks the current report
Unlock Unlocks the current report
History Displays a Reports Run History
Create PR Automatically creates and files a .PR1 file.

Learning Services | MYOB EXO Getting Started Guide
13 |
Help Display Help Files
Export a Report Export a Report Enables the export of reports for import to
other Alchemex for MYOB EXO systems
Generate
Scheduler
Command
Generate Scheduler Command Generates the command to run
the report unattended
Run Report Batch Run Report Batch Runs all the reports in the chosen folder
from top to bottom
Add
Consolidation
report
Runs a report that contains macros with the purpose of
consolidating data from various other workbooks
Unlock Excel
It is possible that if a report runs into rendering problems
Excel can be left locked. Clicking this will unlock Excel and
allow user interaction
Security Manager Opens the Security manager
RUNNING A REPORT
1. Select the report you want to run. For this example, choose Sales Master under Sales Reports.
2. To run the report click on the green Run icon, You can also right-click and select Run or press Ctrl+R

Learning Services | MYOB EXO Getting Started Guide
14 |
3. Enter Report Parameter. (Date/ Month)
4. Click OK
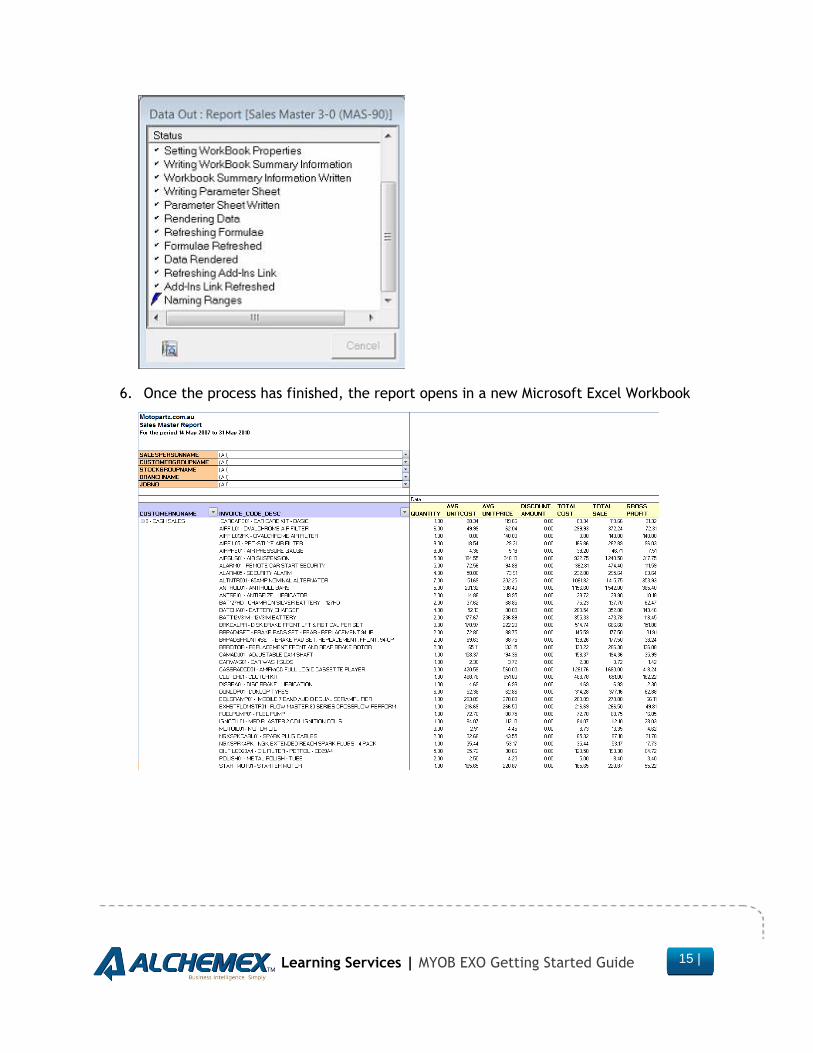
5. The progress Status is displayed on the right of your screen and indicates the process of your report. Depending on the size of your company data, running a report may take some time. You can sometimes cancel the report.
Learning Services | MYOB EXO Getting Started Guide
15 |
6. Once the process has finished, the report opens in a new Microsoft Excel Workbook

Learning Services | MYOB EXO Getting Started Guide
16 |
COPYING, PASTING AND RENAMING REPORTS
You can copy and paste a report, at any stage, in the report manager. These functions are
useful in Alchemex for MYOB EXO Business because all the Master reports are locked and you
need to make a copy of these master reports. Use the copy, paste, and renaming methods so
you can create new reports from an existing report and therefore not corrupt the master
report.
You may have a sales report that shows a customer analysis on sales; however, you want to
create another report that shows sales analyzed by Reps. You can create a copy of the
original report, and then rename the copy to Sales by Rep, and then customize the new Sales
by Rep report. You have the benefit of re-using all the containers and expressions in the
original report without having to create them from scratch.
To create a new report from an existing report
1. Open the Report Manager from the Alchemex for MYOB EXO Business menu under Reports
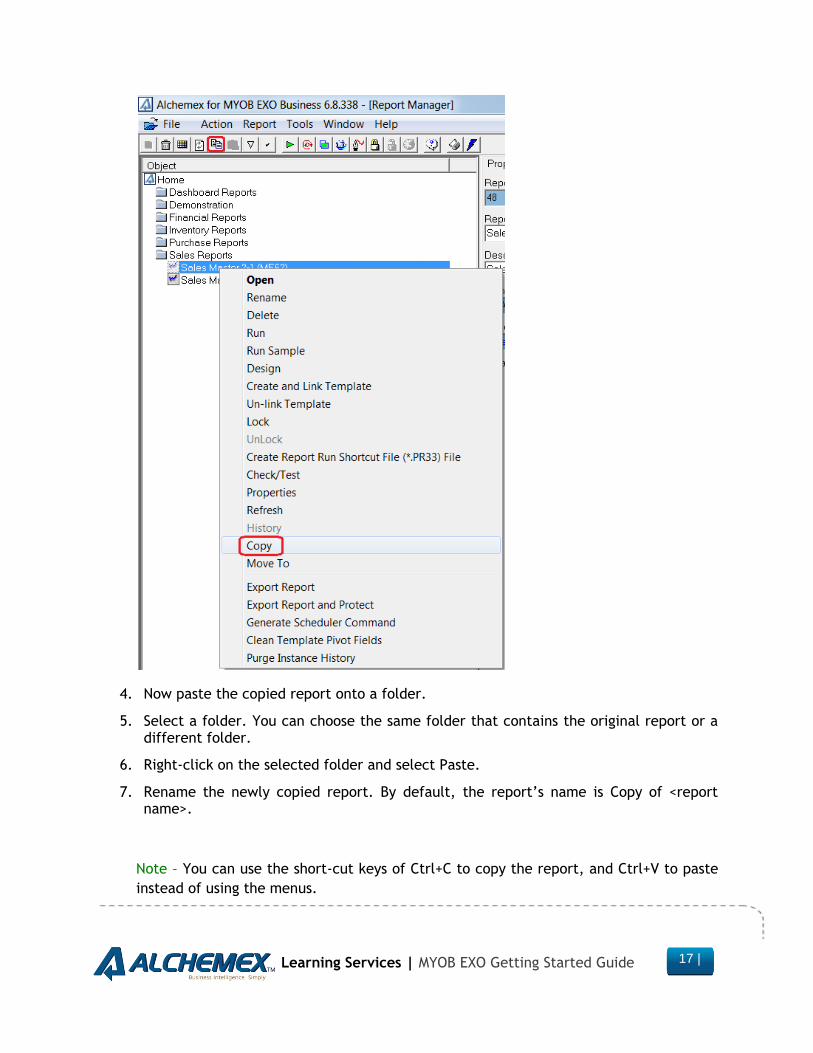
2. Right-click on the report you want to make a copy of; e.g. Sales Master
3. Select Copy to copy that report to the Clipboard.
Learning Services | MYOB EXO Getting Started Guide
17 |
4. Now paste the copied report onto a folder.
5. Select a folder. You can choose the same folder that contains the original report or a different folder.
6. Right-click on the selected folder and select Paste.
7. Rename the newly copied report. By default, the report’s name is Copy of <report name>.
Note – You can use the short-cut keys of Ctrl+C to copy the report, and Ctrl+V to paste
instead of using the menus.

Learning Services | MYOB EXO Getting Started Guide
18 |
Right-click on the report and select Rename to give the report a different name. You now
have an exact duplicate of the original report that will obtain its data from the same place,
and deliver it in the same format, until you make any changes to this new report.

Learning Services | MYOB EXO Getting Started Guide
19 |
CREATING AND LINKING A REPORT
It is entirely possible to customize the look and layout of the Alchemex for MYOB EXO Business
Standard Reports. Although these reports are designed to encompass the needs of most
business organizations, you may want to change the appearance (colors, text style, etc.) to
reflect your company image, and perhaps change the order or inclusion of columns to suit
your company processes. These changes can be saved for the next time you run the report.
Creating Excel templates enables the user to create a template from an open Excel workbook
and link it to an existing report so as to standardize the output format of the chosen report
for every run instance in future.
Note:
If you are unsure of making changes to any of the Standard Reports, you should create a copy
of the report before you make any changes.
Alchemex for MYOB EXO Business users must make a copy of a report in order to edit the
standard reports.
To copy a report
1. Open the Alchemex for MYOB EXO Business Report Manager.
2. Right-click the report you want to copy and select Copy.
3. Right-click on the report folder in which you want to paste the copy and select Paste. The copy of the report is renamed as Copy of and the original report name.
To create and link the Report
1. Open the Alchemex for MYOB EXO Business Report Manager.
2. Select and run the report you want to customize; e.g., Copy of Sales Master.

Learning Services | MYOB EXO Getting Started Guide
20 |
3. Make the changes to the report; ensure that Sheet1 (where Alchemex for MYOB EXO Business puts the Raw Data) and Sheet2 (where Alchemex for MYOB EXO Business puts the report parameters) are unchanged.
4. After completing the changes, leave the workbook open and go back to the Report Manager.
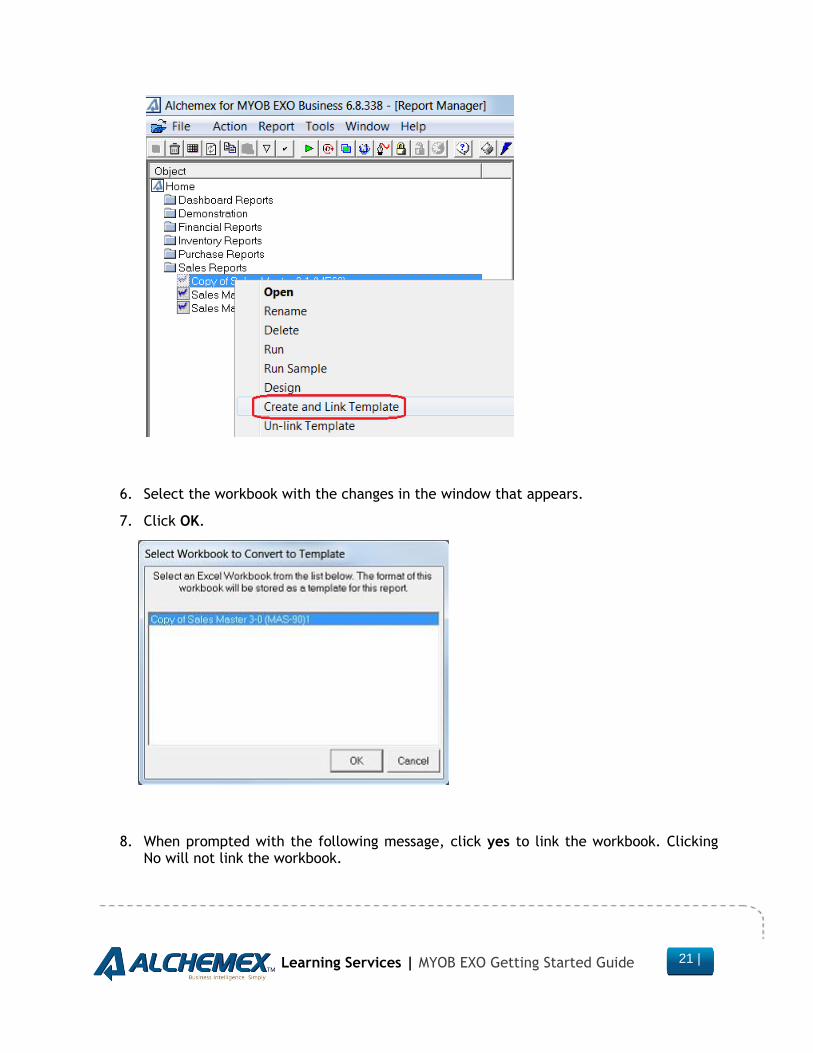
5. Right-click on the report for which the changes were made and select Create and Link Template.
Learning Services | MYOB EXO Getting Started Guide
21 |
6. Select the workbook with the changes in the window that appears.
7. Click OK.
8. When prompted with the following message, click yes to link the workbook. Clicking No will not link the workbook.

Learning Services | MYOB EXO Getting Started Guide
22 |
9. When prompted to specify the template name, change the name of the template. Doing so ensures that the original template is not overwritten with the copy
10. Click OK.
Once the template has been successfully linked, a message is displayed.

Learning Services | MYOB EXO Getting Started Guide
23 |
ADDING & CREATING A NEW REPORT
To create a new report from existing containers, you must first create a new folder.
Remember that folders contain all the reports related to a particular topic. For example, all
reports related to Sales. You cannot create sub folders.
Creating a New Report from Existing Containers
This process consists of two steps:
Adding a folder
Adding a report
To add a folder
1. Open the Alchemex for MYOB EXO Business Report Manager.
2. Select Home.
3. Right click and select Add Folder. The Enter a Name for the Folder window opens
4. Enter a name for your folder; e.g., Sales Test.
5. Click OK.
To add a report
1. Select the Folder where you want to add the report; e.g., Sales Test.
2. Right-click and select Add Report.
3. Select the type of report to add when prompted. You will add a standard report

Learning Services | MYOB EXO Getting Started Guide
24 |
4. Enter a new name for the report; e.g., Sales Report.
5. Click OK and the Select Data Container window opens.
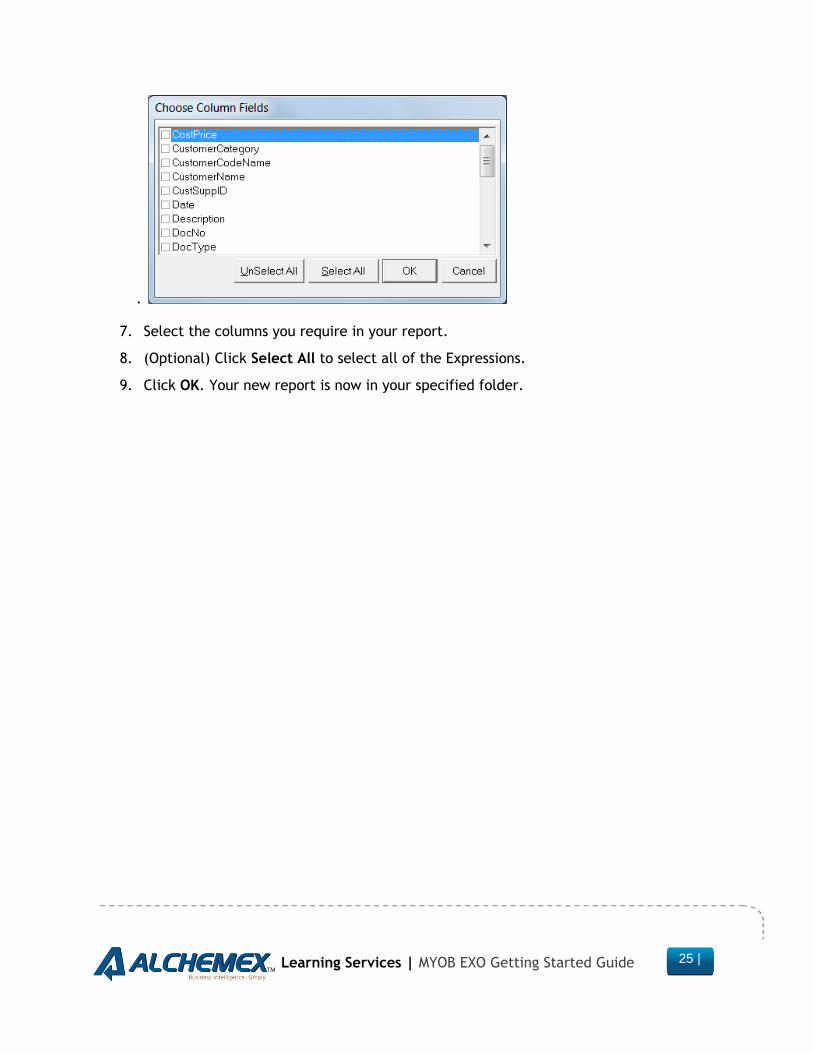
6. Select the data container from which you want to source your data; e.g., Sales Analysis. The Choose Column field’s window opens.
Learning Services | MYOB EXO Getting Started Guide
25 |
.
7. Select the columns you require in your report.
8. (Optional) Click Select All to select all of the Expressions.
9. Click OK. Your new report is now in your specified folder.

Learning Services | MYOB EXO Getting Started Guide
26 |
ALCHEMEX FOR MYOB EXO BUSINESS REPORT PROPERTIES
The report type (Standard, Dataless, Sub query or Union) mainly determines which standard
tabs are available on the selected Properties window. A typical Properties window of
Standard report types has, besides the Properties tab also a tab for each report output
property, namely Columns, Filters, Parameters, Sort Fields, and Aggregate Filters.
Report Properties Overview
We will look at the properties and columns of a standard report.
When selecting a report, tabs appear on the right of the screen. These tabs allow you to
modify the report’s display output.
Properties Tab
The Properties tab enables you to view and change general report details such as the report
name and description. To confirm any change select the Apply button on the top right of the
properties window

Learning Services | MYOB EXO Getting Started Guide
27 |
Columns Tab
The columns window lists the columns that make up the Excel report. You are able to Add,
Remove or change the order of the columns using the buttons on the top right of the window.
Learning Services | MYOB EXO Getting Started Guide
28 |
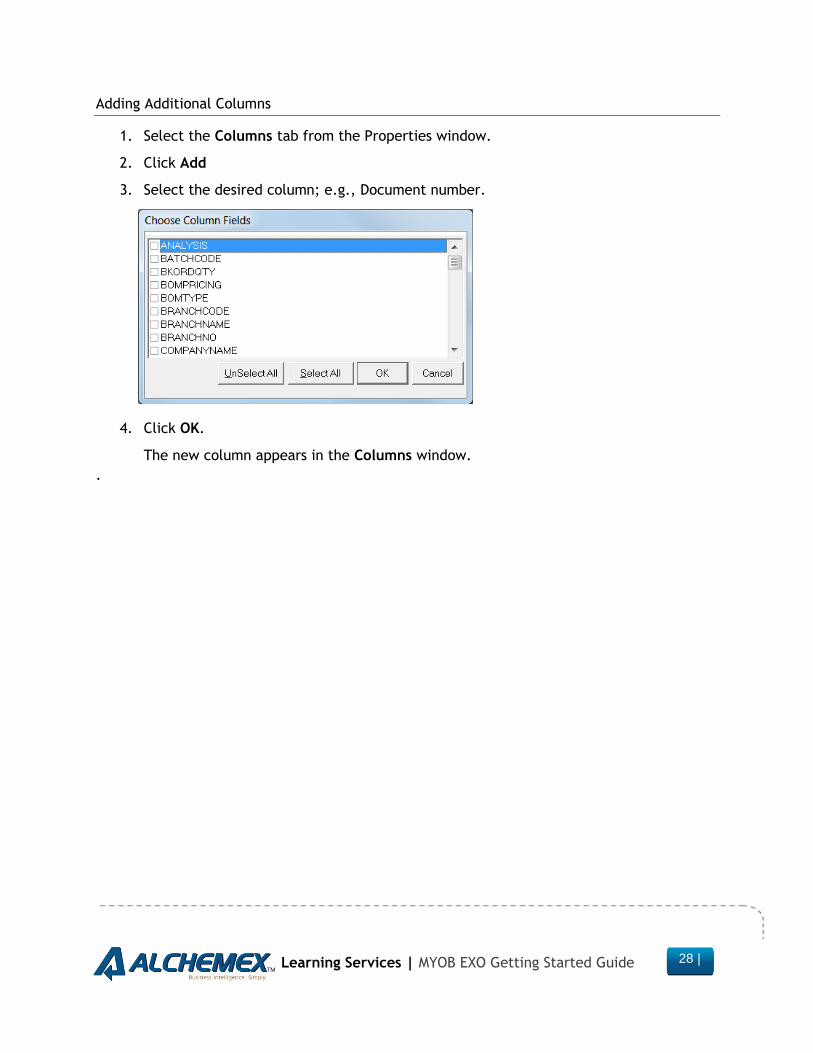
Adding Additional Columns
1. Select the Columns tab from the Properties window.
2. Click Add
3. Select the desired column; e.g., Document number.
4. Click OK.
The new column appears in the Columns window.
.

Learning Services | MYOB EXO Getting Started Guide
29 |
Moving and Deleting Columns
Moving Columns
If you want the columns to appear in a certain order in Microsoft® Excel®, you can change
their order in the Properties window.
1. From the Properties window, select the Columns tab
2. Select the desired column/s
3. Click Move Up or Move Down
OR
4. Select the desired column/s
5. Drag to the appropriate position.
Deleting Columns
1. From the Properties window, right click on the desired column.
2. Click Delete.
Learning Services | MYOB EXO Getting Started Guide
30 |
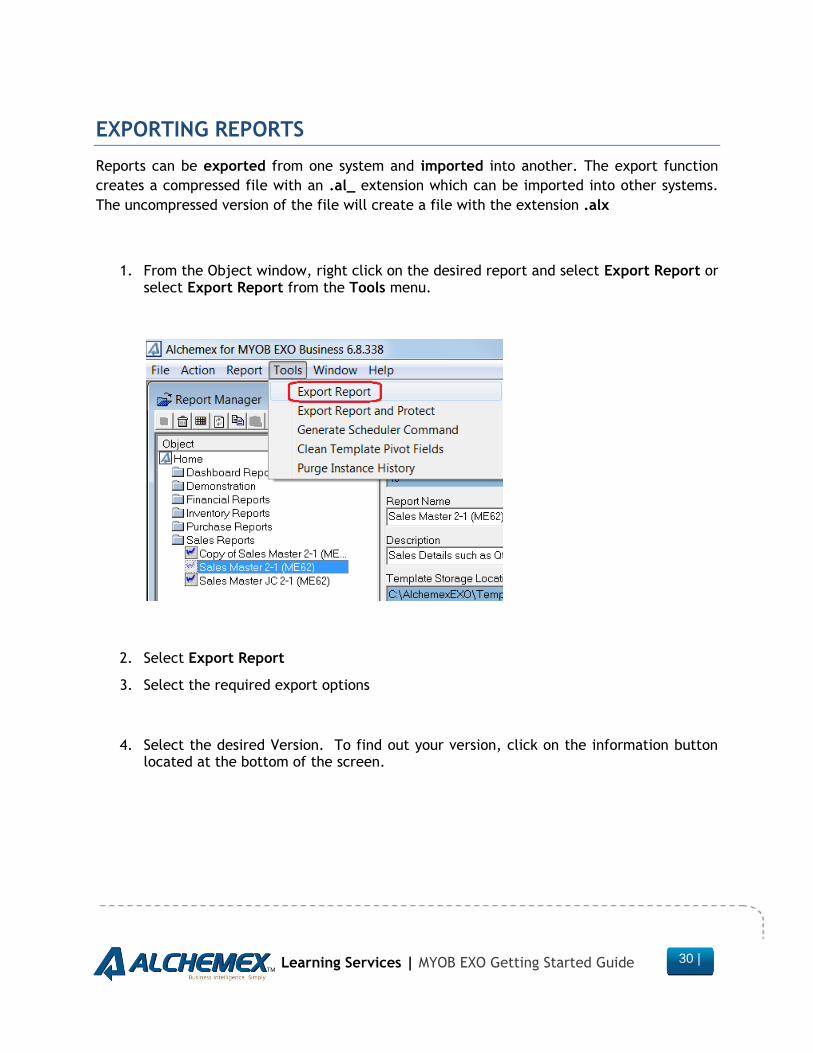
EXPORTING REPORTS
Reports can be exported from one system and imported into another. The export function
creates a compressed file with an .al_ extension which can be imported into other systems.
The uncompressed version of the file will create a file with the extension .alx
1. From the Object window, right click on the desired report and select Export Report or select Export Report from the Tools menu.
2. Select Export Report
3. Select the required export options
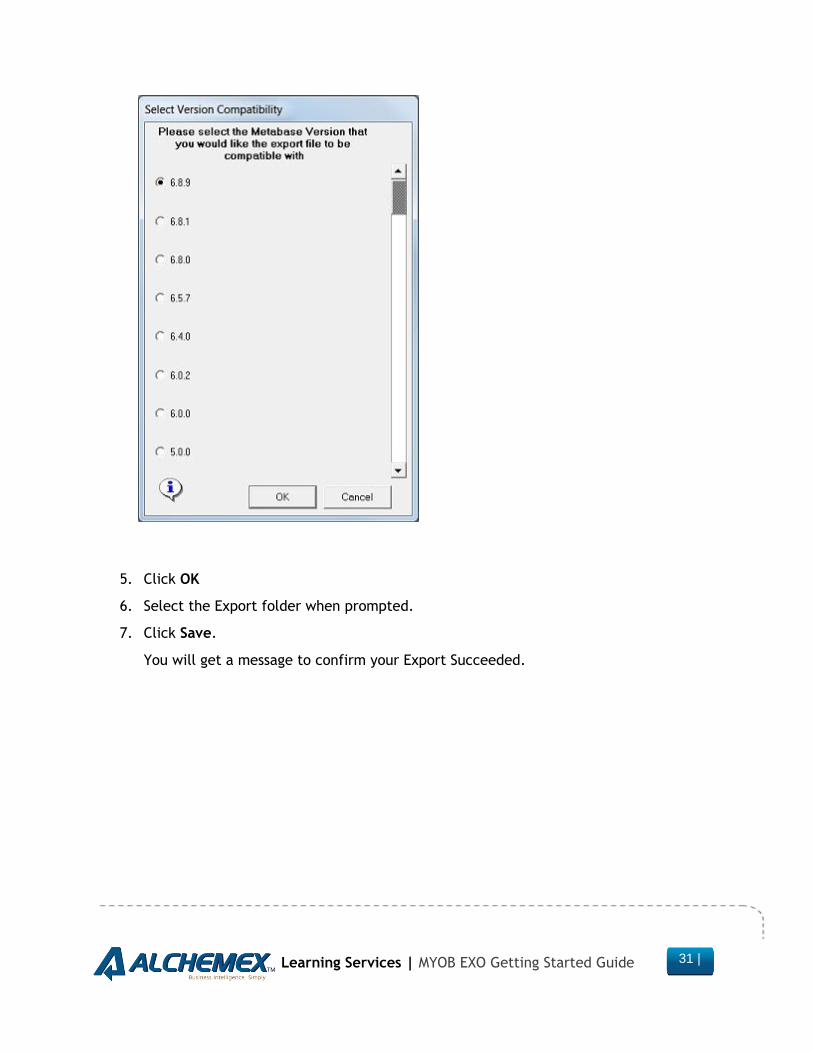
4. Select the desired Version. To find out your version, click on the information button located at the bottom of the screen.
Learning Services | MYOB EXO Getting Started Guide
31 |
5. Click OK
6. Select the Export folder when prompted.
7. Click Save.
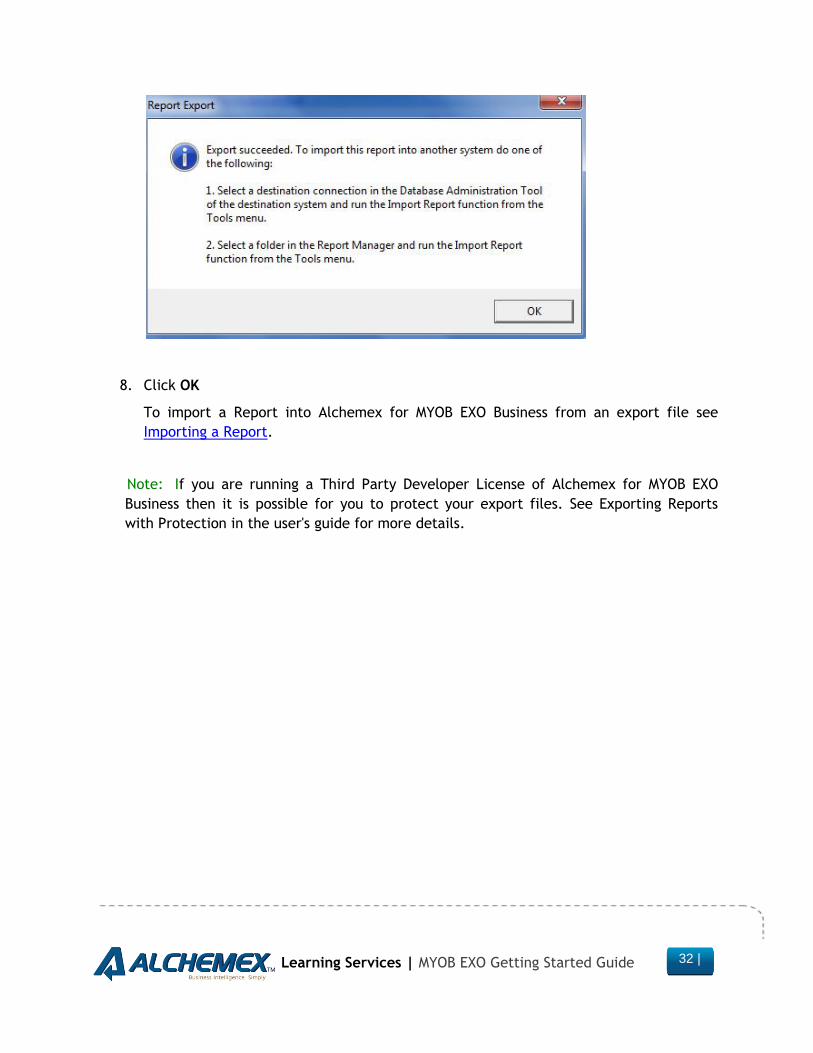
You will get a message to confirm your Export Succeeded.
Learning Services | MYOB EXO Getting Started Guide
32 |
8. Click OK
To import a Report into Alchemex for MYOB EXO Business from an export file see
Importing a Report.
Note: If you are running a Third Party Developer License of Alchemex for MYOB EXO
Business then it is possible for you to protect your export files. See Exporting Reports
with Protection in the user's guide for more details.
Learning Services | MYOB EXO Getting Started Guide
33 |
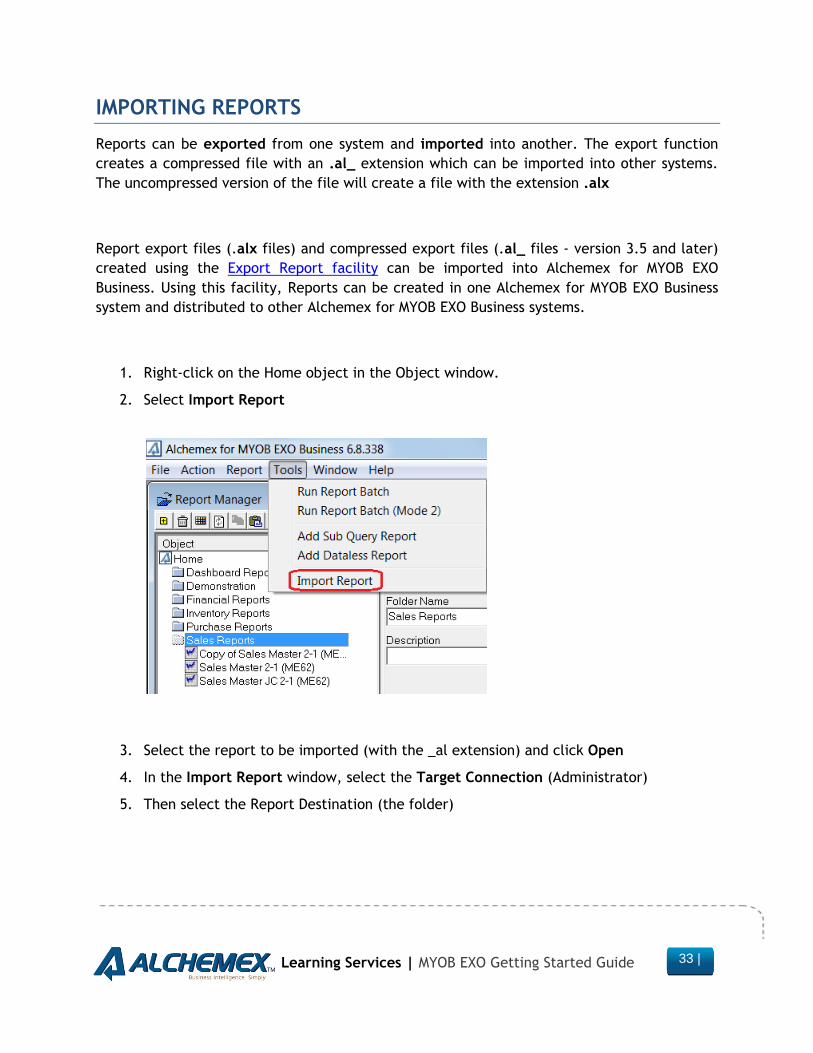
IMPORTING REPORTS
Reports can be exported from one system and imported into another. The export function
creates a compressed file with an .al_ extension which can be imported into other systems.
The uncompressed version of the file will create a file with the extension .alx
Report export files (.alx files) and compressed export files (.al_ files - version 3.5 and later)
created using the Export Report facility can be imported into Alchemex for MYOB EXO
Business. Using this facility, Reports can be created in one Alchemex for MYOB EXO Business
system and distributed to other Alchemex for MYOB EXO Business systems.
1. Right-click on the Home object in the Object window.
2. Select Import Report
3. Select the report to be imported (with the _al extension) and click Open
4. In the Import Report window, select the Target Connection (Administrator)
5. Then select the Report Destination (the folder)

Learning Services | MYOB EXO Getting Started Guide
34 |
6. Click Import
7. Click OK.
8. Double-click on the Sales Reports folder to refresh.
Below is a list of the information that is supplied to you for an import and a description
of each element:

Learning Services | MYOB EXO Getting Started Guide
35 |
Report Name The original name of the Report in the Source
Alchemex for MYOB EXO Business System
Created By
Company The Company that created the Export File
Report Container
Source
The Source Container for the Report in the Source
Alchemex for MYOB EXO Business System
Creation Time The Date and time that the Export File was created
Original Template
Name
The name of the Report Template in the Source
Alchemex for MYOB EXO Business System
Template File Size The size (in bytes) of the Report Template File
Original
Connection Name
The name of the Source Data Connection in the
Alchemex for MYOB EXO Business Source System
Export Library
Version
The Version of the Export Program Library used to
create the export file
Import Library
Version
The Version of the Import Program Library being used
to perform the import
Target Connection The Connection that you have selected as the Source
for the new report that will be created by the import
Target Connection
Type
The Source Connection Type of the Connection that
you have selected as the Source for the new report
that will be created by the import
Report Destination The Report Manager Folder into which the new report
will be imported

Learning Services | MYOB EXO Getting Started Guide
36 |
SECURITY MANAGER
.
Method
1. In Windows, Click on All Programs, Alchemex for MYOB EXO Business and then click on Security Manager.
2. In the Security Manager window, make sure the Security On checkbox is checked.
3. Click the Add button under the Roles section to add a new role.
4. On the Reports tab, select the reports that the Role should be able to access.
5. Note that Union/sub reports are automatically added when the main report is added.
6. Then click the Users tab and select the users) that should belong to this role.
The user now has access to the reports that the system administrator has assigned to the role.

Learning Services | MYOB EXO Getting Started Guide
37 |
GETTING SUPPORT
The Alchemex for MYOB EXO Business Help Files have been written to provide maximum information
and assistance to all Alchemex for MYOB EXO Business users. Every effort has been made to make
Alchemex for MYOB EXO Business easy to understand and use. The comprehensive help files can be
accessed by pressing the F1 button in your Alchemex for MYOB EXO Business software.
.
Alchemex Contact Information
Website www.alchemex.com
BI Community - Find product videos and a comprehensive
knowledgebase and documentation www.alchemex.ning.com
Knowledgebase - Repository of support articles and help files www.alchemex.com
Online Academy – Offering you specialized Excel and Alchemex
training to enhance your reporting skills www.alchemexacademy.com
Trial Software - A complete installation of the Alchemex
reporting software for you to evaluate over the next 30 days www.alchemex.com
Support – No luck from self-help websites? Email your questions,
comments or problems [email protected]
Customer References www.alchemex.com

Learning Services | MYOB EXO Getting Started Guide
38 |