
Albino 3 Manual 300
79
-
Upload
david-slojewski -
Category
Documents
-
view
94 -
download
1
Transcript of Albino 3 Manual 300


Copyright:LinPlug Virtual Instruments GmbH, 2006 All rights reserved.Rob Papen Sound Design & Music, 2006 All rights reserved.
Concept: Rob Papen and Peter LinsenerInstrument: Peter Linsener and Pavol MarkovičGraphics: Shaun Ellwood (www.decoderdesign.com)Sounds: Rob Papen (except for Noisia and Reyn Banks)Manual: Chris Share, Jacky Ligon
Thanks to (in alphabetical order) Dutch Synth Forum, Ivan Willems, NicoHerz, Patrick Anglard, Patrick Robert, Summa and all beta testers
All technical specifications of the products specified in this manual may be subject to changewithout notice. The documents may not be changed, especially copyright notices may not beremoved or changed. Rob Papen is a trademark of Rob Papen Sound Design & Music. Albinois a trademark of Rob Papen Sound Design & Music and LinPlug Virtual Instruments GmbH.LinPlug is a trademarks of LinPlug Virtual Instruments GmbH. VST is a registered trademarksof Steinberg Media Technologies GmbH. All other trademarks are the property of theirrespective owners.
Rob Papen Albino 3.0 2

WelcomeThank you for purchasing the Rob Papen Albino 3.
The Albino 3 is a fully-professional, highly-flexible, easy-to-use, fourth-generation virtual instrument designed for creating music on your personalcomputer.
The Albino 3 is the unique result of a collaboration between VirtualInstrument designer Peter Linsener and Dutch sound designer Rob Papen.
The Albino 3's key features include high quality presets in a wide range ofstyles, an easy-to-use interface, highly flexible oscillators, four types ofstereo filters, an enormous range of processing and modulation options, apowerful, flexible arpeggiator and a layer system that allows you tocombine up to four layers in one preset.
This manual describes all aspects of the Albino 3 synthesizer and isdesigned so that your use of this software is as efficient and as pleasurableas possible.
We feel that the Albino 3 is exceptional because of its audio quality, itsfeatures and especially because of the presets programmed by RobPapen. We hope you get a lot of pleasure using the Albino 3 Synthesizerand that it becomes an inspirational part of your music-making.
Rob Papen and the LinPlug team, April 2006
Rob Papen Albino 3.0 3

Table of ContentsINSTALLATION................................................................................6
WHAT'S NEW IN ALBINO 3.............................................................7
FEATURES.......................................................................................8
OVERVIEW....................................................................................10
CONTROLS....................................................................................12
LAYERS..........................................................................................13
OSCILLATORS..............................................................................16DIGITAL OSCILLATOR.............................................................17ANALOG OSCILLATOR.............................................................19NOISE OSCILLATOR...............................................................21AUDIO INPUT........................................................................22
FILTERS.........................................................................................23SILK FILTER.........................................................................24CREAM FILTER.....................................................................25SCREAM FILTER....................................................................26COMB FILTER.......................................................................27
AMP................................................................................................29
ENVELOPES..................................................................................31ADSFR ENVELOPE..............................................................315 STAGE ENVELOPE..............................................................33
MODULATION................................................................................35QUAD LFO.........................................................................35MODULATION MATRIX.............................................................37THE ARPEGGIATOR................................................................39
Mode...............................................................39Clk (Clock) .....................................................40Retrigger ........................................................40Step Display....................................................40Length (Len) ..................................................41Swing (Swi).....................................................41Step (Stp)........................................................41Velocity (Vel) ..................................................42Octave (Oct) ..................................................42
EFFECTS.......................................................................................43
Rob Papen Albino 3.0 4

DELAY................................................................................44CHORUS AND CHORUS 2........................................................45PHASER..............................................................................46FLANGER.............................................................................47FILTER................................................................................48REVERB..............................................................................50STEREO DELAY....................................................................51GATOR...............................................................................52WAHWAH...........................................................................54COMPRESSOR.......................................................................55LOFI...................................................................................56
MASTER.........................................................................................58PRECISION...........................................................................58ECS.................................................................................59CHORD (MEMORY)................................................................59GEN...................................................................................60PRESET BROWSER / FILE CONTROLS........................................60GLIDE.................................................................................61SINGLE TRIGGER/VOICES........................................................61VOLUME CONTROL................................................................62
REAR PANEL.................................................................................63
OPTIMIZING CPU USAGE............................................................65
GLOSSARY....................................................................................66
MIDI IMPLEMENTATION CHART.................................................69
APPENDIX A: DIGITAL OSCILLATOR WAVEFORMS ANDRANGES.........................................................................................71
APPENDIX B: LFO/ARPEGGIATOR SYNC SETTINGS .............71
APPENDIX C: DELAY SYNC SETTINGS......................................71
APPENDIX D: MODULATION SOURCES AND DESTINATIONS....72
MODULATION SOURCES..........................................................72MODULATION DESTINATIONS....................................................74
APPENDIX E: USING TUN FILES.................................................77CREATING TUN MICROTUNING FILES WITH SCALA.....................77SPECIFYING THE REFERENCE FREQUENCY OF A MICROTUNING........78
Rob Papen Albino 3.0 5

Installation
Installation on PC
The Albino 3 comes with its own Installer. After downloading the Albino 3you will find a file named "AlbinoInstaller3xx.exe" located in your downloadfolder. Start this program to begin the installation process. The Installer willguide you through the installation process. Make sure you choose the right directory, so your host software finds theAlbino3. Refer to your host software's manual if you are unsure aboutwhere the host software plug-in directory is located.
The instrument file "Albino3.DLL" and the Albino 3 manual and presets willbe placed in the chosen directory. The next time you start your hostsoftware the Albino 3 will be listed in the RTAS or VST Instrument list.
Installation on Mac
The Albino 3 comes with its own Installer. After downloading the Albino 3you will find a file named "AlbinoInstaller3xx.dmg" located in your downloadfolder. Double-click this file to decompress and open the image, thendouble-click the installer program to begin the installation process.
You will be guided through the installation process. The instrument file"Albino3" and the Albino 3 presets will now be placed in the right directoryfor virtual instruments on your Mac. The next time you start your hostsoftware the Albino 3 will be listed in the AU / RTAS / VST Instrument list.
Common to Mac and PC
After you've installed and opened the full version of the Albino 3, go to theinstrument's rear panel. The S/N edit box should read "Enter here". Enterthe serial number you have received into the S/N edit box. If the serialnumber has not been entered or it has been entered incorrectly, the fullversion of the Albino 3 will not play any notes. To switch back to the mainedit screen click the Albino 3 logo on the rear panel. Now send the Albino 3 a few note-on messages. After the Albino 3receives the first few note-on messages it automatically becomesregistered.
If you have any questions regarding the installation of Albino 3 pleasecontact our support team at www.linplug.com/support/support.htm.
Rob Papen Albino 3.0 6

What's New in Albino 3
In comparison with its predecessor the Albino 2, the Albino 3 contains ahost of new features intended to make your music-making more efficientand enjoyable. These new features are listed below:
Each preset can now be made up of 4 individual layers.Each layer features controls for Visibility, On/Off, Activity, Location,Name, Browse Previous, Browse Next, Load, Save, Volume, Pan, NoteOffset (Transpose), Filter Control Source (Pitchwheel, Modwheel andAftertouch), Key Range and Velocity Range.Wah wah effect.Compressor effect.LoFi effect.Enhanced reverb effect including controls for diffusion, modulation,modulation speed and a sync menu for predelay.The cutoff-modulation-speed of the filter in the Effects section can besynced to song tempo.Oscillator 1 can be used as an audio input so that external audio canbe processed.Each Oscillator now has its own Spread control.Each Oscillator now has a Free-run mode.Each ADSFR Envelope now has 4 additional slope/curve settings.Both envelope types now have a Sync control which switches betweenTime and Sync modes.Filter Saturation now has 4 different modes.2 new types of filter: Scream and Comb.Oscillator 2 can be used to modulate Filter1FMOscillator 4 can be used to modulate Filter2FMThe Bend Range control now has separate controls for Up/Down.The Analog Oscillator now has a control for the sub-oscillator intensity.The Modulation Matrix now has 16 slots.
Rob Papen Albino 3.0 7
Features
The Albino 3 contains a range of features designed to make your music-making more efficient and enjoyable. These features are described below:
Sound Presets consist of 4 separate Layers for rich, complex soundsynthesis.4 oscillators per Layer, 4 types. Oscillator modules include Analog-type, Digital-type, Noise-type and Audio Input-type. FM modulation andAM modulation. Oscillator Sync in Analog Oscillator 2 and 4. Variousfilter routing options.Stereo Filters, 4 types. Filter modules include Silk-type, Cream-type,Scream-type and Comb-type. 3 multimode filters (Silk, Cream andScream), each with a different basic design thus producing differentsounding filters. Filters are stereo with panning and panningmodulation options. Saturation knob precedes each filter to add overdrive to the soundbefore it enters the filter. Four types of Saturation are available.8 envelopes, 2 types. ADSFR type and 5-stage envelope type with loopfunction. Each envelope stage has separate slope/curve settings. Eachoscillator has its own volume envelope. 4 LFOs with various waveforms and midi-syncable. LFO Waves haveadjustable start-phase and waveform-symmetry. LFOs can also be setto mono mode.Modulation Matrix which includes 16 routings with 26 sources and 47destinations. Separate control section for Velocity to: AMP, Filter 1 andFilter 2.Arpeggiator with 32 step rhythm sequencer, step length, clock settings,various modes including modulation and chord, switchable keyboardretrigger, swing, velocity mix, save/load functionalitySpread function for each Oscillator for ultra fat detuned soundsChord memory mode (saved with the preset)
Rob Papen Albino 3.0 8
4 effects units per layer each containing 12 stereo effects including twoChoruses, two Delays, Filter, Phaser, Reverb, Flanger, Gator, WahWah, Compressor and LoFi.Mono/Polyphonic Portamento/Glide featuring Fingered mode,switchable constant Time/constant Rate and Auto-Bend Modes.Sound programs are stored directly on hard disk so providing a virtuallyunlimited number of storage locations. Sounds are sorted into style-maps for easy search. Integrated Sound Browser, MIDI programchange supported.Adjustable Precision setting for recreating the warmth of true analogsynthesizers.Gen (randomize) function for experimentation and fun!Microtonal support (Scala file import) for different scales (Indian,Arabic, etc.)Adjustable keyboard velocity response curve.32-voice polyphony.Adjustable voice limit (mono, 1...12, oo).MIDI activity display (also triggers a C3 when clicked)Several parameters are located on the "rear panel" so they are notchanged accidentally during use.Controller hardware (faderbox or synth) settings can be saved andrestored.Dial operation is switchable between circular and linear modes.
Rob Papen Albino 3.0 9
Overview
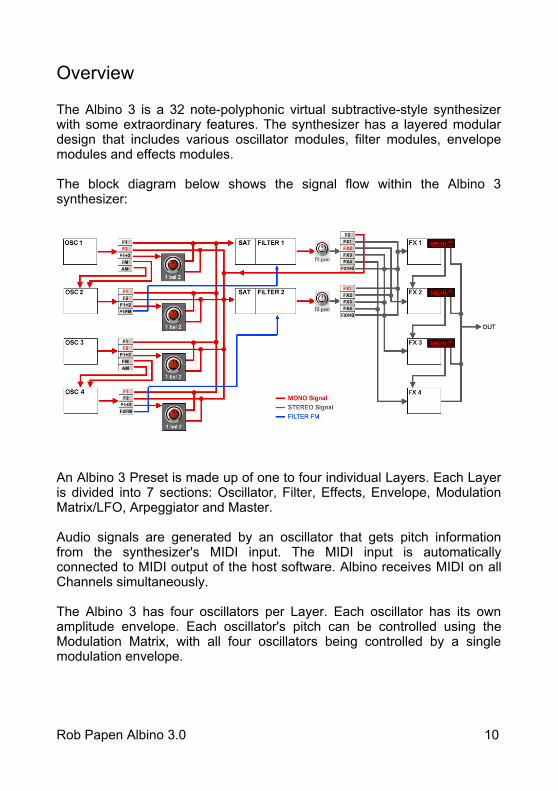
The Albino 3 is a 32 note-polyphonic virtual subtractive-style synthesizerwith some extraordinary features. The synthesizer has a layered modulardesign that includes various oscillator modules, filter modules, envelopemodules and effects modules.
The block diagram below shows the signal flow within the Albino 3synthesizer:
An Albino 3 Preset is made up of one to four individual Layers. Each Layeris divided into 7 sections: Oscillator, Filter, Effects, Envelope, ModulationMatrix/LFO, Arpeggiator and Master.
Audio signals are generated by an oscillator that gets pitch informationfrom the synthesizer's MIDI input. The MIDI input is automaticallyconnected to MIDI output of the host software. Albino receives MIDI on allChannels simultaneously.
The Albino 3 has four oscillators per Layer. Each oscillator has its ownamplitude envelope. Each oscillator's pitch can be controlled using theModulation Matrix, with all four oscillators being controlled by a singlemodulation envelope.
Rob Papen Albino 3.0 10
The output of any or all of the oscillators can be routed to either Filter 1,Filter 2 or both in series or parallel as shown above. The filter modifies thefrequency spectrum of the oscillator's output. Both filters are stereo andcompletely independent, and each has an envelope for controlling its cutoffparameter.
Oscillators one and three have a further routing option. Their output can beused to modulate the frequency and amplitude of oscillators two and fourrespectively. This option increases the richness of the spectrum of themodulated oscillators, producing very interesting, harmonically-rich results.Oscillators two and four can also be used to modulate the cutoff frequencyof Filter 1 and Filter 2 respectively.
The output of the Filter section is then sent to the Effects section whichcontains four independent stereo effects modules, each of which containstwo Choruses, two Delays, a Filter, a Phaser, a Reverb, a Flanger, a Gator,a Wah Wah, a Compressor and LoFi effect. Each effects processor isdescribed in detail later in this manual. The output of the four separateeffects modules can be sent to either the next module or the main output.The output of each filter can be sent to each effects module or to the firstand third effects module.
The audio outputs of the Albino 3 are automatically connected to the inputof your host software's mixer. Here you can set the pan position of theAlbino's output.
At various points throughout the signal path you can modulate the signalusing either envelopes, LFOs, the Arpeggiator or MIDI Controllers. TheAlbino 3 contains 8 independent envelopes. The first 4 control eachoscillator's amplitude. Envelopes 6 and 7 can be used to control Filter 1and Filter 2, while Envelope 8 controls the overall audio amplitude.Envelope 5 is a general purpose envelope designed for use with theModulation Matrix and so can control any available modulation destination. The Albino 3 also contains 4 independent LFOs. Each LFO has its ownenvelope controls as well as syncing and waveshaping options. LFOs canbe routed to any available modulation destination.
Hopefully, this chapter has given you a brief overview of how the Albino 3works. More detailed information can be found in the following chapters.
Rob Papen Albino 3.0 11

Controls
Users have the option of controlling all Albino 3 dials in either a circular or alinear manner depending on the Dial Mode setting on the Albino 3's rearpanel (see the "Main" section of this manual for more information about theAlbino's rear panel).
Holding down the ALT key while clicking on a control changes the selectedcontrol's value a minimum step upwards (when clicking in the upper half ofthe control) or a minimum step downwards (when clicking in the lower halfof the control).
Holding down the CTRL key while clicking on a control sets the control toits default value (e.g. for Volume controls it sets the control's value to -6dB).
Holding down the SHIFT key while changing a control's value enables finercontrol values to be set.
Double clicking once in a Modulation Matrix slot sets the value of the slot to0.00. Double clicking in the same slot a second time resets the slot to itsprevious value.
All Controls can be controlled using external MIDI messages. To do thisyou need to use the Albino 3's ECS which is described in detail later in thismanual.
Rob Papen Albino 3.0 12
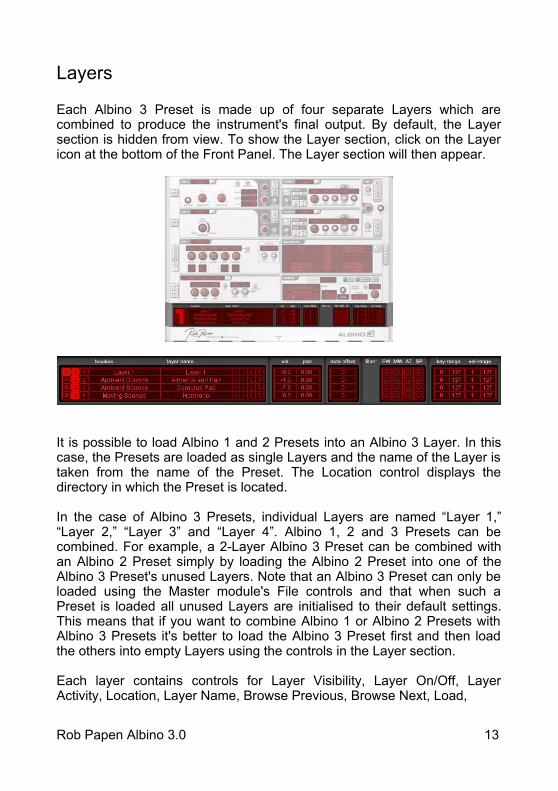
Layers
Each Albino 3 Preset is made up of four separate Layers which arecombined to produce the instrument's final output. By default, the Layersection is hidden from view. To show the Layer section, click on the Layericon at the bottom of the Front Panel. The Layer section will then appear.
It is possible to load Albino 1 and 2 Presets into an Albino 3 Layer. In thiscase, the Presets are loaded as single Layers and the name of the Layer istaken from the name of the Preset. The Location control displays thedirectory in which the Preset is located.
In the case of Albino 3 Presets, individual Layers are named “Layer 1,”“Layer 2,” “Layer 3” and “Layer 4”. Albino 1, 2 and 3 Presets can becombined. For example, a 2-Layer Albino 3 Preset can be combined withan Albino 2 Preset simply by loading the Albino 2 Preset into one of theAlbino 3 Preset's unused Layers. Note that an Albino 3 Preset can only beloaded using the Master module's File controls and that when such aPreset is loaded all unused Layers are initialised to their default settings.This means that if you want to combine Albino 1 or Albino 2 Presets withAlbino 3 Presets it's better to load the Albino 3 Preset first and then loadthe others into empty Layers using the controls in the Layer section.
Each layer contains controls for Layer Visibility, Layer On/Off, LayerActivity, Location, Layer Name, Browse Previous, Browse Next, Load,
Rob Papen Albino 3.0 13
Save, Volume, Pan, Note Offset (Transpose), Filter Control Source(Pitchwheel, Modwheel, Aftertouch and Sustain Pedal), Key Range andVelocity Range. These controls are described below.
The Albino 3's Front Panel displays one Layer at a time. The LayerVisibility control is used to set the Layer that is displayed. The LayerVisibility control is located at the far left of the Layer section and resemblesan “eye.” To change Layers, click on the Layer Visibility control of the Layerthat you wish to see.
Each Layer can be switched on or off using the Layer On/Off control whichis located to the right of the Layer Visibility control. When the control isilluminated the respective Layer is switched on. To turn a Layer on or off,click on the Layer On/Off control.The Layer Activity control is located to the right of the Layer On/Off control.This control has two functions. Firstly, it shows when a Layer receives MIDIdata. Secondly, clicking on the the Layer Activity control triggers therespective Layer.
The Location control displays the name of the current Layer's directory.Whenever a Layer is loaded using the Layer Load and Browse controls(see below), the Location is updated. Clicking on the Location controlopens a popup menu that displays all Locations that are accessible fromthe current Location.
The Layer Name displays the name of the current Layer. Whenever aLayer is loaded using the Layer Load and Browse controls (see below), theLayer name is updated with the name of the current Layer. Clicking on theLayer Name opens a popup menu that displays all Layers in the currentLocation.
As mentioned above, Albino 1 and Albino 2 Presets as well as Albino 3Layers can be loaded into the Albino 3 using the File controls found in theLayer section. Four controls are available: Browse Previous, Browse Next,Load and Save. The Load button opens a dialog that lets you select aPreset/Layer for loading. The Previous and Next buttons allow you totraverse a list of Albino 1 Presets, Albino 2 Presets and Albino 3 Layers.The Save button allows you to save the current Layer which can then beloaded as a Layer into other Presets.
The settings of all controls in the Layer, as well as the Precision, ECS,Chord and Voices settings, are saved with the Layer. The Albino loads andsaves all of its presets directly to hard disk so your computer's RAM doesnot limit the number of available presets.
Rob Papen Albino 3.0 14

Note that Layers can also be loaded using the File controls in the Mastersection. In this case, Layers are loaded as Albino 3 Presets so that allLayers will be initialised to their default settings. If you are designingsounds with multiple Layers it is recommended that the Layers are loadedusing the File controls in the Layer section as this will prevent initialisationof Layers.
The Browse Previous, Browse Next, Load and Save controls are used toload individual Layers into the Albino 3. The Browse Previous and BrowseNext controls select the previous or next Layer/Preset in the currentlocation. Whenever a Layer/Preset is loaded using the Browse Previous orBrowse Next controls, the Layer name is updated with the name of theloaded Layer/Preset. Note that this only applies to Albino 2 Presets andLayers that have been saved individually. The Load button opens a dialogthat lets you select a Layer/Preset for loading. The Save button allows youto save the current Layer/Preset settings.
The "Volume" control sets the volume of each Layer within the Preset.Volume can be set in a range from -oodB to +6dB.
The "Pan" control sets the position within the stereo field of each Layerwithin the Preset. Pan can be set in a range from -1.00 To 1.00.
The Note Offset or “Transpose” control enables a Layer to be transposedby within a -24 to +24 semitone range.
The Filter Control Source consists of four controls, each of whichdetermines the MIDI control source for the Layer. The four availableoptions are Pitchwheel, Modwheel, Aftertouch and Sustain Pedal. To selecta Filter Control Source click on the respective control. These controls areuseful, if for example, you have a multi-Layer Preset that is split across thekeyboard and you want a MIDI controller to control only one Layer withinthe Preset. For example, if you have a lead/bass Preset and want only thelead Layer to respond to the Pitchwheel, then you can achieve this bysetting the lead Layer's Pitchwheel control to On. In this case, the bassLayer will not be affected by the Pitchwheel.
Each Layer can have its own Key Range and Velocity Range. The KeyRange setting determines the range of notes that trigger the Layer. Thiscan be set anywhere in the range 0 to 127. The Velocity Range settingdetermines the range of MIDI note-on velocity values that trigger the Layer.The Velocity Range can be set anywhere in the range 1 to 127.
Rob Papen Albino 3.0 15
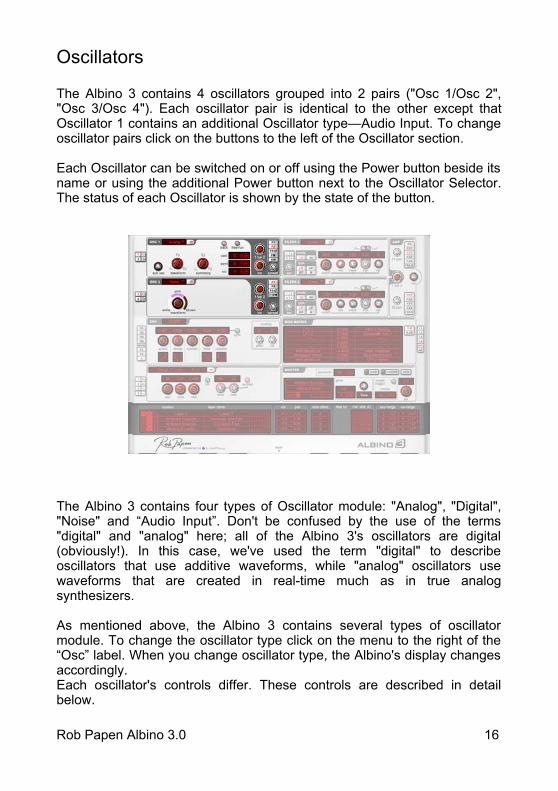
Oscillators
The Albino 3 contains 4 oscillators grouped into 2 pairs ("Osc 1/Osc 2","Osc 3/Osc 4"). Each oscillator pair is identical to the other except thatOscillator 1 contains an additional Oscillator type—Audio Input. To changeoscillator pairs click on the buttons to the left of the Oscillator section.
Each Oscillator can be switched on or off using the Power button beside itsname or using the additional Power button next to the Oscillator Selector.The status of each Oscillator is shown by the state of the button.
The Albino 3 contains four types of Oscillator module: "Analog", "Digital","Noise" and “Audio Input”. Don't be confused by the use of the terms"digital" and "analog" here; all of the Albino 3's oscillators are digital(obviously!). In this case, we've used the term "digital" to describeoscillators that use additive waveforms, while "analog" oscillators usewaveforms that are created in real-time much as in true analogsynthesizers.
As mentioned above, the Albino 3 contains several types of oscillatormodule. To change the oscillator type click on the menu to the right of the“Osc” label. When you change oscillator type, the Albino's display changesaccordingly.Each oscillator's controls differ. These controls are described in detailbelow.
Rob Papen Albino 3.0 16

Digital Oscillator
The Albino 3's "Digital" oscillator outputs a waveform that is a combinationof two basic waveforms. These waveforms are constructed from harmonicsine waves using a unique additive process which ensures a smooth, highquality output signal.
The type of waveform is set by clicking on the Wave item on either side ofthe Waveform Display. This opens a menu that allows you to select fromthe available waveforms. See Appendix A for a complete list of all Digitaloscillator waveforms. The combined output waveform is shown in theWaveform Display. The waveform's pitch range is set in a similar mannerusing the Range item.
Below the Waveform Display is a slider that allows you to interpolatebetween the two waveforms. When the slider is at its leftmost setting, thewaveform consists of purely the leftmost waveform. Similarly, if the slider ismoved all the way to the right the waveform consists of purely the rightmostwaveform. When in an intermediate position, the waveform consists of amixture of the two waveforms. It's probably easier to see this rather thanexplain it, so try it for yourself. Set one wave to Sine and the other to adifferent wave such as Sawtooth. As you move the slider from one end tothe other you can see the wave "morph" from one waveshape to the other.The Waveform display shows a number of cycles corresponding to thelowest waveform range setting.
The Digital oscillator has a range of controls for oscillator's pitch. Theseare: Track, Free-Run, Cent, Semi and Oct. The Track button determineswhether the oscillator tracks the pitch of incoming MIDI messages. TheFree-run button determines the manner in which the oscillator is re-triggered. When the Free-run button is Off, the phase of each note is resetat each onset. When the Free-run button is On, the phase of each notecontinues on from the phase of the previous note. The Cent control setsthe oscillator pitch in cents (a semitone is equal to 100 cents). A range of
Rob Papen Albino 3.0 17
-100 to +100 cents is available. The Semi control sets the oscillator pitch insemitones. A range of -11 to +11 semitones is available. The Oct controlsets the oscillator pitch in octaves. A range of -2 to +7 octaves is available.
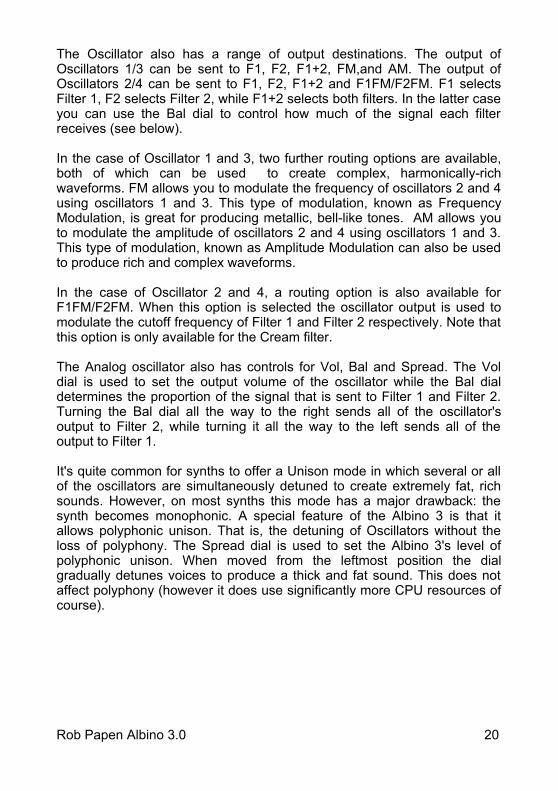
The Oscillator also has a range of output destinations. The output ofOscillators 1/3 can be sent to F1, F2, F1+2, FM,and AM. The output ofOscillators 2/4 can be sent to F1, F2, F1+2 and F1FM/F2FM. F1 selectsFilter 1, F2 selects Filter 2, while F1+2 selects both filters. In the latter caseyou can use the Bal dial to control how much of the signal each filterreceives (see below).
In the case of Oscillator 1 and 3, two further routing options are available,both of which can be used to create complex, harmonically-richwaveforms. FM allows you to modulate the frequency of oscillators 2 and 4using oscillators 1 and 3. This type of modulation, known as FrequencyModulation, is great for producing metallic, bell-like tones. AM allows youto modulate the amplitude of oscillators 2 and 4 using oscillators 1 and 3.This type of modulation, known as Amplitude Modulation can also be usedto produce rich and complex waveforms.In the case of Oscillator 2 and 4, a routing option is also available forF1FM/F2FM. When this option is selected the oscillator output is used tomodulate the cutoff frequency of Filter 1 and Filter 2 respectively. Note thatthis option is only available for the Cream filter.
The Digital oscillator also has controls for Vol, Bal and Spread. The Vol dialis used to set the output volume of the oscillator while the Bal dialdetermines the proportion of the signal that is sent to Filter 1 and Filter 2.Turning the Bal dial all the way to the right sends all of the oscillator'soutput to Filter 2, while turning it all the way to the left sends all of theoutput to Filter 1.
It's quite common for synths to offer a Unison mode in which several or allof the oscillators are simultaneously detuned to create extremely fat, richsounds. However, on most synths this mode has a major drawback: thesynth becomes monophonic. A special feature of the Albino 3 is that itallows polyphonic unison. That is, the detuning of Oscillators without theloss of polyphony. The Spread dial is used to set the Albino 3's level ofpolyphonic unison. When moved from the leftmost position the dialgradually detunes voices to produce a thick and fat sound. This does notaffect polyphony (however it does use significantly more CPU resources ofcourse).
Rob Papen Albino 3.0 18

Analog Oscillator
The Analog oscillator module creates its waveforms in real-time andemulates the sound of an analog synthesizer's oscillator. It contains threecontrols: Waveform, Symmetry and Sub Osc. The Waveform dial sets the oscillator's waveform shape. When turned allthe way to the right it outputs a pulse wave. When turned all the way to theleft it outputs a sawtooth wave. In intermediate positions it outputs awaveform that is a combination of the two.
The Symmetry dial effects the waveform's shape, expanding andcontracting it, as in the case of pulse width modulation. In this casehowever, the waveform reshaping can be applied to any availablewaveform.
The Sub Osc control sets the level of a sub-oscillator one octave lowerthan the oscillator's fundamental pitch. This can be used to add extremelow-end to Presets. The waveform of the sub-oscillator is always a Squarewave.
The Analog oscillator has a range of controls for oscillator's pitch. Theseare: Track, Free-Run, Cent, Semi and Oct. The Track button determineswhether the oscillator tracks the pitch of incoming MIDI messages. TheFree-run button determines the manner in which the oscillator is re-triggered. When the Free-run button is Off, the phase of each note is resetat each onset. When the Free-run button is On, the phase of each notecontinues on from the phase of the previous note. The Cent control setsthe oscillator pitch in cents (a semitone is equal to 100 cents). A range of-100 to +100 cents is available. The Semi control sets the oscillator pitch insemitones. A range of -11 to +11 semitones is available. The Oct controlsets the oscillator pitch in octaves. A range of -2 to +7 octaves is available.
Rob Papen Albino 3.0 19
The Oscillator also has a range of output destinations. The output ofOscillators 1/3 can be sent to F1, F2, F1+2, FM,and AM. The output ofOscillators 2/4 can be sent to F1, F2, F1+2 and F1FM/F2FM. F1 selectsFilter 1, F2 selects Filter 2, while F1+2 selects both filters. In the latter caseyou can use the Bal dial to control how much of the signal each filterreceives (see below).
In the case of Oscillator 1 and 3, two further routing options are available,both of which can be used to create complex, harmonically-richwaveforms. FM allows you to modulate the frequency of oscillators 2 and 4using oscillators 1 and 3. This type of modulation, known as FrequencyModulation, is great for producing metallic, bell-like tones. AM allows youto modulate the amplitude of oscillators 2 and 4 using oscillators 1 and 3.This type of modulation, known as Amplitude Modulation can also be usedto produce rich and complex waveforms.
In the case of Oscillator 2 and 4, a routing option is also available forF1FM/F2FM. When this option is selected the oscillator output is used tomodulate the cutoff frequency of Filter 1 and Filter 2 respectively. Note thatthis option is only available for the Cream filter.
The Analog oscillator also has controls for Vol, Bal and Spread. The Voldial is used to set the output volume of the oscillator while the Bal dialdetermines the proportion of the signal that is sent to Filter 1 and Filter 2.Turning the Bal dial all the way to the right sends all of the oscillator'soutput to Filter 2, while turning it all the way to the left sends all of theoutput to Filter 1.
It's quite common for synths to offer a Unison mode in which several or allof the oscillators are simultaneously detuned to create extremely fat, richsounds. However, on most synths this mode has a major drawback: thesynth becomes monophonic. A special feature of the Albino 3 is that itallows polyphonic unison. That is, the detuning of Oscillators without theloss of polyphony. The Spread dial is used to set the Albino 3's level ofpolyphonic unison. When moved from the leftmost position the dialgradually detunes voices to produce a thick and fat sound. This does notaffect polyphony (however it does use significantly more CPU resources ofcourse).
Rob Papen Albino 3.0 20
Noise Oscillator
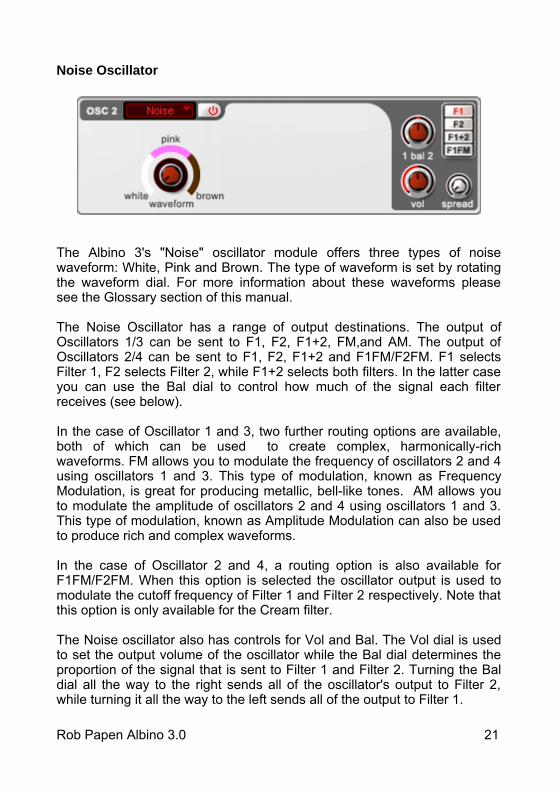
The Albino 3's "Noise" oscillator module offers three types of noisewaveform: White, Pink and Brown. The type of waveform is set by rotatingthe waveform dial. For more information about these waveforms pleasesee the Glossary section of this manual.
The Noise Oscillator has a range of output destinations. The output ofOscillators 1/3 can be sent to F1, F2, F1+2, FM,and AM. The output ofOscillators 2/4 can be sent to F1, F2, F1+2 and F1FM/F2FM. F1 selectsFilter 1, F2 selects Filter 2, while F1+2 selects both filters. In the latter caseyou can use the Bal dial to control how much of the signal each filterreceives (see below).
In the case of Oscillator 1 and 3, two further routing options are available,both of which can be used to create complex, harmonically-richwaveforms. FM allows you to modulate the frequency of oscillators 2 and 4using oscillators 1 and 3. This type of modulation, known as FrequencyModulation, is great for producing metallic, bell-like tones. AM allows youto modulate the amplitude of oscillators 2 and 4 using oscillators 1 and 3.This type of modulation, known as Amplitude Modulation can also be usedto produce rich and complex waveforms.
In the case of Oscillator 2 and 4, a routing option is also available forF1FM/F2FM. When this option is selected the oscillator output is used tomodulate the cutoff frequency of Filter 1 and Filter 2 respectively. Note thatthis option is only available for the Cream filter.
The Noise oscillator also has controls for Vol and Bal. The Vol dial is usedto set the output volume of the oscillator while the Bal dial determines theproportion of the signal that is sent to Filter 1 and Filter 2. Turning the Baldial all the way to the right sends all of the oscillator's output to Filter 2,while turning it all the way to the left sends all of the output to Filter 1.
Rob Papen Albino 3.0 21
Audio Input
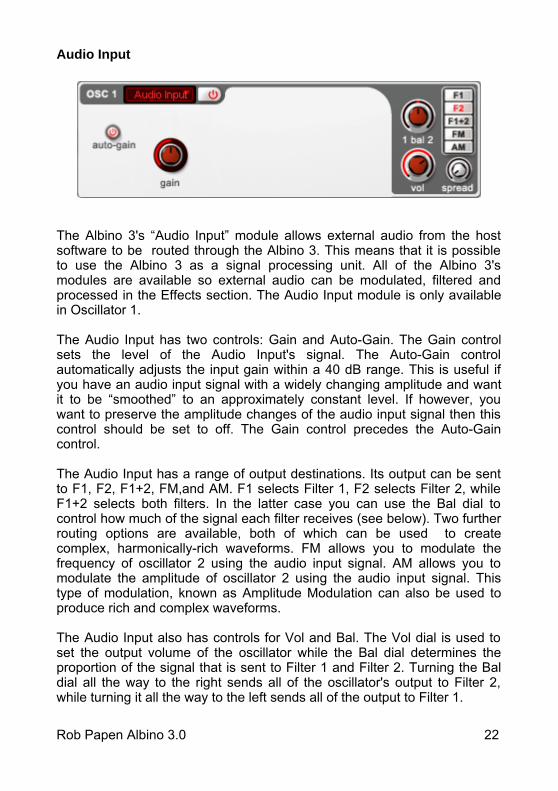
The Albino 3's “Audio Input” module allows external audio from the hostsoftware to be routed through the Albino 3. This means that it is possibleto use the Albino 3 as a signal processing unit. All of the Albino 3'smodules are available so external audio can be modulated, filtered andprocessed in the Effects section. The Audio Input module is only availablein Oscillator 1.
The Audio Input has two controls: Gain and Auto-Gain. The Gain controlsets the level of the Audio Input's signal. The Auto-Gain controlautomatically adjusts the input gain within a 40 dB range. This is useful ifyou have an audio input signal with a widely changing amplitude and wantit to be “smoothed” to an approximately constant level. If however, youwant to preserve the amplitude changes of the audio input signal then thiscontrol should be set to off. The Gain control precedes the Auto-Gaincontrol.
The Audio Input has a range of output destinations. Its output can be sentto F1, F2, F1+2, FM,and AM. F1 selects Filter 1, F2 selects Filter 2, whileF1+2 selects both filters. In the latter case you can use the Bal dial tocontrol how much of the signal each filter receives (see below). Two furtherrouting options are available, both of which can be used to createcomplex, harmonically-rich waveforms. FM allows you to modulate thefrequency of oscillator 2 using the audio input signal. AM allows you tomodulate the amplitude of oscillator 2 using the audio input signal. Thistype of modulation, known as Amplitude Modulation can also be used toproduce rich and complex waveforms.
The Audio Input also has controls for Vol and Bal. The Vol dial is used toset the output volume of the oscillator while the Bal dial determines theproportion of the signal that is sent to Filter 1 and Filter 2. Turning the Baldial all the way to the right sends all of the oscillator's output to Filter 2,while turning it all the way to the left sends all of the output to Filter 1.
Rob Papen Albino 3.0 22
Filters
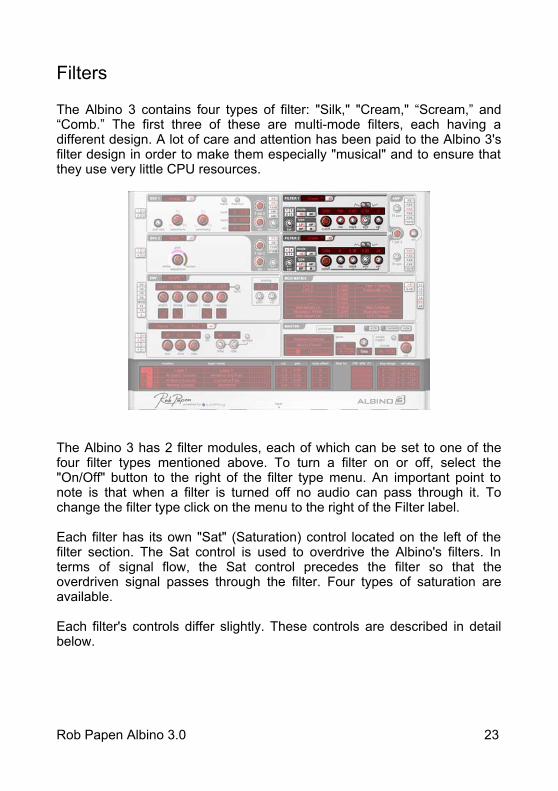
The Albino 3 contains four types of filter: "Silk," "Cream," “Scream,” and“Comb.” The first three of these are multi-mode filters, each having adifferent design. A lot of care and attention has been paid to the Albino 3'sfilter design in order to make them especially "musical" and to ensure thatthey use very little CPU resources.
The Albino 3 has 2 filter modules, each of which can be set to one of thefour filter types mentioned above. To turn a filter on or off, select the"On/Off" button to the right of the filter type menu. An important point tonote is that when a filter is turned off no audio can pass through it. Tochange the filter type click on the menu to the right of the Filter label.
Each filter has its own "Sat" (Saturation) control located on the left of thefilter section. The Sat control is used to overdrive the Albino's filters. Interms of signal flow, the Sat control precedes the filter so that theoverdriven signal passes through the filter. Four types of saturation areavailable.
Each filter's controls differ slightly. These controls are described in detailbelow.
Rob Papen Albino 3.0 23

Silk Filter
The Silk filter contains 4 filter types: LP 12 dB (Low Pass 12 dB/Oct), LP 24dB (Low Pass 24 dB/Oct), HP (High Pass 12 dB/Oct) and BP (Band Pass24 dB/Oct).
The Silk filter contains several parameter controls. These are: Cutoff, Res(Resonance), Track (Tracking), Env (Envelope Depth), Envelope Directionand Vel (Velocity).
Cutoff is used to set the frequency (in Hz) above which frequencies arefiltered out of the signal. When using the Low Pass filters higher settingsproduce brighter sounds while lower settings result in darker sounds. Whenusing the High Pass filters higher settings produce thinner, brighter sounds,while lower settings produce fatter, darker sounds.
Resonance is used to set the amount of emphasis around the cutofffrequency. Higher settings create a more pronounced peak in the signalwhile lower settings produce a flatter response.
Tracking is used to control the degree to which the filter tracks the signal'sfrequency.
Env is used to set the degree to which the filter's envelope effects thesignal. Setting Env to 0.00 means that the envelope has no effect on thefilter. Setting Env to 1.00 means that the filter is modulated by theenvelope's full range.
The Envelope Direction button is used to set either a positive or negativeenvelope shape. This can be used for a range of effects including openingthe filter when a note is released (this is impossible with a non-invertedenvelope).
Rob Papen Albino 3.0 24
The Vel (Velocity) control is used to set the degree to which the filter'scutoff frequency is modulated by the note-on velocity of the MIDI inputsignal.
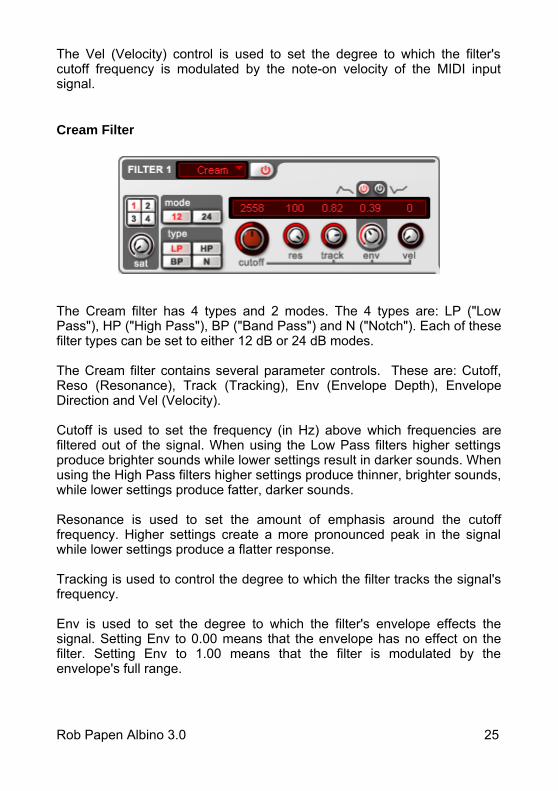
Cream Filter
The Cream filter has 4 types and 2 modes. The 4 types are: LP ("LowPass"), HP ("High Pass"), BP ("Band Pass") and N ("Notch"). Each of thesefilter types can be set to either 12 dB or 24 dB modes.
The Cream filter contains several parameter controls. These are: Cutoff,Reso (Resonance), Track (Tracking), Env (Envelope Depth), EnvelopeDirection and Vel (Velocity).
Cutoff is used to set the frequency (in Hz) above which frequencies arefiltered out of the signal. When using the Low Pass filters higher settingsproduce brighter sounds while lower settings result in darker sounds. Whenusing the High Pass filters higher settings produce thinner, brighter sounds,while lower settings produce fatter, darker sounds. Resonance is used to set the amount of emphasis around the cutofffrequency. Higher settings create a more pronounced peak in the signalwhile lower settings produce a flatter response.
Tracking is used to control the degree to which the filter tracks the signal'sfrequency.
Env is used to set the degree to which the filter's envelope effects thesignal. Setting Env to 0.00 means that the envelope has no effect on thefilter. Setting Env to 1.00 means that the filter is modulated by theenvelope's full range.
Rob Papen Albino 3.0 25
The Envelope Direction button is used to set either a positive or negativeenvelope shape. This can be used for a range of effects including openingthe filter when a note is released (this is impossible with a non-invertedenvelope).
The Vel (Velocity) control is used to set the degree to which the filter'scutoff frequency is modulated by the note-on velocity of the MIDI inputsignal.
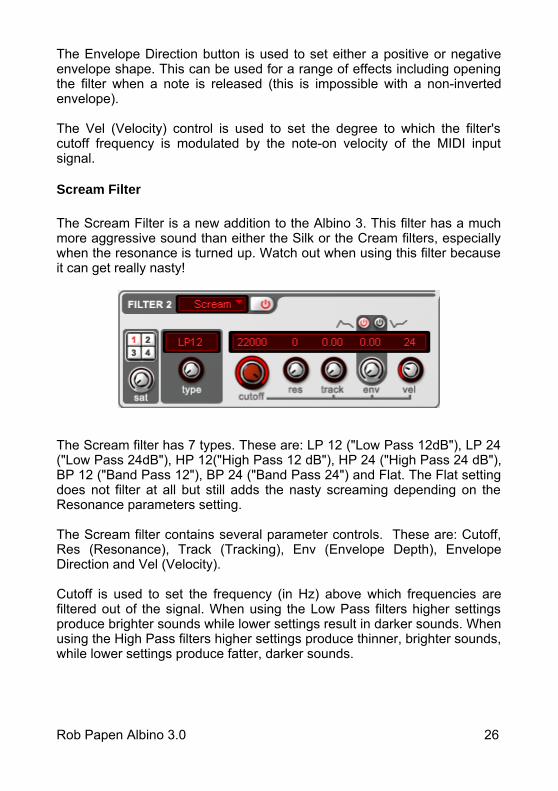
Scream Filter
The Scream Filter is a new addition to the Albino 3. This filter has a muchmore aggressive sound than either the Silk or the Cream filters, especiallywhen the resonance is turned up. Watch out when using this filter becauseit can get really nasty!
The Scream filter has 7 types. These are: LP 12 ("Low Pass 12dB"), LP 24("Low Pass 24dB"), HP 12("High Pass 12 dB"), HP 24 ("High Pass 24 dB"),BP 12 ("Band Pass 12"), BP 24 ("Band Pass 24") and Flat. The Flat settingdoes not filter at all but still adds the nasty screaming depending on theResonance parameters setting.
The Scream filter contains several parameter controls. These are: Cutoff,Res (Resonance), Track (Tracking), Env (Envelope Depth), EnvelopeDirection and Vel (Velocity).
Cutoff is used to set the frequency (in Hz) above which frequencies arefiltered out of the signal. When using the Low Pass filters higher settingsproduce brighter sounds while lower settings result in darker sounds. Whenusing the High Pass filters higher settings produce thinner, brighter sounds,while lower settings produce fatter, darker sounds.
Rob Papen Albino 3.0 26
Resonance is used to set the amount of emphasis around the cutofffrequency. Higher settings create a more pronounced peak in the signalwhile lower settings produce a flatter response.
Tracking is used to control the degree to which the filter tracks the signal'sfrequency.
Env is used to set the degree to which the filter's envelope effects thesignal. Setting Env to 0.00 means that the envelope has no effect on thefilter. Setting Env to 1.00 means that the filter is modulated by theenvelope's full range.
The Envelope Direction button is used to set either a positive or negativeenvelope shape. This can be used for a range of effects including openingthe filter when a note is released (this is impossible with a non-invertedenvelope).
The Vel (Velocity) control is used to set the degree to which the filter'scutoff frequency is modulated by the note-on velocity of the MIDI inputsignal.
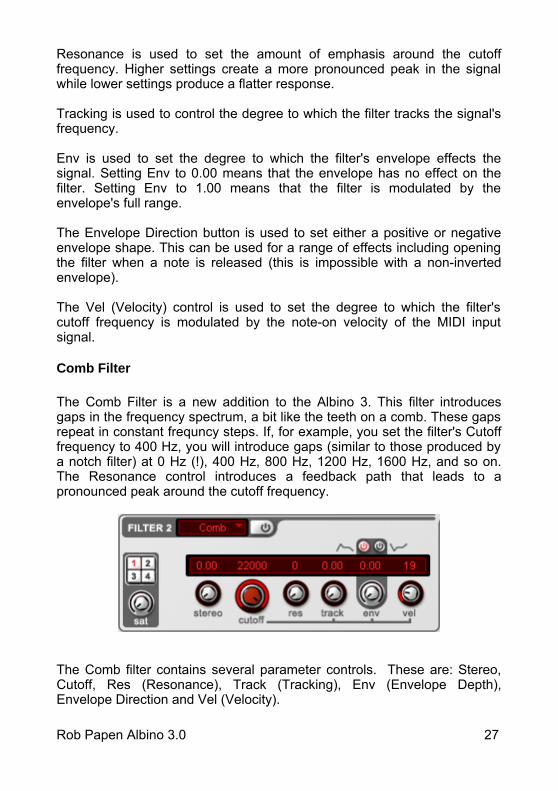
Comb Filter
The Comb Filter is a new addition to the Albino 3. This filter introducesgaps in the frequency spectrum, a bit like the teeth on a comb. These gapsrepeat in constant frequncy steps. If, for example, you set the filter's Cutofffrequency to 400 Hz, you will introduce gaps (similar to those produced bya notch filter) at 0 Hz (!), 400 Hz, 800 Hz, 1200 Hz, 1600 Hz, and so on.The Resonance control introduces a feedback path that leads to apronounced peak around the cutoff frequency.
The Comb filter contains several parameter controls. These are: Stereo,Cutoff, Res (Resonance), Track (Tracking), Env (Envelope Depth),Envelope Direction and Vel (Velocity).
Rob Papen Albino 3.0 27
The Stereo control can be used to create artificial stereo effects. It worksas follows: The more the control is turned from the 0 position, the greaterthe difference between the left and right channel cutoff frequency valuesbecomes. For example, when the Cutoff frequency value is 440 hz and theStereo control is set to 0, the Cutoff frequency of both the left and rightchannels is set to 440 Hz. Alternatively, if the value of the Stereo control isset to 1.0, then the actual cutoff frequency of the left channel will beapproximately 6 semitones below the Cutoff frequency setting (about 310Hz), and right channel will be approximately 6 semitones above the Cutofffrequency setting (about 620 Hz) . This means that if the Stereo control isset to its maximum value, then the difference between the cutofffrequencies of the left and right channels will be one octave. In general,small values (around 0.1 to 0.5) produce the best results.
Cutoff is used to set the frequency (in Hz) of the lowest “notch” in the combfilter. Resonance is used to set the amount of emphasis around the cutofffrequency. Higher settings create a more pronounced peak in the signalwhile lower settings produce a flatter response.
Tracking is used to control the degree to which the filter tracks the signal'sfrequency.
Env is used to set the degree to which the filter's envelope effects thesignal. Setting Env to 0.00 means that the envelope has no effect on thefilter. Setting Env to 1.00 means that the filter is modulated by theenvelope's full range.
The Envelope Direction button is used to set either a positive or negativeenvelope shape. This can be used for a range of effects including openingthe filter when a note is released (this is impossible with a non-invertedenvelope).
The Vel (Velocity) control is used to set the degree to which the filter'scutoff frequency is modulated by the note-on velocity of the MIDI inputsignal.
Rob Papen Albino 3.0 28

Amp
The Albino 3's Amp section is located to the right of the Filter section. Thissection contains controls for routing the filters' outputs as well as generalcontrols for setting the synth's amplitude.
The output from all four filters can be sent to either Effect 1, Effect 2, Effect3, Effect 4 or to Effects 1 and 3 simultaneously by clicking on the outputbuttons to the right of the filter module. Filter 1 has an additional option; itsoutput can be sent to Filter 2.
Rob Papen Albino 3.0 29
This can be used to route the audio through both filters in series to produceextreme filtering effects.
Each filter has its own Pan control. This is used to position the filter's outputsignal within the stereo field. Note that Filter 1's pan control has no effectwhen Filter 1 is routed to Filter 2.
A Balance control is also available. This is used to set the relative outputlevels of Filter 1 and Filter 2. When set all the way to the right Filter 2outputs with maximum volume while Filter 1 is muted. When set all the wayto the left Filter 1 outputs with maximum volume while Filter 2 is muted.When set to an intermediate position both filters' output is in proportion tothe dial's position. When connecting both filters in series (that is, when youroute Filter 1 to Filter 2) this control should be set to the middle position.
The Vel (Velocity) control is used to set the degree to which the amplitudeis modulated by the note-on velocity of the MIDI input signal.
Rob Papen Albino 3.0 30
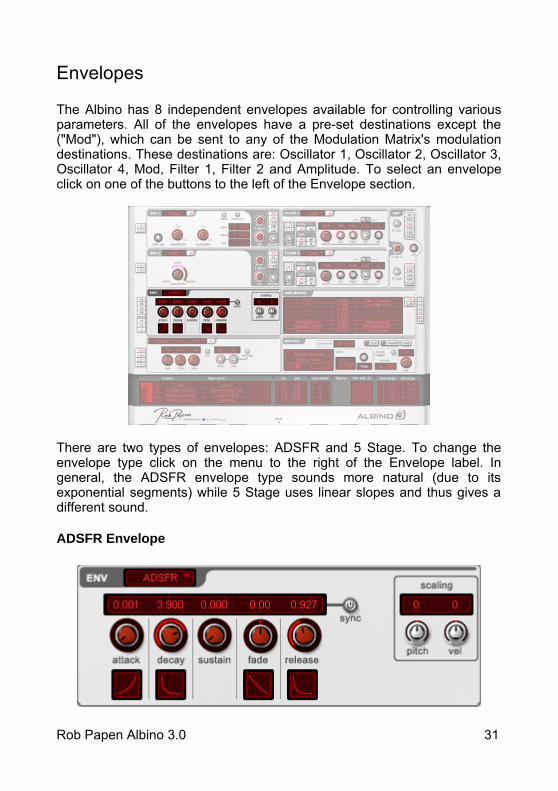
Envelopes
The Albino has 8 independent envelopes available for controlling variousparameters. All of the envelopes have a pre-set destinations except the("Mod"), which can be sent to any of the Modulation Matrix's modulationdestinations. These destinations are: Oscillator 1, Oscillator 2, Oscillator 3,Oscillator 4, Mod, Filter 1, Filter 2 and Amplitude. To select an envelopeclick on one of the buttons to the left of the Envelope section.
There are two types of envelopes: ADSFR and 5 Stage. To change theenvelope type click on the menu to the right of the Envelope label. Ingeneral, the ADSFR envelope type sounds more natural (due to itsexponential segments) while 5 Stage uses linear slopes and thus gives adifferent sound.
ADSFR Envelope
Rob Papen Albino 3.0 31

The ADSFR envelope-type consists of controls for Attack, Decay, Sustain,Fade and Release, Pitch-Scaling, Velocity-Scaling and Sync. There arealso 4 “curve” controls for setting the shape of each envelope segment.
Each dial has a corresponding “curve” control located below it that is usedto set the shape of the envelope segment. The shape of the segment canrange from extreme negative exponential to extreme positive exponential.To adjust the “curve” setting, click on the control and drag the cursor up ordown. The change in the curve's shape will be shown on the control.
The Attack dial setting determines the length of time (in seconds) it takesfor the amplitude envelope to reach the full envelope depth. For example, ifthe Attack slider is set to 0.100 seconds, the sounds amplitude will movefrom zero to full volume within 100 milliseconds.
The Decay dial setting determines the length of time (in seconds) that theamplitude envelope takes to move from the Attack peak level to the Sustainlevel.
The Sustain dial setting determines the amplitude level after the initialAttack/Decay phase.
The Fade dial is used to set the rate at which the signal amplitude movesfrom the Sustain level to either silence (for negative Fade values) or fulloutput (for positive Fade values). A Fade setting of 0 means that the signalamplitude remains at the Sustain level until the key is released.
The Release dial is used to set the length of time (in seconds) that theamplitude envelope takes to move from the current level to silence after thekey is released.
Pitch Scaling allows you to scale the envelope time using the pitch of theincoming MIDI note.
Velocity Scaling allows you to scale envelope time using the velocity of theincoming MIDI note.
In both cases, setting the dial to 0 means that the envelope is not scaledaccording to the incoming MIDI note's pitch or velocity.
The dials can be set to deliberately under-track or even reverse-track. Thisallows you to create sounds that are very smooth and even across theirrange, or that drastically change across their range (as is the case with
Rob Papen Albino 3.0 32

many acoustic instruments). Reverse Track produces an unnatural effectwhich is useful for more experimental sounds.
Pitch Scaling is often used in creating Patches that have differentamplitude release characteristics across their range. By setting anamplitude envelope's Pitch Scaling parameter to a value greater than 0 youcan create a Preset in which low frequency notes have a longer releasetime while the high frequency notes have a short release time. VelocityScaling can be used in a similar manner.
The Sync controls switches the envelope between Time and Sync modes.When set to Time mode, the envelope's controls work in units of seconds.When set to Sync mode, the envelope's controls work in units of fractionsof a bar, where a value of 16 represents one bar. This is useful if you wantto synchronise and envelope segment with the song's current tempo.
5 Stage Envelope
In the 5 Stage Envelope each section of the envelope has its own Timeand Level setting. The Time setting indicates the time (in seconds) it takesfor the signal amplitude to reach the corresponding Level setting.
In the above example the full level (100) is reached in 42 milliseconds (ms)after the note has started. The envelope stays at 100% for 190 ms, dropsto 45% within 596 ms (or 0.596 seconds) and raises to a sustain level of92% within 4.625 seconds.
Note that the 4th level is always the Sustain level and the 5th time and levelare the release time and the release level. The release level shouldnormally be 0.
Rob Papen Albino 3.0 33
The "Loop" button makes the envelope loop continuously. When theSustain level (4th level) is reached, the envelope starts from the beginningagain, and is looped as long as the note is held. Once the note is releasedit no longer loops but instead moves into the release stage (5th level) fromwherever it is at the moment the note is released. This can be used inconjunction with the Albino's Single Trigger mode to apply a continuous,repeating envelope to a series of notes.
Pitch Scaling allows you to scale the envelope time using the pitch of theincoming MIDI note.
Velocity Scaling allows you to scale envelope time using the velocity of theincoming MIDI note.
In both cases, setting the dial to 0 means that the envelope is not scaledaccording to the incoming MIDI note's pitch or velocity.
The dials can be set to deliberately under-track or even reverse-track. Thisallows you to create sounds that are very smooth and even across theirrange, or that drastically change across their range (as is the case withmany acoustic instruments). Reverse Track produces an unnatural effectwhich is useful for more experimental sounds.
Pitch Scaling is often used in creating Patches that have differentamplitude release characteristics across their range. By setting anamplitude envelope's Pitch Scaling parameter to a value greater than 0 youcan create a Patch in which low frequency notes have a longer releasetime while the high frequency notes have a short release time. VelocityScaling can be used in a similar manner.
The Sync controls switches the envelope between Time and Sync modes.When set to Time mode, the envelope's controls work in units of seconds.When set to Sync mode, the envelope's controls work in units of fractionsof a bar, where a value of 16 represents one bar. This is useful if you wantto synchronise and envelope segment with the song's current tempo.
Rob Papen Albino 3.0 34

Modulation
One of the key features of the Albino is its sophisticated modulationcapabilities. The instrument contains four independent LFOs (lowfrequency oscillators) as well as a Modulation Matrix that is used to controlmodulation routing and a sophisticated Arpeggiator .
To select one of the LFOs click on one of the four buttons ("L1", "L2", "L3","L4") to the right of the Quad LFO/Modulation Matrix section. To select theModulation Matrix click on the "MX" button beneath the four LFO buttons.The Arpeggiator is chosen by the “Arp” button at the bottom.
The LFO, Modulation Matrix and Arpeggiator controls are described inmore detail below.
Quad LFO
Rob Papen Albino 3.0 35

An LFO is an oscillator that generates low frequency signals that can beused to modulate other aspects of the signal. The Albino contains 4separate LFOs each offering 9 user parameters. These are: Wave, Freq(Frequency), Symmetry, Phase, Delay, Attack, Decay, Sync and Mono.
To select one of the LFOs waveforms click on one of the waveform buttonsat the bottom left of the LFO section. Six LFO waveforms are available:Sine, Triangle, Ramp, Square, Noise and Sample and Hold. It should benoted that when the Noise and Sample and Hold waveforms are synced totempo, they run at a faster tempo than the other LFO waveforms. Forexample, if you set sync to 1/1, use a tempo of 120 bpm and play a wholenote (4 beats), the duration of one cycle of the regular waveforms (Sine,Triangle, Ramp, Square) will be 2 seconds. However, the Sample and Holdand Noise waveforms will change their state within 1/8 of 2 seconds or 0.25seconds.
The "Freq" (Frequency) parameter determines the LFO's frequency (in Hz).This parameter has no function if Sync is used (see below).
The "Symmetry" parameter can be used to distort the waveform's shape,stretching it or compressing it as required.
The "Phase" parameter sets the point in the waveform cycle at whichmodulation begins.
You can also apply an envelope to the LFO using the Delay, Attack andDecay dials.
The "Delay" parameter sets the amount of time (in seconds) before theLFO begins modulating the signal. A Delay setting of 0 means that the LFObegins operating immediately.
Rob Papen Albino 3.0 36

The Attack dial setting determines the length of time (in seconds) it takesfor the LFO to reach the full modulation depth. This can be used to slowlyincrease the amount of modulation applied to the signal. A setting of 0means that modulation commences immediately.
The Decay dial setting determines the length of time (in seconds) that theLFO modulation depth takes to move from the Attack peak amount to 0.Setting this parameter to oo (infinite) means that modulation is applied foran infinite amount of time, that is, the full duration of the signal.
Finally, you can use the Sync menu to sync LFO triggering with the currenttempo (see Appendix B for the range of possible sync settings).
The Mono button enables one LFO waveform to be applied to all synthvoices simultaneously. When the Mono button is off the LFO waveform isapplied to each voice individually. Alternatively, when the Mono button ison, a single LFO is used for all voices and runs permanently.
The small R = Retrigger switch to the right of the Mono button defineswhether a new note will restart the LFO or not. If you have a pausebetween two notes being played, the LFO will restart with the phase givenby the Phase parameter when the Retrigger is activated. If its deactivated itwill run permanently and is not influenced by notes being played.
Modulation Matrix
The Albino's Modulation Matrix allows you to create 16 user-definedmodulation routings. 47 modulation destinations are available formodulation by 26 modulation sources (see Appendix D for a listing anddescription of all modulation sources and destinations).
Rob Papen Albino 3.0 37

Modulation sources are shown in a column on the left of the display, whilethe destinations are shown on the right. The modulation amount isdisplayed in the middle. To change a routing click on the source ordestination that you want to change. A menu will appear which lets youselect the new source or destination. To remove a modulation source ordestination select the "- - - - -" entry in the menu.
To change the modulation depth click on the amount display and move themouse (while keeping the mouse button pressed) upwards or downwards(increasing or decreasing the value) until the desired amount has beenreached. A negative modulation depth inverts the waveform of themodulation source. Double-clicking on a modulation depth display sets thevalue to 0.00. Double-clicking again on the display restores the previousvalue. This can be usefull when creating new Presets to quickly mutemodulation routings.
The modulation of Main Pitch has a special display for modulation depth.The example above shows a modulation depth of "0:42" (see last row ofthe Modulation Matrix). This means that the main pitch is modulated to adepth of 0 semitones and 42 cents (or 0.42 semitones) more than usual bythe LFO 1when the Modulation wheel is pushed full up. This is also a goodexample of indirect modulation as this line refers to the modulation depth ofslot 1 (the topmost modulation slot). In this slot the main pitch is modulatedby LFO 1 with a depth of 2 cents.
Remember, without using the Modulation Matrix the following can bemodulated directly in the Envelope section: • the oscillators' amplitude by an envelope, • the envelope rate by the pitch of the note played, • the envelope rate by the velocity of the note played
Rob Papen Albino 3.0 38
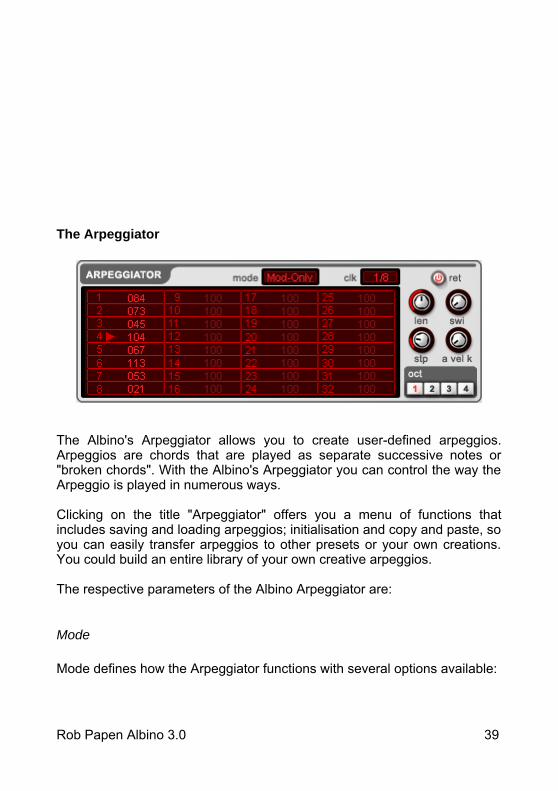
The Arpeggiator
The Albino's Arpeggiator allows you to create user-defined arpeggios.Arpeggios are chords that are played as separate successive notes or"broken chords". With the Albino's Arpeggiator you can control the way theArpeggio is played in numerous ways.
Clicking on the title "Arpeggiator" offers you a menu of functions thatincludes saving and loading arpeggios; initialisation and copy and paste, soyou can easily transfer arpeggios to other presets or your own creations.You could build an entire library of your own creative arpeggios.
The respective parameters of the Albino Arpeggiator are:
Mode
Mode defines how the Arpeggiator functions with several options available:
Rob Papen Albino 3.0 39

Chord: does not play the Chord as separate Notes but as a Chord inrhythmic phrases defined by the other parameters.
Modulation: Basically the Arpeggiator is Off and does not influence Chords(or single notes) being played. But the Arpeggiator is available as aModulation Source in the Modulation Matrix as if it were switched On.Using the Arpeggiator in the Modulation Matrix is like having an LFO withup to 32 individually definable steps.
Up, Down, UpDown, DownUp, UpDown+ and DownUp+ modes play typicalarpeggiator patterns or arpeggios, which as we said before are the notes ofthe chord being played successively instead of simultaneously.
In Up mode the notes are played from lowest Note on upward. In Down itsthe other way around. UpDown and DownUp alternatively play the notesfrom lowest to highest and from highest to lowest. With UpDown it's as thename suggests, first, notes are played from the lowest note upward. withDownUp it's just the opposite.
A + sign behind the mode indicates that the highest and lowest notes arebeing played twice. For example, a C-E-G chord would be played inUpDown-Mode C-E-G-E and again from the beginning, while in upDown+mode it will be played C-E-G-G-E-C and from the beginning on again.
AsPlayed Mode plays the notes in the order the Note On signal arrives orsimply, the way you actually played the chord. This effect is easiest tounderstand when you play notes of a chord not exactly at the same time.The order they are actually played is exactly as you played them.
Random Mode plays the notes of the chord in a random order
Clk (Clock) Clock allows you to set the length of the individual notes in which the chordis separated by the Arpeggiator. For example, playing a C-E-G chord inUp-mode will play all the notes as 1/16th notes when clock is set to 1/16.See appendix B for a list of all possible values.
Retrigger The small Ret = Retrigger switch to the right of the clock parameter defineswhether a new chord will restart the Arpeggiator or not. If you have a pausebetween two chords being played, the Arpeggiator will restart with the first
Rob Papen Albino 3.0 40

step when the Retrigger is activated. If its deactivated it will continue on thenext step when a new chord is played. The steps are described below.
Step DisplayThe big display with the 32 step values is the heart of the Arpeggiator. Hereis where the rhythmic variations of the Arpeggiator can be defined.
As we said before an arpeggio is a Chord broken into Notes of equallength (using the Clock parameter). In the Steps you can give these equalNotes different velocity values, make pauses instead of notes or tie notestogether to create notes with a different note length.
Each step can be set to it's own velocity value of 1..127, and also to thevalue "Off", which means that there is actually a pause, or to "Tie" whichmeans that the steps are bound together creating a longer note.
Keeping our C-E-G chord example, the step values of 127, 127, Off, 100,Tie, 30, Off, Tie would result in the following (assuming a 1/16 clock, andmode Up) Note C being played with maximum velocity, length 1/16th, thenNote E played just the same 1/16th length and 127 velocity, then a 1/16thpause, then Note G played with velocity 100 (an average volume) and anote length of 1/8th (as the next step is tied to this step), then Note Cplayed with a very gentle velocity of 30 at 1/16th length and finally a 1/8thpause. Note that a "Tie" after an "Off" is just the same as placing an "Off" behindan "Off", both resulting in a longer pause. Also note that the arpeggio willvariate the pattern such that when starting with step one again it now playsa E with velocity 127 and 1/16th length first; that's because we played a 3note chord and have a 4 note step definition (playing C-E-G-C, next roundE-G-C-E and then G-C-E-G before starting with the first pattern again).
Length (Len) Length defines the length of the actual Note On time of a note. As we said,clock defines the length of the steps, such as a 1/16th note. With the Lenparameter you can define how much of this time the note is actually Onand how much it is Off. With a setting of full right the note length is thesame as the step length. A middle setting allows the Note to be on just halfof the time (for example a 1/32th of the 1/16th step). The more you turn thedial to the left the shorter the note is played. The effect is most prominentwith sounds that have a short release time.
Rob Papen Albino 3.0 41
Swing (Swi)This adds a swing effect to the notes being played, so within a given clockthe odd step numbers (notes) are lengthened while the even ones areshortened or vice versa; this is much more easy to explore than to explain,just use a pattern of 4 1/8th notes and play with the swing parameter tohear the obvious effect.
Step (Stp)Step allows you to define how many of the up to 32 steps are actually usedfor a particular arpeggio. It could be a very short two step arpeggio oranything up to 32 steps.
Velocity (Vel) While we said that we can define the velocity at which a particular stepplays a note this was only half the story. You can also simply play a chordwith a different velocity for each note. So it could be also interesting toarpeggiate the notes with the velocity at which they are actually played.This is achieved by setting the Velocity parameter to its full right position (kstands for keyboard), in which case the velocity of each step in thearpeggiator has no meaning or is overridden(but Off and Tie keep theirmeaning). On the other hand, the full left setting means that the velocity atwhich the chord is played is meaningless and the velocity of the notes isdetermined only by the arpeggiator. The good thing, as is often the case,lies in the middle; adjusting this parameter somewhere between theseextremes gives you the rhythmic variations of the steps combined with theexpression of the actually played chord.
Octave (Oct) This extends the note range being played regardless of the octave in whichyou played them originally. For example, you can choose notes of thechord and not only will they be played in the octave at which the chord isplayed, but also in the octave above. This can be extended up to 4octaves, again we recommend you just try it to hear the obvious effect.
Rob Papen Albino 3.0 42
Effects
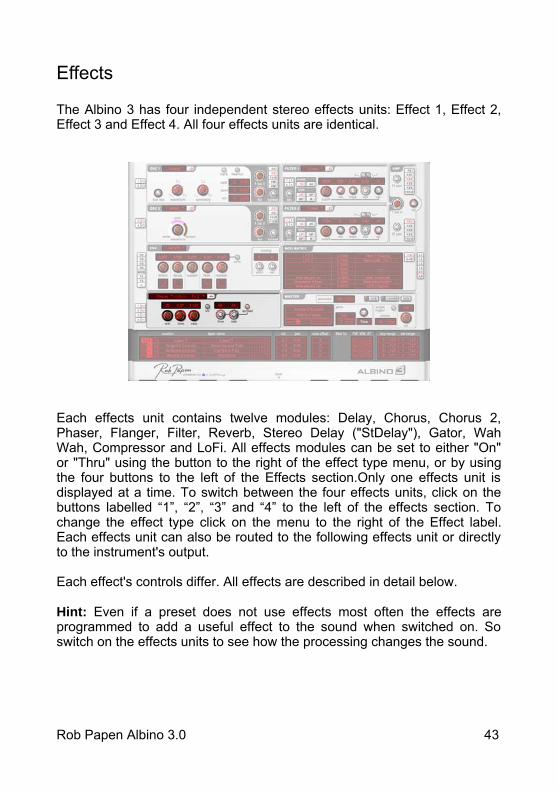
The Albino 3 has four independent stereo effects units: Effect 1, Effect 2,Effect 3 and Effect 4. All four effects units are identical.
Each effects unit contains twelve modules: Delay, Chorus, Chorus 2,Phaser, Flanger, Filter, Reverb, Stereo Delay ("StDelay"), Gator, WahWah, Compressor and LoFi. All effects modules can be set to either "On"or "Thru" using the button to the right of the effect type menu, or by usingthe four buttons to the left of the Effects section.Only one effects unit isdisplayed at a time. To switch between the four effects units, click on thebuttons labelled “1”, “2”, “3” and “4” to the left of the effects section. Tochange the effect type click on the menu to the right of the Effect label.Each effects unit can also be routed to the following effects unit or directlyto the instrument's output.
Each effect's controls differ. All effects are described in detail below.
Hint: Even if a preset does not use effects most often the effects areprogrammed to add a useful effect to the sound when switched on. Soswitch on the effects units to see how the processing changes the sound.
Rob Papen Albino 3.0 43
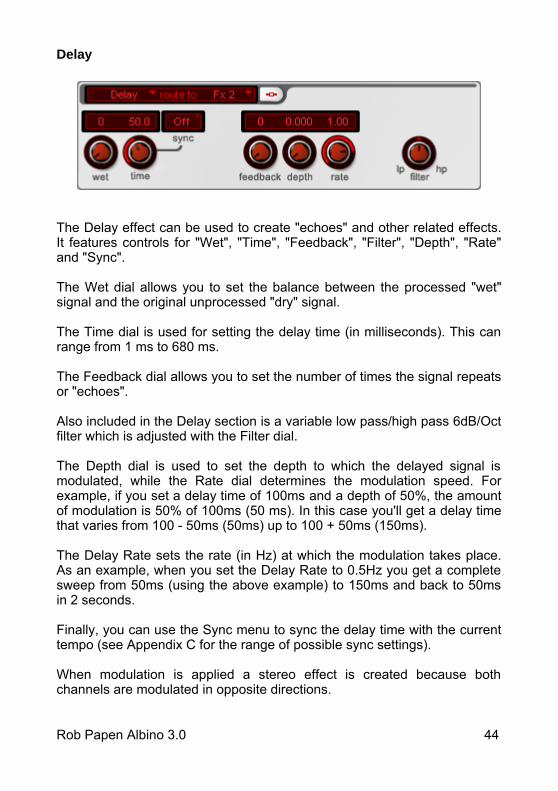
Delay
The Delay effect can be used to create "echoes" and other related effects.It features controls for "Wet", "Time", "Feedback", "Filter", "Depth", "Rate"and "Sync". The Wet dial allows you to set the balance between the processed "wet"signal and the original unprocessed "dry" signal. The Time dial is used for setting the delay time (in milliseconds). This canrange from 1 ms to 680 ms.
The Feedback dial allows you to set the number of times the signal repeatsor "echoes".
Also included in the Delay section is a variable low pass/high pass 6dB/Octfilter which is adjusted with the Filter dial.
The Depth dial is used to set the depth to which the delayed signal ismodulated, while the Rate dial determines the modulation speed. Forexample, if you set a delay time of 100ms and a depth of 50%, the amountof modulation is 50% of 100ms (50 ms). In this case you'll get a delay timethat varies from 100 - 50ms (50ms) up to 100 + 50ms (150ms).
The Delay Rate sets the rate (in Hz) at which the modulation takes place.As an example, when you set the Delay Rate to 0.5Hz you get a completesweep from 50ms (using the above example) to 150ms and back to 50msin 2 seconds.
Finally, you can use the Sync menu to sync the delay time with the currenttempo (see Appendix C for the range of possible sync settings).
When modulation is applied a stereo effect is created because bothchannels are modulated in opposite directions.
Rob Papen Albino 3.0 44
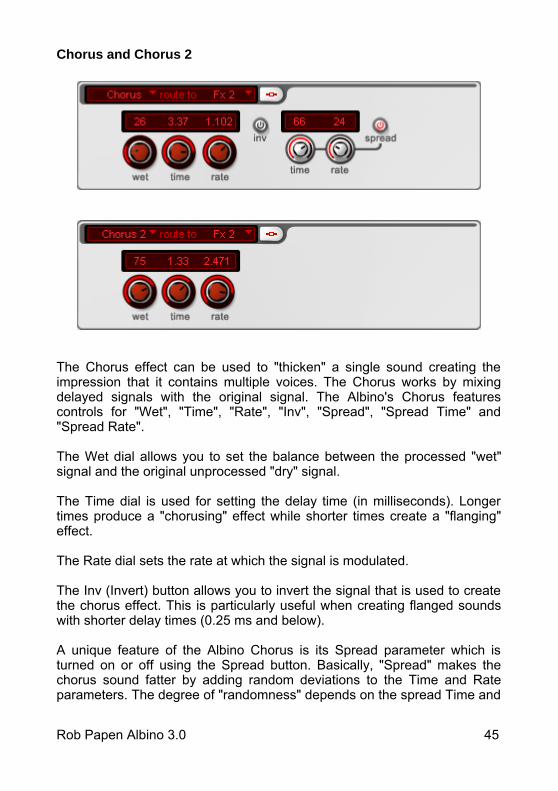
Chorus and Chorus 2
The Chorus effect can be used to "thicken" a single sound creating theimpression that it contains multiple voices. The Chorus works by mixingdelayed signals with the original signal. The Albino's Chorus featurescontrols for "Wet", "Time", "Rate", "Inv", "Spread", "Spread Time" and"Spread Rate". The Wet dial allows you to set the balance between the processed "wet"signal and the original unprocessed "dry" signal. The Time dial is used for setting the delay time (in milliseconds). Longertimes produce a "chorusing" effect while shorter times create a "flanging"effect.
The Rate dial sets the rate at which the signal is modulated. The Inv (Invert) button allows you to invert the signal that is used to createthe chorus effect. This is particularly useful when creating flanged soundswith shorter delay times (0.25 ms and below). A unique feature of the Albino Chorus is its Spread parameter which isturned on or off using the Spread button. Basically, "Spread" makes thechorus sound fatter by adding random deviations to the Time and Rateparameters. The degree of "randomness" depends on the spread Time and
Rob Papen Albino 3.0 45

Rate parameters; setting the Spread Time and Rate to 0 cancels the effect;increasing the value of the Spread Time and Rate parameters addsadditional richness and fullness to the sound. It can also make the effectsound more natural.
Chorus 2 has fewer parameters than Chorus. These are: Wet, Time andRate. This controls are the same as those of Chorus so see above for moreinformation. Chorus 2 has a different internal structure to Chorus whichproducesa different type of sound. The sound of Chorus 2 is richer but lessnatural sounding that Chorus.
Phaser
The Albino Phaser can be used to create "swirling" dynamic movement insounds. The Phaser effect is created by automatically sweeping a series ofequally spaced frequency notches up and down the audio spectrum. TheAlbino's Phaser features controls for "Wet", "Rate", "Depth", "Center","Feed", "Inv" (Invert), “Stereo” and "Stages".
The Wet dial allows you to set the balance between the processed "wet"signal and the original unprocessed "dry" signal. The Rate dial sets the rate at which the signal is modulated. The Depthdial is used to set the depth to which the signal is modulated. The Center dial is used to set the frequency around which modulationoccurs.
The "Feed" (Feedback) control is used to set the amount of internalfeedback employed within the phaser. More internal feedback producesincreasingly pronounced resonant peaks. The Inv (Invert) button allows you to invert the signal that is used to createthe phasing effect.
Rob Papen Albino 3.0 46

Use the Stereo control to widen the stereo image. If it's set full left themodulation on the left and right channel will be in perfect synchronisation.At full right setting the left and right channel will be completely out of phase,creating an extreme stereo effect. The best (rather subtle) stereo effect isachieved with settings around the mid mark.
The final phaser control is "Stages". Each phaser stage shifts the signal'sphase by 180 degrees. The higher the Albino's Stages setting, the morefrequency notches there are in the signal and so the more pronounced isthe phasing effect.
Flanger
The Albino Flanger can be used to create the classic flange effectproduced by two analog tape machines playing back at slightly differentvarying speeds. The Albino's Flanger features controls for "Wet", “Inv(Wet)”, "Time", "Feedback", “Inv (Feedback)”, "Stereo”, Mod Depth Time","Rate” and "Mod Depth Pan". The Rate control also features a Syncparameter.
The Wet dial allows you to set the balance between the processed "wet"signal and the original unprocessed "dry" signal. The Inv(erse) Wet control inverts the effect signal's phase against theoriginal signal, giving a subtly different sound.
The Time control is used to set the length of the effects delay line,simulating the delay between the original (tape machine 1) and the delayed/ wet signal (tape machine 2).
Rob Papen Albino 3.0 47
The Feedback control is used to set the amount of signal the is fed back tothe effect's input, thus producing a stronger, more pronounced and richereffect.
The Inv(erse) Feedback control inverts the phase of the feedback signalwhich again, changes the character of the output sound. The mostpronounced effects are created when both Inv controls (wet and feedback)are either set to Off or On.
The Stereo control creates separate flanging effects for each of the stereochannels. The creates adds width to the effect. This parameter is normallyused sparingly, but can be useful at higher settings.
The Modulation Depth Time is the key parameter for setting the strength ofthe flange effect. Higher settings create a more pronounced effect.
The Modulation Rate control is used to set the speed of the flange effect(the speed of the cyclic changes between the two tape machines). Thisparameter can be set either directly with the dial or as a fraction of thesong's tempo using the display below the Rate dial.
The Rate Sync control is used to synchronise the flanger's modulation ratewith the song's current tempo.
The Mod(ulation) Depth Pan control is a parameter unique to the Albino,and is not normally on flanger effects. This control enables the stereoposition of the flanged signal to be modulated at the same speed as that ofthe Rate control.
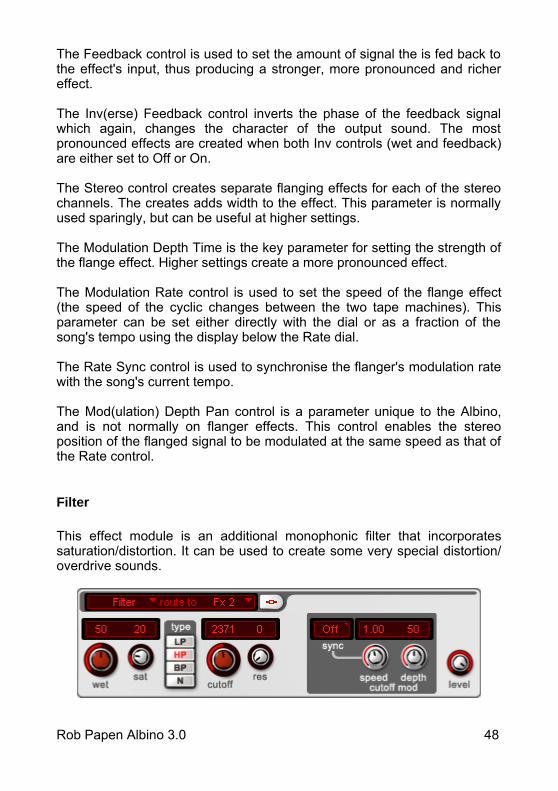
Filter
This effect module is an additional monophonic filter that incorporatessaturation/distortion. It can be used to create some very special distortion/overdrive sounds.
Rob Papen Albino 3.0 48

The Filter features controls for: Wet, Sat (Saturation), Filter Type, Cutoff,Res (Resonance), Cutoff-Mod Speed, Cutoff-Mod Depth, Sync and Level.
The Wet dial allows you to set the balance between the processed "wet"signal and the original unprocessed "dry" signal. The Sat (Saturation) dial enables you to set the amount of filter drive ordistortion.
The Filter Type buttons allow you to select one of four filter types: LP (LowPass), HP (High Pass), BP (Band Pass) and N (Notch).
The Cutoff dial is used to set the frequency (in Hz) above whichfrequencies are filtered out of the signal. When using the Low Pass filter,higher settings produce brighter sounds while lower settings result indarker sounds. When using the High Pass filter, higher settings producethinner, brighter sounds, while lower settings produce fatter, darker sounds. The Resonance dial is used to set the amount of emphasis around thecutoff frequency. Higher settings create a more pronounced peak in thesignal while lower settings produce a flatter response.
The filter's cutoff frequency can be controlled using the Cutoff-Mod Speedand Cutoff-Mod Depth controls. The Cutoff-Mod Speed dial allows you toset the rate (in Hz) at which the filter's cutoff frequency is modulated. TheCutoff-Mod Depth control is used to set the depth to which the filter's cutofffrequency is modulated. A setting of 0% means no modulation occurs.
The Sync control is used to synchronise the filter's cutoff frequencymodulation rate with the song's current tempo.
The level parameter lets you adjust the output level of the filter/saturation.This may be required when you use higher Saturation or Resonancesettings.
Rob Papen Albino 3.0 49

Reverb
The Reverb effect is used to add ambiance to sounds. It features controlsfor Wet, Predelay, Sync, Room Size, Damp (Damping), Div, Mod Speedand Mod.
The Wet dial allows you to set the balance between the processed "wet"signal and the original unprocessed "dry" signal. The Predelay dial enables you to delay the processed signal by a givenamount (in milliseconds) so as to achieve a more natural reverberation.Normally, shorter predelay times are applied in the case of smaller roomsizes while longer predelay times are applied in the case of bigger roomsizes.
The Sync control is used to synchronise the Predelay time with the song'scurrent tempo. The Roomsize dial is used to set the size of the simulated room. TheRoomsize varies from a small chamber (displayed as small box) up to ahuge hall (displayed as big box). You can also set the room size by clickingdirectly on the Roomsize display.
The simulated room's wall materials can be adjusted with the Damp(Damping) control. This parameter ranges from practically loss-freereflecting walls (0% damping) up to very absorbent walls (90% damping).In practical terms, the amount of damping determines the amount of higherfrequencies that are contained in the processed signal: The higher theDamp setting, the less higher frequencies are contained in the processedsignal.
The Dif (“Diffusion”) control is used to set the number of diversion stagesthat are applied to the input signal. As the value of the Dif control is
Rob Papen Albino 3.0 50
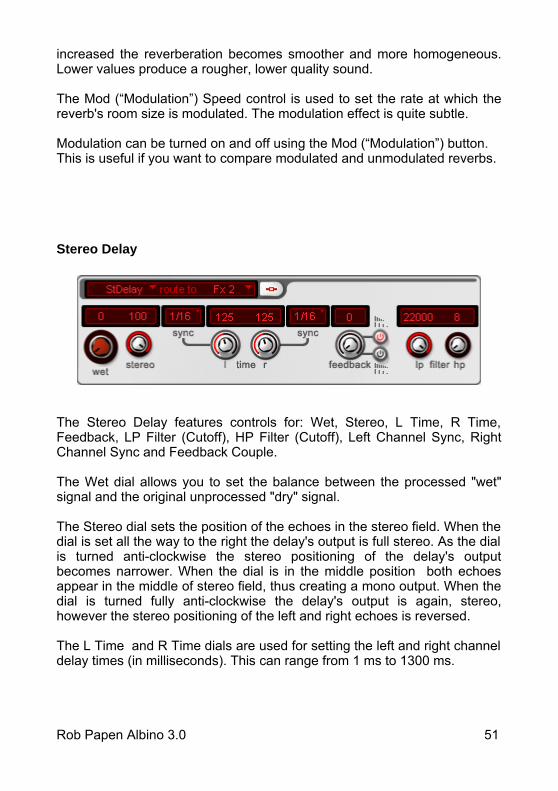
increased the reverberation becomes smoother and more homogeneous.Lower values produce a rougher, lower quality sound.
The Mod (“Modulation”) Speed control is used to set the rate at which thereverb's room size is modulated. The modulation effect is quite subtle.
Modulation can be turned on and off using the Mod (“Modulation”) button.This is useful if you want to compare modulated and unmodulated reverbs.
Stereo Delay
The Stereo Delay features controls for: Wet, Stereo, L Time, R Time,Feedback, LP Filter (Cutoff), HP Filter (Cutoff), Left Channel Sync, RightChannel Sync and Feedback Couple.
The Wet dial allows you to set the balance between the processed "wet"signal and the original unprocessed "dry" signal.
The Stereo dial sets the position of the echoes in the stereo field. When thedial is set all the way to the right the delay's output is full stereo. As the dialis turned anti-clockwise the stereo positioning of the delay's outputbecomes narrower. When the dial is in the middle position both echoesappear in the middle of stereo field, thus creating a mono output. When thedial is turned fully anti-clockwise the delay's output is again, stereo,however the stereo positioning of the left and right echoes is reversed.
The L Time and R Time dials are used for setting the left and right channeldelay times (in milliseconds). This can range from 1 ms to 1300 ms.
Rob Papen Albino 3.0 51

The "Feedback” dial allows you to set the number of times the signalrepeats or "echoes".
The "LP Filter" (Low Pass Filter Cutoff Frequency) dial is used to set thefrequency (in Hz) above which frequencies are filtered out of the signal.Higher settings produce brighter sounds while lower settings result indarker sounds.
The "HP Filter" (High Pass Filter Cutoff Frequency) dial is used to set thefrequency (in Hz) below which frequencies are filtered out of the signal.Higher settings produce thinner, brighter sounds, while lower settingsproduce fatter, darker sounds.
The left and right channels of the delay's output can be independentlysynced to the song's current tempo using the Sync menus located abovethe L Time and R Time dials (see Appendix C for the range of possiblesync settings).
The Feedback Couple buttons (located beside the Feedback dial) are usedto automatically match the feedback amount of the shorter delay to that ofthe longer delay when the upper button is pressed. For example, if you setthe left channel delay time to 10 ms, the right channel delay time to 100 msand feedback to 90%, you will hear the left channel delay fade out muchmore quickly than the right channel delay (this is what you would expect!).However, when you press the upper Feedback Couple button the feedbackof the channel with the shorter delay time is adjusted so that the signalfades out in the same amount of time as the longer delay (thus thefeedback for the shorter time is increased).When the lower Feedback Couple button is pressed the feedback is notautomatically adjusted.
Gator
Rob Papen Albino 3.0 52

The Gator effect is a step-controlled audio gate that can be used to createrhythmic, stuttering and pulsing effects. The effect is unique in that itseparates the input signal into left and right components, each of which canbe gated independently.
The Gator effect contains five controls: These are: Wet, Smooth, Steps,Sync and Link.
The Wet control sets the balance between the dry input audio signal andthe “wet” gated audio signal. Increasing the value of the Wet control alsoincreases the width of panning between the left and right step channels.
The Smooth control sets the envelope shape of the gate for each stepvalue. A lower setting of the Smooth control creates a sharper envelopeshape that produces a more pronounced gating effect. Increasing the valueof the control “smoothes” the envelope creating a more pulsing, tremolo-like sound.
The Steps control consists of two rows of sixteen “buttons”, one for eachrhythmic step of the pattern. When a button is on, the signal is passedthrough the effect. Alternately, when a button is off, the signal is gated. Theduration of each step depends on the setting used in the Sync control(described below).
The Sync control sets the duration of each step. For example, a setting of1/16 means that each pattern step is equivalent to a 16th note. Note thatthe overall tempo at which the Gator effect operates is set in the hostsoftware.
The Link control is used to set the way that the Gator’s step buttonsrespond to user input. This control has three settings: Off, Link and XLink.When set to “Off”, each step button can be switched on and offindependently of any other button. When set to Link, the step buttons forthe left and right patterns are linked together so that switching either buttonturns both buttons on or off. When set to XLink, the step buttons for the leftand right patterns are linked together, however in this case they work in acomplementary manner—when one button is on, the other will be off. Inthis case only one of the two left and right channel buttons can be switchedon at the same time.
Rob Papen Albino 3.0 53

WahWah
The WahWah effect is an amplitude-controlled bandpass filter that can beused to produce vocal-like sounds, particularly “wah-type” sounds.
The WahWah effect contains five controls: These are: Cut (“Cutoff”), Res(“Resonance”), Sensitivity, Attack and Decay.
The Cut control is used to set the centre frequency (in Hz) at which thebandpass filter operates. The Resonance control is used to set the amount of emphasis around thecutoff frequency. Higher settings create a more pronounced peak in thesignal while lower settings produce a flatter response.
The Sensitivity control sets the degree to which the input signal's amplitudeaffects the filter cutoff frequency. Lower values produce a less-pronouncedwah effect, while higher values produce stronger, more vocal-like wahsounds.
The Attack control is used to set the response time of the filter to changesin the input signal's amplitude. Faster Attack times mean that the waheffect is triggered more quickly, while slower Attack times introduce a delaybefore the wah effect is produced.
The Decay control is used to set the recovery time of the filter after theinput signal's amplitude has changed. Faster Decay times mean that thewah effect returns to its default value more quickly, while slower Decaytimes mean that the wah effect returns to its default value more slowly.
Rob Papen Albino 3.0 54

Compressor
The Albino 3's Compressor can be used to control the dynamic range ofthe effect's input signal. Compression can be used to increase theperceived volume of a sound by reducing the level transient peaks, andthus allowing for an increasing of the average signal level without clipping.The Albino 3's compressor has been designed to be as easy to use aspossible. It has five controls: Ratio, Threshold, Attack, Release and Vol(“Volume”). The Compressor's controls are described below:
The Ratio dial is used to set the ratio between the input and output level ofsignals that are above the Compressor's Threshold level. The compressionratio can be set anywhere between 1:1 and 10:1.
The Threshold dial is used to set the signal level at which the Compressorbegins operating. The Threshold dial has a range of -24 to 0dB andautomatically adjusts the make-up Gain to give 0dB signal peaks.
The Attack dial is used to set how quickly the compressor responds tochanges in the input signal. The Release dial sets the amount of time that it takes for the compressor toreturn to unity gain after the signal falls below the Threshold level. TheRelease time has a range of 0.001 to 4.000 seconds.
Because compression reduces the average amplitude of the input signal itis often necessary to increase the signal's amplitude once it has beencompressed. The Albino 3's Compressor provides a Vol (“Volume”) controlthat is used to set this “make-up” gain.
Rob Papen Albino 3.0 55
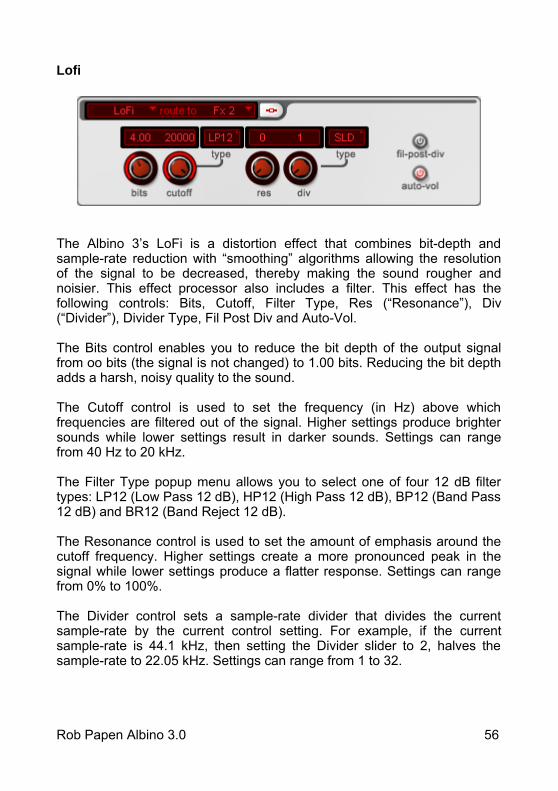
Lofi
The Albino 3’s LoFi is a distortion effect that combines bit-depth andsample-rate reduction with “smoothing” algorithms allowing the resolutionof the signal to be decreased, thereby making the sound rougher andnoisier. This effect processor also includes a filter. This effect has thefollowing controls: Bits, Cutoff, Filter Type, Res (“Resonance”), Div(“Divider”), Divider Type, Fil Post Div and Auto-Vol.
The Bits control enables you to reduce the bit depth of the output signalfrom oo bits (the signal is not changed) to 1.00 bits. Reducing the bit depthadds a harsh, noisy quality to the sound.
The Cutoff control is used to set the frequency (in Hz) above whichfrequencies are filtered out of the signal. Higher settings produce brightersounds while lower settings result in darker sounds. Settings can rangefrom 40 Hz to 20 kHz.
The Filter Type popup menu allows you to select one of four 12 dB filtertypes: LP12 (Low Pass 12 dB), HP12 (High Pass 12 dB), BP12 (Band Pass12 dB) and BR12 (Band Reject 12 dB).
The Resonance control is used to set the amount of emphasis around thecutoff frequency. Higher settings create a more pronounced peak in thesignal while lower settings produce a flatter response. Settings can rangefrom 0% to 100%.
The Divider control sets a sample-rate divider that divides the currentsample-rate by the current control setting. For example, if the currentsample-rate is 44.1 kHz, then setting the Divider slider to 2, halves thesample-rate to 22.05 kHz. Settings can range from 1 to 32.
Rob Papen Albino 3.0 56
When the Divider control (described above) is set to a value other than 1, anew output sample value must be created for each group of samples in theinput audio stream. For example, if the Divider slider is set to a value of 4,then four (possibly different) samples in the input stream are replaced byfour samples with a single value in the output audio stream. The DividerType popup menu determines how the output sample value is created fromthe input samples. Three options are available: “AVG”, “STP” and “SLD”.The “AVG” (“Average”) option calculates the average of the input samplesand uses this as the output sample value for each of the input samples.The “STP” (“Step”) option takes the first sample in each group of inputsamples and uses this as the output sample value for each of the inputsamples. The “SLD” (“Slide”) option takes the first sample in each group ofinput samples, interpolates between them and uses the interpolated valueas the output sample value for each of the input samples.
The Fil Post Div (“Filter Post Divider”) control is used to set the position ofthe LoFi’s Filter with respect to the Divider. By default, the Filter is beforethe Divider in the signal path. Switching this button on moves the Filter toafter the Divider in the signal path.
The Auto-Vol control allows a compressor/expander to be switched into thesignal path. This reduces the overall effect of the LoFi making the soundless harsh and more “musical”.
Rob Papen Albino 3.0 57

Master
The Albino 3's Master section contains various controls for setting globalparameters. These settings are stored within the Preset.
The Master section consists of 8 sub-sections. These are: Precision, ECS(“Easy Controller Setup”), Chord, Gen, File Browser, Glide, Voices and Vol(“Volume”). Each of these sub-sections is described in detail below.
Precision
The "Precision" control can be used to set the accuracy of the Albino 3'ssignal generation. When the "Precision" control is set to less than 100%small inaccuracies are introduced into the waveform at various points in theAlbino 3's signal chain.
Rob Papen Albino 3.0 58
This is useful if you're trying to replicate the warmth of an old analogsynthesizer. Precision can be set in a range from 90% to 100%.
ECS
The ECS (Easy Controller Setup) section makes it simple to control theAlbino 3 from an external MIDI controller (either hardware or software). Allyou have to do is switch on the ECS light (click it once), select a Albino 3parameter with the mouse and then send some MIDI messages to theAlbino 3 from you MIDI source. That's all there is to it! From now on youcan change the parameter with that controller. In addition to this, more thanone controller can be defined to change a particular parameter. In fact, youcan define up to 128 parameter-controller-combinations. This does notdepend on the type of controller you have nor the particular MIDI ControlChange messages it sends. Don't forget to switch off the ECS light afteryou have finished using it (click it again)!
ECS settings can be saved and restored using the "Load" and "Save"functions from the menu that pops up, when you click at the ECS letters. Inaddition, a single controller assignment can be cleared using the "Clear"menu entry. All you have to do is select clear (the ECS light goes on) andmove controls that you wish to be cleared (deassigned from MIDI CC's).Don't forget to switch off the clear-function by clicking the ECS control afteryou have finished!
The “Clear All” function clears all controller assignments at once.
Chord (Memory)
The Chord (Memory) control enables you to record Chords as part of aPreset. Clicking the Chord control opens a popup Menu where you canchoose Off (Chord memory is switched Off and has no effect), Learn(Chord memory will store any 8 notes you play) and Play (any note playedwill trigger the whole chord that was entered in Learn Mode).
The chord memory is great when combined with the Arpeggiator. Note thatthe order in which notes are played in Learn Mode makes a difference: thefirst Note is taken as the Root or basic note and all successive notes areremembered relatively by interval. So if you "learn" the chord C-E-G byactually playing the E first, the C is remembered as -4 semitones and the Gas +3 semitones. This means if you play a C when in play mode the Chordmemory will transfer it to C, a C -4 semitones (a G#) and a C +3 semitones(D#), so you'll hear a G#-C-D#.
Rob Papen Albino 3.0 59

Gen
The "Gen" control is used to generate random patch settings. To generatea new patch click on the button and some or all of the current parametersettings will be changed to new settings. The Gen range is set on theAlbino 3's rear panel (see below). Not all parameters are changed witheach new random patch. With lower settings (e.g. 5%) even lessparameters are affected. Normally, a setting in the range of 2 to 10% willproduce the most interesting and useable results.
Preset Browser / File Controls
The Preset Browser consists of two displays. The upper one shows theCurrent Location and the lower one shows the Current Preset. Whenever aPreset is loaded using the file controls below these displays, the Presetname is updated with the name of the loaded Preset and the bank namewith the name of the directory that contains the Preset.
By default the Preset Browser points to the factory presets installed withAlbino 3. Presets can be changed in three different ways. You can load anew Preset with the file controls, which work by clicking the Prev/Next(“arrow”) buttons located below the Preset name. You can select thedesired Preset directly from the lower display, which turns into a menuwhen you click it. You can also change a Preset by sending a MIDIprogram change command to the synth.
The Current Location can be changed by loading a Preset from a differentdirectory or by selecting the desired location from the upper display, whichalso turns into a menu when you click it.
The File Controls located to the right of the Prev/Next (“arrow”) buttons areused for all File-related operations. The Load button opens a dialog thatlets you select a file for loading. The Save button allows you to save thecurrent Preset settings.
The settings of all sections, including the Volume setting, are saved withthe Preset. The Albino loads and saves all of its Presets directly to harddisk so your computer's RAM does not limit the number of availablePresets. Note that when you load a Preset using the Master section's filecontrols, the previous Preset is erased so if you want to keep the previousPreset make sure you save it before loading another one. Note that it ispossible to load Albino 2 Presets as individual Layers. To do this it is
Rob Papen Albino 3.0 60

recommended that the Layer File controls are used. See the Layer sectionof this manual for further information.
The Preset Browser section also contains a Layer display that shows thenumber of Layers currently used by the Preset. When the display is blankno Layers are being used. When the control displays “S” one Layer is beingused, and when the control displays “L” then 2 or more Layers are in use.
Glide
The Glide or "portamento" section allows you to set the Albino 3'sportamento parameters. "Glide" continuously changes the pitch from onenote to the next, connecting the notes and letting you smoothly "glide" fromone to the other.
The Glide section has three controls: the Glide control, the Range control,and the Time/Rate control.
The Time/Rate control has two settings: Time and Rate. These settingsdetermine the manner in which the pitch of one note moves to that of thenext note. When set to "Time", it takes a constant amount of time to movefrom one note to the next. In this case it will take the same amount of timeto reach the destination pitch regardless of whether the preceding notesare a semitone apart or an octave apart. When set to "Rate", the amount oftime it takes to move from one note to the next depends upon how far apartthe two notes are. The further apart the notes, the longer it will take for thepitch of the first note to reach that of the following note.
The Glide button has 4 values: Off, Held, On and Bend. The On and Offfunctions turn "Glide" on and off. When "Glide" is on, the Time/Rate dial isused to set the length of time it takes for the first note to reach that of thesecond note. The "Held" setting works as follows. If notes overlap thenGlide is applied, however if they don't then the notes are played withoutGlide. This makes it possible to apply Glide only to selected notes. "Bend"allows you to apply a predetermined pitch bend to each note. The bendrange is set using the Range control. A bend range of -48 to +48 semitonesis available.
Single Trigger/Voices
The Single Trigger control is used to activate single trigger mode. Whenthis switch is activated envelopes are only triggered by non-legato (orseparated) notes. If you play in a legato (or overlapping) manner then
Rob Papen Albino 3.0 61
envelopes are continuously applied across all notes. The envelope is onlyre-triggered when legato playing ceases.
The Voices control is used to set the number of voices ("polyphony")available. The maximum polyphony is 32. A variety of settings are availablefor polyphony. These include "mono", "2" to "12" and "oo". One thing thatmay be confusing is the "mono" setting. It can be explained as follows. Saythat you hold down one key and then press and release a second key. Inthe case of the "mono" voice setting, the first note will sound, and then thesecond note sounds. When the second note is released the first notesounds again. This creates a "pedal tone" effect.
Volume Control
The "Volume" control sets the Albino 3's overall output volume. Volume canbe set in a range from -oodB to +6dB.
Rob Papen Albino 3.0 62

Rear Panel
The "Rear Panel" of the Albino 3 is accessed by clicking on the Albino 3logo at the bottom right of the Albino 3's front panel. Several mastercontrols have been located here to make the front panel less crowded, andalso so that they are not changed accidentally while the Albino 3 is in use.The controls located here are Dial Mode, MasterTune, Bend Range andGen Range.
Master Tune is used to set the overall tuning of the Albino 3 if nomicrotuning file is loaded . Tuning can be set from 415.3 Hz to 466.2 Hz.
The Gen Range control is used to set the range for random parametergeneration. It has a range of 0% to 100%. Using lower values will effect thepatch less than using higher values.
The Bend Up Range control is used to set the Albino 3's response to pitchbend messages. Bend Range can be set from 0 to 24 semitones.
The Bend Down Range control is used to set the Albino 3's response topitch bend messages. Bend Down Range can be set from 0 to 24semitones.
Rob Papen Albino 3.0 63
The Bend Down Range control can also be set to “Link” in which case theBend Down Range is the same as the Bend Up Range.
The Velocity Curve control sets the MIDI Response Curve of the Albino 3.The Velocity Curve is set using a “curve” control that is used to set theshape of the response curve. The shape of the curve can range fromextreme negative exponential to extreme positive exponential. To adjustthe “curve” setting, click on the control and drag the cursor up or down. Thechange in the curve's shape will be shown on the control.
Dial Mode is used to select the Albino 3's dial operation mode. Two modesare available: "Cir" (Circular) and "Lin" (Linear). In "Cir" mode the Albino'sdials track cursor movement in a circular fashion around the dial. In "Lin"mode the Albino's dials track vertical cursor movement. It's important tonote that some sequencers can override the instrument's dial modesettings so if the Albino's dials are not operating in the correct manner,check the host program's settings.
Scale: See Appendix E for a complete description of how to use TUN filesin the Albino 3.
Finally, the rear panel also contains your Albino 3's serial number andversion number.
To switch back to the Front Panel click the Albino 3 logo on the RearPanel.
Rob Papen Albino 3.0 64
Optimizing CPU Usage
Software synthesizers are highly CPU-intensive. The real-time calculationof audio waveforms, filters, effects and modulators places a significant loadon the host computer's CPU. As such, the main limiting factor in software synthesizer performance isCPU processing power. Each additional oscillator, filter, effect andmodulator that is included in an instrument adds to the CPU load. As aresult, it's best to switch off any unused units within the Albino 3 toconserve CPU resources.
It may also be useful to use the send effects of your host's mixer instead ofthe Albino 3's effects as they are shared among all instruments.
Rob Papen Albino 3.0 65
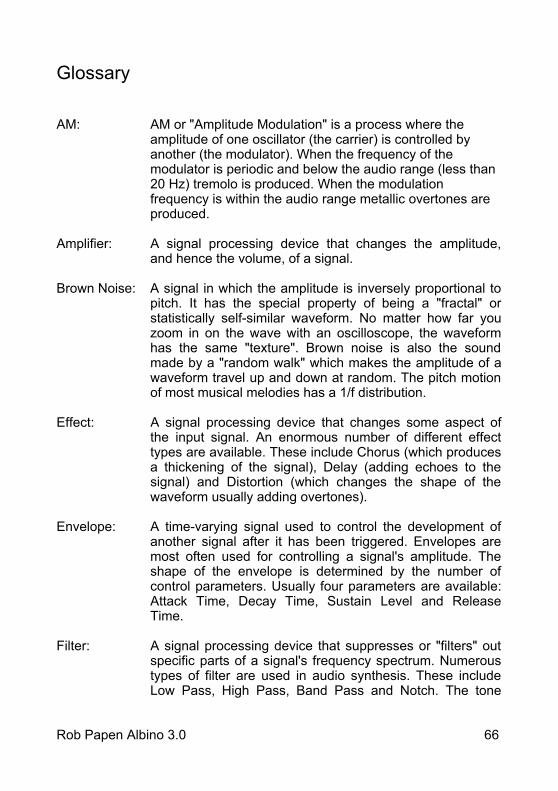
Glossary
AM: AM or "Amplitude Modulation" is a process where theamplitude of one oscillator (the carrier) is controlled byanother (the modulator). When the frequency of themodulator is periodic and below the audio range (less than20 Hz) tremolo is produced. When the modulationfrequency is within the audio range metallic overtones areproduced.
Amplifier: A signal processing device that changes the amplitude,and hence the volume, of a signal.
Brown Noise: A signal in which the amplitude is inversely proportional topitch. It has the special property of being a "fractal" orstatistically self-similar waveform. No matter how far youzoom in on the wave with an oscilloscope, the waveformhas the same "texture". Brown noise is also the soundmade by a "random walk" which makes the amplitude of awaveform travel up and down at random. The pitch motionof most musical melodies has a 1/f distribution.
Effect: A signal processing device that changes some aspect ofthe input signal. An enormous number of different effecttypes are available. These include Chorus (which producesa thickening of the signal), Delay (adding echoes to thesignal) and Distortion (which changes the shape of thewaveform usually adding overtones).
Envelope: A time-varying signal used to control the development ofanother signal after it has been triggered. Envelopes aremost often used for controlling a signal's amplitude. Theshape of the envelope is determined by the number ofcontrol parameters. Usually four parameters are available:Attack Time, Decay Time, Sustain Level and ReleaseTime.
Filter: A signal processing device that suppresses or "filters" outspecific parts of a signal's frequency spectrum. Numeroustypes of filter are used in audio synthesis. These includeLow Pass, High Pass, Band Pass and Notch. The tone
Rob Papen Albino 3.0 66

controls on a stereo amplifier are one example of an audiofilter.
FM: FM or "Frequency Modulation" is a process where thefrequency of one oscillator (the carrier) is controlled byanother (the modulator). When the frequency of themodulator is periodic and below the audio range (less than20 Hz) vibrato is produced. When the modulationfrequency is within the audio range, Frequency Modulationis produced.
LFO: An LFO or "Low Frequency Oscillator" is a periodic signalsource (usually below audio frequency range) used tomodulate another signal parameter. An LFO can be usedfor a variety of effects including vibrato (by modulating thepitch) and tremolo (by modulating the volume).
Modulation Matrix: A signal "junction" where a source signal can be patched
so that it controls a destination signal. The Albino'sModulation Matrix is used for tasks such as modulating anoscillator's amplitude by an LFO.
Oscillator: A signal source that generates a periodic waveform at a
given frequency.
Oscillator Sync: Syncing oscillators means that the slave oscillator does
start a new cycle of its waveform whenever the masterstarts a new cycle. This can produce impressive sounds,especially when the slave is pitch modulated (as in thiscase actually the pitch is not changed but the waveform ofthe slave).
Pink Noise: A signal which contains equal energy per octave. Thismeans that the volume decreases logarithmically withfrequency. Pink noise sounds more natural than whitenoise (it sounds like rushing water or the surf) and is quiterelaxing. It's often used for ambience in electronic music,and as a test signal for "tuning" sound reinforcementsystems (many equalisers and audio spectrum analysershave built-in pink noise generators).
Rob Papen Albino 3.0 67

Ring Modulation: The process of combining two audio signals by
multiplication. Ring Modulation produces sidebands butsuppresses both the carrier and modulating frequencies.
White Noise: A signal which contains equal energy over its frequencyrange-- that is, if you measure the amplitude of the soundfrom 100 to 200 Hz, that segment of the frequencyspectrum will contain the same energy as a segment from5000 to 5100 Hz or even 20,000 to 20,100 Hz. Comparedto other types of noise, white noise has a "bright" sound.
Rob Papen Albino 3.0 68
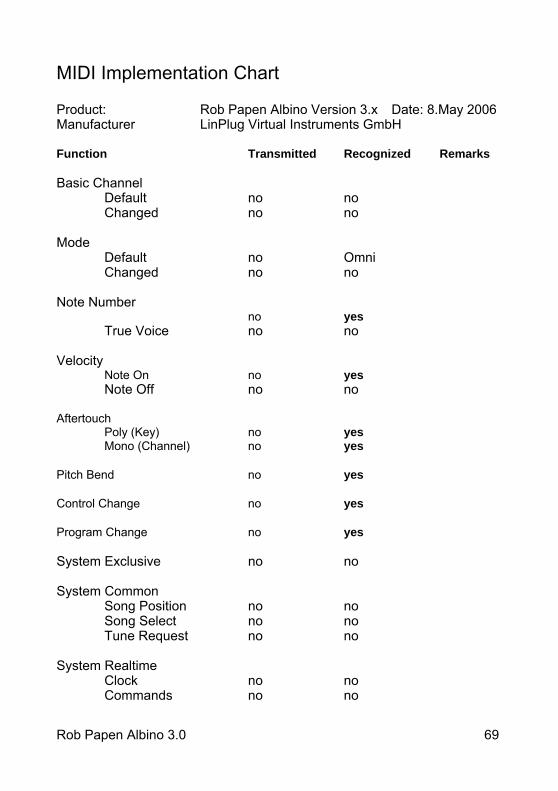
MIDI Implementation Chart
Product: Rob Papen Albino Version 3.x Date: 8.May 2006Manufacturer LinPlug Virtual Instruments GmbH
Function Transmitted Recognized Remarks
Basic ChannelDefault no noChanged no no
Mode Default no OmniChanged no no
Note Numberno yes
True Voice no no
Velocity Note On no yesNote Off no no
AftertouchPoly (Key) no yesMono (Channel) no yes
Pitch Bend no yes
Control Change no yes
Program Change no yes
System Exclusive no no
System CommonSong Position no noSong Select no noTune Request no no
System RealtimeClock no noCommands no no
Rob Papen Albino 3.0 69

Aux MessagesLocal On/Off no noAll Notes Off no yesActive Sensing no noSystem Reset no yes
Rob Papen Albino 3.0 70
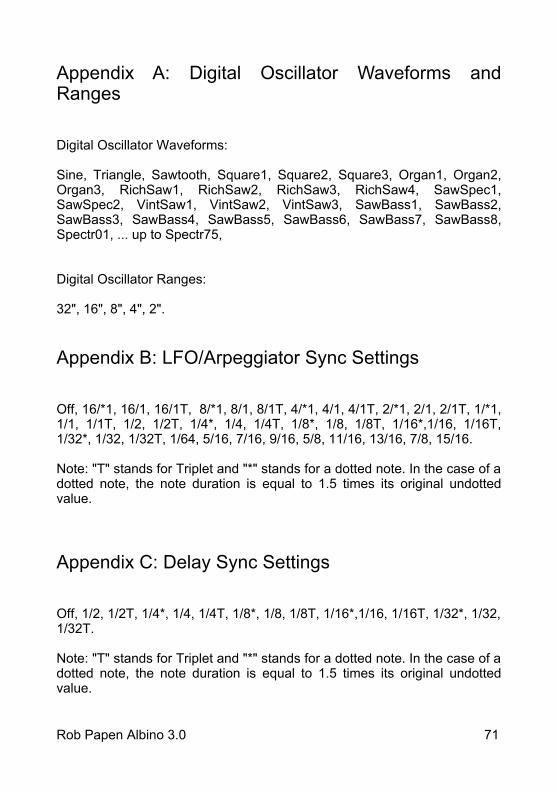
Appendix A: Digital Oscillator Waveforms andRanges
Digital Oscillator Waveforms:
Sine, Triangle, Sawtooth, Square1, Square2, Square3, Organ1, Organ2,Organ3, RichSaw1, RichSaw2, RichSaw3, RichSaw4, SawSpec1,SawSpec2, VintSaw1, VintSaw2, VintSaw3, SawBass1, SawBass2,SawBass3, SawBass4, SawBass5, SawBass6, SawBass7, SawBass8,Spectr01, ... up to Spectr75,
Digital Oscillator Ranges:
32", 16", 8", 4", 2".
Appendix B: LFO/Arpeggiator Sync Settings
Off, 16/*1, 16/1, 16/1T, 8/*1, 8/1, 8/1T, 4/*1, 4/1, 4/1T, 2/*1, 2/1, 2/1T, 1/*1,1/1, 1/1T, 1/2, 1/2T, 1/4*, 1/4, 1/4T, 1/8*, 1/8, 1/8T, 1/16*,1/16, 1/16T,1/32*, 1/32, 1/32T, 1/64, 5/16, 7/16, 9/16, 5/8, 11/16, 13/16, 7/8, 15/16.
Note: "T" stands for Triplet and "*" stands for a dotted note. In the case of adotted note, the note duration is equal to 1.5 times its original undottedvalue.
Appendix C: Delay Sync Settings
Off, 1/2, 1/2T, 1/4*, 1/4, 1/4T, 1/8*, 1/8, 1/8T, 1/16*,1/16, 1/16T, 1/32*, 1/32,1/32T.
Note: "T" stands for Triplet and "*" stands for a dotted note. In the case of adotted note, the note duration is equal to 1.5 times its original undottedvalue.
Rob Papen Albino 3.0 71

Rob Papen Albino 3.0 72

Appendix D: Modulation Sources and Destinations
Modulation Sources:
--- (Off), Note played Exp, Note played Lin, Velocity, Aftertouch, PitchWheel, Modulation Wheel, Breath Controller, Foot Controller,ExpressionContr, CC16 Controller, CC17 Controller, CC18 Controller,CC19 Controller, LFO 1, LFO 2, LFO 3, LFO 4, Osc 1 Envelope, Osc 2Envelope, Osc 3 Envelope, Osc 4 Envelope, Mod-Envelope, Fil1-Envelope,Fil-2-Envelope, Amp-Envelope and Arpeggiator
Two types of modulation source are available: unipolar and bipolar.Unipolar modulation sources increase the modulation destination's value ina single direction (e.g. the ModWheel), while bipolar modulation sourcesboth increment and decrement the modulations destination value (e.g. anLFO).
Modulation Destinations:
---(Off), Osc 1 Amplitude, Osc 1 Pitch, Osc 1 Symmetry, Osc 1 Balance,Osc 2 Amplitude, Osc 2 Pitch, Osc 2 Symmetry, Osc 2 Balance, Osc 3Amplitude, Osc 3 Pitch, Osc 3 Symmetry, Osc 3 Balance, Osc 4 Amplitude,Osc 4 Pitch, Osc 4 Symmetry, Osc 4 Balance, Fil 1 Cutoff, Fil 1Resonance, Fil 1 Panning, Fil 1 Saturation,Fil 2 Cutoff, Fil 2 Resonance, Fil2 Panning, Fil 2 Saturation,Matrix Depth 1, Matrix Depth 2, Matrix Depth 3, Matrix Depth 4, LFO Speed 1, LFO Speed 2, LFO Speed 3, LFO Speed 4,EnvModAttack, EnvModDecay, EnvModRelease, EnvF1 Attack, EnvF1Decay, EnvF1 Release, EnvF2 Attack, EnvF2 Decay, EnvF2 Release,EnvAmpAttack, EnvAmpDecay, EnvAmpRelease, Main Filter Bal, MainAmplitude, Main Pitch
Modulation Sources
Note played Exp The note being played with exponential response.The modulation value follows the frequency of theplayed note (bipolar).
Rob Papen Albino 3.0 73

Note played Lin The note being played with a linear response. Themodulation value follows the note number (bipolar).
Velocity The MIDI note-on velocity information. The harderthe key is hit, the higher the modulation value(unipolar).
Aftertouch(poly) The Aftertouch value of each separate note is usedas modulation source. Your MIDI keyboard mustsupport this. If this doesn't work it is likely that yourkeyboard has no polyphonic aftertouch (unipolar).
Aftertouch(mono) As above, however only one aftertouch value isused for the whole keyboard. All notes beingplayed on a specific channel share the samemonophonic aftertouch value. This is how mostkeyboards work (unipolar).
Pitch Wheel The value of the pitch-Wheel is takes asmodulation source, maybe it makes sense toreduce the Pitch Wheel range to 0 when using thePitch Wheel as modulation source. The PitchWheel is bipolar
Modulation Wheel The MIDI modulation wheel (MIDI CC 1) (unipolar )
Breath Controller MIDI CC 2 (unipolar).
Foot Controller MIDI CC 4 (unipolar).
Expression Contr. MIDI CC 11 (unipolar).
CC16 Controller MIDI CC 16 (bipolar).
CC17 Controller MIDI CC 17 (bipolar).
CC18 Controller MIDI CC 18 (bipolar).
CC19 Controller MIDI CC 19 (bipolar).
LFO 1 LFO 1 (bipolar).
Rob Papen Albino 3.0 74

LFO 2 LFO 2 (bipolar).
LFO 3 LFO 3 (bipolar).
LFO 4 LFO 4 (bipolar).
Osc 1,2,3,4 Envelope The envelope of Oscillator 1,2,3 or 4. Oscillatorenvelopes control the respective oscillator,however if the oscillator is not used, or it makessense within the preset to do so, the envelope canbe used as a modulation source (unipolar).
Mod-Envelope The Mod-Envelope is user-definable and can berouted to any available modulation destination(unipolar).
Fil-1, Fil-2 and Amp Envelope The envelope of the Filters and MainAmplitude. This envelopes control the respectiveFilter / Volume, however if it makes sense withinthe preset to do so, the envelope can be used as amodulation source (unipolar).
Arpeggiator As a special modulation source the Arpeggiator isuseable as modulation source too. (unipolar)
Modulation Destinations
Osc 1,2,3,4 Amplitude The amplitude of Oscillator 1 to 4, used fortremolo.
N.B. In order to create the classic tremolo effect itis better to use Main Amplitude as the modulationdestination as this is applied to the whole voice.
Osc 1,2,3,4 Pitch The pitch of the respective Oscillator, used forvibrato. N.B. In order to create the classic vibrato effect it isbetter to use Main Pitch as the modulationdestination as this is applied to the whole voice.
Osc 1,2,3,4 Symmetry Pulsewidth or Symmetry of the respectiveOscillator waveform, used to thicken a sound or
Rob Papen Albino 3.0 75
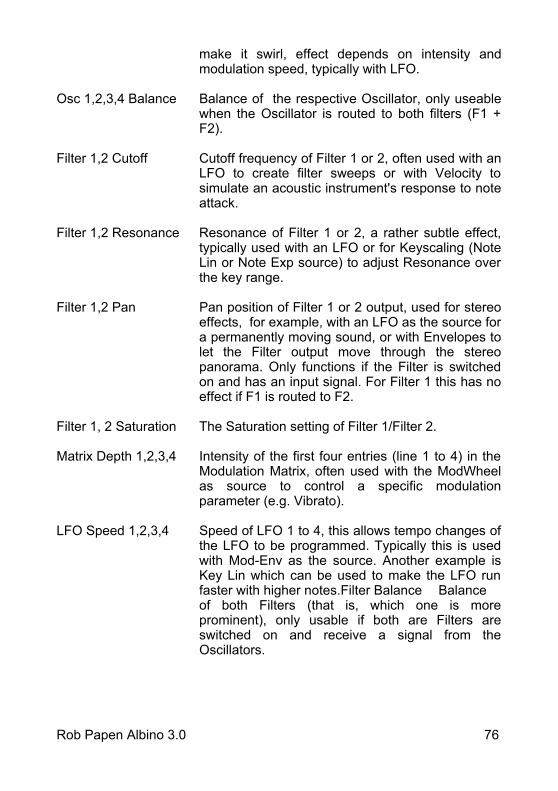
make it swirl, effect depends on intensity andmodulation speed, typically with LFO.
Osc 1,2,3,4 Balance Balance of the respective Oscillator, only useablewhen the Oscillator is routed to both filters (F1 +F2).
Filter 1,2 Cutoff Cutoff frequency of Filter 1 or 2, often used with anLFO to create filter sweeps or with Velocity tosimulate an acoustic instrument's response to noteattack.
Filter 1,2 Resonance Resonance of Filter 1 or 2, a rather subtle effect,typically used with an LFO or for Keyscaling (NoteLin or Note Exp source) to adjust Resonance overthe key range.
Filter 1,2 Pan Pan position of Filter 1 or 2 output, used for stereoeffects, for example, with an LFO as the source fora permanently moving sound, or with Envelopes tolet the Filter output move through the stereopanorama. Only functions if the Filter is switchedon and has an input signal. For Filter 1 this has noeffect if F1 is routed to F2.
Filter 1, 2 Saturation The Saturation setting of Filter 1/Filter 2.
Matrix Depth 1,2,3,4 Intensity of the first four entries (line 1 to 4) in theModulation Matrix, often used with the ModWheelas source to control a specific modulationparameter (e.g. Vibrato).
LFO Speed 1,2,3,4 Speed of LFO 1 to 4, this allows tempo changes ofthe LFO to be programmed. Typically this is usedwith Mod-Env as the source. Another example isKey Lin which can be used to make the LFO runfaster with higher notes.Filter Balance Balanceof both Filters (that is, which one is moreprominent), only usable if both are Filters areswitched on and receive a signal from theOscillators.
Rob Papen Albino 3.0 76

EnvMod, F1, F2, Amp AttackAttack time of the of the Modulation Envelope,Filter 1 Envelope, Filter 2 Envelope and MainAmplitude Envelope.
EnvMod, F1, F2, Amp DecayDecay time of the of the respective Envelope
EnvMod, F1, F2, Amp ReleaseRelease time of the of the respective Envelope
Main Filter Balance Balance of both Filters (that is, which one is moreprominent), only usefull if both are Filters areswitched on and receive a signal from theOscillators.
Main Amplitude Overall amplitude of all oscillators. Often used fortremolo.
Main Pitch Overall pitch of all oscillators. Often used forvibrato.
Rob Papen Albino 3.0 77
Appendix E: Using TUN FilesBy Jacky Ligon
About Microtuning Microtuning, or "microtonality" are methods for tuning musical instrumentswhereby musicians may explore and compose with ethnic, historical andcontemporary tuning-systems. Microtuning musical instruments allows oneto use scales which may have pitches lying between the notes of ourfamiliar Western 12 tone scale. These pitches which are found in the'cracks' of 12 Tone Equal Temperament are one of the things that givemusic's of Bali, India, Africa, Thailand, Turkey and the Middle East (toname but a few) a special intonational flavor, but is something that is ofimmeasurable value to the contemporary acoustic and electroniccomposer, who may require a more broad palette of musical pitches fortheir music.
The quest for creating beautiful and musically useful tuning-systems hasbeen an unending process of discovery and debate amongst musicaltheorists, mathematicians, physicists and musicians going back to earlyhistory. Quite often the reasons for microtuning instruments may involveimproving the consonant intervals of a tuning-system for sweeter soundingharmonies, as well as offering wider variety of choices for melody."Microtuning" an instrument can sometimes mean there may be less ormore than 12 tones in an octave, or even that the octave itself may bestretched or compressed. Microtuning is a vast topic, rich with lore, musicand an infinity of musical possibilities for the sonic explorer.
Creating TUN microtuning files with SCALA
Scala is a freeware utility developed by Manuel Op de Coul in theNetherlands, which can be used for the creation and analysis of historical,ethnic and contemporary microtunings. A powerful capability of Scala isthat it enables the user to create the proprietary tuning data required formicrotuning a wide range of hardware and software synthesizers andsamplers.
Scala may be used to create the TUN format microtuning-files needed toexplore microtunings with this instrument.
The Scala home page is http://www.xs4all.nl/~huygensf/scala/
Rob Papen Albino 3.0 78

Specifying the Reference Frequency of a Microtuning
One of the powerful capabilities of the TUN file format and Scala, is theability to specify the pitch and midi note which will be the reference pitch forthe microtuning in use. This becomes a very important consideration whenone is using a number of different synthesizers and wishes to keep them intune with a given base frequency. It is very common for one to specify achosen concert pitch such as A440 Hz or C261.6256 Hz as a reference fora microtuning, however, the flexibility of the TUN format and Scala enablesone to specify this frequency arbitrarily. In Scala this reference is calledMap Frequency.
As well as being able to specify the Map Frequency, one can also specify acentral midi-note, which will become the starting point for the microtuning inuse. Being able to specify a particular midi-note on the controller, providesa way to map a microtuning beginning on any desired midi key, making iteasier to navigate the keyboard when there may be more or less than 12tones per octave, or where one may desire to have the notes of a tuningfall on certain physical keys.
Important Note
When one uses a TUN microtuning-file in the , the above specifiedmapping properties will override the Master Tuning reference. Normallywhen one is using the default 12 Tone Equal Tempered Scale, the MasterTuning will be used to make fine pitch adjustments around the standardconcert pitch of A440 Hz, but when one has specified another pitch basefor a microtuning when the TUN file is created in Scala, such as C261.6256Hz, the data in the TUN microtuning-file will provide a new pitch reference.
Rob Papen Albino 3.0 79