
AKVIS Chameleondownload.akvis.com/old-chameleon.pdf · AKVIS Chameleon 2 AKVIS Chameleon AKVIS...
28
Transcript of AKVIS Chameleondownload.akvis.com/old-chameleon.pdf · AKVIS Chameleon 2 AKVIS Chameleon AKVIS...


AKVIS Chameleon
2
AKVIS Chameleon AKVIS Chameleon is an efficient tool for automatic adjustment of inserted objects to the target image color range and smoothing of the object's border. The tool is very easy to handle as it does not require precise selection of objects. You copy an object, insert it into another picture, press the button and the object adjusts to the new background as chameleons do - adapting to the new color range and blending with the environment. The tool can be useful for several purposes:
• to insert new objects in a picture, but with much more flexibility and ease than with conventional tools (collage creation); • to conceal undesirable artifacts by replacing them with the nearby parts of the image (similar to the clone tool).
Windows installation
3
Windows installation Minimal system requirements:
• Pentium II; • Operating system: Windows 2000, Windows XP, Windows NT; • 256 Mb RAM; • 15 Mb of free space on the hard disk.
Attention! You must have administrator rights to install the program on your computer. To install the program you should follow the instruction:
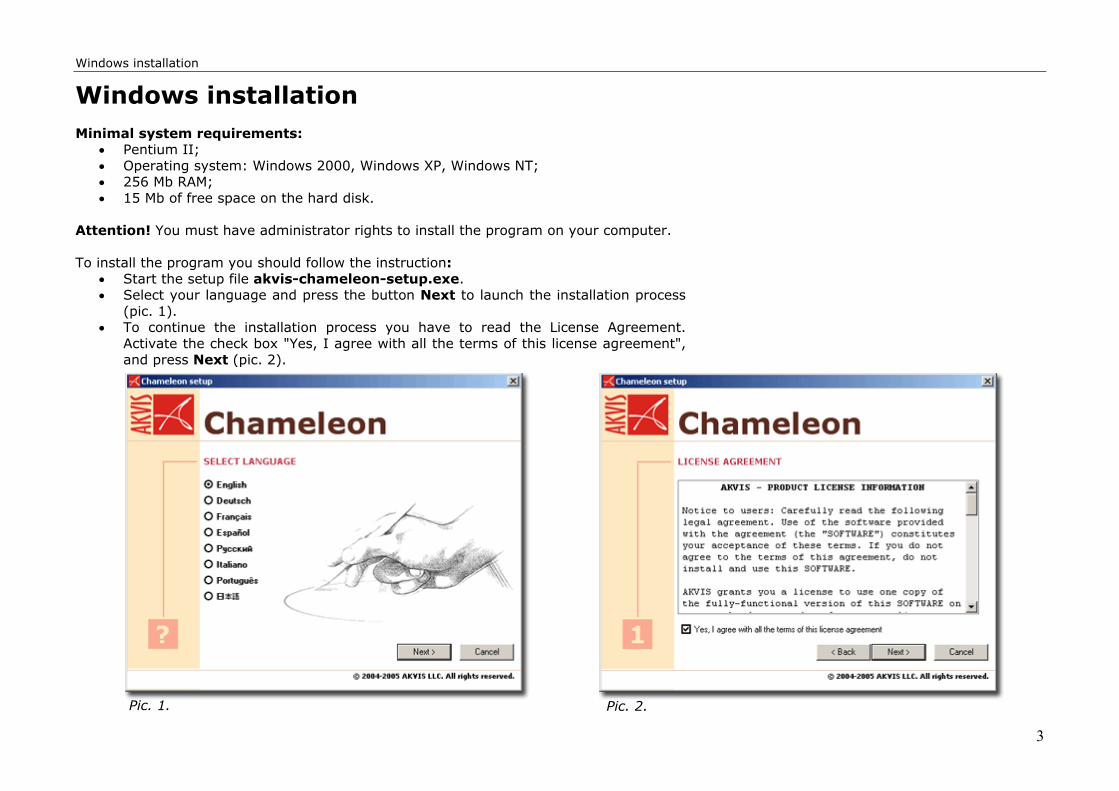
• Start the setup file akvis-chameleon-setup.exe. • Select your language and press the button Next to launch the installation process
(pic. 1). • To continue the installation process you have to read the License Agreement.
Activate the check box "Yes, I agree with all the terms of this license agreement", and press Next (pic. 2).
Pic. 1. Pic. 2.
Windows installation
4
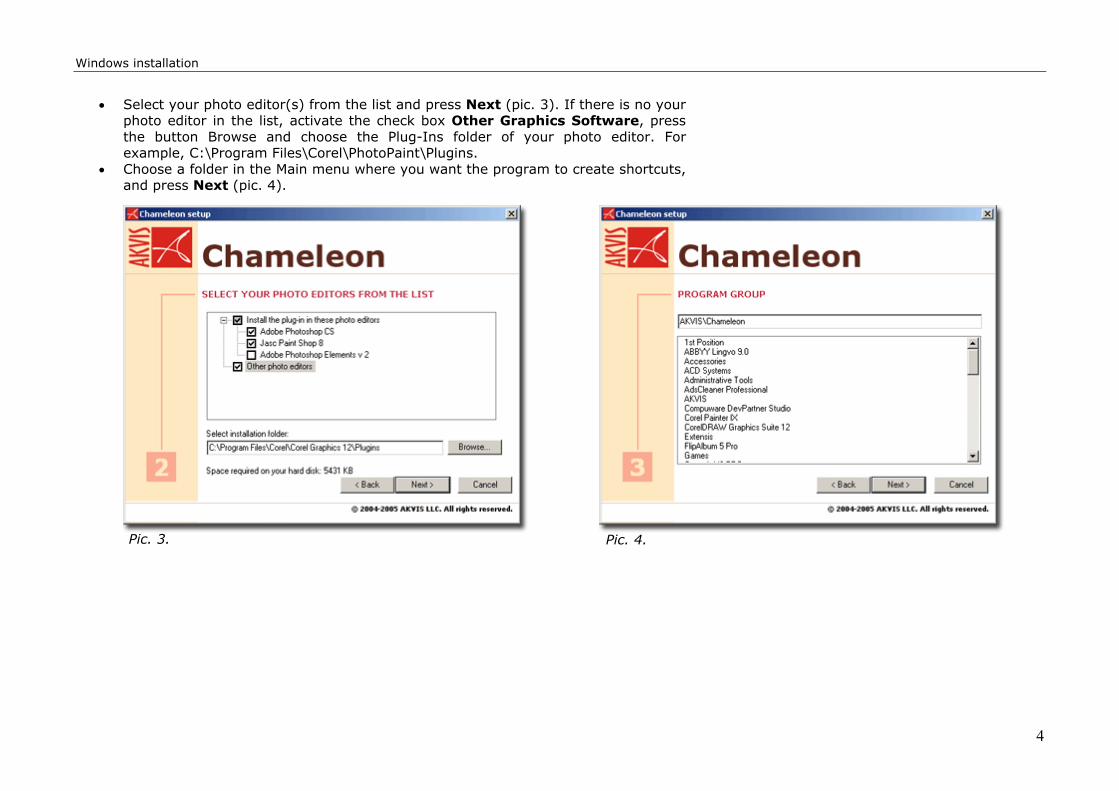
• Select your photo editor(s) from the list and press Next (pic. 3). If there is no your
photo editor in the list, activate the check box Other Graphics Software, press the button Browse and choose the Plug-Ins folder of your photo editor. For example, C:\Program Files\Corel\PhotoPaint\Plugins.
• Choose a folder in the Main menu where you want the program to create shortcuts, and press Next (pic. 4).
Pic. 3. Pic. 4.
Windows installation
5
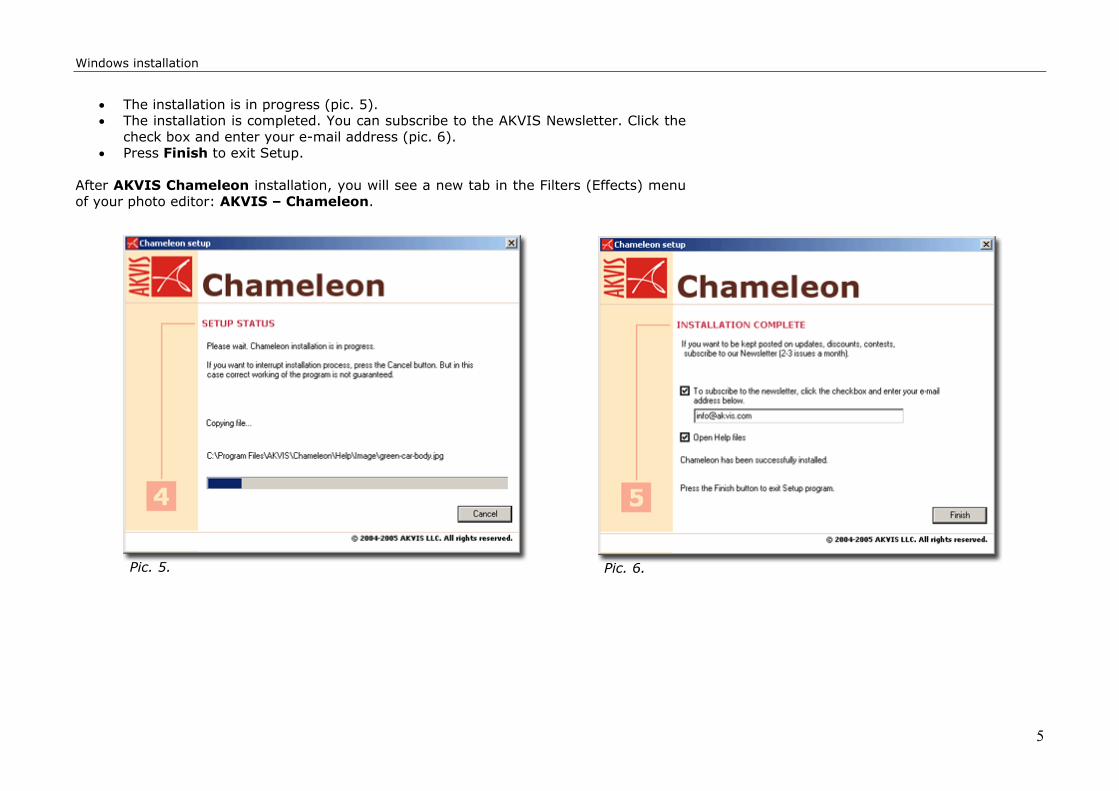
• The installation is in progress (pic. 5). • The installation is completed. You can subscribe to the AKVIS Newsletter. Click the
check box and enter your e-mail address (pic. 6). • Press Finish to exit Setup.
After AKVIS Chameleon installation, you will see a new tab in the Filters (Effects) menu of your photo editor: AKVIS – Chameleon.
Pic. 5. Pic. 6.
Macintosh installation
6
Macintosh installation
Minimal system requirements: • Mac OS X 10.3.9, PowerPC G3; • an installed image editing software: Adobe Photoshop or Adobe Photoshop
Elements. Attention! You must have administrator rights to install the program on your computer. To install the program you should follow the instruction:
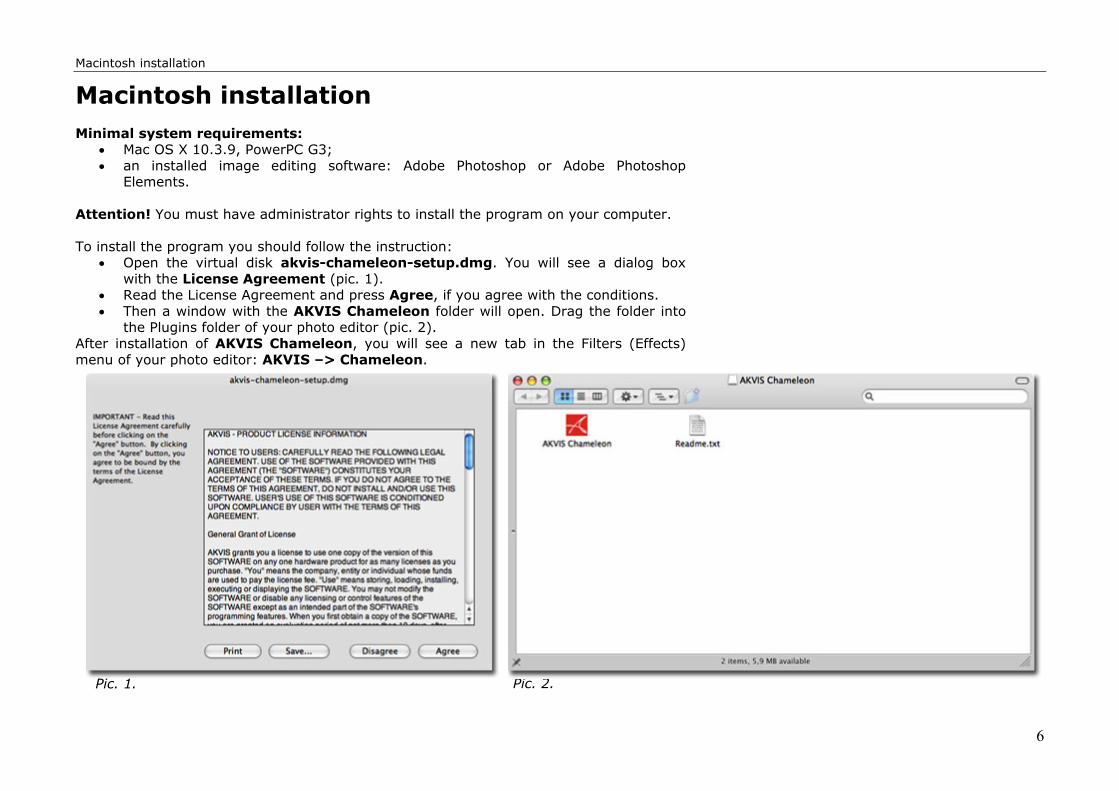
• Open the virtual disk akvis-chameleon-setup.dmg. You will see a dialog box with the License Agreement (pic. 1).
• Read the License Agreement and press Agree, if you agree with the conditions. • Then a window with the AKVIS Chameleon folder will open. Drag the folder into
the Plugins folder of your photo editor (pic. 2). After installation of AKVIS Chameleon, you will see a new tab in the Filters (Effects) menu of your photo editor: AKVIS –> Chameleon.
Pic. 1. Pic. 2.

Program registration
7
Program registration You can buy a license for AKVIS Chameleon at the official web-site www.AKVIS.com. To buy a license you should fill in the form on the product buy-page and order the software using a secure payment system. When the form is filled in and the payment is made, the serial number will be sent to you within minutes. Having received the serial number you can proceed to the program registration. Follow the instructions:
1. Open the window About the program of AKVIS Chameleon (pic. 1). This window
appears when you launch AKVIS Chameleon or when you press the button in the window of this program. Besides, Adobe Photoshop allows calling the About the program window right from its menu Help - About Plug-In – Chameleon (Photoshop - About Plug-In – Chameleon in Macintosh).
2. Press Register/Buy in the window About the program to start the process of activation.
3. Enter your name and your serial number (pic. 2). 4. Choose a method of activation – either through direct connection or by mail – and press
Register. We recommend activating the program through direct connection, as it is the easiest way. At this stage of activation your computer must be connected to Internet.
5. The registration is completed (pic. 3). In case you have chosen activation by mail, you should put the file Chameleon.lic (that you will receive enclosed in the e-mail) into the folder Program Files\AKVIS\Chameleon in Windows, or in your Home Directory in Macintosh.
Pic. 1.
Pic. 2.
Pic. 3.
Using AKVIS Chameleon in Adode Photoshop
8
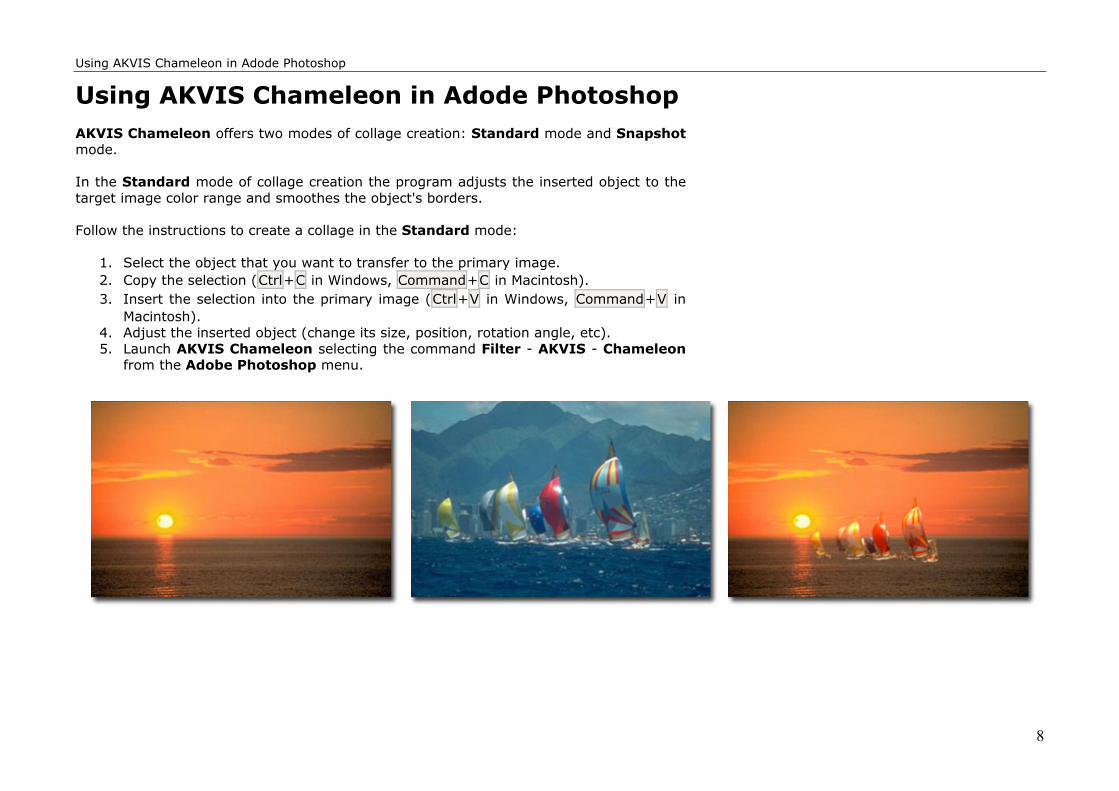
Using AKVIS Chameleon in Adode Photoshop AKVIS Chameleon offers two modes of collage creation: Standard mode and Snapshot mode. In the Standard mode of collage creation the program adjusts the inserted object to the target image color range and smoothes the object's borders. Follow the instructions to create a collage in the Standard mode:
1. Select the object that you want to transfer to the primary image. 2. Copy the selection (Ctrl+C in Windows, Command+C in Macintosh). 3. Insert the selection into the primary image (Ctrl+V in Windows, Command+V in
Macintosh). 4. Adjust the inserted object (change its size, position, rotation angle, etc). 5. Launch AKVIS Chameleon selecting the command Filter - AKVIS - Chameleon
from the Adobe Photoshop menu.

Using AKVIS Chameleon in Adode Photoshop
9
In the Snapshot mode the program does not only smooth the borders of the inserted object and adjusts its color range, but it also makes the object semi-transparent, so that the texture of the primary image can be seen through. Follow the instructions to create a collage in the Snapshot mode:
1. Make a snapshot of the primary image selecting the command Filter – AKVIS – Chameleon (Take Snapshot) in the photo editor Adobe Photoshop.
2. Select the object that you want to transfer to the primary image. 3. Copy the selection (Ctrl+C in Windows, Command+C in Macintosh). 4. Insert the selection into the primary image (Ctrl+V in Windows, Command+V in
Macintosh). 5. Adjust the inserted object (change its size, position, rotation angle, etc). 6. Launch AKVIS Chameleon selecting the command Filter – AKVIS – Chameleon
(Use Snapshot) from the Adobe Photoshop menu.
Using AKVIS Chameleon in Paint Shop Pro
10
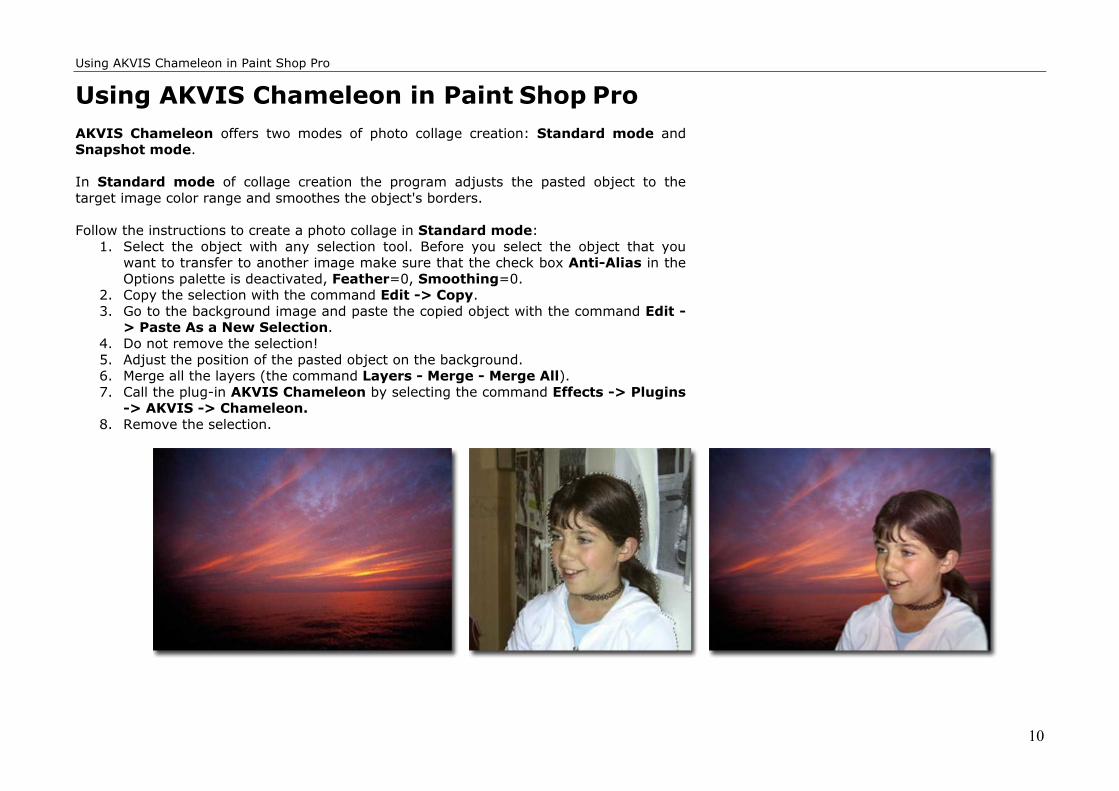
Using AKVIS Chameleon in Paint Shop Pro AKVIS Chameleon offers two modes of photo collage creation: Standard mode and Snapshot mode. In Standard mode of collage creation the program adjusts the pasted object to the target image color range and smoothes the object's borders. Follow the instructions to create a photo collage in Standard mode:
1. Select the object with any selection tool. Before you select the object that you want to transfer to another image make sure that the check box Anti-Alias in the Options palette is deactivated, Feather=0, Smoothing=0.
2. Copy the selection with the command Edit -> Copy. 3. Go to the background image and paste the copied object with the command Edit -
> Paste As a New Selection. 4. Do not remove the selection! 5. Adjust the position of the pasted object on the background. 6. Merge all the layers (the command Layers - Merge - Merge All). 7. Call the plug-in AKVIS Chameleon by selecting the command Effects -> Plugins
-> AKVIS -> Chameleon. 8. Remove the selection.
Using AKVIS Chameleon in Paint Shop Pro
11
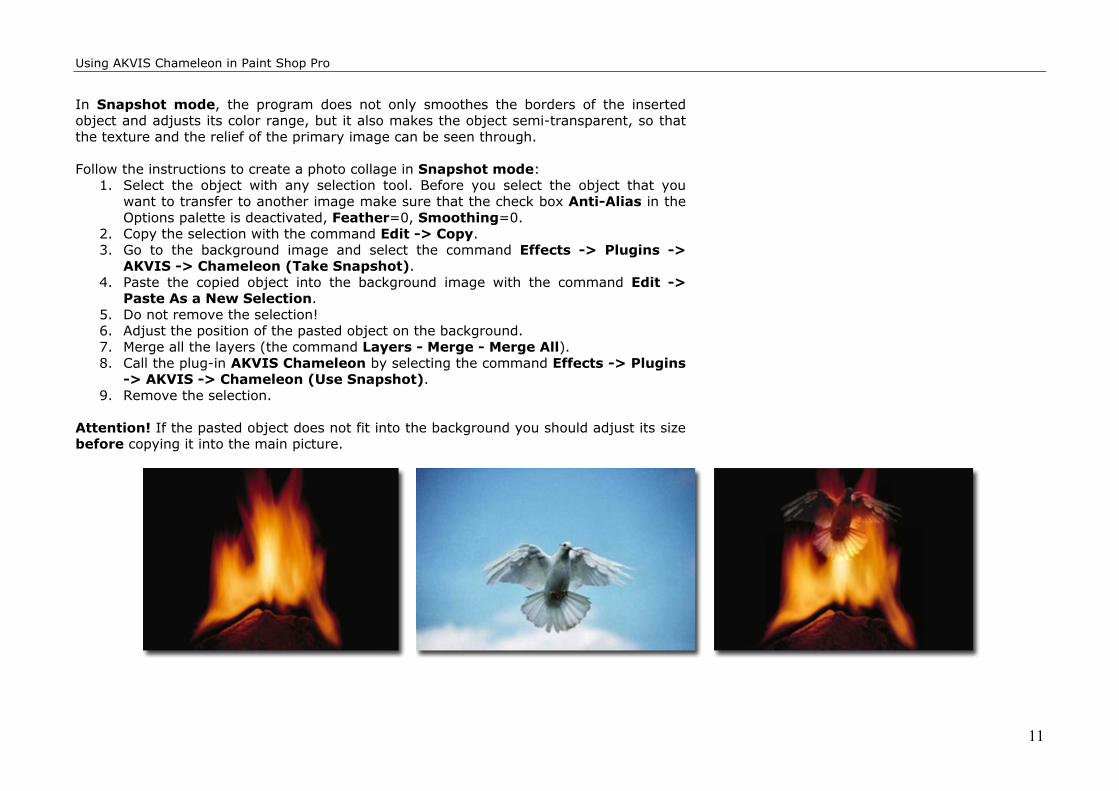
In Snapshot mode, the program does not only smoothes the borders of the inserted object and adjusts its color range, but it also makes the object semi-transparent, so that the texture and the relief of the primary image can be seen through. Follow the instructions to create a photo collage in Snapshot mode:
1. Select the object with any selection tool. Before you select the object that you want to transfer to another image make sure that the check box Anti-Alias in the Options palette is deactivated, Feather=0, Smoothing=0.
2. Copy the selection with the command Edit -> Copy. 3. Go to the background image and select the command Effects -> Plugins ->
AKVIS -> Chameleon (Take Snapshot). 4. Paste the copied object into the background image with the command Edit ->
Paste As a New Selection. 5. Do not remove the selection! 6. Adjust the position of the pasted object on the background. 7. Merge all the layers (the command Layers - Merge - Merge All). 8. Call the plug-in AKVIS Chameleon by selecting the command Effects -> Plugins
-> AKVIS -> Chameleon (Use Snapshot). 9. Remove the selection.
Attention! If the pasted object does not fit into the background you should adjust its size before copying it into the main picture.
Using AKVIS Chameleon in Corel Photo-Paint
12
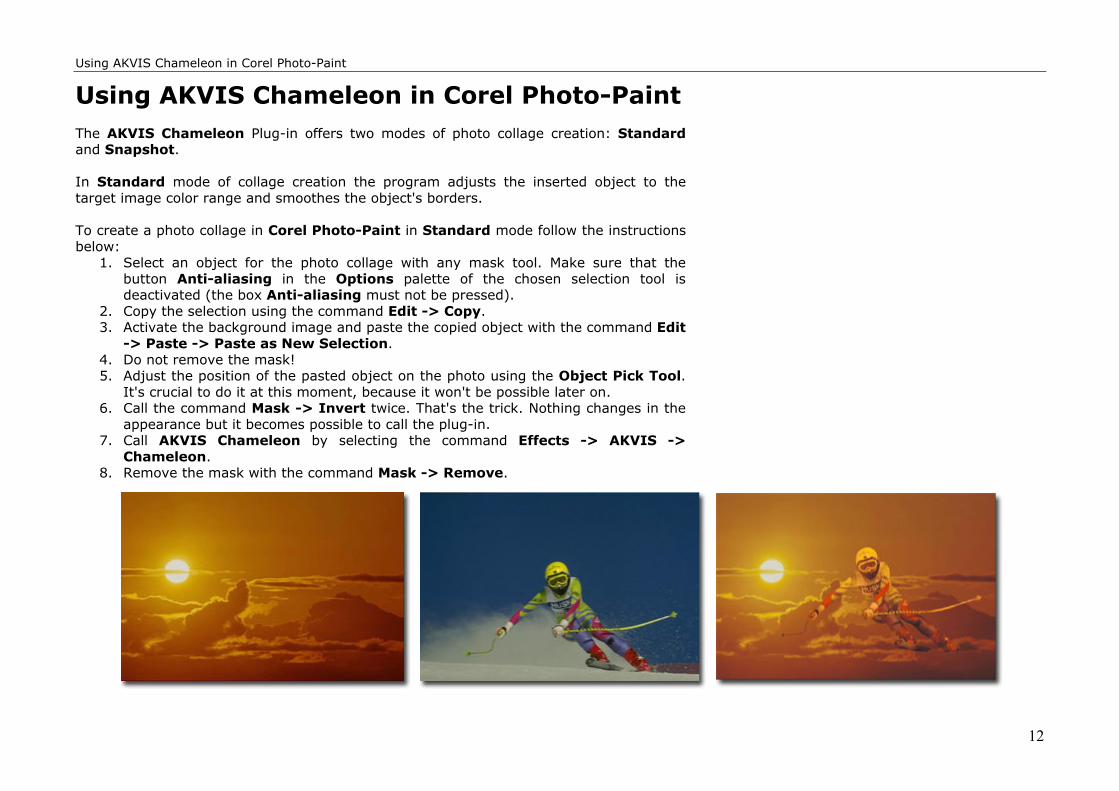
Using AKVIS Chameleon in Corel Photo-Paint The AKVIS Chameleon Plug-in offers two modes of photo collage creation: Standard and Snapshot. In Standard mode of collage creation the program adjusts the inserted object to the target image color range and smoothes the object's borders. To create a photo collage in Corel Photo-Paint in Standard mode follow the instructions below:
1. Select an object for the photo collage with any mask tool. Make sure that the button Anti-aliasing in the Options palette of the chosen selection tool is deactivated (the box Anti-aliasing must not be pressed).
2. Copy the selection using the command Edit -> Copy. 3. Activate the background image and paste the copied object with the command Edit
-> Paste -> Paste as New Selection. 4. Do not remove the mask! 5. Adjust the position of the pasted object on the photo using the Object Pick Tool.
It's crucial to do it at this moment, because it won't be possible later on. 6. Call the command Mask -> Invert twice. That's the trick. Nothing changes in the
appearance but it becomes possible to call the plug-in. 7. Call AKVIS Chameleon by selecting the command Effects -> AKVIS ->
Chameleon. 8. Remove the mask with the command Mask -> Remove.

Using AKVIS Chameleon in Corel Photo-Paint
13
In Snapshot mode, the program does not only smoothes the borders of the inserted object and adjusts its color range, but it also makes the object semi-transparent, so that the texture and the relief of the primary image can be seen through. Follow the instruction to process a photo in Snapshot mode in Corel Photo-Paint:
1. Select an object with any mask tool. Make sure that the button Anti-aliasing in the Options palette of the chosen selection tool is deactivated (the box Anti-aliasing must not be pressed).
2. Copy the selection using the command Edit -> Copy. 3. Activate the background image and call the command Effects -> AKVIS ->
Chameleon (Take Snapshot). 4. Still on the background layer paste the copied object with the command Edit ->
Paste -> Paste as New Selection. 5. Do not remove the mask! 6. Adjust the position of the pasted object on the photo using the Object Pick Tool.
It's crucial to do it at this moment, because it won't be possible later on. 7. Call the command Mask -> Invert twice. That's the trick. Nothing changes in the
appearance but it becomes possible to apply the plug-in. 8. Call the plug-in AKVIS Chameleon by selecting the command Effects -> AKVIS
-> Chameleon (Use Snapshot). 9. Remove the mask with the command Mask -> Remove.
Attention! If the pasted object does not fit into the background you should adjust its size before copying it into the main picture.
Using AKVIS Chameleon in PhotoImpact
14
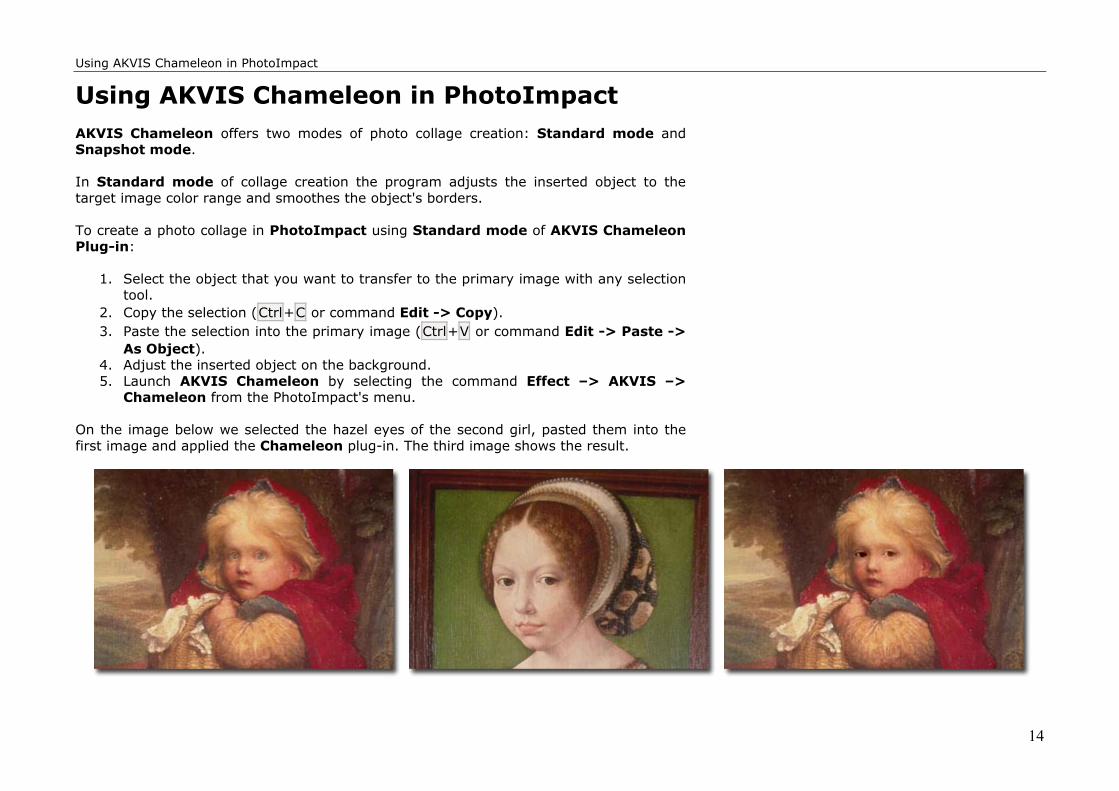
Using AKVIS Chameleon in PhotoImpact AKVIS Chameleon offers two modes of photo collage creation: Standard mode and Snapshot mode. In Standard mode of collage creation the program adjusts the inserted object to the target image color range and smoothes the object's borders. To create a photo collage in PhotoImpact using Standard mode of AKVIS Chameleon Plug-in:
1. Select the object that you want to transfer to the primary image with any selection tool.
2. Copy the selection (Ctrl+C or command Edit -> Copy). 3. Paste the selection into the primary image (Ctrl+V or command Edit -> Paste ->
As Object). 4. Adjust the inserted object on the background. 5. Launch AKVIS Chameleon by selecting the command Effect –> AKVIS –>
Chameleon from the PhotoImpact's menu. On the image below we selected the hazel eyes of the second girl, pasted them into the first image and applied the Chameleon plug-in. The third image shows the result.
Using AKVIS Chameleon in PhotoImpact
15
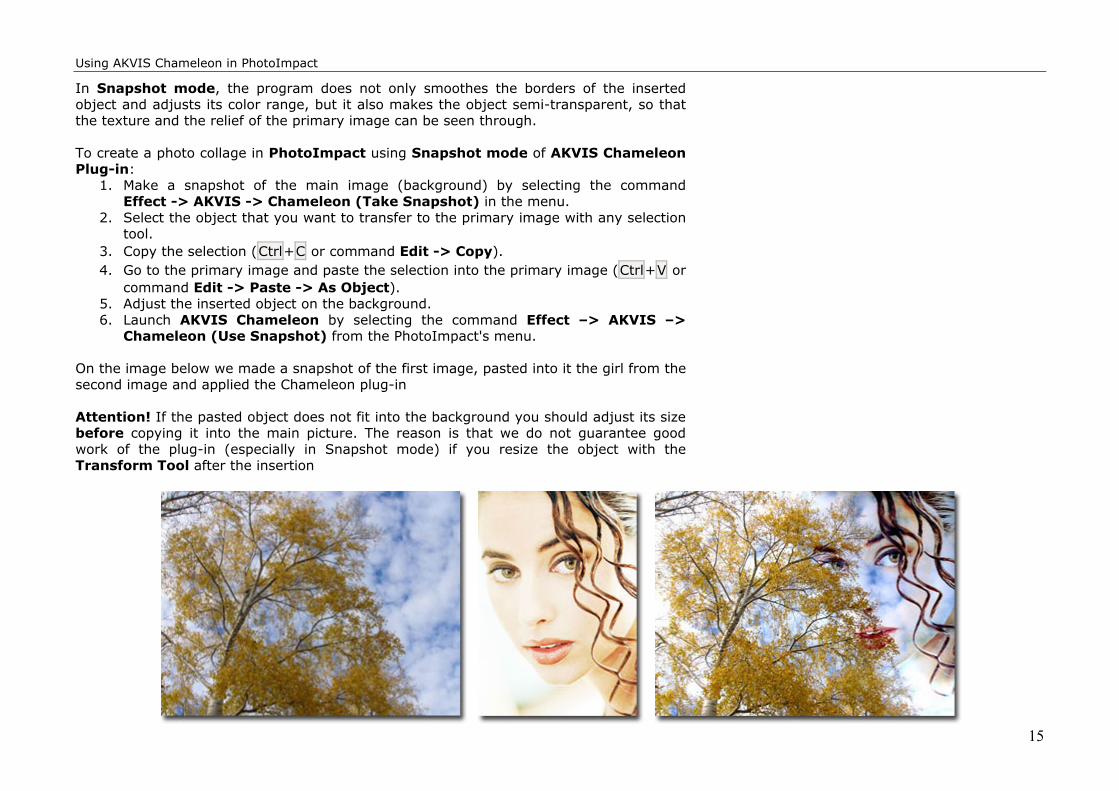
In Snapshot mode, the program does not only smoothes the borders of the inserted object and adjusts its color range, but it also makes the object semi-transparent, so that the texture and the relief of the primary image can be seen through. To create a photo collage in PhotoImpact using Snapshot mode of AKVIS Chameleon Plug-in:
1. Make a snapshot of the main image (background) by selecting the command Effect -> AKVIS -> Chameleon (Take Snapshot) in the menu.
2. Select the object that you want to transfer to the primary image with any selection tool.
3. Copy the selection (Ctrl+C or command Edit -> Copy). 4. Go to the primary image and paste the selection into the primary image (Ctrl+V or
command Edit -> Paste -> As Object). 5. Adjust the inserted object on the background. 6. Launch AKVIS Chameleon by selecting the command Effect –> AKVIS –>
Chameleon (Use Snapshot) from the PhotoImpact's menu. On the image below we made a snapshot of the first image, pasted into it the girl from the second image and applied the Chameleon plug-in Attention! If the pasted object does not fit into the background you should adjust its size before copying it into the main picture. The reason is that we do not guarantee good work of the plug-in (especially in Snapshot mode) if you resize the object with the Transform Tool after the insertion
To sail beyond the sunset
16
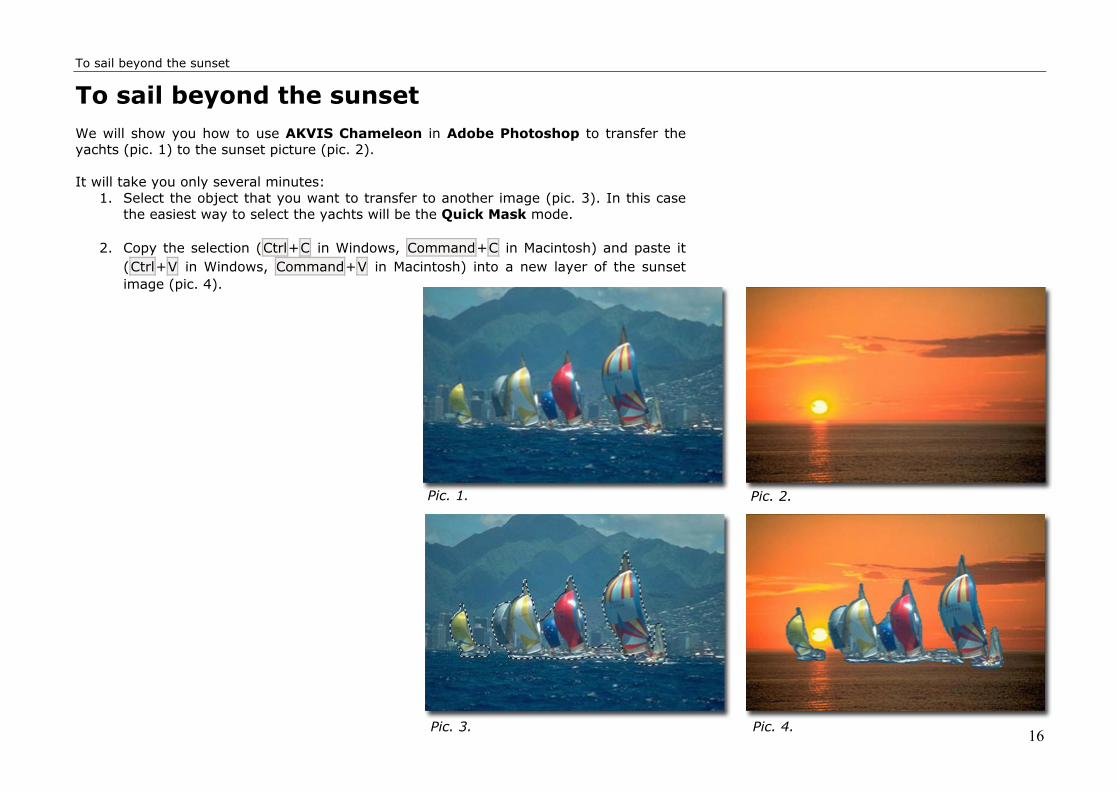
To sail beyond the sunset We will show you how to use AKVIS Chameleon in Adobe Photoshop to transfer the yachts (pic. 1) to the sunset picture (pic. 2). It will take you only several minutes:
1. Select the object that you want to transfer to another image (pic. 3). In this case the easiest way to select the yachts will be the Quick Mask mode.
2. Copy the selection (Ctrl+C in Windows, Command+C in Macintosh) and paste it
(Ctrl+V in Windows, Command+V in Macintosh) into a new layer of the sunset image (pic. 4).
Pic. 1. Pic. 2.
Pic. 3. Pic. 4.

To sail beyond the sunset
17
3. Adjust the object's position on the new landscape.
To change the position of the object you should activate the layer with the pasted object, take the Move tool from the Toolbar, bring the cursor inside the object and press the left mouse button. Drag the object keeping the left button pressed (pic. 5). To change the object's size, call the command Edit - Free Transform and change the parameters W and H in the Options palette. In this case we have reduced the parameters W and H from 100% to 60% (pic. 6).
4. Start AKVIS Chameleon (Filter-AKVIS-Chameleon) and wait a bit (pic. 7).
Pic. 5.
Pic. 6.
Pic. 7.
Blazing photo of a girl
18
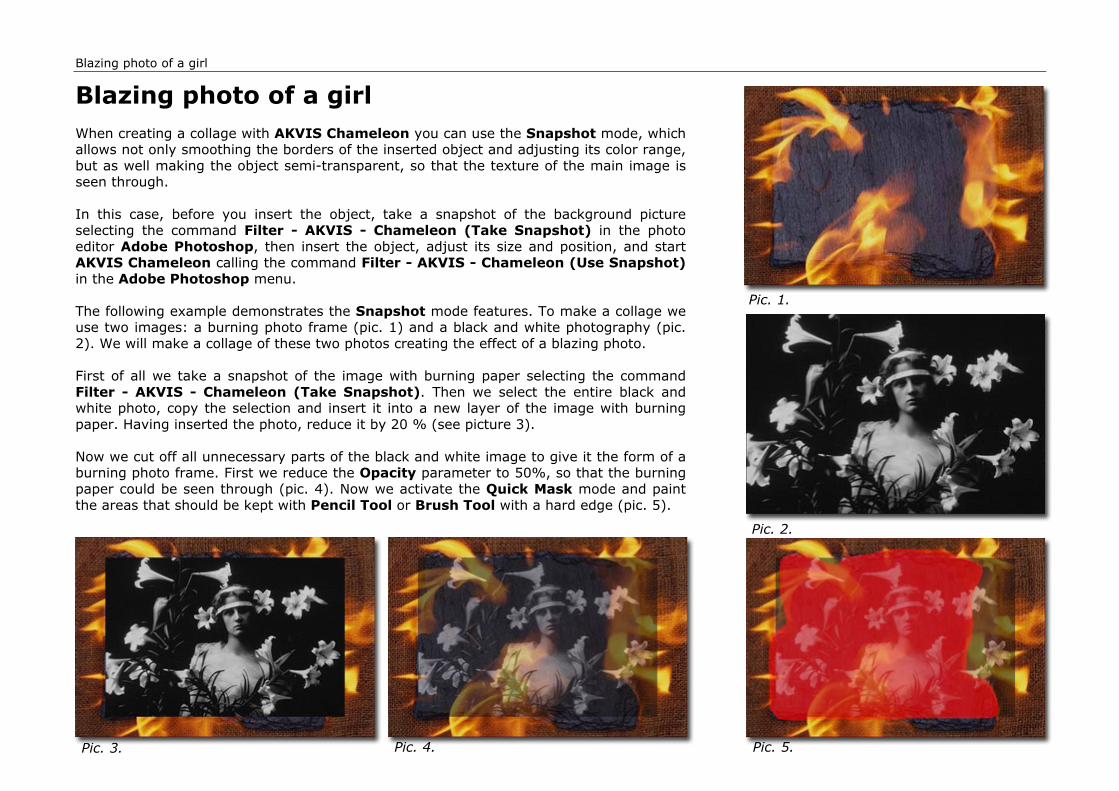
Blazing photo of a girl When creating a collage with AKVIS Chameleon you can use the Snapshot mode, which allows not only smoothing the borders of the inserted object and adjusting its color range, but as well making the object semi-transparent, so that the texture of the main image is seen through. In this case, before you insert the object, take a snapshot of the background picture selecting the command Filter - AKVIS - Chameleon (Take Snapshot) in the photo editor Adobe Photoshop, then insert the object, adjust its size and position, and start AKVIS Chameleon calling the command Filter - AKVIS - Chameleon (Use Snapshot) in the Adobe Photoshop menu. The following example demonstrates the Snapshot mode features. To make a collage we use two images: a burning photo frame (pic. 1) and a black and white photography (pic. 2). We will make a collage of these two photos creating the effect of a blazing photo. First of all we take a snapshot of the image with burning paper selecting the command Filter - AKVIS - Chameleon (Take Snapshot). Then we select the entire black and white photo, copy the selection and insert it into a new layer of the image with burning paper. Having inserted the photo, reduce it by 20 % (see picture 3). Now we cut off all unnecessary parts of the black and white image to give it the form of a burning photo frame. First we reduce the Opacity parameter to 50%, so that the burning paper could be seen through (pic. 4). Now we activate the Quick Mask mode and paint the areas that should be kept with Pencil Tool or Brush Tool with a hard edge (pic. 5).
Pic. 1.
Pic. 2.
Pic. 3. Pic. 4. Pic. 5.
Blazing photo of a girl
19
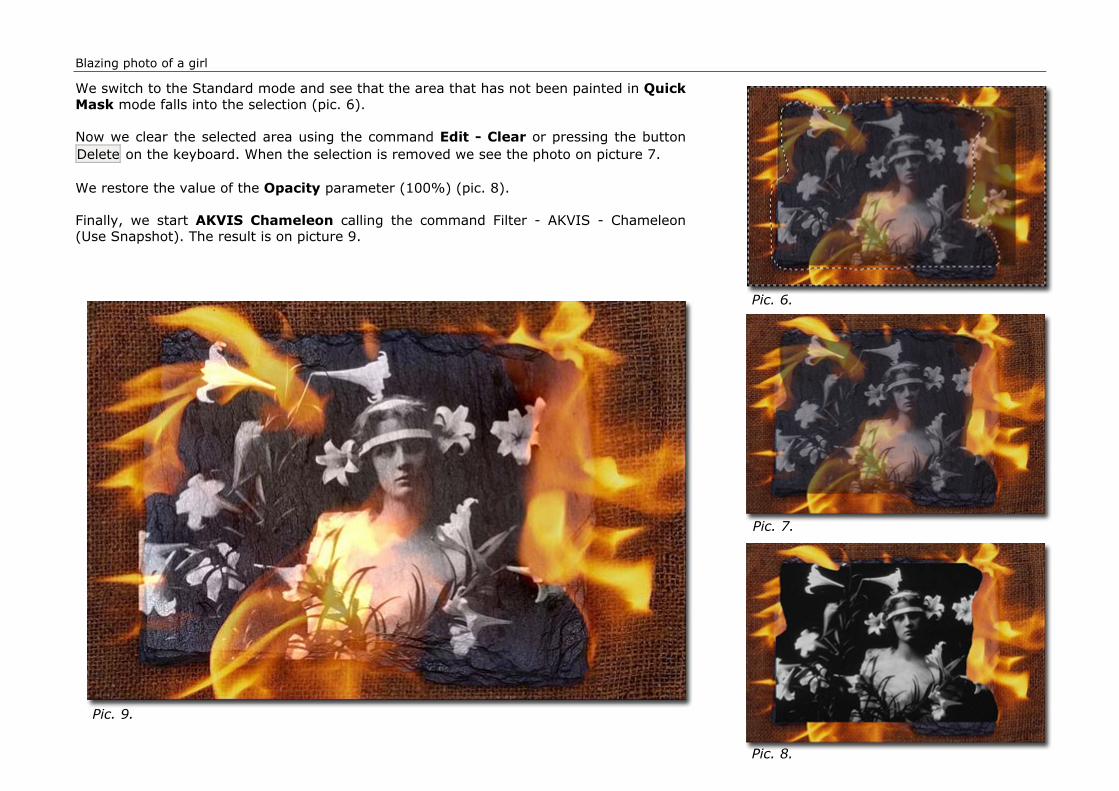
We switch to the Standard mode and see that the area that has not been painted in Quick Mask mode falls into the selection (pic. 6). Now we clear the selected area using the command Edit - Clear or pressing the button Delete on the keyboard. When the selection is removed we see the photo on picture 7. We restore the value of the Opacity parameter (100%) (pic. 8). Finally, we start AKVIS Chameleon calling the command Filter - AKVIS - Chameleon (Use Snapshot). The result is on picture 9.
Pic. 6.
Pic. 7.
Pic. 8.
Pic. 9.
Brand-new eyes for a little girl
20
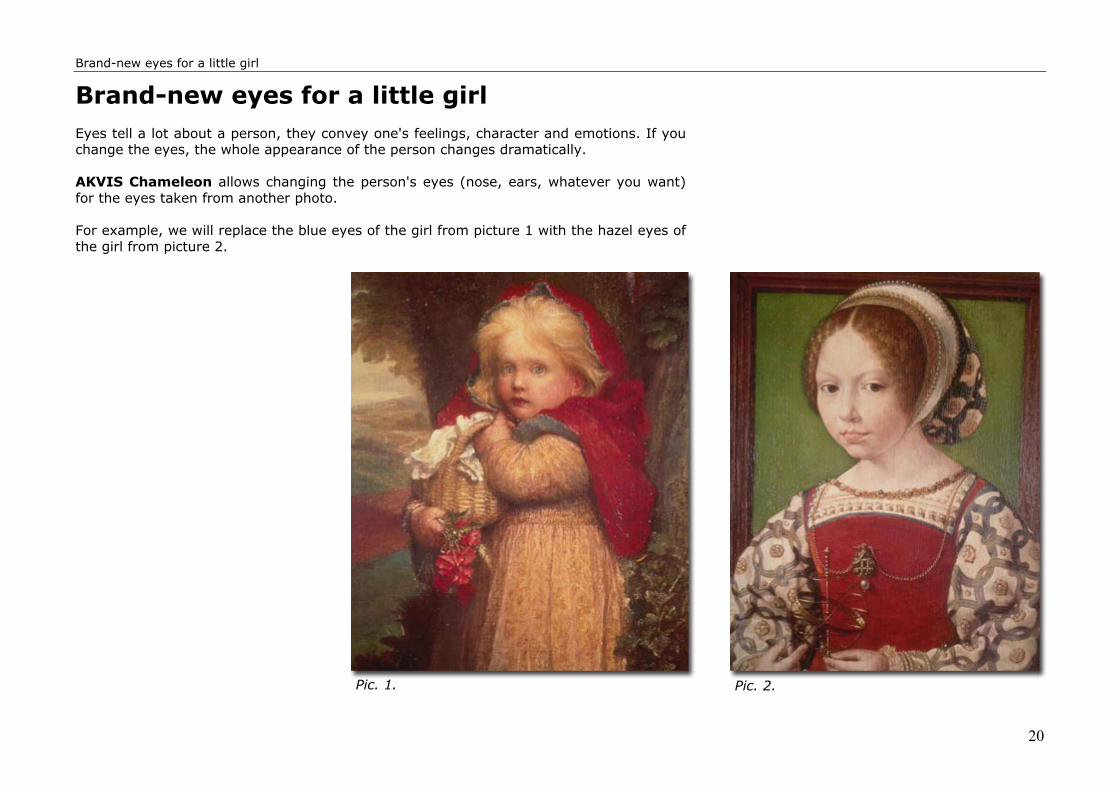
Brand-new eyes for a little girl Eyes tell a lot about a person, they convey one's feelings, character and emotions. If you change the eyes, the whole appearance of the person changes dramatically. AKVIS Chameleon allows changing the person's eyes (nose, ears, whatever you want) for the eyes taken from another photo. For example, we will replace the blue eyes of the girl from picture 1 with the hazel eyes of the girl from picture 2.
Pic. 1. Pic. 2.
Brand-new eyes for a little girl
21
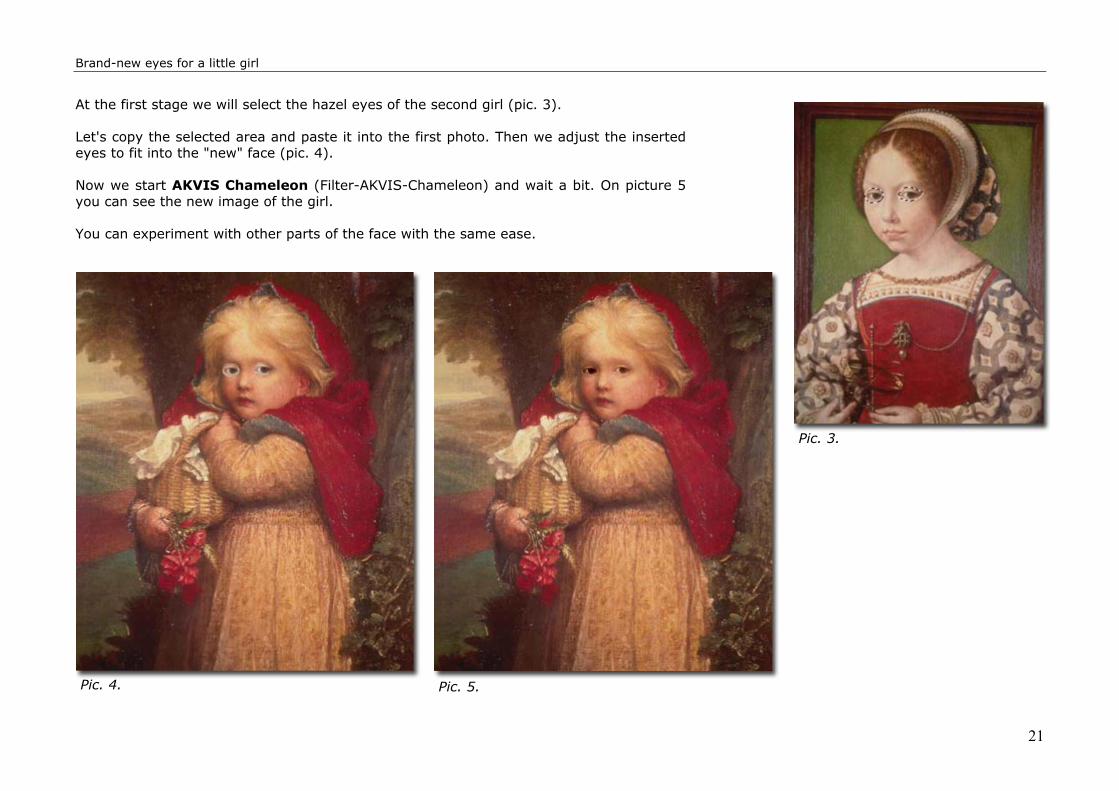
At the first stage we will select the hazel eyes of the second girl (pic. 3). Let's copy the selected area and paste it into the first photo. Then we adjust the inserted eyes to fit into the "new" face (pic. 4). Now we start AKVIS Chameleon (Filter-AKVIS-Chameleon) and wait a bit. On picture 5 you can see the new image of the girl. You can experiment with other parts of the face with the same ease.
Pic. 3.
Pic. 4. Pic. 5.
Wood painting
22
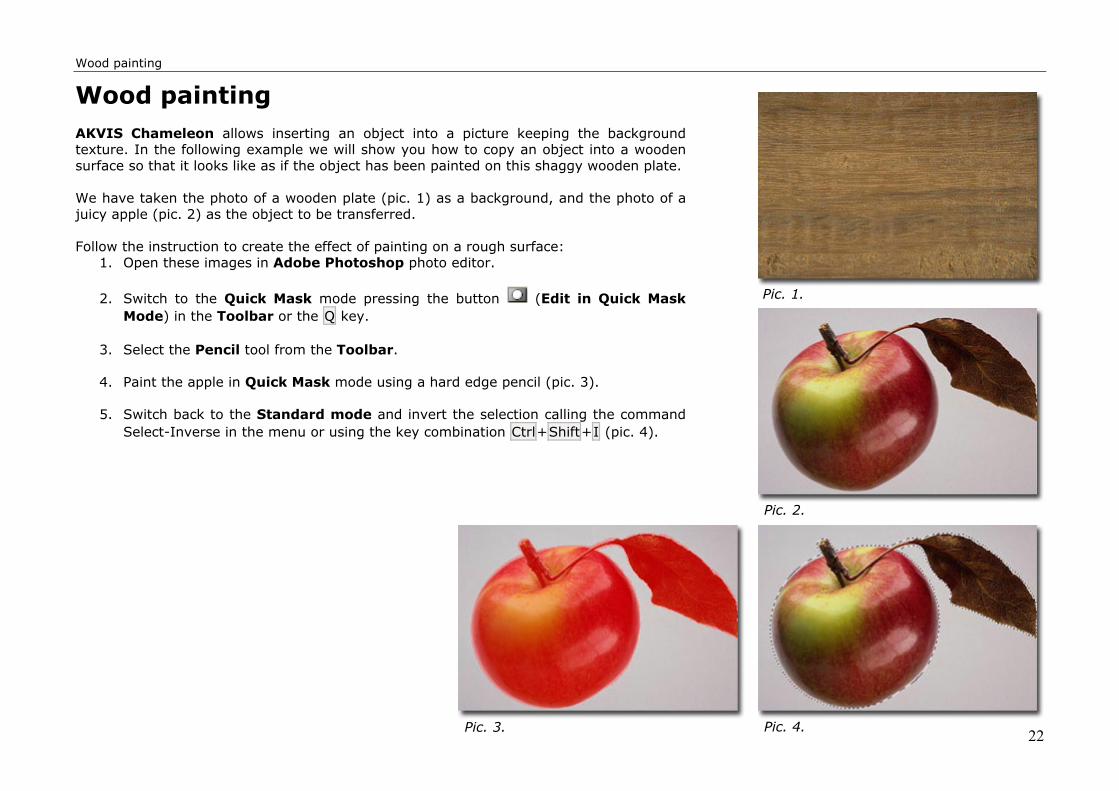
Wood painting AKVIS Chameleon allows inserting an object into a picture keeping the background texture. In the following example we will show you how to copy an object into a wooden surface so that it looks like as if the object has been painted on this shaggy wooden plate. We have taken the photo of a wooden plate (pic. 1) as a background, and the photo of a juicy apple (pic. 2) as the object to be transferred. Follow the instruction to create the effect of painting on a rough surface:
1. Open these images in Adobe Photoshop photo editor.
2. Switch to the Quick Mask mode pressing the button (Edit in Quick Mask Mode) in the Toolbar or the Q key.
3. Select the Pencil tool from the Toolbar.
4. Paint the apple in Quick Mask mode using a hard edge pencil (pic. 3).
5. Switch back to the Standard mode and invert the selection calling the command
Select-Inverse in the menu or using the key combination Ctrl+Shift+I (pic. 4).
Pic. 1.
Pic. 2.
Pic. 3. Pic. 4.
Wood painting
23
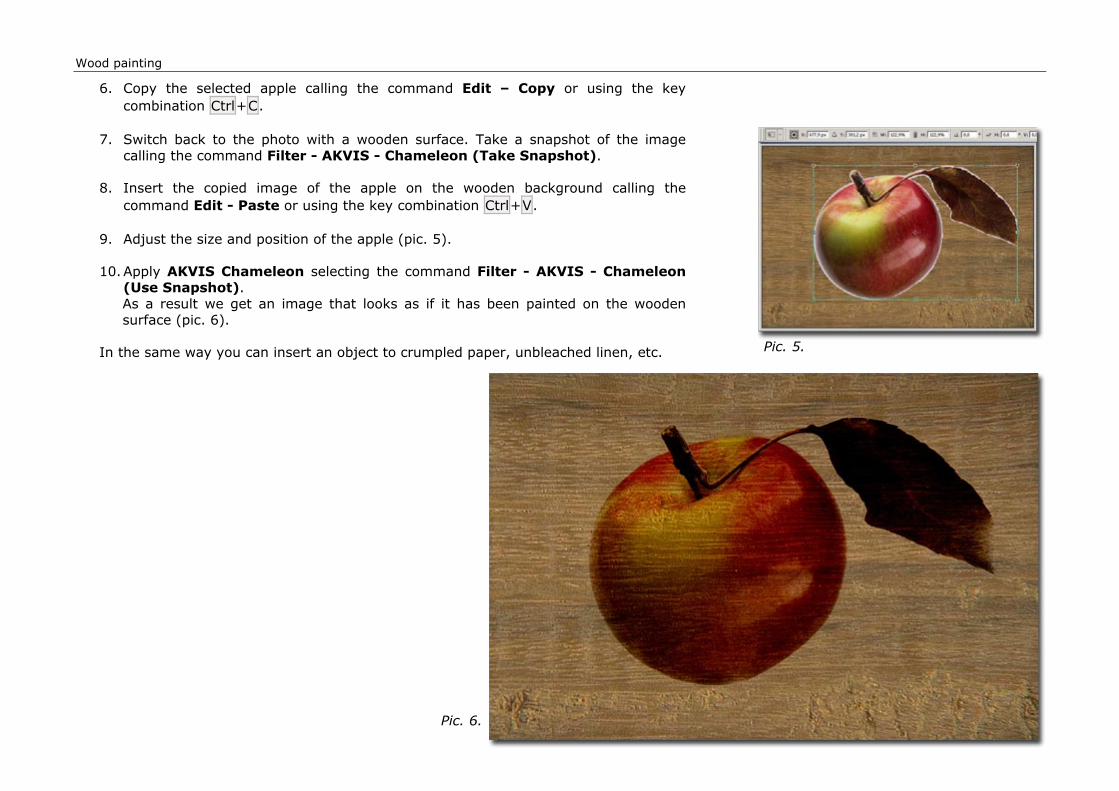
6. Copy the selected apple calling the command Edit – Copy or using the key combination Ctrl+C.
7. Switch back to the photo with a wooden surface. Take a snapshot of the image
calling the command Filter - AKVIS - Chameleon (Take Snapshot).
8. Insert the copied image of the apple on the wooden background calling the command Edit - Paste or using the key combination Ctrl+V.
9. Adjust the size and position of the apple (pic. 5).
10. Apply AKVIS Chameleon selecting the command Filter - AKVIS - Chameleon
(Use Snapshot). As a result we get an image that looks as if it has been painted on the wooden surface (pic. 6).
In the same way you can insert an object to crumpled paper, unbleached linen, etc.
Pic. 5.
Pic. 6.
A greeting card
24
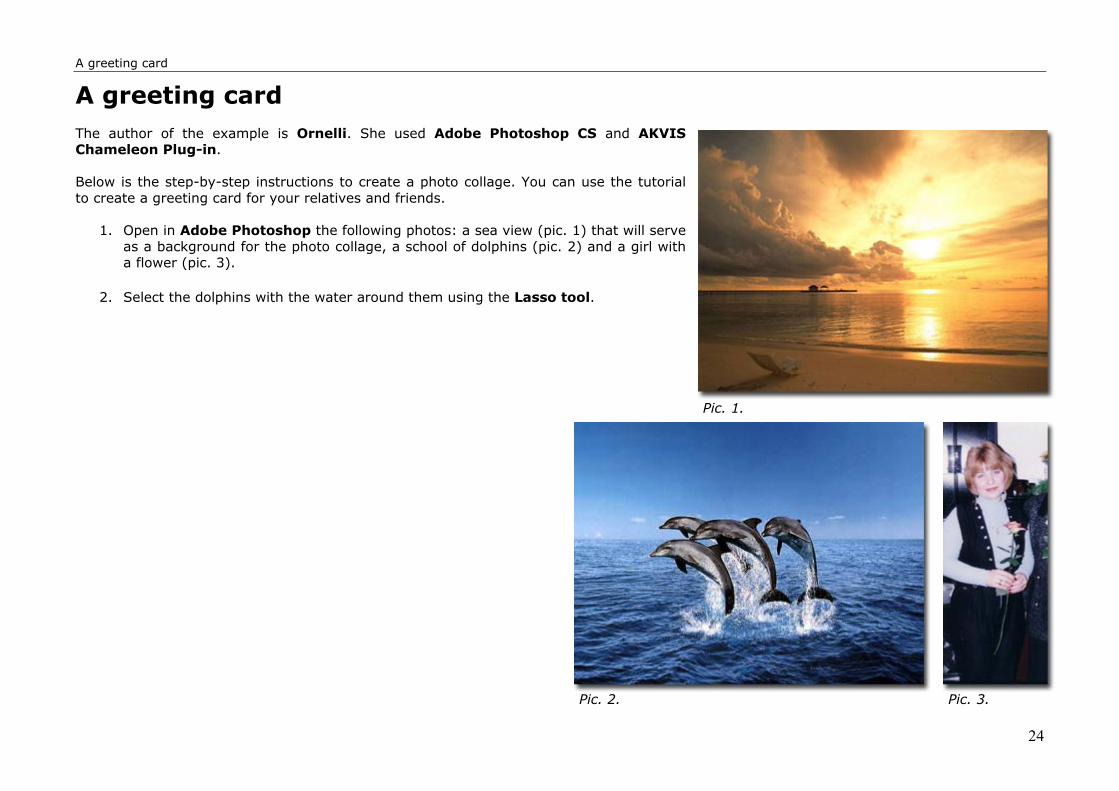
A greeting card The author of the example is Ornelli. She used Adobe Photoshop CS and AKVIS Chameleon Plug-in. Below is the step-by-step instructions to create a photo collage. You can use the tutorial to create a greeting card for your relatives and friends.
1. Open in Adobe Photoshop the following photos: a sea view (pic. 1) that will serve as a background for the photo collage, a school of dolphins (pic. 2) and a girl with a flower (pic. 3).
2. Select the dolphins with the water around them using the Lasso tool.
Pic. 1.
Pic. 2. Pic. 3.
A greeting card
25
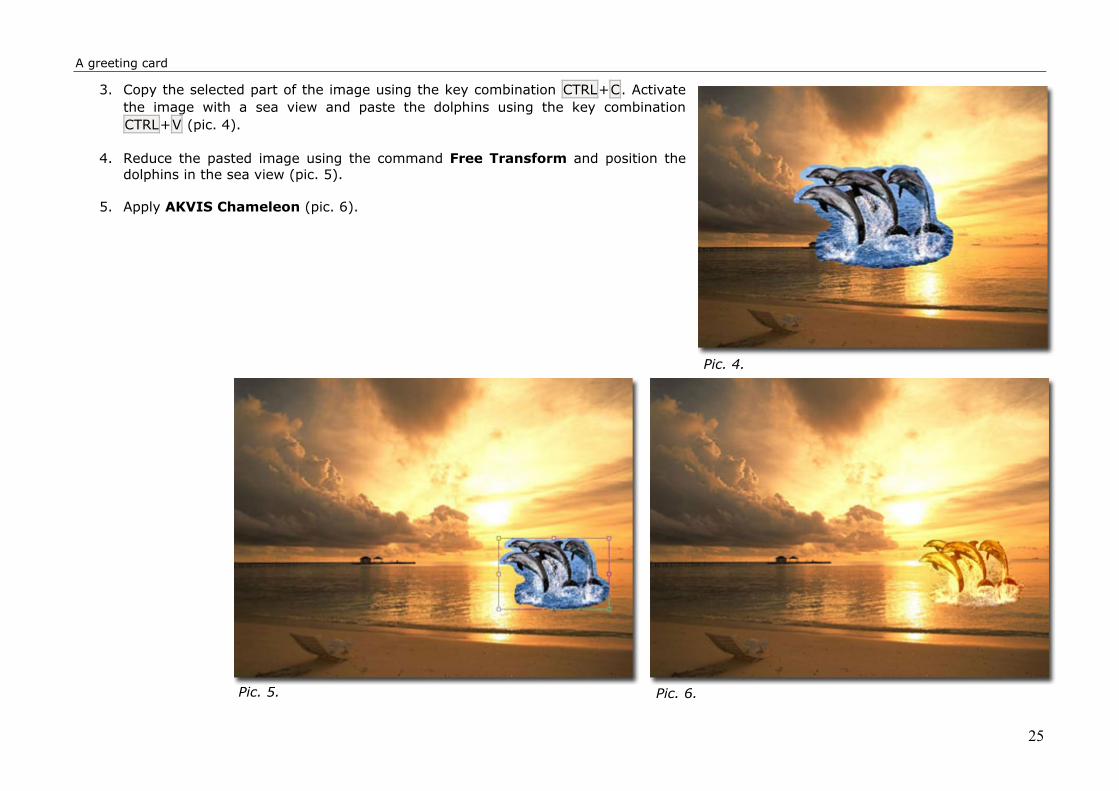
3. Copy the selected part of the image using the key combination CTRL+C. Activate the image with a sea view and paste the dolphins using the key combination CTRL+V (pic. 4).
4. Reduce the pasted image using the command Free Transform and position the
dolphins in the sea view (pic. 5).
5. Apply AKVIS Chameleon (pic. 6).
Pic. 4.
Pic. 5. Pic. 6.
A greeting card
26
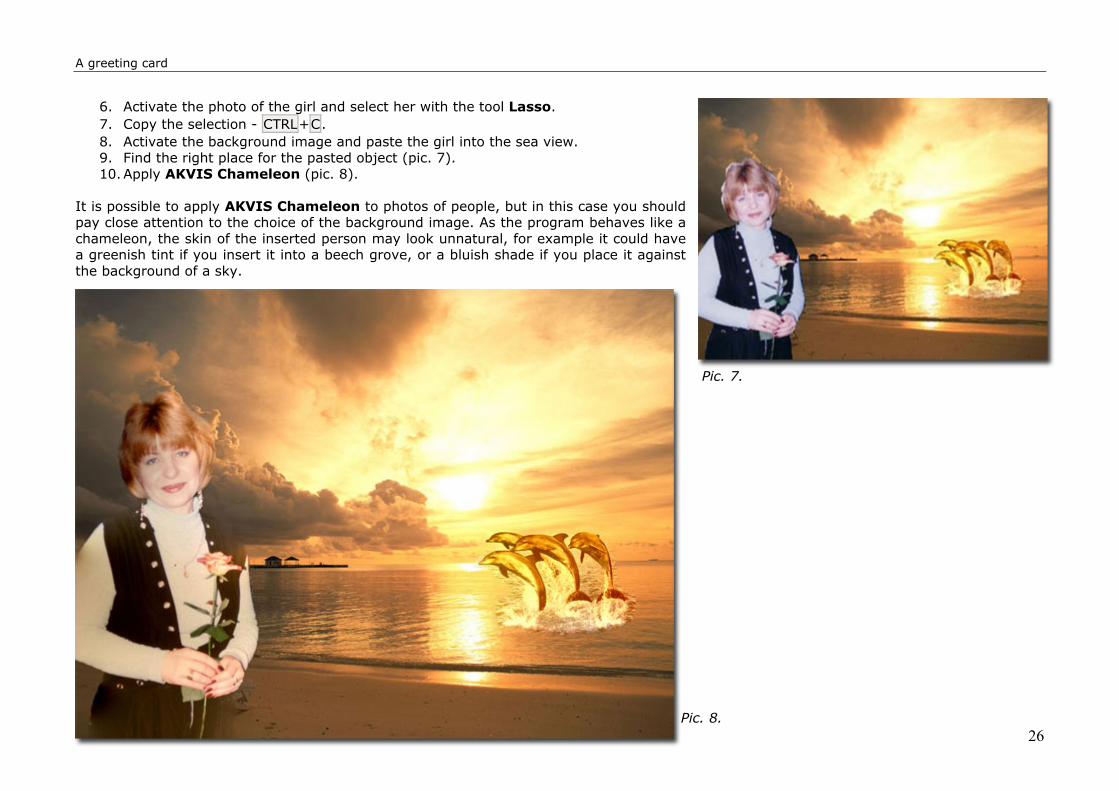
6. Activate the photo of the girl and select her with the tool Lasso. 7. Copy the selection - CTRL+C. 8. Activate the background image and paste the girl into the sea view. 9. Find the right place for the pasted object (pic. 7). 10. Apply AKVIS Chameleon (pic. 8).
It is possible to apply AKVIS Chameleon to photos of people, but in this case you should pay close attention to the choice of the background image. As the program behaves like a chameleon, the skin of the inserted person may look unnatural, for example it could have a greenish tint if you insert it into a beech grove, or a bluish shade if you place it against the background of a sky.
Pic. 7.
Pic. 8.
Bird in the sky
27
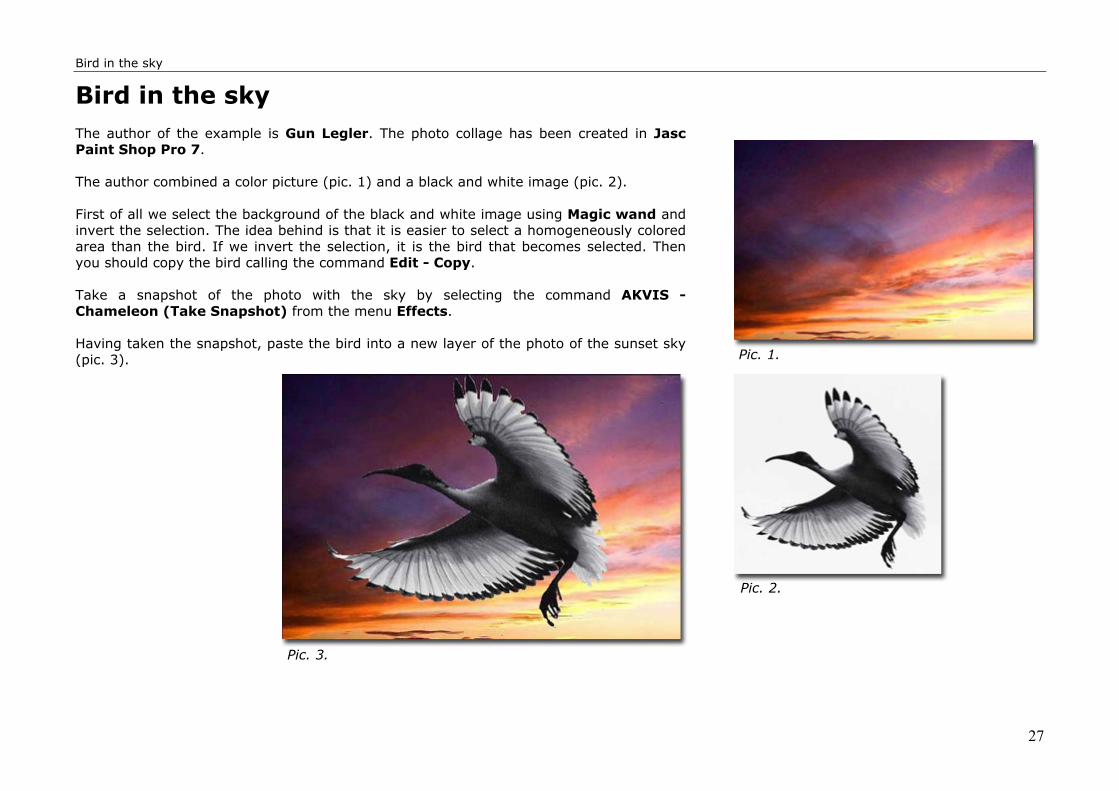
Bird in the sky The author of the example is Gun Legler. The photo collage has been created in Jasc Paint Shop Pro 7. The author combined a color picture (pic. 1) and a black and white image (pic. 2). First of all we select the background of the black and white image using Magic wand and invert the selection. The idea behind is that it is easier to select a homogeneously colored area than the bird. If we invert the selection, it is the bird that becomes selected. Then you should copy the bird calling the command Edit - Copy. Take a snapshot of the photo with the sky by selecting the command AKVIS - Chameleon (Take Snapshot) from the menu Effects. Having taken the snapshot, paste the bird into a new layer of the photo of the sunset sky (pic. 3).
Pic. 1.
Pic. 2.
Pic. 3.
Bird in the sky
28
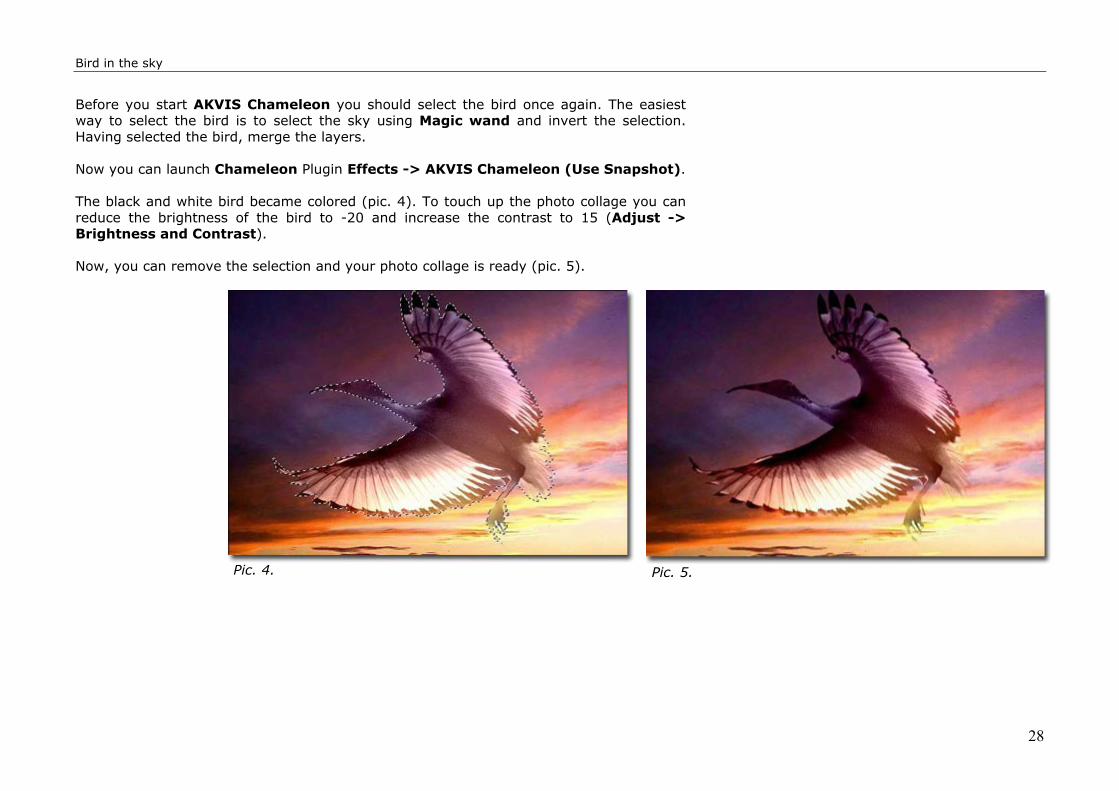
Before you start AKVIS Chameleon you should select the bird once again. The easiest way to select the bird is to select the sky using Magic wand and invert the selection. Having selected the bird, merge the layers. Now you can launch Chameleon Plugin Effects -> AKVIS Chameleon (Use Snapshot). The black and white bird became colored (pic. 4). To touch up the photo collage you can reduce the brightness of the bird to -20 and increase the contrast to 15 (Adjust -> Brightness and Contrast). Now, you can remove the selection and your photo collage is ready (pic. 5).
Pic. 4. Pic. 5.