AJA manual 3G-AMA v1.1 Mini-Converter v1.1 5 Chapter 1: Introduction Overview The 3G-AMA is a triple...
33
Installation & Operation Guide Version 1.1 Published: January 11, 2016 3G-AMA Mini-Converter 4-Ch Balanced Audio Embedder/Disembedder
Transcript of AJA manual 3G-AMA v1.1 Mini-Converter v1.1 5 Chapter 1: Introduction Overview The 3G-AMA is a triple...
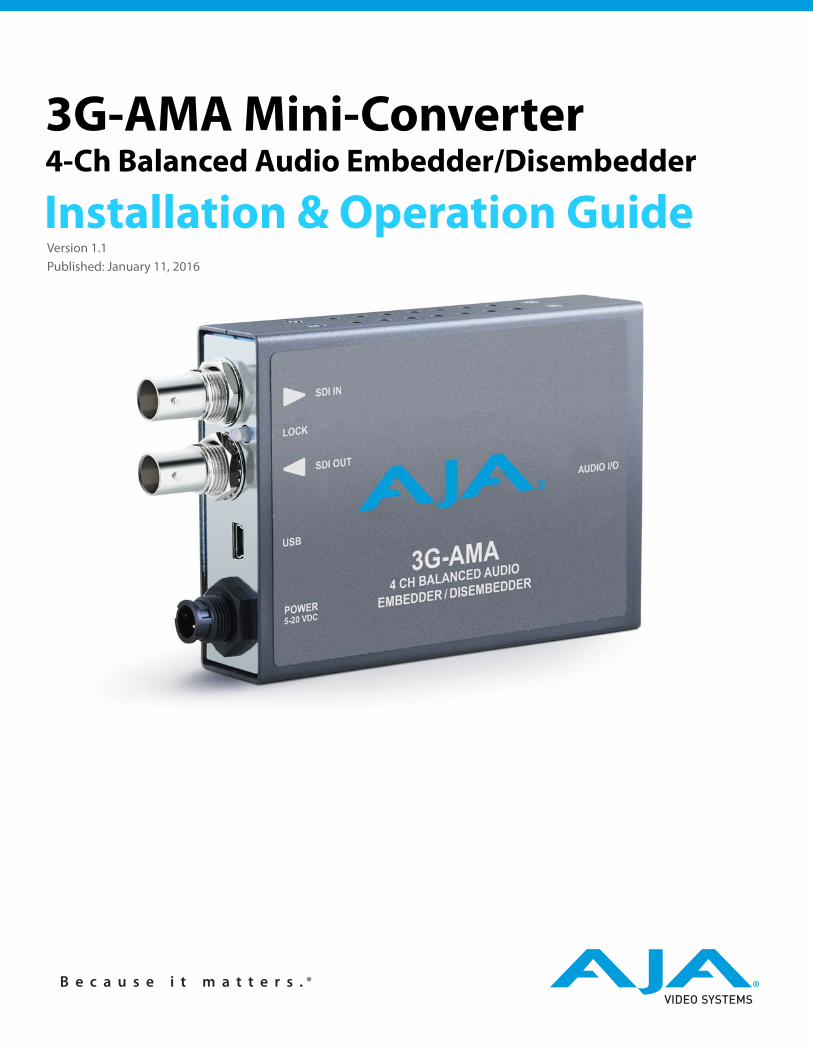
Installation & Operation GuideVersion 1.1Published: January 11, 2016
3G-AMA Mini-Converter4-Ch Balanced Audio Embedder/Disembedder

3G-AMA Mini-Converter v1.1 www.aja.com2
Table of Contents
Notices . . . . . . . . . . . . . . . . . . . . . . . . . . . . . . . . . . . . . . . . . . . . . . . . . . . . . . . . 4Trademarks . . . . . . . . . . . . . . . . . . . . . . . . . . . . . . . . . . . . . . . . . . . . . . . . . . . . . . . . . . . . . . . . . . . . . . . 4Copyright . . . . . . . . . . . . . . . . . . . . . . . . . . . . . . . . . . . . . . . . . . . . . . . . . . . . . . . . . . . . . . . . . . . . . . . . . 4Contacting Support . . . . . . . . . . . . . . . . . . . . . . . . . . . . . . . . . . . . . . . . . . . . . . . . . . . . . . . . . . . . . . . 4
Chapter 1: Introduction . . . . . . . . . . . . . . . . . . . . . . . . . . . . . . . . . . . . . . . . 5Overview. . . . . . . . . . . . . . . . . . . . . . . . . . . . . . . . . . . . . . . . . . . . . . . . . . . . . . . . . . . . . . . . . . . . . . . . . . 5Features . . . . . . . . . . . . . . . . . . . . . . . . . . . . . . . . . . . . . . . . . . . . . . . . . . . . . . . . . . . . . . . . . . . . . . . . . . 53G-AMA Simplified Block Diagram . . . . . . . . . . . . . . . . . . . . . . . . . . . . . . . . . . . . . . . . . . . . . . . . . 63G-AMA I/O Connections . . . . . . . . . . . . . . . . . . . . . . . . . . . . . . . . . . . . . . . . . . . . . . . . . . . . . . . . . . 6User Controls. . . . . . . . . . . . . . . . . . . . . . . . . . . . . . . . . . . . . . . . . . . . . . . . . . . . . . . . . . . . . . . . . . . . . . 7
DIP Switches . . . . . . . . . . . . . . . . . . . . . . . . . . . . . . . . . . . . . . . . . . . . . . . . . . . . . . . . . . . . . . . . . . 7Mini-Config Control . . . . . . . . . . . . . . . . . . . . . . . . . . . . . . . . . . . . . . . . . . . . . . . . . . . . . . . . . . . 7
Installation . . . . . . . . . . . . . . . . . . . . . . . . . . . . . . . . . . . . . . . . . . . . . . . . . . . . . . . . . . . . . . . . . . . . . . . . 7Breakout Cable Pinouts . . . . . . . . . . . . . . . . . . . . . . . . . . . . . . . . . . . . . . . . . . . . . . . . . . . . . . . . . . . . 8
Chapter 2: Operation . . . . . . . . . . . . . . . . . . . . . . . . . . . . . . . . . . . . . . . . . . . 9Default Operational Settings. . . . . . . . . . . . . . . . . . . . . . . . . . . . . . . . . . . . . . . . . . . . . . . . . . . . . . . 9DIP Switches . . . . . . . . . . . . . . . . . . . . . . . . . . . . . . . . . . . . . . . . . . . . . . . . . . . . . . . . . . . . . . . . . . . . . . 9
DIP Switch Settings . . . . . . . . . . . . . . . . . . . . . . . . . . . . . . . . . . . . . . . . . . . . . . . . . . . . . . . . . . 10Switches 4 and 5 Channel Mapping For Embedded Groups . . . . . . . . . . . . . . . . . . . . 11Switches 6 and 7 Channel Mapping For Disembedding Groups . . . . . . . . . . . . . . . . 12
USB Control and Setup—Using AJA Mini-Config. . . . . . . . . . . . . . . . . . . . . . . . . . . . . . . . . . . 12Acquiring Mini-Config. . . . . . . . . . . . . . . . . . . . . . . . . . . . . . . . . . . . . . . . . . . . . . . . . . . . . . . . 12
Mini-Converter Documentation . . . . . . . . . . . . . . . . . . . . . . . . . . . . . . . . . . . . . . . . . . 12Installing Mini-Config . . . . . . . . . . . . . . . . . . . . . . . . . . . . . . . . . . . . . . . . . . . . . . . . . . . . . . . . 13
PC Installation . . . . . . . . . . . . . . . . . . . . . . . . . . . . . . . . . . . . . . . . . . . . . . . . . . . . . . . . . . . 13Mac Installation. . . . . . . . . . . . . . . . . . . . . . . . . . . . . . . . . . . . . . . . . . . . . . . . . . . . . . . . . . 14
Running Mini-Config . . . . . . . . . . . . . . . . . . . . . . . . . . . . . . . . . . . . . . . . . . . . . . . . . . . . . . . . . 14PC Startup . . . . . . . . . . . . . . . . . . . . . . . . . . . . . . . . . . . . . . . . . . . . . . . . . . . . . . . . . . . . . . . 15Mac Startup . . . . . . . . . . . . . . . . . . . . . . . . . . . . . . . . . . . . . . . . . . . . . . . . . . . . . . . . . . . . . 15Saving Setups . . . . . . . . . . . . . . . . . . . . . . . . . . . . . . . . . . . . . . . . . . . . . . . . . . . . . . . . . . . 15
Operating Mini-Config . . . . . . . . . . . . . . . . . . . . . . . . . . . . . . . . . . . . . . . . . . . . . . . . . . . . . . . 15Running Multiple Mini-Converters. . . . . . . . . . . . . . . . . . . . . . . . . . . . . . . . . . . . . . . . 16
Tabbed Screens . . . . . . . . . . . . . . . . . . . . . . . . . . . . . . . . . . . . . . . . . . . . . . . . . . . . . . . . . . . . . . 17Audio-1 Screen. . . . . . . . . . . . . . . . . . . . . . . . . . . . . . . . . . . . . . . . . . . . . . . . . . . . . . . . . . . . . . . . . . . 17Audio-2 Screen. . . . . . . . . . . . . . . . . . . . . . . . . . . . . . . . . . . . . . . . . . . . . . . . . . . . . . . . . . . . . . . . . . . 18Update Screen . . . . . . . . . . . . . . . . . . . . . . . . . . . . . . . . . . . . . . . . . . . . . . . . . . . . . . . . . . . . . . . . . . . 19
Software Update Procedure . . . . . . . . . . . . . . . . . . . . . . . . . . . . . . . . . . . . . . . . . . . . . . . . . . 19Info Screen . . . . . . . . . . . . . . . . . . . . . . . . . . . . . . . . . . . . . . . . . . . . . . . . . . . . . . . . . . . . . . . . . . . . . . . 20
Appendix A: Specifications . . . . . . . . . . . . . . . . . . . . . . . . . . . . . . . . . . . .21Video Input . . . . . . . . . . . . . . . . . . . . . . . . . . . . . . . . . . . . . . . . . . . . . . . . . . . . . . . . . . . . . . . . . . . . . . 21
Input Formats. . . . . . . . . . . . . . . . . . . . . . . . . . . . . . . . . . . . . . . . . . . . . . . . . . . . . . . . . . . . . . . . 21Video Output . . . . . . . . . . . . . . . . . . . . . . . . . . . . . . . . . . . . . . . . . . . . . . . . . . . . . . . . . . . . . . . . . . . . 21
Output Formats . . . . . . . . . . . . . . . . . . . . . . . . . . . . . . . . . . . . . . . . . . . . . . . . . . . . . . . . . . . . . . 21Audio Inputs and Outputs . . . . . . . . . . . . . . . . . . . . . . . . . . . . . . . . . . . . . . . . . . . . . . . . . . . . . . . . 22User Controls. . . . . . . . . . . . . . . . . . . . . . . . . . . . . . . . . . . . . . . . . . . . . . . . . . . . . . . . . . . . . . . . . . . . . 22Physical . . . . . . . . . . . . . . . . . . . . . . . . . . . . . . . . . . . . . . . . . . . . . . . . . . . . . . . . . . . . . . . . . . . . . . . . . . 22
Power . . . . . . . . . . . . . . . . . . . . . . . . . . . . . . . . . . . . . . . . . . . . . . . . . . . . . . . . . . . . . . . . . . . . . . . 22Size. . . . . . . . . . . . . . . . . . . . . . . . . . . . . . . . . . . . . . . . . . . . . . . . . . . . . . . . . . . . . . . . . . . . . . . . . . 22

3G-AMA Mini-Converter v1.1 www.aja.com3
Environment. . . . . . . . . . . . . . . . . . . . . . . . . . . . . . . . . . . . . . . . . . . . . . . . . . . . . . . . . . . . . . . . . 23
Appendix B: Safety and Compliance . . . . . . . . . . . . . . . . . . . . . . . . . . . .24Federal Communications Commission (FCC) Compliance Notices . . . . . . . . . . . . . . . . . . 24
Class B Interference Statement . . . . . . . . . . . . . . . . . . . . . . . . . . . . . . . . . . . . . . . . . . . . . . . 24FCC Caution . . . . . . . . . . . . . . . . . . . . . . . . . . . . . . . . . . . . . . . . . . . . . . . . . . . . . . . . . . . . . . . . . 24
Canadian ICES Statement . . . . . . . . . . . . . . . . . . . . . . . . . . . . . . . . . . . . . . . . . . . . . . . . . . . . . . . . . 24European Union and European Free Trade Association (EFTA) Regulatory Compliance. . . . . . . . . . . . . . . . . . . . . . . . . . . . . . . . . . . . . . . . . . . . . . . . . . . . . . . . . . . 25
Declaration of Conformity . . . . . . . . . . . . . . . . . . . . . . . . . . . . . . . . . . . . . . . . . . . . . . . . . . . . 25Recycling Notice . . . . . . . . . . . . . . . . . . . . . . . . . . . . . . . . . . . . . . . . . . . . . . . . . . . . . . . . . . . . . 26
Korean KCC Compliance Statement . . . . . . . . . . . . . . . . . . . . . . . . . . . . . . . . . . . . . . . . . . . . . . . 26Taiwan Compliance Statement . . . . . . . . . . . . . . . . . . . . . . . . . . . . . . . . . . . . . . . . . . . . . . . . . . . 26Japanese Compliance Statement . . . . . . . . . . . . . . . . . . . . . . . . . . . . . . . . . . . . . . . . . . . . . . . . . 26Translated Warning and Caution Messages. . . . . . . . . . . . . . . . . . . . . . . . . . . . . . . . . . . . . . . . 27Before Operation Please Read These Instructions . . . . . . . . . . . . . . . . . . . . . . . . . . . . . . . . . . 27
Warranty Information . . . . . . . . . . . . . . . . . . . . . . . . . . . . . . . . . . . . . . . . .33Limited Warranty . . . . . . . . . . . . . . . . . . . . . . . . . . . . . . . . . . . . . . . . . . . . . . . . . . . . . . . . . . . . . . . . . 33

3G-AMA Mini-Converter v1.1 www.aja.com4
Notices
TrademarksAJA® and Because it matters.® are registered trademarks of AJA Video Systems, Inc. for use with most AJA products. AJA™ is a trademark of AJA Video Systems, Inc. for use with recorder, router, software and camera products. Because it matters.™ is a trademark of AJA Video Systems, Inc. for use with camera products.
CION®, Corvid Ultra®, lo®, Ki Pro®, KONA®, KUMO®, ROI® and T-Tap® are registered trademarks of AJA Video Systems, Inc.
AJA Control Room™, FiDO™, KiStor™, Science of the Beautiful™, TruScale™, TruZoom™, V2Analog™ and V2Digital™ are trademarks of AJA Video Systems, Inc.
AirPort, Apple, Apple logo, AppleShare, AppleTalk, FireWire, iPod, iPod touch, Mac, Macintosh and ProRes, are registered trademarks of Apple Inc. Final Cut Pro, QuickTime and QuickTime logo are trademarks of Apple Inc.
Avid, Avid DNxHD and Media Composer are registered trademarks of Avid Technology, Inc.
Adobe is a registered trademark of Adobe Systems Incorporated in the United States and/or other countries.
HDMI, the HDMI logo and High-Definition Multimedia Interface are trademarks or registered trademarks of HDMI Licensing, LLC.
DVI is a registered trademark of DDWG.
TASCAM is a registered trademark of TEAC Corporation.
Dolby and the double-D Dolby logo are registered trademarks of Dolby Laboratories Licensing Corporation.
All other trademarks are the property of their respective holders.
Copyright
Copyright © 2016 AJA Video Systems, Inc. All rights reserved. All information in this manual is subject to change without notice. No part of the document may be reproduced or transmitted in any form, or by any means, electronic or mechanical, including photocopying or recording, without the express written permission of AJA Video Systems, Inc.
Contacting Support
When calling for support, have all information at hand prior to calling. To contact AJA for sales or support, use any of the following methods:
Telephone: +1.530.271.3190
FAX: +1.530.271.3140
Web: http://www.aja.com
Support Email: [email protected]
Sales Email: [email protected]

3G-AMA Mini-Converter v1.1 www.aja.com5
Chapter 1: Introduction
Overview
The 3G-AMA is a triple rate 4 channel analog audio embedder/disembedder. Analog audio can be embedded and disembedded simultaneously. The embedder is user selectable, on a channel pair basis, to either pass input audio or embed input audio from the provided breakout cable. The ability to pass incoming ancillary data makes it possible to embed up to 16channels of audio by cascading four units. Horizontal ancillary data (HANC) packets in compliance with SMPTE 291M can also be dropped at the input. Analog audio levels are selectable, via USB connection and Mini-Config software.
The 3G-AMA automatically detects and configures to the input video standard. 3G-SDI formats up to and including 2048x1080p 60 YCbCr 4:2:2 are supported (see "Appendix A: Specifications on page 21" for a complete listing). SDI video loops through the device with minimal delay. Loop through embedded SDI audio supports up to 16 channels.
NOTE: 2048x1080p/psf 29.97 and 30 formats support a maximum of 8 channels embedded audio.
Features• Triple rate 3G, HD, and SD-SDI Embedder/Disembedder
• 4 Channel Balanced Analog Audio I/O
• Supplied breakout cable for balanced analog audio - XLR connectors.
• 1 x BNC 3G-SDI input
• 1 x BNC 3G-SDI output
• Setup via DIP switch or PC/Mac using USB port and supplied USB cable (Mini-Config configuration software application available via download from AJA website)
• Uses universal input +5V power supply AJA model DWP-U-R1 (included)

3G-AMA Mini-Converter v1.1 www.aja.com6
3G-AMA Simplified Block Diagram
3G-AMA I/O Connections
NOTE: The LED adjacent to the SDI connectors indicates by color the detected signal type. Off is no signal, Green is SD-SDI, red is HD-SDI, and amber/orange is 3G-SDI.
EQ Cable Driver
Embed and Pass-throughPacket Processor
Analog Input 1(Ch 1)
XLR Breakout Cable XLR Breakout Cable
3G-SDI Out 13G-SDI In
Analog Input 2(Ch 2)
Analog Input 3(Ch 3)
Analog Input 4(Ch 4)
Analog Output 1(Ch 1)
Analog Output 2(Ch 2)
Analog Output 3(Ch 3)
Analog Output 4(Ch 4)
Dis-Embedder
DAC
DAC
DAC
DAC
ADC
ADC
ADC
ADC
USB Port(connect toPC or Mac)
MiniConfig
DIP SwitchUser Interface
Control
Analog I/O
+ 5 VDCPowerInput
3G-SDI
3G-SDI
USB Port
D-connector(attaches to supplied cable)
CableNot ShownTo Scale
Input BNC
Output BNC
LOCK LED
3G-AMA Mini-Converter v1.1 www.aja.com7
User Controls
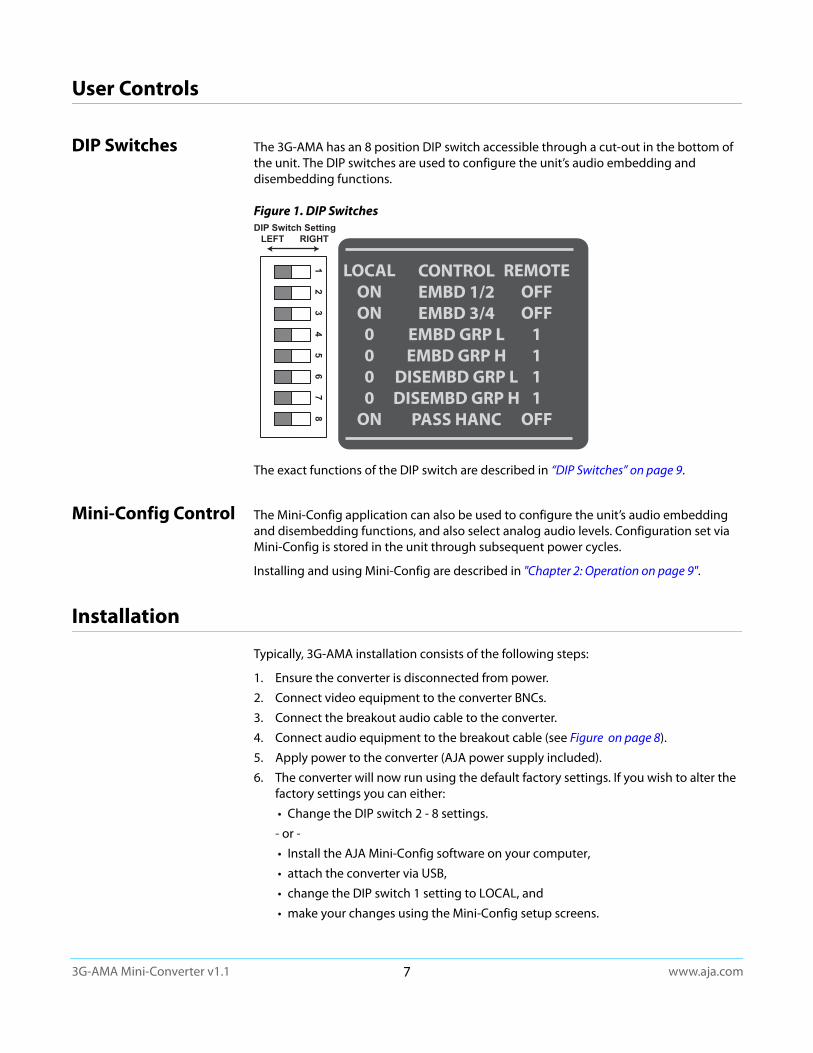
DIP Switches The 3G-AMA has an 8 position DIP switch accessible through a cut-out in the bottom of the unit. The DIP switches are used to configure the unit’s audio embedding and disembedding functions.
Figure 1. DIP Switches
The exact functions of the DIP switch are described in “DIP Switches” on page 9.
Mini-Config Control The Mini-Config application can also be used to configure the unit’s audio embedding and disembedding functions, and also select analog audio levels. Configuration set via Mini-Config is stored in the unit through subsequent power cycles.
Installing and using Mini-Config are described in "Chapter 2: Operation on page 9".
Installation
Typically, 3G-AMA installation consists of the following steps:
1. Ensure the converter is disconnected from power.
2. Connect video equipment to the converter BNCs.
3. Connect the breakout audio cable to the converter.
4. Connect audio equipment to the breakout cable (see Figure on page 8).
5. Apply power to the converter (AJA power supply included).
6. The converter will now run using the default factory settings. If you wish to alter the factory settings you can either:
• Change the DIP switch 2 - 8 settings.
- or -
• Install the AJA Mini-Config software on your computer,
• attach the converter via USB,
• change the DIP switch 1 setting to LOCAL, and
• make your changes using the Mini-Config setup screens.
1
2
3
4
5
6
7
8
DIP Switch SettingLEFT RIGHT
LOCALONON
0000
ON
CONTROLEMBD 1/2EMBD 3/4
EMBD GRP LEMBD GRP H
DISEMBD GRP LDISEMBD GRP H
PASS HANC
REMOTEOFFOFF
1111
OFF
3G-AMA Mini-Converter v1.1 www.aja.com8
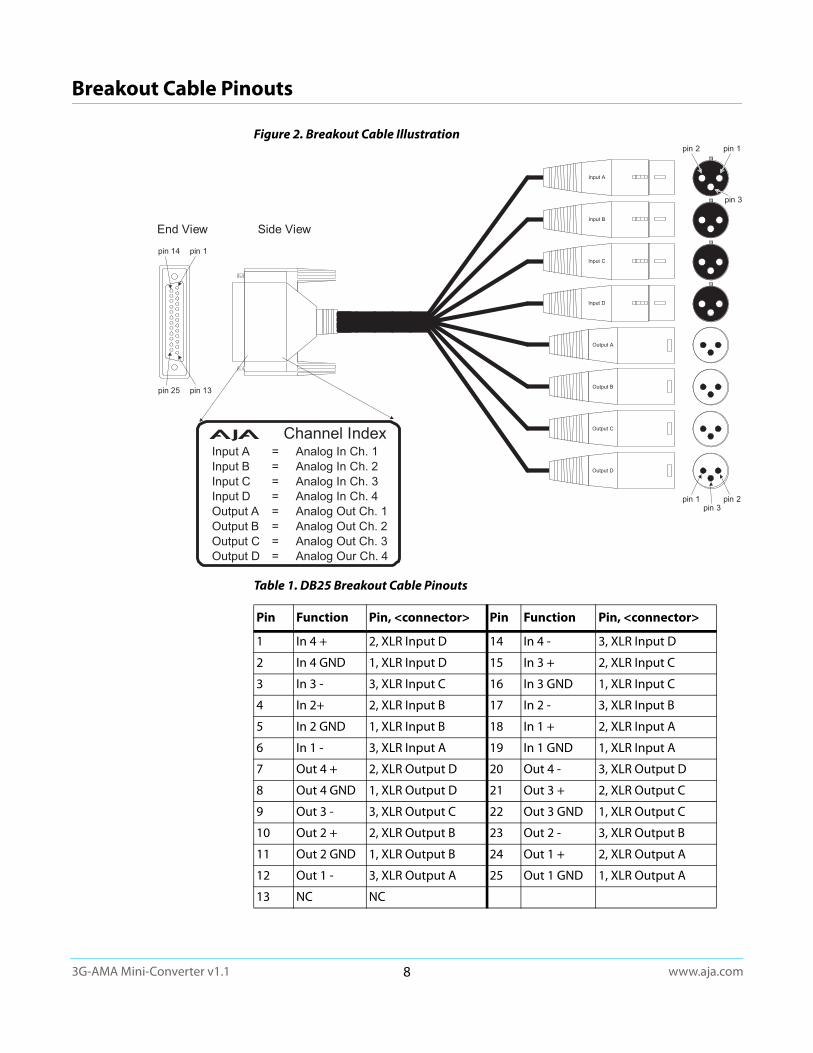
Breakout Cable Pinouts
Figure 2. Breakout Cable Illustration
pin 13
End View Side View
pin 1pin 14
pin 25
pin 1 pin 2pin 3
Input A
Input B
Input C
Input D
Output A
Output B
Output C
Output D
Channel IndexInput AInput BInput CInput DOutput AOutput BOutput COutput D
= Analog In Ch. 1 = Analog In Ch. 2= Analog In Ch. 3= Analog In Ch. 4= Analog Out Ch. 1= Analog Out Ch. 2= Analog Out Ch. 3= Analog Our Ch. 4
pin 2 pin 1
pin 3
Table 1. DB25 Breakout Cable Pinouts
Pin Function Pin, <connector> Pin Function Pin, <connector>
1 In 4 + 2, XLR Input D 14 In 4 - 3, XLR Input D
2 In 4 GND 1, XLR Input D 15 In 3 + 2, XLR Input C
3 In 3 - 3, XLR Input C 16 In 3 GND 1, XLR Input C
4 In 2+ 2, XLR Input B 17 In 2 - 3, XLR Input B
5 In 2 GND 1, XLR Input B 18 In 1 + 2, XLR Input A
6 In 1 - 3, XLR Input A 19 In 1 GND 1, XLR Input A
7 Out 4 + 2, XLR Output D 20 Out 4 - 3, XLR Output D
8 Out 4 GND 1, XLR Output D 21 Out 3 + 2, XLR Output C
9 Out 3 - 3, XLR Output C 22 Out 3 GND 1, XLR Output C
10 Out 2 + 2, XLR Output B 23 Out 2 - 3, XLR Output B
11 Out 2 GND 1, XLR Output B 24 Out 1 + 2, XLR Output A
12 Out 1 - 3, XLR Output A 25 Out 1 GND 1, XLR Output A
13 NC NC

3G-AMA Mini-Converter v1.1 www.aja.com9
Chapter 2: Operation
Default Operational Settings
The 3G-AMA converter ships from the factory with the following configuration:
• Local (DIP switch) control.
• Input analog audio channels 1-4 are embedded to SDI output channels 1-4, overwriting any existing embedded audio.
• Input SDI embedded audio channels 1-4 are disembedded to analog audio output channels 1-4.
• All HANC packets pass from SDI input to output, except for embedded output audio channels 1-4.
• Analog audio levels are set to 0 dBfs = +24 dBu (Pro 1).
If these settings apply to your requirements, you can simply connect the video and audio input and output signal cables and power up the unit.
For other applications, you can configure the unit using its DIP switch settings, or by using the Mini-Config application and a PC or Mac via USB. Analog audio levels can only be set using Mini-Config.
DIP Switches
The 3G-AMA DIP switches configure the audio embedding and disembedding functions.
1
2
3
4
5
6
7
8
DIP Switch SettingLEFT RIGHT
LOCALONON
0000
ON
CONTROLEMBD 1/2EMBD 3/4
EMBD GRP LEMBD GRP H
DISEMBD GRP LDISEMBD GRP H
PASS HANC
REMOTEOFFOFF
1111
OFF
3G-AMA Mini-Converter v1.1 www.aja.com10
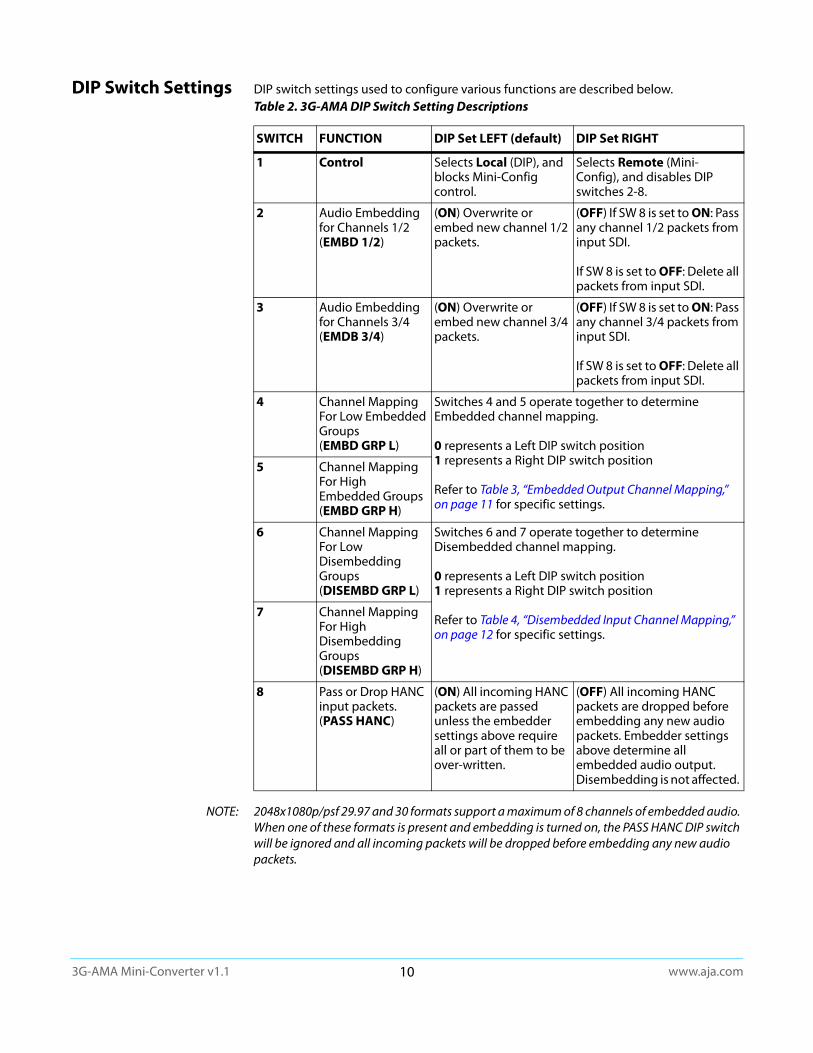
DIP Switch Settings DIP switch settings used to configure various functions are described below.
NOTE: 2048x1080p/psf 29.97 and 30 formats support a maximum of 8 channels of embedded audio. When one of these formats is present and embedding is turned on, the PASS HANC DIP switch will be ignored and all incoming packets will be dropped before embedding any new audio packets.
Table 2. 3G-AMA DIP Switch Setting Descriptions
SWITCH FUNCTION DIP Set LEFT (default) DIP Set RIGHT
1 Control Selects Local (DIP), and blocks Mini-Config control.
Selects Remote (Mini-Config), and disables DIP switches 2-8.
2 Audio Embedding for Channels 1/2(EMBD 1/2)
(ON) Overwrite or embed new channel 1/2 packets.
(OFF) If SW 8 is set to ON: Pass any channel 1/2 packets from input SDI.
If SW 8 is set to OFF: Delete all packets from input SDI.
3 Audio Embedding for Channels 3/4(EMDB 3/4)
(ON) Overwrite or embed new channel 3/4 packets.
(OFF) If SW 8 is set to ON: Pass any channel 3/4 packets from input SDI.
If SW 8 is set to OFF: Delete all packets from input SDI.
4 Channel Mapping For Low Embedded Groups(EMBD GRP L)
Switches 4 and 5 operate together to determine Embedded channel mapping.
0 represents a Left DIP switch position1 represents a Right DIP switch position
Refer to Table 3, “Embedded Output Channel Mapping,” on page 11 for specific settings.
5 Channel Mapping For High Embedded Groups(EMBD GRP H)
6 Channel Mapping For Low Disembedding Groups(DISEMBD GRP L)
Switches 6 and 7 operate together to determine Disembedded channel mapping.
0 represents a Left DIP switch position1 represents a Right DIP switch position
Refer to Table 4, “Disembedded Input Channel Mapping,” on page 12 for specific settings.
7 Channel Mapping For High Disembedding Groups(DISEMBD GRP H)
8 Pass or Drop HANC input packets.(PASS HANC)
(ON) All incoming HANC packets are passed unless the embedder settings above require all or part of them to be over-written.
(OFF) All incoming HANC packets are dropped before embedding any new audio packets. Embedder settings above determine all embedded audio output.Disembedding is not affected.
3G-AMA Mini-Converter v1.1 www.aja.com11
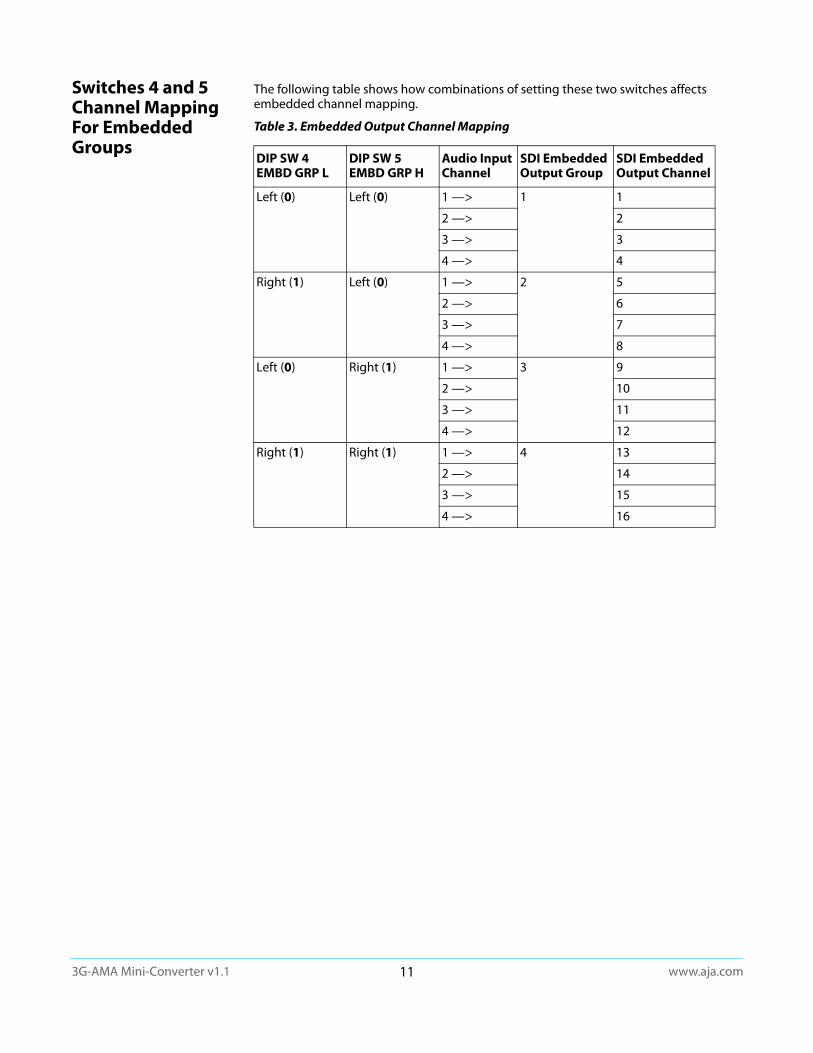
Switches 4 and 5 Channel Mapping For Embedded Groups
The following table shows how combinations of setting these two switches affects embedded channel mapping.
Table 3. Embedded Output Channel Mapping
DIP SW 4 EMBD GRP L
DIP SW 5 EMBD GRP H
Audio Input Channel
SDI Embedded Output Group
SDI Embedded Output Channel
Left (0) Left (0) 1 —> 1 1
2 —> 2
3 —> 3
4 —> 4
Right (1) Left (0) 1 —> 2 5
2 —> 6
3 —> 7
4 —> 8
Left (0) Right (1) 1 —> 3 9
2 —> 10
3 —> 11
4 —> 12
Right (1) Right (1) 1 —> 4 13
2 —> 14
3 —> 15
4 —> 16

3G-AMA Mini-Converter v1.1 www.aja.com12
Switches 6 and 7 Channel Mapping For Disembedding Groups
The following table shows how combinations of setting these two switches affects disembedding channel mapping.
USB Control and Setup—Using AJA Mini-Config
Your AJA Mini-Converter can be used right out of the box for some applications since it is designed to recognize inputs and perform standard actions automatically by default. However, to use its full capability, you must use AJA’s Mini-Config software application for PCs and Macs. This same application can be used to update to new Mini-Converter software released by AJA.
NOTE: DIP switch 1 must be ON (Remote, Right) to permit Mini-Config control of the unit.
Acquiring Mini-Config
AJA’s Mini-Config application is available for download from the AJA website.
To download the latest Mini-Config package, which includes the Mini-Config application, Mini-Converter firmware, and documentation, go to:
https://www.aja.com/en/products/mini-converters/mini-config-software
Select either the Windows or Mac icon to download the desired version.
Mini-Converter Documentation
Included with the Mini-Config package is a complete set of documentation for all Mini-Converters supported by Mini-Config. A .PDF of the Installation and Operation Guide for the currently connected Mini-Converter can be accessed from the Mini-Config UI via the Help/Manual drop-down menu.
Table 4. Disembedded Input Channel Mapping
DIP SW 6 DISEMBD GRP L
DIP SW 7 DISEMBD GRP H
SDI Embedded Input Group
SDI Embedded Input Channel
Audio Output Channel
Left (0) Left (0) 1 1 —> 1
2 —> 2
3 —> 3
4 —> 4
Right (1) Left (0) 2 5 —> 1
6 —> 2
7 —> 3
8—> 4
Left (0) Right (1) 3 9 —> 1
10 —> 2
11 —> 3
12 —> 4
Right (1) Right (1) 4 13 —> 1
14 —> 2
15 —> 3
16 —> 4

3G-AMA Mini-Converter v1.1 www.aja.com13
Documentation for all AJA Mini-Converters that use Mini-Config can also be accessed directly in the Mini-Config download package Documentation folder, and via the Documentation icon available on the Mac installer.
Documentation (and firmware) included with the Mini-Config application are the versions available at the time of distribution. However, Mini-Converter software, firmware and documentation are updated regularly, so newer versions may exist.
To download the latest documentation for an individual Mini-Converter, go to:
https://www.aja.com/en/category/mini-converters
and navigate to the Support webpage of that Mini-Converter.
Installing Mini-Config
PC Installation To install Mini-Config on a Windows PC:
1. Download the application from the AJA website (select the Windows icon on the Mini-Config Support webpage).
2. Open the AJA_MiniConfig.zip file
3. Double-click on the MiniInstaller.msi file.
4. A Setup Wizard will guide you through the installation.
Figure 3. Mini-Config PC Setup Wizard
5. Click Next to begin. Answer the questions in the subsequent dialogues. When finished, an AJA Mini-Config shortcut will be installed on the desktop, and you will be able to locate the Mini-Config application in the AJA folder in the Programs listing.
NOTE: If the Mini-Config application already exists on the PC, a different Setup Wizard appears.
3G-AMA Mini-Converter v1.1 www.aja.com14
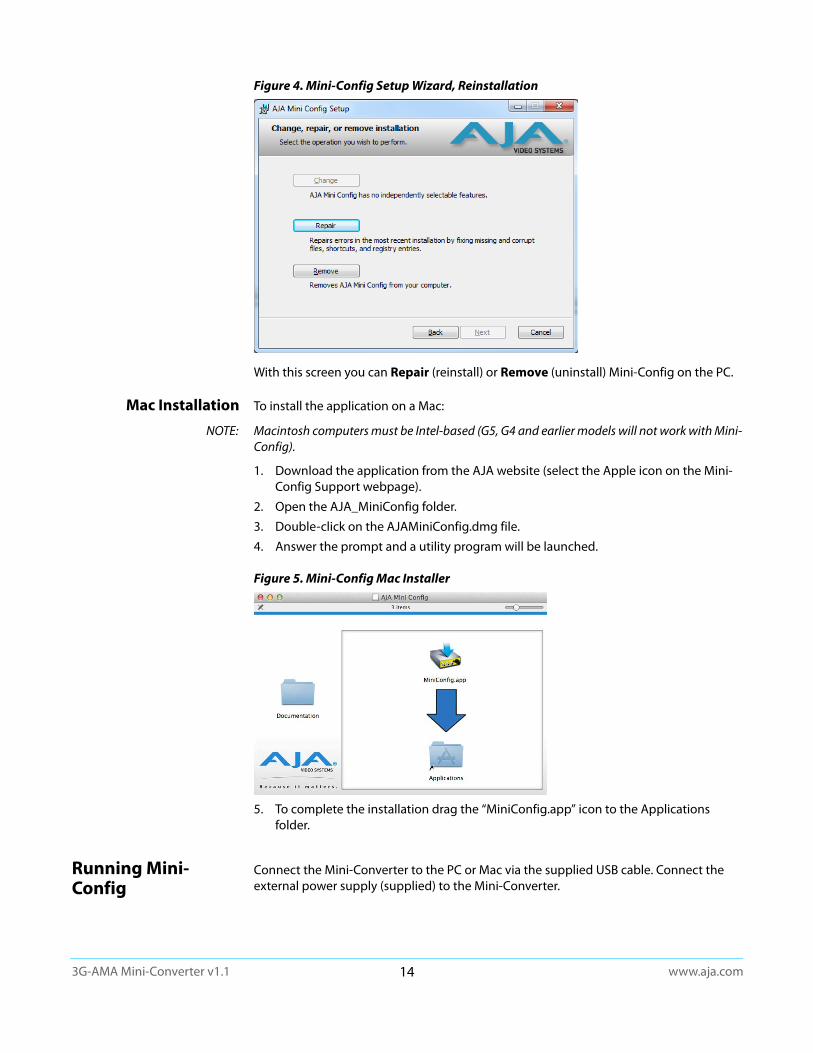
Figure 4. Mini-Config Setup Wizard, Reinstallation
With this screen you can Repair (reinstall) or Remove (uninstall) Mini-Config on the PC.
Mac Installation To install the application on a Mac:
NOTE: Macintosh computers must be Intel-based (G5, G4 and earlier models will not work with Mini-Config).
1. Download the application from the AJA website (select the Apple icon on the Mini-Config Support webpage).
2. Open the AJA_MiniConfig folder.
3. Double-click on the AJAMiniConfig.dmg file.
4. Answer the prompt and a utility program will be launched.
Figure 5. Mini-Config Mac Installer
5. To complete the installation drag the “MiniConfig.app” icon to the Applications folder.
Running Mini-Config
Connect the Mini-Converter to the PC or Mac via the supplied USB cable. Connect the external power supply (supplied) to the Mini-Converter.
3G-AMA Mini-Converter v1.1 www.aja.com15
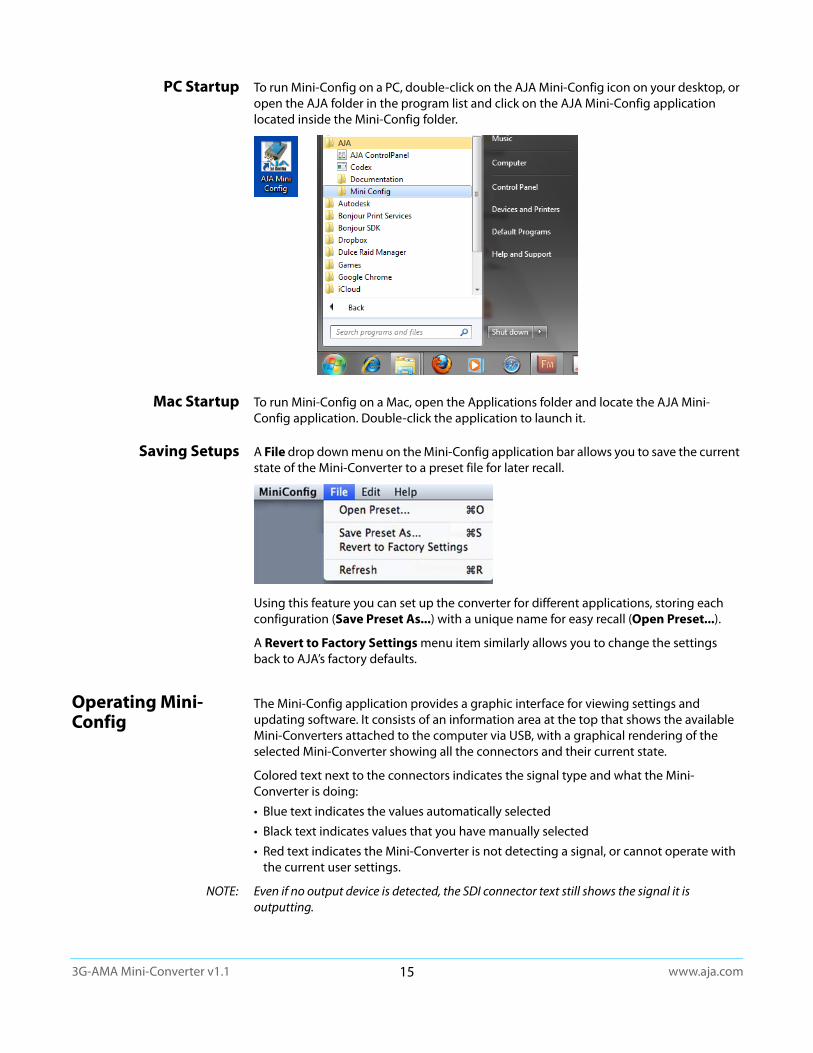
PC Startup To run Mini-Config on a PC, double-click on the AJA Mini-Config icon on your desktop, or open the AJA folder in the program list and click on the AJA Mini-Config application located inside the Mini-Config folder.
Mac Startup To run Mini-Config on a Mac, open the Applications folder and locate the AJA Mini-Config application. Double-click the application to launch it.
Saving Setups A File drop down menu on the Mini-Config application bar allows you to save the current state of the Mini-Converter to a preset file for later recall.
Using this feature you can set up the converter for different applications, storing each configuration (Save Preset As...) with a unique name for easy recall (Open Preset...).
A Revert to Factory Settings menu item similarly allows you to change the settings back to AJA’s factory defaults.
Operating Mini-Config
The Mini-Config application provides a graphic interface for viewing settings and updating software. It consists of an information area at the top that shows the available Mini-Converters attached to the computer via USB, with a graphical rendering of the selected Mini-Converter showing all the connectors and their current state.
Colored text next to the connectors indicates the signal type and what the Mini-Converter is doing:
• Blue text indicates the values automatically selected
• Black text indicates values that you have manually selected
• Red text indicates the Mini-Converter is not detecting a signal, or cannot operate with the current user settings.
NOTE: Even if no output device is detected, the SDI connector text still shows the signal it is outputting.

3G-AMA Mini-Converter v1.1 www.aja.com16
NOTE: Configuration settings in red will change based on the attached output device as well as input signals. For improved accuracy and reliability, you should configure the Mini-Converter only when the target output device is attached and input signals are supplied at the inputs.
Screens are virtually the same on both PC and Mac, with subtle differences that reflect the general look of the platform environment.
Running Multiple Mini-Converters
Mini-Config can manage multiple AJA Mini-Converters connected via USB—even when they are of differing types. However it only connects to one at a time. You can choose which Mini-Converter you wish to control using the pulldown menu in the upper right hand corner. If you want to configure multiple Mini-Converters in parallel, you can do it by running multiple instances of the Mini-Config application and have each control a different Mini-Converter.
NOTE: During a Mini-Converter firmware update, only one Mini-Converter should be connected to the computer via USB.
Figure 6. Example Mini-Config Screen
NOTE: The LED adjacent to the SDI connectors indicates by color the detected signal type. Off is no signal, Green is SD-SDI, red is HD-SDI, and amber/orange is 3G-SDI.
Selecting a Mini-Converter with the pulldown menu causes this application to connect to the selected converter. The graphic of Mini-Converter and text below it provides:
• Type of converter
• Firmware version
• Serial number of the unit.
A status field at the bottom of the screen shows if your application is connected and communicating with the Mini-Converter.
Tabbed screens
Message Showing
Status
Each connector is labeled with the signals
currently detected or manually selected.
Select a USB port and an attached Mini-Converter
(name in parentheses)
Firmware version Serial Number
3G-AMA Mini-Converter v1.1 www.aja.com17
When configuring the Mini-Converter, select it from the top pulldown, view the current settings and change any values. Making a change communicates that new value to the Mini-Converter’s non-volatile memory.
Tabbed Screens The Tabs delineate control screens with groups of controls for each type of task to be performed. The controls for the actual configuration parameters are specific to each Mini-Converter type. When you Click on any of the tab buttons, the pane below the tabs will change to match your tab selection. Any changes you make are immediately applied and will be saved, overwriting previous settings.
Audio-1 Screen
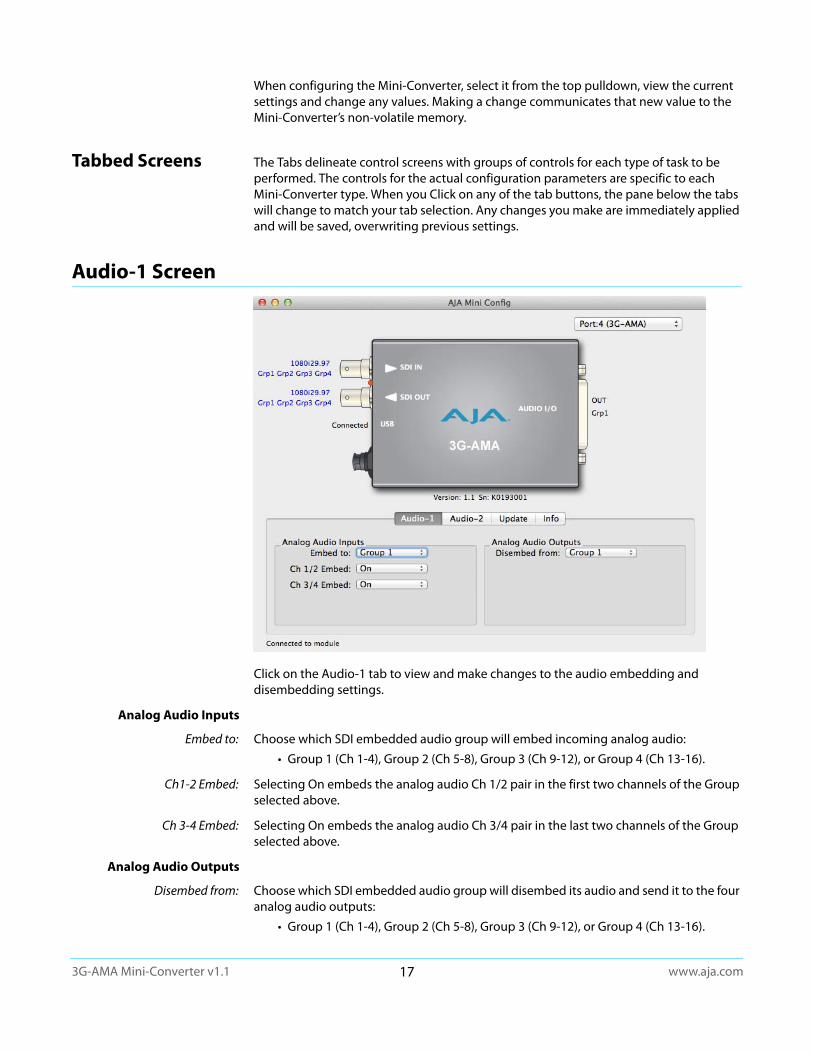
Click on the Audio-1 tab to view and make changes to the audio embedding and disembedding settings.
Analog Audio Inputs
Embed to: Choose which SDI embedded audio group will embed incoming analog audio:
• Group 1 (Ch 1-4), Group 2 (Ch 5-8), Group 3 (Ch 9-12), or Group 4 (Ch 13-16).
Ch1-2 Embed: Selecting On embeds the analog audio Ch 1/2 pair in the first two channels of the Group selected above.
Ch 3-4 Embed: Selecting On embeds the analog audio Ch 3/4 pair in the last two channels of the Group selected above.
Analog Audio Outputs
Disembed from: Choose which SDI embedded audio group will disembed its audio and send it to the four analog audio outputs:
• Group 1 (Ch 1-4), Group 2 (Ch 5-8), Group 3 (Ch 9-12), or Group 4 (Ch 13-16).

3G-AMA Mini-Converter v1.1 www.aja.com18
Audio-2 Screen
Click on the Audio-2 tab to view and make changes to the packet processing and audio level settings.
Packet Processing Control
HANC Data: When Pass is selected, all incoming HANC packets are passed unless the embedder settings require all or part of them to be over-written.
When Remove is selected, all incoming HANC packets are dropped before embedding any new audio packets. The embedder settings determine all embedded audio output. Disembedding is not affected.
NOTE: 2048x1080p/psf 29.97 and 30 formats support a maximum of 8 channels of embedded audio. When one of these formats is present and embedding is turned on, the PASS HANC setting will be ignored and all incoming packets will be dropped before embedding any new audio packets.
3G-SDI Level B: For 3G Level B signals, selects either the 16 audio channels of input Stream A or the 16 channels of input Stream B for disembedding. This setting also controls whether output Stream A or output Stream B will receive embedded audio. This control has no effect if a 3G Level B signal is not detected.
Analog Audio Levels Select from Full Scale Digital settings of +24, +18, +15 (professional), or +12dBu (consumer).
About Audio Levels Professional audio equipment has much higher levels than consumer equipment: a 0 VU reading corresponds to +4 dBu. Connecting a professional +4 dBu device to a consumer audio input (-7 to -8 dBu) may produce overloading, whereas the output of a consumer device probably does not have sufficient power to drive a professional audio input. With consumer and semi-professional audio equipment, a VU reading of 0 dB is typically referenced to -10 dBV, which is equivalent to -7.78 dBu.
3G-AMA Mini-Converter v1.1 www.aja.com19
Update Screen
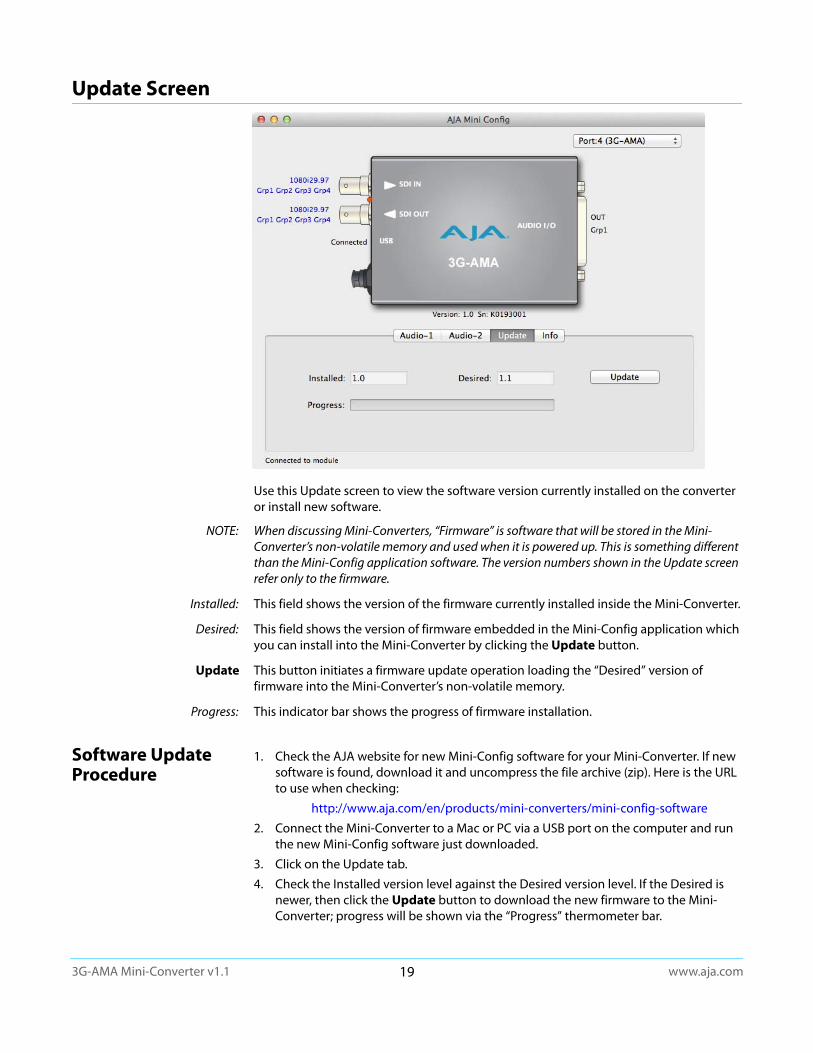
Use this Update screen to view the software version currently installed on the converter or install new software.
NOTE: When discussing Mini-Converters, “Firmware” is software that will be stored in the Mini-Converter’s non-volatile memory and used when it is powered up. This is something different than the Mini-Config application software. The version numbers shown in the Update screen refer only to the firmware.
Installed: This field shows the version of the firmware currently installed inside the Mini-Converter.
Desired: This field shows the version of firmware embedded in the Mini-Config application which you can install into the Mini-Converter by clicking the Update button.
Update This button initiates a firmware update operation loading the “Desired” version of firmware into the Mini-Converter’s non-volatile memory.
Progress: This indicator bar shows the progress of firmware installation.
Software Update Procedure
1. Check the AJA website for new Mini-Config software for your Mini-Converter. If new software is found, download it and uncompress the file archive (zip). Here is the URL to use when checking:
http://www.aja.com/en/products/mini-converters/mini-config-software
2. Connect the Mini-Converter to a Mac or PC via a USB port on the computer and run the new Mini-Config software just downloaded.
3. Click on the Update tab.
4. Check the Installed version level against the Desired version level. If the Desired is newer, then click the Update button to download the new firmware to the Mini-Converter; progress will be shown via the “Progress” thermometer bar.
3G-AMA Mini-Converter v1.1 www.aja.com20
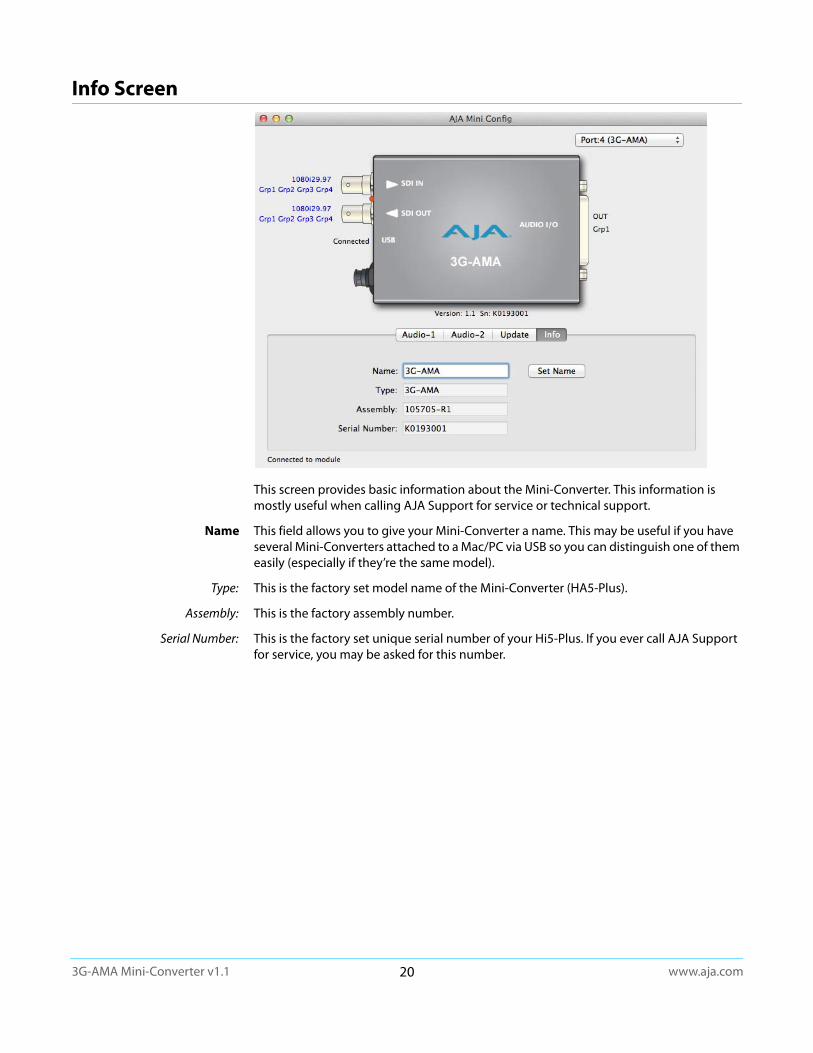
Info Screen
This screen provides basic information about the Mini-Converter. This information is mostly useful when calling AJA Support for service or technical support.
Name This field allows you to give your Mini-Converter a name. This may be useful if you have several Mini-Converters attached to a Mac/PC via USB so you can distinguish one of them easily (especially if they’re the same model).
Type: This is the factory set model name of the Mini-Converter (HA5-Plus).
Assembly: This is the factory assembly number.
Serial Number: This is the factory set unique serial number of your Hi5-Plus. If you ever call AJA Support for service, you may be asked for this number.

3G-AMA Mini-Converter v1.1 www.aja.com21
Appendix A: Specifications
Video Input• SDI, 1x BNC
• 3G SMPTE 424/425M
• HD SMPTE 292/296M
• SD SMPTE 259M
Input Formats (automatic configuration)
1 x 3Gb SDI (level A or B) • 2048x1080p 23.98, 24, 25, 29.97, 30, 50, 59.94, 60
• 2048x1080psf 23.98, 24, 25, 29.97, 30
• 1920x1080p 23.98, 24, 25, 29.97, 30, 50, 59.94, 60
• 1920x1080psf 23.98, 24, 25, 29.97, 30
• 1920x1080i 25, 29.97, 30 (4:4:4 and 4:2:2, 12 bit)
• 1280x720p 50, 59.94, 60 (4:4:4 and 4:2:2, 12 bit)
1 x 1.5Gb SDI • 2048x1080p 23.98, 24, 25, 29.97, 30
• 2048x1080psf 23.98, 24, 25, 29.97, 30
• 1920x1080p 23.98, 24, 25, 29.97, 30
• 1920x1080psf 23.98, 24, 25, 29.97, 30
• 1920x1080i 25, 29.97, 30
• 1280x720p 23.98, 24, 25, 29.97, 30, 50, 59.94, 60
1 x 270Mb SDI • 525i 29.97
• 625i 25
NOTE: Interlaced and Progressive formats shown with frame rates.
Video Output• SDI, 1x BNC
Output Formats Video Out is a delayed, reclocked version of Video In, at same frame rate, etc. Video Out is undefined when no input is present.
Video Latency (time measured between video input and video output connector):
• SD (270 Mb) = 17.2 usec
• HD (1.5 Gb) = 6.3 usec
• 3G level A = 3.2 usec
• 3G level B = 6.1 usec

3G-AMA Mini-Converter v1.1 www.aja.com22
Audio Inputs and Outputs• Balanced Analog Audio, 1 x 25 pin D female connector on converter, 4 channels in, 4
channels out.
• Breakout cable provided with 1 x 25 pin D male connector:
• 4 x XLR female input breakout connector
• 4 x XLR male output breakout connectors
Digital Audio Converters • 24 bit
Embedded Audio • SMPTE 272M (SD): 20-bit, 48KHz synchronous
• SMPTE 299M (3G/HD): 24 bit, 48KHz synchronous
• Incoming embedded audio can be passed, removed, or overridden.
• Up to 16 channels supported.
NOTE: 2048x1080p/psf 29.97 and 30 formats support a maximum of 8 channels embedded audio.
Embed Path Audio Latency (time measured between audio input and video output connector):
• 1100 usec
Disembed Path Audio Latency
(time measured between video input and audio output connector):
• 1200 usec
Analog Audio Levels Configured via Mini-Config software:
Pro 1: 0 dBfs = +24 dBu
Pro 2: 0 dBfs = +18 dBu
Pro 3: 0 dBfs = +15 dBu
Consumer 1: 0 dBfs = +12 dBu
User Controls• External DIP switch
• USB port used with Mini-Config software application to configure device via PC/Mac
Physical
Power • +5 to 20V DC regulated, 6 watts max
• AJA external power supply model DWP-U-R1 (included):
• 100-240V, 50/60Hz universal input
Size • 5.8" x 3.1" x 1 (147 x 79 x 25mm)

3G-AMA Mini-Converter v1.1 www.aja.com23
EnvironmentOperating Temperature : 0 to 40 degrees C (32 to 104 degrees F)
Operating Relative Humidity : 10-90% non-condensing
Operating Altitude: <2,500 meters (<8,000 feet)
Safe Storage Temperature (Power OFF):
-40 to 60 degrees C (-40 to 140 degrees F)

3G-AMA Mini-Converter v1.1 www.aja.com24
Appendix B: Safety and Compliance
Federal Communications Commission (FCC) Compliance Notices
Class B Interference Statement
This equipment has been tested and found to comply with the limits for a Class B digital device, pursuant to Part 15, Subpart B of the FCC Rules. These limits are designed to provide reasonable protection against harmful interference in a residential installation. This equipment generates, uses, and can radiate radio frequency energy and, if not installed and used in accordance with the instructions, may cause harmful interference to radio communications. However, there is no guarantee that interference will not occur in a particular installation. If this equipment does cause harmful interference to radio or television reception, which can be determined by turning the equipment off and on, the user is encouraged to try to correct the interference by one or more of the following measures:
• Reorient or relocate the receiving antenna.
• Increase the separation between the equipment and receiver.
• Connect the equipment into an outlet on a circuit different from that to which the receiver is connected.
• Consult the dealer or an experienced radio/TV technician for help.
FCC Caution This device complies with Part 15 of the FCC Rules. Operation is subject to the following two conditions: (1) This device may not cause harmful interference, and (2) this device must accept any interference received, including interference that may cause undesired operation.
Canadian ICES Statement
Canadian Department of Communications Radio Interference Regulations
This digital apparatus does not exceed the Class B limits for radio-noise emissions from a digital apparatus as set out in the Radio Interference Regulations of the Canadian Department of Communications. This Class B digital apparatus complies with Canadian ICES-003.
Règlement sur le brouillage radioélectrique du ministère des Communications
Cet appareil numérique respecte les limites de bruits radioélectriques visant les appareils numériques de classe B prescrites dans le Règlement sur le brouillage radioélectrique du ministère des Communications du Canada. Cet appareil numérique de la Classe B est conforme à la norme NMB-003 du Canada.

3G-AMA Mini-Converter v1.1 www.aja.com25
European Union and European Free Trade Association (EFTA) Regulatory Compliance
This equipment may be operated in the countries that comprise the member countries of the European Union and the European Free Trade Association. These countries, listed in the following paragraph, are referred to as The European Community throughout this document:
AUSTRIA, BELGIUM, BULGARIA, CYPRUS, CZECH REPUBLIC, DENMARK, ESTONIA, FINLAND, FRANCE, GERMANY, GREECE, HUNGARY, IRELAND, ITALY, LATVIA, LITHUANIA, LUXEMBOURG, MALTA, NETHERLANDS, POLAND, PORTUGAL, ROMANIA, SLOVAKIA, SLOVENIA, SPAIN, SWEDEN, UNITED KINGDOM, ICELAND, LICHTENSTEIN, NORWAY, SWITZERLAND
Declaration of Conformity
Marking by this symbol indicates compliance with the Essential Requirements of the EMC Directive of the European Union 2004/108/EC.
Safety: EN 60065: 2002 + A1: 2006 + A11: 2008 + A2: 2010 + A12: 2011 (GS License)
IEC 60065: 2001 + A1: 2005 + A2: 2010 (CB Scheme Report/Certificate)
Additional licenses issued for specific countries available on request.
Emissions: EN 55103-1: 2009, EN 55022: 2010, CISPR22: 2008
EN 61000-3-2:2006 +A1:2009 +A2:2009, EN 61000-3-3:2008
Environments: E2, E3 and E4
Immunity: EN 55103-2: 2009
EN 61000-4-2:2009, EN 61000-4-3:2006 +A1:2008 +A2:2010,
EN 61000-4-4:2004 +A1:2010, EN 61000-4-5:2005, EN 61000-4-6: 2009
EN 61000-4-11:2004
Environments: E2, E3 and E4
The product is also licensed for additional country specific standards as required for the International Marketplace
Warning! This is a Class B product. In a domestic environment, this product may cause radio interference, in which case, the user may be required to take appropriate measures.
Achtung! Dieses ist ein Gerät der Funkstörgrenzwertklasse B. In Wohnbereichen können bei Betrieb dieses Gerätes Rundfunkstörungen auftreten, in welchen Fällen der Benutzer für entsprechende Gegenmaßnahmen verantwortlich ist.
Attention! Ceci est un produit de Classe B. Dans un environnement domestique, ce produit risque de créer des interférences radioélectriques, il appartiendra alors à l?utilisateur de prendre les mesures spécifiques appropriées.
3G-AMA Mini-Converter v1.1 www.aja.com26
Recycling Notice
Korean KCC Compliance Statement
Taiwan Compliance Statement
This is a Class B product based on the standard of the Bureau of Standards, Metrology and Inspection (BSMI) CNS 13438, Class B. In a domestic environment this product may cause radio interference in which case the user may be required to take adequate measures.
Japanese Compliance Statement
This is a Class B product based on the standard of the VCCI Council (VCCI V-3/2014.04). If this equipment is used in a domestic environment, radio interference may occur, in which case, the user may be required to take corrective actions.
This symbol on the product or its packaging indicates that this product must not be disposed of with your other household waste. Instead, it is your responsibility to dispose of your waste equipment by handing it over to a designated collection point for the recycling of waste electrical and electronic equipment. The separate collection and recycling of your waste equipment at the time of disposal will help conserve natural resources and ensure that it is recycled in a manner that protects human health and the environment. For more information about where you can drop off your waste for recycling, please contact your local authority, or where you purchased your product.
3G-AMA Mini-Converter v1.1 www.aja.com27
Translated Warning and Caution Messages
The following caution statements, warning conventions, and warning messages apply to this product and manual.
Before Operation Please Read These Instructions
Warning! Read and follow all warning notices and instructions marked on the product or included in the documentation.
Avertissement ! Lisez et conformez-vous à tous les avis et instructions d'avertissement indiqués sur le produit ou dans la documentation.
Warnung! Lesen und befolgen Sie die Warnhinweise und Anweisungen, die auf dem Produkt angebracht oder in der Dokumentation enthalten sind.
¡Advertencia! Lea y siga todas las instrucciones y advertencias marcadas en el producto o incluidas en la documentación.
Aviso! Leia e siga todos os avisos e instruções assinalados no produto ou incluídos na documentação.
Avviso! Leggere e seguire tutti gli avvisi e le istruzioni presenti sul prodotto o inclusi nella documentazione.
Warning! Do not use this device near water and clean only with a dry cloth.
Avertissement! N'utilisez pas cet appareil près de l'eau et nettoyez-le seulement avec un tissu sec..
Warnung! Das Gerät nicht in der Nähe von Wasser verwenden und nur mit einem trockenen Tuch säubern.
¡Advertencia! No utilice este dispositivo cerca del agua y límpielo solamente con un paño seco.
Aviso! Não utilize este dispositivo perto da água e limpe-o somente com um pano seco.
Avviso! Non utilizzare questo dispositivo vicino all'acqua e pulirlo soltanto con un panno asciutto.

3G-AMA Mini-Converter v1.1 www.aja.com28
Warning! Do not block any ventilation openings. Install in accordance with the manufacturer's instructions.
Avertissement ! Ne bloquez aucune ouverture de ventilation. Suivez les instructions du fabricant lors de l'installation.
Warnung! Die Lüftungsöffnungen dürfen nicht blockiert werden. Nur gemäß den Anweisungen des Herstellers installieren.
¡Advertencia! No bloquee ninguna de las aberturas de la ventilación. Instale de acuerdo con las instrucciones del fabricante.
Aviso! Não obstrua nenhuma das aberturas de ventilação. Instale de acordo com as instruções do fabricante.
Avviso! Non ostruire le aperture di ventilazione. Installare in conformità con le istruzioni del fornitore.
Warning! Do not install near any heat sources such as radiators, heat registers, stoves, or other apparatus (including amplifiers) that produce heat.
Avertissement ! N'installez pas l'appareil près d'une source de chaleur telle que des radiateurs, des bouches d'air de chauffage, des fourneaux ou d'autres appareils (amplificateurs compris) qui produisent de la chaleur.
Warnung! Nicht in der Nähe von Wärmequellen wie Heizkörpern, Heizregistern, Öfen oder anderen Wärme erzeugenden Geräten (einschließlich Verstärkern) aufstellen.
¡Advertencia! No instale cerca de fuentes de calor tales como radiadores, registros de calor, estufas u otros aparatos (incluidos amplificadores) que generan calor.
Aviso! Não instale perto de nenhuma fonte de calor tal como radiadores, saídas de calor, fogões ou outros aparelhos (incluindo amplificadores) que produzam calor.
Avviso! Non installare vicino a fonti di calore come termosifoni, diffusori di aria calda, stufe o altri apparecchi (amplificatori compresi) che emettono calore.

3G-AMA Mini-Converter v1.1 www.aja.com29
Warning! Do not defeat the safety purpose of the polarized or grounding-type plug. A polarized plug has two blades with one wider than the other. A grounding type plug has two blades and a third grounding prong. The wide blade or the third prong are provided for your safety. If the provided plug does not fit into your outlet, consult an electrician for replacement of the obsolete outlet.
Avertissement! La sécurité de la prise polarisée ou de la prise de type mise à la terre ne doit en aucun cas être empêchée de fonctionner. Une prise polarisée a deux broches, l'une étant plus large que l'autre. Une prise de type mise à la terre a deux broches et une troisième broche pour la mise à la terre. La broche large ou la troisième broche sont fournies pour votre sécurité. Si la prise fournie ne s'insère pas dans votre prise femelle, consultez un électricien pour le remplacement de la prise femelle obsolète.
Warnung! Der Sicherheitszweck des gepolten bzw. Schukosteckers ist zu berücksichtigen. Ein gepolter Stecker verfügt über zwei Pole, von denen einer breiter als der andere ist. Ein Schukostecker verfügt neben den zwei Polen noch über einen dritten Pol zur Erdung. Der breite Pol bzw. der Erdungspol dienen der Sicherheit. Wenn der zur Verfügung gestellte Stecker nicht in Ihren Anschluss passt, konsultieren Sie einen Elektriker, um den veralteten Anschluss zu ersetzen.
¡Advertencia! No eche por tierra la finalidad del tipo de enchufe polarizado con conexión a tierra. Un enchufe polarizado tiene dos espigas, una más ancha que la otra. Un enchufe con conexión a tierra tiene dos espigas iguales y una tercera espiga que sirve para la conexión a tierra. La expiga ancha, o la tercera espiga, sirven para su seguridad. Si el enchufe suministrado no encaja en el tomacorriente, consulte con un electricista para reemplazar el tomacorriente obsoleto.
Aviso! Não anule a finalidade da segurança da ficha polarizada ou do tipo ligação terra. Uma ficha polarizada tem duas lâminas sendo uma mais larga do que a outra. Uma ficha do tipo de ligação à terra tem duas lâminas e um terceiro terminal de ligação à terra. A lâmina larga ou o terceiro terminal são fornecidos para sua segurança. Se a ficha fornecida não couber na sua tomada, consulte um electricista para a substituição da tomada obsoleta.
Avviso! Non compromettere la sicurezza della spina polarizzata o con messa a terra. Una spina polarizzata ha due spinotti, di cui uno più largo. Una spina con messa a terra ha due spinotti e un terzo polo per la messa a terra. Lo spinotto largo o il terzo polo sono forniti per motivi di sicurezza. Se la spina fornita non si inserisce nella presa di corrente, contattare un elettricista per la sostituzione della presa obsoleta.
3G-AMA Mini-Converter v1.1 www.aja.com30
Warning! Since the Mains plug is used as the disconnection for the device, it must remain readily accessible and operable.
Avertissement! Puisque la prise principale est utilisée pour débrancher l'appareil, elle doit rester aisément accessible et fonctionnelle.
Warnung! Da der Netzstecker als Trennvorrichtung dient, muss er stets zugänglich und funktionsfähig sein.
¡Advertencia! Puesto que el enchufe de la red eléctrica se utiliza como dispositivo de desconexión, debe seguir siendo fácilmente accesible y operable.
Aviso! Dado que a ficha principal é utilizada como a desconexão para o dispositivo, esta deve manter-se prontamente acessível e funcional.
Avviso! Poiché il cavo di alimentazione viene usato come dispositivo di sconnessione, deve rimane prontamente accessibile e operabile.
Warning! Protect the power cord from being walked on or pinched particularly at plugs, convenience receptacles, and the point where they exit from the device.
Avertissement! Protégez le cordon d'alimentation pour que l'on ne marche pas dessus ou qu'on le pince, en particulier au niveau des prises mâles, des réceptacles de convenance, et à l'endroit où il sort de l'appareil.
Warnung! Vermeiden Sie, dass auf das Netzkabel getreten oder das Kabel geknickt wird, insbesondere an den Steckern, den Steckdosen und am Kabelausgang am Gerät.
¡Advertencia! Proteja el cable de energía para que no se le pise ni apriete, en especial cerca del enchufe, los receptáculos de conveniencia y el punto del que salen del equipo.
Aviso! Proteja o cabo de alimentação de ser pisado ou de ser comprimido particularmente nas fichas, em tomadas de parede de conveniência e no ponto de onde sai do dispositivo.
Avviso! Proteggere il cavo di alimentazione in modo che nessuno ci cammini sopra e che non venga schiacciato soprattutto in corrispondenza delle spine e del punto in cui esce dal dispositivo.
3G-AMA Mini-Converter v1.1 www.aja.com31
Warning! Unplug this device during lightning storms or when unused for long periods of time.
Avertissement! Débranchez cet appareil pendant les orages avec éclairsou s'il est inutilisé pendant de longues périodes.
Warnung! Das Gerät ist bei Gewitterstürmen oder wenn es über lange Zeiträume ungenutzt bleibt vom Netz zu trennen.
¡Advertencia! Desenchufe este dispositivo durante tormentas eléctricas o cuando no se lo utilice por largos periodos del tiempo.
Aviso! Desconecte este dispositivo da tomada durante trovoadas ou quando não é utilizado durante longos períodos de tempo.
Avviso! Utilizzare soltanto i collegamenti e gli accessori specificati e/o venduti dal produttore, quali il treppiedi e l'esoscheletro.
Warning! Refer all servicing to qualified service personnel. Servicing is required when the device has been damaged in any way, such as power-supply cord or plug is damaged, liquid has been spilled or objects have fallen into the device, the device has been exposed to rain or moisture, does not operate normally, or has been dropped.
Avertissement ! Référez-vous au personnel de service qualifié pour tout entretien. L'entretien est exigé quand l'appareil a été endommagé de quelque manière que ce soit, par exemple lorsque le cordon d'alimentation ou la prise sont endommagés, que du liquide a été versé ou des objets sont tombés dans l'appareil, que l'appareil a été exposé à la pluie ou à l'humidité, ne fonctionne pas normalement ou est tombé.
Warnung! Das Gerät sollte nur von qualifizierten Fachkräften gewartet werden. Eine Wartung ist fällig, wenn das Gerät in irgendeiner Weise beschädigt wurde, wie bei beschädigtem Netzkabel oder Netzstecker, falls Flüssigkeiten oder Objekte in das Gerät gelangen, das Gerät Regen oder Feuchtigkeit ausgesetzt wurde, nicht ordnungsgemäß funktioniert oder fallen gelassen wurde.
¡Advertencia! Consulte al personal calificado por cuestiones de reparación. El servicio de reparación se requiere cuando el dispositivo ha recibido cualquier tipo de daño, por ejemplo cable o espigas dañadas, se ha derramado líquido o se han caído objetos dentro del dispositivo, el dispositivo ha sido expuesto a la lluvia o humedad, o no funciona de modo normal, o se ha caído.
Aviso! Remeta todos os serviços de manutenção para o pessoal de assistência qualificado. A prestação de serviços de manutenção é exigida quando o dispositivo foi danificado mediante qualquer forma, como um cabo de alimentação ou ficha que se encontra danificado/a, quando foi derramado líquido ou caíram objectos sobre o dispositivo, quando o dispositivo foi exposto à chuva ou à humidade, quando não funciona normalmente ou quando foi deixado cair.
Avviso! Fare riferimento al personale qualificato per tutti gli interventi di assistenza. L'assistenza è necessaria quando il dispositivo è stato danneggiato in qualche modo, ad esempio se il cavo di alimentazione o la spina sono danneggiati, è stato rovesciato del liquido è stato rovesciato o qualche oggetto è caduto nel dispositivo, il dispositivo è stato esposto a pioggia o umidità, non funziona correttamente o è caduto.
3G-AMA Mini-Converter v1.1 www.aja.com32
Warning! Do not open the chassis. There are no user-serviceable parts inside. Opening the chassis will void the warranty unless performed by an AJA service center or licensed facility.
Avertissement! Ne pas ouvrir le châssis. Aucun élément à l’intérieur du châssis ne peut être réparé par l’utilisateur. La garantie sera annulée si le châssis est ouvert par toute autre personne qu’un technicien d’un centre de service ou d’un établissement agréé AJA.
Warnung! Öffnen Sie das Gehäuse nicht. Keine der Geräteteile können vom Benutzer gewartet werden. Durch das Öffnen des Gehäuses wird die Garantie hinfällig, es sei denn, solche Wartungsarbeiten werden in einem AJA-Service-Center oder einem lizenzierten Betrieb vorgenommen.
¡Advertencia! No abra el chasis. El interior no contiene piezas reparables por el usuario. El abrir el chasis anulará la garantía a menos que se lo haga en un centro de servicio AJA o en un local autorizado.
Advertência! Não abra o chassi. Não há internamente nenhuma peça que permita manutenção pelo usuário. Abrir o chassi anula a garantia, a menos que a abertura seja realizada por uma central de serviços da AJA ou por um local autorizado.
Avvertenza! Non aprire lo chassis. All’interno non ci sono parti riparabili dall’utente. L’apertura dello chassis invaliderà la garanzia se non viene effettuata da un centro ufficiale o autorizzato AJA.
Warning! Disconnect the external AC power supply line cord(s) from the mains power before moving the unit.
Avertissement! Retirez le ou les cordons d’alimentation en CA de la source d’alimentation principale lorsque vous déplacez l’appareil.
Warnung! Trennen Sie die Wechselstrom-Versorgungskabel vom Netzstrom, bevor Sie das Gerät verschieben.
¡Advertencia! Cuando mueva la unidad desenchufe de la red eléctrica el/los cable(s) de la fuente de alimentación CA tipo brick.
Advertência! Remova os cabos CA de alimentação brick da rede elétrica ao mover a unidade.
Avvertenza! Scollegare il cavo dell’alimentatore quando si sposta l’unità.

3G-AMA Mini-Converter v1.1 www.aja.com33
Warranty Information
Limited Warranty
AJA Video Systems, Inc. (AJA Video) warrants that this product will be free from defects in materials and workmanship for a period of five years from the date of purchase. If a product proves to be defective during this warranty period, AJA Video, at its option, will either repair the defective product without charge for parts and labor, or will provide a replacement in exchange for the defective product.
In order to obtain service under this warranty, you the Customer, must notify AJA Video of the defect before the expiration of the warranty period and make suitable arrangements for the performance of service.The Customer shall be responsible for packaging and shipping the defective product to a designated service center nominated by AJA Video, with shipping charges prepaid. AJA Video shall pay for the return of the product to the Customer if the shipment is to a location within the country in which the AJA Video service center is located. Customer shall be responsible for paying all shipping charges, insurance, duties, taxes, and any other charges for products returned to any other locations.
This warranty shall not apply to any defect, failure or damage caused by improper use or improper or inadequate maintenance and care. AJA Video shall not be obligated to furnish service under this warranty a) to repair damage resulting from attempts by personnel other than AJA Video representatives to install, repair or service the product, b) to repair damage resulting from improper use or connection to incompatible equipment, c) to repair any damage or malfunction caused by the use of non-AJA Video parts or supplies, or d) to service a product that has been modified or integrated with other products when the effect of such a modification or integration increases the time or difficulty of servicing the product.
THIS WARRANTY IS GIVEN BY AJA VIDEO IN LIEU OF ANY OTHER WARRANTIES, EXPRESS OR IMPLIED. AJA VIDEO AND ITS VENDORS DISCLAIM ANY IMPLIED WARRANTIES OF MERCHANTABILITY OR FITNESS FOR A PARTICULAR PURPOSE. AJA VIDEO’S RESPONSIBILITY TO REPAIR OR REPLACE DEFECTIVE PRODUCTS IS THE WHOLE AND EXCLUSIVE REMEDY PROVIDED TO THE CUSTOMER FOR ANY INDIRECT, SPECIAL, INCIDENTAL OR CONSEQUENTIAL DAMAGES IRRESPECTIVE OF WHETHER AJA VIDEO OR THE VENDOR HAS ADVANCE NOTICE OF THE POSSIBILITY OF SUCH DAMAGES.