AHD DVR USER GUIDE Section A Connect all the AHD · PDF fileAHD DVR USER GUIDE Welcome to...
6
AHD DVR USER GUIDE Welcome to choose our CCTV video security products. This series powerful DVR can connect three kinds of video signals (AHD + CVBS + IP) working simultaneously. There is an easy user guide which maybe help you making the DVR and cameras working together. Our goals: a) Connect all the cameras to the DVR and make sure all the videos display normal b) Remote view the DVR( IE Brower / Mobile phone) Section A Connect all the AHD cameras 1) AHD mode (Default Mode) By default, All the DVR’ s channel input mode are set to be AHD mode. In this mode, you can connect the AHD camera and analog 960H camera directly . We don’t recommend connecting the AHD signal together with the analog CVBS to one pair of BNC ports, such as port 1: AHD, port 2 CVBS, port 3 AHD, port4 CVBS , you should connect ports 1,2 AHD then ports 3,4 CVBS. 2) AHD + IP camera hybrid mode This series DVR are able to connect the AHD and IP camera working simultaneously. Change the channel mode if you need. 1. Main Menu 2. Switch channel type USER NAME: admin PASSWORD: (no password) IP ADDRESS: 192.168.1.10
-
Upload
duongxuyen -
Category
Documents
-
view
221 -
download
2
Transcript of AHD DVR USER GUIDE Section A Connect all the AHD · PDF fileAHD DVR USER GUIDE Welcome to...
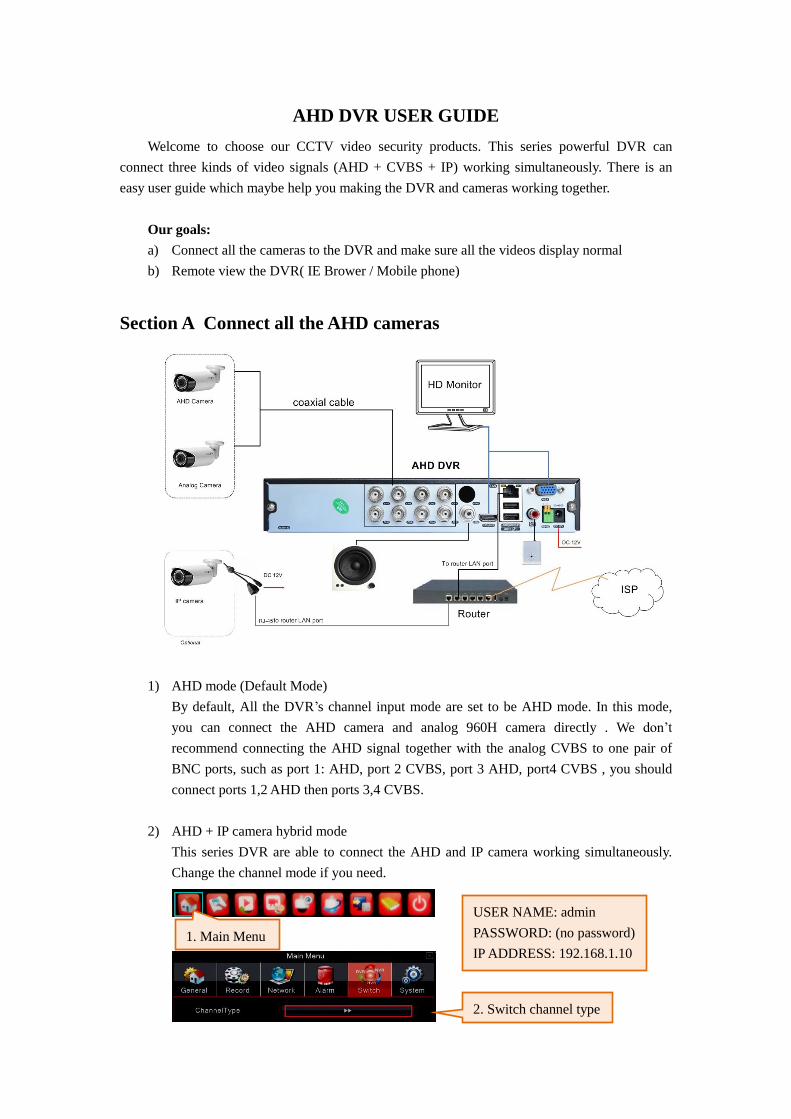
AHD DVR USER GUIDE
Welcome to choose our CCTV video security products. This series powerful DVR can
connect three kinds of video signals (AHD + CVBS + IP) working simultaneously. There is an
easy user guide which maybe help you making the DVR and cameras working together.
Our goals:
a) Connect all the cameras to the DVR and make sure all the videos display normal
b) Remote view the DVR( IE Brower / Mobile phone)
Section A Connect all the AHD cameras
1) AHD mode (Default Mode)
By default, All the DVR’s channel input mode are set to be AHD mode. In this mode,
you can connect the AHD camera and analog 960H camera directly . We don’t
recommend connecting the AHD signal together with the analog CVBS to one pair of
BNC ports, such as port 1: AHD, port 2 CVBS, port 3 AHD, port4 CVBS , you should
connect ports 1,2 AHD then ports 3,4 CVBS.
2) AHD + IP camera hybrid mode
This series DVR are able to connect the AHD and IP camera working simultaneously.
Change the channel mode if you need.
1. Main Menu
2. Switch channel type
USER NAME: admin
PASSWORD: (no password)
IP ADDRESS: 192.168.1.10
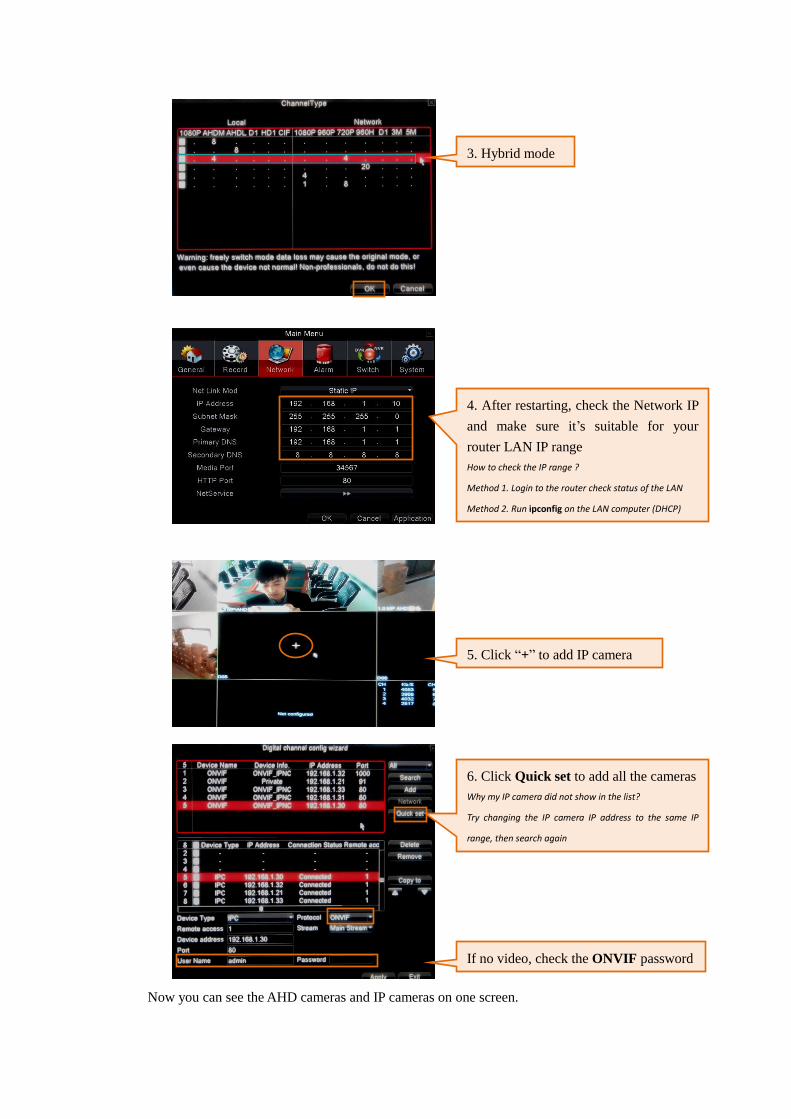
Now you can see the AHD cameras and IP cameras on one screen.
3. Hybrid mode
5. Click “+” to add IP camera
4. After restarting, check the Network IP
and make sure it’s suitable for your
router LAN IP range
How to check the IP range ?
Method 1. Login to the router check status of the LAN
Method 2. Run ipconfig on the LAN computer (DHCP)
6. Click Quick set to add all the cameras
Why my IP camera did not show in the list?
Try changing the IP camera IP address to the same IP
range, then search again
If no video, check the ONVIF password

Section B Remote view the DVR via IE and Smartphone
1) Login to the DVR by local IP address
Refresh to reload the webpage, then you can login to the DVR now.
(USER: admin, no password)
2) Using the P2P ID to remote view the DVR.
1. Find out the P2P ID in Version
message
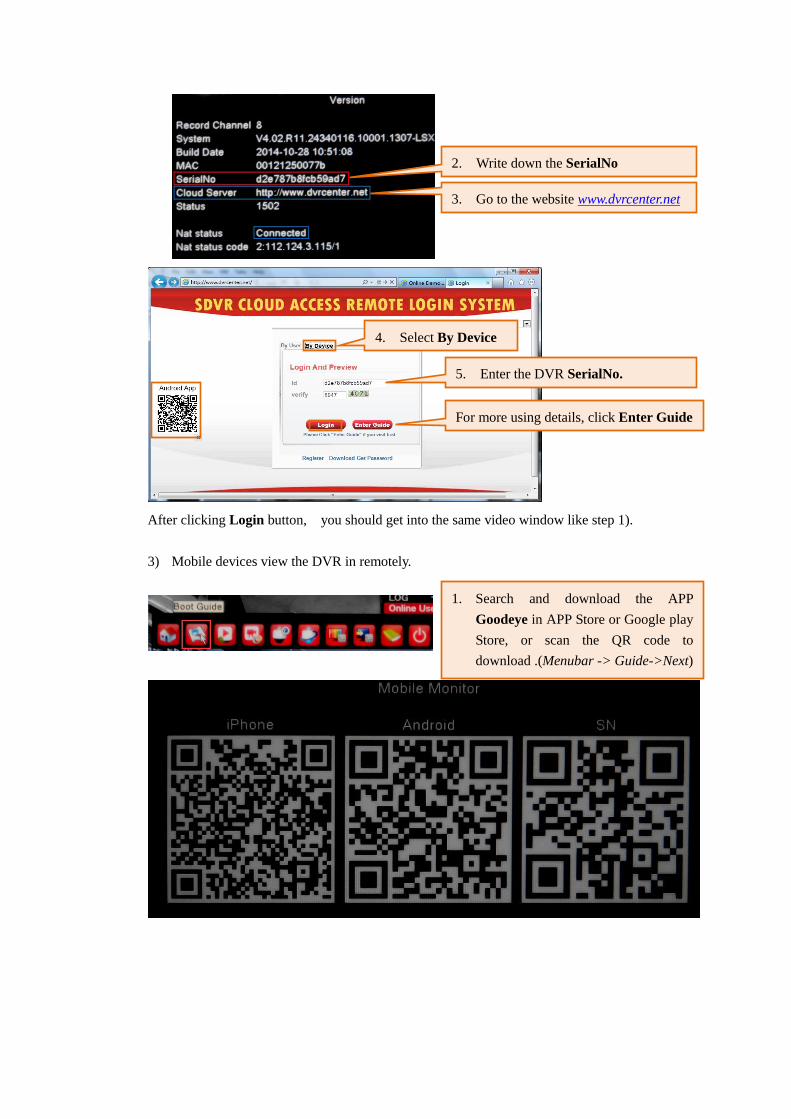
After clicking Login button, you should get into the same video window like step 1).
3) Mobile devices view the DVR in remotely.
2. Write down the SerialNo
3. Go to the website www.dvrcenter.net
5. Enter the DVR SerialNo.
4. Select By Device
For more using details, click Enter Guide
1. Search and download the APP
Goodeye in APP Store or Google play
Store, or scan the QR code to
download .(Menubar -> Guide->Next)

Note: you can register an account if you want to put all your device together . Also you can
Click Local Login directly to fast add a device to your smart phone.
1. Select Local Login
2. Click Add

Note : if you want using the classic DDNS for remote view , you have to forward the HTTP
port (80) and Media port (34567) on the NAT router. For mobile APP , you should click
Adwanced to input the media port when you add the DVR.
--end
Author : Tony
3. Click to scan
the DVR SN QR
code or type in the
SerialNo.
4. Slide left and right to change channel
Function bar
Advanced
Functions