Agrodok-34-Hatching eggs by hens or in an incubator...34. Hatching eggs by hens or in an incubator...
59
Agrodok-series No. 34 Agrodok 34 - Hatching eggs by hens or in an incubator Hatching eggs by hens or in an incubator
Transcript of Agrodok-34-Hatching eggs by hens or in an incubator...34. Hatching eggs by hens or in an incubator...

Agrodok-series No. 34
Agrodok 34 - H
atching eggs by hens or in an incubator
Hatching eggs by hens or in an incubator
© 2004 Agromisa FoundationISBN Agromisa: 90-77073-96-5
The AGRODOK-SERIES is a series of low-priced, practical manuals on small-scale and sustainable agriculture in the tropics. AGRODOK booklets are available in English (E), French (F), Portuguese (P) and Spanish (S). Agrodok publications can be ordered from AGROMISA or CTA.
1. Pig keeping in the tropics P, F, E 2. Soil fertility management S, P, F, E 3. Preservation of fruit and vegetables P, F, E 4. Small-scale chicken production in the tropics S, P, F, E 5. Fruit growing in the tropics P, F, E 6. Simple construction surveying for rural applications P, F, E 7. Goat keeping in the tropics P, F, E 8. Preparation and use of compost S, P, F, E 9. The vegetable garden in the tropics S, P, F, E 10. Cultivation of soya and other legumes P, F, E 11. Erosion control in the tropics S, P, F, E12. Preservationoffishandmeat P,F,E 13. Water harvesting and soil moisture retention P, F, E 14. Dairy cattle husbandry F, E15. Small-scalefreshwaterfishfarming P,F,E 16. Agroforestry P, F, E 17. Cultivation of tomato P, F, E 18. Protection of stored cereal grains and pulses P, F, E 19. Propagating and planting trees P, F, E 20. Backyard rabbit farming in the tropics P, F, E21. On-farmfishculture P,F,E 22. Small-scale production of weaning foods P, F, E 23. Protected cultivation P, F, E 24. Urban Agriculture P, F, E 25. Granaries P, F, E 26. Marketing for small-scale producers P, F, E 27. Establishing and managing water points for village livestock P, F, E28. Identificationofcropdamage P,F,E 29. Pesticides: compounds, use and hazards P, F, E 31. Storage of tropical agricultural products S, P, F, E 32. Beekeeping in the tropics P, F, E 33. Duck keeping in the tropics P, F, E 34. Hatching eggs by hens or in an incubator S, P, F, E 35. Donkeys for transport and tillage P, F, E 36. Preparation of dairy products P, F, E 37. Small-scale seed production P, F, E 38. Starting a cooperative S, P, F, E 39. Non-timber forest products P, F, E 40. Small-scale mushroom cultivation P, F, E 42. Bee products P, F, E 43. Rainwater harvesting for domestic use P, F, E

Agrodok 34
Hatching eggs by hens or in an incubator
Nico van Wageningen Johan Meinderts
Puck Bonnier Henk Kasper

© Agromisa Foundation, Wageningen, 2004. All rights reserved. No part of this book may be reproduced in any form, by print, photocopy, microfilm or any other means, without written permission from the publisher. First edition: 1985 Fourth edition (revised): 1998 Fift edition: 2004 Authors: Nico van Wageningen, Johan Meinderts, Puck Bonnier, Henk Kasper Editor: Jeroen Boland Illustrators: Mario Pereira, Jan de Koning, Kees van Veluw Design: Janneke Reijnders Translation: Robert Corner Printed by: Digigrafi, Wageningen, the Netherlands ISBN: 90-77073-96-5
NUGI: 835

Foreword 3
Foreword
This Agrodok is a revised version of the 1995 edition.
We have received a lot of feedback at Agromisa from our readers. Since 1990 we have had dozens of letters from a variety of countries and these have helped us improve the structure and content of the text in a number of ways. We are particularly grateful to all those readers who have been constructive in their criticism and have taken the pains to write to us with their questions and experiences.
We would also like to thank Mr Kees-Peter de Ridder of IPC Barne-veld Livestock College, for the advice and information he has given us, as well as for his demonstration of a number of different incuba-tors. Finally we have also to thank Mr Arno Overgaag, co-ordinator of Agromisa�s livestock advisory group, at whose initiative this revision was undertaken.
Jeroen Boland, editor
Wageningen, November 1998

Hatching eggs by hens or in an incubator 4
Contents
1 Introduction 6
2 Natural incubation or a mechanical incubator? 9 2.1 The role of the hen in different production systems 9 2.2 The number of eggs to be hatched 10 2.3 Labour required 10 2.4 The cost of building an incubator 11 2.5 The cost of running an incubator 11 2.6 The different performances obtainable from hens and
incubators 12
3 Preparing eggs for incubation 14 3.1 Selection of eggs for hatching 14 3.2 Cleaning the eggs 15 3.3 Storage 15 3.4 Guidelines for handling hatching eggs 15
4 Natural incubation: the hen 17 4.1 Selecting the hen 17 4.2 Preparing for hatching 17 4.3 The nest box 18 4.4 What to do during brooding 19
5 Incubator construction 20 5.1 The essentials for good incubation 20 5.2 Building the case 21 5.3 Heating with a kerosene lamp 25 5.4 Controlling the relative humidity 28 5.5 Two practical examples 29
6 Automatically controlling the temperature 32 6.1 The ether capsule 32 6.2 Building an ether thermostat 34

Contents 5
7 Using the incubator and other procedures 36 7.1 Setting up of the incubator 36 7.2 Adjusting the temperature during incubation 37 7.3 Adjusting the humidity 38 7.4 Ventilation in the incubator 39 7.5 Turning the eggs 39 7.6 Candling the eggs 40 7.7 Keeping records 41
8 Raising chicks by artificial mothering 43 8.1 The need for warmth 43 8.2 Description of a simple brooder 43 8.3 The growing chicks 45 8.4 Guidelines for giving the chicks a good start 46
9 The eggs of other types of fowl 47 9.1 Eggs of the Mandarin or Peking duck and the Barbary
duck (Cairine moschata) 47 9.2 Turkey eggs 48 9.3 Quail eggs 49 9.4 Guinea hen eggs 49
10 Troubleshooting 50
Further reading 53
Useful addresses 55

Hatching eggs by hens or in an incubator 6
1 Introduction
Agromisa receives regular requests for information on natural and arti-ficial methods for hatching out eggs. Although the natural method us-ing a broody hen presents little difficulty, since it is the mother bird that does most of the work, the artificial method with an incubator could also be worth considering in certain circumstances, as there are several advantages to it.
The choice depends largely on your preference in terms of production strategy, and how many eggs you are hoping or able to hatch at any one time. We look at these questions in Chapter 2. To what extent this Agrodok is of use to you depends on your aims and on the facilities available, since we only deal here with natural or artificial methods of hatching a maximum of 50 to 100 eggs at a time. Chapter 4 looks at the question of natural incubation, and will explain the advantages of this approach. The chapter is well worth reading even if you are al-ready decided on the use of a mechanical incubator.
In this Agrodok we are looking at what we consider to be small-scale incubation, meaning the incubation of 50 eggs at a time. At this level there is still a choice possible between the use of natural or artificial incubation, and thus between an intensive or an extensive system, each of which can be profitable at this scale. Agromisa�s work is not aimed at the intensive battery farmers dealing with hundreds or thou-sands of eggs at a time, and these producers will find little of interest in this booklet.
Agromisa discovered that although it was relatively easy to find in-formation on how to manage hens to sit on eggs, there was far less information on small mechanical incubators. We therefore decided to design and produce two different models, one heated electrically and the other using kerosene (paraffin). Kerosene incubators, whether with or without thermostats, generally give good results. They can be made

Introduction 7
out of local materials and do not require much improvisation to get them running.
Between 1990 and 1998 Agromisa received a lot of feedback on its early Agrodok on egg incubation. Your reactions have been taken into account in this new edition. In the earlier edition we described in de-tail two types of electrically heated incubator, one using an ether cap-sule thermostat, and one with a bimetal thermostat. Although the pro-totypes presented no problems, it seems that when used locally there was a serious fire risk. They were also vulnerable to cuts in the power supply and expensive to produce. In addition a certain amount of technical knowledge was needed for their construction. For these rea-sons we have decided not to spend time on these types of incubator in this new edition.
Although electric incubators work very well in general, there are dis-advantages. They are difficult to build. They also require a good elec-tricity supply with no danger of power failures, and one has to be sure of being able to meet the high cost of electricity. On the other hand it is a fact that the lamps used to heat the eggs are essentially providers of light, whilst the process of incubation really requires a source of heat rather than light. Finally, if the incubator is being bought, it is essential that a set of instructions be provided and that spare parts are obtainable for it in the future.
This Agrodok only covers the subject of incubation. It gives little in-formation on other aspects of chick rearing, such as feeding and dis-ease control. You should ask the local poultry farmers or agricultural-ists in your area about the vaccinations required for infectious dis-eases, and also about local breeds that have proved their worth in local conditions (layers, broilers, dual-purpose birds). The bibliography in Appendix 1 also provides some useful information.
A simple way of obtaining chicks is to buy them in. This is often ex-pensive, and you should make sure you obtain a good breed of bird capable of laying large clutches of eggs. These improved breeds gen-

Hatching eggs by hens or in an incubator 8
erally require higher standards of feeding and management than the more resistant local breeds. If you can meet these standards - and only if this is the case - the extra cost of buying in quality chicks will be worth it. But you can also get very good results by artificially hatching the eggs in an incubator, instead of buying in the chicks.
Natural incubation or a mechanical incubator? 9
2 Natural incubation or a mechanical incubator?
There are a number of factors to be taken into account when deciding whether to use a broody hen or a mechanical incubator, and these should be weighed up in the light of your own particular circum-stances. In this chapter we will consider:
? the role of the hen in different production systems, ? the number of eggs to be hatched, ? the work involved, ? the costs of building an incubator, ? the cost of running an incubator, ? the different performance obtainable from hens and incubators.
2.1 The role of the hen in different production systems
Extensive systems In these systems hens are kept in relatively free-range conditions, picking and choosing the insect and plant food that they find in their path. They find all the food that they need - in the wet season they for-age amongst the local crops, and in the dry season they feed off vari-ous protein-rich foods they find in their vicinity. They go broody and sit when they have laid enough eggs. In fact they go broody when their laying period ends; they then sit on the eggs, hatch them, and raise their chicks. They teach the chicks how to survive and look for food. The only role of the poultry farmer here, apart from feeding the hens, is to prevent the hens being stolen and to protect them from predators. When the hen has finished raising her chicks she starts to put on weight again and can be sold for meat. A hen will generally live for about 5 years.

Hatching eggs by hens or in an incubator 10
Intensive systems Here the hens� energy is focussed on production, i.e. putting on weight and laying eggs. The farmer makes sure they are properly housed and fed, and protected from disease. Responsibility for hatching the eggs and raising the chicks is taken by the farmer, who is interested in mak-ing sure that the hens produce as much meat and eggs as possible. The hens may lay for a period of 8 - 10 months. Their housing must be clean and their diet must be well rounded and of good nutritional qual-ity.
Once they stop laying, hens don�t put on much meat, and go rather to fat. The quality of their meat deteriorates and they are often discarded before they come into lay again.
2.2 The number of eggs to be hatched As hens only go broody and sit to hatch when they feel like it, they are not always at hand when they are needed and certainly not regularly throughout the year. If you only need chicks to replace ageing hens, then using broody hens will probably be sufficient. The advantage of an incubator, of course, is that you can use it whenever you need it. The incubator we describe in this booklet can hatch out 50 eggs at a time. Two or three batches of 50 eggs can be hatched in a relatively short time. If you need to handle larger numbers of eggs, it might be more economical to buy an incubator with a capacity of, for example, 100 eggs.
2.3 Labour required When using broodies, if there are no problems with the hens, the time spent on looking after them is limited to feeding them. Using an incu-bator however can be more time-demanding: constructing the incuba-tor, regulating the temperature (during operation), turning the eggs regularly and preferably three times a day up to day 19, regularly add-ing fuel to the burner and/or water to the reservoir. Proper care must be taken to ensure that the right temperature is maintained. All this

Natural incubation or a mechanical incubator? 11
may add up to one or two hours of work per day and requires careful attention. Once the eggs are hatched in an incubator, the chicks will have to be reared and looked after. To be able to do this, you will also have to build an artificial brooder (see Chapter 5 for brooding chicks). A hen, on the other hand, will take care of her chicks herself and will protect them against the cold.
2.4 The cost of building an incubator Most of the material to use should be available locally, such as timber, wire netting, sheet iron, water containers, insulation material (hay, cardboard, etc.), a kerosene lamp, nails, glass, a kerosene container and tools.
You will also need a thermometer, to be able to know the latest mini-mum and maximum temperatures. Some incubators require a constant temperature of 38°C. This means using a thermostat, which can either be bought or home-made. Chapter 5 explains how to make a thermo-stat and in Chapter 7 we explain how to use it. To be able to make one of these thermostats special tools and materials will be needed.
The third device needed to ensure conditions as close as possible to nature inside the incubator is a hygrometer. This is quite a simple in-strument but it can be hard to find locally. It may have to be bought elsewhere. You can also make one yourself, but its construction cannot be dealt with in this Agrodok.
These special instruments can be obtained from the suppliers listed in Appendix 1.
2.5 The cost of running an incubator Broody hens are much more economic than mechanical incubators as they only need to be given feed and water to hatch 12 eggs. The kero-sene incubator described in Chapter 5 will use about half a litre of kerosene every 24 hours for 40 eggs. If 70% of the eggs hatch you

Hatching eggs by hens or in an incubator 12
will get 28 chicks (male and female) in 21 days. You will need 21 x 0.5 litres of kerosene, therefore each chick can be said to cost about half a litre of kerosene. This is an approximation of course, and the actual amount of kerosene used will depend on the construction of the incubator, the time needed to heat the incubator before setting the eggs, how carefully you operate the incubator, etc.
Heating the incubator requires the use of kerosene, gas or electricity. We only consider the use of kerosene incubators in this book. Electric-ity is not considered for the reasons given in Chapter 1.
2.6 The different performances obtainable from hens and incubators
A hen sitting on eggs will provide exactly the right temperature, hu-midity and ventilation for the eggs to develop well. These standards cannot be met by the incubator described in Chapter 5. To optimise the hatching results of artificially incubated eggs, you will need some ex-perience in the careful operation of the device.
Even then your results may be ruined by bad luck. If you run out of fuel you stand to lose 40 eggs. In comparison, if a broody hen aban-dons her nest, only 10 eggs will be lost.
Table 1 below gives an overview of the various factors to be taken into account in the choice of method.

Natural incubation or a mechanical incubator? 13
Table 1: Different aspects of natural (hens) and artificial incuba-tion, for extensive and intensive systems
Aspect Extensive production (Up to 50 eggs at a time)
Intensive production (Over 100 eggs at a time)
1. Technique Hens ? not always broody when
required ? not always cooperative
Incubator ? always available
2. Labour costs ? extra feeding required ? a minimum of sanitation
required ? water ? shelter ? protection
? heat source ? checking and regulating
the temperature ? building the incubator ? turning the eggs artifi-
cially ? refuelling the lamp ? filling the water container
3. Construction costs limited: ? nesting boxes
? local materials ? thermometer ? thermostat ? hygrometer
4. Running costs limited: ? straw sawdust ...
? fuel: kerosene
5. Performance and results ? natural hatching condi-tions guaranteed (tem-perature, relative humid-ity, ventilation)
? hatching qualities: local breeds: easy improved breeds: difficult
? almost optimal conditions ? improved breeds may
permanently produce eggs over a long period.
6. Risks ? few risks ? technical risks: loss of all or some of the eggs

Hatching eggs by hens or in an incubator 14
3 Preparing eggs for incubation
There are three aspects to the preparation of the eggs for incubation: ? selection, ? cleaning, ? storage.
3.1 Selection of eggs for hatching The eggs of different poultry breeds vary in weight from 30 to 70 grams. Best hatching results are obtained by using normally sized eggs from good quality layers (hens that lay well). By taking care to use eggs from good stock, good quality chicks will be obtained, as the qualities of the hen are passed on through her eggs.
To hatch out a chick an egg must of course have been fertilised. There is no proven method of determining whether a fresh egg has been fer-tilised or not. It is therefore important to keep a good fertile cockerel with the hens. One cock can serve several hens, with best results being achieved with 10 hens per cock. After service by a fertile cock a hen will produce fertilised eggs for a period of at least eight days. If you are using a heavy breed, you may need to keep fewer hens per cock.
If you do not run a cockerel with your hens, you should arrange to get hold of one for a short period. Two weeks before starting to collect eggs for hatching, put the cock in amongst them to ensure that the eggs are fertilised. You should also pay attention to each hen�s laying period. She lays her best eggs between the second and eighth month of her laying period. If you are watchful and follow the advice that has been given above, your hatching results will improve.
Never use odd-shaped eggs for incubation (too long, too short, mis-shapen), as their contents will also be abnormal.

Preparing eggs for incubation 15
The egg shell is also an important factor. There should be no cracks, as moisture will be lost during incubation. Dried-out eggs will produce either weak or dead chicks. Avoid using eggs whose shell is contami-nated with pieces of eggshell and feed. These will block the pores in the shell and block the chick�s access to fresh air.
Try to use eggs from several different hens in order to reduce the risks of failure.
3.2 Cleaning the eggs Eggshell is porous - air and water can pass through it. Dirt and dis-ease-bearing organisms can also slip through the eggshell. Reduce the risk of disease by using clean eggs. Never use very dirty eggs for hatching, and it they are soiled clean them with a dry cloth. Do not wash eggs in water. Water will open up the pores and give poorer hatching results.
3.3 Storage If possible, use fresh eggs for hatching. Eggs to be stored should be kept in a cool place. At 20°C it is possible to store eggs for three days.
Eggs for hatching should be collected twice a day and cooled off as quickly as possible. This is especially important when the weather is warm. The optimal level of relative humidity for storing hatching eggs is 70 - 85%. If you find mould on your eggs, the humidity is too high. Never use mouldy eggs for hatching!
All poultry eggs should be stored with the air space inside the eggs (the �air pocket�) uppermost.
3.4 Guidelines for handling hatching eggs ? Collect hatching eggs from the laying sites twice a day.

Hatching eggs by hens or in an incubator 16
? Select the best eggs. Take into account the size of the eggs, their shape, the cleanliness and condition of the shell, and the breed of hen you wish to obtain. ? Only use fresh eggs. If you want to hatch a lot of eggs together, you
can use eggs of up to 14 days old, provided they have been stored at 10 - 16°C. ? Clean dirty eggs with a dry cloth. ? Always place the eggs with the air pocket at the top. ? Any eggs stored at 10 - 16°C should be kept at 21 - 25°C for 12
hours before being transferred to the incubator.

Natural incubation: the hen 17
4 Natural incubation: the hen
This chapter describes natural incubation (brooding and hatching) and how it can be improved. Anyone with some experience of poultry-keeping should find this chapter reasonably straightforward.
4.1 Selecting the hen Look out for a hen that is clearly �going broody�. She will display typical behaviour: ? She produces a typical broody hen sound. ? Her comb shrivels up. ? She occupies her nest, refusing to leave it. ? She may try to gather other eggs from neighbouring nests, pushing
them into her own.
If this behaviour lasts for two days you can assume that the hen is ready for brooding. Broody hens should be healthy and not too small. The following paragraphs give some suggestions for improving hatch-ing conditions.
4.2 Preparing for hatching Dust the broody hen with an insecticide against fleas and lice. Be care-ful when using these products, as they can be harmful to poultry and people if used in the wrong quantities! Consult the local veterinarian. If lice and fleas remain a problem, dusting should be repeated after 10 days. You can find more detailed information on disease prevention in Agrodok 4 �Small-scale poultry production in the tropics�.
Put the hen in a clean nest box after dusting (see next paragraph). At first, until she has 6 to 12 eggs, she will only sit irregularly. Once she starts sitting regularly, remove all the eggs and replace them with good eggs that you have selected for hatching.

Hatching eggs by hens or in an incubator 18
Mark the eggs with a pencil. The eggs that have been removed can be used for animal feed. They can also be boiled and mixed with the hen�s normal feed. The size of the hen and the temperature during the night will determine the number of eggs to put under her. Large hens with good plumage can cover and keep warm as many as 14 eggs, but smaller local hens may be able to cover no more than eight eggs prop-erly.
A duck can often be used as an alternative to a hen. However their broody period is more difficult to detect than in hens and once they start to sit they are even more difficult to dislodge from the nest than a hen.
4.3 The nest box The nest box should be about 35 x 35 cm square and 40 cm high (1 inch = 2.5 cm). The nest itself is about 25 cm wide.
Sitting can be encouraged by keeping the box dark, covering it with a piece of cloth. However the hen must be able to come and go from the nest to feed.
Figure 1: Nest box for broody hen.
Natural incubation: the hen 19
Before using a nest box, clean it thoroughly and dry it in the sun. Put some straw, hay or dry leaves in the box, in the shape of a nest or sau-cer, to prevent the eggs from rolling out. If you can get them, a hand-ful of dry crushed tobacco leaves will help to keep the nest free of parasites (nicotine is an insecticide!). The boxes should be set slightly apart (about 1 metre) to avoid the hens quarrelling. Put the boxes in a safe place, out of reach of dogs, rats and snakes.
4.4 What to do during brooding A broody hen will leave her nest once a day to drink, eat and defecate. Feed should be placed near the nest box. No special feed is required. If the hen refuses to leave her nest, she can be lifted gently and put in front of the feed. She should not leave the nest for more than about 15 minutes. She will often stand up and shift or turn the eggs. This is be-cause the eggs need to be moved about, as the best and warmest place is in the middle under the hen. The eggs should be examined on the ninth day (see Chapter 7). If the chicks have difficulty hatching out, the humidity is probably too low. To help them hatch, put some soil and grass under the wire floor of the nest box and keep it moist.

Hatching eggs by hens or in an incubator 20
5 Incubator construction
5.1 The essentials for good incubation
the micro-climate inside the incubator Mechanical incubators imitate a hen�s natural brooding abilities by providing an artificial micro-climate with the proper temperature, hu-midity, and ventilation, as well as by allowing the eggs to be turned regularly.
Temperature An incubator must reproduce temperature conditions comparable to those provided by a hen warming her eggs with her body heat. If sea-sonal temperatures fall below 35°C an incubator equipped with some form of heating will have to be used. More information on tempera-tures is given further on in this chapter.
To regulate the temperature a 0 - 50°C thermometer and good insula-tion are indispensable. The heat in the incubator is either controlled manually or with the help of a thermostat. Do not try to incubate eggs in seasons where normal temperatures stay above 40°C - this sort of heat kills the embryos. Incubation is impossible in such conditions, except with air-conditioning, and that brings in other complications for the temperature and humidity levels.
Relative humidity levels Relative humidity varies widely with temperature. Incorrect levels will result in the eggs drying out or being poisoned by the gases produced inside the shell. Proper humidity levels can be obtained by putting some water in small containers inside the incubator. A wet-bulb ther-mometer (see below) or a hygrometer is used to measure relative hu-midity.

Incubator construction 21
Ventilation The chick being formed in the egg needs to take in oxygen and give out carbon dioxide. Good ventilation is therefore important, especially as other poisonous gases are also formed and will have to be dispersed by ventilating the incubator.
Regularly turning the eggs This is treated in detail in Chapter 7.
It is now time to turn our attention to the practical question of con-structing an incubator.
5.2 Building the case The case that we suggest you build is the one used in the kerosene in-cubator designed and tested by Agromisa.
Dimensions The incubator described in this book can take up to 50 eggs. It is 55 cm wide and 45 cm long (internal dimensions). An incubator measuring 35 x 35 cm can hold a maximum of 35 eggs. An incubator measuring 60 x 50 cm can hold a maximum of 70 eggs. See figure 2.
Materials Good hardwood is preferable. Softer wood will soon warp in humid conditions. The incubator case can have single or double walls, de-pending on the insulation material to be used (see Insulation). Small wooden laths are used to strengthen the corners. Ideally the door should have a double-glazed window (two layers of glass), but a sin-gle thickness of glass will also do. It should be no bigger than is nec-essary for inspecting the eggs.
The egg tray and the turning device The egg tray consists of a piece of wire netting, fixed if possible at a slight angle with about a centimetre of slope. This allows the eggs to be placed at the best angle with the pointed end downwards and the air

Hatching eggs by hens or in an incubator 22
pocket uppermost. The eggs should be turned regularly (see Chapter 7). This can be done manually, but a simple device exists that can be used to do the job quickly and easily.
Figure 2: Incubator with kerosene lamp heating.
Incubator construction 23
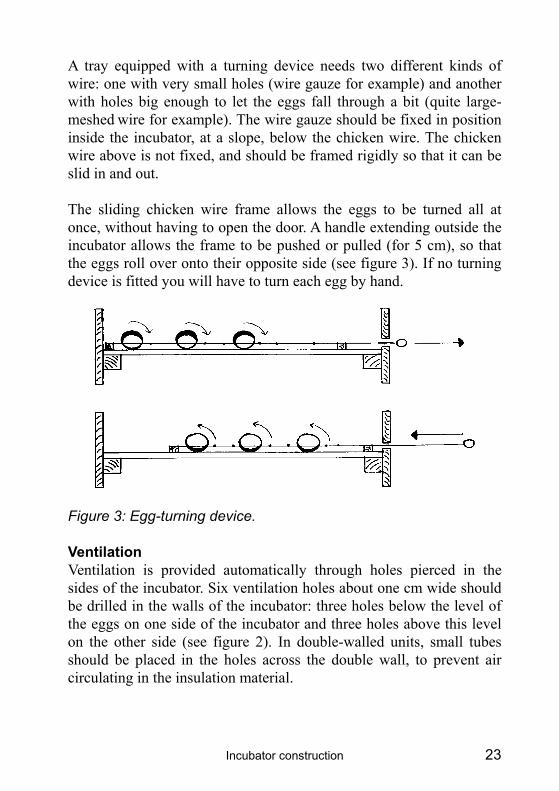
A tray equipped with a turning device needs two different kinds of wire: one with very small holes (wire gauze for example) and another with holes big enough to let the eggs fall through a bit (quite large-meshed wire for example). The wire gauze should be fixed in position inside the incubator, at a slope, below the chicken wire. The chicken wire above is not fixed, and should be framed rigidly so that it can be slid in and out.
The sliding chicken wire frame allows the eggs to be turned all at once, without having to open the door. A handle extending outside the incubator allows the frame to be pushed or pulled (for 5 cm), so that the eggs roll over onto their opposite side (see figure 3). If no turning device is fitted you will have to turn each egg by hand.
Figure 3: Egg-turning device.
Ventilation Ventilation is provided automatically through holes pierced in the sides of the incubator. Six ventilation holes about one cm wide should be drilled in the walls of the incubator: three holes below the level of the eggs on one side of the incubator and three holes above this level on the other side (see figure 2). In double-walled units, small tubes should be placed in the holes across the double wall, to prevent air circulating in the insulation material.

Hatching eggs by hens or in an incubator 24
Insulation Insulation is very important to keep the temperature constant. Insula-tion material that holds a lot of air is best. You could for example use polystyrene or cardboard<cColor:Red> <cColor:>to line the inside of a single-wall incubator, or for a double-walled system you can stuff hay, coconut fibre or cotton between the two walls.
As air is trapped in such material, there is almost no movement of heat from the inside to the outside of the walls. Besides helping to provide a constant temperature, proper insulation also saves fuel. It should help to keep the temperature near the walls the same as in the middle of the incubator.
It is sometimes easy to find boxes made of expanded polystyrene; these provide excellent insulation. Old ice boxes for example, if they are large enough, could be used to make an incubator, as they are very well insulated. Being light they are also easy to transport. However they are very inflammable and their use with a heating lamp is dan-gerous. There is also the problem that the incubator dimensions are determined by the size of the polystyrene box available. As this sort of incubator would have to be built in a completely different way from the one described in this Agrodok, we will not go into any more detail here.
Hot water tank and water containers A special place has to be provided at the bottom of the incubator hous-ing for the water tank (see figure 4). There must also be a space for small containers of water on the egg trays. The total height of the in-cubator will therefore be 40 cm.
The door A vertically sliding door is particularly useful, as it can be either half opened (to refill the water containers) or completely (to check the eggs) without allowing too much warm air to escape. A normal hinged door would let too much heat out and the temperature would drop too fast. The door should have a window in it, so that the temperature and

Incubator construction 25
humidity can be checked without having to open it. A double-glazed window would be ideal for insulation.
5.3 Heating with a kerosene lamp To warm the incubator a kerosene lamp is lit underneath a 10 litre tank of water fitted into the case of the incubator. The distance between the lamp and the tank will have to be determined by trial and error. The hot water in the tank radiates heat into the air of the incubator and warms the eggs (see figure 4).
Figure 4: Side view of a hot water incubator (with vertical dimen-sions).

Hatching eggs by hens or in an incubator 26
The sides and the top of the tank must be right inside the incubator. A piece of towelling (or other thick cloth) should be draped across the top of the tank to diffuse the heat across the bottom of the egg tray.
With this sort of incubator there is little risk of the temperature drop-ping suddenly. If the kerosene lamp goes out the temperature in the water tank only falls gradually. Thanks to the fact that the water takes a long time to cool down, the temperature in the incubator is relatively stable. The towelling acts as a buffer. Figure 4 shows a side view of the same incubator as in figure 2.
If outside temperatures remain fairly stable this sort of incubator re-quires no thermostat. It can be made by anyone with a little know-how and the necessary tools. If you don�t have a container suitable for the water tank you will have to make one yourself. Make sure it is welded water-tight.
The lamp heating the water in the tank will produce gas. Make sure that the gas does not enter the incubator. Use fire-proof material like clay to stop up all the chinks between the tank and its stand.
Figure 5: Filling the tank.
The temperature in the incubator can be regulated by adjusting the flame of the lamp and by checking the thermometer every two or three hours. The hot water in the tank acts as a heat store, so that it may be possible to turn the lamp out for a while once the water is hot enough. After a bit of trial and error you will be able to keep the incubator at a constant temperature by heating it at regular intervals.

Incubator construction 27
As figure 5 shows, once the tank has been filled with water there should be no air in it at all. Any air inside will have an insulating ef-fect, preventing the heat from rising from the water into the incubator.
When you heat the tank full of water, the water will expand and take up more room. To stop pressure increasing in the container, solder a small nozzle into a hole in the side of the tank and attach a transparent tube about 40 cm long to the nozzle. Fix the tube so that it rises verti-cally up the side of the incubator, so that you can see the water level rising in the tube as the tank heats up. Make sure that there is always enough water in the tube to prevent air entering the tank. Top up the tube with water whenever the level drops too low.
Figure 6: Kerosene incubator with internal heat source.
Figure 6 shows a slightly different model of kerosene incubator. In this case the source of heat (which could be a kerosene lamp) is right inside the incubator. In addition, the hot water tank is at the top of the incubator. This incubator model is described in the French-language periodical �Communautés Africaines�, together with building instruc-tions. See the bibliography for details.

Hatching eggs by hens or in an incubator 28
5.4 Controlling the relative humidity Air humidity or relative humidity is less critical for hatching results than heat.
In order to achieve the best results and to prevent the eggs from drying out, try to keep the humidity in the incubator within a certain range. This is because an egg loses a lot of moisture through the pores of the shell. At a certain point eggs which have dried out are easy to recog-nise (see Chapter 7). When the chicks start to hatch it is important to keep the correct humidity level. If the air is too dry, the chicks will dry out very fast and die. If it is too moist, the exchange of gas through the eggshell will be affected. The developing embryos may then be poi-soned by the carbon dioxide gas they produce. Poisoning symptoms are described in Chapter 10.
The humidity in the incubator is measured using a special thermome-ter called a wet-bulb thermometer (see figure 7).
Figure 7: Wet-bulb thermometer.
A wet-bulb thermometer is an ordinary thermometer whose mercury bulb is wrapped in cotton. The cotton is kept moist and acts as a wick. The wet-bulb thermometer reads a lower temperature than the normal (dry-bulb) thermometer. The difference in the temperature readings given by the dry-bulb and the wet-bulb thermometers is a direct meas-

Incubator construction 29
ure of the relative humidity. If the air in the incubator is dry, water evaporates faster from around the wet bulb and causes the thermome-ter to indicate a lower temperature. Table 2 below shows how humid-ity levels are related to temperature.
Table 2: Examples of relative humidity seen in relation to tempera-tures indicated by wet- and dry-bulb thermometers
Incubation day Wet-bulb Tem-perature (°C)*
Dry-bulb Tem-perature (°C)
Relative hu-midity (%)
Maximum weight loss** (%)
0-18 31 38,9 60 19-20 27 36,1 50 } 12-14 21 33 36,1 70 *To convert Centigrade to Fahrenheit: °F = (1.8 * °C) +32 **During incubation, from day 1 to day 21
There is another way of checking on the relative humidity conditions after incubation, and this is by weight. Throughout their time in the incubator the eggs will lose weight and get lighter. This is partly be-cause the water inside them evaporates, and partly because the chick inside gives off carbon dioxide. In general terms we can say that dur-ing the period of about 21 days of incubation the eggs will lose about 12 to 14% of their weight at the start of incubation. By weighing the eggs on the first day and then every five days afterwards we can tell if the relative humidity up to now has been good (12-14% weight loss), too high (under 11% weight loss) or too low (over 15%). Too low a humidity is worse for the eggs and chicks than excessive humidity.
This is a good method if you are inexperienced, as it will help you to adjust the conditions inside the incubator for future operations, so that you are gradually able to get them as close as possible to natural con-ditions (under the hen).
5.5 Two practical examples Here are two practical examples of incubator construction, one from Kenya, and the other from Cameroon.

Hatching eggs by hens or in an incubator 30
Mwatate, Kenya This first example concerns a simple incubator heated with a kerosene lamp and using only one way of controlling the internal conditions - a thermometer. It is a small incubator capable of holding 50 eggs and was built by the manager of a rural livestock centre in Mwatate, Kenya.
Only the cheapest local materials were used to build the incubator. Three air holes were pierced in two sides of the incubator. The hot water tank, full of water was positioned above the lamp. A plastic plate held water for the humidity levels.
Wood: 200 cm x 5 cm x 5 cm for the framework 100 cm x 2.5 cm x 30 cm for the stand for the water
tank Insulation panels: 2 m2 for all the sides of the incubator case Hardboard: 1 m2 for the sides of the incubator case Lamp: Kerosene lamp with a half litre capacity Thermometer: Veterinary thermometer + observation window in
the incubator Hot water tank: An empty 4 litre cooking oil tin, to which a tube
(1.2 cm diameter, 1 metre long) was soldered. The tube is transparant at the end so that water level can be checked.
Hose pipe: 2 m Egg tray: Wire mesh covered with a cotton cloth Water container: Plastic plate One torch: To candle the eggs
Twenty eggs were incubated. They were turned 3 times per day up to the 18th day. A torch was used to candle the eggs (see Chapter 7). A thermometer was placed next to the eggs on the tray so that the tem-perature could be checked.
The results were as follows: of the 20 eggs in the incubator, 11 hatched out, 6 embryos were still-born, 2 eggs were infertile and one

Incubator construction 31
was broken. Although these are not outstanding results, they are suffi-ciently encouraging to justify further attempts. The hatching rate will almost certainly improve when a good routine is established for using the incubator.
Yaoundé, Cameroon An experienced farmer from Yaoundé in Cameroon has written to us with his experience of incubation. He made an incubator inside a tele-vision set equipped with a thermostat (bought in). The inside meas-urements are 57 x 50 x 60 (height) cm. The incubator is insulated with paper and cardboard. There are no air holes. The door on the front is insulated but there is no window. The eggs were turned four times a day by hand.
The incubator can take 70 eggs, but only 50 were used in the test. The heat source was not explained in the description.
The temperature varied from 34 to 37°C. It once rose by accident to 40°C, and on another occasion even to 41°C. There was a difference of 6°C between the wet-bulb and the dry-bulb thermometer readings. 40 eggs hatched out on the 21st and 22nd day. This is quite a good per-formance, given that the temperature was not ideal. Of the 10 eggs that did not hatch out, 2 contained dead embryos, 2 were cracked and 2 were infected.

Hatching eggs by hens or in an incubator 32
6 Automatically controlling the temperature
As explained in Chapter 5, the temperature in a kerosene lamp incuba-tor can be controlled manually. However the temperature can also be controlled automatically using a thermostat consisting of a capsule filled with ether.
6.1 The ether capsule Figure 8 shows the principle involved. The ether capsule compresses when it is cold, i.e. at low temperatures, and expands when hot. Any change in temperature brings about a transformation. The change in-volves a process of expansion: the liquid ether, which takes up little space, changes into gas which takes up a lot of space. Ether actually changes into gas and expands at 35°C, which happens to be very close to the temperature we are looking for in incubation, i.e. 38°C. Thus the fact that the ether capsule is very sensitive to the slightest changes in temperature suits our purposes very well.
Figure 8: Ether capsule.
Figure 9 shows how the whole device works. The thermostat consists of a double capsule filled with ether which expands when the tempera-ture rises. The capsule hangs inside the incubator. It sits in a special support (see figure 9), and is held between an adjustable screw (upon which it is seated) and a rod attached to the upper capsule disk. This rod can slide up and down a small tube linking the capsule holder to the incubator lid.

Automatically controlling the temperature 33
As the temperature rises, the capsule expands, pushing the vertical rod towards the lid. The rod touches a balancing arm which tilts and lifts a small door or trap in the lid of the incubator. Hot air then escapes from inside. When the temperature drops, the capsule contracts and the trap closes again. Any hot air inside the incubator is then trapped inside. The trap and the capsule can be adjusted with screws.
The final adjustment is a matter of trial and error. The first thing to do before adjusting the capsule, the rod and the balancing arm is to warm up the incubator to incubating temperature.
Figure 9: Ether capsule in a kerosene incubator

Hatching eggs by hens or in an incubator 34
6.2 Building an ether thermostat Ether thermostats and even ether capsules can be ordered from com-panies specialising in incubators and incubator parts. There is a list of possible suppliers of incubators and spare parts in Appendix 2.
You can also make a capsule yourself, although it is not a simple mat-ter. A description is given in figure 10. Follow the order given in the instructions.
Figure 10: How to make a double ether capsule.
1 Take four copper or brass disks about 0.5 - 0.8 mm thick and 10 to
12 cm in diameter.
2 Press them firmly in a wooden mould to obtain a pattern of concen-tric grooves. (Instead of using a mould you can use tubes of differ-ent diameter to stamp the grooves into the disks.) Make sure that

Automatically controlling the temperature 35
you can see the pattern of concentric grooves in the disks and that the disks are slightly concave. Instead of the disks you can also use two grooved food tin lids. Work them until they are concave.
3 To make the double capsule the two inner disks have to be joined at their centres, by soldering them together with tin. This can be done by making a hole in the centre of each and either � filling each hole with tin - after having assembled the two cap-
sules (see next step), or � soldering a small tube between the two inner disks - before as-
sembling the capsules.
4 The inner disks have to be soldered, at their edges, to the outer disks. Once this is done you will have created the double capsule. The space inside the capsules is a few cm³ at the most.
5 Using a syringe inject a small amount of ether into each capsule. Ether is a very volatile liquid; the small holes will have to soldered immediately, so that none of the ether escapes. Be very careful - the liquid is inflammable, and the capsule may catch fire.
There is no exact rule for the quantity of ether to use. The thermo-stat will have to be adjusted later. If too little ether is used the cap-sule will not expand sufficiently. If too much is used, you just have to adjust the thermostat with the adjusting screw. It is therefore bet-ter to use too much rather than too little ether.
6 The double capsule is now fixed. The upper part is soldered to the vertical rod ant the lower disk to the adjustable screw.

Hatching eggs by hens or in an incubator 36
7 Using the incubator and other procedures
In this chapter we look at how to set up and run the incubator, includ-ing how to adjust the temperature, humidity and ventilation. We also look at the turning and candling of the eggs and the records to be kept.
7.1 Setting up of the incubator Use the incubator in a room with good insulation, where temperatures will change as little as possible day and night. Good ventilation should be provided, but there should be no draughts. If you make sure of this, you will find your incubator functions better and the fuel bill will de-crease. The incubator could also be placed inside a large box to provide addi-tional insulation, as long as there is adequate ventilation. Before using the incubator for the first time, operate it for at least one week without eggs.
Set up a thermometer on the egg tray with its bulb at a level with the top half of the eggs. If you have several thermometers check to see that the heat spreads evenly across the tray. Open up 2 to 4 air holes and wait for the temperature to stabilise.
You will have to make a few adjustments before the incubator settles at the right temperature. Turn the lamp wick up or down to adjust the heat until you have a constant temperature of 38.9 °C. Don�t forget that as the kerosene level goes down, the flame will also weaken. Fill up the lamp regularly.
Regulation can be said to be complete when the temperature in the incubator has remained stable for at least 24 hours without having had to adjust the thermostat. If it is difficult to regulate you will have to consider insulating the incubator better.

Using the incubator and other procedures 37
Completely fill the water tank with hot water (i.e. at about 40 C). The heat will spread better if there is no air in the tank (see figure 5). Put a container of hot water in the incubator and check the humidity level (see below). When everything is set up properly the eggs can be put on the tray.
7.2 Adjusting the temperature during incubation
The most crucial factor during incubation (especially during the first week) is the temperature. The optimal temperature in the first two weeks is 38.9°C with no more than half a degree of variation up or down. Any rise above 40.5°C is fatal for the embryos.
A rise in temperature at the same time as a drop in humidity can have disastrous results. Drops in temperature will delay hatching but are less harmful than increases in temperature.
From day 19 onward the tempera-ture should be reduced to 36.1 °C because the chicks will be produc-ing their own heat.
If new-born chicks with open beaks can be made out, they are trying to lose heat by breathing more. This might indicate too high a tempera-ture in the incubator. Check the thermometer. In a kerosene incuba-tor the hot air comes from below, and the highest temperatures are of course at the point of the heat source. The most important tem-perature to measure is the tempera-ture at the level of the eggs. The
Figure 11: Checking the tem-perature of the eggs.

Hatching eggs by hens or in an incubator 38
bulb of the thermometer should be positioned exactly 5 cm above the bottom of the egg tray. See figure 11.
7.3 Adjusting the humidity Optimum humidity levels are given in table 2 in Paragraph 5.4. The wet-bulb thermometer will not give correct readings if the cotton around the bulb is dirty. Clean this cotton wick regularly with soap. If you have difficulties in reading the humidity, check the eggs by �can-dling� as described fur-ther on in this section. The correct amount of air space inside the eggs (the air pocket) is shown in figure 12. The humid-ity is adjusted by putting containers of warm water inside the incubator. To prevent the temperature from dropping, use water at body temperature rather than cold water. The larger the surface of water, the more the water will evaporate and the higher the wet-bulb readings (and therefore the humidity) will be. The wet-bulb tempera-ture readings will fall rapidly when you remove a water container. If you need to raise the humidity level or if you don�t have enough con-tainers, put a wet sponge or cloth in the incubator. It is also possible to use a sprayer filled with warm water. Clean the sprayer thoroughly and spray into the incubator through the ventilation holes.
Humidity levels will be influenced by the amount of ventilation and by the humidity of the incoming air.
Figure 12: The proper size of the air pocket at different stages of incubation.

Using the incubator and other procedures 39
The humidity can also be measured by a clock- or hair-hygrometer. Hygrometers are expensive to buy.
7.4 Ventilation in the incubator Good ventilation is important because embryos need oxygen and pro-duce carbon dioxide. The growing chicks may suffocate or choke through insufficient ventilation. The incubator in this Agrodok is pro-vided with air holes for ventilation. The diameter of the holes is about 1 cm. The holes can be opened and closed with plugs. It is difficult to specify how many holes you have to open - it depends on how often you open the door to turn the eggs. Every time you open the door fresh air will enter. Therefore, when you stop turning the eggs after 19 days you may need to open extra holes. At least two holes will have to be permanently open in any case. If you use the automatic turning de-vice described in Chapter 5.2, you will have to have more holes open.
7.5 Turning the eggs If you do not turn the eggs, hatching results will be very poor. There is a clear relationship between the number of times the eggs are turned and the amount of eggs that hatch. Make sure that the eggs are turned 3 times a day for the first 19 days; after that turning is no longer nec-essary. It is most important that you turn the eggs with regular time intervals, than that you turn them more often than three times/day. In between turning times, do not move the eggs at all.
Turning the eggs is very easy with an automatic turner. You can also turn the eggs by hand. It should be done gently but you should not lose time. To prevent the incubator from cooling down, leave the door of the incubator closed as much as possible when you turn the eggs. The best way is to take the entire egg tray out, turn the eggs 180° and put the egg tray in the other way around. Keep the door closed while turning the eggs. If you suspect that the heat is not reaching all the eggs equally, exchange the eggs at the centre with the eggs on the edges of the tray. Mark one side of each egg with a cross or a number

Hatching eggs by hens or in an incubator 40
in pencil. Whenever the egg is turned the mark should change place. See figure 13.
Figure 13: Turning the eggs.
Be sure that your hands are clean. Any contact with the kerosene lamp may leave oily traces on your hands. Oil on an egg�s shell will seal it and air will not be able to pass through the shell.
7.6 Candling the eggs Infertile eggs and dead embryos can be detected by �candling�. Can-dling is of great help during the incubation period, as it can help to determine if the chick is developing according to expectations.
If the chick is not developing well, remove the egg, as it may produce unwanted gas later on. Try to find out why the egg did not develop properly. The troubleshooting list in Chapter 10 of this booklet may give some suggestions.
Candling is best started on the 9th day of incubation. You can start a few days earlier once you have some experience. Figure 14 and figure 15 show what you can expect to see when candling an egg. Remove any infertile egg or eggs containing dead chicks from the incubator.
A second candling should be done after 14 to 18 days of incubation. Once again remove all the dead embryos and check the humidity lev-els.
Do not candle eggs after the 18th day so as not to disturb the growing chicks. As breaking out of the eggs is very tiring for the chicks they need quiet and should not be handled during the last days.

Using the incubator and other procedures 41
Figure 14: Two types of home-made egg viewer (put the egg up against the hole).
Figure 15: Eggs after 9 days of incubation.
7.7 Keeping records It is very important to write down the date on which the eggs are put into the incubator. Note the temperature and humidity twice a day, us-ing table 3. If hatching results are poor at the end of the incubation

Hatching eggs by hens or in an incubator 42
period, your records will tell you whether the temperature or the hu-midity levels were to blame.
Normally hatching rates vary from 50 to 70%. It is rare to achieve 80% or over.
Table 3: Example of a record sheet.
Record sheet for incubator no.: Date of start: of incubation: Day no.
Time 1 Dry-bulb temp.
Wet-bulb temp.
No. times turned
Time 2 Dry-bulb temp.
Wet-bulb temp.
No. times turned
Notes
1 2 3 4 5 6 | | |
19 20 21

Raising chicks by artificial mothering 43
8 Raising chicks by artificial mothering
It is absolutely essential in raising chicks to provide them with the necessary warmth. In this chapter you can read about how to build a simple brooder, a device to ensure that the birds have the conditions they need. We also explain the use of an infra-red lamp to regulate the temperature.
8.1 The need for warmth In order to survive, newly hatched chicks need a source of heat that will prevent their body temperature from falling too low. Whilst they can move about and support low temperatures for a short period, it is important that they be able to warm themselves up as soon as they get cold.
Under normal conditions the mother hen will ensure that they are kept warm. She can handle twice as many chicks as she hatched herself, but only if she is given the chicks when they are small and no later than one day after her own eggs have hatched. If it is not too cold a hen can look after up to 15 chicks. Chicks that have got cold will not die immediately but will start to develop digestive disorders (diar-rhoea) in the week before dying.
8.2 Description of a simple brooder You will have to provide an artificial heat source, such as an infra-red lamp, a light bulb painted red, or an oil or gas lamp. Figure 16 shows a cardboard brooder, consisting of an infra-red lamp and a sort of box that will keep the heat in. The walls can be made of cardboard. The bulb is covered with a conical shade to direct the heat to the chicks.

Hatching eggs by hens or in an incubator 44
Figure 16: A cardboard brooder.
For the first week the lamp is placed 10 cm above the ground. For the first few days the temperature should be at 32°C. Check the tempera-ture at the level of the chicks, i.e. at 5 cm above ground level. The lamp should be raised 5 cm higher every week, as chicks will need less heat as they get older. As they are better protected by their new feathers the temperature can be reduced slightly. The temperatures to observe are given in a table below.
The lamp should hang in the middle of the brooder so that its heat spreads to the whole of the area. The corners of the brooder might be too cold for the chicks during the first two weeks. Put some bricks in these corners and remove them after two weeks. Another solution is to construct a brooder with a circular floor. Figure 17 shows a top view.
For 30 chicks the brooder floor should measure at least 60 x 60 cm. The floor consists of fine-mesh chicken wire, positioned about 5 cm off the ground. The droppings will fall through the holes and keep the floor clean. For the first two or three weeks, however, cover the wire with newspaper to prevent draughts and cold air from rising from be-low. The paper should be changed daily.

Raising chicks by artificial mothering 45
Figure 17: Top view of the brooder, with heat zone indicated.
8.3 The growing chicks Day-old chicks will soon start moving in search of whatever food they can find. They need good quality food, even better than that of the hens. If the weather is good and the place is safe from predators like rats, large birds and dogs, it might be a good idea to let them pick at some vegetation in addition to their normal concentrated feed.
Table 4: Recommended temperatures in the brooder Age in weeks Temperatures in °C (close to the ground) 0-1 32-30 1-2 30-28 2-3 28-25 3-4 25-22 4-5 22-20 5-6 20-18
After two weeks the chicks should be able to walk in and out of the brooder. The artificial heating can be turned off after 4 weeks, if out-side day-time temperatures are above 20°C. You might have to keep the lamp burning during cold nights. Keep an eye on the chicks to make sure that they are comfortable - do they huddle around the heat or do they move away from it?

Hatching eggs by hens or in an incubator 46
8.4 Guidelines for giving the chicks a good start
? The brooder should be cleaned thoroughly with a good disinfectant before putting the chicks inside. ? Keep the brooder dry and avoid draughts during brooding. ? Cover the floor of the brooder with (news)paper during the first
week and change the paper daily. ? Later cover the floor with clean dry litter (sawdust, dry sand, etc.).
Start with 2 cm at first and add clean dry litter daily, gradually building up to 7 cm thick. Alternatively you can use a wire-mesh floor. ? In the first few days feed the chicks by sprinkling grain on the paper
on the brooder floor. ? From the third day on, start feeding mash. ? Feed mash in small quantities, three to four times a day. This will
encourage the chicks to eat more, resulting in more uniform growth and reduced wastage. Some food should be left in the chicks� feed containers at the end of the day. ? Fresh water must be available at all times. If there is disease about
(coccidiosis or worms) you will have to use the proper treatments (consult a veterinarian). ? Provide enough food and water containers for all the chicks to be
able to feed and drink at the same time. ? Keep the brooder and its surroundings clean. Wash food and water
containers daily. ? If you find lice, mites and/or fleas, spray the empty brooder with a
good disinfectant (consult a veterinarian). ? The litter must be turned once a week. Pay particular attention to
litter near the water dishes. Turn it frequently to prevent it from cak-ing.

The eggs of other types of fowl 47
9 The eggs of other types of fowl
The eggs of other birds are not incubated in quite the same way as for hens. Here we will look at the incubation of the eggs of two types of domestic duck, and of turkeys, quail and guinea fowl.
When eggs are stored they should be placed with the air pocket up-permost. This is true for almost all types of fowl.
9.1 Eggs of the Mandarin or Peking duck and the Barbary duck (Cairine moschata)
For artificial incubation, a temperature of 38°C is best. During the first 24 days of incubating duck eggs, relative humidity should be at 70% (wet-bulb temperature = 31°C). During hatching the humidity should rise to 80%. Turning should be carried out several times a day, until the 26th day.
Most of the Mandarin duck�s eggs will not hatch out before 28 days, and the Barbary duck�s will even take 35 days. As duck eggs are dirt-ier than poultry eggs, they need to be cleaned as soon as possible, preferably without wetting them.
Storing conditions are the same as for poultry eggs. A hen that is will-ing to sit is capable of hatching almost as many duck eggs as she would of her own eggs. If the hen has no direct access to water, Pe-king duck eggs should be sprinkled daily with luke-warm water (i.e. at blood temperature) from day 15 to 24, and again on the last day of incubation. Barbary duck eggs should be sprinkled from day 15 to day 32, and on the last day.
Incubation conditions for the Peking duck are as follows (see also table 5).

Hatching eggs by hens or in an incubator 48
Table 5: Incubation conditions for eggs of the Peking duck.
Day Temperature °C
Relative Humidity %
Wet-bulb temp. °C
Max. weight loss %
Minimum turns per day
1-24 38 70 32 5 24-26 38 60 31 } - 5 26-28 37,5 80 32,6 0
The ideal temperature for artificial incubation is 38°C. Relative hu-midity should be at 70% until day 24 (wet-bulb temperature of 31°C). During hatching out the humidity should rise to up to 80%. The eggs should be turned daily until the 26th day. There is little difference for the Barbary duck, except in the time in-tervals. Ideal temperature is also 38°C. Relative humidity should not exceed 70% until day 29 (wet-bulb reading 32°C). During hatching out, the humidity should rise to up to 80%. The eggs should be turned daily until day 32.
Table 6: Incubation conditions for eggs of the Barbary duck.
Day Temperature °C
Relative Humidity %
Wet-bulb temp. °C
Max. weight loss %
Minimum turns per day
1-29 38 70 32 5 29-32 38 60 31 } - 5 32-35 37,5 80 32,6 0
For more information on duck keeping you can consult Agrodok 33: �Duck keeping in the tropics�.
9.2 Turkey eggs Turkey eggs also hatch after 28 days. Medium size eggs give better results than large eggs. They will develop faster in storage than poul-try eggs. For this reason they should not be stored any longer than necessary and they should be collected from the nest several times a day, every 3 hours for example. Not every turkey pullet is a good sit-ter. A broody turkey pullet must be watched especially during the last

The eggs of other types of fowl 49
(fourth) week of sitting. A turkey can cope with 15 to 18 eggs, whereas a hen will only manage 8 to 10 turkey eggs.
Table 7: Incubation conditions for Turkey eggs.
Day Temperature °C
Relative Humidity %
Wet-bulb temp. °C
Max. weight loss %
Minimum turns per day
1-24 39,0 60 31 5 } 12 24-28 37,5 75 33 0
9.3 Quail eggs Quail eggs should not be older than five days when they are set to in-cubate. Turning should be done seven times a day. Incubation takes 18 days. The ideal temperature is 37.7°C. Humidity should be at 60% until day 16. After day 16 the relative humidity may be raised to a very high level: 90% (wet-bulb temperature = 34°C).
Table 8: Incubation conditions for Turkey eggs.
Day Temperature °C
Relative Humidity %
Wet-bulb temp. °C
Max. weight loss %
Minimum turns per day
1-16 37,7 60 31 7 } 21,5 16-18 37,2 90 34 0
9.4 Guinea hen eggs The incubation period of guinea fowl eggs is 28 days. Incubation prac-tices are similar to those for ducks, although the birds are smaller.
Table 9: Incubation conditions for eggs of the Guinea hen.
Day Temperature °C
Relative Humidity %
Wet-bulb temp. °C
Max. weight loss %
Minimum turns per day
1-24 37,2 70 29,1 5 24-26 37 60 29,6 } - 5 26-28 36,8 80 32,6 0

Hatching eggs by hens or in an incubator 50
10 Troubleshooting
Problem 1: Too many �clears� (infertile eggs). When these eggs are opened: no development and no blood rings visible.
Probable cause Prevention a. Too many hens per male bird Use 1 male for every 10 hens b. Males are undernourished. Feed the males separately. c. Males fighting or interfering during mating. Do not keep big flocks, for which many
males are necessary. Always rear breeding males together.
d. Sterility, disease or leg-disorders in the male, or male prefers to mate only with cer-tain hens.
Change the male bird.
e. Male bird too old. Change the male f. Eggs are too old or have been stored or transported in poor conditions.
Avoid using eggs over 1 week old (see Chapter 3)
Problem 2: �Clear� eggs with signs of very early develop-ment (a blood ring or a small dead embryo found when opened).
Probable cause Prevention a. Temperature in incubator is too high or too low.
Check thermometer and thermostat. Follow advice in Chapter 8.
b. Eggs have been stored cold. Do not store eggs in a cold and or draughty place.
c. See 1.f. See 1.f. d. The birds have been kept in poor condi-tions.
Do not incubate the eggs of sick birds.
Problem 3: A lot of eggs with dead chicks.
Probable cause Prevention a. See 2.a; incorrect temperature. See 2.a. b. Incorrect turning. Turn the eggs carefully, and as often as
recommended in Chapter 8. c. Chicks die towards the end of week 2, probably caused by poor feeding of the parents.
Feed good rations, paying special attention to the vitamins A, B2 and B12.
d. Insufficient ventilation. Open more air holes.

Troubleshooting 51
Problem 4: Chicks have developed well but have failed to hatch (unable to break the shell).
Probable cause Prevention a. See 3.b; incorrect turning. See 3.b. b. Incorrect humidity: 1. too dry: air pocket too big. 2. too humid: air pocket too small.
Use a good wet-bulb thermometer. Add water containers or spray more often. Remove water containers.
Problem 5: Chicks break the shell but fail to leave the egg
Probable cause Prevention a. Air too dry. Check the wet-bulb readings; Add water
containers or a wet cloth. b. Chicks develop late (See 6). See 6. c. Temperature peaks very high for a short period of time.
Check the thermostat and the heat lamp.
Problem 6: Sticky chicks - the shell sticks to the hatched chicks.
Probable cause Prevention a. Dehydrated eggs. Low humidity; check the wet-bulb readings. b. Humidity too low during hatching out. Raise the humidity to 70-80% (wet-bulb
temp. over 32°C) during hatching out proc-ess, but not before; keep the incubator closed during hatching out.
Problem 7: Weakly chicks
Probable cause Prevention a. Incubator temperature too high. Check the thermometer.
Problem 8: Small chicks.
Probable cause Prevention a. Eggs to be incubated too small Use only medium size eggs b. Humidity too low. See 5.a.

Hatching eggs by hens or in an incubator 52
Problem 9: Weakly and bad-smelling chicks. Many deaths.
Probable cause Prevention a. Omphalitis or navel infection. Clean and thoroughly disinfect the incubator
and all other equipment used.
Problem 10: Irregular hatching out of chicks.
Probable cause Prevention a. Eggs with different storage periods used. Use no eggs stored for longer than 1 week. b. Different sized eggs. Start incubating large eggs one and a half
days earlier. c. Changing temperatures during incuba-tion.
See 5.c.
d. Temperature higher in the centre of the incubator than at the sides.
Improve incubator insulation.
Problem 11: Chicks walking uncertainly.
Probable cause Prevention a. Brooder floor too smooth. Use rougher material to cover floor.

Further reading 53
Further reading
Agrodok Nº 4. Small Scale Poultry Production in the Tropics (1995). Agromisa, Wageningen
Banerjee, G. C. A textbook of animal husbandry. Oxford and IBH Publishers, New Delhi, Bombay, Calcutta, India
CAB International, 1987. Manuel d�aviculture en zone tropicale , Wallingford, Great Britain.
Ernst, R.A. Hatchery and hatching � egg sanitation. Berkeley, Univ. of California (7 pp).
French, K. M., 1984. Practical Poultry Raising. Peace Corps, Trans Century Corporation, Washington, D.C., USA
Gietema, B. The basics of chicken farming in the tropics.(2003). Stoas. ISBN: 90 5285 0062
Ketelaars, E.H. Chicken farming in warm climatic zones. (2003). Stoas., ISBN: 90 5285 060 7
McArdle, A. A., 1972. Poultry management and production. Angus and Robertson (Publishers) Pty. Ltd., Sydney, Melbourne, Brisbane, Singapore (pp. 750).
Oluyemi, J. A. and Roberts, F. A., 1979. Poultry production in warm wet climates. The MacMillan Press Ltd., London, Basingstoke, Delhi, Dublin, Hong Kong, Johannesburg, Lagos, Melbourne, New York, Singapore and Tokyo.
Portsmouth, J. Practical poultry keeping. Spur Publications, (pp. 207).
Price, C. J. and Reed, J. E., 1971. Poultry husbandry II. FAO, Rome.
Singh, H. and Moore, E. N., 1978. Livestock and poultry produc-tion. Prentice Hall of India, New Delhi.
Hatching eggs by hens or in an incubator 54
Smith, A.J. Poultry (2001), CTA,Nacmillan. ISBN:0 333 473957
Smith, A.J. L�élevage de la volaille. (1991)., ACCT, CTA, Maison-neuve et Larose., 161 pp., ISBN: 92 9028 189 8
Williamson G., Payne W. J. A., 1978. Poultry: An introduction to Animal Husbandry in the tropics, Longman, London (pp. 595-652).
Communautés Africaines Jan/Feb.1992 (pp. 15-20) : Une incubator à pétrole � un outil à la portée de petits éléveurs. B.P. 5946 Douala Akwa � Cameroon. Also obtainable from Agromisa.

Useful addresses 55
Useful addresses
CABI Africa Regional Centre, ICRAF Complex , PO Box 633 Village Market, Nairobi, Kenya, Tel: +254-205 24462, Fax: +254-205 22150, Email: [email protected] (for general enquiries), Email: [email protected] (for scientific enquiries)
CIRAD (Centre de Coopération Internationale et Recherche pour le Développement), Siège social 42, rue Scheffer ; 75116 Paris, France ; Tel:: +33 1 53 70 20 00 : Fax: +33 1 47 55 15 30
DIO: Dierengeneesekunde in ontwikkelingssamenwerking Yalelaan 17 U 3584 CL Utrecht, The Netherlands E-mail : [email protected]; website :www.dio.nl
IAC - International Agricultural Centre Lawickse Allee 11, 6701 AN Wageningen, P.O. Box 88, 6700 AB Wageningen, The Netherlands, Tel: +31 317 495495, Fax: +31 (0)317 495395, E-mail: [email protected]
ILRI (International Livestock Research Institute): Ethiopia, P.O. Box 5689, Addis Ababa, Ethiopia, Tel: +251-1 463215, Fax: +251-1 461252 / 464645, Email: [email protected] ;
ILRI-Burkina Faso, 01 BP 454,

Hatching eggs by hens or in an incubator 56
Bobo-Dioulasso, Burkina Faso, Tel: +226 972-638, Fax: (226) 972-320, Email: [email protected]
ILRI-Niger, BP 12404, Niamey, Niger, Tel: (227) 722-529, Fax: +227 752-208, Email: [email protected];
Mississippi State University Extension Service: http://www.msstate.edu/dept/poultry
National Veterinary Research Centre, P.O. Box 32, Kikuyu, KENYA, E-mail: [email protected]
Practical Training centre (PTC+) PTC+ is an international training institute, which focuses on all the links in the production chain on plant and animal commodities, (agri-cultural) technology, (food) technology and natural areas. Training programmes are practice-oriented and mix theory with prac-tical classes. PTC+ offers �open entry� programmes, �tailor-made� programmes and consultancy. Programmes are offered in the Nether-lands and/or at location. It is the policy of PTC+ to search for partnerships and co-operation programmes with national and international institutions abroad. For more information: visit our web-site www.ptcplus.com and/or write to: PTC+ Head Office P.O. Box 160, 6710 BD Ede, The Netherlands Tel.: +31 318 645700 Fax: +31 318 595869 e-mail: [email protected]

Useful addresses 57
Virginia Cooperative Extension: http://www.ext.vt.ecu/pubs/poultry
World�s Poultry Science Association (WPSA). Working together to feed the World
Objectives of the World�s Poultry Science Association (WPSA) ? Gather knowledge on all aspects of poultry science and the poultry
industry and to bring this knowledge to the poultry industry, poultry scientists and other people with interests in poultry. ? Bring together worldwide those concerned with all aspects of poul-
try science, poultry production and the many diverse ancillary en-terprises that are associated with the industry. ? Dedicate itself to the spread of knowledge so that education and
training are ranked high amongst the interests of WPSA members. ? Promote good poultry husbandry.
What does membership of the WPSA provide? 1 World�s Poultry Science Journal: The World�s Poultry Science
Journal has a high international reputation for its content that covers all aspects of poultry science. The Journal is available to subscribers on the Internet, for further information and subscriptions contact: www.cabi-publishing.org/wpsj
2 World�s Poultry Congresses: exchange of knowledge and experi-ence. Participants will obtain wider insight into the many aspects of

Hatching eggs by hens or in an incubator 58
the poultry industry not only in the field of science and research but also in the supply and processing industry.
3 Congresses and Symposia of Federations: major conferences or-ganized on behalf of the European and Asia Pacific Federations of branches of the WPSA. The working groups of the European Fed-eration also organize in alternate years, symposia, conferences or workshops where scientists can discuss poultry problems with peo-ple from the industry.
4 Branch Meetings: National WPSA branches hold regular meetings, produce newsletters, organize tours and are involved in supporting their national industries.
5 Other WPSA activities: The Netherlands branch of WPSA has es-tablished up a trust fund to finance scholarships. A WPSA Speakers Bureau has been set up to help foster local and regional conferences in the poultry sciences. The Association will consider applications for small scale funding support for specific aspects of conferences, which involve a group of branches or countries in a region. Exam-ples include helping to provide a key expert speaker. Travel assis-tance can be provided to help young WPSA members and students participate in regional and global WPSA Conferences.
Address for further information World�s Poultry Science Association Secretariat: Dr Ir P.C.M. Simons, PO Box 31, 7360 AA Beekbergen, The Netherlands E-mail: [email protected]