AGKSOFT Gilbarco Passport ® Back Office Software1 Introduction he Gilbarco Passport ® can be...
31
AGKSOFT Gilbarco Passport ® Back Office Software Gilbarco Passport® Guide Volume P
Transcript of AGKSOFT Gilbarco Passport ® Back Office Software1 Introduction he Gilbarco Passport ® can be...
AGKSOFT
Gilbarco Passport ® Back Office Software
Gilbarco Passport® Guide
Volume
P

1
Introduction he Gilbarco Passport ® can be connected to your Windows PC using a straight CAT5/RJ45 cable connected to the Passport Router. Your Gilbarco Passport® is a Point-of-sale system with the built-in ability to talk to your Back-Office Software. Your PC must have 2 network cards, one for the internet & the other one to connect to your Passport Router.
Connecting to a PaySafe Router See APPENDIX A.
Connecting to a Cybera Zone Router See APPENDIX B.
Connecting to a MAKO Router See APPENDIX C.
Connecting to a FortiGate Network Box (Conoco Philips/ADS) See APPENDIX D.
Connecting your Windows PC to the Gilbarco Passport Router � Connect RJ45 cable from your Windows PC’s 2nd Ethernet Port directly to the DMZ Port on the Passport Router.
If you are using Conoco Phillips (CP) or HPS Dallas (ADS Dallas), see the last page titled “Conoco Phillips and ADS Dallas” Sometime you can use this method for Conoco Phillips (CP), but not always.
T
2
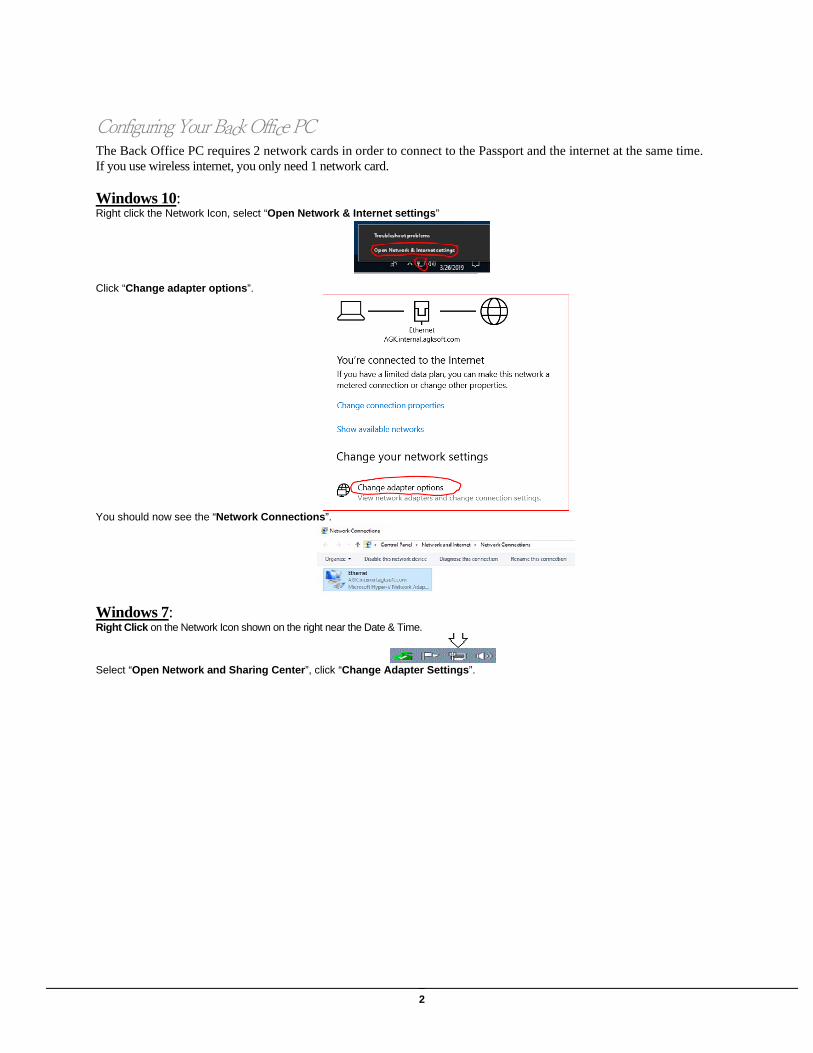
Configuring Your Back Office PC The Back Office PC requires 2 network cards in order to connect to the Passport and the internet at the same time. If you use wireless internet, you only need 1 network card. Windows 10: Right click the Network Icon, select “Open Network & Internet settings”
Click “Change adapter options”.
You should now see the “Network Connections”.
Windows 7: Right Click on the Network Icon shown on the right near the Date & Time.
Select “Open Network and Sharing Center”, click “Change Adapter Settings”.

3
If you see a Red X, you must read the “Troubleshooting” section before you proceed to the next step.
If you see the following, you can now proceed to the next step.
If you do not recognize which card belongs to the Internet and which one belongs to the Passport, “Double Click” the 1st Adapter, you will see the window shown below. Note that “IPv4 Connectivity” says “Internet”, so this is most likely used for the Internet.
Select “Details” and you should now see the Window shown below.
4
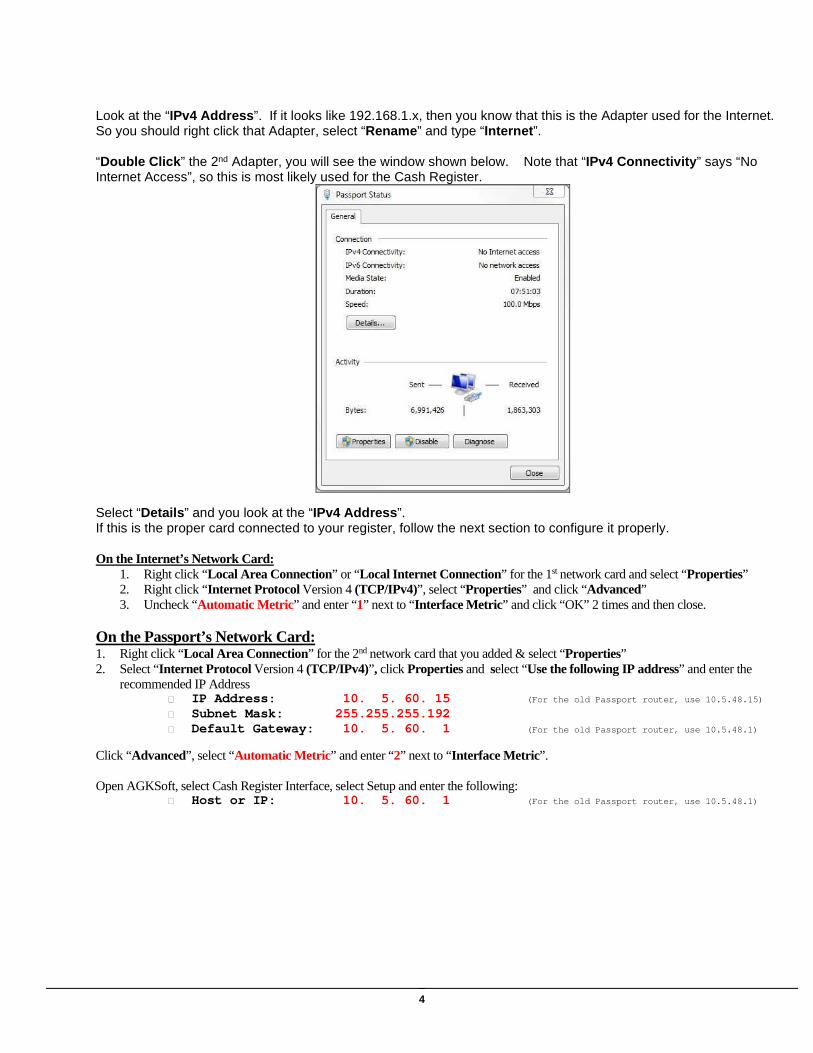
Look at the “IPv4 Address”. If it looks like 192.168.1.x, then you know that this is the Adapter used for the Internet. So you should right click that Adapter, select “Rename” and type “Internet”. “Double Click” the 2nd Adapter, you will see the window shown below. Note that “IPv4 Connectivity” says “No Internet Access”, so this is most likely used for the Cash Register.
Select “Details” and you look at the “IPv4 Address”. If this is the proper card connected to your register, follow the next section to configure it properly. On the Internet’s Network Card:
1. Right click “Local Area Connection” or “Local Internet Connection” for the 1st network card and select “Properties” 2. Right click “Internet Protocol Version 4 (TCP/IPv4)”, select “Properties” and click “Advanced” 3. Uncheck “Automatic Metric ” and enter “1” next to “Interface Metric ” and click “OK” 2 times and then close.
On the Passport’s Network Card: 1. Right click “Local Area Connection” for the 2nd network card that you added & select “Properties” 2. Select “Internet Protocol Version 4 (TCP/IPv4)” , click Properties and select “Use the following IP address” and enter the
recommended IP Address � IP Address: 10. 5. 60. 15 (For the old Passport router, use 10.5.48.15)
� Subnet Mask: 255.255.255.192 � Default Gateway: 10. 5. 60. 1 (For the old Passport router, use 10.5.48.1)
Click “Advanced”, select “Automatic Metric ” and enter “2” next to “Interface Metric”. Open AGKSoft, select Cash Register Interface, select Setup and enter the following:
� Host or IP: 10. 5. 60. 1 (For the old Passport router, use 10.5.48.1)
5
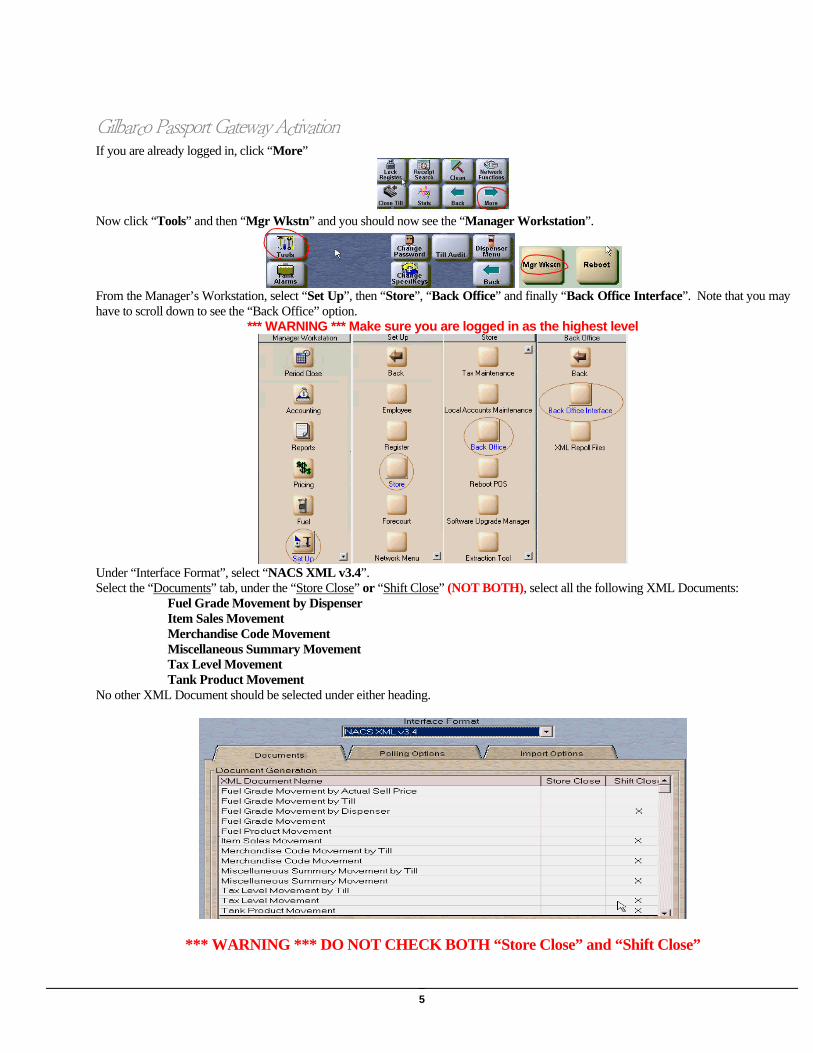
Gilbarco Passport Gateway Activation If you are already logged in, click “More”
Now click “Tools” and then “Mgr Wkstn ” and you should now see the “Manager Workstation”.
From the Manager’s Workstation, select “Set Up”, then “Store”, “ Back Office” and finally “Back Office Interface”. Note that you may have to scroll down to see the “Back Office” option.
*** WARNING *** Make sure you are logged in as the highest level
Under “Interface Format”, select “NACS XML v3.4”. Select the “Documents” tab, under the “Store Close” or “Shift Close” (NOT BOTH) , select all the following XML Documents:
Fuel Grade Movement by Dispenser Item Sales Movement Merchandise Code Movement Miscellaneous Summary Movement Tax Level Movement Tank Product Movement
No other XML Document should be selected under either heading.
*** WARNING *** DO NOT CHECK BOTH “Store Close” and “Shift Close”

6
Select “Generation Options” and check the following options ONLY: Generate Transaction Level Detail (PJR) Generate Acknowledgement Files
(Make sure all other options are not checked)
Select the “Import Options” tab
Make sure to check “The Back Office sends a value of 0 for the base item” and click “Save”. Change the “Process” to [1] item records then pause for [25] milliseconds.
Passport Repoll more than 7 days: The Passport clears the shifts after 7 days by default, so we can change it as follows:
From the Manager’s Workstation, select “Set Up”, then “Store”, and finally “Store Options”. Select “Logging” tab and change the options as shown in the image below.
7
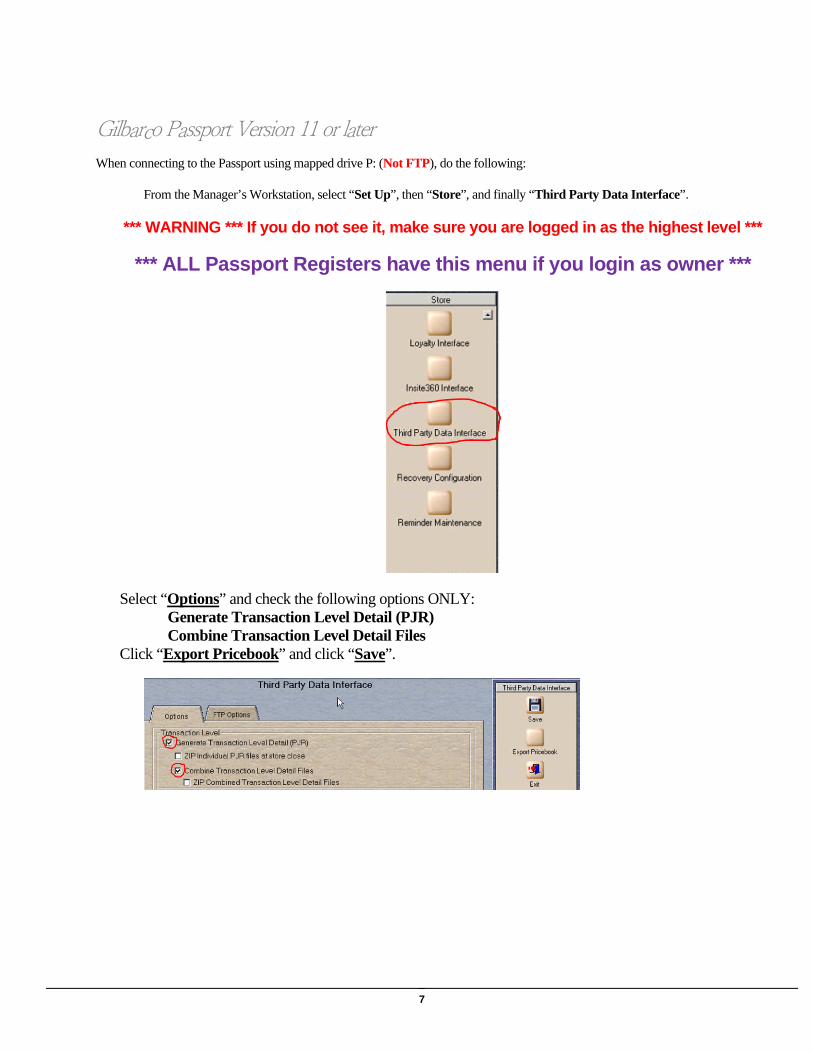
Gilbarco Passport Version 11 or later When connecting to the Passport using mapped drive P: (Not FTP), do the following:
From the Manager’s Workstation, select “Set Up”, then “Store”, and finally “Third Party Data Interface ” .
*** WARNING *** If you do not see it, make sure you are logged in as the highest level ***
*** ALL Passport Registers have this menu if you login as owner ***
Select “Options” and check the following options ONLY: Generate Transaction Level Detail (PJR) Combine Transaction Level Detail Files
Click “Export Pricebook” and click “Save”.
8
Gilbarco Passport Configuration (OPTIONAL) From the Manager’s Workstation, select “Set Up”, “ Store”, “ Income/Expense Account Maintenance”. Add your vendor accounts and be sure to select the “Expense” option for each account. Write down the account ID numbers you assigned to each account. You will need this information later when configuring your vendor accounts from the back office software. Click “Exit” once you are finished.
Select “Tax Maintenance” from the “Store” options. Select the tab that reads “Rates”. add your tax rates one by one according to the following procedure:
� Click “Add”, enter the name, receipt description, and percentage of the tax in the appropriately labeled fields. (percentage can be 0 for tax free) � Click “Update List”, then “Activate”. Repeat for the next tax rate.
Click on the tab labeled “Groups” and for every tax rate you must now create a group to store it. Execute the following procedure for each tax rate you created:
� Click “Add” to create a new group. � In the field labeled “Name”, enter a name that includes the tax rate the group will be used for. If this
group will store a tax rate of 5%, then call it “Tax5”, or “Tax500”. Enter the same description in the field labeled “POS Description”. � Click “Update List” . Select the tax group you just created from the list shown. Select only one tax rate
from the list that appears under the title “Tax Rates”. The tax rate you select will be associated with this tax group. Click “Activate” � When you have finished creating your last tax group, click “Save” and click “Exit”.
Return to the Manager’s Workstation and select “Setup”, then “Register”, and finally “Department Key Maintenance”. For each department that you want to be able to sell from directly, add keys as follows:
Click “Add Key” . Enter the department number next to the “Code” field.
Enter a caption for the key in the “Caption” field.
If you’d like, select an icon for the key and click “Save”
Note: If there isn’t enough space on the form for all of your keys, you can add an additional page of keys by selecting “Add Menu Page”.

9
How How How How would a Gilbarco Technician can would a Gilbarco Technician can would a Gilbarco Technician can would a Gilbarco Technician can cccconfigure the DMZ Portonfigure the DMZ Portonfigure the DMZ Portonfigure the DMZ Port on the New on the New on the New on the New RouterRouterRouterRouter???? After you plug the RJ45 cable into the DMZ port and you do not see any lights, do the following:
1. Plug the RJ45 cable into Port 1, 2, 3 or 4 on the router 2. Change the IP Address to 10.5.48.15 and the Gateway to 10.5.48.1 3. Open a browser and type “10.5.48.1”, login to the Router 4. Select the “Port Management” link on the left. 5. Make sure the DMZ port is Enabled. 6. Select the “Firewall” link on the left. 7. Click “Access Rules” and scroll down until you see “BOSShare” and “FTP” 8. Make sure the [X] Allow checkbox is checked for both. 9. Reboot the router after that. *** WARNING *** Your Gas Pumps will stop working fo r 10 to 15 minutes.
If the connection is still not working, then do the following: 1. Plug the RJ45 cable into Port 1, 2, 3 or 4 on the router 2. Change the IP Address to 10.5.48.15 and the Gateway to 10.5.48.1 3. Open a browser and type “10.5.58.1”, login to the Router 4. Turn the Firewall off temporarily. 5. Change the Host IP to “10.5.48.1” in the AGKSoft Cash Register Interface Setup. 6. Test the connection again.

10
How How How How would a Gilbarco Technician can would a Gilbarco Technician can would a Gilbarco Technician can would a Gilbarco Technician can cccconfigure the DMZ Portonfigure the DMZ Portonfigure the DMZ Portonfigure the DMZ Port on the on the on the on the Old Old Old Old RouterRouterRouterRouter????
After you plug the RJ45 cable into the DMZ port and you do not see any lights, then do the following:
1. Plug the RJ45 cable into Port 1, 2, 3 or 4 on the router 2. Change the IP Address to 10.5.48.15 and the Gateway to 10.5.48.1 3. Open a browser and type “10.5.58.1”, login to the Router 4. Select the “Port Management” link on the left. 5. Make sure the DMZ port is Enabled. 6. Select the “Firewall” link on the left. 7. Click “Access Rules” and scroll down until you see “BOSShare” and “BOSFTP” 8. Make sure the [X] Allow checkbox is checked for both. 9. Reboot the router after that. *** WARNING *** Your Gas Pumps will stop working fo r 10 to 15 minutes.

11
Installing the AGKSoft Software - From your Windows PC Download and Install AGKSoft from the link sent to you from AGKSoft or from AGKSoft’s web-site. Follow the installation instruction until it’s finished. When the installation is finished, restart your PC.
Configuring the AGKSoft Software Click the AGKSoft Icon on your desktop. Note that the default login password is lower case “s”. Before you login, you will need to call AGKSoft to activate your PC.
You should now be in the “AGKSoft Login ” window. Under Password, enter “s” and click OK.
You should now be in the “Business Information” window. Enter your info. and click Save.
Select #1 “Gilbarco Passport” and click OK.
Answer all other questions as best you can.
12
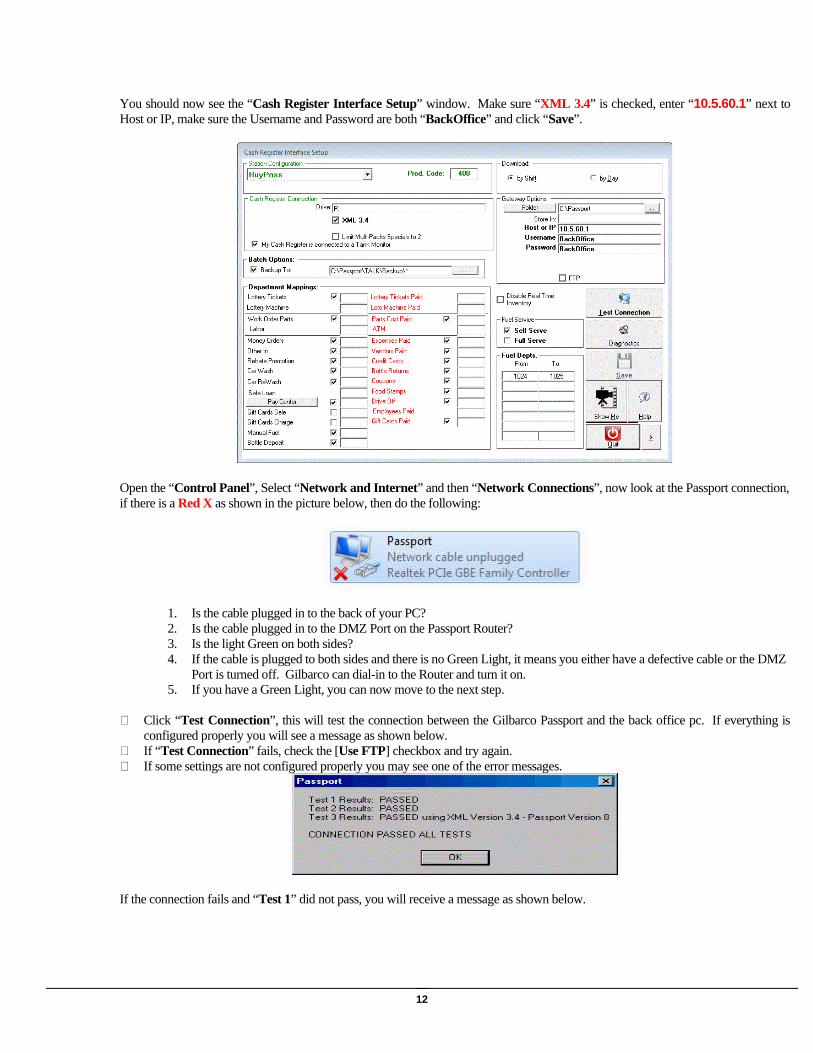
You should now see the “Cash Register Interface Setup” window. Make sure “XML 3.4” is checked, enter “10.5.60.1” next to Host or IP, make sure the Username and Password are both “BackOffice” and click “Save”.
Open the “Control Panel”, Select “Network and Internet” and then “Network Connections”, now look at the Passport connection, if there is a Red X as shown in the picture below, then do the following:
1. Is the cable plugged in to the back of your PC? 2. Is the cable plugged in to the DMZ Port on the Passport Router? 3. Is the light Green on both sides? 4. If the cable is plugged to both sides and there is no Green Light, it means you either have a defective cable or the DMZ
Port is turned off. Gilbarco can dial-in to the Router and turn it on. 5. If you have a Green Light, you can now move to the next step.
� Click “Test Connection”, this will test the connection between the Gilbarco Passport and the back office pc. If everything is
configured properly you will see a message as shown below. � If “ Test Connection” fails, check the [Use FTP] checkbox and try again. � If some settings are not configured properly you may see one of the error messages.
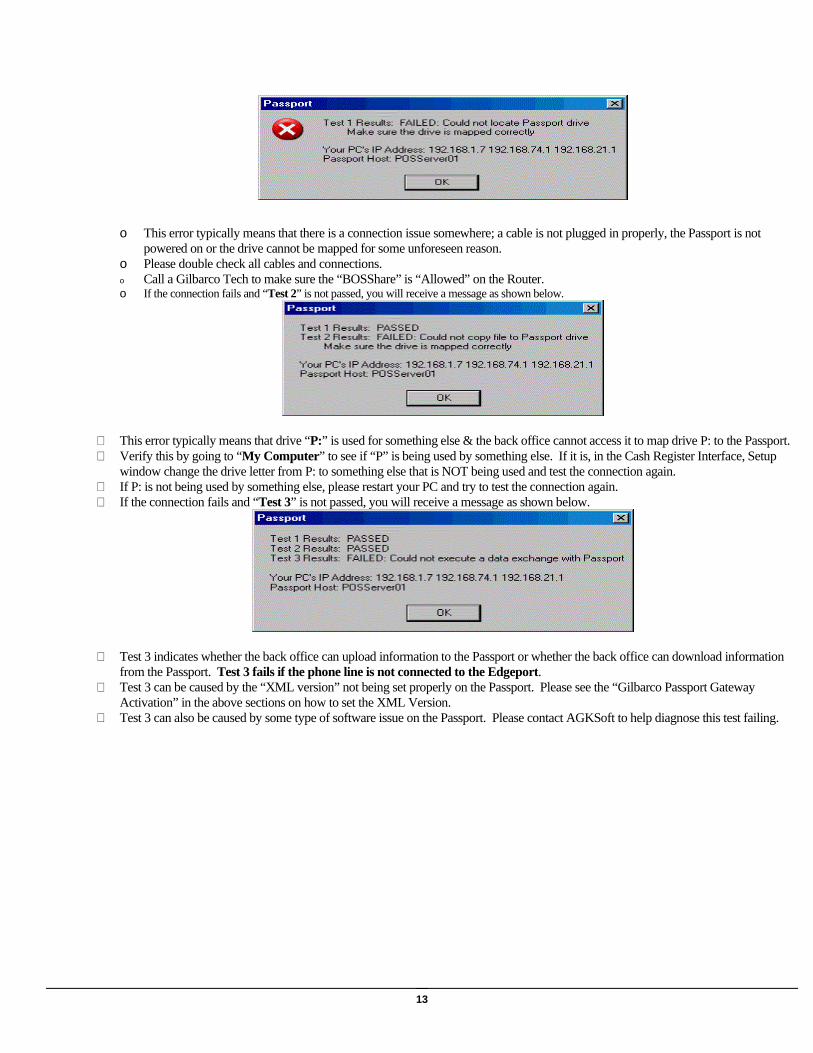
If the connection fails and “Test 1” did not pass, you will receive a message as shown below.
13
o This error typically means that there is a connection issue somewhere; a cable is not plugged in properly, the Passport is not powered on or the drive cannot be mapped for some unforeseen reason.
o Please double check all cables and connections. o Call a Gilbarco Tech to make sure the “BOSShare” is “Allowed” on the Router.
o If the connection fails and “Test 2” is not passed, you will receive a message as shown below.
� This error typically means that drive “P:” is used for something else & the back office cannot access it to map drive P: to the Passport. � Verify this by going to “My Computer” to see if “P” is being used by something else. If it is, in the Cash Register Interface, Setup
window change the drive letter from P: to something else that is NOT being used and test the connection again. � If P: is not being used by something else, please restart your PC and try to test the connection again. � If the connection fails and “Test 3” is not passed, you will receive a message as shown below.
� Test 3 indicates whether the back office can upload information to the Passport or whether the back office can download information from the Passport. Test 3 fails if the phone line is not connected to the Edgeport.
� Test 3 can be caused by the “XML version” not being set properly on the Passport. Please see the “Gilbarco Passport Gateway Activation” in the above sections on how to set the XML Version.
� Test 3 can also be caused by some type of software issue on the Passport. Please contact AGKSoft to help diagnose this test failing.

14
Configuring the AGKSoft Back Office Software � Open the Cash Register Interface and click Setup.
� If you selected XML v3.4 for your Passport Gateway, make sure XML 3.4 is checked.
� Under Station Configuration Choose the credit card network you are using (e.g. BuyPass, ADS-Chicago, Mobil, Shell, etc.)
� Under Download, select “by Shift” if you configured the Passport for “Shift Close” and “by Day” if you configured the Passport for “Store Close”.
� Click the arrow next to “Quit” on the bottom right and you will see “Tender Codes” section. Tender Codes are Method of Payments that will be used on the cash register. These have to be filled in and have to match what was configured on your register or your shift will not balance.
o Clicking on Configure and the software will automatically map the Tender Codes.
Cash Register Connection:
� Drive – This is the drive we use to map to the Passport. By default we use drive P: but if you have a problem using drive P:, you can change it to Z: or any other available drive letter.
� XML 3.4 – This should be checked unless you are using a very old Passport where only XML 3.2 is available.
� My Cash Register is connected to a Tank Monitor – This should be checked if you have a Tank Monitor (Like a Veeder Root) connected to your Passport and your actual numbers do come in automatically.
15
Gateway options:
� Folder – This is where the files will be stored after being downloaded from the Passport Gateway.
� Store In - In some cases there could be multiple software vendors trying to obtain the files being downloaded from the Passport, enter the folder name here where you would like the files to be stored. A situation that may arise is the oil company may pull the information for the fuel sales as well as AGKSoft downloading the files for the shift or day.
� Host or IP – This is the Passport’s IP Address.
� Username and Password – This is the Passport’s username and password to log onto the Gateway or Drive P:. With this filled in, AGKSoft will be able to automatically map the drive without being prompted. If you are unsure of this password please contact Gilbarco.
Batch Options � Back up Batch to – this is the folder where the software will automatically back up all the downloaded shifts
or days in the event that one is needed to be restored. � Department Mappings: This is used to “map” certain department sales amounts from the total sales room
amount.
o Example: If you have a car wash, the department number to enter is 88888; this will put the car wash amount separately in the Short/Over screen.
� Fuel Service: Un-checking which ever service type you do not have will allow the software to hide it where ever gas is shown.
o Example: If you only have self Service gas un-check the Full Service check box.
� Fuel Depts. From - To: This is the range of the department numbers for the gas, the Passport is typically 1024-1025.
o Note: If this is not mapped correctly the gas sales will be included in with the sales room totals.
� Test Connection: This will “test the connection” between the back office pc and the Gilbarco Passport.
� Diagnostics – this will verify that the product code is set correctly for the products based upon the Station Configuration that was chosen.
� Save – Saves any changes.
� Help – Opens up a browser window with help information about this topic.
� Show Me – Opens up a video tutorial on how to use this window.
� Quit – Closes the current window.
16
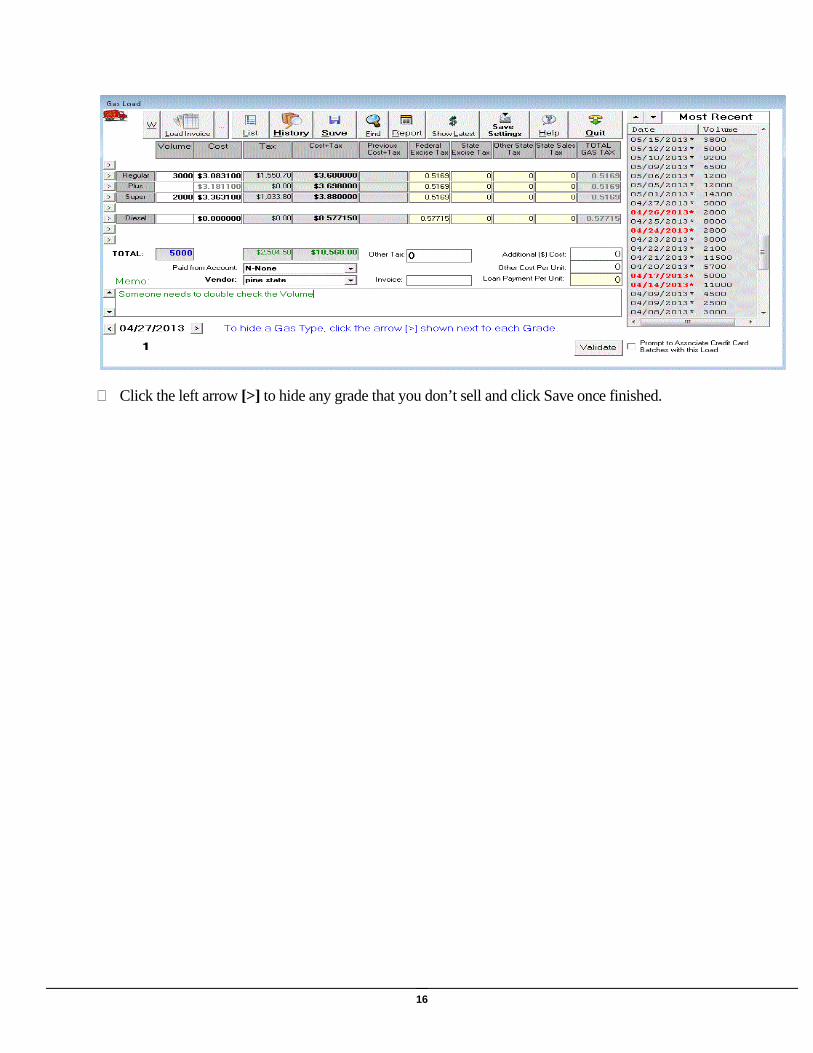
� Click the left arrow [>] to hide any grade that you don’t sell and click Save once finished.
17
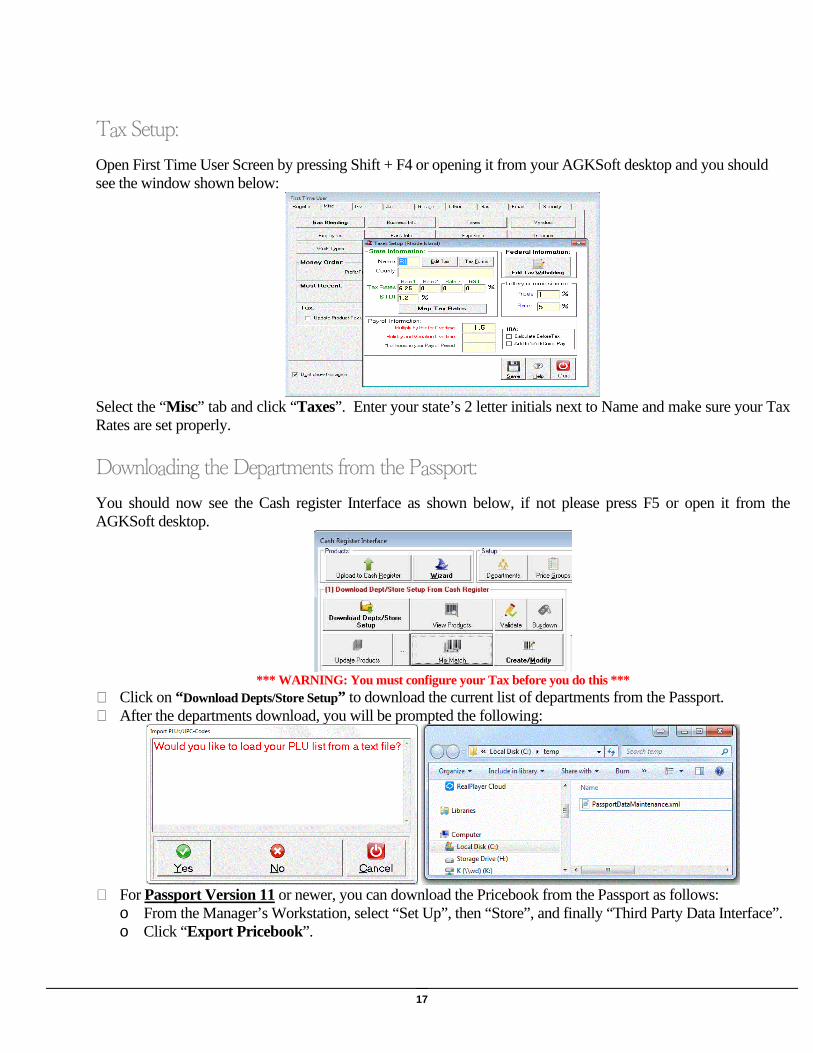
Tax Setup: Open First Time User Screen by pressing Shift + F4 or opening it from your AGKSoft desktop and you should see the window shown below:
Select the “Misc” tab and click “Taxes”. Enter your state’s 2 letter initials next to Name and make sure your Tax Rates are set properly.
Downloading the Departments from the Passport: You should now see the Cash register Interface as shown below, if not please press F5 or open it from the AGKSoft desktop.
*** WARNING: You must configure your Tax before you do this ***
� Click on “ Download Depts/Store Setup” to download the current list of departments from the Passport. � After the departments download, you will be prompted the following:
� For Passport Version 11 or newer, you can download the Pricebook from the Passport as follows:
o From the Manager’s Workstation, select “Set Up”, then “Store”, and finally “Third Party Data Interface”. o Click “Export Pricebook”.
18
o You will see a message stating “Pricebook export has started”, click OK and wait 10 to 15 minutes. � For Passport Version 9 or newer, you can download an XML file directly from the Passport to a memory
stick, see the last page on how to get the file. When you get the file, select YES and locate the “PassportDataMaintenance.xml” file and all your UPC-Codes will load automatically. � For Passport older than Version 9, contact Gilbarco to dial-in and email you a “PLU List Report” in HTML
format. Forward the HTML file to AGKSoft for proper conversion and loading into AGKSoft.
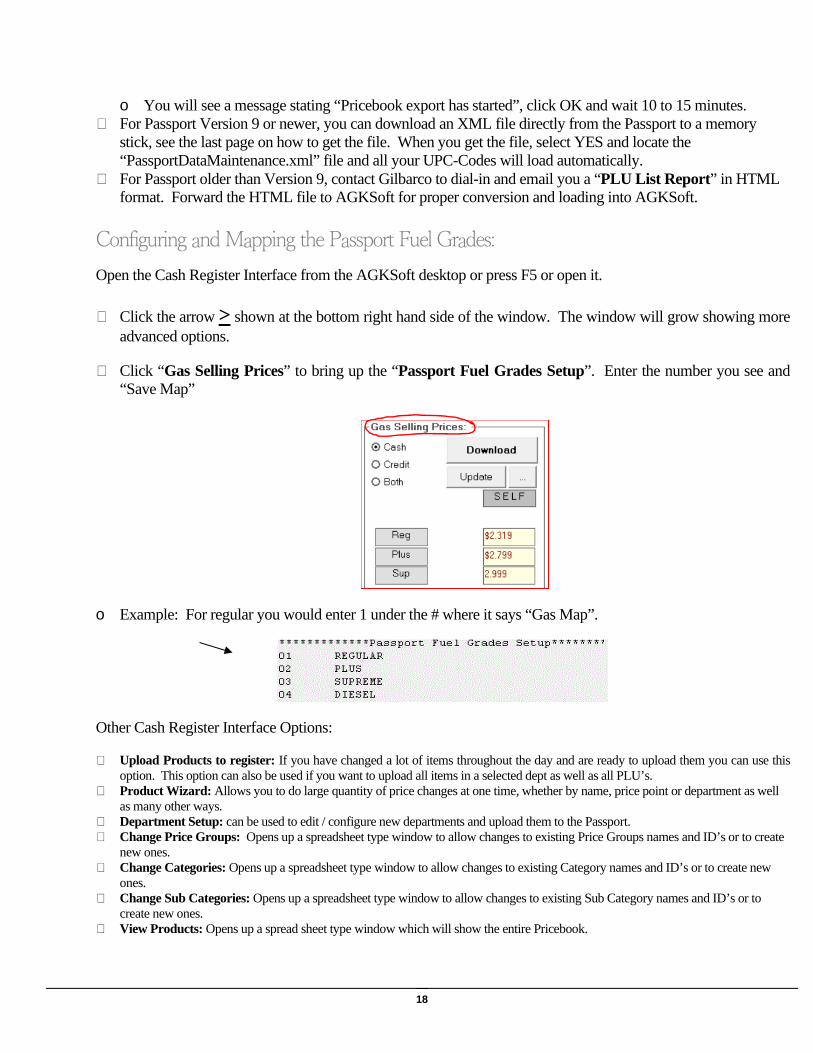
Configuring and Mapping the Passport Fuel Grades: Open the Cash Register Interface from the AGKSoft desktop or press F5 or open it.
� Click the arrow > shown at the bottom right hand side of the window. The window will grow showing more advanced options.
� Click “Gas Selling Prices” to bring up the “Passport Fuel Grades Setup”. Enter the number you see and “Save Map”
o Example: For regular you would enter 1 under the # where it says “Gas Map”.
Other Cash Register Interface Options:
� Upload Products to register: If you have changed a lot of items throughout the day and are ready to upload them you can use this option. This option can also be used if you want to upload all items in a selected dept as well as all PLU’s.
� Product Wizard: Allows you to do large quantity of price changes at one time, whether by name, price point or department as well as many other ways.
� Department Setup: can be used to edit / configure new departments and upload them to the Passport. � Change Price Groups: Opens up a spreadsheet type window to allow changes to existing Price Groups names and ID’s or to create
new ones. � Change Categories: Opens up a spreadsheet type window to allow changes to existing Category names and ID’s or to create new
ones. � Change Sub Categories: Opens up a spreadsheet type window to allow changes to existing Sub Category names and ID’s or to
create new ones. � View Products: Opens up a spread sheet type window which will show the entire Pricebook.
19
� Validate Products: This will generate a list of invalid products, invalid buying vs. selling and also invalid multipliers. It will also move item sales to the proper department in the event the items are moved from.
� Update Depts.: This should only be done the first time downloading from the Passport. This will update the current department setup from what was last downloaded from the Passport.
o If you want control your price book from the back office you will never have to press this button after the first time. � Create / Modify Products- Allows you to work with one item at a time changing pricing, editing the name etc… � Sales Download: downloads the most recently closed shift or day from the Passport. � Last batch: This is the last batch that was downloaded or reprocessed from the Passport. � Show Available Batches: click on this to restore any shifts / days that the software has automatically backed up.
� Note: This is NOT what the Passport has available to download. � Verify: allows you to see the batch number and open / closing time. � Update Sales: posts the downloaded data into the software. � View Sales Log: Allows you to restore the most recently downloaded shifts / day log. � View ALL Sales Logs: Will bring you to all the saved logs that the software backs up automatically. � Auto: This will bring up the Automation window which can automatically download the shifts or days from the Passport. � Setup: Opens the Cash Register Interface Setup window. � Help: Brings up help topics about this window. � Show Me: Brings up a video tutorial on how to use this window. � Open “First Time User” by pressing Shift + F4 or opening it from your AGKSoft desktop. � The First Time User window is where you find everything you need to first configure vendors, Gas Volume, Taxes, Lottery, bank
info and much more. Click on any of the buttons that pertain to your location and start configuring your software.
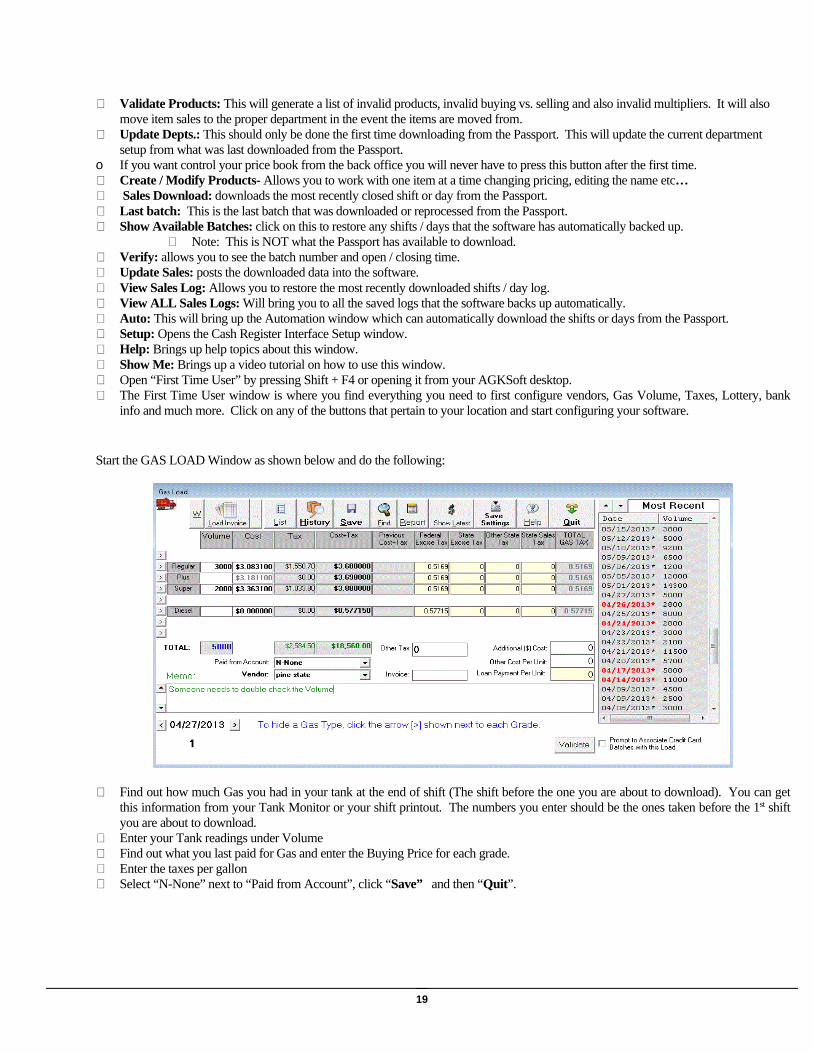
Start the GAS LOAD Window as shown below and do the following:
� Find out how much Gas you had in your tank at the end of shift (The shift before the one you are about to download). You can get this information from your Tank Monitor or your shift printout. The numbers you enter should be the ones taken before the 1st shift you are about to download.
� Enter your Tank readings under Volume � Find out what you last paid for Gas and enter the Buying Price for each grade. � Enter the taxes per gallon � Select “N-None” next to “Paid from Account”, click “Save” and then “Quit”.
20
Downloading your Shift/Day Hit F5 to start the Cash Register Interface.
To download your shift or day, simply click “Sales Download”, when the download is finished, click “Verify ”. This will let you confirm the Date, Open and Closed Time as well as the Batch #. We will use the Batch # as the Shift #. You can override the Batch # with any number that you want to use for your shift #.
If you do not see the proper Gas Sale numbers, you need to look at the “Gas Sale” section in the Sales Log that was open in Notepad and enter the Grade Names that you see there in the Gas Map next to the numbers. You need to re-process your shift again by pressing “R” in your “Cash Register Interface” window.
Now the “Short/Over (End of Shift)” window opens up for you to balance your shift.
Go ahead and balance your shift by validating your “Cash & Checks” and “Safe Drops”. When you finish, click “Close Shift/SAVE”.
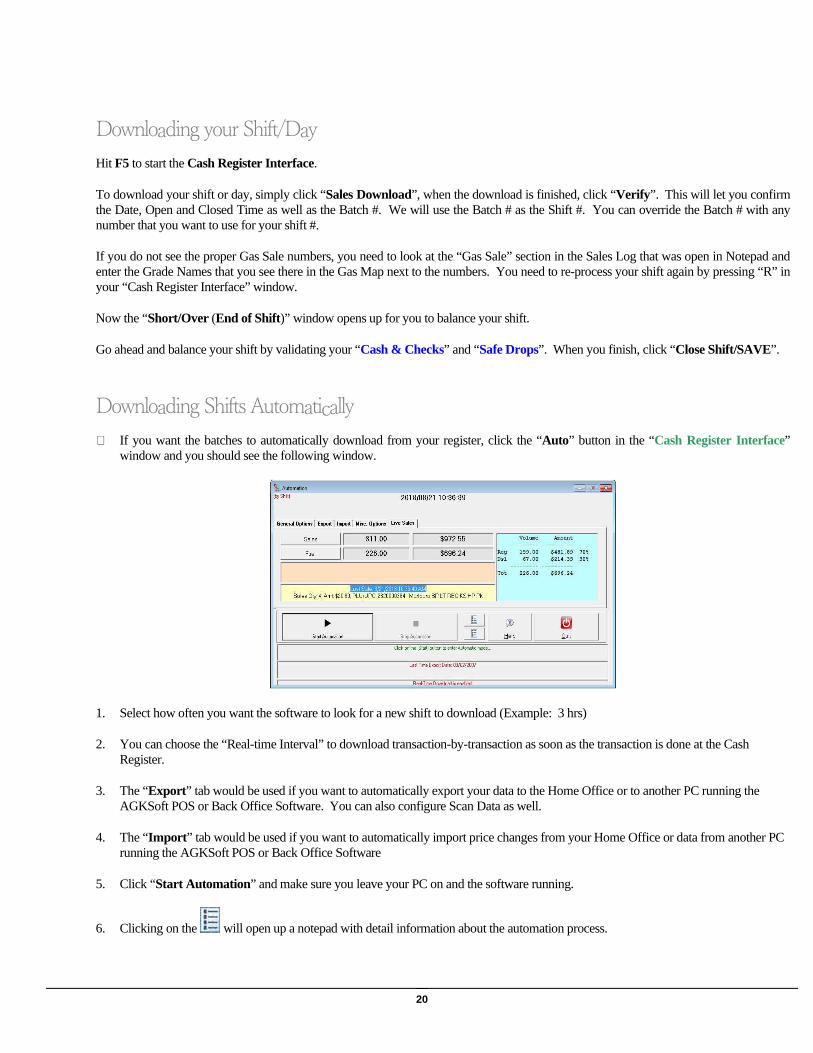
Downloading Shifts Automatically � If you want the batches to automatically download from your register, click the “Auto” button in the “Cash Register Interface”
window and you should see the following window.
1. Select how often you want the software to look for a new shift to download (Example: 3 hrs)
2. You can choose the “Real-time Interval” to download transaction-by-transaction as soon as the transaction is done at the Cash Register.
3. The “Export” tab would be used if you want to automatically export your data to the Home Office or to another PC running the AGKSoft POS or Back Office Software. You can also configure Scan Data as well.
4. The “Import ” tab would be used if you want to automatically import price changes from your Home Office or data from another PC running the AGKSoft POS or Back Office Software
5. Click “Start Automation” and make sure you leave your PC on and the software running.
6. Clicking on the will open up a notepad with detail information about the automation process.
21
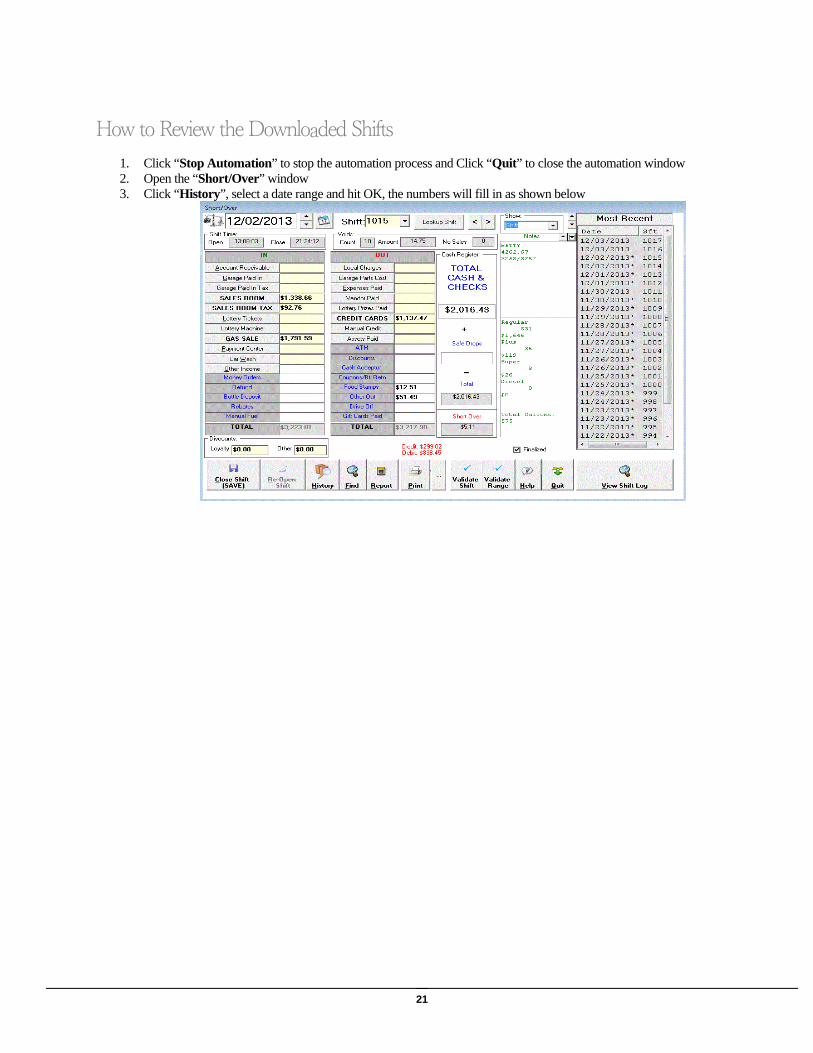
How to Review the Downloaded Shifts 1. Click “Stop Automation” to stop the automation process and Click “Quit” to close the automation window 2. Open the “Short/Over” window 3. Click “History”, select a date range and hit OK, the numbers will fill in as shown below
22
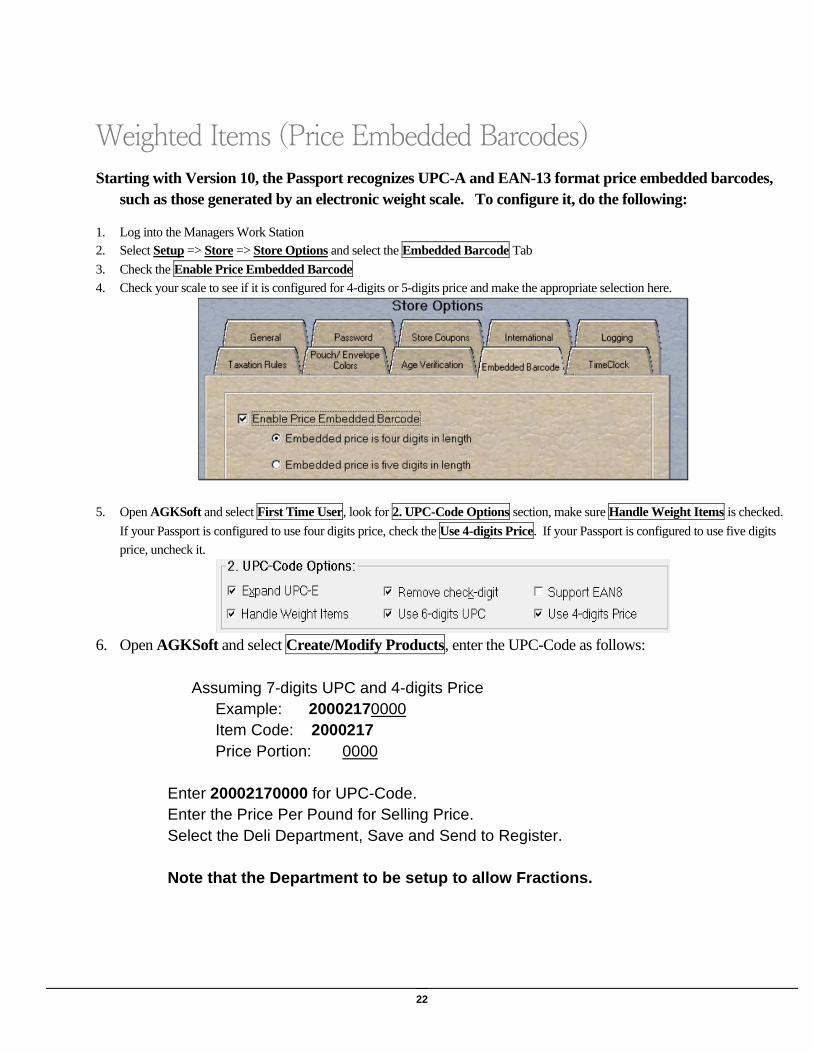
Weighted Items (Price Embedded Barcodes) Starting with Version 10, the Passport recognizes UPC-A and EAN-13 format price embedded barcodes,
such as those generated by an electronic weight scale. To configure it, do the following:
1. Log into the Managers Work Station 2. Select Setup => Store => Store Options and select the Embedded Barcode Tab
3. Check the Enable Price Embedded Barcode 4. Check your scale to see if it is configured for 4-digits or 5-digits price and make the appropriate selection here.
5. Open AGKSoft and select First Time User, look for 2. UPC-Code Options section, make sure Handle Weight Items is checked.
If your Passport is configured to use four digits price, check the Use 4-digits Price. If your Passport is configured to use five digits
price, uncheck it.
6. Open AGKSoft and select Create/Modify Products, enter the UPC-Code as follows: Assuming 7-digits UPC and 4-digits Price
Example: 20002170000 Item Code: 2000217 Price Portion: 0000
Enter 20002170000 for UPC-Code. Enter the Price Per Pound for Selling Price. Select the Deli Department, Save and Send to Register. Note that the Department to be setup to allow Fractions.

23
Downloading PLU file (For Passport Version 9 or 10 ONLY)
*** WARNING: This is not needed for Version 11 or later ***
*** You must download the Passp*** You must download the Passp*** You must download the Passp*** You must download the Passport Departments before you do this ***ort Departments before you do this ***ort Departments before you do this ***ort Departments before you do this *** � Plug a new Memory Stick (USB Drive) into the Back Office PC. � Format the USB Drive, create an “AGKSoft” folder and remove the USB Drive. � Login to Manager’s Workstation as Owner, select “Set Up”, “ Store” and then “Extraction Tool”.
(If you do not see “Extraction Tool”, you are not logged in as Owner)
� From the Extraction Tool window, make sure “Export Data” is selected and click “Next”.
� From the Export Data window, check “Price Book” and click “Next”.
� Click “Refresh Folders” and you should see drives C: D:
� Plug the USB Drive into any available USB plug on the back of the Passport. � Click “Refresh Folders” and you should now see drive “E:” . If you do not see drive “E:” , try another USB Slot or another
USB Drive or reboot your Passport.
� Click the + sign next to E: and select the “AGKSoft” folder and click “Start”. � Exporting the Pricebook can take about 5 to 15 minutes. When done, move the USB Drive back to your Back Office PC.
24
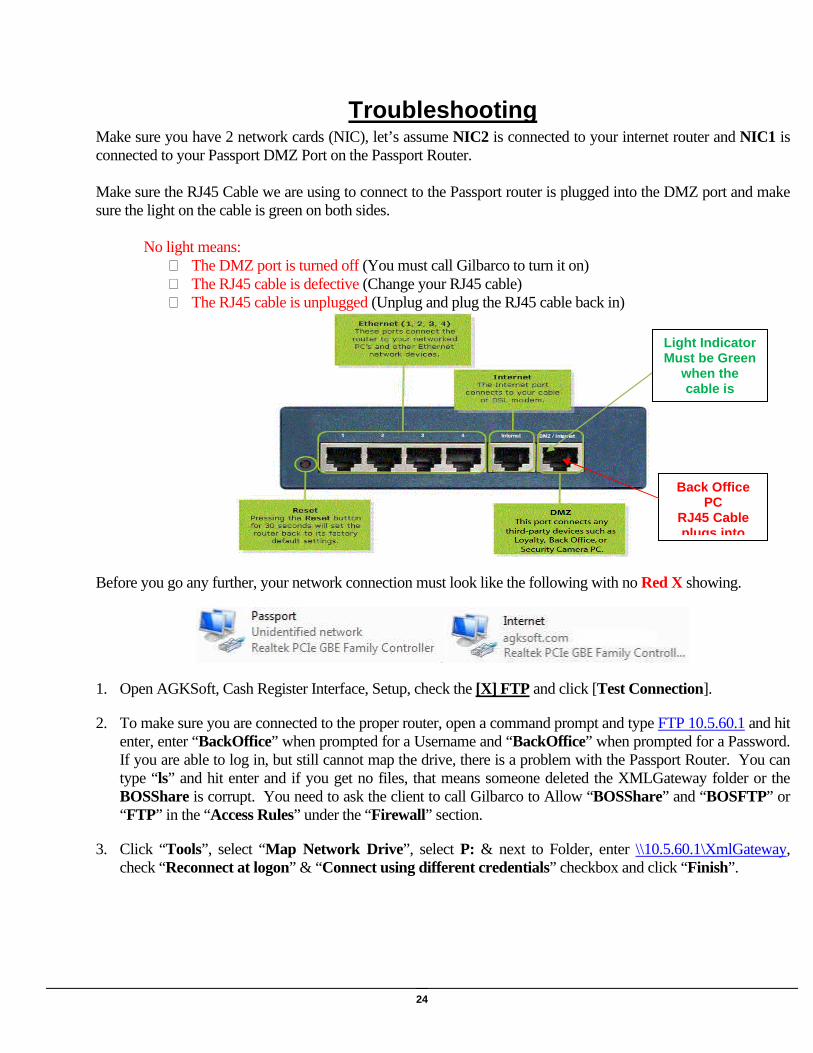
Troubleshooting
Make sure you have 2 network cards (NIC), let’s assume NIC2 is connected to your internet router and NIC1 is connected to your Passport DMZ Port on the Passport Router. Make sure the RJ45 Cable we are using to connect to the Passport router is plugged into the DMZ port and make sure the light on the cable is green on both sides.
No light means: � The DMZ port is turned off (You must call Gilbarco to turn it on) � The RJ45 cable is defective (Change your RJ45 cable) � The RJ45 cable is unplugged (Unplug and plug the RJ45 cable back in)
Before you go any further, your network connection must look like the following with no Red X showing.
1. Open AGKSoft, Cash Register Interface, Setup, check the [X] FTP and click [Test Connection].
2. To make sure you are connected to the proper router, open a command prompt and type FTP 10.5.60.1 and hit enter, enter “BackOffice” when prompted for a Username and “BackOffice” when prompted for a Password. If you are able to log in, but still cannot map the drive, there is a problem with the Passport Router. You can type “ls” and hit enter and if you get no files, that means someone deleted the XMLGateway folder or the BOSShare is corrupt. You need to ask the client to call Gilbarco to Allow “BOSShare” and “BOSFTP” or “FTP” in the “Access Rules” under the “Firewall” section.
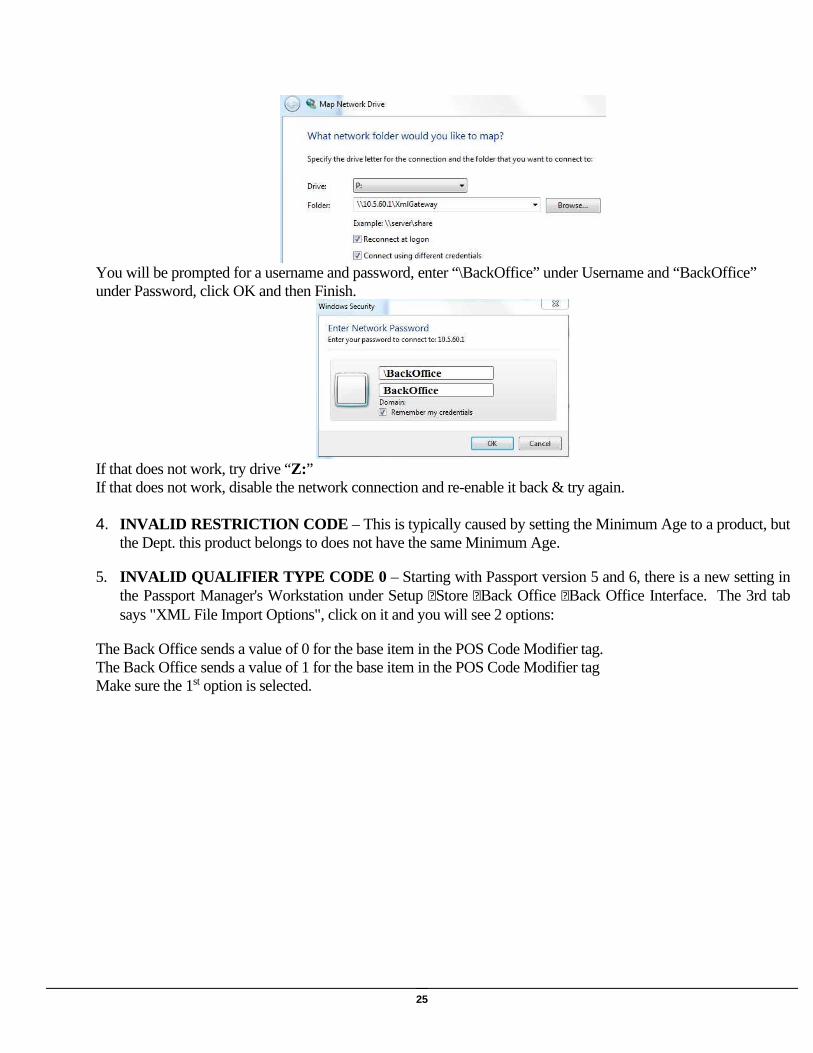
3. Click “Tools”, select “Map Network Drive”, select P: & next to Folder, enter \\10.5.60.1\XmlGateway, check “Reconnect at logon” & “ Connect using different credentials” checkbox and click “Finish”.
Back Office PC
RJ45 Cable plugs into
Light Indicator Must be Green
when the cable is
25
You will be prompted for a username and password, enter “\BackOffice” under Username and “BackOffice” under Password, click OK and then Finish.
If that does not work, try drive “Z:” If that does not work, disable the network connection and re-enable it back & try again. 4. INVALID RESTRICTION CODE – This is typically caused by setting the Minimum Age to a product, but
the Dept. this product belongs to does not have the same Minimum Age.
5. INVALID QUALIFIER TYPE CODE 0 – Starting with Passport version 5 and 6, there is a new setting in the Passport Manager's Workstation under Setup �Store �Back Office �Back Office Interface. The 3rd tab says "XML File Import Options", click on it and you will see 2 options:
The Back Office sends a value of 0 for the base item in the POS Code Modifier tag. The Back Office sends a value of 1 for the base item in the POS Code Modifier tag Make sure the 1st option is selected.
26
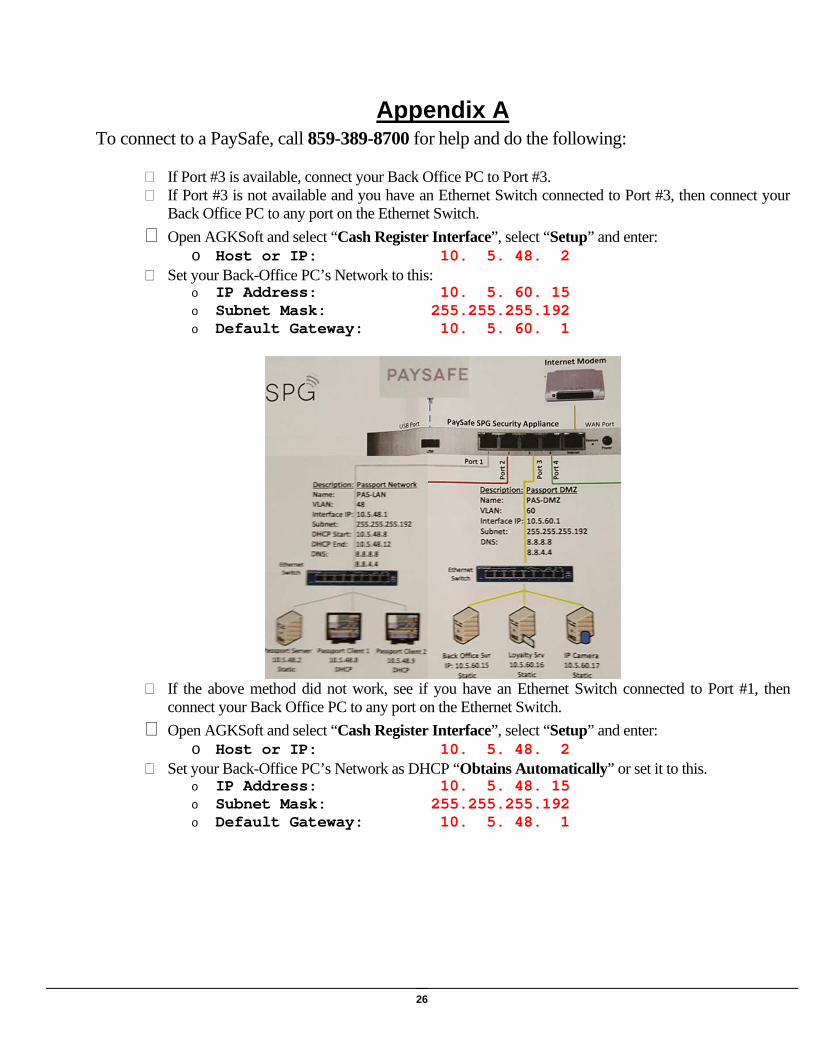
Appendix A
To connect to a PaySafe, call 859-389-8700 for help and do the following: � If Port #3 is available, connect your Back Office PC to Port #3. � If Port #3 is not available and you have an Ethernet Switch connected to Port #3, then connect your
Back Office PC to any port on the Ethernet Switch.
� Open AGKSoft and select “Cash Register Interface”, select “Setup” and enter: o Host or IP: 10. 5. 48. 2
� Set your Back-Office PC’s Network to this: o IP Address: 10. 5. 60. 15 o Subnet Mask: 255.255.255.192 o Default Gateway: 10. 5. 60. 1
� If the above method did not work, see if you have an Ethernet Switch connected to Port #1, then
connect your Back Office PC to any port on the Ethernet Switch.
� Open AGKSoft and select “Cash Register Interface”, select “Setup” and enter: o Host or IP: 10. 5. 48. 2
� Set your Back-Office PC’s Network as DHCP “Obtains Automatically” or set it to this. o IP Address: 10. 5. 48. 15 o Subnet Mask: 255.255.255.192 o Default Gateway: 10. 5. 48. 1
27
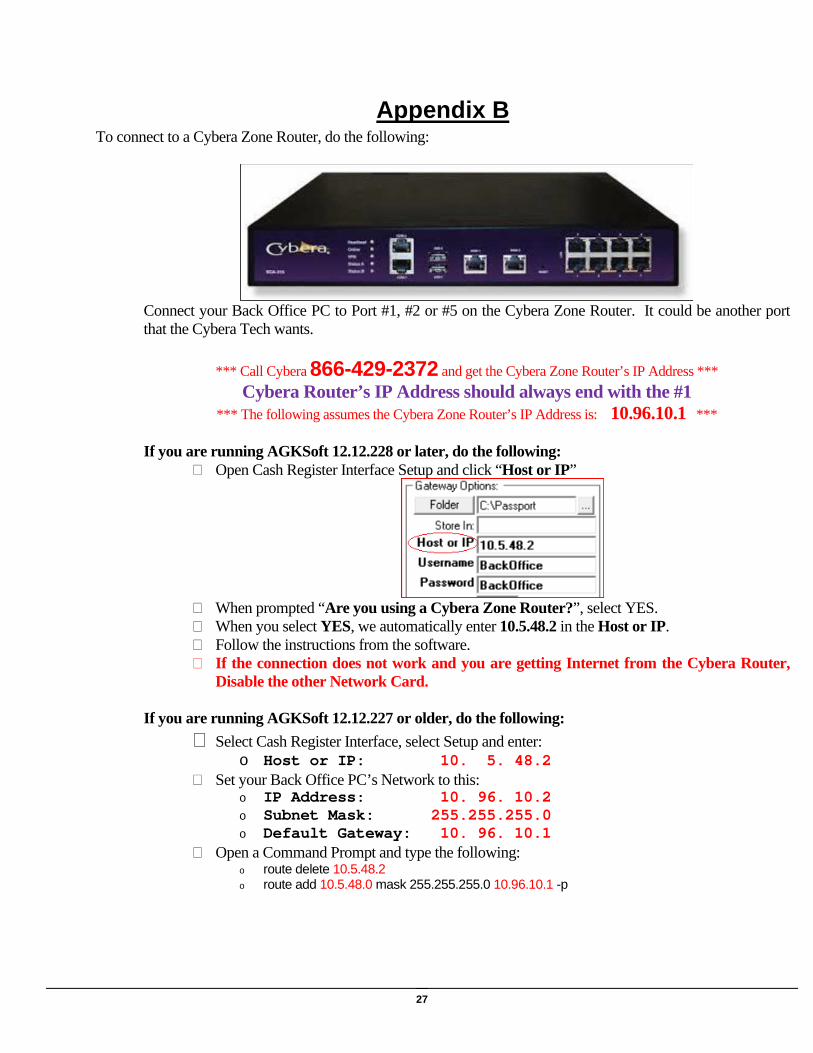
Appendix B
To connect to a Cybera Zone Router, do the following:
Connect your Back Office PC to Port #1, #2 or #5 on the Cybera Zone Router. It could be another port that the Cybera Tech wants.
*** Call Cybera 866-429-2372 and get the Cybera Zone Router’s IP Address ***
Cybera Router’s IP Address should always end with the #1 *** The following assumes the Cybera Zone Router’s IP Address is: 10.96.10.1 ***
If you are running AGKSoft 12.12.228 or later, do the following: � Open Cash Register Interface Setup and click “Host or IP”
� When prompted “Are you using a Cybera Zone Router?”, select YES. � When you select YES, we automatically enter 10.5.48.2 in the Host or IP. � Follow the instructions from the software. � If the connection does not work and you are getting Internet from the Cybera Router,
Disable the other Network Card.
If you are running AGKSoft 12.12.227 or older, do the following:
� Select Cash Register Interface, select Setup and enter: o Host or IP: 10. 5. 48.2
� Set your Back Office PC’s Network to this: o IP Address: 10. 96. 10.2 o Subnet Mask: 255.255.255.0 o Default Gateway: 10. 96. 10.1
� Open a Command Prompt and type the following: o route delete 10.5.48.2
o route add 10.5.48.0 mask 255.255.255.0 10.96.10.1 -p
28
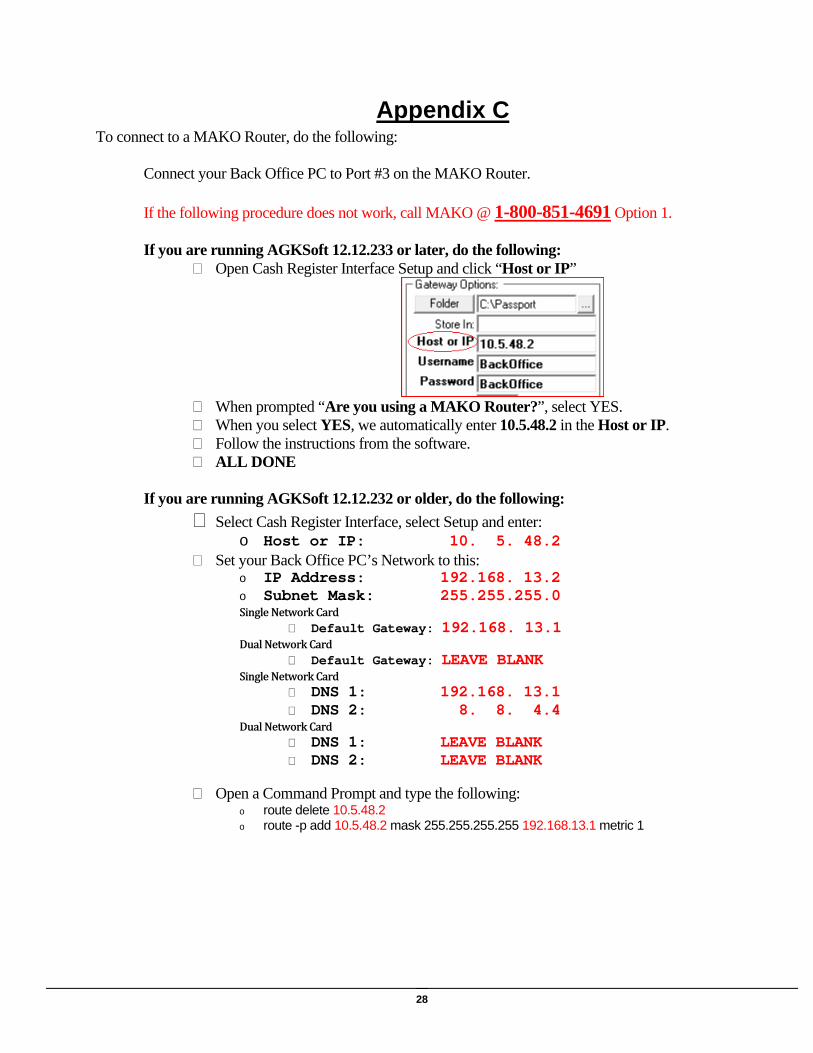
Appendix C
To connect to a MAKO Router, do the following:
Connect your Back Office PC to Port #3 on the MAKO Router. If the following procedure does not work, call MAKO @ 1-800-851-4691 Option 1. If you are running AGKSoft 12.12.233 or later, do the following: � Open Cash Register Interface Setup and click “Host or IP”
� When prompted “Are you using a MAKO Router?”, select YES. � When you select YES, we automatically enter 10.5.48.2 in the Host or IP. � Follow the instructions from the software. � ALL DONE
If you are running AGKSoft 12.12.232 or older, do the following:
� Select Cash Register Interface, select Setup and enter: o Host or IP: 10. 5. 48.2
� Set your Back Office PC’s Network to this: o IP Address: 192.168. 13.2 o Subnet Mask: 255.255.255.0 Single Network Card
� Default Gateway: 192.168. 13.1 Dual Network Card
� Default Gateway: LEAVE BLANK Single Network Card
� DNS 1: 192.168. 13.1 � DNS 2: 8. 8. 4.4
Dual Network Card � DNS 1: LEAVE BLANK � DNS 2: LEAVE BLANK
� Open a Command Prompt and type the following: o route delete 10.5.48.2
o route -p add 10.5.48.2 mask 255.255.255.255 192.168.13.1 metric 1

29
Appendix D
Conoco Phillips and ADS/HPS Dallas (Passport Version 8.03 or later) Plug a straight Cat-5 (RJ45) cable into the FortiGate DMZ port (Do not use a crossover cable)
The Gilbarco Technician must call Conoco Phillips or HPS Dallas and get 2 things:
1 - Passport RV042 Firewall Router WAN IP Address (Example: 10.27.45.11) 2 - FortiGate DMZ Port IP Address (Example: 172.19.43.65)
Open the Cash Register Interface, Setup and click “Host or IP”. Select “YES” when you see the following message.
Automatically configure the IP Address ? If you are a ConocoPhillips or ADS-Dallas/HPS-Dallas site, you should select YES.
Enter your FortiGate DMZ Port IP Address (Example: 172.19.43.65)
Enter your WAN IP Address of the RV042 (Example: 10.27.45.11) AGKSoft will prompt you the following:
Set your 2nd Network Card (The one you are using to connect to the Passport) as follows: IP Address: 172. 19. 43. 66 Subnet Mask: 255.255.255.224 Default Gateway: empty

30
Click OK and you should see the following message: AGKSoft - About to set your route command... Press any key to continue . . .
Press any key and follow the instructions. If for some reason the automatic setup does not work, open File Explorer, open drive C:, then open the TEMP folder and you should see the following:
Right Click on AGKRoute.bat and select “Run as administrator” If for some reason the above does not work, continue reading the rest of this page. The FortiGate IP address you get is unique and is never the same for 2 customers. Add 1 to the last octet (Example: 172.19.43.66). For the Network IP Address, set is as follows:
IP Address: 172. 19. 43. 66 (Note that 65+1=66) Subnet Mask: 255.255.255.224 Default Gateway: empty DNS: 66. 82. 4. 12
Click Start, type CMD, right click on the CMD.EXE and select “Run as administrator” Route -p add 10.27.45.0 mask 255.255.255.0 172.19.43.65
Note that 10.27.45.0 uses the 1st 3 octets of the “WAN IP Address of the RV042” with a ZERO @ the end.
Note that 172.19.43.65 is the exact IP Address of the Fortigate DMZ Port.
Open AGKSoft and Login, open the “Cash Register Interface”, click “Setup” and make sure the Host or IP is set to: 10.27.45.11 (This is the WAN IP Address of the RV042)
Under Username, type: passport or BackOffice Under Password, type: pmcs382000 or BackOffice
To confirm the route, open a CMD prompt and type the following: Route print -4
Look under “Persistent Routes” and make sure what you entered is there.
If you make a mistake and you need to delete the old entry, do the following: Click Start, type CMD, right click on the CMD.EXE and select “Run as administrator”
If you want to delete the IP 10.27.45.0, type the following: Route delete 10.27.45.0