Agilent GenetiSure Pre-Implantation Array-Based … · Agilent GenetiSure Pre-Implantation...
68
Before you begin, view hands-on videos of SurePrint procedures at http://www.agilent.com/genomics/protocolvideos. Agilent GenetiSure Pre-Implantation Array-Based CGH for Aneuploidy Screening PCR-Based Whole Genome Amplification, Labeling, and CGH Microarray Hybridization Protocol Revision B0, August 2016 For Research Use Only. Not for use in diagnostic procedures.
Transcript of Agilent GenetiSure Pre-Implantation Array-Based … · Agilent GenetiSure Pre-Implantation...

Bvh
Agilent GenetiSure Pre-Implantation Array-Based CGH for Aneuploidy ScreeningPCR-Based Whole Genome Amplification, Labeling, and CGH Microarray Hybridization
efore you begin, view hands-on ideos of SurePrint procedures at
ttp://www.agilent.com/genomics/protocolvideos.
ProtocolRevision B0, August 2016
For Research Use Only. Not for use in diagnostic procedures.

GenetiSure Pre-Implantation Array-Based CGH for Aneuploidy Screening
Notices© Agilent Technologies, Inc. 2016No part of this manual may be reproduced in any form or by any means (including electronic storage and retrieval or transla-tion into a foreign language) without prior agreement and written consent from Agi-lent Technologies, Inc. as governed by United States and international copyright laws.
Manual Part NumberG4410-90100
EditionRevision B0, August 2016Agilent Technologies, Inc.5301 Stevens Creek Blvd. Santa Clara, CA 95051 USA
WarrantyThe material contained in this docu-ment is provided “as is,” and is sub-ject to being changed, without notice, in future editions. Further, to the max-imum extent permitted by applicable law, Agilent disclaims all warranties, either express or implied, with regard to this manual and any information contained herein, including but not limited to the implied warranties of merchantability and fitness for a par-ticular purpose. Agilent shall not be liable for errors or for incidental or consequential damages in connection with the furnishing, use, or perfor-mance of this document or of any information contained herein. Should Agilent and the user have a separate written agreement with warranty terms covering the material in this document that conflict with these terms, the warranty terms in the sep-arate agreement shall control.
Technology Licenses The hardware and/or software described in this document are furnished under a license and may be used or copied only in accordance with the terms of such license.
Restricted Rights LegendU.S. Government Restricted Rights. Soft-ware and technical data rights granted to the federal government include only those rights customarily provided to end user cus-tomers. Agilent provides this customary commercial license in Software and techni-cal data pursuant to FAR 12.211 (Technical Data) and 12.212 (Computer Software) and, for the Department of Defense, DFARS 252.227-7015 (Technical Data - Commercial Items) and DFARS 227.7202-3 (Rights in Commercial Computer Software or Com-puter Software Documentation).
Safety Notices
CAUTION
A CAUTION notice denotes a haz-ard. It calls attention to an operat-ing procedure, practice, or the like that, if not correctly performed or adhered to, could result in damage to the product or loss of important data. Do not proceed beyond a CAUTION notice until the indicated conditions are fully understood and met.
WARNING
A WARNING notice denotes a hazard. It calls attention to an operating procedure, practice, or the like that, if not correctly per-formed or adhered to, could result in personal injury or death. Do not proceed beyond a WARNING notice until the indicated condi-tions are fully understood and met.
Technical SupportTechnical product support can be obtained by contacting your local Agilent Support Services representative. Agilent’s world-wide sales and support center telephone numbers can be obtained at the following web site under Contact Us: www.agilent.com/genomicsor send an e-mail to:[email protected]
Notice to CustomerAgilent Technologies shall not be liable for errors contained herein or for incidental or consequential damages in connection with the furnishing, performance, or use of this material.

In This Guide…This guide describes the Agilent recommended operational procedures to screen for DNA copy number variations and aneuploidies in human cell samples (3–10 cells per sample). This protocol is specifically developed and optimized to amplify and enzymatically label DNA and to hybridize to 8×60K GenetiSure Pre-Screen microarray slides to obtain results within 24 hours. The DNA amplification step uses a PCR-based method optimized for samples containing 3–10 human cells collected from a day 5 trophectoderm. Two experimental samples are hybridized on the same array and compared to a Male and Female Reference sample co-hybridized to another array on the slide, for a total of 14 experimental samples on one 8×60K slide.
1 Before You BeginMake sure that you read and understand the information in this chapter and have the necessary equipment and reagents listed before you start an experiment.
2 Sample AmplificationThis chapter describes the method for whole genome amplification of DNA from the experimental sample cells and of the male and female reference DNA samples using the PicoPLEX WGA Kit. Whole genome amplification increases the amount of DNA while maintaining the genomic representation of the samples.
3 Sample Labeling
This chapter describes the steps to differentially label the amplified DNA samples with fluorescent-labeled nucleotides using reagents from the Agilent SureTag Complete DNA Labeling Kit. The procedure uses random primers and the Exo(-) Klenow fragment to differentially label amplified DNA samples with fluorescent-labeled nucleotides.
GenetiSure Pre-Implantation Array-Based CGH for Aneuploidy Screening 3

4 Microarray ProcessingThis chapter describes the steps to hybridize, wash, and scan GenetiSure Pre-Screen microarrays, and to extract data using the Agilent CytoGenomics software, version 3.0 or higher.
5 TroubleshootingThis chapter describes potential reasons for an assay failure.
6 Reference
This chapter contains reference information related to the amplification, labeling, hybridization, and wash kits, and reference information on working with Agilent microarrays.
4 GenetiSure Pre-Implantation Array-Based CGH for Aneuploidy Screening

Content
1 Before You Begin 3Procedural Notes 4Safety Notes 5GenetiSure Pre-Screen Microarray Kit Contents 6Required Reagents and Equipment 6Required Hardware and Software 10Overview of the Workflow 11
2 Sample Amplification 13Step 1. Sample Preparation 14Step 2. Whole Genome Amplification 15Step 3. Quantitation of Amplified DNA using Qubit Fluorometer
(Optional) 18
3 Sample Labeling 21Step 1. Fluorescent Labeling of DNA 22Step 2. Purification of Labeled DNA 24
4 Microarray Processing 27
Hybridization 28Step 1. Prepare the 10× Blocking Agent 28Step 2. Prepare labeled DNA for hybridization 28Step 3. Prepare the hybridization assembly 29Step 4. Hybridize 31
Microarray Wash 33Step 1. Prewarm Agilent Oligo aCGH/ChIP-on-chip Wash Buffer 2
(overnight) 34Step 2. Prepare the equipment 34Step 3. Prewarm Stabilization and Drying Solution (Wash Procedure B
Only) 35
GenetiSure Pre-Implantation Array-Based CGH for Aneuploidy Screening 1

Contents
Step 4. Wash microarrays 37Step 5. Put slides in a slide holder 41
Microarray Scanning and Analysis 43Step 1. Scan the microarray slides 43Step 2. Analyze microarray image 44
5 Troubleshooting 49If the whole genome amplification fails 50If the labeling efficiencies for Cy3 and Cy5 are dissimilar (i.e., the Cy3/Cy5
paired sample is not purple) 50If you have post-labeling signal loss 51If you have high BGNoise values 52If you have poor reproducibility 52
6 Reference 55Reagent Kit Components 56Microarray Handling Tips 58Agilent Microarray Layout and Orientation 59Array/Sample tracking on microarray slides 60
2 GenetiSure Pre-Implantation Array-Based CGH for Aneuploidy Screening

GenetiSure Pre-Implantation Array-Based CGHProtocol
1Before You BeginProcedural Notes 4Safety Notes 5GenetiSure Pre-Screen Microarray Kit Contents 6Required Reagents and Equipment 6Required Hardware and Software 10Overview of the Workflow 11
Make sure that you read and understand the information in this chapter and have the necessary equipment and reagents listed before you start an experiment.
3

1 Before You BeginProcedural Notes
Procedural Notes• Follow the procedure described in this document to amplify DNA from cells
to increase the likelihood of a successful experiment.
• To prevent contamination of reagents by nucleases, always wear powder-free laboratory gloves, and use dedicated solutions and pipettors with nuclease-free aerosol-resistant tips.
• Maintain a clean work area.
• Do not mix stock solutions and reactions containing DNA or enzymes on a vortex mixer. Instead, mix the solutions and reactions by gently tapping the tube with your finger.
• Avoid repeated freeze-thaw cycles of solutions containing DNA or enzymes.
• When preparing frozen reagent stock solutions for use:
1 Thaw the aliquot as quickly as possible without heating above room temperature.
2 Mix briefly on a vortex mixer, and then spin in a microcentrifuge for 5 to 10 seconds to drive the contents off the walls and lid.
3 Store on ice or in a cold block until use.
• In general, follow Biosafety Level 1 (BL1) safety rules.
4 GenetiSure Pre-Implantation Array-Based CGH for Aneuploidy Screening
Before You Begin 1Safety Notes
Safety Notes
CAUTION Wear appropriate personal protective equipment (PPE) when working in the laboratory.
WARNING • 2× HI-RPM Hybridization Buffer (5188-6420) WARNING. Causes serious eye irritation. Causes skin irritation. Harmful to aquatic life with long lasting effects. Wear protective gloves. Wear eye or face protection. Avoid release to the environment. IF IN EYES: Rinse cautiously with water for several minutes. Remove contact lenses, if present and easy to do. Continue rinsing. Dispose of contents and container in accordance with all local, regional, national and international regulations.
• Stabilization and Drying Solution (5190-0423) DANGER. Highly flammable liquid and vapour. Harmful if swallowed, in contact with skin or if inhaled. Causes serious eye irritation. Wear protective gloves. Wear eye or face protection. Keep away from heat, hot surfaces, sparks, open flames or other ignition sources. No smoking. Use explosion-proof electrical, ventilating, lighting and all material-handling equipment. IF INHALED: Remove person to fresh air and keep comfortable for breathing. IF ON SKIN (or hair): Take off immediately all contaminated clothing. Rinse skin with water or shower. Keep cool. Dispose of contents and container in accordance with all local, regional, national and international regulations.
GenetiSure Pre-Implantation Array-Based CGH for Aneuploidy Screening 5

1 Before You BeginGenetiSure Pre-Screen Microarray Kit Contents
GenetiSure Pre-Screen Microarray Kit ContentsStore microarray kits at room temperature. After the microarray foil pouch is opened, store the microarray slides at room temperature (in the dark) under a vacuum desiccator or N2 purge box. Do not store microarray slides in open air after breaking foil.
Required Reagents and Equipment
Table 1 GenetiSure Pre-Screen Microarrays and Gasket Slides (8×60K)
Part Number Description
G5963A GenetiSure Pre-Screen Microarray Kit, 3 slides, 8×60K
G5966A GenetiSure Pre-Screen Microarray Kit, 1 slide, 8×60K
G2534-60018 Hybridization Chamber Gasket Slide Kit, 8-pack format, 3 slides
Table 2 Required reagents for sample amplification
Description Vendor and part number
PicoPLEX WGA Kit Agilent p/n 5190-9533 or Rubicon Genomics p/n R30050; see Table 25 on page 57 for kit contents
1× Phosphate Buffered Saline (PBS), pH 7.4 Life Technologies p/n 10010-023 or equivalent
Qubit dsDNA BR Assay Kit, 100 assays, for use with the Qubit fluorometer (optional)
Life Technologies p/n Q32850
6 GenetiSure Pre-Implantation Array-Based CGH for Aneuploidy Screening

Before You Begin 1Required Reagents and Equipment
* The SureTag Complete DNA Labeling Kit (Agilent p/n 5190-4240) includes 50 SureTag Purification Columns. Use Agilent p/n 5190-3391 to purchase additional columns.
* Optional components recommended if wash procedure B is selected.
Table 3 Required reagents for enzymatic sample labeling
Description Vendor and part number
SureTag Complete DNA Labeling Kit Agilent p/n 5190-4240; see Table 24 on page 56 for kit contents
SureTag Purification Columns* Agilent p/n 5190-3391
1× TE, pH 8.0, Molecular biology grade(10mM Tris-HCl containing 1 mM EDTA•Na2)
Promega p/n V6231 (100 mL) or equivalent
Table 4 Required reagents for hybridization and wash
Description Vendor and part number
Oligo aCGH/ChIP-on-chip Wash Buffer Kitor Oligo aCGH/ChIP-on-chip Wash Buffer 1 and Oligo aCGH/ChIP-on-chip Wash Buffer 2
Agilent p/n 5188-5226; see Table 27 on page 57 for kit contentsAgilent p/n 5188-5221 andAgilent p/n 5188-5222
Stabilization and Drying Solution* Agilent p/n 5185-5979
Oligo aCGH/ChIP-on-chip Hybridization Kit Agilent p/n 5188-5220 (25 slides) or p/n 5188-5380 (100 slides); see Table 26 on page 57 for kit contents
Human Cot-1 DNA Agilent p/n 5190-3393
DNase/RNase-free distilled water Life Technologies p/n 10977-015
Milli-Q ultrapure water Millipore
Acetonitrile* Sigma-Aldrich p/n 271004-1L
70% 2-propanol, molecular biology grade Sigma-Aldrich p/n 563935-4L
GenetiSure Pre-Implantation Array-Based CGH for Aneuploidy Screening 7

1 Before You BeginRequired Reagents and Equipment
Table 5 Required equipment
Description Vendor and part number
GenetiSure Pre-Screen Microarray Kit Agilent p/n G5963A or G5966A; see Table 1
Hybridization Chamber Gasket Slide Kit Agilent p/n G2534-60018; see Table 1
Thermal cycler with heated lid Agilent p/n G8800A or equivalent
96-well PCR plate‡ Agilent p/n 401334 or equivalent
Centrifuge for 96-well plates‡ Eppendorf p/n 5810 or equivalent
PCR plate heat sealer‡ Eppendorf p/n 951023078
Peel-it-lite microplate foil (removable)‡ Eppendorf p/n 951023205
Thin-walled 200-L PCR tubes, tube strips, andPCR tube strip caps
Agilent p/n 410092 or equivalent andAgilent p/n 410096 or equivalent
Agilent Microarray Scanner Bundle Agilent p/n G4900DA or G2565CA, or Agilent p/n G5761AA (available in the EU, Singapore, and South Korea)
Hybridization Chamber, stainless Agilent p/n G2534A
Hybridization oven; temperature set at 67°C Agilent p/n G2545A
Hybridization oven rotator for Agilent Microarray Hybridization Chambers
Agilent p/n G2530-60029
Vacuum concentrator Eppendorf or equivalent
Ozone-barrier slide covers (box of 20)* Agilent p/n G2505-60550
1.5-mL microfuge tubes, RNase-free Ambion p/n AM12400 or equivalent
Magnetic stir plate (×1 or ×3)† Corning p/n 6795-410 or equivalent
Magnetic stir plate with heating element Corning p/n 6795-420 or equivalent
Microcentrifuge with rotor for 1.5-mL tubes and 200-L tubes (or 500-L tubes if cell samples were collected in these tubes)
Eppendorf p/n 5430 or equivalent
Qubit Fluorometer‡ Life Technologies p/n Q32857
Thin-walled, clear 0.5-mL PCR tubes‡ Life Technologies p/n Q32856 or VWR p/n 10011-830
Sterile storage bottle Nalgene 455-1000 or equivalent
8 GenetiSure Pre-Implantation Array-Based CGH for Aneuploidy Screening

Before You Begin 1Required Reagents and Equipment
* Optional. Recommended when processing arrays with a G2565CA scanner in environments in which ozone levels are 5 ppb or higher, as measured by an ozone meter.
‡ Optional.† The number varies depending on if wash procedure A or B is selected.
P10, P20, P200 and P1000 pipettes Pipetman P10, P20, P200, P1000 or equivalent
1.5-L glass dish Pyrex p/n 213-R or equivalent
Magnetic stir bar, 7.9 × 38.1 mm (×2 or ×4)† VWR p/n 58948-150 or equivalent
250 mL capacity slide-staining dish, with slide rack (×3 or ×5)†
Wheaton p/n 900200 or Thermo Shandon p/n 121
Ice bucket and ice
Circulating water baths or incubator, set to 37°C, 67°C, and 98°C
Clean forceps
Powder-free gloves
Sterile, low-binding, nuclease-free aerosol barrier pipette tips
Timer
Vacuum desiccator or N2 purge box for slide storage
Vortex mixer
Table 5 Required equipment
Description Vendor and part number
GenetiSure Pre-Implantation Array-Based CGH for Aneuploidy Screening 9
1 Before You BeginRequired Hardware and Software
Required Hardware and SoftwareThe protocol requires the software needed to operate the Agilent scanner and the Agilent CytoGenomics software (version 3.0 or higher).
• Refer to the Agilent Scanner manual and Agilent CytoGenomics manuals for minimum memory requirements and other specifications for the PC used to the run these software programs. To download the manuals go to: http://www.genomics.agilent.com.
• You can download the design file needed for data extraction and analysis in CytoGenomics from the Agilent SureDesign website. Go to: http://www.agilent.com/genomics/suredesign.
10 GenetiSure Pre-Implantation Array-Based CGH for Aneuploidy Screening

Before You Begin 1Overview of the Workflow
Overview of the WorkflowThe protocol uses a two-color process to screen for copy number variants (CNVs) and aneuploidies in experimental samples compared to male-female reference samples.
Figure 1 Overview of the GenetiSure Pre-Implantation Screening workflow
GenetiSure Pre-Implantation Array-Based CGH for Aneuploidy Screening 11

1 Before You BeginOverview of the Workflow
12 GenetiSure Pre-Implantation Array-Based CGH for Aneuploidy Screening

GenetiSure Pre-Implantation Array-Based CGHProtocol
2Sample AmplificationStep 1. Sample Preparation 14Step 2. Whole Genome Amplification 15Step 3. Quantitation of Amplified DNA using Qubit Fluorometer
(Optional) 18
This chapter describes the method for whole genome amplification of DNA from the experimental sample cells and of the male and female reference DNA samples using the PicoPLEX WGA Kit. Whole genome amplification increases the amount of DNA while maintaining the genomic representation of the samples.
The reference samples (called Human Reference DNA Male and Human Reference DNA Female) are included in the SureTag Complete DNA Labeling Kit. For each microarray slide, a 2.5 ng sample of each reference is amplified alongside the experimental samples.
There is no need to re-determine the concentration of the Human Reference DNA samples. The concentration is 200 ng/μL as measured by both spectrophotometer and fluorometer.
Follow the instructions for whole genome amplification provided in this chapter rather than the instructions in the PicoPLEX WGA Kit user manual provided by Rubicon Genomics.
CAUTION Agilent cannot guarantee microarray performance and does not provide technical support to those who use non-Agilent protocols to process Agilent microarrays.
CAUTION Make sure that the Human Reference DNA samples are completely in solution by pipetting up and down. If needed, incubate at 37°C for 30 minutes.
13

2 Sample AmplificationStep 1. Sample Preparation
Step 1. Sample PreparationThis protocol is intended for use with experimental human cell samples collected from a day 5 trophectoderm, with each sample consisting of 3–10 cells. Agilent does not recommend using the protocol with cells collected from a day 3 blastomere.
Do these steps in a (sterile) vertical laminar flow hood.
1 Prepare dilutions of the male and female reference samples using the steps below. Perform these steps for both the male and female reference samples that are provided in the SureTag Complete DNA Labeling Kit.
a In a fresh tube, combine 5 L of Human Reference DNA with 95 L of 1× PBS (pH 7.4) to create a stock of 10 ng/L. Mix well by pipetting up and down.
b In another fresh tube, combine 5 L of the 10 ng/L stock with 45 L of 1× PBS (pH 7.4) to create a stock of 1 ng/L. Mix well by pipetting up and down.
c Transfer 2.5 L of the 1 ng/L stock to a fresh 200-L tube. This tube contains 2.5 ng of reference DNA, which will be used for whole genome amplification. Keep on ice until required.
NOTE To avoid DNA contamination, do not use serum-containing media or PBS with BSA as the cell transfer solution. Always wash cells using Mg2+/Ca2+-free 1× PBS.
CAUTION Do not mix samples containing cells by pipetting up and down; cells could get stuck to the pipette tip.
NOTE Prepare fresh dilutions of the reference samples for each experiment.
14 GenetiSure Pre-Implantation Array-Based CGH for Aneuploidy Screening

Sample Amplification 2Step 2. Whole Genome Amplification
2 Prepare experimental cell samples.
a Isolate and wash cells in 1× PBS (pH 7.4) to minimize carryover of external DNA contaminants from the preparation.
b Transfer washed cells in a maximum of 2.5 μL of 1× PBS (pH 7.4) into a fresh 200-L tube. Keep on ice until required.
Step 2. Whole Genome AmplificationUse the reagents in the PicoPLEX WGA Kit, Rubicon Genomics p/n R30050.
1 Add 2.5 μL of Cell Extraction Buffer (green cap) to each 200-L tube that contains a diluted reference DNA sample or an experimental sample to bring the total volume to 5 μL for each sample. Avoid touching the pipette tip to bottom of the tube as the cells in the experimental samples may stick to the pipette tip.
2 Mix the components in Table 6 on ice to prepare the Extraction Master Mix. Prior to master mix preparation, mix the Extraction Enzyme Dilution Buffer on a vortex mixer then briefly spin it in a centrifuge. Do not vortex the Cell Extraction Enzyme or the Extraction Master Mix.
3 Add 5 μL of Extraction Master Mix to each 5 μL reference and experimental sample to bring the total volume to 10 μL per sample.
4 Mix the samples by gently flicking the tubes. Do not mix by pipetting as the cells in the experimental samples may stick to the pipette tip. Spin samples briefly in a centrifuge to drive the contents off the walls and lid.
5 Program the thermal cycler to run the program in Table 7.
Table 6 Extraction Master Mix
Volume per reaction (µL) ×16 reactions (µL) including excess
Extraction Enzyme Dilution Buffer (violet cap)
4.8 81.6
Cell Extraction Enzyme (yellow cap) 0.2 3.4
Final Volume 5 85
GenetiSure Pre-Implantation Array-Based CGH for Aneuploidy Screening 15

2 Sample AmplificationStep 2. Whole Genome Amplification
6 Transfer samples to the thermal cycler and start the program.
7 At the completion of the program, remove samples from the thermal cycler and spin briefly in a centrifuge to drive to contents off the walls and lid. Put the samples on ice.
8 Mix the components in Table 8 on ice to prepare the Pre-amplification Master Mix. Prior to master mix preparation, mix the PicoPLEX Pre-Amp Buffer on a vortex mixer then briefly spin it in a centrifuge. Do not vortex the PicoPLEX Pre-Amp Enzyme or the Pre-amplification Master Mix.
9 Add 5 μL of Pre-amplification Master Mix to each reference and experimental sample to bring the total volume of each sample to 15 μL.
10 Mix the samples by gently flicking the tubes. Do not mix by pipetting as the cells in the experimental samples may stick to the pipette tip. Spin samples briefly in a centrifuge to drive the contents off the walls and lid.
11 Program the thermal cycler to run the program in Table 9.
Table 7 Thermal cycler program to lyse the experimental sample cells
Step Temperature Time
Step 1 75°C 10 minutes
Step 2 95°C 4 minutes
Step 3 20°C Hold
Table 8 Pre-amplification Master Mix
Volume per reaction (µL) ×16 reactions (µL) including excess
PicoPlex Pre-Amp Buffer (red cap) 4.8 81.6
PicoPlex Pre-Amp Enzyme (white cap)
0.2 3.4
Final Volume 5 85
16 GenetiSure Pre-Implantation Array-Based CGH for Aneuploidy Screening

Sample Amplification 2Step 2. Whole Genome Amplification
12 Transfer samples to the thermal cycler and start the program.
13 At the completion of the program, remove samples from the thermal cycler and spin briefly in a centrifuge to drive to contents off the walls and lid. Put the samples on ice.
14 Mix the components in Table 10 on ice to prepare the Amplification Master Mix. Prior to master mix preparation, mix the PicoPLEX Amplification Buffer on a vortex mixer then briefly spin it in a centrifuge. Do not vortex the PicoPLEX Amplification Enzyme or the Amplification Master Mix.
Table 9 Thermal cycler program to prepare libraries
Step Temperature Time
Step 1 95°C 2 minutes
Step 2 (12 cycles) 95°C 15 seconds
15°C 50 seconds
25°C 40 seconds
35°C 30 seconds
65°C 40 seconds
75°C 40 seconds
Step 3 4°C Hold
Table 10 Amplification Master Mix
Volume per reaction (µL) ×16 reactions (µL) including excess
Nuclease-Free Water (clear cap) 34.2 581.4
PicoPlex Amplification Buffer (orange cap)
25 425
PicoPlex Amplification Enzyme (blue cap)
0.8 13.6
Final volume 60 1,020
GenetiSure Pre-Implantation Array-Based CGH for Aneuploidy Screening 17

2 Sample AmplificationStep 3. Quantitation of Amplified DNA using Qubit Fluorometer (Optional)
15 Add 60 μL of Amplification Master Mix to each reference and experimental sample to bring the total volume of each sample to 75 μL.
16 Mix the samples by gently flicking the tubes. Do not mix by pipetting as the cells in the experimental samples may stick to the pipette tip. Spin samples briefly in a centrifuge to drive the contents off the walls and lid.
17 Program the thermal cycler to run the program in Table 11.
18 Transfer samples to the thermal cycler and start the program.
19 At the completion of the program, remove samples from the thermal cycler and spin briefly in a centrifuge to drive to contents off the walls and lid.
20 Store the samples at –20°C.
Step 3. Quantitation of Amplified DNA using Qubit Fluorometer (Optional)
Use the Quant-iT dsDNA Broad-Range Assay Kit to measure the concentration of amplified DNA in the reference and experimental samples.
Table 11 Thermal cycler program for amplification
Step Temperature Time
Step 1 95°C 2 minutes
Step 2 (14 cycles) 95°C 15 seconds
65°C 1 minute
75°C 1 minute
Step 3 4°C Hold
18 GenetiSure Pre-Implantation Array-Based CGH for Aneuploidy Screening

Sample Amplification 2Step 3. Quantitation of Amplified DNA using Qubit Fluorometer (Optional)
Allow the Qubit dsDNA BR Assay Kit to equilibrate to room temperature (22–28°C) before use. Temperature fluctuations can affect the accuracy of the assay.
1 Set up and label clear, thin-walled 0.5-mL PCR tubes for all samples (the two Qubit dsDNA BR standards and the reference and experimental samples that you are processing).
2 Make a Qubit working solution. For each sample to be quantified, mix the components in Table 12.
3 In the 0.5-mL tubes labeled for the two Qubit dsDNA BR standards (standard #1 and standard #2), add 190 L of Qubit working solution. Then, add 10 L of Qubit dsDNA BR standard #1 to the tube labeled for standard #1, and add 10 L of Qubit dsDNA BR standard #2 to the tube labeled for standard #2.
4 In the 0.5-mL tubes labeled for your reference and experimental samples, add 199 L of Qubit working solution. Then, add 1 L of sample to each tube.
5 Mix the contents of all tubes on a vortex mixer for 2–3 seconds, taking care not to create bubbles.
6 Incubate the tubes at room temperature for 2 minutes.
7 Calibrate the Qubit.
a On the home screen of the Qubit 1.0, use the up or down arrow to select dsDNA Broad Range Assay as assay type, and then press GO. The standard screen is automatically displayed.
b Select Run new calibration, and then press GO.
c Insert the tube with the first standard into the Qubit Fluorometer, close the lid and press GO. After the reading is done, remove the standard.
d Insert the tube with the second standard into the Qubit Fluorometer, close the lid, and press GO. After the reading is done remove the standard.
Table 12 Qubit Working Solution
Component Volume
Qubit dsDNA BR reagent 1 L
Qubit dsDNA BR buffer 199 L
GenetiSure Pre-Implantation Array-Based CGH for Aneuploidy Screening 19

2 Sample AmplificationStep 3. Quantitation of Amplified DNA using Qubit Fluorometer (Optional)
The calibration is complete after the second standard has been read.
8 Measure the concentrations of amplified DNA in your samples.
a Insert a sample and press GO.
b When the measurement is complete (approximately 5 seconds later), make a note of the reading. The result is displayed on the screen. The number displayed is the concentration of the nucleic acid in the assay tube.
c Remove the sample from the instrument, insert the next sample, and press GO.
d Repeat sample readings until all samples have been read.
e Calculate the concentration of your original sample.
The Qubit Fluorometer gives a value for the Qubit dsDNA BR assay in g/mL. This value corresponds to the concentration after your samples were diluted into the assay tube. To calculate the concentration of your sample, use the equation below.
Sample concentration = QF value × 200
where
QF value = the value given by the Qubit Fluorometer
Generally, sample concentrations are greater than 20 ng/L. Sample concentrations less than 20 ng/L may produce sub-optimal results in the assay. For suggestions on improving the yield of the whole genome amplification step, see “If the whole genome amplification fails” on page 50 of the “Troubleshooting” chapter.
20 GenetiSure Pre-Implantation Array-Based CGH for Aneuploidy Screening
GenetiSure Pre-Implantation Array-Based CGHProtocol
3Sample LabelingStep 1. Fluorescent Labeling of DNA 22Step 2. Purification of Labeled DNA 24
This chapter describes the steps to differentially label the amplified DNA samples with fluorescent-labeled nucleotides using reagents from the Agilent SureTag Complete DNA Labeling Kit. The procedure uses random primers and the Exo(-) Klenow fragment to differentially label amplified DNA samples with fluorescent-labeled nucleotides.
For this procedure, you first differentially label your experimental samples with cyanine-3 (Cy3) and cyanine-5 (Cy5) dyes, and then combine the samples in Cy3-Cy5 pairs. You also differentially label the male and female reference samples with Cy3 and Cy5 dyes and combine as a Cy3-Cy5 pair. If you have an odd number of experimental samples, or an insufficient number of experimental samples to fill all 8 microarrays on the 8×60K slide, label one or more additional male or female reference samples to pair with the odd experimental sample or to fill the empty microarrays.
21

3 Sample LabelingStep 1. Fluorescent Labeling of DNA
Step 1. Fluorescent Labeling of DNAUse the reagents in the Agilent SureTag Complete DNA Labeling Kit, p/n 5190-4240. Note that some of the reagents in this kit (Alu I, Rsa I, BSA, and 10× Restriction Enzyme Buffer) are not used in this protocol.
1 Spin the amplified DNA samples in a centrifuge for 1 minute at 5,000 × g to drive the contents off the walls and lid.
2 Transfer 13 μL of each sample into a new 200-μL tube or into a well of a 96-well PCR plate.
3 Add 2.5 μL of Random Primers to each tube or well that contains 13 μL of sample to bring the total volume to 15.5 μL per sample. Mix well by pipetting up and down gently. Put the samples on ice.
4 Program the thermal cycler to run the program in Table 13.
5 Transfer samples to the thermal cycler and start the program.
6 At the completion of the program, remove samples from the thermal cycler and spin them in a centrifuge for 1 minute at 5,000 × g to drive the contents off the walls and lid. Put samples on ice.
NOTE Cyanine 3-dUTP and cyanine 5-dUTP are light sensitive and are subject to degradation by multiple freeze-thaw cycles. Minimize light exposure throughout the labeling procedure by covering tubes and/or plates with foil whenever possible.
NOTE If you have an odd number of experimental samples, set up an additional labeling reaction tube for a second male or female reference sample. This additional reference sample will be used for pairing with the odd experimental sample in step 12 on page 24. Similarly, if you have an insufficient number of experimental samples to fill all 8 microarrays on the 8×60K slide, set up additional labeling reaction tubes for reference samples (enough to fill the empty microarrays).
Table 13 Thermal cycler program to denature DNA
Step Temperature Time
Step 1 98°C 3 minutes
Step 2 4°C Hold
22 GenetiSure Pre-Implantation Array-Based CGH for Aneuploidy Screening

Sample Labeling 3Step 1. Fluorescent Labeling of DNA
7 Mix the components in Table 14 on ice in the order indicated to prepare one Cy3 and one Cy5 Labeling Master Mix.
8 Add 9.5 μL of one of the Labeling Master Mixes (Cy3 or Cy5) to each sample tube or well to bring the total volume to 25 μL per sample. Mix well by pipetting up and down gently.
• For the male and female reference samples, use the Cy3 Labeling Master Mix for one of the reference samples and use the Cy5 Labeling Master Mix for the other reference sample.
• For the experimental samples, use the Cy3 Labeling Master Mix for half of the samples and use the Cy5 Labeling Master Mix for the other half of the samples. If you have an odd number of experimental samples, use the extra male or female reference sample to create an even number.
9 Program the thermal cycler to run the program in Table 15.
10 Transfer samples to the thermal cycler and start the program.
Table 14 Labeling Master Mix
Component Per reaction (µL) × 8 reactions (µL) including excess
5× Reaction Buffer 5.0 42.5
10× dNTPs 2.5 21.25
Cyanine 3-dUTP or Cyanine 5-dUTP
1.5 12.75
Exo (-) Klenow 0.5 4.25
Final volume of Labeling Master Mix 9.5 80.75
Table 15 Thermal cycler program to label DNA
Step Temperature Time
Step 1 37°C 2 hours
Step 2 65°C 10 minutes
Step 3 4°C hold
GenetiSure Pre-Implantation Array-Based CGH for Aneuploidy Screening 23

3 Sample LabelingStep 2. Purification of Labeled DNA
11 At the completion of the program, remove samples from the thermal cycler and spin them in a centrifuge for1 minute at 5,000 × g to drive to contents off the walls and lid. Put samples on ice.
12 In a fresh 200-L tube, combine the entire volume of the labeled male reference sample and the entire volume of the labeled female reference sample to create a Cy3-Cy5 paired sample with a final volume of 50 L.
13 In a fresh 200-L tube, combine the entire volume of a Cy3-labeled experimental sample with the entire volume of a Cy5-labeled experimental sample to create a Cy3-Cy5 pair with a final volume of 50 L. Repeat for the remaining experimental samples. If you have an odd number of experimental samples, use the extra male or female reference sample to create a Cy3-Cy5 paired sample.
Paired samples of labeled DNA can be stored up to a month at –20°C in the dark.
Step 2. Purification of Labeled DNALabeled DNA is purified using the Purification Columns and Collection Tubes provided with the Agilent SureTag Complete DNA Labeling Kit, p/n 5190-4240.
1 Spin the samples (which now consist of Cy3-Cy5 labeled DNA pairs) in a centrifuge for 1 minute at 5,000 × g to drive the contents off the walls and lid, then transfer each 50 μL sample to a fresh 1.5-mL tube.
2 Add 430 μL of 1× TE (pH 8.0) to each sample.
3 For each sample, place a column into a 1.5-mL collection tube and label the column appropriately. Load each sample onto a column.
4 Cap the columns and spin for 10 minutes at 14,000 × g in a microcentrifuge at room temperature. Discard the flow-through and place the column back in the 1.5-mL collection tube.
NOTE Before you begin purifying labeled DNA, you may want to initiate preparation of the 10× Blocking Agent that is needed for hybridization of the samples to the microarrays. Instructions for preparing the 10× Blocking Agent are provided in “Step 1. Prepare the 10× Blocking Agent” on page 28. You can then perform purification of labeled DNA during the 60 minute incubation of the 10× Blocking Agent.
24 GenetiSure Pre-Implantation Array-Based CGH for Aneuploidy Screening

Sample Labeling 3Step 2. Purification of Labeled DNA
5 Add 480 μL of 1× TE (pH 8.0) to each column.
6 Cap the columns and spin for 10 minutes at 14,000 × g in a microcentrifuge at room temperature. Discard the flow-through and place the column back in the 1.5-mL collection tube.
7 Invert the column into a fresh, appropriately labeled 2.0- mL collection tube using the following procedure.
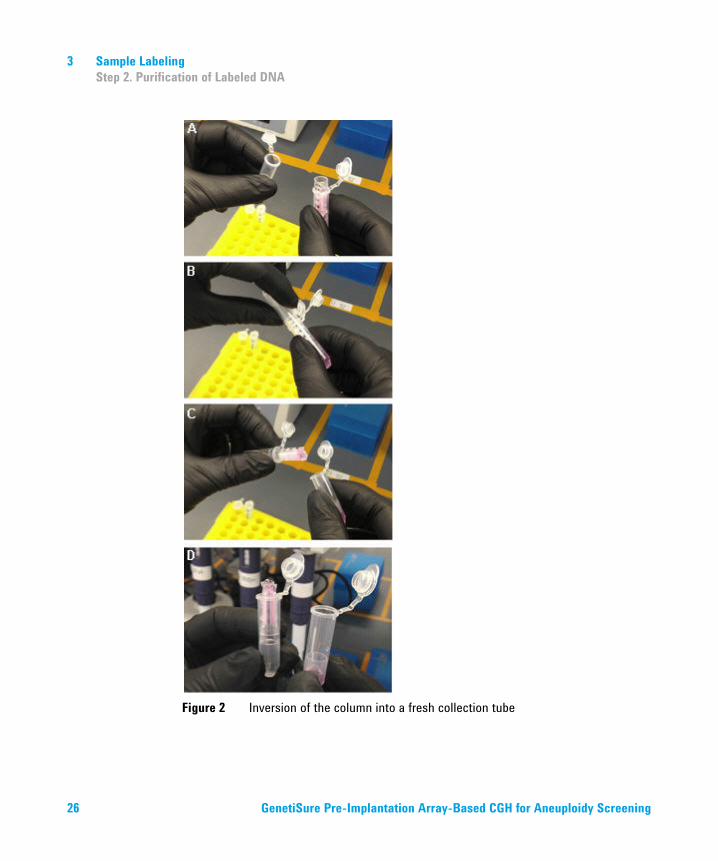
a With the fresh collection tube in one hand and the old collection tube in the other hand (panel A in Figure 2 on page 26), invert the fresh collection tube and use it as tweezers to grasp the edge of the column (panel B in Figure 2). Pull the column out of the old collection tube (panel C in Figure 2). Keep the old collection tube upright throughout.
b Maintain the grip on the column as you flip the fresh collection tube from an inverted to an upright position. Then, release the grip on the column to allow it to slide into the fresh collection tube in the inverted position (panel D in Figure 2). Discard the old collection tube containing the flow- through.
8 Spin the collection tubes containing the inverted columns for 1 minute at approximately 1,000 × g in a microcentrifuge at room temperature to collect the purified sample.
9 Concentrate the samples to dryness in a vacuum concentrator.
10 Resuspend each sample in 16 μL of 1× TE (pH 8.0) by pipetting up and down, then transfer to a fresh 200-μL tube or to the well of a 96-well PCR plate.
Purified samples can be stored up to a month at –20°C in the dark.
GenetiSure Pre-Implantation Array-Based CGH for Aneuploidy Screening 25
3 Sample LabelingStep 2. Purification of Labeled DNA
Figure 2 Inversion of the column into a fresh collection tube
26 GenetiSure Pre-Implantation Array-Based CGH for Aneuploidy Screening

GenetiSure Pre-Implantation Array-Based CGHProtocol
4Microarray ProcessingHybridization 28Microarray Wash 46Microarray Scanning and Analysis 57
This chapter describes the steps to hybridize, wash, and scan GenetiSure Pre-Screen microarrays, and to extract data using the Agilent CytoGenomics software, version 3.0 or higher.
27

4 Microarray ProcessingHybridization
HybridizationUse the reagents in the Agilent Oligo aCGH/ChIP-on-chip Hybridization Kit, p/n 5188-5220 (25) or 5188-5380 (100).
Before you begin, make sure you read and understand “Microarray Handling Tips” on page 58.
Step 1. Prepare the 10× Blocking Agent1 Add 1.35 mL of DNase/RNase-free distilled water to the vial containing
lyophilized 10× aCGH Blocking Agent (included in the Agilent Oligo aCGH/ChIP-on-chip Hybridization Kit, p/n 5188-5220 (25) or 5188-5380 (100)).
2 Leave the 10× aCGH Blocking Agent at room temperature for 60 minutes and then mix on a vortex mixer to reconstitute it before use or storage.
Step 2. Prepare labeled DNA for hybridization1 Mix the components in Table 16 to prepare the Hybridization Master Mix.
NOTE The 10× Blocking Agent can be prepared in advance and stored at –20°C.
Table 16 Hybridization Master Mix
Component Volume (µL) per hybridization
× 8 reactions (µL) including excess
Human Cot-1 DNA (1.0 mg/mL) 2 17
10× aCGH Blocking Agent 4.5 38.25
2× HI-RPM Hybridization Buffer 22.5 191.25
Final Volume of Hybridization Master Mix 29 246.5
28 GenetiSure Pre-Implantation Array-Based CGH for Aneuploidy Screening

Microarray ProcessingMicroarray Processing 4Step 3. Prepare the hybridization assembly
2 Add 29 μL of the Hybridization Master Mix to the each 200-μL tube or plate well that contains a 16-μL sample to bring the total volume to 45 μL per sample.
3 Mix the samples by pipetting up and down. If using 200-μL tubes, cap the tubes. Then, spin the samples in a centrifuge for 1 minute at 5,000 × g to drive contents to the bottom of the tubes or plate wells.
4 Program the thermal cycler to run the program in Table 17.
5 Transfer samples to the thermal cycler and start the program.
6 At the completion of the program, remove samples from the thermal cycler and spin them in a centrifuge for 1 minute at 5,000 × g to drive to contents off the walls and lid.
The samples are ready to be hybridized.
Step 3. Prepare the hybridization assemblyRefer to the Agilent Microarray Hybridization Chamber User Guide (G2534-90004) for detailed instructions on how to load samples, assemble and disassemble chambers, as well as other helpful tips. This user guide can be downloaded from the Agilent Web site at: http://www.agilent.com/cs/library/usermanuals/Public/G2534-90004_HybridizationChamber_User.pdf
Before you begin, make sure you read and understand “Microarray Handling Tips” on page 58.
Table 17 Thermal cycler program to prepare DNA for hybridization
Step Temperature Time
Step 1 98°C 3 minutes
Step 2 37°C 30 minutes
CAUTION The samples must be hybridized immediately.
GenetiSure Pre-Implantation Array-Based CGH for Aneuploidy Screening 29

4 Microarray ProcessingMicroarray ProcessingStep 3. Prepare the hybridization assembly
1 Load a clean gasket slide into the Agilent SureHyb chamber base with the gasket label facing up and aligned with the rectangular section of the chamber base. Ensure that the gasket slide is flush with the chamber base and is not ajar.
2 For each sample, slowly dispense the entire sample (45 μL) onto the center of a gasket well, avoiding contact between the sample and the edges of the rubber gasket.
For the male-female reference sample, make sure to use the gasket well for array 1_1 (refer to Figure 3). Load all gasket wells before you load the microarray slide.
3 Put a microarray slide “active side” down onto the gasket slide, so the numeric barcode side is facing up and the “Agilent”-labeled barcode is facing down (refer to Figure 3). Assess that the sandwich-pair is properly aligned.
4 Put the SureHyb chamber cover onto the sandwiched slides and slide the clamp assembly onto both pieces.
5 Hand-tighten the clamp firmly onto the chamber.
6 Vertically rotate the assembled chamber to wet the slides and assess the mobility of the bubbles. Tap the assembly on a hard surface if necessary to move stationary bubbles.
CAUTION All eight microarrays within a slide must be hybridized to a sample. Leaving a microarray empty may cause a gridding failure during feature extraction.
CAUTION Keep the temperature of the samples as close to 37°C as possible. To do this, process them in small batches and/or put keep them in the thermal cycler until ready to process.
30 GenetiSure Pre-Implantation Array-Based CGH for Aneuploidy Screening

Microarray ProcessingMicroarray Processing 4Step 4. Hybridize
Figure 3 Diagrams of a gasket slide and a double-barcoded microarray slide
Step 4. Hybridize1 Load each assembled chamber into the oven rotator rack. Start from the
center of the rack (position 3 or 4 when counting from the left). Set your hybridization rotator to rotate at 20 rpm.
2 Hybridize at 67°C for 16 hours.
CAUTION If you are not loading all the available positions on the hybridization rotator rack, be sure to balance the loaded hybridization chambers on the rack, similar to a centrifuge, to prevent unnecessary strain on the oven motor.
GenetiSure Pre-Implantation Array-Based CGH for Aneuploidy Screening 31

4 Microarray ProcessingMicroarray ProcessingStep 4. Hybridize
CAUTION You must calibrate the hybridization oven regularly for accuracy of the collected data. Refer to Agilent G2545A Hybridization Calibration Procedure (p/n G2545-90002) for more information.
NOTE The Oligo aCGH/ChIP-on-chip Wash Buffer 2 that is used in the microarray wash procedure needs to be warmed overnight. While you are waiting for the microarray slides to hybridize, do the steps in “Step 1. Prewarm Agilent Oligo aCGH/ChIP-on-chip Wash Buffer 2 (overnight)” on page 34.
32 GenetiSure Pre-Implantation Array-Based CGH for Aneuploidy Screening

Microarray ProcessingMicroarray Processing 4Microarray Wash
Microarray Wash
Before you begin, determine which wash procedure to use:
NOTE The microarray wash procedure must be done in environments where ozone levels are 5 ppb or less, as measured by an ozone meter. For Scanner C, if ozone levels are between 5 and 10 ppb in your laboratory, use the Agilent Ozone Barrier Slide Cover. SureScan microarray scanner uses a slide holder with a built-in ozone barrier. If ozone levels exceed 10 ppb, use the Stabilization and Drying Solution (i.e., Wash Procedure B) together with the ozone barrier.You can also use Carbon Loaded Non-woven Filters to remove ozone from the air. These filters can be installed in either your HVAC system, or as part of small Ozone Controlled Enclosures. These free-standing enclosures can be installed either on a lab bench or as a walk-in room within your lab.
Table 18 Wash procedure to follow
Ozone level in your lab
Wash Procedure Ozone-Barrier Slide Cover
< 5 ppb “Wash Procedure A (without Stabilization and Drying Solution)” on page 37
Optional
> 5 ppb and < 10 ppb “Wash Procedure A (without Stabilization and Drying Solution)” on page 37
Yes
> 10 ppb “Wash Procedure B (with Stabilization and Drying Solution)” on page 39
Yes
GenetiSure Pre-Implantation Array-Based CGH for Aneuploidy Screening 33

4 Microarray ProcessingMicroarray ProcessingStep 1. Prewarm Agilent Oligo aCGH/ChIP-on-chip Wash Buffer 2 (overnight)
Step 1. Prewarm Agilent Oligo aCGH/ChIP-on-chip Wash Buffer 2 (overnight)
The temperature of Oligo aCGH/ChIP-on-chip Wash Buffer 2 must be at 37°C for optimal performance.
1 Add the volume of Wash Buffer 2 required to a sterile storage bottle and warm overnight in an incubator or circulating water bath set to 37°C.
2 Put a slide-staining dish with a lid, a 1.5-L glass dish, and one to two liters of Milli-Q ultrapure water in an incubator or water bath set at 37°C to warm overnight.
Step 2. Prepare the equipmentAlways use clean equipment when doing the hybridization and wash steps.
Use only dishes that are designated and dedicated for use in GenetiSure Pre-Screen experiments.
Solvent washWash staining dishes, racks and stir bars with acetonitrile or 2-Propanol to avoid wash artifacts on your slides and images.
• Use acetonitrile for equipment that was exposed to Stabilization and Drying Solution (i.e., equipment that was used in Wash Procedure B).
• Use 2-Propanol for equipment that was not exposed to Stabilization and Drying Solution (i.e., equipment that was used in Wash Procedure A).
1 Add the slide rack and stir bar to the slide-staining dish.
2 Transfer the slide-staining dish with the slide rack and stir bar to a magnetic stir plate.
3 Fill the slide-staining dish with 100% acetonitrile or 2-Propanol.
WARNING Conduct solvent washes in a vented fume hood.
34 GenetiSure Pre-Implantation Array-Based CGH for Aneuploidy Screening

Microarray ProcessingMicroarray Processing 4Step 3. Prewarm Stabilization and Drying Solution (Wash Procedure B Only)
4 Turn on the magnetic stir plate and adjust the speed to 350 rpm (medium speed).
5 Wash for 5 minutes at room temperature.
6 Discard the solvent as is appropriate for your site.
7 Repeat step 1 through step 6.
8 Air dry all of the equipment in the vented fume hood, then proceed to “Milli-Q ultrapure water wash”, below.
Milli-Q ultrapure water wash
Wash all slide-staining dishes, slide racks, and stir bars thoroughly with high-quality Milli-Q ultrapure water.
1 Run copious amounts of Milli-Q ultrapure water through the slide-staining dishes, slide racks, and stir bars.
2 Empty out the water collected in the dishes.
3 Repeat step 1 and step 2 at least 5 times until all traces of contaminating material are removed.
Step 3. Prewarm Stabilization and Drying Solution (Wash Procedure B Only)
This step is only necessary if you see a visible precipitate in the Stabilization and Drying Solution. If the solution appears clear, proceed to “Step 4. Wash microarrays” on page 37.
The Stabilization and Drying Solution contains an ozone scavenging compound dissolved in acetonitrile. The compound in solution is present in saturating amounts and may precipitate from the solution under normal storage conditions. If the solution shows visible precipitation, warming of the solution is necessary to redissolve the compound. Washing slides using Stabilization and Drying Solution showing visible precipitation will have profound adverse affects on microarray performance.
CAUTION Some detergents may leave fluorescent residue on the dishes. Avoid using any detergent in the washing of the staining dishes, slide racks, or stir bars. If detergent is used, all traces must be removed by copiously rinsing with Milli-Q ultrapure water.
GenetiSure Pre-Implantation Array-Based CGH for Aneuploidy Screening 35

4 Microarray ProcessingMicroarray ProcessingStep 3. Prewarm Stabilization and Drying Solution (Wash Procedure B Only)
1 Put a clean magnetic stir bar into the Stabilization and Drying Solution bottle and recap.
2 Partially fill a plastic bucket with hot water at approximately 40°C to 45°C (for example from a hot water tap).
3 Put the Stabilization and Drying Solution bottle into the hot water in the plastic bucket.
4 Put the plastic bucket on a magnetic stirrer (not a hot-plate) and stir.
5 The hot water cools to room temperature. If the precipitate has not all dissolved replenish the cold water with hot water.
6 Repeat step 5 until the solution is clear.
7 After the precipitate is completely dissolved, allow the solution to equilibrate to room temperature prior to use.
WARNING The Stabilization and Drying Solution is a flammable liquid. Warming the solution will increase the generation of ignitable vapors. Use gloves and eye/face protection in every step of the warming procedures.
WARNING Do not use a hot plate, oven, an open flame or a microwave. Do not increase temperature rapidly. Warm and mix the material away from ignition sources.
WARNING Failure to follow the outlined process will increase the potential for fire, explosion, and possible personal injury.
CAUTION Do not filter the Stabilization and Drying Solution, or the concentration of the ozone scavenger may vary.
36 GenetiSure Pre-Implantation Array-Based CGH for Aneuploidy Screening

Microarray ProcessingMicroarray Processing 4Step 4. Wash microarrays
Step 4. Wash microarraysPerform either Wash Procedure A or Wash Procedure B.
Wash Procedure A (without Stabilization and Drying Solution)
Always use fresh Oligo aCGH/ChIP-on-chip Wash Buffer 1 and Oligo aCGH/ChIP-on-chip Wash Buffer 2 for each wash group (up to five slides).
Table 19 lists the wash conditions for Wash Procedure A. This is the procedure that does not use Stabilization and Drying Solution.
1 Prepare dish #1.
• Completely fill slide-staining dish #1 with Oligo aCGH/ChIP-on-chip Wash Buffer 1 at room temperature.
2 Prepare dish #2.
a Put a slide rack into slide-staining dish #2.
b Add a magnetic stir bar. Fill slide-staining dish #2 with enough Oligo aCGH/ChIP-on-chip Wash Buffer 1 at room temperature to cover the slide rack.
c Put this dish on a magnetic stir plate.
Table 19 Wash conditions
Dish Wash buffer Temperature Time
Disassembly #1 Oligo aCGH/ChIP-on-chip Wash Buffer 1 Room temperature
1st wash #2 Oligo aCGH/ChIP-on-chip Wash Buffer 1 Room temperature 5 minutes
2nd wash #3 Oligo aCGH/ChIP-on-chip Wash Buffer 2 37°C 1 minute
GenetiSure Pre-Implantation Array-Based CGH for Aneuploidy Screening 37

4 Microarray ProcessingMicroarray ProcessingStep 4. Wash microarrays
3 Prepare dish #3.
a Put the prewarmed 1.5-L glass dish on a magnetic stir plate with heating element.
b Put the slide-staining dish #3 into the 1.5-L glass dish.
c Fill the 1.5-L glass dish with pre-warmed Milli-Q ultrapure water.
d Fill the slide-staining dish #3 approximately three-fourths full with Oligo aCGH/ChIP-on-chip Wash Buffer 2 (warmed to 37°C).
e Add a magnetic stir bar.
f Turn on the heating element and maintain temperature of Oligo aCGH/ChIP-on-chip Wash Buffer 2 at 37°C. Monitor with a thermometer.
4 Remove one hybridization chamber from the incubator and resume rotation of the others. Record whether bubbles formed during hybridization and if all bubbles are rotating freely.
5 Prepare the hybridization chamber disassembly.
a Put the hybridization chamber assembly on a flat surface and loosen the thumbscrew, turning counter-clockwise.
b Slide off the clamp assembly and remove the chamber cover.
c With gloved fingers, remove the microarray-gasket sandwich from the chamber base by lifting one end and then grasping in the middle of the long sides. Keep the microarray slide numeric barcode facing up as you quickly transfer the sandwich to slide-staining dish #1. Do not let go of the slides.
d While still holding the slides, submerge the microarray-gasket sandwich into slide-staining dish #1 containing Oligo aCGH/ChIP-on-chip Wash Buffer 1.
6 With the sandwich completely submerged in Oligo aCGH/ChIP-on-chip Wash Buffer 1, pry the sandwich open from the barcode end only:
a Slip one of the blunt ends of the forceps between the slides.
b Gently twist the forceps to separate the slides.
c Let the gasket slide drop to the bottom of the staining dish.
d Remove the microarray slide, grasp it from the upper corners with thumb and forefinger, and quickly put into the slide rack in the slide-staining dish #2 containing Oligo aCGH/ChIP-on-chip Wash Buffer 1 at room temperature. Minimize exposure of the slide to air. Touch only the barcode portion of the microarray slide or its edges!
38 GenetiSure Pre-Implantation Array-Based CGH for Aneuploidy Screening

Microarray ProcessingMicroarray Processing 4Step 4. Wash microarrays
7 Repeat step 4 through step 6 for up to four additional slides in the group. A maximum of five disassembly procedures yielding five microarray slides is advised at one time in order to facilitate uniform washing.
8 When all slides in the group are put into the slide rack in slide-staining dish #2, stir at 350 rpm for 5 minutes. Adjust the setting to get good but not vigorous mixing.
9 Wash the slides in Oligo aCGH/ChIP-on-chip Wash Buffer 2:
a Transfer slide rack to slide-staining dish #3, which contains Oligo aCGH/ChIP-on-chip Wash Buffer 2 at 37°C.
a Activate the magnetic stirrer.
b Wash microarray slides for at least 1 minute and no more than 2 minutes.
Adjust the setting to get thorough mixing without disturbing the microarray slides.
10 Slowly remove the slide rack, trying to minimize droplets on the slides. It should take 5 to 10 seconds to remove the slide rack.
11 Discard used Oligo aCGH/ChIP-on-chip Wash Buffer 1 and Oligo aCGH/ChIP-on-chip Wash Buffer 2.
12 Repeat step 1 through step 11 for the next group of five slides using fresh Oligo aCGH/ChIP-on-chip Wash Buffer 1 and Oligo aCGH/ChIP-on-chip Wash Buffer 2 warmed to 37°C.
13 To minimize the impact of environmental oxidants on signal intensities, scan the slides immediately (proceed to “Step 5. Put slides in a slide holder” on page 41). If necessary, store slides in orange slide boxes in a N2 purge box, in the dark.
Wash Procedure B (with Stabilization and Drying Solution)Cyanine reagents are susceptible to degradation by ozone. Use this wash procedure if the ozone level exceeds 10 ppb in your laboratory.
Always use fresh Oligo aCGH/ChIP-on-chip Wash Buffer 1 and Oligo aCGH/ChIP-on-chip Wash Buffer 2 for each wash group (up to five slides).
The acetonitrile (dish #4) and Stabilization and Drying Solution (dish #5) below may be reused for washing up to 4 batches of 5 slides (total 20 slides) in one experiment. Do not pour the Stabilization and Drying Solution back in the bottle.
GenetiSure Pre-Implantation Array-Based CGH for Aneuploidy Screening 39
4 Microarray ProcessingMicroarray ProcessingStep 4. Wash microarrays
Table 20 lists the wash conditions for the Wash Procedure B with Stabilization and Drying Solution.
1 In the fume hood, fill slide-staining dish #4 approximately three-fourths full with acetonitrile. Add a magnetic stir bar and put this dish on a magnetic stir plate.
2 In the fume hood, fill slide-staining dish #5 approximately three-fourths full with Stabilization and Drying Solution. Add a magnetic stir bar and put this dish on a magnetic stir plate.
3 Perform step 1 through step 9 in “Wash Procedure A (without Stabilization and Drying Solution)” on page 37.
4 Remove the slide rack from Oligo aCGH/ChIP-on-chip Wash Buffer 2 and tilt the rack slightly to minimize wash buffer carry-over. Quickly transfer the slide rack to slide-staining dish #4 containing acetonitrile, and stir at 350 rpm for 10 seconds.
5 Transfer slide rack to slide-staining dish #5 filled with Stabilization and Drying Solution, and stir at 350 rpm for 30 seconds.
WARNING The Stabilization and Drying Solution must be set up in a fume hood. Put the Wash Buffer 1 and Wash Buffer 2 set-up areas close to, or preferably in, the same fume hood. Use gloves and eye/face protection in every step of the wash procedure.
Table 20 Wash conditions
Dish Wash Buffer Temperature Time
Disassembly #1 Oligo aCGH/ChIP-on-chip Wash Buffer 1
Room temperature
1st wash #2 Oligo aCGH/ChIP-on-chip Wash Buffer 1
Room temperature
5 minutes
2nd wash #3 Oligo aCGH/ChIP-on-chip Wash Buffer 2
37°C 1 minute
Acetonitrile wash #4 Acetonitrile Room temperature
10 seconds
3rd wash #5 Stabilization and Drying Solution Room temperature
30 seconds
40 GenetiSure Pre-Implantation Array-Based CGH for Aneuploidy Screening

Microarray ProcessingMicroarray Processing 4Step 5. Put slides in a slide holder
6 Slowly remove the slide rack trying to minimize droplets on the slides. It should take 5 to 10 seconds to remove the slide rack.
7 Discard used Oligo aCGH/ChIP-on-chip Wash Buffer 1 and Oligo aCGH/ChIP-on-chip Wash Buffer 2.
8 Repeat step 1 through step 7 for the next group of five slides using fresh Oligo aCGH/ChIP-on-chip Wash Buffer 1 and Oligo aCGH/ChIP-on-chip Wash Buffer 2 prewarmed to 37°C.
9 Dispose of acetonitrile and Stabilization and Drying Solution as flammable solvents.
10 To minimize the impact of environmental oxidants on signal intensities, scan the slides immediately (proceed to “Step 5. Put slides in a slide holder” on page 41). If necessary, store slides in orange slide boxes in a N2 purge box, in the dark.
Step 5. Put slides in a slide holder
For SureScan microarray scanner
1 Carefully place the end of the slide without the barcode label onto the slide holder ledge nearest the clip hinge.
2 Gently lower the microarray slide into the slide holder. Make sure that the active microarray surface (with “Agilent”-labeled barcode) faces up, toward the slide cover.
3 Close the plastic slide cover, pushing on the tab end until you hear it click.
For more detailed instructions on working with slide holders, refer to the Agilent G4900DA SureScan Microarray Scanner System User Guide.
NOTE The acetonitrile and the Stabilization and Drying Solution may be reused for washing of up to four batches of five slides (that is, total 20 microarray slides) in one experiment. Pour the Stabilization and Drying Solution to a different marked bottle, and protect from light with other flammables. After each use, rinse the slide rack and the slide-staining dish that were in contact with the Stabilization and Drying Solution with acetonitrile followed by a rinse in Milli-Q ultrapure water.
GenetiSure Pre-Implantation Array-Based CGH for Aneuploidy Screening 41

4 Microarray ProcessingMicroarray ProcessingStep 5. Put slides in a slide holder
Figure 4 Slide in slide holder for SureScan microarray scanner
For Agilent Scanner C • In environments in which the ozone level exceeds 5 ppb, immediately put
the slides with active microarray surface (“Agilent”-labeled barcode) facing up in a slide holder. Make sure that the slide is not caught up on any corner. Put an ozone-barrier slide cover on top of the array as shown in Figure 5. Refer to the Agilent Ozone-Barrier Slide Cover User Guide (p/n G2505-90550), included with the slide cover, for more information.
Figure 5 Inserting the ozone-barrier slide cover
• In environments in which the ozone level is below 5 ppb, put the slides with Agilent barcode facing up into a slide holder without the ozone-barrier slide cover.
42 GenetiSure Pre-Implantation Array-Based CGH for Aneuploidy Screening

Microarray ProcessingMicroarray Processing 4Microarray Scanning and Analysis
Microarray Scanning and Analysis
Step 1. Scan the microarray slidesAn Agilent SureScan or Agilent C microarray scanner is required for GenetiSure Pre-Screen microarrays.
Agilent SureScan Microarray Scanner1 Put assembled slide holders into the scanner cassette.
2 Select Protocol AgilentG3_CGH.
3 Verify that the Scanner status in the main window reads “Scanner Ready.”
4 Click Start Scan.
Agilent C Scanner Settings1 Put assembled slide holders, with or without the ozone-barrier slide cover,
into scanner carousel.
2 Select Start Slot m End Slot n.
3 Select Profile AgilentG3_CGH.
4 Verify scan settings. See Table 21.
5 Check that Output Path Browse is set for desired location.
Table 21 C Scanner Scan Settings
For G3 Microarray Formats
Dye channel R+G (red and green)
Scan region Agilent HD (61 x 21.6 mm)
Scan resolution 3 µm
Tiff file dynamic range 16 bit
Red PMT gain 100%
Green PMT gain 100%
XDR <No XDR>
GenetiSure Pre-Implantation Array-Based CGH for Aneuploidy Screening 43
4 Microarray ProcessingMicroarray ProcessingStep 2. Analyze microarray image
6 Verify that the Scanner status in the main window reads “Scanner Ready.”
7 Click Scan Slot m-n on the Scan Control main window.
Step 2. Analyze microarray imageAfter scanning is completed, load the microarray TIF images into the Agilent CytoGenomics software (version 3.0 or higher) for feature extraction and sample analysis.
Agilent CytoGenomics software is a complete and streamlined CGH microarray data analysis solution that has Feature Extraction (FE) software built in and is able to run FE as an integral part of the analysis workflow.
Feature extraction is the process by which data is extracted from the scanned microarray image (*.tif). After feature extraction of each array, Cy5- and Cy3-labeled experimental samples are compared to both female and male references that are co-hybridized to a different array on the same slide and the data are used to calculate QC metrics.
Each experimental sample will be compared to one reference with the opposite labeling (e.g., a Cy3-labeled experimental sample compared to a Cy5-labeled reference) and one reference with the same labeling (e.g., a Cy3-labeled experimental sample compared to a Cy3-labeled reference). To facilitate comparisons between experimental samples and reference samples that are labeled with the same dye, CytoGenomics transposes the signal data from Cy3-labeled experimental samples from the green channel to the red channel, while also transposing the signal data from Cy5-labeled references from the red channel to the green channel (see Figure 6 for an example). The resulting log ratios are computed by Agilent CytoGenomics to identify copy number aberrations, which are recorded in aberration reports that are saved in the Workflow Output folder in the software directory.
44 GenetiSure Pre-Implantation Array-Based CGH for Aneuploidy Screening

Microarray ProcessingMicroarray Processing 4Step 2. Analyze microarray image
Figure 6 Example slide and resulting comparisons for two experimental samples on the slide (Sample1 and Sample2)
When running a workflow in CytoGenomics, use one of the three analysis methods designed for analysis of single cell samples. These analysis methods are described in Table 22.
GenetiSure Pre-Implantation Array-Based CGH for Aneuploidy Screening 45

4 Microarray ProcessingMicroarray ProcessingStep 2. Analyze microarray image
Microarray QC Metrics for experimental samplesThese metrics, which are measured by the CytoGenomics software, are only appropriate for experimental samples analyzed with GenetiSure Pre-Screen microarrays by following the standard operational procedures provided in this protocol. The metrics can be used to assess the relative data quality from a set of experimental samples in an experiment. In some cases, they can indicate potential processing errors that have occurred or suggest that the data from particular microarrays might be compromised. Many factors can influence the range of these metrics, including the amplification reaction, experimental processing, scanner sensitivity, and image processing. The value guidelines presented in Table 23 represent the thresholds that Agilent has observed when analyzing samples using this protocol.
To export the metrics for an experimental sample, select the sample record on the Sample Review screen of the CytoGenomics software (version 3.0 or higher), then click QC metrics at the bottom of the screen.
Table 22 Single cell analysis methods in CytoGenomics (version 3.0 or higher)
Analysis Method Description
Single Cell Recommended Agilent recommends this analysis method for most GenetiSure pre-implantation workflows. The other single cell analysis methods (Single Cell Small Aberration and Single Cell Long Low Aberration) are optimized for special cases. Review the descriptions of these other analysis methods below to determine if your samples fit the cases described
Single Cell Small Aberration Agilent recommends this analysis method for analyses in which you want to focus on a few particular loci of interest. The aberration filter used in this analysis method has a less stringent threshold for aberration size than that used in the Single Cell Recommended analysis method. Consequently, the risk for false positives is higher with this analysis method compared to the Single Cell Recommended analysis method.
Single Cell Long Low Aberration
Agilent recommends this analysis method for analysis of mosaic samples consisting of just a few cells. The Aberration Filter used in this analysis method is capable of finding large aberrations with a compressed log2 ratio.
46 GenetiSure Pre-Implantation Array-Based CGH for Aneuploidy Screening

Microarray ProcessingMicroarray Processing 4Step 2. Analyze microarray image
* On the Agilent SureScan microarray scanner (model G4900DA or G5761AA), the threshold is 15. On the Agilent microarray C scanner model G2565CA, the threshold is 20.
† On the Agilent SureScan microarray scanner (model G4900DA or G5761AA), the threshold is 15. On the Agilent microarray C scanner model G2565CA, the threshold is 20.
Table 23 QC metric thresholds for experimental samples
Metric Excellent Good Evaluate
DerivativeLR_Spread NA 0.7 >0.7
gRepro 0 to 0.10 0.10 to 0.20 < 0 or >0.2
g_BGNoise NA 15 >15
g_Signal2Noise NA 10 < 10
g_SignalIntensity NA 30 < 30
rRepro 0 to 0.10 0.10 to 0.20 >0.2
r_BGNoise NA 15 or 20* >15 or >20†
r_Signal2Noise NA 8 < 8
r_SignalIntensity NA 25 < 25
GenetiSure Pre-Implantation Array-Based CGH for Aneuploidy Screening 47

4 Microarray ProcessingMicroarray ProcessingStep 2. Analyze microarray image
48 GenetiSure Pre-Implantation Array-Based CGH for Aneuploidy Screening
GenetiSure Pre-Implantation Array-Based CGHProtocol
5TroubleshootingIf the whole genome amplification fails 50If the labeling efficiencies for Cy3 and Cy5 are dissimilar (i.e., the Cy3/Cy5
paired sample is not purple) 50If you have post-labeling signal loss 51If you have high BGNoise values 52If you have poor reproducibility 52
This chapter describes potential reasons for an assay failure.
49
5 TroubleshootingIf the whole genome amplification fails
If the whole genome amplification failsIf you have low post-amplification yield, as determined using the Qubit dsDNA BR kit, the whole genome amplification may have been inefficient.
✔ Do not mix solutions containing cells by pipetting up and down, as this may cause the cells to adhere to the pipette tip. Instead, mix the samples by flicking the tubes.
✔ Make sure that the cell lysis and amplification incubations are performed at the correct temperatures. Use a thermal cycler with a heated lid that is set to at least 70°C.
✔ To avoid degradation of the DNA within the cells, do not store the cells for extended periods of time, and make sure that the cells are always stored at the appropriate temperature.
If the labeling efficiencies for Cy3 and Cy5 are dissimilar (i.e., the Cy3/Cy5 paired sample is not purple)
After you pair the Cy3- and Cy5-labeled samples, the paired sample should be purple in color. A paired sample that is too pink indicates inefficient Cy5 labeling. A paired sample that is too blue indicates inefficient Cy3 labeling. Inefficient labeling can result from sub-optimal whole genome amplification and labeling conditions such as too many freeze-thaw cycles for the buffers or Cyanine dUTP, enzyme degradation due to being left warm for too long, wrong temperatures or times, volume mistakes, or too much exposure of the dyes to light or air.
✔ See the troubleshooting suggestions in “If the whole genome amplification fails” on page 50 for suggestions to optimize whole genome amplification.
✔ Keep amplification and labeling enzymes on ice while setting up reactions, and return them to –20°C as quickly as possible. Make sure to store Cyanine dUTP at –20°C.
✔ Double check incubation times and temperatures (use a calibrated thermometer), and use a thermal cycler with heated lid.
✔ Evaporation can be a problem when you process samples at high temperatures. Make sure that sample tubes are completely closed or use a plate heat sealer with your thermal cycler to avoid evaporation.
50 GenetiSure Pre-Implantation Array-Based CGH for Aneuploidy Screening

Troubleshooting 5If you have post-labeling signal loss
✔ Make sure that the pipettes are calibrated.
✔ Make sure that the reagents and master mixes are well mixed. Tap the tube with your finger or use a pipette to move the entire volume up and down. Then, spin in a microcentrifuge for 5–10 seconds to drive the contents off the walls and lid. Do not mix on a vortex mixer the stock solutions and reactions that contain amplified DNA or enzymes.
If you have post-labeling signal lossSignal loss can be due to wash or hybridization conditions that are too stringent, or degradation of the Cy5 signal.
Cy5 signal degradation can be caused by ozone or NOx compounds coming from pollution and/or compressors and centrifuges. Cy5 signal degradation can result in less red signal around the edges of the features, a visible gradient of red intensity across the slide (especially on slides scanned later in a batch), and poor reproducibility of the Cy5-labeled samples.
✔ Check that the oven temperature is 67°C. If needed, recalibrate the hybridization oven. Follow the steps in Agilent G2545A Hybridization Calibration Procedure (publication p/n G2545-90002).
✔ Check that the temperature of Wash 2 is 37°C.
✔ Check that Wash 2 was not accidentally used instead of Wash 1.
✔ Wash and scan slides in an ozone controlled environment (<5 ppb), such as an ozone tent.
✔ Use small batches of slides that can be washed and scanned in about 40 minutes to minimize exposure to air.
✔ For Agilent Scanner C, use the Agilent Ozone-Barrier Slide Cover (p/n G2505-60550). The slide holders used with the SureScan scanner have built-in ozone protection.
✔ Use the Stabilization and Drying Solution as described in “Wash Procedure B (with Stabilization and Drying Solution)” on page 52.
GenetiSure Pre-Implantation Array-Based CGH for Aneuploidy Screening 51

5 TroubleshootingIf you have high BGNoise values
If you have high BGNoise valuesHigh BGNoise can cause lower signal-to-noise values (see Table 24 for thresholds) and higher DLRSD values. BGNoise is defined as the standard deviation of the signals on the negative controls. If the BGNoise is high, examine the microarray image for visible non-uniformities. High BGNoise is often introduced during hybridization steps or washes.
✔ Make sure that the oven is calibrated. Follow the steps in Agilent G2545A Hybridization Calibration Procedure (publication p/n G2545-90002).
Sample hybridization at incorrect temperatures affects the stringency of the hybridization.
✔ Make sure that wash dishes, racks and stir bars are clean. Do not use tap water or detergents to clean the wash equipment. If needed, rinse the wash equipment with 2-propanol (for equipment that was not exposed to Stabilization and Drying Solution) or acetonitrile (for equipment that was exposed to Stabilization and Drying Solution) followed by rinses with Milli-Q ultrapure water.
✔ If high background is observed, perform an additional acetonitrile wash of the slides and then rescan:
1 In the fume hood, fill a slide-staining dish approximately three-fourths full with acetonitrile.
2 Add a magnetic stir bar and put this dish on a magnetic stir plate.
3 Put the slides in a slide rack and transfer the slide rack to the slide-staining dish containing acetonitrile, and stir at 350 rpm for 1 minute.
4 Slowly remove the slide rack and scan the slides immediately.
If you have poor reproducibilityPoor reproducibility (see Table 24 for thresholds), defined as high CVs of signals of replicated probes may indicate that the hybridization volume was too low or that the oven stopped rotating during the hybridization. Only very high scores on this metric will affect the DLRSD.
52 GenetiSure Pre-Implantation Array-Based CGH for Aneuploidy Screening

Troubleshooting 5If you have poor reproducibility
✔ Take care when setting up the gasket-slide hybridization sandwich. Dispense the sample onto the center of the gasket well so as to avoid contact between the sample and the rubber edges of the gasket.
✔ Make sure to hand-tighten the screw of the hybridization chamber as much as possible.
✔ Check that the oven is rotating.
GenetiSure Pre-Implantation Array-Based CGH for Aneuploidy Screening 53

5 TroubleshootingIf you have poor reproducibility
54 GenetiSure Pre-Implantation Array-Based CGH for Aneuploidy Screening

GenetiSure Pre-Implantation Array-Based CGHProtocol
6ReferenceReagent Kit Components 56Microarray Handling Tips 58Agilent Microarray Layout and Orientation 59Array/Sample tracking on microarray slides 60
This chapter contains reference information related to the amplification, labeling, hybridization, and wash kits, and reference information on working with Agilent microarrays.
55

6 ReferenceReagent Kit Components
Reagent Kit ComponentsThe contents of the reagent kits used in this protocol are listed here.
Table 24 Agilent SureTag Complete DNA Labeling Kit, p/n 5190-4240
Component
Human Reference DNA Male
Human Reference DNA Female
10× Restriction Enzyme Buffer*
* Not used in this protocol.
BSA*
Alu I*
Rsa I*
Purification Columns
Nuclease-Free Water
Exo (-) Klenow
5× Reaction Buffer
Cyanine 5-dUTP
Cyanine 3-dUTP
10× dNTPs
Random Primers
56 GenetiSure Pre-Implantation Array-Based CGH for Aneuploidy Screening

Reference 6Reagent Kit Components
Table 25 PicoPLEX WGA Kit, Agilent p/n 5190-9533 or Rubicon Genomics p/n R30050
Component
Cell Extraction Buffer
Extraction Enzyme Dilution Buffer
Cell Extraction Enzyme
PicoPlex Pre-Amp Buffer
PicoPlex Pre-Amp Enzyme
PicoPlex Amplification Buffer
PicoPlex Amplification Enzyme
Nuclease-Free Water
Table 26 Agilent Oligo aCGH/ChIP-on-chip Hybridization Kit, p/n 5188-5220 (25) or 5188-5380 (100)
Component
2× HI-RPM Hybridization Buffer
10× aCGH Blocking Agent
Table 27 Agilent Oligo aCGH/ChIP-on-chip Wash Buffer Kit, p/n 5188-5226
Component
Agilent Oligo aCGH/ChIP-on-Chip Wash Buffer 1
Agilent Oligo aCGH/ChIP-on-Chip Wash Buffer 2
GenetiSure Pre-Implantation Array-Based CGH for Aneuploidy Screening 57

6 ReferenceMicroarray Handling Tips
Microarray Handling TipsIf you are new to microarray processing, and want to practice hybridization, prepare a 1:1 2× HI-RPM Hybridization Buffer and water mix and use a microscope slide or used microarray slide, and a gasket slide. You can use the same slide to practice wash and placement of slide in the slide holder.
Each microarray is printed on the side of the glass slide containing the “Agilent”-labeled barcode. This side is called the “active” side. The numeric barcode is on the inactive side of the slide.
In this “processing and hybridization” procedure, the hybridization mixture is applied directly to the gasket slide, and not to the active side of the oligo microarray. Instead, the active side of the oligo microarray is placed on top of the gasket slide to form a “sandwich slide” pair.
To avoid damaging the microarray, always handle glass slides carefully by their edges. Wear powder-free gloves. Never touch the surfaces of the slides. If you do, you may cause irreparable damage to the microarray.
Never allow the microarray surface to dry out during the hybridization process and washing steps.
CAUTION You must familiarize yourself with the assembly and disassembly instructions for use with the Agilent Microarray Hybridization Chamber (G2534A) and gasket slides. Practice slide kits are available.
58 GenetiSure Pre-Implantation Array-Based CGH for Aneuploidy Screening

Reference 6Agilent Microarray Layout and Orientation
Agilent Microarray Layout and Orientation
Agilent oligo microarray (1 microarray/slide format) as imaged on the Agilent microarray scanner
Figure 7 Agilent microarray slide and slide holders
Agilent oligo microarray formats and the resulting “microarray design files” are based on how the Agilent microarray scanner images 1-inch x 3-inch glass slides. Agilent designed its microarray scanner to scan through the glass slide (back side scanning). The glass slide is securely placed in an Agilent microarray slide holder with the “Agilent” labeled barcode facing the opening of the slide holder (on SureScan Microarray Scanner) or facing the inside of the slide holder (Scanner C). In this orientation, the “active side” containing the microarrays is protected from potential damage by fingerprints and other elements. Once securely placed, the numeric barcode, non-active side of the slide, is visible from the outside of the slide holder.
Figure 7 depicts how the Agilent microarray scanner reads the microarrays and how this relates to the “microarray design files” that Agilent generates during the manufacturing process of its in situ-synthesized oligonucleotide microarrays.
GenetiSure Pre-Implantation Array-Based CGH for Aneuploidy Screening 59

6 ReferenceArray/Sample tracking on microarray slides
Array/Sample tracking on microarray slidesUse the form below to make notes to track your samples on microarray slides.
Position the gasket slide in the SureHyb chamber base with the label to the left and load the samples: top row, left to right, then lower row, left to right. The array suffix assignments from Feature Extraction will then occur in the order shown.
60 GenetiSure Pre-Implantation Array-Based CGH for Aneuploidy Screening

Reference 6Array/Sample tracking on microarray slides
Figure 8 8-pack microarray slide
Array 1_1 Array 1_2 Array 1_3 Array 1_4
Sample: Sample: Sample ample:
Arrays
p p p
BA
Sample: Sample: Sample ample:
ARCODE
A 2 1 A 2 2 A 2 3 A 2 4Array 2_1 Array 2_2 Array 2_3 Array 2_4
Barcode Number __________________________________________________________
GenetiSure Pre-Implantation Array-Based CGH for Aneuploidy Screening 61

6 ReferenceArray/Sample tracking on microarray slides
62 GenetiSure Pre-Implantation Array-Based CGH for Aneuploidy Screening


Agilent Technologies, Inc. 2016
*G4410-90100*G4410-90100Revision A0
www.agilent.com
Agilent Technologies
In This Book
This guide contains a protocol for GenetiSure Pre- Implantation Array- Based CGH Aneuploidy Screening.