Agilent Feature Extraction Software (v10.7) · To install and configure a MySQL database 26 ......
32
Agilent Technologies Agilent Feature Extraction Software (v10.7) Installation Guide Where to find more information 1 System requirements 3 Step 1. Set up to install the example images (optional) 6 Step 2. Determine the type of FE installation you need 6 Step 3. Install FE as a new installation 8 Step 4. Select a database to install 9 Step 5. Install FE as an update installation 18 Step 6. Set up a valid license 21 To install and configure a MySQL database 26 To remove Feature Extraction 31 This guide provides instructions on how to install and start the Agilent Feature Extraction software, version 10.7. Where to find more information Quick Start Guide Find the first steps to learn how to use the Agilent Feature Extraction Software after installation. User Guide Find detailed instructions for using the Feature Extraction Software, as well as definitions and explanations for the fields on the screens. Chapter 1– Working with Feature Extraction Chapter 2– Extracting Microarrays Automatically Chapter 3– Creating Grid Files and Templates Chapter 4– Changing Protocol Settings Chapter 5– Changing Image Displays
-
Upload
phamnguyet -
Category
Documents
-
view
237 -
download
0
Transcript of Agilent Feature Extraction Software (v10.7) · To install and configure a MySQL database 26 ......
Agilent Feature Extraction Software (v10.7)
Installation Guide
Where to find more information 1
System requirements 3
Step 1. Set up to install the example images (optional) 6
Step 2. Determine the type of FE installation you need 6
Step 3. Install FE as a new installation 8
Step 4. Select a database to install 9
Step 5. Install FE as an update installation 18
Step 6. Set up a valid license 21
To install and configure a MySQL database 26
To remove Feature Extraction 31
This guide provides instructions on how to install and start the Agilent Feature Extraction software, version 10.7.
Where to find more information
Quick Start Guide Find the first steps to learn how to use the Agilent Feature Extraction Software after installation.
User Guide Find detailed instructions for using the Feature Extraction Software, as well as definitions and explanations for the fields on the screens.
Chapter 1– Working with Feature Extraction
Chapter 2– Extracting Microarrays Automatically
Chapter 3– Creating Grid Files and Templates
Chapter 4– Changing Protocol Settings
Chapter 5– Changing Image Displays
Agilent Technologies
Reference Guide Find detailed information on protocols, results and Feature Extraction algorithms.
Chapter 1 – Default Protocol Settings
Chapter 2 – QC Report Results
Chapter 3 – Text File Parameters and Results
Chapter 4 – MAGE-ML Results
Chapter 5 – How Algorithms Calculate Results
Chapter 6 – Command Line Feature Extraction
QC Chart Tool Instructions Learn how to set up your own QC metrics and do run charting. The QC Chart Tool Installation and Configuration Guide and QC Chart Tool User Guide are included on the FE installation CD.
NOTE In the next version of Feature Extraction, QC charting and QC Chart Tool will be released as part of Genomic Workbench.
2 Agilent Feature Extraction Software Installation Guide
System requirements
Check that you have the following capabilities and virtual memory settings prior to installing and using Agilent Feature Extraction software (v10.7):
Software
• Windows Server 2003 SP1• XP Professional 32 SP2
• XP Professional 64 SP2
• Vista 32 Business Edition• Vista 64 Business Edition • Internet Explorer 6 or later (version 7 or later is recommended)• Adobe Acrobat Reader 5 or later• Either
• SQL Express 2005 (installed with Feature Extraction)
or
• MySQL 5.0.51 (XP 32 bit)
• MySQL 5.0.45 (Vista and XP 64 bit)
Hardware
• Pentium IV 3 GHz or higher (Dual Core system recommended)
• 2 GB RAM (3- 4 GB with 64- bit OS recommended for 2- and 3- micron scans)
• 40 GB available disk space
• PC must be able to load SQLExpress SQL Server 2005.
Virtual Memory
• Check that the virtual memory page file allows for at least 4GB of virtual memory.
CAUTION When using Windows XP Professional 32 SP3, SQLExpress installation may fail and may require the use of the Windows Installer Cleanup Utility. Use this utility to remove MSXML 6 and then reinstall Feature Extraction. See http://support.microsoft.com/kb/290301for details.
Agilent Feature Extraction Software Installation Guide 3
• For the Windows XP operating system, use these instructions to access the Virtual Memory setting:
Using the Windows XP Classic view
1 Open the Control Panel.
2 Double- click System, and click the Advanced tab.
3 Click Settings (Performance) > Advanced > Change (Virtual Memory).
4 Under paging file size for selected drive, make sure the initial size and the Maximum size are both 4096 MB or greater.
4 Agilent Feature Extraction Software Installation Guide
Using the Windows XP Category view
1 Open the Control Panel.
2 Click Performance and Maintenance.
3 Click System, and click the Advanced tab.
4 Click Settings (Performance) > Advanced > Change (Virtual Memory).
5 Under paging file size for selected drive, make sure the initial size and the Maximum size are both 4096 MB or greater.
Step 1. Set up to install the example images
NOTE True 32-bit systems cannot set virtual memory as high as 4096 MB, but Windows XP can increase the address space for larger applications, as long as the hardware supports it.
Agilent Feature Extraction Software Installation Guide 5
Step 1. Set up to install the example images (optional)
You must install the example images to do the exercises in the Agilent Feature Extraction Quick Start Guide. The images use a separate installer than that for the software.
• To install the example images automatically when Feature Extraction software installs, either install the Feature Extraction software from the CD or place the example image installer in the same directory as the v10.7 installer directory.
• If the image installer is not located in the same directory as the v10.7 installer, you must go to the image installer directory and install the images from there. You can do this either before or after software installation.
Step 2. Determine the type of FE installation you need
There are two types of Feature Extraction installation. Depending on what version is currently installed on the computer, you can install FE 10.7 as a new installation or as an upgrade installation.
New installation
You must install Feature Extraction as a new installation if any of the following is true.
• Feature Extraction is not installed on the computer.
• Feature Extraction v9.5.x or earlier is currently installed on the computer.
FE v10.1 and later use a different database schema than the one provided in FE v9.5x or earlier. For this reason, if the computer is installed with FE v9.5.x or earlier, you must install FE v10.7 as a new installation.
To avoid loss of data, before you perform the new installation:
• Export any user- created FE protocols and QC metric sets from Feature Extraction.
CAUTION The database server included in FE installation is used by both the FE software and the QC Chart Tool (if installed). Any data stored on the current database server for FE v9.5 or earlier will be lost when you install FE v10.7. To avoid loss of data, see the following instructions.
6 Agilent Feature Extraction Software Installation Guide
You can import or add the exported protocols and QC metric sets back to the new database after the new FE version is installed.
• Export QC Chart Tool database (if installed).
You can export all data from the QC Chart Tool using the export database menu option under the file menu of QC Chart Tool. All the entered data is exported and can be imported to the newly installed QC Chart Tool database. Unfortunately the Queries cannot be exported at this time and must be re- created.
Go to “Step 3. Install FE as a new installation” on page 8 if you need to install FE v10.7 as a new installation.
Update installation
If FE v10.1, 10.2, or v10.5 is currently installed on the computer, you can install Feature Extraction as an update installation. You can also install the software as a new installation.
FE v10.7 uses a database schema very similar to the one provided in previous FE v10.x versions. For this reason, you do not need to export user- created protocols and QC metric sets from FE nor backup QC Chart Tool database before you update to v10.7.
Go to “Step 5. Install FE as an update installation” on page 18.
NOTE Do not use the Database Backup-Restore utility to backup the QC Chart Tool database. The Backup of the QC Chart Tool database cannot be loaded into FE 10.7 QC Chart tool database because the 10.7 version of the database has new stat fields that would be lost if this is done.
NOTE The QC Chart Tool database has new metrics added in FE 10.7. Using a backup and restore of the QC Chart Tool from a previous version will wipe out those new stats. To migrate data, you will need to export the database from the File>Export Database menu item in QC Chart Tool. This will export all your extraction data. It will not export your queries or metric sets. If you have custom metric sets that you want to keep, export them using the QC Tool. They can later be imported into either QC Chart Tool or Feature Extraction. Queries cannot be exported and must be recreated by hand.
Agilent Feature Extraction Software Installation Guide 7
Step 3. Install FE as a new installation
You must have administrative privileges to install Feature Extraction Software.1 If you have QC Chart Tool installed and you want to save your data, export
your extraction data using the Export Database function in QC Chart Tool. For detailed instructions, see “To export data” section of the QC Chart Tool User Guide (G4460- 90022) included in FE installation CD. You can also download the QC Chart Tool User Guide from the Agilent Web site at www.agilent.com/chem/feqcmetrics.
2 Export any user- created FE protocols and QC metric sets from the previous Feature Extraction version. For detailed instructions, see “Import or export a protocol to or from the database” on page 90 of the Feature Extraction User Guide.
3 Remove the previous version of Feature Extraction before you install the new version. See “To remove Feature Extraction” on page 31 for detailed instructions.
4 Start Feature Extraction new installation:
• If you are installing from an original CD, insert the CD into the CD drive. If the installation program does not start automatically, double- click Setup.exe on the installation CD.
• If you are installing from a file downloaded from the Agilent Web site, double- click FeatureExtraction10_7_xSetup.exe in the folder where you saved the file.
5 On the Welcome page of the Feature Extraction — InstallShield Wizard, click Next.
6 Accept the terms of the license agreement, then click Next.
In the InstallShield Wizard, the next page prompts you to decide whether to use the provided MSSQL database or a third- party database (only MySQL is supported).
NOTE If you plan to use a MySQL database instead of the SQLExpress database that Agilent provides:• You must install the MySQL database prior to installing the Feature Extraction software. See
“To install and configure a MySQL database” on page 26 and MySQL documentation for installation instructions.
• The QC Chart database will not be available with the Feature Extraction installation, if you chose to use MySQL database.
NOTE Do not use the Backup-Restore utility to backup your database. The 10.7 version of the database has new stat fields that would be lost if this is done.
8 Agilent Feature Extraction Software Installation Guide
Step 4. Select a database to install
• If you plan to use Agilent’s SQLExpress database, continue with “To use the Microsoft SQL database” on page 9.
• If you plan to use MySQL instead, continue with “To use a MySQL database” on page 13.
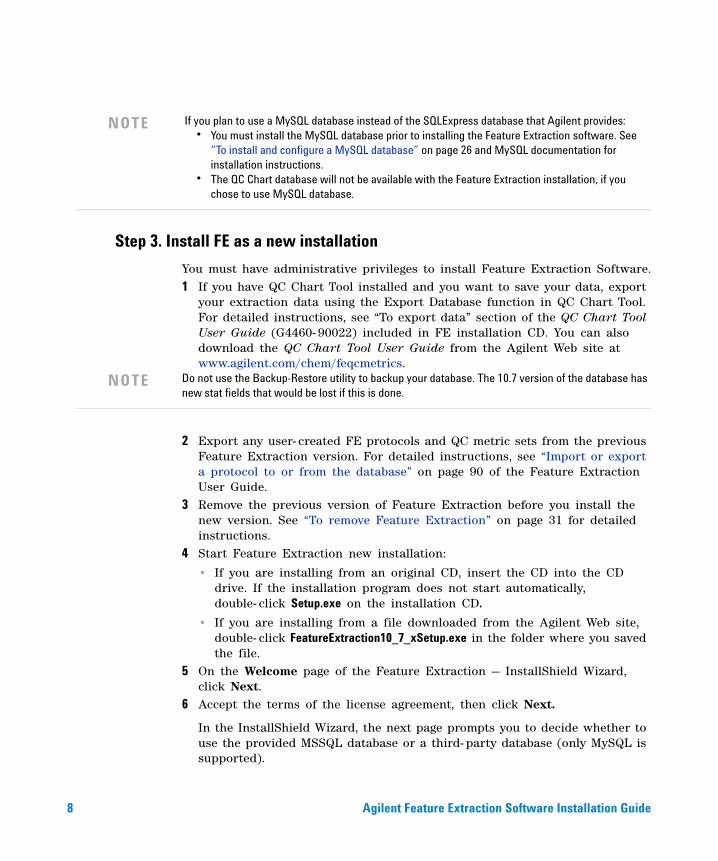
To use the Microsoft SQL database
Figure 1 Specifying MSSQL database
1 To use the MSSQL database, select No (the default).2 Click Next.
The Select Features page appears with components to be installed. It also shows the amount of space required and available on the destination drive for the installation. For a successful installation, check that you have enough disk space required for the installation.
Agilent Feature Extraction Software Installation Guide 9
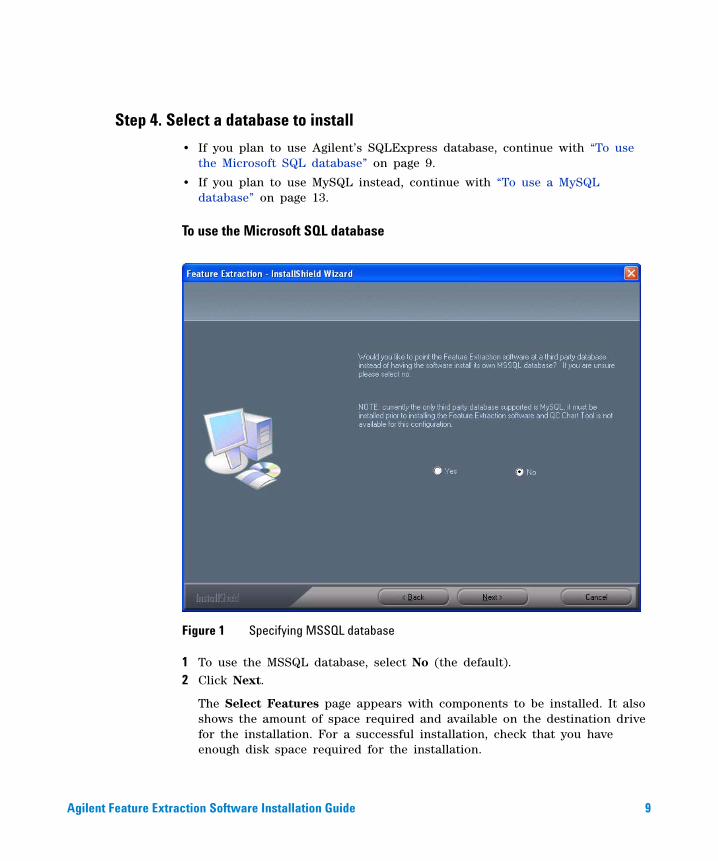
Figure 2 Select Features page
3 Click Next to proceed.4 Click Install to start installing the components displayed in Figure 2.
10 Agilent Feature Extraction Software Installation Guide

Figure 3 Ready to Install the Program page
After a short while, the InstallShield Wizard displays the Setup Progress page shown below.
Agilent Feature Extraction Software Installation Guide 11
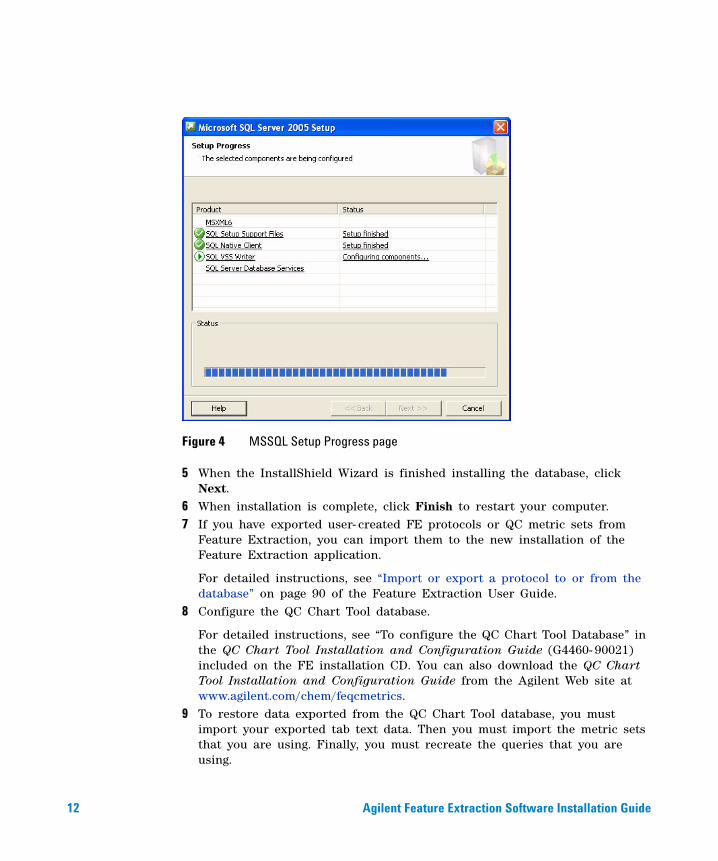
Figure 4 MSSQL Setup Progress page
5 When the InstallShield Wizard is finished installing the database, click Next.
6 When installation is complete, click Finish to restart your computer.7 If you have exported user- created FE protocols or QC metric sets from
Feature Extraction, you can import them to the new installation of the Feature Extraction application.
For detailed instructions, see “Import or export a protocol to or from the database” on page 90 of the Feature Extraction User Guide.
8 Configure the QC Chart Tool database.
For detailed instructions, see “To configure the QC Chart Tool Database” in the QC Chart Tool Installation and Configuration Guide (G4460- 90021) included on the FE installation CD. You can also download the QC Chart Tool Installation and Configuration Guide from the Agilent Web site at www.agilent.com/chem/feqcmetrics.
9 To restore data exported from the QC Chart Tool database, you must import your exported tab text data. Then you must import the metric sets that you are using. Finally, you must recreate the queries that you are using.
12 Agilent Feature Extraction Software Installation Guide
You can download the QC Chart Tool User Guide and the QC Chart Tool Installation and Configuration Guide from the Agilent Web site at www.agilent.com/chem/feqcmetrics.
10 If you start Feature Extraction after restarting your computer, you will get an error message saying that a license does not exist. You must set up a valid license to run Feature Extraction. See “Step 6. Set up a valid license” on page 21.
To use a MySQL database
If you plan to use a MySQL database instead of the MSSQL database that Agilent provides:
• You must install the MySQL database before you install the Feature Extraction software. See “To install and configure a MySQL database” on page 26 and MySQL documentation for installation instructions. See see www.mysql.com for details.
• The QC Chart database will not be available to your Feature Extraction installation, if you choose to use MySQL database.
NOTE The QC Chart Tool only works with the Microsoft SQLServer Express 2005 that is included in the Feature Extraction installation.
Agilent Feature Extraction Software Installation Guide 13
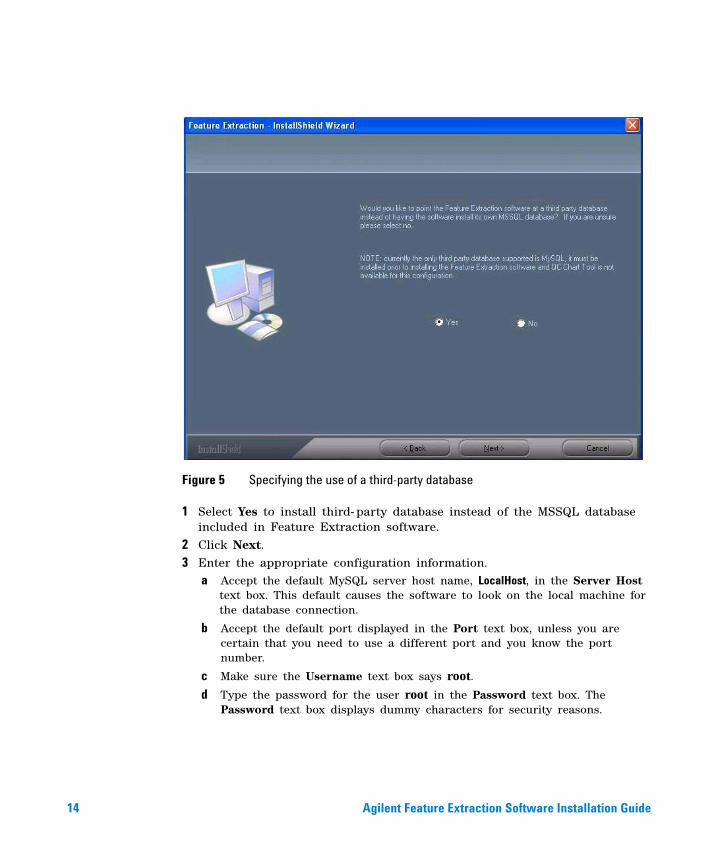
Figure 5 Specifying the use of a third-party database
1 Select Yes to install third- party database instead of the MSSQL database included in Feature Extraction software.
2 Click Next.3 Enter the appropriate configuration information.
a Accept the default MySQL server host name, LocalHost, in the Server Host text box. This default causes the software to look on the local machine for the database connection.
b Accept the default port displayed in the Port text box, unless you are certain that you need to use a different port and you know the port number.
c Make sure the Username text box says root.d Type the password for the user root in the Password text box. The
Password text box displays dummy characters for security reasons.
14 Agilent Feature Extraction Software Installation Guide
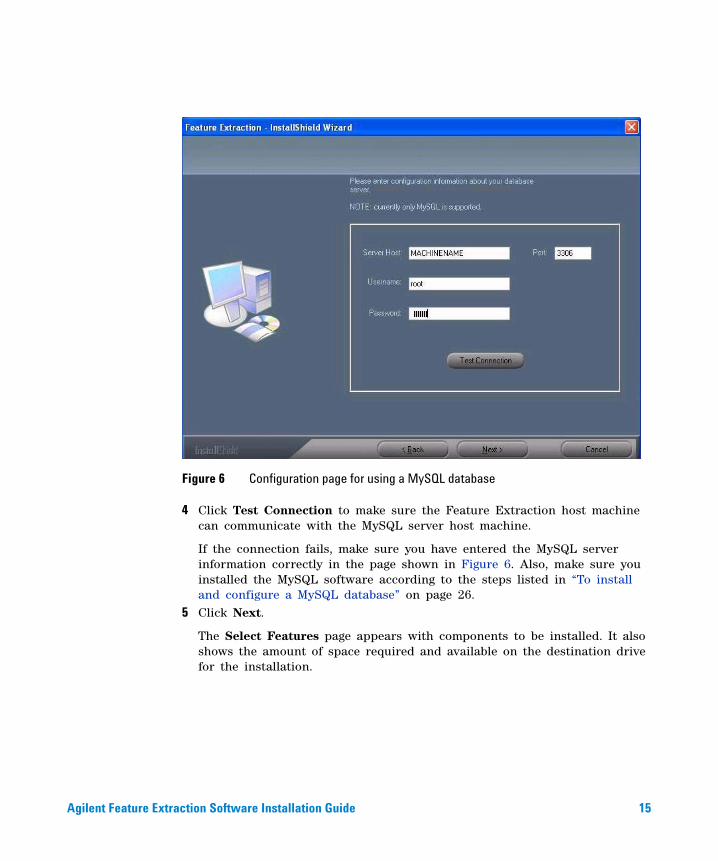
Figure 6 Configuration page for using a MySQL database
4 Click Test Connection to make sure the Feature Extraction host machine can communicate with the MySQL server host machine.
If the connection fails, make sure you have entered the MySQL server information correctly in the page shown in Figure 6. Also, make sure you installed the MySQL software according to the steps listed in “To install and configure a MySQL database” on page 26.
5 Click Next.
The Select Features page appears with components to be installed. It also shows the amount of space required and available on the destination drive for the installation.
Agilent Feature Extraction Software Installation Guide 15

Figure 7 Select Features page
6 Click Next to proceed.
16 Agilent Feature Extraction Software Installation Guide
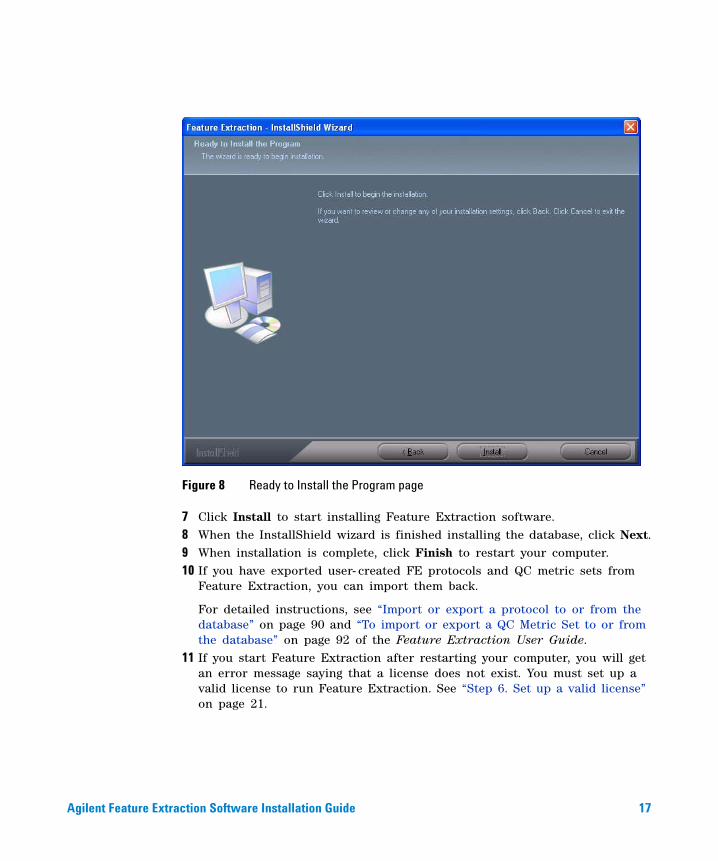
Figure 8 Ready to Install the Program page
7 Click Install to start installing Feature Extraction software.8 When the InstallShield wizard is finished installing the database, click Next.9 When installation is complete, click Finish to restart your computer.10 If you have exported user- created FE protocols and QC metric sets from
Feature Extraction, you can import them back.
For detailed instructions, see “Import or export a protocol to or from the database” on page 90 and “To import or export a QC Metric Set to or from the database” on page 92 of the Feature Extraction User Guide.
11 If you start Feature Extraction after restarting your computer, you will get an error message saying that a license does not exist. You must set up a valid license to run Feature Extraction. See “Step 6. Set up a valid license” on page 21.
Agilent Feature Extraction Software Installation Guide 17
Step 5. Install FE as an update installation
You can update to Feature Extraction v10.7 from v10.x versions without having to remove the previous version. Before starting the update installation, verify that your current FE license is good toward the new version. Current license information can be found under FE menu Help > About. To learn more about FE licenses, see “Types of licenses” on page 21.
1 Start the update installation:
• If you are installing from an original CD, the installation program starts automatically. If it does not, double- click Setup.exe on the CD drive.
• If you are installing from a file downloaded from the Agilent Web site, double- click FeatureExtraction10_7_1Setup.exe in the folder that you saved the file.
2 On the Welcome to Feature Extraction Upgrade — InstallShield Wizard, click Next.
The Select Features page appears with components to be installed.
NOTE If you have Feature Extraction v9.5.3.1 or earlier, you must remove the previous version first before you install v10.7, see “Step 3. Install FE as a new installation” on page 8.
18 Agilent Feature Extraction Software Installation Guide
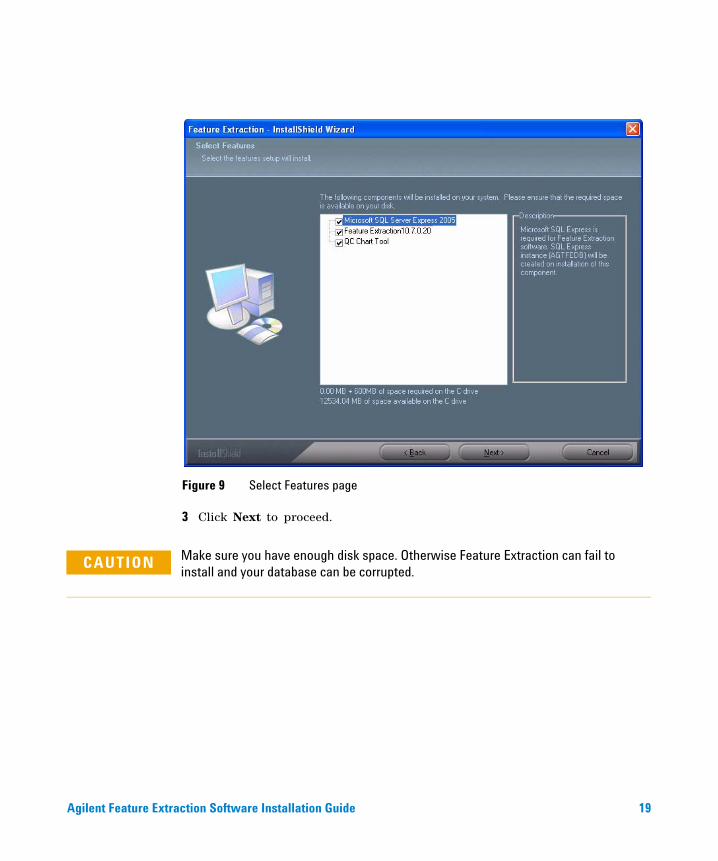
Figure 9 Select Features page
3 Click Next to proceed.
CAUTION Make sure you have enough disk space. Otherwise Feature Extraction can fail to install and your database can be corrupted.
Agilent Feature Extraction Software Installation Guide 19
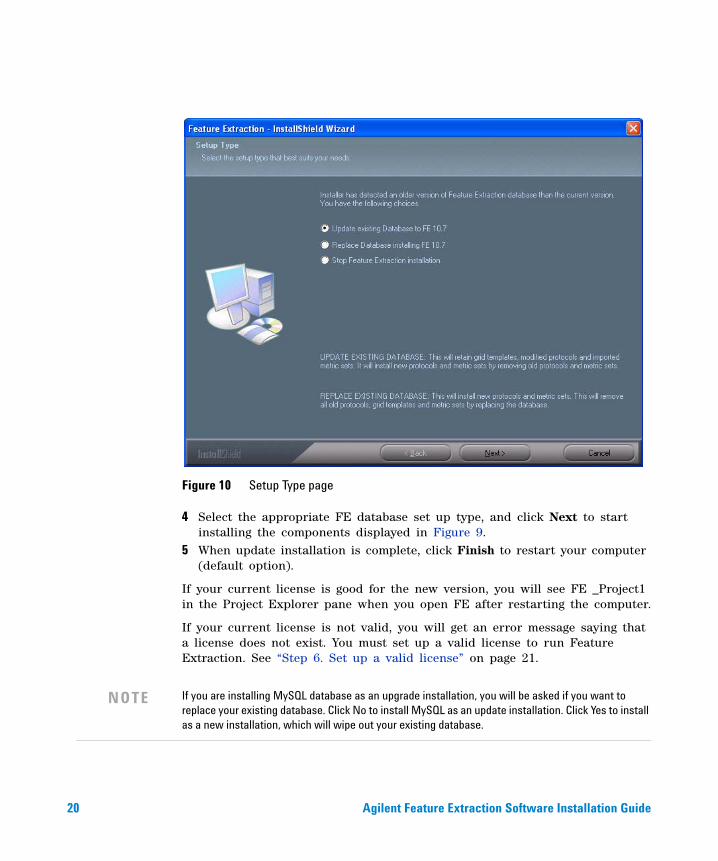
Figure 10 Setup Type page
4 Select the appropriate FE database set up type, and click Next to start installing the components displayed in Figure 9.
5 When update installation is complete, click Finish to restart your computer (default option).
If your current license is good for the new version, you will see FE _Project1 in the Project Explorer pane when you open FE after restarting the computer.
If your current license is not valid, you will get an error message saying that a license does not exist. You must set up a valid license to run Feature Extraction. See “Step 6. Set up a valid license” on page 21.
NOTE If you are installing MySQL database as an upgrade installation, you will be asked if you want to replace your existing database. Click No to install MySQL as an update installation. Click Yes to install as a new installation, which will wipe out your existing database.
20 Agilent Feature Extraction Software Installation Guide
Step 6. Set up a valid license
Types of licenses
Agilent supplies two kinds of licenses: demo and perpetual.
Demo
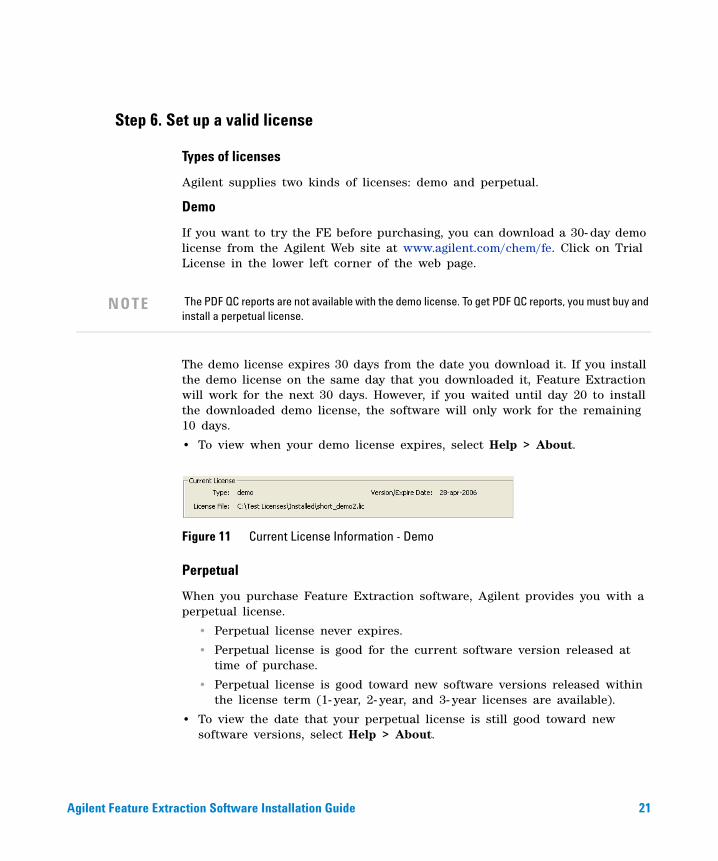
If you want to try the FE before purchasing, you can download a 30- day demo license from the Agilent Web site at www.agilent.com/chem/fe. Click on Trial License in the lower left corner of the web page.
The demo license expires 30 days from the date you download it. If you install the demo license on the same day that you downloaded it, Feature Extraction will work for the next 30 days. However, if you waited until day 20 to install the downloaded demo license, the software will only work for the remaining 10 days.
• To view when your demo license expires, select Help > About.
Figure 11 Current License Information - Demo
Perpetual
When you purchase Feature Extraction software, Agilent provides you with a perpetual license.
• Perpetual license never expires.
• Perpetual license is good for the current software version released at time of purchase.
• Perpetual license is good toward new software versions released within the license term (1- year, 2- year, and 3- year licenses are available).
• To view the date that your perpetual license is still good toward new software versions, select Help > About.
NOTE The PDF QC reports are not available with the demo license. To get PDF QC reports, you must buy and install a perpetual license.
Agilent Feature Extraction Software Installation Guide 21
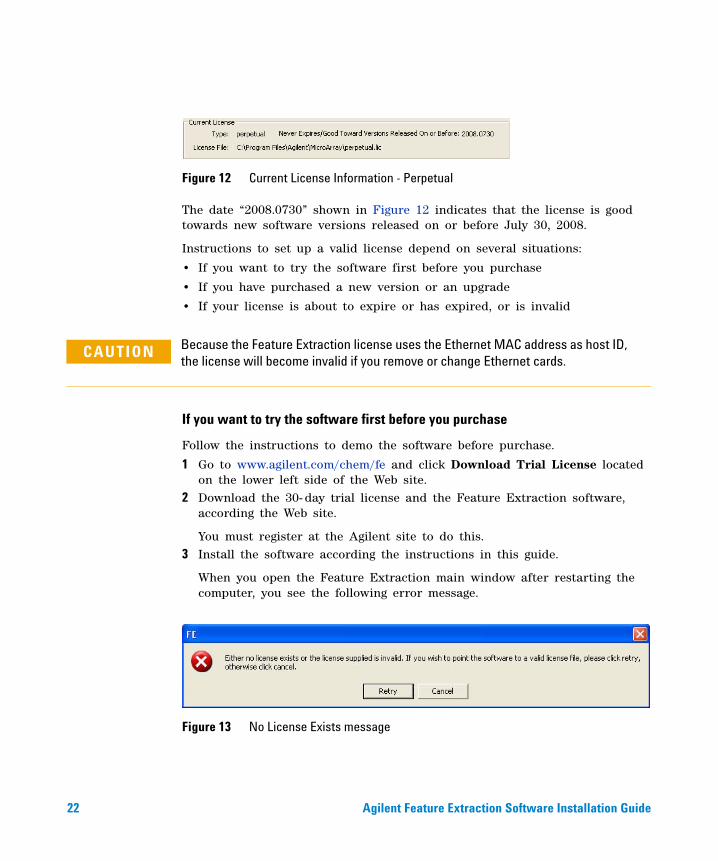
Figure 12 Current License Information - Perpetual
The date “2008.0730” shown in Figure 12 indicates that the license is good towards new software versions released on or before July 30, 2008.
Instructions to set up a valid license depend on several situations:
• If you want to try the software first before you purchase
• If you have purchased a new version or an upgrade
• If your license is about to expire or has expired, or is invalid
If you want to try the software first before you purchase
Follow the instructions to demo the software before purchase.
1 Go to www.agilent.com/chem/fe and click Download Trial License located on the lower left side of the Web site.
2 Download the 30- day trial license and the Feature Extraction software, according the Web site.
You must register at the Agilent site to do this.3 Install the software according the instructions in this guide.
When you open the Feature Extraction main window after restarting the computer, you see the following error message.
Figure 13 No License Exists message
CAUTION Because the Feature Extraction license uses the Ethernet MAC address as host ID, the license will become invalid if you remove or change Ethernet cards.
22 Agilent Feature Extraction Software Installation Guide
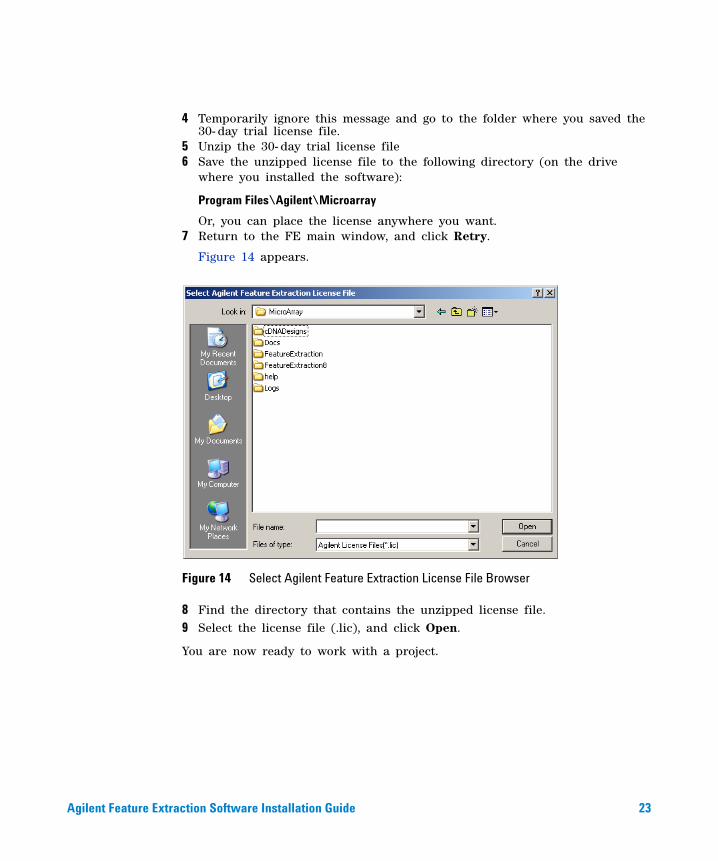
4 Temporarily ignore this message and go to the folder where you saved the 30- day trial license file.
5 Unzip the 30- day trial license file6 Save the unzipped license file to the following directory (on the drive
where you installed the software):
Program Files\Agilent\Microarray
Or, you can place the license anywhere you want.7 Return to the FE main window, and click Retry.
Figure 14 appears.
Figure 14 Select Agilent Feature Extraction License File Browser
8 Find the directory that contains the unzipped license file.9 Select the license file (.lic), and click Open.
You are now ready to work with a project.
Agilent Feature Extraction Software Installation Guide 23
If you bought a new version of the software (with or without an Agilent scanner)
When you purchase Agilent Feature Extraction software, you receive a Software Entitlement Certificate (SEC). To redeem your purchased license, you must go to the Agilent Software License Redemption Web site and use the information on the certificate.
These instructions assume that you have already installed the software.
1 Start the Feature Extraction program. If Figure 13 appears, click Cancel.2 Select Help > Agilent License. This will launch the Internet browser to the
Agilent Software License Redemption Web site at https://software.business.agilent.com/.
Have the following items available:
• Software Entitlement Certificate (SEC) - This PDF contains the Order Number and Certificate Number that you need to provide in order to redeem your purchased license.
• Host ID - This can be found under the menu Help > About. You need to provide the host ID to redeem your purchased license.
3 Follow the instructions on the Agilent Software License Redemption Web site to redeem your license.
After redeeming the license on line, you will receive an email with the license attached.
4 Save the license file to the following directory (on the drive where you installed the software):
Program Files\Agilent\Microarray
Or, you can place the license file anywhere you want.5 If the Feature Extraction program is already running, open a project.
Otherwise, double- click the Feature Extraction icon to open a project.
Figure 13, “No License Exists message,” on page 22 appears:6 Click Retry.
Figure 14, “Select Agilent Feature Extraction License File Browser,” on page 23 appears.
7 Find the directory that contains the license file.8 Select the license file (.lic), and click Open.
Feature Extraction opens automatically with FE_Project1.
24 Agilent Feature Extraction Software Installation Guide
If your license has expired or is invalid for the software version
The software warns you 20 days before your license file expires. The following message appears.
Figure 15 License Will Expire
Without a valid license you can still open an image, import templates and protocols, set up preferences and change protocols. You cannot open a project or open Grid Mode for manual gridding.
If you try to open a project in Feature Extraction and your license has expired or is not valid for the software version, an error message appears saying that your license has expired or is invalid.
You can acquire a valid FE v10.7 license by contacting Agilent.
1 Call your local sales representative or go online to www.agilent.com/chem/wheretobuy to purchase a new license.
After your purchase, you receive a Software Entitlement Certificate.2 Start the Feature Extraction program and select Help > Agilent License.
Have the following items available:
• Software Entitlement Certificate (SEC) - This PDF contains the Order Number and Certificate Number that you need to provide in order to redeem your purchased license.
• Host ID - This can be found under the menu Help > About. You need to provide the host ID to redeem your purchased license.
3 Follow the instructions on the Agilent Software License Redemption Web site to redeem your purchased license.
After redeeming the license on line, you will receive an email with the license attached.
4 Save the license file to the same path as your previous license.
You are now ready to work with a project.
Agilent Feature Extraction Software Installation Guide 25
To install and configure a MySQL database
Feature Extraction v10.7 uses ODBC to interact with the database, so users installing MySQL need to install the MySQL Server (http://dev.mysql.com/downloads/mysql/5.0.html) and the Connector/ODBC - MySQL ODBC driver (http://dev.mysql.com/downloads/connector/odbc/3.51.html).
FE 10.7 has been tested against MySQL 5.0.51 on Windows XP, and MySQL 5.0.45 on Windows Vista. The ODBC- tested ODBC driver is Connector/ODBC 3.51.
You must install the MySQL database software before installing FE. If you wish to switch to MySQL after installing FE, then you must remove FE, install MySQL, and reinstall Feature Extraction.
System requirements
Read the system requirements for MySQL software in the MySQL documentation, and make sure you have the required capabilities and virtual memory settings prior to installing MySQL software for use with Agilent Feature Extraction software (v10.7).
Make sure that you install the appropriate release of MySQL database software according to the following table.
NOTE Agilent does not support use of FE with a remote database. Install MySQL on the same computer as Feature Extraction.
Windows operating system version MySQL release MySQL installation file name
Windows 2000 32 SP4 5.0.51 mysql-essential-5.0.51a-win32.msi
Windows 2003 32 SP1 5.0.51 mysql-essential-5.0.51a-win32.msi
XP Professional 32 SP2 or later 5.0.51 mysql-essential-5.0.51a-win32.msi
XP Professional 64 SP2 or later 5.0.51 mysql-essential-5.0.51a-winx64.msi
Vista 32 Professional SP1 or later 5.0.45 mysql-essential-5[1].0.45-win32.msi
Vista 64 Professional SP1 or later 5.0.45 mysql-essential-5[1].0.45-winx64.msi
26 Agilent Feature Extraction Software Installation Guide
1 Log onto the computer on which you will install both Feature Extraction and MySQL, using a user name (such as Administrator) with administrative privileges.
2 Start the MySQL installer (for example, mysql-essential-5.0.51-win32.msi).
The system launches the MySQL Setup Wizard.3 Click Next.4 In the Setup Type page, accept the default option, Typical, and click Next.5 The Setup Wizard displays the Ready to Install the Program page. Click
Install.6 Click Next until the Setup Wizard displays the Wizard Completed page.
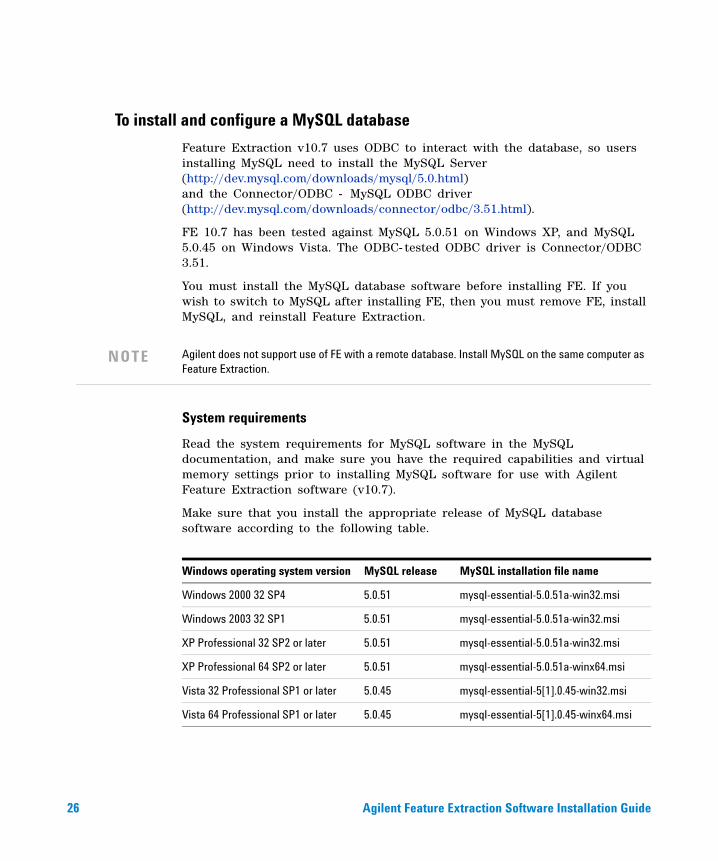
Figure 16 The MySQL Wizard Completed page, prior to configuration
7 Make sure the Configure the MySQL Server Now check box is marked. Click Finish.
The system displays the MySQL Server Instance configuration wizard.8 Click Next.
The configuration wizard prompts you to select a configuration type.
NOTE On Vista systems, you must use MySQL release 5.0.45, not 5.0.51.
Agilent Feature Extraction Software Installation Guide 27
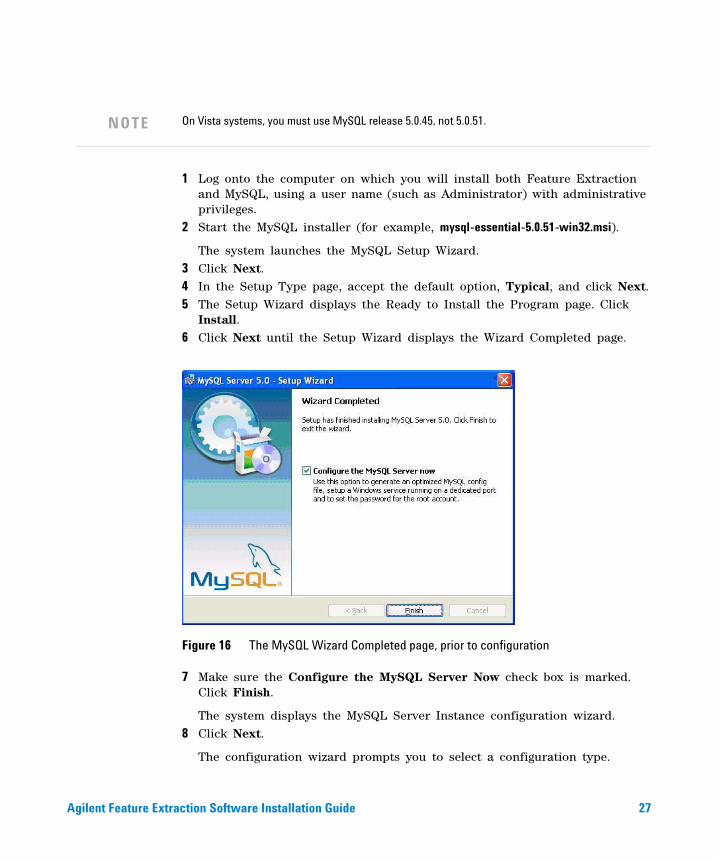
Figure 17 Selecting a configuration type
9 Select Detailed Configuration, and click Next.10 Select Server Machine as the server type, and click Next.11 Accept the default “database usage” option, Multifunctional Database, and
click Next.12 Accept the default number of concurrent database connections, Decision
Support (DSS/OLAP). This option allows up to 20 concurrent database connections. Click Next.
13 The configuration wizard displays the networking options page. Accept the default values, and click Next.
28 Agilent Feature Extraction Software Installation Guide

Figure 18 Networking options page
14 Accept the default option, Standard Character Set, and click Next15 The configuration wizard displays the Windows options page. Mark the
Include Bin Directory in Windows PATH check box; both check boxes on the page should be marked. Click Next.
Figure 19 Configuring the Windows options
Agilent Feature Extraction Software Installation Guide 29
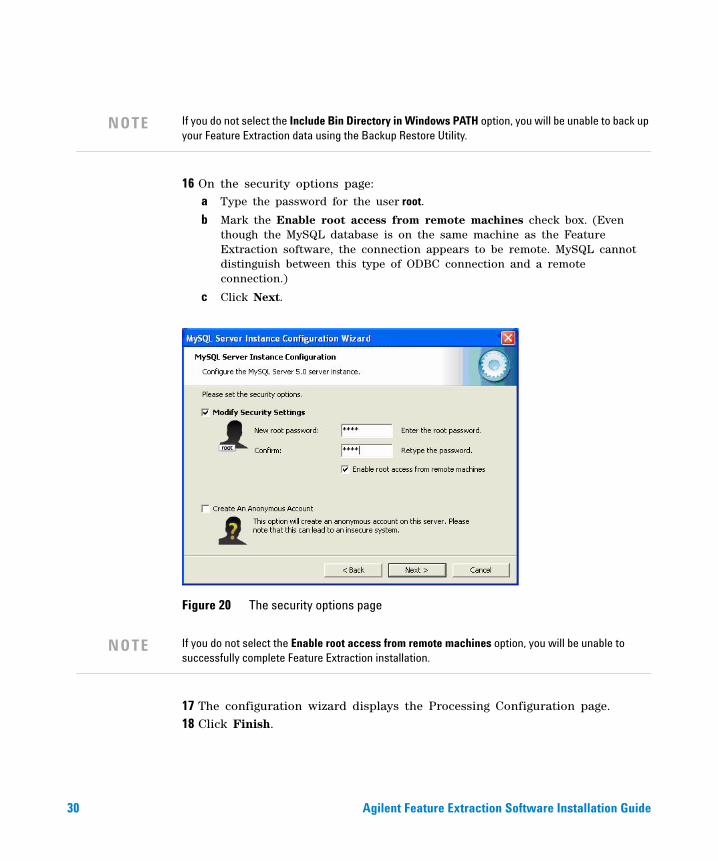
16 On the security options page:a Type the password for the user root.
b Mark the Enable root access from remote machines check box. (Even though the MySQL database is on the same machine as the Feature Extraction software, the connection appears to be remote. MySQL cannot distinguish between this type of ODBC connection and a remote connection.)
c Click Next.
Figure 20 The security options page
17 The configuration wizard displays the Processing Configuration page.18 Click Finish.
NOTE If you do not select the Include Bin Directory in Windows PATH option, you will be unable to back up your Feature Extraction data using the Backup Restore Utility.
NOTE If you do not select the Enable root access from remote machines option, you will be unable to successfully complete Feature Extraction installation.
30 Agilent Feature Extraction Software Installation Guide
To remove Feature Extraction
If you need to remove a previous version of Feature Extraction before you install v10.7, you can do so using the Add or Remove Programs from the Windows Control Panel.
1 Click Windows Start button and select Control Panel.2 Double- click Add or Remove Programs.3 Select Feature Extraction from the Currently installed programs list, and
click Remove.4 When the remove is complete, restart the computer.
After you restart the computer, see step 4 to start Feature Extraction new installation.
Agilent Feature Extraction Software Installation Guide 31
Agilent Technologies
Agilent Technologies, Inc. 2009
Seventh Edition, October 2009
*G4460-90023*
G4460-90023
www.agilent.com
In this guide
This guide contains the system requirements and brief instructions to show you how to:
• Install the software
• Install the example images
• Set up a valid license
Adobe® and Acrobat® are trademarks of Adobe Systems Incorporated.
Java™ is a U.S. trademark of Sun Microsystems, Inc.
Pentium ® is a U.S. registered trademark of Intel Corporation.
Windows ® is a U.S. registered trademarks of Microsoft Corporation.
MySQL is a registered trademark of MySQL AB in the United States, the European Union and other countries.


![MySQL Backups: From strategy to Implementation · socket = MySQL user = password = [mysqld] datadir = C:\ProgramData\MySQL\MySQL](https://static.fdocuments.us/doc/165x107/5f704292aa081b44af438380/mysql-backups-from-strategy-to-implementation-socket-mysql-user-password-.jpg)