AG Utilities & Mobile Link
48
AG Utilities & Mobile Link For 8 Series Mobile Computers: 8000 / 8300 / 8400 / 8500 DOC Version 1.02
Transcript of AG Utilities & Mobile Link

AG Utilities & Mobile Link
For 8 Series Mobile Computers: 8000 / 8300 / 8400 / 8500
DOC Version 1.02

Copyright © 2008~2010 CIPHERLAB CO., LTD. All rights reserved
The software contains proprietary information of CIPHERLAB CO., LTD.; it is provided under a license agreement containing restrictions on use and disclosure and is also protected by copyright law. Reverse engineering of the software is prohibited.
Due to continued product development this information may change without notice. The information and intellectual property contained herein is confidential between CIPHERLAB and the client and remains the exclusive property of CIPHERLAB CO., LTD. If you find any problems in the documentation, please report them to us in writing. CIPHERLAB does not warrant that this document is error-free.
No part of this publication may be reproduced, stored in a retrieval system, or transmitted in any form or by any means, electronic, mechanical, photocopying, recording or otherwise without the prior written permission of CIPHERLAB CO., LTD.
For product consultancy and technical support, please contact your local sales representative. Also, you may visit our web site for more information.
The CipherLab logo is a registered trademark of CIPHERLAB CO., LTD.
All brand, product and service, and trademark names are the property of their registered owners.
The editorial use of these names is for identification as well as to the benefit of the owners, with no intention of infringement.
CIPHERLAB CO., LTD. Website: http://www.cipherlab.com

Version Date Notes
1.02 Nov. 01, 2010 Modified: 3 Mobile Link — update screenshots
Modified: 3.2.1 View Link Status — 8000/8300 supports Auto Upload
Modified: 3.2.5 Change Data File Settings — update Auto File Name
1.01 Sep. 13, 2010 New: re-organize and add 8400
Modified: 1.3 ProgLoad — add support of .BIN file
Modified: 2.1 Data_Read — add support of Auto Upload
Modified: 3.2.1 View Link Status — add description that 8000/8300/8500 requires selecting “Upload Data” from the terminal menu
New: 4 DBF_Converter
1.00 Sep. 12, 2008 Initial release
RELEASE NOTES


CONTENTS
RELEASE NOTES .............................................................................................................................. - 3 -
INTRODUCTION.................................................................................................................................... 1
DOWNLOAD UTILITIES ......................................................................................................................... 3 1.1 AG_Load ...................................................................................................................................... 3
1.1.1 Run AG_Load.exe ............................................................................................................... 4 1.1.2 Run Command Line ........................................................................................................... 6
1.2 DLookup ...................................................................................................................................... 7 1.2.1 Run DLookup.exe ............................................................................................................... 8 1.2.2 Run Command Line .........................................................................................................10
1.3 ProgLoad ...................................................................................................................................11 1.3.1 Run ProgLoad.exe ............................................................................................................12
UPLOAD UTILITIES .............................................................................................................................13 2.1 Data_Read ................................................................................................................................13
2.1.1 Run Data_Read.exe .........................................................................................................14 2.1.2 Command Line Configuration..........................................................................................18
2.2 WLAN_Read ..............................................................................................................................20 2.2.1 Run WLAN_Read.exe .......................................................................................................21 2.2.2 Command Line Configuration..........................................................................................24
2.3 AGX_Read .................................................................................................................................27 2.3.1 Run AGX.Read.exe ...........................................................................................................28
MOBILE LINK .....................................................................................................................................29 3.1 Looking at the Work Area.........................................................................................................29
3.1.1 Prerequisites ....................................................................................................................29 3.1.2 Menu Bar & Toolbar Buttons...........................................................................................30
3.2 Receiving Data over the Network ............................................................................................31 3.2.1 View Link Status...............................................................................................................31 3.2.2 View Received Files..........................................................................................................33 3.2.3 View Device Information ..................................................................................................36 3.2.4 Change Connection Settings ...........................................................................................37 3.2.5 Change Data File Settings ...............................................................................................38
DBF_CONVERTER (8400 ONLY)........................................................................................................41

1
FORGE Application Generator for 8000/8300/8400/8500 Series Mobile Computers, batch or WLAN version, is designed for the users to develop custom templates for the use with AG runtime preloaded on the mobile computers.
We also provide several utilities as alternatives when dealing with the following tasks:
Download Application Template (Batch/WLAN)
Download Lookup File (Batch only)
Download Application Program (Batch/WLAN)
Upload Data (Batch/WLAN)
Upload Application Template (Batch only)
DBF Converter (Batch only)
Instead of direct link, we now provide new utility Mobile Link that allows the mobile computer to establish a connection with the host computer over network. Ethernet Cradles are required for such net link. Most of all, multiple connections are made possible and easier.
This manual serves to provide comprehensive understanding of these AG utilities. We recommend that you read the document thoroughly before use and keep it at hand for quick reference.
Thank you for choosing CipherLab products!
INTRODUCTION

2
AG Utilities & Mobile Link User Guide

3
1.1 AG_LOAD
Without the need to run the Batch or WLAN Application Generator programs, you can use AG_Load.exe to download a template file to your mobile computer. Alternatively, you may use command lines in your own code.
Chapter 1 DOWNLOAD UTILITIES
1
2
3
4

4
AG Utilities & Mobile Link User Guide
1.1.1 RUN AG_LOAD.EXE
1) In the File Type box, select the file type of the target AG template file.
File Type Description
The AGX format is used by the template file of Forge AG program (Batch) for 8000/8300/8400/8500 Series Mobile Computers.
The ATX format is used by the template file of Batch AG program AG711*.exe for 711 Mobile Computer.
The ATF format is used by the template file of WLAN AG programs for 8000/8300/8400/8500 Series Mobile computers.
2) In the File name box, type the file path where the AG template file is located.
Otherwise, click Browse to locate the AG template file you want to download. Click Open in the dialog box as shown below.
5
Download Utilities
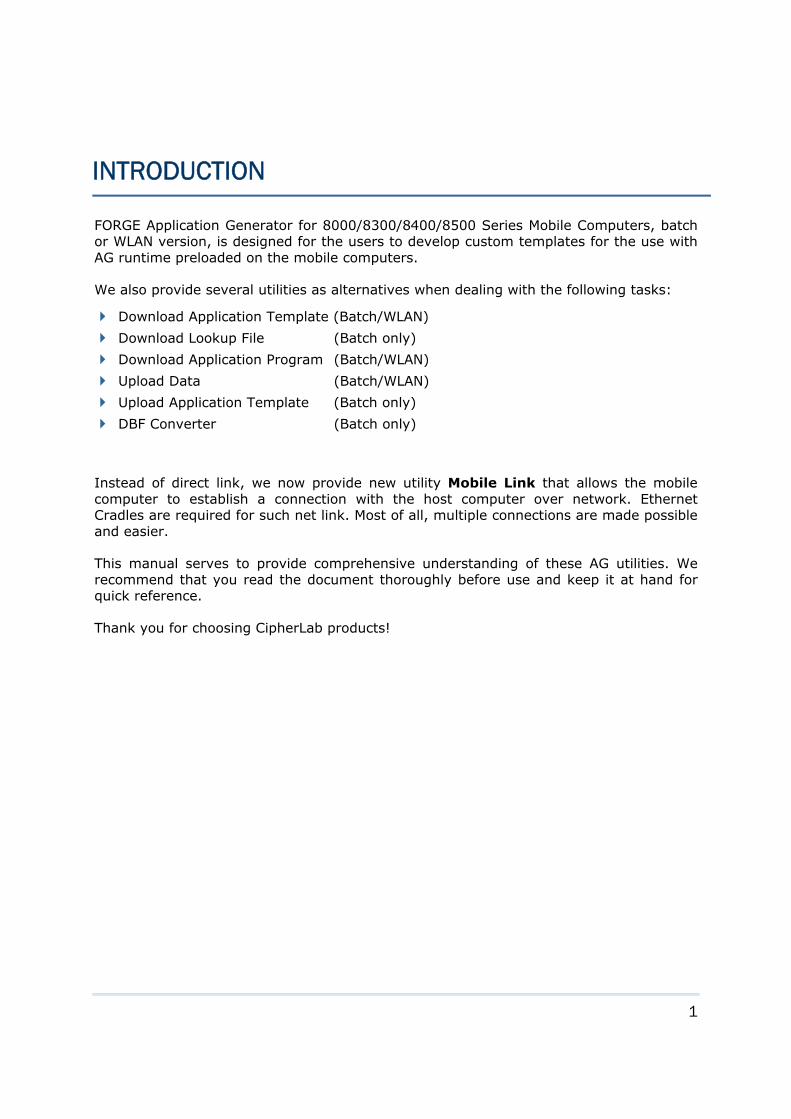
3) In the Download via box, select the download interface.
Download via Description
RS-232/IrDA/USB VCOM is available on 711/8000/8300/8400/8500 Series Mobile Computers.
Proceed to configure COM port (1~255) and baud rate settings.
Cradle-IR interface is available on 711/8000/8300/8500 Series Mobile Computers. Cradles or IR-Transceivers are required.
Proceed to configure COM port (1~255) and baud rate settings.
Modem interface is available on 8000/8300/8400/8500 Series Mobile Computers. Modem Cradles are required.
Proceed to configure modem if necessary.
Note: Mobile Link is provided for mobile computers to establish a connection with the host via Ethernet Cradles. However, it only allows uploading data currently.
4) Click OK to start the download process.

6
AG Utilities & Mobile Link User Guide
1.1.2 RUN COMMAND LINE
You can use the command line to download the AG template file as well. At the command line prompt, use the following command line arguments:
AG_Load <File name>,<COM port>,<Baud rate>,<Download via>,<File type>
For example,
AG_Load SAMPLE.AGX,1,1,1,1 //COM 1, 115200 bps, RS-232/IrDA, AGX file
If command line arguments are not given, you may select the appropriate parameters from the dialog box that pops up. Each argument is explained in the table below.
Argument Description
File name Max length: 256 bytes
COM port Range: 1 ~ 255 (It is set to 1 by default in the utility program.)
Range: 1 ~ 5 (It is set to 1 by default in the utility program.) Baud rate
1: 115200 bps
2: 57600 bps
3: 38400 bps
4: 19200 bps
5: 9600 bps Range: 1 ~ 3 (It is set to 1 by default in the utility program.) Download via
1: RS-232 or IrDA
2: Cradle-IR
3: Modem Range: 1 ~ 3 (It is set to 1 by default in the utility program.) File type
1: AGX file
2: ATX file
3: ATF file

7
Download Utilities
1.2 DLOOKUP
Without the need to run the Batch Application Generator programs, you can use DLookup.exe to download a lookup file to your mobile computer. Alternatively, you may use command lines in your own code.
Note: (1) For 8400, USB Virtual COM shares the interface option of RS-232/IrDA. (2) Cradle-IR is not supported on 8400.
1
2
3

8
AG Utilities & Mobile Link User Guide
1.2.1 RUN DLOOKUP.EXE
1) In the File name box, type the file path where the lookup file is located.
Otherwise, click Browse to locate the lookup file you want to download. Click Open in the dialog box as shown below.
2) In the Download via box, select the download interface.
Download via Description
RS-232 or IrDA interface is available on 711/8000/8300/8400/8500 Series Mobile Computers.
Proceed to configure COM port (1~255) and baud rate settings.
Cradle-IR interface is available on 711/8000/8300/8500 Series Mobile Computers. Cradles or IR-Transceivers are required.
Proceed to configure COM port (1~255) and baud rate settings.
Modem interface is available on 8000/8300/8400/8500 Series Mobile Computers. Modem Cradles are required.
Proceed to configure modem if necessary.

9
Download Utilities
Note: Mobile Link is provided for mobile computers to establish a connection with the host via Ethernet Cradles. However, it only allows uploading data currently.
3) Click OK to start the download process.

10
AG Utilities & Mobile Link User Guide
1.2.2 RUN COMMAND LINE
You can use the command line to download the lookup file as well. At the command line prompt, use the following command line arguments:
DLookup <File name>,<Download via>,<COM port>,<Baud rate>,<Show message box>
For example,
DLookup DEMO_LOOKUP.TXT,1,1,1,0
// RS-232/IrDA, COM 1, 115200 bps, No message box
If command line arguments are not given, you may select the appropriate parameters from the dialog box that pops up. Each argument is explained in the table below.
Argument Description
File name Max length: 256 bytes
Range: 1 ~ 3 (It is set to 1 by default in the utility program.) Download via
1: RS-232 or IrDA
2: Cradle-IR
3: Modem COM port Range: 1 ~ 255 (It is set to 1 by default in the utility program.)
Range: 1 ~ 5 (It is set to 1 by default in the utility program.) Baud rate
1: 115200 bps
2: 57600 bps
3: 38400 bps
4: 19200 bps
5: 9600 bps Range: 0 ~ 1 (It is set to 1 by default in the utility program.) Show message box
0: Disable
1: Enable

11
Download Utilities
1.3 PROGLOAD
Without the need to run the Batch or WLAN Application Generator programs, you can use ProgLoad.exe to download a program (*.SHX, *.SYN or *.BIN) to your mobile computer.
Note: (1) For 8400, USB Virtual COM shares the interface option of RS-232/IrDA. (2) Cradle-IR is not supported on 8400.
1
2
3

12
AG Utilities & Mobile Link User Guide
1.3.1 RUN PROGLOAD.EXE
1) In the Comm type box, select the download interface.
Comm Type Description
RS-232/IrDA Connection via direct RS-232 cable, IrDA port, or Bluetooth SPP
Cradle-IR Connection via cradle
TCP/IP Connection over networks
2) In the File type box, type the file path where the program file is located.
Otherwise, click Browse to locate the program file you want to download. Click Open in the dialog box as shown below.
File Type Description
.SHX file Any C program, such as AG Runtime, BASIC Runtime, font file, etc.
.SYN file Any BASIC program after BASIC Runtime has been installed first.
.BIN file Any C program
Use PC utility “SHX2Bin.exe” to convert the program (.shx .bin).
3) Click OK to start the download process.
Note: Mobile Link is provided for mobile computers to establish a connection with the host via Ethernet Cradles. However, it only allows uploading data currently.

13
2.1 DATA_READ
Without the need to run the Batch Application Generator program, you can use Data_Read.exe to receive the data file(s) uploaded from your mobile computer. Alternatively, you may use command lines in your own code. However, if you want to upload data files over the network via Ethernet Cradles, use Mobile Link instead.
It supports automatically uploading data to a host computer when the upload interface is properly configured — Cradle-IR, RS-232 or USB VCOM. Once the mobile computer is seated in the cradle or connected via the RS-232 or USB Virtual COM cable, there will be a running dot or hourglass icon displayed on the upper-right corner of the screen, indicating the mobile computer is ready for auto upload. Please make sure the interface on the mobile computer is matching!
Auto Upload Support 8000 8300 8400 8500
Interface Required Cradle-IR Cradle-IR
RS-232
RS-232
USB VCOM
Cradle-IR
Chapter 2 UPLOAD UTILITIES
1
3
52
64
7

14
AG Utilities & Mobile Link User Guide
2.1.1 RUN DATA_READ.EXE
1) In the Directory box under File Properties, type the file path where the data file will be saved to.
Otherwise, click Browse to select which directory the data file is saved to. Type the file name and click Save in the dialog box as shown below.

15
Chapter 2 Upload Utilities
2) If you want to save another data file to the same directory as specified above, simply type the file name here.
3) In the Save mode box under File Properties, select the appropriate file mode and configure related settings. You may click the [Data Convert] button to configure settings for converting the received data into an Excel file.
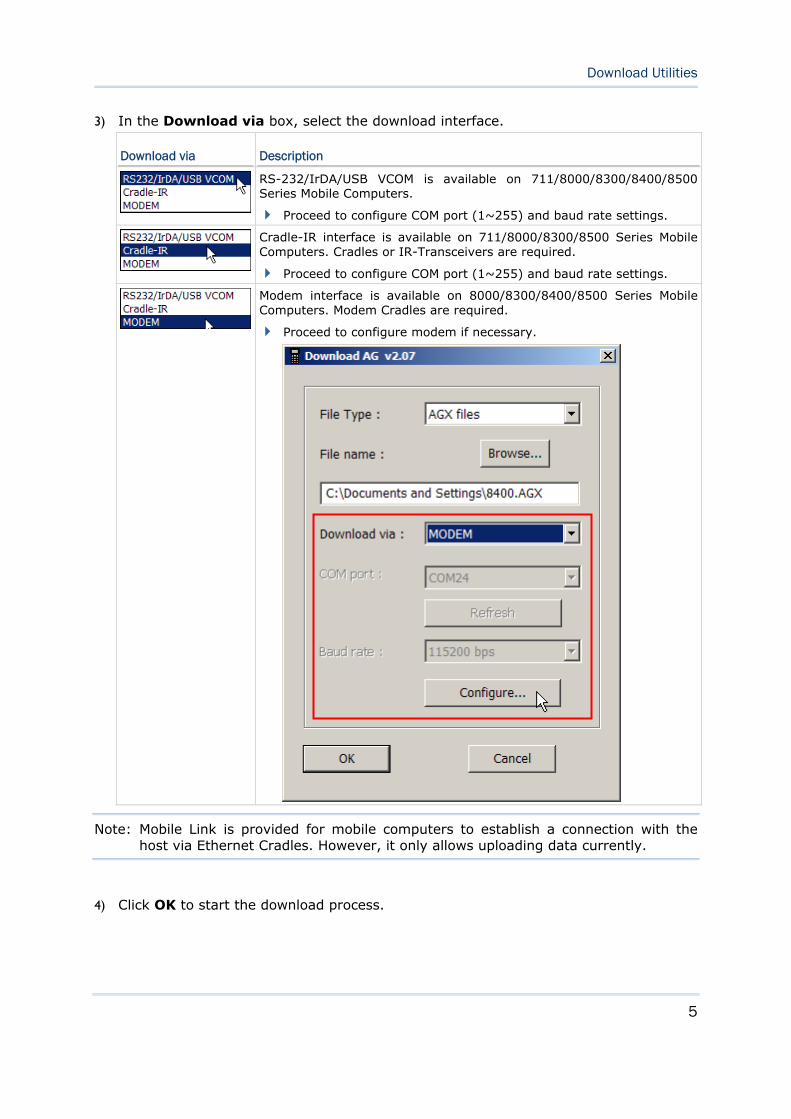
Save Mode Description
Overwrite: If the file name you give is the same as of an existing file, the uploaded data will overwrite the original data. Otherwise, it will create a new file.
Append: If the file name you give is the same as of an existing file, the uploaded data will be appended to the original data. Otherwise, it will create a new file.
16
AG Utilities & Mobile Link User Guide
Save Mode Description
Keyboard emulation: Data is emulated as typed text and sent to the active window.
In the Inter-character delay box under Communication Parameters, type or select a value that matches the computer response time of the keyboard interface. Such delay time is inserted between every character being transmitted. The longer the delay time is, the slower the transmission speed will be.
Auto file name: The uploaded data will be saved to the specified directory with a file name that is automatically generated based on the system date and time.
The best practice requires specifying reasonable polling time with Keep online for receiving data automatically enabled.
Auto append: If the file name you give is the same as of an existing file, the uploaded data will be appended to the original data. Otherwise, it will create a new file.
The best practice requires specifying reasonable polling time with Keep online for receiving data automatically enabled.
Name by the first record: The received data will be saved to a file named by its first record.
For example, in Batch Application Generator you may design Form 1 to allow only one line for a specific file name and proceed to other forms for collecting data. Thus, the first record will be used to keep its file name. However, if the file name you give is the same as of an existing file, the uploaded data will overwrite the original data.
4) Under Options, select appropriate settings for the file mode you selected in step 3.
5) In the Interface box under Communication Parameters, select the upload interface.
Interface Description
RS-232/IrDA/USB VCOM is available on 711/8000/8300/8400/8500 Series Mobile Computers.
Proceed to configure COM port (1~255) and baud rate settings.
Cradle-IR interface is available on 711/8000/8300/8500 Series Mobile Computers. Cradles or IR-Transceivers are required.
Proceed to configure COM port (1~255) and baud rate settings.
Modem interface is available on 8000/8300/8400/8500 Series Mobile Computers. Modem Cradles are required.
Select Modem-TAPI when using TAPI-compliant communication application on the host computer. Proceed to configure modem if necessary.

17
Chapter 2 Upload Utilities
Modem interface is available on 8000/8300/8400/8500 Series Mobile Computers. Modem Cradles are required.
Select Modem-COM when using COM port based modem, and proceed to configure COM port and baud rate settings.
Note: Mobile Link is provided for mobile computers to establish a connection with the host via Ethernet Cradles. However, it only allows uploading data currently.
6) Select whether to delete the data file, as well as lookup files, upon completion of auto upload.
7) Click OK to start the upload process.

18
AG Utilities & Mobile Link User Guide
2.1.2 COMMAND LINE CONFIGURATION
You can use the command line to download the lookup file as well. At the command line prompt, use the following command line arguments:
Data_Read <File name>,<Upload via>,<COM Port>,<Baud rate>,<Save mode>,
<Add CR character>,<Add LF character>,<Show error>,<Show data>,
<Show dialog box>,<Keep online>,<Polling time>,<Inter-Char delay>
For example,
Data_Read DataFile_1.TXT,1,1,1,1,1,1,1,1,0,1,2,0
// RS-232/IrDA, COM 1, 115200 bps, Overwrite, Add CR, Add LF, Show error message, Show data, Hide dialog box, Keep online, Polling time 2 seconds, No Inter-Char delay
If command line arguments are not given, you may select the appropriate parameters from the dialog box that pops up. Each argument is explained in the table below.
Argument Description
File name Max length: 256 bytes
Range: 1 ~ 4 (It is set to 1 by default in the utility program.) Upload via
1 (R) : RS-232 or IrDA
2 (I) : Cradle-IR
3 (T) : Modem-TAPI
4 (M) : Modem-COM COM port Range: 1 ~ 255 (It is set to 1 by default in the utility program.)
Range: 1 ~ 5 (It is set to 1 by default in the utility program.) Baud rate
1 (115200) : 115200 bps
2 ( 57600) : 57600 bps
3 ( 38400) : 38400 bps
4 ( 19200) : 19200 bps
5 ( 9600) : 9600 bps Range: 1 ~ 5 (It is set to 1 by default in the utility program.) Save mode
1: Overwrite
2: Append
3: Keyboard emulation
4: Auto file name
5: Auto append

19
Chapter 2 Upload Utilities
Range: 0 ~ 1 (It is set to 1 by default in the utility program.) Add CR character
0: Disable
1: Enable
Range: 0 ~ 1 (It is set to 1 by default in the utility program.) Add LF character
0: Disable
1: Enable
Range: 0 ~ 1 (It is set to 1 by default in the utility program.) Show error
0: Disable
1: Enable
Range: 0 ~ 1 (It is set to 1 by default in the utility program.) Show data
0: Disable
1: Enable
Range: 0 ~ 1 (It is set to 1 by default in the utility program.) Show dialog box
0: Disable
1: Enable
Range: 0 ~ 1 (It is set to 0 by default in the utility program.) Keep online
0: Disable
1: Enable
Polling time Range: 1 ~ 999 sec (It is set to 2 by default in the utility program.)
Inter-Char delay Range: 0 ~ 255 ms (It is set to 2 by default in the utility program.)

20
AG Utilities & Mobile Link User Guide
2.2 WLAN_READ
If no lookup file is in use, without the need to run the Wireless Database Manager programs, you can use WLAN_Read.exe to receive the collected data from your mobile computer in a real-time way.
1
3
4
8
2
6
5
7

21
Chapter 2 Upload Utilities
2.2.1 RUN WLAN_READ.EXE
1) In the Local port box, type the local port you want to use.
2) In the Supported clients box, type the maximum number (1 ~ 512) of client devices that are allowed to connect to the local port.
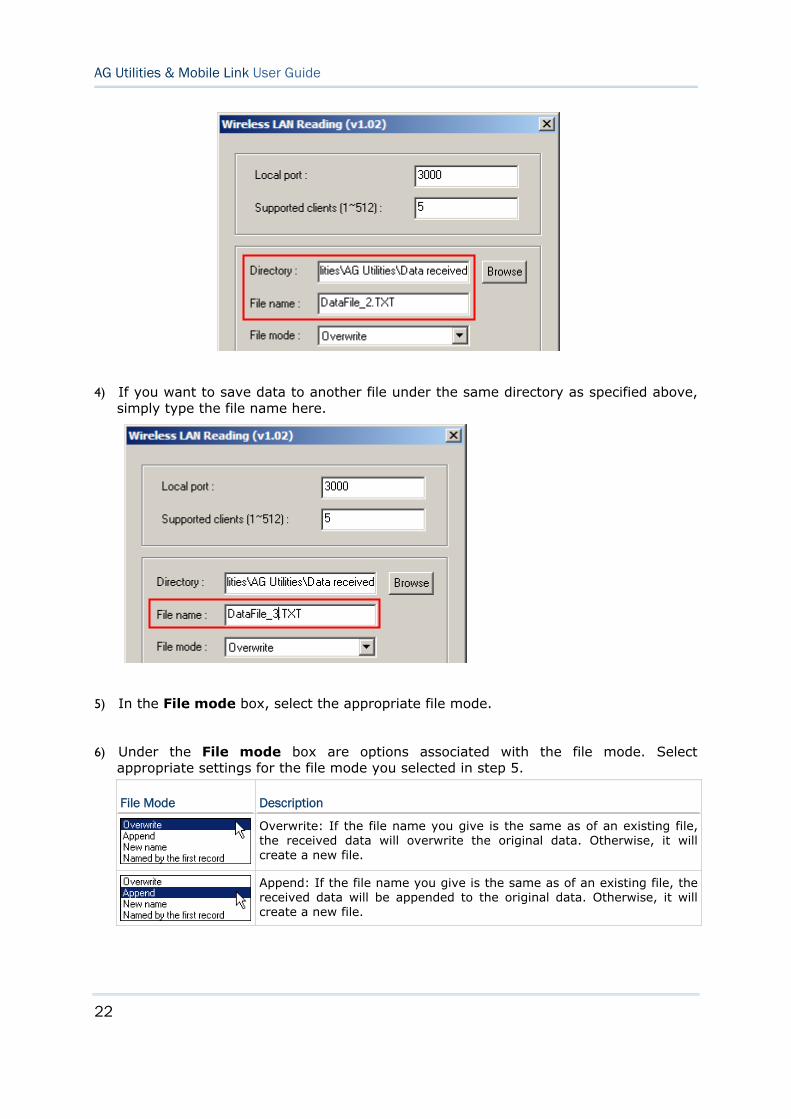
3) In the Directory box, type the file path where the data will be saved to.
Otherwise, click Browse to select which directory the data file is saved to. Type the file name and click Save in the dialog box as shown below.
22
AG Utilities & Mobile Link User Guide
4) If you want to save data to another file under the same directory as specified above, simply type the file name here.
5) In the File mode box, select the appropriate file mode.
6) Under the File mode box are options associated with the file mode. Select appropriate settings for the file mode you selected in step 5.
File Mode Description
Overwrite: If the file name you give is the same as of an existing file, the received data will overwrite the original data. Otherwise, it will create a new file.
Append: If the file name you give is the same as of an existing file, the received data will be appended to the original data. Otherwise, it will create a new file.
23
Chapter 2 Upload Utilities
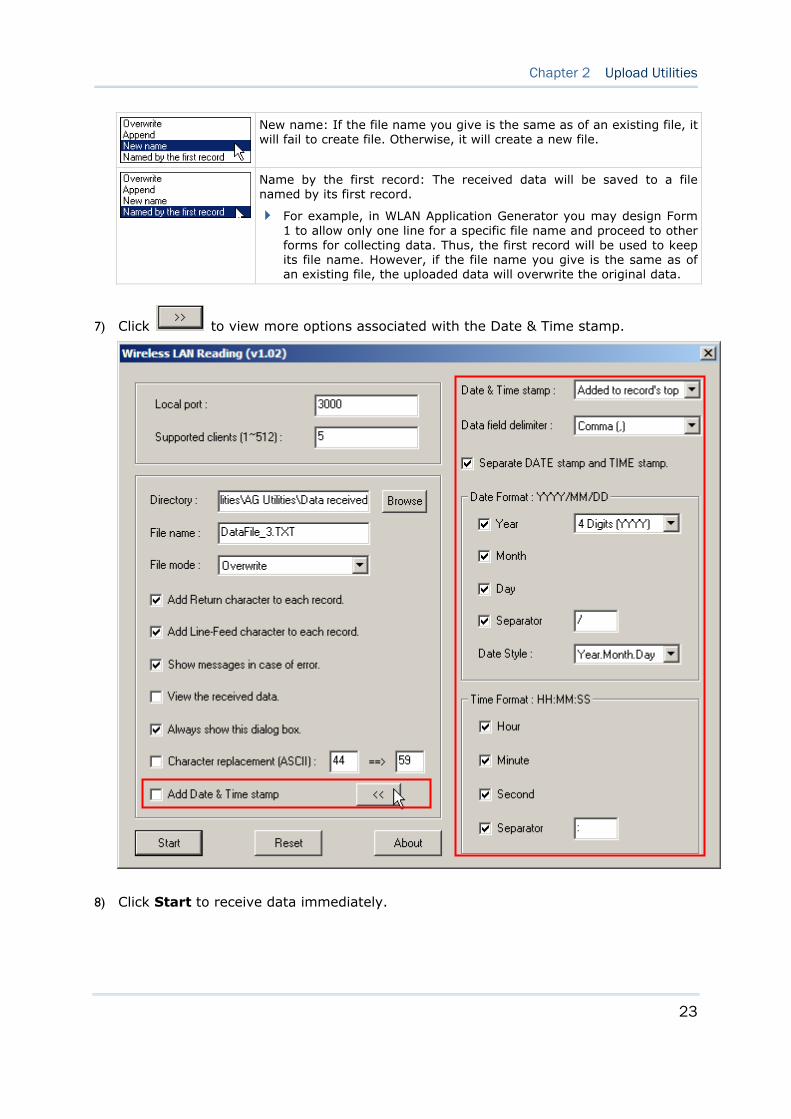
New name: If the file name you give is the same as of an existing file, it will fail to create file. Otherwise, it will create a new file.
Name by the first record: The received data will be saved to a file named by its first record.
For example, in WLAN Application Generator you may design Form 1 to allow only one line for a specific file name and proceed to other forms for collecting data. Thus, the first record will be used to keep its file name. However, if the file name you give is the same as of an existing file, the uploaded data will overwrite the original data.
7) Click to view more options associated with the Date & Time stamp.
8) Click Start to receive data immediately.

24
AG Utilities & Mobile Link User Guide
2.2.2 COMMAND LINE CONFIGURATION
You can use the command line to download the lookup file as well. At the command line prompt, use the following command line arguments:
Wlan_Read <File name>,<File mode>,<Add CR character>,<Add LF character>,
<Show error>,<Show data>,<Show dialog box>,<Replace delimiter>,
<Character_1>,<Character_2>,<Add Date & Time stamp>,<Stamp position>,
<Separate Date & Time stamp>,<Field delimiter>,<Year>,<Year format>,
<Month>,<Day>,<Separate Date>,<Date separator>,<Date style>,
<Hour>,<Minute>,<Second>,<Separate Time>,<Time separator>,
<Local port>,<Supported client number>
If command line arguments are not given, you may select the appropriate parameters from the dialog box that pops up. Each argument is explained in the table below.
Argument Description
File name Max length: 256 bytes
Range: 1 ~ 4 (It is set to 1 by default in the utility program.) File mode
1: Overwrite
2: Append
3: New name
4: Name by the first record Range: 0 ~ 1 (It is set to 1 by default in the utility program.) Add CR character
0: Disable
1: Enable
Range: 0 ~ 1 (It is set to 1 by default in the utility program.) Add LF character
0: Disable
1: Enable
Range: 0 ~ 1 (It is set to 1 by default in the utility program.) Show error
0: Disable
1: Enable
Range: 0 ~ 1 (It is set to 1 by default in the utility program.) Show data
0: Disable
1: Enable

25
Chapter 2 Upload Utilities
Range: 0 ~ 1 (It is set to 1 by default in the utility program.) Show dialog box
0: Disable
1: Enable
Range: 0 ~ 1 (It is set to 0 by default in the utility program.) Replace delimiter
0: Disable
1: Enable
Character_1 One ASCII character for the original delimiter
(It is set to 44 (comma) by default in the utility program.)
Character_2 One ASCII character for the new delimiter
(It is set to 59 (semicolon) by default in the utility program.)
Range: 0 ~ 1 (It is set to 0 by default in the utility program.) Add Date & Time stamp
0: Disable
1: Enable
Range: 0 ~ 1 (It is set to 0 by default in the utility program.) Stamp position
0: Top
1: Bottom
Range: 0 ~ 1 (It is set to 1 by default in the utility program.) Separate Date & Time stamp 0: Disable
1: Enable
Range: 0 ~ 4 (It is set to 0 by default in the utility program.) Field delimiter
0: Comma (,)
1: Colon (:)
2: Semicolon (;)
3: Slash (/)
4: Backslash (\) Range: 0 ~ 1 (It is set to 1 by default in the utility program.) Year – add info
0: Disable
1: Enable
Range: 0 ~ 1 (It is set to 0 by default in the utility program.) Year format
0: 4 digits (YYYY)
1: 2 digits (YY)
Range: 0 ~ 1 (It is set to 1 by default in the utility program.) Month – add info
0: Disable
1: Enable
Range: 0 ~ 1 (It is set to 1 by default in the utility program.) Day – add info
0: Disable
1: Enable

26
AG Utilities & Mobile Link User Guide
Range: 0 ~ 1 (It is set to 1 by default in the utility program.) Date – add separator
0: Disable
1: Enable
Date separator One character (It is set to slash (/) by default in the utility program.)
Range: 0 ~ 2 (It is set to 0 by default in the utility program.) Date style
0: Year.Month.Day
1: Month.Day.Year
2: Day.Month.Year Range: 0 ~ 1 (It is set to 1 by default in the utility program.) Hour – add info
0: Disable
1: Enable
Range: 0 ~ 1 (It is set to 1 by default in the utility program.) Minute – add info
0: Disable
1: Enable
Range: 0 ~ 1 (It is set to 1 by default in the utility program.) Second – add info
0: Disable
1: Enable
Range: 0 ~ 1 (It is set to 1 by default in the utility program.) Time – add separator
0: Disable
1: Enable
Time separator One character (It is set to colon (:) by default in the utility program.)
Local port Range: 1 ~ 65535 (It is set to 3000 by default in the utility program.)
Supported client number Range: 1 ~ 512 (It is set to 5 by default in the utility program.)

27
Chapter 2 Upload Utilities
2.3 AGX_READ
When using the Forge AG program version 1.00.0005 or later to create and download a template file, it may be configured to allow uploading the template file from the mobile computer at a later time.
Without the need to run the Batch Application Generator programs, you can use AGX_Read.exe to receive a template file (*.AGX) from your mobile computer.
Note: Cradle-IR is not supported on 8400.
1
3
4
2

28
AG Utilities & Mobile Link User Guide
2.3.1 RUN AGX.READ.EXE
1) In the Directory box, type the file path where the .AGX file is to be saved.
Otherwise, click to locate where to save the file. You may change the file name as well.
2) In the Password box, enter the correct password for access to the template file.
3) In the Interface box, select the upload interface.
Comm Type Description
RS-232/IrDA/USB VCOM
Connection via direct RS-232 cable, IrDA port, or USB Virtual COM
Cradle-IR Connection via cradle
4) Click OK to start the download process.
Note: Mobile Link is provided for mobile computers to establish a connection with the host via Ethernet Cradles. However, it only allows uploading data currently.

29
Mobile Link is provided for mobile computers to establish a connection with the host via Ethernet Cradles, and it only allows uploading data currently.
3.1 LOOKING AT THE WORK AREA
3.1.1 PREREQUISITES
By default, it is set to automatically start the link service upon execution of Mobile Link. Once you select to upload data from the mobile computer, you can view the link status and file status respectively as shown below.
You must have configured your Ethernet Cradle to work in Data Mode and connect to the host computer with correct host IP and port number.
You must select “Ethernet” for the upload interface on the mobile computer.
Note: On the System menu, click Link Properties, and then change the Auto Start Link Service setting.
Chapter 3 MOBILE LINK
Toolbar
Menu Bar
30
AG Utilities & Mobile Link User Guide
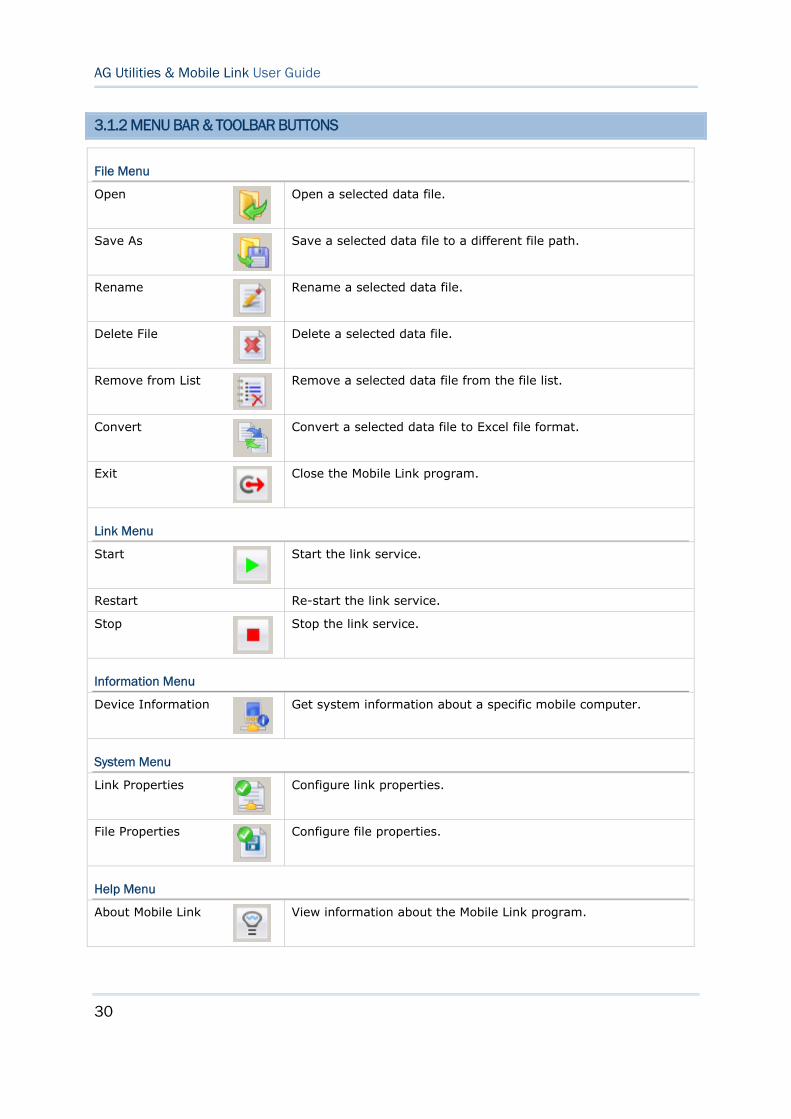
3.1.2 MENU BAR & TOOLBAR BUTTONS
File Menu
Open
Open a selected data file.
Save As
Save a selected data file to a different file path.
Rename
Rename a selected data file.
Delete File
Delete a selected data file.
Remove from List
Remove a selected data file from the file list.
Convert
Convert a selected data file to Excel file format.
Exit
Close the Mobile Link program.
Link Menu
Start
Start the link service.
Restart Re-start the link service.
Stop
Stop the link service.
Information Menu
Device Information
Get system information about a specific mobile computer.
System Menu
Link Properties
Configure link properties.
File Properties
Configure file properties.
Help Menu
About Mobile Link
View information about the Mobile Link program.

31
Chapter 3 Mobile Link
3.2 RECEIVING DATA OVER THE NETWORK
3.2.1 VIEW LINK STATUS
1) Connect your Ethernet Cradle to the host computer over the network.
In Mobile Link, click Links on the left pane of the work area and the IP and MAC address of Ethernet Cradle will be displayed on the right pane.
Note: You must have configured your Ethernet Cradle to connect to the host computer with correct host IP and port number.
2) Seat the mobile computer into your Ethernet Cradle, and start with uploading data.
For 8000/8300/8400, it will automatically start uploading.
For 8500, it requires selecting “Upload Data” from the main menu on the mobile computer.
3) In Mobile Link, more information about the connection will be displayed on the right pane. The connection details include:
Ethernet Cradle IP
Ethernet Cradle MAC Address
Terminal Serial Number (= the mobile computer)
Terminal Type (= the mobile computer)
Connect Time (start time)
Elapse (time elapsed upon completion of receiving data)
32
AG Utilities & Mobile Link User Guide
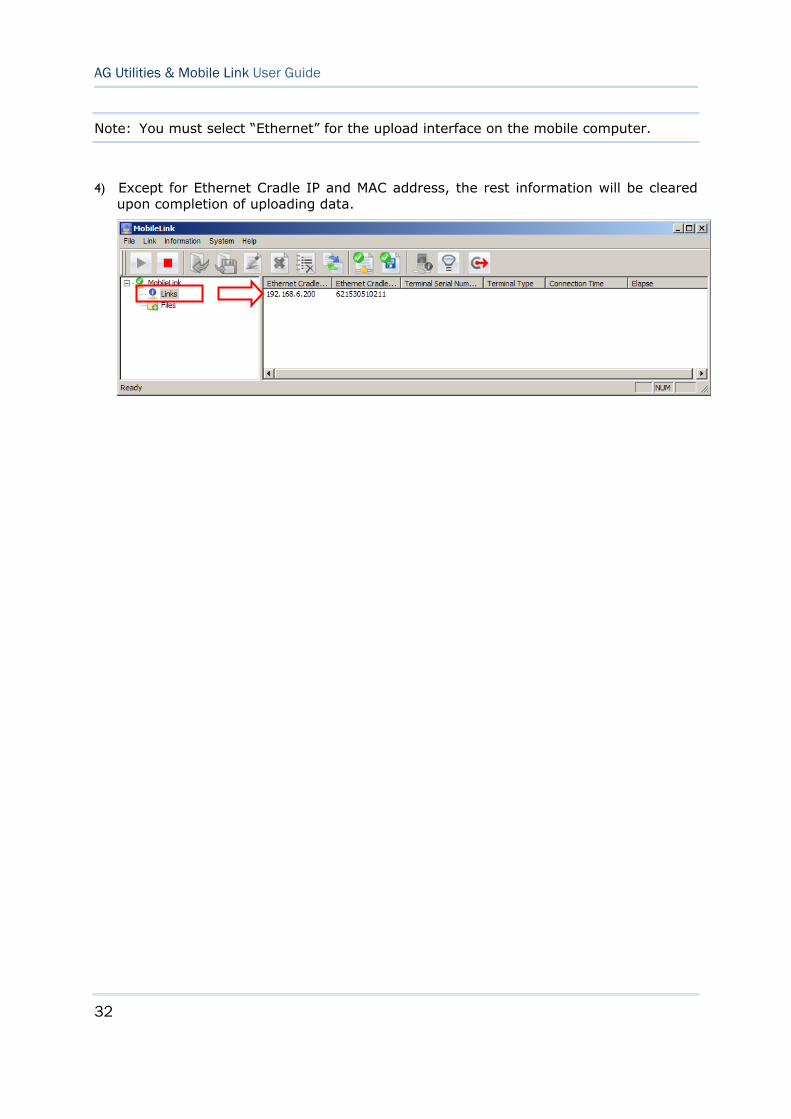
Note: You must select “Ethernet” for the upload interface on the mobile computer.
4) Except for Ethernet Cradle IP and MAC address, the rest information will be cleared upon completion of uploading data.

33
Chapter 3 Mobile Link
3.2.2 VIEW RECEIVED FILES
1) In Mobile Link, click Files on the left pane of the work area and the received file or files will be displayed on the right pane.
Note: You must have configured your Ethernet Cradle to connect to the host computer with correct host IP and port number.
2) Click a file from the file list, and choose a command from the File menu:
On the File menu, click Open to open the selected data file.
On the File menu, click Save As to save the selected data file to a different file path.

34
AG Utilities & Mobile Link User Guide
On the File menu, click Rename to rename the selected data file.
On the File menu, click Delete File to delete the selected data file.
On the File menu, click Remove from List to remove the selected data file from the file list.
35
Chapter 3 Mobile Link
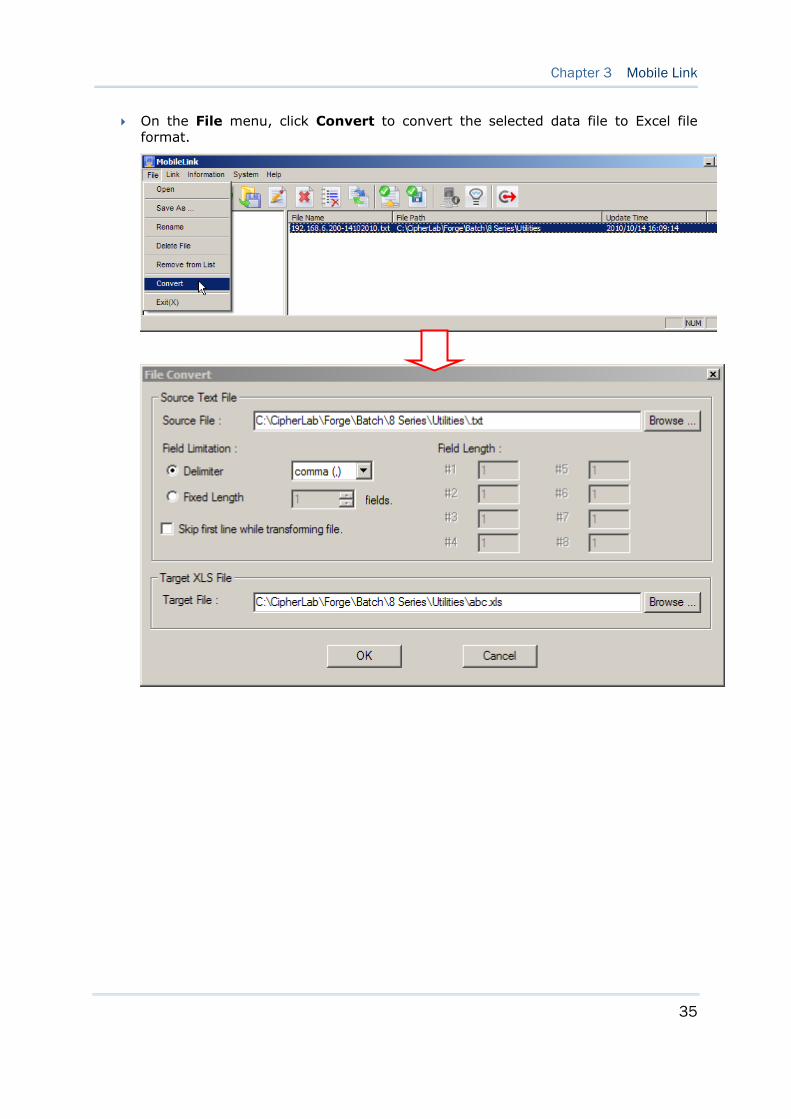
On the File menu, click Convert to convert the selected data file to Excel file format.

36
AG Utilities & Mobile Link User Guide
3.2.3 VIEW DEVICE INFORMATION
In Mobile Link, you can also view the device information while a mobile computer is uploading data.
1) Click an entry from the link list that provides detailed information on each of the current connections.
2) On the Information menu, click Device Information to view system information of a specific mobile computer, such as:
Serial Number (on the title of the dialog box)
Manufacture Date
Library Version
Kernel Version
Font Version
Program Version
Device Type

37
Chapter 3 Mobile Link
3.2.4 CHANGE CONNECTION SETTINGS
You must have configured your Ethernet Cradle to connect to the host computer with correct host IP and port number. On the System menu, click Link Properties to change the following settings:
Link Port: The port number is “2000” by default. You may change it in Mobile Link, as well as on your Ethernet Cradle.
Maximum Links: It allows up to 25 mobile computers to upload data by default. You may change the number to meet your needs.
Refresh Link Information: Type or select an appropriate period of time for Mobile Link to refresh the link status, in units of second.
Attempt to resume connection when disconnection is detected: Type or select how many times Mobile Link will try to resume connection.
Auto Start Link Service: By default, it is set to automatically start the link service upon execution of Mobile Link. You may disable it if necessary.
38
AG Utilities & Mobile Link User Guide
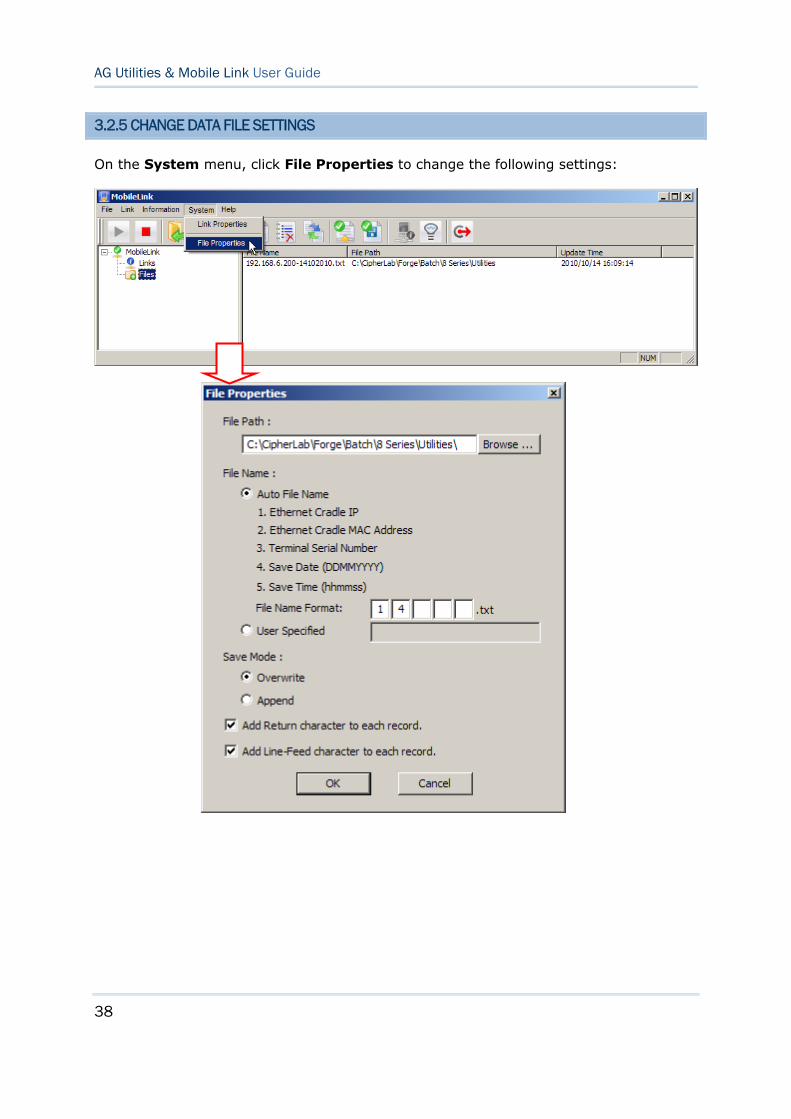
3.2.5 CHANGE DATA FILE SETTINGS
On the System menu, click File Properties to change the following settings:
39
Chapter 3 Mobile Link
File Path
By default, the received data files will be saved in the same folder where the Mobile Link program is saved. Type the file path where the data files will be saved.
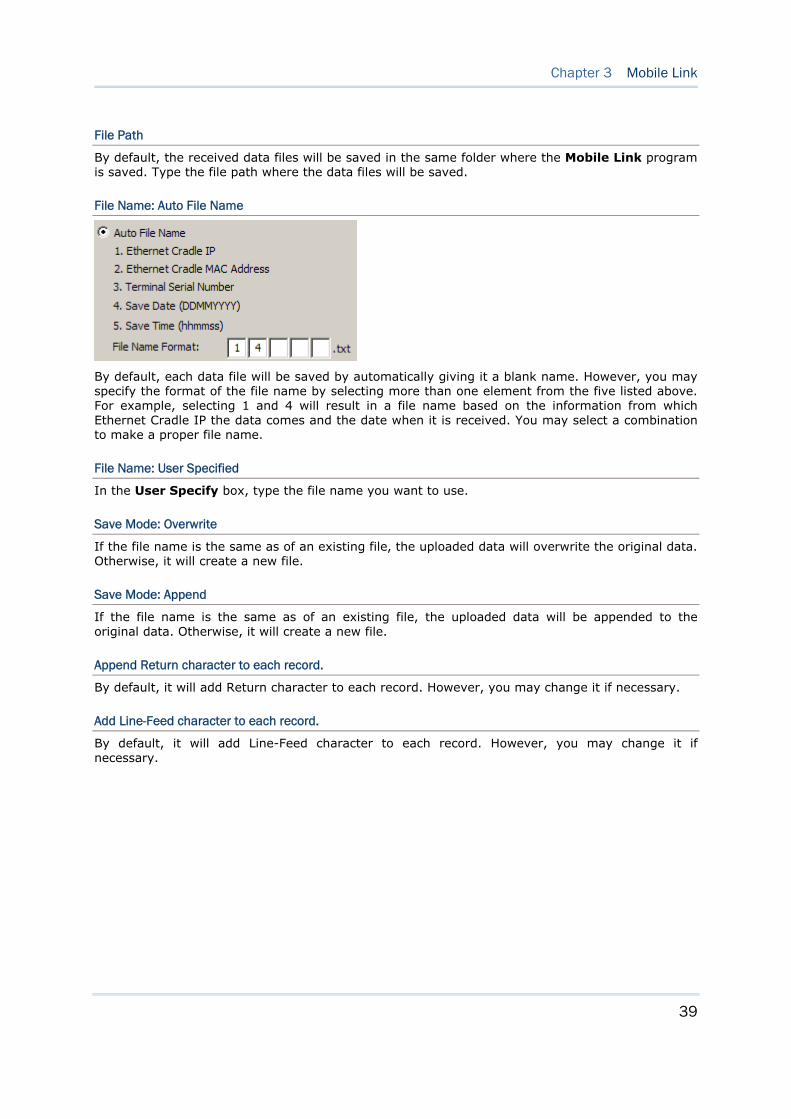
File Name: Auto File Name
By default, each data file will be saved by automatically giving it a blank name. However, you may specify the format of the file name by selecting more than one element from the five listed above. For example, selecting 1 and 4 will result in a file name based on the information from which Ethernet Cradle IP the data comes and the date when it is received. You may select a combination to make a proper file name.
File Name: User Specified
In the User Specify box, type the file name you want to use.
Save Mode: Overwrite
If the file name is the same as of an existing file, the uploaded data will overwrite the original data. Otherwise, it will create a new file.
Save Mode: Append
If the file name is the same as of an existing file, the uploaded data will be appended to the original data. Otherwise, it will create a new file.
Append Return character to each record.
By default, it will add Return character to each record. However, you may change it if necessary.
Add Line-Feed character to each record.
By default, it will add Line-Feed character to each record. However, you may change it if necessary.

40
AG Utilities & Mobile Link User Guide
41
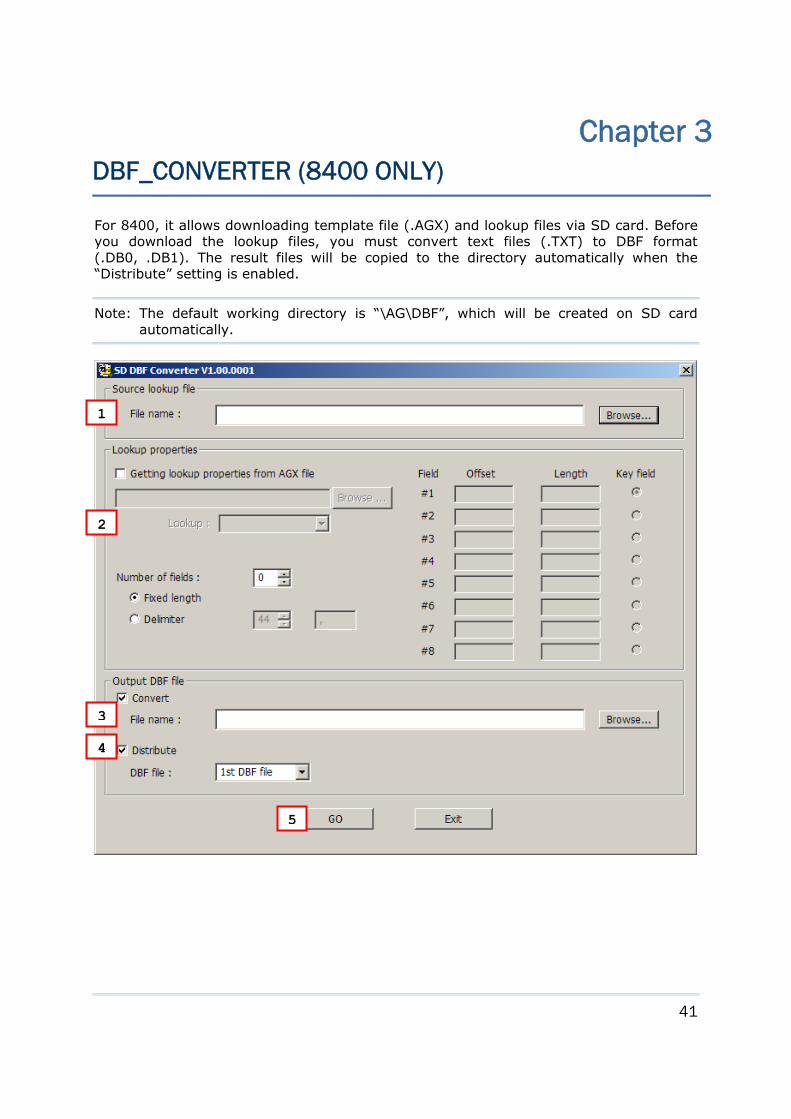
For 8400, it allows downloading template file (.AGX) and lookup files via SD card. Before you download the lookup files, you must convert text files (.TXT) to DBF format (.DB0, .DB1). The result files will be copied to the directory automatically when the “Distribute” setting is enabled.
Note: The default working directory is “\AG\DBF”, which will be created on SD card automatically.
Chapter 3 DBF_CONVERTER (8400 ONLY)
1
3
4
2
5

42
AG Utilities & Mobile Link User Guide
1) For the source lookup file, select a text file (.TXT).
2) For the lookup properties, specify from scratch or select a template file (.AGX) and the target lookup file. For the latter, the properties will be loaded automatically.
3) For the output DBF file, make sure to select the check box of [Convert] and [Distribute].
Specify a file name or select an existing DBF file to save the result file on PC side.
4) On 8400, select 3. Utilities | 8. Load Lookup File and identify the lookup file.
Note: The download interface must be set to “SD”.
5) Click [Go].
It will convert the source file to DBF format and save the result file on PC side.
If you have selected the check box of [Distribute], it will automatically copy the result file to the import directory “\AG\DBF” on SD card.
6) On 8400, press [Enter] to confirm copying files to SD card and checking DBF format.
Depending on the DBF location specified in the template file, it will either (1) load the associated lookup file(s) to SRAM via SD card, or (2) keep the files on SD card for direct access.
Note: It is suggested to check DBF format upon completion of downloading lookup files.