AF-Setting Guidebook - media.canon-asia.com Guidebook Detailed explanations of how to master the...
131
Chapter 5 Chapter 4 Chapter 3 Chapter 2 Chapter 1 INDEX Chapter 0 AF-Setting Guidebook Detailed explanations of how to master the 65-point cross-type AF
-
Upload
truongtruc -
Category
Documents
-
view
219 -
download
5
Transcript of AF-Setting Guidebook - media.canon-asia.com Guidebook Detailed explanations of how to master the...

Chapter 5Chapter 4
Chapter 3Chapter 2
Chapter 1INDEX
Chapter 0
AF-Setting GuidebookDetailed explanations of how to master the 65-point cross-type AF
Chapter 5Chapter 4
Chapter 3Chapter 2
Chapter 1INDEX
Chapter 0
INDEX
2
Chapter 0Features of The AF system on EOS 7D Mark II
Chapter 1AF Configuration Tool
Chapter 2AF area selection modes
Ground-breaking AF setting controls
Chapter 365-point cross-type AF and lens group designations
Chapter 4Utilizing AF and the new Viewfinder
Chapter 5Recommended settings
*In photograph of the guide book, blue color of focus point is for illustration.
Chapter 5Chapter 4
Chapter 3Chapter 2
Chapter 1INDEX
Chapter 0
3
Features of The AF system on EOS 7D Mark II
The newly-designed 65-point AF and versatile AF area selection mode makes it possible to accurately focus on quick-moving subjects.
The newly-developed 65-point cross-type AF* is included on the EOS 7D Mark II. By covering a wide area of the screen with 65 AF points, it is easier to focus on your desired area. The addition of Large Zone AF makes 7 different AF area selection modes available, and when these are used, the AF system can be utilized to match the qualities of the subject, such as any single point for focusing on a still subject, or a specified zone (surface) for subjects with intense movement. This model is now equipped with the AF area selection lever for even easier switching between modes.
*Number of available AF points, cross-type po in t s , and Dua l c ross- type points vary depending on the lens.
Chapter 5Chapter 4
Chapter 3Chapter 2
Chapter 1INDEX
Chapter 0
4
This model is equipped with the same AF ConfigurationTool as the EOS-1D X, making the optimum AI Servo AF settings possible to match the movement characteristics of the subject.
The AI Servo AF (movement AF) on the EOS 7D Mark II uses the same AI Servo AF III algorithm as on the EOS-1D X. This feature makes flexible, high-precision focusing pos s ib l e to match sub jec t movement . The AF Configurat ion Tool is what makes i t possible to customize the properties of AI Servo AF and optimize focusing to fit the subject and shooting situation. When using this function simply choosing from the 6 presets f rom Case 1 to 6 a l lowed for customizat ion of parameters such as tracking sensitivity. This guidebook describes how to take advantage of these AF features.

Chapter 5Chapter 4
Chapter 3Chapter 2
Chapter 1INDEX
Chapter 0
5
Ground-breaking AF setting controls
AF-related setting items in the AF menu
Display tab location
Tab name
All AF-related menu functions now in a separate menu
The AF1 tab includes the AF Configuration Tool
The AF1 tab is important when shooting moving subjects using the AI Servo AF of the EOS 7D Mark II. It is possible to effectively set AI Servo AF characteristics by selecting the option that closely matches the scene with the AF Configuration Tool.

Chapter 5Chapter 4
Chapter 3Chapter 2
Chapter 1INDEX
Chapter 0
6
The Various AF-related functions are now incorporated into an AF menu tabThe various AF-related settings that were previously included in the custom functions (C.Fn) menu, have been incorporated into the new AF menu tab. This makes smooth access to AF-related settings possible. In particular, the AF Configuration Tool included in tab AF1 can be used to easily match settings with the AI Servo AF characteristics, making it an important feature that takes advantage of the advanced AF performance on the EOS 7D Mark II. By selecting from six presets (Case 1 - Case 6), makes it possible to set the AI Servo AF characteristics to most accurately suit the subject's movement, and scene conditions. It is also possible for fine control to adjust each parameters separately. (Refer to P. 9 – 31 for AF Configuration Tool details.) Tabs [AF 2] – [AF 5] include a variety of settings such as shutter-release timing settings, a setting for the number of AF points that can be selected and AF area selection method.

Chapter 5Chapter 4
Chapter 3Chapter 2
Chapter 1INDEX
Chapter 0
7
Various settings for AF functions can be made with AF menu tabs [AF2] - [AF5]
The [AF2] tab includes settings related to cameras priority concerning shutter-release timing when using AI Servo AF. [AI Servo 1st image priority] and [AI Servo 2nd image priority] make it possible to make focusing the priority slowing the shutter-release timing, or prioritize faster shutter-release.
AF2 AI ServoSettings related to the camera priorities when using AI Servo AF
AF3 One-ShotSettings related to focusing and shutter-release timing when using One-Shot AF release priority
Within the [AF3] tab, the [One-Shot AF release priority] settings related to focusing and shutter-release timing when using One-Shot AF release priority. The other options [USM lens electronic MF] and [AF-assist beam firing], control the manual focus operation of some lenses and the operation of AF assist function of attached Speedlites.

Chapter 5Chapter 4
Chapter 3Chapter 2
Chapter 1INDEX
Chapter 0
8
This menu includes detailed settings related to AF point selection.For example, Select AF area selection mode, AF area selection method, Orientation linked AF point,etc..
AF4Includes general settings related to AF point selection
This menu includes detailed settings related to display of AF points.For example, AF point display duringfocus, View finder display illumination,etc..In addition, AF Microadjustment is available for those who need to make fine adjustments to the focus position.
AF5Includes general settings related to display of AF points, etc.

Chapter 5Chapter 4
Chapter 3Chapter 2
Chapter 1INDEX
Chapter 0
Chapter 1
9
Overview of AF Configuration Tool
Case 1Versatile multi-purpose setting
Case 2Continue to focus-track even when the subject momentarily moves from the AF points
Case 3Focus instantly on subjects that move into the AF points
Case 4Focus track subjects that accelerate or decelerate quickly
Case 5Focus on subjects with erratic movement
Case 6Focus on subjects with erratic movement and changes in speed
AF Configuration Tool

Chapter 5Chapter 4
Chapter 3Chapter 2
Chapter 1INDEX
Chapter 0
10
A combination of parameters to best suit the characteristics of subject movement have been used to create the presets from Case 1 – Case 6. By selecting the appropriate icon, the different AI Servo AF settings can be selected to suit the subject.
The best parameters for different subjects and shooting scenes are combined into presets from Case 1 - 6
Overview of AF Configuration Tool
*This setting is not available with the Single-point Spot AF(Manual selection) and Single-point AF(Manual selection) modes
For subjects that change speed and move erratically*
For erratic subjects, moving in any direction*
For subjects that accelerate or decelerate quickly
Instantly focus on subjects suddenly entering AF points
Continue to track subjects, ignoring possible obstacles
Versatile multi-purpose setting
Case 6
Case 5
Case 4
Case 3
Case 2
Case 1

Chapter 5Chapter 4
Chapter 3Chapter 2
Chapter 1INDEX
Chapter 0
11
Select from Case 1 - Case 6 to match subject scenarios
When the [AF1] tab on the EOS 7D Mark II is opened, [Case1 Versatile multi-purpose setting] a running man icon will be displayed. This is the default option for the AF Configuration Tool. Different presets to match the characteristics of the type of subject and its movement, and the shooting conditions, can be selected from Case 1 - Case 6. By simply selecting one of these cases, settings for the AI Servo AF characteristics that match the scene will be used.These six presets are combinations of the following three parameters, [Tracking sensitivity], [Accel./decel. tracking], and [AF pt auto switching]. Using the presets sets the parameters in the most effective way. However, if you wish It is also possible to manually adjust the parameters individually.
The AF Configuration Tool is a function for setting AI Servo AF characteristics. Therefore, it’s settings will have no function when using [One shot AF].

Chapter 5Chapter 4
Chapter 3Chapter 2
Chapter 1INDEX
Chapter 0
12
Moving the purple square over Case 1 – Case 6 will display the name of each case, for example [Case1 Versatile multi-purpose setting]. If you want more detailed information, you can press the INFO button. This will display the help screen containing information about shooting scene examples and which settings to alter and when.
Pushing button while any of [Case] is indicated in display, then text information of AF Setting Characteristics or Shooting Scene Example is indicated.
Hints & Tips
Press the INFO button
Content displays on the help screen
Chapter 5Chapter 4
Chapter 3Chapter 2
Chapter 1INDEX
Chapter 0
13
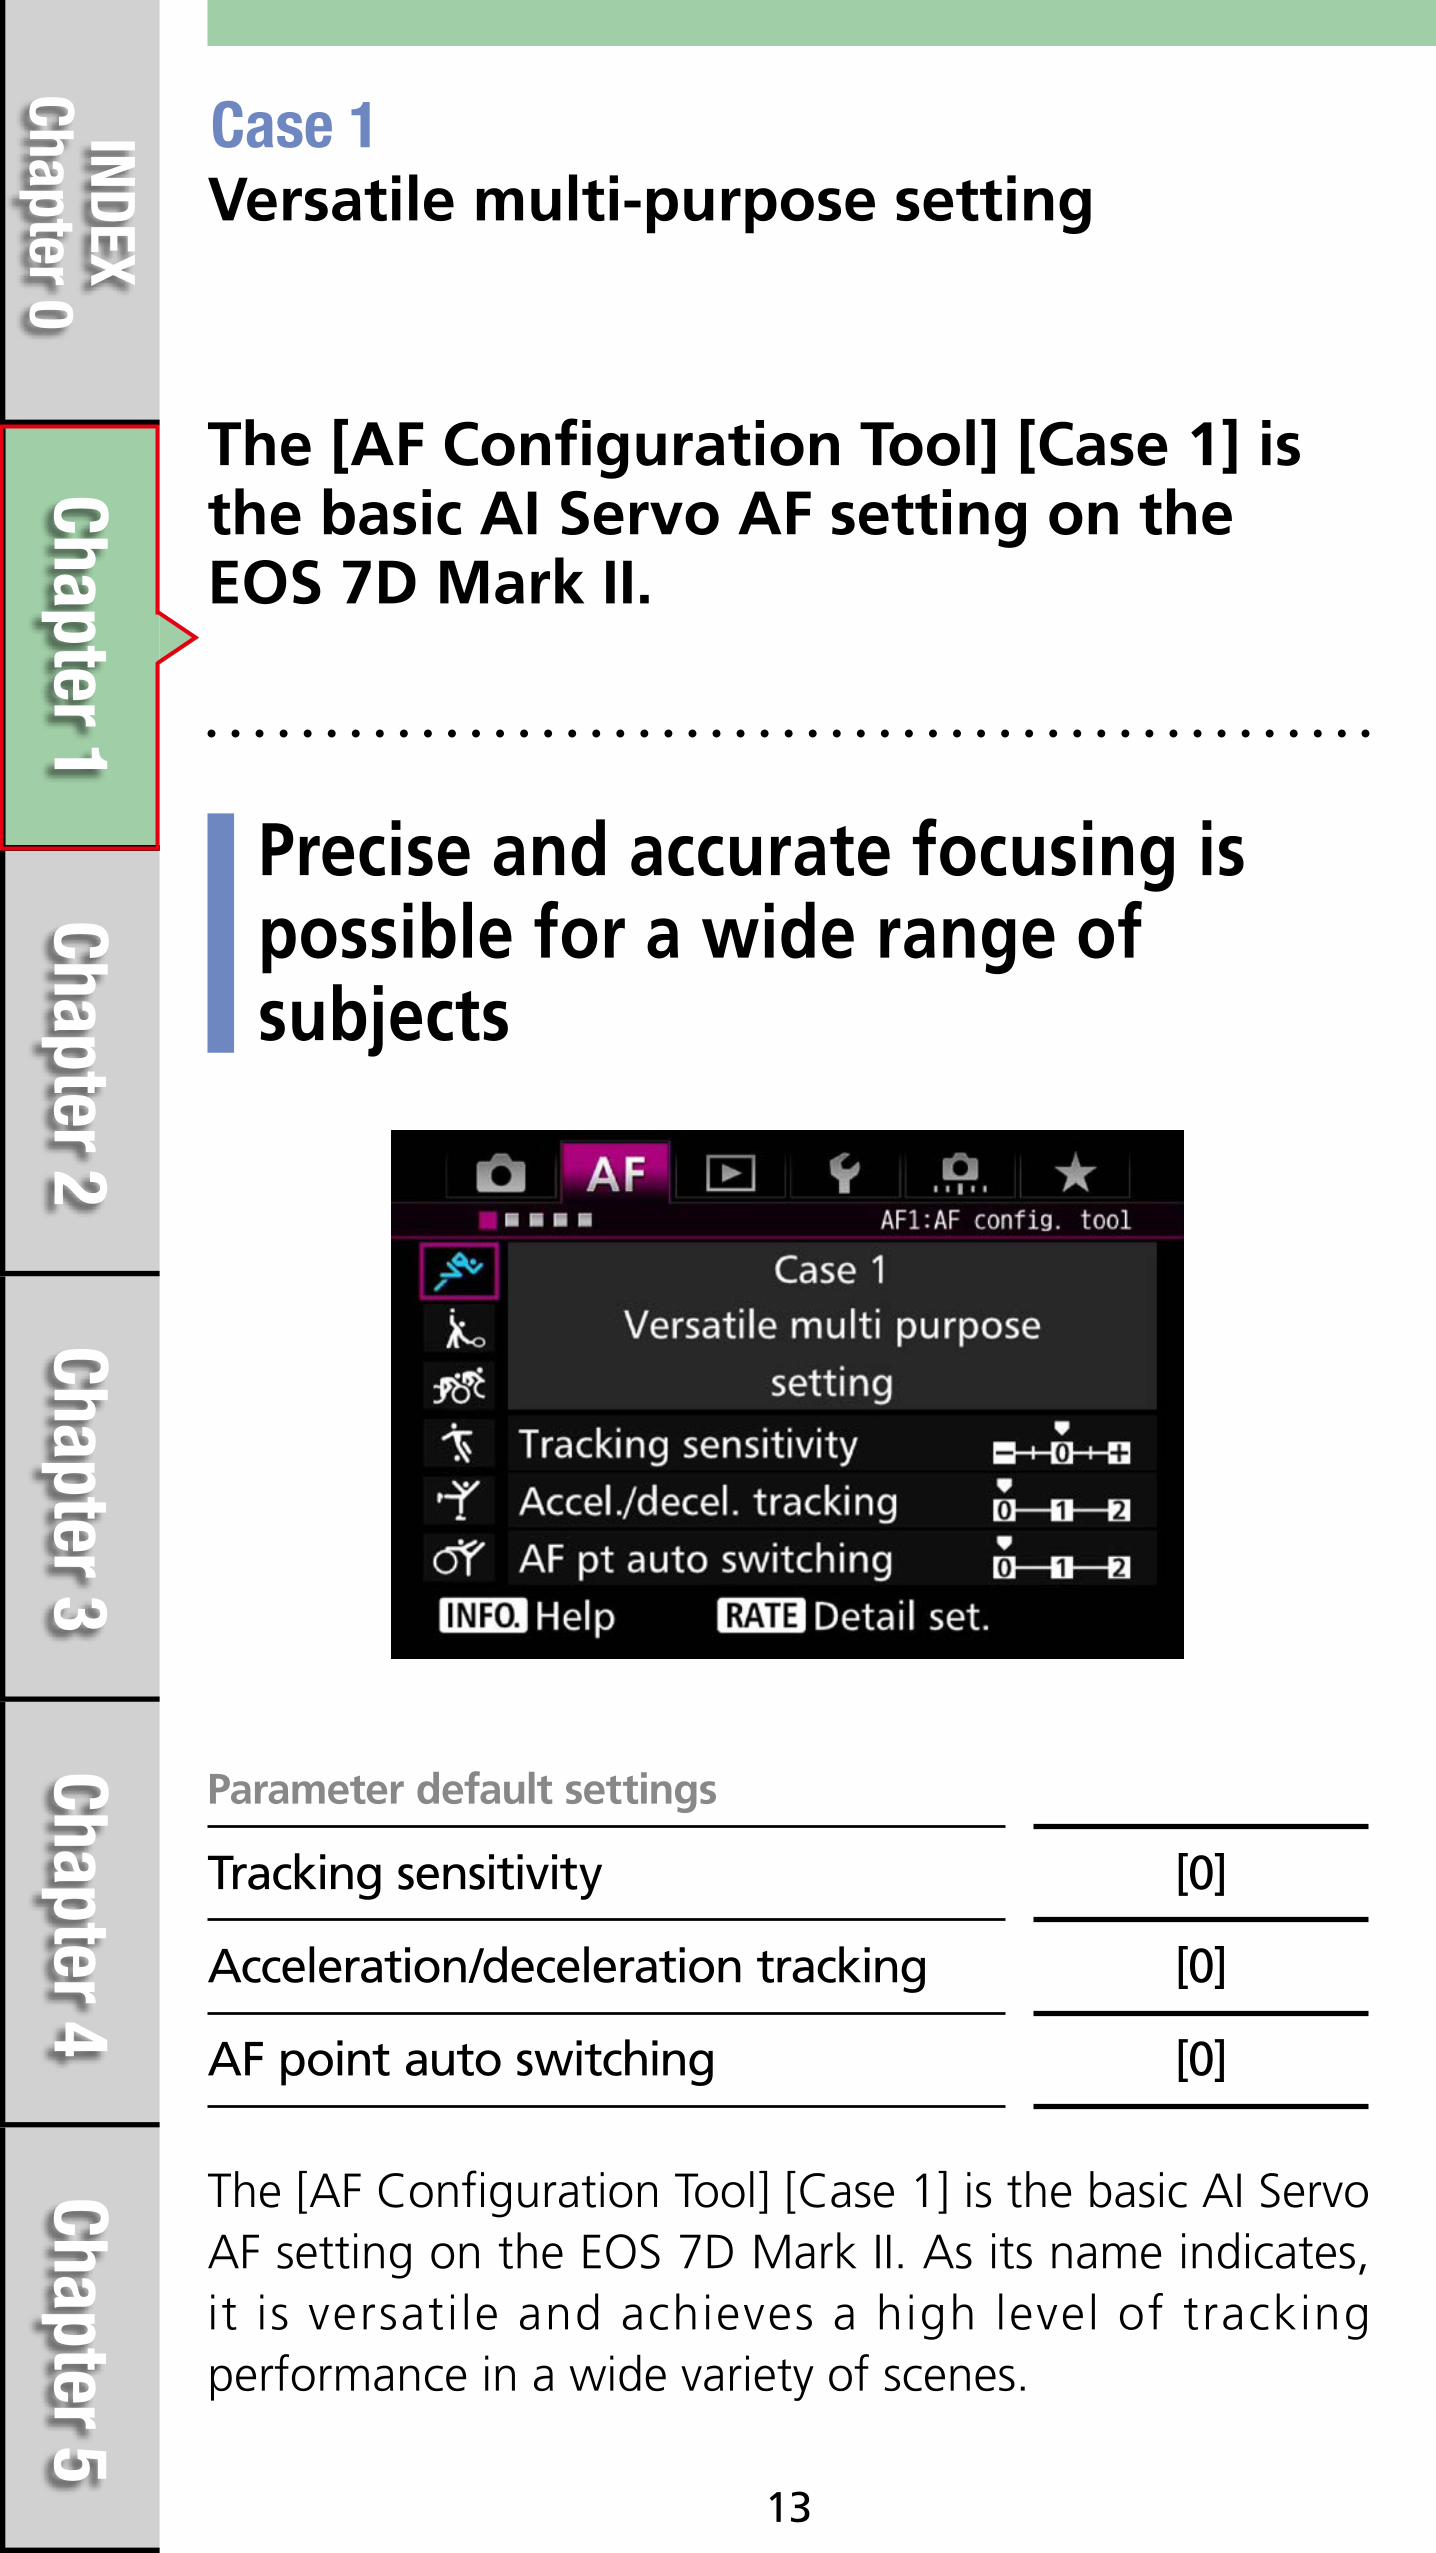
Case 1Versatile multi-purpose setting
Precise and accurate focusing is possible for a wide range of subjects
The [AF Configuration Tool] [Case 1] is the basic AI Servo AF setting on the EOS 7D Mark II. As its name indicates, it is versatile and achieves a high level of tracking performance in a wide variety of scenes.
The [AF Configuration Tool] [Case 1] is the basic AI Servo AF setting on the EOS 7D Mark II.
Parameter default settings
Tracking sensitivity [0]
Acceleration/deceleration tracking [0]
AF point auto switching [0]

Chapter 5Chapter 4
Chapter 3Chapter 2
Chapter 1INDEX
Chapter 0
14
Equipped with AI Servo AF III, the EOS 7D Mark II has improved flexibility in handling a variety of moving subjects, and superior prediction of movement for more accurate focusing. Even with a variety of difficult elements such as extremely fast movement, sudden changes in speed, and interruptions by obstacles, AI Servo AF III overcomes these and is able to capture the subject.Case 1 is the recommend setting to start shooting with, Case 1 will provide great results when shooting a variety of sports and moving subjects. When more specific settings for individual cases are desired, please try Case 2 – Case 6 to match shooting conditions.

Chapter 5Chapter 4
Chapter 3Chapter 2
Chapter 1INDEX
Chapter 0
15
Case 1 can be used to great advantage when shooting moving subjects, making it possible to accurately capture fast subject.
AF on the EOS 7D Mark II is equipped with a new focus tracking algorithm, AI Servo AF III. It supports an even greater variety of subject movement than before, and by utilizing the high level tracking performance of the AI Servo AF III, and Case 1 configuration setting, it can handle many different shooting conditions.
AI Servo AF III makes it possible to carry out precise focus for subjects in a wide variety of conditions
Single-Point
View large image by touching
Photo
Case 1

Chapter 5Chapter 4
Chapter 3Chapter 2
Chapter 1INDEX
Chapter 0
16
Case 2Continue to focus-track even when the subject momentarily moves from the AF points
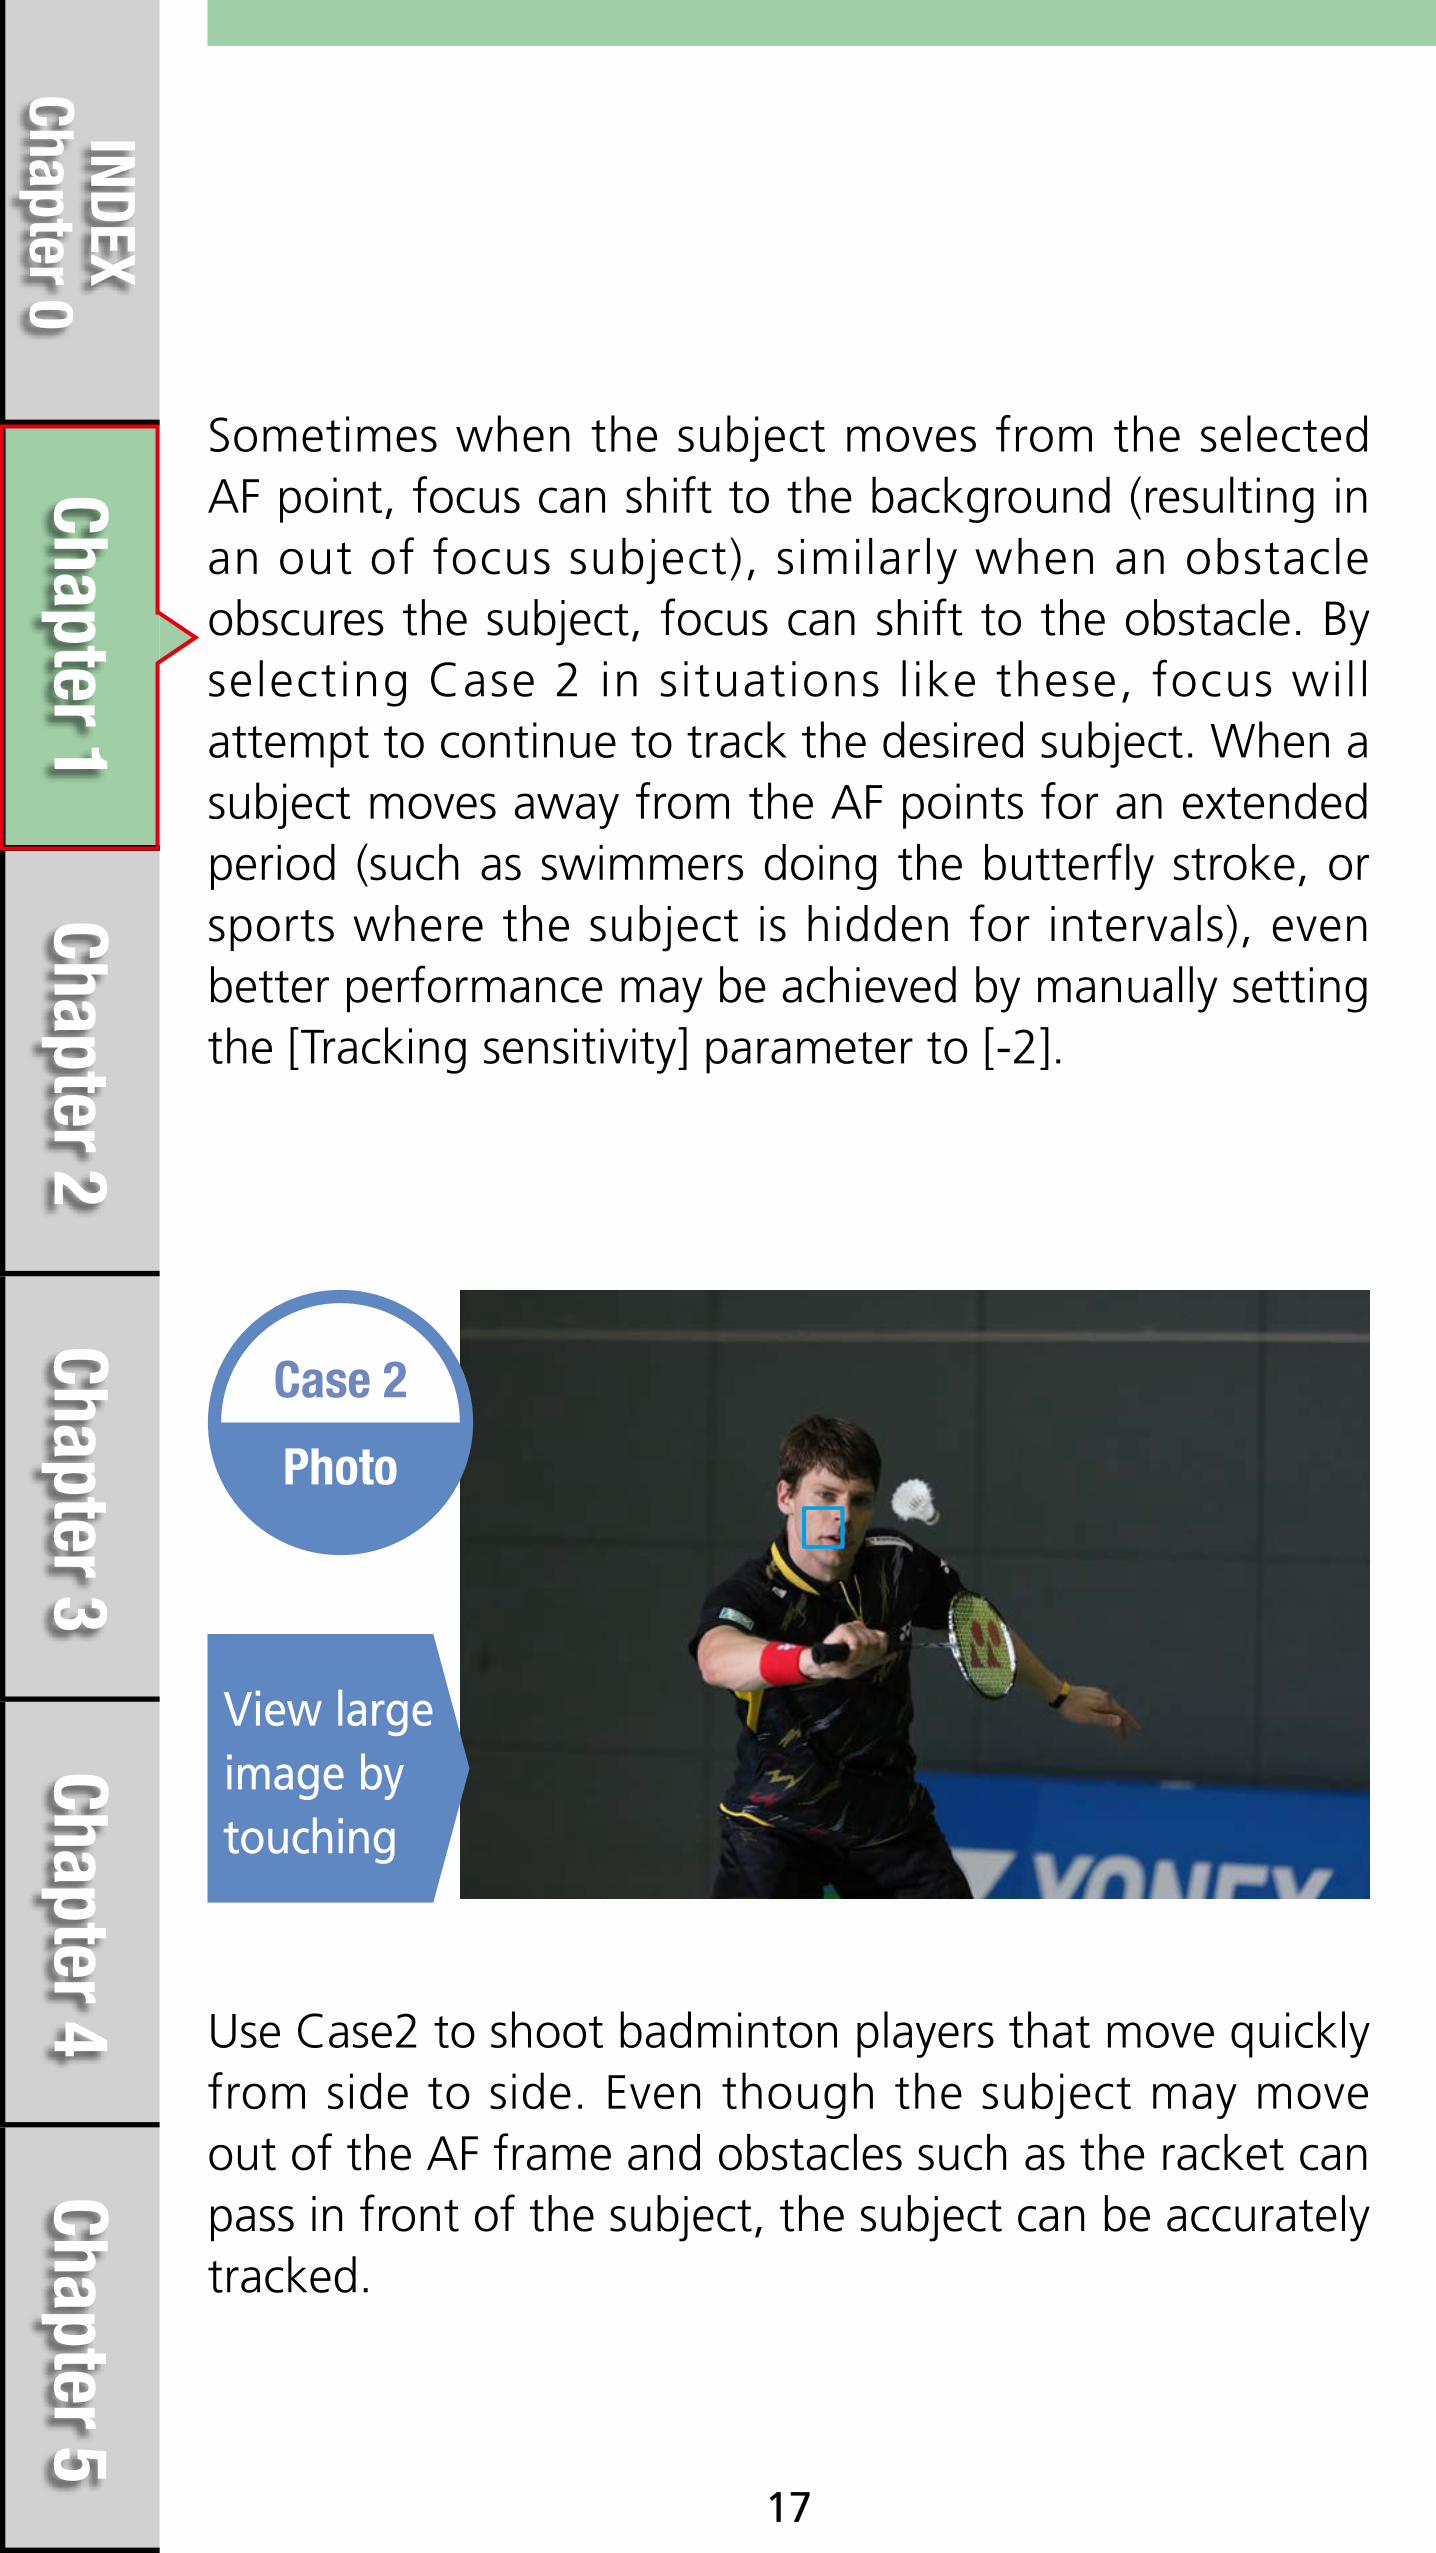
Case 2 is an effective setting for shooting fast moving subjects when they move away from the selected AF point, or when obstacles may momentarily obscure the subject.
Effective when shooting scenes with fast moving subjects, or when an obstacle momentarily appears in front of the subject
Case 2 is an effective setting for shooting fast moving subjects when they move away from the selected AF point, or when obstacles may momentarily obscure the subject.
Parameter default settings
Tracking sensitivity [-1]
Acceleration/deceleration tracking [0]
AF point auto switching [0]
[Locked on : -1]
Chapter 5Chapter 4
Chapter 3Chapter 2
Chapter 1INDEX
Chapter 0
17
Sometimes when the subject moves from the selected AF point, focus can shift to the background (resulting in an out of focus subject), similarly when an obstacle obscures the subject, focus can shift to the obstacle. By selecting Case 2 in situations like these, focus will attempt to continue to track the desired subject. When a subject moves away from the AF points for an extended period (such as swimmers doing the butterfly stroke, or sports where the subject is hidden for intervals), even better performance may be achieved by manually setting the [Tracking sensitivity] parameter to [-2].
View large image by touching
Use Case2 to shoot badminton players that move quickly from side to side. Even though the subject may move out of the AF frame and obstacles such as the racket can pass in front of the subject, the subject can be accurately tracked.
Photo
Case 2
Chapter 5Chapter 4
Chapter 3Chapter 2
Chapter 1INDEX
Chapter 0
18
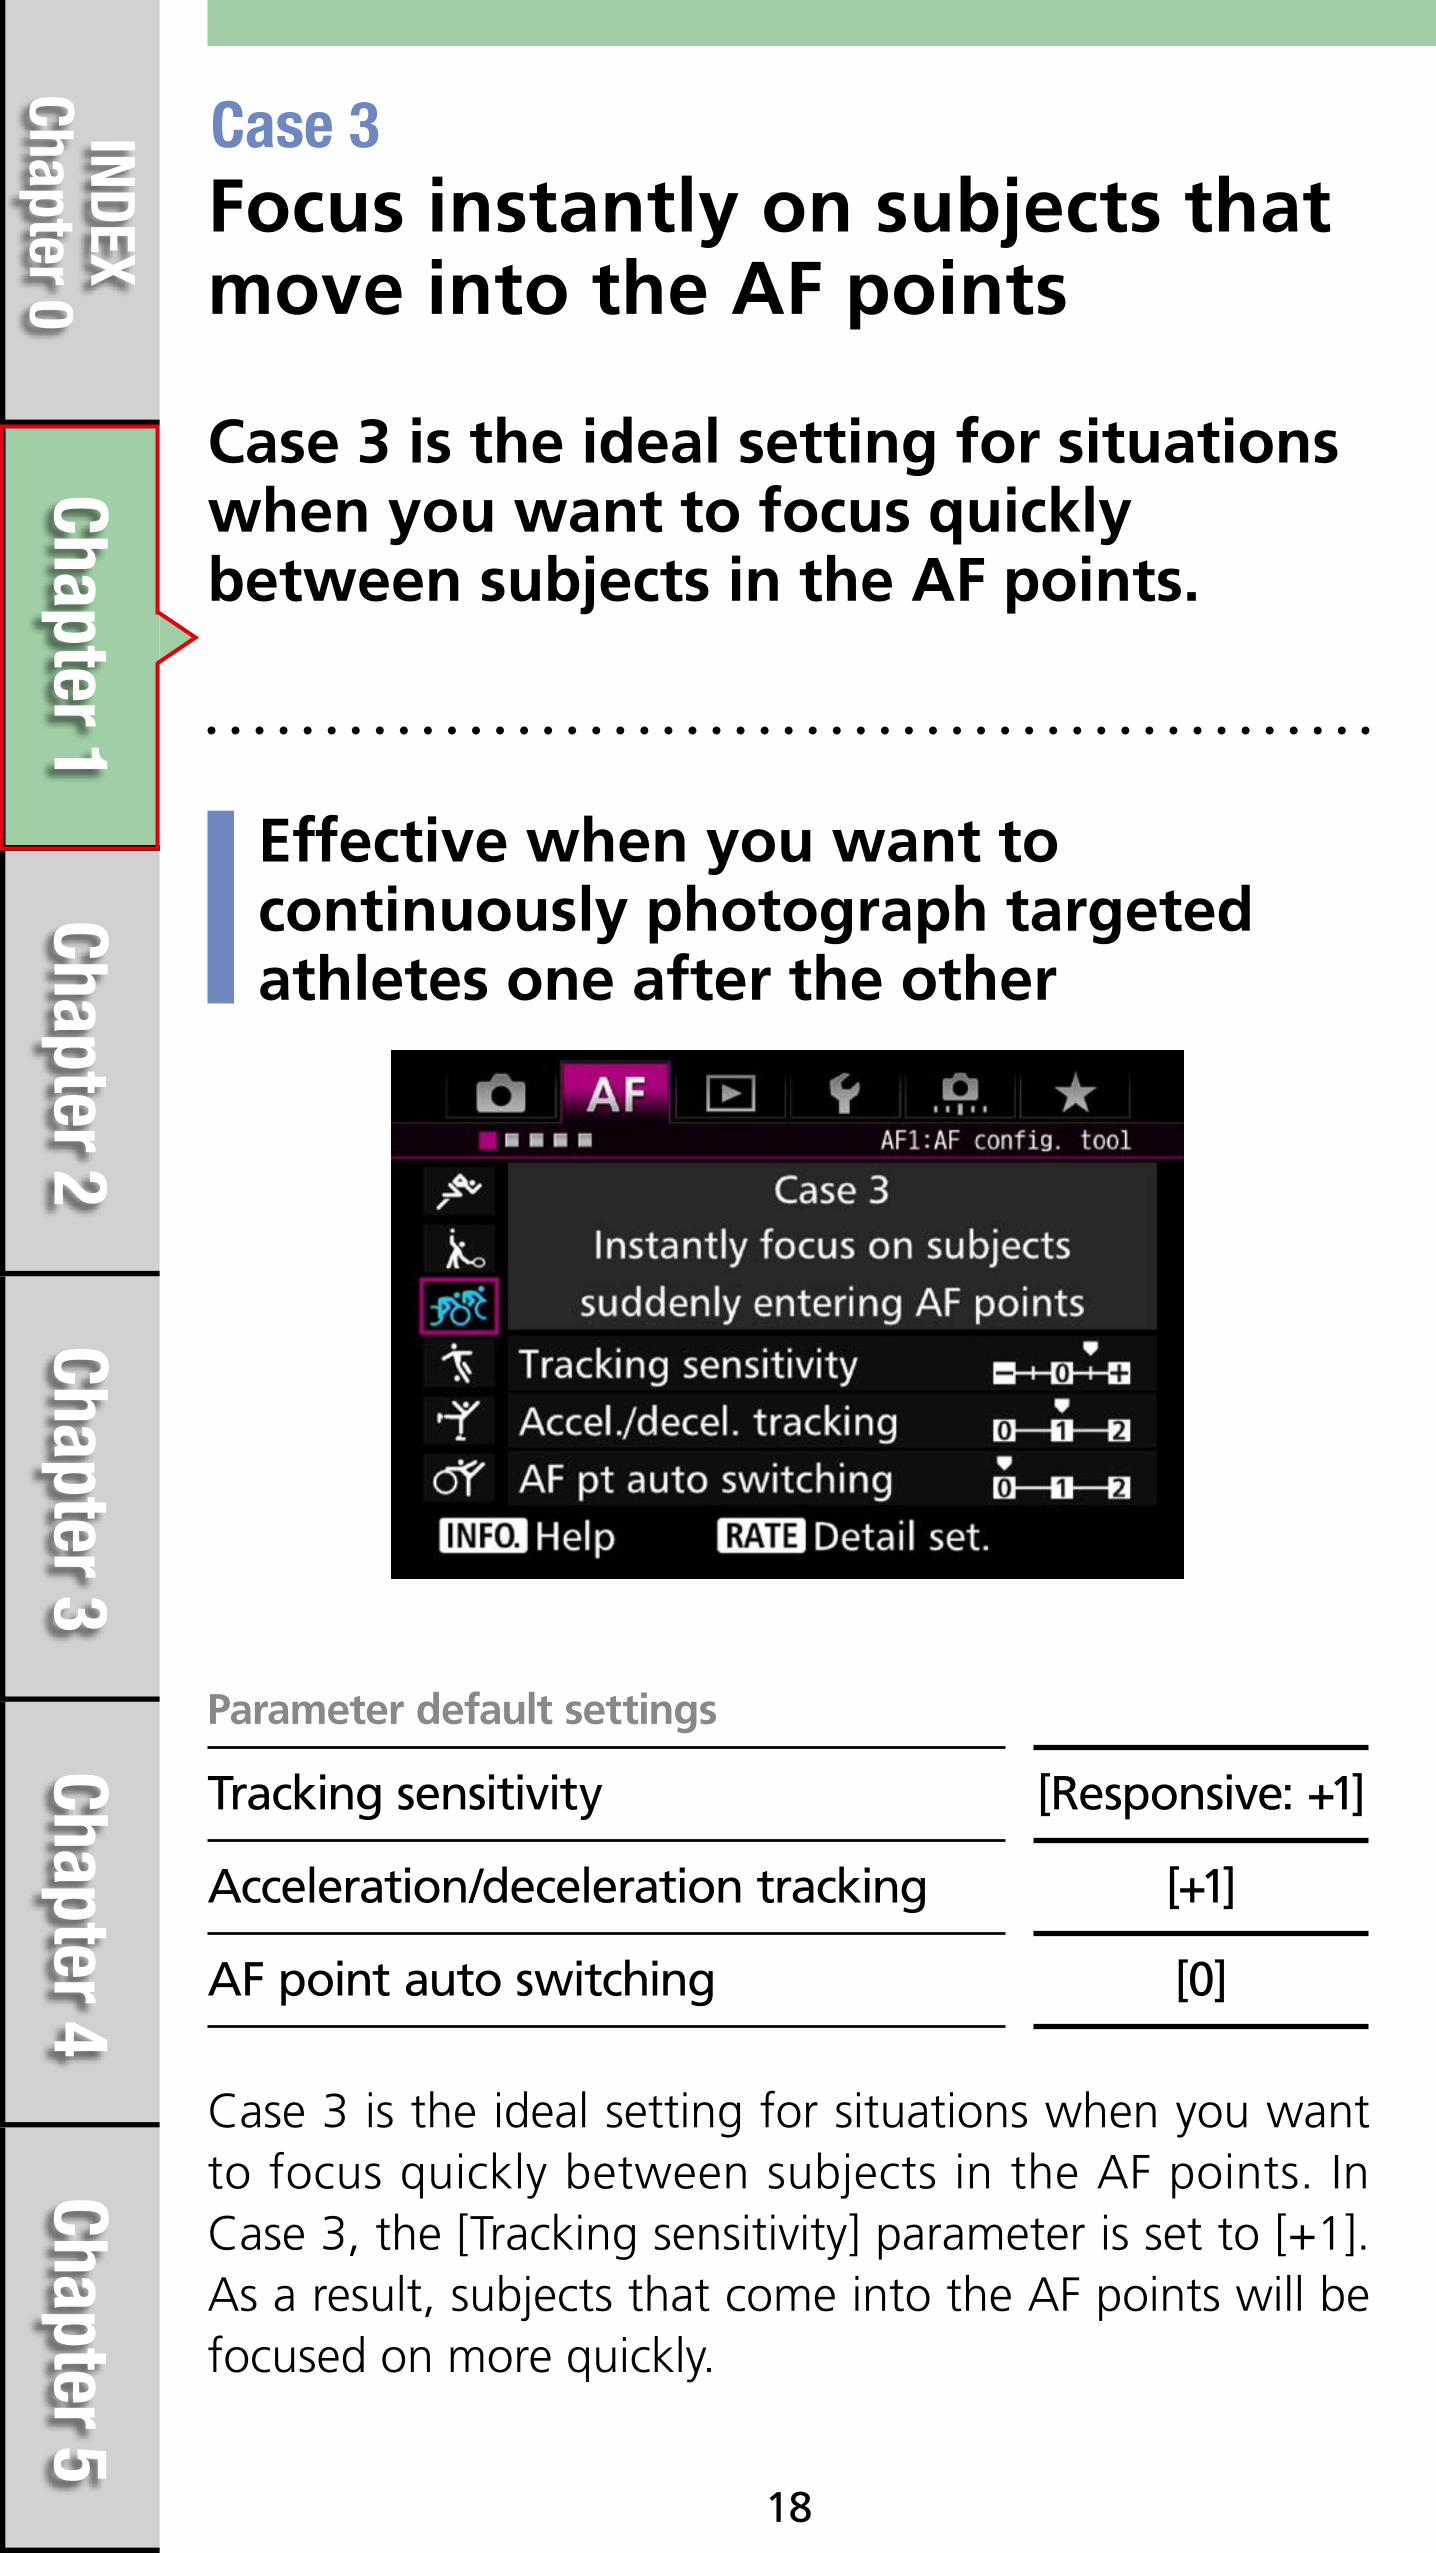
Case 3 is the ideal setting for situations when you want to focus quickly between subjects in the AF points.
Effective when you want to continuously photograph targeted athletes one after the other
Case 3Focus instantly on subjects that move into the AF points
Parameter default settings
Tracking sensitivity [Responsive: +1]
Acceleration/deceleration tracking [+1]
AF point auto switching [0]
Case 3 is the ideal setting for situations when you want to focus quickly between subjects in the AF points. In Case 3, the [Tracking sensitivity] parameter is set to [+1]. As a result, subjects that come into the AF points will be focused on more quickly.

Chapter 5Chapter 4
Chapter 3Chapter 2
Chapter 1INDEX
Chapter 0
19
This setting is effective for scenes when subjects (for example, when a wild bird suddenly jumps out from the shadow of a tree) suddenly appear while you are waiting to shoot. Other shooting situations, this setting can be extremely effective is when switching between different subjects you want to shoot (for example, at the start of a bicycle road race, when you want to shoot continuously and switch from cyclist to cyclist while focusing). When set to Case 3, if the subject moves away from the AF points, the camera may quickly refocus on a different subject or background, in contrast to Case 2. Therefore, it is recommended that you use this setting only when you have a particular objective as indicated above.

Chapter 5Chapter 4
Chapter 3Chapter 2
Chapter 1INDEX
Chapter 0
20
View large image by touching
Photo
Case 3
This is a situation where you anticipate a hiding wild bird jumping out from a nearby nest. You can set Case 3 and wait.The moment the bird appears, you can quickly focus and shoot continuously.
Accurately focusing on a wild bird that suddenly jumps into the frame
Chapter 5Chapter 4
Chapter 3Chapter 2
Chapter 1INDEX
Chapter 0
21
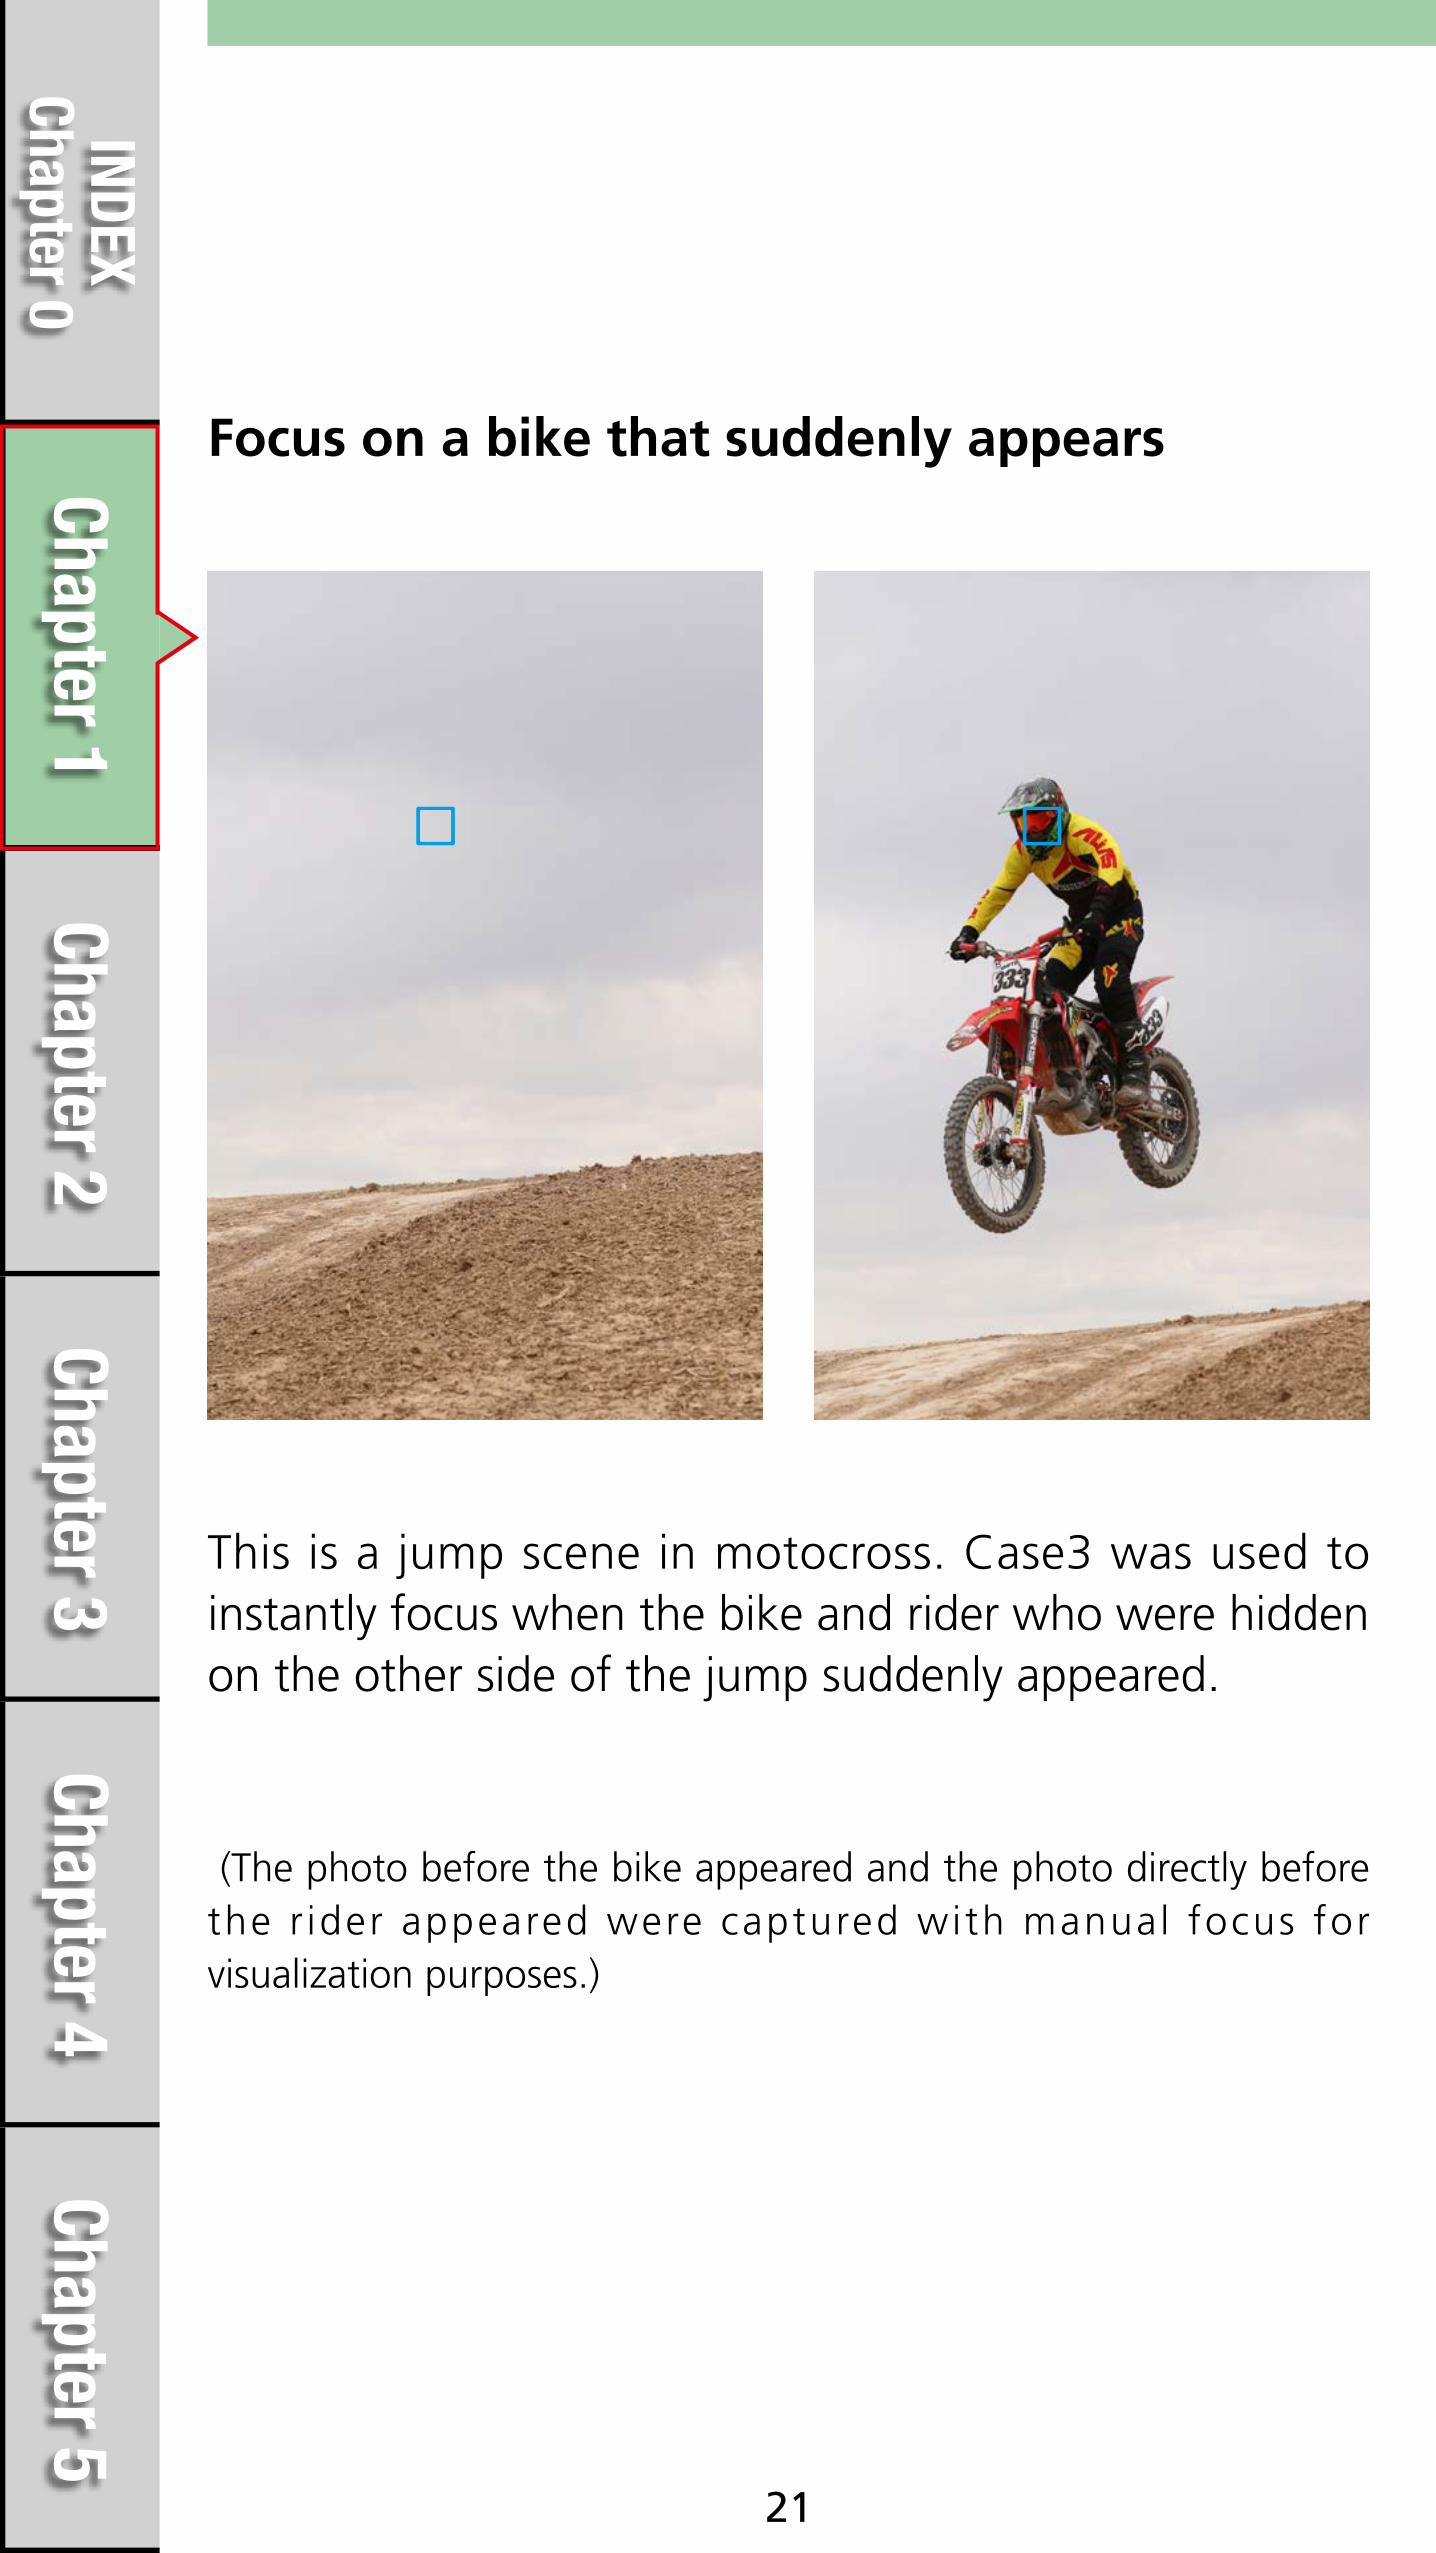
Focus on a bike that suddenly appears
This is a jump scene in motocross. Case3 was used to instantly focus when the bike and rider who were hidden on the other side of the jump suddenly appeared.
(The photo before the bike appeared and the photo directly before the r ider appeared were captured with manual focus for visualization purposes.)

Chapter 5Chapter 4
Chapter 3Chapter 2
Chapter 1INDEX
Chapter 0
22
Case 4Focus track subjects that accelerate or decelerate quickly
Subjects suddenly going from static to moving or sudden stopping can occur in various sports and situations and it can be difficult for the AF system to judge accurately, In these situations, Case 4 is most effective.
Effective when a subject's speed changes rapidly, or in sports where subjects stop or change direction
When shooting sports, motor sport shooting, there are many situations where it will be necessary to deal with fast moving subjects. Subjects suddenly going from static to moving or sudden
Parameter default settings
Tracking sensitivity [0]
Acceleration/deceleration tracking [+1]
AF point auto switching [0]
Chapter 5Chapter 4
Chapter 3Chapter 2
Chapter 1INDEX
Chapter 0
23
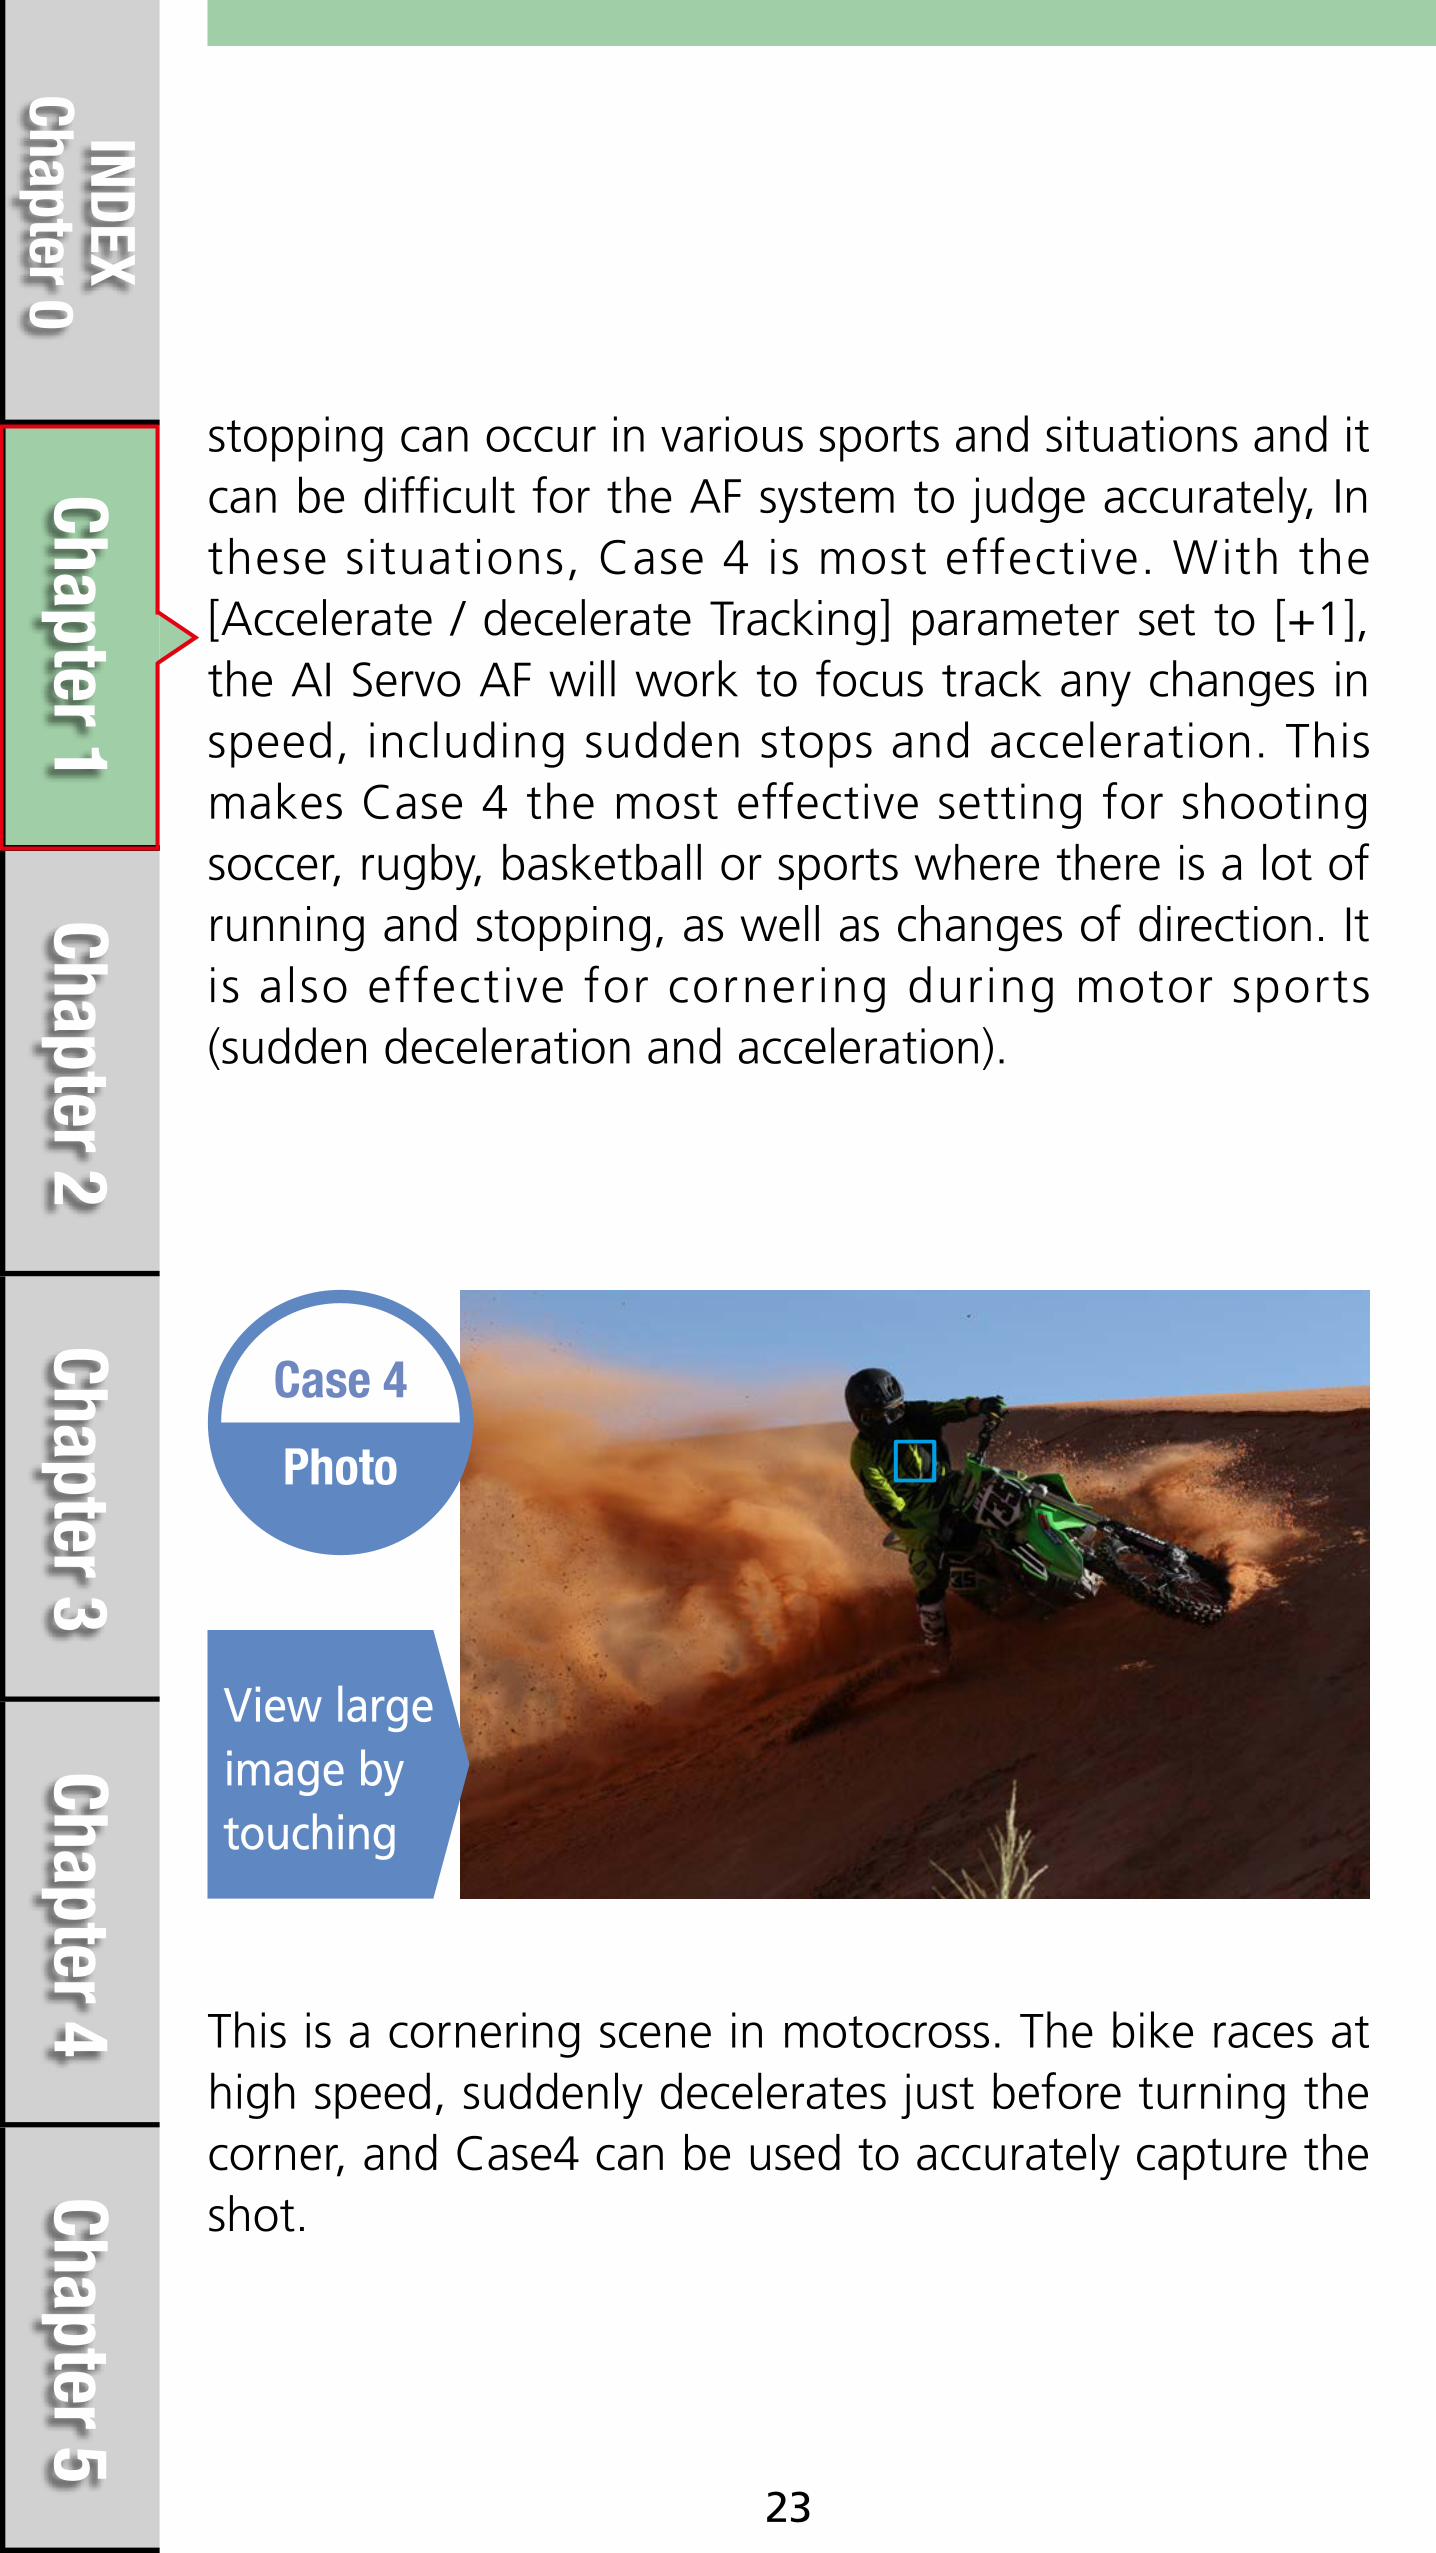
stopping can occur in various sports and situations and it can be difficult for the AF system to judge accurately, In these situations, Case 4 is most effective. With the [Accelerate / decelerate Tracking] parameter set to [+1], the AI Servo AF will work to focus track any changes in speed, including sudden stops and acceleration. This makes Case 4 the most effective setting for shooting soccer, rugby, basketball or sports where there is a lot of running and stopping, as well as changes of direction. It is also effective for cornering during motor sports (sudden deceleration and acceleration).
View large image by touching
Photo
Case 4
This is a cornering scene in motocross. The bike races at high speed, suddenly decelerates just before turning the corner, and Case4 can be used to accurately capture the shot.

Chapter 5Chapter 4
Chapter 3Chapter 2
Chapter 1INDEX
Chapter 0
24
Continuously track players as they suddenly slow down and speed up

Chapter 5Chapter 4
Chapter 3Chapter 2
Chapter 1INDEX
Chapter 0
25
Case 5Focus on subjects with erratic movement
Case 5 is most effective for subjects with large amount of movements which could occur in any direction. This setting works in 65-point automatic selection AF, Zone AF, Large Zone AF, and AF point expansion modes only.
Suitable for sports and fast action where traditionally AF systems have difficulty tracking
Parameter default settings
Tracking sensitivity [0]
Acceleration/deceleration tracking [0]
AF point auto switching [+1]
Chapter 5Chapter 4
Chapter 3Chapter 2
Chapter 1INDEX
Chapter 0
26
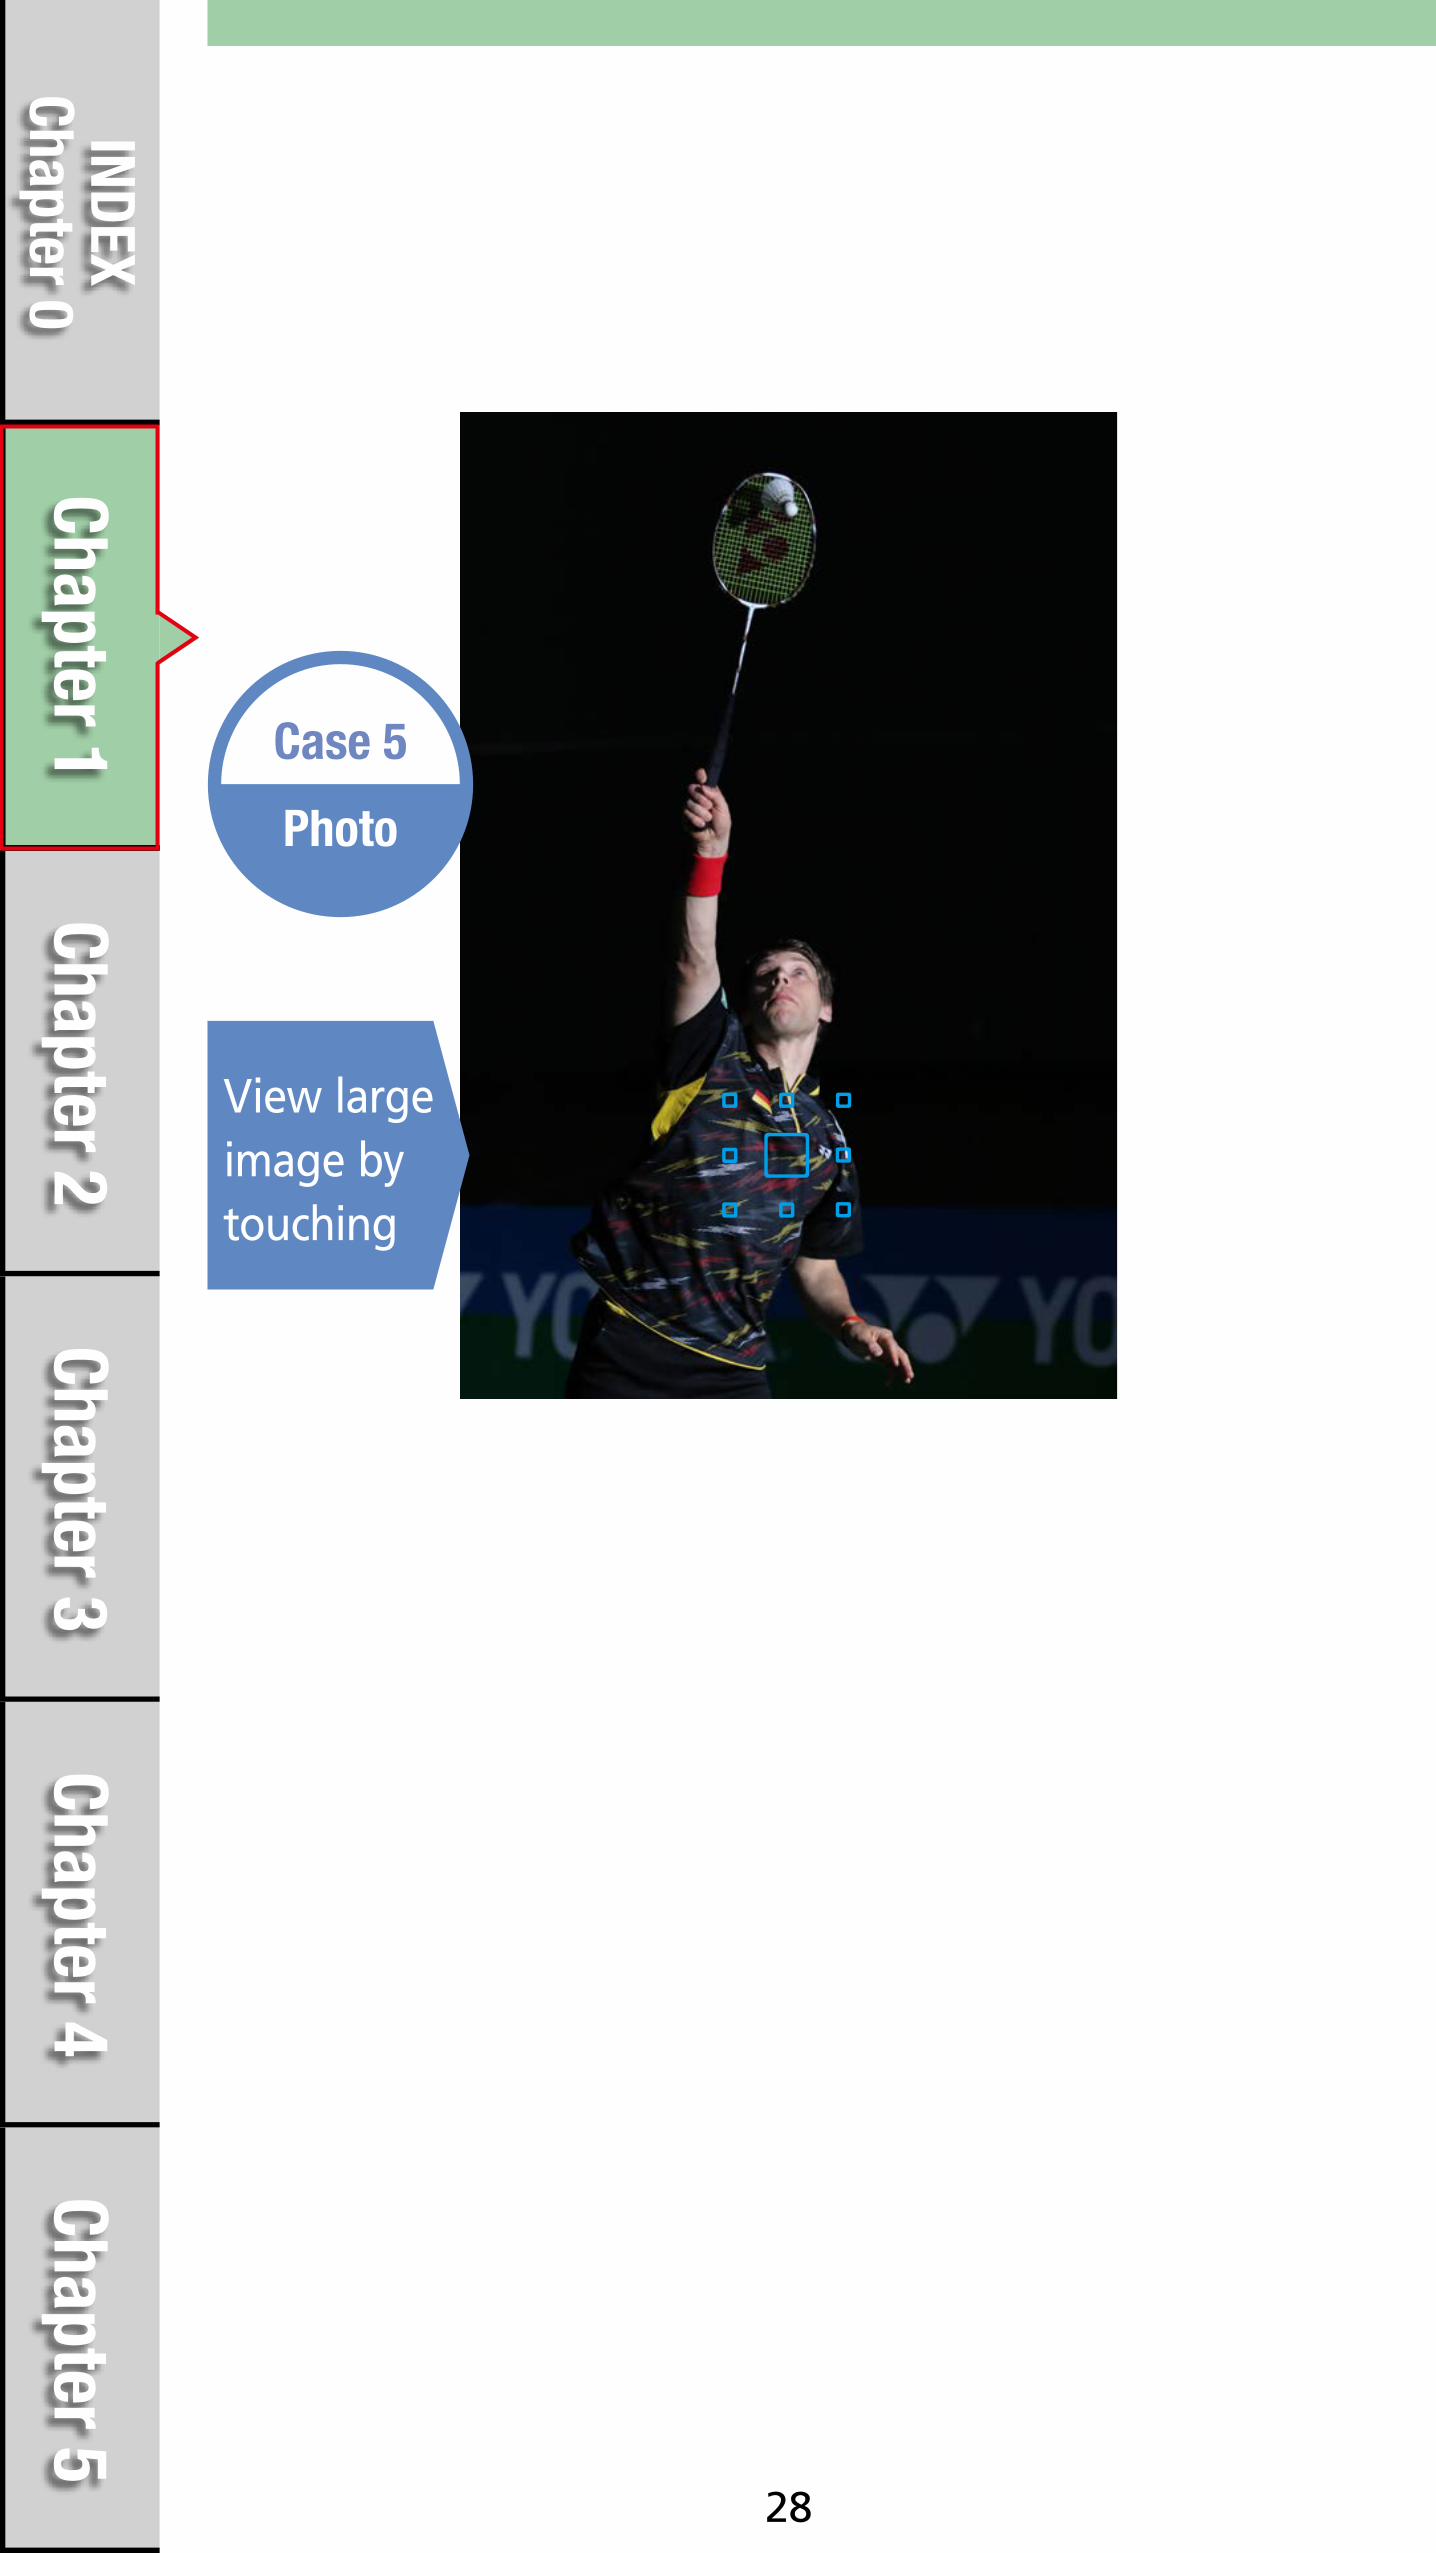
Case 5 is most effective for subjects with large amount of movements which could occur in any direction. This setting works in 65-point automatic selection AF, Zone AF, and AF point expansion modes only. In Case 5, [AF pt auto switching] is set to [+1], when the subject moves away from the manually selected AF point (AF points focused on initially with Zone AF), focusing automatically switches to other AF points that contain the subject. As a result, even when the subject continuously leaves the selected AF point, it is possible to increase the ratio of photos that are in focus. This setting is most effective when shooting subjects with erratic movement such as figure skating,badminton, skateboarding, and inline skating.

Chapter 5Chapter 4
Chapter 3Chapter 2
Chapter 1INDEX
Chapter 0
27
View large image by touching
Photo
Case 5
This is a scene in a badminton tournament where a player jumps and performs a smash. Case 5 works best in this kind of scene where there is significant subject movement both vertically and side to side.
Chapter 5Chapter 4
Chapter 3Chapter 2
Chapter 1INDEX
Chapter 0
28
View large image by touching
Photo
Case 5

Chapter 5Chapter 4
Chapter 3Chapter 2
Chapter 1INDEX
Chapter 0
29
Case 6Focus on subjects with erratic movement and changes in speed
Case 6 is a setting that combines features of both Case 4, and Case 5.(Active for [65-point automatic selection AF], [Large Zone AF], and [AF point expansion].)
Effective when shooting sports that feature lots of quick movements
Case 6 is a setting that combines features of both Case 4 (support for sudden changes in speed), and Case 5 (support for erratic movement in any direction). [Accel./decel. tracking] and [AF pt auto switching] parameters are both [+1].
Parameter default settings
Tracking sensitivity [0]
Acceleration/deceleration tracking [+1]
AF point auto switching [+1]
Chapter 5Chapter 4
Chapter 3Chapter 2
Chapter 1INDEX
Chapter 0
30
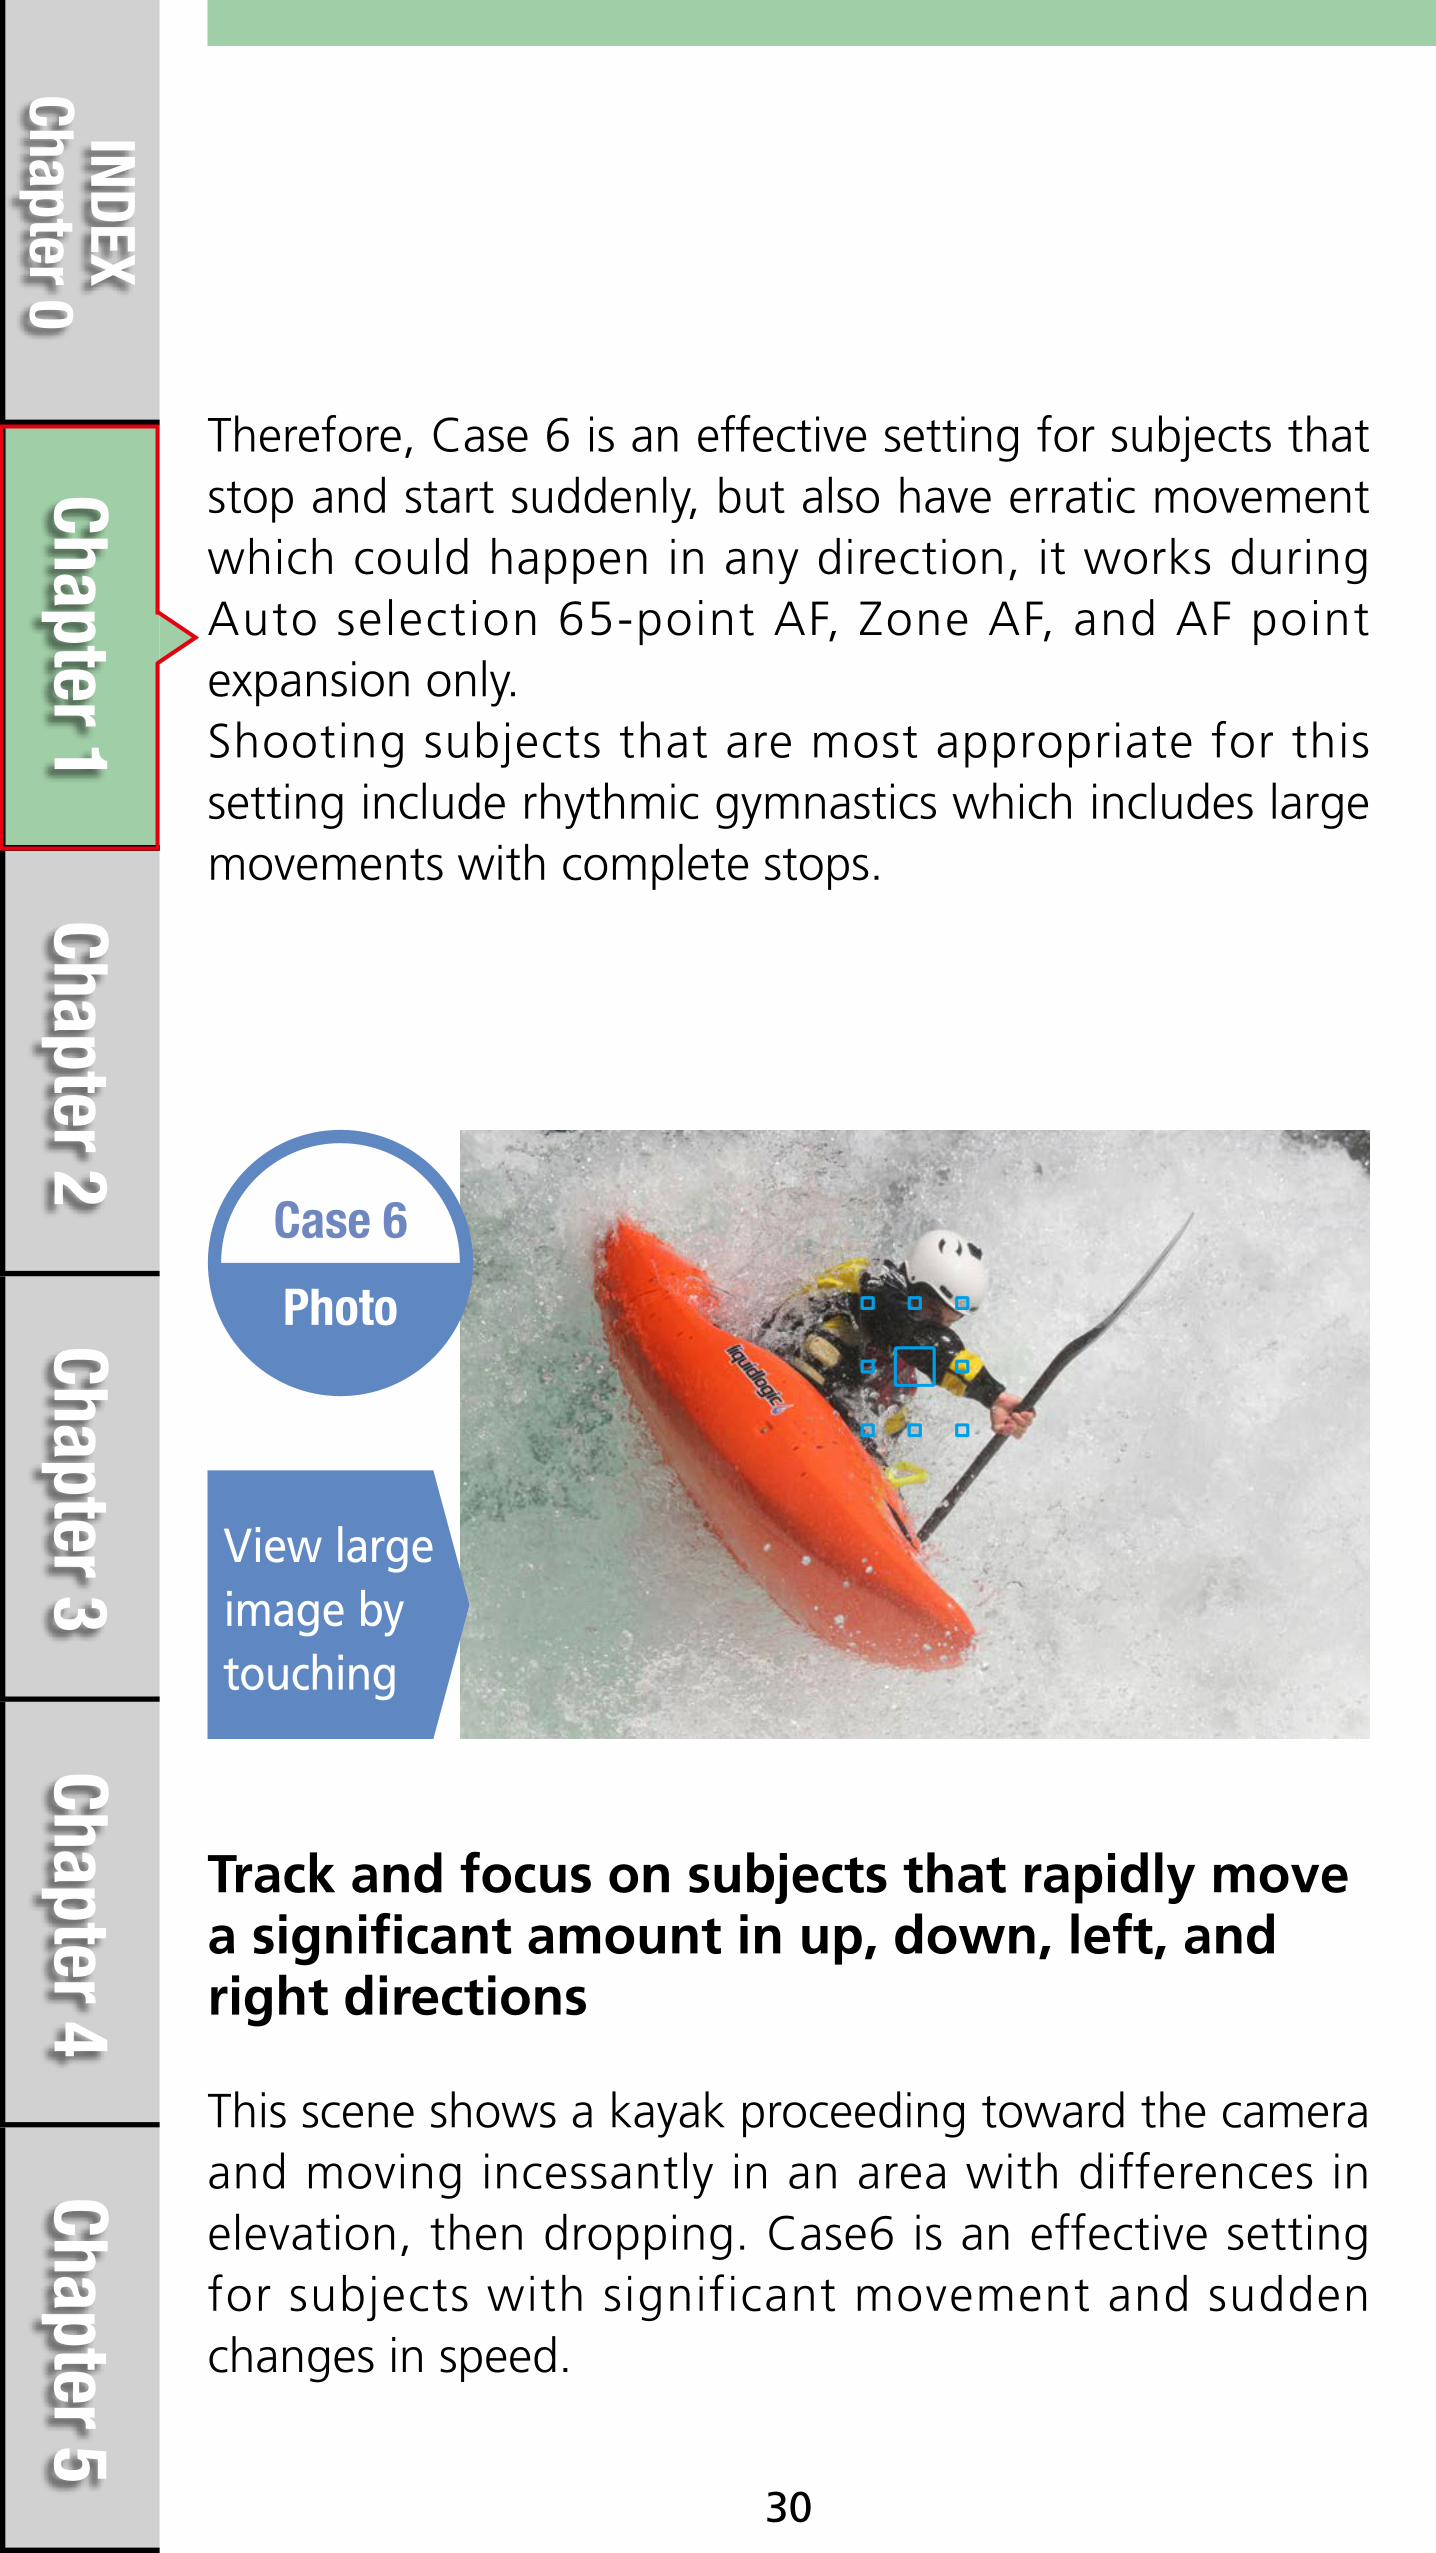
Therefore, Case 6 is an effective setting for subjects that stop and start suddenly, but also have erratic movement which could happen in any direction, it works during Auto selection 65-point AF, Zone AF, and AF point expansion only.Shooting subjects that are most appropriate for this setting include rhythmic gymnastics which includes large movements with complete stops.
View large image by touching
Photo
Case 6
This scene shows a kayak proceeding toward the camera and moving incessantly in an area with differences in elevation, then dropping. Case6 is an effective setting for subjects with significant movement and sudden changes in speed.
Track and focus on subjects that rapidly move a significant amount in up, down, left, and right directions

Chapter 5Chapter 4
Chapter 3Chapter 2
Chapter 1INDEX
Chapter 0
31

Chapter 5Chapter 4
Chapter 3Chapter 2
Chapter 1INDEX
Chapter 0
Chapter 2
32
Overview of AF area selection modes
AF point expansion(Manual selection )(Manual selection, surrounding points)
Single-point Spot AF
Zone AF
Large Zone AF
Single-point AF
65-point automatic selection AF
AF area selection modes

Chapter 5Chapter 4
Chapter 3Chapter 2
Chapter 1INDEX
Chapter 0
33
Overview of AF area selection modes
Change the AF point selection to match your the shooting style
AF modes can be selected to match the subject and conditions
Using only one AF point
Using multiple AF points (zone)
The AF area selection modes make it possible to set how many of the 65-point AF are available to be used. Set the selection method of AF points that best matches the subject and shooting conditions.

Chapter 5Chapter 4
Chapter 3Chapter 2
Chapter 1INDEX
Chapter 0
34
Press the button
Switch modes each time is pressed toward the right or each time the button is pressed
After pressing the button, press to the right, or each time the button is pressed, the AF area selection mode will be switched. In the Menu AF4 tab, by setting [AF area selection method] to [ Main Dial], after pressing the button, you can switch the mode with the Main Dial. Also, with [Custom Controls], when you assign [Direct AF area selection] to , you can switch modes simply by pressing .
How to set the AF area selection mode

Chapter 5Chapter 4
Chapter 3Chapter 2
Chapter 1INDEX
Chapter 0
35
The EOS 7D Mark II is equipped with 65-point AF. Not only can all these AF points each be selected individually, but by also automatic switching between multiple AF points to track the subject, using all 65 AF points. The [AF area selection mode] setting allows the selection of these AF point modes.The two types of modes that you can manually select a single AF point to focus with are [Single-point Spot AF] and [Single-point AF]. The four modes that can switch automatically between multiple AF points to capture moving subjects are AF point expansion (Manual selection, 4 points [Up, down, left, and right]), AF point expansion (Manual selection, surrounding 8 points), Zone AF, and Auto selection of 65 AF points (during AI Servo AF). Mode features are explained from P. 39 - 56, so you can select the mode best suited to your subject's characteristics and shooting scene.
Choose whether only one AF point is used, or select from a vast array of AF selection options
Chapter 5Chapter 4
Chapter 3Chapter 2
Chapter 1INDEX
Chapter 0
36
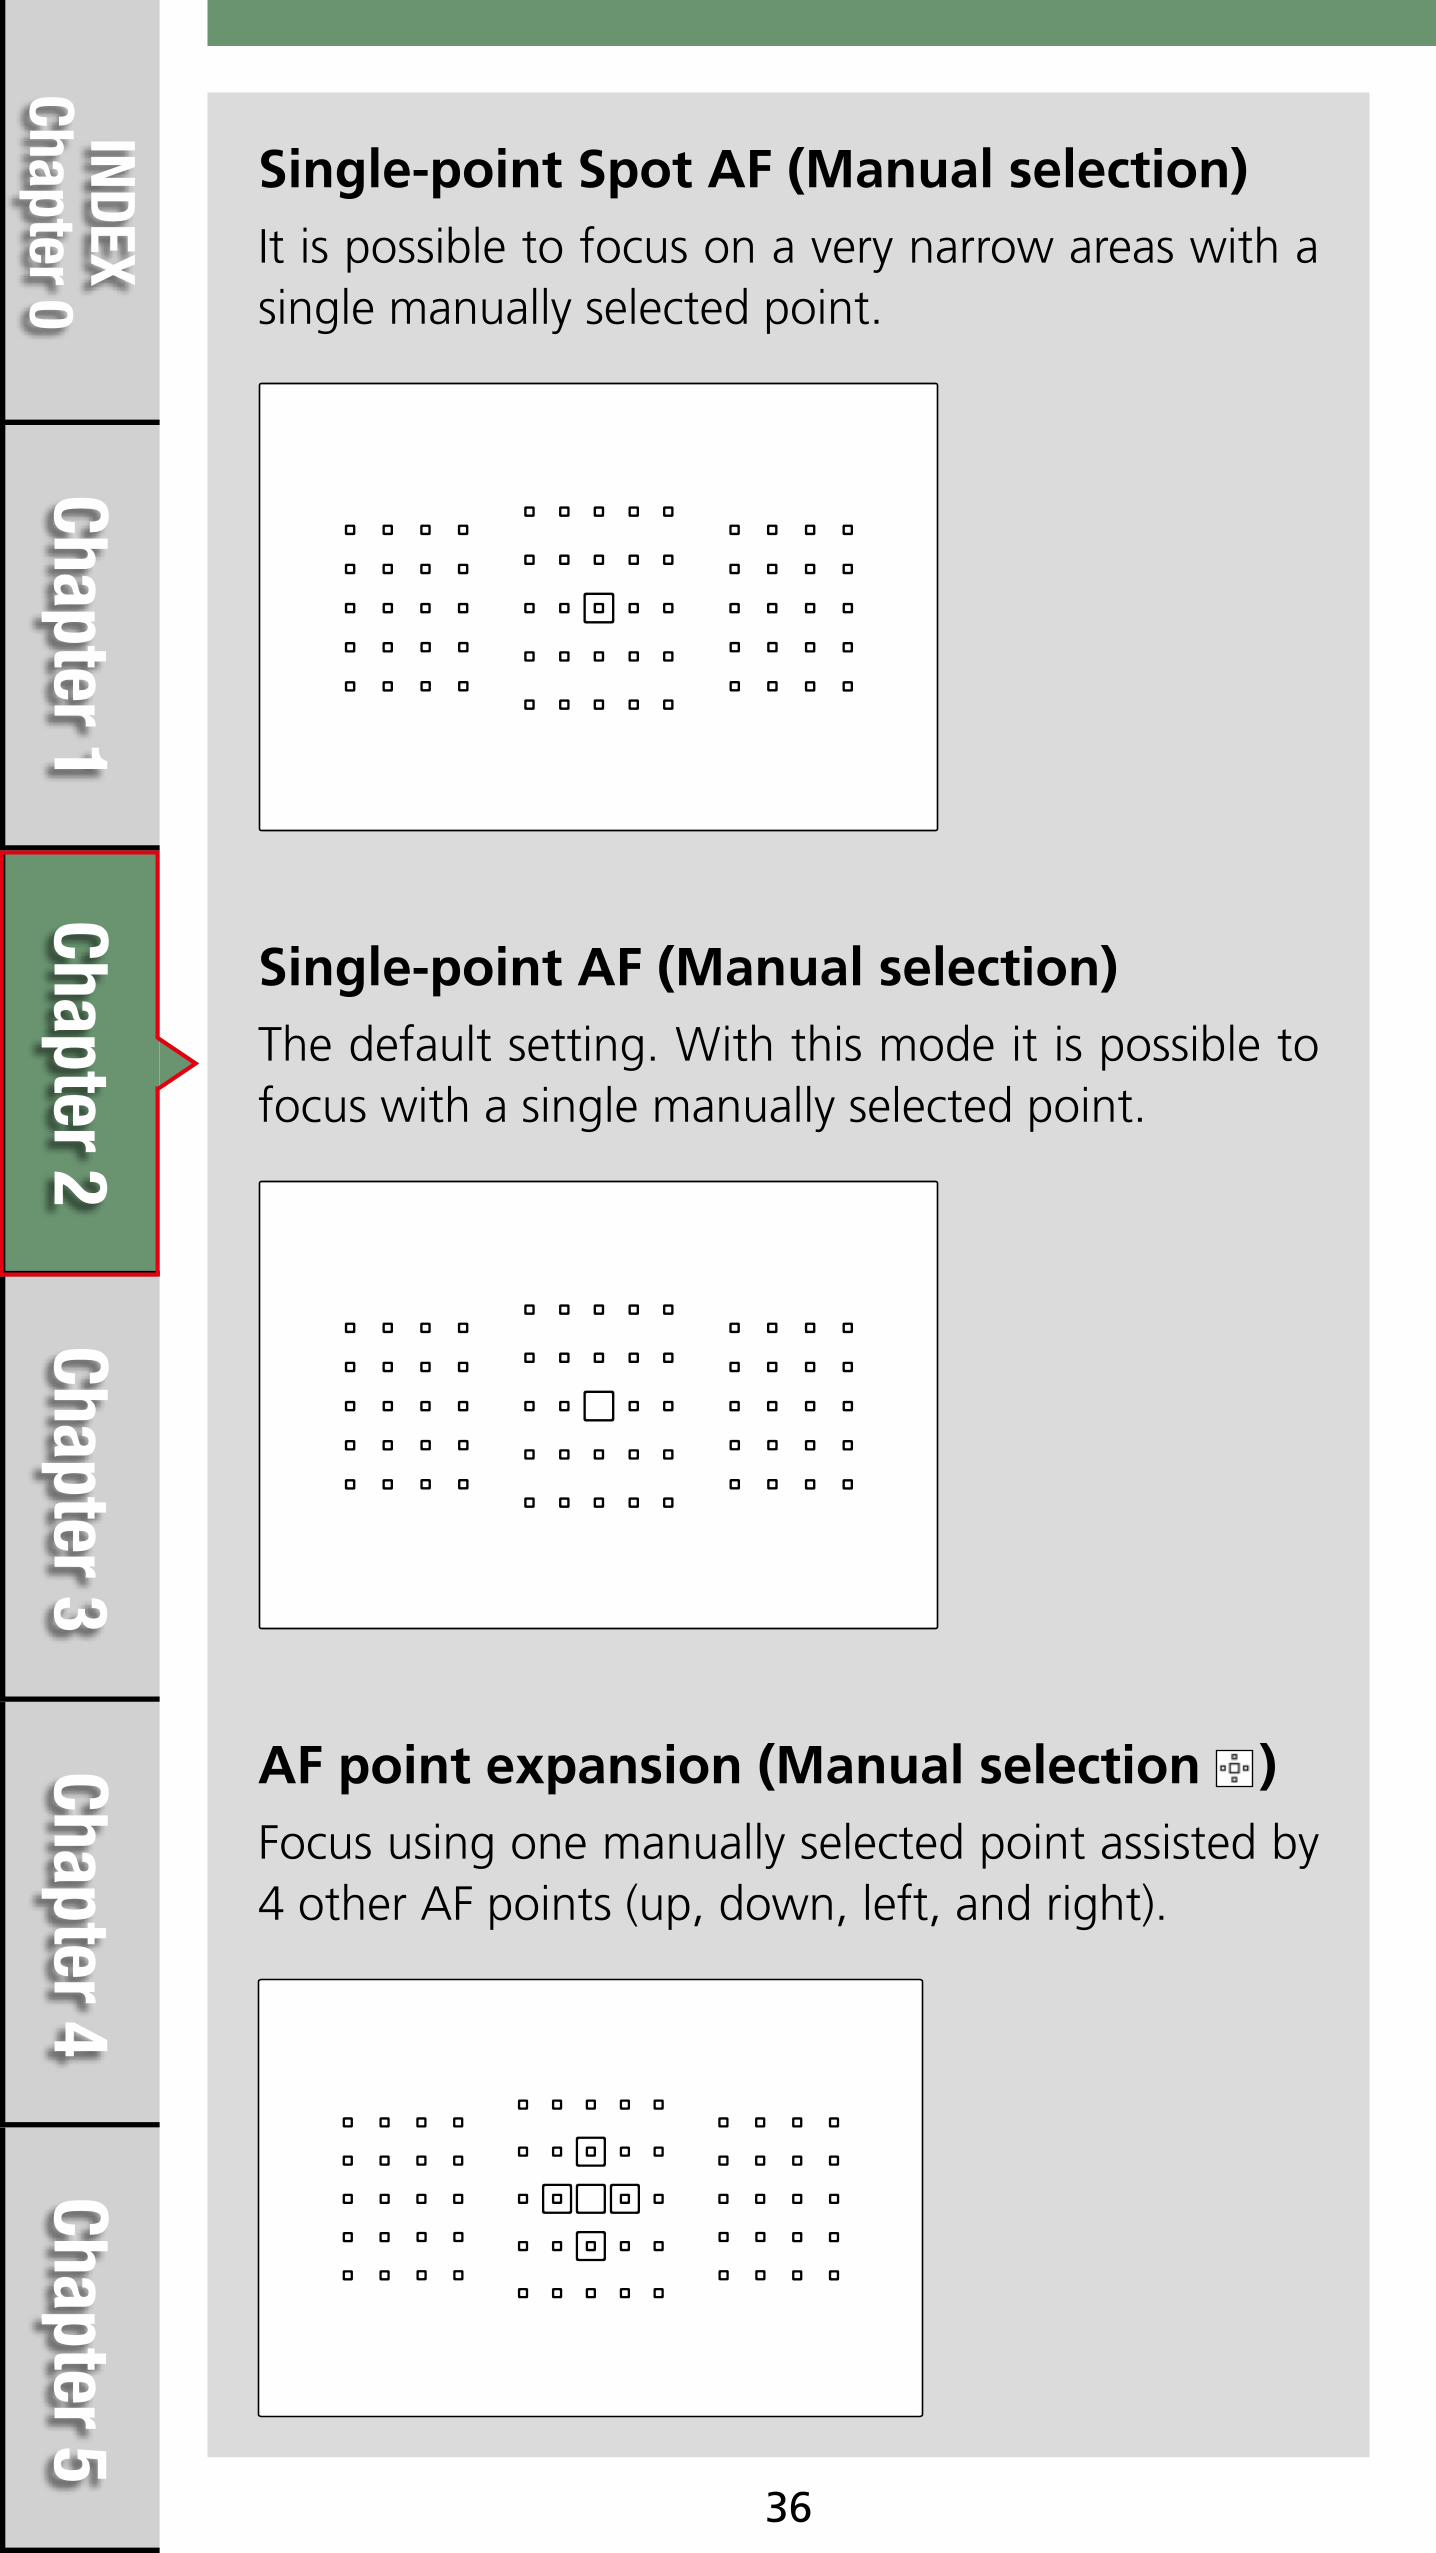
It is possible to focus on a very narrow areas with a single manually selected point.
The default setting. With this mode it is possible to focus with a single manually selected point.
Focus using one manually selected point assisted by 4 other AF points (up, down, left, and right).
Single-point Spot AF (Manual selection)
Single-point AF (Manual selection)
AF point expansion (Manual selection )

Chapter 5Chapter 4
Chapter 3Chapter 2
Chapter 1INDEX
Chapter 0
37
Focus using one manually selected point assisted by the surrounding points.
The 65 AF points are divided into nine zones, and focus is made with the AF points in the selected zone.
AF point expansion (Manual selection, surrounding points)
Zone AF (Manual selection of zone)
Chapter 5Chapter 4
Chapter 3Chapter 2
Chapter 1INDEX
Chapter 0
38
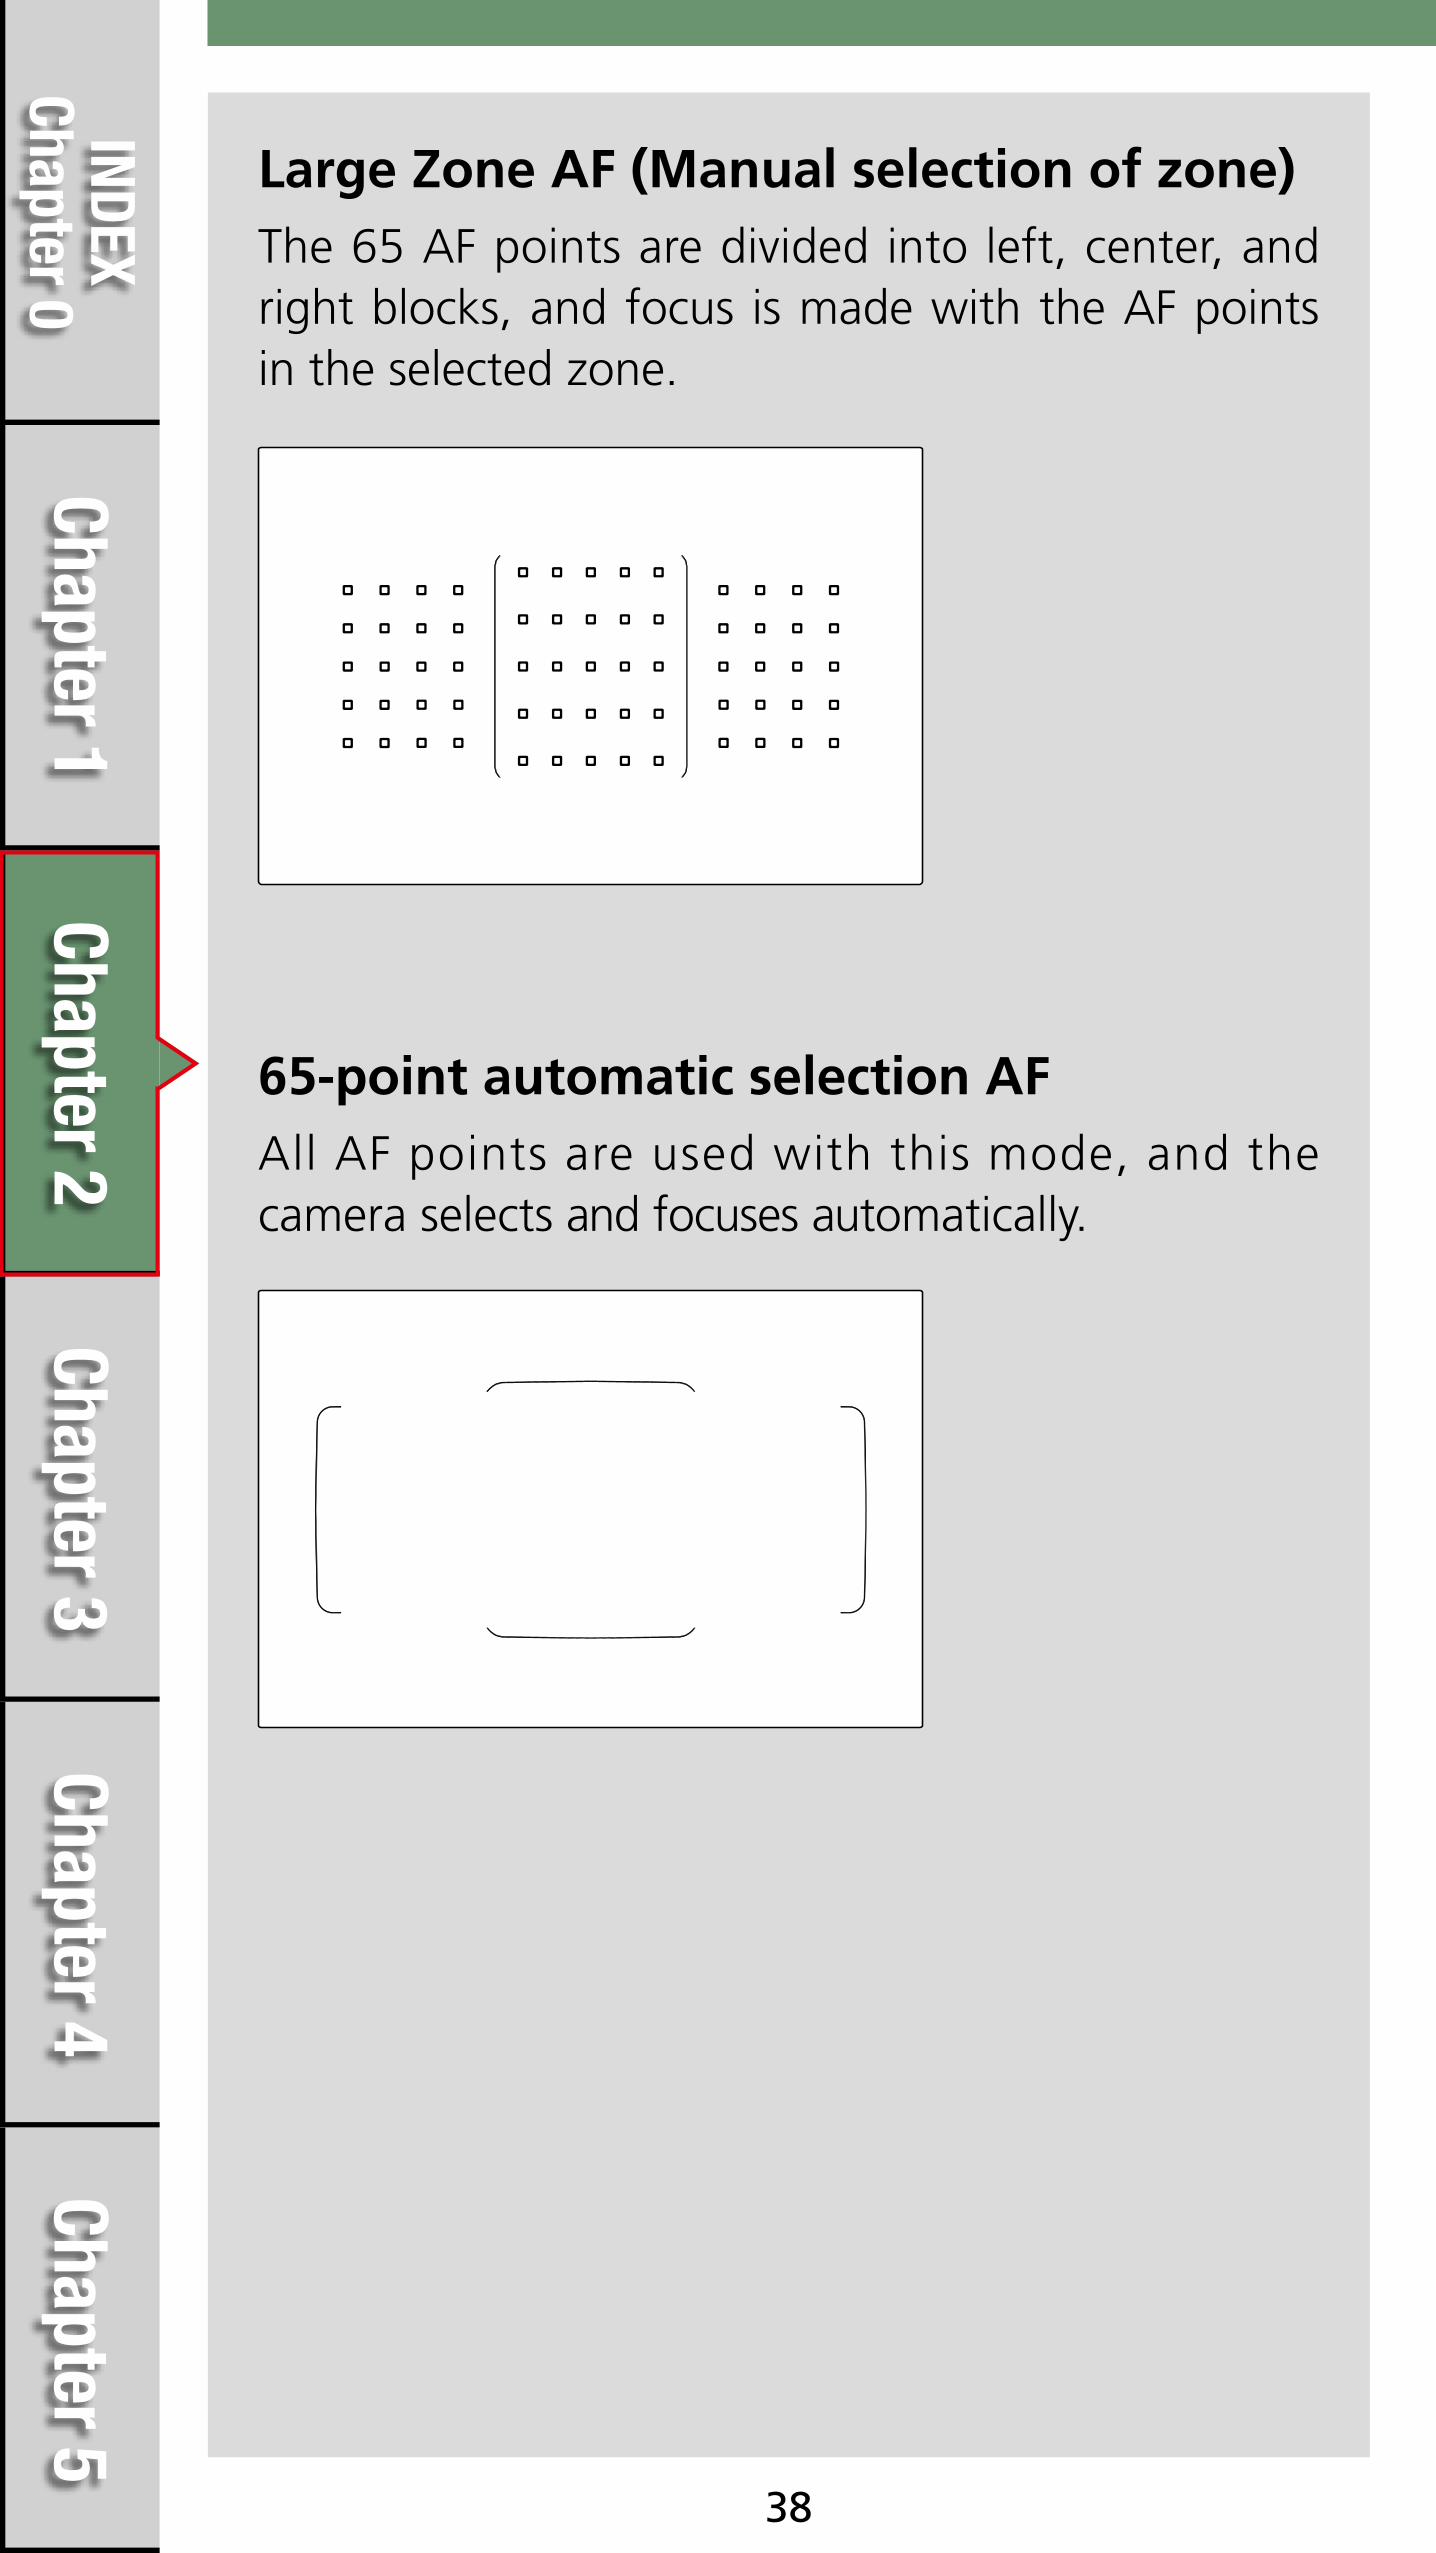
The 65 AF points are divided into left, center, and right blocks, and focus is made with the AF points in the selected zone.
Large Zone AF (Manual selection of zone)
All AF points are used with this mode, and the camera selects and focuses automatically.
65-point automatic selection AF

Chapter 5Chapter 4
Chapter 3Chapter 2
Chapter 1INDEX
Chapter 0
39
Single-point Spot AF
[Single-point spot AF] mode can be used to focus on a small area of the subject.
Focusing on a small or narrow area
[Single-point Spot AF] mode can be used to focus on a small area of the subject. Pinpoint focusing on a single part of the subject is effective for focusing on narrow areas and subjects close to an obstruction with differing distances. For example, in general, eyes are focused on for portraits, however, by using [Single-point Spot AF] you can focus with a high degree of accuracy on the exact location of your choice. This is effective for shooting small wild animals. This i s also useful when photographing helmeted subjects in sports, where you can avoid placing the AF point on the edge of the helmet close to the eye, enabling you to accurately focus on the actual eye of the subject. As [Single-point Spot AF] only focuses on one very small area, it is not really suited to capturing fast moving subjects when set to AI Servo AF and may take longer to focus than other AF area selection modes.
When set to [Single-point Spot AF], a small rectangle is displayed inside the manually selected AF point.

Chapter 5Chapter 4
Chapter 3Chapter 2
Chapter 1INDEX
Chapter 0
40
View large image by touching
Photo
Single-point spot AF
When shooting a close-up of a face in a portrait, it is important to focus on the eye closest to you. If you use Single point AF, the focus will not accidentally lock on a point close to the eye (such as the eyebrow), but will pinpoint focus on exactly the location you want.
You can pinpoint focus on areas such as a person’s eyes

Chapter 5Chapter 4
Chapter 3Chapter 2
Chapter 1INDEX
Chapter 0
41
Single point AF was used for focus on the tiny eyes of a wild squirrel. Single point AF is effective when you want to focus on an extremely small point on the screen.
This is also effective for when you want to focus on a small location in the center of the screen

Chapter 5Chapter 4
Chapter 3Chapter 2
Chapter 1INDEX
Chapter 0
42
Single-point AF
Single-point AF is an easy to use mode for still life photos etc. in One-shot AF
Single-point AF is a mode where one manually selected AF point is used to focus.
For experienced photographers or when it is easy to track the subject with a single AF point, AI Servo AF can be utilized when continuously shooting moving subjects, however, this mode is more effective for shooting still life and landscapes with One-shot AF mode.

Chapter 5Chapter 4
Chapter 3Chapter 2
Chapter 1INDEX
Chapter 0
43
AF point expansion(up, down, left, and right) (surrounding points)
[AF point expansion] is an [AF area selection mode] that is best selected when shooting sports.
For fast moving subjects that are difficult to track with a single AF point
Shooting with AF point expansion (up, down, left, and right)
AF point expansion (surrounding points)
Viewfinder display of [AF point expansion]. The manually selected AF point and surrounding points lights up.

Chapter 5Chapter 4
Chapter 3Chapter 2
Chapter 1INDEX
Chapter 0
44
Using this setting shifts the focus point used from a manually selected AF point, to an adjacent (up, down, left , and right, or surrounding) AF point, to aid focus tracking. When using this setting it is easier to obtain the desired composition as the subject is captured centering around the manually selected AF point. Based on the subject's movement characteristics, (i.e. likelihood of subject moving from the selected AF point) and the size of the subject within the frame, select either [AF point expansion] or [AF area selection mode]. In addition, when the subject has a lot of movement, setting Case 5 or Case 6 from the AF Configuration Tool is also recommended.

Chapter 5Chapter 4
Chapter 3Chapter 2
Chapter 1INDEX
Chapter 0
45
This mode is ideal for sports photography
View large image by touching
Photo
AF point expansion
(up, down, left, and right)
AF point expansion is a versatile mode that can be used in a wide var iety of s i tuat ions, including sports compet i t ions with intense movement. AF point expansion (up, down, left, right) is the perfect setting for tracking and shooting somewhat small subjects that move in a straight line and down such as kayak drop scenes.
Chapter 5Chapter 4
Chapter 3Chapter 2
Chapter 1INDEX
Chapter 0
46
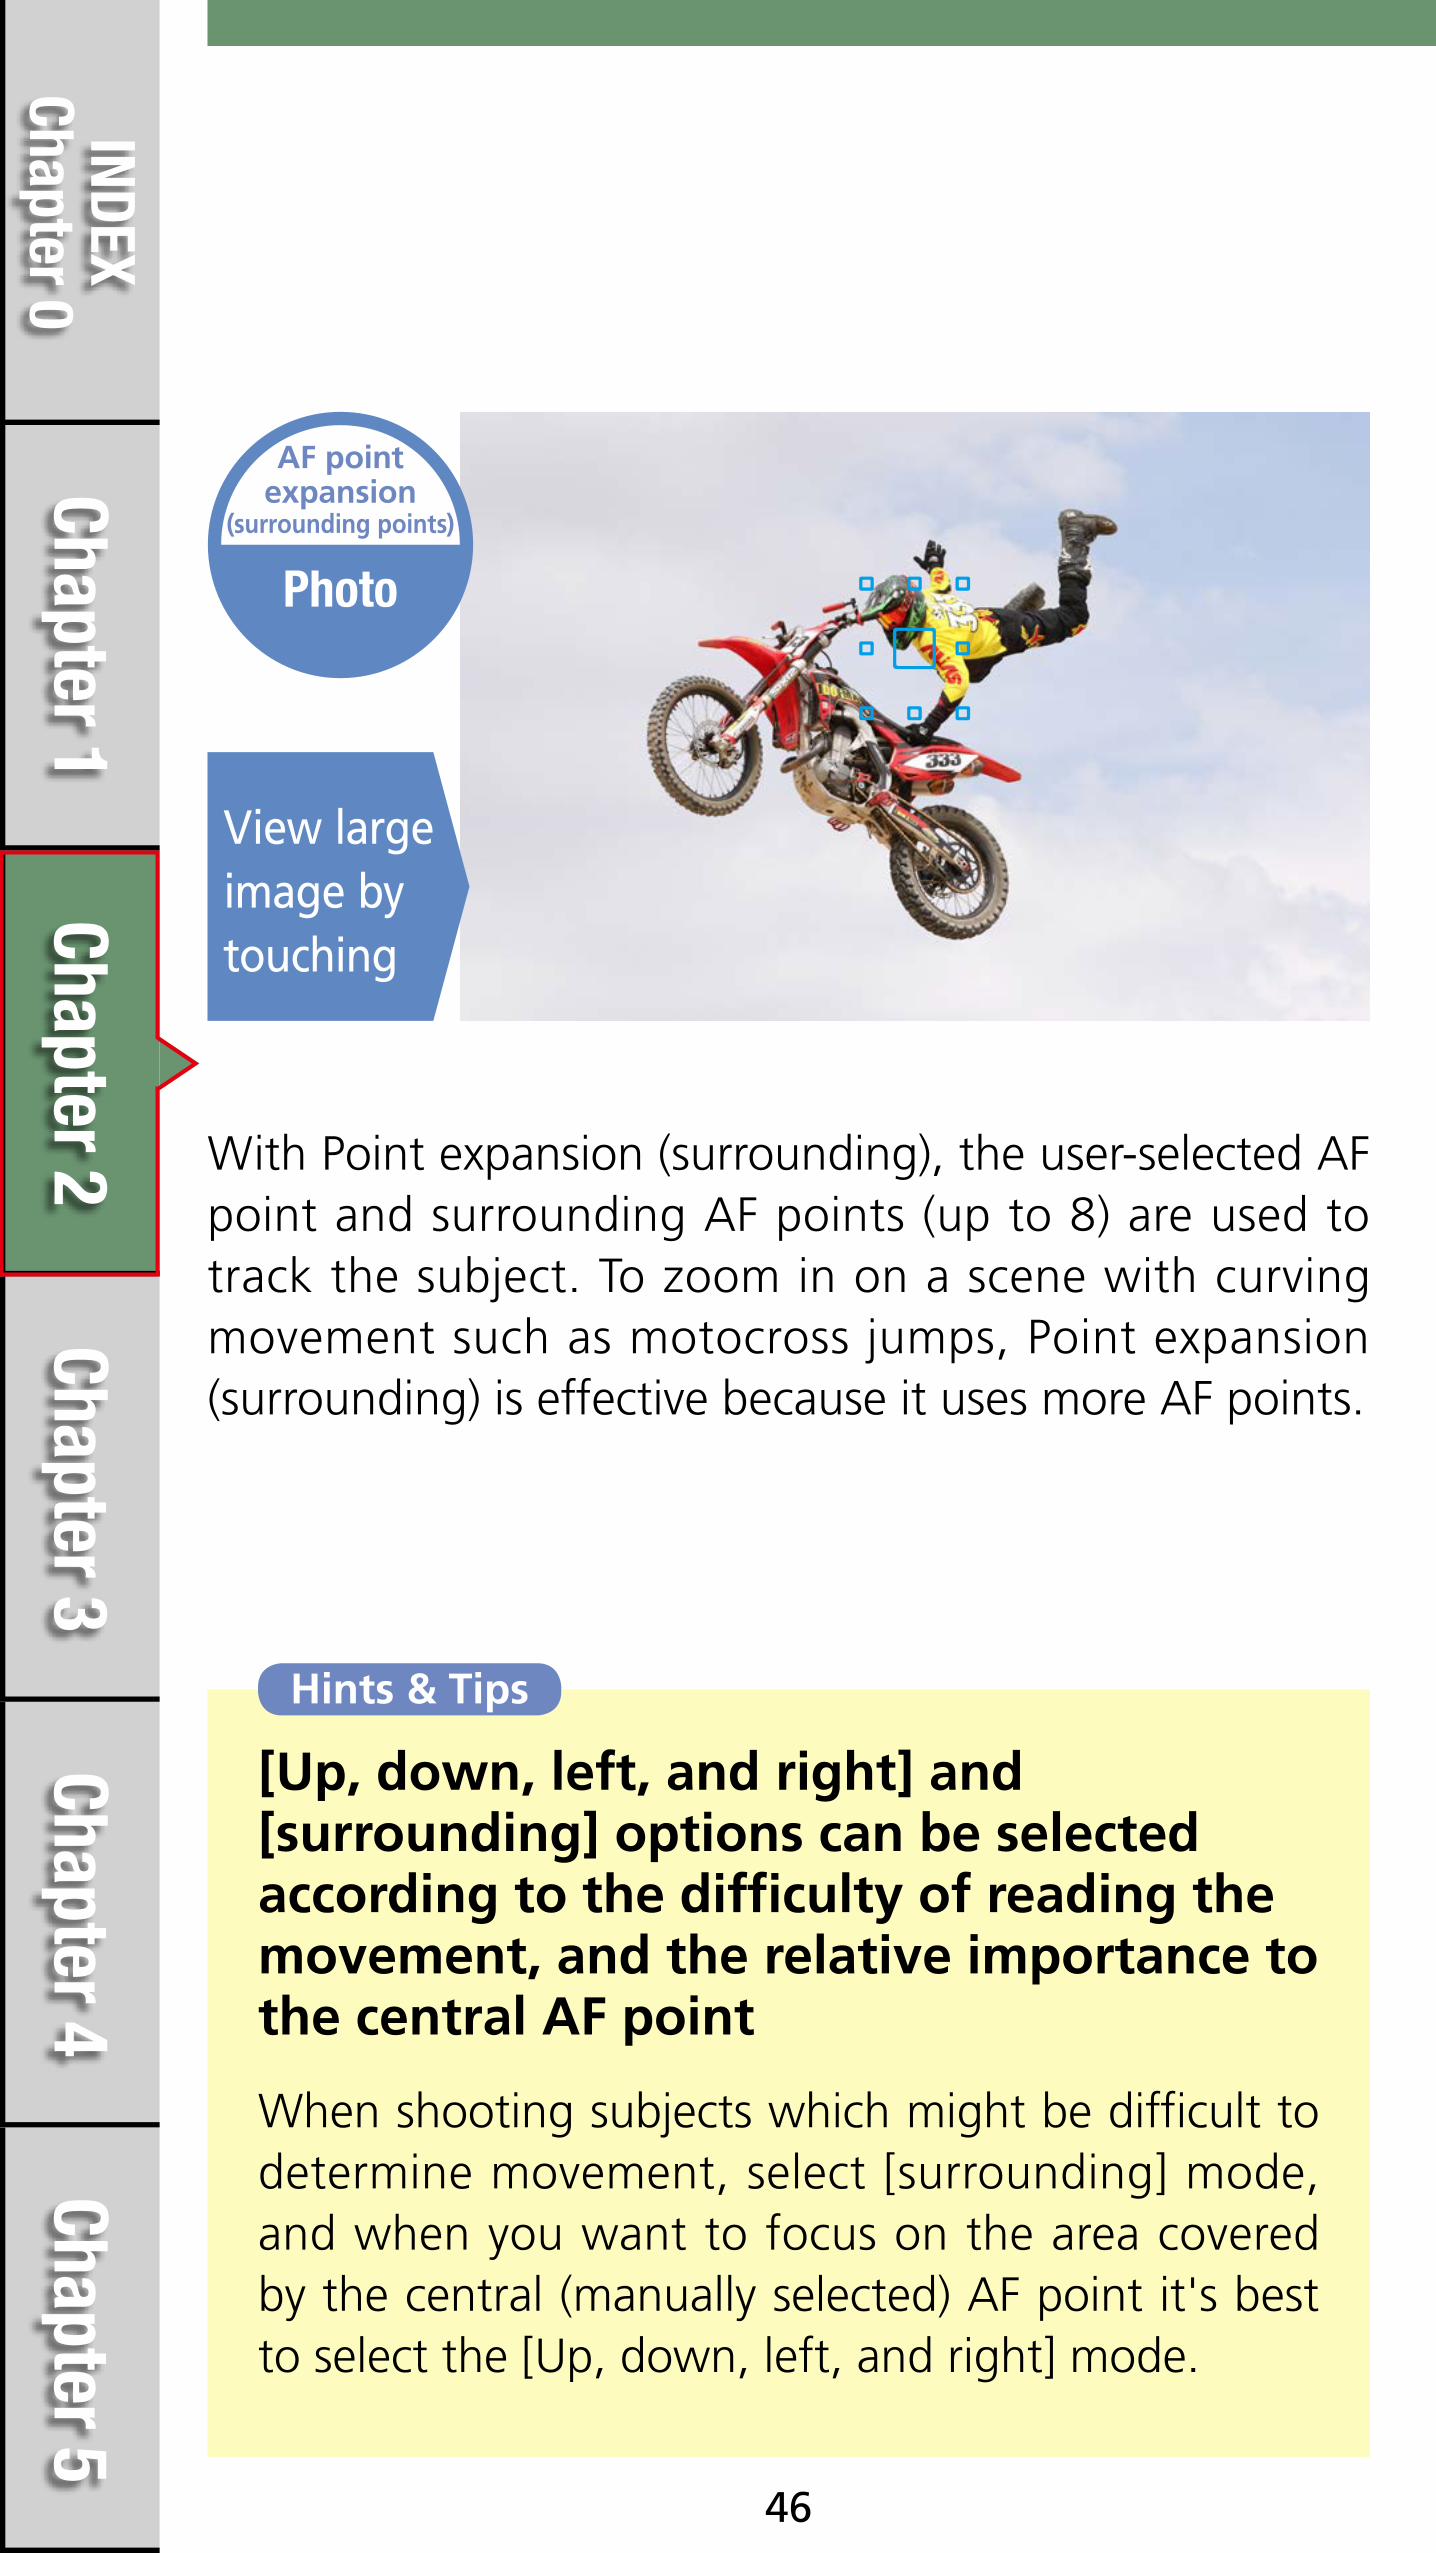
When shooting subjects which might be difficult to determine movement, select [surrounding] mode, and when you want to focus on the area covered by the central (manually selected) AF point it's best to select the [Up, down, left, and right] mode.
[Up, down, left, and right] and [surrounding] options can be selected according to the difficulty of reading the movement, and the relative importance to the central AF point
View large image by touching
Hints & Tips
Photo
AF point expansion
(surrounding points)
With Point expansion (surrounding), the user-selected AF point and surrounding AF points (up to 8) are used to track the subject. To zoom in on a scene with curving movement such as motocross jumps, Point expansion (surrounding) is effective because it uses more AF points.

Chapter 5Chapter 4
Chapter 3Chapter 2
Chapter 1INDEX
Chapter 0
47
Zone AF
With the [Zone AF] mode, one of nine focusing zones can be selected, and the AF point is automatically selected from within that zone.
Effective for capturing subjects within a known area
Zone AF differs from [AF point expansion] with it’s manually selected AF point, which AF tracking is based around. With Zone AF the camera decides where to focus on the subject within the zone, rather than targeting the subject (area) that you want to follow closely. This is more suited for situations (the subject has no obstacles that may block the AF points). This mode is easy to use when you want to focus on areas of the subject that are a larger size, making it possible to easily capture the appropriate area.
The selected AF points display in [Zone AF].

Chapter 5Chapter 4
Chapter 3Chapter 2
Chapter 1INDEX
Chapter 0
48
The 65 AF points are divided into three blocks, left, center, and right, and each has upper, central, and lower zones, and the desired location can be selected from these nine zones.
Selection can be made from nine focusing zones

Chapter 5Chapter 4
Chapter 3Chapter 2
Chapter 1INDEX
Chapter 0
49
View large image by touching
For larger subjects or subjects that move over a larger area
Photo
Zone AF
This photo of a quick-flying bird was shot with Zone AF, and the user-selected center and upper AF frames were set. Zone AF is effective for when you want to capture a moving subject within a specific area.

Chapter 5Chapter 4
Chapter 3Chapter 2
Chapter 1INDEX
Chapter 0
50
Large Zone AF
This new mode features larger zones (left, center, or right in the screen) than Zone AF, and automatically selects AF points for focusing.
Effective for the left, center, and right of the screen, and for capturing the subject in a general area
The newest AF area selection mode on the EOS 7D Mark II is Large Zone AF. This new mode features larger zones (left, center, or right in the screen) than Zone AF, and automatically selects AF points for focusing. Just as with Zone AF, the camera determines the closest subject within the zone and focuses. Even when shooting close-ups of a subject, this feature is effective for keeping the subject in a general area such as the left, center, or right of the screen.
When [Large Zone AF] is set , the area in the selected zone will be displayed.

Chapter 5Chapter 4
Chapter 3Chapter 2
Chapter 1INDEX
Chapter 0
51
Select from three zones: Left, Center, Right
You can select large zones from left, center, and right blocks. AF frames will automatically be selected inside the selected zone.
Left
Center
Right

Chapter 5Chapter 4
Chapter 3Chapter 2
Chapter 1INDEX
Chapter 0
52
View large image by touching
Photo
Large Zone AF
Effective for capturing the subject in a general area
This is a photo of an airplane shot against the sky with Large Zone AF. The right zone is selected and you follow the plane and take the shot as the nose enters the zone. The AF point is automatically selected on the right side of the screen and the camera focuses on the appropriate location.

Chapter 5Chapter 4
Chapter 3Chapter 2
Chapter 1INDEX
Chapter 0
53
65-point automatic selection AF
When using [65-point automatic selection AF] during [AI Servo AF], focusing will start from the manually selected AF point, the camera will the automatically change the AF point selecting from all 65 points as the subject moves.
AI Servo AF with all 65 points used for automatic tracking
When using [One-Shot AF], a single AF point is selected automatically from the 65 points. When using [AI Servo AF], AF starts from the manually selected AF point and then selects the most appropriate from all 65 points.
One-Shot AF
AI Servo AF

Chapter 5Chapter 4
Chapter 3Chapter 2
Chapter 1INDEX
Chapter 0
54
When [65-point automatic selection AF] is set in [AI Servo AF], AF begins from the single selected AF point, and AF switching is carried out using all 65 AF points. This mode is convenient because it is possible to capture subjects in a wide area where AF points are located, however, caution is required as tracking can become difficult under some shooting conditions. 65-point automatic selection is effective for when AF point expansion and Zone AF are insufficient for detecting subject movement (For example, small objects moving around freely or small animals).This feature is also effective for when you want to quickly open up space in a composition to shoot. The subject you are aiming for is captured by a selected single point (such as near the center) and shooting begins. Then, while shooting continuously, move the camera (lens) left or right to shoot. Doing so lets you move to the right or left of the subject’s position and continue focusing while changing the composition. This is an effective technique for framing utilizing space while shooting continuously.

Chapter 5Chapter 4
Chapter 3Chapter 2
Chapter 1INDEX
Chapter 0
55
In [AI Servo AF] setting, the AF point to the left of the screen is selected. Once the person is captured at that position, 65-point automatic AF selection switches points, focuses, and shoots continuously. With EOS iTR AF* color and face detection tracking, the person is accurately and continuously focused on.
The person is captured with the AF point toward the left of the screen, and the AF point then switches for shooting
* iTR = Intelligent Tracking and Recognition

Chapter 5Chapter 4
Chapter 3Chapter 2
Chapter 1INDEX
Chapter 0
56
View large image by touching
Ideal for moving subjects that the old AF systems struggle with
With [AI Serve AF] mode, it is possible to start shooting using a manually selected AF frame covering the subject. This makes continue tracking of the subject easy. For convenience it is possible to select the same start position for Single Point AF and 61 Point automatic selection AF and switch between the two as required.
Hints & Tips
Photo
65-point automatic
selection AF
Chapter 5Chapter 4
Chapter 3Chapter 2
Chapter 1INDEX
Chapter 0
Chapter 3
57
Overview of AF system with 65 all cross-type AF points
65 AF points (1)
Lens groups compatible with 65 cross-type points
65 AF points (2)
Lens groups compatible with 65 AF points
65 AF points (3)
Lens groups compatible with 45 AF points
65 AF points (4)
Lens groups compatible with 5 AF points
65-point cross-type AF and lens group designations

Chapter 5Chapter 4
Chapter 3Chapter 2
Chapter 1INDEX
Chapter 0
58
Overview of AF system with 65 all cross-type AF points
Capture subjects with 65 AF points spread out in a wide configuration in the frame
A new AF system with 65 all cross-type AF points
*The colored AF points are for illustrative purpose only. This does not represent the actual viewfinder display.
This is the EOS 7D Mark II 65 cross-type point diagram. The single point at then center is an f/2.8 cross-type point and f/5.6 cross-type point (Dual cross-type), and all other 64 points are f/5.6 cross-type points. These points make high-precision focusing possible without ever missing the subject.
f/2.8 and f/5.6 cross-type point (Dual cross-type)
f/5.6 cross-type points

Chapter 5Chapter 4
Chapter 3Chapter 2
Chapter 1INDEX
Chapter 0
59
Newly developed 65-point AF sensor
f/2.8 cross-type points
f/5.6 horizontal line detection line sensor
f/5.6 vertical-line detection line sensor
The EOS 7D Mark II is equipped with a newly-developed AF sensor that features 65 AF points. All are cross-type points and the center 5 points are arrayed in a staggered pattern*, further improving tracking performance.
Two-line AF sensors in zigzag pattern
*this line sensors are placed in a two-line zigzag pattern and focusing is performed by doubling the number of lines in order for improved detection consistency.

Chapter 5Chapter 4
Chapter 3Chapter 2
Chapter 1INDEX
Chapter 0
60
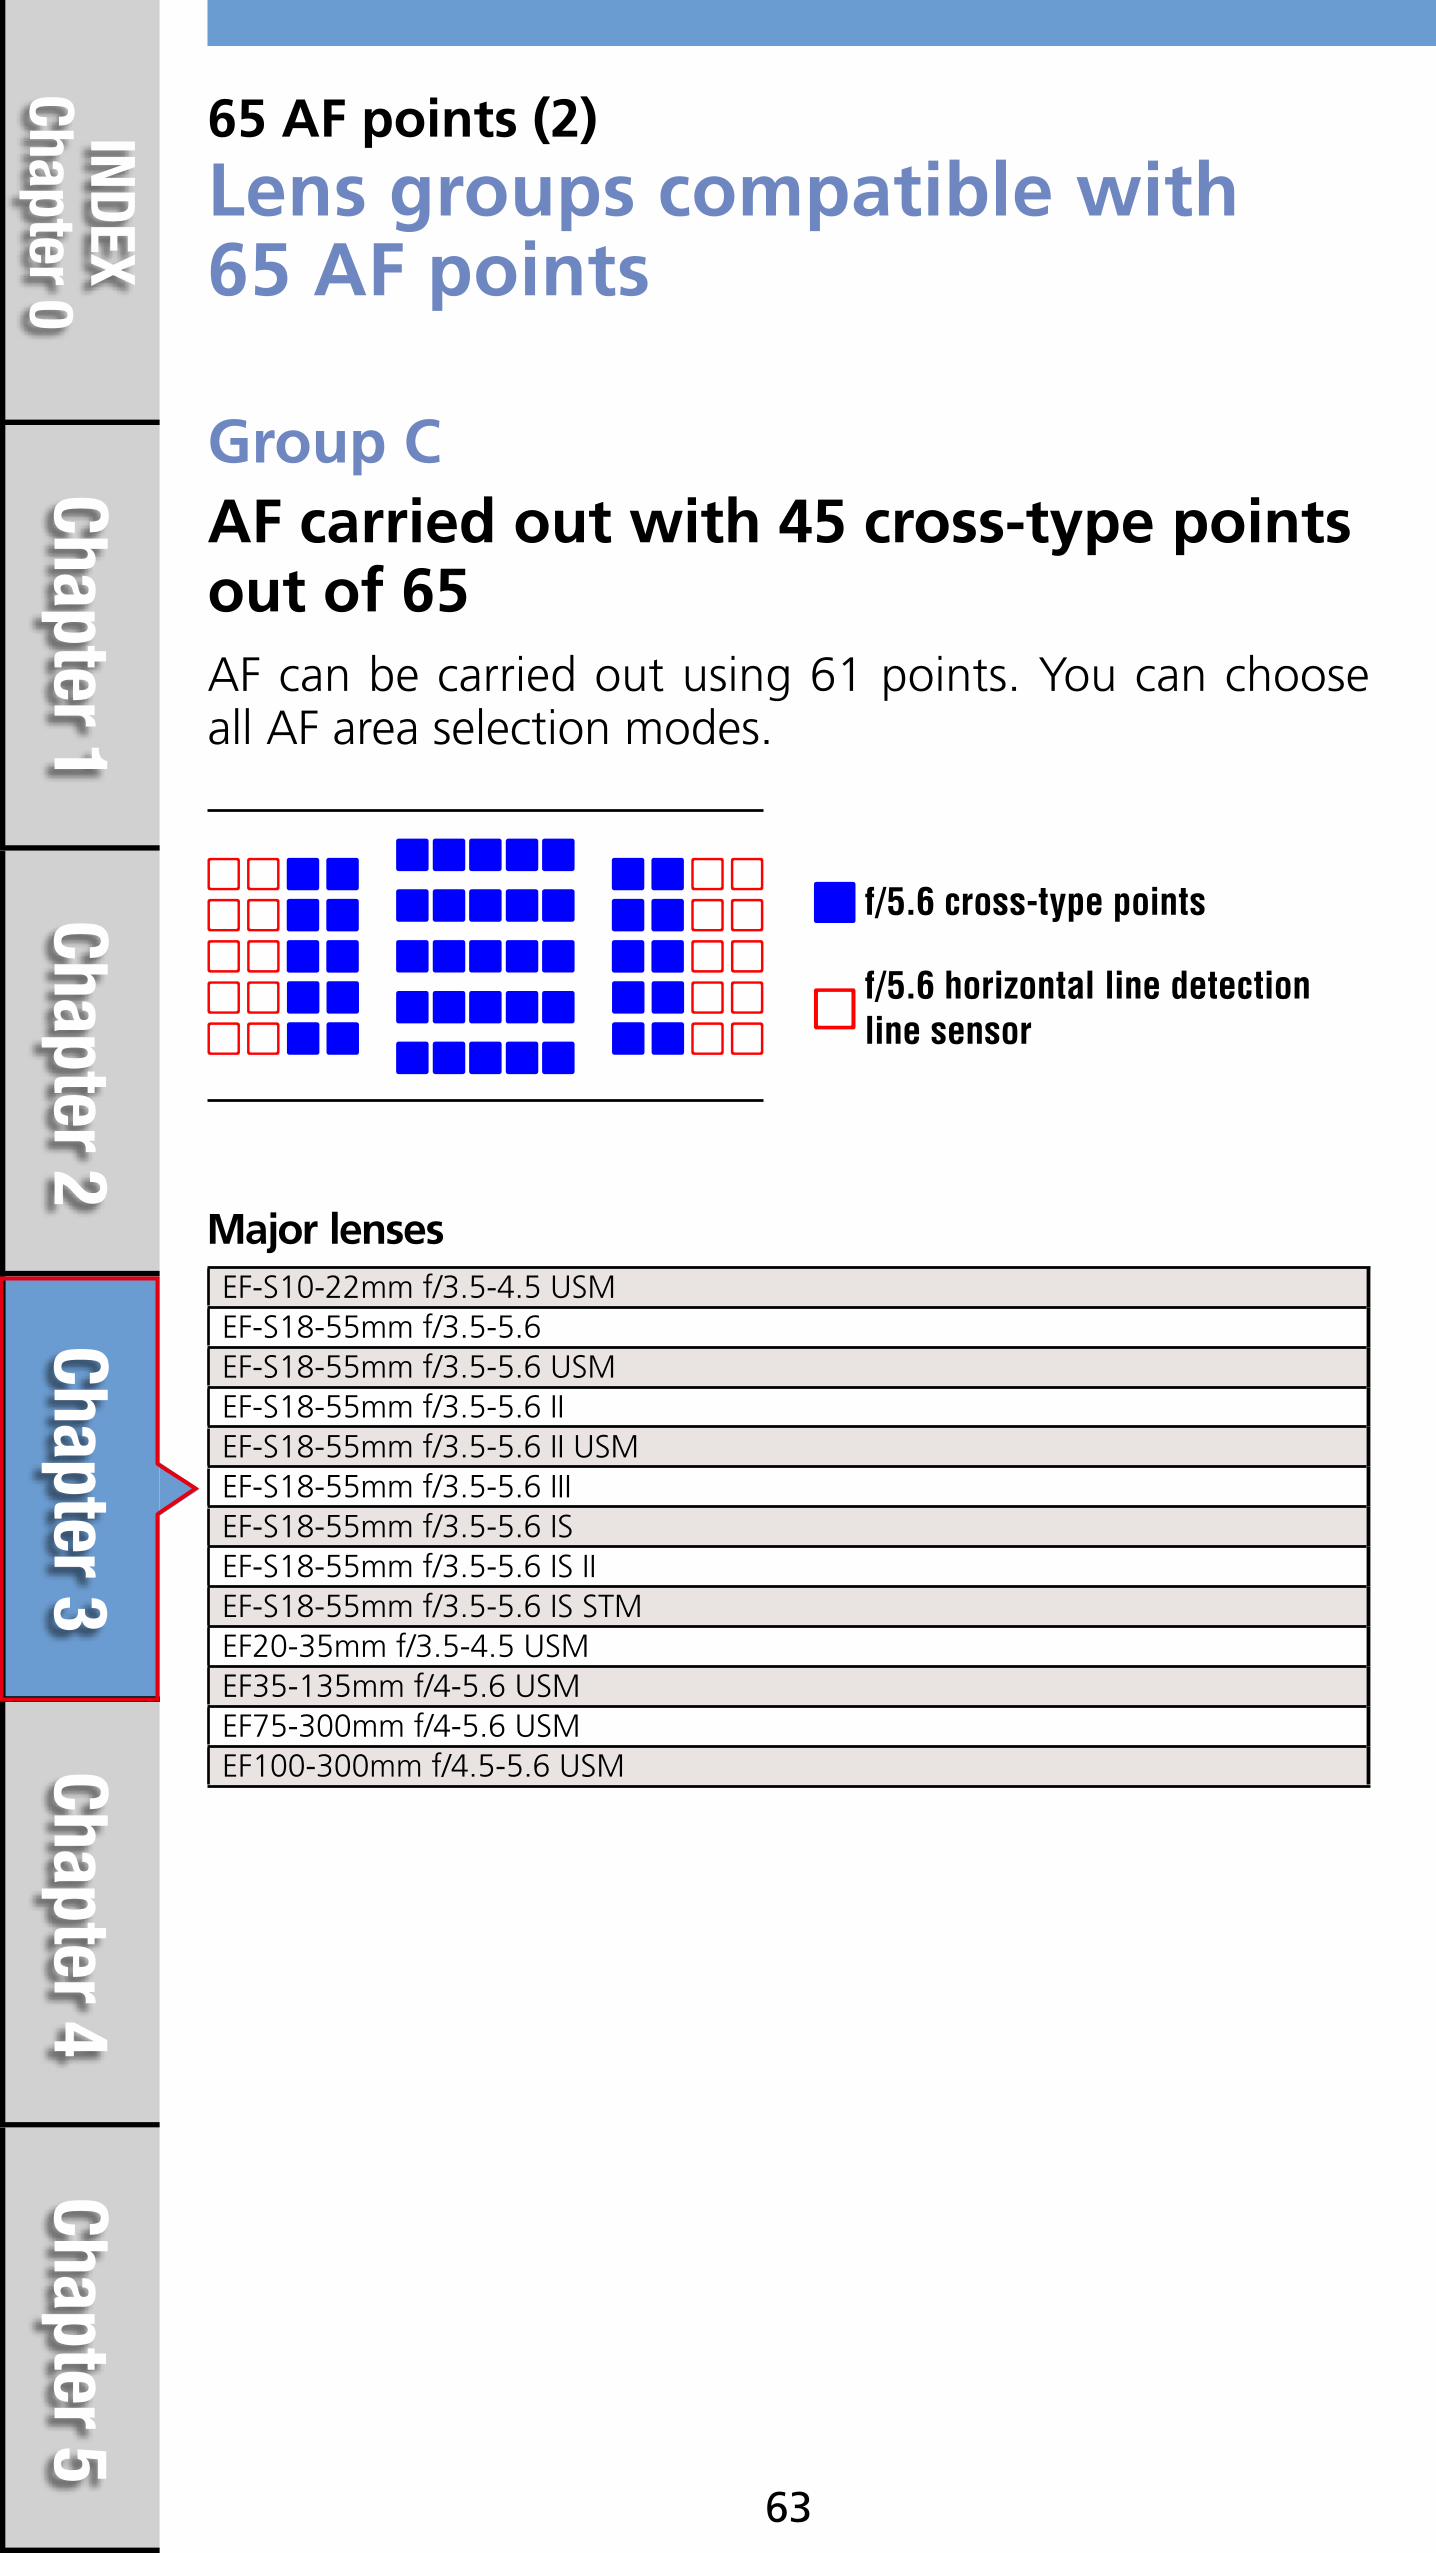
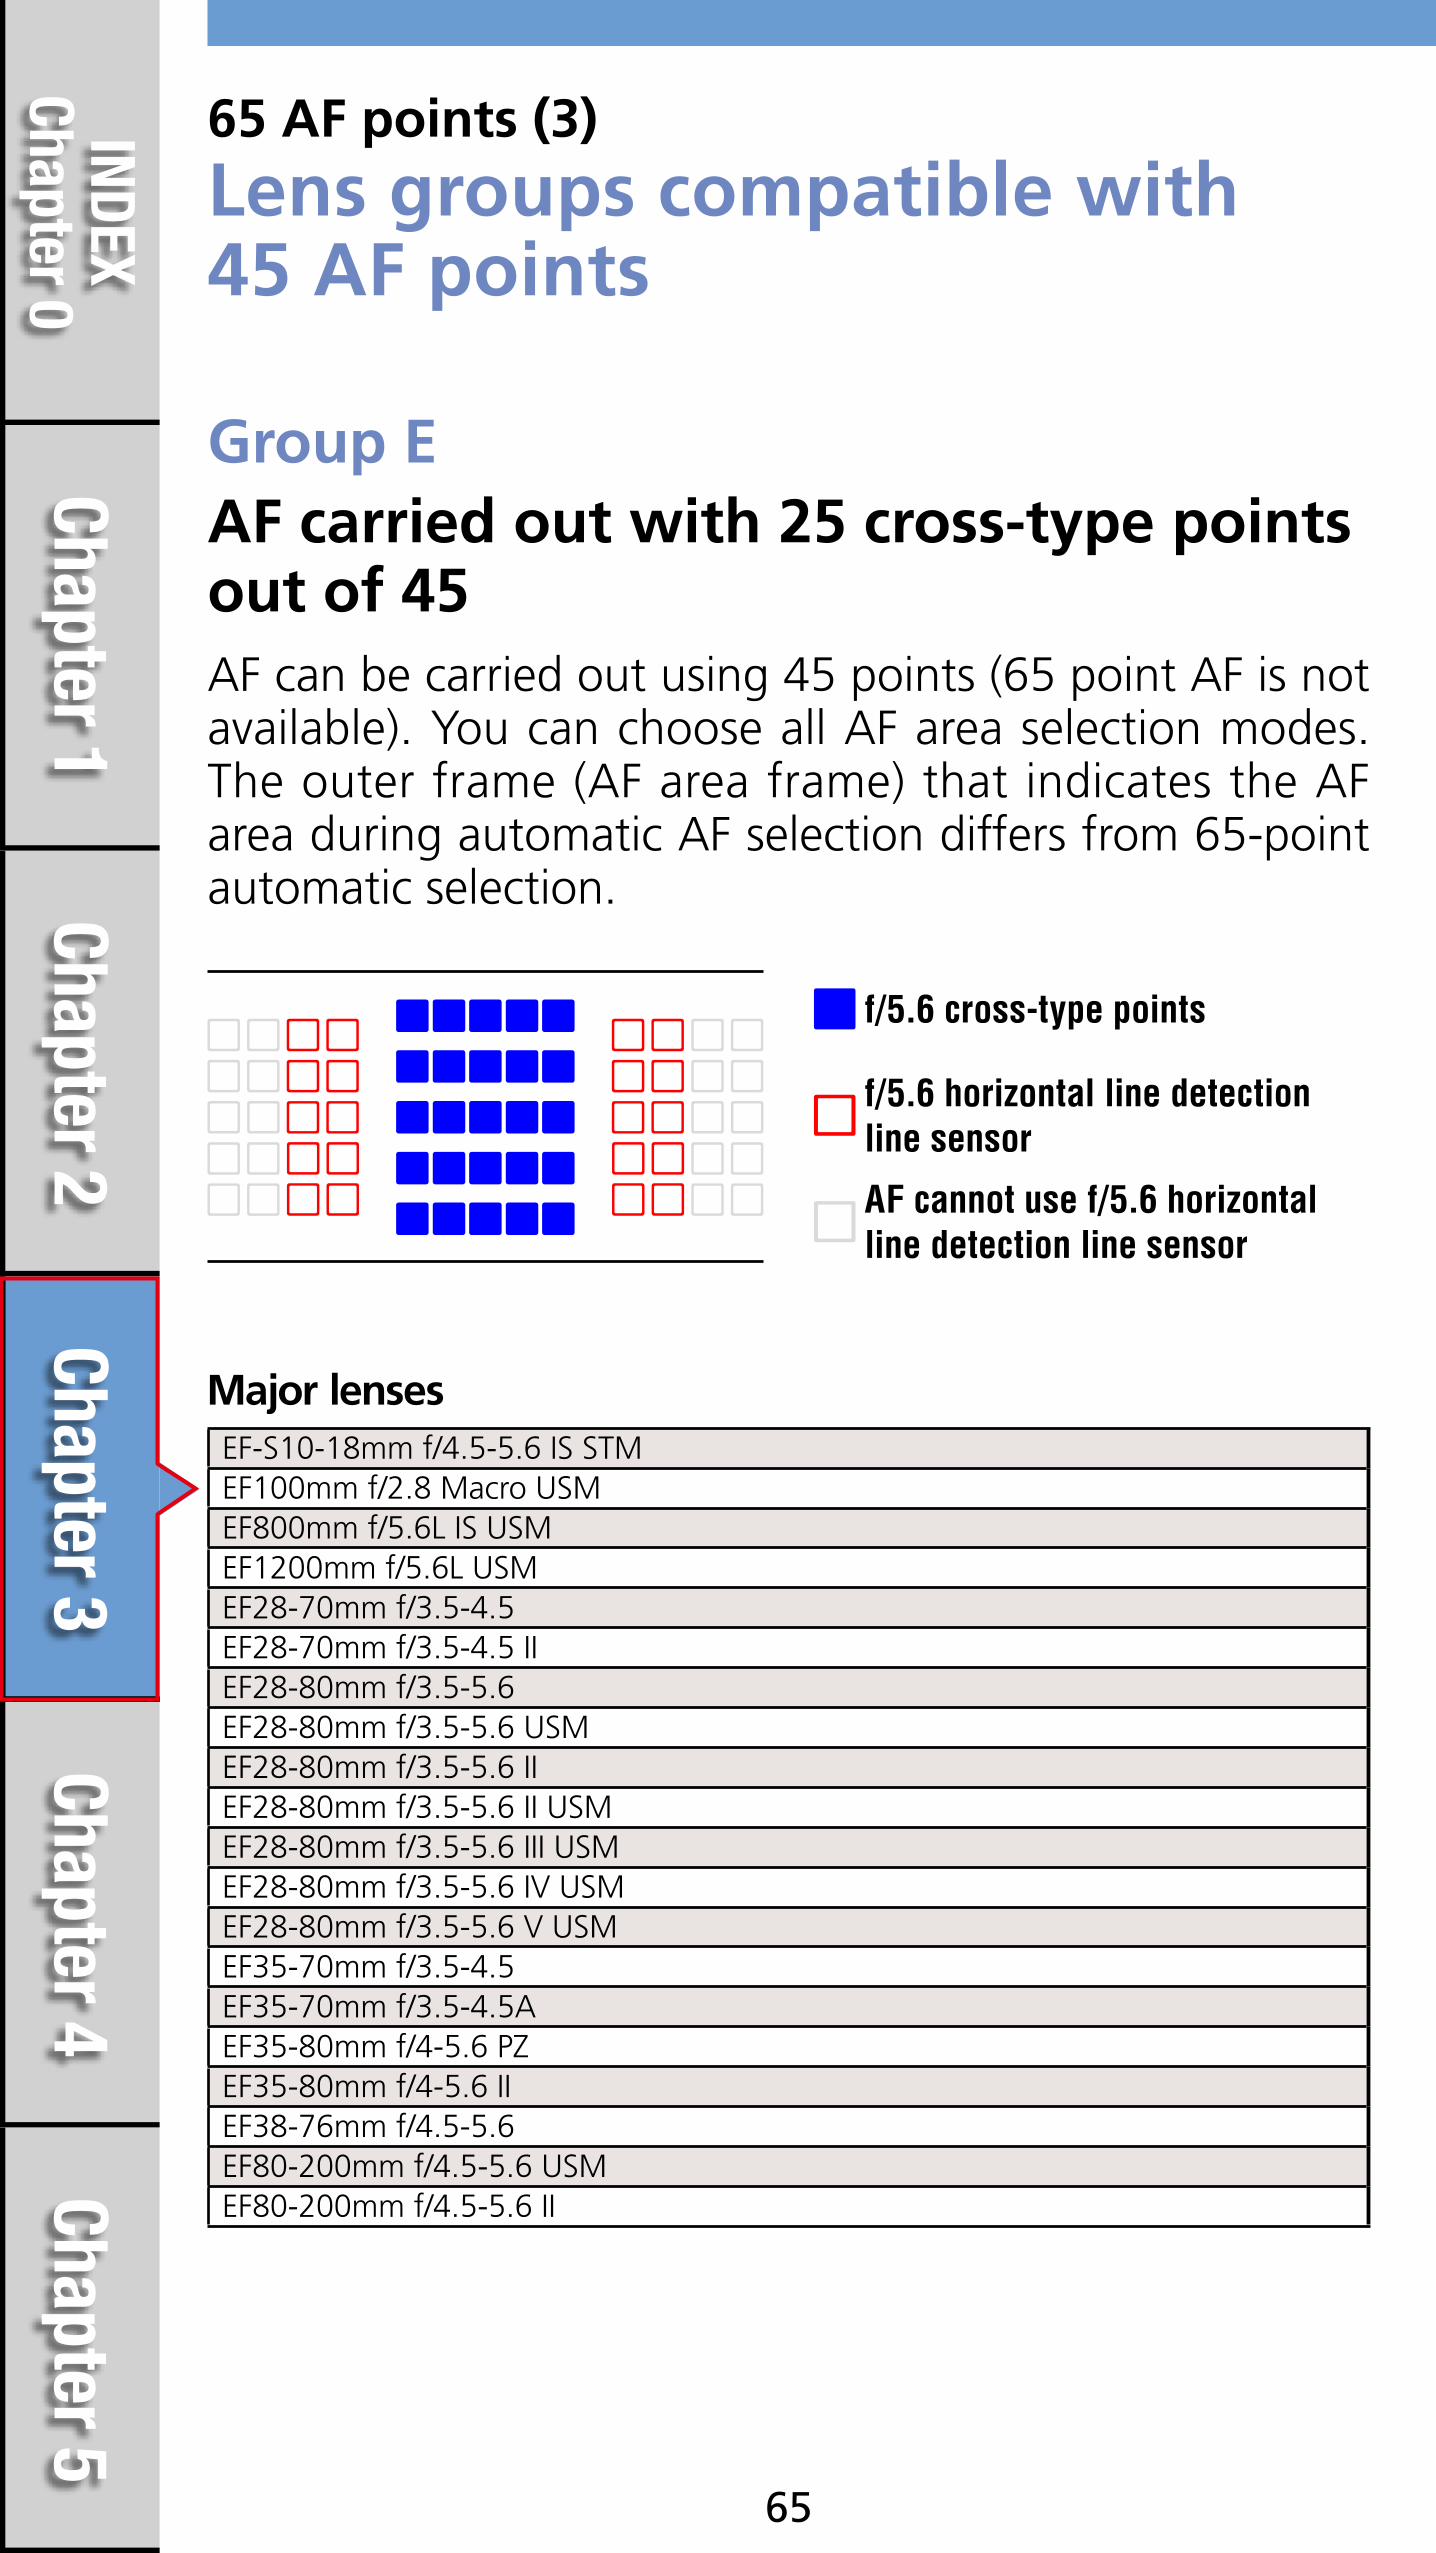
The EOS 7D Mark II is equipped with a new 65-point AF system that goes beyond the 61 AF points on the top of the line EOS-1D X. Because these points are arrayed in a wide area on the screen, you can focus on any point you want nearly up to the edges of the screen. One other feature of this new 65-point AF system is that all of the points use the Cross Sensor with high performance tracking abilities. Cross-type points, which are not easily confused by subject patterns make it possible to accurately track subjects. Additionally, the single point at the center is an f/2.8 and f/5.6 Dual Cross-type point which enables high-precision focusing when using a bright lens with a maximum aperture value up to f/2.8. When using an extender, AF is possible using the single center point, even on a lens with a total maximum aperture of f/8. The cross points and point patterns (cross points/number of points on line) available for cross-type points differ depending on the type of lens being used. Check the groups in A to G on p. 61 - 67 to find your lens.
High-performance cross-type tracking for all 65 points

Chapter 5Chapter 4
Chapter 3Chapter 2
Chapter 1INDEX
Chapter 0
61
Major lensesEF-S24mm f/2.8 STMEF-S17-55mm f/2.8 IS USMEF14mm f/2.8L II USMEF20mm f/2.8 USMEF24mm f/1.4L II USMEF24mm f/2.8 IS USMEF28mm f/1.8 USMEF28mm f/2.8 IS USMEF35mm f/1.4L USMEF35mm f/2 IS USMEF40mm f/2.8 STMEF50mm f/1.2L USMEF50mm f/1.4 USMEF50mm f/1.8 IIEF85mm f/1.2L II USMEF85mm f/1.8 USMEF100mm f/2 USMEF135mm f/2L USMEF135mm f/2L USM + Extender EF1.4xEF200mm f/2.8L II USMEF300mm f/2.8L IS II USMEF400mm f/2.8L IS II USM *1EF16-35mm f/2.8L II USMEF24-70mm f/2.8L II USMEF70-200mm f/2.8L USMEF70-200mm f/2.8L IS USMEF70-200mm f/2.8L IS II USMTS-E45mm f/2.8TS-E90mm f/2.8
65 AF points (1)
Lens groups compatible with 65 cross-type points
Group A
*1: When combining lenses and extenders with *1”, focusing may be inaccurate when using AF. For details, refer to the user guide supplied with the extender.
Extender EF1.4x and Extender EF2x are common to types I / II / III (in the group classification).
f/2.8 and f/5.6 cross-type points (Dual Cross point)
f/5.6 cross-type points
AF can be carried out using 61 points. You can choose all AF area selection modes.
65 cross-type points, single center point is f/2.8 Dual Cross

Chapter 5Chapter 4
Chapter 3Chapter 2
Chapter 1INDEX
Chapter 0
62
Major lensesEF-S60mm f/2.8 Macro USMEF-S15-85mm f/3.5-5.6 IS USMEF-S17-85mm f/4-5.6 IS USMEF-S18-135mm f/3.5-5.6 ISEF-S18-135mm f/3.5-5.6 IS STMEF-S18-200mm f/3.5-5.6 ISEF-S55-250mm f/4-5.6 IS IIEF-S55-250mm f/4-5.6 IS STMEF50mm f/2.5 Compact MacroEF50mm f/2.5 Compact Macro + LIFE SIZE ConverterEF100mm f/2.8 Macro USMEF100mm f/2.8L Macro IS USMEF135mm f/2L USM + Extender EF2xEF180mm f/3.5L Macro USMEF200mm f/2.8L II USM + Extender EF1.4x (or EF2×)EF300mm f/2.8L IS II USM + Extender EF1.4x (or EF2×)EF300mm f/4L IS USM *2EF400mm f/2.8L IS II USM + Extender EF1.4x (or EF2×)EF400mm f/4 DO IS USM *2EF400mm f/4 DO IS II USM *2EF400mm f/5.6L USMEF500mm f/4L IS II USM *2EF600mm f/4L IS II USM *2EF8-15mm f/4L Fisheye USMEF16-35mm f/4L IS USMEF17-40mm f/4L USMEF24-70mm f/4L IS USMEF24-105mm f/3.5-5.6 IS STMEF24-105mm f/4L IS USMEF28-135mm f/3.5-5.6 IS USMEF28-300mm f/3.5-5.6L IS USMEF70-200mm f/2.8L USM + Extender EF1.4x (or EF2×)EF70-200mm f/2.8L IS USM + Extender EF1.4x (or EF2×)EF70-200mm f/2.8L IS II USM + Extender EF1.4x (or EF2×)EF70-200mm f/4L IS USM *2EF70-300mm f/4-5.6 IS USMEF70-300mm f/4-5.6L IS USMEF70-300mm f/4.5-5.6 DO IS USMEF100-400mm f/4.5-5.6L IS USMEF200-400mm f/4L IS USM + Extender x1.4 (Including when using built-in Extender x1.4) *2TS-E17mm f/4L *3TS-E24mm f/3.5L *3TS-E24mm f/3.5L II *3
*2: also uses B type when using Extender EF1.4x*3: Focal display available when using manual focus (When not using tilt or shift).
AF can be carried out using 61 points. You can choose all AF area selection modes.
All 65 points are cross-type pointsGroup B
f/5.6 cross-type points
Chapter 5Chapter 4
Chapter 3Chapter 2
Chapter 1INDEX
Chapter 0
63
Major lensesEF-S10-22mm f/3.5-4.5 USMEF-S18-55mm f/3.5-5.6EF-S18-55mm f/3.5-5.6 USMEF-S18-55mm f/3.5-5.6 IIEF-S18-55mm f/3.5-5.6 II USMEF-S18-55mm f/3.5-5.6 IIIEF-S18-55mm f/3.5-5.6 ISEF-S18-55mm f/3.5-5.6 IS IIEF-S18-55mm f/3.5-5.6 IS STMEF20-35mm f/3.5-4.5 USMEF35-135mm f/4-5.6 USMEF75-300mm f/4-5.6 USMEF100-300mm f/4.5-5.6 USM
65 AF points (2)
Lens groups compatible with 65 AF points
Group C
AF can be carried out using 61 points. You can choose all AF area selection modes.
AF carried out with 45 cross-type points out of 65
f/5.6 cross-type points
f/5.6 horizontal line detection line sensor

Chapter 5Chapter 4
Chapter 3Chapter 2
Chapter 1INDEX
Chapter 0
64
Major lensesEF24-85mm f/3.5-4.5 USMEF35-350mm f/3.5-5.6L USMEF55-200mm f/4.5-5.6 USMEF55-200mm f/4.5-5.6 II USMEF80-200mm f/4.5-5.6EF90-300mm f/4.5-5.6EF90-300mm f/4.5-5.6 USM
f/5.6 cross-type points
f/5.6 horizontal line detection line sensor
Group D
AF can be carried out using 61 points. You can choose all AF area selection modes.
AF carried out with 35 cross-type points out of 65
Chapter 5Chapter 4
Chapter 3Chapter 2
Chapter 1INDEX
Chapter 0
65
Major lensesEF-S10-18mm f/4.5-5.6 IS STMEF100mm f/2.8 Macro USMEF800mm f/5.6L IS USMEF1200mm f/5.6L USMEF28-70mm f/3.5-4.5EF28-70mm f/3.5-4.5 IIEF28-80mm f/3.5-5.6EF28-80mm f/3.5-5.6 USMEF28-80mm f/3.5-5.6 IIEF28-80mm f/3.5-5.6 II USMEF28-80mm f/3.5-5.6 III USMEF28-80mm f/3.5-5.6 IV USMEF28-80mm f/3.5-5.6 V USMEF35-70mm f/3.5-4.5EF35-70mm f/3.5-4.5AEF35-80mm f/4-5.6 PZEF35-80mm f/4-5.6 IIEF38-76mm f/4.5-5.6EF80-200mm f/4.5-5.6 USMEF80-200mm f/4.5-5.6 II
65 AF points (3)
Lens groups compatible with 45 AF points
Group E
AF can be carried out using 45 points (65 point AF is not available). You can choose all AF area selection modes. The outer frame (AF area frame) that indicates the AF area during automatic AF selection differs from 65-point automatic selection.
AF carried out with 25 cross-type points out of 45
f/5.6 cross-type points
f/5.6 horizontal line detection line sensor
AF cannot use f/5.6 horizontal line detection line sensor

Chapter 5Chapter 4
Chapter 3Chapter 2
Chapter 1INDEX
Chapter 0
66
Major lensesEF180mm f/3.5L Macro USM + Extender EF1.4xEF22-55mm f/4-5.6 USMEF28-105mm f/4-5.6EF28-105mm f/4-5.6 USMEF35-80mm f/4-5.6EF35-80mm f/4-5.6 USMEF35-80mm f/4-5.6 III
Group F
AF can be carried out using 45 points (65 point AF is not available). You can choose all AF area selection modes. The outer frame (AF area frame) that indicates the AF area during automatic AF selection differs from 65-point automatic selection.
AF carried out with 15 cross-type points out of 45
f/5.6 cross-type points
f/5.6 horizontal line detection line sensor
f/5.6 vertical line detection line sensor
Unavailable AF points

Chapter 5Chapter 4
Chapter 3Chapter 2
Chapter 1INDEX
Chapter 0
67
Major lensesEF35-105mm f/4.5-5.6EF35-105mm f/4.5-5.6 USMEF300mm f/4L USM + Extender EF2xEF300mm f/4L IS USM + Extender EF2xEF400mm f/4 DO IS USM + Extender EF2xEF400mm f/4 DO IS II USM + Extender EF2xEF400mm f/5.6L USM + Extender EF1.4xEF500mm f/4L IS USM + Extender EF2xEF500mm f/4L IS II USM + Extender EF2xEF500mm f/4.5L USM + Extender EF1.4xEF600mm f/4L USM + Extender EF2xEF600mm f/4L IS USM + Extender EF2xEF600mm f/4L IS II USM + Extender EF2xEF800mm f/5.6L IS USM + Extender EF1.4xEF1200mm f/5.6L USM + Extender EF1.4xEF70-200mm f/4L USM + Extender EF2xEF70-200mm f/4L IS USM + Extender EF2xEF100-400mm f/4.5-5.6L IS USM + Extender EF1.4xEF200-400mm f/4L IS USM Extender1.4x : built-in Ext.1.4x use + Extender EF1.4xEF200-400mm f/4L IS USM Extender1.4x + Extender EF2x
65 AF points (4)
Lens groups compatible with 5 AF points
Group G
AF can be carried out with the center point, or points in up, down, left, or right directions (up, down, left, right AF points cannot be selected. This functions only when AF point expansion is selected). The following AF area selection modes are available: Single-point AF (Manual selection), Single-point Spot AF (Manual selection), and AF point expansion (Manual selection). When an extender is attached to the lens, AF can be carried out when the maximum aperture value is f/8 (from f/5.6 to f/8).
AF carried out with 1 cross-type center points out of 5points
f/5.6 cross-type points
f/5.6 vertical line detection line sensor(Cannot be selected)
f/5.6 horizontal line detection line sensor(Cannot be selected)
Unavailable AF points
Chapter 5Chapter 4
Chapter 3Chapter 2
Chapter 1INDEX
Chapter 0
Chapter 4
68
AF operation and shutter-release timing settings
Utilizing AF and the new Viewfinder
Utilizing the AF point setting and registrationAutomatically switching of AF points for horizontal and vertical shooting
Utilizing the AF point setting and registration[Separate AF points:Point only] is added to [Orientation linked AF point]
Utilizing the AF point setting and registrationInstantly recalled AF points using [Switch to registered AF point]
Instantly switching AF area selection modes
Synchronize initial AF point used for 65-point auto selection AF with manually selected point
Assigning functions to the button
Intelligent Viewfinder II
Anti-flicker shooting

Chapter 5Chapter 4
Chapter 3Chapter 2
Chapter 1INDEX
Chapter 0
69
AF operation and shutter-release timing settings
You can set whether focusing or shutter-release has priority
Equal priorityThis setting gives an equal priority to both focus and shutter-release
Release priorityThis setting gives priority to shutter-release and will capture an image even if it is out of focus. It is effective when you want to minimize any delay when shooting, sacrificing AF performance
Focus priorityThis setting gives priority to focusing on a subject and it cannot capture an image unless it is in focus. It is recommended when you want to ensure your images are in focus sacrificing response speed.
Characteristics for the first shot [AI Servo 1st image priority]
1
Image/Focusing parameters during AI Servo[Set in the AF 2 tab]

Chapter 5Chapter 4
Chapter 3Chapter 2
Chapter 1INDEX
Chapter 0
70
Characteristics during continuous shooting [AI Servo 2nd image priority]
2
Equal priorityThis setting gives an equal priority to both focus and shooting speed during continuous shooting. The speed of continuous shooting may also slow down when it is dark, or in low-contrast.
Shooting speed priorityThis setting gives priority to a continuous shooting speed rather than priority on focus. Continuous shooting speed will not drop.
Focus priorityThis setting gives priority to focusing rather than continuous shooting speed. It cannot shoot a picture unless it is in focus, greatly reducing continuous shooting speed.

Chapter 5Chapter 4
Chapter 3Chapter 2
Chapter 1INDEX
Chapter 0
71
Image/Focusing parameter for One-Shot AF[Set in the AF3 tab]
[One-Shot AF release priority]
ReleaseYou cannot shoot a picture unless it is in focus. It is effective when you want to shoot only after focusing on the subject.
FocusPriority is on the shooting timing rather than focus. It is recommended only when you want to put priority on capturing brief photo opportunities rather than focus.

Chapter 5Chapter 4
Chapter 3Chapter 2
Chapter 1INDEX
Chapter 0
72
The [AF2] and [AF3] tabs include settings related to AF operation parameters and shutter-release timing. With these items it is possible to set which has priority (or a balance) between focusing with AF, and the shutter-release. The [AF2] tab contains the [AI Servo 1st image priority] and [AI Servo 2nd image priority] parameters for AI Servo AF. The priority on focus and shutter-release can be set for both the 1st image and subsequent images during continuous shooting. With [Focus priority], shooting is delayed until after the camera has focus on a subject (this could be just a few milliseconds). With [Release priority/Shooting speed priority] shooting takes place instantly without waiting to focus, resulting in possible out of focus images. The default [Balance priority] sets equal priority on both (attempting to focus without major delays to shutter release timings), ideal for most shooting situations.When using One Shot AF the shooting priority can also be altered via the [One-Shot AF release priority] option in the [AF3] tab. The priority of focusing and shutter-release can be altered in the same way as about during AI servo AF. However there is no [Balance priority], andinstead [Focus priority] is the default setting.
Chapter 5Chapter 4
Chapter 3Chapter 2
Chapter 1INDEX
Chapter 0
73
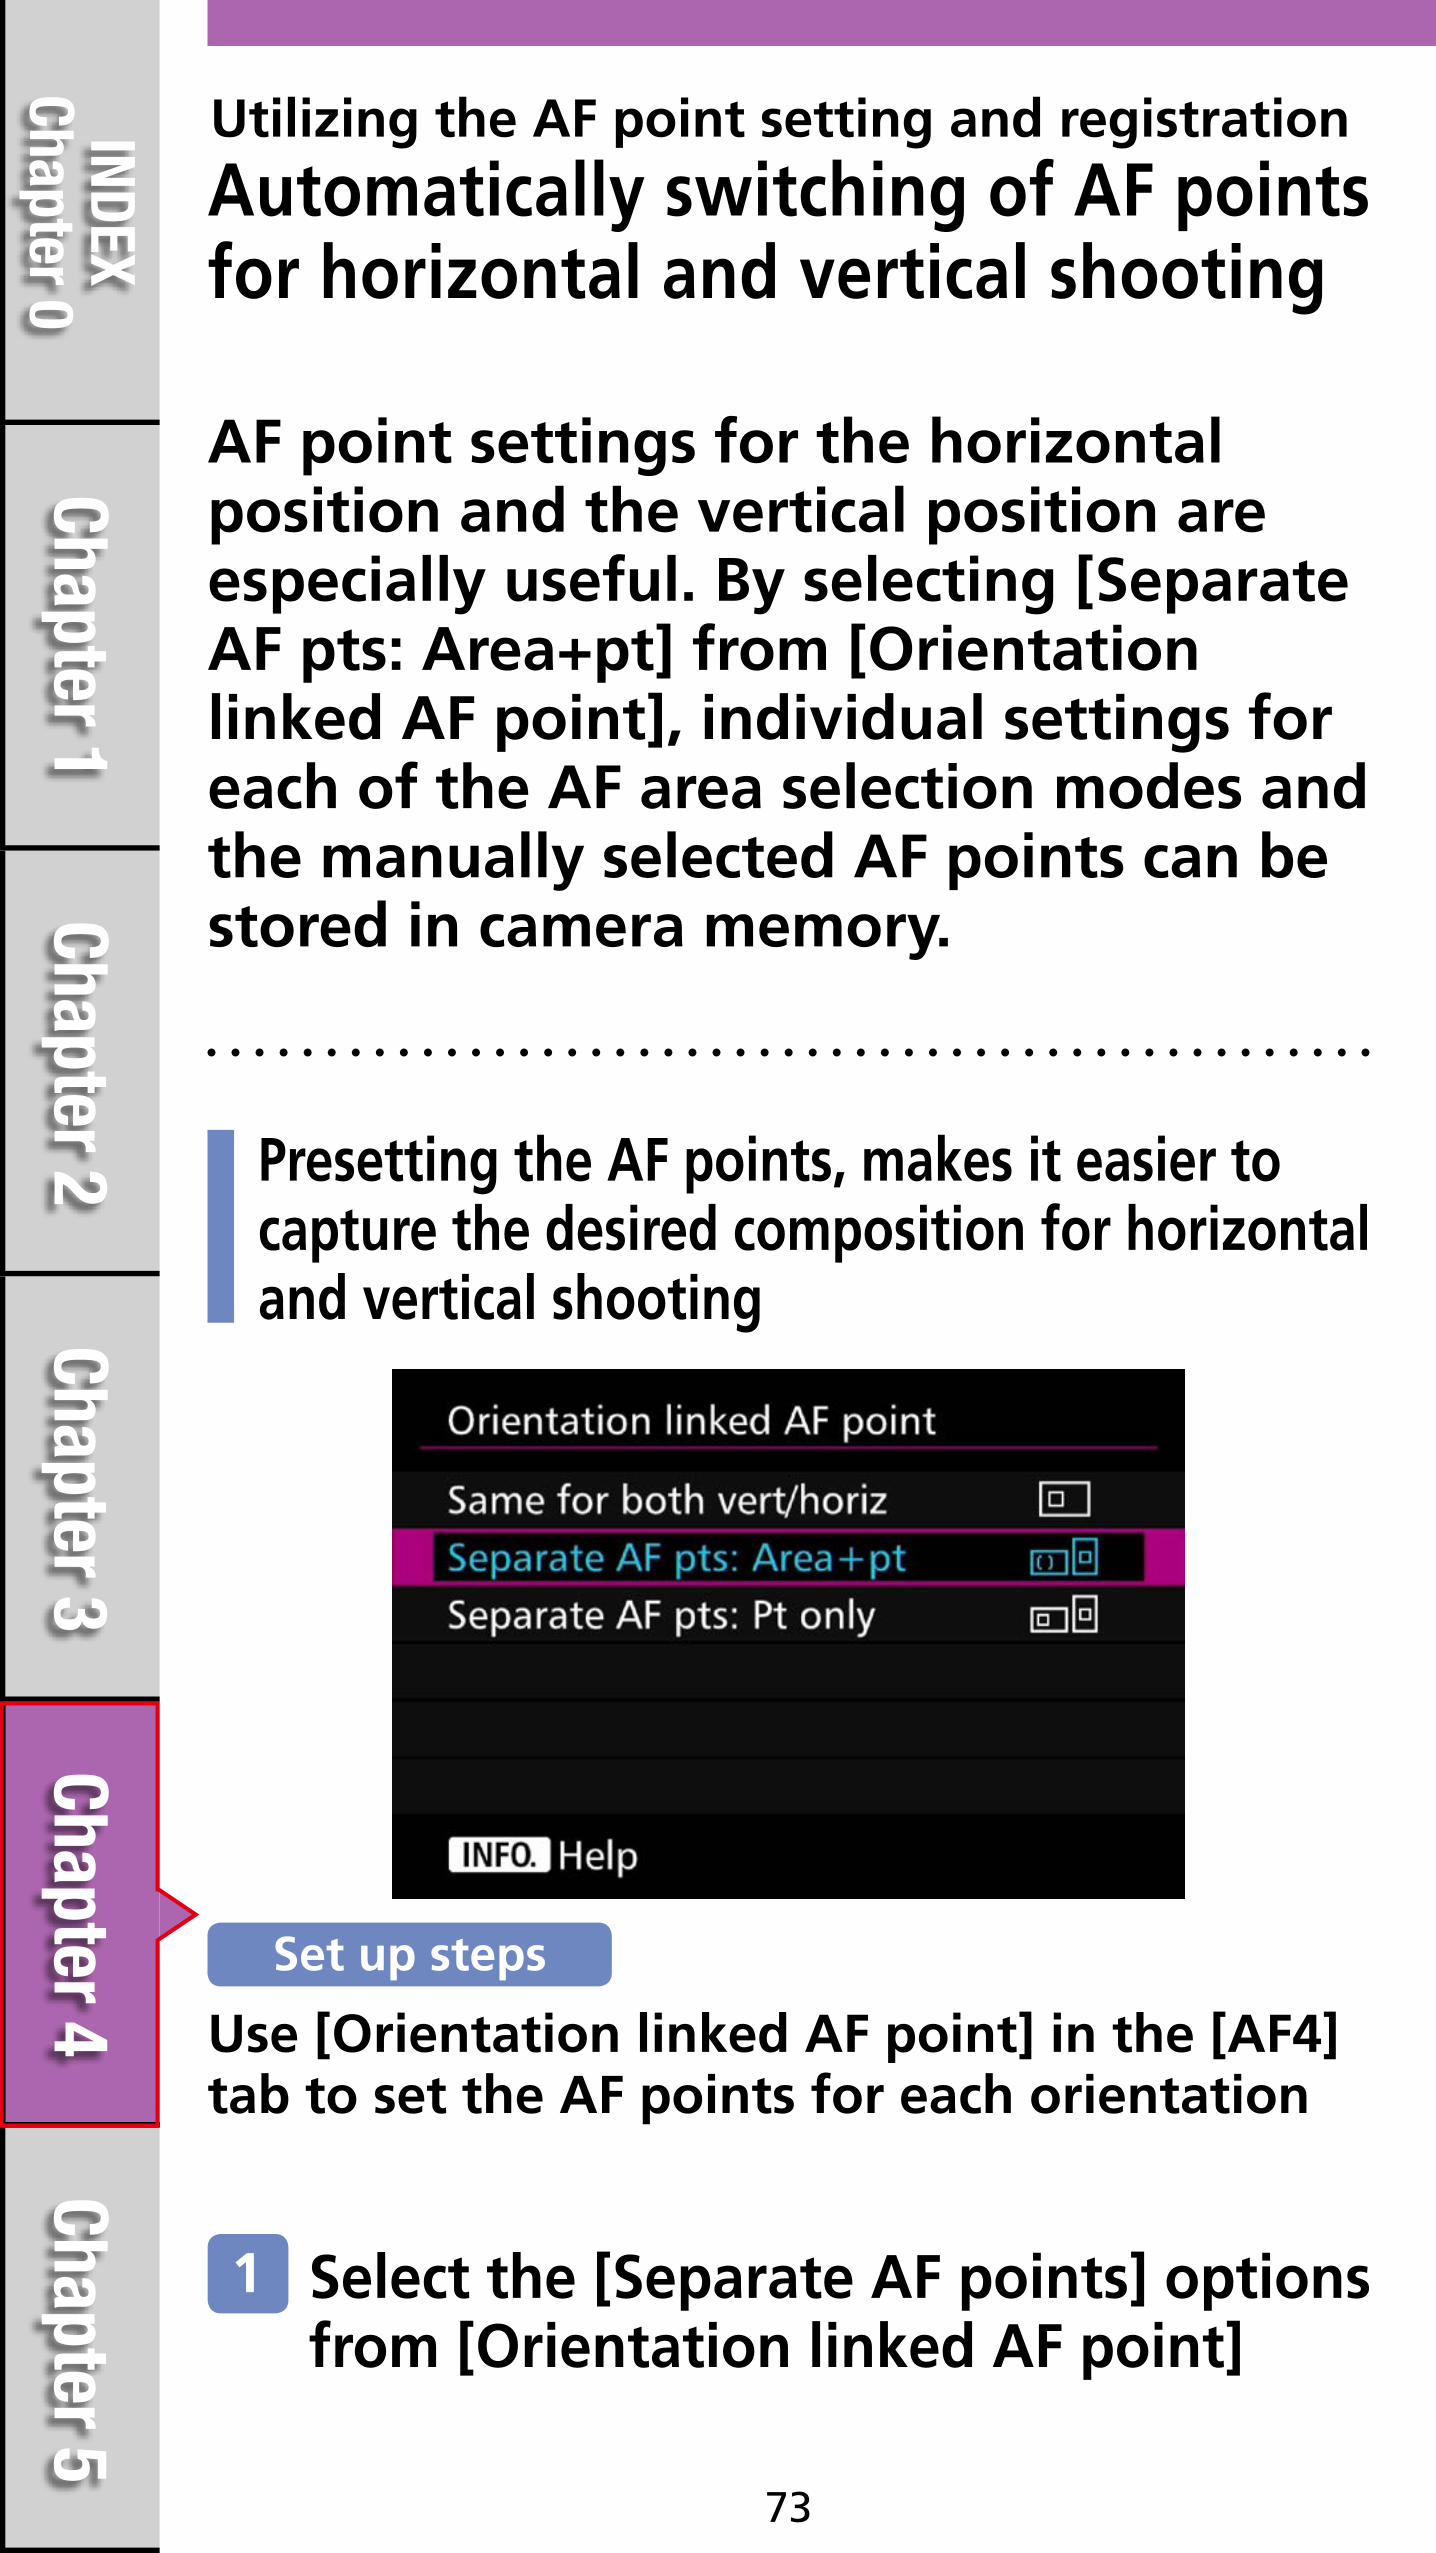
AF point settings for the horizontal position and the vertical position are especially useful. By selecting [Separate AF pts: Area+pt] from [Orientation linked AF point], individual settings for each of the AF area selection modes and the manually selected AF points can be stored in camera memory.
Presetting the AF points, makes it easier to capture the desired composition for horizontal and vertical shooting
Use [Orientation linked AF point] in the [AF4] tab to set the AF points for each orientation
Select the [Separate AF points] options from [Orientation linked AF point]
1
Set up steps
Utilizing the AF point setting and registration
Automatically switching of AF points for horizontal and vertical shooting
Chapter 5Chapter 4
Chapter 3Chapter 2
Chapter 1INDEX
Chapter 0
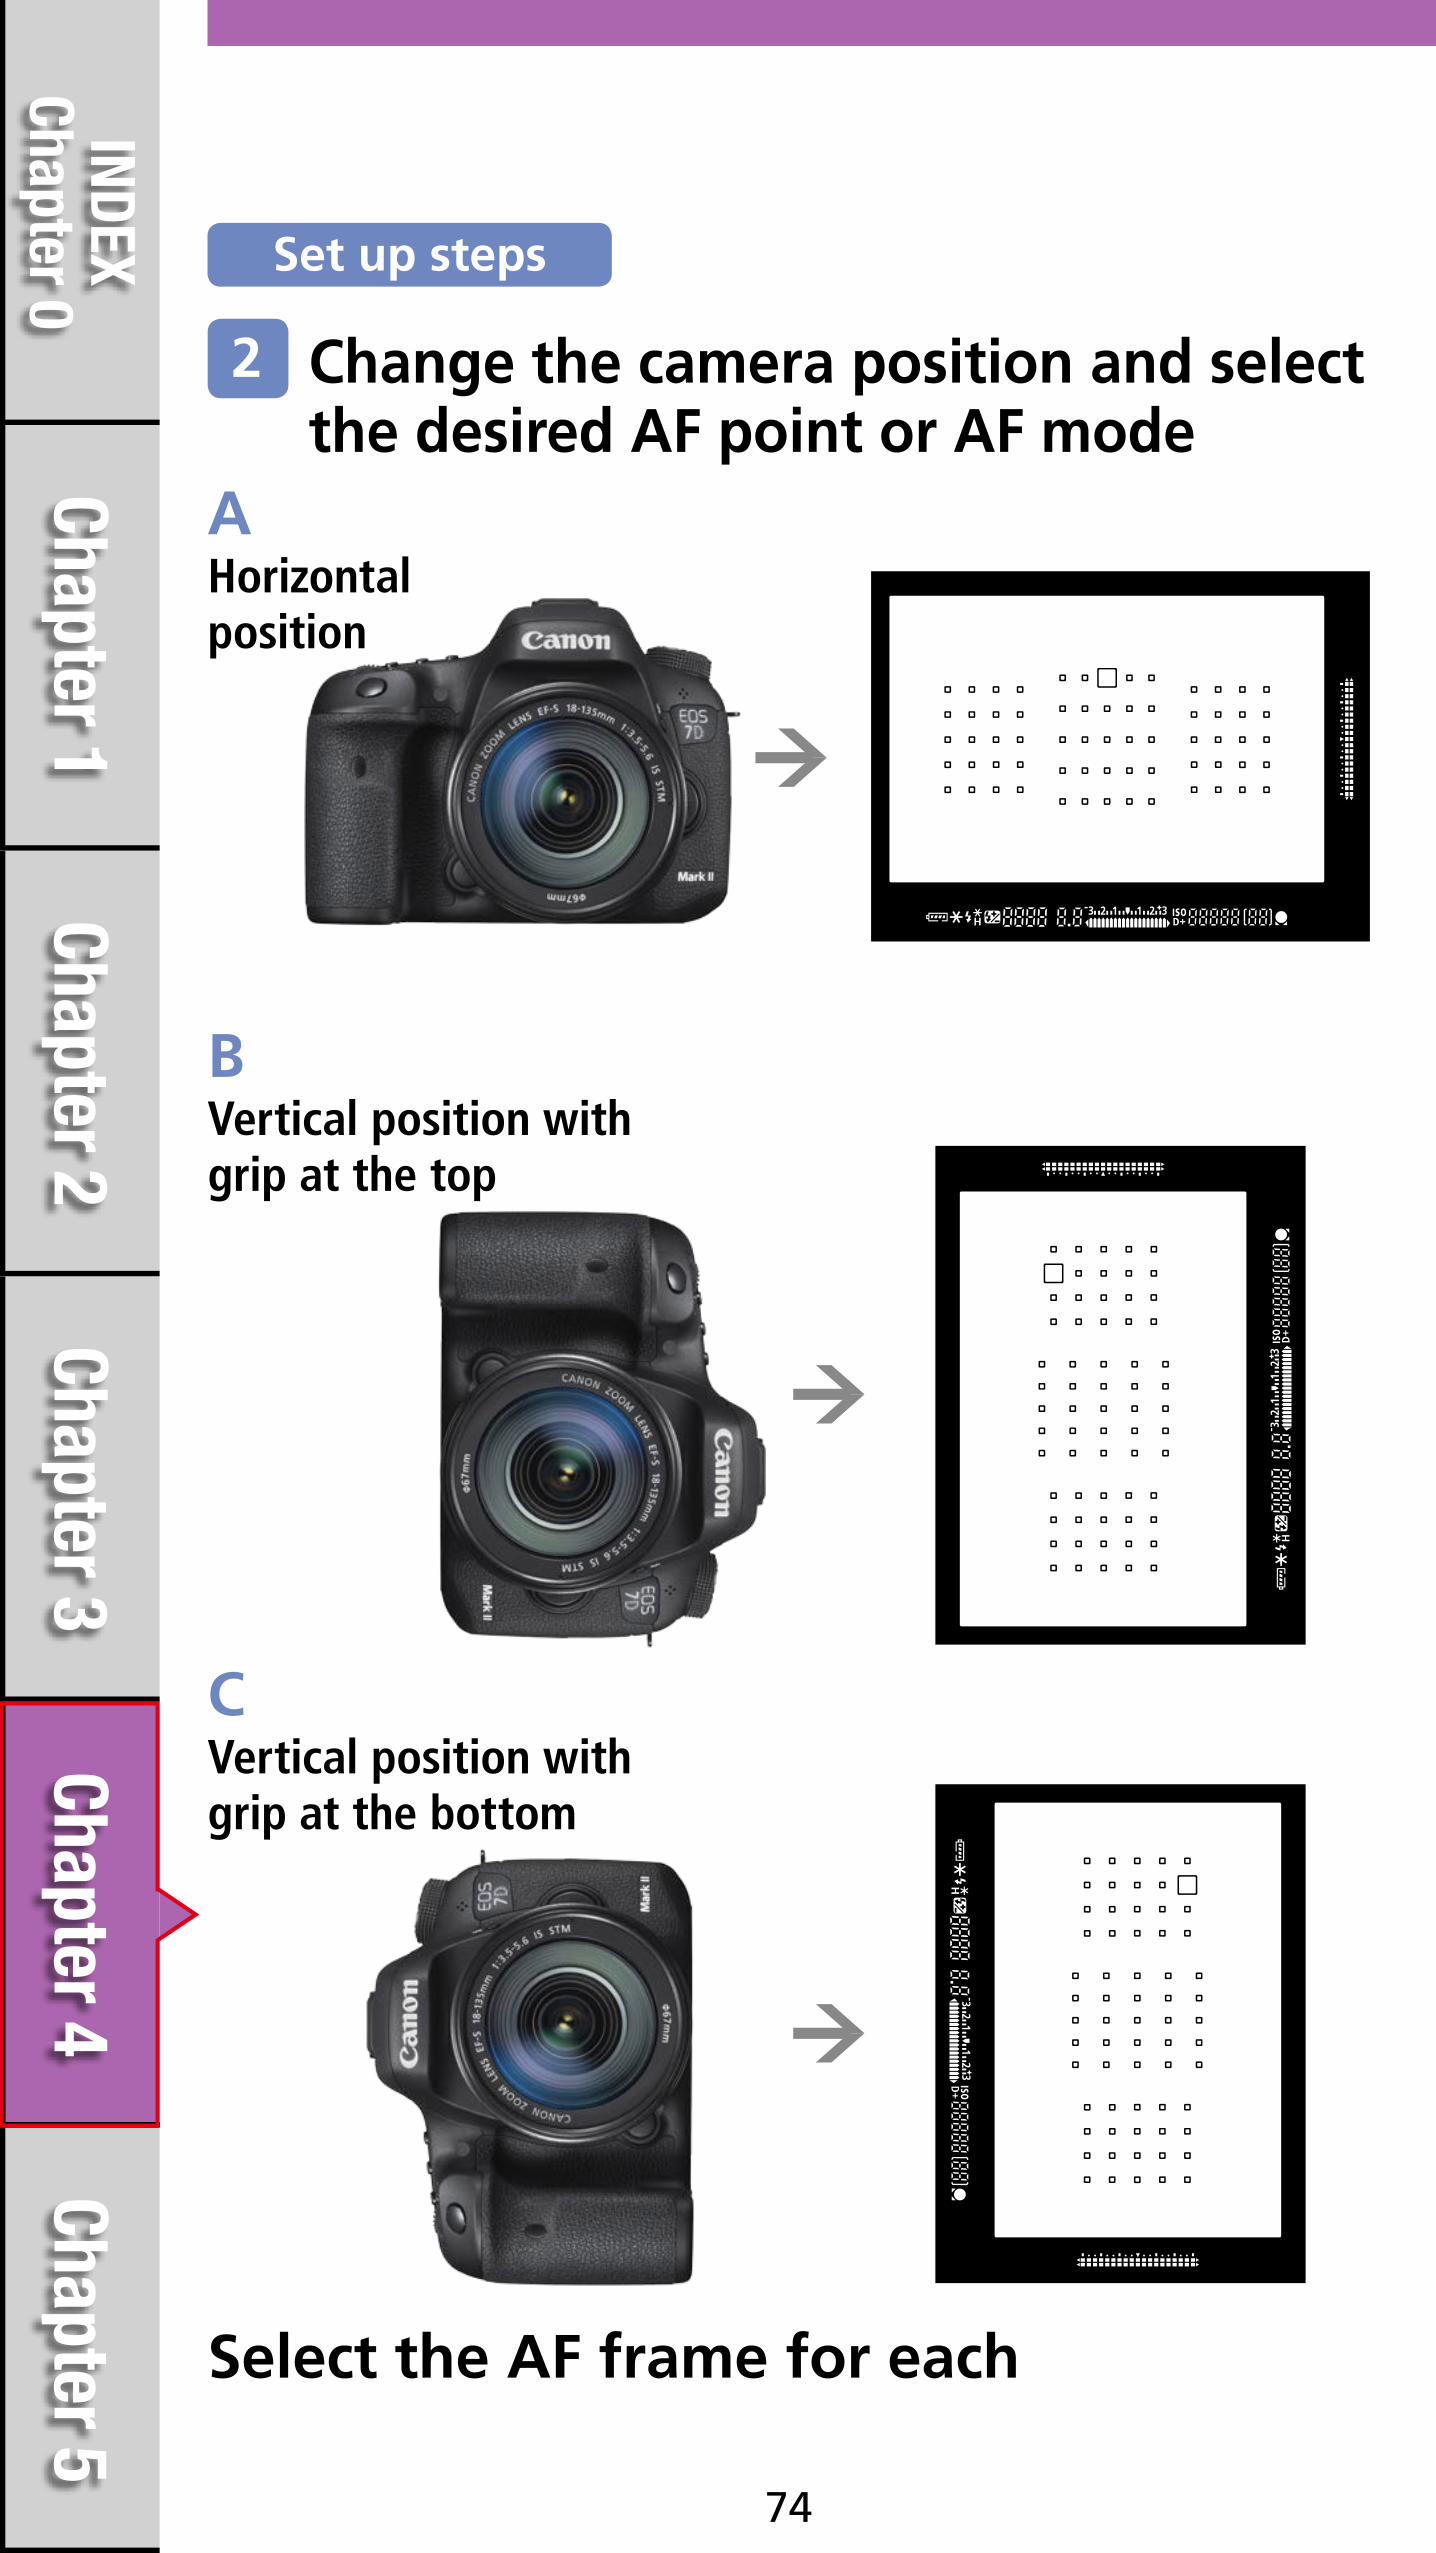
74
Select the AF frame for each
Change the camera position and select the desired AF point or AF mode
2
AHorizontal position
BVertical position with grip at the top
CVertical position with grip at the bottom
Set up steps

Chapter 5Chapter 4
Chapter 3Chapter 2
Chapter 1INDEX
Chapter 0
75
Select the [AF area selection mode] in each position
By changing the camera's orientation, the set AF points and modes will switch automatically
3
Set up steps

Chapter 5Chapter 4
Chapter 3Chapter 2
Chapter 1INDEX
Chapter 0
76
First, select [Separate AF pts: Area+pt] from [Orientation linked AF point]. Next, select the AF area selection mode and the manually selected AF point for each of the positions (orientation) of A) Horizontal position, B) Vertical position with grip at the top, and if required C) Vertical position with grip at the bottom. The settings will automatically be remembered. Now, for each of these orientations the camera will automatically switch to the select mode and AF points.
Set up steps

Chapter 5Chapter 4
Chapter 3Chapter 2
Chapter 1INDEX
Chapter 0
77
During sporting events or concerts, it is common to change the camera between horizontal and vertical positions. The EOS 7D Mark II is equipped with an abundance of AF frames to choose from - 65 points to be exact. This provides a high degree of freedom when composing shots, however, one downfall is that when the uppermost left AF point is selected for shooting while the camera is held in the horizontal position is that when the grip is switched to the vertical position, the AF point ends up in the bottommost lower left of the screen. If you want to keep the entire body of the athlete in the frame while focusing on their face, you must choose another AF point.In situations like this, AF point settings for each position are especially useful. By selecting [Separate AF pts: Area+pt] from [Orientation linked AF point], individual settings for each of the AF area selection modes and the manually selected AF points can be stored in camera memory. In the previous case, for example, if you set the center upper edge AF point beforehand when in the vertical position with the grip at the top, it is possible to have the AF point line up with the position of the face instantly when switching from the horizontal to vertical position.
Chapter 5Chapter 4
Chapter 3Chapter 2
Chapter 1INDEX
Chapter 0
78
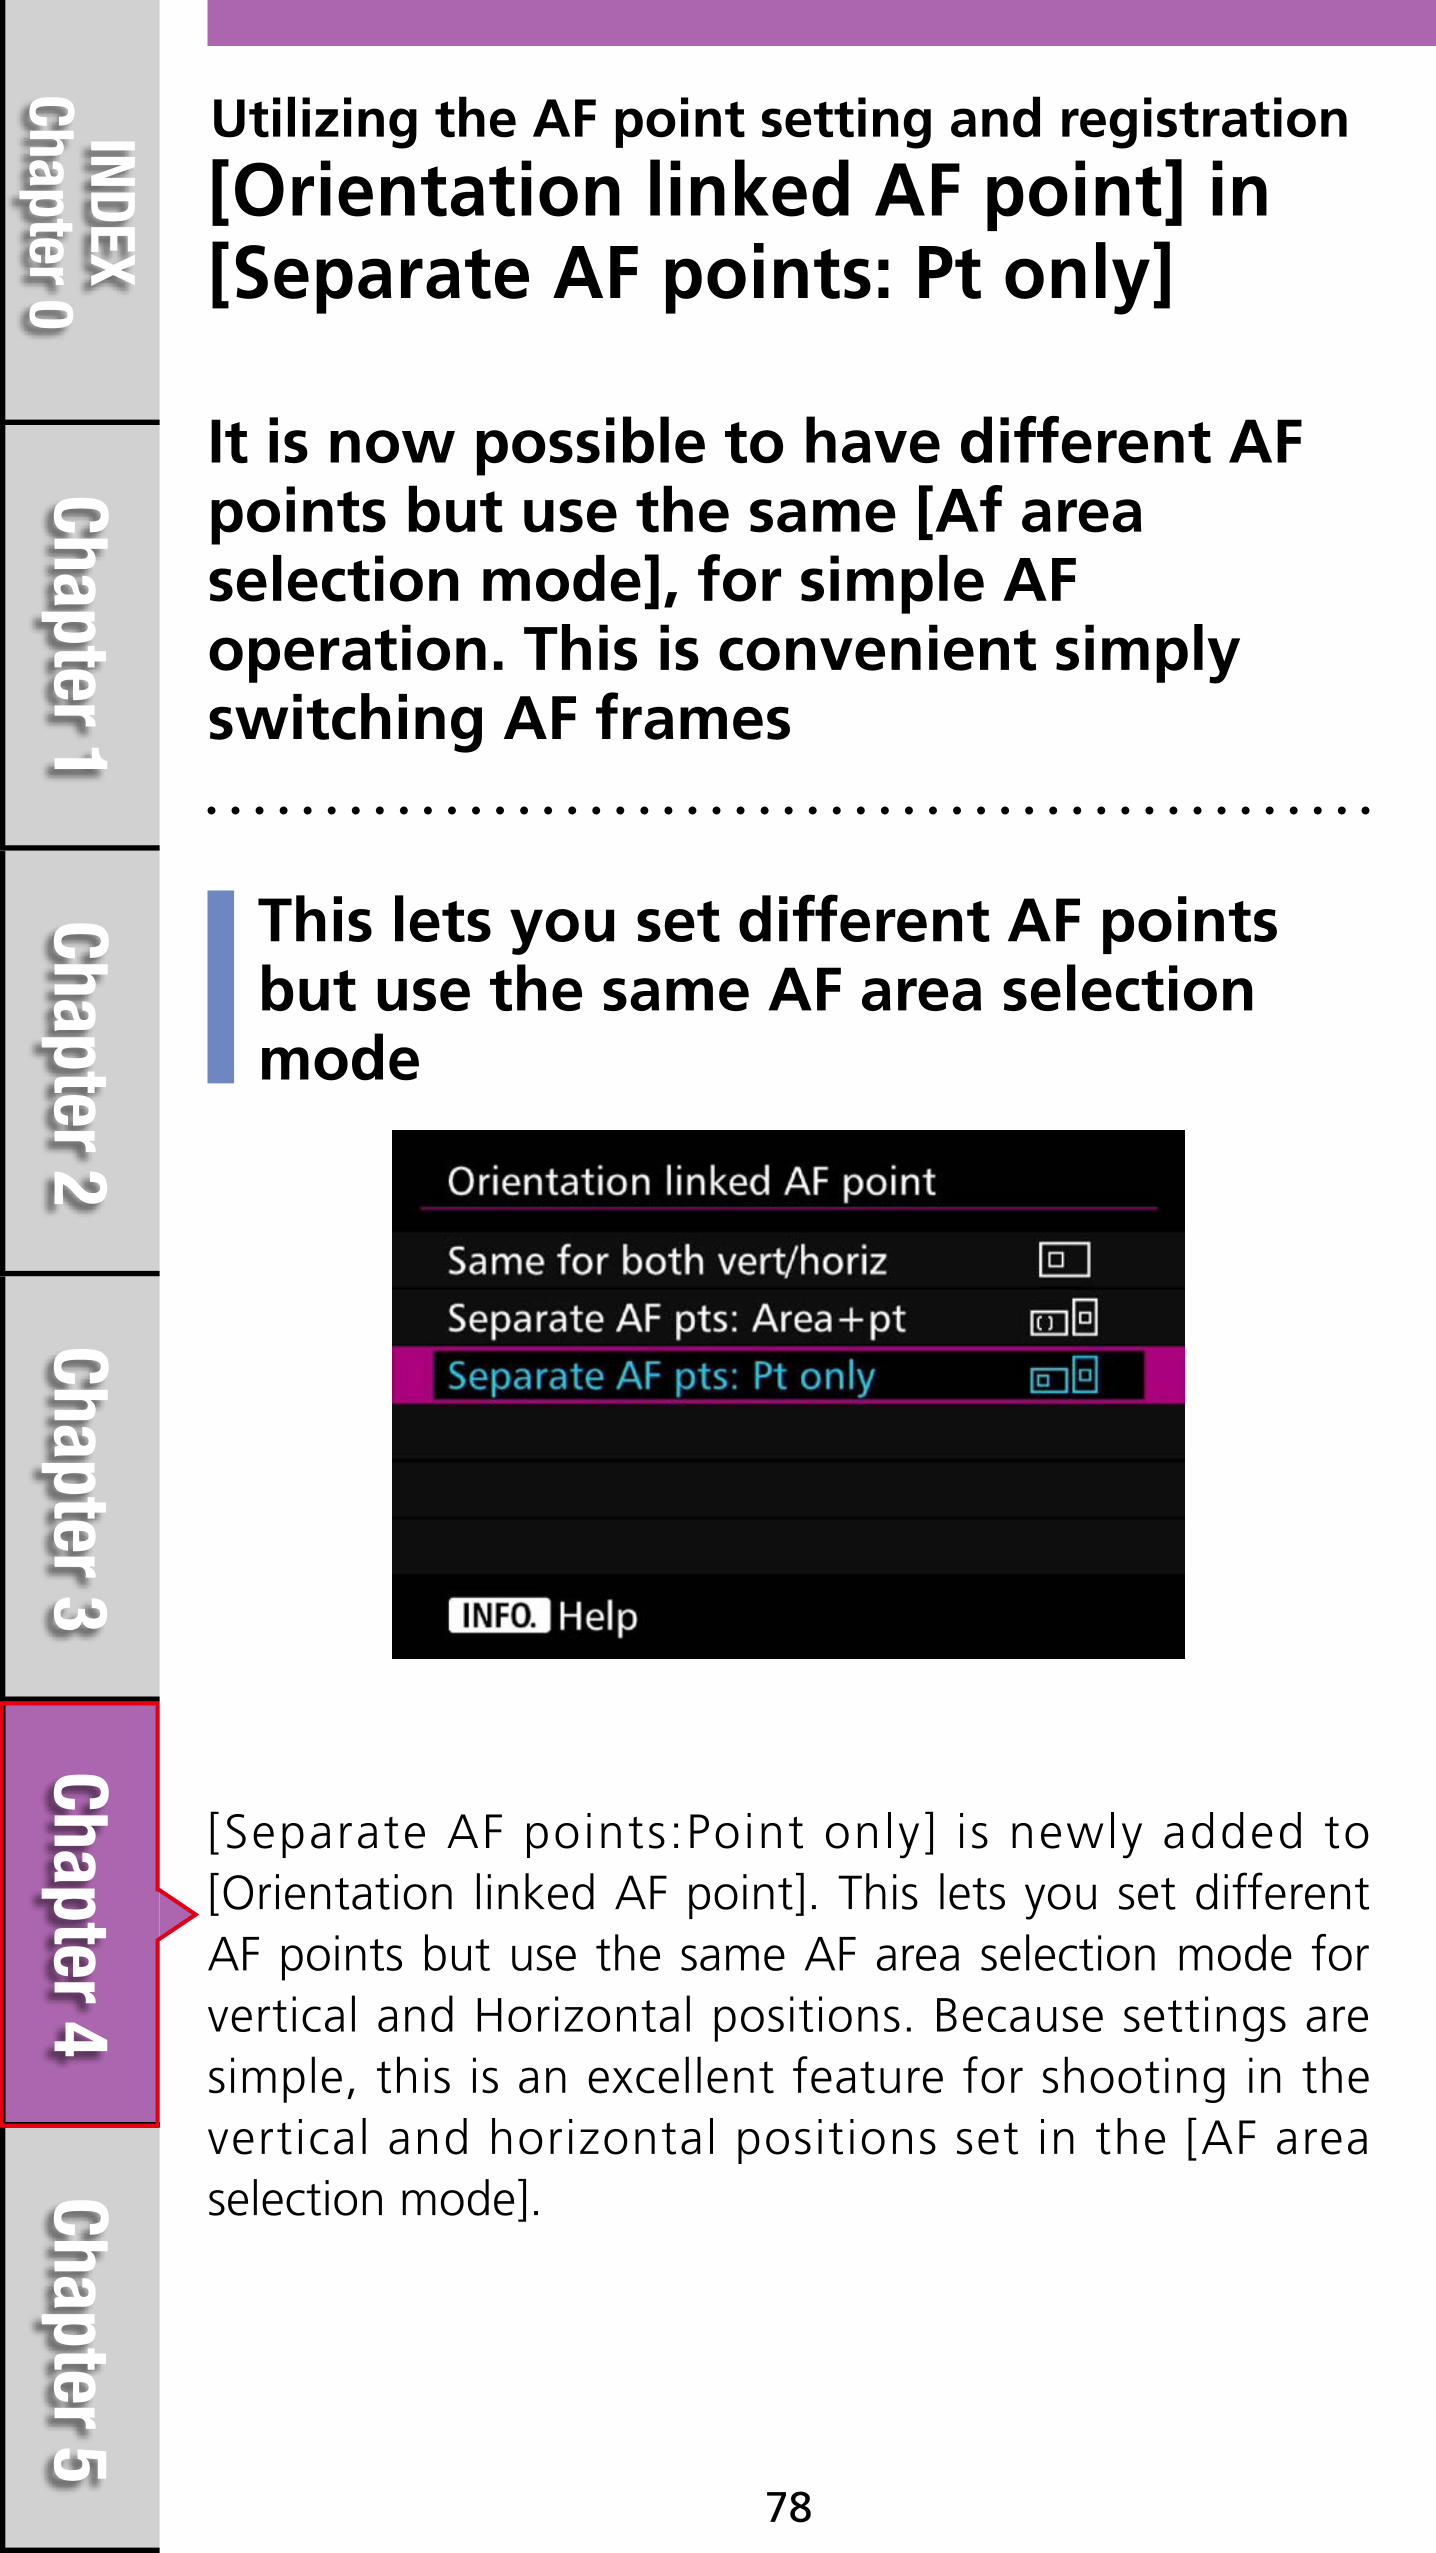
Utilizing the AF point setting and registration
[Orientation linked AF point] in[Separate AF points: Pt only]
It is now possible to have different AF points but use the same [Af area selection mode], for simple AF operation. This is convenient simply switching AF frames
This lets you set different AF points but use the same AF area selection mode
[Separate AF points:Point only] is newly added to [Orientation linked AF point]. This lets you set different AF points but use the same AF area selection mode for vertical and Horizontal positions. Because settings are simple, this is an excellent feature for shooting in the vertical and horizontal positions set in the [AF area selection mode].

Chapter 5Chapter 4
Chapter 3Chapter 2
Chapter 1INDEX
Chapter 0
79
[Separate AF points:Point only]
[Separate AF points: Area+Point]
Switch even the [AF area selection mode] in [Select separate AF points: Area + points]
Chapter 5Chapter 4
Chapter 3Chapter 2
Chapter 1INDEX
Chapter 0
80
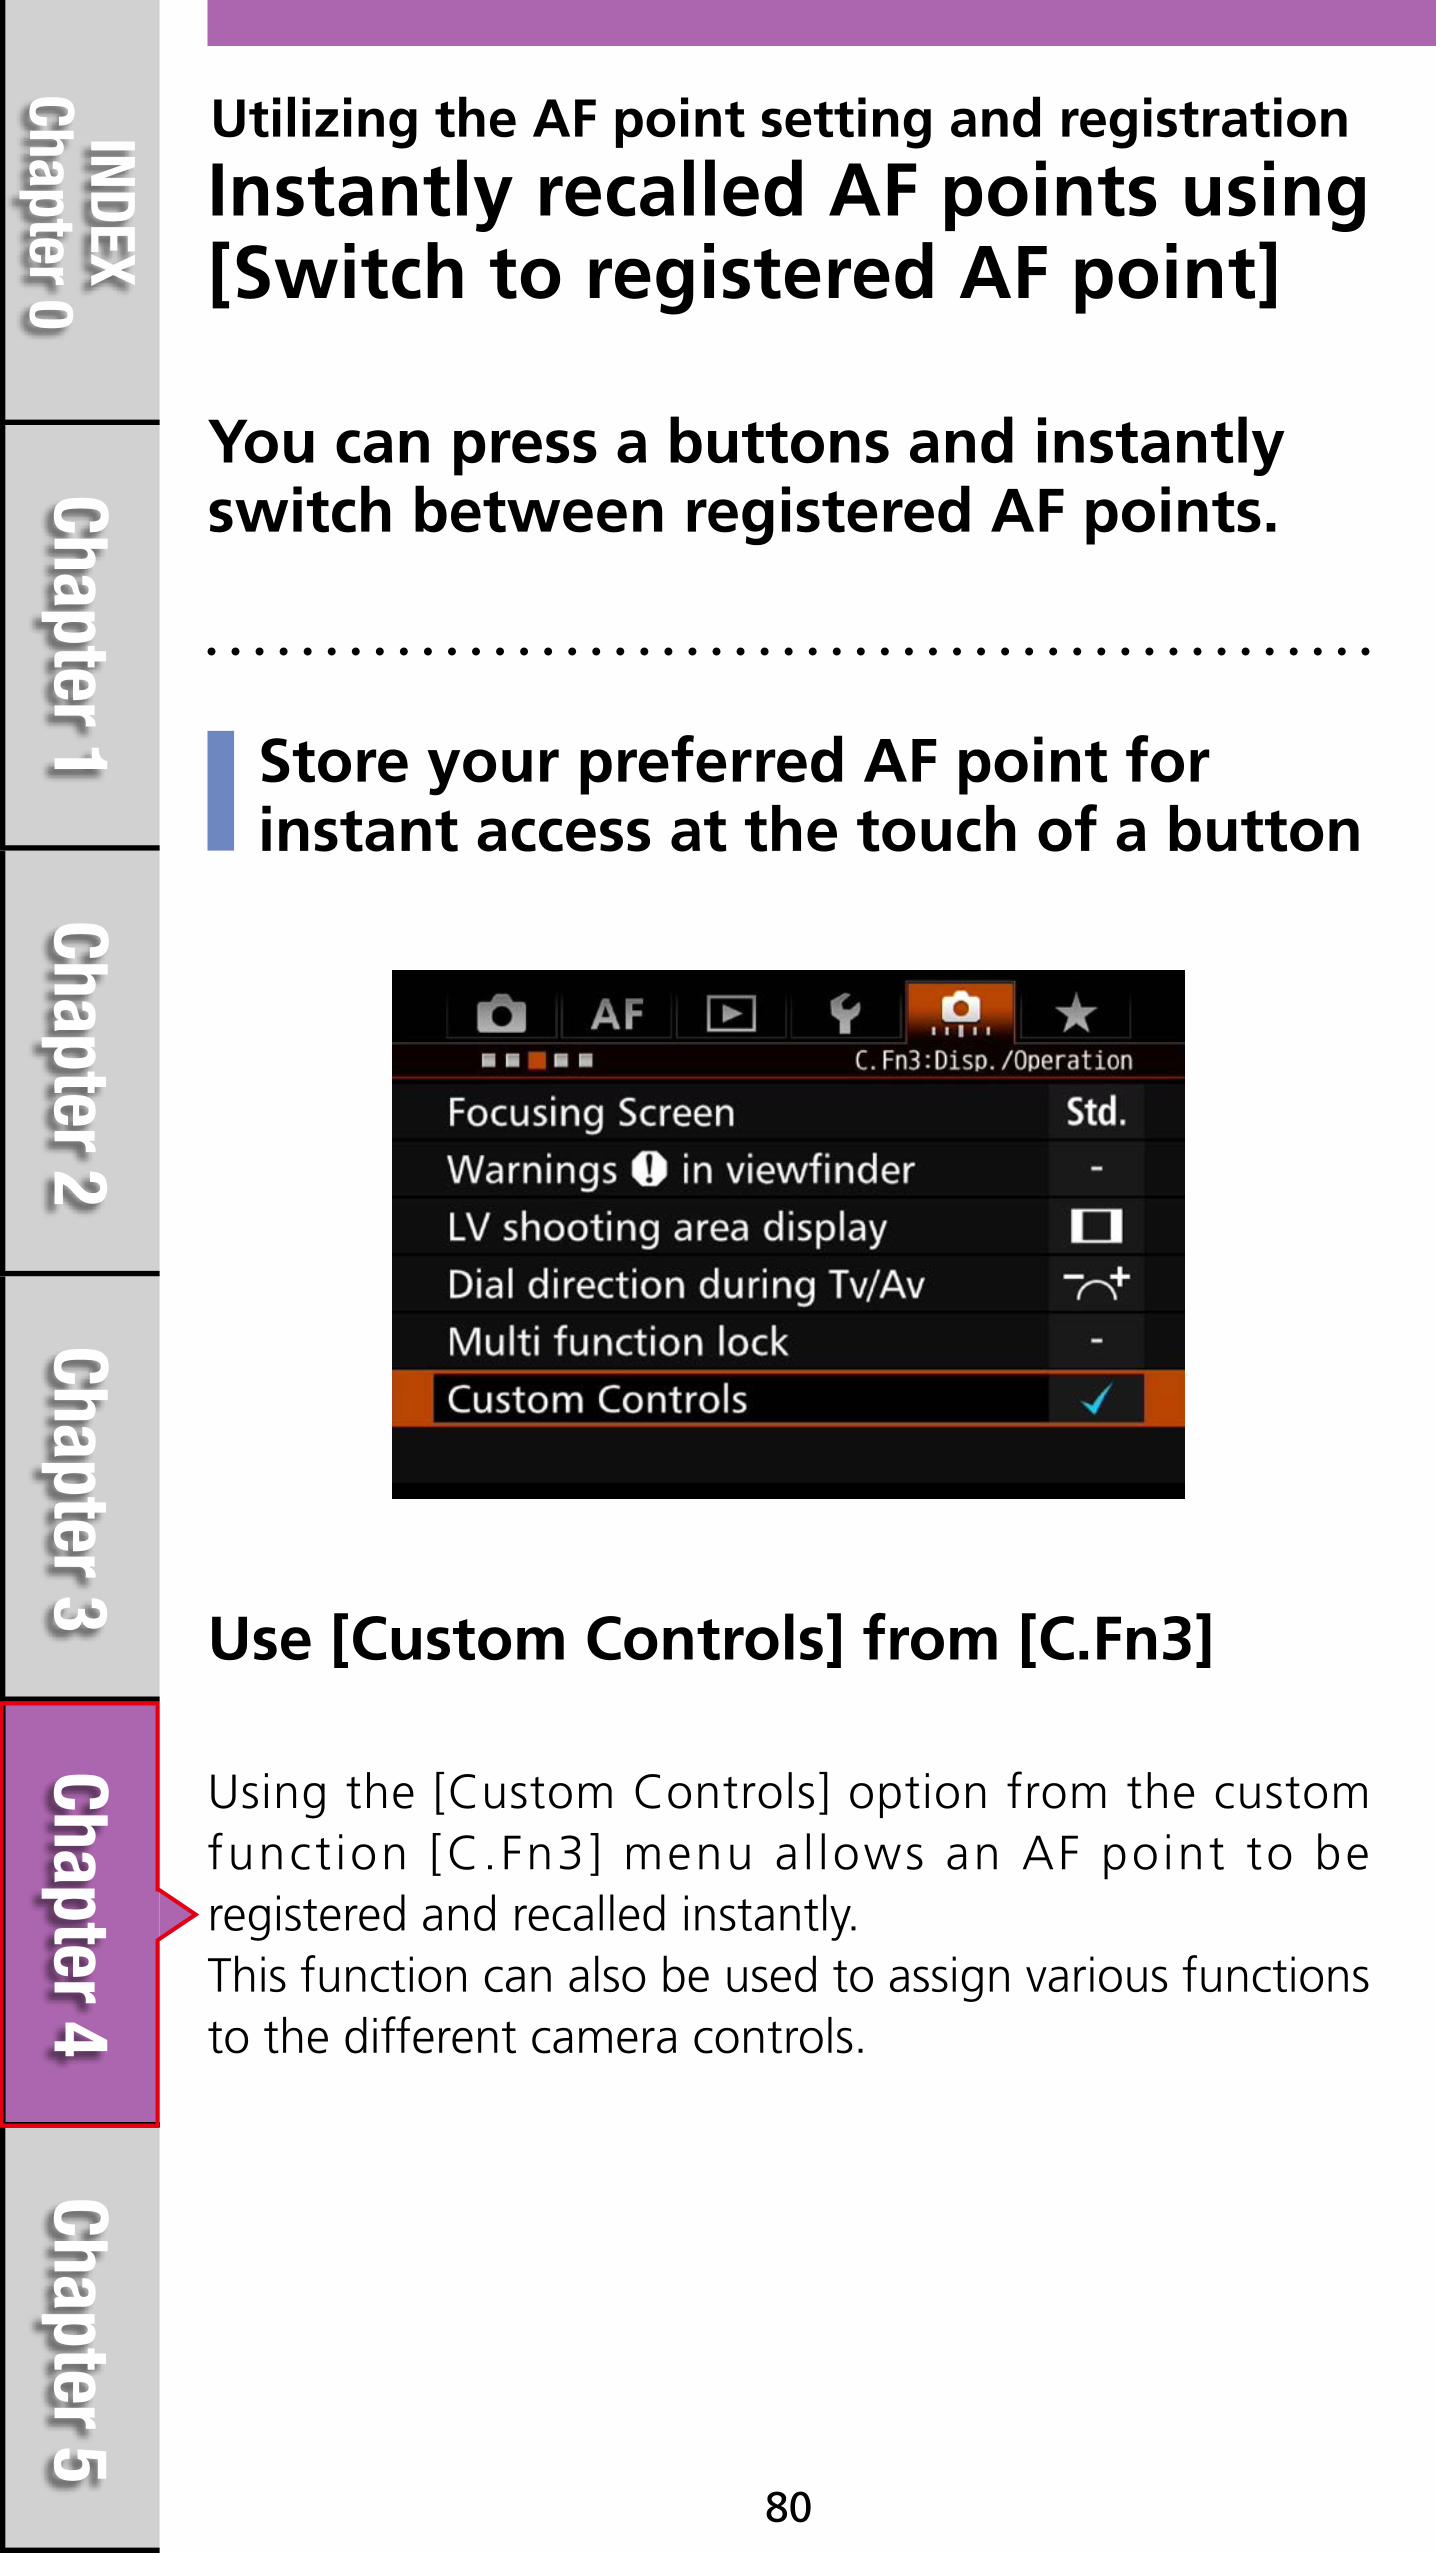
Utilizing the AF point setting and registration
Instantly recalled AF points using [Switch to registered AF point]
You can press a buttons and instantly switch between registered AF points.
Store your preferred AF point for instant access at the touch of a button
Use [Custom Controls] from [C.Fn3]
Using the [Custom Controls] option from the custom function [C.Fn3] menu al lows an AF point to be registered and recalled instantly.This function can also be used to assign various functions to the different camera controls.

Chapter 5Chapter 4
Chapter 3Chapter 2
Chapter 1INDEX
Chapter 0
81
There are two options to customize the controls to register and AF point
Manually select AF points you will want to recall.(This is possible with all AF area selection modes except Zone AF)
Assign [Metering - AF start] to the button, or the button then press info and select [Registered AF point]
Assign [Selected Afpt Cent/Reg AFpt] to the button
Assign [Switch to registered AF point] to the button, or button. Press info to select if the option is applied only when the button is held or not
A
C
B
Set up steps
1
2

Chapter 5Chapter 4
Chapter 3Chapter 2
Chapter 1INDEX
Chapter 0
82
Press the button while pressing the button until you hear a beep.
When the button, or the button are assigned the function [Metering - AF start], instant switching of registered AF points becomes possible. Press the button in the [Customize Controls] assignment screen, and then select [Registered AF point]. Now when the button is held the AF will use the registered AF pointed.
3
After selecting another AF point or AF area mode, press the assigned button (selected in stage 1) to switch to the registered AF point.
4
Chapter 5Chapter 4
Chapter 3Chapter 2
Chapter 1INDEX
Chapter 0
83
AF point registration and usage is described above. Also, for more advanced usage this setting can be combined with [Orientation linked AF point] setting (described on P. 73 - 79). Selecting the option [Select separate AF points], from the [Orientation linked AF point] option makes it is possible to register and recall AF points separately for all three positions, vertical (grip top/bottom), and horizontal as well as the remembered AF point for orientation.
How to cancel registered [Switch to registered AF point]
Press and .

Chapter 5Chapter 4
Chapter 3Chapter 2
Chapter 1INDEX
Chapter 0
84
Another function that is effective for quickly switching AF points while shooting is AF point registration and recall feature possible using[Custom Controls]. There are several methods to achieve this; one is to assign registered AF points to a button via [Custom Controls] function. The second method is AF point or [AF area selection mode] registration. By carrying out either of the two options, you can press a buttons and instantly switch between registered AF points.By registering frequently used AF points, or a strategically placed AF point, enables instant response without the need to reframe or alter the cameras position. Further refinement in operation is possible, with the <Depth-of-field preview>, and the <Lens AF stop> buttons when set to ([Switch to registered AF point] setting). These buttons provide the possibility to [Switch only while pressed] or [Maintain switching until pressed again] settings, making detailed customization possible. Using these settings enables the camera suit the way you shoot.

Chapter 5Chapter 4
Chapter 3Chapter 2
Chapter 1INDEX
Chapter 0
85
This scene was captured by first shooting the airplane that flew from the right to the left after placing the user-set AF point on the athlete at the left, then pressing the button once to switch to the registered AF point at the bottom right, and then placing the airplane that flew from left to right in the right side of the screen. Activating a registered AF point is useful for photographing vehicles such as this, and tennis,badminton plays and other sports where the subjects move left and right in the center of the screen, and can be used as described above. This type of use is effective for shooting competitive sports.

Chapter 5Chapter 4
Chapter 3Chapter 2
Chapter 1INDEX
Chapter 0
86
Instantly switching AF area selection modes
By assigning an [AF area selection mode] to a specific button in the [Custom Control] screen, you can continue shooting and switch AF areas instantly with the press of single button without having to move your eye from the viewfinder.
Instantly switching AF area selection modes with a single button
Assigning functions
On shooting with optional 'AF area selection mode'
Switchable into set 'AF area selection mode'
By pressing the assigned button
Chapter 5Chapter 4
Chapter 3Chapter 2
Chapter 1INDEX
Chapter 0
87
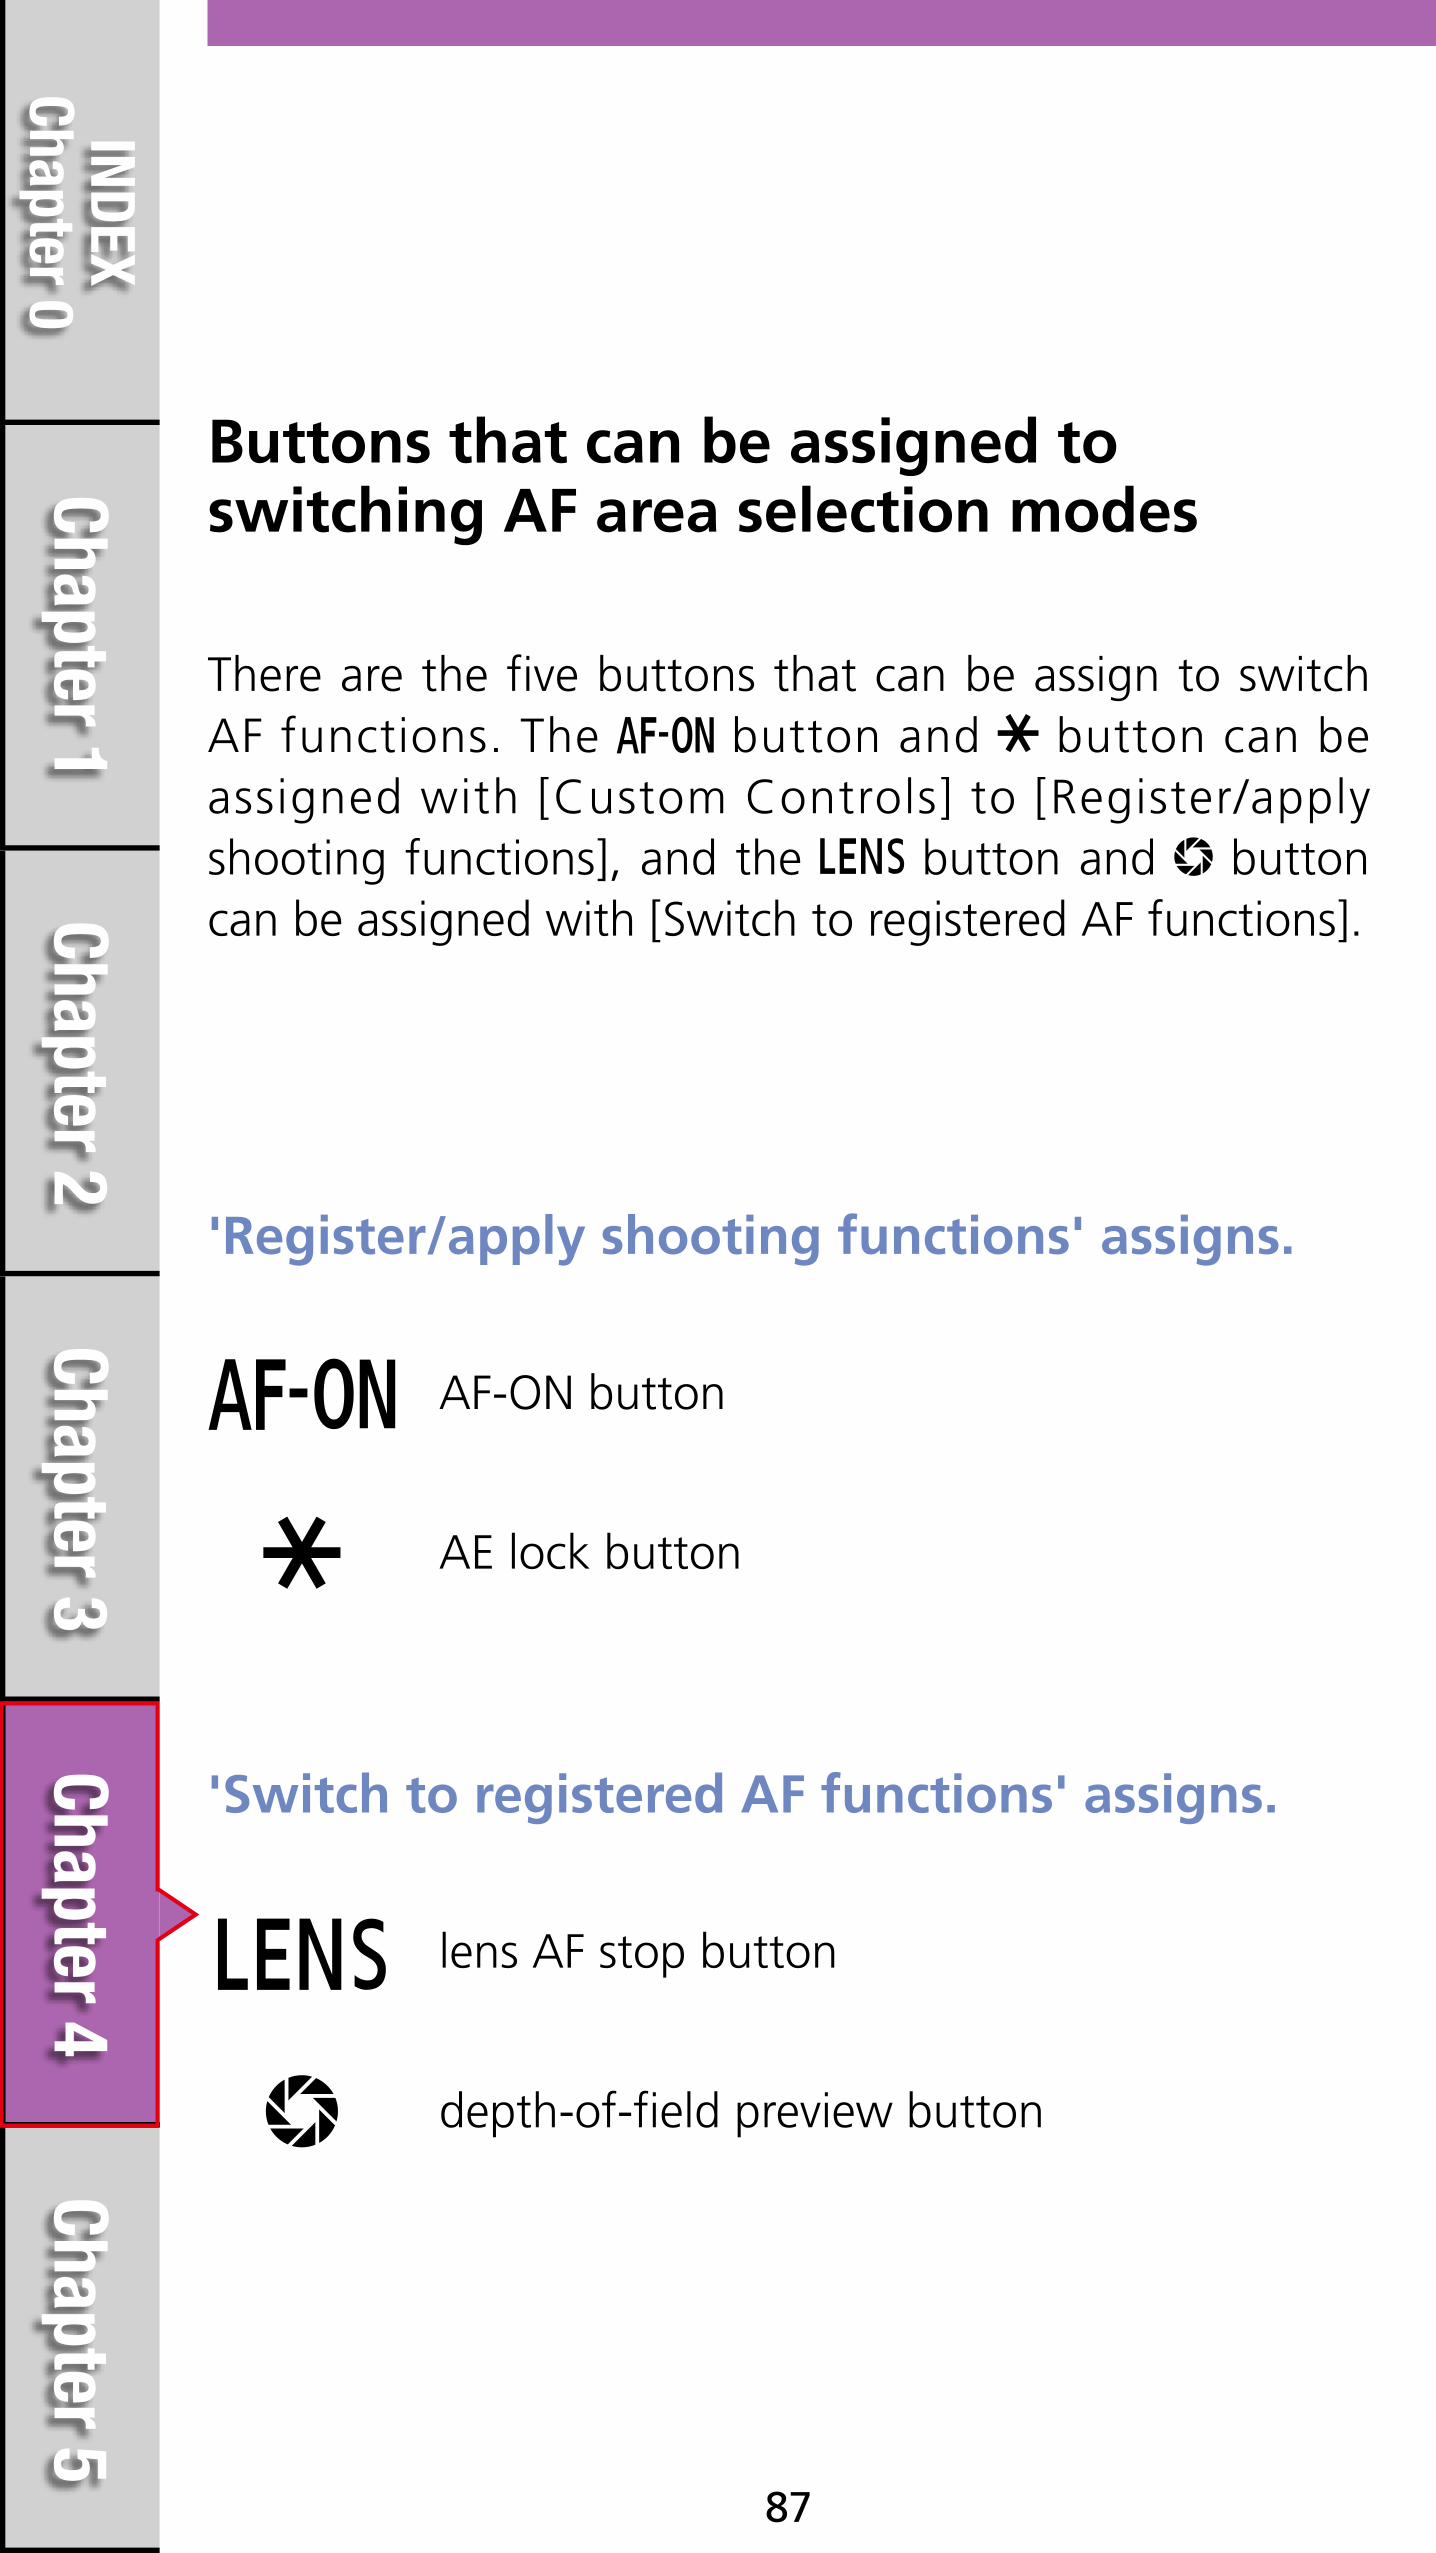
There are the five buttons that can be assign to switch AF functions. The button and button can be assigned with [Custom Controls] to [Register/apply shooting functions], and the button and button can be assigned with [Switch to registered AF functions].
Buttons that can be assigned to switching AF area selection modes
AF-ON button
AE lock button
lens AF stop button
depth-of-field preview button
'Register/apply shooting functions' assigns.
'Switch to registered AF functions' assigns.

Chapter 5Chapter 4
Chapter 3Chapter 2
Chapter 1INDEX
Chapter 0
88
Assign [Register/apply shooting functions] to the button or the button with the custom function’s [Custom Controls]. Press the button on the assign function’s selection screen, (various functions can be set) and select the [AF area selection mode] that you want to use.
Assign to the button, or the button to [Register/apply shooting functions]
Select the [AF area selection mode]
Press the button
[Register/apply shooting functions]
Set up steps
Chapter 5Chapter 4
Chapter 3Chapter 2
Chapter 1INDEX
Chapter 0
89
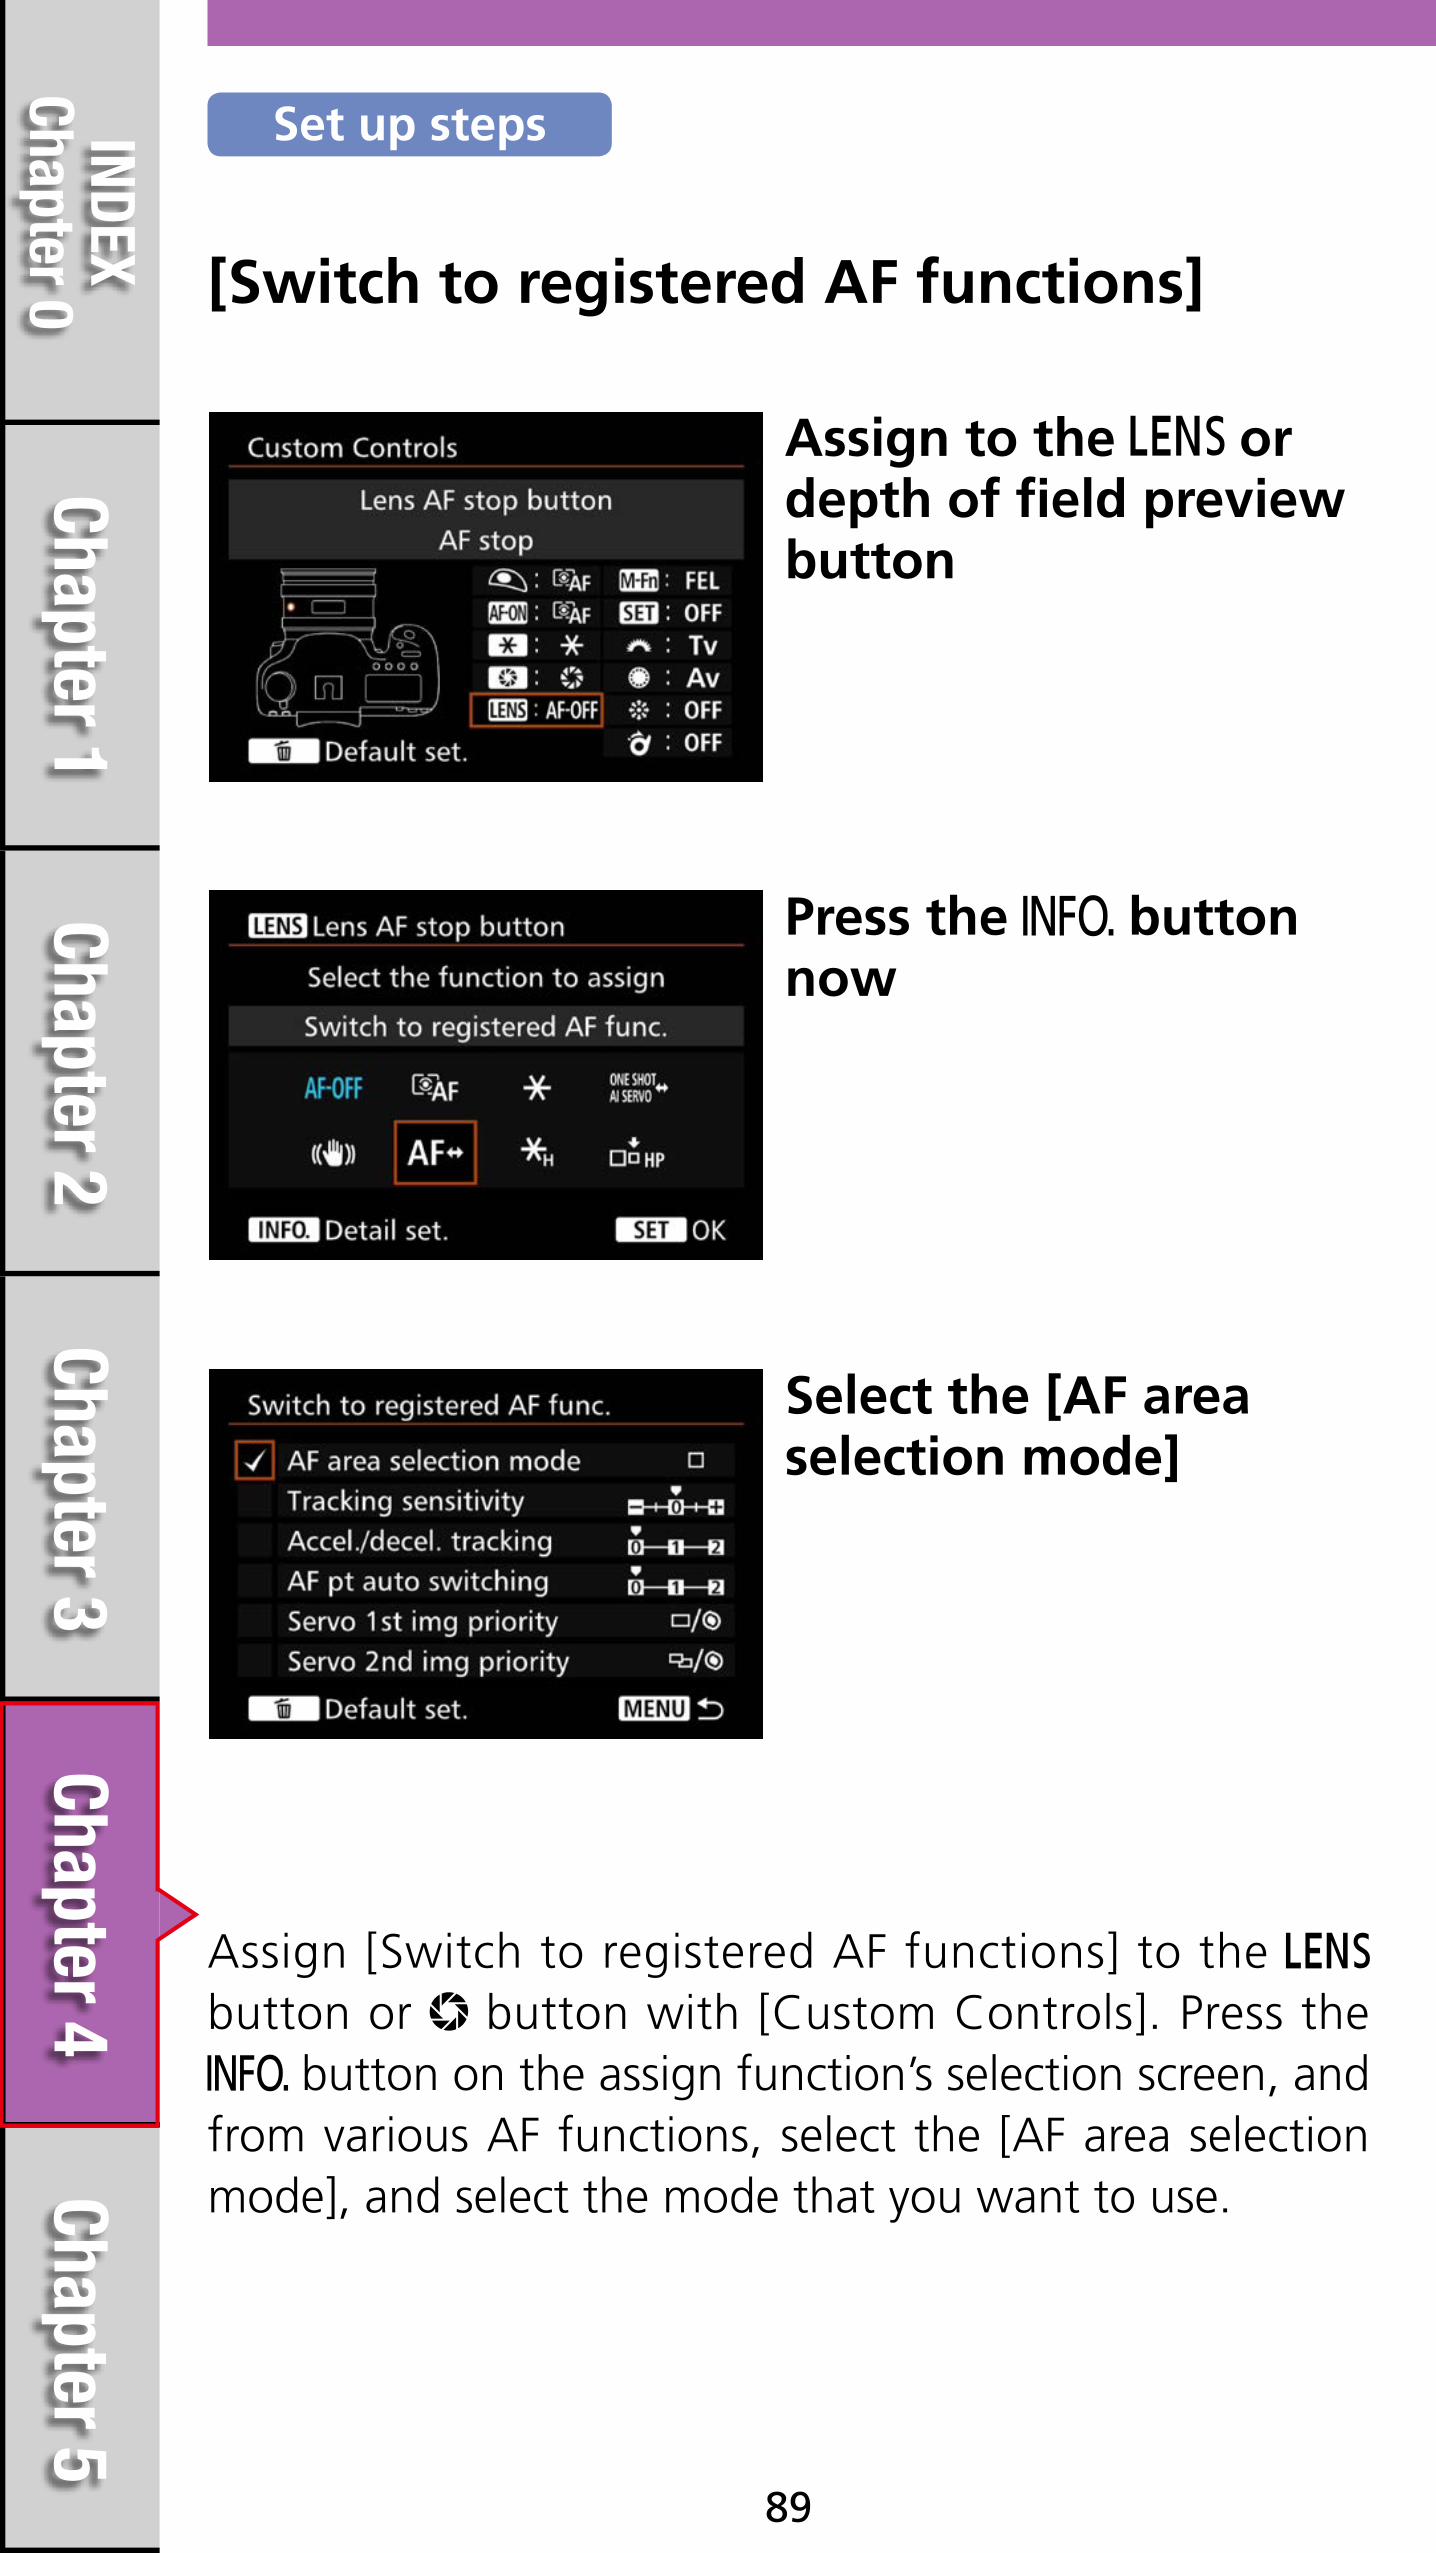
Assign to the or depth of field preview button
Select the [AF area selection mode]
Press the button now
[Switch to registered AF functions]
Set up steps
Assign [Switch to registered AF functions] to the button or button with [Custom Controls]. Press the
button on the assign function’s selection screen, and from various AF functions, select the [AF area selection mode], and select the mode that you want to use.

Chapter 5Chapter 4
Chapter 3Chapter 2
Chapter 1INDEX
Chapter 0
90
AF area selection modes such as [Single-point AF] and [AF point expansion] are effective for switching according to the size and type of subjects. While looking through the viewfinder it can be difficult to change the mode while tracking the subject. However, by assigning the AF area selection modes you want to use, to specific buttons, you can switch instantly while continuing shooting. There are four buttons that can be assigned. Think about the characteristics of the sports and subjects you want to shoot beforehand, and assign the AF area selection modes you think you will use. By assigning different modes to each of the four buttons therefore six modes, you can control up to six modes at will. In addition, aside from the AF area selection modes, various functions can be registered and applied, so by making settings as needed, you have the flexibility to handle conditions as they change.

Chapter 5Chapter 4
Chapter 3Chapter 2
Chapter 1INDEX
Chapter 0
91
Synchronize initial AF point used for 65-point auto selection AF with manually selected point
When switching to [Auto selection: 65 point AF] from another [AF area selection mode], this setting activates auto selection AF starting with the AF point selected before switching in [Initial AFpt. AI Servo AF] Manually set points . This is extremely effective for a series of scenes when switching to other modes to [Auto selection: 65 point AF] for shooting.
Use the AF point from another mode to move to auto selection
[AI Servo AF initiation point in ] has been added to [AF4] to [Manually set points in ]

Chapter 5Chapter 4
Chapter 3Chapter 2
Chapter 1INDEX
Chapter 0
92
[Manual selection: 1 point AF]
[Auto selection: 65 point AF]
For example, this is effective when switch from [Manual selection: 1 point AF] to [Auto selection: 65 point AF] when continuously shooting an athlete to track and shoot.
Chapter 5Chapter 4
Chapter 3Chapter 2
Chapter 1INDEX
Chapter 0
93
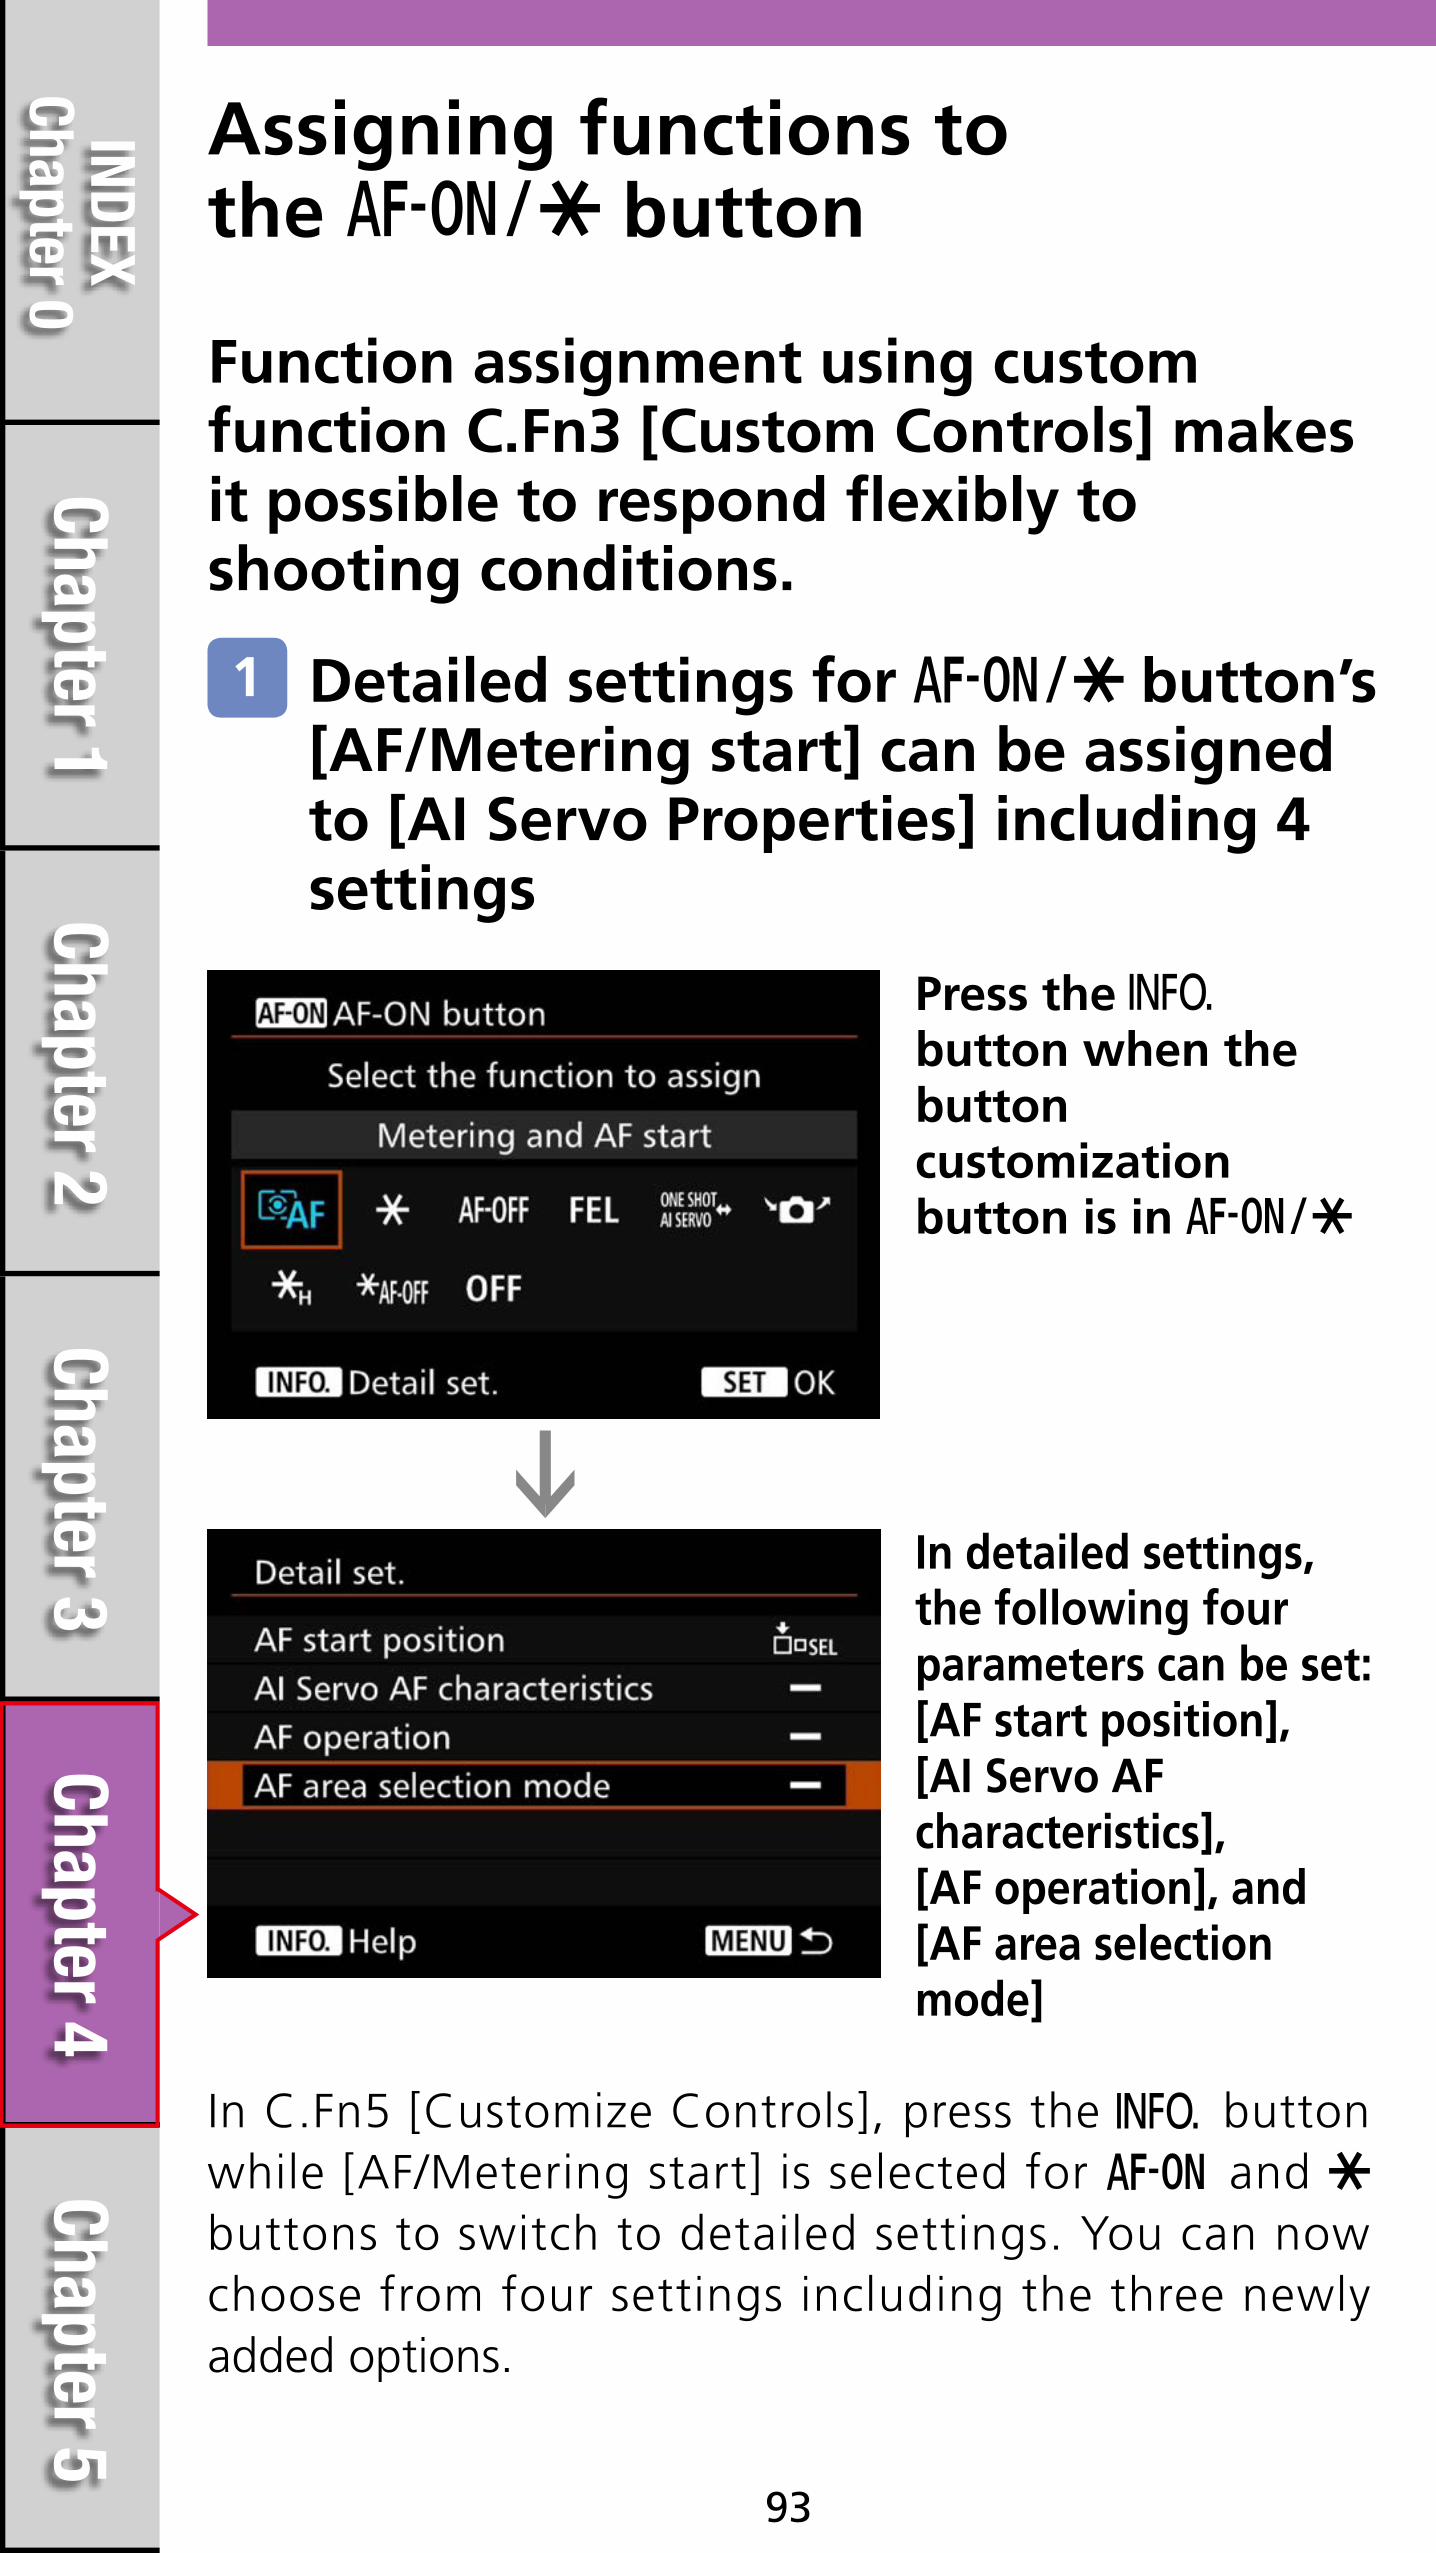
Assigning functions to the button
Press the button when the button customization button is in
Function assignment using custom function C.Fn3 [Custom Controls] makes it possible to respond flexibly to shooting conditions.
Detailed settings for button’s [AF/Metering start] can be assigned to [AI Servo Properties] including 4 settings
1
In C.Fn5 [Customize Controls], press the button while [AF/Metering start] is selected for and buttons to switch to detailed settings. You can now choose from four settings including the three newly added options.
In detailed settings, the following four parameters can be set: [AF start position], [AI Servo AF characteristics], [AF operation], and [AF area selection mode]

Chapter 5Chapter 4
Chapter 3Chapter 2
Chapter 1INDEX
Chapter 0
94
This feature makes it possible to instantly switch between continuous shooting modes using the two adjacent buttons
Assign [Case2] to
Assign [Case1] to
When usually using the button (Case1) to shoot, use the button (Case2) to shoot when there are many obstacles

Chapter 5Chapter 4
Chapter 3Chapter 2
Chapter 1INDEX
Chapter 0
95
Switch AI Servo AF characteristics with the button and button
Example:
When you assign functions to the and buttons, those two adjacent buttons can be used to instantly switch functions for shooting. For example, when assigning the two often used AI Servo AF characteristics (Cases) , it is possible to switch to the optimal AI Servo AF characteristics depending on the subject and if any obstructions may enter the frame.

Chapter 5Chapter 4
Chapter 3Chapter 2
Chapter 1INDEX
Chapter 0
96
It is now possible to assign [ONE SHOT AI SERVO] to the and
buttons
2
[ONE SHOT AI SERVO] has been added to the settings that can be assigned to the and buttons using [Button customization]. With these settings, you can switch AF modes while the button is pressed.
It is now possible to assign [ONE SHOT AI SERVO] to the and buttons using button customization

Chapter 5Chapter 4
Chapter 3Chapter 2
Chapter 1INDEX
Chapter 0
97
The buttons can easily be used to switch to One Shot and AI Servo while looking through the viewfinder
[ONE SHOT AI SERVO] is effective when assigned to the and buttons. This makes it possible to instantly
switch AF modes when you need to shoot quickly.

Chapter 5Chapter 4
Chapter 3Chapter 2
Chapter 1INDEX
Chapter 0
98
Function assignment using custom function C.Fn3 [Custom Controls] makes it possible to respond flexibly to shooting conditions. For example, when using AF functions that can be assigned to the and buttons on the back of the camera, you can instantly switch functions to match the subject and situation without changing how you hold the camera.When [AF/Metering start] is assigned to the or buttons, you can perform detailed settings in [AF start point], [AI Servo AF characteristics (Case)], [AF mode], and [Super high-speed continuous shooting mode]. Using those settings, you can instantly switch parameters to match subject movement and characteristics by using the button to switch to Case1, and the button to switch to Case2, or using the button to switch to AI Servo AF, and the button to switch to One Shot.Because [ONE SHOT AI SERVO] can now be assigned to the and buttons, you can customize controls to meet your preferences or the scene.

Chapter 5Chapter 4
Chapter 3Chapter 2
Chapter 1INDEX
Chapter 0
99
Intelligent Viewfinder II
The Intelligent Viewfinder II is an intelligent viewfinder capable of displaying a rich variety of information in an easy to view format.
New Intelligent Viewfinder equipped on the EOS 7D Mark II
Information items that are displayed or hidden in the viewfinder can be set individually
Electronic level
Flicker detection
AF status indicator
Shooting mode
White balance
AF operation
Drive mode
Metering mode
Exposure level indicator(Metering / Flash metering)
Warning symbol
JPEG/RAW

Chapter 5Chapter 4
Chapter 3Chapter 2
Chapter 1INDEX
Chapter 0
100
Set in [ 2] tab,[Viewfinder display] [Viewfinder level]
When the viewfinder level is set to [Display], the electronic level will appear at the top of the viewfinder. The large, easy to see viewfinder display makes it easier to check camera tilt when shooting.
Viewfinder level

Chapter 5Chapter 4
Chapter 3Chapter 2
Chapter 1INDEX
Chapter 0
101
Viewfinder display
Select [ 2] tab > [Viewfinder display]
Select [Show/hide in viewfinder]
Add a < > to items you want to display
Function setting information related to shooting can be displayed in the lower par t of the view finder. Items to display in [Show/hide in v iewfinder] can be set individually.

Chapter 5Chapter 4
Chapter 3Chapter 2
Chapter 1INDEX
Chapter 0
102
Switching shooting functions while looking through the viewfinder is easyThe Intelligent Viewfinder II on the EOS 7D Mark II is an intelligent viewfinder capable of displaying a rich variety of information in an easy to view format. Especially useful items that can be displayed in the viewfinder are the electronic level and function setting information (can be shown or hidden according to settings). Information important to shooting, including the AF area selection mode represented by the AF frame, can be checked in the viewfinder, making switching functions for shooting easier without ever taking your eye away from the viewfinder. Settings can be switched using the buttons on top of the camera (switched with the Main Dial or Quick Control Dial when the applicable items are available in the viewfinder display), however, in the button customization function for starting settings, this can be assigned to the < > button. Coupled with the easy to use buttons and levers while looking through the viewfinder, a new control system is now available.
Pressing the < > button changes the settable function in thissequence : . . AF WB . .
: Cycle : . /Drive . AF/WB .

Chapter 5Chapter 4
Chapter 3Chapter 2
Chapter 1INDEX
Chapter 0
103
Anti-flicker shooting
Reducing the flicker’s effect from fluorescent lights when shooting
Choose [Enable]
Select [ 4] tab > [Anti-flicker shoot.]
When this function is used, the camera will detect flickering cycles in the light source and shoot at an appropriate time in order to reduce the effect of flickering on the exposure and color balance.
Chapter 5Chapter 4
Chapter 3Chapter 2
Chapter 1INDEX
Chapter 0
104
This is effective when shooting continuously using a high shutter speed
When shooting under fluorescent lighting with a fast shutter speed, flickering can result in uneven exposure at the top and bottom of thescreen, and produce uneven exposure levels. Although adverse effects from flickering is due to a tiny difference in shooting timing, the [Anti-flicker shoot.] function on the EOS 7D Mark II can be used to adjust shooting timing to reduce these adverse effects. This function is effective when shooting sporting competitions or other events held in gymnasiums or auditoriums.
*When [Anti-flicker shoot.] is [Enable] and you shoot under a flickering light source, the shutter-release time lag may become slightly longer. Also, the continuous shooting speed may become slightly slower, and the shooting interval may become irregular.

Chapter 5Chapter 4
Chapter 3Chapter 2
Chapter 1INDEX
Chapter 0
105
Anti-flicker shooting [Enable]
This was shot with the [Anti-flicker shoot.] function. With this function, uneven exposure due to flicker effects was avoided when shooting. Photos taken without the anti-flicker shoot function result in uneven exposure when using continuous shooting.

Chapter 5Chapter 4
Chapter 3Chapter 2
Chapter 1INDEX
Chapter 0
106
Anti-flicker shooting [Disable] (1)
Shots that show color bias due to flicker effects
Chapter 5Chapter 4
Chapter 3Chapter 2
Chapter 1INDEX
Chapter 0
107
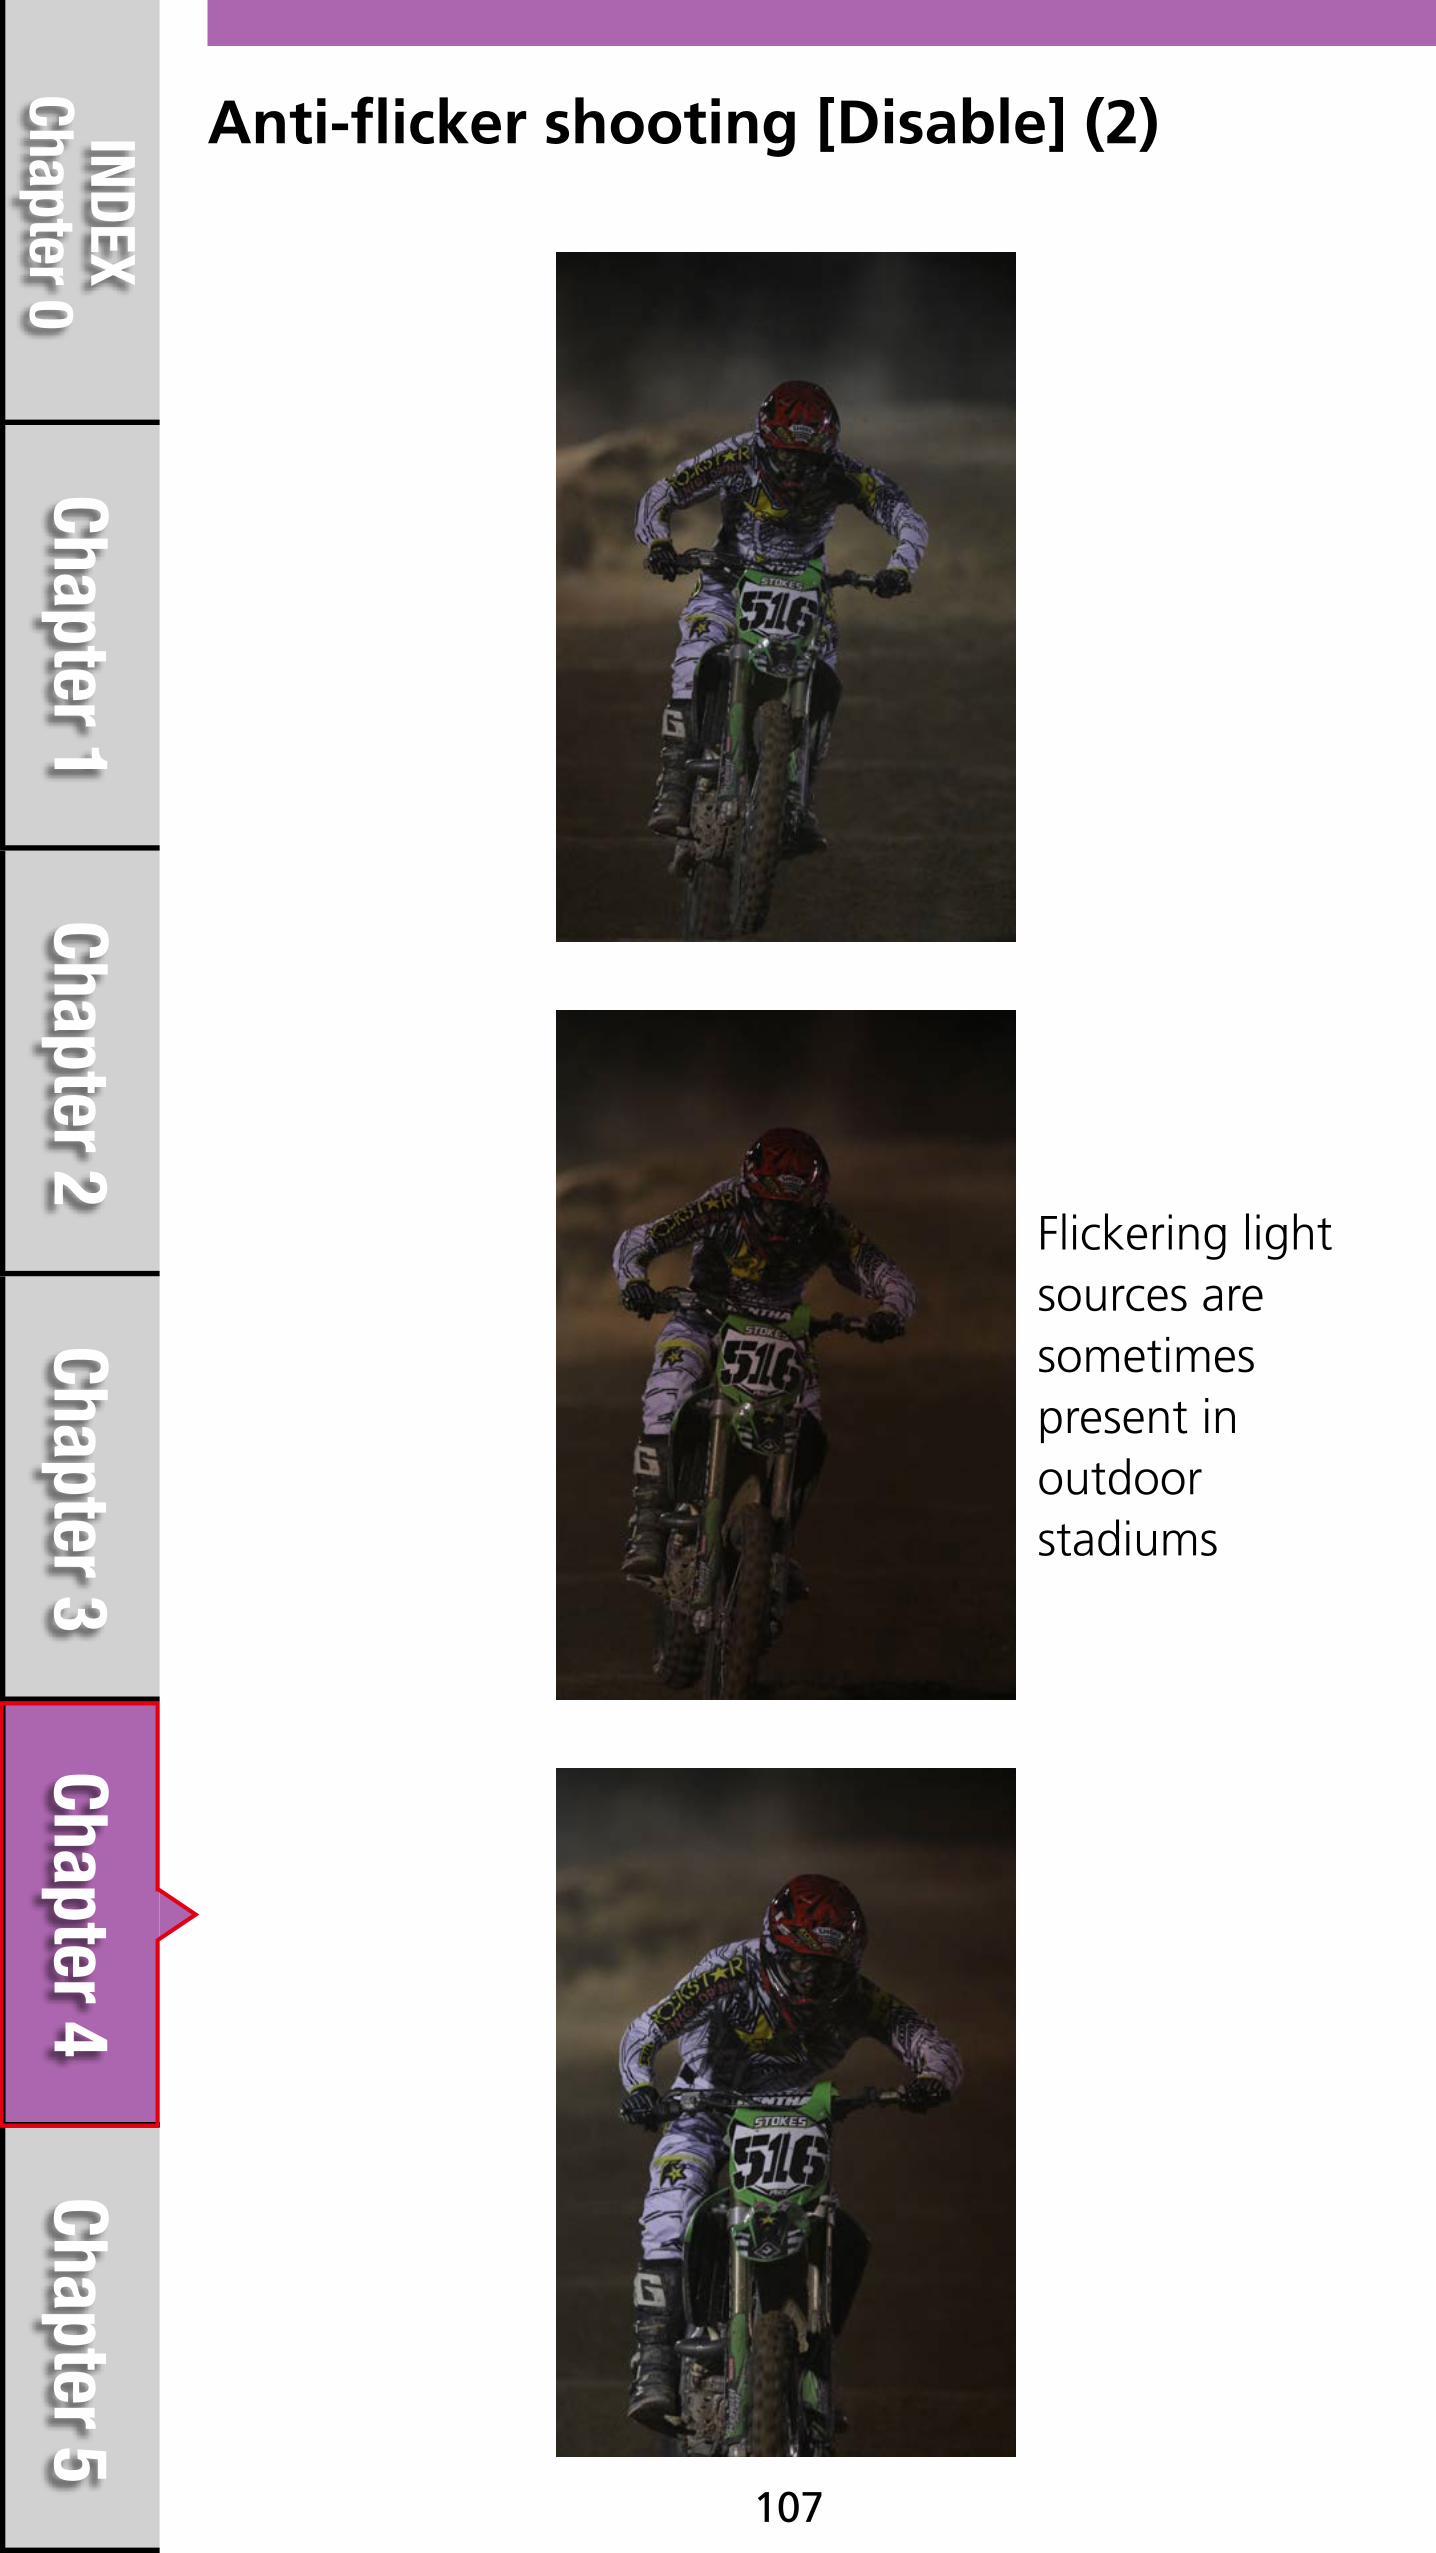
Anti-flicker shooting [Disable] (2)
Flickering light sources are sometimes present in outdoor stadiums

Chapter 5Chapter 4
Chapter 3Chapter 2
Chapter 1INDEX
Chapter 0
Chapter 5
108
Recommended settings:[Subject/Shooting case]
Still life / landscape
Portrait
Fast-moving subjects that approach in a straight line
Sports scenes with intense movement
Sports with sudden deceleration
Sports with up and down movement and jumping
Large subjects such as airplanes
Small subjects such as wild birds
Subjects moving around freely/ For framing utilizing space
Points for mastering AF functions for each case

Chapter 5Chapter 4
Chapter 3Chapter 2
Chapter 1INDEX
Chapter 0
109
AF mode ONE SHOTAI SERVO
Drive mode Single imageHigh-speed continuous shooting
AF area selectionmode
Single-point Spot AFSingle-point AFAF point expansion (Manual selection )AF point expansion (Surrounding)Zone AFLarge Zone AF65-point automatic selection AF
AF ConfigurationTool
———(Not used for ONE SHOT AF)
Still life/landscape
Use [Single-point AF] to focus on the optimal location in the composition
When shooting still subjects such as landscapes, set [AF area selection mode] to [Single point AF], then select the AF point in the optimal location of the composition and shoot. Set the AF mode to [ONE SHOT].
Recommended settings

Chapter 5Chapter 4
Chapter 3Chapter 2
Chapter 1INDEX
Chapter 0
110
Recommended settings
Portrait
[Single-point Spot AF] is especiallyeffective for focusing on eyes.
When shooting close - up portraits, it is important to focus on the eye closest to you. In that situation, set the AF area selection mode to [Spot single point AF] to focus. AF mode ONE SHOT is also appropriate.
AF mode ONE SHOTAI SERVO
Drive mode Single imageHigh-speed continuous shooting
AF area selectionmode
Single-point Spot AFSingle-point AFAF point expansion (Manual selection )AF point expansion (Surrounding)Zone AFLarge Zone AF65-point automatic selection AF
AF ConfigurationTool
———(Not used for ONE SHOT AF)

Chapter 5Chapter 4
Chapter 3Chapter 2
Chapter 1INDEX
Chapter 0
111
Recommended settings
Fast-moving subjects that approach in a straight line
Case1 is a standard setting foruse in a wide variety of situations
For situations where you are shooting an athlete from head on, Single point AF and AF Configuration Tool Case1 setting can be used to accurately capture the movement of a subject that comes right by your position. Don’t forget about AI SERVO and high-speed continuous shooting.
AF mode ONE SHOTAI SERVO
Drive mode Single imageHigh-speed continuous shooting
AF area selectionmode
Single-point Spot AFSingle-point AFAF point expansion (Manual selection )AF point expansion (Surrounding)Zone AFLarge Zone AF65-point automatic selection AF
AF ConfigurationTool
Case1

Chapter 5Chapter 4
Chapter 3Chapter 2
Chapter 1INDEX
Chapter 0
112
Recommended settings
Sports scenes with intense movement
Continue to track subjectswith [AF point expansion] and [Case2].
For sports with a lot of intense movement, such as kayaking, soccer, and rugby, where other subjects (obstructions) block the subject you are aiming for, the combination of AF point expansion and Case2 is effective. Choose either the Up, down, left, right option or Surrounding for AF point expansion according to the amount of subject movement.
AF mode ONE SHOTAI SERVO
Drive mode Single imageHigh-speed continuous shooting
AF area selectionmode
Single-point Spot AFSingle-point AFAF point expansion (Manual selection )AF point expansion (Surrounding)Zone AFLarge Zone AF65-point automatic selection AF
AF ConfigurationTool
Case2

Chapter 5Chapter 4
Chapter 3Chapter 2
Chapter 1INDEX
Chapter 0
113
Recommended settings
Sports with sudden deceleration
Use [Case4] to deal with changes in speed.
For competitions with sudden deceleration (or sudden acceleration) such as cornering in motor sports and running long jumps in track and field, [Case4] is effective. [Case6] is also recommended for a lot of movement in the up, down, left, right directions.
AF mode ONE SHOTAI SERVO
Drive mode Single imageHigh-speed continuous shooting
AF area selectionmode
Single-point Spot AFSingle-point AFAF point expansion (Manual selection )AF point expansion (Surrounding)Zone AFLarge Zone AF65-point automatic selection AF
AF ConfigurationTool
Case4 or Case6
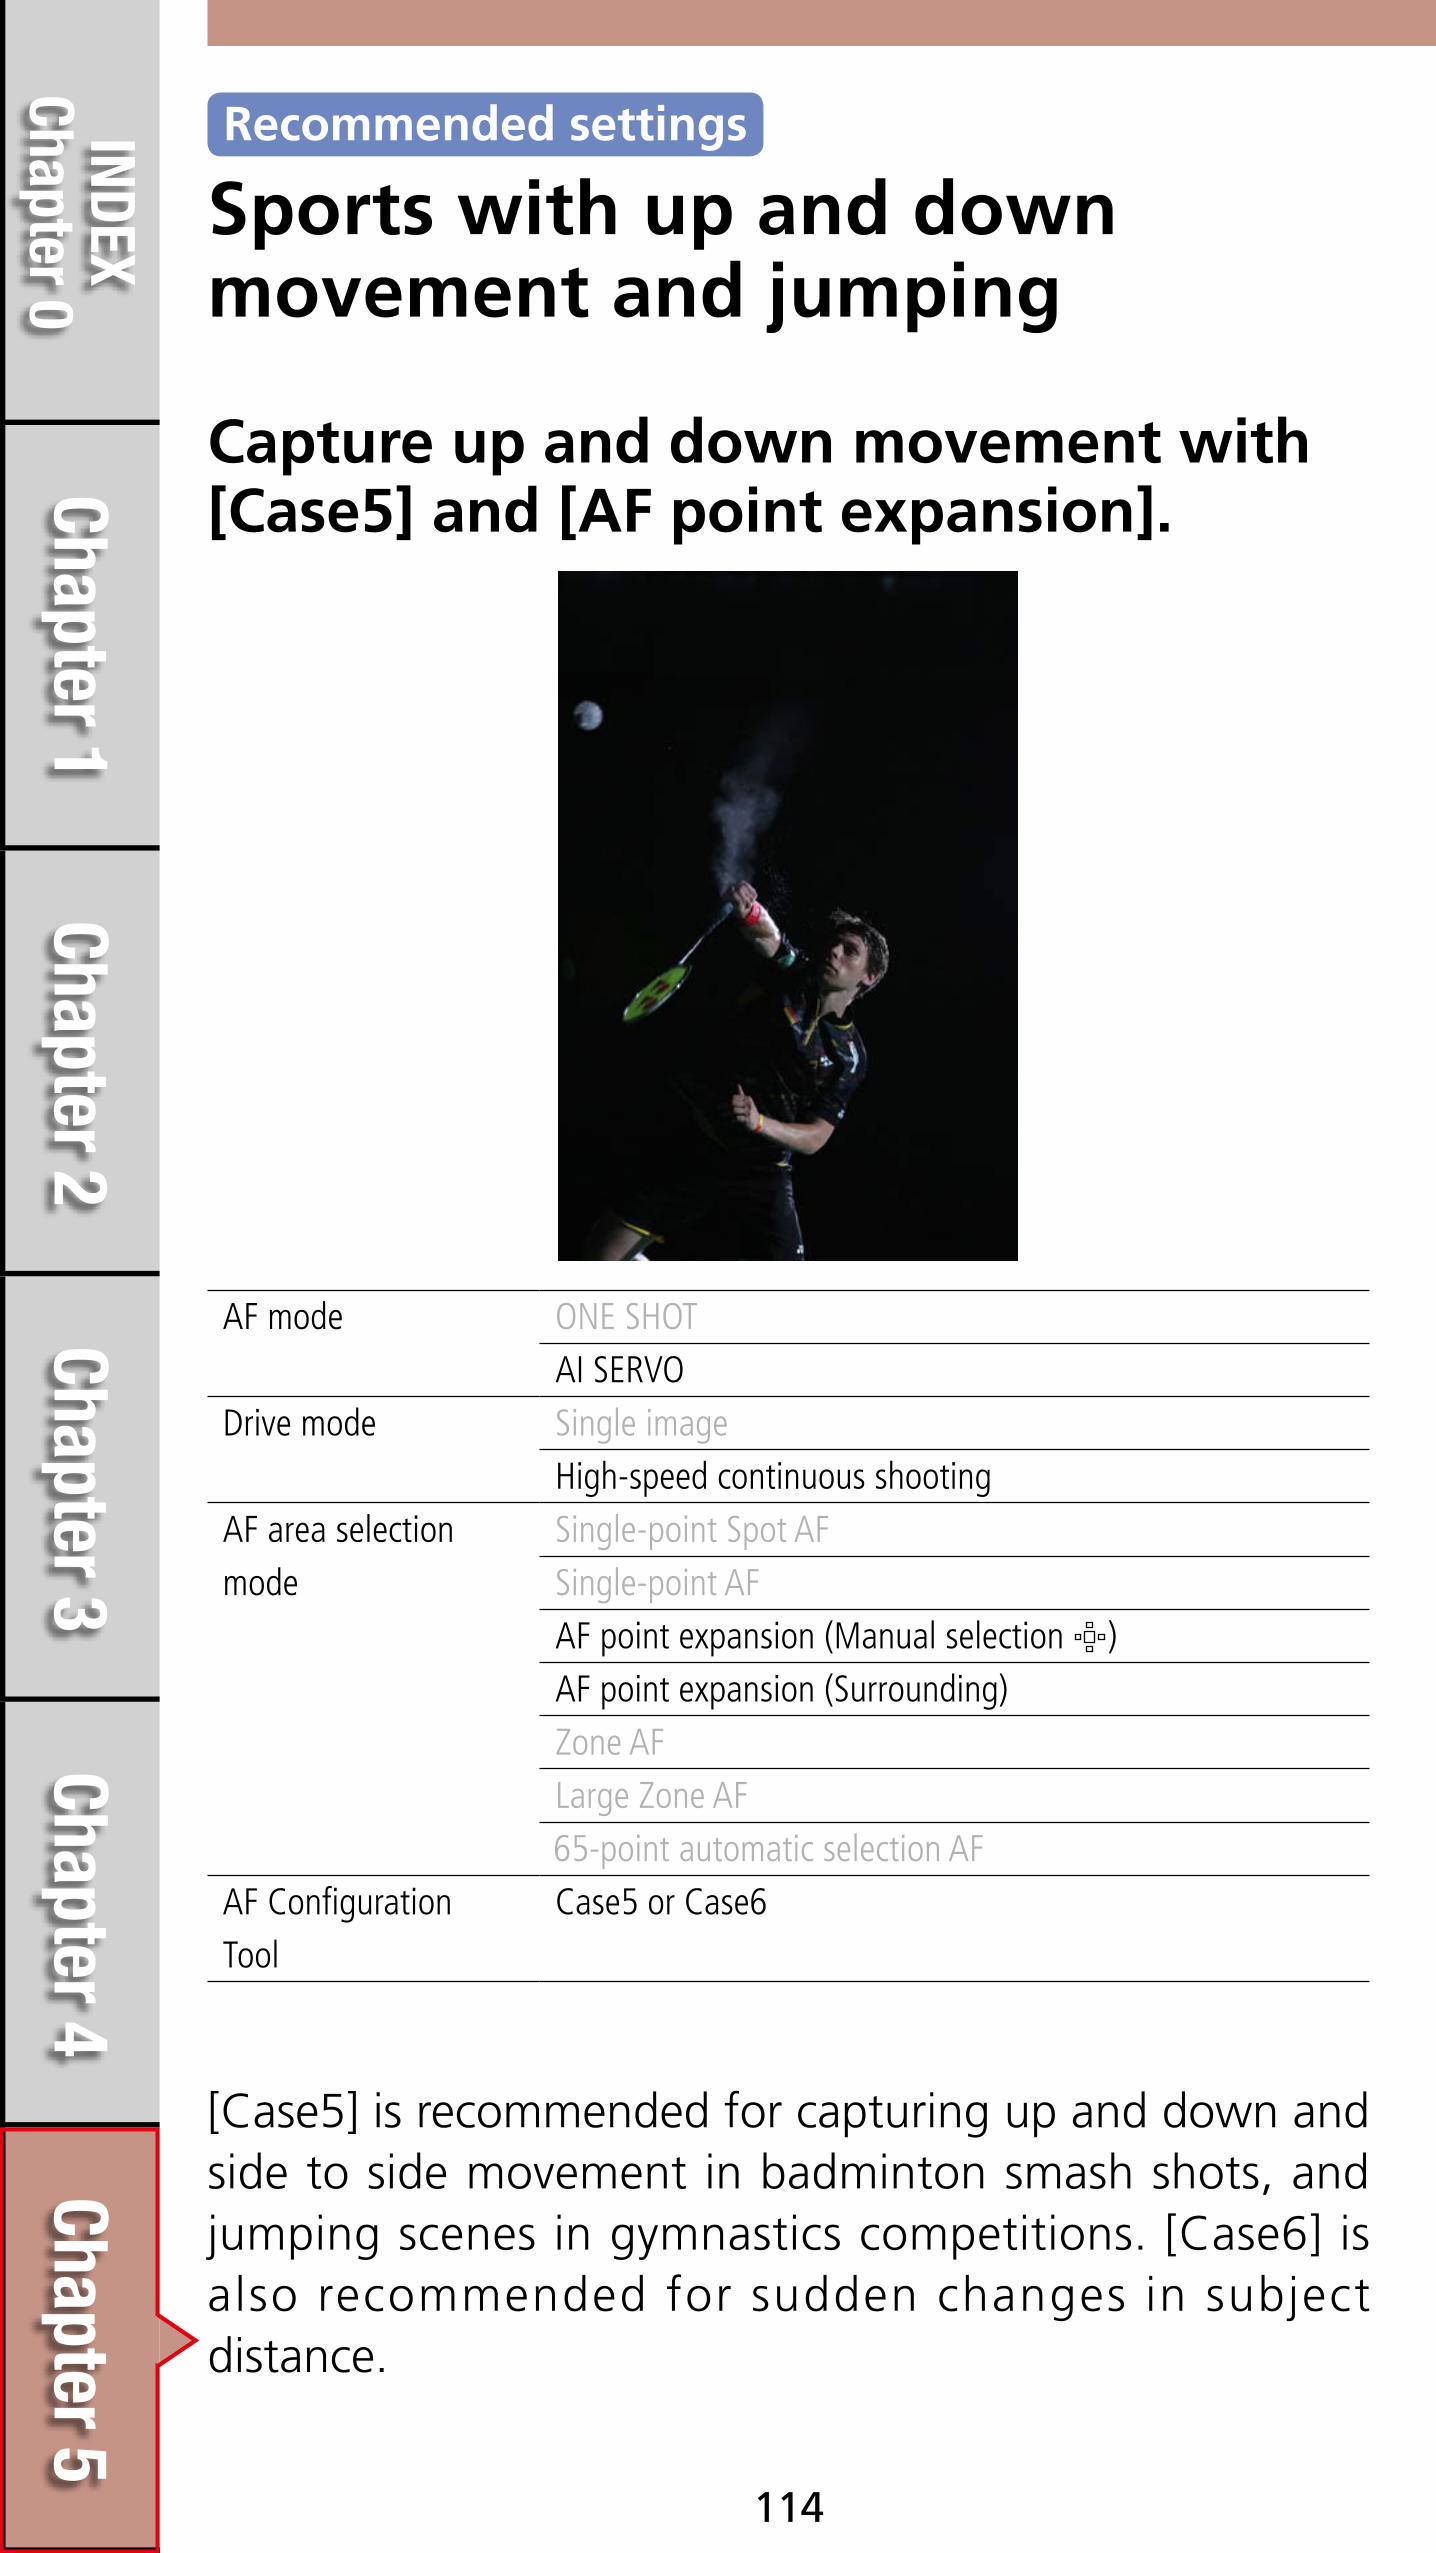
Chapter 5Chapter 4
Chapter 3Chapter 2
Chapter 1INDEX
Chapter 0
114
Recommended settings
Sports with up and down movement and jumping
Capture up and down movement with [Case5] and [AF point expansion].
[Case5] is recommended for capturing up and down and side to side movement in badminton smash shots, and jumping scenes in gymnastics competitions. [Case6] is also recommended for sudden changes in subject distance.
AF mode ONE SHOTAI SERVO
Drive mode Single imageHigh-speed continuous shooting
AF area selectionmode
Single-point Spot AFSingle-point AFAF point expansion (Manual selection )AF point expansion (Surrounding)Zone AFLarge Zone AF65-point automatic selection AF
AF ConfigurationTool
Case5 or Case6

Chapter 5Chapter 4
Chapter 3Chapter 2
Chapter 1INDEX
Chapter 0
115
Recommended settings
Large subjects such as airplanes
Capture the surface of a subject byusing [Large Zone AF].
For shooting close-ups of a large subject such as an airplane, set [AF area selection mode] to [Large Zone AF].
AF mode ONE SHOTAI SERVO
Drive mode Single imageHigh-speed continuous shooting
AF area selectionmode
Single-point Spot AFSingle-point AFAF point expansion (Manual selection )AF point expansion (Surrounding)Zone AFLarge Zone AF65-point automatic selection AF
AF ConfigurationTool
Case1

Chapter 5Chapter 4
Chapter 3Chapter 2
Chapter 1INDEX
Chapter 0
116
Recommended settings
Small subjects such as wild birds
Use [Zone AF] and capture the surface of the subject from a somewhat narrow angle.
When shooting small, quick-moving subjects such as wild birds, etc., use [Zone AF] to specify a location in the screen to more effectively capture the subject.
AF mode ONE SHOTAI SERVO
Drive mode Single imageHigh-speed continuous shooting
AF area selectionmode
Single-point Spot AFSingle-point AFAF point expansion (Manual selection )AF point expansion (Surrounding)Zone AFLarge Zone AF65-point automatic selection AF
AF ConfigurationTool
Case1

Chapter 5Chapter 4
Chapter 3Chapter 2
Chapter 1INDEX
Chapter 0
117
Recommended settings
Subjects moving around freely / For framing utilizing space
Use[65-point automatic selection AF] and capture subjects in a wide area
[65-point automatic selection AF] is effective for when AF point expansion and Zone AF are insufficient for detecting subject movement (For example, small objects moving around freely or small animals). This feature is also effective for when you want to quickly open up space in a composition to shoot.
AF mode ONE SHOTAI SERVO
Drive mode Single imageHigh-speed continuous shooting
AF area selectionmode
Single-point Spot AFSingle-point AFAF point expansion (Manual selection )AF point expansion (Surrounding)Zone AFLarge Zone AF65-point automatic selection AF
AF ConfigurationTool
Case1 or Case2

Chapter 5Chapter 4
Chapter 3Chapter 2
Chapter 1INDEX
Chapter 0
118
This section introduces recommended settings to math various subjects and shooting situations from landscapes and portraits, to shooting fastmoving subjects such as sports and wild birds. An important point to remember is to set [AF area selection mode] to [AF point expansion] (up, down, left, right/surrounding), or [Zone AF]. Next, [Case1] is generally recommended for [AF Configuration Tool]. If you want even higher AF tracking accuracy to match the characteristics of moving subjects, use [Case2] to [Case6]. Make sure to use the EOS 7D Mark II high-performance 65-point cross-type AF and 10 fps high-speed continuous shooting functions to better enjoy capturing split-second scenes.
Points for mastering AF functions for each case

119

120

121

122

123

124

125

126

127

128

129

130

131