AEON Web EDI User Guide - B2B
102
Aeon Web EDI User Guide 2018 AEON Web EDI User Guide_REV.1.2_22102018 Page 1 of 102 AEON Web EDI User Guide Prepared by: B2B Commerce (M) Sdn Bhd Created on: 24 November 2011 Last Updated on: 22 October 2018 Document Version: Version 1.2 This document is the property of B2B Commerce (M) Sdn Bhd. No exploitation or transfer of any information contained herein is permitted in the absence of an agreement with B2B Commerce (M) Sdn Bhd, and neither the document nor any such information may be released without the written consent of B2B Commerce (M) Sdn Bhd.
Transcript of AEON Web EDI User Guide - B2B

Aeon Web EDI User Guide 2018
AEON Web EDI User Guide_REV.1.2_22102018 Page 1 of 102
AEON Web EDI User Guide
Prepared by: B2B Commerce (M) Sdn Bhd Created on: 24 November 2011 Last Updated on: 22 October 2018 Document Version: Version 1.2
This document is the property of B2B Commerce (M) Sdn Bhd. No exploitation or transfer of any information contained herein is permitted in the absence of an agreement with B2B Commerce (M) Sdn Bhd, and neither the document nor any such information may be released without the written consent of B2B Commerce (M) Sdn Bhd.
Aeon Web EDI User Guide 2018
AEON Web EDI User Guide_REV.1.2_22102018 Page 2 of 102
Table of Contents Chapter 1: Overview ............................................................................................................................................................... 5
1.1 Objectives ...................................................................................................................................................................... 5
1.2 Conventions Used in User Guide .................................................................................................................................. 5
Chapter 2: User Login .............................................................................................................................................................. 6 2.1 Login Screen .................................................................................................................................................................. 6
2.2 First Time Login Screen ................................................................................................................................................. 6
2.3 Forgot Password ........................................................................................................................................................... 7
2.4.1 User Information .................................................................................................................................................... 8
2.4.2 Password ................................................................................................................................................................ 9
Chapter 3: Purchase Order ................................................................................................................................................... 10 3.1 Purchase Order Process .............................................................................................................................................. 10
3.2 Purchase Order Module Step by Step ......................................................................................................................... 11
3.2.1 List Purchase Order .............................................................................................................................................. 11
3.2.2 Validate Purchase Order ...................................................................................................................................... 15
3.2.3 Export Purchase Order (Optional) ........................................................................................................................ 16
3.2.4 Print Purchase Order ............................................................................................................................................ 17
3.2.5 Manage Notification ............................................................................................................................................ 18
3.2.6 Download Tag Label ............................................................................................................................................. 19
Chapter 4: Delivery Order ..................................................................................................................................................... 20 4.1 Delivery Order Process ................................................................................................................................................ 20
4.2 Delivery Order Module Step by Step .......................................................................................................................... 22
4.2.1 List Delivery Order................................................................................................................................................ 22
4.2.2 Modify Delivery Order ......................................................................................................................................... 23
4.2.3 Import Delivery Order (Optional) ......................................................................................................................... 27
4.2.4 View Delivery Order ............................................................................................................................................. 30
4.2.5 Print Delivery Order in batch ............................................................................................................................... 31
4.2.6 Export Delivery Order (Optional) ......................................................................................................................... 32
4.2.7 Send Delivery Order ............................................................................................................................................. 34
Aeon Web EDI User Guide 2018
AEON Web EDI User Guide_REV.1.2_22102018 Page 3 of 102
Chapter 5: Receiving Note .................................................................................................................................................... 37 5.2 Receiving Note Module Step by Step .......................................................................................................................... 38
5.2.1 List Receiving Note ............................................................................................................................................... 38
5.2.2 View Receiving Note ............................................................................................................................................ 42
5.2.3 Print Receiving Note ............................................................................................................................................. 43
5.2.4 Export Receiving Note .......................................................................................................................................... 43
5.2.5 Manage notification ............................................................................................................................................. 45
Chapter 6: Outright Invoice .................................................................................................................................................. 46 6.2 Outright Invoice Module Step by Step ........................................................................................................................ 47
6.2.1 Modify Invoice...................................................................................................................................................... 47
6.2.2 Import Invoice (Optional) ..................................................................................................................................... 50
6.2.3 List Invoice ............................................................................................................................................................ 55
6.2.4 View Invoice ......................................................................................................................................................... 60
6.2.5 Print Invoice ......................................................................................................................................................... 61
6.2.6 Export Invoice (Optional) ..................................................................................................................................... 62
6.2.7 Send Invoice ......................................................................................................................................................... 64
Chapter 7: Good Return Note ............................................................................................................................................... 67 7.1 Good Return Note Process .......................................................................................................................................... 67
7.2 Goods Return Note Module Step by Step ................................................................................................................... 68
7.2.1 Goods Return Note .............................................................................................................................................. 68
7.2.2 View Goods Return Note ..................................................................................................................................... 73
7.2.3 Print Goods Return Note ...................................................................................................................................... 74
7.2.4 Export Goods Return Note ................................................................................................................................... 75
Chapter 8: Debit Note ........................................................................................................................................................... 77 8.2 Debit Note Module Step by Step ................................................................................................................................ 78
8.2.1 Debit Note ............................................................................................................................................................ 78
8.2.2 View Debit Note ................................................................................................................................................... 83
8.2.3 Print Debit Note ................................................................................................................................................... 84
8.2.4 Export Debit Note (Optional) ............................................................................................................................... 85
8.2.5 Manage Notification ............................................................................................................................................ 87

Aeon Web EDI User Guide 2018
AEON Web EDI User Guide_REV.1.2_22102018 Page 4 of 102
Chapter 9: Payment Advice ................................................................................................................................................... 88
9.1 Payment Advice Step by Step ..................................................................................................................................... 88
9.1.1 Payment Advice ................................................................................................................................................... 88
Chapter 10: AEON Invoice ..................................................................................................................................................... 92 10.1 AEON Invoice Process ............................................................................................................................................... 92
10.2 AEON Invoice Module Step by Step .......................................................................................................................... 93
10.2.1 List AEON Invoice ............................................................................................................................................... 93
10.2.2 View AEON Invoice ............................................................................................................................................. 99
10.2.3 Print AEON Invoice ........................................................................................................................................... 100
10.2.4 Export AEON Invoice ........................................................................................................................................ 100
Aeon Web EDI User Guide 2018
AEON Web EDI User Guide_REV.1.2_22102018 Page 5 of 102
1.1 Objectives
This user guide provides step by step guide on how to prepare, create/ modify, link hierarchy, publish and synchronized your item data.
1.2 Conventions Used in User Guide
Fonts in Bold
Naming convention that appears on screen, button, menu, tab, link or field in the eportal modules.
Step-by-step process box.
Optional feature box.
Tip/Note box.
Buyer Aeon’s staff
Supplier Aeon’s Suppliers
Chapter 1: Overview
Aeon Web EDI User Guide 2018
AEON Web EDI User Guide_REV.1.2_22102018 Page 6 of 102
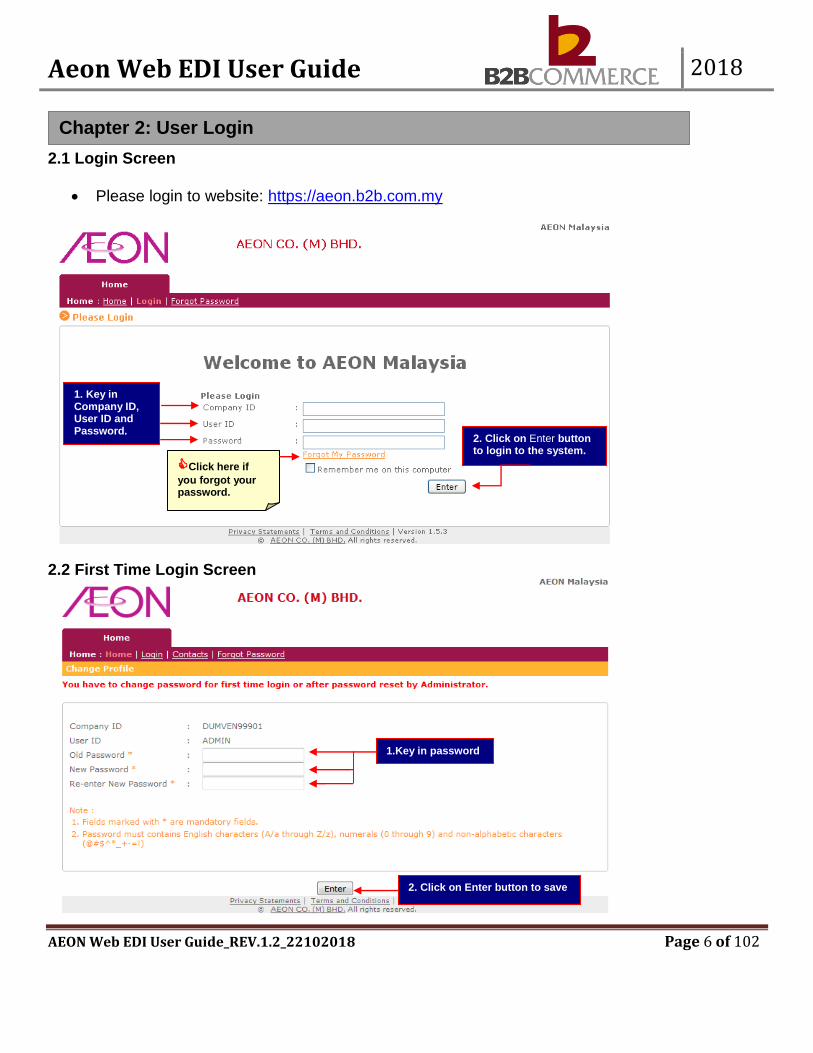
2.1 Login Screen
• Please login to website: https://aeon.b2b.com.my
2.2 First Time Login Screen
1. Key in Company ID, User ID and Password.
1. Key in Company ID, User ID and Password.
1. Key in Company ID, User ID and Password.
1. Key in Company ID, User ID and Password.
Click here if
you forgot your password.
Click here if
you forgot your password.
Click here if
you forgot your password.
Click here if
you forgot your password.
2. Click on Enter button to login to the system.
2. Click on Enter button to login to the system.
2. Click on Enter button to login to the system.
2. Click on Enter button to login to the system.
1.Key in password
1.Key in password
1.Key in password
1.Key in password
2. Click on Enter button to save 2. Click on Enter button to save 2. Click on Enter button to save 2. Click on Enter button to save
Chapter 2: User Login

Aeon Web EDI User Guide 2018
AEON Web EDI User Guide_REV.1.2_22102018 Page 7 of 102
2.3 Forgot Password
2. Key in Company ID, User ID and the word shown.
2. Key in Company ID, User ID and the word shown.
2. Key in Company ID, User ID and the word shown.
2. Key in Company ID, User ID and the word shown.
3. Click on Send button, password will send via email. 3. Click on Send button, password will send via email. 3. Click on Send button, password will send via email. 3. Click on Send button, password will send via email.
1. Click on Forgot Password link to reset your password.
1. Click on Forgot Password link to reset your password.
1. Click on Forgot Password link to reset your password.
1. Click on Forgot Password link to reset your password.

Aeon Web EDI User Guide 2018
AEON Web EDI User Guide_REV.1.2_22102018 Page 8 of 102
2.4 Change Profile
2.4.1 User Information
3. Key in Designation, Tel No, Mobile No, Fax No & Email address.
3. Key in Designation, Tel No, Mobile No, Fax No & Email address.
3. Key in Designation, Tel No, Mobile No, Fax No & Email address.
3. Key in Designation, Tel No, Mobile No, Fax No & Email address.
4. Click on Save button to Save / Update. 4. Click on Save button to Save / Update. 4. Click on Save button to Save / Update. 4. Click on Save button to Save / Update.
1. Click on Change Profile link to update profile.
1. Click on Change Profile link to update profile.
1. Click on Change Profile link to update profile.
1. Click on Change Profile link to update profile.
2. Click on User Information tab to update profile. 2. Click on User Information tab to update profile. 2. Click on User Information tab to update profile. 2. Click on User Information tab to update profile.
Aeon Web EDI User Guide 2018
AEON Web EDI User Guide_REV.1.2_22102018 Page 9 of 102
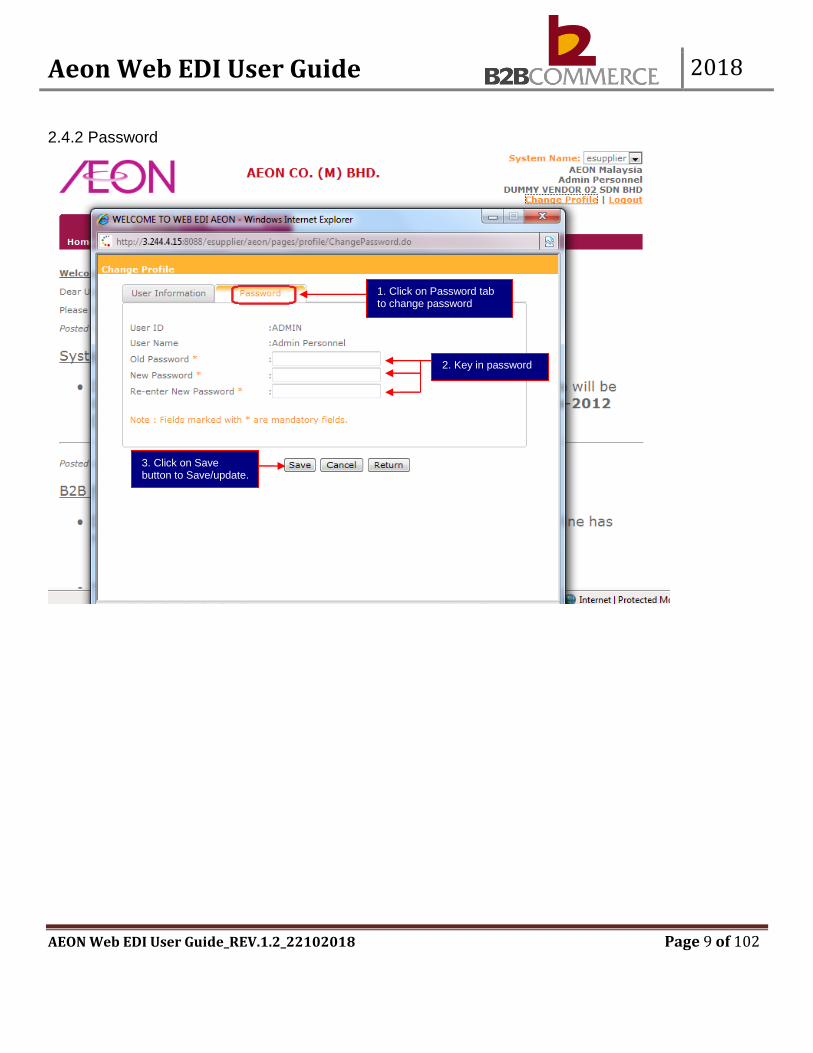
2.4.2 Password
1. Click on Password tab to change password 1. Click on Password tab to change password 1. Click on Password tab to change password 1. Click on Password tab to change password
2. Key in password 2. Key in password 2. Key in password 2. Key in password
3. Click on Save button to Save/update.
3. Click on Save button to Save/update.
Chapter 3: Purchase Order3. Click on
Save button to Save/update.
3. Click on Save button to Save/update.
Aeon Web EDI User Guide 2018
AEON Web EDI User Guide_REV.1.2_22102018 Page 10 of 102
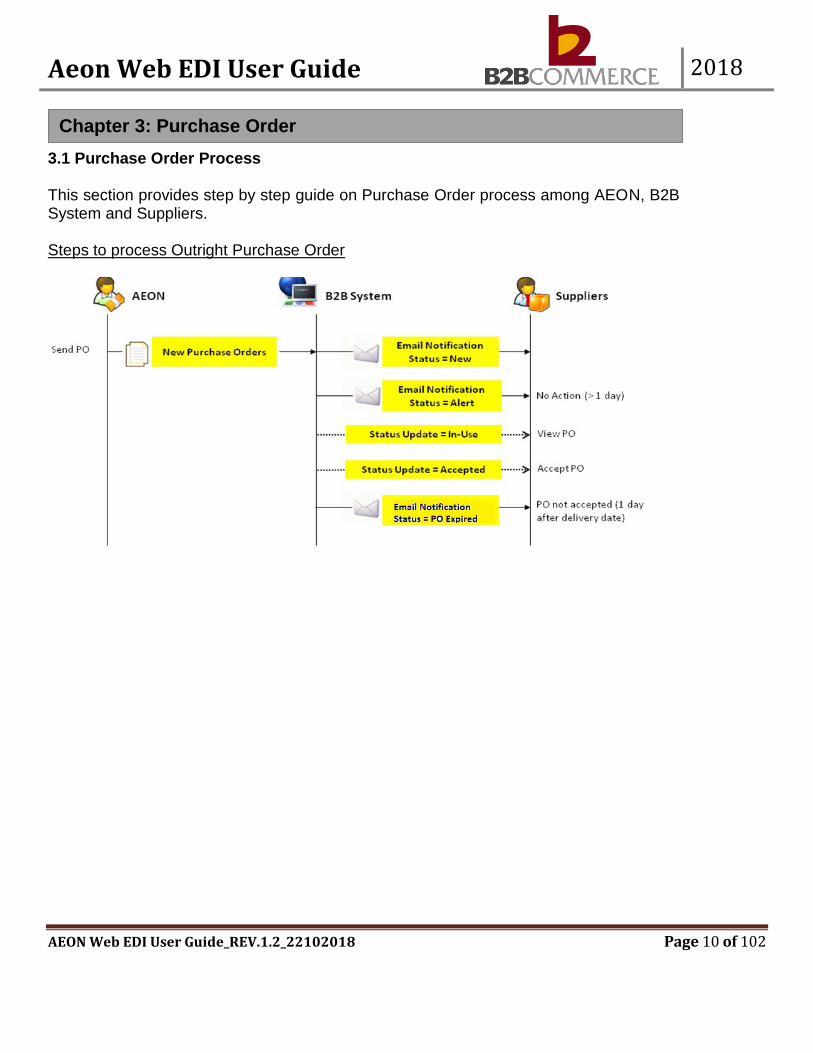
3.1 Purchase Order Process This section provides step by step guide on Purchase Order process among AEON, B2B System and Suppliers. Steps to process Outright Purchase Order
Chapter 3: Purchase Order

Aeon Web EDI User Guide 2018
AEON Web EDI User Guide_REV.1.2_22102018 Page 11 of 102
3.2 Purchase Order Module Step by Step This section provides step by step guide for supplier to List, Validate, View, Print, Export, Manage Notification, Tag label.
3.2.1 List Purchase Order
Step 1 Select Purchase Order Document
Step 2 List Purchase Order
Status Definition: New Supplier received new purchase order In-use Supplier has viewed the purchase order. Alert Supplier has not open/view the purchase order after 1 day. Accepted Supplier has accepted the purchase order
2. Click on Order No to view order.
2. Click on Order No to view order.
2. Click on Order No to view order.
2. Click on Order No to view order.
1. Click on Documents tab and select Orders.
1. Click on Documents tab and select Orders.
1. Click on Documents tab and select Orders.
1. Click on Documents tab and select Orders.
Aeon Web EDI User Guide 2018
AEON Web EDI User Guide_REV.1.2_22102018 Page 12 of 102
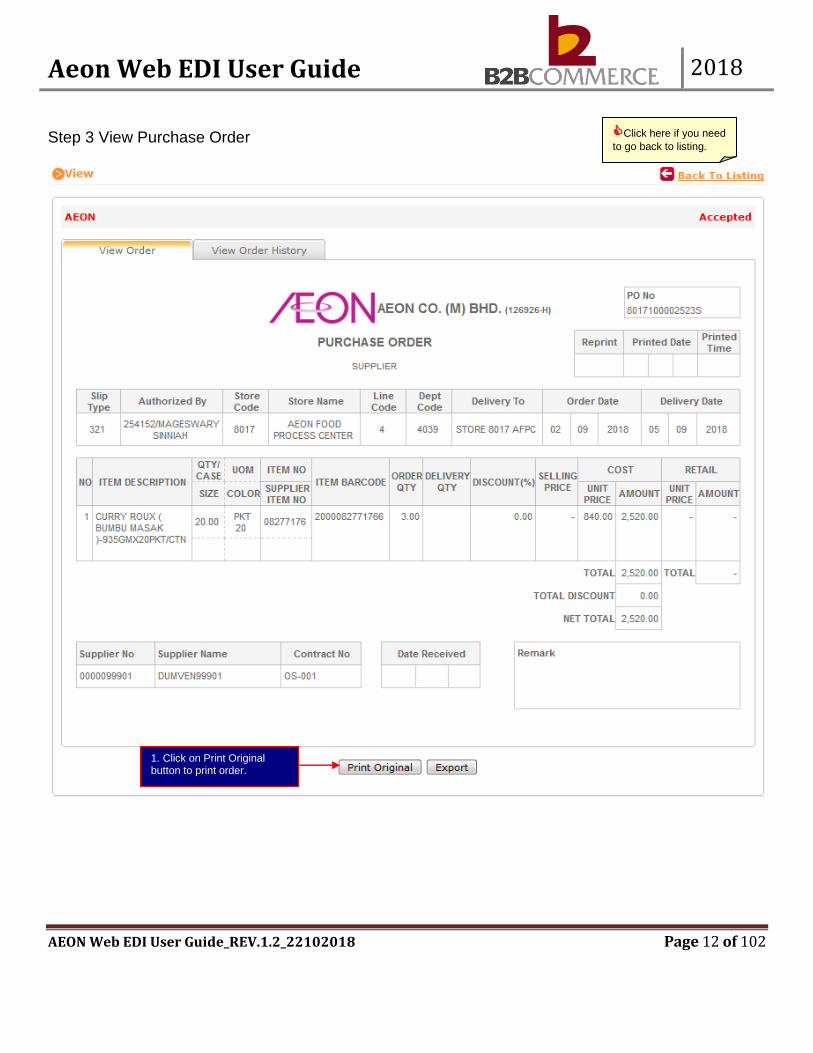
Step 3 View Purchase Order
Click here if you need
to go back to listing.
Click here if you need
to go back to listing.
Click here if you need
to go back to listing.
Click here if you need
to go back to listing.
1. Click on Print Original button to print order.
1. Click on Print Original button to print order.
1. Click on Print Original button to print order.
1. Click on Print Original button to print order.

Aeon Web EDI User Guide 2018
AEON Web EDI User Guide_REV.1.2_22102018 Page 13 of 102
Step 4 Print Purchase Order
Order print
out in PDF format.
Order print
out in PDF format.
Order print
out in PDF format.
Order print
out in PDF format.

Aeon Web EDI User Guide 2018
AEON Web EDI User Guide_REV.1.2_22102018 Page 14 of 102
Step 5 View Purchase Order History (Optional)
1. Click on View Order History tab to check order history.
1. Click on View Order History tab to check order history.
1. Click on View Order History tab to check order history.
1. Click on View Order History tab to check order history.

Aeon Web EDI User Guide 2018
AEON Web EDI User Guide_REV.1.2_22102018 Page 15 of 102
3.2.2 Validate Purchase Order
Allows the user to validate purchase order in batch
1. Click on Validate link to validate purchase order in batch.
1. Click on Validate link to validate purchase order in batch.
1. Click on Validate link to validate purchase order in batch.
1. Click on Validate link to validate purchase order in batch.
2. Key search criteria
2. Key search criteria
2. Key search criteria
2. Key search criteria
3. Click on Search button
5. Click on Accept button to accept order.
5. Click on Accept button to accept order.
5. Click on Accept button to accept order.
5. Click on Accept button to accept order.
4. Tick on the check box to select the order to validate at a time.
4. Tick on the check box to select the order to validate at a time.
4. Tick on the check box to select the order to validate at a time.
4. Tick on the check box to select the order to validate at a time.
Click on this button if you need to clear the search Click on this button if you need to clear the search Click on this button if you need to clear the search Click on this button if you need to clear the search
Click here for
additional field (search criteria).
Click here for
additional field (search criteria).
Click here for
additional field (search criteria).
Click here for
additional field (search criteria).
Aeon Web EDI User Guide 2018
AEON Web EDI User Guide_REV.1.2_22102018 Page 16 of 102
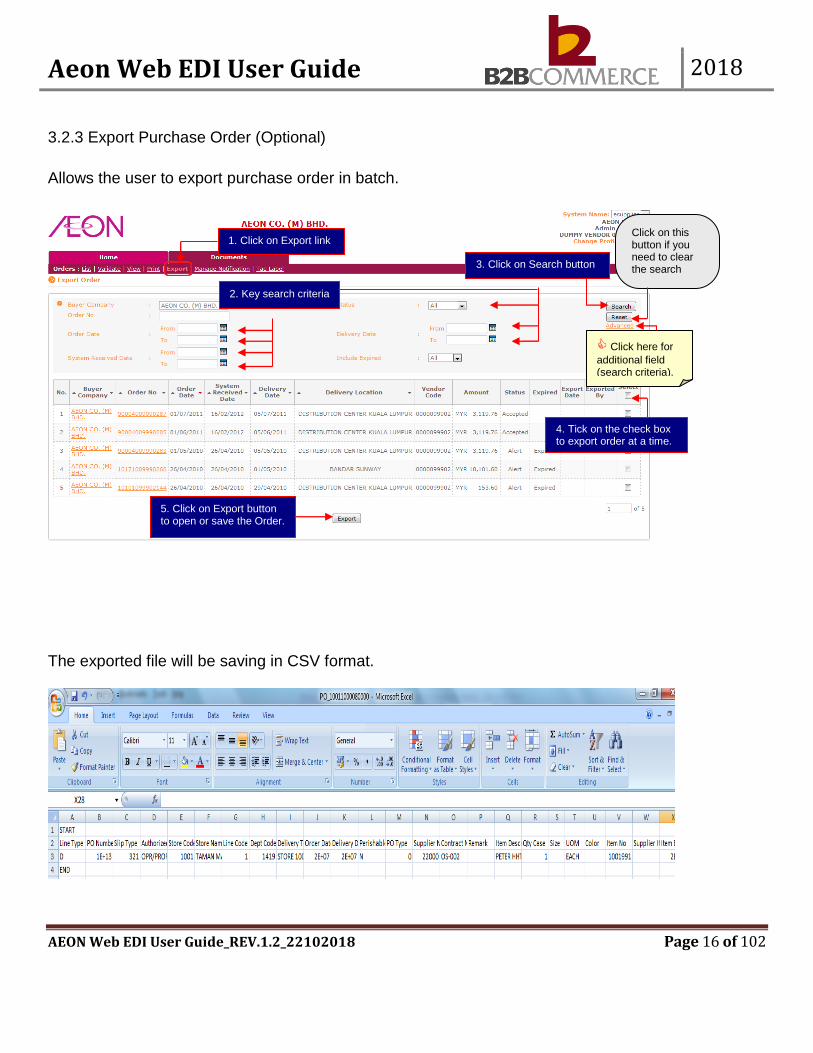
3.2.3 Export Purchase Order (Optional)
Allows the user to export purchase order in batch.
The exported file will be saving in CSV format.
2. Key search criteria
2. Key search criteria
2. Key search criteria
2. Key search criteria
3. Click on Search button
3. Click on Search button
3. Click on Search button
3. Click on Search button
4. Tick on the check box to export order at a time.
4. Tick on the check box to export order at a time.
4. Tick on the check box to export order at a time.
4. Tick on the check box to export order at a time.
5. Click on Export button to open or save the Order.
5. Click on Export button to open or save the Order.
5. Click on Export button to open or save the Order.
5. Click on Export button to open or save the Order.
1. Click on Export link
1. Click on Export link
1. Click on Export link
1. Click on Export link
Click on this button if you need to clear the search Click on this button if you need to clear the search Click on this button if you need to clear the search Click on this button if you need to clear the search
Click here for
additional field (search criteria).
Click here for
additional field (search criteria).
Click here for
additional field (search criteria).
Click here for
additional field (search criteria).

Aeon Web EDI User Guide 2018
AEON Web EDI User Guide_REV.1.2_22102018 Page 17 of 102
3.2.4 Print Purchase Order
Allows the user to print purchase order in batch
2. Key search criteria
2. Key search criteria
2. Key search criteria
2. Key search criteria
3. Click on Search button
3. Click on Search button
3. Click on Search button
3. Click on Search button
4. Tick on the check box to print order at a time.
4. Tick on the check box to print order at a time.
4. Tick on the check box to print order at a time.
4. Tick on the check box to print order at a time.
5. Click on Print Original button to print order.
5. Click on Print Original button to print order.
5. Click on Print Original button to print order.
5. Click on Print Original button to print order.
1. Click on Print link
1. Click on Print link
1. Click on Print link
1. Click on Print link
Click on this button if you need to clear the search Click on this button if you need to clear the search Click on this button if you need to clear the search Click on this button if you need to clear the search
Click here for
additional field (search criteria).
Click here for
additional field (search criteria).
Click here for
additional field (search criteria).
Click here for
additional field (search criteria).

Aeon Web EDI User Guide 2018
AEON Web EDI User Guide_REV.1.2_22102018 Page 18 of 102
3.2.5 Manage Notification
Allows the user to maintain or change the email notification setting
2. Set the notification frequency
2. Set the notification frequency
2. Set the notification frequency
2. Set the notification frequency
3. Key in email address
3. Key in email address
3. Key in email address
3. Key in email address
4. Click on Save button to Save/Update
4. Click on Save button to Save/Update
4. Click on Save button to Save/Update
4. Click on Save button to Save/Update
Click Reset for default
to original data.
Click Reset for default
to original data.
Click Reset for default
to original data.
Click Reset for default
to original data.
1. Click on Manage Notification link
1. Click on Manage Notification link
1. Click on Manage Notification link
1. Click on Manage Notification link

Aeon Web EDI User Guide 2018
AEON Web EDI User Guide_REV.1.2_22102018 Page 19 of 102
3.2.6 Download Tag Label
The downloaded file will be in CSV format.
5. Click on Download button to open or save the tag label.
5. Click on Download button to open or save the tag label.
5. Click on Download button to open or save the tag label.
5. Click on Download button to open or save the tag label.
1. Click on Tag Label link
1. Click on Tag Label link
1. Click on Tag Label link
1. Click on Tag Label link
Click on this button if you need to clear the search Click on this button if you need to clear the search Click on this button if you need to clear the search Click on this button if you need to clear the search
3. Click on Search button
3. Click on Search button
3. Click on Search button
3. Click on Search button
Click here
for additional field (search criteria)
Click here
for additional field (search criteria)
Click here
for additional field (search criteria)
Click here
for additional field (search criteria)
4. Tick on the check box to download tag label at a time.
4. Tick on the check box to download tag label at a time.
Chapter 4: Delivery Order4. Tick on
the check box to download tag label at a time.
4. Tick on the check box to download tag label at a time.
2. Key search criteria
2. Key search criteria
2. Key search criteria
2. Key search criteria

Aeon Web EDI User Guide 2018
AEON Web EDI User Guide_REV.1.2_22102018 Page 20 of 102
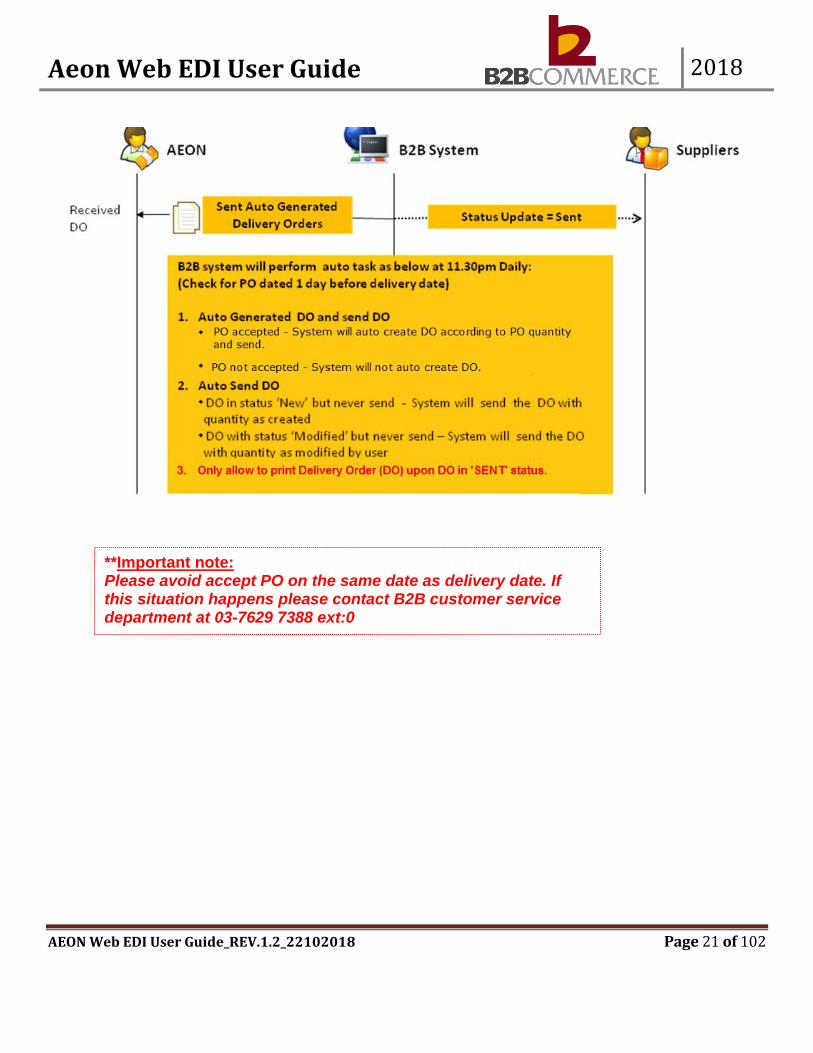
4.1 Delivery Order Process This section provides step by step guide on Delivery Order process among AEON, B2B System and Suppliers. Steps to create Delivery Order
Chapter 4: Delivery Order
Aeon Web EDI User Guide 2018
AEON Web EDI User Guide_REV.1.2_22102018 Page 21 of 102
**Important note: Please avoid accept PO on the same date as delivery date. If this situation happens please contact B2B customer service department at 03-7629 7388 ext:0 **Important note: Please avoid accept PO on the same date as delivery date. If this situation happens please contact B2B customer service department at 03-7629 7388 ext:0 **Important note: Please avoid accept PO on the same date as delivery date. If this situation happens please contact B2B customer service department at 03-7629 7388 ext:0 **Important note: Please avoid accept PO on the same date as delivery date. If this situation happens please contact B2B customer service department at 03-7629 7388 ext:0

Aeon Web EDI User Guide 2018
AEON Web EDI User Guide_REV.1.2_22102018 Page 22 of 102
4.2 Delivery Order Module Step by Step This section provides step by step guide for supplier to list, import, modify, view, print, export and send Delivery Orders.
4.2.1 List Delivery Order
Step 1 Select Delivery Order Document
Step 2 List Delivery Order
Status Definition: New System generated new delivery order. Modify Supplier has modified delivery order. Send Supplier has sent the delivery order.
1. Click on Document tab and select Delivery Order.
1. Click on Document tab and select Delivery Order.
1. Click on Document tab and select Delivery Order.
1. Click on Document tab and select Delivery Order.
2. Click on Delivery Order No
2. Click on Delivery Order No
2. Click on Delivery Order No
2. Click on Delivery Order No
Aeon Web EDI User Guide 2018
AEON Web EDI User Guide_REV.1.2_22102018 Page 23 of 102
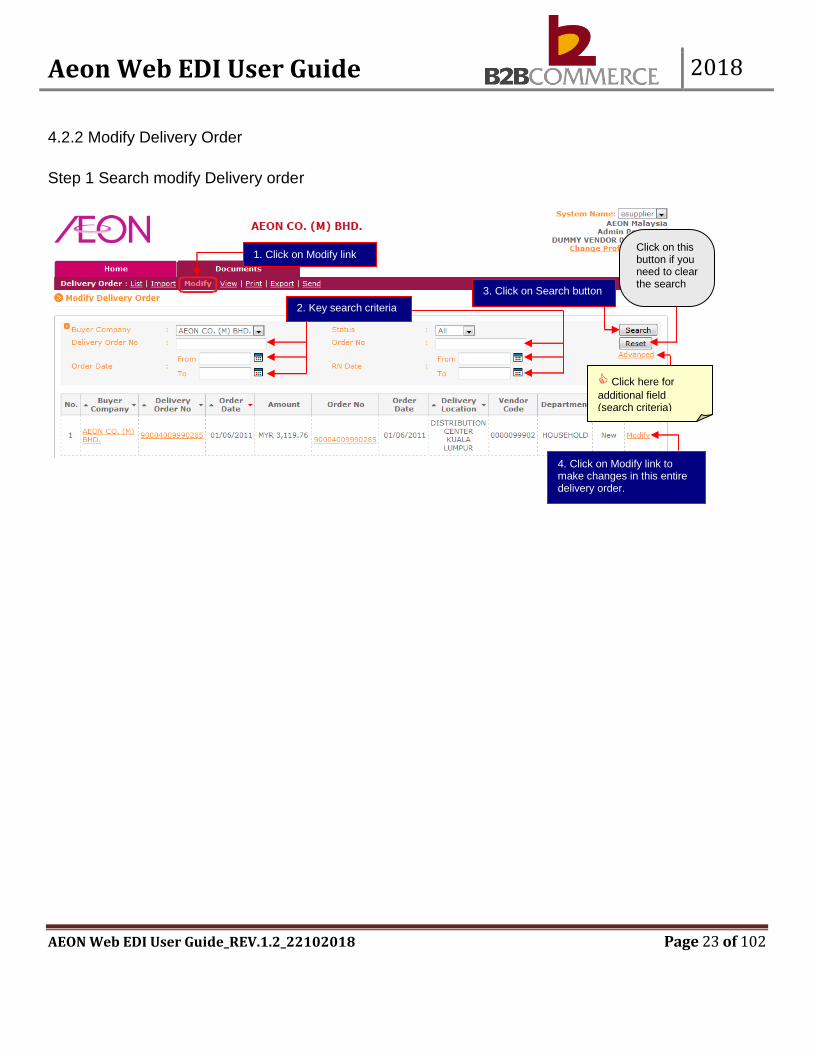
4.2.2 Modify Delivery Order
Step 1 Search modify Delivery order
2. Key search criteria
2. Key search criteria
2. Key search criteria
2. Key search criteria
3. Click on Search button
3. Click on Search button
3. Click on Search button
3. Click on Search button
4. Click on Modify link to make changes in this entire delivery order.
4. Click on Modify link to make changes in this entire delivery order.
4. Click on Modify link to make changes in this entire delivery order.
4. Click on Modify link to make changes in this entire delivery order.
1. Click on Modify link
1. Click on Modify link
1. Click on Modify link
1. Click on Modify link
Click on this button if you need to clear the search Click on this button if you need to clear the search Click on this button if you need to clear the search Click on this button if you need to clear the search
Click here for
additional field (search criteria)
Click here for
additional field (search criteria)
Click here for
additional field (search criteria)
Click here for
additional field (search criteria)
Aeon Web EDI User Guide 2018
AEON Web EDI User Guide_REV.1.2_22102018 Page 24 of 102
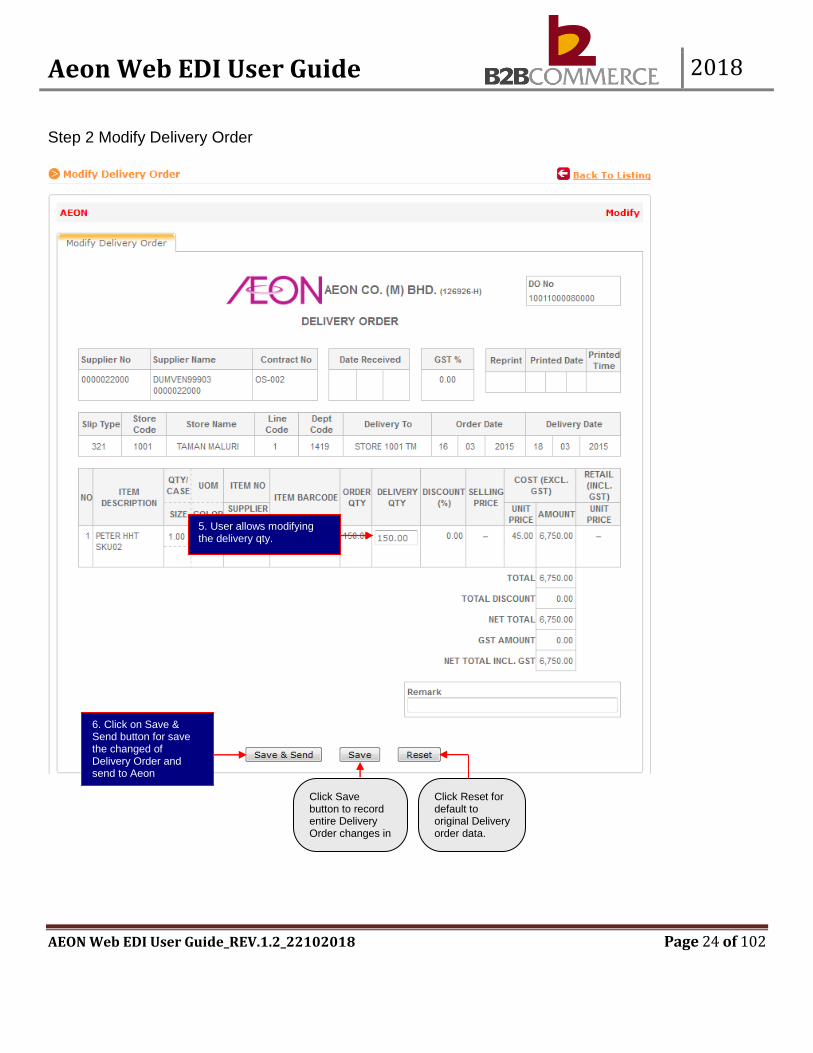
Step 2 Modify Delivery Order
6. Click on Save & Send button for save the changed of Delivery Order and send to Aeon
6. Click on Save & Send button for save the changed of Delivery Order and send to Aeon
6. Click on Save & Send button for save the changed of Delivery Order and send to Aeon
6. Click on Save & Send button for save the changed of Delivery Order and send to Aeon
5. User allows modifying the delivery qty.
5. User allows modifying the delivery qty.
5. User allows modifying the delivery qty.
5. User allows modifying the delivery qty.
Click Save button to record entire Delivery Order changes in B2B.
Click Save button to record entire Delivery Order changes in B2B.
Click Save button to record entire Delivery Order changes in B2B.
Click Reset for default to original Delivery order data. Click Reset for default to original Delivery order data. Click Reset for default to original Delivery order data. Click Reset for default to original Delivery order data.
Aeon Web EDI User Guide 2018
AEON Web EDI User Guide_REV.1.2_22102018 Page 25 of 102
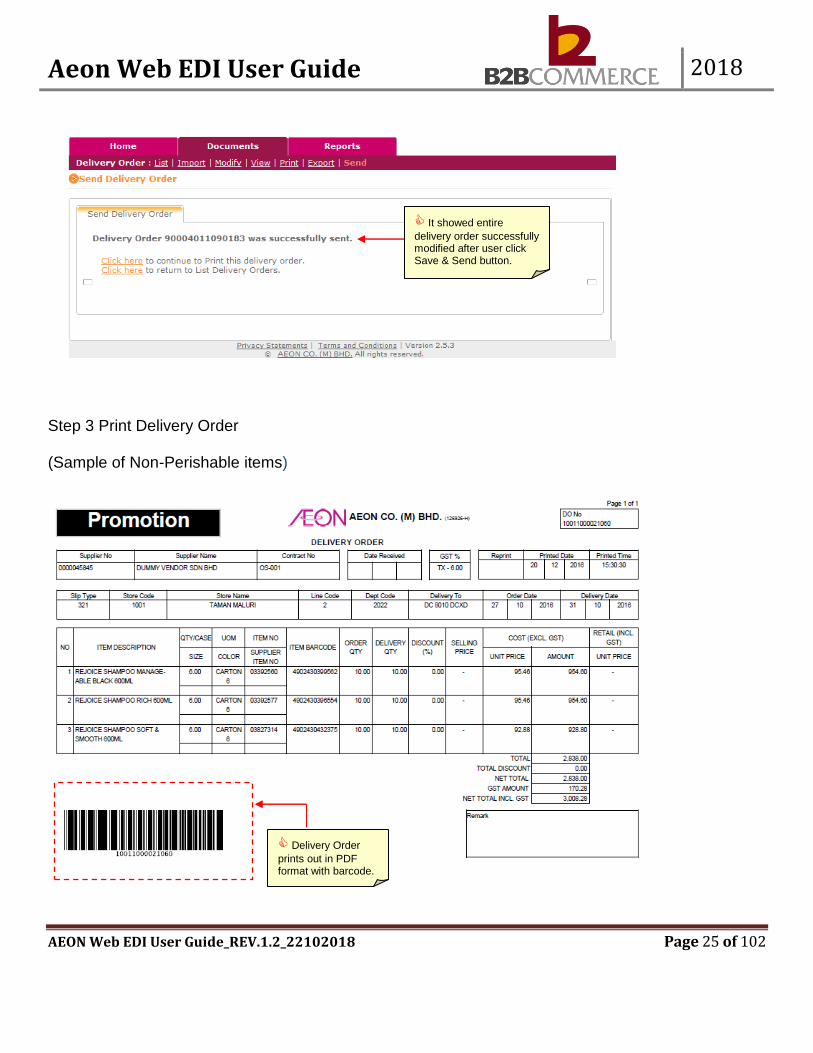
Step 3 Print Delivery Order (Sample of Non-Perishable items)
It showed entire
delivery order successfully modified after user click Save & Send button.
It showed entire
delivery order successfully modified after user click Save & Send button.
It showed entire
delivery order successfully modified after user click Save & Send button.
It showed entire
delivery order successfully modified after user click Save & Send button.
Delivery Order
prints out in PDF format with barcode.
Delivery Order
prints out in PDF format with barcode.
Delivery Order
prints out in PDF format with barcode.
Delivery Order
prints out in PDF format with barcode.

Aeon Web EDI User Guide 2018
AEON Web EDI User Guide_REV.1.2_22102018 Page 26 of 102
(Sample of Perishable items in store code 8018)
Aeon Web EDI User Guide 2018
AEON Web EDI User Guide_REV.1.2_22102018 Page 27 of 102
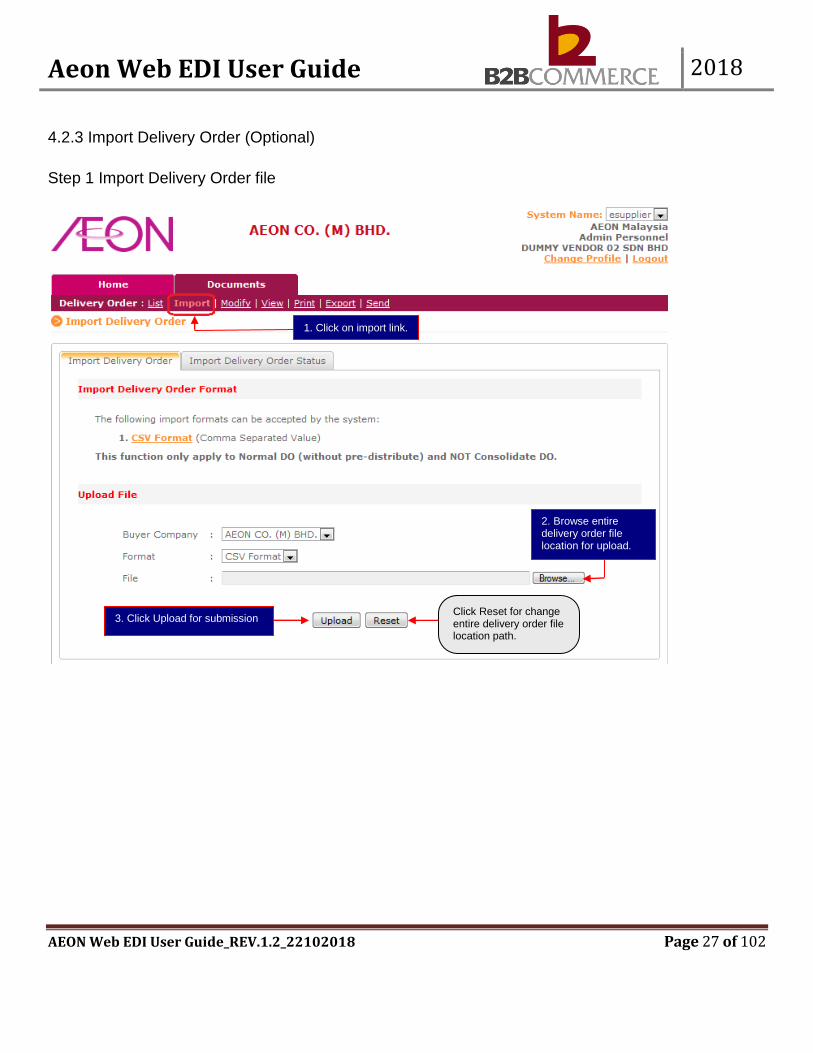
4.2.3 Import Delivery Order (Optional)
Step 1 Import Delivery Order file
1. Click on import link.
1. Click on import link.
1. Click on import link.
1. Click on import link.
2. Browse entire delivery order file location for upload.
2. Browse entire delivery order file location for upload.
2. Browse entire delivery order file location for upload.
2. Browse entire delivery order file location for upload.
3. Click Upload for submission 3. Click Upload for submission 3. Click Upload for submission 3. Click Upload for submission
Click Reset for change entire delivery order file location path. Click Reset for change entire delivery order file location path. Click Reset for change entire delivery order file location path. Click Reset for change entire delivery order file location path.

Aeon Web EDI User Guide 2018
AEON Web EDI User Guide_REV.1.2_22102018 Page 28 of 102
Import Delivery requirements filed:
Aeon Web EDI User Guide 2018
AEON Web EDI User Guide_REV.1.2_22102018 Page 29 of 102
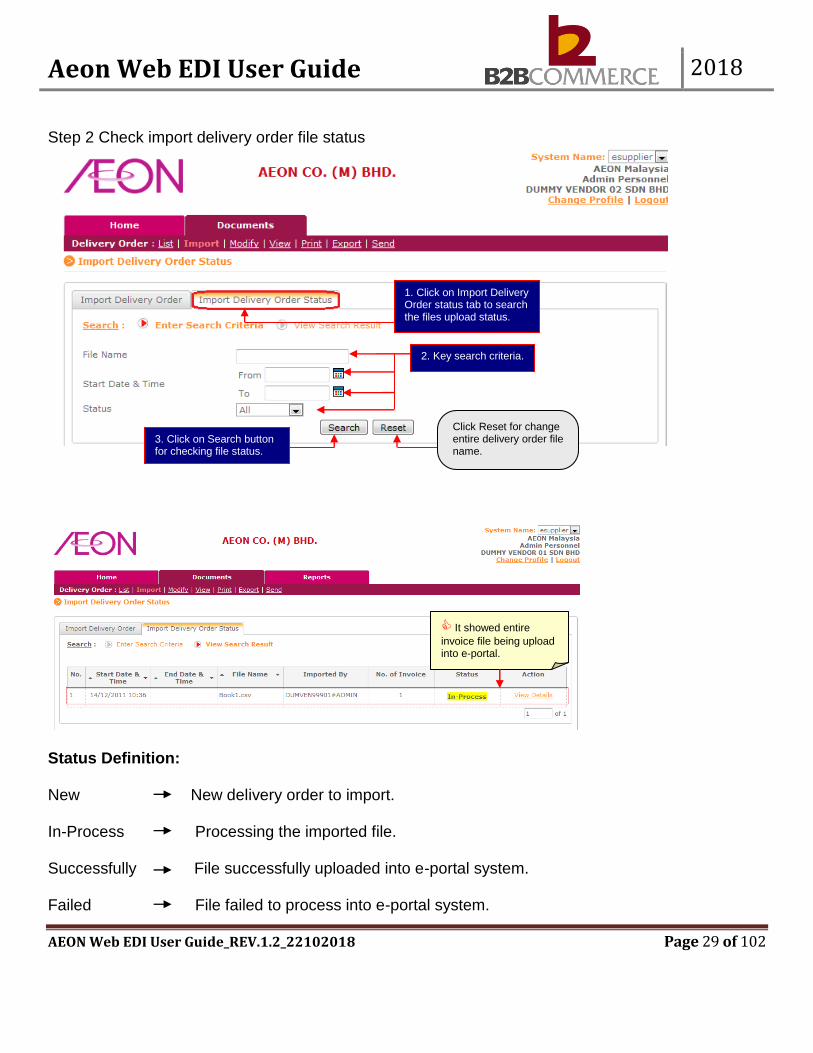
Step 2 Check import delivery order file status
Status Definition: New New delivery order to import. In-Process Processing the imported file. Successfully File successfully uploaded into e-portal system. Failed File failed to process into e-portal system.
1. Click on Import Delivery Order status tab to search the files upload status.
1. Click on Import Delivery Order status tab to search the files upload status.
1. Click on Import Delivery Order status tab to search the files upload status.
1. Click on Import Delivery Order status tab to search the files upload status.
2. Key search criteria. 2. Key search criteria. 2. Key search criteria. 2. Key search criteria.
3. Click on Search button for checking file status. 3. Click on Search button for checking file status. 3. Click on Search button for checking file status. 3. Click on Search button for checking file status.
It showed entire
invoice file being upload into e-portal.
It showed entire
invoice file being upload into e-portal.
It showed entire
invoice file being upload into e-portal.
It showed entire
invoice file being upload into e-portal.
Click Reset for change entire delivery order file name. Click Reset for change entire delivery order file name. Click Reset for change entire delivery order file name. Click Reset for change entire delivery order file name.
Aeon Web EDI User Guide 2018
AEON Web EDI User Guide_REV.1.2_22102018 Page 30 of 102
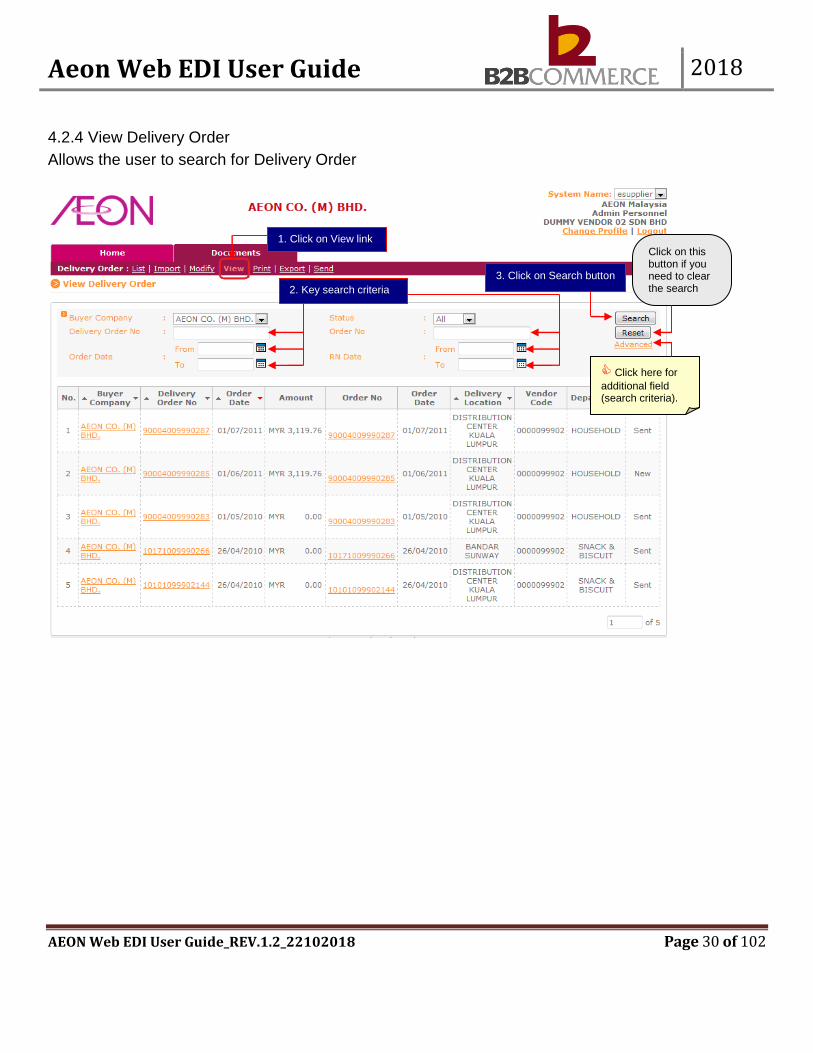
4.2.4 View Delivery Order
Allows the user to search for Delivery Order
2. Key search criteria
2. Key search criteria
2. Key search criteria
2. Key search criteria
3. Click on Search button
3. Click on Search button
3. Click on Search button
3. Click on Search button
Click here for
additional field (search criteria).
Click here for
additional field (search criteria).
Click here for
additional field (search criteria).
Click here for
additional field (search criteria).
1. Click on View link
1. Click on View link
1. Click on View link
1. Click on View link
Click on this button if you need to clear the search Click on this button if you need to clear the search Click on this button if you need to clear the search Click on this button if you need to clear the search

Aeon Web EDI User Guide 2018
AEON Web EDI User Guide_REV.1.2_22102018 Page 31 of 102
4.2.5 Print Delivery Order in batch
Only allow to print Delivery Order (DO) upon DO in 'SENT' status.
2. Key search criteria
2. Key search criteria
2. Key search criteria
2. Key search criteria
3. Click on Search button
3. Click on Search button
3. Click on Search button
3. Click on Search button
5. Click on Print Original button to print delivery order.
5. Click on Print Original button to print delivery order.
5. Click on Print Original button to print delivery order.
5. Click on Print Original button to print delivery order.
1. Click on Print link
1. Click on Print link
1. Click on Print link
1. Click on Print link Click here
for additional field (search criteria).
Click here
for additional field (search criteria).
Click here
for additional field (search criteria).
Click here
for additional field (search criteria).
4. Tick on the check box to print Delivery order at a time.
4. Tick on the check box to print Delivery order at a time.
4. Tick on the check box to print Delivery order at a time.
4. Tick on the check box to print Delivery order at a time.
Click on this button if you need to clear the search Click on this button if you need to clear the search Click on this button if you need to clear the search Click on this button if you need to clear the search

Aeon Web EDI User Guide 2018
AEON Web EDI User Guide_REV.1.2_22102018 Page 32 of 102
4.2.6 Export Delivery Order (Optional)
Allows the user to export delivery order in batch.
2. Key search criteria
2. Key search criteria
2. Key search criteria
2. Key search criteria
3. Click on Search button
3. Click on Search button
3. Click on Search button
3. Click on Search button
5. Click on Export button to export delivery order 5. Click on Export button to export delivery order 5. Click on Export button to export delivery order 5. Click on Export button to export delivery order
1. Click on Export link
1. Click on Export link
1. Click on Export link
1. Click on Export link
Click on this button if you need to clear the search. Click on this button if you need to clear the search. Click on this button if you need to clear the search. Click on this button if you need to clear the search.
Click here
for additional field (search criteria)
Click here
for additional field (search criteria)
Click here
for additional field (search criteria)
Click here
for additional field (search criteria)
4. Tick on the check box to export delivery order at a time.
4. Tick on the check box to export delivery order at a time.
4. Tick on the check box to export delivery order at a time.
4. Tick on the check box to export delivery order at a time.

Aeon Web EDI User Guide 2018
AEON Web EDI User Guide_REV.1.2_22102018 Page 33 of 102
The exported Delivery Order can be view / save in CSV format as below:
User can open the Delivery Order in CSV format as below:

Aeon Web EDI User Guide 2018
AEON Web EDI User Guide_REV.1.2_22102018 Page 34 of 102
4.2.7 Send Delivery Order
Allows the user to send Delivery Order in batch
2. Key search criteria
2. Key search criteria
2. Key search criteria
2. Key search criteria
3. Click on Search button
3. Click on Search button
3. Click on Search button
3. Click on Search button
4. Tick on the check box to select the delivery order for send to Aeon. 4. Tick on the check box to select the delivery order for send to Aeon. 4. Tick on the check box to select the delivery order for send to Aeon. 4. Tick on the check box to select the delivery order for send to Aeon.
5. Click on Send button to confirm send entire selected delivery order to Aeon.
5. Click on Send button to confirm send entire selected delivery order to Aeon.
5. Click on Send button to confirm send entire selected delivery order to Aeon.
5. Click on Send button to confirm send entire selected delivery order to Aeon.
Click on this button if you need to clear the search Click on this button if you need to clear the search Click on this button if you need to clear the search Click on this button if you need to clear the search
Click
here for additional field (search criteria).
Click
here for additional field (search criteria).
Click
here for additional field (search criteria).
Click
here for additional field (search criteria).
1. Click on Send link
1. Click on Send link
1. Click on Send link
1. Click on Send link

Aeon Web EDI User Guide 2018
AEON Web EDI User Guide_REV.1.2_22102018 Page 35 of 102
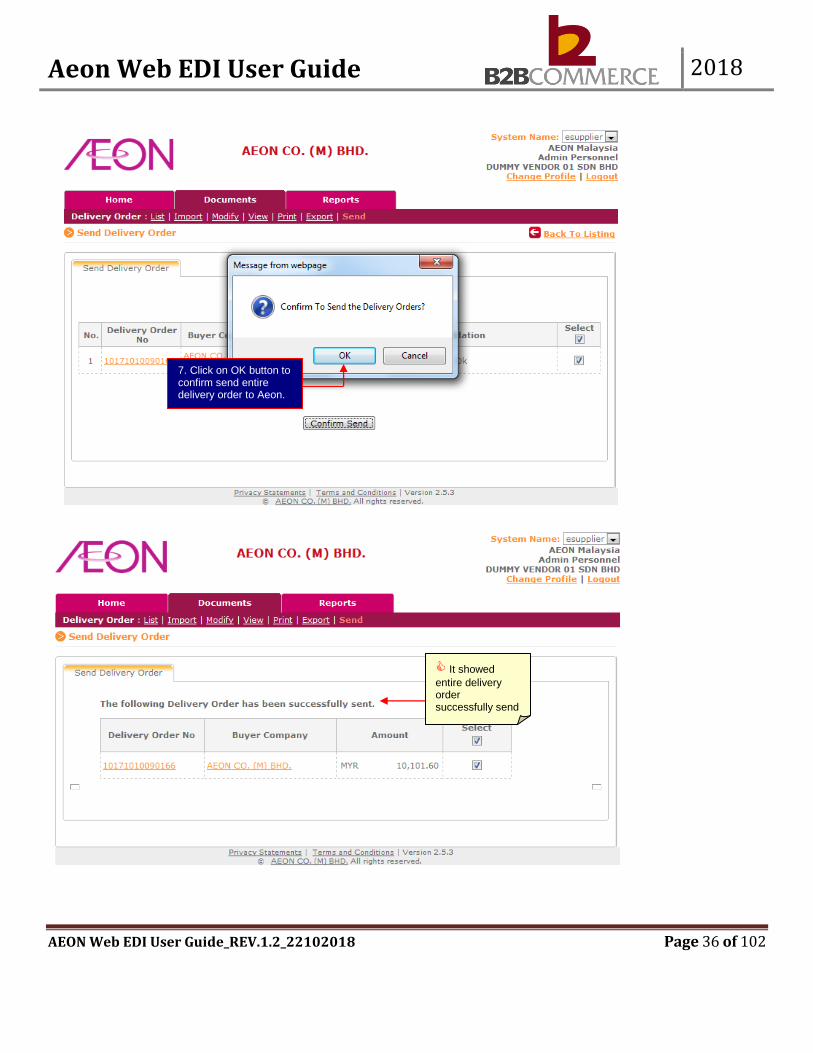
6. Click on Confirm Send button to confirm send entire selected delivery order to Aeon 6. Click on Confirm Send button to confirm send entire selected delivery order to Aeon 6. Click on Confirm Send button to confirm send entire selected delivery order to Aeon 6. Click on Confirm Send button to confirm send entire selected delivery order to Aeon
Aeon Web EDI User Guide 2018
AEON Web EDI User Guide_REV.1.2_22102018 Page 36 of 102
7. Click on OK button to confirm send entire delivery order to Aeon. 7. Click on OK button to confirm send entire delivery order to Aeon. 7. Click on OK button to confirm send entire delivery order to Aeon. 7. Click on OK button to confirm send entire delivery order to Aeon.
It showed
entire delivery order successfully send to Aeon.
It showed
entire delivery order successfully send to Aeon.
Chapter 5: Receiving Note It
showed entire delivery order successfully send to Aeon.
It showed
entire delivery order successfully send to Aeon.

Aeon Web EDI User Guide 2018
AEON Web EDI User Guide_REV.1.2_22102018 Page 37 of 102
5.1 Receiving Note Steps to view Receiving Note This section provides step by step guide on Receiving Note process among AEON, B2B System and Suppliers.
Chapter 5: Receiving Note

Aeon Web EDI User Guide 2018
AEON Web EDI User Guide_REV.1.2_22102018 Page 38 of 102
5.2 Receiving Note Module Step by Step This section provides step by step guide for supplier to List, View, Print, Export and Manage Notification.
5.2.1 List Receiving Note
Step 1 Select Receiving Note Document
Step 2 List Receiving Note
Status Definition: New Supplier received new RN from AEON. Alert Supplier has not view/printed the RN after 1 day. Accepted Supplier has viewed/printed the RN.
1. Click on Documents tab and select Receiving Note.
1. Click on Documents tab and select Receiving Note.
1. Click on Documents tab and select Receiving Note.
1. Click on Documents tab and select Receiving Note.
2. Click on Receiving Note No to view Receiving Note.
2. Click on Receiving Note No to view Receiving Note.
2. Click on Receiving Note No to view Receiving Note.
2. Click on Receiving Note No to view Receiving Note.

Aeon Web EDI User Guide 2018
AEON Web EDI User Guide_REV.1.2_22102018 Page 39 of 102
Step 3 View Receiving Note
3. Click on Print Original button to print Receiving Note.
3. Click on Print Original button to print Receiving Note.
3. Click on Print Original button to print Receiving Note.
3. Click on Print Original button to print Receiving Note.
Click on Export button to export Receiving Note.
Click on Export button to export Receiving Note.
Click on Export button to export Receiving Note.
Click on Export button to export Receiving Note.
Aeon Web EDI User Guide 2018
AEON Web EDI User Guide_REV.1.2_22102018 Page 40 of 102
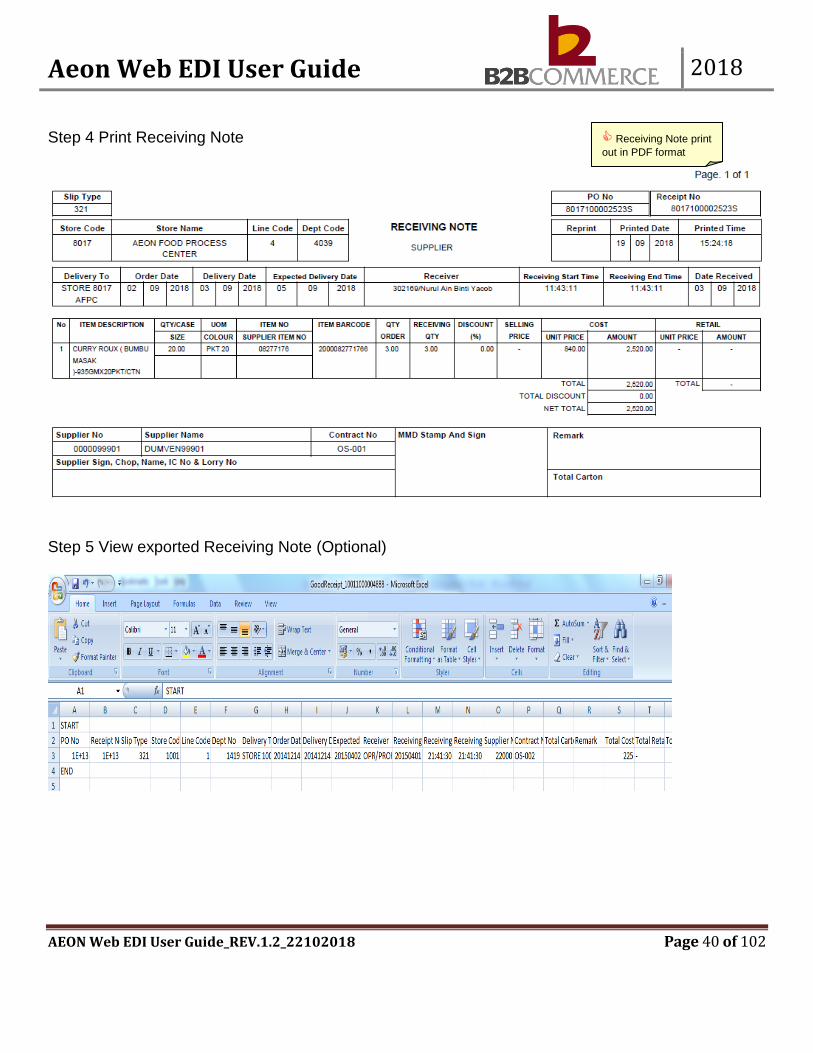
Step 4 Print Receiving Note
Step 5 View exported Receiving Note (Optional)
Receiving Note print
out in PDF format
Receiving Note print
out in PDF format
Receiving Note print
out in PDF format
Receiving Note print
out in PDF format

Aeon Web EDI User Guide 2018
AEON Web EDI User Guide_REV.1.2_22102018 Page 41 of 102
Step 6 View Receiving Note History (Optional)
1. Click on View Receiving Note History
1. Click on View Receiving Note History
1. Click on View Receiving Note History
1. Click on View Receiving Note History
Aeon Web EDI User Guide 2018
AEON Web EDI User Guide_REV.1.2_22102018 Page 42 of 102
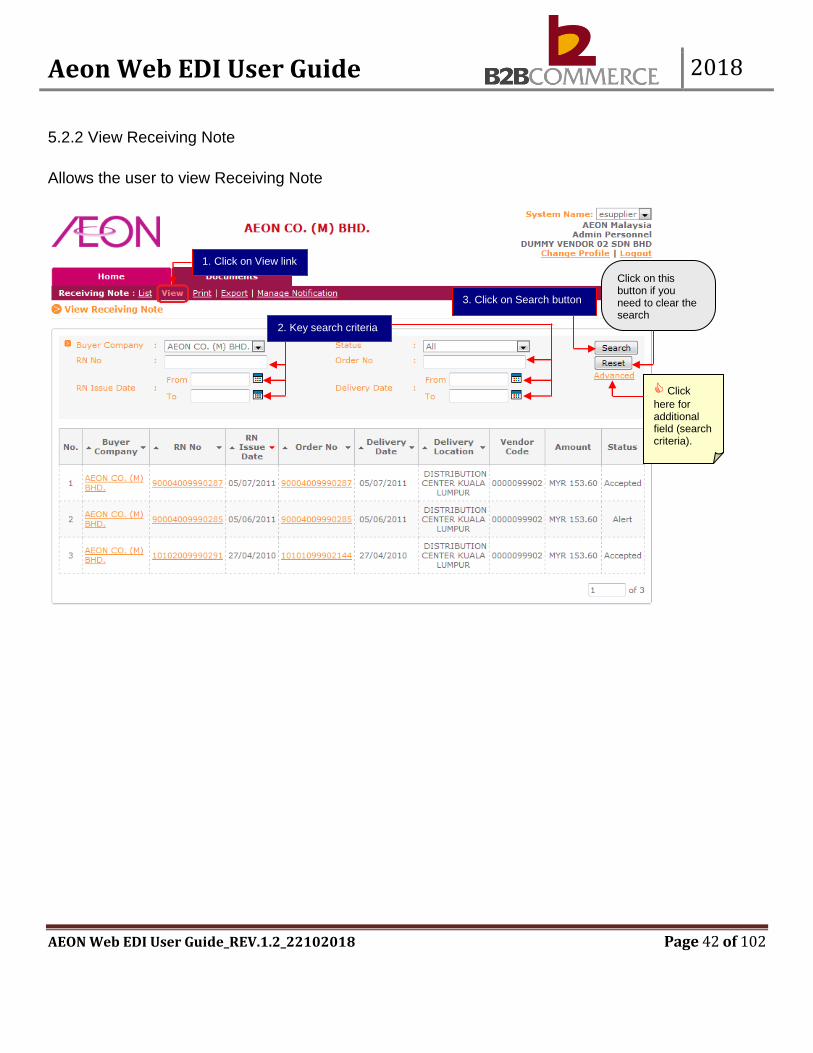
5.2.2 View Receiving Note
Allows the user to view Receiving Note
3. Click on Search button 3. Click on Search button 3. Click on Search button 3. Click on Search button
2. Key search criteria
2. Key search criteria
2. Key search criteria
2. Key search criteria
1. Click on View link
1. Click on View link
1. Click on View link
1. Click on View link
Click on this button if you need to clear the search Click on this button if you need to clear the search Click on this button if you need to clear the search Click on this button if you need to clear the search
Click
here for additional field (search criteria).
Click
here for additional field (search criteria).
Click
here for additional field (search criteria).
Click
here for additional field (search criteria).
Aeon Web EDI User Guide 2018
AEON Web EDI User Guide_REV.1.2_22102018 Page 43 of 102
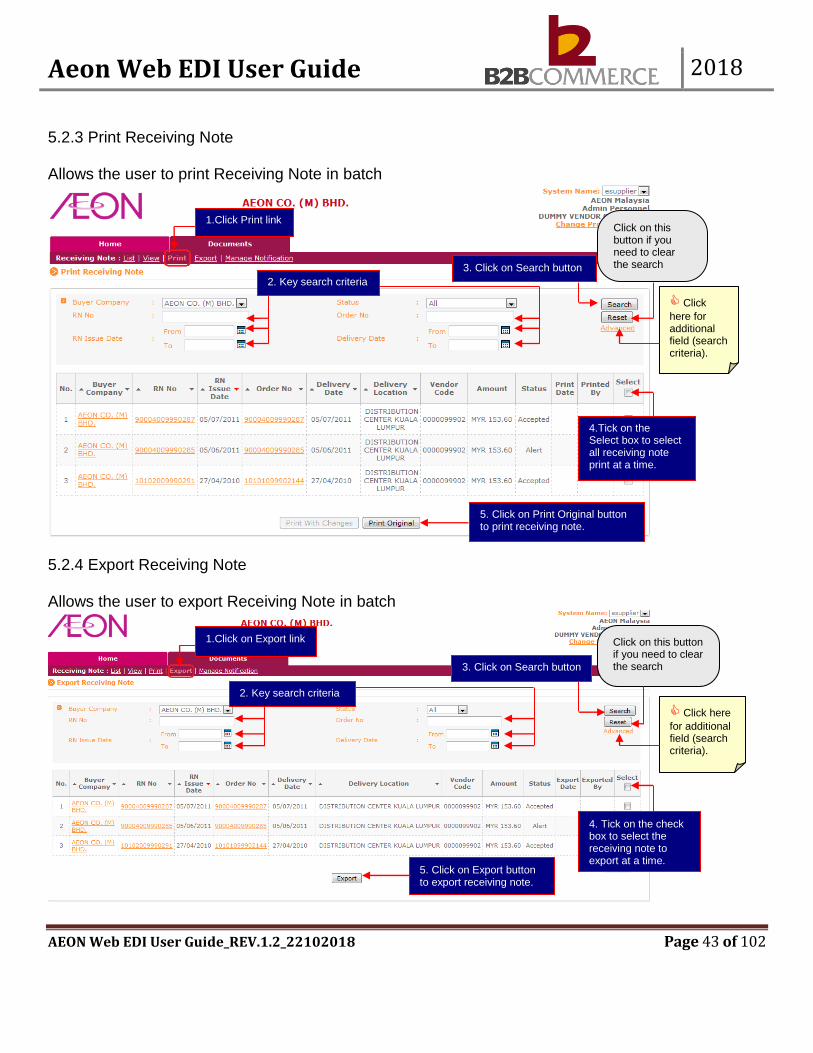
5.2.3 Print Receiving Note Allows the user to print Receiving Note in batch
5.2.4 Export Receiving Note Allows the user to export Receiving Note in batch
2. Key search criteria
2. Key search criteria
2. Key search criteria
2. Key search criteria
3. Click on Search button 3. Click on Search button 3. Click on Search button 3. Click on Search button
4.Tick on the Select box to select all receiving note print at a time. 4.Tick on the Select box to select all receiving note print at a time. 4.Tick on the Select box to select all receiving note print at a time. 4.Tick on the Select box to select all receiving note print at a time.
5. Click on Print Original button to print receiving note. 5. Click on Print Original button to print receiving note. 5. Click on Print Original button to print receiving note. 5. Click on Print Original button to print receiving note.
2. Key search criteria
2. Key search criteria
2. Key search criteria
2. Key search criteria
3. Click on Search button 3. Click on Search button 3. Click on Search button 3. Click on Search button
5. Click on Export button to export receiving note. 5. Click on Export button to export receiving note. 5. Click on Export button to export receiving note. 5. Click on Export button to export receiving note.
1.Click Print link
1.Click Print link
1.Click Print link
1.Click Print link
Click on this button if you need to clear the search Click on this button if you need to clear the search Click on this button if you need to clear the search Click on this button if you need to clear the search
Click
here for additional field (search criteria).
Click
here for additional field (search criteria).
Click
here for additional field (search criteria).
Click
here for additional field (search criteria).
1.Click on Export link
1.Click on Export link
1.Click on Export link
1.Click on Export link
Click on this button if you need to clear the search Click on this button if you need to clear the search Click on this button if you need to clear the search Click on this button if you need to clear the search
Click here
for additional field (search criteria).
Click here
for additional field (search criteria).
Click here
for additional field (search criteria).
Click here
for additional field (search criteria).
4. Tick on the check box to select the receiving note to export at a time. 4. Tick on the check box to select the receiving note to export at a time. 4. Tick on the check box to select the receiving note to export at a time. 4. Tick on the check box to select the receiving note to
Aeon Web EDI User Guide 2018
AEON Web EDI User Guide_REV.1.2_22102018 Page 44 of 102
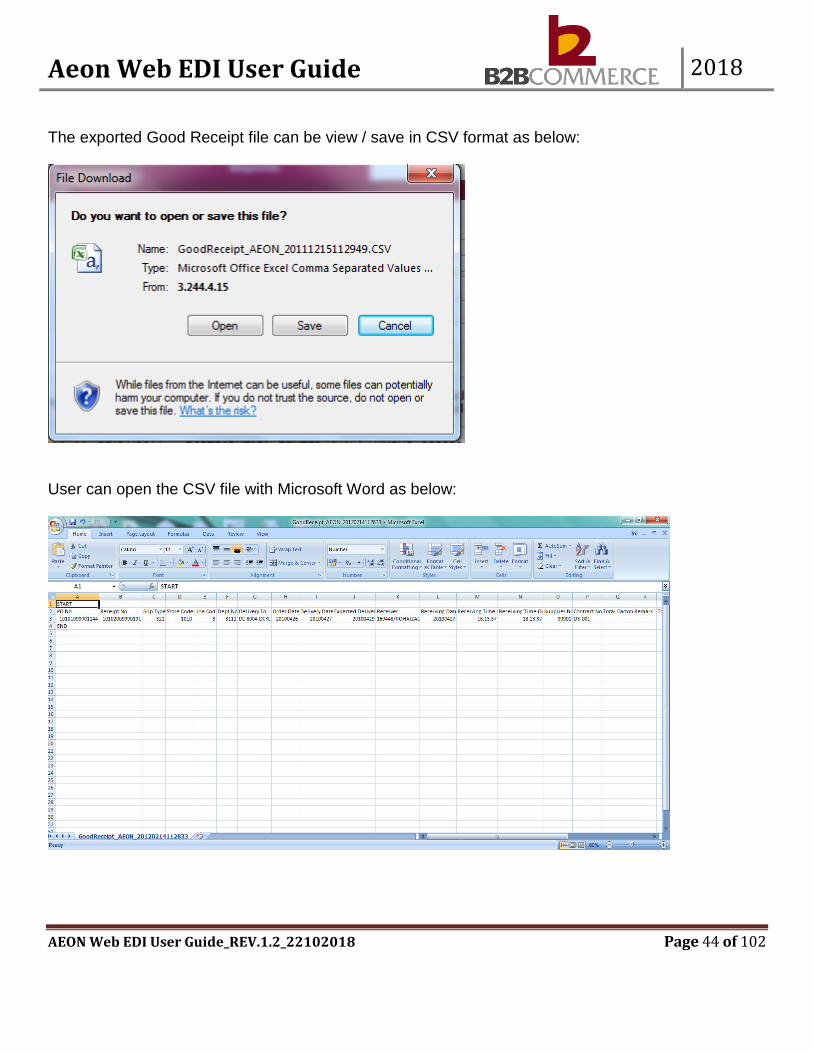
The exported Good Receipt file can be view / save in CSV format as below:
User can open the CSV file with Microsoft Word as below:

Aeon Web EDI User Guide 2018
AEON Web EDI User Guide_REV.1.2_22102018 Page 45 of 102
5.2.5 Manage notification Allows the user to manage receiving note notification setup
2. Select one type of notification 2. Select one type of notification 2. Select one type of notification 2. Select one type of notification
3. Enter valid email notification for entire user. 3. Enter valid email notification for entire user. Chapter 6: Outright Invoice3. Enter valid email
notification for entire user. 3. Enter valid email notification for entire user.
4. Click on Save button to save entire user’s notification. 4. Click on Save button to save entire user’s notification. 4. Click on Save button to save entire user’s notification. 4. Click on Save button to save entire user’s notification.
Click on this button if you
need to reset notification setup. for entire user.
Click on this button if you
need to reset notification setup. for entire user.
Click on this button if you
need to reset notification setup. for entire user.
Click on this button if you
need to reset notification setup. for entire user.
1 Click on Manage Notification link
1 Click on Manage Notification link
1 Click on Manage Notification link
1 Click on Manage Notification link

Aeon Web EDI User Guide 2018
AEON Web EDI User Guide_REV.1.2_22102018 Page 46 of 102
6.1 Invoice Process Steps to create Outright Invoice This section provides step by step guide on Invoice process among Aeon, B2B System and Suppliers. Steps to Send Invoice
Chapter 6: Outright Invoice

Aeon Web EDI User Guide 2018
AEON Web EDI User Guide_REV.1.2_22102018 Page 47 of 102
6.2 Outright Invoice Module Step by Step This section provides step by step guide for supplier to list, import, modify, view, print, export and send invoice
6.2.1 Modify Invoice
Step 1 Select Outright Invoice Document
Step 2 Search modify invoice
1. Click on Documents tab and select Outright Invoice.
1. Click on Documents tab and select Outright Invoice.
1. Click on Documents tab and select Outright Invoice.
1. Click on Documents tab and select Outright Invoice.
2. Click on Modify link. 2. Click on Modify link. 2. Click on Modify link. 2. Click on Modify link.
3. Key search criteria 3. Key search criteria 3. Key search criteria 3. Key search criteria
4. Click on Search button to search the invoice to modify either in New or Modify status. 4. Click on Search button to search the invoice to modify either in New or Modify status. 4. Click on Search button to search the invoice to modify either in New or Modify status. 4. Click on Search button to search the invoice to modify either in New or Modify status.
5. Click Modify link to enter modify detail pages for user to make changes in this entire invoice base on the search result. 5. Click Modify link to enter modify detail pages for user to make changes in this entire invoice base on the search result. 5. Click Modify link to enter modify detail pages for user to make changes in this entire invoice base on the search result.
Click on this button if you need to clear the search Click on this button if you need to clear the search Click on this button if you need to clear the search Click on this button if you need to clear the search
Click
here for additional field (search criteria).
Click
here for additional field (search criteria).
Click
here for additional field (search criteria).
Click
here for additional field (search criteria).

Aeon Web EDI User Guide 2018
AEON Web EDI User Guide_REV.1.2_22102018 Page 48 of 102
Step 3: Modify 2 columns of invoices
6. Enter Invoice No 6. Enter Invoice No 6. Enter Invoice No 6. Enter Invoice No
7. Click here to select Invoice Date 7. Click here to select Invoice Date 7. Click here to select Invoice Date 7. Click here to select Invoice Date
8. Click Save and Send for save the changed of invoice and immediate send to Aeon. 8. Click Save and Send for save the changed of invoice and immediate send to Aeon. 8. Click Save and Send for save the changed of invoice and immediate send to Aeon. 8. Click Save and Send for save the changed of invoice and immediate send to Aeon.
Click Save
button to record entire invoice changes.
Click Save
button to record entire invoice changes.
Click Save
button to record entire invoice changes.
Click Save
Click Reset for
default to original Invoice data.
Click Reset for
default to original Invoice data.
Click Reset for
default to original Invoice data.
Click Reset for
default to original Invoice data.
Aeon Web EDI User Guide 2018
AEON Web EDI User Guide_REV.1.2_22102018 Page 49 of 102
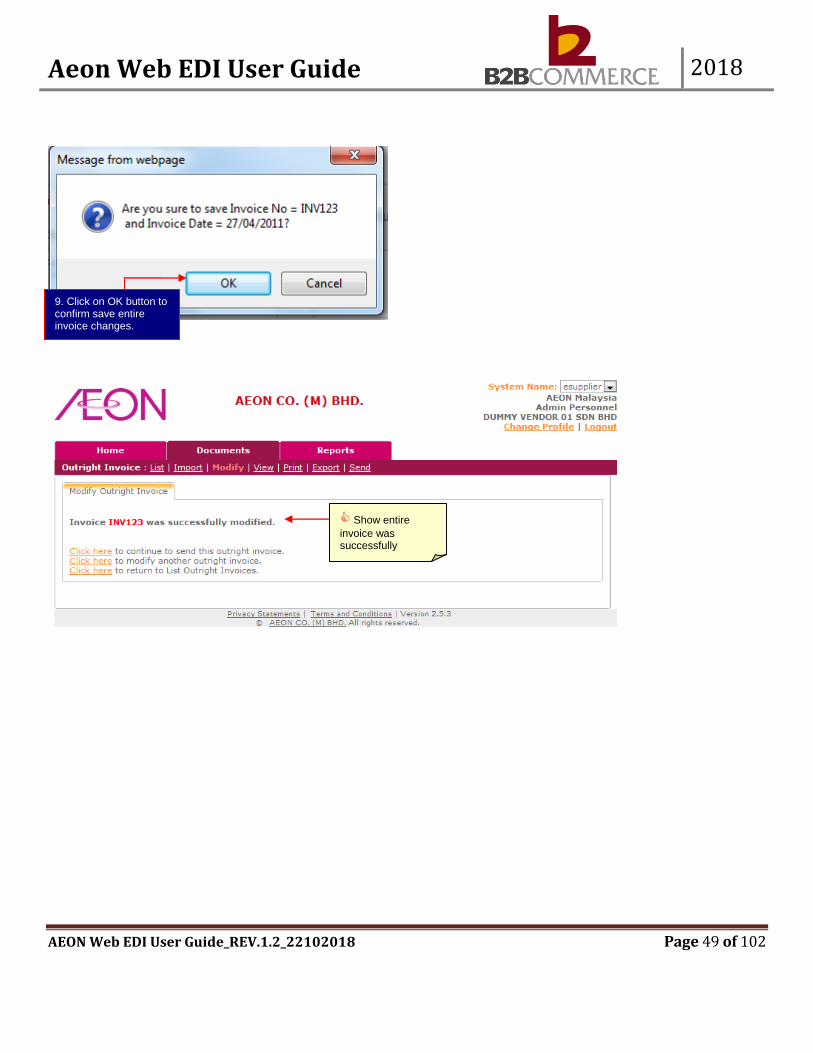
9. Click on OK button to confirm save entire invoice changes. 9. Click on OK button to confirm save entire invoice changes. 9. Click on OK button to confirm save entire invoice changes. 9. Click on OK button to confirm save entire invoice changes.
Show entire
invoice was successfully modified.
Show entire
invoice was successfully modified.
Show entire
invoice was successfully modified.
Show entire
invoice was successfully modified.

Aeon Web EDI User Guide 2018
AEON Web EDI User Guide_REV.1.2_22102018 Page 50 of 102
6.2.2 Import Invoice (Optional)
Step 1 Import Invoice
file
1. Click on Import link
1. Click on Import link
1. Click on Import link
1. Click on Import link
2. Browse entire invoice file location for upload.
2. Browse entire invoice file location for upload.
2. Browse entire invoice file location for upload.
2. Browse entire invoice file location for upload.
3. Click Upload for submission 3. Click Upload for submission 3. Click Upload for submission 3. Click Upload for submission
4. Click Reset for change entire invoice file location path. 4. Click Reset for change entire invoice file location path. 4. Click Reset for change entire invoice file location path. 4. Click Reset for change entire invoice file location path.
Click here to
double check the invoice file format in according before upload entire invoice file.
Click here to
double check the invoice file format in according before upload entire invoice file.
Click here to
double check the invoice file format in according before upload entire invoice file.
Click here to
double check the invoice file format in according before upload entire invoice file.
Aeon Web EDI User Guide 2018
AEON Web EDI User Guide_REV.1.2_22102018 Page 51 of 102
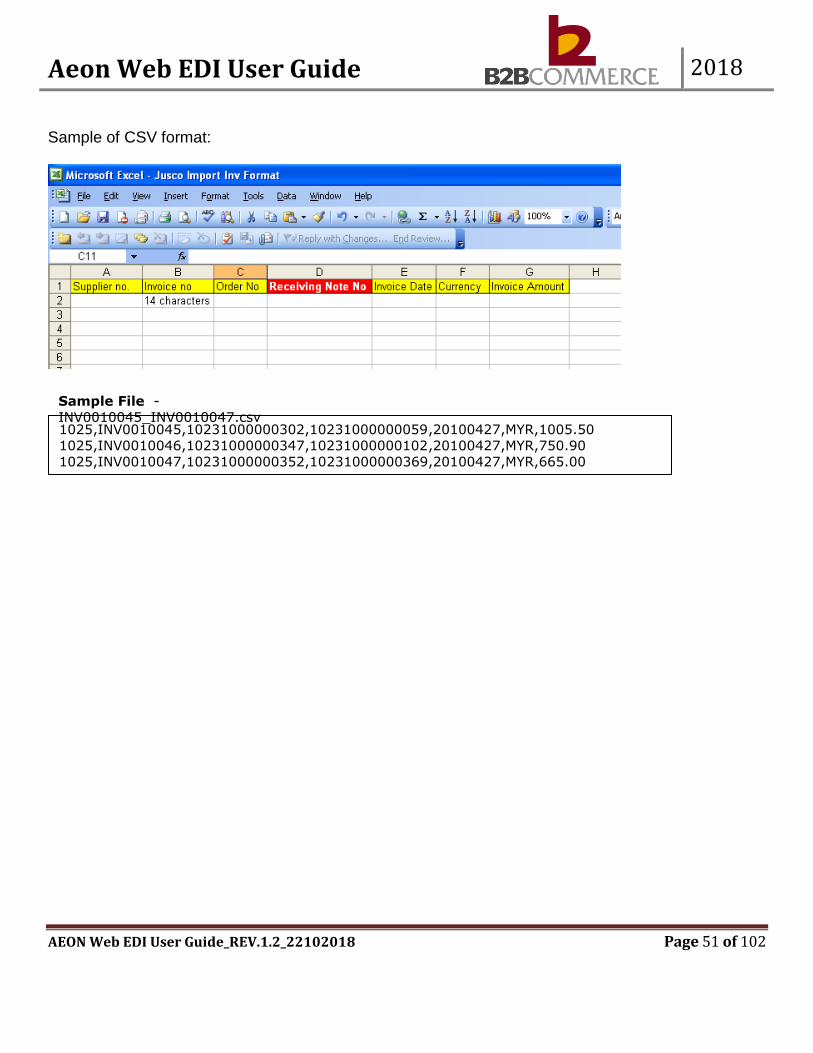
Sample of CSV format:
1025,INV0010045,10231000000302,10231000000059,20100427,MYR,1005.50 1025,INV0010046,10231000000347,10231000000102,20100427,MYR,750.90 1025,INV0010047,10231000000352,10231000000369,20100427,MYR,665.00
Sample File -
INV0010045_INV0010047.csv
Aeon Web EDI User Guide 2018
AEON Web EDI User Guide_REV.1.2_22102018 Page 52 of 102
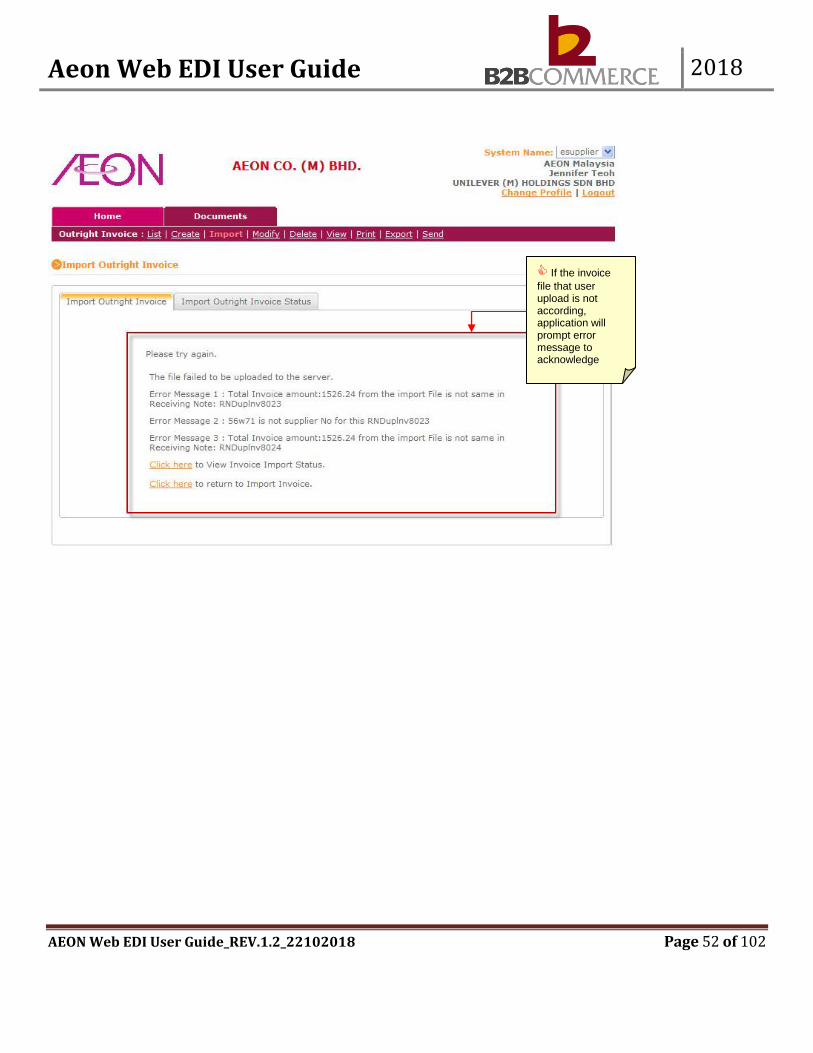
If the invoice
file that user upload is not according, application will prompt error message to acknowledge user.
If the invoice
file that user upload is not according, application will prompt error message to acknowledge user.
If the invoice
file that user upload is not according, application will prompt error message to acknowledge user.
If the invoice
file that user upload is not according, application will prompt error message to acknowledge user.

Aeon Web EDI User Guide 2018
AEON Web EDI User Guide_REV.1.2_22102018 Page 53 of 102
Step 2 Check import outright invoice file status
1. Click to search the files upload status in Import Outright Invoice status. 1. Click to search the files upload status in Import Outright Invoice status. 1. Click to search the files upload status in Import Outright Invoice status. 1. Click to search the files upload status in Import Outright Invoice status.
2. Key search criteria 2. Key search criteria 2. Key search criteria 2. Key search criteria
3. Click Search button for checking file status. 3. Click Search button for checking file status. 3. Click Search button for checking file status. 3. Click Search button for checking file status.
4. Click Reset button to clear search criteria 4. Click Reset button to clear search criteria 4. Click Reset button to clear search criteria 4. Click Reset button to clear search criteria
It showed entire invoice file
being upload into e-portal.
It showed entire invoice file
being upload into e-portal.
It showed entire invoice file
being upload into e-portal.
It showed entire invoice file
being upload into e-portal.

Aeon Web EDI User Guide 2018
AEON Web EDI User Guide_REV.1.2_22102018 Page 54 of 102
Status Definition: New New Outright Invoice to import. In-Process Processing the imported file. Successfully File successfully uploaded into e-portal system. Failed File failed to process into e-portal system. Remarks: Always remember to SEND the invoice after import the invoice.
Aeon Web EDI User Guide 2018
AEON Web EDI User Guide_REV.1.2_22102018 Page 55 of 102
6.2.3 List Invoice
Step 1 List Invoice
Status Definition: New System created New Invoice. Modify Supplier has modified Invoice and save in B2B system. Sent Supplier has sent Invoice to AEON.
2. Click on invoice no to view invoice.
2. Click on invoice no to view invoice.
2. Click on invoice no to view invoice.
2. Click on invoice no to view invoice.
1. Click on List link
1. Click on List link
1. Click on List link
1. Click on List link
Aeon Web EDI User Guide 2018
AEON Web EDI User Guide_REV.1.2_22102018 Page 56 of 102
Step 2 View Invoice
3. Click on Print Original button to print Invoice.
3. Click on Print Original button to print Invoice.
3. Click on Print Original button to print Invoice.
3. Click on Print Original button to print Invoice.
Click on Export button to export Invoice.
Click on Export button to export Invoice.
Click on Export button to export Invoice.
Click on Export button to export Invoice.
Aeon Web EDI User Guide 2018
AEON Web EDI User Guide_REV.1.2_22102018 Page 57 of 102
Step 3 View Invoice History (Optional)
1. Click on View Outright Invoice History tab to check Invoice history. 1. Click on View Outright Invoice History tab to check Invoice history. 1. Click on View Outright Invoice History tab to check Invoice history. 1. Click on View Outright Invoice History tab to check Invoice history.
Aeon Web EDI User Guide 2018
AEON Web EDI User Guide_REV.1.2_22102018 Page 58 of 102
Aeon Web EDI User Guide 2018
AEON Web EDI User Guide_REV.1.2_22102018 Page 59 of 102
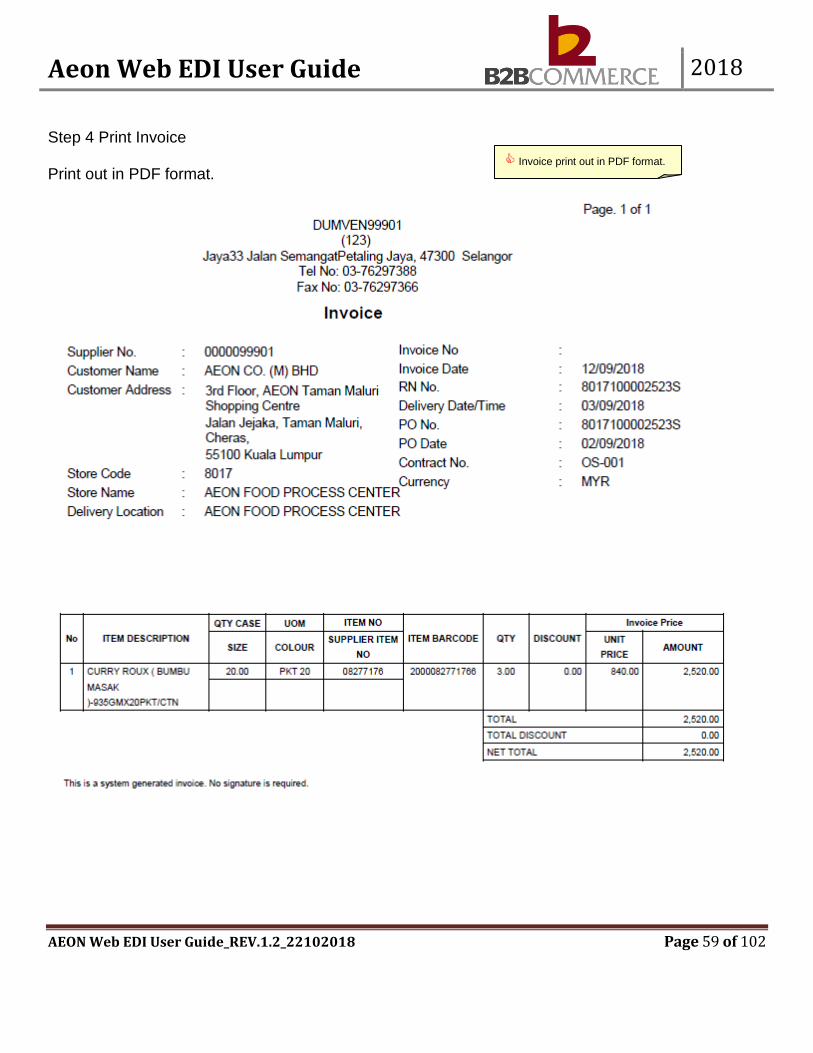
Step 4 Print Invoice Print out in PDF format.
Invoice print out in PDF format.
Invoice print out in PDF format.
Invoice print out in PDF format.
Invoice print out in PDF format.
Aeon Web EDI User Guide 2018
AEON Web EDI User Guide_REV.1.2_22102018 Page 60 of 102
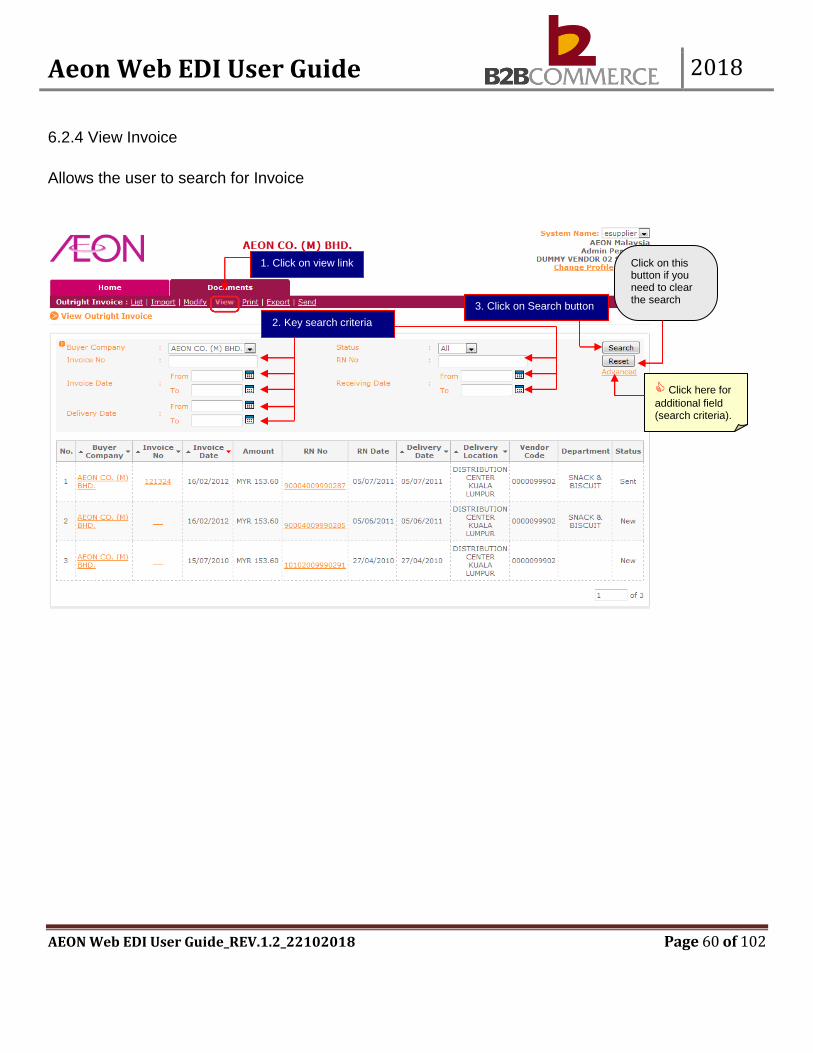
6.2.4 View Invoice
Allows the user to search for Invoice
1. Click on view link 1. Click on view link 1. Click on view link 1. Click on view link
3. Click on Search button 3. Click on Search button 3. Click on Search button 3. Click on Search button
Click here for
additional field (search criteria).
Click here for
additional field (search criteria).
Click here for
additional field (search criteria).
Click here for
additional field (search criteria).
2. Key search criteria 2. Key search criteria 2. Key search criteria 2. Key search criteria
Click on this button if you need to clear the search Click on this button if you need to clear the search Click on this button if you need to clear the search Click on this button if you need to clear the search
Aeon Web EDI User Guide 2018
AEON Web EDI User Guide_REV.1.2_22102018 Page 61 of 102
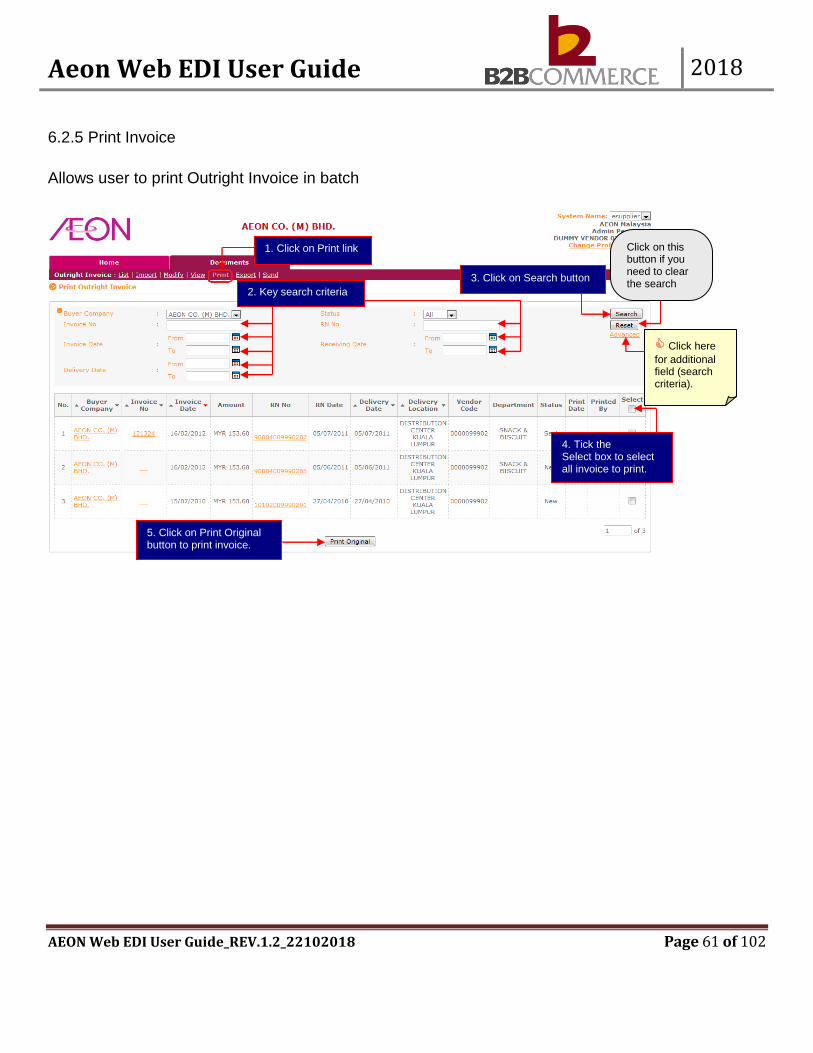
6.2.5 Print Invoice
Allows user to print Outright Invoice in batch
2. Key search criteria 2. Key search criteria 2. Key search criteria 2. Key search criteria
1. Click on Print link 1. Click on Print link 1. Click on Print link 1. Click on Print link
3. Click on Search button 3. Click on Search button 3. Click on Search button 3. Click on Search button
5. Click on Print Original button to print invoice. 5. Click on Print Original button to print invoice. 5. Click on Print Original button to print invoice. 5. Click on Print Original button to print invoice.
Click on this button if you need to clear the search Click on this button if you need to clear the search Click on this button if you need to clear the search Click on this button if you need to clear the search
Click here
for additional field (search criteria).
Click here
for additional field (search criteria).
Click here
for additional field (search criteria).
Click here
for additional field (search criteria).
4. Tick the Select box to select all invoice to print. 4. Tick the Select box to select all invoice to print. 4. Tick the Select box to select all invoice to print. 4. Tick the Select box to select all invoice to print.

Aeon Web EDI User Guide 2018
AEON Web EDI User Guide_REV.1.2_22102018 Page 62 of 102
6.2.6 Export Invoice (Optional)
Allows the user to export Outright Invoice in batch
2. Key search criteria 2. Key search criteria 2. Key search criteria 2. Key search criteria
1. Click on view link 1. Click on view link 1. Click on view link 1. Click on view link
3. Click on Search button 3. Click on Search button 3. Click on Search button 3. Click on Search button
4. Tick the Select box to select all invoice to export. 4. Tick the Select box to select all invoice to export. 4. Tick the Select box to select all invoice to export. 4. Tick the Select box to select all invoice to export.
5. Click on Export button to open or save the invoice in CSV format 5. Click on Export button to open or save the invoice in CSV format 5. Click on Export button to open or save the invoice in CSV format 5. Click on Export button to open or save the invoice in CSV format
Click on this button if you need to clear the search Click on this button if you need to clear the search Click on this button if you need to clear the search Click on this button if you need to clear the search
Click here for
additional field (search criteria).
Click here for
additional field (search criteria).
Click here for
additional field (search criteria).
Click here for
additional field (search criteria).

Aeon Web EDI User Guide 2018
AEON Web EDI User Guide_REV.1.2_22102018 Page 63 of 102
The exported Outright Invoice file can be view / save in CSV format as below:
User can open the CSV file with Microsoft Word as below:

Aeon Web EDI User Guide 2018
AEON Web EDI User Guide_REV.1.2_22102018 Page 64 of 102
6.2.7 Send Invoice
Allows the user to send invoice in batch
1. Click on Send link 1. Click on Send link 1. Click on Send link 1. Click on Send link
2. Key search criteria 2. Key search criteria 2. Key search criteria 2. Key search criteria
3. Click on Search button 3. Click on Search button 3. Click on Search button 3. Click on Search button
4. Tick the check box to select all invoices send to Aeon. 4. Tick the check box to select all invoices send to Aeon. 4. Tick the check box to select all invoices send to Aeon. 4. Tick the check box to select all invoices send to Aeon.
5. Click on Send button to confirm send entire selected invoice to Aeon. 5. Click on Send button to confirm send entire selected invoice to Aeon. 5. Click on Send button to confirm send entire selected invoice to Aeon. 5. Click on Send button to confirm send entire selected invoice to Aeon.
Click on this button if you need to clear the search Click on this button if you need to clear the search Click on this button if you need to clear the search Click on this button if you need to clear the search
Click here for
additional field (search criteria).
Click here for
additional field (search criteria).
Click here for
additional field (search criteria).
Click here for
additional field (search criteria).
Aeon Web EDI User Guide 2018
AEON Web EDI User Guide_REV.1.2_22102018 Page 65 of 102
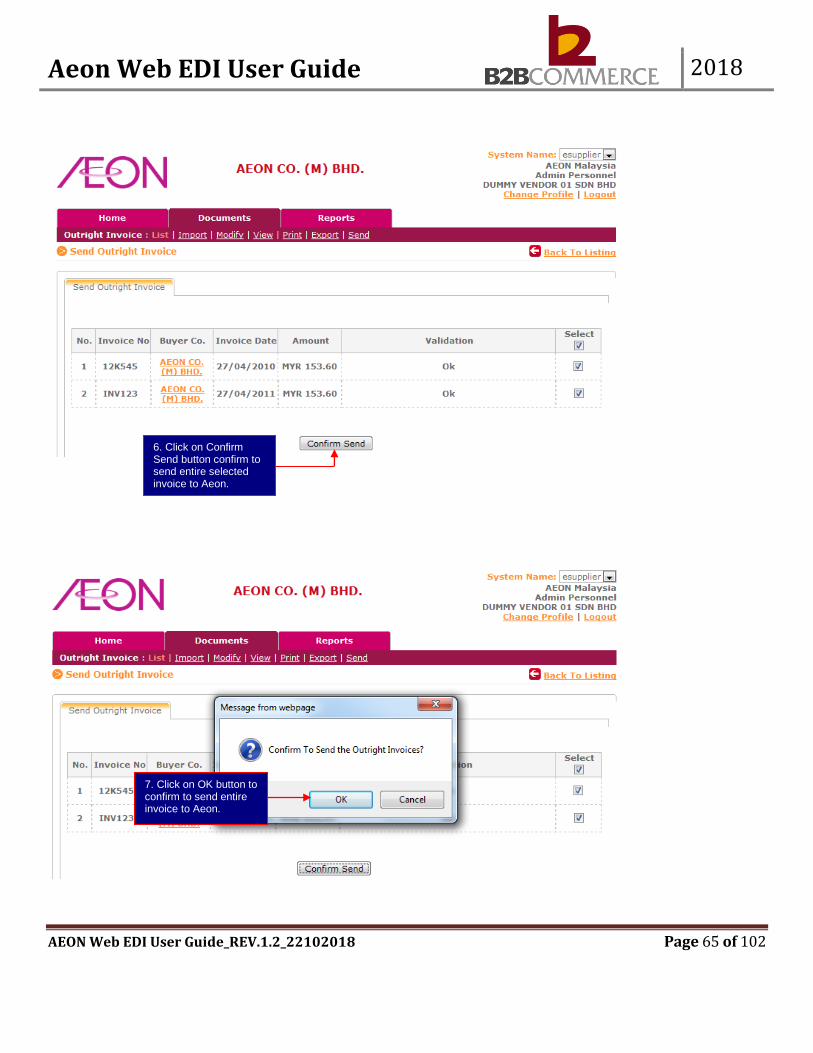
6. Click on Confirm Send button confirm to send entire selected invoice to Aeon. 6. Click on Confirm Send button confirm to send entire selected invoice to Aeon. 6. Click on Confirm Send button confirm to send entire selected invoice to Aeon. 6. Click on Confirm Send button confirm to send entire selected invoice to Aeon.
7. Click on OK button to confirm to send entire invoice to Aeon. 7. Click on OK button to confirm to send entire invoice to Aeon. 7. Click on OK button to confirm to send entire invoice to Aeon. 7. Click on OK button to confirm to send entire invoice to Aeon.
Aeon Web EDI User Guide 2018
AEON Web EDI User Guide_REV.1.2_22102018 Page 66 of 102
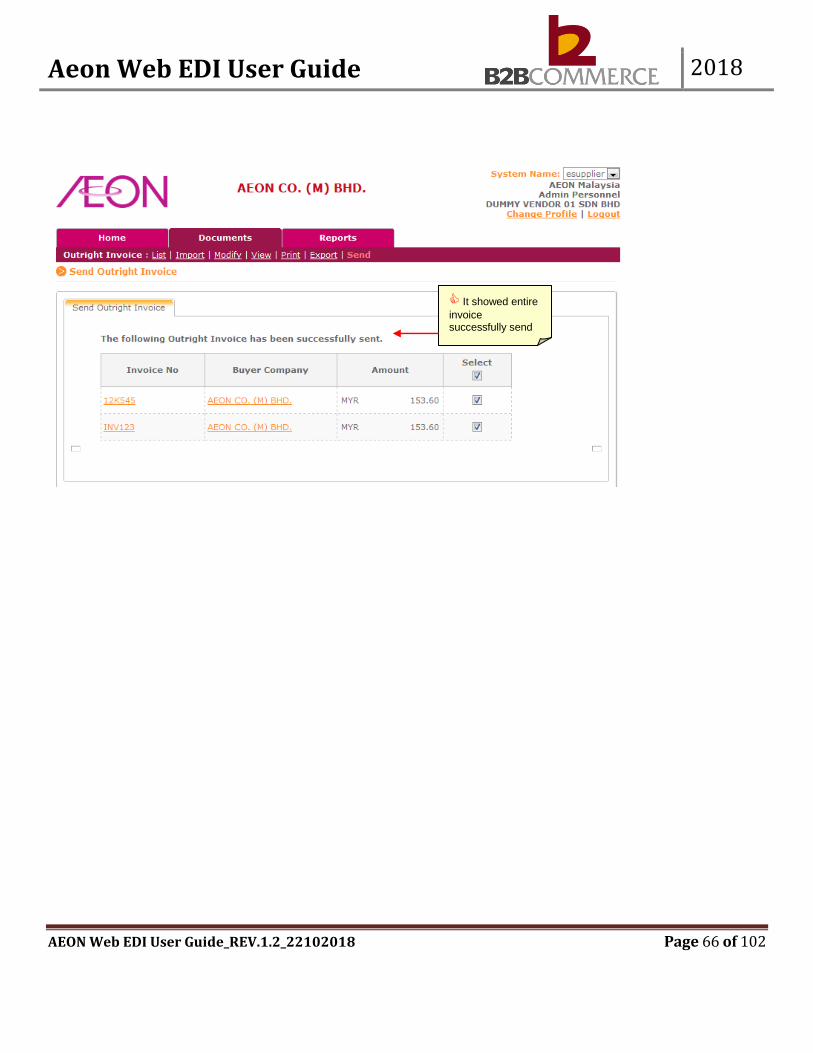
It showed entire
invoice successfully send to Aeon.
It showed entire
invoice successfully send to Aeon.
Chapter 7: Good Return Note It
showed entire invoice successfully send to Aeon.
It showed entire
invoice successfully send to Aeon.
Aeon Web EDI User Guide 2018
AEON Web EDI User Guide_REV.1.2_22102018 Page 67 of 102
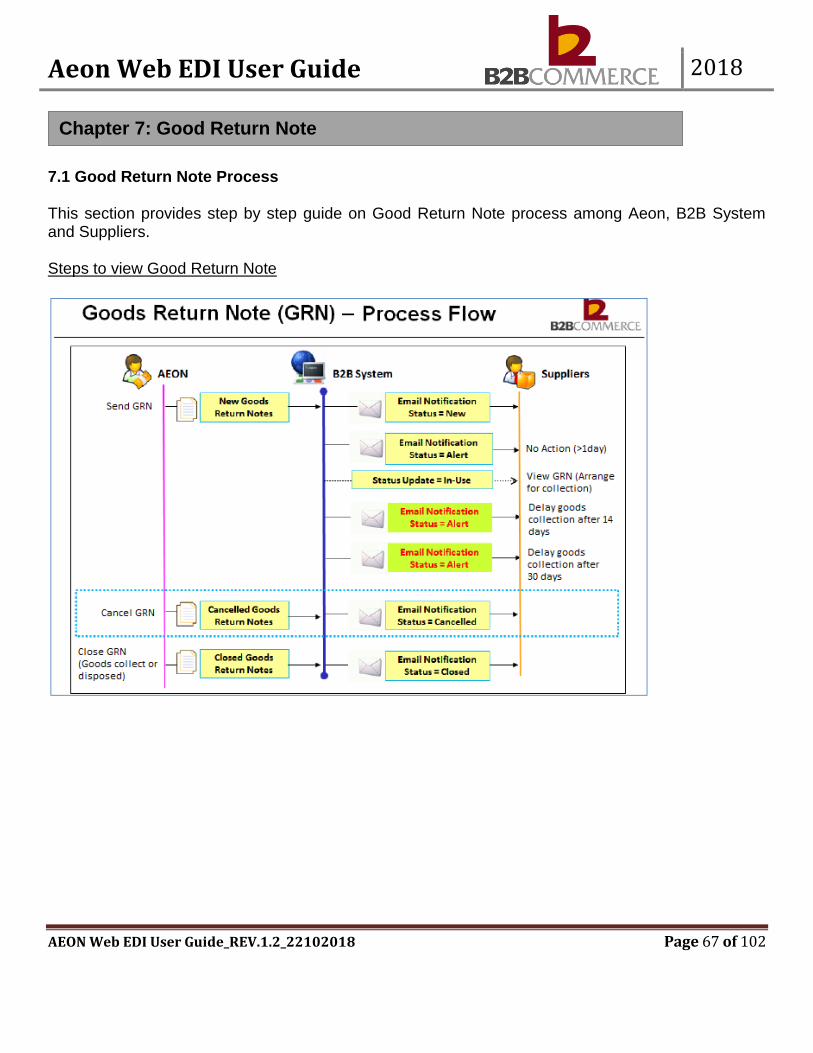
7.1 Good Return Note Process This section provides step by step guide on Good Return Note process among Aeon, B2B System and Suppliers. Steps to view Good Return Note
Chapter 7: Good Return Note

Aeon Web EDI User Guide 2018
AEON Web EDI User Guide_REV.1.2_22102018 Page 68 of 102
7.2 Goods Return Note Module Step by Step This section provides step by step guide for supplier to List, View, Print and Export. 7.2.1 Goods Return Note Step 1 Select Goods Return Note Document
1. Click on Documents tab and select Goods Return Note.
1. Click on Documents tab and select Goods Return Note.
1. Click on Documents tab and select Goods Return Note.
1. Click on Documents tab and select Goods Return Note.
Aeon Web EDI User Guide 2018
AEON Web EDI User Guide_REV.1.2_22102018 Page 69 of 102
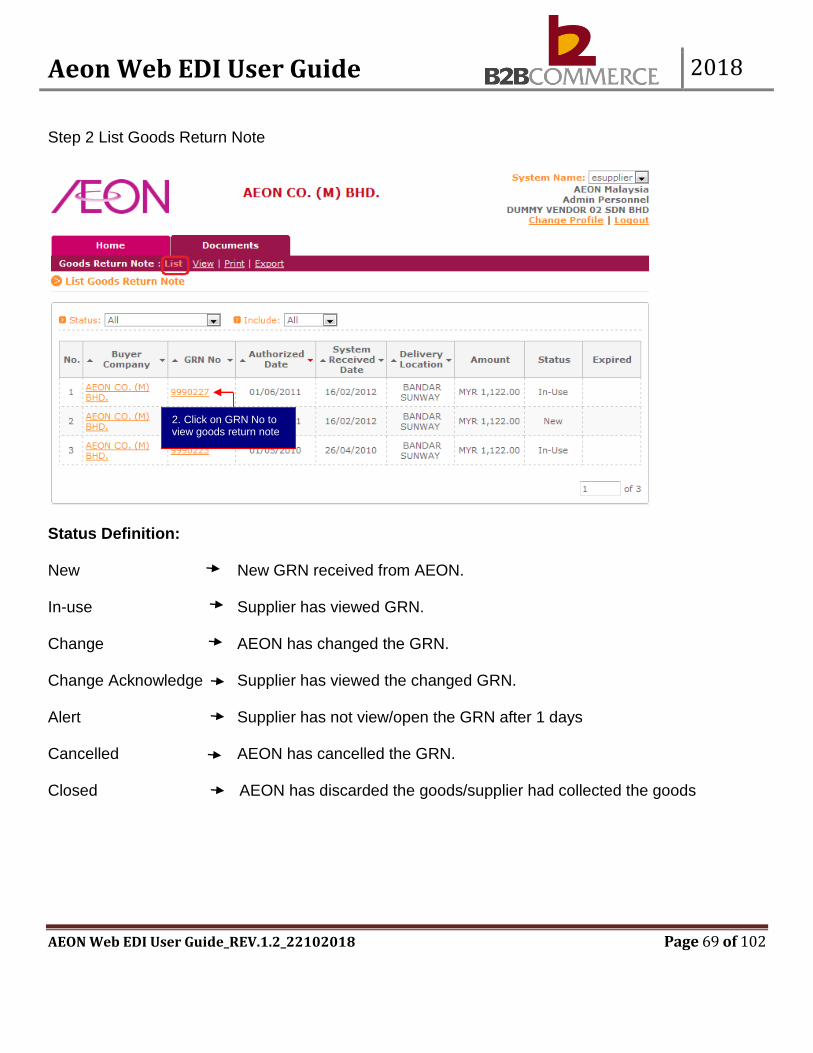
Step 2 List Goods Return Note
Status Definition: New New GRN received from AEON. In-use Supplier has viewed GRN. Change AEON has changed the GRN. Change Acknowledge Supplier has viewed the changed GRN. Alert Supplier has not view/open the GRN after 1 days Cancelled AEON has cancelled the GRN. Closed AEON has discarded the goods/supplier had collected the goods
2. Click on GRN No to view goods return note
2. Click on GRN No to view goods return note
2. Click on GRN No to view goods return note
2. Click on GRN No to view goods return note
Aeon Web EDI User Guide 2018
AEON Web EDI User Guide_REV.1.2_22102018 Page 70 of 102
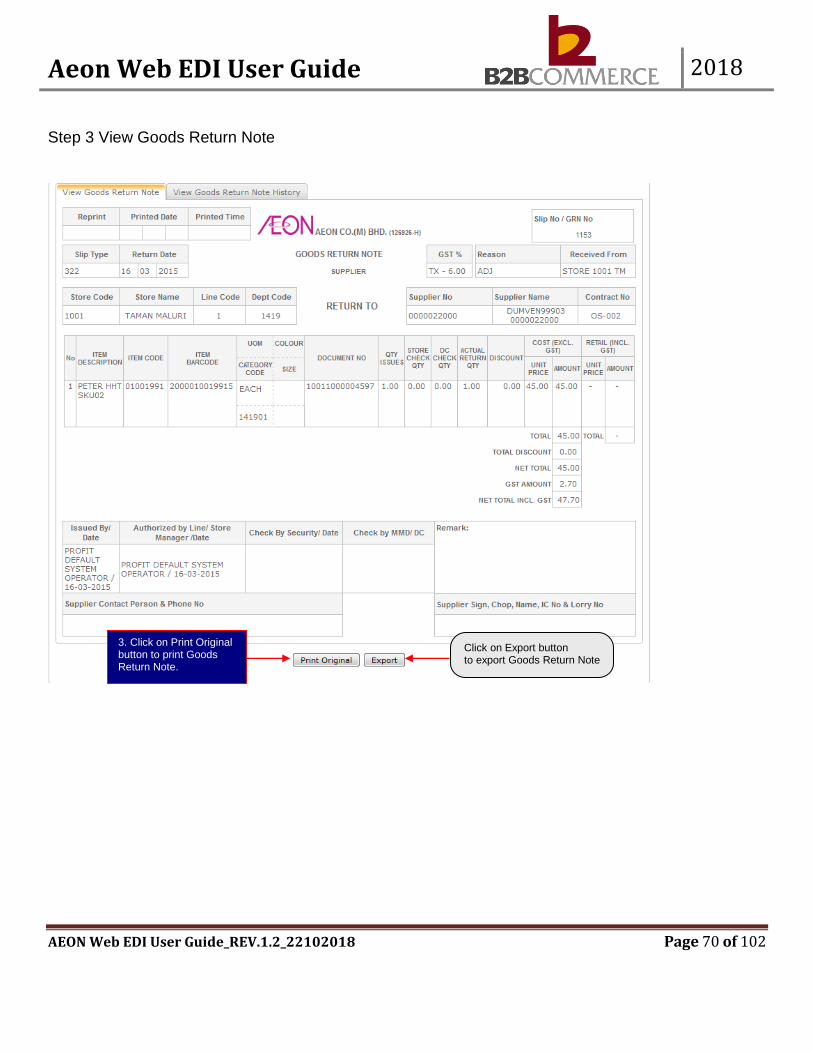
Step 3 View Goods Return Note
3. Click on Print Original button to print Goods Return Note.
3. Click on Print Original button to print Goods Return Note.
3. Click on Print Original button to print Goods Return Note.
3. Click on Print Original button to print Goods Return Note.
Click on Export button to export Goods Return Note
Click on Export button to export Goods Return Note
Click on Export button to export Goods Return Note
Click on Export button to export Goods Return Note
Aeon Web EDI User Guide 2018
AEON Web EDI User Guide_REV.1.2_22102018 Page 71 of 102
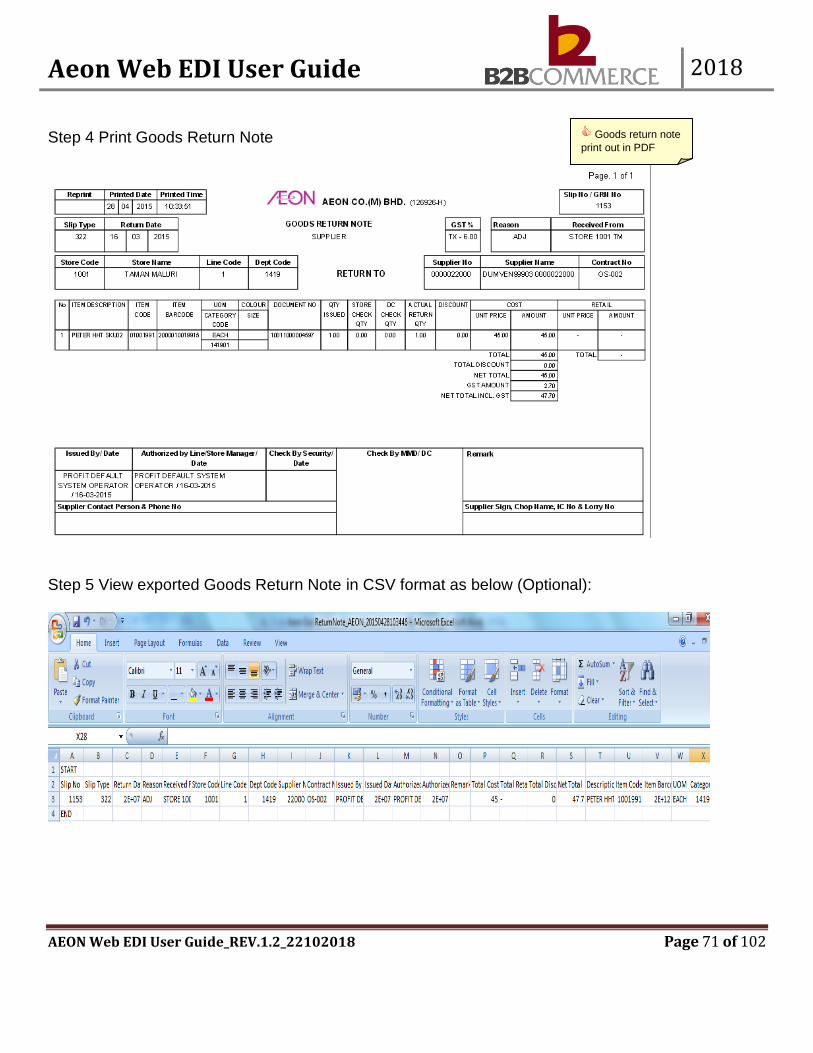
Step 4 Print Goods Return Note
Step 5 View exported Goods Return Note in CSV format as below (Optional):
Goods return note
print out in PDF
Goods return note
print out in PDF
Goods return note
print out in PDF
Goods return note
print out in PDF
Aeon Web EDI User Guide 2018
AEON Web EDI User Guide_REV.1.2_22102018 Page 72 of 102
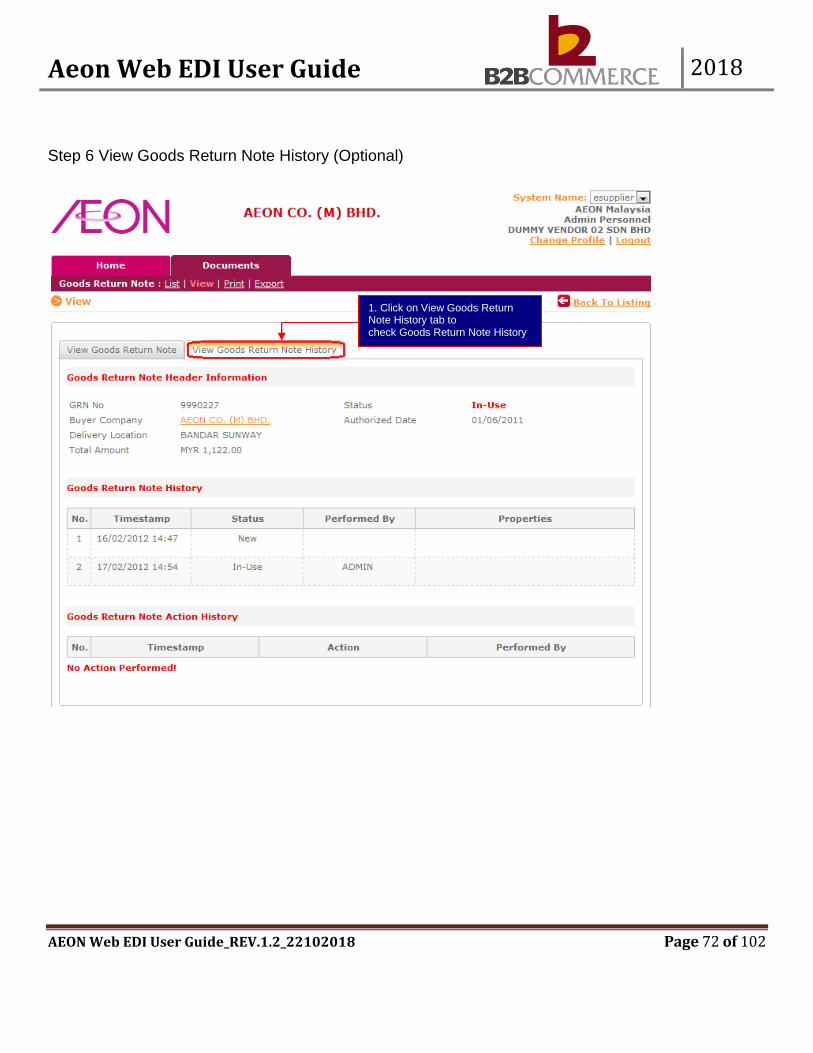
Step 6 View Goods Return Note History (Optional)
1. Click on View Goods Return Note History tab to check Goods Return Note History 1. Click on View Goods Return Note History tab to check Goods Return Note History 1. Click on View Goods Return Note History tab to check Goods Return Note History 1. Click on View Goods Return Note History tab to check Goods Return Note History

Aeon Web EDI User Guide 2018
AEON Web EDI User Guide_REV.1.2_22102018 Page 73 of 102
7.2.2 View Goods Return Note
Allows the user to view Goods Return Note
2. Key search criteria
2. Key search criteria
2. Key search criteria
2. Key search criteria
3. Click on Search button 3. Click on Search button 3. Click on Search button 3. Click on Search button
1. Click on View link 1. Click on View link 1. Click on View link 1. Click on View link
Click on this button if you need to clear the search Click on this button if you need to clear the search Click on this button if you need to clear the search Click on this button if you need to clear the search
Click here
for additional field (search criteria).
Click here
for additional field (search criteria).
Click here
for additional field (search criteria).
Click here
for additional field (search criteria).
Aeon Web EDI User Guide 2018
AEON Web EDI User Guide_REV.1.2_22102018 Page 74 of 102
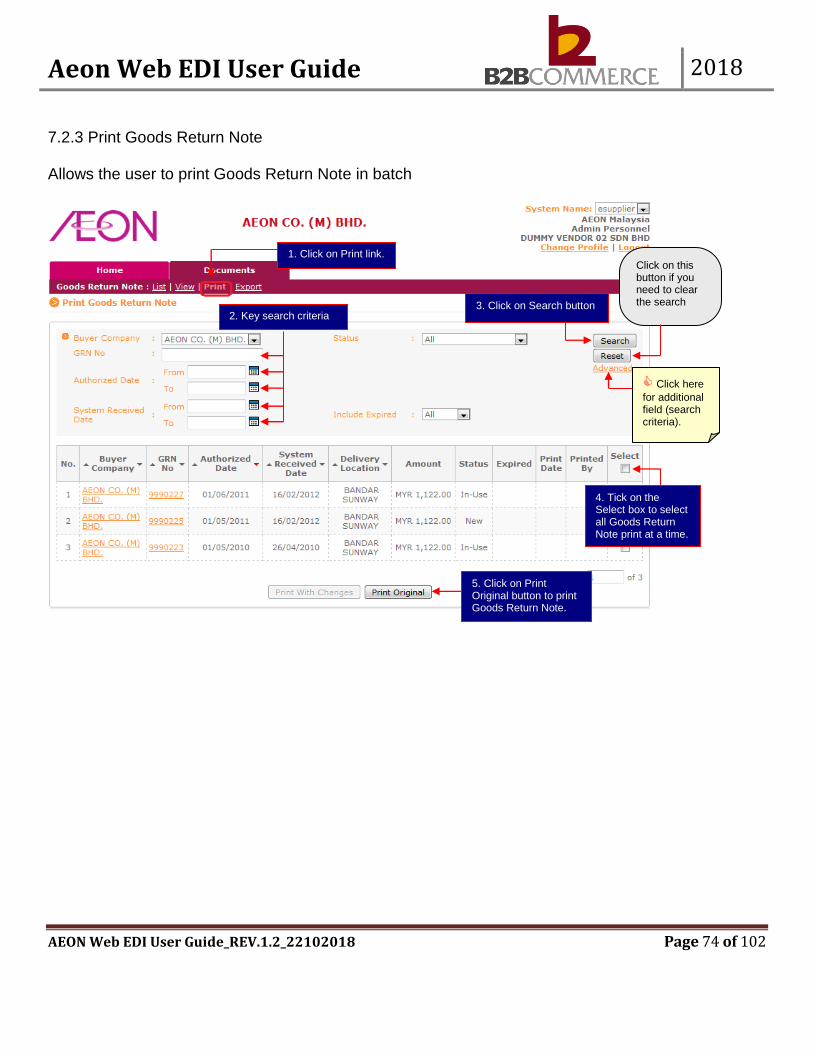
7.2.3 Print Goods Return Note Allows the user to print Goods Return Note in batch
2. Key search criteria
2. Key search criteria
2. Key search criteria
2. Key search criteria
3. Click on Search button 3. Click on Search button 3. Click on Search button 3. Click on Search button
4. Tick on the Select box to select all Goods Return Note print at a time.
4. Tick on the Select box to select all Goods Return Note print at a time.
4. Tick on the Select box to select all Goods Return Note print at a time.
4. Tick on the Select box to select all Goods Return Note print at a time.
5. Click on Print Original button to print Goods Return Note. 5. Click on Print Original button to print Goods Return Note. 5. Click on Print Original button to print Goods Return Note. 5. Click on Print Original button to print Goods Return Note.
1. Click on Print link. 1. Click on Print link. 1. Click on Print link. 1. Click on Print link.
Click on this button if you need to clear the search Click on this button if you need to clear the search Click on this button if you need to clear the search Click on this button if you need to clear the search
Click here
for additional field (search criteria).
Click here
for additional field (search criteria).
Click here
for additional field (search criteria).
Click here
for additional field (search criteria).
Aeon Web EDI User Guide 2018
AEON Web EDI User Guide_REV.1.2_22102018 Page 75 of 102
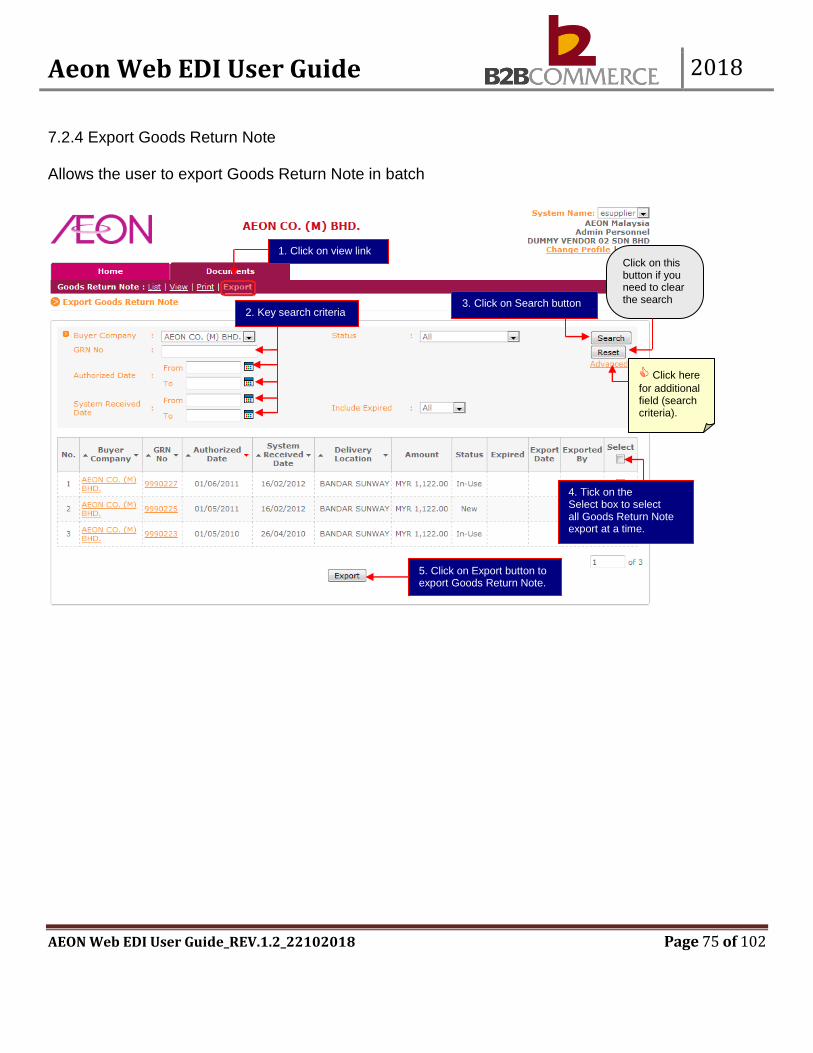
7.2.4 Export Goods Return Note Allows the user to export Goods Return Note in batch
1. Click on view link 1. Click on view link 1. Click on view link 1. Click on view link
2. Key search criteria
2. Key search criteria
2. Key search criteria
2. Key search criteria
3. Click on Search button 3. Click on Search button 3. Click on Search button 3. Click on Search button
4. Tick on the Select box to select all Goods Return Note export at a time. 4. Tick on the Select box to select all Goods Return Note export at a time. 4. Tick on the Select box to select all Goods Return Note export at a time. 4. Tick on the Select box to select all Goods Return Note export at a time.
5. Click on Export button to export Goods Return Note. 5. Click on Export button to export Goods Return Note. 5. Click on Export button to export Goods Return Note. 5. Click on Export button to export Goods Return Note.
Click here
for additional field (search criteria).
Click here
for additional field (search criteria).
Click here
for additional field (search criteria).
Click here
for additional field (search criteria).
Click on this button if you need to clear the search Click on this button if you need to clear the search Chapter 8: Debit NoteClick
on this button if you need to clear the search Click on this button if you need to clear the search
Aeon Web EDI User Guide 2018
AEON Web EDI User Guide_REV.1.2_22102018 Page 76 of 102
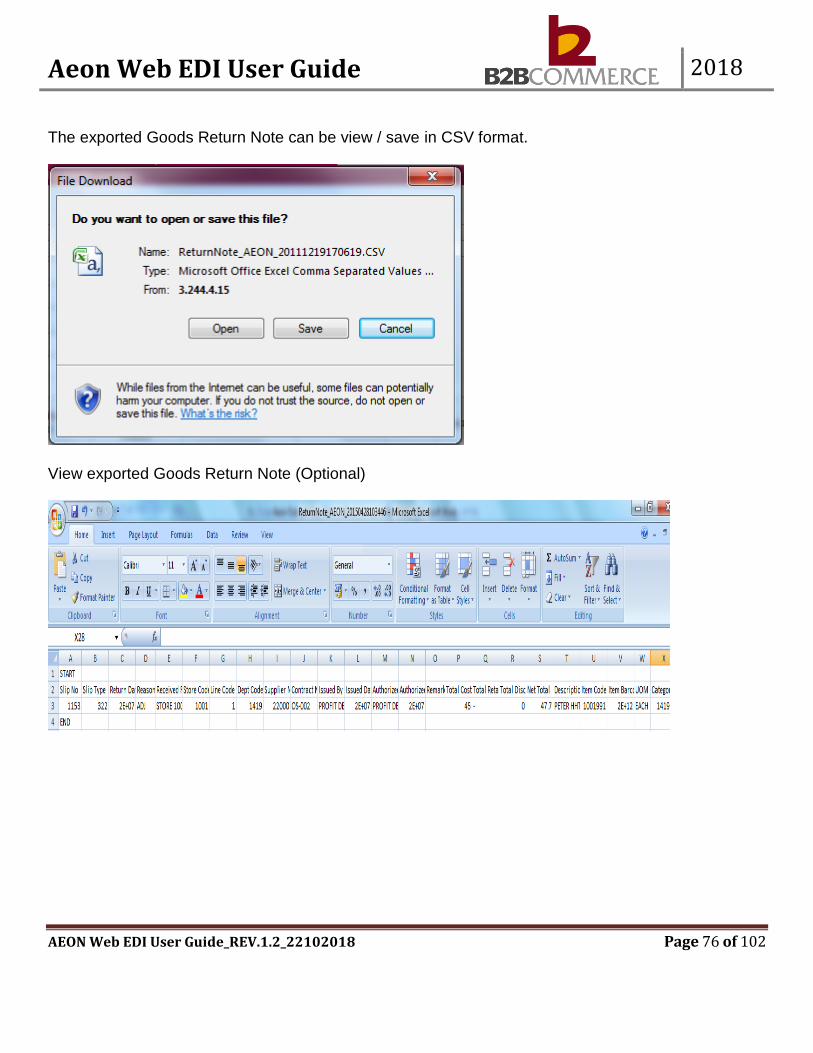
The exported Goods Return Note can be view / save in CSV format.
View exported Goods Return Note (Optional)

Aeon Web EDI User Guide 2018
AEON Web EDI User Guide_REV.1.2_22102018 Page 77 of 102
8.1 Debit Note Process This section provides step by step guide on Debit Note process among AEON, B2B System and Suppliers. Steps to view Debit Note
Chapter 8: Debit Note
Aeon Web EDI User Guide 2018
AEON Web EDI User Guide_REV.1.2_22102018 Page 78 of 102
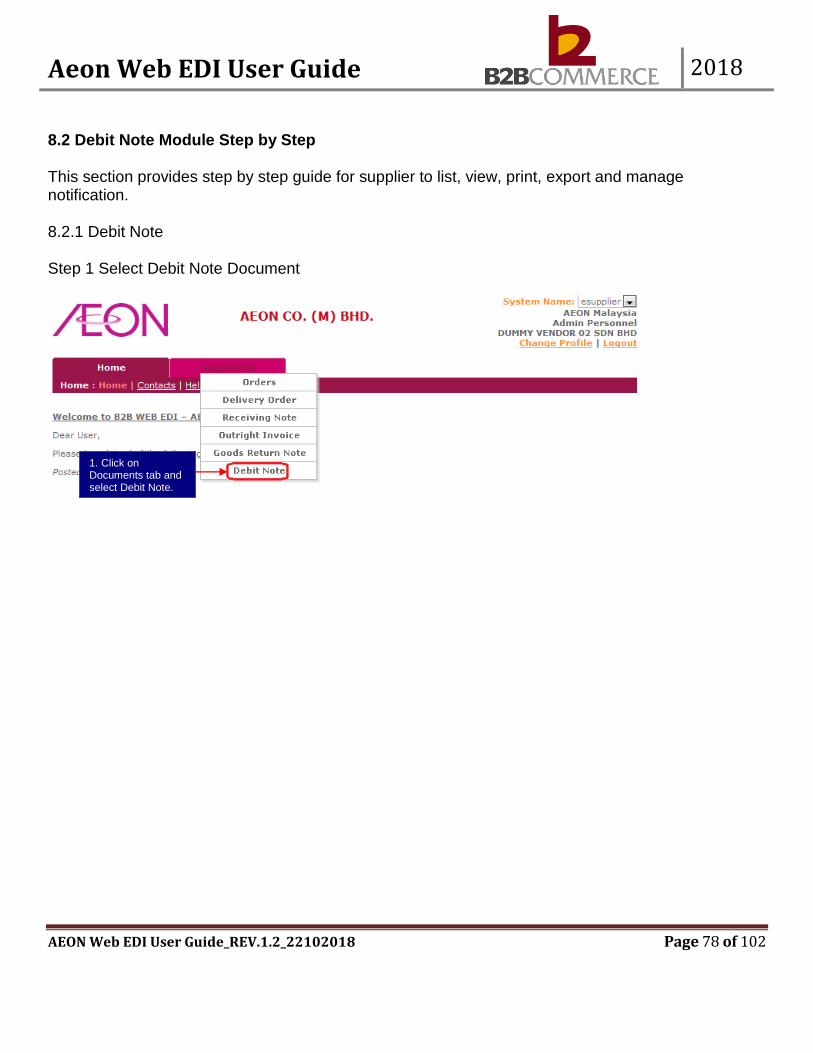
8.2 Debit Note Module Step by Step This section provides step by step guide for supplier to list, view, print, export and manage notification. 8.2.1 Debit Note Step 1 Select Debit Note Document
1. Click on Documents tab and select Debit Note.
1. Click on Documents tab and select Debit Note.
1. Click on Documents tab and select Debit Note.
1. Click on Documents tab and select Debit Note.
Aeon Web EDI User Guide 2018
AEON Web EDI User Guide_REV.1.2_22102018 Page 79 of 102
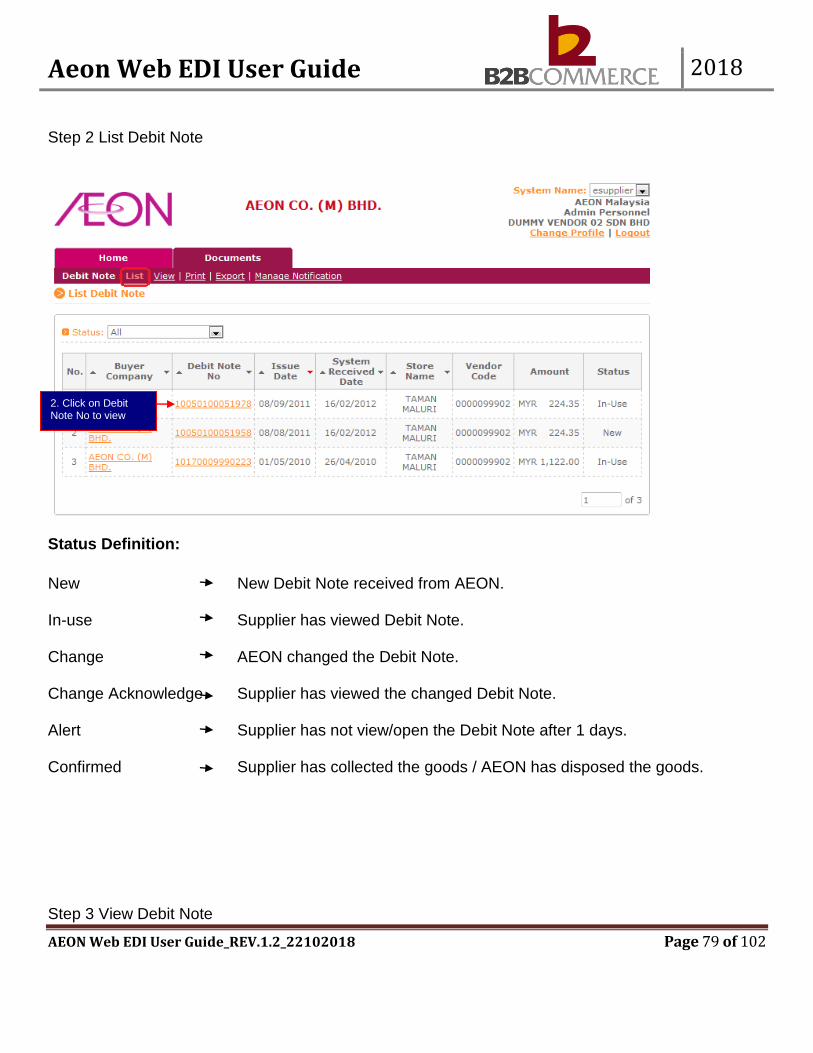
Step 2 List Debit Note
Status Definition:
New New Debit Note received from AEON. In-use Supplier has viewed Debit Note. Change AEON changed the Debit Note. Change Acknowledge Supplier has viewed the changed Debit Note. Alert Supplier has not view/open the Debit Note after 1 days. Confirmed Supplier has collected the goods / AEON has disposed the goods. Step 3 View Debit Note
2. Click on Debit Note No to view
2. Click on Debit Note No to view
2. Click on Debit Note No to view
2. Click on Debit Note No to view
Aeon Web EDI User Guide 2018
AEON Web EDI User Guide_REV.1.2_22102018 Page 80 of 102
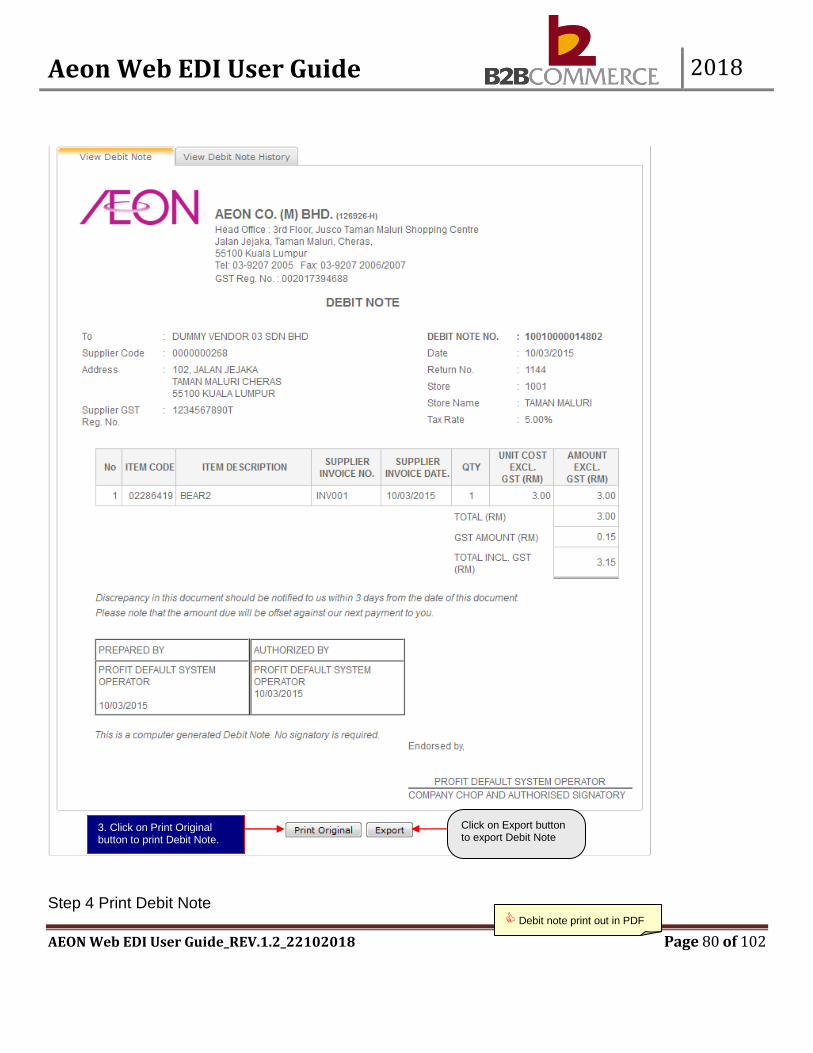
Step 4 Print Debit Note
3. Click on Print Original button to print Debit Note.
3. Click on Print Original button to print Debit Note.
3. Click on Print Original button to print Debit Note.
3. Click on Print Original button to print Debit Note.
Debit note print out in PDF
Debit note print out in PDF
Debit note print out in PDF
Debit note print out in PDF
Click on Export button to export Debit Note
Click on Export button to export Debit Note
Click on Export button to export Debit Note
Click on Export button to export Debit Note
Aeon Web EDI User Guide 2018
AEON Web EDI User Guide_REV.1.2_22102018 Page 81 of 102
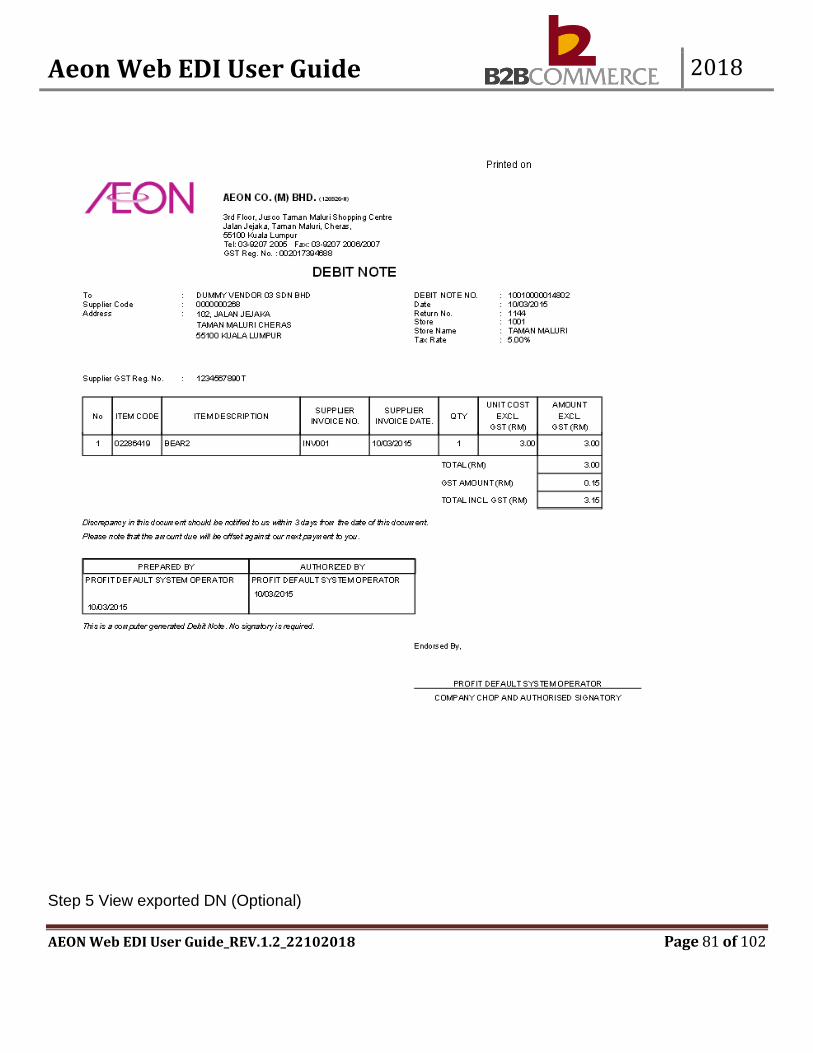
Step 5 View exported DN (Optional)
Aeon Web EDI User Guide 2018
AEON Web EDI User Guide_REV.1.2_22102018 Page 82 of 102
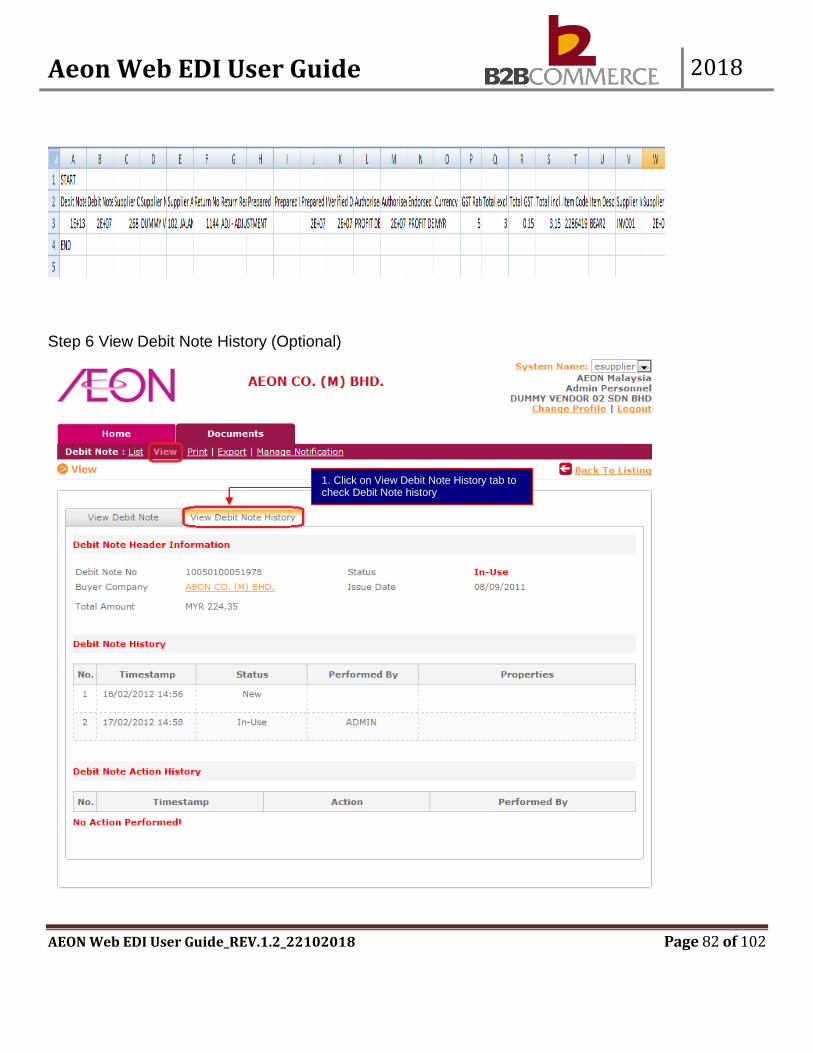
Step 6 View Debit Note History (Optional)
1. Click on View Debit Note History tab to check Debit Note history 1. Click on View Debit Note History tab to check Debit Note history 1. Click on View Debit Note History tab to check Debit Note history 1. Click on View Debit Note History tab to check Debit Note history

Aeon Web EDI User Guide 2018
AEON Web EDI User Guide_REV.1.2_22102018 Page 83 of 102
8.2.2 View Debit Note
Allows the user to view Debit note
1. Click on View link 1. Click on View link 1. Click on View link 1. Click on View link
2. Key search criteria
2. Key search criteria
2. Key search criteria
2. Key search criteria
3. Click on Search button 3. Click on Search button 3. Click on Search button 3. Click on Search button
Click on this button if you need to clear the search Click on this button if you need to clear the search Click on this button if you need to clear the search Click on this button if you need to clear the search
Click here for
additional field (search criteria).
Click here for
additional field (search criteria).
Click here for
additional field (search criteria).
Click here for
additional field (search criteria).
Aeon Web EDI User Guide 2018
AEON Web EDI User Guide_REV.1.2_22102018 Page 84 of 102
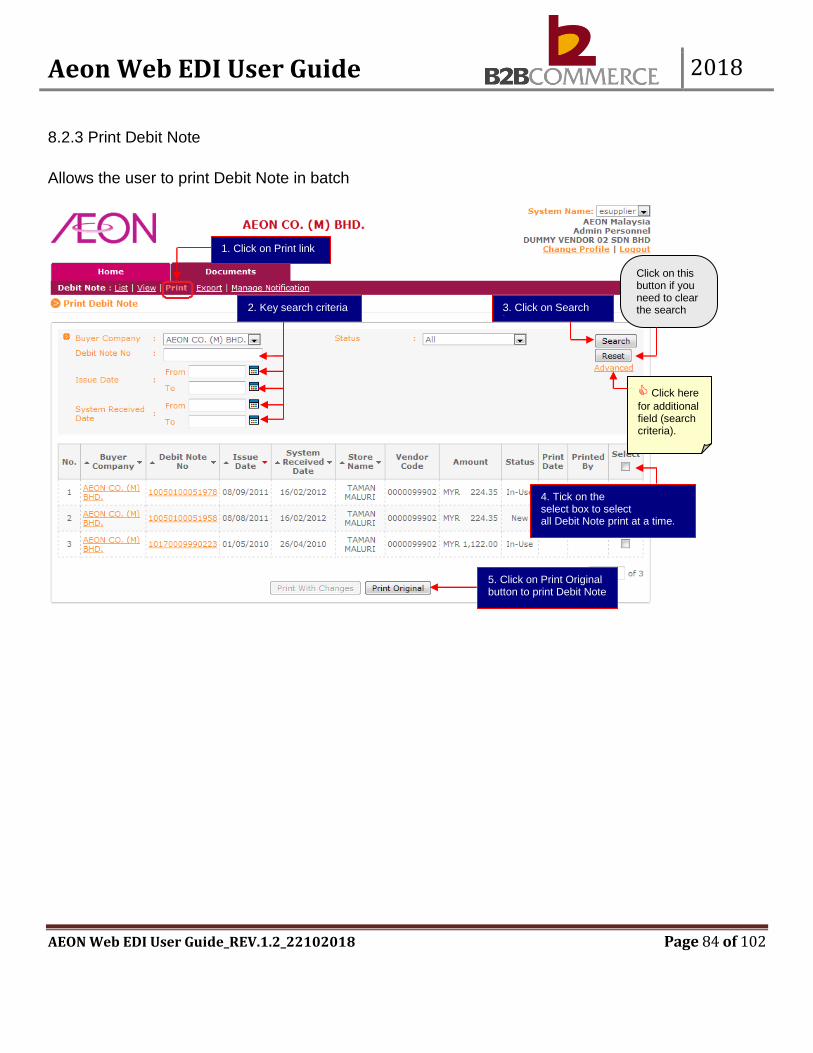
8.2.3 Print Debit Note
Allows the user to print Debit Note in batch
1. Click on Print link 1. Click on Print link 1. Click on Print link 1. Click on Print link
2. Key search criteria
2. Key search criteria
2. Key search criteria
2. Key search criteria
3. Click on Search button. 3. Click on Search button. 3. Click on Search button. 3. Click on Search button.
4. Tick on the select box to select all Debit Note print at a time. 4. Tick on the select box to select all Debit Note print at a time. 4. Tick on the select box to select all Debit Note print at a time. 4. Tick on the select box to select all Debit Note print at a time.
5. Click on Print Original button to print Debit Note 5. Click on Print Original button to print Debit Note 5. Click on Print Original button to print Debit Note 5. Click on Print Original button to print Debit Note
Click on this button if you need to clear the search Click on this button if you need to clear the search Click on this button if you need to clear the search Click on this button if you need to clear the search
Click here
for additional field (search criteria).
Click here
for additional field (search criteria).
Click here
for additional field (search criteria).
Click here
for additional field (search criteria).
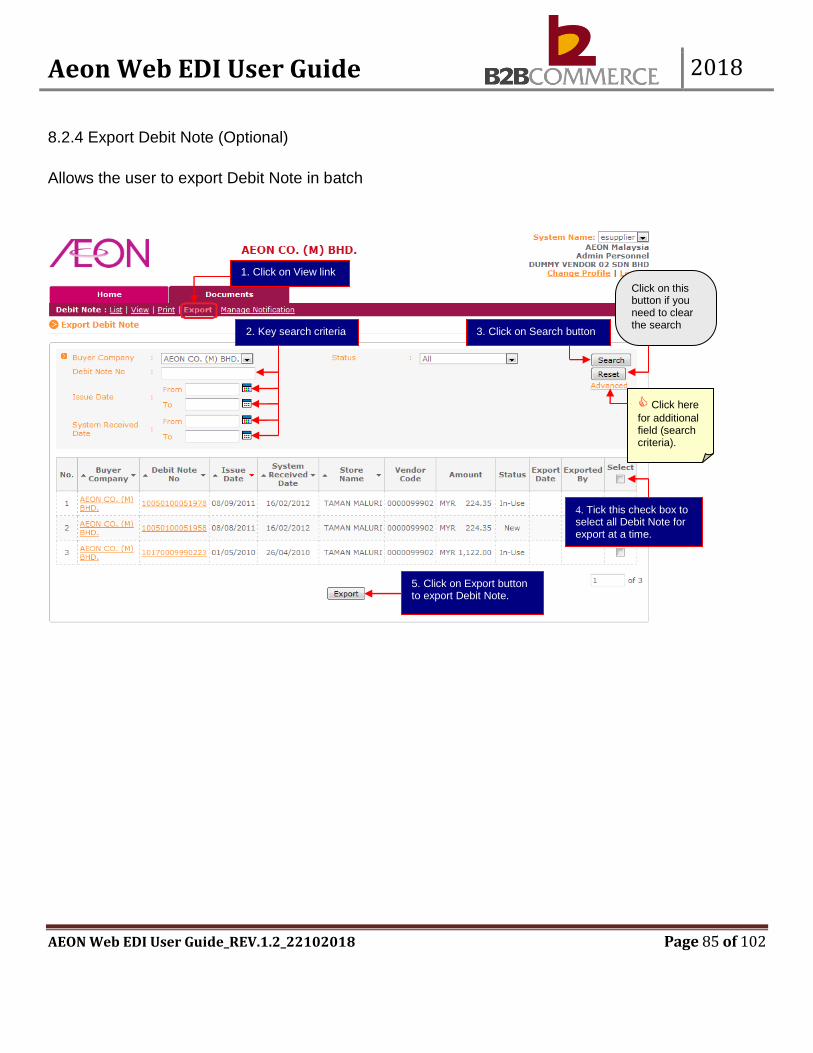
Aeon Web EDI User Guide 2018
AEON Web EDI User Guide_REV.1.2_22102018 Page 85 of 102
8.2.4 Export Debit Note (Optional)
Allows the user to export Debit Note in batch
1. Click on View link 1. Click on View link 1. Click on View link 1. Click on View link
2. Key search criteria
2. Key search criteria
2. Key search criteria
2. Key search criteria
3. Click on Search button 3. Click on Search button 3. Click on Search button 3. Click on Search button
4. Tick this check box to select all Debit Note for export at a time. 4. Tick this check box to select all Debit Note for export at a time. 4. Tick this check box to select all Debit Note for export at a time. 4. Tick this check box to select all Debit Note for export at a time.
5. Click on Export button to export Debit Note. 5. Click on Export button to export Debit Note. 5. Click on Export button to export Debit Note. 5. Click on Export button to export Debit Note.
Click on this button if you need to clear the search Click on this button if you need to clear the search Click on this button if you need to clear the search Click on this button if you need to clear the search
Click here
for additional field (search criteria).
Click here
for additional field (search criteria).
Click here
for additional field (search criteria).
Click here
for additional field (search criteria).
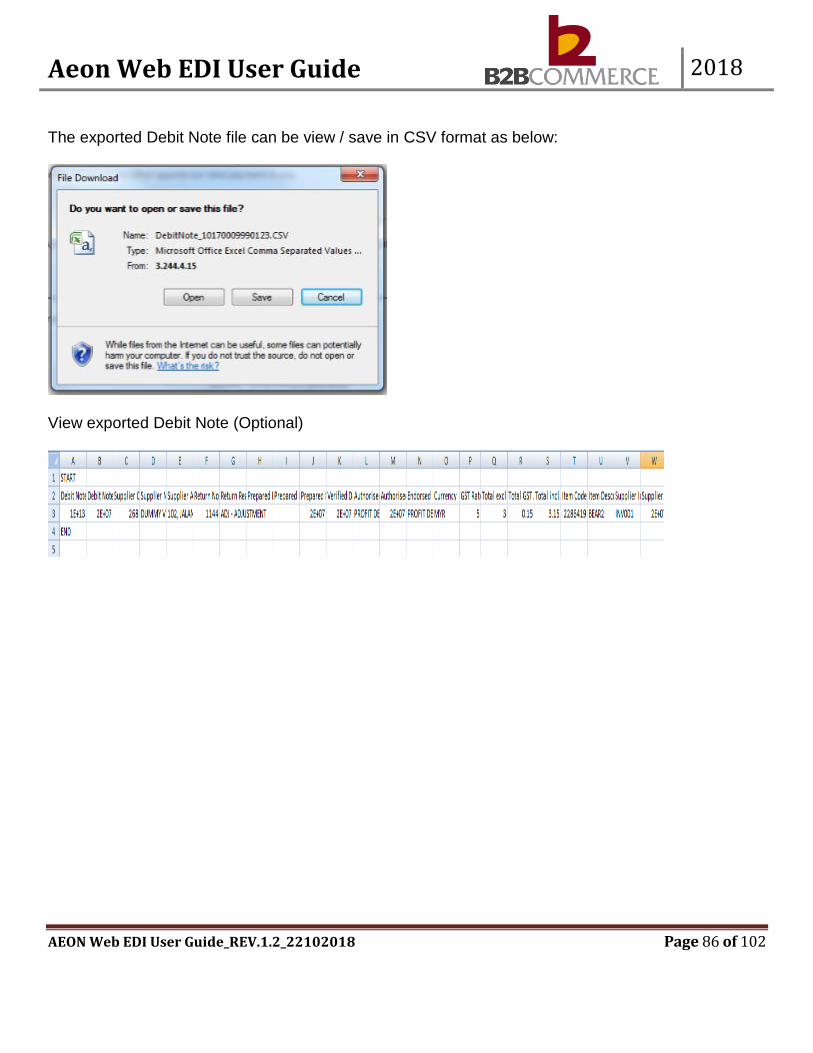
Aeon Web EDI User Guide 2018
AEON Web EDI User Guide_REV.1.2_22102018 Page 86 of 102
The exported Debit Note file can be view / save in CSV format as below:
View exported Debit Note (Optional)
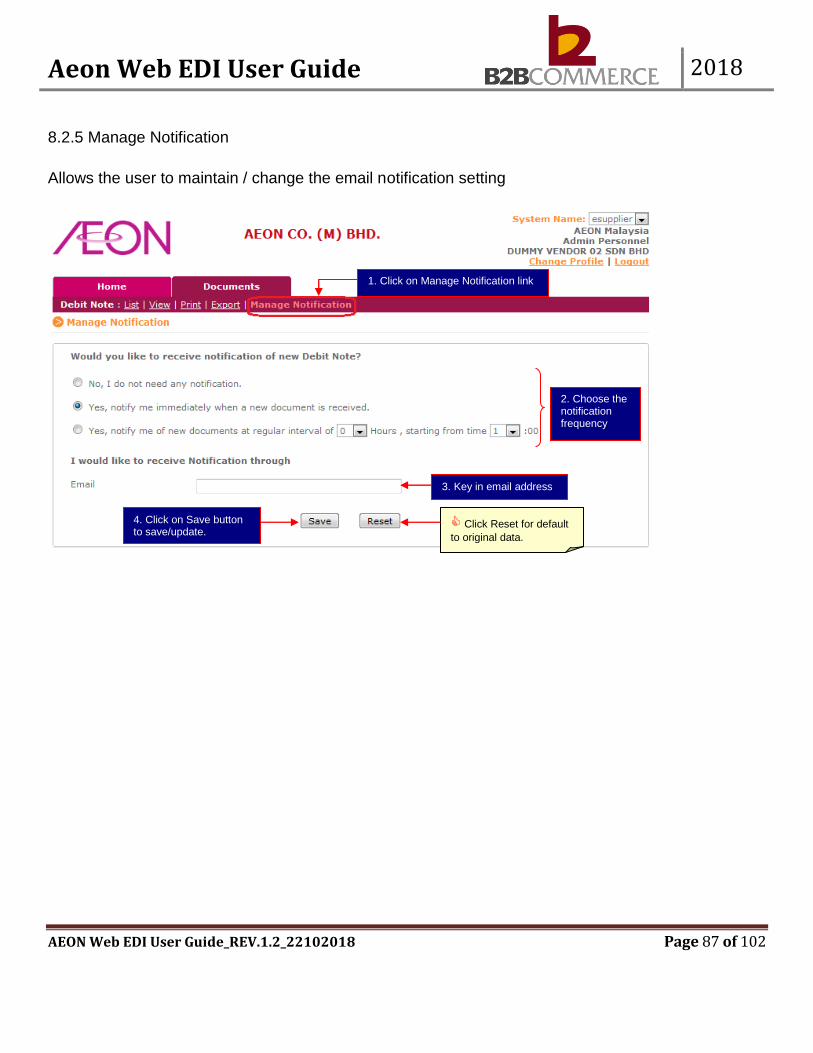
Aeon Web EDI User Guide 2018
AEON Web EDI User Guide_REV.1.2_22102018 Page 87 of 102
8.2.5 Manage Notification
Allows the user to maintain / change the email notification setting
2. Choose the notification frequency
2. Choose the notification frequency
2. Choose the notification frequency
2. Choose the notification frequency
3. Key in email address
3. Key in email address
3. Key in email address
3. Key in email address
4. Click on Save button to save/update.
4. Click on Save button to save/update.
4. Click on Save button to save/update.
4. Click on Save button to save/update.
Click Reset for default
to original data.
Click Reset for default
to original data.
Click Reset for default
to original data.
Click Reset for default
to original data.
1. Click on Manage Notification link
1. Click on Manage Notification link
Chapter 9: Payment Advice1. Click on Manage
Notification link
1. Click on Manage Notification link

Aeon Web EDI User Guide 2018
AEON Web EDI User Guide_REV.1.2_22102018 Page 88 of 102
9.1 Payment Advice Step by Step This section provides step by step guide for supplier to view. 9.1.1 Payment Advice Step 1 Select Payment Advice
1. Click on Documents tab and select Payment advice document.
1. Click on Documents tab and select Payment advice document.
1. Click on Documents tab and select Payment advice document.
1. Click on Documents tab and select Payment advice document.
Chapter 9: Payment Advice
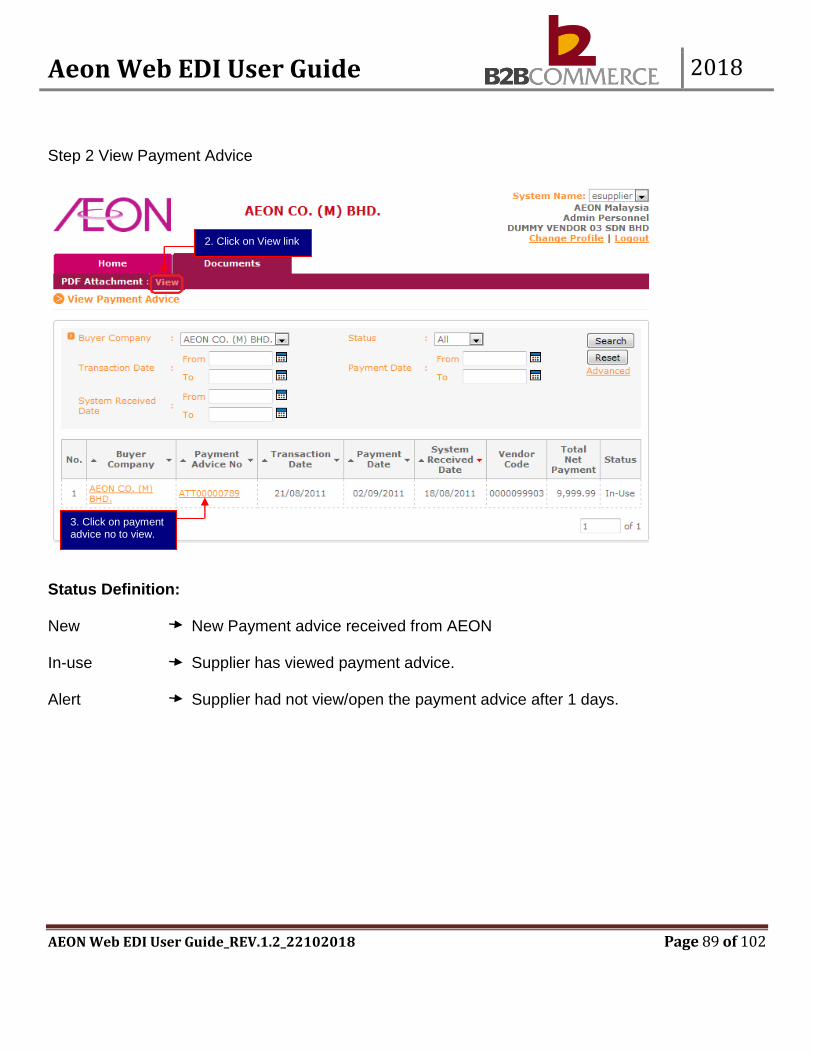
Aeon Web EDI User Guide 2018
AEON Web EDI User Guide_REV.1.2_22102018 Page 89 of 102
Step 2 View Payment Advice
Status Definition: New New Payment advice received from AEON In-use Supplier has viewed payment advice. Alert Supplier had not view/open the payment advice after 1 days.
3. Click on payment advice no to view.
3. Click on payment advice no to view.
3. Click on payment advice no to view.
3. Click on payment advice no to view.
2. Click on View link 2. Click on View link 2. Click on View link 2. Click on View link
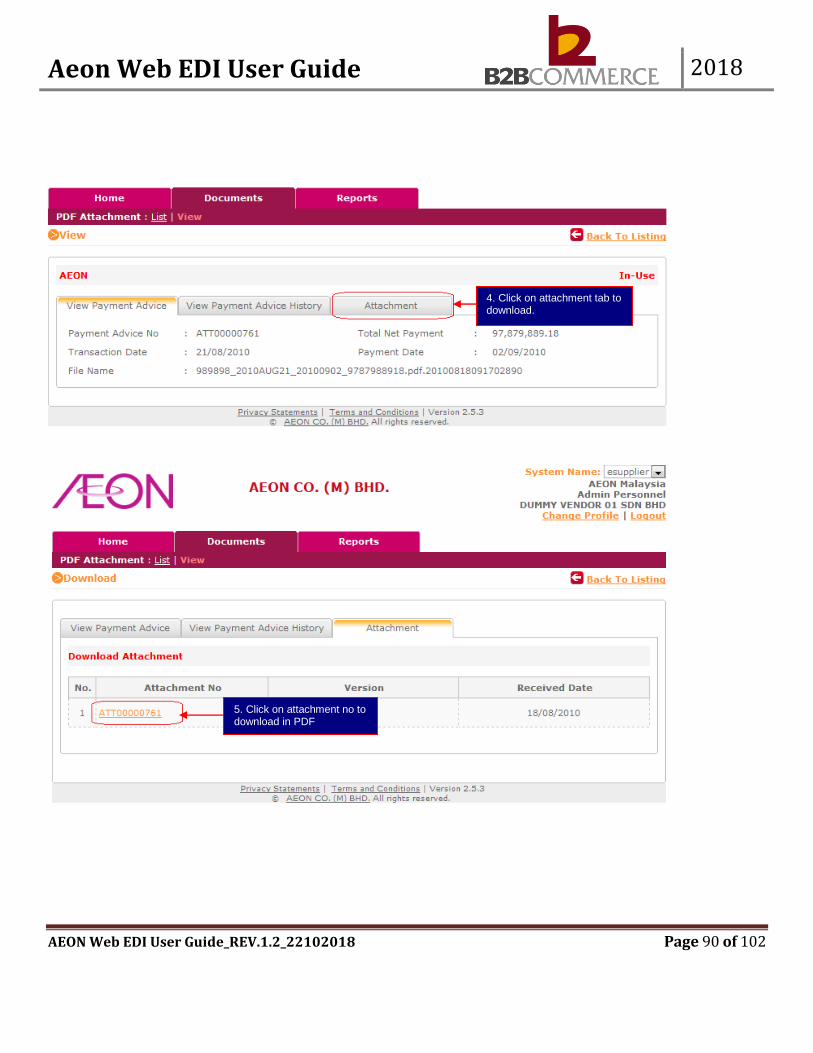
Aeon Web EDI User Guide 2018
AEON Web EDI User Guide_REV.1.2_22102018 Page 90 of 102
4. Click on attachment tab to download.
4. Click on attachment tab to download.
4. Click on attachment tab to download.
4. Click on attachment tab to download.
5. Click on attachment no to download in PDF
5. Click on attachment no to download in PDF
5. Click on attachment no to download in PDF
5. Click on attachment no to download in PDF
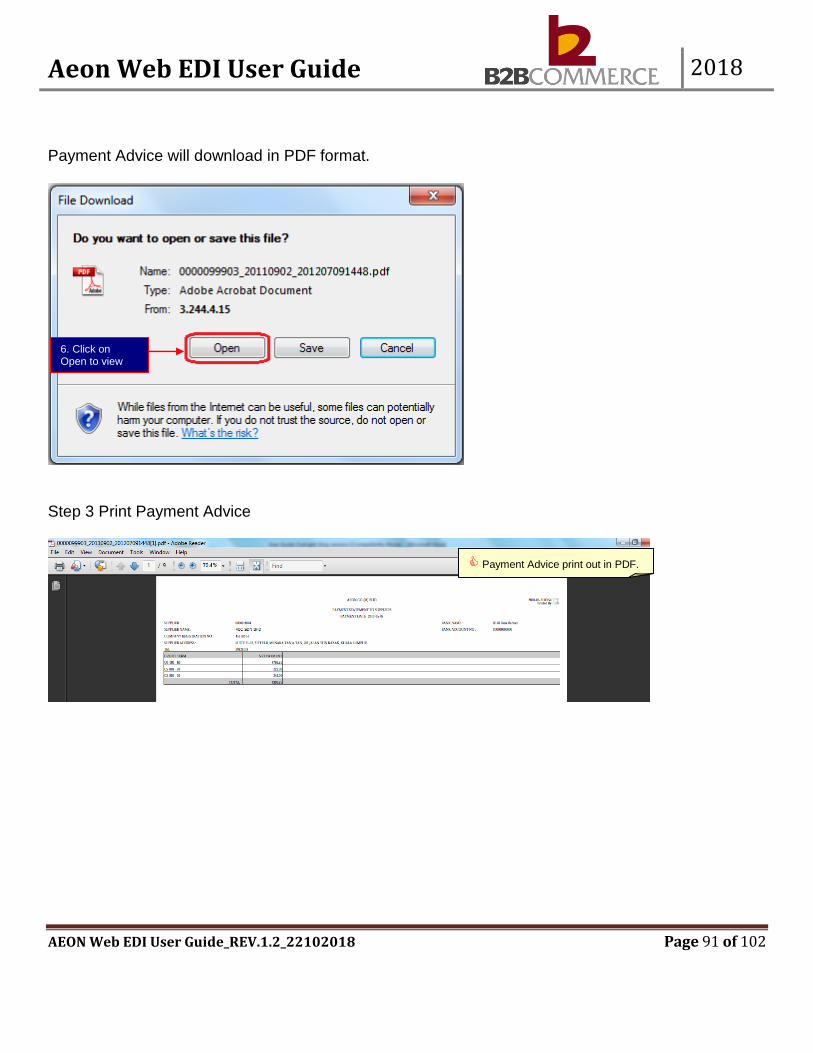
Aeon Web EDI User Guide 2018
AEON Web EDI User Guide_REV.1.2_22102018 Page 91 of 102
Payment Advice will download in PDF format.
Step 3 Print Payment Advice
6. Click on Open to view the file.
6. Click on Open to view the file.
6. Click on Open to view the file.
6. Click on Open to view the file.
Payment Advice print out in PDF.
Payment Advice print out in PDF.
Chapter 10: AEON Invoice Payment Advice print
out in PDF.
Payment Advice print out in PDF.
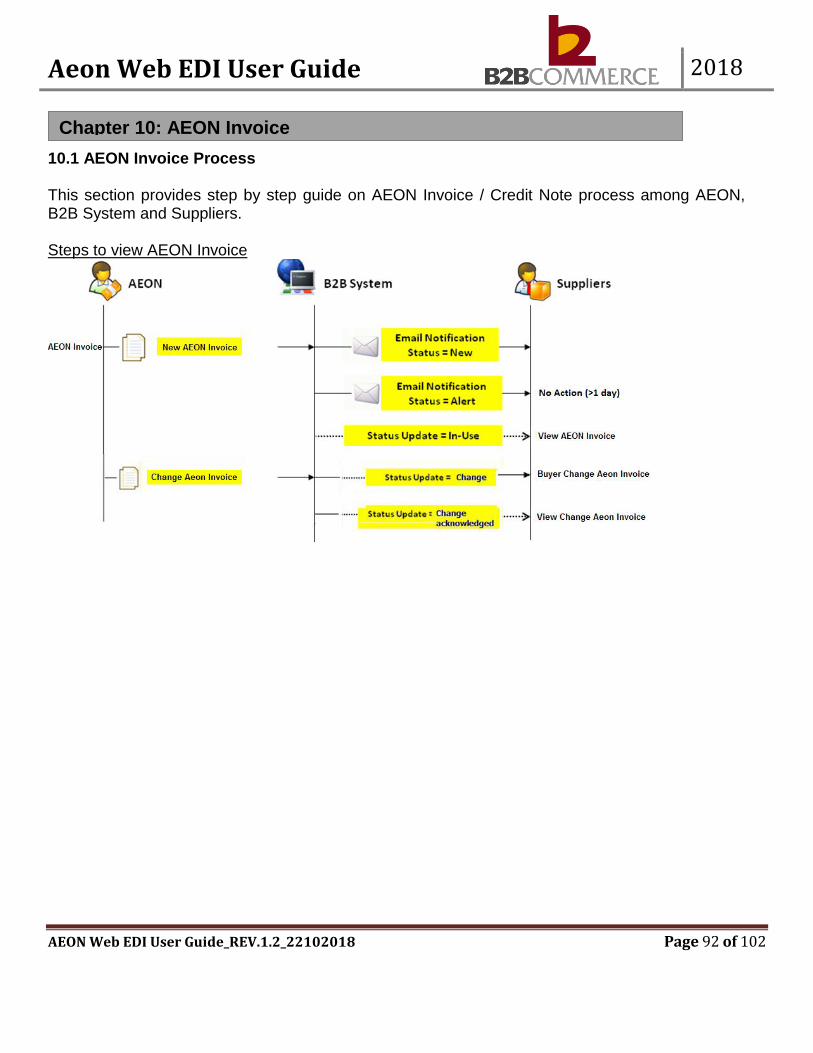
Aeon Web EDI User Guide 2018
AEON Web EDI User Guide_REV.1.2_22102018 Page 92 of 102
10.1 AEON Invoice Process This section provides step by step guide on AEON Invoice / Credit Note process among AEON, B2B System and Suppliers. Steps to view AEON Invoice
Chapter 10: AEON Invoice
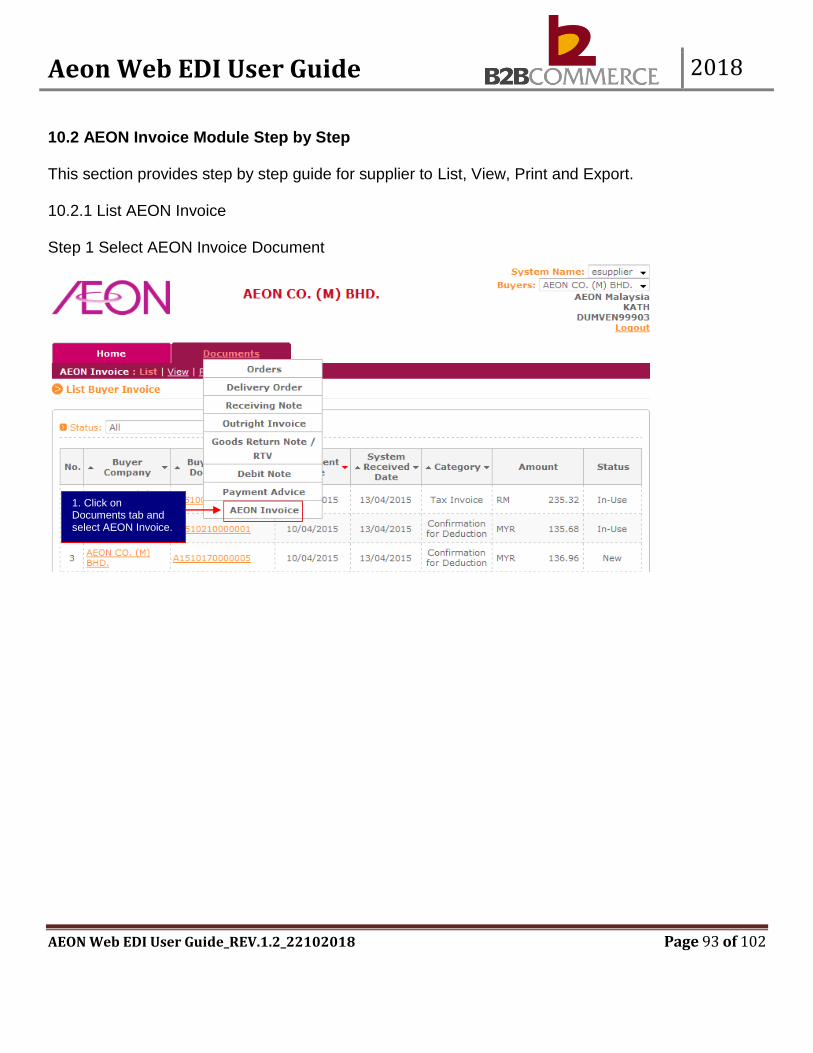
Aeon Web EDI User Guide 2018
AEON Web EDI User Guide_REV.1.2_22102018 Page 93 of 102
10.2 AEON Invoice Module Step by Step This section provides step by step guide for supplier to List, View, Print and Export. 10.2.1 List AEON Invoice Step 1 Select AEON Invoice Document
1. Click on Documents tab and select AEON Invoice.
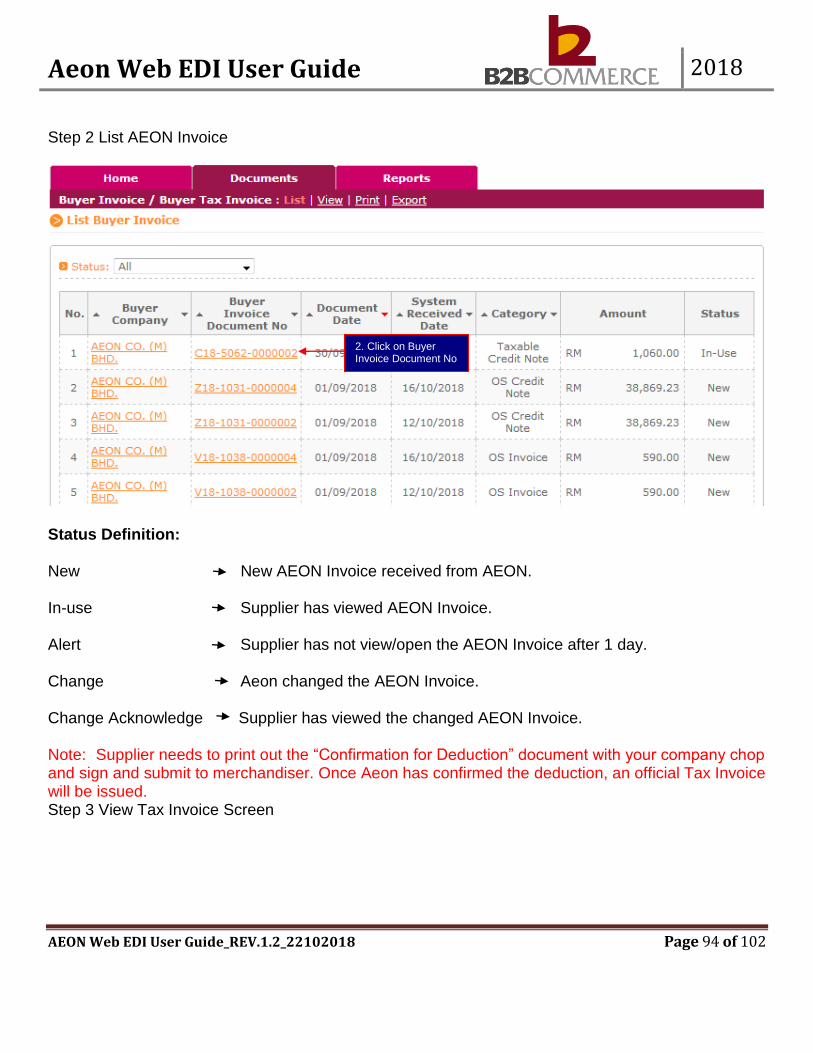
Aeon Web EDI User Guide 2018
AEON Web EDI User Guide_REV.1.2_22102018 Page 94 of 102
Step 2 List AEON Invoice
Status Definition: New New AEON Invoice received from AEON. In-use Supplier has viewed AEON Invoice. Alert Supplier has not view/open the AEON Invoice after 1 day. Change Aeon changed the AEON Invoice. Change Acknowledge Supplier has viewed the changed AEON Invoice. Note: Supplier needs to print out the “Confirmation for Deduction” document with your company chop and sign and submit to merchandiser. Once Aeon has confirmed the deduction, an official Tax Invoice will be issued. Step 3 View Tax Invoice Screen
2. Click on Buyer Invoice Document No
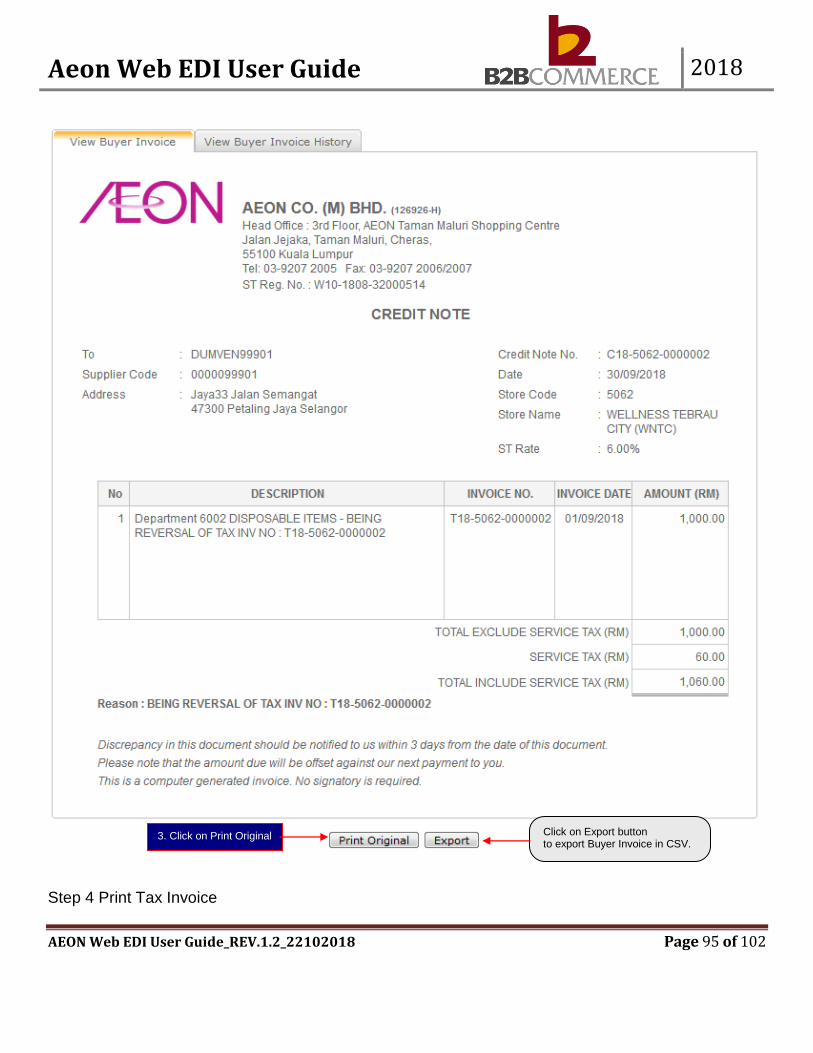
Aeon Web EDI User Guide 2018
AEON Web EDI User Guide_REV.1.2_22102018 Page 95 of 102
Step 4 Print Tax Invoice
3. Click on Print Original Click on Export button to export Buyer Invoice in CSV.

Aeon Web EDI User Guide 2018
AEON Web EDI User Guide_REV.1.2_22102018 Page 96 of 102

Aeon Web EDI User Guide 2018
AEON Web EDI User Guide_REV.1.2_22102018 Page 97 of 102
Print Confirmation for Deduction
Note: Supplier needs to print out the “Confirmation for Deduction” document with your company chop and sign and submit to merchandiser. Once Aeon has confirmed the deduction, an official Tax Invoice will be issued.
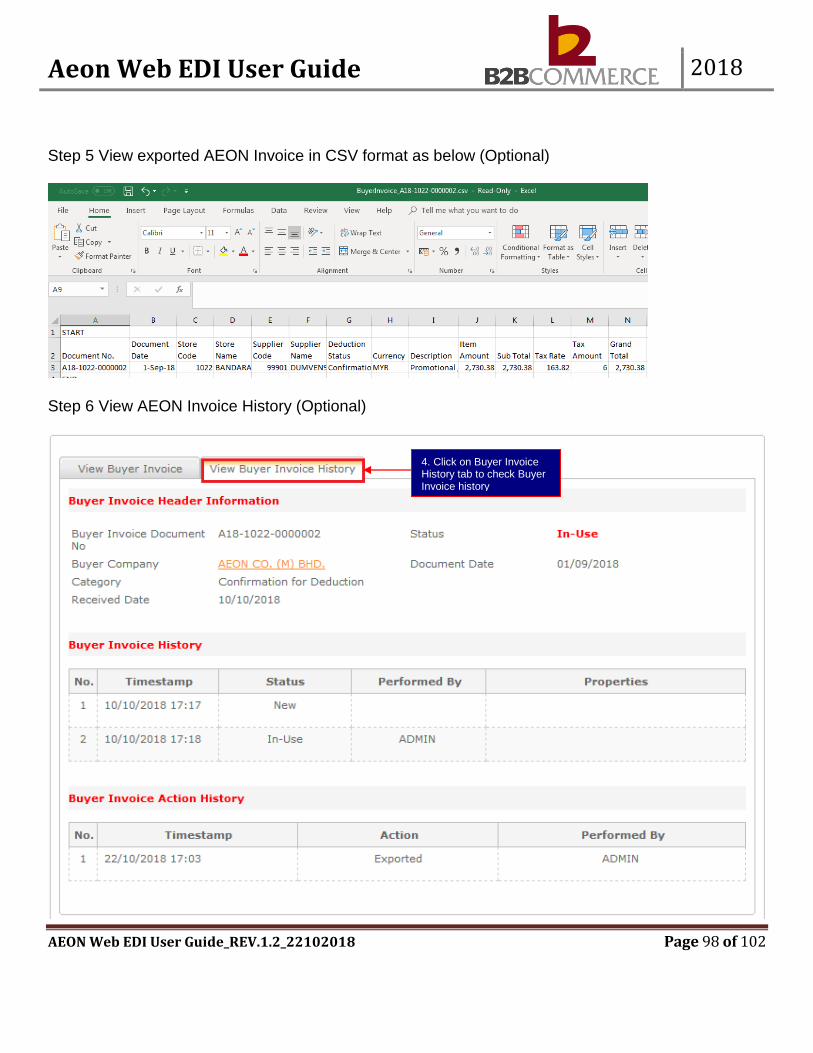
Aeon Web EDI User Guide 2018
AEON Web EDI User Guide_REV.1.2_22102018 Page 98 of 102
Step 5 View exported AEON Invoice in CSV format as below (Optional)
Step 6 View AEON Invoice History (Optional)
4. Click on Buyer Invoice History tab to check Buyer Invoice history

Aeon Web EDI User Guide 2018
AEON Web EDI User Guide_REV.1.2_22102018 Page 99 of 102
10.2.2 View AEON Invoice Allows the user to search and view AEON Invoice / Credit Note by category
1. Click on View link
2. Key in Buyer Inv.Doc No
3. Select Category
4. Click on Search button
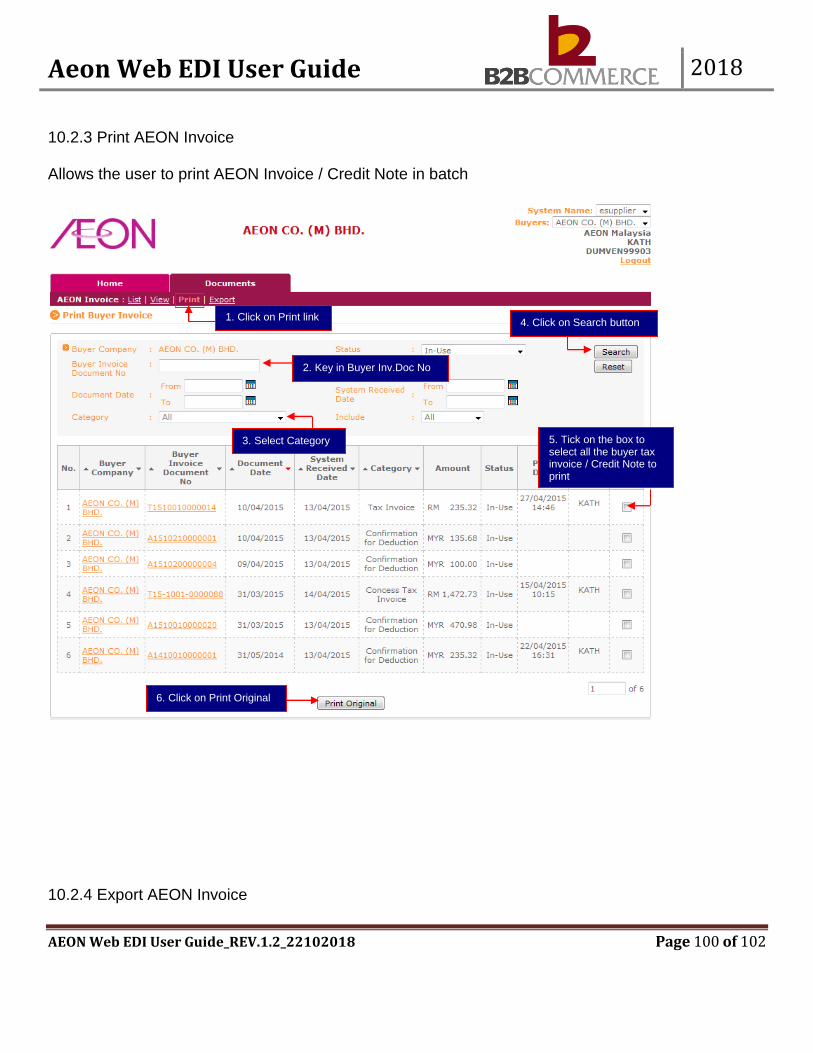
Aeon Web EDI User Guide 2018
AEON Web EDI User Guide_REV.1.2_22102018 Page 100 of 102
10.2.3 Print AEON Invoice Allows the user to print AEON Invoice / Credit Note in batch
10.2.4 Export AEON Invoice
1. Click on Print link
2. Key in Buyer Inv.Doc No
3. Select Category
4. Click on Search button
6. Click on Print Original button
5. Tick on the box to select all the buyer tax invoice / Credit Note to print
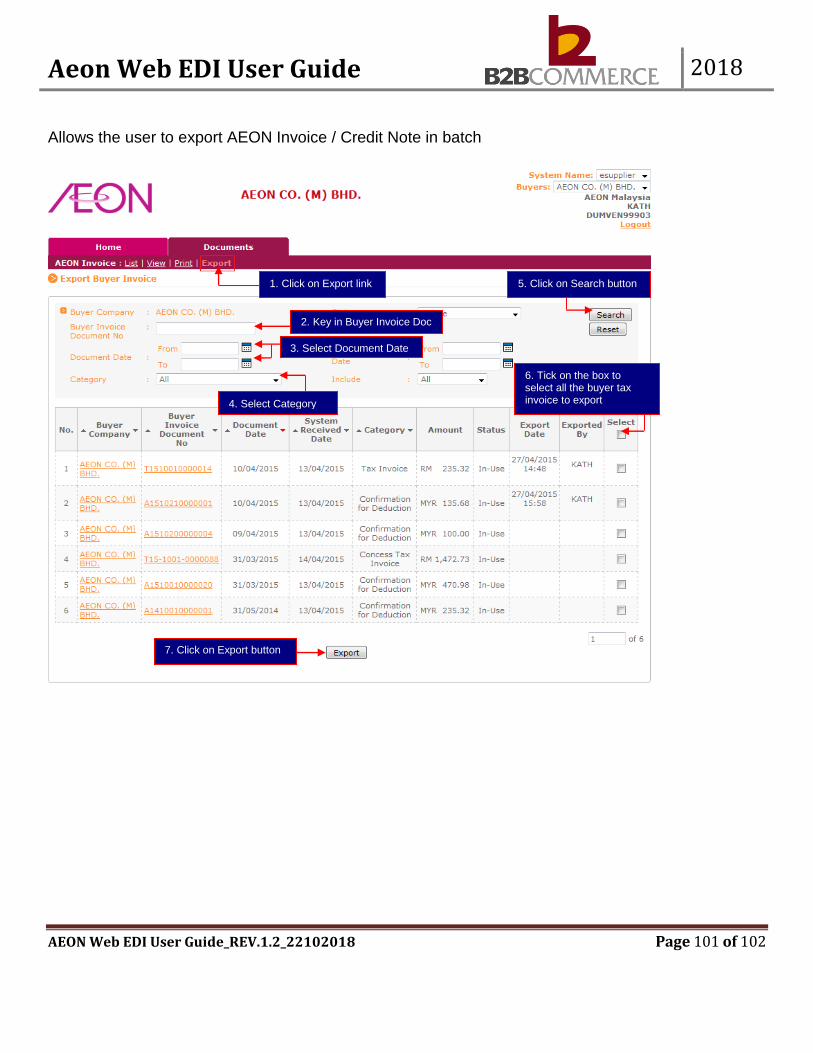
Aeon Web EDI User Guide 2018
AEON Web EDI User Guide_REV.1.2_22102018 Page 101 of 102
Allows the user to export AEON Invoice / Credit Note in batch
1. Click on Export link
2. Key in Buyer Invoice Doc No.
4. Select Category
5. Click on Search button
3. Select Document Date
6. Tick on the box to select all the buyer tax invoice to export
7. Click on Export button
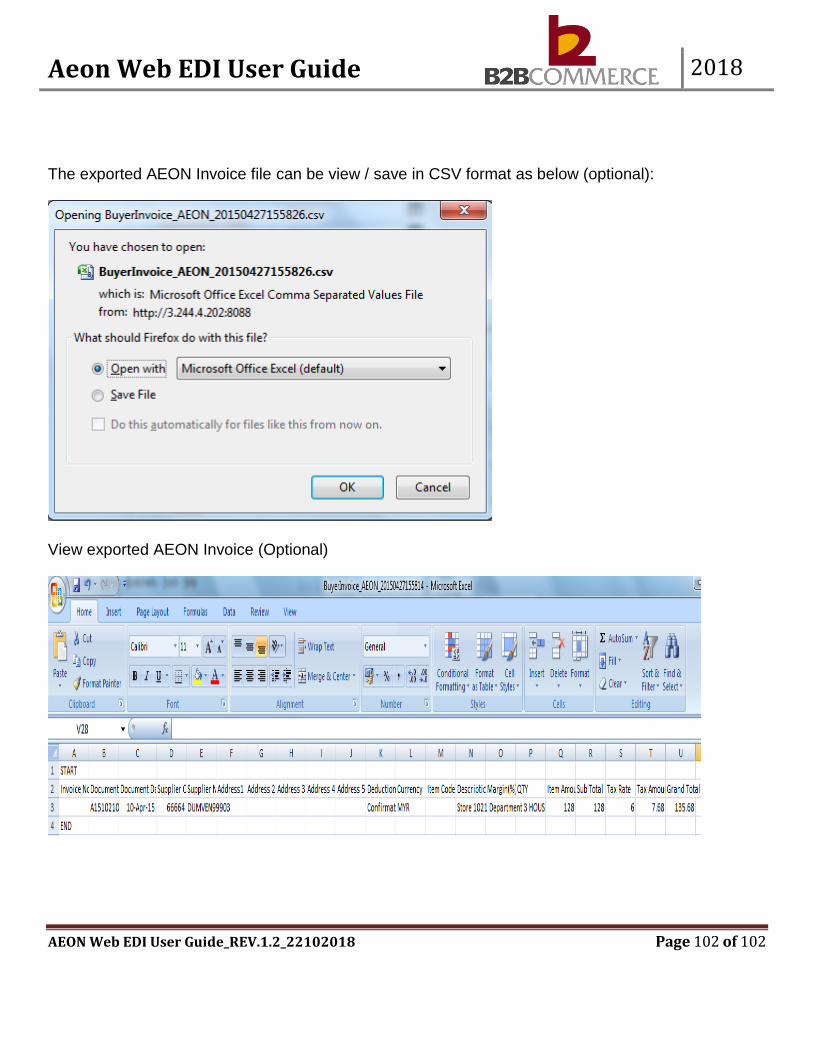
Aeon Web EDI User Guide 2018
AEON Web EDI User Guide_REV.1.2_22102018 Page 102 of 102
The exported AEON Invoice file can be view / save in CSV format as below (optional):
View exported AEON Invoice (Optional)