
Advantech AE Technical Share Documentadvdownload.advantech.com/productfile/Downloadfile5... ·...
20
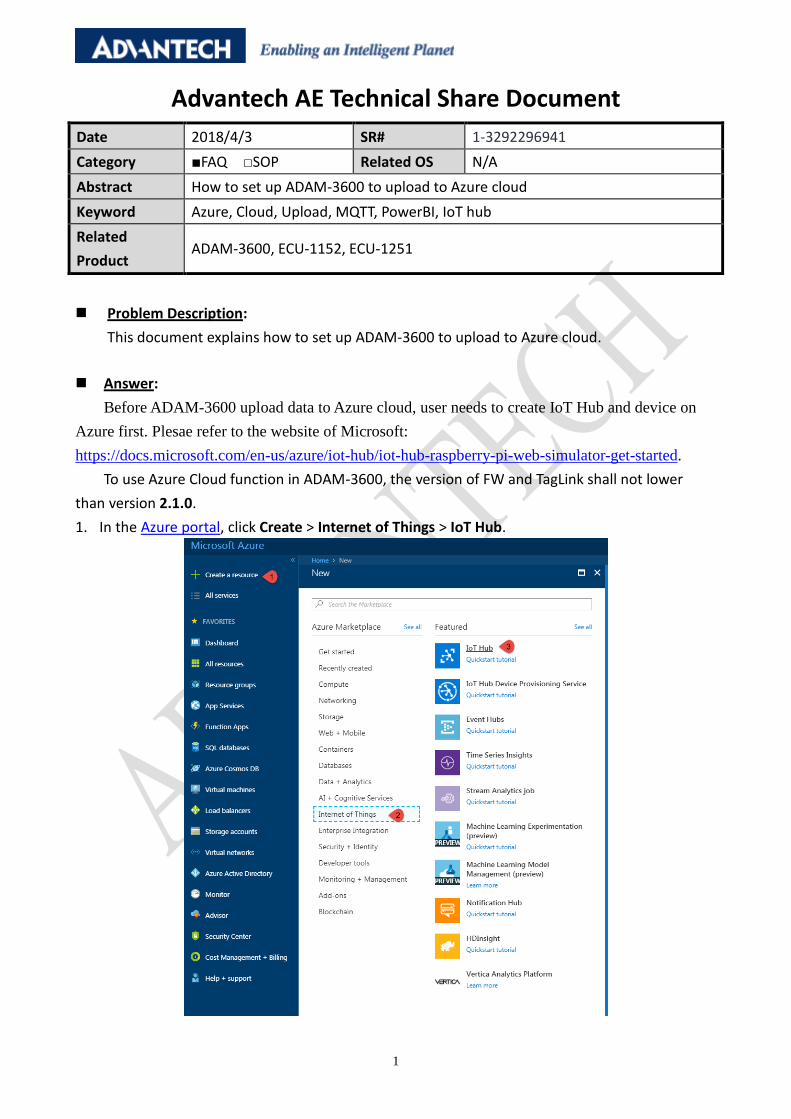
1 Advantech AE Technical Share Document Date 2018/4/3 SR# 1-3292296941 Category ■FAQ □SOP Related OS N/A Abstract How to set up ADAM-3600 to upload to Azure cloud Keyword Azure, Cloud, Upload, MQTT, PowerBI, IoT hub Related Product ADAM-3600, ECU-1152, ECU-1251 Problem Description: This document explains how to set up ADAM-3600 to upload to Azure cloud. Answer: Before ADAM-3600 upload data to Azure cloud, user needs to create IoT Hub and device on Azure first. Plesae refer to the website of Microsoft: https://docs.microsoft.com/en-us/azure/iot-hub/iot-hub-raspberry-pi-web-simulator-get-started. To use Azure Cloud function in ADAM-3600, the version of FW and TagLink shall not lower than version 2.1.0. 1. In the Azure portal, click Create > Internet of Things > IoT Hub.
Transcript of Advantech AE Technical Share Documentadvdownload.advantech.com/productfile/Downloadfile5... ·...
1
Advantech AE Technical Share Document
Date 2018/4/3 SR# 1-3292296941
Category ■FAQ □SOP Related OS N/A
Abstract How to set up ADAM-3600 to upload to Azure cloud
Keyword Azure, Cloud, Upload, MQTT, PowerBI, IoT hub
Related
Product ADAM-3600, ECU-1152, ECU-1251
Problem Description:
This document explains how to set up ADAM-3600 to upload to Azure cloud.
Answer:
Before ADAM-3600 upload data to Azure cloud, user needs to create IoT Hub and device on
Azure first. Plesae refer to the website of Microsoft:
https://docs.microsoft.com/en-us/azure/iot-hub/iot-hub-raspberry-pi-web-simulator-get-started.
To use Azure Cloud function in ADAM-3600, the version of FW and TagLink shall not lower
than version 2.1.0.
1. In the Azure portal, click Create > Internet of Things > IoT Hub.

2
2. In the IoT hub pane, enter the following information for your IoT hub:
Name: Enter the name of your IoT hub. (If the name you enter is valid, a green check mark appears.)
Pricing and scale tier: Select the F1 - Free tier if possible. (Only one Free IoT Hub is allowed per
subscription.)
Resource group: Create a resource group to host the IoT hub or use an existing one.
Location: Select the closest location to you where the IoT hub is created.
Pin to dashboard: Select this option for easy access to your IoT hub from the dashboard.
Click Create after you finish the setting.

3
3. After your IoT hub is created, click it on the dashboard.
4. Click IoT Devices > Add > Fill in Device ID with the name you want > Auto Generate Keys >
Save.

4
5. Click the Device Id you created.
Copy the Connection string. (We will paste it in TagLink project settings later.)
5
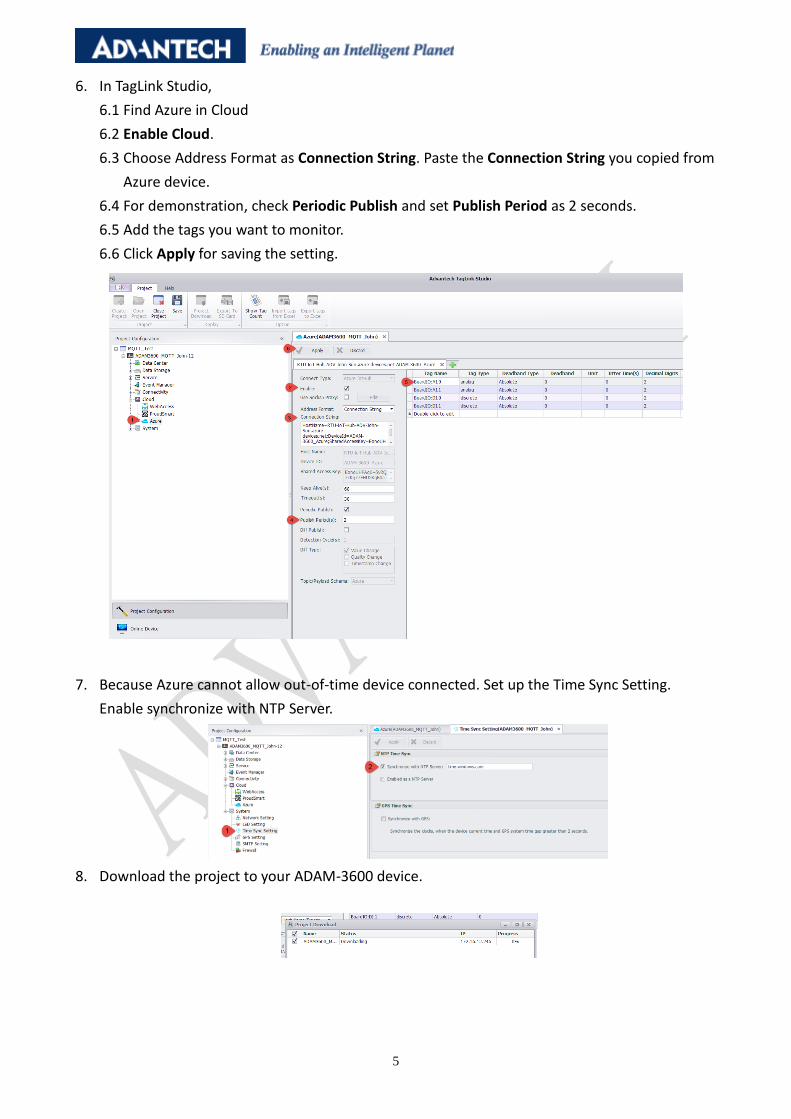
6. In TagLink Studio,
6.1 Find Azure in Cloud
6.2 Enable Cloud.
6.3 Choose Address Format as Connection String. Paste the Connection String you copied from
Azure device.
6.4 For demonstration, check Periodic Publish and set Publish Period as 2 seconds.
6.5 Add the tags you want to monitor.
6.6 Click Apply for saving the setting.
7. Because Azure cannot allow out-of-time device connected. Set up the Time Sync Setting.
Enable synchronize with NTP Server.
8. Download the project to your ADAM-3600 device.
6
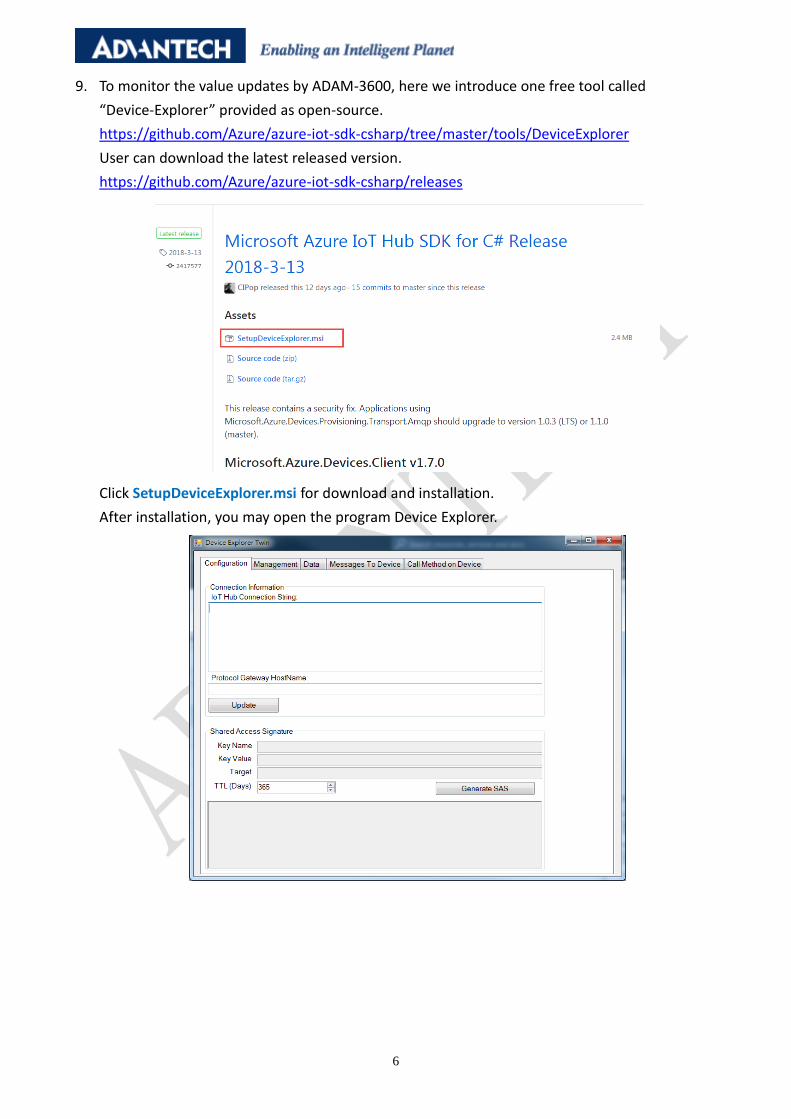
9. To monitor the value updates by ADAM-3600, here we introduce one free tool called
“Device-Explorer” provided as open-source.
https://github.com/Azure/azure-iot-sdk-csharp/tree/master/tools/DeviceExplorer
User can download the latest released version.
https://github.com/Azure/azure-iot-sdk-csharp/releases
Click SetupDeviceExplorer.msi for download and installation.
After installation, you may open the program Device Explorer.

7
10. For the IoT Hub Connection String, users can copy from their Azure IoT Hub.
Click Shared access policies iothubowner (one default policy) Copy Connection string.
11. Paste the connection string into Device Explorer, and click Update.
8
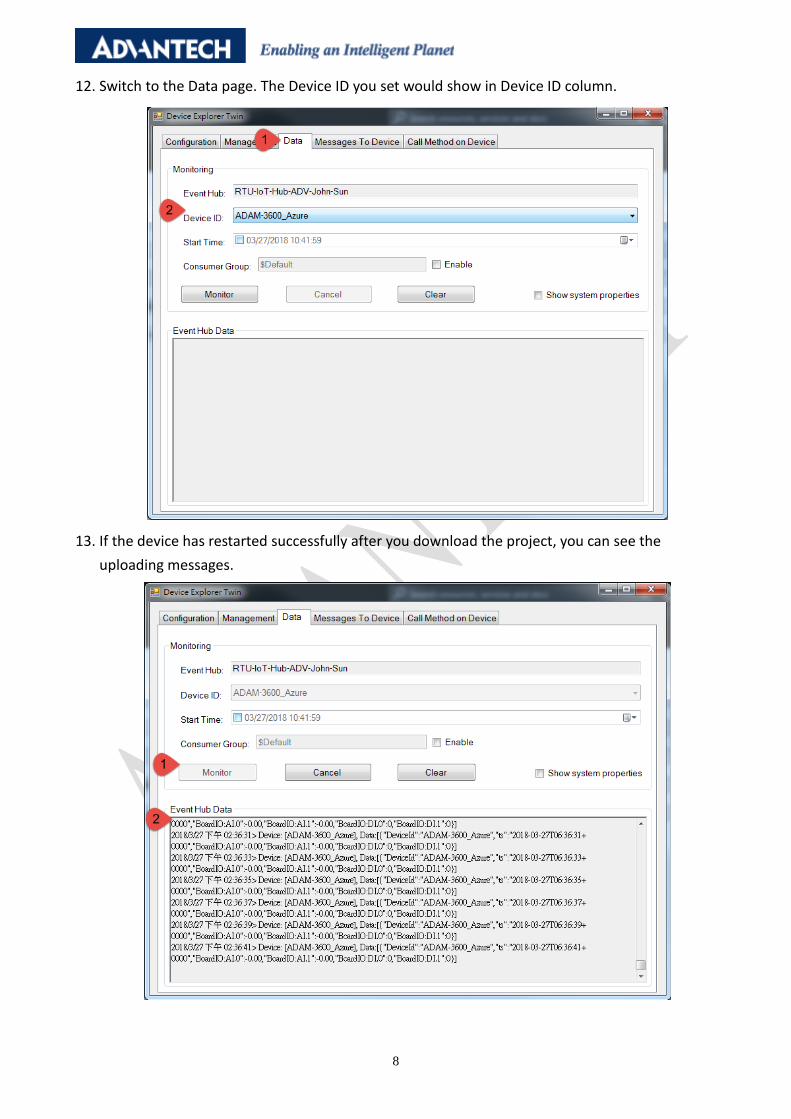
12. Switch to the Data page. The Device ID you set would show in Device ID column.
13. If the device has restarted successfully after you download the project, you can see the
uploading messages.
9
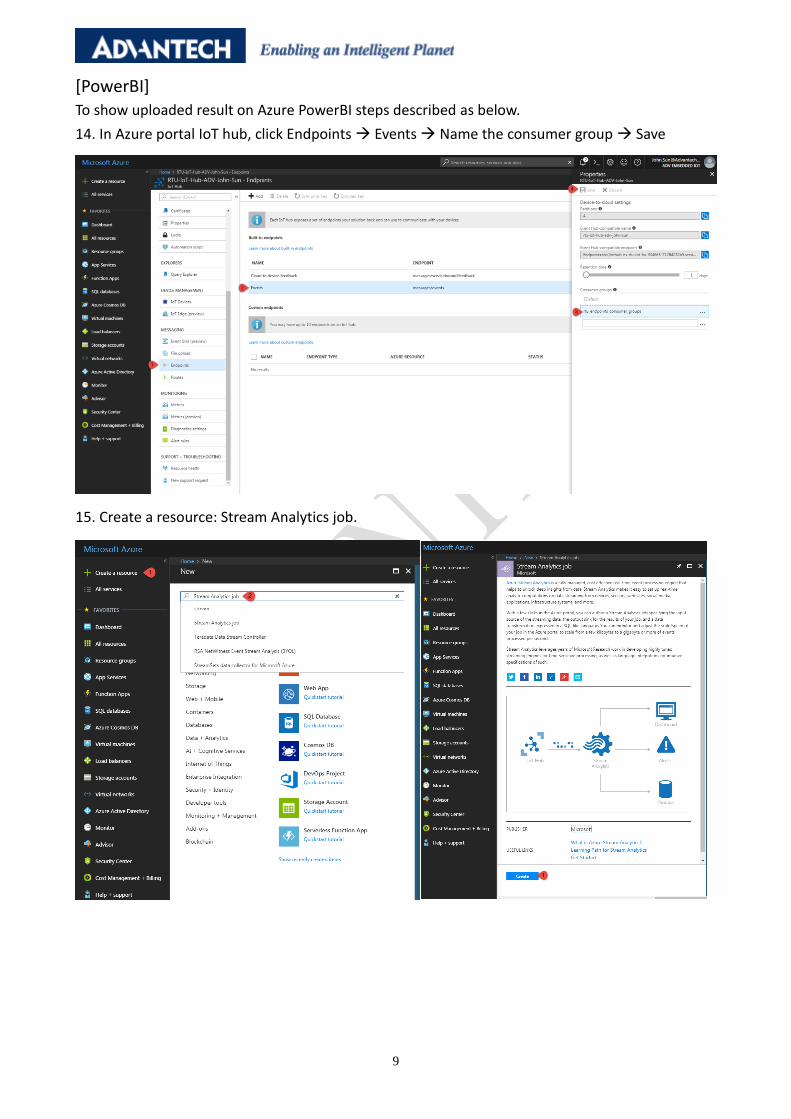
[PowerBI]
To show uploaded result on Azure PowerBI steps described as below.
14. In Azure portal IoT hub, click Endpoints Events Name the consumer group Save
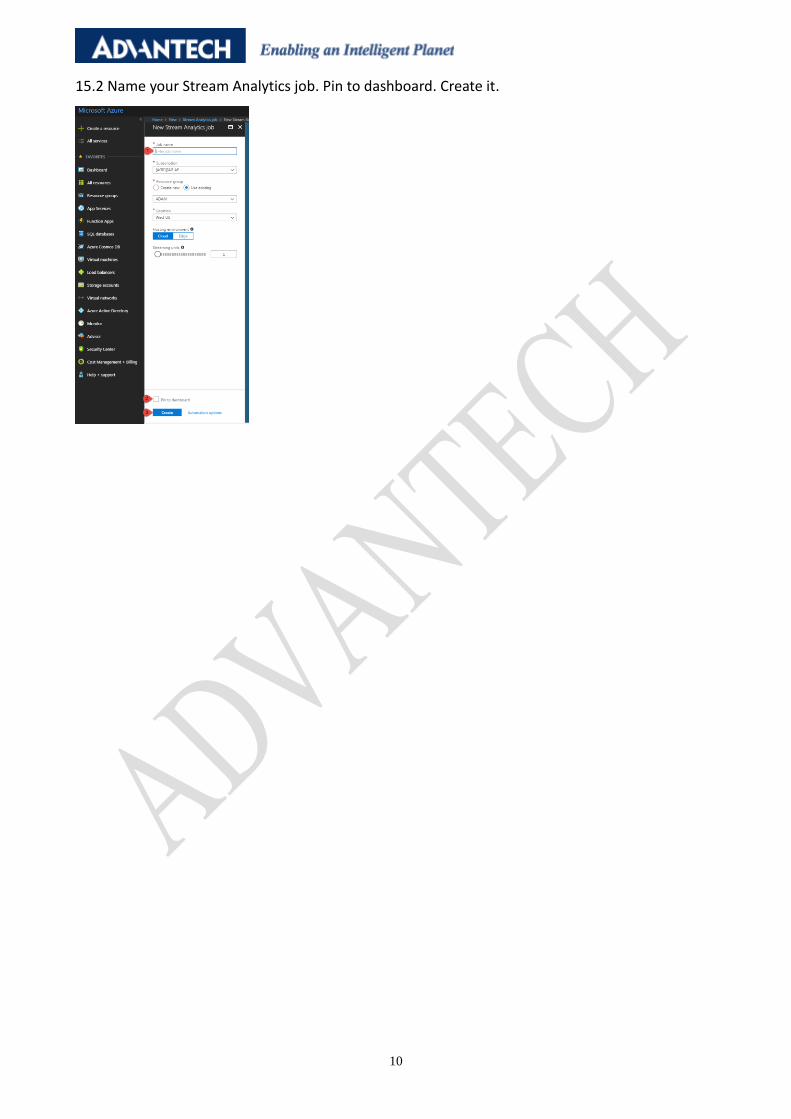
15. Create a resource: Stream Analytics job.
11
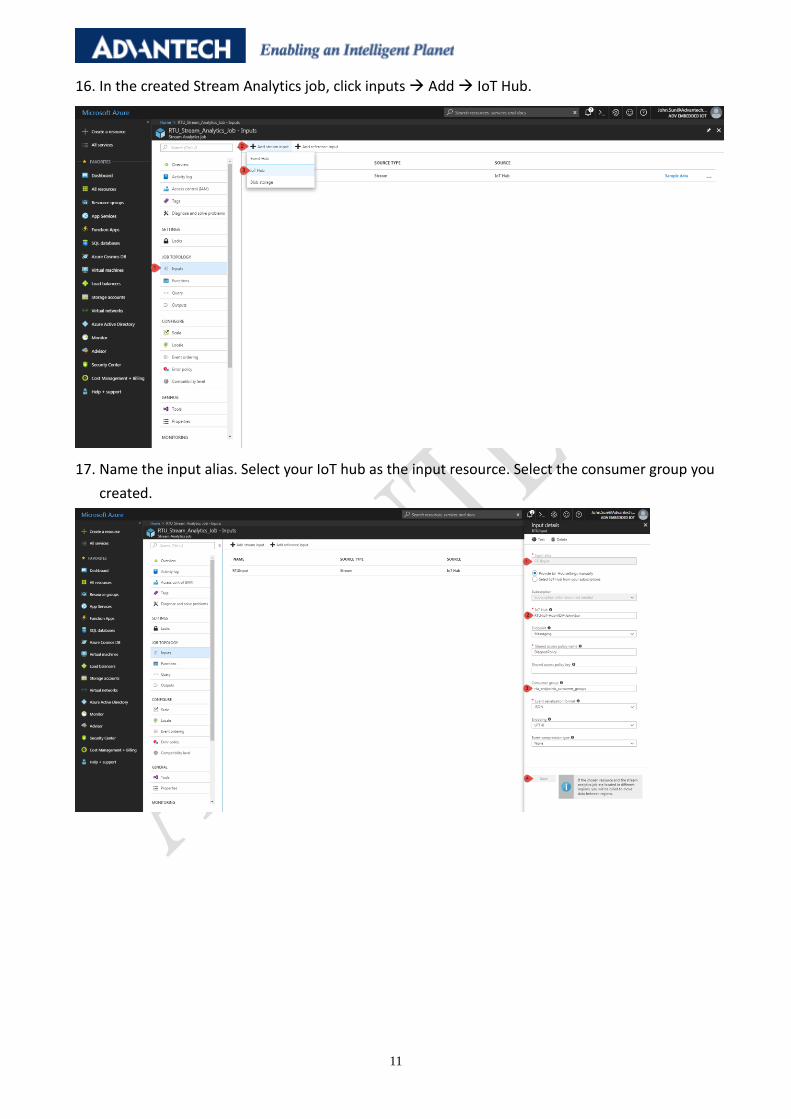
16. In the created Stream Analytics job, click inputs Add IoT Hub.
17. Name the input alias. Select your IoT hub as the input resource. Select the consumer group you
created.
12
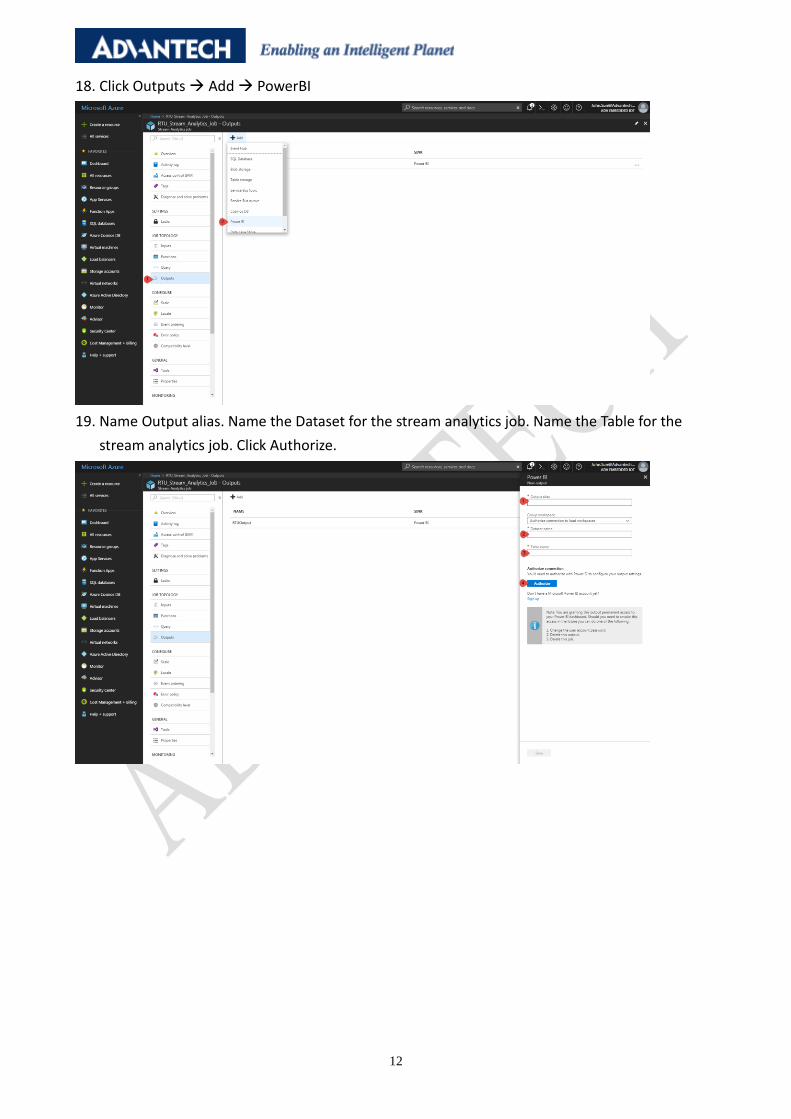
18. Click Outputs Add PowerBI
19. Name Output alias. Name the Dataset for the stream analytics job. Name the Table for the
stream analytics job. Click Authorize.

13
20. Click Query. Make the relationship of input and output by typing SQL program.
21. Before testing the Query setting, we make a testing file. Copy one line of messages from Device
Explorer, and make a file to save this line.

14
22. Click “…” next to the inputs, and select Upload sample data from file.
23. Upload the created testing file.
24. Run Test and the parsed result would show at the right side as column.

15
25. After testing, we start the stream analytics job by click Overview Start Start
It may takes few minutes to start the Stream Analytics Job.
26. Log in PowerBI Portal: https://powerbi.microsoft.com/en-us/landing/signin/
27. Create a dashboard.

16
28. In the created dashboard, click Add tile Custom Streaming Data in REAL-TIME DATA Next.
29. Select your dataset and click Next.
30. Select the Visualization Type and filed you want to show on the dashboard.
17
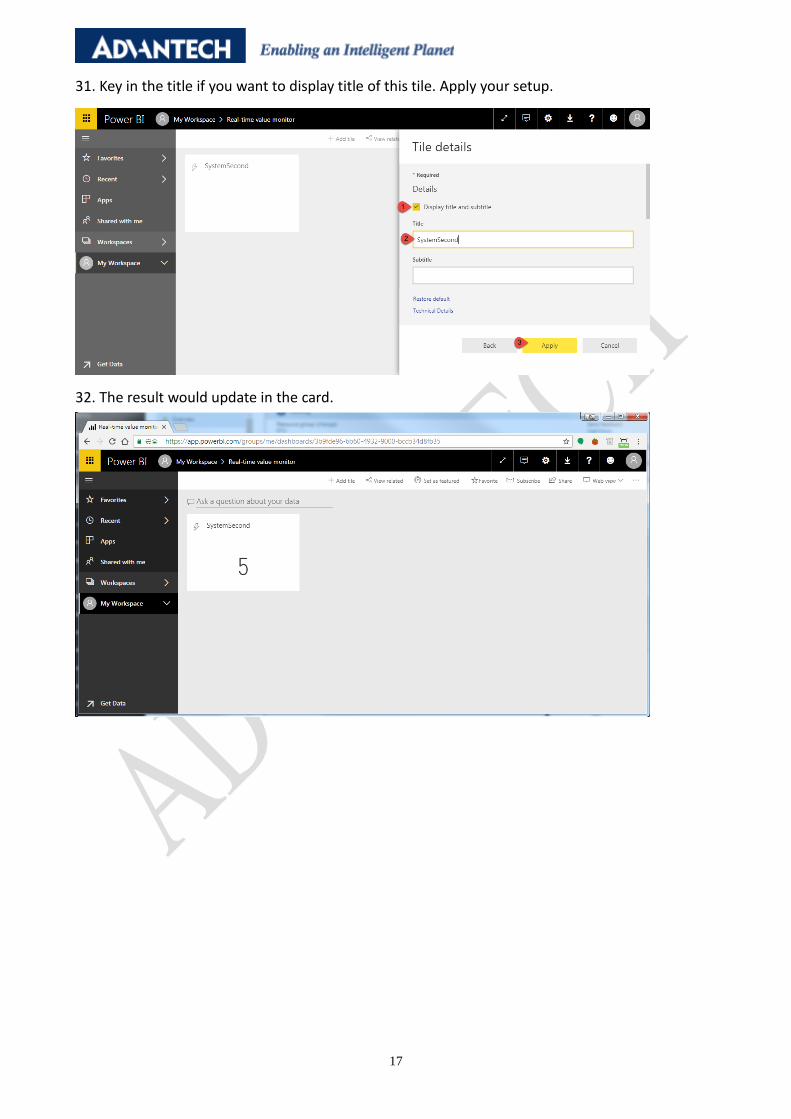
31. Key in the title if you want to display title of this tile. Apply your setup.
32. The result would update in the card.
18
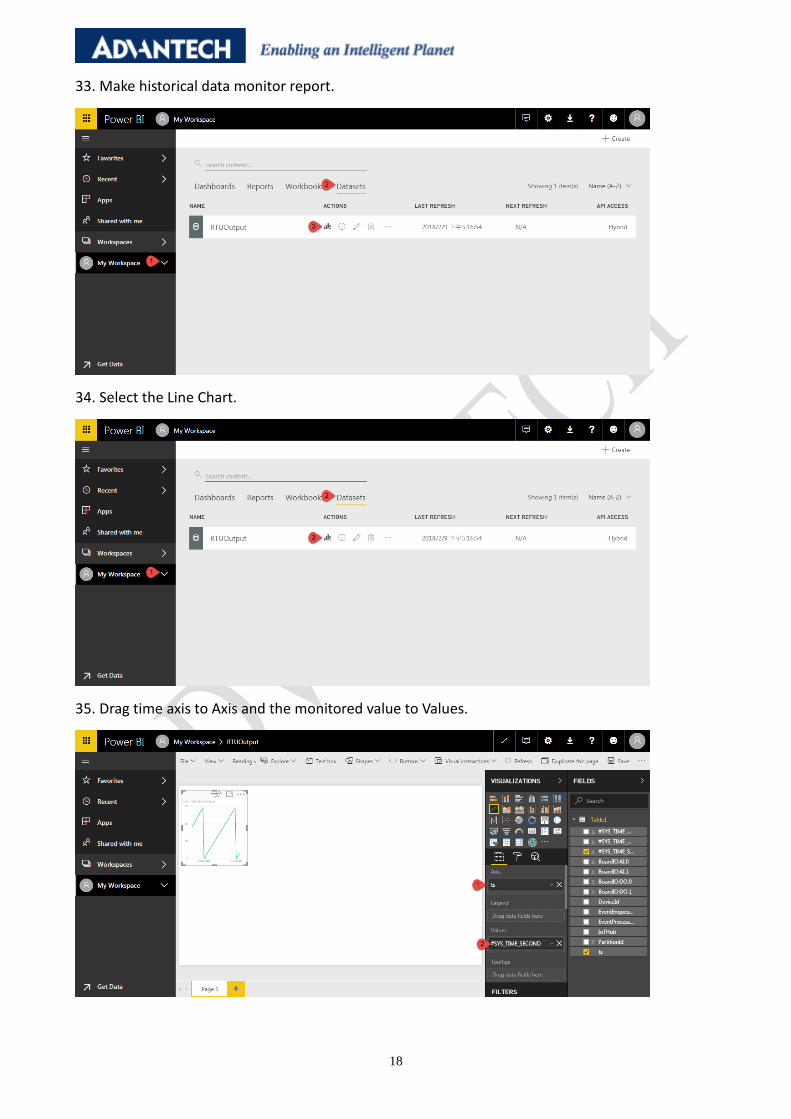
33. Make historical data monitor report.
34. Select the Line Chart.
35. Drag time axis to Axis and the monitored value to Values.

19
36. Save the report.
37. The created report is saved in My Workspace Reports.

20
[Postscripts] 38. The cloud upload can work even though LAN2 of ADAM-3600 is private IP (11.0.0.4) through
the PC which can access to the Internet. Generally, there is no need to set LAN1 as public IP.
However, please check the settings of the firewall to make sure the port 8883 can work. (For
example, Advantech IT sometimes makes 8883 port unavailable.)
39. After we use Address Format as “Host Name/ Device ID” to set up, the setting may change to
“Connection String”. However, it would bother if you check the HostName, Device ID, and
Primary Key in Connection String are correct.
40. Please make sure the time synchronization on the device is correct. If the time is not correct,
Azure cannot allow the device to connect.