ADVANCED RIFLE MARKSMANSHIP (Phase IV of Basic …pointshooting.com/rifle7.pdf · FM 3-22.9(FM...
57
FM 3-22.9(FM 23-9) 7-1 CHAPTER 7 ADVANCED RIFLE MARKSMANSHIP (Phase IV of Basic Rifle Marksmanship) The procedures and techniques for implementing the Army rifle marksmanship training program are based on all soldiers understanding common firing principles, being proficient marksmen, and being confident in applying their firing skills in combat. During preliminary marksmanship instruction, instructors-trainers emphasize initial learning by reviewing, reinforcing, and practicing the basics. This chapter concentrates on advanced techniques and procedures the soldier will need to participate in collective training during unit live-fire training exercises. Areas discussed in this chapter include advanced firing positions, combat firing techniques, NBC firing, unassisted night fire, moving target engagement, short-range marksmanship (SRM) training, and squad designated marksman (SDM) training. NOTE: The unit METL and STRAC allocation will determine which ARM tasks will be trained. Section I. ADVANCED FIRING POSITIONS After mastering the four marksmanship fundamentals in the two basic firing positions, the next step is to master the four fundamentals while firing from a variety of advanced firing positions. The following paragraphs demonstrate the most common firing positions a soldier may be required to fire from. The firer’s position may change but the application of the remaining three fundamentals applied from a stable position never changes. Ultimately, any firing position that aids the firer in applying the fundamentals is acceptable, as long as it is applied consistently each time it is used to avoid changing the firer’s sight picture. 7-1. ALTERNATE PRONE FIRING POSITION This position is an alternative to both prone supported and unsupported firing positions (Figure 7-1). The firer can assume a comfortable position while maintaining the same relationship between his body and the axis of the rifle. This position relaxes the stomach muscles and allows the firer to breathe naturally. Figure 7-1. Alternate prone firing position.
Transcript of ADVANCED RIFLE MARKSMANSHIP (Phase IV of Basic …pointshooting.com/rifle7.pdf · FM 3-22.9(FM...
FM 3-22.9(FM 23-9)
7-1
CHAPTER 7ADVANCED RIFLE MARKSMANSHIP
(Phase IV of Basic Rifle Marksmanship)
The procedures and techniques for implementing the Army riflemarksmanship training program are based on all soldiers understandingcommon firing principles, being proficient marksmen, and being confidentin applying their firing skills in combat. During preliminary marksmanshipinstruction, instructors-trainers emphasize initial learning by reviewing,reinforcing, and practicing the basics. This chapter concentrates onadvanced techniques and procedures the soldier will need to participate incollective training during unit live-fire training exercises. Areas discussedin this chapter include advanced firing positions, combat firing techniques,NBC firing, unassisted night fire, moving target engagement, short-rangemarksmanship (SRM) training, and squad designated marksman (SDM)training.
NOTE: The unit METL and STRAC allocation will determine which ARM tasks will betrained.
Section I. ADVANCED FIRING POSITIONSAfter mastering the four marksmanship fundamentals in the two basic firing positions, thenext step is to master the four fundamentals while firing from a variety of advanced firingpositions. The following paragraphs demonstrate the most common firing positions a soldiermay be required to fire from. The firer’s position may change but the application of theremaining three fundamentals applied from a stable position never changes. Ultimately, anyfiring position that aids the firer in applying the fundamentals is acceptable, as long as it isapplied consistently each time it is used to avoid changing the firer’s sight picture.
7-1. ALTERNATE PRONE FIRING POSITIONThis position is an alternative to both prone supported and unsupported firing positions(Figure 7-1). The firer can assume a comfortable position while maintaining the samerelationship between his body and the axis of the rifle. This position relaxes the stomachmuscles and allows the firer to breathe naturally.
Figure 7-1. Alternate prone firing position.
FM 3-22.9
7-2
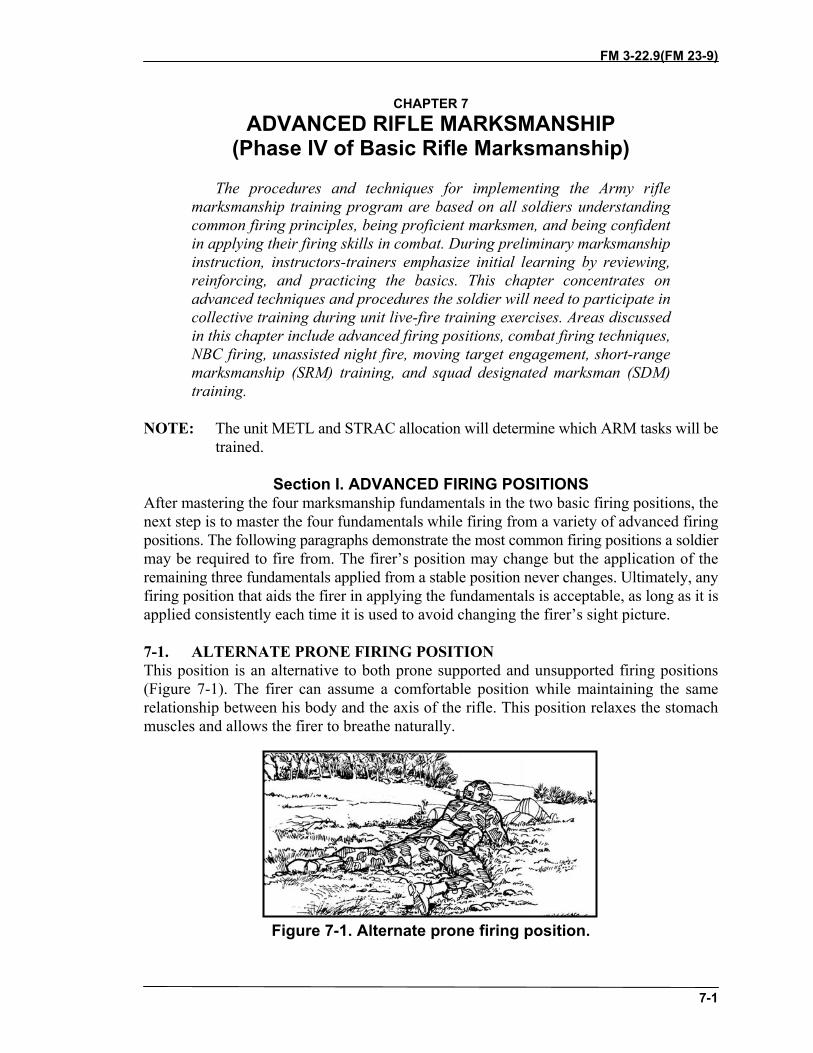
7-2. KNEELING SUPPORTED FIRING POSITIONThis position allows the soldier to obtain the height necessary to observe many target areas,taking advantage of available cover (Figure 7-2). Solid cover that can support any part of thebody or rifle assists in firing accuracy.
Figure 7-2. Kneeling supported firing position.
7-3. KNEELING UNSUPPORTED FIRING POSITIONThis position is assumed quickly, places the soldier high enough to see over small brush, andprovides a stable firing position (Figure 7-3). The nonfiring elbow should be pushed forwardof the knee so the upper arm is resting on a flat portion of the knee to provide stability. Thetrailing foot should be placed in a comfortable position.
Figure 7-3. Kneeling unsupported firing position.
FM 3-22.9
7-3
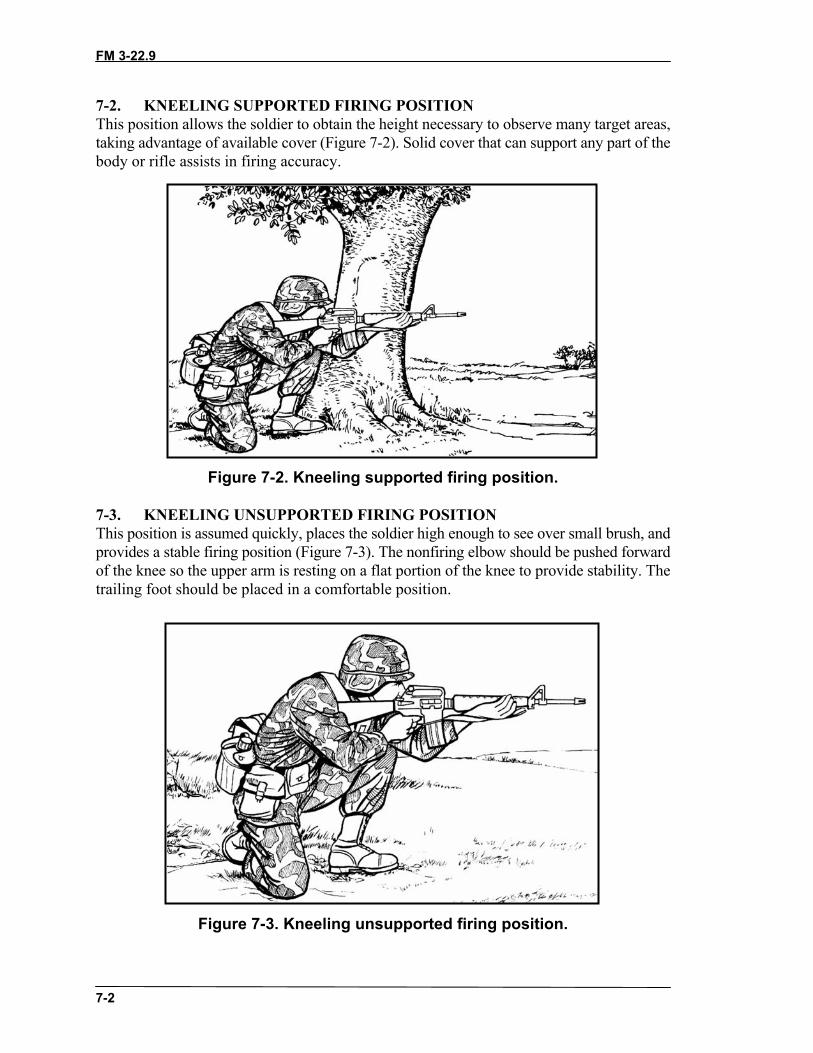
7-4. STANDING FIRING POSITIONTo assume the standing firing position, the soldier faces his target, executes a facingmovement to his firing side, and spreads his feet a comfortable distance apart (Figure 7-4).With his firing hand on the pistol grip and his nonfiring hand on either the upper handguardor the bottom of the magazine, the soldier places the butt of the rifle in the pocket formedby his firing shoulder so the sights are level with his eyes. The weight of the rifle issupported by the firing shoulder pocket and nonfiring hand. The soldier shifts his feet untilhe is aiming naturally at the target and his weight is evenly distributed on both feet. Thestanding position provides the least stability but could be needed for observing the targetarea since it can be assumed quickly while moving. Support for any portion of the body orrifle improves stability. More stability can be obtained by adjusting the ammunition pouchto support the nonfiring elbow, allowing the rifle magazine to rest in the nonfiring hand.
Figure 7-4. Standing firing position.
7-5. MODIFIED SUPPORTED FIRING POSITIONOnce the basic firing skills have been mastered during initial training, the soldier should beencouraged to modify positions, to take advantage of available cover, to use anything thathelps to steady the rifle, or to make any change that allows him to hit more combat targets.
FM 3-22.9
7-4
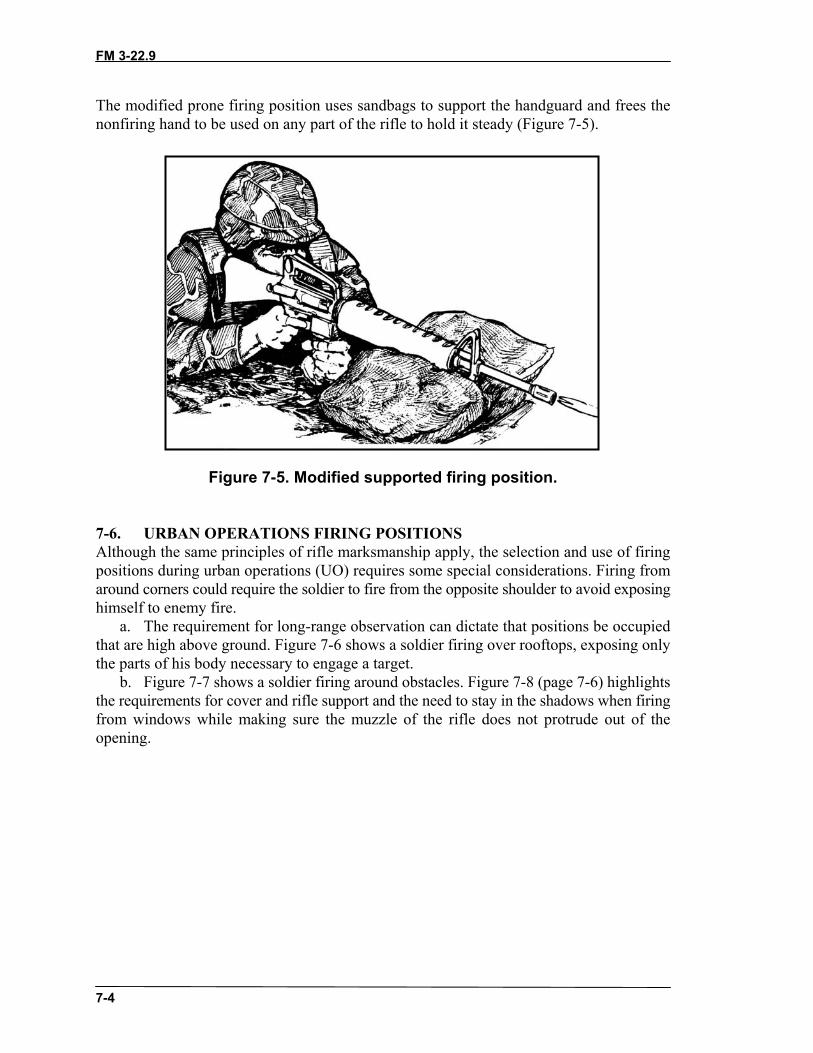
The modified prone firing position uses sandbags to support the handguard and frees thenonfiring hand to be used on any part of the rifle to hold it steady (Figure 7-5).
Figure 7-5. Modified supported firing position.
7-6. URBAN OPERATIONS FIRING POSITIONSAlthough the same principles of rifle marksmanship apply, the selection and use of firingpositions during urban operations (UO) requires some special considerations. Firing fromaround corners could require the soldier to fire from the opposite shoulder to avoid exposinghimself to enemy fire.
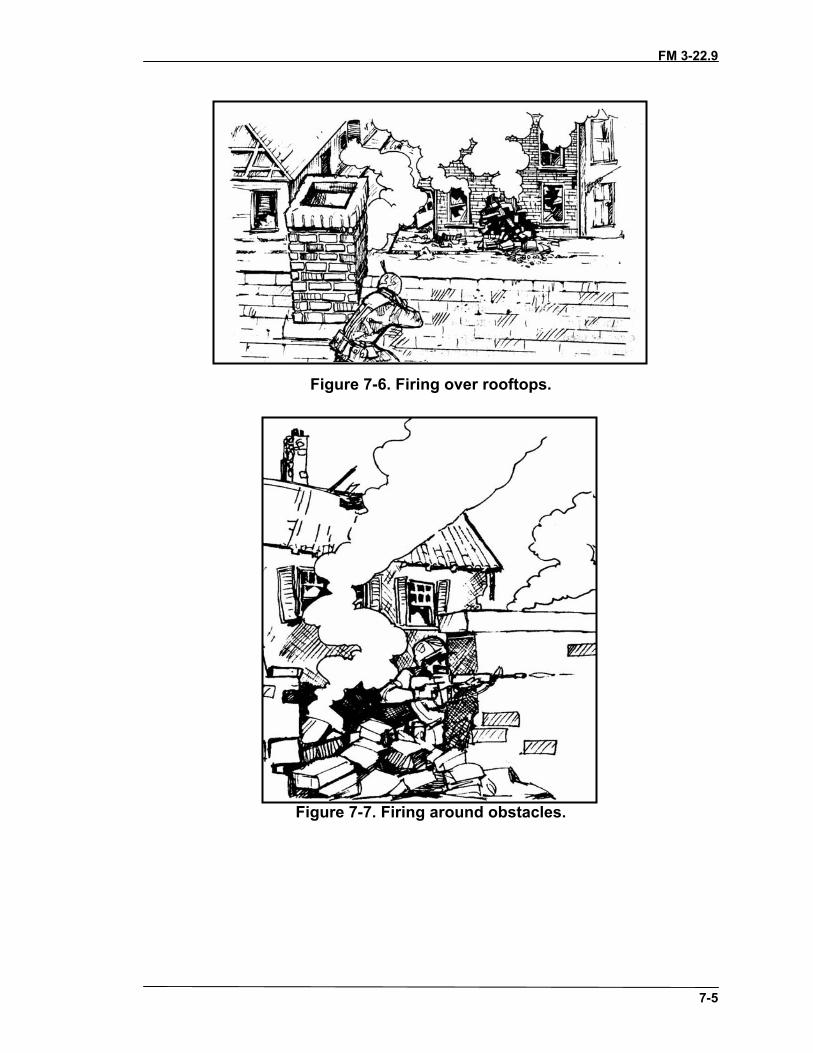
a. The requirement for long-range observation can dictate that positions be occupiedthat are high above ground. Figure 7-6 shows a soldier firing over rooftops, exposing onlythe parts of his body necessary to engage a target.
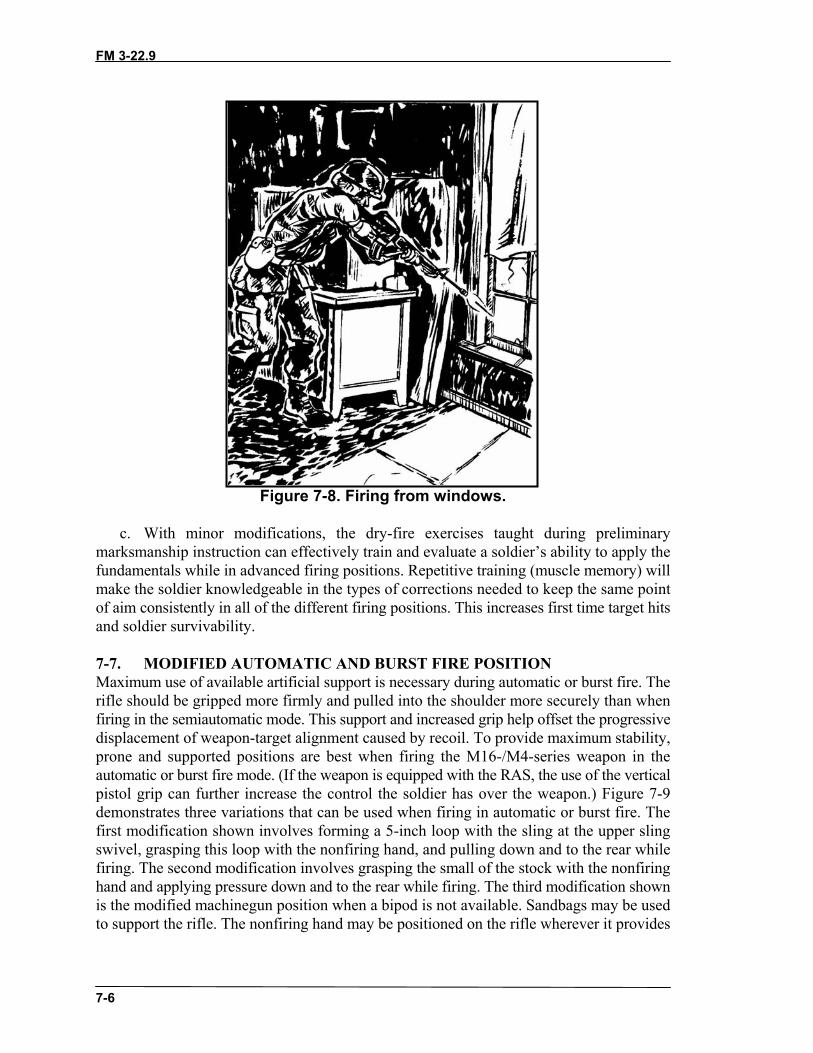
b. Figure 7-7 shows a soldier firing around obstacles. Figure 7-8 (page 7-6) highlightsthe requirements for cover and rifle support and the need to stay in the shadows when firingfrom windows while making sure the muzzle of the rifle does not protrude out of theopening.
FM 3-22.9
7-5
Figure 7-6. Firing over rooftops.
Figure 7-7. Firing around obstacles.
FM 3-22.9
7-6
Figure 7-8. Firing from windows.
c. With minor modifications, the dry-fire exercises taught during preliminarymarksmanship instruction can effectively train and evaluate a soldier’s ability to apply thefundamentals while in advanced firing positions. Repetitive training (muscle memory) willmake the soldier knowledgeable in the types of corrections needed to keep the same pointof aim consistently in all of the different firing positions. This increases first time target hitsand soldier survivability.
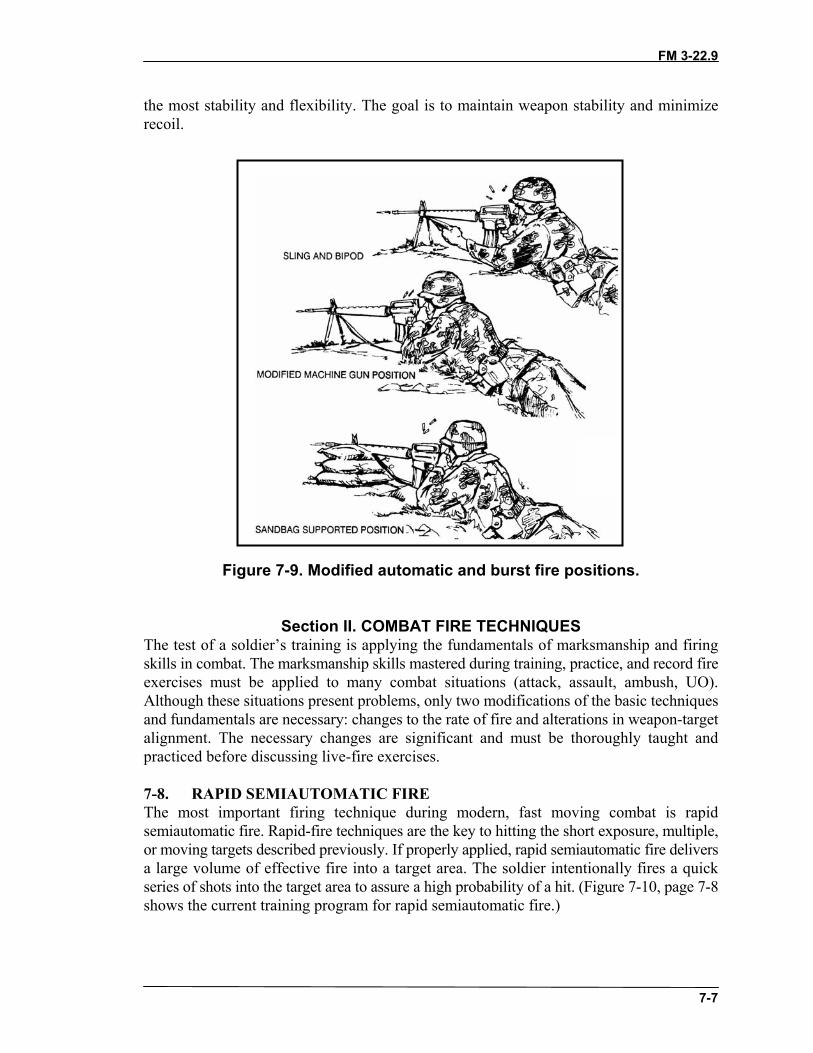
7-7. MODIFIED AUTOMATIC AND BURST FIRE POSITIONMaximum use of available artificial support is necessary during automatic or burst fire. Therifle should be gripped more firmly and pulled into the shoulder more securely than whenfiring in the semiautomatic mode. This support and increased grip help offset the progressivedisplacement of weapon-target alignment caused by recoil. To provide maximum stability,prone and supported positions are best when firing the M16-/M4-series weapon in theautomatic or burst fire mode. (If the weapon is equipped with the RAS, the use of the verticalpistol grip can further increase the control the soldier has over the weapon.) Figure 7-9demonstrates three variations that can be used when firing in automatic or burst fire. Thefirst modification shown involves forming a 5-inch loop with the sling at the upper slingswivel, grasping this loop with the nonfiring hand, and pulling down and to the rear whilefiring. The second modification involves grasping the small of the stock with the nonfiringhand and applying pressure down and to the rear while firing. The third modification shownis the modified machinegun position when a bipod is not available. Sandbags may be usedto support the rifle. The nonfiring hand may be positioned on the rifle wherever it provides
FM 3-22.9
7-7
the most stability and flexibility. The goal is to maintain weapon stability and minimizerecoil.
Figure 7-9. Modified automatic and burst fire positions.
Section II. COMBAT FIRE TECHNIQUESThe test of a soldier’s training is applying the fundamentals of marksmanship and firingskills in combat. The marksmanship skills mastered during training, practice, and record fireexercises must be applied to many combat situations (attack, assault, ambush, UO).Although these situations present problems, only two modifications of the basic techniquesand fundamentals are necessary: changes to the rate of fire and alterations in weapon-targetalignment. The necessary changes are significant and must be thoroughly taught andpracticed before discussing live-fire exercises.
7-8. RAPID SEMIAUTOMATIC FIREThe most important firing technique during modern, fast moving combat is rapidsemiautomatic fire. Rapid-fire techniques are the key to hitting the short exposure, multiple,or moving targets described previously. If properly applied, rapid semiautomatic fire deliversa large volume of effective fire into a target area. The soldier intentionally fires a quickseries of shots into the target area to assure a high probability of a hit. (Figure 7-10, page 7-8shows the current training program for rapid semiautomatic fire.)
FM 3-22.9
7-8
Instructional Intent:Soldiers learn to engage targets using rapid semiautomatic fire and practice rapid magazinechanges.Special Instructions:Ensure M16A1 rear sight is set on the unmarked aperture.Ensure M16A2/A3/A4 and M4 series weapon’s rear sight is set on the 0-2 aperture.Use a 25-meter alternate course C qualification target.Ensure soldier is in a proper supported firing position.Soldier is given four 5-round magazines of 5.56ammunition.Soldier fires one round at each of the 10 silhouettes on the alternate course C qualification target.Soldier does a rapid magazine change after each magazine is fired.Soldier uses rapid semiautomatic fire to engage targets.The first iteration of 10 rounds is fired in a time limit of 40 seconds.The second iteration of 10 rounds is fired in a time limit of 30 seconds.Each target is inspected and posted after each iteration.Observables:Coaches are analyzing the firer’s fundamentals continuously.Each soldier must obtain 14 silhouette target hits.
Figure 7-10. Rapid semiautomatic fire training program.
a. Effectiveness of Rapid Fire. When a soldier uses rapid semiautomatic fire properly,he sacrifices some accuracy to deliver a greater volume of effective fire to hit more targets.It is surprising how devastatingly accurate rapid fire can be. At ranges beyond 25 meters,rapid semiautomatic fire is superior to automatic fire in all measures (shots per target, triggerpulls per hit, and even time to hit). The decrease in accuracy when firing faster is reducedwith proper training and repeated practice.
b. Control of Rapid Semiautomatic Fire. With proper training, the soldier canproperly select the appropriate mode of fire; semiautomatic fire, rapid semiautomatic fire,or automatic/burst. Leaders must assure proper fire discipline at all times. Even in training,unaimed fire must never be tolerated, especially unaimed automatic fire.
c. Modifications for Rapid Fire. Increases in speed and volume should be sought onlyafter the soldier has demonstrated expertise and accuracy during slow semiautomatic fire.The rapid application of the four fundamentals will result in a well-aimed shot every one ortwo seconds. This technique of fire allows a unit to place the most effective volume of firein a target area while conserving ammunition. It is the most accurate means of deliveringsuppressive fire. Trainers must consider the impact of the increased rate of fire on thesoldier’s ability to properly apply the fundamentals of marksmanship and other combat firingskills. These fundamentals and skills include:
(1) Marksmanship Fundamentals. The four fundamentals are used when firing in therapid semiautomatic mode. The following differences apply:
(a) Steady Position. Good support improves accuracy and reduces recovery time betweenshots. A somewhat tighter grip on the hand guard assists in recovery time and in rapidlyshifting or distributing fire to subsequent targets. When possible, the rifle should pivot at thepoint where the non-firing hand meets the support. The soldier should avoid changing theposition of the non-firing hand on the support, because it is awkward and time consumingwhen rapidly firing a series of shots.
FM 3-22.9
7-9
(b) Aiming. Sighting and stock weld do not change during rapid semiautomatic fire. Thefirer’s head remains on the stock for every shot, his firing eye is aligned with the rearaperture, and his focus is on the front sight post. In slow fire, the soldier seeks a stable sightpicture. In the fast moving situations requiring rapid semiautomatic fire, the soldier mustaccept target movement, and unsteady sight picture, and keep firing into the target area untilthe target is down or there is no chance of a hit. Every shot must be aimed.
(c) Breath Control. Breath control must be modified because the soldier does not havetime to take a complete breath between shots. He must hold his breath at some point in thefiring process and take shallow breaths between shots.
(c) Trigger Squeeze. To maintain the desired rate of fire, the soldier has only a shortperiod to squeeze the trigger (one well-aimed shot every one or two seconds). The firer mustcause the rifle to fire in a period of about one-half of a second or less and still not anticipatethe precise instant of firing. It is important that initial trigger pressure be applied as soon asa target is identified and while the front sight post is being brought to the desired point ofaim. When the front sight post reaches the point of aim, final pressure must be applied tocause the rifle to fire almost at once. This added pressure, or final trigger squeeze, must beapplied without disturbing the lay of the rifle. Repeated dry-fire training, using theWeaponeer device, and live-fire practice ensure the soldier can squeeze the trigger andmaintain a rapid rate of fire consistently and accurately.
NOTE: The soldier can increase the firing rate by firing, then releasing just enoughpressure on the trigger to reset the sear, then immediately fire the next shot. Thistechnique eliminates some of the time used in fully releasing the pressure on thetrigger. It allows the firer to rapidly deliver subsequent rounds. Training andpractice sessions are required for soldiers to become proficient in the techniqueof rapid trigger squeeze.
(2) Immediate Action. To maintain an increased rate of suppressive fire, immediateaction must be applied quickly. The firer must identify the problem and correct the stoppageimmediately. Repeated dry-fire practice, using blanks or dummy rounds, followed by live-fire training and evaluation ensures that soldiers can rapidly apply immediate action whileother soldiers initiate fire.
d. Rapid-Fire Training. Soldiers should be well trained in all aspects of slowsemiautomatic firing before attempting any rapid-fire training. Those who display a lack ofknowledge of the fundamental skills of marksmanship should not advance to rapidsemiautomatic training until these skills are learned and mastered. Initial training shouldfocus on the modifications to the fundamentals and other basic combat skills necessaryduring rapid semiautomatic firing.
(1) Dry-Fire Exercises. Repeated dry-fire exercises are the most efficient meansavailable to ensure soldiers can apply modifications to the fundamentals. Multiple dry-fireexercises are needed, emphasizing a rapid shift in position and point of aim, followed bybreath control and fast trigger squeeze. Blanks or dummy rounds may be used to train rapidmagazine changes and the application of immediate action. The soldier should displayknowledge and skill during these dry-fire exercises before attempting live fire.
FM 3-22.9
7-10
(2) Live-Fire Exercises. There are two types of live-fire exercises.(a) Individual. Emphasis is on each soldier maintaining a heavy volume of accurate fire.
Weapon downtime (during immediate action and rapid magazine changes) is kept to aminimum. Firing should begin at shorter ranges, progressing to longer ranges as soldiersdisplay increased proficiency. Exposure or engagement times are shortened and the numberof rounds increased to simulate the need for a heavy volume of fire. Downrange feedbackis necessary to determine accuracy of fire.
(b) Collective. Rapid semiautomatic fire should be the primary means of delivering fireduring a collective live-fire exercise (LFX). It is the most accurate technique of placing alarge volume of fire on poorly defined targets or target areas. Emphasis should be onstaggered rapid magazine changes, maintaining a continuous volume of fire, and conservingammunition.
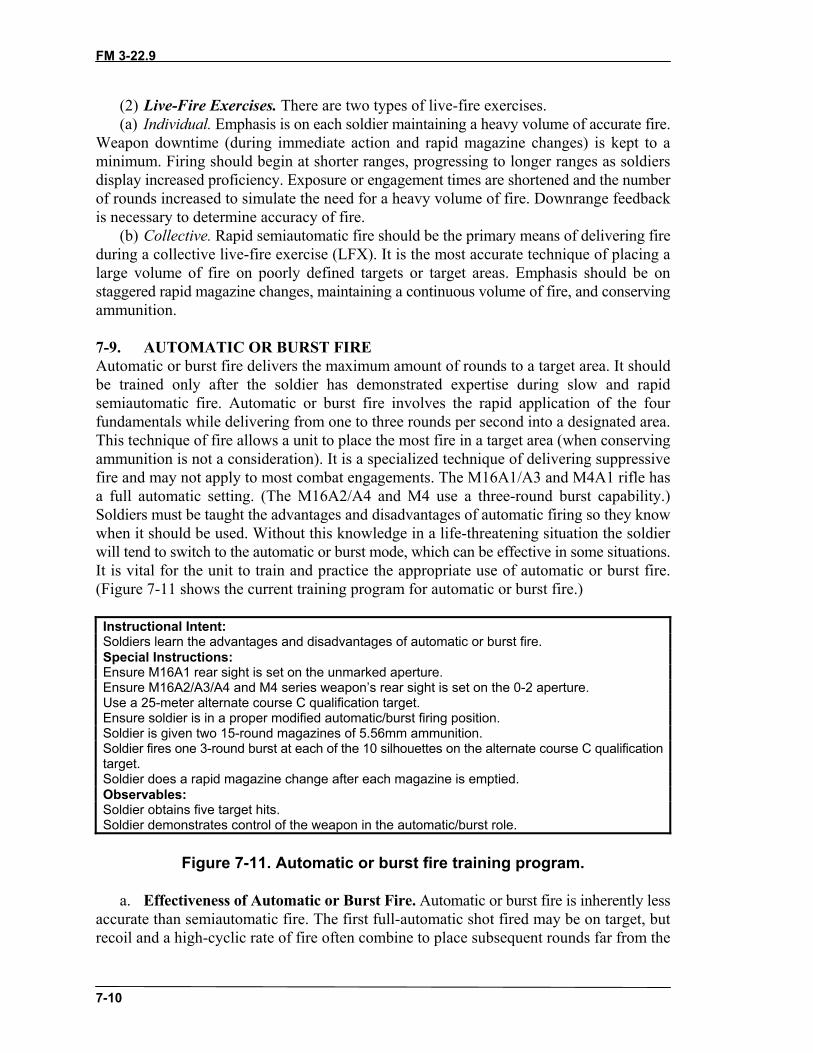
7-9. AUTOMATIC OR BURST FIREAutomatic or burst fire delivers the maximum amount of rounds to a target area. It shouldbe trained only after the soldier has demonstrated expertise during slow and rapidsemiautomatic fire. Automatic or burst fire involves the rapid application of the fourfundamentals while delivering from one to three rounds per second into a designated area.This technique of fire allows a unit to place the most fire in a target area (when conservingammunition is not a consideration). It is a specialized technique of delivering suppressivefire and may not apply to most combat engagements. The M16A1/A3 and M4A1 rifle hasa full automatic setting. (The M16A2/A4 and M4 use a three-round burst capability.)Soldiers must be taught the advantages and disadvantages of automatic firing so they knowwhen it should be used. Without this knowledge in a life-threatening situation the soldierwill tend to switch to the automatic or burst mode, which can be effective in some situations.It is vital for the unit to train and practice the appropriate use of automatic or burst fire.(Figure 7-11 shows the current training program for automatic or burst fire.)
Instructional Intent:Soldiers learn the advantages and disadvantages of automatic or burst fire.Special Instructions:Ensure M16A1 rear sight is set on the unmarked aperture.Ensure M16A2/A3/A4 and M4 series weapon’s rear sight is set on the 0-2 aperture.Use a 25-meter alternate course C qualification target.Ensure soldier is in a proper modified automatic/burst firing position.Soldier is given two 15-round magazines of 5.56mm ammunition.Soldier fires one 3-round burst at each of the 10 silhouettes on the alternate course C qualificationtarget.Soldier does a rapid magazine change after each magazine is emptied.Observables:Soldier obtains five target hits.Soldier demonstrates control of the weapon in the automatic/burst role.
Figure 7-11. Automatic or burst fire training program.
a. Effectiveness of Automatic or Burst Fire. Automatic or burst fire is inherently lessaccurate than semiautomatic fire. The first full-automatic shot fired may be on target, butrecoil and a high-cyclic rate of fire often combine to place subsequent rounds far from the
FM 3-22.9
7-11
desired point of impact. Even controlled (three-round burst) automatic or burst fire mayplace only one round on the target. Because of these inaccuracies, it is difficult to evaluatethe effectiveness of automatic or burst fire, and even more difficult to establish absoluteguidelines for its use.
(1) Closely spaced multiple targets, appearing at the same time at 50 meters or closer,may be engaged effectively with automatic or burst fire. More widely spaced targetsappearing at greater distances should be engaged with semiautomatic fire.
(2) The M16-series rifles and the M4-series should normally be employed in thesemiautomatic mode. Depending on the tactical situation, the following conditions wouldbe factors against the use of automatic or burst fire:
• Ammunition is in short supply or resupply may be difficult.• Single targets are being engaged.• Widely spaced multiple targets are being engaged.• The distance to the target is beyond 50 meters.• The effect of bullets on the target cannot be observed.• Artificial support is not available.• Targets may be effectively engaged using semiautomatic fire.
(3) In some combat situations, the use of automatic or burst fire can improvesurvivability and enhance mission accomplishment. Clearing buildings, final assaults, FPF,and ambushes may require limited use of automatic or burst fire. Depending on the tacticalsituation, the following conditions may favor the use of automatic or burst fire:
• Enough available ammunition. Problems are not anticipated with resupply.• Closely spaced multiple targets appear at 50 meters or less.• Maximum fire is immediately required at an area target.• Tracers or some other means can be used to observe the effect of bullets on the
target.• Leaders can maintain adequate control over weapons firing on automatic.• Good artificial support is available.• The initial sound of gunfire disperses closely spaced targets.
(4) Trainers must ensure soldiers understand the capabilities and limitations of automaticor burst fire. They must know when it should and should not be used.
b. Modifications for the Automatic or Burst Fire Position. Trainers must considerthe impact of the greatly increased rate of fire on the soldier’s ability to properly apply thefundamentals of marksmanship and other combat firing skills. These fundamentals and skillsinclude:
(1) Immediate Action. To maintain automatic or burst fire, immediate action must beapplied quickly. The firer must identify the problem and correct it immediately. Repeateddry-fire practice, using blanks or dummy rounds, followed by live-fire training andevaluation, ensures soldiers can rapidly apply immediate action.
(2) Marksmanship Fundamentals. The four fundamentals are used when firing in theautomatic mode. The following differences apply:
(a) Steady Position. Maximum use of available artificial support is necessary duringautomatic or burst fire. The rifle should be gripped more firmly and pulled into the shouldermore securely than when firing in the semiautomatic mode. This support and increased griphelp offset the progressive displacement of weapon-target alignment caused by recoil. To
FM 3-22.9
7-12
provide maximum stability, prone and supported firing positions are best (see Figure 7-9,page 7-8). One possible modification involves forming a 5-inch loop with the sling at theupper sling swivel, grasping this loop with the nonfiring hand, and pulling down and to therear while firing. Another modification involves grasping the small of the stock with thenonfiring hand and applying pressure down and to the rear while firing. If a bipod is notavailable, sandbags may be used to support the rifle. The nonfiring hand may be positionedon the rifle wherever it provides the most stability and flexibility. The goal is to maintainweapon stability and minimize recoil.
NOTE: If the weapon is equipped with the RAS, using the vertical pistol grip can furtherincrease the control the soldier has over the weapon.
(b) Aiming. The aiming process does not change during automatic or burst fire. Thefirer’s head remains on the stock, his firing eye stays aligned with the rear sight aperture, andhis focus is on the front sight post. Although recoil may disrupt this process, the firer musttry to apply the aiming techniques throughout recoil.
(c) Breath Control. Breath control must be modified because the firer will not have thetime to breathe between shots. He must hold his breath for each burst and adapt his breathingcycle, taking breaths between bursts.
(d) Trigger Squeeze. Training and repeated dry-fire practice will aid the soldier inapplying proper trigger squeeze during automatic firing. Live-fire exercises will enable himto improve this skill.
• M16A1. Trigger squeeze is applied in the normal manner up to the instant therifle fires. Because three-round bursts are the most effective rate of fire, pressureon the trigger should be released as quickly as possible. The index finger shouldremain on the trigger, but a quick release of pressure is necessary to prevent anexcessive number of rounds from being fired in one burst. With much dry-firepractice, the soldier can become proficient at delivering three-round bursts withthe squeeze-release technique.
• M16A2/3/4 and M4-series weapons. Trigger squeeze is applied in the normalmanner up to the instant the rifle fires. Using the burst-mode, the firer holds thetrigger to the rear until three rounds are fired. He then releases pressure on thetrigger until it resets, then reapplies pressure for the next three-round burst.
NOTES: 1. The trigger is not slapped or jerked. It is squeezed and pressure is quicklyreleased.
2. Depending on the position of the burst cam when the selector is moved to theburst mode, the rifle may fire one, two, or three rounds when the trigger isheld to the rear the first time. If the rifle fires only one or two rounds, thefirer must quickly release pressure on the trigger and squeeze again, holdingit to the rear until a three-round burst is completed.
c. Magazine Changes. Rapid magazine changes are vital in maintaining automatic orburst fire.
d. Training of Automatic or Burst Fire Techniques. Initial training should focus onthe modifications to the fundamentals and other basic combat skills necessary during

FM 3-22.9
7-13
automatic firing. Repeated dry-fire exercises are the most efficient means available to ensuresoldiers can apply these modifications. Multiple dry-fire exercises are needed, emphasizinga stable position and point of aim, followed by breath control and the appropriate triggersqueeze. Blanks or dummy rounds may be used to train trigger squeeze, rapid magazinechanges, and application of immediate action. The soldier should display knowledge andskill during these exercises before attempting live fire.
NOTE: Soldiers should be well trained in all aspects of slow semiautomatic firing beforeattempting any automatic training. Those who display a lack of knowledge offundamental skills should not advance to automatic or burst fire training untilthese skills are learned.
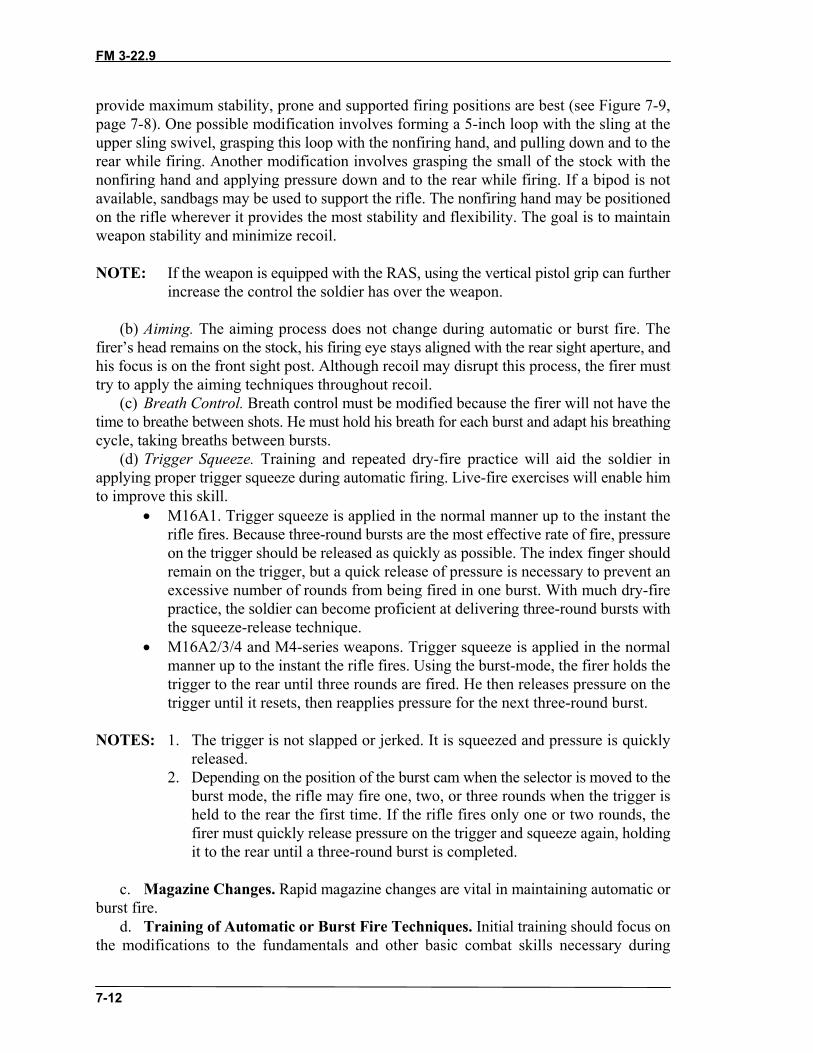
7-10. SUPPRESSIVE FIREIn many tactical situations, combat rifle fire will be directed to suppress enemy personnelor weapons positions. Suppressive fire is rifle fire precisely aimed at a definite point or areatarget. Some situations may require a soldier to place suppressive fire into a wide area suchas a wood line, hedgerow, or small building while, at other times, the target may be a bunkeror window. Suppressive fire is used to control the enemy and the area he occupies. It isemployed to kill the enemy or to prevent him from observing the battlefield or effectivelyusing his weapons. When a sustained volume of accurate suppressive fire is placed on enemylocations to contain him, it can be effective even though he cannot be seen. Effectivelypinning the enemy down behind cover reduces his ability to deliver fire and allows friendlyforces to move. (Figure 7-12 shows the current training program for suppressive fire.)
Instructional Intent:Soldier learns to suppress targets using suppressive fire.Special Instructions:Ensure M16A1 rear sight is set on the unmarked aperture.Ensure M16A2/A3/A4 and M4 series weapon’s rear sight is set on the 0-2 aperture.Ensure the 25-meter scaled landscape target is used.Soldier is given two 9-round magazines and one 12-round magazine of 5.56mm-ball ammunition.Ensure soldier is in a proper supported firing position.Soldier fires 9 rounds at the “open window” area of the target using rapid semiautomatic fire with thefirst 9-round magazine.Soldier fires 12 rounds at the “fence or hedgerow” area of the target using rapid semiautomatic firewith the 12-round magazine.Soldier fires three 3-round bursts at the “tank turret” area of the target using the automatic/burstmode of the weapon with the second 9-round magazine.Observables:Soldier achieves 5 hits out of 9 inside the “open window” area within 18 seconds.Soldier achieves 10 hits out of 12 inside the dotted lines surrounding the “fence or hedgerow” areawithin 24 seconds.Soldier achieves 3 hits out of nine inside the “tank turret” area within 24 seconds.
Figure 7-12. Suppressive fire training program.
a. Nature of the Target. Many soldiers have difficulty delivering effective suppressivefire when they cannot see a definite target. They must fire at likely locations or in a generalarea where the enemy is known to exist. Even though definite targets cannot be seen, most
FM 3-22.9
7-14
suppressive fire should be well aimed. Figure 7-13 shows a landscape target suitable forsuppressive fire training. When this type of target is used, trainers must develop a firingprogram to include areas of engagement and designated target areas be credited as sustainedeffective suppressive fire. At 25 meters, this target provides the firer an area to suppresswithout definite targets to engage.
Figure 7-13. Landscape target.
b. Point of Aim. Suppressive fire should be well-aimed, sustained, semiautomatic fire.Although lacking a definite target, the soldier must be taught to control and accuratelydeliver fire within the limits of the suppressed area. The sights are used as when engaginga point-type target with the front sight post placed so each shot impacts within the desiredarea (window, firing portal, tree line).
c. Rate of Fire. During most phases of live fire (grouping, zeroing, qualifying), shotsare delivered using the slow semiautomatic rate of fire (one round every 3 to 10 seconds).During training, this allows a slow and precise application of the fundamentals. Successfulsuppressive fire requires that a faster but sustained rate of fire be used. Firing full automaticor bursts (13 rounds per second) for a few seconds may sometimes be necessary to gaininitial fire superiority. Rapid semiautomatic fire (one round every one or two seconds)allows the firer to sustain a large volume of accurate fire while conserving ammunition. Thetactical situation dictates the most useful rate of fire, but the following must be considered:
(1) Applying Fundamentals. As the stress of combat increases, some soldiers may failto apply the fundamentals of marksmanship. This factor contributes to soldiers firing lessaccurately and without obtaining the intended results. While some modifications areappropriate, the basic fundamentals should be applied and emphasized regardless of the rateof fire or combat stress. Strategies to enhance marksmanship skills during combat stressinclude shooting prone as opposed to standing, and providing a high carbohydrate and ormoderate sodium diet. Factors that contribute to combat stress are:
(a) Environmental. Environmental stressors have been shown to degrade marksmanshipaccuracy up to 20 percent. Such stressors include heat and altitude.
FM 3-22.9
7-15
(b) Operational. Operational stressors have been shown to degrade marksmanshipaccuracy from 17 percent to 136 percent. Such stressors include MOPP gear; tasks thatrequire carrying rucksacks, litter patients, and other equipment on the body; and sleepdeprivation.
(2) Making Rapid Magazine Changes. One of the keys to sustained suppressive fire isreloading the rifle rapidly. Rapid magazine changes must be correctly taught and practicedduring dry-fire and live-fire exercises until the soldier becomes proficient. Small-unittraining exercises must be conducted so soldiers who are providing suppressive fire practicemagazine changes that are staggered. Firing is, therefore, controlled and coordinated so thata continuous volume of accurate suppressive fire is delivered to the target area.
(3) Conserving Ammunition. Automatic or burst fire should be used sparingly and onlyto gain initial fire superiority. Depending on the tactical situation, the rate of fire should beadjusted so that a minimum number of rounds are expended. Accurate fire conservesammunition, while preventing the enemy from placing effective fire on friendly positions.
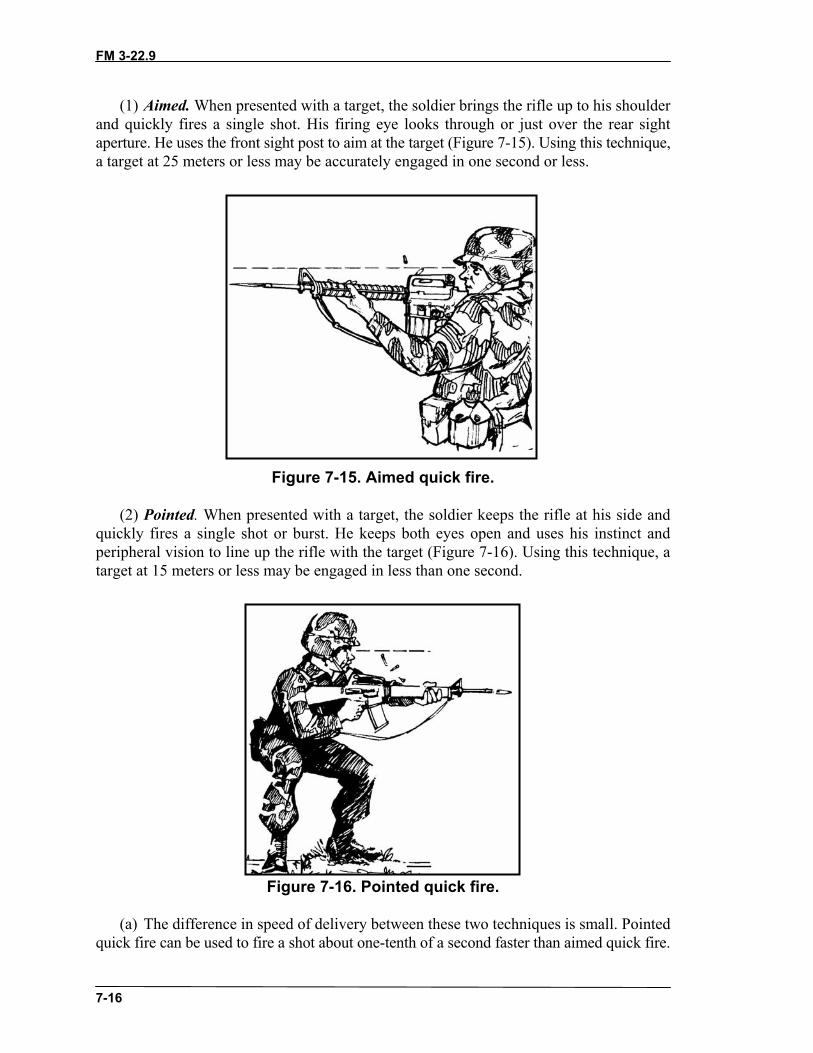
7-11. QUICK FIREThe two main techniques of directing fire with a rifle are to aim using the sights and to useweapon alignment, instinct, bullet strike, or tracers to direct the fire. The preferred techniqueis to use the sights, but sometimes quick reflex action is required. Quick fire is a techniqueused to deliver fast, effective fire on surprise personnel targets at close ranges (25 meters orless). Quick-fire procedures have also been referred to as instinctive firing or quick kill.(Figure 7-14 shows the current training program for quick fire.)
Instructional Intent:Soldiers learn how to engage targets using the quick-fire techniques.Special Instructions:Ensure M16A1 rear sight is set on the unmarked aperture.Ensure M16A2/A3/A4 and M4-series weapon’s rear sight is set on the 0-2 aperture.Soldier is given two 10-round magazines.Soldier engages 10 target exposures of 2 seconds each at 15 meters using the first 10-roundmagazine.Soldier moves to the 25- meter line and engages 10 target exposures of 2 seconds each at 25meters using the second 10-round magazine.Observables:Soldier achieves 7 target hits out of 10 target exposures at 15 meters.Soldier achieves 5 target hits out of 10 target exposures at 25 meters.
Figure 7-14. Quick fire training program.
NOTE: Quick fire will only be conducted by soldiers in basic training. Short-rangemarksmanship will be conducted at unit level.
a. Effectiveness of Quick Fire. Quick-fire techniques are appropriate for soldiers, whoare presented with close, suddenly appearing, surprise enemy targets; or when closeengagement is imminent. Fire may be delivered in the SEMIAUTO orAUTOMATIC/BURST mode. For example, a point man in a patrol may carry the weaponon AUTOMATIC/BURST. This may also be required when clearing a room or bunker.Initial training should be in the SAFE mode. Two techniques of delivering quick fire are:
FM 3-22.9
7-16
(1) Aimed. When presented with a target, the soldier brings the rifle up to his shoulderand quickly fires a single shot. His firing eye looks through or just over the rear sightaperture. He uses the front sight post to aim at the target (Figure 7-15). Using this technique,a target at 25 meters or less may be accurately engaged in one second or less.
Figure 7-15. Aimed quick fire.
(2) Pointed. When presented with a target, the soldier keeps the rifle at his side andquickly fires a single shot or burst. He keeps both eyes open and uses his instinct andperipheral vision to line up the rifle with the target (Figure 7-16). Using this technique, atarget at 15 meters or less may be engaged in less than one second.
Figure 7-16. Pointed quick fire.
(a) The difference in speed of delivery between these two techniques is small. Pointedquick fire can be used to fire a shot about one-tenth of a second faster than aimed quick fire.
FM 3-22.9
7-17
The difference in accuracy, however, is more pronounced. A soldier well trained in pointedquick fire can hit an E-type silhouette target at 15 meters, although the shot may strikeanywhere on the target. A soldier well trained in aimed quick fire can hit an E-typesilhouette target at 25 meters, with the shot or burst striking 5 inches from the center of mass.This variance of target hit for this type of engagement reinforces the need for well-aimedshots.
(b) The key to the successful employment of either technique is practice. Both pointedand aimed quick fire must be repeatedly practiced during dry-fire training. Live-fireexercises provide further skill enhancement and illustrate the difference in accuracy betweenthe two techniques. Tactical considerations dictate which technique is most effective in agiven situation, and when single shot versus burst fire is used.
(c) Pointed and aimed quick fire should be used only when a target cannot be engagedfast enough using the sights in a normal manner. These techniques should be limited totargets appearing at 25 meters or less. Modern short-range combat (SRC) techniquesemphasize carrying the rifle with the butt high, so the rifle sights can be brought into displayas quickly as firing a hasty unaimed shot. In extremely dangerous moments, special reactionteams (SRTs) commonly advance with weapons shouldered, aiming as they advance.
b. Four Fundamental Modifications for Quick-Fire Techniques. Quick-firetechniques require major modifications to the four fundamentals of marksmanship. Thesemodifications represent a significant departure from the normal applications of the fourfundamentals. Initial training in these differences, followed by repeated dry-fire exercises,will be necessary to prepare the soldier for live fire.
(1) Steady Position. The quickness of shot delivery prevents the soldier from assuminga stable firing position. He must fire from his present position when the target appears. If thesoldier is moving, he must stop. Adjustments for stability and support cannot be made beforethe round is fired.
(a) Aimed. The butt of the rifle is pulled into the pocket of the shoulder as the cheekcomes in contact with the stock. Both hands firmly grip the rifle, applying rearward pressure.The firing eye looks through or just over the rear sight aperture. The firer’s sight is placedon the target.
(b) Pointed. The rifle is pulled into the soldier’s side and both hands firmly grip the rifle,applying rearward pressure.
(2) Aiming. This fundamental must be highly modified because the soldier may not havetime to look through the rear sight, find the front sight, and align it with the target.
(a) Aimed. The soldier’s initial focus is on the target. As the rifle is brought up, the firingeye looks through or just over the rear sight aperture at the target. Using his peripheralvision, the soldier locates the front sight post and brings it to the center of the target. Whenthe front sight post is in focus, the shot is fired. Focus remains on the front sight postthroughout the aiming process.
(b) Pointed. The soldier’s focus is placed on the center or slightly below the center ofthe target as the rifle is aligned with it and is fired. The soldier’s instinctive pointing abilityand peripheral vision are used to aid proper alignment.
NOTE: Using either aiming technique, bullets may tend to impact above the desiredlocation. Repeated live-fire practice is necessary to determine the best aim point
FM 3-22.9
7-18
on the target or the best focus. Such practice should begin with the soldier usinga center of mass aim.
(3) Breath Control. This fundamental has little application to the first shot of quick fire.The round must be fired before a conscious decision can be made about breathing. Ifsubsequent shots are necessary, breathing must not interfere with the necessity of firingquickly. When possible, use short, shallow breaths.
(4) Trigger Squeeze. Initial pressure is applied as weapon alignment is moved towardthe target. Trigger squeeze is exerted so when weapon-target alignment is achieved, theround is fired at once. The soldier requires much training and practice to perfect this rapidsqueezing of the trigger.
Section III. NUCLEAR, BIOLOGICAL, AND CHEMICAL FIRINGAll soldiers must effectively fire their weapons to accomplish combat missions in an NBCenvironment. With proper training and practice, soldiers gain confidence in their ability toeffectively hit targets in full MOPP equipment. MOPP firing proficiency must be part ofevery unit’s training program. (Figure 7-17 shows the current training program for NBCfiring.)
Instructional Intent:The primary objective of NBC fire is to develop the soldier’s confidence and ability to engagetargets while in any level of MOPP.Special Instructions:Ensure M16A1 rear sight is set on the unmarked aperture.Ensure M16A2/A3/A4 and M4 series weapon’s rear sight is set on the 0-2 aperture.Ensure soldiers have insert lenses, if required, before firing.Ensure soldiers have proper seal on the mask to prevent fogging and loss of visibility.Soldier is given two 10-round magazines.Soldier engages 10 50-meter target exposures from the foxhole supported firing position.Soldier engages 10 50-meter target exposures from the prone unsupported firing position with thesecond 10-round magazine.This is a GO NO-GO exercise.Observables:Soldier obtains 11 hits out of 20 target exposures.
Figure 7-17. NBC fire training program.
7-12. MOPP EQUIPMENT FIRE TRAININGFiring weapons is only part of overall NBC training. Soldiers must first be familiar withNBC equipment, its use, and proper wear before they progress to learning the techniques ofMOPP firing. Trainers must consider the impact of MOPP equipment (hood or mask, gloves,overgarments) on the soldier’s ability to properly apply the fundamentals of marksmanshipand combat firing skills.
a. Operation and Function Modification. Handling the rifle, performing operationand function checks, loading and unloading, and cleaning are affected by MOPP equipment.Movements are slowed, tasks take longer to complete and often require more effort. Visionis impaired, and care is needed to avoid damaging MOPP equipment and possible exposure
FM 3-22.9
7-19
to lethal agents. Because of the great differences between no MOPP and MOPP4, soldiersmust be trained in all aspects of operation and maintenance of the weapon while practicingat the highest MOPP level. Only through repeated training and practice can the soldier beexpected to perform tasks efficiently.
b. Immediate Action. Under normal conditions a soldier should be able to clear astoppage in three to five seconds. Under full MOPP, however, this may take as long as tenseconds to successfully complete. Dry-fire practice under these conditions is necessary toreduce time and streamline actions. Hood or mask and gloves must be worn. Care must betaken not to snag or damage the gloves or dislodge the hood or mask during movements.Applying immediate action to a variety of stoppages during dry fire must be practiced usingdummy or blank ammunition until such actions can be performed by instinct.
(1) Vision is limited to what can be seen through the mask lenses or faceplate. Peripheralvision is severely restricted. The lenses or faceplate may be scratched or partly fogged,further restricting vision.
NOTE: Soldiers requiring corrective lenses must be issued insert lenses before training.
(2) Scanning movement may be restricted by the hood or mask. Any of these factorscould adversely affect the soldier’s ability to quickly and accurately detect targets.Additional skill practice should be conducted.
c. Marksmanship Fundamentals. Although the four marksmanship fundamentalsremain valid during MOPP firing, some modifications may be needed to accommodate theequipment.
(1) Steady Position. Due to the added bulk of the over garment, firing positions mayneed adjustment for stability and comfort. Dry and live firing while standing, crouching, orsquatting may be necessary to reduce bodily contact with contaminated ground or foliage.A consistent spot or stock weld is difficult to maintain due to the shape of the protectivemask. This requires the firer to hold his head in an awkward position to place the eye behindthe sight.
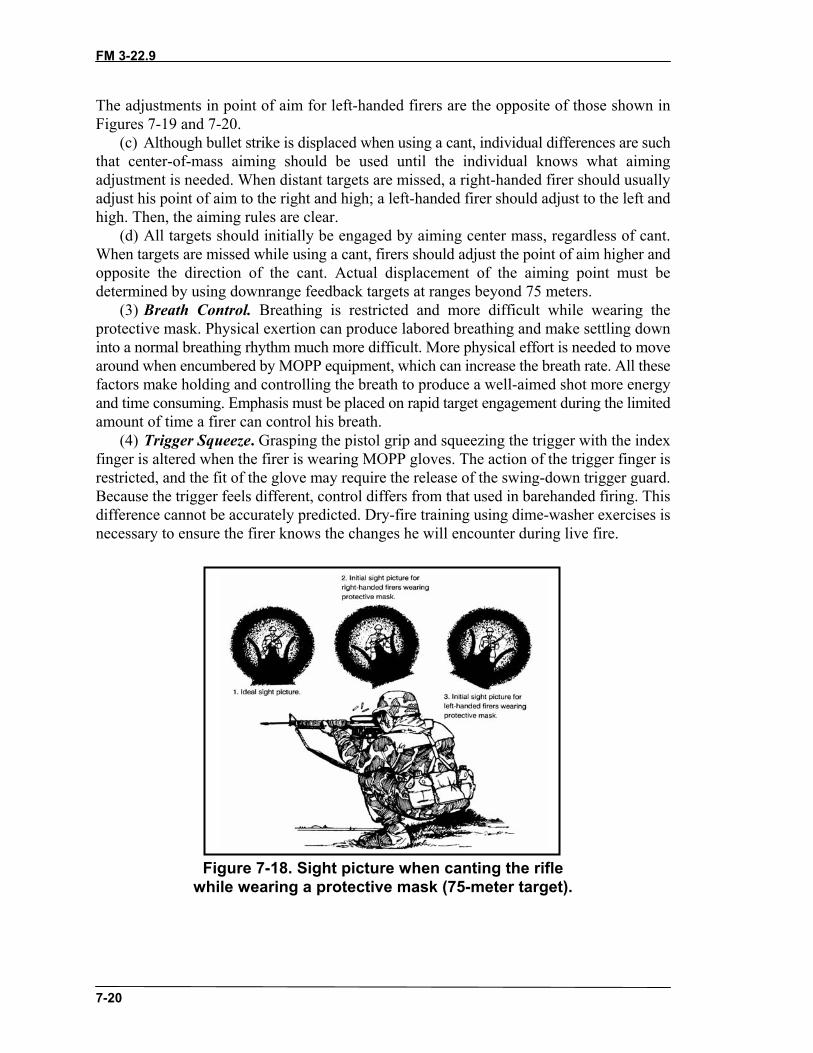
(2) Aiming. Wearing a protective mask may force firers to rotate (cant) the rifle to seethrough the rear aperture. The weapon should be rotated the least amount possible to seethrough and line up the sights. The center tip of the front sight post should be placed on theideal aiming point. This ideal aiming procedure (Figure 7-18, page 7-20) should be the initialprocedure taught and practiced.
(a) If this cannot be achieved, a canted sight picture may be practiced. The normalamount of cant needed by most firers to properly see through the sights has a limitedinfluence on rounds fired at ranges between 75 meters or less.
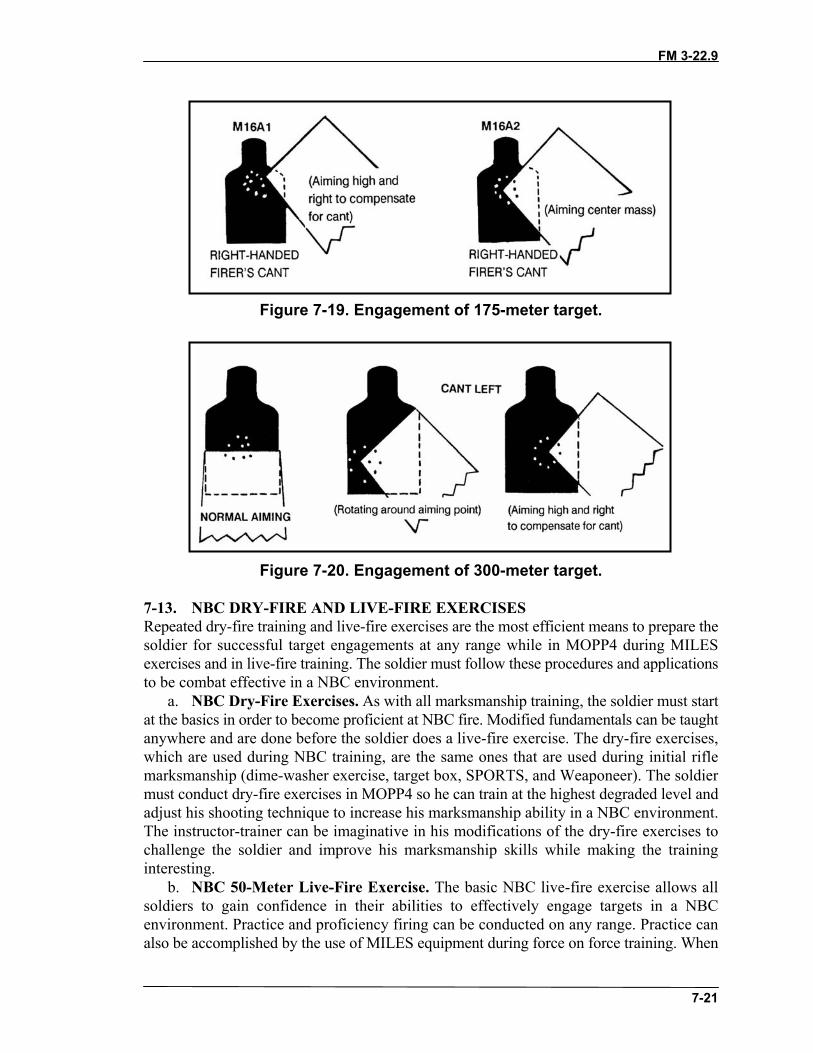
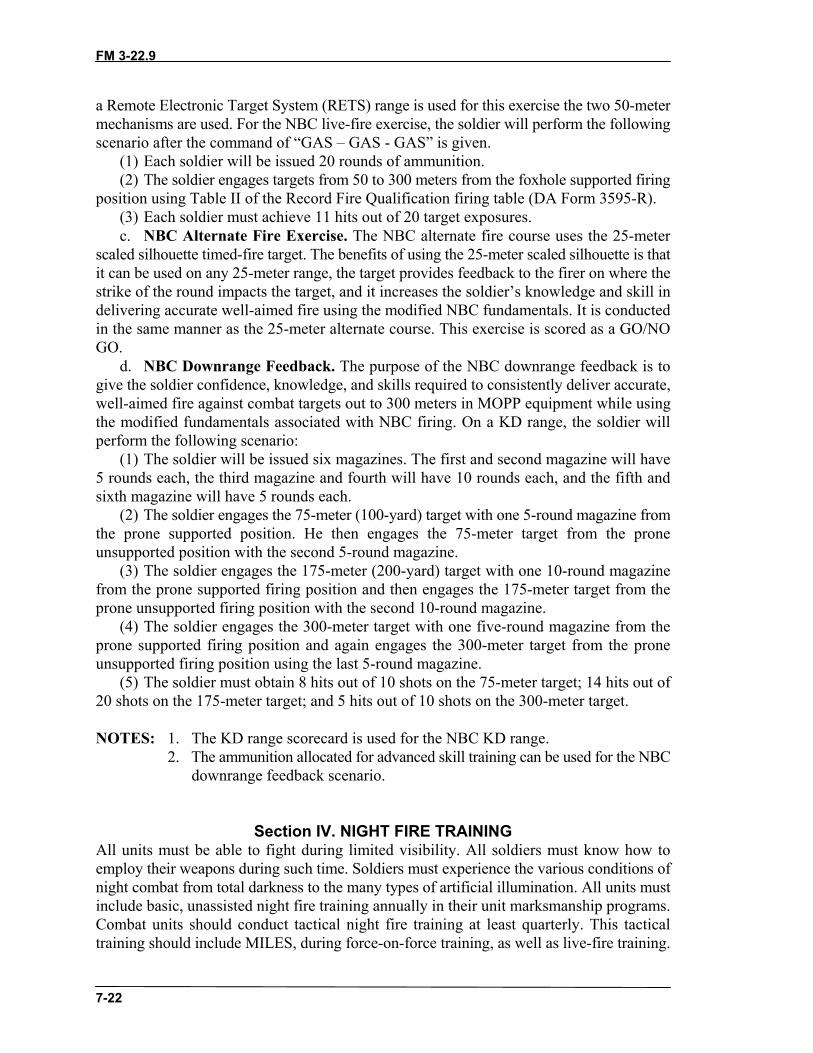
(b) Rifle ballistics causes the strike of the bullet to impact low in the direction of the cant(when a cant is used) at longer ranges. Due to this shift in bullet strike and the manyindividual differences in sight alignment when wearing a protective mask, it is important toconduct downrange feedback training at ranges beyond 75 meters on known-distance ranges.This allows soldiers to determine what aiming adjustments are needed to achieve centertarget hits. Figure 7-19, page 7-21, shows what might be expected for a right-handed firerengaging a target at 175 meters with no cant and a certain amount of cant, and theadjustment in point of aim needed to move the bullet strike to the center of the target. Figure7-20, shows what might be expected for a right-handed firer engaging a 300-meter target.
FM 3-22.9
7-20
The adjustments in point of aim for left-handed firers are the opposite of those shown inFigures 7-19 and 7-20.
(c) Although bullet strike is displaced when using a cant, individual differences are suchthat center-of-mass aiming should be used until the individual knows what aimingadjustment is needed. When distant targets are missed, a right-handed firer should usuallyadjust his point of aim to the right and high; a left-handed firer should adjust to the left andhigh. Then, the aiming rules are clear.
(d) All targets should initially be engaged by aiming center mass, regardless of cant.When targets are missed while using a cant, firers should adjust the point of aim higher andopposite the direction of the cant. Actual displacement of the aiming point must bedetermined by using downrange feedback targets at ranges beyond 75 meters.
(3) Breath Control. Breathing is restricted and more difficult while wearing theprotective mask. Physical exertion can produce labored breathing and make settling downinto a normal breathing rhythm much more difficult. More physical effort is needed to movearound when encumbered by MOPP equipment, which can increase the breath rate. All thesefactors make holding and controlling the breath to produce a well-aimed shot more energyand time consuming. Emphasis must be placed on rapid target engagement during the limitedamount of time a firer can control his breath.
(4) Trigger Squeeze. Grasping the pistol grip and squeezing the trigger with the indexfinger is altered when the firer is wearing MOPP gloves. The action of the trigger finger isrestricted, and the fit of the glove may require the release of the swing-down trigger guard.Because the trigger feels different, control differs from that used in barehanded firing. Thisdifference cannot be accurately predicted. Dry-fire training using dime-washer exercises isnecessary to ensure the firer knows the changes he will encounter during live fire.
Figure 7-18. Sight picture when canting the riflewhile wearing a protective mask (75-meter target).
FM 3-22.9
7-21
Figure 7-19. Engagement of 175-meter target.
Figure 7-20. Engagement of 300-meter target.
7-13. NBC DRY-FIRE AND LIVE-FIRE EXERCISESRepeated dry-fire training and live-fire exercises are the most efficient means to prepare thesoldier for successful target engagements at any range while in MOPP4 during MILESexercises and in live-fire training. The soldier must follow these procedures and applicationsto be combat effective in a NBC environment.
a. NBC Dry-Fire Exercises. As with all marksmanship training, the soldier must startat the basics in order to become proficient at NBC fire. Modified fundamentals can be taughtanywhere and are done before the soldier does a live-fire exercise. The dry-fire exercises,which are used during NBC training, are the same ones that are used during initial riflemarksmanship (dime-washer exercise, target box, SPORTS, and Weaponeer). The soldiermust conduct dry-fire exercises in MOPP4 so he can train at the highest degraded level andadjust his shooting technique to increase his marksmanship ability in a NBC environment.The instructor-trainer can be imaginative in his modifications of the dry-fire exercises tochallenge the soldier and improve his marksmanship skills while making the traininginteresting.
b. NBC 50-Meter Live-Fire Exercise. The basic NBC live-fire exercise allows allsoldiers to gain confidence in their abilities to effectively engage targets in a NBCenvironment. Practice and proficiency firing can be conducted on any range. Practice canalso be accomplished by the use of MILES equipment during force on force training. When
FM 3-22.9
7-22
a Remote Electronic Target System (RETS) range is used for this exercise the two 50-metermechanisms are used. For the NBC live-fire exercise, the soldier will perform the followingscenario after the command of “GAS – GAS - GAS” is given.
(1) Each soldier will be issued 20 rounds of ammunition.(2) The soldier engages targets from 50 to 300 meters from the foxhole supported firing
position using Table II of the Record Fire Qualification firing table (DA Form 3595-R).(3) Each soldier must achieve 11 hits out of 20 target exposures.c. NBC Alternate Fire Exercise. The NBC alternate fire course uses the 25-meter
scaled silhouette timed-fire target. The benefits of using the 25-meter scaled silhouette is thatit can be used on any 25-meter range, the target provides feedback to the firer on where thestrike of the round impacts the target, and it increases the soldier’s knowledge and skill indelivering accurate well-aimed fire using the modified NBC fundamentals. It is conductedin the same manner as the 25-meter alternate course. This exercise is scored as a GO/NOGO.
d. NBC Downrange Feedback. The purpose of the NBC downrange feedback is togive the soldier confidence, knowledge, and skills required to consistently deliver accurate,well-aimed fire against combat targets out to 300 meters in MOPP equipment while usingthe modified fundamentals associated with NBC firing. On a KD range, the soldier willperform the following scenario:
(1) The soldier will be issued six magazines. The first and second magazine will have5 rounds each, the third magazine and fourth will have 10 rounds each, and the fifth andsixth magazine will have 5 rounds each.
(2) The soldier engages the 75-meter (100-yard) target with one 5-round magazine fromthe prone supported position. He then engages the 75-meter target from the proneunsupported position with the second 5-round magazine.
(3) The soldier engages the 175-meter (200-yard) target with one 10-round magazinefrom the prone supported firing position and then engages the 175-meter target from theprone unsupported firing position with the second 10-round magazine.
(4) The soldier engages the 300-meter target with one five-round magazine from theprone supported firing position and again engages the 300-meter target from the proneunsupported firing position using the last 5-round magazine.
(5) The soldier must obtain 8 hits out of 10 shots on the 75-meter target; 14 hits out of20 shots on the 175-meter target; and 5 hits out of 10 shots on the 300-meter target.
NOTES: 1. The KD range scorecard is used for the NBC KD range.2. The ammunition allocated for advanced skill training can be used for the NBC
downrange feedback scenario.
Section IV. NIGHT FIRE TRAININGAll units must be able to fight during limited visibility. All soldiers must know how toemploy their weapons during such time. Soldiers must experience the various conditions ofnight combat from total darkness to the many types of artificial illumination. All units mustinclude basic, unassisted night fire training annually in their unit marksmanship programs.Combat units should conduct tactical night fire training at least quarterly. This tacticaltraining should include MILES, during force-on-force training, as well as live-fire training.
FM 3-22.9
7-23
The many effects darkness has on night firing are discussed in this section. This section willprovide units guidance on training soldiers to be effective in total darkness without usingiron sights and using iron sights during limited visibility. (Figure 7-21 shows the currenttraining program for unassisted night fire training.) (See Appendix H for more detailedinformation on night fighting.)
Instructional Intent:The primary training objective of unassisted night fire is to develop the soldier’s confidence in hisability to hit targets when he cannot see through his rifle sights and does not have night visioncapability.Special Instructions:Ensure M16A1 rear sight is set on the unmarked aperture.Ensure M16A2/A3/A4 and M4 series weapon’s rear sight is set on the 0-2 aperture.Soldier is given two 15-round magazines with tracer/ ball ammunition (10 rounds ball/ 5 roundstracer) in each magazine.Soldier engages the 50-meter E-type silhouette target from the foxhole supported fighting positionwith one magazine.Soldier engages the 50-meter E-type silhouette target from the prone unsupported fighting positionwith the second magazine.This is a GO/ NO GO exercise.Observables:Soldier achieves 7hits out of 30 target exposures.
Figure 7-21. Unassisted night fire training program.
7-14. UNASSISTED NIGHT FIRE TRAININGTrainers must consider the impact of limited visibility on the soldier’s ability to properlyapply the fundamentals of marksmanship and combat firing skills. During limited visibility,a firer cannot generally use his sights in most situations and without artificial illuminationthe sights block his field of vision. These fundamentals and skills include:
a. Operation and Maintenance of the Weapon. Handling the weapon, performingoperation and function checks, loading and unloading, and maintenance are all affected bynighttime conditions. Movements are slower, tasks take longer to complete, vision isimpaired, and equipment is more easily misplaced or lost. Because combat conditions andenforcement of noise and light discipline restrict the use of illumination, soldiers must betrained to operate, service, and clean their weapons in total darkness. Although initialpractice of these tasks should occur during daylight to facilitate control and error correction,repeated practice during actual nighttime conditions should be integrated with other training.Only through repeated practice and training can the soldier be expected to perform all tasksefficiently.
b. Immediate Action. Under normal conditions, a soldier should clear a stoppage inthree to five seconds. After dark this task usually takes longer. Identifying the problem maybe difficult and frustrating for the soldier. A hands-only technique of identifying a stoppagemust be taught and practiced. Clearing the stoppage using few or no visual indicators mustalso be included. The firer must practice applying immediate action with his eyes closed.Dry-fire practice (applying SPORTS) using dummy or blank rounds under these conditionsis necessary to reduce time and build confidence. Training should be practiced first duringdaylight for better control and error correction by the trainer. Once the soldier is confident
FM 3-22.9
7-24
in applying immediate action in darkness, he can perform such actions rapidly on thefiring line.
c. Marksmanship Fundamentals. The four marksmanship fundamentals apply to nightfiring. Some modifications are needed depending on the conditions. The firer must still placeeffective fire on the targets or target areas that have been detected.
(1) Steady Position. When the firer is firing unassisted, changes in his head position andor stock weld will be necessary, especially when using weapon-target alignment techniques.His head is positioned high so that he is aligning his weapon on the target and looking justover the iron sights. His cheek should remain in contact with the stock. Repeated dry-firepractice, followed by live-fire training, is necessary to learn and refine these modificationsand still achieve the steadiest position.
(2) Aiming. Modifications to the aiming process vary. When firing unassisted, the firer’soff-center vision is used instead of pinpoint focus. Both eyes are open to gather themaximum available light, and are focused down range.
(3) Breathing. This fundamental is not affected by unassisted night fire conditions.(4) Trigger Squeeze. This fundamental is not affected by unassisted night fire conditions.
The objective is to not disrupt alignment of the weapon with the target.d. Unassisted Night Firing Positions. The recommended firing position for use during
limited visibility is the supported firing position. This position, when used during limitedvisibility, differs slightly from the supported position taught in earlier periods of instructionbecause the firer cannot use his sights during limited visibility; in fact, the sights block hisfield of vision. To effectively engage targets during limited visibility, the firer assumes asupported firing position, establishes a raised stock weld (looks 2 to 3 inches above thesights level with the barrel), points the weapon at the target, and fires in the semiautomaticmode. To obtain optimum results, the firer should keep his eyes open, and his head, arms,and rifle should move as one unit.
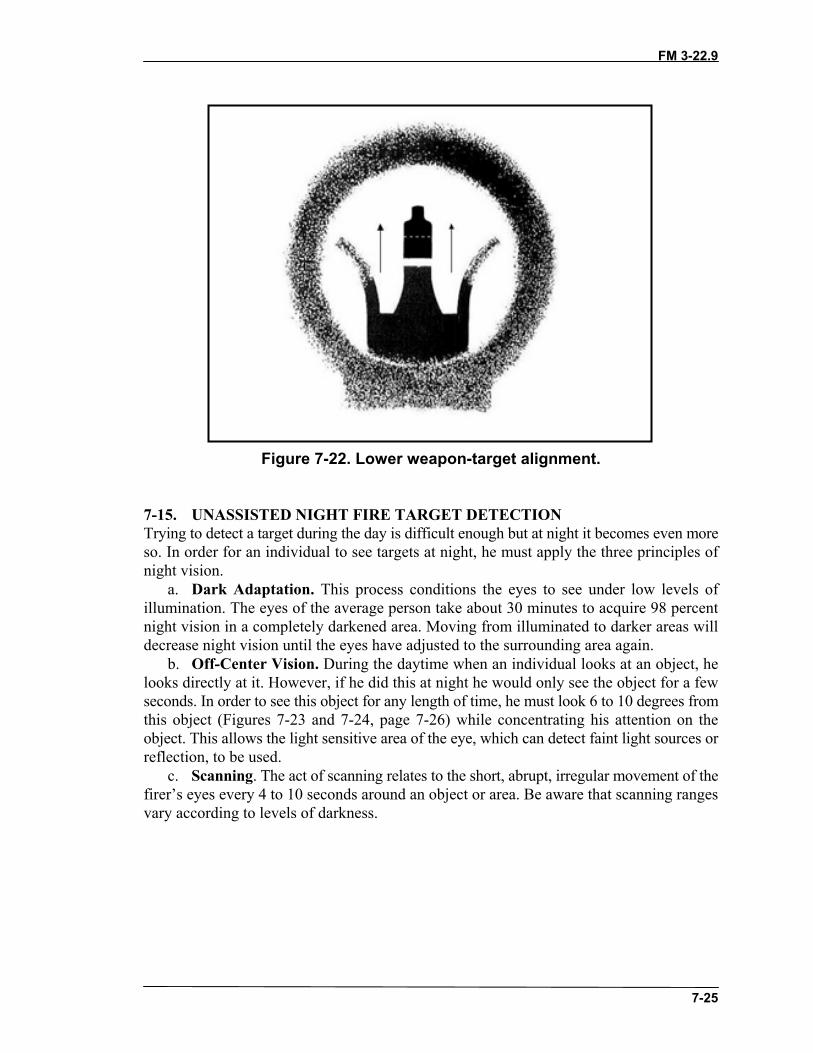
e. Unassisted Night Fire. The firer must detect and engage targets without artificialillumination or night vision devices. Potential target areas are scanned. When the target isdetected, the firer should engage it using a modified quick-fire position. The firer should takea few seconds to improve weapon-target alignment by pointing slightly low to compensatefor the usual tendency to fire high (Figure 7-22). Tracer ammunition may provide feedbackon the line of trajectory and facilitate any adjustments in weapon-target alignment.
FM 3-22.9
7-25
Figure 7-22. Lower weapon-target alignment.
7-15. UNASSISTED NIGHT FIRE TARGET DETECTIONTrying to detect a target during the day is difficult enough but at night it becomes even moreso. In order for an individual to see targets at night, he must apply the three principles ofnight vision.
a. Dark Adaptation. This process conditions the eyes to see under low levels ofillumination. The eyes of the average person take about 30 minutes to acquire 98 percentnight vision in a completely darkened area. Moving from illuminated to darker areas willdecrease night vision until the eyes have adjusted to the surrounding area again.
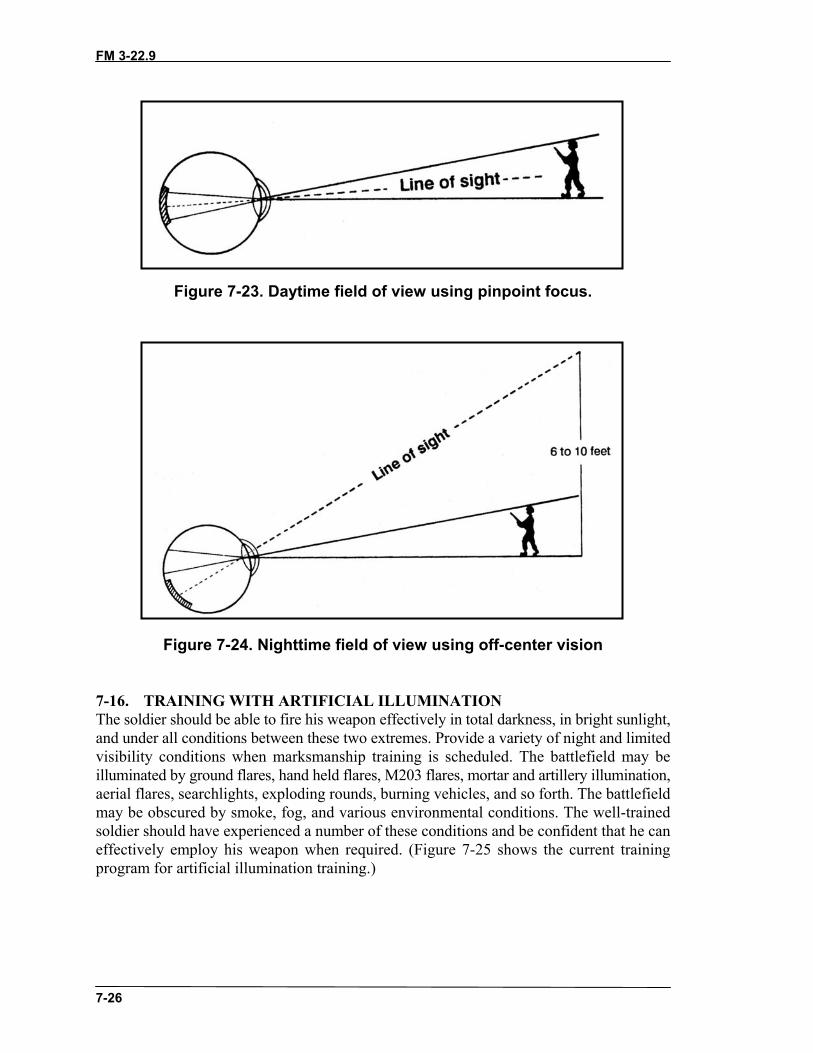
b. Off-Center Vision. During the daytime when an individual looks at an object, helooks directly at it. However, if he did this at night he would only see the object for a fewseconds. In order to see this object for any length of time, he must look 6 to 10 degrees fromthis object (Figures 7-23 and 7-24, page 7-26) while concentrating his attention on theobject. This allows the light sensitive area of the eye, which can detect faint light sources orreflection, to be used.
c. Scanning. The act of scanning relates to the short, abrupt, irregular movement of thefirer’s eyes every 4 to 10 seconds around an object or area. Be aware that scanning rangesvary according to levels of darkness.
FM 3-22.9
7-26
Figure 7-23. Daytime field of view using pinpoint focus.
Figure 7-24. Nighttime field of view using off-center vision
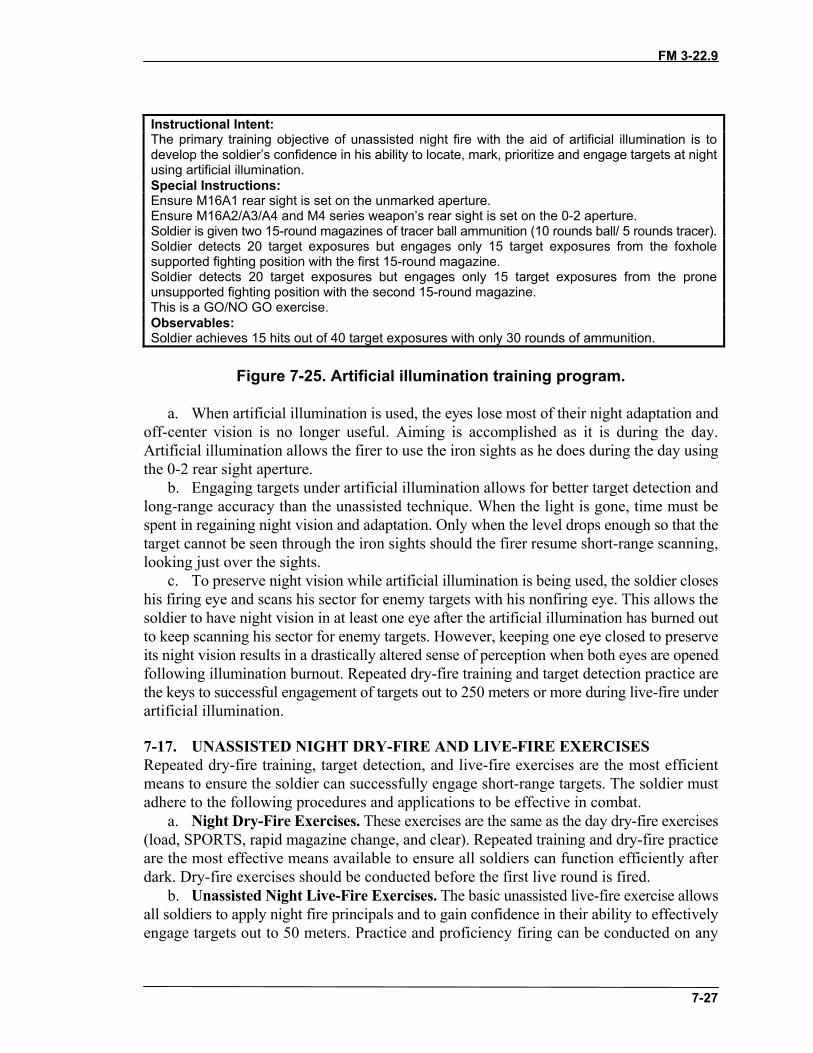
7-16. TRAINING WITH ARTIFICIAL ILLUMINATIONThe soldier should be able to fire his weapon effectively in total darkness, in bright sunlight,and under all conditions between these two extremes. Provide a variety of night and limitedvisibility conditions when marksmanship training is scheduled. The battlefield may beilluminated by ground flares, hand held flares, M203 flares, mortar and artillery illumination,aerial flares, searchlights, exploding rounds, burning vehicles, and so forth. The battlefieldmay be obscured by smoke, fog, and various environmental conditions. The well-trainedsoldier should have experienced a number of these conditions and be confident that he caneffectively employ his weapon when required. (Figure 7-25 shows the current trainingprogram for artificial illumination training.)
FM 3-22.9
7-27
Instructional Intent:The primary training objective of unassisted night fire with the aid of artificial illumination is todevelop the soldier’s confidence in his ability to locate, mark, prioritize and engage targets at nightusing artificial illumination.Special Instructions:Ensure M16A1 rear sight is set on the unmarked aperture.Ensure M16A2/A3/A4 and M4 series weapon’s rear sight is set on the 0-2 aperture.Soldier is given two 15-round magazines of tracer ball ammunition (10 rounds ball/ 5 rounds tracer).Soldier detects 20 target exposures but engages only 15 target exposures from the foxholesupported fighting position with the first 15-round magazine.Soldier detects 20 target exposures but engages only 15 target exposures from the proneunsupported fighting position with the second 15-round magazine.This is a GO/NO GO exercise.Observables:Soldier achieves 15 hits out of 40 target exposures with only 30 rounds of ammunition.
Figure 7-25. Artificial illumination training program.
a. When artificial illumination is used, the eyes lose most of their night adaptation andoff-center vision is no longer useful. Aiming is accomplished as it is during the day.Artificial illumination allows the firer to use the iron sights as he does during the day usingthe 0-2 rear sight aperture.
b. Engaging targets under artificial illumination allows for better target detection andlong-range accuracy than the unassisted technique. When the light is gone, time must bespent in regaining night vision and adaptation. Only when the level drops enough so that thetarget cannot be seen through the iron sights should the firer resume short-range scanning,looking just over the sights.
c. To preserve night vision while artificial illumination is being used, the soldier closeshis firing eye and scans his sector for enemy targets with his nonfiring eye. This allows thesoldier to have night vision in at least one eye after the artificial illumination has burned outto keep scanning his sector for enemy targets. However, keeping one eye closed to preserveits night vision results in a drastically altered sense of perception when both eyes are openedfollowing illumination burnout. Repeated dry-fire training and target detection practice arethe keys to successful engagement of targets out to 250 meters or more during live-fire underartificial illumination.
7-17. UNASSISTED NIGHT DRY-FIRE AND LIVE-FIRE EXERCISESRepeated dry-fire training, target detection, and live-fire exercises are the most efficientmeans to ensure the soldier can successfully engage short-range targets. The soldier mustadhere to the following procedures and applications to be effective in combat.
a. Night Dry-Fire Exercises. These exercises are the same as the day dry-fire exercises(load, SPORTS, rapid magazine change, and clear). Repeated training and dry-fire practiceare the most effective means available to ensure all soldiers can function efficiently afterdark. Dry-fire exercises should be conducted before the first live round is fired.
b. Unassisted Night Live-Fire Exercises. The basic unassisted live-fire exercise allowsall soldiers to apply night fire principals and to gain confidence in their ability to effectivelyengage targets out to 50 meters. Practice and proficiency firing can be conducted on any
FM 3-22.9
7-28
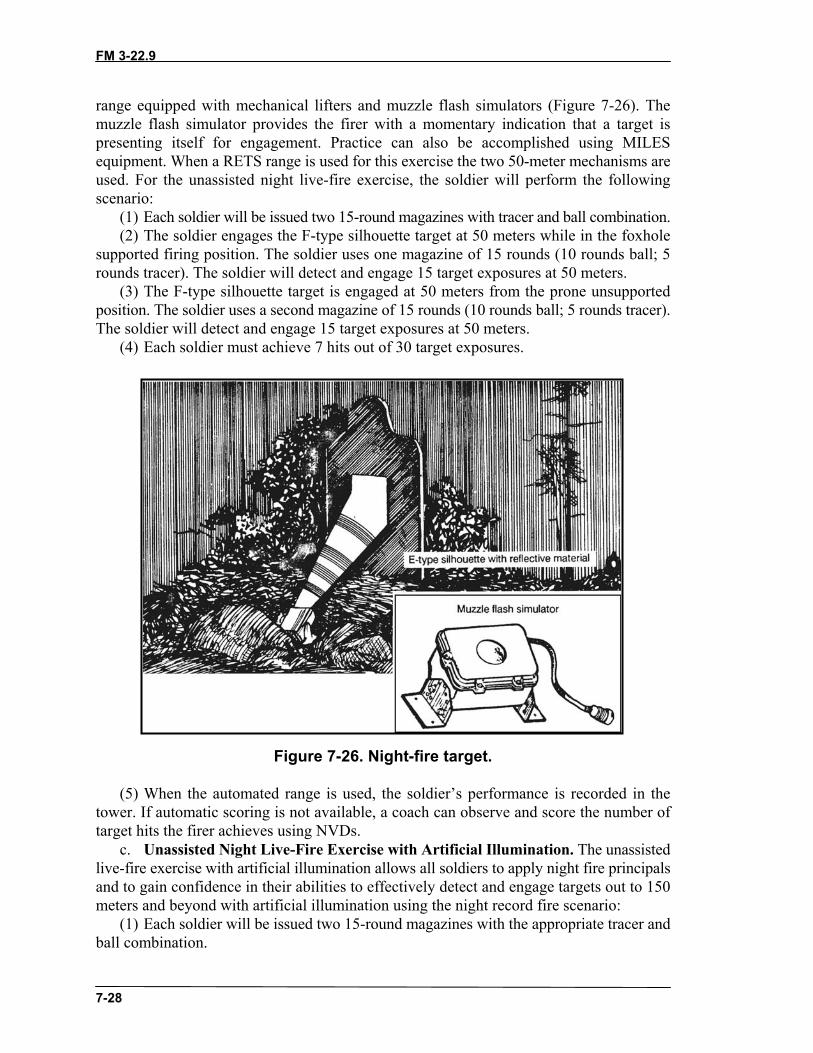
range equipped with mechanical lifters and muzzle flash simulators (Figure 7-26). Themuzzle flash simulator provides the firer with a momentary indication that a target ispresenting itself for engagement. Practice can also be accomplished using MILESequipment. When a RETS range is used for this exercise the two 50-meter mechanisms areused. For the unassisted night live-fire exercise, the soldier will perform the followingscenario:
(1) Each soldier will be issued two 15-round magazines with tracer and ball combination.(2) The soldier engages the F-type silhouette target at 50 meters while in the foxhole
supported firing position. The soldier uses one magazine of 15 rounds (10 rounds ball; 5rounds tracer). The soldier will detect and engage 15 target exposures at 50 meters.
(3) The F-type silhouette target is engaged at 50 meters from the prone unsupportedposition. The soldier uses a second magazine of 15 rounds (10 rounds ball; 5 rounds tracer).The soldier will detect and engage 15 target exposures at 50 meters.
(4) Each soldier must achieve 7 hits out of 30 target exposures.
Figure 7-26. Night-fire target.
(5) When the automated range is used, the soldier’s performance is recorded in thetower. If automatic scoring is not available, a coach can observe and score the number oftarget hits the firer achieves using NVDs.
c. Unassisted Night Live-Fire Exercise with Artificial Illumination. The unassistedlive-fire exercise with artificial illumination allows all soldiers to apply night fire principalsand to gain confidence in their abilities to effectively detect and engage targets out to 150meters and beyond with artificial illumination using the night record fire scenario:
(1) Each soldier will be issued two 15-round magazines with the appropriate tracer andball combination.
FM 3-22.9
7-29
(2) During night, each soldier will detect and or engage 20 E-type silhouette targetexposures from 50 to 250 meters with one magazine of 15 rounds (10 rounds ball; 5 roundstracer) while in the foxhole supported firing position.
(3) During night, each soldier will detect and or engage 20 E-type silhouette targetexposures from 50 to 250 meters with the second magazine of 15 rounds (10 rounds ball; 5rounds tracer) while in the prone unsupported firing position.
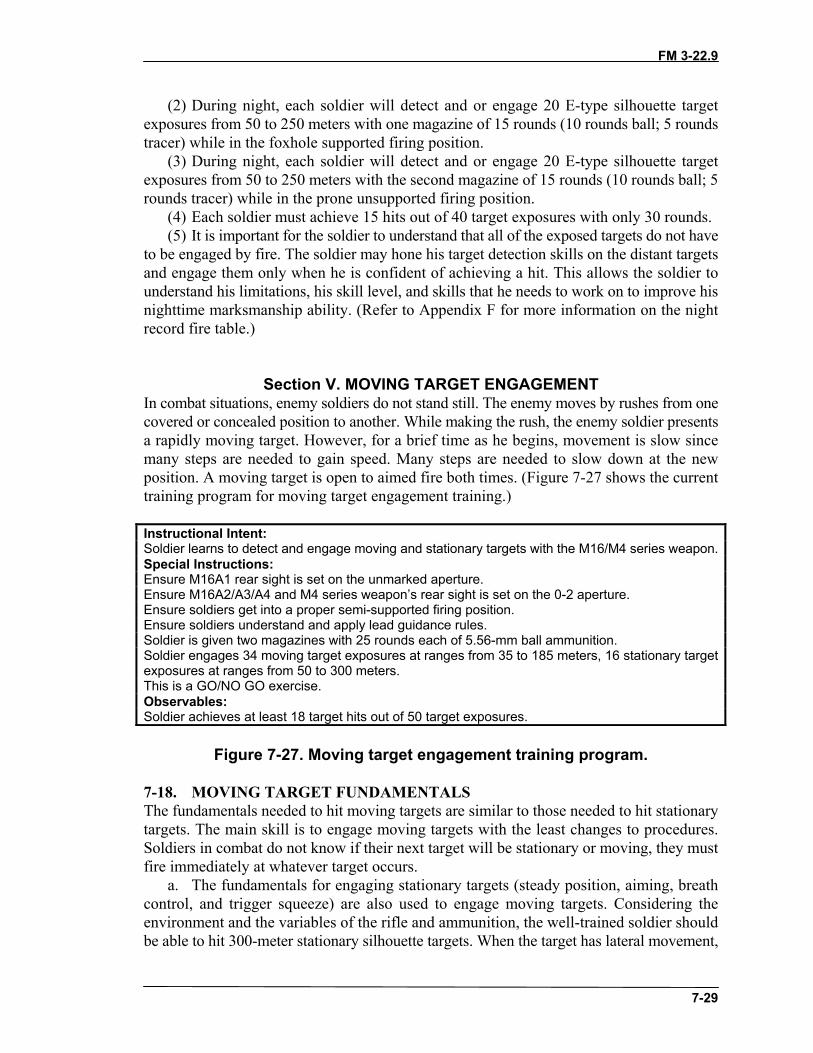
(4) Each soldier must achieve 15 hits out of 40 target exposures with only 30 rounds.(5) It is important for the soldier to understand that all of the exposed targets do not have
to be engaged by fire. The soldier may hone his target detection skills on the distant targetsand engage them only when he is confident of achieving a hit. This allows the soldier tounderstand his limitations, his skill level, and skills that he needs to work on to improve hisnighttime marksmanship ability. (Refer to Appendix F for more information on the nightrecord fire table.)
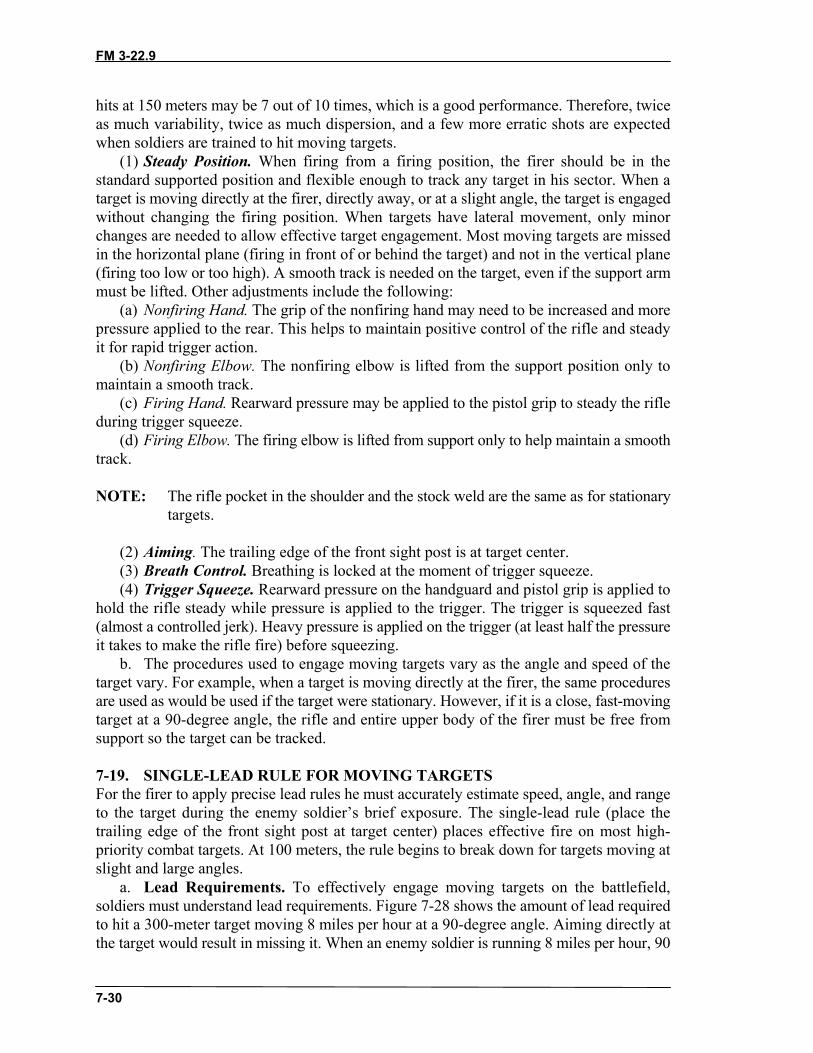
Section V. MOVING TARGET ENGAGEMENTIn combat situations, enemy soldiers do not stand still. The enemy moves by rushes from onecovered or concealed position to another. While making the rush, the enemy soldier presentsa rapidly moving target. However, for a brief time as he begins, movement is slow sincemany steps are needed to gain speed. Many steps are needed to slow down at the newposition. A moving target is open to aimed fire both times. (Figure 7-27 shows the currenttraining program for moving target engagement training.)
Instructional Intent:Soldier learns to detect and engage moving and stationary targets with the M16/M4 series weapon.Special Instructions:Ensure M16A1 rear sight is set on the unmarked aperture.Ensure M16A2/A3/A4 and M4 series weapon’s rear sight is set on the 0-2 aperture.Ensure soldiers get into a proper semi-supported firing position.Ensure soldiers understand and apply lead guidance rules.Soldier is given two magazines with 25 rounds each of 5.56-mm ball ammunition.Soldier engages 34 moving target exposures at ranges from 35 to 185 meters, 16 stationary targetexposures at ranges from 50 to 300 meters.This is a GO/NO GO exercise.Observables:Soldier achieves at least 18 target hits out of 50 target exposures.
Figure 7-27. Moving target engagement training program.
7-18. MOVING TARGET FUNDAMENTALSThe fundamentals needed to hit moving targets are similar to those needed to hit stationarytargets. The main skill is to engage moving targets with the least changes to procedures.Soldiers in combat do not know if their next target will be stationary or moving, they mustfire immediately at whatever target occurs.
a. The fundamentals for engaging stationary targets (steady position, aiming, breathcontrol, and trigger squeeze) are also used to engage moving targets. Considering theenvironment and the variables of the rifle and ammunition, the well-trained soldier shouldbe able to hit 300-meter stationary silhouette targets. When the target has lateral movement,
FM 3-22.9
7-30
hits at 150 meters may be 7 out of 10 times, which is a good performance. Therefore, twiceas much variability, twice as much dispersion, and a few more erratic shots are expectedwhen soldiers are trained to hit moving targets.
(1) Steady Position. When firing from a firing position, the firer should be in thestandard supported position and flexible enough to track any target in his sector. When atarget is moving directly at the firer, directly away, or at a slight angle, the target is engagedwithout changing the firing position. When targets have lateral movement, only minorchanges are needed to allow effective target engagement. Most moving targets are missedin the horizontal plane (firing in front of or behind the target) and not in the vertical plane(firing too low or too high). A smooth track is needed on the target, even if the support armmust be lifted. Other adjustments include the following:
(a) Nonfiring Hand. The grip of the nonfiring hand may need to be increased and morepressure applied to the rear. This helps to maintain positive control of the rifle and steadyit for rapid trigger action.
(b) Nonfiring Elbow. The nonfiring elbow is lifted from the support position only tomaintain a smooth track.
(c) Firing Hand. Rearward pressure may be applied to the pistol grip to steady the rifleduring trigger squeeze.
(d) Firing Elbow. The firing elbow is lifted from support only to help maintain a smoothtrack.
NOTE: The rifle pocket in the shoulder and the stock weld are the same as for stationarytargets.
(2) Aiming. The trailing edge of the front sight post is at target center.(3) Breath Control. Breathing is locked at the moment of trigger squeeze.(4) Trigger Squeeze. Rearward pressure on the handguard and pistol grip is applied to
hold the rifle steady while pressure is applied to the trigger. The trigger is squeezed fast(almost a controlled jerk). Heavy pressure is applied on the trigger (at least half the pressureit takes to make the rifle fire) before squeezing.
b. The procedures used to engage moving targets vary as the angle and speed of thetarget vary. For example, when a target is moving directly at the firer, the same proceduresare used as would be used if the target were stationary. However, if it is a close, fast-movingtarget at a 90-degree angle, the rifle and entire upper body of the firer must be free fromsupport so the target can be tracked.
7-19. SINGLE-LEAD RULE FOR MOVING TARGETSFor the firer to apply precise lead rules he must accurately estimate speed, angle, and rangeto the target during the enemy soldier’s brief exposure. The single-lead rule (place thetrailing edge of the front sight post at target center) places effective fire on most high-priority combat targets. At 100 meters, the rule begins to break down for targets moving atslight and large angles.
a. Lead Requirements. To effectively engage moving targets on the battlefield,soldiers must understand lead requirements. Figure 7-28 shows the amount of lead requiredto hit a 300-meter target moving 8 miles per hour at a 90-degree angle. Aiming directly atthe target would result in missing it. When an enemy soldier is running 8 miles per hour, 90
FM 3-22.9
7-31
degrees to the firer, and at a range of 300 meters, he covers 4 1/2 feet while the bullet istraveling toward him. To get a hit, the firer must aim and fire at position D when the enemyis at position A. This indicates the need for target lead and for marksmanship trainers toknow bullet speed and how it relates to the range, angle, and speed of the target. Soldiersmust understand that targets moving fast and laterally must be led by some distance if theyare to be hit.
Figure 7-28. Lead requirement based on distance and approach angle.
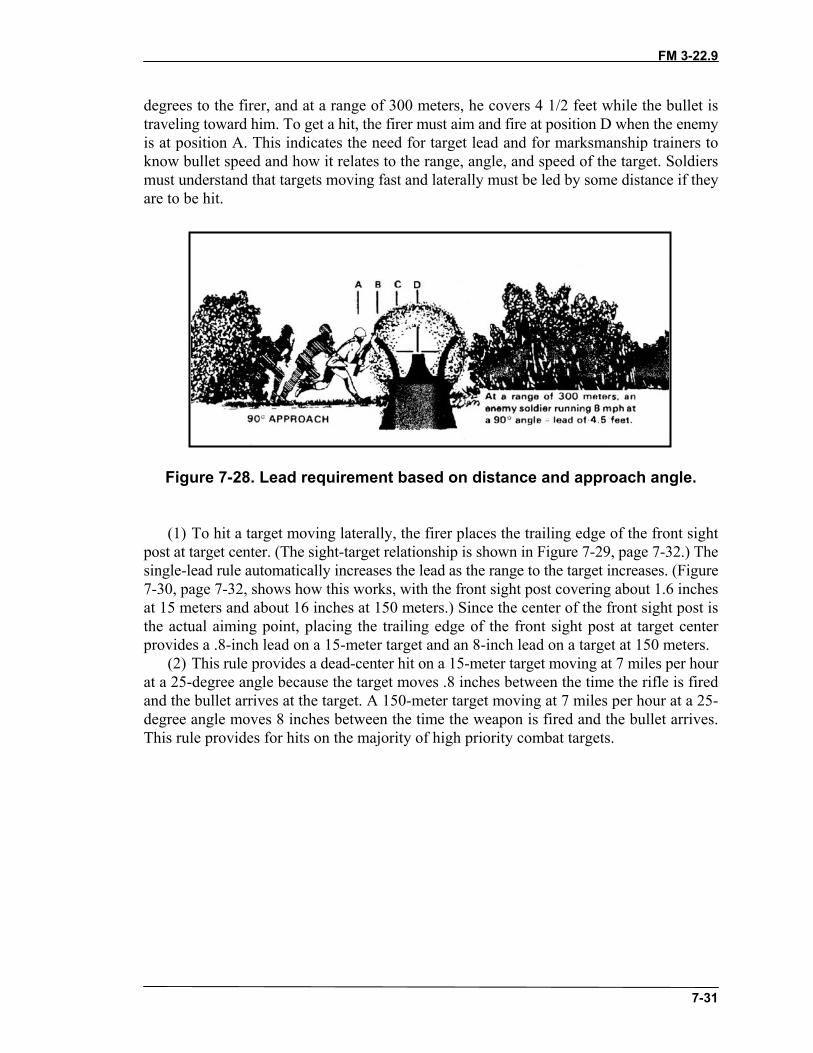
(1) To hit a target moving laterally, the firer places the trailing edge of the front sightpost at target center. (The sight-target relationship is shown in Figure 7-29, page 7-32.) Thesingle-lead rule automatically increases the lead as the range to the target increases. (Figure7-30, page 7-32, shows how this works, with the front sight post covering about 1.6 inchesat 15 meters and about 16 inches at 150 meters.) Since the center of the front sight post isthe actual aiming point, placing the trailing edge of the front sight post at target centerprovides a .8-inch lead on a 15-meter target and an 8-inch lead on a target at 150 meters.
(2) This rule provides a dead-center hit on a 15-meter target moving at 7 miles per hourat a 25-degree angle because the target moves .8 inches between the time the rifle is firedand the bullet arrives at the target. A 150-meter target moving at 7 miles per hour at a 25-degree angle moves 8 inches between the time the weapon is fired and the bullet arrives.This rule provides for hits on the majority of high priority combat targets.
FM 3-22.9
7-32
Figure 7-29. Single-lead rule.
Figure 7-30. Lead increasing at greater ranges.
b. Target Speed. Figure 7-31 reflects the differences in lateral speed for various anglesof target movement for a target traveling at 8 miles per hour at a distance of 150 meters fromthe firer. The angle of target movement is the angle between the target-firer line and thetarget’s direction of movement. An 8-mile-per-hour target moves 24 inches during thebullet’s flight time. If the target is moving on a 15-degree angle, it moves 6 inches (theequivalent of 2 miles per hour).
FM 3-22.9
7-33
Figure 7-31. Target movement (distance) at various angles.
(2) Since the target lead is half the perceived width of the front sight post, at 100 metersthe standard sight provides 5.4 inches of lead for the M16A1/2/3/4 and M4 front sights(Table 7-1).
RANGE: 100 METERS(STANDARD SIGHT)
TARGET SPEEDANGLE OF TARGET
MOVEMENT(Degrees)
4 MPH 6 MPH 8 MPH5 +4.9” +4.5” +4.3”10 +4.1” +3.5” +2.7”15 +3.5” +2.5” +1.5”20 +2.8” +1.5” +.2”25 +2.2” +.7” -1.0”30 +1.7” -.2” -2.0”35 +1.1” -1.1” -3.2”40 +.6” -1.9” -4.3”45 -2.7” -5.4”50 -.4” -3.3” -6.2”55 -.8” -4.0” -7.0”60 -1.2” -4.5” -7.7”65 -1.5” -4.9” -8.4”70 -1.7” -5.3” -8.8”75 -1.9” -5.6” -9.2”80 -2.0” -5.9” -9.6”85 -2.1” -5.9” -9.7”90 -2.1” -6.0” -9.8”
NOTE: Plus (+) indicates bullet strike in the direction of movement; minus (-) indicates bullet strikebehind the target center
Table 7-1. Angle of target movement.
FM 3-22.9
7-34
c. Target Distance. The front sight post covers only a small part of close-in targets,providing hits on close targets moving at any angle and any speed. However, if the lead ruleis applied on more distant targets moving at a slight angle—for example, 5 degrees at 100meters—the bullet strikes forward of target center, about 4 inches with standard sights andabout 7 inches with LLLSS sights. Soldiers must be taught to fire at targets as though theyare stationary until lateral movement is observed (15 degrees).
(1) The rule provides for many speed-angle combinations that place the bullet within 2inches of target center (Table 7-1). Since the soldier is expected to fire a 12-inch group onmoving targets at 100 meters, the rule provides for hits on the majority of targets. Even theworst case (a 90-degree target moving at 8 miles per hour) would result in the shot-groupcenter being located 9.8 inches behind target center. If bullets were evenly distributed in a12-inch group, this would result in hitting the target 40 percent of the time.
(2) Soldiers should be taught to increase their lead if they miss the targets, whichincreases their probability of hitting all targets. The amount of additional lead requiredshould be developed through experience with only general guidance provided. For example,if there is much lateral movement of the target and the soldier feels, by applying the lead ruleand firing fundamentals, he has missed the target, he should increase his lead.
(3) The training program must be simple and provide soldiers with only relevantinformation to improve their performance in combat. All soldiers should understand andapply the single-lead rule in the absence of more information. Soldiers should understandthat moving targets coming toward them or on a slight angle (0 to 15 degrees) should beengaged as stationary targets. Information should be presented and practice allowed onapplying additional lead to targets for soldiers who demonstrate this aptitude.
d. Target Angle. The single-lead rule does not apply to targets moving at small andlarge angles (Table 7-2).
(1) A walking enemy soldier at 250 meters is hit dead center when he is moving at 40degrees. Hits can be obtained if he is moving on any angle between 15 and 75 degrees. Whenhe is running, a center hit is obtained when the target is on an angle of 18 degrees; missesoccur when he exceeds an angle of 30 to 35 degrees.
(2) The information provided in Figure 7-31 and Table 7-1 (page 7-33) is designed toenhance instructor understanding so proper concepts are presented during instruction. Forexample, a target at 100 meters moving at 6 miles per hour receives a center hit whenmoving at 29 degrees. When moving at an angle less than 29 degrees, the bullet strikessomewhat in front of target center. When moving at an angle of more than 29 degrees, thebullet strikes somewhat behind target center.
FM 3-22.9
7-35
STANDARD SIGHTRANGE 4 MPH 6 MPH 8 MPH
25M 48° 30° 22°50M 47° 30° 22°100M 45° 29° 21°150M 44° 28° 20°200M 41° 27° 19°250M 40° 26° 18°300M 33° 21° 16°350M 38° 24° 18°400M 35° 22° 17°450M 33° 21° 16°
Table 7-2. Target angle when dead center;hits occur using the single-lead rule.
7-20. MOVING TARGET LIVE-FIRE EXERCISEA firing scenario is engaged once for practice and then for qualification. Soldiers who failto qualify on the initial day of qualification receive only one refire the same day.
7-21. MOVING TARGET TECHNIQUESThe two primary techniques of engaging moving targets are tracking and trapping.
a. Tracking is a more accurate technique of engaging targets by experienced firers. Itinvolves establishing and maintaining an aiming point in relationship to the target andmaintaining that sight picture (moving with the target) while squeezing the trigger. As thetarget moves, this technique puts the firer in position for a second shot if the first one misses.
b. Trapping is the setting up of an aiming point forward of the target and along thetarget path. The trigger is squeezed as the target comes into the sights. This is a techniquethat works on targets with slow lateral movement. It does not require tracking skills. It doesrequire that the firer know precisely when the rifle is going to fire. Some soldiers cansqueeze the trigger without reacting to the rifle firing, and they may fire better using thistechnique. Another technique is to use a modified 25-meter scaled timed-fire silhouette(Figure 7-32, page 7-36). Trainers evaluate performance based on where shot groups areplaced when the lead rule is applied. This target can be used for both the M16-series rifles,and the M4 carbine.
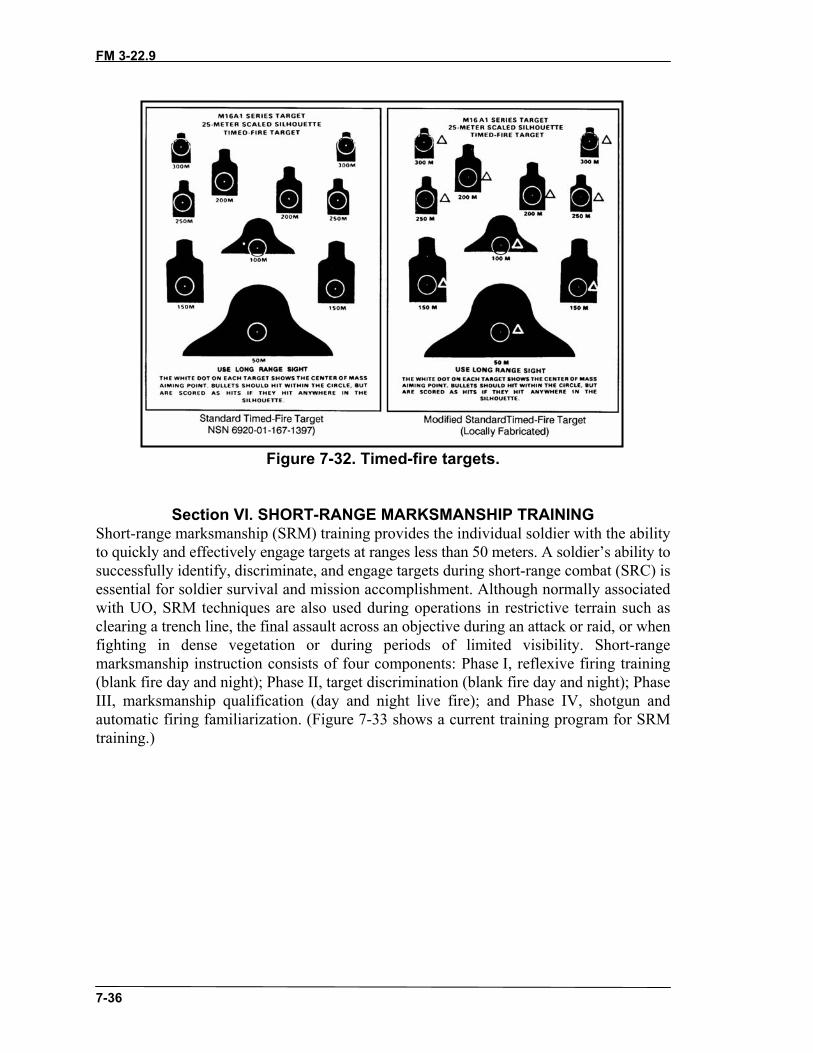
FM 3-22.9
7-36
Figure 7-32. Timed-fire targets.
Section VI. SHORT-RANGE MARKSMANSHIP TRAININGShort-range marksmanship (SRM) training provides the individual soldier with the abilityto quickly and effectively engage targets at ranges less than 50 meters. A soldier’s ability tosuccessfully identify, discriminate, and engage targets during short-range combat (SRC) isessential for soldier survival and mission accomplishment. Although normally associatedwith UO, SRM techniques are also used during operations in restrictive terrain such asclearing a trench line, the final assault across an objective during an attack or raid, or whenfighting in dense vegetation or during periods of limited visibility. Short-rangemarksmanship instruction consists of four components: Phase I, reflexive firing training(blank fire day and night); Phase II, target discrimination (blank fire day and night); PhaseIII, marksmanship qualification (day and night live fire); and Phase IV, shotgun andautomatic firing familiarization. (Figure 7-33 shows a current training program for SRMtraining.)
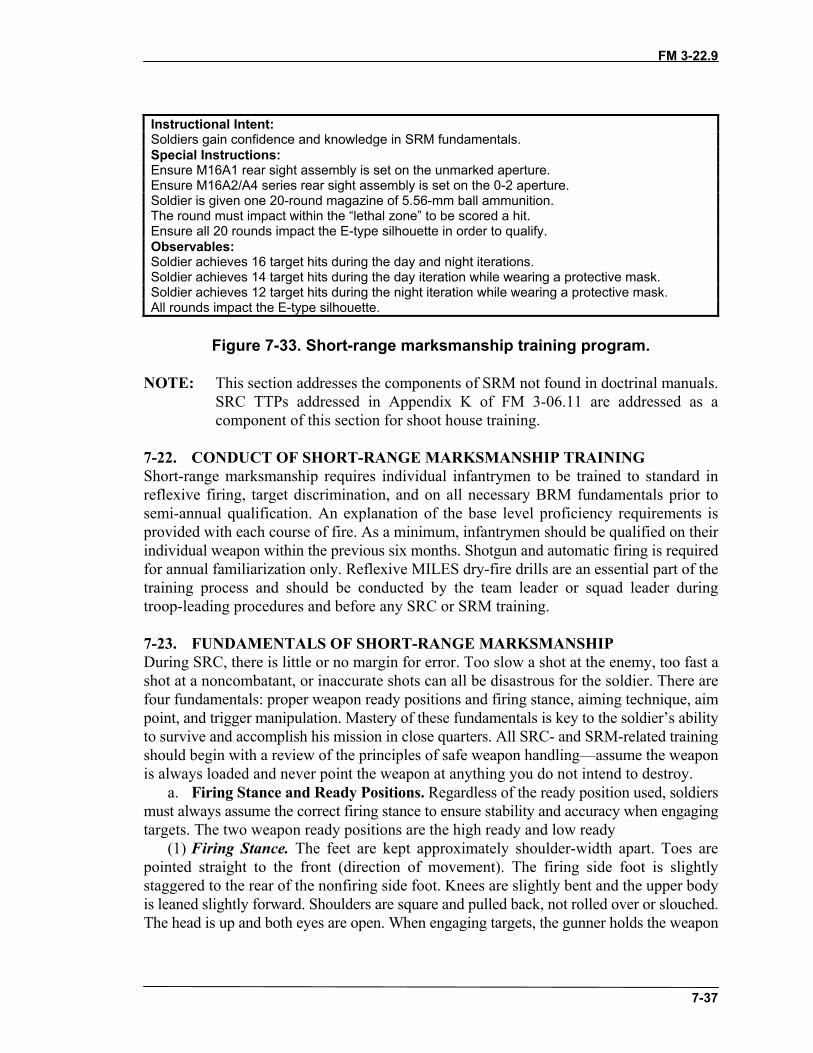
FM 3-22.9
7-37
Instructional Intent:Soldiers gain confidence and knowledge in SRM fundamentals.Special Instructions:Ensure M16A1 rear sight assembly is set on the unmarked aperture.Ensure M16A2/A4 series rear sight assembly is set on the 0-2 aperture.Soldier is given one 20-round magazine of 5.56-mm ball ammunition.The round must impact within the “lethal zone” to be scored a hit.Ensure all 20 rounds impact the E-type silhouette in order to qualify.Observables:Soldier achieves 16 target hits during the day and night iterations.Soldier achieves 14 target hits during the day iteration while wearing a protective mask.Soldier achieves 12 target hits during the night iteration while wearing a protective mask.All rounds impact the E-type silhouette.
Figure 7-33. Short-range marksmanship training program.
NOTE: This section addresses the components of SRM not found in doctrinal manuals.SRC TTPs addressed in Appendix K of FM 3-06.11 are addressed as acomponent of this section for shoot house training.
7-22. CONDUCT OF SHORT-RANGE MARKSMANSHIP TRAININGShort-range marksmanship requires individual infantrymen to be trained to standard inreflexive firing, target discrimination, and on all necessary BRM fundamentals prior tosemi-annual qualification. An explanation of the base level proficiency requirements isprovided with each course of fire. As a minimum, infantrymen should be qualified on theirindividual weapon within the previous six months. Shotgun and automatic firing is requiredfor annual familiarization only. Reflexive MILES dry-fire drills are an essential part of thetraining process and should be conducted by the team leader or squad leader duringtroop-leading procedures and before any SRC or SRM training.
7-23. FUNDAMENTALS OF SHORT-RANGE MARKSMANSHIPDuring SRC, there is little or no margin for error. Too slow a shot at the enemy, too fast ashot at a noncombatant, or inaccurate shots can all be disastrous for the soldier. There arefour fundamentals: proper weapon ready positions and firing stance, aiming technique, aimpoint, and trigger manipulation. Mastery of these fundamentals is key to the soldier’s abilityto survive and accomplish his mission in close quarters. All SRC- and SRM-related trainingshould begin with a review of the principles of safe weapon handling—assume the weaponis always loaded and never point the weapon at anything you do not intend to destroy.
a. Firing Stance and Ready Positions. Regardless of the ready position used, soldiersmust always assume the correct firing stance to ensure stability and accuracy when engagingtargets. The two weapon ready positions are the high ready and low ready
(1) Firing Stance. The feet are kept approximately shoulder-width apart. Toes arepointed straight to the front (direction of movement). The firing side foot is slightlystaggered to the rear of the nonfiring side foot. Knees are slightly bent and the upper bodyis leaned slightly forward. Shoulders are square and pulled back, not rolled over or slouched.The head is up and both eyes are open. When engaging targets, the gunner holds the weapon
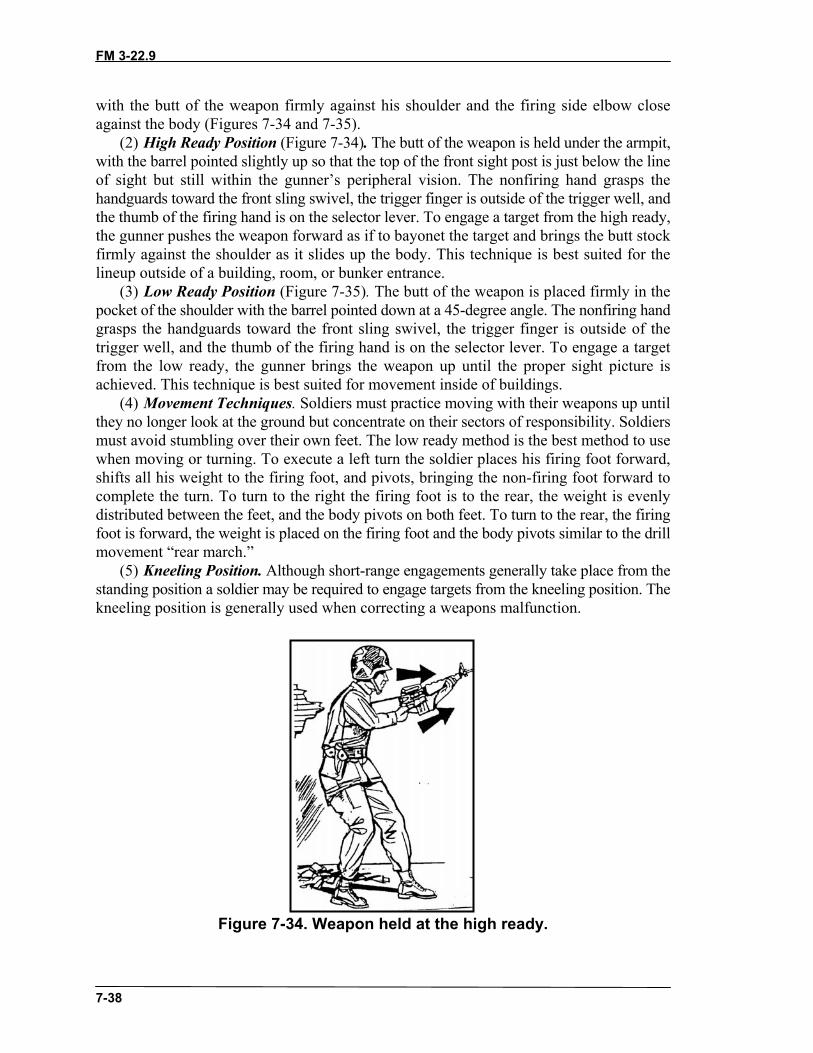
FM 3-22.9
7-38
with the butt of the weapon firmly against his shoulder and the firing side elbow closeagainst the body (Figures 7-34 and 7-35).
(2) High Ready Position (Figure 7-34). The butt of the weapon is held under the armpit,with the barrel pointed slightly up so that the top of the front sight post is just below the lineof sight but still within the gunner’s peripheral vision. The nonfiring hand grasps thehandguards toward the front sling swivel, the trigger finger is outside of the trigger well, andthe thumb of the firing hand is on the selector lever. To engage a target from the high ready,the gunner pushes the weapon forward as if to bayonet the target and brings the butt stockfirmly against the shoulder as it slides up the body. This technique is best suited for thelineup outside of a building, room, or bunker entrance.
(3) Low Ready Position (Figure 7-35). The butt of the weapon is placed firmly in thepocket of the shoulder with the barrel pointed down at a 45-degree angle. The nonfiring handgrasps the handguards toward the front sling swivel, the trigger finger is outside of thetrigger well, and the thumb of the firing hand is on the selector lever. To engage a targetfrom the low ready, the gunner brings the weapon up until the proper sight picture isachieved. This technique is best suited for movement inside of buildings.
(4) Movement Techniques. Soldiers must practice moving with their weapons up untilthey no longer look at the ground but concentrate on their sectors of responsibility. Soldiersmust avoid stumbling over their own feet. The low ready method is the best method to usewhen moving or turning. To execute a left turn the soldier places his firing foot forward,shifts all his weight to the firing foot, and pivots, bringing the non-firing foot forward tocomplete the turn. To turn to the right the firing foot is to the rear, the weight is evenlydistributed between the feet, and the body pivots on both feet. To turn to the rear, the firingfoot is forward, the weight is placed on the firing foot and the body pivots similar to the drillmovement “rear march.”
(5) Kneeling Position. Although short-range engagements generally take place from thestanding position a soldier may be required to engage targets from the kneeling position. Thekneeling position is generally used when correcting a weapons malfunction.
Figure 7-34. Weapon held at the high ready.
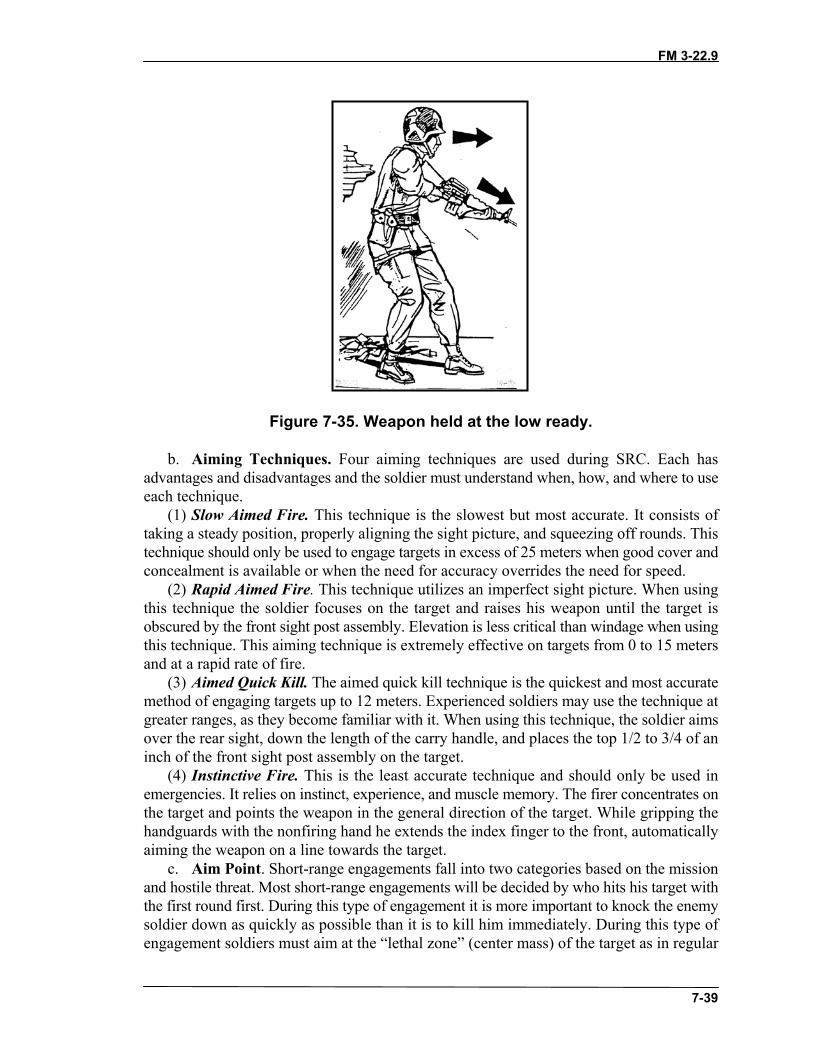
FM 3-22.9
7-39
Figure 7-35. Weapon held at the low ready.
b. Aiming Techniques. Four aiming techniques are used during SRC. Each hasadvantages and disadvantages and the soldier must understand when, how, and where to useeach technique.
(1) Slow Aimed Fire. This technique is the slowest but most accurate. It consists oftaking a steady position, properly aligning the sight picture, and squeezing off rounds. Thistechnique should only be used to engage targets in excess of 25 meters when good cover andconcealment is available or when the need for accuracy overrides the need for speed.
(2) Rapid Aimed Fire. This technique utilizes an imperfect sight picture. When usingthis technique the soldier focuses on the target and raises his weapon until the target isobscured by the front sight post assembly. Elevation is less critical than windage when usingthis technique. This aiming technique is extremely effective on targets from 0 to 15 metersand at a rapid rate of fire.
(3) Aimed Quick Kill. The aimed quick kill technique is the quickest and most accuratemethod of engaging targets up to 12 meters. Experienced soldiers may use the technique atgreater ranges, as they become familiar with it. When using this technique, the soldier aimsover the rear sight, down the length of the carry handle, and places the top 1/2 to 3/4 of aninch of the front sight post assembly on the target.
(4) Instinctive Fire. This is the least accurate technique and should only be used inemergencies. It relies on instinct, experience, and muscle memory. The firer concentrates onthe target and points the weapon in the general direction of the target. While gripping thehandguards with the nonfiring hand he extends the index finger to the front, automaticallyaiming the weapon on a line towards the target.
c. Aim Point. Short-range engagements fall into two categories based on the missionand hostile threat. Most short-range engagements will be decided by who hits his target withthe first round first. During this type of engagement it is more important to knock the enemysoldier down as quickly as possible than it is to kill him immediately. During this type ofengagement soldiers must aim at the “lethal zone” (center mass) of the target as in regular
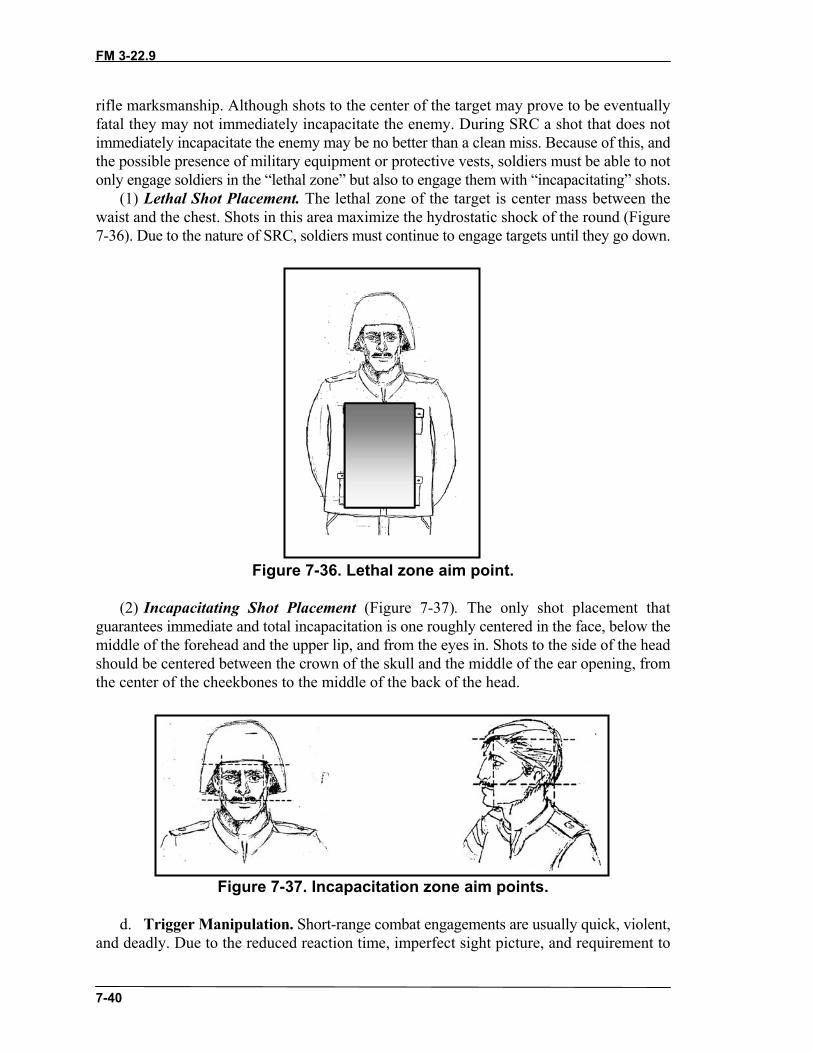
FM 3-22.9
7-40
rifle marksmanship. Although shots to the center of the target may prove to be eventuallyfatal they may not immediately incapacitate the enemy. During SRC a shot that does notimmediately incapacitate the enemy may be no better than a clean miss. Because of this, andthe possible presence of military equipment or protective vests, soldiers must be able to notonly engage soldiers in the “lethal zone” but also to engage them with “incapacitating” shots.
(1) Lethal Shot Placement. The lethal zone of the target is center mass between thewaist and the chest. Shots in this area maximize the hydrostatic shock of the round (Figure7-36). Due to the nature of SRC, soldiers must continue to engage targets until they go down.
Figure 7-36. Lethal zone aim point.
(2) Incapacitating Shot Placement (Figure 7-37). The only shot placement thatguarantees immediate and total incapacitation is one roughly centered in the face, below themiddle of the forehead and the upper lip, and from the eyes in. Shots to the side of the headshould be centered between the crown of the skull and the middle of the ear opening, fromthe center of the cheekbones to the middle of the back of the head.
Figure 7-37. Incapacitation zone aim points.
d. Trigger Manipulation. Short-range combat engagements are usually quick, violent,and deadly. Due to the reduced reaction time, imperfect sight picture, and requirement to
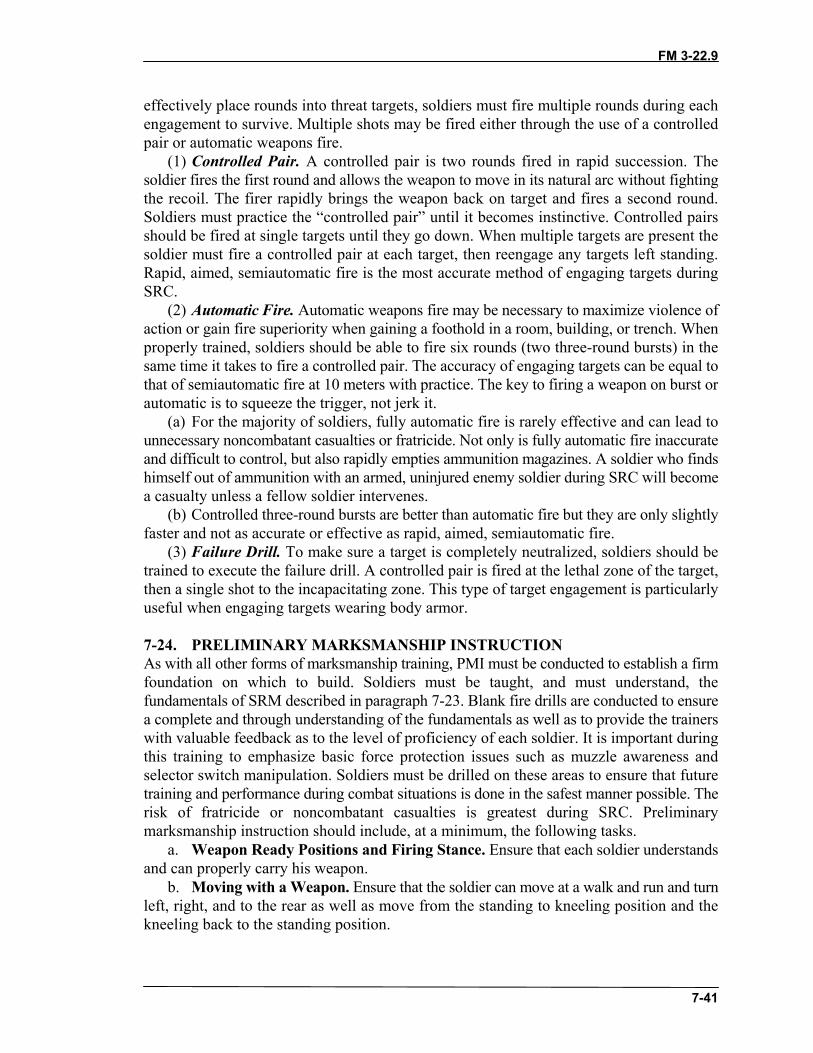
FM 3-22.9
7-41
effectively place rounds into threat targets, soldiers must fire multiple rounds during eachengagement to survive. Multiple shots may be fired either through the use of a controlledpair or automatic weapons fire.
(1) Controlled Pair. A controlled pair is two rounds fired in rapid succession. Thesoldier fires the first round and allows the weapon to move in its natural arc without fightingthe recoil. The firer rapidly brings the weapon back on target and fires a second round.Soldiers must practice the “controlled pair” until it becomes instinctive. Controlled pairsshould be fired at single targets until they go down. When multiple targets are present thesoldier must fire a controlled pair at each target, then reengage any targets left standing.Rapid, aimed, semiautomatic fire is the most accurate method of engaging targets duringSRC.
(2) Automatic Fire. Automatic weapons fire may be necessary to maximize violence ofaction or gain fire superiority when gaining a foothold in a room, building, or trench. Whenproperly trained, soldiers should be able to fire six rounds (two three-round bursts) in thesame time it takes to fire a controlled pair. The accuracy of engaging targets can be equal tothat of semiautomatic fire at 10 meters with practice. The key to firing a weapon on burst orautomatic is to squeeze the trigger, not jerk it.
(a) For the majority of soldiers, fully automatic fire is rarely effective and can lead tounnecessary noncombatant casualties or fratricide. Not only is fully automatic fire inaccurateand difficult to control, but also rapidly empties ammunition magazines. A soldier who findshimself out of ammunition with an armed, uninjured enemy soldier during SRC will becomea casualty unless a fellow soldier intervenes.
(b) Controlled three-round bursts are better than automatic fire but they are only slightlyfaster and not as accurate or effective as rapid, aimed, semiautomatic fire.
(3) Failure Drill. To make sure a target is completely neutralized, soldiers should betrained to execute the failure drill. A controlled pair is fired at the lethal zone of the target,then a single shot to the incapacitating zone. This type of target engagement is particularlyuseful when engaging targets wearing body armor.
7-24. PRELIMINARY MARKSMANSHIP INSTRUCTIONAs with all other forms of marksmanship training, PMI must be conducted to establish a firmfoundation on which to build. Soldiers must be taught, and must understand, thefundamentals of SRM described in paragraph 7-23. Blank fire drills are conducted to ensurea complete and through understanding of the fundamentals as well as to provide the trainerswith valuable feedback as to the level of proficiency of each soldier. It is important duringthis training to emphasize basic force protection issues such as muzzle awareness andselector switch manipulation. Soldiers must be drilled on these areas to ensure that futuretraining and performance during combat situations is done in the safest manner possible. Therisk of fratricide or noncombatant casualties is greatest during SRC. Preliminarymarksmanship instruction should include, at a minimum, the following tasks.
a. Weapon Ready Positions and Firing Stance. Ensure that each soldier understandsand can properly carry his weapon.
b. Moving with a Weapon. Ensure that the soldier can move at a walk and run and turnleft, right, and to the rear as well as move from the standing to kneeling position and thekneeling back to the standing position.
FM 3-22.9
7-42
c. Weapons Malfunction Drills. Ensure soldiers instinctively drop to the kneelingposition, clear a malfunction (using SPORTS), and continue to engage targets. This drill canbe performed by issuing each soldier a magazine loaded with six to eight rounds of blankammunition with one expended blank round.
d. Target Engagement Drills. These drills teach soldiers to move from the readyposition to the firing stance, emphasizing speed and precision movements. Soldiers must beobserved to ensure that the finger is outside the trigger well and that the selector switchremains on the “safe” position until the weapon is raised to the firing position. This is a forceprotection issue and must be drilled until all soldiers can perform to standard.
7-25. PHASE I, REFLEXIVE FIRE TRAININGReflexive fire training provides the fundamental skills required to conduct short-rangemarksmanship. It involves the practical application of all four of the fundamentals of SRM.All soldiers must receive a go on the task Conduct Reflexive Firing, before proceeding withtraining. Reflexive firing should be conducted as refresher training as often as possible toinsure that soldier’s skills are always at the highest possible level. This is a perishable skillthat must be constantly reinforced.
a. Reflexive Firing Targets. Targets can be locally purchased (FBI style) ormanufactured by the unit (bowling pin targets). E-type silhouettes may be painted as shownin Figure 7-38.
Figure 7-38. Dimensions and placement of bowling pin targets.
b. Range Setup. The range must be at least 25 meters in length with identificationmarks at the 5-, 10-, 15-, and 25-meter distances. Each lane should be marked in a way thatprevents cross firing between lanes. A lane safety-coach is assigned to each lane to observeand evaluate the soldier’s performance as well as ensure the safe conduct of firing. All firingcues are given by the tower or line safety.
c. Conduct of Training. Each soldier will conduct a dry-fire exercise and a blank-fireexercise prior to conducting the live-fire exercise. The dry-fire and blank-fire exercises willgive the soldier the repetition needed to successfully engage targets quickly and accurately.Soldiers start at the 25-meter line at the low ready facing the targets. The soldier is then toldthe engagement position (for example, facing left, turn right) and, once in position, is giventhe cue to fire. The soldier must, on cue, assume the proper firing position and stance, placethe selector lever on semi, use the correct aiming technique for the target’s distance, and

FM 3-22.9
7-43
engage the target. After engaging the target the soldier will continue to cover the target toreinforce firing until the threat is eliminated. Rounds fired after the time standard will bescored as a miss. The number of rounds fired after the time standard will be subtracted fromthe total number of hits the soldier has scored. The soldier will be evaluated on a “GO/NOGO” basis based on the standards in the training and evaluation outline (T&EO) and scoringtable. Soldiers must complete a blank fire iteration before being allowed to live fire.
(1) Each soldier will identify and engage the proper targets at ranges from 5 to 25 metersfrom the stationary position, while turning and walking. Soldiers must score a GO on thefamiliarization firing tables (Table 7-3 and Table 7-4, page 7-44) before attempting toqualify.
NOTE: All rounds must impact on the E-type silhouette. Hits are defined as being in thelethal zone (bowling pin).
(2) All tables are fired at night, with and without protective mask, and using automaticfire for familiarization. The tables are also fired using night vision devices. The standard forprotective mask firing is 60 percent day and 50 percent night. Unit commanders shouldconduct training continually to first establish and then sustain levels of proficiency inreflexive firing.
NOTE: If the soldiers will be engaging targets with either lasers, optics, or the protectivemask, they should complete all steps using the same equipment. Do not have thesoldier’s familiarize with iron sights and then fire the live exercise while wearingthe protective mask.
POSITIONROUNDS
FIREDDISTANCE
(meters) METHODTIME
STANDARD
LETHALZONE HIT
STANDARDStraight ahead 4 25 Single shot None 3Straight ahead 4 10 Single shot None 3Straight ahead 4 25 Controlled pair None 3Straight ahead 4 10 Controlled pair None 3
Table 7-3. Familiarization (stationary).
POSITIONROUNDS
FIREDDISTANCE
(meters) METHODTIME
STANDARD
LETHALZONE HIT
STANDARDFacing left;turning right
4 25 Controlled pair None 3
Facing right;turning left
4 25 Controlled pair None 3
Straight aheadwalking
4 10start at 15
Controlled pair None 3
Straight ahead 4 5 Controlled pair None 3
Table 7-4. Familiarization (moving).
FM 3-22.9
7-44
7-26. PHASE II, TARGET DISCRIMINATION TRAININGTarget discrimination is the act of distinguishing between threat and non-threat targetsduring SRC. During SRC, there is little or no margin for error. A shot at a noncombatant orfriendly soldier, or slow inaccurate shots can all be disastrous. Target discrimination is aninescapable responsibility and must be stressed in all situations regardless of mission. It isessential that this training be aimed at instilling fire control and discipline in individualsoldiers. The first priority is always the safety of the Infantryman.
a. Target Discrimination Targets. Target discrimination is best taught using two ormore E-type silhouettes with bowling pins painted on each side of the silhouette (such asbrown side and green side). The instructor calls out a color for the shooter to identify on thecommand “READY, UP” or at the “whistle blast.” The shooter quickly scans all targets forthe color and engages using a controlled pair. This is the standard that all Infantrymen trainto. It will effectively train Infantrymen to accomplish missions under the expected ROE. TheOPFOR will wear distinctive uniforms during force-on-force training, which will prepareInfantrymen to eliminate threats based on enemy uniforms and reduce the chances of anInfantryman hesitating and becoming a casualty. Using realistic targets displaying threat andnonthreat personnel is another variation.
(1) Alternative methods include using multiple E-type silhouettes with different paintedshapes (squares, triangles, and circles). The instructor calls out a shape for the firers toidentify. On the command “READY, UP,” or at a whistle blast, the shooters quickly scan allthree targets searching for the shape and engage using the controlled pair technique. This isrepeated until one shape is mastered. Subsequently, a sequence of shapes are announced, andthe firers engage accordingly.
(2) Another variation is to paint a series of 3-inch circles on the E-type silhouettes. Theinstructors call out which circle to engage (for example, top left) and firers react accordingly.Marksmanship is emphasized using this technique.
(3) Another technique for training is to use pop-up targets (electrical or pull targets).(4) A good technique for teaching soldiers target discrimination is to have them focus
on the target’s hands. If a target is a threat, the first and most obvious indicator is a weaponin the target’s hands. This is also the center of the uniform, which soldiers should focus on.The soldier must mentally take a “flash picture” of the entire target because an armed targetcould possibly be a fellow soldier or other friendly, which is why soldiers train on uniforms(green or brown silhouettes). This level of target discrimination should not be trained untilsoldiers are thoroughly proficient in basic SRC and SRM tasks.
b. Range Set-up. The range must be at least 25 meters in length and each lane shouldbe at least 5 meters wide. Each lane should have target holders and should be marked in away that prevents cross firing between lanes. A coach/safety is assigned to each lane toobserve and control the soldier’s performance. The tower, lane safety, or senior instructorgives all firing commands.
c. Conduct of Training. Each soldier must complete a dry-fire exercise and a blank-fire exercise before moving on to the live-fire portion. (Table 7-3 will be used to score thisexercise.) Regardless of the type of target used, the following method will be used to conducttraining. The soldier will begin all engagements facing away from the target, which requiresthe soldier to identify and discriminate, and reinforces skills used during reflexive firingtraining. The soldier will be given a target description and, on the command “READY,”
FM 3-22.9
7-45
begins to scan for the target. On cue (“Up,” voice command, or whistle blast), the soldierwill turn toward and engage the target.
(1) Instructors should vary commands and targets so that the soldier does not fall intoa pattern. Intermixing “no fire” commands will add to realism.
(2) A soldier will be scored as a “NO GO” if he fails to engage a target or engages atarget other than the one called for by the instructor. Soldiers will complete a blank firevalidation on this task before live firing. Soldiers will also receive a “NO GO” if at any timetheir weapon is pointed at another soldier or they fail to keep their weapon on safe beforeacquiring and engaging the targets. The first priority is always the safety of the soldier.
(3) All soldiers must receive a “GO” on this task before SRM qualification. Targets mustbe scored and marked after each firing distance.
NOTE: Initial training and sustainment training may be conducted by changing theuniform in the standards statement.
7-27. PHASE III, SHORT-RANGE MARKSMANSHIP QUALIFICATIONEach soldier will conduct a blank-fire exercise under the same conditions as the actualqualification. Each soldier will have a coach to ensure that he is acquiring the target; that theweapon remains on safe until time to engage the target and is then placed back on safe; andthat he maintains muzzle awareness throughout the exercise. If a soldier is having difficultyduring the blank-fire exercise, he will not continue with the qualification and will beretrained. Soldiers should conduct SRM qualification semiannually. In addition toqualification, commanders should conduct familiarization using the same qualificationstandards while altering the conditions. Firing the qualification tables in protective masksand during periods of limited visibility should be included. Soldiers should train as theyfight—that is with all MTOE equipment. Although the qualification is intended to be firedwith open sights only, iterations using laser aiming devices, close-combat optics (CCO), andNVDs is highly encouraged. Soldiers must complete a blank fire iteration of the qualificationtables before conducting live-fire qualification.
NOTE: If the soldiers will be engaging targets with either lasers, optics, or the protectivemask, they should complete all steps using the same equipment. Do not have thesoldier’s familiarization with iron sights and then fire the live exercise whilewearing the protective mask.
Each soldier engages the target IAW the firing table (Table 7-5) and scores 16 hits dayand night. The standard when wearing a protective mask is 14 day and 12 night. For scoringpurposes, a hit is a round that impacts within the “lethal zone.” In addition to achieving aqualifying score, all 20 rounds must hit the E-type silhouette in order to qualify.
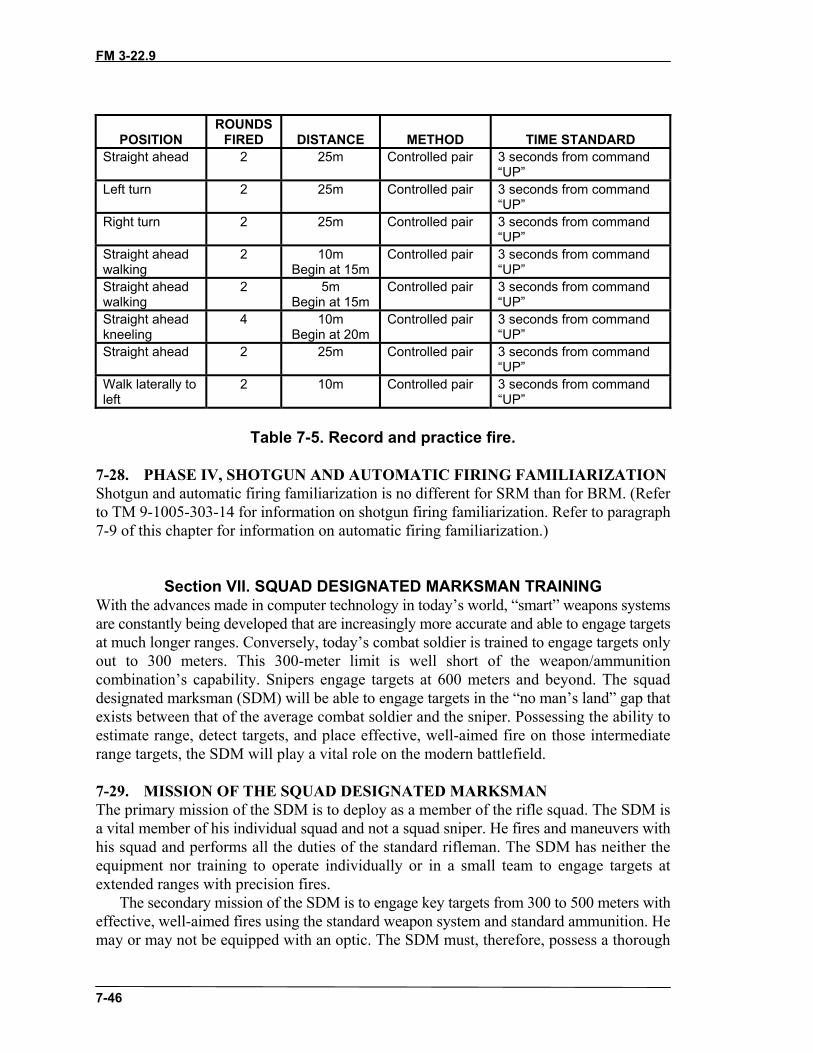
FM 3-22.9
7-46
POSITIONROUNDS
FIRED DISTANCE METHOD TIME STANDARDStraight ahead 2 25m Controlled pair 3 seconds from command
“UP”Left turn 2 25m Controlled pair 3 seconds from command
“UP”Right turn 2 25m Controlled pair 3 seconds from command
“UP”Straight aheadwalking
2 10mBegin at 15m
Controlled pair 3 seconds from command“UP”
Straight aheadwalking
2 5mBegin at 15m
Controlled pair 3 seconds from command“UP”
Straight aheadkneeling
4 10mBegin at 20m
Controlled pair 3 seconds from command“UP”
Straight ahead 2 25m Controlled pair 3 seconds from command“UP”
Walk laterally toleft
2 10m Controlled pair 3 seconds from command“UP”
Table 7-5. Record and practice fire.
7-28. PHASE IV, SHOTGUN AND AUTOMATIC FIRING FAMILIARIZATIONShotgun and automatic firing familiarization is no different for SRM than for BRM. (Referto TM 9-1005-303-14 for information on shotgun firing familiarization. Refer to paragraph7-9 of this chapter for information on automatic firing familiarization.)
Section VII. SQUAD DESIGNATED MARKSMAN TRAININGWith the advances made in computer technology in today’s world, “smart” weapons systemsare constantly being developed that are increasingly more accurate and able to engage targetsat much longer ranges. Conversely, today’s combat soldier is trained to engage targets onlyout to 300 meters. This 300-meter limit is well short of the weapon/ammunitioncombination’s capability. Snipers engage targets at 600 meters and beyond. The squaddesignated marksman (SDM) will be able to engage targets in the “no man’s land” gap thatexists between that of the average combat soldier and the sniper. Possessing the ability toestimate range, detect targets, and place effective, well-aimed fire on those intermediaterange targets, the SDM will play a vital role on the modern battlefield.
7-29. MISSION OF THE SQUAD DESIGNATED MARKSMANThe primary mission of the SDM is to deploy as a member of the rifle squad. The SDM isa vital member of his individual squad and not a squad sniper. He fires and maneuvers withhis squad and performs all the duties of the standard rifleman. The SDM has neither theequipment nor training to operate individually or in a small team to engage targets atextended ranges with precision fires.
The secondary mission of the SDM is to engage key targets from 300 to 500 meters witheffective, well-aimed fires using the standard weapon system and standard ammunition. Hemay or may not be equipped with an optic. The SDM must, therefore, possess a thorough
FM 3-22.9
7-47
understanding and mastery of the fundamentals of rifle marksmanship as well as ballistics,elevation and windage hold-off, sight manipulation, and range estimation.
7-30. SQUAD DESIGNATED MARKSMAN PROGRAMThe SDM program will provide the squad with a designated marksman that has been trainedto engage targets from 300 to 500 meters. He will operate and maneuver as a rifleman, butwill have the added responsibility of engaging targets with effective, well-aimed fires outto 500 meters. He can also be used to help direct the fires of other squad members intoenemy positions. Due to the increased skill level required for his position, the SDM mustmaintain a high level of proficiency through continued training of the required skills.
a. Selection. The platoon sergeant and squad leaders must take special considerationin selecting the SDM. The SDM must have a solid marksmanship performance, must havea clear understanding of the fundamentals, and must be able to apply these fundamentalsconsistently during dry-fire and live-fire training.
b. Concept. There are five phases to complete to be a qualified SDM. Each phasestresses marksmanship fundamentals and specific skill areas required to perform as an SDM.Soldiers must receive a “GO” in each phase to continue training. Should a soldier fail anyarea, he should be removed from training.
7-31. SQUAD DESIGNATED MARKSMAN SKILLS PROGRESSIONThe skills progression program for the SDM is based on the M16-/M4-series weaponssystems and 100 rounds per man ammunition requirement. The program will assess thesoldier’s ability to apply the fundamentals of marksmanship and train and assess the soldierin several key areas in which he must be proficient to successfully perform his mission.These areas include basic ballistics, mechanical elevation and windage adjustments,elevation and windage hold-off (adjusted aiming points), and range estimation. The firingevents will also serve to both reinforce and assess these areas. All weapons used duringtraining will be the assigned weapons of each soldier participating in the training. The firingevents will be conducted with the iron sights or back-up iron sights (BIS) only. The firingevents will be conducted on a KD range that enables firing out to 600 meters at a minimum.
NOTE: If an optic is issued for use, the phase dealing with adjusted aiming points andits record fire will be removed and relevant optics training and testing will besubstituted.
a. PHASE I—Position Evaluation. Phase I of the training consists of assuming theproper firing positions and demonstrating the ability to consistently assume each position.The proper positioning of the soldier is vital in completing his mission of deliveringaccurate, well-aimed fire. The foxhole supported and prone unsupported firing positions willprovide the soldier with the smallest target exposure and will be used during this trainingcycle. The prone supported position can be substituted for the foxhole supported positiondependent on range configurations.

FM 3-22.9
7-48
NOTES: 1. Ensure weapon is cleared and that no ammunition is loaded prior to training.2. Ensure weapon is zeroed prior to training.3. Ensure the soldier is able to assume a steady firing position.
(1) Foxhole Supported. The soldier must be able to successfully assume a propersupported position while firing from a foxhole. The trainer must ensure that the soldier hasa good steady position. To accomplish this, the trainer must do the following:
(a) Eye Relief. Ensure that the soldier demonstrates a consistent eye relief by checkingthe placement of the soldier’s cheek on the butt stock of the weapon. Check to make surethat the soldier’s eye is the same distance from the rear sight each time he is evaluated.
(b) Trigger Finger. Not all soldiers will place their finger on the trigger in the sameplace; ensure that the soldier uses his own style. Check to ensure that the soldier places hisfinger on the trigger the same way each time he is evaluated.
(c) Elbows. The elbows should be placed firmly on the outside edge of the foxhole acomfortable distance apart. A sandbag, and not the arms, should take the weight of theweapon. Slightly nudge the soldier to ensure that his position is stable each time he isevaluated.
(d) Nonfiring Hand. The nonfiring hand should be placed in such a way that the soldieris comfortable and that it provides the best stability for the weapon on the support. Show thesoldier different ways this can be done. After the weapon has been stabilized, nudge thesoldier to ensure that the weapon is being supported properly.
(e) Legs. The legs will be inside the foxhole while firing. The legs should be plantedfirmly enough so that the soldier can maintain a stable position while firing. Slightly nudgethe soldier to make sure that his legs are firmly planted in the foxhole.
After the soldier has assumed a good supported position in the foxhole, the trainer checkshis position and takes notes on all of the above characteristics using the Position EvaluationChecklist in Appendix B. After all characteristics have been noted, have the soldier lay hisweapon down, relax, and then assume another supported position. The soldier will assumeanother good supported position in the foxhole and the trainer will evaluate the position bycomparing his notes from the original supported position. The soldier should maintain thesame characteristic in the second evaluation as he did in the first. Once the trainer is satisfiedthat the soldier has demonstrated the proper position and is able to show it in twoconsecutive attempts, the soldier will move to the unsupported prone position. The trainerwill have the soldier assume a good unsupported firing position.
NOTE: The main areas that will differ between the foxhole supported and the pronesupported positions are in the placement of the elbows, legs, and non-firing hand.These body positions will be similar to those of the prone unsupported position.
(2) Prone Unsupported. The trainer will have the soldier assume a good unsupportedfiring position, then check the same characteristics as with the supported firing position withthe exception of the elbows, the nonfiring hand and the legs.
(a) Elbows. The elbows should be placed on the ground a comfortable distance apart.The bone, and not the muscles, should support the weight of the weapon. This will preventany unnecessary muscle fatigue and will allow for a steadier firing position. Slightly nudgethe soldier to ensure that his position is stable.
FM 3-22.9
7-49
(b) Nonfiring Hand. The nonfiring hand will be placed in a comfortable position on thehand guards. The nonfiring hand will not be supported on the ground, sandbag or anythingthat would create a supported position.
(c) Legs. Not all soldiers position their legs the same way while shooting from the proneposition. Ensure that the soldier’s legs are positioned in such a way that he has a stableposition. Spread the legs a comfortable distance apart with the heels on the ground or asclose as possible without causing strain.
The trainer then checks the same characteristics as with the supported firing position andtaking special care to observe the positioning of the elbows, the non-firing hand and the legs.The trainer will then take notes on the soldier’s unsupported prone firing position checkingthe above characteristics using the position evaluation checklists in Appendix B. Once thetrainer has noted the soldier’s position he will have the soldier lay his weapon down, standup, relax, and then get back down into another unsupported prone position. The soldiershould maintain the same characteristic in the second evaluation as he did in the firstevaluation. The trainer should let the soldier hold this firing position for approximately 15seconds to check for shaking. If the soldier starts to shake, have him relax, then repositionhimself. Once the trainer is satisfied that the soldier has demonstrated the proper positionand is able to accomplish it in two consecutive attempts, the soldier will move on to the nextphase of training.
(3) Follow-Through. Applying the fundamentals increases the chances of a well-aimedshot being fired. When mastered, additional skills can help to increase the accuracy of thatwell-aimed shot. One of these skills is follow-through.
(a) Follow-through is the act of continuing to apply all the marksmanship fundamentalsas the weapon fires as well as immediately after it fires. It consists of:
• Keeping the head in firm contact with the stock (stock weld).• Keeping the finger on the trigger all the way to the rear.• Continuing to look through the rear aperture.• Keeping muscles relaxed.• Avoiding reaction to recoil and or noise.• Releasing the trigger only after the recoil has stopped.
(b) A good follow-through ensures the weapon is allowed to fire and recoil naturally.The soldier/rifle combination reacts as a single unit to such actions.
b. PHASE II—Dry-Fire Training. During the dry-fire training portion the soldiermust demonstrate that he can apply the fundamentals of marksmanship correctly. SDMsmust have a solid grasp on the fundamentals to successfully engage targets at longer ranges.If the soldier does not receive a “GO” in this phase of training then he will be dropped fromthe course.
NOTES: 1. Ensure weapon is cleared and that no ammunition is loaded prior to training.2. Ensure weapon is zeroed prior to training.3. Ensure the soldier is able to consistently apply the fundamentals of
marksmanship.
FM 3-22.9
7-50
(1) Borelight Exercise. If the borelight is not available, the target-box exercise will beused. The borelight dry-fire exercise will provide continuous evaluation of the soldierthroughout the integrated act of firing.
(a) To start the exercise, a 25-meter zero target is attached to a flat surface and thesoldier is positioned 10 meters away facing the target. The soldier assumes a good pronesupported firing position with the borelight inserted in the barrel of the weapon and placedin the dry-fire mode. (The instructor, making notes IAW the SDM position record sheet[Appendix B], will evaluate the soldier’s position.) Once the instructor has evaluated thesoldier’s position, the soldier will aim center mass of the silhouette on the 25-meter zerotarget and squeeze the trigger.
(b) The borelight will be activated as the trigger is fired and the laser will be seen on the25-meter zero target. The 25-meter zero target will be marked exactly were the borelightlaser hit the target. The soldier will get out of position and then get back into a pronesupported firing position. This process will be done until a three-round shot group has beenachieved. The soldier will do the same from the prone unsupported. To receive a “GO,” thesoldier must place a three-round shot group in a 3-centimeter circle from both pronepositions.
(2) Target-Box Exercise. The target-box exercise checks the consistency of aiming andplacement of three-round shot groups in a dry-fire environment. To conduct the exercise, thetarget man places the silhouette anywhere on a plain sheet of paper and moves the silhouettetarget as directed by the soldier. The two positions must have already been established sothat the rifle is pointed at some place on the paper. Twenty-five meters separate thepositions. When the soldier establishes proper aiming, he squeezes the trigger to signal tothe target man that the shot was fired. The target man then marks through the silhouette witha pen or pencil at the center of mass of the target. The target man then moves the silhouetteto another spot on the paper and tells the firer to repeat the process twice more to obtain ashot group. (A simulated shot group covered within a 1/2-centimeter circle indicatesconsistent aiming.) Since no rifle or ammunition variability is involved, and since there isno requirement to place the shot group in a certain location, a 1/2-centimeter standard maybe compared to obtaining a 4-centimeter shot group on the 25-meter live-fire zero range.
(3) Dime/Washer Drill. The use of the dime/washer drill is a very effective way ofmeasuring the soldier’s trigger squeeze. Have the soldier take aim and squeeze the trigger.If the dime or washer remains in place then he has successfully squeezed the trigger. (Thesoldier must successfully obtain five out of five consecutive shot groups within 1 centimeterand without allowing the dime or washer to drop.) The trainer will make his own evaluationof the soldier’s performance and give the soldier a “GO” or “NO-GO.” If the soldier receivesa “NO-GO,” the trainer recommends re-training, re-testing, or possible removal from thecourse.
After completion of both Phase I and Phase II, the soldier will conduct a firing event(Table 7-6) to zero or confirm the zero on his weapon and reinforce the fundamentals ofmarksmanship. This firing event will be conducted on a 25-meter range. (The soldier mustzero or confirm his zero within 18 rounds.) If the soldier cannot zero within 18 rounds, thetrainer recommends re-training, re-testing, or possible removal from the course. After theweapon is zeroed, any additional rounds will be fired and the coach will observe the soldierfor deficiencies in his marksmanship fundamentals.
FM 3-22.9
7-51
FIRING EVENT ROUNDS TARGET RANGEZero/Zero Confirmation 18 25 meters
Table 7-6. Zero/zero confirmation firing event.
c. PHASE III—Range Estimation and Sight Manipulation 100 to 500 Meters. TheSDMs must use range estimation methods to determine distance between their position andthe target.
NOTES: 1. Ensure weapon is cleared and that no ammunition is loaded prior to training.2. Ensure weapon is zeroed prior to training.3. Ensure the soldier knows how to adjust for wind and gravity.4. Ensure the soldier can manipulate the rear sight for different ranges.
(1) Range Estimation Training. The SDM can use several different methods todetermine range to the target to include the 100-meter unit-of-measure method, range cardmethod, front sight post method, appearance of objects method, and the combination method.
(a) 100-Meter Unit-of-Measure Method. To use this method, the SDM must be able tovisualize a distance of 100 meters on the ground. For ranges up to 500 meters, the SDMdetermines the number of 100-meter increments between the two objects he wishes tomeasure. Beyond 500 meters, he must select a point halfway to the object and determine thenumber of 100-meter increments to the halfway point, then double it to find the range tothe object.
(b) Range Card Method. The SDM can also use a range card to quickly determine rangesthroughout the target area. Once a target is detected, the SDM determines where it is locatedon the card and then reads the proper range to the target.
(c) Front Sight Post Method. Another method to estimate range is by using the frontsight post as a scale. Generally, if a man-sized target is 1/2 the width of the front sight post,then he is approximately 300 meters away. If the target is 1/4 the width of the front sightpost, then the target is approximately 600 meters away. This method can be used for a quickestimation and engagement.
(d) Appearance of Objects Method. This method is a means of determining range basedon the size and visible characteristics of an object. To use this method with any degree ofaccuracy, the SDM must be familiar with the appearance and visible detail of an object atvarious ranges. However, some common guidelines can be used in relation to a human targetto determine range.
• At 200 meters a human target is clear and details can be seen.• At 300 meters the target is still clear, but no details can be seen.• At 400 meters the target’s outline is clear; however, the target itself is blurry.• At 500 meters the body tapers and the head disappears.• At 600 meters the body resembles a wedge shape.
(e) Combination Method. In a combat environment, perfect conditions rarely exist.Therefore, only one method of range estimation may not be enough for the SDM’s specificmission. For example, terrain with much dead space limits the accuracy of the 100-meter
FM 3-22.9
7-52
method. By using a combination of two or more methods to determine an unknown range,an experienced SDM should arrive at an estimated range close to the true range.
(2) Factors Affecting Range Estimation. Three factors affect range estimation: natureof the target, nature of the terrain, and light conditions.
• Nature of the Target. An object of regular outline, such as a house, appears closerthan one of irregular outline, such as a clump of trees. A target that contrasts withits background appears to be closer than it actually is. A partly exposed targetappears more distant than it actually is.
• Nature of the Terrain. As the observer’s eye follows the contour of the terrain,he tends to overestimate distant targets. Observing over smooth terrain, such assand, water, or snow, causes the observer to underestimate distant targets.Looking downhill, the target appears farther away. Looking uphill, the targetappears closer.
• Light Conditions. The more clearly a target can be seen, the closer it appears.When the sun is behind the observer, the target appears to be closer. When thesun is behind the target, the target is more difficult to see and appears to befarther away.
The trainer will have a range estimation course set up for the soldier to practice on usingE-type silhouettes at ranges from 100 meters out to 700 meters. Give the soldiers time to findthe method that works best for them. Once the soldiers have had time to practice, they willbe tested on their ability to estimate range. The soldiers will be given six targets to estimatethe range for. The soldier must estimate the range within 50 meters of the actual range toreceive a “GO.” The soldier must estimate range correctly six out of six targets to move onto the next portion of this phase.
(3) Elevation Knob Training. Elevation knob training is nothing more than being ableto adjust the rear elevation knob to adjust for various ranges that the SDM will have toengage. The rear elevation knob adjusts the point of aim from 300 to 800 meters on theM16A2, and 300 to 600 meters on the M16A4 and M4. The soldier must take his weaponand determine how many adjustments (clicks) there are between the different range settingson his rear elevation adjustment knob (Tables 7-7 and 7-8). With this knowledge he canbetter determine his range settings for the different distances between the 100-meteradjustments.
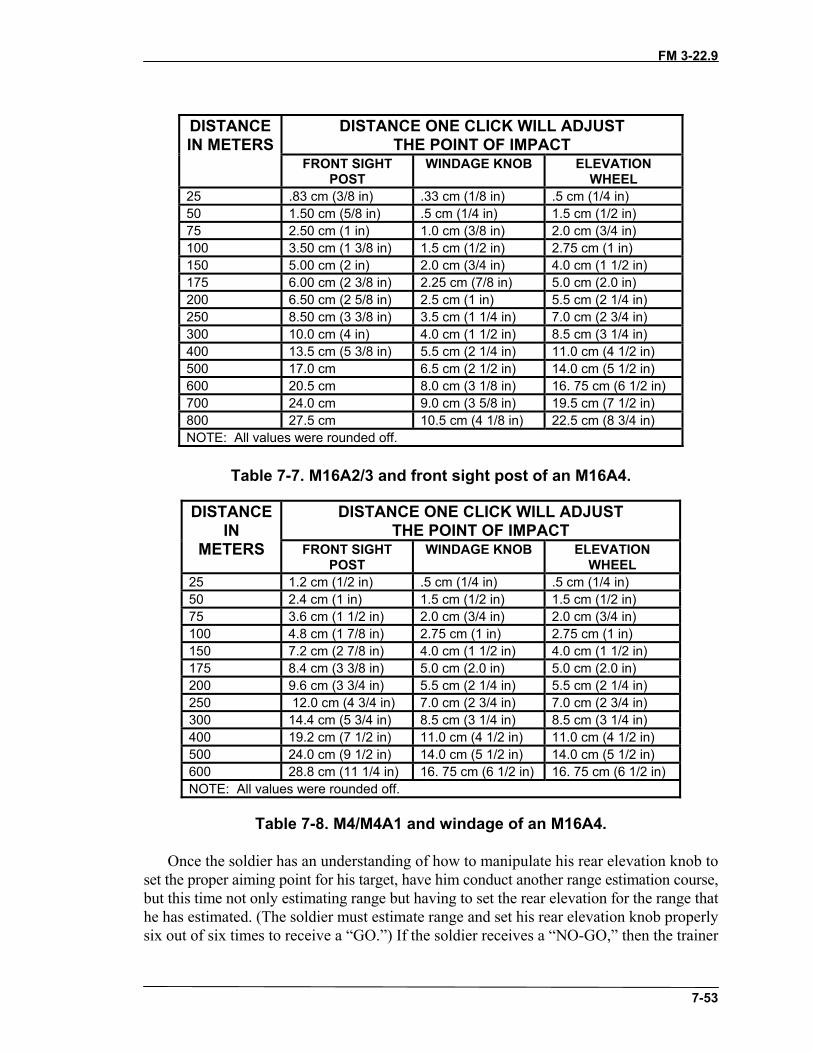
FM 3-22.9
7-53
DISTANCE ONE CLICK WILL ADJUSTTHE POINT OF IMPACT
DISTANCEIN METERS
FRONT SIGHTPOST
WINDAGE KNOB ELEVATIONWHEEL
25 .83 cm (3/8 in) .33 cm (1/8 in) .5 cm (1/4 in)50 1.50 cm (5/8 in) .5 cm (1/4 in) 1.5 cm (1/2 in)75 2.50 cm (1 in) 1.0 cm (3/8 in) 2.0 cm (3/4 in)100 3.50 cm (1 3/8 in) 1.5 cm (1/2 in) 2.75 cm (1 in)150 5.00 cm (2 in) 2.0 cm (3/4 in) 4.0 cm (1 1/2 in)175 6.00 cm (2 3/8 in) 2.25 cm (7/8 in) 5.0 cm (2.0 in)200 6.50 cm (2 5/8 in) 2.5 cm (1 in) 5.5 cm (2 1/4 in)250 8.50 cm (3 3/8 in) 3.5 cm (1 1/4 in) 7.0 cm (2 3/4 in)300 10.0 cm (4 in) 4.0 cm (1 1/2 in) 8.5 cm (3 1/4 in)400 13.5 cm (5 3/8 in) 5.5 cm (2 1/4 in) 11.0 cm (4 1/2 in)500 17.0 cm 6.5 cm (2 1/2 in) 14.0 cm (5 1/2 in)600 20.5 cm 8.0 cm (3 1/8 in) 16. 75 cm (6 1/2 in)700 24.0 cm 9.0 cm (3 5/8 in) 19.5 cm (7 1/2 in)800 27.5 cm 10.5 cm (4 1/8 in) 22.5 cm (8 3/4 in)NOTE: All values were rounded off.
Table 7-7. M16A2/3 and front sight post of an M16A4.
DISTANCE ONE CLICK WILL ADJUSTTHE POINT OF IMPACT
DISTANCEIN
METERS FRONT SIGHTPOST
WINDAGE KNOB ELEVATIONWHEEL
25 1.2 cm (1/2 in) .5 cm (1/4 in) .5 cm (1/4 in)50 2.4 cm (1 in) 1.5 cm (1/2 in) 1.5 cm (1/2 in)75 3.6 cm (1 1/2 in) 2.0 cm (3/4 in) 2.0 cm (3/4 in)100 4.8 cm (1 7/8 in) 2.75 cm (1 in) 2.75 cm (1 in)150 7.2 cm (2 7/8 in) 4.0 cm (1 1/2 in) 4.0 cm (1 1/2 in)175 8.4 cm (3 3/8 in) 5.0 cm (2.0 in) 5.0 cm (2.0 in)200 9.6 cm (3 3/4 in) 5.5 cm (2 1/4 in) 5.5 cm (2 1/4 in)250 12.0 cm (4 3/4 in) 7.0 cm (2 3/4 in) 7.0 cm (2 3/4 in)300 14.4 cm (5 3/4 in) 8.5 cm (3 1/4 in) 8.5 cm (3 1/4 in)400 19.2 cm (7 1/2 in) 11.0 cm (4 1/2 in) 11.0 cm (4 1/2 in)500 24.0 cm (9 1/2 in) 14.0 cm (5 1/2 in) 14.0 cm (5 1/2 in)600 28.8 cm (11 1/4 in) 16. 75 cm (6 1/2 in) 16. 75 cm (6 1/2 in)NOTE: All values were rounded off.
Table 7-8. M4/M4A1 and windage of an M16A4.
Once the soldier has an understanding of how to manipulate his rear elevation knob toset the proper aiming point for his target, have him conduct another range estimation course,but this time not only estimating range but having to set the rear elevation for the range thathe has estimated. (The soldier must estimate range and set his rear elevation knob properlysix out of six times to receive a “GO.”) If the soldier receives a “NO-GO,” then the trainer
FM 3-22.9
7-54
recommends re-training, re-testing, or possible removal from the course. Once the soldierhas an understanding of range estimation and sight manipulation, he is able to begin the live-fire training exercise (Table 7-9). The soldier will be given 20 rounds in which to engage 20targets at ranges from 100 to 500 meters using mechanical sight adjustments.
FIRING EVENT ROUNDS TARGET RANGEKnown Distance (Mech. Adj.) 20 100 to 500 meters
Table 7-9. Known distance (Mech. Adj.) firing event.
NOTES: 1. Ensure weapon is zeroed prior to training.2. Ensure the soldier knows how to adjust for wind and gravity.3. Ensure the soldier can manipulate the rear sight for different ranges.
d. PHASE IV—Hold-Off 100 to 500 Meters. Hold-off is shifting the point of aim toachieve a desired point of impact. Certain situations, such as multiple targets at varyingranges and rapidly changing winds, do not allow proper windage and elevation adjustments.This technique is used only when the SDM does not have time to change his sight setting.The SDM rarely achieves pinpoint accuracy when holding off, since a minor error in rangedetermination or a lack of a precise aiming point might cause the bullet to miss the desiredpoint. Therefore, familiarization and practice of elevation and windage hold-off techniquesprepares the SDM to meet these situations.
NOTES: 1. Ensure weapon is cleared and that no ammunition is loaded prior to training.2. Ensure weapon is zeroed prior to training3. Ensure the soldier knows how to adjust for wind and gravity.4. Ensure the soldier can manipulate the rear sight for different ranges.
(1) Elevation. The SDM uses hold-off to hit a target at ranges other than the range forwhich the rifle is presently adjusted. When a soldier aims directly at a target at ranges greaterthan the set range, his bullet will hit below the point of aim. At lesser ranges, his bullet willhit higher than the point of aim. If the SDM understands this and knows about trajectory andbullet drop, he will be able to hit the target at ranges other than that for which the rifle wasadjusted. For example, the SDM adjusts the rifle for a target located 500 meters downrangeand another target appears at a range of 600 meters. The hold-off would be 25 inches; thatis, the SDM should hold off 25 inches above the center of visible mass in order to hit thecenter of mass of that particular target. If another target were to appear at 400 meters, theSDM would aim 14 inches below the center of visible mass in order to hit the center of mass.The chart in Figure 7-39 shows the projectile’s trajectory when fired from the M16A2 andthe M4 carbine. The red line shows the trajectory of the M4 carbine and the blue line showsthe trajectory of the M16A2. This demonstrates the drop of the round at various ranges. Thisdiagram will also assist the trainer in teaching vertical hold-off during this phase.
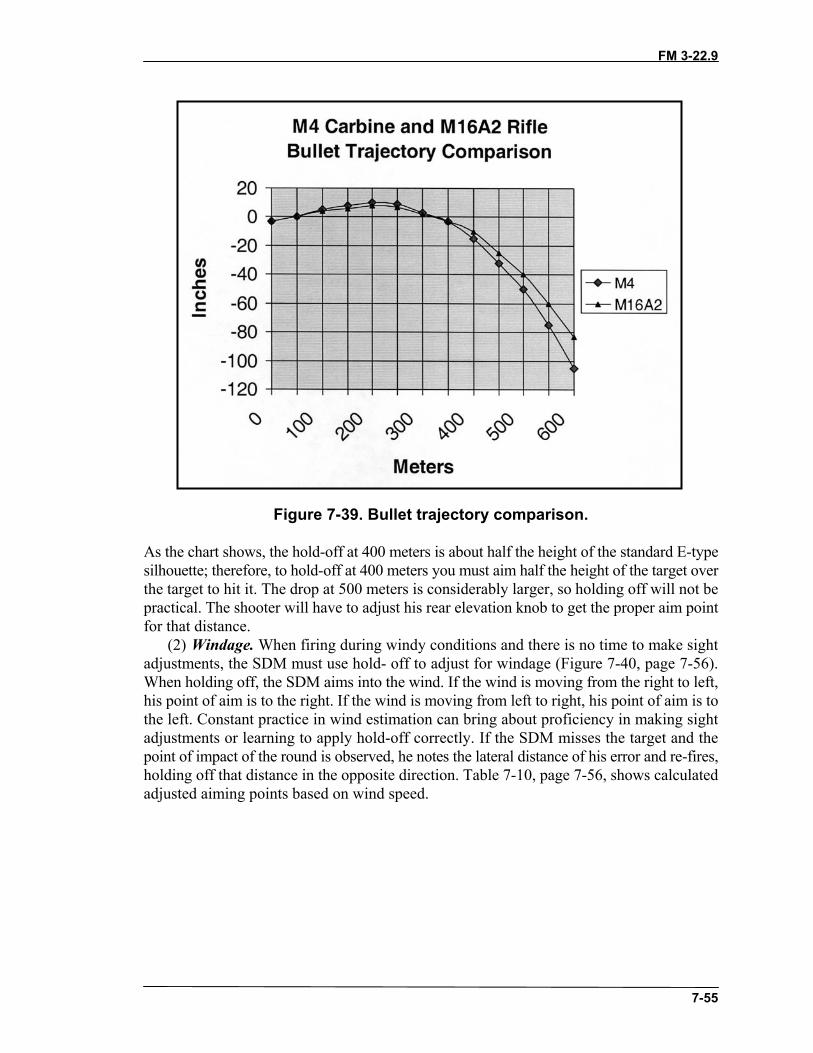
FM 3-22.9
7-55
Figure 7-39. Bullet trajectory comparison.
As the chart shows, the hold-off at 400 meters is about half the height of the standard E-typesilhouette; therefore, to hold-off at 400 meters you must aim half the height of the target overthe target to hit it. The drop at 500 meters is considerably larger, so holding off will not bepractical. The shooter will have to adjust his rear elevation knob to get the proper aim pointfor that distance.
(2) Windage. When firing during windy conditions and there is no time to make sightadjustments, the SDM must use hold- off to adjust for windage (Figure 7-40, page 7-56).When holding off, the SDM aims into the wind. If the wind is moving from the right to left,his point of aim is to the right. If the wind is moving from left to right, his point of aim is tothe left. Constant practice in wind estimation can bring about proficiency in making sightadjustments or learning to apply hold-off correctly. If the SDM misses the target and thepoint of impact of the round is observed, he notes the lateral distance of his error and re-fires,holding off that distance in the opposite direction. Table 7-10, page 7-56, shows calculatedadjusted aiming points based on wind speed.
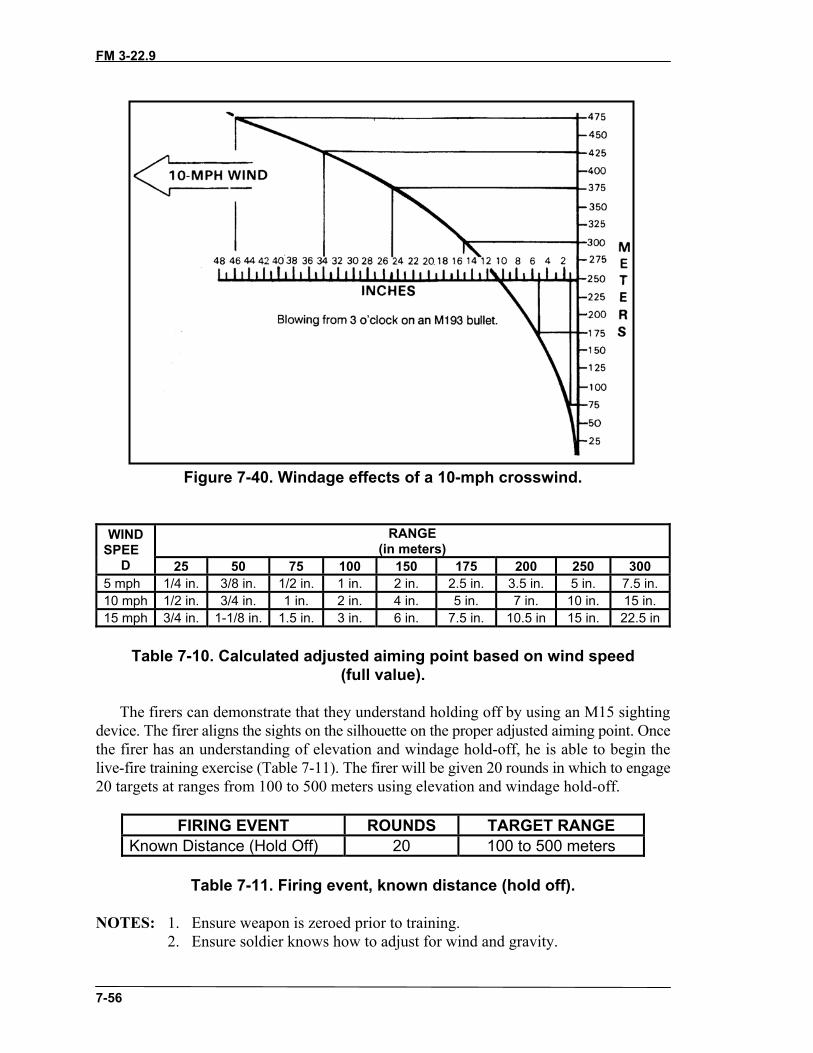
FM 3-22.9
7-56
Figure 7-40. Windage effects of a 10-mph crosswind.
RANGE(in meters)
WINDSPEE
D 25 50 75 100 150 175 200 250 3005 mph 1/4 in. 3/8 in. 1/2 in. 1 in. 2 in. 2.5 in. 3.5 in. 5 in. 7.5 in.10 mph 1/2 in. 3/4 in. 1 in. 2 in. 4 in. 5 in. 7 in. 10 in. 15 in.15 mph 3/4 in. 1-1/8 in. 1.5 in. 3 in. 6 in. 7.5 in. 10.5 in 15 in. 22.5 in
Table 7-10. Calculated adjusted aiming point based on wind speed(full value).
The firers can demonstrate that they understand holding off by using an M15 sightingdevice. The firer aligns the sights on the silhouette on the proper adjusted aiming point. Oncethe firer has an understanding of elevation and windage hold-off, he is able to begin thelive-fire training exercise (Table 7-11). The firer will be given 20 rounds in which to engage20 targets at ranges from 100 to 500 meters using elevation and windage hold-off.
FIRING EVENT ROUNDS TARGET RANGEKnown Distance (Hold Off) 20 100 to 500 meters
Table 7-11. Firing event, known distance (hold off).
NOTES: 1. Ensure weapon is zeroed prior to training.2. Ensure soldier knows how to adjust for wind and gravity.
FM 3-22.9
7-57
3. Ensure soldier can manipulate the rear sight for different ranges.
e. PHASE V—Field Fire 100 to 500 Meters. Field fire will consist of both a RecordFire I and a Record Fire II course. The field-fire events (Table 7-12) will test the individual’smarksmanship, range estimation, and target detection skills. Each Record Fire course willhave targets at ranges from 100 to 500 meters. Each firer will engage a total of 20 targetswith 20 rounds. Soldiers will fire the table using both the foxhole supported or pronesupported position (sandbags) and the prone unsupported firing position. An individual mustattain a total of 14 hits out of 20 targets to pass. The Record Fire I course requires theindividual to use mechanical elevation and windage adjustments. The Record Fire II courserequires the individual to use elevation and windage hold-off (adjusted aiming points). If theSDM is issued an optic, the Record Fire II course will substitute use of that optic instead ofusing adjusted aiming points.
NOTES: 1. Ensure weapon is zeroed prior to training.2. Ensure soldier is able to assume a steady firing position.3. Ensure soldier is able to consistently apply the fundamentals ofmarksmanship.4. Ensure soldier knows how to adjust for wind and gravity.5. Ensure soldier can manipulate the rear sight for different ranges.
FIRING EVENT ROUNDS TARGET RANGE STANDARDRecord Fire I 20 100 to 500 meters 14 of 20Record Fire II 20 100 to 500 meters 14 of 20
Table 7-12. Firing event, Record Fire I and II.
NOTE: The firer must engage 14 out of 20 targets at 100 to 500 meters during eachfield-fire exercise. (See Appendix B for a reproducible scorecard.)
f. Certification. Once the firer has successfully completed the SDM program, he isdesignated as an SDM and will be able to perform all duties and responsibilities set forth bythese guidelines.
NOTE: The skills of the SDM are highly perishable and sustainment training should beconducted to ensure retention of the skills. At a minimum, sustainment trainingshould be conducted semiannually.