Advanced learning packages: primary microscience ...
43
The UNESCO-Associated Centre for Microscience Experiments RADMASTE Centre, University of the Witwatersrand, Johannesburg, South Africa Tel: (+) 27 11 717 4802 Fax: (+) 27 11 403 8733 email: [email protected] website: www.microsci.org.za CHAPTER 2
Transcript of Advanced learning packages: primary microscience ...

The UNESCO-Associated Centre for Microscience ExperimentsRADMASTE Centre, University of the Witwatersrand, Johannesburg, South Africa
Tel: (+) 27 11 717 4802 Fax: (+) 27 11 403 8733 email: [email protected] website: www.microsci.org.za
CHAPTER 2
CHAPTER 2
Expansion And Contraction
2.1 The undecided drop. 38 - 392.2 Where does the extra liquid come from? 40 - 412.3 The tallest liquid. 42 - 432.4 The story of a slender and a plump propette. 44 - 452.5 The lazy thin wire. 46 - 47
The Three States Of Water
2.6 Ice and liquid water. 48 - 492.7 Where does the water come from? 50 - 512.8 Measuring evaporation. 52 - 532.9 The states of water. 54 - 552.10 How can we know that it is water? 56 - 572.11 About water vapour 58 - 592.12 The water cycle. 602.13 Wind and evaporation. 61 - 622.14 Evaporation and Temperature. 632.15 Evaporation and surface area. 64 - 652.16 Is there water in plant leaves? 662.17 Is it still the water I know? 67 - 68
How Do Living Things Reproduce?
2.18 What does a seed look like? 692.19 Growing a new plant. 70 - 712.20 Do seeds need water to grow into new plants? 72 - 732.21 Do seeds start to grow in all temperatures. 74 - 762.22 New plants from parts of plants. 77 - 78
The UNESCO-Associated Centre for Microscience ExperimentsRADMASTE Centre, University of the Witwatersrand, Johannesburg, South Africa
Tel: (+) 27 11 717 4802 Fax: (+) 27 11 403 8733 email: [email protected] website: www.microsci.org.za
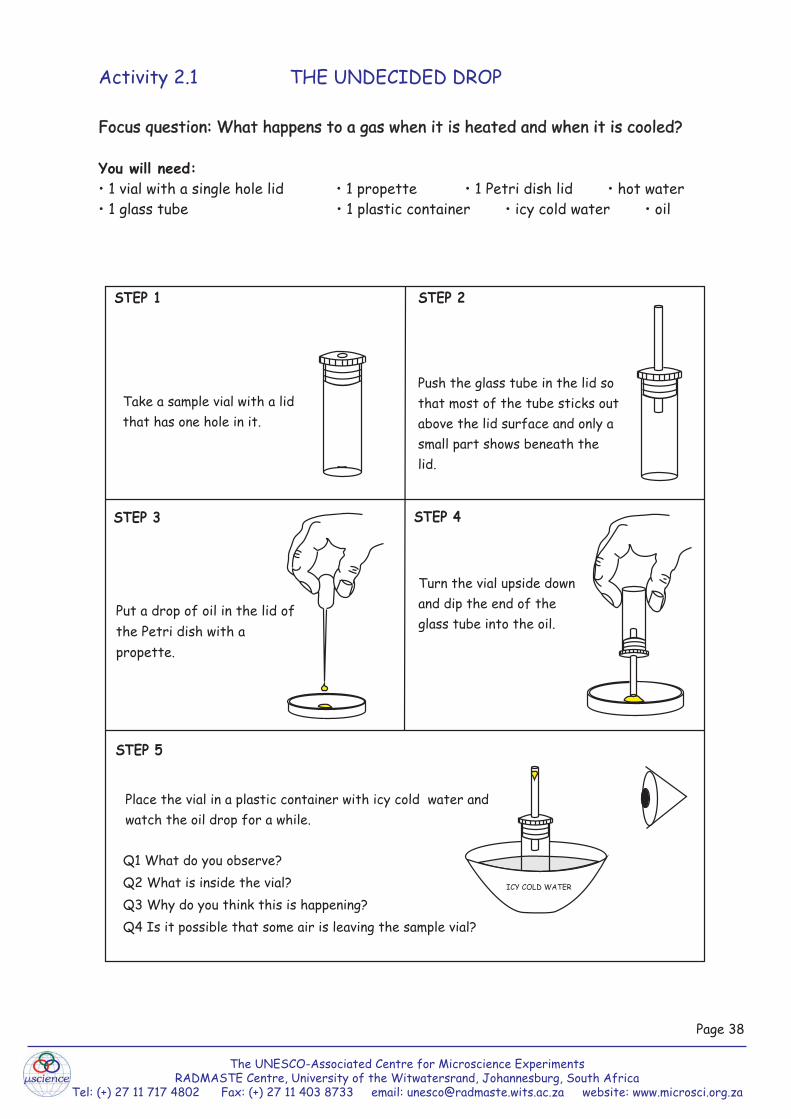
Push the glass tube in the lid so that most of the tube sticks out above the lid surface and only a small part shows beneath the lid.
STEP 1
STEP 4
Take a sample vial with a lid that has one hole in it.
STEP 3
Put a drop of oil in the lid of the Petri dish with a propette.
Turn the vial upside down and dip the end of the glass tube into the oil.
STEP 2
STEP 5
Place the vial in a plastic container with icy cold water and watch the oil drop for a while.
Q1 What do you observe?Q2 What is inside the vial? Q3 Why do you think this is happening?Q4 Is it possible that some air is leaving the sample vial?
ICY COLD WATER
Page 38
The UNESCO-Associated Centre for Microscience ExperimentsRADMASTE Centre, University of the Witwatersrand, Johannesburg, South Africa
Tel: (+) 27 11 717 4802 Fax: (+) 27 11 403 8733 email: [email protected] website: www.microsci.org.za
Activity 2.1 THE UNDECIDED DROP
Focus question: What happens to a gas when it is heated and when it is cooled?
You will need:• 1 vial with a single hole lid • 1 propette • 1 Petri dish lid • hot water• 1 glass tube • 1 plastic container • icy cold water • oil
Focus question: What happens to a gas when it is heated and when it is cooled?

The UNESCO-Associated Centre for Microscience ExperimentsRADMASTE Centre, University of the Witwatersrand, Johannesburg, South Africa
Tel: (+) 27 11 717 4802 Fax: (+) 27 11 403 8733 email: [email protected] website: www.microsci.org.za
heat
A representation of learner’s conceptthat molecules expand upon heating
STEP 6
ICY COLD WATERWARM WATER
thermometer
Now place the vial in a container with hot water and watch the oil drop.
Q5 What do you see?Q6 What makes the drop move up and down in this
activity?Q7 What is the effect of heating on gases?Q8 What is the gas in this activity?Q9 What is the effect of cooling on gases?Q10 Describe what happens to the particles of this gas when the vial is immersed in icy cold
water.Q11 Describe what happens to the particles of this gas when the vial is immersed in hot water. Q12 Make a drawing to represent the air in the vial when the vial is immersed in the hot water
and when the vial is immersed in the cold water.Q13 Put a thermometer in warm water and note what
happens. Put it in the cold water. Whathappens?
Q14 How does this activity on ‘the undecided drop’relate to how the thermometer works?
Mrs Mahlangu asked her grade 5 learners to show with a drawing whathappens to the particles of a substancewhen it is heated.This is a microscopic representation Lebo gave.
Q15 According to the particulate theory of matter, what happens to the particles of a substance when it is heated?
Q16 Is Lebo's view about the concept of expansion of substances on heating, similar to those commonly held by the scientific community? Explain your views.
Q17 Is this substance a gas, a liquid or a solid? How do you know?Q18 Make a drawing of a scientifically acceptable representation.
HOT WATER
Page 39

Activity 2.2 WHERE DOES THE EXTRA LIQUID COME FROM?
Focus question: How does a thermometer work?
You will need:
! 1 vial with a single hole lid ! 1 propette ! hot water ! 1 marker! 1 glass tube ! 1 plastic container ! icy cold water
STEP 1 STEP 2
STEP 4STEP 3
Fill the vial with water and close ittightly with the lid.
Use the propette to add morewater through the hole in thelid so that the vial iscompletely filled.
Push the glass tube into thehole in the lid so that thereis some water in the tube.
Mark the level of thewater with a marker.
Place the vial in acontainer with hotwater and watchthe water level.
Q1 What happens to the water levelwhen the vial is placed in hotwater for some time?
Q2 Where does the extra water come from?
STEP 5
HOT WATERHOT WATERHOT WATERHOT WATER
After a few minutes, mark the new waterlevel.
STEP 6
HOT WATERHOT WATERHOT WATER
Page 40
The UNESCO-Associated Centre for Microscience ExperimentsRADMASTE Centre, University of the Witwatersrand, Johannesburg, South Africa
Tel: (+) 27 11 717 4802 Fax: (+) 27 11 403 8733 email: [email protected] website: www.microsci.org.za

STEP 7
HOT WATERCOLD WATER
Replace the hot water in the container with cold water and watch the level of the water in the tube.
Q3 What happens to the level of water when the vial is placed in icy cold water for a while?
Q4 Is it possible that some water may be leaving the vial?
Q5 Why is this happening?
Q6 How is this system similar to a thermometer?
Q7 Can this system serve as a thermometer?
Q8 What can be done to make this system serve as a thermometer?
Q9 What happens to water when it is heated and when it is cooled?
Q10 How does a thermometer work?
Page 41
The UNESCO-Associated Centre for Microscience ExperimentsRADMASTE Centre, University of the Witwatersrand, Johannesburg, South Africa
Tel: (+) 27 11 717 4802 Fax: (+) 27 11 403 8733 email: [email protected] website: www.microsci.org.za
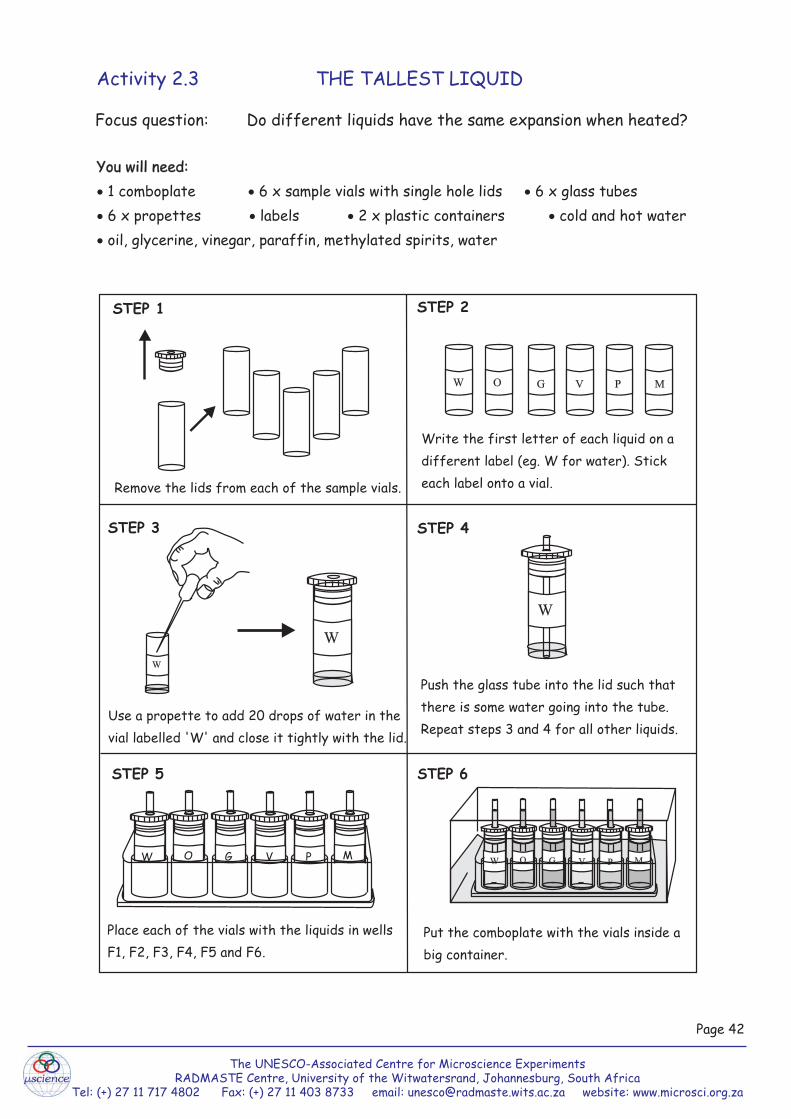
Activity 2.3 THE TALLEST LIQUID
Focus question: Do different liquids have the same expansion when heated?
You will need:! 1 comboplate ! 6 x sample vials with single hole lids ! 6 x glass tubes! 6 x propettes ! labels ! 2 x plastic containers ! cold and hot water! oil, glycerine, vinegar, paraffin, methylated spirits, water
You will need:
Write the first letter of each liquid on a different label (eg. W for water). Stick each label onto a vial.
STEP 1 STEP 2
STEP 3
STEP 5
STEP 4
Remove the lids from each of the sample vials.
Use a propette to add 20 drops of water in the vial labelled 'W' and close it tightly with the lid.
W
W
W O G V P M
Push the glass tube into the lid such that there is some water going into the tube.Repeat steps 3 and 4 for all other liquids.
W
STEP 6
PO G V MW
Place each of the vials with the liquids in wells F1, F2, F3, F4, F5 and F6.
PO G V MW
Put the comboplate with the vials inside a big container.
Page 42
The UNESCO-Associated Centre for Microscience ExperimentsRADMASTE Centre, University of the Witwatersrand, Johannesburg, South Africa
Tel: (+) 27 11 717 4802 Fax: (+) 27 11 403 8733 email: [email protected] website: www.microsci.org.za
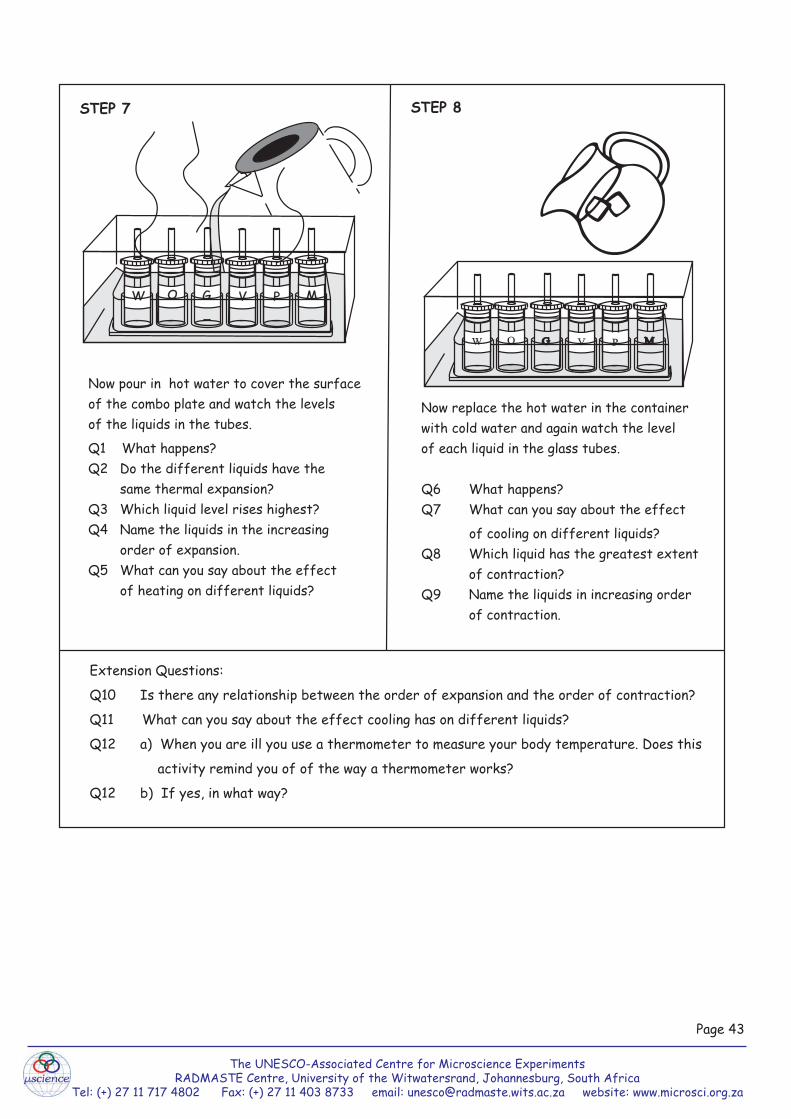
Now pour in hot water to cover the surface of the combo plate and watch the levels of the liquids in the tubes.Q1 What happens?Q2 Do the different liquids have the same thermal expansion? Q3 Which liquid level rises highest?Q4 Name the liquids in the increasing order of expansion.Q5 What can you say about the effect of heating on different liquids?
STEP 8
Now replace the hot water in the containerwith cold water and again watch the level of each liquid in the glass tubes.
STEP 7
PO G V MW
PO G V MW
Q6 What happens?Q7 What can you say about the effect
of cooling on different liquids?Q8 Which liquid has the greatest extent of contraction?Q9 Name the liquids in increasing order of contraction.
Extension Questions:Q10 Is there any relationship between the order of expansion and the order of contraction?Q11 What can you say about the effect cooling has on different liquids?Q12 a) When you are ill you use a thermometer to measure your body temperature. Does this
activity remind you of of the way a thermometer works?Q12 b) If yes, in what way?
Page 43
The UNESCO-Associated Centre for Microscience ExperimentsRADMASTE Centre, University of the Witwatersrand, Johannesburg, South Africa
Tel: (+) 27 11 717 4802 Fax: (+) 27 11 403 8733 email: [email protected] website: www.microsci.org.za
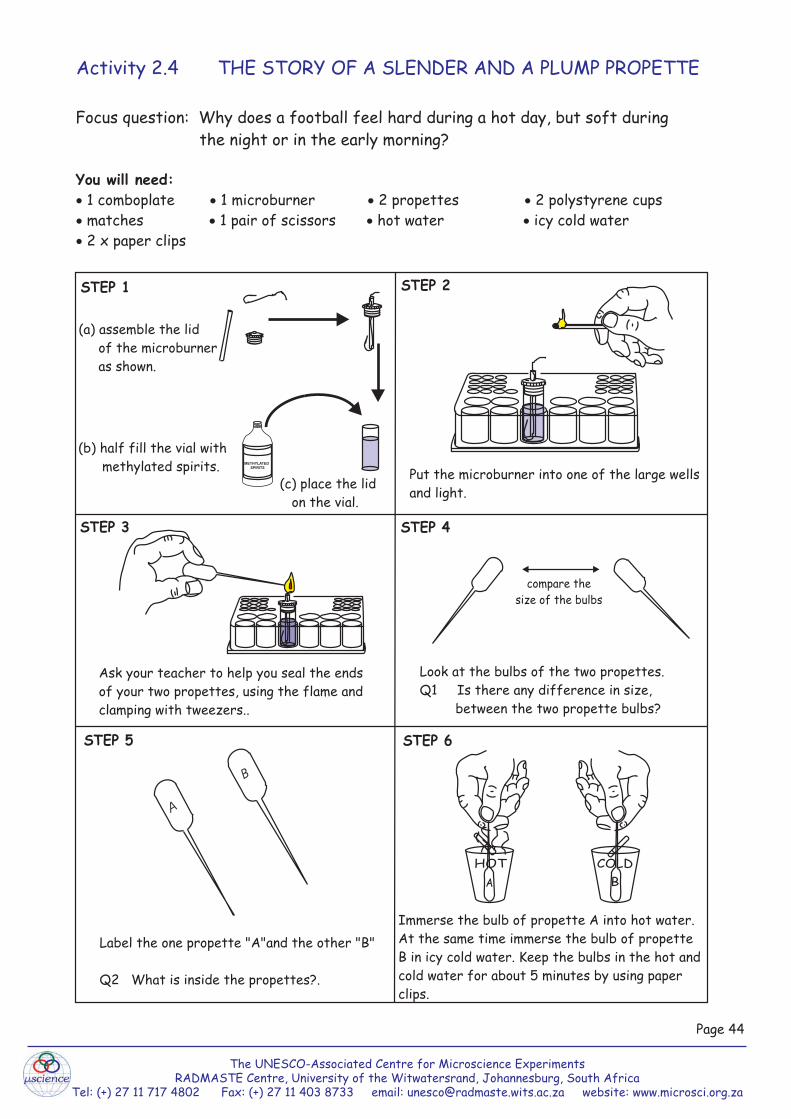
Activity 2.4 THE STORY OF A SLENDER AND A PLUMP PROPETTE
Focus question: Why does a football feel hard during a hot day, but soft during the night or in the early morning?
You will need:! 1 comboplate ! 1 microburner ! 2 propettes ! 2 polystyrene cups! matches ! 1 pair of scissors ! hot water ! icy cold water! 2 x paper clips
Look at the bulbs of the two propettes.Q1 Is there any difference in size, between the two propette bulbs?
STEP 1 STEP 2
STEP 3
STEP 5 STEP 6
STEP 4
Ask your teacher to help you seal the endsof your two propettes, using the flame and clamping with tweezers..
Put the microburner into one of the large wells and light. (c) place the lid
on the vial.
Label the one propette "A"and the other "B"
Q2 What is inside the propettes?.
A
B
Immerse the bulb of propette A into hot water.At the same time immerse the bulb of propette B in icy cold water. Keep the bulbs in the hot and cold water for about 5 minutes by using paper clips.
(a) assemble the lid of the microburner as shown.
(b) half fill the vial with methylated spirits.
AHOT COLD
B
Page 44
The UNESCO-Associated Centre for Microscience ExperimentsRADMASTE Centre, University of the Witwatersrand, Johannesburg, South Africa
Tel: (+) 27 11 717 4802 Fax: (+) 27 11 403 8733 email: [email protected] website: www.microsci.org.za
compare thesize of the bulbs
METHYLATEDSPIRITS

STEP 8
STEP 9
Q8 What causes the inflation of balloons and balls? Q9 A football is pumped up hard during the day when it is warm. When the
temperature falls in the evening the football does not feel so hard anymore.Explain this.
Now immerse the bulb of propette B into the hot water for 3 minutes.Q7 What happened?
Use a pair of scissors to snip off the sealed end of each propette so that they can be used again.
STEP 7
Remove at the same time
Q5 What caused this?Q6 What do you think will happen if you immerse the bulb of propette B in
hot water for a few minutes?
Q3 Do you see any difference between them?
Q4 Describe what you see.
Remove the propettes at the same time and look at the bulbs.
Cut the sealed tip
HOTA
Page 45
COLD
B
HOT
A
The UNESCO-Associated Centre for Microscience ExperimentsRADMASTE Centre, University of the Witwatersrand, Johannesburg, South Africa
Tel: (+) 27 11 717 4802 Fax: (+) 27 11 403 8733 email: [email protected] website: www.microsci.org.za

Activity 2.5 THE LAZY THIN WIRE
Focus question: What happens to the length of a piece of wire when it is heated?
Insert one microstand into well A3 and another in well D12.
Insert a glass tube into well B6.
Tie one end of a rubber band to the glass tube.Insert the other end in well A3 and press in with the microstand. Insert the straw on the glass tube.
You will need:
! 1 comboplate ! 2 x microstands ! 1 thin rubber band ! 1 piece of cardboard! 1 microburner ! 12 cm copper wire ! 1 glass tube ! 1 straw
You will need:
STEP 1 STEP 2
STEP 4
Tightly tie a piece of copper wire to the glass tube and to the microstand in well D12.
STEP 3
Page 46
wet cotton wool
Straw
rubber band
The UNESCO-Associated Centre for Microscience ExperimentsRADMASTE Centre, University of the Witwatersrand, Johannesburg, South Africa
Tel: (+) 27 11 717 4802 Fax: (+) 27 11 403 8733 email: [email protected] website: www.microsci.org.za
A
D
E
1
45
67
8
1011 12
L
1
2
3
4
5
6
D12
A3
1
2
34
5
D12
B6
A3
B6
D12
DA3
B6
D12

Heat the wire with the microburner for some minutes and note the position of the tube as the wire is heated.
Place a piece of cardboard with markings (as illustrated) in the background of the glass tube and make a mark on the cardboard to show the position of the tube before heating.
STEP 5
Straw
STEP 6
Q1 What happened to the position of the straw when the wire was heated?
Q2 What does this mean for the length of the wire?
Q3 What is actually happening to the particles of the wire when it expands?
Q4 What do you think will happen when the wire is cooled?
Q5 When a substance expands on heating, does that mean the particles have become bigger?
Q6 Why do lifts sometimes jam on very hot or very cold days?
Page 47
The UNESCO-Associated Centre for Microscience ExperimentsRADMASTE Centre, University of the Witwatersrand, Johannesburg, South Africa
Tel: (+) 27 11 717 4802 Fax: (+) 27 11 403 8733 email: [email protected] website: www.microsci.org.za
A3
B6
D12
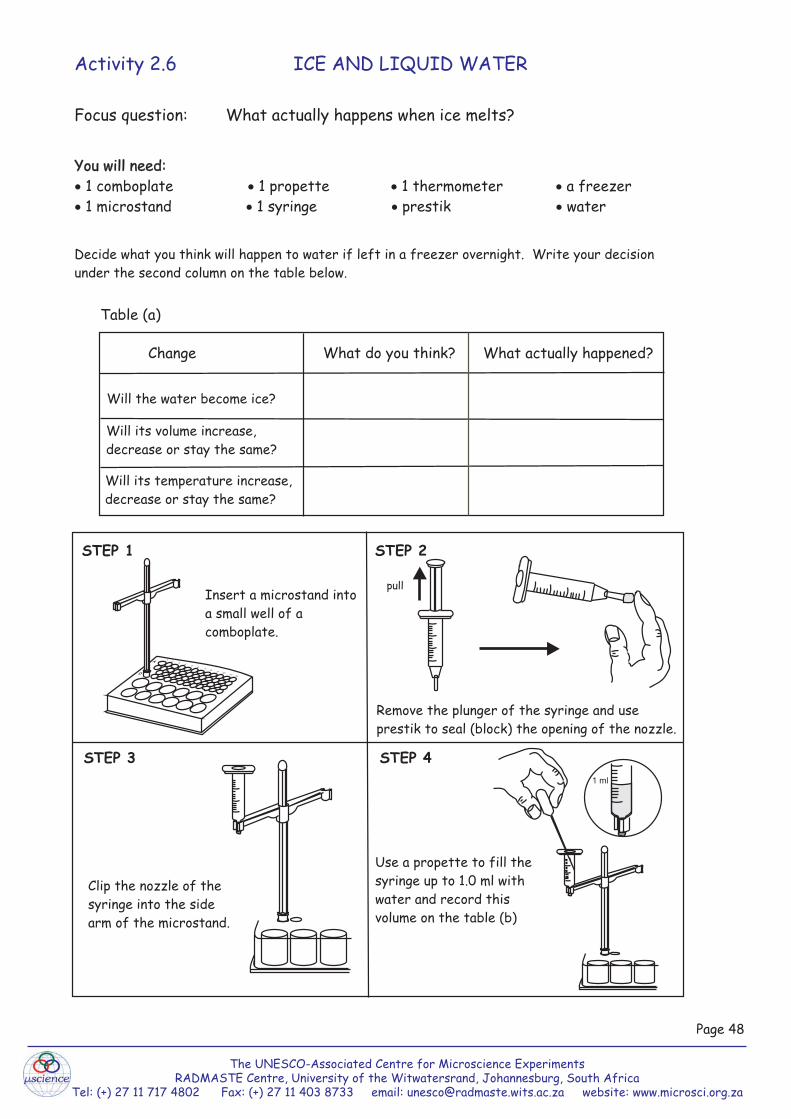
Activity 2.6 ICE AND LIQUID WATER
Focus question: What actually happens when ice melts?
Decide what you think will happen to water if left in a freezer overnight. Write your decision under the second column on the table below.
You will need:! 1 comboplate ! 1 propette ! 1 thermometer ! a freezer! 1 microstand ! 1 syringe ! prestik ! water
You will need:
Use a propette to fill the syringe up to 1.0 ml with water and record this volume on the table (b)
1 ml
Remove the plunger of the syringe and use prestik to seal (block) the opening of the nozzle.
STEP 1 STEP 2
Insert a microstand into a small well of a comboplate.
STEP 3
A
D
1 23
45
67
89 10
1112
STEP 4
Clip the nozzle of the syringe into the side arm of the microstand.
pull
Table (a)
Change What do you think? What actually happened?
Will its temperature increase,decrease or stay the same?
Will its volume increase,decrease or stay the same?
Will the water become ice?
Page 48
The UNESCO-Associated Centre for Microscience ExperimentsRADMASTE Centre, University of the Witwatersrand, Johannesburg, South Africa
Tel: (+) 27 11 717 4802 Fax: (+) 27 11 403 8733 email: [email protected] website: www.microsci.org.za

Put the system (syringe, comboplate, microstand) in the freezer and leave for two hours or overnight.
Look at the ice and water in the syringe as the ice melts.Q7 Look at the ice and liquid water. Which is at the bottom and which is at the top?Q8 Does ice float on water or does it sink?Q9 Which has a higher density: ice or liquid water?Q10 Note the volume of water after
melting and say whether there is expansion or contraction or no volume change when ice melts.
Insert the thermometer in the syringe and use the warmth of your hands to melt the ice in the syringe. As the ice melts watch the temperature closely.Q5 Does the temperature of water increase, decrease or stay the same as ice melts?Q6 What is the melting point of ice?
Remove the syringe from the freezer (after two hours or overnight) and note the volume and state of water; measure the temperature with a thermometer.Q1 Record your findings on table (b) under 'after'.Q2 Answer the questions in table (a) and write them in the third column.Q3 Are there differences between what you thought would happen and what
actually happened?Q4 Does water expand or contract when it freezes?
STEP 5
STEP 6
Use a thermometer to measure the temperature of the water and record your findings on table (b) under ‘Before’.
STEP 7
STEP 9
Table (b)
Property Before AfterVolume/ ml
0temperature/ C
state
thermometer
STEP 8
1ml
.
Page 49
The UNESCO-Associated Centre for Microscience ExperimentsRADMASTE Centre, University of the Witwatersrand, Johannesburg, South Africa
Tel: (+) 27 11 717 4802 Fax: (+) 27 11 403 8733 email: [email protected] website: www.microsci.org.za
0 0
2 0
1 0
3 0
5 0
C
2 0
0 0
1 0
3 0
5 0
C
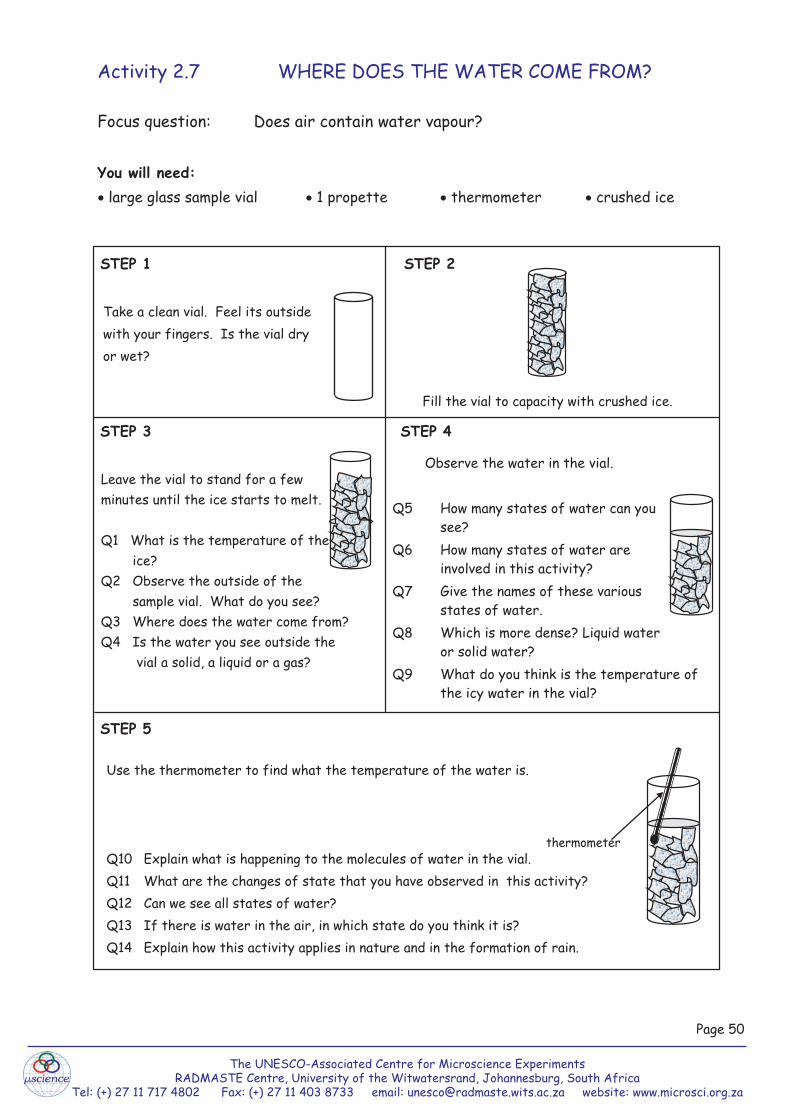
Activity 2.7 WHERE DOES THE WATER COME FROM?
Focus question: Does air contain water vapour?
You will need:
! large glass sample vial ! 1 propette ! thermometer ! crushed ice
STEP 1
STEP 3
STEP 2
Fill the vial to capacity with crushed ice.
Take a clean vial. Feel its outside with your fingers. Is the vial dry or wet?
STEP 4
Leave the vial to stand for a few minutes until the ice starts to melt.
Q1 What is the temperature of the ice?Q2 Observe the outside of the sample vial. What do you see?Q3 Where does the water come from?Q4 Is the water you see outside the vial a solid, a liquid or a gas?
Use the thermometer to find what the temperature of the water is.
Q10 Explain what is happening to the molecules of water in the vial.Q11 What are the changes of state that you have observed in this activity?Q12 Can we see all states of water?Q13 If there is water in the air, in which state do you think it is?Q14 Explain how this activity applies in nature and in the formation of rain.
Observe the water in the vial.
Q5 How many states of water can you see?
Q6 How many states of water are involved in this activity?
Q7 Give the names of these various states of water.
Q8 Which is more dense? Liquid water or solid water?
Q9 What do you think is the temperature of the icy water in the vial?
STEP 5
thermometer
Page 50
The UNESCO-Associated Centre for Microscience ExperimentsRADMASTE Centre, University of the Witwatersrand, Johannesburg, South Africa
Tel: (+) 27 11 717 4802 Fax: (+) 27 11 403 8733 email: [email protected] website: www.microsci.org.za
The UNESCO-Associated Centre for Microscience ExperimentsRADMASTE Centre, University of the Witwatersrand, Johannesburg, South Africa
Tel: (+) 27 11 717 4802 Fax: (+) 27 11 403 8733 email: [email protected] website: www.microsci.org.za
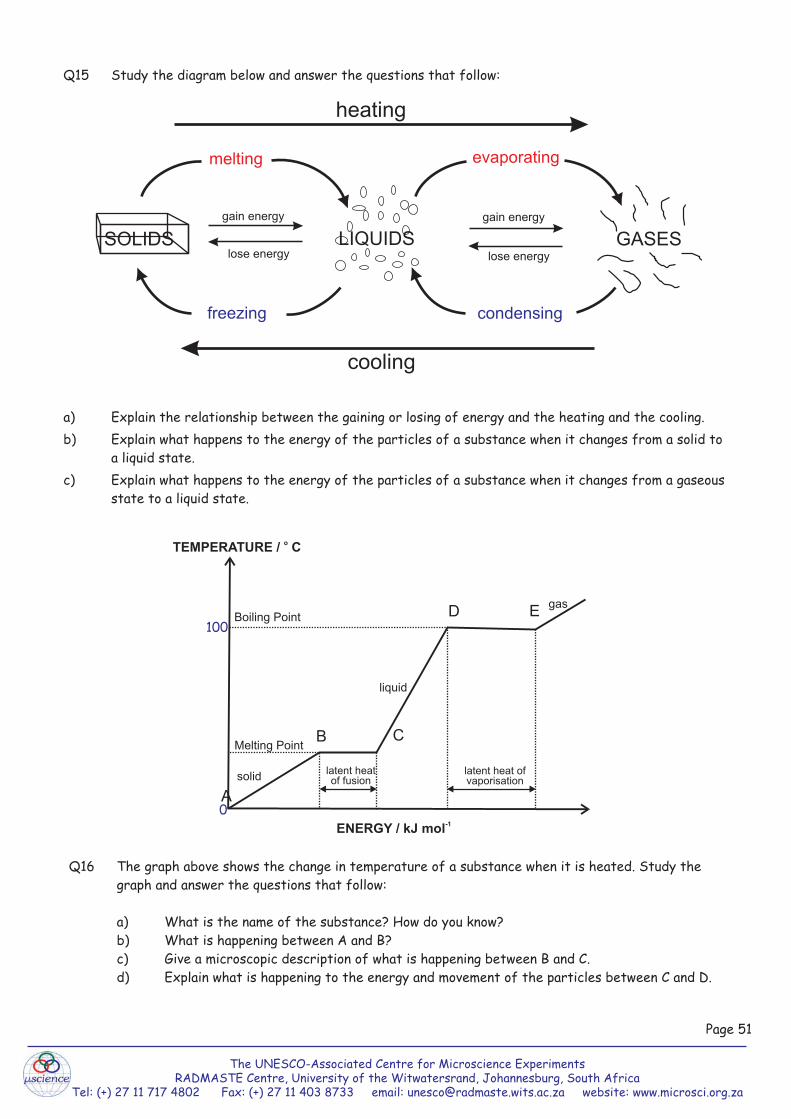
Q15 Study the diagram below and answer the questions that follow:
a) Explain the relationship between the gaining or losing of energy and the heating and the cooling.b) Explain what happens to the energy of the particles of a substance when it changes from a solid to
a liquid state.c) Explain what happens to the energy of the particles of a substance when it changes from a gaseous
state to a liquid state.
melting evaporating
condensingfreezing
LIQUIDSSOLIDS GASES
gain energy
lose energy lose energy
gain energy
heating
cooling
Q16 The graph above shows the change in temperature of a substance when it is heated. Study the graph and answer the questions that follow:
a) What is the name of the substance? How do you know?b) What is happening between A and B?c) Give a microscopic description of what is happening between B and C.d) Explain what is happening to the energy and movement of the particles between C and D.
oTEMPERATURE / C
-1ENERGY / kJ mol
Boiling Point
Melting Point
solid
liquid
gas
A
B C
D E
latent heatof fusion
latent heat ofvaporisation
0
100
Page 51

Activity 2.8 MEASURING EVAPORATION
Focus question: How is the temperature drop related to evaporation?
You will need:! 1 comboplate ! 2 thermometers ! 2 rubber bands ! 1 stop watch ! water! 1 microstand ! cotton wool ! 2 propettes ! methylated spirits
You will need:
Wrap the bulb of each thermometer with a piece of cotton wool and keep it firm with a rubber band.Q1 What is the temperature of the cotton wool?
STEP 1 STEP 2
STEP 5
Place the comboplate close to an open window to allow free circulation of air.
Observe for several minutes what happens to both themometer readings and record your findings on the table that follows.
Fit the thermometers in the arms of the microstand and turn the thermometers in such a way that the markings on the thermometers can be read.
STEP 4STEP 3
STEP 6
STEP 7
cotton wool
Using a propette put about 1 ml methylated spirits into F3. Use another propette to transfer water into F1.
Dip the cotton wool of one thermometer in methylated spirits and that of the other in the water at the same time.
METHYLATED SPIRITS
F1 F3 F4
TAP WATERTAP WATER
Fit the microstandinto D7.
Page 52
F1 F3
D7
D7
The UNESCO-Associated Centre for Microscience ExperimentsRADMASTE Centre, University of the Witwatersrand, Johannesburg, South Africa
Tel: (+) 27 11 717 4802 Fax: (+) 27 11 403 8733 email: [email protected] website: www.microsci.org.za
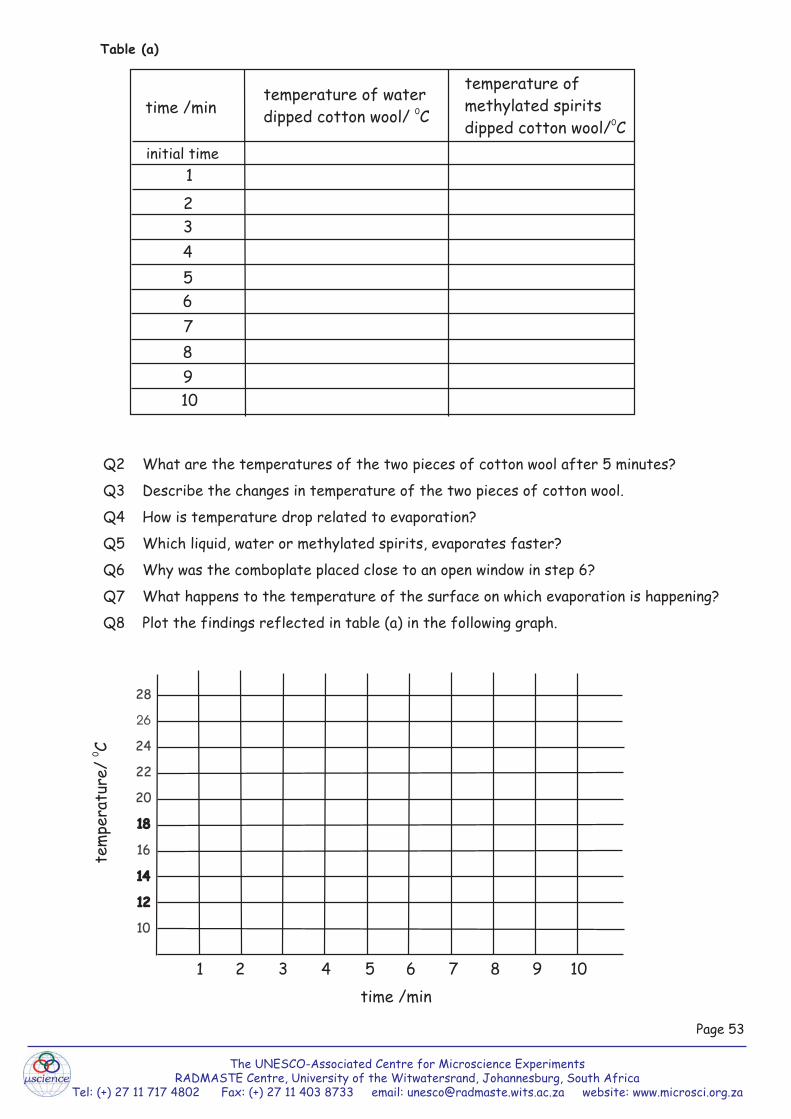
Q2 What are the temperatures of the two pieces of cotton wool after 5 minutes?Q3 Describe the changes in temperature of the two pieces of cotton wool.Q4 How is temperature drop related to evaporation?Q5 Which liquid, water or methylated spirits, evaporates faster?Q6 Why was the comboplate placed close to an open window in step 6?Q7Q8
What happens to the temperature of the surface on which evaporation is happening?Plot the findings reflected in table (a) in the following graph.
Table (a)
temperature ofmethylated spirits
0dipped cotton wool/ Ctime /min
initial time1234567
temperature of water0dipped cotton wool/ C
8910
time /min
0te
mpe
ratu
re/
C
28
26
24
22
20
1818
16
1414
1212
10
1021 3 4 5 6 7 8 9
Page 53
The UNESCO-Associated Centre for Microscience ExperimentsRADMASTE Centre, University of the Witwatersrand, Johannesburg, South Africa
Tel: (+) 27 11 717 4802 Fax: (+) 27 11 403 8733 email: [email protected] website: www.microsci.org.za

Activity 2.9 THE STATES OF WATER
MAKING ICE FOR THIS EXPERIMENT:
Focus question:
You will need:
! 1 comboplate ! 1 large sample vial with lid (size 4) ! tap water ! a freezer
• Fill the large wells of a comboplate with tap water. • Put the comboplate into the freezer. You may need to leave it there for a day.
Just before you do this experiment, turn the comboplate upside down and shake it toremove the pieces of ice.
Q1 Do the ice cubes float or not?
Q2 Where have you seen ice floating before?
Q3 Look at the water in the sample vial.
(a) How many states of water can you see?
(b) Give the names of the various states of water.
Q4 What do you think will happen to the ice after a while?
Q5 How do you know that ice is water?
Q6 Feel the outside of the sample vial. Does the vial feel dry or wet?
Q7 Is the water on the outside of the vial a liquid, a solid or a gas?
Q8 Where does the water on the outside come from?
Q9 Can you see water in the air around you?
Q11 Can you see all the states of water?
Q12 Complete the concept map on the next page by filling the empty spaces.
Can water exist in different forms or states?
Step 1 Take the lid off the large sample vial and then half fill it with tap water.
Step 2 Put 2 or 3 pieces of ice into the large sample vial. Close the vial with the lid.
Questions
Q10 In how many states can we find water?
Page 54
The UNESCO-Associated Centre for Microscience ExperimentsRADMASTE Centre, University of the Witwatersrand, Johannesburg, South Africa
Tel: (+) 27 11 717 4802 Fax: (+) 27 11 403 8733 email: [email protected] website: www.microsci.org.za

The UNESCO-Associated Centre for Microscience ExperimentsRADMASTE Centre, University of the Witwatersrand, Johannesburg, South Africa
Tel: (+) 27 11 717 4802 Fax: (+) 27 11 403 8733 email: [email protected] website: www.microsci.org.za
lakes
oceans
rivers
toform collects in
snow ice
solid
for example
hail
clouds
fog
mist
steam
to form
water vapour
which is called
dew
for example
liquid
can exist as
WATER
change of________
due to
change inpressure
causes causes changes
by changing
to to to to
by changing by changing by changing
e.g. increased pressurecausing
ice to melt
liquid
liquid liquid solid
gas
gas
melting freezing
CONCEPT MAP OF PROPERTIES OF WATER
Page 55
Activity 2.10 HOW CAN WE KNOW THAT IT IS WATER?
Step 1
Step 2
Step 3
Step 4
Step 5
ANHYDROUS COPPER SULPHATE
Focus Question: How can we test for water?
You will need:
Light the microburner. Be careful not to burn yourself.
Put 2 microspatulas of blue copper sulphate crystals into the glass fusion tube.
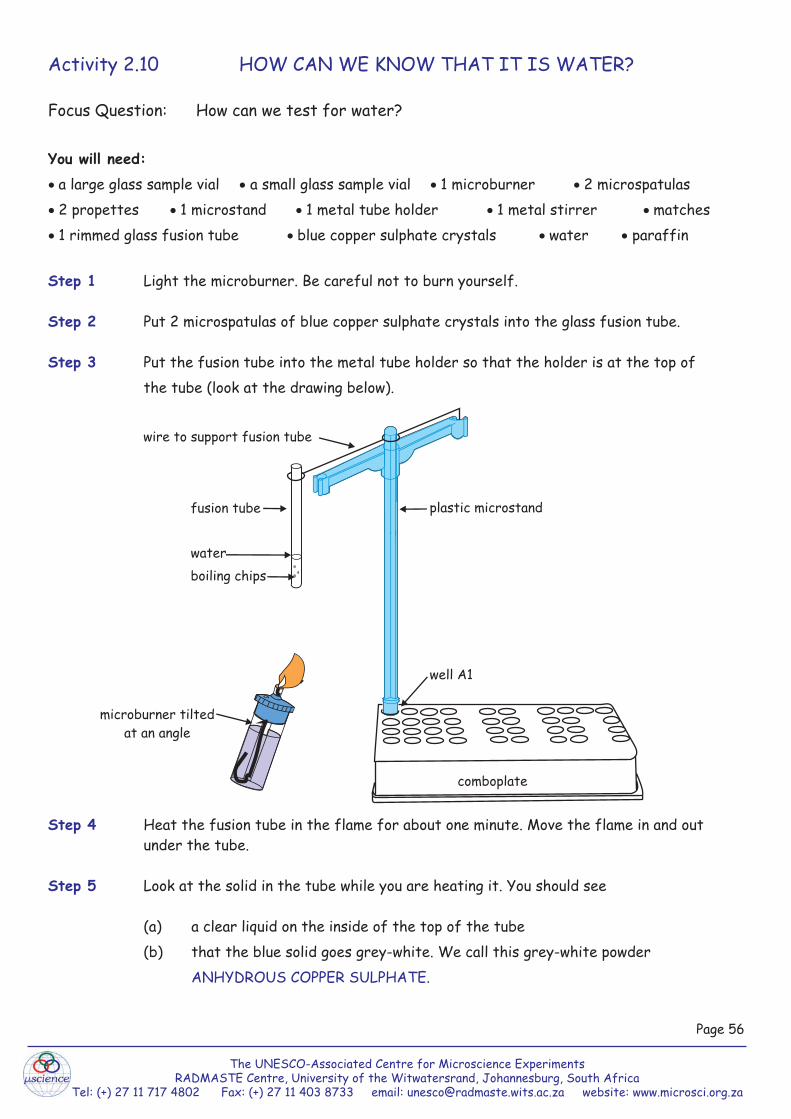
Put the fusion tube into the metal tube holder so that the holder is at the top ofthe tube (look at the drawing below).
Heat the fusion tube in the flame for about one minute. Move the flame in and outunder the tube.
! a large glass sample vial ! a small glass sample vial ! 1 microburner ! 2 microspatulas ! 2 propettes ! 1 microstand ! 1 metal tube holder ! 1 metal stirrer ! matches! 1 rimmed glass fusion tube ! blue copper sulphate crystals ! water ! paraffin
Look at the solid in the tube while you are heating it. You should see
(a) a clear liquid on the inside of the top of the tube(b) that the blue solid goes grey-white. We call this grey-white powder
.
The UNESCO-Associated Centre for Microscience ExperimentsRADMASTE Centre, University of the Witwatersrand, Johannesburg, South Africa
Tel: (+) 27 11 717 4802 Fax: (+) 27 11 403 8733 email: [email protected] website: www.microsci.org.za
Page 56
fusion tube
waterboiling chips
wire to support fusion tube
plastic microstand
well A1
comboplate
microburner tiltedat an angle
The UNESCO-Associated Centre for Microscience ExperimentsRADMASTE Centre, University of the Witwatersrand, Johannesburg, South Africa
Tel: (+) 27 11 717 4802 Fax: (+) 27 11 403 8733 email: [email protected] website: www.microsci.org.za
Step 6
Step 7
Step 8
Step 9
Step 10
Step 11
Step 12
Step 13
Step 14
Keep heating the tube until all the clear liquid disappears.
Stop heating the fusion tube when all the clear liquid has disappeared.
When the tube is cool, use the metal stirrer to break the grey-white solid in the fusion tube into very small pieces.
If some of the solid in the fusion tube is still blue, heat the fusion tube again.
Keep heating the solid in the fusion tube until all the powder is grey-white and until all the clear liquid has disappeared.
When the tube is cool, take two to three microspatulas of grey-white powder out of the tube. Keep this for the next activity.
Put about half of the remaining grey-white powder into the small sample vial. Putthe rest of the powder into the large sample vial.
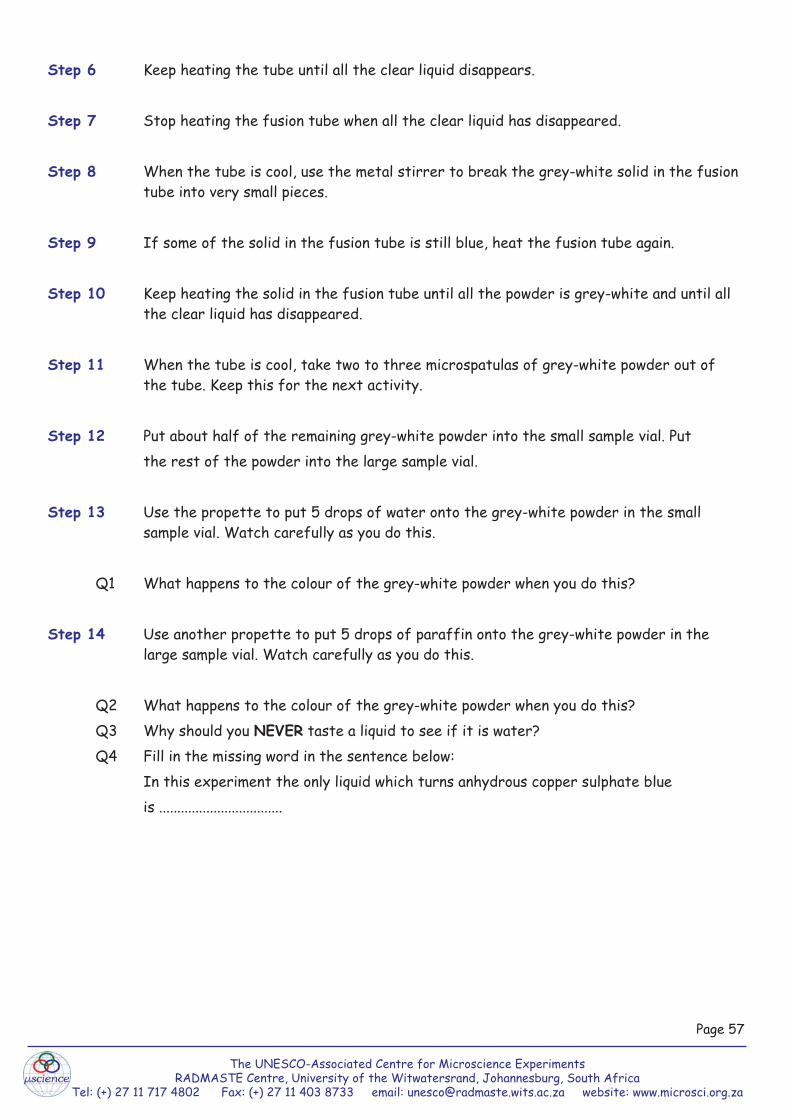
Use the propette to put 5 drops of water onto the grey-white powder in the small sample vial. Watch carefully as you do this.
Q1 What happens to the colour of the grey-white powder when you do this?
Use another propette to put 5 drops of paraffin onto the grey-white powder in the large sample vial. Watch carefully as you do this.
Q2 What happens to the colour of the grey-white powder when you do this?Q3 Why should you NEVER taste a liquid to see if it is water?Q4 Fill in the missing word in the sentence below:
In this experiment the only liquid which turns anhydrous copper sulphate blueis ..................................
Page 57
The UNESCO-Associated Centre for Microscience ExperimentsRADMASTE Centre, University of the Witwatersrand, Johannesburg, South Africa
Tel: (+) 27 11 717 4802 Fax: (+) 27 11 403 8733 email: [email protected] website: www.microsci.org.za
Activity 2.11 ABOUT WATER VAPOUR
Step 1
Step2
Step 3
Step 4
Step 5
Focus question: Can water become invisible and yet still exist?
You will need:
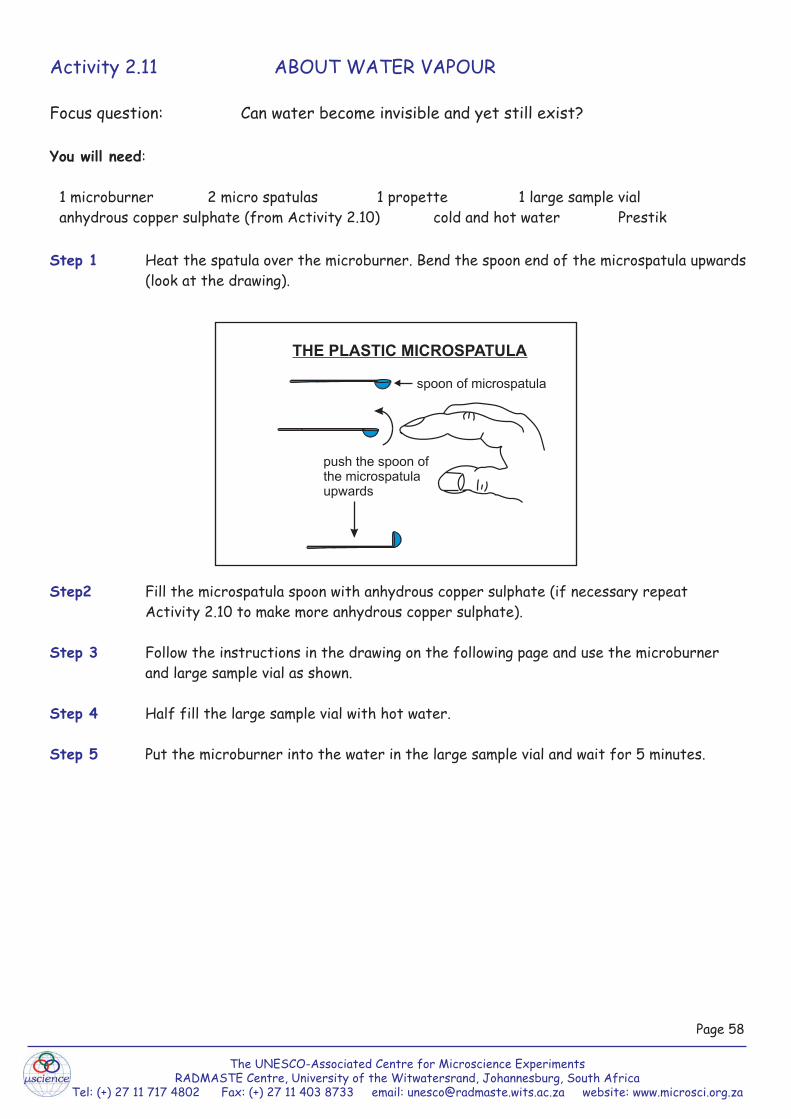
Heat the spatula over the microburner. Bend the spoon end of the microspatula upwards (look at the drawing).
Fill the microspatula spoon with anhydrous copper sulphate (if necessary repeat Activity 2.10 to make more anhydrous copper sulphate).
Follow the instructions in the drawing on the following page and use the microburner and large sample vial as shown.
Half fill the large sample vial with hot water.
Put the microburner into the water in the large sample vial and wait for 5 minutes.
1 microburner 2 micro spatulas 1 propette 1 large sample vialanhydrous copper sulphate (from Activity 2.10) cold and hot water Prestik
Page 58
THE PLASTIC MICROSPATULA
spoon of microspatula
push the spoon of the microspatulaupwards

The UNESCO-Associated Centre for Microscience ExperimentsRADMASTE Centre, University of the Witwatersrand, Johannesburg, South Africa
Tel: (+) 27 11 717 4802 Fax: (+) 27 11 403 8733 email: [email protected] website: www.microsci.org.za
Remove the lid and glass tube from the microburner
Add 20 drops ofwater to the vial of
the burner
Remove the glass tubeand string from the microburnerlid.
Push the bent microspatula withcopper sulphate up through themicroburner lid.
Hold the microspatulain place using Prestik
Block the small hole inthe lid with Prestik
Put the microburner into a large sample vial which ishalf filled with hot water
Prestik
coppersulphatehot water
largevial
Q1 What happened to the colour of the anhydrous copper sulphate?
When you have seen what has happened, clean everything first and then start again.
Follow ALL the instructions on the drawing above again, ONLY this time, DO NOT ADD TWENTY DROPS OF WATER TO THE MICROBURNER VIAL.
Q2 What happened to the colour of the anhydrous copper sulphate in this second experiment?Q3 The grey-white colour of anhydrous copper sulphate will only change to blue in the presence
of ......Q4 Did the colour of the anhydrous copper sulphate change when:
(a) there was water in the microburner vial? (b) there was no water in the microburner vial?
Q5 (a) Did you see the water which changed the colour of the grey-white anhydrous coppersulphate to blue?
(b) Where did the water come from?Q6 Can water become invisible?Q7 Where do you think you will find the most water in the air:
(a) at the sea?(b) in the mountains?
Step 6
Page 59
The UNESCO-Associated Centre for Microscience ExperimentsRADMASTE Centre, University of the Witwatersrand, Johannesburg, South Africa
Tel: (+) 27 11 717 4802 Fax: (+) 27 11 403 8733 email: [email protected] website: www.microsci.org.za
Activity 2.12 THE WATER CYCLE
Step 1
Step 2
Step 3
Step 4
Step 5
Focus question: What do we mean by the 'water cycle'?
You will need:! 1 large sample vial ! 1 marking pen ! 1 syringe (2 ml) ! tap water! 1 square of aluminium foil (5 cm x 5 cm)
Use the syringe to put 2 ml of tap water into the sample vial and put the lid back on.
Wrap the square of aluminium foil around the lid and top of the sample vial so that
about a quarter of the vial is covered with foil.
Mark the initial level of the water with the marking pen.
Put the sample vial in the sun and wait a couple of hours before you answer the questions
below.
Take the lid off a large sample vial.
Q1 What happens to the water level in the sample vial after a while? Q2 (a) What do you see on the inside walls of the sample vial?
(b) Where do you think this substance comes from? Explain.Q3 (a) What is the name of the process during which gaseous water changes to liquid
water?(b) What is the name of the process during which water in the liquid state changes
into water in the gaseous state?Q4 How are your observations related to the 'water cycle'? Explain what 'the water cycle'
is.
Page 60

The UNESCO-Associated Centre for Microscience ExperimentsRADMASTE Centre, University of the Witwatersrand, Johannesburg, South Africa
Tel: (+) 27 11 717 4802 Fax: (+) 27 11 403 8733 email: [email protected] website: www.microsci.org.za
Activity 2.13 WIND AND EVAPORATION
Step 1
Step 2
Step 3
Step 4
Step 5
Step 6
Step 7
Focus question: How does the wind affect evaporation?
! 2 large sample vials ! tap water ! 1 marking pen (permanent) ! 1 syringe (2 ml)
Mark down a scale on one of the large sample vials. See illustration below to do this:
(a) Take off the lid
(b) Draw 1 ml of water into the syringe
(c) Push the plunger of the syringe to put all the water into the vial
(d) Mark the level of the water in the vial
(e) Label this water level 1 ml
(f) Repeat b, c, d and e several times. Your scale should look like the example:
Repeat step l(a) to (f) with the other large sample vial using the same syringe.
Make sure that the last marking in both vials is exactly the same. Fill both vials up
to the last marking, e.g. if the last marking is 17 ml, then the water level should be at
17 ml in both sample vials.
Use the marking pen to label the sample vials: A and B.
Place sample vial A in a windy, shady place (e.g. on the shelf near an open window) and sample vial B in a non-windy, shady place (e.g. on the shelf away from the open window).
Write down the volume of water (in ml) in each sample vial in the table which follows.
Read the volume of water in sample vials A and B at least once a day for two or three days.
You will need:
You should have about 17 markings on the sample vial.
1 ml2 ml3 ml4 ml5 ml
Page 61
The UNESCO-Associated Centre for Microscience ExperimentsRADMASTE Centre, University of the Witwatersrand, Johannesburg, South Africa
Tel: (+) 27 11 717 4802 Fax: (+) 27 11 403 8733 email: [email protected] website: www.microsci.org.za
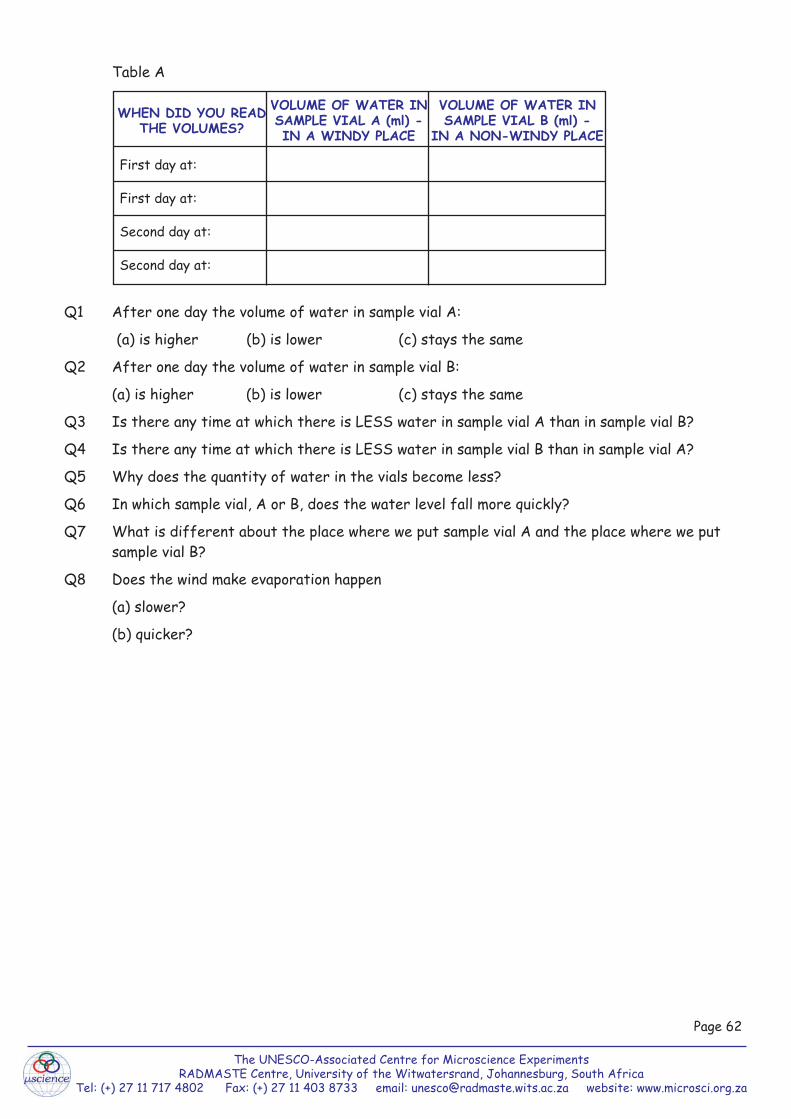
Table A
Q1 After one day the volume of water in sample vial A:
(a) is higher (b) is lower (c) stays the same
Q2 After one day the volume of water in sample vial B:
(a) is higher (b) is lower (c) stays the same
Q3 Is there any time at which there is LESS water in sample vial A than in sample vial B?
Q4 Is there any time at which there is LESS water in sample vial B than in sample vial A?
Q5 Why does the quantity of water in the vials become less?
Q6 In which sample vial, A or B, does the water level fall more quickly?
Q7 What is different about the place where we put sample vial A and the place where we put sample vial B?
Q8 Does the wind make evaporation happen
(a) slower?
(b) quicker?
WHEN DID YOU READTHE VOLUMES?
VOLUME OF WATER INSAMPLE VIAL A (ml) - IN A WINDY PLACE
VOLUME OF WATER INSAMPLE VIAL B (ml) -
IN A NON-WINDY PLACE
First day at:
First day at:
Second day at:
Second day at:
Page 62

The UNESCO-Associated Centre for Microscience ExperimentsRADMASTE Centre, University of the Witwatersrand, Johannesburg, South Africa
Tel: (+) 27 11 717 4802 Fax: (+) 27 11 403 8733 email: [email protected] website: www.microsci.org.za
Focus question: Does evaporation happen faster in a warm place or in a cool place?
You will need:
! 2 large sample vials ! tap water ! 1 marking pen (permanent) ! 1 syringe (2 ml)
Use the sample vials A and B you used in Activity 2.13. Fill these with water, using the syringe, in the same way as in step 1 before.
Put sample vial A in a warm place and sample vial B in a cool place.
Write down the volume of water (in ml) in each sample vial in the table below. Read the volume of water in sample vials A and B at least once a day for two or three days.
Q1 Does the volume of water
(a) get less in A and B? (b) get less in A only? (c) get less in B only?
Q2 Take a look at the water in your sample vials during the second day. Which sample vial hasless water: A or B?
Q3 In which vial, A or B, does the water evaporate faster?
Q4 In what way is the place where we put sample vial A different to the place where we put sample vial B?
Q5 Where will wet clothes dry quicker: in the sun or in the shade?
Q6 Cross out the wrong word in the following sentence:
Evaporation happens faster/slower in hot places than in cooler places.
Activity 2.14 EVAPORATION AND TEMPERATURE
Step 1
Step 2
Step 3
WHEN DID YOU READTHE VOLUMES?
VOLUME OF WATER INSAMPLE VIAL A (ml) - IN A WARM PLACE
VOLUME OF WATER INSAMPLE VIAL B (ml) -
IN A COOL PLACE
First day at:
First day at:
Second day at:
Second day at:
Page 63
The UNESCO-Associated Centre for Microscience ExperimentsRADMASTE Centre, University of the Witwatersrand, Johannesburg, South Africa
Tel: (+) 27 11 717 4802 Fax: (+) 27 11 403 8733 email: [email protected] website: www.microsci.org.za
Activity 2.15 EVAPORATION AND SURFACE AREA
Step 1
Step 2
Step 3
Step 4
Step 5
Focus question: Does evaporation happen faster from a big surface or from a small surface?
Use sample vials A and B from Activity 2.13. Use the syringe to fill sample vials A and B with water. (Both vials should have about 17 ml of water.)
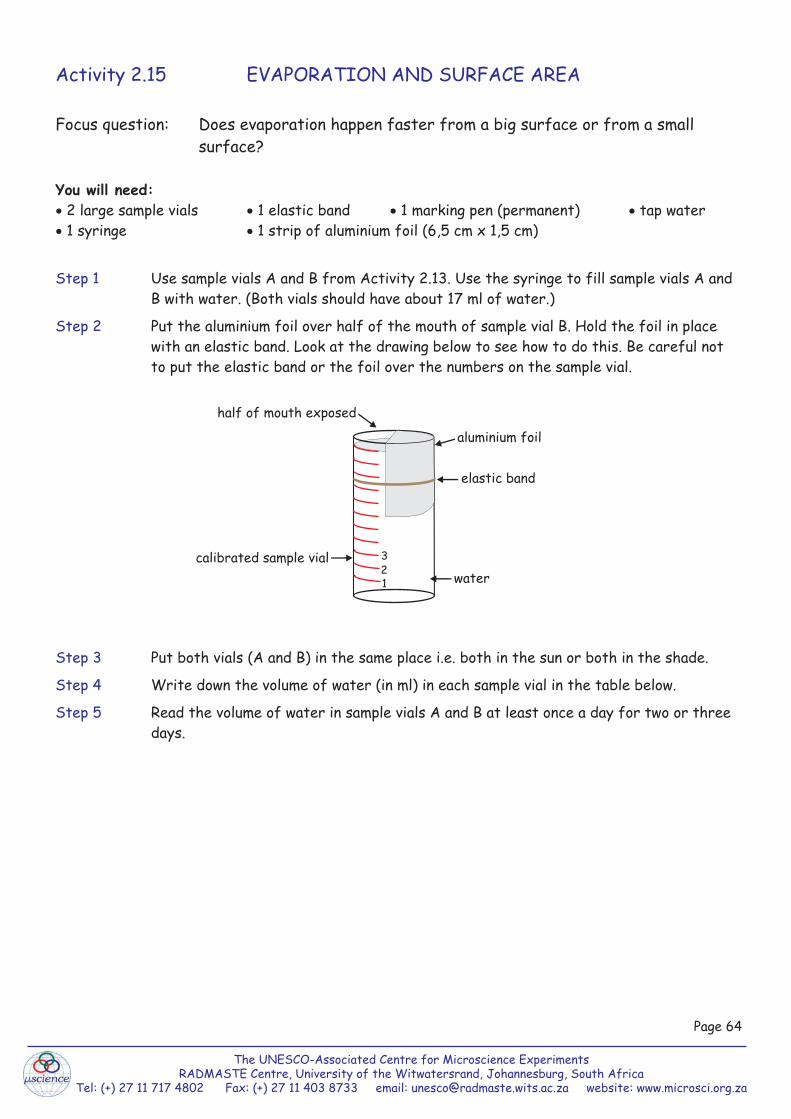
Put the aluminium foil over half of the mouth of sample vial B. Hold the foil in place with an elastic band. Look at the drawing below to see how to do this. Be careful not to put the elastic band or the foil over the numbers on the sample vial.
Put both vials (A and B) in the same place i.e. both in the sun or both in the shade.
Write down the volume of water (in ml) in each sample vial in the table below.
Read the volume of water in sample vials A and B at least once a day for two or three days.
You will need:! 2 large sample vials ! 1 elastic band ! 1 marking pen (permanent) ! tap water! 1 syringe ! 1 strip of aluminium foil (6,5 cm x 1,5 cm)
123calibrated sample vial
half of mouth exposed
aluminium foil
elastic band
water
Page 64

The UNESCO-Associated Centre for Microscience ExperimentsRADMASTE Centre, University of the Witwatersrand, Johannesburg, South Africa
Tel: (+) 27 11 717 4802 Fax: (+) 27 11 403 8733 email: [email protected] website: www.microsci.org.za
Q1 After one day does the volume of water in both sample vials:
(a) stay the same? (b) become bigger? (c) become smaller?
Q2 Where does evaporation take place - from the surface of the water or from the water at the bottom of the vial?
Q3 Compare the two water volumes each time you take a measurement. Are they the same? If not, which one is more (more water)?
Q4 Which vial, A or B, contains LESS water at the end of the experiment?
Q5 Which water surface is bigger: A or B?
Q6 1 teaspoon of water is put into a saucer; 1 teaspoon of water is put into a large sample vial. The saucer and the vial are put in the sun. Would you expect the water to evaporate faster from the vial or from the saucer?
WHEN DID YOU READTHE VOLUMES?
VOLUME OF WATER INLARGE SAMPLE VIAL A
(ml)
VOLUME OF WATER INLARGE SAMPLE VIAL B
(ml)
First day at:
First day at:
Second day at:
Second day at:
Page 65

The UNESCO-Associated Centre for Microscience ExperimentsRADMASTE Centre, University of the Witwatersrand, Johannesburg, South Africa
Tel: (+) 27 11 717 4802 Fax: (+) 27 11 403 8733 email: [email protected] website: www.microsci.org.za
Can we get drinking water from plants?
No need to die of thirst!Imagine that you are in the middle of a desert without water. There are no rivers and no lakes in the desert. This experiment will tell you what you can do in order to survive your outdoor venture. Remember: some of the items used in this experiment may not be available to you outdoors and you may need to think of other similar ways to collect water if you were in this situation.
You will need:
Use the pair of scissors to cut the leaf into small squares about 1 cm wide and long. If the leaf has thorns or prickly hairs, be careful not to hurt yourself.
Remove the lid from the sample vial.
Put the leaf cuttings in the vial.
Put the lid back onto the sample vial.
Put the vial in the sun for about 30 - 45 min.
Use another microspatula to add a few grains of anhydrous copper sulphate to this colourless liquid. (Activity 2.10 tells you how to make anhydrous copper sulphate).
Q2 What happened to the white anhydrous copper sulphate when it was added to the colourless liquid?
Q3 What is the name of the colourless liquid that was formed in the sample vial?
Q4 Where does this water come from?
Q5 Would the quantity of leaf cuttings be sufficient to fill the sample vial with water?
Activity 2.16 IS THERE WATER IN PLANT LEAVES?
Step 1
Step 2
Step 3
Step 4
Step 5
Step 6
Step 7
Focus question:
! 1 small sample vial with lid (without holes) ! 1 succulent plant leaf (Xerophytes work best)
! 2 microspatulas ! Prestik ! 1 pair of scissors ! anhydrous copper sulphate
Q1 Describe what you see on the sides of the sample vial.
Open the sample vial. Use the spooned end of the microspatula to remove some of the colourless liquid.
Page 66
The UNESCO-Associated Centre for Microscience ExperimentsRADMASTE Centre, University of the Witwatersrand, Johannesburg, South Africa
Tel: (+) 27 11 717 4802 Fax: (+) 27 11 403 8733 email: [email protected] website: www.microsci.org.za
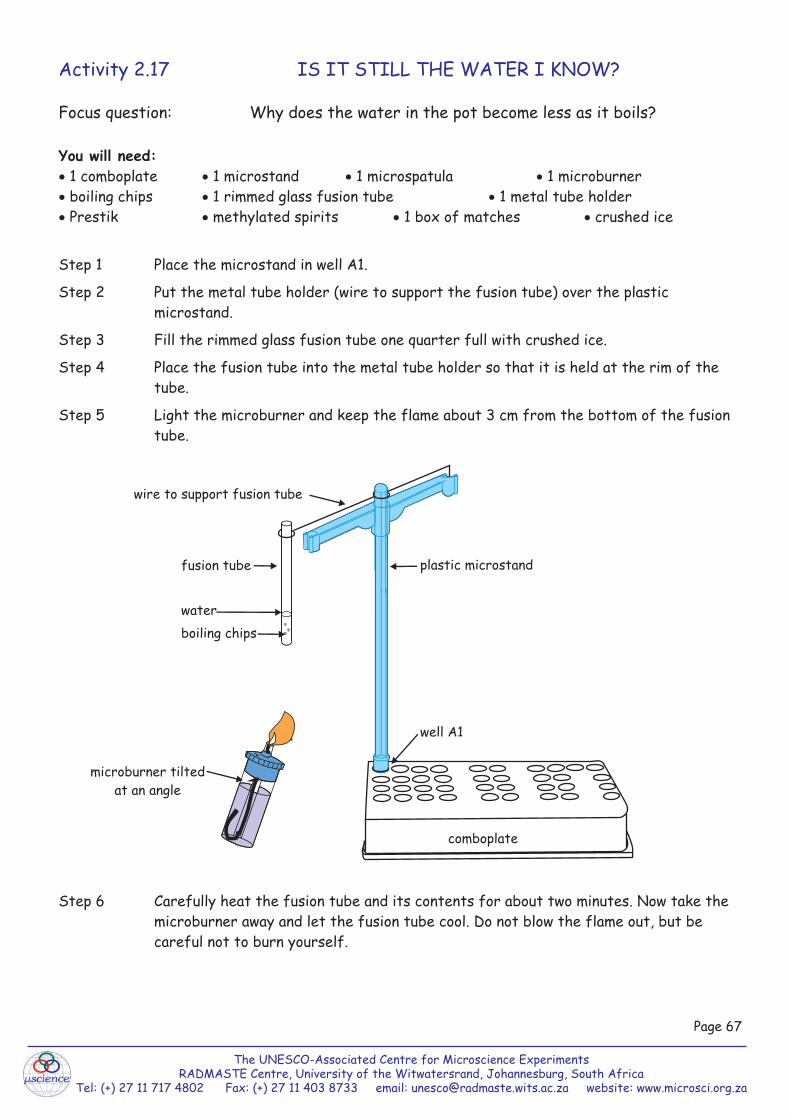
Activity 2.17 IS IT STILL THE WATER I KNOW?
Focus question:
You will need:! 1 comboplate ! 1 microstand ! 1 microspatula ! 1 microburner! boiling chips ! 1 rimmed glass fusion tube ! 1 metal tube holder! Prestik ! methylated spirits ! 1 box of matches ! crushed ice
Step 1
Step 2
Step 3
Step 4
Step 5
Step 6
Why does the water in the pot become less as it boils?
Place the microstand in well A1.
Put the metal tube holder (wire to support the fusion tube) over the plastic microstand.
Fill the rimmed glass fusion tube one quarter full with crushed ice.
Place the fusion tube into the metal tube holder so that it is held at the rim of the tube.
Light the microburner and keep the flame about 3 cm from the bottom of the fusion tube.
Carefully heat the fusion tube and its contents for about two minutes. Now take the microburner away and let the fusion tube cool. Do not blow the flame out, but be careful not to burn yourself.
fusion tube
waterboiling chips
wire to support fusion tube
plastic microstand
well A1
comboplate
microburner tiltedat an angle
Page 67

The UNESCO-Associated Centre for Microscience ExperimentsRADMASTE Centre, University of the Witwatersrand, Johannesburg, South Africa
Tel: (+) 27 11 717 4802 Fax: (+) 27 11 403 8733 email: [email protected] website: www.microsci.org.za
Q1 In what state of water (solid, liquid or gas) was the crushed ice when you put it in the fusion tube?
Q2 After heating the tube for two minutes was the ice still in the same state? What happened?
a) If nothing happens while heating the tube for about 2-3 minutes, raise the position of the microburner until you do observe something happening. Continue with the experiment.
b) If hot water begins to squirt out of the tube, lower the position of the microburner. Continue with the experiment.
Add 3 boiling chips to the contents of the fusion tube.
Heat the fusion tube and contents again by keeping the flame about 3 cm from
the bottom of the tube.
Continue to heat until there is no more water in the fusion tube. This may take about ten minutes.
Q3 In what state (solid, liquid or gas) was the water in the fusion tube before you started heating it?
Q4 What happens to the water after heating it for about 2 minutes?
Q5 What is it called when water bubbles while being heated vigorously?
Q6 Does the quantity of water in the fusion tube stay the same as you heat it?
Q7 Where did the 'missing' water go to when you heated the fusion tube?
Q8 In what state (solid, liquid or gas) was the water that went 'missing'?
Q9 What was needed to change water from ice into gaseous water?
Q10 What would you do to change gaseous water into solid water?
Step 7
Step 8
Step 9
Page 68

The UNESCO-Associated Centre for Microscience ExperimentsRADMASTE Centre, University of the Witwatersrand, Johannesburg, South Africa
Tel: (+) 27 11 717 4802 Fax: (+) 27 11 403 8733 email: [email protected] website: www.microsci.org.za
ACTIVITY 2.18 WHAT DOES A SEED LOOK LIKE?
Introduction: Many plants produce seeds. These seeds grow into new plants.
To study a seed you need:! petri dish ! a few dry bean seeds and pea seeds/lentil seeds! water ! forceps ! hand lens ! paper towel
1 First soak the bean seeds in water in thepetri dish for about a day.
3 Use the hand lens to look at one of the seeds.
5 Use forceps to remove the torn seed coat. The seed breaks into two halves.
Q1 Make a drawing of the baby plant to show the young root and the young stem.Q2 Repeat steps 1 to 6 with pea seeds and /or lentil seeds. Make your own drawings of these seeds.
2 Remove the seeds, dry the dish and replace the seeds in the dried dish.
4 Find the labelled structures on your own seed.
6 Use the hand lens to look at the baby plant inside the seed
Torn seed coat(covering)
Inside of seed
Opening in seed
Page 69

The UNESCO-Associated Centre for Microscience ExperimentsRADMASTE Centre, University of the Witwatersrand, Johannesburg, South Africa
Tel: (+) 27 11 717 4802 Fax: (+) 27 11 403 8733 email: [email protected] website: www.microsci.org.za
ACTIVITY 2.19 GROWING A NEW PLANT
INTRODUCTIONNew plants grow from seeds. You have seen that there is a baby plant inside a seed. Now you can grow your own plant from a seed.
To grow a plant from a seed you need:! vial ! petri dish ! a few sunflower seeds or bean seeds ! blotting paper ! water ! paper towel ! ruler ! string
1 First soak the seeds in water in the petri dish for about a day.
3 Place a few seeds between the blotting paper and the vial.
Put the vial in a warm (not hot) place, out of direct sunlight. Check to make sure that the blotting paper is
always damp. Add more water to the bottom of the vial if necessary.
Look at the seeds every day for a week. Answer the following questions in your notebook.
2 Line the vial with blotting paper.
4 Fill the vial with crumpled paper towel and add water to the bottom of the vial so that the blotting paper becomes damp.
blottingpaper
vial
blottingpaper
vial
seeds
blottingpaper
vial
seeds
water
Page 70

The UNESCO-Associated Centre for Microscience ExperimentsRADMASTE Centre, University of the Witwatersrand, Johannesburg, South Africa
Tel: (+) 27 11 717 4802 Fax: (+) 27 11 403 8733 email: [email protected] website: www.microsci.org.za
QUESTIONS
Q1 Which part of the young plant grows out of the seed first? Is it the young root or the young shoot?Q2 In which direction does the young root grow?Q3 In which direction does the young shoot grow?
Do not take the young plant out of the vial. Use a piece of string and a ruler to measure the length of the young root every day for about 10 days.
Q4 Write your results in a table like the one below.
Q5 Do the same with the young shoot and also write your results in the table.Q6 Draw a picture of the young plant on days 1, 5 and 9.
Day Length of young root in mm
Length of young shootin mm
1
2
3
4
5
etc.
0
2
5
0
0
2
Page 71

The UNESCO-Associated Centre for Microscience ExperimentsRADMASTE Centre, University of the Witwatersrand, Johannesburg, South Africa
Tel: (+) 27 11 717 4802 Fax: (+) 27 11 403 8733 email: [email protected] website: www.microsci.org.za
blottingpaper
vial
seeds
water
INTRODUCTIONYou have seen that new plants grow from seeds. Now we need to find out what seeds need to grow into new plants.
To grow a plant from a seed you need:! 2 vials ! petri dish ! a few sunflower seeds or bean seeds! blotting paper ! paper towel ! water
1 First soak half of the seeds in water in the petri dish for about a day.
3 Place a few soaked seeds between the blotting paper and the wall of one vial.
5 Fill the vials with crumpled paper towel.
ACTIVITY 2.20 DO SEEDS NEED WATER TO GROW INTO NEW PLANTS?
2 Line 2 vials each with a sheet of blotting paper.
4 Then place a few dry seeds of the same sort between the blotting paper and the wall of the other vial.
6 Add 2 ml water only to the vial with the soaked seeds. Put both vials in the same place.
blottingpaper
vial
blottingpaper
vial
seeds
blottingpaper
vial
seeds
soaked seeds dry seeds
2 ml water
Page 72

The UNESCO-Associated Centre for Microscience ExperimentsRADMASTE Centre, University of the Witwatersrand, Johannesburg, South Africa
Tel: (+) 27 11 717 4802 Fax: (+) 27 11 403 8733 email: [email protected] website: www.microsci.org.za
Look at the seeds every day for a week. Make sure that the vial that started out wet remains wet by adding more water as necessary.
Answer the following questions in your notebook.
Q1 Which young plants grew out of the seeds first? The soaked ones or the dry ones?Q2 Do seeds need water to grow?
Page 73

The UNESCO-Associated Centre for Microscience ExperimentsRADMASTE Centre, University of the Witwatersrand, Johannesburg, South Africa
Tel: (+) 27 11 717 4802 Fax: (+) 27 11 403 8733 email: [email protected] website: www.microsci.org.za
ACTIVITY 2.21 DO SEEDS START TO GROW IN ALL TEMPERATURES?
INTRODUCTIONYou have seen that new plants grow from seeds if they have enough water. Now we need to find out what
else seeds need to grow into healthy new plants. Work in groups so that each group uses a place with a
different temperature. Afterwards, you will compare your results with the results of other groups.
Each group needs:! vial ! petri dish ! a few sunflower seeds or bean seeds ! blotting paper ! water ! paper towel ! thermometer
1 First soak the seeds in water in the petri dish for about a day.
3 Place a few seeds between the blotting paper and the vial.
2 Line the vial with blotting paper.
4 Fill the vial with crumpled paper towel and add 2 ml water to the bottom of the vial.
00
20
20
40
405
0
60
80
010
010
C
0 0
2 0
2 0
4 0
4 0
5 0
6 0
8 0
10
01
00
C
o90 C
0 0
2 0
1 0
4 0
3 0
5 0C
0 0
2 0
1 0
4 0
3 0
5 0
C
o28 Co77 C
o37 C
blottingpaper
vial
blottingpaper
vial
seeds
blottingpaper
vial
seeds
water
Page 74
The UNESCO-Associated Centre for Microscience ExperimentsRADMASTE Centre, University of the Witwatersrand, Johannesburg, South Africa
Tel: (+) 27 11 717 4802 Fax: (+) 27 11 403 8733 email: [email protected] website: www.microsci.org.za
Step 5
Step 6
Step 7
Step 8
Step 9
Step 10
o94 Co18.8 C
Choose a place out of direct sunlight for your vial and seeds. Some suitable places could be:! the refrigerator.! the deep freezer.! a stone floor.! windowsills facing different directions like north, west etc.! different parts of your school - cloakroom, the classroom and so on.! a very hot place near a heater or cooker.
Place the thermometer beside the vial.
Add water to the vial as necessary.
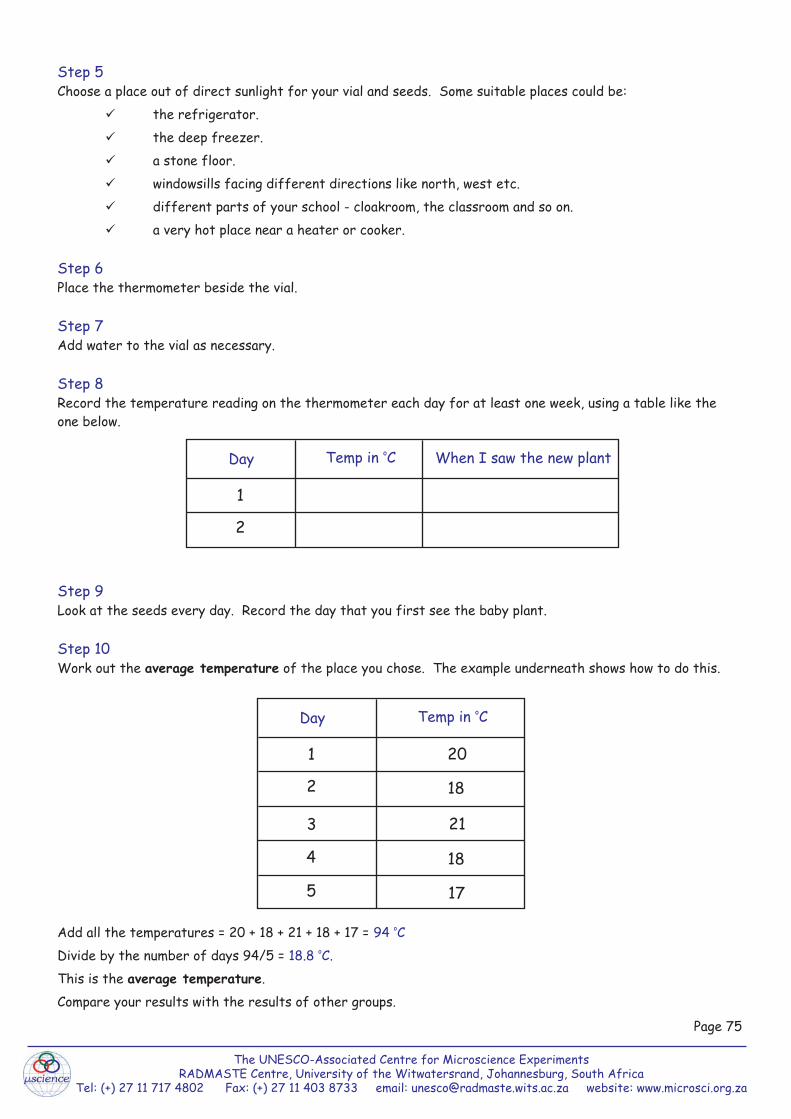
Record the temperature reading on the thermometer each day for at least one week, using a table like the one below.
Look at the seeds every day. Record the day that you first see the baby plant.
Work out the average temperature of the place you chose. The example underneath shows how to do this.
Add all the temperatures = 20 + 18 + 21 + 18 + 17 = Divide by the number of days 94/5 = .This is the average temperature.Compare your results with the results of other groups.
Day oTemp in C When I saw the new plant
1
2
Day oTemp in C
1
2
3
4
5
20
18
21
18
17
Page 75
The UNESCO-Associated Centre for Microscience ExperimentsRADMASTE Centre, University of the Witwatersrand, Johannesburg, South Africa
Tel: (+) 27 11 717 4802 Fax: (+) 27 11 403 8733 email: [email protected] website: www.microsci.org.za
Q1 Why did we use seeds of the same type?Q2 What was the average temperature of the place where the young plant took the shortest time to start
to grow?
Q3 What was the average temperature of the place where the young plant took the longest time to start to grow?
Q4 Were there any places where the seeds did not start to grow at all?
Q5 Copy and complete the following sentence:
We found that with (type).............................. seeds, they started to grow fastest, at (temp)................. and slowest at (temp)........................
Page 76

The UNESCO-Associated Centre for Microscience ExperimentsRADMASTE Centre, University of the Witwatersrand, Johannesburg, South Africa
Tel: (+) 27 11 717 4802 Fax: (+) 27 11 403 8733 email: [email protected] website: www.microsci.org.za
Activity 2.22 NEW PLANTS FROM PARTS OF PLANTSPART ONE
INTRODUCTIONYou have seen that new plants grow from seeds. New plants also grow from parts of plants.
To grow a new plant from a part of a plant you need:! a Geranium or African violet or Begonia plant in a pot or garden! plant pot ! scissors ! water ! vial ! propette
1 Choose a healthy, well watered plant.
5 After about 10 days, the leaf stalk will grow roots.
Water the leaf in the pot. It will grow into a new plant with its own roots, stems and leaves. If you wait long enough, it may even grow flowers. You can give the new plant to somebody for a present.
!"soil
3 Put the leaf in a vial of water and leave it for several days.
2 Take a leaf with its stalk from the plant.
6 After a further week, you can plant the leaf in a plant pot with soil.
4 Use a propette to add water to the vial from time to time so that the leaf does not dry out.
water
Page 77

The UNESCO-Associated Centre for Microscience ExperimentsRADMASTE Centre, University of the Witwatersrand, Johannesburg, South Africa
Tel: (+) 27 11 717 4802 Fax: (+) 27 11 403 8733 email: [email protected] website: www.microsci.org.za
NEW PLANTS FROM PARTS OF PLANTS
PART TWO
INTRODUCTIONYou have seen that new plants can grow from leaves. New plants can also grow from other parts.
To grow potatoes from pieces of potato you need:! potato ! knife ! plant pot ! soil
1 First collect a potato which has "eyes" .
3 Plant each potato piece in a plant pot with soil.
5 You can cook and eat your own potatoes.
2 Cut the potato into pieces, so that each piece has one or two "eyes"
4 After a few months, each potato piece will grow into a whole potato plant.
eyes of potato
or
Page 78