
Advanced Database Project: Document Stores and MongoDB · MongoDB is an open-source document...
35
Advanced Database Project: Document Stores and MongoDB Sivaporn Homvanish (0472422) Tzu-Man Wu (0475596)
Transcript of Advanced Database Project: Document Stores and MongoDB · MongoDB is an open-source document...

Advanced Database Project: Document Stores and MongoDB
Sivaporn Homvanish (0472422)
Tzu-Man Wu (0475596)

Table of contents
Background 3 Introduction of Database Management System 3 SQL vs NoSQL 3 Document Database 4
Introduction to MongoDB 4 What is MongoDB 4 Key differences between SQL and MongoDB terminologies 4 Installation 5 Connect to MongoDB 6 MongoDB Data Storage Structure 9 Basics and CRUD Operations 10
Create operation 12 Read operation 13 Update operation 16 Delete operation 20
Implementation 21 Application Overview 21 Environment setup 23
NodeJS with MongoDB Atlas (Cloud services) 23 Installation MongoDB NodeJS driver 23 Connect Application with MongoDB Atlas 24
Function Design 28 Add product 28 Display products 29 Edit product 31 Delete product 33
Conclusion 34
References 34

1. Background 1.1. Introduction of Database Management System
Database Management System (DBMS) is a software package for managing database. It provides several kinds of operations such as create, retrieve, update data including managing data manipulation. The DBMS essential serves as an interface that bridge between end users or applications with a database to ensure data integrity and consistency.
1.2. SQL vs NoSQL SQL stands for Structured Query Language. It is a standard language for relational
database management and data handling. It allows manipulating structured data whose entities/variables are associated with certain relations.
NoSQL stands for Non-Structured Query Language. It is designed to deal with huge and intensive data that have various demands for modern applications such as different data structures, customization, complex real-time data, etc. It combines a wide variety of different database technologies to support nowadays technologies.
Features SQL NoSQL
Type Table-based database Various types such as ● Document-based database ● Key-value pairs ● Graph database ● Wide-column stores
Scaling Vertical scaling, it scales by a power of its hardware
Horizontal scaling, it scales by increasing servers in the pool resources to reduce the load
Flexibility Fix schemas which identified since predefine phase
High flexibility due to dynamic schemas
ACID Compliance Comply with ACID Sacrifice ACID compliance for flexibility and performance
Examples ● MySql ● Oracle ● Sqlite ● Postgres ● MS-SQL
● MongoDB ● Redis ● Hbase ● Neo4j ● CouchDB

1.3. Document Database According to the need for unstructured data, the rapid growth of cloud computing and high demands of a requirement. Document database is introduced to loosen the restrictions on database schemas by using the document data model. Key Advantages: [1]
● Independent document units help increase performance and distribute data across servers.
● Easy to apply application logic without translation between application and SQL queries.
● Support unstructured data that provide flexibility for data migration and usage.
2. Introduction to MongoDB 2.1. What is MongoDB
MongoDB is an open-source document database. It provides capability and flexibility of querying and indexing data. MongoDB is one of NoSQL database which is a schemaless data model that gives user suppleness to work on various data structures.
Below is the structure of MongoDB together with the example of the data format. This structure is totally different from a normal SQL query. However, it provides flexibility for various data formations.
2.2. Key differences between SQL and MongoDB terminologies Dues to many types of databases, terminologies of each database are different. The
following table presents the concept and several SQL terminologies that consistent with MongoDB concept and terminologies.

Comparison between SQL and MongoDB terminologies
SQL Terms MongoDB Terms
Database Database
Table Collection
Row Document
Column Field
Joins Embedded documents, linking
2.3. Installation Install MongoDB
1. Download MongoDB installer (.msi) that compatible with your window version from https://www.mongodb.com/download-center. This report is used window x64 bits community edition.
2. Run MongoDB installer (.msi file) by navigating to the directory that stores the
program and follows the wizard instruction. Start MongoDB as a windows services
1. Open Command Prompt as an Administrator. 2. Create MongoDB database directory for storing data. 3. Change file path to the directory that you need to store database and create a
data directory
4. Start MongoDB by running mongod.exe. You can point to your database
directory by running command --dbpath following with directory path

5. Open another ‘Command Prompt’ as an Administrator to connect to MongoDB
by running mongo.exe
2.4. Connect to MongoDB Overview
To connect to MongoDB Server, there are multiple choices to install the MongoDB client. The figure below shows two main method, drivers and shell. If users create their own application and desire to use MongoDB to manage data, they have to install a MongoDB driver which is matching their programming language. The driver will send the queries from backend server code to MongoDB server. On the other hand, users can also only use MongoDB shell to interact with MongoDB server. After MongoDB server receives the queries, it will communicate with Storage Engine. Here the MongoDB default Engine is WiredTiger. The storage engine can manage and work with data efficiently, so it handles all data access such as data-read and data-write with memory and disk.
Drivers For different programming languages, MongoDB provides different kinds of drivers to
let application interact with MongoDB Server. After installing the driver, programmers can embed it inside their application code to link MongoDB server. Multiple MongoDB drivers can be found on the official MongoDB Docs page in the following link: https://docs.mongodb.com/ecosystem/drivers/

Shell From the MongoDB official website as below, there are multiple methods of different
programming languages for users to be selected.[2]
Insert Command from Mongo Shell [2]
Insert Command from NodeJS [2]

Insert Command from PHP [2]
Insert Command from JAVA [2]
The shell allows us to write queries which are very similar to the queries in different
drivers. Using MongoDB shell is an easier way to learn and connect with MongoDB no matter which programming language is used. Although the syntax of programming languages are different, the core method to deal with data is similar. Therefore, we will use MongoDB shell which is connected to our local MongoDB server to introduce how to write commands in the upcoming part. Start to run MongoDB server in the background of Windows
If you are a Windows user, after following 2.3 Installation, MongoDB Server will run automatically once you turn on your computer. There is another option that allows users to stop running MongoDB server and start running it again by Command Prompt.
1. Open Command Prompt and run as Administrator. 2. Type net stop MongoDB to stop MongoDB server 3. Open Command Prompt again 4. Type mongod --dbpath following with directory path to start MongoDB server 5. Keep the server running (Do not close)

Use Mongo Shell to connect to MongoDB Server 1. Open another Command Prompt 2. Type mongo
2.5. MongoDB Data Storage Structure Database & Collection & Documents
MongoDB as a NoSQL document-based database has a different data storage structure from SQL. From the figure below, in MongoDB, users can have multiple databases. Each database can have multiple collections and each collection can have multiple documents. Compared to SQL, collection in MongoDB equivalent to a table in SQL, and documents equal several rows in a SQL table.

JSON Document MongoDB uses JSON documents to store its data. There is an example of a JSON
document below. The document is always surrounding by curly brackets. Inside the curly brackets, it stores fields which each field consists of a key and value. The key is the name of an attribute and it is normally put inside quotation marks(optional). Value can be different kinds of data types such as string, number, boolean, array, object, and even another document. In other words, we can have nested documents inside a document. For the value, quotation marks are used depending on your data type.
2.6. Basics and CRUD Operations CRUD stands for Create, Read, Update and Delete operations. These are fundamental
operations that use to manage documents of the collection in MongoDB. After finish installation and start MongoDB server (section 2.4), you can use CRUD
operations for query or editing data in the database. To see other useful commands apart from CRUD, you can type help to see more information.

The following command below is the frequency used commands:
● show dbs ○ List all of the databases in the MongoDB server
● show collections ○ List all of the collections in the MongoDB server
● use <db_name> ○ Select a database to be used
Below are the CRUD syntax and structure. [3]
In the following part, we will use a simple example to show how to use CRUD
operations. We create a database named sample and a collection named bookstoreproduct to store the information of the books we sell.

2.6.1. Create operation To create data into the database, MongoDB provides insertOne and insertMany
command as below depending on how many data you intend to create. For these two functions, you can put two kinds of arguments. The first one is your data, and the second one is writeConcern for optional use. The writeConcern argument allows you to set many extra conditions such as the timeout option to specify a time limit to prevent write operations from blocking indefinitely and another option to request acknowledgment that the write operation has been written to the on-disk journal. However, if we use only data argument and omit the writeConcern, MongoDB will assign writeConcern default value to that command automatically. [2]
Create collection methods Description
insertOne(<data>,<options>) Inserts a single document into a collection.
insertMany(<data>,<options>) Inserts multiple documents into a collection.
Now, we try to use insertOne command to insert one data into our bookstoreproduct
collection. Command:

After executing the command, we get the result as below. If inserting is completed, we will receive a unique automatically generating id for the inserted data. The id is related to the order of the data you insert, and it can be changed later by the users as well.
Result:
Below is the data we just inserted:
Next, we try to use insertMany command to insert more than one data at one time into our bookstoreproduct collection. For this operation, all required documents for inserting should create as a 1 object. So, the syntax must be covered with square blankets. For example, db.bookstoreproduct.insertMany( [<document>,<document>,... ] ).
2.6.2. Read operation To read data from the database, MongoDB provides find and findOne command as
below depending on how many data you intend to show. For these two functions, you can put two kinds of arguments. The first one is your filter condition using query operators to return the matching documents in a collection, and the second one is the fields you intend to return in the matching documents.

Read collection methods Description
find(<filter>,<options>) Return a cursor object(allow us to cycle through the results) which only show the first 20 documents by default at one time.
findOne(<filter>,<options>) Only return the first matching document in the collection based on the filter.
Example: find Command:
Result: It will only show the first 20 documents by default because if it always returns all the
data, it will take too long if we have a million documents. By typing it, MongoDB will use the find’s cursor to fetch and display the next bunch of data on the screen.[3]
To see the result in a well-format, we can use .pretty() method. It will show the data in
the database that easier to read. Command:
Result:
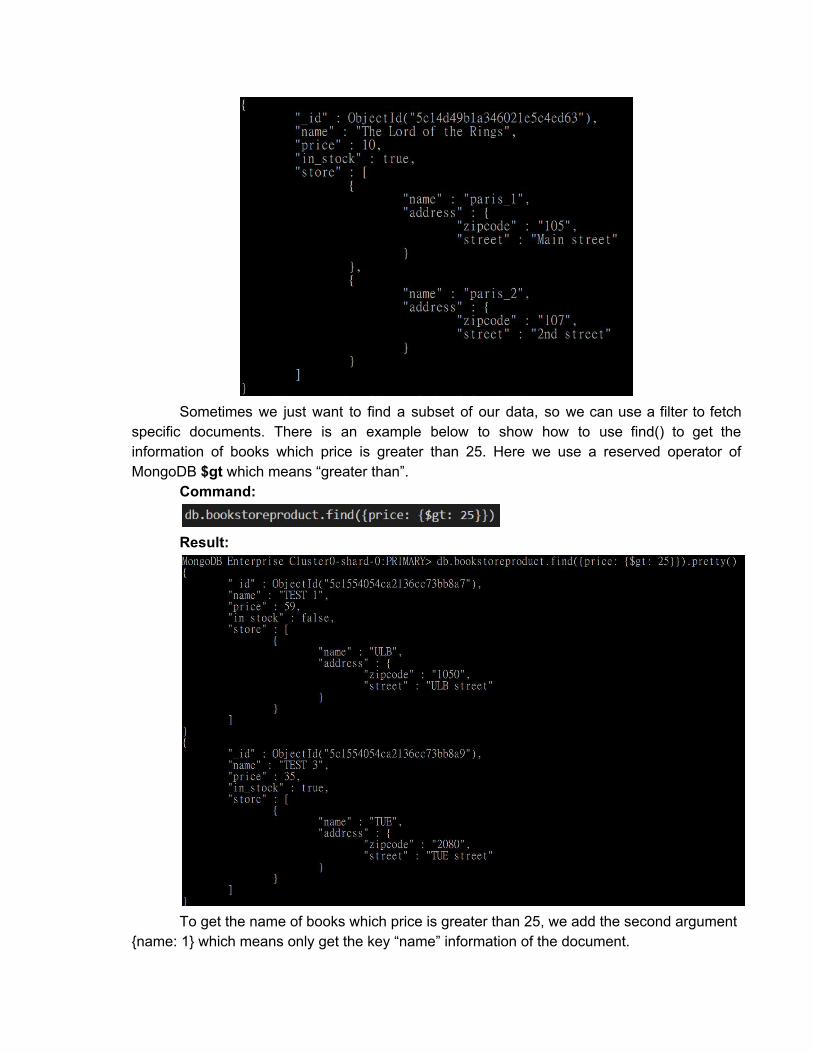
Sometimes we just want to find a subset of our data, so we can use a filter to fetch
specific documents. There is an example below to show how to use find() to get the information of books which price is greater than 25. Here we use a reserved operator of MongoDB $gt which means “greater than”.
Command:
Result:
To get the name of books which price is greater than 25, we add the second argument
{name: 1} which means only get the key “name” information of the document.

Command:
Result:
To only return the first matching document in the collection based on the filter. Example: findOne Command:
Result:
2.6.3. Update operation Update operator is used for modifying and adding extra data to the database.
MongoDB provides updateOne, updateMany, and replaceOne commands to select documents that needed to be updated. There are 3 arguments, the first one is your filter condition using query operators to return the matching documents in a collection, the second one is information that you need to update over the existing value. The last one is the option for your command. Below are the syntax and structures of update operation.
Update collection methods Description
updateOne(<filter>,<data>,<options>) Update a first single document in the collection based on the filter.
updateMany(<filter>,<data>,<options>) Update all document in the collection based on the filter.
replaceOne(<filter>,<data>,<options>) Replace a first single document in the collection based on the filter.
Operators for filter update operation
Operation names Description
$set Replace the value of the field with a specific value of the operation. If the field does not exist, $set will add a new field to the document. This operation has the following form: { $set: { <field1>: <value1>, ... } }

$min Update value while the specified value of the operation is less than the current value of the field. If specified field does not exist, $min will set the field to the specified value in the operation. This operation has the following form: { $min: { <field1>: <value1>, ... } }
$max Update value while the specified value of the operation is greater than the current value of the field. If specified field does not exist, $max will set the field to the specified value in the operation. This operation has the following form: { $max: { <field1>: <value1>, ... } }
$inc Increment the value of the field with the specified value of the operation. This operation has the following form: { $inc: { <field1>: <amount1>, <field2>: <amount2>, ... } }
$rename Update the name of the field with specified value of the operation. This operation has the following form: {$rename: { <field1>: <newName1>, <field2>: <newName2>, ... } }
Example: updateOne This is current data in the database.

Command:
Result: Book’s name has been updated from Smuffs to Smurf.
Example: updateMany We have inserted 3 books to the collection. All of the books price are set to 59. In this
example, we will use updateMany() to update the prices of the books to 69. Below is the inserted books information.
Command: We used reserved operator $regex to find all book names that contain “TEST” inside.
Then, we updated the price to 69.

Result:
Example: replaceOne Replace the document details of the first book which contains “TEST” in its name. Command:
Result: From the previous example result of updateMany(). Book name “TEST 1” has
ObjectID(5c153d251e0007f2dfc39d68). However, when we use replaceOne() operation. It will replace all the document. So, the current document of ObjectID(5c153d251e0007f2dfc39d68) structure will be changed to {“price: 49”} based on replacement command that was run.

2.6.4. Delete operation Delete operator is used to remove documents from a collection. There are 2
arguments, the first one is your filter condition using query operators to return the matching documents in a collection, the second one is the option for your command. Below are the syntax and structures of delete operation.
Update collection methods Description
deleteOne(<filter>,<options>) Delete a first single document from a collection in the database based on the filter
deleteMany(<filter>,<options>) Delete all document from a collection in the database based on the filter
Example: deleteOne() Currently, we have 3 documents in the database. We can show the number of
collections by using .count() function.

Command:
Result:
Example: deleteMany() There are 5 documents in the database. We will delete all books that its name contains
“TEST”. From the previous example, there are only 2 books left which are “TEST 2” and “TEST 3” to be deleted
Command:
Result: After running deleteMany(), Book name “TEST2” and “TEST 3” were deleted from the
database.
For more information about CRUD operations, you can refer to the official MongoDB
site in the following link: https://docs.mongodb.com/manual/crud/
3. Implementation 3.1. Application Overview
In this project, we implemented ‘Travel Agency’ webpage to store data about the trips that the company provided to customers. Users can see trip lists, add more trips, deleted and modify trip details such as location, date, price, image, and detail. This website was implemented by Node.js together with MongoDB Altlas cloud database. More explanation will be explained in the following section.

The main page of the website:
Details page:

Add Trip page:
3.2. Environment setup 3.2.1. NodeJS with MongoDB Atlas (Cloud services)
What is NodeJS? NodeJS is an open source run-time server environment that executes
JavaScript code outside of a browser and it is compatible with various operating systems e.g. OS X, Microsoft, and Linux. There is an asynchronous feature for all APIs of NodeJS that help server get a response faster.[4][5] What is MongoDB Atlas?
MongoDB Atlas is a could services that fully-managed database by handling complex configuration and helping users to seamlessly integrate their business with the newest database facilities. Atlas also provides a friendly user interface and API that helps users reduce database management time.[6]
3.2.2. Installation MongoDB NodeJS driver Download MongoDB NodeJS driver from https://mongodb.github.io/node-mongodb-native/ and use the command below to install. [7]

3.2.3. Connect Application with MongoDB Atlas How to create MongoDB Atlas cluster? [3]
1. Create an Atlas user account by the following link: https://www.mongodb.com/cloud/atlas
2. Create Atlas Cluster a. Select ‘Cloud Provider & Region’ b. Select Cluster Tier c. Name your cluster d. Click ‘Deploy’to deploy the cluster
3. Configure security for the cluster
a. Select ‘Security’ b. Go to ‘MongoDB users’ tab, click ‘+ Add new user’
c. Enter username and password d. Select user privileges e. Click ‘Add user’

4. Go to ’IP Whitelist’ tab, click ‘+ Add IP Address’
How to connect to MongoDB Atlas? 1. Select ‘Overview’ and click ‘Connect’
2. Choose ‘Connect Your Application’

3. Select ‘Short SRV connection string (shell 3.6+)’ and copy the SRV
address
4. Replace <Password> for your user and specify the database name.
Otherwise, your collection will be in default database named ‘test’

5. Connect Atlas cluster to NodeJS application
How to start the connection?
1. Open Command Prompt, go to your application directory and run the command ‘npm start’. This command will call your application. However, you will get an error because the connection between application and Atlas cluster is not connected yet.
2. Repeat step 1) by opening a new window and run ‘npm run start:server’
to make a connection between your application and Atlas cluster
3. Refresh your application connection

3.3. Function Design According to the advantage and flexibility of MongoDB with other programming languages, we selected NodeJS to develop our ‘Travel Agency’ website. In this topic, we will show how we integrate NodeJS application with MongoDB Altas database. [3]
3.3.1. Add product To insert data, we need to use MongoDB NodeJS syntax below:
db.collection(<collection name>).insertOne( <your doucument information>) .then(result =>{ //adding actions. You can add log or response message, etc. }) .catch(err => {
//adding log or error message });
Below is a part of our implementation for adding the trip to the database:
The result of adding a trip on the website:

3.3.2. Display products To display all of the data, we need to use MongoDB NodeJS syntax below:
db.collection(<collection name>).find() .forEach(
//adding actions. ) .then( //adding actions. You can add log or response message, etc. ).catch(err => { //adding log or error message });
Below is a part of our implementation for display all the trips on the website:

Our implementation is using find().forEach() function in order to read the data one by one and display them on the main page.
The result of displaying the trip on the website:
To display one single data, we need to use MongoDB NodeJS syntax below:
db.collection(<collection name>).findOne(<fitered by document information>) .then( //adding actions. You can add log or response message, etc. ).catch(err => { //adding log or error message });

Below is a part of our implementation for display the trips on the website:
The result of displaying the detail of a trip on the website:
3.3.3. Edit product To update data, we need to use MongoDB NodeJS syntax below:
db.collection(<collection name>).updateOne(<fitered by document
information>, {$set: <update information>}) .then(result => { //adding actions. You can add log or response message, etc. }) .catch(err => { //adding log or error message });
Below is a part of our implementation to update the trips on the website:

The result of editing the trip on the website: Once we click ‘Edit’ button on the main page, it will direct you to another page to update data.
In this example, we updated ‘Start Date’ and ‘Detail’ as shown below

The ‘Start Date’ and ‘Detail’ has been updated.
3.3.4. Delete product To delete data, we need to use MongoDB NodeJS syntax below:
db.collection(<collection name>).deleteOne(<filtered by document information>) .then( result => { //adding actions. You can add log or response message, etc. }) .catch(err => { //adding log or error message });
Below is a part of our implementation to delete the trips on the website:
The result of deleting the Vancouver trip on the website:

4. Conclusion MongoDB is a powerful document database that provides a lot of flexibilities for users.
It can be used with various programming languages with similar query syntax as normal MongoDB query. The schemaless property provides suppleness of rapid growth of complexity of data. Developers can migrate data from the existing database to MongoDB and start running MongoDB database promptly. Moreover, it also has MongoDB Atlas cloud services to support business nowadays.
5. References [1] MongoDB. (2018). Document Databases. [online] Available at:
https://www.mongodb.com/document-databases. [2] Docs.mongodb.com. (2018). MongoDB Documentation. [online] Available at:
https://docs.mongodb.com/. [3] udemy. (2018). [online] Available at:
https://www.udemy.com/mongodb-the-complete-developers-guide/.
[4] En.wikipedia.org. (2018). Node.js. [online] Available at: https://en.wikipedia.org/wiki/Node.js.

[5] www.tutorialspoint.com. (2018). Node.js Introduction. [online] Available at:
https://www.tutorialspoint.com/nodejs/nodejs_introduction.htm . [6] MongoDB. (2018). Fully Managed MongoDB, hosted on AWS, Azure, and GCP.
[online] Available at: https://www.mongodb.com/cloud/atlas. [7] Mongodb.github.io. (2018). Installation Guide. [online] Available at: http://mongodb.github.io/node-mongodb-native/3.1/installation-guide/installation-guide/.


![Mapping-based SPARQL access to a MongoDB … SPARQL access to a MongoDB database ... Mapping-based SPARQL access to a MongoDB database. [Research Report] ... 1 Introduction](https://static.fdocuments.us/doc/165x107/5aa658b37f8b9ab4788e5d21/mapping-based-sparql-access-to-a-mongodb-sparql-access-to-a-mongodb-database.jpg)


