Adobe Dreamweaver CS4: Learning the Tools · Adobe Dreamweaver CS4: Learning the Tools ... browsers...
18
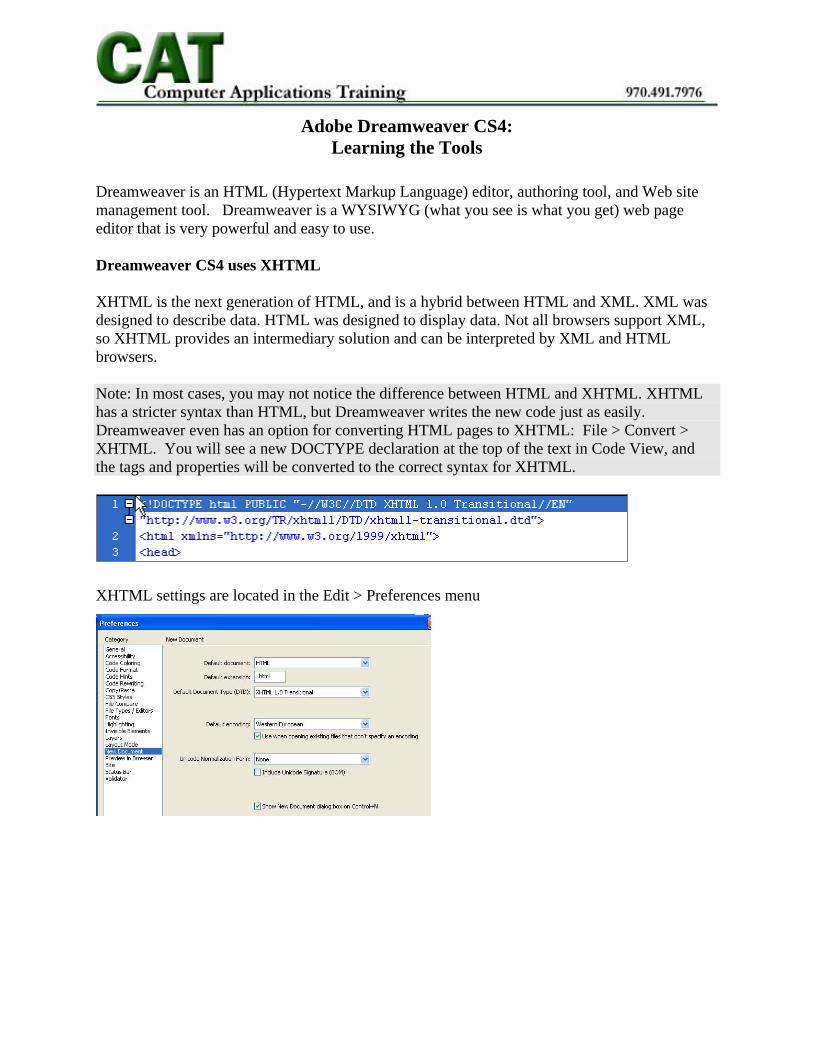
Adobe Dreamweaver CS4: Learning the Tools Dreamweaver is an HTML (Hypertext Markup Language) editor, authoring tool, and Web site management tool. Dreamweaver is a WYSIWYG (what you see is what you get) web page editor that is very powerful and easy to use. Dreamweaver CS4 uses XHTML XHTML is the next generation of HTML, and is a hybrid between HTML and XML. XML was designed to describe data. HTML was designed to display data. Not all browsers support XML, so XHTML provides an intermediary solution and can be interpreted by XML and HTML browsers. Note: In most cases, you may not notice the difference between HTML and XHTML. XHTML has a stricter syntax than HTML, but Dreamweaver writes the new code just as easily. Dreamweaver even has an option for converting HTML pages to XHTML: File > Convert > XHTML. You will see a new DOCTYPE declaration at the top of the text in Code View, and the tags and properties will be converted to the correct syntax for XHTML. XHTML settings are located in the Edit > Preferences menu
Transcript of Adobe Dreamweaver CS4: Learning the Tools · Adobe Dreamweaver CS4: Learning the Tools ... browsers...
Adobe Dreamweaver CS4:
Learning the Tools
Dreamweaver is an HTML (Hypertext Markup Language) editor, authoring tool, and Web site management tool. Dreamweaver is a WYSIWYG (what you see is what you get) web page editor that is very powerful and easy to use. Dreamweaver CS4 uses XHTML XHTML is the next generation of HTML, and is a hybrid between HTML and XML. XML was designed to describe data. HTML was designed to display data. Not all browsers support XML, so XHTML provides an intermediary solution and can be interpreted by XML and HTML browsers. Note: In most cases, you may not notice the difference between HTML and XHTML. XHTML has a stricter syntax than HTML, but Dreamweaver writes the new code just as easily. Dreamweaver even has an option for converting HTML pages to XHTML: File > Convert > XHTML. You will see a new DOCTYPE declaration at the top of the text in Code View, and the tags and properties will be converted to the correct syntax for XHTML.
XHTML settings are located in the Edit > Preferences menu

U:\On-site\FCampana\dreamweaver8\Dreamweaver_cs4.doc Page 2 of 18 © Computer Training Support Services Colorado State University
The Work Area When you launch Dreamweaver you will have the option as to how the panels display with the work area. Change the view of the Panels and Panel Groups accordingly to reflect what you are creating or editing. The Dreamweaver 8/CS3/CS4 look is streamlined and saves screen space making the interface a lot easier to learn. The Document Window displays your web page approximately as it will appear in a web browser.
Insert Bar
The Insert Bar contains buttons for inserting common web page elements such as images, tables, layers, hyperlinks, and rollover images. What You Should Know About the Insert Bar In Dreamweaver CS4, use the Classic view to display the Insert Bar in a tabbed Menu. Using the Classic view will display Dreamweaver tools similar to CS3.
U:\On-site\FCampana\dreamweaver8\Dreamweaver_cs4.doc Page 3 of 18 © Computer Training Support Services Colorado State University
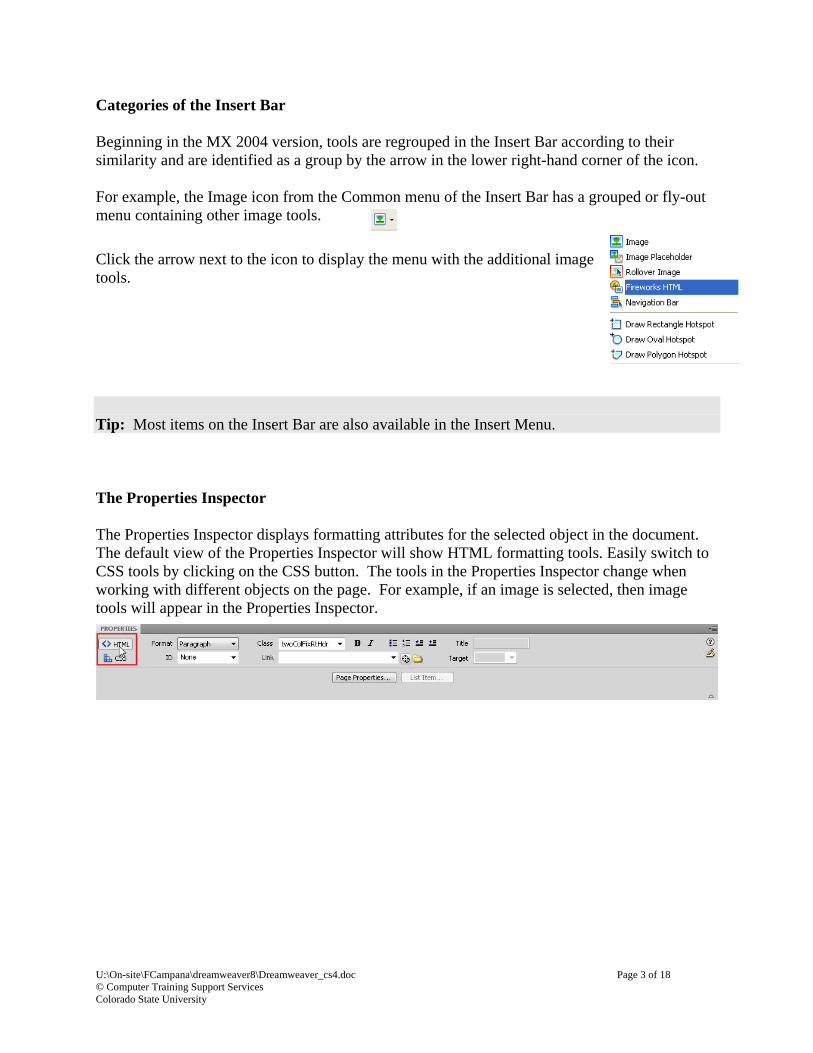
Categories of the Insert Bar Beginning in the MX 2004 version, tools are regrouped in the Insert Bar according to their similarity and are identified as a group by the arrow in the lower right-hand corner of the icon. For example, the Image icon from the Common menu of the Insert Bar has a grouped or fly-out menu containing other image tools.
Click the arrow next to the icon to display the menu with the additional image tools. Tip: Most items on the Insert Bar are also available in the Insert Menu. The Properties Inspector The Properties Inspector displays formatting attributes for the selected object in the document. The default view of the Properties Inspector will show HTML formatting tools. Easily switch to CSS tools by clicking on the CSS button. The tools in the Properties Inspector change when working with different objects on the page. For example, if an image is selected, then image tools will appear in the Properties Inspector.

U:\On-site\FCampana\dreamweaver8\Dreamweaver_cs4.doc Page 4 of 18 © Computer Training Support Services Colorado State University
The Document Window Document Toolbar
The Document Toolbar allows access to several page options such as the page title, different document view options, an option to Put or Get files to/from the Remote (Web) Server, preview in browser, and several other options. The Title Bar contains the title of the current Web Page. Note: this title will also appear in the title bar of the Web browser, and will be used as a bookmark name if the end user adds the page to their “favorite” list. Tip: See Page 9 of this document for more information on Document Titles. Tip: An Example of a proper title would be: Staff Information, Foreign Languages Department – Colorado State University It is best practice to identify the page, the department, and end with a reference to Colorado State University. Status Bar
At the bottom of the Document Window is the Status Bar, which contains tools to help you get information about the web page. Tag Selector The Tag Selector is located in the lower-left corner of the Status Bar and provides easy access to select HTML tags on your page. Window Size Pop-up Menu The Window Size Pop-up Menu is a guide that you can use when designing web pages. Select the arrow in the lower right corner of the tool to display a list of browser window dimensions. Tip: if the options from the Window Size Pop-up pull down menu are not available, then restore down your document window. Selecting an option from the pull down menu will resize your work area or document to the selected window dimension. Example, when choosing to design a web page at a 1024 x 768 resolution, the actual viewable dimensions in the browser window are 955 x 600 pixels. The dimensions are less than the screen resolution because the browser interface takes up space.
U:\On-site\FCampana\dreamweaver8\Dreamweaver_cs4.doc Page 5 of 18 © Computer Training Support Services Colorado State University
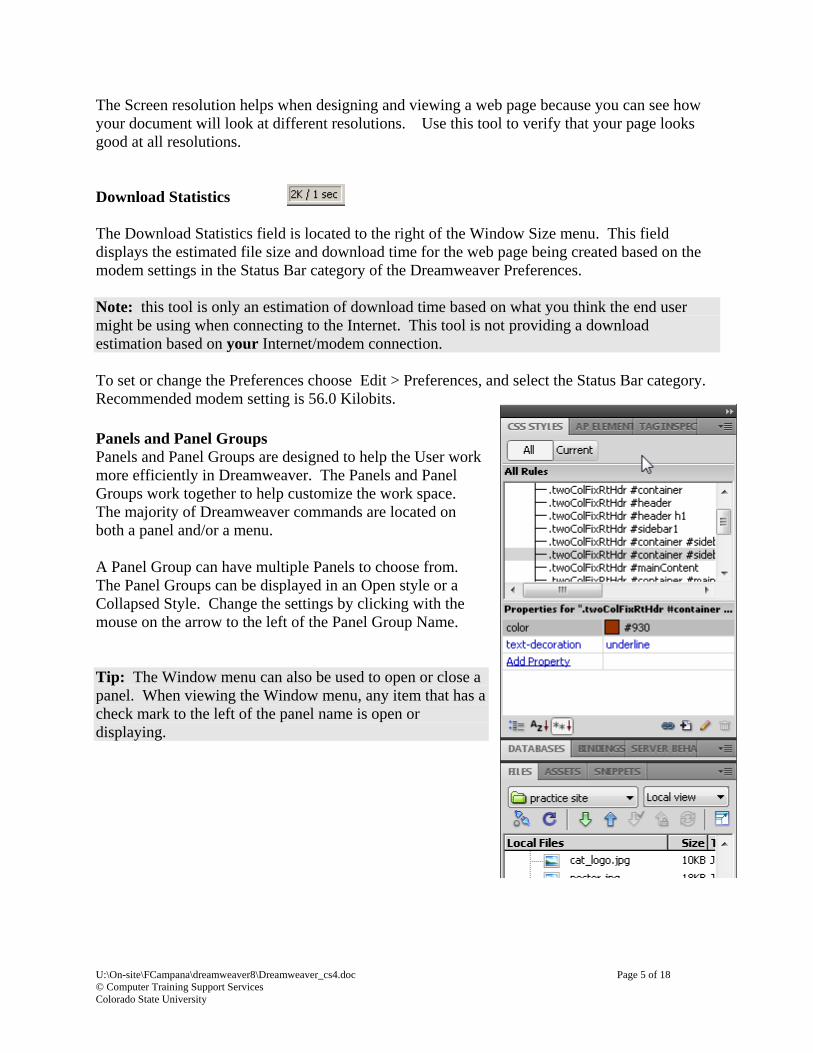
The Screen resolution helps when designing and viewing a web page because you can see how your document will look at different resolutions. Use this tool to verify that your page looks good at all resolutions. Download Statistics The Download Statistics field is located to the right of the Window Size menu. This field displays the estimated file size and download time for the web page being created based on the modem settings in the Status Bar category of the Dreamweaver Preferences. Note: this tool is only an estimation of download time based on what you think the end user might be using when connecting to the Internet. This tool is not providing a download estimation based on your Internet/modem connection. To set or change the Preferences choose Edit > Preferences, and select the Status Bar category. Recommended modem setting is 56.0 Kilobits. Panels and Panel Groups Panels and Panel Groups are designed to help the User work more efficiently in Dreamweaver. The Panels and Panel Groups work together to help customize the work space. The majority of Dreamweaver commands are located on both a panel and/or a menu. A Panel Group can have multiple Panels to choose from. The Panel Groups can be displayed in an Open style or a Collapsed Style. Change the settings by clicking with the mouse on the arrow to the left of the Panel Group Name. Tip: The Window menu can also be used to open or close a panel. When viewing the Window menu, any item that has a check mark to the left of the panel name is open or displaying.
U:\On-site\FCampana\dreamweaver8\Dreamweaver_cs4.doc Page 6 of 18 © Computer Training Support Services Colorado State University
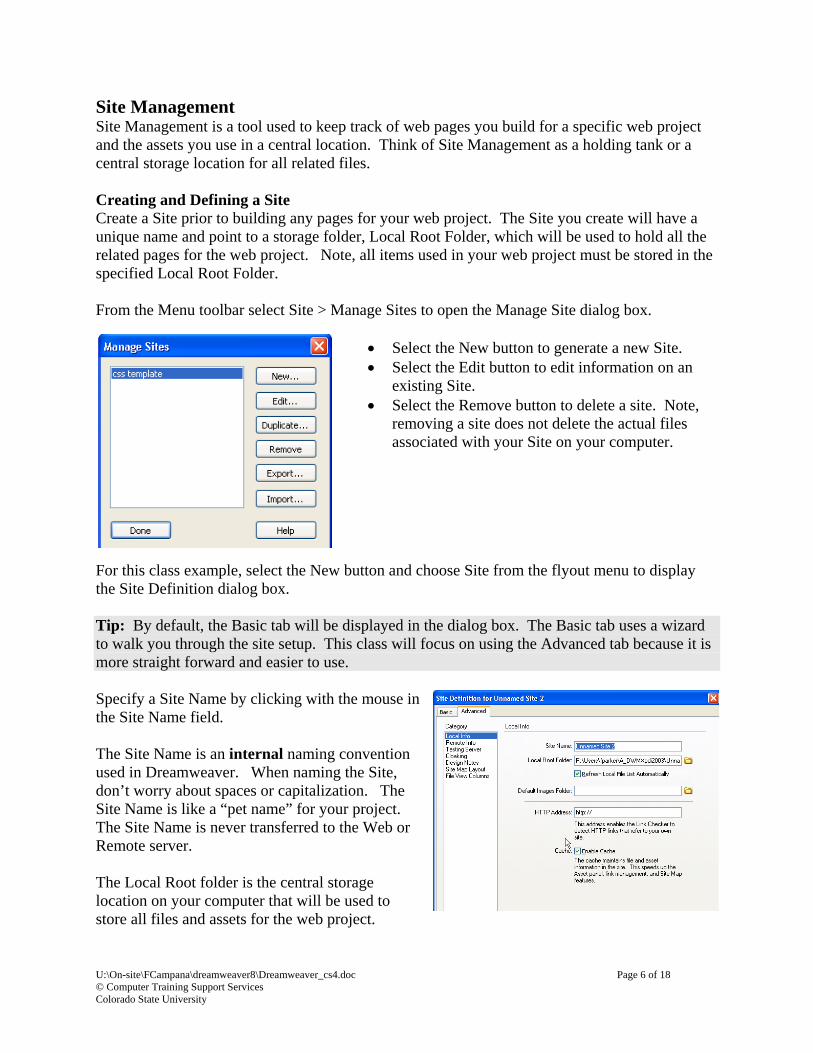
Site Management Site Management is a tool used to keep track of web pages you build for a specific web project and the assets you use in a central location. Think of Site Management as a holding tank or a central storage location for all related files. Creating and Defining a Site Create a Site prior to building any pages for your web project. The Site you create will have a unique name and point to a storage folder, Local Root Folder, which will be used to hold all the related pages for the web project. Note, all items used in your web project must be stored in the specified Local Root Folder. From the Menu toolbar select Site > Manage Sites to open the Manage Site dialog box.
Select the New button to generate a new Site. Select the Edit button to edit information on an
existing Site. Select the Remove button to delete a site. Note,
removing a site does not delete the actual files associated with your Site on your computer.
For this class example, select the New button and choose Site from the flyout menu to display the Site Definition dialog box. Tip: By default, the Basic tab will be displayed in the dialog box. The Basic tab uses a wizard to walk you through the site setup. This class will focus on using the Advanced tab because it is more straight forward and easier to use. Specify a Site Name by clicking with the mouse in the Site Name field. The Site Name is an internal naming convention used in Dreamweaver. When naming the Site, don’t worry about spaces or capitalization. The Site Name is like a “pet name” for your project. The Site Name is never transferred to the Web or Remote server. The Local Root folder is the central storage location on your computer that will be used to store all files and assets for the web project.
U:\On-site\FCampana\dreamweaver8\Dreamweaver_cs4.doc Page 7 of 18 © Computer Training Support Services Colorado State University
Browse and select the folder to be used for the central storage or select the Folder icon to the right of the Local Root Folder field to create a new folder. The file folder chosen or created will be known as the Local Root Folder for your project in Dreamweaver. Tip: All files and assets that you plan on using in your web project must be stored in the Local Root folder. All the folders, subfolders and files that are used in your web project should be stored in the specified Local Root folder so that when you create your pages and link to assets all file references will be relative to your Site. The Site dialog box needs to know where all the images are stored within the Site. Use the Default Images Folder field to point to the folder within your Local Root Folder that will contain or hold all images files for the web project.
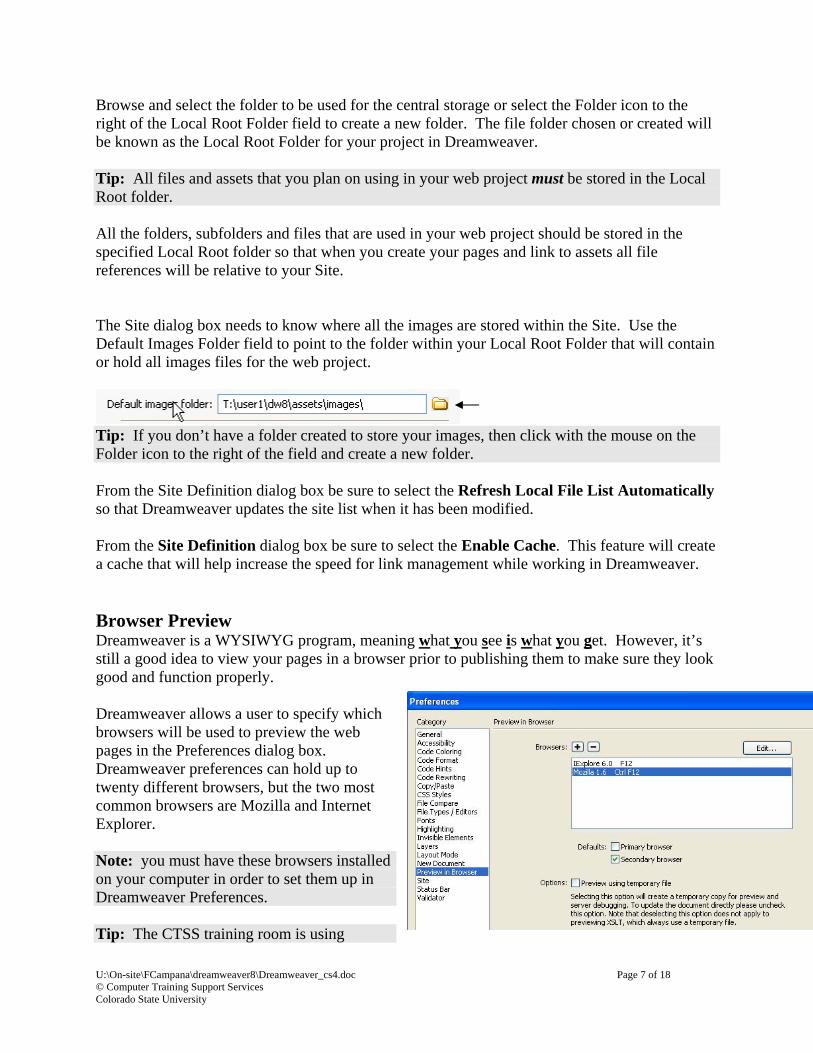
Tip: If you don’t have a folder created to store your images, then click with the mouse on the Folder icon to the right of the field and create a new folder. From the Site Definition dialog box be sure to select the Refresh Local File List Automatically so that Dreamweaver updates the site list when it has been modified. From the Site Definition dialog box be sure to select the Enable Cache. This feature will create a cache that will help increase the speed for link management while working in Dreamweaver. Browser Preview Dreamweaver is a WYSIWYG program, meaning what you see is what you get. However, it’s still a good idea to view your pages in a browser prior to publishing them to make sure they look good and function properly. Dreamweaver allows a user to specify which browsers will be used to preview the web pages in the Preferences dialog box. Dreamweaver preferences can hold up to twenty different browsers, but the two most common browsers are Mozilla and Internet Explorer. Note: you must have these browsers installed on your computer in order to set them up in Dreamweaver Preferences. Tip: The CTSS training room is using
U:\On-site\FCampana\dreamweaver8\Dreamweaver_cs4.doc Page 8 of 18 © Computer Training Support Services Colorado State University
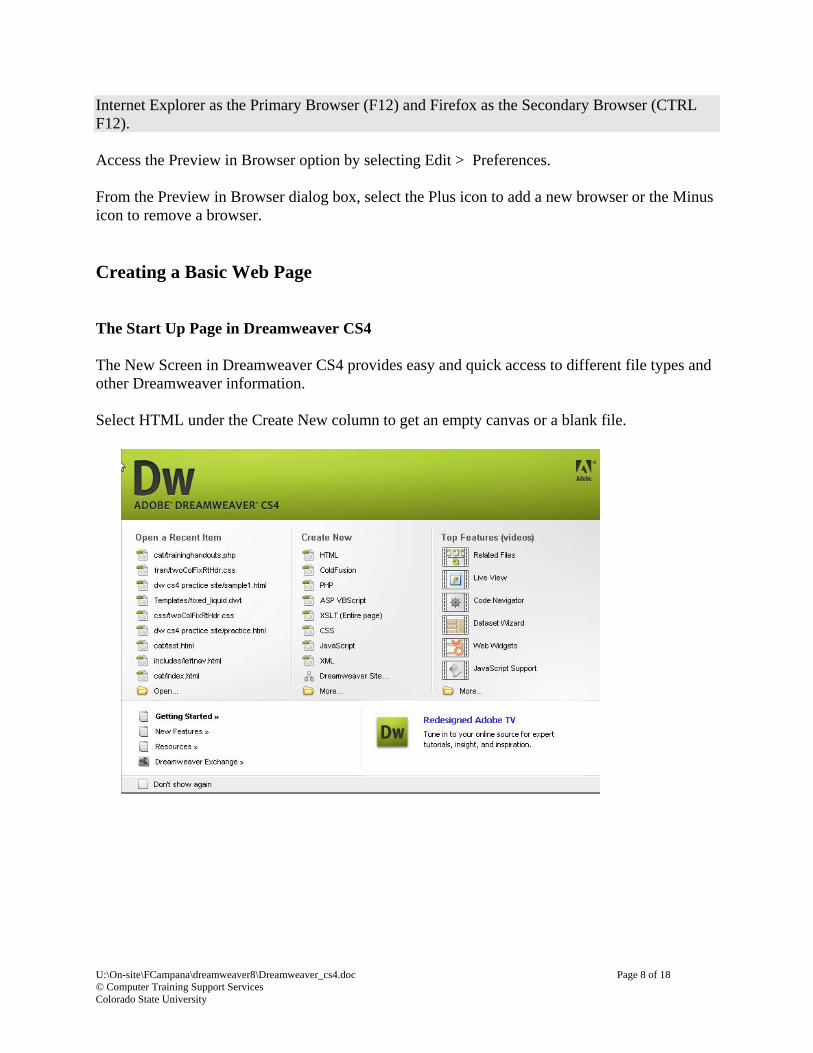
Internet Explorer as the Primary Browser (F12) and Firefox as the Secondary Browser (CTRL F12). Access the Preview in Browser option by selecting Edit > Preferences. From the Preview in Browser dialog box, select the Plus icon to add a new browser or the Minus icon to remove a browser. Creating a Basic Web Page The Start Up Page in Dreamweaver CS4 The New Screen in Dreamweaver CS4 provides easy and quick access to different file types and other Dreamweaver information. Select HTML under the Create New column to get an empty canvas or a blank file.
U:\On-site\FCampana\dreamweaver8\Dreamweaver_cs4.doc Page 9 of 18 © Computer Training Support Services Colorado State University
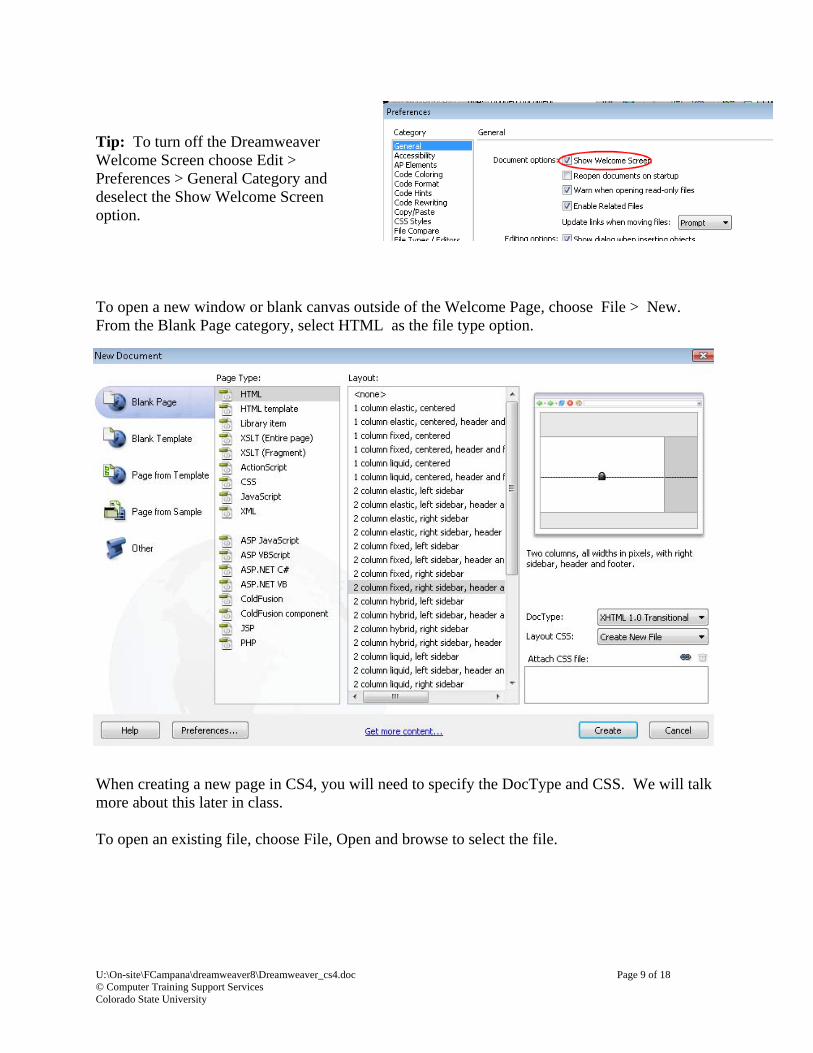
Tip: To turn off the Dreamweaver Welcome Screen choose Edit > Preferences > General Category and deselect the Show Welcome Screen option. To open a new window or blank canvas outside of the Welcome Page, choose File > New. From the Blank Page category, select HTML as the file type option.
When creating a new page in CS4, you will need to specify the DocType and CSS. We will talk more about this later in class. To open an existing file, choose File, Open and browse to select the file.
U:\On-site\FCampana\dreamweaver8\Dreamweaver_cs4.doc Page 10 of 18 © Computer Training Support Services Colorado State University
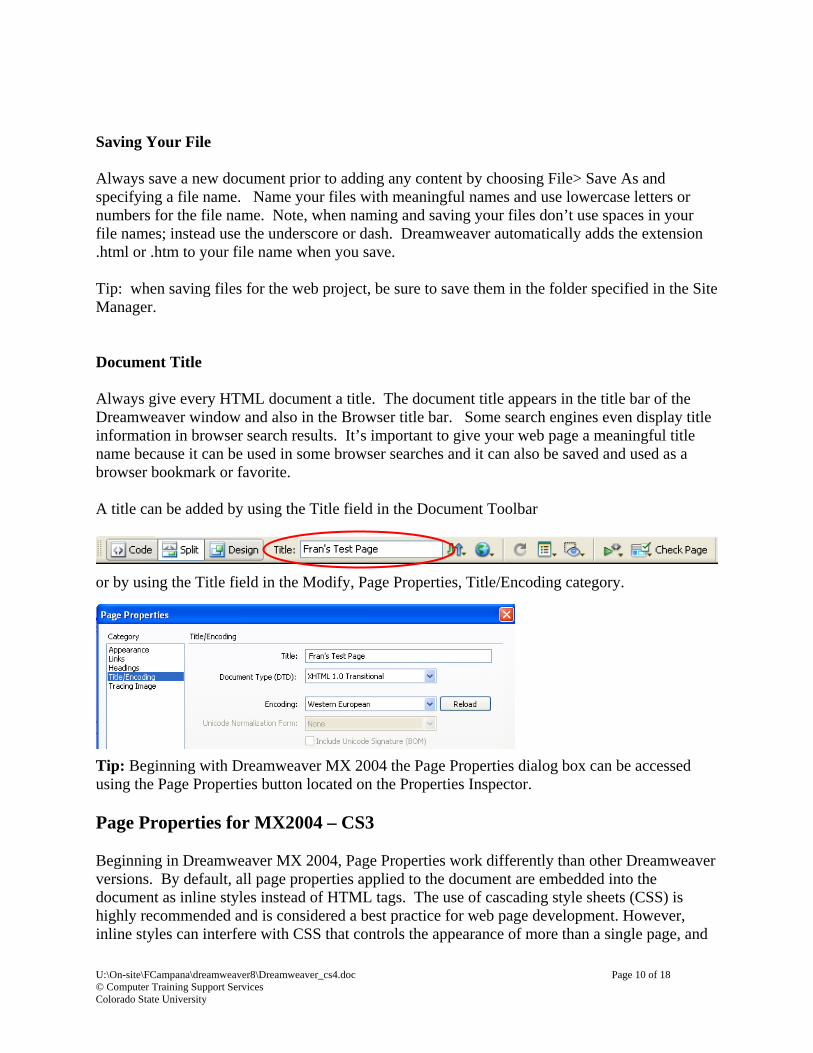
Saving Your File Always save a new document prior to adding any content by choosing File> Save As and specifying a file name. Name your files with meaningful names and use lowercase letters or numbers for the file name. Note, when naming and saving your files don’t use spaces in your file names; instead use the underscore or dash. Dreamweaver automatically adds the extension .html or .htm to your file name when you save. Tip: when saving files for the web project, be sure to save them in the folder specified in the Site Manager. Document Title Always give every HTML document a title. The document title appears in the title bar of the Dreamweaver window and also in the Browser title bar. Some search engines even display title information in browser search results. It’s important to give your web page a meaningful title name because it can be used in some browser searches and it can also be saved and used as a browser bookmark or favorite. A title can be added by using the Title field in the Document Toolbar
or by using the Title field in the Modify, Page Properties, Title/Encoding category.
Tip: Beginning with Dreamweaver MX 2004 the Page Properties dialog box can be accessed using the Page Properties button located on the Properties Inspector. Page Properties for MX2004 – CS3 Beginning in Dreamweaver MX 2004, Page Properties work differently than other Dreamweaver versions. By default, all page properties applied to the document are embedded into the document as inline styles instead of HTML tags. The use of cascading style sheets (CSS) is highly recommended and is considered a best practice for web page development. However, inline styles can interfere with CSS that controls the appearance of more than a single page, and
U:\On-site\FCampana\dreamweaver8\Dreamweaver_cs4.doc Page 11 of 18 © Computer Training Support Services Colorado State University
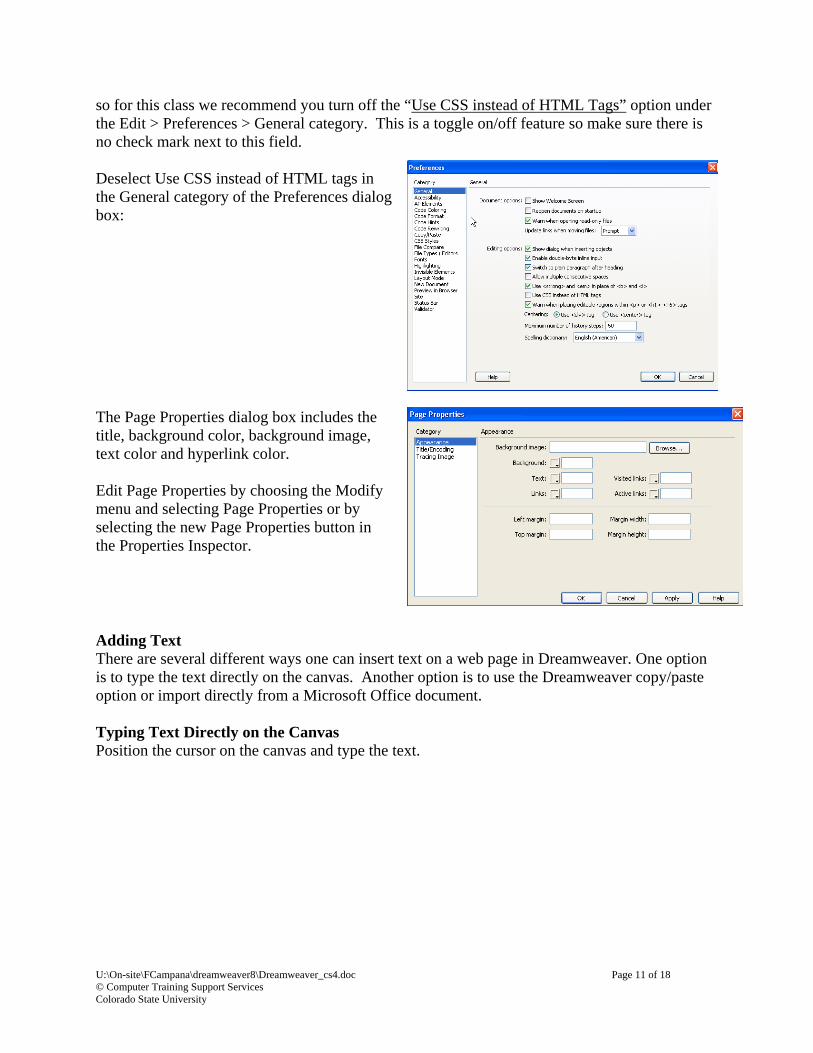
so for this class we recommend you turn off the “Use CSS instead of HTML Tags” option under the Edit > Preferences > General category. This is a toggle on/off feature so make sure there is no check mark next to this field. Deselect Use CSS instead of HTML tags in the General category of the Preferences dialog box: The Page Properties dialog box includes the title, background color, background image, text color and hyperlink color. Edit Page Properties by choosing the Modify menu and selecting Page Properties or by selecting the new Page Properties button in the Properties Inspector. Adding Text There are several different ways one can insert text on a web page in Dreamweaver. One option is to type the text directly on the canvas. Another option is to use the Dreamweaver copy/paste option or import directly from a Microsoft Office document. Typing Text Directly on the Canvas Position the cursor on the canvas and type the text.
U:\On-site\FCampana\dreamweaver8\Dreamweaver_cs4.doc Page 12 of 18 © Computer Training Support Services Colorado State University
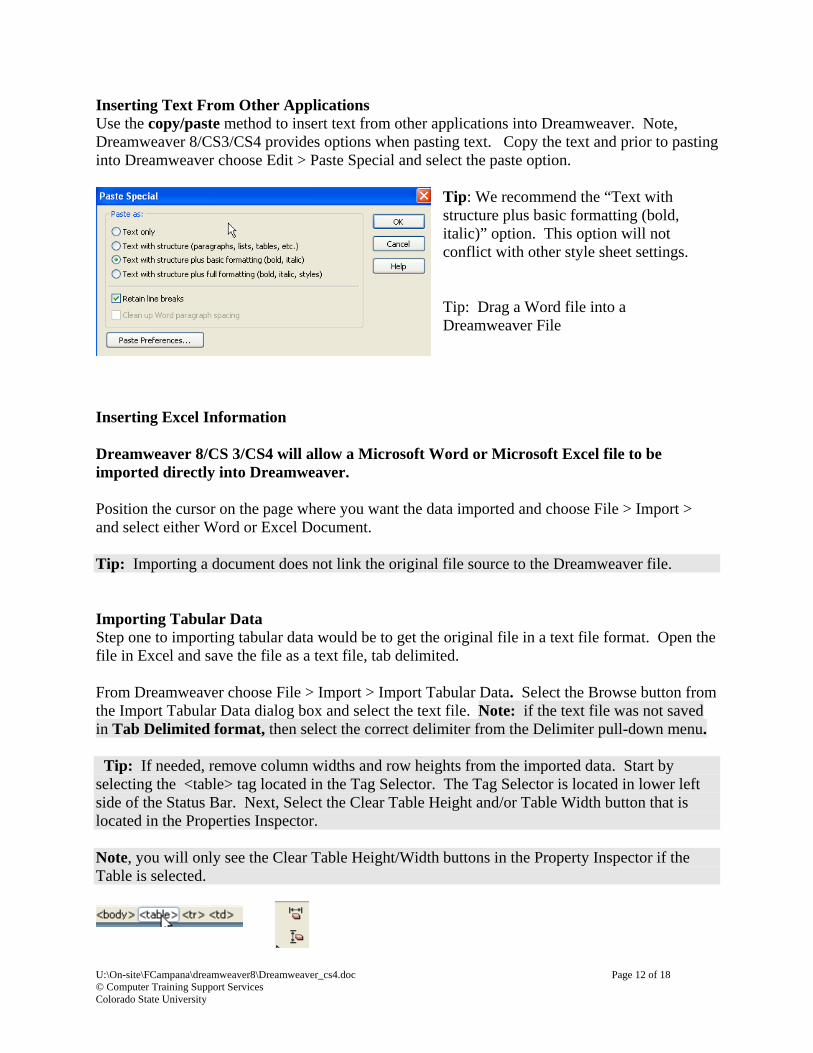
Inserting Text From Other Applications Use the copy/paste method to insert text from other applications into Dreamweaver. Note, Dreamweaver 8/CS3/CS4 provides options when pasting text. Copy the text and prior to pasting into Dreamweaver choose Edit > Paste Special and select the paste option.
Tip: We recommend the “Text with structure plus basic formatting (bold, italic)” option. This option will not conflict with other style sheet settings. Tip: Drag a Word file into a Dreamweaver File
Inserting Excel Information Dreamweaver 8/CS 3/CS4 will allow a Microsoft Word or Microsoft Excel file to be imported directly into Dreamweaver. Position the cursor on the page where you want the data imported and choose File > Import > and select either Word or Excel Document. Tip: Importing a document does not link the original file source to the Dreamweaver file. Importing Tabular Data Step one to importing tabular data would be to get the original file in a text file format. Open the file in Excel and save the file as a text file, tab delimited. From Dreamweaver choose File > Import > Import Tabular Data. Select the Browse button from the Import Tabular Data dialog box and select the text file. Note: if the text file was not saved in Tab Delimited format, then select the correct delimiter from the Delimiter pull-down menu. Tip: If needed, remove column widths and row heights from the imported data. Start by selecting the <table> tag located in the Tag Selector. The Tag Selector is located in lower left side of the Status Bar. Next, Select the Clear Table Height and/or Table Width button that is located in the Properties Inspector. Note, you will only see the Clear Table Height/Width buttons in the Property Inspector if the Table is selected.
U:\On-site\FCampana\dreamweaver8\Dreamweaver_cs4.doc Page 13 of 18 © Computer Training Support Services Colorado State University
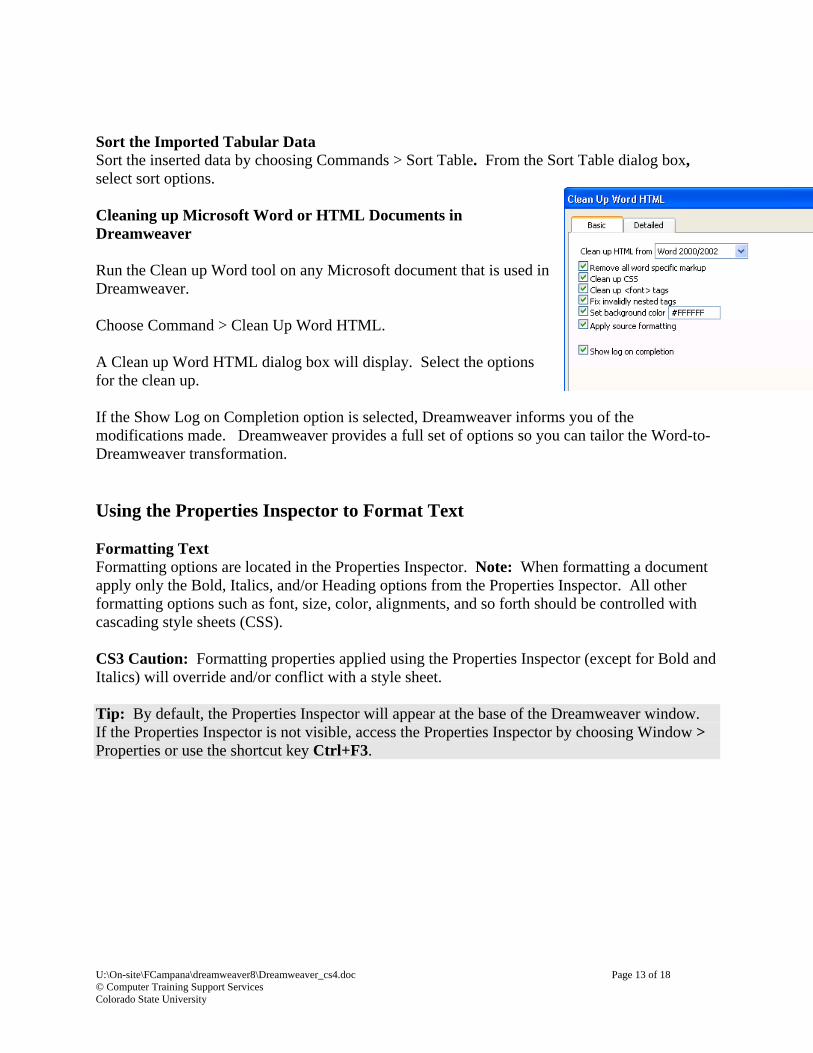
Sort the Imported Tabular Data Sort the inserted data by choosing Commands > Sort Table. From the Sort Table dialog box, select sort options. Cleaning up Microsoft Word or HTML Documents in Dreamweaver Run the Clean up Word tool on any Microsoft document that is used in Dreamweaver. Choose Command > Clean Up Word HTML. A Clean up Word HTML dialog box will display. Select the options for the clean up. If the Show Log on Completion option is selected, Dreamweaver informs you of the modifications made. Dreamweaver provides a full set of options so you can tailor the Word-to-Dreamweaver transformation. Using the Properties Inspector to Format Text Formatting Text Formatting options are located in the Properties Inspector. Note: When formatting a document apply only the Bold, Italics, and/or Heading options from the Properties Inspector. All other formatting options such as font, size, color, alignments, and so forth should be controlled with cascading style sheets (CSS). CS3 Caution: Formatting properties applied using the Properties Inspector (except for Bold and Italics) will override and/or conflict with a style sheet. Tip: By default, the Properties Inspector will appear at the base of the Dreamweaver window. If the Properties Inspector is not visible, access the Properties Inspector by choosing Window > Properties or use the shortcut key Ctrl+F3.
U:\On-site\FCampana\dreamweaver8\Dreamweaver_cs4.doc Page 14 of 18 © Computer Training Support Services Colorado State University
XX XX X
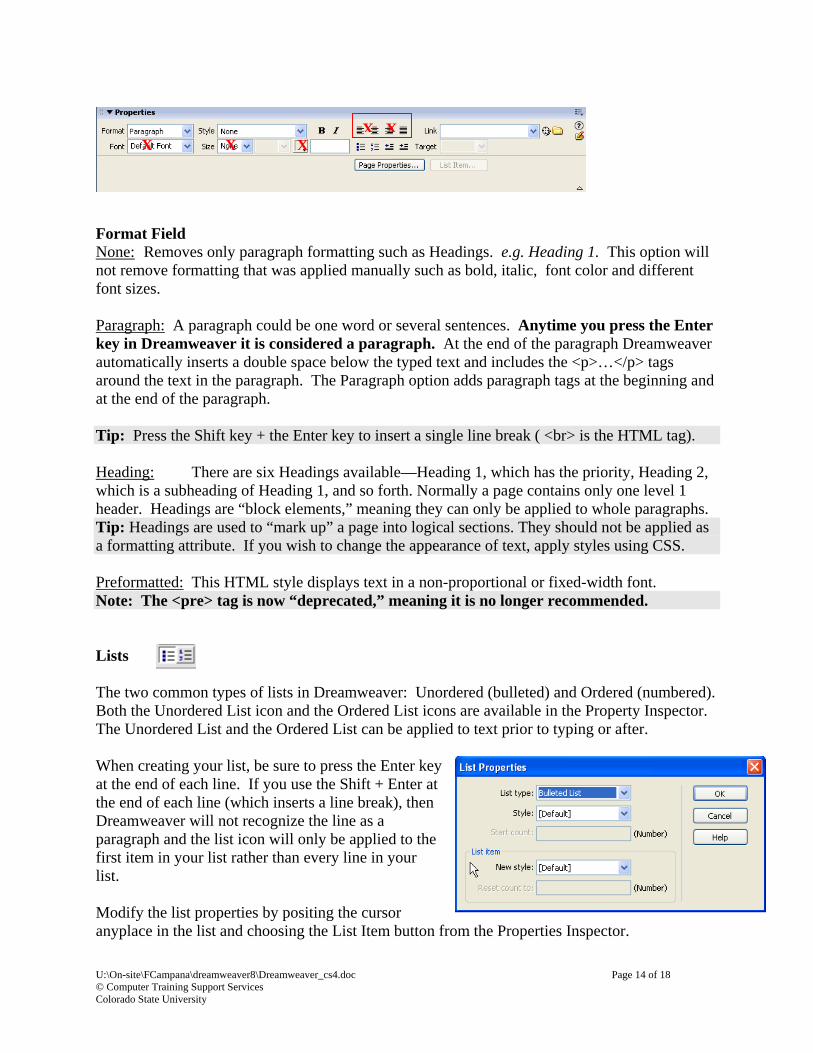
Format Field None: Removes only paragraph formatting such as Headings. e.g. Heading 1. This option will not remove formatting that was applied manually such as bold, italic, font color and different font sizes. Paragraph: A paragraph could be one word or several sentences. Anytime you press the Enter key in Dreamweaver it is considered a paragraph. At the end of the paragraph Dreamweaver automatically inserts a double space below the typed text and includes the <p>…</p> tags around the text in the paragraph. The Paragraph option adds paragraph tags at the beginning and at the end of the paragraph. Tip: Press the Shift key + the Enter key to insert a single line break ( <br> is the HTML tag). Heading: There are six Headings available—Heading 1, which has the priority, Heading 2, which is a subheading of Heading 1, and so forth. Normally a page contains only one level 1 header. Headings are “block elements,” meaning they can only be applied to whole paragraphs. Tip: Headings are used to “mark up” a page into logical sections. They should not be applied as a formatting attribute. If you wish to change the appearance of text, apply styles using CSS. Preformatted: This HTML style displays text in a non-proportional or fixed-width font. Note: The <pre> tag is now “deprecated,” meaning it is no longer recommended. Lists The two common types of lists in Dreamweaver: Unordered (bulleted) and Ordered (numbered). Both the Unordered List icon and the Ordered List icons are available in the Property Inspector. The Unordered List and the Ordered List can be applied to text prior to typing or after. When creating your list, be sure to press the Enter key at the end of each line. If you use the Shift + Enter at the end of each line (which inserts a line break), then Dreamweaver will not recognize the line as a paragraph and the list icon will only be applied to the first item in your list rather than every line in your list. Modify the list properties by positing the cursor anyplace in the list and choosing the List Item button from the Properties Inspector.
U:\On-site\FCampana\dreamweaver8\Dreamweaver_cs4.doc Page 15 of 18 © Computer Training Support Services Colorado State University
Images The two standard images types that most browsers support are GIF and JPEG.
GIF (CompuServe Graphics Interchange Format - GIF extension) JPEG (Joint Photographic Experts Group - JPG or JPEG extension) PNG (Portable Network Graphic) PNG (pronounced “ping”) graphics were designed
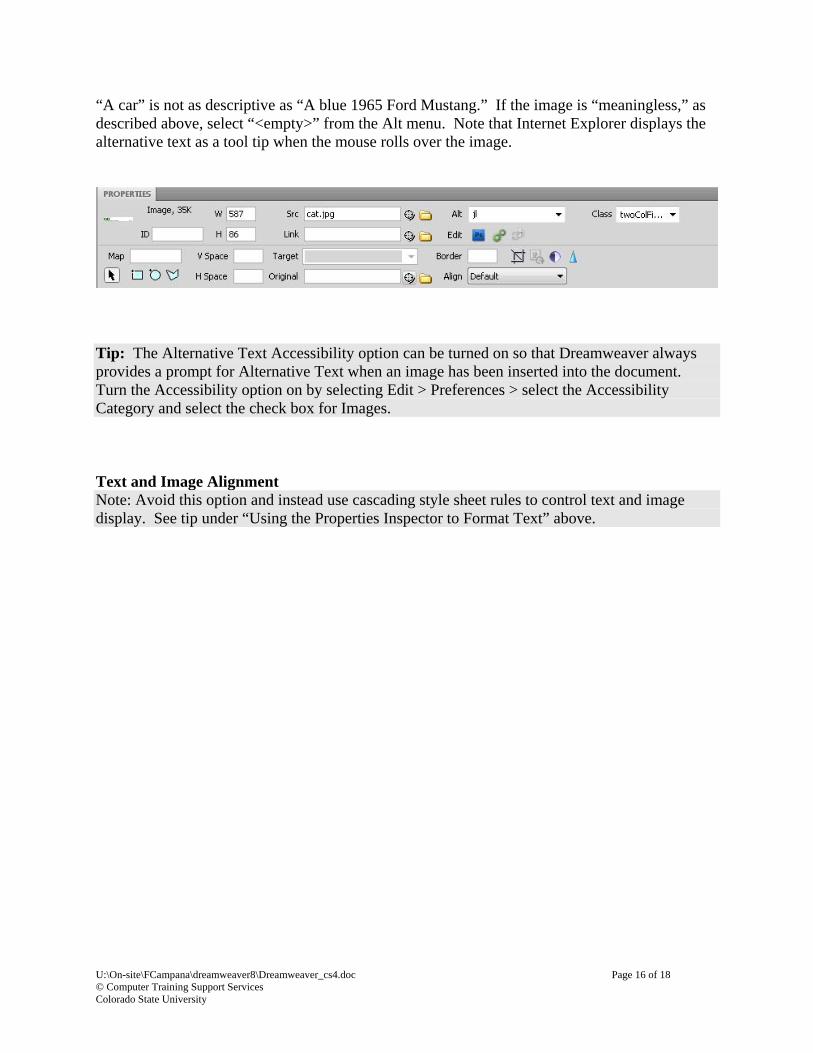
specifically for use on the Web, and offer a range of versatile features. More Image Information GIF art images lack the higher quality of JPEG files, but are more compact and display more quickly in web browsers. GIF images work well for black and white "wireframe" or line drawings while JPEG images are more appropriate for "raster" or full color images such as photographs. PNG image features include a full range of color depths, support for sophisticated image transparency, better interlacing, and automatic corrections for display monitor gamma. PNG images can also hold a short text description of the image's content, which allows Internet search engines to search for images based on these embedded text descriptions. You can create your own images, scan them, or buy them as part of a commercial clip art package. You can also find GIF, JPEG, and PNG images on the Internet's many free and royalty-free (public domain) image archives. Inserting an Image ***Save your page first. Place the cursor where you want to insert the image. From the Insert Menu choose Image and browse to select the image. An image can also be inserted by choosing the Image icon from the Common menu located in the Inset Bar. Alternative Text (Alt text) Alternative text must be added to every image that is added to a web page. Alternative text is used for those readers who choose to use text-only browsers or have image loading turned off. In addition, use of alternative text allows users with visual impairments to understand the meaning of images on a web page. When inserting alternative text, be sure to use text that describes the intent of images. Some images are what might be called “eye candy”—they add no meaningful content to the page. Other images add important information and should be accompanied by descriptions of the meaning they convey. Using alternative text to give meaning to your images goes a long way toward making your web pages more accessible to all users. Adding Alt Text: Select an image on the page and the Properties Inspector will change to display image properties. Position the cursor in the Alt field and enter a descriptive label for that image. Keep in mind that
U:\On-site\FCampana\dreamweaver8\Dreamweaver_cs4.doc Page 16 of 18 © Computer Training Support Services Colorado State University
“A car” is not as descriptive as “A blue 1965 Ford Mustang.” If the image is “meaningless,” as described above, select “<empty>” from the Alt menu. Note that Internet Explorer displays the alternative text as a tool tip when the mouse rolls over the image.
Tip: The Alternative Text Accessibility option can be turned on so that Dreamweaver always provides a prompt for Alternative Text when an image has been inserted into the document. Turn the Accessibility option on by selecting Edit > Preferences > select the Accessibility Category and select the check box for Images. Text and Image Alignment Note: Avoid this option and instead use cascading style sheet rules to control text and image display. See tip under “Using the Properties Inspector to Format Text” above.
U:\On-site\FCampana\dreamweaver8\Dreamweaver_cs4.doc Page 17 of 18 © Computer Training Support Services Colorado State University
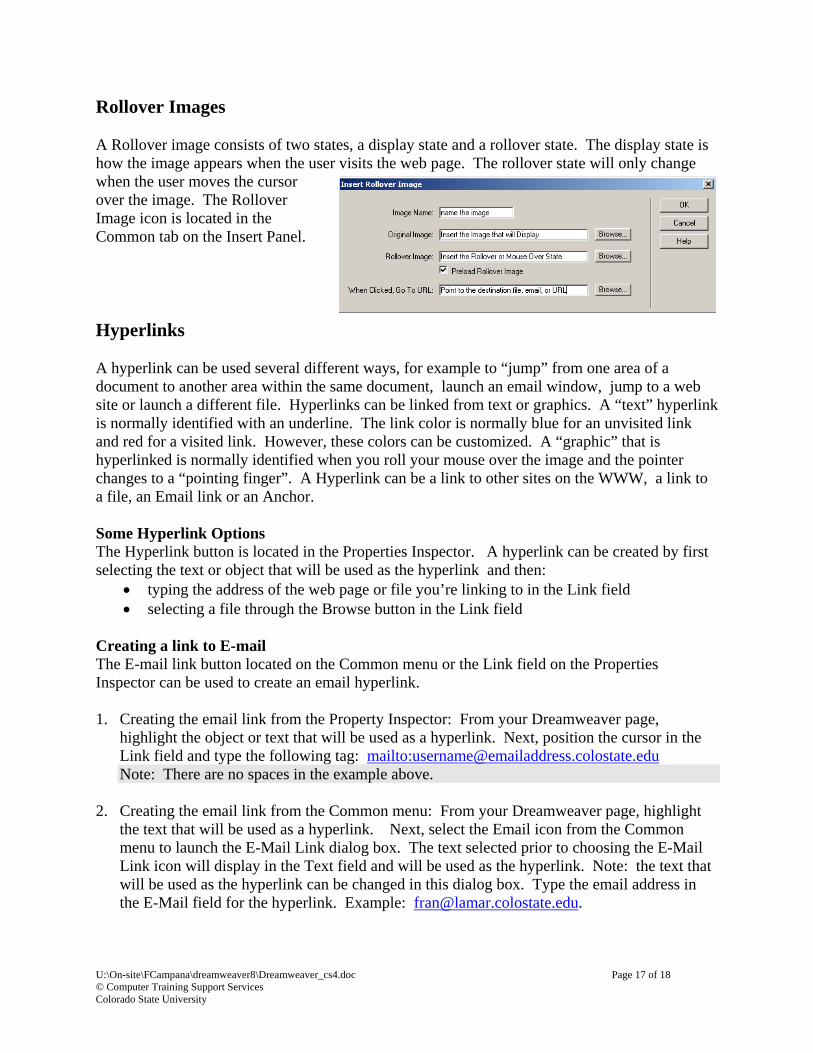
Rollover Images A Rollover image consists of two states, a display state and a rollover state. The display state is how the image appears when the user visits the web page. The rollover state will only change when the user moves the cursor over the image. The Rollover Image icon is located in the Common tab on the Insert Panel. Hyperlinks A hyperlink can be used several different ways, for example to “jump” from one area of a document to another area within the same document, launch an email window, jump to a web site or launch a different file. Hyperlinks can be linked from text or graphics. A “text” hyperlink is normally identified with an underline. The link color is normally blue for an unvisited link and red for a visited link. However, these colors can be customized. A “graphic” that is hyperlinked is normally identified when you roll your mouse over the image and the pointer changes to a “pointing finger”. A Hyperlink can be a link to other sites on the WWW, a link to a file, an Email link or an Anchor. Some Hyperlink Options The Hyperlink button is located in the Properties Inspector. A hyperlink can be created by first selecting the text or object that will be used as the hyperlink and then:
typing the address of the web page or file you’re linking to in the Link field selecting a file through the Browse button in the Link field
Creating a link to E-mail The E-mail link button located on the Common menu or the Link field on the Properties Inspector can be used to create an email hyperlink. 1. Creating the email link from the Property Inspector: From your Dreamweaver page,
highlight the object or text that will be used as a hyperlink. Next, position the cursor in the Link field and type the following tag: mailto:[email protected] Note: There are no spaces in the example above.
2. Creating the email link from the Common menu: From your Dreamweaver page, highlight
the text that will be used as a hyperlink. Next, select the Email icon from the Common menu to launch the E-Mail Link dialog box. The text selected prior to choosing the E-Mail Link icon will display in the Text field and will be used as the hyperlink. Note: the text that will be used as the hyperlink can be changed in this dialog box. Type the email address in the E-Mail field for the hyperlink. Example: [email protected].
U:\On-site\FCampana\dreamweaver8\Dreamweaver_cs4.doc Page 18 of 18 © Computer Training Support Services Colorado State University
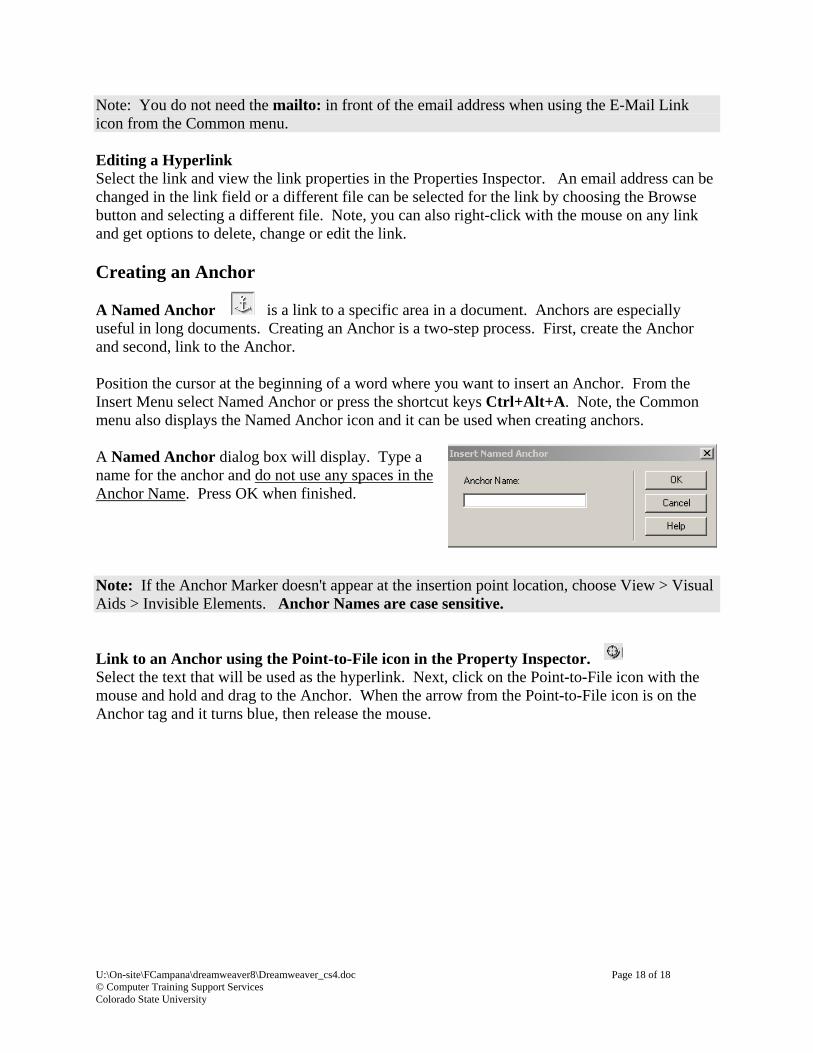
Note: You do not need the mailto: in front of the email address when using the E-Mail Link icon from the Common menu. Editing a Hyperlink Select the link and view the link properties in the Properties Inspector. An email address can be changed in the link field or a different file can be selected for the link by choosing the Browse button and selecting a different file. Note, you can also right-click with the mouse on any link and get options to delete, change or edit the link. Creating an Anchor A Named Anchor is a link to a specific area in a document. Anchors are especially useful in long documents. Creating an Anchor is a two-step process. First, create the Anchor and second, link to the Anchor. Position the cursor at the beginning of a word where you want to insert an Anchor. From the Insert Menu select Named Anchor or press the shortcut keys Ctrl+Alt+A. Note, the Common menu also displays the Named Anchor icon and it can be used when creating anchors. A Named Anchor dialog box will display. Type a name for the anchor and do not use any spaces in the Anchor Name. Press OK when finished. Note: If the Anchor Marker doesn't appear at the insertion point location, choose View > Visual Aids > Invisible Elements. Anchor Names are case sensitive. Link to an Anchor using the Point-to-File icon in the Property Inspector. Select the text that will be used as the hyperlink. Next, click on the Point-to-File icon with the mouse and hold and drag to the Anchor. When the arrow from the Point-to-File icon is on the Anchor tag and it turns blue, then release the mouse.