Adobe Connect Instructions - Oakland -...
3
1 Instructions for Connecting to an Adobe Connect “Virtual Classroom” Session Note: We strongly recommend that you obtain a headset with a microphone so you can ‘talk’ with us during the “Virtual Classroom” Sessions. The headset will also be useful for completing some of the 21 Things. 1. The Schedule: Go the Oakland Schools 21 Things portal: http://21things4teachersoakland.weebly.com/ and click on the Virtual Sessions tab. 2. Click on the URL for the “Virtual Classroom” Sessions. 3. You will arrive at the REMC Adobe Connect room. a. Click on Guest. b. Put your name in the box provided. c. Click on the “Enter Room” button and wait a minute while it loads. IMPORTANT: You may need to “allow” or say “yes” to a plugin (only needed the first time you do this). 4. You will arrive at the Adobe Connect Virtual Classroom Environment. Your window and arrangement of boxes will look slightly different than the one shown in the picture.
Transcript of Adobe Connect Instructions - Oakland -...
1
Instructions for Connecting to an Adobe Connect “Virtual Classroom” Session
Note: We strongly recommend that you obtain a headset with a microphone so you can ‘talk’ with us during the “Virtual Classroom” Sessions. The headset will also be useful for completing some of the 21 Things.
1. The Schedule: Go the Oakland Schools 21 Things portal: http://21things4teachersoakland.weebly.com/ and click on the Virtual Sessions tab.
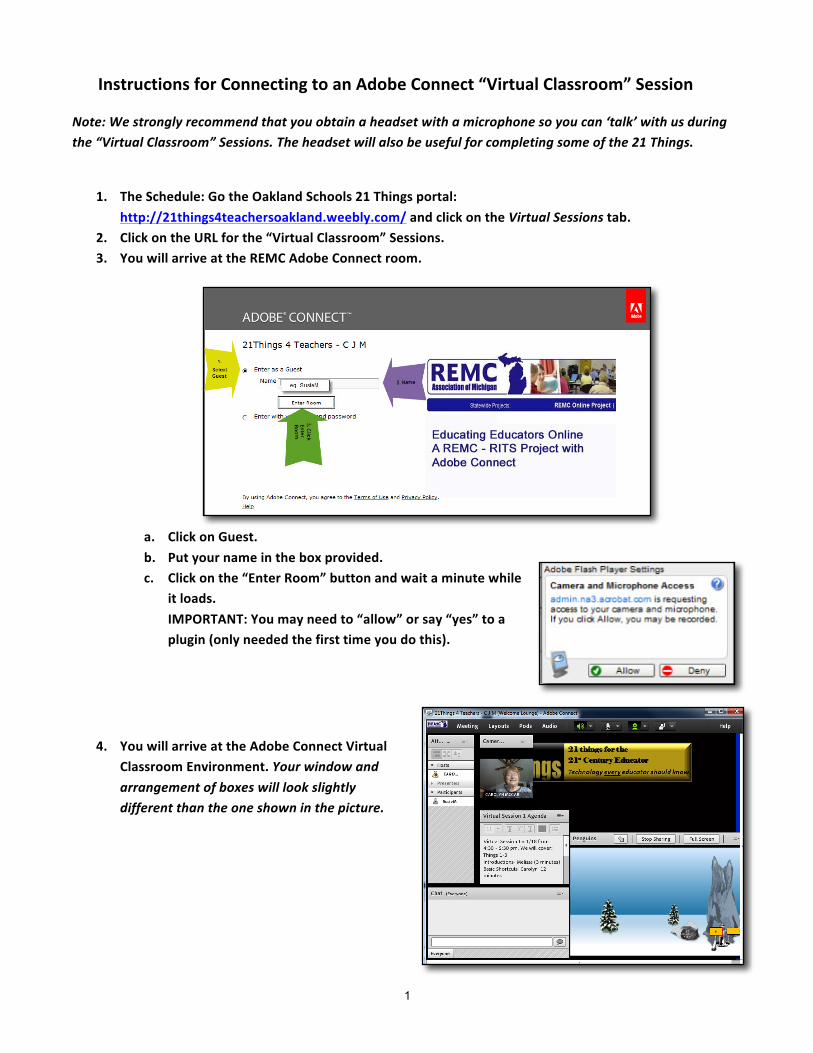
2. Click on the URL for the “Virtual Classroom” Sessions. 3. You will arrive at the REMC Adobe Connect room.
a. Click on Guest. b. Put your name in the box provided. c. Click on the “Enter Room” button and wait a minute while
it loads. IMPORTANT: You may need to “allow” or say “yes” to a plugin (only needed the first time you do this).
4. You will arrive at the Adobe Connect Virtual Classroom Environment. Your window and arrangement of boxes will look slightly different than the one shown in the picture.

2
5. The instructor is shown as the “host”
6. Participants are shown below that with their name and a slightly different icon. 7. You should have your USB headset plugged in so you can check your
audio settings. a. Click on the word Meeting on the top menu. b. Select Audio Setup Wizard.
1. Welcome and click on Next
2. Test Sound Output (click Play Sound)
3. When the bar moves you should hear sound (click Next)
4. Microphone setup – click on
the drop-‐down arrow to make sure you select your USB headset (or selected device) Click on Next
5. Record the sentence provided by clicking on record and talking. Adjust your volume level if it fills the space. Stop the recording. Then Play it to see if you hear yourself. Click Next
6. Test Silence Level
Click on Next when completed.
Click on Finish when done.
8. From the Meeting menu you can also select Full Screen as well as exit the meeting. (You can also exit with the x on the top right of the window.
9. The small speaker icon lets you adjust your volume of your speakers.

3
10. Interacting with the Presenter is important. There are several ways.
a. Raised Hand on the top of the screen provides options.
b. Raised hand looks like this in the Attendee list.
c. Lower your hand or change the status by clicking x Clear Status.
d. Using the Chat window – you type in the lower bar and click enter and your text will appear in the window with your name.
e. To chat directly with another individual or the host use the small drop down icon at the top right of the chat window. This will start a new tab at the bottom of the Chat window (shown below) so that you can select it to continue chatting with the individual selected, or Everyone.
111. Your instructors can share their screens, a PowerPoint, or other items with you by using a “share pod” 12. That’s all there is to it! If you want to learn more about Adobe Connect and how you can get a limited free one to use yourself visit and Create a free account at https://acrobat.com/welcome.html#si=1