Administrators Guide: Wyse® Winterm™ 1 series, Based on Wyse ...

Administrators GuideWyse® XenithTM Release 2.0Products: C00X (Wyse Xenith), R00LX (Wyse Xenith Pro), T00X (Xenith 2)
Issue: 100912 PN: 883940-01 Rev. G
Copyright Notices© 2012, Wyse Technology Inc. All rights reserved.
This manual and the software and firmware described in it are copyrighted. You may not reproduce, transmit, transcribe, store in a retrieval system, or translate into any language or computer language, in any form or by any means, electronic, mechanical, magnetic, optical, chemical, manual or otherwise, any part of this publication without express written permission.
End User License Agreement (“License”)A copy of the Wyse Technology End User License Agreement is included in the software and provided for your reference only. The License at http://www.wyse.com/license as of the purchase date is the controlling licensing agreement. By copying, using, or installing the software or the product, you agree to be bound by those terms.
TrademarksThe Wyse and PocketCloud logos and Wyse and PocketCloud are trademarks of Wyse Technology Inc. Other product names mentioned herein are for identification purposes only and may be trademarks and/or registered trademarks of their respective companies. Specifications subject to change without notice.
PatentsThis product and/or associated software are protected by copyright, international treaties, and various patents, including the following U.S. patents: 6,836,885 and 5,918,039.
Restricted Rights LegendYou acknowledge that the Software is of U.S. origin. You agree to comply with all applicable international and national laws that apply to the Software, including the U.S. Export Administration Regulations, as well as end-user, end-use and country destination restrictions issued by U.S. and other governments. For additional information on exporting the Software, see http://www.microsoft.com/exporting.
Ordering InformationFor availability, pricing, and ordering information in the United States and Canada, call 1-800-GET-WYSE (1-800-438-9973) or visit us at wyse.com. In all other countries, contact your sales representative.
FCC StatementThis equipment has been tested and found to comply with the limits for either Class A or Class B digital devices, pursuant to Part 15 of the FCC Rules. These limits are designed to provide reasonable protection against harmful interference in a residential installation. This equipment generates, uses, and can radiate radio frequency energy and, if not installed and used in accordance with the instructions, may cause harmful interference to radio communications. However, there is no guarantee that interference will not occur in a particular installation. If this equipment does cause harmful interference to radio or television reception, which can be determined by turning the equipment off and on, the user is encouraged to try to correct the interference by one or more of the following measures:• Reorient or relocate the receiving antenna.• Increase the separation between the equipment and the receiver.• Connect the equipment into an outlet on a circuit different from that to which the receiver is connected.• Consult the dealer or an experienced radio/TV technician for help.
Shielded interconnect cables and shielded AC power cable must be employed with this equipment to insure compliance with the pertinent RF emission limits governing this device. Changes or modifications not expressly approved by the system’s manufacturer could void the user’s authority to operate the equipment.

For Hardware with Wireless 802.11 CapabilitiesOperation on the 5.15-5.25 GHz frequency band is restricted to indoor use only. The FCC/IC requires indoor use for the 5.15-5.25 GHz band to reduce the potential for harmful interference to co-channel Systems. Therefore, it will only transmit on the 5.25-5.35 GHz, 5.47-5.725 GHz, and 5.725-5.850 GHz band when associated with an access point (AP).
CautionModifications made to the product, unless expressly approved by Wyse Technology, could void the user’s authority to operate the equipment.
Canadian DOC NoticesClass A - This digital apparatus does not exceed the Class A limits for radio noise emissions from digital apparatus set out in the Radio Interference Regulations of the Canadian Department of Communications. Le présent appareil numérique n’émet pas de bruits radioélectriques dépassant les limites applicables aux appareils numériques de la classe A prescrites dans le Réglement sur le brouillage radioélectrique édicté par le Ministère des Communications du Canada.
Class B - This digital apparatus does not exceed the Class B limits for radio noise emissions from digital apparatus set out in the Radio Interference Regulations of the Canadian Department of Communications. Le présent appareil numérique n’émet pas de bruits radioélectriques dépassant les limites applicables aux appareils numériques de la classe B prescrites dans le Réglement sur le brouillage radioélectrique édicté par le Ministère des Communications du Canada.
For Hardware with Wireless 802.11 Capabilities Pour matériel avec capacités 802.11 sans filThis radio transmitter (identify the device by certification number, or model number if Category II) has been approved by Industry Canada to operate with the antenna types listed below with the maximum permissible gain and required antenna impedance for each antenna type indicated. Antenna types not included in this list, having a gain greater than maximum gain indicated for that type, are strictly prohibited for use with this device. Le présent émetteur radio (identifier l’appareil au moyen du numéro de certification, ou du numéro de modèle si l’appareil relève de la Catégorie II) a été agréé par Industry Canada pour utilisation avec les types d’antennes répertoriées dans la liste ci-dessous, présentant le gain maximum autorisé et l’impédance d’antenne requise pour chaque type d’antenne. L’utilisation avec le présent appareil de types d’antennes qui ne sont pas répertoriées dans ladite liste, présentant un gain supérieur au gain maximum indiqué pour ce type, est strictement interdite.
This device complies with Industry Canada license-exempt RSS standard(s). Operation is subject to the following tow conditions: (1) this device may not cause interference, and (2) this device must accept any interference, including interference that may cause undesired operation of the device. Le présent appareil répond aux normes RSS exemptes de licence d’Industry Canada. Son utilisation est sujette aux deux conditions suivantes : (1) le présent appareil ne peut pas causer de brouillage, et (2) le présent appareil doit accepter tout brouillage, y compris tout brouillage pouvant entraîner des dysfonctionnements.
Regulatory Compliance for Thin Clients
Basic EMC and Safety RequirementsWyse thin clients are compliant with the regulatory requirements in the regions listed below.
U.S.A. - FCC Part 15 (class B), cUL 60950
Canada - IC ICES-003, CAN/CSA-C22 No. 60950
Europe - EN 55022 (class B), EN 55024
Wireless Usage and RequirementsRadio transmitting type devices (RF module) are present in models with the wireless option. These devices operate in the 2.4 GHz band (i.e. 802.11B/G/N LAN & Bluetooth).
As a general guideline, a separation of 20 cm (8 inches) between the wireless device and the body, for use of a wireless device near the body (this does not include extremities) is typical. This device should be used more than 20 cm (8 inches) from the body when wireless devices are on and transmitting.
Some circumstances require restrictions on wireless devices. Examples of common restrictions include:• When in environments where you are uncertain of the sanction to use wireless devices, ask the applicable
authority for authorization prior to use or turning on the wireless device.• Every country has different restrictions on the use of wireless devices. Since your system is equipped with a
wireless device, when traveling between countries with your system, check with the local Radio Approval authorities prior to any move or trip for any restrictions on the use of a wireless device in the destination country.
• Wireless devices are not user-serviceable. Do not modify them in any way. Modification to a wireless device will void the authorization to use it. Please contact the manufacturer for service.
Device Power SupplyUse only the external power supply that comes with your zero client. For power and voltage ratings, see the serial number label or regulatory label on your device. For power adapter replacement, contact your Wyse Service Representative. For proper replacement compare the labels on both zero client and power adapter to ensure that their voltages match.
WarningUse of any other power adapter may damage your zero client or the power adapter. The damage caused by an improper power adapter is not covered by warranty.
Battery InformationModels C00X, R00LX, and T00X contains an internal button cell battery replaceable by Wyse or one of our Authorized Service Centers. For service, visit http://www.wyse.com/support/authorized-service-centers.
WarningThere is a risk of explosion if the battery is replaced by an incorrect type. Always dispose of used batteries according to the instructions accompanying the battery.
WarningPerchlorate Materials – Special Handling May Be Required under California Code of Regulations, title 22. (Only required within the U.S.A.)
Contents
Summary of Revisions vii
1 Introduction 1About this Guide 2
Finding the Information You Need in this Guide 2Wyse Technical Support 2
Related Documentation and Services 2Wyse Online Community 2
2 Before You Start: Requirements and Recommendations 3Required: Citrix XenDesktop Server Environment 3Recommended: Central Configuration 3
Set Up Auto-Detection of the XenDesktop Server 3Set Up Automatic Updates 4
Adding DHCP Options #161 and #162 4
3 Getting Started: Quickly Learning the Basics 5Logging On to Your Desktop 6Using Your Desktop 7Signing Off and Shutting Down 8
4 Key Features 9Log on Dialog Box Features 9Wyse Xenith Toolbar Features 10Using the List of Desktops 11
Editing Desktops 12Manually Configuring Global Connection Settings 14
5 Configuring Connectivity Options 17Network Setup 18Remote Connections 24Central Configuration 27
6 Configuring Local Settings Options 29System Preferences 30Display 32Peripherals 34Printer 36
7 Performing Diagnostics 41System Tools 41Network Tools 43
Using Ping 43Using Trace Route 44
vi Contents
A Central Configuration: Automating Updates and Configurations 45How to Set Up Automatic Updates and Configurations 45
Step 1: Prepare the Root Directory and Folder Structure on the File Server 46Step 2: Direct Your Zero Client to the File Server Using DHCP Options 47Step 3: Reboot or Start Your Zero Client 47
B Creating and Using xen.ini Files 49Downloading and Using Sample INI Files 49Rules and Recommendations for Constructing a xen.ini File 50Parameters for a xen.ini File 51
C Using DHCP Options 73
D CMOS Management 77CMOS Local Management: Extracting CMOS Settings to a USB Key for Distribution 77
E Examples of Common Printing Configurations 79Printing to Local USB or Parallel Printers 80
Using the Printer Setup Dialog Box for Local USB or Parallel Printers 80Using INI Parameters for Local USB or Parallel Printers 80
Printing to Non-Windows Network Printers (LPD) 82Using the Printer Setup Dialog Box for Non-Windows Network Printers (LPD) 82Using INI Parameters for Non-Windows Network Printers (LPD) 83
Printing to Windows Network Printers (SMB) 84Using the Printer Setup Dialog Box for Windows Network Printers (SMB) 84Using INI Parameters for Windows Network Printers (SMB) 87
Example 1: Defining an SMB Printer with Generic User Credentials in Plain Text 87Example 2: Defining an SMB Printer with Generic User Credentials that are Encrypted 87
Using Your Zero Client as a Print Server (LPD) 88Using the Printer Setup Dialog Box for Configuring LPD Services 88Using INI Parameters for Configuring LPD Services 89
Configuring ThinPrint 90
F Troubleshooting and FAQs 91Viewing System Information 91Example: Directing Your Zero Client to a XenDesktop Server 92Changing Default Settings 93Resetting to Factory Defaults Without Proper Central Configuration 93About Wyse Device Manager (WDM) 93
Tables 95
Summary of Revisions
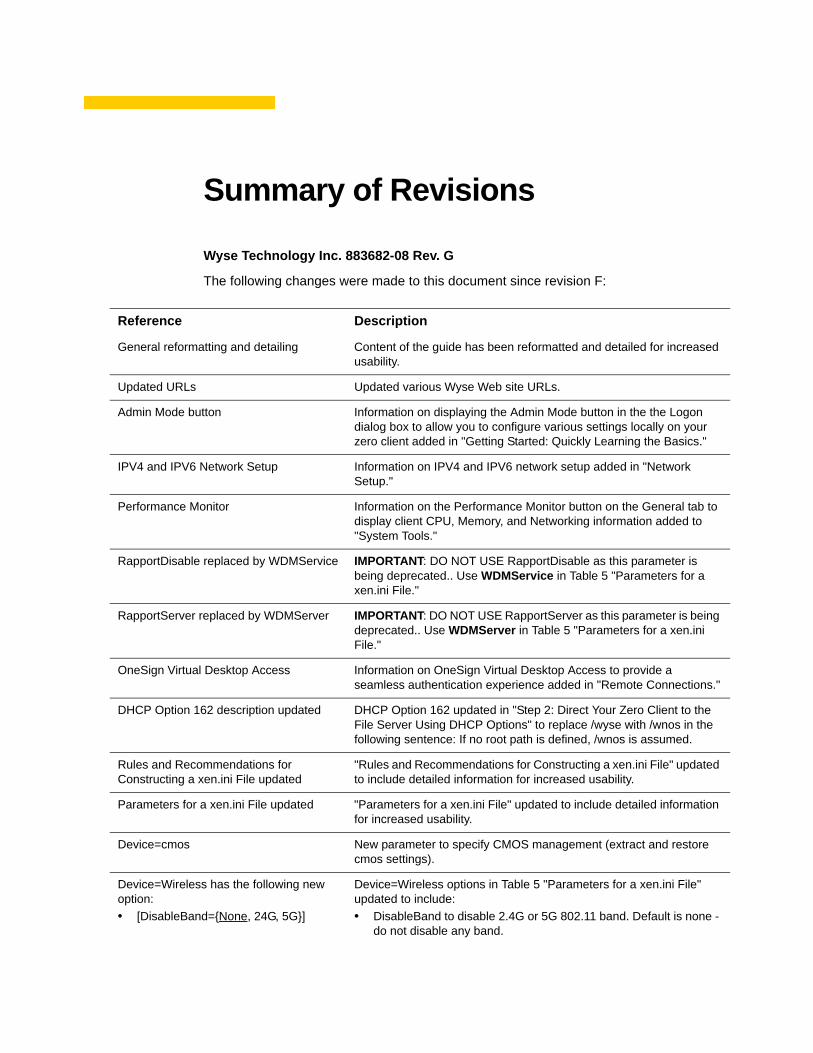
Wyse Technology Inc. 883682-08 Rev. G
The following changes were made to this document since revision F:
Reference Description
General reformatting and detailing Content of the guide has been reformatted and detailed for increased usability.
Updated URLs Updated various Wyse Web site URLs.
Admin Mode button Information on displaying the Admin Mode button in the the Logon dialog box to allow you to configure various settings locally on your zero client added in "Getting Started: Quickly Learning the Basics."
IPV4 and IPV6 Network Setup Information on IPV4 and IPV6 network setup added in "Network Setup."
Performance Monitor Information on the Performance Monitor button on the General tab to display client CPU, Memory, and Networking information added to "System Tools."
RapportDisable replaced by WDMService IMPORTANT: DO NOT USE RapportDisable as this parameter is being deprecated.. Use WDMService in Table 5 "Parameters for a xen.ini File."
RapportServer replaced by WDMServer IMPORTANT: DO NOT USE RapportServer as this parameter is being deprecated.. Use WDMServer in Table 5 "Parameters for a xen.ini File."
OneSign Virtual Desktop Access Information on OneSign Virtual Desktop Access to provide a seamless authentication experience added in "Remote Connections."
DHCP Option 162 description updated DHCP Option 162 updated in "Step 2: Direct Your Zero Client to the File Server Using DHCP Options" to replace /wyse with /wnos in the following sentence: If no root path is defined, /wnos is assumed.
Rules and Recommendations for Constructing a xen.ini File updated
"Rules and Recommendations for Constructing a xen.ini File" updated to include detailed information for increased usability.
Parameters for a xen.ini File updated "Parameters for a xen.ini File" updated to include detailed information for increased usability.
Device=cmos New parameter to specify CMOS management (extract and restore cmos settings).
Device=Wireless has the following new option:• [DisableBand={None, 24G, 5G}]
Device=Wireless options in Table 5 "Parameters for a xen.ini File" updated to include:• DisableBand to disable 2.4G or 5G 802.11 band. Default is none -
do not disable any band.
viii Summary of Revisions
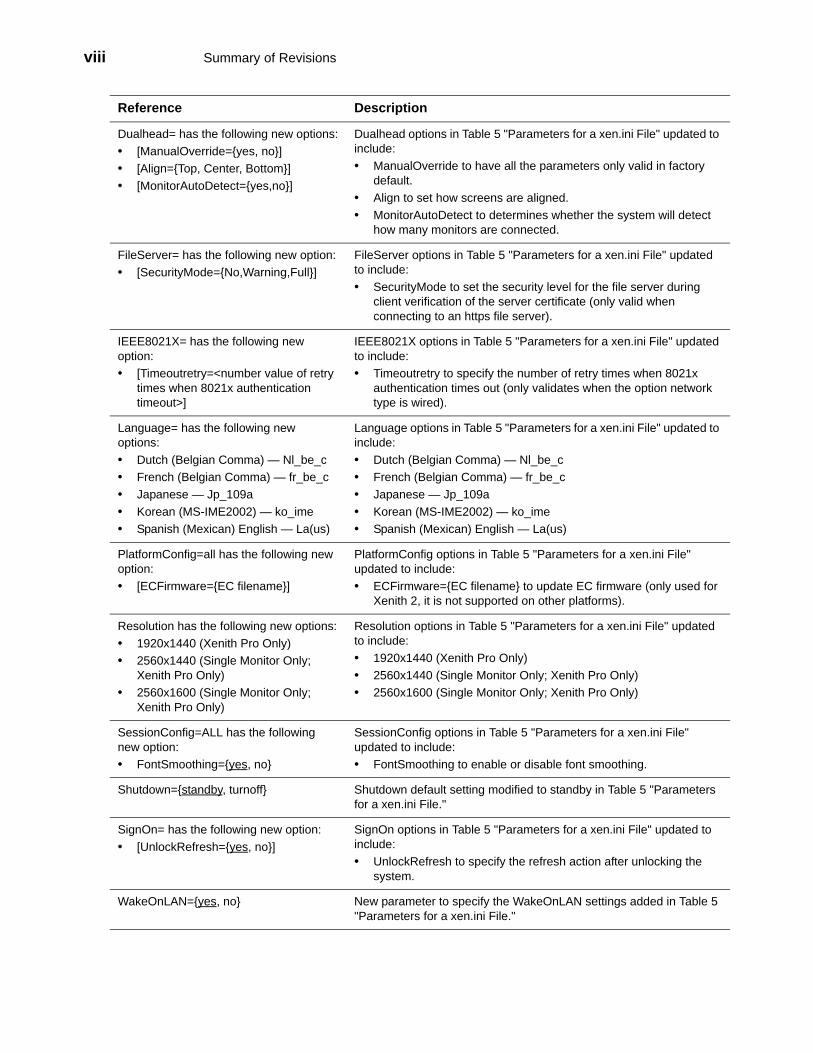
Dualhead= has the following new options:• [ManualOverride={yes, no}]• [Align={Top, Center, Bottom}]• [MonitorAutoDetect={yes,no}]
Dualhead options in Table 5 "Parameters for a xen.ini File" updated to include:• ManualOverride to have all the parameters only valid in factory
default.• Align to set how screens are aligned.• MonitorAutoDetect to determines whether the system will detect
how many monitors are connected.
FileServer= has the following new option:• [SecurityMode={No,Warning,Full}]
FileServer options in Table 5 "Parameters for a xen.ini File" updated to include:• SecurityMode to set the security level for the file server during
client verification of the server certificate (only valid when connecting to an https file server).
IEEE8021X= has the following new option:• [Timeoutretry=<number value of retry
times when 8021x authentication timeout>]
IEEE8021X options in Table 5 "Parameters for a xen.ini File" updated to include:• Timeoutretry to specify the number of retry times when 8021x
authentication times out (only validates when the option network type is wired).
Language= has the following new options:• Dutch (Belgian Comma) — Nl_be_c• French (Belgian Comma) — fr_be_c• Japanese — Jp_109a• Korean (MS-IME2002) — ko_ime• Spanish (Mexican) English — La(us)
Language options in Table 5 "Parameters for a xen.ini File" updated to include:• Dutch (Belgian Comma) — Nl_be_c• French (Belgian Comma) — fr_be_c• Japanese — Jp_109a• Korean (MS-IME2002) — ko_ime• Spanish (Mexican) English — La(us)
PlatformConfig=all has the following new option:• [ECFirmware={EC filename}]
PlatformConfig options in Table 5 "Parameters for a xen.ini File" updated to include:• ECFirmware={EC filename} to update EC firmware (only used for
Xenith 2, it is not supported on other platforms).
Resolution has the following new options:• 1920x1440 (Xenith Pro Only)• 2560x1440 (Single Monitor Only;
Xenith Pro Only)• 2560x1600 (Single Monitor Only;
Xenith Pro Only)
Resolution options in Table 5 "Parameters for a xen.ini File" updated to include:• 1920x1440 (Xenith Pro Only)• 2560x1440 (Single Monitor Only; Xenith Pro Only)• 2560x1600 (Single Monitor Only; Xenith Pro Only)
SessionConfig=ALL has the following new option:• FontSmoothing={yes, no}
SessionConfig options in Table 5 "Parameters for a xen.ini File" updated to include:• FontSmoothing to enable or disable font smoothing.
Shutdown={standby, turnoff} Shutdown default setting modified to standby in Table 5 "Parameters for a xen.ini File."
SignOn= has the following new option:• [UnlockRefresh={yes, no}]
SignOn options in Table 5 "Parameters for a xen.ini File" updated to include:• UnlockRefresh to specify the refresh action after unlocking the
system.
WakeOnLAN={yes, no} New parameter to specify the WakeOnLAN settings added in Table 5 "Parameters for a xen.ini File."
Reference Description
Summary of Revisions ix
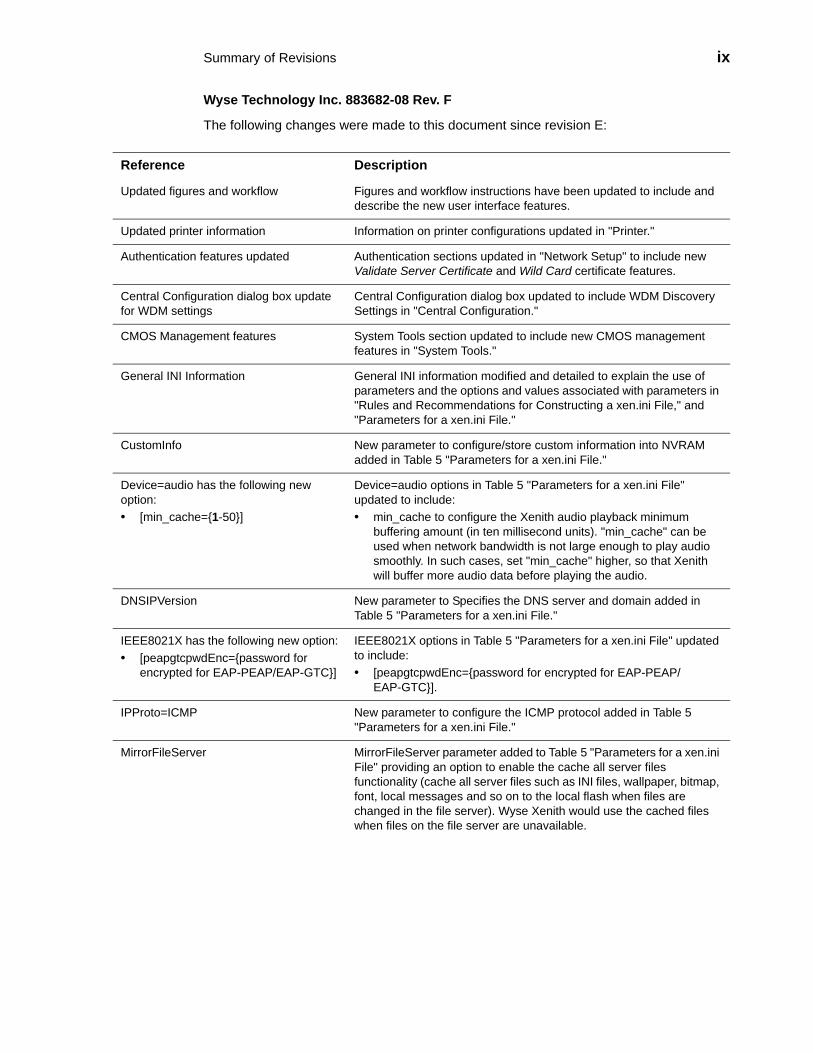
Wyse Technology Inc. 883682-08 Rev. F
The following changes were made to this document since revision E:
Reference Description
Updated figures and workflow Figures and workflow instructions have been updated to include and describe the new user interface features.
Updated printer information Information on printer configurations updated in "Printer."
Authentication features updated Authentication sections updated in "Network Setup" to include new Validate Server Certificate and Wild Card certificate features.
Central Configuration dialog box update for WDM settings
Central Configuration dialog box updated to include WDM Discovery Settings in "Central Configuration."
CMOS Management features System Tools section updated to include new CMOS management features in "System Tools."
General INI Information General INI information modified and detailed to explain the use of parameters and the options and values associated with parameters in "Rules and Recommendations for Constructing a xen.ini File," and "Parameters for a xen.ini File."
CustomInfo New parameter to configure/store custom information into NVRAM added in Table 5 "Parameters for a xen.ini File."
Device=audio has the following new option:• [min_cache={1-50}]
Device=audio options in Table 5 "Parameters for a xen.ini File" updated to include:• min_cache to configure the Xenith audio playback minimum
buffering amount (in ten millisecond units). "min_cache" can be used when network bandwidth is not large enough to play audio smoothly. In such cases, set "min_cache" higher, so that Xenith will buffer more audio data before playing the audio.
DNSIPVersion New parameter to Specifies the DNS server and domain added in Table 5 "Parameters for a xen.ini File."
IEEE8021X has the following new option:• [peapgtcpwdEnc={password for
encrypted for EAP-PEAP/EAP-GTC}]
IEEE8021X options in Table 5 "Parameters for a xen.ini File" updated to include:• [peapgtcpwdEnc={password for encrypted for EAP-PEAP/
EAP-GTC}].
IPProto=ICMP New parameter to configure the ICMP protocol added in Table 5 "Parameters for a xen.ini File."
MirrorFileServer MirrorFileServer parameter added to Table 5 "Parameters for a xen.ini File" providing an option to enable the cache all server files functionality (cache all server files such as INI files, wallpaper, bitmap, font, local messages and so on to the local flash when files are changed in the file server). Wyse Xenith would use the cached files when files on the file server are unavailable.
x Summary of Revisions
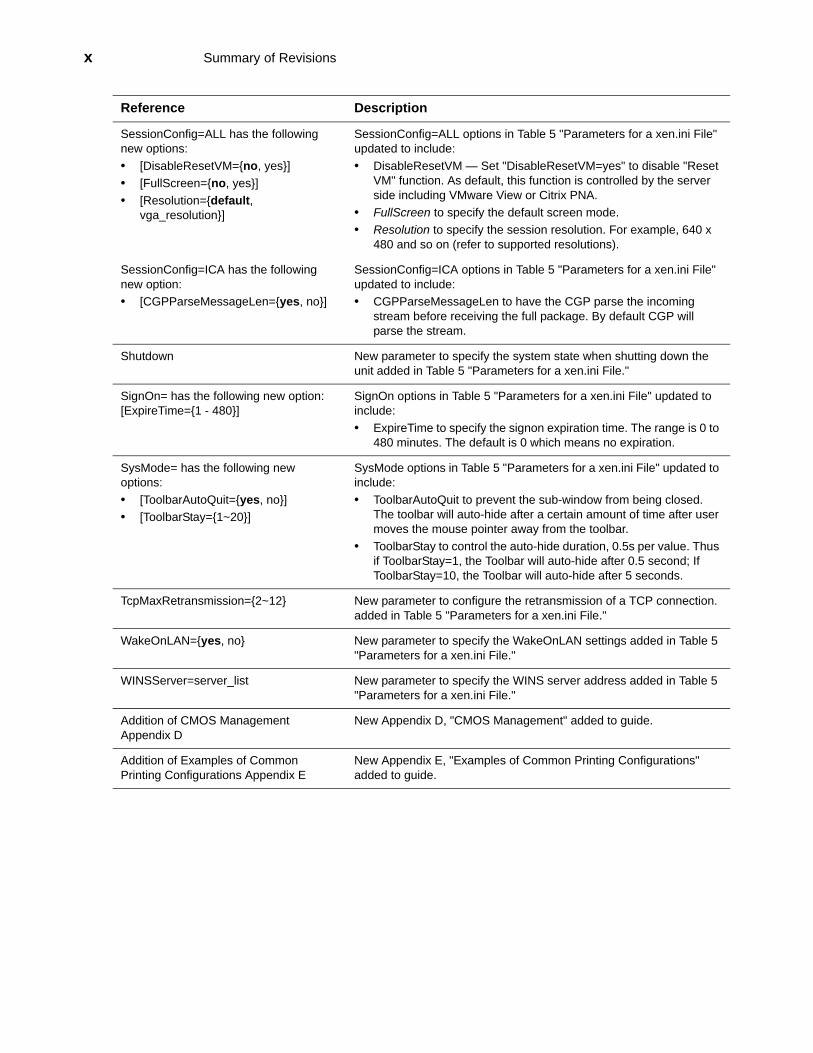
SessionConfig=ALL has the following new options:• [DisableResetVM={no, yes}] • [FullScreen={no, yes}]• [Resolution={default,
vga_resolution}]
SessionConfig=ALL options in Table 5 "Parameters for a xen.ini File" updated to include:• DisableResetVM — Set "DisableResetVM=yes" to disable "Reset
VM" function. As default, this function is controlled by the server side including VMware View or Citrix PNA.
• FullScreen to specify the default screen mode.• Resolution to specify the session resolution. For example, 640 x
480 and so on (refer to supported resolutions).
SessionConfig=ICA has the following new option:• [CGPParseMessageLen={yes, no}]
SessionConfig=ICA options in Table 5 "Parameters for a xen.ini File" updated to include:• CGPParseMessageLen to have the CGP parse the incoming
stream before receiving the full package. By default CGP will parse the stream.
Shutdown New parameter to specify the system state when shutting down the unit added in Table 5 "Parameters for a xen.ini File."
SignOn= has the following new option:[ExpireTime={1 - 480}]
SignOn options in Table 5 "Parameters for a xen.ini File" updated to include:• ExpireTime to specify the signon expiration time. The range is 0 to
480 minutes. The default is 0 which means no expiration.
SysMode= has the following new options:• [ToolbarAutoQuit={yes, no}] • [ToolbarStay={1~20}]
SysMode options in Table 5 "Parameters for a xen.ini File" updated to include:• ToolbarAutoQuit to prevent the sub-window from being closed.
The toolbar will auto-hide after a certain amount of time after user moves the mouse pointer away from the toolbar.
• ToolbarStay to control the auto-hide duration, 0.5s per value. Thus if ToolbarStay=1, the Toolbar will auto-hide after 0.5 second; If ToolbarStay=10, the Toolbar will auto-hide after 5 seconds.
TcpMaxRetransmission={2~12} New parameter to configure the retransmission of a TCP connection. added in Table 5 "Parameters for a xen.ini File."
WakeOnLAN={yes, no} New parameter to specify the WakeOnLAN settings added in Table 5 "Parameters for a xen.ini File."
WINSServer=server_list New parameter to specify the WINS server address added in Table 5 "Parameters for a xen.ini File."
Addition of CMOS Management Appendix D
New Appendix D, "CMOS Management" added to guide.
Addition of Examples of Common Printing Configurations Appendix E
New Appendix E, "Examples of Common Printing Configurations" added to guide.
Reference Description

1 Introduction
Wyse® Xenith™, Wyse® Xenith Pro™, and Wyse® Xenith 2™ are zero clients built for Citrix XenDesktop and represent an entirely new approach to delivering virtual desktops. Wyse Xenith zero clients deliver a Citrix HDX™ experience with zero delays, zero management, zero security risks, and (almost) zero energy use. Users will benefit from an instant-on, plug-n-play, high performance zero client while administrators can have peace of mind knowing they have a virus immune, hands-off, self-updating zero client deployed.
TIP: The Citrix Receiver is included in the Xenith firmware, allowing you to gain access to your Citrix XenDesktop environment and the HDX experience seconds after taking it out of the box. If your environment is properly set up (see "Recommended: Central Configuration"), your zero client will always check for updates to the firmware and automatically update the firmware.
2 Chapter 1
About this GuideThis guide is intended for administrators. It provides step-by-step instructions to configure your zero client to establish a connection to a virtual desktop. It also contains information on configuring settings locally (using the GUI) and remotely (using INI files).
Finding the Information You Need in this GuideYou can use either the Search window or Find toolbar to locate a word, series of words, or partial word in an active PDF document. For detailed information on using these features, refer to the Help in your PDF reader.
Wyse Technical SupportTo access Wyse technical resources, visit http://www.wyse.com/support. If you still have questions, you can submit your questions using the Wyse Self-Service Center at http://support.wyse.com/selfservice.html or call Customer Support at 1-800-800-WYSE (toll free in U.S. and Canada). Hours of operation are from 6:00 A.M. to 5:00 P.M. Pacific Time, Monday through Friday.
To access international support, visit http://www.wyse.com/global.
Related Documentation and ServicesFact Sheets containing the features of hardware products are available on the Wyse Web site. Go to http://www.wyse.com/products and use the Cloud clients tab to locate and download the Fact Sheet for your hardware product.
Wyse Xenith Sample INI files are intended for administrators. These files are available from the Wyse Web site (go to http://www.wyse.com/manuals, search for sample.ini, click the reference guide link for Wyse Xenith, and then click the sample ini link to open and use the file download dialog box to save the self-extracting sample INI file to a folder you want). These sample files are annotated to allow you to use them as a “starter set” (that you can modify for your users needs) to quickly get your file server up and running. For detailed steps, see "Downloading and Using Sample INI Files."
Wyse Cloud Software is available on the Wyse Web site at: http://www.wyse.com/products/software.
Wyse Online CommunityWyse maintains an online community where users of our products can seek and exchange information on user forums. Visit the Wyse Online Community forums at: http://community.wyse.com/forum.
2 Before You Start: Requirements and RecommendationsTo properly deliver a virtual XenDesktop environment to your zero client:• A XenDesktop server environment is required (see "Required: Citrix XenDesktop
Server Environment") • Central configuration is recommended (see "Recommended: Central Configuration").
Required: Citrix XenDesktop Server EnvironmentTo deploy desktops to your zero client using the XenDesktop environment, a properly configured Citrix XenDesktop 4.0 or later server environment is required. The XenDesktop server delivers virtual desktops to your zero clients, providing users a personalized desktop each time they log on.
For detailed instructions on how to complete the installation of a XenDesktop server environment, refer to the documentation provided by Citrix or to the Citrix Knowledge Center at: http://support.citrix.com.
TIP: Although your zero client is designed for Citrix XenDesktop, XenApp published desktops are also supported; however, published applications are not recommended as only full-screen sessions are supported with your zero client.
Recommended: Central ConfigurationCentral configuration allows your zero client to automatically:• Detect the XenDesktop Server (see "Set Up Auto-Detection of the XenDesktop
Server")• Update itself (see "Set Up Automatic Updates")
Set Up Auto-Detection of the XenDesktop ServerSetting up a DHCP server to specify the Citrix Web Interface URL (DHCP Option #181) allows a network connected zero client to automatically detect the location of the XenDesktop server where a user can log on and use their desktop. Without an automatic detection set-up, an administrator must enter the address locally using the Remote Connections dialog box (see "Remote Connections").
To add DHCP Option #181:
1. On your DHCP server, use the Predefined Options and Values dialog box to add a DHCP Standard Option.
2. In the Option Type dialog box, enter the Name (for example, Citrix Web Interface URL), Data Type (String), Code (181), and Description (for example, Default XenDesktop).

4 Chapter 2
3. Use the Scope Options dialog box to activate the option (select the 181 check box and enter the String Value—IP Address of the server). TIP: For detailed instructions on adding DHCP Option #181, refer to Wyse Knowledge Base Solution #19575 (go to the Wyse Knowledge Base at http://www.wyse.com/kb and search for 19575).
Set Up Automatic UpdatesUsing DHCP (options 161 and 162) and Citrix DDC (Desktop Delivery Controller) to implement INI files will enable you to automatically push firmware updates and any desired default configuration to all zero clients in your environment.
For your zero client to successfully access INI files and update itself from a file server, you simply:
1. Set up a file server with the correct folder structure (where the INI files and other update files are located). It is recommended to use Citrix DDC since it is already a Web server. For details on setting up HTTP access (by adding a Wyse folder next to the Citrix folder and activating the appropriate MIME Types) see "Central Configuration: Automating Updates and Configurations."
2. Direct your zero client to the file server using DHCP (see "Adding DHCP Options #161 and #162").
3. Reboot or start your zero client.
TIP: For details on these steps, see "Central Configuration: Automating Updates and Configurations." For details on using INI files, see "Creating and Using xen.ini Files."
Adding DHCP Options #161 and #162To add DHCP Option #161:
1. On your DHCP server, use the Predefined Options and Values dialog box to add a DHCP Standard Option.
2. In the Option Type dialog box, enter the Name (for example, Citrix Server), Data Type (String), Code (161), and Description (for example, Citrix Server).
3. Use the Scope Options dialog box to activate the option (select the 161 check box and enter the String Value—IP Address of the server).
To add DHCP Option #162:
1. On your DHCP server, use the Predefined Options and Values dialog box to add a DHCP Standard Option.
2. In the Option Type dialog box, enter the Name (for example, Server Starting Path), Data Type (String), Code (162), and Description (for example, Server Starting Path).
3. Use the Scope Options dialog box to activate the option (select the 162 check box and enter the String Value—IP Address of the server).
TIP: For detailed instructions on adding DHCP Options #161 and #162, refer to Wyse Knowledge Base Solution #16132 (go to the Wyse Knowledge Base at http://www.wyse.com/kb and search for 16132).
3 Getting Started: Quickly Learning the BasicsGetting started includes:• "Logging On to Your Desktop"• "Using Your Desktop"• "Signing Off and Shutting Down"
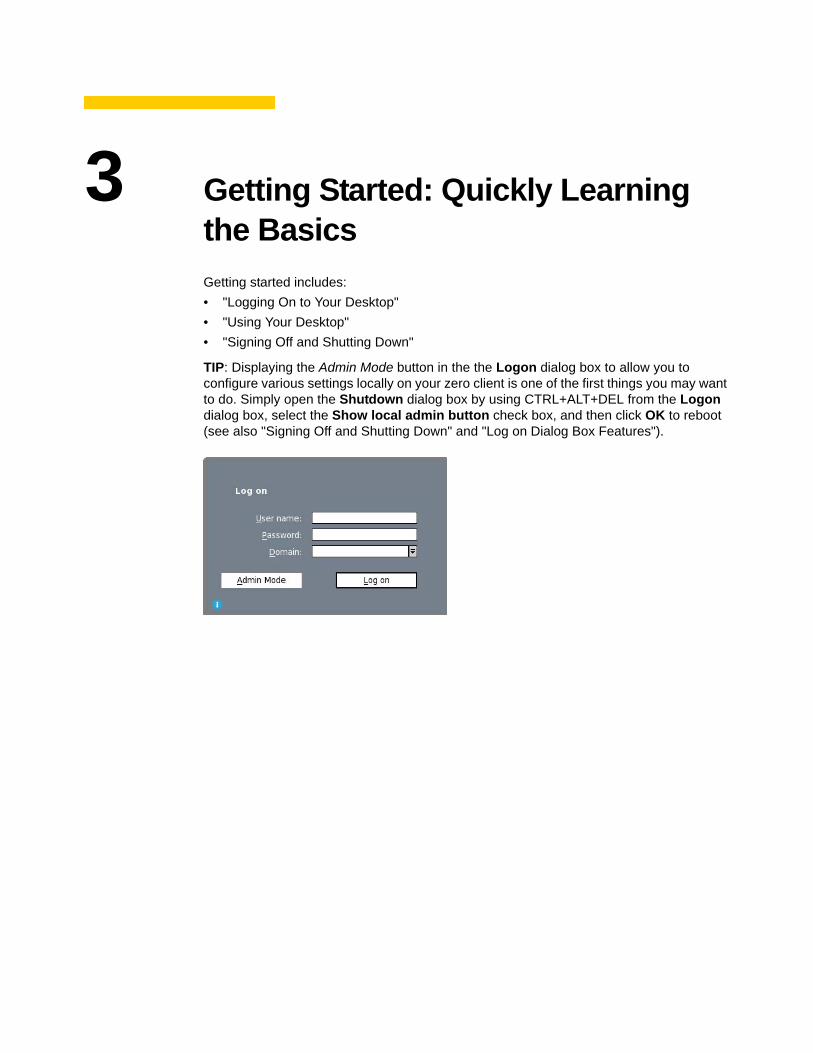
TIP: Displaying the Admin Mode button in the the Logon dialog box to allow you to configure various settings locally on your zero client is one of the first things you may want to do. Simply open the Shutdown dialog box by using CTRL+ALT+DEL from the Logon dialog box, select the Show local admin button check box, and then click OK to reboot (see also "Signing Off and Shutting Down" and "Log on Dialog Box Features").

6 Chapter 3
Logging On to Your DesktopUsually, you will simply turn on your network connected zero client and it will automatically detect the location of the XenDesktop server where you can log on and use your desktop (if you are set up for automatic detection, as described in "Recommended: Central Configuration"). However, if you are not set up for automatic detection, you must enter the Citrix Web Interface URL into a dialog box before you can log on.
1. Plug in your zero client to your network cable, and then press the power button to turn on your zero client to see the XenDesktop Log on dialog box. Enter your User name, Password, and Domain, and then click Log on. After authentication is successful, your desktop is presented for use (see "Using Your Desktop").
2. (Optional) If you do not see a Log on dialog box, you will see the Configure XenDesktop location message Your XenDesktop environment could not be automatically detected. Enter the Citrix Web Interface URL.Click OK. Note that you only need to complete this URL configuration once (or after reboot to factory defaults). After your zero client “knows” the location of your server, it automatically connects to the server for logon when you start your zero client in the future.
The Log on dialog box appears.Enter the User name, Password, and Domain and click Log on. After authentication is successful, your desktop is presented for use.
Getting Started: Quickly Learning the Basics 7
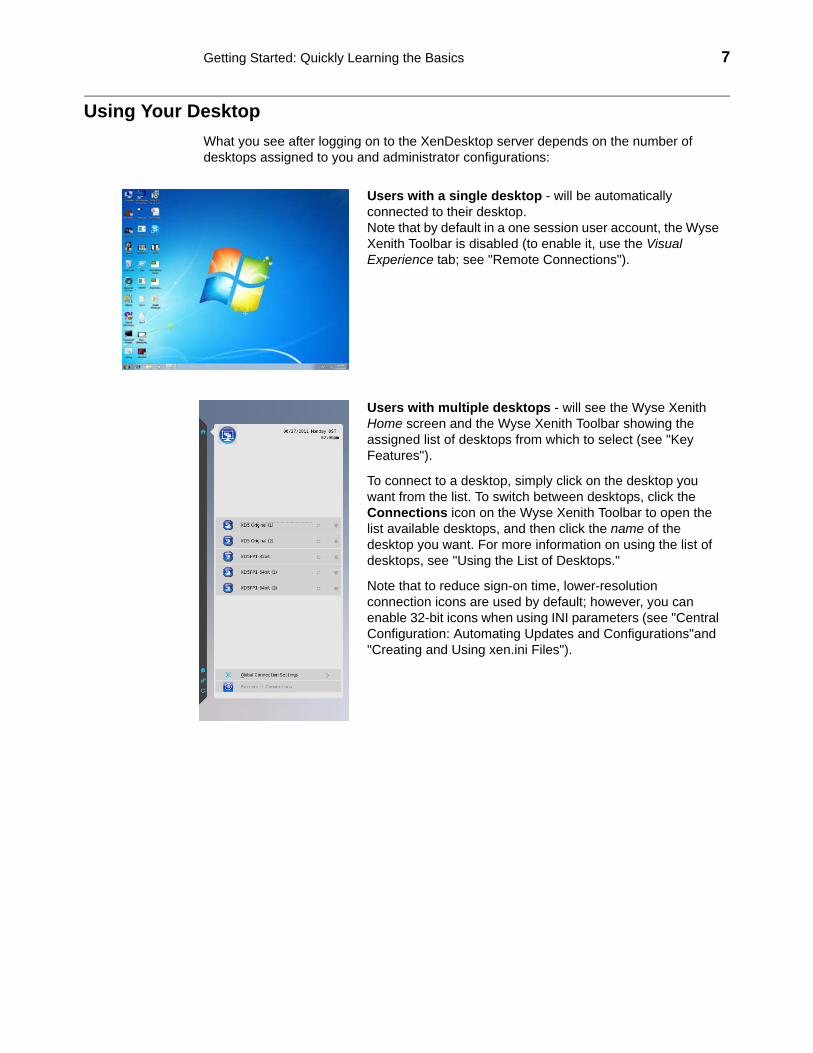
Using Your DesktopWhat you see after logging on to the XenDesktop server depends on the number of desktops assigned to you and administrator configurations:
Users with a single desktop - will be automatically connected to their desktop.Note that by default in a one session user account, the Wyse Xenith Toolbar is disabled (to enable it, use the Visual Experience tab; see "Remote Connections").
Users with multiple desktops - will see the Wyse Xenith Home screen and the Wyse Xenith Toolbar showing the assigned list of desktops from which to select (see "Key Features").
To connect to a desktop, simply click on the desktop you want from the list. To switch between desktops, click the Connections icon on the Wyse Xenith Toolbar to open the list available desktops, and then click the name of the desktop you want. For more information on using the list of desktops, see "Using the List of Desktops."
Note that to reduce sign-on time, lower-resolution connection icons are used by default; however, you can enable 32-bit icons when using INI parameters (see "Central Configuration: Automating Updates and Configurations"and "Creating and Using xen.ini Files").
8 Chapter 3
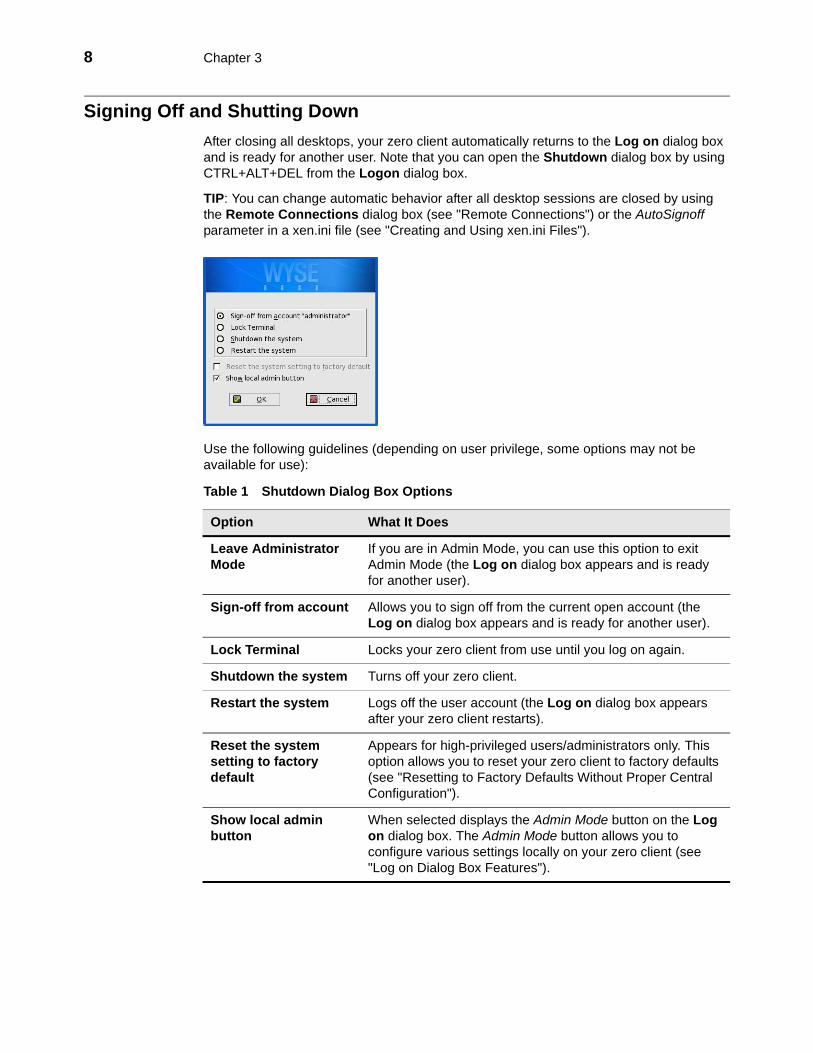
Signing Off and Shutting DownAfter closing all desktops, your zero client automatically returns to the Log on dialog box and is ready for another user. Note that you can open the Shutdown dialog box by using CTRL+ALT+DEL from the Logon dialog box.
TIP: You can change automatic behavior after all desktop sessions are closed by using the Remote Connections dialog box (see "Remote Connections") or the AutoSignoff parameter in a xen.ini file (see "Creating and Using xen.ini Files").
Use the following guidelines (depending on user privilege, some options may not be available for use):
Table 1 Shutdown Dialog Box Options
Option What It Does
Leave Administrator Mode
If you are in Admin Mode, you can use this option to exit Admin Mode (the Log on dialog box appears and is ready for another user).
Sign-off from account Allows you to sign off from the current open account (the Log on dialog box appears and is ready for another user).
Lock Terminal Locks your zero client from use until you log on again.
Shutdown the system Turns off your zero client.
Restart the system Logs off the user account (the Log on dialog box appears after your zero client restarts).
Reset the system setting to factory default
Appears for high-privileged users/administrators only. This option allows you to reset your zero client to factory defaults (see "Resetting to Factory Defaults Without Proper Central Configuration").
Show local admin button
When selected displays the Admin Mode button on the Log on dialog box. The Admin Mode button allows you to configure various settings locally on your zero client (see "Log on Dialog Box Features").

4 Key Features
This chapter includes:• "Log on Dialog Box Features"• "Wyse Xenith Toolbar Features"• "Using the List of Desktops"
Log on Dialog Box FeaturesWhile the Log on dialog box allows you to log on to the server, it also allows you to:• Obtain system information.• Access Admin Mode to configure your zero client settings.• Change or reset your own password and unlock your account.• Open the Shutdown dialog box by using CTRL+ALT+DEL.
Use the following guidelines:• System Information - Click the System Information icon to open the System
Information dialog box and view your zero client system information such as System Version, IP Address, information on devices connected to your zero client, event logs, and so on (see "Viewing System Information").
• Admin Mode - Click the Admin Mode button to access Admin Mode to configure settings locally on your zero client (not XenDesktop configurations). For example, you can manually configure the Citrix Web Interface URL (or override the Citrix Web Interface URL that is centrally defined by file servers) by using the Remote Connections dialog box (see "Remote Connections"). To exit Admin Mode, use the Leave Administrator Mode option on the Shutdown dialog box, or use the Leave Administrator Mode icon (X) on the top right of the System Settings menu. TIP: By default the Admin Mode button is not displayed on the Log on dialog box. You can display it by selecting the Show local admin button check box on the Shutdown dialog box (see "Signing Off and Shutting Down"). CAUTION: By default there is no password needed for Admin Mode button use. You can password protect the Admin Mode button (to require logon credentials) by using the AdminMode parameter in a xen.ini file (see "Creating and Using xen.ini Files").
10 Chapter 4
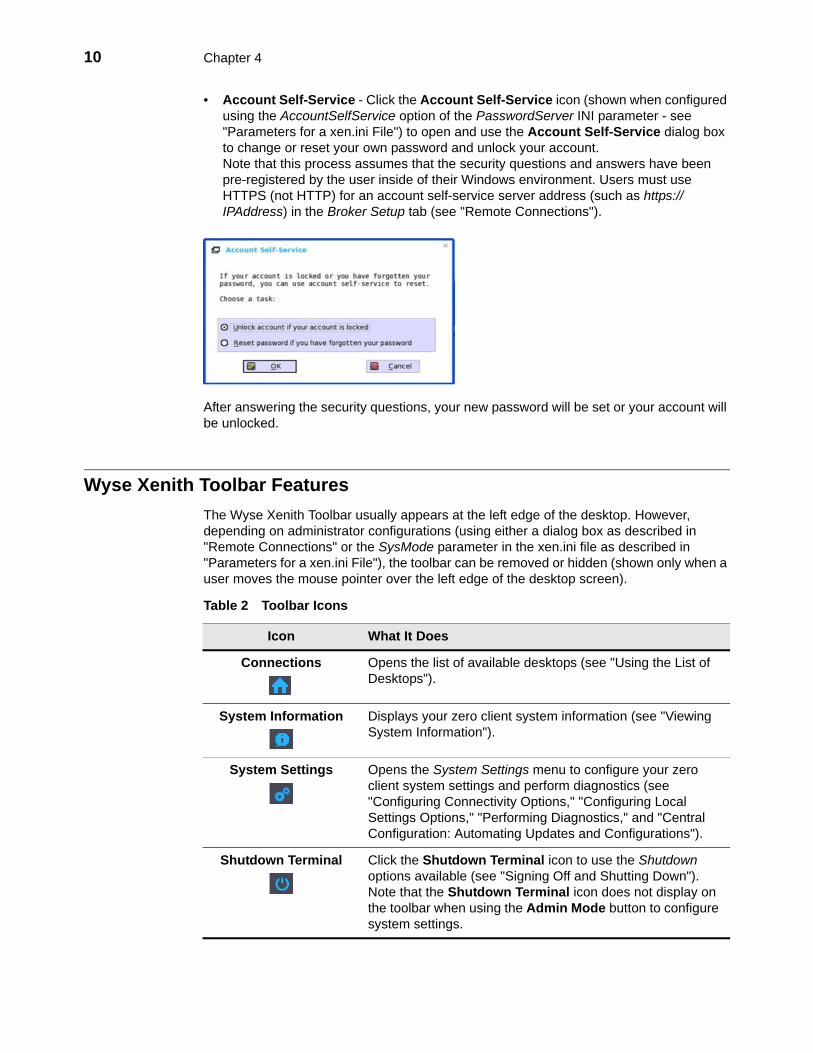
• Account Self-Service - Click the Account Self-Service icon (shown when configured using the AccountSelfService option of the PasswordServer INI parameter - see "Parameters for a xen.ini File") to open and use the Account Self-Service dialog box to change or reset your own password and unlock your account. Note that this process assumes that the security questions and answers have been pre-registered by the user inside of their Windows environment. Users must use HTTPS (not HTTP) for an account self-service server address (such as https://IPAddress) in the Broker Setup tab (see "Remote Connections").
After answering the security questions, your new password will be set or your account will be unlocked.
Wyse Xenith Toolbar FeaturesThe Wyse Xenith Toolbar usually appears at the left edge of the desktop. However, depending on administrator configurations (using either a dialog box as described in "Remote Connections" or the SysMode parameter in the xen.ini file as described in "Parameters for a xen.ini File"), the toolbar can be removed or hidden (shown only when a user moves the mouse pointer over the left edge of the desktop screen).
Table 2 Toolbar Icons
Icon What It Does
Connections Opens the list of available desktops (see "Using the List of Desktops").
System Information Displays your zero client system information (see "Viewing System Information").
System Settings Opens the System Settings menu to configure your zero client system settings and perform diagnostics (see "Configuring Connectivity Options," "Configuring Local Settings Options," "Performing Diagnostics," and "Central Configuration: Automating Updates and Configurations").
Shutdown Terminal Click the Shutdown Terminal icon to use the Shutdown options available (see "Signing Off and Shutting Down"). Note that the Shutdown Terminal icon does not display on the toolbar when using the Admin Mode button to configure system settings.
Key Features 11
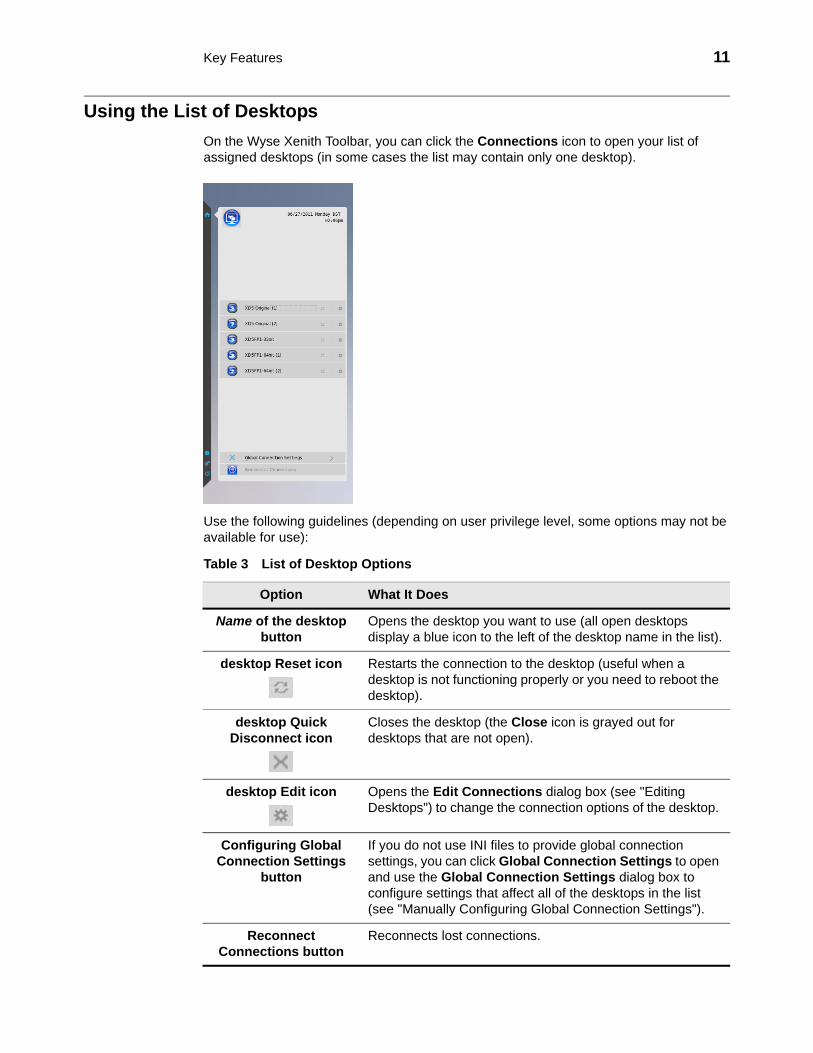
Using the List of DesktopsOn the Wyse Xenith Toolbar, you can click the Connections icon to open your list of assigned desktops (in some cases the list may contain only one desktop).
Use the following guidelines (depending on user privilege level, some options may not be available for use):
Table 3 List of Desktop Options
Option What It Does
Name of the desktop button
Opens the desktop you want to use (all open desktops display a blue icon to the left of the desktop name in the list).
desktop Reset icon Restarts the connection to the desktop (useful when a desktop is not functioning properly or you need to reboot the desktop).
desktop Quick Disconnect icon
Closes the desktop (the Close icon is grayed out for desktops that are not open).
desktop Edit icon Opens the Edit Connections dialog box (see "Editing Desktops") to change the connection options of the desktop.
Configuring Global Connection Settings
button
If you do not use INI files to provide global connection settings, you can click Global Connection Settings to open and use the Global Connection Settings dialog box to configure settings that affect all of the desktops in the list (see "Manually Configuring Global Connection Settings").
Reconnect Connections button
Reconnects lost connections.
12 Chapter 4
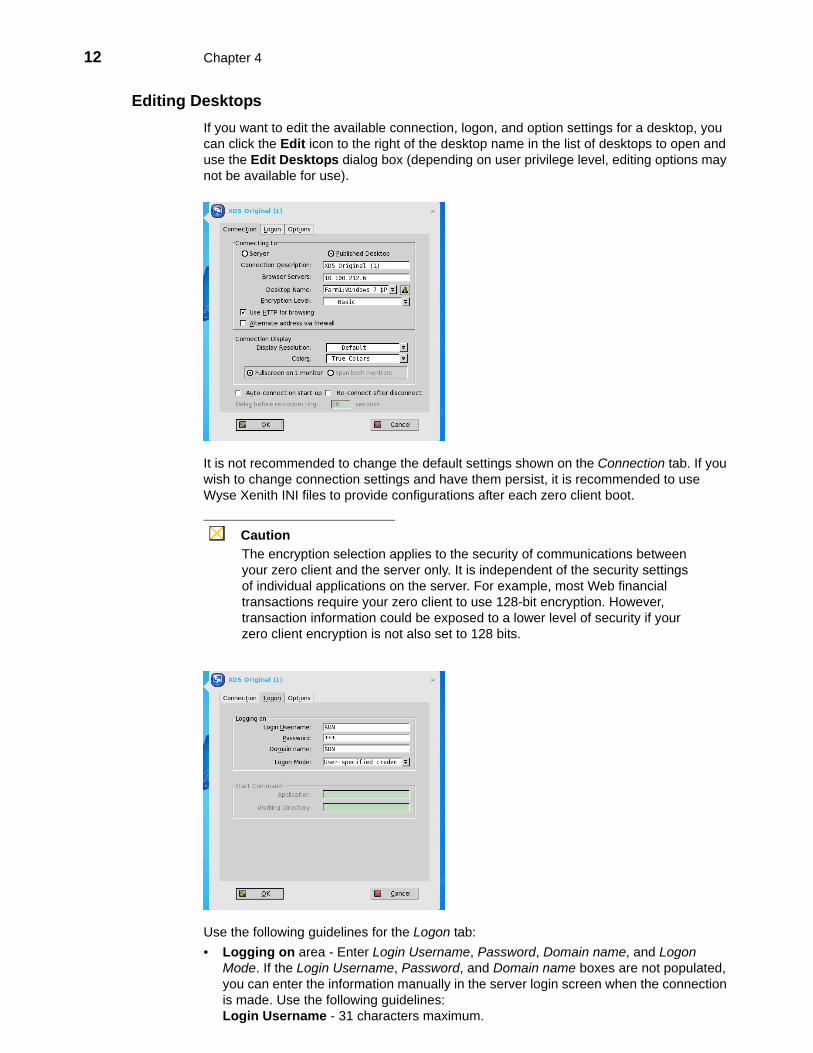
Editing DesktopsIf you want to edit the available connection, logon, and option settings for a desktop, you can click the Edit icon to the right of the desktop name in the list of desktops to open and use the Edit Desktops dialog box (depending on user privilege level, editing options may not be available for use).
It is not recommended to change the default settings shown on the Connection tab. If you wish to change connection settings and have them persist, it is recommended to use Wyse Xenith INI files to provide configurations after each zero client boot.
CautionThe encryption selection applies to the security of communications between your zero client and the server only. It is independent of the security settings of individual applications on the server. For example, most Web financial transactions require your zero client to use 128-bit encryption. However, transaction information could be exposed to a lower level of security if your zero client encryption is not also set to 128 bits.
Use the following guidelines for the Logon tab:• Logging on area - Enter Login Username, Password, Domain name, and Logon
Mode. If the Login Username, Password, and Domain name boxes are not populated, you can enter the information manually in the server login screen when the connection is made. Use the following guidelines: Login Username - 31 characters maximum.
Key Features 13
Password - 19 characters maximum. Domain Name - 31 characters maximum. Logon Mode - Select User-specified credentials, Smart Card, or Local User.
• Application (127 characters maximum) and Working Directory (63 characters maximum) - Enter an initialization string and arguments, including an associated working directory, that you want to start automatically on the server when the connection is made.
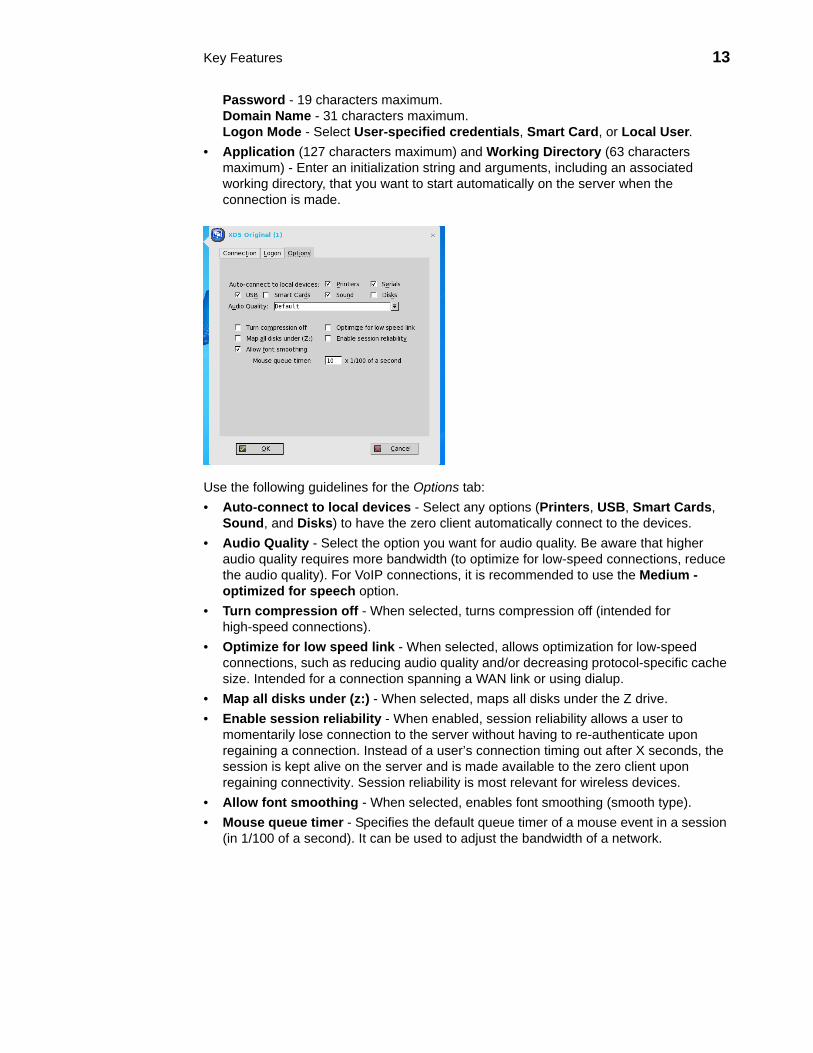
Use the following guidelines for the Options tab:• Auto-connect to local devices - Select any options (Printers, USB, Smart Cards,
Sound, and Disks) to have the zero client automatically connect to the devices.• Audio Quality - Select the option you want for audio quality. Be aware that higher
audio quality requires more bandwidth (to optimize for low-speed connections, reduce the audio quality). For VoIP connections, it is recommended to use the Medium - optimized for speech option.
• Turn compression off - When selected, turns compression off (intended for high-speed connections).
• Optimize for low speed link - When selected, allows optimization for low-speed connections, such as reducing audio quality and/or decreasing protocol-specific cache size. Intended for a connection spanning a WAN link or using dialup.
• Map all disks under (z:) - When selected, maps all disks under the Z drive. • Enable session reliability - When enabled, session reliability allows a user to
momentarily lose connection to the server without having to re-authenticate upon regaining a connection. Instead of a user’s connection timing out after X seconds, the session is kept alive on the server and is made available to the zero client upon regaining connectivity. Session reliability is most relevant for wireless devices.
• Allow font smoothing - When selected, enables font smoothing (smooth type).• Mouse queue timer - Specifies the default queue timer of a mouse event in a session
(in 1/100 of a second). It can be used to adjust the bandwidth of a network.
14 Chapter 4
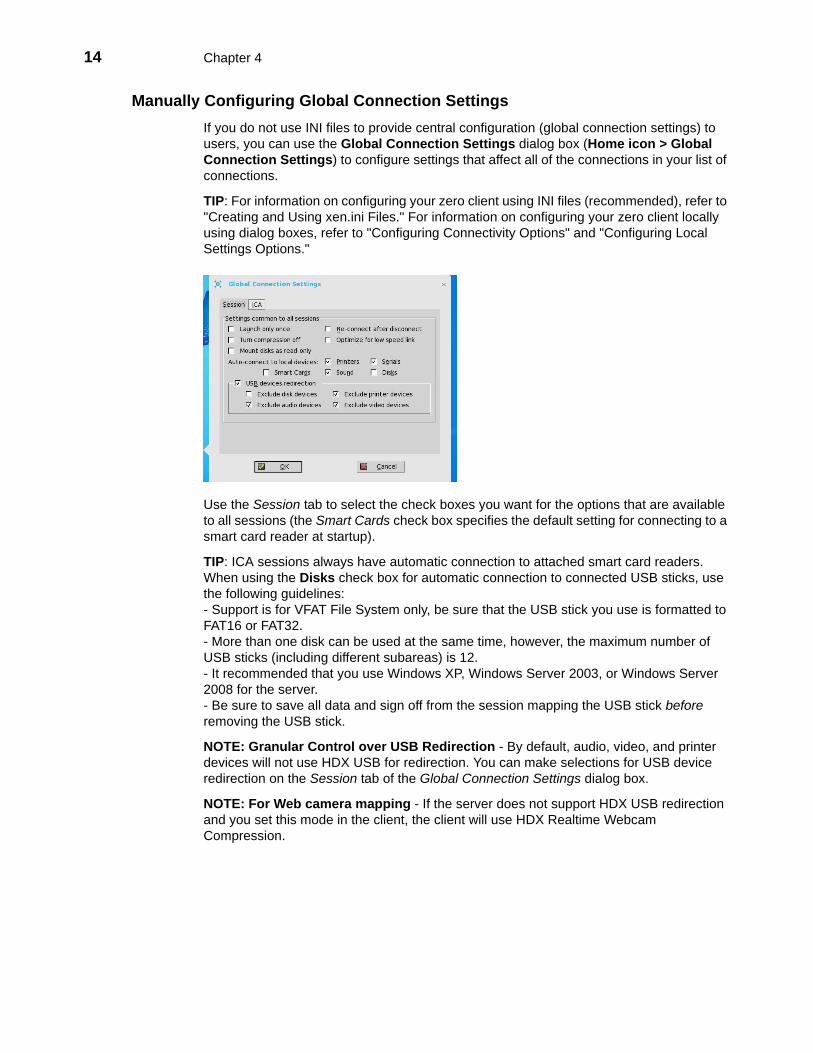
Manually Configuring Global Connection SettingsIf you do not use INI files to provide central configuration (global connection settings) to users, you can use the Global Connection Settings dialog box (Home icon > Global Connection Settings) to configure settings that affect all of the connections in your list of connections.
TIP: For information on configuring your zero client using INI files (recommended), refer to "Creating and Using xen.ini Files." For information on configuring your zero client locally using dialog boxes, refer to "Configuring Connectivity Options" and "Configuring Local Settings Options."
Use the Session tab to select the check boxes you want for the options that are available to all sessions (the Smart Cards check box specifies the default setting for connecting to a smart card reader at startup).
TIP: ICA sessions always have automatic connection to attached smart card readers. When using the Disks check box for automatic connection to connected USB sticks, use the following guidelines: - Support is for VFAT File System only, be sure that the USB stick you use is formatted to FAT16 or FAT32. - More than one disk can be used at the same time, however, the maximum number of USB sticks (including different subareas) is 12. - It recommended that you use Windows XP, Windows Server 2003, or Windows Server 2008 for the server. - Be sure to save all data and sign off from the session mapping the USB stick before removing the USB stick.
NOTE: Granular Control over USB Redirection - By default, audio, video, and printer devices will not use HDX USB for redirection. You can make selections for USB device redirection on the Session tab of the Global Connection Settings dialog box.
NOTE: For Web camera mapping - If the server does not support HDX USB redirection and you set this mode in the client, the client will use HDX Realtime Webcam Compression.

Key Features 15
Use the ICA tab to select the check boxes you want for the options that are available to all ICA sessions. Select the audio quality optimized for your connection. Note the following: Map to - When a drive is entered, maps a disk under the drive. Map all disks under - When selected, you can use the drop-down list to select the drive under which you want to maps all disks.

16 Chapter 4
This page intentionally blank.
5 Configuring Connectivity Options
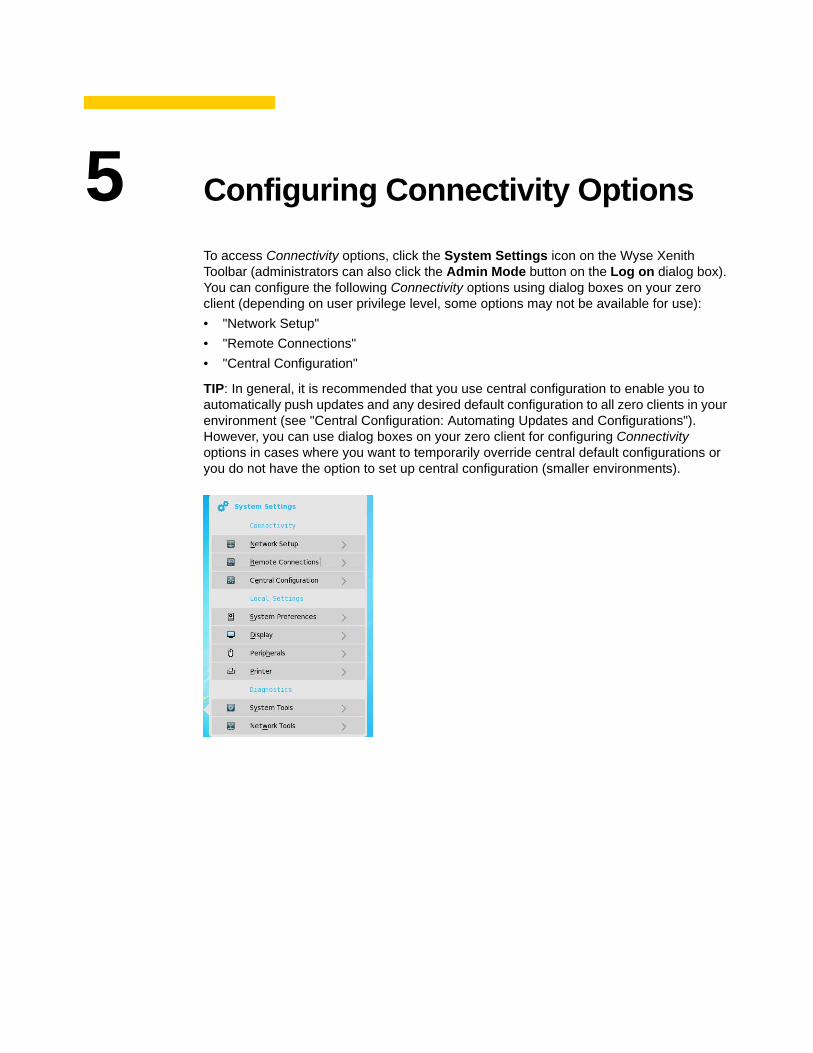
To access Connectivity options, click the System Settings icon on the Wyse Xenith Toolbar (administrators can also click the Admin Mode button on the Log on dialog box). You can configure the following Connectivity options using dialog boxes on your zero client (depending on user privilege level, some options may not be available for use):• "Network Setup"• "Remote Connections"• "Central Configuration"
TIP: In general, it is recommended that you use central configuration to enable you to automatically push updates and any desired default configuration to all zero clients in your environment (see "Central Configuration: Automating Updates and Configurations"). However, you can use dialog boxes on your zero client for configuring Connectivity options in cases where you want to temporarily override central default configurations or you do not have the option to set up central configuration (smaller environments).
18 Chapter 5
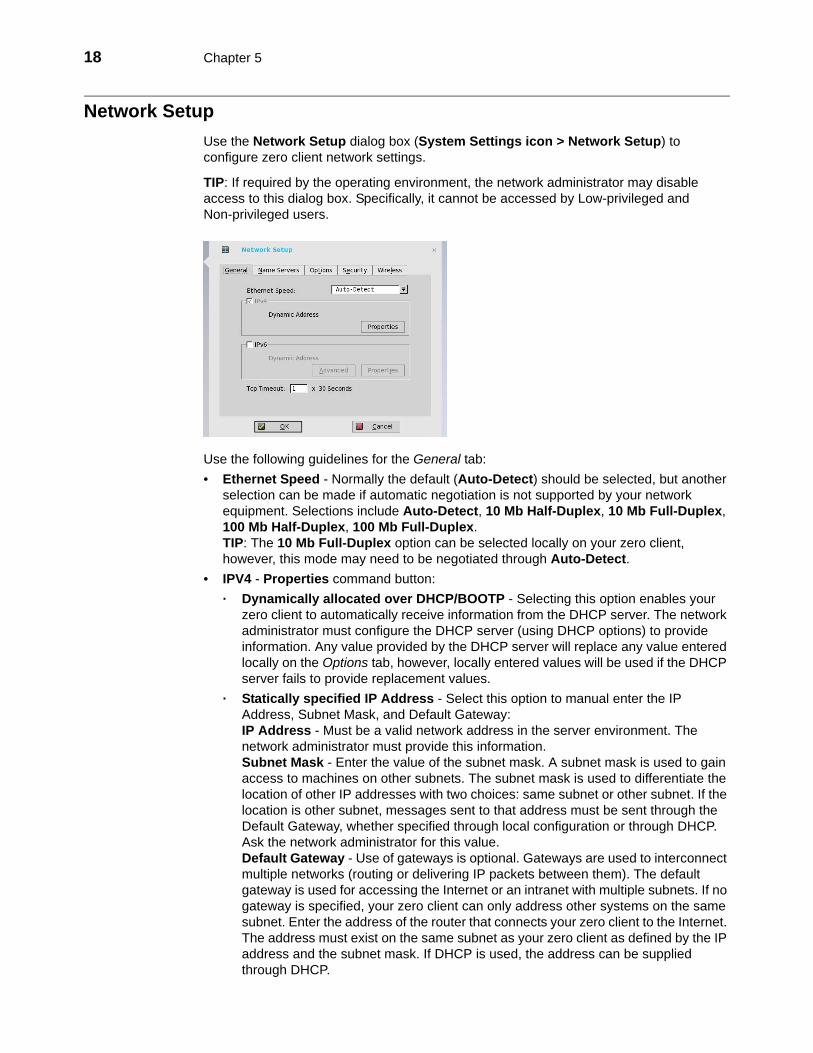
Network SetupUse the Network Setup dialog box (System Settings icon > Network Setup) to configure zero client network settings.
TIP: If required by the operating environment, the network administrator may disable access to this dialog box. Specifically, it cannot be accessed by Low-privileged and Non-privileged users.
Use the following guidelines for the General tab:• Ethernet Speed - Normally the default (Auto-Detect) should be selected, but another
selection can be made if automatic negotiation is not supported by your network equipment. Selections include Auto-Detect, 10 Mb Half-Duplex, 10 Mb Full-Duplex, 100 Mb Half-Duplex, 100 Mb Full-Duplex. TIP: The 10 Mb Full-Duplex option can be selected locally on your zero client, however, this mode may need to be negotiated through Auto-Detect.
• IPV4 - Properties command button:· Dynamically allocated over DHCP/BOOTP - Selecting this option enables your
zero client to automatically receive information from the DHCP server. The network administrator must configure the DHCP server (using DHCP options) to provide information. Any value provided by the DHCP server will replace any value entered locally on the Options tab, however, locally entered values will be used if the DHCP server fails to provide replacement values.
· Statically specified IP Address - Select this option to manual enter the IP Address, Subnet Mask, and Default Gateway: IP Address - Must be a valid network address in the server environment. The network administrator must provide this information. Subnet Mask - Enter the value of the subnet mask. A subnet mask is used to gain access to machines on other subnets. The subnet mask is used to differentiate the location of other IP addresses with two choices: same subnet or other subnet. If the location is other subnet, messages sent to that address must be sent through the Default Gateway, whether specified through local configuration or through DHCP. Ask the network administrator for this value. Default Gateway - Use of gateways is optional. Gateways are used to interconnect multiple networks (routing or delivering IP packets between them). The default gateway is used for accessing the Internet or an intranet with multiple subnets. If no gateway is specified, your zero client can only address other systems on the same subnet. Enter the address of the router that connects your zero client to the Internet. The address must exist on the same subnet as your zero client as defined by the IP address and the subnet mask. If DHCP is used, the address can be supplied through DHCP.
Configuring Connectivity Options 19
• IPV6 - Advanced command button: Allows you to select various setting options supported by IPV6.
• IPV6 - Properties command button:· Wait DHCP - Selecting this option enables your zero client to wait for IPV6 DHCP
before signing on (if not selected the system will only wait for IPV4 DHCP if enabled).
· Dynamically allocated over DHCP/BOOTP - Selecting this option enables your zero client to automatically receive information from the DHCP server. The network administrator must configure the DHCP server (using DHCP options) to provide information. Any value provided by the DHCP server will replace any value entered locally on the Options tab, however, locally entered values will be used if the DHCP server fails to provide replacement values.
· Statically specified IP Address - Select this option to manual enter the IP Address, Subnet Mask, and Default Gateway: IP Address - Must be a valid network address in the server environment. The network administrator must provide this information. Subnet Mask - Enter the value of the subnet mask. A subnet mask is used to gain access to machines on other subnets. The subnet mask is used to differentiate the location of other IP addresses with two choices: same subnet or other subnet. If the location is other subnet, messages sent to that address must be sent through the Default Gateway, whether specified through local configuration or through DHCP. Ask the network administrator for this value. Default Gateway - Use of gateways is optional. Gateways are used to interconnect multiple networks (routing or delivering IP packets between them). The default gateway is used for accessing the Internet or an intranet with multiple subnets. If no gateway is specified, your zero client can only address other systems on the same subnet. Enter the address of the router that connects your zero client to the Internet. The address must exist on the same subnet as your zero client as defined by the IP address and the subnet mask. If DHCP is used, the address can be supplied through DHCP.
· DNS Servers - Use of DNS is optional. DNS allows you to specify remote systems by their host names rather than IP addresses. If a specific IP address (instead of a name) is entered for a connection, it rather than DNS will be used to make the connection. Enter the network address of an available DNS Server. The value for this box may be supplied by a DHCP server. If the DHCP server supplies this value, it will replace any locally configured value. If the DHCP server does not supply this value, the locally configured value will be used. TIP: You may enter two DNS Server addresses, separated by a semicolon, comma, or space. The first address is for the primary DNS server and the second is for a backup DNS server.
• Tcp Timeout - Enter the number of 30 seconds for the timeout value of a TCP connection. The value must be 1 or 2 which means the connection timeout value is from 1x30= 30 seconds to 2x30= 60 seconds.
20 Chapter 5
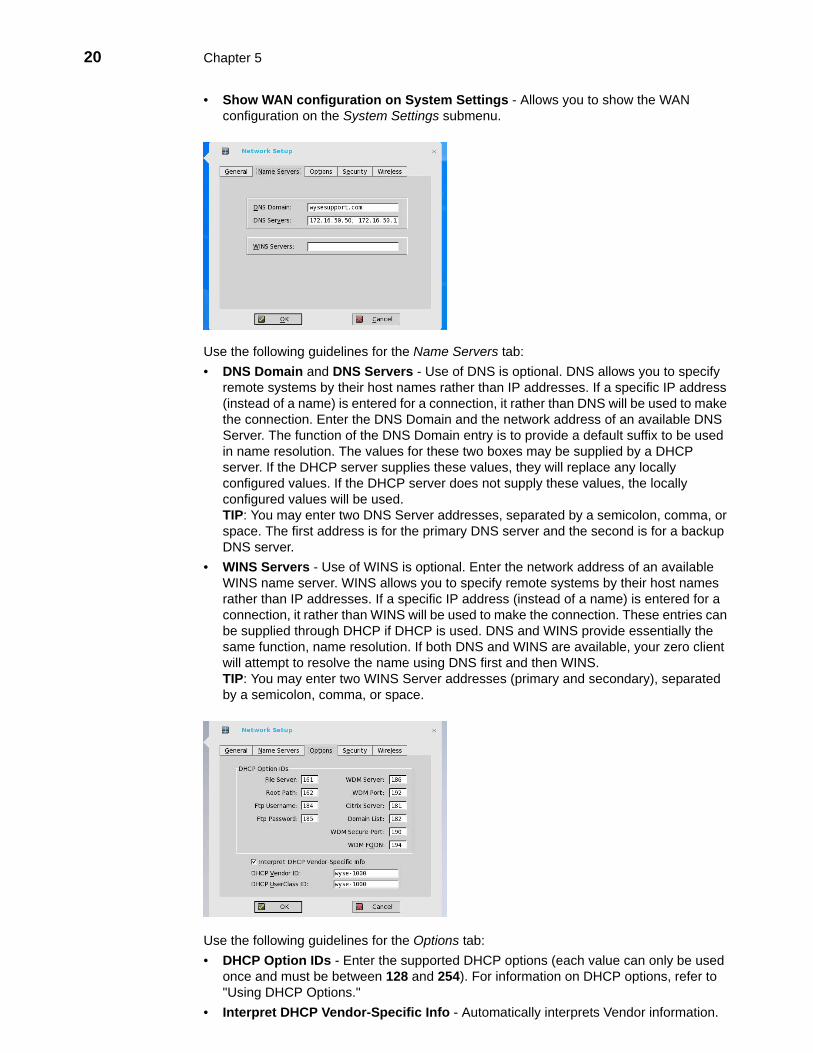
• Show WAN configuration on System Settings - Allows you to show the WAN configuration on the System Settings submenu.
Use the following guidelines for the Name Servers tab:• DNS Domain and DNS Servers - Use of DNS is optional. DNS allows you to specify
remote systems by their host names rather than IP addresses. If a specific IP address (instead of a name) is entered for a connection, it rather than DNS will be used to make the connection. Enter the DNS Domain and the network address of an available DNS Server. The function of the DNS Domain entry is to provide a default suffix to be used in name resolution. The values for these two boxes may be supplied by a DHCP server. If the DHCP server supplies these values, they will replace any locally configured values. If the DHCP server does not supply these values, the locally configured values will be used. TIP: You may enter two DNS Server addresses, separated by a semicolon, comma, or space. The first address is for the primary DNS server and the second is for a backup DNS server.
• WINS Servers - Use of WINS is optional. Enter the network address of an available WINS name server. WINS allows you to specify remote systems by their host names rather than IP addresses. If a specific IP address (instead of a name) is entered for a connection, it rather than WINS will be used to make the connection. These entries can be supplied through DHCP if DHCP is used. DNS and WINS provide essentially the same function, name resolution. If both DNS and WINS are available, your zero client will attempt to resolve the name using DNS first and then WINS. TIP: You may enter two WINS Server addresses (primary and secondary), separated by a semicolon, comma, or space.
Use the following guidelines for the Options tab:• DHCP Option IDs - Enter the supported DHCP options (each value can only be used
once and must be between 128 and 254). For information on DHCP options, refer to "Using DHCP Options."
• Interpret DHCP Vendor-Specific Info - Automatically interprets Vendor information.
Configuring Connectivity Options 21
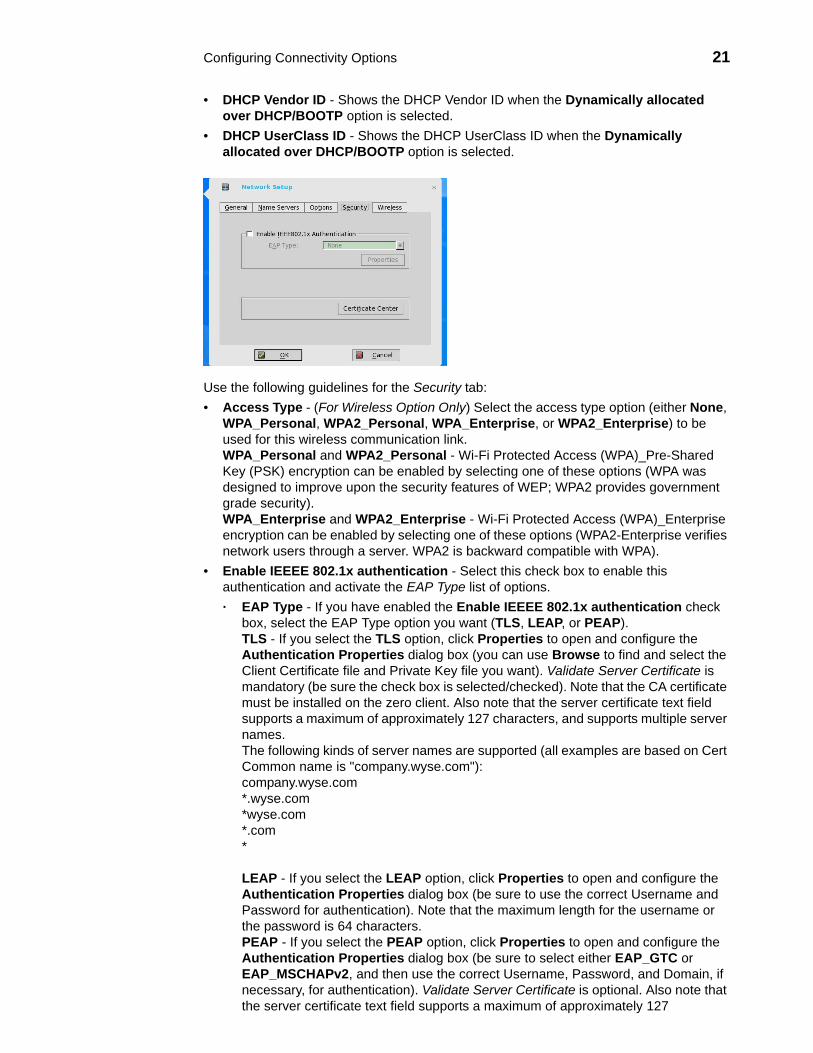
• DHCP Vendor ID - Shows the DHCP Vendor ID when the Dynamically allocated over DHCP/BOOTP option is selected.
• DHCP UserClass ID - Shows the DHCP UserClass ID when the Dynamically allocated over DHCP/BOOTP option is selected.
Use the following guidelines for the Security tab: • Access Type - (For Wireless Option Only) Select the access type option (either None,
WPA_Personal, WPA2_Personal, WPA_Enterprise, or WPA2_Enterprise) to be used for this wireless communication link. WPA_Personal and WPA2_Personal - Wi-Fi Protected Access (WPA)_Pre-Shared Key (PSK) encryption can be enabled by selecting one of these options (WPA was designed to improve upon the security features of WEP; WPA2 provides government grade security). WPA_Enterprise and WPA2_Enterprise - Wi-Fi Protected Access (WPA)_Enterprise encryption can be enabled by selecting one of these options (WPA2-Enterprise verifies network users through a server. WPA2 is backward compatible with WPA).
• Enable IEEEE 802.1x authentication - Select this check box to enable this authentication and activate the EAP Type list of options. · EAP Type - If you have enabled the Enable IEEEE 802.1x authentication check
box, select the EAP Type option you want (TLS, LEAP, or PEAP). TLS - If you select the TLS option, click Properties to open and configure the Authentication Properties dialog box (you can use Browse to find and select the Client Certificate file and Private Key file you want). Validate Server Certificate is mandatory (be sure the check box is selected/checked). Note that the CA certificate must be installed on the zero client. Also note that the server certificate text field supports a maximum of approximately 127 characters, and supports multiple server names. The following kinds of server names are supported (all examples are based on Cert Common name is "company.wyse.com"): company.wyse.com *.wyse.com *wyse.com *.com * LEAP - If you select the LEAP option, click Properties to open and configure the Authentication Properties dialog box (be sure to use the correct Username and Password for authentication). Note that the maximum length for the username or the password is 64 characters. PEAP - If you select the PEAP option, click Properties to open and configure the Authentication Properties dialog box (be sure to select either EAP_GTC or EAP_MSCHAPv2, and then use the correct Username, Password, and Domain, if necessary, for authentication). Validate Server Certificate is optional. Also note that the server certificate text field supports a maximum of approximately 127
22 Chapter 5
characters, and supports multiple server names. The following kinds of server names are supported (all examples are based on Cert Common name is "company.wyse.com"): company.wyse.com *.wyse.com *wyse.com *.com * To configure EAP-GTC, enter the username only, and the password or PIN will be asked when authenticating. To configure EAP-MSCHAPv2, enter the username, password, and domain (domain\username in the username box is supported, but you must leave the domain box blank). Note that the CA certificate must be installed on your zero client (the server certificate is forced to be validated). Also note that when EAP Type EAP-MSCCHAPV2 is selected on the Authentication Properties dialog box (for PEEP IEEE802.1x authentication), an option to hide the domain is available for selection (the Username and Password text boxes are available for use, but the Domain text box displays gray).
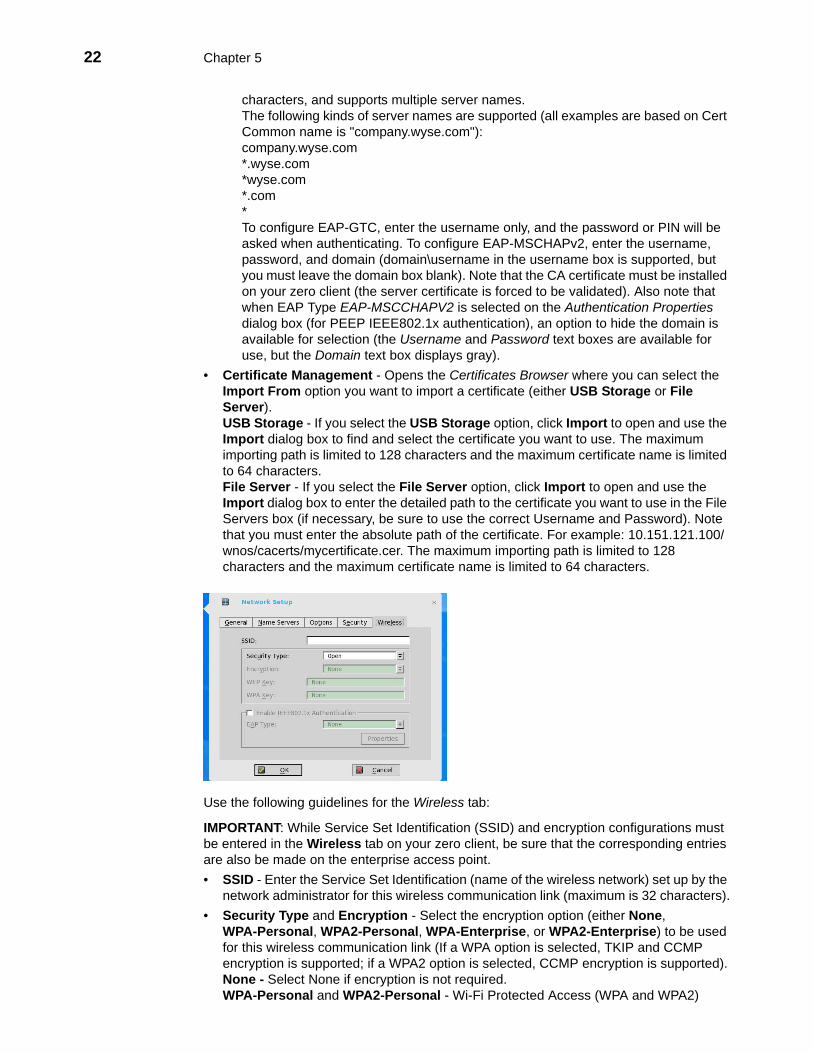
• Certificate Management - Opens the Certificates Browser where you can select the Import From option you want to import a certificate (either USB Storage or File Server). USB Storage - If you select the USB Storage option, click Import to open and use the Import dialog box to find and select the certificate you want to use. The maximum importing path is limited to 128 characters and the maximum certificate name is limited to 64 characters. File Server - If you select the File Server option, click Import to open and use the Import dialog box to enter the detailed path to the certificate you want to use in the File Servers box (if necessary, be sure to use the correct Username and Password). Note that you must enter the absolute path of the certificate. For example: 10.151.121.100/wnos/cacerts/mycertificate.cer. The maximum importing path is limited to 128 characters and the maximum certificate name is limited to 64 characters.
Use the following guidelines for the Wireless tab:
IMPORTANT: While Service Set Identification (SSID) and encryption configurations must be entered in the Wireless tab on your zero client, be sure that the corresponding entries are also be made on the enterprise access point.• SSID - Enter the Service Set Identification (name of the wireless network) set up by the
network administrator for this wireless communication link (maximum is 32 characters).• Security Type and Encryption - Select the encryption option (either None,
WPA-Personal, WPA2-Personal, WPA-Enterprise, or WPA2-Enterprise) to be used for this wireless communication link (If a WPA option is selected, TKIP and CCMP encryption is supported; if a WPA2 option is selected, CCMP encryption is supported). None - Select None if encryption is not required. WPA-Personal and WPA2-Personal - Wi-Fi Protected Access (WPA and WPA2)
Configuring Connectivity Options 23
Personal encryption is designed to improve upon the security features of WEP but is still designed for home and small office networks that do not require the complexity of an authentication server (WPA2 provides more security than WPA). WPA-Enterprise and WPA2-Enterprise - Wi-Fi Protected Access (WPA and WPA2) Enterprise encryption is designed to improve upon the security features of WEP but also verifies network users through an authentication server (WPA2 provides more security than WPA; WPA2 is backward compatible with WPA).
• WEP Key or WPA Key - If either box is active (depending on Encryption option), enter the key according to your Encryption selection. The selected key is used to encrypt/decrypt each frame transmitted from or received by the wireless adapter. The access point must recognize frames encrypted by the same key. Keys can be 5 or 13 characters for the 64 or 128 bit encryption key, or specified as 10 or 26 hex-decimal digits.
• Enable IEEEE 802.1x authentication - Select this check box to enable this authentication and activate the EAP Type list of options.
• EAP Type - If you have enabled the Enable IEEEE 802.1x authentication check box, select the EAP Type option you want (TLS, LEAP, or PEAP). TLS - If you select the TLS option, click Properties to open and configure the Authentication Properties dialog box (you can use Browse to find and select the Client Certificate file and Private Key file you want). Validate Server Certificate is mandatory (be sure the check box is selected/checked). Note that the CA certificate must be installed on the zero client. Also note that the server certificate text field supports a maximum of approximately 127 characters, and supports multiple server names. The following kinds of server names are supported (all examples are based on Cert Common name is "company.wyse.com"): company.wyse.com *.wyse.com *wyse.com *.com * LEAP - If you select the LEAP option, click Properties to open and configure the Authentication Properties dialog box (be sure to use the correct Username and Password for authentication). Note that the maximum length for the username or the password is 64 characters. PEAP - If you select the PEAP option, click Properties to open and configure the Authentication Properties dialog box (be sure to select either EAP_GTC or EAP_MSCHAPv2, and then use the correct Username, Password, and Domain, if necessary, for authentication). Validate Server Certificate is optional. Also note that the server certificate text field supports a maximum of approximately 127 characters, and supports multiple server names. The following kinds of server names are supported (all examples are based on Cert Common name is "company.wyse.com"): company.wyse.com *.wyse.com *wyse.com *.com * To configure EAP-GTC, enter the username only, and the password or PIN will be asked when authenticating. To configure EAP-MSCHAPv2, enter the username, password, and domain (domain\username in the username box is supported, but you must leave the domain box blank). Note that the CA certificate must be installed on your zero client (the server certificate is forced to be validated). Also note that when EAP Type EAP-MSCCHAPV2 is selected on the Authentication Properties dialog box (for PEEP IEEE802.1x authentication), an option to hide the domain is available for selection (the Username and Password text boxes are available for use, but the Domain text box displays gray).
24 Chapter 5
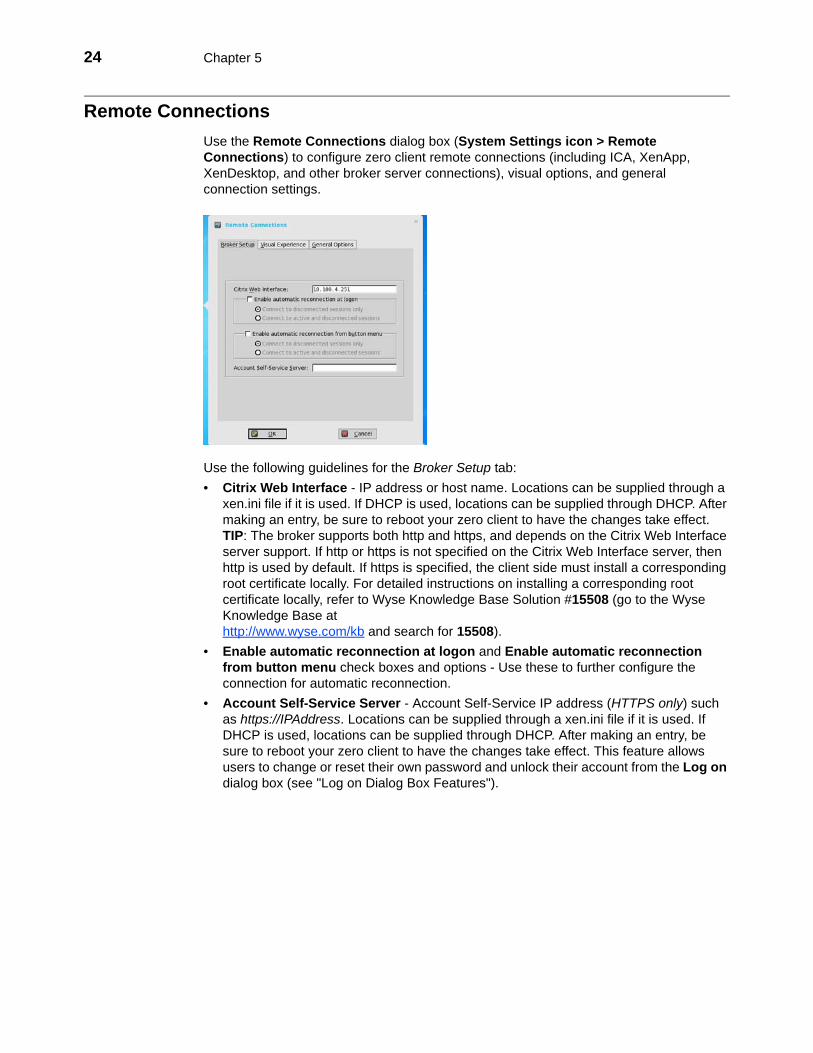
Remote ConnectionsUse the Remote Connections dialog box (System Settings icon > Remote Connections) to configure zero client remote connections (including ICA, XenApp, XenDesktop, and other broker server connections), visual options, and general connection settings.
Use the following guidelines for the Broker Setup tab:• Citrix Web Interface - IP address or host name. Locations can be supplied through a
xen.ini file if it is used. If DHCP is used, locations can be supplied through DHCP. After making an entry, be sure to reboot your zero client to have the changes take effect. TIP: The broker supports both http and https, and depends on the Citrix Web Interface server support. If http or https is not specified on the Citrix Web Interface server, then http is used by default. If https is specified, the client side must install a corresponding root certificate locally. For detailed instructions on installing a corresponding root certificate locally, refer to Wyse Knowledge Base Solution #15508 (go to the Wyse Knowledge Base at http://www.wyse.com/kb and search for 15508).
• Enable automatic reconnection at logon and Enable automatic reconnection from button menu check boxes and options - Use these to further configure the connection for automatic reconnection.
• Account Self-Service Server - Account Self-Service IP address (HTTPS only) such as https://IPAddress. Locations can be supplied through a xen.ini file if it is used. If DHCP is used, locations can be supplied through DHCP. After making an entry, be sure to reboot your zero client to have the changes take effect. This feature allows users to change or reset their own password and unlock their account from the Log on dialog box (see "Log on Dialog Box Features").
Configuring Connectivity Options 25
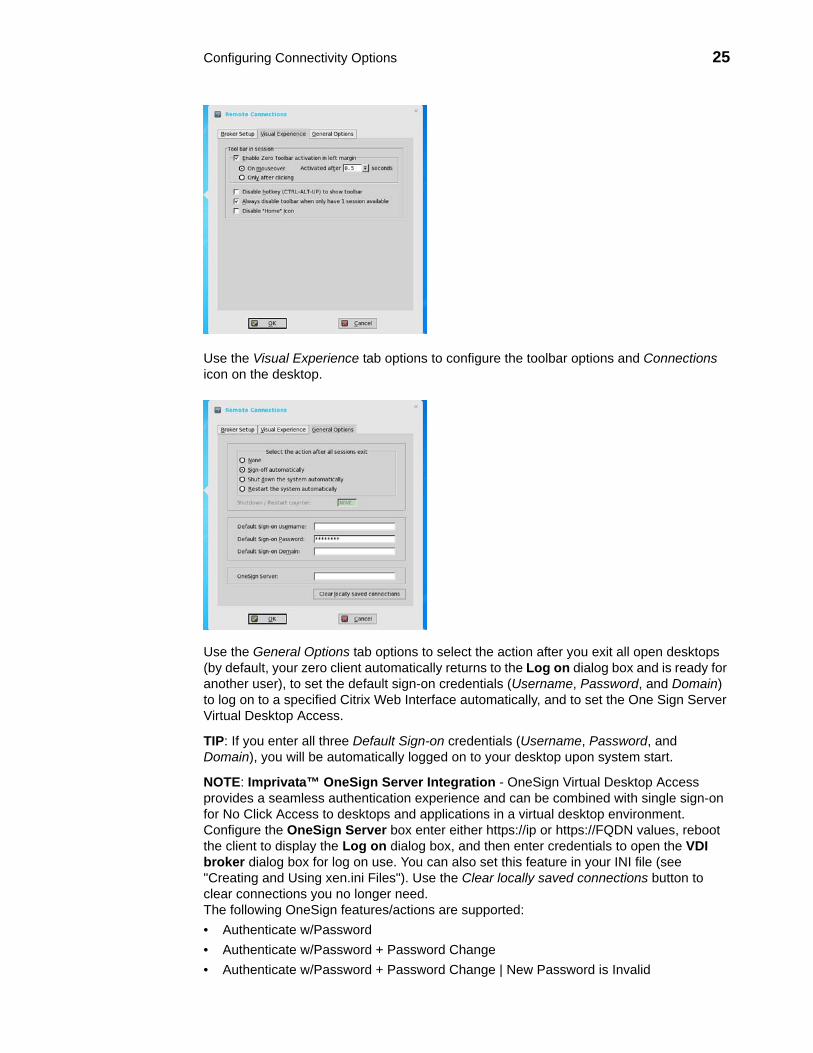
Use the Visual Experience tab options to configure the toolbar options and Connections icon on the desktop.
Use the General Options tab options to select the action after you exit all open desktops (by default, your zero client automatically returns to the Log on dialog box and is ready for another user), to set the default sign-on credentials (Username, Password, and Domain) to log on to a specified Citrix Web Interface automatically, and to set the One Sign Server Virtual Desktop Access.
TIP: If you enter all three Default Sign-on credentials (Username, Password, and Domain), you will be automatically logged on to your desktop upon system start.
NOTE: Imprivata™ OneSign Server Integration - OneSign Virtual Desktop Access provides a seamless authentication experience and can be combined with single sign-on for No Click Access to desktops and applications in a virtual desktop environment. Configure the OneSign Server box enter either https://ip or https://FQDN values, reboot the client to display the Log on dialog box, and then enter credentials to open the VDI broker dialog box for log on use. You can also set this feature in your INI file (see "Creating and Using xen.ini Files"). Use the Clear locally saved connections button to clear connections you no longer need. The following OneSign features/actions are supported:• Authenticate w/Password• Authenticate w/Password + Password Change• Authenticate w/Password + Password Change | New Password is Invalid
26 Chapter 5
• Authenticate w/Proximity Card + Password• Authenticate w/Proximity Card + Pin• Authenticate w/Proximity Card + Pin | Pin not enrolled• Interrupt Authentication• Authenticate w/Proximity Card Alone | Retrieve Password• Retrieve User Identity Password• Reset User Identity Password• Update User Identity Password• Enroll Proximity Card• Lock/unlock Terminal with Proximity Card (Proximity Card reader supported: RFideas
pcProx Plus with USB; Part Number: RDR-80581AKU)
Configuring Connectivity Options 27
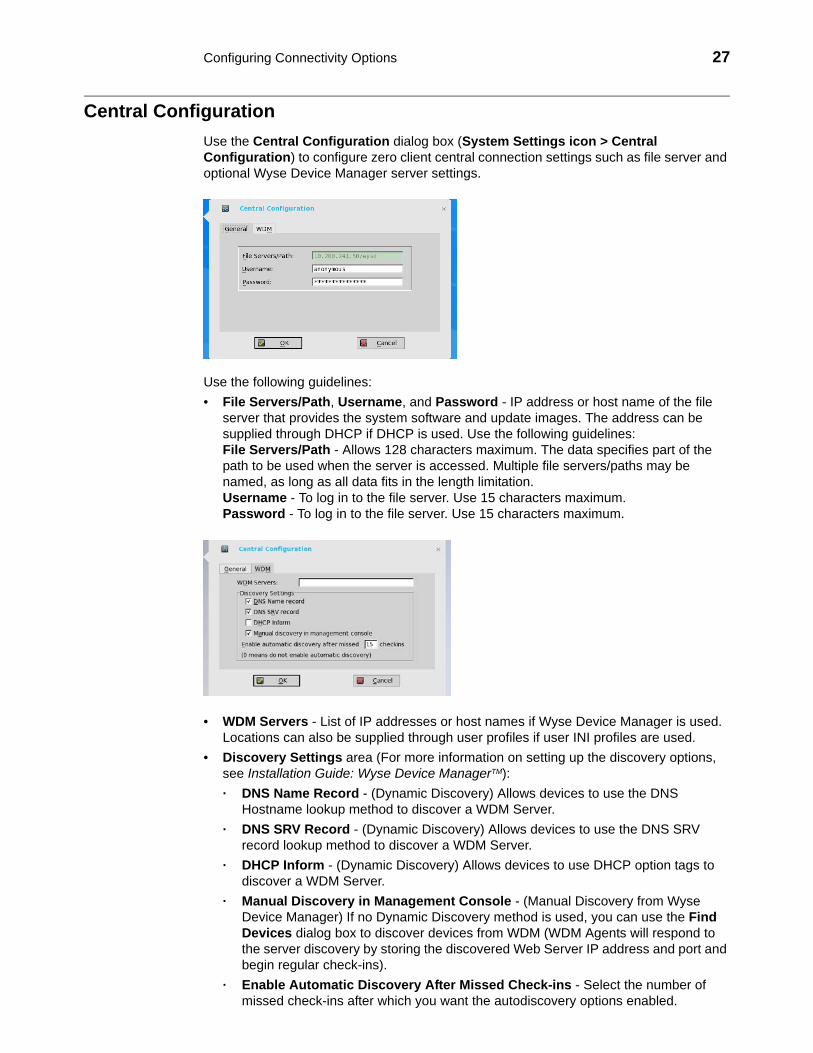
Central ConfigurationUse the Central Configuration dialog box (System Settings icon > Central Configuration) to configure zero client central connection settings such as file server and optional Wyse Device Manager server settings.
Use the following guidelines:• File Servers/Path, Username, and Password - IP address or host name of the file
server that provides the system software and update images. The address can be supplied through DHCP if DHCP is used. Use the following guidelines: File Servers/Path - Allows 128 characters maximum. The data specifies part of the path to be used when the server is accessed. Multiple file servers/paths may be named, as long as all data fits in the length limitation. Username - To log in to the file server. Use 15 characters maximum. Password - To log in to the file server. Use 15 characters maximum.
• WDM Servers - List of IP addresses or host names if Wyse Device Manager is used. Locations can also be supplied through user profiles if user INI profiles are used.
• Discovery Settings area (For more information on setting up the discovery options, see Installation Guide: Wyse Device ManagerTM):· DNS Name Record - (Dynamic Discovery) Allows devices to use the DNS
Hostname lookup method to discover a WDM Server.· DNS SRV Record - (Dynamic Discovery) Allows devices to use the DNS SRV
record lookup method to discover a WDM Server.· DHCP Inform - (Dynamic Discovery) Allows devices to use DHCP option tags to
discover a WDM Server.· Manual Discovery in Management Console - (Manual Discovery from Wyse
Device Manager) If no Dynamic Discovery method is used, you can use the Find Devices dialog box to discover devices from WDM (WDM Agents will respond to the server discovery by storing the discovered Web Server IP address and port and begin regular check-ins).
· Enable Automatic Discovery After Missed Check-ins - Select the number of missed check-ins after which you want the autodiscovery options enabled.

28 Chapter 5
This page intentionally blank.
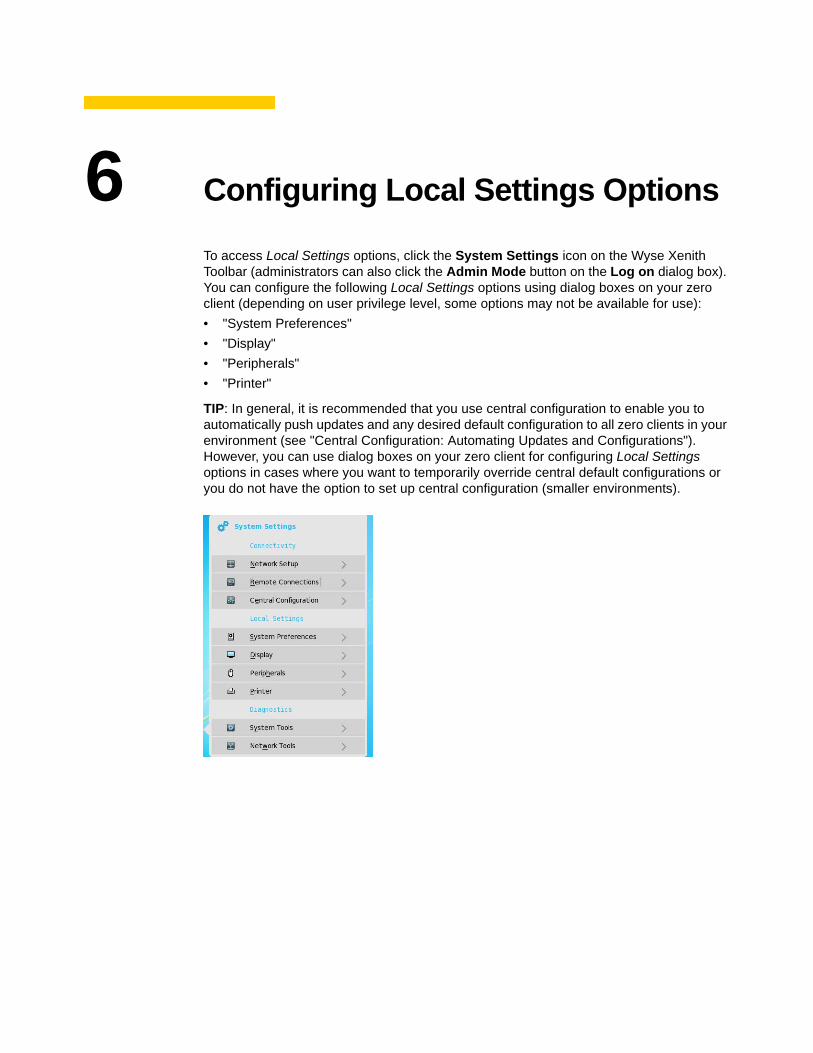
6 Configuring Local Settings Options
To access Local Settings options, click the System Settings icon on the Wyse Xenith Toolbar (administrators can also click the Admin Mode button on the Log on dialog box). You can configure the following Local Settings options using dialog boxes on your zero client (depending on user privilege level, some options may not be available for use):• "System Preferences"• "Display"• "Peripherals"• "Printer"
TIP: In general, it is recommended that you use central configuration to enable you to automatically push updates and any desired default configuration to all zero clients in your environment (see "Central Configuration: Automating Updates and Configurations"). However, you can use dialog boxes on your zero client for configuring Local Settings options in cases where you want to temporarily override central default configurations or you do not have the option to set up central configuration (smaller environments).
30 Chapter 6
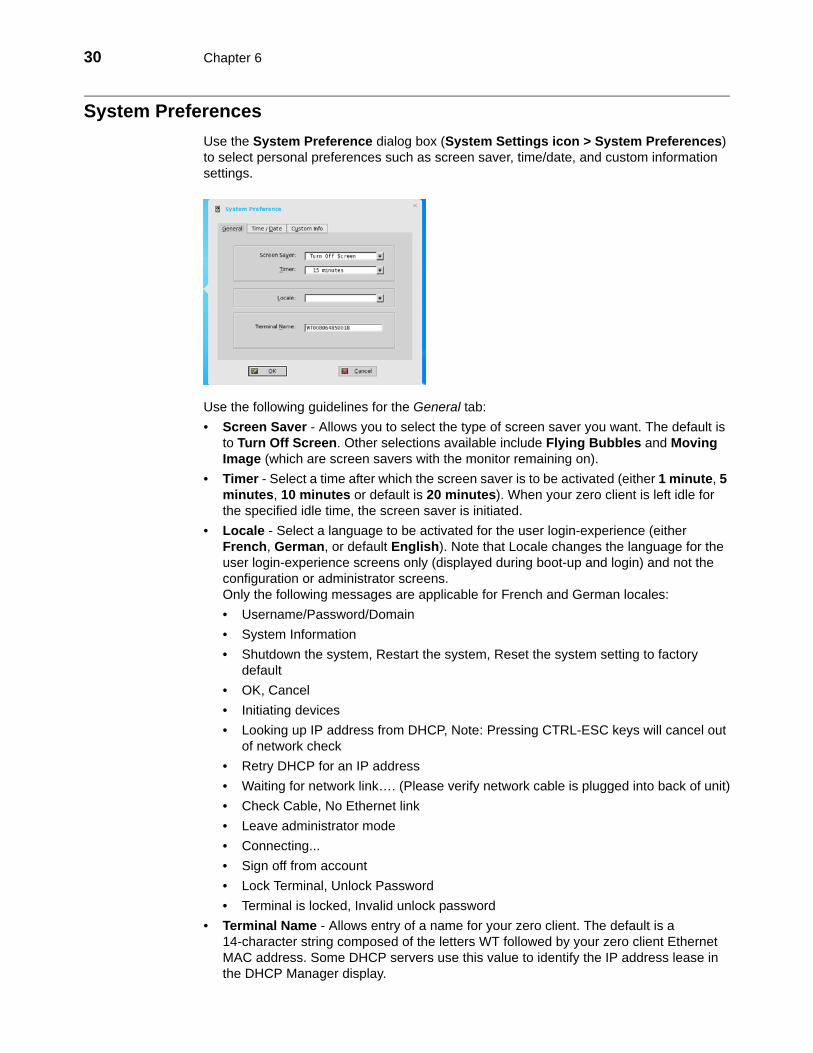
System PreferencesUse the System Preference dialog box (System Settings icon > System Preferences) to select personal preferences such as screen saver, time/date, and custom information settings.
Use the following guidelines for the General tab:• Screen Saver - Allows you to select the type of screen saver you want. The default is
to Turn Off Screen. Other selections available include Flying Bubbles and Moving Image (which are screen savers with the monitor remaining on).
• Timer - Select a time after which the screen saver is to be activated (either 1 minute, 5 minutes, 10 minutes or default is 20 minutes). When your zero client is left idle for the specified idle time, the screen saver is initiated.
• Locale - Select a language to be activated for the user login-experience (either French, German, or default English). Note that Locale changes the language for the user login-experience screens only (displayed during boot-up and login) and not the configuration or administrator screens. Only the following messages are applicable for French and German locales:• Username/Password/Domain• System Information• Shutdown the system, Restart the system, Reset the system setting to factory
default• OK, Cancel• Initiating devices• Looking up IP address from DHCP, Note: Pressing CTRL-ESC keys will cancel out
of network check• Retry DHCP for an IP address• Waiting for network link…. (Please verify network cable is plugged into back of unit)• Check Cable, No Ethernet link• Leave administrator mode• Connecting...• Sign off from account• Lock Terminal, Unlock Password• Terminal is locked, Invalid unlock password
• Terminal Name - Allows entry of a name for your zero client. The default is a 14-character string composed of the letters WT followed by your zero client Ethernet MAC address. Some DHCP servers use this value to identify the IP address lease in the DHCP Manager display.
Configuring Local Settings Options 31
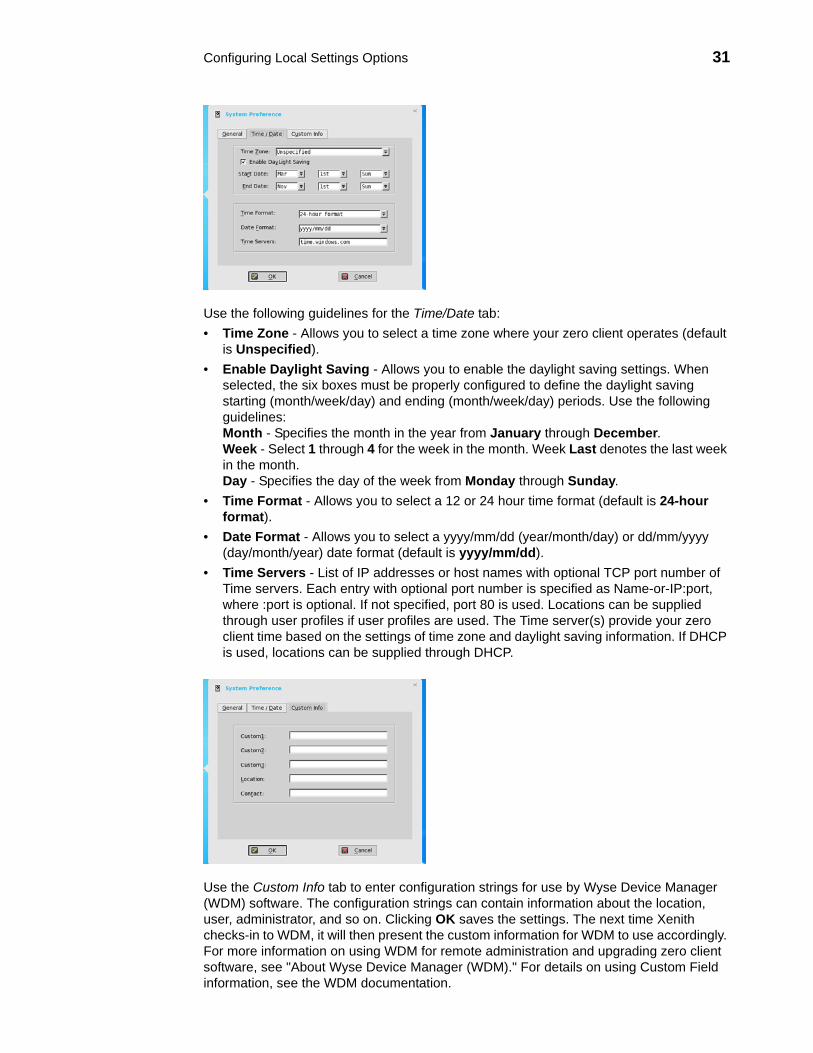
Use the following guidelines for the Time/Date tab:• Time Zone - Allows you to select a time zone where your zero client operates (default
is Unspecified).• Enable Daylight Saving - Allows you to enable the daylight saving settings. When
selected, the six boxes must be properly configured to define the daylight saving starting (month/week/day) and ending (month/week/day) periods. Use the following guidelines: Month - Specifies the month in the year from January through December. Week - Select 1 through 4 for the week in the month. Week Last denotes the last week in the month. Day - Specifies the day of the week from Monday through Sunday.
• Time Format - Allows you to select a 12 or 24 hour time format (default is 24-hour format).
• Date Format - Allows you to select a yyyy/mm/dd (year/month/day) or dd/mm/yyyy (day/month/year) date format (default is yyyy/mm/dd).
• Time Servers - List of IP addresses or host names with optional TCP port number of Time servers. Each entry with optional port number is specified as Name-or-IP:port, where :port is optional. If not specified, port 80 is used. Locations can be supplied through user profiles if user profiles are used. The Time server(s) provide your zero client time based on the settings of time zone and daylight saving information. If DHCP is used, locations can be supplied through DHCP.
Use the Custom Info tab to enter configuration strings for use by Wyse Device Manager (WDM) software. The configuration strings can contain information about the location, user, administrator, and so on. Clicking OK saves the settings. The next time Xenith checks-in to WDM, it will then present the custom information for WDM to use accordingly. For more information on using WDM for remote administration and upgrading zero client software, see "About Wyse Device Manager (WDM)." For details on using Custom Field information, see the WDM documentation.
32 Chapter 6
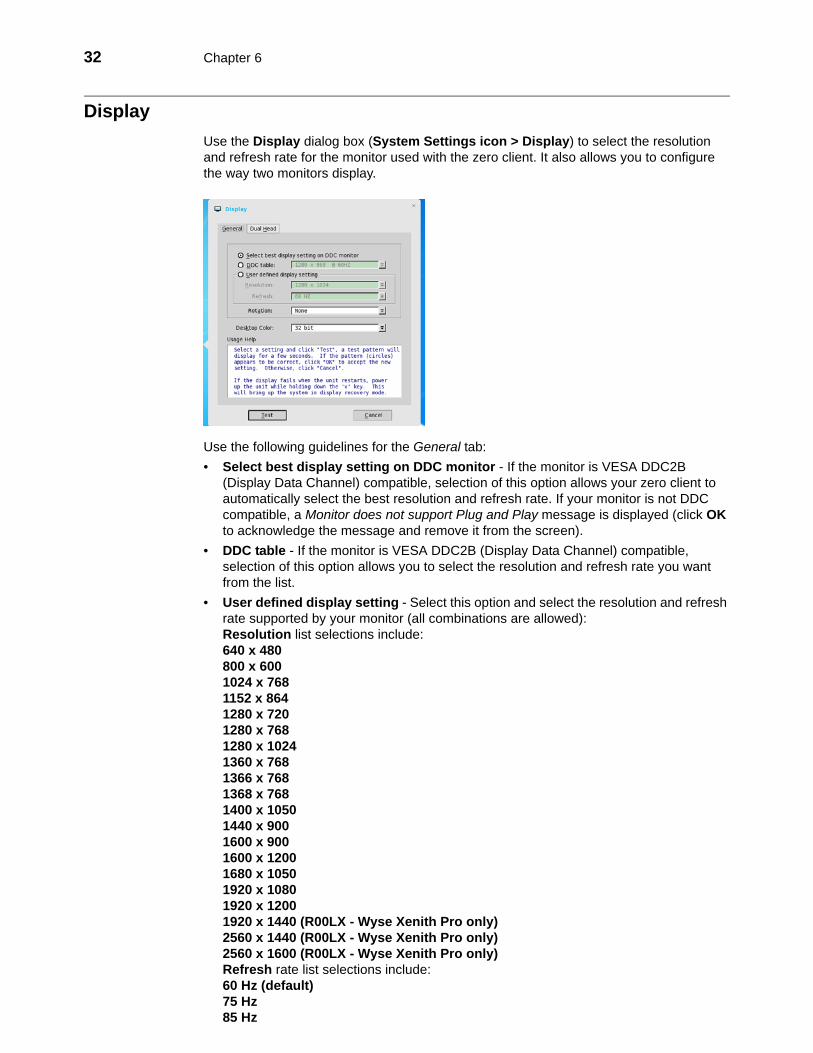
Display Use the Display dialog box (System Settings icon > Display) to select the resolution and refresh rate for the monitor used with the zero client. It also allows you to configure the way two monitors display.
Use the following guidelines for the General tab:• Select best display setting on DDC monitor - If the monitor is VESA DDC2B
(Display Data Channel) compatible, selection of this option allows your zero client to automatically select the best resolution and refresh rate. If your monitor is not DDC compatible, a Monitor does not support Plug and Play message is displayed (click OK to acknowledge the message and remove it from the screen).
• DDC table - If the monitor is VESA DDC2B (Display Data Channel) compatible, selection of this option allows you to select the resolution and refresh rate you want from the list.
• User defined display setting - Select this option and select the resolution and refresh rate supported by your monitor (all combinations are allowed): Resolution list selections include: 640 x 480 800 x 600 1024 x 768 1152 x 864 1280 x 720 1280 x 768 1280 x 1024 1360 x 768 1366 x 768 1368 x 768 1400 x 1050 1440 x 900 1600 x 900 1600 x 1200 1680 x 1050 1920 x 1080 1920 x 1200 1920 x 1440 (R00LX - Wyse Xenith Pro only) 2560 x 1440 (R00LX - Wyse Xenith Pro only) 2560 x 1600 (R00LX - Wyse Xenith Pro only) Refresh rate list selections include: 60 Hz (default) 75 Hz 85 Hz
Configuring Local Settings Options 33
• Rotation - Select a rotation option (either None or Right turn). Note that right rotations provide a 90 degree rotation.
• Desktop Color - Select the Desktop Color (either 16 bit or 32 bit).• Usage Help area - Contains brief instructions for using the Display dialog box and
running the test. No operator entry can be made in this box. Make note of the instructions in the area regarding v-key reset usage in case of display failure.
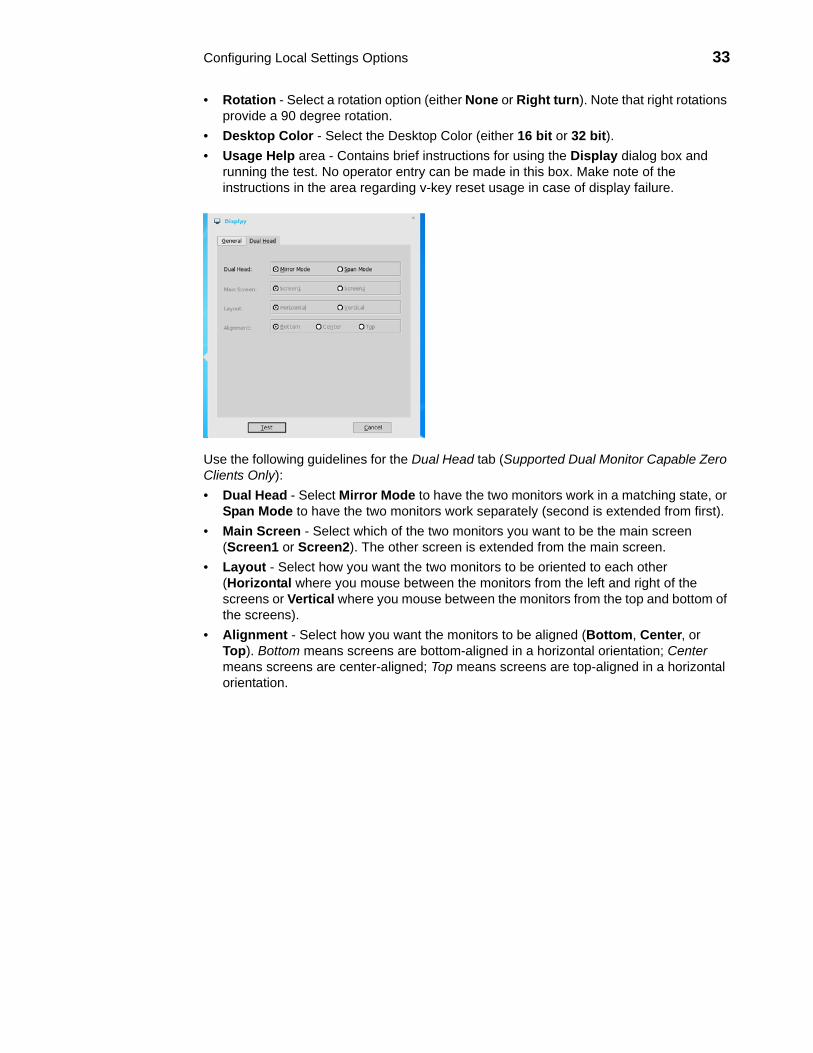
Use the following guidelines for the Dual Head tab (Supported Dual Monitor Capable Zero Clients Only):• Dual Head - Select Mirror Mode to have the two monitors work in a matching state, or
Span Mode to have the two monitors work separately (second is extended from first).• Main Screen - Select which of the two monitors you want to be the main screen
(Screen1 or Screen2). The other screen is extended from the main screen.• Layout - Select how you want the two monitors to be oriented to each other
(Horizontal where you mouse between the monitors from the left and right of the screens or Vertical where you mouse between the monitors from the top and bottom of the screens).
• Alignment - Select how you want the monitors to be aligned (Bottom, Center, or Top). Bottom means screens are bottom-aligned in a horizontal orientation; Center means screens are center-aligned; Top means screens are top-aligned in a horizontal orientation.
34 Chapter 6
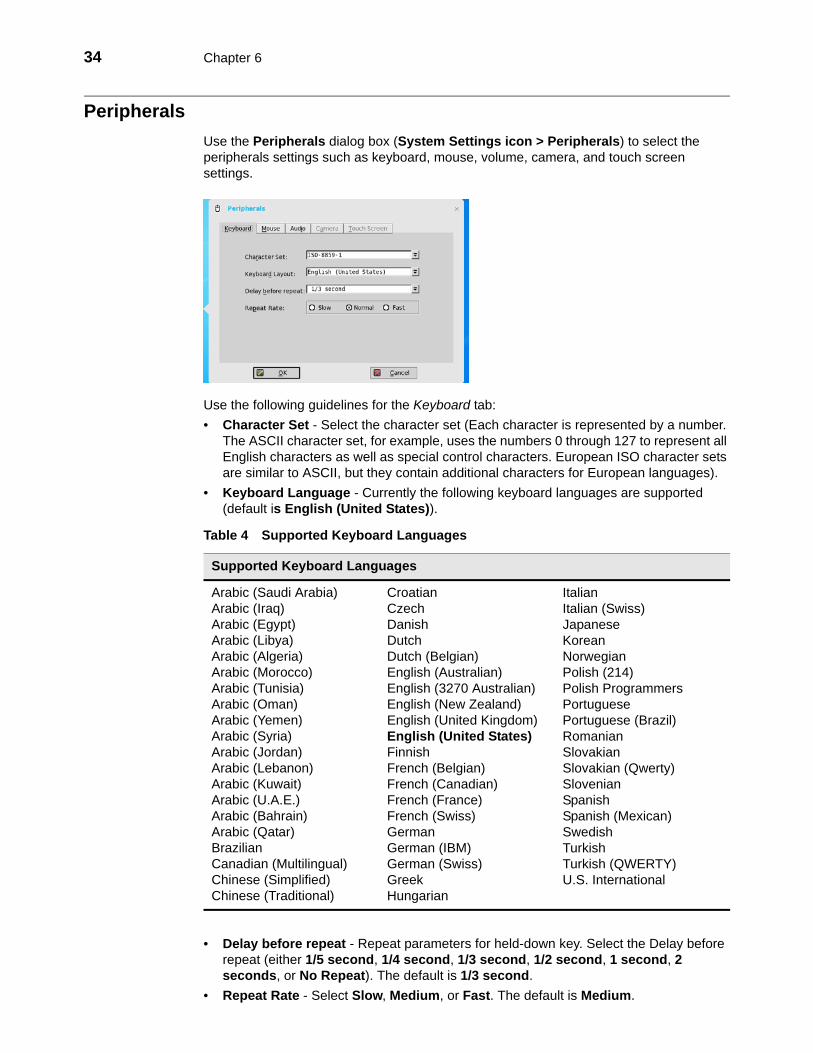
Peripherals Use the Peripherals dialog box (System Settings icon > Peripherals) to select the peripherals settings such as keyboard, mouse, volume, camera, and touch screen settings.
Use the following guidelines for the Keyboard tab:• Character Set - Select the character set (Each character is represented by a number.
The ASCII character set, for example, uses the numbers 0 through 127 to represent all English characters as well as special control characters. European ISO character sets are similar to ASCII, but they contain additional characters for European languages).
• Keyboard Language - Currently the following keyboard languages are supported (default is English (United States)).
Table 4 Supported Keyboard Languages
Supported Keyboard Languages
Arabic (Saudi Arabia) Arabic (Iraq) Arabic (Egypt) Arabic (Libya) Arabic (Algeria) Arabic (Morocco) Arabic (Tunisia) Arabic (Oman) Arabic (Yemen) Arabic (Syria) Arabic (Jordan) Arabic (Lebanon) Arabic (Kuwait) Arabic (U.A.E.) Arabic (Bahrain) Arabic (Qatar) Brazilian Canadian (Multilingual) Chinese (Simplified) Chinese (Traditional)
Croatian Czech Danish Dutch Dutch (Belgian) English (Australian) English (3270 Australian) English (New Zealand) English (United Kingdom) English (United States) Finnish French (Belgian) French (Canadian) French (France) French (Swiss) German German (IBM) German (Swiss) Greek Hungarian
Italian Italian (Swiss) Japanese Korean Norwegian Polish (214) Polish Programmers Portuguese Portuguese (Brazil) Romanian Slovakian Slovakian (Qwerty) Slovenian Spanish Spanish (Mexican) Swedish Turkish Turkish (QWERTY) U.S. International
• Delay before repeat - Repeat parameters for held-down key. Select the Delay before repeat (either 1/5 second, 1/4 second, 1/3 second, 1/2 second, 1 second, 2 seconds, or No Repeat). The default is 1/3 second.
• Repeat Rate - Select Slow, Medium, or Fast. The default is Medium.
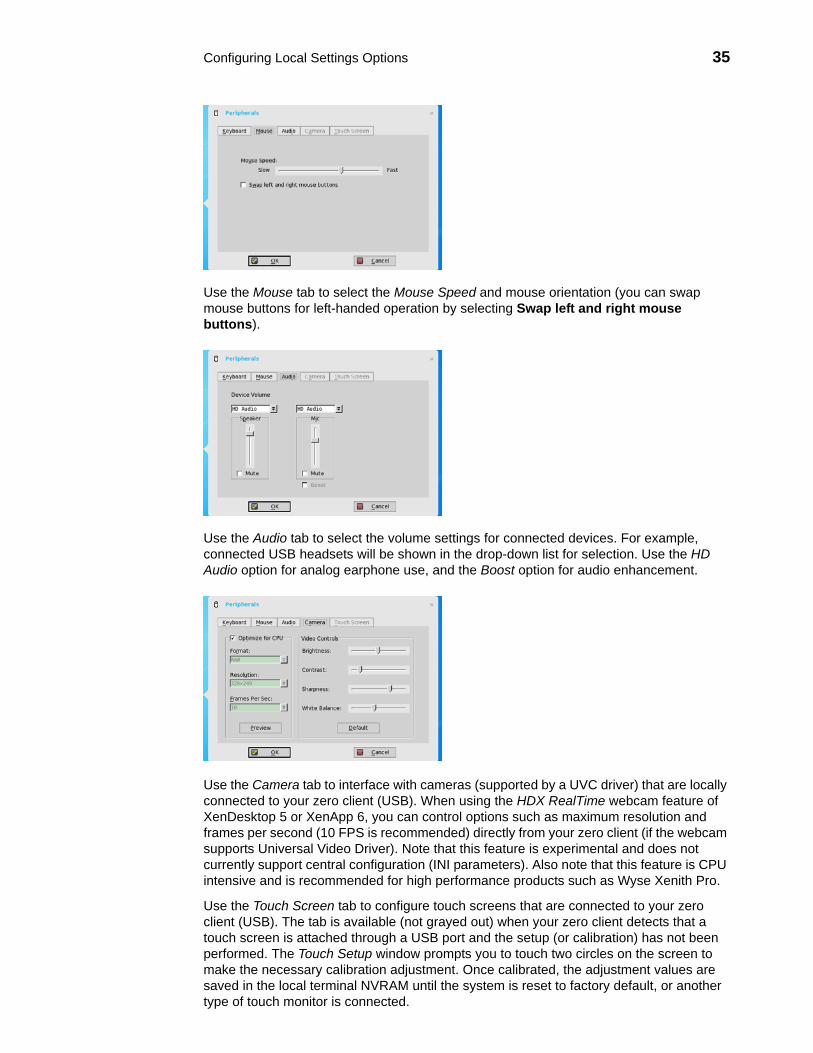
Configuring Local Settings Options 35
Use the Mouse tab to select the Mouse Speed and mouse orientation (you can swap mouse buttons for left-handed operation by selecting Swap left and right mouse buttons).
Use the Audio tab to select the volume settings for connected devices. For example, connected USB headsets will be shown in the drop-down list for selection. Use the HD Audio option for analog earphone use, and the Boost option for audio enhancement.
Use the Camera tab to interface with cameras (supported by a UVC driver) that are locally connected to your zero client (USB). When using the HDX RealTime webcam feature of XenDesktop 5 or XenApp 6, you can control options such as maximum resolution and frames per second (10 FPS is recommended) directly from your zero client (if the webcam supports Universal Video Driver). Note that this feature is experimental and does not currently support central configuration (INI parameters). Also note that this feature is CPU intensive and is recommended for high performance products such as Wyse Xenith Pro.
Use the Touch Screen tab to configure touch screens that are connected to your zero client (USB). The tab is available (not grayed out) when your zero client detects that a touch screen is attached through a USB port and the setup (or calibration) has not been performed. The Touch Setup window prompts you to touch two circles on the screen to make the necessary calibration adjustment. Once calibrated, the adjustment values are saved in the local terminal NVRAM until the system is reset to factory default, or another type of touch monitor is connected.
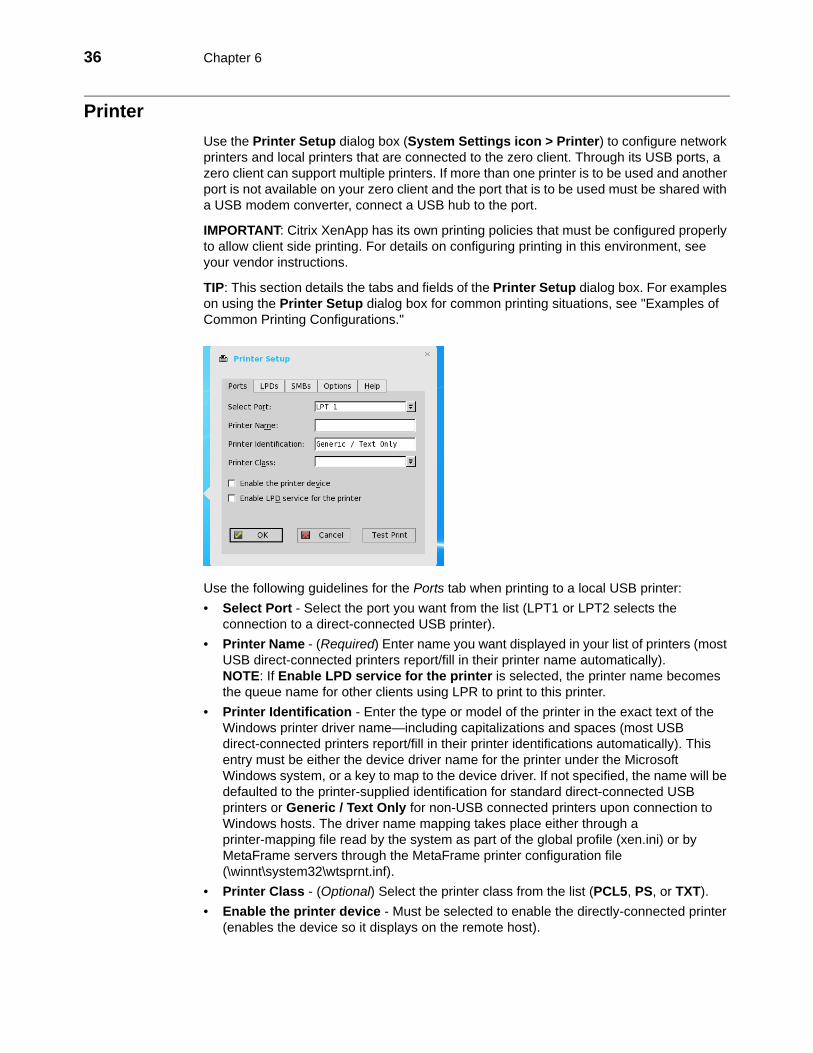
36 Chapter 6
Printer Use the Printer Setup dialog box (System Settings icon > Printer) to configure network printers and local printers that are connected to the zero client. Through its USB ports, a zero client can support multiple printers. If more than one printer is to be used and another port is not available on your zero client and the port that is to be used must be shared with a USB modem converter, connect a USB hub to the port.
IMPORTANT: Citrix XenApp has its own printing policies that must be configured properly to allow client side printing. For details on configuring printing in this environment, see your vendor instructions.
TIP: This section details the tabs and fields of the Printer Setup dialog box. For examples on using the Printer Setup dialog box for common printing situations, see "Examples of Common Printing Configurations."
Use the following guidelines for the Ports tab when printing to a local USB printer:• Select Port - Select the port you want from the list (LPT1 or LPT2 selects the
connection to a direct-connected USB printer).• Printer Name - (Required) Enter name you want displayed in your list of printers (most
USB direct-connected printers report/fill in their printer name automatically). NOTE: If Enable LPD service for the printer is selected, the printer name becomes the queue name for other clients using LPR to print to this printer.
• Printer Identification - Enter the type or model of the printer in the exact text of the Windows printer driver name—including capitalizations and spaces (most USB direct-connected printers report/fill in their printer identifications automatically). This entry must be either the device driver name for the printer under the Microsoft Windows system, or a key to map to the device driver. If not specified, the name will be defaulted to the printer-supplied identification for standard direct-connected USB printers or Generic / Text Only for non-USB connected printers upon connection to Windows hosts. The driver name mapping takes place either through a printer-mapping file read by the system as part of the global profile (xen.ini) or by MetaFrame servers through the MetaFrame printer configuration file (\winnt\system32\wtsprnt.inf).
• Printer Class - (Optional) Select the printer class from the list (PCL5, PS, or TXT).• Enable the printer device - Must be selected to enable the directly-connected printer
(enables the device so it displays on the remote host).
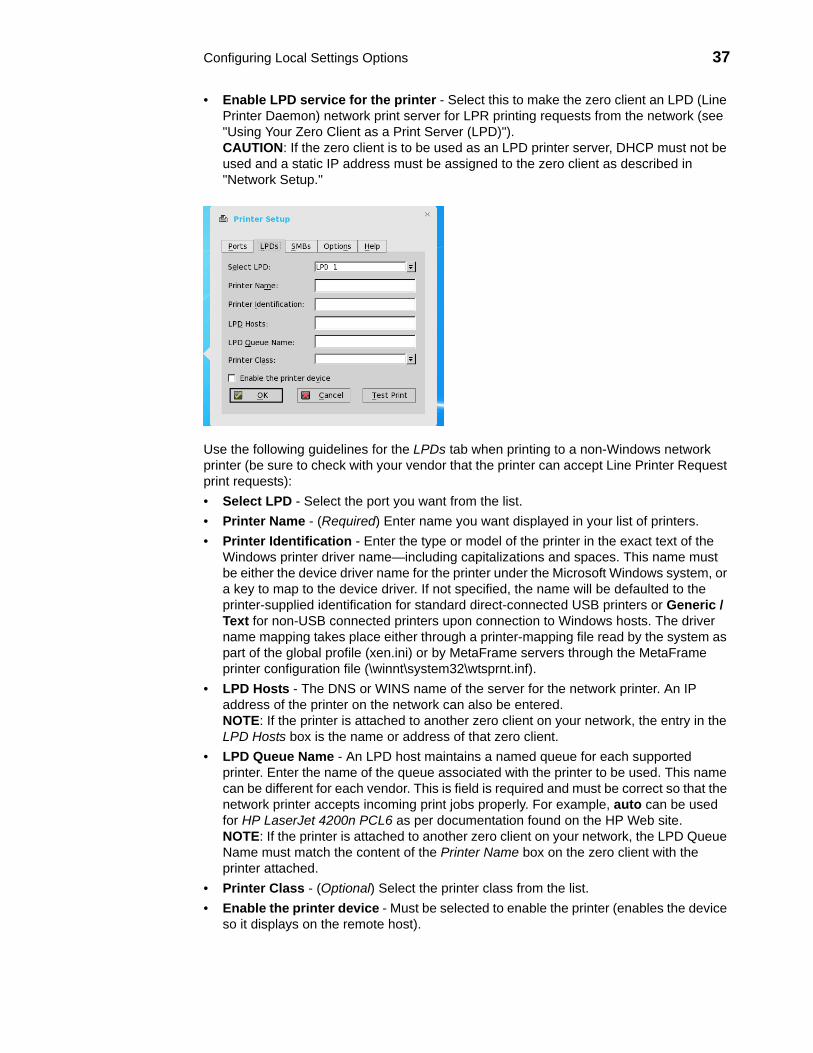
Configuring Local Settings Options 37
• Enable LPD service for the printer - Select this to make the zero client an LPD (Line Printer Daemon) network print server for LPR printing requests from the network (see "Using Your Zero Client as a Print Server (LPD)"). CAUTION: If the zero client is to be used as an LPD printer server, DHCP must not be used and a static IP address must be assigned to the zero client as described in "Network Setup."
Use the following guidelines for the LPDs tab when printing to a non-Windows network printer (be sure to check with your vendor that the printer can accept Line Printer Request print requests):• Select LPD - Select the port you want from the list.• Printer Name - (Required) Enter name you want displayed in your list of printers.• Printer Identification - Enter the type or model of the printer in the exact text of the
Windows printer driver name—including capitalizations and spaces. This name must be either the device driver name for the printer under the Microsoft Windows system, or a key to map to the device driver. If not specified, the name will be defaulted to the printer-supplied identification for standard direct-connected USB printers or Generic / Text for non-USB connected printers upon connection to Windows hosts. The driver name mapping takes place either through a printer-mapping file read by the system as part of the global profile (xen.ini) or by MetaFrame servers through the MetaFrame printer configuration file (\winnt\system32\wtsprnt.inf).
• LPD Hosts - The DNS or WINS name of the server for the network printer. An IP address of the printer on the network can also be entered. NOTE: If the printer is attached to another zero client on your network, the entry in the LPD Hosts box is the name or address of that zero client.
• LPD Queue Name - An LPD host maintains a named queue for each supported printer. Enter the name of the queue associated with the printer to be used. This name can be different for each vendor. This is field is required and must be correct so that the network printer accepts incoming print jobs properly. For example, auto can be used for HP LaserJet 4200n PCL6 as per documentation found on the HP Web site. NOTE: If the printer is attached to another zero client on your network, the LPD Queue Name must match the content of the Printer Name box on the zero client with the printer attached.
• Printer Class - (Optional) Select the printer class from the list.• Enable the printer device - Must be selected to enable the printer (enables the device
so it displays on the remote host).
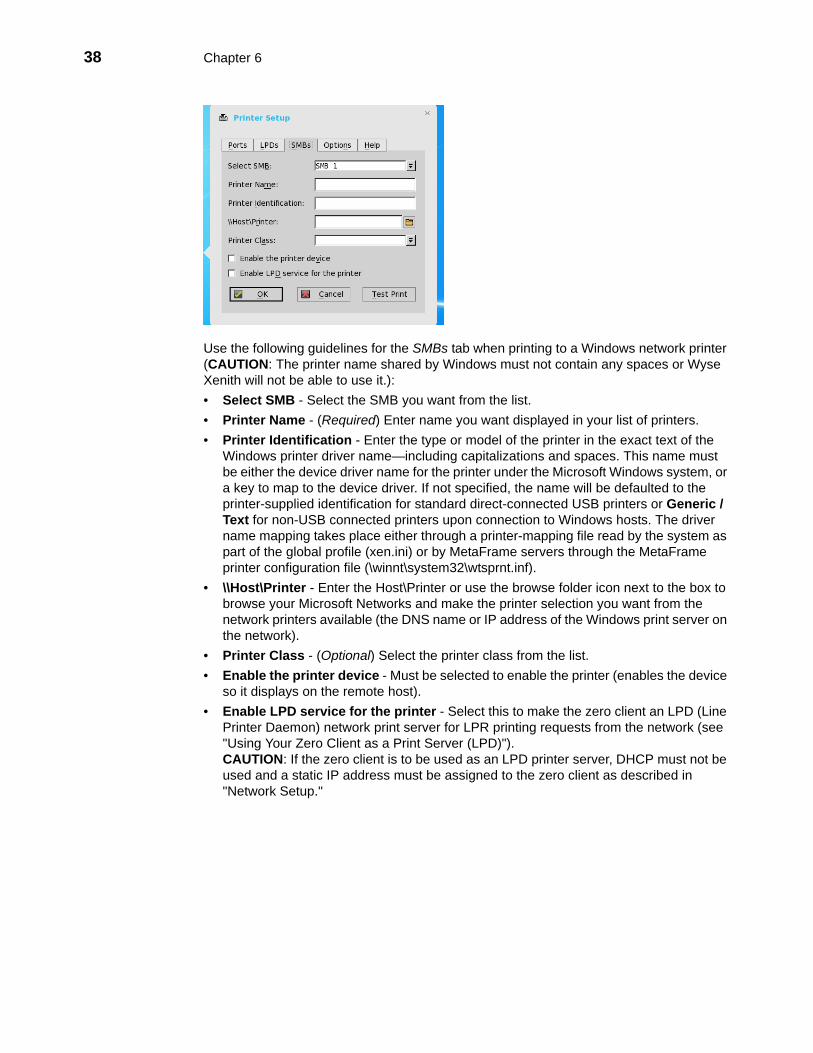
38 Chapter 6
Use the following guidelines for the SMBs tab when printing to a Windows network printer (CAUTION: The printer name shared by Windows must not contain any spaces or Wyse Xenith will not be able to use it.):• Select SMB - Select the SMB you want from the list.• Printer Name - (Required) Enter name you want displayed in your list of printers.• Printer Identification - Enter the type or model of the printer in the exact text of the
Windows printer driver name—including capitalizations and spaces. This name must be either the device driver name for the printer under the Microsoft Windows system, or a key to map to the device driver. If not specified, the name will be defaulted to the printer-supplied identification for standard direct-connected USB printers or Generic / Text for non-USB connected printers upon connection to Windows hosts. The driver name mapping takes place either through a printer-mapping file read by the system as part of the global profile (xen.ini) or by MetaFrame servers through the MetaFrame printer configuration file (\winnt\system32\wtsprnt.inf).
• \\Host\Printer - Enter the Host\Printer or use the browse folder icon next to the box to browse your Microsoft Networks and make the printer selection you want from the network printers available (the DNS name or IP address of the Windows print server on the network).
• Printer Class - (Optional) Select the printer class from the list.• Enable the printer device - Must be selected to enable the printer (enables the device
so it displays on the remote host).• Enable LPD service for the printer - Select this to make the zero client an LPD (Line
Printer Daemon) network print server for LPR printing requests from the network (see "Using Your Zero Client as a Print Server (LPD)"). CAUTION: If the zero client is to be used as an LPD printer server, DHCP must not be used and a static IP address must be assigned to the zero client as described in "Network Setup."
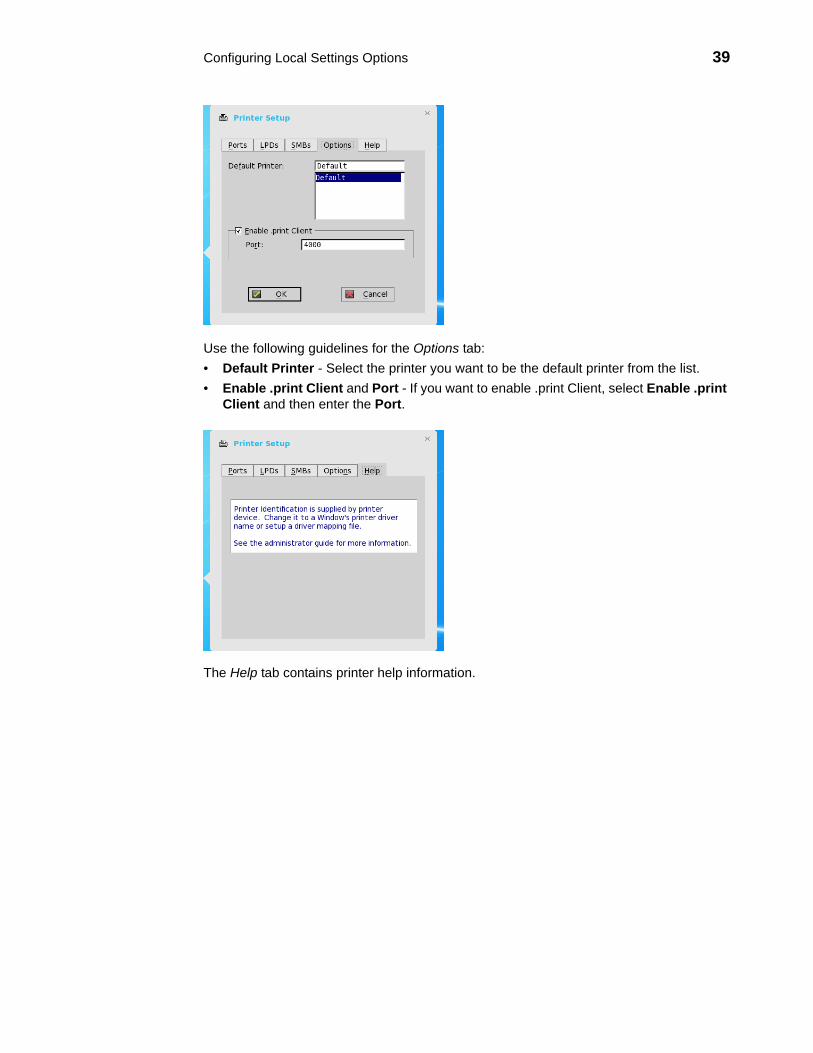
Configuring Local Settings Options 39
Use the following guidelines for the Options tab:• Default Printer - Select the printer you want to be the default printer from the list.• Enable .print Client and Port - If you want to enable .print Client, select Enable .print
Client and then enter the Port.
The Help tab contains printer help information.

40 Chapter 6
This page intentionally blank.
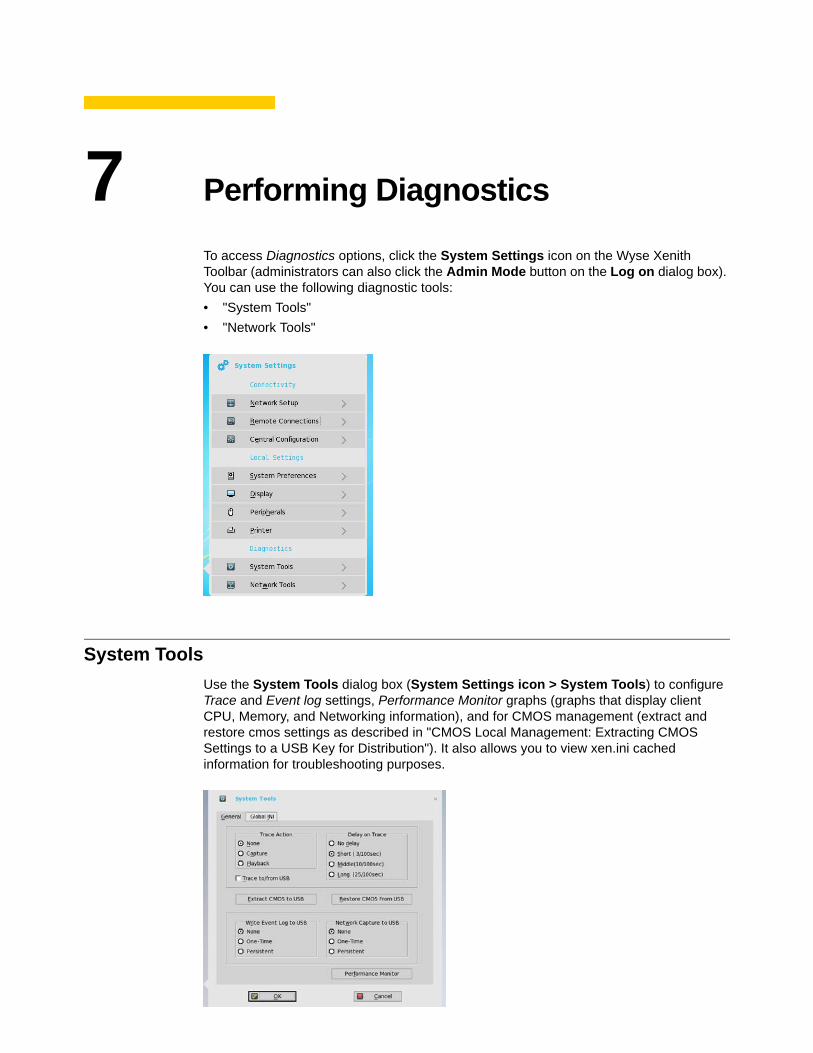
7 Performing Diagnostics
To access Diagnostics options, click the System Settings icon on the Wyse Xenith Toolbar (administrators can also click the Admin Mode button on the Log on dialog box). You can use the following diagnostic tools:• "System Tools"• "Network Tools"
System ToolsUse the System Tools dialog box (System Settings icon > System Tools) to configure Trace and Event log settings, Performance Monitor graphs (graphs that display client CPU, Memory, and Networking information), and for CMOS management (extract and restore cmos settings as described in "CMOS Local Management: Extracting CMOS Settings to a USB Key for Distribution"). It also allows you to view xen.ini cached information for troubleshooting purposes.

42 Chapter 7
Use the Trace and Event log options on the General tab to configure the settings you want (be sure to enable the EnableTrace option of the Privilege parameter in a xen.ini file - see "Creating and Using xen.ini Files").
Use the Network capture to USB option on the General tab to enable the capture of network information (a network trace of all traffic coming in and out of the zero client) to a USB drive that is inserted into your zero client (after logon and use of the XenDesktop server or network, you will see a WTOS_WS.pcap file in the USB drive which you can analyze using software such as a packet analyzer used for network troubleshooting, analysis, and so on). IMPORTANT: Be sure to insert the USB drive into your zero client before selecting the Network capture to USB option. Note that the Network capture to USB option is automatically cleared if there is no USB drive inserted and you exit the dialog box, or after restarting your zero client (if needed, you must select the option again).
Use the Performance Monitor button on the General tab to display client CPU, Memory, and Networking information (graphs display on top of all windows).
You can view xen.ini information on the Global INI tab.
(MirrorFileServer Parameter Use Only) Use the Mirror File Server tab to view, format, and delete locally stored files that are designated within the wnos.ini as backup (the locally saved files will be used when the server is not accessible). The files that are saved locally are copies of files within the wnos folder on the server.
The MirrorFileServer parameter is supported on Xenith and Xenith Pro Only (not supported on Xenith 2). IMPORTANT: For Xenith 2, use the depreicated EnableCacheIni parameter to locally cache the xen.ini file ONLY. EnableCacheIni={no, yes}. Default is no.
For MirrorFileServer parameter details, see "Parameters for a xen.ini File."
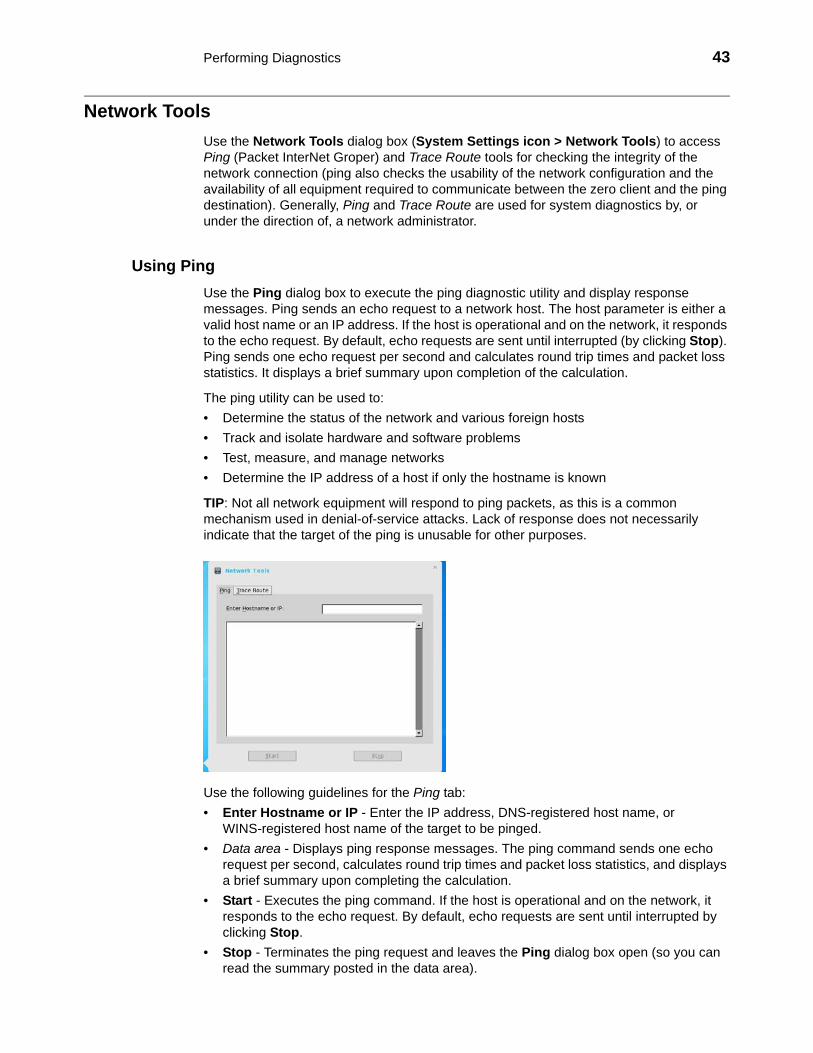
Performing Diagnostics 43
Network ToolsUse the Network Tools dialog box (System Settings icon > Network Tools) to access Ping (Packet InterNet Groper) and Trace Route tools for checking the integrity of the network connection (ping also checks the usability of the network configuration and the availability of all equipment required to communicate between the zero client and the ping destination). Generally, Ping and Trace Route are used for system diagnostics by, or under the direction of, a network administrator.
Using PingUse the Ping dialog box to execute the ping diagnostic utility and display response messages. Ping sends an echo request to a network host. The host parameter is either a valid host name or an IP address. If the host is operational and on the network, it responds to the echo request. By default, echo requests are sent until interrupted (by clicking Stop). Ping sends one echo request per second and calculates round trip times and packet loss statistics. It displays a brief summary upon completion of the calculation.
The ping utility can be used to:• Determine the status of the network and various foreign hosts• Track and isolate hardware and software problems• Test, measure, and manage networks• Determine the IP address of a host if only the hostname is known
TIP: Not all network equipment will respond to ping packets, as this is a common mechanism used in denial-of-service attacks. Lack of response does not necessarily indicate that the target of the ping is unusable for other purposes.
Use the following guidelines for the Ping tab:• Enter Hostname or IP - Enter the IP address, DNS-registered host name, or
WINS-registered host name of the target to be pinged.• Data area - Displays ping response messages. The ping command sends one echo
request per second, calculates round trip times and packet loss statistics, and displays a brief summary upon completing the calculation.
• Start - Executes the ping command. If the host is operational and on the network, it responds to the echo request. By default, echo requests are sent until interrupted by clicking Stop.
• Stop - Terminates the ping request and leaves the Ping dialog box open (so you can read the summary posted in the data area).
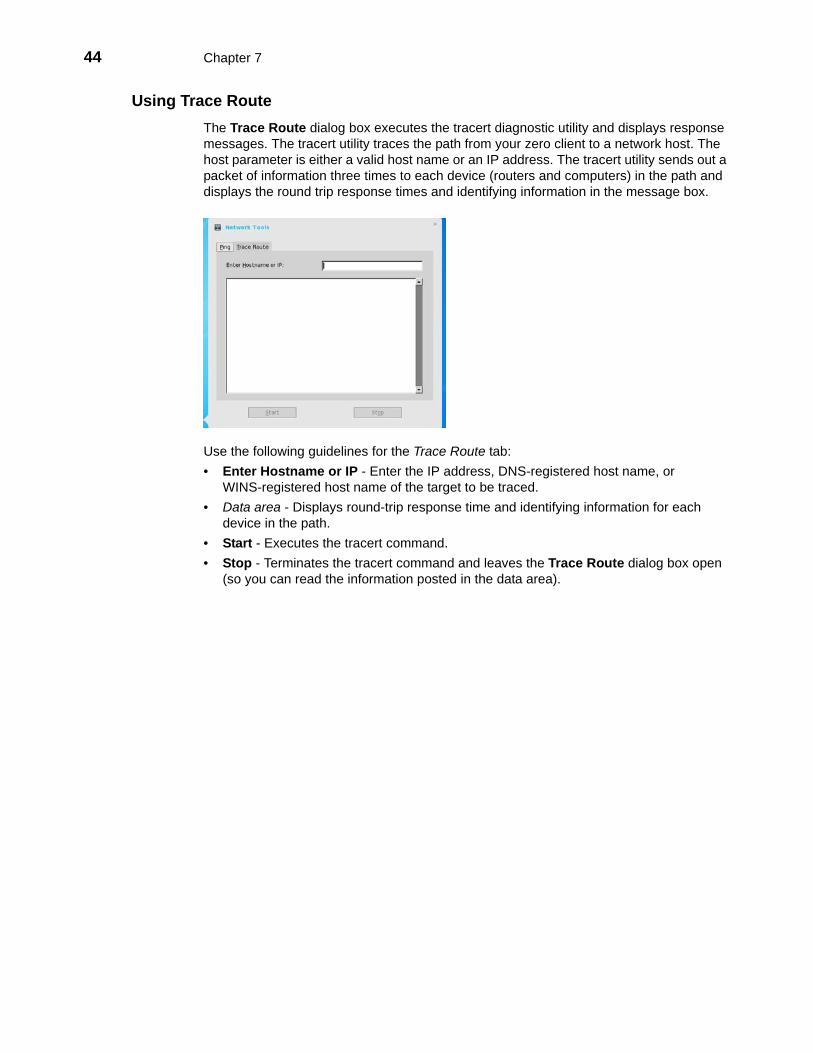
44 Chapter 7
Using Trace RouteThe Trace Route dialog box executes the tracert diagnostic utility and displays response messages. The tracert utility traces the path from your zero client to a network host. The host parameter is either a valid host name or an IP address. The tracert utility sends out a packet of information three times to each device (routers and computers) in the path and displays the round trip response times and identifying information in the message box.
Use the following guidelines for the Trace Route tab:• Enter Hostname or IP - Enter the IP address, DNS-registered host name, or
WINS-registered host name of the target to be traced.• Data area - Displays round-trip response time and identifying information for each
device in the path.• Start - Executes the tracert command. • Stop - Terminates the tracert command and leaves the Trace Route dialog box open
(so you can read the information posted in the data area).
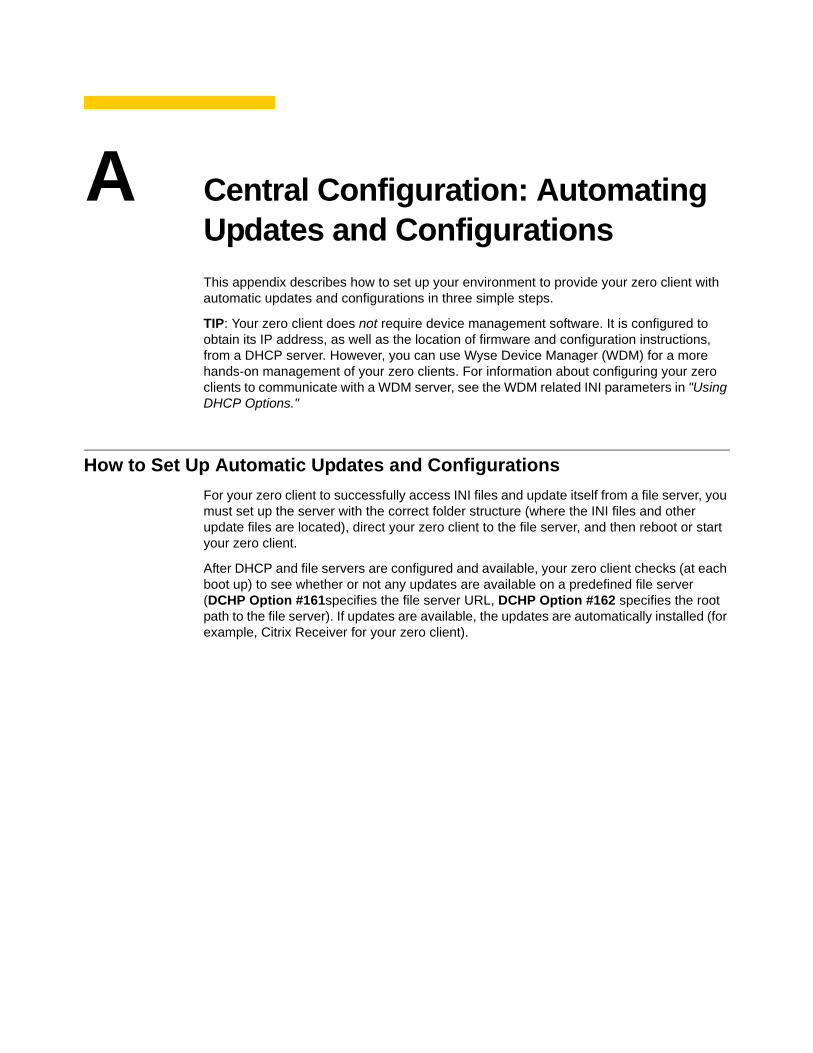
A Central Configuration: Automating Updates and ConfigurationsThis appendix describes how to set up your environment to provide your zero client with automatic updates and configurations in three simple steps.
TIP: Your zero client does not require device management software. It is configured to obtain its IP address, as well as the location of firmware and configuration instructions, from a DHCP server. However, you can use Wyse Device Manager (WDM) for a more hands-on management of your zero clients. For information about configuring your zero clients to communicate with a WDM server, see the WDM related INI parameters in "Using DHCP Options."
How to Set Up Automatic Updates and ConfigurationsFor your zero client to successfully access INI files and update itself from a file server, you must set up the server with the correct folder structure (where the INI files and other update files are located), direct your zero client to the file server, and then reboot or start your zero client.
After DHCP and file servers are configured and available, your zero client checks (at each boot up) to see whether or not any updates are available on a predefined file server (DCHP Option #161specifies the file server URL, DCHP Option #162 specifies the root path to the file server). If updates are available, the updates are automatically installed (for example, Citrix Receiver for your zero client).
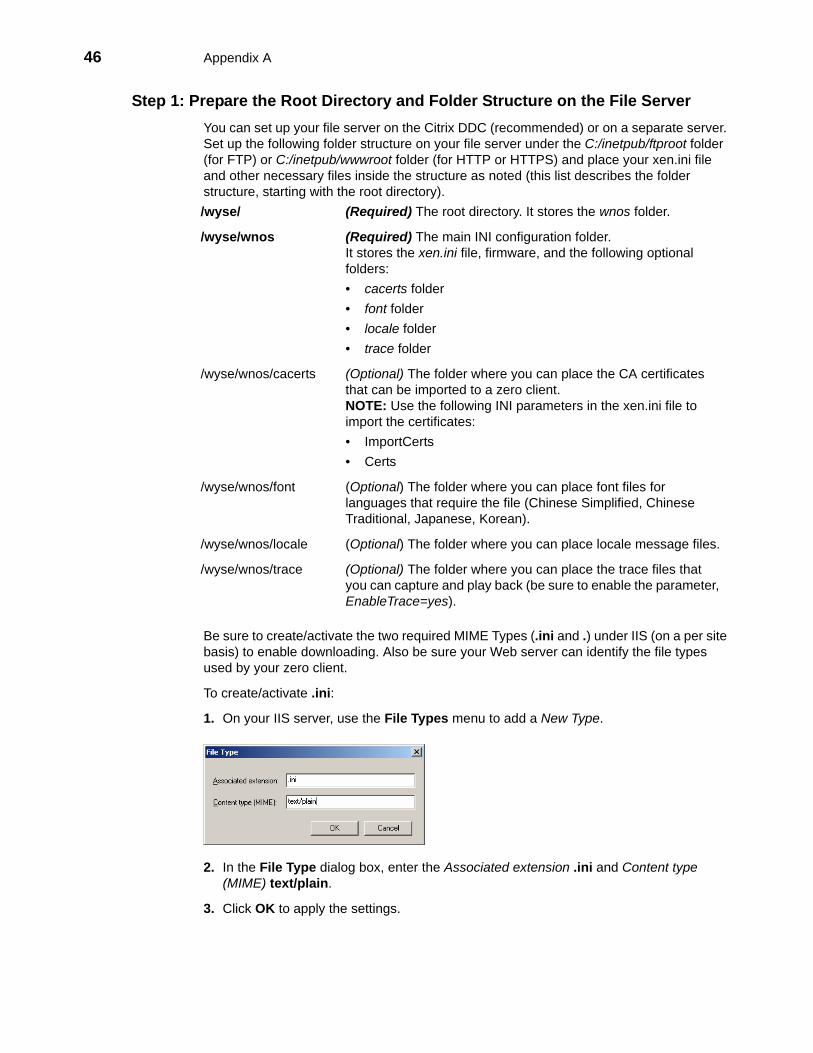
46 Appendix A
Step 1: Prepare the Root Directory and Folder Structure on the File ServerYou can set up your file server on the Citrix DDC (recommended) or on a separate server. Set up the following folder structure on your file server under the C:/inetpub/ftproot folder (for FTP) or C:/inetpub/wwwroot folder (for HTTP or HTTPS) and place your xen.ini file and other necessary files inside the structure as noted (this list describes the folder structure, starting with the root directory).
Be sure to create/activate the two required MIME Types (.ini and .) under IIS (on a per site basis) to enable downloading. Also be sure your Web server can identify the file types used by your zero client.
To create/activate .ini:
1. On your IIS server, use the File Types menu to add a New Type.
2. In the File Type dialog box, enter the Associated extension .ini and Content type (MIME) text/plain.
3. Click OK to apply the settings.
/wyse/ (Required) The root directory. It stores the wnos folder.
/wyse/wnos (Required) The main INI configuration folder. It stores the xen.ini file, firmware, and the following optional folders:• cacerts folder • font folder • locale folder • trace folder
/wyse/wnos/cacerts (Optional) The folder where you can place the CA certificates that can be imported to a zero client. NOTE: Use the following INI parameters in the xen.ini file to import the certificates: • ImportCerts • Certs
/wyse/wnos/font (Optional) The folder where you can place font files for languages that require the file (Chinese Simplified, Chinese Traditional, Japanese, Korean).
/wyse/wnos/locale (Optional) The folder where you can place locale message files.
/wyse/wnos/trace (Optional) The folder where you can place the trace files that you can capture and play back (be sure to enable the parameter, EnableTrace=yes).
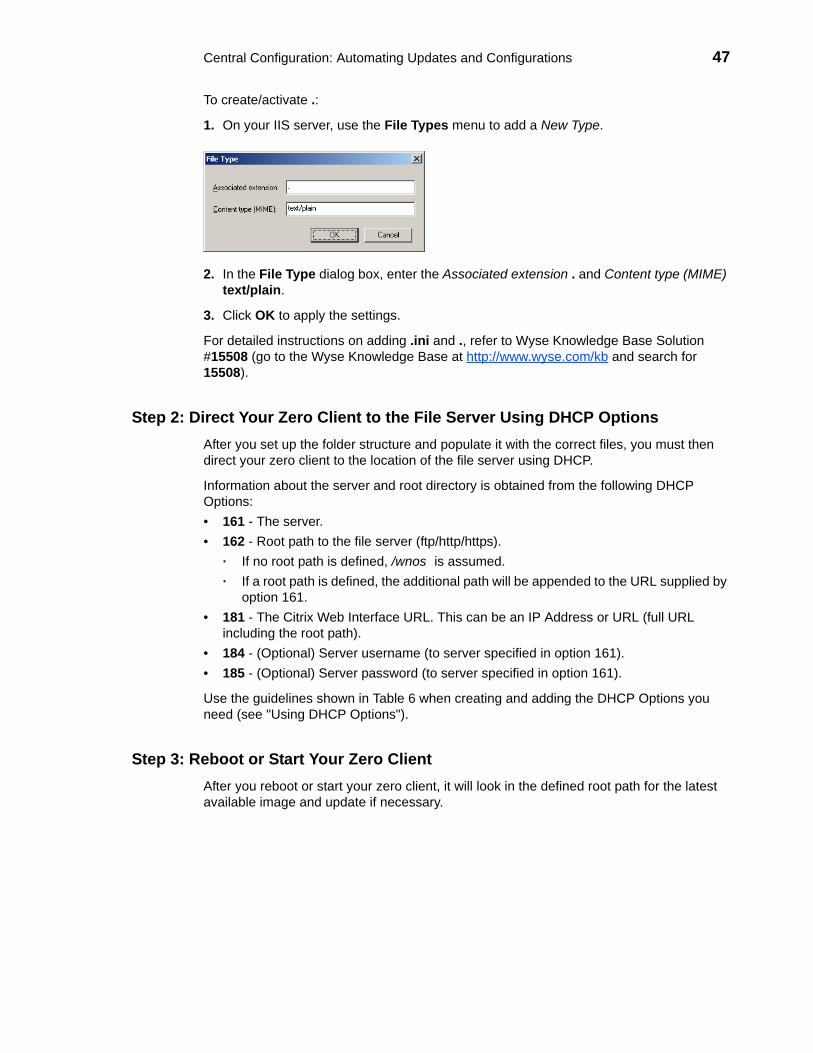
Central Configuration: Automating Updates and Configurations 47
To create/activate .:
1. On your IIS server, use the File Types menu to add a New Type.
2. In the File Type dialog box, enter the Associated extension . and Content type (MIME) text/plain.
3. Click OK to apply the settings.
For detailed instructions on adding .ini and ., refer to Wyse Knowledge Base Solution #15508 (go to the Wyse Knowledge Base at http://www.wyse.com/kb and search for 15508).
Step 2: Direct Your Zero Client to the File Server Using DHCP OptionsAfter you set up the folder structure and populate it with the correct files, you must then direct your zero client to the location of the file server using DHCP.
Information about the server and root directory is obtained from the following DHCP Options: • 161 - The server.• 162 - Root path to the file server (ftp/http/https).
· If no root path is defined, /wnos is assumed.· If a root path is defined, the additional path will be appended to the URL supplied by
option 161.• 181 - The Citrix Web Interface URL. This can be an IP Address or URL (full URL
including the root path).• 184 - (Optional) Server username (to server specified in option 161).• 185 - (Optional) Server password (to server specified in option 161).
Use the guidelines shown in Table 6 when creating and adding the DHCP Options you need (see "Using DHCP Options").
Step 3: Reboot or Start Your Zero ClientAfter you reboot or start your zero client, it will look in the defined root path for the latest available image and update if necessary.

48 Appendix A
This page intentionally blank.

B Creating and Using xen.ini Files
In this chapter you will learn how to construct and use a xen.ini file. The xen.ini file you create will provide your zero client with automatic updates and configurations.
It includes:• "Downloading and Using Sample INI Files"• "Rules and Recommendations for Constructing a xen.ini File"• "Parameters for a xen.ini File"
Downloading and Using Sample INI FilesWyse Xenith Sample INI files are available from Wyse and can be modified to suit the individual connection profile needs for your users. These sample files are annotated to allow you to use them as a “starter set” (that you can modify) to quickly get your file server up and running.
To download and use the files:
1. From the file server machine on which you want to load the INI files for use, go to the Wyse Knowledge Base at http://www.wyse.com/kb.
2. On the Knowledge Base page, type sample.ini in the search box and click Go.
3. In the resulting solutions Title list, click the reference guide link for Wyse Xenith (for example, Reference Guide - Wyse® Xenith™).
4. In the resulting attachments Name list, click the Sample INI link for the .exe file you want (for example, Xenith_Sample_MAY2010.exe) to open and use the File Download dialog box. IMPORTANT: After downloading the self-extracting sample INI file to the file server you want, double-click the Xen_Sample_May2010.ini file, and then modify the file (using an ASCII text editor) as needed for your use. Be sure to rename the sample file to xen.ini for use.
50 Appendix B
Rules and Recommendations for Constructing a xen.ini FileIn general, xen.ini files follow currently accepted “standard” INI file formatting conventions. The INI files consist of Wyse parameters. If you are using an INI file, the only parameter you must use is the Connect parameter (see Connect in Table 5 "Parameters for a xen.ini File"). Any of the rest of the parameters can be used if you desire, but are not necessary unless you want changes from client and “other” defaults (for example, “other” can be the default resolution of your monitor). Every parameter has a name and a value, with the name appearing to the left of the equals sign (name=value). Number signs (#) indicate the start of a comment. Comments can begin anywhere on a line. Everything between the # and the End of Line is ignored. Along with these general formatting conventions, use the following guidelines when constructing the INI files:
1. Connect is the Only Required Parameter As stated earlier, if you are using an INI file, the only parameter you must use is the Connect parameter. Any of the rest of the parameters can be used if you desire, but are not necessary unless you want changes from client and “other” defaults.
2. Continue Lines by using a Space and Backslash Placing a space and backslash ( \) at the end of a line indicates line continuation; that is, the backslash means that the line and the following line are, for the purposes of reading code, the same line. No white space can appear after the backslash; the requirement of white space between parameter entries is maintained by the use of the space before the backslash. In addition, starting all parameters at the left margin and placing at least one leading space (or tab) at the beginning of all (and only) continuation lines makes an INI file easier to read. Note that in circumstances where you require string concatenation, you can use a backslash without a space before or after it to concatenate with the first set of characters from the previous line; for example the strings snow and ball may be concatenated to give snowball.
3. Blank Lines Make Files Easy for Humans to Read Using blank lines is recommended for making code easier for you to read. For example:
BootOrder=harddisk;usb;pxe
SessionConfig=ICAPnliteServer=xxxxxSessionConfig=ICA MapDisksUnderZ=yes USBRedirection=HDX AudioQuality=HighDomainList="dellwyse.com"Password=PCCOPIDIPKCKPGGC encrypt=yes
MaxVNCD=1VncPassword="NCAOIIBOMPACMOAFMPBJ" Encrypt=yesVncPrompt=No Accept=5
4. Comment by using a # Sign As stated earlier, number signs (#) indicate the start of a comment. Comments can begin anywhere on a line. Everything between the # and the End of Line is ignored.
5. Values with White Spaces Require Quotation Marks Values (of parameters and their options) containing white spaces must be placed inside quotation marks (use common-practice nesting rules).
6. Separate Lists by using Semicolons or Commas Use semicolons or commas for list separators.
Creating and Using xen.ini Files 51
Parameters for a xen.ini FileTable 5 contains the most commonly used parameters in a xen.ini file (underlined values are defaults).
IMPORTANT: The underlined value for a parameter is the default value. Some parameters also have options shown within brackets [ ]. If an option has an underlined value (default), that option and default value will automatically be used with the parameter (options without underlined values can also be used if you want to, but are not automatically used with the parameter). In addition, when using parameters and options, you can leave the default value or change it to another value shown. For example, in the following case where: ParameterX={yes, no} [Option1={0, 1}] [Option2={1, 2, 3, 4}] If you use ParameterX, then Option1 and its default value 0 will automatically be used as Option1 has an underlined value (default of 0). You can still use Option2 if you want to, however, Option2 is not automatically used with the parameter as Option2 does not have a default (underlined) value.
Table 5 Parameters for a xen.ini File
Parameter Description
AddCertificate=<filename>password=<plain text password>Password-enc=<encrypted password>
Specifies a certificate file residing in the subfolder cacerts under the wnos folder to load on the nand flash device (on platforms with nand flash), or on the memory. The length of the filename, including the trailing period and the file extension, is limited to 64 characters.This is required when configuring the Citrix Secure Gateway PNAgent Interface (PNAgent/Lite servers) in the Network Setup dialog box. Adding certificates are required if the user CSG environments use certificate agents that are not covered by the built-in certificates. The certificates are used to validate server identities by your zero client.Supported files include .crt file on ICA CSG; .cer and .pfx in 802.1x.password and Password-enc are used for .pfx files.
AdminMode={yes, no}[admin-username=<encrypted_username>][admin-password=<encrypted_password>][Username=<username>][Password=<password>]
Default is no.Yes/no option to password protect the use of the Admin Mode button on the Log on dialog box to configure settings. Set to yes to require a username and password to use the Admin Mode button to configure settings.Encrypted strings are used for admin-username and admin-password.

52 Appendix B
AutoLoad=[0, 1, 2, 101, 102, 201, 202] Default is 1.Specifies the firmware update mode.0 — Disable checking for image.1 — (Default) Enable a forced firmware upgrade/downgrade process.2 — Enable a comparison/non-forced upgrade only process.101 — Enable firmware upgrade/downgrade process, but have a popup message that identifies the firmware version and then prompts with OK and Cancel buttons appearing before the process; completion message appears after process.102 — Enable upgrade only, but have a popup message that identifies the firmware version and then prompts with OK and Cancel buttons appearing before the process; completion message appears after process.201 — Enable a forced firmware upgrade/downgrade process, but have a popup message with OK button appearing before process although process will begin in 20 seconds in any case; completion message appears after process.202 — Enable a comparison/non-forced upgrade only process, but have a popup message with OK and Cancel buttons appearing before the process; completion message appears after process.
AutoSelectSingleCert={yes, no} Yes/no option to select the single client certificate available. When HTTPS is configured to verify client certificate, one window pops up for the user to select the client certificate. If only one client certificate is available, set "AutoSelectSingleCert=yes" will not prompt the window and automatically select the client certificate.
AutoSignoff={yes, no} Default is yes.Yes/no option to automatically sign-off a user when the last opened session is closed.
BootpDisable={no, yes} Default is no.Yes/no option to support both DHCP and BOOTP to obtain the network configurations. In the first two tries, only DHCP is requested. Then, both DHCP and BOOTP are requested. For some environments, BOOTP requests will delay obtaining the IP from the DHCP server. Set BootpDisable=yes will only perform a DHCP request. This setting is only valid after the next reboot. (CIR59279)
BootOrder={PXE, HardDisk, USB} Not supported on Xenith 2.BootOrder — Sets the boot order for the BIOS. [Intro build 1.5.0_02] The boot order must follow these rules:1. The boot order is a list of these three options separated by a semi-colon (;)or a comma (,).2. Every option must be used.3. The options must be different.For example, the following settings are valid: BootOrder=PXE;HardDisk;USB BootOrder=HardDisk;PXE;USB BootOrder=USB;PXE;HardDiskHowever, the following settings are invalid: BootOrder=PXE;HardDisk BootOrder=PXE;PXE;USB BootOrder=PXE;HardDisk;USB;PXEIf the first boot order is not HardDisk, the system restart will boot from the BIOS setting.
Table 5 Parameters for a xen.ini File , Continued
Parameter Description
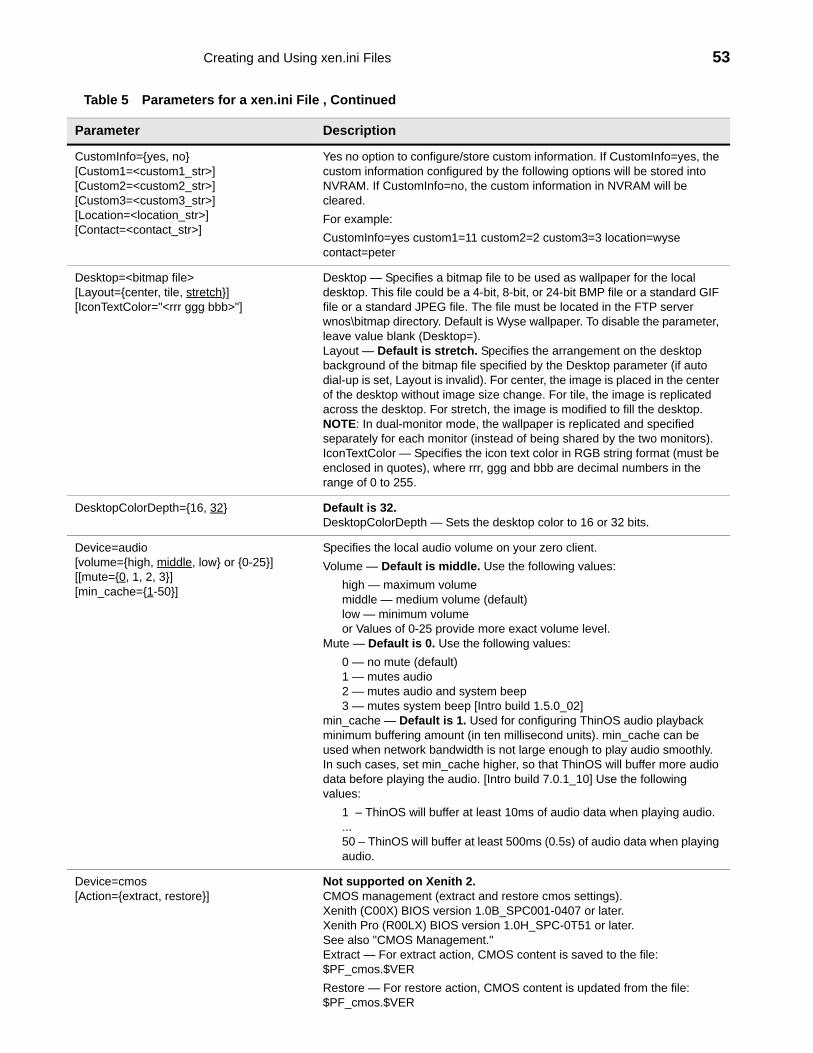
Creating and Using xen.ini Files 53
CustomInfo={yes, no} [Custom1=<custom1_str>] [Custom2=<custom2_str>] [Custom3=<custom3_str>] [Location=<location_str>] [Contact=<contact_str>]
Yes no option to configure/store custom information. If CustomInfo=yes, the custom information configured by the following options will be stored into NVRAM. If CustomInfo=no, the custom information in NVRAM will be cleared. For example:CustomInfo=yes custom1=11 custom2=2 custom3=3 location=wyse contact=peter
Desktop=<bitmap file>[Layout={center, tile, stretch}][IconTextColor="<rrr ggg bbb>"]
Desktop — Specifies a bitmap file to be used as wallpaper for the local desktop. This file could be a 4-bit, 8-bit, or 24-bit BMP file or a standard GIF file or a standard JPEG file. The file must be located in the FTP server wnos\bitmap directory. Default is Wyse wallpaper. To disable the parameter, leave value blank (Desktop=). Layout — Default is stretch. Specifies the arrangement on the desktop background of the bitmap file specified by the Desktop parameter (if auto dial-up is set, Layout is invalid). For center, the image is placed in the center of the desktop without image size change. For tile, the image is replicated across the desktop. For stretch, the image is modified to fill the desktop. NOTE: In dual-monitor mode, the wallpaper is replicated and specified separately for each monitor (instead of being shared by the two monitors). IconTextColor — Specifies the icon text color in RGB string format (must be enclosed in quotes), where rrr, ggg and bbb are decimal numbers in the range of 0 to 255.
DesktopColorDepth={16, 32} Default is 32.DesktopColorDepth — Sets the desktop color to 16 or 32 bits.
Device=audio[volume={high, middle, low} or {0-25}][[mute={0, 1, 2, 3}][min_cache={1-50}]
Specifies the local audio volume on your zero client.Volume — Default is middle. Use the following values:
high — maximum volumemiddle — medium volume (default)low — minimum volumeor Values of 0-25 provide more exact volume level.
Mute — Default is 0. Use the following values:0 — no mute (default)1 — mutes audio 2 — mutes audio and system beep3 — mutes system beep [Intro build 1.5.0_02]
min_cache — Default is 1. Used for configuring ThinOS audio playback minimum buffering amount (in ten millisecond units). min_cache can be used when network bandwidth is not large enough to play audio smoothly. In such cases, set min_cache higher, so that ThinOS will buffer more audio data before playing the audio. [Intro build 7.0.1_10] Use the following values:
1 – ThinOS will buffer at least 10ms of audio data when playing audio....50 – ThinOS will buffer at least 500ms (0.5s) of audio data when playing audio.
Device=cmos [Action={extract, restore}]
Not supported on Xenith 2.CMOS management (extract and restore cmos settings).Xenith (C00X) BIOS version 1.0B_SPC001-0407 or later.Xenith Pro (R00LX) BIOS version 1.0H_SPC-0T51 or later.See also "CMOS Management."Extract — For extract action, CMOS content is saved to the file: $PF_cmos.$VERRestore — For restore action, CMOS content is updated from the file: $PF_cmos.$VER
Table 5 Parameters for a xen.ini File , Continued
Parameter Description
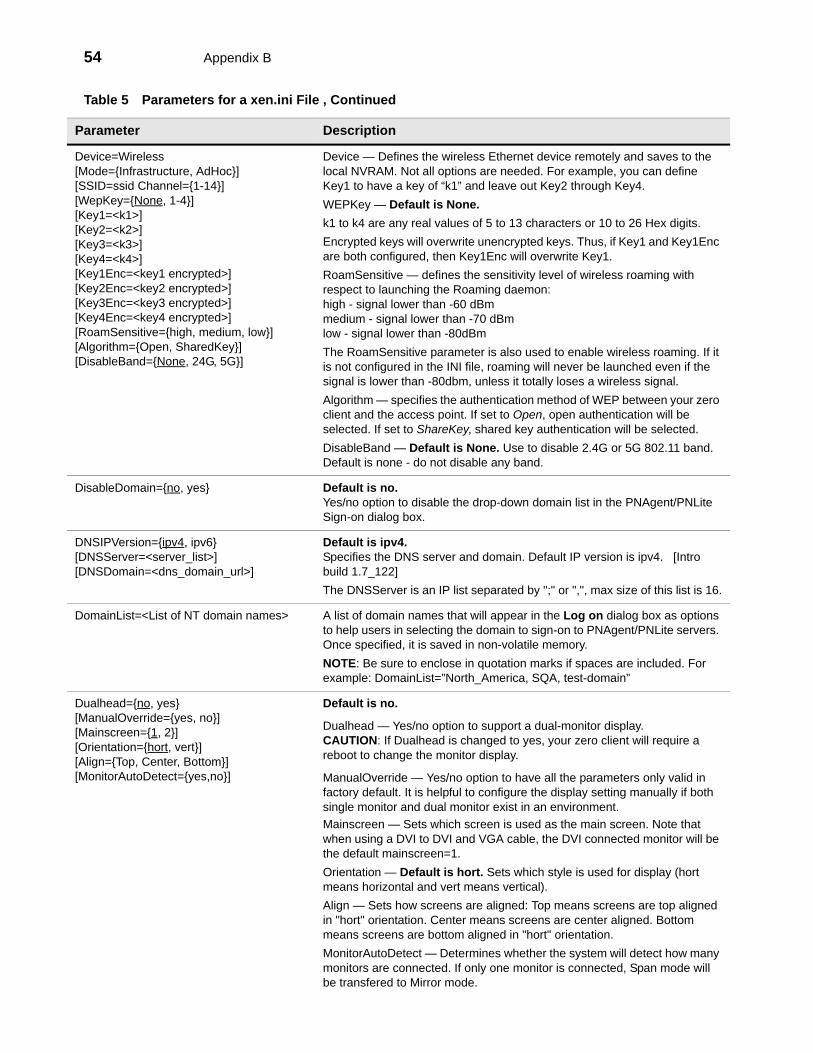
54 Appendix B
Device=Wireless[Mode={Infrastructure, AdHoc}][SSID=ssid Channel={1-14}] [WepKey={None, 1-4}][Key1=<k1>][Key2=<k2>][Key3=<k3>][Key4=<k4>][Key1Enc=<key1 encrypted>][Key2Enc=<key2 encrypted>][Key3Enc=<key3 encrypted>][Key4Enc=<key4 encrypted>][RoamSensitive={high, medium, low}][Algorithm={Open, SharedKey}][DisableBand={None, 24G, 5G}]
Device — Defines the wireless Ethernet device remotely and saves to the local NVRAM. Not all options are needed. For example, you can define Key1 to have a key of “k1” and leave out Key2 through Key4.WEPKey — Default is None.k1 to k4 are any real values of 5 to 13 characters or 10 to 26 Hex digits.Encrypted keys will overwrite unencrypted keys. Thus, if Key1 and Key1Enc are both configured, then Key1Enc will overwrite Key1.RoamSensitive — defines the sensitivity level of wireless roaming with respect to launching the Roaming daemon: high - signal lower than -60 dBm medium - signal lower than -70 dBm low - signal lower than -80dBmThe RoamSensitive parameter is also used to enable wireless roaming. If it is not configured in the INI file, roaming will never be launched even if the signal is lower than -80dbm, unless it totally loses a wireless signal.Algorithm — specifies the authentication method of WEP between your zero client and the access point. If set to Open, open authentication will be selected. If set to ShareKey, shared key authentication will be selected.DisableBand — Default is None. Use to disable 2.4G or 5G 802.11 band. Default is none - do not disable any band.
DisableDomain={no, yes} Default is no.Yes/no option to disable the drop-down domain list in the PNAgent/PNLite Sign-on dialog box.
DNSIPVersion={ipv4, ipv6}[DNSServer=<server_list>][DNSDomain=<dns_domain_url>]
Default is ipv4.Specifies the DNS server and domain. Default IP version is ipv4. [Intro build 1.7_122]The DNSServer is an IP list separated by ";" or ",", max size of this list is 16.
DomainList=<List of NT domain names> A list of domain names that will appear in the Log on dialog box as options to help users in selecting the domain to sign-on to PNAgent/PNLite servers. Once specified, it is saved in non-volatile memory.NOTE: Be sure to enclose in quotation marks if spaces are included. For example: DomainList=”North_America, SQA, test-domain”
Dualhead={no, yes}[ManualOverride={yes, no}][Mainscreen={1, 2}][Orientation={hort, vert}][Align={Top, Center, Bottom}][MonitorAutoDetect={yes,no}]
Default is no.
Dualhead — Yes/no option to support a dual-monitor display. CAUTION: If Dualhead is changed to yes, your zero client will require a reboot to change the monitor display.
ManualOverride — Yes/no option to have all the parameters only valid in factory default. It is helpful to configure the display setting manually if both single monitor and dual monitor exist in an environment.Mainscreen — Sets which screen is used as the main screen. Note that when using a DVI to DVI and VGA cable, the DVI connected monitor will be the default mainscreen=1.Orientation — Default is hort. Sets which style is used for display (hort means horizontal and vert means vertical).Align — Sets how screens are aligned: Top means screens are top aligned in "hort" orientation. Center means screens are center aligned. Bottom means screens are bottom aligned in "hort" orientation.MonitorAutoDetect — Determines whether the system will detect how many monitors are connected. If only one monitor is connected, Span mode will be transfered to Mirror mode.
Table 5 Parameters for a xen.ini File , Continued
Parameter Description
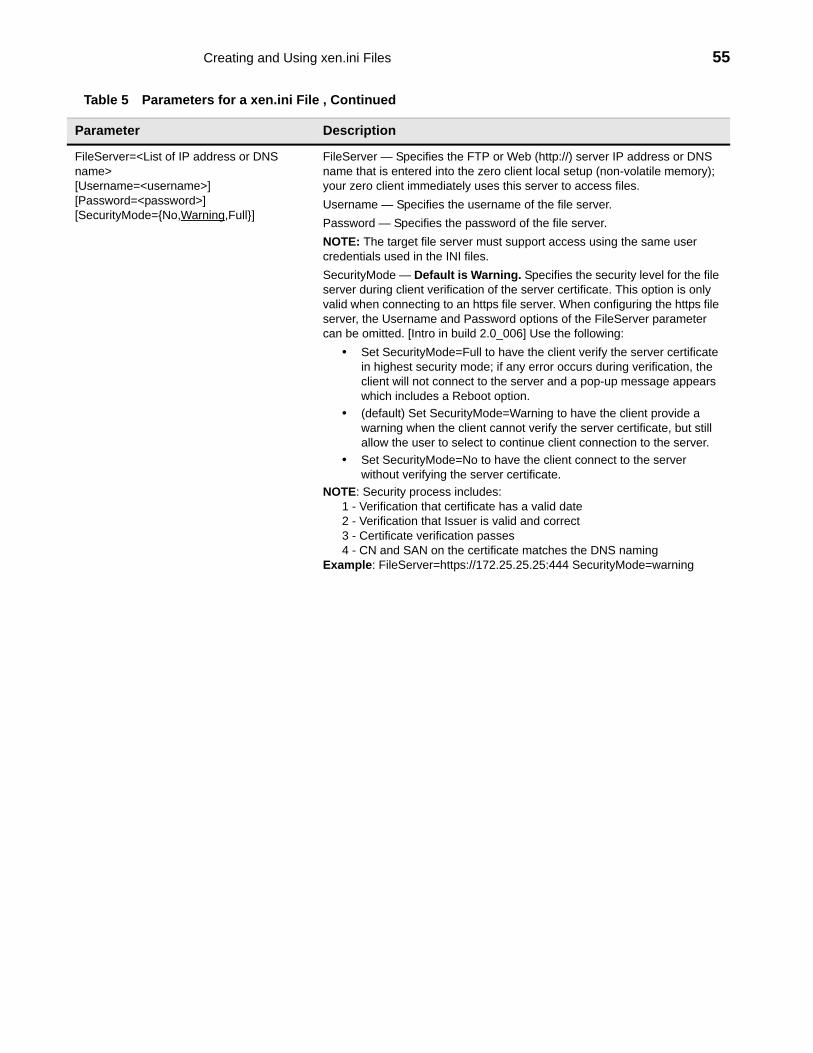
Creating and Using xen.ini Files 55
FileServer=<List of IP address or DNS name>[Username=<username>][Password=<password>][SecurityMode={No,Warning,Full}]
FileServer — Specifies the FTP or Web (http://) server IP address or DNS name that is entered into the zero client local setup (non-volatile memory); your zero client immediately uses this server to access files.Username — Specifies the username of the file server.Password — Specifies the password of the file server.NOTE: The target file server must support access using the same user credentials used in the INI files.SecurityMode — Default is Warning. Specifies the security level for the file server during client verification of the server certificate. This option is only valid when connecting to an https file server. When configuring the https file server, the Username and Password options of the FileServer parameter can be omitted. [Intro in build 2.0_006] Use the following:
• Set SecurityMode=Full to have the client verify the server certificate in highest security mode; if any error occurs during verification, the client will not connect to the server and a pop-up message appears which includes a Reboot option.
• (default) Set SecurityMode=Warning to have the client provide a warning when the client cannot verify the server certificate, but still allow the user to select to continue client connection to the server.
• Set SecurityMode=No to have the client connect to the server without verifying the server certificate.
NOTE: Security process includes:1 - Verification that certificate has a valid date 2 - Verification that Issuer is valid and correct3 - Certificate verification passes4 - CN and SAN on the certificate matches the DNS naming
Example: FileServer=https://172.25.25.25:444 SecurityMode=warning
Table 5 Parameters for a xen.ini File , Continued
Parameter Description
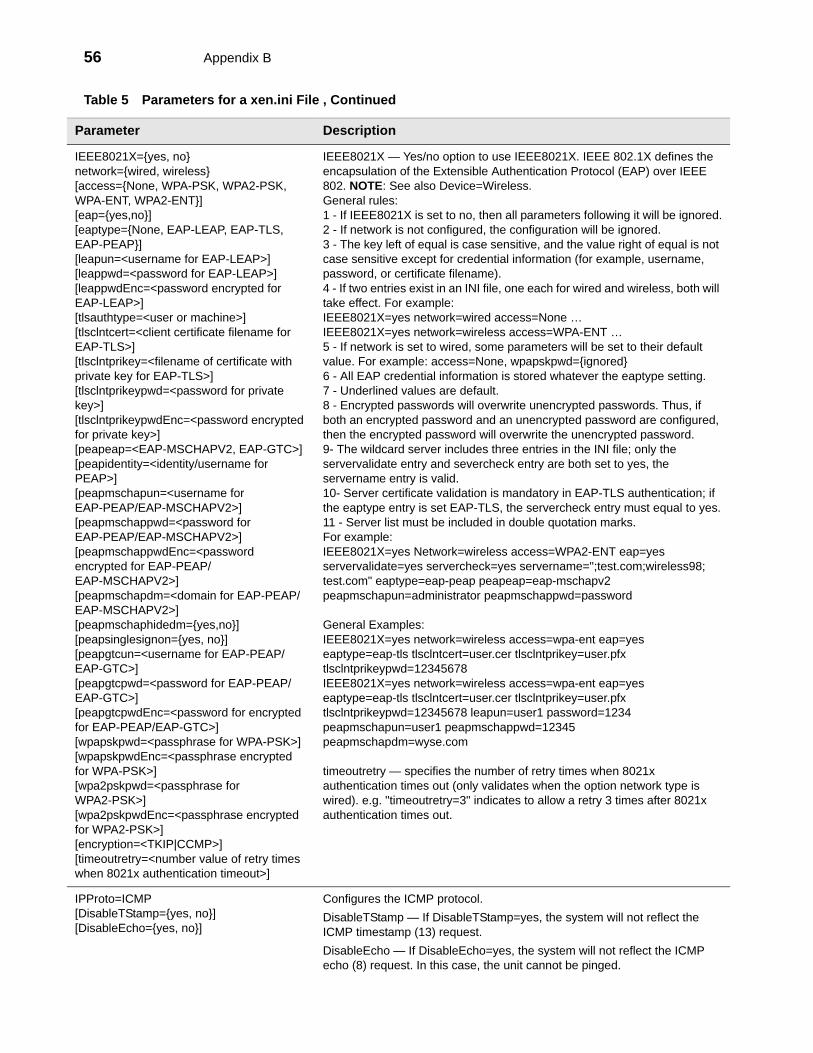
56 Appendix B
IEEE8021X={yes, no}network={wired, wireless}[access={None, WPA-PSK, WPA2-PSK, WPA-ENT, WPA2-ENT}][eap={yes,no}][eaptype={None, EAP-LEAP, EAP-TLS, EAP-PEAP}][leapun=<username for EAP-LEAP>][leappwd=<password for EAP-LEAP>][leappwdEnc=<password encrypted for EAP-LEAP>][tlsauthtype=<user or machine>][tlsclntcert=<client certificate filename for EAP-TLS>][tlsclntprikey=<filename of certificate with private key for EAP-TLS>][tlsclntprikeypwd=<password for private key>][tlsclntprikeypwdEnc=<password encrypted for private key>][peapeap=<EAP-MSCHAPV2, EAP-GTC>][peapidentity=<identity/username for PEAP>][peapmschapun=<username for EAP-PEAP/EAP-MSCHAPV2>][peapmschappwd=<password for EAP-PEAP/EAP-MSCHAPV2>][peapmschappwdEnc=<password encrypted for EAP-PEAP/EAP-MSCHAPV2>][peapmschapdm=<domain for EAP-PEAP/EAP-MSCHAPV2>][peapmschaphidedm={yes,no}][peapsinglesignon={yes, no}][peapgtcun=<username for EAP-PEAP/EAP-GTC>][peapgtcpwd=<password for EAP-PEAP/EAP-GTC>][peapgtcpwdEnc=<password for encrypted for EAP-PEAP/EAP-GTC>][wpapskpwd=<passphrase for WPA-PSK>][wpapskpwdEnc=<passphrase encrypted for WPA-PSK>][wpa2pskpwd=<passphrase for WPA2-PSK>][wpa2pskpwdEnc=<passphrase encrypted for WPA2-PSK>][encryption=<TKIP|CCMP>][timeoutretry=<number value of retry times when 8021x authentication timeout>]
IEEE8021X — Yes/no option to use IEEE8021X. IEEE 802.1X defines the encapsulation of the Extensible Authentication Protocol (EAP) over IEEE 802. NOTE: See also Device=Wireless.General rules:1 - If IEEE8021X is set to no, then all parameters following it will be ignored.2 - If network is not configured, the configuration will be ignored.3 - The key left of equal is case sensitive, and the value right of equal is not case sensitive except for credential information (for example, username, password, or certificate filename).4 - If two entries exist in an INI file, one each for wired and wireless, both will take effect. For example:IEEE8021X=yes network=wired access=None …IEEE8021X=yes network=wireless access=WPA-ENT …5 - If network is set to wired, some parameters will be set to their default value. For example: access=None, wpapskpwd={ignored}6 - All EAP credential information is stored whatever the eaptype setting.7 - Underlined values are default.8 - Encrypted passwords will overwrite unencrypted passwords. Thus, if both an encrypted password and an unencrypted password are configured, then the encrypted password will overwrite the unencrypted password.9- The wildcard server includes three entries in the INI file; only the servervalidate entry and severcheck entry are both set to yes, the servername entry is valid. 10- Server certificate validation is mandatory in EAP-TLS authentication; if the eaptype entry is set EAP-TLS, the servercheck entry must equal to yes.11 - Server list must be included in double quotation marks.For example: IEEE8021X=yes Network=wireless access=WPA2-ENT eap=yes servervalidate=yes servercheck=yes servername=";test.com;wireless98; test.com" eaptype=eap-peap peapeap=eap-mschapv2 peapmschapun=administrator peapmschappwd=password
General Examples:IEEE8021X=yes network=wireless access=wpa-ent eap=yes eaptype=eap-tls tlsclntcert=user.cer tlsclntprikey=user.pfx tlsclntprikeypwd=12345678 IEEE8021X=yes network=wireless access=wpa-ent eap=yes eaptype=eap-tls tlsclntcert=user.cer tlsclntprikey=user.pfx tlsclntprikeypwd=12345678 leapun=user1 password=1234 peapmschapun=user1 peapmschappwd=12345 peapmschapdm=wyse.com
timeoutretry — specifies the number of retry times when 8021x authentication times out (only validates when the option network type is wired). e.g. "timeoutretry=3" indicates to allow a retry 3 times after 8021x authentication times out.
IPProto=ICMP[DisableTStamp={yes, no}] [DisableEcho={yes, no}]
Configures the ICMP protocol. DisableTStamp — If DisableTStamp=yes, the system will not reflect the ICMP timestamp (13) request. DisableEcho — If DisableEcho=yes, the system will not reflect the ICMP echo (8) request. In this case, the unit cannot be pinged.
Table 5 Parameters for a xen.ini File , Continued
Parameter Description
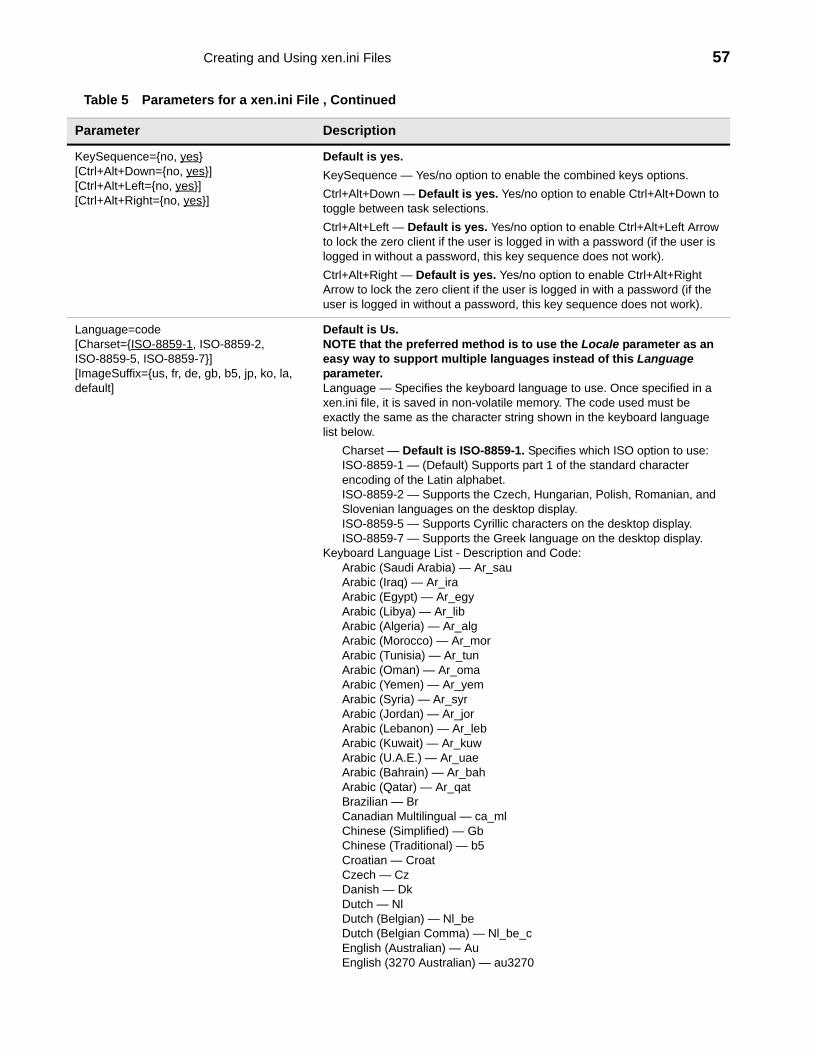
Creating and Using xen.ini Files 57
KeySequence={no, yes}[Ctrl+Alt+Down={no, yes}][Ctrl+Alt+Left={no, yes}][Ctrl+Alt+Right={no, yes}]
Default is yes.KeySequence — Yes/no option to enable the combined keys options.Ctrl+Alt+Down — Default is yes. Yes/no option to enable Ctrl+Alt+Down to toggle between task selections.Ctrl+Alt+Left — Default is yes. Yes/no option to enable Ctrl+Alt+Left Arrow to lock the zero client if the user is logged in with a password (if the user is logged in without a password, this key sequence does not work).Ctrl+Alt+Right — Default is yes. Yes/no option to enable Ctrl+Alt+Right Arrow to lock the zero client if the user is logged in with a password (if the user is logged in without a password, this key sequence does not work).
Language=code[Charset={ISO-8859-1, ISO-8859-2, ISO-8859-5, ISO-8859-7}][ImageSuffix={us, fr, de, gb, b5, jp, ko, la, default]
Default is Us. NOTE that the preferred method is to use the Locale parameter as an easy way to support multiple languages instead of this Language parameter.Language — Specifies the keyboard language to use. Once specified in a xen.ini file, it is saved in non-volatile memory. The code used must be exactly the same as the character string shown in the keyboard language list below.
Charset — Default is ISO-8859-1. Specifies which ISO option to use: ISO-8859-1 — (Default) Supports part 1 of the standard character encoding of the Latin alphabet. ISO-8859-2 — Supports the Czech, Hungarian, Polish, Romanian, and Slovenian languages on the desktop display. ISO-8859-5 — Supports Cyrillic characters on the desktop display. ISO-8859-7 — Supports the Greek language on the desktop display.
Keyboard Language List - Description and Code:Arabic (Saudi Arabia) — Ar_sauArabic (Iraq) — Ar_iraArabic (Egypt) — Ar_egyArabic (Libya) — Ar_libArabic (Algeria) — Ar_algArabic (Morocco) — Ar_morArabic (Tunisia) — Ar_tunArabic (Oman) — Ar_omaArabic (Yemen) — Ar_yemArabic (Syria) — Ar_syrArabic (Jordan) — Ar_jorArabic (Lebanon) — Ar_lebArabic (Kuwait) — Ar_kuwArabic (U.A.E.) — Ar_uaeArabic (Bahrain) — Ar_bahArabic (Qatar) — Ar_qatBrazilian — BrCanadian Multilingual — ca_mlChinese (Simplified) — GbChinese (Traditional) — b5Croatian — CroatCzech — CzDanish — DkDutch — NlDutch (Belgian) — Nl_beDutch (Belgian Comma) — Nl_be_cEnglish (Australian) — AuEnglish (3270 Australian) — au3270
Table 5 Parameters for a xen.ini File , Continued
Parameter Description
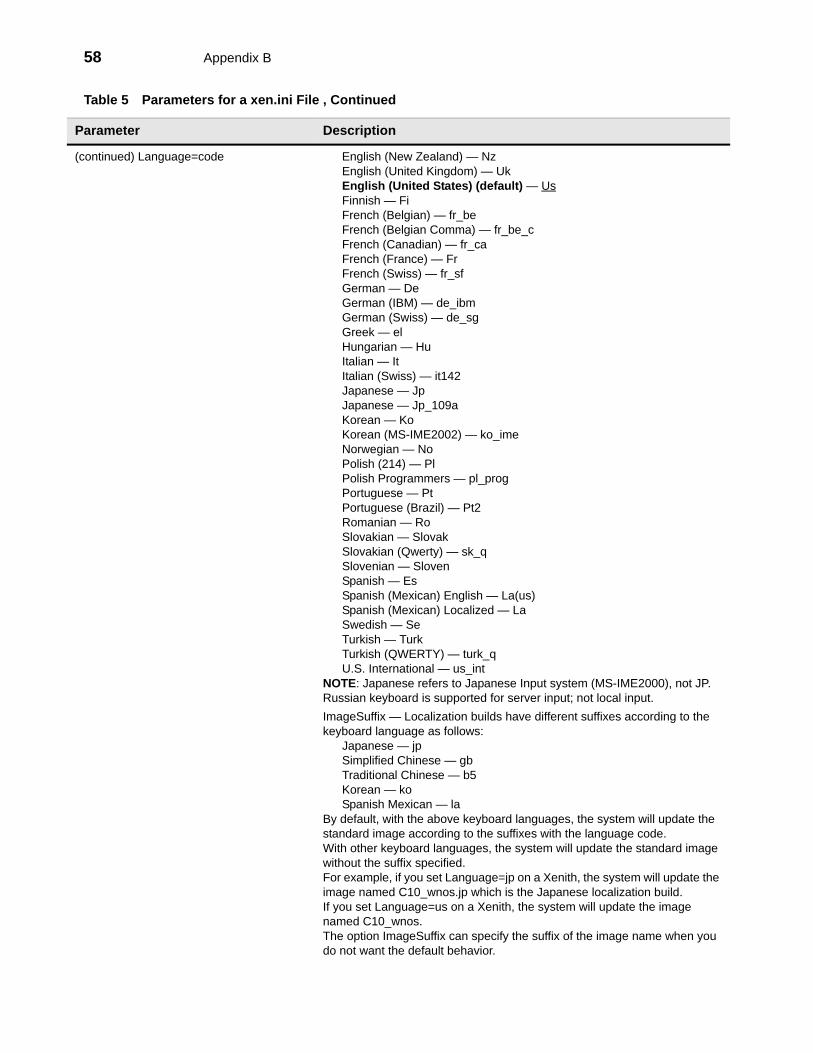
58 Appendix B
(continued) Language=code English (New Zealand) — NzEnglish (United Kingdom) — UkEnglish (United States) (default) — UsFinnish — FiFrench (Belgian) — fr_beFrench (Belgian Comma) — fr_be_cFrench (Canadian) — fr_caFrench (France) — FrFrench (Swiss) — fr_sfGerman — DeGerman (IBM) — de_ibmGerman (Swiss) — de_sgGreek — elHungarian — HuItalian — ItItalian (Swiss) — it142Japanese — JpJapanese — Jp_109aKorean — KoKorean (MS-IME2002) — ko_imeNorwegian — NoPolish (214) — PlPolish Programmers — pl_progPortuguese — PtPortuguese (Brazil) — Pt2Romanian — RoSlovakian — SlovakSlovakian (Qwerty) — sk_qSlovenian — SlovenSpanish — EsSpanish (Mexican) English — La(us)Spanish (Mexican) Localized — LaSwedish — SeTurkish — TurkTurkish (QWERTY) — turk_qU.S. International — us_int
NOTE: Japanese refers to Japanese Input system (MS-IME2000), not JP. Russian keyboard is supported for server input; not local input.ImageSuffix — Localization builds have different suffixes according to the keyboard language as follows:
Japanese — jpSimplified Chinese — gbTraditional Chinese — b5Korean — koSpanish Mexican — la
By default, with the above keyboard languages, the system will update the standard image according to the suffixes with the language code.With other keyboard languages, the system will update the standard image without the suffix specified.For example, if you set Language=jp on a Xenith, the system will update the image named C10_wnos.jp which is the Japanese localization build.If you set Language=us on a Xenith, the system will update the image named C10_wnos.The option ImageSuffix can specify the suffix of the image name when you do not want the default behavior.
Table 5 Parameters for a xen.ini File , Continued
Parameter Description
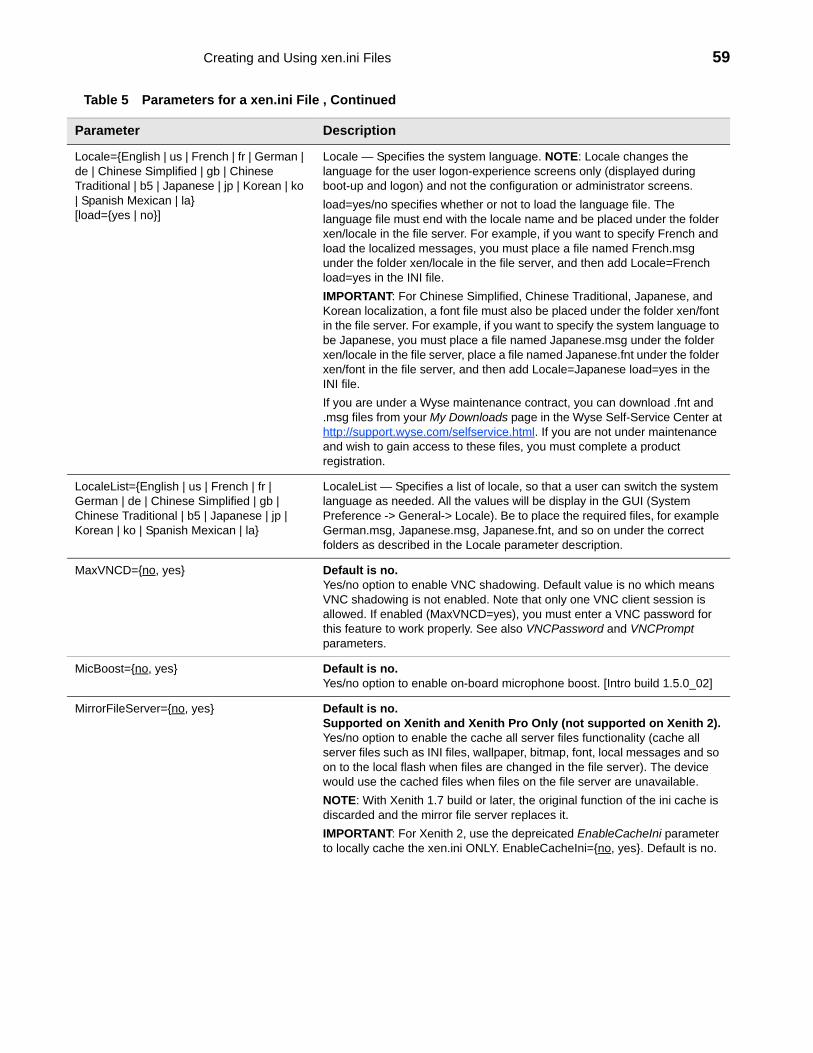
Creating and Using xen.ini Files 59
Locale={English | us | French | fr | German | de | Chinese Simplified | gb | Chinese Traditional | b5 | Japanese | jp | Korean | ko | Spanish Mexican | la} [load={yes | no}]
Locale — Specifies the system language. NOTE: Locale changes the language for the user logon-experience screens only (displayed during boot-up and logon) and not the configuration or administrator screens.load=yes/no specifies whether or not to load the language file. The language file must end with the locale name and be placed under the folder xen/locale in the file server. For example, if you want to specify French and load the localized messages, you must place a file named French.msg under the folder xen/locale in the file server, and then add Locale=French load=yes in the INI file.IMPORTANT: For Chinese Simplified, Chinese Traditional, Japanese, and Korean localization, a font file must also be placed under the folder xen/font in the file server. For example, if you want to specify the system language to be Japanese, you must place a file named Japanese.msg under the folder xen/locale in the file server, place a file named Japanese.fnt under the folder xen/font in the file server, and then add Locale=Japanese load=yes in the INI file.If you are under a Wyse maintenance contract, you can download .fnt and .msg files from your My Downloads page in the Wyse Self-Service Center at http://support.wyse.com/selfservice.html. If you are not under maintenance and wish to gain access to these files, you must complete a product registration.
LocaleList={English | us | French | fr | German | de | Chinese Simplified | gb | Chinese Traditional | b5 | Japanese | jp | Korean | ko | Spanish Mexican | la}
LocaleList — Specifies a list of locale, so that a user can switch the system language as needed. All the values will be display in the GUI (System Preference -> General-> Locale). Be to place the required files, for example German.msg, Japanese.msg, Japanese.fnt, and so on under the correct folders as described in the Locale parameter description.
MaxVNCD={no, yes} Default is no.Yes/no option to enable VNC shadowing. Default value is no which means VNC shadowing is not enabled. Note that only one VNC client session is allowed. If enabled (MaxVNCD=yes), you must enter a VNC password for this feature to work properly. See also VNCPassword and VNCPrompt parameters.
MicBoost={no, yes} Default is no.Yes/no option to enable on-board microphone boost. [Intro build 1.5.0_02]
MirrorFileServer={no, yes} Default is no. Supported on Xenith and Xenith Pro Only (not supported on Xenith 2).Yes/no option to enable the cache all server files functionality (cache all server files such as INI files, wallpaper, bitmap, font, local messages and so on to the local flash when files are changed in the file server). The device would use the cached files when files on the file server are unavailable. NOTE: With Xenith 1.7 build or later, the original function of the ini cache is discarded and the mirror file server replaces it.IMPORTANT: For Xenith 2, use the depreicated EnableCacheIni parameter to locally cache the xen.ini ONLY. EnableCacheIni={no, yes}. Default is no.
Table 5 Parameters for a xen.ini File , Continued
Parameter Description

60 Appendix B
NoReducer={no, yes}[Encryption={Basic, 40, 56, 128, Login-128, None}]
Default is no.NoReducer — Yes/no option to turn off compression. Default is no, which enables compression. To turn off compression, enter yes.Used here this parameter is a global statement for all connections. It sets the default value of NoReducer.NOTE: By default the ICA protocol compresses its data to minimize the amount of data that needs to traverse the network. This compression can be as much as 50% for text-based applications (such as Microsoft Word) and 40% less for graphics applications than the uncompressed data streams.Encryption — (ICA Only) Default is Basic. Specifies the default setting of encryption level for all ICA connections. The highest level is 128-bit security. The lowest is Basic.
PasswordServer=<password_server> [AccountSelfService={no, yes}] [connect=<ica sever>] [encryption={Basic, 40, 56, 128, Login-128, None}]
PasswordServer — (ICA Only) Specifies the IP Address of the password server (which can be defined as an Account Self Service server (AccountSelfService=yes) or a direct connection (connect=) - if no option is specified, it will connect with the ICA protocol).AccountSelfService — Default is no. Yes/no option to define the password server as an Account Self Service server. AccountSelfService=yes also displays the Account Self-Service icon on the Log on dialog box. If AccountSelfService=yes option follows the PasswordServer parameter, the password server specified will be defined as the account self-service server and the connect option will be invalid.connect — Defines the password server as a direct connection to an ICA server that can be logged on to modify a password for a user sign-on with a password timeout. An encryption option can also be set for this direct connection. [Intro build 1.5.0_01]
PlatformConfig=all[EncryptFS=yes] [ECFirmware={EC filename}]
Supported on Xenith and Xenith Pro Only (not supported on Xenith 2).Encrypts local flash, specifically cached INI files and credentials that are stored (if using signon=yes).NOTE: Event log will display new statements stating that FileSystem encryption has been enabled. ECFirmware is only used for Xenith 2 to update EC firmware, it is not supported on other platforms.
Table 5 Parameters for a xen.ini File , Continued
Parameter Description
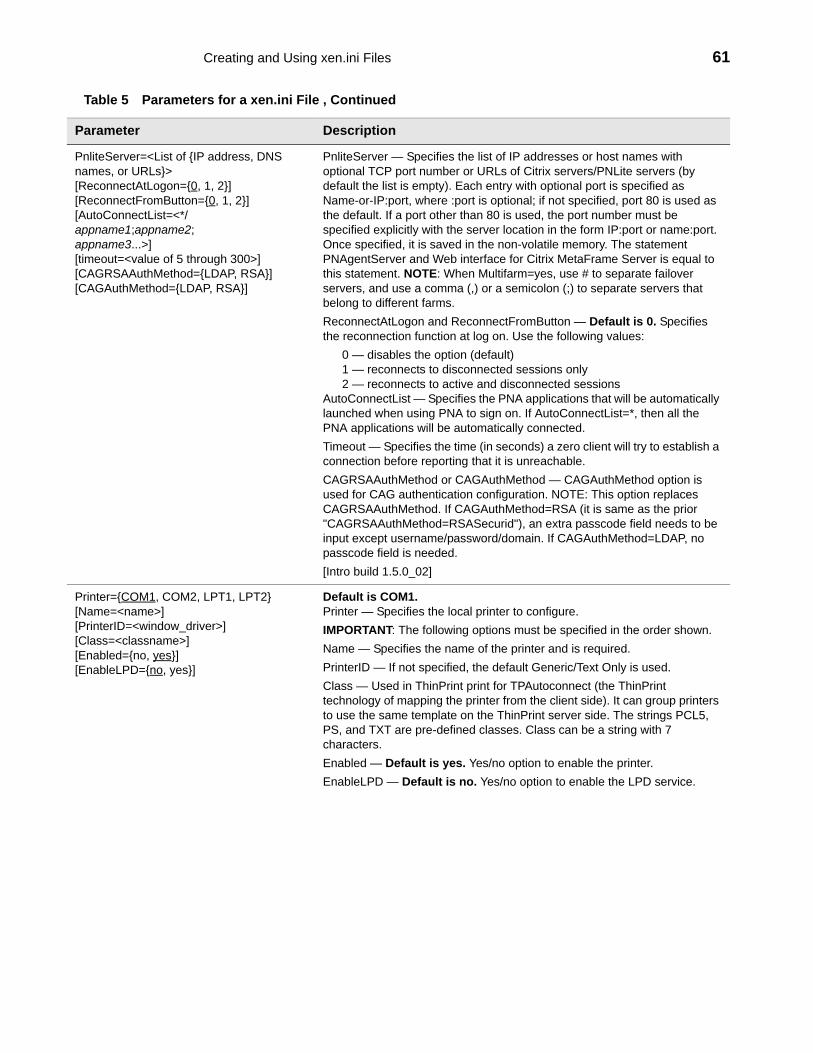
Creating and Using xen.ini Files 61
PnliteServer=<List of {IP address, DNS names, or URLs}> [ReconnectAtLogon={0, 1, 2}][ReconnectFromButton={0, 1, 2}][AutoConnectList=<*/appname1;appname2; appname3...>][timeout=<value of 5 through 300>][CAGRSAAuthMethod={LDAP, RSA}][CAGAuthMethod={LDAP, RSA}]
PnliteServer — Specifies the list of IP addresses or host names with optional TCP port number or URLs of Citrix servers/PNLite servers (by default the list is empty). Each entry with optional port is specified as Name-or-IP:port, where :port is optional; if not specified, port 80 is used as the default. If a port other than 80 is used, the port number must be specified explicitly with the server location in the form IP:port or name:port. Once specified, it is saved in the non-volatile memory. The statement PNAgentServer and Web interface for Citrix MetaFrame Server is equal to this statement. NOTE: When Multifarm=yes, use # to separate failover servers, and use a comma (,) or a semicolon (;) to separate servers that belong to different farms.ReconnectAtLogon and ReconnectFromButton — Default is 0. Specifies the reconnection function at log on. Use the following values:
0 — disables the option (default) 1 — reconnects to disconnected sessions only2 — reconnects to active and disconnected sessions
AutoConnectList — Specifies the PNA applications that will be automatically launched when using PNA to sign on. If AutoConnectList=*, then all the PNA applications will be automatically connected.Timeout — Specifies the time (in seconds) a zero client will try to establish a connection before reporting that it is unreachable. CAGRSAAuthMethod or CAGAuthMethod — CAGAuthMethod option is used for CAG authentication configuration. NOTE: This option replaces CAGRSAAuthMethod. If CAGAuthMethod=RSA (it is same as the prior "CAGRSAAuthMethod=RSASecurid"), an extra passcode field needs to be input except username/password/domain. If CAGAuthMethod=LDAP, no passcode field is needed.[Intro build 1.5.0_02]
Printer={COM1, COM2, LPT1, LPT2} [Name=<name>] [PrinterID=<window_driver>] [Class=<classname>][Enabled={no, yes}] [EnableLPD={no, yes}]
Default is COM1.Printer — Specifies the local printer to configure. IMPORTANT: The following options must be specified in the order shown.Name — Specifies the name of the printer and is required. PrinterID — If not specified, the default Generic/Text Only is used.Class — Used in ThinPrint print for TPAutoconnect (the ThinPrint technology of mapping the printer from the client side). It can group printers to use the same template on the ThinPrint server side. The strings PCL5, PS, and TXT are pre-defined classes. Class can be a string with 7 characters.Enabled — Default is yes. Yes/no option to enable the printer.EnableLPD — Default is no. Yes/no option to enable the LPD service.
Table 5 Parameters for a xen.ini File , Continued
Parameter Description
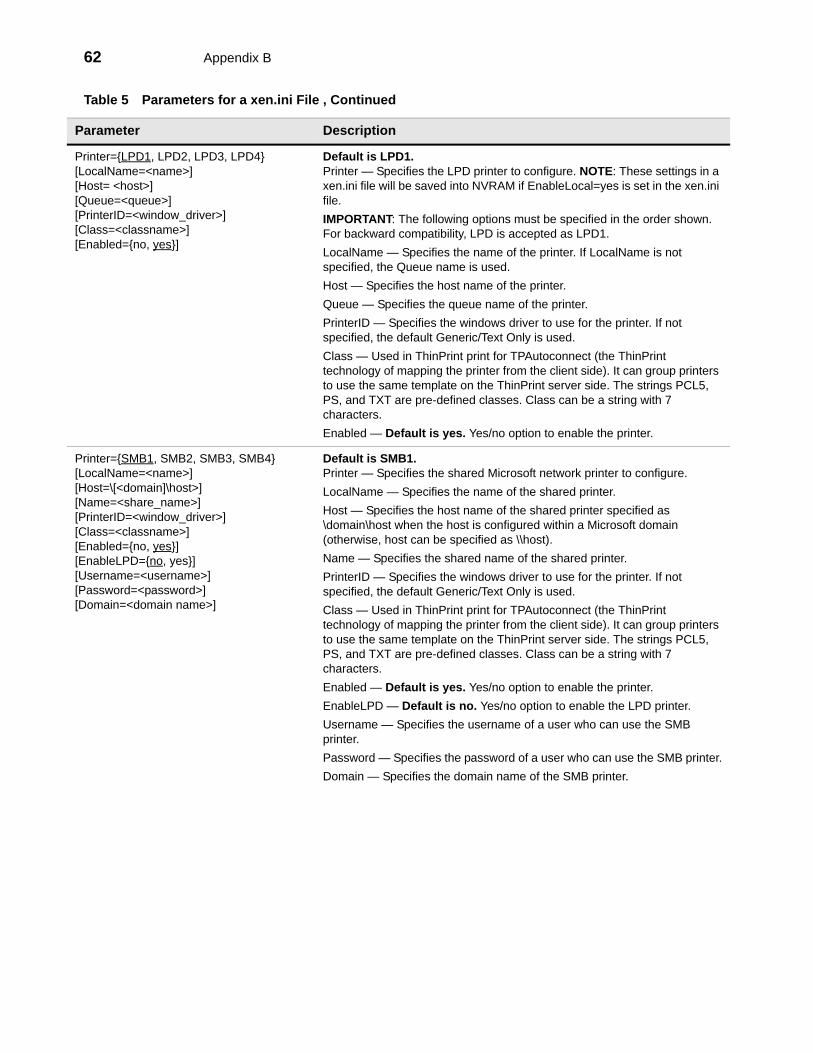
62 Appendix B
Printer={LPD1, LPD2, LPD3, LPD4} [LocalName=<name>][Host= <host>][Queue=<queue>][PrinterID=<window_driver>][Class=<classname>][Enabled={no, yes}]
Default is LPD1.Printer — Specifies the LPD printer to configure. NOTE: These settings in a xen.ini file will be saved into NVRAM if EnableLocal=yes is set in the xen.ini file.IMPORTANT: The following options must be specified in the order shown. For backward compatibility, LPD is accepted as LPD1.LocalName — Specifies the name of the printer. If LocalName is not specified, the Queue name is used. Host — Specifies the host name of the printer.Queue — Specifies the queue name of the printer.PrinterID — Specifies the windows driver to use for the printer. If not specified, the default Generic/Text Only is used.Class — Used in ThinPrint print for TPAutoconnect (the ThinPrint technology of mapping the printer from the client side). It can group printers to use the same template on the ThinPrint server side. The strings PCL5, PS, and TXT are pre-defined classes. Class can be a string with 7 characters.Enabled — Default is yes. Yes/no option to enable the printer.
Printer={SMB1, SMB2, SMB3, SMB4}[LocalName=<name>][Host=\[<domain]\host>][Name=<share_name>] [PrinterID=<window_driver>][Class=<classname>][Enabled={no, yes}][EnableLPD={no, yes}][Username=<username>][Password=<password>][Domain=<domain name>]
Default is SMB1.Printer — Specifies the shared Microsoft network printer to configure. LocalName — Specifies the name of the shared printer.Host — Specifies the host name of the shared printer specified as \domain\host when the host is configured within a Microsoft domain (otherwise, host can be specified as \\host).Name — Specifies the shared name of the shared printer.PrinterID — Specifies the windows driver to use for the printer. If not specified, the default Generic/Text Only is used.Class — Used in ThinPrint print for TPAutoconnect (the ThinPrint technology of mapping the printer from the client side). It can group printers to use the same template on the ThinPrint server side. The strings PCL5, PS, and TXT are pre-defined classes. Class can be a string with 7 characters.Enabled — Default is yes. Yes/no option to enable the printer.EnableLPD — Default is no. Yes/no option to enable the LPD printer.Username — Specifies the username of a user who can use the SMB printer. Password — Specifies the password of a user who can use the SMB printer.Domain — Specifies the domain name of the SMB printer.
Table 5 Parameters for a xen.ini File , Continued
Parameter Description
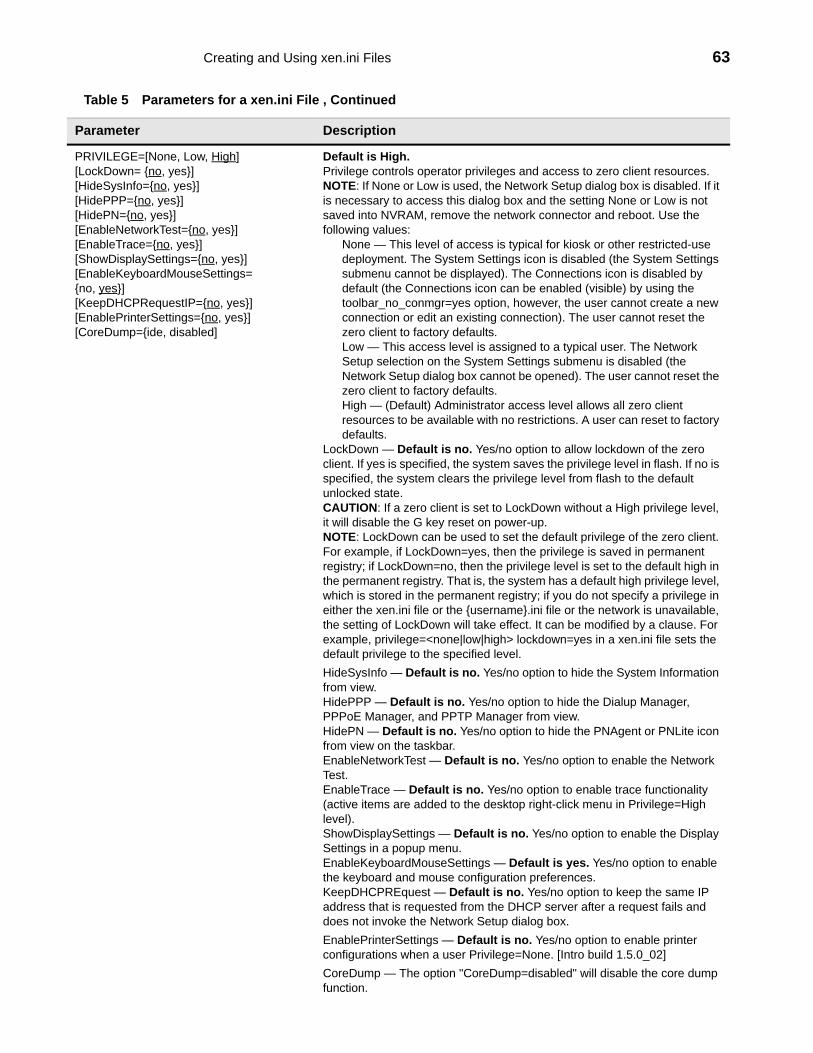
Creating and Using xen.ini Files 63
PRIVILEGE=[None, Low, High] [LockDown= {no, yes}] [HideSysInfo={no, yes}] [HidePPP={no, yes}] [HidePN={no, yes}] [EnableNetworkTest={no, yes}][EnableTrace={no, yes}][ShowDisplaySettings={no, yes}][EnableKeyboardMouseSettings= {no, yes}][KeepDHCPRequestIP={no, yes}][EnablePrinterSettings={no, yes}][CoreDump={ide, disabled]
Default is High.Privilege controls operator privileges and access to zero client resources. NOTE: If None or Low is used, the Network Setup dialog box is disabled. If it is necessary to access this dialog box and the setting None or Low is not saved into NVRAM, remove the network connector and reboot. Use the following values:
None — This level of access is typical for kiosk or other restricted-use deployment. The System Settings icon is disabled (the System Settings submenu cannot be displayed). The Connections icon is disabled by default (the Connections icon can be enabled (visible) by using the toolbar_no_conmgr=yes option, however, the user cannot create a new connection or edit an existing connection). The user cannot reset the zero client to factory defaults. Low — This access level is assigned to a typical user. The Network Setup selection on the System Settings submenu is disabled (the Network Setup dialog box cannot be opened). The user cannot reset the zero client to factory defaults. High — (Default) Administrator access level allows all zero client resources to be available with no restrictions. A user can reset to factory defaults.
LockDown — Default is no. Yes/no option to allow lockdown of the zero client. If yes is specified, the system saves the privilege level in flash. If no is specified, the system clears the privilege level from flash to the default unlocked state. CAUTION: If a zero client is set to LockDown without a High privilege level, it will disable the G key reset on power-up. NOTE: LockDown can be used to set the default privilege of the zero client. For example, if LockDown=yes, then the privilege is saved in permanent registry; if LockDown=no, then the privilege level is set to the default high in the permanent registry. That is, the system has a default high privilege level, which is stored in the permanent registry; if you do not specify a privilege in either the xen.ini file or the {username}.ini file or the network is unavailable, the setting of LockDown will take effect. It can be modified by a clause. For example, privilege=<none|low|high> lockdown=yes in a xen.ini file sets the default privilege to the specified level. HideSysInfo — Default is no. Yes/no option to hide the System Information from view. HidePPP — Default is no. Yes/no option to hide the Dialup Manager, PPPoE Manager, and PPTP Manager from view. HidePN — Default is no. Yes/no option to hide the PNAgent or PNLite icon from view on the taskbar. EnableNetworkTest — Default is no. Yes/no option to enable the Network Test. EnableTrace — Default is no. Yes/no option to enable trace functionality (active items are added to the desktop right-click menu in Privilege=High level). ShowDisplaySettings — Default is no. Yes/no option to enable the Display Settings in a popup menu. EnableKeyboardMouseSettings — Default is yes. Yes/no option to enable the keyboard and mouse configuration preferences. KeepDHCPREquest — Default is no. Yes/no option to keep the same IP address that is requested from the DHCP server after a request fails and does not invoke the Network Setup dialog box.EnablePrinterSettings — Default is no. Yes/no option to enable printer configurations when a user Privilege=None. [Intro build 1.5.0_02]CoreDump — The option "CoreDump=disabled" will disable the core dump function.
Table 5 Parameters for a xen.ini File , Continued
Parameter Description
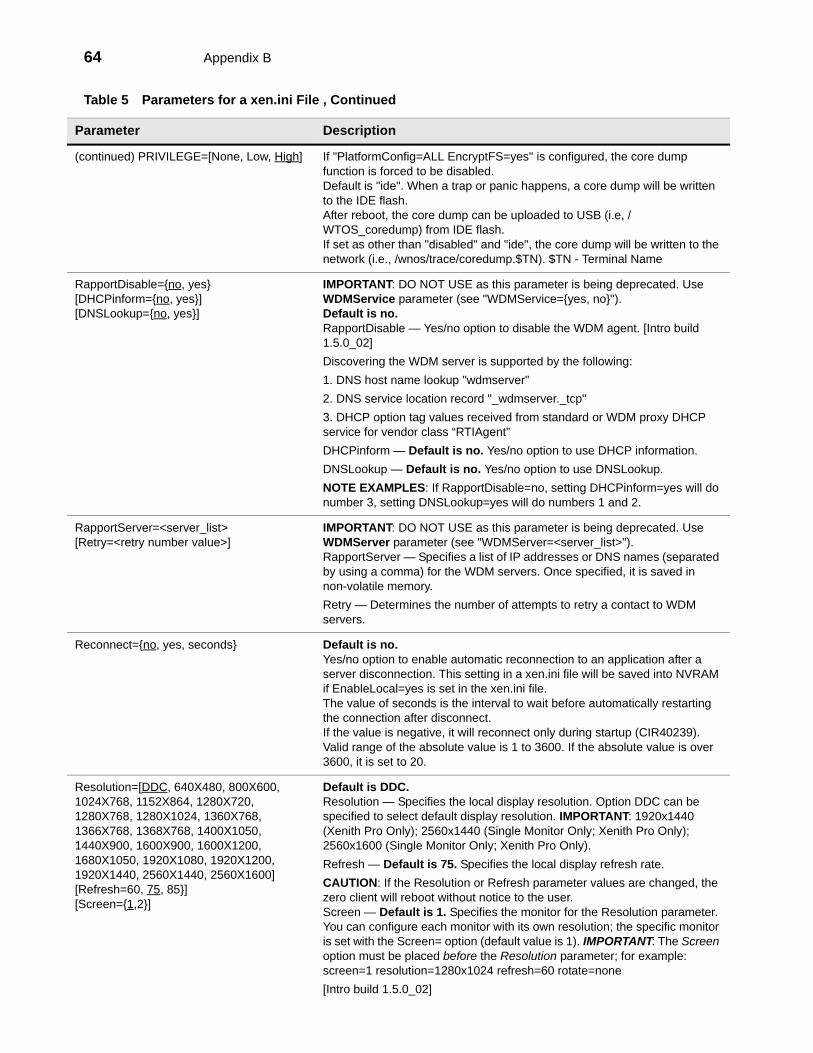
64 Appendix B
(continued) PRIVILEGE=[None, Low, High] If "PlatformConfig=ALL EncryptFS=yes" is configured, the core dump function is forced to be disabled. Default is "ide". When a trap or panic happens, a core dump will be written to the IDE flash.After reboot, the core dump can be uploaded to USB (i.e, /WTOS_coredump) from IDE flash.If set as other than "disabled" and "ide", the core dump will be written to the network (i.e., /wnos/trace/coredump.$TN). $TN - Terminal Name
RapportDisable={no, yes} [DHCPinform={no, yes}] [DNSLookup={no, yes}]
IMPORTANT: DO NOT USE as this parameter is being deprecated. Use WDMService parameter (see "WDMService={yes, no}").Default is no. RapportDisable — Yes/no option to disable the WDM agent. [Intro build 1.5.0_02]Discovering the WDM server is supported by the following:1. DNS host name lookup "wdmserver"2. DNS service location record "_wdmserver._tcp"3. DHCP option tag values received from standard or WDM proxy DHCP service for vendor class “RTIAgent”DHCPinform — Default is no. Yes/no option to use DHCP information. DNSLookup — Default is no. Yes/no option to use DNSLookup. NOTE EXAMPLES: If RapportDisable=no, setting DHCPinform=yes will do number 3, setting DNSLookup=yes will do numbers 1 and 2.
RapportServer=<server_list>[Retry=<retry number value>]
IMPORTANT: DO NOT USE as this parameter is being deprecated. Use WDMServer parameter (see "WDMServer=<server_list>").RapportServer — Specifies a list of IP addresses or DNS names (separated by using a comma) for the WDM servers. Once specified, it is saved in non-volatile memory.Retry — Determines the number of attempts to retry a contact to WDM servers.
Reconnect={no, yes, seconds} Default is no.Yes/no option to enable automatic reconnection to an application after a server disconnection. This setting in a xen.ini file will be saved into NVRAM if EnableLocal=yes is set in the xen.ini file.The value of seconds is the interval to wait before automatically restarting the connection after disconnect.If the value is negative, it will reconnect only during startup (CIR40239).Valid range of the absolute value is 1 to 3600. If the absolute value is over 3600, it is set to 20.
Resolution=[DDC, 640X480, 800X600, 1024X768, 1152X864, 1280X720, 1280X768, 1280X1024, 1360X768, 1366X768, 1368X768, 1400X1050, 1440X900, 1600X900, 1600X1200, 1680X1050, 1920X1080, 1920X1200, 1920X1440, 2560X1440, 2560X1600] [Refresh=60, 75, 85}][Screen={1,2}]
Default is DDC.Resolution — Specifies the local display resolution. Option DDC can be specified to select default display resolution. IMPORTANT: 1920x1440 (Xenith Pro Only); 2560x1440 (Single Monitor Only; Xenith Pro Only); 2560x1600 (Single Monitor Only; Xenith Pro Only).Refresh — Default is 75. Specifies the local display refresh rate.CAUTION: If the Resolution or Refresh parameter values are changed, the zero client will reboot without notice to the user.Screen — Default is 1. Specifies the monitor for the Resolution parameter. You can configure each monitor with its own resolution; the specific monitor is set with the Screen= option (default value is 1). IMPORTANT: The Screen option must be placed before the Resolution parameter; for example: screen=1 resolution=1280x1024 refresh=60 rotate=none [Intro build 1.5.0_02]
Table 5 Parameters for a xen.ini File , Continued
Parameter Description
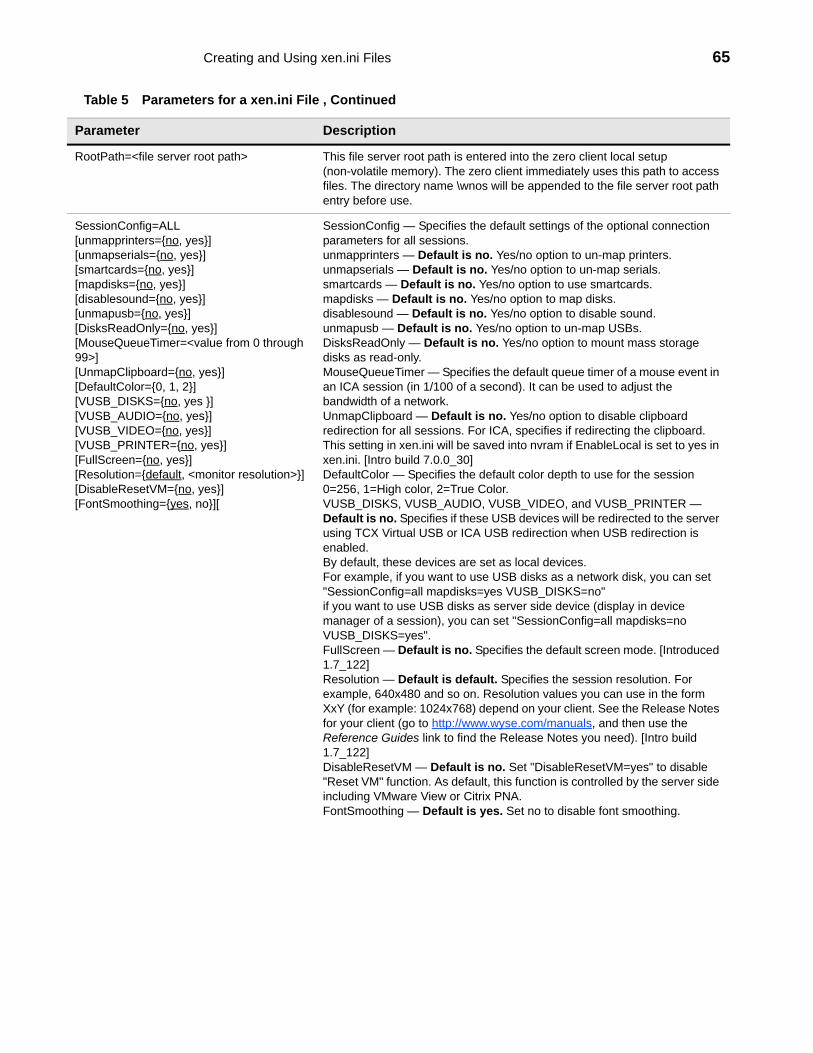
Creating and Using xen.ini Files 65
RootPath=<file server root path> This file server root path is entered into the zero client local setup (non-volatile memory). The zero client immediately uses this path to access files. The directory name \wnos will be appended to the file server root path entry before use.
SessionConfig=ALL[unmapprinters={no, yes}][unmapserials={no, yes}][smartcards={no, yes}][mapdisks={no, yes}][disablesound={no, yes}][unmapusb={no, yes}][DisksReadOnly={no, yes}][MouseQueueTimer=<value from 0 through 99>][UnmapClipboard={no, yes}][DefaultColor={0, 1, 2}][VUSB_DISKS={no, yes }][VUSB_AUDIO={no, yes}][VUSB_VIDEO={no, yes}] [VUSB_PRINTER={no, yes}] [FullScreen={no, yes}][Resolution={default, <monitor resolution>}][DisableResetVM={no, yes}] [FontSmoothing={yes, no}][
SessionConfig — Specifies the default settings of the optional connection parameters for all sessions.unmapprinters — Default is no. Yes/no option to un-map printers.unmapserials — Default is no. Yes/no option to un-map serials.smartcards — Default is no. Yes/no option to use smartcards.mapdisks — Default is no. Yes/no option to map disks.disablesound — Default is no. Yes/no option to disable sound.unmapusb — Default is no. Yes/no option to un-map USBs.DisksReadOnly — Default is no. Yes/no option to mount mass storage disks as read-only.MouseQueueTimer — Specifies the default queue timer of a mouse event in an ICA session (in 1/100 of a second). It can be used to adjust the bandwidth of a network.UnmapClipboard — Default is no. Yes/no option to disable clipboard redirection for all sessions. For ICA, specifies if redirecting the clipboard. This setting in xen.ini will be saved into nvram if EnableLocal is set to yes in xen.ini. [Intro build 7.0.0_30]DefaultColor — Specifies the default color depth to use for the session 0=256, 1=High color, 2=True Color.VUSB_DISKS, VUSB_AUDIO, VUSB_VIDEO, and VUSB_PRINTER — Default is no. Specifies if these USB devices will be redirected to the server using TCX Virtual USB or ICA USB redirection when USB redirection is enabled. By default, these devices are set as local devices.For example, if you want to use USB disks as a network disk, you can set "SessionConfig=all mapdisks=yes VUSB_DISKS=no"if you want to use USB disks as server side device (display in device manager of a session), you can set "SessionConfig=all mapdisks=no VUSB_DISKS=yes".FullScreen — Default is no. Specifies the default screen mode. [Introduced 1.7_122]Resolution — Default is default. Specifies the session resolution. For example, 640x480 and so on. Resolution values you can use in the form XxY (for example: 1024x768) depend on your client. See the Release Notes for your client (go to http://www.wyse.com/manuals, and then use the Reference Guides link to find the Release Notes you need). [Intro build 1.7_122]DisableResetVM — Default is no. Set "DisableResetVM=yes" to disable "Reset VM" function. As default, this function is controlled by the server side including VMware View or Citrix PNA.FontSmoothing — Default is yes. Set no to disable font smoothing.
Table 5 Parameters for a xen.ini File , Continued
Parameter Description
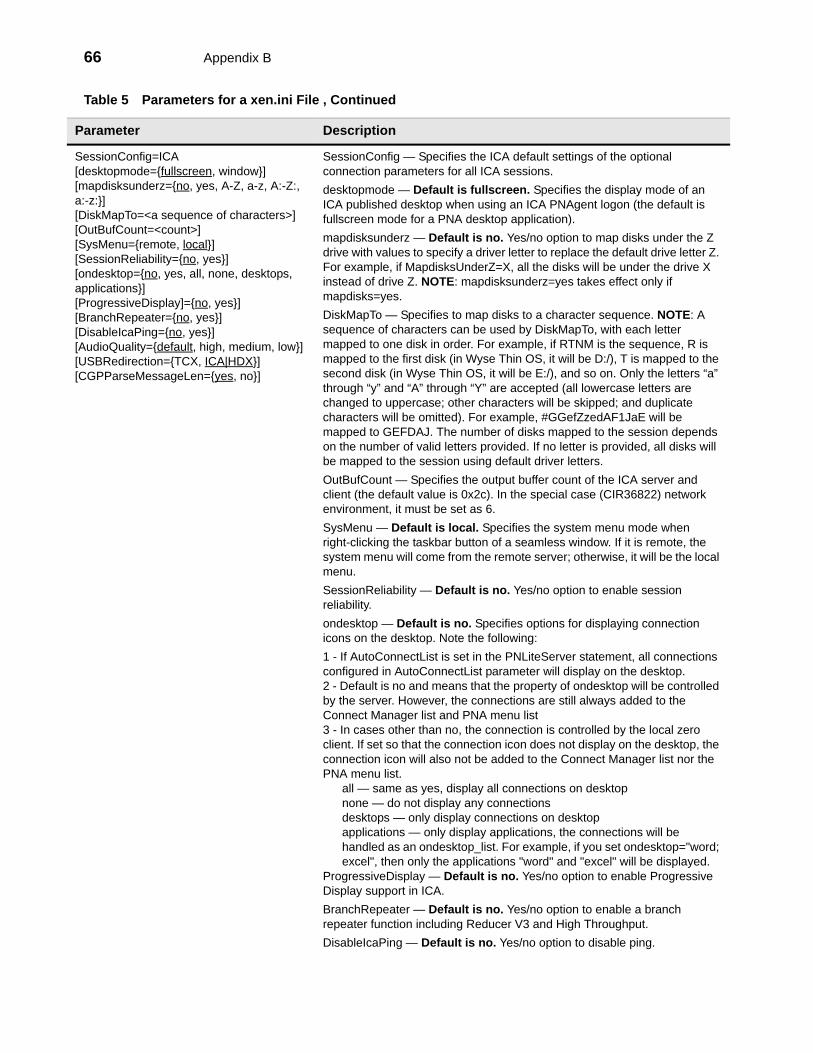
66 Appendix B
SessionConfig=ICA [desktopmode={fullscreen, window}][mapdisksunderz={no, yes, A-Z, a-z, A:-Z:, a:-z:}][DiskMapTo=<a sequence of characters>][OutBufCount=<count>] [SysMenu={remote, local}] [SessionReliability={no, yes}] [ondesktop={no, yes, all, none, desktops, applications}] [ProgressiveDisplay]={no, yes}][BranchRepeater={no, yes}][DisableIcaPing={no, yes}][AudioQuality={default, high, medium, low}][USBRedirection={TCX, ICA|HDX}][CGPParseMessageLen={yes, no}]
SessionConfig — Specifies the ICA default settings of the optional connection parameters for all ICA sessions.desktopmode — Default is fullscreen. Specifies the display mode of an ICA published desktop when using an ICA PNAgent logon (the default is fullscreen mode for a PNA desktop application).mapdisksunderz — Default is no. Yes/no option to map disks under the Z drive with values to specify a driver letter to replace the default drive letter Z. For example, if MapdisksUnderZ=X, all the disks will be under the drive X instead of drive Z. NOTE: mapdisksunderz=yes takes effect only if mapdisks=yes.DiskMapTo — Specifies to map disks to a character sequence. NOTE: A sequence of characters can be used by DiskMapTo, with each letter mapped to one disk in order. For example, if RTNM is the sequence, R is mapped to the first disk (in Wyse Thin OS, it will be D:/), T is mapped to the second disk (in Wyse Thin OS, it will be E:/), and so on. Only the letters “a” through “y” and “A” through “Y” are accepted (all lowercase letters are changed to uppercase; other characters will be skipped; and duplicate characters will be omitted). For example, #GGefZzedAF1JaE will be mapped to GEFDAJ. The number of disks mapped to the session depends on the number of valid letters provided. If no letter is provided, all disks will be mapped to the session using default driver letters.OutBufCount — Specifies the output buffer count of the ICA server and client (the default value is 0x2c). In the special case (CIR36822) network environment, it must be set as 6.SysMenu — Default is local. Specifies the system menu mode when right-clicking the taskbar button of a seamless window. If it is remote, the system menu will come from the remote server; otherwise, it will be the local menu.SessionReliability — Default is no. Yes/no option to enable session reliability.ondesktop — Default is no. Specifies options for displaying connection icons on the desktop. Note the following:1 - If AutoConnectList is set in the PNLiteServer statement, all connections configured in AutoConnectList parameter will display on the desktop.2 - Default is no and means that the property of ondesktop will be controlled by the server. However, the connections are still always added to the Connect Manager list and PNA menu list3 - In cases other than no, the connection is controlled by the local zero client. If set so that the connection icon does not display on the desktop, the connection icon will also not be added to the Connect Manager list nor the PNA menu list.
all — same as yes, display all connections on desktopnone — do not display any connections desktops — only display connections on desktopapplications — only display applications, the connections will be handled as an ondesktop_list. For example, if you set ondesktop="word; excel", then only the applications "word" and "excel" will be displayed.
ProgressiveDisplay — Default is no. Yes/no option to enable Progressive Display support in ICA. BranchRepeater — Default is no. Yes/no option to enable a branch repeater function including Reducer V3 and High Throughput. DisableIcaPing — Default is no. Yes/no option to disable ping.
Table 5 Parameters for a xen.ini File , Continued
Parameter Description
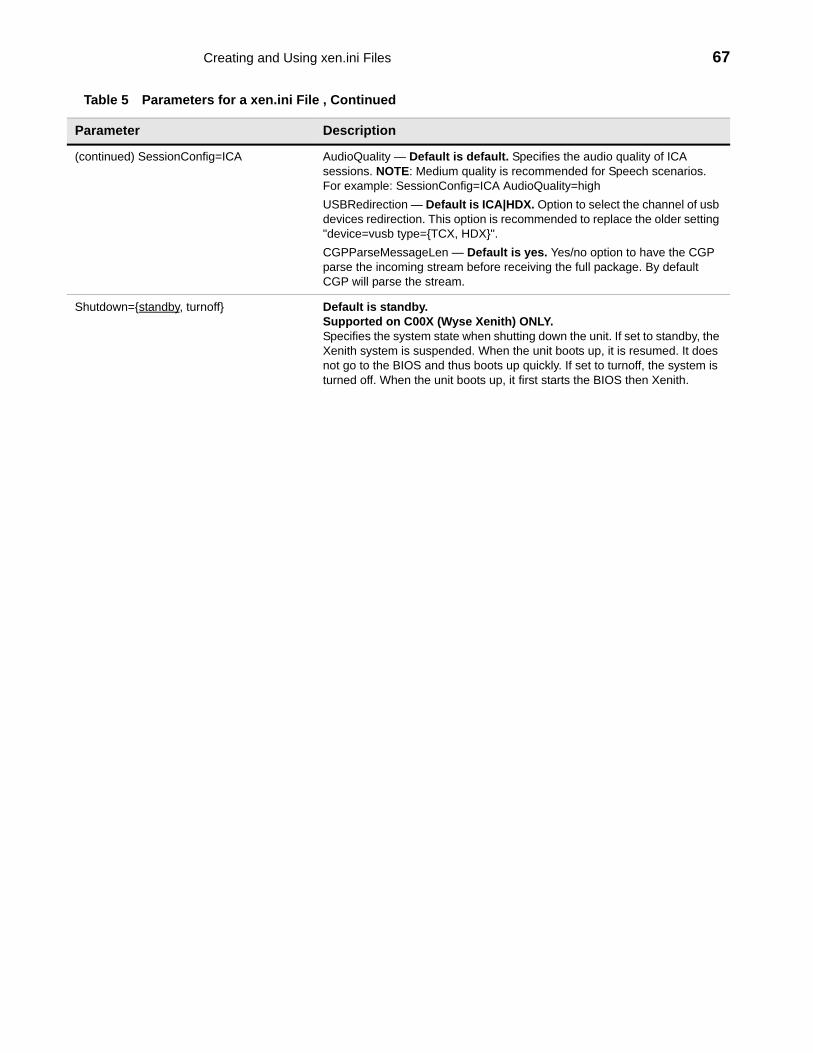
Creating and Using xen.ini Files 67
(continued) SessionConfig=ICA AudioQuality — Default is default. Specifies the audio quality of ICA sessions. NOTE: Medium quality is recommended for Speech scenarios. For example: SessionConfig=ICA AudioQuality=highUSBRedirection — Default is ICA|HDX. Option to select the channel of usb devices redirection. This option is recommended to replace the older setting "device=vusb type={TCX, HDX}".CGPParseMessageLen — Default is yes. Yes/no option to have the CGP parse the incoming stream before receiving the full package. By default CGP will parse the stream.
Shutdown={standby, turnoff} Default is standby.Supported on C00X (Wyse Xenith) ONLY. Specifies the system state when shutting down the unit. If set to standby, the Xenith system is suspended. When the unit boots up, it is resumed. It does not go to the BIOS and thus boots up quickly. If set to turnoff, the system is turned off. When the unit boots up, it first starts the BIOS then Xenith.
Table 5 Parameters for a xen.ini File , Continued
Parameter Description

68 Appendix B
SignOn={yes,no} [MaxConnect=<max value>] [ConnectionManager={maximize, minimize, hide}] [EnableOK={no, yes}] [DisableGuest={no, yes}][DisablePassword={no, yes}][LastUserName={no, yes}][RequireSmartCard={no, yes}] [SCRemovalBehavior= {-1, 0, 1}][SaveLastDomainUser={yes, no, user, domain}][DefaultINI=<filename>][IconGroupStyle=<default folder>][PasswordVariables={yes, no}][LockTerminal={yes, no}][ExpireTime=< value from 0 throgh 480>][UnlockRefresh={yes, no}]
Default is yes.SignOn — Yes/no option to enable the sign-on process. MaxConnect — Default is 216. Maximum number of connections allowed to be specified in the xen.ini file. The range allowed for MaxConnect is 100 to 1000. The default maximum is 216 entries.ConnectionManager — Default is minimize. State of the Connect Manager during sign-on. [Intro build 5.0.006]EnableOK — Default is no. Yes/no option to show the OK and Cancel command buttons in the Sign-on dialog box. [Intro build 5.0.010]DisableGuest — Default is no. Yes/no option to disable the guest sign-on. [Intro build 5.0.010]DisablePassword — Default is no. Yes/no option to disable the password text box and password check box in the Sign-on dialog box. [Intro build 5.0.010]LastUserName — Default is no. Yes/no option to display the last sign-on username after the user logs off. [Intro build 5.0.010]RequireSmartCard — Default is no. Yes/no option to force logon with smartcard. [Intro build 6.4.0]SCRemovalBehavior — Default is 0. Specifies what happens after a smart card is removed. [Intro build 6.5.0_14] Use the following values:
-1 — System keeps working, but cannot communicate further with the server, and the lock terminal option is grayed out.0 — System will log off (default) 1 — System will be locked and can be unlocked only when the same certificate is used with the smart card
SaveLastDomainUser — Specifies to save the username and domain into NVRAM once signon is successful. On next reboot, the username and domain saved in the NVRAM will be displayed in signon server as the default username and domain if no DefaultUser is set in the xen.ini file. The size of username/domain is limited to 32 characters, and if larger than 32, it will first be truncated and then saved into NVRAM. If SaveLastDomainUser=user, only the username will be saved into NVRAM.If SaveLastDomainUser=domain, only the domain name will be saved into NVRAM. (CIR57726)DefaultINI — The optional DefaultINI configures a file name which is in the default folder of the username ini files.If the {username}.ini is not found, this file will be loaded as default. (CIR51869)IconGroupStyle — The optional IconGroupStyle configures the icongroup style on the desktop. PNAgent published applications can be configured with the client folder in the PNA server. If set IconGroupStyle=folder, the PNAgent published applications which are specified to display on the desktop will display with the folder. After clicking the folder icon, the subfolder or applications in this folder will display on the desktop. In this case, there is an Up to 1 Level icon on top. Clicking this icon will display the up one level folder contents. [Intro build 7.0.1_07]PasswordVariables — Default is no. Yes/no option to support variable mapping ($TN, $UN etc) for a password.LockTerminal — Default is yes. Yes/no option to lock the terminal. The default is yes. If set LockTerminal=no, the function of locking terminal will be disabled. It disables the Lock Terminal from a Right Click on the desktop or from clicking the Shutdown option > Lock Terminal. It also disables lock terminal even if set "ScreenSaver=_minutes_ LockTerminal=yes".
Table 5 Parameters for a xen.ini File , Continued
Parameter Description
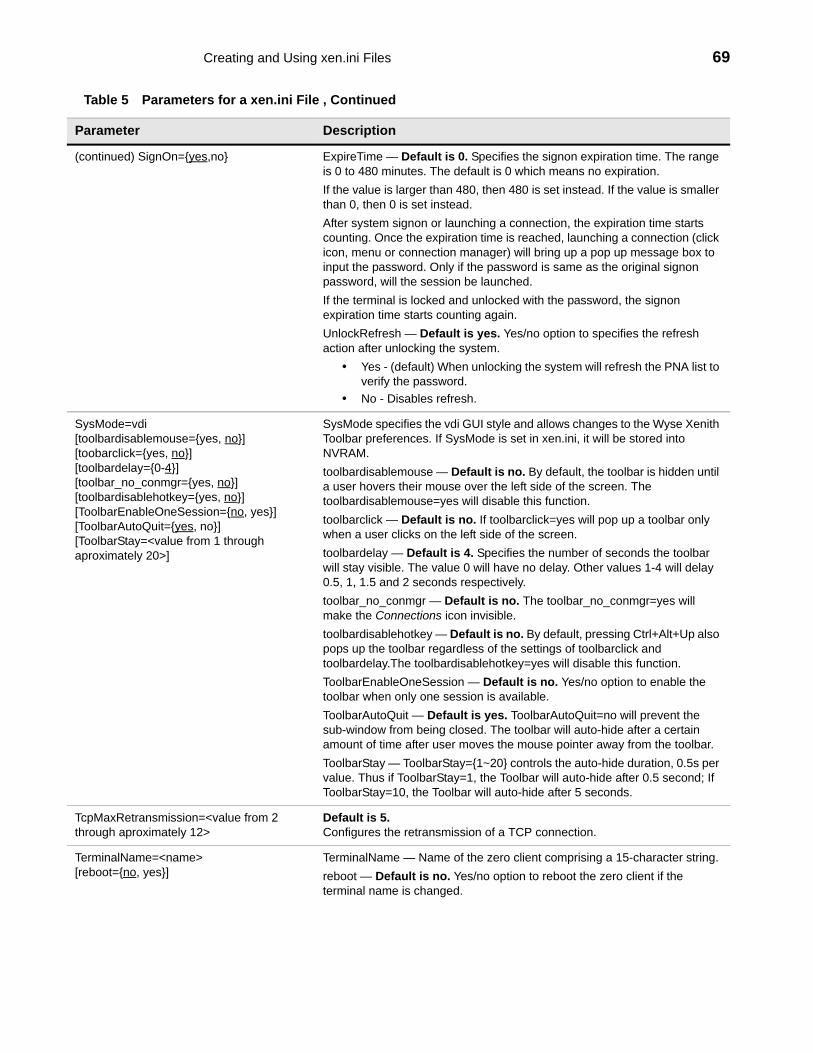
Creating and Using xen.ini Files 69
(continued) SignOn={yes,no} ExpireTime — Default is 0. Specifies the signon expiration time. The range is 0 to 480 minutes. The default is 0 which means no expiration.If the value is larger than 480, then 480 is set instead. If the value is smaller than 0, then 0 is set instead.After system signon or launching a connection, the expiration time starts counting. Once the expiration time is reached, launching a connection (click icon, menu or connection manager) will bring up a pop up message box to input the password. Only if the password is same as the original signon password, will the session be launched.If the terminal is locked and unlocked with the password, the signon expiration time starts counting again.UnlockRefresh — Default is yes. Yes/no option to specifies the refresh action after unlocking the system.
• Yes - (default) When unlocking the system will refresh the PNA list to verify the password.
• No - Disables refresh.
SysMode=vdi[toolbardisablemouse={yes, no}] [toobarclick={yes, no}][toolbardelay={0-4}] [toolbar_no_conmgr={yes, no}] [toolbardisablehotkey={yes, no}][ToolbarEnableOneSession={no, yes}] [ToolbarAutoQuit={yes, no}] [ToolbarStay=<value from 1 through aproximately 20>]
SysMode specifies the vdi GUI style and allows changes to the Wyse Xenith Toolbar preferences. If SysMode is set in xen.ini, it will be stored into NVRAM. toolbardisablemouse — Default is no. By default, the toolbar is hidden until a user hovers their mouse over the left side of the screen. The toolbardisablemouse=yes will disable this function.toolbarclick — Default is no. If toolbarclick=yes will pop up a toolbar only when a user clicks on the left side of the screen.toolbardelay — Default is 4. Specifies the number of seconds the toolbar will stay visible. The value 0 will have no delay. Other values 1-4 will delay 0.5, 1, 1.5 and 2 seconds respectively.toolbar_no_conmgr — Default is no. The toolbar_no_conmgr=yes will make the Connections icon invisible.toolbardisablehotkey — Default is no. By default, pressing Ctrl+Alt+Up also pops up the toolbar regardless of the settings of toolbarclick and toolbardelay.The toolbardisablehotkey=yes will disable this function.ToolbarEnableOneSession — Default is no. Yes/no option to enable the toolbar when only one session is available.ToolbarAutoQuit — Default is yes. ToolbarAutoQuit=no will prevent the sub-window from being closed. The toolbar will auto-hide after a certain amount of time after user moves the mouse pointer away from the toolbar.ToolbarStay — ToolbarStay={1~20} controls the auto-hide duration, 0.5s per value. Thus if ToolbarStay=1, the Toolbar will auto-hide after 0.5 second; If ToolbarStay=10, the Toolbar will auto-hide after 5 seconds.
TcpMaxRetransmission=<value from 2 through aproximately 12>
Default is 5.Configures the retransmission of a TCP connection.
TerminalName=<name>[reboot={no, yes}]
TerminalName — Name of the zero client comprising a 15-character string.reboot — Default is no. Yes/no option to reboot the zero client if the terminal name is changed.
Table 5 Parameters for a xen.ini File , Continued
Parameter Description
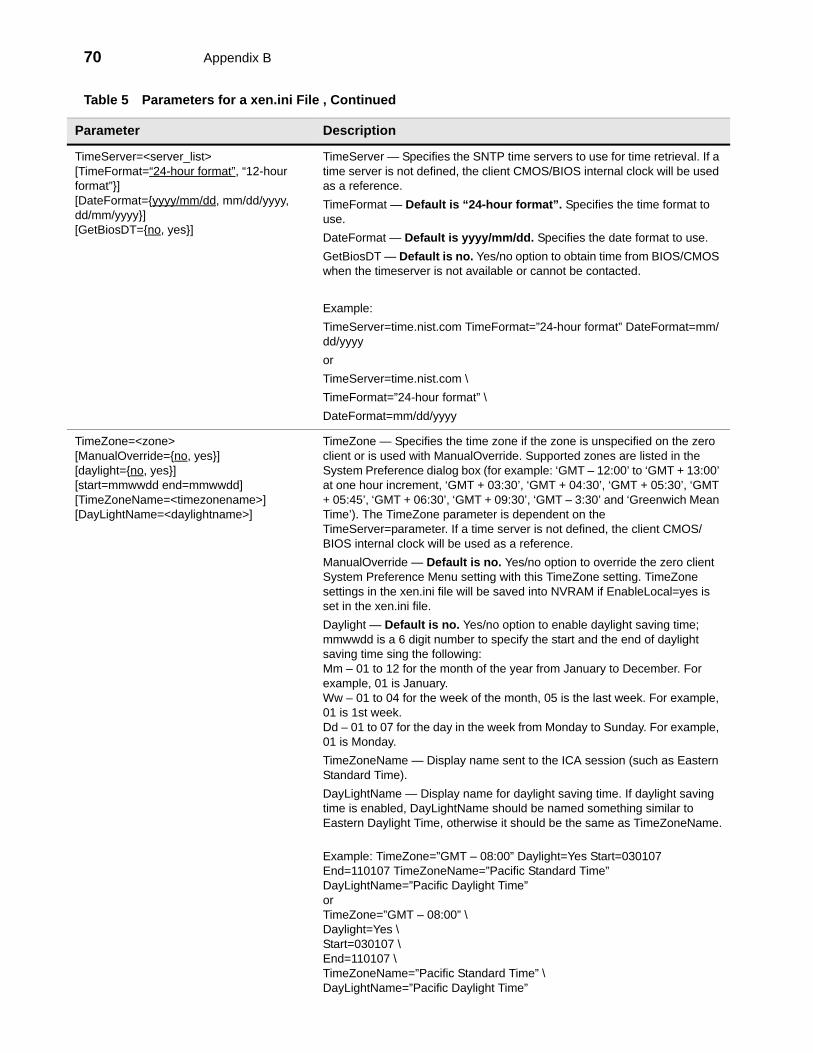
70 Appendix B
TimeServer=<server_list> [TimeFormat=“24-hour format”, “12-hour format”}] [DateFormat={yyyy/mm/dd, mm/dd/yyyy, dd/mm/yyyy}][GetBiosDT={no, yes}]
TimeServer — Specifies the SNTP time servers to use for time retrieval. If a time server is not defined, the client CMOS/BIOS internal clock will be used as a reference.TimeFormat — Default is “24-hour format”. Specifies the time format to use. DateFormat — Default is yyyy/mm/dd. Specifies the date format to use.GetBiosDT — Default is no. Yes/no option to obtain time from BIOS/CMOS when the timeserver is not available or cannot be contacted.
Example: TimeServer=time.nist.com TimeFormat=”24-hour format” DateFormat=mm/dd/yyyyorTimeServer=time.nist.com \TimeFormat=”24-hour format” \DateFormat=mm/dd/yyyy
TimeZone=<zone> [ManualOverride={no, yes}] [daylight={no, yes}] [start=mmwwdd end=mmwwdd] [TimeZoneName=<timezonename>] [DayLightName=<daylightname>]
TimeZone — Specifies the time zone if the zone is unspecified on the zero client or is used with ManualOverride. Supported zones are listed in the System Preference dialog box (for example: ‘GMT – 12:00’ to ‘GMT + 13:00’ at one hour increment, ‘GMT + 03:30’, ‘GMT + 04:30’, ‘GMT + 05:30’, ‘GMT + 05:45’, ‘GMT + 06:30’, ‘GMT + 09:30’, ‘GMT – 3:30’ and ‘Greenwich Mean Time’). The TimeZone parameter is dependent on the TimeServer=parameter. If a time server is not defined, the client CMOS/BIOS internal clock will be used as a reference.ManualOverride — Default is no. Yes/no option to override the zero client System Preference Menu setting with this TimeZone setting. TimeZone settings in the xen.ini file will be saved into NVRAM if EnableLocal=yes is set in the xen.ini file.Daylight — Default is no. Yes/no option to enable daylight saving time; mmwwdd is a 6 digit number to specify the start and the end of daylight saving time sing the following: Mm – 01 to 12 for the month of the year from January to December. For example, 01 is January. Ww – 01 to 04 for the week of the month, 05 is the last week. For example, 01 is 1st week. Dd – 01 to 07 for the day in the week from Monday to Sunday. For example, 01 is Monday.TimeZoneName — Display name sent to the ICA session (such as Eastern Standard Time).DayLightName — Display name for daylight saving time. If daylight saving time is enabled, DayLightName should be named something similar to Eastern Daylight Time, otherwise it should be the same as TimeZoneName.
Example: TimeZone=”GMT – 08:00” Daylight=Yes Start=030107 End=110107 TimeZoneName=”Pacific Standard Time” DayLightName=”Pacific Daylight Time”or TimeZone=”GMT – 08:00” \Daylight=Yes \Start=030107 \End=110107 \TimeZoneName=”Pacific Standard Time” \DayLightName=”Pacific Daylight Time”
Table 5 Parameters for a xen.ini File , Continued
Parameter Description
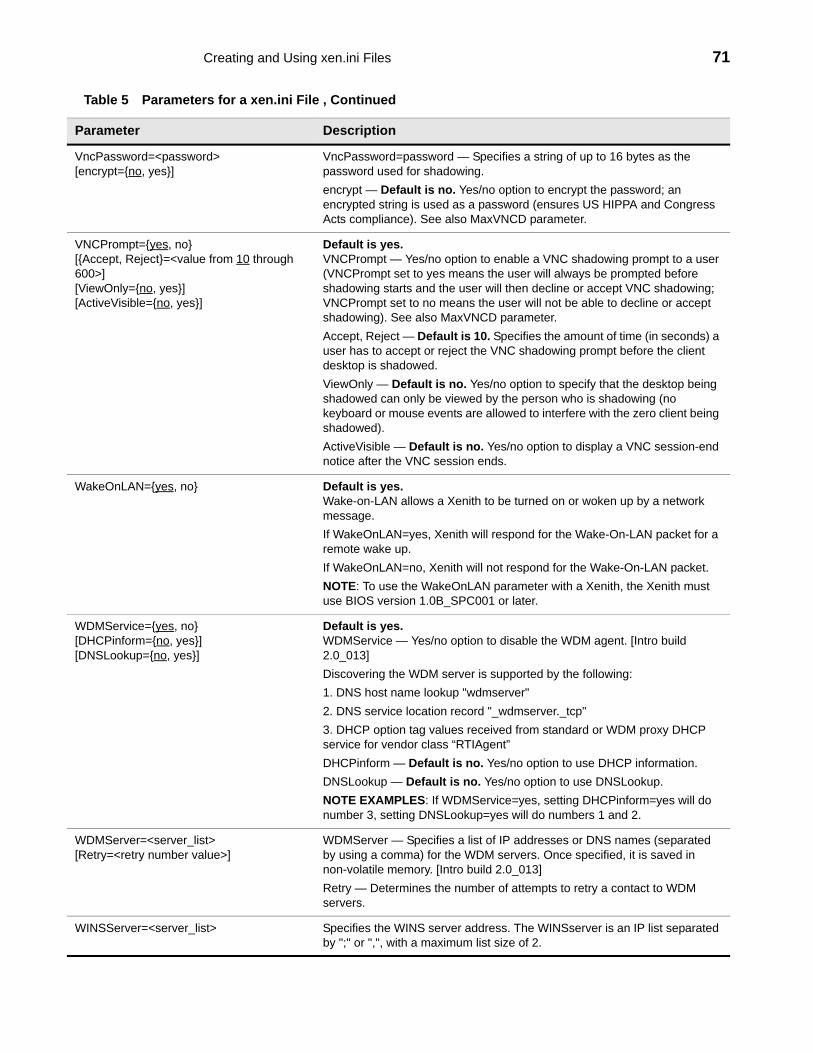
Creating and Using xen.ini Files 71
VncPassword=<password> [encrypt={no, yes}]
VncPassword=password — Specifies a string of up to 16 bytes as the password used for shadowing. encrypt — Default is no. Yes/no option to encrypt the password; an encrypted string is used as a password (ensures US HIPPA and Congress Acts compliance). See also MaxVNCD parameter.
VNCPrompt={yes, no} [{Accept, Reject}=<value from 10 through 600>] [ViewOnly={no, yes}][ActiveVisible={no, yes}]
Default is yes.VNCPrompt — Yes/no option to enable a VNC shadowing prompt to a user (VNCPrompt set to yes means the user will always be prompted before shadowing starts and the user will then decline or accept VNC shadowing; VNCPrompt set to no means the user will not be able to decline or accept shadowing). See also MaxVNCD parameter.Accept, Reject — Default is 10. Specifies the amount of time (in seconds) a user has to accept or reject the VNC shadowing prompt before the client desktop is shadowed. ViewOnly — Default is no. Yes/no option to specify that the desktop being shadowed can only be viewed by the person who is shadowing (no keyboard or mouse events are allowed to interfere with the zero client being shadowed).ActiveVisible — Default is no. Yes/no option to display a VNC session-end notice after the VNC session ends.
WakeOnLAN={yes, no} Default is yes.Wake-on-LAN allows a Xenith to be turned on or woken up by a network message.If WakeOnLAN=yes, Xenith will respond for the Wake-On-LAN packet for a remote wake up. If WakeOnLAN=no, Xenith will not respond for the Wake-On-LAN packet.NOTE: To use the WakeOnLAN parameter with a Xenith, the Xenith must use BIOS version 1.0B_SPC001 or later.
WDMService={yes, no} [DHCPinform={no, yes}] [DNSLookup={no, yes}]
Default is yes. WDMService — Yes/no option to disable the WDM agent. [Intro build 2.0_013]Discovering the WDM server is supported by the following:1. DNS host name lookup "wdmserver"2. DNS service location record "_wdmserver._tcp"3. DHCP option tag values received from standard or WDM proxy DHCP service for vendor class “RTIAgent”DHCPinform — Default is no. Yes/no option to use DHCP information. DNSLookup — Default is no. Yes/no option to use DNSLookup. NOTE EXAMPLES: If WDMService=yes, setting DHCPinform=yes will do number 3, setting DNSLookup=yes will do numbers 1 and 2.
WDMServer=<server_list>[Retry=<retry number value>]
WDMServer — Specifies a list of IP addresses or DNS names (separated by using a comma) for the WDM servers. Once specified, it is saved in non-volatile memory. [Intro build 2.0_013]Retry — Determines the number of attempts to retry a contact to WDM servers.
WINSServer=<server_list> Specifies the WINS server address. The WINSserver is an IP list separated by ";" or ",", with a maximum list size of 2.
Table 5 Parameters for a xen.ini File , Continued
Parameter Description

72 Appendix B
This page intentionally blank.
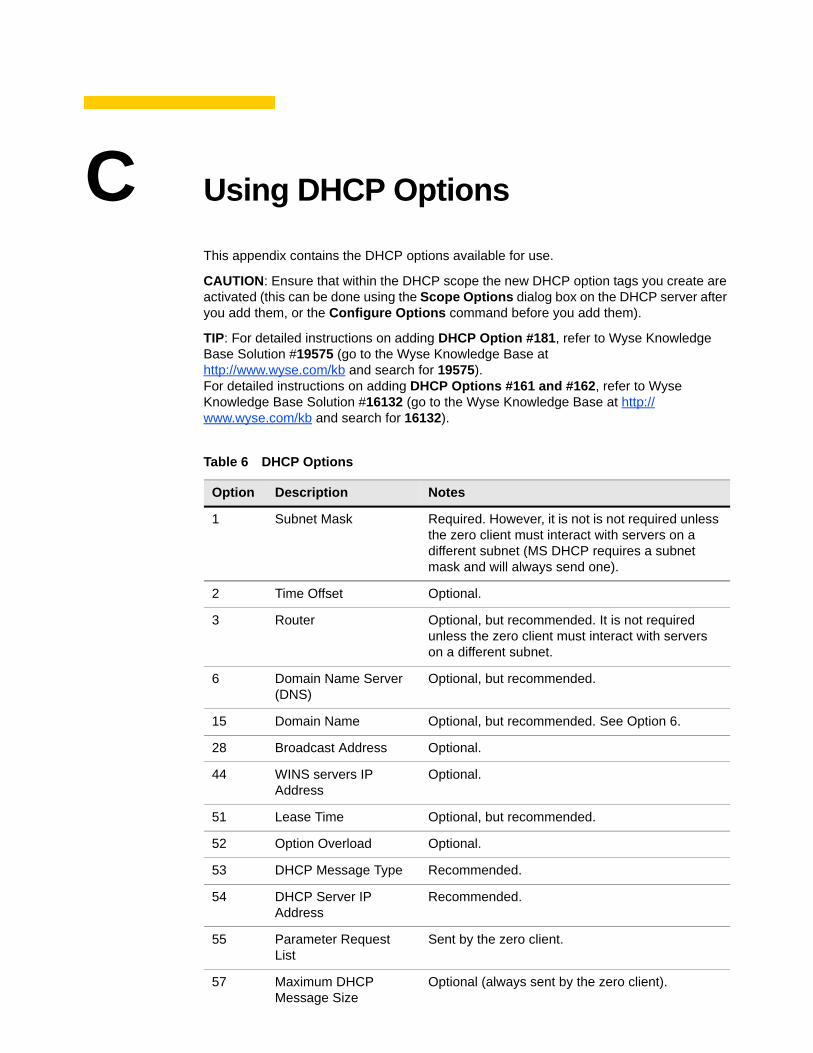
C Using DHCP Options
This appendix contains the DHCP options available for use.
CAUTION: Ensure that within the DHCP scope the new DHCP option tags you create are activated (this can be done using the Scope Options dialog box on the DHCP server after you add them, or the Configure Options command before you add them).
TIP: For detailed instructions on adding DHCP Option #181, refer to Wyse Knowledge Base Solution #19575 (go to the Wyse Knowledge Base at http://www.wyse.com/kb and search for 19575). For detailed instructions on adding DHCP Options #161 and #162, refer to Wyse Knowledge Base Solution #16132 (go to the Wyse Knowledge Base at http://www.wyse.com/kb and search for 16132).
Table 6 DHCP Options
Option Description Notes
1 Subnet Mask Required. However, it is not is not required unless the zero client must interact with servers on a different subnet (MS DHCP requires a subnet mask and will always send one).
2 Time Offset Optional.
3 Router Optional, but recommended. It is not required unless the zero client must interact with servers on a different subnet.
6 Domain Name Server (DNS)
Optional, but recommended.
15 Domain Name Optional, but recommended. See Option 6.
28 Broadcast Address Optional.
44 WINS servers IP Address
Optional.
51 Lease Time Optional, but recommended.
52 Option Overload Optional.
53 DHCP Message Type Recommended.
54 DHCP Server IP Address
Recommended.
55 Parameter Request List
Sent by the zero client.
57 Maximum DHCP Message Size
Optional (always sent by the zero client).
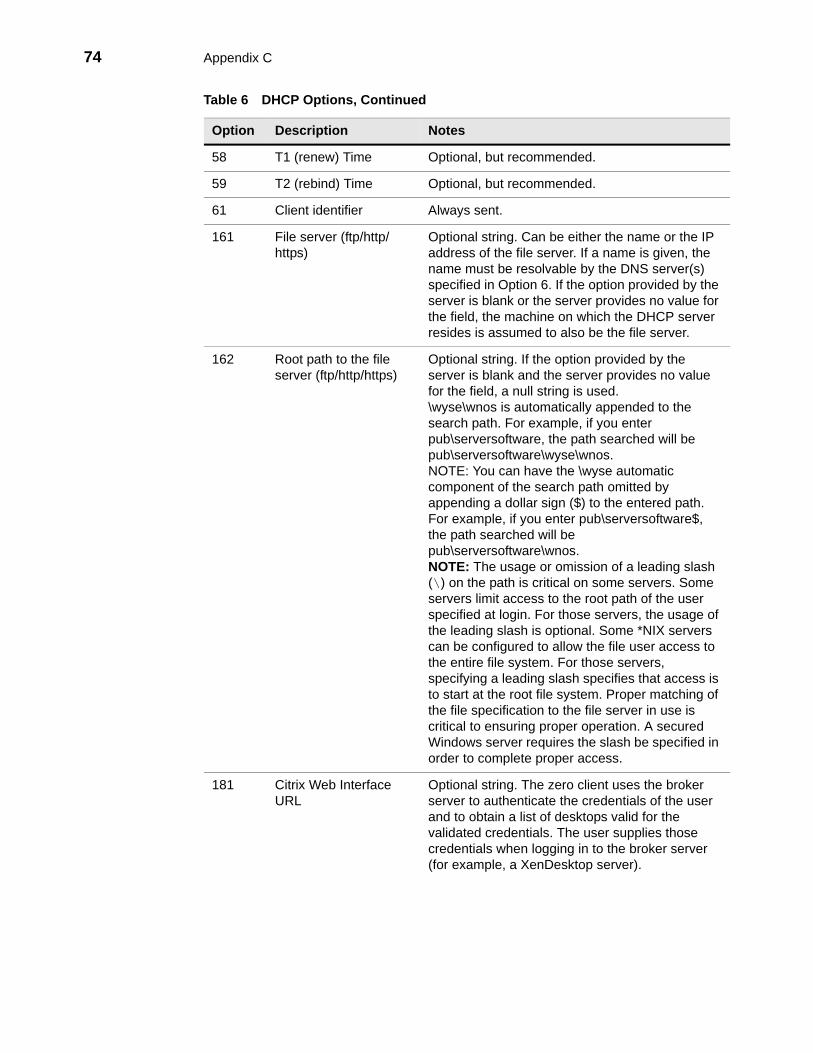
74 Appendix C
58 T1 (renew) Time Optional, but recommended.
59 T2 (rebind) Time Optional, but recommended.
61 Client identifier Always sent.
161 File server (ftp/http/https)
Optional string. Can be either the name or the IP address of the file server. If a name is given, the name must be resolvable by the DNS server(s) specified in Option 6. If the option provided by the server is blank or the server provides no value for the field, the machine on which the DHCP server resides is assumed to also be the file server.
162 Root path to the file server (ftp/http/https)
Optional string. If the option provided by the server is blank and the server provides no value for the field, a null string is used.\wyse\wnos is automatically appended to the search path. For example, if you enter pub\serversoftware, the path searched will be pub\serversoftware\wyse\wnos.NOTE: You can have the \wyse automatic component of the search path omitted by appending a dollar sign ($) to the entered path. For example, if you enter pub\serversoftware$, the path searched will be pub\serversoftware\wnos.NOTE: The usage or omission of a leading slash (\) on the path is critical on some servers. Some servers limit access to the root path of the user specified at login. For those servers, the usage of the leading slash is optional. Some *NIX servers can be configured to allow the file user access to the entire file system. For those servers, specifying a leading slash specifies that access is to start at the root file system. Proper matching of the file specification to the file server in use is critical to ensuring proper operation. A secured Windows server requires the slash be specified in order to complete proper access.
181 Citrix Web Interface URL
Optional string. The zero client uses the broker server to authenticate the credentials of the user and to obtain a list of desktops valid for the validated credentials. The user supplies those credentials when logging in to the broker server (for example, a XenDesktop server).
Table 6 DHCP Options, Continued
Option Description Notes

Using DHCP Options 75
182 NT domain list for PNAgent/PNLite
Optional string. The zero client creates a pull-down list of domains from the information supplied in option 182. This list is presented at zero client login in the order specified in the DHCP option (for example, the first domain specified becomes the default). The selected domain is the one which must authenticate the user ID and password. Only the selected domain is used in the authentication process. If the domain list is incomplete and the user credentials must be verified against a domain not in the list (assuming that the server in option 181 is capable of authenticating against a domain not in the list), the user has the option of not using any of the domains specified in option 182 and typing a different domain name at the time of login.
184 File server Username Optional string. Username to use when authenticating to the server specified in Option 161.
185 File server Password Optional string. Password to use when authenticating to the server specified in Option 161.
186 Wyse Device Manager (WDM) server list
Optional binary IP addresses of WDM. This option can specify up to two Wyse Device Manager servers. If two are specified, at boot time the zero client will attempt to check-in to the first server. If it cannot contact the first server it will try to check-in to the second server.
190 WDM secure port Optional number. Word, or two-bytes array. Specifies to use HTTPS to communicate with WDM instead of HTTP.
Table 6 DHCP Options, Continued
Option Description Notes

76 Appendix C
This page intentionally blank.

D CMOS Management
This appendix includes general CMOS management information for use with the following supported versions:• Xenith (C00X) BIOS version 1.0B_SPC001-0407 or later• Xenith Pro (R00LX) BIOS version 1.0H_SPC-0T51 or later
CMOS Local Management: Extracting CMOS Settings to a USB Key for Distribution
CMOS local management allows Xenith administrators to easily manage CMOS settings for small deployments of zero clients using USB Key distribution methods.
This case example uses Xenith Pro BIOS version 1.0H_SPC-0T51. However, you can use these instructions for other supported BIOS versions.
Step 1: Prepare a Reference Device containing BIOS version 1.0H_SPC-0T517 or later
1. On the zero client you want to use as a Reference Device (the reference device will be the golden image you will use to distribute to other zero clients), enter the BIOS Setup Utility (during boot, press and hold the Delete key, enter the password Fireport—this is case sensitive—and press Enter) and configure the CMOS settings you want (supported CMOS settings include: AutoPower, BootOrder, P-key setting, BiosPassword—and for Xenith Pro BIOS version 1.0B_SPC001-0407 or later the WakeOnLAN setting).
2. Save your CMOS settings before exiting the utility.
Step 2: Extract the CMOS Settings to a USB Key
1. On the zero client you want to use as a Reference Device, attach a formatted USB Key (to format on Windows 7 computers for example: attach the USB Key, right-click on the USB key, select Format, click Restore device defaults, select Quick Format, click Start).
2. Use the Extract CMOS to USB GUI feature of Xenith to extract the CMOS settings to the USB Key: Wyse Zero Desktop: On the General tab of the System Tools dialog box (System Settings icon > System Tools > General tab), click Extract CMOS to USB.
3. After successful extraction (you will see a pop-up message: CMOS: extract to R00LX_cmos.1.0H_SPC), properly eject and detach the USB Key. The CMOS settings on the USB Key are now ready for distribution to other zero clients.

78 Appendix D
Step 3: Restore the CMOS Settings to Your Target Devices
1. On all of the target zero clients that you want to distribute the Reference Device CMOS settings, start the zero client.
2. Use the Restore CMOS from USB GUI feature of Xenith to write the CMOS settings from the USB Key to the target zero client: Wyse Zero Desktop: On the General tab of the System Tools dialog box (System Settings icon > System Tools > General tab), click Restore CMOS from USB.
3. After successful restoration (you will see a pop-up message: CMOS: restore from R00LX_cmos.1.0H_SPC), properly eject and detach the USB Key. The CMOS settings on the USB Key are now written to your target zero client.
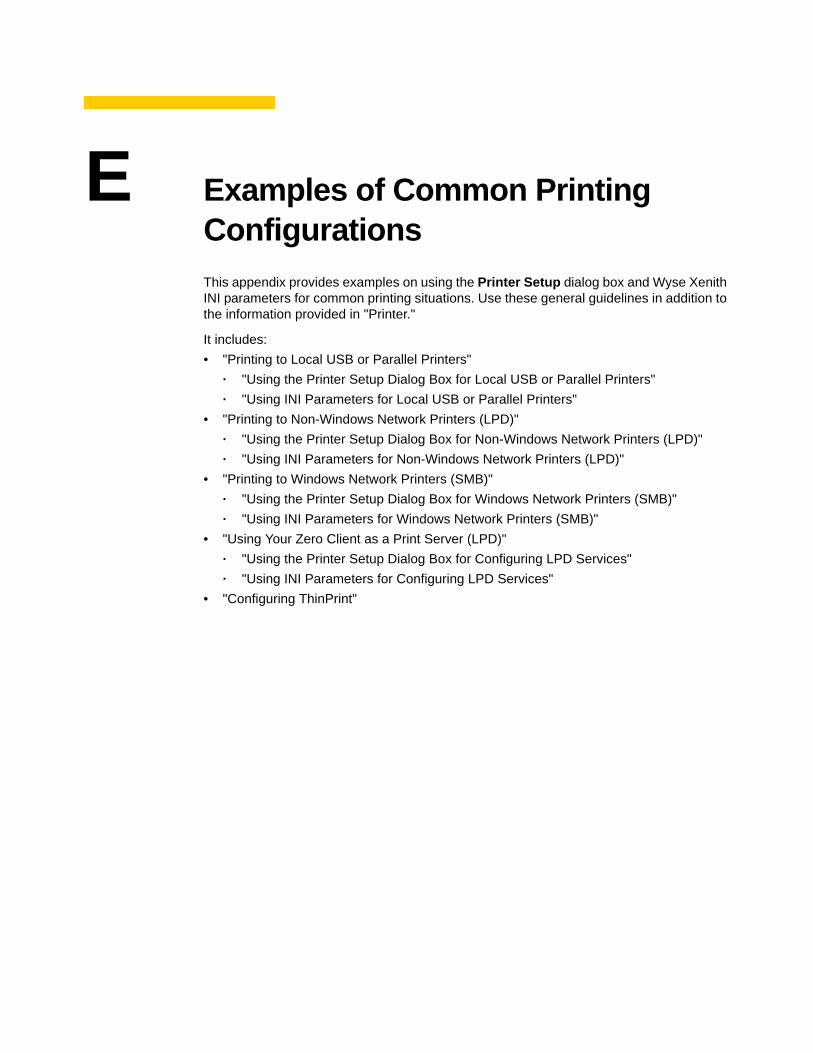
E Examples of Common Printing ConfigurationsThis appendix provides examples on using the Printer Setup dialog box and Wyse Xenith INI parameters for common printing situations. Use these general guidelines in addition to the information provided in "Printer."
It includes:• "Printing to Local USB or Parallel Printers"
· "Using the Printer Setup Dialog Box for Local USB or Parallel Printers"· "Using INI Parameters for Local USB or Parallel Printers"
• "Printing to Non-Windows Network Printers (LPD)"· "Using the Printer Setup Dialog Box for Non-Windows Network Printers (LPD)"· "Using INI Parameters for Non-Windows Network Printers (LPD)"
• "Printing to Windows Network Printers (SMB)"· "Using the Printer Setup Dialog Box for Windows Network Printers (SMB)"· "Using INI Parameters for Windows Network Printers (SMB)"
• "Using Your Zero Client as a Print Server (LPD)"· "Using the Printer Setup Dialog Box for Configuring LPD Services"· "Using INI Parameters for Configuring LPD Services"
• "Configuring ThinPrint"
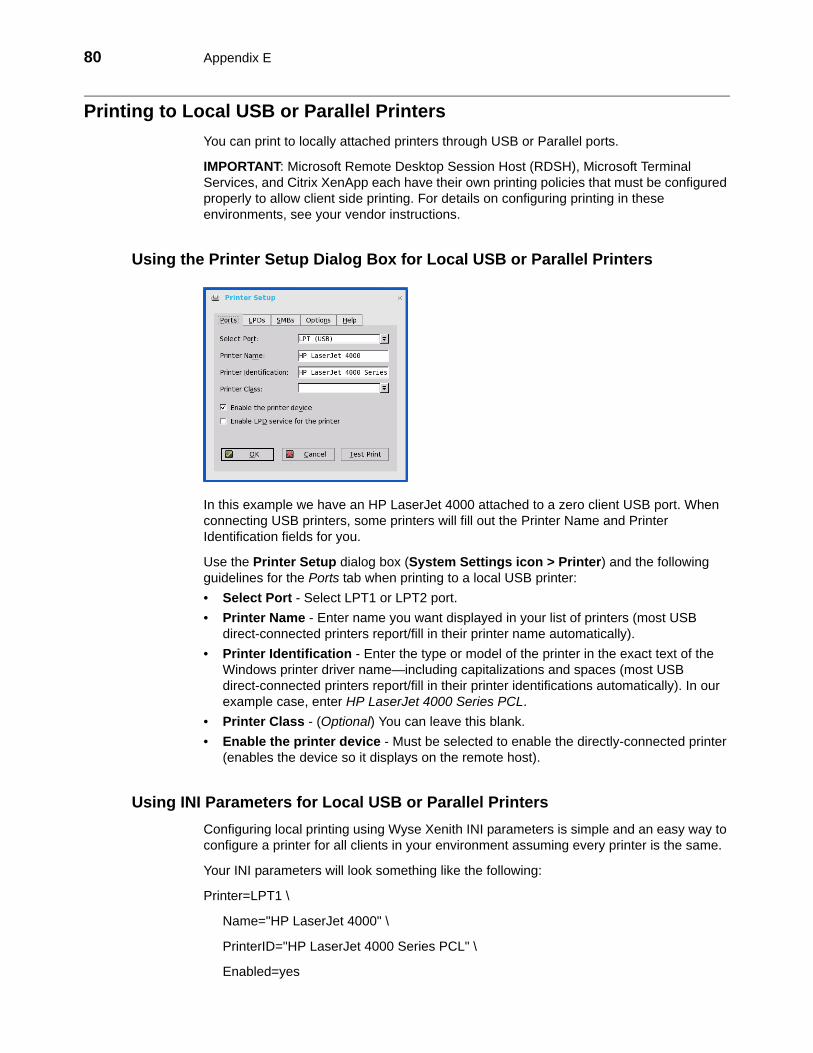
80 Appendix E
Printing to Local USB or Parallel PrintersYou can print to locally attached printers through USB or Parallel ports.
IMPORTANT: Microsoft Remote Desktop Session Host (RDSH), Microsoft Terminal Services, and Citrix XenApp each have their own printing policies that must be configured properly to allow client side printing. For details on configuring printing in these environments, see your vendor instructions.
Using the Printer Setup Dialog Box for Local USB or Parallel Printers
In this example we have an HP LaserJet 4000 attached to a zero client USB port. When connecting USB printers, some printers will fill out the Printer Name and Printer Identification fields for you.
Use the Printer Setup dialog box (System Settings icon > Printer) and the following guidelines for the Ports tab when printing to a local USB printer:• Select Port - Select LPT1 or LPT2 port.• Printer Name - Enter name you want displayed in your list of printers (most USB
direct-connected printers report/fill in their printer name automatically). • Printer Identification - Enter the type or model of the printer in the exact text of the
Windows printer driver name—including capitalizations and spaces (most USB direct-connected printers report/fill in their printer identifications automatically). In our example case, enter HP LaserJet 4000 Series PCL.
• Printer Class - (Optional) You can leave this blank.• Enable the printer device - Must be selected to enable the directly-connected printer
(enables the device so it displays on the remote host).
Using INI Parameters for Local USB or Parallel PrintersConfiguring local printing using Wyse Xenith INI parameters is simple and an easy way to configure a printer for all clients in your environment assuming every printer is the same.
Your INI parameters will look something like the following:
Printer=LPT1 \
Name="HP LaserJet 4000" \
PrinterID="HP LaserJet 4000 Series PCL" \
Enabled=yes
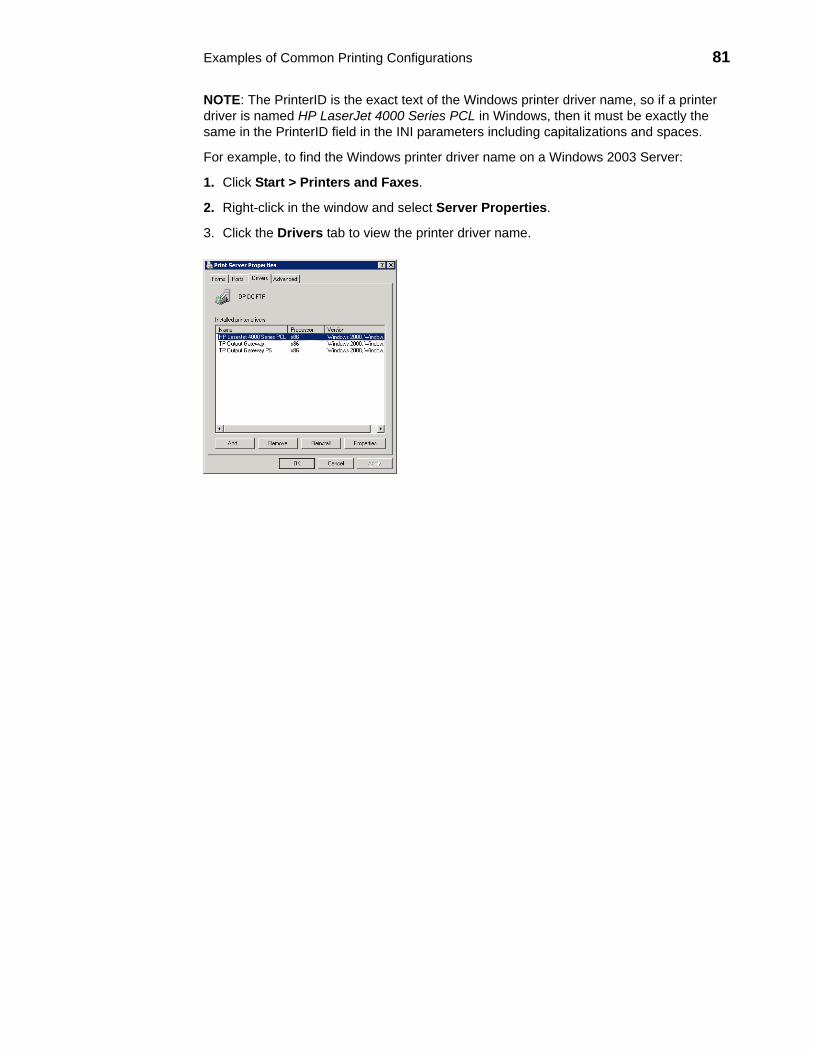
Examples of Common Printing Configurations 81
NOTE: The PrinterID is the exact text of the Windows printer driver name, so if a printer driver is named HP LaserJet 4000 Series PCL in Windows, then it must be exactly the same in the PrinterID field in the INI parameters including capitalizations and spaces.
For example, to find the Windows printer driver name on a Windows 2003 Server:
1. Click Start > Printers and Faxes.
2. Right-click in the window and select Server Properties.
3. Click the Drivers tab to view the printer driver name.
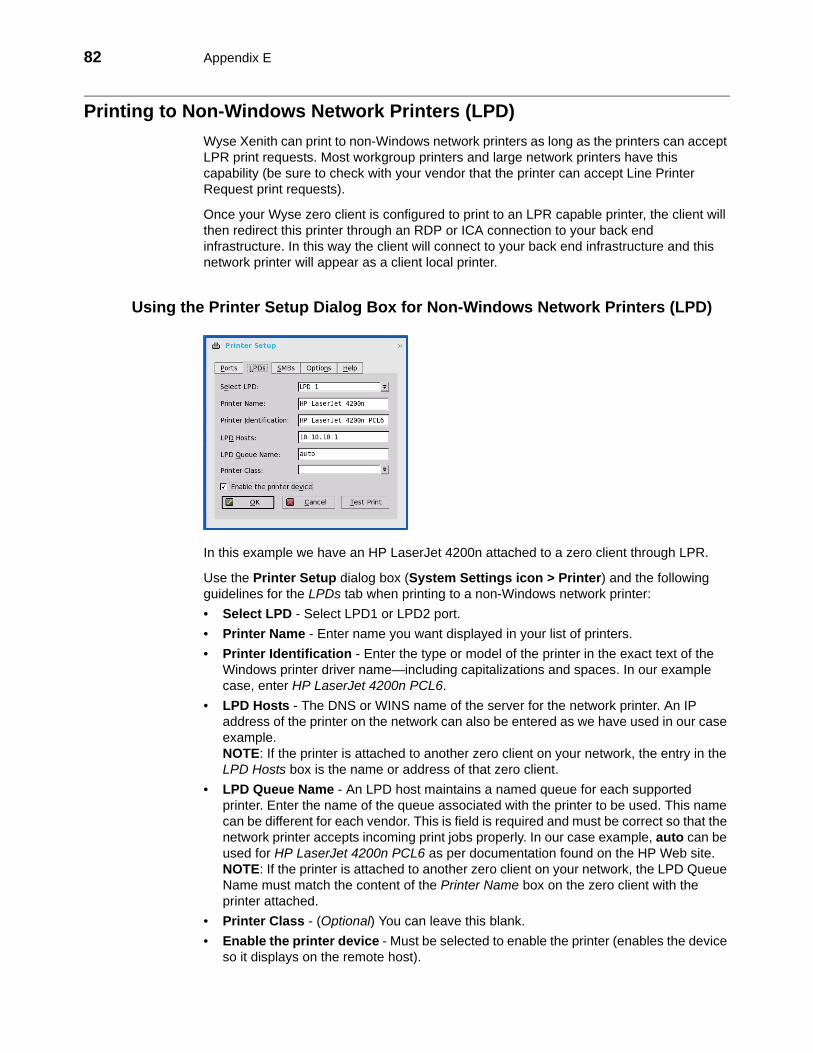
82 Appendix E
Printing to Non-Windows Network Printers (LPD)Wyse Xenith can print to non-Windows network printers as long as the printers can accept LPR print requests. Most workgroup printers and large network printers have this capability (be sure to check with your vendor that the printer can accept Line Printer Request print requests).
Once your Wyse zero client is configured to print to an LPR capable printer, the client will then redirect this printer through an RDP or ICA connection to your back end infrastructure. In this way the client will connect to your back end infrastructure and this network printer will appear as a client local printer.
Using the Printer Setup Dialog Box for Non-Windows Network Printers (LPD)
In this example we have an HP LaserJet 4200n attached to a zero client through LPR.
Use the Printer Setup dialog box (System Settings icon > Printer) and the following guidelines for the LPDs tab when printing to a non-Windows network printer:• Select LPD - Select LPD1 or LPD2 port.• Printer Name - Enter name you want displayed in your list of printers.• Printer Identification - Enter the type or model of the printer in the exact text of the
Windows printer driver name—including capitalizations and spaces. In our example case, enter HP LaserJet 4200n PCL6.
• LPD Hosts - The DNS or WINS name of the server for the network printer. An IP address of the printer on the network can also be entered as we have used in our case example. NOTE: If the printer is attached to another zero client on your network, the entry in the LPD Hosts box is the name or address of that zero client.
• LPD Queue Name - An LPD host maintains a named queue for each supported printer. Enter the name of the queue associated with the printer to be used. This name can be different for each vendor. This is field is required and must be correct so that the network printer accepts incoming print jobs properly. In our case example, auto can be used for HP LaserJet 4200n PCL6 as per documentation found on the HP Web site. NOTE: If the printer is attached to another zero client on your network, the LPD Queue Name must match the content of the Printer Name box on the zero client with the printer attached.
• Printer Class - (Optional) You can leave this blank.• Enable the printer device - Must be selected to enable the printer (enables the device
so it displays on the remote host).
Examples of Common Printing Configurations 83
Using INI Parameters for Non-Windows Network Printers (LPD)Configuring network printing using Wyse Xenith INI parameters is simple and an easy way to configure a printer for all clients in your environment assuming every printer is the same.
Your INI parameters will look something like the following:
Printer=LPD1 \
LocalName="HP LaserJet 4200n" \
Host=10.10.10.1 \
Queue=auto \
PrinterID="HP LaserJet 4200 PCL6" \
Enabled=yes
NOTE: The PrinterID is the exact text of the Windows printer driver name, so if a printer driver is named HP LaserJet 4200n PCL6 in Windows, then it must be exactly the same in the PrinterID field in the INI parameters including capitalizations and spaces.
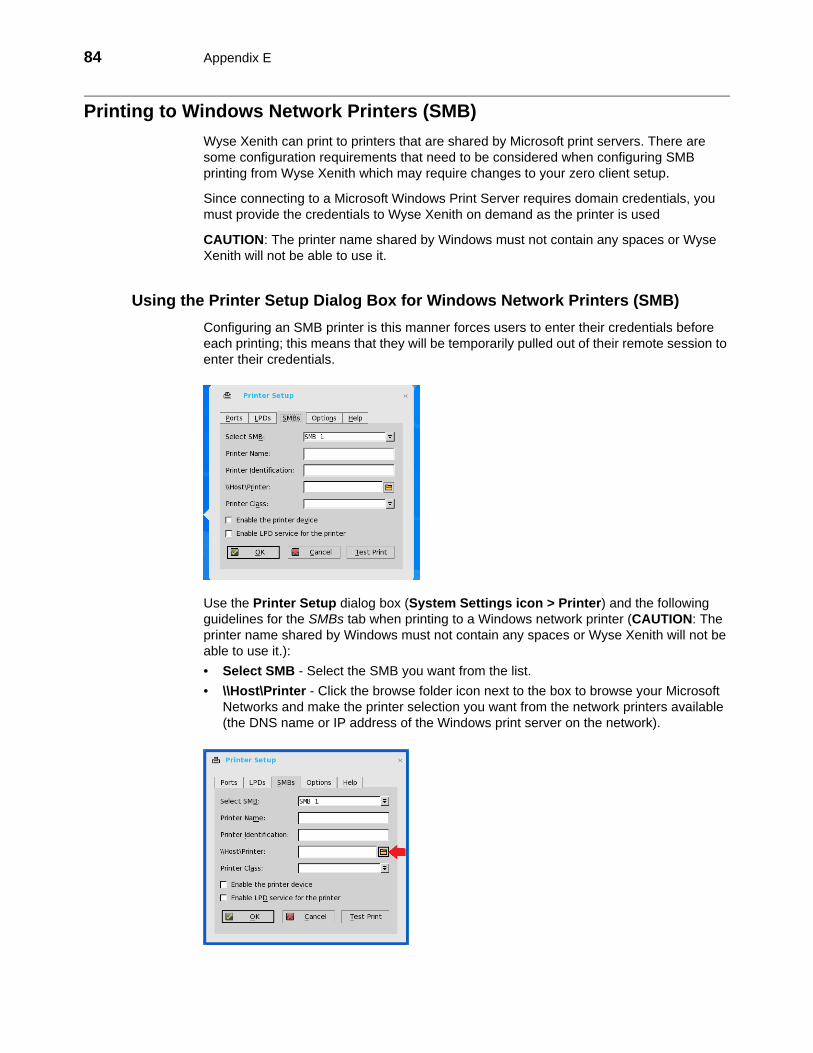
84 Appendix E
Printing to Windows Network Printers (SMB)Wyse Xenith can print to printers that are shared by Microsoft print servers. There are some configuration requirements that need to be considered when configuring SMB printing from Wyse Xenith which may require changes to your zero client setup.
Since connecting to a Microsoft Windows Print Server requires domain credentials, you must provide the credentials to Wyse Xenith on demand as the printer is used
CAUTION: The printer name shared by Windows must not contain any spaces or Wyse Xenith will not be able to use it.
Using the Printer Setup Dialog Box for Windows Network Printers (SMB)Configuring an SMB printer is this manner forces users to enter their credentials before each printing; this means that they will be temporarily pulled out of their remote session to enter their credentials.
Use the Printer Setup dialog box (System Settings icon > Printer) and the following guidelines for the SMBs tab when printing to a Windows network printer (CAUTION: The printer name shared by Windows must not contain any spaces or Wyse Xenith will not be able to use it.):• Select SMB - Select the SMB you want from the list.• \\Host\Printer - Click the browse folder icon next to the box to browse your Microsoft
Networks and make the printer selection you want from the network printers available (the DNS name or IP address of the Windows print server on the network).
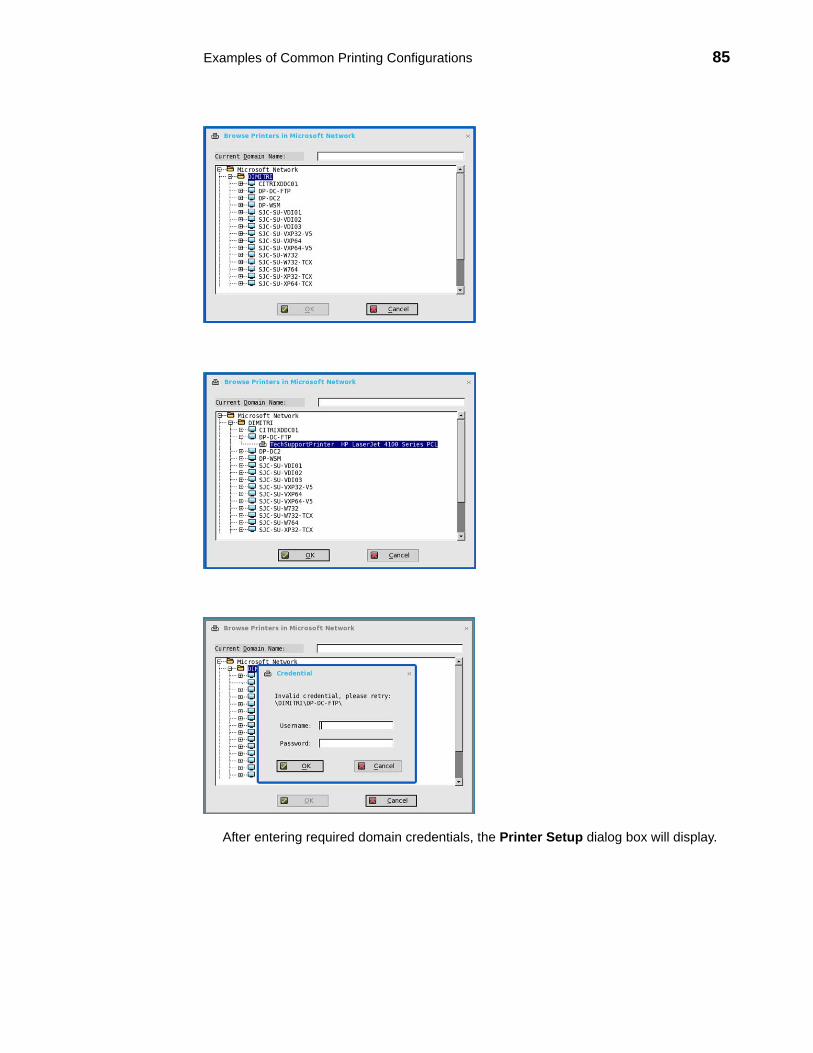
Examples of Common Printing Configurations 85
After entering required domain credentials, the Printer Setup dialog box will display.
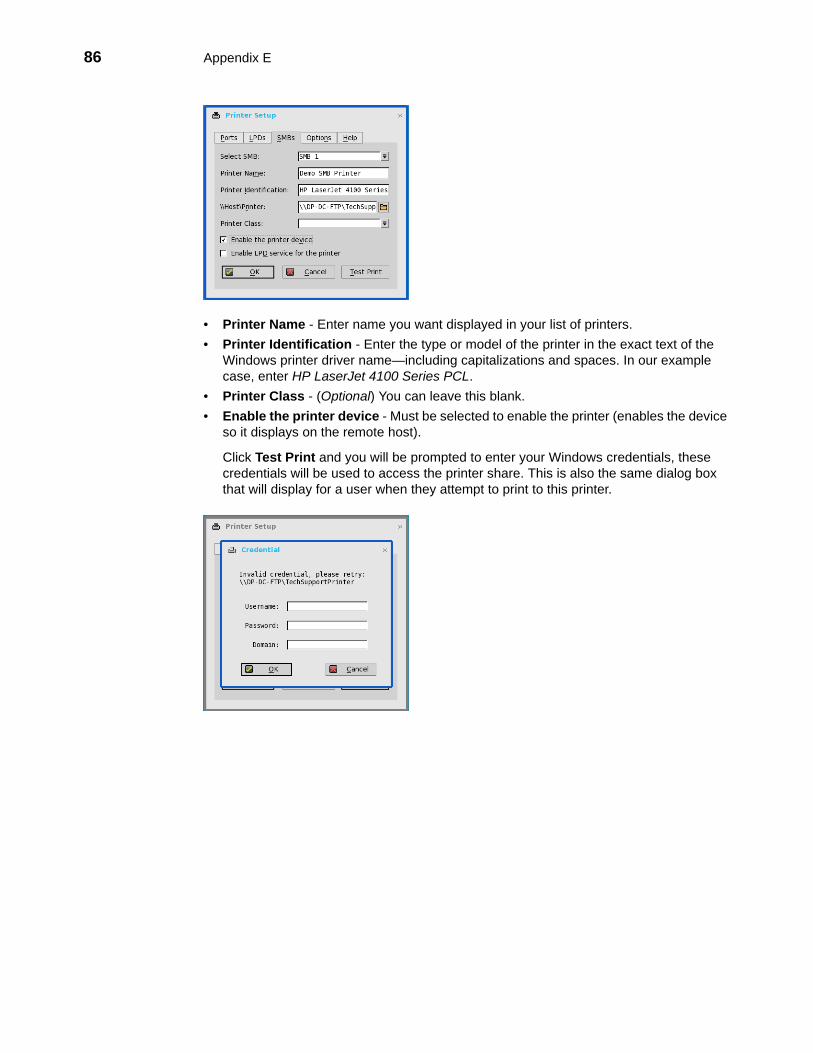
86 Appendix E
• Printer Name - Enter name you want displayed in your list of printers.• Printer Identification - Enter the type or model of the printer in the exact text of the
Windows printer driver name—including capitalizations and spaces. In our example case, enter HP LaserJet 4100 Series PCL.
• Printer Class - (Optional) You can leave this blank.• Enable the printer device - Must be selected to enable the printer (enables the device
so it displays on the remote host).
Click Test Print and you will be prompted to enter your Windows credentials, these credentials will be used to access the printer share. This is also the same dialog box that will display for a user when they attempt to print to this printer.
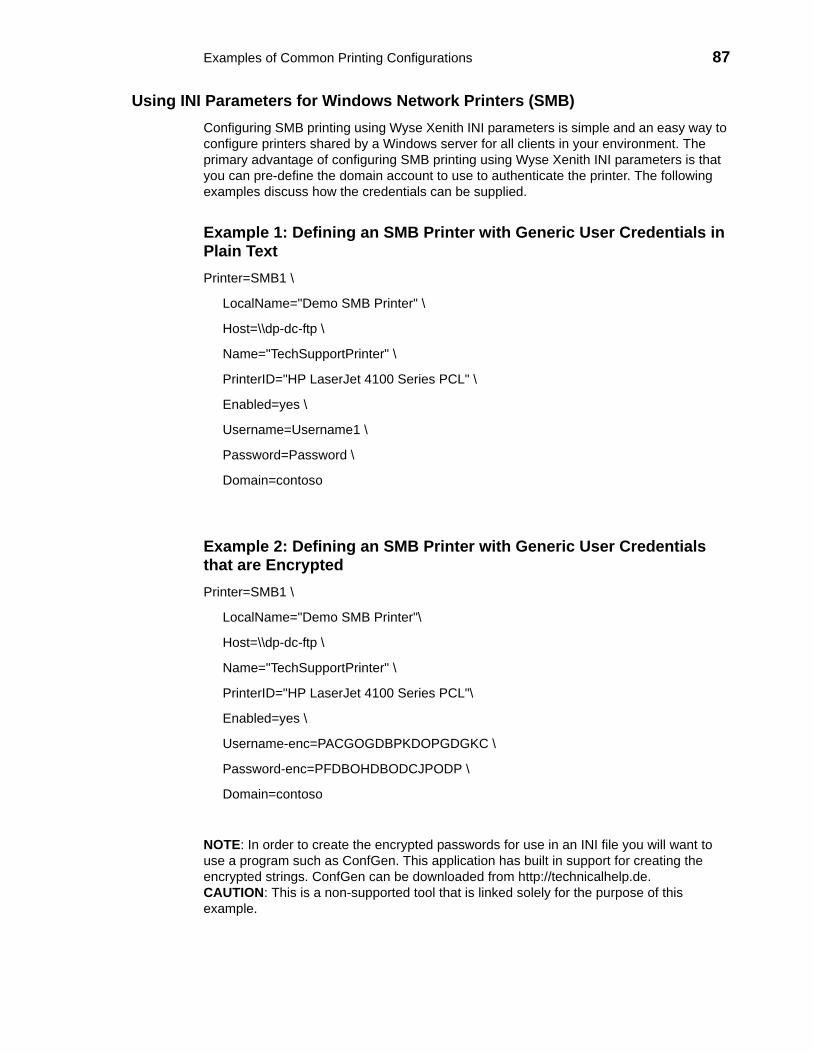
Examples of Common Printing Configurations 87
Using INI Parameters for Windows Network Printers (SMB)Configuring SMB printing using Wyse Xenith INI parameters is simple and an easy way to configure printers shared by a Windows server for all clients in your environment. The primary advantage of configuring SMB printing using Wyse Xenith INI parameters is that you can pre-define the domain account to use to authenticate the printer. The following examples discuss how the credentials can be supplied.
Example 1: Defining an SMB Printer with Generic User Credentials in Plain TextPrinter=SMB1 \
LocalName="Demo SMB Printer" \
Host=\\dp-dc-ftp \
Name="TechSupportPrinter" \
PrinterID="HP LaserJet 4100 Series PCL" \
Enabled=yes \
Username=Username1 \
Password=Password \
Domain=contoso
Example 2: Defining an SMB Printer with Generic User Credentials that are EncryptedPrinter=SMB1 \
LocalName="Demo SMB Printer"\
Host=\\dp-dc-ftp \
Name="TechSupportPrinter" \
PrinterID="HP LaserJet 4100 Series PCL"\
Enabled=yes \
Username-enc=PACGOGDBPKDOPGDGKC \
Password-enc=PFDBOHDBODCJPODP \
Domain=contoso
NOTE: In order to create the encrypted passwords for use in an INI file you will want to use a program such as ConfGen. This application has built in support for creating the encrypted strings. ConfGen can be downloaded from http://technicalhelp.de. CAUTION: This is a non-supported tool that is linked solely for the purpose of this example.
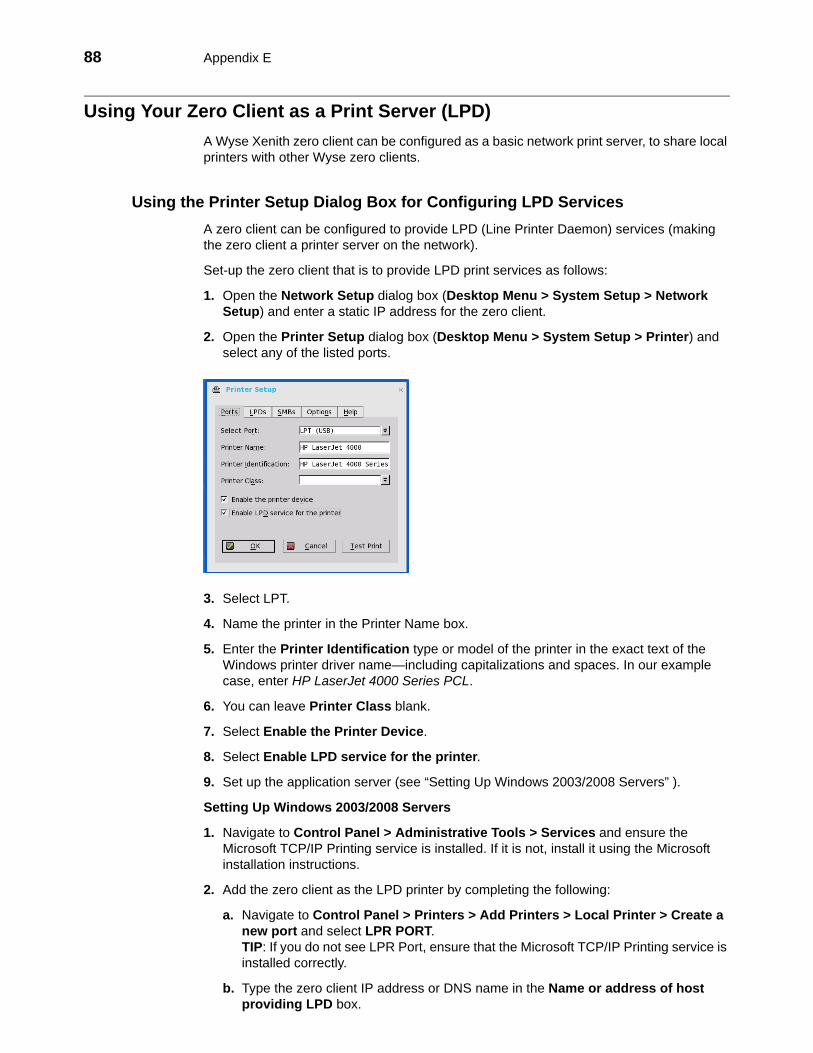
88 Appendix E
Using Your Zero Client as a Print Server (LPD)A Wyse Xenith zero client can be configured as a basic network print server, to share local printers with other Wyse zero clients.
Using the Printer Setup Dialog Box for Configuring LPD Services A zero client can be configured to provide LPD (Line Printer Daemon) services (making the zero client a printer server on the network).
Set-up the zero client that is to provide LPD print services as follows:
1. Open the Network Setup dialog box (Desktop Menu > System Setup > Network Setup) and enter a static IP address for the zero client.
2. Open the Printer Setup dialog box (Desktop Menu > System Setup > Printer) and select any of the listed ports.
3. Select LPT.
4. Name the printer in the Printer Name box.
5. Enter the Printer Identification type or model of the printer in the exact text of the Windows printer driver name—including capitalizations and spaces. In our example case, enter HP LaserJet 4000 Series PCL.
6. You can leave Printer Class blank.
7. Select Enable the Printer Device.
8. Select Enable LPD service for the printer.
9. Set up the application server (see “Setting Up Windows 2003/2008 Servers” ).
Setting Up Windows 2003/2008 Servers
1. Navigate to Control Panel > Administrative Tools > Services and ensure the Microsoft TCP/IP Printing service is installed. If it is not, install it using the Microsoft installation instructions.
2. Add the zero client as the LPD printer by completing the following:
a. Navigate to Control Panel > Printers > Add Printers > Local Printer > Create a new port and select LPR PORT. TIP: If you do not see LPR Port, ensure that the Microsoft TCP/IP Printing service is installed correctly.
b. Type the zero client IP address or DNS name in the Name or address of host providing LPD box.
Examples of Common Printing Configurations 89
c. Type the printer name (assigned in “Using the Printer Setup Dialog Box for Configuring LPD Services” ) in the Name of printer on that machine box.
d. Click OK, and then click NEXT.
3. After you have selected the printer, you can perform your normal printer setup for the application server. For example, select the manufacturer printer type and printer name.
Using INI Parameters for Configuring LPD ServicesConfiguring LPD printing using Wyse Xenith INI parameters is simple and an easy way to configure a Wyse Xenith zero client to be a basic network print server, to share local printers with other Wyse zero clients.
Your INI parameters will look something like the following:
Printer=LPT1 \
Name="HP LaserJet 4000" \
PrinterID="HP LaserJet 4000 Series PCL" \
Enabled=yes \
EnableLPD=yes
IMPORTANT: The PrinterID is the exact text of the Windows printer driver name, so if a printer driver is named HP LaserJet 4000 Series PCL in Windows, then it must be exactly the same in the PrinterID field in the INI parameters including capitalizations and spaces.
90 Appendix E
Configuring ThinPrintNo ThinPrint-specific configuration is available on the zero clients. Thus to be able to use ThinPrint, users must first set up their printers according to the user documentation, and then configure ThinPrint on the zero client using the Printer Setup dialog box.
Use the following guidelines:• Use the Printer Identification field to enter a printer class (you can change the printer
name as needed).• Printer IDs are assigned (depending on the physical port) as follows:
• COM1 = 1• COM2 = 2• LPT1 = 3 (USB printers are detected automatically on LPT1)• LPT2 = 4• LPD0 = 5 (The LPD Queue name is transmitted as the printer name; the Printer
Identification as class)• LPD1 = 6 (The LPD Queue name is transmitted as the printer name; the Printer
Identification as class)• LPD2 = 7 (The LPD Queue name is transmitted as the printer name; the Printer
Identification as class)• LPD3 = 8 (The LPD Queue name is transmitted as the printer name; the Printer
Identification as class)• SMB1 = 9 (In the form \\host\printershare)• SMB2 = 10• SMB3 = 11• SMB4 = 12
To install the relevant ThinPrint product on the server use the following guidelines:• Printer Object(s) Created Manually by the Administrator - After you install .print
Engine, create a printer object on the server to use the native driver and ThinPort as a printer port. You can use any protocol (TCP, RDP, or ICA) because Wyse Xenith has .print clients for all of the protocols. The printer object needs to observe ThinPrint naming conventions (for example, HPLJ5#_:2, in which case print jobs will be sent to the local printer that has ID number .2) by referring to .print client port ID. If no ID number is present, the .print client sends the print job to the printer set as current.
• Printer Object(s) Created Automatically by ThinPrint AutoConnect - When using ThinPrint AutoConnect, the zero client identifies with the zero client ID number 84 (and thus is recognized as a zero client without a local spooler). You can also set up a template on the server that uses a native driver (for example, HPLJ5) and ThinPort, and then name this template as you want in the form _#AnyName. You can then make sure that the rules (on ThinPrint Autoconnect [1]) have been set to assign the desired local printers to use this server template. The assigned printer will then be shown in the user session using the HPLJ5 driver and ThinPort; it will be named automatically according to ThinPrint naming convention with the printer name from the client side included. Alternatively, you can also define a template name according to the client printer name (replace .AnyName. with printer name 4. and 5. above [for example, _#HP Laserjet 5]) so that the local printer object .HP Laserjet 5. will be mapped to this template without any rules defined on the ThinPrint Autoconnect.

F Troubleshooting and FAQs
This appendix contains troubleshooting and frequently asked questions relating to your zero client.
It includes the following topics:• "Viewing System Information"• "Example: Directing Your Zero Client to a XenDesktop Server"• "Changing Default Settings"• "Resetting to Factory Defaults Without Proper Central Configuration"• "About Wyse Device Manager (WDM)"
Viewing System InformationHow do I view my zero client system information?
On the Wyse Xenith Toolbar, click the System Information icon to display the following types of system information (items vary by product):• General tab - Displays general information such as System Version, Serial Number,
Boot From, Memory Size (Total and Free), Terminal Name, IP Address, Net Mask, Gateway, and DHCP Lease.
• Devices tab - Displays information such as the CPU Speed, ROM Size, Monitor, Parallel Ports, Ethernet Speed, Memory Speed, NAND Size, Resolution, Serial Ports, and MAC Address. NOTE: Clicking the Device Viewer button allows you to easily view recognized devices.
• Copyright/Patents tab - Displays the software copyright and patent notices.• Event Log tab - Displays your zero client start-up steps (normally beginning from
System Version to Checking Firmware) or error Messages that are helpful for debugging problems.
• Status tab - Displays status information about TCP performance-related parameters, CPU Busy, System Up Time, Wireless performance-related parameters, Free Memory, and DHCP lease time remaining.
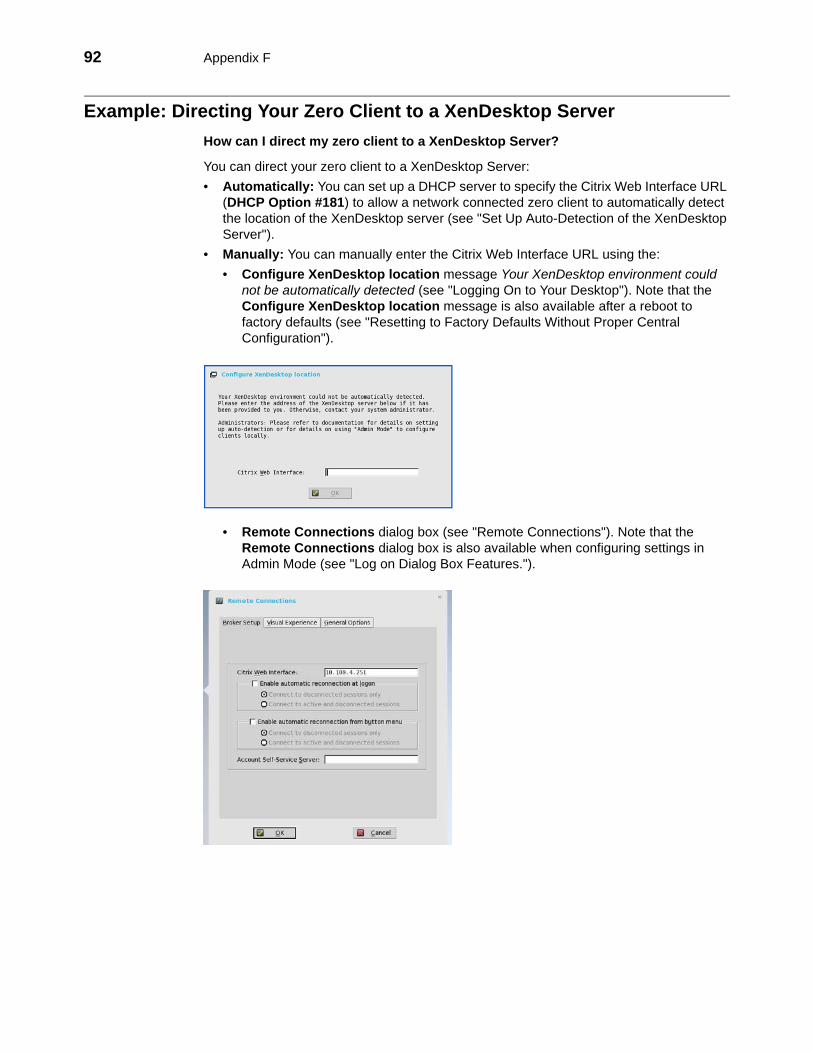
92 Appendix F
Example: Directing Your Zero Client to a XenDesktop ServerHow can I direct my zero client to a XenDesktop Server?
You can direct your zero client to a XenDesktop Server:• Automatically: You can set up a DHCP server to specify the Citrix Web Interface URL
(DHCP Option #181) to allow a network connected zero client to automatically detect the location of the XenDesktop server (see "Set Up Auto-Detection of the XenDesktop Server").
• Manually: You can manually enter the Citrix Web Interface URL using the:• Configure XenDesktop location message Your XenDesktop environment could
not be automatically detected (see "Logging On to Your Desktop"). Note that the Configure XenDesktop location message is also available after a reboot to factory defaults (see "Resetting to Factory Defaults Without Proper Central Configuration").
• Remote Connections dialog box (see "Remote Connections"). Note that the Remote Connections dialog box is also available when configuring settings in Admin Mode (see "Log on Dialog Box Features.").
Troubleshooting and FAQs 93
Changing Default SettingsHow do I change the zero client default settings?
To change default settings, you can:• Use the Admin Mode button as described in "Log on Dialog Box Features."• Use the System Settings icon as described in "Configuring Connectivity Options" and
"Configuring Local Settings Options."
Resetting to Factory Defaults Without Proper Central ConfigurationWhat happens when I reset my zero client to factory defaults without proper central configuration?
Depending on your environment, you must complete one of the following to reset your zero client to factory defaults:• If you have DHCP server but do not have it configured to direct you to the
XenDesktop server - When you reset to factory defaults in this environment, the Configure XenDesktop location message Your XenDesktop environment could not be automatically detected will appear and you must enter the Citrix Web Interface URL to direct your zero client to the XenDesktop server (see "Logging On to Your Desktop").
• If you are resetting to factory defaults in a secure environment without a DHCP server - When you reset to factory defaults in this environment, the Network Setup dialog box will appear and you must complete the necessary information for your environment using a static IP Address for your zero client (see "Network Setup"). After completing the Network Setup dialog box, click OK and the Remote Connections dialog box will appear. You must enter the Citrix Web Interface URL to direct your zero client to the XenDesktop server (see "Remote Connections").
About Wyse Device Manager (WDM)Wyse Device ManagerTM (WDM) servers provide network management services to your zero clients (complete user-desktop control—with features such as remote shadow, reboot, shutdown, boot, rename, automatic device check-in support, Wake-On-LAN, change device properties, and so on). With WDM you can manage all of your network devices from one simple-to-use console.

94 Appendix F
This page intentionally blank.

Tables1 Shutdown Dialog Box Options 82 Toolbar Icons 103 List of Desktop Options 114 Supported Keyboard Languages 345 Parameters for a xen.ini File 516 DHCP Options 73

Administrators Guide Wyse® XenithTM Issue: 100912
Written and published by: Wyse Technology Inc., October 2012
Created using FrameMaker® and Acrobat®