Administrative Guide - St. Clair County ROE · thank the team at SmoothWall for bringing the IPCop...
69
Administrative Guide Chris Clancey Harry Goldschmitt John Kastner Eric Oberlander Peter Walker
-
Upload
truongxuyen -
Category
Documents
-
view
212 -
download
0
Transcript of Administrative Guide - St. Clair County ROE · thank the team at SmoothWall for bringing the IPCop...

Administrative Guide
Chris ClanceyHarry Goldschmitt
John KastnerEric Oberlander
Peter Walker

Administrative Guideby Chris Clancey, Harry Goldschmitt, John Kastner, Eric Oberlander, and Peter Walker
Published 20 September 2004Copyright© 2002-2004 Chris Clancey, Harry Goldschmitt, John Kastner, Eric Oberlander, Peter Walker
Permission is granted to copy, distribute and/or modify this document under the terms of the GNU Free Documentation License, Version 1.2 or anylater version published by the Free Software Foundation; with no Invariant Sections, with no Front-Cover Texts, and with no Back-Cover Texts. Acopy of the license is included in the section entitledGNU Free Documentation License.

Table of ContentsPreface . . . . . . . . . . . . . . . . . . . . . . . . . . . . . . . . . . . . . . . . . . . . . . . . . . . . . . . . . . . . . . . . . . . . . . . . . . . . . . . . . . . . . . . . . . vi
1. Rights and Disclaimers. . . . . . . . . . . . . . . . . . . . . . . . . . . . . . . . . . . . . . . . . . . . . . . . . . . . . . . . . . . . . . . . . . . . vi2. Forward . . . . . . . . . . . . . . . . . . . . . . . . . . . . . . . . . . . . . . . . . . . . . . . . . . . . . . . . . . . . . . . . . . . . . . . . . . . . . . . . . vi
1. Project Leader’s Introduction. . . . . . . . . . . . . . . . . . . . . . . . . . . . . . . . . . . . . . . . . . . . . . . . . . . . . . . . . . . . . . . . . . . . 11.1. What Is IPCop? . . . . . . . . . . . . . . . . . . . . . . . . . . . . . . . . . . . . . . . . . . . . . . . . . . . . . . . . . . . . . . . . . . . . . . . . 11.2. Partial List of Features. . . . . . . . . . . . . . . . . . . . . . . . . . . . . . . . . . . . . . . . . . . . . . . . . . . . . . . . . . . . . . . . . . . 11.3. Acknowledgements. . . . . . . . . . . . . . . . . . . . . . . . . . . . . . . . . . . . . . . . . . . . . . . . . . . . . . . . . . . . . . . . . . . . . 3
2. Administration and Configuration. . . . . . . . . . . . . . . . . . . . . . . . . . . . . . . . . . . . . . . . . . . . . . . . . . . . . . . . . . . . . . . . 52.1. Home Administrative Window. . . . . . . . . . . . . . . . . . . . . . . . . . . . . . . . . . . . . . . . . . . . . . . . . . . . . . . . . . . . 52.2. System Web Pages. . . . . . . . . . . . . . . . . . . . . . . . . . . . . . . . . . . . . . . . . . . . . . . . . . . . . . . . . . . . . . . . . . . . . . 7
2.2.1. Updates AW . . . . . . . . . . . . . . . . . . . . . . . . . . . . . . . . . . . . . . . . . . . . . . . . . . . . . . . . . . . . . . . . . . . . 82.2.2. Passwords . . . . . . . . . . . . . . . . . . . . . . . . . . . . . . . . . . . . . . . . . . . . . . . . . . . . . . . . . . . . . . . . . . . . . . 92.2.3. SSH Access. . . . . . . . . . . . . . . . . . . . . . . . . . . . . . . . . . . . . . . . . . . . . . . . . . . . . . . . . . . . . . . . . . . . . 92.2.4. GUI Settings . . . . . . . . . . . . . . . . . . . . . . . . . . . . . . . . . . . . . . . . . . . . . . . . . . . . . . . . . . . . . . . . . . . 122.2.5. Backup Web Page. . . . . . . . . . . . . . . . . . . . . . . . . . . . . . . . . . . . . . . . . . . . . . . . . . . . . . . . . . . . . . 132.2.6. Shutdown Web Page. . . . . . . . . . . . . . . . . . . . . . . . . . . . . . . . . . . . . . . . . . . . . . . . . . . . . . . . . . . . 15
2.3. Status Menu. . . . . . . . . . . . . . . . . . . . . . . . . . . . . . . . . . . . . . . . . . . . . . . . . . . . . . . . . . . . . . . . . . . . . . . . . . . 162.3.1. System Status. . . . . . . . . . . . . . . . . . . . . . . . . . . . . . . . . . . . . . . . . . . . . . . . . . . . . . . . . . . . . . . . . . . 162.3.2. Network Status. . . . . . . . . . . . . . . . . . . . . . . . . . . . . . . . . . . . . . . . . . . . . . . . . . . . . . . . . . . . . . . . . 182.3.3. System Graphs. . . . . . . . . . . . . . . . . . . . . . . . . . . . . . . . . . . . . . . . . . . . . . . . . . . . . . . . . . . . . . . . . . 202.3.4. Traffic Graphs. . . . . . . . . . . . . . . . . . . . . . . . . . . . . . . . . . . . . . . . . . . . . . . . . . . . . . . . . . . . . . . . . . 202.3.5. Proxy Graphs. . . . . . . . . . . . . . . . . . . . . . . . . . . . . . . . . . . . . . . . . . . . . . . . . . . . . . . . . . . . . . . . . . . 202.3.6. Connections. . . . . . . . . . . . . . . . . . . . . . . . . . . . . . . . . . . . . . . . . . . . . . . . . . . . . . . . . . . . . . . . . . . . 21
2.4. Network Menu . . . . . . . . . . . . . . . . . . . . . . . . . . . . . . . . . . . . . . . . . . . . . . . . . . . . . . . . . . . . . . . . . . . . . . . . . 222.4.1. Dialup . . . . . . . . . . . . . . . . . . . . . . . . . . . . . . . . . . . . . . . . . . . . . . . . . . . . . . . . . . . . . . . . . . . . . . . . . 222.4.2. Upload . . . . . . . . . . . . . . . . . . . . . . . . . . . . . . . . . . . . . . . . . . . . . . . . . . . . . . . . . . . . . . . . . . . . . . . . . 242.4.3. Modem . . . . . . . . . . . . . . . . . . . . . . . . . . . . . . . . . . . . . . . . . . . . . . . . . . . . . . . . . . . . . . . . . . . . . . . . 242.4.4. External Aliases Administrative Web Page. . . . . . . . . . . . . . . . . . . . . . . . . . . . . . . . . . . . . . . . 27
2.5. Services Menu. . . . . . . . . . . . . . . . . . . . . . . . . . . . . . . . . . . . . . . . . . . . . . . . . . . . . . . . . . . . . . . . . . . . . . . . . 282.5.1. Web Proxy Administrative Web Page. . . . . . . . . . . . . . . . . . . . . . . . . . . . . . . . . . . . . . . . . . . . . . 292.5.2. DHCP Administrative Web Page. . . . . . . . . . . . . . . . . . . . . . . . . . . . . . . . . . . . . . . . . . . . . . . . . . 302.5.3. Dynamic DNS Administrative Web Page. . . . . . . . . . . . . . . . . . . . . . . . . . . . . . . . . . . . . . . . . . 342.5.4. Edit Hosts Administrative Web Page. . . . . . . . . . . . . . . . . . . . . . . . . . . . . . . . . . . . . . . . . . . . . . 352.5.5. Time Server Administrative Web Page. . . . . . . . . . . . . . . . . . . . . . . . . . . . . . . . . . . . . . . . . . . . . 362.5.6. Traffic Shaping Administrative Web Page. . . . . . . . . . . . . . . . . . . . . . . . . . . . . . . . . . . . . . . . . . 372.5.7. Intrusion Detection System Administrative Web Page. . . . . . . . . . . . . . . . . . . . . . . . . . . . . . . 39
2.6. Firewall Menu . . . . . . . . . . . . . . . . . . . . . . . . . . . . . . . . . . . . . . . . . . . . . . . . . . . . . . . . . . . . . . . . . . . . . . . . . 392.6.1. Port Forwarding Administrative Web Page. . . . . . . . . . . . . . . . . . . . . . . . . . . . . . . . . . . . . . . . 392.6.2. External Access Administrative Web Page. . . . . . . . . . . . . . . . . . . . . . . . . . . . . . . . . . . . . . . . . 412.6.3. DMZ Pinholes Administrative Web Page. . . . . . . . . . . . . . . . . . . . . . . . . . . . . . . . . . . . . . . . . . 422.6.4. Blue Access Administrative Web Page. . . . . . . . . . . . . . . . . . . . . . . . . . . . . . . . . . . . . . . . . . . . 44
2.7. VPNs Menu . . . . . . . . . . . . . . . . . . . . . . . . . . . . . . . . . . . . . . . . . . . . . . . . . . . . . . . . . . . . . . . . . . . . . . . . . . . 442.7.1. Virtual Private Networks (VPNs). . . . . . . . . . . . . . . . . . . . . . . . . . . . . . . . . . . . . . . . . . . . . . . . . 442.7.2. Global Settings . . . . . . . . . . . . . . . . . . . . . . . . . . . . . . . . . . . . . . . . . . . . . . . . . . . . . . . . . . . . . . . . . 442.7.3. Connection status and control. . . . . . . . . . . . . . . . . . . . . . . . . . . . . . . . . . . . . . . . . . . . . . . . . . . . 452.7.4. Certificate Authorities. . . . . . . . . . . . . . . . . . . . . . . . . . . . . . . . . . . . . . . . . . . . . . . . . . . . . . . . . . . 47
2.8. Logs Menu . . . . . . . . . . . . . . . . . . . . . . . . . . . . . . . . . . . . . . . . . . . . . . . . . . . . . . . . . . . . . . . . . . . . . . . . . . . . 472.8.1. Introduction . . . . . . . . . . . . . . . . . . . . . . . . . . . . . . . . . . . . . . . . . . . . . . . . . . . . . . . . . . . . . . . . . . . . 482.8.2. Log Settings Administrative Web Page. . . . . . . . . . . . . . . . . . . . . . . . . . . . . . . . . . . . . . . . . . . . 482.8.3. Log Summary Page. . . . . . . . . . . . . . . . . . . . . . . . . . . . . . . . . . . . . . . . . . . . . . . . . . . . . . . . . . . . . 482.8.4. Proxy Logs Page. . . . . . . . . . . . . . . . . . . . . . . . . . . . . . . . . . . . . . . . . . . . . . . . . . . . . . . . . . . . . . . 502.8.5. Firewall Logs Page . . . . . . . . . . . . . . . . . . . . . . . . . . . . . . . . . . . . . . . . . . . . . . . . . . . . . . . . . . . . . 52
iii
AdministrativeGuide
2.8.6. Intrusion Detection System Log Page. . . . . . . . . . . . . . . . . . . . . . . . . . . . . . . . . . . . . . . . . . . . . 522.8.7. System Log Page. . . . . . . . . . . . . . . . . . . . . . . . . . . . . . . . . . . . . . . . . . . . . . . . . . . . . . . . . . . . . . . 55
A. GNU Free Documentation License. . . . . . . . . . . . . . . . . . . . . . . . . . . . . . . . . . . . . . . . . . . . . . . . . . . . . . . . . . . . . . 57A.1. 0. Preamble. . . . . . . . . . . . . . . . . . . . . . . . . . . . . . . . . . . . . . . . . . . . . . . . . . . . . . . . . . . . . . . . . . . . . . . . . . . 57A.2. 1. Applicability and Definitions . . . . . . . . . . . . . . . . . . . . . . . . . . . . . . . . . . . . . . . . . . . . . . . . . . . . . . . . . 57A.3. 2. Verbatim Copying . . . . . . . . . . . . . . . . . . . . . . . . . . . . . . . . . . . . . . . . . . . . . . . . . . . . . . . . . . . . . . . . . . . 58A.4. 3. Copying In Quantity. . . . . . . . . . . . . . . . . . . . . . . . . . . . . . . . . . . . . . . . . . . . . . . . . . . . . . . . . . . . . . . . . 58A.5. 4. Modifications . . . . . . . . . . . . . . . . . . . . . . . . . . . . . . . . . . . . . . . . . . . . . . . . . . . . . . . . . . . . . . . . . . . . . . . 59A.6. 5. Combining Documents. . . . . . . . . . . . . . . . . . . . . . . . . . . . . . . . . . . . . . . . . . . . . . . . . . . . . . . . . . . . . . . 60A.7. 6. Collections of Documents. . . . . . . . . . . . . . . . . . . . . . . . . . . . . . . . . . . . . . . . . . . . . . . . . . . . . . . . . . . . 60A.8. 7. Aggregation With Independent Works. . . . . . . . . . . . . . . . . . . . . . . . . . . . . . . . . . . . . . . . . . . . . . . . . 61A.9. 8. Translation . . . . . . . . . . . . . . . . . . . . . . . . . . . . . . . . . . . . . . . . . . . . . . . . . . . . . . . . . . . . . . . . . . . . . . . . . 61A.10. 9. Termination . . . . . . . . . . . . . . . . . . . . . . . . . . . . . . . . . . . . . . . . . . . . . . . . . . . . . . . . . . . . . . . . . . . . . . . 61A.11. 10. Future Revisions of This License. . . . . . . . . . . . . . . . . . . . . . . . . . . . . . . . . . . . . . . . . . . . . . . . . . . 61A.12. ADDENDUM: How to use this License for your documents. . . . . . . . . . . . . . . . . . . . . . . . . . . . . . . 61
iv

List of Figures2.1. PPP Settings. . . . . . . . . . . . . . . . . . . . . . . . . . . . . . . . . . . . . . . . . . . . . . . . . . . . . . . . . . . . . . . . . . . . . . . . . . . . . . . . 252.2. Upload Modem Drivers. . . . . . . . . . . . . . . . . . . . . . . . . . . . . . . . . . . . . . . . . . . . . . . . . . . . . . . . . . . . . . . . . . . . . . 262.3. Modem Settings. . . . . . . . . . . . . . . . . . . . . . . . . . . . . . . . . . . . . . . . . . . . . . . . . . . . . . . . . . . . . . . . . . . . . . . . . . . . . 272.4. External Aliases Settings. . . . . . . . . . . . . . . . . . . . . . . . . . . . . . . . . . . . . . . . . . . . . . . . . . . . . . . . . . . . . . . . . . . . . 282.5. Port Forwarding Settings. . . . . . . . . . . . . . . . . . . . . . . . . . . . . . . . . . . . . . . . . . . . . . . . . . . . . . . . . . . . . . . . . . . . . 402.6. External Access Settings. . . . . . . . . . . . . . . . . . . . . . . . . . . . . . . . . . . . . . . . . . . . . . . . . . . . . . . . . . . . . . . . . . . . . 422.7. Pinhole Settings. . . . . . . . . . . . . . . . . . . . . . . . . . . . . . . . . . . . . . . . . . . . . . . . . . . . . . . . . . . . . . . . . . . . . . . . . . . . . 432.8. Blue Access Settings. . . . . . . . . . . . . . . . . . . . . . . . . . . . . . . . . . . . . . . . . . . . . . . . . . . . . . . . . . . . . . . . . . . . . . . . . 442.9. VPN Global Settings. . . . . . . . . . . . . . . . . . . . . . . . . . . . . . . . . . . . . . . . . . . . . . . . . . . . . . . . . . . . . . . . . . . . . . . . . 452.10. VPN Connection status and control window: Initial View. . . . . . . . . . . . . . . . . . . . . . . . . . . . . . . . . . . . . . . 452.11. VPN Connection Type Selection. . . . . . . . . . . . . . . . . . . . . . . . . . . . . . . . . . . . . . . . . . . . . . . . . . . . . . . . . . . . . 452.12. VPN Host-to-Net Connection Input. . . . . . . . . . . . . . . . . . . . . . . . . . . . . . . . . . . . . . . . . . . . . . . . . . . . . . . . . . . 462.13. VPN Net-to-Net Connection Input. . . . . . . . . . . . . . . . . . . . . . . . . . . . . . . . . . . . . . . . . . . . . . . . . . . . . . . . . . . . 462.14. VPN Authentication Input. . . . . . . . . . . . . . . . . . . . . . . . . . . . . . . . . . . . . . . . . . . . . . . . . . . . . . . . . . . . . . . . . . . 472.15. VPN Certificate Authorities window: Initial View. . . . . . . . . . . . . . . . . . . . . . . . . . . . . . . . . . . . . . . . . . . . . . 472.16. Log Settings. . . . . . . . . . . . . . . . . . . . . . . . . . . . . . . . . . . . . . . . . . . . . . . . . . . . . . . . . . . . . . . . . . . . . . . . . . . . . . . 482.17. Log Summary Output. . . . . . . . . . . . . . . . . . . . . . . . . . . . . . . . . . . . . . . . . . . . . . . . . . . . . . . . . . . . . . . . . . . . . . . 492.18. Proxy Log Output . . . . . . . . . . . . . . . . . . . . . . . . . . . . . . . . . . . . . . . . . . . . . . . . . . . . . . . . . . . . . . . . . . . . . . . . . . 512.19. Firewall Log Output . . . . . . . . . . . . . . . . . . . . . . . . . . . . . . . . . . . . . . . . . . . . . . . . . . . . . . . . . . . . . . . . . . . . . . . . 532.20. IDS Log Output . . . . . . . . . . . . . . . . . . . . . . . . . . . . . . . . . . . . . . . . . . . . . . . . . . . . . . . . . . . . . . . . . . . . . . . . . . . . 542.21. System Log Output. . . . . . . . . . . . . . . . . . . . . . . . . . . . . . . . . . . . . . . . . . . . . . . . . . . . . . . . . . . . . . . . . . . . . . . . . 56
v

Preface1. Rights and DisclaimersIPCop is Copyright the IPCop Linux Group.
IPCop Linux is published under the GNU General Public License. For more information please visit our web site atIPCop Web Site. [http://www.ipcop.org]You may copy it in whole or in part as long as the copies retain this copyrightstatement. The information contained within this document may change from one version to the next.
All programs and details contained within this document have been created to the best of our knowledge and testedcarefully. However, errors cannot be completely ruled out. Therefore IPCop does not express or imply any guaranteesfor errors within this document or consequent damage arising from the availability, performance or use of this orrelated material.
The use of names in general use, names of firms, trade names, etc. in this document, even without special notation,does not imply that such names can be considered as “free” in terms of trademark legislation and that they can be usedby anyone.
All trade names are used without a guarantee of free usage and might be registered trademarks. As a general rule,IPCop adheres to the notation of the manufacturer. Other products mentioned here could be trademarks of therespective manufacturer.
1st Edition - December 29, 2001
Editor Charles Williams
I would like to thank the folks that reviewed and corrected the document: Harry Goldschmitt, Mark Wormgoor, EricS. Johansson and the rest of the IPCop Linux Group.
2nd Edition - January 10, 2003
Editors - Chris Clancey, James Brice, Harry Goldschmitt, and Rebecca Ward
3rd Edition - April 25, 2003
Editors - Chris Clancey, Harry Goldschmitt, and Rebecca Ward
4th Edition - September 25, 2004
Editors - Chris Clancey, Harry Goldschmitt, John Kastner, Eric Oberlander and Peter Walker
2. ForwardHello. On behalf of our Project Leader, Jack Beglinger, the Documentation staff would like to welcome you to theIPCop Users Administration Document. We would like to take this opportunity to thank you for trying our firewalland we hope that it will serve your needs. The team would also like to thank the IPCop Linux Community for itscontinuing presence and the outstanding job it does helping new and experienced users alike. We would also like tothank the team at SmoothWall for bringing the IPCop Linux Community together.
Whether you are an existing user moving up the version chain or a new user getting ready for your first install, wehope you will find all you need to get up and running in this manual. If, for some reason, something is not coveredhere and you feel it should be, then by all means contact us and let us know. We always like to hear from our userbase (actually some of us are just kinda lonely sitting on the computer all day and a little note is nice every once in a
vi

Preface
while) and hope to be able to accommodate their needs as much as possible. Now you can relax and enjoy the Internetwithout having to worry.
So, here is a bit of information for those of you that have the time to read this and are waiting for your IPCop Linuxbox to install. The initial release of IPCop was an interim release to assist us in finding problems in the IPCop LinuxDistribution. We are now on our third full release. If you do happen to find problems, please check the IPCop FAQfirst as we attempt to update the FAQ as soon as we find a problem and can provide solid information on either a workaround or a direct fix.
If your problem is not referenced in the FAQ then you can either join us on IRC (server: irc.openprojects.net channel:#ipcop), contact the IPCop mailing list or send the IPCop Linux Group an email for direct support. Please beadvised that you will more than likely receive a faster response and solution by using the first 3 methods listed above.Contacting the IPCop Linux Group directly could have a large delay, depending upon our development schedule.
You may find further information as well as the newest FAQ, mailing list information and IPCop Linux Group contactinformation on our web site:IPCop Web Site[http://www.ipcop.org]
vii

Chapter 1. Project Leader’s IntroductionWelcome and thank-you for looking at and/or using IPCop.
1.1. What Is IPCop?Now, what is IPCop?
1. IPCop is a firewall; first, last and always.
2. IPCop is a specialized Linux Distribution; complete, configured, and ready to protect your network. Further, itis distributed under the GNU General Public License[http://www.gnu.org/licenses/gpl.html], complete sourceready to be downloaded, reviewed, or even be modified and/or recompiled by yourself for your personal needs orsecurity reasons.
3. IPCop is a community; where members help each other, all sharing to improve the project and each other. Thishelp goes from simple “Networking 101”type of instruction and direction, to helping members customize theirIPCop to meet a specialized needs such as Net-Phones (VoIP) and multiple office integration.
This was a trick question. The correct answer is: All of the above.
Background:
IPCop grew out of many needs. The first of those needs was a need for secure protection of our personal andcommercial networks. When IPCop started October 2001, there were other firewalls available. However, the teamthat started IPCop felt that the other two needs that IPCop fills were not addressed; GPL and a sense of community.
The IPCop founding group decided to do things differently and forked the base GPL code of an existing firewall andstarted out anew, looking to keep user community needs in the forefront. Among those needs is the need of the user tomake IPCop their own, to install improvements, to just learn by seeing what others have done. Through these needs iswhere development gets some of improvements to IPCop, directly listening and seeing what has been done and why.This community makes IPCop grow and IPCop helps them grow.
Now, after almost two and a half years, the first major overhaul of IPCop has been released. With it, a lot of cool thingshave been added; quad network support, intrusion detection on all networks and a slick new interface, to name a few.
And so again, Welcome to IPCop!
Jack BeglingerProject Leader
1.2. Partial List of Features• IPTable network filters• IDE, SCSI and CF (Disk on a Chip) drive support.• Quad Network support:
• GREEN — Internal Trusted Network
1

Project Leader’sIntroduction
• BLUE — Wireless Semi-Trusted Network (can be used a second Green)
• ORANGE — DMZ for Internet accessed servers
• RED — The Internet connected via:
• Dial modem
• ISDN
• NIC Connected:
• DSL Modem
• Cable Modem
• USB Connected (w/ right driver):
• DSL Modem
• Cable Modem
• Multiple “Real” IP supported on RED when using a Static IP base.• DHCP client support on RED to receive IP from ISP, also support for a dynamic DNS to be updated as this IPchanges.
• DHCP server for GREEN and BLUE to simplify network setup and maintenance.• NTP server and client for setting IPCop clock and supplying a common clock for internal GREEN and BLUEnetworks.
• Intrusion Detection for ALL networks (RED, ORANGE, BLUE and GREEN)• Vitural Private Network (VPN) to allow multiple sites to act as single large network.• Proxy Support for both Web Surfing and DNS support allow for “faster” connection response on and simplifiednetwork setup.
• Administration after initial load is via a secure Web Interface including:
• Performance Graphics for CPU, Memory and Disk as well as Network throughput
• Log viewing with autorotation.
• Multiple language support.
• Use of older equipment. 386 or better. Version 1.4 has been tested on 486sx25 with 12M of RAM and 273M ofhard drive. This was the oldest and smallest we could find we could find at the time of test. It was loaded via theNet Install option and supported a full Cable Modem download speed of 3Mb/s.
2

Project Leader’sIntroduction
1.3. AcknowledgementsIPCop software is both a collaborative project and built upon great prior works. These acknowledgements will covermany to help both directly and indirectly, but will never the less miss untold many who toiled to help develop thisproject but I failed to get them noted here. To those, I say many thanks and sorry for missing your name.
For the rest, thank you. . . For a more up to listing please see System−→Credits in IPCop.
Core Team
• Mark Wormgoor — Lead Developer
• Alan Hourihane — SMP & SCSI Developer
• Giles Espinesse —
• Harry Goldschmitt — Lead Documentation
• Eric Oberlander — Developer & Translation Coordinator
Developers. Mark Wormgoor, Alan Hourihane, Eric S. Johansson, Darren Critchley, Robert Kerr, Gilles Espinasse,Steve Bootes, Graham Smith, Robert Wood, Eric Oberlander, Tim Butterfield and David Kilpatrick.
Documentors. Harry Goldschmitt, Chris Clancey, John Kastner, Eric Oberlander, Peter Walker
Translators.
• Brazilian Portuguese:Edson-Empresa, Claudio Corrêa Porto, Adilson Oliveira, Mauricio Andrade, WladimirNunes
• Chinese:Vince Chu, Yuan-Chen Cheng, Sohoguard
• Czech:Petr Dvoracek, Jakub Moc
• Danish: Michael Rasmussen
• Dutch: Gerard Zwart, Berdt van der Lingen, Tony Vroon, Mark Wormgoor
• Finnish: Kai Käpölä
• French:Bertrand Sarthre, Michel Janssens, Erwann Simon, Patrick Bernaud, Marc Faid’herbe, Eric Legigan, EricBerthomier, Stéphane Le Bourdon, Stéphane Thirion, Jan M. Dziewulski,spoutnik, Eric Darriak, Eric Boniface
• German: Dirk Loss, Ludwig Steininger, Helmet, Markus, Michael Knappe, Michael Linke, Richard Hartmann,Ufuk Altinkaynak, Gerhard Abrahams, Benjamin Kohberg, Samuel Wiktor
• Greek:Spyros Tsiolis, A. Papageorgiou, G. Xrysostomou
• Hungarian: Ádám Makovecz, Ferenc Mányi-Szabó
• Italian: Fabio Gava, Antonio Stano, Marco Spreafico
• Latino Spanish:Fernando Diaz
• Norwegian:Morten Grendal, Alexander Dawson, Mounir S. Chermiti, Runar Skraastad, Alf-Ivar Holm
3

Project Leader’sIntroduction
• Polish: Jack Korzeniowski, Piotr, Andrzej Zolnierowicz
• Portuguese:Luis Santos, Renato Kenji Kano, Mark Peter, Wladimir Nunes, Daniela Cattarossi
• Romanian:Viorel Melinte
• Russian/Ukranian:Vladimir Grichina, Vitaly Tarasov
• SpanishCurtis Anderson, Diego Lombardia, Mark Peter, QuiQue Soriano, David Cabrera Lozano, Jose Sanchez,Santiago Cassina, Marcelo Zunino, Alfredo Matignon
• Swedish:Anders Sahlman, Christer Jonson
• Turkish: Ismail Murat Dilek, Emre Sumengen
• Vietnamese:Le Dinh Long
Other Projects and Companies: Traverse Technologies — Improved Dual ISDN and DOV support, Linux fromScratch (LFS) — Code Base for IPCop 1.4, FreeSwan and OpenFreeSwan — IPSec and VPN software, Smoothwall— Original foundation and inspiration, . . . and others too numerous to mention.
4

Chapter 2. Administration and Configuration2.1. Home Administrative Window
To access the IPCop GUI is as simple as starting your browser and entering the IP address (of the green IPCopinterface) or hostname of your IPCop server along with a port director of either 445 (https/secure) or 81(redirected to445): https://ipcop:445 or https://192.168.10.1:445 or http://ipcop:81 or http://192.168.10.1:81.
Note: Deprecation of HTTP Port 81 Connections
As of IPCop Release 1.4.0, http connections to port 81 will be redirected to https on port 445. Several yearsago, when IPCop was originally designed, a small fraction of browsers could not handle the https protocol,so http on port 81 was made available. Most of these browsers have fallen out of use and sending IPCoppasswords in the clear, over http is inherently dangerous, so http connections have been deprecated. For thosein the habit of using port 81, the connection will be automatically redirected to https. If you are still using abrowser that can not handle https, please download one of the many browsers that can and use it.
You should now be looking at the Home Page of your IPCop server’s Administration GUI. You can immediatelystart exploring the different options and the information available to you through this interface. Below, we havelisted the Main Configuration/Administration Options available through the GUI. When you have acquainted yourselfsufficiently with the system, please continue with the next section.
IPCop’s Administrative web pages or AWs are available via the tabs at the top of the screen.
• System: System configuration and utility functions associated with IPCop, itself.
• Status Displays detailed information on the status of various portions of your IPCop server.
• Network Used for the configuration/administration of your dial-up/PPP settings.
• Services: Configuration/Administration of your IPCop server’s many Services options.
• Firewall: Configuration/Administration of IPCop’s firewall options.
• VPNs: Configuration/Administration of your IPCop server’s Virtual Private Network settings and options.
• Logs: View all your IPCop server’s logs (firewall, IDS, etc.)
5

Administrationand Configuration
The Home web page is one of several web pages that will look differently depending on the way IPCop is configured.If your Internet connection is via an Ethernet RED interface the Home web page will only not show the currentconnection name, etc.
If all went well during the configuration of your PPP connection and PPP is the connection type being used to connectto the Internet, then you will see 3 buttons on the IPCop GUI main page.
Note
You will not see an active connection until you have finished configuring your IPCop server.
At the top left corner of the folder you will see the fully qualified domain name of your IPCop machine.
Modem Connection Buttons
• Connect - This will force a connection attempt to the Internet.
• Disconnect - This will sever the connection to the Internet.
• Refresh - This will refresh the information on the main screen.
6

Administrationand Configuration
In addition to the above buttons you will see the “Current Profile” being used to connect to the Internet (Set in theDialup AW). Below the “Current Profile” line, you will see your actual connection status. This will be one of thefollowing:
• Idle - No connection to the Internet and not trying to connect.
• Dialing - Attempting to connect to the Internet.
• Connected - Currently connected to the Internet.
If you are currently connected to the Internet you will see a Connection status line in the following format:
• Connected ( #d #h #m #s)
• d=Days connected
• h=Hours connected
• m=Minutes connected
• s=Seconds connected
Below your connection status line you will see a line similar to the following:
7:07pm up 1 day, 7:21, 0 users, load average: 0.03, 0.01, 0.00
This line is basically the output of the Linuxuptime command and displays the current time, the days/hours/minutesthat IPCop has been running without a reboot, number of users logged in to the IPCop server, and the load average onthe IPCop server. Additionally, if there are updates available for IPCop that you have not yet installed, you will beinformed via this page.
IPCop has two web users, in addition to the root login user. The first is called admin. Authenticating as this user givesaccess to all AWs. The other user, called dial, is able only to use the Connect or Disconnect buttons. By default, thedial user is disabled; to enable it you must set a password for that user. No password is required to view the Home orInformation AWs. All others require the admin password.
2.2. System Web PagesThis group of web pages is designed to help you administer and control the IPCop server itself. To get to these webpages, select System from the tab bar at the top of the screen. The following choices will appear in a dropdown:
• Home— Returns to the home page.
• Updates— Allows you to query and apply fixes to IPCop.
• Passwords— Allows you to set the admin and optionally, the dial password.
• SSH Access— Allows you to enable and configure Secure Shell, SSH, access to IPCop.
• GUI Settings— Enables or disables the use of JavaScript and allows you to set the language of the web display.
• Backup— Backs up your IPCop settings either to files or to a floppy disk. You can also restore your settings fromthis web page.
7

Administrationand Configuration
• Shutdown— Shutdown or restart your IPCop from this web page.
• Credits—This web page lists the many volunteers and other projects that make IPCop so great.
2.2.1. Updates AW
This section has 3 sections:
1.Shows your current patch level.
2. Informs you of new patches available.
3.Allows you to apply a given patch.
Every time you connect to the Internet IPCop will check for any new Updates that may be available. You may alsomanually check for updates by clicking the Refresh update list. When a new patch is available you will see theinformation on screen with the short description and a link for more information. Follow the “Info” link. When youhave followed the link you will see a page with all relevant information about the patch including a download link.
Downloading the patch will place it on the machine you are running your web browser on, not the IPCop machine.Once you have downloaded the patch simply use the Update page to Browse to where you saved it and then Uploadthe patch to apply it to your IPCop server.
Note
The Opera web browser does not handle uploads properly and thus should not be used for applying a patchto your IPCop server.
8

Administrationand Configuration
Note
Only IPCop official patches will actually install on your IPCop server. Some patches may automaticallyreboot your IPCop server, so please readall patch information thoroughly before applying said patch.
2.2.2. Passwords
The Passwords subsection of this AW is present to allow you to change the Admin and/or Dial User passwords, as youdeem necessary. Simply enter the desired password once in each field for the User you wish to update and click onSave.
Entering the Dial password activates the Dial user ID. This special user has the ability to use the buttons on the IPCopHomeweb page but cannot get to any other IPCop web pages. Use this facility if you have a dial up connection andwant to allow users to connect to the Internet, but not have admin authority on the firewall.
2.2.3. SSH AccessThe SSH subsection of this AW allows you to decide if remote SSH access is available on your IPCop server or not.By placing a checkmark in the box you will activate remote SSH access. It is also possible to configure several SSHdaemon parameters from this web page. The SSH option is disabled by default and we would advise enabling itonlyas needed and then disabling it afterwards.
9

Administrationand Configuration
Similar to the HTTP and HTTPS ports for the IPCop machine being switched to ports 81 and 445, the SSH porton the IPCop machine is switched to 222. If you are using a GUI based application to access your IPCop machine,remember to specify port 222. If you are using the SSH, scp or sftp commands, the syntax for specifying non-standardports is different for each command, even though they are related. Assuming your IPCop machine is at IP address192.168.254.1, the commands would be:
SSH
$ ssh -p 222 [email protected]
SCP
$ scp -P 222 some/file [email protected]:
SFTP
$ sftp -o port=222 [email protected]
Use your desktop machine’s man pages to get a more complete explanation of these commands.
2.2.3.1. SSH Options
The following SSH options are available from the web page:
10

Administrationand Configuration
Enabled: Checking this box enables SSH. Unless you use external access, SSH will only beavailable from the GREEN network. With SSH enabled it possible for anyone withthe IPCop root password to log into your firewall at the command prompt.
Support SSH protocol version 1 (required only for old clients) Checking this box enables support of SSH version1 clients. Use of this option is strongly discouraged. There are known vulnerabilitieswith SSH version 1. Use this option only for temporary access, if you only have SSHversion 1 clients and there is no way to upgrade to SSH version 2. Most, if not all, ofthe current SSH clients support version 2. Upgrade your clients if at all possible.
Allow TCP Forwarding Checking this box, allows you to create SSH encrypted tunnels between machines insideyour firewall and external users.
What use is this when IPCop already has a VPN?
You are on the road and something goes wrong with one of your servers. You haven’tset up a road warrior VPN connection. If you know your IPCop root password youcan use SSH port forwarding to get through your firewall and get access to a serveron one of your protected networks. These next few paragraphs will discuss how to dothis, assuming you have a Telnet server running on an internal computer at 10.0.0.20.It also assumes your remote machine is a Linux machine. The putty SSH command onWindows has the same capabilities, but they are accessed via dialog boxes. You mayalready have done one or more of the first two steps.
1.Enable or have someone else enable external access for port 445, the HTTPS port.
2.Use the IPCop web pages to enable SSH access, port forwarding and externalaccess for port 222.
3.Create an SSH tunnel between your remote machine and the internal server runningan SSH daemon by issuing the command:
$ ssh -p 222 -N -f -L 12345:10.0.0.20:23 root@ipcop
-p 222 IPCop listens for SSH on port 222, not the normal22.
-N in conjunction with -f, tells SSH to run in the back-ground without terminating. If you use this option,you will have to remember to use kill to terminatethe SSH process. As an alternative, you may want toadd the commandsleep 100 to the end of thecommand line, and not use the -N option. If you dothis the SSH invoked by the ssh command will ter-minate after 100 seconds, but the telnet session andits tunnel will not terminate.
-f option to run SSH in the background.
-L tells SSH to build a port forwarding tunnel as speci-fied by the next parameters.
11

Administrationand Configuration
12345 The local port that will be used to tunnel to theremote service. This should be greater than 1024,otherwise you must be running as root to bind to wellknown ports.
10.0.0.20 This is the GREEN address of the remote server.
23 This specifies the remote port number to be used,Telnet.
[email protected] Finally, this specifies you will be using your IPCopfirewall as the port forwarding agent. You need a userID to log in as, and the only one available on is root.You will be prompted for IPCop’s root password.
4. Finally, log into the remote Telnet using the tunnel.
$ ssh localhost 12345
localhost is the machine you are running on. The loopback address 127.0.0.1is defined as localhost. 12345 is the local tunnel port specified on the previouscommand.
There is a tutorial on SSH port forwarding at Dev Shed[http://www.devshed.com/c/a/Administration/Secure-Tunnelling-with-SSH/].
Allow password based authentication Allows users to log into the IPCop server using the root password. If youdecide to turn this off, set up your SSH key files, first and then verify you can log inusing your key files.
Allow public key based authentication By checking this box, public key authentication can be used bySSH. This is the preferred method of securing IPCop using SSH. This article[http://security.itworld.com/4360/LWD010410SSHtips/page_1.html]has a discussionabout usingSSH-keygento generate RSA keys and how to use them with SSH.
2.2.3.2. SSH Host Keys
This section lists the host key fingerprints used by SSH on IPCop to verify you are opening a session with the rightmachine. The first time a session is opened, one of the fingerprints will be displayed by SSH and you will be asked toverify it’s correct. If you wish, you verify can it by looking at this web page.
2.2.4. GUI SettingsThis web page governs how the IPCop web pages function and appear.
12

Administrationand Configuration
Enable Javascript: The 1.4.0 administrative web pages use JavaScript extensively to provide an improvedlook and feel. However, some browsers do not work properly wth JavaScript. If thisbutton is not checked, the various drop down menus will be disabled and your choiceson any page will appear across the top of the page.
Display hostname in window title: This checkbox will turn on the display of an IPCop host’s name at the topof each web page. If you are maintaining more than one IPCop machine, this will beadvantageous, since you will be able to tell which machine your browser is currentlydisplaying.
Select the language you wish IPCop to display in: This drop down menu will let you choose which one of the 23languages currently available for IPCop web pages, this IPCop will use for its display.
You can also select the language to be used by IPCop during installation. However, yourdesired language may not be available during installation. The IPCop translation groupis planning on making more languages available as volunteers aid the translation effort.When new languages become available, you will be able to download a new languageand if desired, activate it from this AW.
Of course, you may wish to translate IPCop to another language yourself. If youdo, we urge you to contact the IPCop Translation Coordinator, Eric Oberlander,<[email protected]> , first. He may be aware of on-going translation projects for your language. Please check the IPCop How To Translate[http://www.ipcop.org/cgi-bin/twiki/view/IPCop/HowToTranslate]web page for moredetails.
2.2.5. Backup Web PageThere are two ways to back up IPCop and three ways to restore it. One backup creates disk files and one puts its outputon a floppy.
Creating a backup floppy limits the amount of data saved, since the result must fit onto a 1.44 MB floppy. It is,however, the backup used when restoring IPCop from scratch. During IPCop installation, you will be prompted for afloppy disk to restore. All settings saved on the floppy will be restored, and installation will complete.
When first creating backup files IPCop creates two files, a tar.gz file and a .dat file. It also creates a unique backup keythat will be used to encrypt all the tar.gz files. The Encrypted and Unencrypted descriptions of the files are misnomers.While the .dat file is encrypted, the encryption is used to “sign” the .dat file, so it can’t be accidentally restored on adifferent IPCop machine. Once a key has been created, only .dat files can be used for a restore.
For full backup/restore protectionall methods and files should be used for backups, as explained in the followingscenarios.
13

Administrationand Configuration
IPCop settings are damaged Use an appropriate .dat file to restore saved settings.
You have to reinstall IPCop Use a backup floppy, if you have one, during the installation process to restore yourold settings. Then import the .tar.gz file to the new IPCop machine and restore allsettings and logs.
2.2.5.1. Backup to Files
This panel of the Backup web page manages the creation, export, import and restore of IPCop file backups. By clickingon the create button, IPCop will create a backup key, if one has not been created previously, and create the two backupfiles. If this is the first time you’ve created backup files, the text in the Import .tar.gz button will change to Import.dat. This indicates that in the future only .dat files may be imported. Next, export both files to the computer you arerunning your web browser on by clicking on their Export links.
If you wish to restore from a backup file, select one of the backup sets shown in the Backup Sets window. Or import asaved .dat file from another machine.
2.2.5.2. Backup to Floppy
14

Administrationand Configuration
This panel of the Backup Web Page will let you back up your IPCop configuration to a floppy disk. The easiest wayto restore your configuration is to reinstall IPCop from CD-ROM or HTTP/FTP. Early in the installation process, youwill be asked if you have a floppy with an IPCop system configuration on it. If you wish to restore your configurationfrom a backup floppy, place the floppy disk in the floppy drive and select the Restore button. Your configuration willbe restored and installation will terminate.
After installation completes, you can use the Backup Web page to import an unsigned .tar.gz file and restore from it,regaining missing logs, etc.
Warning
At this time, IPCop will not overwrite DOS formatted floppy disks. To format a floppy disk for IPCop, youwill need to format it for Linux. The command to do this is:
# fdformat /dev/fd0
If you have another Linux machine, you can format a floppy on that machine. Otherwise, use SSH or puttyto log in to IPCop as root, and issue the command there.fdformat will not prompt for a floppy like DOSformat will, so insert the floppy disk into the floppy disk drive before issuingfdformat .
2.2.5.3. Backup configuration
Place a floppy disk in the floppy disk drive and click the Backup button. Your configuration will be written to thefloppy and verified.
2.2.5.4. Information
All messages generated during a backup or will appear in this section of the page.
2.2.6. Shutdown Web PageThis page allows you to either Shutdown or Reboot the IPCop server. Simply click the button of the option you wantand that’s it.
15

Administrationand Configuration
2.3. Status Menu2.3.1. System StatusThe Status pages present you with a VERY thorough list of information regarding the current status of your IPCopserver. The first subsection, System Status, displays the following in top-down order:
2.3.1.1. Services
Services - Displays which services are currently running.
2.3.1.2. Memory
Memory - Displays the memory/swapfile usage on your IPCop server.
16

Administrationand Configuration
2.3.1.3. Disk Usage
Disk Usage - Displays the total/used amount of hard drive space on your IPCop server.
2.3.1.4. Uptime and Users
Uptime and Users - Displays the output of theuptime command and information on users currently logged in on theIPCop server.
2.3.1.5. Loaded Modules
Loaded Modules - This displays all modules currently loaded and in use by the kernel.
17

Administrationand Configuration
2.3.1.6. Kernel Version
Kernel Version - This displays information on the IPCop Kernel itself.
2.3.2. Network StatusContent to be written...
2.3.2.1. Interfaces
Interfaces - This section displays information onall your network devices. This includes PPP, IPSec, Loopback, etc.
18

Administrationand Configuration
Content to be checked...
2.3.2.2. Current Dynamic Leases
Displays the contents of the/var/state/dhcp/dhcpd.leases file if DHCP is enabled. The current dynamicleases are listed, with hostnames if available, and expiry dates.
Leases that have expired are scored through.
Note
This section willonlybe visible if DHCP is enabled. Refer to the section on theDHCP Serverfor details.
2.3.2.3. Routing Table Entries
Content to be written...
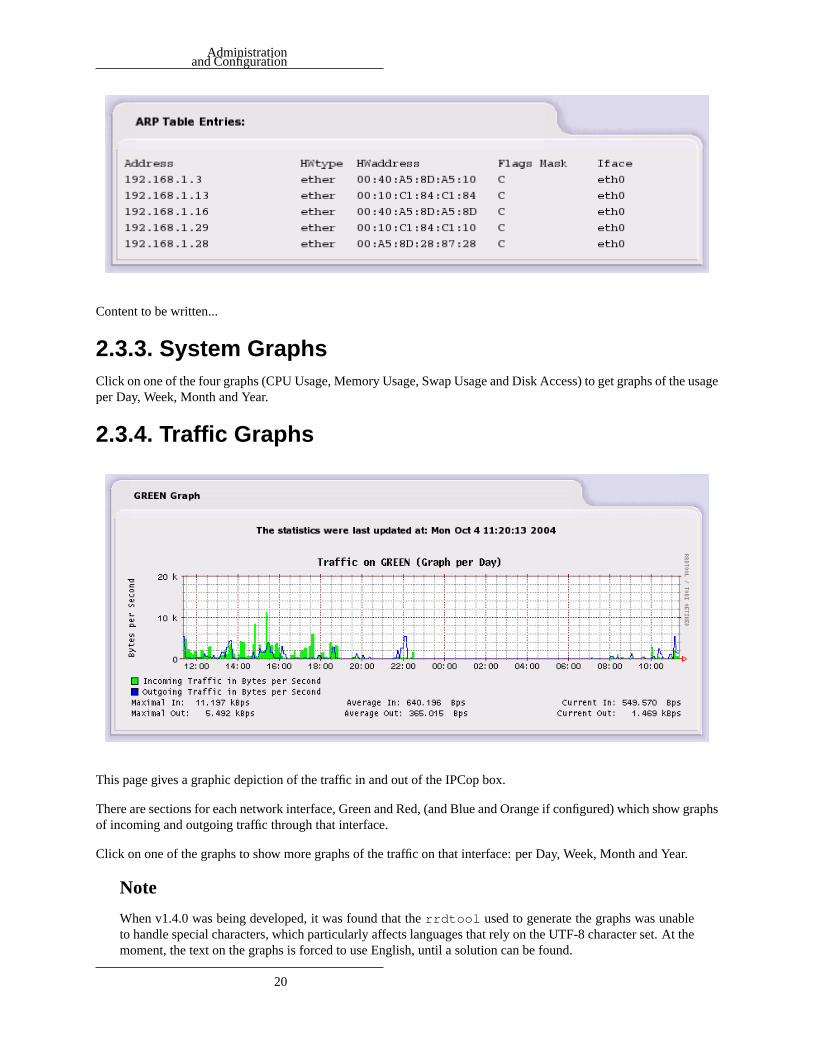
2.3.2.4. ARP Table Entries
19
Administrationand Configuration
Content to be written...
2.3.3. System GraphsClick on one of the four graphs (CPU Usage, Memory Usage, Swap Usage and Disk Access) to get graphs of the usageper Day, Week, Month and Year.
2.3.4. Traffic Graphs
This page gives a graphic depiction of the traffic in and out of the IPCop box.
There are sections for each network interface, Green and Red, (and Blue and Orange if configured) which show graphsof incoming and outgoing traffic through that interface.
Click on one of the graphs to show more graphs of the traffic on that interface: per Day, Week, Month and Year.
Note
When v1.4.0 was being developed, it was found that therrdtool used to generate the graphs was unableto handle special characters, which particularly affects languages that rely on the UTF-8 character set. At themoment, the text on the graphs is forced to use English, until a solution can be found.
20

Administrationand Configuration
2.3.5. Proxy Graphs
This page shows traffic through the proxy service of the IPCop box. The first section gives the date and time the graphwas created, the lines analyzed, the duration of the analysis, the speed (lines per second), the start and end date andtime of the graph, and the domain (overall length of the graph in time).
This information is useful in seeing whether the proxy is the correct size for the load being experienced.
2.3.6. Connections
21

Administrationand Configuration
IPCop uses the Linux Netfilter or IPTables firewall facility to maintain a stateful firewall. Stateful firewalls keep trackof connections to and from all GREEN, BLUE and ORANGE network IP addresses, based on both the source anddestination IP addresses and ports, as well as the state of the connection itself. After a connection is establishedinvolving protected machines, only packets consistent with the current state of the connection are allowed through theIPCop firewall.
The IPTables Connection Tracking window shows the IPTables connections. Connection end points are color-codedbased on their network location. The color-coding legend is displayed at the top of the page. Information on individualconnections is displayed next. Each connection from or to your networks is shown.
Click on an IP Address to do a reverse DNS lookup.
2.4. Network Menu2.4.1. DialupThis subsection of the Dialup Administration Window (AW) is divided into 5 different editable sections and is onlyapplicable if you are accessing the Internet using an analog modem, an ISDN device or a DSL connection.
Note that you cannot select or modify a profile while the IPCop server is online, or waiting to go online in “Dialon Demand” mode. Before using this page, go to the Home AW and if the status line reports Connected or Dial onDemand waiting then the click on the Disconnect button before returning to this Window. After setting up or selectingProfiles, remember to return to the Home AW and click the Connect button, if you want your IPCop server to go backonline.
Profiles . This section of the Window provides the facilities to name and set up new Dialup Profiles (up to a total offive), or to rename existing Profiles and change their parameters.
Select a Profile to be created or modified from the drop-down list. Fill in or change the parameters for the profile (seebelow) and click on the Save button. To select the Profile to be used for future connections, use the drop-down list tomake your choice and click the Select button at the bottom of the page. Use the Restore button while editing a Profileto reinstate the previous Profile settings.
Telephony . This section allows you to do the following:
22

Administrationand Configuration
1.Select the appropriate Interface for your Internet connection device. This will be either a Communications port(COM1 - COM4) used mostly for modems and ISDN cards, or PPPoE which is used mostly for DSL connections.
2.Select the appropriate Computer to modem rate. This will decide how quickly data is passed to and from yourconnection device. With older computer systems or modems, you may find it necessary to use one of the lowerdata rates to establish reliable computer/ modem communications.
3.Enter the correct Number to dial for your Internet connection. If connecting through the PPPoE interface thenchances are you will probably be leaving this blank.
4.Select whether or not the Modem speaker on. Having the speaker on allows you to hear the connection takingplace and can be a useful diagnostic aid when troubleshooting. This option is only likely to be useful if you areconnecting via an analog modem.
5.Select your Dialing mode . Use Tone dialing unless your telephone connection only recognizes Pulse dialing.Pulse dialing is a lot slower than Tone dialing.
6.Enter your desired Maximum retries. This will decide how often IPCop attempts to connect to the Internet aftera failed connection attempt.
7.Enter your Idle timeout . This will decide how IPCop handles your Internet connection when nothing is actuallybeing sent or received via the Internet connection. The number you enter here indicates to IPCop how long itshould wait after any Internet activity before it disconnects the modem link. If you set this parameter to 0 thenIPCop, once connected, will not disconnect from the Internet of its own accord.
8.The Persistent Connection checkbox is used to instruct IPCop to maintain the modem connection at all times, evenin the absence of Internet activity. In this mode it will attempt to reconnect the Internet connection whenever thelink fails for any reason, such as a connection time-out at the ISP end of the modem link. Use this mode withcaution. If you have metered connection charges you probably will not want to use this feature. However, if youhave unlimited service time (often called "Flatrate") with your ISP, you may want to use this in order to keep thelink connected as much as possible. Note that in Persistent mode, IPCop will cease reconnecting after more thanthe number of consecutive failed dial attempts set in Maximum Retries In this event, you have to use the Dialbutton on the Home AW.
9.Dial on Demand is available by clicking the checkbox. Note that after enabling Dial on Demand, you still haveto click the Connect button on the Home AW before IPCop will start connecting automatically when it detectsInternet activity. The Dial on Demand option is not available for PPPoE connections.
10.The Dial on Demand for DNS option determines whether IPCop will connect automatically when it detects DNSrequests. This will be usually what you will want to happen.
11.Connect on IPCop Restart will make IPCop connect after booting, if Dial on Demand is not selected. You willprobably want to set this option as active if you are also using Dial on Demand. This is because the combinationof settings will automatically put the IPCop system into Dial on Demand waiting mode each time the IPCopserver is switched on or rebooted.
12.ISP Requires Carriage Return Some ISPs require that the modem sends a carriage return to signal to indicate thatit is finished sending data. If your ISP requires this, then leave it checked. If not then you can uncheck this box.The default is checked.
23

Administrationand Configuration
Additional PPPoE settings - If either PPPoE or USB ADSL is enabled, additional configuration options are available.Here you can enter two additional parameters, a service name, and a concentrator name, which some ISPs require. Ifyour ISP does not require them, or does not give you any, then you may leave these two fields blank. Your ISP willgive you two settings, VPI and VCI, which you must enter if you are using a USB ADSL connection.
Authentication. Username and Password are the username and password that your ISP should have supplied to youwhen you opened your account with them. There are several ways in which ISPs use this username and password tologin to their systems. The most common methods are PAP or CHAP. Select this if your ISP uses either of those two.If your ISP uses a text-based login script, choose standard login script. For people in the UK who use Demon Internetas their ISP, a special script has been created for them to use. The "Other" login script option has been provided forpeople who have ISPs with special needs. If you need to do this, you will need to login to the IPCop box and create afile in /etc/ppp. This filename (without the /etc/ppp component) should be entered into the Script name box. The filecontains ’expect send’ pairs, separated by a tab.USERNAMEwill be substituted for the username andPASSWORDforthe password. Examine the file demonloginscript in /etc/ppp, and use it as an example of what should be in this file.
DNS. Select Automatic if your ISP supports automatic DNS server configuration, as is now usually the case. Thealternative is to leave Automatic unticked and put IP addresses in the Primary DNS and Secondary DNS boxes. TheseIP addresses will generally be provided where necessary by your ISP.
2.4.2. UploadUse this page to download the files necessary for supporting various modems to your desktop machine, and thenupload it to your IPCop server.
Upload Speedtouch USB Firmware.Use this section to upload the file mgmt.o to the IPCop server - USB ADSLwill not function before this has been done. Use the link specified to go to the web page, register and download the fileto your desktop machine. Then choose the file on your desktop machine, and then press the upload button to transferit to IPCop. Once this has been successfully uploaded, you can use USB ADSL.
Upload ECI ADSL Synch.bin File. Use this section to upload the file sync.bin to the IPCop server - ECI ADSL willnot function before this has been done. Use the link specified to go to the web page and download the file to yourdesktop machine. Then choose the file on your desktop machine, and then press the upload button to transfer it toIPCop. Once this has been successfully uploaded, you can use ECI ADSL.
Upload Fritz!DSL Driver. Use this section to upload the file fcdsl.o to the IPCop server - Fritz!DSL will not functionbefore this has been done. Use the link specified to go to the web page and download the file to your desktop machine.Then choose the file on your desktop machine, and then press the upload button to transfer it to IPCop. Once this hasbeen successfully uploaded, you can use Fritz!DSL.
2.4.3. ModemModem Configuration. Is only applicable if you are attempting to connect to the Internet with a standard analogmodem. The default settings that appear in this Administration Window are appropriate for most analog modems.However if you are experiencing problems connecting, then compare these settings with those suggested in the modemmanual for use with your particular modem. Any or all of these settings may be left blank.
Init - The standard Initialization string used by most Hayes-compatible modems is already provided for you in thisfield. If, however, your modem requires a different setting then by all means change it.
Hangup - The standard Hang up string used by most Hayes-compatible modems is already provided for you in thisfield. If, however, your modem requires a different setting then by all means change it.
24

Administrationand Configuration
Figure 2.1. PPP Settings
25

Administrationand Configuration
Figure 2.2. Upload Modem Drivers
26

Administrationand Configuration
Speaker on - The standard Speaker on string used by most Hayes-compatible modems is already provided for you inthis field. If, however, your modem requires a different setting then by all means change it.
Speaker off - The standard Speaker-off string used by most Hayes-compatible modems is already provided for you inthis field. If, however, your modem requires a different setting then by all means change it.
Tone Dial - The standard Tone Dial string used by most Hayes-compatible modems is already provided for you inthis field. If your modem and telephone line can support the Tone Dial feature and you are experiencing problemsconnecting then make sure that this string is appropriate for use with your modem.
Pulse Dial - The standard Pulse Dial string used by most Hayes-compatible modems is already provided for you inthis field. You should not need to change it, but if your telephone service does not support Tone Dialing then you mayneed to make sure this is the correct string for your modem.
The only section in this area that may not be blank is the Connect Timeout. This tells IPCop the amount of time toallow the modem to attempt to connect. After this number of seconds has elapsed without proper response on thereceiving end, IPCop will give up and move on to the next connection attempt. The default should work fine for youbut if you notice that the connection is being dropped in the middle of the negotiation sequence (turn on the modemspeaker and listen to the attempted connection) then you may need to increase this parameter slightly until it connectssuccessfully.
Figure 2.3. Modem Settings
2.4.4. External Aliases Administrative Web Page
Note
This Administrative Web Page will only appear as a menu item if your RED interface is STATIC.
In some cases, your ISP may assign you a range of IP addresses for your network.
If you have multiple IP addresses, only, so that you can connect multiple, non-server computers, to the Internet, youwill no longer need the extra addresses. IPCop should connect directly to your modem or the Internet.
27

Administrationand Configuration
Figure 2.4. External Aliases Settings
On the other hand, if you are providing a server on one of internal computers you may need to use multiple aliases onyour RED interface. To use this facility effectively, you may have to adjust IPCop’s routing tables by hand.
Add a new alias. Section to be written...
Once you have entered all the information, click the Enabled box and press Add. This will move the entry to the nextsection, and list it as an alias.
Current aliases. This section lists the aliases that are in effect. To remove one, click the “Trash Can” icon. To editone, click the “Yellow Pencil” icon.
To enable or disable a rule - click on the “Enabled” icon (the checkbox on the left of the Action column) for theparticular entry you want to enable or disable. The icon changes to an empty box when a rule is disabled. Click on thecheckbox to enable it again.
2.5. Services MenuAs well as performing its core function of Internet firewall, IPCop can provide a number of other services that areuseful in a small network.
These are:
• Proxy(Web Proxy Server)
• DHCP Server
• Dynamic DNS Management
• Edit Hosts(Local DNS Server)
28

Administrationand Configuration
• Time Server
• Traffic Shaping
• Intrusion Detection System
In a larger network it is likely that these services will be provided by dedicated servers and should be disabled here.
2.5.1. Web Proxy Administrative Web PageA web proxy server is a program that makes requests for web pages on behalf of all the other machines on yourintranet. The proxy server will cache the pages it retrieves from the web so that if 3 machines request the same pageonly one transfer from the Internet is required. If your organization has a number of commonly used web sites this cansave on Internet accesses.
Normally you must configure the web browsers used on your network to use the proxy server for Internet access.You should set the name/address of the proxy to that of the IPCop machine and the port to the one you have enteredinto the Proxy Port box, default 800. This configuration allows browsers to bypass the proxy if they wish. It is alsopossible to run the proxy in “transparent” mode. In this case the browsers need no special configuration and the firewallautomatically redirects all traffic on port 80, the standard HTTP port, to the proxy server.
You can choose if you want to proxy requests from your Green (private) network and/or your Blue (wireless) network.Just tick the relevant boxes.
If you choose to enable the proxy then you can also log web accesses by ticking the Log Enabled box. Accesses madethrough the proxy can be seen by clicking the Proxy Logs choice of the Logs menu.
If your ISP requires you to use their cache for web access then you should specify the hostname and port in theUpstream proxy text box. If your ISP’s proxy requires a user name and password then enter them in the Upstreamusername and Upstream password boxes.
29

Administrationand Configuration
Cache Management. You can choose how much disk space should be used for caching web pages in the CacheManagement section. You can also set the size of the smallest object to be cached, normally 0, and the largest,4096KB. For privacy reasons, the proxy will not cache pages received via https, or other pages where a username andpassword are submitted via the URL.
Transfer limits. The web proxy can also be used to control how your users access the web. The only control accessiblevia the web interface is the maximum size of data received from and sent to the web. You can use this to prevent yourusers downloading large files and slowing Internet access for everyone else. Set these to 0,the default, to remove allrestrictions.
To save any changes, press the Save button.
You can flush all pages out of the proxy cache at any time by clicking the Clear Cache button.
Warning
Caching can take up a lot of space on your hard drive. If you use a large cache, then the minimum size harddrive listed in the IPCop documentation will not be large enough.
The larger the cache you choose the more memory is required by the proxy server to manage the cache. Ifyou are running IPCop on a machine with low memory do not choose a large cache.
2.5.2. DHCP Administrative Web PageDHCP (Dynamic Host Configuration Protocol) allows you to control the network configuration of all your PCs fromyour IPCop machine. When a PC joins your network it will be given a valid IP address and its DNS and WINSconfiguration will be set from the IPCop machine. To use this feature the PCs must be set to obtain their networkconfiguration automatically.
30

Administrationand Configuration
You can choose if you want to provide this service to your Green (private) network and/or your Blue (wireless)network. Just tick the relevant box.
For a full explanation of DHCP you may want to read Linux Magazine’s “ Network Nirvana - How to make NetworkConfiguration as easy as DHCP ”[http://www.linux-mag.com/2000-04/networknirvana_01.html]
2.5.2.1. DHCP Server Parameters
The following DHCP parameters can be set from the web interface:
Start Address (optional) You can specify the lowest and highest addresses that the server will hand out to otherPCs. The default is to hand out all the addresses within the subnet you set up when youinstalled IPCop. If you have machines on your network that do not use DHCP and havetheir IP addresses set manually you should set the start and end address so that the serverwill not hand out any of these manual IPs.
You should also make sure that any addresses listed in the fixed lease section (see below)are also outside this range.
End Address (optional) Specify the highest address you will handout (see above).
Primary DNS Specifies what the DHCP server should tell its clients to use for their Primary DNSserver. Because IPCop runs a DNS proxy, you will probably want to leave the defaultalone so the Primary DNS server is set to the IPCop box’s IP address. If you have yourown DNS server then specify it here.
Secondary DNS You can also specify a second DNS server which will be used if the primary isunavailable. This could be another DNS server on your network or that of your ISP.
Default lease time This can be left at its default value unless you need to specify your own value. Thedefault lease time is the time interval IP address leases are good for. Before, thelease time for an address expires your computers will request a renewal of their lease,specifying their current IP address. If DHCP parameters have been changed, when alease renewal request is made the changes will be propagated. Generally, leases arerenewed by the server.
Maximum lease time This can be left at its default value unless you need to specify your own value. Themaximum lease time is the time interval during which the DHCP server will alwayshonor client renewal requests for their current IP addresses. After the maximum leasetime, client IP addresses may be changed by the server. If the dynamic IP address rangehas changed, the server will hand out an IP address in the new dynamic range.
Domain name suffix (optional) There should not be a leading period in this box. Sets the domain name that theDHCP server will pass to the clients. If any host name cannot be resolved, the clientwill try again after appending the specified name to the original host name. Many ISP’sDHCP servers set the default domain name to their network and tell customers to getto the web by entering “www” as the default home page on their browser. “www” isnot a fully qualified domain name. But the software in your computer will append thedomain name suffix supplied by the ISP’s DHCP server to it, creating a FQDN for theweb server. If you do not want your users to have to unlearn addresses like www, set theDomain name suffix identically to your ISP’s DHCP server specifies.
31

Administrationand Configuration
WINS server address (optional) If you are running a Windows network and have a Windows Naming Service,WINS, server, you can put its IP address in this box. The DHCP server will pass thisaddress to all hosts when they get their network parameters.
When you press Save, the change is acted upon.
2.5.2.2. Add a new fixed lease
If you have machines whose IP addresses you would like to manage centrally but require that they always get the samefixed IP address you can tell the DHCP server to assign a fixed IP based on the MAC address of the network card inthe machine.
This is different to using manual addresses as these machines will still contact the DHCP server to ask for their IPaddress and will take whatever we have configured for them.
You can specify the following fixed lease parameters:
MAC Address The six octet/byte colon separated MAC address of the machine that will be given thefixed lease.
Warning
The format of the MAC address is xx:xx:xx:xx:xx:xx, not xx-xx-xx-xx-xx-xx, as somemachines show, i.e. 00:e5:b0:00:02:d2.
IP Address The static lease IP address that the DHCP server will always hand out for the associatedMAC address. Do not use an address in the server’s dynamic address range.
Next Address (optional) Some machines on your network may be thin clients that need to load a boot file from anetwork server. You can specify the server here if needed.
File Name (optional) Specify the boot file for this machine.
Root Path (optional) If the boot file is not in the default directory then specify the full path to it here.
Enabled Click on this check box to tell the DHCP server to hand out this static lease. If the entryis not enabled, it will be stored in IPCop’s files, but the DHCP server will not issue thislease.
32

Administrationand Configuration
2.5.2.3. Current fixed leases
This section displays current fixed leases and allows editing or deletion of them.
To edit an existing lease, click on its pencil icon. The fixed leases values will be displayed in the Add a new fixedlease section of the page. The fixed lease will have been removed from the fixed lease display. Unless the Save buttonin the Add a new fixed lease section is pressed, the lease will be lost. Make any necessary changes and press Save.
To remove an existing profile, click on its trash can icon. The lease will be removed.
2.5.2.4. Current dynamic leases
If DHCP is enabled, this section lists the dynamic leases contained in the/var/state/dhcp/dhcpd.leasesfile. The IP Address, MAC Address, hostname (if available) and lease expiry time of each record are shown, sorted byIP Address.
It is easy to cut and paste a MAC Address from here into thefixed leasesection, if needed.
33

Administrationand Configuration
Lease times that have already expired are “struck through”.
2.5.2.5. Error messages
An error message will appear at the top of the page if a mistake is found in the input data, after you press the Savebutton.
2.5.3. Dynamic DNS Administrative Web PageDynamic DNS (DYNDNS) allows you to make your server available to the Internet even though it does not have astatic IP address. To use DYNDNS you must first register a subdomain with a DYNDNS provider. Then wheneveryour server connects to the Internet and is given an IP address by your ISP it must inform the DYNDNS server ofthat IP address. When a client machine wishes to connect to your server it will resolve the address by going to theDYNDNS server, which will give it the latest value. If this is up to date then the client will be able to contact yourserver (assuming your firewall rules allow this). IPCop makes the process of keeping your DYNDNS address up todate easier by providing automatic updates for many of the DYNDNS providers.
2.5.3.1. Add a host
The following DYNDNS parameters can be set from the web interface:
Service Choose a DYNDNS provider from the dropdown. You should have already registeredwith that provider.
Behind a proxy This tick box should be ticked only if you are using the no-ip.com service and yourIPCop is behind a proxy. This tick box is ignored by other services.
Enable wildcards Enable Wildcards will allow you to have all the subdomains of your dynamic DNShostname pointing to the same IP as your hostname (e.g. with this tick box enabled,www.ipcop.dyndns.org will point to the same IP as ipcop.dyndns.org). This tick boxis useless with no-ip.com service, as they only allow this to be activated or deactivateddirectly on their website.
Hostname Enter the hostname you registered with your DYNDNS provider.
Domain Enter the domain name you registered with your DYNDNS provider.
Username Enter the username you registered with your DYNDNS provider.
34

Administrationand Configuration
Password Enter the password for your username.
Enabled If this is not ticked then IPCop will not update the information on the DYNDNS server.It will retain the information so you can re-enable DYNDNS updates without reenteringthe data.
2.5.3.2. Current hosts
This section shows the DYNDNS entries you have currently configured.
To edit an entry click on its pencil icon. The entry’s data will be displayed in the form above. Make your changes andclick the Save button on the form.
You can also update the Behind a proxy, Use wildcards and Enabled tick boxes directly from the current hosts listentry.
2.5.3.3. Forcing a Manual Update
You can force IPCop to refresh the information manually by pressing Force Update, however, it is best to only updatewhen the IP address has actually changed, as dynamic DNS service providers don’t like to handle updates that makeno changes. Once the host entries have been enabled your IP will automatically be updated each time your IP changes.
2.5.4. Edit Hosts Administrative Web PageAs well as caching DNS information from the Internet, the DNS proxy on IPCop allows you to manually enter hostswhose address you want to maintain locally. These could be addresses of local machines or machines on the Internetwhose address you might want to override.
35

Administrationand Configuration
2.5.4.1. Add a host
The following parameters can be set from the web interface:
Source IP Enter the IP address here.
Hostname Enter the host name here.
Domain name (optional) If the host is in another domain then enter it here.
When you press Add, the entry will be saved.
2.5.4.2. Current hosts
This section shows the local DNS entries you have currently configured.
To edit an entry click on its pencil icon. The entry’s data will be displayed in the form above. Make your changes andclick the Save button on the form.
To delete an entry click on its Trash Can icon.
2.5.5. Time Server Administrative Web PageIPCop can be configured to obtain the time from a known accurate timeserver on the Internet. In addition to this it canalso provide this time to other machines on your network.
36

Administrationand Configuration
To configure the time system, make sure that the Enabled box is ticked and enter the full name of the timeserver youwant to use in the Primary NTP Server box. You can also enter an optional Secondary NTP Server if you want.
If you want to provide a time service to the rest of your network then tick the Provide time to local network checkbox.
You can choose to update the time on IPCop on a periodic basis, for instance every hour, or to update it when you wishfrom this web page (just click Set Time Now).
To save your configuration click the Save button.
If you do not want to use an Internet timeserver you can enter the time manually and click the Instant Update button.
Note
Although IPCop can act as a timeserver for your network, it uses the ntpdate program to update its time ona periodic basis instead of allowing the more accurate ntpd server to maintain the time continuously. Thismeans that the IPCop clock is more likely to drift out of synchronisation with the real time but does notrequire that IPCop is permanently connected to the Internet.
2.5.6. Traffic Shaping Administrative Web PageTraffic Shaping allows you to prioritize IP traffic moving through your firewall. IPCop uses WonderShaper toaccomplish this. WonderShaper was designed to minimize ping latency, ensure that interactive traffic like SSH isresponsive all while downloading or uploading bulk traffic.
37

Administrationand Configuration
Many ISPs sell speed as download rates, not as latency. To maximize download speeds, they configure their equipmentto hold large queues of your traffic. When interactive traffic is mixed into these large queues, their latency shoots wayup, as ACK packets must wait in line before they reach you. IPCop takes matters into its own hands and prioritizes yourtraffic the way you want it. This is done by setting traffic into High, Medium and Low priority categories. Ping trafficalways has the highest priority — to let you show off how fast your connection is while doing massive downloads.
To use Traffic Shaping in IPCop:
1. Use well known fast sites to estimate your maximum upload and download speeds. Fill in the speeds in thecorresponding boxes of the Settings portion of the web page.
2. Enable traffic shaping by checking the Enable box.
3. Identify what services are used behind your firewall.
4. Then sort these into your 3 priority levels. For example:
a. Interactive traffic such as SSH (port 22) and VOIP (voice over IP) go into the high priority group.
b. Your normal surfing and communicating traffic like the web (port 80) and streaming video/audio to into themedium priority group.
c. Put your bulk traffic such as P2P file sharing into the low traffic group.
5. Create a list of services and priorities using the Add service portion of the web page.
38

Administrationand Configuration
The services, above, are only examples of the potential Traffic Shaping configuration. Depending on your usage, youwill undoubtedly want to rearrange your choices of high, medium and low priority traffic.
2.5.7. Intrusion Detection System Administrative WebPageIPCop contains a powerful intrusion detection system, Snort, which analyses the contents of packets received by thefirewall and searches for known signatures of malicious activity.
IPCop can monitor packets on the Red, Green and Blue interfaces. Just tick the relevant boxes and click the Savebutton.
As more attacks are discovered the rules Snort uses to recognize them will be updated. To download the latest version,click the Download new rule set button.
2.6. Firewall Menu2.6.1. Port Forwarding Administrative Web PageThis subsection allows you to configure the Port Forwarding settings for IPCop. This is 100% optional, so you maysafely ignore this section if you do not wish to make use of this feature.
2.6.1.1. Port Forwarding Overview
Firewalls prevent externally initiated requests from accessing the protected system. However, sometimes, this is toostrict a situation. For example, if one is running a web server, then any requests to that web server by users outside theprotected network will be blocked by default. This means that only other users on the same internal network can usethe web server. This is not the normal situation for web servers. Most peoplewantoutsiders to be able to access theserver. This is where Port Forwarding comes in.
Port Forwarding is a service that allows limited access to the internal LANs from outside. When you set up yourserver, you can choose the receiving or “listening” ports on the internal network machines. This is done differentlydepending on which software is being used. Please refer to the documentation that came with your servers to set upthe ports on those servers.
Once those receiving ports are ready, you are ready to enter information into the AW on IPCop. The TCP/UDP dropdown list allows you to choose which protocol this rule will follow. Most regular servers use TCP. Some game serversand chat servers use UDP. If the protocol is not specified in the server documentation, then it is usually TCP. Sourceport is the port to which the outsiders will connect. In most cases, this will be the standard port for the service being
39

Administrationand Configuration
offered (80 for web servers, 20 for FTP servers, 53 for mail servers, etc.) If you wish, you may specify a range of portsto forward. To specify a range use the “:” character between two port numbers, lowest number first. Destination IP isthe internal IP address of the server (for example, you may have your web server on 192.168.0.3). Destination Port isthe port that you chose when you set up your server in the first paragraph. The SourceIP dropdown menu allows youto choose which Red IP this rule will affect. IPCop has the capability of handling more than one Red IP. If you onlyhave one Red IP set up, then choose Default IP.
2.6.1.2. Port Forwarding and External Access
The Port Forwarding interface was re-written for version 1.3.0. It is quite different from earlier versions. However,please note that the port numbers used for a particular service have not changed, and you should still refer to theseabove.
The External Access page hasNO affect on the GREEN or ORANGE networks. It is there to allow you to open portsto the IPCop box itself and not the GREEN or ORANGE networks.
How do you open up external access then? It is combined into the Port Forward page - there is a field on the pagelabeled:
’Source IP, or network (blank for "ALL"):’
This is the field that controls external access - if you leave it BLANK, your port forward will be open toALLINTERNET ADDRESSES. Alternatively if you put an address or network in there, it will be restricted to that networkor Internet address.
Figure 2.5. Port Forwarding Settings
You can have more than one external address - after you have created the port forward entry, it will appear in the table.If you wish to add another external address, click the Red Pencil with the Plus sign next to the entry, the entry screen
40

Administrationand Configuration
at the top of the page will change (it will load values from the port forward) and allow you to enter an external IPaddress or network.
When added you will now notice that there is a new entry under the port forward in the table.
Other things to note:
• We support the GRE protocol.
• You can have port ranges and wildcards. Valid wildcards are:
• * which translates to 1-65535
• 85-* which translates into 85-65535
• *-500 which translates into 1-500
Valid characters to separate a port range are “:” or “-”. Note that - will be modified to a “:” even though it will bedisplayed as a “-” on the screen.
You only need to enter the first source port, the destination will be filled in for you.
You can edit a record by clicking on the Yellow Pencil icon in the Action column, and until you hit the update button,nothing changes and nothing is lost.
When you are editing a record, you will see the record highlighted in yellow.
To delete a record, click on the Trash Can icon on the right hand side of the Action column.
Ports ranges cannot overlap each other.
Individual ports cannot be placed in the middle of a range i.e. if you have 2000-3000 already set up and then try toforward port 2500, it will give you an error. You cannot forward the same port to several machines.
Reserved ports - on the main Red Address (DEFAULT IP) some ports are reserved for IPCop to do its business, theyare 67, 68, 81, 222, and 445.
When you edit a port forward, there will be an extra check box labeled ’Override external access to ALL’. This is usedas a quick and dirty way to open a port to ALL Internet addresses for testing or whatever your reasons. This was auser request.
If you have a port forward with multiple external accesses, when you delete all of the external accesses, the portbecomes open to ALL addresses, be careful of this one.
There is a Shortcut to enable or disable a port forward or external access - click on the “Enabled” icon (the checkboxin the Action column) for the particular entry you want to enable or disable. The icon changes to an empty box whena rule is disabled. Click on the checkbox to enable it again.Note: when you disable the port forward, all associatedexternal accesses are disabled, and when you enable the port forward, all associated external accesses are enabled.
2.6.2. External Access Administrative Web PageThis subsection allows you to configure the External Access settings for IPCop machine itself. This is 100% optional,so you may safely ignore this section if you do not wish to make use of this feature.
From v1.3.0 onwards, External Access only controls access to the IPCop box. It has no affect on the Green, Blue orOrange network access. That is now controlled in the Port Forwarding section, see above.
41

Administrationand Configuration
Figure 2.6. External Access Settings
If you wish to maintain your IPCop machine remotely, you should specify TCP port 445, https. If you have enabledssh access, you can also enable TCP port 222, ssh.
The TCP/UDP drop down list allows you to choose which protocol this rule will follow. Most regular servers use TCP.If the protocol is not specified in the server documentation, then it is usually TCP. Source IP is the IP address of anexternal machine you give permission to access your firewall. You may leave this blank, which allows any IP addressto connect. Although dangerous, this is useful if you want to maintain your machine from anywhere in the world.However, if you can limit the IP addresses for remote maintenance, the IP addresses of those machines or networksthat are allowed access, should be listed in this box. Destination Port is the external port that they are allowed toaccess, i.e. 445. The Destination IP dropdown menu allows you to choose which Red IP this rule will affect. IPCophas the capability of handling more than one Red IP. If you only have one Red IP set up, then choose Default IP.
Once you have entered all the information, click the Enabled box and press Add. This will move the rule to the nextsection, and list it as an active rule.
Current rules lists the rules that are in effect. To remove one, click the “Trash Can” icon. To edit one, click the “YellowPencil” icon.
To enable or disable a rule - click on the “Enabled” icon (the checkbox in the Action column) for the particular entryyou want to enable or disable. The icon changes to an empty box when a rule is disabled. Click on the checkbox toenable it again.
2.6.3. DMZ Pinholes Administrative Web PageThis subsection allows you to configure the DMZ Pinholes settings for IPCop. This is 100% optional, so you maysafely ignore this section if you do not wish to make use of this feature.
This page willonlybe visible if you have installed and configured an Orange or a Blue network interface card.
A DMZ or Demilitarized Zone (Orange zone) is used as a semi-safe interchange point between the external Red Zoneand the internal Green zone. The Green zone has all your internal machines. The Red zone is the Internet at large. TheDMZ allows them to share servers without allowing undue access to the internal LAN by those in the Red Zone.
42

Administrationand Configuration
Figure 2.7. Pinhole Settings
For example, suppose that your business has a web server. Certainly, you want your customers (those in the Red zone)to be able to access it. But suppose you also want your web server to be able to send customer orders to employees inthe Green Zone? In a traditional firewall setup, this wouldn’t work, because the request for access to the Green zonewould be initiating from outside the Green zone. You certainly do not want to give all your customers direct access tothe machines on the Green side, so how can this work? By using the DMZ and DMZ pinholes.
DMZ pinholes give machines in the Orange (DMZ) zone limited access to certain ports on Green machines. Becauseservers (the machines in the Orange zone) have to have relaxed rules with respect to the Red zone, they are moresusceptible to hacking attacks. By only allowing limited access from Orange to Green, this will help to preventunauthorized access to restricted areas should your server be compromised.
The TCP/UDP drop down list allows you to choose which protocol this rule will follow. Most regular servers useTCP. Some game servers and chat servers use UDP. If the protocol is not specified in the server documentation, thenit is usually TCP. Use the protocol specified on thePort Forwarding page.
Source Net is a drop down menu that shows the available source networks on the machine.
Source IP is the IP address of the machine that you wish to give permission to access your internal servers.
Destination Net is a drop down menu that shows the available networks on the machine.
The Destination IP is the machine in the Green or Blue zone that will receive the request.
Destination Port is the port on the machine that will be listening for the request.
Once you have entered all the information, click the Enabled box and press Add. This will move the rule to the nextsection, and list it as an active rule.
Current rules lists the rules that are in effect. To remove one, click the “Trash Can” icon. To edit one, click the “YellowPencil” icon.
43

Administrationand Configuration
To enable or disable a rule - click on the “Enabled” icon (the checkbox in the Action column) for the particular entryyou want to enable or disable. The icon changes to an empty box when a rule is disabled. Click on the checkbox toenable it again.
2.6.4. Blue Access Administrative Web PageThis subsection allows you to configure which Wireless Access Points on the Blue network can connect to IPCop.This is 100% optional, so you may safely ignore this section if you do not wish to make use of this feature.
This page willonlybe visible if you have installed and configured a Blue network interface card.
Figure 2.8. Blue Access Settings
In the Settings section you input the IP Address or the MAC Address of a wireless Access Point, or a machine, on theBlue network that you want to connect to the Internet through IPCop. If you want to connect to the Green networkfrom the Blue network, you have to either open a pinhole (refer toDMZ Pinholes page) or use a VPN.
Once you have entered all the information, click the Enabled box and press Add. This will move the rule to the nextsection, and list it as an active rule.
Manual control and status lists the rules that are in effect. To remove one, click the “Trash Can” icon. To edit one,click the “Yellow Pencil” icon.
To enable or disable a rule - click on the “Enabled” icon (the checkbox on the right) for the particular entry you wantto enable or disable. The icon changes to an empty box when a rule is disabled. Click on the checkbox to enable itagain.
2.7. VPNs Menu2.7.1. Virtual Private Networks (VPNs)IPCop can easily establish VPNs between other IPCop servers. However, IPCop can also inter-operate with just aboutany VPN product that supports IPSec and standard encryption technologies such as 3DES.
Section to be written...
44

Administrationand Configuration
2.7.2. Global Settings
Figure 2.9. VPN Global Settings
Section to be written...
2.7.3. Connection status and control
Figure 2.10. VPN Connection status and control window: Initial View
Section to be written...
2.7.3.1. Connection Type
Figure 2.11. VPN Connection Type Selection
45

Administrationand Configuration
Section to be written...
2.7.3.2. Host-to-Net Connection
Figure 2.12. VPN Host-to-Net Connection Input
Name. A simple name (lowercase only, with no spaces) to identify this connection.
Section to be written...
2.7.3.3. Net-to-Net Connection
Figure 2.13. VPN Net-to-Net Connection Input
Name. A simple name (lowercase only, with no spaces) to identify this connection.
IPCop side. Section to be written...
46

Administrationand Configuration
Section to be written...
2.7.3.4. Authentication
Figure 2.14. VPN Authentication Input
Section to be written...
2.7.4. Certificate Authorities
Figure 2.15. VPN Certificate Authorities window: Initial View
Section to be written...
47
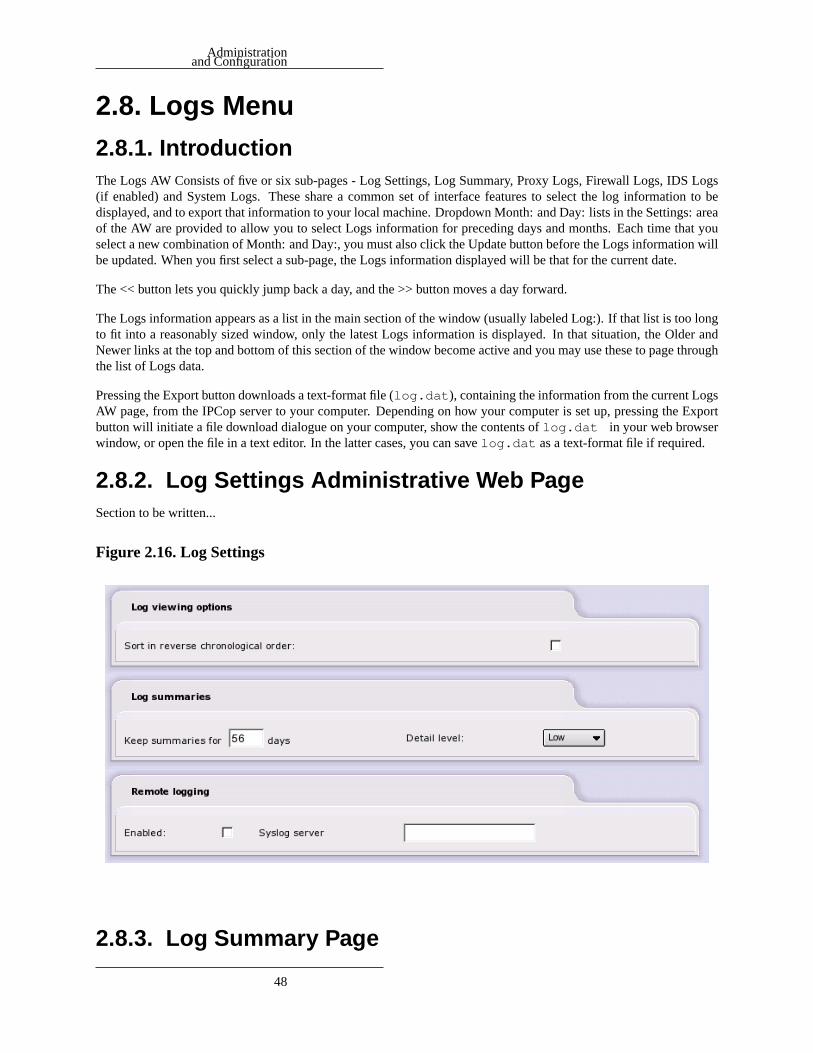
Administrationand Configuration
2.8. Logs Menu2.8.1. IntroductionThe Logs AW Consists of five or six sub-pages - Log Settings, Log Summary, Proxy Logs, Firewall Logs, IDS Logs(if enabled) and System Logs. These share a common set of interface features to select the log information to bedisplayed, and to export that information to your local machine. Dropdown Month: and Day: lists in the Settings: areaof the AW are provided to allow you to select Logs information for preceding days and months. Each time that youselect a new combination of Month: and Day:, you must also click the Update button before the Logs information willbe updated. When you first select a sub-page, the Logs information displayed will be that for the current date.
The << button lets you quickly jump back a day, and the >> button moves a day forward.
The Logs information appears as a list in the main section of the window (usually labeled Log:). If that list is too longto fit into a reasonably sized window, only the latest Logs information is displayed. In that situation, the Older andNewer links at the top and bottom of this section of the window become active and you may use these to page throughthe list of Logs data.
Pressing the Export button downloads a text-format file (log.dat ), containing the information from the current LogsAW page, from the IPCop server to your computer. Depending on how your computer is set up, pressing the Exportbutton will initiate a file download dialogue on your computer, show the contents oflog.dat in your web browserwindow, or open the file in a text editor. In the latter cases, you can savelog.dat as a text-format file if required.
2.8.2. Log Settings Administrative Web PageSection to be written...
Figure 2.16. Log Settings
2.8.3. Log Summary Page
48

Administrationand Configuration
Figure 2.17. Log Summary Output
49

Administrationand Configuration
Section to be written...
2.8.4. Proxy Logs PageThis page provides you with the facility to see the files that have been cached by the web proxy server within IPCop.The web proxy is inactive after first installation of IPCop, and may be activated (and deactivated) through a specificadministration page (Services > Proxy).
Note
The Proxy Log menu item willonlyappear if you have enabled logging on the Services > Proxy page.
Due to the large amount of information that has to be processed, the Web Proxy page can take an appreciabletime to appear after its initial selection or an Update.
There are several controls on this page in addition to the Month:, Day:, and Update controls described at the beginningof this Section:
• The Source IP: dropdown box allows you selectively look at web proxy activity related to individual IP addresseson the local network, or the activity related to ALL machines that have used the proxy.
• The Ignore filter: box allows you type in a regular expressions text string to define which file types should beomitted from the web proxy Logs. The default string hides image files (.gif, .jpeg, .png & .png), stylesheet files(.css) and JavaScript files (.js).
• The Enable ignore filter: tick box allows you to control whether the Ignore filter: is active or not.
• The Restore defaults button allows you to return the above controls and filters to their defaults.
For this page, the Logs information appearing in the Log: section of the window consists of:
• The Time the file was requested and cached.
• The Source IP address of the local system requesting the file.
• The Website - or more precisely the URL for each file requested and cached.
50

Administrationand Configuration
Figure 2.18. Proxy Log Output
51

Administrationand Configuration
Note
The Website URL entries in these Logs are also hyperlinks to the referenced web pages or files.
2.8.5. Firewall Logs PageThis page shows data packets that have been blocked by the IPCop firewall.
Note
Not all denied packets are hostile attempts by crackers to gain access to your machine. Blocked packetscommonly occur for a number of harmless reasons and many can be safely ignored. Among these may beattempted connections to the "ident/auth" port (113), which are blocked by default in IPCop.
The controls on this page are the basic Month, Day, << (Day before), >> (Day after), Update and Export buttons thatare described in detail at the beginning of this Section.
The Log: section of this page contains an entry for each of the packets that were "dropped" by the firewall. Includedis the time of the event, the Source and Destination IP addresses and ports for the dropped packet, the protocol usedfor that packet, and the IPCop Chain and Interface involved.
You can obtain information about the listed IP addresses by clicking on an IP Address. IPCop performs a DNS lookupand reports any available information about its registration and ownership.
2.8.6. Intrusion Detection System Log PageThis page shows incidents detected by the IPCop Intrusion Detection System (IDS). The IDS system is inactive afterfirst installation of IPCop, and may be activated (and deactivated) through a specific administration page (Services >Intrusion Detection).
The controls on this page are the basic Month, Day, << (Day before), >> (Day after), Update and Export buttons thatare described in detail at the beginning of this Section. These allow you to examine the IDS Logs for a specific day.These Logs consist of a number of items for each detected incident:
• The Date: and time of the incident.
• Name: - a description of the incident.
• Priority: (if available). This is the severity of the incident, graded as 1 ("bad"), 2 ("not too bad"), & 3 ("possiblybad").
• Type: - a general description of the incident (if available).
• IP Info: - the IP identities (address & port) of the source and target involved in the incident. Each IP address is ahyperlink, which you can use to perform a DNS lookup for that IP address and obtain any available informationabout its registration and ownership.
• References: - hyperlinked URLs to any available sources of information for this type of incident.
• SID: - the Snort ID number (if available). "Snort" is the software module used by IPCop to provide the IDSfunction, and SID is the ID code used by the Snort module to identify a particular pattern of attack. This parameteris hyperlinked to a web page carrying the relevant entry on the Snort database of intrusion signatures.
52

Administrationand Configuration
Figure 2.19. Firewall Log Output
53

Administrationand Configuration
Figure 2.20. IDS Log Output
54

Administrationand Configuration
2.8.7. System Log PageThis page allows you to view the system and other miscellaneous Logs. (See the beginning of this Section on howto use the Month, Day, << (Day before), >> (Day after) and Update controls). There are eleven different categories,selected via the Section dropdown list:
• IPCop (default) - general IPCop events like PPP profile saving and connection ("PPP has gone up on ppp0") and disconnection ("PPP has gone down on ppp0 ") of dialup modem links.
• RED - traffic sent over the interface that is providing the PPP interface for IPCOP. This includes the data strings sentto, and received from modems and other network interfaces. This can be a very useful resource in troubleshooting"failure to connect" situations.
• DNS - shows a log of activity for dnsmasq, the domain name service utility.
• DHCP server - shows a log of activity for the DHCP Server function within IPCop.
• SSH - provides a record of users who have logged in to, and out of the IPCop server over a network via the SSHinterface.
• NTP - shows a log of activity for the ntpd Server function.
• Cron - provides a record of activity of the cron daemon.
• Login/Logout- provides a record of users who have logged in to, and out of the IPCop server. This includes bothlocal log-ins and logins over a network via the SSH interface.
• Kernel - is a record of kernel activity in the IPCop server.
• IPSec - is a record of activity of IPSec - the VPN software module used by IPCop.
• Update transcript - is a log of the results of any updates applied to the IPCop software via the System > Updatewindow.
55

Administrationand Configuration
Figure 2.21. System Log Output
56

Appendix A. GNU Free DocumentationLicenseVersion 1.2, November 2002
Copyright (C) 2000,2001,2002 Free Software Foundation, Inc. 59 Temple Place, Suite 330, Boston, MA 02111-1307USA. Everyone is permitted to copy and distribute verbatim copies of this license document, but changing it is notallowed.
A.1. 0. PreambleThe purpose of this License is to make a manual, textbook, or other functional and useful document “free” in the senseof freedom: to assure everyone the effective freedom to copy and redistribute it, with or without modifying it, eithercommercially or noncommercially. Secondarily, this License preserves for the author and publisher a way to get creditfor their work, while not being considered responsible for modifications made by others.
This License is a kind of “copyleft”, which means that derivative works of the document must themselves be free in thesame sense. It complements the GNU General Public License, which is a copyleft license designed for free software.
We have designed this License in order to use it for manuals for free software, because free software needs freedocumentation: a free program should come with manuals providing the same freedoms that the software does. Butthis License is not limited to software manuals; it can be used for any textual work, regardless of subject matteror whether it is published as a printed book. We recommend this License principally for works whose purpose isinstruction or reference.
A.2. 1. Applicability and DefinitionsThis License applies to any manual or other work, in any medium, that contains a notice placed by the copyright holdersaying it can be distributed under the terms of this License. Such a notice grants a world-wide, royalty-free license,unlimited in duration, to use that work under the conditions stated herein. The “Document”, below, refers to any suchmanual or work. Any member of the public is a licensee, and is addressed as “you”. You accept the license if youcopy, modify or distribute the work in a way requiring permission under copyright law.
A “Modified Version” of the Document means any work containing the Document or a portion of it, either copiedverbatim, or with modifications and/or translated into another language.
A “Secondary Section” is a named appendix or a front-matter section of the Document that deals exclusively with therelationship of the publishers or authors of the Document to the Document’s overall subject (or to related matters) andcontains nothing that could fall directly within that overall subject. (Thus, if the Document is in part a textbook ofmathematics, a Secondary Section may not explain any mathematics.) The relationship could be a matter of historicalconnection with the subject or with related matters, or of legal, commercial, philosophical, ethical or political positionregarding them.
The “Invariant Sections” are certain Secondary Sections whose titles are designated, as being those of InvariantSections, in the notice that says that the Document is released under this License. If a section does not fit the abovedefinition of Secondary then it is not allowed to be designated as Invariant. The Document may contain zero InvariantSections. If the Document does not identify any Invariant Sections then there are none.
The “Cover Texts” are certain short passages of text that are listed, as Front-Cover Texts or Back-Cover Texts, in thenotice that says that the Document is released under this License. A Front-Cover Text may be at most 5 words, and aBack-Cover Text may be at most 25 words.
57

GNUFree Documenta-tion License
A “Transparent” copy of the Document means a machine-readable copy, represented in a format whose specificationis available to the general public, that is suitable for revising the document straightforwardly with generic text editorsor (for images composed of pixels) generic paint programs or (for drawings) some widely available drawing editor,and that is suitable for input to text formatters or for automatic translation to a variety of formats suitable for inputto text formatters. A copy made in an otherwise Transparent file format whose markup, or absence of markup, hasbeen arranged to thwart or discourage subsequent modification by readers is not Transparent. An image format is notTransparent if used for any substantial amount of text. A copy that is not “Transparent” is called “Opaque”.
Examples of suitable formats for Transparent copies include plain ASCII without markup, Texinfo input format,LaTeX input format, SGML or XML using a publicly available DTD, and standard-conforming simple HTML,PostScript or PDF designed for human modification. Examples of transparent image formats include PNG, XCFand JPG. Opaque formats include PostScript, PDF, proprietary formats that can be read and edited only by proprietaryword processors, SGML or XML for which the DTD and/or processing tools are not generally available, and themachine-generated HTML, PostScript or PDF produced by some word processors for output purposes only.
The “Title Page” means, for a printed book, the title page itself, plus such following pages as are needed to hold,legibly, the material this License requires to appear in the title page. For works in formats which do not have anytitle page as such, “Title Page” means the text near the most prominent appearance of the work’s title, preceding thebeginning of the body of the text.
A section "Entitled XYZ" means a named subunit of the Document whose title either is precisely XYZ or containsXYZ in parentheses following text that translates XYZ in another language. (Here XYZ stands for a specific sectionname mentioned below, such as "Acknowledgements", "Dedications", "Endorsements", or "History".) To "Preservethe Title" of such a section when you modify the Document means that it remains a section "Entitled XYZ" accordingto this definition.
The Document may include Warranty Disclaimers next to the notice which states that this License applies to theDocument. These Warranty Disclaimers are considered to be included by reference in this License, but only asregards disclaiming warranties: any other implication that these Warranty Disclaimers may have is void and has noeffect on the meaning of this License.
A.3. 2. Verbatim CopyingYou may copy and distribute the Document in any medium, either commercially or noncommercially, provided thatthis License, the copyright notices, and the license notice saying this License applies to the Document are reproducedin all copies, and that you add no other conditions whatsoever to those of this License. You may not use technicalmeasures to obstruct or control the reading or further copying of the copies you make or distribute. However, you mayaccept compensation in exchange for copies. If you distribute a large enough number of copies you must also followthe conditions insection 3.
You may also lend copies, under the same conditions stated above, and you may publicly display copies.
A.4. 3. Copying In QuantityIf you publish printed copies (or copies in media that commonly have printed covers) of the Document, numberingmore than 100, and the Document’s license notice requires Cover Texts, you must enclose the copies in covers thatcarry, clearly and legibly, all these Cover Texts: Front-Cover Texts on the front cover, and Back-Cover Texts on theback cover. Both covers must also clearly and legibly identify you as the publisher of these copies. The front covermust present the full title with all words of the title equally prominent and visible. You may add other material on thecovers in addition. Copying with changes limited to the covers, as long as they preserve the title of the Document andsatisfy these conditions, can be treated as verbatim copying in other respects.
If the required texts for either cover are too voluminous to fit legibly, you should put the first ones listed (as many asfit reasonably) on the actual cover, and continue the rest onto adjacent pages.
58

GNUFree Documenta-tion License
If you publish or distribute Opaque copies of the Document numbering more than 100, you must either include amachine-readable Transparent copy along with each Opaque copy, or state in or with each Opaque copy a computer-network location from which the general network-using public has access to download using public-standard networkprotocols a complete Transparent copy of the Document, free of added material. If you use the latter option, you musttake reasonably prudent steps, when you begin distribution of Opaque copies in quantity, to ensure that this Transparentcopy will remain thus accessible at the stated location until at least one year after the last time you distribute an Opaquecopy (directly or through your agents or retailers) of that edition to the public.
It is requested, but not required, that you contact the authors of the Document well before redistributing any largenumber of copies, to give them a chance to provide you with an updated version of the Document.
A.5. 4. ModificationsYou may copy and distribute a Modified Version of the Document under the conditions ofsections 2and3 above,provided that you release the Modified Version under precisely this License, with the Modified Version filling the roleof the Document, thus licensing distribution and modification of the Modified Version to whoever possesses a copy ofit. In addition, you must do these things in the Modified Version:
A. Use in the Title Page (and on the covers, if any) a title distinct from that of the Document, and from those ofprevious versions (which should, if there were any, be listed in the History section of the Document). You mayuse the same title as a previous version if the original publisher of that version gives permission.
B. List on the Title Page, as authors, one or more persons or entities responsible for authorship of the modificationsin the Modified Version, together with at least five of the principal authors of the Document (all of its principalauthors, if it has fewer than five), unless they release you from this requirement.
C.State on the Title page the name of the publisher of the Modified Version, as the publisher.
D. Preserve all the copyright notices of the Document.
E.Add an appropriate copyright notice for your modifications adjacent to the other copyright notices.
F. Include, immediately after the copyright notices, a license notice giving the public permission to use the ModifiedVersion under the terms of this License, in the form shown in the Addendum below.
G.Preserve in that license notice the full lists of Invariant Sections and required Cover Texts given in the Document’slicense notice.
H. Include an unaltered copy of this License.
I. Preserve the section entitled “History”, Preserve its Title, and add to it an item stating at least the title, year, newauthors, and publisher of the Modified Version as given on the Title Page. If there is no section Entitled “History”in the Document, create one stating the title, year, authors, and publisher of the Document as given on its TitlePage, then add an item describing the Modified Version as stated in the previous sentence.
J.Preserve the network location, if any, given in the Document for public access to a Transparent copy of theDocument, and likewise the network locations given in the Document for previous versions it was based on.These may be placed in the “History” section. You may omit a network location for a work that was published atleast four years before the Document itself, or if the original publisher of the version it refers to gives permission.
K. In any section Entitled “Acknowledgements” or “Dedications”, Preserve the Title of the section, and preservein the section all the substance and tone of each of the contributor acknowledgements and/or dedications giventherein.
59

GNUFree Documenta-tion License
L. Preserve all the Invariant Sections of the Document, unaltered in their text and in their titles. Section numbers orthe equivalent are not considered part of the section titles.
M. Delete any section Entitled “Endorsements”. Such a section may not be included in the Modified Version.
N. Do not retitle any existing section to be Entitled “Endorsements” or to conflict in title with any Invariant Section.
O.Preserve any Warranty Disclaimers.
If the Modified Version includes new front-matter sections or appendices that qualify as Secondary Sections andcontain no material copied from the Document, you may at your option designate some or all of these sections asinvariant. To do this, add their titles to the list of Invariant Sections in the Modified Version’s license notice. Thesetitles must be distinct from any other section titles.
You may add a section Entitled “Endorsements”, provided it contains nothing but endorsements of your ModifiedVersion by various parties--for example, statements of peer review or that the text has been approved by an organizationas the authoritative definition of a standard.
You may add a passage of up to five words as a Front-Cover Text, and a passage of up to 25 words as a Back-CoverText, to the end of the list of Cover Texts in the Modified Version. Only one passage of Front-Cover Text and oneof Back-Cover Text may be added by (or through arrangements made ‘by) any one entity. If the Document alreadyincludes a cover text for the same cover, previously added by you or by arrangement made by the same entity youare acting on behalf of, you may not add another; but you may replace the old one, on explicit permission from theprevious publisher that added the old one.
The author(s) and publisher(s) of the Document do not by this License give permission to use their names for publicityfor or to assert or imply endorsement of any Modified Version.
A.6. 5. Combining DocumentsYou may combine the Document with other documents released under this License, under the terms defined insection4 above for modified versions, provided that you include in the combination all of the Invariant Sections of all of theoriginal documents, unmodified, and list them all as Invariant Sections of your combined work in its license notice,and that you preserve all their Warranty Disclaimers.
The combined work need only contain one copy of this License, and multiple identical Invariant Sections may bereplaced with a single copy. If there are multiple Invariant Sections with the same name but different contents, makethe title of each such section unique by adding at the end of it, in parentheses, the name of the original author orpublisher of that section if known, or else a unique number. Make the same adjustment to the section titles in the listof Invariant Sections in the license notice of the combined work.
In the combination, you must combine any sections Entitled “History” in the various original documents, forming onesection Entitled “History”; likewise combine any sections Entitled “Acknowledgements”, and any sections Entitled“Dedications”. You must delete all sections Entitled “Endorsements.”
A.7. 6. Collections of DocumentsYou may make a collection consisting of the Document and other documents released under this License, and replacethe individual copies of this License in the various documents with a single copy that is included in the collection,provided that you follow the rules of this License for verbatim copying of each of the documents in all other respects.
60

GNUFree Documenta-tion License
You may extract a single document from such a collection, and distribute it individually under this License, providedyou insert a copy of this License into the extracted document, and follow this License in all other respects regardingverbatim copying of that document.
A.8. 7. Aggregation With Independent WorksA compilation of the Document or its derivatives with other separate and independent documents or works, in or ona volume of a storage or distribution medium, is called an “aggregate” if the copyright resulting from the compilationis not used to limit the legal rights of the compilation’s users beyond what the individual works permit. When theDocument is included an aggregate, this License does not apply to the other works in the aggregate which are notthemselves derivative works of the Document.
If the Cover Text requirement ofsection 3is applicable to these copies of the Document, then if the Document is lessthan one half of the entire aggregate, the Document’s Cover Texts may be placed on covers that bracket the Documentwithin the aggregate, or the electronic equivalent of covers if the Document is in electronic form. Otherwise they mustappear on printed covers that bracket the whole aggregate.
A.9. 8. TranslationTranslation is considered a kind of modification, so you may distribute translations of the Document under the termsof section 4. Replacing Invariant Sections with translations requires special permission from their copyright holders,but you may include translations of some or all Invariant Sections in addition to the original versions of these InvariantSections. You may include a translation of this License, and all the license notices in the Document, and any WarranyDisclaimers, provided that you also include the original English version of this License and the original versions ofthose notices and disclaimers. In case of a disagreement between the translation and the original version of thisLicense or a notice or disclaimer, the original version will prevail.
If a section in the Document is Entitled “Acknowledgements”, “Dedications”, or “History”, the requirement (section4) to Preserve its Title (section 1) will typically require changing the actual title.
A.10. 9. TerminationYou may not copy, modify, sublicense, or distribute the Document except as expressly provided for under this License.Any other attempt to copy, modify, sublicense or distribute the Document is void, and will automatically terminateyour rights under this License. However, parties who have received copies, or rights, from you under this License willnot have their licenses terminated so long as such parties remain in full compliance.
A.11. 10. Future Revisions of This LicenseThe Free Software Foundation may publish new, revised versions of the GNU Free Documentation License from timeto time. Such new versions will be similar in spirit to the present version, but may differ in detail to address newproblems or concerns. See the GNU Free Documentation License[http://www.gnu.org/licenses/licenses.html#FDL]web site.
Each version of the License is given a distinguishing version number. If the Document specifies that a particularnumbered version of this License “or any later version” applies to it, you have the option of following the terms andconditions either of that specified version or of any later version that has been published (not as a draft) by the FreeSoftware Foundation. If the Document does not specify a version number of this License, you may choose any versionever published (not as a draft) by the Free Software Foundation.
61

GNUFree Documenta-tion License
A.12. ADDENDUM: How to use this License foryour documentsTo use this License in a document you have written, include a copy of the License in the document and put thefollowing copyright and license notices just after the title page:
Copyright© YEAR YOUR NAME. Permission is granted to copy, distribute and/or modify thisdocument under the terms of the GNU Free Documentation License, Version 1.2 or any later versionpublished by the Free Software Foundation; with no Invariant Sections, no Front-Cover Texts,and no Back-Cover Texts. A copy of the license is included in the section entitled “GNU FreeDocumentation License”.
If you have Invariant Sections, Front-Cover Texts and Back-Cover Texts, replace the “with...Texts.” line with this:
with the Invariant Sections being LIST THEIR TITLES, with the Front-Cover Texts being LIST,and with the Back-Cover Texts being LIST.
If you have Invariant Sections without Cover Texts, or some other combination of the three, merge those twoalternatives to suit the situation.
If your document contains nontrivial examples of program code, we recommend releasing these exam-ples in parallel under your choice of free software license, such as the GNU General Public License[http://www.gnu.org/licenses/gpl.html]to permit their use in free software.
62