Administrative & Management Guide - Bill4Time
43
Bill4Time Administrative Guide 2018 Page 1 Administrative Guide 2018
Transcript of Administrative & Management Guide - Bill4Time

Bill4Time Administrative Guide 2018
Page 1
Administrative Guide 2018

Bill4Time Administrative Guide 2018
Page 2
Table of Contents
Section 1: The Dashboard .................................................................................................................................................................. 3
Section 2: System Administration ..................................................................................................................................................... 5
General .................................................................................................................................................................................................. 5
System ................................................................................................................................................................................................... 6
Invoice Setup ......................................................................................................................................................................................... 8
Custom Lists ........................................................................................................................................................................................ 11
Company Logo ..................................................................................................................................................................................... 13
File Storage .......................................................................................................................................................................................... 13
Client Portal ......................................................................................................................................................................................... 14
Subscription ........................................................................................................................................................................................ 16
Section 3: Users .............................................................................................................................................................................. 17
Setting up a New User ......................................................................................................................................................................... 17
Editing a User Account ........................................................................................................................................................................ 18
User Permissions ................................................................................................................................................................................. 19
Client Access........................................................................................................................................................................................ 21
Section 4: Clients ............................................................................................................................................................................ 21
Creating a Client .................................................................................................................................................................................. 22
Client Details ....................................................................................................................................................................................... 24
Invoice Presets .................................................................................................................................................................................... 25
Billing Rates ......................................................................................................................................................................................... 26
User Access ......................................................................................................................................................................................... 27
Contacts Tab ........................................................................................................................................................................................ 27
Notes/Files .......................................................................................................................................................................................... 28
Accounting Tab ....................................................................................................................................... Error! Bookmark not defined.
Trust Account ...................................................................................................................................................................................... 30
Section 5: Projects ........................................................................................................................................................................... 32
Creating a Project ................................................................................................................................................................................ 33
Section 6: Invoicing ......................................................................................................................................................................... 34
Creating the Invoice Batch .................................................................................................................................................................. 34
Reviewing Invoices in the Batch .......................................................................................................................................................... 35
Viewing and Editing Invoices ............................................................................................................................................................... 36
Print and Send Invoices ....................................................................................................................................................................... 39
Find Invoice ......................................................................................................................................................................................... 41
Create Draft ......................................................................................................................................................................................... 41
Create Statements .............................................................................................................................................................................. 42

Bill4Time Administrative Guide 2018
Page 3
Section 1: The Dashboard Upon logging into Bill4Time you are taken to the dashboard. The dashboard is the central hub for all the functions of Bill4Time. Most features in Bill4Time can be accessed from here. The functions displayed are based on each user and his/her security settings.
1. Tools – At the top, you will have some tools to choose from. a. Click your name at the top to bring down your options to view My Profile, Users, Settings, Subscription,
and Log Out. If some of these options are unavailable, that means you do not have access to that area of the program.
b. Click the plus icon to bring up the option to add a new Client, Project, Time Entry, Expense, Internal Time, Invoice or Payment.
c. If you are on the Bill4Time Legal plan, you can click the check mark to access the Conflict Checker where you can search for key words or phrases to run conflict checks in your system.
Figure 1 - The Dashboard
9

Bill4Time Administrative Guide 2018
Page 4
d. Click the question mark icon to bring up the Help Menu where you can access popular training tutorials, how to contact support, and more.
e. By clicking the clock icon, you will have access to add new entries via the Multi Timer. This allows you to start/pause timers for different clients and convert them to time entries when finished. This timer is built into the server so if you close your browser, your computer shuts down, or you switch computers, you will have access to these timers no matter where you go.
2. Search – The Search toolbar allows you to search for your Clients and Projects by name. 3. Clients – Access to all client-related functions, such as creating, editing, and searching for clients. You also have
access to manage your contacts. 4. Projects – Access to all project-related functions, such as creating, editing, and searching for projects. Note:
While we are referring to “Projects,” you may rename this term to better suit your company, such as Matter,
Case, etc. For the purpose of this document, we will continue to use “Project”.
5. Time/Expenses – Access to time entry/expense screens, and basic time reporting for your activity. 6. Scheduling – For entering and reviewing scheduled events. 7. Invoicing – For creating, viewing, and searching for invoices. 8. Reports – Access to over 40 different reports to pull data such as summary of time billed to AR aging. 9. Accounting- For viewing all client balances, posting payments, and making balance adjustments. 10. Add Time – Add a new time entry. 11. Add Internal Time – If turned on in your Settings, allows you to add non-client, non-billable time for the user
signed in. 12. Add Expense – Add a new expense entry. 13. The links at the bottom of the Dashboard – Access to the Settings, Downloads for Mobile/Desktop
Widget/QuickBooks Integration, the Ideas Site, and technical support.
The different sections of the Dashboard can be changed for each user who signs into the program. By clicking the gear icon on your Dashboard, you will get a selection of different Dashboard Widgets which you can remove, edit, move around, and add. The gear icon is located at the far right, next to the “Add Expense” button. After clicking the gear icon, you can choose from the following widgets:
o Time Entry Grid – A quick way to enter or review time entries billed on that specific day for the user signed in.
o Recent Projects – Gives you quick access to the last 10/25/50/ or All projects that you have worked on. Clicking the
“+” symbol to the left of a specific Project will open a new time entry with the Client/Project filled in.
o Projects by Due Date – Gives you quick access to projects with specific due dates.
o Assigned/Subscribed Projects – Gives you quick access to all projects either assigned or subscribed to you.
o Budgeted Projects – Gives you quick access to budgeted projects and their tracked hours.
o Favorite Reports – Gives you quick access to your favorite reports you saved in the system.
o Today’s Time Entries – Shows you today’s entries that were made by you.
o Weekly Billable Hours – Chart to show your billable hours per week.
o Recent Time Entries – Shows you the entries that were made by you in the past week.
o Today’s Schedule – Shows you your scheduled entries for that particular day.
o Weekly Billable Amount – Chart that shows the amount of work you billed per week.
Bill4Time Administrative Guide 2018
Page 5
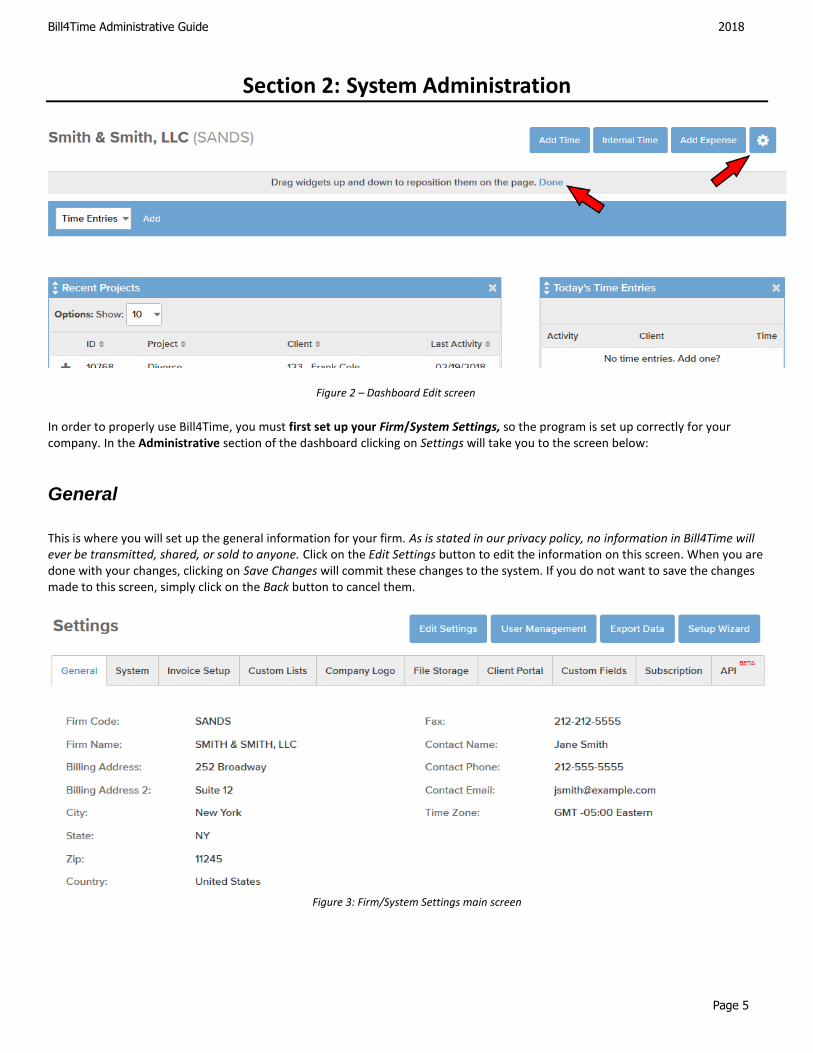
Section 2: System Administration
In order to properly use Bill4Time, you must first set up your Firm/System Settings, so the program is set up correctly for your company. In the Administrative section of the dashboard clicking on Settings will take you to the screen below:
General This is where you will set up the general information for your firm. As is stated in our privacy policy, no information in Bill4Time will ever be transmitted, shared, or sold to anyone. Click on the Edit Settings button to edit the information on this screen. When you are done with your changes, clicking on Save Changes will commit these changes to the system. If you do not want to save the changes made to this screen, simply click on the Back button to cancel them.
Figure 2 – Dashboard Edit screen
Figure 3: Firm/System Settings main screen

Bill4Time Administrative Guide 2018
Page 6
System This is where you will customize your system settings. To enable/disable a feature, make sure you click Edit Settings first. See below for details of each feature used in the System tab.
Figure 4: Edit System Settings
• Track Client Locations –To track your client’s various business locations. With this enabled, you can input various locations and select the appropriate one when creating a project.
• Track Internal (non-client) Time – If you want your users to track their non-billable/non-client related time such as lunch breaks, internal meetings, vacations, etc.
• Track Project Due Dates – Allows you to track due dates for each project in the system.
• Verify Entries Before Billing – If selected, during the process of creating Invoices, the user will be required to verify and approve each billable time entry before approving the Invoice. This is for an extra quality assurance check before Invoices are sent. If this option is not selected, you can still review and make corrections to invoices before finalizing and printing them.
• Verify Expenses Before Billing – This is the same as the Verify Time Entries Before Billing option. If not selected, you can still review and edit expenses before billing.
• Allow “Non-Project Related” Time Entries – If selected, users will be able to enter billable time that is not part of a client project. Since there is no project assigned to these activities, you will need to create a Client Summary Report to view all of these time entries. When creating a statement for these entries, just choose the name of the client.
• Require Activity Type on Time Entry – Makes the Activity Type field a required entry on the time entry screen. If you do not wish to require an Activity Type, just uncheck this box.
• Enable Auto Text Types – This option allows you to use the Auto Text list. (Found in the Custom Lists tab). This allows the user to replace abbreviations on the time entry screen to their full text equivalents.
• Use Trust Accounting – This allows you track payments from a trust account. Useful for lawyers and law firms, but not needed for other professions.
• Allow Overtime Billing Rates – Checking this will allow you to bill differently for overtime work, so you can later mark a time entry as Overtime and it will be billed accordingly.
If you mouse-over the icon a description will pop-up regarding each item.

Bill4Time Administrative Guide 2018
Page 7
• Allow Custom Project IDs – This allows you to override the standard ID set in the system when you add/edit a project to let you customize your own IDs.
• Sort Project Drop-Downs Alphabetically – Checking this will sort your projects in alphabetical order automatically.
• Enable LEDES File Export – Used to convert invoices into electronic bills. Used by lawyers and law firms.
• Enable ABA Standard Codes – This allows the American Board Association activity/task codes to be required fields for time/expense entries. Used for LEDES exported invoices.
• Enable Great American File Export – LEDES file for this specific company if needed.
• Enable Custom Invoice Numbers – This allows you to edit invoice numbers.
• Accounting Type (drop down selection) o Bill4Time Accounting – Utilize the Bill4Time internal accounting system to receive payments, track
balances/credits, and auto-assign Invoice numbers.
o QuickBooks Accounting – By selecting this option, you can use the Bill4Time QuickBooks Connect program to
transfer invoice and payment data as well as balance adjustments directly into QuickBooks. For more information
please see our support documentation on using QuickBooks Connect.
o External Accounting – With this option selected, you will use Bill4Time for everything through the invoicing
process, and then use another accounting system or program for handling payments, receivables, balances, etc
• Accounting Isolation (drop down selection) o Client Isolation – Allows for combined accounting for every project under the client.
o Project Isolation – Allows for separate accounts for each project under the client.
• Project Mnemonic – A descriptive word that best captures your company’s types of projects. Some examples are: Matter, Case, Ticket, Issue, etc. The changes will be reflected throughout the entire Bill4Time system for your firm, including invoices, reports, and statements.
• Labor Mnemonic – A descriptive word that best captures your company’s type of service. Some examples are: Labor, Labour, Service, etc.
• Tax Mnemonic – A descriptive word that best describes your company’s tax type. Some examples are: Tax, GST, VAT, etc.
• Tax 2 Mnemonic – A descriptive word that best describes your company’s second tax type. Some examples are: Tax, GST, VAT, etc.
• Expense Markup – Enter the default markup percentage that will be used when entering expenses. You may override this amount if you wish when you enter each expense.
• System Date Format – Choose between either U.S. or European date formats.
• Week Display – This will allow you to choose between mm/dd/yyyy or dd/mm/yyyy
• Time Interval – Interval for time entries when using the timer. So when you track “0.1” of your time, the timer tracks one time interval.
• Default Currency – Choose the currency symbol that you wish work with. You can also change the currency symbol for only a specific client from in the Client Settings section.
• Export Data – Allows you to backup all data (client, contacts, invoices, accounting activity, project details, user details, etc.) as a hard copy on any computer needed. It is exported as a .csv file, compatible with Excel.
More on the accounting isolation The Accounting Isolation can be set on the company level under the Settings which will default to all clients in the account. You also have the ability to override this setting per client so the isolation you use the most would want to be setup under the Settings.
Please note that if you make changes either to the whole account or per client, then you will need to go back and edit each payments/adjustment you made that is not applied to any invoices to point them to the right project they belong to or the accounting will not be accurate.

Bill4Time Administrative Guide 2018
Page 8
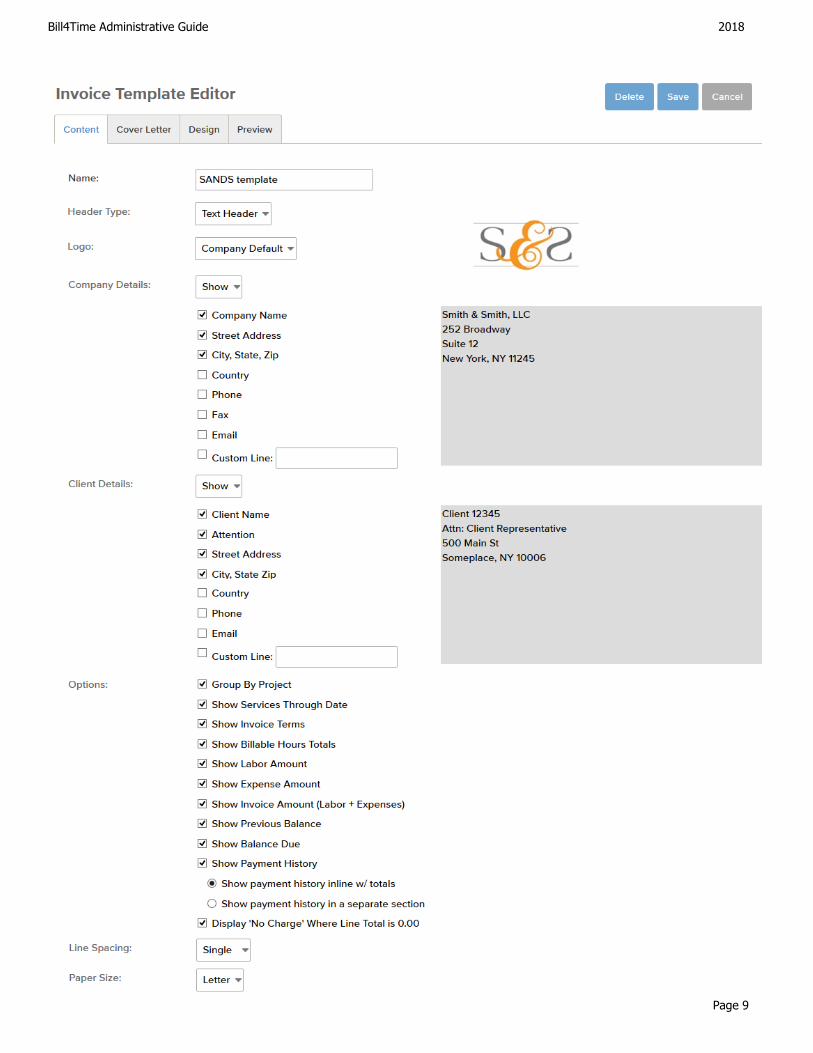
Invoice Setup Your Invoice Setup allows you to customize your Invoice Template settings for your firm. If you would like more customization on your invoices, Bill4Time does offer customized invoices with the Bill4Time Enterprise plan. For more information please contact Support at [email protected] or 877-245-5484.
Figure 5: Invoice Setup
• Calculate Tax on Labor –To charge sales tax on labor/service
• Calculate Tax on Expenses – To charge tax on all expenses
• Calculate Tax 2 on Labor – Secondary tax on labor/service
• Calculate Tax 2 on Expenses – Secondary tax on expenses Note: You can apply specific tax rates on certain expenses, too. Find under the “Custom Lists” tab in the Firm/System Settings (page 12), or make the adjustment in the client’s details page (choose the Invoice Presets tab on that page).
• Track Paid/Unpaid Invoice Status – This feature lets you apply payments to specific Invoices, thus automatically changing the invoice statuses from unpaid to paid, or vice versa.
• Late Fee Type – This feature allows you to set the late fee rates based on either a flat fee or discount. You can set your grace period and have this auto-calculate on past due invoices.
• Default Invoice Template – This allows you to create a default invoice template for your clients which can be changed for each client in the Invoice Presets tab of the client’s detail page. Click New Template to add a new template or click the clipboard icon next to the chosen template to edit it. From there, you will see this screen:
Bill4Time Administrative Guide 2018
Page 9

Bill4Time Administrative Guide 2018
Page 10
Figure 6: Invoice Template Editor
• Header Type – Allows you to customize the header with Text, Custom (picture), or Letterhead options.
• Logo – Allows you to add a logo to your templates.
• Company Details – Turn on/off certain company details to show on the invoice.
• Client Details – Turn on/off certain client details to show on the invoice.
• Options – Turn on/off certain options for your invoices.
• Line Spacing – Single or double line spacing options
• Paper Size – Letter or A4 paper options.
• Columns – Turn on/off certain columns for your invoices
• Footer Type – Allows you to customize the footer with text, an uploaded image, or space for your letterhead office stationary. This setting will show at the bottom of each invoice.
• Advanced Options – Allows for page numbers or repeating of headers/footers for PDF.
• Invoice Add-Ons – Allow you to attach receipts and add Trust or User Hours summary at the bottom of invoices. You can then pick the Design and Preview tab to see what the invoice will look like if you were to create them now. Once finished, click Save.
Bill4Time Administrative Guide 2018
Page 11
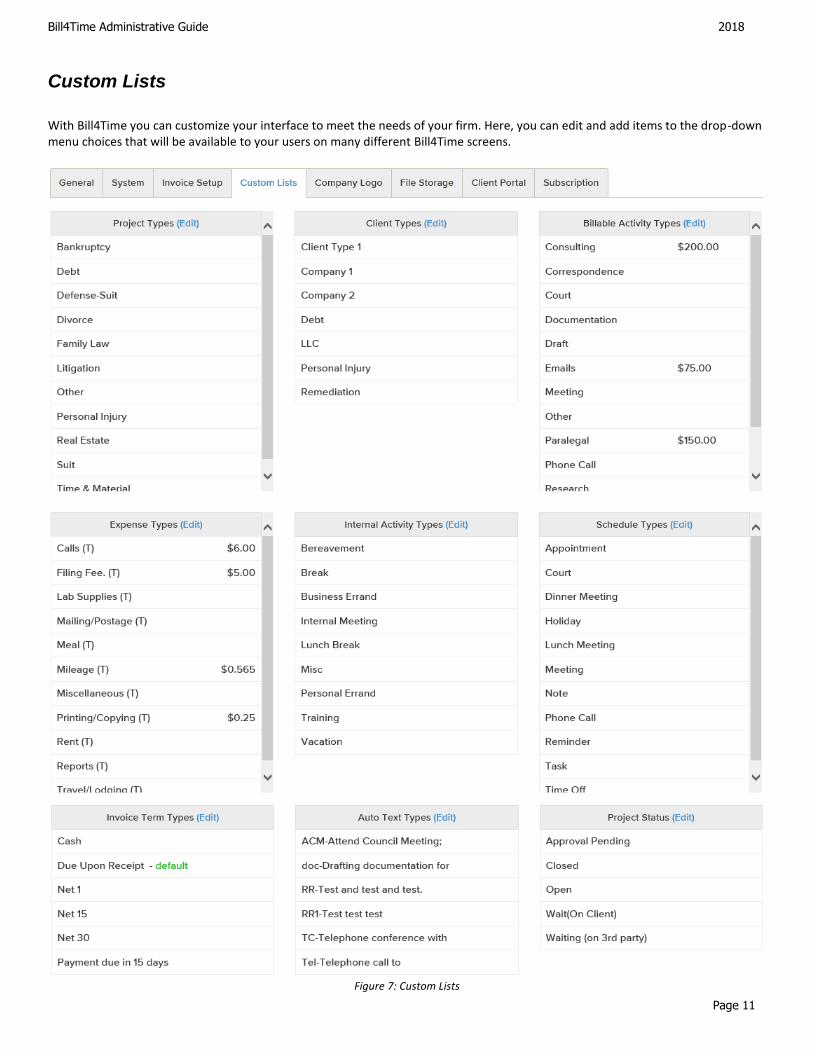
Custom Lists With Bill4Time you can customize your interface to meet the needs of your firm. Here, you can edit and add items to the drop-down menu choices that will be available to your users on many different Bill4Time screens.
Figure 7: Custom Lists

Bill4Time Administrative Guide 2018
Page 12
Click on Edit next to the category type to make changes. An example of editing the Billable Activity Type list is in Figure 8. To add a new item to the list, enter it in the New Item Field, then click the Add button. To remove an item, click the “x” icon to the right.
The different types you can edit and change are:
• Project Types – To segregate your projects
• Billable Activity Types – For time entries
• Expense Types – For expense entries.
• Internal Activity Types – For internal time
• Schedule Types – For scheduled activities
• Invoice Term Types – For payment terms
• Project Status – Statuses for projects
• Auto Text Types –
Auto Text Types
The Auto Text feature makes entering time easier. If you are often writing sentences over and over again than follow these steps to make this process a lot faster:
• Pick your Hot Key symbol. You will use this symbol after typing an
abbreviation in order to trigger the text replacement.
• Put in your Abbreviation for the sentence.
• Write in the Full Text that you would like shown below in Figure 9 is an example for an auto text. The example below shows:
o Hot Key “!”
o Abbreviation “ACM”
o Full Text “Attend Council Meeting;”
When you open a time entry, you put in the abbreviation and hot key. Once you leave the Summary Box it will appear as the Full Text. Example: ACM! = Attend Council Meeting; (or whatever you choose). For more information please see contact [email protected] or call us at 877-245-5484.
Figure 8: Custom List Editing
Figure 9: Auto Text Editing
Figure 8: Billable Activity Types

Bill4Time Administrative Guide 2018
Page 13
Company Logo You can add a logo to both your Dashboard and invoice to make the system more personable and customizable. Click the Edit Settings button, and then upload your logo for the system and your invoices. The system logo will replace the “Bill4Time” logo located at the top left corner of every page in the system. If you have any issues uploading your logo please email [email protected] for further assistance.
Figure 10: Company Dashboard/Invoice Logo Upload Page
File Storage Bill4Time can be used as an online document management system as all documents uploaded to the program can be accessed from any computer and any location. We also integrate with Box so any files uploaded to the program will automatically upload to the folder in your Box account. If you upload files in your Box account it will upload them to the appropriate clients in Bill4Time as well.
Figure 11: File Storage tab
Bill4Time Administrative Guide 2018
Page 14
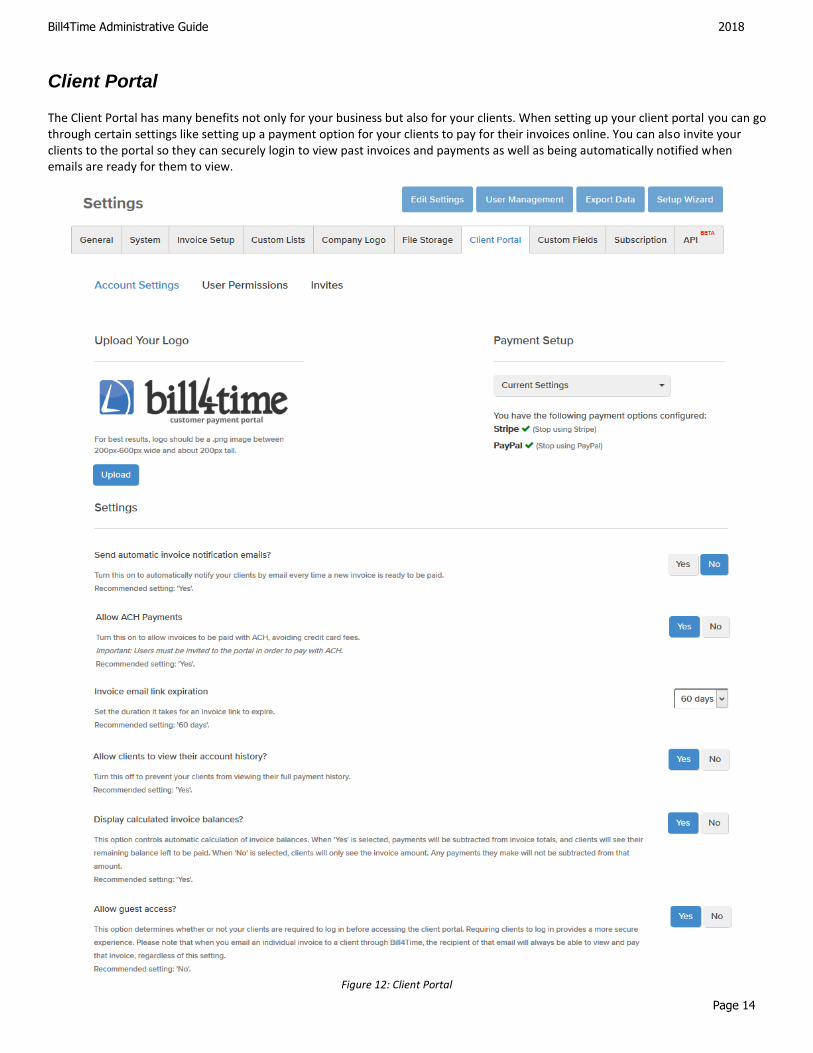
Client Portal The Client Portal has many benefits not only for your business but also for your clients. When setting up your client portal you can go through certain settings like setting up a payment option for your clients to pay for their invoices online. You can also invite your clients to the portal so they can securely login to view past invoices and payments as well as being automatically notified when emails are ready for them to view.
Figure 12: Client Portal

Bill4Time Administrative Guide 2018
Page 15
After creating and finalizing the invoice, you can either click on the Email button on the Invoice Details page or click the envelope
icon next to a finalized invoice on your Invoice Management screen.
Once the client clicks on the link, it will open their invoice for them to view online (Figure 12b). Here, the client can see a digital copy
of the invoice. At the top right corner, there will be an Invoice Total and Account Balance. They will also be able to view full account
history to view past invoices and payments in their account. They can print the invoice as well as save it as a PDF and of course pay
for the invoice if you are linked up with either Stripe, PayPal, LawPay, or other payment options.
Figure 12a: Emailing Invoice

Bill4Time Administrative Guide 2018
Page 16
Subscription This is where you can see your firm’s billing history (bills your firm incurs each month for the use of the Bill4Time service). From here, you can view your billing history for all past charges as well as update your credit card at any point. To change the credit card on file, do the following:
• Click the Update Payment Method button.
• Enter the new credit card information.
• Click Save and the system will automatically verify and save the card information for future bills.
You will be able to view the current plan you are on as well as Upgrade your plan if needed. Click here for more information on pricing/plans.
Figure 12b: Client Portal Invoice Preview
Bill4Time Administrative Guide 2018
Page 17
Section 3: Users
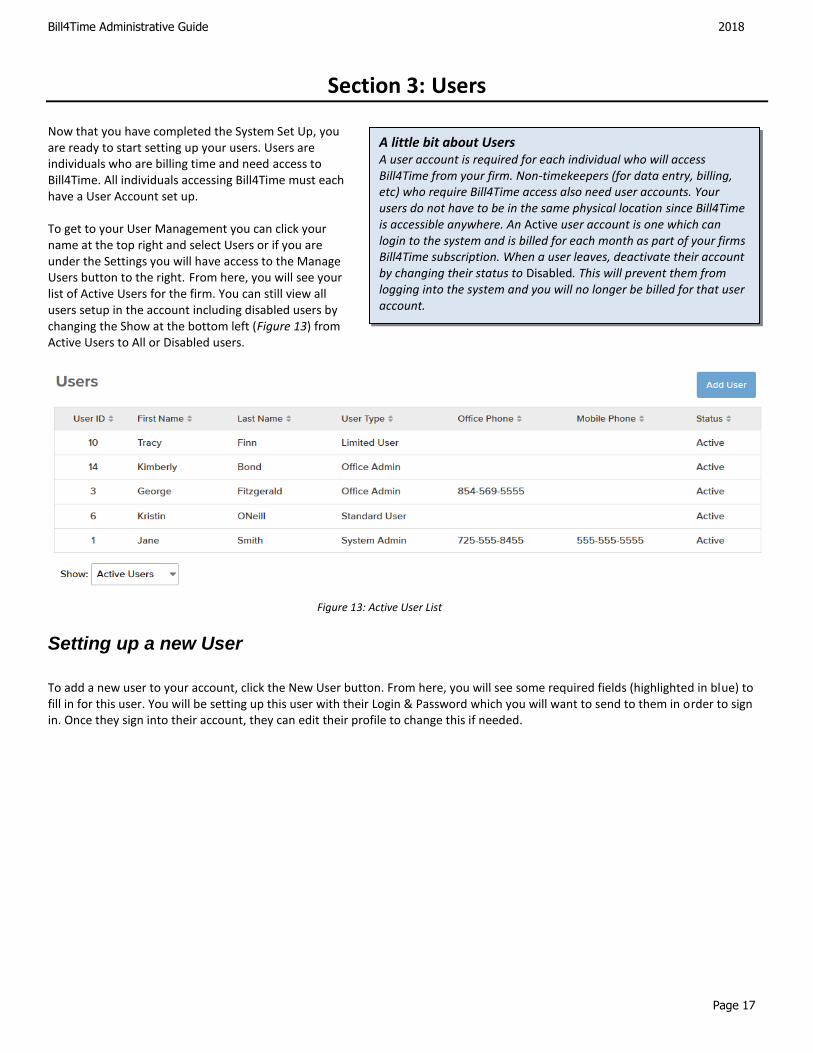
Now that you have completed the System Set Up, you are ready to start setting up your users. Users are individuals who are billing time and need access to Bill4Time. All individuals accessing Bill4Time must each have a User Account set up. To get to your User Management you can click your name at the top right and select Users or if you are under the Settings you will have access to the Manage Users button to the right. From here, you will see your list of Active Users for the firm. You can still view all users setup in the account including disabled users by changing the Show at the bottom left (Figure 13) from Active Users to All or Disabled users.
Setting up a new User To add a new user to your account, click the New User button. From here, you will see some required fields (highlighted in blue) to fill in for this user. You will be setting up this user with their Login & Password which you will want to send to them in order to sign in. Once they sign into their account, they can edit their profile to change this if needed.
A little bit about Users A user account is required for each individual who will access Bill4Time from your firm. Non-timekeepers (for data entry, billing, etc) who require Bill4Time access also need user accounts. Your users do not have to be in the same physical location since Bill4Time is accessible anywhere. An Active user account is one which can login to the system and is billed for each month as part of your firms Bill4Time subscription. When a user leaves, deactivate their account by changing their status to Disabled. This will prevent them from logging into the system and you will no longer be billed for that user account.
Figure 13: Active User List

Bill4Time Administrative Guide 2018
Page 18
Figure 14: New User Setup
The required fields have light blue text boxes:
• First name
• Last name
• Email – This can be used when emailing invoices.
• Login – The user will need this to access the system. It is not case
sensitive.
• Password – The user will need this to access the system. It is not case
sensitive.
• User Type – The accessibility of the functions and information stored in
the software. This will determine which options appear on the user’s dashboard as well as be a template for their User
Permissions (Figure 15)
• Std. Hourly Rate – The defaulted user rate. You can over-ride this rate in the client details, project details, activity type, and
time entry.
Notable optional fields:
• Initials – This will be used on the invoice, noting the user’s contribution to the work and expense entries. You can put up to
20 characters with spaces. If there is nothing in this text field, it will default to the first letter of the first and last name.
• Contractor – This feature allows you to have temporary users to your Bill4Time account. Here, you put in the rate that they
are charging you. The Std. Hourly Rate is the rate that will be on the invoice for your clients to pay you.
• Status – This is where you would activate or deactivate the user. This will affect your monthly subscription.
Click the HR Information tab if desired which is just for internal purposes, and when finished, click Save. Note that each active user account is billed accordingly in your monthly service fee.
Editing a User Account The user account is now created, and you can view or edit the information for a User at any time. Once the user is setup in the system you can go through the options available like User Permissions.
If the user forgot the Company ID, Username, or Password, they can send a password reset as long as their correct email is setup in their account. If not, the Admin will need to go in and reset this information for them for security purposes.

Bill4Time Administrative Guide 2018
Page 19
User Permissions
Configure what part of the system you would like the user to access. To enable/disable a permission, check the boxes next to
the specific permissions.
Figure 15: A Selection of the User Permissions screen
System Administration These permissions should only be given to the office/firm administrator or owner
• Users– The user can view the complete list of users, set up new and delete users, change user permissions, and view/edit
passwords.
• Clients – Access to Client Management
o View Clients – The user can view client’s information
o Create/Edit clients – The user can create new clients or edit information on existing clients.
• Firm Settings – ability to edit settings for the firm such as preferences, address, credit card, etc.
Rates
• View Billing Rates – The user can see all the billing rates and all total billed amounts pertaining to these rates.
• Edit/Define Billing Rates – The user can edit billing rates for clients, employees, or projects.
Accounting
• View Balances – The user can see the client balances of all clients.
• Receive Payments – The user can receive payments towards clients and projects.

Bill4Time Administrative Guide 2018
Page 20
Invoicing
• Invoicing – The user can create, edit, and delete invoices.
• View Invoices – The user can see all clients’ invoices.
• Resend Invoices/Balance Statements – The user can reprint Invoices and balance statements.
Projects
• Create/Edit/Close Projects – The user can create a new project, edit an existing project, and close a completed project.
• Access Projects – The user can view projects.
o All Projects – The user can view all projects.
o All Open Projects – The user can view only open projects.
o Limited Project Access – The user can only see their personal data entered on projects.
• Allow projects assigned to this user – The user can be an account manager for assigned projects
• View Billable Hours – The user can see the billable hours.
Time/Expense Entries
• View other user’s time/expenses – This user can view other users time/expenses.
o Enter time/expenses for other users – This user can enter billable time and expense entries for other users.
• Enter Expenses – The user can enter his/her expenses that will be billed to clients.
• Can Override Billing Rates on Time Entries – The user can view and override his/her billable rates and other Users billing
rates on time entries. This feature is not automatically enabled and must be checked off to be able to view this option.
• Allow Entries to be Excluded from Invoices – This allows the user to be able to exclude their entries from being invoiced.
• Limit time/expense and internal time entries to the current week – This user will only be allowed to add time to the
current week and not outside of it.
• Limit time/expense and internal time entries to the current month – This user will only be allowed to add time to the
current month and not outside of it.
Scheduling
• View Other Users Schedules – The user can see another user’s calendar or the All Users calendar.
• Manage Other Users Schedules – The user can add new or edit existing entries to another user’s calendar.
Reporting
• Full Reporting Access – The user can run reports with data for the entire firm.
• Limited Reporting Access – The user will only be able to run reports for their own time/expenses.
Account Manager Settings
• View time/expense entries – If checked, this allows the user to view entries created by any users under the clients they
manage.
• Edit time/expense entries – If checked, this allows the user to view/edit entries created by any users under the clients they
manage.
• View Billable Rates – If checked, this allows the user to view rates on entries created by any users under the clients they
manage.
• Edit Billable Rates – If checked, this allows the user to edit rates on entries created by any user under the clients they
manage.
• View Balances – If checked, this allows the user to view balances on entries created by any users under the clients they
manage.
Once you are finished editing user permissions, click the Save Changes button.

Bill4Time Administrative Guide 2018
Page 21
Client Access From this screen you can select which clients the user has access to. If you revoke client access for a user, that means they will no longer be able to view or add time/expenses to that client/matter. System Administrators automatically have access to all clients.
Figure 16: Client Access Settings
Select the check box next to Full Access to give this user access to all clients (default). If you select Limited Access you can then select which clients the user can access. Check All will enable all clients, Clear All will disable all. You can also go through and eliminate access on a per client level from the Client itself. Once you are finished making the necessary changes, click Save Changes.
Section 4: Clients
Once you’ve set up your firm and users’ settings, it’s time to start entering clients. Click the Clients tab and you will be taken to the Client Management screen (Figure 17). If you have not created any clients yet, this screen will not display any clients.

Bill4Time Administrative Guide 2018
Page 22
Figure 17: Client Management Screen
Creating a Client From the Client Management screen, click the Add Client button to be taken to the screen below:
Figure 18: New Client Screen

Bill4Time Administrative Guide 2018
Page 23
The only required field (as denoted with the light blue text box) is the Client Name. The notable optional fields are as follows:
• Client ID – If not filled in, a numerical ID will automatically assign itself to the client.
• Client Name – Here you can enter the clients name on how you wish to organize your client in the system. So for example, if you would like to order your clients by last name, first name you would enter that here.
• Account Manager - The user who is the primary manager for this client
• Email – This is the primary email used to email your invoice through the Bill4Time portal
• Phone; Mobile; Fax; and Billing Address – This information can be pulled on your invoices dependent on your invoice template settings.
• Billing Name – The Billing name is what will show on your client invoices. This is specific if you organize your clients in Client Name by last name, first name but on the invoice you would like it to show first name last name.
• Creation Date – If no date is selected, it defaults to the date that the client was inputted into Bill4Time.
• Client Settings o Status – A new client is automatically set up as Active. Change this to Disabled when you are ready to close the
client. o Client Type – Here you can segregate your clients any way you want to make client management easier. You can
click the plus icon to view and edit your client types which can be useful on reports. o VAT Number – can be filled in if available. o ABA Codes – Turn this on or off, depending on the ABA code setting in the Firm/System settings. This enables you
to custom the ABA code setting for each client. o Currency Code & Symbol – Change the standard currency symbol per client if needed. o Accounting Isolation
▪ Firm Default – The account isolation that is chosen in the Firm/System settings. ▪ Client - Allows combined accounting for every project under the client. The accounting under each project
is the sum of all projects under this one client. ▪ Project - Allows separate accounts for each project under the client. The accounting under each project is
separate from the accounting activity of the other projects for this one client.
When you are finished click the Save button to commit the client to the system, and you will be taken to the Client Details screen.
If you followed the steps above a new client has then been created. From here, you can create projects, time entries and expense entries for the client, but you may want to go through the Edit Client process to ensure that custom settings for this client are correct.
Bill4Time Administrative Guide 2018
Page 24
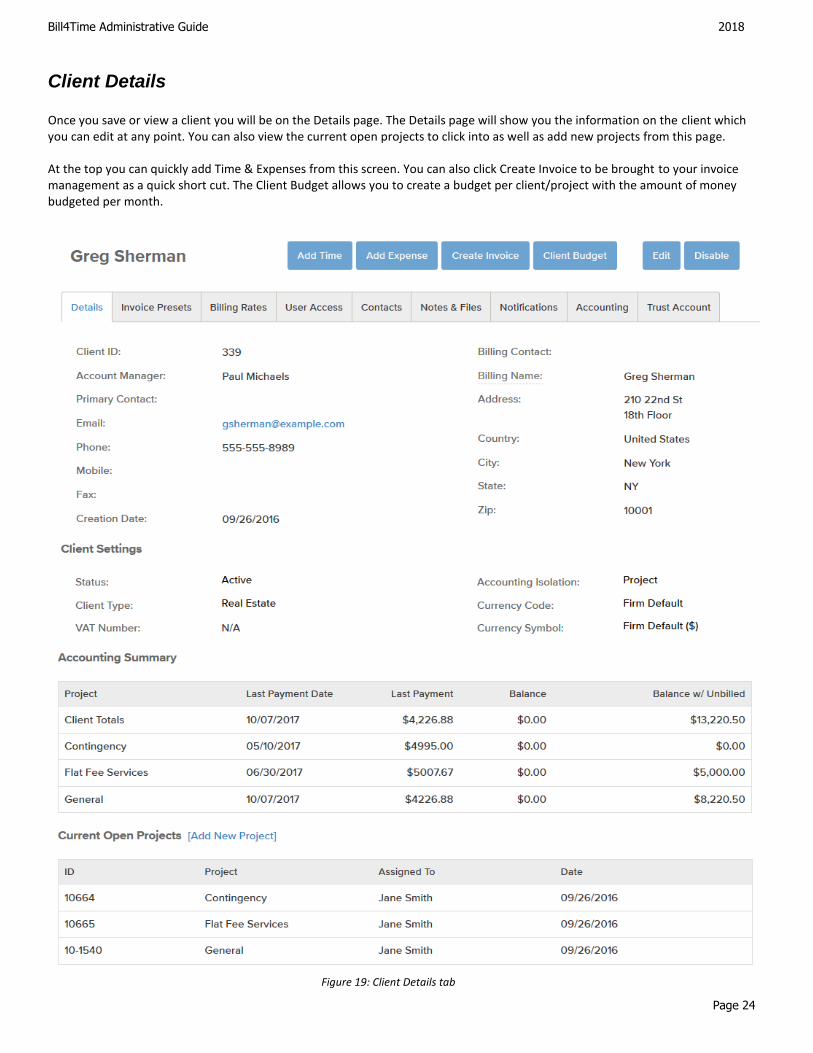
Client Details Once you save or view a client you will be on the Details page. The Details page will show you the information on the client which you can edit at any point. You can also view the current open projects to click into as well as add new projects from this page. At the top you can quickly add Time & Expenses from this screen. You can also click Create Invoice to be brought to your invoice management as a quick short cut. The Client Budget allows you to create a budget per client/project with the amount of money budgeted per month.
Figure 19: Client Details tab

Bill4Time Administrative Guide 2018
Page 25
Invoice Presets Here you will be able to set up different Invoice options that will only apply to this client. This is useful if your client has specific requirements for their template or different header, late fee, or tax preferences. Making any changes to your clients Invoice Presets will only affect this client and the projects underneath. You can change these presets on a per project level as well.
Figure 20: Invoice Presets Screen
The notable fields are the following:
• Payment Terms – These will be displayed on your invoice if it is enabled in the invoice template.
• Invoice ATTN: This is the name that will accompany the client’s address in the invoice. These will be displayed on your invoice if it is enabled in the invoice template.
• Tax Rates – This allows you to edit the tax rates setup on your client to override your default setup in the Settings.
• Late Fees – This allows you to edit the Late Fees setup on your client to override your default setup in your Settings.
• Invoice Template – This allows you to change the template you need by clicking on the template you wish the client to use. The check mark denotes which template is currently used for the client. To switch to a different template, click the desired template. To create a new template, click the New Template button.

Bill4Time Administrative Guide 2018
Page 26
• Invoice Header Text – This pulls from your Settings and can be overrode to change the header that will appear on the invoice.
• Invoice Note Text: This pulls from your Settings and can be overrode to change the note that will appear on the invoice.
Billing Rates Here, you will set up any custom billing rates for this client. The two options are: 1. Flat Rate (All Users) – Selecting this option will have the client billed at
the same hourly rate for all users’ hourly work. It overrides all hourly rates set per user in the User Setup. When selecting this you will be prompted to enter the flat rate amount.
2. Per User –All employees bill at their standard rates (as defined in the User Details page) and you can override those rates from this screen on a per-user basis. These changes will only affect the client you are editing.
The user’s default rates will be listed to the right. If you wish to override the default rate, select the user which will activate the override rate field. Enter in the hourly rate for this user, specific to this client.
If you are working with any Contractors, you can click Show Contractor Rates to view the contractor rates setup in their user profile and to override them as well. When you are done, click on the Save Billing Rates button.
Figure 21: Billing Rates Screen
This client-level rate overrides the user’s Standard Hourly Rate stated in the User Details page. What can override the rate from the client level? The rates at the project, activity, and time entry level.
Note on Billing: The billing rates here apply for this client only but can still be overridden on a per-
project basis. When creating a project, you will have the option to set a custom billing rate (hourly) or set the project as flat-fee billing. More information, consult Bill4Time’s supplemental guide: The User Guide and look under Creating Projects.

Bill4Time Administrative Guide 2018
Page 27
User Access
From this tab you can select which users have access to this client. If you set a user to not have access to a client, they will not be able to create projects for the client, view any projects that are open for the client, or do any billable work for the client. Essentially, they will not know that the client exists. Selecting the User Access tab will take you to this screen:
Figure 22: User Access (per-client view)
By default, each client is set up to be accessible by all users, indicated by a check mark next to “Automatically Add all Current and Future Users” and their names. This enables all the current users in your firm - as well as any users added in the future - access to this client. If you want to choose the users that can have access to this client, uncheck the “Automatically Add…” box and place a check mark next to any users that you want to enable client access. You will not be able to remove client access from System Administrators. Click the Save Changes button to commit these changes to the system.
Contacts Tab You can create contact records for key personnel at the client level. This information is important because it can be looked up by anyone in the firm as well as being displayed alongside relevant projects. Select the Contacts tab to be taken to this screen:
Please Note – If you already removed user access
from the Client Access tab under the user profile, they will not have access to the client even though they are checked in the User Access tab on the Client profile.

Bill4Time Administrative Guide 2018
Page 28
Figure 23: View Client Contacts
To add a new contact, click on the Add Contact button. First Name and Last Name are the only fields required. Click on Additional Information to enter more information (eg: address, department, etc.) into the contacts account as well. Click Save to commit this contact to the system.
Notes/Files From this section you can add notes or file attachments that are important for your servicing the client but not relevant to one particular project. You can upload just about any type of file attachment (up to 50 MB) or just enter text information. This data is available to all users that have access to the client and is not part of any client projects. Select the Notes/Files tab to be taken to this screen:
Figure 24: Client Notes/Files
To add a File Attachment, click on the Add File button. You can then browser your computer to select the file you wish to add. Put in a description in the required Comment section and click the Save button. To add a new note, click on the Add Note button. Enter in your Subject and Note text (both required). Then click the Save button to attach this note to your client’s portfolio. You may edit or delete any Note/File attachments at any time from the main screen. Any previously entered notes and files will be listed.

Bill4Time Administrative Guide 2018
Page 29
Accounting Tab
This tab will show you a snapshot of the client’s accounting history, including invoices, payments, adjustments, and unbilled activity. Click on the Accounting tab to be taken to the screen below:
Figure 25: Client Accounting
If you click on an invoice it will bring you to the Invoice Details page for that invoice. You can also click the Print & PDF buttons to open and save an invoice from this page as well. “Unbilled Activity” represents time entries and expenses that have been entered for the client that have either not been billed or not on a finalized invoice. A Balance Adjustment can be used either for a debit on the account not related to either a fee or expense or a credit which can be used to write off a balance or credit an account.
1. Click the Balance Adjustment button and a pop-up
window will open (Figure 26).
2. Enter in the amount.
3. Click on the calendar icon to select a date of the
adjustment.
4. Select debit or credit for the adjustment type.
5. The Public Note is shown on the invoice and under
the Accounting tab. The Private Note is only for
internal reasons. The only way to access the saved
Private Note, is to see the Balance Adjustment
Details pop-up window.
6. If the adjustment is a credit you can apply this to
any open invoices
7. Then click Save when finished
Figure 26: Enter Balance Adjustment

Bill4Time Administrative Guide 2018
Page 30
A payment can be entered and applied to invoices to deduct from the total outstanding: 1. Click the Receive Payment button.
2. Choose a specific Project to reflect the
unpaid invoices or keep it set to All to
show all invoices outstanding for any
project.
3. Enter in the payment Amount.
4. Change the date if needed.
5. Select the Payment Method.
6. Enter in the Reference number (optional)
7. Put in a description in the Notes field
(optional)
8. Check the box next to specific invoice(s)
you want this payment applied to – the
Applied Amount will automatically
calculate based on how the “Amount” is
filled in.
9. Click Save
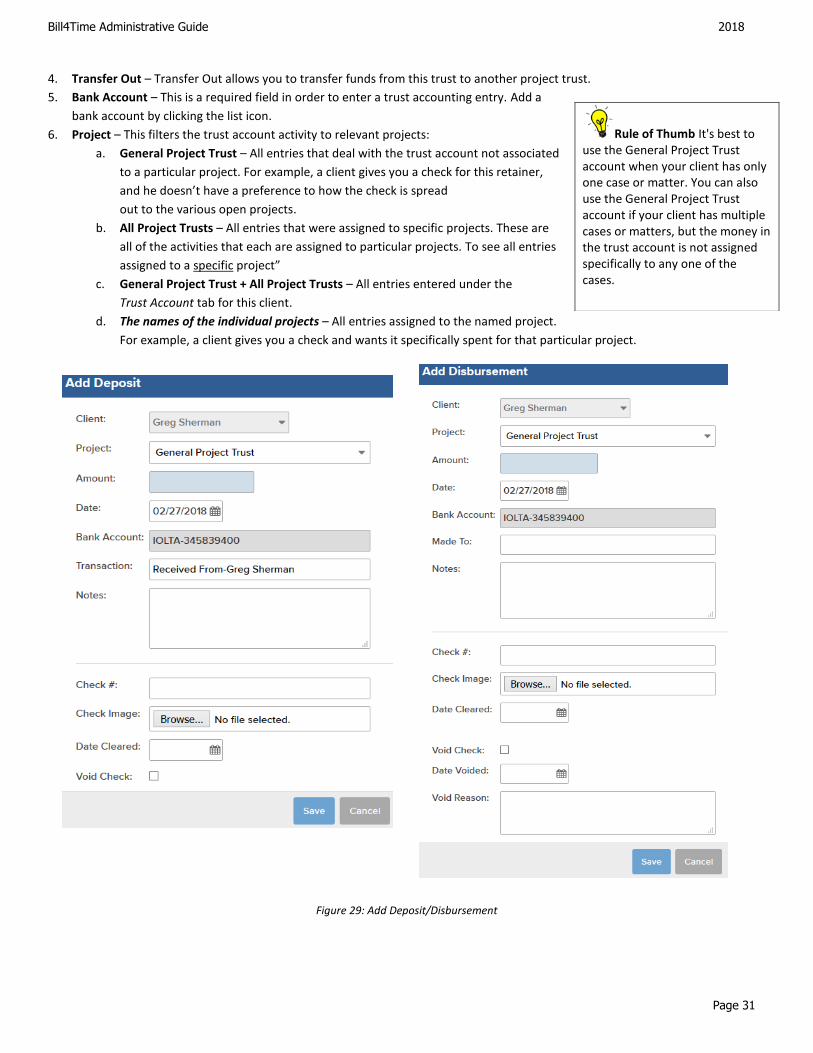
Trust Account This tab will allow you to keep track of trust account transactions for each client and associated projects. Note that Trust Accounting is only available on Bill4Time Legal plans. This enables you to manage your trust account balance without affecting the balance the client owes your company. Click on the Trust Account tab to display the screen below:
1. Add Deposit – Used to record payments intended to add funds to the trust account.
2. Add Disbursement – Used to record withdrawals to pay fees that are not towards your firm.
3. Transfer In – Transfer In allows you to transfer funds from another project trust into this trust.
Figure 27: View/edit payment or adjustment
Figure 28: Client Trust Account
Bill4Time Administrative Guide 2018
Page 31
4. Transfer Out – Transfer Out allows you to transfer funds from this trust to another project trust.
5. Bank Account – This is a required field in order to enter a trust accounting entry. Add a
bank account by clicking the list icon.
6. Project – This filters the trust account activity to relevant projects:
a. General Project Trust – All entries that deal with the trust account not associated
to a particular project. For example, a client gives you a check for this retainer,
and he doesn’t have a preference to how the check is spread
out to the various open projects.
b. All Project Trusts – All entries that were assigned to specific projects. These are
all of the activities that each are assigned to particular projects. To see all entries
assigned to a specific project”
c. General Project Trust + All Project Trusts – All entries entered under the
Trust Account tab for this client.
d. The names of the individual projects – All entries assigned to the named project.
For example, a client gives you a check and wants it specifically spent for that particular project.
Rule of Thumb It's best to use the General Project Trust account when your client has only one case or matter. You can also use the General Project Trust account if your client has multiple cases or matters, but the money in the trust account is not assigned specifically to any one of the cases.
Figure 29: Add Deposit/Disbursement
Bill4Time Administrative Guide 2018
Page 32
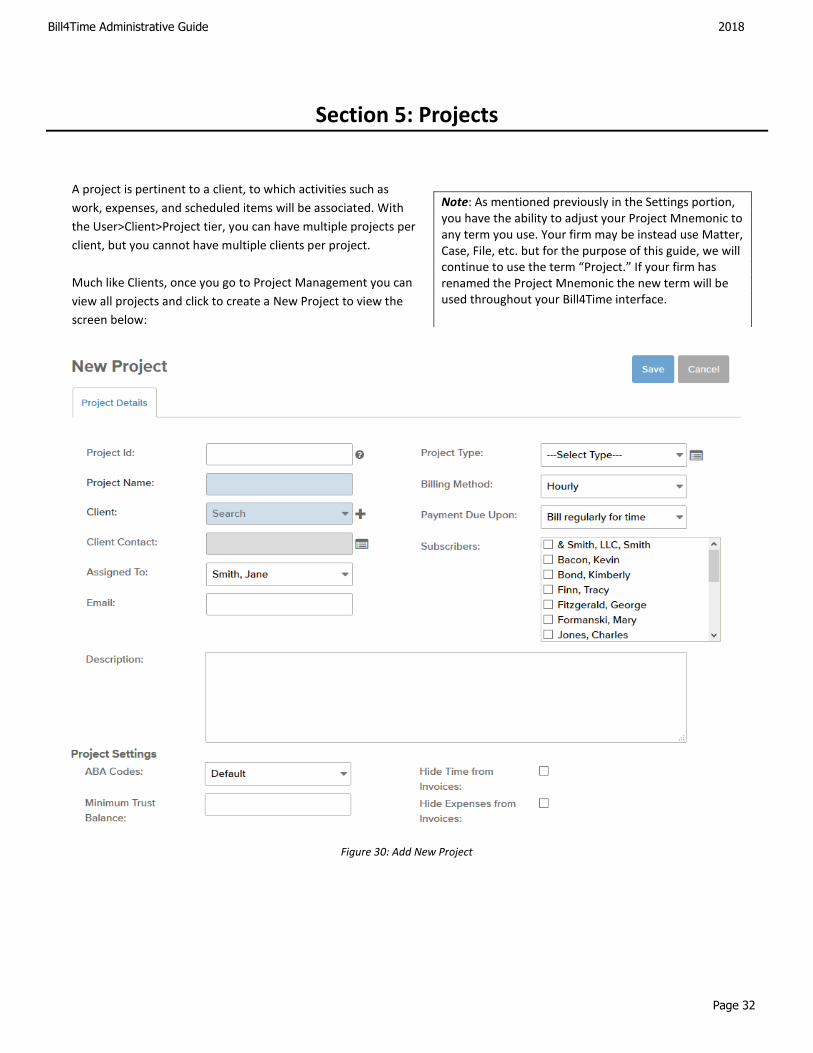
Section 5: Projects
A project is pertinent to a client, to which activities such as
work, expenses, and scheduled items will be associated. With
the User>Client>Project tier, you can have multiple projects per
client, but you cannot have multiple clients per project.
Much like Clients, once you go to Project Management you can
view all projects and click to create a New Project to view the
screen below:
Note: As mentioned previously in the Settings portion, you have the ability to adjust your Project Mnemonic to any term you use. Your firm may be instead use Matter, Case, File, etc. but for the purpose of this guide, we will continue to use the term “Project.” If your firm has renamed the Project Mnemonic the new term will be used throughout your Bill4Time interface.
Figure 30: Add New Project

Bill4Time Administrative Guide 2018
Page 33
Creating a Project
The only required field (as denoted with the light blue text box) is the Client Name & Matter name. The notable optional fields are as follows:
• Project ID – If not filled in, a numerical ID will automatically assign itself to the client.
• Project Name – Here you can enter the projects name
• Client Name – Enter in your clients name here. If you have not added the client yet you can click the plus icon to add one.
• Client Contact – You can enter in a contact per Project if needed.
• Assigned To – Select which user this project is assigned to.
• Project Type – Here you can segregate your projects any way you want to make project management easier. You can click the plus icon to view and edit your project types which can be useful on reports.
• Billing Method o Hourly – All entries saved will bill at the hourly rates setup in the system.
o Contingency – This project is billing at a percentage of a settlement fee. All entries saved will be non-billable by default
allowing you to track the hours worked but at no dollar amount. Once you receive the settlement fee add one more
time entry and change the Entry Type from Hourly to Case Closing Settlement. That will allow you to enter in your
settlement amount to bill on your invoice.
o Flat Fee – Reoccuring – All entries are billable and will bill at the flat fee setup in the system. This method is basically for
billing a certain fee each month and not tracking hours worked.
o Flat Fee – One Time – All entries saved will be non-billable by default allowing you to track the hours worked but at no
dollar amount. Once you are ready to bill the project you would add one more entry and change the Entry Type from
Hourly to Project Closing Fee to fill out the rest of your entry and save it. This will allow you to track the hours worked
and only bill the flat fee whenever needed.
• Payment Due Upon
o Bill regularly for time – This setting enables you to still generate invoices while the project is still open. Regardless of
your flat rate setting, you will be able to create invoices. For one-time flat fee projects, your invoices will show the work
entry as “unbillable” (i.e. There is no hourly rate attached to these work entries) but still included on the invoice. This still
requires you to go through the normal billing procedures.
o Bill at Project closing – This setting only allows you to create an invoice when the project status is closed. Even though
you have work entries recorded, you will not see this project available when you are on the “New Invoice Batch” screen unless you close the project.
• Subscribers – You can use Subscribers to allow alerts for users as well as customize user access on a per client level.
• Description – You can setup a description per matter which is strictly internal.
• ABA Codes – Turn this on or off, depending on the ABA code setting in the Firm/System settings. This enables you to
custom the ABA code setting for each project.
• Minimum Trust Balance – Enter a minimum trust balance here for tracking purposes only.
• Hide Time from Invoices – This defaults all time entries to be set to “Exclude from Invoice” so they are never billed.
• Hide Expenses from Invoices – This defaults all expense entries to be set to “Exclude from Invoice” so they are never billed.
When you are finished, click the Save button to commit the project to the system, and you will be taken to the Project Details screen. The Projects have the same options as in your Clients, which will allow you to update the Invoice Presets, Rates, Contacts, Notes/Files, etc per each project if necessary.

Bill4Time Administrative Guide 2018
Page 34
Section 6: Invoicing When you go through invoicing, you can either create single invoices or batches. Once you click into Invoicing in your blue menu bar you will be at the page below. Once on Invoice management you will be able to view all invoices created in the past, when they were created, their current status, and the totals amount per invoice or batch. You can also search by Batch IDs, Created Date From & To, Status, and Invoice Date. You can click into any invoice to view and edit if the invoice is still set to a Pre-bill. Click on the blue Invoicing tab to display the menu below:
Creating the Invoice Batch When creating your invoices, go through Create Invoice to get to your New Invoice Batch screen.
1. First, select a date range. You can check the box to select a “Billing Start Date” but keep in mind this is not required and does not show on invoices. If not checked, the system will automatically pull everything up till your Through Date. Your “Billing Through Date” is your stop date and your “Invoice Date” is just the date of the invoice.
2. Select which clients & projects to bill. 3. Put in a description for this batch, if you desire. 4. Click the Save button. The invoices are created and will be set with a “Pre-Bill” status.
Figure 31: Invoice Management screen
Remember 1) An invoice batch can include as many invoices as you want. 2) All invoices start off with a “Pre-Bill” status.
For more advanced invoicing tips and further invoicing information, visit: https://bill4time.zendesk.com/forums

Bill4Time Administrative Guide 2018
Page 35
The first step to invoicing your clients is to create a new batch of invoices. Click on the Create Invoice button to be taken to this screen:
Reviewing Invoices in the Batch All entries in your invoice batch will list separately. You can click into each invoice individually to make the edits you need (Figure 33)
Figure 32: Creating New Invoice

Bill4Time Administrative Guide 2018
Page 36
You will now see a list of invoices that are included in this batch. Notice how all invoices are showing in “Pre-Bill” status. From this screen your options are:
1. Create PDF – Create a PDF of all of the listed invoices in the batch. Once all of the invoices are finalized. Each invoice will be on a separate page in one PDF.
2. Create ZIP – Create ZIP allows you to save a zip file with each invoice as a PDF separately. 3. Print on Letterhead – Prints all invoices in your batch without your default header so you can print the invoices to separate
sheets of paper with your own letterhead. 4. Print – Prints all invoices in your batch. Each invoice will print separately. 5. Edit – This allows you to edit/add/remove what clients/projects are included in the batch. Once all invoice are finalized in
your batch, you will no longer be able to edit the batch. 6. Delete – This will delete the entire batch of invoices. All of these invoices will be deleted, but none of the work/expense
entries are lost. All entries go back to unbilled activity, so you can create invoices again for these items. 7. Back – The Back button will take you back to the previous screen you were on. 8. Finalize/Unfinalize – You will see check boxes to the far left of the invoices. You can check the boxes and use the Finalize
and Unfinalize buttons to mass update your batch. 9. Trust Payments – Trust Payments allows you to view the trust balances available and to pay for each invoice from Trust.
The next step in the billing process is to go through each of the Invoices, ensure they are correct, and finalize them.
Viewing and Editing Invoices From this screen you can review the invoice and make any necessary corrections to it before finalizing or printing. Hover over an entry and click it to open and make changes. When finished, click the Save & Close button. Those changes will immediately be reflected on the invoice. The following options are available from this screen:
Figure 33: View Invoice Batch

Bill4Time Administrative Guide 2018
Page 37
Figure 34: Viewing Invoice

Bill4Time Administrative Guide 2018
Page 38
• Print – Shows the invoice as a print preview, ready to be printed. If the invoice is still in “Pre-Bill” status, the printout will reflect this status.
• Create PDF – Creates a PDF of the invoice. If the invoice is still in “Pre-Bill” status, the PDF will reflect this status. With this PDF, you can print it, save it, or attach it to an email.
• Finalize (Unfinalize) – Marks the invoice as “Finalized,” locks all invoice edits, and automatically brings up the next invoice in “Pre-Bill” status. Once Finalized, there will be an Unfinalize button that will allow you to put the invoice back into a pre-bill state to make further edits.
• Edit – Click to Edit the invoice to bring you back to the Invoice Batch page which will allow you to bring in new entries or add more clients/projects to your existing batch.
• Delete – Deletes the invoice from this batch.
• Save – Saves all invoice edits. However, this does not finalize the invoice. It may still be subject to other edits in the system (eg: billing rate change).
• Back – Brings you back to the previous screen or the previous invoice in this batch.
• Prev/Next – Takes you to the Previous or Next invoice in the batch.
• Invoice Details – The details page will allow you to make further changes to the pre-bill (more information below) and edit the entries within the pre-bill.
• Invoice Summary Tab – Completely summarizes your invoice with a single listed item showing the date span, summary
detail, total hours, and total amounts. This is particularly useful when you bill retainers and you want to show clients only
the total time billed and the total billed amount to the retainer.
• Payments Tab – Allows you to apply payments that may have already been saved as well as creating new payments.
The following are further options that can be made at the pre-bill level (Figure 34):
• Invoice Date – Select the date of the invoice
• Billing Through – Select the billing through date to update or bring in new entries
• Invoice Terms – Applies payment terms on invoices. Choose from the pull-down menu or
click the pencil icon to edit the current list and add your own payment term.
• Invoice Discount – Applies an invoice discount at either a percentage or flat amount. You can
also use the Discount Options link to apply it to just labor, expenses, or both.
• Invoice Description – This is an internal title and will show on invoice management and
reports.
• Invoice Notes – Includes an invoice note which will show on the bottom of the last page of the invoice.
• Export LEDES 98B File – Exports the invoice to a LEDES 98B File. Make sure you enable this feature in the Firm/System
settings.
• Group by Project – If unchecked, the invoice items will be listed chronologically, without grouping them by project. If
checked, the invoice items will be grouped by project and listed chronologically.
• Write up/down Labor/Expense Totals – Enables you to have a fixed amount for labor and/or expenses, while still
maintaining the hours, a rate per hour, and individual expense amounts.
Remember Click “Save” to save the changes made to the pre-bill.
Bill4Time Administrative Guide 2018
Page 39
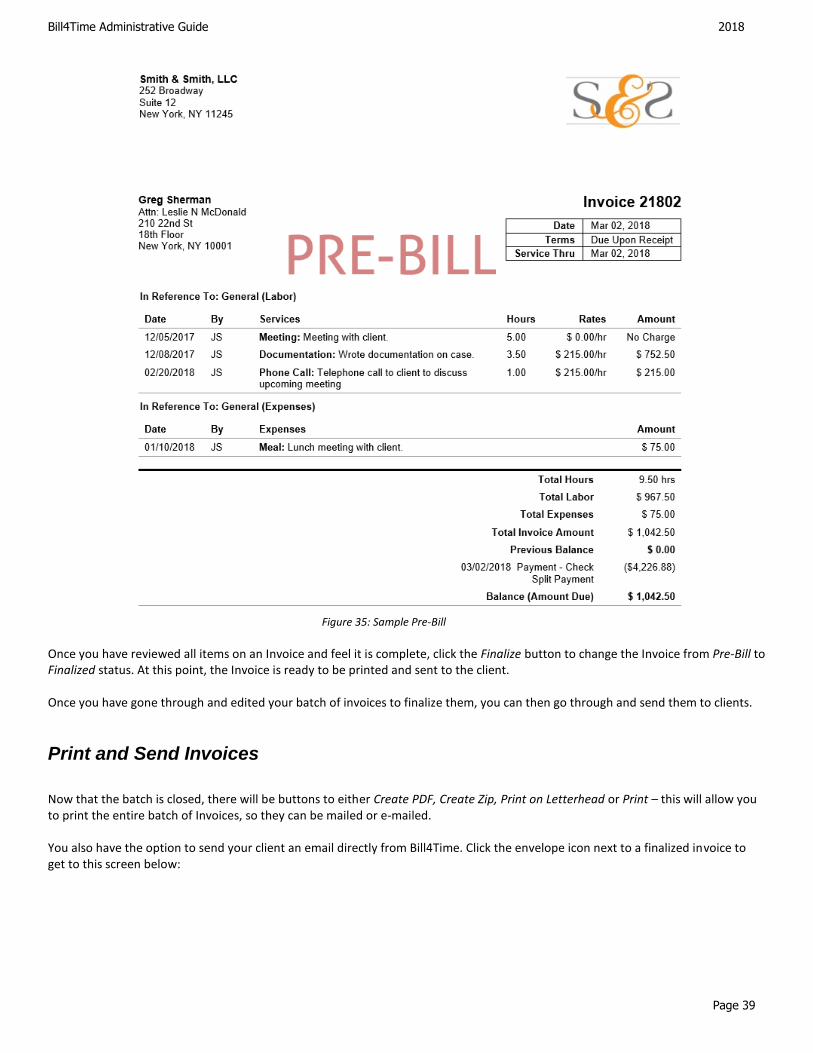
Once you have reviewed all items on an Invoice and feel it is complete, click the Finalize button to change the Invoice from Pre-Bill to Finalized status. At this point, the Invoice is ready to be printed and sent to the client. Once you have gone through and edited your batch of invoices to finalize them, you can then go through and send them to clients.
Print and Send Invoices
Now that the batch is closed, there will be buttons to either Create PDF, Create Zip, Print on Letterhead or Print – this will allow you to print the entire batch of Invoices, so they can be mailed or e-mailed. You also have the option to send your client an email directly from Bill4Time. Click the envelope icon next to a finalized invoice to get to this screen below:
Figure 35: Sample Pre-Bill

Bill4Time Administrative Guide 2018
Page 40
Once you open the Email Invoice pop you can see the options available. This will show the Clients name and Invoice number. If you click to generate the invoice link you can see the invoice as the client sees it. You can choose a contact from your list and choose who the email is being sent from. You can enter multiple people in the To and CC fields and enter the Subject and Body as needed. Once finished click Send. Once your client receives the email and clicks the link they will get sent to their client portal which is shown below: From their client portal they can click to Print the invoice, download a PDF, and click “Pay Now” if payment options in the portal settings were enabled. To learn more about this feature go to page 14 in the Guide for instructions on how to set this feature up in your account.
Figure 37: Sample Pre-Bill Figure 36: Email Invoice
Figure 37: Client Portal Preview

Bill4Time Administrative Guide 2018
Page 41
Find Invoice From Invoice Management click Find Invoice to get you to this screen:
If you know the Invoice # that you would like to see, enter that into the Invoice # field and click Search. You can also filter the list by client and Project by clicking on the Client drop-down to select a specific client and see all Invoices for that client.
Create Draft
In the Invoice Management click Create Draft. This will bring you to the figure below where you can select a client and project. Create Draft is a great way to view the unbilled activity for a particular client and project without creating an invoice.
First choose the Client filter and pick a Client. Your Projects will then pull up and you can choose from the drop down to either view All Projects or pick one at a time. Once you choose your Client/Project(s) click the Create button.
Figure 38: Invoice Search
Figure 39: Create Draft

Bill4Time Administrative Guide 2018
Page 42
Figure 40: Draft Invoice
Here you can view and edit the entries to make changes. If you are satisfied and still are working on the Project, just exit out of the pop-up. If you are satisfied with the Invoice and are finished entering entries for this Client/Project, then click the Create Invoice button which brings you to the Invoice Details screen in Invoice Management where you can Finalize and Print it.
Create Statements
Lastly in Invoice Management click Create Statements button to bring you to the figure below.
Figure 41: Create Statements

Bill4Time Administrative Guide 2018
Page 43
Filters to choose from are as follows:
• Statement Filter – This allows you to show all clients or only clients with Outstanding balances
• Client Status – Choose from Active Clients, Disabled Clients, or All Clients.
• Account Manager – Choose from any account managers in the account
• Display Firm Logo – Uncheck this if you choose not to print the Logo together with your header
• Display Firm Address – Uncheck this if you choose not to print the client address with the logo. Also you have the option put
your header either Left, Center, or Right of your page.
• Display Firm Footer – Check to display the footer note setup in the settings
• Start Date – Pick a specific start date that pulls the data onto the statement
• End Date – Pick a specific end that that pulls the data onto the statement
• Exclude Recently Invoiced – This filter allows you to eliminate any clients/projects that have been billed in the last 15 or 30
days.
• Display Country on client address – If checked displays the countries address from client settings.
You can print out statements for your Clients (and projects) who have outstanding balances. Check off the Clients/Projects you would like to Print out or check all by checking the box next to “Client Name” and click the Create Statement button.
Figure 42: Print Account Statement
You can print these out in batches or pick which statements to print out individually and send them to your clients. Remember to make payments and balance adjustments just go into the Accounting tab from the Menu screen or in each Client or Projects account.


![VMware AirWatch Mobile Device Management … · VMware AirWatch Mobile Device Management . Supplemental Administrative Guidance . ... and Syslog Guide [8] VMware AirWatch ... Installation](https://static.fdocuments.us/doc/165x107/5b04e5a37f8b9a2d518e4108/vmware-airwatch-mobile-device-management-airwatch-mobile-device-management-.jpg)