Admin Manual - FIT Tracking Solutions
121
Admin Manual Version 10 Alcea Technologies Inc. www.fittrackingsolutions.com
Transcript of Admin Manual - FIT Tracking Solutions

Admin Manual
Version 10
Alcea Technologies Inc.www.fittrackingsolutions.com

1.0 Introducing FIT ...................................................................................................................... 6
1.1 What’s New? .................................................................................................................... 61.2 Additional Documentation ................................................................................................ 61.3 Accessing Customer Support ........................................................................................... 61.4 About Alcea Technologies Inc. ......................................................................................... 6
2.0 FIT Trials ................................................................................................................................ 8
2.1 System Requirements ...................................................................................................... 82.2 Downloading FIT ............................................................................................................... 9
2.2.1 Downloading Alternatives/Lack of GUI ...................................................................... 92.3 Performing Initial FIT Configurations .............................................................................. 10
2.3.1 Configuration Steps: ................................................................................................ 10
3.0 Logging In to FIT ................................................................................................................. 12
3.1 Configurable Options ...................................................................................................... 123.2 Login Page Configuration ................................................................................................ 13
3.2.1 Alternate Login Page ............................................................................................... 14
4.0 Sorting and Previewing Data ............................................................................................... 15
5.0 General Options .................................................................................................................. 16
5.1 User Administration Screen ............................................................................................ 175.1.1 User Administration Tabs ........................................................................................ 185.1.2 User List Controls .................................................................................................... 185.1.3 Adding a User to FIT ................................................................................................ 185.1.4 Editing the User Profile ........................................................................................... 195.1.5 User Info Tab ........................................................................................................... 20
5.2 Group Settings ................................................................................................................ 215.2.1 Groups ..................................................................................................................... 215.2.2 Group Administration .............................................................................................. 215.2.3 Group Details Tab .................................................................................................... 225.2.4 Manage Users Tab .................................................................................................. 225.2.5 Profile Settings ........................................................................................................ 235.2.6 Advanced Settings Tab ............................................................................................ 235.2.7 Group Examples ...................................................................................................... 25
5.3 Server Configuration ....................................................................................................... 285.4 SMTP Settings ................................................................................................................ 335.5 Testing the Notification ................................................................................................... 345.6 Changing the Notify List ................................................................................................. 365.7 Customizing Strings ........................................................................................................ 37
5.7.1 Languages ............................................................................................................... 375.7.2 Samples ................................................................................................................... 37
5.8 File Upload ...................................................................................................................... 385.9 Bulk Update .................................................................................................................... 39
2
6.0 Working With Fields ............................................................................................................ 41
6.1 Custom Fields ................................................................................................................. 436.1.1 Field Attributes ........................................................................................................ 446.1.2 History Attributes .................................................................................................... 46
6.2 Default Fields .................................................................................................................. 476.2.1 Disabling and Enabling Default Fields ..................................................................... 486.2.2 Adding and Deleting Default Field Values ............................................................... 496.2.3 Adding and Deleting Status Levels ......................................................................... 496.2.4 Adding and Deleting Priority Levels ........................................................................ 506.2.5 Adding and Deleting Projects .................................................................................. 51
7.0 Field Hierarchy .................................................................................................................... 54
7.0.1 Table Hierarchy Edit ................................................................................................ 557.0.2 Direct Hierarchy Edit ............................................................................................... 56
8.0 Field Controls ...................................................................................................................... 57
9.0 Field Order .......................................................................................................................... 59
9.1 Color Coding ................................................................................................................... 60
10.0 Workflow Overview .......................................................................................................... 63
10.0.1 Workflow Attributes .............................................................................................. 6410.0.2 Order is Important ................................................................................................. 6610.0.3 Multiple ways to do things .................................................................................... 6610.0.4 Workflow Examples .............................................................................................. 67
11.0 Rank / Escalation: .............................................................................................................. 69
11.0.1 Formula Examples: ................................................................................................ 69
12.0 Advanced Options ............................................................................................................. 71
12.1 Database Administration ............................................................................................... 7212.2 Event Scheduling .......................................................................................................... 72
12.2.1 Event Details ......................................................................................................... 7212.2.2 Notification Options ............................................................................................... 7312.2.3 Event Example: ..................................................................................................... 7312.2.4 Workflow Options ................................................................................................. 7412.2.5 Backup Options ..................................................................................................... 74
12.3 Data Import ................................................................................................................... 7512.4 Data Export ................................................................................................................... 7612.5 SOAP Functions ............................................................................................................ 7712.6 System Info .................................................................................................................. 7812.7 Exception Log ............................................................................................................... 7812.8 Backup .......................................................................................................................... 7912.9 Unarchive ...................................................................................................................... 79
3

12.10 System Message ........................................................................................................ 8012.11 Shutdown ................................................................................................................... 8112.12 Track Administration ................................................................................................... 81
13.0 Anonymous Access to FIT ................................................................................................ 83
13.1 Scenarios in Which Anonymous Access is Used ......................................................... 8313.2 Enabling Anonymous Entry ........................................................................................... 83
13.2.1 Enabling the Anonymous Entry Feature ................................................................ 8313.2.2 Creating an Issue Entry Page ................................................................................ 85
13.3 Enabling Anonymous Querying .................................................................................... 8513.3.1 Enabling the Anonymous Querying Feature .......................................................... 8513.3.2 Creating an Issue Query Page ............................................................................... 87
14.0 Anonymous Email Retrieval .............................................................................................. 88
14.1 How Anonymous Email Retrieval Works ...................................................................... 8814.2 Specifying a Return Message ....................................................................................... 8814.3 Setting Up Mail Rules for Anonymous Email Retrieval ................................................. 8914.4 Configuring Your Mailbox ............................................................................................. 91
15.0 System Dashboard ............................................................................................................ 92
15.1 Dashboard Access ........................................................................................................ 9215.2 Dashboard Controls ...................................................................................................... 9215.3 Editing the System Dashboard ..................................................................................... 93
Appendix A: Understanding Issues Management ............................................................... 95
Appendix B: SOAP Functions ................................................................................................. 99
Appendix C: Metrics ............................................................................................................. 108
Appendix D: Interface Customizations ............................................................................... 112
Appendix E: Track Relationships ......................................................................................... 119
4

5
© 2016 Alcea Technologies Inc. All rights reserved.
Information in this document is subject to change without notice. Alcea Technologies Inc. and the FIT logos are trademarks of Alcea Technologies, Inc. Windows® is a registered trademark of Microsoft Corporation. All other trademarks are the property of their respective owners. The software described in this document is furnished under a license agreement or nondisclosure agreement. The software may be used or copied only in accordance with the terms of those agreements. The contents of this manual and accompanying software are protected by copyright. No part of this publication may be reproduced, stored in a retrieval system, or transmitted, in any form or by any means, electronic, mechanical, recording, or otherwise without the written consent of Alcea Technologies Inc.

1.0 Introducing FITFIT is an innovative and easy-to-use issue management solution, providing you with the tools to track issues, coordinate projects, and effortlessly manage the change process within your organization.
This publication provides you with an overview of FIT’s capabilities and also provides you with detailed steps for conducting typical tasks performed only by FIT administrators.
A second publication — the FIT User Manual — is also available. The user manual outlines global functions that can be performed by all FIT users, including administrators. For more information, see the FIT User Manual, available at
http://www.fittrackingsolutions.com/support/documentation.html
1.1 What’s New?Our latest free product upgrades are available at,
http://www.fittrackingsolutions.com/support/upgrades.html
Announcements about new and upcoming events are available at,
http://www.fittrackingsolutions.com/index.html
1.2 Additional DocumentationAdditional documentation, including the user manual, Web Help, product FAQs and troubleshooting tips, is available at,
http://www.fittrackingsolutions.com/support/documentation.html.
1.3 Accessing Customer SupportYou can contact us at the following numbers and email address:
1.4 About Alcea Technologies Inc.Established by IT professionals for IT professionals, Alcea Technologies Inc. has been providing premium information technology solutions since 1997.
Telephone: 1 . 613 . 563 . 9595
Toll free: 1 . 877 . 321 . 4463
Fax: 1 . 613 . 563 . 9494
Helpdesk: http://www.fittrackingsolutions.com/support/helpdesk.html
Email: [email protected]
6
Our flagship product, FIT, is a market leader in tracking resolutions software. Quick to install, easy to use, and simple to customize, FIT includes a support package that is unprecedented in the industry.
FIT solutions offer power and simplicity to identify, track, and resolve corporate and customer issues throughout any organization.
Alcea's corporate mandate is to continue offering world class IT products and services to our global customers, which include public and private organizations, government departments, and fortune 500 companies.
For more information about Alcea Technologies Inc., visit http://www.alceatech.com
For more information about FIT, visit http://www.fittrackingsolutions.com
7

2.0 FIT Trials
There are three easy ways to access a trial version of FIT at the following location:
http://www.fittrackingsolutions.com/demos/index.html
1. Trial Hosted SystemsAlcea offers a hosted 30 day trial which runs on our server and can be created and used immediately.
These trial systems are fully functional and all data will be kept intact for you once you decide that you want to become a permanent customer. Alternatively, the data can also be archived and sent to you if you decide to host the server on your own machine at a later date.
2. Trial DownloadThe FIT software can be downloaded and installed on your own server within 5 minutes. This trial system is actually the complete product and you do not need to uninstall or reconfigure anything once you decide to purchase. Before you download FIT, please review our system requirements summary below. Downloading instruction are also available below.
3. Online Help SystemAlcea also allows you to login to our on-line help system and take a look at how we are using the system ourselves to better serve our customers.
Detailed purchasing and installation information is available at:
http://www.fittrackingsolutions.com/pricing/index.html
2.1 System Requirements
The system requirements for FIT are:
> Minimum requirements:
• 10M HD space / 1000 issues
• (assuming JRE is already installed)
• 1G RAM
> Recommended:
• 20G HD space plus 100M HD space per 1000 issues
• 2G RAM
> Platforms:
8FIT Trials

• Windows (95, 98, ME, 2000, XP, Vista, 2007)
• Mac OSX
• Linux - (requires Java Virtual Machine 1.6 or greater)
• Solaris - (requires Java Virtual Machine 1.6or greater)
• Other - (will run on any other platform that also has Java Virtual Machine 1.18 or greater)
NOTE Administrators must account for space needed for any attachments.
2.2 Downloading FIT
In less than 5 minutes, you can have a full system running on your own server.
To setup FIT
1 Navigate to http://www.fittrackingsolutions.com/Web_Installers/install.html
2 Choose from the list of available installers
3 On Windows simply follow the prompts to download the Fit.msi install file to your computer desktop.On a Unix system, you must save the Fit.tar on your system and extract the contents using the command “tar -xvf Fit.tar”. This will present you with a Fit script that you can run.
4 Once the Fit.msi file is on your computer desktop, double-click the file icon and follow the prompts to download FIT.For Unix, run Fit script as “./Fit” or run Fit manually using the contents in the script.
5 Once the software application is installed, you are prompted to perform initial configurations as outlined in the following section.
NOTES The FIT trial version is the complete application with some minor restrictions as outlined at http://www.fittrackingsolutions.com/demos/index.html
We provide you with a key to override these restrictions once you purchase the product. For more information, visit http://www.fittrackingsolutions.com/pricing/index.html
A 30 day trial key is also available when necessary.
Downloading Alternatives/Lack of GUI
If you are using a system without GUI implementation, you may experience problems with our install file. If so, we have alternatives methods available upon request.
9FIT Trials
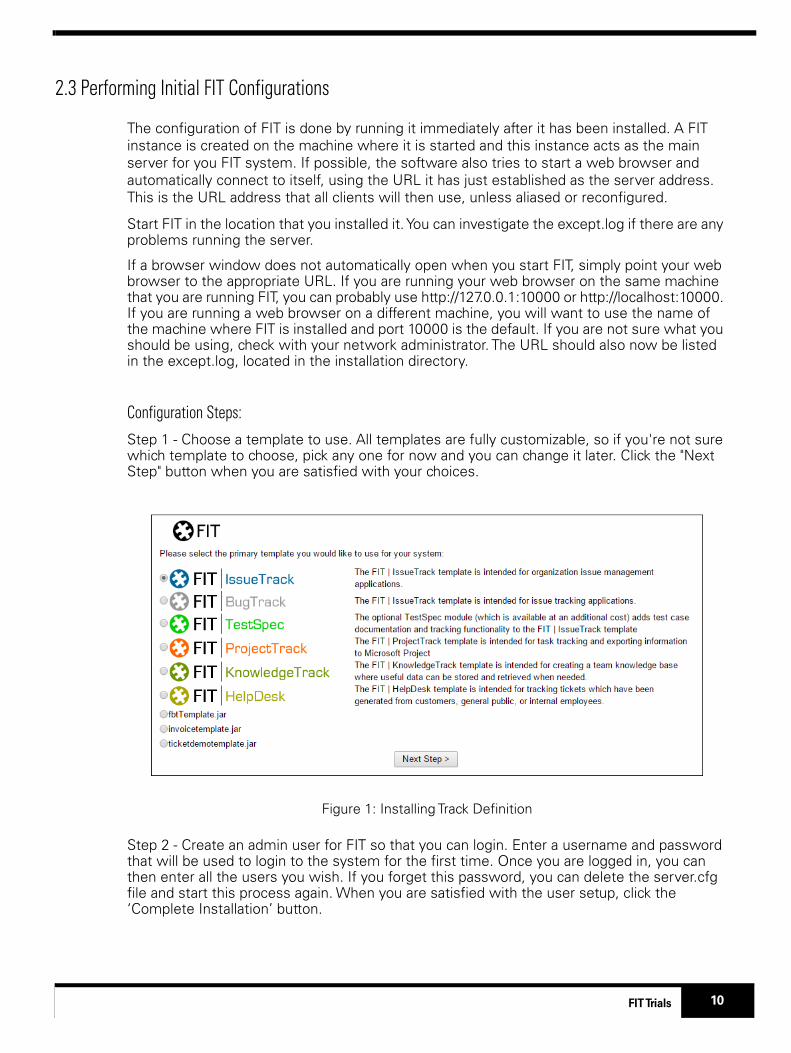
2.3 Performing Initial FIT Configurations
The configuration of FIT is done by running it immediately after it has been installed. A FIT instance is created on the machine where it is started and this instance acts as the main server for you FIT system. If possible, the software also tries to start a web browser and automatically connect to itself, using the URL it has just established as the server address. This is the URL address that all clients will then use, unless aliased or reconfigured.
Start FIT in the location that you installed it. You can investigate the except.log if there are any problems running the server.
If a browser window does not automatically open when you start FIT, simply point your web browser to the appropriate URL. If you are running your web browser on the same machine that you are running FIT, you can probably use http://127.0.0.1:10000 or http://localhost:10000. If you are running a web browser on a different machine, you will want to use the name of the machine where FIT is installed and port 10000 is the default. If you are not sure what you should be using, check with your network administrator. The URL should also now be listed in the except.log, located in the installation directory.
Configuration Steps:
Step 1 - Choose a template to use. All templates are fully customizable, so if you're not sure which template to choose, pick any one for now and you can change it later. Click the "Next Step" button when you are satisfied with your choices.
Figure 1: Installing Track Definition
Step 2 - Create an admin user for FIT so that you can login. Enter a username and password that will be used to login to the system for the first time. Once you are logged in, you can then enter all the users you wish. If you forget this password, you can delete the server.cfg file and start this process again. When you are satisfied with the user setup, click the ‘Complete Installation’ button.
10FIT Trials

Figure 2: Configuration Screen For Adding First Accounts
At this point you can review your choices and you are ready to start using FIT. Upon clicking the ‘Complete Installation’ button, you can login with one of the usernames you created and start using FIT!
NOTE If you would like to re-run the installation process, delete the file called "server.cfg" created in the FIT directory. When this file exists, FIT runs in tracking mode - but when it is not found, FIT runs in installation mode.
11FIT Trials
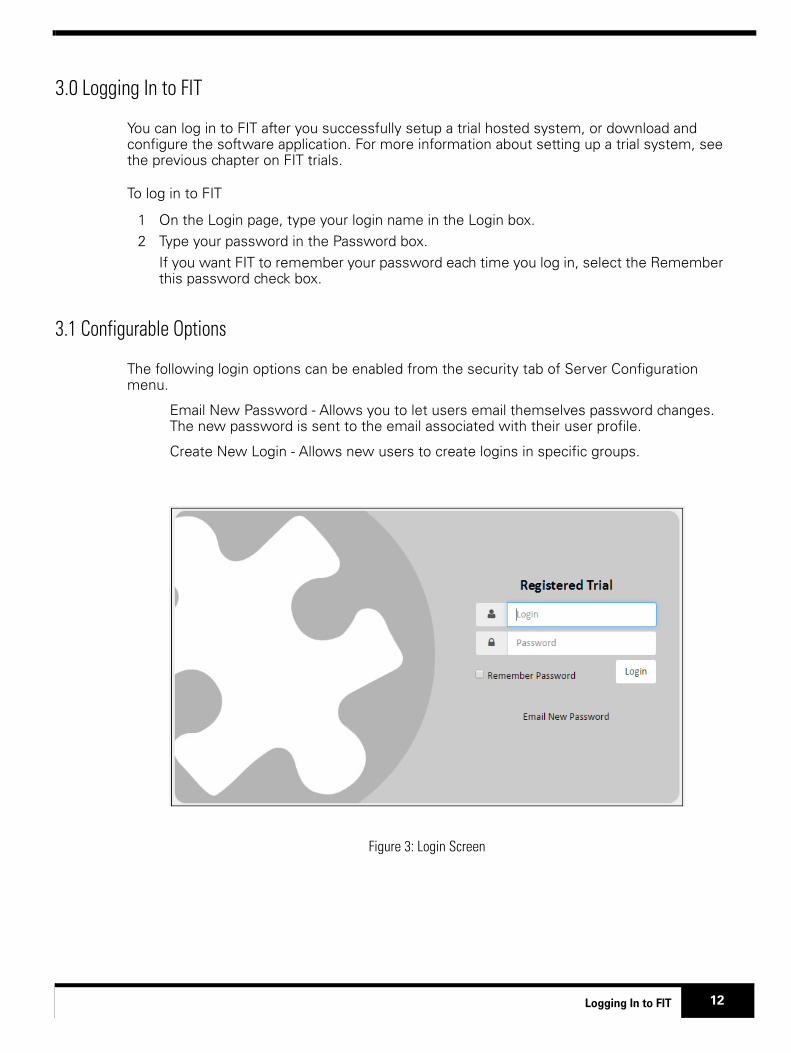
3.0 Logging In to FIT
You can log in to FIT after you successfully setup a trial hosted system, or download and configure the software application. For more information about setting up a trial system, see the previous chapter on FIT trials.
To log in to FIT
1 On the Login page, type your login name in the Login box.2 Type your password in the Password box.
If you want FIT to remember your password each time you log in, select the Remember this password check box.
3.1 Configurable Options
The following login options can be enabled from the security tab of Server Configuration menu.
Email New Password - Allows you to let users email themselves password changes. The new password is sent to the email associated with their user profile.
Create New Login - Allows new users to create logins in specific groups.
Figure 3: Login Screen
12Logging In to FIT

3.2 Login Page Configuration
The following are string variables which can be configured to customize the login page.
rLogo - you can change this to a URL for a logo that is already on the web or copy a logo to your main Fit server directory and access the file name directly. The Admin -> File Upload menu allows you to copy a file to the public FIT directory where it can be accessed directly.
rLogoAlt - the title displayed over the logo
rLoginBackground - the background behind the login frame.
rLoginBackdrop - the image behind the actual login prompt.
rLoginTrackText - text to appear on top left of login screen. A second logo is normally located there (controlled by rLogo)
sLoginNotesAtTop - allows you to define notes at the top of the login page
sLoginNotes - allows you to define notes on the bottom of the login page
Once you login to the FIT system, the main menu is displayed with a list of FAQ items as your first list of issues. For a complete explanation of the menu screens, please see the section on “Viewing and Customizing” in the FIT User Manual. These items can be removed for a completely empty system by using the “Remove All Data” option in Admin->Data Import.
Figure 4: Main Menu Screen
13Logging In to FIT

Alternate Login Page
Figure 5: Original Login Page
The original login screen alternative format is available by restarting FIT with the following line configured in the server.cfg:
com.other.HttpHandler.default=com.other.default
The following configuration strings are available:
sLoginNotesAtTop - allows you to define notes at the top of the login page
sLoginNotes - allows you to define notes on the bottom of the login page
sProductVersion - allows you to remove the product version string from the login page by setting to a one space string.
14Logging In to FIT
15Sorting and Previewing Data
4.0 Sorting and Previewing Data
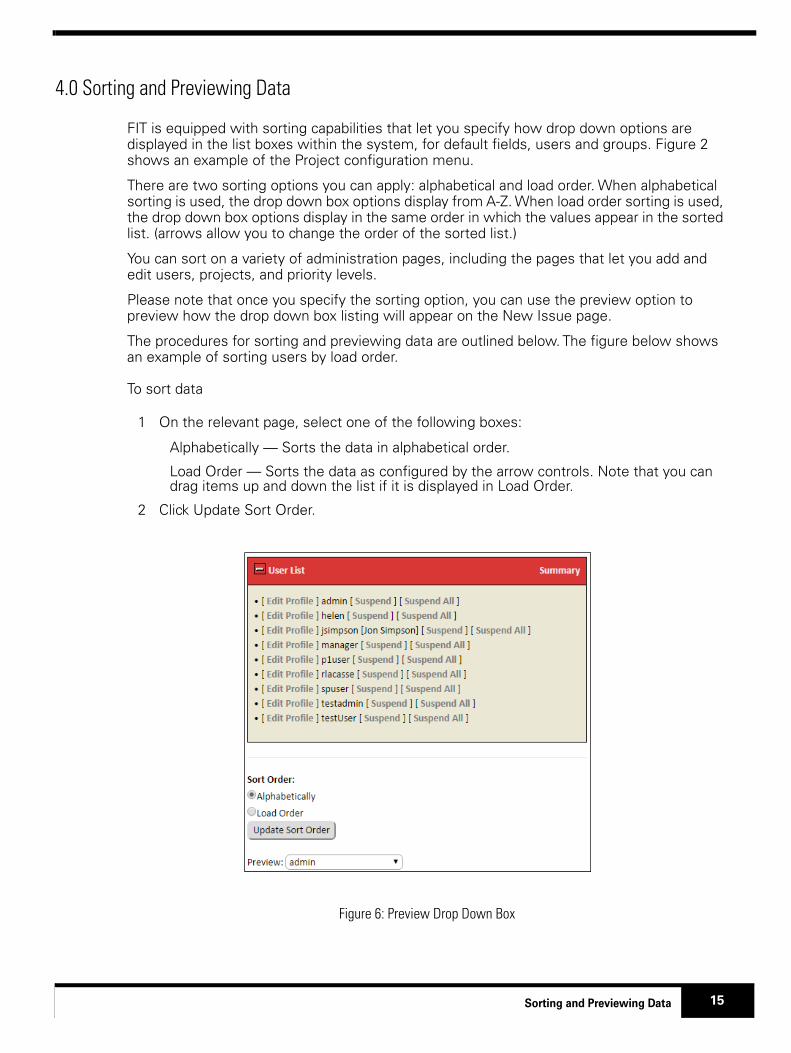
FIT is equipped with sorting capabilities that let you specify how drop down options are displayed in the list boxes within the system, for default fields, users and groups. Figure 2 shows an example of the Project configuration menu.
There are two sorting options you can apply: alphabetical and load order. When alphabetical sorting is used, the drop down box options display from A-Z. When load order sorting is used, the drop down box options display in the same order in which the values appear in the sorted list. (arrows allow you to change the order of the sorted list.)
You can sort on a variety of administration pages, including the pages that let you add and edit users, projects, and priority levels.
Please note that once you specify the sorting option, you can use the preview option to preview how the drop down box listing will appear on the New Issue page.
The procedures for sorting and previewing data are outlined below. The figure below shows an example of sorting users by load order.
To sort data
1 On the relevant page, select one of the following boxes:
Alphabetically — Sorts the data in alphabetical order.
Load Order — Sorts the data as configured by the arrow controls. Note that you can drag items up and down the list if it is displayed in Load Order.
2 Click Update Sort Order.
Figure 6: Preview Drop Down Box
5.0 General Options
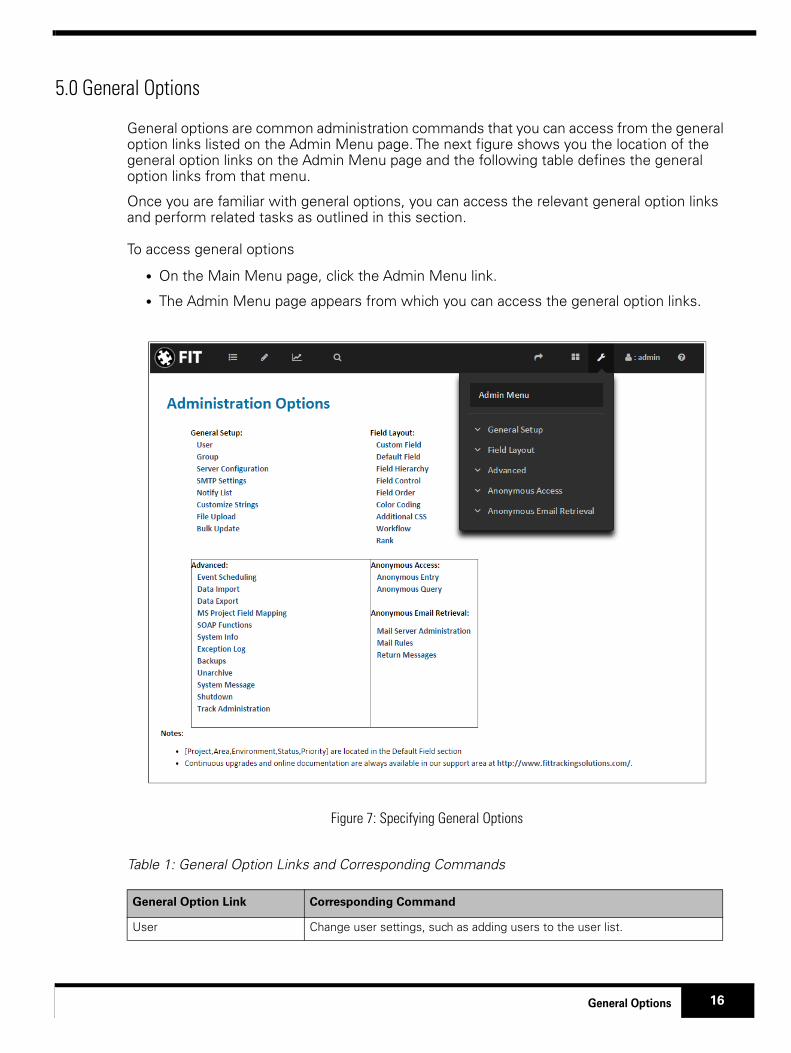
General options are common administration commands that you can access from the general option links listed on the Admin Menu page. The next figure shows you the location of the general option links on the Admin Menu page and the following table defines the general option links from that menu.
Once you are familiar with general options, you can access the relevant general option links and perform related tasks as outlined in this section.
To access general options
• On the Main Menu page, click the Admin Menu link.
• The Admin Menu page appears from which you can access the general option links.
Figure 7: Specifying General Options
Table 1: General Option Links and Corresponding Commands
General Option Link Corresponding Command
User Change user settings, such as adding users to the user list.
16General Options

5.1 User Administration Screen
When you initially install FIT, you specify the individuals who can access and use the software application. These individuals are called users or logins.
The User Admin section is divided into two columns. The right side of this menu lists the current users and the controls for editing them. The left half of the menu allows you to change the properties of users.
Figure 8: User Administration Page
Group Change group settings, such as adding groups to the groups list.
Server Configuration Change the settings of the server on which FIT is running.
SMTP SettingsAdd an SMTP server or change its configuration. The SMTP server is used for email notification.
Notify ListConfigure the notification drop-down list, which lets you add or remove users who are notified by email when new issues enter the system or when issue updates occur.
Customize Strings Change global text strings that appear on FIT pages.
File Uploadallows you to copy a file to the public FIT directory where it can be accessed directly.
Track Administration Controls for addition and configuration of additional tracks for the system.
General Option Link Corresponding Command
17General Options

User Administration Tabs
Create User Tab - allows you to create a new user. The options listed here are listed in the section below.
File Import Tab - allows you to save time by importing multiple users from a CSV file.
Track Import Tab - allows you to grant access to the active track for users in other tracks on your system.
In addition, you can edit each user’s profile by clicking the Edit Profile link beside the corresponding user in the User list. For more detailed information about editing a user’s profile, see the FIT User Manual available at: http://www.fittrackingsolutions.com/support/documentation.html.
User List Controls
Figure 9: User List Controls
The User List menu provides links to edit or delete any existing users. In addition, there is a control at the bottom of this list which allows you to order these users (load order) or list them in alphabetical order. This is the option which controls how the user list drop-downs (ie: Assigned To) are ordered within the FIT system.
If you are using load order, you will see arrow icons on the left which allow you to move the users up or down the list. You can also drag users up and down the list.
Adding a User to FIT
When you add a user, you specify the following properties into the create user tab for each:
• User Id — The identification used to log in to FIT. For example, “jsmith” or “msullivan.”
• Password — The password used by the user to log in to FIT. For example, the same password the user enters to log on to their computer.
• User Tag — Further identification for the user. For example, “Jacob Smith” or “Mary Sullivan.”
18General Options

• Email Address — The email address to which issue notification is sent. This is generally the user’s email address.
• User Type — The user’s access level; normal, read-only, or administrator.
• Normal — Can view, assign, and close issues.
• Administrator — Can access the full system, which includes the ability to view, assign, and close issues as well as the ability to configure FIT.
• Read-only — Can only view issues.
• Selected Groups — Choose the groups you want the user added to (CTRL to multi select)
• Profile to Copy — Choose a user to model the new user’s profile after. All preferences and column settings will be copied.
• Selected Tracks — Select the Tracks you wish to grant the user access to, if using the Track feature.
TIP You can use the arrow keys in the user list to organize the users (for example, click an arrow key to move a user at the top of the list to the bottom of the list.)
• You must create at least one administrator so that you can configure and maintain the system. If you inadvertently delete an administrator, navigate to Program Files/FIT folder and delete the server.cfg file. This lets you restart FIT and enter an administrator. You won’t lose any data or special settings.
Editing the User Profile
You can change each user’s profile by clicking the Edit Profile link beside each user name. Clicking this link calls up a series of user profile attributes that you can change, including the user password, user info (for example, email and user tag), the user’s group information, user preferences, and the columns that display when an issue is logged. The user profile functionality is fully explained in the FIT User Manual, which is available at http://www.fittrackingsolutions.com/support/documentation.html
This document will simply outline the extra admin options which are available on the “User Info” tab, when an administrator changes the profile for a user.
To access the admin profile options
1 On the Admin Menu page, click the ‘User’ link, under General Setup.2 On the User Administration page, click the Edit Profile link, in the User List, that
corresponds to the user’s profile to which you want to edit.
19General Options

Figure 10: Additional Admin Profile Settings
User Info Tab
The Update Password option (under User Info tab) is to set the password for the selected user profile.
The Update User Info section allows you to add a ‘User Tag’ that displays as a suffix (by default) that is displayed along with the user’s name.
The Change Signature section allows you to add a signature that accompanies updated comments.
The Update Groups option (under User Info tab) allows you to change the groups that a user belongs to without having to go to the Groups admin menu and importing to a group.
The Update User Type option lets you change the access type for a user.
The Copy User Profile option lets you copy the profile settings of this user to a set of other users. This is useful if you want to set up a default user and use their settings for all future users by copying it’s profile to all new users.
The Force Logout option allows you to remotely logout with the selected user.
20General Options

5.2 Group Settings
This section outlines how to add groups and also provides general information for working with complex groups.
Groups
You can use groups to separate users that work on different tasks or projects. When users are grouped, you can restrict the information that group members can access and view. You can also add users to multiple groups to address more complex scenarios where specific permissions apply to various individuals.
Using groups also lets you create a system within your organization in which some of the information in FIT is client-specific. For example, you can create two specific customer groups that cannot see each other or their restricted issues. In addition, you can hide or control access to specific fields from different user groups.
Group Administration
Figure 11: Group Administration Menu
21General Options

The group list is listed on the right side of the group administration page. The order of the page is controlled by the Sort Order setting on the bottom right. You can have the groups listed alphabetically, or in a specified order. If you use the load order setting, you can drag items or use the movement icons, which are present if you are using that setting.
The group list has a link for editing and deleting a group. There are also quick links (not shown) at the top of the page to User and Project administration menus, which are closely related features.
When a group is edited, it’s attributes are listed on the left hand side of the page. A group definition is defined by the attributes defined on the three tabs on this page.
Group Details Tab
The most basic concepts of a group involve the visibility of issues and the visibility of other users in the system. FIT defines two basic group properties:
Group Name: Name given to the group definition you are configuring.
Projects Visible: Defines the projects for which issues are visible to members of a group. All issues have a project field (possibly renamed) which is used to group issues of a common criteria. This project field is the most basic form of security for groups. Any issues which belong to a visible project are visible to members of this group.
NOTE All projects are visible by default, unless one or more is selected in this set.
NOTE The Group Security Filter (under advanced settings tab) can override projects visible. If this is set, project visibility is set by the filter being used.
Groups Visible: defines the users who can be seen by members of this group. If another group is not listed in this selection, then it’s members will not show up in the user lists for members of this group. Ultimately, this means that members of this group can not assign issues to other individuals, unless they belong to a group in this list.
Add To Selected Tracks: This option lets you coordinate changes between multiple tracks, so that groups do not have to be modified multiple times.
Manage Users Tab
Group management involves adding and removing users from a group. There are three operations which are used for configuration (Add/Move/Remove).
Add Users To Group: This is a list of all users who are not currently a member of this group. Selected users are simply added to this group, in addition to remaining in any other groups they are already a member of.
NOTE When you add a user to a group, they are not removed from their other groups. The initial group for a user is the Master List. When you first add a user to a group, you will probably want to use the move utility so they are removed from the Master List which has full access.
Move Users To Group: This is a list of all users who are not currently a member of this group. Selected users are moved to this group only, removing them from any other groups that they are currently a member of.
22General Options

Remove Users From Group: This is a list of all the users who are currently members of this group. All selections will be removed from this group. If they are not members of any other group, they will be placed in the Master List, which has access to everything. Therefore, it is best to first create another group with the desired permissions, and move them to that group, rather than removing them here.
NOTE Group assignment can also be done from the User Profile (Info Tab), by any administrator.
Profile Settings
In some cases, an administrator wants to control the preferences of a set of users. The options on this tab allow you to restrict a user from modifying specific sets of profile preferences.
Advanced Settings Tab
The advanced settings are kept separate from the basic group operations of the other tabs. These attributes allow more complex security and permissions and are generally not needed for simple setups.
Other Groups That This Group is visible To: This option can help save time when creating groups. The selection box is a list of all the other groups in the system. The selected groups here are groups, whose members are able to see the users in this group. It is a faster way of changing the “groups visible” attribute of these selected groups, to include the group we are currently editing (so we don’t then have to go through them one by one).
Hide Users From Others In Group: This option will simply allow you to set permissions for a group, without allowing them to see one another in the system. Consequentially, members of a group cannot see, or assign issues to other members of the same group.
Show Group in Notify List: This option controls whether the group is available to choose in the group selection of the Notify List (defaults to visible).
Group Special Permissions
Group Security Filter: You may use a filter to control access to issues, rather than the normal “Projects Visible” setting. If you select a filter here, it will override the normal “Projects Visible” selection. You can add projects to the filter if you want to add back the basic behavior.
A Group Security Filter allows you to define complex group access by defining any filter you wish. The filter must however be created before it can be used for the group. If the filter is not desired as a drop-down filter from the menu bar, there is an advanced option for it to only be used for administration purposes.
NOTE The Group Security Filter definition is saved inside the group definition that uses it. This means that any changes to the filter will not affect any groups using it, unless the group is re-saved.
Use Projects Visible: This option will have the system use the Projects Visible setting from the Group Details tab, even though a Group Security Filter is set to define this group. This
23General Options

allows a filter to be used across many different groups rather then needing to define a specific filter for each group where the project is part of the filter definition.
Group has Read-only Permissions: This option will define all users of this group as read-only type users. Keep in mind that users in multiple groups may not be restricted if another group grants them access.
Allow Create New Login from Login Page: This option will make the group visible as an option for new logins being created by new users on the login page.
Additional Permissions
These options permit the administrator to specify some special access permissions. These permissions are useful when issues flow between groups by allowing access if a user created the issue or has had it assigned to them.
Common scenarios are issues which move from one project to another, as groups reassign issues between groups.
Assigned to the User: This option allows a user to see any issues to which he is currently assigned ownership, even if the user’s group does not permit access.
Entered by the User : This option allows a user to see any issues which they have added to the system, even if the user’s group does not permit access.
Containing the User in the Notify List: This option allows a user to see any issues to which they have been added in the Notify List, even if the user’s group does not permit access.
Assigned to a Member of the User’s Group: This option allows a user to see any issues to which he or another member of his group is currently assigned ownership, even if the user’s group does not permit access.
Entered by a Member of the User’s Group: This option allows a user to see any issues to which he or another member of his group has entered, even if the user’s group does not permit access.
NOTE The project of an issue can NOT change to/from a project set up with unique ids, since the id may already be used by another project. This might be important when you are determining how to set up groups for projects. If you avoid the unique ids, this is not a problem.
Menu Controls
Cannot create New Issues: This option removes access to the “New Issue” menu for all members of this group, so that they are not allowed to create new issues.
Can access Bulk Update: The Bulk Update feature is only accessible to administrators of the system unless they are in a group with this option enabled.
Disable Dashboard: The dashboard menu item is not visible for users in this group.
24General Options

Field Control
Copy Field Control Settings From Group: Allows the administrator to copy field control settings from another group which has already been defined. If left blank, the Field Control Settings will remain unchanged.
Group Examples
The simplest case is to have all users in the Master List (default group), where every user can see every other user and all issues in the system. However, you can make things as complicated as you like and we have put together a few common examples to illustrate how groups can be set up for a few other scenarios.
Example 1: Project Based Security
The easiest way to secure a system is to use the project field to segregate data in your system. Each group can be granted access to a defined set of projects, so that they only see the issues for those projects.
NOTE The default setup for a group is to see ALL projects. If no projects are selected, then the group sees all projects.
For example, a Manager oversees three groups, where all communication is done between the manager and the customers OR the manager and his team of developers.
1. Customer enters issue to the track [Customer - Manager]
2. Manager reviews issue and assigns it to the developer group [Manager - Customers/Developers]
3. Developers notify the manager that the issue is resolved. [Developer - Manager]
4. Manager notifies customer that the issue is resolved.
Visibility of other users in the system is controlled by the “Groups Visible” selection for a group. Members of a group will only see users in groups that are made visible to them using this setting. If a user is in multiple groups, then a set is made from all of the users groups.
The other major concern in any system is what issues a user has access to. You can configure FIT so that each subgroup has access to a specific project (or set of projects).
Additional customers or internal groups can be set up in exactly the same way. Additionally, you can use field controls to secure specific fields for particular groups or workflow to add more rules to your system.
Example 2: Group Security Filter
Sometimes using “Projects Visible” is not enough for a system and you want to control access for a group by a special criteria. In this case, save a “System Filter” to define the criteria you are looking at for this group. This is done from the Save Options section of the Filters menu, with the “For administration purposes” option set, so it does not appear in the general filters drop-down.
25General Options

Figure 12: Advanced System Filter Options Section
Once this filter is saved, it can then be selected as the Group Security Filter in the Advanced Group Settings tab to control exactly what members of that group can see.
NOTE Setting a Security Filter overrides the Projects Visible settings
NOTE The “Use Projects Visible” attribute under the Group Security Filter setting allows the filter to control the projects that are visible for the group, rather than using the normal Projects Visible selection on the Group Details tab.
Example 3: Issues between Groups
When issues are moving between groups you may want a group in one project to see issues from another project. In this case you can use additional permissions to allow users to assign issues to members of other groups.
26General Options
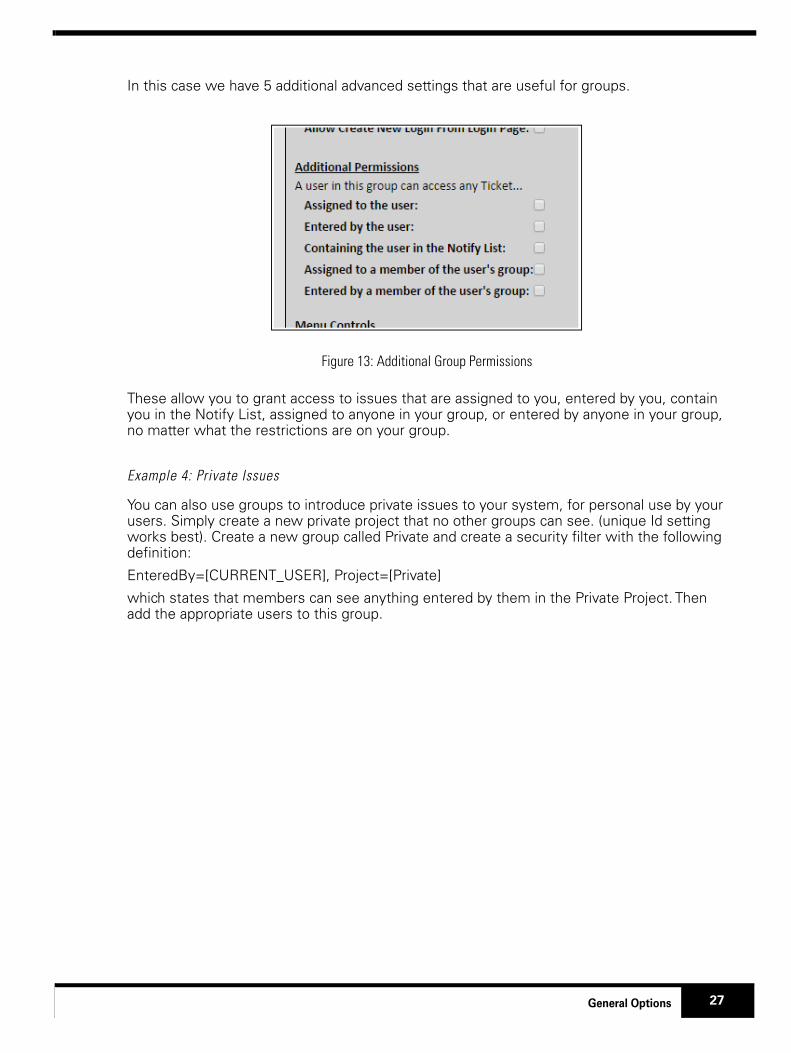
In this case we have 5 additional advanced settings that are useful for groups.
Figure 13: Additional Group Permissions
These allow you to grant access to issues that are assigned to you, entered by you, contain you in the Notify List, assigned to anyone in your group, or entered by anyone in your group, no matter what the restrictions are on your group.
Example 4: Private Issues
You can also use groups to introduce private issues to your system, for personal use by your users. Simply create a new private project that no other groups can see. (unique Id setting works best). Create a new group called Private and create a security filter with the following definition:
EnteredBy=[CURRENT_USER], Project=[Private]
which states that members can see anything entered by them in the Private Project. Then add the appropriate users to this group.
27General Options

5.3 Server Configuration
The Server Configuration controls all of the major server settings for FIT.
This admin menu is divided into several tabs, corresponding to related server options for the system.
Server Configuration Options
Server Options Lets you...
FIT Server NameUse the server name instead of the default IP address. This is used for links to the system, such as links to issues in email notification summaries.
FIT Port Specify the port that FIT is running on. If this is changed, you must stop and restart FIT for the new port to take effect. The port default is 10000.
FIT IP Address Choose a desired IP address on systems with multiple IP addresses.
Disable Auto Browser Launch
Stop the server from automatically opening a browser and connecting to the server. This is particularly useful on console systems, which do not have a graphics context that allows this. The launch feature is enabled for new systems being set up, quickly showing new admins how to connect to the server. Once you are happy with your system, you can certainly disable this.
General Options
Skin To Use
Customize your skin to one of the listed layout types. This will change the headers and footers. Additional designs can be discussed with us as custom changes. Make sure to match the skin to an appropriate stylesheet. For additional information, see Appendix D.
Stylesheet To Use
Customize the default style sheet used for displaying system pages. If you create a new custom Cascading Style Sheet (CSS) file and place it in the FIT server directory, it is also displayed in this list (may require a restart).
Server Time Zone Changes the Server Time Zone (can be overwritten by users).
Disable URLs And Issue IDs As LinksNo longer change URLs and “Issue X” strings to links when reading issue details.
Disable Confirm DeleteStop the system from prompting you every time you delete an item from the admin menu.
Disable Parent/Child Controls Allow parents to be Closed, even if a Child is still Open.
Use Alternate Login PageSet to a different URL if you are logging in from an external page so that users go to the same location when they logout.
Disable Dashboard Hide the Dashboard Link to disable this feature.
Default TrackSet the default track when a user logs in (for systems with multiple tracks).
28General Options

Enable Language Links
This option will add a “Change Language” option to the list of Session Options, next to the Welcome label, offering the option to change the default language for the user. The language options are also added to the login screen.Note: users will need to logout after any changes to this option.
Main Menu Options
Enable Jump Back/Forward 10 LinksAdd links to jump backwards/forwards 10 issues in addition to the jump ahead/back links that are there by default.
Diable View All IssuesRemove the feature that allows you to list all issues on one page (which can impact other users)
Set View All Issues Grouping Size This option helps minimize the impact of the "View All Issues" option. Smaller grouping sizes will have a smaller impact on the system.
Disable Normal Edit ProfileRemove the Edit Profile link so that users cannot modify their user information and passwords.
Enable Read Only Edit Profile Allow Read Only users to modify their user information and passwords.
Disable Main Menu Live Update Do not show updated details on Main Menu using Ajax.
Disable WhoWhat Live UpdateDo not list viewing/editing icons on Main Menu indicating other users working on issues.
Only Show Edit Links to IssuesOnly show edit links on the Main Menu rather than the View links beside the edit links.
Disable Row HighlightingDisable highlighting of rows on main menu as mouse moves over them.
Quick ViewQuick View function options when user clicks on row in the main menu.
Disable Child Highlighting Indent child relationships rather then highlighting them in yellow. This functionality is dependent on the “Show child task list for each parent” option in a user’s profile.
Disable RTF HTML Editor Disable the RTF Editor when modifying text areas.
Notification
Default History Type for NotificationsThis is the history type that will be used for notifications where it can not be obtained from a user profile (ie: anonymous).
Disable Automatic Notifications to Assigned To User
By default notifications are no longer sent to the Assignee of a Task, regardless of whether or not the user is on the Notify List. This option disables this feature.
Enable Attachments In Notifications Attach attachments to outgoing notification emails.
Enable Attachment Prompts for Email Basic Response
Show attachment prompts for Email Basic Response feature on View menu.
Enable Attachment Prompts for Email Task Details
Adds a attachment prompts to Email Details feature on View menu. Attachments are emailed along with the details but not added to the issue.
Suppress Notifications by DefaultDefault the suppress notification checkbox to “Checked”.
Server Options Lets you...
29General Options

Disable Suppress Bulk Notifications By Default
This will disable automatic checking of the Suppress Notification check box on the Bulk Update screen.
Enable Custom Notification TemplateAllows you to customize email notifications. This will replace the default email notification template with the contents of the “sCustomNotificationTemplate” configurable string.
Issue Detail
Allow Editing of New Issue StatusAllow users to edit the initial status of a bug from the New Issue menu
Show Reject Count Show number of times issue has been changed to Rejected status.
Restrict Status
Restrict status applies only to users with administrator privileges and the user who opened a given issue. This means that no other users can move the issue to any of these status states. The states are controlled with the “sRestrictStatusValue” string. This string consists of a comma-delimited list of states that are to be restricted. (more complex rules can be setup using workflow)
Add Creator To Notify List Automatically add the creator of every issue to the Notify List for that issue. These users are then sent email notification of all changes to a given issue (unless they make the changes themselves).
Disable Duplicate Submit CatchDisable feature that stops a second identical issue from being submitted.
Disable Single Entry CatchDisable feature that stops an issue entry page from being used more than once to enter details.
Disable User TagsDo not append the User Tag (from a user's profile) to the userid in all drop-downs in the system. This tag is nice for systems where userids are not immediately obvious.
Show User Tags First This option displays the User Tag as a prefix instead of a suffix. This option is used in conjunction with the preceeding one.
Use Normal PM Fields
The default behaviour for Actual Hours, Estimated Hours, and Percent Complete is to show a readonly value for parent Tasks, consisting of the totals for the children.This option overrides the default behaviour and allows the parent to control the values.
Disable all RTF functionalityRTF editor will be removed from all textareas and they will default to standard text.
Enable Parent Pick UtilityUse parent picker utility for parent selections (default field), instead of just showing parent id
Attachment PromptsDefault number of attachment prompts that are available on edit screens.
Disable Background Attachment Feature
Disables the background loading of attachments in favour of the older model (which appends to final submit).
Leading Zeros This controls the leading zeros that are displayed for the issue id. It offers a way to enforce that IDs are a consistent size.
Server Options Lets you...
30General Options

An option may indicate that it spans all tracks for a system. In this case you do not need to set the option for each individual track, as the setting is copied to all other tracks automatically.
Issue Cache SizeThis is the amount of memory used to cache a single issue in the system. Cacheing uses memory but increases system performance by making commonly used field data immediately accessible.
Security
Enable security bypass when assigning Issues
Permit assignments to users who can not see a given project, allowing users to see any issues assigned to them, regardless of project.
Enable security bypass when Entering Issues
Permit the creation of new issues to users who can not see a given project, allowing users to create issues for other users, regardless of project.
Enable Security Bypass when user is in Notify List
Allow users to see an issue if they are in the Notify List, regardless of the project that issue belongs to.
Strict Password Options
Disable Password Cookies - Remove the option from the Login page for remembering passwords.Enforce 8 Characters Enforce 1 Upper Case Enforce 1 Lower Case Enforce 1 Number Enforce 1 Non-alphanumeric
Enable Case Insensitive Login Logins do not differentiate between upper and lower case for logins.
Enable Session Cookies
Use cookies to store the session information, rather than embedding it in the URLs for the system. This will allow users to cut and paste URLs from within the system, without the danger of passing the session information. Session information can otherwise be used to login as another user.
Disable Password CookiesDo not allow your users to store their passwords as a cookie in their browser
Enforce Password Reset after Change Force a user to change their password the next time they login.
Force Reset of All Passwordsadd a flag to each user profile, forcing them to change their user profile the next time they use the system.
Unsuccessful login attempts before locking out user
Number of times a userid can try to login without giving the correct password.
Session Timeout (in Hours) The inactivity time that will cause a session id to expire.
Email New PasswordEnables the feature form login pages, so that users can reset their own passwords. (new passwords are sent to associated email address).
Enable Create User from Login Page option
Enables an option on login page, allowing new users to create a new login.
Server Options Lets you...
31General Options

Figure 14: Changing the Server Configuration
To change the server configuration
1 On the Admin Menu page, click the Server Configuration link.
2 Options are divided into tabs according to functionality. Note that some options span the entire system, where tracks are used. The remainder are specific to the active track.
3 Make changes as desired on any of the tabs.4 Click Change Settings.
32General Options
5.4 SMTP Settings
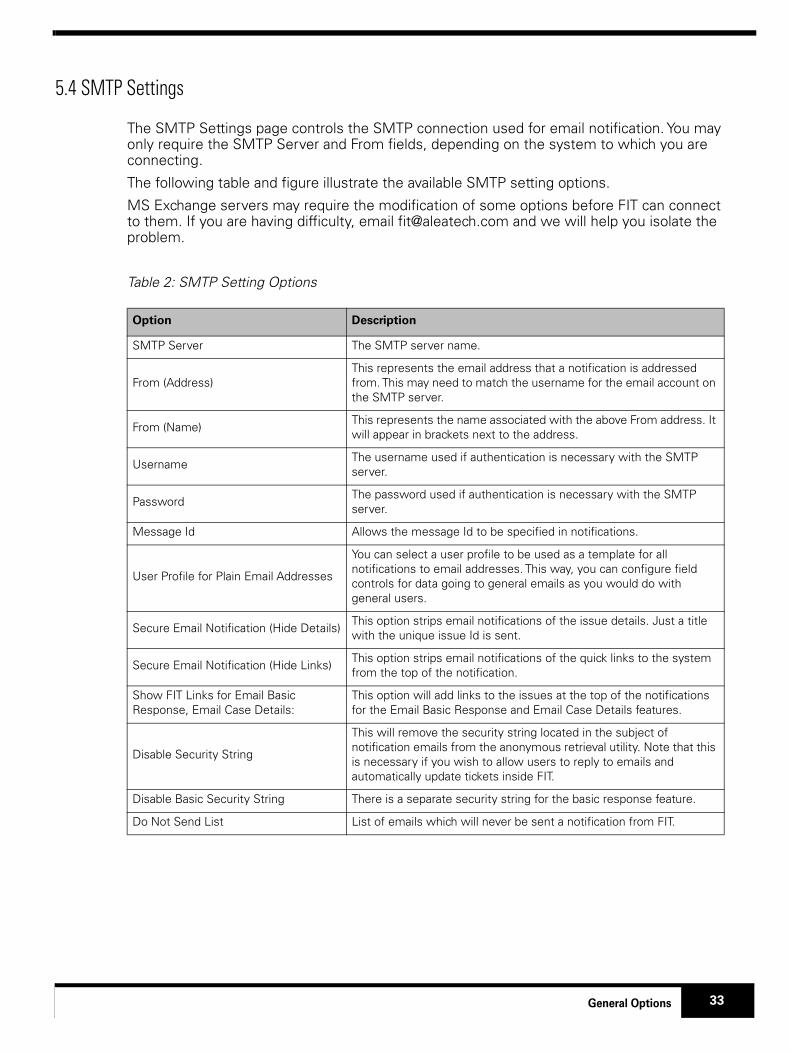
The SMTP Settings page controls the SMTP connection used for email notification. You may only require the SMTP Server and From fields, depending on the system to which you are connecting.
The following table and figure illustrate the available SMTP setting options.
MS Exchange servers may require the modification of some options before FIT can connect to them. If you are having difficulty, email [email protected] and we will help you isolate the problem.
Table 2: SMTP Setting Options
Option Description
SMTP Server The SMTP server name.
From (Address)This represents the email address that a notification is addressed from. This may need to match the username for the email account on the SMTP server.
From (Name)This represents the name associated with the above From address. It will appear in brackets next to the address.
UsernameThe username used if authentication is necessary with the SMTP server.
PasswordThe password used if authentication is necessary with the SMTP server.
Message Id Allows the message Id to be specified in notifications.
User Profile for Plain Email Addresses
You can select a user profile to be used as a template for all notifications to email addresses. This way, you can configure field controls for data going to general emails as you would do with general users.
Secure Email Notification (Hide Details)This option strips email notifications of the issue details. Just a title with the unique issue Id is sent.
Secure Email Notification (Hide Links)This option strips email notifications of the quick links to the system from the top of the notification.
Show FIT Links for Email Basic Response, Email Case Details:
This option will add links to the issues at the top of the notifications for the Email Basic Response and Email Case Details features.
Disable Security String
This will remove the security string located in the subject of notification emails from the anonymous retrieval utility. Note that this is necessary if you wish to allow users to reply to emails and automatically update tickets inside FIT.
Disable Basic Security String There is a separate security string for the basic response feature.
Do Not Send List List of emails which will never be sent a notification from FIT.
33General Options

Figure 15: SMTP Setting Options
To change the SMTP settings
1 On the Admin Menu page, click the SMTP Settings link under General Setup.2 On the SMTP Settings page, specify the appropriate SMTP settings.3 Click Change Settings.
5.5 Testing the Notification
The notification rules state that a notification is sent to the Assigned To user in the following conditions:
1 The email address for the Assigned To user does not match the email address for the user who is making the modification (Last Modified By), to stop unnecessary flooding of emails.
2 When an email address exists in the profile for the Assigned To user.
Therefore, you must be careful when testing the notification procedure if you are making simple tests to yourself. Pay attention to the “Notified/Skipped” comment at the top of the results page, after a change is made.
34General Options
The SMTP Settings menu also provides a “Test Notification” link on the top right of the page. This can be used to quickly test the current settings. Please make sure to check the Admin->Exception Log regularly to look for any notification errors. This menu shows any exceptions which have occurred since the last restart of the product.
35General Options
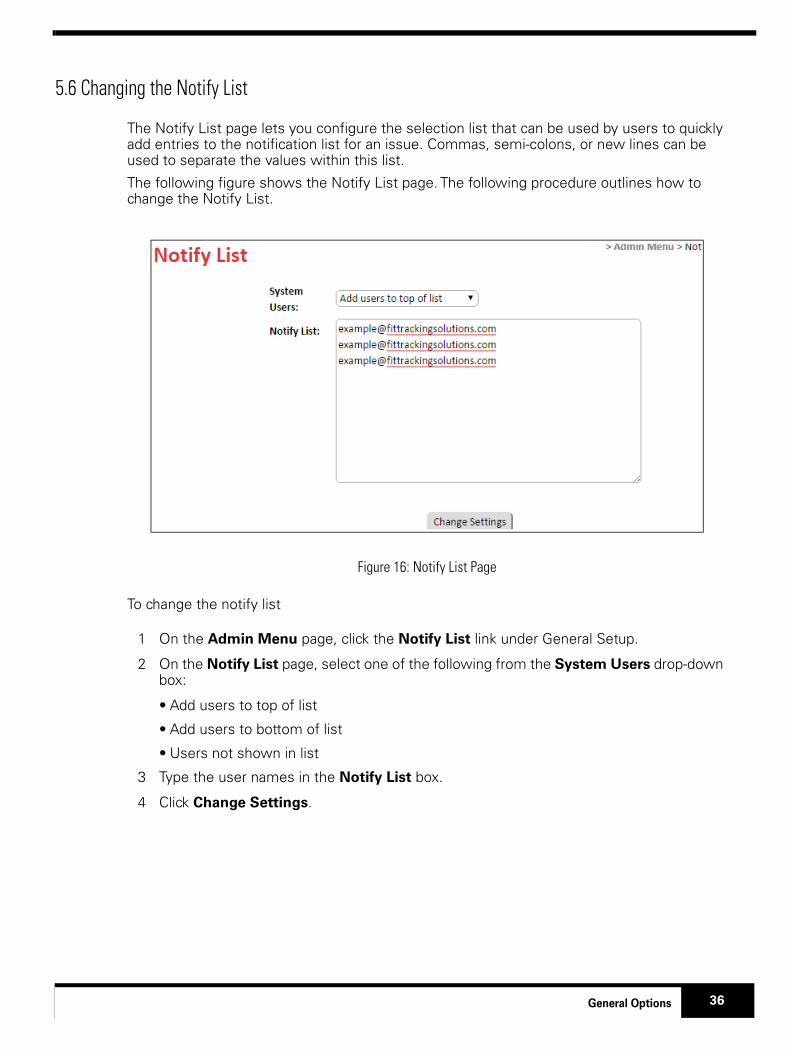
5.6 Changing the Notify List
The Notify List page lets you configure the selection list that can be used by users to quickly add entries to the notification list for an issue. Commas, semi-colons, or new lines can be used to separate the values within this list.
The following figure shows the Notify List page. The following procedure outlines how to change the Notify List.
Figure 16: Notify List Page
To change the notify list
1 On the Admin Menu page, click the Notify List link under General Setup.
2 On the Notify List page, select one of the following from the System Users drop-down box:
• Add users to top of list
• Add users to bottom of list
• Users not shown in list
3 Type the user names in the Notify List box.
4 Click Change Settings.
36General Options

5.7 Customizing Strings
You can customize all of the strings within FIT. This is useful for tailoring the product to meet a variety of change management needs.
You can enter HTML values into the strings and you can change the meaning of a particular field if you want to use it for another purpose. For example, if a default string is not relevant to you, you can change the string to something else. When you change the string, all references to this field are automatically changed to correspond to the string’s value.
Languages
FIT has recently incorporated the ability to manage languages. You can now store every string in the system in multiple languages. By default English is set as the default language, with French and Portuguese (Spanish coming soon) languages for users to choose from. In addition, you may create a new language and customize all the strings to meet your needs. If you wish to create a language, it is probably fastest to create the language and then modify the LANG-xxxx.cfg file manually. You can use the lang.cfg file from the bugserver.jar as a template if you like (or make a request for us to send it to you).
Samples
Because the list of customizable strings is long, we have chosen to highlight some key examples in the next table. The following figure then outlines the Customize Strings page and the following procedure outlines how to customize strings.
Table 3: Sample Customizable Strings
String Description
sHeadThis string appears at the top of every FIT page, above the logo and menu.
sBody This string appears after the menu, but before any page content.
sFootThis string appears at the bottom of every FIT page. You can use this string to include information or to close any HTML tags opened above.
sURLPREFIXThis string allows you to forward FIT through a separate Web server, such as IIS or apache.
sRestrictStatus
This string controls the actions of some users. This string contains a list of status states which cannot be set (for an issue) by any user except an admin user or the creator of the issue. All other users will not see these status types as valid options for status on the modify pages.
sHiddenComparison
This string controls the entries that are automatically hidden, when viewing the Main Menu page. The default setting for this field is Closed. However, you can place any list of status types here (separated by commas). If the status of an issue is listed here and the hide value is set, then your list will not contain this issue.
37General Options
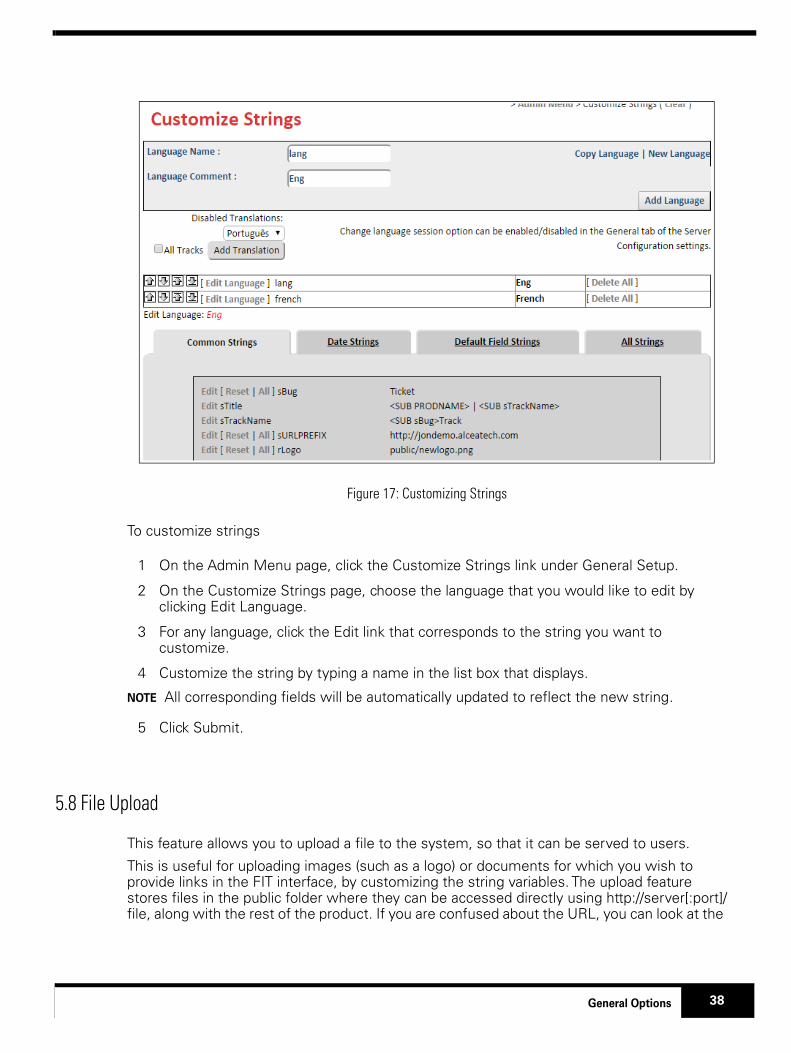
Figure 17: Customizing Strings
To customize strings
1 On the Admin Menu page, click the Customize Strings link under General Setup.
2 On the Customize Strings page, choose the language that you would like to edit by clicking Edit Language.
3 For any language, click the Edit link that corresponds to the string you want to customize.
4 Customize the string by typing a name in the list box that displays.
NOTE All corresponding fields will be automatically updated to reflect the new string.
5 Click Submit.
5.8 File Upload
This feature allows you to upload a file to the system, so that it can be served to users.
This is useful for uploading images (such as a logo) or documents for which you wish to provide links in the FIT interface, by customizing the string variables. The upload feature stores files in the public folder where they can be accessed directly using http://server[:port]/file, along with the rest of the product. If you are confused about the URL, you can look at the
38General Options

properties of any of the other images that are being shown by FIT. This feature is extremely useful if you do not have direct access to the server where FIT is running.
5.9 Bulk Update
Bulk updates allow you to simultaneously update the status of multiple issues within the FIT system. For example, if a user leaves your organization, you can simultaneously assign all of his or her issues to another user.
The bulk update functionality is designed to work in conjunction with the filters feature. Filters allow you to group issues with similar characteristics. For example, you can create a filter to view all issues related to user documentation, or you can create a filter based on a specific username to view all issues assigned to a specific FIT user. Then you can perform a bulk update on the filtered information. Filters are fully described in the FIT User Manual which is available at http://www.fittrackingsolutions.com/support/documentation.html
To perform a bulk update, navigate to the Bulk Update page (located in the General Setup section of the Admin Menu). You are free to apply a filter to narrow down the issues that you want to update. When this is complete, specify how you want to update all the issues using the options on the Bulk Update page. All issues that are checked/selected will automatically update, changing all fields that have been checked/selected.
The next figure shows you the Bulk Update page and the corresponding procedure outlines how to perform a bulk update.
Figure 18: Performing Bulk Updates
To perform a bulk update
1 On the Main Menu page under Actions, click the Bulk Update link.
2 On the Bulk Update page, choose a filter from the Filter Bar.
39General Options

This is only required if you want to narrow down the issues to update.
3 Select the listed issues that you want to update.
4 In the options box within the Bulk Update page, select the attribute check boxes corresponding to the issue attributes you want to change.
For example, if you want to change the issue’s status, select the New Status check box.
5 Specify the change.
6 Click Save.
NOTES Due to the power of this feature, notification is suppressed by default for the Bulk Update feature. If you would like the notification to run as normal, simply uncheck the “suppress notification” checkbox, next to the “Save” button.
A cloning feature has been added to this page to allow you to create new bugs where fields default to the values of the issue they are being cloned from. The “Start New History” blanks out the history for the new cloned issue, rather than keeping the parent’s entries. The “Record Cloning Note” simply places a “cloned from” note in the description.
Bulk Update is only granted to administrators unless specifically set for a user in the Group settings.
40General Options
6.0 Working With Fields
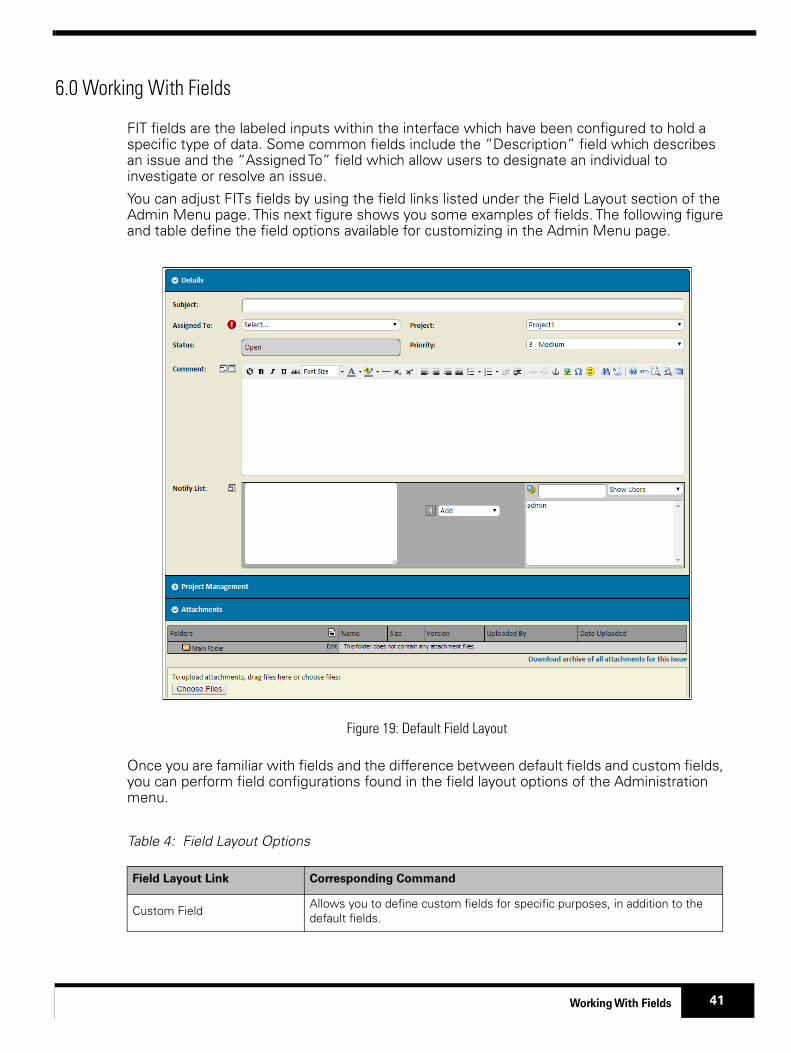
FIT fields are the labeled inputs within the interface which have been configured to hold a specific type of data. Some common fields include the “Description” field which describes an issue and the “Assigned To” field which allow users to designate an individual to investigate or resolve an issue.
You can adjust FITs fields by using the field links listed under the Field Layout section of the Admin Menu page. This next figure shows you some examples of fields. The following figure and table define the field options available for customizing in the Admin Menu page.
Figure 19: Default Field Layout
Once you are familiar with fields and the difference between default fields and custom fields, you can perform field configurations found in the field layout options of the Administration menu.
Table 4: Field Layout Options
Field Layout Link Corresponding Command
Custom FieldAllows you to define custom fields for specific purposes, in addition to the default fields.
41Working With Fields

Figure 20: Field Layout Options
Default Field
Controls the default fields which are permanently added when a system is created. These fields have specific purposes and are common to most systems. If they are not desired, then they must be hidden, since they can not be removed. The default fields are Project, Area, Environment, Status, Priority, and Description, depending on the template you are using.
Field Hierarchy
Creates a parent-child relationship between different fields so that modifications to the parent field change the options that are available to the child field. This can greatly reduce the options of a child field and avoid problems where the values of two fields do not match.
Field Control Enforces and/or restricts field information available to FIT users.
Field Order Create custom field sections and customize field ordering.
Color CodeDefines color code definitions for advanced formatting of the Main Menu page. This allows you to highlight data that is important in specific columns and/or rows.
Additional CSSDefine CSS attributes that override the current CSS definitions declared in the selected CSS file. Allows you to change attributes without saving a new CSS file.
WorkflowDefine rules to control field access and advanced behaviours that are dependent on issue states.
RankDefine the ranking/escalation formula to compute rank field for ordering issues.
Field Layout Link Corresponding Command
42Working With Fields
6.1 Custom Fields
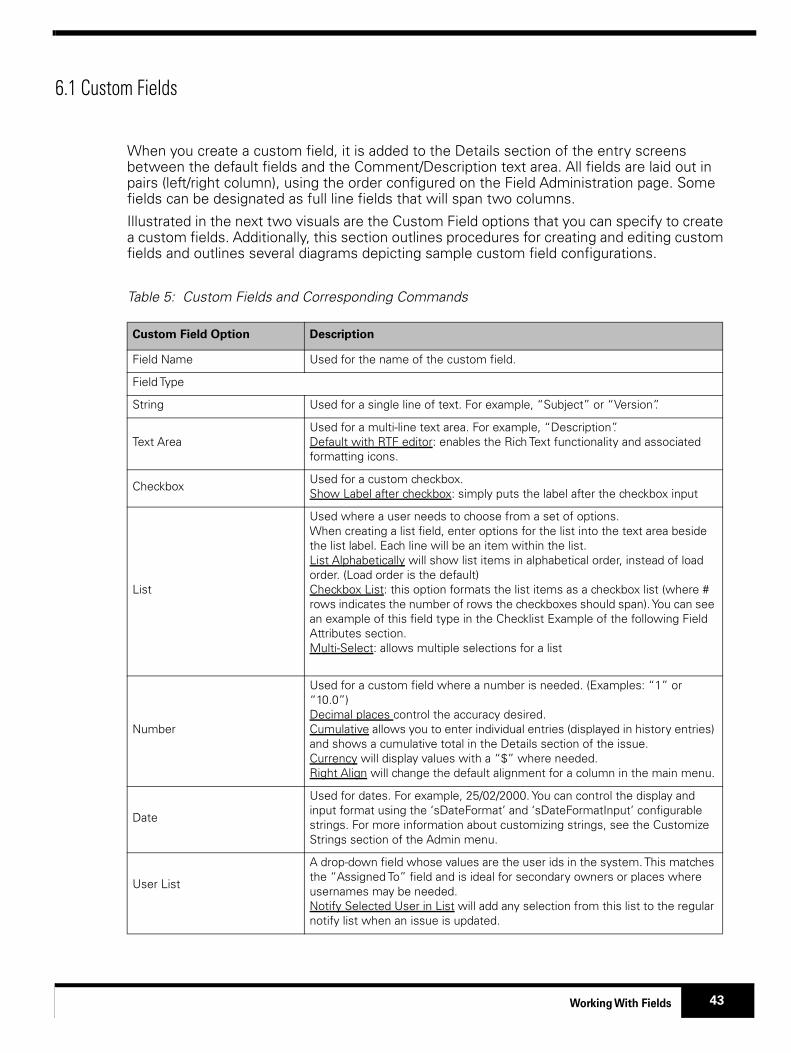
When you create a custom field, it is added to the Details section of the entry screens between the default fields and the Comment/Description text area. All fields are laid out in pairs (left/right column), using the order configured on the Field Administration page. Some fields can be designated as full line fields that will span two columns.
Illustrated in the next two visuals are the Custom Field options that you can specify to create a custom fields. Additionally, this section outlines procedures for creating and editing custom fields and outlines several diagrams depicting sample custom field configurations.
Table 5: Custom Fields and Corresponding Commands
Custom Field Option Description
Field Name Used for the name of the custom field.
Field Type
String Used for a single line of text. For example, “Subject” or “Version”.
Text AreaUsed for a multi-line text area. For example, “Description”.Default with RTF editor: enables the Rich Text functionality and associated formatting icons.
CheckboxUsed for a custom checkbox.Show Label after checkbox: simply puts the label after the checkbox input
List
Used where a user needs to choose from a set of options. When creating a list field, enter options for the list into the text area beside the list label. Each line will be an item within the list. List Alphabetically will show list items in alphabetical order, instead of load order. (Load order is the default)Checkbox List: this option formats the list items as a checkbox list (where # rows indicates the number of rows the checkboxes should span). You can see an example of this field type in the Checklist Example of the following Field Attributes section.Multi-Select: allows multiple selections for a list
Number
Used for a custom field where a number is needed. (Examples: “1” or “10.0”)Decimal places control the accuracy desired. Cumulative allows you to enter individual entries (displayed in history entries) and shows a cumulative total in the Details section of the issue.Currency will display values with a “$” where needed.Right Align will change the default alignment for a column in the main menu.
Date
Used for dates. For example, 25/02/2000. You can control the display and input format using the ‘sDateFormat’ and ‘sDateFormatInput’ configurable strings. For more information about customizing strings, see the Customize Strings section of the Admin menu.
User List
A drop-down field whose values are the user ids in the system. This matches the “Assigned To” field and is ideal for secondary owners or places where usernames may be needed.Notify Selected User in List will add any selection from this list to the regular notify list when an issue is updated.
43Working With Fields

Field Attributes
The field attributes help with the display of custom fields, which otherwise display in a common two column format within defined sections as seen below in the Info section. Additional field attributes may also be used to deviate from this layout (in addition to field order configuration).
Use Full Row: The blank space next to the Status field occurs when a blank field is added in Field Order, or simply when a full row field is displayed after an odd number of regular fields. In the example above, the Comment field is an RTF textarea which is always a full row. However, any regular field can span a full line with this option in the same manner. It would not span multiple rows, since it will not accept new lines.
Label Width: Default behavior calls for the label to take 25% of the width of the line. In many cases, the label of a field may be quite long and tends to wrap. The Label width option allows you to modify the label width of a field using the full row option to use 1/4, 2/4 or 3/4 of the line.
Id listA way of listing multiple ids for other issues in the system. These ids will appear as links to other issues.
Advanced Field Types
These types are quite complex and require advanced knowledge of the systemTrack Association FieldsCustom Fields
Track Association Fields
Track Associations can be created using the parent and child field types These associations are (1-N) relationships allowing you to link a parent issue from one track to N child issues in another track and have them displayed with field data in the associated track. Additional information is available by clicking on the info icon on the top right. The following image illustrates a relationship field selection.
Appendix E has more discussion on this advanced behavior.
Custom
This is used to specify a custom class which was developed for a specific custom feature. If you are interested in a custom feature, you will need to contact our support team to discuss custom development. Appendix C has more examples of this advanced behavior. Example:com.other.FormulaCustomUserField: allows you to define an OGNL formula for field valuesThe Metrics section gives more examples of common uses for these advanced fields.
Custom Field Option Description
44Working With Fields

Wrap Label: When the screen width changes, it is up to the browser to try and fit fields withing the space provided. FIT tries not to wrap the label text where possible, because the display is affected when fields span multiple lines. However, in many cases, a long field name requires wrapping, so this option is provided.
Add Blank: This option adds a blank option to the top of a list field.
Show Label above Input: This option moves the label above the field name, spreading out the layout for readability and giving more room for the label text. If this is used, best results are achieved when it is done to all the fields in a section. The following Checklist Example shows all the fields using this option.
Figure 21: Checklist Example (Showing Label Above and Hint option)
Show Hint: The show hint option will show a clickable info icon which allows the user to view an inline hint which is configured by the administrator. The Checklist example above shows the hint icon next to the Title field label. When clicked, a small inline window shows the field hint information.
Configure Translations: The system language strings can be configured in the Customize Strings feature of general setup. This allows the administrator to configure multiple languages but does not allow any means of configuring the custom fields for FIT. This Configure Translations option turns on language configuration for a particular string and any list items for this string. Once configured, the field list will display a Configure Translations option in the custom field listing as below:
Figure 22: Field Translation Option Turned On
When selected, you will be able to define strings for each language. If there are list options, and additional set of strings will be listed, where string lists must match on a line for line basis.
45Working With Fields

History Attributes
Every issue tracked within FIT has full history traceback which is recorded and displayed as the final section when viewing an issue. The user has the option of showing this traceback in a number of forms by selecting the appropriate traceback option in the history section header. The following images show the three main formats available, with the two remaining formats being mixes of these three.
Figure 23: Traceback History Format
The Default history format is a dated feature which shows a select group of fields in the history traceback. Additional user fields can be added to this format by configuring the fields as history type field, using the history attribute.
The Traceback history format is the most common and informative history format. It displays all field changes for a given update.
The Quick history format simply shows an itemized list of entries for an issue with a limited common set of default fields. Further historical changes are only visible by changing the history format.
Traceback + Quick format displays all field updates for it’s limited set of default fields.
The Detailed Traceback format displays all history along with the last user per updated field.
46Working With Fields
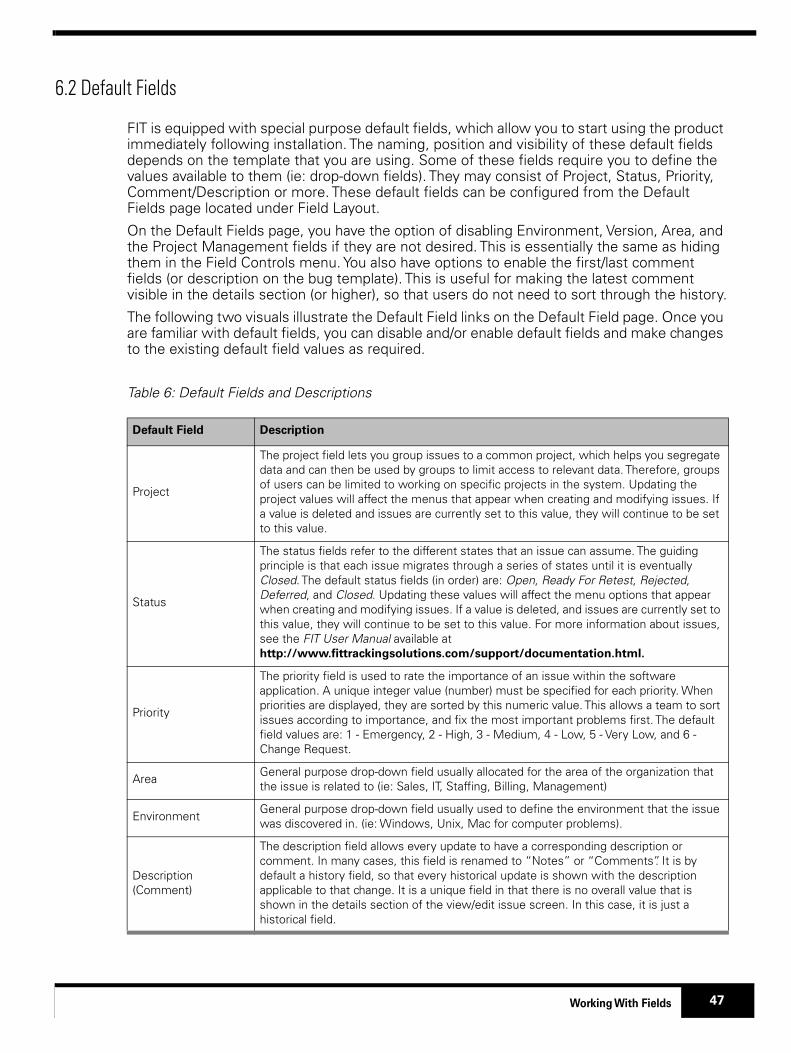
6.2 Default Fields
FIT is equipped with special purpose default fields, which allow you to start using the product immediately following installation. The naming, position and visibility of these default fields depends on the template that you are using. Some of these fields require you to define the values available to them (ie: drop-down fields). They may consist of Project, Status, Priority, Comment/Description or more. These default fields can be configured from the Default Fields page located under Field Layout.
On the Default Fields page, you have the option of disabling Environment, Version, Area, and the Project Management fields if they are not desired. This is essentially the same as hiding them in the Field Controls menu. You also have options to enable the first/last comment fields (or description on the bug template). This is useful for making the latest comment visible in the details section (or higher), so that users do not need to sort through the history.
The following two visuals illustrate the Default Field links on the Default Field page. Once you are familiar with default fields, you can disable and/or enable default fields and make changes to the existing default field values as required.
Table 6:
Default Field Description
Project
The project field lets you group issues to a common project, which helps you segregate data and can then be used by groups to limit access to relevant data. Therefore, groups of users can be limited to working on specific projects in the system. Updating the project values will affect the menus that appear when creating and modifying issues. If a value is deleted and issues are currently set to this value, they will continue to be set to this value.
Status
The status fields refer to the different states that an issue can assume. The guiding principle is that each issue migrates through a series of states until it is eventually Closed. The default status fields (in order) are: Open, Ready For Retest, Rejected, Deferred, and Closed. Updating these values will affect the menu options that appear when creating and modifying issues. If a value is deleted, and issues are currently set to this value, they will continue to be set to this value. For more information about issues, see the FIT User Manual available at http://www.fittrackingsolutions.com/support/documentation.html.
Priority
The priority field is used to rate the importance of an issue within the software application. A unique integer value (number) must be specified for each priority. When priorities are displayed, they are sorted by this numeric value. This allows a team to sort issues according to importance, and fix the most important problems first. The default field values are: 1 - Emergency, 2 - High, 3 - Medium, 4 - Low, 5 - Very Low, and 6 - Change Request.
AreaGeneral purpose drop-down field usually allocated for the area of the organization that the issue is related to (ie: Sales, IT, Staffing, Billing, Management)
EnvironmentGeneral purpose drop-down field usually used to define the environment that the issue was discovered in. (ie: Windows, Unix, Mac for computer problems).
Description(Comment)
The description field allows every update to have a corresponding description or comment. In many cases, this field is renamed to “Notes” or “Comments”. It is by default a history field, so that every historical update is shown with the description applicable to that change. It is a unique field in that there is no overall value that is shown in the details section of the view/edit issue screen. In this case, it is just a historical field.
Default Fields and Descriptions
47Working With Fields

Figure 24: Default Field Page
Disabling and Enabling Default Fields
You can enable/disable several default field options, depending on your needs.
To enable/disable default fields
1 On the Admin Menu page under Field Layout, click the Default Field link or General Settings option in drop-down skins.
2 On the Default Field page, select one of the following check boxes that corresponds to the field you want to enable or disable:
• Disable Env/Version Fields - removes the default Environment and Version fields from the system.
• Disable Area Field - removes the default Area from the system.
• Disable Project Management Fields - removes the Project Management section from the system.
• Enable First Comment Field - shows a separate field which displays the first history comment.
• Enable First Non Blank Comment Field - ignores any blank comments as first
48Working With Fields
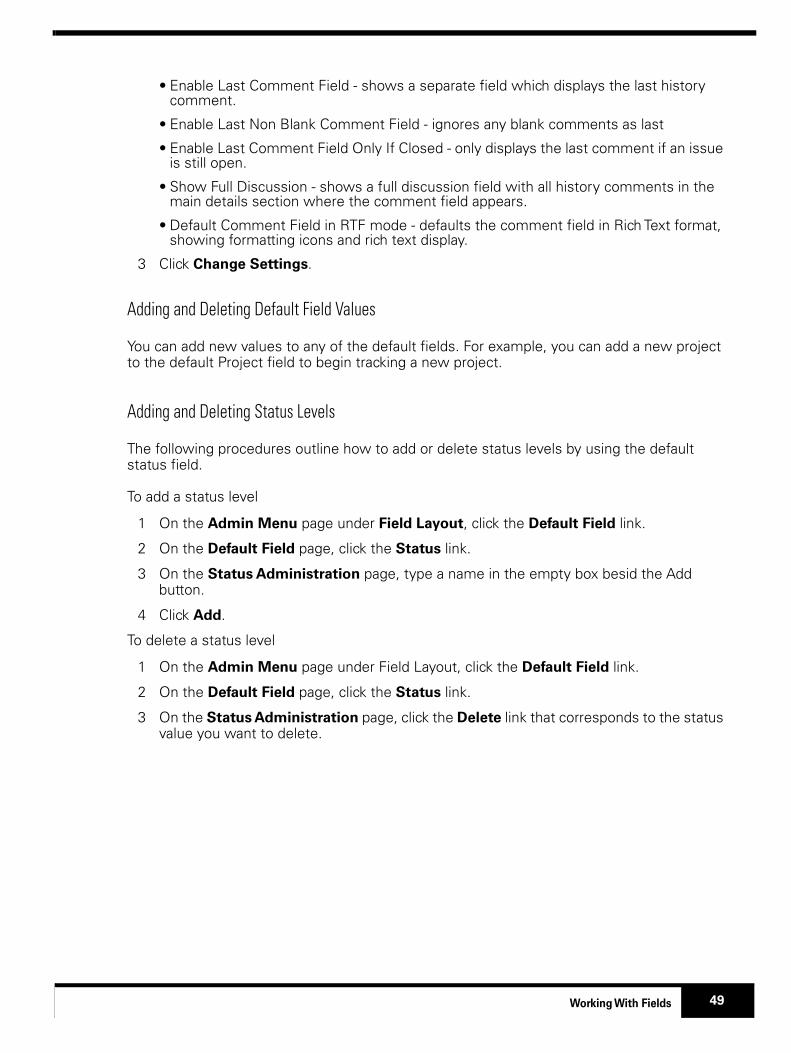
• Enable Last Comment Field - shows a separate field which displays the last history comment.
• Enable Last Non Blank Comment Field - ignores any blank comments as last
• Enable Last Comment Field Only If Closed - only displays the last comment if an issue is still open.
• Show Full Discussion - shows a full discussion field with all history comments in the main details section where the comment field appears.
• Default Comment Field in RTF mode - defaults the comment field in Rich Text format, showing formatting icons and rich text display.
3 Click Change Settings.
Adding and Deleting Default Field Values
You can add new values to any of the default fields. For example, you can add a new project to the default Project field to begin tracking a new project.
Adding and Deleting Status Levels
The following procedures outline how to add or delete status levels by using the default status field.
To add a status level
1 On the Admin Menu page under Field Layout, click the Default Field link.
2 On the Default Field page, click the Status link.
3 On the Status Administration page, type a name in the empty box besid the Add button.
4 Click Add.
To delete a status level
1 On the Admin Menu page under Field Layout, click the Default Field link.
2 On the Default Field page, click the Status link.
3 On the Status Administration page, click the Delete link that corresponds to the status value you want to delete.
49Working With Fields
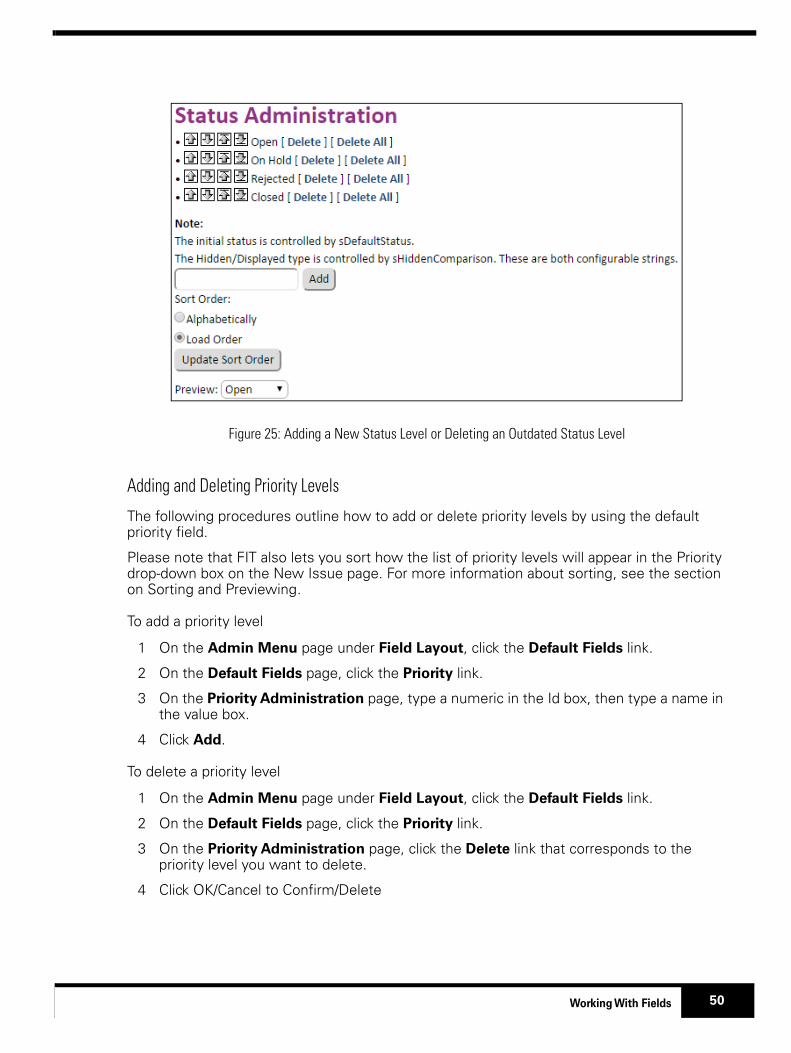
Figure 25: Adding a New Status Level or Deleting an Outdated Status Level
Adding and Deleting Priority Levels
The following procedures outline how to add or delete priority levels by using the default priority field.
Please note that FIT also lets you sort how the list of priority levels will appear in the Priority drop-down box on the New Issue page. For more information about sorting, see the section on Sorting and Previewing.
To add a priority level
1 On the Admin Menu page under Field Layout, click the Default Fields link.
2 On the Default Fields page, click the Priority link.
3 On the Priority Administration page, type a numeric in the Id box, then type a name in the value box.
4 Click Add.
To delete a priority level
1 On the Admin Menu page under Field Layout, click the Default Fields link.
2 On the Default Fields page, click the Priority link.
3 On the Priority Administration page, click the Delete link that corresponds to the priority level you want to delete.
4 Click OK/Cancel to Confirm/Delete
50Working With Fields

Figure 26: Adding or Deleting a Priority Level
Adding and Deleting Projects
The Project Admin menu, accessed from the Default Field section of the Admin Menu, is composed of a current project list on the right of the screen and a Project Details control tab, on the left of your screen for setting specific project properties.
Figure 27: Project Administration Menu
51Working With Fields

The Project List allows you to edit, delete or change the order of existing projects. As with other drop-downs in this system, you can list the projects alphabetically, or you can create your own order by setting the “Sort Order” attribute, located below the Project List. If you are ordering the items yourself, you will notice icons on the left of the list to move items up or down the list. You can also drag items up and down.
The following procedures outline how to add or delete a project by using the default project field.
To add new project
1 On the Admin Menu page under Field Layout, click the Default Field link.
2 On the Default Field page, click the Projects link.
3 On the Project Administration page, type a name in the Project Name box.
4 Set the appropriate attributes for the project as defined on the next page.
5 Click Add.
To delete a project
1 On the Admin Menu page under Field Layout, click the Default Field link.
2 On the Default Field page, click the Project link.
3 On the Project Administration page, click the Delete link that corresponds to the project you want to delete.
4 Select Ok/Cancel to Confirm/Delete
Project Attributes
The following attributes are located on the Project Details menu.
Add to Projects Visible for Groups: this is a convenience option for making new projects visible to other groups without needing to go and manually add a new project to a list of groups one at a time.
NOTE The list of groups can be confusing here when editing a project because the default behaviour of a group is to show all projects. If you see a group selected here and you have not manually added it, it is probably because it is set to see all groups.
NOTE This option is only available to add projects to groups. You can not use this selection to remove a project from a group because groups will show a project if no groups are selected as visible.
Prefix: You may create a prefix to be shown in front of the id for all issues in a given project.
Suffix: You may configure a suffix to be shown next to the id for all issues in a given project.
Use Unique Ids: This flag ensures that a given project has it’s own set of ids. This means that the sequential numbering of the given project solely reflects issues in that project.
NOTE Since a Unique project has it’s own set of Ids, you can not move an issue to/from a unique project, as it may overwrite an issue in the other project.
52Working With Fields
Set Next Id: You can use this to set the next id for a given project. All future ids will increment from this value.
WARNING If you set this to a value which is lower than some of your existing issues, this option will overwrite existing data as the id is incremented.
Add To Selected Tracks: In many cases, a configuration is desired across multiple tracks. This option propagates the same change across any selected tracks, so the changes do not have to be done manually again.
53Working With Fields

7.0 Field Hierarchy
Field relationships between drop-down lists can be created with the use of the Field Hierarchy page. This feature lets you link a parent field to a child field so that any modifications to the parent field will change the list options that are available in the child field. This makes sure that the values of two fields will match. Multiple relationships can be created for a parent to control a number of child fields. It is also possible to create levels of hierarchies so that the child field also controls a hierarchy for another relationship.
If a field is deleted, the hierarchy must be deleted manually, or users may see an error.
To establish field hierarchy
1 On the Admin Menu page under Field Layout, click the Field Hierarchy link.
2 On the Field Hierarchy page, select a parent field from the Parent Field drop-down box.
3 Select a child field from the Child Field drop-down box.
4 Click New Field Hierarchy.
5 Set the desired relationships, using one of the two edit formats.
6 Check your relationship is correct, using the View Relationship (current settings) feature, at the bottom of each edit menu.
After a hierarchy is created, the relationships can then be handled in one of two ways (direct or table relationship). There are links between the two from both screens, so you can evaluate which is best for you. The main hierarchy list allows you to add new relationships or modify existing ones.
54Field Hierarchy
Figure 28: Field Hierarchy Edit Page
Table Hierarchy Edit
The most convenient method for setting up relationships is to use the table view, where relationships are made by simply checking off the cell of a matrix, where parent values make up the columns and child values make up the rows. When the box is enabled, the child will be listed as a valid option whenever the corresponding parent has been selected.
55Field Hierarchy

Figure 29: Creating a Table Hierarchal Relationship
Direct Hierarchy Edit
When relationships get too large to handle in a table, you may need or prefer to edit your them with the general edit method, where specific relationships are edited for one row or column at a time. In this case, you must choose the specific relationship that you want to change, and then proceed to Step 2, to actually make the modification, in one of two ways.
The Update submit button will save your changes in addition to any existing settings for the current Parent. This allows you to simply select the new items that you want to associate to a parent value (or set of parents).
The Save submit button will save your setting for the selected parent as the complete relationship and any existing values for that parent will be overwritten.
56Field Hierarchy

8.0 Field Controls
The Field Control page is used to enforce and/or restrict field information for different parties. All control properties are set for each group, allowing the creation of different roles levels and different access permissions for users.
Fields and Sections appear down the page in the sequential order that they are displayed in the system, matching the field order screen. Settings for each group are then displayed as a column, where the field or section attributes can be set for that particular group.
Each section can be set as Open (default), Closed or Hidden. A Closed section will simply default in the closed/minimized position, requiring you to click on the open icon to view details of a field within that section.
Field attributes depend on the type of field. Most fields allow you to control visibility or the mandatory/required setting which forces users to enter data for a given field. If a field is read only by nature (ie: Info Section), this setting is not listed, nor is the Read/Write Attribute.
The mandatory setting forces users to enter data in a specific field. This option adds a red exclamation mark (!) image on the left of a mandatory field, so that it is obvious to the user. If the user does not edit the field, they are presented with an error prompt, until they comply.
There are three mandatory setting options:
• Blank —Not necessary
• Yes —Forces a user to submit data when a new issue is created. This is useful to ensure that users add enough information for a new issue and do not accidentally skip or leave an important field blank.
• Always —Takes the functionality one step further, by ensuring that data is entered at every step. This is extremely useful for the “Assigned To” field so that the correct person is sent the notification on every update. Without this setting, an updater may forget to change the username and the notification may never be sent.
Field data can also be restricted by group using any of the following options:
• Read/Write — Default for all editable fields. This option allows a field to be read and modified on any update.
• Read Only — Restricts a group to reading privileges only.
• RO After Created (AC) —Write access is only given on the New Issue form.
• Hidden —Hides a field from a group on all screens.
The following figure displays field controls for three groups (Master List, normal and Developers). The Assigned To and Project fields have been set to Mandatory and Mandatory always for the Master List group.
57Field Controls

Figure 30: Field Control Page
To apply field controls
1 On the Admin Menu page under Field Layout, click the Field Control link.
2 On the Field Control page, make sure that the group columns are visible for the groups you want to modify.
3 Set the attributes for the relevant fields.
4 Click Save.
This page gets unmanageable for systems with large numbers of groups, so groups are hidden by default if there are more than 10. In this case, you must select the groups that you want to change manually from the “Show Groups” area.
Copy Settings Tab
Configuring fields for multiple groups can be a relatively long process on larger systems. Therefore, the copy settings feature allows you to copy field control settings from one group to another. Simply choose the group that you want to copy settings from and then the groups that you wish to copy the settings to. All settings for the second group list will be overwritten.
58Field Controls

9.0 Field Order
The Field Order page is used to rearrange the field layout on the New/Edit/View Issue screens. A list of fields is displayed on the left side of the screen, and the various functions, as well as a legend, are displayed on the right. The legend differentiates between default fields, custom fields, sections, blank fields, and a special marker, the custom field target slot.
• Moving the various fields up and down the list will change the order they are displayed on the New/Edit/View Issue screens.
• New sections can be created with the Add Section button. Sections can also be deleted from the list. If any of the four default sections (Info, Details, Attachments or Project Management) are deleted, they can be recreated by pressing the Restore Default Sections button.
• Blank fields can be added with the Add Blank Field button. These are used for spacing.
• The Hide/Show Hidden Fields button will hide or show hidden fields in the list of fields on the left side of the page.
• The Reset Field Order button will return the field order to the default layout.
• The New Custom Field Target Slot is a special marker that can be moved up and down in the list like a regular field. When new custom fields are added to the system, they will be placed into the field order above this marker.
Figure 30: Field Order Menu
59Field Order

9.1 Color Coding
The Color Coding menu is used to set up rules for highlighting the fields displayed in the Main Menu table. The "Field" drop-down is used to select a field to add color codes to. After a field is selected, the “Input Color Codes” form allows you to set coloring options including the background and fields you wish to be highlighted. You may also add your own custom CSS attributes which will be applied to the selected fields.
Figure 31: Color Coding Attributes
When values in the main menu table match the rules set up here, the corresponding table cells are rendered with the desired color. Once a rule is added, it appears in the "Existing Color Codes" list. From here, color codes can be reordered, edited, or deleted. The field will now appear in the "Fields with existing color codes" drop-down (for quicker access).
Figure 32: Color Coding Example
60Field Order
The color codes shown in the above example are explained below:
* In the Bug Id column, the top three cells are colored silver are given a black outline. This is achieved with a color code where Bug ID is greater than "ROBOT-001".
http://www.fittrackingsolutions.com/support/admin/images/cc-ex1.gif
* In the Subject column, cells containing the word "test" are colored grey, and cells containing the word "sales" are colored lime green. Note that issues containing both "test" as well as "sales" in the subject will be colored grey, because the "test" rule is placed above the "sales" rule, giving it priority.
http://www.fittrackingsolutions.com/support/admin/images/cc-ex2.gif
* In the Status column, "Ready For Retest" and "Rejected" cells are colored, and are given a two pixel wide border. Also, "Closed" cells are colored silver.
http://www.fittrackingsolutions.com/support/admin/images/cc-ex3.gif
* In the Priority column, the severity of the issue corresponds to a change in hue from red to yellow.
http://www.fittrackingsolutions.com/support/admin/images/cc-ex4.gif
* For the Assigned To column, two color codes rules have been set up. If an issue is assigned to a user in the same group as the current user, it is colored teal with aqua text and border. If the issue is assigned to the current user, another rule gives the cell the same coloring, except with bold, yellow text. (Note that the CURRENT_USER rule is placed above the CURRENT_GROUP rule to give it priority).
http://www.fittrackingsolutions.com/support/admin/images/cc-ex5.gif
* In the Date Modified column, issues that have been modified on the current date (Sept 14th) are given a green background color.
http://www.fittrackingsolutions.com/support/admin/images/cc-ex6.gif
* Lastly, in the Requested Due Date column, issues that are due "today" or "yesterday" are colored with a red background, white, bold text, and an orange border. As well, they are set to take up the whole row of the main menu.
http://www.fittrackingsolutions.com/support/admin/images/cc-ex7.gif
Other Color Coding functionality:
* When creating a color code there is a "Priority" option. Entering 0 gives the color code the lowest possible priorty. A color code with higher priority will replace a color code with a lower priority. For example, say you have two color codes in your system; one that makes the background color red if the issue is Assigned To "John Doe" and colors the whole row, and the other makes the background color green if an issue's Status is "Open". View 'Screenshot 1' below to see what the main menu would look like if the first color code is given higher priority. Then, view Screenshot 2 to see what it would look like if the second color code is given higher priority.
61Field Order

Figure 33: Setting Color Coding Priority
* There is also a "Highlight Fields" selection box, which contains all visible fields in the system. Whichever field the color code is being created for is selected by default, but by selecting more fields you can have the color code applied to other fields as well. For example, say we create a color code for Status that sets the background color to green if the issue's status is "Ready For Retest", but then we select "Subject" in the Highlight Fields selection box.
Figure 34: Color Coding Subject based on Status
NOTE Individual users are given an option in their profile that allows then to enable or disable color coding.
62Field Order

10.0 Workflow Overview
Workflow allows you to define rules for field access, modifications and layout, based on the state of an issue, in addition to the field control settings which are setup globally. A workflow rule will enable you to catch flow states of issues and define possible future states or immediate actions based on the current state of an issue. Common examples include:
• set field defaults• notify user when a bug hits a given state (Example 1)• hide a section of fields from a group (Example2)• change a field automatically (Example 3)• control the flow of an issue from state to state. (Example 4)• control who can close an issue. (Example 4)
Workflow rules are defined by a filter definition that is compared/tested against the state of issues any time data is retrieved or modified. If an issue is matched, a set of requirements and restrictions can be tested, actions can be executed, and field access (controls) or options (flow) can be modified accordingly.
When a rule definition matches the state of a desired issue, the rule's attributes are checked to see if any changes are needed in the regular process or display of the issue. The "Field Controls" and "Flow Control" attributes control any changes needed when viewing/modifying an issue. The "Restrictions" and "Pre/Post Requirements" are checked before any changes to an issue can be made. The "Actions" are executed after a change is successfully made.
Figure 30: The workflow process
63Workflow Overview
Workflow Attributes
The following table defines the attributes that make up a workflow rule. The rule is defined by a state definition which is tested against an issue, to determine if the other rule attributes are to be invoked at every stage in the life of that issue. Restrictions, Requirements and Actions are attributes that are checked when an issue is modified. Flow Controls and Field Controls are attributes which alter the interface and corresponding controls available to a user when they are editing/viewing an existing state of an issue. In order to see all the controls, you must first create a rule in the summary.
Table 7: Workflow Attributes
Summary
General Options
When a request to the system is made, workflow rules are read sequen-tially to build a master rule which will be used to control the request being made. However, if a rule matches the current criteria the default behavior is to jump out of this list and use the controls that were just found.
Rule Name/Comment: A simple way for you to document your rules.
Copy Rule - allows you to make a clone of this rule for a similar purpose.
New Rule - clears the form to create a completely new rule.
Continue Building Rule: specifies that the properties of a rule are simply added to the properties of the master rule and the system does not stop after a match to this rule is made.
Overwrite all settings from prior rules: specifies that any attribute from a matching rule will overwrite the master setting, rather than being appended to the current master set.
Special Purpose (event/other rule) : stops a rule from being considered in general requests to the system. Instead, the rule is only used by events or links from other advanced rules.
Disable Rule : stops a rule from being used
Definition
State Definition
The State Definition is a set of general options, combined with a system fil-ter, that are used to identify when the rule will be used. Issues are checked against a rule definition to see if the current rule is relevant.
General Usage Options: Normal Changes to Existing Issues: specifies that this rule should be checked for all requests on existing issues in the system.New Entries: specifies that this rule should be checked for all new issue requests.Clone Entries : specifies that this rule should be checked for all clone requests
Pre State Definition
The prior state of an issue is checked to make sure that the rule is only used for issues coming from a specific state.
Restrictions
Restrictions are used to determine what individuals are allowed to move an issue to a given state. If a restricted user tries to move an issue to a state, they are returned an error message.
64Workflow Overview
Requirements
A workflow rule can test that a given set of requirements exist, before allowing an issue to reach a given state. Requirements are defined as a filter, just like the actual workflow definition. If the requirement filter is not passed, the user is returned an error message
Pre Requirements
A filter definition that is tested before any changes are made to an issue to ensure that the requirements are met before an edit is performed. If this test fails, the change will not be allowed.
Post Requirements
A filter definition that is tested to determine if the post state of the issue will meet a set of criteria after a change is made. If this test fails, the change will not be allowed.
Actions
If the new state of an issue matches a given workflow definition and the requirements and restrictions are passed, then a set of actions can be per-formed on the issue state change.
The Action Notify List is used to notify users of this state change.The AutoChange field options allow you to change the value for a specified field.The OGNL Formula allows you to use the actual fields of the internal Java BugStruct class in an OGNL assignment. You can use existing bug attributes in workflow autochange. (ie: re-assign to creator by autochanging assignedTo field back to <SUB bs.mEnteredBy> See full list of BugStruct fields in Rank docs. The Advanced AutoChange option allows you to change from normal autochange updates to auto creation of new issues or auto updates of a set of existing issues.- Normal : a rule will use autochange for the issue that hits the rule, changing any of the fields listed in the auto change field settings area.- Create (using (another rule) : this option allows you to fire another rule which will create multiple issues for every issue matching the filter definition of the selected rule. The new issues will be created in the track where the selected rule is defined and you can set field defaults using autochange field settings area of that selected rule. A safety value can also be set so that you can not overflow your system with issues by setting an undefinitive filter definition. - Create a new item : simply spawns one new item when the rule is hit. Very useful from the Events feature.
NOTE The new Disable option allows you to only allow a rule to be used when run from an event or another rule.
NOTE You can use also workflow rules from the Event Scheduling feature.
Controls
Flow Control
Flow Control limits the list options for the given state.The example given says that for a bug in the [Ready to Release] state, the only selectable options that will show up will be the ones listed: "Closed", "Deferred", "Ready For Release", "Ready For Retest", "Rejected"
You should include the one in the state definition, because it is the one that needs to be defaulted to. If it is not present, the first one in the list will be selected by default and may not be noticed. Alternatively, you could make it an always mandatory field, so that something is always chosen.
Table 7: Workflow Attributes
65Workflow Overview
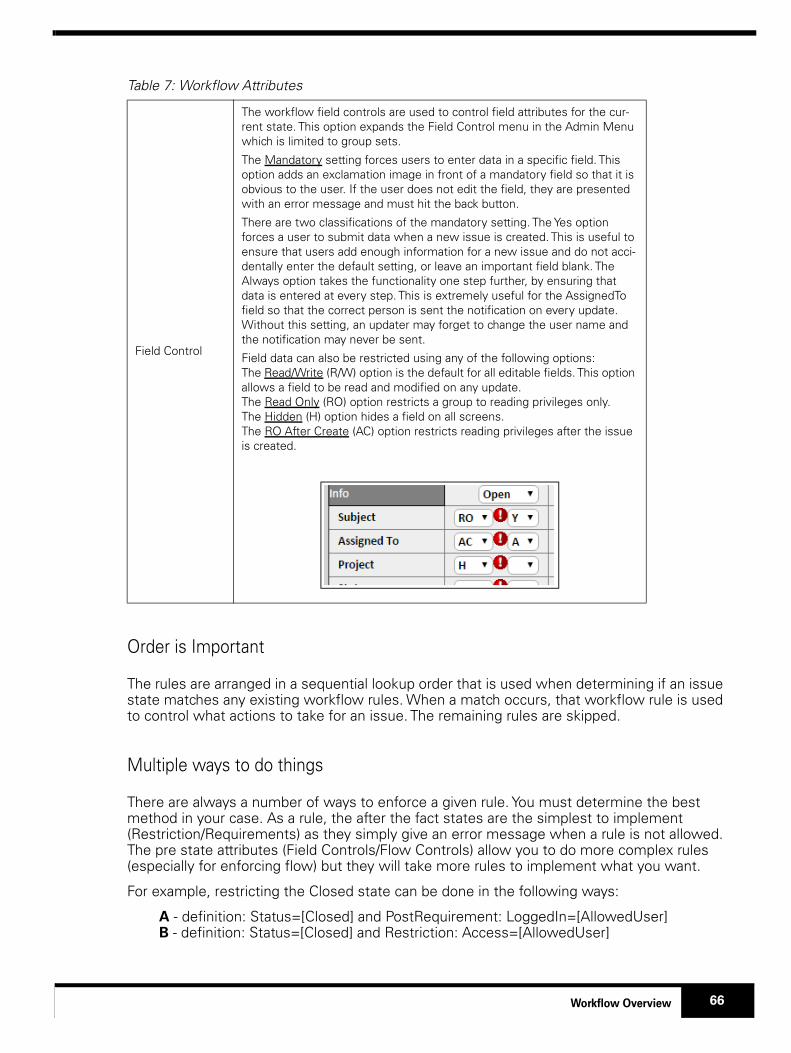
Order is Important
The rules are arranged in a sequential lookup order that is used when determining if an issue state matches any existing workflow rules. When a match occurs, that workflow rule is used to control what actions to take for an issue. The remaining rules are skipped.
Multiple ways to do things
There are always a number of ways to enforce a given rule. You must determine the best method in your case. As a rule, the after the fact states are the simplest to implement (Restriction/Requirements) as they simply give an error message when a rule is not allowed. The pre state attributes (Field Controls/Flow Controls) allow you to do more complex rules (especially for enforcing flow) but they will take more rules to implement what you want.
For example, restricting the Closed state can be done in the following ways:
A - definition: Status=[Closed] and PostRequirement: LoggedIn=[AllowedUser] B - definition: Status=[Closed] and Restriction: Access=[AllowedUser]
Field Control
The workflow field controls are used to control field attributes for the cur-rent state. This option expands the Field Control menu in the Admin Menu which is limited to group sets.
The Mandatory setting forces users to enter data in a specific field. This option adds an exclamation image in front of a mandatory field so that it is obvious to the user. If the user does not edit the field, they are presented with an error message and must hit the back button.
There are two classifications of the mandatory setting. The Yes option forces a user to submit data when a new issue is created. This is useful to ensure that users add enough information for a new issue and do not acci-dentally enter the default setting, or leave an important field blank. The Always option takes the functionality one step further, by ensuring that data is entered at every step. This is extremely useful for the AssignedTo field so that the correct person is sent the notification on every update. Without this setting, an updater may forget to change the user name and the notification may never be sent.
Field data can also be restricted using any of the following options: The Read/Write (R/W) option is the default for all editable fields. This option allows a field to be read and modified on any update. The Read Only (RO) option restricts a group to reading privileges only.The Hidden (H) option hides a field on all screens.The RO After Create (AC) option restricts reading privileges after the issue is created.
Table 7: Workflow Attributes
66Workflow Overview

C - create two rules for all other states. One for the AllowedUser, which included the Closed option in Status flow. The other for all other users that do not have access, without the Closed state in the Status flow.
Options A/B can be done with one simple rule.Option C will allow users to see their true options beforehand, rather than simply giving the error message after the fact.
Workflow Examples
Example 1: Email the Management group immediately, if there are any new Emergency issues for the Customer Support group.
The following rule reads “for all new entries which are of high priority (value 1), and that are assigned to the Customer Support group” we have a following action where “manger is sent an email notification”
Definition: New Entries, Priority=[1], Assigned To=[Customer Support]
Action: Notify=[manager1]
Example 2: Hide the Management Section from the General Employee group
The following rule reads “for all new/existing/cloned issues, where the logged in user is in the Gerneral Employee group” we will “hide the Management section (which includes all fields inside it)”
Definition: New Entries, Normal Changes to Existing Issues, Cloned Issues, LoggedIn=[General Employee]
Field Control: Management = [H]
Example 3: Automatically reassign a Closed issue back to the person who opened it
The following rule reads “for all existing issues which are in the Closed state and were just changed to the Closed state” we have an action to “automatically change the AssignedTo field back to the user which initially entered the issue (which will also notify them of the change)”
Definition: Normal Changes to Existing Issues, Status=[Closed], Field Changed=[Status]
Action: AutoChange [AssignedTo=”<SUB bs.mEnteredBy>”]
Example 4: Flow Control
The following example shows you how you can implement the default flow states that are listed in our product overview (see Appendix A).
Figure 31: Basic Workflow Process Driven by Status Field
67Workflow Overview

The following rules were created to achieve the desired workflow process in the previous image.
Figure 32: Configured Workflow Rules Controlling Example Status Flow
Example 5: The following two rules outline how to restrict the ability to close an issue
Rule 1: Set a flow control that shows all states except for Closed
Definition: New Entries, Normal Changes to Existing Issues
Flow Control: Status = [Open, Ready For Retest, Rejected]
Rule 2: Create a second rule that overrides the first one for users in QA
Definition: New Entries, Normal Changes to Existing Issues, Logged In = [QA]
Flow Control: Status = [Closed]
68Workflow Overview
11.0 Rank / Escalation:
A special rank field is available to allow you to sort issues using a configurable ranking formula. The rank menu allows you to define the formula used in this calculation. The formula is based on an OGNL computation using the internal fields of the BugStruct Java class, whose fields are listed on the Rank menu, within FIT. The rank field is displayed just like any other field. It can be added as a column in the main menu and made visible to any of the issue detail screens.
The formula must return a numerical rank which is commonly used for escalation purposes. You can also set the rank to specific values that can be searched for by filters. This is very useful for triggering events, such as overdue items.
When using dates in the formulas, you must remember that dates are calculated down to the millisecond. When you enter a due date, you typically only enter the year/month/day. The system however, stores it down to the millisecond (defaulting to 0's if it has nothing else). Therefore you can not simply compare dates to the current Date() method, as the millisecond at any instance is not going to be 0's.
Formula Examples:
Default Formula (if empty) is:
(100-mPriority*10)+getElapsedTime()
Set rank based on priority:
mPriority
Formula for setting rank to 1 for any issues that have passed their due date.
(mRequestedDueDate!=null) ? ( (mRequestedDueDate == new java.util.Date()) ? 1 : 0 ) : 0
Formula for setting rank to 1 for any issues that are Open and any issues that were closed in the last X milliseconds. (ie: last week X=1000ms*60sec*60min*24hours*7days
(mCurrentStatus=="Open") ? 1 : (mCurrentStatus=="Closed" && (mDateLastModified.getTime() > new java.util.Date().getTime()-X)) ? 1 : 0
NOTE Substitute "X" for "new Long(XL).longValue()" for large numbers (ie: greater than 10 days)
Set rank based on priority, where priority increases (towards 1.0) as time since last modified grows... items that are priority 2 will reach priority 1 in 4 hours, items that are priority 3 will reach priority 2 in 1 day:
@@rint(@@max(1.0, (mPriority - (mPriority==2?(getSecondsSinceLastModified()/14400.0):0.0) - (mPriority==3?(getSecondsSinceLastModified()/86400.0):0.0)))*1000)/1000
Custom fields must be referenced using their field ID. For example, the following formula references a custom numerical field with id 21:
(mUserFields!=null && mUserFields.get(new Integer(21))!=null) ? mUserFields.get(new Integer("21")) : 0
We simply set rank to be the same value as the custom field here!
69Rank / Escalation:

This formula will set (to 1) any requested due date that matches today:
(mRequestedDueDate!=null) ? ( (mRequestedDueDate.getDay() == new java.util.Date().getDay() && mRequestedDueDate.getMonth() == new java.util.Date().getMonth() && mRequestedDueDate.getYear() == new java.util.Date().getYear() ) ? 1 : 0 ) : 0
70Rank / Escalation:

12.0 Advanced Options
Advanced options are available from the advanced option links listed on the Admin Menu page and they are illustrated in the next two visuals.
Once you are familiar with advanced options, you can perform related tasks as outlined in this section.
Figure 33: Specifying Advanced Option
Table 8: Advanced Option Links and Corresponding Commands
Database Administration Controls for Connection to JDBC database (Database Module Only)
Event Scheduling Creation/Modification of scheduled events. (ie: weekly notifications)
Data Import Imports issues in CSV format. Also lets you remove all data from the system.
Data Export Exports issues in CSV or XML format.
MS Project Field MappingMaps FIT fields to MS Project fields so that users can use the Export to MS Project option on the Main Menu
SOAP FunctionsProvides a mechanism for developers to quickly query the FIT system. Details about SOAP are outlined in the SOAP Functions reference section.
System InfoProvides system information, including full server details. This helps you or other support groups address any unforeseen problems.
71Advanced Options

12.1 Database Administration
This feature is available to systems using the database module, for making connections to a JDBC database and using the system migration feature. Please see the Database Module documentation for additional information.
12.2 Event Scheduling
This menu is used for defining scheduled events, including the following :
• Filtered List delivery - scheduled delivery of desired lists of issues
• Report delivery - scheduled delivery of reports
• Chart delivery - scheduled delivery of charts
• Workflow Events - scheduled execution of predefined workflow rules.
• Scheduled backups
Event Details
The Event Details tab allows you to define when an event is to start running and for how long it will continue to do so.
Task Name: You must define a name for your event. This event is then available on the top of the menu for editing or deleting
Start Date: The day that this event is to begin.
Start Time : The hour that this event will begin.
Repeating: The frequency that this event will recur.
End Task: Define how long this event will continue to run for.
NOTE The event settings are based on the start time and an event will only run if defined properly. If you have an event where the event does not have a repeat time between the start time and the end time, the event will not fire. (ie: if it is 4pm and I define an
Exception LogLists past debugging exceptions. This helps you or other support groups address any unforeseen problems.
BackupsBacks up a copy of all files with a choice of including or excluding installation files.
Unarchive Allows you to unarchive any archived issues (bX.old)
System Message Lets you send a system message to all FIT users.
Shutdown Gives you the option of completing a safe server shut down.
Track Administration Allows you to activate/create tracks by configuring templates to the system.
72Advanced Options

event to start this morning at 9am (default), with a repeating value of “hourly” and an End Task value of “After 5 repetitions”, the event will never run.
NOTE If an event is set to end after a certain number of repetitions, the initial execution is not counted as a repetition. So an event set to end after five repetions will execute a total of six times.
The remaining tabs define what the event will actually do.
Notification Options
Generally, an event is used to inform a set of users of the state of the system at a particular time. This is done by defining a filter, chart or report format which will display the desired information in an email, each time the event executes. The Notification Options tab defines the format of any resulting email notifications.
Send Email - check this off to use any of the features on this page.
Subject - the subject to appear in the email notifications from this event
Message - an optional message you may wish to show at the top of the email notification.
Notify List - the list of individuals that you wish to send the email from this event to.
Types of Emails:
Report - A lists of saved reports which you can send in the email notification.
Chart - A list of saved charts which you can send in the email notification.
Filter - A list of saved filters which you can use to generate the output for your email notification.
Filter must be non-empty - Only send the notification if there is output from the filter
Reminders - Allow you to send additional reminder notifications to the Creator, Assignee, or any users in the Notify List, for all issues in the resulting list. The format of these reminders is as a normal notification with all details.
NOTE If a filter that contains [Current User] is selected, the filter will be omitted if the email is being sent to a user who is not in the system (where this option is N/A).
Event Example:
To create an event that acts as a reminder (2 days before an issue is due).
1 - You should first save a filter that will return the data you are looking for, which will be used by our new event:
"Requested due date > - 2 days"
2 - Define a event that starts today and choose an hour when you would like to receive the information.
3 - Define the event to repeat daily, and choose Never as the End Task option.
73Advanced Options

4 - Under the Notification options tab:
• Check off “Send Email”
• Choose a Subject, Message and Notify List (the persons to receive the information)
• Choose the filter you defined in Step 1 under the filters option.
5 - Click the Add Event option.
NOTE Filter must be created separately and prior to creating event. Make sure you are running a recent version that will let you do the -2 days (relative dates feature)
Workflow Options
An event will also let you choose to run a workflow rule. In this case, the rule can be defined in two ways , based on the Field Action attribute located under the Actions tab:
A) If the Advanced Auto Change option of the Field Action workflow attribute is set to normal, all issues that match the filter definition of the rule will then be updated according to the field settings set for the Auto Change feature. This allows you to modify a number of issues in a particular way.
The event runs the state definition of the rule. All matching issues will then be modified by the field settings listed under the Auto Change feature. (The separate entry option here is implied in this case, since it is not an edit).
You may want to read up on the Special Purpose flag for workflow, so that the rule is not run for every system edit.
B) If the Advanced AutoChange option of the Field Action workflow attribute is set to Create a new item (third option), then the event will create exactly one new issue each time it is run. The default details for this issue are defined in the AutoChange settings.
NOTE For systems with multiple tracks, the new issue is created in the track where the rule is defined.
C) If the Advanced AutoChange option of the Field Action workflow attribute is set to Create at most X new item(s) based on “another rule”, the system will create issues for all issues that match the state definition of the rule that is selected. The “at most” option stops this feature from overrunning your system if it is defined incorrectly.
Backup Options
Make Backup- Automatic backups can be accomplished with this task.
The Data files option will save all FIT configuration files. This does not include any program files which are specific to the platform the system is running on, the JVM, or the fit.jar file. This is useful for moving a system to another platform.
The All files option is used as a complete backup that can be run with no installation.
NOTE ** Not available on hosted systems as daily backups are already kept and our team needs to control the disk space available to hosted systems.
74Advanced Options

12.3 Data Import
The Data Import page lets you import a set of issues from a CSV file. This page also lets you remove all issues from the system.
When importing data, the first row of the CSV file must define the fields, which are used in each column. Also, the fields that you import in the CSV file must match the fields that are defined in the system. If not, an error message displays, indicating the field name is not accepted. An import check screen displays prior to the import, summarizing the information being imported.
The Data Import page also lets you remove all issues from the system. The main purpose of this feature is to empty a database and start from scratch. This feature is often used to clear a system prior to importing existing issues from another system.
To import data
1 On the Admin Menu page under Advanced, click the Data Import link.
2 On the Data Import page, click Browse and navigate to the CSV file that you want to import.
3 Click Import.
The Data import menu has a “Remove All Data” feature which is useful if you want to empty your system prior to an import. This option will remove all bugs and attachments and start the IDs at 0 again. No other configuration options are removed.
To remove all data
1 On the Admin Menu page under Advanced, click the Data Import link.
2 On the Data Import page, click Remove All Data.
A warning displays.
3 Click OK to remove all data or Cancel to maintain the data.
75Advanced Options

Figure 34: Importing and Removing Data
12.4 Data Export
You can export data in CSV or XML format. For CSV format, the history is done using [H#] entries in a separate column for each historical element. The field/column name is also preceded by [H], so as not to confuse the current state information, where the titles would be the same. For XML format, the history is provided in the element for each issue.
To export data, you must do the following:
• Select Columns — Select only the fields to export. The selection defaults to any current filters.
• Data Format — Select the format to which you are exporting the information (XML or CSV).
• Include Headings — Select this option if you want the field headings to display as the first row (for example, CSV file).
• Include History — Select this option if you want to summarize the history of the issues.
To export data
1 On the Admin Menu page under Advanced, click the Data Export link.
2 On the Data Export page, select the check box that corresponds to each column you want to display in the Select Columns to Export list.
3 You may also select fields with historical entry information where the [H] option exists. This will export all historical information separated by new lines.
76Advanced Options

4 Select one of the following Data Format options:
• CSV
• XML
5 Select one of the following Export options:
• Include Headings
• Add separators between description entries (shows date of entry).
6 Click Export.
Figure 35: Exporting Data
12.5 SOAP Functions
This SOAP Functions menu allows you to enable SOAP functionality. This allows communication to the system from external applications. SOAP enables the system for a command line interface, CVS integration and other external applications.
The following document is aimed at developers. It explains the WSDL/SOAP interface to FIT. Using the calls defined in this document, a developer can quickly query, create and update issues within the FIT system.
http://www.fittrackingsolutions.com/support/admin/soapAPI.html
The following document provides details of the integration of CVS with the FIT system. This allows you to update your issues with links to all code changes.
http://www.fittrackingsolutions.com/support/admin/tools.html
77Advanced Options
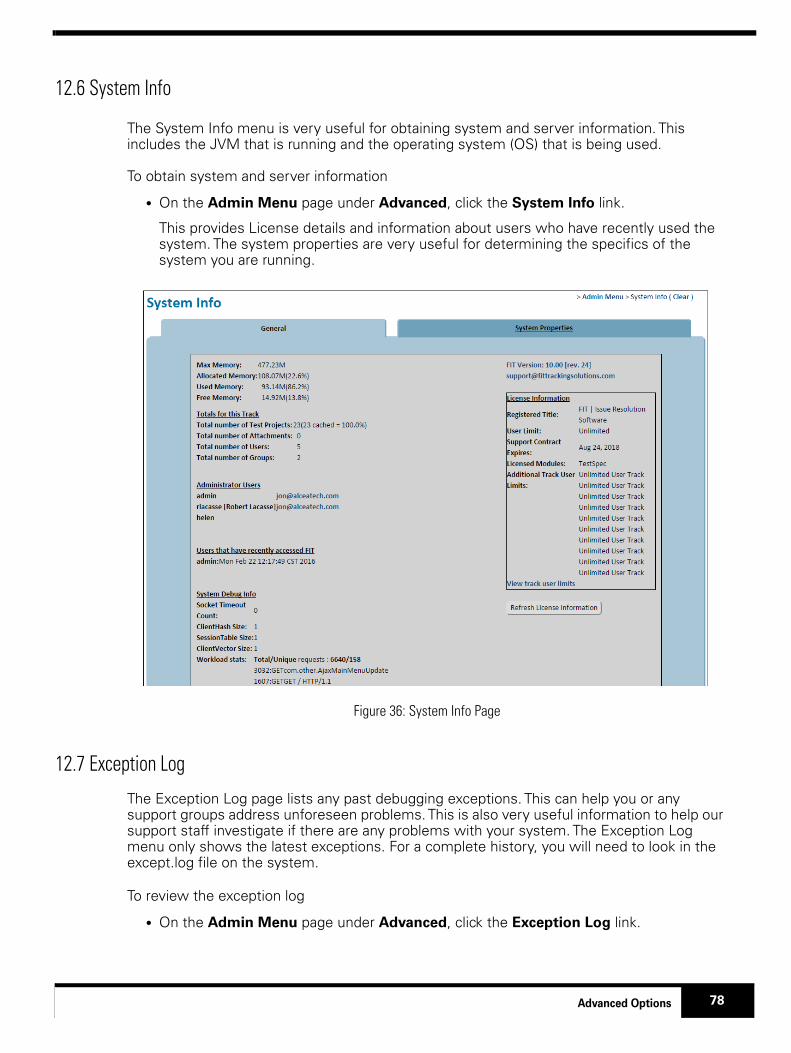
12.6 System Info
The System Info menu is very useful for obtaining system and server information. This includes the JVM that is running and the operating system (OS) that is being used.
To obtain system and server information
• On the Admin Menu page under Advanced, click the System Info link.
This provides License details and information about users who have recently used the system. The system properties are very useful for determining the specifics of the system you are running.
Figure 36: System Info Page
12.7 Exception Log
The Exception Log page lists any past debugging exceptions. This can help you or any support groups address unforeseen problems. This is also very useful information to help our support staff investigate if there are any problems with your system. The Exception Log menu only shows the latest exceptions. For a complete history, you will need to look in the except.log file on the system.
To review the exception log
• On the Admin Menu page under Advanced, click the Exception Log link.
78Advanced Options
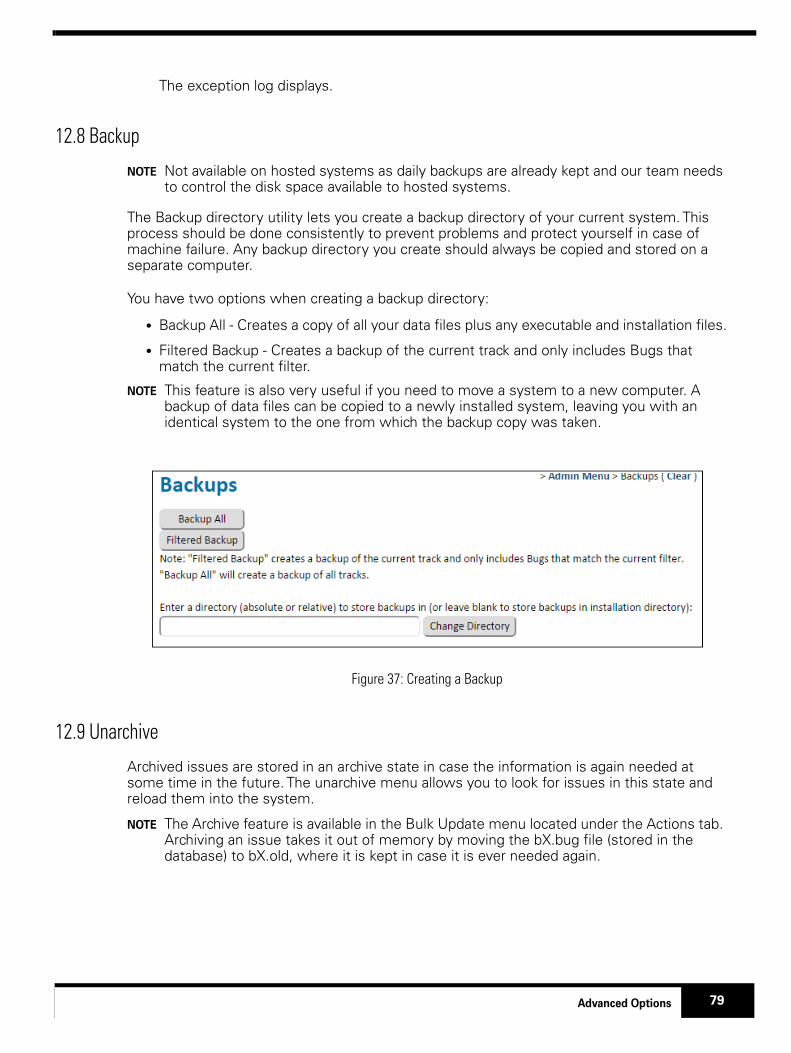
The exception log displays.
12.8 Backup
NOTE Not available on hosted systems as daily backups are already kept and our team needs to control the disk space available to hosted systems.
The Backup directory utility lets you create a backup directory of your current system. This process should be done consistently to prevent problems and protect yourself in case of machine failure. Any backup directory you create should always be copied and stored on a separate computer.
You have two options when creating a backup directory:
• Backup All - Creates a copy of all your data files plus any executable and installation files.
• Filtered Backup - Creates a backup of the current track and only includes Bugs that match the current filter.
NOTE This feature is also very useful if you need to move a system to a new computer. A backup of data files can be copied to a newly installed system, leaving you with an identical system to the one from which the backup copy was taken.
Figure 37: Creating a Backup
12.9 Unarchive
Archived issues are stored in an archive state in case the information is again needed at some time in the future. The unarchive menu allows you to look for issues in this state and reload them into the system.
NOTE The Archive feature is available in the Bulk Update menu located under the Actions tab. Archiving an issue takes it out of memory by moving the bX.bug file (stored in the database) to bX.old, where it is kept in case it is ever needed again.
79Advanced Options

12.10 System Message
Use the System Message page to send out a global system message to all FIT users.
To specify system messages
1 On the Admin Menu page under Advanced, click the System Message link.
2 On the System Message page, type text in the message box (top).
3 Click the users to which you want to send the message in the user list (bottom right box).
If you want to select multiple users, press the CTRL key while clicking each user. If you want to select all users, press the SHIFT key and click the first and last user in the list.
Click Submit
Figure 38: Specifying System Messages
80Advanced Options

12.11 Shutdown
The Shutdown page gives you the option of completing a safe server shut down.
To shut down the server
1 On the Admin Menu page under Advanced, click the Shutdown link.
2 On the Shutdown page, click Shutdown.
12.12 Track Administration
As described fully in the Integrated Systems (TRACKS) section of the main FIT documentation, the TRACK feature allows you to integrate multiple systems into one common interface and administer these independent instances, with one common configurable user base.
The term “TRACK” is used to define each specialized template that is configured in an integrated system. Each system starts out with one TRACK that acts as a tracker for a particular discipline or context, such as bug tracking, issue management, risk management or help desk ticketing. The Track Administration menu is located in the Advanced section of the Admin menu. This menu is composed of five tabs which are used to maintain tracks.
The Track Administration menu allows you to add or activate additional templates to your system. The objects of each of the templates (Tracks) are navigated separately in their own menus. If there is more than one Track configured, there is a “Switch Track” control located in the main menu, just left of the Filter drop-down. Users will have to re-login to see any TRACK changes.
Active Tracks
The Active Tracks tab allows the administrator to delete the selected Track.
Figure 39: Select and Delete Track
81Advanced Options

Add Track
The Add Track tab allows the administrator to add a new TRACK instance to their FIT system. This TRACK will then be available to all relevant users from the “Change Track” drop-down in the menu at the top of all system pages.
A list of Available Templates is shown at the top of the menu. Select the template that most closely matches your requirements. The resulting TRACK will of course be fully customizable, this is just an initial configuration.
The Track Title is used by the “Switch Track” drop-down on all system pages, to link to your new track from your existing tracks. This name will also be used to replace XXX in the “Create New XXX” submenu item which is available from the Actions menu for the drop-down style sheet.
Finally, you must choose the Users that you wish to pull from your existing Tracks. These are the users that you are giving access to the new TRACK
Migrate Track
When migrating a track, choose the template configuration you would like to migrate to, and then type the name of the resulting track. This migrates the existing TRACK, it does not create a new one.
Create Template
This tab is used for creating a template, in case you want to copy your current Track and use it as the base for a new one. This will also allow you to copy a TRACK setup to another machine.
Active Modules
The Active Modules tab indicates additional modules that are currently active on the system. This is actually not TRACK related.
82Advanced Options

13.0 Anonymous Access to FIT
You can give users anonymous access to FIT using the anonymous entry and anonymous query functions. Providing this type of access allows users to use the system without logging in, making these users anonymous to the FIT system.
To use this feature, you must first enable this functionality, which by default is disabled for security purposes. Please note that an example is set up at,
http://www.fittrackingsolutions.com/support/admin/anonymousAccess.html
Then, you must set up common Web pages so that data can be entered (entry page) and queried (queary page) outside of the FIT application. The pages you set up are completely configurable and can be as simple or complex as you like.
FIT is equipped with sample customizable templates that you can use to create your Web pages and integrate them into your Web site. These templates are available on each configuration page within the application. However, in order to customize these Web pages, you must be familiar with HTML and should start by looking at the sample pages listed for each type of access. Alcea can also provide customization services for you.
This section provides you with scenarios in which anonymous access can be used. It also provides you with general directions for enabling anonymous entry and enabling anonymous querying.
13.1 Scenarios in Which Anonymous Access is Used
Below are several scenarios in which anonymous access is used:
• A company wants to design their own Web entry page.
• A company releases software to 25,000 beta testers and wants to collect defects from users. This solution allows users to log defects and gives you the ability to follow up on the status of the defect.
• A company wants to create a knowledge base, allowing software users to query regularquestions/issues within their system.
• A company has separate customers who want to access different projects from Web pages with distinct looks.
13.2 Enabling Anonymous Entry
Enabling anonymous entry can be broken into two key steps: enabling the feature and creating an issue entry page.
Enabling the Anonymous Entry Feature
You can enable the anonymous entry feature by accessing it from the Admin Menu page. Before you enable the feature, you must set up a Web page that users outside of the FIT system will see when reporting on an issue. For more information, see the section on “Creating an Issue Entry Page”.
83Anonymous Access to FIT

To enable the anonymous entry feature
1 On the Admin Menu page under Anonymous Access, click the Anonymous Entry link.
2 On the Anonymous Entry page in the settings tab, select the Enable Anonymous Issue Entry check box to enable the feature.
3 In the box below, type the URL address corresponding to the Web page to which you want to direct users after an issue is created.
4 The users will see this page after submitting an issue. This Web page may read “Thank you for submitting an issue to FIT. We will respond to you within 2 days.”
5 Use the Mandatory Fields tab to select the check boxes that correspond to the mandatory information fields that a user is required to fill in, in order for FIT to accept the issue. This can also ensure that users provide you with the information you require to reproduce or address the issue.
6 Click Change Settings.
Restrict by password - allows you to add a custom password field for added security of information.
Restrict by email address - requires a user to input their email address to see issues created by them (basic screening mechanism)
NOTE An example entry page is available which you can use as a template for your own web form on your site.
Figure 40: Enabling Anonymous Entry
84Anonymous Access to FIT

Creating an Issue Entry Page
You can create an issue entry page by downloading a sample template from FIT.
To create an issue entry page
1 On the Admin Menu page under Anonymous Access, click the Anonymous Entry link.
2 On the Enable Anonymous Issue Entry page, do one of the following:
• Right-click the Sample Anonymous Issue Entry Page link and select Save Target As. Then navigate to a location on your computer to save the template source code locally; or
• Click the Sample Anonymous Issue Entry Page link. Choose Source from the View menu of your internet browser so that you can see the actual html that makes up the page. Use this as your base.
3 Use the source code as the general guidelines for creating your own issue entry Web page.
4 Customize the Web page, including drop-down boxes and field data. Include detailed instructions to your users, that will allow them to log the information you require regarding logged issues.
5 Place the customized template on your Web site in a location where users can locate and use it.
6 Link the customized template to FIT.
NOTE Ensure a post-submission Web page is also available so that FIT can then direct users to it. Test the submission page to ensure it is behaving as you expect, and that the data collected is complete so that you can use the information to reproduce and correct defects reported.
13.3 Enabling Anonymous Querying
Anonymous querying is useful in a variety of situations, which includes the following scenarios:
• To allow users to query issues entered by themselves and/or others in order to reduce duplicate issues from being entered.
• To provide a knowledge base of common problems and their associated solutions.
• To track all issues by email address which is useful because user lists are constantly changing.
In order to use the anonymous querying feature, you must enable the feature and then create an issue query page as outlined in the following sections.
Enabling the Anonymous Querying Feature
You can enable the anonymous querying feature by accessing it from the Admin Menu page. Before you enable the feature, you must set up a Web page that users outside of the FIT system will see when querying an issue.
85Anonymous Access to FIT
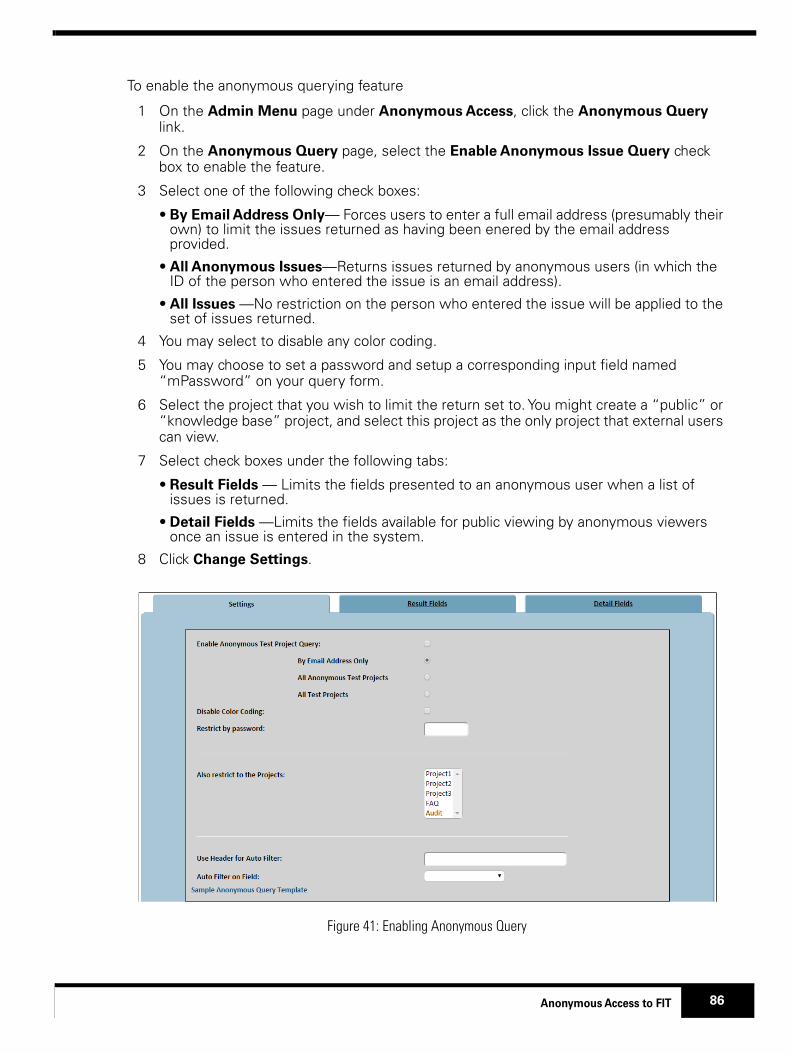
To enable the anonymous querying feature
1 On the Admin Menu page under Anonymous Access, click the Anonymous Query link.
2 On the Anonymous Query page, select the Enable Anonymous Issue Query check box to enable the feature.
3 Select one of the following check boxes:
• By Email Address Only— Forces users to enter a full email address (presumably their own) to limit the issues returned as having been enered by the email address provided.
• All Anonymous Issues—Returns issues returned by anonymous users (in which the ID of the person who entered the issue is an email address).
• All Issues —No restriction on the person who entered the issue will be applied to the set of issues returned.
4 You may select to disable any color coding.
5 You may choose to set a password and setup a corresponding input field named “mPassword” on your query form.
6 Select the project that you wish to limit the return set to. You might create a “public” or “knowledge base” project, and select this project as the only project that external users can view.
7 Select check boxes under the following tabs:
• Result Fields — Limits the fields presented to an anonymous user when a list of issues is returned.
• Detail Fields —Limits the fields available for public viewing by anonymous viewers once an issue is entered in the system.
8 Click Change Settings.
Figure 41: Enabling Anonymous Query
86Anonymous Access to FIT

Creating an Issue Query Page
You can create an issue query page by downloading a sample template from FIT.
To create an issue query page
1 On the Admin Menu page under Anonymous Access, click the Anonymous Query link.
2 On the Anonymous Query page, do one of the following:
• Right-click the Sample Anonymous Issue Query Page link and select Save Target As. Then navigate to a location on your computer to save the template source code locally; or
• Click the Sample Anonymous Query Template link. Choose Source from the View menu.
3 Use the source code as the general guidelines for creating your own issue query Web page.
4 Customize the Web page, including drop-down boxes and field data. Include detailed instructions to your users, that will allow them to log the information you require regarding logged issues.
5 Place the customized template on your website in a location where users can locate and use it.
6 Link the customized template to FIT.
NOTE Ensure a post-submission Web page is also available so that FIT can then direct users to it. Test the submission page to ensure it is behaving as you expect, and that the data collected is complete, so that you can use the information to reproduce and correct defects reported.
87Anonymous Access to FIT

14.0 Anonymous Email Retrieval
Anonymous email retrieval lets you designate a distinct POP/IMAP email account, which collects emails for your FIT system. Once set up, the FIT system continually scans this email account and sends appropriate notification to FIT users.
This section outlines how anonymous email retrieval works and explains how to set up the feature in three phases; specifying a return message, setting up mail rules, and configuring your mailbox.
These options are currently located in the bottom-right column of the Administration Options screen.
14.1 How Anonymous Email Retrieval Works
In order for anonymous email retrieval to work, a set of mail rules must be set up so that FIT can interpret the email (for example, the specific subject) and determine how to enter the information as an issue in the system.
The mail rule can be configured to notify the originator when his or her email is received. The notification reply email may read, “We have received your email and will respond shortly.” The notification reply email also contains a ticket number (the issue ID appended with a security number) for tracking purposes.
FIT then converts the originator’s email contents into an issue and applies the appropriate field properties (for example, priority, project, and assigned to) as defined by the mail rule. Attachments to the email are converted into issue attachments, and if the email was sent in HTML format, it is converted to plain text.
FIT then assigns the issue to a FIT user, and he or she receives email notification. The FIT user responds to the originator, copying a global address such as [email protected]. The FIT user includes the ticket number in the subject as well as additional processing information (for example, closing the issue). The user’s response is appended to the issue history and updates are applied.
NOTE
• This feature can be particularly complex. Mail rules are based on regular expressions, which can be confusing at first. Therefore, we have outlined a few simple examples.
• Testing should be completed with a dedicated email address for this functionality alone.
• Testing should not be done from a personal email account because it will extract all emails sent to this account. Emails that do not match any rules are simply discarded. You may wish to create a catchall in case messages are incorrectly sent.
14.2 Specifying a Return Message
Begin setting up anonymous email by specifying a return message.
To specify a return message
1 On the Admin Menu page under Anonymous Access, click the Return Messages link.
e
88Anonymous Email Retrieval

2 On the Return Message Administration page, type a message name in the Message Name box.This name will appear as reference in the Message list at the top of the page. Ensure this name is symbolic (for example, Order Response).
3 Type a message in the Message box.This message will be sent to FIT users. Ensure this message is clear and concise (for example, “Thank you for your email. We will process it and reply within 2 days.”)
4 Click Add Return Message.
Figure 42: Specifying a Return Message
14.3 Setting Up Mail Rules for Anonymous Email Retrieval
There are some important factors to keep in mind when setting up mail rules:
• A series of mail rules must be created for anonymous email retrieval to work.• Mail rules are processed in an order defined by the user.• When a mail rule matches an incoming message, no additional rules are compared.• Mail rules are based on mail headers and regular expressions. Some examples of
regular expressions are listed below.
Table 9: Examples of Common Regular Expressions
Task Regular Expression
Scan for all emails from [email protected] From: .*[email protected]
Scan all emails for the text “Order” Subject: .*order.*
89Anonymous Email Retrieval
To create a mail rule
1 On the Admin Menu page under Anonymous Access, click the Mail Rules link.
2 On the Mail Rule Administration page, click the Mail Rules link.
3 Type a name for the rule in the Mail Rule Name box.
Ensure this name is symbolic and meaningful for easy recognition.
4 Type a regular expression for the mail rule in the Regular Expression box.
For example, Subject: *order.*
5 Select a return message from the Select a Return Message drop-down box.
This is the message to be sent to the originator of the issue. Do not choose any return message if you do not wish to send the originator an automated response.
6 Select the appropriate items from the Project, Area, Environment and Priority drop-down boxes (if applicable).
7 Select one of the following assignment check boxes:
• Simple — Assigns issues to a single individual. If you choose this option, you can only select single from the accompanying drop-down box.
• Complex — Assigns issues to multiple users based on various algorithms. If you choose this option, you must select either Round Robin or Load Balance from the accompanying drop-down box. Round Robin corresponds to assigning the first issue to A, second to B, third to C and then repeating (fourth to A, fifth to B, sixth to C, etc.). Load Balance examines the number of open issues in the system and assigns the issue to the user who is least busy.
8 The Notify List allows you to make sure a userid or email address is sent a notification whenever an issue is created from this feature. This works in addition to the regular notification rules.
9 Click Add Mail Rule.
Scan all emails from Terry containing the text “Order”
Subject: .*order.* AND From: .*[email protected]*
Create a "Catch-All" rule to catch everything and make sure the system does not ignore any messages
.*
Task Regular Expression
90Anonymous Email Retrieval

14.4 Configuring Your Mailbox
Before you can enable anonymous email retrieval, FIT must be configured to send email notification. For more information, see our section on Server Configuration.
If email notification is set up, you can configure your mailbox on the Mail Server Administration page. Configure a POP account, password, and server, and possible additional info (for example, time between polling). Use the Submit and Test button when you first change this configuration to ensure FIT is able to connect correctly to your mailbox.
To configure your mailbox
1 On the Admin Menu page under Anonymous Access, click the Mail Server Administration link.
2 On the Mail Server Administration page, type a host in the Host box.3 Type the username and password for theemail account on the host server, which will
collect emails for FIT.4 Select the Ignore unmatched messages received check box if you want to ignore
unmatched messages.5 The Send Redundant Email Notifications option will make the system send a
notification email to any users who are using this feature to update issues through email.
6 You can choose to extract any email addresses found in the From, To, or CC lists of the email and have them added to the Notify List of the issue being created.
7 By default, the system will check for emails every minute.8 Click Submit or Submit and Test.
Figure 43: Performing Mail Server Administration
91Anonymous Email Retrieval

15.0 System Dashboard
A full section of the FIT User Manual discusses normal dashboard functionality so there will be very little discussion about it here. Instead, this section discusses the differences that an administrator will see and the controls that exist for the administrator to configure a common system wide dashboard.
15.1 Dashboard Access
There are two options on the General tab of the System Configuration menu which are used to control access to the dashboard.
Disable Dashboard: This is a system wide option which will disable the dashboard option for all users and all tracks. Unless this is enabled, users should see a Dashboard link on the main page header.Login to Dashboard: This option will cause all users to immediately default to the dashboard menu, when they login to the system.
15.2 Dashboard Controls
The dashboard displays one of two component configurations, being the System Dashboard which is configured by the administrator or the Personal Dashboard which can be configured by each individual user. As mentioned in the user manual, these two dashboard configurations can be toggled using the top two selections of the Dashboard Options, as shown below.
Figure 44: Dashboard Options
When a configuration is selected, the system will remember it while the user is logged in. Additionally, a user can set the current configuration as their profile default, using the third option.
During normal administrator use, the system dashboard is in a readonly state and all editing icons are hidden from system dashboard components. If a new component is added to the
92System Dashboard

dashboard from another menu, then it is automatically added to the personal dashboard, since it is the default configuration for edits.
15.3 Editing the System Dashboard
System administrators have an additional dashboard option available on the bottom of the dashboard options, which allows them to edit the system dashboard for all users. When this option is selected, the dashboard selection automatically switches to the system dashboard, and a new system drop-down options menu appears to the left of the normal dashboard options.
While the System Dashboard Options are visible, the system dashboard remains the active dashboard and all components that are added to the dashboard from other sections (such as reports or the main menu lists), will be added to the system dashboard, rather than the administrators personal dashboard (normal default). Additionally, the icons for editing system dashboard components become visible and the personal dashboard can not be selected.
Figure 45: Editing System Dashboard
When changes to the system dashboard are completed, the administrator simply chooses “Done Editing System Dashboard” to complete the editing process. When this is done, the system dashboard remains selected, but the personal dashboard returns to the active editable configuration.
93System Dashboard

94
Reference: Accessing User Options
The following user options are outlined in the FIT User Manual:
The FIT User Manual is available at http://www.fittrackingsolutions.com/support/documentation.html.
User Option General Description
Editing User Profiles Outlines in detail how to edit user profiles.
Creating and Updating Issues Outlines issue tracking, viewing and hiding issues, and updating issues.
FiltersOutlines the filtering functionality and explains preset and custom filters. Also explains how to edit and save filters.
Reports Outlines how to generate quick (preset) and custom reports.
Charts Outlines how to generate quick (preset) and custom charts.
Appendix A: Understanding Issues Management
A Proper Resolution Process Increases Productivity
By implementing a proper Change Process, you are able to optimize workflow and maximize the productivity of your entire team. FIT achieves optimal workflow by maintaining proper ownership and keeping individuals aware of their most immediate responsibilities.
Action Items can be grouped, reviewed and summarized instantly, at any time. This includes details, instructions, attachments and anything else that is needed to comprehend or reproduce a problem that needs to be solved. In addition, documentation is available in the future for review, or to see how similar situations were resolved in the past.
What is Issues Management?
A development team is made up of individuals with different roles, abilities and responsibilities. The success of a team depends on the ability they have to coordinate these roles and responsibilities, and effectively pass information between each member. A team will be working on a number of issues at any given time and each issue can pass through numerous states until it is successfully solved or completed. This is Change Management
Issues Management is the process of organizing and managing these states, recording the history of the issue as it passes from one state to another. Effective management provides a history of the entire process and the activities that each team member performed at a specific state. When issues are properly tracked and documented, individuals performing each step are able to solve problems much more effectively, and the entire process becomes much easier to manage.
FIT encapsulates the "Change process" and allows team members to group and compare issues with common states or elements. FIT Tracking Solutions are extremely flexible and allow complex customization for specific needs. The filter, report and chart features provide powerful tools to compare activities and track the status of issues within your group or team.
The Change Process
A change process is the set of rules that exist to control workflow. These rules define a set of states and determine how an issue can pass from one state to another. This includes not only the path that the issue can take, but also the states that specific users are allowed to assign to an issue.
The default behaviour of FIT is to allow our customers to follow their own change process. When FIT is installed, a default process is put in place to allow the product to function
95

immediately. This includes a common set of states that are outlined in the diagram below. FIT Tracking Solutions can then be configured to meet any needs.
Our default process begins in the "Open" state and progresses to "Ready for Retest" and then onto "Closed". Closed issues are then hidden by default in the system. If the issue is not tested successfully, it is then sent back to the open state to start the process again. An issue can become "Deferred" at anytime and remains in that state until the user is ready to address it.
Figure 46: Simple Workflow Process
Simple Example
A bug is often raised by a tester. A description of the bug is written, including the environment, product revision, and instruction on how to reproduce it (if possible). The bug is then assigned to the project manager to determine which department is responsible. The bug is marked as "Open", and immediately begins a history trail within the system.
The project manager is notified that a new bug has entered the system. Immediately, the manager determines who should be handling the fix for the bug. The bug is then re-assigned to the correct developer who can fix the problem.
The developer reproduces the bug using the information provided by users who defined and directed the bug to him/her. Then the bug is fixed and its status changes to "Ready for Retest". The developer passes the fixed bug to the testing or QA department.
The tester is notified about being assigned a bug, and tests the bug to see if the newest fix is working properly. If it passes, the tester moves the bug to "Closed" , or marks it as "Rejected", if it still does not pass the testing phase. A "Rejected" bug will go back to the developer, who must attempt to fix it again. At any time during this bug fix, the exact status and history of the fix are available to everyone in the system. This information is also easily available for creating reports of outstanding issues. At any stage in this process, there is a full history trail and accountability record as illustrated below (this is also the actual email notification format that is passed to each individual as they are incrementally assigned the issue):
96

Figure 47: Process example
97

Advanced Process Options
As customers have made requests, we have begun to add customizations to allow customers to restrict the process in a few ways. The following configurable strings have been added:
sDefaultStatus allows you to set the default status on the New Bug screen. This is useful if you need to change the set of states in your change process.
sRestrictStatus is used to control the actions of some users. This string contains a status list (separated by commas), which cannot be set by any users, with the exception of an admin user or the creator of the issue. All other users will not see these status types as valid options for status on the modify pages. The default for this string is "Closed", and the option is turned on in the Server Configuration menu.
You are free to structure the states of your process in any way that you like. The states can be changed on the Admin -> Default Fields menu under the Status heading.
98
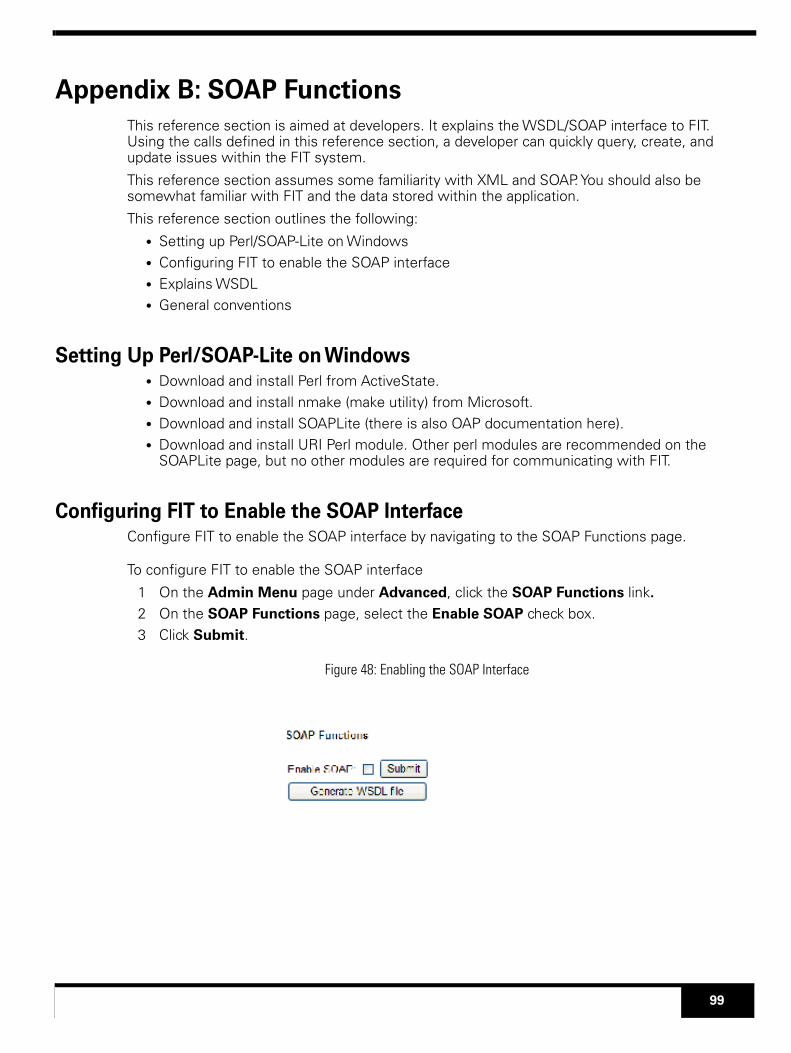
Appendix B: SOAP Functions
This reference section is aimed at developers. It explains the WSDL/SOAP interface to FIT. Using the calls defined in this reference section, a developer can quickly query, create, and update issues within the FIT system.
This reference section assumes some familiarity with XML and SOAP. You should also be somewhat familiar with FIT and the data stored within the application.
This reference section outlines the following:
• Setting up Perl/SOAP-Lite on Windows• Configuring FIT to enable the SOAP interface• Explains WSDL• General conventions
Setting Up Perl/SOAP-Lite on Windows• Download and install Perl from ActiveState.• Download and install nmake (make utility) from Microsoft.• Download and install SOAPLite (there is also OAP documentation here).• Download and install URI Perl module. Other perl modules are recommended on the
SOAPLite page, but no other modules are required for communicating with FIT.
Configuring FIT to Enable the SOAP InterfaceConfigure FIT to enable the SOAP interface by navigating to the SOAP Functions page.
To configure FIT to enable the SOAP interface
1 On the Admin Menu page under Advanced, click the SOAP Functions link.
2 On the SOAP Functions page, select the Enable SOAP check box.3 Click Submit.
Figure 48: Enabling the SOAP Interface
99

WSDL ExplainedWSDL stands for Web Service Description Language, and it defines all of the Web service requests and responses that can be made to FIT. There are four basic operations that can be performed through the Web interface as outlined in the table below.
Table 10:
Request Name Description Read/Write
getIdThis call returns the full issue detail for a single specific issue. It is the equivalent of viewing issue details through the Web interface.
Read-Only
getIssueListThis call allows the caller to define parameters, through which a set of issues will be returned. It is the equivalent of the filter screen in the Web interface.
Read-Only
newIssue Create a new issue within your system using this call. Write
updateIssue Update an existing issue within your system using this call. Write
WSDL Operations
Before executing any examples in this reference section, or using any SOAP functionality, you must configure SOAP within FIT. For details, see the section for “Configuring FIT to Enable the SOAP Interface”
FIT will dynamically generate a custom WSDL file based on how your instance of FIT is configured. For example, if you have custom fields, they will be added to your WSDL file.
All of the examples in this reference section assume the stock FIT installation. You can view the WSDL file by going to http://localhost:10000/FIT.wsdl. This assumes you are using the same computer that FIT is running on and that you are replacing localhost with the name of the computer running FIT.
General ConventionsField names within FIT are prefixed with “m”, and “camelcase” is used for field naming conventions (capitalize the beginning of each word). Example: the Id field is mId, the Date Last Modified field is mDateLastModified.
All of the examples provided are using Perl and SOAP::Lite (a Perl module). We are using this for our examples because Perl and SOAP::Lite are available for almost all operating systems, and they are free. While we are using Perl, most modern programming languages have Web service modules/libraries that should work fine with FIT. Customers with any questions about compatibility or wishing a list of sample platforms can email [email protected] for additional information.
getId
Description
This call returns the full issue detail for a single specific issue. It is the equivalent of viewing issue details through the Web interface.
100

Sample Perl Code
The following Perl code retrieves the details of issues from the system. We turn full debug on, to display both the raw data that we send to FBT, and display the raw data received in response.
#!/usr/bin/perluse SOAP::Lite;print SOAP::Lite ->service("http://localhost:10000/FIT.wsdl") -> on_debug(sub{print@_}) -> getId(SOAP::Data->name("Id" => "10"));
Input
We can see that the following SOAP message is sent to FIT: POST http://localhost:10000Accept: text/xmlAccept: multipart/*Content-Length: 448Content-Type: text/xml; charset=utf-8SOAPAction: "http://localhost:10000/getId"
<?xml version="1.0" encoding="UTF-8"?> <SOAP-ENV:Envelope xmlns:SOAP-ENC="http://schemas.xmlsoap.org/soap/encoding/" SOAP-ENV:encodingStyle="http://schemas.xmlsoap.org/soap/encoding/" xmlns:SOAP-ENV="http://schemas.xmlsoap.org/soap/envelope/" xmlns:xsi="http://www.w3.org/1999/XMLSchema-instance" xmlns:xsd="http://www.w3.org/1999/XMLSchema"> <SOAP-ENV:Body> <getId xmlns=""> <mId xsi:type="xsd:int">10</mId> </getId> </SOAP-ENV:Body></SOAP-ENV:Envelope>OutputThe details of the issues are returned. The contents are contained in an issueStruct element, which in turn contains all of the current (non-history) fields, plus issueEntry structures for each update to the issue. Each issueEntry contains the values that were provided in those updates.
Sample output from the Perl call:
HTTP/1.1 200 OKContent-Length: 1919Content-Type: text/xml; charset=utf-8Client-Date: Tue, 21 Oct 2003 02:38:11 GMTClient-Peer: 127.0.0.1:10000Client-Response-Num: 1
<?xml version="1.0"?>
<SOAP-ENV:Envelope xmlns:xsi="http://www.w3.org/1999/XMLSchema-instance" xmlns:SOAP-ENC="http://schemas.xmlsoap.org/soap/encoding/" xmlns:SOAP-ENV="http://schemas.xmlsoap.org/soap/envelope/" xmlns:xsd="http://www.w3.org/1999/XMLSchema" SOAP-ENV:encodingStyle="http://schemas.xmlsoap.org/soap/encoding/"> <SOAP-ENV:Body> <issueStruct> <mId>10</mId> <mSubject>performance @ Aktiom ... Server timing ...</mSubject> <mDateEntered>Tue Sep 16 00:13:23 EDT 2003</mDateEntered> <mCurrentStatus>Closed</mCurrentStatus> <mCurrentAssignedTo>cjustus</mCurrentAssignedTo> <mLastModifiedBy>cjustus</mLastModifiedBy> <mDateLastModified>Mon Sep 22 21:55:12 EDT 2003</mDateLastModified> <mEnteredBy>cjustus</mEnteredBy> <mPriority>3</mPriority> <mProject>Aktiom</mProject>
101

<mArea>area</mArea> <mVersion></mVersion> <mEnvironment></mEnvironment> <mParent>0</mParent> <mRequestedDueDate>null</mRequestedDueDate> <mActualCompletionDate>null</mActualCompletionDate> <mEstimatedHours>0.0</mEstimatedHours> <mActualHours>0.0</mActualHours> <mPercentComplete>0.0</mPercentComplete> <issueHistory> <issueEntry> <mAssignedTo>cjustus</mAssignedTo> <mWho>cjustus</mWho> <mStatus>Open</mStatus> <mWhen>Tue Sep 16 00:13:23 EDT 2003</mWhen> <mDescription></mDescription> </issueEntry> <issueEntry> <mAssignedTo>cjustus</mAssignedTo> <mWho>cjustus</mWho> <mStatus>Closed</mStatus> <mWhen>Mon Sep 22 21:55:12 EDT 2003</mWhen> <mDescription>istop issue...</mDescription> </issueEntry> </issueHistory> </issueStruct> </SOAP-ENV:Body></SOAP-ENV:Envelope>
Returned Issue 10 - performance @ Aktiom ... Server timing ...
Example 2:
The Perl SOAP API is constantly changing. The most recent working example used the following script:
#!/usr/bin/perluse SOAP::Lite; // +trace => 'debug';
$elem = SOAP::Data->name("filterStructIn" => \SOAP::Data->value( SOAP::Data->name("mId" => "10"), SOAP::Data->name("mContextId" => "7")));
$elem ->type("tns:FilterStructIn");
$response = SOAP::Lite -> uri('http://ticketing.xxx.com/Fit.wsdl') -> proxy('http://ticketing.xxx.com/Fit.wsdl') -> getId($elem);
print $elem;$bug = $response->valueof('//getIdResponse/bugStruct');print "\nReturned Issue " . $bug->{mUniqueProjectId};print " - " . $bug->{mSubject};
getBugListDescription
This function is the SOAP call equivalent to running a filter. Critera submitted via the SOAP call will return a filtered list of issues.
Sample Perl Code
102

The following Perl code shows how to enter filter criteria with SOAP. Take note of the method in which custom fields are entered. The custom field ID numbers can be found on the Admin Menu->Field Layout->Custom Field page.
#!/usr/bin/perluse SOAP::Lite +trace => 'debug';$elem = SOAP::Data->name("filterStructIn" => \SOAP::Data->value( SOAP::Data->name("mPriority" => "1"), SOAP::Data->name("mPriorityOp" => "="), SOAP::Data->name("mPriorityAndOr" => "OR"), SOAP::Data->name("mPriority2" => "2"), SOAP::Data->name("mPriority2Op" => "="), SOAP::Data->name("filterCustomField" => \SOAP::Data->value(SOAP::Data->name("Id" => "5"), SOAP::Data->name("Op" => ">="), SOAP::Data->name("Value" => "2005/05/5"), SOAP::Data->name("AndOr" => "and"), SOAP::Data->name("Op2" => "<="), SOAP::Data->name("Value2" => "2005/05/15")) )) );$elem->type("tns:FilterStructIn");
my $soap = SOAP::Lite ->uri("http://localhost:10000/") ->proxy("http://localhost:10000/FIT.wsdl");$response = $soap->call("getBugList" => $elem);
for my $bug ($response->valueof('//getBugListResponse/bugStructList/bugStruct')) {print "\nReturned Issue " . $bug->{mId};print " - " . $bug->{mSubject};}
Input
We can see that the following SOAP message is sent to FIT:
POST http://localhost:10000Accept: text/xmlAccept: multipart/*Content-Length: 766Content-Type: text/xml; charset=utf-8SOAPAction: "http://localhost:10000/newBug"
<?xml version="1.0" encoding="UTF-8"?><SOAP-ENV:Envelope xmlns:SOAP-ENC="http://schemas.xmlsoap.org/soap/encoding/" SOAP-ENV:encodingStyle="http://schemas.xmlsoap.org/soap/encoding/" xmlns:SOAP-ENV="http://schemas.xmlsoap.org/soap/envelope/" xmlns:xsi="http://www.w3.org/1999/XMLSchema-instance" xmlns:xsd="http://www.w3.org/1999/XMLSchema"><SOAP-ENV:Body><getBugList xmlns=""><mPriority xsi:type="xsd:int">1</mPriority><mPriorityOp xsi:type="xsd:string">=</mPriorityOp><mPriorityAndOr xsi:type="xsd:string">OR</mPriorityAndOr><mPriority2 xsi:type="xsd:int">2</mPriority2><mPriority2Op xsi:type="xsd:string">=</mPriority2Op><filterCustomFields><filterCustomField><Id xsi:type="xsd:int">5</Id><Op xsi:type="xsd:string">>=</Op><Value xsi:type="xsd:string">2005/05/5</Value><AndOr xsi:type="xsd:string">and</AndOr><Op2 xsi:type="xsd:string"><=</Op2><Value2 xsi:type="xsd:string">2005/05/15</Value2></filterCustomField></filterCustomFields></getBugList></SOAP-ENV:Body></SOAP-ENV:Envelope>
103
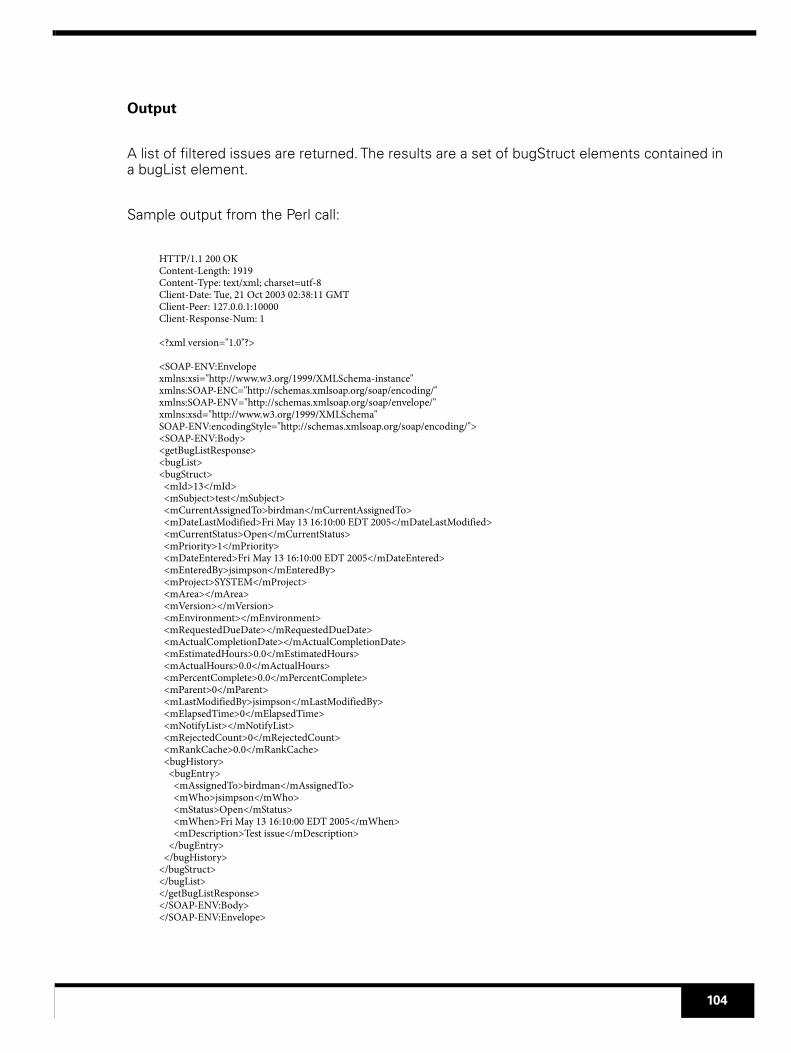
Output
A list of filtered issues are returned. The results are a set of bugStruct elements contained in a bugList element.
Sample output from the Perl call:
HTTP/1.1 200 OKContent-Length: 1919Content-Type: text/xml; charset=utf-8Client-Date: Tue, 21 Oct 2003 02:38:11 GMTClient-Peer: 127.0.0.1:10000Client-Response-Num: 1
<?xml version="1.0"?>
<SOAP-ENV:Envelopexmlns:xsi="http://www.w3.org/1999/XMLSchema-instance"xmlns:SOAP-ENC="http://schemas.xmlsoap.org/soap/encoding/"xmlns:SOAP-ENV="http://schemas.xmlsoap.org/soap/envelope/"xmlns:xsd="http://www.w3.org/1999/XMLSchema"SOAP-ENV:encodingStyle="http://schemas.xmlsoap.org/soap/encoding/"><SOAP-ENV:Body><getBugListResponse><bugList><bugStruct> <mId>13</mId> <mSubject>test</mSubject> <mCurrentAssignedTo>birdman</mCurrentAssignedTo> <mDateLastModified>Fri May 13 16:10:00 EDT 2005</mDateLastModified> <mCurrentStatus>Open</mCurrentStatus> <mPriority>1</mPriority> <mDateEntered>Fri May 13 16:10:00 EDT 2005</mDateEntered> <mEnteredBy>jsimpson</mEnteredBy> <mProject>SYSTEM</mProject> <mArea></mArea> <mVersion></mVersion> <mEnvironment></mEnvironment> <mRequestedDueDate></mRequestedDueDate> <mActualCompletionDate></mActualCompletionDate> <mEstimatedHours>0.0</mEstimatedHours> <mActualHours>0.0</mActualHours> <mPercentComplete>0.0</mPercentComplete> <mParent>0</mParent> <mLastModifiedBy>jsimpson</mLastModifiedBy> <mElapsedTime>0</mElapsedTime> <mNotifyList></mNotifyList> <mRejectedCount>0</mRejectedCount> <mRankCache>0.0</mRankCache> <bugHistory> <bugEntry> <mAssignedTo>birdman</mAssignedTo> <mWho>jsimpson</mWho> <mStatus>Open</mStatus> <mWhen>Fri May 13 16:10:00 EDT 2005</mWhen> <mDescription>Test issue</mDescription> </bugEntry> </bugHistory></bugStruct></bugList></getBugListResponse></SOAP-ENV:Body></SOAP-ENV:Envelope>
104

Returned Issue 13 - test
newBugDescription
This function mirrors the functionality of the New Issue screen. A new issue will be created using the data from any field values submitted via the SOAP call. The new issue's ID is returned.
Sample Perl Code
The following Perl code shows how to enter a new issue with SOAP. Fields that are not included will be set to empty in the newly created issue. Take note of the method in which custom fields are entered. The custom field ID numbers can be found on the Admin Menu->Field Layout->Custom Field page.
#!/usr/bin/perluse SOAP::Lite +trace => 'debug';
$elem = SOAP::Data->name("bugStruct" => \SOAP::Data->value( SOAP::Data->name("mSubject" => "Testing SOAP: newBug call"),
SOAP::Data->name("mDescription" => "This will enter a new issue into the system."), SOAP::Data->name("mAssignedTo" => "admin"), SOAP::Data->name("customField" => \SOAP::Data->value(SOAP::Data->name("Id" => "3"), SOAP::Data->name("Value" => "SOAP UPDATE")) ), SOAP::Data->name("customField" => \SOAP::Data->value(SOAP::Data->name("Id" => "4"), SOAP::Data->name("Value" => "SOAP UPDATE")) )) );$elem->type("tns:BugStruct");
my $soap = SOAP::Lite ->uri("http://localhost:10000/") ->proxy("http://localhost:10000/FIT.wsdl");$response = $soap->call("newBug" => $elem, SOAP::Data->name("loginid" => "jsimpson"), SOAP::Data->name("password" => "myPassword"));
print $response->valueof('//newBugResponse/message');
Input
We can see that the following SOAP message is sent to FIT:
POST http://localhost:10000Accept: text/xmlAccept: multipart/*Content-Length: 766Content-Type: text/xml; charset=utf-8SOAPAction: "http://localhost:10000/newBug"
<?xml version="1.0" encoding="UTF-8"?><SOAP-ENV:Envelope xmlns:SOAP-ENC="http://schemas.xmlsoap.org/soap/encoding/"
105

SOAP-ENV:encodingStyle="http://schemas.xmlsoap.org/soap/encoding/" xmlns:SOAP-ENV="http://schemas.xmlsoap.org/soap/envelope/" xmlns:xsi="http://www.w3.org/1999/XMLSchema-instance" xmlns:xsd="http://www.w3.org/1999/XMLSchema"><SOAP-ENV:Body><newBug xmlns=""><mSubject xsi:type="xsd:string">Testing SOAP: newBug call</mSubject><mDescription xsi:type="xsd:string">This will enter a new issue into the system.</mDescription><mAssignedTo xsi:type="xsd:string">admin</mAssignedTo><customFields><customField> <Id xsi:type="xsd:int">3</Id> <Value xsi:type="xsd:string">SOAP UPDATE</Value></customField><customField> <Id xsi:type="xsd:int">4</Id> <Value xsi:type="xsd:string">SOAP UPDATE</Value></customField></customFields></newBug></SOAP-ENV:Body></SOAP-ENV:Envelope>
Output
The new issue's ID is returned in a message element.
Sample output from the Perl call:
HTTP/1.1 200 OKContent-Length: 1919Content-Type: text/xml; charset=utf-8Client-Date: Tue, 21 Oct 2003 02:38:11 GMTClient-Peer: 127.0.0.1:10000Client-Response-Num: 1
<?xml version="1.0"?>
<SOAP-ENV:Envelopexmlns:xsi="http://www.w3.org/1999/XMLSchema-instance"xmlns:SOAP-ENC="http://schemas.xmlsoap.org/soap/encoding/"xmlns:SOAP-ENV="http://schemas.xmlsoap.org/soap/envelope/"xmlns:xsd="http://www.w3.org/1999/XMLSchema"SOAP-ENV:encodingStyle="http://schemas.xmlsoap.org/soap/encoding/"><SOAP-ENV:Body><newBugResponse><message>Issue 13 has been created.</message></newBugResponse></SOAP-ENV:Body></SOAP-ENV:Envelope>
Issue 13 has been created.
updateBugDescription
106
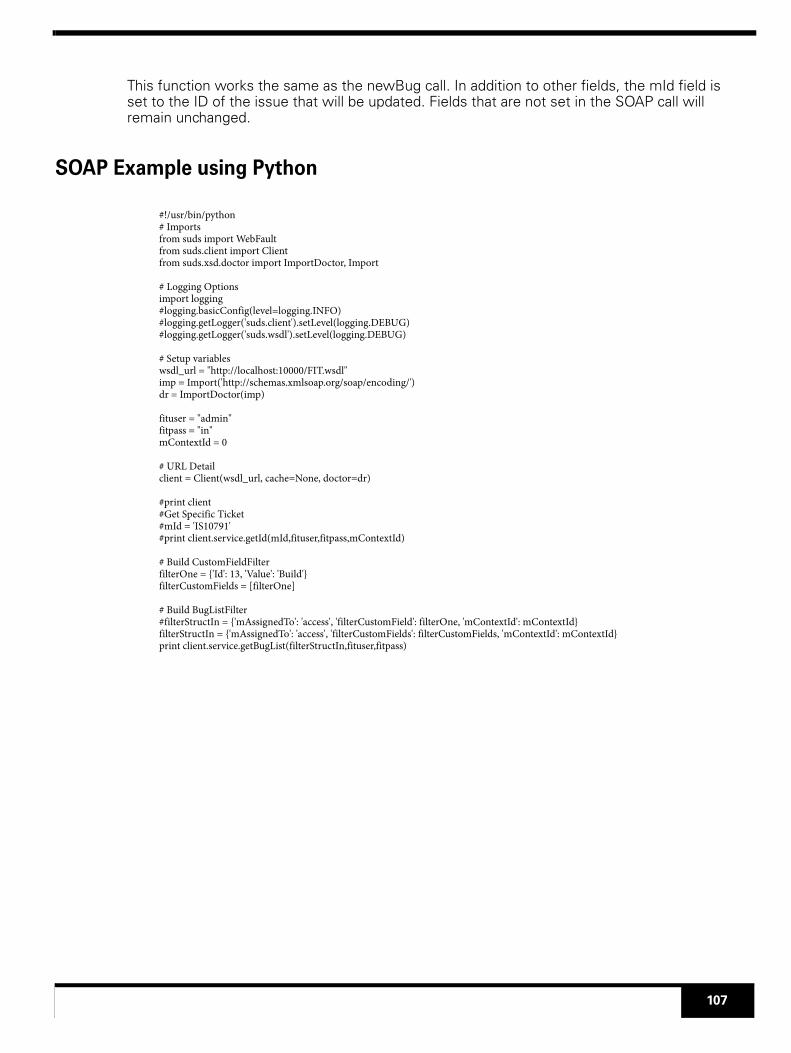
This function works the same as the newBug call. In addition to other fields, the mId field is set to the ID of the issue that will be updated. Fields that are not set in the SOAP call will remain unchanged.
SOAP Example using Python
#!/usr/bin/python# Importsfrom suds import WebFaultfrom suds.client import Clientfrom suds.xsd.doctor import ImportDoctor, Import
# Logging Optionsimport logging#logging.basicConfig(level=logging.INFO)#logging.getLogger('suds.client').setLevel(logging.DEBUG)#logging.getLogger('suds.wsdl').setLevel(logging.DEBUG)
# Setup variableswsdl_url = "http://localhost:10000/FIT.wsdl"imp = Import('http://schemas.xmlsoap.org/soap/encoding/')dr = ImportDoctor(imp)
fituser = "admin"fitpass = "in"mContextId = 0
# URL Detailclient = Client(wsdl_url, cache=None, doctor=dr)
#print client#Get Specific Ticket#mId = 'IS10791'#print client.service.getId(mId,fituser,fitpass,mContextId)
# Build CustomFieldFilterfilterOne = {'Id': 13, 'Value': 'Build'}filterCustomFields = [filterOne]
# Build BugListFilter#filterStructIn = {'mAssignedTo': 'access', 'filterCustomField': filterOne, 'mContextId': mContextId}filterStructIn = {'mAssignedTo': 'access', 'filterCustomFields': filterCustomFields, 'mContextId': mContextId}print client.service.getBugList(filterStructIn,fituser,fitpass)
107

Appendix C: Metrics
OGNL
FIT has always offered a Rank field which allows the administrator to configure Rank a rank formula to compute a calculated value for each issue. This value can be based on the states of issues in combination with values of multiple fields.
The most common use for the Rank field is to create an escalation order for issues based on a combination of:
A) the priority of the issue, and
B) how long the issue has been sitting open
This way, a quick report can be made using the Rank field to order the issues according to status.
In addition, issues which have been sitting more than X days will become more important.
The value for Rank is calculated using an OGNL formula, which allows us to use the values for fields of each bug structure, or methods defined in the BugStruct class, to make a custom calculation. For example, the default Rank formula:
(100-mPriority*10)+getElapsedTime()
This formula calculates an escalation value, where any issue that is open for more than 10 days will escalate to a rank of a new issue in the next Priority scale.
Rank is very useful but it is limited in that it only allows one field for calculations.
How to Add Formulas to Custom User Fields
A common requirement from customers is to get metrics from the system, using the history information that is recorded in issues. For instance:
Finding the duration of time that an issue was in a specific status.Finding the time between two different status states
The best way to make calculations and achieve metrics is to create a custom field to define the information you are looking for (which can be hidden if desired). The contents of this field can be accessed in issue details and ultimately in filters and/or reports. The following classes are useful for advanced user defined fields:
FormulaDateCustomUserField - end result is a date valueFormulaCustomUserField - end result is a numeric value
108
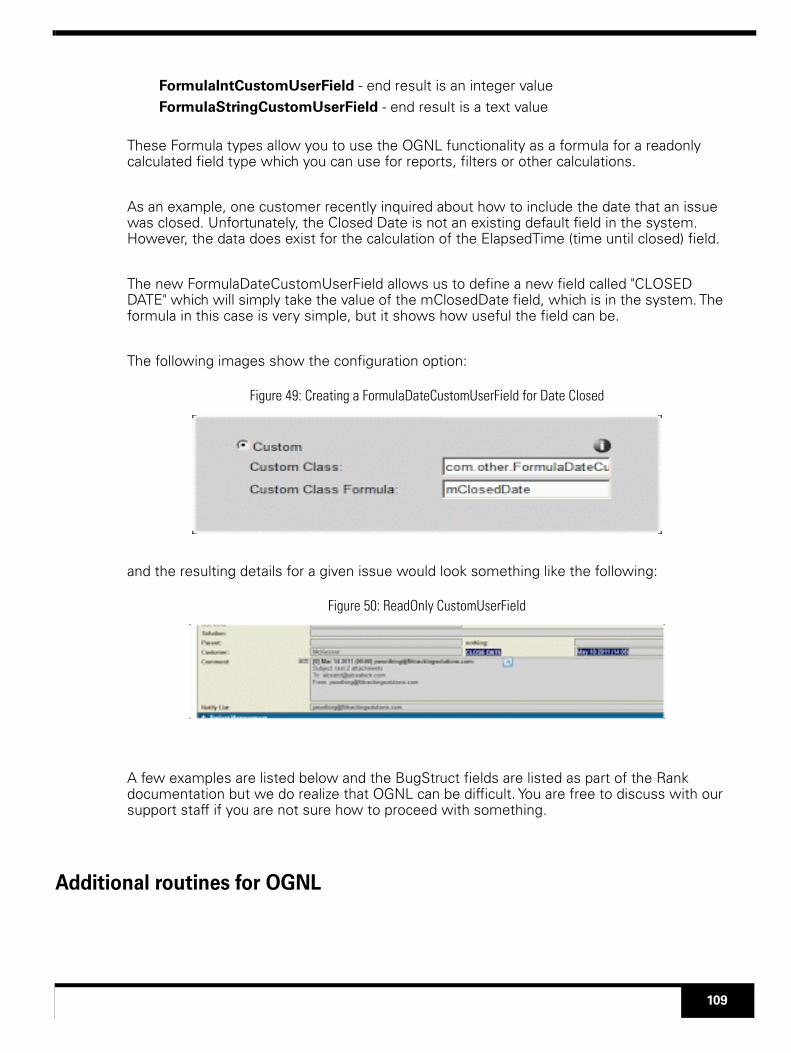
FormulaIntCustomUserField - end result is an integer valueFormulaStringCustomUserField - end result is a text value
These Formula types allow you to use the OGNL functionality as a formula for a readonly calculated field type which you can use for reports, filters or other calculations.
As an example, one customer recently inquired about how to include the date that an issue was closed. Unfortunately, the Closed Date is not an existing default field in the system. However, the data does exist for the calculation of the ElapsedTime (time until closed) field.
The new FormulaDateCustomUserField allows us to define a new field called "CLOSED DATE" which will simply take the value of the mClosedDate field, which is in the system. The formula in this case is very simple, but it shows how useful the field can be.
The following images show the configuration option:
Figure 49: Creating a FormulaDateCustomUserField for Date Closed
and the resulting details for a given issue would look something like the following:
Figure 50: ReadOnly CustomUserField
A few examples are listed below and the BugStruct fields are listed as part of the Rank documentation but we do realize that OGNL can be difficult. You are free to discuss with our support staff if you are not sure how to proceed with something.
Additional routines for OGNL
109
To use any of the formula classes, you must provide an OGNL formula (see Rank documentation), which is used to retrieve data from the issue history. This formula allows you to access values and methods for the internal BugStruct class for each issue. Some valuable methods for metrics include:
// finds the date that the issue was changed FROM a value for a specified field
// or (last=true) the last time it changed FROM that value
dateChangedFrom(int fieldId, String value1, boolean last)
// finds the date that the issue was changed to a value for a specified field
// if value2 is not null, it finds when the issue changed from value1 to value2.
// or (last=true) the last time it changed to that value
// if value1 is null, this will just return when the field was changed (to any value)
dateChangedTo(int fieldId, String value1, String value2, boolean last)
dateLastChangedTo(int fieldId, String value1, String value2)
// find the time taken for an issue to move from one value to another
// fieldId : the id of the field holding the desired value. (Reference ids in custom field setup)
// Note: custom fields are > 100, default fields <100)
// format may take the form of "m", "h", or "d" for (months, hours, or days)
elapsedTimeBetweenStates(int fieldId, String value1, String value2, String format)
elapsedTimeBetweenDates(Date d1, Date d2, String format)
Here are a few examples:
Example 1: Time taken to move from status A to status B (in days)
- Find the id (SID) of the field that holds the status you are interested in.
- Define a custom field called TimeTakenAB using the "custom" advanced field option as follows:
Custom Class : com.other.FormulaIntCustomUserField
Custom Class Formula: elapsedTimeBetweenStates(SID, "A", "B", "d")
The TimeTakenAB field should now show the number of days that each issue took to move from state "A" to state "B". A value of 0 is given for issues where the states were not found.
110

Example 2: Which issues had a field changed to XYZ during the last week.
- Find the id (SID) of the field that holds the values you are interested in.
- Define a custom field called DateChangedToXYZ using the "custom" advanced field option as follows:
Custom Class: com.other.FormulaDateCustomUserField
Custom Class Formula: dateChangedTo(SID, XYZ, null, true)
(alternatively) dateLastChangedTo(SID, XYZ, null)
- The DateChangedToXYZ field should then display the desired date.
Example 3: How many issues were fixed in the last 4 Weeks
- Find the id (SID) of the status field is 20.
- Define a custom field called DateFixed using the "custom" advanced field option as follows:
Custom Class : com.other.FormulaDateCustomUserField
Custom Class formula : dateChangedTo(5,"Fixed")
- Create a filter that uses a relative date ( ie: DateFixed <= -4 weeks) on this new field. The results should only include the issues you are looking for and the field is available in the details section also.
111

Appendix D: Interface Customizations
Skin ConfigurationsThe most obvious customization for Fit is the skin and corresponding skin color, which is configured with CSS settings in the associated stylesheet.
FIT has a number of different skins which have been created to help customers integrate the tool with their existing systems. In addition, any of these skins can be further customized by creating a custom stylesheet, which can control the formatting of HTML items on the page. If you change our skin from the server configuration menu, you must make sure to match the skin choice with a corresponding stylesheet. A mismatch will have unknown consequences to the display of the tool.
If you would like to sample the skins, the following tools will show a list of all the available skins:
http://machine[:port]?...page=com.other.SkinTestAll
http://machine[:port]?...page=com.other.ShowSkins
The following will also show the different colors available on the latest blackcurve skin:
http://machine[:port]?...page=com.other.Skin11TestAll
Adding a Create Child ButtonThe parent field allows you to specify the ID of another issue as a parent. This then causes the specified parent issue to show the current issue in a child list for the parent. A number of customers have requested a simple way to create a child issue directly from the parent, thereby handing the id of the parent directly to the New Issue menu.
Figure 51: Adding a Create Child Button
This Create Child configuration is very useful and is used by default in the FIT Project template. This can be accomplished simply, by creating a blank field, using field order and then customizing the html for that field to:
<table id=projectButtonBar width=100% style="background-color: darkgray; display: none"><tr><td><input type=button onclick="location.href='<SUB URLADD>&page=com.other.NewBug&bs.mParent=<SUB bs.mUniqueProjectId>'" value="Create Child"></td></tr></table><SCRIPT LANGUAGE='Javascript'>function showProjectButtons(){ var page = "<SUB page>"; var readonly = "<SUB READONLY>"; if (readonly != "1" && (page == "com.other.ModifyBug" || page == "com.other.ViewBug")) { document.getElementById("projectButtonBar").style.display=""; }}showProjectButtons();
112

</SCRIPT>
Configuring Track IconsIn the drop-down, hypertext and wideblue skins also allow you to configure your own switch track control which allows you to setup an icon/button control such as this:
To achieve this, the administrator must set the following in server.cfg (to have the system show links instead of a drop-down):
contextStyle=links
You can also set the following to create your own (as above):
contextStyle=custom
If you do this, there is a configurable string (sCustomContextStyle) which will control what is displayed instead. You will need to configure that in each track, after uploading the icons. A simple format for each icon could be:
<a class=hidden xstyle='padding: 5px;<SUB CONTEXT0_DECORATION>' href='<SUB URLADDWITHOUTCONTEXT>&page=com.other.MainMenu&CONTEXT=0'><img border=0 src="issue_icon.png"></a>
Incorporating Other Tools
One of the major advantages of FIT is the simplicity of configuring the look of the tool. The most common way to achieve this is by using the sHead or sFoot custom strings to add additional functionality, in the form of HTML and Javascript.
Example 1: add a financial chart of their company to the header of the tool, by configuring the sHead string to something like:
<img src="http://chart.finance.yahoo.com/t?s=GOOG&lang=en-US®ion=US&width=300&height=180" alt="Google Inc. (GOOG)" height="180" width="300">
which would give you a simple header like this:
113

Figure 52: Adding a Stock Ticker
When creating a custom area within the issue details, the best method is to use the Field Order menu to create a new section. Then create a blank field in this section to configure your desired output.
You can then configure HTML for a blank field and configure the field accordingly.
Example 2: add a map section to display the location of an address for an issue
Google maps has an API which allows you to access mapping functionality. If we create a blank field in the field order menu, we can then use the “Edit HTML” option to add content to the area where that blank field is located. For example, if we add the following:
<script type="text/javascript" src="https://maps.googleapis.com/maps/api/js?key=AIzaSyC_pHnmCHIVwBIGVJqcrbkaevOLs_DcRPI&sensor=false"></script><script>function initialize() {var address = fieldVal("field1"); // take the address from field id “field1” address = address.replace(/<br>/g,","); address = address.replace(/\ \;/g,""); address = address.replace(/ /g,"+");
var geocodeAPI = "https://maps.googleapis.com/maps/api/geocode/json?address="+address+"&sensor=false"; jQuery.getJSON(geocodeAPI , function(data) { var items = []; jQuery.each(data, function() { plot(data.results[0].geometry.location.lat, data.results[0].geometry.location.lng); }); });}
function plot(lat, lng) { var mapOptions = { center: new google.maps.LatLng(lat,lng), zoom: 8, mapTypeId: google.maps.MapTypeId.ROADMAP }; var map = new google.maps.Map(document.getElementById("map-canvas"), mapOptions); new google.maps.Marker({ position: new google.maps.LatLng(lat,lng), map: map});}function fieldVal(str) { if (document.getElementById(str).value) { return document.getElementById(str).value; } return document.getElementById(str).innerHTML;}function showHomeDetails(){ var hd = document.getElementById("homeDetails"); var str = "Street Address: <br>" + fieldVal("field1")+ "<p>" + "<input type=button value='Refresh Map' onclick='initialize();'>"; hd.innerHTML = str; initialize();}
114
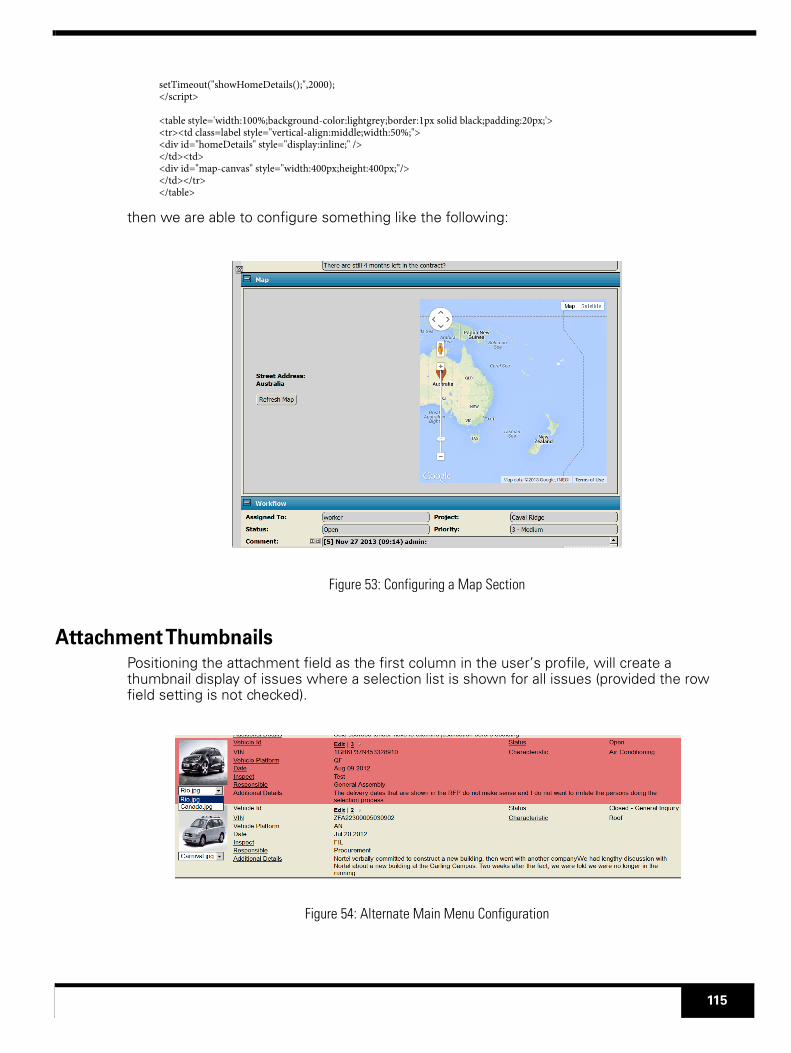
setTimeout("showHomeDetails();",2000);</script>
<table style='width:100%;background-color:lightgrey;border:1px solid black;padding:20px;'><tr><td class=label style="vertical-align:middle;width:50%;"><div id="homeDetails" style="display:inline;" /></td><td><div id="map-canvas" style="width:400px;height:400px;"/></td></tr></table>
then we are able to configure something like the following:
Figure 53: Configuring a Map Section
Attachment ThumbnailsPositioning the attachment field as the first column in the user’s profile, will create a thumbnail display of issues where a selection list is shown for all issues (provided the row field setting is not checked).
Figure 54: Alternate Main Menu Configuration
115

Server Variables
The following is a list of undocumented server variables with a brief description of what they are used for. They can be added manually to the main server.cfg (restart needed) or they can be added from the Server Properties tab of the Server Configuration menu.
Figure 55: Setting Server Properties
Please note that some variables will not function properly without a restart. Also, some variables are not global, so you must account for the track you are in while editing.
allowEditingOfHistoricalEntries - this option add an option which enables a link for each history entry, which allows users to edit the entry (see image below). This feature is disabled by default because it allows users to alter the history of an issue, which is therefore, not a complete audit.
Figure 56: Editing Historical Entries
oldAttachmentModel - This option removes the versioning feature which is now part of attachments
disableBackgroundAttachments - This option removes the Ajax background uploading feature of Version 9. All attachments are uploaded only after the save button is pressed for the issue.
attachmentMaxFileSize - specify a maximum attachment size (in megabytes)
attachmentHideComment - allows you to hide the attachment comment input field
attachmentHideVersion - allows you to hide the attachment Version input field
116

attachmentFolderEditAdminOnly - allows you to restrict folder creation to administrators
disableChildHighlight - removes the yellow highlight color which is given to child issues in the main menu, when “Show Child List” option is turned on in a user profile
enableTabs - this option will let you add tabs to the layout of the issue details menus. A new “Add Tab” control will be available in the Field Order menu. This feature is disabled by default because the display of notifications differs from the display of issues in FIT. Email browsers do not enable javascript, so tabs are simply displayed in sequential order for emails.
extendAreaField- extends the area field to a full line in cases where area names are too long for regular output.
noMainMenuEdit - removes the Edit link from each row on the main menuoldFilterMenu - causes FIT to default to the older filter construction screen, where all fields are displayed sequentially, rather than using the define filter definition controls.
sURLPREFIX - allows you to set the sURLPREFIX custom string for the entire system, rather than having to set in each individual track.
Configuring Translations
The user preferences tab of the user profile has a Language setting which can be used to select the preferred language for a user, if additional languages exist. In addition, the administrator can enable “Enable Language Links” from the general tab of the Server Configuration. If enabled, the Session Options will include “Change Language” link, which can be used to change the language setting for the given user.
Figure 57: Change Language Option
This feature relies on the translations which are defined in the Admin-> Customize Strings feature. All strings in the system can be translated to any desired language. If a user selects that language, then the string conversions are made and the user will see translated labels and links for all the tool features.
In addition, custom fields have a “Configure Translations” option which will allow the administrator to define name translations in addition to value translations (if the field is a drop-down list item). In this case, the translations are done on a line by line basis.
117

When the field is set to translate, a new link is shown for setting up the translated strings. The menu for making the custom field translations will look something like the following:
Figure 58: Translating Custom Drop-down options
A French and Spanish translation is included with the product.
118

Appendix E: Track Relationships
Track Association Fields
A track is the base configuration used to track a particular object (ie: issue/case/ticket/etc) and consists of sections and fields which are put together as a template to properly record details for that object. A number of tracks can be added to one system to track different objects for an organization. When there are multiple tracks in a system, a “Switch Track” drop-down will be displayed next to the Dashboard, enabling the user to switch from the main menu of one list of objects, to another.
Figure 59: Switch Track Example
These tracks may contain data which is related between tracks. For example, a track which is used to manage cases, might contain a field for the customer which entered the ticket. The details for this customer may be stored in another track within that system.
The next logical step is to associate the details from one track to the other. In the following example, a case is visible with relationships to three other tracks (inquiries, individuals and Organizations).
Figure 60: Case Relationships
119

Track Associations can be created using the parent and child field custom field types in the advanced custom field section. These associations are (1-N) relationships allowing you to link a parent issue from one track to N child issues in another track and have them displayed with field data in the associated track. The above example shows two Inquiries (with ids 1 and 4) which are related to the current Case. In addition there is a relationship to one individual (Audrey Flynn) and 1 Organization (Zicom).
Defining Track AssociationsThe parent field type allows you to associate an issue in another track as the first part of a 1-N relationship. The child field type allows you to associate multiple issues of another track in the 1-N relationship.
Parent Track - the track where parent issues will be linked to.
Parent Fields Displayed - a list of field ids (separated by spaces) which will make up the field columns for the parent issues details that are listed. The ids for default fields are listed in the Rank documentation. All custom field ids are available in the custom field menu and must have 100 added to them to be interpreted by this feature (distinguishes from default fields).
If left blank, it will default to [1 2 3 4 5 6], which corresponds to [Id, Subject, AssignedTo, DateLastModified, Status, Priority] and is displayed as:
5 / Unfair Practice / gduser / Nov 25 2013 / Open / Medium
Parent Field Format - allows you to define the exact format of the fields in the selection format. The format is any text where all numeric values preceded by a hash, are converted to the value of the field with that id number. For example, from the example above “ID #1 has subject [#2] and was last modified by #3” would be converted to:
ID 3 has subject [unfair practice] and was last modified by gduser
If not defined, the display is basic and simply uses the Parent Fields Displayed and separates values with a “|”. The above example would be:
This format is also used to view details for row fields on the main menu. The example for Individuals uses the following string:
#101 #119 ,[#103, #104, #105], #102
while Inquiry has nothing defined. Here are the results:
Figure 61: Customizing Relationship Fields
Parent Field Attributes - an optional list of attributes for the fields displayed to control width (ie: mw-ID=Value) of the column or maximum length of text (ie: ml-ID=VALUE).
120

Notes:
You must add 100 to any custom field id values.
Substitute ID and VALUE for field id and desired width/length.
Any id used in the field format, must be listed in the fields displayed.
Parent Association Field Link
The parent association field link will allow you to show the value for a field from another track, given there is a relationship defined for the Local Parent field Id. For example, in our example, we set Local Parent id to (101), which is a the id of the individual relationship field. Then we set the remote field id to (119 which is the id of the last name custom field in the Individual track). This will show then show the associated last name value for any relationship (1-1 relationships only).
In the following screenshot, we made the associated Field Link field visible on the main menu.
You can see it shows the last name which matches the information in the row field.
Figure 62: Parent Association Field Link
Child Track Association
A child or parent reciprocal field must be defined in the associated group, in order for the relationship to be fully related.
The settings for the child field are equivalent to the parent field. The only exception is that a parent field will show a select and new button for making relationships. The parent field also has an Add button for creating new children.
121