ADL 600 - Sound Productions · or raising the ADL 600 mic-input impedance can create subtle...
22
ADL 600 High Voltage Tube Preamplifier Owner’s Manual www.presonus.com Overview Hookup Resources Français Español Deutsch ® English
-
Upload
truongkhanh -
Category
Documents
-
view
216 -
download
2
Transcript of ADL 600 - Sound Productions · or raising the ADL 600 mic-input impedance can create subtle...

ADL 600High Voltage Tube PreamplifierOwner’s Manual
www.presonus.com
Over
view
Hook
upRe
sour
ces
Français
Español
Deutsch
®
English
14. Servicing is required when the apparatus has been damaged in any way, such as if a power-supply cord or plug is damaged; or liquid has been spilled, or objects have fallen, into the apparatus; or if the apparatus has been exposed to rain or moisture, does not operate normally, or has been dropped. All PreSonus products in the USA should be serviced at the PreSonus factory in Baton Rouge, Louisiana. If your product requires a repair, contact [email protected] to arrange for a return-authorization number. Customers outside the USA should contact their local distributor. Your distributor’s contact information is available at www.presonus.com.
15. The apparatus shall be connected to a Mains power outlet with a protective grounding/earthing connection.
16. Where the Mains plug or an appliance coupler is used as the disconnect device, the disconnect device shall remain readily operable.
EU Directives on the Protection of the Environment and Other Euro Stuff RoHS This product is compliant with the EU Directive 2011/65/EU for the Restriction of the use of Certain Hazardous Substances in Electrical and Electronic Equipment. No lead (Pb), cadmium (Cd), mercury (Hg), hexavalent chromium (Cr+6), PBB or PBDE is intentionally added to this device. Any traces of impurities of these substances contained in the parts are below the RoHS specified threshold levels.
REACh This product is compliant with the European Union Directive EC1907/206 for the Registration, Evaluation, Authorization, and Restriction of chemicals (REACh) and contains none or less than 0.1% of the chemicals listed as hazardous chemicals in the REACh regulation.
WEEE This symbol on the product or its packaging indicates that this product must not be disposed of with other waste. Instead, it is your responsibility to dispose of your waste equipment by handing it over to a designated collection point for the recycling of waste electrical and electronic equipment. The separate collection and recycling of your waste equipment at the time of disposal will help conserve natural resources and ensure that it is recycled in a manner that protects human health and the environment. For more information about where you can drop off your waste equipment for recycling, please contact your local city recycling office or the dealer from whom you purchased the product.
CE This product complies with the European Union Council Directives and Standards relating to electromagnetic compatibility EMC Directive (2006/95/EC) and the Low Voltage Directive (2004/108/EC).
Important Safety Instructions
The exclamation point within an equilateral triangle is intended to alert the user to the presence of important operating and maintenance (servicing) instructions in this manual.
The lightning flash with arrowhead symbol within an equilateral triangle is intended to alert the user to the presence of uninsulated “dangerous” voltage within the product’s enclosure that may be
of sufficient magnitude to constitute a risk of electric shock to humans.
CAUTION: TO REDUCE THE RISK OF ELECTRIC SHOCK, DO NOT REMOVE THE COVER. NO USER-SERVICEABLE PARTS INSIDE. REFER SERVICING TO QUALIFIED PERSONNEL.
CAUTION: To reduce the risk of electric shock, do not expose this appliance to rain and moisture. The apparatus shall not be exposed to dripping or splashing liquids and no object filled with liquids, such as
vases, shall be placed on the apparatus.
CAUTION: These service instructions are for use by qualified service personnel only. To reduce the risk of electric shock, do not perform any servicing other than that contained in the operation instructions.
Repairs must be performed by qualified service personnel.
1. Read these instructions.
2. Keep these instructions.
3. Heed all warnings.
4. Follow all instructions.
5. Do not use this apparatus near water.
6. Clean only with dry a cloth.
7. Do not block any ventilation openings. Install in accordance with the manufacturer’s instructions.
8. Do not install near any heat sources, such as radiators, heat registers, stoves, or other apparatus (including amplifiers) that produce heat.
9. Do not defeat the safety purpose of the polarized or grounding-type plug. A polarized plug has two blades, with one wider than the other. A grounding-type plug has two blades and a third grounding prong. The wide blade and the third prong are provided for your safety. If the provided plug does not fit into your outlet, consult an electrician for replacement of the obsolete outlet.
10. Protect the power cord from being walked on or pinched, particularly at plugs, convenience receptacles, and the point where they exit from the apparatus.
11. Use only attachments/accessories specified by PreSonus.
12. Use only with the cart, stand, tripod, bracket, or table specified by the manufacturer or sold with this apparatus. When a cart is used, use caution when moving the cart/apparatus combination to avoid injury from tip-over.
13. Unplug this apparatus during lightning storms or when unused for long periods of time.
Over
view
Hook
upRe
sour
ces
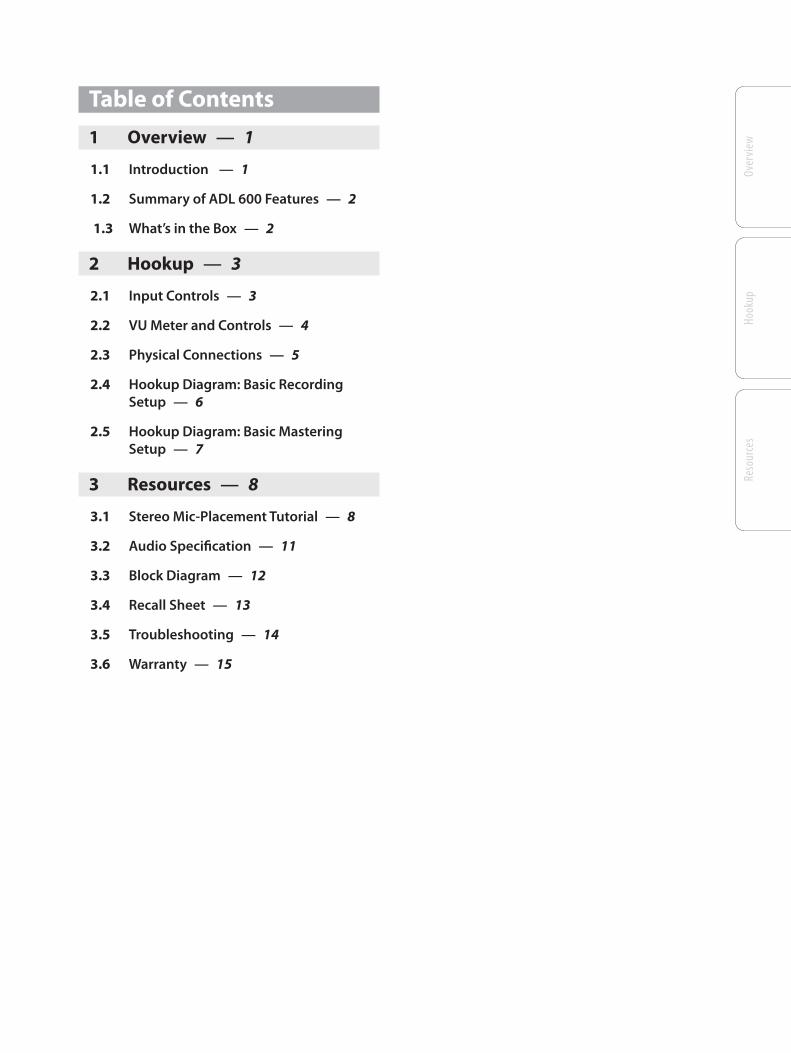
Table of Contents
1 Overview — 1
1.1 Introduction — 1
1.2 Summary of ADL 600 Features — 2
1.3 What’s in the Box — 2
2 Hookup — 3
2.1 Input Controls — 3
2.2 VU Meter and Controls — 4
2.3 Physical Connections — 5
2.4 Hookup Diagram: Basic Recording Setup — 6
2.5 Hookup Diagram: Basic Mastering Setup — 7
3 Resources — 8
3.1 Stereo Mic-Placement Tutorial — 8
3.2 Audio Specification — 11
3.3 Block Diagram — 12
3.4 Recall Sheet — 13
3.5 Troubleshooting — 14
3.6 Warranty — 15

Central Station

Hook
upRe
sour
ces
English
Français
Español
Deutsch
1
Over
view
Introduction 1.1
1 Overview
1.1 Introduction
Thank you for purchasing the PreSonus ADL 600. PreSonus Audio Electronics has designed the ADL 600 utilizing high-grade components to ensure optimum performance that will last a lifetime. Designed in collaboration with famed tube-circuit designer Anthony De Maria, the ADL 600 employs a distinctive Class A, discrete design with three top-grade vacuum tubes per channel, operating with ±300V power rails for maximum headroom and superb tone. The dual-transformer design also ensures low-noise operation, with maximum common-mode rejection. Great for all types of microphones and instruments, the ADL 600 has the sonic power and flexibility to achieve luscious vocals, crystal-clear acoustic guitars, fat bass guitars, dynamic acoustic piano, cracking snares, and much more.
We encourage you to contact us with questions or comments regarding this product. You can reach us by email at [email protected] or call us at 1-225-216-7887 between 9 a.m. and 5 p.m. U.S. Central Time. PreSonus Audio Electronics is committed to constant product improvement, and we value your suggestions highly. We believe the best way to achieve our goal of constant product improvement is by listening to the real experts: our valued customers. We appreciate the support you have shown us through the purchase of this product and are confident that you will enjoy your ADL 600!
ABOUT THIS MANUAL: We suggest that you use this manual to familiarize yourself with the features, applications, and correct connection procedures for the ADL 600 before connecting it to the rest of your studio gear. This will help you avoid problems during installation and setup.
Throughout this manual you will find Power User Tips that can help make you an ADL 600 expert.

2
ADL 600
HookupResources
Overview
1.2 Summary of ADL 600 Features
1.2 Summary of ADL 600 Features
• Mic, line, and instrument inputs
• High-voltage, Class A, dual-transformer, vacuum-tube preamp
• 3 top-grade vacuum tubes (one 12AT7A and two 6922)
• Input-source select
• Variable mic-input impedance (150, 300, 900, 1,500Ω)
• Variable high-pass filter (40, 80, 120 Hz)
• 8-position Gain switch
• Variable Trim adjustment for final stage
• 48V phantom power
• -20 dB pad
• Polarity-reverse switch
• Backlit VU meter (output level) with -6 dB switch (for metering hot signals)
• >73 dB of gain
1.3 What’s in the Box
In addition to this manual, your ADL 600 package contains the following:
PreSonus ADL 600 High Voltage Tube Preamplifier
IEC power cable
Hookup

3
Owner’s Manual
Over
view
Hook
upRe
sour
ces
English
Français
Español
Deutsch
Hook
up
Input Controls 2.1
2 Hookup
2.1 Input Controls
Source Select: The Source Select switch allows you to choose among all signal sources that you have connected to the ADL 600 inputs. It patches the selected input through the signal chain, bypassing the other two inputs. The Source Select switch also provides a choice of four mic-input impedances: 1500Ω, 900Ω, 300Ω, and 150Ω.
Power User Tip: The output of your microphone and the input of any microphone preamp each have a specific impedance. Measured in ohms (Ω), impedance is a way of expressing a circuit’s opposition to a signal attempting to pass through. Lowering or raising the ADL 600 mic-input impedance can create subtle coloring and filtering effects, enabling you to get a wider variety of tonalities without using the EQ. In general, lower input impedance can produce effects that simulate a “darker,” or more “closed-in” tone. Higher input impedance will produce a “brighter,” or more “open,” tone.
High Pass Filter: The high-pass filter’s frequency threshold can be set at 40 Hz, 80 Hz, or 120 Hz. The slope of the filter is -12 dB/octave.
Power User Tip: A high-pass filter attenuates all frequencies below the set threshold. Use this filter, instead of an equalizer, to remove unwanted low frequencies from your source signal.
Gain: This 8-position rotary switch provides 35 dB of gain in 5 dB increments.
Trim: This variable potentiometer (±10 dB) allows you to make fine-trim adjustments to the final preamp stage of the ADL 600 input.

4
ADL 600
OverviewHookup
ResourcesHookup
2.2 VU Meter and Controls
+48V. The 48-volt phantom power, supplied by way of the XLR input, provides power for condenser microphones and other devices requiring continuous power. This power is supplied at a constant level to prevent any signal degradation.
WARNING: Phantom power is only required for condenser micro phones and can severely damage dynamic mics, especially ribbon mics. Therefore, switch
phantom power off for all channels where it is not required.
XLR connector wiring for phantom power
Pin 1=Ground Pin 2=+48V Pin 3=+48V
Polarity Invert: Reverses the polarity of the signal.
Power User Tip: Use Polarity Invert when recording with more than one open microphone to combat phase cancellation between microphones.
-20 dB Pad: The pad provides 20 dB of attenuation for the microphone preamp only.
Power User Tip: The 20 dB pad reduces the signal level coming into your ADL 600, helping to prevent clipping and distortion from high-gain sources. Padding the input increases “headroom” and reduces the likelihood of signal overload.
High Pass On/Off Switch: This switch bypasses or engages the High Pass Filter..
2.2 VU Meter and Controls
VU Meter: The analog VU meters display each channel’s output level.
Meter: These eight-segment LED meters detect output-level peaks and fast transients in each channel.
Meter -6 dB: This switch offsets the VU meters by 6 dB, which can help you meter loud input sources if your VU meter is “slamming” or “pegged.”

5
Owner’s Manual
Over
view
Hook
upRe
sour
ces
English
Français
Español
Deutsch
Hook
up
Physical Connections 2.3
2.3 Physical Connections
Instrument Inputs: The ¼” TS connectors on the front panel are for use with a passive instrument (guitar, bass, etc.). To use this input, turn the Source Select switch to the “Inst” position on the desired channel.
Power User Tip: Passive instruments do not have an internal preamp and should be plugged into an instrument input. Active instruments have an internal preamp and a line-level output and should be plugged into a line input. Plugging a line-level source into the instrument input on the front of the ADL 600 risks damage to the circuit and is likely to produce a very loud and distorted audio signal. So don’t do that!
Mic Inputs: The ADL 600 mic preamps work great with all types of microphones including dynamic, ribbon, and condenser microphones. To use this input, turn the Source Select switch to the any of the mic-impedance positions on the desired channel.
Power User Tip: Dynamic microphones and ribbon microphones (which are a special type of dynamic mic) are generally lower-output devices that, with few exceptions, require no external power source. Sending phantom power to a ribbon mic that doesn’t require it can cause severe damage to the mic – usually beyond repair. Condenser microphones are generally more sensitive than dynamic and ribbon microphones and typically require external +48V phantom power. Always review your microphone’s documentation and follow its recommended operating practices.
Line Inputs: These balanced XLR connections can accept signals from line-level devices such as keyboards, drum machines, and sound modules. You can also use the line inputs to give a stereo mix an extremely full, rich character. To use this input, turn the Source Select switch to the Line position on the desired channel.
Outputs: The ADL 600’s output jacks employ a balanced XLR connector.
Power User Tip: All input and output connectors are transformer-balanced XLRs with the following wiring standard:
Pin 1: GNDPin 2: High (+)Pin 3: Low (-)
IEC Power Connection: The ADL 600 accepts a standard IEC cord.
Note: The input power voltage is set at the factory to correspond with the country to which the ADL 600 was shipped.
6
ADL 600
OverviewHookup
ResourcesHookup
2.4 Hookup Diagram: Basic Recording Setup
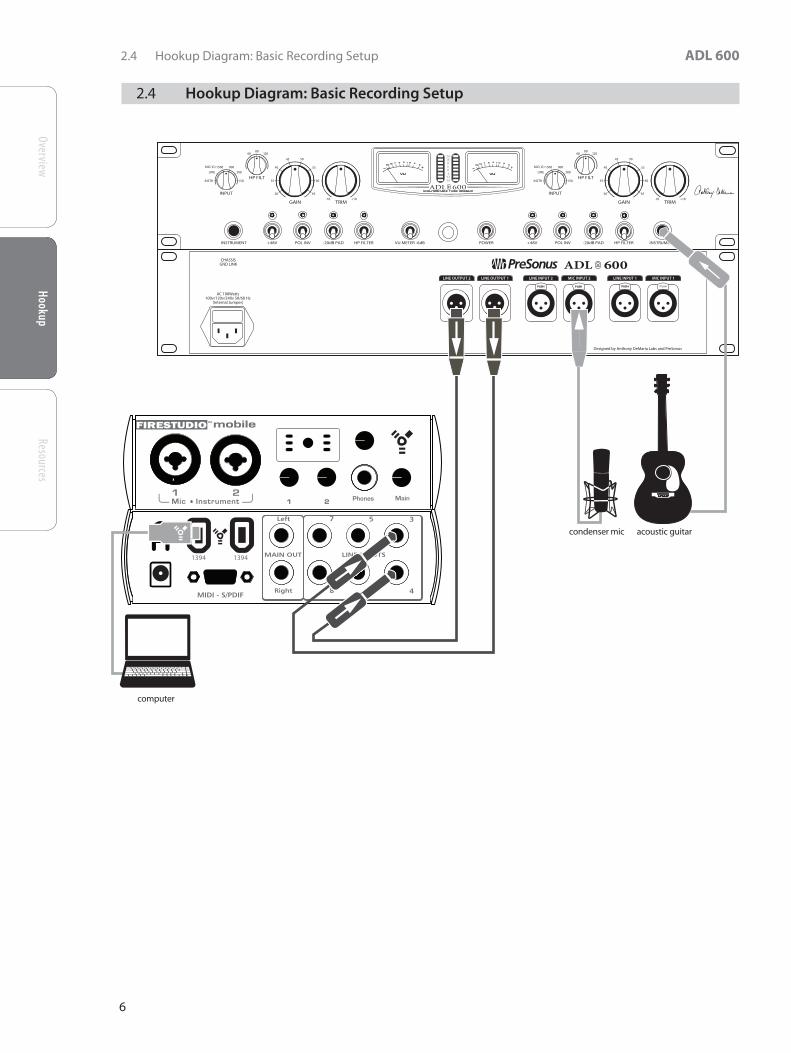
2.4 Hookup Diagram: Basic Recording Setup
53013571020
VU
53013571020
VU
computer
condenser mic acoustic guitar

7
Owner’s Manual
Over
view
Hook
upRe
sour
ces
English
Français
Español
Deutsch
Hook
up
2.5 Hookup Diagram: Basic Mastering Setup
53013571020
VU
53013571020
VU
Hookup Diagram: Basic Mastering Setup 2.5

8
ADL 600
OverviewHookup
ResourcesResources
3 Resources
3.1 Stereo Mic-Placement Tutorial
The following are a few stereo mic applications to help you get started with your ADL 600. These are by no means the only ways to record these instruments; microphone selection and placement is an art. For more information, visit your library or local bookstore, as there are many books and magazines about recording techniques. The Internet is also a great source of recording information, as are instructional videos.
Grand Piano
Place one microphone above the high strings and one microphone above the low strings. Experiment with distance (the farther back the more room you will capture). This technique can be used for live and studio applications.
Electric Guitar
Place a dynamic microphone an inch or two away from the speaker of the guitar amplifier. Experiment with exact location. If you are recording an amp with multiple speakers, experiment with each one to see if one sounds better than the others. Place a condenser microphone approximately six feet away, pointed at the amp. Experiment with distance. Also experiment with inverting the phase of the room microphone to check for phase cancellation and reinforcement. (Select the “fuller”-sounding position.) In a live application, omit the condenser microphone.
3.1 Stereo Mic-Placement Tutorial
9
Owner’s Manual
Over
view
Hook
upRe
sour
ces
English
Français
Español
Deutsch
Reso
urce
s
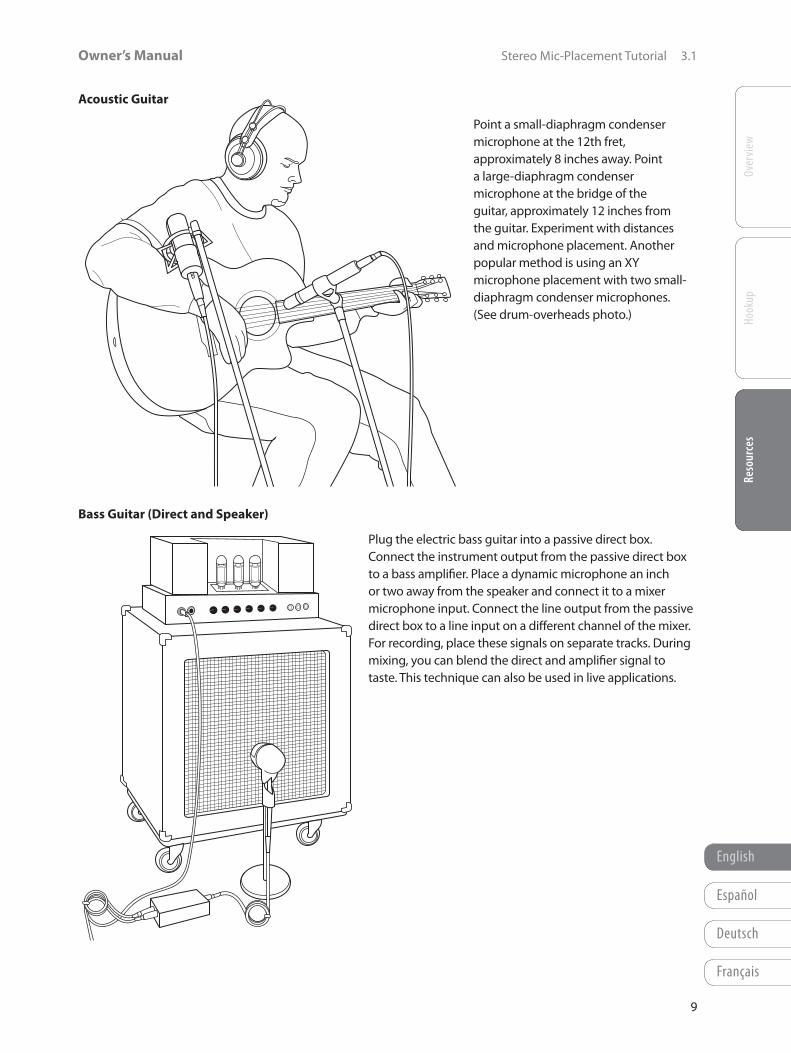
Acoustic Guitar
Point a small-diaphragm condenser microphone at the 12th fret, approximately 8 inches away. Point a large-diaphragm condenser microphone at the bridge of the guitar, approximately 12 inches from the guitar. Experiment with distances and microphone placement. Another popular method is using an XY microphone placement with two small-diaphragm condenser microphones. (See drum-overheads photo.)
Bass Guitar (Direct and Speaker)
Plug the electric bass guitar into a passive direct box. Connect the instrument output from the passive direct box to a bass amplifier. Place a dynamic microphone an inch or two away from the speaker and connect it to a mixer microphone input. Connect the line output from the passive direct box to a line input on a different channel of the mixer. For recording, place these signals on separate tracks. During mixing, you can blend the direct and amplifier signal to taste. This technique can also be used in live applications.
Stereo Mic-Placement Tutorial 3.1
10
ADL 600
OverviewHookup
ResourcesResources
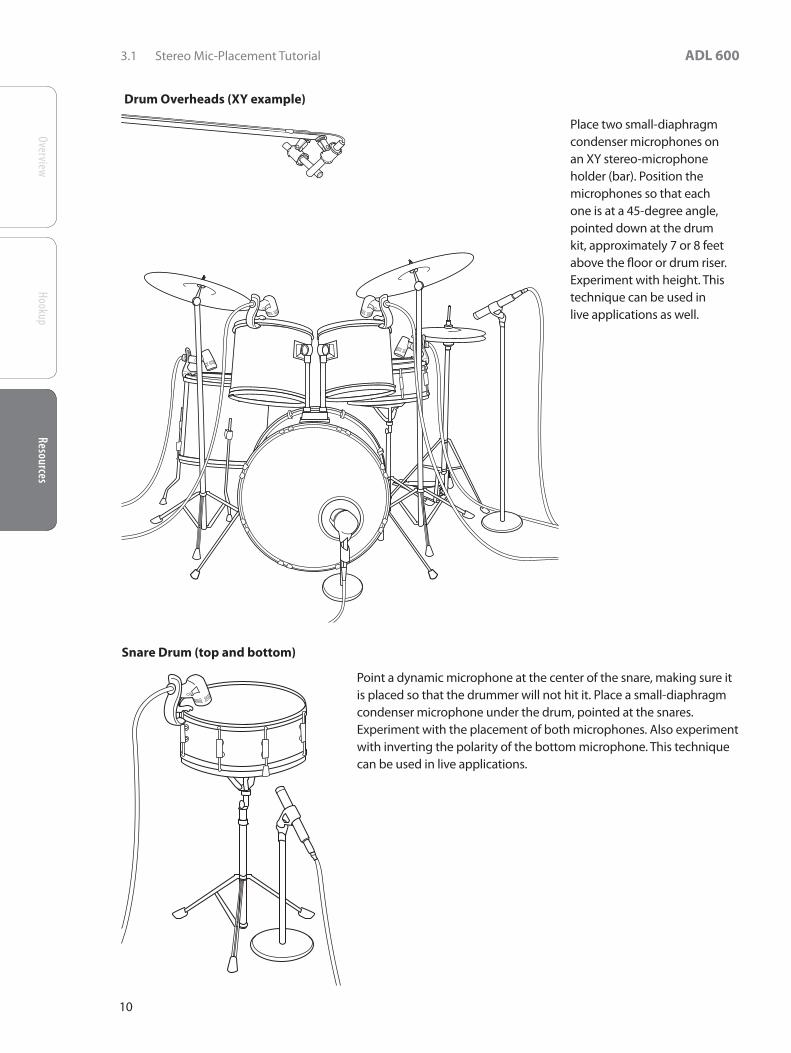
Drum Overheads (XY example)
Place two small-diaphragm condenser microphones on an XY stereo-microphone holder (bar). Position the microphones so that each one is at a 45-degree angle, pointed down at the drum kit, approximately 7 or 8 feet above the floor or drum riser. Experiment with height. This technique can be used in live applications as well.
Snare Drum (top and bottom)
Point a dynamic microphone at the center of the snare, making sure it is placed so that the drummer will not hit it. Place a small-diaphragm condenser microphone under the drum, pointed at the snares. Experiment with the placement of both microphones. Also experiment with inverting the polarity of the bottom microphone. This technique can be used in live applications.
3.1 Stereo Mic-Placement Tutorial

11
Owner’s Manual
Over
view
Hook
upRe
sour
ces
English
Français
Español
Deutsch
Reso
urce
s
3.2 Audio Specification
Input ImpedanceMicrophone Selectable, 150/300/900/1500Ω
Balanced Line 2 kΩ
Instrument 100 kΩ
Maximum Input LevelMicrophone (1500Ω, -20 dB Pad out) +5 dBu
Microphone (1500Ω, -20 dB Pad in) +25 dBu
Balanced Line +30 dBu
Instrument +30 dBu
Gain RangeMicrophone (1500Ω, -20 dB Pad out) 18 dB to 72 dB
Balanced Line -12 dB to 40 dB
Instrument -5 dB to 42 dB
PerformanceNoise Floor (all inputs, minimum gain) -95 dBu (A-weighted)
Microphone Equivalent Input Noise (EIN) -125 dBu (A-weighted)
Frequency Response 10 Hz to 45 kHz, ±1 dB
Maximum Output Level +23 dBu (@ 0.5%THD+N)
Output Impedance 600Ω
Tube Complement (per channel) (1) 12AT7A, (2) 6922
PowerInternal supply, standard IEC connector 115 or 230 VAC / 100W
PhysicalDimensions 2U rackmount
Height 3.5” (88.9 mm)
Depth 17” (431.8 mm)
Width 19” (482.6 mm)
Weight 28 lb. (12.7 kg)
Audio Specifications 3.2
12
ADL 600
OverviewHookup
ResourcesResources
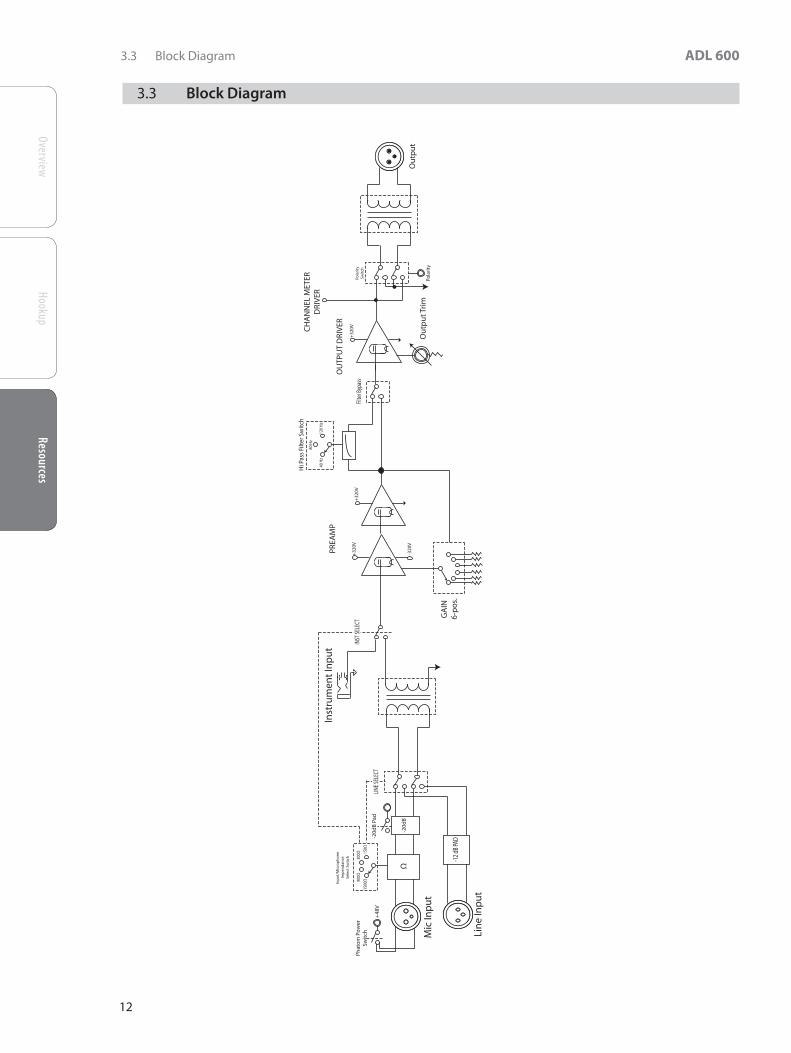
3.3 Block Diagram
Lin
e In
pu
t
Inst
rum
ent
Inp
ut
Ω
1500
Ω900Ω
300Ω 15
0Ω
Inp
ut/
Mic
rop
ho
ne
Imp
end
ance
Sele
ct S
wit
ch
LINE S
ELEC
T
-12 d
B PAD
INST
SELE
CT
PREA
MP
+32
0V+
320V
-320
V
GA
IN6-
po
s.
Pola
rity
Swit
ch
40 H
z
80 H
z
120
Hz
Filte
r Byp
ass
Hi P
ass
Filte
r Sw
itch
+32
0V
Ou
tpu
t Tri
mO
utp
ut
Mic
Inp
ut
Phat
om
Po
wer
Swit
ch
+48
V-2
0dB
Pad
-20d
B
OU
TPU
T D
RIV
ER
Pola
rity
CH
AN
NEL
MET
ERD
RIV
ER
3.3 Block Diagram

13
Owner’s Manual
Over
view
Hook
upRe
sour
ces
English
Français
Español
Deutsch
Reso
urce
s
3.4 Recall Sheet
53
01
35
710
20
VU
53
01
35
710
20
VU
On
Off
On
Off
On
Off
On
Off
On
Off
On
Off
On
Off
On
Off
DAT
E:
MIC
/IN
STR
CH
1:
SON
G T
ITLE
:
MIC
/IN
STR
CH
2:
ART
IST:
NO
TES:
53
01
35
710
20
VU
53
01
35
710
20
VU
On
Off
On
Off
On
Off
On
Off
On
Off
On
Off
On
Off
On
Off
DAT
E:
MIC
/IN
STR
CH
1:
SON
G T
ITLE
:
MIC
/IN
STR
CH
2:
ART
IST:
NO
TES:
Recall Sheet 3.4

14
ADL 600
OverviewHookup
ResourcesResources
3.5 Troubleshooting
3.5 Troubleshooting
No power.
First make sure your unit is plugged in. If it’s connected to a power conditioner, verify that the power conditioner is turned on and functioning properly. Check the fuse on the back panel of the ADL 600. (Be sure to disconnect the power from the ADL 600 before opening the fuse housing.) A blown fuse may look black on the inside or the wire inside might appear broken, and a very black fuse indicates that something may have shorted out. Try replacing the fuse with a new one. The ADL 600 uses a 2 Amp fuse. If the fuse blows again, please contact PreSonus to get your ADL 600 repaired.
Not passing audio.
If the ADL 600 appears to power on but it’s not passing signal (the lights are on but nobody’s home), first check all the cables connected to your ADL 600 and make sure that they are working correctly. Also, verify that the Source Select switch is set to the correct input and that the Gain control is set to provide enough amplitude for the signal. If you have your ADL 600 connected to a patch bay, try connecting a source directly to the ADL 600 to rule out a problem with the patch bay.
ADL 600 emits noise when the front panel is tapped.
Tubes can become microphonic over time, which is a fancy way of saying they can begin to act like a microphone—and not a good one. In this case, one or more of the tubes will need to be replaced. Contact PreSonus or a service professional to locate and replace the offending tube.
Hiss.
This is another common indication of a tube in need of replacement. Again, contact PreSonus or a service professional to locate and replace the offending tube.

15
Owner’s Manual
Over
view
Hook
upRe
sour
ces
English
Français
Español
Deutsch
Reso
urce
s
Warranty 3.6
3.6 Warranty
PreSonus Audio Electronics, Inc., warrants this product to be free of defects in material and workmanship for a period of one year from the date of original retail purchase. This warranty is enforceable only by the original retail purchaser. To be protected by this warranty, the purchaser must complete and return the enclosed warranty card within 14 days of purchase. During the warranty period PreSonus shall, at its sole and absolute option, repair or replace, free of charge, any product that proves to be defective on inspection by PreSonus or its authorized service representative. If you are located in the USA and need warranty repair, please submit an online technical support request at http://support.presonus.com to receive a return-authorization number and shipping information. If you are located outside of the USA, please contact the PreSonus distributor for your region for warranty repairs. All inquiries must be accompanied by a description of the problem. All authorized returns must be sent to the PreSonus repair facility postage prepaid, insured, and properly packaged. PreSonus reserves the right to update any unit returned for repair. PreSonus reserves the right to change or improve the design of the product at any time without prior notice. This warranty does not cover claims for damage due to abuse, neglect, alteration, or attempted repair by unauthorized personnel and is limited to failures arising during normal use that are due to defects in material or workmanship in the product. Any implied warranties, including implied warranties of merchantability and fitness for a particular purpose, are limited in duration to the length of this limited warranty. Some states do not allow limitations on how long an implied warranty lasts, so the above limitation may not apply to you. In no event will PreSonus be liable for incidental, consequential, or other damages resulting from the breach of any express or implied warranty, including, among other things, damage to property, damage based on inconvenience or on loss of use of the product, and, to the extent permitted by law, damages for personal injury. Some states do not allow the exclusion of limitation of incidental or consequential damages, so the above limitation or exclusion may not apply to you. This warranty gives you specific legal rights, and you may also have other rights, which vary from state to state. This warranty only applies to products sold and used in the United States of America. For warranty information in all other countries, please refer to your local distributor.
PreSonus Audio Electronics, Inc. 7257 Florida Blvd. Baton Rouge, LA 70806 USA 1-225-216-7887 www.presonus.com
16
EMC Statement:
NOTE: This equipment has been tested and found to comply with the limits for a Class B digital device, pursuant to part 15 of the FCC Rules. These limits are designed to provide reasonable protection against harmful interference in a residential installation. This equipment generates, uses, and can radiate radio frequency energy and, if not installed and used in accordance with the instructions, may cause harmful interference to radio communications. However, there is no guarantee that interference will not occur in a particular installation. If this equipment does cause harmful interference to radio or television reception, which can be determined by turning the equipment off and on, the user is encouraged to try to correct the interference by one or more of the following measures:
• Reorient or relocate the receiving antenna.
• Increase the separation between the equipment and the receiver.
• Connect the equipment into an outlet on a circuit different from that to which the receiver is connected.
• Consult the dealer or an experienced radio/TV technician for help.
CAUTION: Changes or modifications to this device not expressly approved by PreSonus Audio Electronics could void the user’s authority to operate the equipment under FCC rules.
This apparatus does not exceed the Class A/Class B (whichever is applicable) limits for radio noise emissions from digital apparatus as set out in the radio interference regulations of the Canadian Department of Communications.
ATTENTION — Le présent appareil numérique n’émet pas de bruits radioélectriques dépassant les limites applicables aux appareils numériques de classe A/de classe B (selon le cas) prescrites dans le règlement sur le brouillage radioélectrique édicté par le ministère des communications du Canada.

17
Added bonus: PreSonus’ previously Top Secret recipe for…
Chicken and Andouille GumboIngredients:
• 1 C All-Purpose flour
• ¾ C Vegetable Oil
• 1 large onion (diced)
• 1 small onion (quartered)
• 6 celery stalks (diced)
• 1 large green bell pepper (diced)
• 3 cloves garlic (2 minced, 1 whole)
• 1 lb link Andouille sausage
• 4 Chicken leg quarters
• 4 qt water
• 4 bay leaves
• 1 tsp thyme
• 1 tsp Old Bay seasoning
• 1-2 C frozen okra, sliced
• ¼ C fresh parsley, minced
• 6-8 eggs (optional)
Cooking Instructions:
1. In a large pot, combine whole chicken leg quarters, water, quartered onion, Old Bay, 2 bay leaves and 1 whole clove garlic.
Cover and bring to a low boil. Simmer stock until chicken is falling off the bone. Remove the chicken and set aside. Discard
the onion, bay leaves, and garlic, reserving the liquid.
2. In a heavy saucepan, heat 1 Tbsp of the oil on medium high heat and brown the andouille until it is cooked through. Set
aside sausage for later.
3. In the same saucepan, add and heat remaining oil. Slowly add flour 1-2 Tbsp at a time, stirring continuously. Continue cook-
ing and stirring the roux until it is a dark brown (it should look like melted dark chocolate). Be careful to not to get the oil
too hot or the flour will burn and you’ll have to start over.
4. Once roux has reached the correct color, add diced onion, celery, green pepper, and minced garlic. Cook until vegetables
are very tender. Do not cover.
5. Slowly add 1 quart of chicken broth and bring to a low boil, stirring constantly.
6. Transfer roux mixture to a soup pot and bring to low boil. Do not cover, the roux will settle on the bottom of the pot and burn.
7. Add remaining chicken broth, bay leaves, and thyme. Simmer for 30 minutes.
8. While gumbo is simmering, debone and shred chicken and slice the andouille.
9. Add chicken and andouille to gumbo and return to a simmer. Simmer for 30-45 minutes.
10. Stir in frozen okra and parsley and bring to a rolling boil.
11. Optional: Crack one egg into a teacup and quickly pour into the boiling gumbo. Repeat with the other eggs being careful
not to cluster them too closely. After all the eggs have risen back to the surface, reduce heat and simmer.
12. 12. Correct seasoning with salt and pepper (red, white and/or black) if necessary.
13. Serve over rice with potato salad.
Serves 12
© 2012 PreSonus Audio Electronics, Inc. All Rights Reserved. AudioBox, DigiMax, FireStudio, Nimbit, PreSonus, QMix, StudioLive, and XMAX are trademarks or registered trademarks of PreSonus Audio Electronics, Inc. Capture, Impact, Mixverb Presence, RedLightDist, SampleOne, Studio One, and Tricomp are trademarks or registered trademarks of PreSonus Software Ltd. Mac, Mac OS, and Macintosh are registered trademarks of Apple, Inc., in the U.S. and other countries. Windows is a registered trademark of Microsoft, Inc., in the U.S. and other countries. Other product names mentioned herein may be trademarks of their respective companies. All specifications subject to change without notice...except the recipe, which is a classic.
Dinner is Served

7257 Florida Boulevard • Baton Rouge, Louisiana 70806 USA • 1-225-216-7887www.presonus.com
Part# 820-ADL0016-B
ADL 600High Voltage Tube PreamplifierOwner’s Manual
®