Addendum to EDMS document 1392936 “Instruction Manual for inserting the CMS ZDCs using the HXTC...
10
o EDMS document 1392936 “Instruction Manual for inserting the sing the HXTC crane” n to the ZDC detectors in the TAN instrument slot at Pt5, this slot iation Monitor (BRAN). The HXTC crane is used in exactly the same ma e ZDC to remove and insert the BRAN between the TAN slot and an exte Sarcophage. The procedural steps and times for the lifting of the B are identical to those of the ZDC (described in EDMS 1392936). rocedures unique to the BRAN are the use of a dedicated fixture for o the Crane, and the procedures for emergency removal of the BRAN in ane failure. These procedures are outlined in this document. as a mass of ~45 kg, and presents only ~ 10% of the crane’s tested o BRAN installed in TAN alongside ZDC detectors on 56 side of Pt5 P. Debbins Nov. 03, 2014
-
Upload
benedict-bailey -
Category
Documents
-
view
223 -
download
0
Transcript of Addendum to EDMS document 1392936 “Instruction Manual for inserting the CMS ZDCs using the HXTC...
Addendum to EDMS document 1392936 “Instruction Manual for inserting the CMS ZDCs using the HXTC crane”
In addition to the ZDC detectors in the TAN instrument slot at Pt5, this slot also containsa Beam Radiation Monitor (BRAN). The HXTC crane is used in exactly the same manneras with the ZDC to remove and insert the BRAN between the TAN slot and an externalShielding Sarcophage. The procedural steps and times for the lifting of the BRAN with theHXTC crane are identical to those of the ZDC (described in EDMS 1392936).
The only procedures unique to the BRAN are the use of a dedicated fixture for attachingThe BRAN to the Crane, and the procedures for emergency removal of the BRAN in caseOf HXTC crane failure. These procedures are outlined in this document.
The BRAN has a mass of ~45 kg, and presents only ~ 10% of the crane’s tested operating Capacity.
BRAN installed in TAN alongside ZDC detectors on 56 side of Pt5
P. DebbinsNov. 03, 2014

BRAN FIXTURE. The bran fixture is a 2 piece system: the upperAssembly is bolted to the crane, the lower is bolted to the BRANLifting point.
BRAN liftingPoint: acceptsM8 bolt
BRAN Fixture lower assemblyShown bolted to model BRAN
BRAN FixtureUpper AssemblyMounted on Crane
BRAN fixture assembly matedWith 6mm pin
The Technical Reference for the BRAN fixture is found at:
http://newton.physics.uiowa.edu/~pdebbins/CMS_ZDC_Crane_Documents_Archive_2014/BRAN_Documents/

To lift the BRAN the following steps are performed:
1. Affix the lower fixture element to the BRAN (M8 x 25 bolt), either in TAN or Sarcophage (2 minutes)2. Bring the Sarcophage into position alongside the TAN (5 minutes).3. Lower the crane carrier beam to mate the upper fixture element with the lower (5 minutes).4. Pin the elements together (1 minute). 5. Perform the crane operations identically to the ZDC, either moving BRAN from TAN to Sarco or Sarco to TAN (15 minutes). 6. Remove the lower fixture from the BRAN (2 minutes)
These, very conservative, time estimates are based on tests with BRAN mock-up on the real TAN and crane.
Sarcophage shown placed With alignment marks on LHC Tunnel floor.
Lifting of BRAN (model) with HXTC CraneAnd BRAN fixture.

Risk Analysis
The weight of BRAN represents only 10% of the working capacity of the crane, so the probability of malfunctioning is considerably lower than the already low probability Studied for ZDC case.
The only possible problem that can be foreseen is an event of crane failure, where the load remains stuck between the TAN and the Sarcophage. In that case we foresee similar recovery steps as utilized for the BRAN located at IP1.
The IP5 BRAN Fixture lower assembly, which is attached to the BRAN during Lifting operations provides for attachment of flexible slings and rigid handles 250mm In length. These allow for the hand lifting by two persons of the BRAN, unpinning of theFixture, and placement of the BRAN in the best location given the current position of theSystem (either into the TAN slot or to the sarcophage). If required, a spare emptysarcophage is located in the ZDC bunkers at Pt5.

Recovery procedure:
In case of a problem with the crane the recovery procedure will be supervised by the radioprotection team to ensure respect of ALARA principles. If required, a mobile shielding panel can be provided by CMS technical team in order to further protect the operators.
There are two possible ways to remove the BRAN depending on where in thepossible trajectory it got stuck:
1. Eyelets attached at the end of the bar on the top of BRAN can beused to fix lifting straps that then can be used to lift BRAN eitherdirectly by hand or by use of a cross bar. This is the preferred optionas it can be done in any position of the BRAN and requires onlythreading the strap through already existing eyelets.
2. Depending upon the location of the BRAN relative to the TAN, 1 or 2 liftingbars can be screwed rapidly onto the bar on top of the BRAN. These provide a rigid handle for additional capability to maneuver the BRAN. In any case 1 bar canalways be attached.
Breakdown of time required for each operation as measured during tests with a mock-up:
1. Bringing of the lifting handles and straps from storage in ZDC bunker (3 minutes) 2. Slinging of straps through eyelets and/or bolting of the handles in place (2 minutes) 3. Lifting the BRAN and disconnection from the crane (1 minute) 4. Move of the BRAN either into TAN or into the sarcophage (2-3 minutes).
The timing of these procedures will be confirmed during the trial installations of the BRAN model in the presence of HSE and RP.
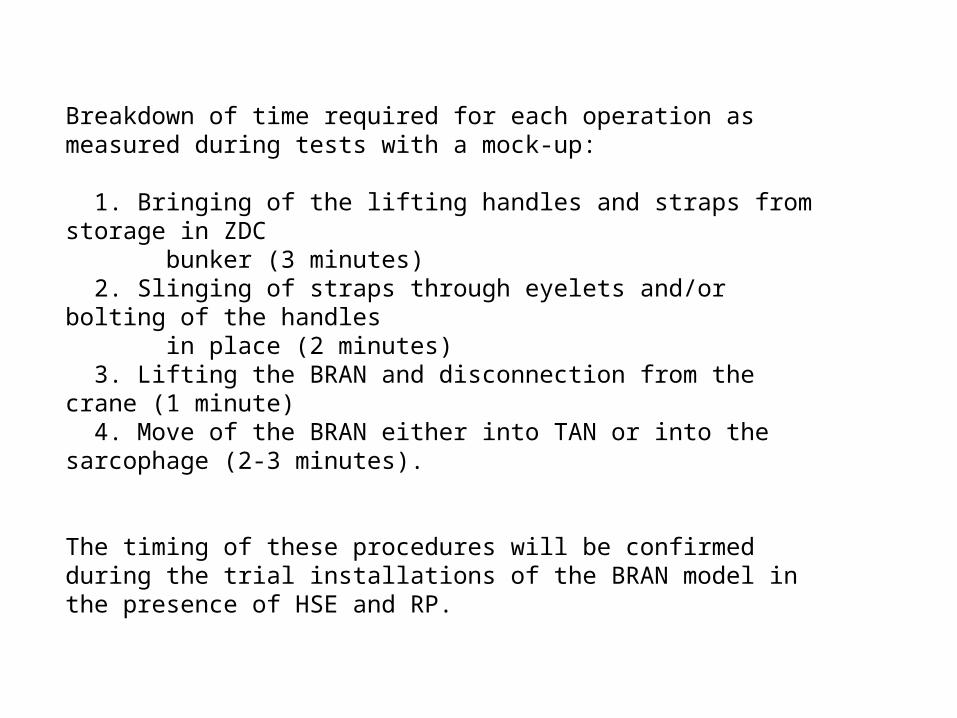
BRAN Emergency Handling Points
250mm BAR 2 independent bars can beRigidly screwed onto Threaded studs of the FixtureLower assembly.
Lifting StrapsAny combination of Straps and rigid barsCan be quickly affixed toFixture when needed.
Detail of Strap Eyelets andThreaded stud of FixtureLower assembly
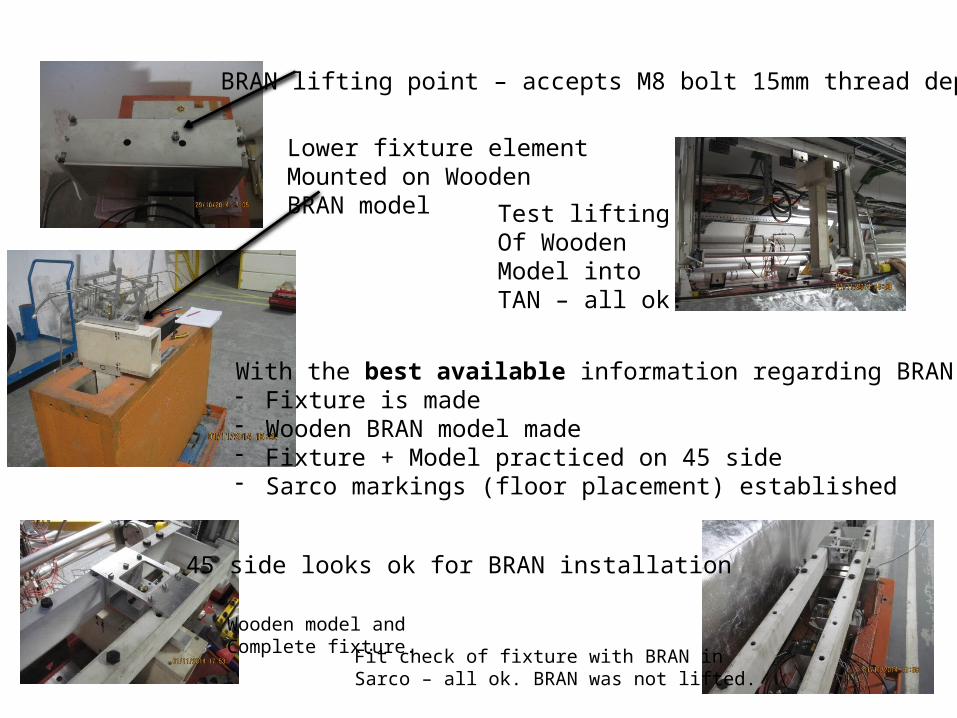
BRAN lifting point – accepts M8 bolt 15mm thread depth
Lower fixture elementMounted on WoodenBRAN model
Wooden model and Complete fixture.
Test liftingOf WoodenModel intoTAN – all ok.
Fit check of fixture with BRAN in Sarco – all ok. BRAN was not lifted.
With the best available information regarding BRAN- Fixture is made- Wooden BRAN model made- Fixture + Model practiced on 45 side- Sarco markings (floor placement) established
45 side looks ok for BRAN installation

Other Preparations for BRAN Installation
45 Side BRAN mounting block located forward of normal placement(200mm slot front – BRAN cntr). 56 BRAN is in normal location
This causes an impact with the Stainless Bars. No drilling required.The original TAN holes exist. Simply relocate pins back to original place
There are ceramic chips and a Hex Wrench in the TAN slot below BRANLocation. Need to clean out. Wrench is likely activated.
56 side crane – 2 working days needed to make sarco alignments and Check out procedures with model BRAN. Assume we want to installBoth BRANs on the same day.
Lifting straps – If the emergency recovery hardware is required to be on handDuring the BRAN lifting then Approved straps will need to be provided.