Addendum for Finale 2009 - GIA Publications · Addendum for Finale 2009. 2 ... 5. Continue pressing...
13
Tom Carruth finale finale ® The New Approach to Learning Projects The Addendum for Finale 2009
Transcript of Addendum for Finale 2009 - GIA Publications · Addendum for Finale 2009. 2 ... 5. Continue pressing...
1
Tom Carruth
finalefinale
®
The New Approach to Learning
ProjectsThe
G-XXXXTheFinaleProjectsCVR 6/9/08 9:37 AM Page 1
Addendumfor
Finale 2009
2
The Finale Projects
Addendum for Finale 2009
There are four basic differences between Finale 2009 and Finale 2008 that you will need to be aware of when working on the projects in The Finale Projects.
1. The way expressions work has been altered. Also, staff lists have been minimized and more automated. Expressions can be applied for a region in Finale 2009.
2. Multi-page editing. This won’t affect much in the way you work other than in the way you create a shape over a page break.
3. Aria Player for Garritan. Loading sounds using the setup wizard remains the same; however, loading sounds into an older or non-VST/AU file is quite different and simplified in Finale 2009.
4. Creation of SmartMusic files has been altered and simplified quite a bit.
All other functions work as they do Finale 2008. What follows are detailed descriptions of the four basic differ-ences new in Finale 2009.
ExpressionsExpressions have changed quite a bit in Finale 2009. You can input expressions exactly the same way you did with Finale 2008; however, you don’t need to be concerned with whether an expression is note-attached or measure-attached. Finale 2009 makes this decision automatically, based on expression categories. Figure 1 shows the new Expression Selection dialog.

3
Figure 1. The Expression Selection dialog
The following instructions are for Finale 2009b. As always, check to insure that you have the latest maintenance release of Finale. Finale 2009b is available online (www.finalemusic.com), or you can check for updates to Finale at any time by selecting Help menu > Check for Updates.
Staff lists are pre-created for the Rehearsal Marks and Tempo Alteration categories. All other markings can be assigned to a group of staves the same way you would apply articulations to a region. In the score, select the Ex-pression tool and click-and-drag around the staves to which you want to apply an expression. When you release the mouse, the Expression Selection dialogopens, allowing you to select the expression you want.
Although not as necessary as in previous versions, you can assign an expression to a Staff List if you want. When the Expression Selection dialog opens, select the desired expression. Then from the Assign dropdown menu, select the option you want. You can select Assign to Staves… to create a staff list for assignment (see figure 2).
Figure 2. The Assign dropdown menu
Mass Input. You can also use the metatool (shortcut key) for an item as you learned with articulations. For ex-ample, say you want to assign the forte dynamic mark ( f ) to show in four staves of the score. Hold 4 (the meta-tool for forte) and drag around the four staves to which you want to assign the expression. When you release the
4
mouse, the expression appears on all four staves.
With Finale 2009, some things have changed. An alternate way to paste expressions for several staves is to use the new Paste Up and Paste Down keyboard shortcuts. Try this:
1. Input an expression on the top staff of a piece.
2. Select the expression’s handle.
3. Press and hold Ctrl–Shift on Windows or Option on Macintosh.
4. Press Down Arrow to paste to the next staff down.
5. Continue pressing Down Arrow to paste to additional staves.
6. Press Up Arrow with this key combination to paste to the staff above the currently selected expression.
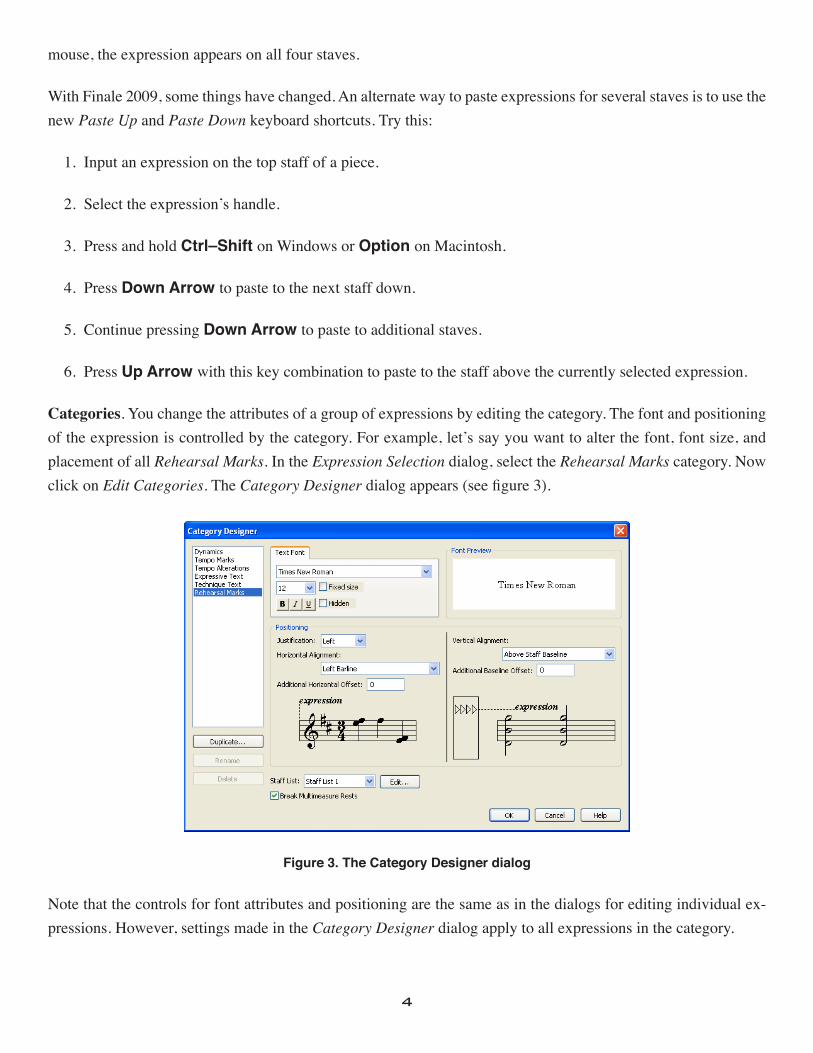
Categories. You change the attributes of a group of expressions by editing the category. The font and positioning of the expression is controlled by the category. For example, let’s say you want to alter the font, font size, and placement of all Rehearsal Marks. In the Expression Selection dialog, select the Rehearsal Marks category. Now click on Edit Categories. The Category Designer dialog appears (see figure 3).
Figure 3. The Category Designer dialog
Note that the controls for font attributes and positioning are the same as in the dialogs for editing individual ex-pressions. However, settings made in the Category Designer dialog apply to all expressions in the category.

5
Once you change these attributes, all of the expressions in the category should change. If an expression’s attri-butes don’t change, then the expression isn’t assigned to use the category settings. Single-click an expression in the Expression Selection dialog, then click Edit. The Expression Designer dialog appears (see figure 4).
Figure 4. The Expression Designer dialog
Note the setting for using category attributes or using the settings as specified in the expression editing dialog box. Figure 4 shows where to set the category control for fonts in the Expression Designer dialog. This is accessible on the Main tab. Click the Positioning tab to access the category control for positioning as shown in figure 5.

6
Figure 5. Setting category controls for an individual expression
Although this process is fairly automated, if you would like to change a group of expressions to the category set-tings, you can select more than one by shift-clicking a contiguous group (click the first one, hold Shift, then click the last one in the group). To select a non-contiguous group, Ctrl/Command-click the ones you want. Then from the dropdown menu in the bottom-right corner you can select the category attributes you want to reset (see figure 6). Note that to the left of the Reset to Category menu there is a Move To menu that moves expressions from one category to another.
Figure 6. The Reset to Category dropdown menu
On pages 162–164, the section on Play 2nd time only is effected quite a bit in Finale 2009 and 2010. There is no need to create three expressions; two are adequate to do the job.
1. Create an expression starting with the category Technique Text. Input the full text Play 2nd time only.
2. Select the playback tab and set the type to Velocity, the value to 0 and set Play on pass to 1.
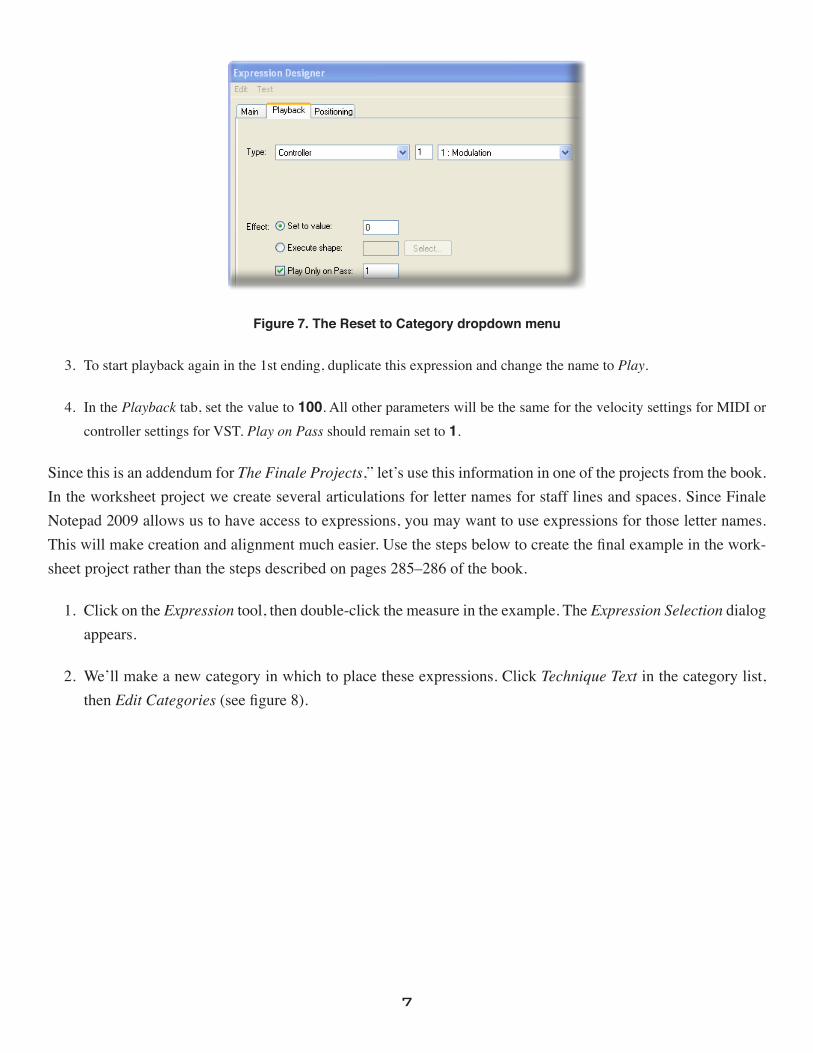
a. If using Garritan or VST sounds, set the type to Controller and the value to the right to Modulation as shown in figure 7. Also set the value to 0 and Play on Pass to 1.
7
Figure 7. The Reset to Category dropdown menu
3. To start playback again in the 1st ending, duplicate this expression and change the name to Play.
4. In the Playback tab, set the value to 100. All other parameters will be the same for the velocity settings for MIDI or controller settings for VST. Play on Pass should remain set to 1.
Since this is an addendum for The Finale Projects,” let’s use this information in one of the projects from the book. In the worksheet project we create several articulations for letter names for staff lines and spaces. Since Finale Notepad 2009 allows us to have access to expressions, you may want to use expressions for those letter names. This will make creation and alignment much easier. Use the steps below to create the final example in the work-sheet project rather than the steps described on pages 285–286 of the book.
1. Click on the Expression tool, then double-click the measure in the example. The Expression Selection dialog appears.
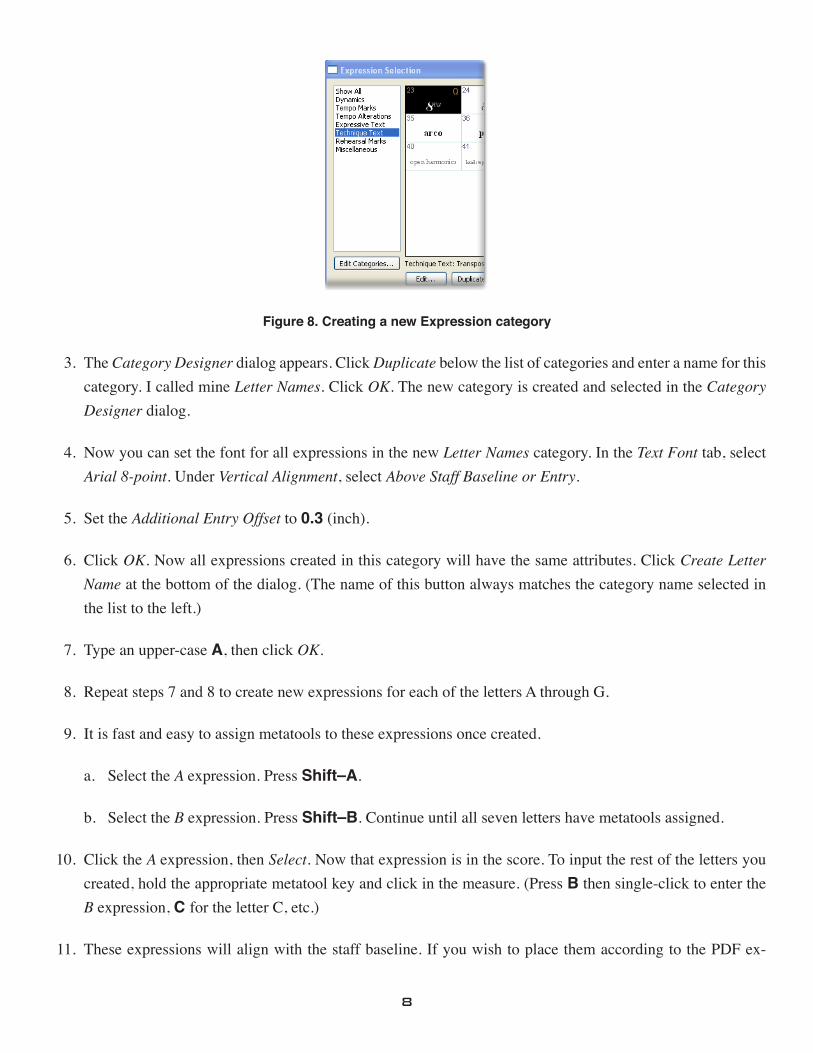
2. We’ll make a new category in which to place these expressions. Click Technique Text in the category list, then Edit Categories (see figure 8).
8
Figure 8. Creating a new Expression category
3. The Category Designer dialog appears. Click Duplicate below the list of categories and enter a name for this category. I called mine Letter Names. Click OK. The new category is created and selected in the Category Designer dialog.
4. Now you can set the font for all expressions in the new Letter Names category. In the Text Font tab, select Arial 8-point. Under Vertical Alignment, select Above Staff Baseline or Entry.
5. Set the Additional Entry Offset to 0.3 (inch).
6. Click OK. Now all expressions created in this category will have the same attributes. Click Create Letter Name at the bottom of the dialog. (The name of this button always matches the category name selected in the list to the left.)
7. Type an upper-case A, then click OK.
8. Repeat steps 7 and 8 to create new expressions for each of the letters A through G.
9. It is fast and easy to assign metatools to these expressions once created.
a. Select the A expression. Press Shift–A.
b. Select the B expression. Press Shift–B. Continue until all seven letters have metatools assigned.
10. Click the A expression, then Select. Now that expression is in the score. To input the rest of the letters you created, hold the appropriate metatool key and click in the measure. (Press B then single-click to enter the B expression, C for the letter C, etc.)
11. These expressions will align with the staff baseline. If you wish to place them according to the PDF ex-

9
ample, follow the instructions below for Snap to Grid. This will make both horizontal and vertical alignment very easy.
12. Page 286 in The Finale Projects describes showing the grid for alignment. Now you can turn on Snap to Grid as described on page 290. Select Expressions, and as you drag the expressions, they will snap in line with each other.
Multipage EditingIn older versions of Finale you could view more than one page at a time. However, you could only edit the page that displayed in the top left corner of the screen. Finale 2009 allows you to edit any page that is visible on the screen. You can copy and paste from one page to the next and drag shapes across pages. For example, on page 71 of The Finale Projects there is a section entitled Dragging Shapes over Page Breaks. It describes switching to Scroll View to do this. This is unnecessary in Finale 2009.
1. When you double-click to start a slur or a hairpin, simply continue to hold down the mouse button.
2. Drag the shape onto the next page and into the staff to which you want it assigned (see figure 9, step 2).
3. Position the shape to the note (for a slur) or the end position (hairpin) for that shape as shown in figure 9, step 3.
Figure 9. Entering a shape across pages
10
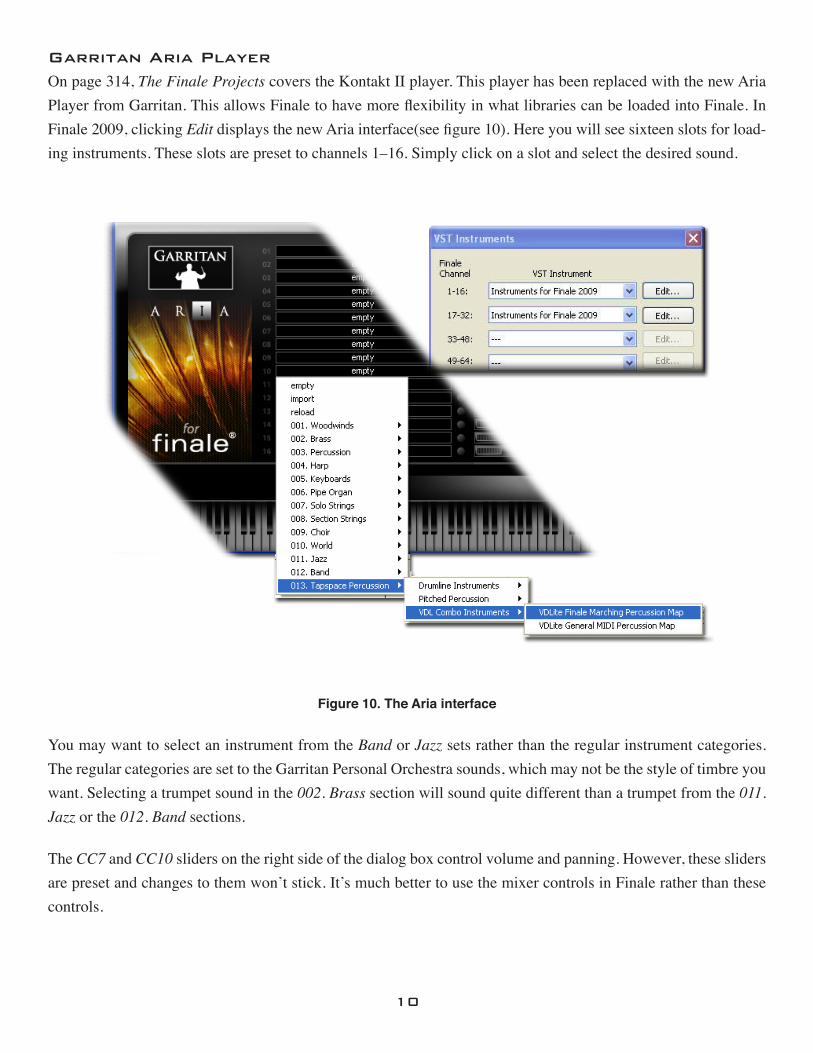
Garritan Aria PlayerOn page 314, The Finale Projects covers the Kontakt II player. This player has been replaced with the new Aria Player from Garritan. This allows Finale to have more flexibility in what libraries can be loaded into Finale. In Finale 2009, clicking Edit displays the new Aria interface(see figure 10). Here you will see sixteen slots for load-ing instruments. These slots are preset to channels 1–16. Simply click on a slot and select the desired sound.
The Finale Projects Addendum for Finale 2009 10
Figure 9. The Aria interface
You may want to select an instrument from the Band or Jazz sets rather than the regular
instrument categories. The regular categories are set to the Garritan Personal Orchestra sounds,
which may not be the style of timbre you want. Selecting a trumpet sound in the 002. Brass
section will sound quite different than a trumpet from the 011. Jazz or the 012. Band sections.
The CC7 and CC10 sliders on the right side of the dialog box control volume and panning.
However, these sliders are preset and changes to them won’t stick. It’s much better to use the
mixer controls in Finale rather than these controls.
Creating SmartMusic Files
Starting on page 326, The Finale Projects discusses creating SmartMusic files. You may want to
review the sections on creating Ensemble and Intelligent Accompaniment files. The procedure in
Finale 2009 is somewhat different for saving the file, as described below. However, the creation
of SmartMusic markers is still important to know for Intelligent Accompaniment files.
SmartMusic Assessable files are completely different and much simplified in Finale 2009. Here
are some important new steps to follow when creating any of the three types of SmartMusic files.
Figure 10. The Aria interface
You may want to select an instrument from the Band or Jazz sets rather than the regular instrument categories. The regular categories are set to the Garritan Personal Orchestra sounds, which may not be the style of timbre you want. Selecting a trumpet sound in the 002. Brass section will sound quite different than a trumpet from the 011. Jazz or the 012. Band sections.
The CC7 and CC10 sliders on the right side of the dialog box control volume and panning. However, these sliders are preset and changes to them won’t stick. It’s much better to use the mixer controls in Finale rather than these controls.
11
Creating SmartMusic FilesStarting on page 326, The Finale Projects discusses creating SmartMusic files. You may want to review the sections on creating Ensemble and Intelligent Accompaniment files. The procedure in Finale 2009 is somewhat different for saving the file, as described below. However, the creation of SmartMusic markers is still important to know for Intelligent Accompaniment files. SmartMusic Assessable files are completely different and much simplified in Finale 2009. Here are some important new steps to follow when creating any of the three types of SmartMusic files.
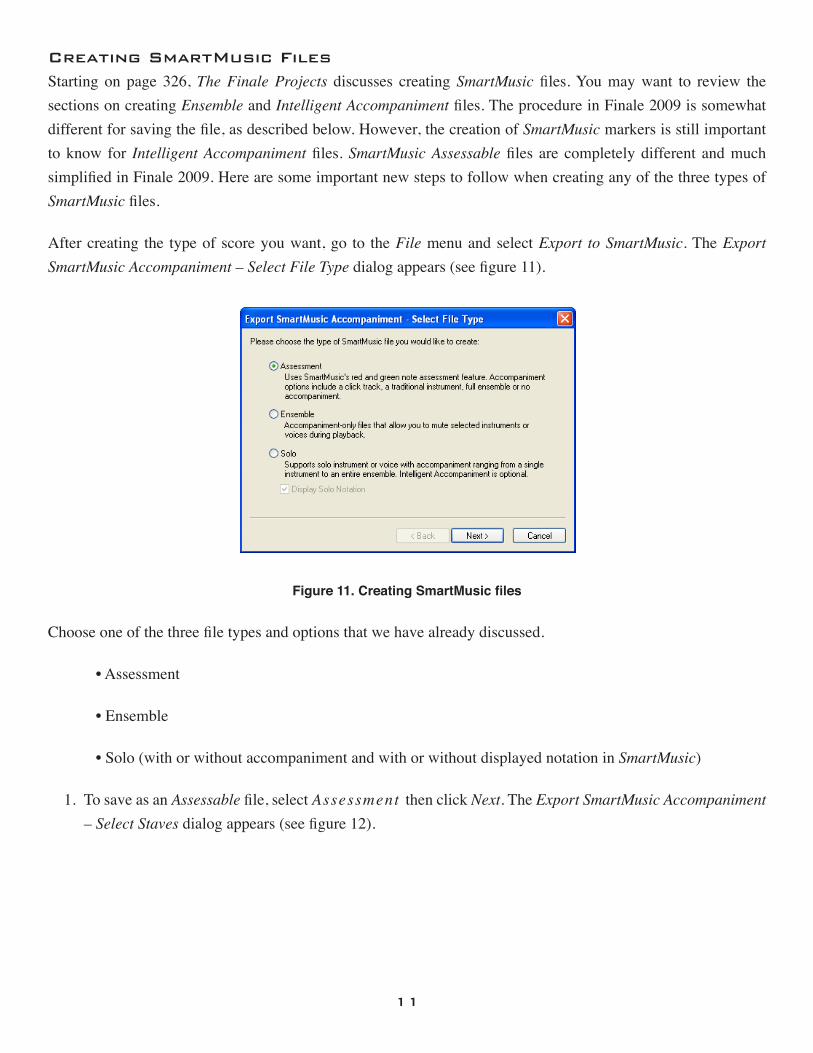
After creating the type of score you want, go to the File menu and select Export to SmartMusic. The Export SmartMusic Accompaniment – Select File Type dialog appears (see figure 11).
The Finale Projects Addendum for Finale 2009 11
After creating the type of score you want, go to the File menu and select Export to SmartMusic.
The Export SmartMusic Accompaniment – Select File Type dialog appears (see figure 10).
Figure 10. Creating SmartMusic files
Choose one of the three file types and options that we have already discussed.
• Assessment
• Ensemble
• Solo (with or without accompaniment and with or without displayed notation in
SmartMusic)
1. To save as an Assessable file, select Assessment then click Next. The Export SmartMusic
Accompaniment – Select Staves dialog appears (see figure 11).
Figure 11. Selecting the staves for a SmartMusic Accompaniment file
Figure 11. Creating SmartMusic files
Choose one of the three file types and options that we have already discussed.
• Assessment
• Ensemble
• Solo (with or without accompaniment and with or without displayed notation in SmartMusic)
1. To save as an Assessable file, select Assessment then click Next. The Export SmartMusic Accompaniment – Select Staves dialog appears (see figure 12).
12
The Finale Projects Addendum for Finale 2009 11
After creating the type of score you want, go to the File menu and select Export to SmartMusic.
The Export SmartMusic Accompaniment – Select File Type dialog appears (see figure 10).
Figure 10. Creating SmartMusic files
Choose one of the three file types and options that we have already discussed.
• Assessment
• Ensemble
• Solo (with or without accompaniment and with or without displayed notation in
SmartMusic)
1. To save as an Assessable file, select Assessment then click Next. The Export SmartMusic
Accompaniment – Select Staves dialog appears (see figure 11).
Figure 11. Selecting the staves for a SmartMusic Accompaniment file
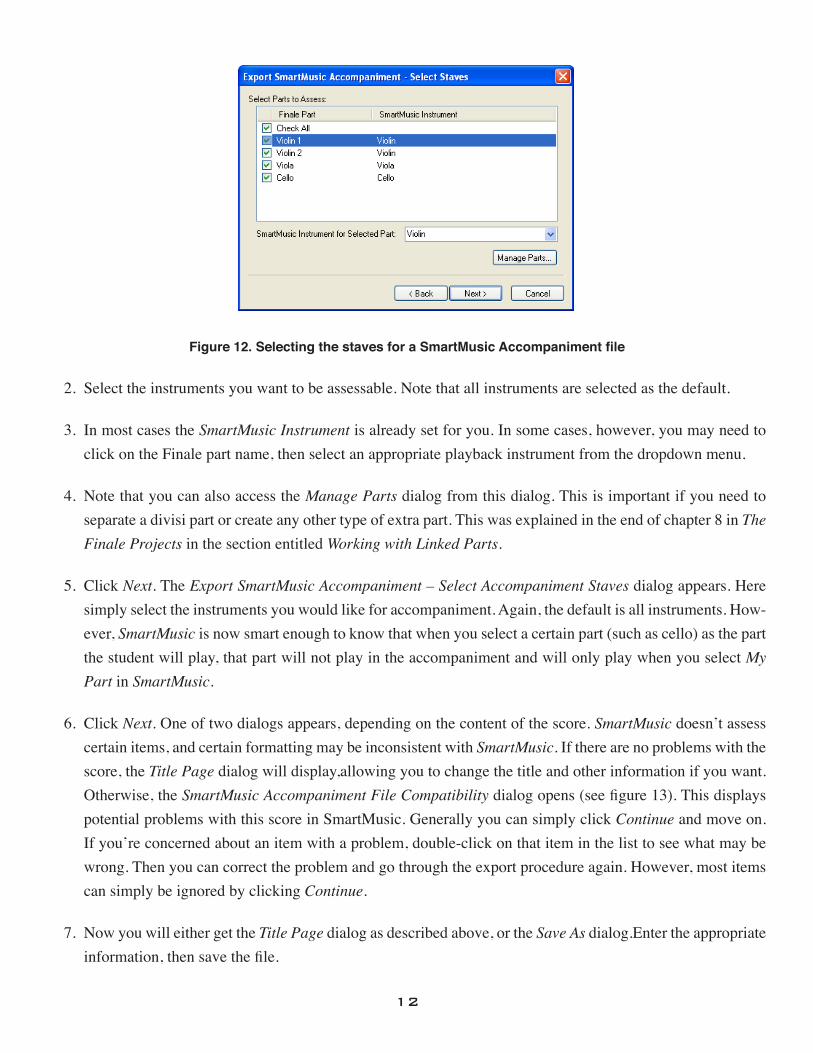
Figure 12. Selecting the staves for a SmartMusic Accompaniment file
2. Select the instruments you want to be assessable. Note that all instruments are selected as the default.
3. In most cases the SmartMusic Instrument is already set for you. In some cases, however, you may need to click on the Finale part name, then select an appropriate playback instrument from the dropdown menu.
4. Note that you can also access the Manage Parts dialog from this dialog. This is important if you need to separate a divisi part or create any other type of extra part. This was explained in the end of chapter 8 in The Finale Projects in the section entitled Working with Linked Parts.
5. Click Next. The Export SmartMusic Accompaniment – Select Accompaniment Staves dialog appears. Here simply select the instruments you would like for accompaniment. Again, the default is all instruments. How-ever, SmartMusic is now smart enough to know that when you select a certain part (such as cello) as the part the student will play, that part will not play in the accompaniment and will only play when you select My Part in SmartMusic.
6. Click Next. One of two dialogs appears, depending on the content of the score. SmartMusic doesn’t assess certain items, and certain formatting may be inconsistent with SmartMusic. If there are no problems with the score, the Title Page dialog will display,allowing you to change the title and other information if you want. Otherwise, the SmartMusic Accompaniment File Compatibility dialog opens (see figure 13). This displays potential problems with this score in SmartMusic. Generally you can simply click Continue and move on. If you’re concerned about an item with a problem, double-click on that item in the list to see what may be wrong. Then you can correct the problem and go through the export procedure again. However, most items can simply be ignored by clicking Continue.
7. Now you will either get the Title Page dialog as described above, or the Save As dialog.Enter the appropriate information, then save the file.

13
8. To save as Ensemble, select that option, click Next, then enter a filename and click Save.
9. To save as a Solo, select that option. Note once again that you can save with or without a notation file to display in SmartMusic.
10. Select the part that you want as the solo part along with an appropriate playback instrument. Click Next. Select the staves for the accompaniment. Click Next.
11. Check the title and composer information. Click Next.
12. Enter a file name and click Save.
The Finale Projects Addendum for Finale 2009 13
Figure 12. The SmartMusic Accompaniment File Compatibility dialog
7. Now you will either get the Title Page dialog as described above, or the Save As dialog.
Enter the appropriate information, then save the file.
8. To save as Ensemble, select that option, click Next, then enter a filename and click Save.
9. To save as a Solo, select that option. Note once again that you can save with or without a
notation file to display in SmartMusic.
10. Select the part that you want as the solo part along with an appropriate playback
instrument. Click Next. Select the staves for the accompaniment. Click Next.
11. Check the title and composer information. Click Next.
12. Enter a file name and click Save.
Figure 13. The SmartMusic Accompaniment File Compatibility dialo