Adaptec ESB2/ICH7R/ICH9R SATA RAID Setup Instructions€¦ · Adaptec ESB2/ICH7R/ICH9R SATA RAID...
20
Adaptec ESB2/ICH7R/ICH9R SATA RAID Setup Instructions 1 Adaptec ESB2/ICH7R/ICH9R SATA RAID Setup Instructions After all the hardware components have been installed, you must configure the Adaptec Embedded Serial ATA RAID, and then install the Windows operating system. All necessary drivers are included on the Supermicro bootable CDs that came with your motherboard. Note: The following section provides information on the Adaptec SATA RAID Driver based on the Intel South Bridge-ESB2, ICH7R or ICH9R Controller. 1 Introduction to the Adaptec SATA RAID Driver Serial ATA (SATA) Serial ATA(SATA) is a physical storage interface. It uses a single cable with a mini- mum of four wires to create a point-to-point connection between devices. It is a serial link which supports SATA Transfer rates up to 3.0 Gbps. Because the serial cables used in SATA are thinner than the traditional cables used in Parallel ATA(PATA), SATA systems have better airflow and can be installed in smaller chassis than PATA systems. In addition, the cables used in PATA can only extend to 40cm long, while Serial ATA cables can extend up to one meter. Overall, Serial ATA provides better functionality than Parallel ATA. Introduction to the Intel ESB2/ICH7R/ICH9R I/O Controller Hub Located in the South Bridge of an Intel chipset, the ESB2, ICH7R or ICH9R I/O Controller Hub provides the I/O subsystem with access to the rest of the system. It supports 1-channel Ultra ATA/100 Bus Master IDE controller (PATA) and one Adaptec's Serial ATA (SATA) Host Controller, which support up to six Serial ATA drives, up to two RAID volumes and up to four drives in RAID Configurations. (See the table on Page 2 for details.)
Transcript of Adaptec ESB2/ICH7R/ICH9R SATA RAID Setup Instructions€¦ · Adaptec ESB2/ICH7R/ICH9R SATA RAID...
Adaptec ESB2/ICH7R/ICH9R SATA RAID Setup Instructions
1
Adaptec ESB2/ICH7R/ICH9R SATA RAID Setup Instructions
After all the hardware components have been installed, you must configure the Adaptec Embedded Serial ATA RAID, and then install the Windows operating system. All necessary drivers are included on the Supermicro bootable CDs that came with your motherboard.
Note: The following section provides information on the Adaptec SATA RAID Driver based on the Intel South Bridge-ESB2, ICH7R or ICH9R Controller.
1 Introduction to the Adaptec SATA RAID Driver
Serial ATA (SATA)Serial ATA(SATA) is a physical storage interface. It uses a single cable with a mini-mum of four wires to create a point-to-point connection between devices. It is a serial link which supports SATA Transfer rates up to 3.0 Gbps. Because the serial cables used in SATA are thinner than the traditional cables used in Parallel ATA(PATA), SATA systems have better airflow and can be installed in smaller chassis than PATA systems. In addition, the cables used in PATA can only extend to 40cm long, while Serial ATA cables can extend up to one meter. Overall, Serial ATA provides better functionality than Parallel ATA.
Introduction to the Intel ESB2/ICH7R/ICH9R I/O Controller Hub
Located in the South Bridge of an Intel chipset, the ESB2, ICH7R or ICH9R I/O Controller Hub provides the I/O subsystem with access to the rest of the system. It supports 1-channel Ultra ATA/100 Bus Master IDE controller (PATA) and one Adaptec's Serial ATA (SATA) Host Controller, which support up to six Serial ATA drives, up to two RAID volumes and up to four drives in RAID Configurations. (See the table on Page 2 for details.)
2
Adaptec SATA RAID Setup Guidelines
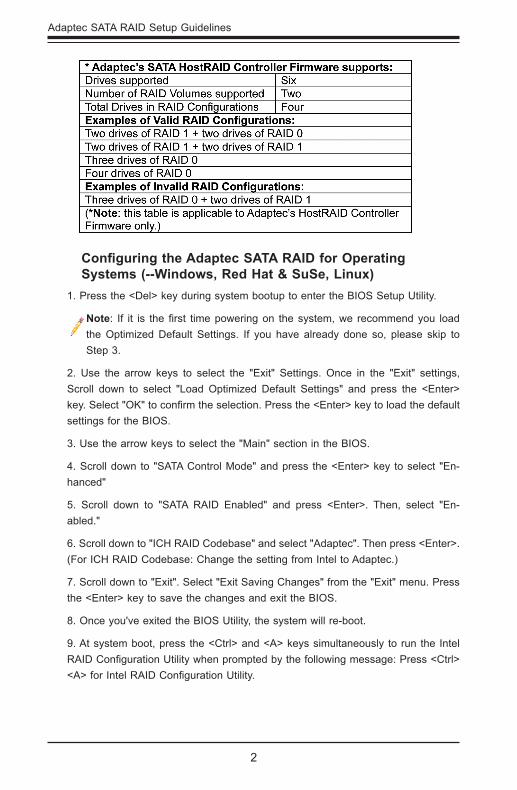
Configuring the Adaptec SATA RAID for Operating Systems (--Windows, Red Hat & SuSe, Linux)
1. Press the <Del> key during system bootup to enter the BIOS Setup Utility.
Note: If it is the first time powering on the system, we recommend you load the Optimized Default Settings. If you have already done so, please skip to Step 3.
2. Use the arrow keys to select the "Exit" Settings. Once in the "Exit" settings, Scroll down to select "Load Optimized Default Settings" and press the <Enter> key. Select "OK" to confirm the selection. Press the <Enter> key to load the default settings for the BIOS.
3. Use the arrow keys to select the "Main" section in the BIOS.
4. Scroll down to "SATA Control Mode" and press the <Enter> key to select "En-hanced"
5. Scroll down to "SATA RAID Enabled" and press <Enter>. Then, select "En-abled."
6. Scroll down to "ICH RAID Codebase" and select "Adaptec". Then press <Enter>. (For ICH RAID Codebase: Change the setting from Intel to Adaptec.)
7. Scroll down to "Exit". Select "Exit Saving Changes" from the "Exit" menu. Press the <Enter> key to save the changes and exit the BIOS.
8. Once you've exited the BIOS Utility, the system will re-boot.
9. At system boot, press the <Ctrl> and <A> keys simultaneously to run the Intel RAID Configuration Utility when prompted by the following message: Press <Ctrl> <A> for Intel RAID Configuration Utility.

Adaptec ESB2/ICH7R/ICH9R SATA RAID Setup Instructions
3
The Adaptec Embedded SATA HostRAID DriverThe Adaptec Embedded Serial ATA RAID Controller adds SATA/RAID functionality and performance enhancements to a motherboard. RAID striping (RAID 0) allows data to be written across multiple drives, greatly improving hard disk I/O perfor-mance. RAID mirroring (RAID 1) allows data to be simultaneously written to two drives, improving data security even when a single hard disk fails. A Stripe of Mirrors (RAID 10) provides multiple RAID 1 mirrors and a RAID 0 stripe, maximizing data security and system efficiency. By incorporating the Adaptec Embedded Serial ATA into the motherboard design, Supermicro's motherboards offer the user the benefits of SATARAID without the high costs associated with hardware RAID applications.
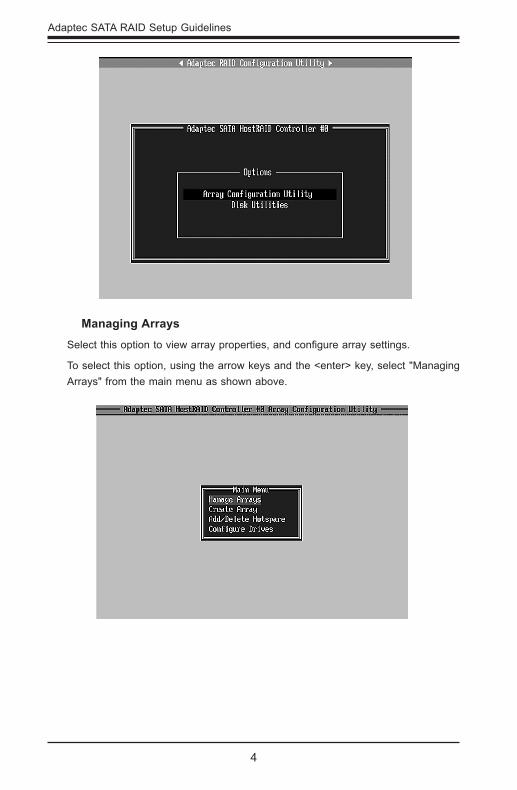
Using the Adaptec RAID Configuration Utility (ARC) The Adaptec RAID Configuration Utility, an embedded BIOS Utility, includes the following:
Array Configuration Utility: Use this utility to create, configure and manage arrays.
Disk Utilities: Use this option to format or verify disks.
To run the Adaptec RAID Configuration Utility, you will need to do the following:
1. Enable RAID functions in the system BIOS (refer to Chapter 4 for System BIOS Configurations).
2. Press the <Ctrl> and <A> keys simultaneously when prompted to do so during system boot. (Refer to the previous page for detailed instructions.)
Using the Array Configuration Utility (ACU)When you press <Ctrl> and <A> keys simultaneously at the prompt at system bootup, the main menu will appear.
Note: To select an option, use the arrow keys to highlight the item and then press the <Enter> key to select it. To return to the previous menu, press the <ESC> key. Press the <Insert> key to select a drive. When a drive is highlighted (selected), press the <Delete> key to de-select it.
4
Adaptec SATA RAID Setup Guidelines
Managing Arrays
Select this option to view array properties, and configure array settings.
To select this option, using the arrow keys and the <enter> key, select "Managing Arrays" from the main menu as shown above.
Adaptec ESB2/ICH7R/ICH9R SATA RAID Setup Instructions
5
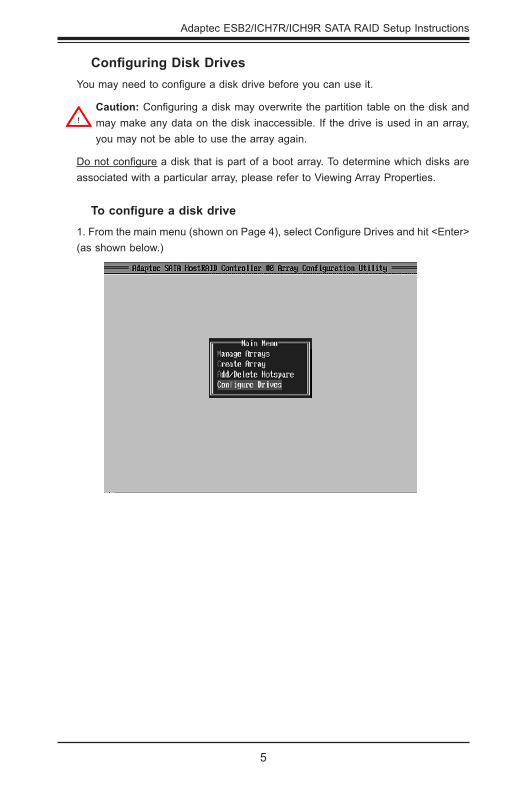
Configuring Disk DrivesYou may need to configure a disk drive before you can use it.
Caution: Configuring a disk may overwrite the partition table on the disk and may make any data on the disk inaccessible. If the drive is used in an array, you may not be able to use the array again.
Do not configure a disk that is part of a boot array. To determine which disks are associated with a particular array, please refer to Viewing Array Properties.
To configure a disk drive
1. From the main menu (shown on Page 4), select Configure Drives and hit <Enter> (as shown below.)
!
6
Adaptec SATA RAID Setup Guidelines
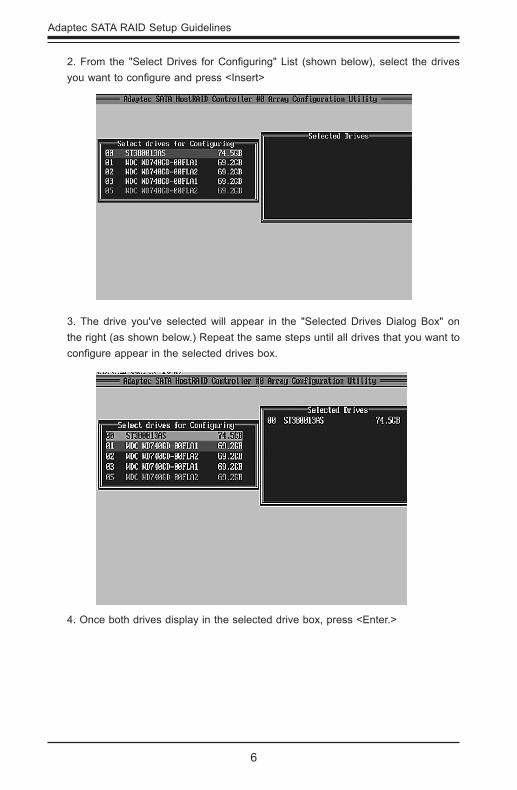
2. From the "Select Drives for Configuring" List (shown below), select the drives you want to configure and press <Insert>
3. The drive you've selected will appear in the "Selected Drives Dialog Box" on the right (as shown below.) Repeat the same steps until all drives that you want to configure appear in the selected drives box.
4. Once both drives display in the selected drive box, press <Enter.>
Adaptec ESB2/ICH7R/ICH9R SATA RAID Setup Instructions
7
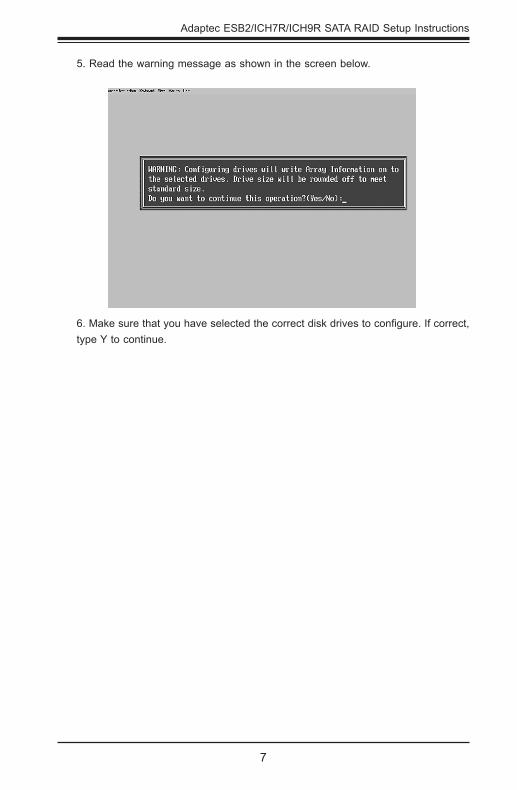
5. Read the warning message as shown in the screen below.
6. Make sure that you have selected the correct disk drives to configure. If correct, type Y to continue.
8
Adaptec SATA RAID Setup Guidelines
Creating Arrays
Before you create arrays, make sure that the disks for the array are connected and installed in your system. Disks with no usable space, or are not initialized or formatted are shown in gray and cannot be used.
Note: It is recommended that you configure devices before you create arrays.
To create an array
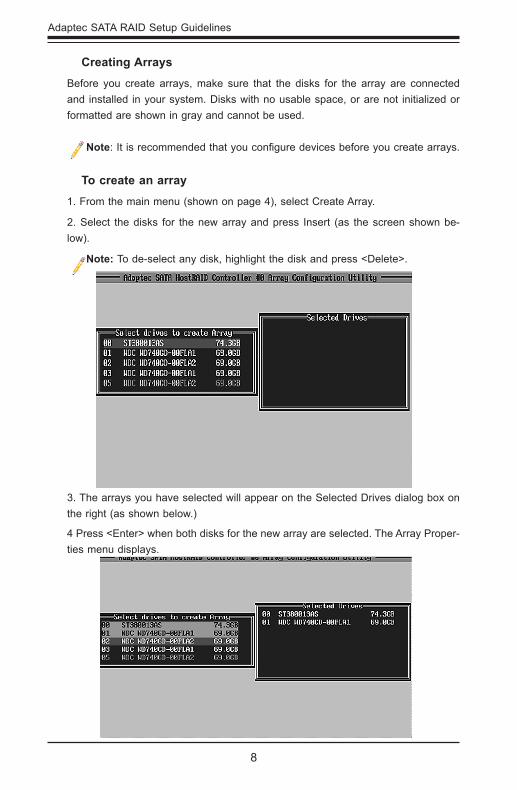
1. From the main menu (shown on page 4), select Create Array.
2. Select the disks for the new array and press Insert (as the screen shown be-low).
Note: To de-select any disk, highlight the disk and press <Delete>.
3. The arrays you have selected will appear on the Selected Drives dialog box on the right (as shown below.)
4 Press <Enter> when both disks for the new array are selected. The Array Proper-ties menu displays.
Adaptec ESB2/ICH7R/ICH9R SATA RAID Setup Instructions
9
To Assign Array PropertiesOnce a new array is completed, you can assign properties to the array.
Caution: Once the array is created and its properties are assigned, you can-not change the array properties using this utility.
To assign properties to the new array
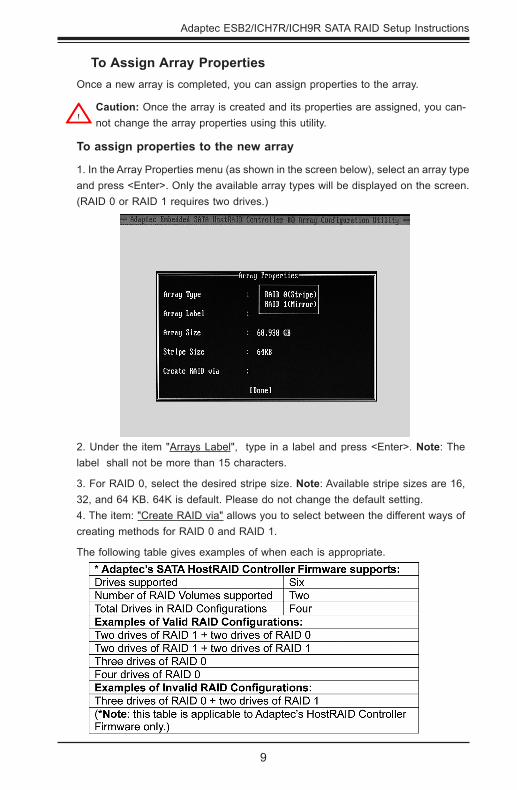
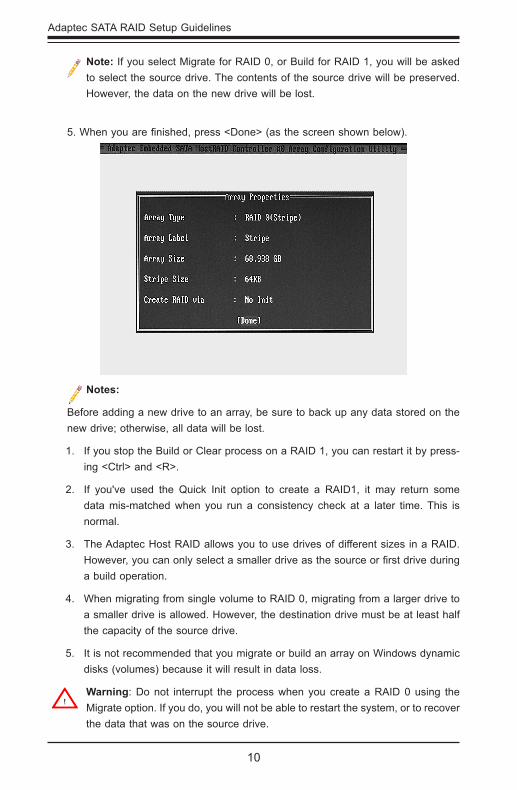
1. In the Array Properties menu (as shown in the screen below), select an array type and press <Enter>. Only the available array types will be displayed on the screen. (RAID 0 or RAID 1 requires two drives.)
2. Under the item "Arrays Label", type in a label and press <Enter>. Note: The label shall not be more than 15 characters.
3. For RAID 0, select the desired stripe size. Note: Available stripe sizes are 16, 32, and 64 KB. 64K is default. Please do not change the default setting.4. The item: "Create RAID via" allows you to select between the different ways of creating methods for RAID 0 and RAID 1.
The following table gives examples of when each is appropriate.
!
10
Adaptec SATA RAID Setup Guidelines
Notes:
Before adding a new drive to an array, be sure to back up any data stored on the new drive; otherwise, all data will be lost.
If you stop the Build or Clear process on a RAID 1, you can restart it by press-1. ing <Ctrl> and <R>.
If you've used the Quick Init option to create a RAID1, it may return some 2. data mis-matched when you run a consistency check at a later time. This is normal.
The Adaptec Host RAID allows you to use drives of different sizes in a RAID. 3. However, you can only select a smaller drive as the source or first drive during a build operation.
When migrating from single volume to RAID 0, migrating from a larger drive to 4. a smaller drive is allowed. However, the destination drive must be at least half the capacity of the source drive.
It is not recommended that you migrate or build an array on Windows dynamic 5. disks (volumes) because it will result in data loss.
Warning: Do not interrupt the process when you create a RAID 0 using the Migrate option. If you do, you will not be able to restart the system, or to recover the data that was on the source drive.
Note: If you select Migrate for RAID 0, or Build for RAID 1, you will be asked to select the source drive. The contents of the source drive will be preserved. However, the data on the new drive will be lost.
5. When you are finished, press <Done> (as the screen shown below).
!
Adaptec ESB2/ICH7R/ICH9R SATA RAID Setup Instructions
11
Adding a Bootable Array
To make an array bootable:
From the Main menu, select Manage Arrays. 1.
From the List of Arrays, select the array you want to make bootable, and press 2. <Ctrl> and <B>.
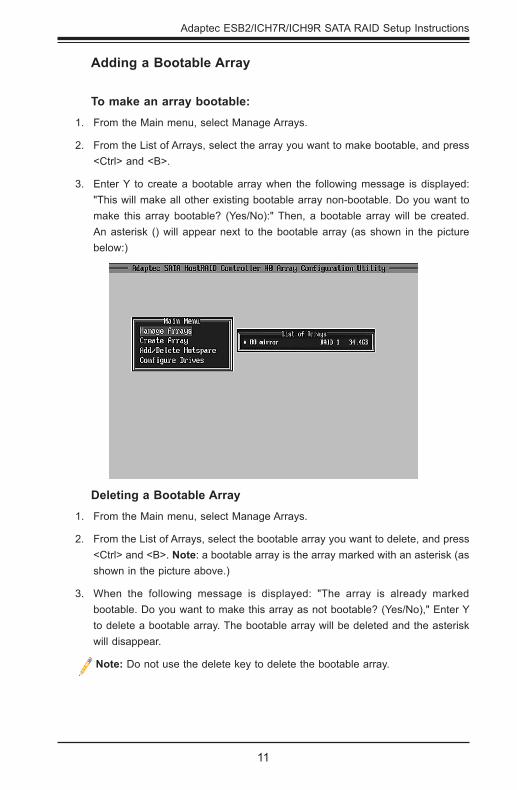
Enter Y to create a bootable array when the following message is displayed: 3. "This will make all other existing bootable array non-bootable. Do you want to make this array bootable? (Yes/No):" Then, a bootable array will be created. An asterisk () will appear next to the bootable array (as shown in the picture below:)
Deleting a Bootable Array
From the Main menu, select Manage Arrays. 1.
From the List of Arrays, select the bootable array you want to delete, and press 2. <Ctrl> and <B>. Note: a bootable array is the array marked with an asterisk (as shown in the picture above.)
When the following message is displayed: "The array is already marked 3. bootable. Do you want to make this array as not bootable? (Yes/No)," Enter Y to delete a bootable array. The bootable array will be deleted and the asterisk will disappear.
Note: Do not use the delete key to delete the bootable array.

12
Adaptec SATA RAID Setup Guidelines
Adding/Deleting Hotspares
To add a Hotspare
Note: In order to rebuild a RAID (RAID 0 or RAID 1), you would need to add a new HDD as a hotspare.
From the main menu (shown on Page 4), select Add/Delete Hotspares.1.
Use the up and down arrow keys to highlight and select the disk you want to 2. designate as a hotspare, press <Insert>, and then <Enter>.
Select Yes when the following prompt is displayed: "Do you want to create 3. spare?" (Yes/No?)
The spare you have selected will appear in the Selected drives Menu.4.
To delete a Hotspare
From the main menu (shown on Page 4), select Add/Delete Hotspares.1.
Use the up and down arrow keys to highlight and select the Hotspare you want 2. to delete, press <delete>, and then <Enter>.
When the following warning is displayed: "Do you want to delete the hot spare?" 3. (Yes/No?), select Yes to delete the hotspare you have selected.
Adaptec ESB2/ICH7R/ICH9R SATA RAID Setup Instructions
13
Viewing Array Properties
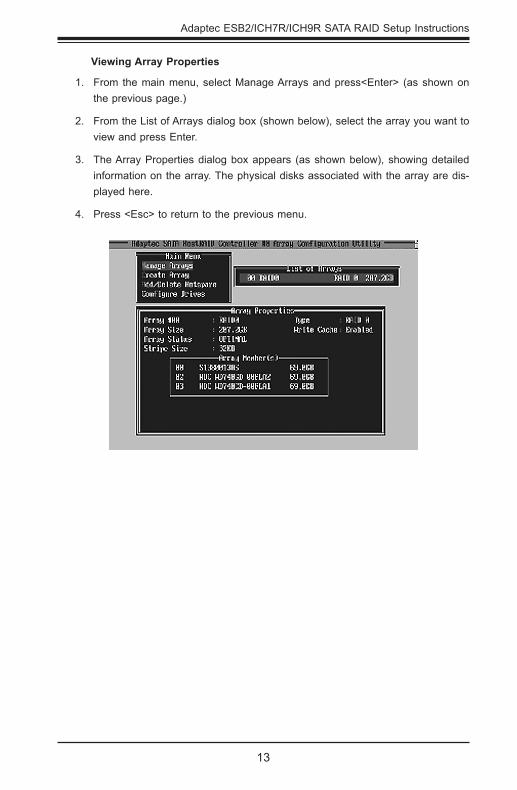
From the main menu, select Manage Arrays and press<Enter> (as shown on 1. the previous page.)
From the List of Arrays dialog box (shown below), select the array you want to 2. view and press Enter.
The Array Properties dialog box appears (as shown below), showing detailed 3. information on the array. The physical disks associated with the array are dis-played here.
Press <Esc> to return to the previous menu.4.
14
Adaptec SATA RAID Setup Guidelines
Rebuilding Arrays
Note 1: Rebuilding applies to Fault Tolerant array (RAID 1) only.
If an array Build process is interrupted or when one critical member is missing, you must perform a Rebuild to restore its functionality. For a critical array rebuild operation, the optimal drive is the source drive.
Note 2: If no spare array exists and a hard disk drive fails, you need to create a spare before you can rebuild an array.
To Rebuild an array
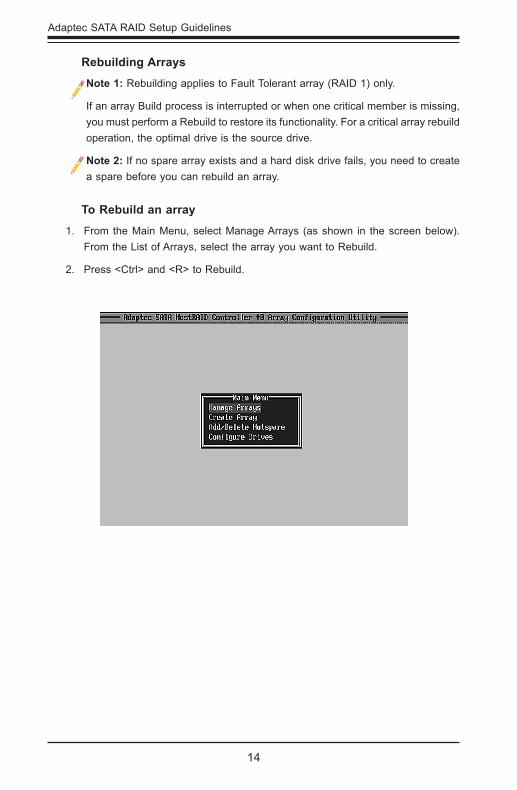
From the Main Menu, select Manage Arrays (as shown in the screen below). 1. From the List of Arrays, select the array you want to Rebuild.
Press <Ctrl> and <R> to Rebuild.2.
Adaptec ESB2/ICH7R/ICH9R SATA RAID Setup Instructions
15
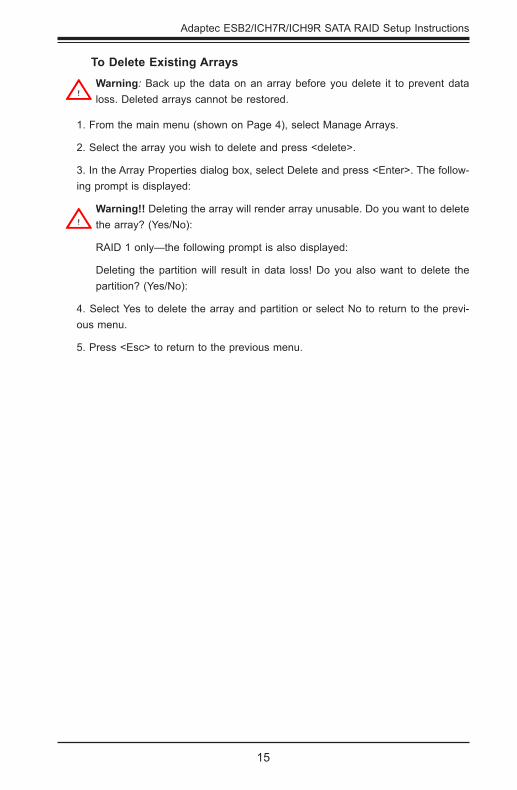
To Delete Existing Arrays
Warning: Back up the data on an array before you delete it to prevent data loss. Deleted arrays cannot be restored.
1. From the main menu (shown on Page 4), select Manage Arrays.
2. Select the array you wish to delete and press <delete>.
3. In the Array Properties dialog box, select Delete and press <Enter>. The follow-ing prompt is displayed:
Warning!! Deleting the array will render array unusable. Do you want to delete the array? (Yes/No):
RAID 1 only—the following prompt is also displayed:
Deleting the partition will result in data loss! Do you also want to delete the partition? (Yes/No):
4. Select Yes to delete the array and partition or select No to return to the previ-ous menu.
5. Press <Esc> to return to the previous menu.
!
!
16
Adaptec SATA RAID Setup Guidelines
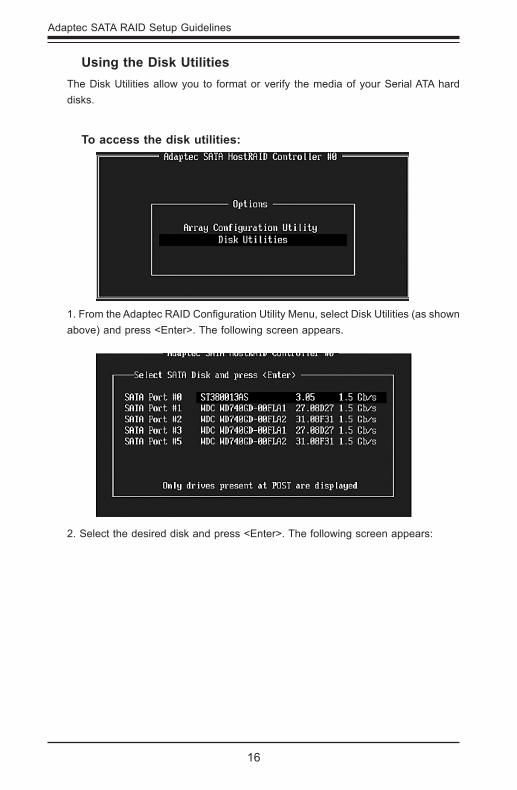
Using the Disk UtilitiesThe Disk Utilities allow you to format or verify the media of your Serial ATA hard disks.
To access the disk utilities:
1. From the Adaptec RAID Configuration Utility Menu, select Disk Utilities (as shown above) and press <Enter>. The following screen appears.
2. Select the desired disk and press <Enter>. The following screen appears:
Adaptec ESB2/ICH7R/ICH9R SATA RAID Setup Instructions
17
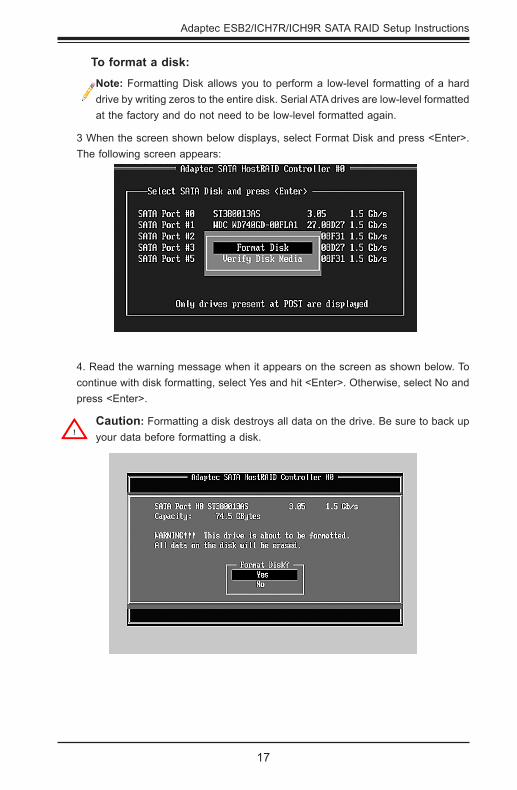
To format a disk:
Note: Formatting Disk allows you to perform a low-level formatting of a hard drive by writing zeros to the entire disk. Serial ATA drives are low-level formatted at the factory and do not need to be low-level formatted again.
3 When the screen shown below displays, select Format Disk and press <Enter>. The following screen appears:
4. Read the warning message when it appears on the screen as shown below. To continue with disk formatting, select Yes and hit <Enter>. Otherwise, select No and press <Enter>.
Caution: Formatting a disk destroys all data on the drive. Be sure to back up your data before formatting a disk.!
18
Adaptec SATA RAID Setup Guidelines
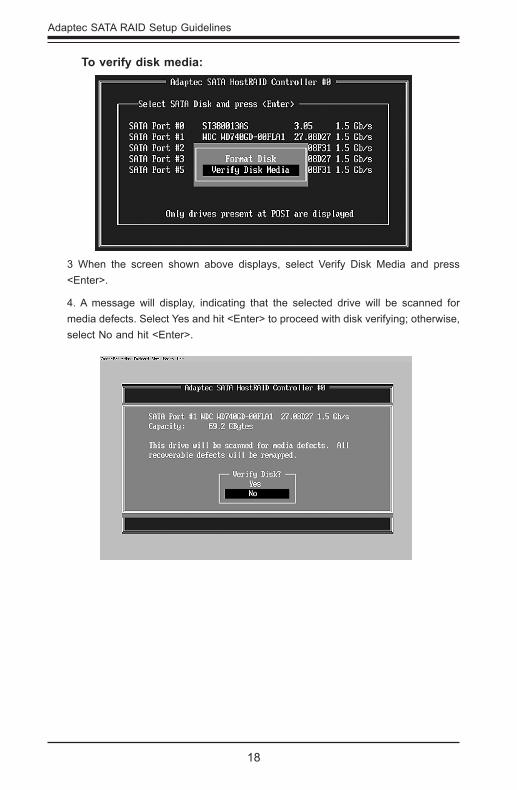
To verify disk media:
3 When the screen shown above displays, select Verify Disk Media and press <Enter>.
4. A message will display, indicating that the selected drive will be scanned for media defects. Select Yes and hit <Enter> to proceed with disk verifying; otherwise, select No and hit <Enter>.

Adaptec ESB2/ICH7R/ICH9R SATA RAID Setup Instructions
19
To Exit Adaptec RAID Configuration Utility
1. Once you have completed RAID array configurations, press <ESC> to exit. The following screen will appear.
2. Press Yes to exit the Utility.
20
Adaptec SATA RAID Setup Guidelines
2 Installing Intel's ESB2, ICH7R or ICH9R Driver by Adaptec and Installing a new Windows OS
Insert Supermicro's bootable CD that came with the package into the CD 1. Drive at system reboot, and the screen: "Supermicro Driver Diskette Maker" will appear.
Choose from the list the item: "Intel ESB2 or ICH7R/ICH9R Driver by 3rd Party 2. (Adaptec)" and press <ENTER>.
From the next screen displayed, select the OS driver you want to install and 3. press <Enter>.
Insert a formatted diskette into drive A: and press <Enter> as prompted.4.
Exit the program after the process is completed. Then, reboot the system.5.
Insert the Microsoft Windows OS Setup CD in the CD Driver, and the system 6. will start to boot up from CD.
Press the <F6> key when the message-"Press F6 if you need to install a third 7. party SCSI or RAID driver" displays.
When the Windows OS Setup screen appears, press "S" to specify additional 8. device(s).
Insert the driver diskette-"Adaptec SATA Driver" into Drive A: and press the 9. <Enter> key.
Choose the Adaptec SATA Driver from the list indicated in the Windows OS 10. Setup Screen, and press the <Enter> key.
Press the <Enter> key to continue the installation process. (If you need to specify 11. any additional devices to be installed, do it at this time.) Once all devices are specified, press the <Enter> key to continue with the installation.
From the Windows OS Setup screen, press <Enter>. The OS Setup will 12. automatically load all device files, and, then, continue with the Windows OS installation.
After Windows OS Installation is completed, the system will automatically 13. reboot.