Action Request System 5.1 Configuring AR...
212
Action Request System 5.1 Configuring AR System PART NO: AR-510-CFG-01
Transcript of Action Request System 5.1 Configuring AR...
PART NO: AR-510-CFG-01
Action Request System 5.1Configuring AR System

Copyright © 1991-2002 Peregrine Remedy, Inc. All rights reserved.
Information contained in this document is proprietary to Peregrine Remedy, Inc., and may be used or disclosed only with written permission from Peregrine Remedy, Inc. This book, or any part thereof, may not be reproduced without the prior written permission of Peregrine Remedy, Inc.. This document refers to numerous products by their trade names. In most, if not all, cases these designations are claimed as Trademarks or Registered Trademarks by their respective companies.
Remedy, the Remedy Corporation logo and design, Action Request System, and AR System are registered or other trademarks of Peregrine Remedy, Inc., Mountain View, CA, USA.
This document and the related software described in this manual are supplied under license or nondisclosure agreement and may be used or copied only in accordance with the terms of the agreement. The information in this document is subject to change without notice and does not represent a commitment on the part of Peregrine Remedy, Inc.. Contact Customer Support to verify the date of the latest version of this document.
The names of companies and individuals used in the sample database and in examples in the manuals are fictitious and are intended to illustrate the use of the software. Any resemblance to actual companies or individuals, whether past or present, is purely coincidental.
If you need technical support for this product, or would like to request documentation for a product for which you are licensed, contact Customer Support by email at [email protected].
If you have comments or suggestions about this documentation, contact Information Development by email at [email protected].
This edition applies to version 5.1 of the licensed program.
U.S. GOVERNMENT RIGHTS. Use, duplication, or disclosure by the Government is subject to Peregrine Remedy, Inc.’s commercial software license(s). If you are the U.S. government, you agree that these written materials are “commercial computer software”-related documentation licensed pursuant to the terms of Peregrine Remedy, Inc.’s commercial computer software license(s) in accordance with 48 C.F.R. 12.212 of the Federal Acquisition Regulations and its successors and 48 C.F.R. 227.7202-1 of the DoD FAR Supplement and its successors. Unpublished rights are reserved under the copyright laws of the United States.
Remedy Corporation1585 Charleston Road, Mountain View, CA 94043Tel 650.903.5200Fax 650.903.9001www.remedy.com

Table of Contents
Preface . . . . . . . . . . . . . . . . . . . . . . . . . . . . . . . . . . . . . . 7
Audience . . . . . . . . . . . . . . . . . . . . . . . . . . . . . . . . 7
Overview of This Manual . . . . . . . . . . . . . . . . . . . . . . . . . 8
Action Request System Documents . . . . . . . . . . . . . . . . . . . . 9
Chapter 1 Action Request System Architecture . . . . . . . . . . . . . . . . . . . 11
AR System Architecture Overview . . . . . . . . . . . . . . . . . . . . 12
Mid Tier. . . . . . . . . . . . . . . . . . . . . . . . . . . . . . 14
AR System Server . . . . . . . . . . . . . . . . . . . . . . . . . . 17
AR System and Web Services . . . . . . . . . . . . . . . . . . . . . . 21
Creating and Publishing a Web Service . . . . . . . . . . . . . . . . . 21
Consuming a Web Service . . . . . . . . . . . . . . . . . . . . . . 22
Scalability . . . . . . . . . . . . . . . . . . . . . . . . . . . . . . 23
Mid Tier Scalability . . . . . . . . . . . . . . . . . . . . . . . . . 23
AR System Server Scalability . . . . . . . . . . . . . . . . . . . . . 23
Working With a Portmapper Service in AR System . . . . . . . . . . . . 30
Windows and Portmapper Services . . . . . . . . . . . . . . . . . . 32
Configuring Clients Through Environment Variables. . . . . . . . . . . 32
Chapter 2 Defining Your User Base . . . . . . . . . . . . . . . . . . . . . . . . 33
Adding and Modifying User Information. . . . . . . . . . . . . . . . . 34
Allowing Guest Users . . . . . . . . . . . . . . . . . . . . . . . . . 38
Validating Password Information . . . . . . . . . . . . . . . . . . . . 39
Licensing and Access Control . . . . . . . . . . . . . . . . . . . . . . 40
License Types . . . . . . . . . . . . . . . . . . . . . . . . . . . 40
Table of Contents ! 3

Action Request System 5.1
License Pools. . . . . . . . . . . . . . . . . . . . . . . . . . . . 41
Displaying User License Information. . . . . . . . . . . . . . . . . . 41
Chapter 3 Setting Preferences . . . . . . . . . . . . . . . . . . . . . . . . . . 45
User Preferences and Customizations . . . . . . . . . . . . . . . . . . 46
Local Preferences . . . . . . . . . . . . . . . . . . . . . . . . . . . 47
Centralized Preferences . . . . . . . . . . . . . . . . . . . . . . . . 47
Creating a Preference Server . . . . . . . . . . . . . . . . . . . . . 48
Configuring Clients to Use a Preference Server . . . . . . . . . . . . . 48
Setting Centralized Preferences on Windows Clients . . . . . . . . . . . 49
Setting Centralized Preferences on Web Clients . . . . . . . . . . . . . 50
Chapter 4 Configuring Servers and Clients . . . . . . . . . . . . . . . . . . . . 57
Configuring AR System Servers . . . . . . . . . . . . . . . . . . . . . 58
Server Information—Platform . . . . . . . . . . . . . . . . . . . . 60
Server Information—Timeouts . . . . . . . . . . . . . . . . . . . . 61
Server Information—Licenses . . . . . . . . . . . . . . . . . . . . 64
Server Information—Configuration . . . . . . . . . . . . . . . . . . 65
Server Information—Log Files . . . . . . . . . . . . . . . . . . . . 72
Server Information—Database . . . . . . . . . . . . . . . . . . . . 76
Server Information—Server Ports and Queues . . . . . . . . . . . . . 77
Server Information—Advanced . . . . . . . . . . . . . . . . . . . . 84
Server Information—Full Text Search . . . . . . . . . . . . . . . . . 87
Server Information—Source Control . . . . . . . . . . . . . . . . . 95
Server Information—Server Events . . . . . . . . . . . . . . . . . . 99
Server Information—Connection Settings . . . . . . . . . . . . . . 102
Server Information—Currency Types . . . . . . . . . . . . . . . . 105
Configuring Multiple Servers . . . . . . . . . . . . . . . . . . . . . . 108
Configuring Multiple Servers on One Machine . . . . . . . . . . . . 108
Configuring Multiple Servers to Access the Same Database . . . . . . . 111
Running a Stand-Alone AR System Server . . . . . . . . . . . . . . . . 113
Configuring Firewalls with AR System Servers . . . . . . . . . . . . . . 114
Configuring Clients for AR System Servers . . . . . . . . . . . . . . . . 116
Configuring a Mail Server . . . . . . . . . . . . . . . . . . . . . . . 118
Configuring a Server to Use Plug-Ins . . . . . . . . . . . . . . . . . . 118
Configuring the AR System Server for External Authentication (AREA) . . . 119
4 " Table of Contents

Configuring AR System
Configuring a Server for Alerts . . . . . . . . . . . . . . . . . . . . . 121
Chapter 5 Configuring the Mid Tier . . . . . . . . . . . . . . . . . . . . . . . 123
Using the Configuration Tool . . . . . . . . . . . . . . . . . . . . . . 124
Accessing the Configuration Tool . . . . . . . . . . . . . . . . . . 124
Using the Configuration Tool with a Load Balancer . . . . . . . . . . 124
Specifying Configuration Settings . . . . . . . . . . . . . . . . . . 125
Deploying Web-based Applications . . . . . . . . . . . . . . . . . . . 138
Deployment File Structure . . . . . . . . . . . . . . . . . . . . . 139
Deployment Methods . . . . . . . . . . . . . . . . . . . . . . . 142
Configuring Deployment Settings . . . . . . . . . . . . . . . . . . 143
Chapter 6 Configuring LDAP Plug-Ins . . . . . . . . . . . . . . . . . . . . . . 145
Configuring the ARDBC LDAP Plug-In . . . . . . . . . . . . . . . . . 146
Configuring the AREA LDAP Plug-In . . . . . . . . . . . . . . . . . . 148
Verifying Server Configuration Settings . . . . . . . . . . . . . . . 153
Logging Options . . . . . . . . . . . . . . . . . . . . . . . . . . . 153
Appendix A AR System Configuration Files . . . . . . . . . . . . . . . . . . . . . 155
ar . . . . . . . . . . . . . . . . . . . . . . . . . . . . . . . . . . 156
ar.conf (ar.cfg) . . . . . . . . . . . . . . . . . . . . . . . . . . . . 157
ardb.conf (ardb.cfg) . . . . . . . . . . . . . . . . . . . . . . . . . . 185
armonitor.conf (armonitor.cfg) . . . . . . . . . . . . . . . . . . . . . 189
Appendix B AR System Server Utilities . . . . . . . . . . . . . . . . . . . . . . . 191
arcache (arcache.exe) . . . . . . . . . . . . . . . . . . . . . . . . . 192
arforkd (UNIX only). . . . . . . . . . . . . . . . . . . . . . . . . . 195
armonitor (armonitor.exe) . . . . . . . . . . . . . . . . . . . . . . . 195
arplugin (arplugin.exe). . . . . . . . . . . . . . . . . . . . . . . . . 196
arreload (arreload.exe) . . . . . . . . . . . . . . . . . . . . . . . . . 197
arserverd (arserver.exe) . . . . . . . . . . . . . . . . . . . . . . . . 199
arservftd (arfts.exe) . . . . . . . . . . . . . . . . . . . . . . . . . . 202
arsignal (arsignal.exe) . . . . . . . . . . . . . . . . . . . . . . . . . 203
Index . . . . . . . . . . . . . . . . . . . . . . . . . . . . . . . . . . . . . 205
Table of Contents ! 5

Action Request System 5.1
6 " Table of Contents

Preface
Audience
This guide is written for administrators who are responsible for setting up and maintaining the Action Request System® (AR System®). It is intended to aid new and current administrators of AR System. This guide builds upon the topics and strategies discussed in the Developing AR System Applications: Basic guide. If you are a current AR System administrator, this guide helps you enhance the ease of use and performance of your AR System environment. If you are a new AR System administrator, this guide helps you create an effective and efficient AR System environment.
Before you explore the topics in this guide, ensure that you understand the terms and concepts discussed in the Optimizing and Troubleshooting AR System guide, which contains all the required information for setting up and administering a basic AR System environment. Your knowledge of basic administrative AR System tasks is crucial for successful implementation of the strategies discussed in this guide.
You must know how to use AR System, including AR System Administrator, AR System Windows User Tool, and AR System Import. Refer to the Installing AR System guide, the Developing AR System Applications: Basic guide, and the Developing AR System Applications: Advanced guide for additional information.
Preface ! 7

Action Request System 5.1
Overview of This Manual
! Chapter 1, Action Request System Architecture, describes the AR System components and how they work together.
! Chapter 2, Defining Your User Base, provides information and instructions for adding, modifying, and deleting users in your AR System environment, and configuring licensing information.
! Chapter 3, Setting Preferences, discusses options for setting user and administrator preferences both locally and on a server for access from computers other than your own.
! Chapter 4, Configuring Servers and Clients, provides configuration information for Server Information settings, AR System servers, multiple servers, clients, and server extensions.
! Chapter 5, Configuring the Mid Tier, describes the architecture of the mid tier and provides information for performing mid tier configuration tasks, including deployment of web-based AR System applications.
! Chapter 6, Configuring LDAP Plug-Ins, provides instructions for configuring settings for the ARDBC and AREA plug-ins.
! Appendix A, AR System Configuration Files, provides information about AR System configuration files.
! Appendix B, AR System Server Utilities, provides information about AR System server utilities.
8 " Preface

Configuring AR System
Action Request System Documents
Title and Part Number Description Audience Format
Action Request System Concepts Guide
AR-510-CG-01
Overview of AR System architecture and features with in-depth examples; includes information about other AR System products.
Everyone Print and PDF
Installing AR System
AR-510-IG-01
Procedures for installing and licensing AR System.
Administrators Print and PDF
Developing AR System Applications: Basic
AR-510-DABG-01
Basic procedures for creating and modifying an AR System application for tracking data and processes.
Administrators Print and PDF
Developing AR System Applications: Advanced
AR-510-DAAG-01
Advanced procedures for extending and customizing AR System applications.
Administrators Print and PDF
Configuring AR System
AR-510-CFG-01
Server administration topics on configuring servers and the mid tier, and maintaining AR System.
Administrators Print and PDF
Optimizing and Troubleshooting AR System
AR-510-OTG-01
Server administration topics and technical essays related to monitoring and maintaining AR System for the purpose of optimizing performance and troubleshooting problems.
Administrators Print and PDF
AR System Database Reference Guide
AR-510-DRG-01
Database administration topics and rules related to how AR System interacts with specific databases; includes an overview of the data dictionary tables.
Administrators Print and PDF
Action Request System Distributed Server Option Administrator’s Guide
AR-510-DSOG-01
Server administration and procedures for implementing a distributed AR System server environment with the Distributed Server Option.
Administrators Print by special order and PDF
Action Request SystemEmail Engine Guide
AR-510-EEG-01
Procedures for installing, configuring, and using the AR System Email Engine.
Administrators Print by special order and PDF
AR System C API Reference Guide
AR-510-CAPI-01
Information about AR System data structures, API function calls, and OLE support.
Administrators and Programmers
Print by special order and PDF
Action Request System Documents ! 9

Action Request System 5.1
Action Request System Java API Information about Java classes, methods, and variables that integrate with AR System.
Administrators and Programmers
HTML
Action Request System Error Messages Guide
AR-510-EMG-01
List and expanded descriptions of AR System error messages.
Administrators and Programmers
Print by special order and PDF
Action Request System Master Index
AR-510-MI-01
Combined index of all books. Everyone Print by special order and PDF
Action Request SystemRelease Notes
AR-510-RN-01
New features list, compatibility lists, international issues, open and fixed issues.
Everyone Print and PDF
AR System User Tool Help Procedures for using AR System Windows User Tool.
Everyone Help menu
AR System Import Help Procedures for using AR System Import. Administrators Help menu
AR System Administrator Help Procedures for creating and modifying an AR System application for tracking data and processes.
Administrators Help menu
AR System Alert Help Procedures for using AR System Alert. Everyone Help Menu
Unless otherwise noted, online documentation is available in Adobe Acrobat (PDF) format on AR System product installation CDs and/or on the Customer Support web site.
Title and Part Number Description Audience Format
10 " Preface

CHAPTER
1
Action Request System ArchitectureThis chapter discusses the overall architecture of AR System 5.1 and provides a conceptual overview of the AR System server and mid tier.
The following topics are covered:
! AR System Architecture Overview on page 12
! Scalability on page 23
! Working With a Portmapper Service in AR System on page 30
Action Request System Architecture ! 11

Action Request System 5.1
AR System Architecture Overview
AR System is based on a client/server architecture, which includes three functional environments:
! Presentation—The presentation piece of AR System is responsible for presenting services and displaying data to clients through various interfaces. These interfaces include browsers, cell phones, PCs, Personal Data Assistants (PDAs), AR System User, AR System Administrator, and API programs. All of these interfaces enable you to access AR System. Clients can be thought of as consumers of services that the AR System server provides.
! Business Processing—This portion of the architecture includes:
! The mid tier
! The AR System server
! Servers such as the Distributed Server Option (DSO), Full Text Search (FTS), and approval server
! The Enterprise Integration Engine (EIE)
! web services
The business processing piece of AR System is responsible for providing services to clients and processing the data entered through clients. Applications that reside within the business processing arena act as go-betweens for the clients and the database, enforcing the rules of your business processes.
! Data Storage—The data storage element contains the actual data for the system. AR System supports DB2, Informix, Oracle, Sybase, and MS SQL databases. For each of the relational databases, tables owned by other systems can also be referenced as if they were owned by AR System. Also, ARDBC plug-ins can be created and configured to allow access to data stored outside the database as if it were located within tables that are owned by AR System.
12 "Chapter 1—Action Request System Architecture

Configuring AR System
Figure 1-1 depicts the relationship between the components that reside within each of the functional environments of the AR System architecture. Notice that there is no definitive starting and ending point separating the three environments, because their functions sometimes overlap.
Figure 1-1: AR System Architecture
Within these three functional environments, several system components work together to provide power, flexibility, and scalability. The rest of this chapter focuses on two of those components, the mid tier and the AR System server, and the interaction between them.
For more information about the AR System architecture, refer to the Action Request System Concepts Guide.
Presentation
BusinessProcessing
DataStorage
Mid-Tier
Non-AR SystemDatabase
Other Non-DatabaseData Sources
AR SystemDatabase
BrowserClients
WindowsClients
WirelessClients
Palm OSClient
Sync
Internet
Services1. Reporting2. Flashboards3. ...
AR System ServerServices1. Approval2. DSO3. Application
Servers4. ...
ARDBCPlug-in
SupportPrograms
AR System Architecture Overview ! 13

Action Request System 5.1
Mid TierThe mid tier serves both as a client of the AR System server and a server to the browser. The mid tier enables you to deploy AR System applications on the web and access the AR System server from a web server. The mid tier provides instructions to the browser in the form of document markup and downloadable scripts. These instructions describe how to present application data and how to interact with the user.
The mid tier leverages a Java Server Pages (JSP) engine and includes a collection of servlets that are plugged in to the web server. The JSP engine facilitates communication between the browser and the web server. It provides components and add-in services that run on the web server.
The web server manages the transfer of all HTML content to the web browser. Key infrastructure components, such as the Form Definition Cache on the web server, servlets, tag handlers, and other services (special Java classes) translate client requests, interpret responses from the AR System server, and run server-side processes that bring AR System functionality to web clients.
Unlike AR System User Tool for Windows, a web browser is a generic client that has no inherent knowledge of any application that might run within it. By acting as an interpreter, the mid tier allows a web browser to become a fully functional AR System client, enhancing scalability and performance.
The key components of the mid tier infrastructure are:
! Web Server—Receives requests for a web page and maps the Uniform Resource Locator (URL) to a local file on the host server. The server then loads this file from disk and serves it across the network to the user's web browser.
! JSP Engine—Handles the JSP files and the basic request/response interface in the web browser environment.
! Content Manager—Retrieves client presentation content from the cache for each AR System object in the page. If the requested content is not in the cache, it is constructed by the cache and returned. The content is constructed using a transformer, which in turn calls upon the Extensible Stylesheets Language Transformation (XSLT) processor and the Extensible Markup Language (XML) parser.
14 "Chapter 1—Action Request System Architecture
Configuring AR System
! JSP Servlets—A servlet is a small piece of Java code, often translated from a JSP file, that runs on a web server. The advantage of a Java servlet on servers with heavy traffic is that servlets can execute more quickly than Common Gateway Interface (CGI) applications.
! Action Handler Servlets—Code that handles data transactions from the browser.
! Cache—Enforces permissions and gets content from the content cache. If the requested content is not in the cache, the cache services get definitions from the AR System server and cache the definitions, using them to construct content.
! Application Manager—Uses the cache to deploy AR System web applications onto the web server and updates them as they change.
! JAVA API—The AR System Java API is used to communicate with the AR System server. The object model provides a set of classes representing the data structures and functions of the API. The Server Proxy class encapsulates all communication with AR System servers and provides connection pooling for performance and scalability.
! Configuration Tool—The mid tier includes a Configuration Tool that enables you to set properties for the mid tier. It is accessible through a JSP file in a browser, using a separate login. The properties submitted from the Configuration Tool are both stored in memory for quick retrieval and written to a file called config.properties for persistence between web server restarts.
Properties that can be set using the Configuration Tool include the list of AR System servers to access, the session time-out interval, cache size, directory locations, Reporting Tool options, deployment methods, logging, MIME types, and user authentication for web services.
For more information about the mid tier, refer to Chapter 5, Configuring the Mid Tier.
AR System Architecture Overview ! 15

Action Request System 5.1
Figure 1-2 depicts the infrastructure of the mid tier.
Figure 1-2: Mid Tier Infrastructure
AR System Servers
ApplicationPage Requests
ApplicationAction Requests
Form JSP Servlets
Web Server
JSP Engine
Content Manager
Cache
Action RequestServlets
Remedy TagHandlers
WorkflowTranslator
AR Object Model
AR Server Proxy
ApplicationManager
Transformer
Logger
Resource Manager
Configuration
16 "Chapter 1—Action Request System Architecture

Configuring AR System
AR System ServerThe AR System server processes all of the data entered by a client. As the workflow engine between the client and the database server, the AR System server writes data into the database when an AR System request is created, and retrieves that data when a client requests it. The server verifies that a user has permission to perform each transaction that is requested, thereby enforcing any access control that you have defined as part of an application. The server also evaluates the data in the database with each transaction to determine whether workflow should be triggered.
The AR System server has no direct user interface. Clients, such as the mid tier, AR System User Tool, and other applications, communicate with AR System by means of a well-defined application program interface (API). Both a C interface and a Java interface are available.
When a client submits a request to the server, the request enters through the API, goes through access control and data validation, filter processing, and then transactions are committed to the data repository as appropriate.
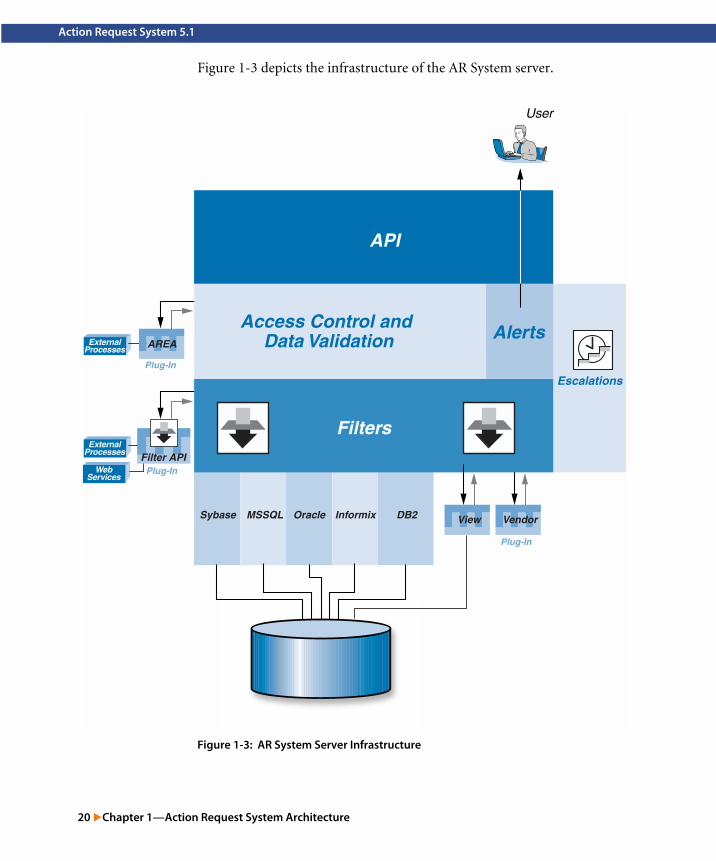
The key components of the AR System server architecture are:
! Application Program Interface (API)—A set of functions and data structures that provide application programmers with access to the full functionality of a product. Developers can create clients written in C or Java. The AR System API is documented in the AR System C API Reference Guide and the Action Request System Java API HTML pages.
! Access Control and Data Validation—A security feature in which AR System administrators limit the access users have to forms, to specific fields within a form, to specific functions within the system, and to data stored within the system.
! Alerts—AR System Alert is a client program that functions as a “desktop pager.” This component within the AR System server supports desktop pages such as flashing icons, audible beeps, sound files, and message windows. For example, it can display a message alerting help desk personnel that a new problem has been assigned to them.
For more information about alerts, see the Developing AR System Applications: Advanced guide and the AR System Alert online help.
AR System Architecture Overview ! 17
Action Request System 5.1
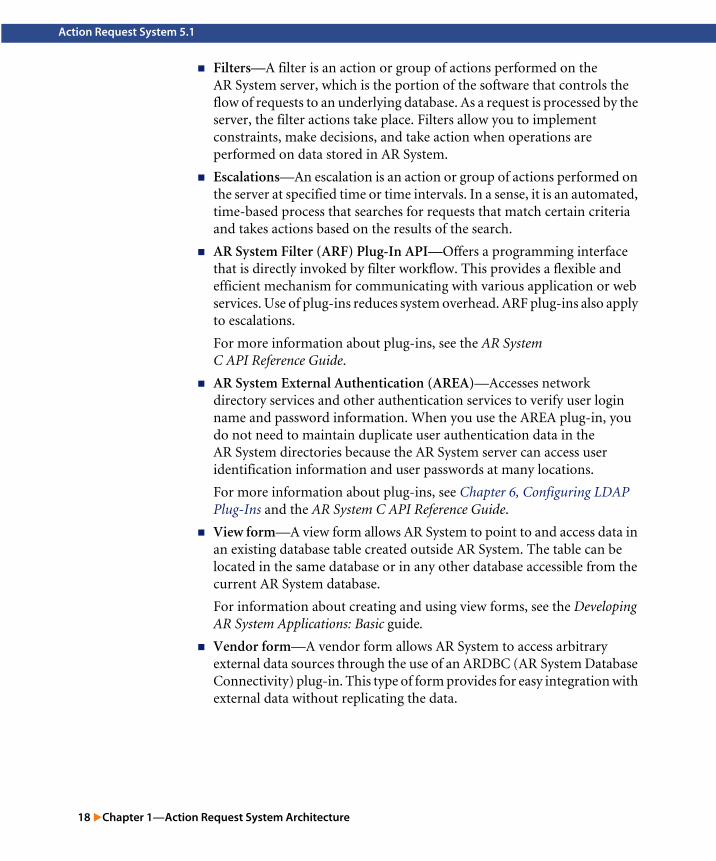
! Filters—A filter is an action or group of actions performed on the AR System server, which is the portion of the software that controls the flow of requests to an underlying database. As a request is processed by the server, the filter actions take place. Filters allow you to implement constraints, make decisions, and take action when operations are performed on data stored in AR System.
! Escalations—An escalation is an action or group of actions performed on the server at specified time or time intervals. In a sense, it is an automated, time-based process that searches for requests that match certain criteria and takes actions based on the results of the search.
! AR System Filter (ARF) Plug-In API—Offers a programming interface that is directly invoked by filter workflow. This provides a flexible and efficient mechanism for communicating with various application or web services. Use of plug-ins reduces system overhead. ARF plug-ins also apply to escalations.
For more information about plug-ins, see the AR System C API Reference Guide.
! AR System External Authentication (AREA)—Accesses network directory services and other authentication services to verify user login name and password information. When you use the AREA plug-in, you do not need to maintain duplicate user authentication data in the AR System directories because the AR System server can access user identification information and user passwords at many locations.
For more information about plug-ins, see Chapter 6, Configuring LDAP Plug-Ins and the AR System C API Reference Guide.
! View form—A view form allows AR System to point to and access data in an existing database table created outside AR System. The table can be located in the same database or in any other database accessible from the current AR System database.
For information about creating and using view forms, see the Developing AR System Applications: Basic guide.
! Vendor form—A vendor form allows AR System to access arbitrary external data sources through the use of an ARDBC (AR System Database Connectivity) plug-in. This type of form provides for easy integration with external data without replicating the data.
18 "Chapter 1—Action Request System Architecture

Configuring AR System
For information about creating and using external forms, see the Developing AR System Applications: Basic guide.
! Database servers—The AR System uses standard relational databases for storing and retrieving data. Architecturally, the database server is a set of processes that are completely separate from the AR System server processes. Physically, the database server processes can be running on the same computer as the AR System server or on a different computer. The database server can be run on any platform that the particular database supports.
AR System Architecture Overview ! 19
Action Request System 5.1
Figure 1-3 depicts the infrastructure of the AR System server.
Figure 1-3: AR System Server Infrastructure
Plug-In
Plug-In
Plug-In
Escalations
Filters
Access Control and Data Validation
API
Alerts
User
Sybase MSSQL Oracle Informix DB2 VendorView
Filter API
AREAExternalProcesses
ExternalProcesses
WebServices
20 "Chapter 1—Action Request System Architecture

Configuring AR System
AR System and Web Services
Web services enable AR System functionality to be available over the web (publishing), and enable AR System applications to access third-party applications. For both publishing and using web services, you set a base form to which the information is set, or through which the information is pushed to other forms or applications. You must map the AR System fields on a base form to input or output parameters of a web services operation. A field can participate as either an input parameter, an output parameter, or both. You can map to a simple flat document or to a complex hierarchical document involving parent and child relationships.
Creating and Publishing a Web ServiceA web service is created and modified in AR System Administrator using the Web Services graphical user interface. Publishing web services makes AR System operations available over the Internet or an intranet network.
Web services that are published in AR System can be simple, such as creating a record in the AR System database, or more complex, such as processing a purchase order that spans across multiple AR System forms.
Each web service consists of the following:
! A base form on which it operates. You specify this form you create the web service. For web services that span across multiple AR System forms, the base form is the master form.
! A list of Create, Get, or Set operations. When you create a web service, by default it automatically has four named operations: OpCreate, OpGet, OpList, and OpSet. You can have more than one operation of the same type or you can have no operations of a particular type.
! A mapping that specifies how individual elements of incoming and outgoing XML documents are mapped to field and forms of the AR System. These are essentially the input and out parameters of the web service.
! An association with XML Schema (.xsd file). Global elements an complex types referred to in the schema can be used in mappings associated with operations.
AR System and Web Services ! 21
Action Request System 5.1
Consuming a Web ServiceYou can use an external web service by creating a Web Service Set Fields filter action to enter data from the web service into a base form. You can then view the form in an AR System client.
For more information about creating and publishing web services, refer to the Developing AR System Applications: Advanced guide.
22 "Chapter 1—Action Request System Architecture
Configuring AR System
Scalability
Scalability is enhanced in both the mid tier and the AR System server.
Mid Tier ScalabilityThe strategy for processing and serving browser-client requests is based on several components. These components work together to take input from the client and compute a response that the user finally sees in the browser as regular HTML or Dynamic HTML (DHTML). These mid tier components do not run in a separate proprietary process, but in the JSP engine using standard web protocols.
The use of JSP servlets makes the Mid Tier scalable in the following ways.
! Multiple threads connecting to a servlet can handle many concurrent users.
! Many active links execute in the browser, eliminating round trips to the web server.
! Common web-server mechanisms and practices can be used for scaling and load balancing.
! Since the JSP engine is a plug-in of the web server that runs in the same process, network calls are not needed for the two to communicate.
! The mid tier caches AR System definitions, requiring fewer trips to retrieve them from the AR System server.
Additionally, the architecture supports server clusters, or web farms, which are hardware setups in which several physical web servers share the load directed to one logical server (one IP address). In a web farm, a local director receives requests and sends them to whichever physical server has the most resources available to handle them.
AR System Server ScalabilityThe AR System multithreaded server is scalable from a single thread performing all server functions to multiple threads, each performing specific functions. The threads adapt to the configuration parameters defined, and they distribute the load. You determine what amount of operating system resources to dedicate to AR System.
Scalability ! 23

Action Request System 5.1
The multithreaded architecture uses two key concepts—queues and threads—as shown in Figure 1-4. The following sections describe how these queues and threads function in the AR System server.
Figure 1-4: Multithreaded Server Architecture
Dispatcher
WorkerThread
WorkerThreads
WorkerThread
WorkerThreads
WorkerThreads
WorkerThreads
AR SystemAdministrator
BrowserClient Client
AR SystemAPI Programmer
Client
Dispatcher
Note: The number of worker threads for fast,list, and private queues can be increased tothe maximum numberof connections your database and hardwarecan support.
Database
WorkerThreads
Mid-Tier
FastQueue
AdminQueue
390621-390634390636-390669390680-390694
EscalationQueue
Flash-boardsQueue
ListQueue
AlertQueue
390600390603 390619 390601390620 390635
PrivateQueues
24 "Chapter 1—Action Request System Architecture

Configuring AR System
QueuesA queue is a meeting point where remote procedure calls (RPCs) wait to be handled by the worker threads that process the RPCs. When a queue is created, it automatically starts the minimum number of threads specified for its thread type. The default for this setting is 1. For more information, refer to Threads on page 28.
There are seven types of AR System queues. Each queue has an RPC program number associated with it, as outlined in the following table.
Note: Administration, alert, escalation, Flashboards, fast, and list queues use a fixed RPC program number. However, private queues can be configured to use any RPC program number within the ranges of RPC program numbers reserved for private queues.
The following sections describe the different types of queues.
References to the configuration file apply to the configuration file specific to your system. The configuration file for Windows is ar.cfg. For UNIX, this file is ar.conf.
Administration Queue
The administration (admin) queue is the only AR System queue that can perform every operation within the system. It performs all administrative restructuring operations, guaranteeing the serialization and integrity of all restructuring operations. This queue can have only one thread.
Queue Type RPC Program Number
Admin 390600
Alert 390601
Escalation 390603
Flashboards 390619
Fast 390620
List 390635
Private 390621–390634, 390636–390669, 390680–390694
Scalability ! 25

Action Request System 5.1
All servers include an admin queue, which is the default server setting. Since an admin queue has a single thread available to handle requests, a server that has only an admin queue (and no fast or list queues) will function as a single-threaded server. While the admin queue handles all administrative functions, it can also perform the functions of all other queues if no other queues are configured. If no other queues are configured, all requests are placed in the admin queue.
Alert Queue
The alert queue handles all alerts that are sent to registered clients. The alert queue handles only internal requests, not requests from outside the AR System server. The threads in this queue do not open database connections, so they do not use many resources.
The minimum thread count for the alert queue is 1. If the server is supporting Remedy Notifier 4.x clients, set a maximum of 5 alert threads because those client versions cannot handle more than 5 simultaneous connection requests. If the server is supporting Remedy Notifier 3.x or earlier clients, set a maximum of 1 alert thread because those client versions do not correctly handle simultaneous connection requests.
To configure an alert queue, see Defining Queues and Configuring Threads on page 82.
Escalation Queue
All servers automatically create an escalation queue unless Disable Escalations is configured. (For more information, see Configuring Multiple Servers to Access the Same Database on page 111.) The escalation queue handles only internal requests, not requests from outside the AR System server. It handles escalations specified by the administrator and performs all escalation processing. Like the admin queue, the escalation queue has only one thread.
Flashboards Queue
The Flashboards queue is a private queue that is automatically created if your system has a Flashboards license. The queue supports all functionality of the Flashboards product to ensure dedicated access without overwhelming the other queues in your system.
26 "Chapter 1—Action Request System Architecture

Configuring AR System
Fast Queue
The fast queue handles the operations that generally run to completion quickly without blocking access to the database. The fast queue handles all server operations except for administrative operations that restructure the database (which use the administration queue) and the ARExport, ARGetListEntry, ARGetListEntryWithFields, and ARGetEntryStatistics API calls (which use the list queue). See the AR System C API Reference Guide for more information about API calls.
One or more threads can serve the fast queue if a fast queue is configured. To configure a fast queue, see Defining Queues and Configuring Threads on page 82.
List Queue
The list queue handles operations of AR System that might require significant time, block access to the database, or both. These operations include ARExport, ARGetListEntry, ARGetListEntryWithFields, and ARGetEntryStatistics.
One or more threads can serve the list queue if a list queue is configured. To configure a list queue, see Defining Queues and Configuring Threads on page 82.
Private Queues
Administrators also can create private queues for specific users who need dedicated access. For example, you might create a private queue for a user who is performing critical operations that you do not want blocked by other users. Private queues guarantee a certain bandwidth dedicated to clients using these queues.
Private queues support all operations except restructuring operations. Restructuring operations are supported only by the administration server (see Administration Queue on page 25). To configure a private queue, see Defining Queues and Configuring Threads on page 82.
Each private queue can be supported by one or more threads. To connect a user to a private queue, see Configuring Clients for AR System Servers on page 116.
Scalability ! 27

Action Request System 5.1
Threads The term thread is short for “thread of execution.” Threads allow the server to process concurrent client requests. Each thread within the multithreaded server can carry out a client request before returning to the queue to process the next one. You should start only as many threads as your database and system resources can reasonably support. The total number of threads cannot exceed the number of database connections that are available to the AR System server.
All threads within a process share network and system resources; therefore, you should consider carefully the available resources of your network when establishing the minimum and maximum thread settings for your server queues.
There are three types of AR System threads:
! Dispatcher
! Worker
! Thread Manager
The following sections describe the different types of threads.
Dispatcher Thread
The dispatcher thread routes requests to the appropriate queues. This thread receives connection requests from clients. The dispatcher thread then places the requests into the appropriate queue where each request can be handled by one of multiple worker threads.
Every call that the dispatcher thread receives is assigned an RPC ID that can be used to identify the call from the time the call is placed into a queue until a response is sent to the client.
In general, the dispatcher thread uses the following logic to dispatch calls:
! If no other queues are defined, the dispatcher thread routes all requests to the admin queue. However, if fast and list queues are created in addition to the admin queue, the dispatcher routes client requests according to the type of operation being performed. If private queues are created, the dispatcher will direct the call to the appropriate private queue based on the RPC program number of the request.
28 "Chapter 1—Action Request System Architecture

Configuring AR System
A request is routed to the appropriate queue based on its RPC program number. For example, a call that has RPC program number 390600 will be routed to the admin queue.
! If a call with RPC program number 390620 (fast) or 390635 (list) is received and there is no fast or list queue, the dispatcher thread routes the call to the admin queue. If there is only a list queue, the dispatcher thread places the call in that queue. If there is only a fast queue, the dispatcher thread directs the call to that queue. If there are both fast and list queues, the dispatcher routes the call to the appropriate queue based on the call number.
! If a call is received with RPC program number 390601 (previously supported by the Notification server, which has now been merged with the AR System server), the dispatcher routes the call to the fast queue.
! If a call is received with an RPC program number other than those specified for admin, fast, list, and Flashboards queues, the dispatcher identifies the call as destined for a private queue. If a private queue supporting the RPC program number exists, the dispatcher thread routes the call to that queue. If no private queue exists but there is a fast or list queue, the call will be routed to the appropriate queue based on its RPC program number. If there is no fast or list queue, the call will be routed to the admin queue. The escalation and alert queues do not receive calls from the dispatcher.
Worker Threads
Worker threads respond to the RPCs that have been dispatched to individual queues. Each queue creates one or more worker threads. The worker threads within a queue are identical and can handle any request. However, only the worker thread started by the admin queue can handle calls that modify definitions or server configuration settings.
Upon startup, each thread creates a connection to the database that it uses throughout its existence. If the thread is unable to establish a connection, it terminates itself, notifying the queue that no more threads should be started. The database connection is dedicated to the thread, even when that particular thread is not busy.
Any available worker thread can remove the request from the queue, read the request, process it, and return results to the client before returning to the queue to respond to another request. When a request is placed in a queue and no existing threads are available to handle it, a new thread is started until the queue reaches the maximum number of threads allowed for its thread type.
Scalability ! 29

Action Request System 5.1
Thread Manager
The thread manager is responsible for ensuring that a thread is restarted if it dies.
Determining How Many Threads You NeedA major benefit of a multithreaded server is not having “fast” operations held up behind a slow “list” operation. Deciding how many fast and list threads you need depends on your particular setup and situation. For example, not specifying enough list threads might mean you have idle fast threads but an overloaded list queue.
Another consideration is that list threads require more memory than fast threads. For example, a complicated query might require a great deal of memory at a given moment. A few of these large queries can temporarily exhaust your system resources.
To determine how many threads of each type you need, start by examining the types of API calls in your API log file. If your system processes many fast operations, you might decide to increase the number of fast threads. A different rule of thumb is to specify a larger maximum of list threads than fast threads, simply because fast operations are generally performed more quickly than list operations.
Do not specify an artificially high number of maximum threads because the threads would essentially get in one another’s way by consuming resources that other threads need. To set the number of minimum and maximum threads, see Server Information—Server Ports and Queues on page 77.
Working With a Portmapper Service in AR System
A portmapper functions as a “directory” of services and the ports on which those services are running. Processes can opt to register or not register their location with a portmapper. A common reason for not registering with a portmapper is security.
30 "Chapter 1—Action Request System Architecture

Configuring AR System
If an AR System server is registered with a portmapper, your clients do not need to know what port the server is listening on because the clients can identify the port using the portmapper and direct API calls to the appropriate TCP port. If a server is not registered with a portmapper, you will need to assign a TCP port number to that server. Otherwise, the system must search for an open port to communicate on each time the server is restarted. Your clients will not know where to find your AR System server because the port may be different if the AR System server is restarted.
Registering with a portmapper and assigning TCP port numbers are not mutually exclusive options. You can do both. If you specify a particular port for a server and register the server with a portmapper, clients within the firewall do not need to be configured to access the specified port number.
If the AR System server is not registered with a portmapper:
! Client processes must be able to identify the port to communicate on to contact the server. For more information about configuring ports for the client, see Configuring Windows Clients to Avoid Using a Portmapper on page 117.
Working With a Portmapper Service in AR System ! 31

Action Request System 5.1
! Macros started by the server in a firewall environment will not be able to find the server. To fix this, register the server with a portmapper. You can use the runmacro utility, which has a command-line port setting.
For more information, refer to Configuring Clients Through Environment Variables on page 32.
Windows and Portmapper ServicesBecause many Windows environments do not have a portmapper service, one is provided with the AR System server. If you already have a portmapper, AR System will register with it if requested. If not, you can specify that the AR System Portmapper service should be started and used as the portmapper for the system.
There is no AR System Portmapper for UNIX because all UNIX operating systems automatically include a portmapper as a standard feature.
Configuring Clients Through Environment VariablesWhen using a client on a UNIX server, you can connect to the AR System or private servers at a specific TCP port by setting the AR TCP Port variable.
The following strategies require that all servers that the client uses are on the same port.
For the C shell, use the following commands to set ARTCPPORT:
% setenv ARTCPPORT <TCP_Port_Number>% aruser &
For the Bourne shell, use the following commands to set ARTCPPORT:
% ARTCPPORT=<TCP_Port_Number>; export ARTCPPORT% aruser &
For an API program, you can set variables through a shell or from within the program For more information, refer to the AR System C API Reference Guide.
32 "Chapter 1—Action Request System Architecture

CHAPTER
2
Defining Your User BaseThis chapter provides instructions for managing information about your AR System users. It includes the following information:
! Adding and Modifying User Information on page 34
! Allowing Guest Users on page 38
! Validating Password Information on page 39
! Licensing and Access Control on page 40
Defining Your User Base ! 33

Action Request System 5.1
Adding and Modifying User Information
In AR System, you can have registered users and guest users. Each type of user has different privileges within the system, as discussed in the following sections.
Use the User form, shown in Figure 2-1, to define the components that work together to determine each user’s access to AR System: login name, password, group membership, and license type. You also define alert information for each user in this form.
To grant a user permission for AR System objects, add the user to the groups to which access will be given. To make a user part of a group, select the appropriate group from the Group List menu list in the User form. (Multiple group names in the Group List field are separated by spaces.) You can select from the reserved AR System groups. For more information about groups, refer to the Developing AR System Applications: Basic guide.
Figure 2-1: User Form in New Mode
34 "Chapter 2—Defining Your User Base

Configuring AR System
The following table lists the key fields in the User form.
Field Description
Login Name Identifying name that the user will enter into the User Name field when logging in to AR System. The name may be the same or different than the user name by which this user is known to the underlying operating system.
Password Identifying password that the user will enter when logging in to AR System. This field is limited to 29 characters.
The Password field is encrypted, so users cannot retrieve passwords in clear text; for example, to log in to applications. This password encryption also applies to transferring passwords by using the Distributed Server Option. To enhance system security, select a password that is different from those used for other purposes.
If unsecure passwords are needed for applications, store the password in a character field rather than the Password field (field 102).
If the password field is left blank, the AR System server will not validate the password with the user’s Windows NT or UNIX password, unless you configure the server to cross-reference a blank password. For more information, refer to Server Information—Configuration on page 65.
Group List Lists the access control groups to which the user belongs. If you leave this field empty, the user will have only basic Submitter, Assignee, Assignee Group, or Public permissions. Specify groups by name or ID, as defined in the Group form, when entering groups in the Group list.
User permissions are determined in the Group List field of the User form. If you later change the Group ID for a group, the users originally assigned to the group will still be attached to the old ID. If there is no group with the old ID, these users will lose access to any AR System object for which they do not have permission through another group.
This field is limited to 4000 bytes, including expanded strings.
Full Name Full name of a user. By default, this name appears in the Results pane of the User form when users perform a search operation.
License Type Type of license that the user is assigned: Read, Fixed, or Floating. The default is Read. (For detailed information about licensing, refer to the licensing chapter in the Installing AR System guide.)
Adding and Modifying User Information ! 35

Action Request System 5.1
Use the following procedures to create, modify, or delete AR System users and to allow users to change their information.
Creating New Users
To use the three Fixed Write licenses included with AR System for your users, follow these steps to create new users, or rename any default user by referring to Modifying User Information on page 37.
1 Log in to the AR System User Tool Tool.
2 Enter your user name and password into the Login dialog box, and click OK.
If you are the first administrator to log in, you must log in as Demo and leave the password field empty. (AR System user names are case-sensitive, which means that you must type Demo, not demo or DEMO.)
During initial installation, the Demo user is installed without a required password. To keep AR System secure, add a password for this user as soon as possible.
3 Choose File > Open.
4 Select User from the appropriate server.
5 Click New to open the User form in Create mode.
6 Enter information in the appropriate fields, as described in the previous table.
7 Save your changes.
If adding the user causes you to exceed your license agreement, an error message appears.
Full Text License Type
Type of full text search license that the user has: None, Fixed, or Floating. The default is None.
For more information about the full text search feature, see the Developing AR System Applications: Advanced guide.
Default Notify Mechanism
Method by which the user is notified for filter and escalation Notify actions when User Default is specified. The default setting on the User form is Alert.
Email Address Email address used to notify the user if email is the notify method.
Field Description
36 "Chapter 2—Defining Your User Base

Configuring AR System
Modifying User Information
Warning: Do not modify the Demo user’s Fixed Write license or Administrator group membership until you have created another Administrator user first, or you will lose administrator privileges.
1 In AR System User Tool, choose File > Open.
2 Select User from the appropriate server.
3 Click Search to open the User form in Search mode.
4 Choose Actions > Search to retrieve a list of currently defined users.
5 Select the appropriate user from the list.
6 Modify information in the appropriate fields.
7 Save your changes.
Deleting Users
Warning: Do not delete the Demo user until you have created another Administrator user first, or you will lose administrator privileges.
1 In AR System User Tool, choose File > Open.
2 Select User from the appropriate server.
3 Click Search to open the User form in Search mode.
4 Choose Actions > Search to retrieve a list of currently defined users.
5 Select the appropriate user from the list.
6 Choose Actions > Delete.
A confirmation box appears to verify that you want to delete the selected users.
7 Click OK.
Allowing Users to Change User Record Information
Use the Assignee group to allow users to modify their own passwords, default notification mechanisms, or email addresses.
1 In AR System Administrator, make the User form’s Assigned To field visible. (By default, the field is hidden.)
For more information, refer to the information about the Display tab for fields in the Developing AR System Applications: Basic guide.
Adding and Modifying User Information ! 37
Action Request System 5.1
2 In the User form, give the Assignee group Change permission for the Password, Default Notify Mechanisms, or Email Address fields.
For information about defining field permissions, refer to the Developing AR System Applications: Basic guide.
3 In the User form, set the form permissions to Public and Visible.
4 Save your changes.
5 Log in to AR System User Tool as an administrator, and choose File > Open.
6 Select User from the appropriate server.
7 Click Search to open the User form in Search mode.
The Assigned To field will be visible in the User form.
8 Choose Actions > Search to retrieve a list of currently defined users.
9 Select the appropriate user from the list.
10 In the User form, copy the Login name to the Assigned To field to make the user the Assignee.
You can also make the user the submitter by entering the same name in the Login name field and in the Creator field.
11 Save your changes.
Allowing Guest Users
AR System includes a setting that enables you to permit users who are not recognized users (that is, not listed in the User form) to have access to AR System User Tool as a member of the Public Group. Allowing guest users can involve as many as three settings, depending on whether you want the user to only log in to AR System User Tool or also to submit new requests and modify existing requests for which the guest user is the original submitter.
Allowing Guest Users
1 In AR System Administrator, select a server to administer.
2 Choose File > Server Information.
3 Click the Configuration tab.
4 Select the Allow Guest Users check box.
The guest user can log in to AR System User Tool and access all of the AR System objects for which the Public group has permission.
5 Click OK.
38 "Chapter 2—Defining Your User Base

Configuring AR System
6 To allow the guest user to create new requests, complete the following steps for each field in which you would expect a value to be supplied:
a Open the form in AR System Administrator.
b Double-click the field to open the Field Properties window.
c Click the Permissions tab.
d Select the Allow Any User to Submit check box.
The guest user can assign a value to the field even though the guest user does not belong to a group with Change permission for the field. For more information, see Special Submitter Access Mode on page 44.
e Save your changes.
7 To enable guest users to modify an existing request for which they are the submitter (in the Submitter field), complete the following steps:
a Choose File > Server Information.
The Server Information window appears.
b Click the Licenses tab.
c From the Submitter Mode option list, select Locked.
The guest user can modify all existing requests, where the guest user is the original submitter, without a write license for fields that have Change access for the Submitter group. For more information about the special submit setting, refer to the Developing AR System Applications: Basic guide.
d Click OK.
Validating Password Information
The AR System server can validate the password entered by the user against their Windows NT or UNIX login password instead of maintaining an AR System-specific password. To allow this, you must:
! Ensure that the AR System user name and the operating system user name are identical. Leave the Password field in the User form blank. (See the column Field on page 35.)
! In AR System Administrator, select the Cross Ref Blank Password check box in the Configuration tab of the Server Information dialog box. (For more information on password configuration, refer to Server Information—Configuration on page 65.)
Validating Password Information ! 39

Action Request System 5.1
Where supported, the operating system password validation feature enables the operating system to set the following password policies (which are not covered by the AR System password manager):
! Aging—Determines how quickly a password expires.
! Lockout periods—Limits the number of incorrect logins a user can enter before getting locked out.
! Length—Sets a consistent password length.
Licensing and Access Control
When creating users, you must assign a license type to each user. The type of license a user has determines the user’s ability to access AR System objects and to perform tasks.
The following section explains AR System license types. It also introduces a setting that overrides a user’s need for a write license when modifying fields in requests for which the user is the initial submitter.
License TypesOne component that determines the access that a user will have to AR System is the type of license you assign. A complete discussion of licensing is found in the Installing AR System guide, but the important license elements as they relate to access control are summarized in the following table.
License Type Description
Read Enables users to search and display existing requests. Users cannot submit new requests, or modify or save data in existing requests. This type of access to the system is also called View access.
40 "Chapter 2—Defining Your User Base

Configuring AR System
License PoolsYou can reserve a number of floating licenses for a group, subject to the number of floating licenses available in the database. When a member of a group logs in, a license from the license pool for that group is granted. When the user has finished with the license it is released back into the pool.
If there are no licenses available in the pool, a check is made to see if the user is a member of any other group that has a license pool. If there are no licenses available in any pool the user is a member of, a check is made for floating licenses not associated with any pool. At no time is a user granted a floating license from a pool of which he is not a member.
License pools allow you to give priority to a group that needs licenses more urgently. The group with the smallest group ID has the highest priority. When a non-reserved floating license becomes available, it is granted to the next user who needs it, regardless of the priority of that user’s access to the system.
You specify the number of licenses reserved for a group in the Group form in AR System User Tool. For more information about groups, refer to the Developing AR System Applications: Basic guide.
Displaying User License InformationUse the License Information dialog box to view information about AR System users and to release floating licenses.
Fixed Write Includes all of the capabilities of a Read license, and also enables users to modify and save data for existing requests based on the groups to which the user belongs. AR System administrators and subadministrators must have a Fixed Write license. Other AR System users who consistently need to modify requests should also have Fixed Write licenses.
Floating Write Includes all of the capabilities of a Read license, and also enables users to modify and save data for existing requests based on the groups to which the user belongs. Floating Write licenses can be used by multiple users, one user at a time. This type of license is designed for users who occasionally need to modify and save data for existing requests.
License Type Description
Licensing and Access Control ! 41

Action Request System 5.1
Viewing User InformationThe License Information dialog box displays information about the registered and current users on the currently selected server.
The registered user information displayed in the License Information dialog box is the information that was submitted for each user in the User form. See Adding and Modifying User Information on page 34 for more information.
Displaying User License Information
1 In the server window, choose File > License Information to view the License Information dialog box in AR System Administrator.
Figure 2-2: License Information
2 From the Category option list, select the appropriate license category.
! Current Licenses: For each user currently connected to AR System, displays the name of the user, the type of AR System license assigned, the type of FTS license, the connect time during the current session, the time that the user last accessed the server during this session, the floating write license pool, and the floating FTS license pool.
! Registered Licenses: For all users known to AR System, displays the name of the user, the type of AR System license assigned, the type of FTS license, the default notification mechanism, and the email address.
3 To display all users for the selected licenses category, select the appropriate license type from the menu.
Categoryoptions
License types
42 "Chapter 2—Defining Your User Base

Configuring AR System
The Write License Pool and FTS License Pool columns show the name of the current group (pool) from which the user’s floating write and FTS licenses have been acquired. At another time, if a license has been acquired from a different pool to which the user belongs, that pool name will be displayed.
4 Click Close.
Releasing Floating LicensesAs an administrator, you can use the License Information dialog box to release a floating license that has not yet timed out. A user can be released only once per hour.
When using floating licenses, a time-out interval determines the point at which a user’s floating license is automatically released if the user has performed no action against the server within that interval. However, sometimes you must free a user license that has not yet timed out. For example, if a user goes home without releasing the current license and another user cannot get onto the system because all licenses are in use, it may be necessary to release the license held by the user who has left.
Releasing a Floating License
1 In AR System Administrator, open the server window.
2 Choose File > License Information to view the License Information dialog box.
3 From the Category option list, select Current Licenses.
4 From the License Type list, select Floating.
A list of users with the selected license type appears.
5 From the list of active users, select the appropriate user.
6 Click Release User.
The license “token” held by that user is released. Another user can take the “token” and start working. If the original user returns, the user will not be able to get back into the system if no “tokens” are available.
Note: If you release a Fixed or Read license, this procedure removes the user from the list of current users; there is no effect on the user’s ability to connect to the server. The next time the user accesses the server, the user’s license information will reappear.
Licensing and Access Control ! 43

Action Request System 5.1
Special Submitter Access ModeAR System contains a setting that allows users to modify requests that they initially submitted even if they do not have a write license. To enable this feature, set the Submitter Mode to Locked in the Licenses tab of the Server Information dialog box, then restart AR System server. Descriptions of both Submitter Mode options follow.
! Locked: Allows users who have their name in the Submitter field to modify requests without a write license. In this mode, once the entry is submitted, the value in the Submitter field cannot be changed.
! Changeable: Requires users to have a write license to change any record, including requests for which they are the submitter.
44 "Chapter 2—Defining Your User Base

CHAPTER
3
Setting PreferencesThis chapter discusses options for setting user and administrator preferences both locally and on the server (centralized). It provides the following information:
! User Preferences and Customizations on page 46
! Local Preferences on page 47
! Centralized Preferences on page 47
Setting Preferences ! 45

Action Request System 5.1
User Preferences and Customizations
Users can set individual preferences for the behavior and display characteristics of each client. These preferences can be stored locally (on the client machine) or centrally (on a designated preference server).
Users logging in to AR System User Tool can choose to use local or centralized preferences. Centralized preferences help users who want to have the same settings and customizations available when logging in to multiple machines. Local preferences will be used when no preference server is designated or available. Regardless of whether centralized or local preferences are used, multiple users can use the same client machine with individual preferences and customizations. For more information, see Setting Centralized Preferences on Windows Clients on page 49.
For multiple users on a single machine, you should set up separate user accounts by creating individual Home directories. See AR System User Tool online help for more information on the content and format of files in the Home directory. See the client installation section in the Installing AR System guide for information about setting up user accounts.
Users logging in to web clients must use centralized preferences to store preferences. See Setting Centralized Preferences on Web Clients on page 50 for more information.
46 "Chapter 3—Setting Preferences

Configuring AR System
Local Preferences
If you choose not to install centralized preferences, your local ar.ini file will be used to determine your preferences.
To use localized preferences, specify none at the prompt for a preference server when you log in. Your preferences will be saved to your local ar.ini file.
Figure 3-1: Selecting a Preference Server at Login
Note: There is no synchronization between local and centralized preferences; local preferences will not be stored on your preference server. Similarly, the system does not update your ar.ini file when you set your centralized preferences.
Centralized Preferences
To use centralized preferences, you must have created at least one preference server, and you must configure clients to log in to the preference server. Web clients also must have access to the web view of the AR System User Preference form.
If you have not installed the preference forms, and subsequently want to use centralized preferences, you can import the definition files. There are three preference forms, and all three must be loaded on the preference server for centralized user preferences to function properly. For more information about these forms, see Creating a Preference Server on page 48.
Select (none) to use localized preferences.
Local Preferences ! 47

Action Request System 5.1
Creating a Preference ServerTo create a preference server, install or import the following forms and associated objects outlined in the following table:
For information about installing centralized preference forms, see the Installing AR System guide. For information about importing forms and other server objects, see the Developing AR System Applications: Advanced guide.
Configuring Clients to Use a Preference ServerTo use centralized preferences in AR System User Tool, users must specify a preference server during login by selecting the server from the drop-down list in the Preference Server field of the Login dialog box.
Form Purpose and Content
User Preference form
Stores preferences for AR System User Tool, AR System Alert (if installed), and web clients. This form has three views:
! Default Administrator view—Displays every field on the form, including the Request ID, Modified Date, and Last Modified By fields. Administrators have access to every user entry for this form.
! User view—Displays all preference fields, but hides all administrative fields. Users can access only their own preference entries.
! Web view—Displays web preference fields. Users can access only their own preference entries.
Central File form For AR System User Tool only, stores copies of locally stored customized files such as saved searches, favorite forms, macros, reports, customized field defaults, and user data files. Note that recently used forms, guides, applications, and requests are stored in the AR System User Preference form.
Administrator Preference form
Stores preferences for AR System Administrator and AR System Import. By default, this form has administrator permissions only. You may want to set subadministrator permissions by following the procedures in the Developing AR System Applications: Basic guide.
Display preferences and the list of login servers are shared with AR System User Tool and are stored in the AR System User Preference form.
48 "Chapter 3—Setting Preferences

Configuring AR System
For web clients, the administrator specifies preference servers. Administrators can specify the names of preference servers during the mid tier installation, or they can specify these servers later by using the AR System Configuration Tool. For more information, see Chapter 5, Configuring the Mid Tier. Also, see the online help for AR System User Tool, AR System Administrator, AR System Alert, and AR System Configuration Tool.
Ensure that users can modify their entries on the preference forms. To do this, assign a write license to every centralized preference user, or set the Submitter Mode on the server to Locked, which allows users to modify requests without a write license. For more information, see Adding and Modifying User Information on page 34 and Special Submitter Access Mode on page 44.
Setting Centralized Preferences on Windows ClientsUser and administrator preferences can be set using the following client tools:
! For AR System User Tool and AR System Alert, preference settings are accessed through the Tools > Options menu, and are stored in the AR System User Preference form.
! For AR System Administrator and AR System Import, preference settings are accessed through the File > Preferences menu, and are stored in the AR System Administrator Preference form.
In AR System User Tool, users can also create and save customizations such as reports, macros, favorite forms, user data, custom field defaults, and saved searches. All of these customizations are stored locally on the client, but they can be uploaded to and downloaded from the AR System Central File form for centralized access.
Preferences can be set in AR System User Tool to synchronize local and central copies by uploading or downloading files manually or automatically, such as when the user logs in. Before selecting a synchronization method, users should consider the number of customizations, the frequency of changes, and whether central or local copies of files are likely to be the most current.
For more information about creating customizations, and downloading and uploading custom files, refer to AR System User Tool online help.
Centralized Preferences ! 49

Action Request System 5.1
Setting Centralized Preferences on Web ClientsWeb client users set preferences by opening their own entry on the AR System User Preference form and submitting changes. Because a limited number of preferences are applicable to the web, a customized web view is available for this form.
For information about creating and deploying web applications, refer to the Developing AR System Applications: Basic guide.
The following table lists the fields in the web view of the User Preferences form.
Field Name Description
Login Name Allows the administrator to create and modify preferences for a specific user by entering that user’s login name in this field. Users can search for and modify their own preference records. The default setting is $USER$.
Short Description Allows the administrator to create and modify preferences for a specific user based upon a value in this field. Users can search for and modify their own preference records. The default setting is Preference entry for $USER$.
On New Defines the action a new form will take when accessed multiple times. The options are:
! Set Fields to Default Values (the default)—Designates that fields on new forms will be filled with default values when a new form is opened.
! Keep Previous Field Values—Designates that fields on new forms will be filled with the values from the previous form when a new form is opened.
! Clear All Fields—Designates that all fields on new forms will be cleared when a new form is opened.
! None—Designates that it will take the default value set by the administrator.
50 "Chapter 3—Setting Preferences

Configuring AR System
On New—Confirm After a New Request
Defines whether there will be a confirmation after a new request.
! If Yes is selected, a dialog box will appear after the form is submitted to verify the submitted entry and the entry ID. If
! If No is selected, the entry will be submitted without verification.
The default is No.
Report—Crystal Report Viewer
Designates an application for viewing Crystal Reports. The choices are:
! Java (using browser JVM)! Java (using Java Plug-in)! ActiveX! Netscape Plug-in! HTML with frames! HTML without frames (the default)! None (The system will take the default value that
the administrator sets.)
Report—Report Server Defines the name of the server where the four reporting forms reside: ReportType, ReportCreator, Report, and ReportSelection. The server name also serves as the home for report definition files created. This entry is necessary when the server that stores the reporting forms is different from the server that stores the data to be reported on. This field is blank by default.
On Search Defines the action a search form will take when accessed multiple times. The options are:
! Set Fields to Default Values—Designates that fields on search forms will be filled with default values when a new search form is opened.
! Keep Previous Field Values—Designates that fields on search forms will be filled with the values from the previous search form when a new search form is opened.
! Clear All Fields (the default)—Designates that all fields on search forms will be clear when a new search form is opened.
! None—Designates that it will take the default value set by the administrator.
Field Name Description
Centralized Preferences ! 51

Action Request System 5.1
On Search—Limit Number of Items Returned
Defines whether the number of search results returned is limited.
! If No is selected, all results will be returned. ! If Yes is selected, only up to the number in the
How Many field will be returned. The default is No.
On Search—How Many Defines the limit for the number of search results returned. The numerical value entered here will be applied if Yes is selected in the Limit Number of Items Returned field. (If No is selected, this field is disabled.)
The default value is 1000.
Alert—Refresh Interval Defines the interval, in minutes, that passes between queries to the Alert Events form. The default value is 0.
The alert list displays the user’s alerts by querying the Alert Events form that contains the user’s alerts.
Alert—Alert Servers Defines which servers will contribute alerts to a web-based alert list. The administrator can enter the server names to retrieve alerts from this field. The server names must be separated by the comma ( , ) delimiter.
This field is clear by default.
Diary Field—Show Most Recent First
Defines the order in which entries will appear in the diary field of a form. The choices are Yes, Default, No, and None.
! Yes indicates that diary entries will be listed in descending order by date, starting with the most recent entry.
! No indicates that diary entries will be listed in ascending order by date, starting with the earliest entry.
! If Default or None is selected, the field option defaults to Yes.
The default is Yes.
Logging—Active Links Defines whether logging for active links will be enabled.
! If Yes is selected, active link logging is enabled.! If No is selected, active link logging is disabled.The default is No.
Field Name Description
52 "Chapter 3—Setting Preferences
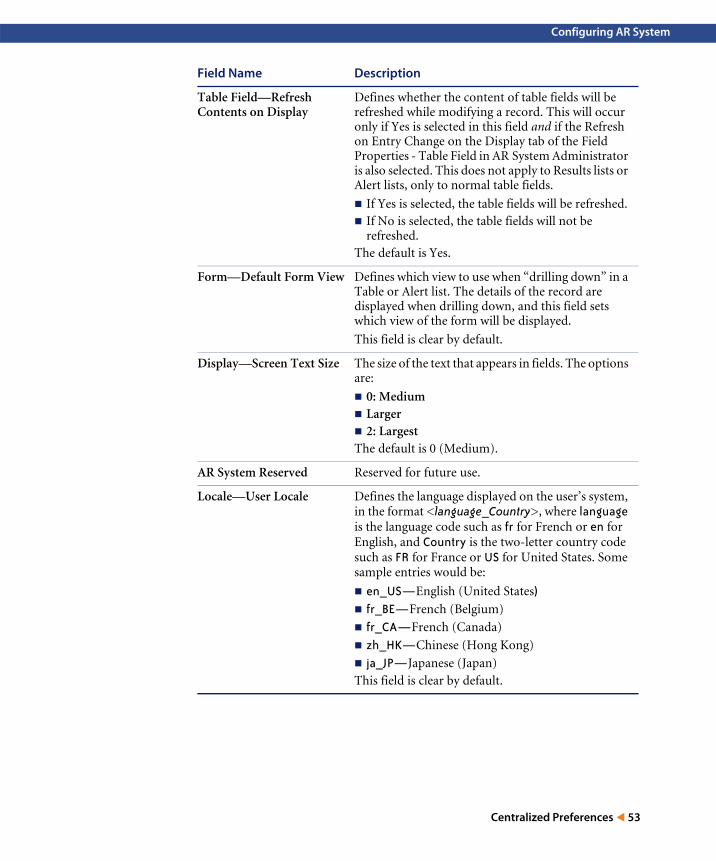
Configuring AR System
Table Field—Refresh Contents on Display
Defines whether the content of table fields will be refreshed while modifying a record. This will occur only if Yes is selected in this field and if the Refresh on Entry Change on the Display tab of the Field Properties - Table Field in AR System Administrator is also selected. This does not apply to Results lists or Alert lists, only to normal table fields.
! If Yes is selected, the table fields will be refreshed. ! If No is selected, the table fields will not be
refreshed. The default is Yes.
Form—Default Form View Defines which view to use when “drilling down” in a Table or Alert list. The details of the record are displayed when drilling down, and this field sets which view of the form will be displayed.
This field is clear by default.
Display—Screen Text Size The size of the text that appears in fields. The options are:
! 0: Medium! Larger! 2: LargestThe default is 0 (Medium).
AR System Reserved Reserved for future use.
Locale—User Locale Defines the language displayed on the user’s system, in the format <language_Country>, where language is the language code such as fr for French or en for English, and Country is the two-letter country code such as FR for France or US for United States. Some sample entries would be:
! en_US—English (United States)! fr_BE—French (Belgium)
! fr_CA—French (Canada)
! zh_HK—Chinese (Hong Kong)
! ja_JP—Japanese (Japan)This field is clear by default.
Field Name Description
Centralized Preferences ! 53

Action Request System 5.1
Locale—Time Zone Defines the time zone displayed on the user’s system; for example, GMT+1:00 for Europe/Paris, GMT+8:00 for Asia/Hong Kong, or GMT-5:00 for America/New York.
This field is clear by default.
Locale—Display Date/Time Style
Defines the format in which the date and time appear. The options are Short, Long, and Custom, according to Java formats. This is platform-independent and will not automatically be the same as the AR System User Tool preferences, or as any preferences set in the Windows Control Panel. Use a predefined Java format or customize a Java format to set web view Date/Time appearances apart from the length format that can be defined and customized in this field.
The default is Short.
Locale—Custom Time Format
Defines the custom Date/Time length format if Custom is selected from the Display Date/Time Style menu list. This will define only the custom length format. To customize separators and other options, use a predefined Java format or a customized Java format created within Java. This field is active only when Custom is chosen in the Display Date/Time Style field.
This field is clear by default.
Currency The type of currency to be applied for this locale; for example, USD for United States dollars.
Accessibility—Accessible Mode
Specifies if an accessible mode should apply to this view and if so, which mode. The options are
! Default; no accessible mode used.! Accessible Mode—Screen Magnifier/Low Vision.
This view will be accessed with a screen magnification device.
! Accessible Mode—Screen Reader/Low Vision. This view will be accessed using screen reader software.
This field is clear by default.
Field Name Description
54 "Chapter 3—Setting Preferences

Configuring AR System
Accessibility—Accessible Message
Specifies the type of nonvisual feedback that applies to workflow for this view. The options are
! No Action—No messages are shown for accessibility. Active link message actions of the type Accessible are ignored.
! Message Action—Displays accessibility messages defined by active link message action of type Accessible.
! All Actions—Displays accessibility messages to reflect visual changes on the page as well as accessible messages defined by an active link message actionof the type Accessible. Accessibility messages are displayed for visual changes caused by change field and set field active link actions, and other user actions such as table refresh. These messages reflect the visual changes that the user would have experienced otherwise.
If a field is hidden, changes caused by these actions are ignored.
Accessibility—Menu Access Option
Specifies the method by which to access character menus. The options are
! 0: Default —Use a pointing device to expand menus and make selections.
! 1: Keyboard—Use the keyboard to expand menus and make selections.
Accessibility—Menu Display Size
Specifies the maximum display size of each submenu levels. When the number of items in a submenu exceeds this value, a vertical scroll bar will appear.
The default value is 20.
Accessibility—Session Timeout in Minutes
Specifies the number of minutes after which a session times out.
Accessibility—Custom Style Sheet
If a customized style sheet is used with this view, specifies the file name of the style sheet.
Field Name Description
Centralized Preferences ! 55

Action Request System 5.1
56 "Chapter 3—Setting Preferences

CHAPTER
4
Configuring Servers and ClientsThis chapter discusses configuring servers to work with AR System.
The following topics are covered:
! Configuring AR System Servers on page 58
! Configuring Multiple Servers on page 108
! Running a Stand-Alone AR System Server on page 113
! Configuring Firewalls with AR System Servers on page 114
! Configuring Clients for AR System Servers on page 116
! Configuring a Mail Server on page 118
! Configuring a Server to Use Plug-Ins on page 118
! Configuring the AR System Server for External Authentication (AREA) on page 119
! Configuring a Server for Alerts on page 121
For information about the mid tier and the Configuration Tool, see Chapter 5, Configuring the Mid Tier.
Configuring Servers and Clients ! 57

Action Request System 5.1
Configuring AR System Servers
Every AR System server has a veriety of configuration settings that control how the server works and how it interacts with users. Configuration settings are specific for each server.
Use the Server Information dialog box in AR System Administrator to display information about the currently selected server and to set server options. You must be an administrator to make changes in this dialog box.The Server Information dialog box includes both display-only fields and fields in which you can set options. If you do not set an option for a field, the default value applies.
Note: The Server Information dialog box will not display the tabs or the information for administering the Full Text Search Option if the server is not licensed for this option. For information about using this option, refer to Server Information—Full Text Search on page 87 and the Developing AR System Applications: Advanced guide.
The following table lists the tabs you can click in the Server Information dialog box. The information provided in each tab is described in the sections that follow. Although we strongly recommend that you use AR System Administrator to change server settings, you can change settings manually in the server configuration file (ar.cfg for Windows or ar.conf for UNIX).
Tab Information Page
Platform Displays information about the platform on which the selected server is running.
page 60
Timeouts Sets various timeouts for the currently selected server.
page 61
Licenses Displays the type and number of AR System licenses on a server. You also set the Submitter Mode in this tab.
page 64
Configuration Sets general configuration options. page 65
Log Files Sets debugging modes for the system. page 72
Database Displays information about the database that the selected server communicates with. You also define a database password and configuration file location in this tab.
page 76
58 "Chapter 4—Configuring Servers and Clients

Configuring AR System
Server Ports and Queues
Configures AR System to communicate with client tools, services, and other servers on the network. Displays information relevant to the user of the multiple threads in the AR System server.
page 77
Advanced Sets parameters related to AR System efficiency, security, localization, and server statistics.
page 84
Full Text Search If you are licensed for this option, configures the Full Text Search option.
page 87
Source Control Sets source control integration within AR System. page 95
Server Events Sets the options for logging internal server changes.
page 99
Connection Settings
Enables you to configure passwords used between the AR System server and its external subsystems.
page 102
Currency Types Specifies currency types that are available in AR System.
page 105
Tab Information Page
Configuring AR System Servers ! 59

Action Request System 5.1
Server Information—PlatformUse the Platform tab to view information about the platform on which the selected server is running.
Displaying Platform Information About the Currently Selected Server
1 Open the server window.
2 Select a server to administer.
3 Choose File > Server Information.
4 Click the Platform tab.
Figure 4-1: Server Information—Platform Tab
5 Edit the options, as needed:
Server Version Displays the version number of the AR System software on the server. This value corresponds to the $VERSION$ keyword.
Server Directory
Displays the folder (directory) where the AR System server is installed on the server system.
Hardware Displays the hardware platform on which the server is running. This value corresponds to the $HARDWARE$ keyword.
60 "Chapter 4—Configuring Servers and Clients

Configuring AR System
6 Click Apply.
Server Information—TimeoutsUse the Timeouts tab to set the timeouts for the currently selected server.
Setting Timeouts
1 Open the server wndow.
2 Select a server to administer.
3 Choose File > Server Information.
OperatingSystem
Displays the operating system software version running on the server system. This value corresponds to the $OS$ keyword.
Server Name Alias
Defines an alias that is always interpreted as the current server. An alias allows you to use a functional name for a server rather than a machine name (for example, ACME or HelpDesk). Do not enter a fully qualified domain name. An alias makes it easier to move workflow between machines.
Entering an alias in this field does not automatically assign an alias to the server. The network environment must reflect a change to the server name before entering the alias name in this field. The alias name must be a valid host name on your network. Accordingly, you might need to update DNS, your host files, NIS, and so on.
After you make all your changes to the server environment, users can log in to AR System User Tool using the new server alias, just like any other server name.
Refer to your network operating system documentation for information on creating an alias for the server.
Server Time Displays the current time on the server (in the local time zone).
Configuring AR System Servers ! 61

Action Request System 5.1
4 Click the Timeouts tab.
Figure 4-2: Server Information—Timeouts Tab
5 Edit the options, as needed:
Process Timeout (seconds)
Prevents a server from being blocked when a process requested in a Set Fields filter or escalation action does not return a value soon enough. The server waits a specified interval and then returns with a $NULL$ value even if the process has not been completed.
Enter a number from 1 through 60 seconds. The default is 5. Specifying long intervals can cause an increase in response time for users.
Alert Send Timeout (seconds)
Sets the time limit (in seconds) allowed for making contact with alert clients. The default is 7 seconds.
Filter API RPC Timeout (seconds)
Sets the time limit (in seconds) allowed for the Filter API RPC to respond to the server’s request. The default is 60 seconds. The minimum is zero (0), the maximum is 300.
62 "Chapter 4—Configuring Servers and Clients
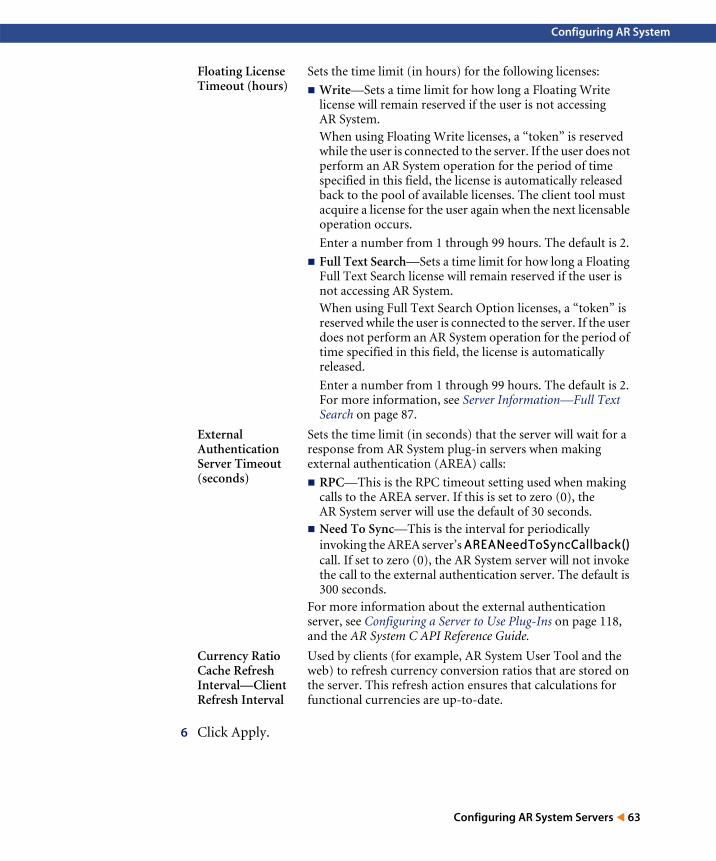
Configuring AR System
6 Click Apply.
Floating License Timeout (hours)
Sets the time limit (in hours) for the following licenses:
! Write—Sets a time limit for how long a Floating Write license will remain reserved if the user is not accessing AR System. When using Floating Write licenses, a “token” is reserved while the user is connected to the server. If the user does not perform an AR System operation for the period of time specified in this field, the license is automatically released back to the pool of available licenses. The client tool must acquire a license for the user again when the next licensable operation occurs.
Enter a number from 1 through 99 hours. The default is 2.
! Full Text Search—Sets a time limit for how long a Floating Full Text Search license will remain reserved if the user is not accessing AR System. When using Full Text Search Option licenses, a “token” is reserved while the user is connected to the server. If the user does not perform an AR System operation for the period of time specified in this field, the license is automatically released.
Enter a number from 1 through 99 hours. The default is 2. For more information, see Server Information—Full Text Search on page 87.
External Authentication Server Timeout (seconds)
Sets the time limit (in seconds) that the server will wait for a response from AR System plug-in servers when making external authentication (AREA) calls:
! RPC—This is the RPC timeout setting used when making calls to the AREA server. If this is set to zero (0), the AR System server will use the default of 30 seconds.
! Need To Sync—This is the interval for periodically invoking the AREA server’s AREANeedToSyncCallback() call. If set to zero (0), the AR System server will not invoke the call to the external authentication server. The default is 300 seconds.
For more information about the external authentication server, see Configuring a Server to Use Plug-Ins on page 118, and the AR System C API Reference Guide.
Currency Ratio Cache Refresh Interval—Client Refresh Interval
Used by clients (for example, AR System User Tool and the web) to refresh currency conversion ratios that are stored on the server. This refresh action ensures that calculations for functional currencies are up-to-date.
Configuring AR System Servers ! 63

Action Request System 5.1
Server Information—LicensesUse the Licenses tab to display information about the type and number of AR System licenses on a server. You can also set the Submitter Mode in this tab.
Displaying Server License Information and Setting the Submitter Mode
1 Open the server window.
2 Select a server to administer.
3 Choose File > Server Information.
4 Click the Licenses tab.
Figure 4-3: Server Information—Licenses Tab
5 Edit the options, as needed:
Server License Type Displays the license type of the server.
Fixed Write Licenses
Displays the total number of Fixed Write licenses on the server.
Floating Write Licenses
Displays the total number of Floating Write licenses on the server.
64 "Chapter 4—Configuring Servers and Clients

Configuring AR System
6 Click Apply.
To display information about the users of these licenses, refer to Displaying User License Information on page 41.
Server Information—ConfigurationUse the Configuration tab to set administrative options.
Setting Configuration Options
1 Open the server window.
2 Select a server to administer.
3 Choose File > Server Information.
Fixed Full Text Licenses
Displays the total number of Fixed Full Text Search licenses on the server.
Floating Full Text Licenses
Displays the total number of Floating Full Text Search licenses on the server.
Max Forms Allowed on Server
Displays the number of forms your license allows you to create on the server. If this field reads Unlimited, you can create as many forms as you want.
AR SystemServer ID
Displays the AR System identifier code attached to the server license.
Submitter Mode Defines the conditions under which submitters can modify the requests they initially submit (that is, where their names are in the Submitter field). Choose one of the following options:
! Locked—Users can modify requests they submit without a write license.
! Changeable (the default)—Users must have a write license to modify requests.
Note: Changes to the Submitter Mode settings do not take effect until the server is stopped and restarted.
For more information, refer to Special Submitter Access Mode on page 44.
Configuring AR System Servers ! 65
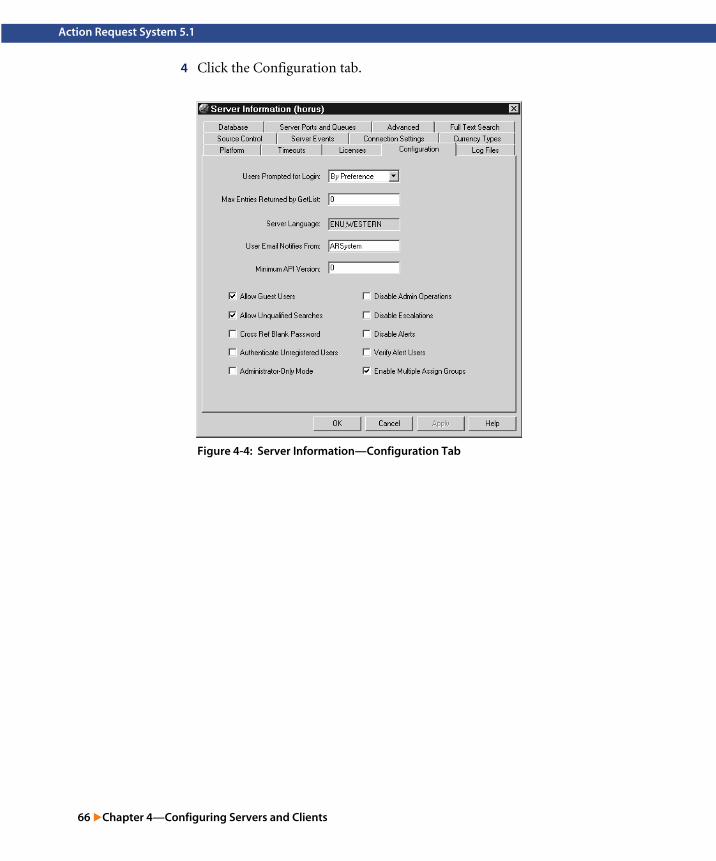
Action Request System 5.1
4 Click the Configuration tab.
Figure 4-4: Server Information—Configuration Tab
66 "Chapter 4—Configuring Servers and Clients
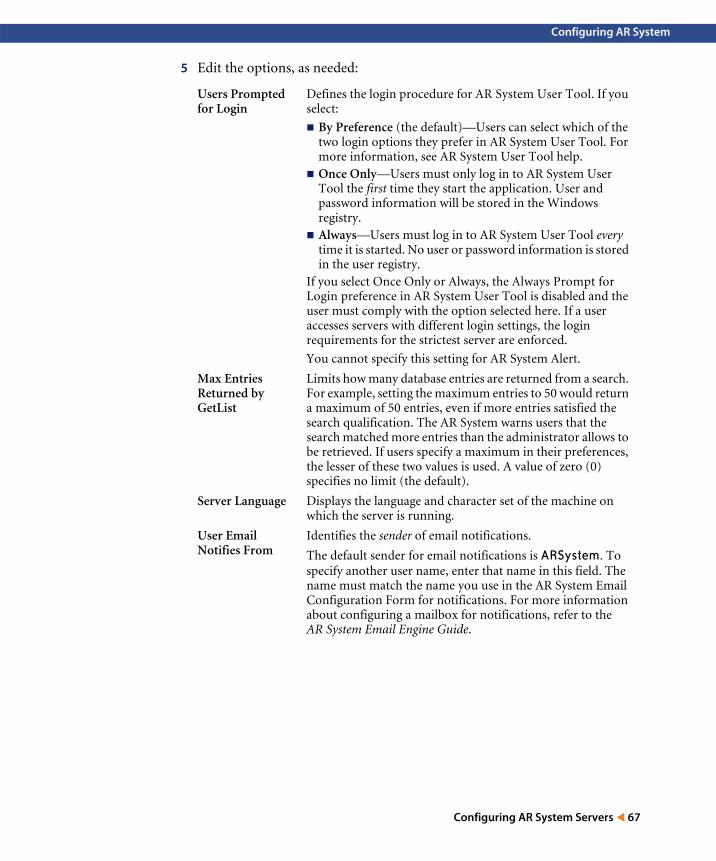
Configuring AR System
5 Edit the options, as needed:
Users Prompted for Login
Defines the login procedure for AR System User Tool. If you select:
! By Preference (the default)—Users can select which of the two login options they prefer in AR System User Tool. For more information, see AR System User Tool help.
! Once Only—Users must only log in to AR System User Tool the first time they start the application. User and password information will be stored in the Windows registry.
! Always—Users must log in to AR System User Tool every time it is started. No user or password information is stored in the user registry.
If you select Once Only or Always, the Always Prompt for Login preference in AR System User Tool is disabled and the user must comply with the option selected here. If a user accesses servers with different login settings, the login requirements for the strictest server are enforced.
You cannot specify this setting for AR System Alert.
Max Entries Returned by GetList
Limits how many database entries are returned from a search. For example, setting the maximum entries to 50 would return a maximum of 50 entries, even if more entries satisfied the search qualification. The AR System warns users that the search matched more entries than the administrator allows to be retrieved. If users specify a maximum in their preferences, the lesser of these two values is used. A value of zero (0) specifies no limit (the default).
Server Language Displays the language and character set of the machine on which the server is running.
User Email Notifies From
Identifies the sender of email notifications.
The default sender for email notifications is ARSystem. To specify another user name, enter that name in this field. The name must match the name you use in the AR System Email Configuration Form for notifications. For more information about configuring a mailbox for notifications, refer to the AR System Email Engine Guide.
Configuring AR System Servers ! 67

Action Request System 5.1
Minimum API Version
Specifies the oldest API version with which the server will communicate.
The corresponding API and AR System versions are as follows:
! API 9 and AR System 5.1! API 8 and AR System 5.0! API 7 and AR System 4.5! API 6 and AR System 4.0! API 5 and AR System 3.2! API 4 and AR System 3.0 and 3.1If you set the minimum API version to 9, clients prior to version 5.1 will not be able to communicate with the AR System 5.1 server. If you set the API version to 0 or none, all clients will be able to communicate with the server. For information about setting passwords to increase security, refer to Server Information—Connection Settings on page 102.
Allow Guest Users Defines whether AR System will permit access to users who are not registered users of the system to log in. If the check box is:
Selected (the default)—Guest users can log in and perform the following tasks:
! View all forms and fields for which the Public group has Visible permission.
! Execute all active links for which the Public group has permission.
! View all fields for which the guest user is the submitter or assignee, if the Submitter Group or Assignee Group has View permission for the field.
! Submit new requests if the fields on a form have the Allow Any User to Submit check box selected, as described in the Developing AR System Applications: Basic guide.
! Modify all fields for which the guest user is the submitter, if the Submitter Group has Change permission for the field and if the Submitter Mode is Locked, as described in Server Information—Licenses on page 64.
Cleared—Users who are not registered AR System users cannot log in to AR System clients.
68 "Chapter 4—Configuring Servers and Clients

Configuring AR System
Allow Unqualified Searches
Defines whether the server will accept unqualified searches (searches for which no search criteria are specified). If you do not select this feature, you force users to enter a search criteria when performing queries. If the check box is:
! Selected (the default)—All database searches are allowed.! Cleared—The server will not accept unqualified database
searches.
Note: Consider restricting unqualified searches to prevent the performance penalty of retrieving and returning large blocks of data due to accidental, unqualified searches to the database.
Cross Ref Blank Password
Defines how AR System authenticates a user whose User form record has no password. When a user logs in, AR System searches its own database for that user. If the user has a password, the system uses it. If the Password field is empty, AR System will continue to attempt to find a password for the user if this option is selected.
If the check box is:
! Selected—AR System attempts to validate the password against an external authenticator if one is configured, or the password in the Windows NT server domain or the UNIX server’s /etc/passwd file.
! Cleared (the default)—AR System concludes that an empty password field means that the user has no password.
In the Login window, users will see an Authentication field. If your AR System server is running on Windows NT or Windows 2000, the contents of this field will be used as a domain name when the server authenticates the user with the operating system. If the server is instead configured to use an external authenticator, the contents of this field will be passed to the authenticator.
Configuring AR System Servers ! 69

Action Request System 5.1
Authenticate Unregistered Users
Defines how AR System validates a user who has no record in the User form.
When a user logs in to AR System, the server attempts to validate the user against registered users (users who are listed in the User form). If a match is found, that user definition and the permissions specified in the matching User record are used. If no match is found, AR System continues to attempt to validate the user or stops the validation process depending on whether this option is selected. If the check box is:
! Selected, and External Authentication is not configured—AR System searches the /etc/passwd file or NIS password map (on a UNIX server) for a match. If a match is found, the user is considered a valid user (not a guest) of the system. The UNIX group specification from the file or NIS is retrieved, and the user is considered a member of the AR System group whose Group ID matches the UNIX group. On Windows servers, the user is considered a member of the group whose Group ID is 0.The AR System authenticates to the default domain (on a Windows server). The optional authentication string entered by the user when they logged in will be used as the Windows domain name for authentication purposes.
On UNIX servers, Selected is the default value.
! Selected, and External Authentication is configured—AR System sends a request to the external authentication server to authenticate the user. If a match is found, the user is considered a valid user (not a guest user) of the system. For more information, refer to Configuring a Server to Use Plug-Ins on page 118. The authentication string entered by the user when they logged in will be passed to the external authenticator for its use.
! Cleared— AR System stops the validation process and manages the user as a guest user if Allow Guest Users is enabled.On Windows NT servers, Cleared is the default.
For information about configuring external authentication, see Setting Server Ports and Queues on page 78.
70 "Chapter 4—Configuring Servers and Clients

Configuring AR System
Administrator-Only Mode
Enables you to allow only administrators and subadministrators to access AR System. If the check box is:
! Selected—Users who are not administrators or subadministrators cannot perform any AR System operations. This is useful during system maintenance.
! Cleared (the default)—All users can access AR System.Administrator-Only Mode can be set by administrators only, not subadministrators. After an administrator sets this option, subadministrators can access only forms for which they have permission.
Disable Admin Operations
Disables certain operations that can be performed only by administrators and subadministrators, which enables you to control changes to the database by disabling administrator operations. This prevents conflicts where multiple servers are attached to the same database. If the check box is:
! Selected—Administrators cannot perform operations that affect the server’s data dictionary.
! Cleared (the default)—Administrators can perform their usual operations including all data dictionary restructuring operations.
Disable Escalations
Enables you to prevent running escalations on the server. This prevents workflow conflicts where multiple servers are attached to the same database. If the checkbox is:
! Selected—The server will not run escalations.! Cleared (the default)—Escalations run as normal.
Disable Alerts Enables you to prevent alert messages from being sent to users when an alert event is entered in to the system. This setting is only acknowledged at startup, so any changes will not take effect until the server is restarted.If the checkbox is:
! Selected—The server will not send any alert messages to clients. No threads will run in the Alert Queue.
! Cleared (the default)—The server will send alert messages to designated clients whenever an alert event is entered into the system.
Configuring AR System Servers ! 71

Action Request System 5.1
6 Click Apply.
Server Information—Log FilesUse the Log Files tab to set one or more of the debugging modes shown in Figure 4-5 on page 74. In debug trace mode, AR System creates log files containing information about system activity.
Once activated, logging starts immediately. You can activate logging at any time.
Warning: Do not keep logging turned on continuously. Log files consume increasing amounts of disk space as messages accumulate, unless you limit the log file size. Monitor your disk resources carefully while logging is active.
Verify Alert Users This indicates whether the server should check its list of registered alert clients to determine if they are listening and ready to receive alert messages. As this setting is acknowledged only at server startup, any changes will not take effect until the server is restarted. Selecting this option may result in a large amount of network activity at server startup.If the checkbox is:
! Selected—The server will verify the list of clients. If the clients are not listening, they will be removed from the list of registered clients.
! Cleared (the default)—The server will not perform the verification.
Regardless of the setting, if a subsequent alert message is sent to a client that is not listening, they will be removed from the list of currently registered clients at that time.
Enable Multiple Assign Groups
Allows multiple assignee groups to be stored in row-level security Field 112. This enables users from multiple groups to access the same entry (as in the sample qualification, 'Assignee Group' = ";50;51;").
The options are:
! Selected—Allows multiple assignee groups to be stored.! Cleared (the default)—Allows only one assignee group to
be stored.
72 "Chapter 4—Configuring Servers and Clients

Configuring AR System
You can enter a location other than the default location (<ar_install_dir>/db on UNIX and <ar_install_dir>\Arserver\Db on Windows), and a name for each of the log files created in debug mode. You can also specify the same location and file for multiple types of logging to write all of the data logged to a single file.
Note: You can also set debug modes for active links, macros, API calls, databases, and filters in AR System User Tool through the Logging tab in the Options dialog box. When a check box is selected, a log file with the name specified in the Log File Path will contain all logging information. The file will be stored in the default folder (for example, \Home) unless you change it. You can also use the log information to analyze the active links used in guides. Log files are enabled in AR System User Tool because that is where active links and macros run.
For more information about the debug trace modes and log files, refer to the Optimizing and Troubleshooting AR System guide.
Setting Log Files
1 Open the server window.
2 Select a server to administer.
3 Choose File > Server Information.
Configuring AR System Servers ! 73

Action Request System 5.1
4 Click the Log Files tab.
Figure 4-5: Server Information—Log Files Tab
5 Select the check box next to each appropriate debug trace mode.
You can select all, some, or no log files. The File Name field is disabled until you select the related check box. After you select a logging mode, you can specify a different file name, or you can leave the field unchanged to accept the default file name.
API Logs information about all API calls made by all clients. Information is logged on entry and exit of every API call. The default log file name is arapi.log.
Distributed Server
If you are licensed for the Distributed Server Option, logs information about distributed server activity. Information includes the distributed operations that were attempted and whether the operation was successful. The default log file name is ardist.log.
Escalation Logs information about escalation activity. Information includes the escalations that executed, whether the escalation qualification found any matches, and any escalation actions taken. The default log file name is arescl.log.
74 "Chapter 4—Configuring Servers and Clients

Configuring AR System
6 From the Log-File Creation field, choose one of the following options:
! Create Backup—Creates new log files, and the contents of the previous log files are written to <logname>.bak files.
! Append to Existing—Log files and their contents are preserved, and new information is appended to them.
7 From the Client-Side Logging Group list, select the group that will be able to use logging options in AR System clients. Logging options are disabled (grayed out) for users who are not members of this group.
For more information about the client logging, refer to the Optimizing and Troubleshooting AR System guide.
8 In the Maximum Log-File Size field, enter the maximum size (in bytes) for the log file. A value of zero (0) specifies no limit (the default).
Filter Logs information about filter activity for each operation. Information includes the filters that attempted to execute and all filter actions performed. The default log file name is arfilter.log.
SQL Logs SQL commands sent to the database. Information is logged for each SQL command issued, including a time stamp and the user name of the user performing the operation. The default log file name is arsql.log.
Thread Logs information about threads that are being started and restarted on the server. The default log file name is arthread.log.
User Logs information about connection activity for each user. Information includes the time that each user logs in, whether the user is able to obtain a license, and when each floating license is released. This enables you to keep an audit trail of user activity to help you determine if you need more floating licenses. The default log file name is aruser.log.
Alert Logs detailed information on user registration and on the generation and delivery of alerts. The default log file name is aralert.log.
Plug-In Server Logs the events of plug-ins that AR System uses. The default log file name is arplugin.log. For more information about using plug-ins, refer to the AR System C API Reference Guide.
ARFORK (UNIX only)
On UNIX systems, logs all arforkd activity (a process that reduces the amount of memory an AR System server uses when forking new processes).
Configuring AR System Servers ! 75

Action Request System 5.1
When the log file reaches this maximum, new information wraps to the top of the file, overwriting the old information. If you do not specify a maximum size limit, you run the risk of running out of disk space on your system.
9 Click Apply.
Server Information—DatabaseUse the Database tab to view and configure information about the database that you are using.
Displaying and Updating Information About the Database
1 Open the server window.
2 Select a server to administer.
3 Choose File > Server Information.
4 Click the Database tab.
Figure 4-6: Server Information—Database Tab
76 "Chapter 4—Configuring Servers and Clients

Configuring AR System
5 Edit the options, as needed:
6 Click Apply.
Server Information—Server Ports and QueuesUse the Server Ports and Queues tab to set server ports and RPC numbers as needed to communicate with other servers, clients, and services on the network. The Server Queue region on this tab allows you to configure server queues and threads as appropriate for your server, taking advantage of the multithreaded design of AR System.
Database Type Displays the type of database that the AR System server is using.
Database Home For UNIX only, displays the directory path of the underlying database that the AR System server is using.
Database Name Displays the name of the database created for AR System within the underlying database server.
Database Version Displays the version of the database that the AR System server is using.
Database User Name
Displays the user name that AR System uses to access the database.
Database Password
For Sybase, Oracle, Microsoft SQL Server, or DB2 databases, this field enables you to define the password used by AR System for access to the database. The existing password is not displayed.
Enter a value in the Database Password field to change the password.
The default database password created by AR System is AR#Admin#. If you changed the password and do not remember it, or if you have changed it outside of AR System and need to reflect the change within AR System, log in to the database as the database administrator and change it back to the default. If the encrypted password is in the ar.conf configuration file, delete it from there.
Database Configuration File
Displays the contents of the ardb configuration file used by the advanced AR System feature that appends clauses to the SQL statements that create tables and indexes.
For more information about the ardb file, seeAppendix A, AR System Configuration Files.
Request ID Uses Clustered Index
For Microsoft SQL Server or Sybase databases only. If selected (default), AR System creates the Request ID field as a clustered index to boost performance.
Configuring AR System Servers ! 77

Action Request System 5.1
Assigning TCP Port Numbers to AR System ServersYou assign one TCP port number for the AR System server. All initial contact with the server is through a single port. If you run multiple servers on the same machine, each server must use a unique port.
Clients must be configured with the server port number to enable server access without the use of a portmapper. If you do not allow the server to register with a portmapper, you must assign a TCP port number for the AR System server. For more information about configuring clients, see Configuring Clients for AR System Servers on page 116.
Do not assign port numbers that conflict with port numbers used by other applications or other programs running on your system. To find out which port numbers are already in use, use the rpcinfo -p command (UNIX) or the netstat -a command (Windows) at the command-line prompt. If you do not check available ports, you could assign port numbers that conflict with other applications, and your servers might not start as expected. Client tools can use ports 0–65535.
On UNIX, port numbers within the range 1–1024 are available only for use by the superuser, and many of these numbers are reserved.
Setting Server Ports and Queues
1 Open the server window.
2 Select a server to administer.
3 Choose File > Server Information.
78 "Chapter 4—Configuring Servers and Clients

Configuring AR System
4 Click the Server Ports and Queues tab.
Figure 4-7: Server Information—Server Ports and Queues Tab
Configuring AR System Servers ! 79

Action Request System 5.1
5 Edit the options, as needed:
Server TCP/IP Port Defines the TCP/IP port number for the AR System server. Allows clients to have access to the server without a portmapper.
When set to zero (0), which is the default, the port is assigned by the portmapper.
For more information, see Assigning TCP Port Numbers to AR System Servers on page 78.
External Authentication Server RPC Program Number
Enables an external authentication (AREA) server. Entering a non-zero value will enable authentication using an AREA service. The default RPC program number for the plug-in service is 390695. Entering no value or zero (0) will disable authentication using an AREA service, and the AR System server will access the operating system for authentication purposes.
For more information about how to set up an external authentication server, see Configuring a Server to Use Plug-Ins on page 118. For information about configuring an AREA LDAP plug-in, see Chapter 6, Configuring LDAP Plug-Ins.
Distributed Server RPC Program Number
Specifies the default RPC program number for the AR System server queue used by distributed servers. This enables you to direct DSO traffic to private queues. For more information, see the Action Request System Distributed Server Option Guide.
Alert Outbound Port
The specific TCP port to which the server binds when sending alert messages to registered clients. If multiple alert threads are started, the number represents the starting port number in a consecutive range of numbers available for use by the alert threads. If no port number is specified, or if zero (0) is entered, the server is randomly assigned an available port by the portmapper.
80 "Chapter 4—Configuring Servers and Clients

Configuring AR System
6 In the Server TCP/IP Port field, enter the number that you want to use for the server port.
Note: If you set the Server TCP/IP Port field to a value less than 1024, older clients will not be able to connect. For older clients, choose a value greater than 1024.
7 In the Alert Outbound Port field, enter the number that you want to use for the Alert port.
Register with Portmapper
If the check box is:
! Selected—The AR System server and the plug-in server are registered with AR System Portmapper. The server is registered immediately if not previously registered. AR System clients can get the port number of the AR System server and the plug-in server from AR System Portmapper.
! Cleared—The AR System server and the plug-in server are not registered with AR System Portmapper. If the server was previously registered, this option removes the registration. AR System clients cannot get the port number of the AR System server and the plug-in server from the portmapper.
If you are running multiple servers on a single machine, you can have only one server select the Register with Portmapper option.
Server Queue Enables you to define server queues specific to your needs. Click the Type column and select the type of server queue (private, fast, list or alert) from the drop-down menu.
If you select a private server queue, click the RPC Program Number column to select an RPC program number from the drop-down menu. Fast, list, and alert server queues are automatically assigned a default program number.
For most types of server queues, you can specify a minimum and maximum number of threads. If you do not specify a number, the system defaults to one minimum and one maximum thread per server queue.
For more information, see Defining Queues and Configuring Threads on page 82.
Flashboards Server Requires a Flashboards license. The options are:
! Selected (default for Flashboards users)—Starts a Flashboards server queue on RPC program number 390619.
! Cleared—A Flashboards server queue will not be started.
Configuring AR System Servers ! 81

Action Request System 5.1
If no port number is specified, the server is randomly assigned an available port.
8 If you plan to use an external authentication server, set the External Authentication Server RPC Program Number.
! Entering the value of 390695 enables authentication using an AREA service.
! Entering no value or zero disables authentication using an AREA service.
If you set the value to zero (0), the AR System server makes no attempt to communicate with the AREA server. For more information about external authentication, see Configuring the AR System Server for External Authentication (AREA) on page 119 and Chapter 6, Configuring LDAP Plug-Ins.
Note: You must have an AREA server built and prepared before you set the RPC Socket number here. See the the AR System C API Reference Guide for information.
9 Click the Register with Portmapper check box as appropriate to select or deselect the Portmapper option. For more information about AR System portmapper, see Working With a Portmapper Service in AR System on page 30.
10 Click Apply.
11 Restart the server for the changes to take effect.
Note: To change the port number that the AR System server uses when communicating with the plug-in server, you must edit the Plugin-Port option of the ar.cfg (ar.conf) file., and restart the server. For more information, refer to Plugin-Port on page 183.
Defining Queues and Configuring ThreadsAll servers include an admin queue; it is the default server setting and cannot be configured. The Admin queue can have only one thread at any time.
When you define additional server queues, AR System automatically assigns corresponding RPC program numbers or provides ranges of RPC program numbers, and you define the minimum and maximum number of threads for each alert, fast, list, and private server queue that you are using. To add server queues and configure threads, perform the following procedure.
For more information, refer to Queues on page 25 and Threads on page 28.
82 "Chapter 4—Configuring Servers and Clients

Configuring AR System
Adding Server Queues and Configuring Threads
1 In AR System Administrator, select a server and choose File > Server Information.
The Server Information dialog box appears.
2 In the Server Information dialog box, click the Server Ports and Queues tab.
Figure 4-8: Entering Server Queue Information
3 In the Server Queue box, click in the Type column. When the drop-down menu appears, select a Fast, List, Alert, or Private server.
! If you select a Fast server, the RPC Program Number 390620 is automatically assigned.
For information about fast servers, see Fast Queue on page 27.
! If you select a List server, the RPC Program Number 390635 is automatically assigned.
For information about list servers, see List Queue on page 27.
! If you select an Alert server, the RPC Program Number 390601 is automatically assigned. If an Alert server is not specified, the Alert Queue will automatically start one thread.
For information about alert servers, see Alert Queue on page 26.
Configuring AR System Servers ! 83

Action Request System 5.1
! If you select a Private server, a drop-down menu appears. Select an RPC program number from the following ranges: 390621-390634, 390636-390669, 390680-390694.
! If you click the Flashboards Server check box at the bottom of the Server Ports and Queues tab, the Flashboards queue will be started.
4 In the Min Threads field, enter the minimum number of threads that you want started at startup.
The default is 1.
5 In the Max Threads field, enter the maximum number of threads that your system will be allowed to start.
The default is 1. When all of the existing worker threads are in use, the system starts additional threads as needed until the maximum number is reached. These additional threads remain active until the server is rebooted.
6 Click Apply.
Note: If you have removed a queue or decreased the maximum number of threads for a queue, restart the server for the changes to take effect.
Server Information—AdvancedUse the Advanced tab to create settings for performance and security.
Setting Advanced Options
1 Open the server window.
2 Select a server to administer.
3 Choose File > Server Information.
84 "Chapter 4—Configuring Servers and Clients

Configuring AR System
4 Click the Advanced tab.
Figure 4-9: Server Information—Advanced Tab
5 Edit the options as needed:
Maximum Filters for an Operation
Defines the number of filters that can be performed in an operation. The default and recommended number is 10000. Increase this number at your own risk only if you reach a limit in your system and you have verified that your workflow is valid.
Maximum Stack of Filters
Defines the maximum number of nested filters and filter guides that will execute, in order to prevent recursive actions on the server. The default and recommended number is 25. Increase this number at your own risk only if you reach a limit in your system and you have verified that your workflow is valid.
Maximum Line Length in Email
Defines the maximum line length that can be in an email. If a single line of the message is over this length, a return is automatically inserted. Limits the line length of emails passed through the mail server to protect users from excessively long lines. The default is 1024.
Configuring AR System Servers ! 85

Action Request System 5.1
Default Web Path Defines the base URL to the mid tier and is used by clients such as AR System Alert and Flashboards. It is the value for the keyword $HOMEURL$.
The URL should look like this:
http://<host>/<context_path>Where:
! host is the name of the server (for example, www.remedy.com)
! context_path is the URL context path of the AR System application registered with the servlet engine. This is set up during installation. The default value is arsys.
Security—Active Link Run Process Directory
Security feature that allows you to define the only directory in which active link processes can execute.
If no directory is specified, active link processes can run from any directory. Otherwise, specify which directory the Run Process action can run from, for example, c:\arsys.
Security—Active Link Run Process Shell(UNIX servers only)
Security feature that allows you to define which shell is the parent of an active link server process. If no path is specified, administrators can specify any shell.
Otherwise, specify which type of shell the Run Process action can use, for example, /bin/csh.
Security—Allow arcache and arreload
If selected, allows the administrator to use the arcache and arreload utilities. For more information, refer to arcache (arcache.exe) on page 192 and arreload (arreload.exe) on page 197. The default is selected.
Localized Error Messages—Localize Server
Allows the administrator to enable or disable localization of messages on the server. If the check box is:
! Selected—Uses AR System Message Catalog to load the messages. The server is localized enabling the clients to display localized messages. Clients such as AR System User Tool still have local catalogs, such as the user.dll. You must select the Localize Server check box to see localized error messages.
! Cleared (default)—Shows the message from the error catalog and does not make use of the AR System Message Catalog form. The localization of messages is disabled. The default message is displayed.
Localized Error Messages—Catalog Form Name
Displays the name of the form the server uses to resolve error messages when “Localize Server” is selected. For more information about Localized Error Messages Catalog form, see the Developing AR System Applications: Advanced guide.
86 "Chapter 4—Configuring Servers and Clients

Configuring AR System
6 Click Apply.
Server Information—Full Text SearchUse the Full Text Search tab to set FTS options. The Full Text Search tab only appears in the Server Information dialog box if you have an FTS license.
Defining Full Text Search Information
1 Open the server window.
2 Select a server to administer.
3 Choose File > Server Information.
4 Click the Full Text Search tab.
Server Statistics—Server Recording Mode
Specifies how the server will record server statistics. Select one of the following options:
! Off (the default)—Do not record server statistics.! Cumulative Queue—Record a cumulative statistic that is
a combination of all the queue statistics.! Cumulative and Individual Queue—Record a cumulative
statistic that is a combination of all the queue statistics as well as statistics of each queue individually.
Information is recorded in the Server Statistics form, which is installed when you install AR System. For more information, refer to the Developing AR System Applications: Advanced guide.
Server Statistics—Recording Interval (seconds)
Defines how often the server will record server statistics. The default is 60 seconds.
Remember that one (Cumulative Queue) or more (Cumulative and Individual Queue) entries are recorded in the Server Statistics form during each interval. If you have a short interval, many records will be created. This can have an affect on the performance of the system and the size of the database if you configure with too short an interval.
Configuring AR System Servers ! 87

Action Request System 5.1
Figure 4-10: Server Information—Full Text Search Tab
88 "Chapter 4—Configuring Servers and Clients
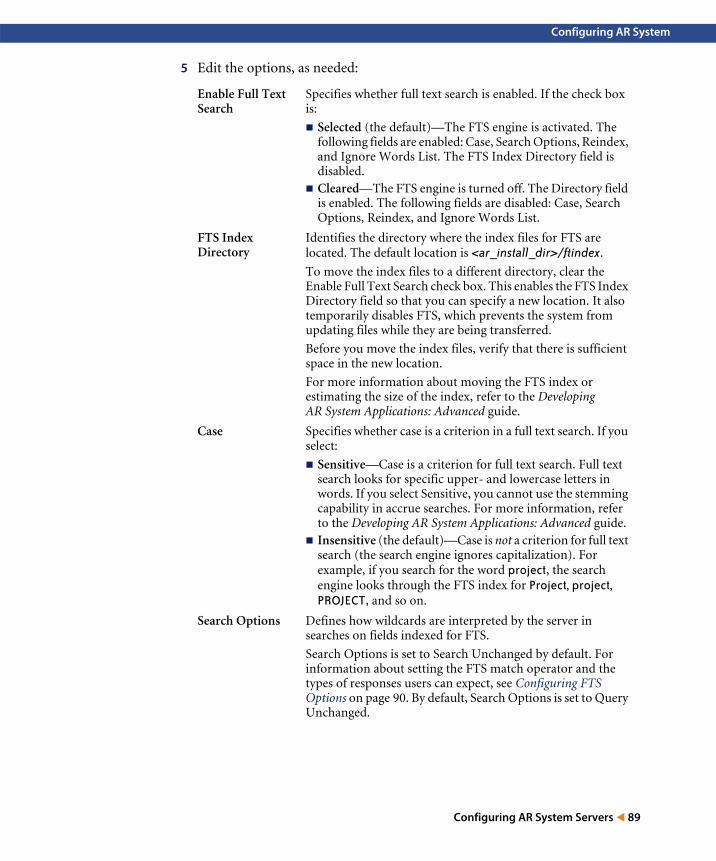
Configuring AR System
5 Edit the options, as needed:
Enable Full Text Search
Specifies whether full text search is enabled. If the check box is:
! Selected (the default)—The FTS engine is activated. The following fields are enabled: Case, Search Options, Reindex, and Ignore Words List. The FTS Index Directory field is disabled.
! Cleared—The FTS engine is turned off. The Directory field is enabled. The following fields are disabled: Case, Search Options, Reindex, and Ignore Words List.
FTS Index Directory
Identifies the directory where the index files for FTS are located. The default location is <ar_install_dir>/ftindex.
To move the index files to a different directory, clear the Enable Full Text Search check box. This enables the FTS Index Directory field so that you can specify a new location. It also temporarily disables FTS, which prevents the system from updating files while they are being transferred.
Before you move the index files, verify that there is sufficient space in the new location.
For more information about moving the FTS index or estimating the size of the index, refer to the Developing AR System Applications: Advanced guide.
Case Specifies whether case is a criterion in a full text search. If you select:
! Sensitive—Case is a criterion for full text search. Full text search looks for specific upper- and lowercase letters in words. If you select Sensitive, you cannot use the stemming capability in accrue searches. For more information, refer to the Developing AR System Applications: Advanced guide.
! Insensitive (the default)—Case is not a criterion for full text search (the search engine ignores capitalization). For example, if you search for the word project, the search engine looks through the FTS index for Project, project, PROJECT, and so on.
Search Options Defines how wildcards are interpreted by the server in searches on fields indexed for FTS.
Search Options is set to Search Unchanged by default. For information about setting the FTS match operator and the types of responses users can expect, see Configuring FTS Options on page 90. By default, Search Options is set to Query Unchanged.
Configuring AR System Servers ! 89

Action Request System 5.1
6 Click Apply.
Configuring FTS OptionsIn both accrue and nonaccrue searches, the Search Options list in the Full Text Search tab enables you to configure how the server interprets searches on fields indexed for FTS. You can define how the server interprets FTS searches using wildcards. This is important because the presence or absence of wildcards in a full text search can impact performance.
If FTS is set to add wildcards to the search string, the stem capability on accrue searches is disabled. For more information, refer to the Developing AR System Applications: Advanced guide.
Configuring the FTS Options
1 With the Full Text Search tab selected in the Server Information dialog box, select an item from the Search Options list.
Figure 4-11: Full Text Search Options
2 Select an option as described in Accrue Operator Searches on page 91.
3 Click Apply.
Reindex Specifies whether the FTS index should be rebuilt. If the check box is:
! Selected—The FTS index will be rebuilt. Reindexing can take a long time. For information about reindexing, see Rebuilding the Full Text Search Index on page 94.
! Cleared (the default)—The FTS index will not be rebuilt.
Ignore Words List Displays the Ignore Words List dialog box used to specify which words will not be indexed for FTS; AR System ignores these words in the database during a full text search. To use the Ignore Words List, see Modifying the Ignore Words List on page 93.
90 "Chapter 4—Configuring Servers and Clients

Configuring AR System
Accrue Operator SearchesTable 4-1 shows the effects of different options on searches that use an accrue operator.
Table 4-1: Search Options Using an Accrue Operator (Sheet 1 of 2)
Search Option Search Term Used
Server Interpretation
AR System Requests Retrieved
Search Performance Results
Force Leading and Trailing Wild Cards
turn,%turn,turn%,%turn%,
%turn%,%turn%,%turn%,%turn%,
Any request with “turn” as part of the word, including:
! right turn! turn left! turned! return! turned left! user returned! turnabout is
Slowest search performance for users.
Maximum number of requests retrieved.
Ignore Leading and Force Trailing Wild Card
turn,%turn,turn%,%turn%,
turn%,turn%,turn%,turn%,
Any request with “turn” as the starting part of the word, including:
! right turn! turn left! turned! turned left! turnabout is
Does not retrieve requests with “return” in them.
Relatively fast search.
Retrieves the number of requests most users probably anticipate from FTS.
Ignore Leading Wild Card
turn,%turn,turn%,%turn%,
turn,turn,turn%,turn%,
Any request starting with the word “turn” and some stems, including:
! right turn! turn left! turned! turned left
Does not retrieve requests with “return” in them.
Relatively fast search.
Might not retrieve the requests that users expect because search does not consistently add a trailing wildcard. For example, the search terms turn% and %turn% retrieve requests with “turnabout” in them; the other search terms do not.
Configuring AR System Servers ! 91
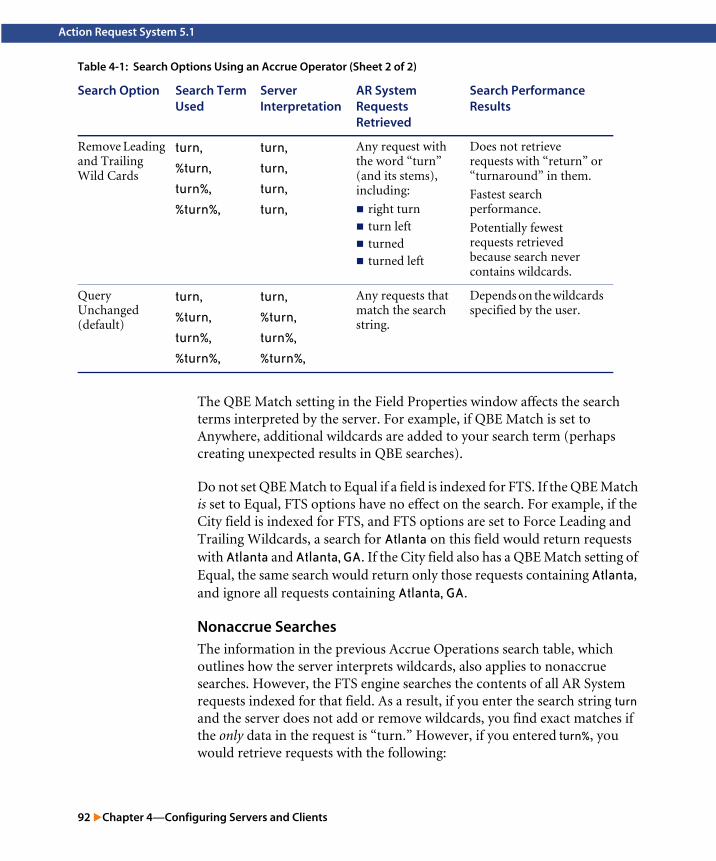
Action Request System 5.1
The QBE Match setting in the Field Properties window affects the search terms interpreted by the server. For example, if QBE Match is set to Anywhere, additional wildcards are added to your search term (perhaps creating unexpected results in QBE searches).
Do not set QBE Match to Equal if a field is indexed for FTS. If the QBE Match is set to Equal, FTS options have no effect on the search. For example, if the City field is indexed for FTS, and FTS options are set to Force Leading and Trailing Wildcards, a search for Atlanta on this field would return requests with Atlanta and Atlanta, GA. If the City field also has a QBE Match setting of Equal, the same search would return only those requests containing Atlanta, and ignore all requests containing Atlanta, GA.
Nonaccrue SearchesThe information in the previous Accrue Operations search table, which outlines how the server interprets wildcards, also applies to nonaccrue searches. However, the FTS engine searches the contents of all AR System requests indexed for that field. As a result, if you enter the search string turn and the server does not add or remove wildcards, you find exact matches if the only data in the request is “turn.” However, if you entered turn%, you would retrieve requests with the following:
Remove Leading and Trailing Wild Cards
turn,%turn,turn%,%turn%,
turn,turn,turn,turn,
Any request with the word “turn” (and its stems), including:
! right turn! turn left! turned! turned left
Does not retrieve requests with “return” or “turnaround” in them.
Fastest search performance.
Potentially fewest requests retrieved because search never contains wildcards.
Query Unchanged (default)
turn,%turn,turn%,%turn%,
turn,%turn,turn%,%turn%,
Any requests that match the search string.
Depends on the wildcards specified by the user.
Table 4-1: Search Options Using an Accrue Operator (Sheet 2 of 2)
Search Option Search Term Used
Server Interpretation
AR System Requests Retrieved
Search Performance Results
92 "Chapter 4—Configuring Servers and Clients

Configuring AR System
! turn left
! turned
! turned left
! turning
! turnabout
Modifying the Ignore Words ListThe Ignore Words list causes the full text search engine to ignore frequently used words or words you do not want indexed (such as and, the, because, and so on).
If you extensively modify the Ignore Words list, consider rebuilding the FTS index. Because the indexes are already created, the modified Ignore Words list affects only changes to the FTS index that are made after you click OK. To rebuild the index, see Rebuilding the Full Text Search Index on page 94.
Changing the Ignore Words List
1 In the FTS tab of the Server Information dialog box, click Ignore Words List.
The Ignore Words list dialog box appears, as shown in Figure 4-12. This list contains the words that are currently defined.
This dialog box enables you to define which words do not appear in the index. You can modify the existing list line by line, or you can append a series of words to the list by loading a file.
Figure 4-12: Ignore Words List for Search
Configuring AR System Servers ! 93

Action Request System 5.1
2 Perform one or more of the following steps:
! To add a word to the list, type it in the Word field, and then click Add.
Each item in the list must be unique.
! To delete a word from the list, select it, and then click Remove.
! To modify a request in the list, select it, edit it in the Word field, and then click Modify.
The edited item reappears in the list.
! To delete all words from the list, click Remove All.
! To append a list of words to the list, click Load From File, and then select a file from the dialog box.
3 Click OK to save the settings.
4 Click Apply to save all the changes you made in the Full Text Search tab.
The modified Ignore Words list affects only changes to the FTS index that are made after you click OK.
If you install the AR System server in a supported language other than English, the Ignore Words list will have words of that language in it, rather than the English words. Some languages, such as Japanese, do not have any words in the Ignore Words list.
Rebuilding the Full Text Search IndexIf you must rebuild the FTS index, be aware that rebuilding it can take several hours. Do not rebuild an index or define fields for FTS during normal production hours, especially if you have many AR System requests in your database.
Rebuilding the FTS Index
1 In the Server window, select the server that is licensed for FTS.
2 Choose File > Server Information.
The Server Information dialog box appears.
3 Click the Full Text Search tab.
4 If you are rebuilding the index at a new location, perform the following steps:
a Disable FTS by clearing the Enable Full Text Search check box.
b Click Apply.
c Type the new location of the index in the FTS Index Directory field.
94 "Chapter 4—Configuring Servers and Clients

Configuring AR System
d Click Apply.
e Select the Enable Full Text Search check box.
f Click Apply.
5 Select the Reindex check box.
6 Click OK to start the reindexing process.
You are prompted whether you want to continue reindexing.
7 Click OK to continue with the reindex.
You can exit at any time. The process pauses for five minutes after you click OK to allow the AR System server to relinquish the current index files. Then, the reindexing begins on the server.
Server Information—Source ControlUse the Source Control tab to configure source control (SC) within the AR System by creating or selecting SC projects. Administrators can also set the level of SC integration they want, for example, Enforced or Advisory mode. Here you define specific options for your SC system as well as create, add, and open SC projects. How SC is integrated with AR System differs based upon which SC application you use. You will find the SC feature especially helpful in moving applications from development to production.
To use SC with AR System, you must understand the details of your SC application and database. Different SC applications will have slightly different feature sets, creating slightly different implementations with AR System. For specific information, refer to your SC application documentation.
For a detailed discussion on SC issues, refer to the Developing AR System Applications: Advanced guide.
Note: You must install and configure your SC system before implementing SC with AR System. The recommended method of SC integration is installing and running the SC client instead of editing paths in the system registry. A correct installation of the SC client should work properly with AR System. When using the SC system, make sure that you have enabled integration and that you have installed the SC clients.
Configuring AR System Servers ! 95

Action Request System 5.1
Configuring Source Control
1 Open the server window.
2 Select a server to administer.
3 Choose File > Server Information.
4 Click the Source Control tab.
Figure 4-13: Server Information—Source Control Tab
96 "Chapter 4—Configuring Servers and Clients

Configuring AR System
5 Edit the options, as needed:
6 To activate Source Code Control integration in AR System, select the following:
a Click the Enable Source Control Integration check box.
The SC options in the Source Control tab become activated.
Enable Source Control Integration
Defines if SC within AR System is activated.
! Selected—Activates SC and enables you to configure SC software (for example, Microsoft Visual SourceSafe or PVCS Version Manager) with AR System.
! Cleared (the default)—No SC is activated in AR System.
Mode ! Enforced—System strictly enforces SC version control on AR System objects; for example, check-out and check-in. Enforced integration causes AR System Administrator to prompt developers to check out the object when it is modified. If the system is in Enforced mode, you cannot modify and save an object if you do not check it out from SC first. Enforced mode extends also to group permissions and bulk update operations. Developers cannot modify objects if they are not first checked out in SC.
! Advisory—System warns user when SC version control is not satisfied with respect to check-out and check-in, but still allows a developer to update AR System. When a developer checks in an object, the SC system is updated only if AR System Administrator gets exclusive access to the SC system. If the system is in Advisory mode, you can modify and save an object without having it checked out from the SC and updating the Checked Out To property on AR System server. The system will prompt you with a warning but still allows you to proceed with your modifications.
Comments Required in Check In
Determines if comments are needed when checking in system objects.
Comments Required in Check Out
Determines if comments are needed when checking out system objects.
Provider Name Lists the SC software installed on your system. You can choose different SC software for different projects.
Project Name Brings up a project dialog box to select a project and location to enter into SC.
Configuring AR System Servers ! 97

Action Request System 5.1
b Choose the Enforced or Advisory Mode option to define the level of SC integration you want with AR System.
c Choose to add optional check-in or required check-out comments to SC.
SC comments can be optional with AR System. However, if you select that comments are required, you must enter them each time you check in or check out an object.
d From the Provider Name list, choose your SC system.
Warning: Choose an SC system and stay with it. Do not mix SC systems. Otherwise, you run the risk of introducing inconsistencies within the AR System server environment.
e Click Browse to create or open an SC project.
Depending on which SC application you integrate with AR System, different actions occur. For example:
! With Microsoft Visual SourceSafe, you must log in to SourceSafe, then open or create a SourceSafe project.
! With PVCS Version Manager, you create or open an SC project.
The contents of the read-only Project Name field contains information used only for internal server processes.
The last project opened in the Source Control tab is the current project displayed in the AR System Administrator client. If you are in an environment with multiple developers, make sure you are all using the correct project.
7 Click Apply.
Your settings are saved to the server. They define the current information for all AR System administrators and AR System application developers connected to the system. You can use the SC features as needed.
98 "Chapter 4—Configuring Servers and Clients

Configuring AR System
When you create an SC project in AR System, you can check into SC any object that appears in the New Server Object dialog box of AR System Administrator, except for distributed pools, distributed mappings, and groups. The following figure shows an example of an active link created and checked into Source Control. Objects are saved in the SC database as .def files.
Figure 4-14: Source Code Control Display
Server Information—Server EventsUse the Server Events tab to select the server activities that you want to log.
When you select specific server events, those events are logged in the Server Events form, thereby making server-related changes available to workflow and API programs. For information about the Server Events form, viewing recorded server events, and using server events in workflow, see the Developing AR System Applications: Advanced guide.
New active link
Configuring AR System Servers ! 99

Action Request System 5.1
The options on the Server Events tab of the Server Information dialog box specify which activities you want to log.
Setting Options for Server Events
1 Open the server window.
2 Select a server to administer.
3 Choose File > Server Information.
4 Click the Server Events tab.
Figure 4-15: Server Information—Server Events Tab
100 "Chapter 4—Configuring Servers and Clients

Configuring AR System
5 Edit the options, as needed:
6 Click Apply.
Server Events Form This field specifies the name of the form that is populated with information on specific server events. Only one server event form per server is allowed. The form is generated automatically by AR System. The form is defined from a unique combination of AR System reserved fields.
The default name is Server Events; you can rename the form, as needed.
Server Cache Changes Select the check box next to any of the following events if you want to log changes to these objects. All checked activities will be recorded in the Server Events form:
! Active Link! Container! Escalation! Field! Filter! Import! Menu! Form ! View
User/Group Changes Select User, Group, or both if you want to log additions, modifications, or deletions to the User or Group form, or any user or group changes using the access control utilities arcache and arreload. If checked, user or group changes will be recorded in the Server Events form.
Server Setting Changes Determines if an entry is created in the Server Events form as a result of the ARSetServerInfo call. If the check box is:
! Selected—Changes in configuration settings will create a log in the Server Events form.
! Cleared (the default)—Any changes in configuration settings for the specified server will not be recorded in the Server Events form.
Alert Client Registration Determines if an entry is created in the Server Events form as a result of Alert Tool logs to the AR System server.
Configuring AR System Servers ! 101

Action Request System 5.1
Server Information—Connection SettingsThe Connection Settings tab enables you to add an extra layer of security by configuring connection settings for the AR System Application Service, the Mid Tier Service, Plug-In Service, and by both remote and local Distributed Servers.
Setting Connection Settings
1 Open the server window.
2 Select a server to administer.
3 Choose File > Server Information.
4 Click the Connection Settings tab.
Figure 4-16: Server Information—Connection Settings Tab
102 "Chapter 4—Configuring Servers and Clients

Configuring AR System
5 Edit the options, as needed:
Application Service Password
Specifies the password that AR System application services such as AR System Approval Server will use to access the AR System server.
Asterisks in the field indicate that a password has been defined. If the field is empty, no password has been defined. The user can remove the password by leaving the field blank. If all values, numbers, and letters are removed from the field, and then the field is saved, there will no longer be any password defined for the user.
Mid-Tier Administration Password
Specifies the password that the mid tier will use to access the AR System server.
Plug-In Server tab—Local Password
Sets a plug-in server password, if applicable.
If this option is specified, arplugin will accept connections only from AR System servers that have been configured to use the same password set in the Plug-In Server Target Password field.
If this option is not specified, arplugin will accept connections from AR System servers that have not been configured to use a Plug-In Server Target Password.
Plug-In Server tab—Target Connection Settings
Defines the name and port number for the plug-in server.
The server name and port number create a unique entry. Therefore, if the user modifies an existing server name or port number, the password will be cleared. If the user chooses to remove the password for a particular entry, the user can specify a server name and port number with no password for that entry. The next time the user displays the table, the entry will not be displayed.
Configuring AR System Servers ! 103

Action Request System 5.1
DSO Server tab—Local Password
Specifies the password that a DSO server will use to access this AR System server.
DSO Server tab— Local RPC Program Number
Specifies the RPC program number that DSO will use to access the AR System server. If you leave the field blank, DSO will access any other user using fast and list queues. You can specify a private queue to define all DSO traffic to use that private queue to isolate the opeations of DSO and interactive users.
DSO Server tab—Target Connection Settings
Sets the DSO remote server name and password (if applicable) that the DSO server will use when accessing other AR System servers. If the user modifies the server name, the Password column will be cleared.
Enter the information as follows:
a Enter the remote DSO server name. b Enter a password in the Password column. (Leave the
password blank if you do not want to specify a password, or if you want to clear the existing password.)
c Select an RPC program number that will be used when interacting with the specified server (optional). If you leave the field blank, a value of zero will be entered and access to the server will default to using the fast and list queues.
d Enter a port number for the specified server (optional). If you leave the field blank, a value of zero will be entered and the systme will use a portmapper on the specified server to locate the AR System server TCP port number.
104 "Chapter 4—Configuring Servers and Clients

Configuring AR System
Note: If you are creating passwords for the Application Service and DSO server, you can set the minimum API version to 9 to ensure that secure 5.1 servers cannot communicate with servers running previous AR System versions. For information about setting the API version, refer to Server Information—Configuration on page 65.
6 Click Apply.
7 Restart the AR System server for the Connection Settings to take effect.
Server Information—Currency TypesUse the Currency Types settings to specify the currency types that are accessible in AR System Administrator. These currency types (represented by three-character abbreviations such as USD) are stored in the AR System Currency Codes form. The types that appear in this dialog box are those from the Currency Codes form that are marked as active. When you add or remove currency types in the Server Information dialog box, the AR System configuration file (ar.cfg or ar.conf) is updated with your changes.
Remote Workflow tab—Local Password
Sets a password used to access the current server when there is workflow frm another server that references the current server. By defining a password, you require that only workflow defined on another server to access this server must have a password defined. This insures protection of the server from outbound access.
Remote Workflow tab—Target Connection Settings
Sets a workflow password used to access the specified remote server, if there is any workflow that references the remote server. If the remote server has specified a workflow password, you must register that server and password, or you cannot access that server through workflow.
Configuring AR System Servers ! 105

Action Request System 5.1
For more details about currency types, refer to the Developing AR System Applications: Basic guide.
Setting Currency Types
1 Open the server window.
2 Select a server to administer.
3 Choose File > Server Information.
4 Click the Currency Types tab.
Figure 4-17: Server Information—Currency Types Tab
106 "Chapter 4—Configuring Servers and Clients

Configuring AR System
5 Edit the options, as needed:
6 Click Apply.
Choose Default Allowable Types Allowable currency types are types that are valid entries in a currency field. These currency types are visible in menus or drop-down lists in AR System Administrator and in client screens.
From the list in the left column, select a currency type, and click Add. Your selection will be added to the table on the right, which shows the three-character currency type and the default decimal precision level for that currency type. For example, the currency type USD has a default of two decimals of precision. You can modify this precision level by entering a new value in the Precision column. For example, to specify four decimals of precision, enter 4.
To remove a currency type, select it and click Remove.
Choose Default Functional Types You must also specify the functional currencies that will be stored as part of the field value. When a request is submitted that includes a currency value, the server converts that value to a functional currency type and stores it.
You must include at least one functional currency type. There is no limit to the number of functional currency types you can specify; however, adding more than five currency types may have an adverse effect on server performance.
From the list in the left column, select a functional currency type, and click Add. Your selection will be added to the table on the right, which shows the three-character currency type and the default decimal precision level for that currency type. For example, the currency type USD has a default of two decimals of precision. You can modify this precision level by entering a new value in the Precision column. For example, to specify four decimals of precision, enter 4.
To remove a currency type, select it and click Remove.
Configuring AR System Servers ! 107

Action Request System 5.1
Configuring Multiple Servers
You can configure multiple servers to run on a single host machine. You can also configure multiple servers on independent host machines to access the same database. These distinct features are discussed in the following sections. To learn more about installing multiple servers, see the Installing AR System guide.
Configuring Multiple Servers on One MachineThe ability to run multiple servers on a single host machine offers the following advantages:
! Provides a cost-effective solution by allowing you to support more customers with less hardware.
! Enables mutually exclusive groups of users to access separate AR System servers on a single host machine.
! Gives you the option to use a single high-end system for production, development, and test.
Each server connects to a different database, as shown in Figure 4-18, and each server must have a separate license.
Figure 4-18: Configuring Multiple Servers on One Machine
Host
Server
Server
108 "Chapter 4—Configuring Servers and Clients

Configuring AR System
For more information about licensing, see the Installing AR System guide.
Configuring Multiple Servers on One Machine
Additional servers are installed the same way you install your original AR System server. You must run the AR System server installer again for each additional server you want to run on the host machine. For information on installing servers, see the Installing AR System guide.
The following procedure highlights the configuration parameters necessary to support multiple servers on one machine. While you may have configured these parameters during installation, the steps are noted here for verification and troubleshooting purposes.
Only one server may be registered with a portmapper if you are configuring multiple servers to run on one machine. You must assign unique port numbers for each server. Do not assign port numbers that conflict with port numbers used by other applications or other programs running on your system. You can find out which port numbers are already registered by using the rpcinfo -p command (UNIX) or the netstat -a command (Windows) at the command-line prompt. If you do not check available ports, you could assign port numbers that conflict with other applications, and your servers might not start as expected.
On UNIX, port numbers within the range 1-1024 are only available for use by the superuser, and many of these numbers are reserved. Client tools can use ports 0–65535.
Configuring Multiple Servers ! 109
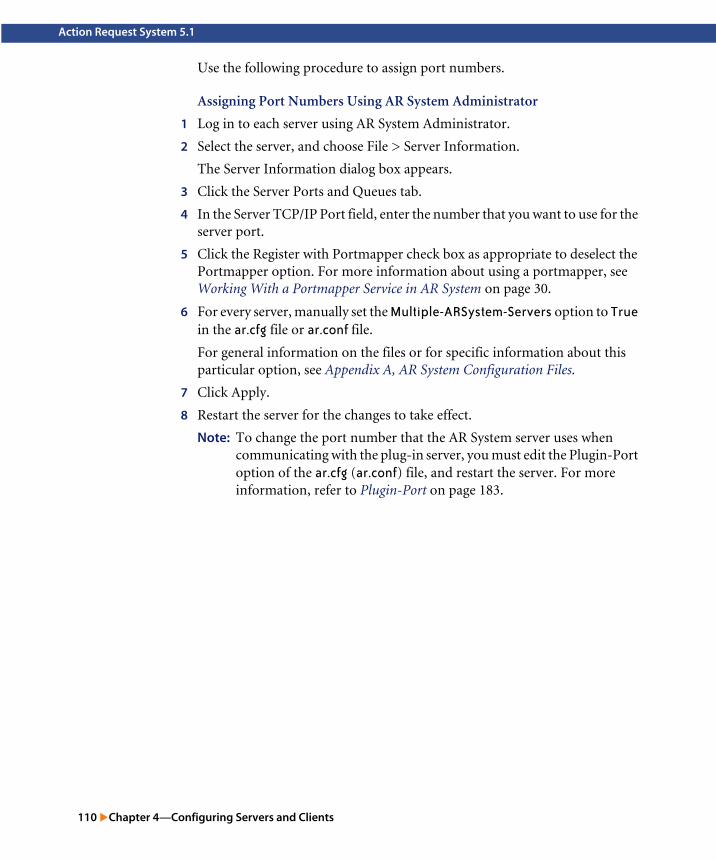
Action Request System 5.1
Use the following procedure to assign port numbers.
Assigning Port Numbers Using AR System Administrator
1 Log in to each server using AR System Administrator.
2 Select the server, and choose File > Server Information.
The Server Information dialog box appears.
3 Click the Server Ports and Queues tab.
4 In the Server TCP/IP Port field, enter the number that you want to use for the server port.
5 Click the Register with Portmapper check box as appropriate to deselect the Portmapper option. For more information about using a portmapper, see Working With a Portmapper Service in AR System on page 30.
6 For every server, manually set the Multiple-ARSystem-Servers option to True in the ar.cfg file or ar.conf file.
For general information on the files or for specific information about this particular option, see Appendix A, AR System Configuration Files.
7 Click Apply.
8 Restart the server for the changes to take effect.
Note: To change the port number that the AR System server uses when communicating with the plug-in server, you must edit the Plugin-Port option of the ar.cfg (ar.conf) file, and restart the server. For more information, refer to Plugin-Port on page 183.
110 "Chapter 4—Configuring Servers and Clients

Configuring AR System
Configuring Multiple Servers to Access the Same DatabaseThe ability to configure multiple servers to share the same AR System database, as shown in Figure 4-19, offers the following advantages:
! Enables you to use multiple servers to access multiple applications from a single high-performance database sharing the same data.
! Gives you one point of database management.
! Provides easy backup and replication at the database level.
! Increases scalability by increasing the bandwidth that can be applied to a single data set.
Figure 4-19: Multiple Servers Accessing the Same AR System Database
During installation, you will be prompted to specify a database for each server as well as database login information and database settings. You will want to specify the same information for each case, making sure you choose the upgrade option for the second and subsequent servers. For more information about installing multiple servers, see the Installing AR System guide.
The following procedure highlights configuration options that are available to protect your data when running multiple servers against the same database.
HostHost Host
Server Server
Configuring Multiple Servers ! 111

Action Request System 5.1
Configuring Multiple Servers to Access the Same DatabaseWhen running multiple servers against a single database, you can configure the following options to protect your data.
! Disable Administrator Operations—Disabling administrator operations (such as CreateSchema, SetSchema, and CreateField) is necessary when you run multiple servers against the same database. To prevent more than one server from updating a form when another server is using that form, you can disable administrator operations in the Server Information dialog box.
Only one AR System server in this configuration should have administrator operations enabled.
! Disable Escalations—To prevent workflow conflicts between multiple servers that are attached to the same database, you can disable escalations.
Only one AR System server in this configuration should have escalations enabled.
! Server Events—You should record server events such as cache changes, user and group changes, and alert client registrations. A filter that uses the arsignal utility fires upon cache, user, and group changes, and notifies other servers to reload their cache. A filter that fires upon Alert client registration notifies other servers to update their internal Alert user information.
You need to disable these options on all but one server in the set of servers accessing the same database. Only one server should perform administrator operations and perform escalations. The server that performs administrator operations should have filters applied to its server events form that use the arsignal utility to notify the other servers of changes to the cache. For more information on arsignal, see arsignal (arsignal.exe) on page 203.
To configure AR System Alert to work in this environment, you must create a filter to notify all other AR System servers in the cluster of alert registration events. An alert registration event occurs when an Alert Tool logs into an AR System server. The filter you must create will execute a Run Process that uses the arsignal utility to notify other AR System servers of the registration event. Without this filter, other AR System servers in the cluster would be unaware of these registration events.
112 "Chapter 4—Configuring Servers and Clients

Configuring AR System
To enable AR System Alert to recognize all of the AR System servers in the cluster, version 5.1 of the AR System Alert should be used.In addition, the AR System server IP addresses must be mapped to each other. For example, if you have three AR System servers—A, B, and C—in the cluster, add the following lines to the ar.conf (ar.cfg) file for server A:
Map-IP-Address <Server_B_IP_Address> <Server_A_IP_Address>Map-IP-Address <Server_C_IP_Address> <Server_A_IP_Address>
Configuring Options for Multiple Servers Accessing the Same Database
1 Open a server window.
2 Choose File > Server Information from the menu bar.
3 Click the Configuration tab.
4 Decide which server in the set will perform administrator operations.
a Enable Administrator Operations on this server.
b Configure your system to notify companion servers of structure changes.
c Enable Server Events.
5 For companion servers, do the following:
a Disable Administrator Operation.
All Administrator operations with the exception of logging and setting ports will be disabled. See Server Information—Configuration on page 65 for more information.
b Disable Server Events.
6 Decide which server in the set will perform escalations.
a For this server, Enable Escalations.
b For companion servers, Disable Escalations.
Escalations will not be disabled until you restart the server. See Server Information—Configuration on page 65 for more information.
Running a Stand-Alone AR System Server
To run the AR System Windows server disconnected from the network (for example, on a laptop computer), use the following procedure:
Running a Stand-Alone AR System Server ! 113

Action Request System 5.1
Running a Stand-Alone AR System Server
1 Open the C:\WINDOWS\system32\drivers\etc\HOSTS file (or the drive that Windows server is installed on).
2 Enter the following alias entry:
<IPAddress> <local_host_name>.<domain_name> <local_host_name>For example:
174.21.8.109 coyote.acme.com coyote
Many configurations of Windows require you to remove all DNS servers when running as a stand-alone server. This avoids long pauses caused by the Windows networking software trying to communicate with the network during AR System interaction. Remember what you removed so that you can add it back when reconnecting to the network.
3 Save the file.
4 Shut down and restart the system.
The AR System server will now also function when disconnected from the network.
Configuring Firewalls with AR System Servers
This section describes the connections required to connect to an AR System server through a firewall, without using a portmapper. In Figure 4-20 on page 115, the AR System User Tool client connects to a specific port of the AR System server. When the user makes a request of the AR System server, the response is returned on the same TCP connection that makes the request. (AR System Administrator and AR System User Tool use the same port to talk to the AR System server; therefore, they are configured the same way for firewalls.)
114 "Chapter 4—Configuring Servers and Clients

Configuring AR System
When the AR System server determines an alert is required, it sends the alert message to AR System Alert using TCP on the outbound port specified in the configuration, as shown in Figure 4-20. For more information about setting ports, refer to Server Information—Server Ports and Queues on page 77.
Figure 4-20: Transmitting Alerts through a Firewall
To enable these connections through the firewall, the AR System server, and the client, each must be configured to communicate on the proper ports.
! AR System server—The AR System administrator assigns a specific port number in the Server TCP/IP Port box as described in Assigning TCP Port Numbers to AR System Servers on page 78.
! Client—The administrator or user configures the Advanced Server Properties in the Accounts dialog box as described in Configuring Windows Clients to Avoid Using a Portmapper on page 117. This informs the clients of the location on the firewall through which they can connect to AR System servers.
ALERT
AR Systemserver
Firewall
Outbound PortInbound Port
TCP Call
AR SystemAlert
AR SystemUser Tool
Configuring Firewalls with AR System Servers ! 115

Action Request System 5.1
Configuring Clients for AR System Servers
When servers are configured to run on specific TCP ports, the clients need to be configured to match.
For more information about working with a portmapper, see Working With a Portmapper Service in AR System on page 30. For more information about TCP port numbers, see Assigning TCP Port Numbers to AR System Servers on page 78.
To access private AR System queues, client machines must either set the appropriate RPC and TCP values in the Accounts dialog box, or have the ARRPC and ARTCPPORT environment variables set. For more information about private queues, see Private Queues on page 27. Refer also to the discussion in Configuring a Server to Use Plug-Ins on page 118.
You can set these ports in the Advanced Server Properties of the Accounts dialog box as the following section explains.
Use the following procedure to set Advanced Server Properties for Windows clients.
116 "Chapter 4—Configuring Servers and Clients

Configuring AR System
Configuring Windows Clients to Avoid Using a Portmapper
To avoid using a portmapper when accessing AR System servers, client machines must have the TCP Port set as described in the following procedure:
1 In AR System User Tool, choose Tools > Account to open the Account dialog box.
Figure 4-21: Advanced Server Properties
2 Select the Advanced Server Properties check box to view the advanced port columns. Otherwise, you see only the first two columns.
3 Click in one of the following columns and type the port number or the private server number that you want to connect to:
! TCP represents the port number of the specified AR System server.
! RPC represents the program number of a private server, if you are using a private server. This setting allows you to connect to a private server.
4 Click OK.
5 Log in again to activate these changes.
Advanced Server Properties
Configuring Clients for AR System Servers ! 117

Action Request System 5.1
Configuring a Mail Server
To configure a server to process requests sent through email and to send email notifications on Windows, you must:
1 Install the AR System email engine.
2 Configure the AR System server for use with the email engine.
3 Set up email for requests and searches. This includes the following tasks:
a Establish an email address.
b Set up the mail server.
c Configure additional mailboxes to be used in your organization.
d Start the mail process.
4 Configure email for notifications by creating a notification mailbox.
For more information about installing the email engine, see the Installing AR System guide. For information about configuring the email engine, see the Action Request System Email Engine Guide.
Configuring a Server to Use Plug-Ins
You may want to use plug-ins for:
! AR System database connectivity (ARDBC)—Used to create an AR System vendor form to access external data. For information about vendor forms, refer to the Developing AR System Applications: Basic guide.
! AR System external authentication (AREA)—Used to resolve user accounts against directory services.
! AR System filters (ARF)—Used to make a call from workflow to external services, and capture returned data.
The AR System supports the plug-in service and API, but if you have problems with a specific plug-in, call the plug-in service provider for assistance.
For more information about creating ARDBC, AREA, or ARF plug-ins, refer to the AR System C API Reference Guide.
118 "Chapter 4—Configuring Servers and Clients

Configuring AR System
Configuring a Server to Use Plug-Ins
1 Modify the following settings in the ar.conf file (on UNIX) or the ar.cfg file (on Windows):
! Plugin (page 182)
! Number of threads, for example:
! Plugin-ARDBC-Threads (page 182)
! Plugin-AREA-Threads (page 182)
! Plugin-ARFilter-API-Threads (page 183)
! Plugin-Log-Level (page 170)
! Plugin-Port (page 183)
! Server-Plugin-Alias (page 184)
! Server-Plugin-Default-Timeout (page 184)
These settings are described in Appendix A, AR System Configuration Files on the pages noted.
2 Modify the plug-in target password (page 102).
3 Modify the plug-in log file (page 72).
Configuring the AR System Server for External Authentication (AREA)
After you have installed an AREA plug-in, you can set up the AR System server to use external authentication.
It is important to understand that there are three types of external authentication. Two of the three authentication methods use the authentication string described in the AR System C API Reference Guide.
Users can be authenticated externally in three ways. Depending on your system and configuration, users can be authenticated:
! To the operating system (UNIX only)—The AR System server authenticates to the operating system. Currently, the authentication string has no effect when authenticating to a UNIX operating system.
Configuring the AR System Server for External Authentication (AREA) ! 119

Action Request System 5.1
! To the server domain (Windows NT/2000)—The AR System server authenticates to the Windows NT/2000 server domain. If a value has been entered in the Authentication String field, that value will be used as the domain name to which the AR System server will authenticate.
! To the AREA service—If you have configured external authentication to an AREA service, the user name, password, and authentication values entered will be provided to the AREA service.
Before configuring external authentication for an AREA service, you must configure your server to use plug-ins, as described in Configuring a Server to Use Plug-Ins on page 118. You must also start the plug-in service, as described in Appendix B, AR System Server Utilities.
After the service is started, you must set up the server for external authentication as described in the following procedure.
Configuring the AR System Server for External Authentication
To configure the AR System server to use external authentication, use AR System Administrator. The settings you specify in AR System Administrator persist across server restarts.
1 In AR System Administrator, select a server, and open the Server Information dialog box.
2 Click the Configuration tab and select:
! Authenticate Unregistered Users to specify that all users in the User form can log in and be authenticated internally; users not in the form will be authenticated externally. If this option is cleared, the AR System stops the validation process and manages the user as a guest user.
! Cross Ref Blank Password to specify that all users in the User Form can log in and be authenticated externally if the password field in the form is left blank for that user. If this selection is cleared, a blank password field in the User Form is treated as no password for that user.
3 Click the Server Ports and Queues tab and set the External Authentication Server RPC Program Number.
Entering a non-zero value will enable authentication using an AREA service. Entering no value or zero will disable authentication using an AREA service.
If you specify this setting to zero (0), the AR System server makes no attempt to communicate with the AREA server.
120 "Chapter 4—Configuring Servers and Clients

Configuring AR System
4 Choose the Timeouts tab to set the RPC and SYNC time-outs for External Authentication.
External Authentication Timeout (seconds) is the amount of time the AR System server will wait for a response from the AREA server.
! RPC is the RPC time-out (seconds) setting used when making calls to the AREA server. If set to zero (0), the AR System server will not invoke the call to the external authentication server. The default is 30 seconds.
! Need To Sync is the interval for periodically invoking the AREA server's AREANeedToSyncCallback() call. If set to zero (0), the AR System server will not invoke the call to the external authentication server. The default is 300 seconds.
5 Save your settings.
Configuring a Server for Alerts
To enable users to receive alerts from the server through AR System Alert, configure your server as described in the following procedure.
The previous Notification Server command-line configuration options are not available in AR System 5.0 or later. To configure your server for alerts, use AR System Administrator as described in the following procedure.
Configuring a Server to Send Alerts
1 In AR System Administrator, select the server you want to configure, and open the Server Information dialog box.
2 Click the Server Ports and Queues tab, and perform the following steps:
a In the Alert Outbound Port field, enter the port number that the server will use when sending alerts.
A zero (0) means the server will use random port selection.
b Configure the Alert queue to adjust the minimum and maximum threads.
For more information, refer to Server Information—Server Ports and Queues on page 77.
3 Click the Timeouts tab, and in the Alert Send Timeout (seconds) field, enter the number of seconds the server will wait during connection attempts before timing out.
4 Click the Configuration tab, and perform the following steps:
Configuring a Server for Alerts ! 121

Action Request System 5.1
a Select the Verify Alert Users check box to have the server verify at boot-up time that each of the users it thinks are registered are actually still running and listening for alert messages.
b Select the Disable Alerts check box to have the server refrain from sending alert messages when alert events are entered into the system.
5 If you want the server to translate IP addresses before sending alert messages to users, edit the Map-IP-Address option in the ar.conf file.
For more information, refer to Map-IP-Address on page 168.
122 "Chapter 4—Configuring Servers and Clients

CHAPTER
5
Configuring the Mid TierThis chapter provides information and instructions for configuring the AR System mid tier and using the AR System Configuration Tool for deployment of web applications. It includes the following sections:
! Using the Configuration Tool on page 124
! Deploying Web-based Applications on page 138
Configuring the Mid Tier ! 123

Action Request System 5.1
Using the Configuration Tool
The AR System Configuration Tool enables you to configure a variety of settings in the mid tier from a browser. For example, you can add or modify AR System server information, add, delete, or modify MIME types, change the configuration password, update cache policy information, and specify user authentication for web services. In addition, you can use the Configuration Tool to deploy web-based AR System application.
Accessing the Configuration ToolTo access the Configuration Tool, open a browser and enter the following URL:
http://<host>/<contextpath>/apps/shared/config/config.jsp
where <host> is the name of the web server and <contextpath> is the path representing the location of the mid tier (arsys by default). When the Login page appears, enter the login password, and click Login. If you have not changed the password yet, the default password is arsystem.
Once you log in successfully, the Configuration Tool Overview window appears, which provides a read-only display of the current settings for your installation. Use the navigation bar at the left to select configuration tasks.
Using the Configuration Tool with a Load BalancerIf you are using the Configuration Tool with a load balancer, you must use the web server’s real IP address, not a virtual IP address, to open the Configuration Tool. Explicitly configure the mid tier on the actual web server, not the load balancer. The Configuration Tool will not function as expected if you use a virtual server to open it.
Each web server will have its own mid tier. You must configure each mid tier individually, and you should configure each mid tier identically.
Also, configure the load balancer for session affinity—sometimes called the “sticky” setting on some load balancers—so that all activity for one session is associated with the same web server. A persistent session allows login content to be maintained, and enables report and attachment files to be kept in a session-specific directory and to be cleaned up when the session ends.
124 "Chapter 5—Configuring the Mid Tier

Configuring AR System
For information on mid tier settings, refer to Configuration Tool online help at
http://<host>/<contextpath>/apps/shared/doc/config/en/.
Specifying Configuration SettingsThis section explains the configuration settings that you can specify and update using the Configuration Tool. To access the pages for these settings, click the appropriate links in the navigation bar. Step-by-step instructions for configuring these settings are provided in the AR System Configuration Tool help.
General SettingsUnder General Settings (Figure 5-1), you can specify servers to be used for configuration, as well as settings for log files generated by configuration functions.
Figure 5-1: Configuration Tool General Settings
Using the Configuration Tool ! 125
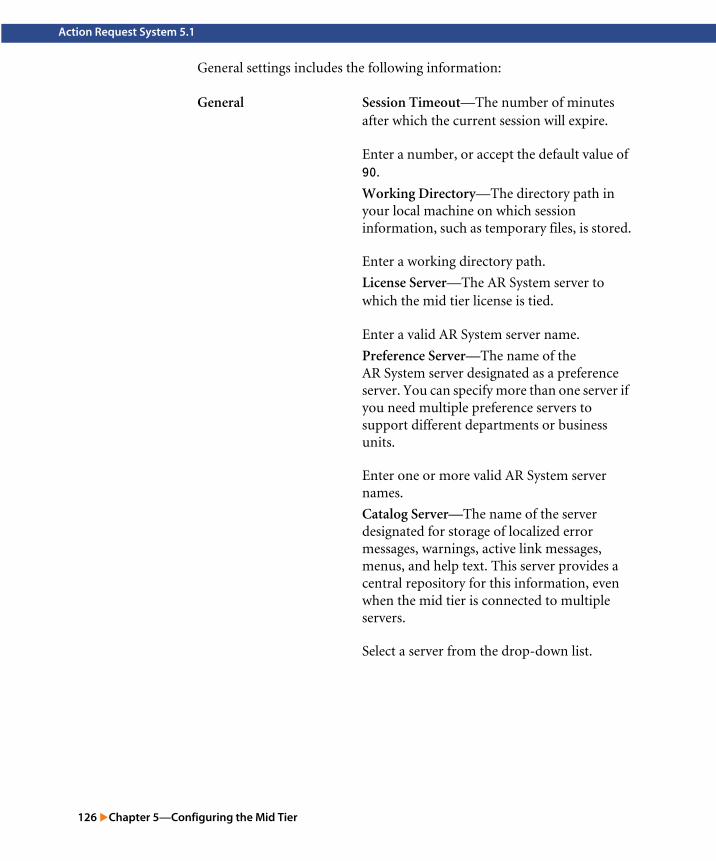
Action Request System 5.1
General settings includes the following information:
General Session Timeout—The number of minutes after which the current session will expire.
Enter a number, or accept the default value of 90.
Working Directory—The directory path in your local machine on which session information, such as temporary files, is stored.
Enter a working directory path.
License Server—The AR System server to which the mid tier license is tied.
Enter a valid AR System server name.
Preference Server—The name of the AR System server designated as a preference server. You can specify more than one server if you need multiple preference servers to support different departments or business units.
Enter one or more valid AR System server names.
Catalog Server—The name of the server designated for storage of localized error messages, warnings, active link messages, menus, and help text. This server provides a central repository for this information, even when the mid tier is connected to multiple servers.
Select a server from the drop-down list.
126 "Chapter 5—Configuring the Mid Tier

Configuring AR System
Reporting Tool Crystal Report Location—The name and port number of the web server on which Crystal reports are installed.
Enter a web server name. For iPlanet web servers, enter the information in the following format: <server>:<port>/cgi-bin/wcscgi.exe
Reporting Working Directory—The default directory in which reports will be stored.
Enter a directory path.
Logging Log Categories—The type of information to be stored in the log file.
Enter one or more categories, or accept the default value of All. The available categories are:
APPMGRCACHECONFIGCONTENTMGRFLASHBOARDLOGGINGMISCPERFORMANCEREPORTINGSESSIONSHARETAGHANDLERTRANSFORMERWEBSERVICESWIRELESSWORKFLOW
Log Directory—The directory in which log files are stored; for example, c:\arsystem\logfiles.
Enter a directory path for storage of log files.
Using the Configuration Tool ! 127

Action Request System 5.1
Log Rollover Limit—The maximum size (in kilobytes) a file reaches before a backup copy is automatically made. The default log file name is armidtier.log. When the log file reaches this limit, a backup copy is made with the same file name and an incremental number (for example, armidtier.log.1).
Enter a number for the maximum file size.
Log Level—The level of detail for logging information.
! Basic—Provides the lowest level of detail. Only server start time and error messages are logged.
! Info—Provides a moderate level of detail. Logs all Basic level messages, plus server transaction requests and responses.
! Debug—Provides the highest level of detail.
The default is Basic.
Select a log level.
128 "Chapter 5—Configuring the Mid Tier

Configuring AR System
ARServer SettingsUnder ARServer settings, you can add, delete, or modify information about servers used by the mid tier. For each server, you specify a server name, the administration password used by the server, the port number used by that server, and the RPC protocol number used by the server.
Figure 5-2: ARServer Settings
Log Viewer—The method by which you want to view log files.
! System (Windows platforms only)—Data is stored in a log file in the servlet engine. To view the log data, you must open the file dbmon.exe, which is located in the directory where your ServletExec installation resides.
! File (all platforms)—Data is saved to a file in the specified log directory.
The default is File.
Select a log viewing option.
Maximum Backups Allowed—The maximum number of backup files that the system will generate when the log file size exceeds the limit specified in the Log Rollover Limit.
The default is 10 backups.
Enter the number of maximum backups for your environment.
Using the Configuration Tool ! 129

Action Request System 5.1
Adding a New Server
1 Enter the following information about the new server:
! Server Name: The name of the new server. The name must be that of a server that is recognized by the AR System.
! Admin Password: The AR System password used ot access this server. As you type the password, asterisks are are entered instead of the actual password characters.
! Port#: The port number you previoussly configured to access the AR System server. If you have not configured a port number, leave this field blank.
! RPC#: The Remote Procedure Call (RPC) protocol number that the server will use. This number can be used for connection to a private server.
2 Click Add Server.
3 Once you have added a server, the ARServer settings window is redisplayed with the new server listed.
Editing Server Properties
1 In the Edit/Delete column of the ARServers window, the checkbox next to the server whose properties you want to edit.
2 Click Edit.
3 In the Admin Password, Port# or RPC# fields, make the appropriate changes. You cannot edit the server name. If you need to change the name of a server, you must delete that server and add it again.
4 Click Save ARServer to save the updates, or click Cancel to discard the updates and return to the ARServers window.
Deleting One or More Servers
1 In the Edit/Delete column of the ARServers window, click the check boxes next to the servers you want to delete. To select all servers, click the Select All link below the list.
2 Click Delete. The selected servers are deleted.
130 "Chapter 5—Configuring the Mid Tier

Configuring AR System
Cache SettingsUnder Cache Settings, you can specify update intervals for the mid tier cache, how updater threads are used for one server or multiple servers, the conditions under which items are loaded to the cache, and the maximum number of forms that can be cached. You can also use the Cache Settings window to update the mid tier cache at any time.
Figure 5-3: Cache Settings
Updating Cache Settings
1 Enter the following information in the Cache Settings window:
! Update Per Server: Whether one thread will update a single server or multipe servers.
! Select Multiple threads (the default) to use one cache updater thread for each server.
! Select Single thread to use one cache updateer thread for all servers.
! Loading Policy: How items will be loaded to the cache.
! Select All on Demand to load individual forms, active links, containers, or menus upon request.
! Select Pre-load all to load all forms, active links, containers, or menus only upon the first request for each object type.
! Select Pre-load related (the default) to load forms and their associated active links together upon request.
Using the Configuration Tool ! 131

Action Request System 5.1
! Update Interval (seconds): The interval in seconds at which cache information will be updated. A value of zero (0) means that the cache will not be updated. The default values is 3600 seconds (60 minutes).
To update this value, enter the new number of seconds.
! Object Invalidation Time (seconds): The number of seconds after which a component is removed from the cache. The default value is 43200 seconds (720 minutes).
To update this value, enter the new number of seconds.
! Maximum Forms Allowed: The maximum number of AR System forms that can be cached. The default value is 1000 forms. To update this value, enter the new number of forms.
2 Click Save Changes.
Restoring Previous Settings
To restore previous settings, click Reset Defaults before you save changes.
Updating the Cache Immediately
You can update the objects already in the cache at any time with the latest versions on the AR System server.
To update cache objects immediately, click Update Cache Now. New objects are cached the first time an object is deployed.
132 "Chapter 5—Configuring the Mid Tier

Configuring AR System
MIME Type SettingsUnder MIME Type Settings, you can view the list of current Multipurpose Internet Mail Exchange (MIME) attachment types used by AR System. These attachments enable users to include a variety of files such as spreadsheets, text files, audio and video clips, and graphics with AR System forms. MIME types currently included are listed in alpahbetical order by their extensions. You can add or delete MIME types as needed.
Figure 5-4: MIME Type Settings
Adding a New MIME Type
1 In the MIME Types window, click Add MIME Type.
The Add MIME Types window appears.
Figure 5-5: Configuration Tool—Add New MIME Types
2 Enter the following information:
! In the File Extension field, enter the extension, without a preceding period, for the MIME type you want to add.
! In the MIME Type field, enter a description for the MIME type you are adding.
Using the Configuration Tool ! 133

Action Request System 5.1
3 Click Add MIME type.
The MIME type is added to the list, in alphabetical order by its extension.
Editing Existing MIME Types
1 In the MIME Type Settings window, select the MIME type whose properties you want to edit.
The Edit MIME Type window appears.
Figure 5-6: Configuration Tool—Edit MIME Types
2 In the MIME type field, make the necessary updates to the description for the selected MIME type.
3 Click Save MIME Type to save the updates, or Cancel to discard the updates and return to the MIME Type Settings window.
Deleting a MIME Type
You can delete existing MIME types. After a MIME type is deleted, its file type cannot be used as an attachment with AR System forms.
Warning: You will not be prompted to confirm deletions of MIME types, and you cannot undo a delete action. Ensure that the MIME types you select are actually the ones you want to delete. If you accidentally delete the wrong MIME type, you must add it again.
1 In the MIME Types window, select the names for the MIME types you want to delete. (If the list of MIME types is long, you may need to scroll to find the MIME types you want to delete.)
! To select a single MIME type, click the type.
! To select multiple consecutive MIME types, use Shift+Click.
! To select multiple nonconsecutive MIME types, use Ctrl+Click.
134 "Chapter 5—Configuring the Mid Tier

Configuring AR System
2 Click Delete.
The selected MIME types are deleted.
Deployer SettingsUnder Deployer Settings, you can specify web views and associated files to be deployed. These items can be deployed either automatically (in the background, when a user requests a form), or manually (by selecting an application to be deployed).
Figure 5-7: Configuration Tool—Deployer Settings
For more information about deploying web applications, see Deploying Web-based Applications on page 138.
Using the Configuration Tool ! 135

Action Request System 5.1
Web Service SettingsUnder Web Service settings, you can enter a name for user authentication for access to published web services used by AR System. User information such as user name, password, and domain name are passed to the service through Simple Object Access Protocol (SOAP) headers. If a user name cannot be found in the SOAP headers, the name specified in this field is used to connect to the server where the needed web service resides. There is no default value for this field.
Figure 5-8: Web Service Settings
Specifying a Name for User Authentication
1 In the Anonymous User Name field, enter a user name.
2 Click Save Changes.
For more information about web services, refer to the Developing AR System Applications: Advanced guide.
136 "Chapter 5—Configuring the Mid Tier

Configuring AR System
Change PasswordYou can change the password used to access the Configuration Tool by entering a new password consisting of between 5 and 20 characters.
Figure 5-9: Configuration Tool—Change Password
Changing the Configuration Password
1 In The Change Password window, enter the following information:
! In the Old Password field, enter the current configuration password.
! In the New Password field, carefully type the new configuraiton password. The password should include no fewer than 5 and no more than 20 characters. As you type, asterisks are entered instead of the actual password characters.
! In the Confirm New Password field, re-enter the new configuration password exactly as you entered it in the New Password field.
2 Click Change Password to accept the new configuration password, or click Clear to keep your original password.
3 To verify that the new configuration password is in effect, log out of the Configuration Tool and log in again.
Using the Configuration Tool ! 137

Action Request System 5.1
Deploying Web-based Applications
To publish your finished web applications, the web views and associated files must be deployed. When you create a web view, AR System Administrator stores the view as a JSP file within the form definition. Form definitions are transferred to the mid tier cache either manually (using the Update Cache Now button in the Configuration Tool Cache Settings page), or through the cache update policy you define in the Configuration Tool, as described in Configuration Tool online help.
The mid tier Application Manager is responsible for deployment and for keeping deployed JSP files synchronized with form definitions in cache. During the deployment process, the Application Manager works with the mid tier cache to collect form and application definitions from the AR System server. The Application Manager uses the definitions in cache to create a JSP file for each web view and to copy these JSP files, and supporting files such as images, to a directory structure on the web server. For more information on mid tier architecture, refer to Mid Tier on page 14.
When an existing application is redeployed, the Application Manager updates the directory structure to reflect the changes to the application. The Application Manager uses the application web alias to name the deployed application folder. If you changed the application web alias before deploying, the existing directory structure for that application will not be changed or removed.
Note: This clean-up process includes the <appalias> directory and its subdirectories and files. It does not include files in the arforms directory.
For more information on the contents of the directory structure, refer to Deployment File Structure on page 139.
138 "Chapter 5—Configuring the Mid Tier

Configuring AR System
Deployment File StructureWhen you perform the deployment process, the mid tier creates a file structure that groups web views by locale, AR System server, and application web alias. Support files (such as images) are organized under each application. The JSP files created for views are named using the form web alias and view web alias. Figure 5-10 shows the deployment file structure.
Figure 5-10: Deployment File Structure
<base>
<locale2>
<servername>
arforms
<appalias>
<formalias>_<viewalias>.jsp
<locale1>
<servername>
arforms
<appalias>
<formalias>_<viewalias>.jsp
<formalias>_form.tms
<formalias>_<viewalias>.jsp
<supportfiles>.*
<supportfiles>.*
start.jsp
<appalias>_app.tms
<supportfiles_dir>
Deploying Web-based Applications ! 139
Action Request System 5.1
The deployment file structure contains the following elements:
<base> The directory to which you deployed, typically C:\Program Files\arsys\Mid-Tier\apps.
<locale1>
<locale2>
The locale of the web view, defined in AR System Administrator by choosing Form > Manage Views. There will be one such directory for each deployed locale. If you did not specify a view locale, this directory will be named default. For more information on setting the locale for views, refer to the Developing AR System Applications: Basic guide.
<servername> The name of the AR System server that contains the forms.
arforms Contains the JSP files created from web view definitions in cache. All applications within a locale share the JSP files stored here.
<appalias> The web alias of the application object, defined in the Create (or Modify) Application window. If the forms for which you created web views are not in an application object, your web views will be deployed to the arforms directory. For information on setting the application web alias, refer to the Developing AR System Applications: Basic guide.
Note that the JSP files in this directory are not actual web views. They reference JSP files with the same name in the arforms directory.
If you have created customized login and logout pages for your application, you must store them in this directory. To work with an application, you must also direct users to the JSP files located under appalias, not to the JSP files under arforms. For more information, refer to the Developing AR System Applications: Basic guide.
140 "Chapter 5—Configuring the Mid Tier

Configuring AR System
start.jsp If a primary form is defined in the application object, and the primary view corresponds to a web view, the Application Manager deploys start.jsp to the <appalias> directory. This page references the primary view, and can be used as the entry point for the application.
A start.jsp file will be deployed for all locales sharing the same view label. To ensure that each start.jsp references a particular web view, assign a unique label to selected views and specify this label as the primary view in the application object.
Note: If both web (fields fixed position) and web (fields relative position) views share the same label and locale, the system randomly selects one of these views to create start.jsp.
If you use start.jsp as the entry point for your application, the URL must go directly to start.jsp, such as http://<host>/<contextpath>/apps/<locale>/<servername>/<appalias>/start.jsp. You cannot use ViewFormServlet to reference start.jsp. For more information, refer to the Developing AR System Applications: Basic guide.
For more information on specifying a primary form and view, refer to the Developing AR System Applications: Basic guide.
<formalias>_form.tms The timestamp used by the Application Manager to determine whether to deploy the form.
<appalias>_app.tms The timestamp used by the Application Manager to determine whether to deploy the application.
<formalias> The web alias of the form for which you created web views, defined in AR System Administrator by choosing Form > Set Web Alias. For information on setting the form web alias, refer to the Developing AR System Applications: Basic guide.
<viewalias> The web alias of the web view, defined in AR System Administrator by choosing Form > Current View > Properties. For information on setting the view web alias, refer to the Developing AR System Applications: Basic guide.
<supportfile>.* A support file referenced in a web view.
<supportfile_dir> A support file directory referenced in a web view.
Deploying Web-based Applications ! 141

Action Request System 5.1
If you created your application in a workspace (as described in the Developing AR System Applications: Basic guide), the following structures and references all agree:
! The physical directory structure for the support files
! The support file structure defined in the application object
! The relative file references within the web view
The deployment process will also copy these support files to the directory specified. You can modify file references within the web view manually by editing the source, as described in the Developing AR System Applications: Basic guide. You can also manually change the support file directory structure as needed.
Deployment MethodsThe Application Manager provides two deployment methods: background deployment and manual deployment. You can choose a deployment method in the Deployer Settings page of the Configuration Tool.
Background DeploymentWith this feature, deployment is handled automatically by the Application Manager. Background deployment works with the objects in mid tier cache. When a user requests a form, if the files or application are not already deployed, the Application Manager deploys them. If a required object is not in cache, it is loaded from the AR System server and then deployed. If the object is in cache, it is deployed immediately, even if it is not the same as the most current version on the AR System server.
The cache update policy defined in the Cache Settings page of the Configuration Tool determines when and how cached objects are synchronized with definitions on the server. When you make changes to a form or application, the Application Manager will redeploy the form or application the next time the cache updates and a user accesses the files in the browser. If you have made changes to objects in the AR System server and want them to be available to users immediately, click the Update Cache Now button in the Configuration Tool Cache Settings page. For more information, refer to Configuration Tool online help.
Note: If you have modified deployed JSP files directly, your changes will be overwritten by background deployment.
142 "Chapter 5—Configuring the Mid Tier

Configuring AR System
Background deployment is enabled by default, but you can disable it in the Configuration Tool. For more information, refer to Configuring Deployment Settings.
Manual DeploymentManual deployment updates the mid tier cache with the most current definitions from the AR System server first, and then deploys applications to the web server. You manually deploy by configuring and selecting specific applications in the Configuration Tool. For more information, refer to the next section, Configuring Deployment Settings.
Configuring Deployment SettingsUse the Configuration Tool to deploy applications manually or to configure background deployment. For more information on the deployment process, refer to Configuring the Mid Tier on page 123.
Manual DeploymentTo deploy applications manually, you must configure mid tier settings for your application before deploying the application. Use the following procedures to prepare the mid tier and deploy your application.
Configuring Mid Tier Settings for an Application
1 Start the AR System Configuration Tool.
Access the AR System Configuration Tool from your browser. The default location is http://<host>/arsys/apps/shared/config/config.jsp. The default password is arsystem.
The AR System Configuration Tool opens to the Overview page.
2 Add the server containing the application you want to deploy as follows:
a Click on the ARServer Settings link.
b Click the Add Server button.
c Enter the server name in the Server Name field.
d Enter other server information as required by your configuration.
e Click the Add Server button.
3 Click the Deployer Settings link, and add the application you want to deploy as follows:
a Click the Add Application button.
Deploying Web-based Applications ! 143
Action Request System 5.1
b In the ARServer Name field, select the name of the server that contains the application.
c In the Web Alias Name field, select the application alias.
d Click the Add Application button.
Deploying an Application Manually
1 Start the AR System Configuration Tool.
Access the AR System Configuration Tool from your browser. The default location is http://<host>/arsys/apps/shared/config/config.jsp. The default password is arsys tem.
The AR System Configuration Tool opens to the Overview page.
2 Select the Deployer Settings link.
3 In the Delete/Deploy column, select the check box next to the application you want to deploy.
If you do not see the name of the application you want to deploy, follow the previous procedure, Configuring Mid Tier Settings for an Application.
4 Click Deploy.
If your application deploys successfully, you will receive a confirmation message.
Background DeploymentUse the Configuration Tool to disable or enable background deployment, according to the following procedure.
Configuring Background Deployment
1 Start the AR System Configuration Tool.
Access the AR System Configuration Tool from your browser. The default location is http://<host>/arsys/apps/shared/config/config.jsp. The default password is arsystem.
The AR System Configuration Tool opens to the Overview page.
2 Select the Deployer Settings link.
3 Next to the Background Deploy setting, select On or Off.
4 Click Save Change.
5 If you have made changes to your applications and you want these changes to be available immediately, click the Update Cache Now button in the Configuration Tool Cache Settings page.
144 "Chapter 5—Configuring the Mid Tier

CHAPTER
6
Configuring LDAP Plug-InsThis chapter discusses configuration of the AR System Database Connectivity (ARDBC) and AR External Authentication (AREA) Lightweight Directory Access Protocol (LDAP) plug-ins. These plug-ins can be installed as part of the AR System server installation.
For information about configuring AR System servers to work with plug-ins, see Configuring a Server to Use Plug-Ins on page 118.
This chapter includes the following information:
! Configuring the ARDBC LDAP Plug-In on page 146
! Configuring the AREA LDAP Plug-In on page 148
Configuring LDAP Plug-Ins ! 145

Action Request System 5.1
Configuring the ARDBC LDAP Plug-In
The ARDBC LDAP Plug-in enables you to access data stored in an external directory service as if this data were entries stored in a typical AR System form. You may search, modify, and create data in a directory service using this plug-in. You may also use this data to participate in workflow as well as to populate character menus and table fields.
This section describes the procedures for configuring and using the ARDBC LDAP Plug-in to integrate the AR System with a directory service.
If you selected the ARDBC LDAP plug-in option during installation of the AR System server, you can configure the ARDBC LDAP Plug-In using the ARDBC LDAP Configuration form in the AR System User Tool. If you did not choose the plug-in option during installation, you can run the AR System server installer again to install the configuration form. Refer to the Installing AR System guide for instructions.
The ARDBC LDAP Plug-In requires access to the directory service in order to create new records or to perform searches and modifications. You can configure the plug-in to use simple authentication to connect to the directory service, enhance security by using a Secure Sockets Layer (SSL) connection, or specify a certificate database from which to authenticate the server certificate.
Use the following procedure to configure the ARDBC LDAP Plug-in.
Configuring the ARDBC LDAP Plug-In
1 Open the AR System User Tool and log into the AR System server as a user in the Administrator group.
2 Choose File > Open to display the task finder.
3 Select the ARDBC LDAP Configuration form, and click New.
146 "Chapter 6—Configuring LDAP Plug-Ins

Configuring AR System
The ARDBC LDAP Configuration form opens, as shown in Figure 6-1.
Figure 6-1: ARDBC LDAP Configuration Form
4 Enter the host name of the directory service from which you want information for the vendor form.
5 Enter a port number for this directory service. The default port number is 389, or 636 if using an SSL connection.
6 Enter the distinguished name of the user account that the ARDBC LDAP plug-in will use when logging in to the directory service. This name was designated by the administrator who set up the LDAP service.
7 Enter the password for this user account. (For security, asterisks replace the characters you enter for the password.)
8 To use an SSL connection, click Yes in the Using SSL field; otherwise, accept the default value of No. If you select Yes, the Certificate Database field becomes active, and you can enter a certificate database as described in step 9.
9 If you selected Yes in the Using Secure Sockets Layer field, enter the directory name where the certificate database files cert7.db and key3.db are located. The certificate database is generated by Netscape utilities and includes certificates from trusted certificate authorities.
10 Click Save.
The system updates the ar.cfg/ar.conf file with the parameters you have specified in this form.
Configuring the ARDBC LDAP Plug-In ! 147
Action Request System 5.1
Configuring the AREA LDAP Plug-In
The AR External Authentication (AREA) LDAP plug-in enables you to authenticate AR System users against external LDAP directory services.
This section describes the procedures for configuring and using the AREA LDAP plug-in to integrate the AR System with an external directory service.
If you selected the AREA Plug-in option during installation of the AR System server, you can configure the AREA LDAP Plug-in using the AREA LDAP Configuration form in the AR System User Tool. If you did not choose the plug-in option during the original installation, you can run the AR System server installer again and select the ARDBC and AREA LDAP plug-in options.
Before configuring the AREA LDAP plug-in, set up user and group information in an LDAP directory service. Then, use the following procedure to enter these settings into the AREA LDAP Configuration form.
Configuring Settings for the AREA LDAP Plug-In
Open the AR System User Tool and log into the AR System server as a user in the Administrator group.
1 Choose File > Open to display the task finder.
2 Select the AREA LDAP Configuration application, and click New.
148 "Chapter 6—Configuring LDAP Plug-Ins
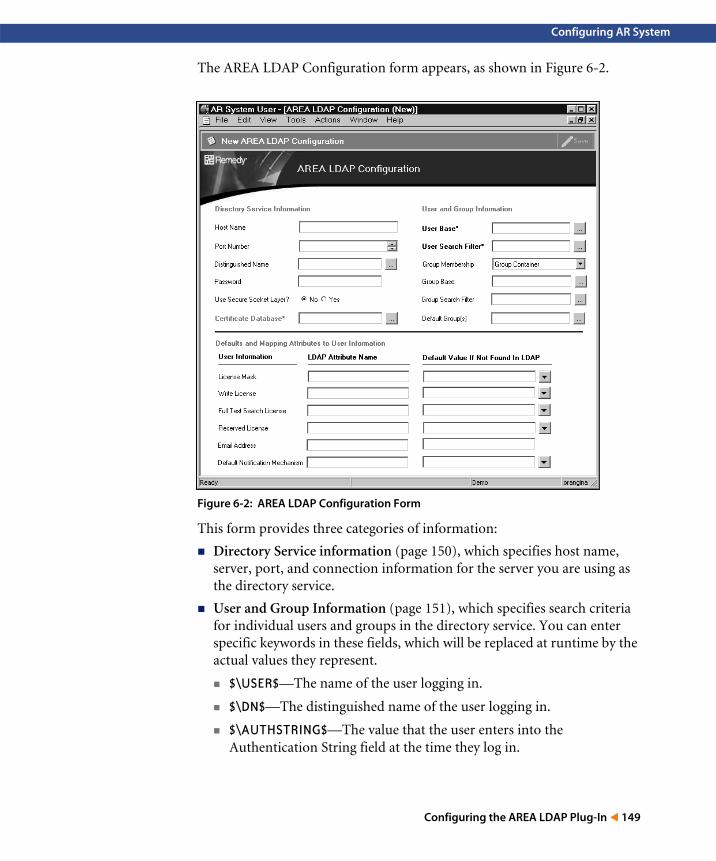
Configuring AR System
The AREA LDAP Configuration form appears, as shown in Figure 6-2.
Figure 6-2: AREA LDAP Configuration Form
This form provides three categories of information:
! Directory Service information (page 150), which specifies host name, server, port, and connection information for the server you are using as the directory service.
! User and Group Information (page 151), which specifies search criteria for individual users and groups in the directory service. You can enter specific keywords in these fields, which will be replaced at runtime by the actual values they represent.
! $\USER$—The name of the user logging in.
! $\DN$—The distinguished name of the user logging in.
! $\AUTHSTRING$—The value that the user enters into the Authentication String field at the time they log in.
Configuring the AREA LDAP Plug-In ! 149

Action Request System 5.1
! $\NETWORKADDR$—The IP address of the AR System client that is accessing the AR System server.
! Defaults and Mapping Attributes to User Information (page 152), which specifies the AR System fields, their corresponding attribute names in the directory service, and default AR System values for these fields if no value is found in the directory service. The settings you specify in this form are saved in the ar.cfg or ar.conf file.
3 Under Directory Service Information, enter the following information, as shown in Figure 6-3:
Figure 6-3: AREA LDAP Configuration—Directory Service Information
a Host Name: Enter the name of the server on which the directory service is hosted.
b Port Number: Enter the number of the port on which the directory service is listening.
c Distinguished Name: The distinguished name is the name for a user account that has read permissions and can search the directory service for user objects. Enter a distinguished name for this configuration.
d Password: Enter a password for the distinguished name specified in step d.
e Use Secure Sockets Layer?: To specify an SSL connection to the directory service, click the Yes option button. A Yes selection enables the Certificate Database field, and you can enter a certificate database in step f.
f Certificate Database: If you selected Yes in the Use Secure Sockets Layer? field, enter the directory name where the certificate database files cert7.db and key3.db are located. The certificate database is generated by Netscape utilities and includes certificates from trusted certificate authorities.
150 "Chapter 6—Configuring LDAP Plug-Ins
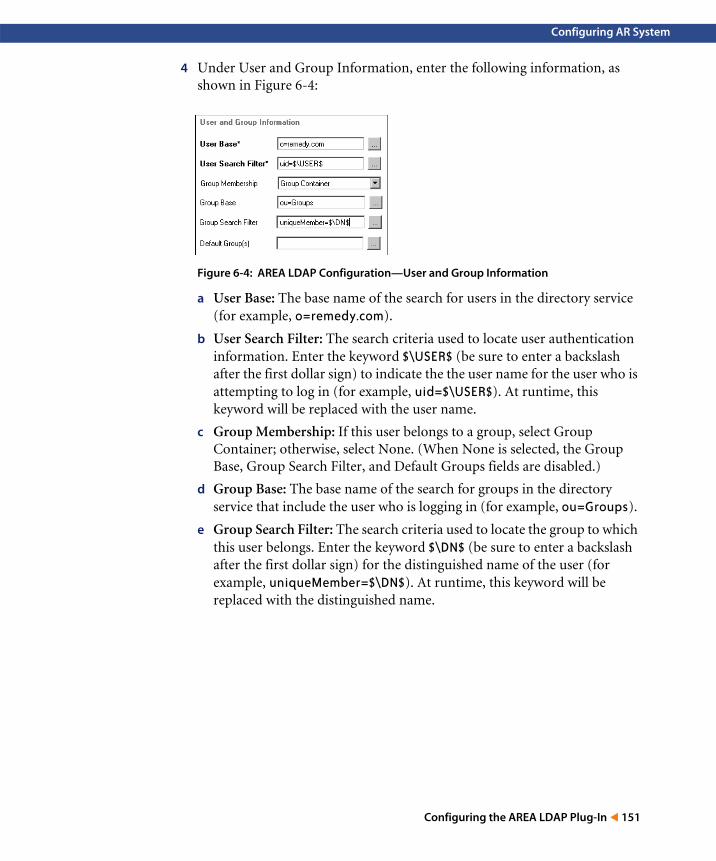
Configuring AR System
4 Under User and Group Information, enter the following information, as shown in Figure 6-4:
Figure 6-4: AREA LDAP Configuration—User and Group Information
a User Base: The base name of the search for users in the directory service (for example, o=remedy.com).
b User Search Filter: The search criteria used to locate user authentication information. Enter the keyword $\USER$ (be sure to enter a backslash after the first dollar sign) to indicate the the user name for the user who is attempting to log in (for example, uid=$\USER$). At runtime, this keyword will be replaced with the user name.
c Group Membership: If this user belongs to a group, select Group Container; otherwise, select None. (When None is selected, the Group Base, Group Search Filter, and Default Groups fields are disabled.)
d Group Base: The base name of the search for groups in the directory service that include the user who is logging in (for example, ou=Groups).
e Group Search Filter: The search criteria used to locate the group to which this user belongs. Enter the keyword $\DN$ (be sure to enter a backslash after the first dollar sign) for the distinguished name of the user (for example, uniqueMember=$\DN$). At runtime, this keyword will be replaced with the distinguished name.
Configuring the AREA LDAP Plug-In ! 151

Action Request System 5.1
5 Under Defaults and Mapping Attributes to User Information, enter names for the following attributes in the LDAP Attribute Name column, as shown in Figure 6-5. In the Default AR Value if Not Found in LDAP column, select or enter a default value that will be used if a value is not found in the directory service.
Figure 6-5: AREA LDAP Configuration—Defaults and Mapping Attributes
a License Mask: Enter a number for the license mask. The license mask specifies whether or not the AREA plug-in will override existing information from the User form for write, reserved, and FTS licenses, and which license types will be overridden by the value returned by the AREA plug-in. The value for the license mask is represented by an integer, as outlined in the first column of the following table. An X in the column for the license type means that the value returned from the AREA plug-in will override the license that is present in the User form for the specified user.
b License Type: Select the type of license—read-only, or floating.
License Mask Reserved FTS Write
0
1 x
2 x
3 x x
4 x
5 x x
6 x x
7 x x x
152 "Chapter 6—Configuring LDAP Plug-Ins

Configuring AR System
c Full Text License Type: If your organization has a license for full-text search (FTS), select the type of FTS license.
d License Reserved: The license type to be selected for a reserved license.
e Email Address: Enter a default email address for notifications.
f Default Notification Mechanism: Select the notification method used in your environment—none, alert, or email.
6 Click Save.
The system updates the ar.cfg or ar.conf files with the parameters you have specified in this form.
Verifying Server Configuration SettingsBe sure that your AR System server is properly configured to work with the AREA plug-in. In AR System Administrator, verify that the Cross Ref Blank Password or Authenticate Unregistered User are checked, so that the AR System server can call the AREA plug-in.
Note: In AR System Administrator, make sure that the External Authentication RPC number in the Server Ports and Queues section of the Server Information dialog box is set to 390695. For more information about the settings in this dialog box, see Configuring a Server to Use Plug-Ins on page 118.
Logging Options
You can view information in the plug-in log file (arplugin.log), which can be accessed from the path <ar_server_install_directory>\ARserver\Db\arplugin.log, or in AR System Administrator, in the Logging section of the Server Information dialog box. You can specify the level of plugin service logging by setting a log level under the setting PLUGIN_LOG_LEVEL in the ar.cfg or ar.conf file. For more information about plug-in log levels, refer to Appendix A, AR System Configuration Files.
Logging Options ! 153

Action Request System 5.1
154 "Chapter 6—Configuring LDAP Plug-Ins

APPENDIX
A
AR System Configuration FilesThis appendix contains information about the AR System configuration files. Each file name is listed by its UNIX name. Where it is different, the Windows equivalent is listed in parentheses after the UNIX name.
This appendix covers the following configuration files:
! ar on page 156
! ar.conf (ar.cfg) on page 157
! ardb.conf (ardb.cfg) on page 185
! armonitor.conf (armonitor.cfg) on page 189
AR System Configuration Files ! 155

Action Request System 5.1
ar
Description The ar file contains the list of AR System servers to which the client tools (AR System User, AR System Administrator, AR System Alert, and AR System Import) connect if no servers are specified on startup. The ARGetListServer function uses this file to return a list of available servers.
The format of this file consists of two fields separated by a space or tab:
<server-name> <server-information-list>
The <server-name> parameter is the name of the server machine. The name is resolved to a network address by using the name resolution strategy of the local machine. The <server-information-list> parameter identifies the server as an AR System server (AR) as well as the TCP port and RPC program numbers, as applicable.
Lines with a pound sign (#) in column 1 are treated as comments and are ignored.
Synopsis UNIX—$ARCONFIGDIR/arWindows—<ar_home_dir>\ar
Environment ARCONFIGDIR
UNIX only: Specifies the directory where the ar.conf file and other AR System configuration files are stored. This directory defaults to <ar_install_dir>/conf if you do not set this variable.
Examples The following directory file registers two server machines as AR System servers:
# Directory file for AR System serversremedy ARserver2 AR;;3030;;390600
The example includes the TCP port and RPC program numbers for server2.
156 "Appendix A—AR System Configuration Files

Configuring AR System
ar.conf (ar.cfg)
Description The ar.conf (ar.cfg) file contains configuration information used by AR System. It resides on machines with AR System servers only and provides configuration information about the server. The name of the file is ar.conf on UNIX servers and ar.cfg on Windows servers.
Any process can retrieve configuration information from the ar.conf (ar.cfg) file by using the ARGetServerInfo function. You can modify the information by using the ARSetServerInfo function. Updates made by using ARSetServerInfo take effect immediately. Manual changes to the file do not take effect until the AR System server process is restarted or signaled to reread the configuration file with arsignal -c.
Synopsis UNIX—<ar_install_dir>/conf/ar.confWindows—<ar_install_dir>\Conf\ar.cfg
Options The format of this file consists of two fields, separated by a space or tab:
<parameter> <value>
Each parameter represents a particular configuration option. The associated value represents the current setting for that option. All numeric values are in a base 10 system. The available configuration options (and the valid settings for each) are described in the following sections. Lines that do not begin with one of these options are ignored.
Lines with a pound sign (#) in column 1 are treated as comments and ignored.
Options You Can Set Using AR System AdministratorUse the Server Information dialog box in AR System Administrator to set the following options.
Active-Link-Dir
The directory where active link server run processes are stored. Only commands located in the specified directory can be run. This is a security feature. It ensures that clients or API programs can use only a safe set of server processes.
ar.conf (ar.cfg) ! 157

Action Request System 5.1
Active-Link-Shell
UNIX only: A shell that will be the parent of any active link server process. This parameter causes the server to start the shell with the specified process as a parameter. This is a security feature. The specified shell might be a security shell that verifies a path, or runs with a user ID other than the one that the server uses. For example, if the server runs as root and an administrator specified a shell that runs as a lower user privilege, an active link will invoke the shell that runs as a user, instead of as root. You can now set this parameter in the Advanced tab of the Server Information dialog box. Refer to Configuring AR System Servers on page 58 for more information about the Server Information dialog box.
Admin-Only-Mode
A setting indicating that only administrators and subadministrators can access the server. Valid values for this option are T and F. The default is F (not in admin-only mode).
Alert-Check-Users
Tells the AR System server to check all registered alert user connections at startup time. This may slow the startup process, but it removes all inaccessible connections. Valid values for this option are T and F. The default is F (do not check alert users).
Alert-Log-File
The name of the file to use if alert tracing is turned on (see Debug-mode on page 161). This argument is expressed as the full path name.
Alert-Outbound-Port
The specific TCP port to which the AR System server binds when sending alerts. If more than one worker thread is running in the alert queue, this setting represents the starting port number in a range of consecutive port numbers that are assigned in sequence to the threads.
Alert-Send-Timeout
Specifies the amount of time lapsed before a send attempt is aborted. Each alert is attempted to be delivered twice. If the second attempt fails, the alert is not sent and the user alert registration is removed.
158 "Appendix A—AR System Configuration Files

Configuring AR System
Allow-Guest-Users
A flag indicating whether the AR System server accepts guest users. Guest users are users not registered with AR System in a User form. If allowed, guest users have no permissions but may perform some basic operations. Guest users may submit requests to forms for which permission has been given to the Public group and fields have been defined as allowing any user to submit. If not allowed, unregistered users have no access to the system. Valid values for this option are T and F. The default value is T (allow guest users).
Allow-Backquote-In-Process-String
Allows the server to run a process with a backquote in the process name or in its arguments. Valid values are T and F. The default is F.
Allow-Unqual-Queries
A flag indicating whether the AR System server allows unqualified searches. Unqualified searches are ARGetListEntry or ARGetListEntryWithFields calls in which the qualifier parameter is either NULL or has an operation value of zero (AR_COND_OP_NONE). These searches can cause performance problems because they return all requests for a given form. (This operation is especially problematic for large forms.) Valid values for this option are T and F. The default value is T (allow unqualified searches).
Arforkd-Log-File
The name of the file to use if arforkd tracing is turned on (see Debug-mode on page 161). This argument is expressed as the full path name.
API-Log-File
The name of the file to use if API tracing is turned on (see Debug-mode on page 161). This argument is expressed as the full path name.
Case-Insensitive-Search
A setting indicating whether full text search is case-sensitive. Valid values for this option are 0 (case-sensitive) and 1 (case-insensitive). The default value is 1.
ar.conf (ar.cfg) ! 159

Action Request System 5.1
Changed-By-Another-Check
A setting indicating whether the system will check if an entry has been changed by another user since you retrieved the entry. If you attempt to save modifications to an entry, you will receive a warning and must confirm the save. Valid values for this option are T and F. The default is T (perform the check and issue a warning).
Clustered-Index
A setting indicating whether indexes for the database are clustered. Valid values for this option are T and F. The default is T (use a clustered index). You must set this configuration before you start the AR System server.
Collection-directory
The collection directory for the full text search (FTS) engine. This directory contains all defined FTS indexes. This directory is used only if fields are indexed for FTS. This argument is expressed as the full path name.
Crossref-Blank-Password
A flag indicating how the system responds when a user’s login name is not assigned a password in the User form. Valid values for this option are T and F. The default value is F (blank passwords not cross-referenced). If set to T, the system attempts to validate the password in the Windows server domain (or through the External Authentication API if external authentication is turned on), or against the UNIX server /etc/passwd file. This option enables you to manage group membership and other support information by using AR System, while still managing passwords with the /etc/passwd file (UNIX) or the server domain security model (Windows).
Db-password
The database password associated with the ARSystem database and table space (applicable for Sybase, MS SQL, and Oracle DB2 databases only). The password can be modified by using the ARSetServerInfo function and is stored in encrypted form. If you change the password manually, specify this option by using clear text, and change the password by using AR System Administrator to encrypt it.
160 "Appendix A—AR System Configuration Files

Configuring AR System
DB2-Server-Name
The name of the DB2 database server.
DB2-Database-Alias
The DB2 database alias name for the AR System database.
Debug-mode
A bitmask indicating the server debug modes. Each bit has a corresponding value. To activate one bit, supply its value for the Debug-mode option. To activate two or more bits, add the values, and supply the total. (For example, to activate bits 1 and 3, use the number 5 because bit 1 has a value of 1, and bit 3 has a value of 4.) To deactivate a bit, subtract its value from the Debug-mode total.
! Bit 1 (Value=1): Turns on SQL tracing for the arserverd process (applicable for SQL databases only). The default file for SQL tracing is arsql.log (located in the directory specified for the Server-directory option). You can override this default by using the SQL-Log-File option.
! Bit 2 (Value=2): Turns on filter tracing for the arserverd process. The default file for filter tracing is arfilter.log (located in the directory specified for the Server-directory option). You can override this default by using the Filter-Log-File option.
! Bit 3 (Value=4): Turns on user tracing for the arserverd process. The default file for user tracing is aruser.log (located in the directory specified for the Server-directory option). You can override this default by using the User-Log-File option.
! Bit 4 (Value=8): Turns on escalation tracing for the arserverd process. The default file for escalation tracing is arescl.log (located in the directory specified for the Server-directory option). You can override this default by using the Escalation-Log-File option.
! Bit 5 (Value=16): Turns on API tracing for the arserverd process. The default file for API tracing is arapi.log (located in the directory specified for the Server-directory option). You can override this default by using the API-Log-File option.
! Bit 6 (Value 32): Turns on thread tracing for the arserverd process. The default file for thread tracing is arthread.log (located in the directory specified for the Server-directory option). You can override this default by using the Thread-Log-File option.
ar.conf (ar.cfg) ! 161

Action Request System 5.1
! Bit 7 (Value=64): Turns on alert tracing for the arserverd process. The default file for alert tracing is aralert.log (located in the directory specified for the Server-directory option). You can override this default by using the Alert-Log-File option.
! Bit 8 (Value=128): Turns on arforkd tracing for the arserverd process. The default file for arforkd tracing is arforkd.log (located in the directory specified for the Server-directory option). You can override this default by using the arforkd-Log-File option.
! Bit 16 (Value=32768): Turns on distributed server tracing for the arservdsd process (applicable for Distributed Server Option only). The default file for distributed server tracing is ardist.log (located in the directory specified for the Server-directory option). You can override this default by using the Distrib-Log-File option.
! Bit 17 (Value= 65536): Turns on Approval Server tracing. Specify the location for the log file arapprov.log using form AP: Admin-Server Settings, accessed from the Approval Menu > Server Settings command.
! Bit 18 (Value=131072): Turns on plug-in tracing for the arserverd process. The default file for plug-in tracing is arplugin.log (located in the directory specified for the Server-directory option). You can override this default by using the Plugin-Log-File option.
Default-Web-Path
The URL to the directory path for the default web server pointing to the AR System server.
Disable-Admin-Ops
A flag that indicates whether administrator operations are allowed on the server. The values for this option are 0 (disabled) and 1 (enabled). The default is 1.
Disable-Alerts
Prevents alerts from being sent when alert events are created. Valid values for this option are T and F. The default is F (alerts are enabled). If the parameter is set to T, no threads are started in the alert queue and no alerts are sent. Changes to this setting do not take effect until the server is restarted.
162 "Appendix A—AR System Configuration Files
Configuring AR System
Disable-Escalations
A flag that indicates whether escalations are allowed on the server. The values for this option are T and F. The default is T.
Disable-User-Cache-Utilities
Prevents unauthorized users from attempting to use User Cache commands. Valid values for this option are T and F. The default is F (cache utilities are enabled). If the parameter is set to T, then the arreload and arcache utilities are disabled for the AR System server.
Distrib-Log-File
The name of the file to use if distributed server tracing is turned on (see Debug-mode on page 161). This argument is expressed as the full path name.
Distributed-RPC-Socket
The specific AR System server to use for the distributed server. By default, the distributed server runs in the queues like any other user.
DSO-Host-Name
The name for the current machine for DSO use. This setting allows for an alias for the current machine within Distributed Mapping distributions.
DSO-Mark-Pending-Retry-Flag
A flag indicating if the DSO will stop the processing of a pending list in case it fails to contact a busy AR System server after retrying once. Valid values are T and F.
DSO-Merge-DupID-Overwrite
Defines what action the server will perform if a duplicate entry ID is found on the target AR System server. Valid values are T and F. If set to T, mapped fields are updated, and unmapped fields are set to NULL.
DSO-Polling-Interval
Defines the intervals at which the DSO will poll for requests. This is used as a backup in case the signals from the AR System server are missed. This may be an integer between 15 and 7200, but 0 can be used to apply the default time value.
ar.conf (ar.cfg) ! 163

Action Request System 5.1
DSO-Target-Connection
Defines the information for the target AR System server. The following format is used:
DSO-Target-Connection: <server_name>:<RPC_number> <port_number>
DSO-Target-Password
The password used to access the target AR System server through the distributed server. The following format is used:
DSO-Target-Password: <server_name>:<encrypted_password>
DSO-Timeout-Normal
Defines the timeout the DSO applies during communication with the AR System server. It overrides the default timeout value and may be an integer between 60 and 21600 (in seconds), representing a range from 1 minute to 6 hours. If the value is set out of range, the closest integer to that value will be applied. If no value is entered, the default value (120 seconds) is used.
DSO-User-Password
The password for the local distributed server user.
Email-AIX-Use-Old-System
For AIX platforms only, enables use of the AR System 5.0 and earlier email notification method with a version of the Java SDK earlier than 1.4. The default value is T (use existing email notification method).
Email-Delivery-System
UNIX only: Specifies that the email utility is to be used on UNIX. The default is "/usr/lib/sendmail -t -oi -f "%f""
Email-Import-Form-By-Default
Specifies whether or not email forms are imported by default when the AR System server is started up. Valid values are True (T) and F (False). A value of T means that email forms will be imported by default when the AR System server is restarted; a value of F means that the forms will not be imported by default. The default is T.
164 "Appendix A—AR System Configuration Files

Configuring AR System
Email-Notify-From
The sender name to use for filter-generated email notifications where no subject is specified. Only trusted email users may use this name. This field is limited to 29 characters.
Escalation-Log-File
The name of the file to use if escalation tracing is turned on (see Debug-mode on page 161). This argument is expressed as the full path name.
External-Authentication-RPC-Socket
The RPC socket number on which an external authentication server awaits requests for authentication. A 0 value means external authentication will not be used. The default value is 0.
External-Authentication-RPC-Timeout
The RPC timeout (in seconds) used when making calls to the authentication (AREA) server. The default value is 30 seconds.
External-Authentication-Sync-Timeout
The internal timeout (in seconds) the AR System server uses to periodically invoke the external authentication server’s AREANeedToSyncCallback() function, which instructs the AR System server to renew its internally stored user information in the event there are changes made to the source used to authenticate users. A 0 value means that the AR System server will not invoke the call to the external authentication (AREA) server. The default value is 300 seconds.
Filter-Api-Timeout
Indicates the time limit (in seconds) allowed for the Filter API RPC to respond to the server’s request before returning an error. The minimum value is 0, and the maximum is 300. The default is 60 seconds.
Filter-Log-File
The name of the file to use if filter tracing is turned on (see Debug-mode on page 161). This argument is expressed as the full path name.
ar.conf (ar.cfg) ! 165

Action Request System 5.1
Filter-Max-Stack
The maximum number of levels of recursion allowed for a given operation. The data modification performed by an AR_FILTER_ACTION_FIELDP filter action could trigger a second set, or level, of filters, one of which could trigger filters a third level down and so on. This option limits the number of times such recursion can happen, preventing the server crash that would occur if the recursion continued indefinitely. The default value is 25.
Filter-Max-Total
The maximum number of filters that the server will execute for a given operation. The default value is 10000.
FullText-License-Timeout
The number of hours the AR System server waits before disconnecting inactive users with Full Text Search (FTS) licenses. If a user is holding a floating FTS license token, the system also frees the token at this time. The default value is two hours.
FullText-matchop
! A setting indicating the type of match operation used by the FTS engine.
! 0: Append leading and trailing wildcards to every word. This option produces the highest number of matches but causes the largest performance impact.
! 1: Truncate all leading wildcards and append trailing wildcards to every word. This option produces a reasonable number of matches while still being efficient.
! 2: Truncate all leading wildcards (do not truncate or append trailing wildcards).
! 3: Truncate all wildcards. This option is the most efficient match operation type but produces the lowest number of matches.
! 4: Leave all wildcards as specified by the user. This option requires that users understand how to use wildcards and their impact on performance.
166 "Appendix A—AR System Configuration Files

Configuring AR System
FullText-state
A setting indicating whether the full text search (FTS) engine is enabled. Valid values for this option are 0 (off) and 1 (on). The default value is 1 (FTS on).
IP-Name
A parameter used to specify that a server has multiple names. The parameter can appear in the ar.conf (ar.cfg) file more than once.
When checking workflow and connections against itself, the server will compare its server name, host name, IP aliases, and any names given by the IP-Name parameter to the name passed to it. If the name matches any of those, the server will conclude that the workflow or connection is for itself.
The IP-Name parameter can be used for servers with variable length domains or for servers on machines with multiple internet addresses. For example, to allow connection to a machine named tix as tix, tix.company.com, or tix.eng.company.com, an administrator would have three IP-Name entries, one for each of the connection names.
To allow connection to a machine with multiple internet addresses like tix.company.com, tix.biggercompany.com, and ticks.evenbigger.com, an administrator would create an IP-Name entry for each of those names.
License-Timeout
The number of hours the AR System server waits before disconnecting inactive users. If a user is holding a floating write license token, the system also frees the token at this time. The default value is two hours.
Localized-Server
Indicates whether the server is running in localized support mode. If it is not, the server does not search for or use localized strings. If localized support mode is running, localized messages are used, if present. The values for this option are T (localized) and F (not localized). The default is F.
ar.conf (ar.cfg) ! 167

Action Request System 5.1
Log-File-Append
A flag that indicates whether to create a separate *.bak file or to append to the existing log file. Valid values for this option are T and F. A value of F creates a *.bak file; T indicates that new log information be appended to the existing file. The default is F (create .bak file).
Map-IP-Address
The specific IP address mappings for alerts to work through firewalls. A list of IP addresses that are enabled to pass through a firewall are set up in a firewall table by the administrator of the firewall. You must set up a mapping for each client machine that has access through the firewall. For example, the following figure maps 123.45.67.89 (AR System Server) and 24.5.9.89 (AR System Alert). The entry is 123.45.67.89 24.5.9.89.
Figure A-1: Mapping IP Addresses Through a Firewall
The following is a multiple line example:
Map-IP-Address: 123.45.67.89 24.5.9.89
Map-IP-Address: 123.45.67.90 24.5.8.10
Map-IP-Address: 123.45.67.91 24.5.7.11
Max-Entries-Per-Query
The maximum number of requests returned by a single search. Because users can also specify the maximum number of requests returned (through Search Preferences), the actual maximum is the lower of these two values. The default value is no (server-defined) maximum.
24.5.9.89
AR Systemserver
Firewall
Map-IP-Address: 123.45.67.89 24.5.9.89Map-IP-Address: 123.45.67.90 24.5.8.10
Firewall table of IP addresses
123.45.67.89 24.5.9.89
Internal table ofIP address mappings
123.45.67.89
ALERT
168 "Appendix A—AR System Configuration Files

Configuring AR System
Max-Log-File-Size
The maximum size in bytes for system log files. If the maximum is reached, the logging cycle starts over at the beginning of the file, overwriting existing information. The default value is 0 (no limit).
Mid-Tier-Service-Password
Specifies the password that administrators will need to access the Mid Tier.
Minimum-API-Version
Specifies the oldest API version with which the server will communicate. The default value is 0, which means that the server will communicate with all API versions. If the client’s API version is less than the specified value, the server will refuse to talk with the client, and the client will receive a decode error. The API version for release 5.1 is 9.
Multiple-ARSystem-Servers
A flag indicating whether you want to run multiple servers on one host machine. Valid values for this option are T and F. To run multiple servers, you must set this option to T in the configuration file for each server you are running. The default value is F (you are not running multiple servers on one machine).
Note: If you set this option to T and are running previous versions of AR System applications, such as DSO or the Approval Server, those applications will not work. You must upgrade your applications if you want them to work with this option.
Plugin-Log-File
The name of the file to use if plug-in tracing is turned on (see Debug-mode on page 161). This argument is expressed as the full path name.
ar.conf (ar.cfg) ! 169

Action Request System 5.1
Plugin-Log-Level
A setting that determines the level of detail for log messages. Valid values are as follows. The values represent the amount of log information that is printed. The lower the value, the more information that is included.
Plugin-Password
If this option is specified, arplugin will accept connections only from AR System servers that have been configured to use the same password by way of the Server-Plugin-Target-Password attribute. If this option is not specified, arplugin will accept connections from AR System servers that have not been configured to use a password.
Private-RPC-Socket
The specific RPC program number that determines the type of queue to which requests will be routed, as well as the number of threads running on that queue. See Queues on page 25 for more information.
Table A-1: Plugin Log Level Settings
Setting Value Description
ARPLUGIN_OFF 10000 No log information is printed.
ARPLUGIN_SEVERE 1000 Only severe messages are printed. This is the default value if no log level is specified.
ARPLUGIN_WARNING 900 Severe and warning messages are printed.
ARPLUGIN_INFO 800 Status, severe, and warning messages are printed.
ARPLUGIN_CONFIG 700 Configuration, status, severe, and warning messages are printed.
ARPLUGIN_FINE 600 Internal exceptions.
ARPLUGIN_FINER 500 Trace logs that log tasks as they are executed within the system.
ARPLUGIN_FINEST 400 Code-level information.
ARPLUGIN_ALL 100 All log information is printed.
170 "Appendix A—AR System Configuration Files

Configuring AR System
Register-With-Portmapper
This setting can be used to prevent the AR System server from registering with a portmapper. This feature is to be used in conjunction with setting specific ports to enable you to run servers on machines that do not have a portmapper. Valid values are T and F. The default is T (register with portmapper).
No more than one server should attempt to register with AR System Portmapper in an environment with multiple servers on one machine.
Save-Login
A value indicating whether users must log in to client tools. Allows users to save previous login of their choice.
SCC-Comment-Checkin
An integer (0 or 1) value indicating whether a source code control integration requires you to enter a comment at checkin time. The default value is 0 (no comment is required).
SCC-Comment-Checkout
An integer (0 or 1) value indicating whether a source code control integration requires you to enter a comment at checkout time. The default value is 0 (no comment is required).
SCC-Enabled
A value (0 or 1) indicating whether a source code control system is being used with AR System. The default value is 0 (source code is disabled).
SCC-Integration-Mode
An integer (0 or 1) value indicating the level of source code control integration. A 0 value means Advisory. A 1 value means Enforced. The default is 0. For more information about these modes, see Server Information—Source Control on page 95.
0: Controlled by user (default setting).
1: Force no login that is controlled by the administrator.
2: Force login that is controlled by the administrator.
ar.conf (ar.cfg) ! 171

Action Request System 5.1
SCC-Target-Dir
A character string for the source code control system target directory. If none is present, this value is NULL. This string is limited to 255 characters.
Server-directory
The data directory for AR System, expressed as a full path name. This directory contains support files and log files for the AR System server.
Server-Name
An alias that is always interpreted as the current server. The option is used in multiple server installations to differentiate servers. If you specify a value for Server-Name, type that value after the -h option when you use the arreload command-line utility. If you have a value for Server-Name, and you use arreload without the -h option and the Server-Name value, arreload will use the default server name rather than the name specified by Server-Name. The Server-Name value is not fully qualified. For example, type alpha instead of alpha.remedy.com.
Server-Plugin-Target-Password
The AR System server uses the specified password whenever communicating with a plug-in service running at the host name and port number specified. The syntax for this option is as follows:
Server-Plugin-Target-Password: <host_name>:
<port_number>:<encrypted_password>
Server-Stats-Rec-Mode
The server statistics recording mode determines what is written to the server statistics form. There are three modes designated by the following numerical values:
0: Indicates that recording is off. (This is the default.)
1: Indicates that the server record only the cumulative queue statistics. Cumulative statistics are the sum of all the individual queue statistics.
2: Indicates that the server record both the cumulative queue statistics and the individual queue statistics. One entry will be written for the cumulative statistics and a separate entry will be written for each queue.
172 "Appendix A—AR System Configuration Files

Configuring AR System
You can read the statistics in the Server Statistics form, which is installed when you install AR System. For more information, refer to the Optimizing and Troubleshooting AR System guide.
Server-Stats-Rec-Interval
Defines (in seconds) how often the server will record server statistics. The default is 60 seconds.
Set-Process-Timeout
The number of seconds the AR System server waits before ending a set fields process that has not completed. Valid values for this option are 1 through 60. The default value is 5 seconds.
SQL-Log-File
The name of the file to use if SQL tracing is turned on (see Debug-mode on page 161). This argument is expressed as the full path name.
Submitter-Mode
A setting indicating whether the Submitter field can be changed and whether the submitter of a request must have a license to modify it. In locked mode, the Submitter field cannot be changed after submission, and the submitter can modify the request without a write license (if the Submitter group has change permission). In changeable mode, the Submitter field can be changed after submit, but the submitter must have a write license to modify the request (if the Submitter group has change permission). Valid values for this option are 1 (locked) and 2 (changeable). The default value is 2.
TCD-Specific-Port
The specific TCP port to use for the arserver process. The dispatcher is randomly assigned to an available port if you do not specify this option. See Dispatcher Thread on page 28 for more information.
Thread-Log-File
The name of the file to use if thread tracing is turned on (see Debug-mode on page 161). This argument is expressed as the full path name.
ar.conf (ar.cfg) ! 173

Action Request System 5.1
Use-Password-File
For Windows: A flag indicating whether the Windows domain service is used to validate users not registered with AR System. If so, users in the Windows domain are considered valid users of AR System and are assigned to the Public group. Valid values are T and F. The default value is F (do not use domain service).
For UNIX: A flag indicating whether the /etc/passwd file is used to validate users not registered with AR System. If so, users in /etc/passwd are considered valid users of AR System and are assigned to a group identified by the UNIX group ID. Valid values for this option are T and F. The default value is T (use password file).
User-Log-File
The name of the file to use if user tracing is turned on (see Debug-mode on page 161). This argument is expressed as the full path name.
Options You Can View Using AR System AdministratorThe following options are displayed in AR System Administrator but cannot be set in AR System Administrator:
Dbhome-directory
UNIX only: The home directory for the underlying database (applicable for SQL databases only). This argument is expressed as the full path name.
Db-name
The name of the underlying SQL database (not applicable for Oracle databases). The default value is ARSystem.
Db-user
The user name that AR System uses to access the underlying database (Oracle, Sybase, or MS SQL). The default is ARAdmin.
Informix-DBServer-Name
The name of the server where the underlying database is located (applicable for Informix databases only).
174 "Appendix A—AR System Configuration Files

Configuring AR System
Informix-Relay-Module
Specifies the environment setting for the path for the Informix relay module (applicable for Informix databases only).
Informix-TBConfig
The name of the configuration file for the underlying database (applicable for Informix databases only). The default name is onconfig.
Oracle-SID
The system ID for the underlying database (applicable for Oracle databases only).
Oracle-Two-Task
The two-task environment setting for the underlying database (applicable for Oracle databases only).
Sybase-Character-Set
The alternate character set to use for communications between AR System and the underlying database (applicable for Sybase databases only).
Sybase-Server-Name
The logical server name of the underlying database (applicable for Sybase databases only). The default name is SYBASE.
Options You Cannot Set or View Using AR System AdministratorThe following options cannot be set or viewed in AR System Administrator:
Application-Enable
A flag that indicates whether to create the Application Pending form to support Application-Command syntax even if there is no Approval Server license. Valid values are T and F. The defult is F (no Application Pending form is created.)
Db-Max-Attach-Size
The maximum size (in bytes) for attached files in the Oracle RDBMS. The default value is 1000000 (1 MB). The maximum value allowed is limited by your server operating system and configuration.
ar.conf (ar.cfg) ! 175

Action Request System 5.1
Db-Max-Text-Size
The maximum size allowed for long character text data in Oracle databases, SQL Server, and Sybase databases. For Oracle databases, this value is also used for memory allocation during the processing of long text data; therefore, you must use it conservatively. The default for an Oracle database is 1 MB. For SQL Server and Sybase, the default is 2,147,483,647 bytes. The maximum value allowed for either database is 2,147,483,647 bytes.
Default-Order-By
The default value to order search results. Valid values are T and F. T indicates that there is a default order, which is to sort by entry ID. F indicates that there is no default order and no order clause is added to the command if there is not a specific sort order specified. The default is T (apply default sort order).
Delay-Recache-Time
The number of seconds before making the latest cache available to all threads. Valid values for this option are 0 to 60 seconds. The minimum is 0, which means every API call will get the latest cache (that is, the cache will be copied for every administrator call). Setting the option to 0 causes slower performance for cache operations. The default value is 5 seconds.
Disable-Client-Operation
Restricts time-consuming operations (such as reporting) during busy times, improving the overall performance. This option can be set to certain times of the day. It can also exclude users of specific groups so that they are not blocked from performing the specified operation. For example, you can allow only the administrator to perform reporting during busy hours.
The syntax for this option is:
Disable-Client-Operation: <tag_number_to_disable> [[<start_time>]-[<stop_time>]] [<group_ID_list>]
The tag number is defined in the ar.h file. To specify start and stop times, enter them in 24-hour format (hh:mm). The times are include times. For example, 00:00-13:59 disables from midnight until 1:59 p.m.
176 "Appendix A—AR System Configuration Files

Configuring AR System
The group_ID_list is a list of none, one, or multiple group IDs delimited by spaces. To specify the groups to exclude, enter the group ID. For example:
Disable-Client-Operation: 1 13:00-17:59 1
The second and third sections are optional and are delineated by spaces. For example, if you did not specify a start or stop time, the syntax would look like this:
Disable-Client-Operation: 2 18:00- 10
To start disabling operations from midnight until 6:00 a.m. excepting group 10, enter:
Disable-Client-Operation: 2 -6:00 10
If there is no argument for the second section, the option disables the operations from the client all the time. If there is no argument for the third section (users to exclude), then all users from that client cannot run the operations.
You can specify multiple Disable-Client-Operation lines.
The following table lists the Disable-Client-Operation tag numbers.
Tag Number Definition
1 AR System clients prior to the 5.0 version
2 AR System Administrator
3 AR System User
4 AR System Import
5 Distributed server
6 AR System ODBC
7 Approval server
8 AR System web server (waserver)
9 Mid tier (version 5.0 and later)
10 Palm Pilot
11 Flashboards
12 Flashboards mid tier
13 Enterprise integration
14 arreload
ar.conf (ar.cfg) ! 177

Action Request System 5.1
Encrypt-Data-Encryption-Algorithm
An integer value indicating the encryption algorithm. If you switch to a new algorithm, client connections using the old algorithm automatically perform a key exchange to create keys that correspond to the new algorithm. The default is 0 (zero), RCA encryption, 128-bit key.
Encrypt-Public-Key-Expire
An integer value (in seconds) indicating the amount of time for the duration of the public key. After expiration, the server creates a new public key. The default is 86400 seconds (24 hours).
15 arcache
16 ardist
17 runmacro
18 armaild, armailex (pre-5.1)
19 arimportcmd
20 Report creator plug-in
21 AR System Alert
4000 Driver (sample program)
4001 Distributor of application
4002 arhelp
4003 arjanitor
4004 armenu
4005 arstruct
4006 artext
4007 arsqled
4008 archgsel
Tag Number Definition
178 "Appendix A—AR System Configuration Files

Configuring AR System
Encrypt-Security-Policy
An integer value indicating whether encryption is on or off. The values are as follows:
! 0: Encryption between the client and server is allowed, but not required.
! 1: Encryption between the client and server is required; unencrypted communication is not allowed.
! 2 (the default): Encryption between the client and server is disabled.
Encrypt-Session-Hash-Entries
The size of the hash table that holds the encrypted session information. The default is 509, there is no maximum.
Encrypt-Symmetric-Data-Key-Expire
An integer value (in seconds) indicating the amount of time for the duration of the data encryption key. After expiration, if necessary, a new key exchange occurs. The default is 2700 seconds (45 minutes).
FTS-Debug-mode
A bitmask indicating the trace levels for the arservftd process.
! Bit 1: Turns on VDK failure message logging.
! Bit 2: Turns on incoming command logging.
! Bit 3: Turns on drop index logging.
! Bit 4: Turns on VDK command logging.
! Bit 8: Eliminates VDK internal logging.
To perform all types of indexer process logging without VDK internal logging, add the following line to your configuration file:
FTS-Debug-mode: 143
The 143 trace option consists of 128 (elimination of VDK internal logging) plus 15 (logging all activity in the indexer process).
FullText-home
The home directory for the full text search (FTS) engine (applicable if you have an FTS license only). This argument is expressed as the full path name.
ar.conf (ar.cfg) ! 179

Action Request System 5.1
FullText-threshold-high
The threshold value for not performing a complex search that requires a search on an FTS indexed field (applicable for SQL databases only). Temporary tables are used when the number of FTS matches reaches or exceeds the value specified for the FullText-threshold-low option. Large table operations can degrade database server performance. If the total number of rows (when the temporary and data tables are joined) is greater than this value, AR System does not perform the search. In this case, the system displays a message stating that the search is too complex. If a search involves multiple FTS operations, the number of matches for each operation is multiplied to determine the total number of rows. Because large three-way joins usually time out, the value for this option must be less than the square of the FullText-threshold-low value. The default value is 1,000,000.
FullText-threshold-low
The threshold value for using temporary tables when a search requires a search on an FTS indexed field (applicable for SQL databases only). Set this option based on the limits of the underlying database associated with using the IN operator. The IN operator (which yields better performance) is used provided that the number of FTS matches is less than this value. If the number of matches reaches or exceeds this value, temporary tables are used instead. Valid values for this option are 1 through 250. The default value is 200. (Values less than 1 are set to 200; values greater than 250 are set to 250.)
GetListEntry-Server-Date-Format
Returns the GetListEntry date formatted on the server instead of on the client.This option is used mainly for backward compatibility purposes. Valid values are T and F. The default value is F (format dates on client).
Internal-User-Info-Hash-Lists
The number of shared, linked lists that hold all user-related information. This number must be represented in a power of 2. The default setting is 128, the minimum number is 2, and there is no maximum number defined.
Note: AR System does not check to ensure that the number defined in the ar.conf/ar.cfg file is in a power of 2; therefore, unexpected behaviors of the AR System server might occur if the number is not in a power of 2.
180 "Appendix A—AR System Configuration Files

Configuring AR System
Internal-User-Instance-Timeout
The amount of time the AR System server waits before terminating expired user instances. The default setting is 1 hour, the maximum is 2 hours, and the minimum is 30 minutes.
MailNotifyDir
Windows only: Indicates the full path name for the mailntfy directory that holds all of the email notifications the server sends to the armailex service. The armailex service deletes them after they are processed. The default value is <ar_install_dir>\Arserver\mailntfy.
Max-Notify-Mail-Line-Len
The maximum line length for notification messages. If a mail message contains a string of characters longer than this length without a return, a return is automatically inserted at the closest word break before this length. The minimum is 80, the maximum is 1024, which is also the default.
Multiple-Assign-Groups
Defines whether multiple assignee groups will be stored in row-level security Field 112. This enables users from multiple groups to access the same entry. In the past, only one group could be stored in Field 112. Valid values for this option are T and F. The default value is T (allow multiple groups).
Oracle-Cursor-Sharing
Specifies the database setting that matches the setting in the Oracle initialization file (oracle.ini). If the oracle.ini file includes the line CURSOR_SHARING=FORCE, use FORCE as the value for this option also, to indicate an Oracle setting to the AR System server.
Oracle-Search-On-Clob
Defines whether CLOBs can be searched. Valid values are T and F. If the option is set to T, when the search is performed, the qualification can include all the diary fields and character fields that are stored in the database as CLOB columns. Including these fields affects performance, and indexes cannot be used for this type of query. If the option is set to F, these fields are not included. CLOBs can use the operator LIKE, but not =. The default is F (do not allow search on CLOBs).
ar.conf (ar.cfg) ! 181

Action Request System 5.1
Oracle-Bulk-Fetch-Count
Defines the number of the rows of data fetched at a time from the result set when querying an Oracle database. The minimum is 1, the maximum is 100 and the default is 50. The higher the value, the more memory is used during data retrieval.
Plugin
File name of one or more plug-ins that the plug-in service will load. The file name of the DLL or shared object is provided. The file name may be an absolute file name or may be relative to the AR System installation directory. You may have as many Plugin: lines in the ar.conf (ar.cfg) file as needed, but only one file name may be listed for each occurrence of the option.
Plugin-ARDBC-Threads
The number of threads that are dedicated to handling ARDBC requests from the AR System server. Optionally, you can specify a maximum number of threads, as shown in the following example:
Plugin-ARDBC-Threads: <minimum number of threads> [<maximum number of threads>]
To specify a minimum of 3 threads and a maximum of 10, the syntax is:
Plugin-ARDBC-Threads: 3 10
By default, 1 thread is initiated if this option is not specified. The plug-in service will increase the number of threads for a given plug-in if there is sufficient demand up to the “maximum number of threads.”
Plugin-AREA-Threads
One can specify the number of threads that are dedicated to handling AREA requests from the AR System server. Optionally, you can specify a maximum number of threads, as shown in the following example:
Plugin-AREA-Threads: <minimum number of threads> [<maximum number of threads>]
To specify a minimum of 3 threads and a maximum of 10, the syntax is:
Plugin-AREA-Threads: 3 10
182 "Appendix A—AR System Configuration Files

Configuring AR System
By default, 1 thread is initiated if this option is not specified. The plug-in service will increase the number of threads for a given plug-in if there is sufficient demand up to the “maximum number of threads.”
Plugin-ARFilter-API-Threads
One can specify the number of threads that are dedicated to handling AR System Filter API requests from the AR System server. Optionally, you can specify a maximum number of threads, as shown in the following example:
Plugin-ARFilter-API-Threads: <minimum number of threads> [<maximum number of threads>]
To specify a minimum of 3 threads and a maximum of 10, the syntax is:
Plugin-ARFilter-API-Threads: 3 10
By default, 1 thread is initiated if this option is not specified. The plug-in service will increase the number of threads for a given plug-in if there is sufficient demand up to the “maximum number of threads.”
Plugin-Port
The port number on which the plug-in service will wait for incoming requests.
Plugin-Disable-Remote
Specifies whether the plug-in service will accept calls from a remote server. Valied values are T and F. If the option is set to T, the plug-in service accepts calls only from an AR System server running on the local machine. The AR System server then receives an RPC error, and this error is propagated back to the AR System client that initiated the operation. The default is F (allow calls from a remote server).
Record-Server-Events
A character string that contains a list of numeric event types separated by semicolons. If this option is not set or does not include event types, the server will not create an event schema or record schema events. If the server does not recognize an event type, it will ignore that element. When this option has a value of NULL, the server will remove the event list.
ar.conf (ar.cfg) ! 183

Action Request System 5.1
Server-Plugin-Alias
When the AR System server performs a call to a plug-in service, it must determine if the plug-in name is an alias. Aliases can be used to direct the AR System server to access a plug-in service that is running on a different host or is listening at a specific port number. The syntax for this option is as follows:
Server-Plugin-Alias: <alias_name> <real_name> <host_name>[:<port_number>]
Workflow (that is, references to AR Filter API and ARDBC plug-ins) references a plug-in name. This name can be an alias to a real plug-in running on a specific host at a given port number. This allows you to locate a plug-in on a remote host or to run more than one instance of a plug-in on one host. For example, to run the RMDY.ARDBC.XML plug-in on the remote host foo at port number 12345, you would add the following to your ar.cfg:
Server-Plugin-Alias: RMDY.ARDBC.XML RMDY.ARDBC.XML foo:12345
Note that the alias and real plug-in names can be identical if you are simply locating the plug-in on a remote host. If you want to run more than one instance of the plug-in on the same or different hosts, you would create different aliases that reference the same plug-in running on their respective hosts.
Server-Plugin-Default-Timeout
The number of seconds within which the plug-in service must respond to the call before an error is returned. The minimum value is 0, and the maximum is 300. The default is 60 seconds.
Suppress-warnings
A series of zero or more message numbers (separated by spaces) that identify the informational or warning messages that the system should suppress. Can be used to suppress server warnings and notes only.
184 "Appendix A—AR System Configuration Files

Configuring AR System
Two-Digit-Year-Cutoff
An integer that specifies the cutoff year for interpreting a two-digit year as a four-digit year. For example, if the two-digit cutoff year is 2040, a two-digit year would fall between 1941 and 2040. A date of 1/5/55 would be interpreted as 1/1/1955 and a date of 1/1/30 would be interpreted as 1/1/2030.
If a two-digit year cutoff is not specified, a rolling two-digit year is used. Two-digit years would then be interpreted as the years between the current year plus 29 years and the current year minus 70 years. For example, if the current year is 2002, two-digit years would be interpreted as years between 1922 and 2031.
Environment ARCONFIGDIR
UNIX only: Specifies the directory where the ar.conf file and other AR System configuration files are stored. This directory defaults to <ar_install_dir>/conf if you do not set this variable.
Examples The following configuration file identifies two directory locations:
# Configuration file for AR System serverServer-directory: /usr/ar/dbDbhome-directory: /usr/SQL-DB
The location of the data directory for this server is /usr/ar/db. The location of the SQL database files is /usr/SQL-DB.
ardb.conf (ardb.cfg)
Description The ardb.conf (ardb.cfg) file contains SQL clauses that an administrator can append to the SQL statements issued by AR System when a form, field, or index is created or modified.
Create the ardb.conf file in your configuration directory, which is the conf directory of the ar_install_dir. On UNIX, the directory may be changed by setting the ARCONFIGDIR environment variable.
ardb.conf (ardb.cfg) ! 185

Action Request System 5.1
When you create a form, field, or index, AR System references the ardb configuration file for clauses to append to the SQL statement. If it finds no matching information, AR System creates the form, field, or index as it would normally. If it finds matching information, it appends the specified clause to the SQL statement that creates the form, field, or index.
Warning: AR System does not verify that the SQL clauses specified in your ardb configuration file are correct or safe. AR System merely attaches the SQL clause to the statement used when a form or index is created. Because you can append any valid SQL clause (the entire clause must exist on one line in the file because no new-line characters are allowed) to the CREATE statement for a form, field, or index, use this feature wisely.
The format of this file is organized by forms. To create an ardb.conf file, complete the following steps:
1 Type a line for the name of the form and a line for the clause you want added to the CREATE statement, as follows:
Form: <form_name>Clause: <clause>
Note: When you use AR System Administrator to change the name of a form, the ardb configuration file is edited automatically to match the new name.
2 Include field clause information below the applicable form information.
a Add a field line with an open brace.
Field {
You must include a space in the field line between Field and the opening brace.
b Add a line for the field ID.
Id: <field_ID>
c Add a line for the SQL clause.
Clause: <clause>
186 "Appendix A—AR System Configuration Files

Configuring AR System
d Place the closing brace in a line of its own below the clause line for the field.
3 Include index clause information.
a Add an index line with an open brace.
Index {
You must include a space in the index line between Index and the opening brace.
b Add a line for the field IDs in the index.
Id: <index_ID>
If an index contains multiple fields, add several field ID lines before the clause for that index.
c Add a line for the SQL clause.
Clause: <clause>
Clauses you specify for the tables of a form are not attached automatically to any index you create for that form. You must specify the clause in the index clause. For example, if you specify that a form is to reside in a specific part of your database, and you want an index for that form to reside in the same space, you must specify the clause for both the form and index.
d Place the closing brace in a line of its own below the clause line for the index.
TThe file should look something like this:
Form: <form_name>Clause: <clause>
Field {Id: <field_ID>Clause: <clause>}Index {Id: <index_ID>Id: <index_ID>Clause: <clause>}
ardb.conf (ardb.cfg) ! 187

Action Request System 5.1
Leading spaces are ignored by the ardb configuration file, so you may want to add them to keep your file organized.
When you create or update the ardb.conf file, the changes do not take place immediately—changes occur when the table (or index) is restructured.
Synopsis UNIX—<ar_config_dir>/conf/ardb.conf or $ARCONFIGDIR/ardb.confWindows—<ar_config_dir>\Conf\ardb.cfg
Environment ARCONFIGDIR
UNIX only: Specifies the directory where the ar directory file and other AR System configuration files are stored. This directory defaults to <ar_install_dir>/conf if you do not set this variable.
Examples The following example shows ardb configuration file information for theHD-Answer form on an Oracle database. The tables for the HD-Answer form will build on segment two. The indexes include the Submitter (ID 2), Status (ID 7), and Assigned To (ID 4) fields. The clauses for the indexes instruct the database to leave 70 percent of each index free for updates and insertions.
Form:HD-AnswerClause:TABLESPACE seg2
Field {Id:536870913Clause: NOT FOR REPLICATION
}Index {Id:2Id:7Clause:PCTFREE 70
}Index {Id:4Clause:PCTFREE 70
}
Oracle Note To redirect CLOB storage in the ardb.conf file on an Oracle database, place the following syntax before the closing parenthesis in the appropriate field clause:
188 "Appendix A—AR System Configuration Files

Configuring AR System
) LOB(C<xxx>) STORE AS <LOB_segname>
Notice that there is a lead parenthesis ( ) ), and no trailing parenthesis. The system adds the closing parenthesis.
For example, assume that field 536870913 in the previous example is a CLOB field in an Oracle database. To redirect storage in the ardb.conf file, the syntax would look as follows:
Form:HD-AnswerClause:TABLESPACE seg2
Field {Id:536870913Clause: ) LOB(C536870913) STORE AS <LOB_segname>
}
LOB_segname is the name of the LOB data segment. You must create it before using it in the ardb.conf file. For more information, refer to Oracle database documentation.
armonitor.conf (armonitor.cfg)
Description The armonitor.conf (armonitor.cfg) file is read by the armonitor (armonitor.exe) binary, which executes the commands listed in the configuration file.
Synopsis UNIX—/etc/arsystem/<server_name>/armonitor.confWindows—<ar_install_dir>\Conf\armonitor.cfg
Options The format of this file consists of two types of entries. One type of entry is two fields, separated by a space or tab:
<parameter> <value>
Each parameter represents a particular configuration option. The associated value represents the current setting for that option. All numeric values are in a base 10 system. The available configuration options (and the valid settings for each) are described in the following sections. Lines that do not begin with one of these options are ignored.
armonitor.conf (armonitor.cfg) ! 189

Action Request System 5.1
The other type of entry is a command issued by armonitor to start various server processes. Lines with a pound sign (#) in column 1 are treated as comments and ignored.
The valid parameter entries are as follows.
Environment-variable
Defines environment values established for armonitor. You can include many instances of the Environment-variable option in the armonitor.conf (armonitor.cfg) file. Before initiating any processes, armonitor will set any values specified through this option in its environment. These values will then be inherited by all processes initiated by armonitor. This is a platform-independent way of defining environment variables.
An example of the format for this option is:
Environment-variable: ARDATEONLY=MM/dd/yyyy
Monitor-directory
Defines the directory of the armonitor. This value is initially created by the installer and is the same as the installation directory.
190 "Appendix A—AR System Configuration Files

APPENDIX
B
AR System Server UtilitiesThis appendix contains information about the AR System server utilities. Each utility is listed by its UNIX name. If there is a Windows equivalent, it is listed in parentheses after the UNIX name.
This appendix covers the following utilities:
! arcache (arcache.exe)
! arforkd (UNIX Only)
! armonitor (armonitor.exe)
! arplugin (arplugin.exe)
! arreload (arreload.exe)
! arserverd (arserver.exe)
! arservftd (arfts.exe)
! arsignal (arsignal.exe)
Client utilities are discussed in the Developing AR System Applications: Advanced guide.
AR System Server Utilities ! 191

Action Request System 5.1
arcache (arcache.exe)
Description The arcache utility executes the AR System interface that lets you update an entry in the access control cache for a user or group and distribute your change to the specified AR System servers. This program is generally used in a multiple server environment with centralized access control. It is also used for error recovery in a single server environment.
Filters that execute on submit and modify to the User and Group forms are typically used to run this program. Changes to those forms update the local cache automatically. The filters ensure that all changes to user or group information are distributed across the system.
If the server is running on a specific port and arcache cannot obtain the port information from the portmapper, you must set the ARTCPPORT variable. For example, if the port number is 2020, type the following command at a DOS prompt:
set ARTCPPORT=2020
At a UNIX prompt, type:
setenv ARTCPPORT 2020
For more information about portmappers and AR System, refer to Working With a Portmapper Service in AR System on page 30.
Synopsis arcache {-U|-G}{a|d} -e <entryId> [-g <groupList>] [-i <groupId>] [-lf <fulltextLicense>] [-lw <writeLicense>] [-m <mailAddress>][-n <name>] [-p <password>][-s <server_name>] [-t <groupType>] [-x <notifyMech>][-d]
Options You can specify the following options in any order on the command line:
-e
Specifies the Request ID associated with the user or group in the access control cache (required). If you are adding a new user or group, you can specify any value that does not already exist in the cache.
192 "Appendix B—AR System Server Utilities

Configuring AR System
-g
Specifies the set of groups to which the user belongs (applicable for adding or updating users only). Group membership defines the permissions the user has in the system. Use the group ID to identify each group (separated by semicolons). Special group IDs are 1 (Administrator), 2 (Customize), and 5 (Subadministrator). For example, if the group ID for the Technical Support group is 43, and you want to assign the user to the Customize and Technical Support groups, specify this option as -g "2;43;".
-G
Specifies the type of group cache operation. Valid values for this option are a (add new or update existing group) and d (delete existing group). The -G and -U options are mutually exclusive.
-i
Specifies the group ID (applicable for adding or updating groups only).
-lf
Specifies the type of Full Text Search license to assign (applicable for adding or updating users only). Valid values for this option are 0 (none), 1 (fixed), or 2 (floating). The default value is 0.
-lw
Specifies the type of write license to assign (applicable for adding or updating users only). Valid values for this option are 0 (read), 1 (fixed), or 2 (floating). The default value is 0.
-m
Specifies the default email address for sending messages (applicable for adding or updating users only).
-n
Specifies the name of the user or group (required for add operations, recommended for delete operations).
-p
Specifies the password to assign (applicable for adding or updating users only).
arcache (arcache.exe) ! 193
Action Request System 5.1
-s
Specifies the name of an individual AR System server to distribute your change to. If you do not specify this option, the system updates all AR System servers (based on the ar directory file on UNIX or the ServerList Registry value on Windows NT).
-t
Specifies the group type (applicable for adding or updating groups only). Valid values for this option are 0 (none), 1 (view only), or 2 (view/change). The default value is 0.
-U
Specifies the type of user cache operation. Valid values for this option are a (add new or update existing user) or d (delete existing user). The -U and -G options are mutually exclusive.
-x
Specifies the default alert mechanism to use (applicable for adding or updating users only). Valid values for this option are 0 (none), 1 (notifier), or 2 (email). The default value is 1.
-d
Runs the program in debug mode. Messages that detail the progress of each operation being performed are printed to stdout. Use this mode to diagnose problems with the arcache process only.
Environment ARCONFIGDIR
UNIX only: Specifies the directory where the ar.conf file and other AR System configuration files are stored. This directory defaults to <ar_install_dir>/conf if you do not set this variable.
Examples Add a new user, Sam Johnson, to the access control cache of all AR System servers. Use 000000000000104 as the Request ID, [email protected] as the default email address, and notifier as the default alert mechanism. The syntax is as follows:
arcache -Ua -e000000000000104 -n "Sam Johnson"-m "[email protected]" -x 1
No password or group membership is specified for this user.
Add an admin user with a fixed license. The syntax is as follows:
194 "Appendix B—AR System Server Utilities

Configuring AR System
arcache -Ua -eTEMP999 -lw 1 -n "TEMPADMIN"-p"" -s <bentley> -g "1;"
Note: You can disable arcache with a setting in the ar.conf (ar.cfg) file. When the setting is active you can still run arcache, but it has no effect on the server, and the cache does not get flushed. For more information, refer to Disable-User-Cache-Utilities on page 163.
Files UNIX—$ARCONFIGDIR/ar
Windows—Uses a ServerList Registry value.
arforkd (UNIX only)
Description The arforkd process reduces the amount of memory an AR System server uses when forking new processes as a result of filters that run processes, set fields to values returned from processes, or send email notifications. This small process runs new processes on behalf of the server. The AR System server starts the arforkd process and restarts the arforkd process if it dies.
The ar.conf file contains configuration information for arforkd. For more information about this file, refer to ar.conf (ar.cfg) on page 157.
armonitor (armonitor.exe)
Description The armonitor process starts and restarts the AR System server, distributed server, and processes specified in the armonitor.conf (UNIX) or armonitor.cfg (Windows) file. On Windows, it is typically started from the Services panel. If you need to start armonitor manually, you must specify -m as a command line argument.
If a process terminates, armonitor restarts the server. If the server dies more than four times within 30 seconds, armonitor will give up restarting that server.
Synopsis UNIX—armonitor -c <full_path_to_armonitor_config_file> -s <server_name>
Windows—armonitor -c <full_path_to_armonitor_config_file> -m
arforkd (UNIX only) ! 195

Action Request System 5.1
Options You can specify the following option on the command line:
-c
Causes the monitor to load information from the configuration file armonitor.conf (armonitor.cfg).
-m
Windows only: Runs the process in manual mode, not as a Windows service. If you run the process in a DOS window, you must use the -m option.
-s
UNIX only: Name of the server that you specify at the time of installation. This can be used to identify a monitor process when multiple monitors are running on the same host.
arplugin (arplugin.exe)
Description The arplugin utility executes the plug-in service, which implements and deploys several server-side APIs. The armonitor utility initiates arplugin.
Synopsis arplugin [-i <install_directory>] [-m] [-s <server_name>]
Options You can specify the following option on the command line:
-i
Specifies the directory where the AR System server was installed.
-m
Windows only: Runs the process in manual mode, not as a Windows service. If you run the process in a DOS window, you must use the -m option.
-s
Specifies the server name that contains the plug-in.
Environment ARINSTALLDIR
The directory where the AR System server was installed. The -i option takes precedence over this environment variable.
UNIX: The default is /usr/ar.
196 "Appendix B—AR System Server Utilities

Configuring AR System
Windows: The default is taken from the Windows Registry. If the install location was not added to the Windows Registry when the AR System server was installed, the default is then C:\arservdb.
ARCONFIGDIR
The directory where the ar.conf (ar.cfg) configuration file is stored. The default is in the conf subdirectory of the AR System server installation directory (/usr/ar/conf on UNIX andC:\Program Files\AR System\Conf on Windows).
arreload (arreload.exe)
Description The arreload utility executes the AR System interface that enables you to empty the access control cache on one or more AR System servers and reload it from a particular User or Group form.
If you experience problems with permissions or behaviors in either the Group or User forms, the cache may need to be emptied and reloaded. Run arreload to reload the cache.
This process must run on the AR System server where the source form is located (the source machine). It deletes cached requests on the specified target machines and reloads the cache from the form on the source machine, synchronizing the cache with the available users and groups defined in the User and Group forms.
If the server is running on a specific port and arreload cannot obtain the port information from portmapper, you must set the ARTCPPORT variable. For example, if the port number is 2020, type the following command at a DOS prompt:
set ARTCPPORT=2020
At a UNIX prompt, type:
setenv ARTCPPORT 2020
For more information about portmappers and AR System, refer to Working With a Portmapper Service in AR System on page 30.
arreload (arreload.exe) ! 197

Action Request System 5.1
Synopsis arreload -a <adminUser> {-u|-g} <schema> [-f] [-p <adminPassword>] [-s <server_name>][-h <Server-Name_value>][-d]
Options You can specify the following options in any order on the command line:
-a
Specifies a user with Administrator permission on the target servers (required).
-f
Deletes all user or group requests from the cache on the specified target machines before reloading from the source machine. arreload deletes requests submitted by the source machine only if you do not specify this option. In multithreaded server environments where access control is being managed remotely (using arcache), the existing cache requests may have been submitted from different machines. Specifying this option causes requests submitted from any server other than the source machine to be lost from the cache of the target machines because all requests are deleted from the cache, regardless of their source. Specifying this option has no effect if access control is being managed locally (that is, the local machine is the only server submitting requests to the cache). This option is useful if you rename the server where AR System is running or move the server to a different machine.
-g
Specifies the name of the source form for reloading group requests (required if you do not specify the -u option).
-h
Specifies the name of the server if you have added a Server-Name value in the ar configuration file. If you have a value for Server-Name, and you use arreload without the -h option, arreload will use the default server name rather than the name specified by Server-Name.
-p
Specifies the password for the user specified by the -a option (required if a password is defined for that user).
-s
Specifies the name of an individual AR System server on which to reload the cache. The system reloads the cache on all AR System servers (based on the ar directory file) if you do not specify this option.
198 "Appendix B—AR System Server Utilities

Configuring AR System
-u
Specifies the name of the source form for reloading user requests (required if you do not specify the -g option).
-d
Runs the program in debug mode. Messages are printed to stdout and detail the progress of each operation being performed. Use this mode to diagnose problems with the arreload process only.
Environment ARCONFIGDIR
UNIX only: Specifies the directory where the ar.conf file and other AR System configuration files are stored. This directory defaults to <ar_install_dir>/conf if you do not set this variable.
Examples Connect as Admin (using the password fun4me) and delete all user requests from the access control cache of all AR System servers. Reload the cache on all machines from the User form on the current machine. The syntax is as follows:
arreload -u User -a Admin -p fun4me -f
Reload the cache on all machines from the Group form and the User form on the current machine. The syntax is as follows:
arreload -u User -g Group -a Admin -p fun4me -f -d
Note: You can disable arreload with a setting in the ar.conf (ar.cfg) file. When the setting is active you can still run arreload, but it has no effect on the server, and the cache does not get flushed.
Files UNIX—$ARCONFIGDIR/ar
arserverd (arserver.exe)
Description The arserverd process (UNIX) or arserver.exe executable (Windows) represents the main part of AR System. It handles all interactions between clients and the database, making all access to the system dependent on this process.
arserverd (arserver.exe) ! 199

Action Request System 5.1
Although this process can be started manually on both platforms, it is most often started with armonitor. On the UNIX platform, arserverd can be started manually by using the command <ar_install_dir>/bin/arsystem Start. On Windows or UNIX, if the process is shut down (whether accidentally or purposely), you can restart it at any time.
In UNIX, sending a SIGUSR1 signal causes arserverd to reread all configuration files. Sending a SIGHUP signal causes it to reread the configuration files and reset all cached structure information. Generally, these signals are only sent after performing a manual repair or restore operation. However, neither causes any damage or adversely affects users currently accessing AR System.
Synopsis arserverd [-s <server_name>] [-i <install_directory>][-l <license_directory>] [-m]
Options You can specify the following options in any order on the command line:
-i
Specifies the directory where the AR System server was installed.
-l
Specifies the directory where the arsystem.lic license file is stored.
-m
Windows only: Runs the process in manual mode, not as a Windows service. If you run the process in a DOS window, you must use the -m option.
-s
Name of the server you specified during the installation of AR System.
Environment ARCONFIGDIR
The directory where the ar.conf (ar.cfg) configuration file is stored. The default is in the conf subdirectory of the AR System server installation directory (<install_directory>/conf on UNIX and <install_directory>\conf on Windows).
ARDATE
The date format used by the program.
200 "Appendix B—AR System Server Utilities

Configuring AR System
UNIX only: This value consists of a string of operators as defined by the strftime library call (some combinations appear successfully, but cannot be translated for input). If you do not set this variable, the system uses the date format for the language specified by the LANG environment variable.
Windows only: This value consists of a string of operators as defined by Regional Settings. If you do not set this variable, the system uses the date format specified in the Regional Settings of the user account that runs the service.
ARDATEONLY
The date format used by the program.
UNIX only: This value consists of a string of operators as defined by the strftime library call. (Some combinations are displayed successfully but cannot be translated for input.) If you do not set this variable, the system uses the date format for the language specified by the LANG environment variable.
Windows only: This value consists of a string of operators as defined by Regional Settings. If you do not set this variable, the system uses the date format specified in the Regional Settings of the user account that runs the service.
ARTIMEONLY
The time format used by the program.
UNIX only: This value consists of a string of operators as defined by the strftime library call. (Some combinations are displayed successfully but cannot be translated for input.) If you do not set this variable, the system uses the date format for the language specified by the LANG environment variable.
Windows only: This value consists of a string of operators as defined by Regional Settings. If you do not set this variable, the system uses the date format specified in the Regional Settings of the user account that runs the service.
Files UNIX
<ar_install_dir>/conf/ar or $ARCONFIGDIR/ar<ar_install_dir>/conf/ar.conf or $ARCONFIGDIR/ar.conf/etc/arsystem/<server_name>/arsystem.lic/etc/services
arserverd (arserver.exe) ! 201
Action Request System 5.1
Windows
<ar_install_dir>Conf\ar.cfgC:Program Files\Common Files\arsystem\licenses\<server_name>
\arsystem.lic<win_sys_dir>\drivers\etc\services
arservftd (arfts.exe)
Description The arservftd utility is the indexer daemon for the AR System full text search (FTS) feature. It manages and updates all FTS indexes defined in the system.
Although this process can be started manually, it is usually launched and managed by AR System. If arservftd is shut down, you can restart it at any time.
In UNIX, sending a SIGUSR1 signal causes arservftd to reread all configuration files. Sending a SIGHUP signal causes it to both reread the configuration files and reset all cached structure information. Generally, these signals are sent only after performing manual repair or restore operation. However, neither causes any damage or adversely affects users currently accessing AR System.
Synopsis UNIX—arservftd
Windows—arfts.exe
Environment ARCONFIGDIR
The directory where the ar directory file and other AR System configuration files are stored. The default is <install_directory>/conf.
Files UNIX
$ARCONFIGDIR/ar.conf<ar_install_dir>/db/arftp.lst<ar_install_dir>/db/arftinp.lst<ar_install_dir>/db/arft.log<ar_install_dir>/db/arftext.log
202 "Appendix B—AR System Server Utilities

Configuring AR System
Windows
$ARCONFIGDIR\ar.cfg<ar_install_dir>\Arserver\Db\arftp.lst<ar_install_dir>\Arserver\Db\arftinp.lst<ar_install_dir>\Arserver\Db\arft.log<ar_install_dir>\Arserver\Db\arftext.log
arsignal (arsignal.exe)
Description The arsignal process forces an arserver to load or reload information. The process can be run on any machine.
Synopsis arsignal {-c|-g|-l|-a} <server_name>[:port][sigArgument]
The server name identifies the server that is to reload information. If a TCP port is to be specified as well (needed if the server does not register with AR System Portmapper), it is appended to the server name, separated by a colon. sigArgument is a string that is applicable when using the option -a.
Options You can specify one of the following options:
-c
Causes the server to reload information from its configuration file ar.conf (ar.cfg).
-g
Causes the server to reload group and data dictionary information from the database.
-l
Causes the server to reload license information.
-a
Causes the server to update internal Alert user information using the details provided in sigArgument. For more information, see the Remedy White Paper “Using a Hardware Load Balancer with AR System 5.1 Servers.”
arsignal (arsignal.exe) ! 203

Action Request System 5.1
204 "Appendix B—AR System Server Utilities

Index
Aaccess control
group list 35licensing 40User form 34
accessibility 54, 55accrue searches 91active links
logging 52run process directory and shell 86
addingMIME types 133servers 130
admin queue 25administrator operations, disabling 71Administrator Preference form 48administrator-only mode 71advanced server information 84Advanced Server Properties check box 117advisory mode, source control 97alerts
alert client registration 112configuring server 121disabling 71log file 75queue 26server architecture and 17time-out 62verifying users who receive 72
alias for server name 61
allowingguest users 68unqualified searches 69
APIarchitecture and 17log file 74version 68
appending to existing log file 75Application Manager 15, 138application services password 103applications
primary form 141ar file 156AR System Alert 17AR System and Windows NT, stand-alone server
113AR System Portmapper 30, 81AR System Server ID 65ar.conf (ar.cfg) file 157ar.ini file 47aralert.log 75arcache utility 86, 192architecture
AR System server 17mid tier 14
architecture, AR System 12architecture, multithreaded server 23ardb.conf (ardb.cfg) file 185ARDBC configuration form 147AREA 18
configuring server 119
Index ! 205

Action Request System 5.1
RPC program number 82, 120AREA LDAP configuration form 149ARF plug-in API 18arfilter.log 75arforkd log file 75arforkd utility 195arforms directory 140armonitor utility 195armonitor.conf (armonitor.cfg) file 189arplugin utility 196arplugin.log 75arreload utility 86, 197arserverd (arserver) utility 199arservftd (arfts) utility 202arsignal utility 112, 203arsql.log 75arthread.log 75aruser.log 75assignee groups 72assigning TCP port numbers 78authenticating unregistered users 70Authentication field 69
Bbackup log file 75, 129blank password 39
Ccache 138cache changes 101cache update policy 142case sensitivity, full text search 89catalog server 126categories, logging 127central file form 48centralized preferences 47certificate database 150changes
server cache 101user and group 101
clients, configuring TCP port numbers 116client-side, logging group 75clustered index used with Request ID 77comments in source control 97config.properties file 15
configuration filesar 156ar.conf (ar.cfg) 157ardb.conf (ardb.cfg) 185armonitor.conf (armonitor.cfg) 189
configuration password 129configuration settings 125Configuration Tool 15
accessing 124applications and 143catalog server 126change password 137Content Manager 14Crystal Reports web server 127deployer settings 135deployment and 138, 144license server 126log files 127MIME type settings 133overview of 124preference server 126reporting working directory 127specifying configuration settings 125using with a load balancer 124web service settings 136working directory 126
configuringAREA server 119clients 32, 48, 116databases 77firewalls 114full text search 90mail server 118multiple servers 108server for alerts 121server for plug-ins 118server information 65threads 82Windows clients and portmapper 116
Content Manager 14cross-reference blank password 35, 69, 120Crystal Reports web server 127currency types 54, 105current licenses 42customizing environment 46
206 " Index

Configuring AR System
Ddata, reloading 203database servers 19databases
configuration file 77password 77server information 76UNIX directory 77user name 77version 77
debug modestrace mode 72using log files 72
Default Notify Mechanism field 36default web path 86deleting
Demo user 37users 37
Demo user 36deployment
arforms directory 140background deploy 144background deployment 142deployer settings 135file structure 139manual deploy 143overview 138start.jsp 141
disablingadministrator operations 71alerts 71escalations 71full text search 89
dispatcher thread 28distinguished name 150Distributed Server log file 74DSO local server password 104DSO remote server password 104
Eemail
line length 85notifications 67
Email Address reserved field 36enforced mode, source control 97
entries returned by GetList 67environment
AR System architecture 12customizing 46variables 32
error messages, localizing 86escalations
disabling 71log file 74process time-out 62
events, server 99external authentication 18, 119external authentication (AREA)
configuring server 119RPC program number 80, 82, 120time-out 63
Ffast queue 27file configurations
ar 156ar.conf (ar.cfg) 157ardb.conf (ardb.cfg) 185armonitor.conf (armonitor.cfg) 189
Filter API RPC time-out 62filters
log file 75maximum 85process time-out 62
firewalls 114fixed full text licenses 65fixed write licenses 64Flashboards
queue 26server 81
floating licenses 43, 63, 64forms
Administrator Preference form 48server, maximum number 65User 34User Central File form 48User Preference form 48vendor 18view 18web-based 138
Index ! 207

Action Request System 5.1
Full Name field 35full text search
case sensitivity 89disabling 89enabling 89Ignore Words List 90, 93indexes 90, 94license time-outs 63licenses 36options 89, 91wildcards 90
GGetList 67Group List field 35groups
changes 101multiple assignee 72
guest users 68
Hhardware platform 60
IIgnore Words List
index criteria 90modifying 93
indexesIgnore Words List 90rebuilding 94
JJava API 15JSP engine 14JSP files 138
LLDAP
ARDBC LDAP configuration form 147ARDBC LDAP plug-in 146AREA configuration form 149AREA plug-in 148AREA plug-in installation option 148certificate database 150distinguished name 150
license server 126License Type reserved field 35licenses
access control 40current 42fixed full text search 65fixed write 64floating full text search 65floating write 64full text search 36license pools 41maximum number of forms 65pools 41registered users 42releasing floating 43server information 64submitter mode 65type 64type of license 35types 40user 41
list queue 27load balancer 124local preferences 47locale 54localizing error messages 86log files 127
alert 75API 74arforkd 75backup 75Configuration Tool 127Distributed Server 74escalation 74filter 75log directory 127log level 128log rollover limit 128log viewer 129plug-in 75server information 72setting 73SQL 75thread 75trace mode 72
208 " Index

Configuring AR System
user 75logging in 67Login Name field 35
Mmail server 118max forms allowed on server 65maximum
entries returned by GetList 67filters for an operation 85line length in email 85log-file size 75stack of filters 85
mid tier 14administration password 103Application Manager 138cache 138
MIME types 133modes
administrator-only 71debugging 72server records 87source code 97submitter 44, 64, 65
multiple assign groups 72multiple servers 77, 108multithreaded servers
architecture 23queues 25–27RPC program numbers 25threads 28–30
multi-tier architecture 12
Nnonaccrue searches 92notifications
email 67ports 80time-out 62
Ooperating system 61operations, preventing 71Oracle database 188
Ppassword
configuration 137Cross Ref Blank Password option 39
passwordsadministering 102application service password 103configuration password 129database 77Demo 36length 40modifying by users 37Password field 35plug-in server password 103security 35validating 39, 69
performance tuningrequest ID uses clustered index 77unqualified searches 69
permission types 35plug-ins
AR System filter plug-in API 18ARDBC LDAP plug-in 146, 147configuring server 118LDAP AREA plug-in 148log file 75server password 103
pools of licenses 41port numbers. See TCP port numbersportmapper
See also Remedy Portmapper See also TCP port numbersdependency, removing 117
portsnotification 80server 77
preference forms 48preference server 126preferences
centralized 47forms 48local 47server 48setting with client tools 49synchronization 47, 49
Index ! 209

Action Request System 5.1
user 46web users 50
preventing user operations 71primary forms 141private queues 27private servers
adding 117operations supported 27
process time-out 62
Qqueries. See searchesqueues
configuring threads 82overview 25–27server 77, 81server statistics 87
Rrecording interval, statistics 87registered licenses 42registered users 34registering with portmapper 81reindexing full text search 90Remote Procedure Call (RPC). See RPC program
numbersreporting working directory 127request ID uses clustered index 77requests
processing 29restarting threads 30routing to appropriate queues 28submitter mode 44, 65
rollover limit 129rollover limit, log files 128RPC program numbers
AR RPC number 117external authentication server 80, 82, 120fixed 25Flashboards 81setting 78
run process directory 86
Sscalability
AR System server 23Mid Tier 23
searchesaccrue 91full text search 89nonaccrue 92unqualified 69
Secure Sockets Layer 147, 150security 86
Demo password 36passwords 35
server events 112server information
advanced 84configuration 65currency types 105database 76full text search 87licenses 64log files 72overview 58password administration 102platform 60server events 99server ports 77source control 95timeouts 61
server recording mode 87server statistics 87server utilities
arcache 192arforkd 195armonitor 195arplugin 196arreload 197arserverd (arserver) 199arservftd (arfts) 202arsignal 203
serversalerts, configuring for 121AR System 17, 123architecture 23AREA 119cache changes 101configuring clients 116
210 " Index

Configuring AR System
configuring for plug-ins 118configuring multiple servers 108configuring threads 82database 19directory 60Flashboards 81full text search, configuring 90language 67license server 126license type 64mail 118maximum forms allowed 65multiple 77, 108multiple servers sharing same database 111name alias 61ports 77preference 48, 126private 27processing concurrent requests 28queue 81queues 25–27report server 51stand-alone 113statistics 87TCP port numbers. See TCP port numbersTCP/IP port 80time zone 61version 60web 14
servlets 15, 23session timeout 126settings
log files 73server information 58
settings, in Configuration Tool 125source control
advisory and enforced modes 97comments 97server information 95
SQL, log file 75stand-alone server, Windows NT 113start.jsp 141start.jsp file 141starting
armonitor utility 195
statisticsrecording 87
style sheets 55submitter mode 65submitter, special access mode 44support files
directory structure 139timestamp 141
Ttable fields 53TCP port numbers
See also AR System PortmapperAR TCP Port 117assigning 78configuring clients 116
TCP/IP port 80thread log file 75thread manager 30threads
configuring 82notification 80processing requests 29restarting 30routing requests 28types of 28–29worker 25, 29
time zone 61timeouts 61timestamp, support files 141trace modes
debugging 72
UUNIX
database directory 77email notifications 67
UNIX serversstarting 195
unqualified searches 69unregistered users, authenticating 70User
Central File form 48Preference form 48
User form 34
Index ! 211

Action Request System 5.1
user names 35user preferences
customizing 46users
alert 72authenticating 70changes 101defining 34deleting 37Demo user 37email notifies from 67guest 68license information 41log file 75operations, preventing 71permissions 35prompted for login 67web 50
utilitiesarcache 192arforkd 195armonitor 195arplugin 196arreload 197arserverd (arserver) 199arservftd (arfts) 202arsignal 203
Vvalidating passwords 69variable, environment 32vendor form 18verifying alert users 72version
database 77servers 60
view form 18
Wweb
centralized preferences 50Configuration Tool 15default path 86server 14
web alias, in web view 141
web applicationscache 138deploying 138file structure 139JSP files 138
web applications, primary form 141web service configuration settings 136web services 12, 15, 21, 136wildcards 90Windows clients 116Windows servers
data reload 203starting 195
worker threads 25, 29workflow server password 105workflow, logging 75working directory, Configuration Tool 126
XXML Transformer 14
212 " Index