Acrobat Digital Document Authoring
6
©Olin Library Arc Page 1 of 6 Adobe Acrobat 8: Digital Document Authoring Adobe Acrobat allows you to easily create PDF files to distribute. PDF files are not only compact, but can include font and formatting information so that what you send looks just like what readers see. This session will get you started with Acrobat 8.0 Professional. Although this session just scratches the surface of what is capable in Acrobat, it probably covers about 90% of what people use Acrobat for in the Arc. By the time you’re done with this session, you should: • Know how to Create a PDF document from a scanner or from a file • Notice some of the overlaps in the Acrobat interface • Know how to creat a PDF from within another program “Getting Started” Window Upon launching Acrobat, you will be greeted with the “Getting Started…” window. As you can see, this window offers links to all the major tasks within Acrobat. As it turns out, this window is completely redundant, as all of these options appear in the “Tasks” toolbar. If you are using Acrobat on your own machine and find this screen annoying, you can click the check box in the upper right hand corner to stop it from coming up every time you launch the program. Then again, it doesn’t cost you any time to jump right in from this window. Create PDF From Scanner Creating a PDF from the scanner allows you to turn physical copies of documents into commonly used PDF files. As this is the most common way PDF files are created in the Arc, we’ll talk about it first. The whole process is incredibly simple, allowing you to scan an image directly into PDF format. To Scan Directly into PDF 1. Click on “Create PDF” and select “From Scanner…” from the drop down menu 2. In the “Input>Scanner” section of the resulting dialog box select the appropriate option from the drop down menu. If you only have one scanner connected to the computer, there will only really be one option. In some cases, though, there
-
Upload
sarah-bombich -
Category
Documents
-
view
302 -
download
4
description
From a workshop series offered in Fall 2007.
Transcript of Acrobat Digital Document Authoring

©Olin Library Arc Page 1 of 6
Adobe Acrobat 8: Digital Document Authoring
Adobe Acrobat allows you to easily create PDF files to distribute. PDF files are not only compact, but can include font and formatting information so that what you send looks just like what readers see. This session will get you started with Acrobat 8.0 Professional. Although this session just scratches the surface of what is capable in Acrobat, it probably covers about 90% of what people use Acrobat for in the Arc. By the time you’re done with this session, you should:
• Know how to Create a PDF document from a scanner or from a file • Notice some of the overlaps in the Acrobat interface • Know how to creat a PDF from within another program
“Getting Started” Window Upon launching Acrobat, you will be greeted with the “Getting Started…” window. As you can see, this window offers links to all the major tasks within Acrobat. As it turns out, this window is completely redundant, as all of these options appear in the “Tasks” toolbar. If you are using Acrobat on your own machine and find this screen annoying, you can click the check box in the upper right hand corner to stop it from coming up every time you launch the program. Then again, it doesn’t cost you any time to jump right in from this window.
Create PDF
From Scanner Creating a PDF from the scanner allows you to turn physical copies of documents into commonly used PDF files. As this is the most common way PDF files are created in the Arc, we’ll talk about it first. The whole process is incredibly simple, allowing you to scan an image directly into PDF format. To Scan Directly into PDF 1. Click on “Create PDF” and select “From Scanner…” from the
drop down menu 2. In the “Input>Scanner” section of the resulting dialog box
select the appropriate option from the drop down menu.
If you only have one scanner connected to the computer, there will only really be one option. In some cases, though, there

©Olin Library Arc Page 2 of 6
may be more than one driver for a single scanner. Remember that each option here is a driver.
To Scan Directly into PDF continued… 3. In the “Output” section of the dialog box select
either “New PDF Document” or “Append” depending on what you intend to do
4. Use the slider in the “Document section to set optimize the file size and click on the “Options” button to set more advanced features
These are some simple options that allow you to have some control over file size. If you want more control, you will need to select “Show Native Scanner Interface” (See below)
5. Once all settings have been set click the “Scan”
button to scan your file 6. If you have more pages to scan, simply repeat this
process.
You should notice that the Output section in the Adobe Scan dialog box will default to Append. This will add the scanned pages to the file.
To “Show Native Scanner Interface” 1. Click on the “Scanner Options” button 2. From the Interface drop down menu select
“Show Scanner’s Native Interface” 3. Click “OK” This is particularly useful on a scanner with an automatic document feeder, as you may need to select between that input and the flatbed. What options and controls the scanner’s native interface offers will vary from scanner to scanner.
From File You can also easily create a PDF file from any program that prints. There are two ways to go about this: one from within Acrobat, the other from within the program used to create the file. PLEASE NOTE: Creating a PDF from file assumes that you have already created the file in another program. From within Acrobat 1. Select Create PDF>From File 2. An “Open” window will appear for you to
select the file you want to convert to PDF 3. After selecting a file, click the “Open” button,
and Acrobat will create a PDF version of the file.
From within another program You can also easily create a PDF file from within any other program that prints. (This assumes, of course that you have a full version of Acrobat installed on your computer, which is the case in the Arc)
©Olin Library Arc Page 3 of 6
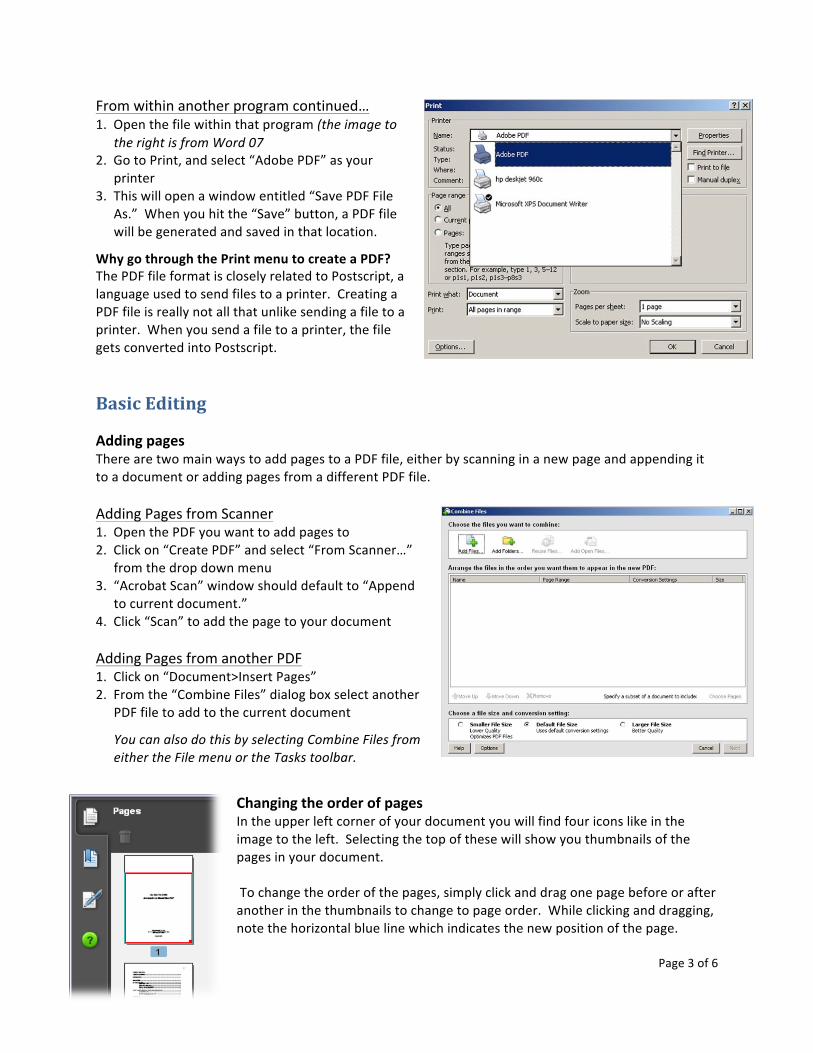
From within another program continued… 1. Open the file within that program (the image to
the right is from Word 07 2. Go to Print, and select “Adobe PDF” as your
printer 3. This will open a window entitled “Save PDF File
As.” When you hit the “Save” button, a PDF file will be generated and saved in that location.
Why go through the Print menu to create a PDF? The PDF file format is closely related to Postscript, a language used to send files to a printer. Creating a PDF file is really not all that unlike sending a file to a printer. When you send a file to a printer, the file gets converted into Postscript.
Basic Editing
Adding pages There are two main ways to add pages to a PDF file, either by scanning in a new page and appending it to a document or adding pages from a different PDF file. Adding Pages from Scanner 1. Open the PDF you want to add pages to 2. Click on “Create PDF” and select “From Scanner…”
from the drop down menu 3. “Acrobat Scan” window should default to “Append
to current document.” 4. Click “Scan” to add the page to your document Adding Pages from another PDF 1. Click on “Document>Insert Pages” 2. From the “Combine Files” dialog box select another
PDF file to add to the current document
You can also do this by selecting Combine Files from either the File menu or the Tasks toolbar.
Changing the order of pages In the upper left corner of your document you will find four icons like in the image to the left. Selecting the top of these will show you thumbnails of the pages in your document. To change the order of the pages, simply click and drag one page before or after another in the thumbnails to change to page order. While clicking and dragging, note the horizontal blue line which indicates the new position of the page.

©Olin Library Arc Page 4 of 6
Cropping The crop tool is located under Tools>Advanced Editing. Select the area to be included by clicking on one corner and dragging to the opposite corner. Click within the selected area to crop the page. A dialog box will appear. Simply hitting enter will crop the selected page. Note that the dialog box also gives you the opportunity to apply the selected crop to multiple pages within the document.
Exporting
It is possible to export a PDF file into another file format. The most likely reason you might want to do this is if you have used OCR and want to work on a file in, say, Word. Note that not all coding information will be included in this conversion. Because of this you must expect some errors, either in formatting or character recognition that you will need to fix. Forms Acrobat also allows you to create interactive PDF forms. The tools for building PDF forms are more robust than in past versions, although it still requires some investment in time to make a good looking and working form. There are a number of form templates already available in Acrobat, or you can create a form from another document that you have created. It is probably best to think of creating a form in that you are adding a layer on top of an already existing document. If you select Create New Form you will be prompted to select the source document. Note that when you create from an electronic document, the browse window defaults to show only files that are already in PDF format. Don’t worry if your file is not already a PDF. Just change the browse window to show the appropriate file type and select. Acrobat will then create a PDF version of the document to be made into a form.

©Olin Library Arc Page 5 of 6
Acrobat will then prompt to run Auto Field Detection. While this can certainly prove useful, you should expect to have to do some adjustment to get your form right. In Windows, the work of creating the form in actually done in a program called Adobe LiveCycle Designer. It is possible that you won’t even notice that you’re in a different program.
At this point you should be able to see the document. The orange boxes on the document are form fields that were autodetected. Note that they may not completely match the area designed for a piece of data. Note the windows on the right side of the screen. These windows can be toggled by selecting them under the Window tab at the top of the screen. Adding and Modifying Fields First we’ll talk about adding an field by hand, and then we’ll talk about modifying it (as modifying an object is the same whether it was generated by autodetection or placed by hand). In the Library window there are a variety of objects which may be added to a document. For this example, select a text box. Clicking on the document will then drop a text box. Move the box by clicking it and dragging. Modify the size of the text box by dragging on the points along the outside of the box. An object or group of objects can be copied and pasted. The Object window shows the properties of an object. You can quickly change properties of the object, or even the object type.

©Olin Library Arc Page 6 of 6
Note: The quickest way to simply add text to an existing document (say, an application that you would like to fill in by “typing” rather than by hand) will be to work in Adobe Illustrator. Either scan the document directly into Illustrator, or create a PDF of a digital version, save it, and open in Illustrator. Then use the Type Tool to add text to the document. Click on the Type Tool on the left, then click and drag to form a blue box on the document. Once you’ve dragged the box, you can type within it. Clicking the Selection Tool at the top of the left menu will allow you to move the type field as you like (click and drag with the mouse for large movements, or use the arrow keys on the keyboard for more precise adjustment).