ACH Positive Pay User Guide - Hancock Whitney · Total ACH Debits – All ACH debit transactions...
36
ACH Positive Pay User Guide Contents Logging In ............................................................................................. 2 Dashboard ........................................................................................... 3 ACH Positive Pay Credits ..................................................................... 3 ACH Positive Pay Debits ...................................................................... 4 Change Module.................................................................................... 5 Preferences .......................................................................................... 6 Credit and Debit Modules ................................................................... 6 Credit Module ...................................................................................... 7 Notification Method and Condition ..................................................... 7 Setup: Approved List ........................................................................... 10 Approved List Definition ...................................................................... 11 Add a Company to the Approved List.................................................. 12 Edit a Company on the Approved List ................................................. 14 Delete a Company on the Approved List ............................................ 14 Approved List Report ........................................................................... 15 Notification Rules Report .................................................................... 16 Transaction History .............................................................................. 17 Credit Transaction History ................................................................... 18 Transaction History: Add to Approved List.......................................... 20 Debit Module ....................................................................................... 22 Notification Method and Condition ..................................................... 22 Setup: Approved List ........................................................................... 25 Approved List Definition ...................................................................... 25 Add a Company to the Approved List.................................................. 28 Edit a Company on the Approved List ................................................. 29 Delete a Company on the Approved List ............................................ 29 Approved List Report ........................................................................... 30 Notification Rules Report .................................................................... 30 Transaction History .............................................................................. 32 Debit Transaction History .................................................................... 33 Transaction History: Add to Approved List.......................................... 35
Transcript of ACH Positive Pay User Guide - Hancock Whitney · Total ACH Debits – All ACH debit transactions...

ACH Positive Pay User Guide Contents Logging In ............................................................................................. 2
Dashboard ........................................................................................... 3
ACH Positive Pay Credits ..................................................................... 3
ACH Positive Pay Debits ...................................................................... 4
Change Module .................................................................................... 5
Preferences .......................................................................................... 6
Credit and Debit Modules ................................................................... 6
Credit Module ...................................................................................... 7
Notification Method and Condition ..................................................... 7
Setup: Approved List ........................................................................... 10
Approved List Definition ...................................................................... 11
Add a Company to the Approved List .................................................. 12
Edit a Company on the Approved List ................................................. 14
Delete a Company on the Approved List ............................................ 14
Approved List Report ........................................................................... 15
Notification Rules Report .................................................................... 16
Transaction History .............................................................................. 17
Credit Transaction History ................................................................... 18
Transaction History: Add to Approved List .......................................... 20
Debit Module ....................................................................................... 22
Notification Method and Condition ..................................................... 22
Setup: Approved List ........................................................................... 25
Approved List Definition ...................................................................... 25
Add a Company to the Approved List .................................................. 28
Edit a Company on the Approved List ................................................. 29
Delete a Company on the Approved List ............................................ 29
Approved List Report ........................................................................... 30
Notification Rules Report .................................................................... 30
Transaction History .............................................................................. 32
Debit Transaction History .................................................................... 33
Transaction History: Add to Approved List .......................................... 35
ACH POSITIVE PAY USER GUIDE
Updated June, 2019
2
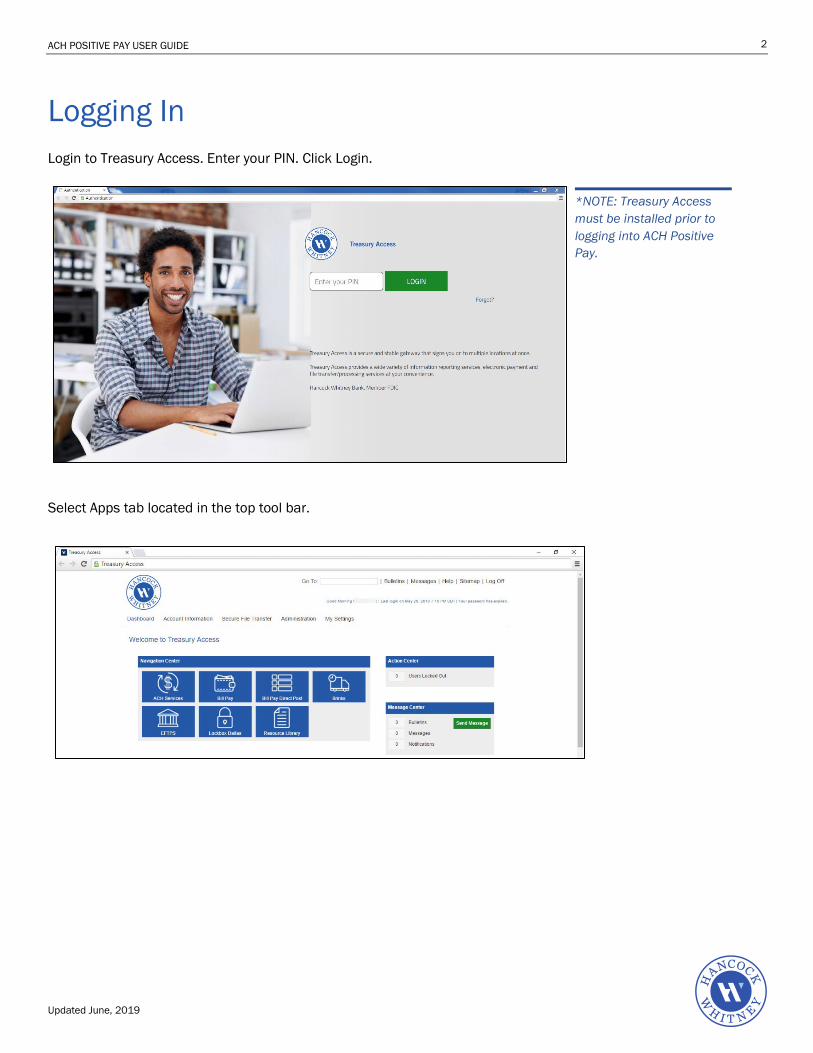
Logging In Login to Treasury Access. Enter your PIN. Click Login.
Select Apps tab located in the top tool bar.
*NOTE: Treasury Access must be installed prior to logging into ACH Positive Pay.

ACH POSITIVE PAY USER GUIDE
Updated June, 2019
3
The Apps landing page will display. Click on ACH Positive Pay.
Dashboard
Upon login to ACH Positive Pay the Dashboard will display. This is a quick reference summary of today’s transaction information, totals and counts. The end of day cut-off time is displayed, indicating the deadline for decision on today’s exception transactions. End of Day Cutoff time is 12:30 pm (CT). Users can also navigate to transactions with a specific status by clicking on the dollar amount link located to the right of the status.
ACH Positive Pay Credits 1: Total ACH Credits – All ACH credit transactions for today regardless of transaction
status.
2: Set to Pay – ACH credits set to pay by system default if the user does not decision the item before cutoff time, credits User has selected to pay, credits that meet the parameters of the Approved List and will be paid and credits the FI has paid on behalf of the customer.

ACH POSITIVE PAY USER GUIDE
Updated June, 2019
4
3: Set to Return – ACH credits set to return by system default if the user does not decision the item before cutoff time, credits the User has selected to return and credits returned by the FI on behalf of the customer.
4: Approved List Exceptions – Items not currently marked as paid as a result of the company not being setup on the Approved List.
ACH Positive Pay Debits 1: Total ACH Debits – All ACH debit transactions for today regardless of transaction status.
2: Set to Pay – ACH debits set to pay by system default if the user does not decision the item before cutoff time, debits User has selected to pay, debits that meet the parameters of the Approved List and will be paid and debits the FI has paid on behalf of the customer.
3: Set to Return – ACH debits set to return by system default if the user does not decision the item before cutoff time, debits the User has selected to return and debits returned by the FI on behalf of the customer.
4: Approved List Exceptions – Items not currently marked as paid as a result of the company not being setup on the Approved List.
Selecting any of these options will bring you to the Transaction History screen in ACH Positive Pay and only the transactions for the selected option will display.
To navigate back to the Dashboard select Change Module in the menu bar next to the users name.
To view Reports on the Dashboard, click on the drop down menu.
– Audit Report – View users that have logged into the system and what action was taken on a specific day or days.
– Notification Delivery – View Recipients, Message types and Status of all Notification of Delivery.
To view Transactions, click on the Transaction View menu.
– View type of transaction, descrpition, account number, Date, Credit or Debit, Current Status and Manage status.
– Filter by Accounts, Status, Min Amount, Max Amount and Date Range.

ACH POSITIVE PAY USER GUIDE
Updated June, 2019
5
Change Module There are multiple options to navigate to the ACH Positive Pay modules from the Dashboard.
1: Click on ACH Positive Pay Credits or ACH Positive Pay Debits in the dark blue box within the Dashboard window.
or
2: Click on Change Module and select ACH Positive Pay Credits or ACH Positive Pay Debits from the drop down window in the top tool bar next to User name
Either selection will bring you to the Welcome page where you can navigate to multiple functions within ACH Positive Pay Credits or ACH Positive Pay Debits. Available options are based on User privileges.
To navigate back to the Dashboard click the Change Module in the top tool bar.
You can navigate between the Dashboard and the ACH Positive Pay Credit or Debit module by selecting the Module you want to enter.
Under the user that is logged in there is the Preferences tab and the Logout button. To change your default preferences click on the Preferences tab.

ACH POSITIVE PAY USER GUIDE
Updated June, 2019
6
Preferences
The Preferences option allows the user to customize their Default Module, Default Dashboard Page, Default ACH Positive Pay Debits Page or Default ACH Positive Pay Credits Page. Click the drop down under the users name on the right. Click on Preferences.
The Preferences screen displays Default Module, Default Dashboard Page, Default ACH Positive Pay Debits Page or Default ACH Positive Pay Credits Page. You can make any of the options available in the drop down for the Default Module, Default Dashboard Page, Default ACH Positive Pay Debits Page or Default ACH Positive Pay Credits Page. Click the Save button in the middle bottom of the page to save your selection.
Credit and Debit Modules
Under ACH Positive Pay Credits and ACH Positive Pay Debits modules, you have the option to:
Setup: Notification Rules and Approved List
Reports: Approved List and Notification Rules Report
Transaction History for each different module that you are in.

ACH POSITIVE PAY USER GUIDE
Updated June, 2019
7
Credit Module Setup: Notification Rules
Notification Method and Condition
– The Notification Methods are Emails with the Email Address defaulted to the Clients Primary Contact.
– Cell Phones may be used for notifications.
– The Client Primary Contact may be replaced and/or additional contacts may be added and the Notification Condition may be changed.
– The Notification Condition is to Notify for all Credits.
For ACH Positive Pay Credit Notifications
1: Click on Setup then select, Notification Rules to open the Account Selection page. The Select Account(s) is a listing of all Account Numbers the User has access to.
2: Select Accounts and use the arrows in the middle to move the Account Number(s) to the Account(s) Selected section.
Note: Account Numbers with an * have the default Notification Rule Email.

ACH POSITIVE PAY USER GUIDE
Updated June, 2019
8
3: Click Next to go to the Contacts page
4: Information at the top of the contacts tab notifies the user who currently receives the notifications.
5: Contact Phone Text – To add a Cell Phone number, click in the Cell Phone 1 box. Type the 10-digit cell phone number. You may add up to 6 cell phone numbers to receive a Text ALERT.
6: E-mail – To replace the Primary Contact email, type the new email address in Email1. You may enter up to 6 email addresses to receive an email ALERT.
7: Click Next to go to the Conditions page.
8: Review the Notification Conditions for when you will receive an ALERT.

ACH POSITIVE PAY USER GUIDE
Updated June, 2019
9
CONDITION EXPLANATION
Notify for all ACH Credits
You will receive an ALERT for every ACH Credit to your account.
Notify only when an ACH Credit is Over
Enter the dollar amount
You will receive an ALERT for all ACH Credit greater than the dollar
amount.
You will not receive an ALERT for an ACH Credit equal to or less than the dollar amount.
Notify only when an ACH Credit is created
by a Company not found in the Approved
List
You will receive an ALERT for ACH Credits that do not meet the
parameters of a Company on the Approved List.
You will not receive an ALERT for ACH Credits that meet the parameters of a Company on the Approved List.
9: Either leave the default configuration as Notify for all ACH Credits or select another Notification Condition.
10: Click Next to go to the Confirm page
11: Review the Account(s), Contact(s) and Condition. To make a change, click Back.
12: Click Save.
– Success Message: Notification Rules have been configuration successfully.
– Click Start Over to go to the Selection page or navigate to another page.
– If the default Notification Rules have been change, the Account will no longer have *
In the Notification Rules, an Account added after Initial Setup will be included in the Account List and display for the Client Users that have access to that Account.

ACH POSITIVE PAY USER GUIDE
Updated June, 2019
10
Setup: Approved List
Approved List Definitions
Trusted Trading Partners that you have authorized for ACH Credit payment may be added to the Approved List.
ALERT
If the Account Notification Condition is “Notify only when an ACH Credit is created by a Company not found in the Approved List”:
– You will receive an ALERT for transactions that do not meet the parameters of a Company on the Approved List.
– You will not receive an ALERT for transactions that meet the parameters of a Company on the Approved List.
Review the Notification Conditions if the Account Notification Condition is not “Notify only when an ACH Credit is created by a Company not found in the Approved List”.
TRANSACTION STATUS
Account set to Pay All:
– The file load status is Pay System for transactions that do not meet the parameters of a Company on the Approved List.
– The file load status is Approved List Pay for transactions that do meet the parameters of a Company on the Approved List.
Account set to Return All:
– The file load status is Return – System for transactions that do not meet the parameters of a Company on the Approved List.
– The file load status is Approved List Pay for transactions that do meet the parameters of a Company on the Approved List.

ACH POSITIVE PAY USER GUIDE
Updated June, 2019
11
APPROVED LIST FIELD DEFINITIONS
Company ID
– Required Field – Field validated as exact match – Maximum of 10 characters including spaces – Valid characters are:
– A-Z a-z 0-9 – dash – – period . – number sign # – comma , – space – underscore _
Company Name:
– Optional Field – Field is not validated – Maximum of 16 characters including spaces
Max Amount:
– Optional Field; however, it is recommended to enter an amount
– Values: – Blank: any amounts meet the parameters – Zero: no amount meets the parameters – Highest amount: $99,999,999.99 – The transaction meets the parameters when the amount is
less than or equal to the Max Amount. – The transaction does not meet the parameters when the
amount is greater than the Max Amount.
Frequency:
– Values for a given period: – Select: Frequency not applied – DAILY: 1 business day – WEEKLY: 7 calendar days – BIWEEKLY: 14 calendar days – MONTHLY: Monthly date to date – QUARTERLY: Quarterly date to date – YEARLY: Yearly date to date
– Date to Date exceptions: – January 29, 30, 31 in a non-leap year: February 28 – January 30, 31 in a leap year: February 29 – March 31: April 30 – May 31: June 30 – August 31: September 30 – October 31: November 30
– If multiple transactions are on a file the sort order is highest to lowest dollar value. – If the transaction with the highest dollar value exceeds the Maximum Amount, all
transactions on the file are not approved. – If the transaction with the highest dollar value is equal to or less than the
Maximum Amount, that transaction is approved and all other transactions on the file are not approved.

ACH POSITIVE PAY USER GUIDE
Updated June, 2019
12
– Counter – The counter begins with the file transaction received after the Company and
Account is added to the Approved List regardless if the transaction meets or does not meet the parameters of the Approved List.
– The counter resets with every transaction received after the Company and Account is added to the Approved List regardless if the transaction meets or does not meet the parameters of the Approved List.
Start Date:
– Required Field – Field is validated – Format mm/dd/yyyy – Start Date: business date of the file load
– The transaction meets the parameters when the date is equal to or after the Start Date.
– The transaction does not meet the parameters when the date is before the Start Date.
End Date – Format mm/dd/yyyy – End Date: business date of the file load
– The transaction meets the parameters when the date is equal to or before the End Date.
– The transaction does not meet the parameters when the date is after the End Date.
– The transaction meets the parameters when the file is blank.
Add a Company to the Approved List 1: Click Setup then Approved List to open the Approved List page.
2: Click Create to open the Approved Company page –
3: Click in the Company ID box. Type the Company ID.

ACH POSITIVE PAY USER GUIDE
Updated June, 2019
13
4: The Company Name is an optional field. Click in the Company Name box. Type the Company Name.
5: Click in the Max Amount box. Type the Maximum Dollar Amount. If left blank any amount is acceptable.
6: Frequency is an optional field. Leave the default select to not apply the Frequency.
7: Use the frequency dropdown arrow to select DAILY, WEEKLY, BIWEEKLY, MONTHLY, QUARTERLY, or YEARLY.
8: Click in the Start Date box to open the calendar. Select the date.
9: End Date is an optional field. Click in the End Date box to open the calendar. Select the date.
10: Select the Account(s) and use the arrows in the middle to move the Account(s) to the right.
11: Click Save. – Success Message: Approved Company Saved Successfully.

ACH POSITIVE PAY USER GUIDE
Updated June, 2019
14
Edit a Company on the Approved List 1: Click Setup then Approved List to open the Approved List page.
2: Locate the Company. Click Edit in the Edit Column to open the Approved Company page.
3: Edit the fields and Accounts as needed.
4: Click Save. – Success Message: Approved Company Saved Successfully.
Delete a Company from the Approved List for All Accounts 1: Click Setup then Approved List to open the Approved List page.
2: Locate the Company. Check the box in the Delete Column. You may select more than one Company to delete.
3: Click Delete.
– Success Message: Approved Companies Deleted Successfully

ACH POSITIVE PAY USER GUIDE
Updated June, 2019
15
Reports
Click the drop down arrow next to Reports in the menu bar to make report selection.
Approved List Reports 1: Click Reports then Approved List to open the Approved List Report; drop down menu
allows user to search approved list entries by account number. 2: Select the account number from the drop down menu. 3: Click Search.
All approved list entries will appear for the account number selected. Click View under the Action column to view details of the company setup.
Notification Rules Report 1: Click Reports then Notification Rules Report to open the Notification Rules Report page.
2: The Notification Rules Report displays by the full Account Number. The following chart provides description of each field in the report.

ACH POSITIVE PAY USER GUIDE
Updated June, 2019
16

ACH POSITIVE PAY USER GUIDE
Updated June, 2019
17
Transaction History
Transaction Status
TRANSACTION STATUS FOR ACCOUNTS SET TO PAY ALL
– Transaction loads with status Pay – System if Company ID does not meet Approved List parameters.
– Transaction loads with status Approved List Pay if Company ID does meet Approved List parameters.
– Client User may change transaction status Pay - System to return the transaction which will change the status to Return - User. This action must be performed within the Return Deadline Rules.
– Client User may change transaction status Approved List Pay to return the transactions which will change the status to Return - User. This action must be performed within the Return Deadline Rules.
– Client User may change transaction status Return – User to pay the transaction which will change the status to Pay – User. This action must be performed before the end of day. Transactions with status Return – User after end of day cannot be changed to pay.
– Client User may change transaction status Pay – User to return the transaction which will change the status to Return – User. This action must be performed within the Return Deadline Rules.
TRANSACTION STATUS FOR ACCOUNTS SET TO RETURN ALL
– Transaction loads with status Return – System if Company ID does not meet Approved List parameters.
– Transaction loads with status Approved List Pay if Company ID does meet Approved List parameters.
– Client User may change transaction status Return – System to pay the transaction which will change the status to Pay – User. This action must be performed before the end of day. Transactions with status Return – System after end of day cannot be changed to pay.
– Client User may change transaction status Approved List Pay to return the transaction which will change the status to Return – User. This action must be performed within the Return Deadline Rules.
– Client User may change transaction status Return – User to pay the transaction which will change the status to Pay – User. This action must be performed before the end of day. Transactions with status Return – User after end of day cannot be changed to pay.
– Client User may change transaction status Pay – User to return the transaction which will change the status to Return – User. This action must be performed within the Return Deadline Rules.

ACH POSITIVE PAY USER GUIDE
Updated June, 2019
18
Credit Transaction History 1: Click Transaction History to open the Credit Transaction History page. Transactions
display based on the date shown below the Date Range. 2: Click Pay or Return under the Manage Column to change status of the transaction
STATUS CHANGE STATUS
Pay – System Return – User
Pay – User Return – User
Approved List Pay Return – User
Return – System Pay – User
Return – User Pay – User
Pay – FI Return – User
Return – FI Pay – User
ACH POSITIVE PAY USER GUIDE
Updated June, 2019
19
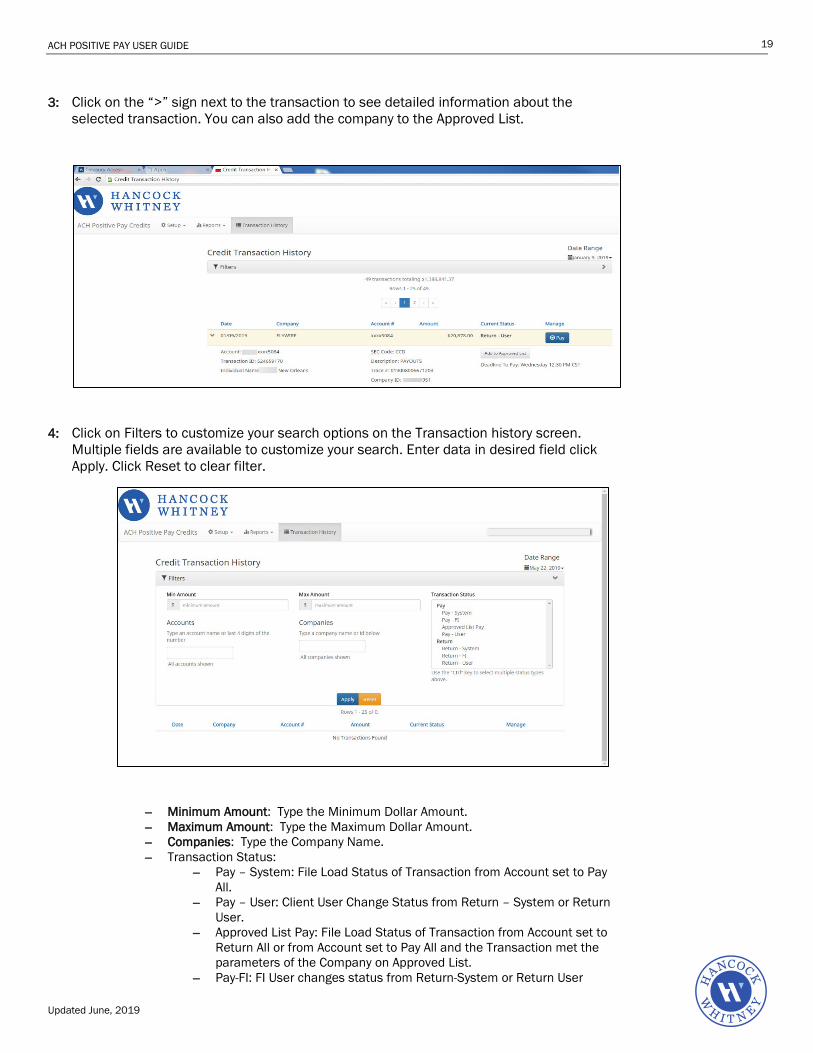
3: Click on the “>” sign next to the transaction to see detailed information about the selected transaction. You can also add the company to the Approved List.
4: Click on Filters to customize your search options on the Transaction history screen. Multiple fields are available to customize your search. Enter data in desired field click Apply. Click Reset to clear filter.
– Minimum Amount: Type the Minimum Dollar Amount. – Maximum Amount: Type the Maximum Dollar Amount. – Companies: Type the Company Name. – Transaction Status:
– Pay – System: File Load Status of Transaction from Account set to Pay All.
– Pay – User: Client User Change Status from Return – System or Return User.
– Approved List Pay: File Load Status of Transaction from Account set to Return All or from Account set to Pay All and the Transaction met the parameters of the Company on Approved List.
– Pay-FI: FI User changes status from Return-System or Return User

ACH POSITIVE PAY USER GUIDE
Updated June, 2019
20
– Return – System: File Load Status of Transaction from Account set to Return All
– Return – User: Client User change Status from Pay – System or Pay – User or Approved List Pay
– Return-FI: FI User change status from Pay-System or Pay-User or Approved List Pay
– Account Number: Type an account name or last 4 digits of the number. – Date Range: Select Date Range to search for transactions on a specific Date or
Date Range.
Transaction History: Add to Approved List
Trusted Trading Partners that you have authorized for ACH Credit payment may be added to the Approved List.
ALERT
If the Account Notification Condition is “Notify only when an ACH Credit is created by a Company not found in the Approved Company List.”:
– You will receive an ALERT for transactions that do not meet the parameters of a Company on the Approved List.
– You will not receive an ALERT for transactions that meet the parameters of a Company on the Approved List.
Review the Notification Conditions in Section 3.1 if the Account Notification Condition is not “Notify only when an ACH Credit is created by a Company not found in the Approved Company List.”
TRANSACTION STATUS
Account set to Pay All:
– The file load status is Pay – System for transactions that do not meet the parameters of a Company on the Approved List.
– The file load status is Approved List Pay for transactions that do meet the parameters of a Company on the Approved List.
Account set to Return All:
– The file load status is Return – System for transactions that do not meet the parameters of a Company on the Approved List.
– The file load status is Approved List Pay for transactions that do meet the parameters of a Company on the Approved List.

ACH POSITIVE PAY USER GUIDE
Updated June, 2019
21
1: The user can add a company to the Approved List when choosing to Pay a transaction when selecting the Pay button under the manage column.
2: Click Add to Approved List to open the Add Company to Approved List Window.
3: Click Save
Field Description Can be Modified Company ID Populated with data in the transaction Company Name Populated with data in the transaction Max Amount Populated with amount of transactions √ Frequency Left blank √ Start Date Populated with date of transaction √ End Date Left blank √

ACH POSITIVE PAY USER GUIDE
Updated June, 2019
22
Debit Module Setup: Notification Rules
Notification Method and Condition
– The Notification Methods are Emails with the Email Address defaulted to the Client Primary Contact.
– The Notification Condition is Notify for all Debits.
– The Client Primary Contact may be replaced and/or additional contacts may be added and the Notification Condition may be changed.
– Cell Phones may be used for notifications.
For ACH Positive Pay Debit Notifications
1: Click on Setup then select, Notification Rules to open the Account Selection page. The Select Account(s) is a listing of all Account Numbers the User has access to.
2: Select Accounts and use the arrows in the middle to move the Account Number(s) to the Account(s) Selected section.
Note: Account Numbers with an * have the default Notification Rule Email.

ACH POSITIVE PAY USER GUIDE
Updated June, 2019
23
3: Click Next to go to the Contacts page
4: Contact Phone Text – To add a Cell Phone number, click in the Cell Phone 1 box. Type the 10-digit cell phone number. You may add up to 6 cell phone numbers to receive a Text ALERT.
5: E-mail – To replace the Primary Contact email, type the new email address in Email1. You may enter up to 6 email addresses to receive an email ALERT.
6: Click Next to go to the Conditions page.
CONDITION EXPLANATION
Notify for all ACH Debits.
You will receive an ALERT for every ACH Debit to your account.
Notify only when an ACH Debit is Over
Enter the dollar amount
You will receive an ALERT for all ACH Debit greater than the dollar
amount.
You will not receive an ALERT for an ACH Debit equal to or less than the dollar amount.
Notify only when an ACH Debit meets one
or more of the following criteria
You will receive an ALERT for the criteria you select.
Select one, two or all three criteria:
– Payment made by check – Payment made over the Internet – Payment made over the phone
Notify only when an ACH Debit is created
by a Company not found in the Approved
List
You will receive an ALERT for ACH Debits that do not meet the
parameters of a Company on the Approved List.
You will not receive an ALERT for ACH Debits that meet the parameters of a Company on the Approved List.
Note: Information at the top of the contacts tab notifies the user who currently receives the notifications.

ACH POSITIVE PAY USER GUIDE
Updated June, 2019
24
7: Select Notification Condition.
8: Click Next to go to the Confirm page.
9: Review the Account(s), Contact(s) and Condition. To make a change, click Back.
10: Click Save.
– Success Message: Notification Rules have been configuration successfully.
– Click Start Over to go to the Selection page or navigate to another page.
– If the default Notification Rules have been change, the Account will no longer have *
In the Notification Rules, an Account added after Initial Setup will be included in the Account List and display for the Client Users that have access to that Account.

ACH POSITIVE PAY USER GUIDE
Updated June, 2019
25
Setup: Approved List
Approved List Definitions
Trusted Trading Partners that you have authorized for ACH Debit payment may be added to the Approved List.
ALERT
If the Account Notification Condition is “Notify only when an ACH Debit is created by a Company not found in the Approved List”:
– You will receive an ALERT for transactions that do not meet the parameters of a Company on the Approved List.
– You will not receive an ALERT for transactions that meet the parameters of a Company on the Approved List.
Review the Notification Conditions if the Account Notification Condition is not “Notify only when an ACH Debit is created by a Company not found in the Approved List”.
TRANSACTION STATUS
Account set to Pay All:
– The file load status is Pay System for transactions that do not meet the parameters of a Company on the Approved List.
– The file load status is Approved List Pay for transactions that do meet the parameters of a Company on the Approved List.
Account set to Return All:
– The file load status is Return – System for transactions that do not meet the parameters of a Company on the Approved List.
– The file load status is Approved List Pay for transactions that do meet the parameters of a Company on the Approved List.

ACH POSITIVE PAY USER GUIDE
Updated June, 2019
26
APPROVED LIST FIELD DEFINITIONS
Company ID
– Required Field – Field validated as exact match – Maximum of 10 characters including spaces – Valid characters are:
– A-Z a-z 0-9 – dash – – period . – number sign # – comma , – space – underscore _
Company Name:
– Optional Field – Field is not validated – Maximum of 16 characters including spaces
Max Amount:
– Optional Field; however, it is recommended to enter an amount
– Values: – Blank: any amounts meet the parameters – Zero: no amount meets the parameters – Highest amount: $99,999,999.99 – The transaction meets the parameters when the amount is
less than or equal to the Max Amount. – The transaction does not meet the parameters when the
amount is greater than the Max Amount.
Frequency:
– Values for a given period: – Select: Frequency not applied – DAILY: 1 business day – WEEKLY: 7 calendar days – BIWEEKLY: 14 calendar days – MONTHLY: Monthly date to date – QUARTERLY: Quarterly date to date – YEARLY: Yearly date to date
– Date to Date exceptions: – January 29, 30, 31 in a non-leap year: February 28 – January 30, 31 in a leap year: February 29 – March 31: April 30 – May 31: June 30 – August 31: September 30 – October 31: November 30
– If multiple transactions are on a file the sort order is highest to lowest dollar value. – If the transaction with the highest dollar value exceeds the Maximum Amount, all
transactions on the file are not approved.

ACH POSITIVE PAY USER GUIDE
Updated June, 2019
27
– If the transaction with the highest dollar value is equal to or less than the Maximum Amount, that transaction is approved and all other transactions on the file are not approved.
– Counter – The counter begins with the file transaction received after the Company and
Account is added to the Approved List regardless if the transaction meets or does not meet the parameters of the Approved List.
– The counter resets with every transaction received after the Company and Account is added to the Approved List regardless if the transaction meets or does not meet the parameters of the Approved List.
Start Date:
– Required Field – Field is validated – Format mm/dd/yyyy – Start Date: business date of the file load
– The transaction meets the parameters when the date is equal to or after the Start Date.
– The transaction does not meet the parameters when the date is before the Start Date.
End Date
– Format mm/dd/yyyy – End Date: business date of the file load
– The transaction meets the parameters when the date is equal to or before the End Date.
– The transaction does not meet the parameters when the date is after the End Date.
– The transaction meets the parameters when the file is blank.

ACH POSITIVE PAY USER GUIDE
Updated June, 2019
28
Add a Company to the Approved List 1: Click Setup then Approved List to open the Approved List page.
2: Click Create to open the Approved Company page.
3: Click in the Company ID box. Type the Company ID.
4: The Company Name is an optional field. Click in the Company Name box. Type the Company Name.
5: Click in the Max Amount box. Type the Maximum Dollar Amount. If left blank any amount is acceptable.
6: Frequency is an optional field. Leave the default select to not apply the Frequency.
7: Use the frequency dropdown arrow to select DAILY, WEEKLY, BIWEEKLY, MONTHLY, QUARTERLY, or YEARLY.
8: Click in the Start Date box to open the calendar. Select the date.
9: End Date is an optional field. Click in the End Date box to open the calendar. Select the date.
10: Select the Account(s) and use the arrows in the middle to move the Account(s) to the right.
11: Click Save. – Success Message: Approved Company Saved Successfully.

ACH POSITIVE PAY USER GUIDE
Updated June, 2019
29
Edit a Company on the Approved List 1: Click Setup then Approved List to open the Approved List page.
2: Locate the Company. Click Edit in the Edit Column to open the Approved Company page.
3: Edit the fields and Accounts as needed.
4: Click Save.
– Success Message: Approved Company Saved Successfully.
Delete a Company from the Approved List for All Accounts 1: Click Setup then Approved List to open the Approved List page.
2: Locate the Company. Check the box in the Delete Column. You may select more than
one Company to delete.
3: Click Delete.
4: Success Message: Approved Companies Deleted Successfully

ACH POSITIVE PAY USER GUIDE
Updated June, 2019
30
Reports
Click the drop down arrow next to Reports in the menu bar to make report selection.
Approved List Reports 1: Click Reports then Approved List to open the Approved List Report; drop down menu allows
user to search approved list entries by account number. 2: Select the account number from the drop down menu. 3: Click Search.
All approved list entries will appear for the account number selected. Click View under the Action column to view details of the company setup.
Notification Rules Report 1: Click Reports then Notification Rules Report to open the Notification Rules Report page.

ACH POSITIVE PAY USER GUIDE
Updated June, 2019
31
2: The Notification Rules Report displays by the full Account Number. The following chart provides description of each field in the report.

ACH POSITIVE PAY USER GUIDE
Updated June, 2019
32
Transaction History
Transaction Status
TRANSACTION STATUS FOR ACCOUNTS SET TO PAY ALL
– Transaction loads with status Pay – System if Company ID does not meet Approved List parameters.
– Transaction loads with status Approved List Pay if Company ID does meet Approved List parameters.
– Client User may change transaction status Pay - System to return the transaction which will change the status to Return - User. This action must be performed within the Return Deadline Rules.
– Client User may change transaction status Approved List Pay to return the transactions which will change the status to Return - User. This action must be performed within the Return Deadline Rules.
– Client User may change transaction status Return – User to pay the transaction which will change the status to Pay – User. This action must be performed before the end of day. Transactions with status Return – User after end of day cannot be changed to pay.
– Client User may change transaction status Pay – User to return the transaction which will change the status to Return – User. This action must be performed within the Return Deadline Rules.
TRANSACTION STATUS FOR ACCOUNTS SET TO RETURN ALL
– Transaction loads with status Return – System if Company ID does not meet Approved List parameters.
– Transaction loads with status Approved List Pay if Company ID does meet Approved List parameters.
– Client User may change transaction status Return – System to pay the transaction which will change the status to Pay – User. This action must be performed before the end of day. Transactions with status Return – System after end of day cannot be changed to pay.
– Client User may change transaction status Approved List Pay to return the transaction which will change the status to Return – User. This action must be performed within the Return Deadline Rules.
– Client User may change transaction status Return – User to pay the transaction which will change the status to Pay – User. This action must be performed before the end of day. Transactions with status Return – User after end of day cannot be changed to pay.
– Client User may change transaction status Pay – User to return the transaction which will change the status to Return – User. This action must be performed within the Return Deadline Rules.

ACH POSITIVE PAY USER GUIDE
Updated June, 2019
33
Debit Transaction History 1: Click Transaction History to open the Debit Transaction History page. Transactions display
based on the date shown below the Date Range. 2: Click Pay or Return under the Manage Column to change status of the transaction.
STATUS CHANGE STATUS
Pay – System Return – User
Pay – User Return – User
Approved List Pay Return – User
Return – System Pay – User
Return – User Pay – User
Pay – FI Return – User
Return – FI Pay – User

ACH POSITIVE PAY USER GUIDE
Updated June, 2019
34
3: Click on the “>” sign next to the transaction to see detailed information about the selected transaction. You can also add the company to the Approved List
4: Click on Filters to customize your search options on the Transaction history screen. Multiple fields are available to customize your search. Enter data in desired field click Apply. Click Reset to clear filter.
– Minimum Amount: Type the Minimum Dollar Amount. – Maximum Amount: Type the Maximum Dollar Amount. – Companies: Type the Company Name. – Transaction Status:
– Pay – System: File Load Status of Transaction from Account set to Pay All.
– Pay – User: Client User Change Status from Return – System or Return User.
– Approved List Pay: File Load Status of Transaction from Account set to Return All or from Account set to Pay All and the Transaction met the parameters of the Company on Approved List.
– Pay-FI: FI User changes status from Return-System or Return User – Return – System: File Load Status of Transaction from Account set to
Return All – Return – User: Client User change Status from Pay – System or Pay –
User or Approved List Pay – Return-FI: FI User change status from Pay-System or Pay-User or
Approved List Pay – Account Number: Type an account name or last 4 digits of the number. – Date Range: Select Date Range to search for transactions on a specific Date or
Date Range.

ACH POSITIVE PAY USER GUIDE
Updated June, 2019
35
Transaction History: Add to Approved List
Trusted Trading Partners that you have authorized for ACH Debit payment may be added to the Approved List.
ALERT
If the Account Notification Condition is “Notify only when an ACH Debit is created by a Company not found in the Approved Company List.”:
– You will receive an ALERT for transactions that do not meet the parameters of a Company on the Approved List.
– You will not receive an ALERT for transactions that meet the parameters of a Company on the Approved List.
Review the Notification Conditions in Section 3.1 if the Account Notification Condition is not “Notify only when an ACH Debit is created by a Company not found in the Approved Company List.”
TRANSACTION STATUS
Account set to Pay All:
– The file load status is Pay – System for transactions that do not meet the parameters of a Company on the Approved List.
– The file load status is Approved List Pay for transactions that do meet the parameters of a Company on the Approved List.
Account set to Return All:
– The file load status is Return – System for transactions that do not meet the parameters of a Company on the Approved List.
– The file load status is Approved List Pay for transactions that do meet the parameters of a Company on the Approved List.
1: The user can add a company to the Approved List when choosing to Pay a transaction when selecting the Pay button under the manage column
2: Click Add to Approved List to open the Add Company to Approved List Window.

ACH POSITIVE PAY USER GUIDE
Updated June, 2019
36
3: Click Save.
Field Description Can be Modified Company ID Populated with data in the transaction Company Name Populated with data in the transaction Max Amount Populated with amount of transactions √ Frequency Left blank √ Start Date Populated with date of transaction √ End Date Left blank √
`
Hancock Whitney Bank, Member FDIC.