Acer Aspire 5742 Hard Drive Removal - Amazon Web Services€¦ · Acer Aspire 5742 Hard Drive...
5
Acer Aspire 5742 Hard Drive Removal Replace the hard drive in your Acer Aspire 5742. Geschrieben von: Skylar MacDonald Acer Aspire 5742 Hard Drive Removal Entwurf: 2020-01-22 Anleitung Nr: 12154 - Dieses Dokument wurde am 2020-04-14 01:19:43 AM (MST) erstellt. © iFixit — CC BY-NC-SA de.iFixit.com Seite 1 von 5
Transcript of Acer Aspire 5742 Hard Drive Removal - Amazon Web Services€¦ · Acer Aspire 5742 Hard Drive...

Acer Aspire 5742 Hard Drive RemovalReplace the hard drive in your Acer Aspire 5742.
Geschrieben von: Skylar MacDonald
Acer Aspire 5742 Hard Drive Removal Entwurf: 2020-01-22Anleitung Nr: 12154 -
Dieses Dokument wurde am 2020-04-14 01:19:43 AM (MST) erstellt.
© iFixit — CC BY-NC-SA de.iFixit.com Seite 1 von 5

EINLEITUNG
Removal of the hard drive is easy, but just be careful not to knock, jerk or drop it in the process asit's a delicate electromechanical device.
WERKZEUGE:Phillips #00 Screwdriver (1)Spudger (1)
TEILE:1 TB SSD / Upgrade Bundle (1)250 GB SSD / Upgrade Bundle (1)500 GB SSD / Upgrade Bundle (1)2 TB SSD / Upgrade Bundle (1)
Acer Aspire 5742 Hard Drive Removal Entwurf: 2020-01-22Anleitung Nr: 12154 -
Dieses Dokument wurde am 2020-04-14 01:19:43 AM (MST) erstellt.
© iFixit — CC BY-NC-SA de.iFixit.com Seite 2 von 5

Schritt 1 — Battery
Move the battery catch to the "unlocked" position.
Pull back the second spring-loaded battery catch until the battery pops up.
Remove the battery.
Schritt 2 — Cover Panel
Turn the notebook around to face you.
There are two Phillips #00 screws securing the cover panel to the rest of the notebook. Removethese screws.
Acer Aspire 5742 Hard Drive Removal Entwurf: 2020-01-22Anleitung Nr: 12154 -
Dieses Dokument wurde am 2020-04-14 01:19:43 AM (MST) erstellt.
© iFixit — CC BY-NC-SA de.iFixit.com Seite 3 von 5
To reassemble your device, follow these instructions in reverse order.
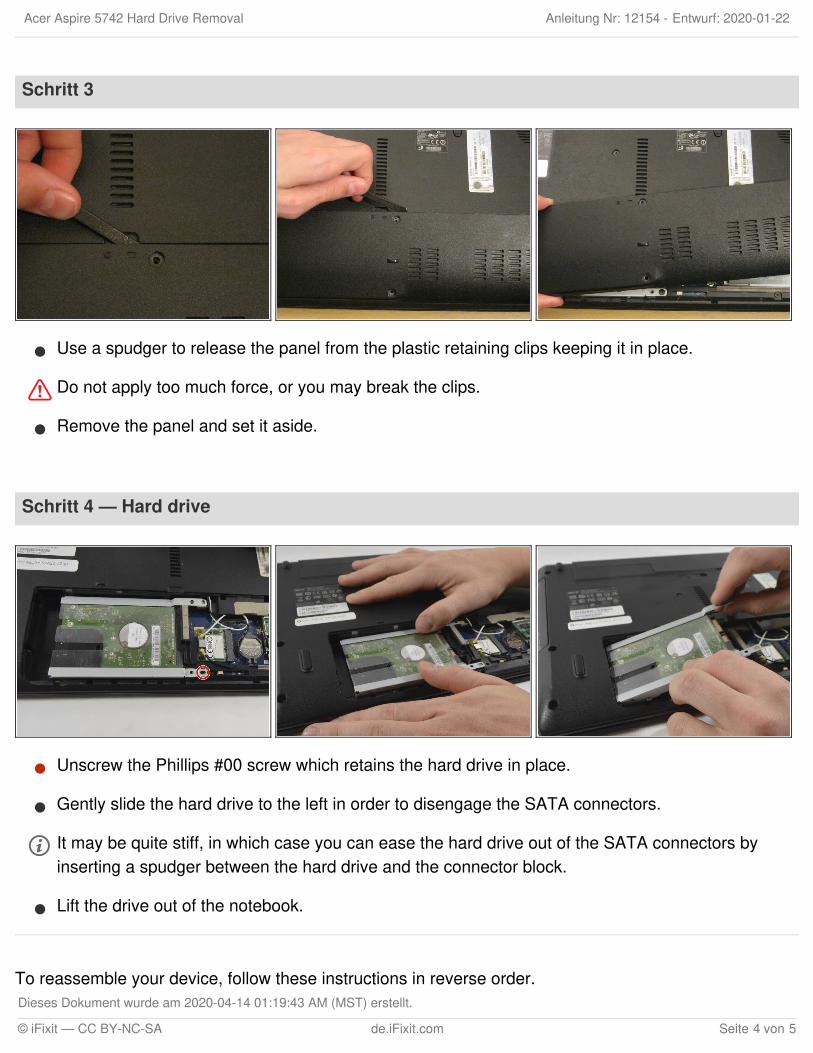
Schritt 3
Use a spudger to release the panel from the plastic retaining clips keeping it in place.
Do not apply too much force, or you may break the clips.
Remove the panel and set it aside.
Schritt 4 — Hard drive
Unscrew the Phillips #00 screw which retains the hard drive in place.
Gently slide the hard drive to the left in order to disengage the SATA connectors.
It may be quite stiff, in which case you can ease the hard drive out of the SATA connectors byinserting a spudger between the hard drive and the connector block.
Lift the drive out of the notebook.
Acer Aspire 5742 Hard Drive Removal Entwurf: 2020-01-22Anleitung Nr: 12154 -
Dieses Dokument wurde am 2020-04-14 01:19:43 AM (MST) erstellt.
© iFixit — CC BY-NC-SA de.iFixit.com Seite 4 von 5

Acer Aspire 5742 Hard Drive Removal Entwurf: 2020-01-22Anleitung Nr: 12154 -
Dieses Dokument wurde am 2020-04-14 01:19:43 AM (MST) erstellt.
© iFixit — CC BY-NC-SA de.iFixit.com Seite 5 von 5
![Acer Aspire 5930G[1]](https://static.fdocuments.us/doc/165x107/54800cfcb37959892b8b5ad6/acer-aspire-5930g1.jpg)