Accounts Payable / Purchase Order Process · PDF fileAccounts Payable / Purchase Order Process...
17
Revised 2/24/06 Accounts Payable / Purchase Order Process Overview Reference Manual 1. Proxy Approving 2. Receipt Exceptions 3. Processing Receipts 4. Receipt Batch Errors 5. PO Invoice Processing 5.1 Printing Purchase Orders 5.2 Entering PO Invoices 5.3 Multiple Receipts for one PO 5.4 Receipt / Invoice Amount Differences 5.5 No Receipt Process 6. Incorrect PO Vendor Process 6.1 Returning a Receipt 6.2 Duplicating a PO with a New Vendor
Transcript of Accounts Payable / Purchase Order Process · PDF fileAccounts Payable / Purchase Order Process...

Revised 2/24/06
Accounts Payable / Purchase Order Process Overview
Reference Manual
1. Proxy Approving 2. Receipt Exceptions 3. Processing Receipts 4. Receipt Batch Errors 5. PO Invoice Processing 5.1 Printing Purchase Orders 5.2 Entering PO Invoices 5.3 Multiple Receipts for one PO 5.4 Receipt / Invoice Amount Differences 5.5 No Receipt Process 6. Incorrect PO Vendor Process 6.1 Returning a Receipt 6.2 Duplicating a PO with a New Vendor
Revised 2/24/06
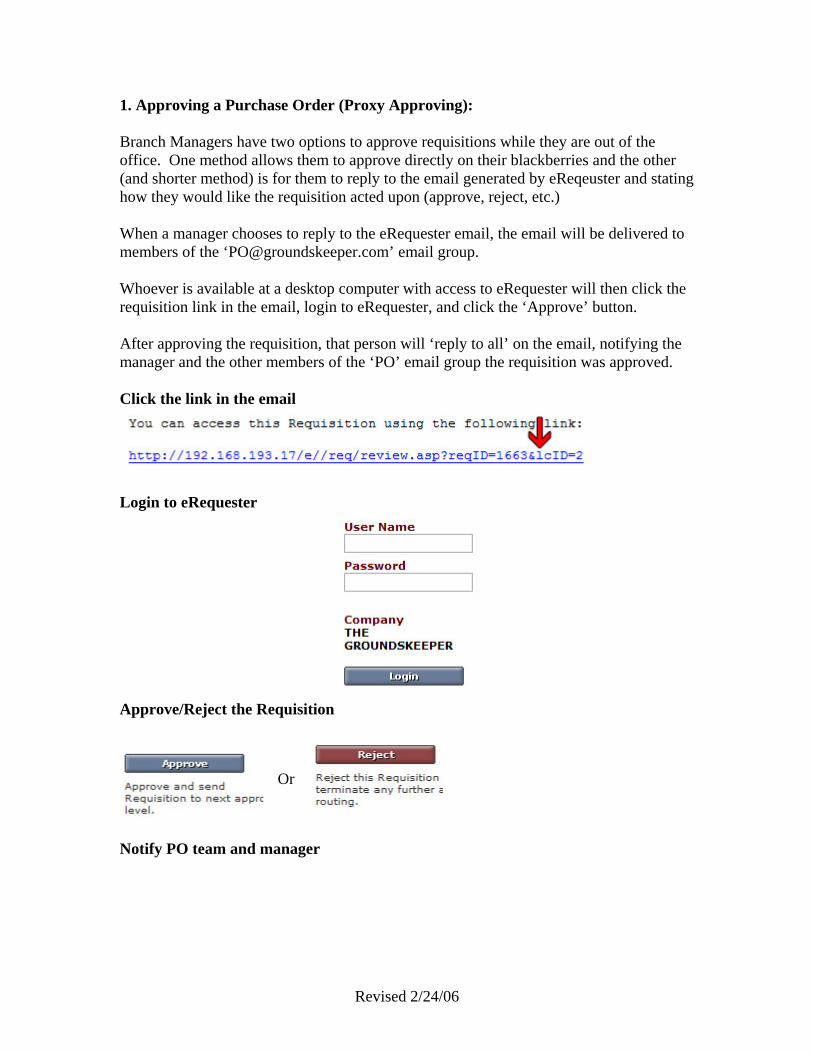
1. Approving a Purchase Order (Proxy Approving): Branch Managers have two options to approve requisitions while they are out of the office. One method allows them to approve directly on their blackberries and the other (and shorter method) is for them to reply to the email generated by eReqeuster and stating how they would like the requisition acted upon (approve, reject, etc.) When a manager chooses to reply to the eRequester email, the email will be delivered to members of the ‘[email protected]’ email group. Whoever is available at a desktop computer with access to eRequester will then click the requisition link in the email, login to eRequester, and click the ‘Approve’ button. After approving the requisition, that person will ‘reply to all’ on the email, notifying the manager and the other members of the ‘PO’ email group the requisition was approved. Click the link in the email
Login to eRequester
Approve/Reject the Requisition
Or
Notify PO team and manager
Revised 2/24/06
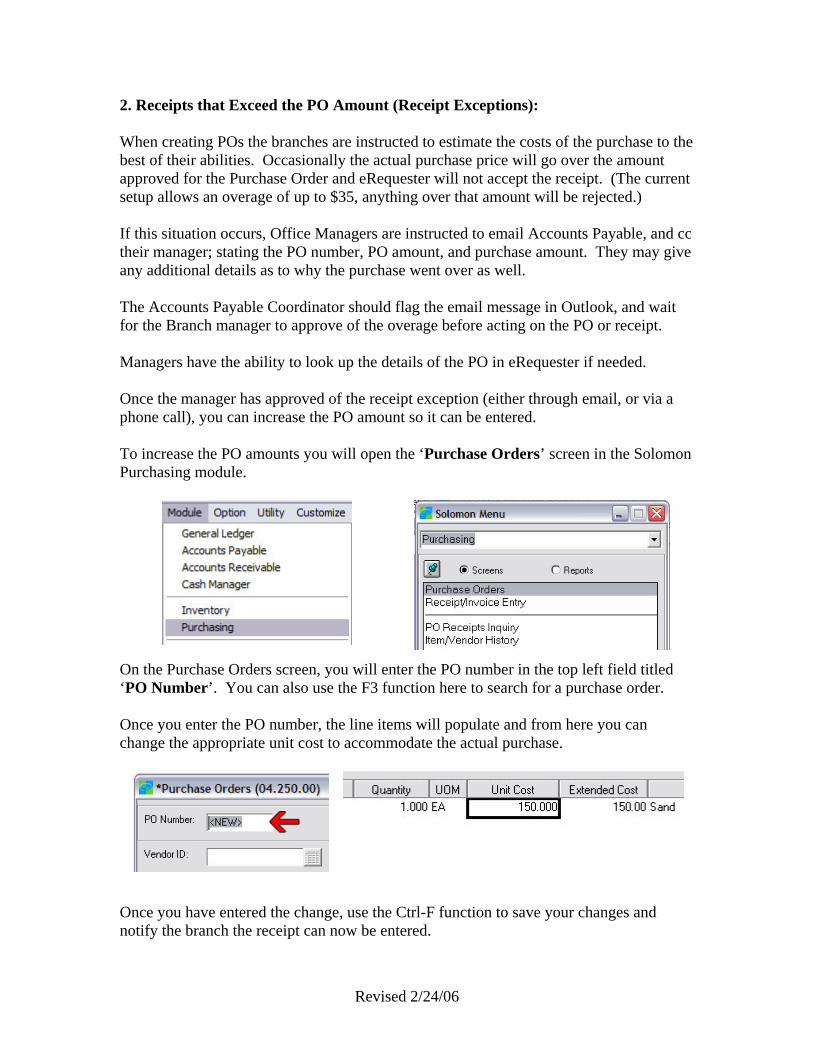
2. Receipts that Exceed the PO Amount (Receipt Exceptions): When creating POs the branches are instructed to estimate the costs of the purchase to the best of their abilities. Occasionally the actual purchase price will go over the amount approved for the Purchase Order and eRequester will not accept the receipt. (The current setup allows an overage of up to $35, anything over that amount will be rejected.) If this situation occurs, Office Managers are instructed to email Accounts Payable, and cc their manager; stating the PO number, PO amount, and purchase amount. They may give any additional details as to why the purchase went over as well. The Accounts Payable Coordinator should flag the email message in Outlook, and wait for the Branch manager to approve of the overage before acting on the PO or receipt. Managers have the ability to look up the details of the PO in eRequester if needed. Once the manager has approved of the receipt exception (either through email, or via a phone call), you can increase the PO amount so it can be entered. To increase the PO amounts you will open the ‘Purchase Orders’ screen in the Solomon Purchasing module.
On the Purchase Orders screen, you will enter the PO number in the top left field titled ‘PO Number’. You can also use the F3 function here to search for a purchase order. Once you enter the PO number, the line items will populate and from here you can change the appropriate unit cost to accommodate the actual purchase.
Once you have entered the change, use the Ctrl-F function to save your changes and notify the branch the receipt can now be entered.

Revised 2/24/06
3. Processing PO Receipts PO Receipts should be released at the end of each day in order to give the most accurate account of costs for that period. Special care should be taken around month end close to ensure the receipts are falling into the correct period. Releasing PO Receipt Batches (Daily Process) As the branches enter their own receipts for their POs in eRequester, the program will create PO receipt batches in Solomon and put them on hold. This means that every day these batches should be released in Solomon. To release these batches, open the ‘Purchasing’ module in Solomon and select the ‘Receipt/Invoice Entry’ screen.
On the Receipt/Invoice Entry screen you will pull up the list of Receipt Batches by putting your cursor in the uppermost left-hand field titled ‘Batch Number’ and hitting the F3 button. Batches on hold are indicated by an ‘H’ in the status column.
Revised 2/24/06
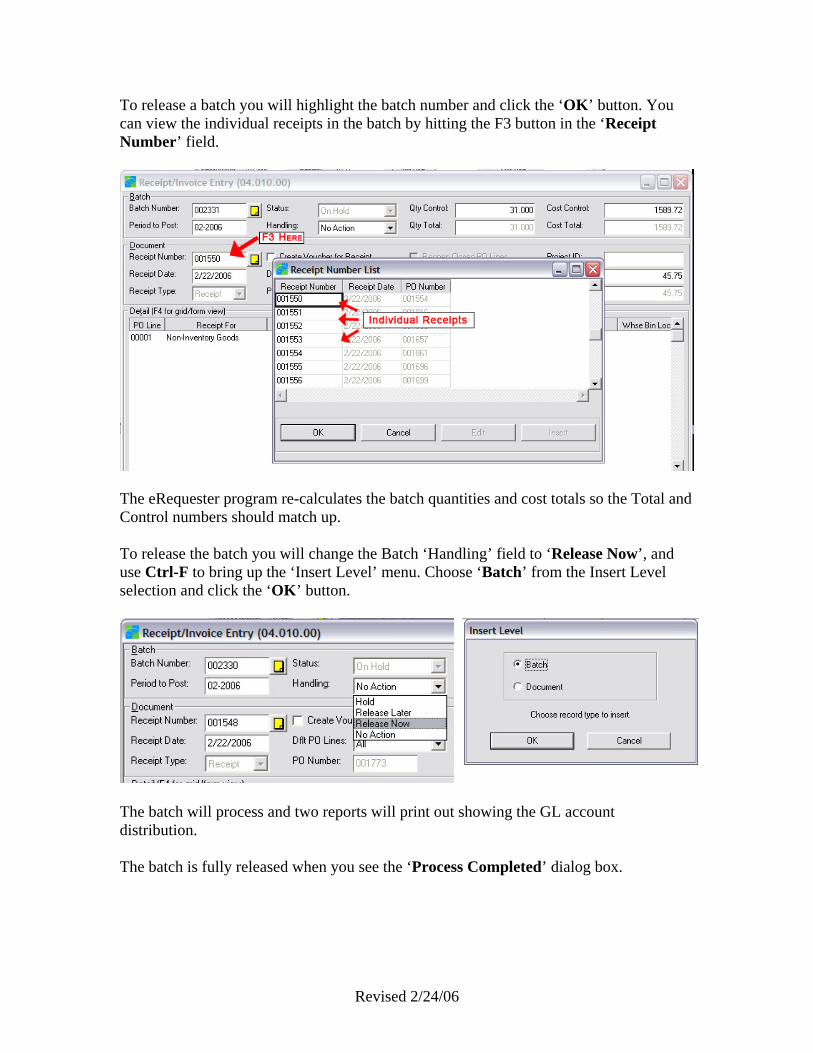
To release a batch you will highlight the batch number and click the ‘OK’ button. You can view the individual receipts in the batch by hitting the F3 button in the ‘Receipt Number’ field.
The eRequester program re-calculates the batch quantities and cost totals so the Total and Control numbers should match up. To release the batch you will change the Batch ‘Handling’ field to ‘Release Now’, and use Ctrl-F to bring up the ‘Insert Level’ menu. Choose ‘Batch’ from the Insert Level selection and click the ‘OK’ button.
The batch will process and two reports will print out showing the GL account distribution. The batch is fully released when you see the ‘Process Completed’ dialog box.

Revised 2/24/06
4. PO Receipt Batch Errors Occasionally you will receive an error message when releasing a receipt batch (see example below). Most of the time this is due to total document costs including a remainder dollar amount for the total (ex: a quantity of 2 and a price of $1.998 ea. the total will be 3.996 rather than 3.99 or $4.00 even).
This situation occasionally arises, but is easily solved. To correct the batch you will go back to the ‘Receipt/Invoice Entry’ screen and open the batch list. If a batch has an error during its release, the status will be changed to an ‘S’ which indicates its release was suspended.
Select the suspended batch from the batch list and open it. Upon opening a document, you will notice the batch handling field (among others) is grayed out, this is because the document had no errors and were released (or in the process of releasing). Solomon will start at the top of the document list releasing each document until it runs into an error. To locate which document is holding up the release, hit F3 in the document number field and open a document halfway down the document list.
Revised 2/24/06
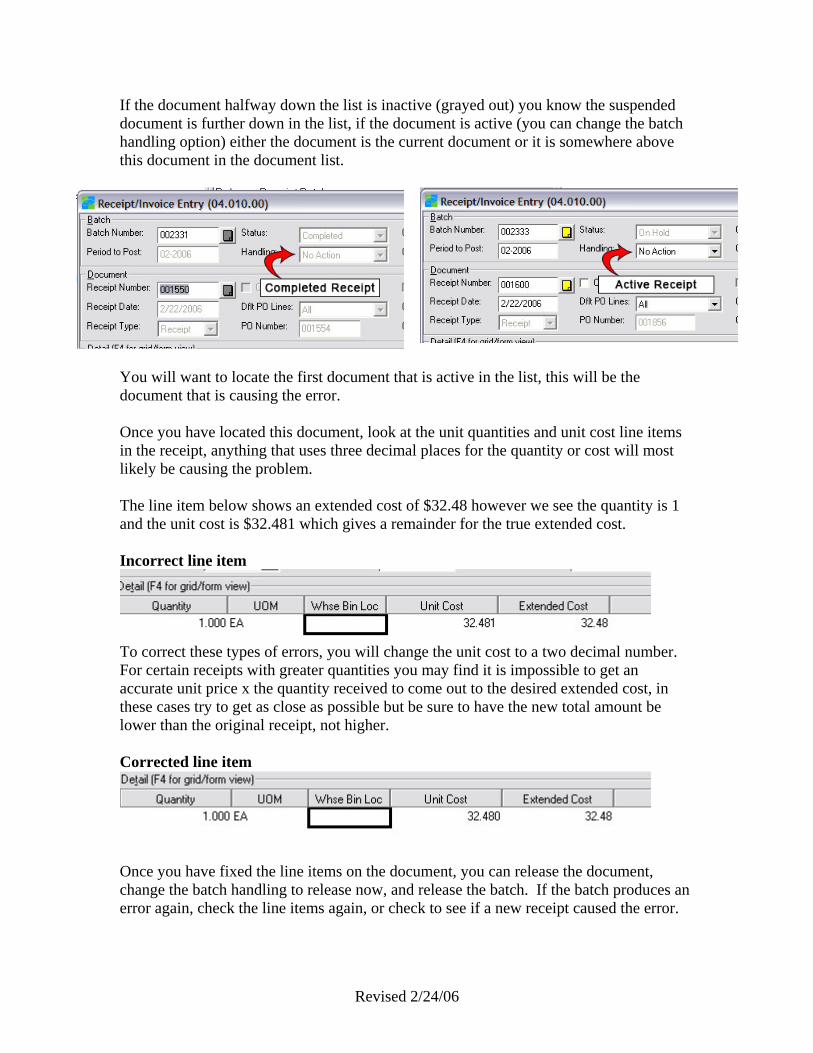
If the document halfway down the list is inactive (grayed out) you know the suspended document is further down in the list, if the document is active (you can change the batch handling option) either the document is the current document or it is somewhere above this document in the document list.
You will want to locate the first document that is active in the list, this will be the document that is causing the error. Once you have located this document, look at the unit quantities and unit cost line items in the receipt, anything that uses three decimal places for the quantity or cost will most likely be causing the problem. The line item below shows an extended cost of $32.48 however we see the quantity is 1 and the unit cost is $32.481 which gives a remainder for the true extended cost. Incorrect line item
To correct these types of errors, you will change the unit cost to a two decimal number. For certain receipts with greater quantities you may find it is impossible to get an accurate unit price x the quantity received to come out to the desired extended cost, in these cases try to get as close as possible but be sure to have the new total amount be lower than the original receipt, not higher. Corrected line item
Once you have fixed the line items on the document, you can release the document, change the batch handling to release now, and release the batch. If the batch produces an error again, check the line items again, or check to see if a new receipt caused the error.

Revised 2/24/06
5. Processing PO Invoices Each branch location will create their own POs however the information on these purchases will immediately be available to management and accounting. Once the purchase has been made, the Office Manager at the branch location will receive the paper receipt, and enter the information into the system referencing the PO number assigned to the purchase. The office manager will send down the paper receipts with the Purchase Order attached on a regular basis (at least weekly). Vendors will be instructed to send all invoices directly to the corporate PO box, attn: Accounts Payable. When invoices are received from vendors, the Accounts Payable coordinator should check to see if there are any corresponding paper receipts to match with the invoice. If there are corresponding paper receipts, they will be attached to the back of the invoice and entered according to the following process. If there are not any corresponding receipts or packing slips for the invoice, the AP coordinator will print out the purchase order in eRequester, attach it to the back of the invoice and enter it using the following process. 5.1 Printing Purchase Orders in eRequester To print a Purchase order using eRequester you will first have to login to the system by going to the following address using your internet explorer browser: http://hebe/e Login using your supplied username and password and you will be taken to the main screen where you will see ‘Search’ as one of the options in the uppermost left hand side of the screen.
Click on ‘Search’ and you will be taken to the search page where you will be able to search for the PO using the number. For tips on searching by other criteria, see the eRequester Help Document section 4.1.

Revised 2/24/06
Check the ‘ID’ box under ‘Advanced Criteria’ on the search page, and choose the option for ‘PO ID’. In the box next to PO ID, you will enter the PO number, remember a valid PO number is six digits long with leading zeros (ex: 000001,000123,001234). Once you have entered the number, click the ‘Search’ button above the PO ID field. The page will reload and you will see the Requisition information appear to the right. To print the PO, click once on the requisition line to highlight it, and right click on it to get an option menu. Select ‘View PO’ from the option menu, and a new window will open displaying the Purchase Order.
To print the PO, you can either click on the ‘Print’ link on the uppermost right hand side of the page, or go to ‘File > Print’ and you will bring up the regular print dialog box.

Revised 2/24/06
5.2 Entering PO Invoices in Solomon In order to process payment timely and take advantage of any discounts that may be available, invoices should be entered as often as possible. To enter invoices referencing a valid Purchase Order, you will login to Solomon, open the ‘Accounts Payable’ Module, and click on the ‘Voucher/Adjustment Entry’ screen.
On the Voucher and Adjustment Entry Screen, you will first need to input the vendor the invoice is for into the ‘Vendor ID’ field. If you do not know the Vendor ID number for the vendor, you may hit the F3 key to bring up the Solomon vendor list and select it from there. You may use the Tab key to jump to from field to field on the entry screen. Once you have the vendor Id input, you will next input the PO number into the ‘PO Nbr’ field. You may also use the F3 key to search for available POs for the selected vendor. Once you have entered a PO number for the vendor, Solomon will pull up a list of available receipts for that PO. These receipts are what has been entered at the branches in eRequester, and released in Solomon. In most cases there will be one receipt in the list, in these cases check the box next to the receipt, and click the ‘OK’ button. (See below for no receipt (section 5.5), multiple receipt (section 5.3), or ‘PO does not exist for this vendor’ situations (section 6)).
Selecting the receipt will populate the line items below with the proper coding and dollar amounts for the receipt. (This information is pulled from the PO and the receipt).

Revised 2/24/06
Next you will enter the invoice number into the ‘Invoice Nbr’ field. Following this, you will enter the date of the invoice in the ‘Invoice Date’ field, (Solomon determines when the invoice should be paid based on the invoice date, and the payment terms setup for the vendor). The following image shows the relevant fields for input, and also the order in which they should be completed.
The last item to complete is the ‘Amount’ field; this should be the dollar amount of the invoice. If the receipts were entered correctly, the ‘Balance’ field and the invoice amount will be the same. (See section 5.4 for situations where the invoice amount and receipt ‘balance’ are different). If the invoice amount and balance are the same, you can finish the document using the Ctrl-F function, selecting document, and clicking the ‘OK’ button.
Repeat the process to enter more invoices into the same batch.

Revised 2/24/06
5.3 Multiple Receipts on one PO: Occasionally a purchase order will have more than one receipt. These can be caused by backordered items at the time of purchase, multiple shipments, etc. The easiest way to verify which receipts should be used for the invoice being entered is to look the PO up in eRequester. Login to eRequester and search for the PO using the same procedure described in ##). Highlight the PO line and right click on the item and select ‘Receive’.
The page that loads will show the dollar amount of each receipt along with the receipt number (this is under ‘Receipt History’ at the bottom of the page).
The above example shows two receipts for one PO, the actual invoice reflected the amount of $3950. We see that if we add these receipts up, they equal the invoice total, so therefore you would select both receipts to pay the invoice. If the invoice was for only $35, you would only select receipt number 001488 to pay the invoice. See section 5.4 if the receipt amounts shown do not correspond to the current invoice.
Revised 2/24/06
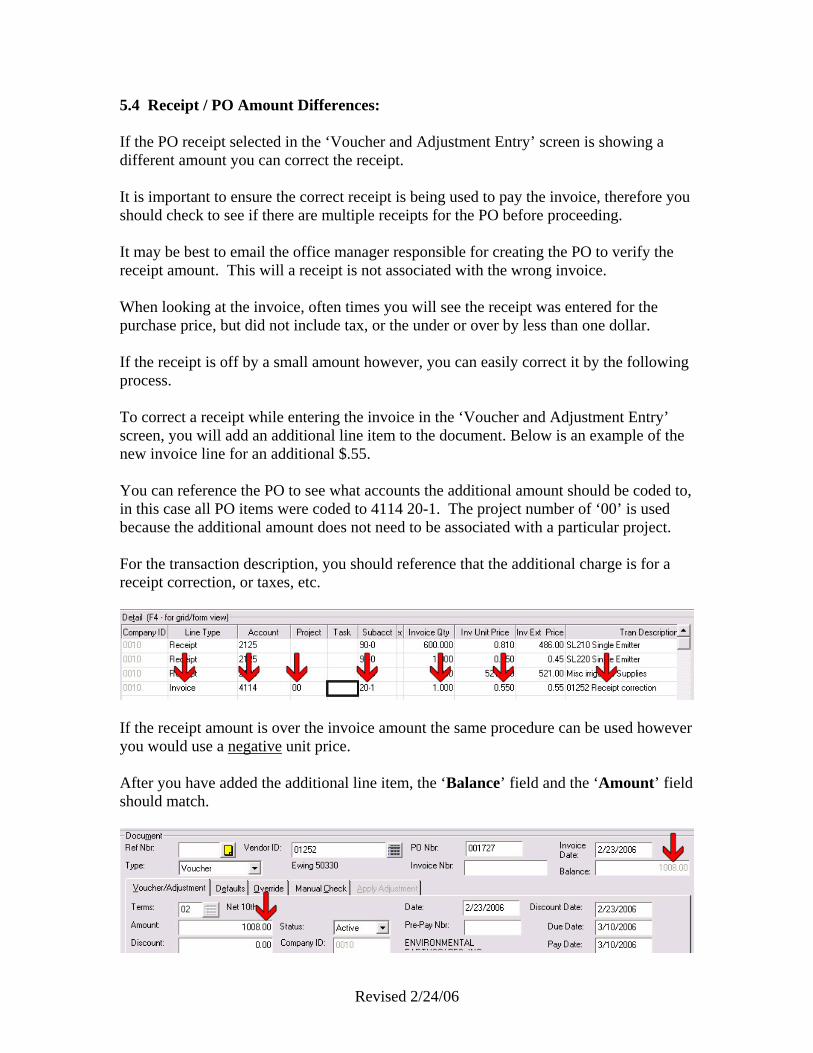
5.4 Receipt / PO Amount Differences: If the PO receipt selected in the ‘Voucher and Adjustment Entry’ screen is showing a different amount you can correct the receipt. It is important to ensure the correct receipt is being used to pay the invoice, therefore you should check to see if there are multiple receipts for the PO before proceeding. It may be best to email the office manager responsible for creating the PO to verify the receipt amount. This will a receipt is not associated with the wrong invoice. When looking at the invoice, often times you will see the receipt was entered for the purchase price, but did not include tax, or the under or over by less than one dollar. If the receipt is off by a small amount however, you can easily correct it by the following process. To correct a receipt while entering the invoice in the ‘Voucher and Adjustment Entry’ screen, you will add an additional line item to the document. Below is an example of the new invoice line for an additional $.55. You can reference the PO to see what accounts the additional amount should be coded to, in this case all PO items were coded to 4114 20-1. The project number of ‘00’ is used because the additional amount does not need to be associated with a particular project. For the transaction description, you should reference that the additional charge is for a receipt correction, or taxes, etc.
If the receipt amount is over the invoice amount the same procedure can be used however you would use a negative unit price. After you have added the additional line item, the ‘Balance’ field and the ‘Amount’ field should match.

Revised 2/24/06
5.5 No Receipts Process: Should you receive the message that there are no ‘receipts to vouch’ means either the branches have not entered any receipts for the purchase, or that the receipt has been entered but not released. In these situations you can check the receipt history in eRequester for an unreleased receipt, or email the eRequester user who created the PO, notifying them of the invoice amount, and that they need to enter a receipt for the PO. 6. Incorrect Vendor for PO: Should you receive the message stating “PO does not exist for this vendor” when entering an invoice, you should first double check to verify the vendor entered matches the invoicing vendor (verify customer/account numbers if available). Secondly you should check the PO to see if this was created for the same vendor as the invoicing vendor. Finally, check if the receipt entered for the PO matches the invoice you are entering. If it does not match, the PO number may have been recorded incorrectly, and a valid invoice may exist for this vendor, it is not recommended you process a return in these situations. If the PO was created for the wrong vendor and a receipt has been entered for the incorrect PO # matching the same amount of the invoice you have, you will have to return the receipt and create a new PO for the invoice. (See below). Unfortunately once a PO is created for a particular vendor, this vendor selection cannot be changed. 6.1 Returning a Receipt: To process a return for a receipt is done through the Solomon ‘Receipt/Invoice Entry’ screen in the Purchasing Module (accrual will be debited and GL accounts will be credited). To enter a return, open the ‘Purchasing’ module in Solomon and select the ‘Receipt/Invoice Entry’ screen.

Revised 2/24/06
Indicate the new document is a return by dropping down the ‘Receipt Type’ field and selecting ‘Return’. Next you will change the ‘Dflt PO Lines’ field to the ‘All’ option, and enter the PO number in the ‘PO Number’ field.
Once the PO is entered, the dollar amounts and line items of any receipts entered will be imported. If you are returning all receipts for the PO (in situations of an incorrect vendor selection, you will return all receipts), you will update the ‘Qty Control’ and ‘Cost Control’ fields to match the total fields below them. If you only need to return one of the line items but do not need the others, highlight one of the fields on the undesired lines and hit the Delete key, the line item will be taken out of the return. Likewise you can change the dollar amount of the line items if partial returns are needed.
Once you are done with the document, you will close it using the Ctrl-F function, and release the batch according to the above section outlining the process to release receipt batches.

Revised 2/24/06
6.2 Duplicating a PO for a different Vendor: If a PO was created for the wrong vendor, you can easily duplicate the PO and create one for the correct vendor in eRequester. Fir you will need to login to eRequester and search for the original PO (See instructions in section 5.1). Once you have located the original PO, you will right click on the PO line item and select ‘Make Requisition’. This will create a new eRequester requisition using the original PO details.
Because the original requisition was created for the wrong vendor, we will obviously want to correct this before submitting the new requisition. To change the vendors you will click the ‘[edit]’ link next to the ‘Review Items’ section title. You will be taken to a page that displays each line item of the PO, you will click the ‘edit’ link next to each item to change the vendor for that item.
If there is only one line item, you only have to do this once, if there are more than one, you will have to change the vendor for each item. When you click on the ‘edit’ button for a line item, you will be taken to the item setup page. The item setup page is the same entry page that the branches use to create the PO items. At the top of the page you will see the vendor selection.

Revised 2/24/06
Click on the Magnifying glass button next to the ‘Vendor’ field to select the correct vendor. This will pull up the vendor search, type in the name or the vendor ID of the correct vendor and click the search button. Once the results display click on the desired vendor name and it will be inserted into the vendor field. Incorrect Vendor
Corrected Vendor
Once you have selected the correct vendor for the item, you will click the ‘Submit & Review’ button. You will be taken back to the Review Items page where you will repeat the process for each line item in the requisition. When you are finished changing the vendors, you will click the ‘Continue’ button. Lastly you will need to submit the requisition and give a purchase justification on the next page. You should reference the PO number this purchase and state why it is being replaced (wrong vendor, wrong account number, etc.).
Once submitted you can turn the requisition into a PO and receive normally (See Sections 2.1 and 3.2 of the eRequester Manual). Once you have the new PO number, you should write the new PO number on the invoice, release any pending receipt batches and process the invoice normally.