Access One - Epicor · User profile ... may return to the Home Page/Dashboard view from any other...
22
Access One User Manual
Transcript of Access One - Epicor · User profile ... may return to the Home Page/Dashboard view from any other...
Access One User Manual

The contents of this document are for informational purposes only and are subject to change without notice. Epicor Software Corporation makes no guarantee, representations or warranties with regard to the enclosed information and specifically disclaims, to the full extent of the law, any applicable implied warranties, such as fitness for a particular purpose, merchantability, satisfactory quality or reasonable skill and care. This document and its contents, including the viewpoints, dates and functional content expressed herein are believed to be accurate as of its date of publication, July 2016. The usage of any Epicor software shall be pursuant to the applicable end user license agreement and the performance of any consulting services by Epicor personnel shall be pursuant to applicable standard services terms and conditions. Usage of the solution(s) described in this document with other Epicor software or third party products may require the purchase of licenses for such other products. Epicor and the Epicor logo, are trademarks of Epicor Software Corporation, registered in the United States and other countries. All other marks are owned by their respective owners. Copyright © 2016 Epicor Software Corporation. All rights reserved.

Table of Contents Introduction .......................................................................................................................................................................... 1 Log in & password maintenance .......................................................................................................................................... 2 Navigation ............................................................................................................................................................................. 4 Home page/dashboard ......................................................................................................................................................... 5
Merchant info tab .......................................................................................................................................................... 5 Reports tab ........................................................................................................................................................................... 7
Payment history ............................................................................................................................................................ 7 Batch history .................................................................................................................................................................. 8 Voids/declines ............................................................................................................................................................... 9 Transaction qualification ............................................................................................................................................... 9 Authorizations log ....................................................................................................................................................... 11 Returns ........................................................................................................................................................................ 11 Transaction Search ...................................................................................................................................................... 12 Retrievals/chargebacks ............................................................................................................................................... 13 Reports ........................................................................................................................................................................ 13 Daily/monthly transaction report .............................................................................................................................. 13
Merchant adjustment .................................................................................................................................................. 14 Statements tab ................................................................................................................................................................... 14 Admin tab ........................................................................................................................................................................... 16
Messages ..................................................................................................................................................................... 16 User maint ................................................................................................................................................................... 16 Manage users ............................................................................................................................................................. 16 User profile ................................................................................................................................................................ 18
Tax reports ................................................................................................................................................................... 18

Introduction AccessOne® is your secure, comprehensive online bankcard reporting tool. When you log into AccessOne® a Home Page/Dashboard will display as the default giving you an overview and summary of your bankcard activity. You may return to the Home Page/Dashboard view from any other window by clicking on the Epicor Payment Exchange logo in the upper left corner of the window.
At the top of the AccessOne® window you will find 3-4 tabs:
Merch Info—displays either a list of all locations that can be accessed from the current login or location specific information. This tab is displayed for the primary login but is based on user security and may not be visible for all users.
Reports—contains submenu selections for; Batch History, Payment History, Transaction Search, Retrievals & Chargebacks and other useful functions.
Statements—is the tab that provides easy access to your monthly processing statements. Admin—is your path to view important Messages, User Maintenance, and Tax Reports.
Previous day bankcard history will be updated to AccessOne® daily after 8am Central time. The current day’s activity will not be available to view until after the settlement and update takes place.
This guide describes many of the features of AccessOne®. We recommended that as you read through this guide you log in and explore it on your own.
1 July 14, 2016

Log in & password maintenance The person listed as the primary contact on the Merchant Credit Application will receive an e- mail for the initial setup of the main (primary) account. The primary account will have the exclusive ability to setup and establish other AccessOne® users within your organization.
The email, received from [email protected] is rather simple and will look similar to the one shown below.
When you click the link in the email a Reset Password screen, like the one shown on the following page, will display. You must enter information in several fields.
The User Name for the main account will be your 12 digit Merchant ID. Enter your First Name and Last Name in the fields as shown below. Skip over the Current Password field leaving the embedded dots. Enter your New Password.
- Your password must be 8-20 characters and include an alpha character, a number and a special character (!@#$% etc..).
Re-type your password in the Confirm New Password field. Enter your Email address. Choose the security Question by clicking the drop down. Finally, enter your Answer to the security question and click Submit.
2 July 14, 2016
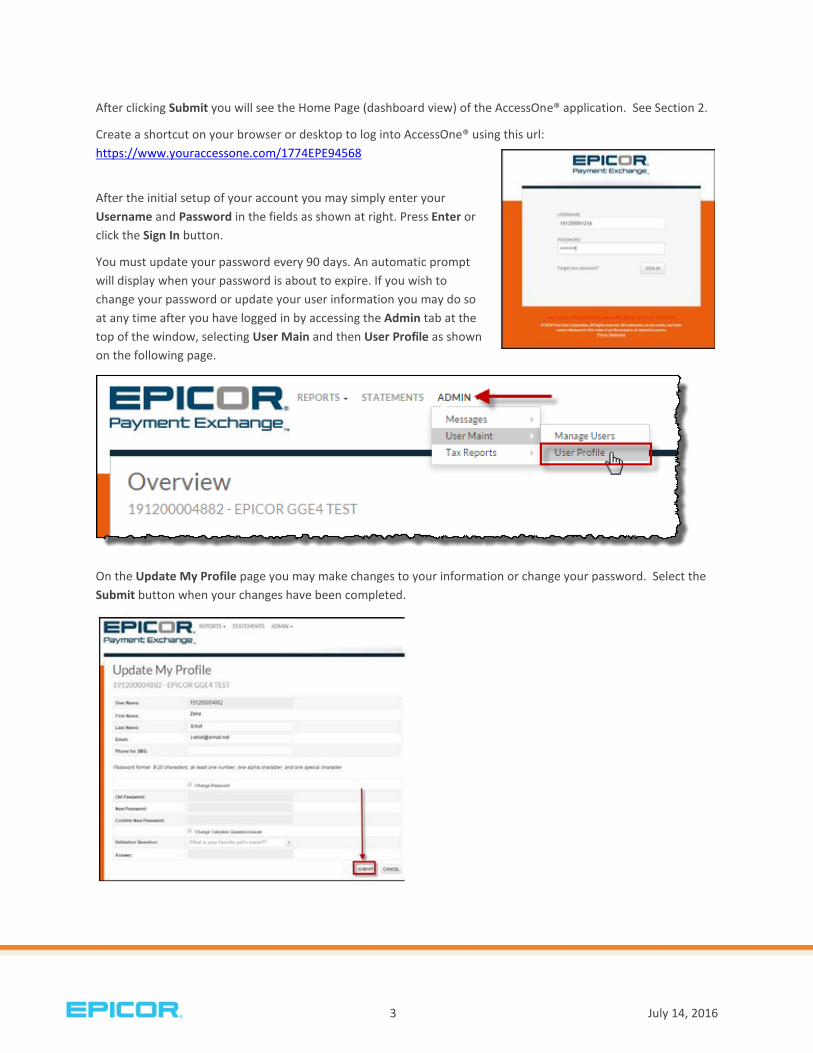
After clicking Submit you will see the Home Page (dashboard view) of the AccessOne® application. See Section 2.
Create a shortcut on your browser or desktop to log into AccessOne® using this url: https://www.youraccessone.com/1774EPE94568
After the initial setup of your account you may simply enter your Username and Password in the fields as shown at right. Press Enter or click the Sign In button.
You must update your password every 90 days. An automatic prompt will display when your password is about to expire. If you wish to change your password or update your user information you may do so at any time after you have logged in by accessing the Admin tab at the top of the window, selecting User Main and then User Profile as shown on the following page.
On the Update My Profile page you may make changes to your information or change your password. Select the Submit button when your changes have been completed.
3 July 14, 2016
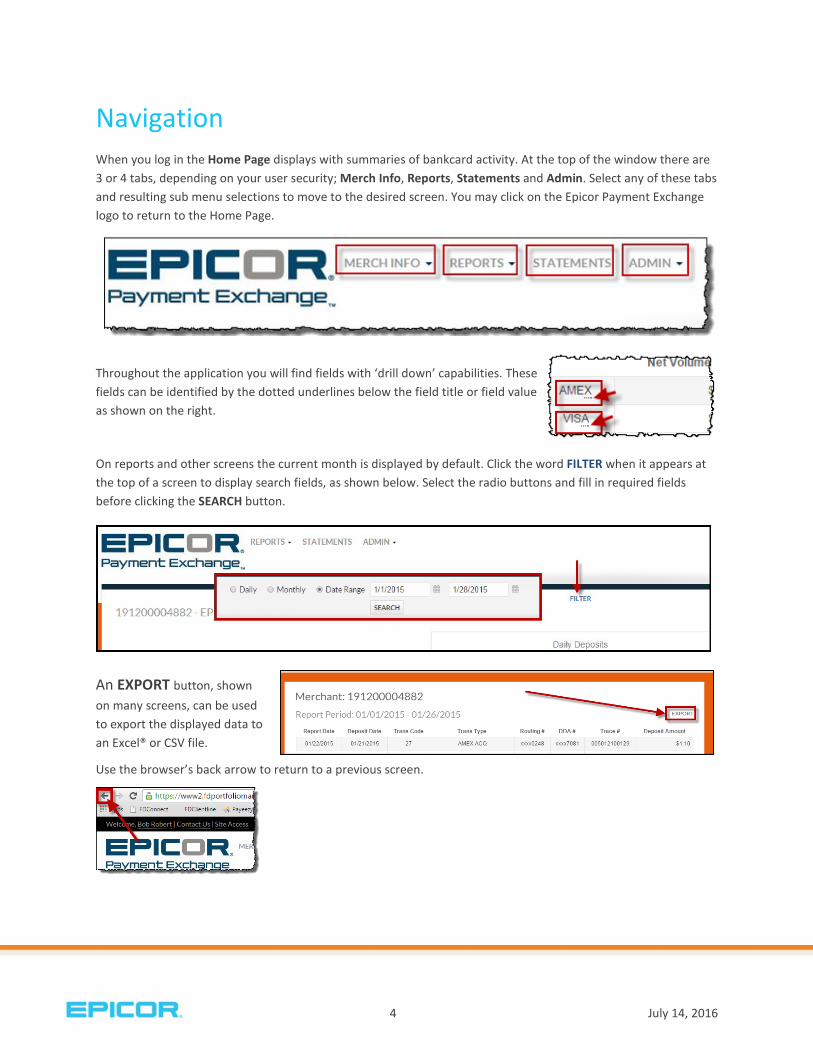
Navigation When you log in the Home Page displays with summaries of bankcard activity. At the top of the window there are 3 or 4 tabs, depending on your user security; Merch Info, Reports, Statements and Admin. Select any of these tabs and resulting sub menu selections to move to the desired screen. You may click on the Epicor Payment Exchange logo to return to the Home Page.
Throughout the application you will find fields with ‘drill down’ capabilities. These fields can be identified by the dotted underlines below the field title or field value as shown on the right.
On reports and other screens the current month is displayed by default. Click the word FILTER when it appears at the top of a screen to display search fields, as shown below. Select the radio buttons and fill in required fields before clicking the SEARCH button.
An EXPORT button, shown on many screens, can be used to export the displayed data to an Excel® or CSV file.
Use the browser’s back arrow to return to a previous screen.
4 July 14, 2016

Home page/dashboard The Home Page or reporting Dashboard provides an ‘at-a-glace’ view of your company’s bankcard activities. This window gives you a graphical view of your card activity over the past 12 months. There are also tables that include Monthly Card Volume, Card Volume and Volume Analysis and Ratio to Sales.
Notice the tabs at the top of the screen provide access to other AccessOne® features and are described in the sections that follow.
Multi-location users: The Home Page will display consolidated data for ALL locations. To view specific location details access the selections in the Reports tab as described in the following section.
Merchant info tab AccessOne® users with multiple locations (or Merchant IDs) may have the capability of accessing and viewing each location with a single login. The “Chain” Merchant # is used as the master login providing access to each location. To see a list of all locations select the MERCH INFO tab and click on the Merchant Information selection.
5 July 14, 2016
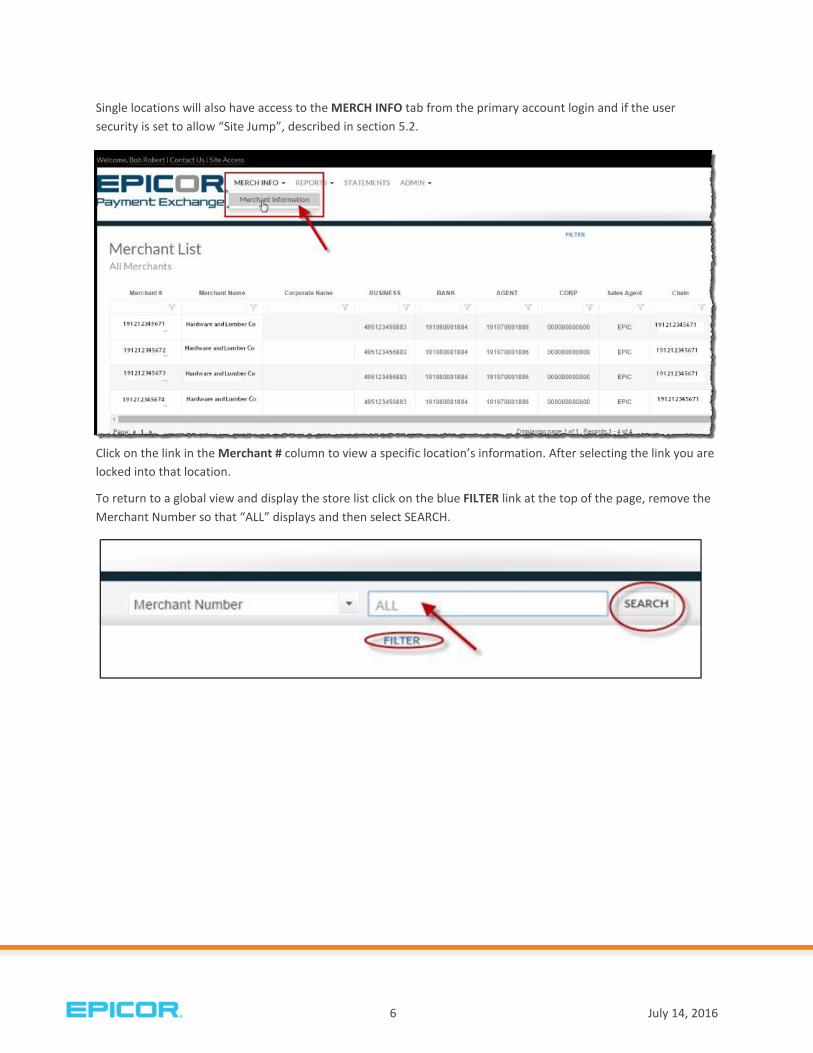
Single locations will also have access to the MERCH INFO tab from the primary account login and if the user security is set to allow “Site Jump”, described in section 5.2.
Click on the link in the Merchant # column to view a specific location’s information. After selecting the link you are locked into that location.
To return to a global view and display the store list click on the blue FILTER link at the top of the page, remove the Merchant Number so that “ALL” displays and then select SEARCH.
6 July 14, 2016
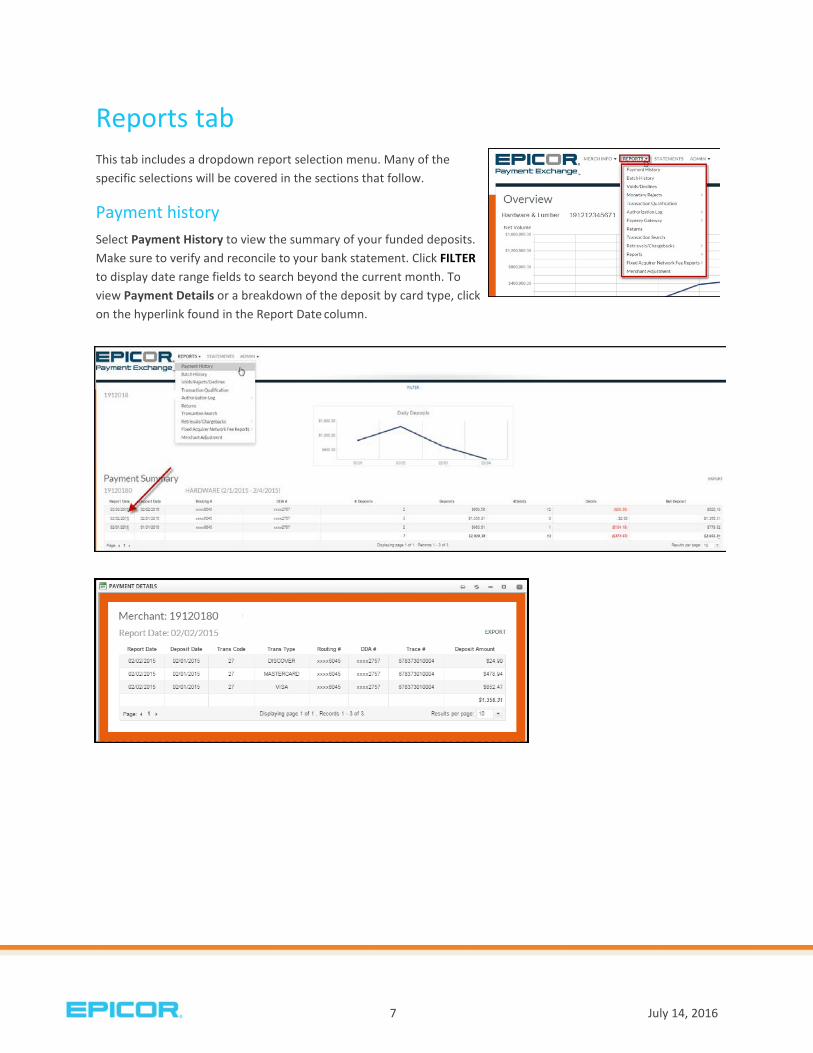
Reports tab This tab includes a dropdown report selection menu. Many of the specific selections will be covered in the sections that follow.
Payment history Select Payment History to view the summary of your funded deposits. Make sure to verify and reconcile to your bank statement. Click FILTER to display date range fields to search beyond the current month. To view Payment Details or a breakdown of the deposit by card type, click on the hyperlink found in the Report Date column.
7 July 14, 2016

Batch history Settled batches are found under the Batch History selection. Click on the link in the Batch # column to drill down to the Batch Details.
The Batch Details window displays each card or transaction that makes up the batch.
8 July 14, 2016

Voids/declines This selection does not currently display information. Declines will be reported in the Authorization Log, described below.
Transaction qualification The Transaction Qualification reports provide an estimate of your clearing expense by transaction. Debit transactions are not calculated on this report but expenses will show on the end of month statement. Select CREATE NEW REPORT to begin.
The Create New Transaction Qualification Report window contains a number of filters and selections. Choose the date or date range and select the All Merchants check box if you wish to include all merchant IDs. Click on the Edit link to select specific merchant IDs to be included.
You may select other Report Filters if you wish, but selection of any report filter is not required. Make sure to assign a Report Name before selecting the RUN REPORT button.
When your report is ready the Status column will indicate “Completed”. Click the View Report link to retrieve the results.
9 July 14, 2016
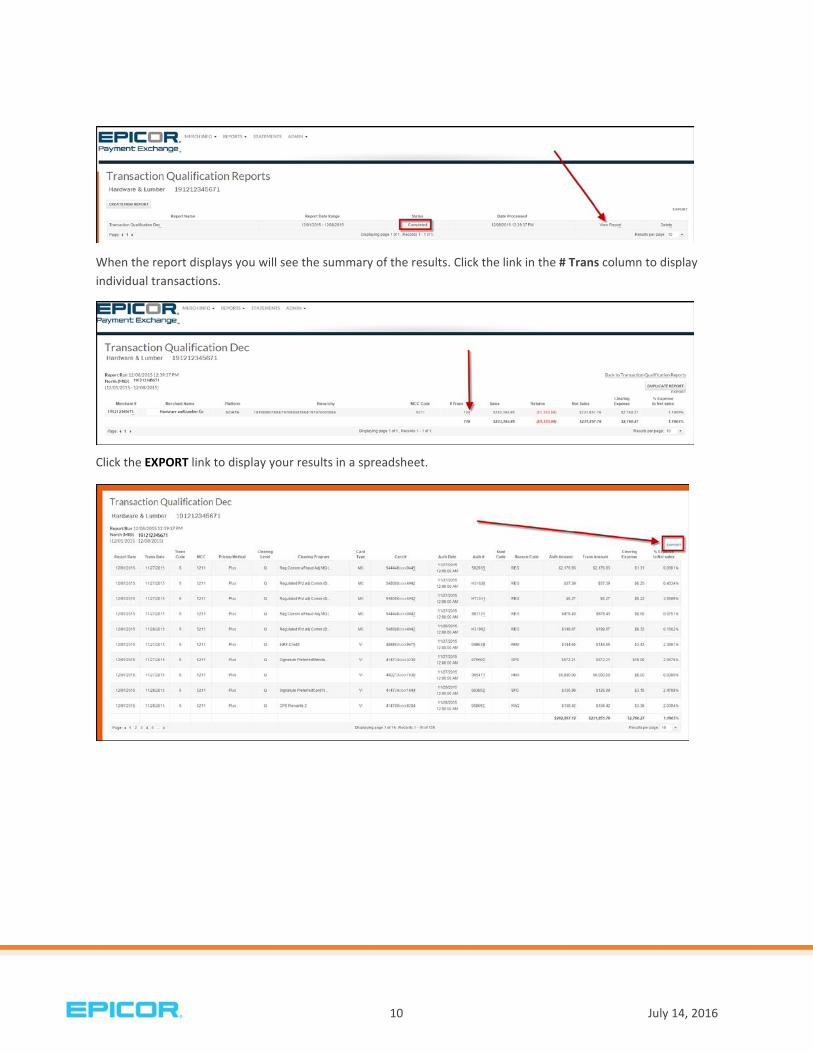
When the report displays you will see the summary of the results. Click the link in the # Trans column to display individual transactions.
Click the EXPORT link to display your results in a spreadsheet.
10 July 14, 2016
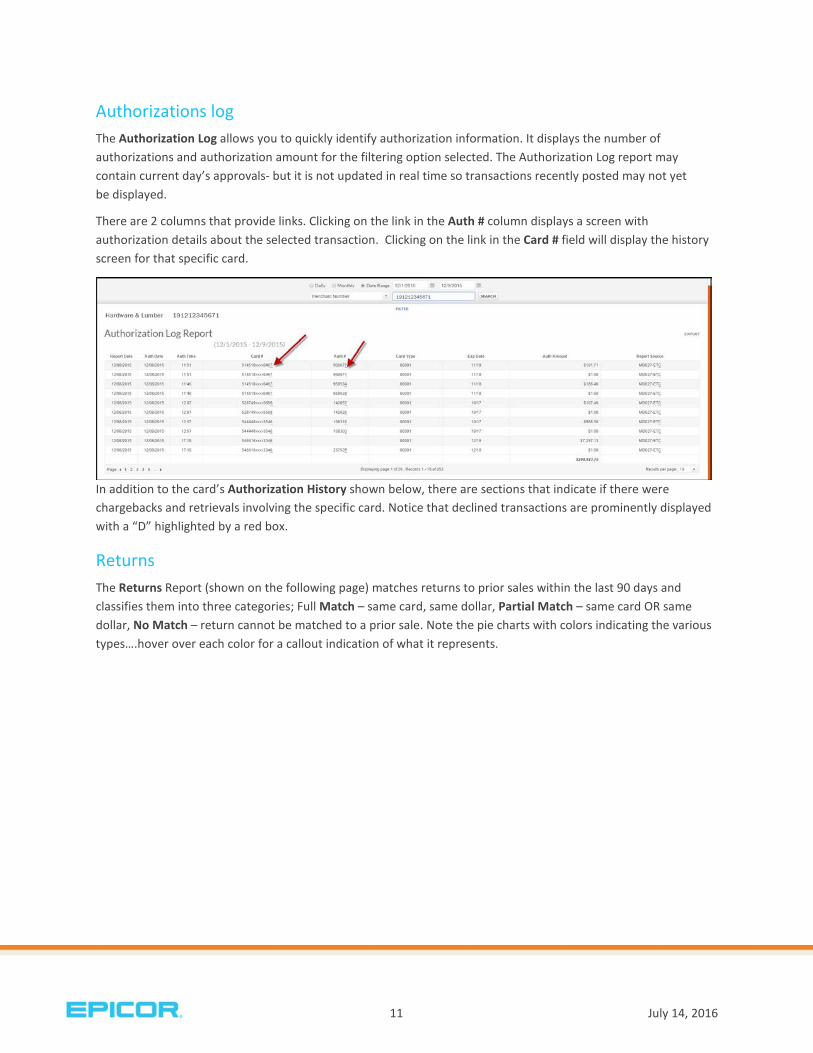
Authorizations log The Authorization Log allows you to quickly identify authorization information. It displays the number of authorizations and authorization amount for the filtering option selected. The Authorization Log report may contain current day’s approvals- but it is not updated in real time so transactions recently posted may not yet be displayed.
There are 2 columns that provide links. Clicking on the link in the Auth # column displays a screen with authorization details about the selected transaction. Clicking on the link in the Card # field will display the history screen for that specific card.
In addition to the card’s Authorization History shown below, there are sections that indicate if there were chargebacks and retrievals involving the specific card. Notice that declined transactions are prominently displayed with a “D” highlighted by a red box.
Returns The Returns Report (shown on the following page) matches returns to prior sales within the last 90 days and classifies them into three categories; Full Match – same card, same dollar, Partial Match – same card OR same dollar, No Match – return cannot be matched to a prior sale. Note the pie charts with colors indicating the various types….hover over each color for a callout indication of what it represents.
11 July 14, 2016

Transaction Search The Transaction Search allows a card search to be completed for a specific credit card number processed within the last 18 months based on filtering options selected.
12 July 14, 2016
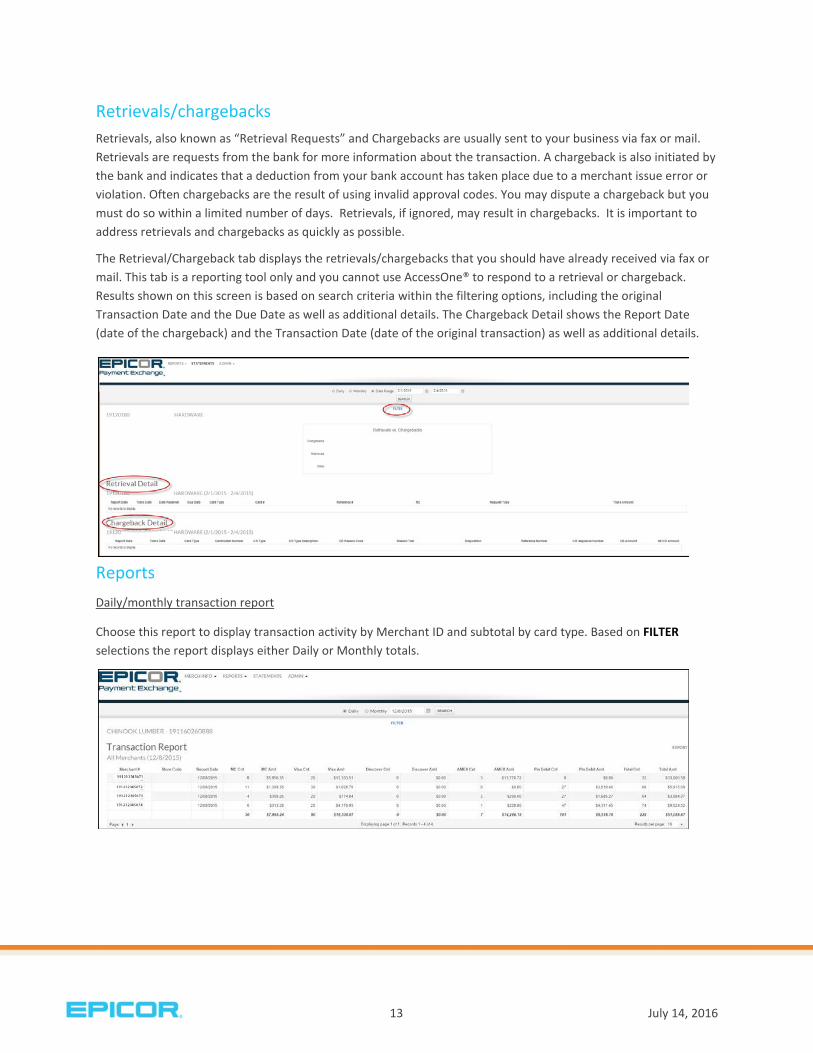
Retrievals/chargebacks Retrievals, also known as “Retrieval Requests” and Chargebacks are usually sent to your business via fax or mail. Retrievals are requests from the bank for more information about the transaction. A chargeback is also initiated by the bank and indicates that a deduction from your bank account has taken place due to a merchant issue error or violation. Often chargebacks are the result of using invalid approval codes. You may dispute a chargeback but you must do so within a limited number of days. Retrievals, if ignored, may result in chargebacks. It is important to address retrievals and chargebacks as quickly as possible.
The Retrieval/Chargeback tab displays the retrievals/chargebacks that you should have already received via fax or mail. This tab is a reporting tool only and you cannot use AccessOne® to respond to a retrieval or chargeback. Results shown on this screen is based on search criteria within the filtering options, including the original Transaction Date and the Due Date as well as additional details. The Chargeback Detail shows the Report Date (date of the chargeback) and the Transaction Date (date of the original transaction) as well as additional details.
Reports Daily/monthly transaction report
Choose this report to display transaction activity by Merchant ID and subtotal by card type. Based on FILTER selections the report displays either Daily or Monthly totals.
13 July 14, 2016
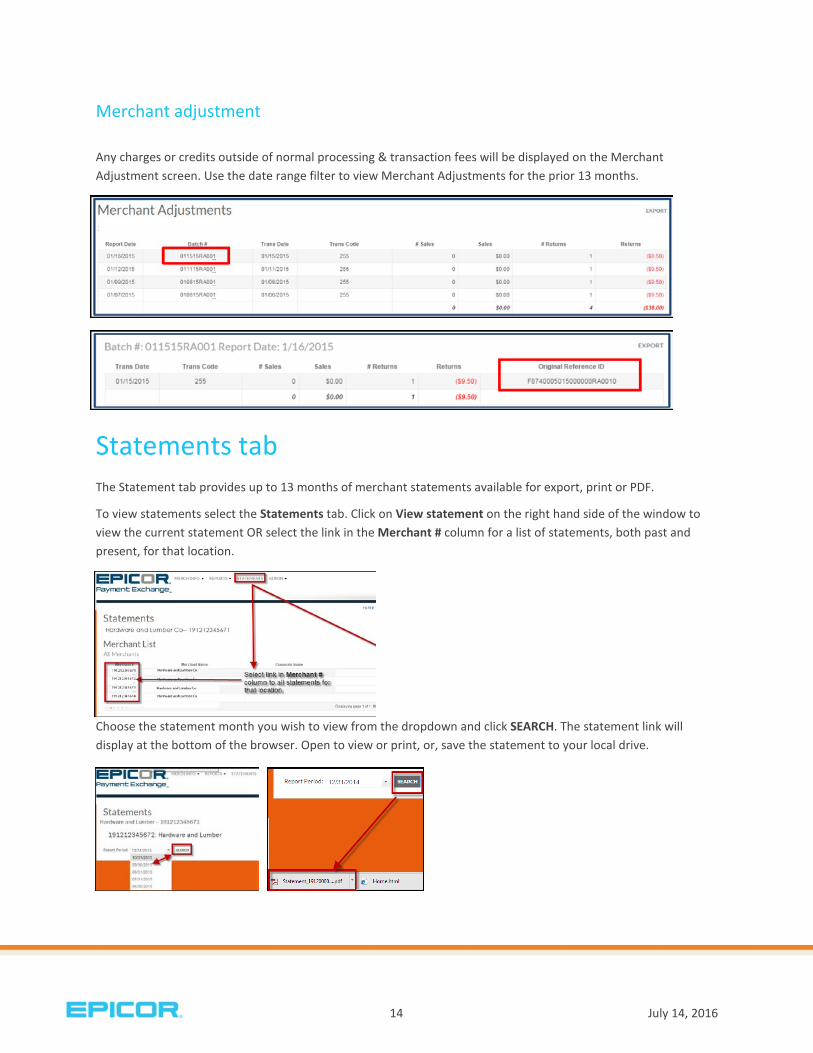
Merchant adjustment
Any charges or credits outside of normal processing & transaction fees will be displayed on the Merchant Adjustment screen. Use the date range filter to view Merchant Adjustments for the prior 13 months.
Statements tab The Statement tab provides up to 13 months of merchant statements available for export, print or PDF.
To view statements select the Statements tab. Click on View statement on the right hand side of the window to view the current statement OR select the link in the Merchant # column for a list of statements, both past and present, for that location.
Choose the statement month you wish to view from the dropdown and click SEARCH. The statement link will display at the bottom of the browser. Open to view or print, or, save the statement to your local drive.
14 July 14, 2016
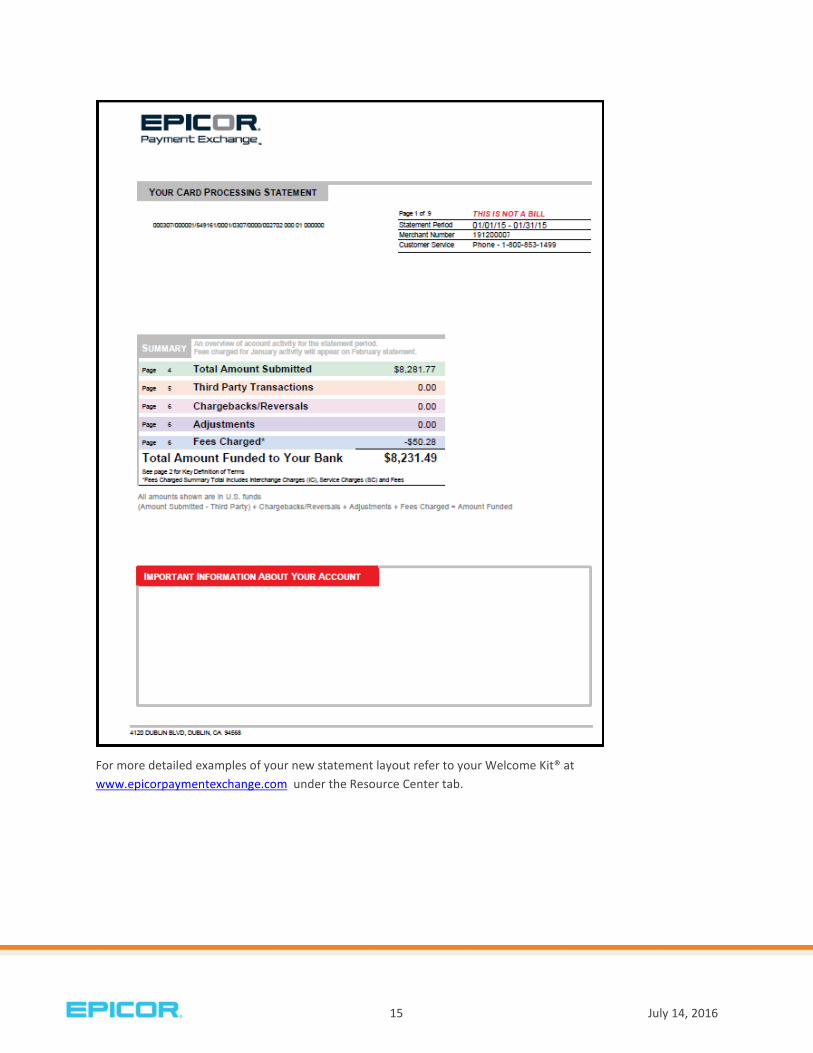
For more detailed examples of your new statement layout refer to your Welcome Kit® at www.epicorpaymentexchange.com under the Resource Center tab.
15 July 14, 2016
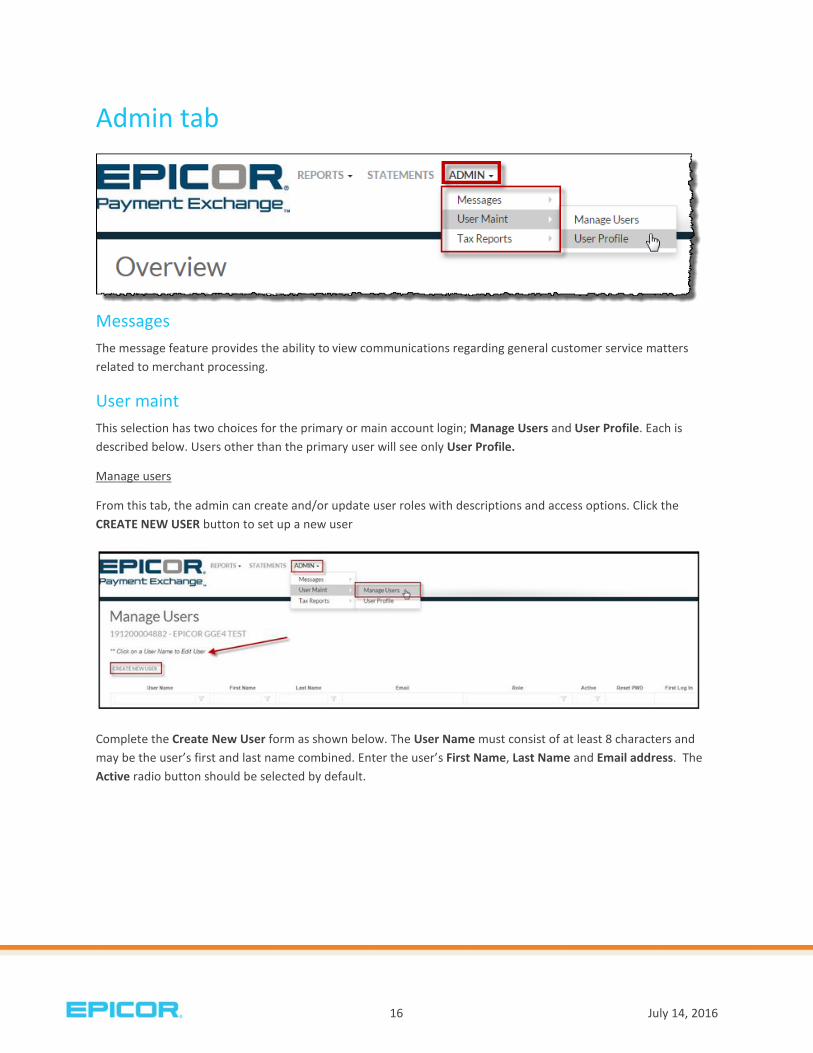
Admin tab
Messages The message feature provides the ability to view communications regarding general customer service matters related to merchant processing.
User maint This selection has two choices for the primary or main account login; Manage Users and User Profile. Each is described below. Users other than the primary user will see only User Profile.
Manage users
From this tab, the admin can create and/or update user roles with descriptions and access options. Click the CREATE NEW USER button to set up a new user
Complete the Create New User form as shown below. The User Name must consist of at least 8 characters and may be the user’s first and last name combined. Enter the user’s First Name, Last Name and Email address. The Active radio button should be selected by default.
16 July 14, 2016
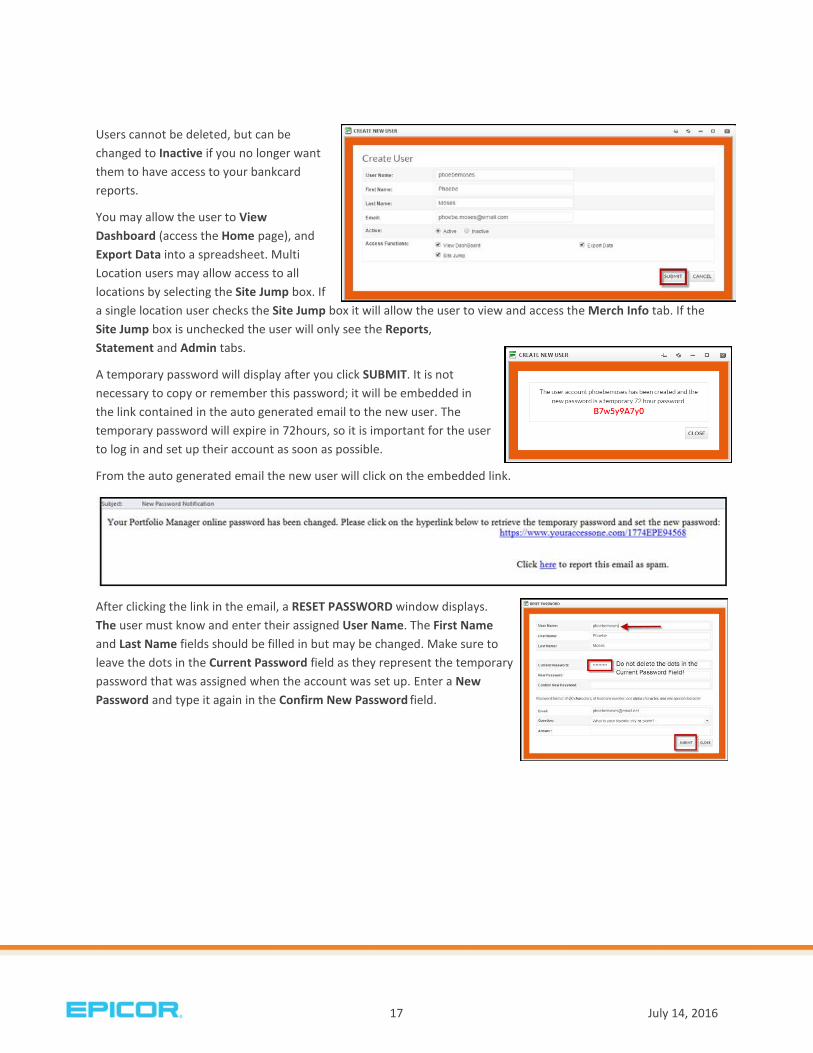
Users cannot be deleted, but can be changed to Inactive if you no longer want them to have access to your bankcard reports.
You may allow the user to View Dashboard (access the Home page), and Export Data into a spreadsheet. Multi Location users may allow access to all locations by selecting the Site Jump box. If a single location user checks the Site Jump box it will allow the user to view and access the Merch Info tab. If the Site Jump box is unchecked the user will only see the Reports, Statement and Admin tabs.
A temporary password will display after you click SUBMIT. It is not necessary to copy or remember this password; it will be embedded in the link contained in the auto generated email to the new user. The temporary password will expire in 72hours, so it is important for the user to log in and set up their account as soon as possible.
From the auto generated email the new user will click on the embedded link.
After clicking the link in the email, a RESET PASSWORD window displays. The user must know and enter their assigned User Name. The First Name and Last Name fields should be filled in but may be changed. Make sure to leave the dots in the Current Password field as they represent the temporary password that was assigned when the account was set up. Enter a New Password and type it again in the Confirm New Password field.
17 July 14, 2016

Remember that a password must be 8-20 characters and contain a letter, number and special character. Verify the Email and select from one of the 4 security questions found in the Question field. Enter your Answer and remember that the answer is caps sensitive. Click the SUBMIT button when finished.
Note: The appropriate answer to the security question is required when the user resets their password.
User profile
The User Profile screen is used to perform the following functions; change a name, change/reset a password, select a new security question and/or answer.
Select the Change Password and/or the Change Validation Question/Answer boxes as needed. Make your changes and click SUBMIT to update.
Tax reports The Tax Reports tab gives you the ability to review your IRS Tax Validation Response.
18 July 14, 2016
About Epicor Epicor Software Corporation drives business growth. We provide flexible, industry-specific software that is designed around the needs of our manufacturing, distribution, retail, and service industry customers. More than 40 years of experience with our customers’ unique business processes and operational requirements is built into every solution—in the cloud, hosted, or on premises. With a deep understanding of your industry, Epicor solutions spur growth while managing complexity. The result is powerful solutions that free your resources so you can grow your business. For more information, connect with Epicor or visit www.epicor.com.
Corporate Office 804 Las Cimas Parkway Austin, TX 78746 USA Toll Free: +1.888.448.2636 Direct: +1.512.328.2300 Fax: +1.512.278.5590
Latin America and Caribbean Blvd. Antonio L. Rodriguez #1882 Int. 104 Plaza Central, Col. Santa Maria Monterrey, Nuevo Leon, CP 64650 Mexico Phone: +52.81.1551.7100 Fax: +52.81.1551.7117
Europe, Middle East and Africa No. 1 The Arena Downshire Way Bracknell, Berkshire RG12 1PU United Kingdom Phone: +44.1344.468468 Fax: +44.1344.468010
Asia 238A Thomson Road #23-06 Novena Square Tower A Singapore 307684 Singapore Phone: +65.6333.8121 Fax: +65.6333.8131
Australia and New Zealand Suite 2 Level 8, 100 Pacific Highway North Sydney, NSW 2060 Australia Phone: +61.2.9927.6200 Fax: +61.2.9927.6298