ABT Mesquite Tutorial
16
Mesquite Tutorial 1 A Guide for using Mesquite to teach Plant Diversity using Tree-Thinking Overview This guide provides a general overview of how to use Mesquite: a modular system for evolutionary analysis Version 2.75. A free-open source copy can be downloaded at http://mesquiteproject.org/ . The guide can be modified easily to study any groups of organisms (living or fossil), and can be tailored to the needs of the students (simple to complex). Using freely available and Open-Source software can allow students to explore and construct phylogenies in lab or at home using either morphological or DNA sequence data. The objectives in these modules are for students to learn how to construct, read and interpret phylogenetic trees. This guide is specifically associated with an exercise to investigate the history and patterns of evolution in plants, but it can be used for other taxa and activities. This guide has several modules describing how to set up the computer, how to conduct an analysis using morphological data, and how to conduct an analysis using molecular sequence data. Modules in this Guide Setup and Installing Software for this Guide Morphological Data (Discreet/Categorical) Module 1. Observe and describe the unknown 2. Score and enter morphological data to produce a data matrix 3. Build a phylogenetic tree, and consensus tree 4. Examine character states on the trees 5. Printing and saving the results Molecular Sequence Data (DNA) Module 1. Understanding sequence data files (FASTA, GenBank, text files) 2. Loading sequence data files in to Mesquite 3. Sequence alignment and tree building 4. Examine previous character states on molecular phylogenies 5. Printing and saving the results
Transcript of ABT Mesquite Tutorial
Mesquite Tutorial 1
A Guide for using Mesquite to teach Plant Diversity using Tree-Thinking Overview This guide provides a general overview of how to use Mesquite: a modular system for evolutionary analysis Version 2.75. A free-open source copy can be downloaded at http://mesquiteproject.org/ . The guide can be modified easily to study any groups of organisms (living or fossil), and can be tailored to the needs of the students (simple to complex). Using freely available and Open-Source software can allow students to explore and construct phylogenies in lab or at home using either morphological or DNA sequence data. The objectives in these modules are for students to learn how to construct, read and interpret phylogenetic trees. This guide is specifically associated with an exercise to investigate the history and patterns of evolution in plants, but it can be used for other taxa and activities. This guide has several modules describing how to set up the computer, how to conduct an analysis using morphological data, and how to conduct an analysis using molecular sequence data. Modules in this Guide Setup and Installing Software for this Guide Morphological Data (Discreet/Categorical) Module
1. Observe and describe the unknown 2. Score and enter morphological data to produce a data matrix 3. Build a phylogenetic tree, and consensus tree 4. Examine character states on the trees 5. Printing and saving the results
Molecular Sequence Data (DNA) Module
1. Understanding sequence data files (FASTA, GenBank, text files) 2. Loading sequence data files in to Mesquite 3. Sequence alignment and tree building 4. Examine previous character states on molecular phylogenies 5. Printing and saving the results

Mesquite Tutorial 2
Setup and Installing Software
Overview This guide uses Mesquite, an open source, cross-platform (UNIX/LINUX, Mac OS X, Windows) phylogenetic tree building and testing software. Mesquite can accept categorical, discrete, continuous or DNA sequence data. The full manual is available from the mesquite home page http://mesquiteproject.org/ and can be used to supplement studies beyond the scope of this guide. Procedure
1. Download software from http://mesquiteproject.org/mesquite/download/download.html and select the operating system.
2. Install the software by double-clicking on the downloaded file. The installer will produce a file called Mesquite, which will contain several files and four Mesquite icons with different memory amounts in the name.
3. Download MUSCLE, an alignment algorithm that is used with molecular sequence data
a. Download MUSCLE to the desktop or downloads folder of your computer from www.drive5.com/muscle/. Click on the Downloads tab to the left and select the operating system.
b. Move the file into the Mesquite Folder, and we will need to tell it where to find the program for the alignment step in Molecular Sequence Module.
4. Choose the icon called Mesquite You need only the normal small memory version. Create a shortcut to the desktop.
5. Open Mesquite, and wait for the program to load its dependencies. 6. The software should now be installed and ready for data entry.
Morphological Data (discreet/categorical) Module Overview This section describes how to use Mesquite to analyze discrete data such as morphological traits. This section describes 1. creating the project file, 2. constructing phylogenetic trees, and 3. mapping trait evolution on branches. Procedure: Creating the Project and Data File
1. From top toolbar select File, then New. A new pop-up window will appear. 2. Name the project (e.g. MorphologicalPhylogeny.nex). Filenames must end with
the .nex extension. The software does not automatically add the extension. 3. Select the Where dropdown menu and choose where to save the project. 4. Click Save 5. The (New File Options) window and request information about the data matrix.
a. Click on the Name box and name of the matrix (e.g. Morphological Characters.)

Mesquite Tutorial 3
b. Click on Enter the Number of Taxa and enter the number of taxa/groups, (e.g. 5) in your study. Taxa can be added or removed later.
c. Check the Make Character Matrix box. The box for Make Taxa Block should also be checked.
d. Click OK. 6. The (New Character Matrix) window will open.
a. Click into the textbox. Enter a name for the character matrix. b. Enter in the number of characters (e.g. 10) c. Select Standard Categorical Data as the data type (default). d. Click OK. e. The project window will now open, with the project file name (e.g.
MorphologicalPhylogeny.nex) appearing at the top of the window. 7. The project window will show the name of your data matrix you produced (e.g.
Morphological Characters) and contain the main project window. for Mesquite. The Project and Character Matrix tabs are always displayed by default when creating a new project (Figure 1). The tab on the left contains all the subfiles for the project. The Character Matrix toolbar (Figure 2.) is to the left of the matrix.
8. You can exit out of a tab by clicking the X in the top right of the tab. It will close the tab, but it is not deleted. To restore a tab, click on Show Matrix from the left Character Matrix dropdown menu.
Figure 1. View of sample project window showing project tab, Character Matrix tab, Character Matrix toolbar, and Data Matrix.
Mesquite Tutorial 4
Procedure—Entering Taxon and Character names in “Character Matrix” Tab 1. Double-click the box named “taxon 1” in the first row of Character Matrix tab and
the text cursor will appear. Enter the group name (e.g. Outgroup). Press ENTER, and the cursor will move to the next cell. Repeat for all taxa.
2. Double-click or click the first column in the Character Matrix and name the character with a short name or description (e.g. vascular tissue present, multicellular, produces seeds). Name the other characters.
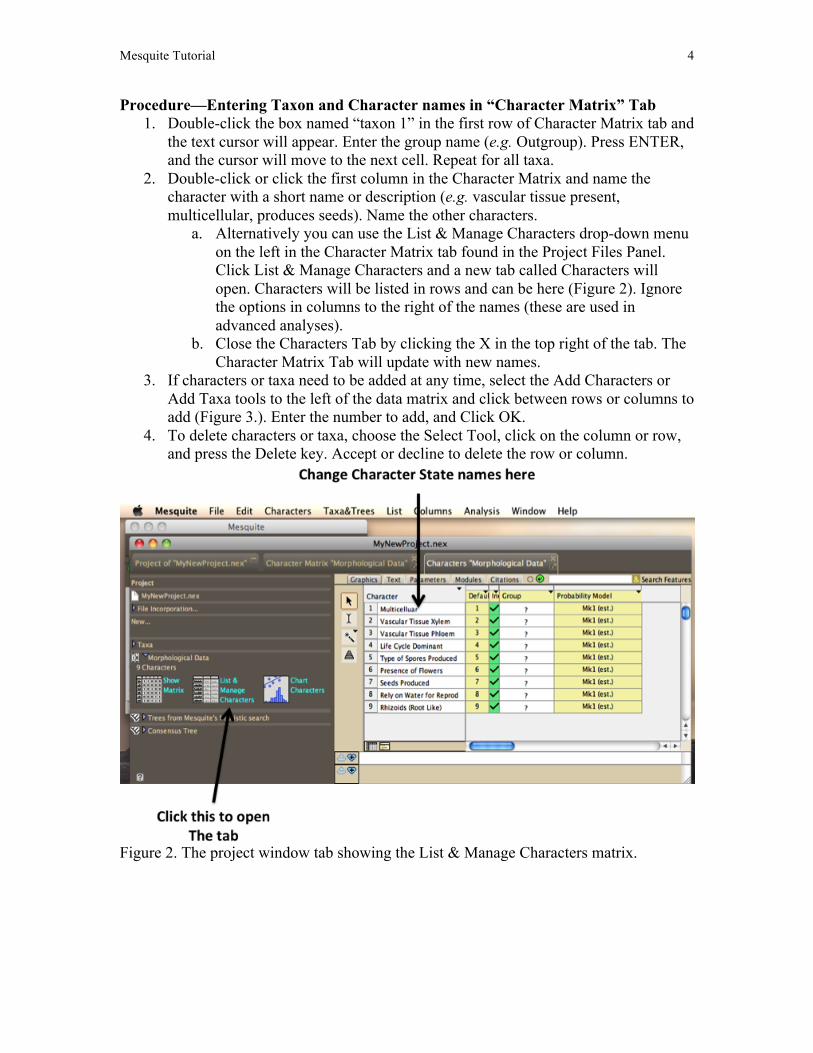
a. Alternatively you can use the List & Manage Characters drop-down menu on the left in the Character Matrix tab found in the Project Files Panel. Click List & Manage Characters and a new tab called Characters will open. Characters will be listed in rows and can be here (Figure 2). Ignore the options in columns to the right of the names (these are used in advanced analyses).
b. Close the Characters Tab by clicking the X in the top right of the tab. The Character Matrix Tab will update with new names.
3. If characters or taxa need to be added at any time, select the Add Characters or Add Taxa tools to the left of the data matrix and click between rows or columns to add (Figure 3.). Enter the number to add, and Click OK.
4. To delete characters or taxa, choose the Select Tool, click on the column or row, and press the Delete key. Accept or decline to delete the row or column.
Figure 2. The project window tab showing the List & Manage Characters matrix.
Mesquite Tutorial 5
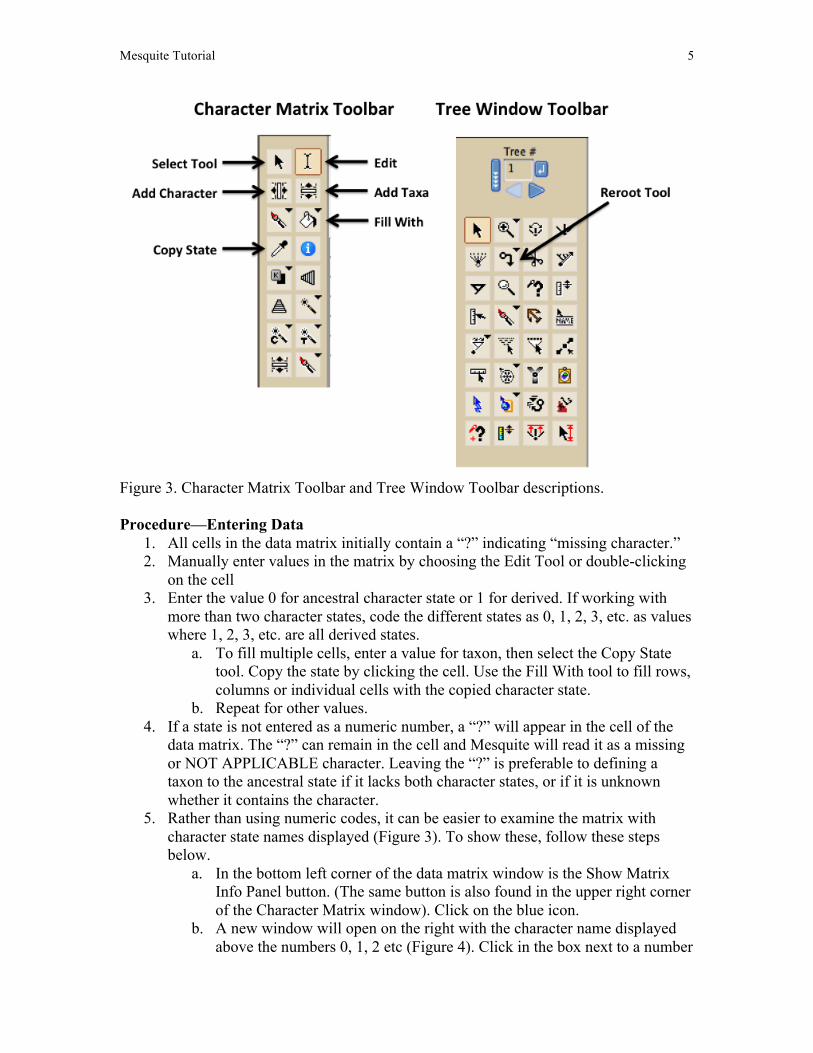
Figure 3. Character Matrix Toolbar and Tree Window Toolbar descriptions. Procedure—Entering Data
1. All cells in the data matrix initially contain a “?” indicating “missing character.” 2. Manually enter values in the matrix by choosing the Edit Tool or double-clicking
on the cell 3. Enter the value 0 for ancestral character state or 1 for derived. If working with
more than two character states, code the different states as 0, 1, 2, 3, etc. as values where 1, 2, 3, etc. are all derived states.
a. To fill multiple cells, enter a value for taxon, then select the Copy State tool. Copy the state by clicking the cell. Use the Fill With tool to fill rows, columns or individual cells with the copied character state.
b. Repeat for other values. 4. If a state is not entered as a numeric number, a “?” will appear in the cell of the
data matrix. The “?” can remain in the cell and Mesquite will read it as a missing or NOT APPLICABLE character. Leaving the “?” is preferable to defining a taxon to the ancestral state if it lacks both character states, or if it is unknown whether it contains the character.
5. Rather than using numeric codes, it can be easier to examine the matrix with character state names displayed (Figure 3). To show these, follow these steps below.
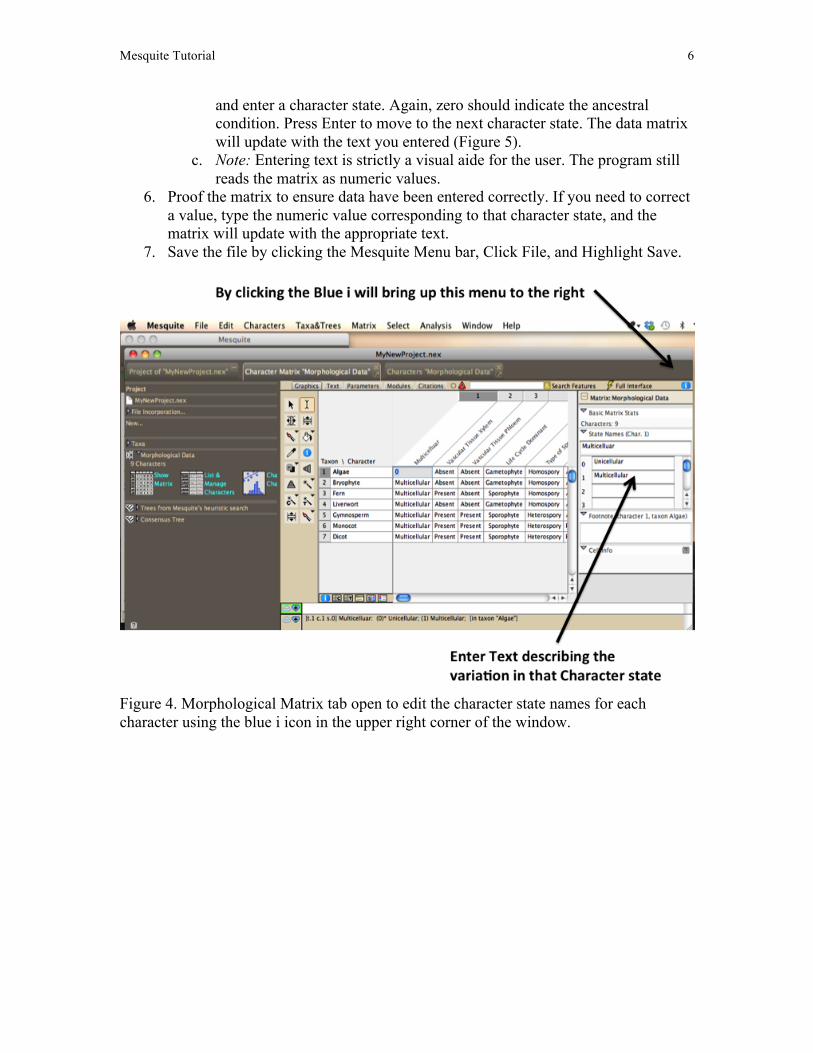
a. In the bottom left corner of the data matrix window is the Show Matrix Info Panel button. (The same button is also found in the upper right corner of the Character Matrix window). Click on the blue icon.
b. A new window will open on the right with the character name displayed above the numbers 0, 1, 2 etc (Figure 4). Click in the box next to a number
Mesquite Tutorial 6
and enter a character state. Again, zero should indicate the ancestral condition. Press Enter to move to the next character state. The data matrix will update with the text you entered (Figure 5).
c. Note: Entering text is strictly a visual aide for the user. The program still reads the matrix as numeric values.
6. Proof the matrix to ensure data have been entered correctly. If you need to correct a value, type the numeric value corresponding to that character state, and the matrix will update with the appropriate text.
7. Save the file by clicking the Mesquite Menu bar, Click File, and Highlight Save.
Figure 4. Morphological Matrix tab open to edit the character state names for each character using the blue i icon in the upper right corner of the window.
Mesquite Tutorial 7
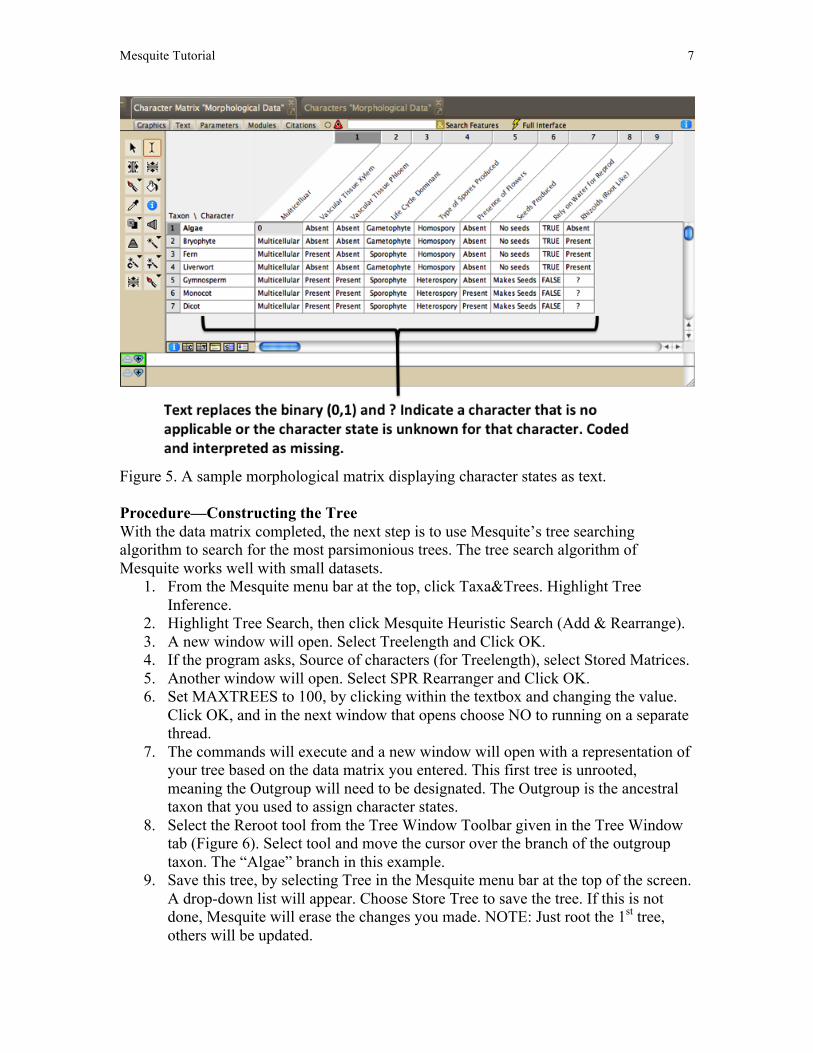
Figure 5. A sample morphological matrix displaying character states as text. Procedure—Constructing the Tree With the data matrix completed, the next step is to use Mesquite’s tree searching algorithm to search for the most parsimonious trees. The tree search algorithm of Mesquite works well with small datasets.
1. From the Mesquite menu bar at the top, click Taxa&Trees. Highlight Tree Inference.
2. Highlight Tree Search, then click Mesquite Heuristic Search (Add & Rearrange). 3. A new window will open. Select Treelength and Click OK. 4. If the program asks, Source of characters (for Treelength), select Stored Matrices. 5. Another window will open. Select SPR Rearranger and Click OK. 6. Set MAXTREES to 100, by clicking within the textbox and changing the value.
Click OK, and in the next window that opens choose NO to running on a separate thread.
7. The commands will execute and a new window will open with a representation of your tree based on the data matrix you entered. This first tree is unrooted, meaning the Outgroup will need to be designated. The Outgroup is the ancestral taxon that you used to assign character states.
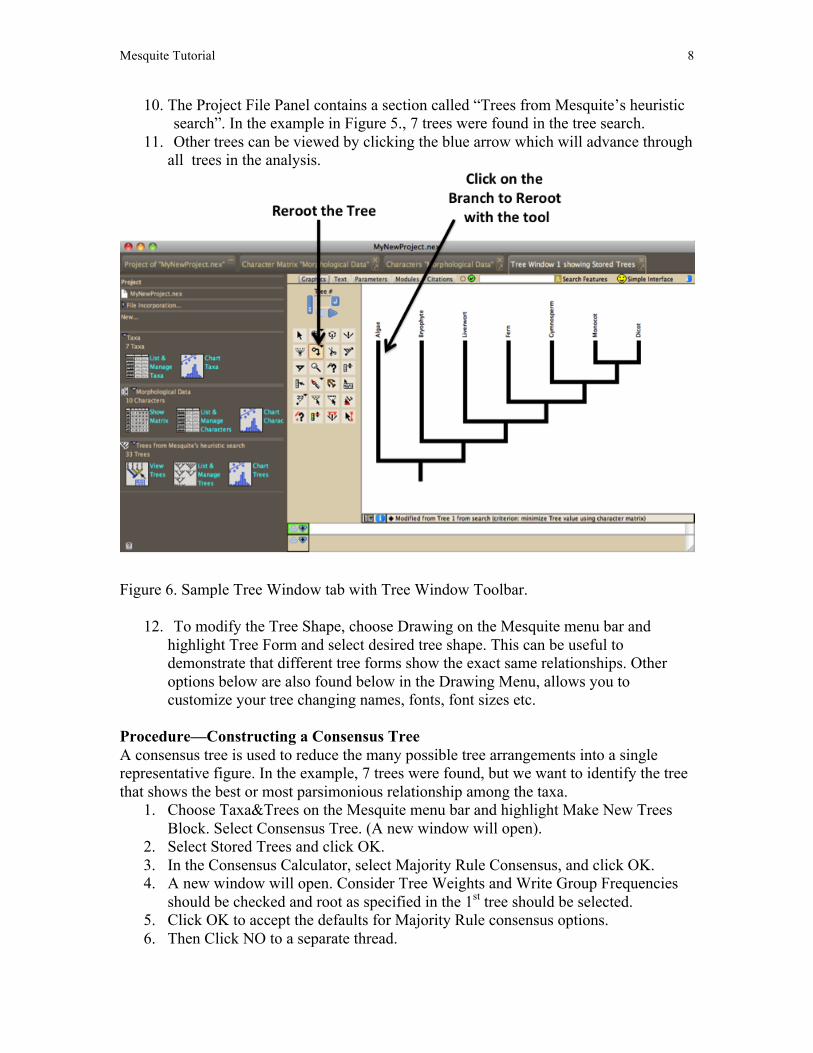
8. Select the Reroot tool from the Tree Window Toolbar given in the Tree Window tab (Figure 6). Select tool and move the cursor over the branch of the outgroup taxon. The “Algae” branch in this example.
9. Save this tree, by selecting Tree in the Mesquite menu bar at the top of the screen. A drop-down list will appear. Choose Store Tree to save the tree. If this is not done, Mesquite will erase the changes you made. NOTE: Just root the 1st tree, others will be updated.
Mesquite Tutorial 8
10. The Project File Panel contains a section called “Trees from Mesquite’s heuristic search”. In the example in Figure 5., 7 trees were found in the tree search.
11. Other trees can be viewed by clicking the blue arrow which will advance through all trees in the analysis.
Figure 6. Sample Tree Window tab with Tree Window Toolbar.
12. To modify the Tree Shape, choose Drawing on the Mesquite menu bar and highlight Tree Form and select desired tree shape. This can be useful to demonstrate that different tree forms show the exact same relationships. Other options below are also found below in the Drawing Menu, allows you to customize your tree changing names, fonts, font sizes etc.
Procedure—Constructing a Consensus Tree A consensus tree is used to reduce the many possible tree arrangements into a single representative figure. In the example, 7 trees were found, but we want to identify the tree that shows the best or most parsimonious relationship among the taxa.
1. Choose Taxa&Trees on the Mesquite menu bar and highlight Make New Trees Block. Select Consensus Tree. (A new window will open).
2. Select Stored Trees and click OK. 3. In the Consensus Calculator, select Majority Rule Consensus, and click OK. 4. A new window will open. Consider Tree Weights and Write Group Frequencies
should be checked and root as specified in the 1st tree should be selected. 5. Click OK to accept the defaults for Majority Rule consensus options. 6. Then Click NO to a separate thread.
Mesquite Tutorial 9
7. A new window will ask which Tree Block do you want to use choose Trees from Mesquite’s heuristic search.
8. Trees Ready, Click yes to view them. 9. The tree will be produced, and, as above, it is UNROOTED. Root the tree using
the out-group as described previously. 10. Examine the Consensus Tree.
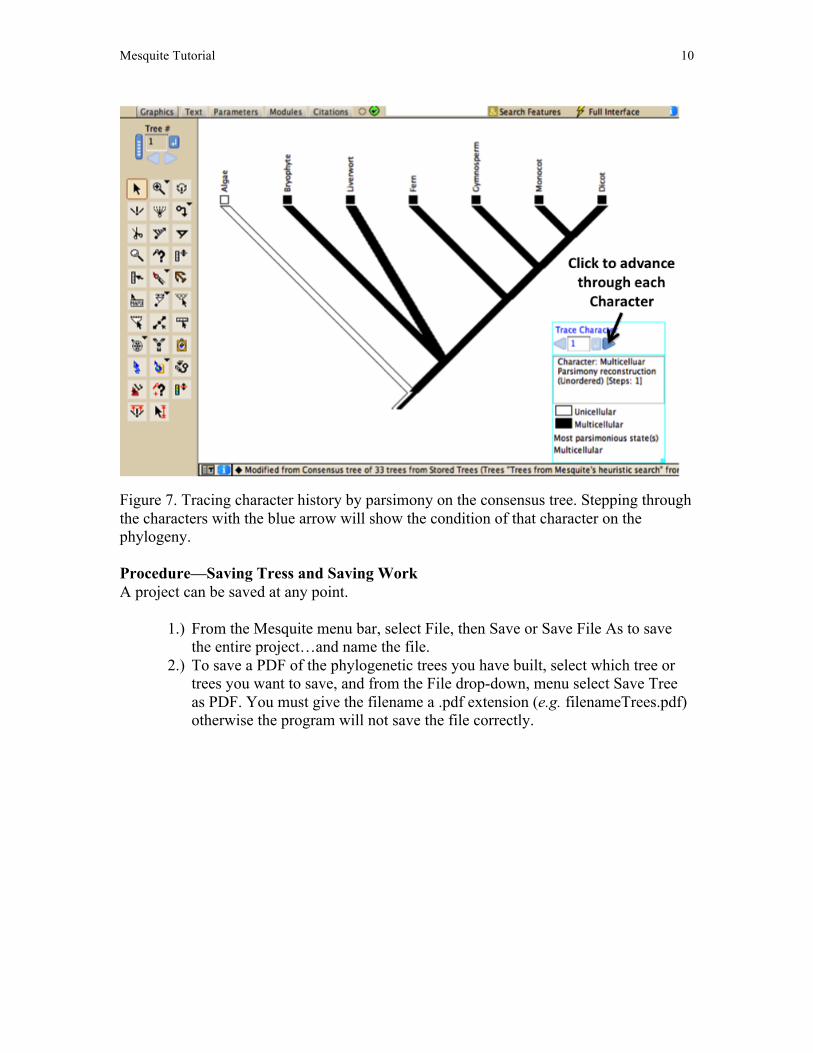
Procedure— Tracing Characters on Tree branches (Parsimony and Ancestral States) Having constructed both the most parsimonious trees and a Majority Rule Consensus Tree from the morphological dataset, it is now informative to evaluate how informative the characters we chose are and how those characters influence phylogenetic relationships. Mesquites’ built in functions can analyze and explore those patterns.
1.) Select Analysis from the Mesquite. Choose Trace Character History. 2.) Select Stored Characters and click OK. 3.) Select Parsimony of Ancestral States and click OK. 4.) A box will appear over the top of the tree. Click in the corner of this new box to
drag and move. Figure 7. 5.) Clicking the left and right navigation buttons on the Trace Character Box will
scroll through all the characters in the data matrix. Coloration on the tree will indicate branches where different character states are found. NOTE: For additional analysis, choose Likelihood Ancestral States and Current Probability Models (default) for the Ancestral State Reconstruction Method will produce a tree showing the likelihood of different character state changes.
6.) To remove Trace Character from the Tree Window, choose Trace from the
Mesquite menu bar and click Trace, then click close Trace.
Mesquite Tutorial 10
Figure 7. Tracing character history by parsimony on the consensus tree. Stepping through the characters with the blue arrow will show the condition of that character on the phylogeny. Procedure—Saving Tress and Saving Work A project can be saved at any point.
1.) From the Mesquite menu bar, select File, then Save or Save File As to save the entire project…and name the file.
2.) To save a PDF of the phylogenetic trees you have built, select which tree or trees you want to save, and from the File drop-down, menu select Save Tree as PDF. You must give the filename a .pdf extension (e.g. filenameTrees.pdf) otherwise the program will not save the file correctly.
Mesquite Tutorial 11
Molecular DNA Sequence Data Module Overview This section describes how to use Mesquite to analyze molecular sequence data to study evolution. The procedure below continues to use the example of analyzing evolution in the major plant groups. The module also shows how to use information from the Morphological Data Module to examine the relationship between molecular and morphological data in producing phylogenetic trees. The procedure begins by constructing a phylogenetic tree using genetic sequence data and ends with mapping morphological characters onto branches. Procedure—Understanding Sequence Data files (FASTA, GenBank, Text Files) Mesquite can read many types of data file formats such as FASTA (end in .fa or .fasta), NEXUS (such as the one from before .nex), and TEXT (.txt). Data in the FASTA and NEXUS formats can be downloaded publicly from the NCBI Gene (http://www.ncbi.nlm.nih.gov/gene) or NCBI Nucleotide databases database (http://www.ncbi.nlm.nih.gov/nuccore) for a specific gene of interest or specific nucleotide sequence. The GenBank sequence files include more complex metadata, while the FASTA formatted sequences look like this: >gi|12407550|gb|AF226820.1| Mnium hornum ribulose-1,5-bisphosphate carboxylase large subunit (rbcL) gene, partial cds; chloroplast gene for chloroplast product GGATTTAAAGCTGGTGTNNNNGATTACAGATTAACTTATTACACTCCAGATTATCAGACTACAGAAACTG ATATTTTAGCAGCATTCCGAATGACTCCTCAACCGGGAGTACCAGCTGAAGAGGCAGGAGCGGCAGTAGC TGCGGAATCTTCCACCGGTACATGGACCACTGTTTGGACTGATGGACTTACTAGTCTTGATCGTTACAAA GGACGATGCTATGGTATTGAAGCAGTTCCTGGAGAAGATAATCAATATATTGCTTATGTTGCTTACCCAT These data can be found, by searching all databases at http://www.ncbi.nlm.nih.gov/ for the species/taxon name and/or the name of the gene of interest (e.g. Mnium hornum rbcL). Once identified, select Nucleotide and then select the FASTA format. Text can be copied and pasted into a text editor such as TextWrangler (http://www.barebones.com/products/textwrangler/), Notepad ++ (http://notepad-plus-plus.org/) or TextEdit (http://download.cnet.com/TextEdit/3000-2351_4-10842593.html). A sample data set in FASTA (PlantRBCL2012.fasta) or TEXT (PlantRBCL2012.txt) format that can be downloaded from (http://www.ou.edu/gibsonlab/Tree_Thinking/Tree_Thinking.html). Procedure—Loading Sequence Data files
1.) Start Mesquite and open the File dropdown menu. Select Open File and choose you molecular data file (e.g. PlantRBCL2012.fasta). Click OPEN.
2.) In the Translate File Window, select FASTA (DNA/RNA) and click OK. 3.) Save the Imported File as a NEXUS file (.nex). Be sure to include the .nex
extension or the file will not save correctly. Click SAVE. 4.) The matrix will look similar to binary characters there are now colored
alphabetic characters representing the four DNA bases (A, T, C, G). (Figure 8).
Mesquite Tutorial 12
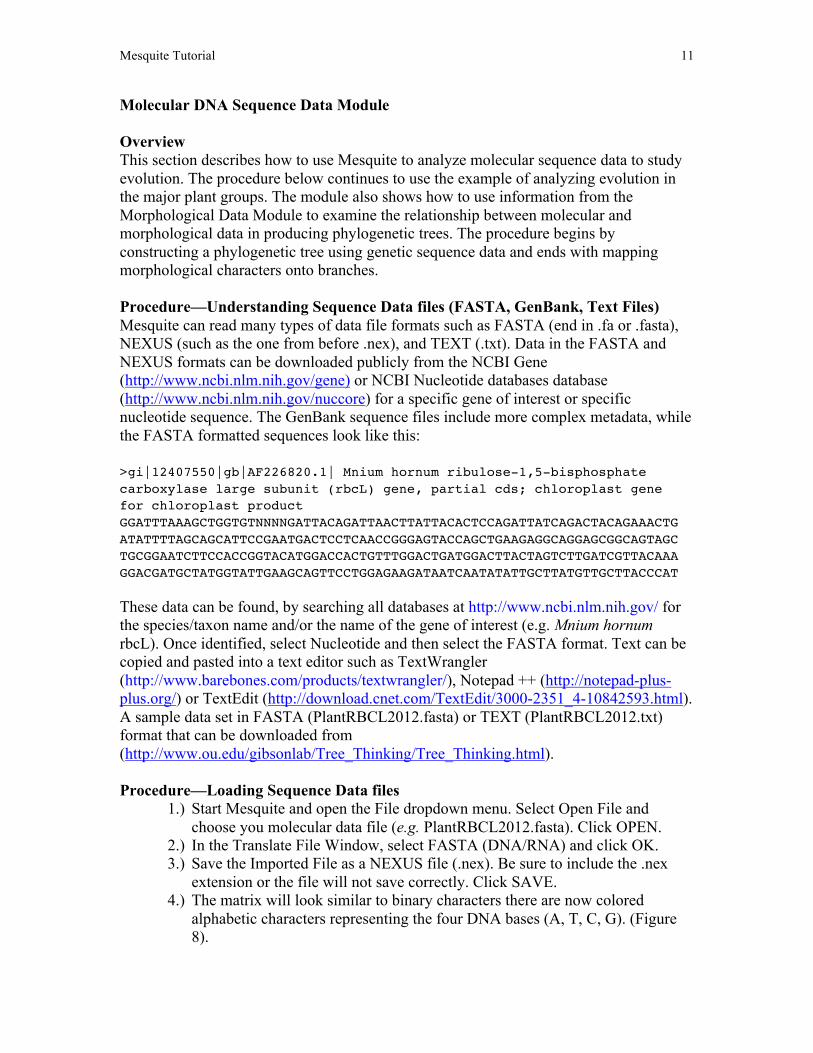
5.) A new project tab will open. Choose show matrix in the project files panel to open Character Matrix Tab.
6.) The sequences of each taxon are not ready to be analyzed. They need to be aligned them so that each base-position (the characters in molecular phylogenetic analysis) is in a homologous position across taxa. Otherwise, the analysis will be meaningless.
Figure 8. An unaligned sequence data matrix. Note the colors and letters of DNA data, as well as names in the Taxon column. Overview: Sequence Alignment To find which bases are homologous among taxa, sequences are aligned using the MUSCLE search algorithm to find the best alignment of sequences to each other. This is done through an iterative process until the “best” alignment is identified. Gaps are often introduced into the alignment due to random deletions, frame shift mutations or insertions in the genes of interest to allow for two sequences to still maximally overlap. The less gaps (insertions, deletions or sequencing error) the better. We will leverage a search algorithm that will look for the best alignment of the sequences to each other, over and over again till it finds the “best” alignment with the least introduced gaps. Procedure—Sequence Alignment
1.) Select Matrix from Mesquite menu bar. 2.) Highlight Align Multiple Sequences and select Muscle Align. 3.) A new window will open. Choose NO to running on a separate thread. 4.) A new window will open. In the box, indicate the path to the MUSCLE aligner
program. 5.) After defining the path for MUSCLE, choose OK.
Mesquite Tutorial 13
6.) The terminal window will open and you can see the program executing. Once the process has finished, exit out of the terminal window and return to Mesquite.
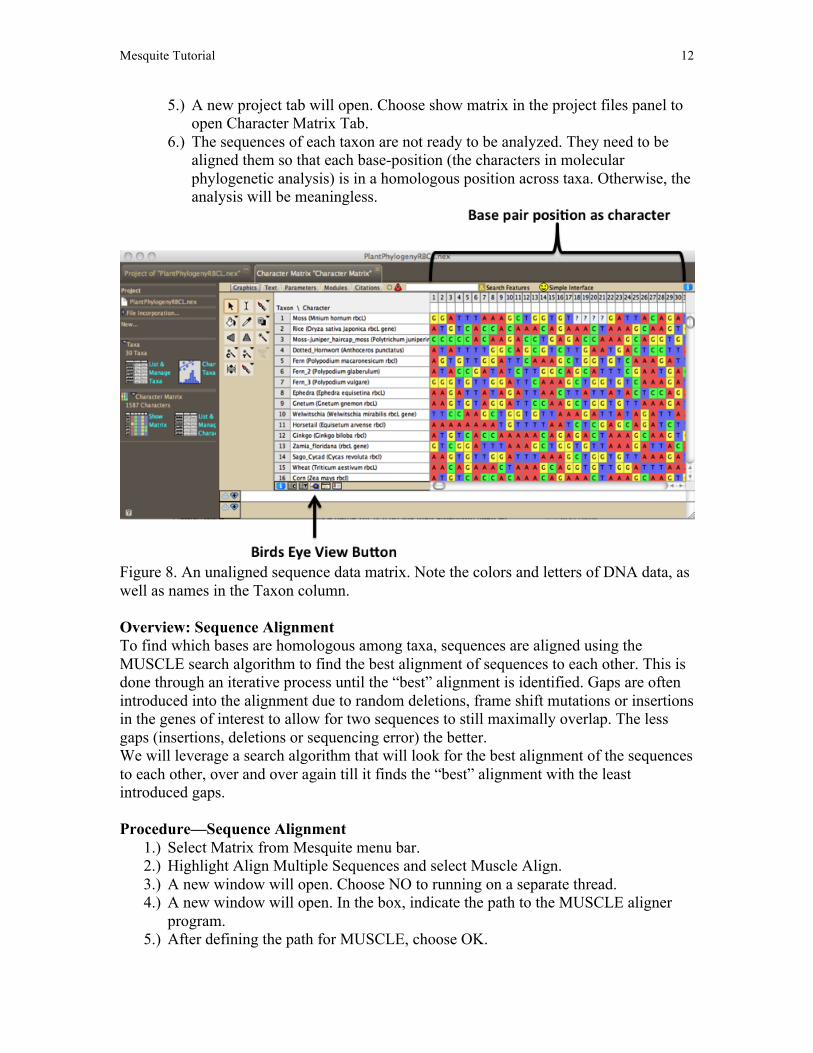
7.) To better understanding sequence alignment, examine a Bird’s Eye view by clicking on the Birds Eye View in the lower left-hand corner of the matrix window (Figure 9).
8.) Notice where the pattern creates vertical lines of the same color. These are regions of high sequence homology. The open white gaps indicate the absence of sequences from the gene being compared (Figure 9).
Figure 9. Bird’s Eye View of aligned sequences. from the plant groups. Notice the regions of high sequence similarity indicated by vertical lines of the same color. Procedure: Constructing the Phylogenetic Tree Using DNA Sequence Data
Using aligned sequences, a tree can now be constructed. 1.) In Mesquite, select Taxa&Trees from the Mesquite menu bar. 2.) Select Tree Inference, then choose Tree Search and Mesquite Heuristic Search
(Add&Rearrange). 3.) In the next Criteria for tree search window, select Treelength and click OK.
NOTE: Choose Confidence Interval (C.I.) if you want to quantify a measure of homoplasy in a tree. The C.I. will = 1.00 if there no homoplasy and decrease with increasing homoplasy.
4.) Choose SPR Rearranger and click OK. 5.) Set MAXTREES to 10 (You can set for larger, but it will take longer to analyze). 6.) Click OK and choose NO to separate thread on the next box. 7.) The command will execute and a two New Windows will appear with the title
“Tree Search” and “Command is executing”. Don’t close the windows. This step may take awhile (as long as 20 minutes), which is why the number of trees should be reduced from 100 to 10.
Mesquite Tutorial 14
8.) Clicking on the down arrow within the Tree Search progress bar will report how the analysis is running.
9.) To quit the job, click Emergency Cancel and the job will stop searching if it is taking too long.
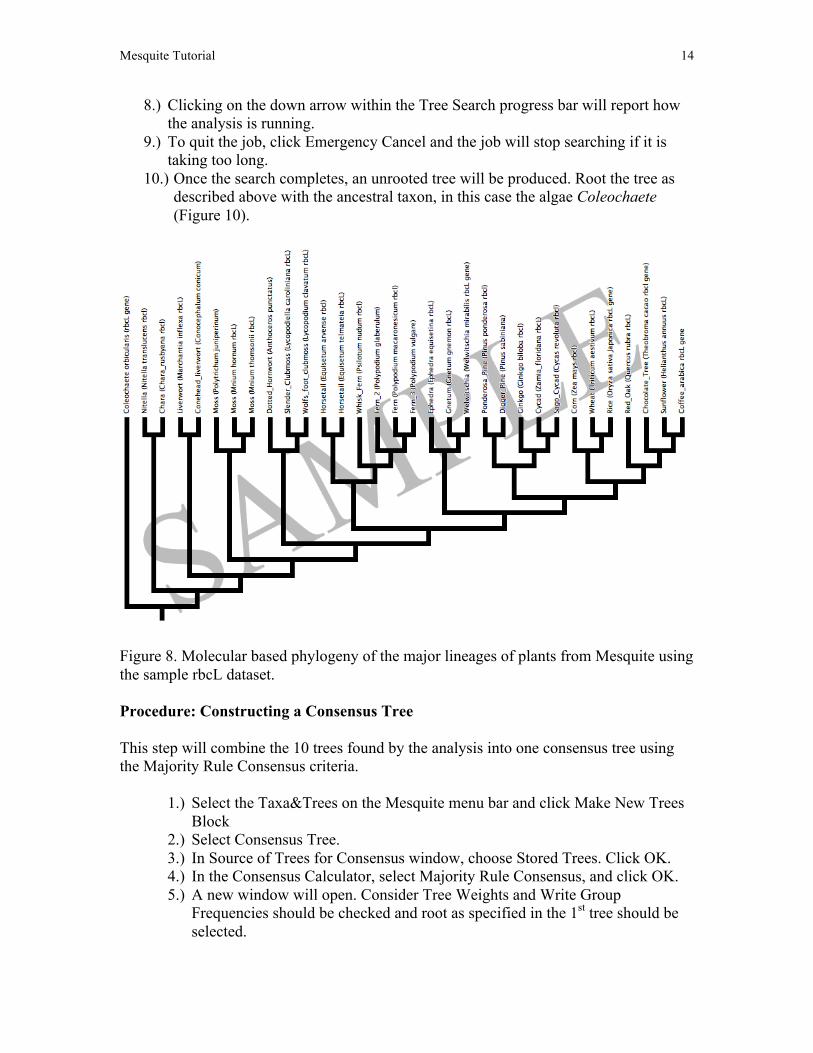
10.) Once the search completes, an unrooted tree will be produced. Root the tree as described above with the ancestral taxon, in this case the algae Coleochaete (Figure 10).
Figure 8. Molecular based phylogeny of the major lineages of plants from Mesquite using the sample rbcL dataset. Procedure: Constructing a Consensus Tree This step will combine the 10 trees found by the analysis into one consensus tree using the Majority Rule Consensus criteria.
1.) Select the Taxa&Trees on the Mesquite menu bar and click Make New Trees Block
2.) Select Consensus Tree. 3.) In Source of Trees for Consensus window, choose Stored Trees. Click OK. 4.) In the Consensus Calculator, select Majority Rule Consensus, and click OK. 5.) A new window will open. Consider Tree Weights and Write Group
Frequencies should be checked and root as specified in the 1st tree should be selected.
Mesquite Tutorial 15
6.) Click OK to accept the defaults for Majority Rule consensus options. 7.) Then Click NO to a separate thread. 8.) A new window will ask which Tree Block do you want to use choose Trees
from Mesquite’s heuristic search. 9.) Trees Ready, Click yes to view them.
10.) The tree will be produced, and, as above, it is UNROOTED. Root the tree using the out-group as described previously.
11.) Examine the Consensus Tree. Advanced Phylogenetic Study (Optional) With the completion of both the morphological and molecular sequence modules, two trees will have been produced. A morphology-based phylogeny based on physical characteristics and a molecular-based phylogeny based on sequence data. To investigate how sequence data give insights on morphological trait evolution, an additional matrix can be created after producing the molecular sequenced phylogeny. Mesquite can be used to reconstruct morphological characters onto the phylogenetic tree. Procedure: Adding Morphological Traits to the Molecular Phylogeny
1. From the Mesquite menu bar, choose Characters. 2. Click New Empty Matrix. 3. Name the new data matrix as described above (e.g. Morphological
Characters.nex). 4. Choose a number of characters that were found to be phylogenetically informative
from the morphological analysis (e.g. vascular tissue, seeds, flowers) 5. Enter the number of characters to be used into the box and choose Standard
Categorical Data. Click OK. 6. Enter the characters you chose and score them as ancestral or derived in
comparison to the out-group in this study. Use a lab manual or text to identify traits in species from the DNA sequence analysis that were not in the morphological phylogeny.
7. Click on the Consensus Tree Window Tab. 8. Click Analysis from the Mesquite menu bar and choose Trace Character History. 9. Select Stored Characters, and then click OK.
10. Select Parsimony Ancestral States, and click OK 11. Select the new data matrix you want to use, e.g. Morphological Characters and
click OK. 12. Mesquite will now show those characters over top of the molecular phylogeny.
Examine the patterns of morphological trait evolution relative to the molecular phylogeny (Figure 11).
13. A box will appear over the top of the tree. Click in the corner of this new box to drag and move. Figure 11.
14. Clicking the left and right navigation buttons on the Trace Character Box will scroll through all the characters in the data matrix. Coloration on the tree will indicate branches where different character states are found.

Mesquite Tutorial 16
NOTE: For additional analysis, choose Likelihood Ancestral States and Current Probability Models (default) for the Ancestral State Reconstruction Method will produce a tree showing the likelihood of different character state changes
15. To remove Trace Character from the Tree Window, choose Trace from the Mesquite menu bar and click Trace, then click close Trace.
Figure 11. Display of the Trace Ancestral Characters onto the phylogeny through parsimony.