About the Author - ArteKaos Airbrush
99
Transcript of About the Author - ArteKaos Airbrush
About the Author
Bob Downie is an experienced modeler with more than 20 years of
experience in airbrushing. With his show-stopping paint finishes, he has
won numerous Best Paint awards in many competitions, including a Best
Paint/Finish award at the 1997 GSL International Model Car
Championship. A frequent contributor to Scale Auto Enthusiast magazine,
he is a professional industrial designer, with his own design and illustration
firm in Atlanta, Georgia-
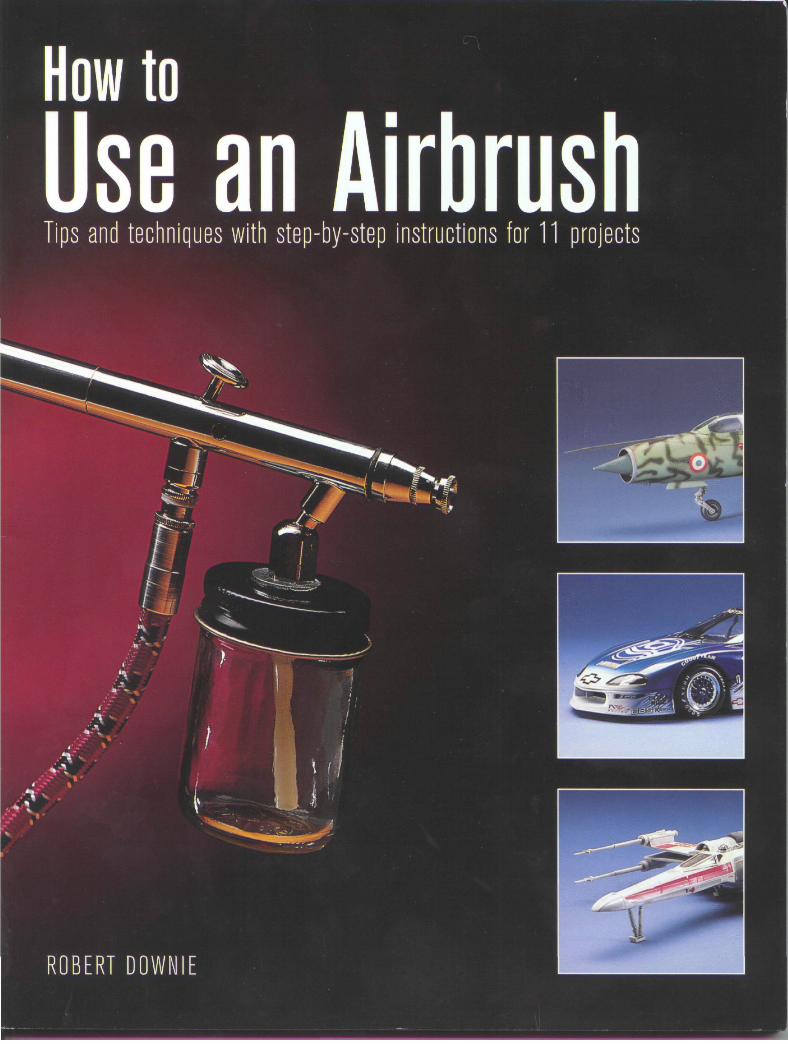
How toUse an AirbrushR O B E R T D O W N I E
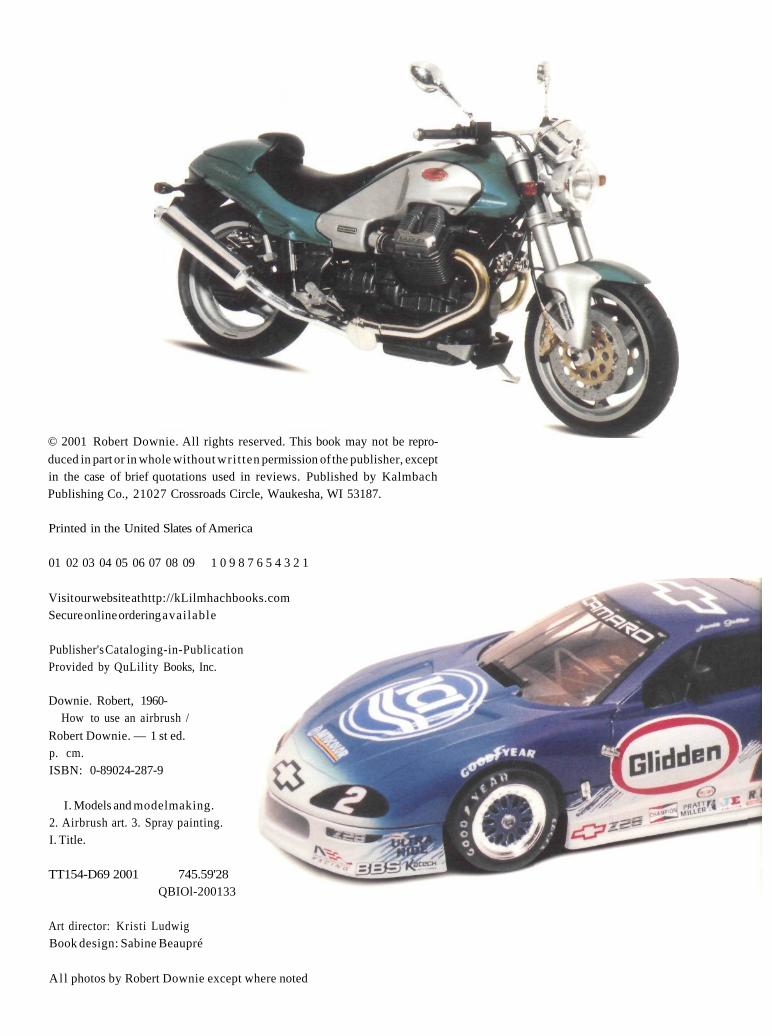
© 2001 Robert Downie. All rights reserved. This book may not be repro-
duced in part or in whole without wri t ten permission of the publisher, exceptin the case of brief quotations used in reviews. Published by KalmbachPublishing Co., 21027 Crossroads Circle, Waukesha, WI 53187.
Printed in the United Slates of America
01 02 03 04 05 06 07 08 09 1 0 9 8 7 6 5 4 3 2 1
Visit our website at http://kLilmhachbooks.comSecure online ordering available
Publisher's Cataloging-in-PublicationProvided by QuLility Books, Inc.
Downie. Robert, 1960-How to use an airbrush /
Robert Downie. — 1 st ed.p. cm.ISBN: 0-89024-287-9
I. Models and modelmaking.2. Airbrush art. 3. Spray painting.I. Title.
TT154-D69 2001 745.59'28QBIOl-200133
Art director: Kristi LudwigBook design: Sabine Beaupré
All photos by Robert Downie except where noted
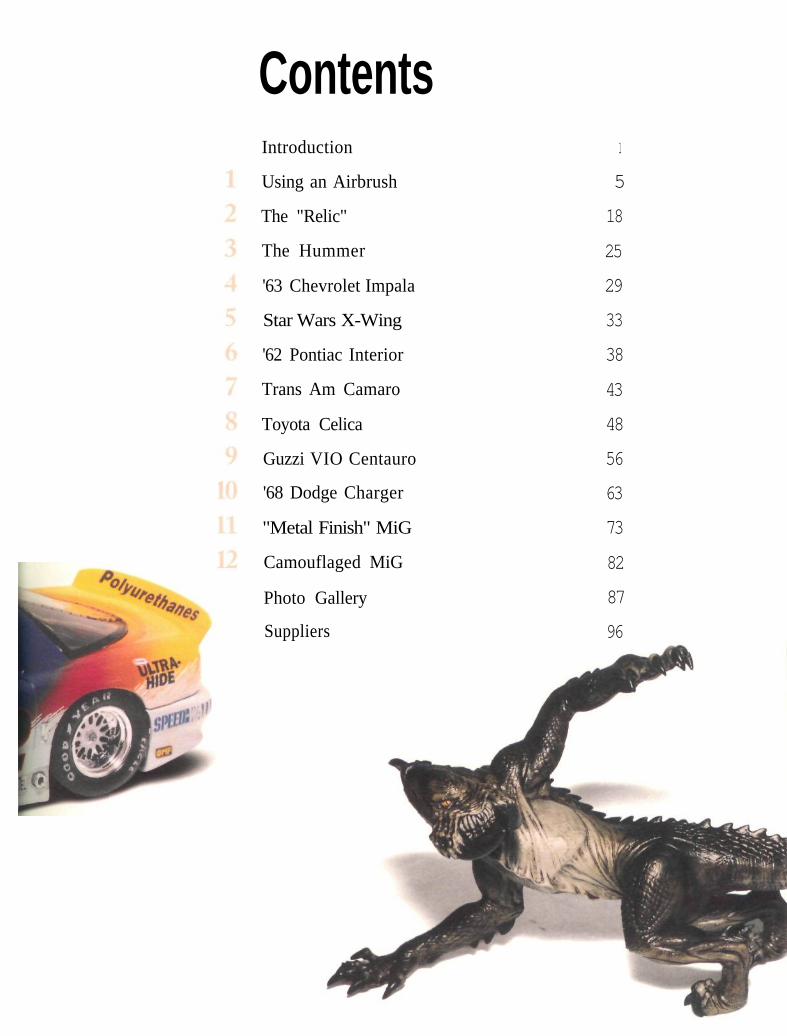
ContentsIntroduction
Using an Airbrush
The "Relic"
The Hummer
'63 Chevrolet Impala
Star Wars X-Wing
'62 Pontiac Interior
Trans Am Camaro
Toyota Celica
Guzzi VIO Centauro
'68 Dodge Charger
"Metal Finish" MiG
Camouflaged MiG
Photo Gallery
Suppliers
1
5
18
25
29
33
38
43
48
56
63
73
82
87
96
Introductionne of the greatest challenges a modeler faces is creatinga great finish on a model. An airbrush is a tool that canhelp immensely. But while some modelers have mas-
tered the use of this tool, others simply lack the experi-ence—or confidence—to achieve the desired results. In fact, toomany of you already own an airbrush, but are afraid of it. Youfind it easier to leave it in the box. and instead continue to use"spray bombs"—paint from aerosol eans.
The airbrush unjustly intimidates loo many people. This bookwill help you learn to use this wonderfully versatile tool. Wi th al i t t l e practice and experimentation, you too can quickly masterits use.
There are hooks and magazines that deal with airbrushing, but
most cater to artists who paint flat, two-dimensional surfaces:T-shirts, posters, and canvas. This book is written specificallyfor modelers. You want detailed instruction on how to use yourairbrush to paint three-dimensional surfaces, replicating a vari-ety of realistic finishes on your favorite models. The book, willteach you lo achieve many surface finishes with an airbrush.And I'll give you information about the mechanics of layeringthe airbrushed finish with other techniques.
This book wi l l help you in three ways: (1 ) It will give youbackground on the equipment—the types of airbrushes you can
use for various purposes. (2) It will introduce you to methods ofapplying appropriate paints. (3) It will provide a wealth of addi-tional tips, techniques, and detailed step-by-step instructions tohelp you achieve a dazzling array of finishes.
Each chapter wil l cover a project. Each will teach you how toachieve various finishes on particular types of models, showingyou the materials and tools you will need. Also, I ' l l show yousome of the problems and specific effects associated with theimproper use ot materials.
As in many areas of modeling, the more practice you gel, thebelter model builder you wil l become. Most of the techniquesshown in this book I've used successfully for many years.However, a few of the leehniques I tried out myself for the first
lime, just to demonstrate some additional options for these projects.I suggest you use the same combination: practice to master
common skills, and experiment lo learn new ones. With theproper tools and experience, and a little trial and error, anyonecan learn to use his or her airbrush wi th a min imum of sircssand effort.
Believe me. once you achieve that first truly great finish, youwill understand the immense feeling of accomplishment. Youwil l be well on your way lo mastering a tool that has revolu-tionized how paint finishes are applied to models. Successbreeds confidence. Soon, you will be confident enough to tackle
any paint finish you desire on your models.I would like to thank all who helped guide me along (he path
lowards completion of this book. First, 1 want to thank PatCovert, whose friendship and encouragement means a lot to me.
He was also the one who put me in louch wilh Kalmbach Booksand the opportunity to write this book. Also, many thanks go toa college professor of mine. Joe Ferrer, a great teacher of pro-fessional modelmaking and painting. From him I learned mostof the skills lhat I use both professionally and in my hobby.Finally, I want lo lhank my good friend Bob Iloll'els, an accom-plished modelmaker skilled in the construction of many types ot
models. He generously allowed me to borrow a number of hismodels to study and photograph in preparing th is book, and heanswered my myriad questions on applying various new fin-ishes. You wil l see a number of his models as examples throughout this book. 1 am forever indebted to him for the help he iiasnot only given lo me but shared with you as well.

Getting Started: E q u i p m e n t ,Mate r ia l s , and Basic Techniques
his chapter will introduce you to the basic tools,
materials, and techniques needed to use an air-
brush properly. I will show you various types of air-
brushes, some of the effects you can achieve with them,
and some options in choosing air-propellant systems.
Why use an airbrush? What makes it so superior to a
spray can? For one thing, an airbrush gives far greater
control over the volume and pressure of the air flow. It
also gives you greater control of the consistency (and the
color) of the paint that is being sprayed.
In contrast, a spray ean gives you lots of paint delivered
under lots of pressure. The volume of paint and the air
pressure are fixed; you can't adjust it. Too much paint flows
out at once, obliterating detail. It ;dso causes paint to run
or creates thin spots on sharp edges or raised details.
Or the spray-can paint flows out under too little pres-
sure, causing a thiek, grainy, "orange-peel" effect.
While it is not impossible to achieve a good finish with
spray cans, it is far easier to achieve a great finish with
an airbrush.
5
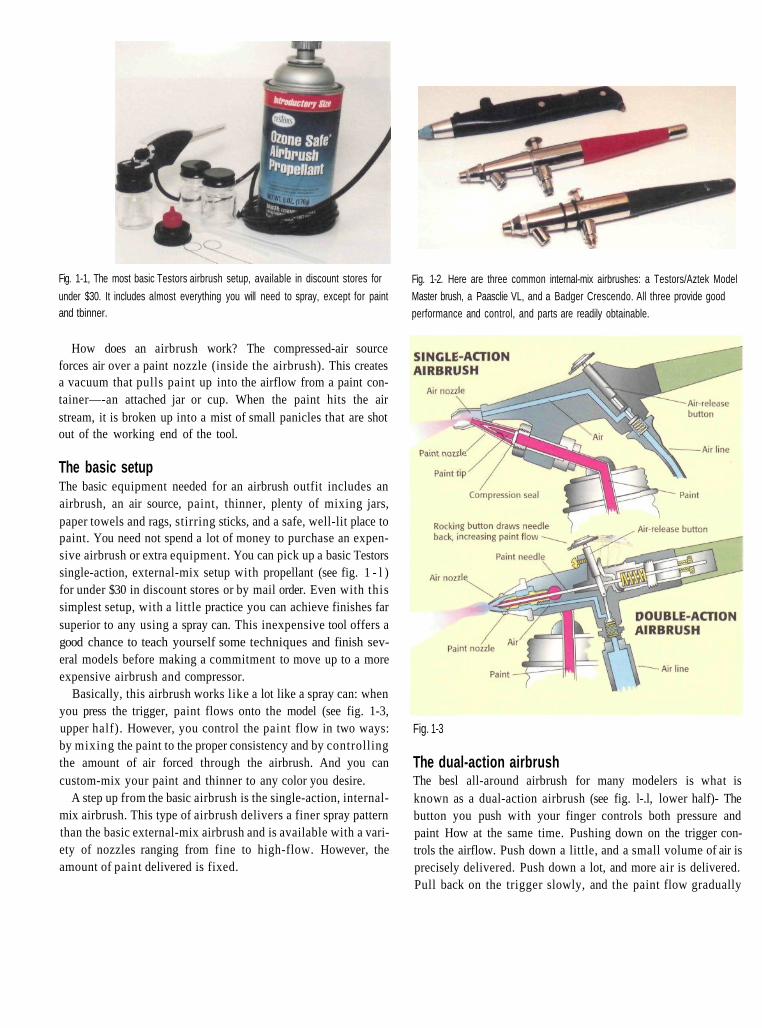
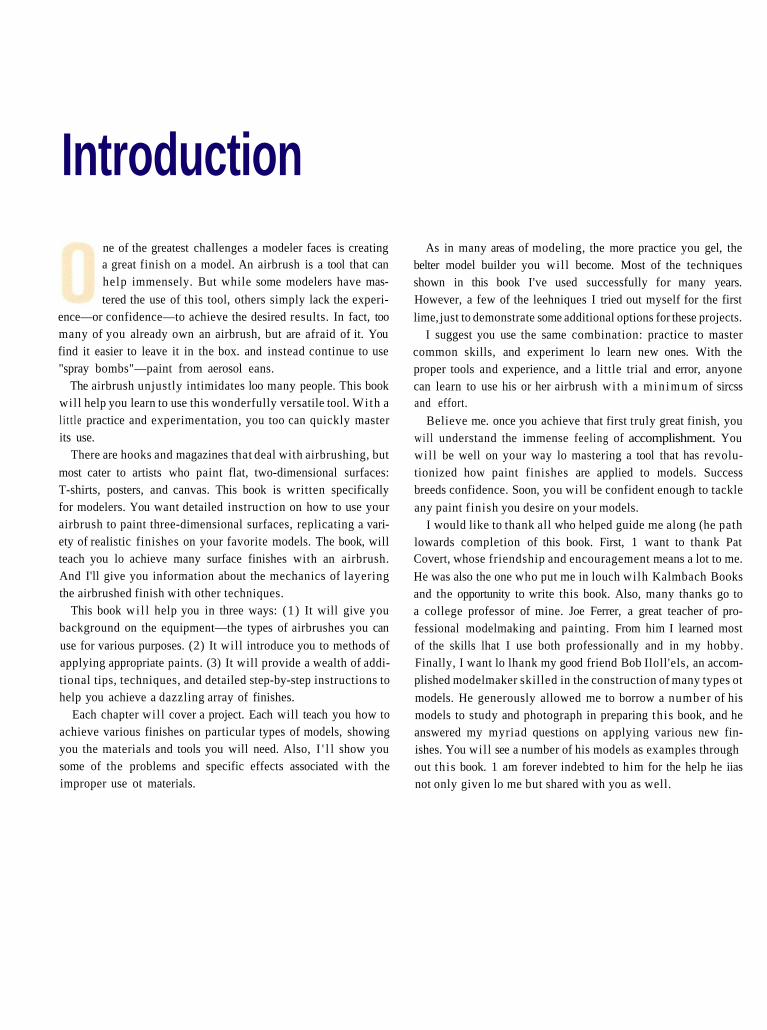
Fig. 1-1, The most basic Testors airbrush setup, available in discount stores for
under $30. It includes almost everything you will need to spray, except for paintand tbinner.
How does an airbrush work? The compressed-air sourceforces air over a paint nozzle (inside the airbrush). This createsa vacuum that pulls paint up into the airflow from a paint con-tainer—-an attached jar or cup. When the paint hits the airstream, it is broken up into a mist of small panicles that are shotout of the working end of the tool.
The basic setupThe basic equipment needed for an airbrush outfit includes anairbrush, an air source, paint, thinner, plenty of mixing jars,paper towels and rags, stirring sticks, and a safe, well-lit place topaint. You need not spend a lot of money to purchase an expen-sive airbrush or extra equipment. You can pick up a basic Testorssingle-action, external-mix setup with propellant (see fig. 1 - l )for under $30 in discount stores or by mail order. Even with thissimplest setup, with a little practice you can achieve finishes farsuperior to any using a spray can. This inexpensive tool offers agood chance to teach yourself some techniques and finish sev-eral models before making a commitment to move up to a moreexpensive airbrush and compressor.
Basically, this airbrush works like a lot like a spray can: whenyou press the trigger, paint flows onto the model (see fig. 1-3,upper half). However, you control the paint flow in two ways:by mixing the paint to the proper consistency and by controllingthe amount of air forced through the airbrush. And you cancustom-mix your paint and thinner to any color you desire.
A step up from the basic airbrush is the single-action, internal-mix airbrush. This type of airbrush delivers a finer spray patternthan the basic external-mix airbrush and is available with a vari-ety of nozzles ranging from fine to high-flow. However, theamount of paint delivered is fixed.
Fig. 1-2. Here are three common internal-mix airbrushes: a Testors/Aztek ModelMaster brush, a Paasclie VL, and a Badger Crescendo. All three provide goodperformance and control, and parts are readily obtainable.
Fig. 1-3
The dual-action airbrushThe besl all-around airbrush for many modelers is what isknown as a dual-action airbrush (see fig. l-.l, lower half)- Thebutton you push with your finger controls both pressure andpaint How at the same time. Pushing down on the trigger con-trols the airflow. Push down a little, and a small volume of air isprecisely delivered. Push down a lot, and more air is delivered.Pull back on the trigger slowly, and the paint flow gradually
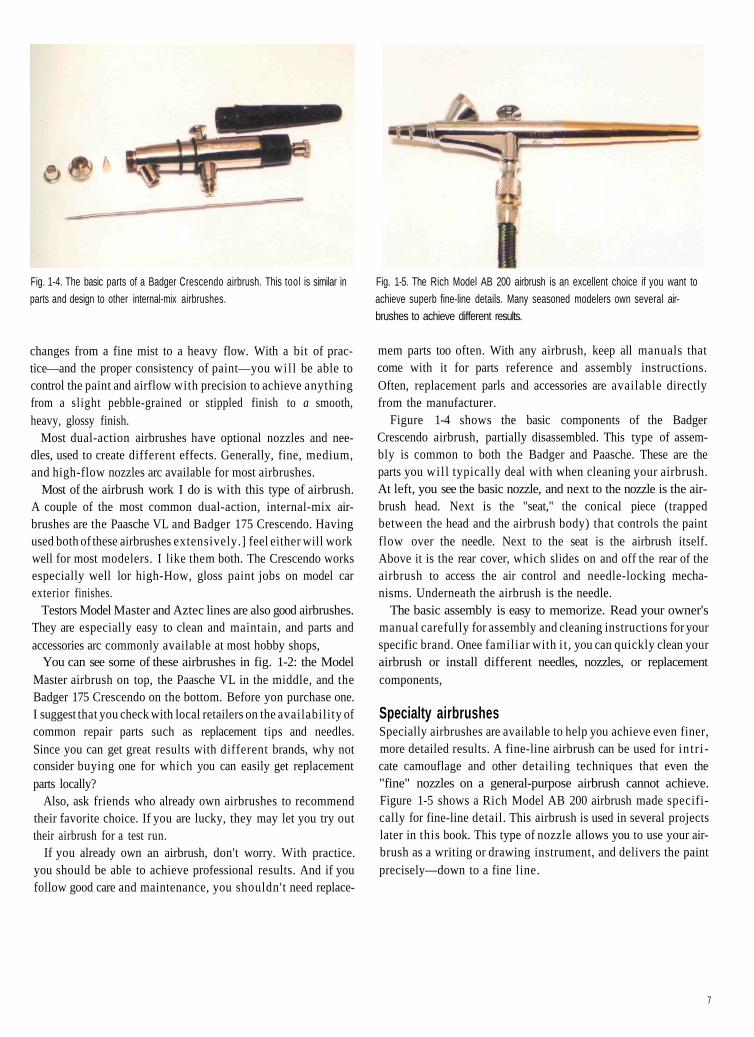
Fig. 1-4. The basic parts of a Badger Crescendo airbrush. This tool is similar inparts and design to other internal-mix airbrushes.
changes from a fine mist to a heavy flow. With a bit of prac-tice—and the proper consistency of paint—you wil l be able tocontrol the paint and airflow with precision to achieve anythingfrom a slight pebble-grained or stippled finish to a smooth,heavy, glossy finish.
Most dual-action airbrushes have optional nozzles and nee-dles, used to create different effects. Generally, fine, medium,and high-flow nozzles arc available for most airbrushes.
Most of the airbrush work I do is with this type of airbrush.A couple of the most common dual-action, internal-mix air-brushes are the Paasche VL and Badger 175 Crescendo. Havingused both of these airbrushes extensively.] feel either will workwell for most modelers. I like them both. The Crescendo worksespecially well lor high-How, gloss paint jobs on model carexterior finishes.
Testors Model Master and Aztec lines are also good airbrushes.They are especially easy to clean and maintain, and parts andaccessories arc commonly available at most hobby shops,
You can see some of these airbrushes in fig. 1-2: the ModelMaster airbrush on top, the Paasche VL in the middle, and theBadger 175 Crescendo on the bottom. Before yon purchase one.I suggest that you check with local retailers on the availability ofcommon repair parts such as replacement tips and needles.Since you can get great results with different brands, why notconsider buying one for which you can easily get replacementparts locally?
Also, ask friends who already own airbrushes to recommendtheir favorite choice. If you are lucky, they may let you try outtheir airbrush for a test run.
If you already own an airbrush, don't worry. With practice.you should be able to achieve professional results. And if youfollow good care and maintenance, you shouldn't need replace-
Fig. 1-5. The Rich Model AB 200 airbrush is an excellent choice if you want toachieve superb fine-line details. Many seasoned modelers own several air-brushes to achieve different results.
mem parts too often. With any airbrush, keep all manuals thatcome with it for parts reference and assembly instructions.Often, replacement parls and accessories are available directlyfrom the manufacturer.
Figure 1-4 shows the basic components of the BadgerCrescendo airbrush, partially disassembled. This type of assem-bly is common to both the Badger and Paasche. These are theparts you wil l typically deal with when cleaning your airbrush.At left, you see the basic nozzle, and next to the nozzle is the air-brush head. Next is the "seat," the conical piece (trappedbetween the head and the airbrush body) that controls the paintflow over the needle. Next to the seat is the airbrush itself.Above it is the rear cover, which slides on and off the rear of theairbrush to access the air control and needle-locking mecha-nisms. Underneath the airbrush is the needle.
The basic assembly is easy to memorize. Read your owner'smanual carefully for assembly and cleaning instructions for yourspecific brand. Onee familiar with i t , you can quickly clean yourairbrush or install different needles, nozzles, or replacementcomponents,
Specialty airbrushesSpecially airbrushes are available to help you achieve even finer,more detailed results. A fine-line airbrush can be used for intr i -cate camouflage and other detailing techniques that even the"fine" nozzles on a general-purpose airbrush cannot achieve.Figure 1-5 shows a Rich Model AB 200 airbrush made specifi-cally for fine-line detail. This airbrush is used in several projectslater in this book. This type of nozzle allows you to use your air-brush as a writing or drawing instrument, and delivers the paintprecisely—down to a fine line.
7
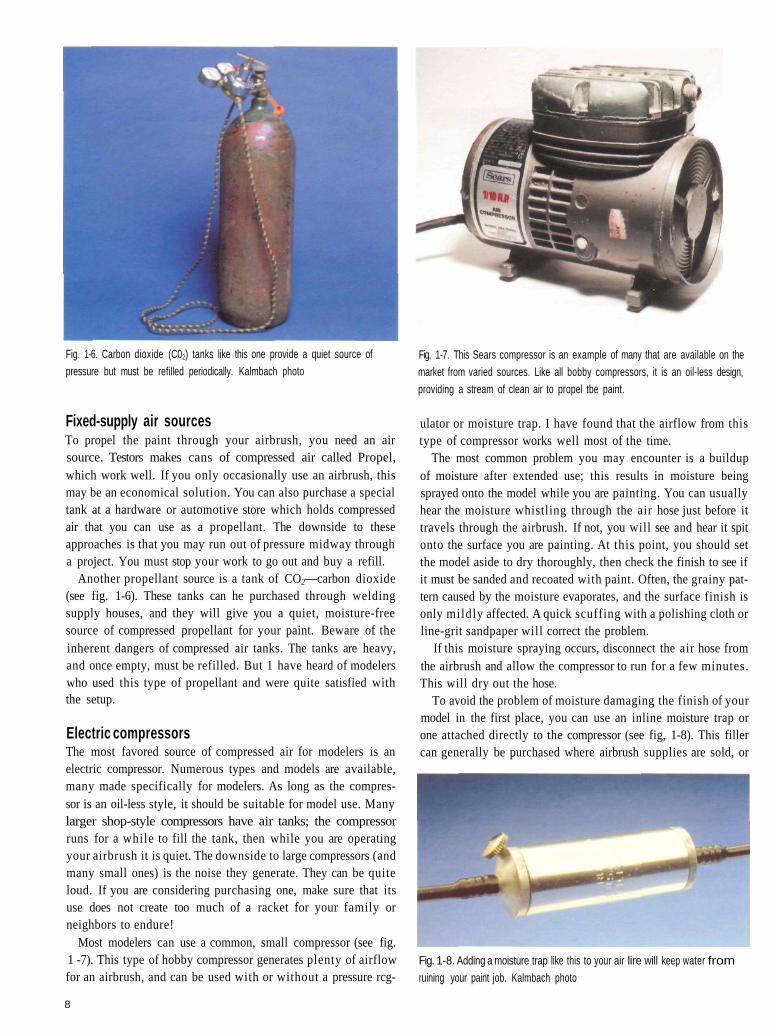
Fig. 1-6. Carbon dioxide (C02) tanks like this one provide a quiet source ofpressure but must be refilled periodically. Kalmbach photo
Fixed-supply air sourcesTo propel the paint through your airbrush, you need an airsource. Testors makes cans of compressed air called Propel,which work well. If you only occasionally use an airbrush, thismay be an economical solution. You can also purchase a specialtank at a hardware or automotive store which holds compressedair that you can use as a propellant. The downside to theseapproaches is that you may run out of pressure midway througha project. You must stop your work to go out and buy a refill.
Another propellant source is a tank of CO2—carbon dioxide(see fig. 1-6). These tanks can he purchased through weldingsupply houses, and they will give you a quiet, moisture-freesource of compressed propellant for your paint. Beware of theinherent dangers of compressed air tanks. The tanks are heavy,and once empty, must be refilled. But 1 have heard of modelerswho used this type of propellant and were quite satisfied withthe setup.
Electric compressorsThe most favored source of compressed air for modelers is anelectric compressor. Numerous types and models are available,many made specifically for modelers. As long as the compres-sor is an oil-less style, it should be suitable for model use. Manylarger shop-style compressors have air tanks; the compressorruns for a while to fill the tank, then while you are operatingyour airbrush it is quiet. The downside to large compressors (andmany small ones) is the noise they generate. They can be quiteloud. If you are considering purchasing one, make sure that itsuse does not create too much of a racket for your family orneighbors to endure!
Most modelers can use a common, small compressor (see fig.1 -7). This type of hobby compressor generates plenty of airflowfor an airbrush, and can be used with or without a pressure rcg-
Fig. 1-7. This Sears compressor is an example of many that are available on themarket from varied sources. Like all bobby compressors, it is an oil-less design,providing a stream of clean air to propel tbe paint.
ulator or moisture trap. I have found that the airflow from thistype of compressor works well most of the time.
The most common problem you may encounter is a buildupof moisture after extended use; this results in moisture beingsprayed onto the model while you are painting. You can usuallyhear the moisture whistling through the air hose just before ittravels through the airbrush. If not, you will see and hear it spitonto the surface you are painting. At this point, you should setthe model aside to dry thoroughly, then check the finish to see ifit must be sanded and recoated with paint. Often, the grainy pat-tern caused by the moisture evaporates, and the surface finish isonly mildly affected. A quick scuffing with a polishing cloth orline-grit sandpaper will correct the problem.
If this moisture spraying occurs, disconnect the air hose fromthe airbrush and allow the compressor to run for a few minutes.This will dry out the hose.
To avoid the problem of moisture damaging the finish of yourmodel in the first place, you can use an inline moisture trap orone attached directly to the compressor (see fig, 1-8). This fillercan generally be purchased where airbrush supplies are sold, or
Fig. 1-8. Adding a moisture trap like this to your air lire will keep water fromruining your paint job. Kalmbach photo
8
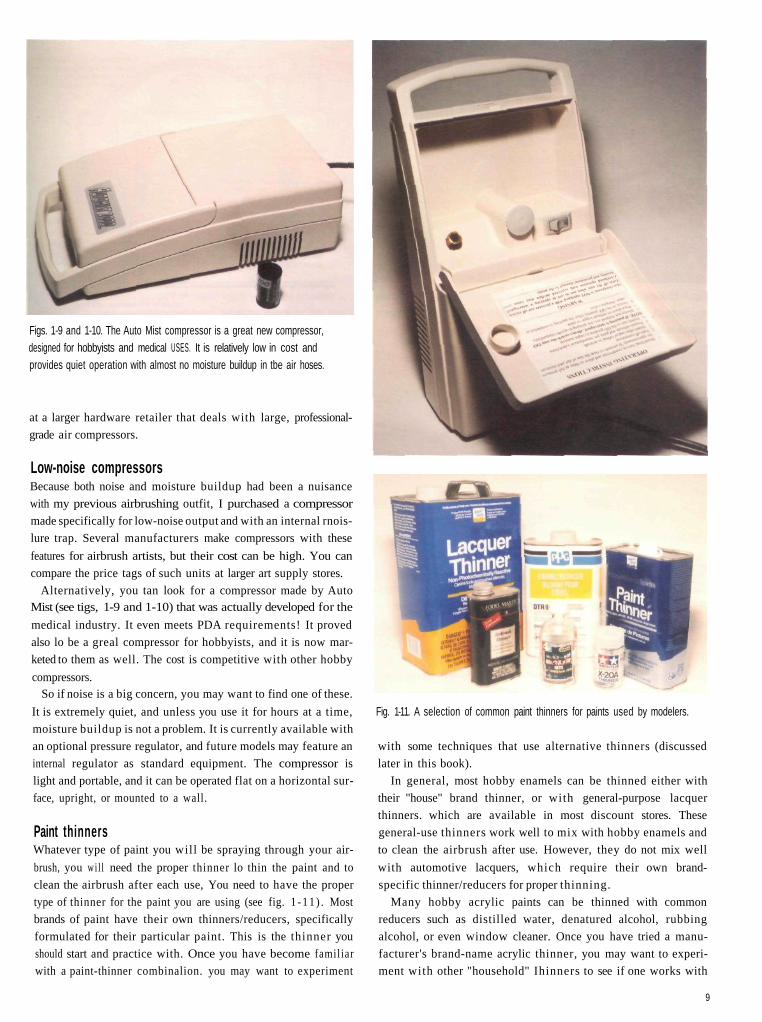
Figs. 1-9 and 1-10. The Auto Mist compressor is a great new compressor,designed for hobbyists and medical USES. It is relatively low in cost andprovides quiet operation with almost no moisture buildup in tbe air hoses.
at a larger hardware retailer that deals with large, professional-
grade air compressors.
Low-noise compressorsBecause both noise and moisture buildup had been a nuisance
with my previous airbrushing outfit, I purchased a compressor
made specifically for low-noise output and with an internal rnois-
lure trap. Several manufacturers make compressors with these
features for airbrush artists, but their cost can be high. You can
compare the price tags of such units at larger art supply stores.
Alternatively, you tan look for a compressor made by AutoMist (see tigs, 1-9 and 1-10) that was actually developed for the
medical industry. It even meets PDA requirements! It proved
also lo be a greal compressor for hobbyists, and it is now mar-
keted to them as well. The cost is competitive with other hobby
compressors.So if noise is a big concern, you may want to find one of these.
It is extremely quiet, and unless you use it for hours at a time,
moisture buildup is not a problem. It is currently available with
an optional pressure regulator, and future models may feature an
internal regulator as standard equipment. The compressor is
light and portable, and it can be operated flat on a horizontal sur-
face, upright, or mounted to a wall.
Paint thinnersWhatever type of paint you will be spraying through your air-
brush, you wi l l need the proper thinner lo thin the paint and to
clean the airbrush after each use, You need to have the proper
type of thinner for the paint you are using (see fig. 1 -11) . Most
brands of paint have their own thinners/reducers, specifically
formulated for their particular paint. This is the thinner you
should start and practice with. Once you have become familiar
with a paint-thinner combinalion. you may want to experiment
Fig. 1-11. A selection of common paint thinners for paints used by modelers.
with some techniques that use alternative thinners (discussed
later in this book).
In general, most hobby enamels can be thinned either with
their "house" brand thinner, or with general-purpose lacquer
thinners. which are available in most discount stores. These
general-use thinners work well to mix with hobby enamels and
to clean the airbrush after use. However, they do not mix well
with automotive lacquers, which require their own brand-
specific thinner/reducers for proper thinning.
Many hobby acrylic paints can be thinned with common
reducers such as distilled water, denatured alcohol, rubbing
alcohol, or even window cleaner. Once you have tried a manu-
facturer's brand-name acrylic thinner, you may want to experi-
ment with other "household" Ihinners to see if one works with
9
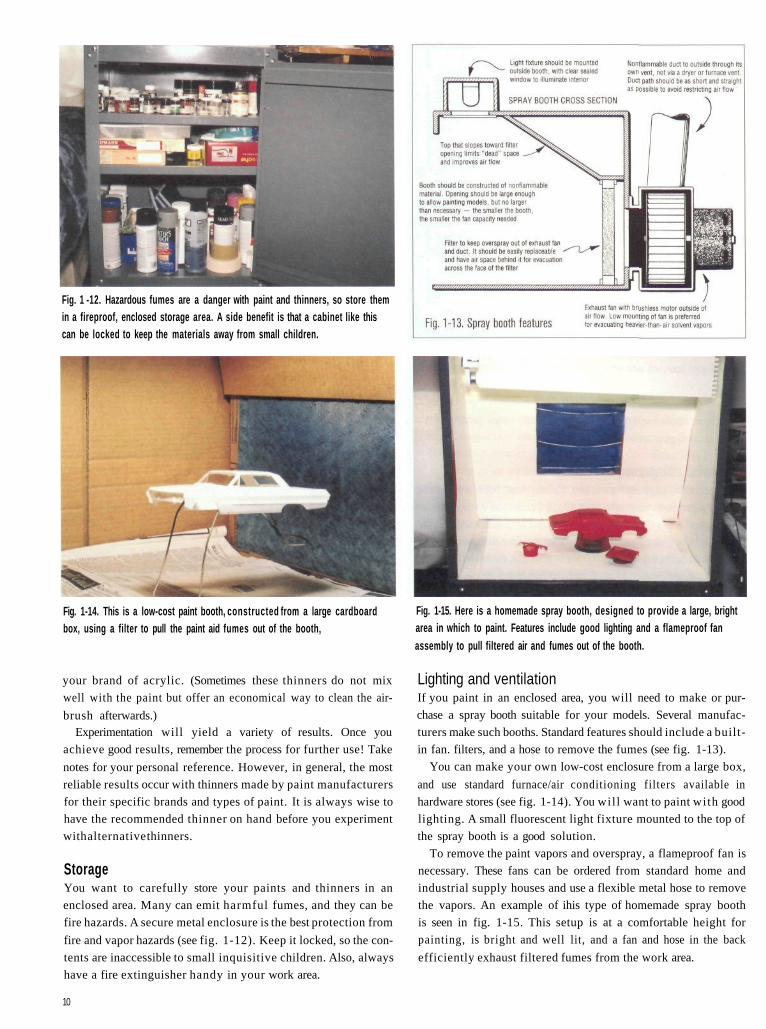
Fig. 1 -12. Hazardous fumes are a danger with paint and thinners, so store themin a fireproof, enclosed storage area. A side benefit is that a cabinet like thiscan be locked to keep the materials away from small children.
Fig. 1-14. This is a low-cost paint booth, constructed from a large cardboardbox, using a filter to pull the paint aid fumes out of the booth,
your brand of acrylic. (Sometimes these thinners do not mix
well with the paint but offer an economical way to clean the air-
brush afterwards.)Experimentation will yield a variety of results. Once you
achieve good results, remember the process for further use! Take
notes for your personal reference. However, in general, the most
reliable results occur with thinners made by paint manufacturers
for their specific brands and types of paint. It is always wise to
have the recommended thinner on hand before you experiment
with alternative thinners.
StorageYou want to carefully store your paints and thinners in an
enclosed area. Many can emit harmful fumes, and they can be
fire hazards. A secure metal enclosure is the best protection from
fire and vapor hazards (see fig. 1-12). Keep it locked, so the con-
tents are inaccessible to small inquisitive children. Also, always
have a fire extinguisher handy in your work area.
Fig. 1-15. Here is a homemade spray booth, designed to provide a large, brightarea in which to paint. Features include good lighting and a flameproof fanassembly to pull filtered air and fumes out of the booth.
Lighting and ventilationIf you paint in an enclosed area, you will need to make or pur-
chase a spray booth suitable for your models. Several manufac-
turers make such booths. Standard features should include a built-
in fan. filters, and a hose to remove the fumes (see fig. 1-13).
You can make your own low-cost enclosure from a large box,
and use standard furnace/air conditioning filters available in
hardware stores (see fig. 1-14). You wil l want to paint with good
lighting. A small fluorescent light fixture mounted to the top of
the spray booth is a good solution.
To remove the paint vapors and overspray, a flameproof fan is
necessary. These fans can be ordered from standard home and
industrial supply houses and use a flexible metal hose to remove
the vapors. An example of ihis type of homemade spray booth
is seen in fig. 1-15. This setup is at a comfortable height for
painting, is bright and well lit, and a fan and hose in the back
efficiently exhaust filtered fumes from the work area.
10
Organic (carbon-based) solvents found in paints and thinners can do serious harm if you inhale them or absorb them through the skin. Here's apartial list of the solvents found in some model paints and thinners:
Product Solvents includedAccu-paint thinner acetone, methyl ethyl ketoneFloquil Dio-Sol, airbrush thinner naphtha, toluene, xyleneScalecoat and Scalecoat II thinner naphtha, xylene
Clear coats and other lacquers acetone, toluene, xyleneCommon lacquer thinner methyl ethyl ketone, methyl isobutyl ketone, toluene
Short-term effects of high-level exposure to these solvents include breathing difficulty, dizziness, fatigue, nausea, and headaches. Severe casescan result in loss of consciousness and respiratory failure. Obviously, if you experience any of the initial symptoms, get into fresh air immediatelyand take steps to see that the exposure isn't repeated. Seek medical attention promptly if any symptoms persist.
Long-term effects of contact with dangerous levels of the solvents can include deterioration of bone marrow, Wood disorders, and nervous sys-tem damage,
These products can be used safely. By providing adequate ventilation (a spray booth] and wearing an approved respirator, such as the one infig. 1-16, you can keep exposure to these chemicals well within safe levels, Look for a chemical-cartridge respirator that fits your face properlyand doesn't allow any air in except through the filters. The masks are available in several styles and sizes. Follow the manufacturer's direction
regarding proper fitting and maintenance.Safety labels of paints and thinners usually list the type of chemical cartridge needed to protect you from that product's ingredients. For most
of the solvents listed above, a TC-23C cartridge for equivalent) approved by NIOSH and MSHA is recommended. This number can be found on thecartridge itself as well as on the packaging for the mask and cartridge.
Eye protection is also a must when working with solvents, A stray splash or spray of solvent can easily injure your eyes, so a pair of safetygoggles should be standard equipment.
This information isn't designed to scare you away from the solvent-based paints. However, it's important to understand the need for safety andthe methods you should take to protect yourself and your family.
Solvent disposalNever dispose of your old thinner or paint by pouring it down a drain. Also refrain from sneaking out to the back yard and dumping it behind thegarage.
Use an old solvent can (never a glass container] to collect old paint and solvents. Many local municipalities have special collection dates forhazardous materials once or twice a year. Other require these materials to be dropped off at a central location.
- from Painting and Weathering Railroad Models, by Jeff Wilson (Kalmbach Books)
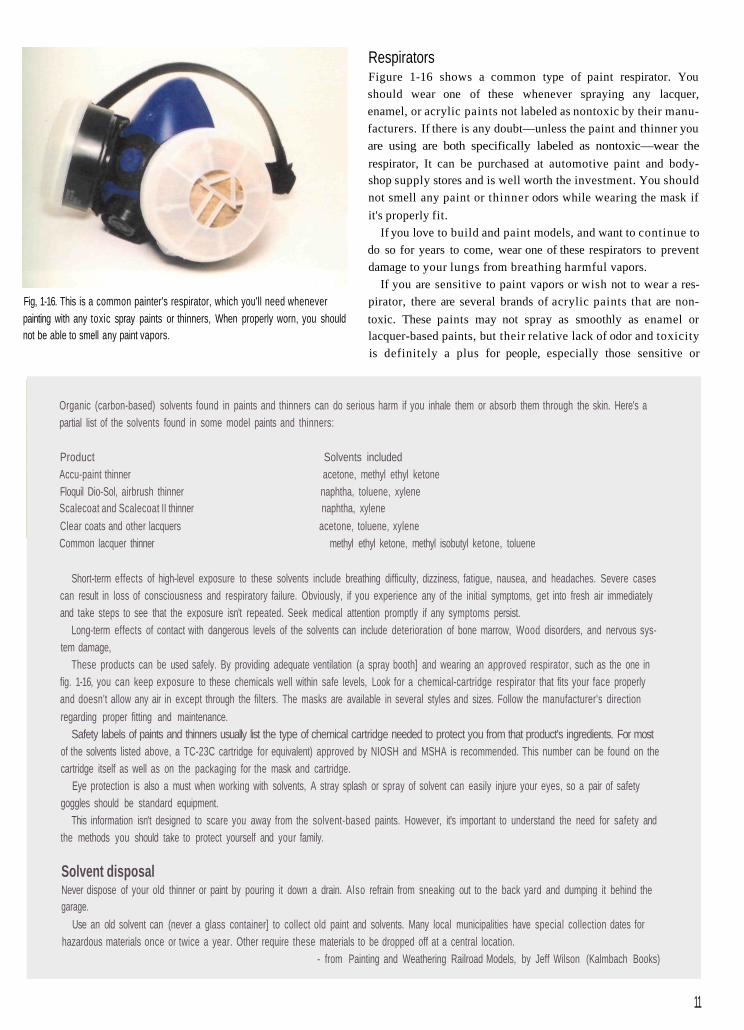
Fig, 1-16. This is a common painter's respirator, which you'll need wheneverpainting with any toxic spray paints or thinners, When properly worn, you shouldnot be able to smell any paint vapors.
RespiratorsFigure 1-16 shows a common type of paint respirator. You
should wear one of these whenever spraying any lacquer,
enamel, or acrylic paints not labeled as nontoxic by their manu-
facturers. If there is any doubt—unless the paint and thinner you
are using are both specifically labeled as nontoxic—wear the
respirator, It can be purchased at automotive paint and body-shop supply stores and is well worth the investment. You should
not smell any paint or thinner odors while wearing the mask if
it's properly fit.
If you love to build and paint models, and want to continue to
do so for years to come, wear one of these respirators to prevent
damage to your lungs from breathing harmful vapors.
If you are sensitive to paint vapors or wish not to wear a res-
pirator, there are several brands of acrylic paints that are non-
toxic. These paints may not spray as smoothly as enamel orlacquer-based paints, but their relative lack of odor and toxicity
is definitely a plus for people, especially those sensitive or
11
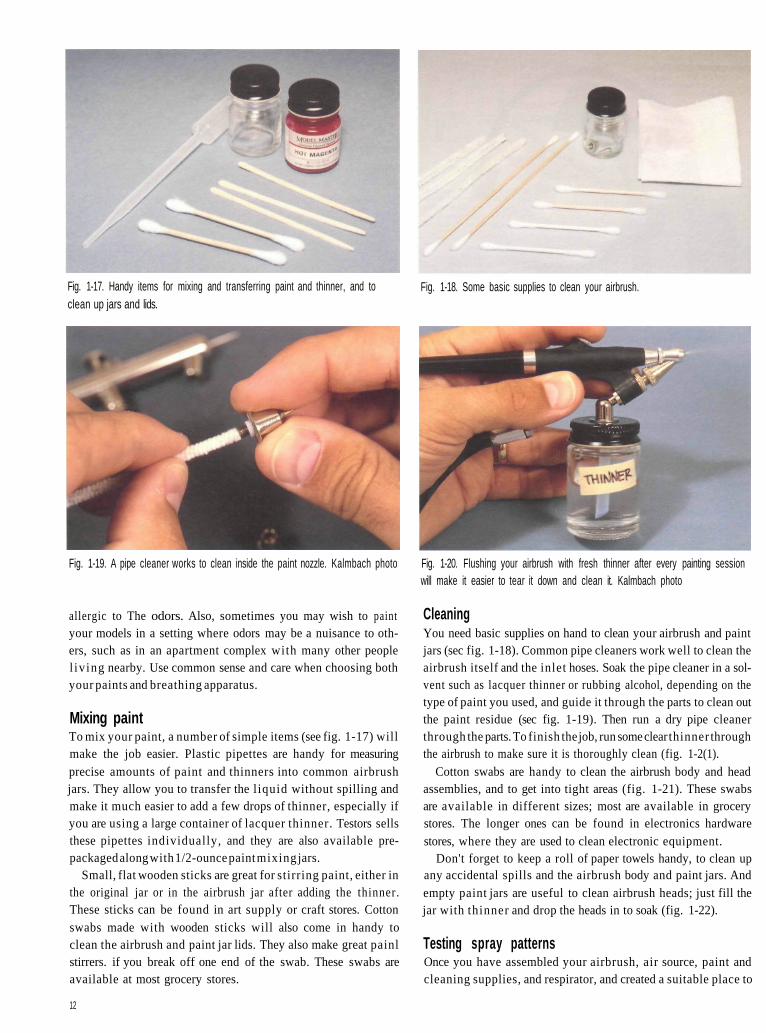
Fig. 1-17. Handy items for mixing and transferring paint and thinner, and toclean up jars and lids.
Fig. 1-18. Some basic supplies to clean your airbrush.
Fig. 1-19. A pipe cleaner works to clean inside the paint nozzle. Kalmbach photo
allergic to The odors. Also, sometimes you may wish to paintyour models in a setting where odors may be a nuisance to oth-ers, such as in an apartment complex with many other peoplel iv ing nearby. Use common sense and care when choosing bothyour paints and breathing apparatus.
Mixing paintTo mix your paint, a number of simple items (see fig. 1-17) willmake the job easier. Plastic pipettes are handy for measuringprecise amounts of paint and thinners into common airbrushjars. They allow you to transfer the l iquid without spilling andmake it much easier to add a few drops of thinner, especially ifyou are using a large container of lacquer thinner. Testors sellsthese pipettes individually, and they are also available pre-packaged along with 1/2-ounce paint mixing jars.
Small, flat wooden sticks are great for stirring paint, either inthe original jar or in the airbrush jar after adding the thinner.These sticks can be found in art supply or craft stores. Cottonswabs made with wooden sticks will also come in handy toclean the airbrush and paint jar lids. They also make great painlstirrers. if you break off one end of the swab. These swabs areavailable at most grocery stores.
CleaningYou need basic supplies on hand to clean your airbrush and paintjars (sec fig. 1-18). Common pipe cleaners work well to clean theairbrush itself and the inlet hoses. Soak the pipe cleaner in a sol-vent such as lacquer thinner or rubbing alcohol, depending on thetype of paint you used, and guide it through the parts to clean outthe paint residue (sec fig. 1-19). Then run a dry pipe cleanerthrough the parts. To finish the job, run some clear thinner throughthe airbrush to make sure it is thoroughly clean (fig. 1-2(1).
Cotton swabs are handy to clean the airbrush body and headassemblies, and to get into tight areas (fig. 1-21). These swabsare available in different sizes; most are available in grocerystores. The longer ones can be found in electronics hardwarestores, where they are used to clean electronic equipment.
Don't forget to keep a roll of paper towels handy, to clean upany accidental spills and the airbrush body and paint jars. Andempty paint jars are useful to clean airbrush heads; just fill thejar with thinner and drop the heads in to soak (fig. 1-22).
Testing spray patternsOnce you have assembled your airbrush, air source, paint andcleaning supplies, and respirator, and created a suitable place to
12
Fig. 1-20. Flushing your airbrush with fresh thinner after every painting sessionwill make it easier to tear it down and clean it. Kalmbach photo
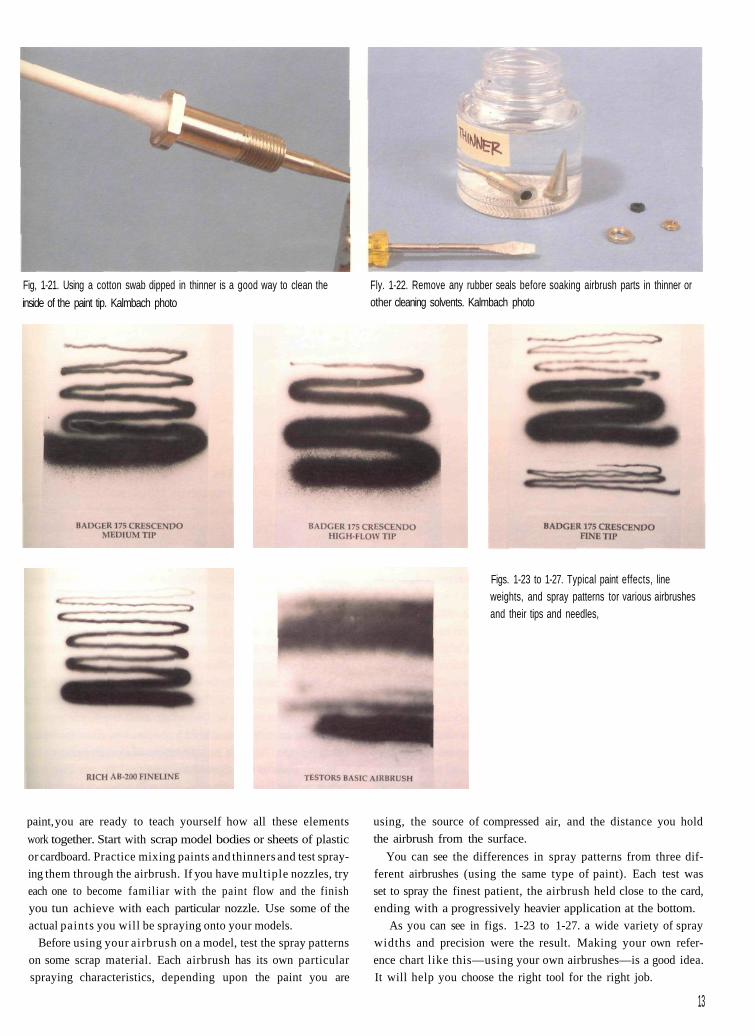
Fig, 1-21. Using a cotton swab dipped in thinner is a good way to clean the
inside of the paint tip. Kalmbach photo
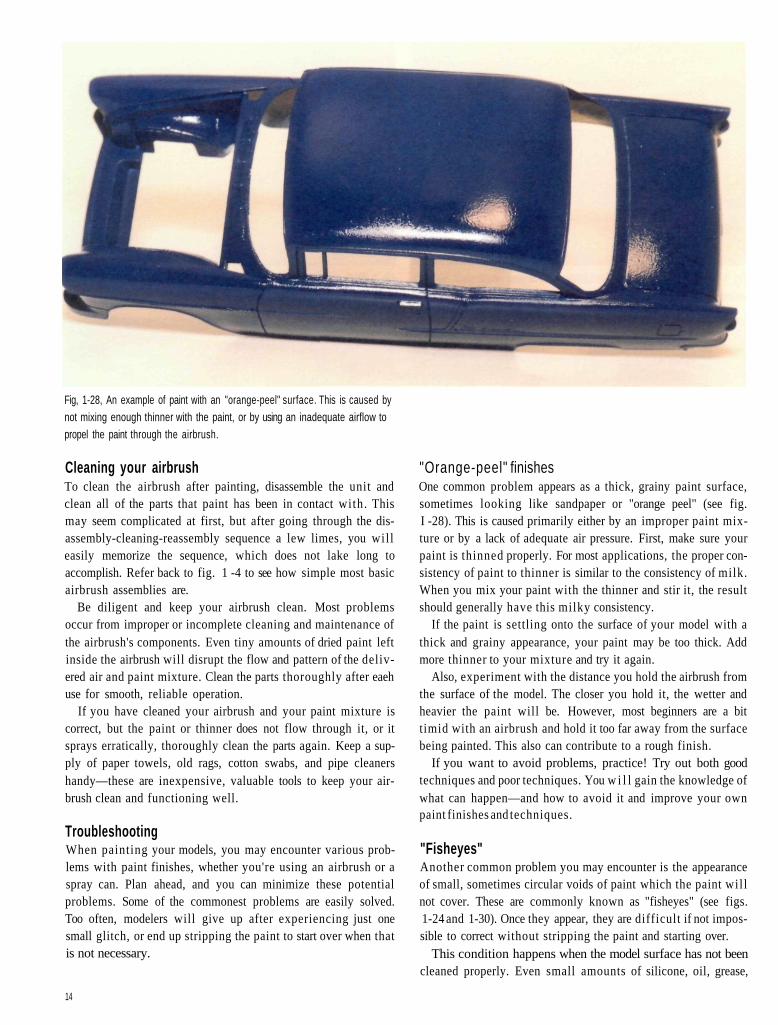
Fly. 1-22. Remove any rubber seals before soaking airbrush parts in thinner orother cleaning solvents. Kalmbach photo
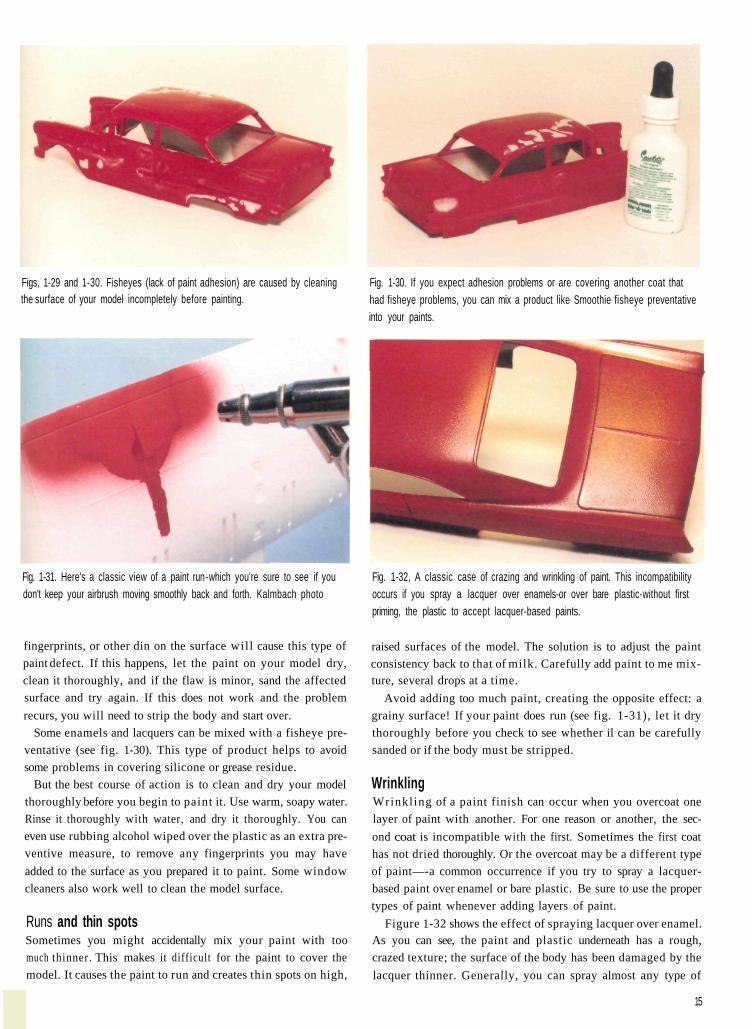
Figs. 1-23 to 1-27. Typical paint effects, lineweights, and spray patterns tor various airbrushesand their tips and needles,
paint, you are ready to teach yourself how all these elements
work together. Start with scrap model bodies or sheets of plastic
or cardboard. Practice mixing paints and thinners and test spray-
ing them through the airbrush. If you have multiple nozzles, try
each one to become familiar with the paint flow and the finish
you tun achieve with each particular nozzle. Use some of the
actual paints you will be spraying onto your models.
Before using your airbrush on a model, test the spray patterns
on some scrap material. Each airbrush has its own particular
spraying characteristics, depending upon the paint you are
using, the source of compressed air, and the distance you hold
the airbrush from the surface.
You can see the differences in spray patterns from three dif-
ferent airbrushes (using the same type of paint). Each test was
set to spray the finest patient, the airbrush held close to the card,
ending with a progressively heavier application at the bottom.
As you can see in figs. 1-23 to 1-27. a wide variety of spray
widths and precision were the result. Making your own refer-
ence chart like this—using your own airbrushes—is a good idea.
It will help you choose the right tool for the right job.
13
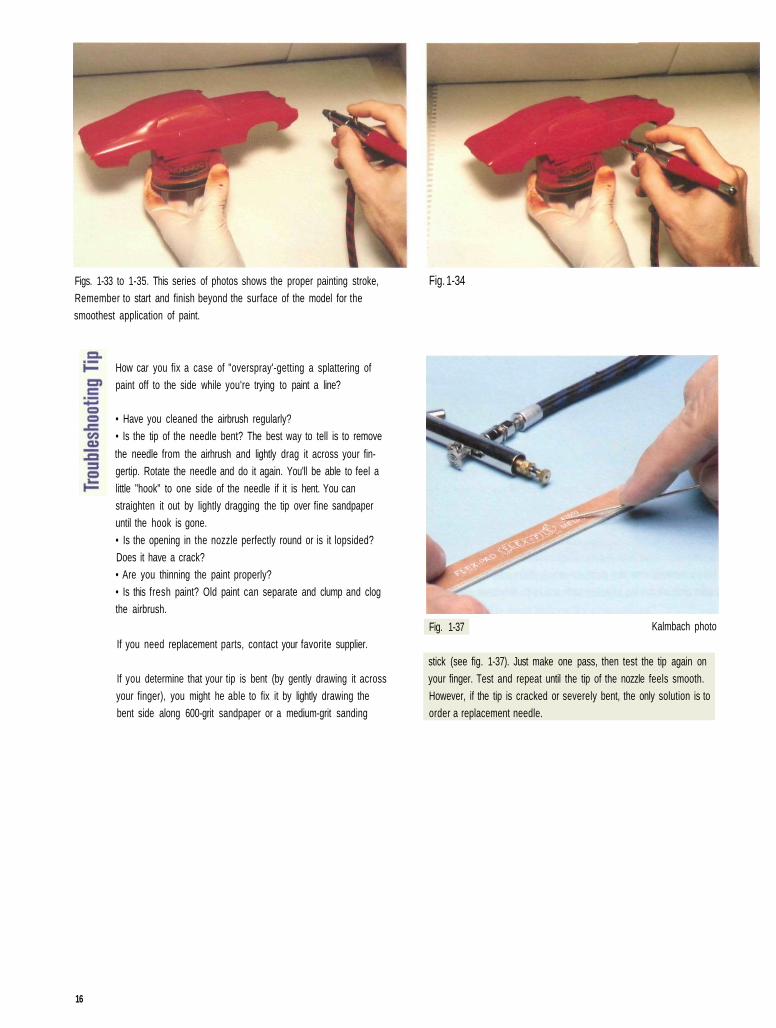
Fig, 1-28, An example of paint with an "orange-peel" surface. This is caused bynot mixing enough thinner with the paint, or by using an inadequate airflow topropel the paint through the airbrush.
Cleaning your airbrushTo clean the airbrush after painting, disassemble the unit andclean all of the parts that paint has been in contact with. Thismay seem complicated at first, but after going through the dis-assembly-cleaning-reassembly sequence a lew limes, you wil leasily memorize the sequence, which does not lake long toaccomplish. Refer back to fig. 1 -4 to see how simple most basicairbrush assemblies are.
Be diligent and keep your airbrush clean. Most problemsoccur from improper or incomplete cleaning and maintenance ofthe airbrush's components. Even tiny amounts of dried paint leftinside the airbrush will disrupt the flow and pattern of the deliv-ered air and paint mixture. Clean the parts thoroughly after eaehuse for smooth, reliable operation.
If you have cleaned your airbrush and your paint mixture iscorrect, but the paint or thinner does not flow through it, or itsprays erratically, thoroughly clean the parts again. Keep a sup-ply of paper towels, old rags, cotton swabs, and pipe cleanershandy—these are inexpensive, valuable tools to keep your air-brush clean and functioning well.
TroubleshootingWhen painting your models, you may encounter various prob-lems with paint finishes, whether you're using an airbrush or aspray can. Plan ahead, and you can minimize these potentialproblems. Some of the commonest problems are easily solved.Too often, modelers will give up after experiencing just onesmall glitch, or end up stripping the paint to start over when thatis not necessary.
"Orange-peel" finishesOne common problem appears as a thick, grainy paint surface,sometimes looking like sandpaper or "orange peel" (see fig.I -28). This is caused primarily either by an improper paint mix-ture or by a lack of adequate air pressure. First, make sure yourpaint is thinned properly. For most applications, the proper con-sistency of paint to thinner is similar to the consistency of milk.When you mix your paint with the thinner and stir it, the resultshould generally have this milky consistency.
If the paint is settling onto the surface of your model with athick and grainy appearance, your paint may be too thick. Addmore thinner to your mixture and try it again.
Also, experiment with the distance you hold the airbrush fromthe surface of the model. The closer you hold it, the wetter andheavier the paint will be. However, most beginners are a bittimid with an airbrush and hold it too far away from the surfacebeing painted. This also can contribute to a rough finish.
If you want to avoid problems, practice! Try out both goodtechniques and poor techniques. You w i l l gain the knowledge ofwhat can happen—and how to avoid it and improve your ownpaint finishes and techniques.
"Fisheyes"Another common problem you may encounter is the appearanceof small, sometimes circular voids of paint which the paint wil lnot cover. These are commonly known as "fisheyes" (see figs.1-24 and 1-30). Once they appear, they are difficult if not impos-sible to correct without stripping the paint and starting over.
This condition happens when the model surface has not beencleaned properly. Even small amounts of silicone, oil, grease,
14
Figs, 1-29 and 1-30. Fisheyes (lack of paint adhesion) are caused by cleaningthe surface of your model incompletely before painting.
Fig. 1-30. If you expect adhesion problems or are covering another coat thathad fisheye problems, you can mix a product like Smoothie fisheye preventativeinto your paints.
Fig. 1-31. Here's a classic view of a paint run - which you're sure to see if youdon't keep your airbrush moving smoothly back and forth. Kalmbach photo
fingerprints, or other din on the surface wil l cause this type of
paint defect. If this happens, let the paint on your model dry,
clean it thoroughly, and if the flaw is minor, sand the affected
surface and try again. If this does not work and the problem
recurs, you will need to strip the body and start over.
Some enamels and lacquers can be mixed with a fisheye pre-
ventative (see fig. 1-30). This type of product helps to avoid
some problems in covering silicone or grease residue.
But the best course of action is to clean and dry your model
thoroughly before you begin to paint it. Use warm, soapy water.
Rinse it thoroughly with water, and dry it thoroughly. You can
even use rubbing alcohol wiped over the plastic as an extra pre-
ventive measure, to remove any fingerprints you may have
added to the surface as you prepared it to paint. Some window
cleaners also work well to clean the model surface.
Runs and thin spotsSometimes you might accidentally mix your paint with too
much thinner. This makes it difficult for the paint to cover the
model. It causes the paint to run and creates thin spots on high,
Fig. 1-32, A classic case of crazing and wrinkling of paint. This incompatibilityoccurs if you spray a lacquer over enamels-or over bare plastic-without firstpriming, the plastic to accept lacquer-based paints.
raised surfaces of the model. The solution is to adjust the paint
consistency back to that of milk. Carefully add paint to me mix-ture, several drops at a time.
Avoid adding too much paint, creating the opposite effect: a
grainy surface! If your paint does run (see fig. 1-31), let it dry
thoroughly before you check to see whether il can be carefully
sanded or if the body must be stripped.
WrinklingWrinkling of a paint finish can occur when you overcoat one
layer of paint with another. For one reason or another, the sec-
ond coat is incompatible with the first. Sometimes the first coat
has not dried thoroughly. Or the overcoat may be a different type
of paint—-a common occurrence if you try to spray a lacquer-
based paint over enamel or bare plastic. Be sure to use the proper
types of paint whenever adding layers of paint.
Figure 1-32 shows the effect of spraying lacquer over enamel.As you can see, the paint and plastic underneath has a rough,
crazed texture; the surface of the body has been damaged by the
lacquer thinner. Generally, you can spray almost any type of
15
Figs. 1-33 to 1-35. This series of photos shows the proper painting stroke,Remember to start and finish beyond the surface of the model for thesmoothest application of paint.
Fig. 1-34
How car you fix a case of "overspray'-getting a splattering ofpaint off to the side while you're trying to paint a line?
• Have you cleaned the airbrush regularly?• Is the tip of the needle bent? The best way to tell is to remove
the needle from the airhrush and lightly drag it across your fin-gertip. Rotate the needle and do it again. You'll be able to feel alittle "hook" to one side of the needle if it is hent. You canstraighten it out by lightly dragging the tip over fine sandpaperuntil the hook is gone.• Is the opening in the nozzle perfectly round or is it lopsided?Does it have a crack?• Are you thinning the paint properly?• Is this fresh paint? Old paint can separate and clump and clogthe airbrush.
If you need replacement parts, contact your favorite supplier.
If you determine that your tip is bent (by gently drawing it acrossyour finger), you might he able to fix it by lightly drawing thebent side along 600-grit sandpaper or a medium-grit sanding
Fig. 1-37 Kalmbach photo
stick (see fig. 1-37). Just make one pass, then test the tip again onyour finger. Test and repeat until the tip of the nozzle feels smooth.However, if the tip is cracked or severely bent, the only solution is toorder a replacement needle.
16
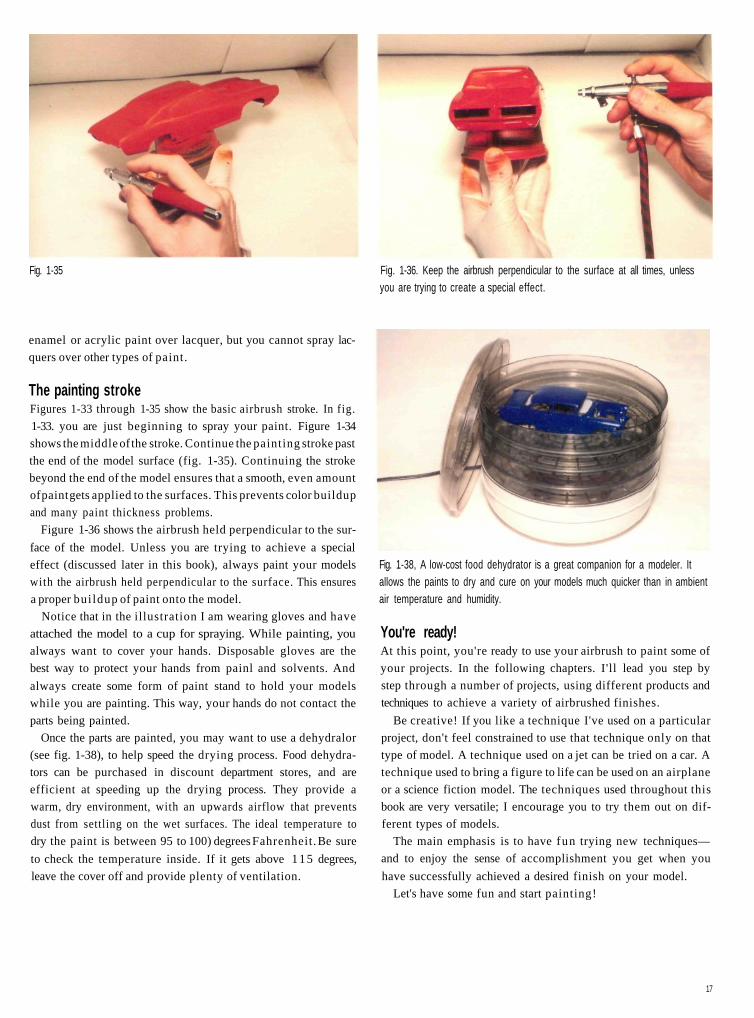
Fig. 1-35
enamel or acrylic paint over lacquer, but you cannot spray lac-
quers over other types of paint.
The painting strokeFigures 1-33 through 1-35 show the basic airbrush stroke. In fig.
1-33. you are just beginning to spray your paint. Figure 1-34
shows the middle of the stroke. Continue the painting stroke past
the end of the model surface (fig. 1-35). Continuing the stroke
beyond the end of the model ensures that a smooth, even amount
of paint gets applied to the surfaces. This prevents color buildup
and many paint thickness problems.
Figure 1-36 shows the airbrush held perpendicular to the sur-
face of the model. Unless you are trying to achieve a special
effect (discussed later in this book), always paint your models
with the airbrush held perpendicular to the surface. This ensures
a proper bui ldup of paint onto the model.
Notice that in the illustration I am wearing gloves and have
attached the model to a cup for spraying. While painting, you
always want to cover your hands. Disposable gloves are the
best way to protect your hands from painl and solvents. And
always create some form of paint stand to hold your models
while you are painting. This way, your hands do not contact the
parts being painted.
Once the parts are painted, you may want to use a dehydralor
(see fig. 1-38), to help speed the drying process. Food dehydra-
tors can be purchased in discount department stores, and are
efficient at speeding up the drying process. They provide a
warm, dry environment, with an upwards airflow that prevents
dust from settling on the wet surfaces. The ideal temperature to
dry the paint is between 95 to 100) degrees Fahrenheit. Be sure
to check the temperature inside. If it gets above 1 1 5 degrees,
leave the cover off and provide plenty of ventilation.
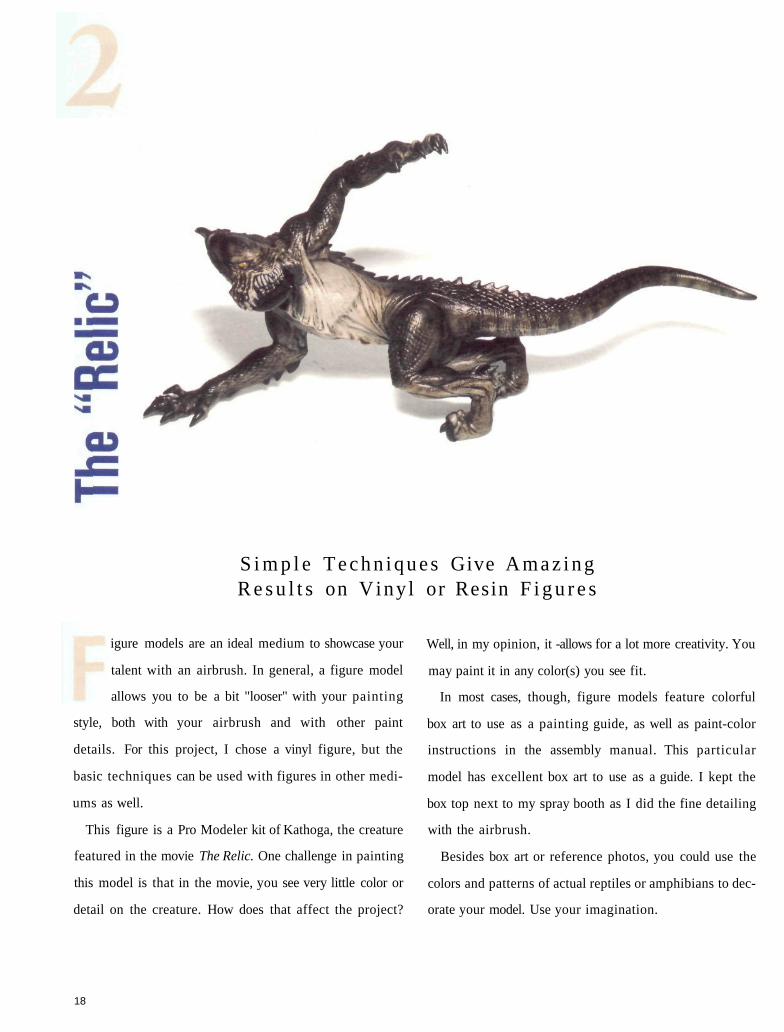
Fig. 1-38, A low-cost food dehydrator is a great companion for a modeler. Itallows the paints to dry and cure on your models much quicker than in ambientair temperature and humidity.
You're ready!At this point, you're ready to use your airbrush to paint some of
your projects. In the following chapters. I'll lead you step by
step through a number of projects, using different products and
techniques to achieve a variety of airbrushed finishes.
Be creative! If you like a technique I've used on a particular
project, don't feel constrained to use that technique only on that
type of model. A technique used on a jet can be tried on a car. A
technique used to bring a figure to life can be used on an airplane
or a science fiction model. The techniques used throughout this
book are very versatile; I encourage you to try them out on dif-
ferent types of models.
The main emphasis is to have fun trying new techniques—
and to enjoy the sense of accomplishment you get when you
have successfully achieved a desired finish on your model.
Let's have some fun and start painting!
17
Fig. 1-36. Keep the airbrush perpendicular to the surface at all times, unlessyou are trying to create a special effect.
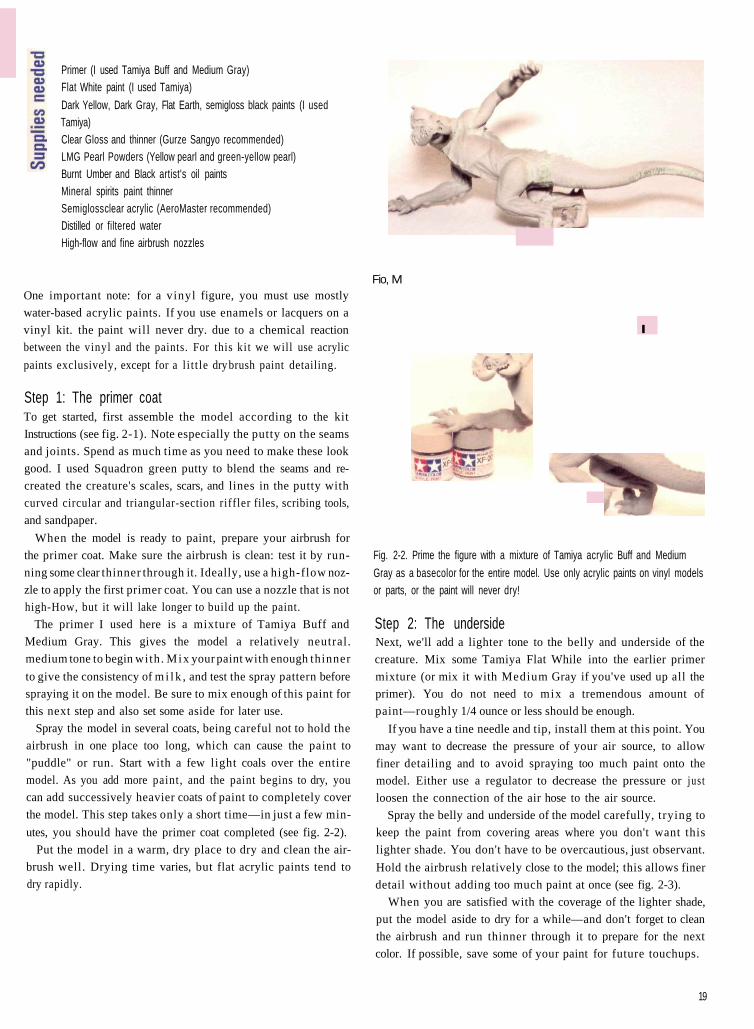
S i m p l e T e c h n i q u e s Give A m a z i n gR e s u l t s on Viny l or Resin F i g u r e s
igure models are an ideal medium to showcase your
talent with an airbrush. In general, a figure model
allows you to be a bit "looser" with your painting
style, both with your airbrush and with other paint
details. For this project, I chose a vinyl figure, but the
basic techniques can be used with figures in other medi-
ums as well.
This figure is a Pro Modeler kit of Kathoga, the creature
featured in the movie The Relic. One challenge in painting
this model is that in the movie, you see very little color or
detail on the creature. How does that affect the project?
Well, in my opinion, it -allows for a lot more creativity. You
may paint it in any color(s) you see fit.
In most cases, though, figure models feature colorful
box art to use as a painting guide, as well as paint-color
instructions in the assembly manual. This particular
model has excellent box art to use as a guide. I kept the
box top next to my spray booth as I did the fine detailing
with the airbrush.
Besides box art or reference photos, you could use the
colors and patterns of actual reptiles or amphibians to dec-
orate your model. Use your imagination.
18
Primer (I used Tamiya Buff and Medium Gray)Flat White paint (I used Tamiya)
Dark Yellow, Dark Gray, Flat Earth, semigloss black paints (I usedTamiya)Clear Gloss and thinner (Gurze Sangyo recommended)LMG Pearl Powders (Yellow pearl and green-yellow pearl)Burnt Umber and Black artist's oil paintsMineral spirits paint thinnerSemigloss clear acrylic (AeroMaster recommended)Distilled or filtered waterHigh-flow and fine airbrush nozzles
One important note: for a vinyl figure, you must use mostly
water-based acrylic paints. If you use enamels or lacquers on a
vinyl kit. the paint will never dry. due to a chemical reaction
between the vinyl and the paints. For this ki t we will use acrylic
paints exclusively, except for a l i t t le dry brush paint detailing.
Step 1: The primer coatTo get started, first assemble the model according to the kit
Instructions (see fig. 2-1). Note especially the putty on the seams
and joints. Spend as much time as you need to make these look
good. I used Squadron green putty to blend the seams and re-
created the creature's scales, scars, and lines in the putty with
curved circular and triangular-section riffler files, scribing tools,
and sandpaper.
When the model is ready to paint, prepare your airbrush for
the primer coat. Make sure the airbrush is clean: test it by run-
ning some clear thinner through it. Ideally, use a high-flow noz-
zle to apply the first primer coat. You can use a nozzle that is not
high-How, but it will lake longer to build up the paint.
The primer I used here is a mixture of Tamiya Buff and
Medium Gray. This gives the model a relatively neutral.
medium tone to begin with. Mix your paint with enough thinner
to give the consistency of m i l k , and test the spray pattern before
spraying it on the model. Be sure to mix enough of this paint for
this next step and also set some aside for later use.
Spray the model in several coats, being careful not to hold the
airbrush in one place too long, which can cause the paint to
"puddle" or run. Start with a few light coals over the entire
model. As you add more paint, and the paint begins to dry, you
can add successively heavier coats of paint to completely cover
the model. This step takes only a short time—in just a few min-
utes, you should have the primer coat completed (see fig. 2-2).
Put the model in a warm, dry place to dry and clean the air-
brush well. Drying time varies, but flat acrylic paints tend to
dry rapidly.
Fio, M
I
Fig. 2-2. Prime the figure with a mixture of Tamiya acrylic Buff and Medium
Gray as a basecolor for the entire model. Use only acrylic paints on vinyl modelsor parts, or the paint will never dry!
Step 2: The undersideNext, we'll add a lighter tone to the belly and underside of the
creature. Mix some Tamiya Flat While into the earlier primer
mixture (or mix it with Medium Gray if you've used up all the
primer). You do not need to mix a tremendous amount of
paint—roughly 1/4 ounce or less should be enough.
If you have a tine needle and tip, install them at this point. You
may want to decrease the pressure of your air source, to allow
finer detailing and to avoid spraying too much paint onto the
model. Either use a regulator to decrease the pressure or just
loosen the connection of the air hose to the air source.
Spray the belly and underside of the model carefully, trying to
keep the paint from covering areas where you don't want this
lighter shade. You don't have to be overcautious, just observant.
Hold the airbrush relatively close to the model; this allows finer
detail without adding too much paint at once (see fig. 2-3).
When you are satisfied with the coverage of the lighter shade,
put the model aside to dry for a while—and don't forget to clean
the airbrush and run thinner through it to prepare for the next
color. If possible, save some of your paint for future touchups.
19

Fig. 2-3. Paint the belly a lighter tone than the rest of the body.
Step 3: Adding a warm colorThe next step adds a bit of warm color to the model. We w i l l do
that by using the fine tip installed on the airbrush to apply
Tamiya Dark Yellow paint. As before, mix the paint to a mi lky
consistency, then carefully spray the dark yellow mixture to the
sides and darker areas of the model. Test the color on scrap
paper or cardstock before adding it to the model.
Be careful to avoid covering the lighter shade on the under-
side you just finished. Work carefully, again decreasing the pres-
sure to make the paint application smooth, light, and steady.
If you overdo the application of this color, you can go back to
the earlier, lighter color and carefully "fog in" a touchup to the
affected area, a relatively easy fix. Afterwards, clean the air-
brush well and let the model dry. Figure 2-4 shows the model
after this stage.
Step 4: Adding the dark colorThe darkest colors on the creature are a mixture of Tamiya
Semigloss Black, German Gray, and Flat Earth. Adjust the ratios
of these colors as you see fit. The main idea is to have a dark
color, but not as dark as black. The Flat Earth color gives the
paint a warm earth tone that complements the other eolors. This
color and mixture do not have to be exact; use your own color
sense and imagination to make it look right to you.
You wil l need to mix about 1/4 to 1/2 oz. of paint for this step. Be
sure to thin it to the right consistency. Test the spray pattern on
cardstock. You will be painting relatively fine lines in this step;
it is fairly easy with a little practice.
Hold the airbrush quite close to the model, and use as little air
pressure as possible—-just enough for the paint to smoothly exit
onto the model in a very fine pattern (see fig. 2-5). Paint the top
surfaces of the model, the spikes, and a number of narrow verti-
cal stripes on the tail and over parts of the arms and legs.
Fig. 2-5. Apply a darker mixture with a fine nozzle for a striped effect, especiallyon the tail. It also adds depth and color to the spine and extremities without
obliterating the layered colors underneath.
You may also want to add spots to the model. If your paint tip
is fine enough and your hand is steady enough, you can spray
the spots freehand. Try this technique on scrap material first. But
if you want more control whi le painting spots, simply cut a
mask: Take a piece of card stock and punch a couple of different-
sized holes into it (see fig. 2-7). Again, test this on scrap mate-
rial first.
Hold the mask close to the model, but not touching it where
the spot is to be located. Make sure there is roughly 1/16" clear-
ance, as you do not want the spots too dark or hard-edged. It
doesn't take a lot of paint to make the spots; just a few light
passes over the hole wil l do the trick.
Figure 2-6 shows the model after you have finished these
detailing steps. Applying the color for darker areas takes more
time than earlier steps because the detail is finer, but the tech-
nique is loose (and fun!). Once you have finished, set the model
aside to dry thoroughly, clean the airbrush, remove the fine tip.
and install the high-flow tip for the next step.
20
Fig, 2-4. Using Dark Yellow to highlight certain areas glues the creature an
added dimension of color.
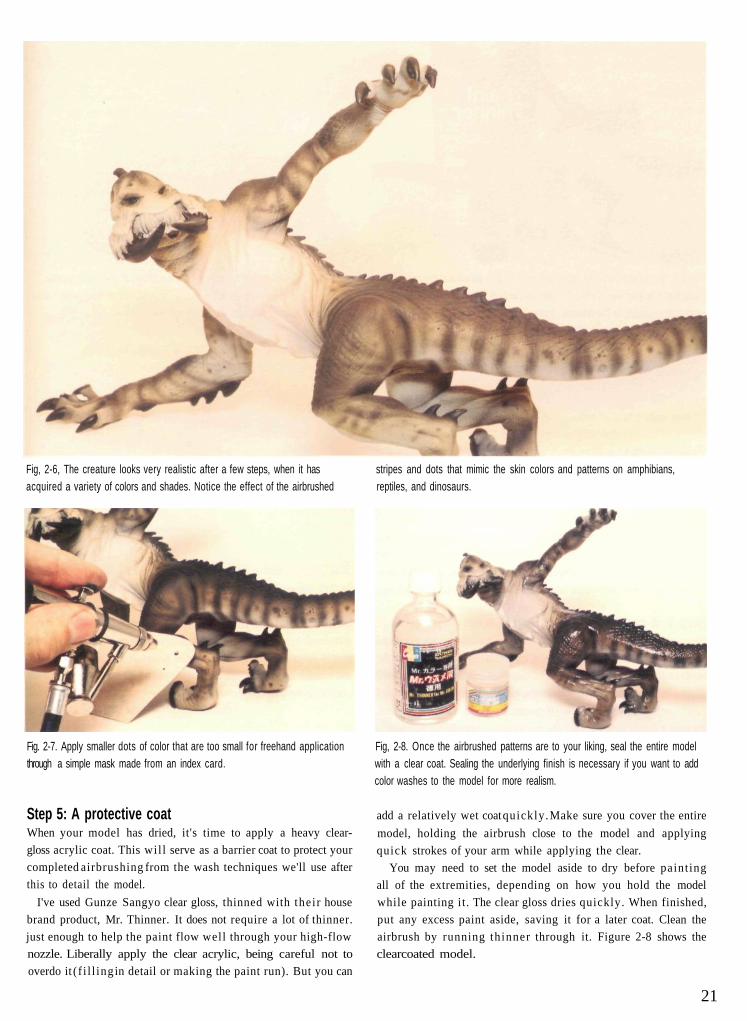
Fig, 2-6, The creature looks very realistic after a few steps, when it hasacquired a variety of colors and shades. Notice the effect of the airbrushed
Fig. 2-7. Apply smaller dots of color that are too small for freehand applicationthrough a simple mask made from an index card.
Step 5: A protective coatWhen your model has dried, it's time to apply a heavy clear-
gloss acrylic coat. This wil l serve as a barrier coat to protect your
completed airbrushing from the wash techniques we'll use after
this to detail the model.
I've used Gunze Sangyo clear gloss, thinned with their house
brand product, Mr. Thinner. It does not require a lot of thinner.
just enough to help the paint flow well through your high-flow
nozzle. Liberally apply the clear acrylic, being careful not to
overdo it ( f i l l ing in detail or making the paint run). But you can
stripes and dots that mimic the skin colors and patterns on amphibians,reptiles, and dinosaurs.
Fig, 2-8. Once the airbrushed patterns are to your liking, seal the entire modelwith a clear coat. Sealing the underlying finish is necessary if you want to addcolor washes to the model for more realism.
add a relatively wet coat quickly. Make sure you cover the entire
model, holding the airbrush close to the model and applying
quick strokes of your arm while applying the clear.
You may need to set the model aside to dry before painting
all of the extremities, depending on how you hold the model
while painting it. The clear gloss dries quickly. When finished,
put any excess paint aside, saving it for a later coat. Clean the
airbrush by running thinner through it. Figure 2-8 shows the
clearcoated model.
21
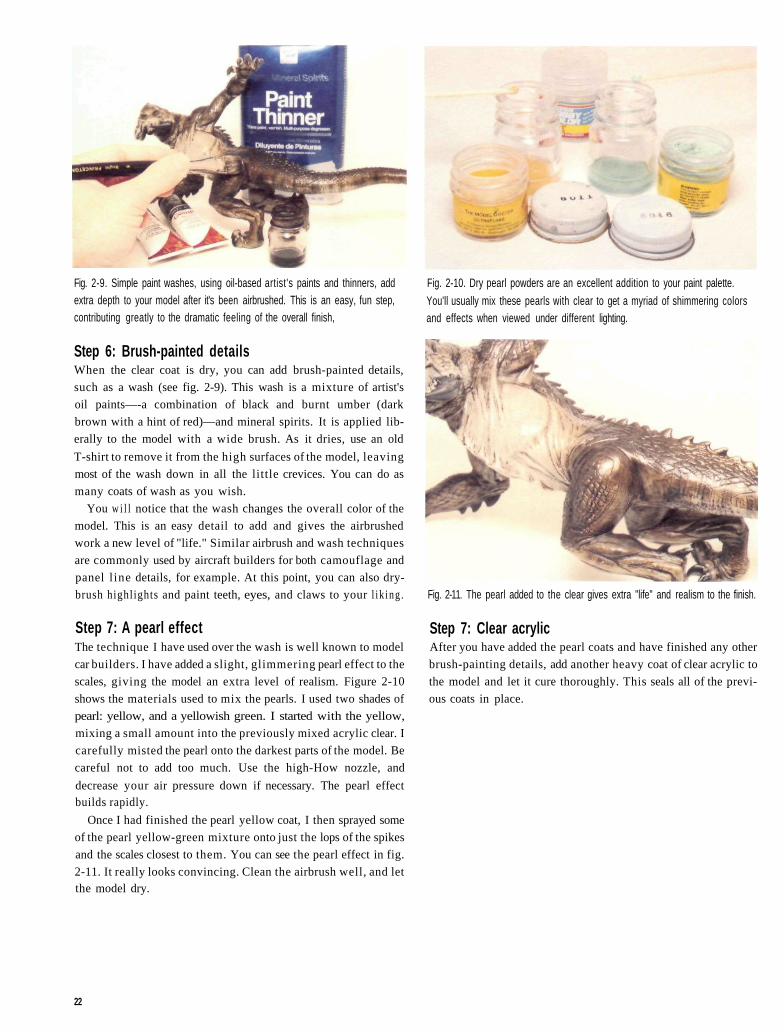
Fig. 2-9. Simple paint washes, using oil-based artist's paints and thinners, addextra depth to your model after it's been airbrushed. This is an easy, fun step,contributing greatly to the dramatic feeling of the overall finish,
Step 6: Brush-painted detailsWhen the clear coat is dry, you can add brush-painted details,
such as a wash (see fig. 2-9). This wash is a mixture of artist's
oil paints—-a combination of black and burnt umber (dark
brown with a hint of red)—and mineral spirits. It is applied lib-
erally to the model with a wide brush. As it dries, use an old
T-shirt to remove it from the high surfaces of the model, leaving
most of the wash down in all the little crevices. You can do as
many coats of wash as you wish.
You w i l l notice that the wash changes the overall color of the
model. This is an easy detail to add and gives the airbrushed
work a new level of "life." Similar airbrush and wash techniques
are commonly used by aircraft builders for both camouflage and
panel l ine details, for example. At this point, you can also dry-
brush highlights and paint teeth, eyes, and claws to your l ik ing .
Step 7: A pearl effectThe technique I have used over the wash is well known to model
car builders. I have added a slight, glimmering pearl effect to the
scales, giving the model an extra level of realism. Figure 2-10
shows the materials used to mix the pearls. I used two shades of
pearl: yellow, and a yellowish green. I started with the yellow,
mixing a small amount into the previously mixed acrylic clear. I
carefully misted the pearl onto the darkest parts of the model. Be
careful not to add too much. Use the high-How nozzle, and
decrease your air pressure down if necessary. The pearl effectbuilds rapidly.
Once I had finished the pearl yellow coat, I then sprayed some
of the pearl yellow-green mixture onto just the lops of the spikes
and the scales closest to them. You can see the pearl effect in fig.
2-11. It really looks convincing. Clean the airbrush well, and letthe model dry.
Fig. 2-10. Dry pearl powders are an excellent addition to your paint palette.
You'll usually mix these pearls with clear to get a myriad of shimmering colorsand effects when viewed under different lighting.
Fig. 2-11. The pearl added to the clear gives extra "life" and realism to the finish.
Step 7: Clear acrylicAfter you have added the pearl coats and have finished any other
brush-painting details, add another heavy coat of clear acrylic to
the model and let it cure thoroughly. This seals all of the previ-
ous coats in place.
22
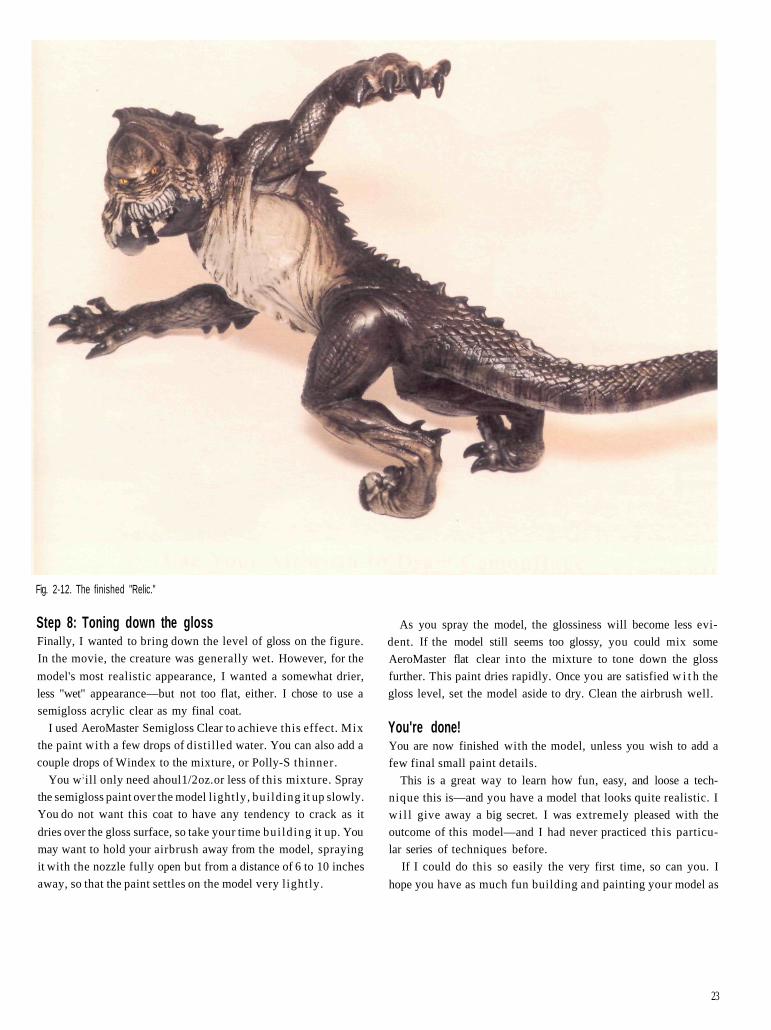
Fig. 2-12. The finished "Relic."
Step 8: Toning down the glossFinally, I wanted to bring down the level of gloss on the figure.
In the movie, the creature was generally wet. However, for the
model's most realistic appearance, I wanted a somewhat drier,
less "wet" appearance—but not too flat, either. I chose to use a
semigloss acrylic clear as my final coat.
I used AeroMaster Semigloss Clear to achieve this effect. Mix
the paint with a few drops of distilled water. You can also add a
couple drops of Windex to the mixture, or Polly-S thinner.
You w ;ill only need ahoul 1/2 oz. or less of this mixture. Spray
the semigloss paint over the model l ightly, bui lding it up slowly.
You do not want this coat to have any tendency to crack as it
dries over the gloss surface, so take your time bui lding it up. You
may want to hold your airbrush away from the model, spraying
it with the nozzle fully open but from a distance of 6 to 10 inches
away, so that the paint settles on the model very lightly.
As you spray the model, the glossiness will become less evi-
dent. If the model still seems too glossy, you could mix some
AeroMaster flat clear into the mixture to tone down the gloss
further. This paint dries rapidly. Once you are satisfied w i t h the
gloss level, set the model aside to dry. Clean the airbrush well.
You're done!You are now finished with the model, unless you wish to add a
few final small paint details.
This is a great way to learn how fun, easy, and loose a tech-
nique this is—and you have a model that looks quite realistic. I
wi l l give away a big secret. I was extremely pleased with the
outcome of this model—and I had never practiced this particu-
lar series of techniques before.
If I could do this so easily the very first time, so can you. I
hope you have as much fun building and painting your model as
23
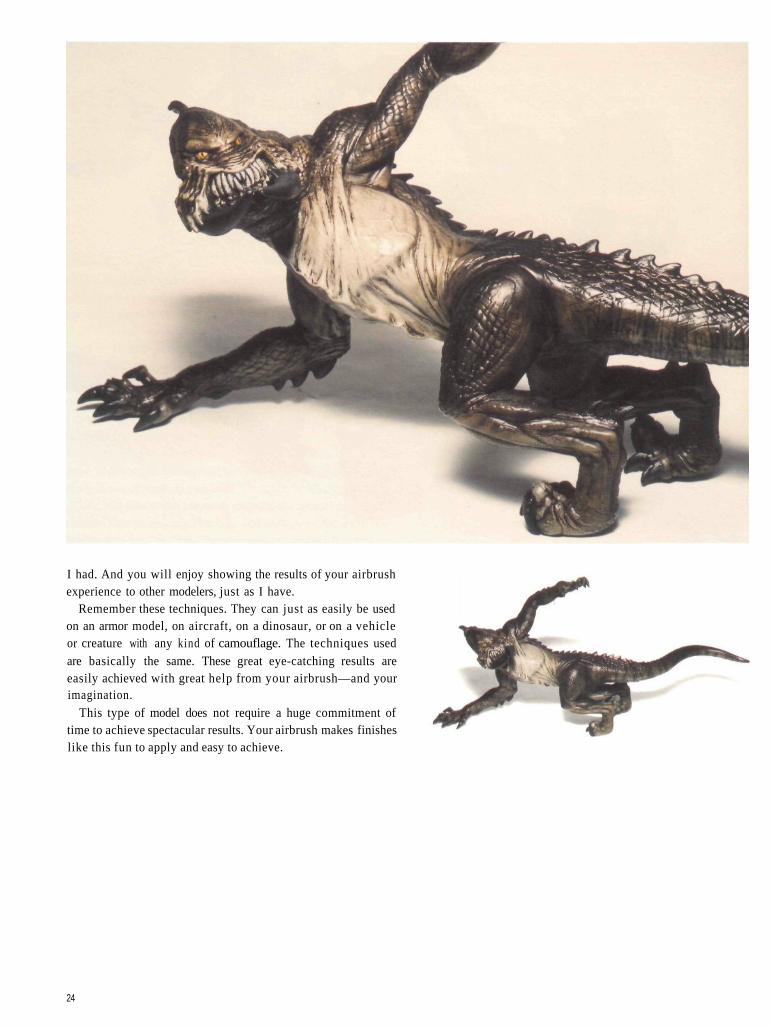
I had. And you will enjoy showing the results of your airbrushexperience to other modelers, just as I have.
Remember these techniques. They can just as easily be usedon an armor model, on aircraft, on a dinosaur, or on a vehicleor creature with any kind of camouflage. The techniques usedare basically the same. These great eye-catching results areeasily achieved with great help from your airbrush—and yourimagination.
This type of model does not require a huge commitment oftime to achieve spectacular results. Your airbrush makes finisheslike this fun to apply and easy to achieve.
24
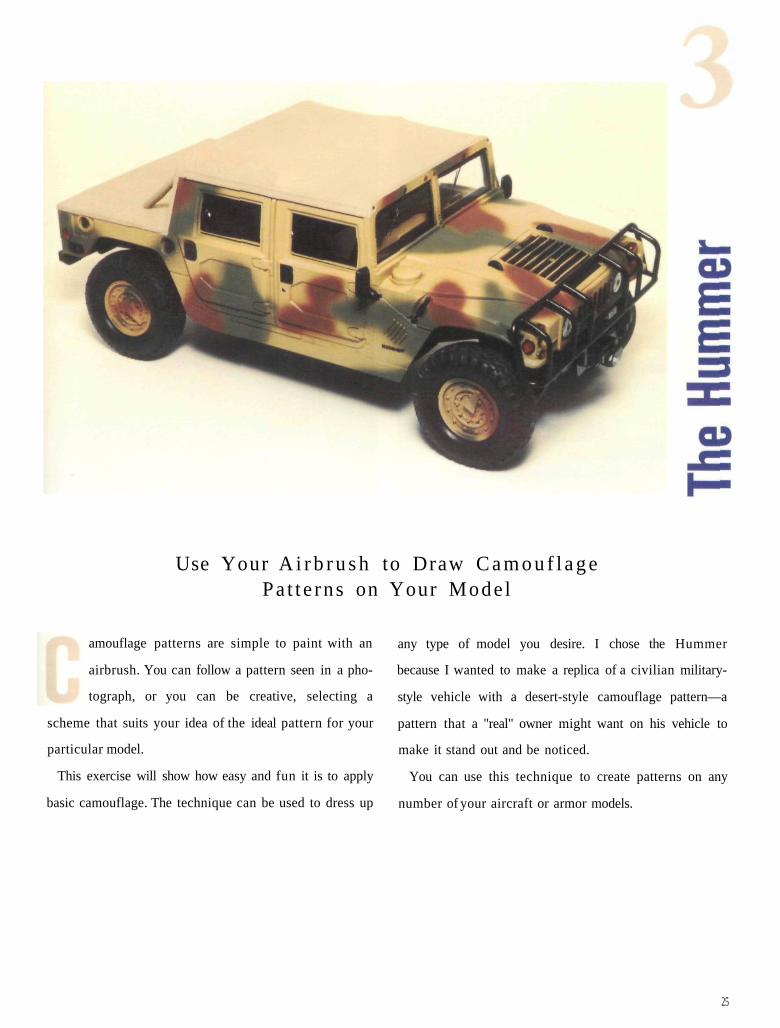
Use Your A i r b r u s h to Draw C a m o u f l a g ePa t t e rns on Your Mode l
amouflage patterns are simple to paint with an
airbrush. You can follow a pattern seen in a pho-
tograph, or you can be creative, selecting a
scheme that suits your idea of the ideal pattern for your
particular model.
This exercise will show how easy and fun it is to apply
basic camouflage. The technique can be used to dress up
any type of model you desire. I chose the Hummer
because I wanted to make a replica of a civilian military-
style vehicle with a desert-style camouflage pattern—a
pattern that a "real" owner might want on his vehicle to
make it stand out and be noticed.
You can use this technique to create patterns on any
number of your aircraft or armor models.
25
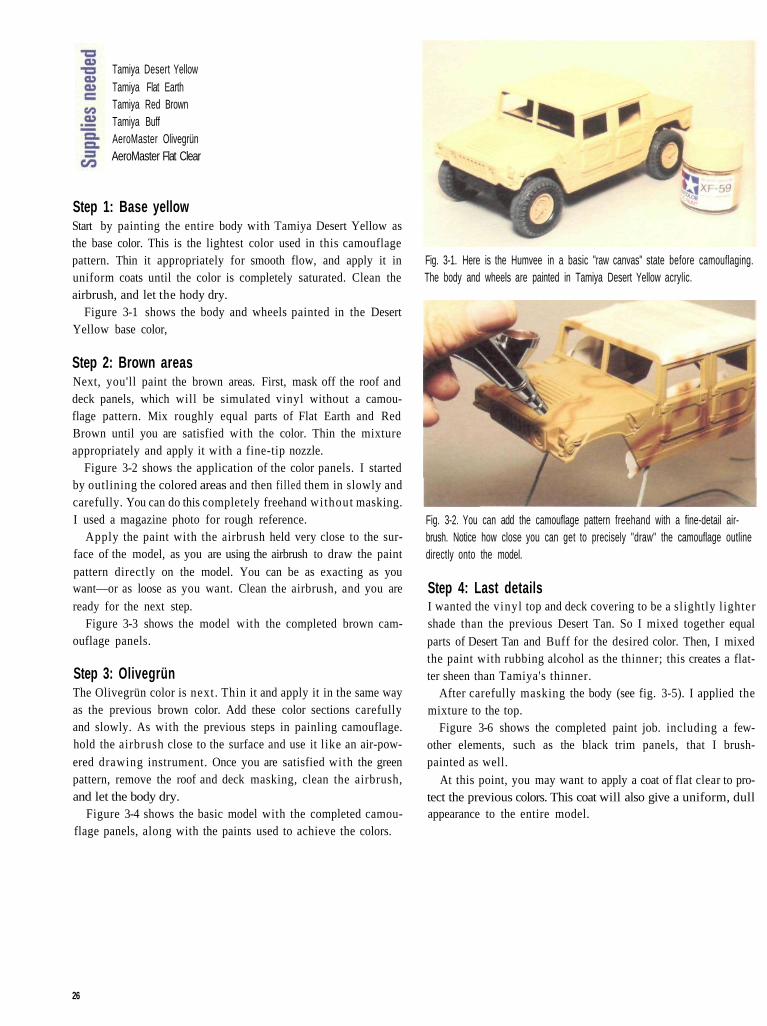
Tamiya Desert YellowTamiya Flat EarthTamiya Red BrownTamiya BuffAeroMaster OlivegrünAeroMaster Flat Clear
Step 1: Base yellowStart by painting the entire body with Tamiya Desert Yellow asthe base color. This is the lightest color used in this camouflagepattern. Thin it appropriately for smooth flow, and apply it inuniform coats until the color is completely saturated. Clean theairbrush, and let the hody dry.
Figure 3-1 shows the body and wheels painted in the DesertYellow base color,
Step 2: Brown areasNext, you'll paint the brown areas. First, mask off the roof anddeck panels, which will be simulated vinyl without a camou-flage pattern. Mix roughly equal parts of Flat Earth and RedBrown until you are satisfied with the color. Thin the mixtureappropriately and apply it with a fine-tip nozzle.
Figure 3-2 shows the application of the color panels. I startedby outlining the colored areas and then filled them in slowly andcarefully. You can do this completely freehand without masking.I used a magazine photo for rough reference.
Apply the paint with the airbrush held very close to the sur-face of the model, as you are using the airbrush to draw the paintpattern directly on the model. You can be as exacting as youwant—or as loose as you want. Clean the airbrush, and you areready for the next step.
Figure 3-3 shows the model with the completed brown cam-ouflage panels.
Step 3: OlivegrünThe Olivegrün color is next. Thin it and apply it in the same wayas the previous brown color. Add these color sections carefullyand slowly. As with the previous steps in painling camouflage.hold the airbrush close to the surface and use it like an air-pow-ered drawing instrument. Once you are satisfied with the greenpattern, remove the roof and deck masking, clean the airbrush,and let the body dry.
Figure 3-4 shows the basic model with the completed camou-flage panels, along with the paints used to achieve the colors.
Fig. 3-1. Here is the Humvee in a basic "raw canvas" state before camouflaging.The body and wheels are painted in Tamiya Desert Yellow acrylic.
Fig. 3-2. You can add the camouflage pattern freehand with a fine-detail air-brush. Notice how close you can get to precisely "draw" the camouflage outlinedirectly onto the model.
Step 4: Last detailsI wanted the vinyl top and deck covering to be a slightly lightershade than the previous Desert Tan. So I mixed together equalparts of Desert Tan and Buff for the desired color. Then, I mixedthe paint with rubbing alcohol as the thinner; this creates a flat-ter sheen than Tamiya's thinner.
After carefully masking the body (see fig. 3-5). I applied themixture to the top.
Figure 3-6 shows the completed paint job. including a few-other elements, such as the black trim panels, that I brush-painted as well.
At this point, you may want to apply a coat of flat clear to pro-tect the previous colors. This coat will also give a uniform, dullappearance to the entire model.
26

Fig, 3-3, With the addition of sections painted with a mixture of Tamiya Flat
Earth and Red Brown, the camouflage pattern is halfway complete.
Fig. 34. Add AeroMaster Olivegrün as the next camouflage color. Here, the
model shows off its finished camouflage pattern, with the colors used to achieve
the effect.
Fig. 3-5. The vinyl top and deck covering should he a slightly lighter shade than
the previous Desert Yellow. Mask off the camouflaged areas, and spray a mix-
lure of Desert Yellow and Buff to achieve the correct shade.
Fig. 3-6. The finished paint job was very easy to apply and was quick to dry. A
simple model like this is an easy way to familiarize yourself with camouflage
techniques, Once you've tried it, you can quickly move on towards more intri-
cate camouflage patterns on any subject.
27
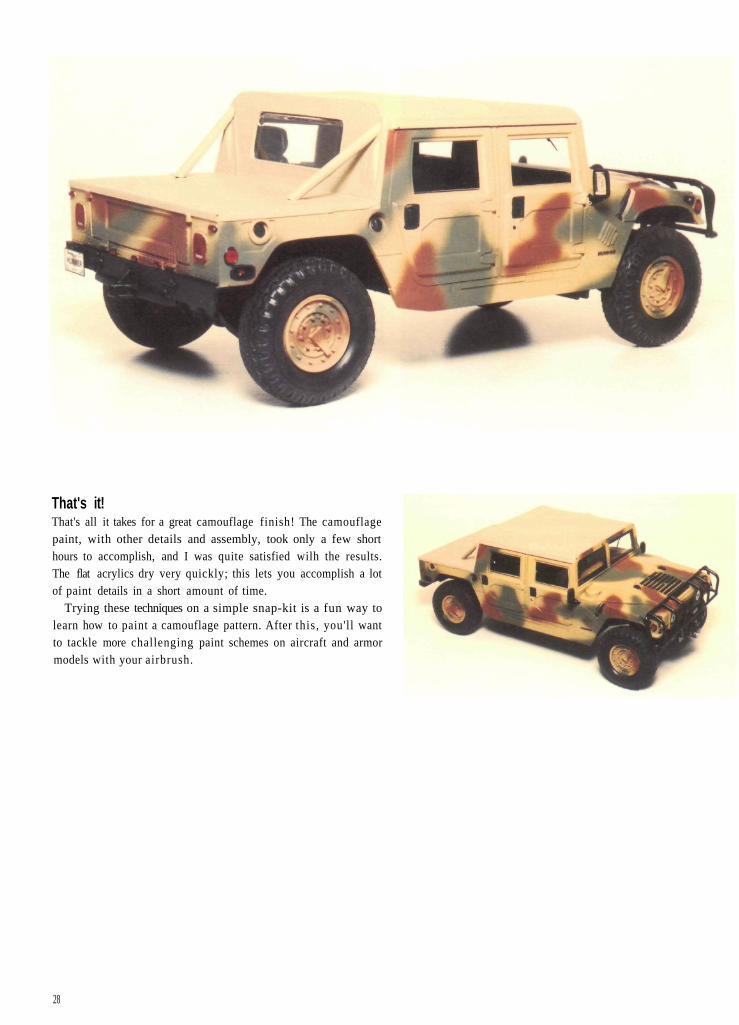
That's it!That's all it takes for a great camouflage finish! The camouflagepaint, with other details and assembly, took only a few shorthours to accomplish, and I was quite satisfied wilh the results.The flat acrylics dry very quickly; this lets you accomplish a lotof paint details in a short amount of time.
Trying these techniques on a simple snap-kit is a fun way tolearn how to paint a camouflage pattern. After this, you'll wantto tackle more challenging paint schemes on aircraft and armormodels with your airbrush.
28
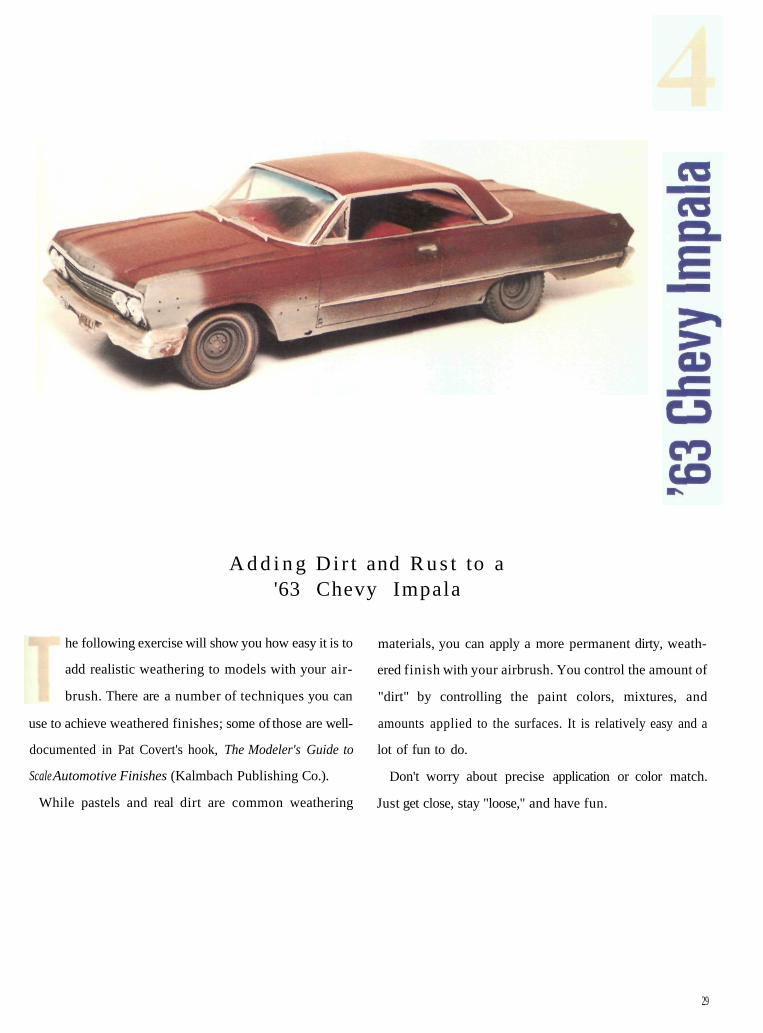
A d d i n g Di r t and R u s t to a'63 Chevy Impala
he following exercise will show you how easy it is to
add realistic weathering to models with your air-
brush. There are a number of techniques you can
use to achieve weathered finishes; some of those are well-
documented in Pat Covert's hook, The Modeler's Guide to
Scale Automotive Finishes (Kalmbach Publishing Co.).
While pastels and real dirt are common weathering
materials, you can apply a more permanent dirty, weath-
ered finish with your airbrush. You control the amount of
"dirt" by controlling the paint colors, mixtures, and
amounts applied to the surfaces. It is relatively easy and a
lot of fun to do.
Don't worry about precise application or color match.
Just get close, stay "loose," and have fun.
29

Model Master Acryl RustTamiya Neutral GreyPolly S RustTestors Transparent Blue and Transparent Green spray paints
Step 1: Painting the modelPaint the body on this '63 Impala using a combination of flat
acrylics: a rust-colored primer overall, highlighted with a few
areas of light gray primer for touchups. First paint the chassis
with flat black, and then detail it with brush-painted engine,
transmission, and exhaust details (see fig. 4-1).
You can be as exacting as you want with the colors. But real-
istically, once the model has been "dirtied," all the colors blend
together, so your chassis detail colors don't need to be especially
precise before you apply the weathering.
Step 2: Add the rustThe first step in weathering the chassis is to add a fine mist of
Model Master Rust acrylic paint to the chassis. Figure 4-2 shows
a light, general application of the paint. You can use a medium
or heavy tip.
You want to mist the paint on rather "dry." so don't hold the
airbrush too close. Start at about a foot away, and adjust the dis-
tance until you are happy with the results. This step will go
quickly, and the rust color dries rapidly as well.
You may not need to thin the paint for this detail. But if the
unthinned paint does not flow from your airbrush, thin it just
enough for it to flow out in a grainy pattern.
Step 3: Add the "dirt"The next step is to add the "dirt" color lo the chassis. Use any
acrylic flat color in the tan range. Some colors are actually made
to resemble earth: just choose your favorite. The color shown infig. 4-3 is Polly S Rust, which is actually a good earth lone.
Apply this color using the same method as the rust. You may
want to direct the dirt rearward, however, g iv ing more of the
paint buildup to the front-facing surfaces of chassis and wheel
wells, to simulate the motion and direction of dirt being sprayed
onto the chassis. Just focus on aiming your airbrush as you apply
paint toward the rear of the car in general.
This coat covers quickly. You can apply a light coat to simu-
late a newer car, or a heavier coat as shown here to create an
older car or truck. It's easy to overdo this weathering on a
"newer" vehicle. To keep the dirty color from bui lding up too
rapidly, you can mix up to half of the color with acrylic flat clear.
This wil l reduce the overall dirt-color saturation. With very lit-
tle practice, you will easily master this effect with your airbrush.
Fig. 4-1. Here's the basic chassis detail, painted befote adding weathering. Theweathering will cover up a lot of fine paint details, so your colors and finishesneed not be exact or precise.
Fig. 1-2. Lightly spray a fine mist of Model Master Rust acrylic paint onto thechassis as the first step toward a weathered airbrush finish.
Step 4: Spraying the bodySave the remaining "dirt" mix to apply to the body—or mix
your favorite acrylic dirt color for the body. If you haven't
already, you'll want to thin the paint a bit with some flat clear
acrylic paint and test the pattern first. Generally, spray more
heavily on the lower side panels, more lightly as you go over the
top of the model.
I masked the windshield wiper paths (see fig. 4-5). After
applying the "dirt," I removed the mask, resulting in a very
accurate-looking dirty windshield with wiper marks in place.
Notice the windshield tint strip (see fig. 4-4). added with a
fine-line detail airbrush. This little detail really sets a model
apart, and is best replicated with an airbrush rather than decals
or any other means. I like to use transparent blue and green
enamel colors from spray cans for this, spraying the paint from
the cans carefully into my airbrush jar. Then I apply this paint
directly with the fine tip airbrush to the windshield. No th inn ing
of the paint should be necessary, and the enamel "bites" into the
clear plastic wi th ease. Mold the nozzle quite close to the surface,
and gently apply the paint in a side-to-side motion as if you are
drawing the pattern onto the top of the windshield.
30
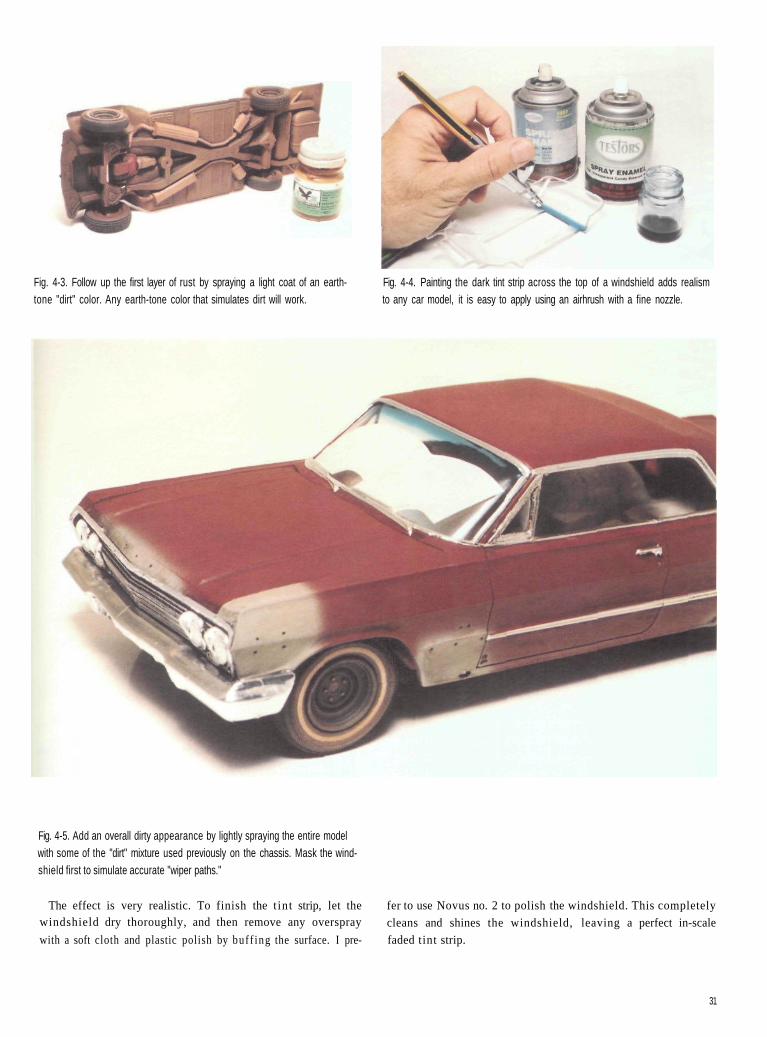
Fig. 4-3. Follow up the first layer of rust by spraying a light coat of an earth-tone "dirt" color. Any earth-tone color that simulates dirt will work.
Fig. 4-4. Painting the dark tint strip across the top of a windshield adds realismto any car model, it is easy to apply using an airhrush with a fine nozzle.
Fig. 4-5. Add an overall dirty appearance by lightly spraying the entire modelwith some of the "dirt" mixture used previously on the chassis. Mask the wind-shield first to simulate accurate "wiper paths."
The effect is very realistic. To finish the t int strip, let thewindshield dry thoroughly, and then remove any overspray
with a soft cloth and plastic polish by buff ing the surface. I pre-
fer to use Novus no. 2 to polish the windshield. This completely
cleans and shines the windshield, leaving a perfect in-scale
faded tint strip.
31
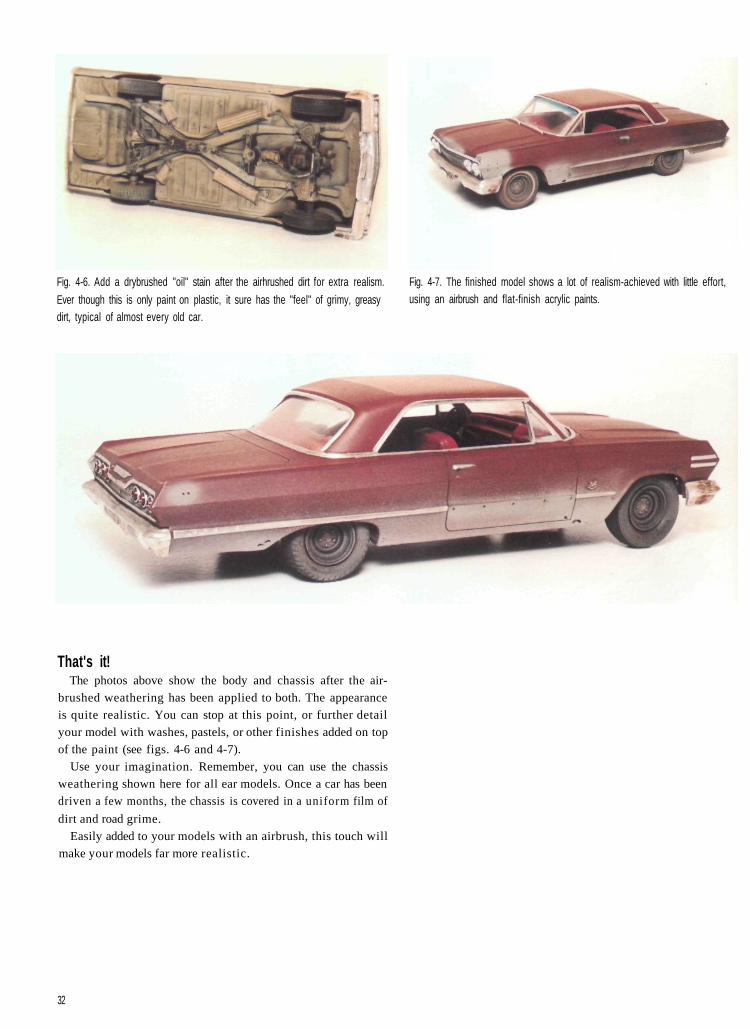
Fig. 4-6. Add a drybrushed "oil" stain after the airhrushed dirt for extra realism.
Ever though this is only paint on plastic, it sure has the "feel" of grimy, greasydirt, typical of almost every old car.
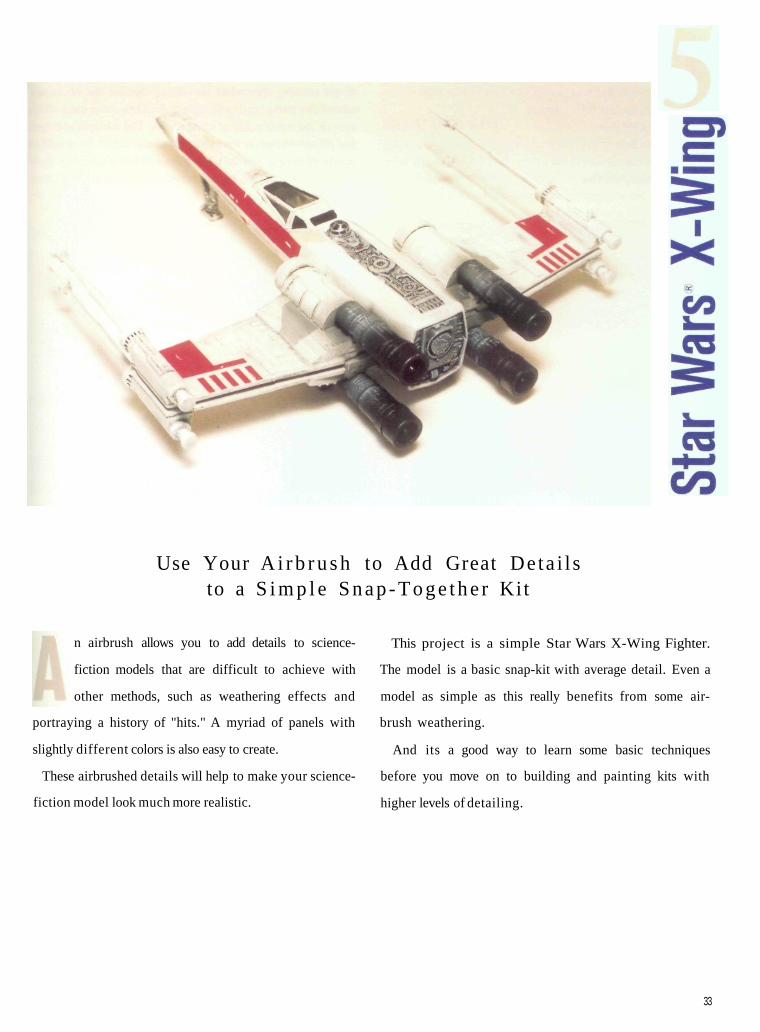
Fig. 4-7. The finished model shows a lot of realism-achieved with little effort,using an airbrush and flat-finish acrylic paints.
That's it!The photos above show the body and chassis after the air-
brushed weathering has been applied to both. The appearance
is quite realistic. You can stop at this point, or further detail
your model with washes, pastels, or other finishes added on top
of the paint (see figs. 4-6 and 4-7).
Use your imagination. Remember, you can use the chassis
weathering shown here for all ear models. Once a car has been
driven a few months, the chassis is covered in a uniform film of
dirt and road grime.
Easily added to your models with an airbrush, this touch will
make your models far more realistic.
32
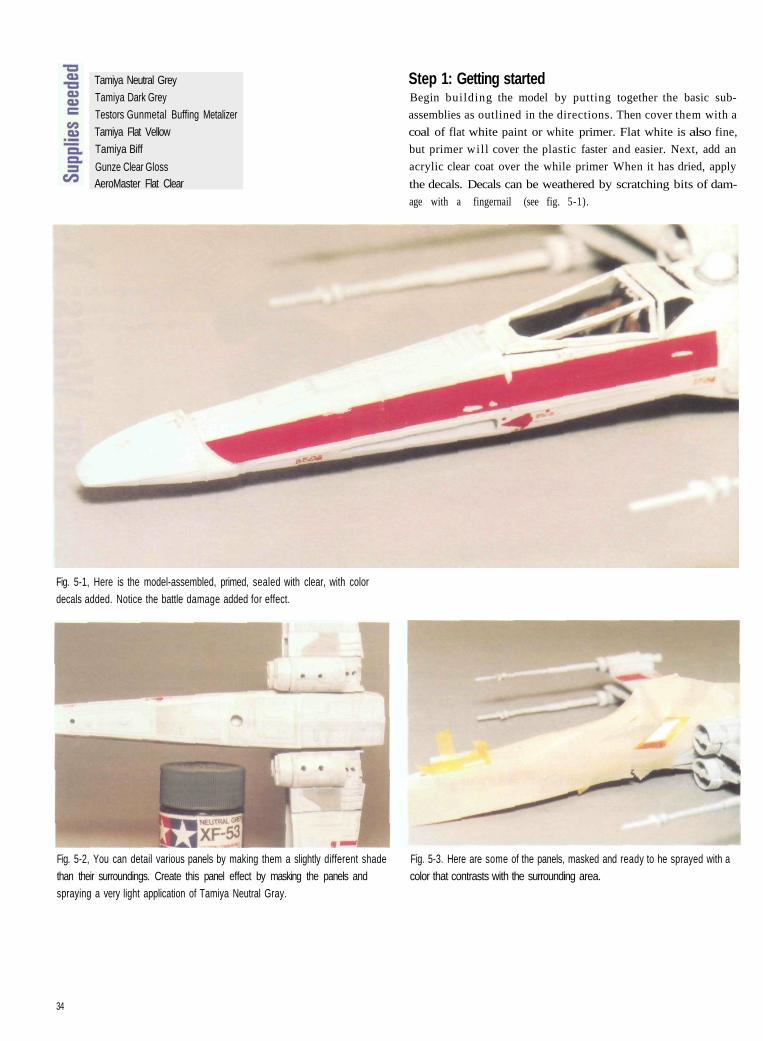
Use Your A i r b r u s h to Add Great Deta i l sto a S i m p l e S n a p - T o g e t h e r Kit
n airbrush allows you to add details to science-
fiction models that are difficult to achieve with
other methods, such as weathering effects and
portraying a history of "hits." A myriad of panels with
slightly different colors is also easy to create.
These airbrushed details will help to make your science-
fiction model look much more realistic.
This project is a simple Star Wars X-Wing Fighter.
The model is a basic snap-kit with average detail. Even a
model as simple as this really benefits from some air-
brush weathering.
And its a good way to learn some basic techniques
before you move on to building and painting kits with
higher levels of detailing.
33
Tamiya Neutral GreyTamiya Dark GreyTestors Gunmetal Buffing MetalizerTamiya Flat VellowTamiya Biff
Gunze Clear GlossAeroMaster Flat Clear
Step 1: Getting startedBegin building the model by putting together the basic sub-
assemblies as outlined in the directions. Then cover them with a
coal of flat white paint or white primer. Flat white is also fine,
but primer wil l cover the plastic faster and easier. Next, add an
acrylic clear coat over the while primer When it has dried, apply
the decals. Decals can be weathered by scratching bits of dam-
age with a fingernail (see fig. 5-1).
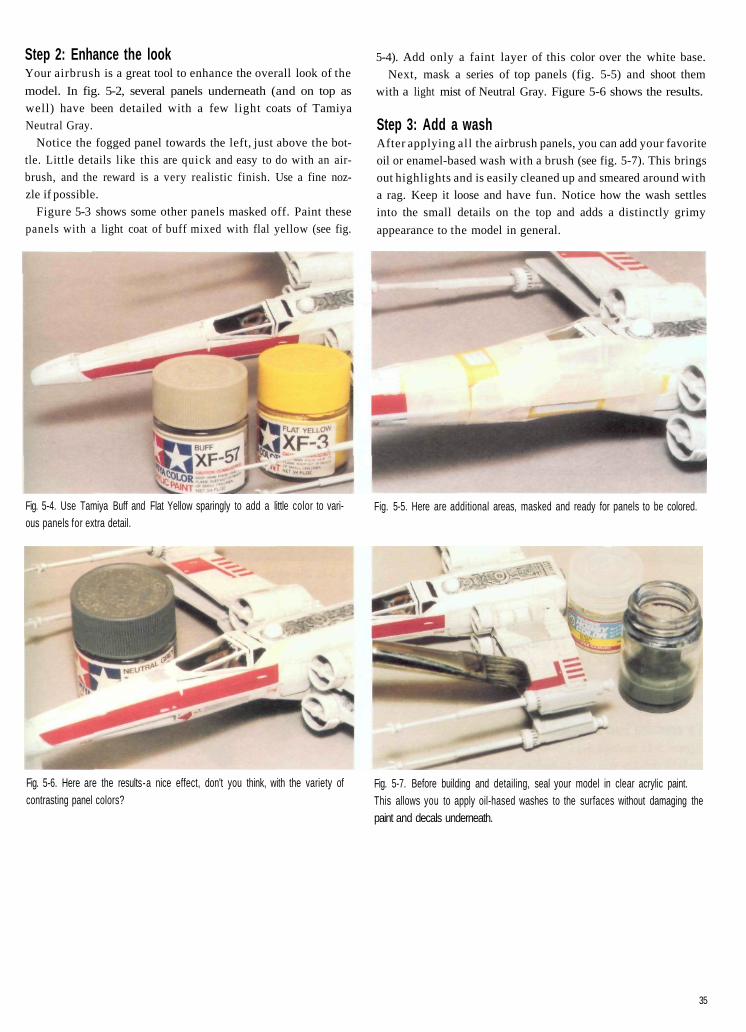
Fig. 5-1, Here is the model-assembled, primed, sealed with clear, with colordecals added. Notice the battle damage added for effect.
Fig. 5-2, You can detail various panels by making them a slightly different shadethan their surroundings. Create this panel effect by masking the panels andspraying a very light application of Tamiya Neutral Gray.
Fig. 5-3. Here are some of the panels, masked and ready to he sprayed with acolor that contrasts with the surrounding area.
34
Step 2: Enhance the lookYour airbrush is a great tool to enhance the overall look of the
model. In fig. 5-2, several panels underneath (and on top as
well) have been detailed with a few light coats of Tamiya
Neutral Gray.
Notice the fogged panel towards the left, just above the bot-
tle. Little details like this are quick and easy to do with an air-
brush, and the reward is a very realistic finish. Use a fine noz-
zle if possible.
Figure 5-3 shows some other panels masked off. Paint these
panels with a light coat of buff mixed with flal yellow (see fig.
5-4). Add only a faint layer of this color over the white base.
Next, mask a series of top panels (fig. 5-5) and shoot them
with a light mist of Neutral Gray. Figure 5-6 shows the results.
Step 3: Add a washAfter applying all the airbrush panels, you can add your favorite
oil or enamel-based wash with a brush (see fig. 5-7). This brings
out highlights and is easily cleaned up and smeared around with
a rag. Keep it loose and have fun. Notice how the wash settles
into the small details on the top and adds a distinctly grimy
appearance to the model in general.
Fig. 5-4. Use Tamiya Buff and Flat Yellow sparingly to add a little color to vari-ous panels for extra detail.
Fig. 5-5. Here are additional areas, masked and ready for panels to be colored.
Fig. 5-6. Here are the results - a nice effect, don't you think, with the variety ofcontrasting panel colors?
Fig. 5-7. Before building and detailing, seal your model in clear acrylic paint.This allows you to apply oil-hased washes to the surfaces without damaging thepaint and decals underneath.
35

Fig, 5-8. Exhaust burns and "hits" are easy to create by carefully sprayingTamiya Dark Gray to the appropriate areas. This adds a lot of realism and life to
an otherwise simple model kit.
Step 4: Engine exhaust burns and "hits"Now you can tackle the engine exhaust burns and "hits" caused
by flying, burning debris (see fig. 5-8). You don't need to mask
the parts. Just apply the dark gray color around where the
engines mount. Hold the airbrush close to the model, at about a
45-degree angle, and gently spray small "hits" to the surface
with a momentary push of the airbrush trigger. You can also use
flat black paint acrylic paint for this step if you want the burn
marks to look even darker.
Assemble the engines, and paint them in dark gray towards
the inlet side, gradually fading to a metalizer gunmetal shade
towards the exhaust end (see fig. 5-9). You can install the
engines once they're dry.
Step 5: Add a protective coatWhen you are happy with the painted weathering, overcoat the
entire model wi th flat clear acrylic. Be sure to mask the canopy
(see fig. 5-10). After applying the flat clear, you can add further
brush-painted details. I brought out the finish of the airbrushed
engine and other raised mechanical areas by using a drybrushed
mixture of white and silver enamel paints.
It's amazing how easy it is!Figures 5-11 through 5-13 show the finished model. It is amaz-
ing how quickly you can do realistic weathering using your air-
brush. Start with simple models. Once you have learned the
techniques, you will soon tackle complex weathering and detail-
ing with ease, applying them with expert results.
Fig, 5-9. Airbrush Ihe engmEs with a combination of Testors GunmEtal Metalizertowards the rear, fading from Tamiya Dark Grey at the front inlet area.
Fig, 5-10, After adding all the paint details, mask the canopy. After that, seal the
entire model with a flat clear mixture (to dull down and smooth out the previ-ously applied paint).
36
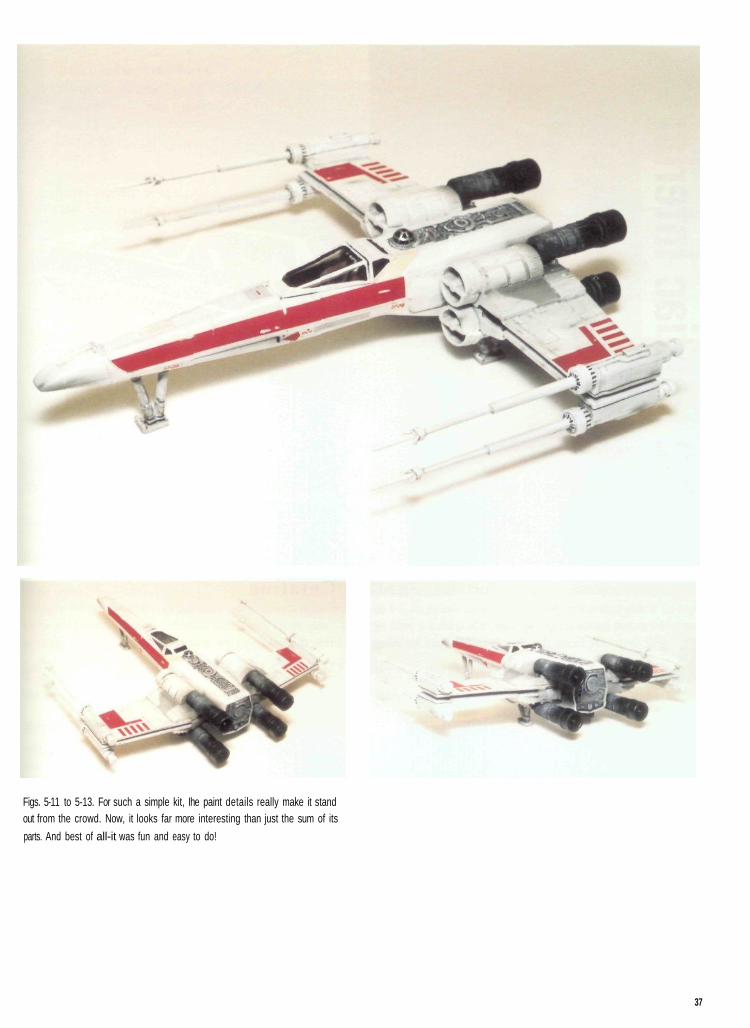
Figs. 5-11 to 5-13. For such a simple kit, Ihe paint details really make it standout from the crowd. Now, it looks far more interesting than just the sum of its
parts. And best of all-it was fun and easy to do!
37
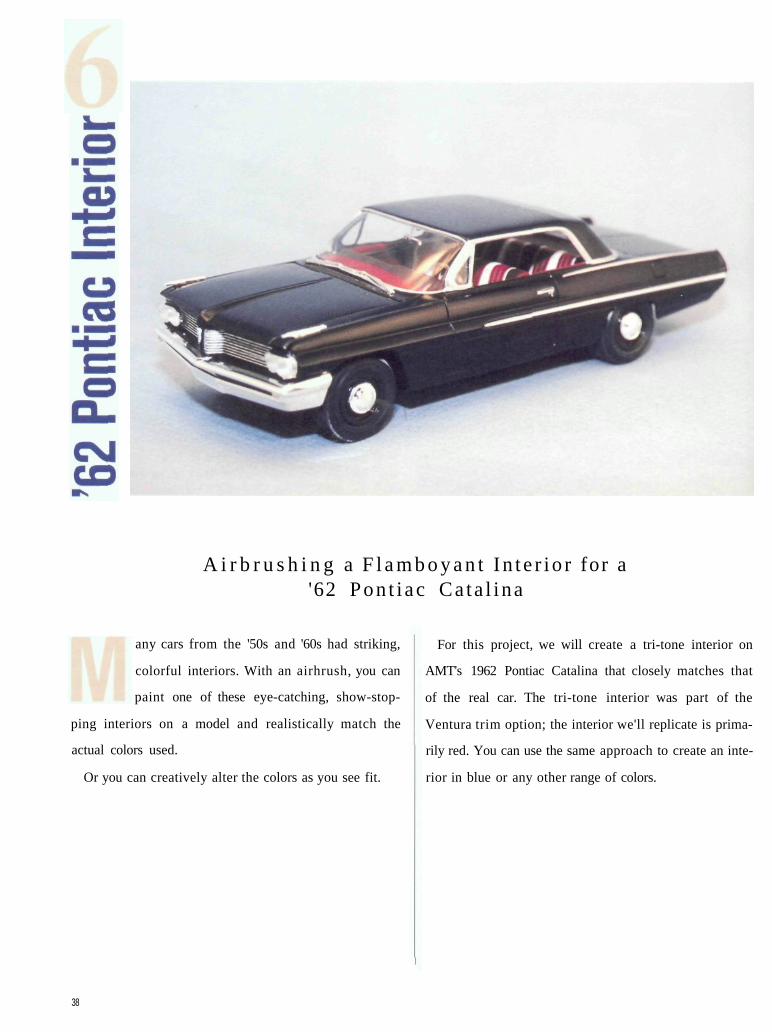
A i r b r u s h i n g a F l a m b o y a n t In t e r io r for a'62 Pon t i ac Ca ta l ina
any cars from the '50s and '60s had striking,
colorful interiors. With an airhrush, you can
paint one of these eye-catching, show-stop-
ping interiors on a model and realistically match the
actual colors used.
Or you can creatively alter the colors as you see fit.
For this project, we will create a tri-tone interior on
AMT's 1962 Pontiac Catalina that closely matches that
of the real car. The tri-tone interior was part of the
Ventura trim option; the interior we'll replicate is prima-
rily red. You can use the same approach to create an inte-
rior in blue or any other range of colors.
38
Primer (I used Boyd's White Primer)Red paint (I used Tamiya Gloss Red and Flat Red)Black paint (I used Tamiya Semigioss Black)
Clear (I used Testors Dullcote Lacquer)Masking tapeHobby knifeBurnishing tool/toothpick
Various thinners for the above paintsDetail paints (to use after the interior is airbrusbed)
This project uses a combination of enamels and acrylics; how-
ever, you can use only enamels or acrylics, if you wish.
Step 1: Prep workBegin by separating the model's parts from the trees. Clean up
mold lines and trim points. You may wish to paint the parts in
subassemblies for easier handling.
Glue the seatbacks to the front seat, f i l l the seam with gap-
f i l l i n g super glue, and sand the seam smooth once it's dry.
Next, clean the pans with warm, soapy water and let them dry
thoroughly.
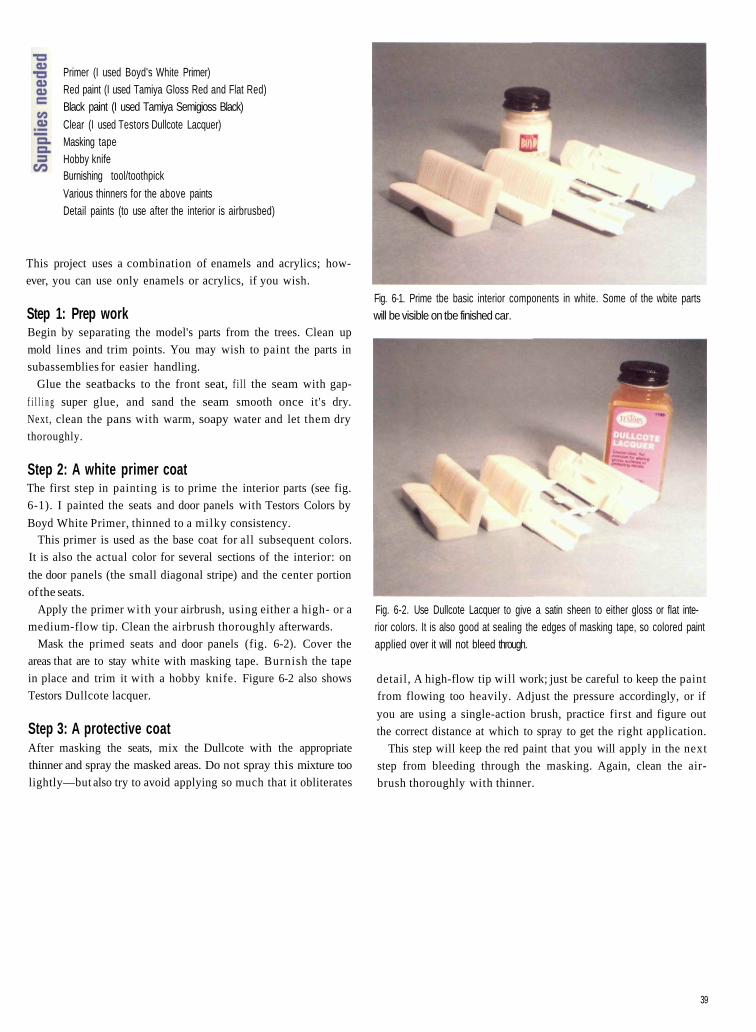
Step 2: A white primer coatThe first step in painting is to prime the interior parts (see fig.
6-1). I painted the seats and door panels with Testors Colors by
Boyd White Primer, thinned to a milky consistency.This primer is used as the base coat for all subsequent colors.
It is also the actual color for several sections of the interior: on
the door panels (the small diagonal stripe) and the center portion
of the seats.
Apply the primer with your airbrush, using either a high- or a
medium-flow tip. Clean the airbrush thoroughly afterwards.
Mask the primed seats and door panels (fig. 6-2). Cover the
areas that are to stay white with masking tape. Burnish the tape
in place and trim it with a hobby knife. Figure 6-2 also shows
Testors Dullcote lacquer.
Step 3: A protective coatAfter masking the seats, mix the Dullcote with the appropriate
thinner and spray the masked areas. Do not spray this mixture too
lightly—but also try to avoid applying so much that it obliterates
Fig. 6-1. Prime tbe basic interior components in white. Some of the wbite partswill be visible on tbe finished car.
Fig. 6-2. Use Dullcote Lacquer to give a satin sheen to either gloss or flat inte-rior colors. It is also good at sealing the edges of masking tape, so colored paintapplied over it will not bleed through.
detail, A high-flow tip will work; just be careful to keep the paint
from flowing too heavily. Adjust the pressure accordingly, or if
you are using a single-action brush, practice first and figure out
the correct distance at which to spray to get the right application.
This step will keep the red paint that you will apply in the next
step from bleeding through the masking. Again, clean the air-
brush thoroughly with thinner.
39
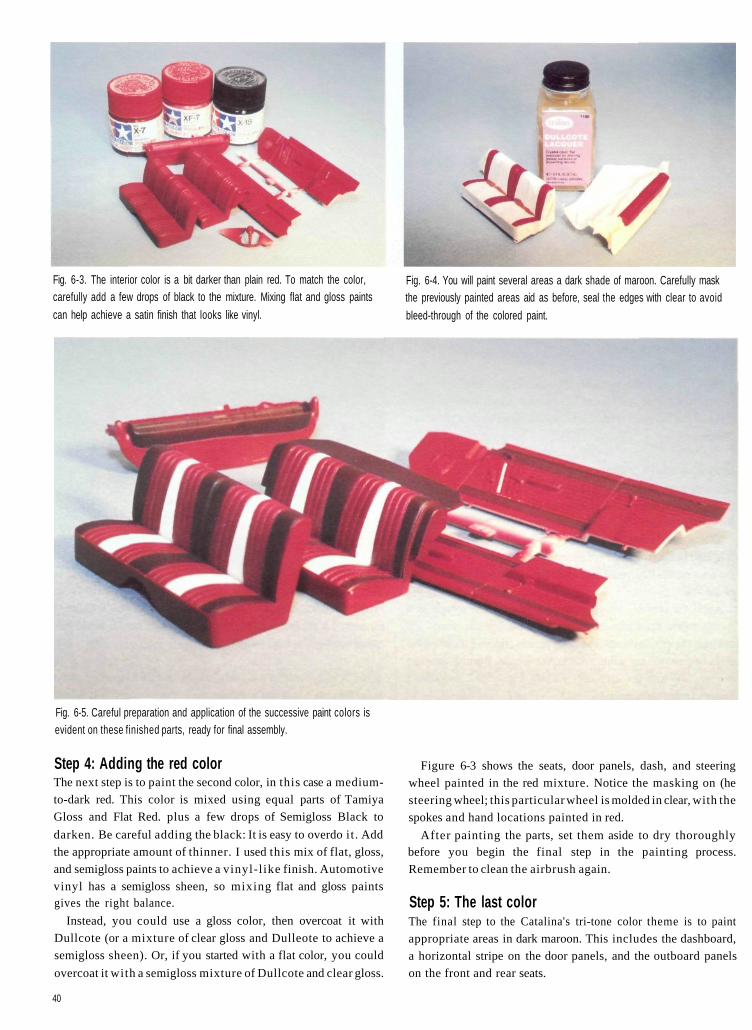
Fig. 6-3. The interior color is a bit darker than plain red. To match the color,carefully add a few drops of black to the mixture. Mixing flat and gloss paints
can help achieve a satin finish that looks like vinyl.
Fig. 6-4. You will paint several areas a dark shade of maroon. Carefully maskthe previously painted areas aid as before, seal the edges with clear to avoid
bleed-through of the colored paint.
Fig. 6-5. Careful preparation and application of the successive paint colors isevident on these finished parts, ready for final assembly.
Step 4: Adding the red colorThe next step is to paint the second color, in this case a medium-
to-dark red. This color is mixed using equal parts of Tamiya
Gloss and Flat Red. plus a few drops of Semigloss Black to
darken. Be careful adding the black: It is easy to overdo it. Add
the appropriate amount of thinner. I used this mix of flat, gloss,
and semigloss paints to achieve a vinyl-like finish. Automotive
vinyl has a semigloss sheen, so mixing flat and gloss paintsgives the right balance.
Instead, you could use a gloss color, then overcoat it with
Dullcote (or a mixture of clear gloss and Dulleote to achieve a
semigloss sheen). Or, if you started with a flat color, you could
overcoat it with a semigloss mixture of Dullcote and clear gloss.
Figure 6-3 shows the seats, door panels, dash, and steering
wheel painted in the red mixture. Notice the masking on (he
steering wheel; this particular wheel is molded in clear, with the
spokes and hand locations painted in red.
After painting the parts, set them aside to dry thoroughlybefore you begin the final step in the painting process.
Remember to clean the airbrush again.
Step 5: The last colorThe final step to the Catalina's tri-tone color theme is to paint
appropriate areas in dark maroon. This includes the dashboard,
a horizontal stripe on the door panels, and the outboard panels
on the front and rear seats.
40
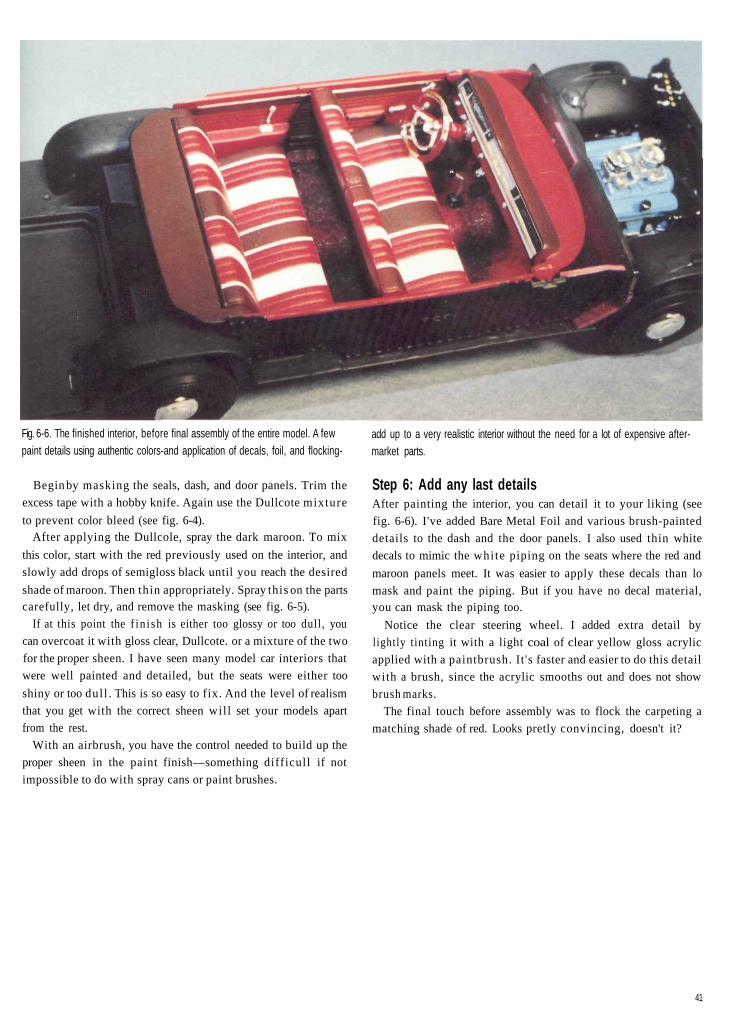
Fig. 6-6. The finished interior, before final assembly of the entire model. A fewpaint details using authentic colors-and application of decals, foil, and flocking-
Begin by masking the seals, dash, and door panels. Trim the
excess tape with a hobby knife. Again use the Dullcote mixture
to prevent color bleed (see fig. 6-4).After applying the Dullcole, spray the dark maroon. To mix
this color, start with the red previously used on the interior, and
slowly add drops of semigloss black until you reach the desired
shade of maroon. Then thin appropriately. Spray this on the partscarefully, let dry, and remove the masking (see fig. 6-5).
If at this point the f in i sh is either too glossy or too dull, you
can overcoat it with gloss clear, Dullcote. or a mixture of the two
for the proper sheen. I have seen many model car interiors that
were well painted and detailed, but the seats were either too
shiny or too dul l . This is so easy to fix. And the level of realism
that you get with the correct sheen wil l set your models apart
from the rest.
With an airbrush, you have the control needed to build up the
proper sheen in the paint finish—something difficull if not
impossible to do with spray cans or paint brushes.
add up to a very realistic interior without the need for a lot of expensive after-market parts.
Step 6: Add any last detailsAfter painting the interior, you can detail it to your liking (see
fig. 6-6). I've added Bare Metal Foil and various brush-painted
details to the dash and the door panels. I also used thin white
decals to mimic the white piping on the seats where the red and
maroon panels meet. It was easier to apply these decals than lo
mask and paint the piping. But if you have no decal material,you can mask the piping too.
Notice the clear steering wheel. I added extra detail by
lightly tinting it with a light coal of clear yellow gloss acrylic
applied with a paintbrush. It 's faster and easier to do this detail
with a brush, since the acrylic smooths out and does not show
brush marks.
The final touch before assembly was to flock the carpeting a
matching shade of red. Looks pretly convincing, doesn't it?
41
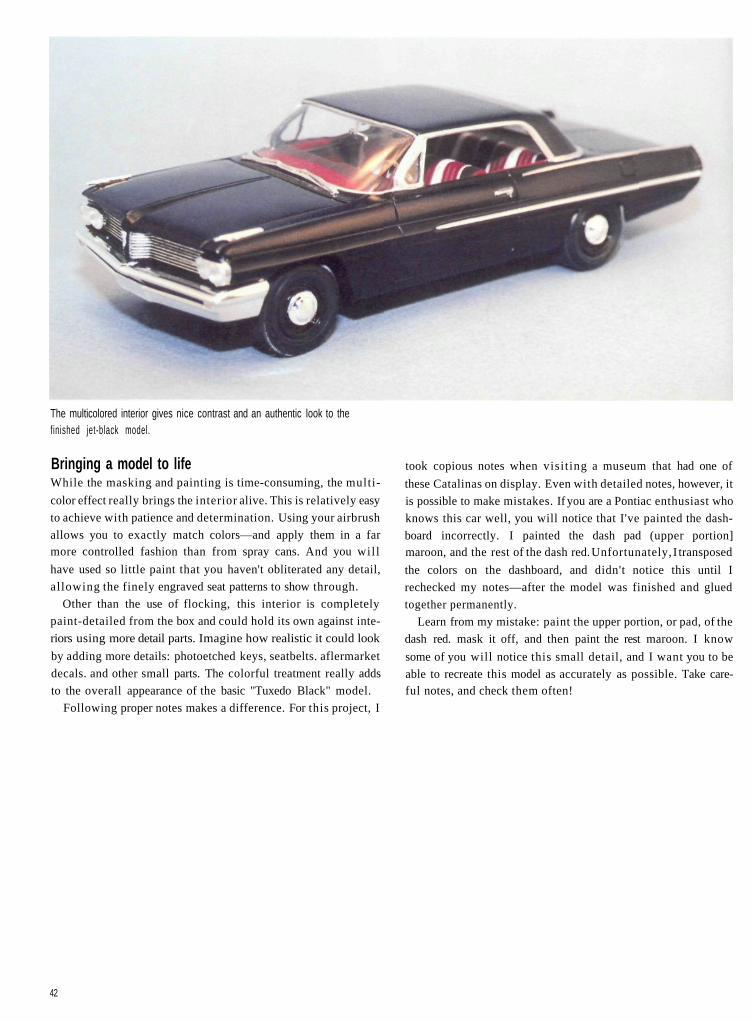
The multicolored interior gives nice contrast and an authentic look to thefinished jet-black model.
Bringing a model to lifeWhile the masking and painting is time-consuming, the multi-
color effect really brings the interior alive. This is relatively easy
to achieve with patience and determination. Using your airbrush
allows you to exactly match colors—and apply them in a farmore controlled fashion than from spray cans. And you wil l
have used so little paint that you haven't obliterated any detail,
allowing the finely engraved seat patterns to show through.
Other than the use of flocking, this interior is completely
paint-detailed from the box and could hold its own against inte-
riors using more detail parts. Imagine how realistic it could look
by adding more details: photoetched keys, seatbelts. aflermarket
decals. and other small parts. The colorful treatment really adds
to the overall appearance of the basic "Tuxedo Black" model.
Following proper notes makes a difference. For this project, I
took copious notes when visit ing a museum that had one of
these Catalinas on display. Even with detailed notes, however, it
is possible to make mistakes. If you are a Pontiac enthusiast who
knows this car well, you will notice that I've painted the dash-
board incorrectly. I painted the dash pad (upper portion]maroon, and the rest of the dash red. Unfortunately, I transposed
the colors on the dashboard, and didn't notice this until I
rechecked my notes—after the model was finished and glued
together permanently.
Learn from my mistake: paint the upper portion, or pad, of the
dash red. mask it off, and then paint the rest maroon. I know
some of you will notice this small detail, and I want you to be
able to recreate this model as accurately as possible. Take care-ful notes, and check them often!
42
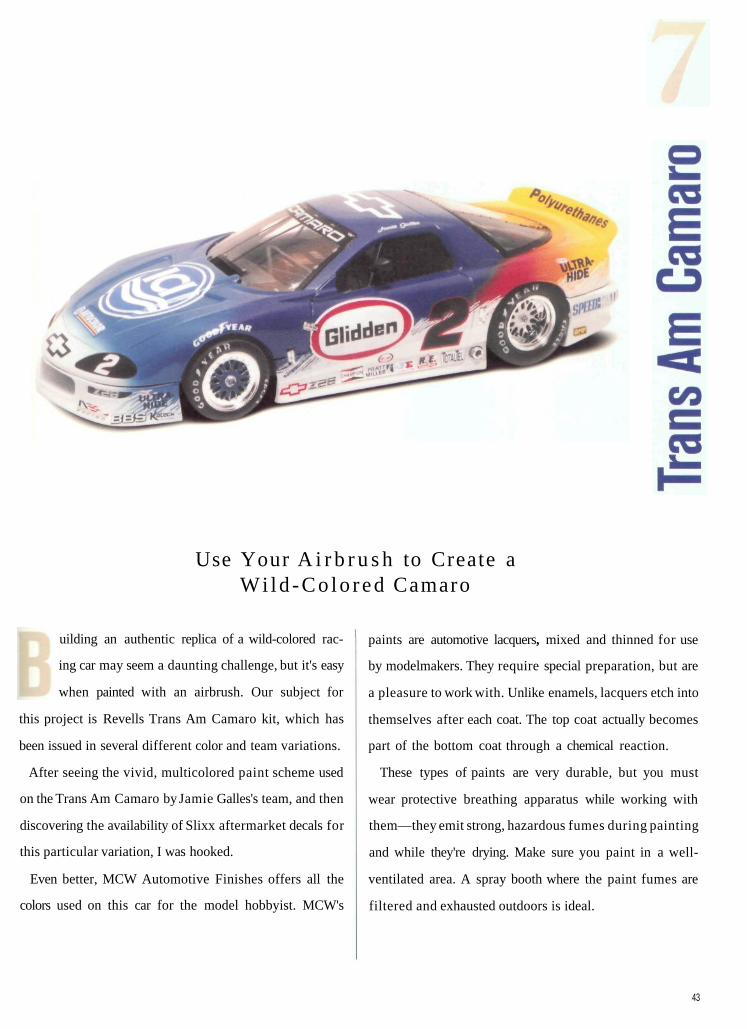
uilding an authentic replica of a wild-colored rac-
ing car may seem a daunting challenge, but it's easy
when painted with an airbrush. Our subject for
this project is Revells Trans Am Camaro kit, which has
been issued in several different color and team variations.
After seeing the vivid, multicolored paint scheme used
on the Trans Am Camaro by Jamie Galles's team, and then
discovering the availability of Slixx aftermarket decals for
this particular variation, I was hooked.
Even better, MCW Automotive Finishes offers all the
colors used on this car for the model hobbyist. MCW's
paints are automotive lacquers, mixed and thinned for use
by modelmakers. They require special preparation, but are
a pleasure to work with. Unlike enamels, lacquers etch into
themselves after each coat. The top coat actually becomes
part of the bottom coat through a chemical reaction.
These types of paints are very durable, but you must
wear protective breathing apparatus while working with
them—they emit strong, hazardous fumes during painting
and while they're drying. Make sure you paint in a well-
ventilated area. A spray booth where the paint fumes are
filtered and exhausted outdoors is ideal.
Use Your A i r b r u s h to Create aWi ld -Co lo red Camaro
43
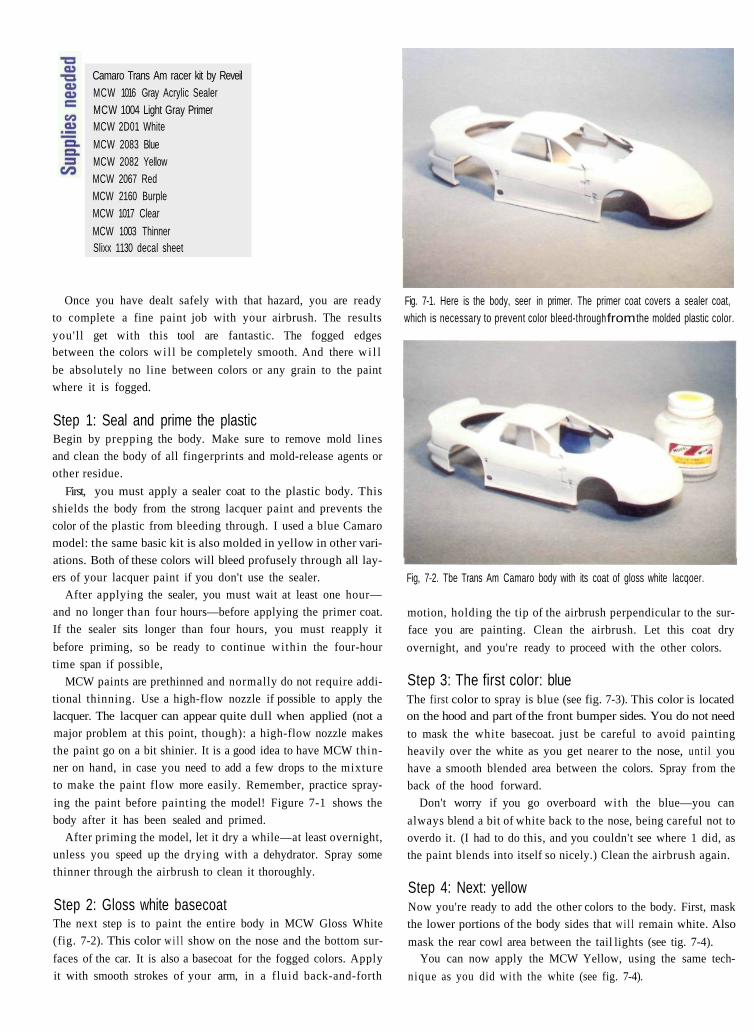
Once you have dealt safely with that hazard, you are ready
to complete a fine paint job with your airbrush. The results
you'll get with this tool are fantastic. The fogged edgesbetween the colors wi l l be completely smooth. And there wi l l
be absolutely no line between colors or any grain to the paint
where it is fogged.
Step 1: Seal and prime the plasticBegin by prepping the body. Make sure to remove mold lines
and clean the body of all fingerprints and mold-release agents or
other residue.
First, you must apply a sealer coat to the plastic body. This
shields the body from the strong lacquer paint and prevents the
color of the plastic from bleeding through. I used a blue Camaro
model: the same basic kit is also molded in yellow in other vari-
ations. Both of these colors will bleed profusely through all lay-
ers of your lacquer paint if you don't use the sealer.
After applying the sealer, you must wait at least one hour—
and no longer than four hours—before applying the primer coat.
If the sealer sits longer than four hours, you must reapply it
before priming, so be ready to continue within the four-hour
time span if possible,
MCW paints are prethinned and normally do not require addi-
tional thinning. Use a high-flow nozzle if possible to apply the
lacquer. The lacquer can appear quite dull when applied (not a
major problem at this point, though): a high-flow nozzle makes
the paint go on a bit shinier. It is a good idea to have MCW thin-
ner on hand, in case you need to add a few drops to the mixture
to make the paint flow more easily. Remember, practice spray-
ing the paint before painting the model! Figure 7-1 shows the
body after it has been sealed and primed.
After priming the model, let it dry a while—at least overnight,
unless you speed up the drying with a dehydrator. Spray some
thinner through the airbrush to clean it thoroughly.
Step 2: Gloss white basecoatThe next step is to paint the entire body in MCW Gloss White
(fig. 7-2). This color w i l l show on the nose and the bottom sur-
faces of the car. It is also a basecoat for the fogged colors. Apply
it with smooth strokes of your arm, in a f luid back-and-forth
Fig. 7-1. Here is the body, seer in primer. The primer coat covers a sealer coat,which is necessary to prevent color bleed-through from the molded plastic color.
Fig, 7-2. Tbe Trans Am Camaro body with its coat of gloss white lacqoer.
motion, holding the tip of the airbrush perpendicular to the sur-
face you are painting. Clean the airbrush. Let this coat dry
overnight, and you're ready to proceed with the other colors.
Step 3: The first color: blueThe first color to spray is blue (see fig. 7-3). This color is locatedon the hood and part of the front bumper sides. You do not need
to mask the white basecoat. just be careful to avoid painting
heavily over the white as you get nearer to the nose, unt i l you
have a smooth blended area between the colors. Spray from the
back of the hood forward.
Don't worry if you go overboard with the blue—you can
always blend a bit of white back to the nose, being careful not to
overdo it. (I had to do this, and you couldn't see where 1 did, as
the paint blends into itself so nicely.) Clean the airbrush again.
Step 4: Next: yellowNow you're ready to add the other colors to the body. First, mask
the lower portions of the body sides that w i l l remain white. Also
mask the rear cowl area between the tail lights (see tig. 7-4).You can now apply the MCW Yellow, using the same tech-
nique as you did with the white (see fig. 7-4).
Camaro Trans Am racer kit by ReveilMCW 1016 Gray Acrylic SealerMCW 1004 Light Gray PrimerMCW 2D01 White
MCW 2083 BlueMCW 2082 YellowMCW 2067 RedMCW 2160 BurpleMCW 1017 Clear
MCW 1003 ThinnerSlixx 1130 decal sheet
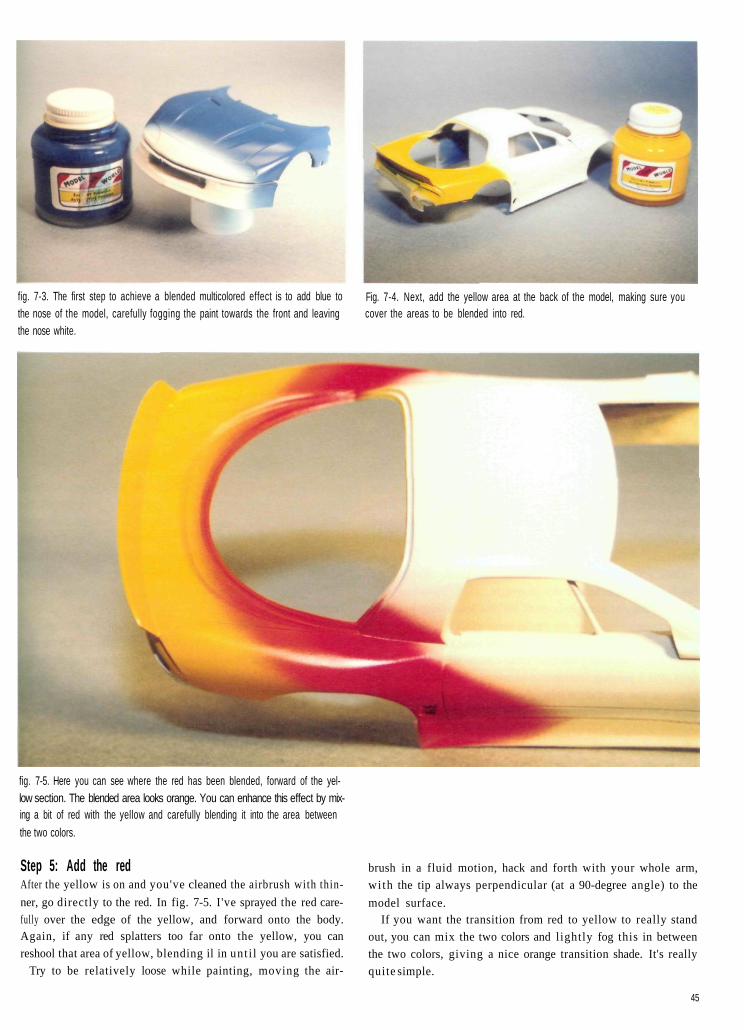
fig. 7-3. The first step to achieve a blended multicolored effect is to add blue tothe nose of the model, carefully fogging the paint towards the front and leavingthe nose white.
Fig. 7-4. Next, add the yellow area at the back of the model, making sure youcover the areas to be blended into red.
fig. 7-5. Here you can see where the red has been blended, forward of the yel-low section. The blended area looks orange. You can enhance this effect by mix-ing a bit of red with the yellow and carefully blending it into the area between
the two colors.
Step 5: Add the redAfter the yellow is on and you've cleaned the airbrush with thin-
ner, go directly to the red. In fig. 7-5. I've sprayed the red care-
fully over the edge of the yellow, and forward onto the body.Again, if any red splatters too far onto the yellow, you can
reshool that area of yellow, blending il in unt i l you are satisfied.
Try to be relatively loose while painting, moving the air-
brush in a fluid motion, hack and forth with your whole arm,
with the tip always perpendicular (at a 90-degree angle) to the
model surface.If you want the transition from red to yellow to really stand
out, you can mix the two colors and lightly fog this in between
the two colors, giving a nice orange transition shade. It's really
quite simple.
45
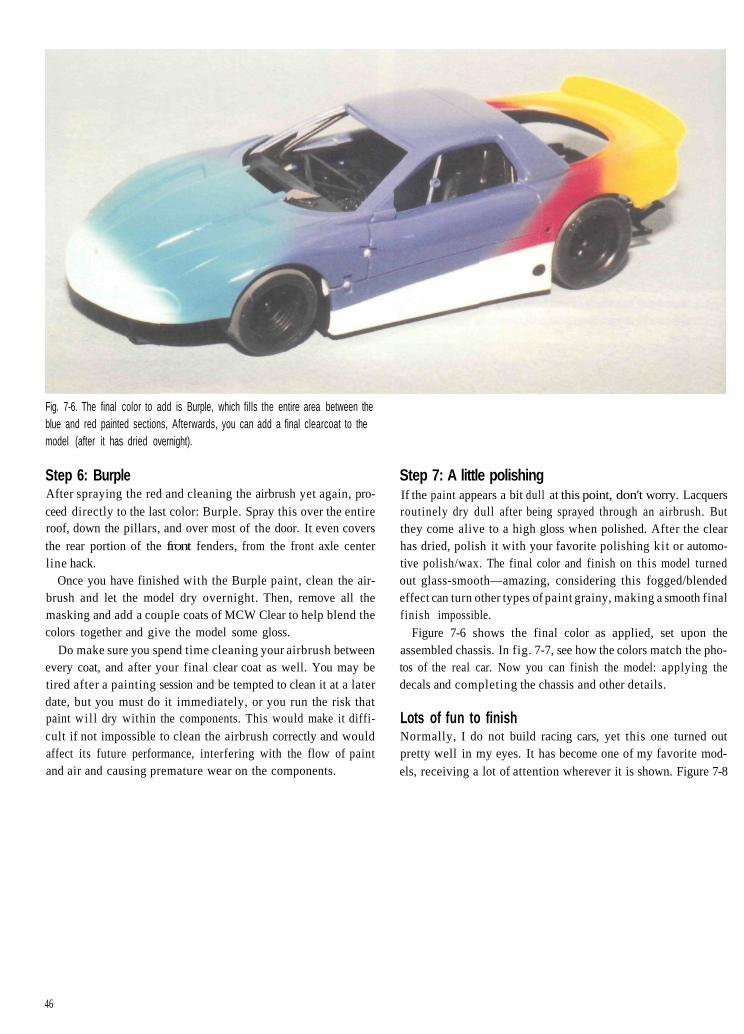
Fig. 7-6. The final color to add is Burple, which fills the entire area between theblue and red painted sections, Afterwards, you can add a final clearcoat to themodel (after it has dried overnight).
Step 6: BurpleAfter spraying the red and cleaning the airbrush yet again, pro-ceed directly to the last color: Burple. Spray this over the entireroof, down the pillars, and over most of the door. It even coversthe rear portion of the front fenders, from the front axle centerline hack.
Once you have finished with the Burple paint, clean the air-brush and let the model dry overnight. Then, remove all themasking and add a couple coats of MCW Clear to help blend thecolors together and give the model some gloss.
Do make sure you spend time cleaning your airbrush betweenevery coat, and after your final clear coat as well. You may betired after a painting session and be tempted to clean it at a laterdate, but you must do it immediately, or you run the risk thatpaint wi l l dry within the components. This would make it diffi-cult if not impossible to clean the airbrush correctly and wouldaffect its future performance, interfering with the flow of paintand air and causing premature wear on the components.
Step 7: A little polishingIf the paint appears a bit dull at this point, don't worry. Lacquersroutinely dry dull after being sprayed through an airbrush. Butthey come alive to a high gloss when polished. After the clearhas dried, polish it with your favorite polishing ki t or automo-tive polish/wax. The final color and finish on this model turnedout glass-smooth—amazing, considering this fogged/blendedeffect can turn other types of paint grainy, making a smooth finalfinish impossible.
Figure 7-6 shows the final color as applied, set upon theassembled chassis. In fig. 7-7, see how the colors match the pho-tos of the real car. Now you can finish the model: applying thedecals and completing the chassis and other details.
Lots of fun to finishNormally, I do not build racing cars, yet this one turned outpretty well in my eyes. It has become one of my favorite mod-els, receiving a lot of attention wherever it is shown. Figure 7-8
46
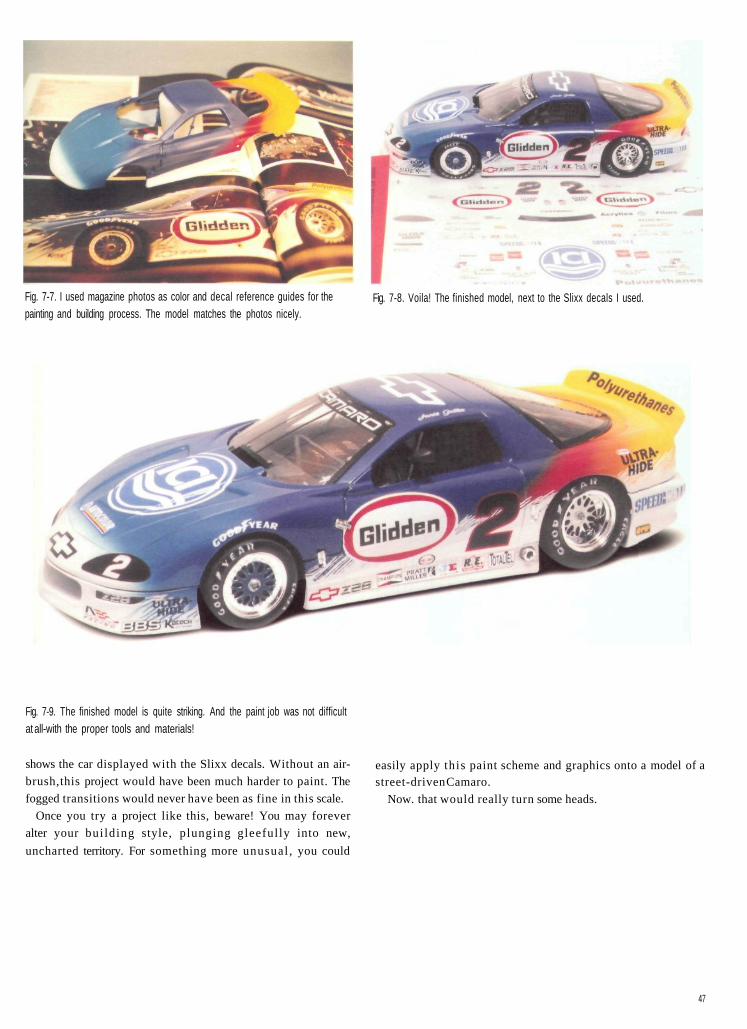
Fig. 7-7. I used magazine photos as color and decal reference guides for thepainting and building process. The model matches the photos nicely.
Fig. 7-8. Voila! The finished model, next to the Slixx decals I used.
Fig. 7-9. The finished model is quite striking. And the paint job was not difficultat all-with the proper tools and materials!
shows the car displayed with the Slixx decals. Without an air-
brush, this project would have been much harder to paint. The
fogged transitions would never have been as fine in this scale.
Once you try a project like this, beware! You may forever
alter your bui lding style, plunging gleefully into new,
uncharted territory. For something more unusual , you could
easily apply this paint scheme and graphics onto a model of astreet-driven Camaro.
Now. that would really turn some heads.
47
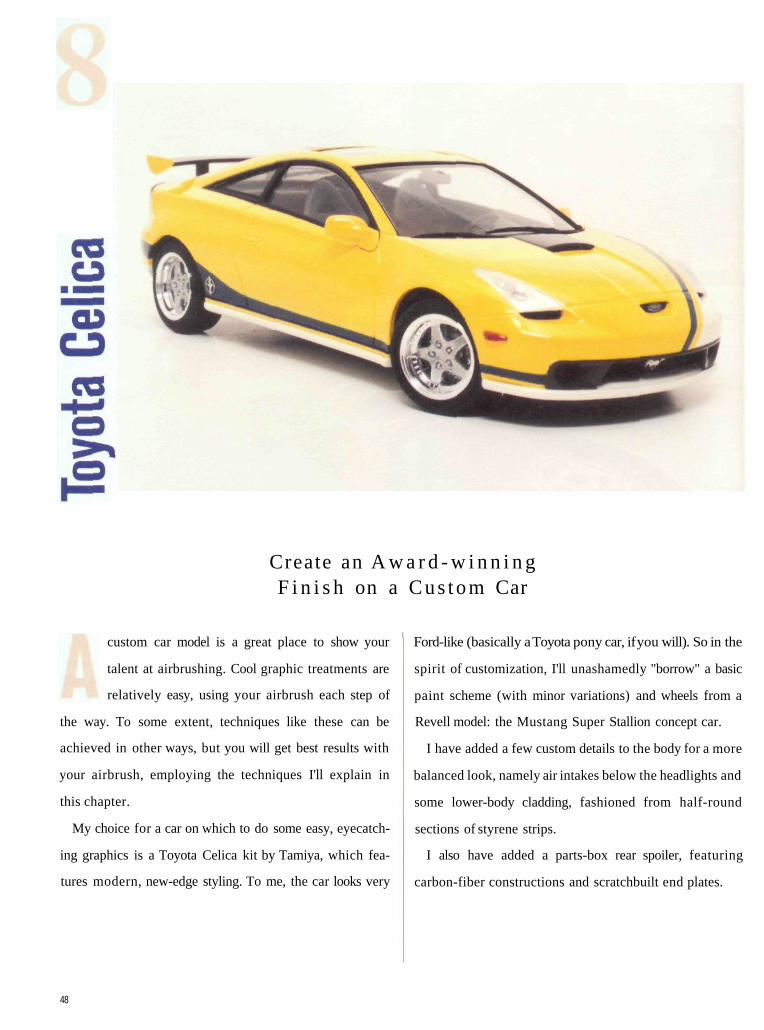
Create an A w a r d - w i n n i n gF i n i s h on a C u s t o m Car
custom car model is a great place to show your
talent at airbrushing. Cool graphic treatments are
relatively easy, using your airbrush each step of
the way. To some extent, techniques like these can be
achieved in other ways, but you will get best results with
your airbrush, employing the techniques I'll explain in
this chapter.
My choice for a car on which to do some easy, eyecatch-
ing graphics is a Toyota Celica kit by Tamiya, which fea-
tures modern, new-edge styling. To me, the car looks very
Ford-like (basically a Toyota pony car, if you will). So in the
spirit of customization, I'll unashamedly "borrow" a basic
paint scheme (with minor variations) and wheels from a
Revell model: the Mustang Super Stallion concept car.
I have added a few custom details to the body for a more
balanced look, namely air intakes below the headlights and
some lower-body cladding, fashioned from half-round
sections of styrene strips.
I also have added a parts-box rear spoiler, featuring
carbon-fiber constructions and scratchbuilt end plates.
48
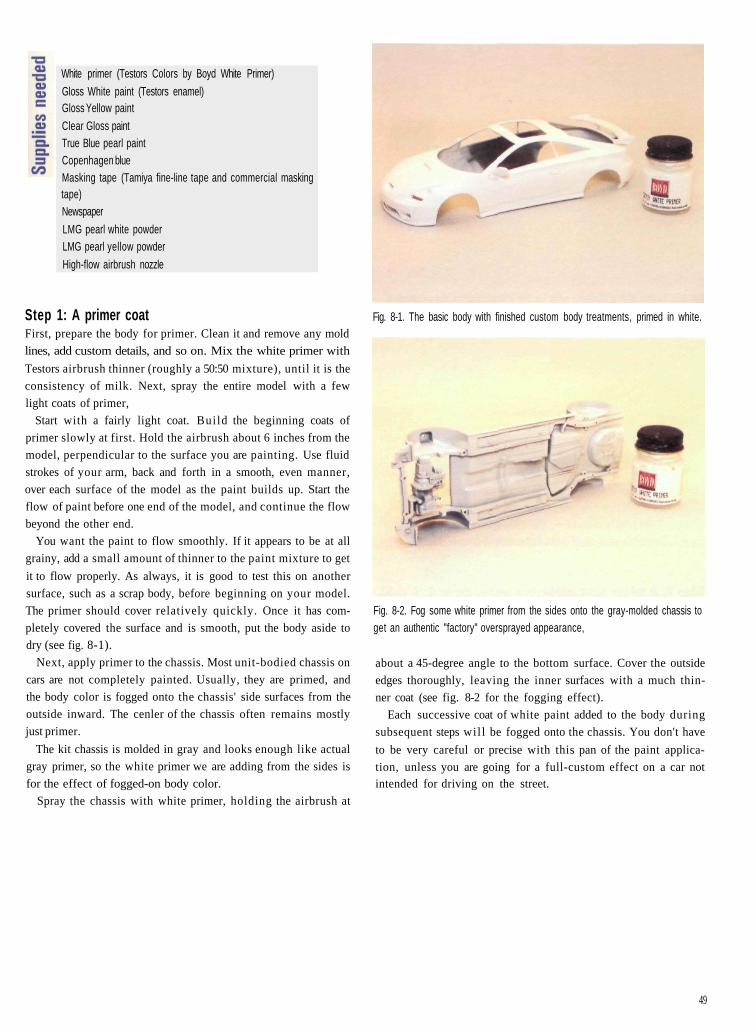
White primer (Testors Colors by Boyd White Primer)
Gloss White paint (Testors enamel)Gloss Yellow paint
Clear Gloss paintTrue Blue pearl paintCopenhagen blueMasking tape (Tamiya fine-line tape and commercial maskingtape)Newspaper
LMG pearl white powderLMG pearl yellow powder
High-flow airbrush nozzle
Step 1: A primer coatFirst, prepare the body for primer. Clean it and remove any mold
lines, add custom details, and so on. Mix the white primer with
Testors airbrush thinner (roughly a 50:50 mixture), until it is the
consistency of milk. Next, spray the entire model with a few
light coats of primer,
Start with a fairly light coat. Build the beginning coats of
primer slowly at first. Hold the airbrush about 6 inches from the
model, perpendicular to the surface you are painting. Use fluid
strokes of your arm, back and forth in a smooth, even manner,
over each surface of the model as the paint builds up. Start the
flow of paint before one end of the model, and continue the flow
beyond the other end.
You want the paint to flow smoothly. If it appears to be at all
grainy, add a small amount of thinner to the paint mixture to get
it to flow properly. As always, it is good to test this on another
surface, such as a scrap body, before beginning on your model.
The primer should cover relatively quickly. Once it has com-
pletely covered the surface and is smooth, put the body aside to
dry (see fig. 8-1).Next, apply primer to the chassis. Most unit-bodied chassis on
cars are not completely painted. Usually, they are primed, and
the body color is fogged onto the chassis' side surfaces from the
outside inward. The cenler of the chassis often remains mostly
just primer.
The kit chassis is molded in gray and looks enough like actual
gray primer, so the white primer we are adding from the sides is
for the effect of fogged-on body color.
Spray the chassis with white primer, holding the airbrush at
Fig. 8-1. The basic body with finished custom body treatments, primed in white.
Fig. 8-2. Fog some white primer from the sides onto the gray-molded chassis toget an authentic "factory" oversprayed appearance,
about a 45-degree angle to the bottom surface. Cover the outside
edges thoroughly, leaving the inner surfaces with a much thin-
ner coat (see fig. 8-2 for the fogging effect).
Each successive coat of white paint added to the body during
subsequent steps wil l be fogged onto the chassis. You don't have
to be very careful or precise with this pan of the paint applica-
tion, unless you are going for a full-custom effect on a car notintended for driving on the street.
49
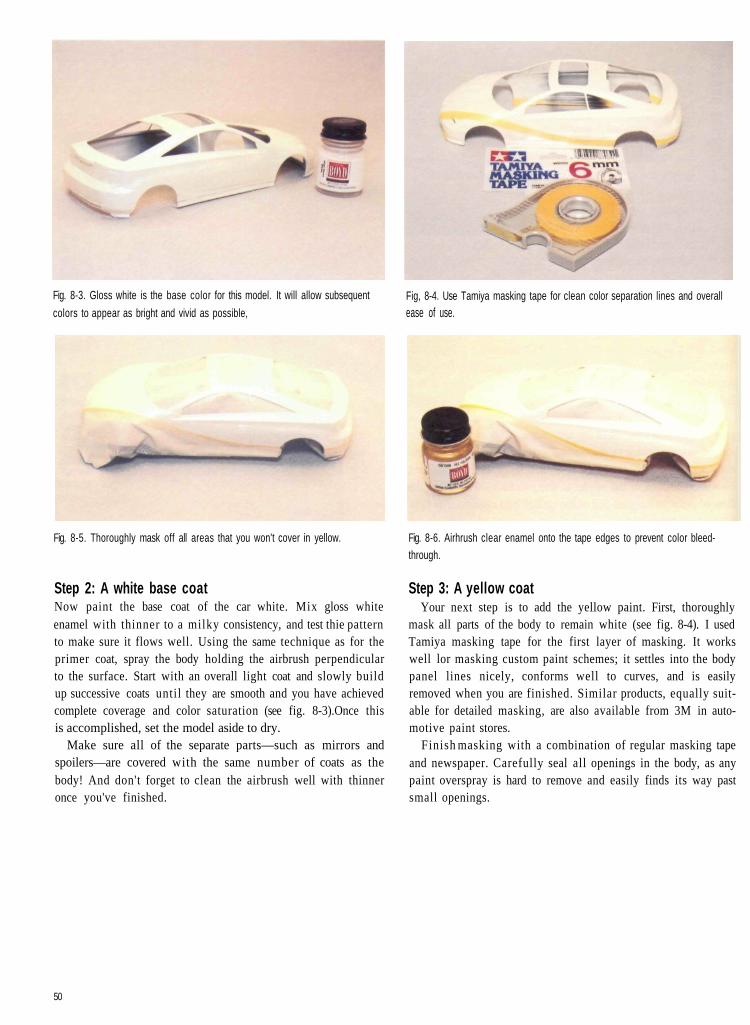
Fig. 8-3. Gloss white is the base color for this model. It will allow subsequent
colors to appear as bright and vivid as possible,Fig, 8-4. Use Tamiya masking tape for clean color separation lines and overallease of use.
Fig. 8-5. Thoroughly mask off all areas that you won't cover in yellow.
Step 2: A white base coatNow paint the base coat of the car white. Mix gloss whiteenamel with thinner to a milky consistency, and test thie patternto make sure it flows well. Using the same technique as for theprimer coat, spray the body holding the airbrush perpendicularto the surface. Start with an overall light coat and slowly buildup successive coats until they are smooth and you have achievedcomplete coverage and color saturation (see fig. 8-3).Once thisis accomplished, set the model aside to dry.
Make sure all of the separate parts—such as mirrors andspoilers—are covered with the same number of coats as thebody! And don't forget to clean the airbrush well with thinneronce you've finished.
Fig. 8-6. Airhrush clear enamel onto the tape edges to prevent color bleed-through.
Step 3: A yellow coatYour next step is to add the yellow paint. First, thoroughly
mask all parts of the body to remain white (see fig. 8-4). I usedTamiya masking tape for the first layer of masking. It workswell lor masking custom paint schemes; it settles into the bodypanel lines nicely, conforms well to curves, and is easilyremoved when you are finished. Similar products, equally suit-able for detailed masking, are also available from 3M in auto-motive paint stores.
Finish masking with a combination of regular masking tapeand newspaper. Carefully seal all openings in the body, as anypaint overspray is hard to remove and easily finds its way pastsmall openings.
50
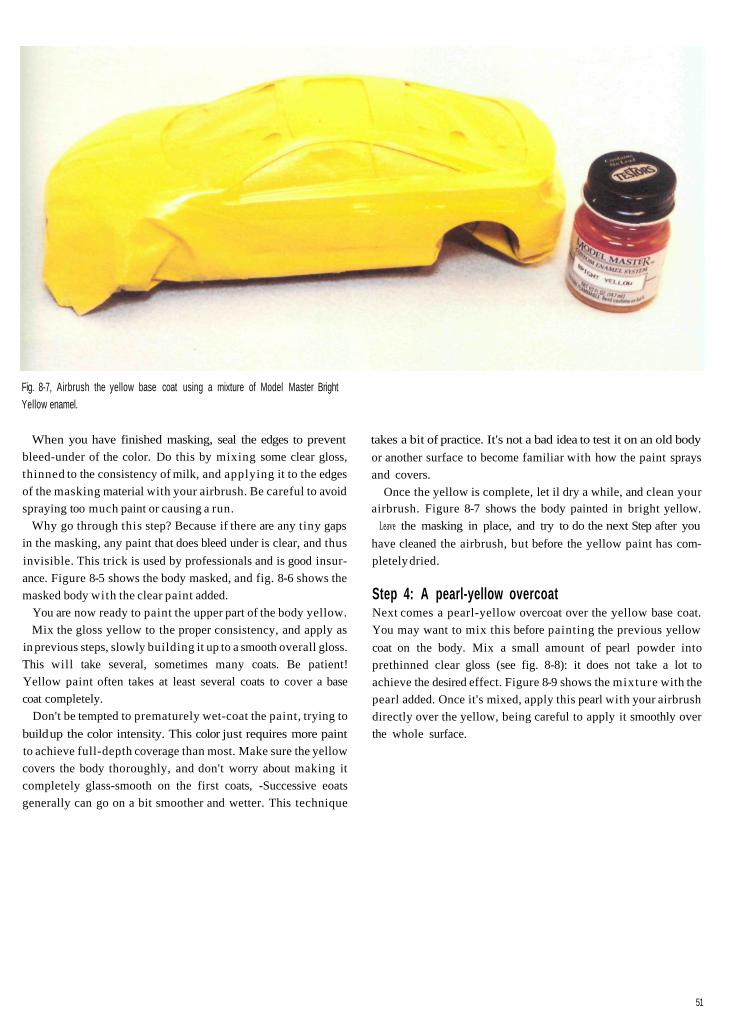
Fig. 8-7, Airbrush the yellow base coat using a mixture of Model Master BrightYellow enamel.
When you have finished masking, seal the edges to prevent
bleed-under of the color. Do this by mixing some clear gloss,
thinned to the consistency of milk, and applying it to the edges
of the masking material with your airbrush. Be careful to avoid
spraying too much paint or causing a run.
Why go through this step? Because if there are any tiny gaps
in the masking, any paint that does bleed under is clear, and thus
invisible. This trick is used by professionals and is good insur-
ance. Figure 8-5 shows the body masked, and fig. 8-6 shows the
masked body with the clear paint added.
You are now ready to paint the upper part of the body yellow.
Mix the gloss yellow to the proper consistency, and apply as
in previous steps, slowly building it up to a smooth overall gloss.
This will take several, sometimes many coats. Be patient!
Yellow paint often takes at least several coats to cover a base
coat completely.
Don't be tempted to prematurely wet-coat the paint, trying to
build up the color intensity. This color just requires more paint
to achieve full-depth coverage than most. Make sure the yellow
covers the body thoroughly, and don't worry about making it
completely glass-smooth on the first coats, -Successive eoats
generally can go on a bit smoother and wetter. This technique
takes a bit of practice. It's not a bad idea to test it on an old body
or another surface to become familiar with how the paint sprays
and covers.
Once the yellow is complete, let il dry a while, and clean yourairbrush. Figure 8-7 shows the body painted in bright yellow.
Leave the masking in place, and try to do the next Step after you
have cleaned the airbrush, but before the yellow paint has com-
pletely dried.
Step 4: A pearl-yellow overcoatNext comes a pearl-yellow overcoat over the yellow base coat.
You may want to mix this before painting the previous yellow
coat on the body. Mix a small amount of pearl powder into
prethinned clear gloss (see fig. 8-8): it does not take a lot to
achieve the desired effect. Figure 8-9 shows the mixture with the
pearl added. Once it's mixed, apply this pearl with your airbrush
directly over the yellow, being careful to apply it smoothly over
the whole surface.
51
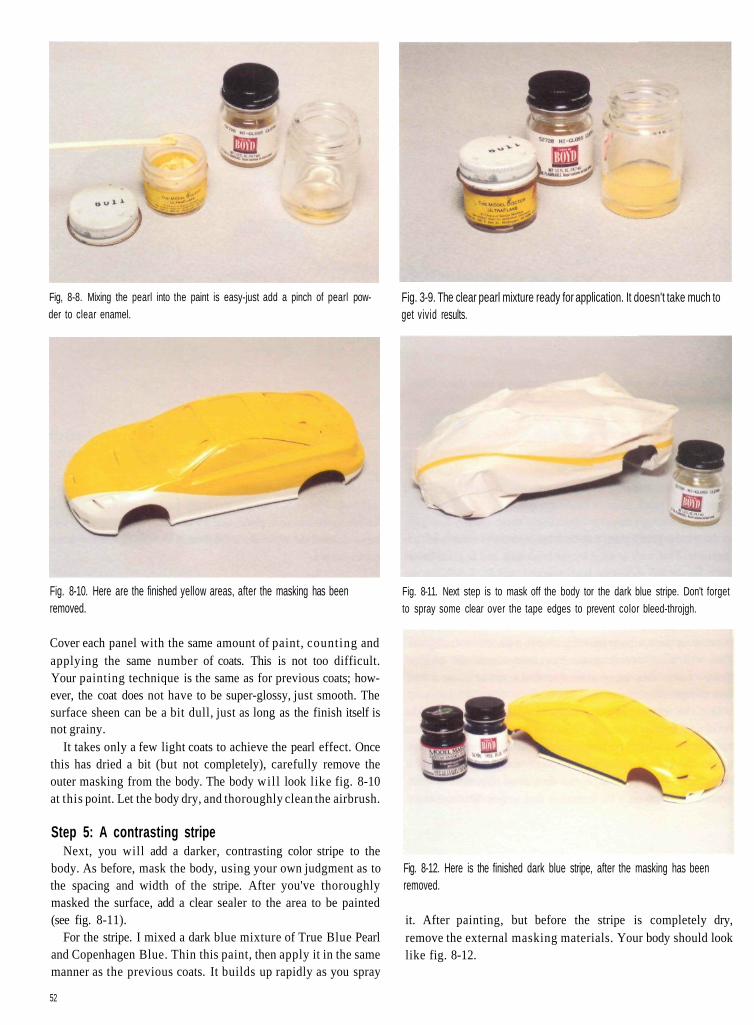
Fig, 8-8. Mixing the pearl into the paint is easy-just add a pinch of pearl pow-der to clear enamel.
Fig. 3-9. The clear pearl mixture ready for application. It doesn't take much toget vivid results.
Fig. 8-10. Here are the finished yellow areas, after the masking has beenremoved.
Cover each panel with the same amount of paint, counting andapplying the same number of coats. This is not too difficult.Your painting technique is the same as for previous coats; how-ever, the coat does not have to be super-glossy, just smooth. Thesurface sheen can be a bit dull, just as long as the finish itself isnot grainy.
It takes only a few light coats to achieve the pearl effect. Oncethis has dried a bit (but not completely), carefully remove theouter masking from the body. The body wil l look like fig. 8-10at this point. Let the body dry, and thoroughly clean the airbrush.
Step 5: A contrasting stripeNext, you will add a darker, contrasting color stripe to the
body. As before, mask the body, using your own judgment as tothe spacing and width of the stripe. After you've thoroughlymasked the surface, add a clear sealer to the area to be painted(see fig. 8-11).
For the stripe. I mixed a dark blue mixture of True Blue Pearland Copenhagen Blue. Thin this paint, then apply it in the samemanner as the previous coats. It builds up rapidly as you spray
Fig. 8-11. Next step is to mask off the body tor the dark blue stripe. Don't forgetto spray some clear over the tape edges to prevent color bleed-throjgh.
Fig. 8-12. Here is the finished dark blue stripe, after the masking has beenremoved.
it. After painting, but before the stripe is completely dry,remove the external masking materials. Your body should looklike fig. 8-12.
52
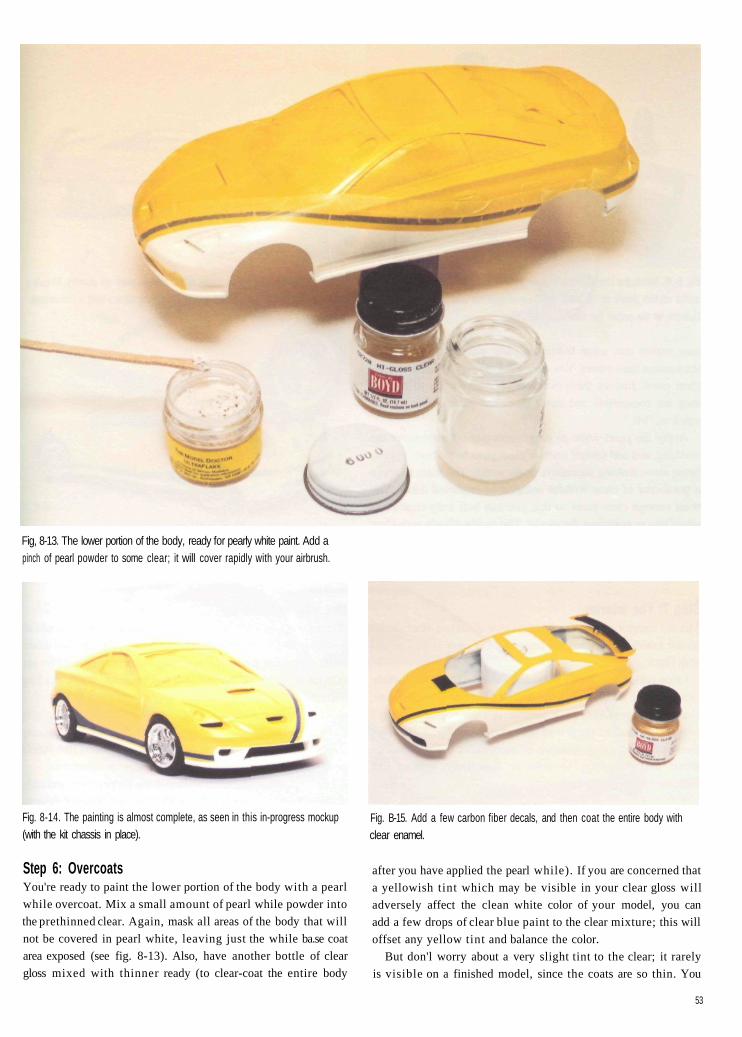
Fig, 8-13. The lower portion of the body, ready for pearly white paint. Add apinch of pearl powder to some clear; it will cover rapidly with your airbrush.
Fig. 8-14. The painting is almost complete, as seen in this in-progress mockup(with the kit chassis in place).
Step 6: OvercoatsYou're ready to paint the lower portion of the body with a pearl
while overcoat. Mix a small amount of pearl while powder into
the prethinned clear. Again, mask all areas of the body that will
not be covered in pearl white, leaving just the while ba.se coat
area exposed (see fig. 8-13). Also, have another bottle of clear
gloss mixed with thinner ready (to clear-coat the entire body
Fig. B-15. Add a few carbon fiber decals, and then coat the entire body withclear enamel.
after you have applied the pearl while). If you are concerned that
a yellowish tint which may be visible in your clear gloss will
adversely affect the clean white color of your model, you can
add a few drops of clear blue paint to the clear mixture; this will
offset any yellow tint and balance the color.
But don'l worry about a very slight tint to the clear; it rarely
is visible on a finished model, since the coats are so thin. You
53
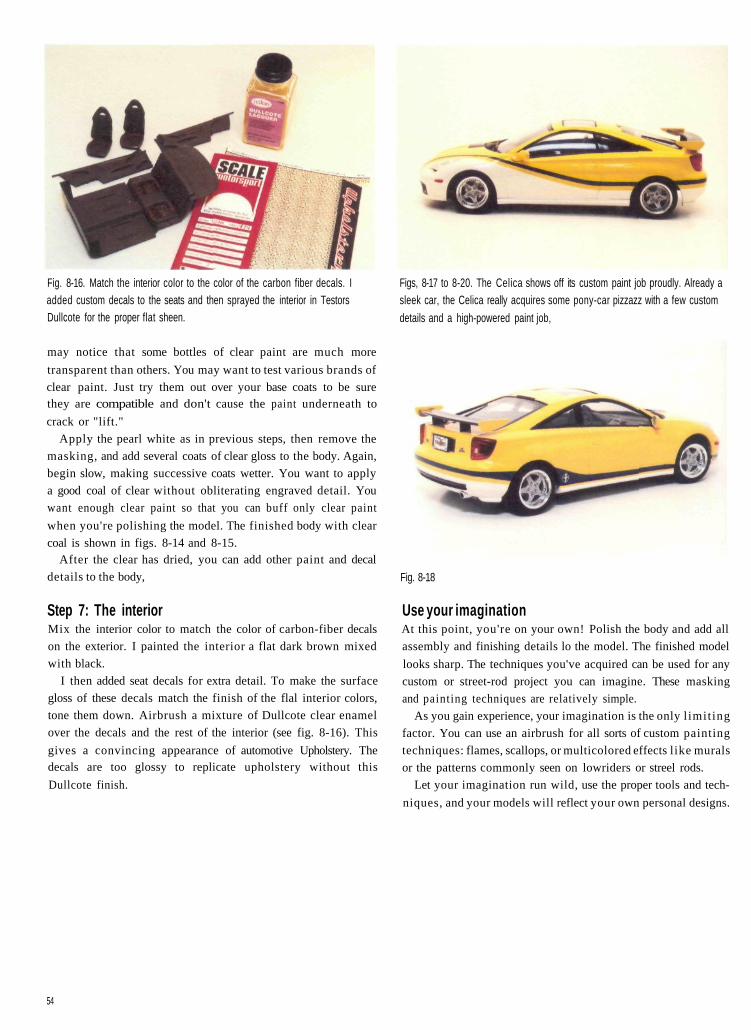
Fig. 8-16. Match the interior color to the color of the carbon fiber decals. Iadded custom decals to the seats and then sprayed the interior in TestorsDullcote for the proper flat sheen.
may notice that some bottles of clear paint are much more
transparent than others. You may want to test various brands of
clear paint. Just try them out over your base coats to be surethey are compatible and don't cause the paint underneath to
crack or "lift."
Apply the pearl white as in previous steps, then remove the
masking, and add several coats of clear gloss to the body. Again,
begin slow, making successive coats wetter. You want to apply
a good coal of clear without obliterating engraved detail. You
want enough clear paint so that you can buff only clear paint
when you're polishing the model. The finished body with clear
coal is shown in figs. 8-14 and 8-15.After the clear has dried, you can add other paint and decal
details to the body,
Step 7: The interiorMix the interior color to match the color of carbon-fiber decals
on the exterior. I painted the interior a flat dark brown mixed
with black.
I then added seat decals for extra detail. To make the surface
gloss of these decals match the finish of the flal interior colors,
tone them down. Airbrush a mixture of Dullcote clear enamel
over the decals and the rest of the interior (see fig. 8-16). This
gives a convincing appearance of automotive Upholstery. Thedecals are too glossy to replicate upholstery without this
Dullcote finish.
Figs, 8-17 to 8-20. The Celica shows off its custom paint job proudly. Already asleek car, the Celica really acquires some pony-car pizzazz with a few custom
details and a high-powered paint job,
Fig. 8-18
Use your imaginationAt this point, you're on your own! Polish the body and add all
assembly and finishing details lo the model. The finished model
looks sharp. The techniques you've acquired can be used for any
custom or street-rod project you can imagine. These masking
and painting techniques are relatively simple.
As you gain experience, your imagination is the only l imiting
factor. You can use an airbrush for all sorts of custom painting
techniques: flames, scallops, or multicolored effects like murals
or the patterns commonly seen on lowriders or streel rods.
Let your imagination run wild, use the proper tools and tech-
niques, and your models will reflect your own personal designs.
54
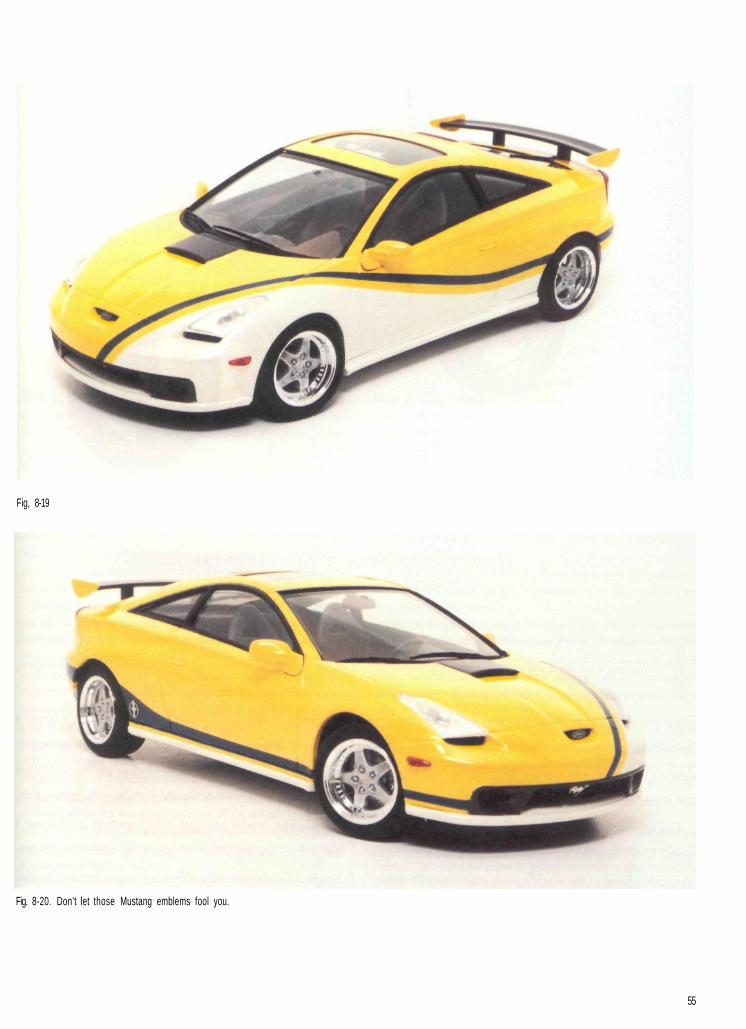
Fig, 8-19
Fig. 8-20. Don't let those Mustang emblems fool you.
55

How to A c h i e v e a Spec tacu la r"Showroom" Finish
o really show off your talent with an airbrush, try
building a modern motorcycle model. It's an excit-
ing chance to build a model that showcases almost
every possible finish. Whether you build a full-blown
"crotch-rocket" or a chrome-laden, laid-back cruiser, your
airbrush and your creativity are the tools that will bring the
colors and finishes alive.
The subject for this project is Tamiya's 1/12 scale Moto
Guzzi VI0 Centauro kit. This model is a beautiful repre-
sentation of one of the world's most interesting "standard"
motorcycles. In a nutshell, a standard is a fairly simple
motorcycle, bridging the gap between sport bikes and
cruisers; the rider sits upright and the engine is exposed.
This open arrangement allows full visibility of the engine,
drive train, and all details of the motorcycle.
I could vividly recall seeing this kit built by a friend a
couple of years back. This particular kit has very modern-
some might say controversial—styling and would allow
me to use a variety of airbrushing effects to help detail the
model. The model also has a fair amount of chrome. I
knew the combination of gleaming chrome and air-
brushed finishes would result in a spectacular shelf model.
After a quick trip to the local motorcycle dealership for
reference pictures, I was eager to begin.
56
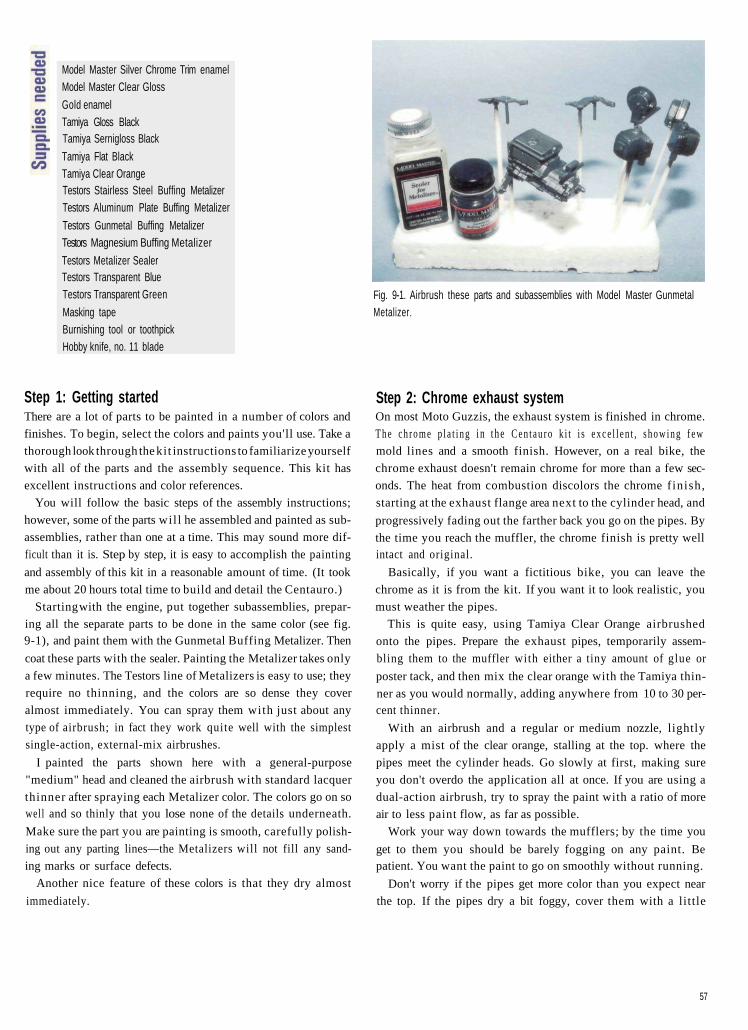
Model Master Silver Chrome Trim enamelModel Master Clear Gloss
Gold enamelTamiya Gloss BlackTamiya Sernigloss Black
Tamiya Flat BlackTamiya Clear OrangeTestors Stairless Steel Buffing MetalizerTestors Aluminum Plate Buffing Metalizer
Testors Gunmetal Buffing MetalizerTestors Magnesium Buffing Metalizer
Testors Metalizer SealerTestors Transparent BlueTestors Transparent Green
Masking tapeBurnishing tool or toothpickHobby knife, no. 11 blade
Fig. 9-1. Airbrush these parts and subassemblies with Model Master GunmetalMetalizer.
Step 1: Getting startedThere are a lot of parts to be painted in a number of colors and
finishes. To begin, select the colors and paints you'll use. Take a
thorough look through the kit instructions to familiarize yourself
with all of the parts and the assembly sequence. This kit has
excellent instructions and color references.
You will follow the basic steps of the assembly instructions;
however, some of the parts wil l he assembled and painted as sub-
assemblies, rather than one at a time. This may sound more dif-
ficult than it is. Step by step, it is easy to accomplish the painting
and assembly of this kit in a reasonable amount of time. (It took
me about 20 hours total time to build and detail the Centauro.)
Starting with the engine, put together subassemblies, prepar-
ing all the separate parts to be done in the same color (see fig.9-1), and paint them with the Gunmetal Buffing Metalizer. Then
coat these parts with the sealer. Painting the Metalizer takes only
a few minutes. The Testors line of Metalizers is easy to use; they
require no thinning, and the colors are so dense they cover
almost immediately. You can spray them with just about any
type of airbrush; in fact they work quite well with the simplest
single-action, external-mix airbrushes.
I painted the parts shown here with a general-purpose
"medium" head and cleaned the airbrush with standard lacquer
thinner after spraying each Metalizer color. The colors go on sowell and so thinly that you lose none of the details underneath.
Make sure the part you are painting is smooth, carefully polish-
ing out any parting lines—the Metalizers will not fill any sand-
ing marks or surface defects.
Another nice feature of these colors is that they dry almost
immediately.
Step 2: Chrome exhaust systemOn most Moto Guzzis, the exhaust system is finished in chrome.
T h e c h r o m e p l a t i n g i n t h e C e n t a u r o k i t i s e x c e l l e n t , s h o w i n g f e w
mold lines and a smooth finish. However, on a real bike, the
chrome exhaust doesn't remain chrome for more than a few sec-
onds. The heat from combustion discolors the chrome finish,
starting at the exhaust flange area next to the cylinder head, and
progressively fading out the farther back you go on the pipes. By
the time you reach the muffler, the chrome finish is pretty wellintact and original.
Basically, if you want a fictitious bike, you can leave the
chrome as it is from the kit. If you want it to look realistic, you
must weather the pipes.
This is quite easy, using Tamiya Clear Orange airbrushed
onto the pipes. Prepare the exhaust pipes, temporarily assem-
bling them to the muffler with either a tiny amount of glue or
poster tack, and then mix the clear orange with the Tamiya thin-
ner as you would normally, adding anywhere from 10 to 30 per-cent thinner.
With an airbrush and a regular or medium nozzle, lightly
apply a mist of the clear orange, stalling at the top. where the
pipes meet the cylinder heads. Go slowly at first, making sure
you don't overdo the application all at once. If you are using a
dual-action airbrush, try to spray the paint with a ratio of more
air to less paint flow, as far as possible.
Work your way down towards the mufflers; by the time you
get to them you should be barely fogging on any paint. Bepatient. You want the paint to go on smoothly without running.
Don't worry if the pipes get more color than you expect near
the top. If the pipes dry a bit foggy, cover them with a little
57

Fig. 9-2. Add minor heat discoloration onto the chrome exhaust by airhrushingTamiya Clear Orange over the parts until you achieve the desired color.
Tamiya Clear Gloss. Set the pipes aside to dry, and they are
ready for assembly (sec fig. 9-2).
This technique gives the effect of a fairly new bike. You can
also add more "bluing" and discoloration over the airbrushed
areas later. Common artist's markers (such as the Prismamarkers
brand) work well for the effect. You can test the colors at an art
supply store. Warm grays and blues work especially well. A
good idea is to practice this technique on some of the chrome
sprue that comes with the kit, or any from your parts box. Take
a look at a real motorcycle for reference, take some notes, and
have fun!
Step 3: Chassis and subframeThe chassis and rear swing-arm subframe are next, to be
painted in an almost full-gloss black. You can achieve good
results with either gloss black or semigloss black alone; however,to me, the finish looked somewhere in between—an. easy fix with
an airbrush.
As seen in fig. 9-3, mix equal parts of Tamiya Gloss Black and
Semi gloss Black. Thin the paint with Tamiya thinner, and make
a few practice runs on an old body or piece of cardboard to famil-
iarize yourself with the paint flow. If the paint is mixed correctly,
it wi l l flow very smoothly from the airbrush.
Fig, 9-3. Airbrush the frame and swing arm with a mixture of Tamiya Gloss andSemigloss Black paints for the desired "factory" sheen,
Do the basic assembly, clean up parting lines, and apply the
black paint mixture on the parts (with a high-flow nozzle, if pos-
sible). The black covers quickly. You may find that it goes on
rather wet. You can help dry the parts between coats by using theair flow from your airbrush without any paint.
Once a few coats have been applied, subsequent paint coats
cover even better. These paints dry rather quickly, especially if
you use a dehydrator to accelerate drying time.
Step 4: Various partsNext, you will airbrush the various chassis detail parts. First,
detail the brake rotors, Start by cleaning the parts, mount them
for painting, and mix some Testors Gold with some Clear gloss
enamel.
You'll want to use about a 30:70 ratio of gold to clear. Be
careful not to mix too much; you're painting just a couple of
small items, and the exact ratio is not that important. Thin this
mixture roughly 50:50 with Testors enamel thinner for airbrush-
ing, and paint the rotors (see fig. 9-4),
The paint covers quickly; once it's applied, put the parts aside
to dry overnight. Again, a dehydrator will cut the drying time if
you are impatient.
58
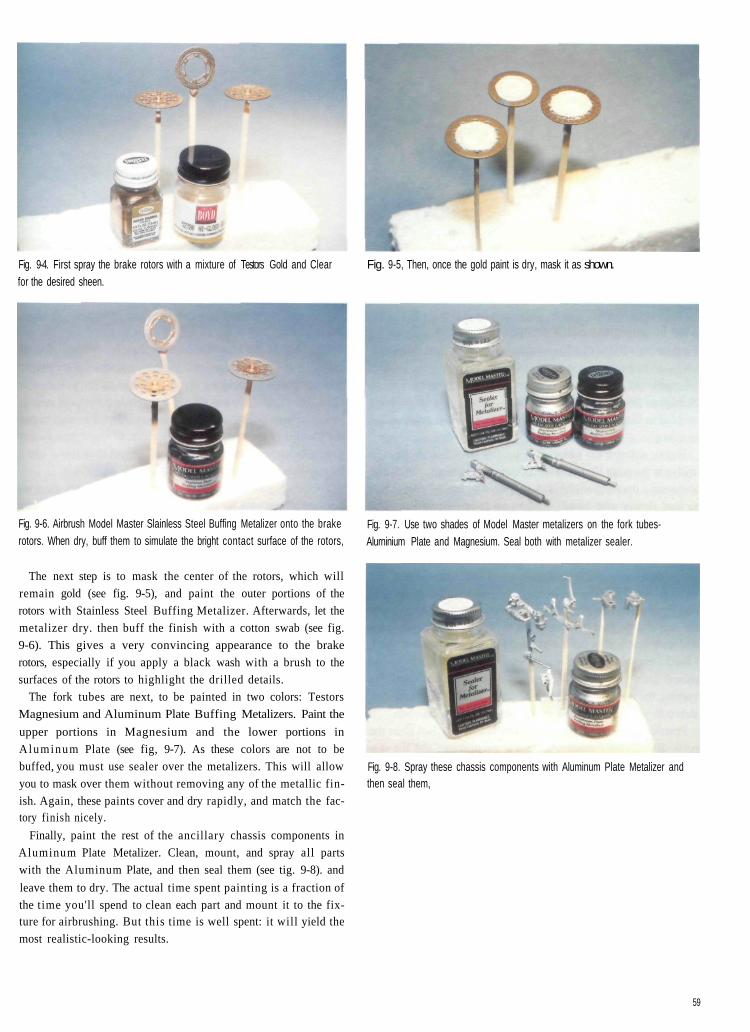
Fig. 9-4. First spray the brake rotors with a mixture of Testors Gold and Clearfor the desired sheen.
Fig. 9-5, Then, once the gold paint is dry, mask it as shown.
Fig. 9-6. Airbrush Model Master Slainless Steel Buffing Metalizer onto the brakerotors. When dry, buff them to simulate the bright contact surface of the rotors,
The next step is to mask the center of the rotors, which will
remain gold (see fig. 9-5), and paint the outer portions of the
rotors with Stainless Steel Buffing Metalizer. Afterwards, let the
metalizer dry. then buff the finish with a cotton swab (see fig.
9-6). This gives a very convincing appearance to the brake
rotors, especially if you apply a black wash with a brush to the
surfaces of the rotors to highlight the drilled details.
The fork tubes are next, to be painted in two colors: Testors
Magnesium and Aluminum Plate Buffing Metalizers. Paint the
upper portions in Magnesium and the lower portions in
Aluminum Plate (see fig, 9-7). As these colors are not to be
buffed, you must use sealer over the metalizers. This will allow
you to mask over them without removing any of the metallic fin-
ish. Again, these paints cover and dry rapidly, and match the fac-tory finish nicely.
Finally, paint the rest of the ancillary chassis components in
Aluminum Plate Metalizer. Clean, mount, and spray all parts
with the Aluminum Plate, and then seal them (see tig. 9-8). and
leave them to dry. The actual time spent painting is a fraction of
the time you'll spend to clean each part and mount it to the fix-ture for airbrushing. But this time is well spent: it will yield the
most realistic-looking results.
Fig. 9-7. Use two shades of Model Master metalizers on the fork tubes-Alurninium Plate and Magnesium. Seal both with metalizer sealer.
Fig. 9-8. Spray these chassis components with Aluminum Plate Metalizer andthen seal them,
59
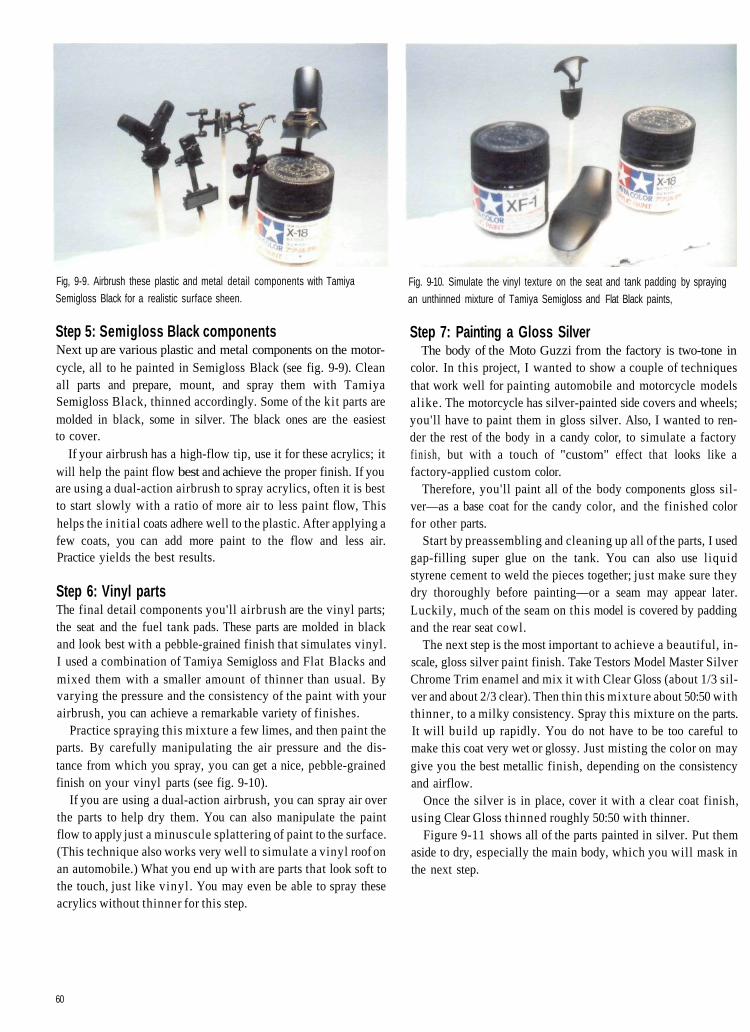
Fig, 9-9. Airbrush these plastic and metal detail components with TamiyaSemigloss Black for a realistic surface sheen.
Step 5: Semigloss Black componentsNext up are various plastic and metal components on the motor-cycle, all to he painted in Semigloss Black (see fig. 9-9). Cleanall parts and prepare, mount, and spray them with TamiyaSemigloss Black, thinned accordingly. Some of the kit parts aremolded in black, some in silver. The black ones are the easiestto cover.
If your airbrush has a high-flow tip, use it for these acrylics; itwill help the paint flow best and achieve the proper finish. If youare using a dual-action airbrush to spray acrylics, often it is bestto start slowly with a ratio of more air to less paint flow, Thishelps the initial coats adhere well to the plastic. After applying afew coats, you can add more paint to the flow and less air.Practice yields the best results.
Step 6: Vinyl partsThe final detail components you'll airbrush are the vinyl parts;the seat and the fuel tank pads. These parts are molded in blackand look best with a pebble-grained finish that simulates vinyl.I used a combination of Tamiya Semigloss and Flat Blacks andmixed them with a smaller amount of thinner than usual. Byvarying the pressure and the consistency of the paint with yourairbrush, you can achieve a remarkable variety of finishes.
Practice spraying this mixture a few limes, and then paint theparts. By carefully manipulating the air pressure and the dis-tance from which you spray, you can get a nice, pebble-grainedfinish on your vinyl parts (see fig. 9-10).
If you are using a dual-action airbrush, you can spray air overthe parts to help dry them. You can also manipulate the paintflow to apply just a minuscule splattering of paint to the surface.(This technique also works very well to simulate a vinyl roof onan automobile.) What you end up with are parts that look soft tothe touch, just like vinyl. You may even be able to spray theseacrylics without thinner for this step.
Fig. 9-10. Simulate the vinyl texture on the seat and tank padding by sprayingan unthinned mixture of Tamiya Semigloss and Flat Black paints,
Step 7: Painting a Gloss SilverThe body of the Moto Guzzi from the factory is two-tone in
color. In this project, I wanted to show a couple of techniquesthat work well for painting automobile and motorcycle modelsalike. The motorcycle has silver-painted side covers and wheels;you'll have to paint them in gloss silver. Also, I wanted to ren-der the rest of the body in a candy color, to simulate a factoryfinish, but with a touch of "custom" effect that looks like afactory-applied custom color.
Therefore, you'll paint all of the body components gloss sil-ver—as a base coat for the candy color, and the finished colorfor other parts.
Start by preassembling and cleaning up all of the parts, I usedgap-filling super glue on the tank. You can also use liquidstyrene cement to weld the pieces together; just make sure theydry thoroughly before painting—or a seam may appear later.Luckily, much of the seam on this model is covered by paddingand the rear seat cowl.
The next step is the most important to achieve a beautiful, in-scale, gloss silver paint finish. Take Testors Model Master SilverChrome Trim enamel and mix it with Clear Gloss (about 1/3 sil-ver and about 2/3 clear). Then thin this mixture about 50:50 withthinner, to a milky consistency. Spray this mixture on the parts.It will build up rapidly. You do not have to be too careful tomake this coat very wet or glossy. Just misting the color on maygive you the best metallic finish, depending on the consistencyand airflow.
Once the silver is in place, cover it with a clear coat finish,using Clear Gloss thinned roughly 50:50 with thinner.
Figure 9-11 shows all of the parts painted in silver. Put themaside to dry, especially the main body, which you will mask inthe next step.
60
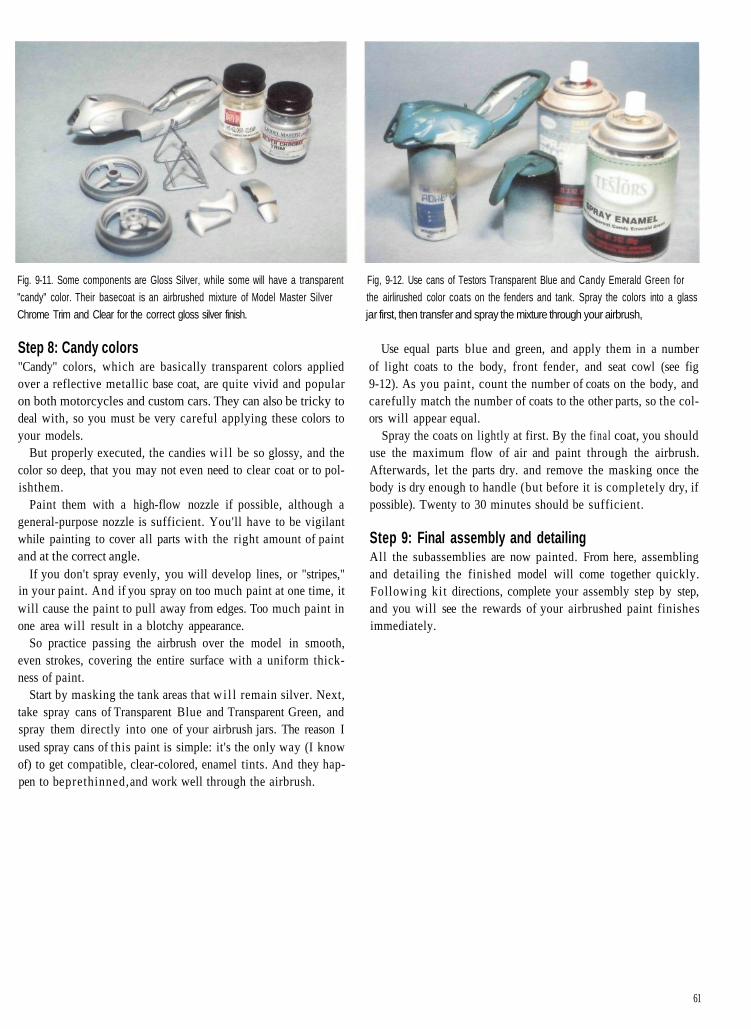
Fig. 9-11. Some components are Gloss Silver, while some will have a transparent"candy" color. Their basecoat is an airbrushed mixture of Model Master SilverChrome Trim and Clear for the correct gloss silver finish.
Step 8: Candy colors"Candy" colors, which are basically transparent colors appliedover a reflective metallic base coat, are quite vivid and popularon both motorcycles and custom cars. They can also be tricky todeal with, so you must be very careful applying these colors toyour models.
But properly executed, the candies wi l l be so glossy, and thecolor so deep, that you may not even need to clear coat or to pol-ish them.
Paint them with a high-flow nozzle if possible, although ageneral-purpose nozzle is sufficient. You'll have to be vigilantwhile painting to cover all parts with the right amount of paintand at the correct angle.
If you don't spray evenly, you will develop lines, or "stripes,"in your paint. And if you spray on too much paint at one time, itwill cause the paint to pull away from edges. Too much paint inone area will result in a blotchy appearance.
So practice passing the airbrush over the model in smooth,even strokes, covering the entire surface with a uniform thick-ness of paint.
Start by masking the tank areas that w i l l remain silver. Next,take spray cans of Transparent Blue and Transparent Green, andspray them directly into one of your airbrush jars. The reason Iused spray cans of this paint is simple: it's the only way (I knowof) to get compatible, clear-colored, enamel tints. And they hap-pen to be prethinned, and work well through the airbrush.
Fig, 9-12. Use cans of Testors Transparent Blue and Candy Emerald Green forthe airlirushed color coats on the fenders and tank. Spray the colors into a glassjar first, then transfer and spray the mixture through your airbrush,
Use equal parts blue and green, and apply them in a numberof light coats to the body, front fender, and seat cowl (see fig9-12). As you paint, count the number of coats on the body, andcarefully match the number of coats to the other parts, so the col-ors will appear equal.
Spray the coats on lightly at first. By the f inal coat, you shoulduse the maximum flow of air and paint through the airbrush.Afterwards, let the parts dry. and remove the masking once thebody is dry enough to handle (but before it is completely dry, ifpossible). Twenty to 30 minutes should be sufficient.
Step 9: Final assembly and detailingAll the subassemblies are now painted. From here, assemblingand detailing the finished model will come together quickly.Following ki t directions, complete your assembly step by step,and you will see the rewards of your airbrushed paint finishesimmediately.
61
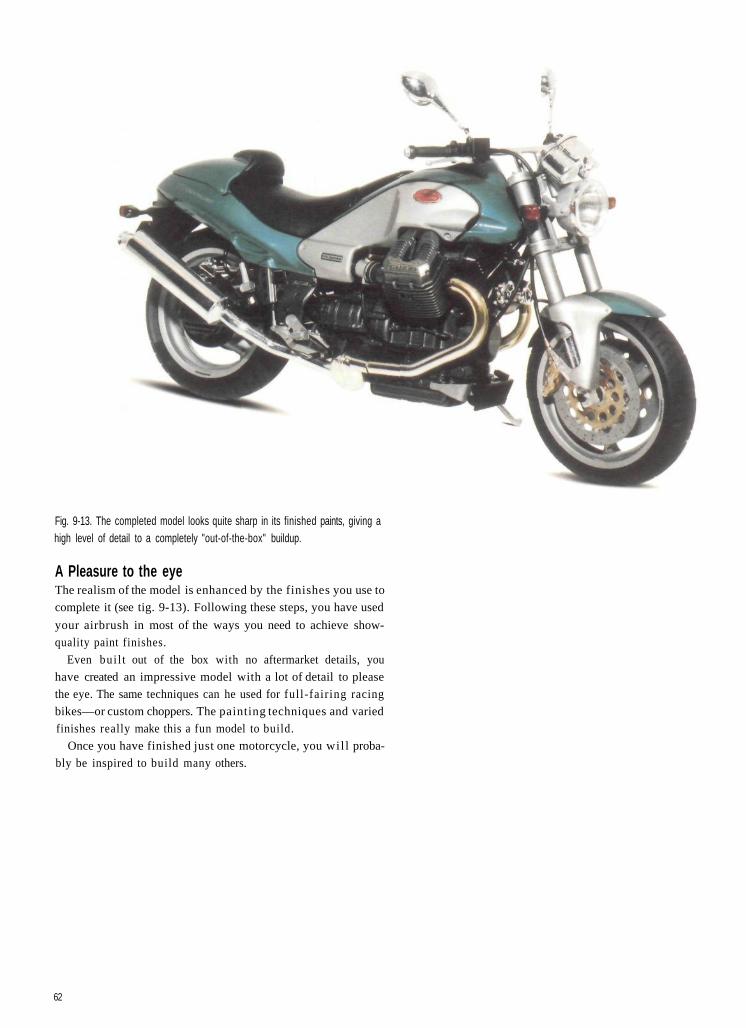
Fig. 9-13. The completed model looks quite sharp in its finished paints, giving ahigh level of detail to a completely "out-of-the-box" buildup.
A Pleasure to the eyeThe realism of the model is enhanced by the finishes you use to
complete it (see tig. 9-13). Following these steps, you have used
your airbrush in most of the ways you need to achieve show-
quality paint finishes.
Even bui l t out of the box with no aftermarket details, you
have created an impressive model with a lot of detail to please
the eye. The same techniques can he used for full-fairing racing
bikes—or custom choppers. The painting techniques and varied
finishes really make this a fun model to build.
Once you have finished just one motorcycle, you wil l proba-
bly be inspired to build many others.
62
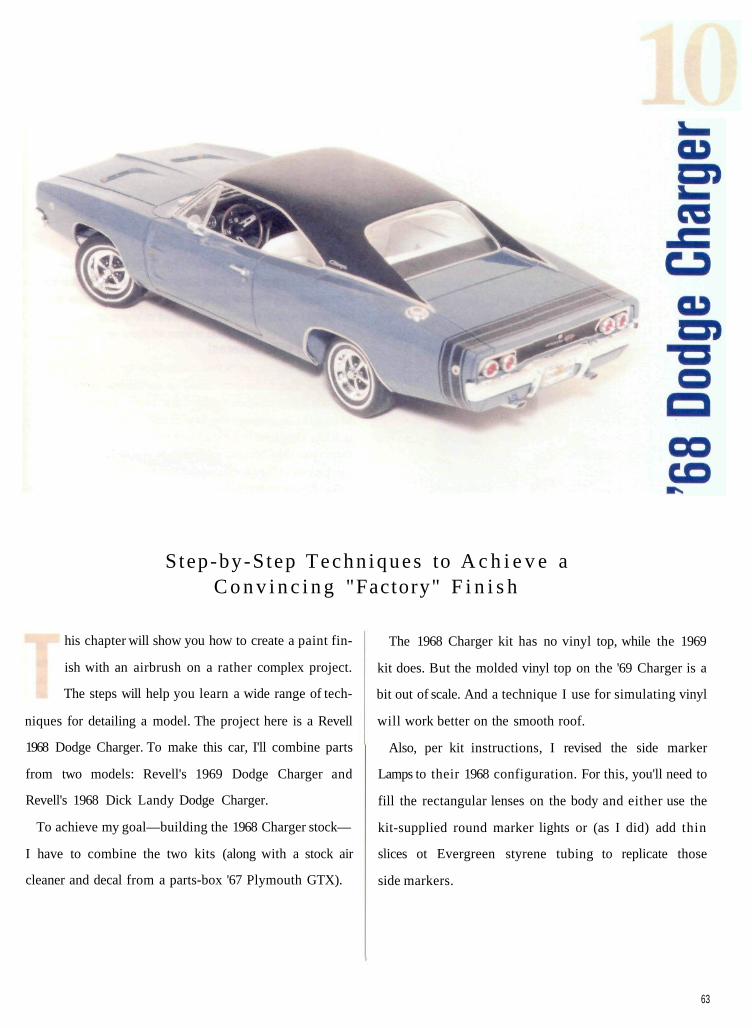
Step-by-Step Techn iques to A c h i e v e aC o n v i n c i n g "Factory" F i n i s h
his chapter will show you how to create a paint fin-
ish with an airbrush on a rather complex project.
The steps will help you learn a wide range of tech-
niques for detailing a model. The project here is a Revell
1968 Dodge Charger. To make this car, I'll combine parts
from two models: Revell's 1969 Dodge Charger and
Revell's 1968 Dick Landy Dodge Charger.
To achieve my goal—building the 1968 Charger stock—
I have to combine the two kits (along with a stock air
cleaner and decal from a parts-box '67 Plymouth GTX).
The 1968 Charger kit has no vinyl top, while the 1969
kit does. But the molded vinyl top on the '69 Charger is a
bit out of scale. And a technique I use for simulating vinyl
will work better on the smooth roof.
Also, per kit instructions, I revised the side marker
Lamps to their 1968 configuration. For this, you'll need to
fill the rectangular lenses on the body and either use the
kit-supplied round marker lights or (as I did) add thin
slices ot Evergreen styrene tubing to replicate those
side markers.
63
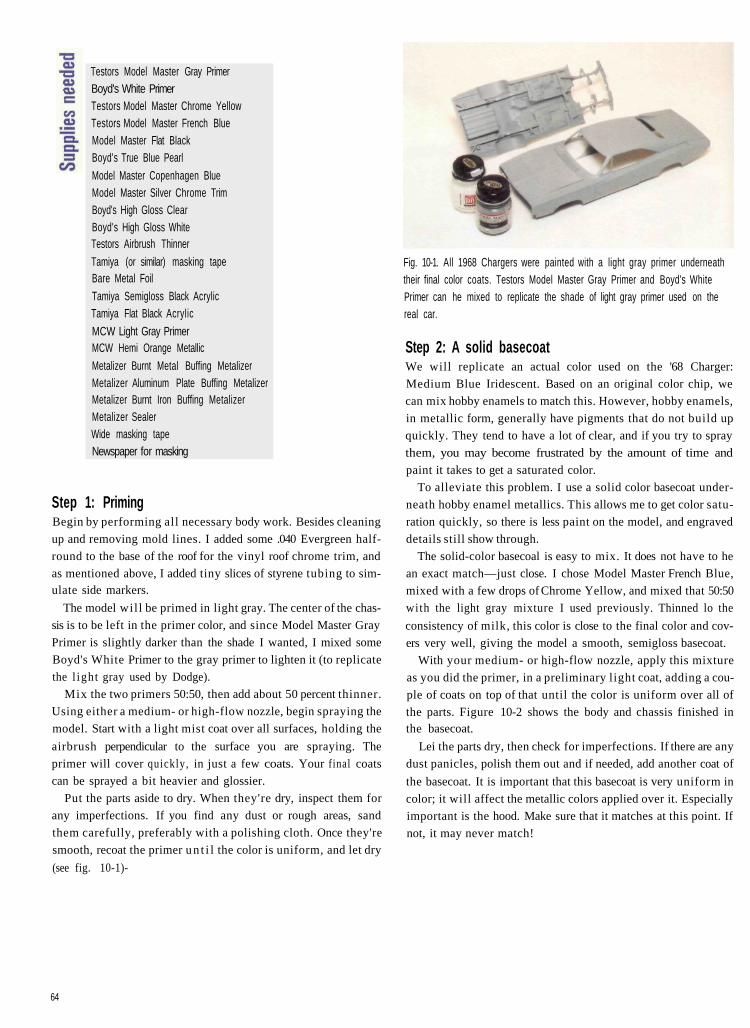
Testors Model Master Gray PrimerBoyd's White PrimerTestors Model Master Chrome YellowTestors Model Master French BlueModel Master Flat BlackBoyd's True Blue Pearl
Model Master Copenhagen BlueModel Master Silver Chrome TrimBoyd's High Gloss ClearBoyd's High Gloss WhiteTestors Airbrush Thinner
Tamiya (or similar) masking tapeBare Metal Foil
Tamiya Semigloss Black AcrylicTamiya Flat Black Acrylic
MCW Light Gray PrimerMCW Hemi Orange Metallic
Metalizer Burnt Metal Buffing MetalizerMetalizer Aluminum Plate Buffing MetalizerMetalizer Burnt Iron Buffing MetalizerMetalizer SealerWide masking tapeNewspaper for masking
Step 1: PrimingBegin by performing all necessary body work. Besides cleaning
up and removing mold lines. I added some .040 Evergreen half-
round to the base of the roof for the vinyl roof chrome trim, and
as mentioned above, I added tiny slices of styrene tubing to sim-ulate side markers.
The model wil l be primed in light gray. The center of the chas-
sis is to be left in the primer color, and since Model Master Gray
Primer is slightly darker than the shade I wanted, I mixed some
Boyd's White Primer to the gray primer to lighten it (to replicate
the l ight gray used by Dodge).
Mix the two primers 50:50, then add about 50 percent thinner.
Using either a medium- or high-flow nozzle, begin spraying the
model. Start with a light mist coat over all surfaces, holding the
airbrush perpendicular to the surface you are spraying. The
primer will cover quickly, in just a few coats. Your final coats
can be sprayed a bit heavier and glossier.
Put the parts aside to dry. When they're dry, inspect them for
any imperfections. If you find any dust or rough areas, sand
them carefully, preferably with a polishing cloth. Once they're
smooth, recoat the primer un t i l the color is uniform, and let dry
(see fig. 10-1)-
Fig. 10-1. All 1968 Chargers were painted with a light gray primer underneaththeir final color coats. Testors Model Master Gray Primer and Boyd's WhitePrimer can he mixed to replicate the shade of light gray primer used on thereal car.
Step 2: A solid basecoatWe will replicate an actual color used on the '68 Charger:
Medium Blue Iridescent. Based on an original color chip, we
can mix hobby enamels to match this. However, hobby enamels,
in metallic form, generally have pigments that do not build up
quickly. They tend to have a lot of clear, and if you try to spray
them, you may become frustrated by the amount of time and
paint it takes to get a saturated color.
To alleviate this problem. I use a solid color basecoat under-
neath hobby enamel metallics. This allows me to get color satu-
ration quickly, so there is less paint on the model, and engraved
details still show through.
The solid-color basecoal is easy to mix. It does not have to he
an exact match—just close. I chose Model Master French Blue,
mixed with a few drops of Chrome Yellow, and mixed that 50:50
with the light gray mixture I used previously. Thinned lo the
consistency of milk, this color is close to the final color and cov-
ers very well, giving the model a smooth, semigloss basecoat.
With your medium- or high-flow nozzle, apply this mixture
as you did the primer, in a preliminary light coat, adding a cou-
ple of coats on top of that until the color is uniform over all of
the parts. Figure 10-2 shows the body and chassis finished inthe basecoat.
Lei the parts dry, then check for imperfections. If there are any
dust panicles, polish them out and if needed, add another coat of
the basecoat. It is important that this basecoat is very uniform in
color; it will affect the metallic colors applied over it. Especially
important is the hood. Make sure that it matches at this point. If
not, it may never match!
64
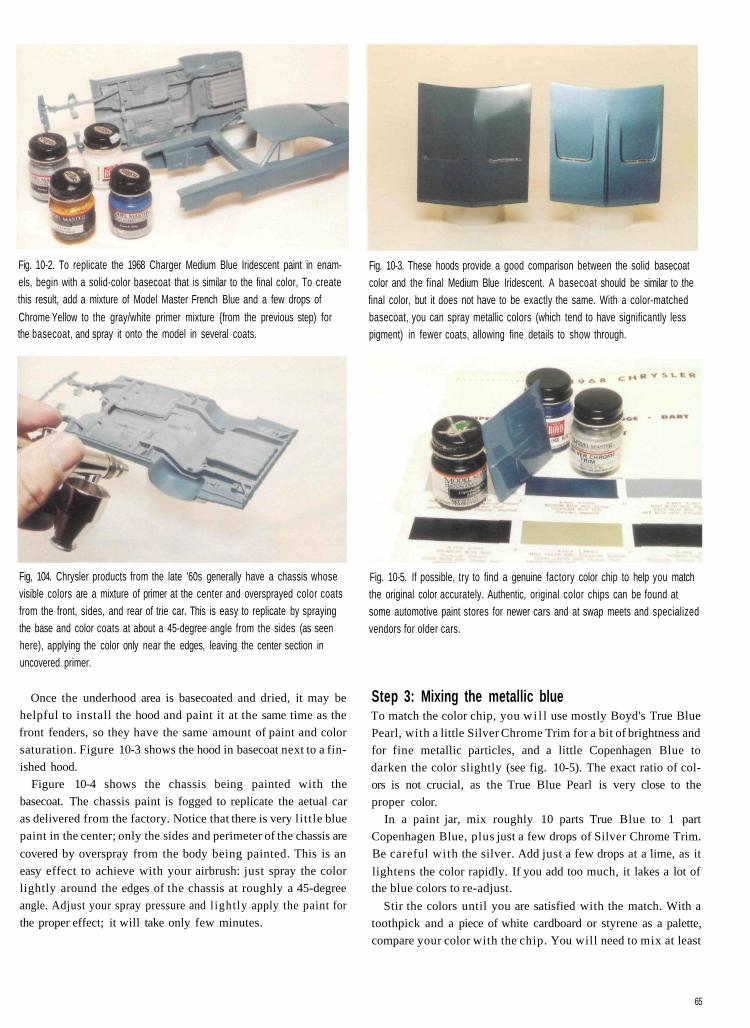
Fig. 10-2. To replicate the 1968 Charger Medium Blue Iridescent paint in enam-els, begin with a solid-color basecoat that is similar to the final color, To createthis result, add a mixture of Model Master French Blue and a few drops of
Chrome Yellow to the gray/white primer mixture {from the previous step) forthe basecoat, and spray it onto the model in several coats.
Fig. 10-3. These hoods provide a good comparison between the solid basecoatcolor and the final Medium Blue Iridescent. A basecoat should be similar to thefinal color, but it does not have to be exactly the same. With a color-matchedbasecoat, you can spray metallic colors (which tend to have significantly lesspigment) in fewer coats, allowing fine details to show through.
Fig, 104. Chrysler products from the late '60s generally have a chassis whosevisible colors are a mixture of primer at the center and oversprayed color coatsfrom the front, sides, and rear of trie car. This is easy to replicate by sprayingthe base and color coats at about a 45-degree angle from the sides (as seenhere), applying the color only near the edges, leaving the center section inuncovered primer.
Once the underhood area is basecoated and dried, it may be
helpful to install the hood and paint it at the same time as the
front fenders, so they have the same amount of paint and color
saturation. Figure 10-3 shows the hood in basecoat next to a fin-
ished hood.
Figure 10-4 shows the chassis being painted with the
basecoat. The chassis paint is fogged to replicate the aetual car
as delivered from the factory. Notice that there is very little blue
paint in the center; only the sides and perimeter of the chassis are
covered by overspray from the body being painted. This is an
easy effect to achieve with your airbrush: just spray the color
lightly around the edges of the chassis at roughly a 45-degree
angle. Adjust your spray pressure and l ight ly apply the paint for
the proper effect; it will take only few minutes.
Fig. 10-5. If possible, try to find a genuine factory color chip to help you matchthe original color accurately. Authentic, original color chips can be found atsome automotive paint stores for newer cars and at swap meets and specializedvendors for older cars.
Step 3: Mixing the metallic blueTo match the color chip, you wi l l use mostly Boyd's True Blue
Pearl, with a little Silver Chrome Trim for a bit of brightness and
for fine metallic particles, and a little Copenhagen Blue to
darken the color slightly (see fig. 10-5). The exact ratio of col-
ors is not crucial, as the True Blue Pearl is very close to the
proper color.
In a paint jar, mix roughly 10 parts True Blue to 1 part
Copenhagen Blue, plus just a few drops of Silver Chrome Trim.
Be careful with the silver. Add just a few drops at a lime, as it
lightens the color rapidly. If you add too much, it lakes a lot ofthe blue colors to re-adjust.
Stir the colors until you are satisfied with the match. With a
toothpick and a piece of white cardboard or styrene as a palette,
compare your color with the chip. You will need to mix at least
65
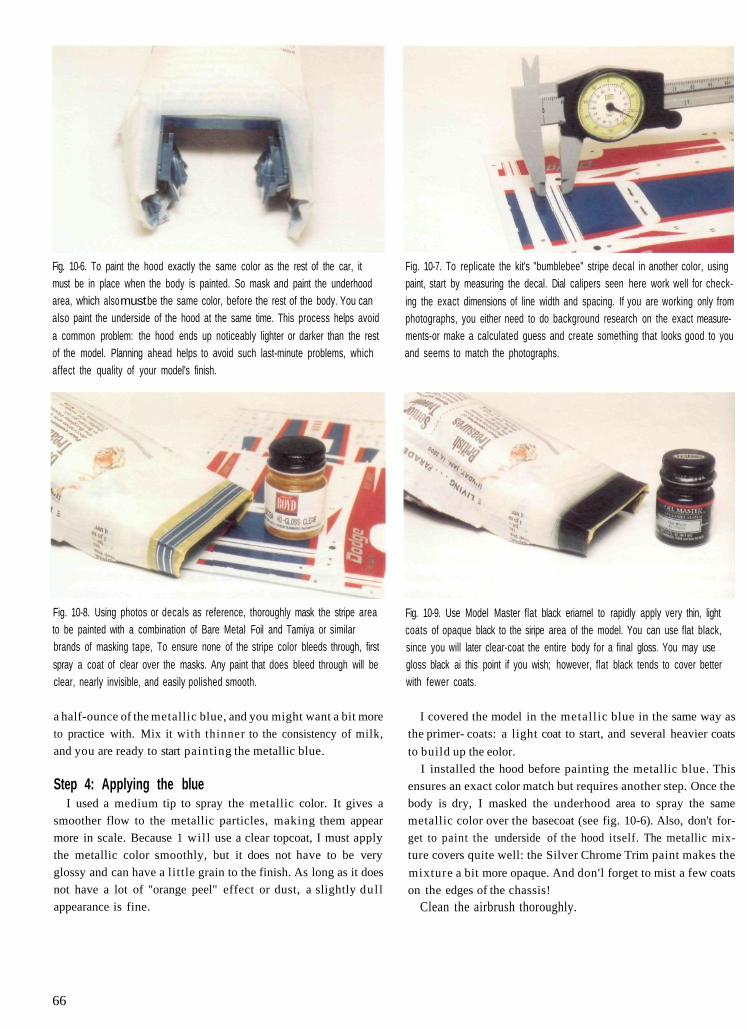
Fig. 10-6. To paint the hood exactly the same color as the rest of the car, itmust be in place when the body is painted. So mask and paint the underhoodarea, which also must be the same color, before the rest of the body. You canalso paint the underside of the hood at the same time. This process helps avoid
a common problem: the hood ends up noticeably lighter or darker than the restof the model. Planning ahead helps to avoid such last-minute problems, whichaffect the quality of your model's finish.
Fig. 10-7. To replicate the kit's "bumblebee" stripe decal in another color, usingpaint, start by measuring the decal. Dial calipers seen here work well for check-
ing the exact dimensions of line width and spacing. If you are working only fromphotographs, you either need to do background research on the exact measure-ments-or make a calculated guess and create something that looks good to youand seems to match the photographs.
Fig. 10-8. Using photos or decals as reference, thoroughly mask the stripe areato be painted with a combination of Bare Metal Foil and Tamiya or similarbrands of masking tape, To ensure none of the stripe color bleeds through, first
spray a coat of clear over the masks. Any paint that does bleed through will beclear, nearly invisible, and easily polished smooth.
a half-ounce of the metallic blue, and you might want a bit more
to practice with. Mix it with thinner to the consistency of milk,
and you are ready to start painting the metallic blue.
Step 4: Applying the blueI used a medium tip to spray the metallic color. It gives a
smoother flow to the metallic particles, making them appear
more in scale. Because 1 wil l use a clear topcoat, I must apply
the metallic color smoothly, but it does not have to be very
glossy and can have a little grain to the finish. As long as it does
not have a lot of "orange peel" effect or dust, a slightly dul l
appearance is fine.
Fig. 10-9. Use Model Master flat black eriarnel to rapidly apply very thin, lightcoats of opaque black to the siripe area of the model. You can use flat black,since you will later clear-coat the entire body for a final gloss. You may usegloss black ai this point if you wish; however, flat black tends to cover betterwith fewer coats.
I covered the model in the metallic blue in the same way as
the primer- coats: a light coat to start, and several heavier coats
to build up the eolor.
I installed the hood before painting the metallic blue. This
ensures an exact color match but requires another step. Once the
body is dry, I masked the underhood area to spray the same
metallic color over the basecoat (see fig. 10-6). Also, don't for-
get to paint the underside of the hood itself. The metallic mix-
ture covers quite well: the Silver Chrome Trim paint makes the
mixture a bit more opaque. And don'l forget to mist a few coats
on the edges of the chassis!
Clean the airbrush thoroughly.
66
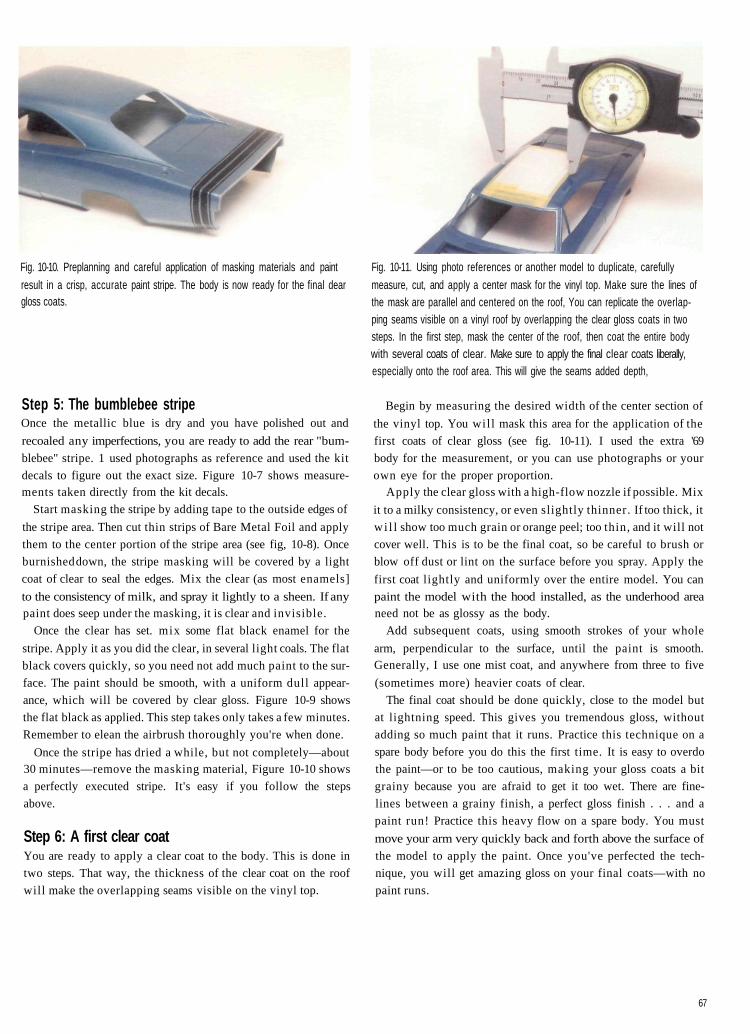
Fig. 10-10. Preplanning and careful application of masking materials and paint
result in a crisp, accurate paint stripe. The body is now ready for the final deargloss coats.
Step 5: The bumblebee stripeOnce the metallic blue is dry and you have polished out and
recoaled any imperfections, you are ready to add the rear "bum-
blebee" stripe. 1 used photographs as reference and used the kit
decals to figure out the exact size. Figure 10-7 shows measure-ments taken directly from the kit decals.
Start masking the stripe by adding tape to the outside edges of
the stripe area. Then cut thin strips of Bare Metal Foil and apply
them to the center portion of the stripe area (see fig, 10-8). Once
burnished down, the stripe masking will be covered by a light
coat of clear to seal the edges. Mix the clear (as most enamels]
to the consistency of milk, and spray it lightly to a sheen. If anypaint does seep under the masking, it is clear and invisible.
Once the clear has set. mix some flat black enamel for the
stripe. Apply it as you did the clear, in several light coals. The flat
black covers quickly, so you need not add much paint to the sur-
face. The paint should be smooth, with a uniform dull appear-
ance, which will be covered by clear gloss. Figure 10-9 shows
the flat black as applied. This step takes only takes a few minutes.
Remember to elean the airbrush thoroughly you're when done.
Once the stripe has dried a while, but not completely—about30 minutes—remove the masking material, Figure 10-10 shows
a perfectly executed stripe. It's easy if you follow the steps
above.
Step 6: A first clear coatYou are ready to apply a clear coat to the body. This is done in
two steps. That way, the thickness of the clear coat on the roof
will make the overlapping seams visible on the vinyl top.
Fig. 10-11. Using photo references or another model to duplicate, carefully
measure, cut, and apply a center mask for the vinyl top. Make sure the lines ofthe mask are parallel and centered on the roof, You can replicate the overlap-ping seams visible on a vinyl roof by overlapping the clear gloss coats in twosteps. In the first step, mask the center of the roof, then coat the entire bodywith several coats of clear. Make sure to apply the final clear coats liberally,especially onto the roof area. This will give the seams added depth,
Begin by measuring the desired width of the center section of
the vinyl top. You wil l mask this area for the application of the
first coats of clear gloss (see fig. 10-11). I used the extra '69
body for the measurement, or you can use photographs or your
own eye for the proper proportion.Apply the clear gloss with a high-flow nozzle if possible. Mix
it to a milky consistency, or even slightly thinner. If too thick, it
w i l l show too much grain or orange peel; too thin, and it will not
cover well. This is to be the final coat, so be careful to brush or
blow off dust or lint on the surface before you spray. Apply the
first coat lightly and uniformly over the entire model. You can
paint the model with the hood installed, as the underhood areaneed not be as glossy as the body.
Add subsequent coats, using smooth strokes of your whole
arm, perpendicular to the surface, until the paint is smooth.Generally, I use one mist coat, and anywhere from three to five
(sometimes more) heavier coats of clear.
The final coat should be done quickly, close to the model but
at lightning speed. This gives you tremendous gloss, without
adding so much paint that it runs. Practice this technique on a
spare body before you do this the first time. It is easy to overdo
the paint—or to be too cautious, making your gloss coats a bit
grainy because you are afraid to get it too wet. There are fine-
lines between a grainy finish, a perfect gloss finish . . . and a
paint run! Practice this heavy flow on a spare body. You must
move your arm very quickly back and forth above the surface of
the model to apply the paint. Once you've perfected the tech-
nique, you will get amazing gloss on your final coats—with no
paint runs.
67
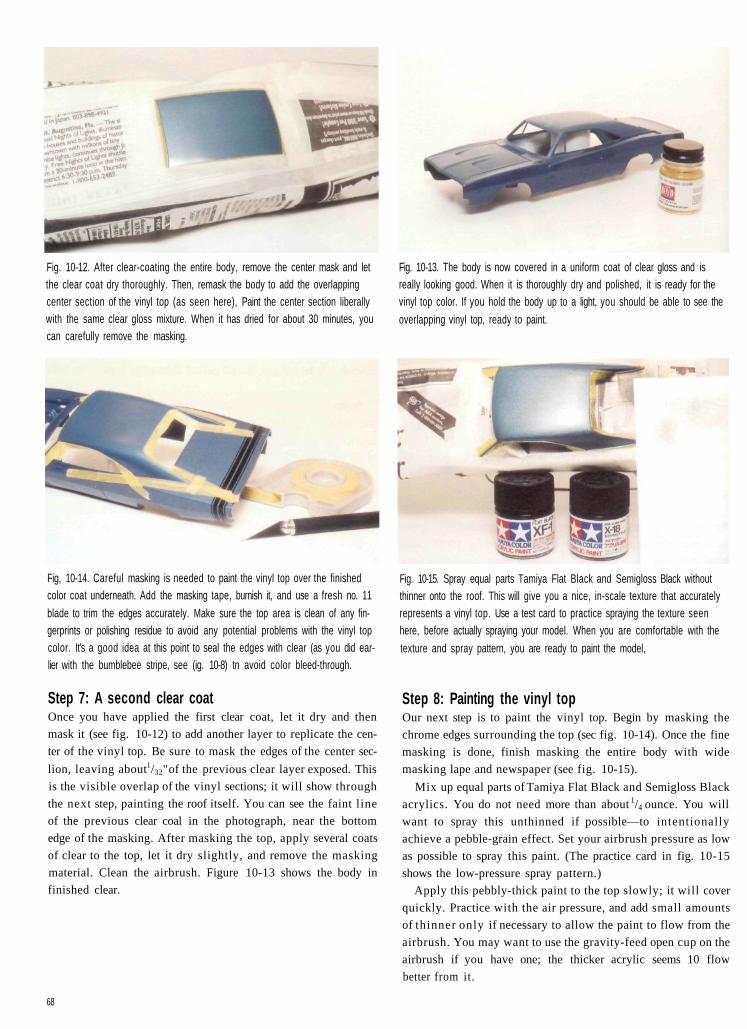
Fig. 10-12. After clear-coating the entire body, remove the center mask and letthe clear coat dry thoroughly. Then, remask the body to add the overlappingcenter section of the vinyl top (as seen here), Paint the center section liberallywith the same clear gloss mixture. When it has dried for about 30 minutes, youcan carefully remove the masking.
Fig. 10-13. The body is now covered in a uniform coat of clear gloss and isreally looking good. When it is thoroughly dry and polished, it is ready for thevinyl top color. If you hold the body up to a light, you should be able to see the
overlapping vinyl top, ready to paint.
Fig, 10-14. Careful masking is needed to paint the vinyl top over the finishedcolor coat underneath. Add the masking tape, burnish it, and use a fresh no. 11
blade to trim the edges accurately. Make sure the top area is clean of any fin-gerprints or polishing residue to avoid any potential problems with the vinyl topcolor. It's a good idea at this point to seal the edges with clear (as you did ear-lier with the bumblebee stripe, see (ig. 10-8) tn avoid color bleed-through.
Step 7: A second clear coatOnce you have applied the first clear coat, let it dry and then
mask it (see fig. 10-12) to add another layer to replicate the cen-
ter of the vinyl top. Be sure to mask the edges of the center sec-
lion, leaving about 1/32" of the previous clear layer exposed. This
is the visible overlap of the vinyl sections; it will show through
the next step, painting the roof itself. You can see the faint line
of the previous clear coal in the photograph, near the bottom
edge of the masking. After masking the top, apply several coats
of clear to the top, let it dry slightly, and remove the masking
material. Clean the airbrush. Figure 10-13 shows the body in
finished clear.
Fig. 10-15. Spray equal parts Tamiya Flat Black and Semigloss Black withoutthinner onto the roof. This will give you a nice, in-scale texture that accuratelyrepresents a vinyl top. Use a test card to practice spraying the texture seenhere, before actually spraying your model. When you are comfortable with the
texture and spray pattern, you are ready to paint the model,
Step 8: Painting the vinyl topOur next step is to paint the vinyl top. Begin by masking the
chrome edges surrounding the top (sec fig. 10-14). Once the fine
masking is done, finish masking the entire body with wide
masking lape and newspaper (see fig. 10-15).
Mix up equal parts of Tamiya Flat Black and Semigloss Black
acrylics. You do not need more than about 1/4 ounce. You will
want to spray this unthinned if possible—to intentionally
achieve a pebble-grain effect. Set your airbrush pressure as low
as possible to spray this paint. (The practice card in fig. 10-15
shows the low-pressure spray pattern.)
Apply this pebbly-thick paint to the top slowly; it will cover
quickly. Practice with the air pressure, and add small amounts
of thinner only if necessary to allow the paint to flow from the
airbrush. You may want to use the gravity-feed open cup on the
airbrush if you have one; the thicker acrylic seems 10 flow
better from it.
68
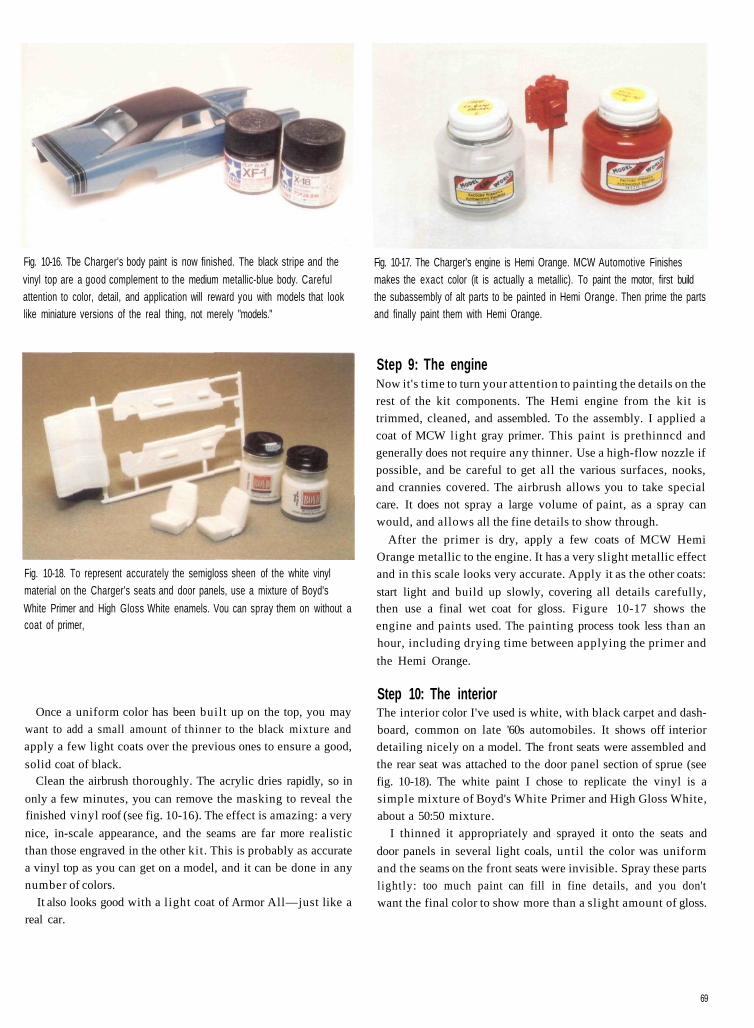
Fig. 10-16. Tbe Charger's body paint is now finished. The black stripe and the
vinyl top are a good complement to the medium metallic-blue body. Carefulattention to color, detail, and application will reward you with models that looklike miniature versions of the real thing, not merely "models."
Fig. 10-17. The Charger's engine is Hemi Orange. MCW Automotive Finishesmakes the exact color (it is actually a metallic). To paint the motor, first buildthe subassembly of alt parts to be painted in Hemi Orange. Then prime the partsand finally paint them with Hemi Orange.
Fig. 10-18. To represent accurately the semigloss sheen of the white vinylmaterial on the Charger's seats and door panels, use a mixture of Boyd's
White Primer and High Gloss White enamels. Vou can spray them on without acoat of primer,
Once a uniform color has been built up on the top, you may
want to add a small amount of thinner to the black mixture and
apply a few light coats over the previous ones to ensure a good,
solid coat of black.Clean the airbrush thoroughly. The acrylic dries rapidly, so in
only a few minutes, you can remove the masking to reveal thefinished vinyl roof (see fig. 10-16). The effect is amazing: a very
nice, in-scale appearance, and the seams are far more realistic
than those engraved in the other kit. This is probably as accurate
a vinyl top as you can get on a model, and it can be done in any
number of colors.
It also looks good with a light coat of Armor All—just like a
real car.
Step 9: The engineNow it's time to turn your attention to painting the details on the
rest of the kit components. The Hemi engine from the kit is
trimmed, cleaned, and assembled. To the assembly. I applied a
coat of MCW light gray primer. This paint is prethinncd and
generally does not require any thinner. Use a high-flow nozzle if
possible, and be careful to get all the various surfaces, nooks,
and crannies covered. The airbrush allows you to take special
care. It does not spray a large volume of paint, as a spray can
would, and allows all the fine details to show through.
After the primer is dry, apply a few coats of MCW Hemi
Orange metallic to the engine. It has a very slight metallic effect
and in this scale looks very accurate. Apply it as the other coats:
start light and build up slowly, covering all details carefully,then use a final wet coat for gloss. Figure 10-17 shows the
engine and paints used. The painting process took less than an
hour, including drying time between applying the primer and
the Hemi Orange.
Step 10: The interiorThe interior color I've used is white, with black carpet and dash-
board, common on late '60s automobiles. It shows off interior
detailing nicely on a model. The front seats were assembled and
the rear seat was attached to the door panel section of sprue (see
fig. 10-18). The white paint I chose to replicate the vinyl is a
simple mixture of Boyd's White Primer and High Gloss White,
about a 50:50 mixture.
I thinned it appropriately and sprayed it onto the seats and
door panels in several light coals, until the color was uniform
and the seams on the front seats were invisible. Spray these parts
lightly: too much paint can fill in fine details, and you don't
want the final color to show more than a slight amount of gloss.
69
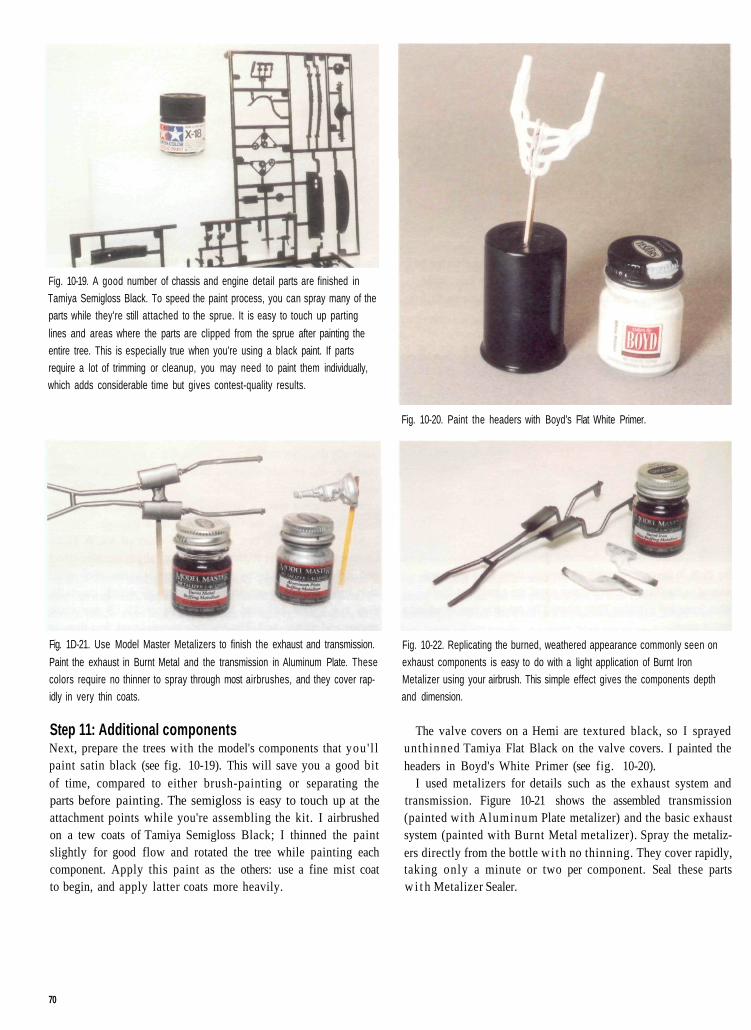
Fig. 10-19. A good number of chassis and engine detail parts are finished inTamiya Semigloss Black. To speed the paint process, you can spray many of theparts while they're still attached to the sprue. It is easy to touch up parting
lines and areas where the parts are clipped from the sprue after painting theentire tree. This is especially true when you're using a black paint. If partsrequire a lot of trimming or cleanup, you may need to paint them individually,which adds considerable time but gives contest-quality results.
Fig. 10-20. Paint the headers with Boyd's Flat White Primer.
Fig. 1D-21. Use Model Master Metalizers to finish the exhaust and transmission.
Paint the exhaust in Burnt Metal and the transmission in Aluminum Plate. Thesecolors require no thinner to spray through most airbrushes, and they cover rap-idly in very thin coats.
Step 11: Additional componentsNext, prepare the trees with the model's components that you ' l lpaint satin black (see fig. 10-19). This will save you a good bitof time, compared to either brush-painting or separating theparts before painting. The semigloss is easy to touch up at theattachment points while you're assembling the kit. I airbrushedon a tew coats of Tamiya Semigloss Black; I thinned the paintslightly for good flow and rotated the tree while painting eachcomponent. Apply this paint as the others: use a fine mist coatto begin, and apply latter coats more heavily.
Fig. 10-22. Replicating the burned, weathered appearance commonly seen onexhaust components is easy to do with a light application of Burnt IronMetalizer using your airbrush. This simple effect gives the components depthand dimension.
The valve covers on a Hemi are textured black, so I sprayedunthinned Tamiya Flat Black on the valve covers. I painted theheaders in Boyd's White Primer (see fig. 10-20).
I used metalizers for details such as the exhaust system andtransmission. Figure 10-21 shows the assembled transmission(painted with Aluminum Plate metalizer) and the basic exhaustsystem (painted with Burnt Metal metalizer). Spray the metaliz-ers directly from the bottle wi th no thinning. They cover rapidly,taking only a minute or two per component. Seal these partsw i t h Metalizer Sealer.
70
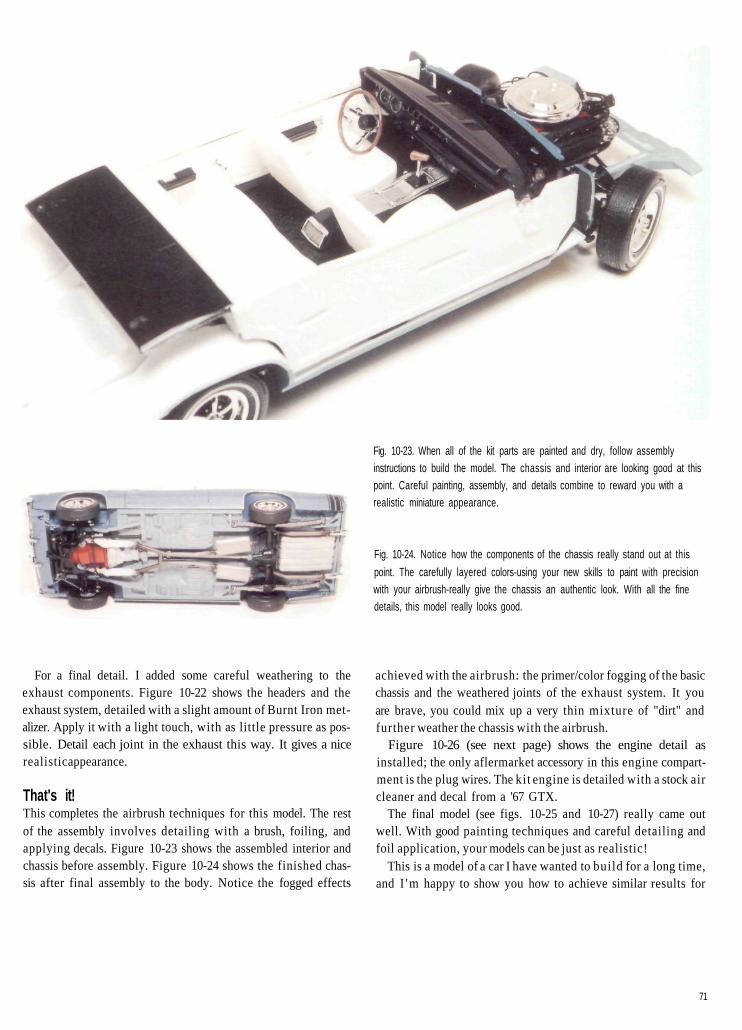
Fig. 10-23. When all of the kit parts are painted and dry, follow assemblyinstructions to build the model. The chassis and interior are looking good at thispoint. Careful painting, assembly, and details combine to reward you with arealistic miniature appearance.
Fig. 10-24. Notice how the components of the chassis really stand out at this
point. The carefully layered colors-using your new skills to paint with precisionwith your airbrush-really give the chassis an authentic look. With all the finedetails, this model really looks good.
For a final detail. I added some careful weathering to theexhaust components. Figure 10-22 shows the headers and theexhaust system, detailed with a slight amount of Burnt Iron met-alizer. Apply it with a light touch, with as little pressure as pos-sible. Detail each joint in the exhaust this way. It gives a nicerealistic appearance.
That's it!This completes the airbrush techniques for this model. The restof the assembly involves detailing with a brush, foiling, andapplying decals. Figure 10-23 shows the assembled interior andchassis before assembly. Figure 10-24 shows the finished chas-sis after final assembly to the body. Notice the fogged effects
achieved with the airbrush: the primer/color fogging of the basicchassis and the weathered joints of the exhaust system. It youare brave, you could mix up a very thin mixture of "dirt" andfurther weather the chassis with the airbrush.
Figure 10-26 (see next page) shows the engine detail asinstalled; the only aflermarket accessory in this engine compart-ment is the plug wires. The kit engine is detailed with a stock aircleaner and decal from a '67 GTX.
The final model (see figs. 10-25 and 10-27) really came outwell. With good painting techniques and careful detailing andfoil application, your models can be just as realistic!
This is a model of a car I have wanted to build for a long time,and I 'm happy to show you how to achieve similar results for
71
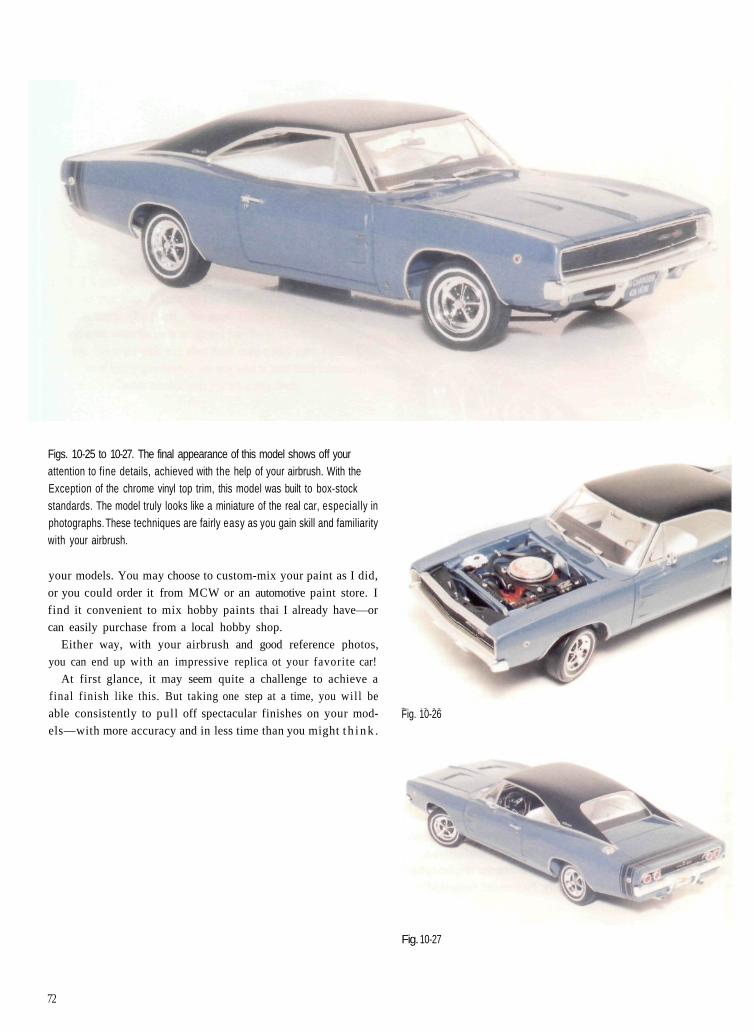
Figs. 10-25 to 10-27. The final appearance of this model shows off yourattention to fine details, achieved with the help of your airbrush. With theException of the chrome vinyl top trim, this model was built to box-stockstandards. The model truly looks like a miniature of the real car, especially inphotographs. These techniques are fairly easy as you gain skill and familiaritywith your airbrush.
your models. You may choose to custom-mix your paint as I did,
or you could order it from MCW or an automotive paint store. I
find it convenient to mix hobby paints thai I already have—or
can easily purchase from a local hobby shop.
Either way, with your airbrush and good reference photos,
you can end up with an impressive replica ot your favorite car!
At first glance, it may seem quite a challenge to achieve a
final finish like this. But taking one step at a time, you wil l be
able consistently to pull off spectacular finishes on your mod-
els—with more accuracy and in less time than you might t h i n k .Fig. 10-26
Fig. 10-27
72
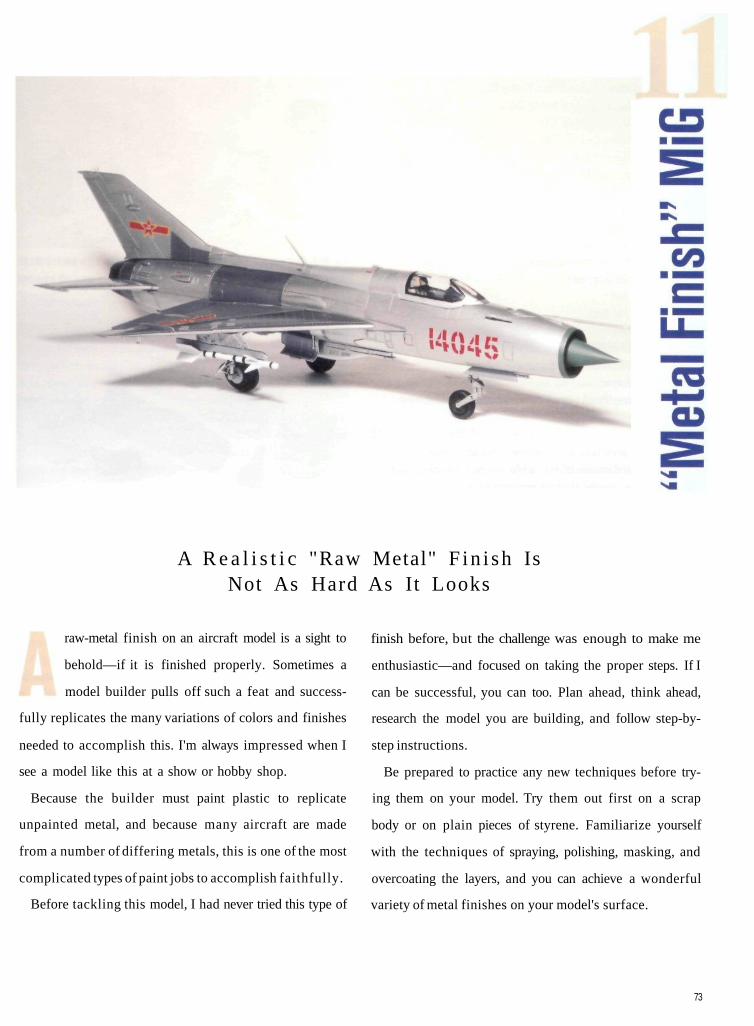
A R e a l i s t i c "Raw Metal" F in i sh IsNot As Hard As It Looks
raw-metal finish on an aircraft model is a sight to
behold—if it is finished properly. Sometimes a
model builder pulls off such a feat and success-
fully replicates the many variations of colors and finishes
needed to accomplish this. I'm always impressed when I
see a model like this at a show or hobby shop.
Because the builder must paint plastic to replicate
unpainted metal, and because many aircraft are made
from a number of differing metals, this is one of the most
complicated types of paint jobs to accomplish faithfully.
Before tackling this model, I had never tried this type of
finish before, but the challenge was enough to make me
enthusiastic—and focused on taking the proper steps. If I
can be successful, you can too. Plan ahead, think ahead,
research the model you are building, and follow step-by-
step instructions.
Be prepared to practice any new techniques before try-
ing them on your model. Try them out first on a scrap
body or on plain pieces of styrene. Familiarize yourself
with the techniques of spraying, polishing, masking, and
overcoating the layers, and you can achieve a wonderful
variety of metal finishes on your model's surface.
73

The model seen here is an excellent subject for either begin-ners or seasoned modelers. It is a MiG21 in 1/48 scale, made byAcademy. The model is well engineered, has clear assemblyinstructions, and assemblies without particular problems. Theparts fit very well and require only a minimum of fil l ing and fin-ishing prior to painting.
Step 1: Painting the cockpitEach step of the model assembly shown will follow the kitinstructions. The first area to paint is the cockpit (sec fig, 11-1).Paint the basic cockpit and instrument panel in AeroMasterCockpit Blue Green. Trim and clean the parts.
Prepare your airbrush with either a fine or medium tip; test-spray the color through the airbrush to see how it flows. If it needsthinning, add a few drops of either bottled or distilled water orAeroMastcr/Poly S thinner to the mixture.
Once it sprays smoothly, apply it to the cockpit and instru-ment panel. This color wi l l cover rapidly. When you're fin-ished, set the parts aside to dry. At this point, you will alsowant to paint the inner parts of the fuselage in the same color(see fig. 11-2), Clean the airbrush thoroughly with water orrubbing alcohol.
When the instrument panel has dried, you may want to coat itwith a layer of Testors Dullcote Lacquer (if you will be detail-painting the instruments with brush-painted acrylics, as I did).The Dullcote wil l protect the underlying surface from mixingwith the acrylic brush paints. Mix the Dullcote about 50:50 witheither lacquer thinner or Model Master Airbrush enamel thinner;apply it to both the instrument panel and cockpit.
Fig. 11-1. Here you see a variety of cockpit components, with the paints used toairbrush their details.
Fig, 11-2. After finishing the cockpit but before assembling the fuselage section,paint the interior cockpit portion of the fuselage in Aeromaster Cockpit BlueGreen and the portion around the nosecone Radome/Hub Green.
Set the parts aside to dry, and clean the airbrush with lacquerthinner. When the instrument panel is dry, you can brush-paintthe instrument details as you see fit.
Step 2: The noseconeThe next part to detail is the nosecone. Follow kit instructions onadding lead fishing weights inside the cone. When the glue isdry, you are ready to paint it with AeroMaster Radome/Hub Green.
As before, test-spray the paint to see if it needs thinning. Ifso, use either bottled water or AeroMaster/Poly S thinner. Thiscolor also covers rapidly. When the nosecone is painted, set itaside to dry.
Next, spray the green on the inner surfaces of the fuselage (seefig. 11 -2). Afterwards, clean the airbrush with water or rubbingalcohol.
Model Master Aluminum Plate Nonbuffing MetalizerModel Master Aluminum Plate Buffing Metalizer
Model Master Gunmetal Buffing MetalizerModel Master Gunmetal Nonbuffing MetalizerModel Master Dark Anodonic Gray Buffing MetalizerModel Master Stainless Steel Buffing Metalizer
Colors by Boyd White PrimerTestors Dullcote Lacquer
Testors Airbrush ThinnerLacquer ThinnerAeroMaster Warpac Cockpit Blue Green
AeroMaster Radome/Hub GreenTamiya Medium Grey
Tamiya BuffTamiya Flat Black
Gunze ClearGunze FS 36375 Gray
Gunze FS 34092 Dark GreenGunze ThinnerAeroMaster/Poly S airbrush thinner or bottled or distilled water
74
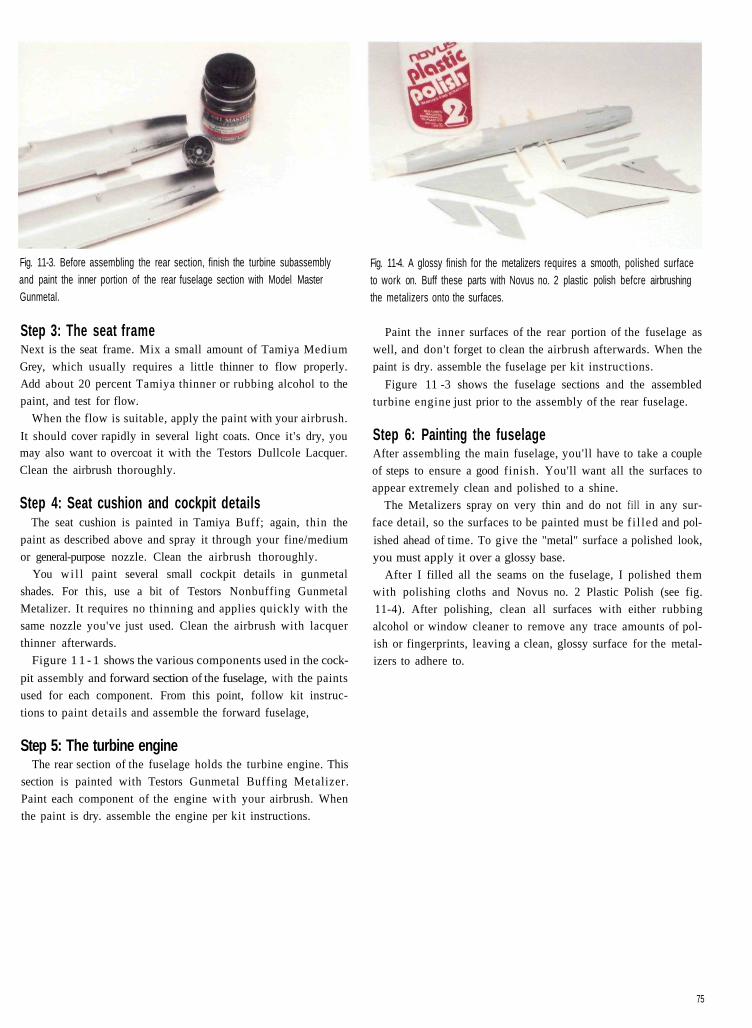
Fig. 11-3. Before assembling the rear section, finish the turbine subassemblyand paint the inner portion of the rear fuselage section with Model MasterGunmetal.
Step 3: The seat frameNext is the seat frame. Mix a small amount of Tamiya Medium
Grey, which usually requires a little thinner to flow properly.
Add about 20 percent Tamiya thinner or rubbing alcohol to the
paint, and test for flow.
When the flow is suitable, apply the paint with your airbrush.
It should cover rapidly in several light coats. Once it's dry, youmay also want to overcoat it with the Testors Dullcole Lacquer.
Clean the airbrush thoroughly.
Step 4: Seat cushion and cockpit detailsThe seat cushion is painted in Tamiya Buff; again, thin the
paint as described above and spray it through your fine/medium
or general-purpose nozzle. Clean the airbrush thoroughly.
You wi l l paint several small cockpit details in gunmetal
shades. For this, use a bit of Testors Nonbuffing Gunmetal
Metalizer. It requires no thinning and applies quickly with the
same nozzle you've just used. Clean the airbrush with lacquer
thinner afterwards.
Figure 1 1 - 1 shows the various components used in the cock-
pit assembly and forward section of the fuselage, with the paints
used for each component. From this point, follow kit instruc-
tions to paint details and assemble the forward fuselage,
Step 5: The turbine engineThe rear section of the fuselage holds the turbine engine. This
section is painted with Testors Gunmetal Buffing Metalizer.
Paint each component of the engine with your airbrush. When
the paint is dry. assemble the engine per kit instructions.
Fig. 11-4. A glossy finish for the metalizers requires a smooth, polished surfaceto work on. Buff these parts with Novus no. 2 plastic polish befcre airbrushingthe metalizers onto the surfaces.
Paint the inner surfaces of the rear portion of the fuselage as
well, and don't forget to clean the airbrush afterwards. When the
paint is dry. assemble the fuselage per kit instructions.
Figure 11 -3 shows the fuselage sections and the assembled
turbine engine just prior to the assembly of the rear fuselage.
Step 6: Painting the fuselageAfter assembling the main fuselage, you'll have to take a couple
of steps to ensure a good finish. You'll want all the surfaces to
appear extremely clean and polished to a shine.
The Metalizers spray on very thin and do not fill in any sur-
face detail, so the surfaces to be painted must be f i l led and pol-
ished ahead of time. To give the "metal" surface a polished look,
you must apply it over a glossy base.
After I filled all the seams on the fuselage, I polished them
with polishing cloths and Novus no. 2 Plastic Polish (see fig.
11-4). After polishing, clean all surfaces with either rubbing
alcohol or window cleaner to remove any trace amounts of pol-
ish or fingerprints, leaving a clean, glossy surface for the metal-
izers to adhere to.
75
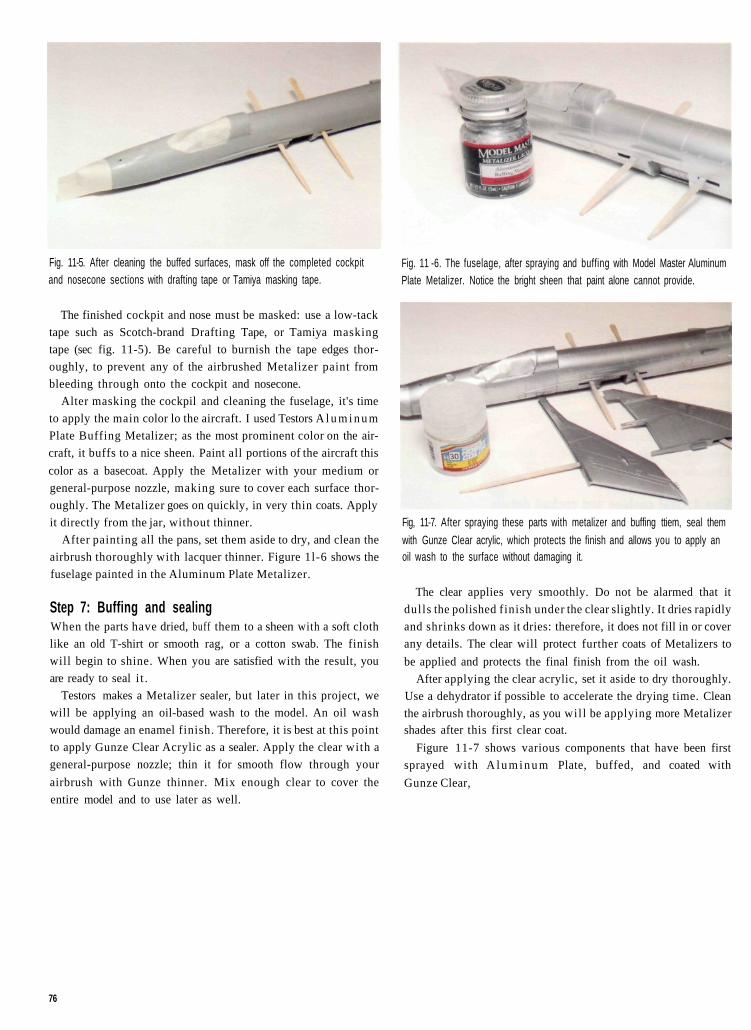
Fig. 11-5. After cleaning the buffed surfaces, mask off the completed cockpitand nosecone sections with drafting tape or Tamiya masking tape.
The finished cockpit and nose must be masked: use a low-tack
tape such as Scotch-brand Drafting Tape, or Tamiya masking
tape (sec fig. 11-5). Be careful to burnish the tape edges thor-
oughly, to prevent any of the airbrushed Metalizer paint from
bleeding through onto the cockpit and nosecone.
Alter masking the cockpil and cleaning the fuselage, it's time
to apply the main color lo the aircraft. I used Testors A l u m i n u m
Plate Buffing Metalizer; as the most prominent color on the air-
craft, it buffs to a nice sheen. Paint all portions of the aircraft this
color as a basecoat. Apply the Metalizer with your medium or
general-purpose nozzle, making sure to cover each surface thor-
oughly. The Metalizer goes on quickly, in very thin coats. Apply
it directly from the jar, without thinner.
After painting all the pans, set them aside to dry, and clean the
airbrush thoroughly with lacquer thinner. Figure 1l-6 shows the
fuselage painted in the Aluminum Plate Metalizer.
Step 7: Buffing and sealingWhen the parts have dried, buff them to a sheen with a soft cloth
like an old T-shirt or smooth rag, or a cotton swab. The finish
will begin to shine. When you are satisfied with the result, you
are ready to seal i t .
Testors makes a Metalizer sealer, but later in this project, we
will be applying an oil-based wash to the model. An oil wash
would damage an enamel finish. Therefore, it is best at this point
to apply Gunze Clear Acrylic as a sealer. Apply the clear with a
general-purpose nozzle; thin it for smooth flow through your
airbrush with Gunze thinner. Mix enough clear to cover the
entire model and to use later as well.
Fig. 11 -6. The fuselage, after spraying and buffing with Model Master AluminumPlate Metalizer. Notice the bright sheen that paint alone cannot provide.
Fig, 11-7. After spraying these parts with metalizer and buffing ttiem, seal them
with Gunze Clear acrylic, which protects the finish and allows you to apply anoil wash to the surface without damaging it.
The clear applies very smoothly. Do not be alarmed that it
dulls the polished finish under the clear slightly. It dries rapidly
and shrinks down as it dries: therefore, it does not fill in or cover
any details. The clear will protect further coats of Metalizers to
be applied and protects the final finish from the oil wash.
After applying the clear acrylic, set it aside to dry thoroughly.
Use a dehydrator if possible to accelerate the drying time. Clean
the airbrush thoroughly, as you wil l be applying more Metalizershades after this first clear coat.
Figure 11-7 shows various components that have been first
sprayed with A l u m i n u m Plate, buffed, and coated with
Gunze Clear,
76
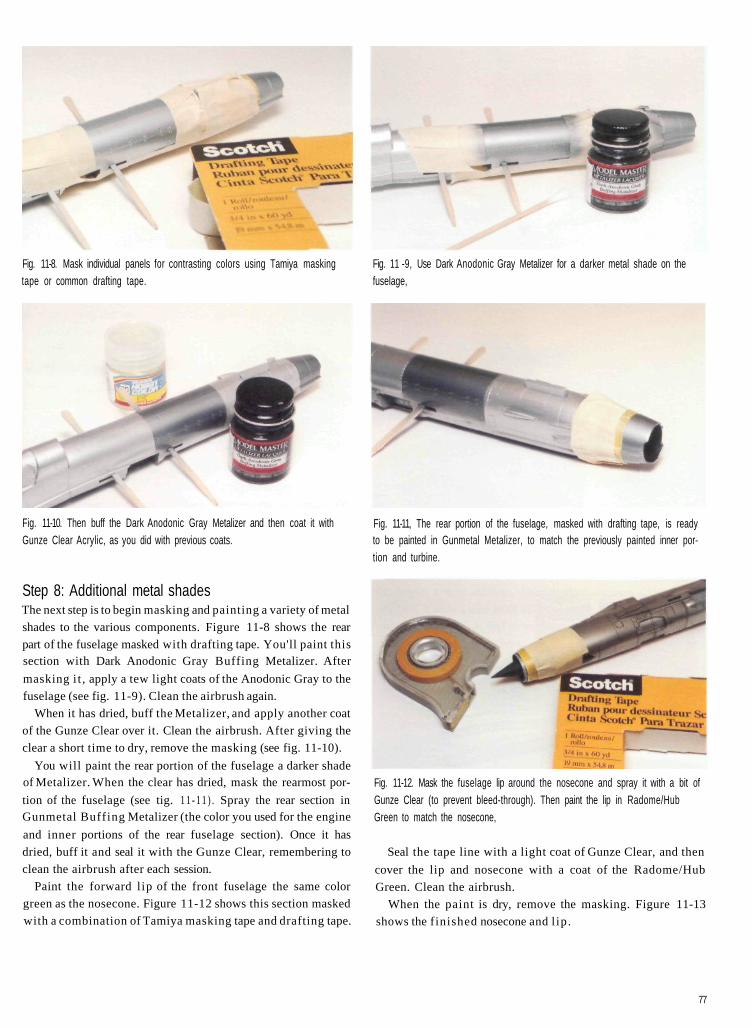
Fig. 11-8. Mask individual panels for contrasting colors using Tamiya maskingtape or common drafting tape.
Fig. 11 -9, Use Dark Anodonic Gray Metalizer for a darker metal shade on thefuselage,
Fig. 11-10. Then buff the Dark Anodonic Gray Metalizer and then coat it withGunze Clear Acrylic, as you did with previous coats.
Step 8: Additional metal shadesThe next step is to begin masking and painting a variety of metal
shades to the various components. Figure 11-8 shows the rear
part of the fuselage masked with drafting tape. You'll paint thissection with Dark Anodonic Gray Buffing Metalizer. After
masking i t , apply a tew light coats of the Anodonic Gray to the
fuselage (see fig. 11-9). Clean the airbrush again.
When it has dried, buff the Metalizer, and apply another coat
of the Gunze Clear over it. Clean the airbrush. After giving the
clear a short time to dry, remove the masking (see fig. 11-10).
You will paint the rear portion of the fuselage a darker shadeof Metalizer. When the clear has dried, mask the rearmost por-
tion of the fuselage (see tig. 1 1 - 1 1 ) . Spray the rear section inGunmetal Buffing Metalizer (the color you used for the engine
and inner portions of the rear fuselage section). Once it has
dried, buff it and seal it with the Gunze Clear, remembering to
clean the airbrush after each session.
Paint the forward l ip of the front fuselage the same color
green as the nosecone. Figure 11-12 shows this section masked
with a combination of Tamiya masking tape and drafting tape.
Fig. 11-11, The rear portion of the fuselage, masked with drafting tape, is readyto be painted in Gunmetal Metalizer, to match the previously painted inner por-tion and turbine.
Fig. 11-12. Mask the fuselage lip around the nosecone and spray it with a bit ofGunze Clear (to prevent bleed-through). Then paint the lip in Radome/HubGreen to match the nosecone,
Seal the tape line with a light coat of Gunze Clear, and then
cover the lip and nosecone with a coat of the Radome/Hub
Green. Clean the airbrush.
When the paint is dry, remove the masking. Figure 11-13
shows the finished nosecone and l ip.
77
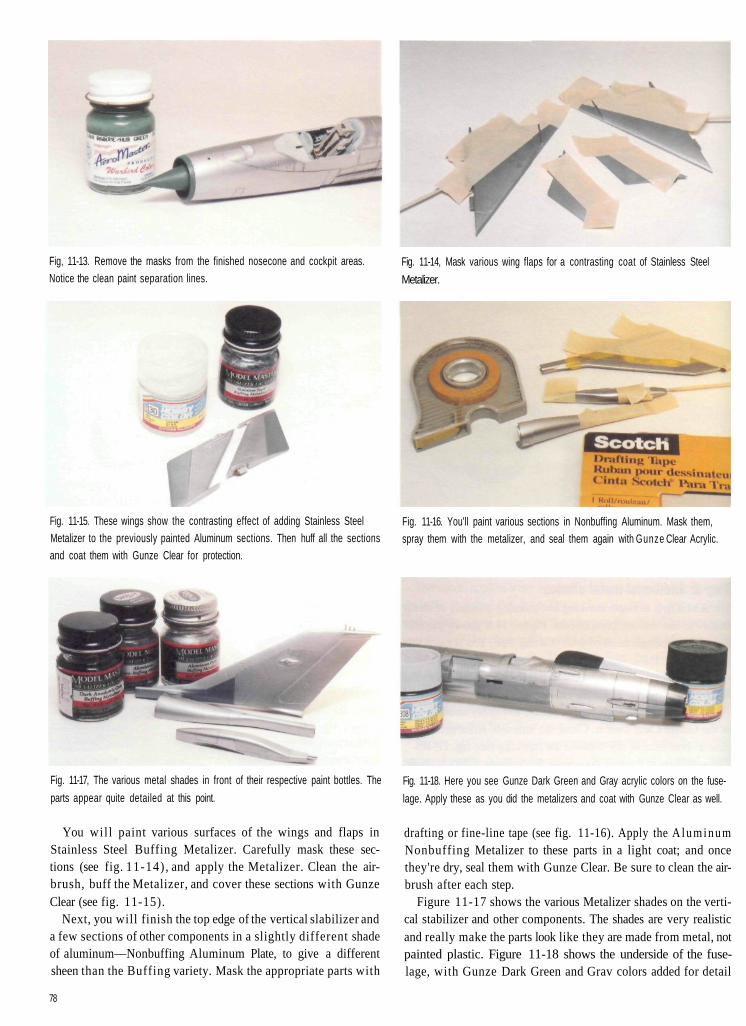
Fig, 11-13. Remove the masks from the finished nosecone and cockpit areas.Notice the clean paint separation lines.
Fig. 11-15. These wings show the contrasting effect of adding Stainless SteelMetalizer to the previously painted Aluminum sections. Then huff all the sectionsand coat them with Gunze Clear for protection.
Fig. 11-14, Mask various wing flaps for a contrasting coat of Stainless Steel
Metalizer.
Fig. 11-16. You'll paint various sections in Nonbuffing Aluminum. Mask them,spray them with the metalizer, and seal them again with Gunze Clear Acrylic.
Fig. 11-17, The various metal shades in front of their respective paint bottles. The
parts appear quite detailed at this point.
You wil l paint various surfaces of the wings and flaps inStainless Steel Buffing Metalizer. Carefully mask these sec-tions (see fig. 11-14) , and apply the Metalizer. Clean the air-brush, buff the Metalizer, and cover these sections with GunzeClear (see fig. 11-15).
Next, you will finish the top edge of the vertical slabilizer anda few sections of other components in a slightly different shadeof aluminum—Nonbuffing Aluminum Plate, to give a differentsheen than the Buffing variety. Mask the appropriate parts with
Fig. 11-18. Here you see Gunze Dark Green and Gray acrylic colors on the fuse-
lage. Apply these as you did the metalizers and coat with Gunze Clear as well.
drafting or fine-line tape (see fig. 11-16). Apply the A luminumNonbuffing Metalizer to these parts in a light coat; and oncethey're dry, seal them with Gunze Clear. Be sure to clean the air-brush after each step.
Figure 11-17 shows the various Metalizer shades on the verti-cal stabilizer and other components. The shades are very realisticand really make the parts look like they are made from metal, notpainted plastic. Figure 11-18 shows the underside of the fuse-lage, with Gunze Dark Green and Grav colors added for detail
78

Fig. 11-19. Mask the canopy before painting it.
as well (using the same steps as for all the other color panels).The cockpit canopy is molded in clear, and is also to be painted
in Aluminum Nonbuffing Melalizer. Mask it thoroughly (sec fig.
11-19), Then apply a bit of Gunze clear to seal the edges, clean
the airbrush, and add a coat of the Aluminum Metalizer. Figure
11-20 shows the finished canopy and a couple of landing gear
parts also painted in Nonbuffing Melalizer. You can now paint-
detail the canopy itself by hand and install it onto the aircraft.
Step 9: An oil-based washThis kit is molded with an incredible array of engraved details,
such as panel lines and rivets. These parts are easy to detail with
an oil wash (see fig. 11-21). Mix the wash using your favorite
shades of oil or enamel paints. Mix them with enough mineral
spirits that they flow nicely into the engraved lines. Because you
use an oil-based wash, it will not dry too rapidly. You'll be able
to remove it with a paper towel and rag for a short time after
applying it.
This also is a great way to weather the surface, as the wash
dulls down the shiny surface of the clear underneath it. giving
Fig. 11-21), Finish the landing geat and canopy parts in Aluminum NonbiiffingMetalizer,
Fig, 11-21. Here's the reason for the Gunze Clear coat. You can bring out all the
fine engraved details-and get a bit of weathering-by adding an oil-based wash.Thin artist's oil paints with mineral spirits, and apply it with a soft, wide brush.
the model a very realistic, weathered appearance. Wilh a littlepractice, it adds a nice level of detail to the mode!. You may also
use materials such as SnJ aluminum polishing powder and pow-
dered pastels to further bring out details on the model.
79
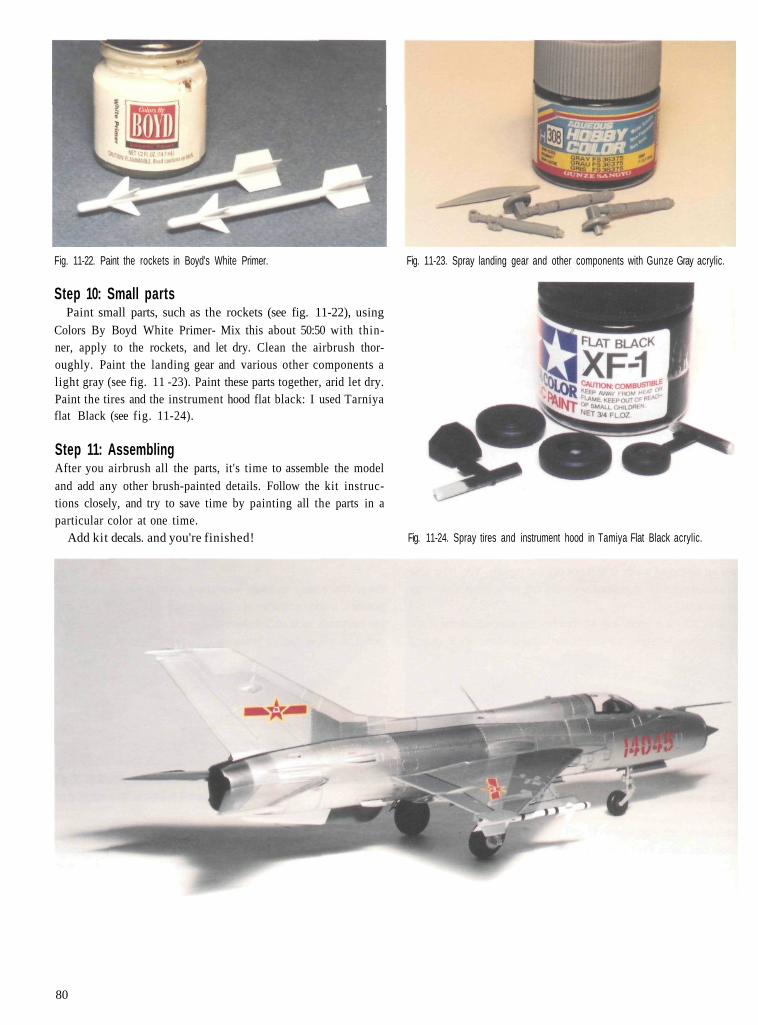
Fig. 11-22. Paint the rockets in Boyd's White Primer.
Step 10: Small partsPaint small parts, such as the rockets (see fig. 11-22), using
Colors By Boyd White Primer- Mix this about 50:50 with thin-ner, apply to the rockets, and let dry. Clean the airbrush thor-oughly. Paint the landing gear and various other components alight gray (see fig. 11 -23). Paint these parts together, arid let dry.Paint the tires and the instrument hood flat black: I used Tarniyaflat Black (see fig. 11-24).
Step 11: AssemblingAfter you airbrush all the parts, it's time to assemble the modeland add any other brush-painted details. Follow the kit instruc-tions closely, and try to save time by painting all the parts in aparticular color at one time.
Add kit decals. and you're finished!
Fig. 11-23. Spray landing gear and other components with Gunze Gray acrylic.
Fig. 11-24. Spray tires and instrument hood in Tamiya Flat Black acrylic.
80
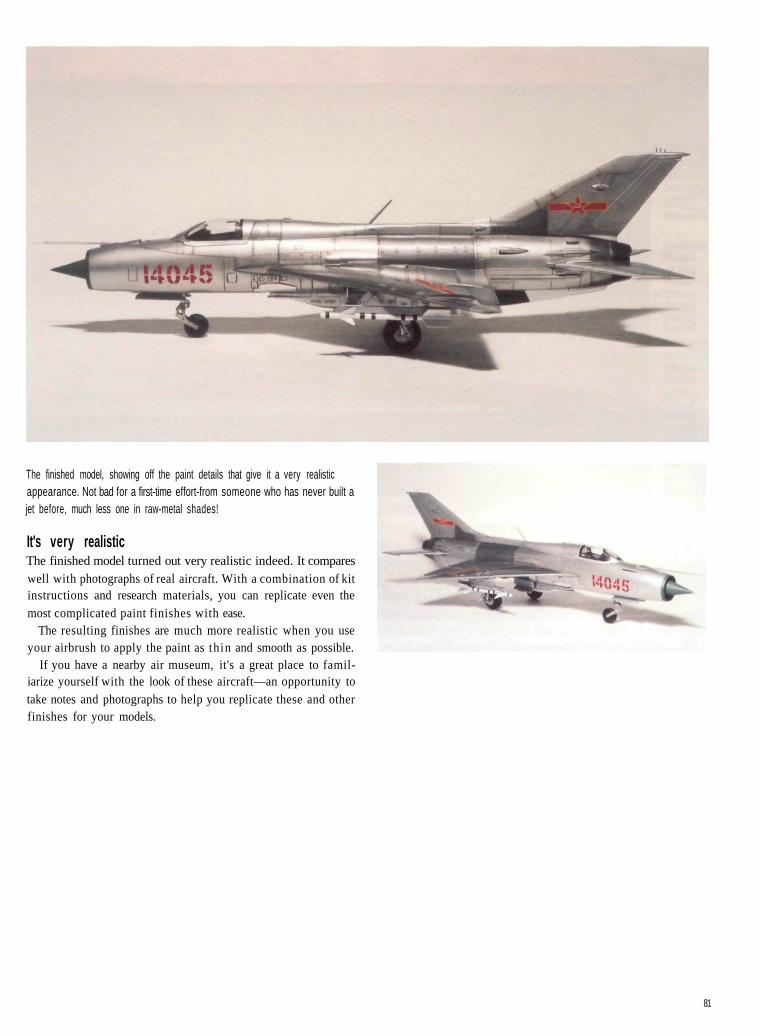
The finished model, showing off the paint details that give it a very realisticappearance. Not bad for a first-time effort-from someone who has never built ajet before, much less one in raw-metal shades!
It's very realisticThe finished model turned out very realistic indeed. It compareswell with photographs of real aircraft. With a combination of kitinstructions and research materials, you can replicate even themost complicated paint finishes with ease.
The resulting finishes are much more realistic when you useyour airbrush to apply the paint as thin and smooth as possible.
If you have a nearby air museum, it's a great place to famil-iarize yourself with the look of these aircraft—an opportunity totake notes and photographs to help you replicate these and otherfinishes for your models.
81

An I n t r i c a t e but S i m p l e - t o - A p p l y PaintScheme Br ings This MiG 21 to Life
ircraft models present a unique opportunity to try
your talents at more than one style of airbrushing
technique. The MiG 21—the subject of this and
the previous chapter—can be decorated not only in raw
metal shades, but in several types of camouflage as well.
This project variation replicates an Indian Air Force
MiG-2lFL Type 77 paint scheme. If you have an airbrush
with a fine detailing nozzle, you can duplicate the fine
tiger-stripe camouflage theme on this aircraft very nicely.
This model was painted by Bob Holfels, using a Rich
AB 200 airbrush. It is possible to replicate the pattern with
other nozzles, but you'll have more control over your spray
pattern using an airbrush with a fine-line nozzle. The Rich
airbrush made it easy to paint the stripes.
The only caveat is that it is time-consuming, and you'll
probably want to paint the stripes in one sitting. Make
sure you have several hours of time, and you will enjoy
the process.
82
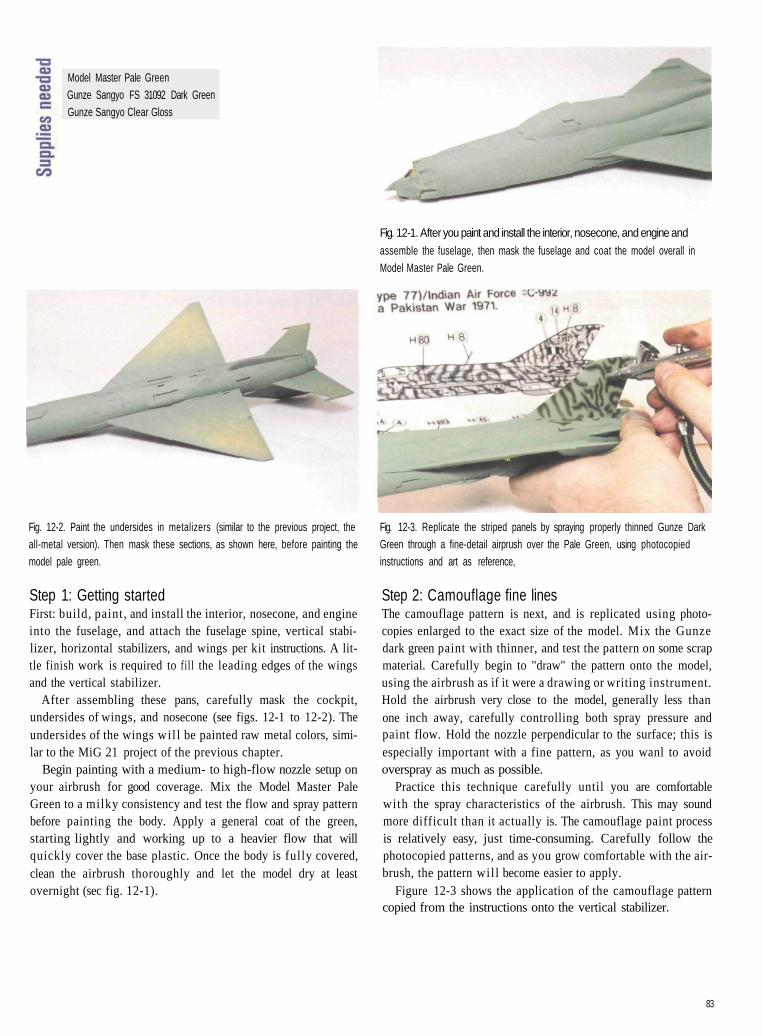
Model Master Pale GreenGunze Sangyo FS 31092 Dark GreenGunze Sangyo Clear Gloss
Fig. 12-1. After you paint and install the interior, nosecone, and engine and
assemble the fuselage, then mask the fuselage and coat the model overall inModel Master Pale Green.
Fig. 12-2. Paint the undersides in metalizers (similar to the previous project, theall-metal version). Then mask these sections, as shown here, before painting themodel pale green.
Step 1: Getting startedFirst: build, paint, and install the interior, nosecone, and engineinto the fuselage, and attach the fuselage spine, vertical stabi-lizer, horizontal stabilizers, and wings per kit instructions. A lit-tle finish work is required to fill the leading edges of the wingsand the vertical stabilizer.
After assembling these pans, carefully mask the cockpit,undersides of wings, and nosecone (see figs. 12-1 to 12-2). Theundersides of the wings wil l be painted raw metal colors, simi-lar to the MiG 21 project of the previous chapter.
Begin painting with a medium- to high-flow nozzle setup onyour airbrush for good coverage. Mix the Model Master PaleGreen to a milky consistency and test the flow and spray patternbefore painting the body. Apply a general coat of the green,starting lightly and working up to a heavier flow that willquickly cover the base plastic. Once the body is fully covered,clean the airbrush thoroughly and let the model dry at leastovernight (sec fig. 12-1).
Fig. 12-3. Replicate the striped panels by spraying properly thinned Gunze DarkGreen through a fine-detail airprush over the Pale Green, using photocopiedinstructions and art as reference,
Step 2: Camouflage fine linesThe camouflage pattern is next, and is replicated using photo-copies enlarged to the exact size of the model. Mix the Gunzedark green paint with thinner, and test the pattern on some scrapmaterial. Carefully begin to "draw" the pattern onto the model,using the airbrush as if it were a drawing or writing instrument.Hold the airbrush very close to the model, generally less thanone inch away, carefully controlling both spray pressure andpaint flow. Hold the nozzle perpendicular to the surface; this isespecially important with a fine pattern, as you wanl to avoidoverspray as much as possible.
Practice this technique carefully until you are comfortablewith the spray characteristics of the airbrush. This may soundmore difficult than it actually is. The camouflage paint processis relatively easy, just time-consuming. Carefully follow thephotocopied patterns, and as you grow comfortable with the air-brush, the pattern wil l become easier to apply.
Figure 12-3 shows the application of the camouflage patterncopied from the instructions onto the vertical stabilizer.
83
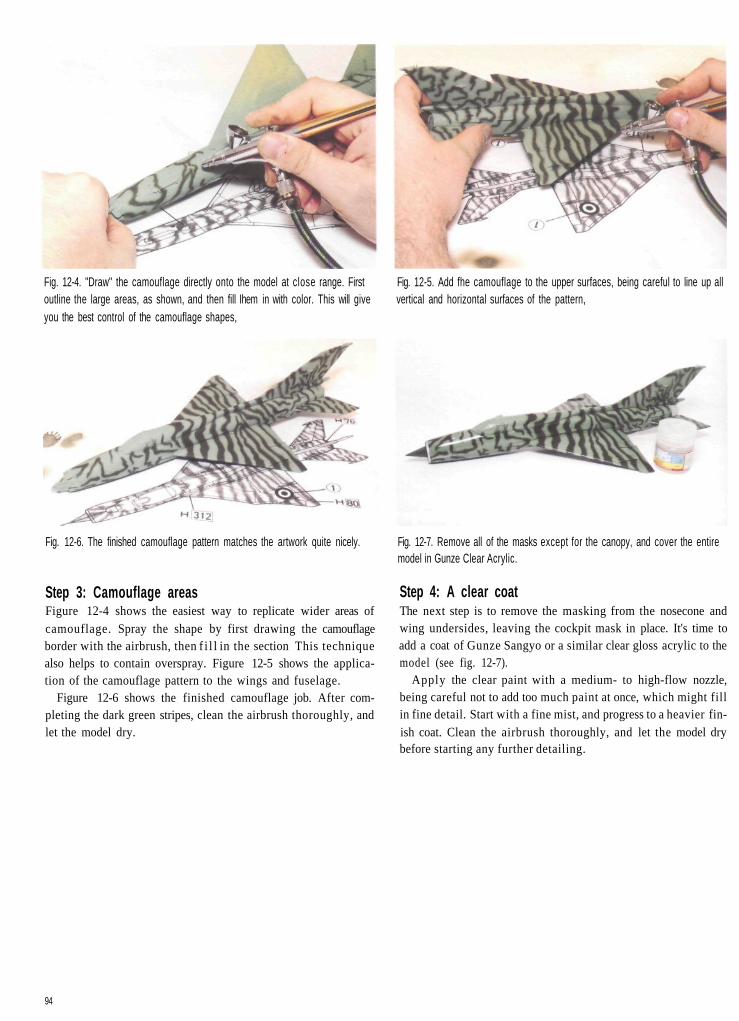
Fig. 12-4. "Draw" the camouflage directly onto the model at close range. Firstoutline the large areas, as shown, and then fill Ihem in with color. This will giveyou the best control of the camouflage shapes,
Fig. 12-6. The finished camouflage pattern matches the artwork quite nicely.
Step 3: Camouflage areasFigure 12-4 shows the easiest way to replicate wider areas ofcamouflage. Spray the shape by first drawing the camouflageborder with the airbrush, then f i l l in the section This techniquealso helps to contain overspray. Figure 12-5 shows the applica-tion of the camouflage pattern to the wings and fuselage.
Figure 12-6 shows the finished camouflage job. After com-pleting the dark green stripes, clean the airbrush thoroughly, andlet the model dry.
Fig. 12-5. Add fhe camouflage to the upper surfaces, being careful to line up allvertical and horizontal surfaces of the pattern,
Fig. 12-7. Remove all of the masks except for the canopy, and cover the entiremodel in Gunze Clear Acrylic.
Step 4: A clear coatThe next step is to remove the masking from the nosecone andwing undersides, leaving the cockpit mask in place. It's time toadd a coat of Gunze Sangyo or a similar clear gloss acrylic to themodel (see fig. 12-7).
Apply the clear paint with a medium- to high-flow nozzle,being careful not to add too much paint at once, which might fillin fine detail. Start with a fine mist, and progress to a heavier fin-ish coat. Clean the airbrush thoroughly, and let the model drybefore starting any further detailing.
94
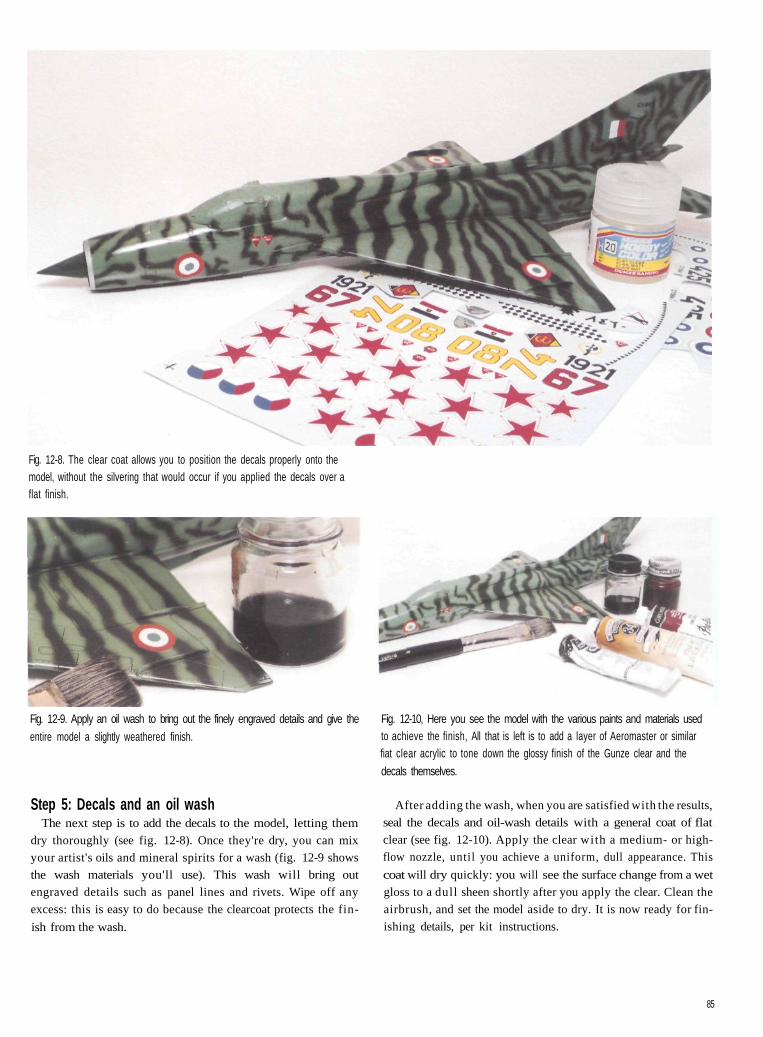
Fig. 12-8. The clear coat allows you to position the decals properly onto themodel, without the silvering that would occur if you applied the decals over aflat finish.
Fig. 12-9. Apply an oil wash to bring out the finely engraved details and give the
entire model a slightly weathered finish.
Step 5: Decals and an oil washThe next step is to add the decals to the model, letting them
dry thoroughly (see fig. 12-8). Once they're dry, you can mix
your artist's oils and mineral spirits for a wash (fig. 12-9 shows
the wash materials you'll use). This wash will bring out
engraved details such as panel lines and rivets. Wipe off any
excess: this is easy to do because the clearcoat protects the fin-
ish from the wash.
Fig. 12-10, Here you see the model with the various paints and materials usedto achieve the finish, All that is left is to add a layer of Aeromaster or similarfiat clear acrylic to tone down the glossy finish of the Gunze clear and the
decals themselves.
After adding the wash, when you are satisfied with the results,
seal the decals and oil-wash details with a general coat of flat
clear (see fig. 12-10). Apply the clear with a medium- or high-
flow nozzle, until you achieve a uniform, dull appearance. This
coat will dry quickly: you will see the surface change from a wet
gloss to a dull sheen shortly after you apply the clear. Clean the
airbrush, and set the model aside to dry. It is now ready for fin-
ishing details, per kit instructions.
85
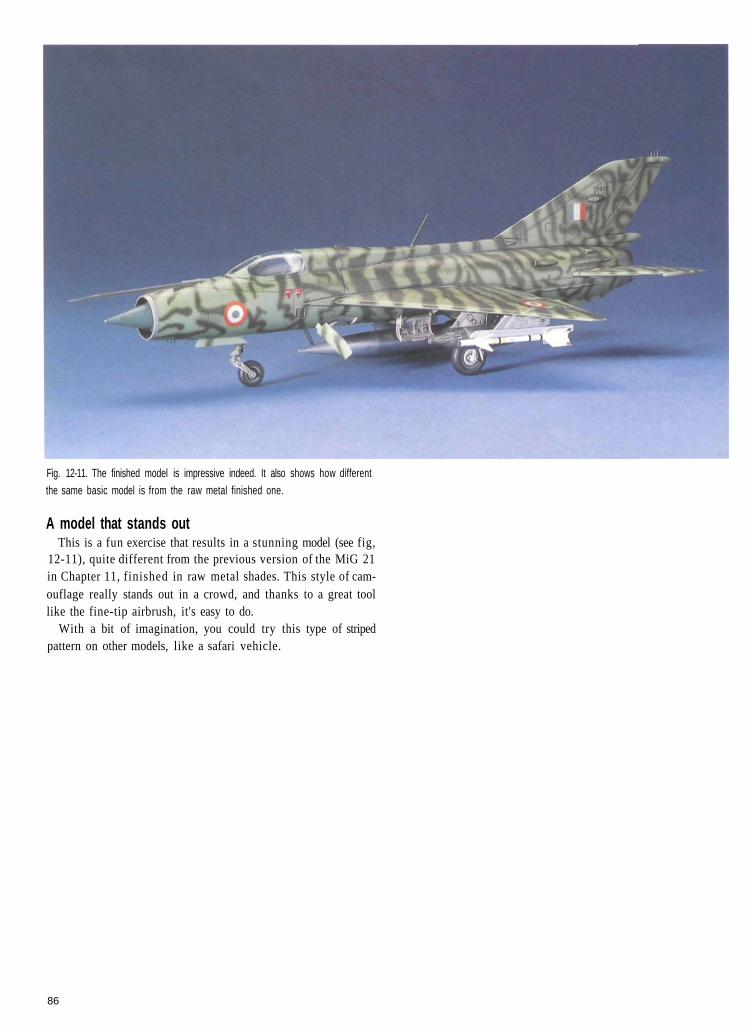
Fig. 12-11. The finished model is impressive indeed. It also shows how differentthe same basic model is from the raw metal finished one.
A model that stands outThis is a fun exercise that results in a stunning model (see fig,
12-11), quite different from the previous version of the MiG 21in Chapter 11, finished in raw metal shades. This style of cam-ouflage really stands out in a crowd, and thanks to a great toollike the fine-tip airbrush, it's easy to do.
With a bit of imagination, you could try this type of stripedpattern on other models, like a safari vehicle.
86
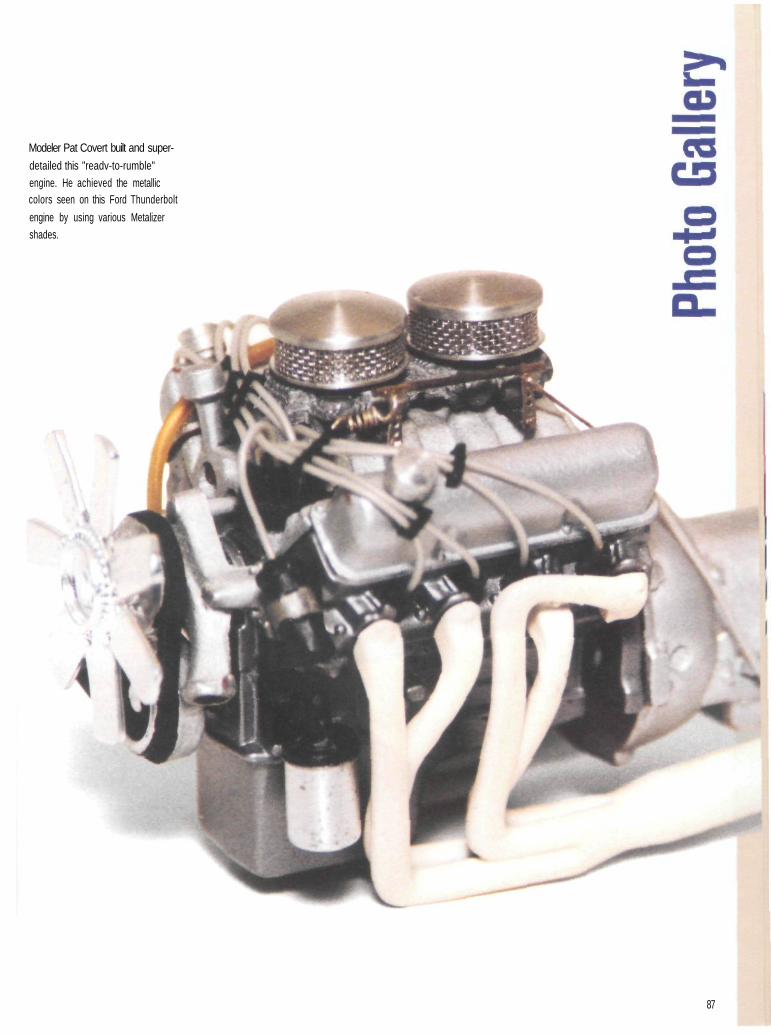
Modeler Pat Covert built and super-
detailed this "readv-to-rumble"engine. He achieved the metalliccolors seen on this Ford Thunderbolt
engine by using various Metalizershades.
87
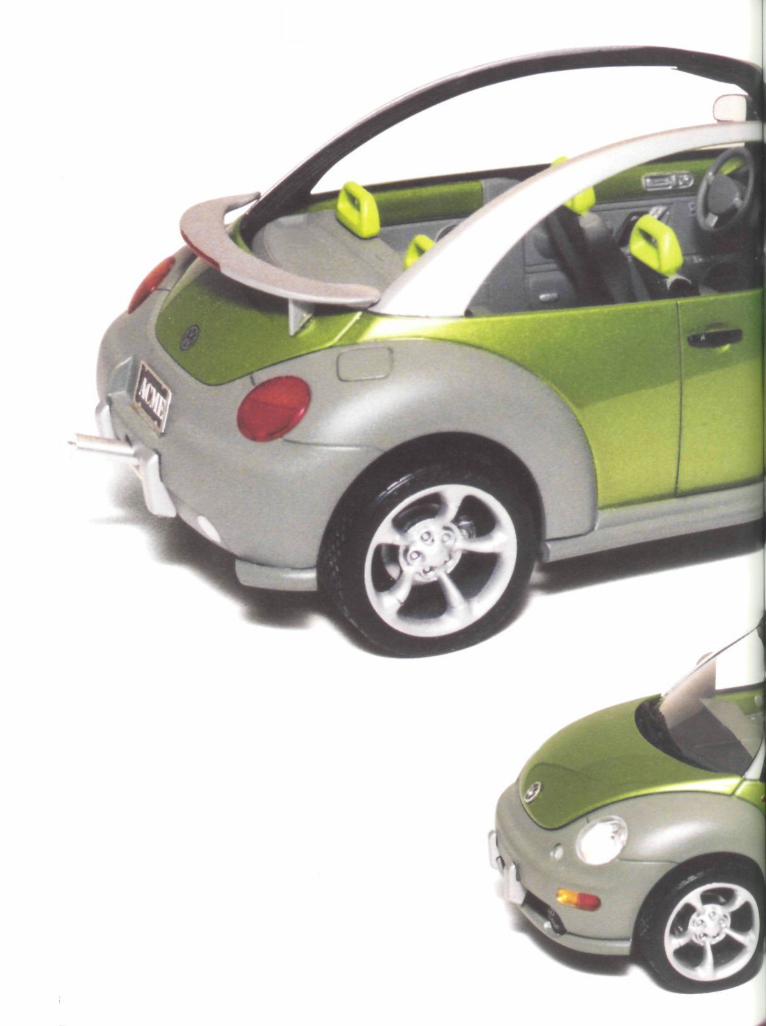
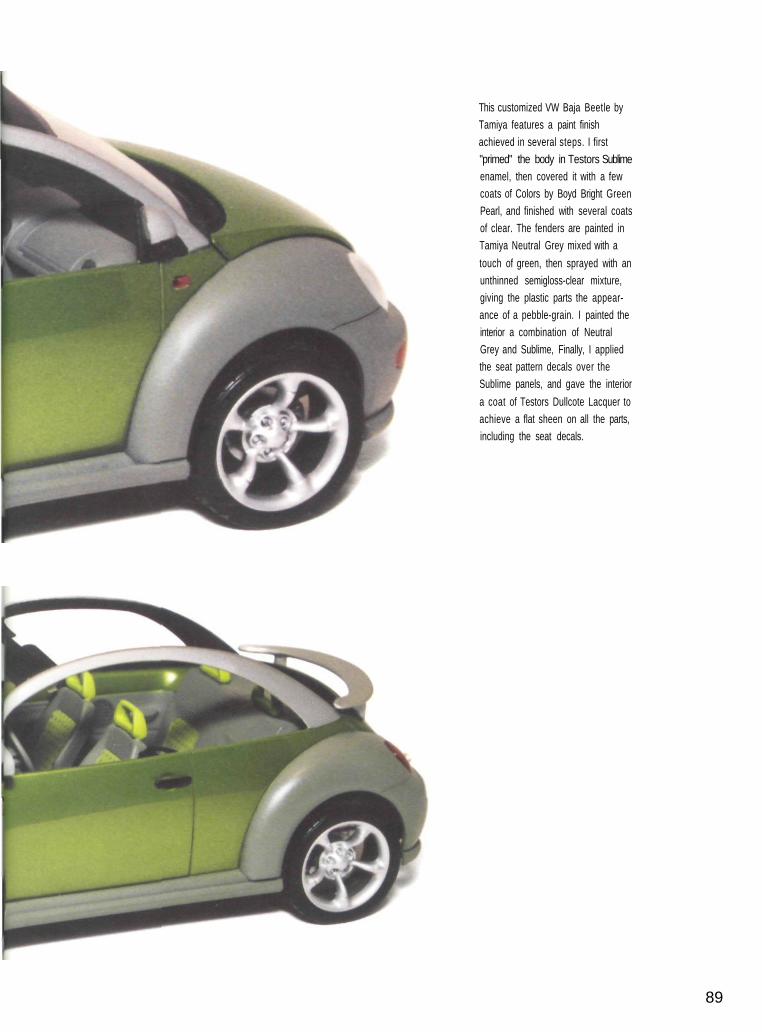
This customized VW Baja Beetle byTamiya features a paint finishachieved in several steps. I first"primed" the body in Testors Sublimeenamel, then covered it with a fewcoats of Colors by Boyd Bright GreenPearl, and finished with several coatsof clear. The fenders are painted inTamiya Neutral Grey mixed with a
touch of green, then sprayed with anunthinned semigloss-clear mixture,giving the plastic parts the appear-ance of a pebble-grain. I painted theinterior a combination of NeutralGrey and Sublime, Finally, I appliedthe seat pattern decals over theSublime panels, and gave the interior
a coat of Testors Dullcote Lacquer toachieve a flat sheen on all the parts,including the seat decals.
89
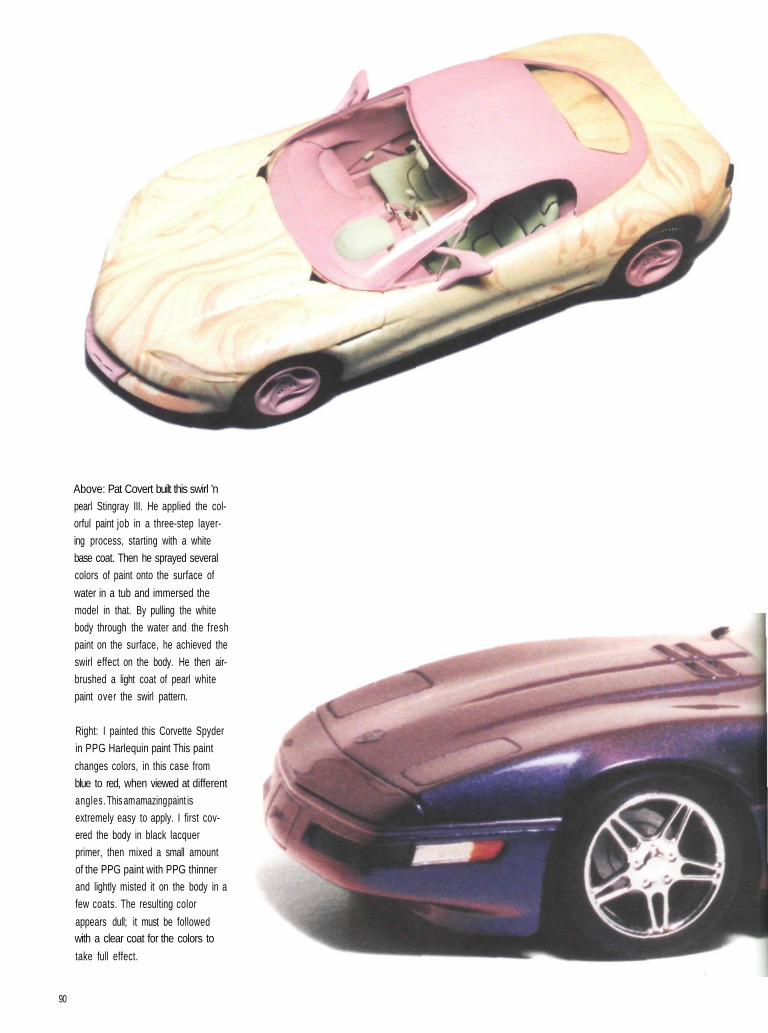
Above: Pat Covert built this swirl 'npearl Stingray III. He applied the col-orful paint job in a three-step layer-ing process, starting with a whitebase coat. Then he sprayed severalcolors of paint onto the surface of
water in a tub and immersed themodel in that. By pulling the whitebody through the water and the freshpaint on the surface, he achieved theswirl effect on the body. He then air-brushed a light coat of pearl whitepaint over the swirl pattern.
Right: I painted this Corvette Spyderin PPG Harlequin paint This paint
changes colors, in this case fromblue to red, when viewed at differentangles. This am amazing paint isextremely easy to apply. I first cov-ered the body in black lacquerprimer, then mixed a small amountof the PPG paint with PPG thinnerand lightly misted it on the body in afew coats. The resulting color
appears dull; it must be followedwith a clear coat for the colors to
take full effect.
90
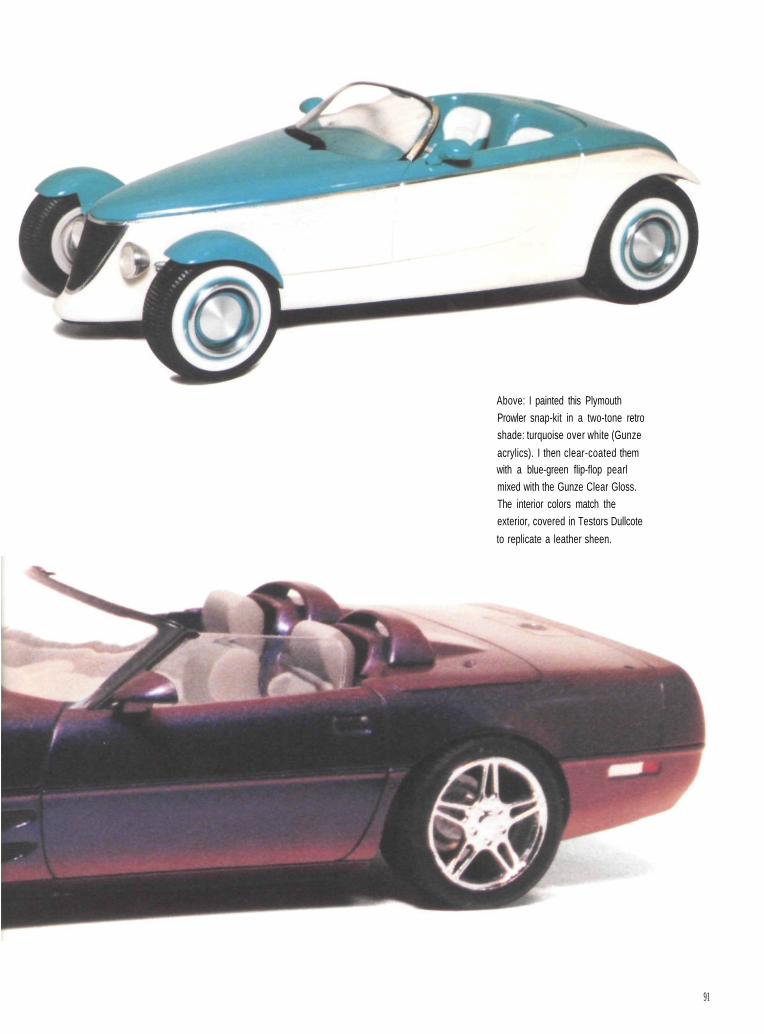
Above: I painted this PlymouthProwler snap-kit in a two-tone retroshade: turquoise over white (Gunze
acrylics). I then clear-coated themwith a blue-green flip-flop pearlmixed with the Gunze Clear Gloss.The interior colors match theexterior, covered in Testors Dullcote
to replicate a leather sheen.
91
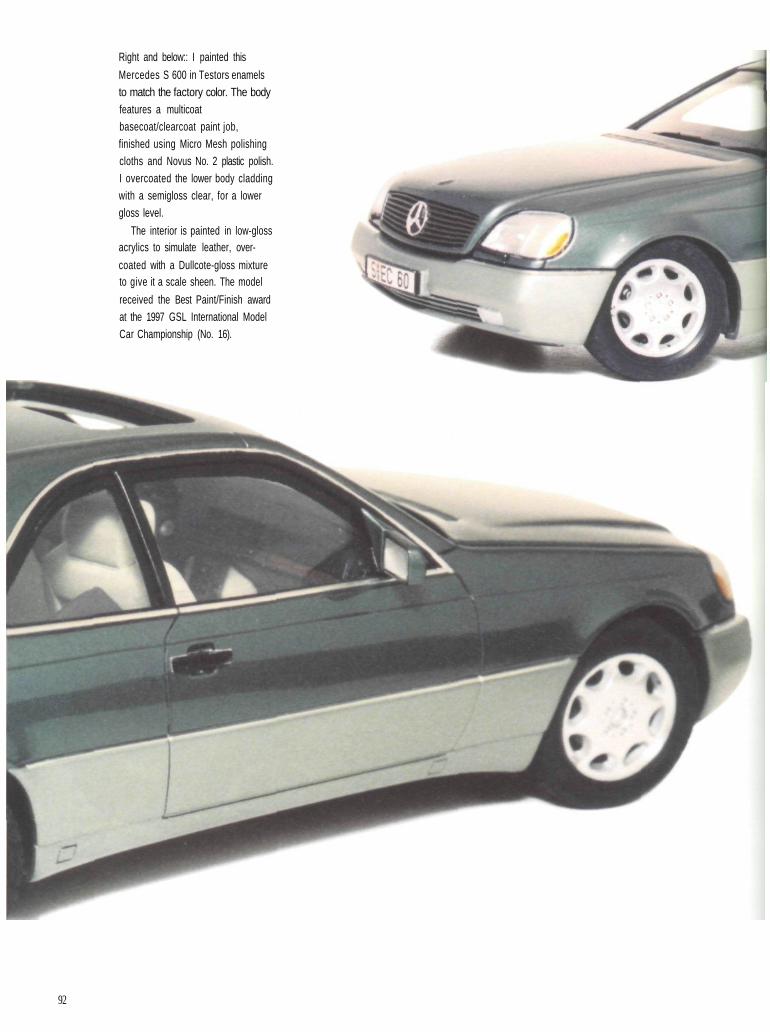
Right and below:: I painted this
Mercedes S 600 in Testors enamelsto match the factory color. The bodyfeatures a multicoatbasecoat/clearcoat paint job,finished using Micro Mesh polishingcloths and Novus No. 2 plastic polish.I overcoated the lower body claddingwith a semigloss clear, for a lowergloss level.
The interior is painted in low-glossacrylics to simulate leather, over-
coated with a Dullcote-gloss mixtureto give it a scale sheen. The model
received the Best Paint/Finish awardat the 1997 GSL International ModelCar Championship (No. 16).
92
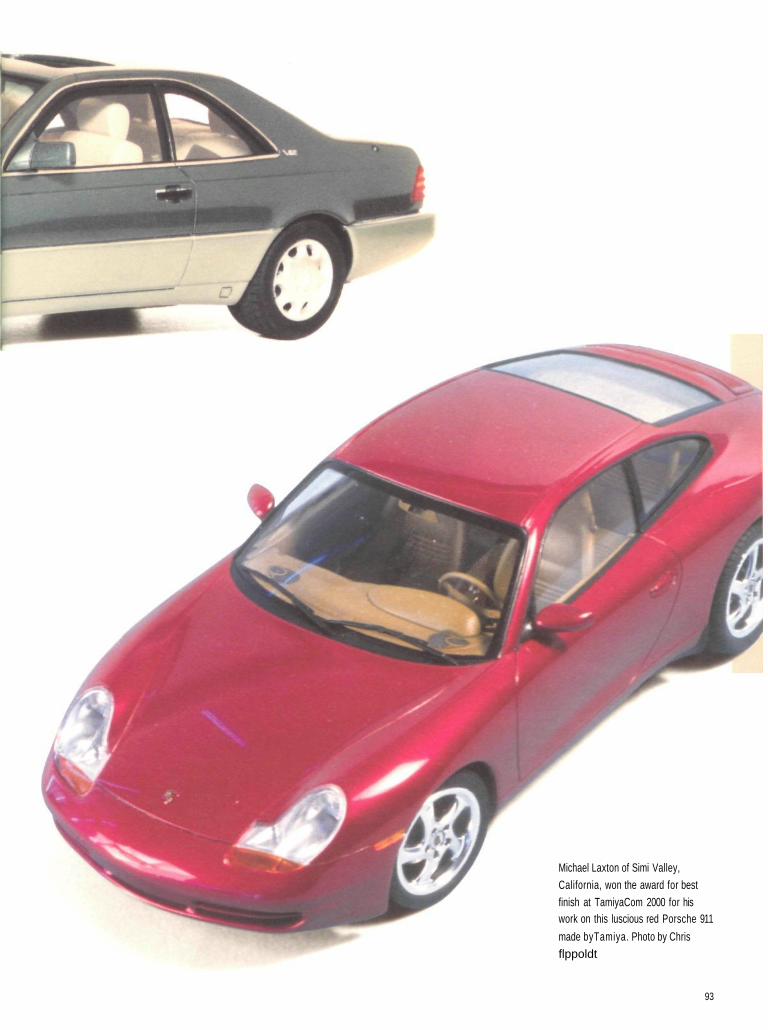
Michael Laxton of Simi Valley,California, won the award for bestfinish at TamiyaCom 2000 for hiswork on this luscious red Porsche 911
made byTamiya. Photo by Chrisflppoldt
93
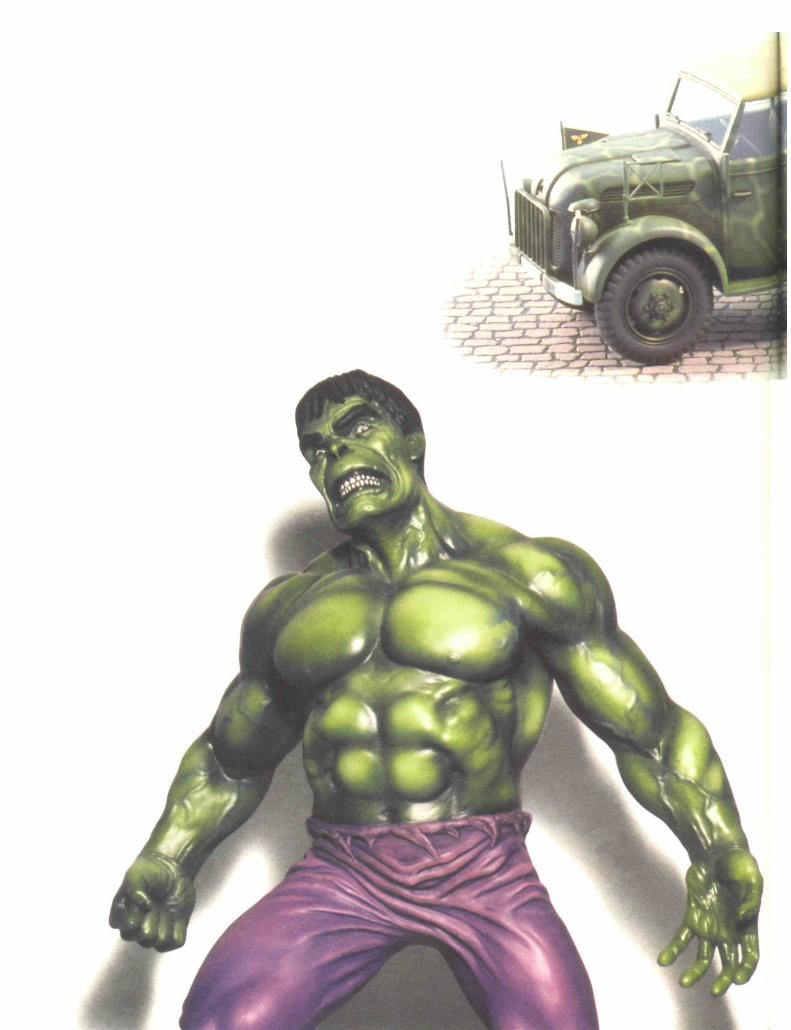
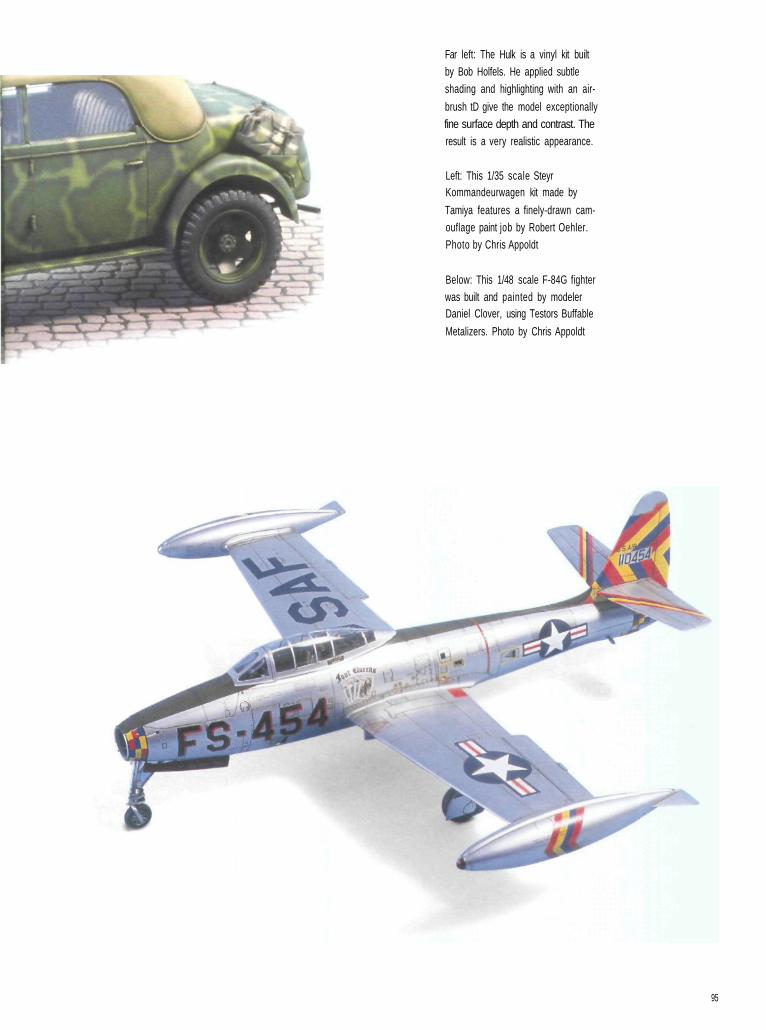
Far left: The Hulk is a vinyl kit builtby Bob Holfels. He applied subtleshading and highlighting with an air-
brush tD give the model exceptionallyfine surface depth and contrast. Theresult is a very realistic appearance.
Left: This 1/35 scale SteyrKommandeurwagen kit made by
Tamiya features a finely-drawn cam-ouflage paint job by Robert Oehler.Photo by Chris Appoldt
Below: This 1/48 scale F-84G fighterwas built and painted by modelerDaniel Clover, using Testors Buffable
Metalizers. Photo by Chris Appoldt
95
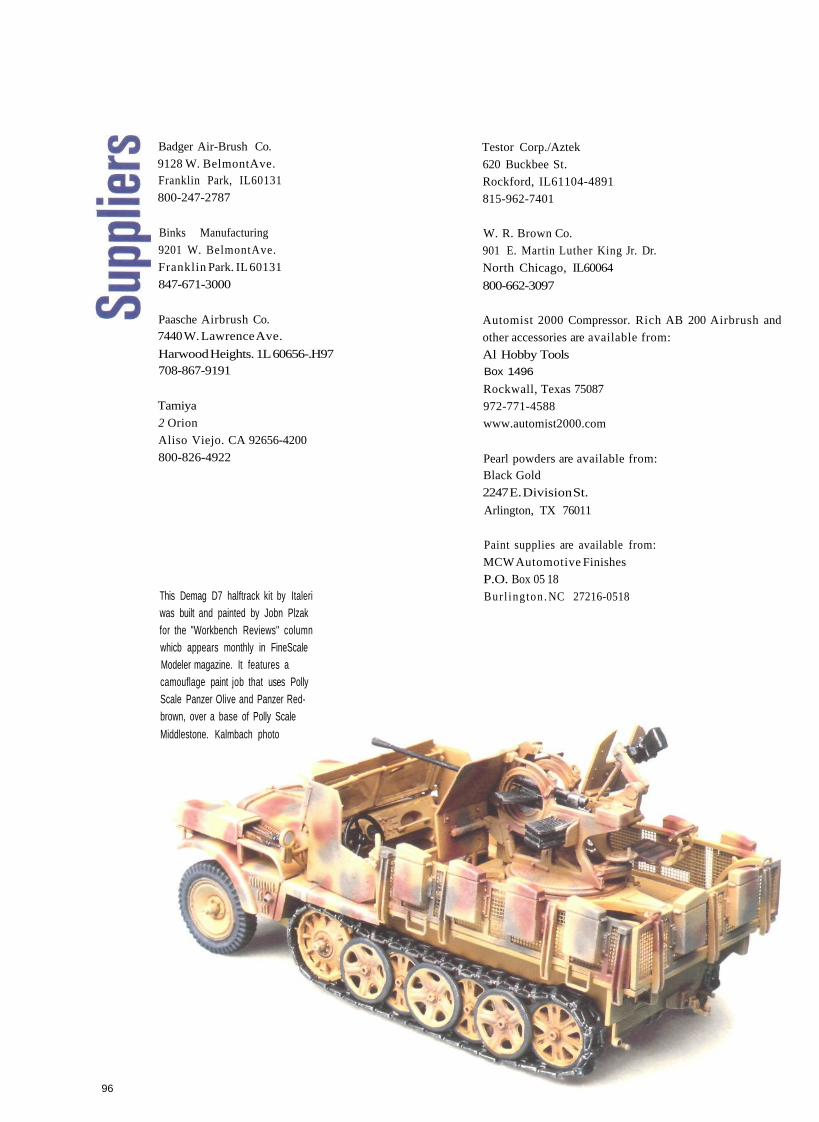
Badger Air-Brush Co.
9128 W. BelmontAve.Franklin Park, IL60131
800-247-2787
Binks Manufacturing
9201 W. BelmontAve.
Franklin Park. IL 60131
847-671-3000
Paasche Airbrush Co.7440 W. Lawrence Ave.
Harwood Heights. 1L 60656-.H97708-867-9191
Tamiya
2 Orion
Aliso Viejo. CA 92656-4200
800-826-4922
Testor Corp./Aztek
620 Buckbee St.
Rockford, IL61104-4891
815-962-7401
W. R. Brown Co.
901 E. Martin Luther King Jr. Dr.
North Chicago, IL60064
800-662-3097
Automist 2000 Compressor. Rich AB 200 Airbrush and
other accessories are available from:
Al Hobby ToolsBox 1496
Rockwall, Texas 75087
972-771-4588
www.automist2000.com
Pearl powders are available from:Black Gold
2247 E. Division St.
Arlington, TX 76011
This Demag D7 halftrack kit by Italeriwas built and painted by Jobn Plzakfor the "Workbench Reviews" columnwhicb appears monthly in FineScaleModeler magazine. It features acamouflage paint job that uses PollyScale Panzer Olive and Panzer Red-brown, over a base of Polly Scale
Middlestone. Kalmbach photo
Paint supplies are available from:
MCW Automotive Finishes
P.O. Box 05 18Burl ington . NC 27216-0518
96