Aadhaar Verification & Authentication - esic.in
61
Aadhaar Verification & Authentication 1
Transcript of Aadhaar Verification & Authentication - esic.in

Aadhaar
Verification &
Authentication
1
Contents
Driver Installation – Windows OS
Aadhaar Authentication and Verification Process
1
2
4
Edit Aadhaar Number at LDC/UDC5
Aadhaar Authentication and Verification - Dhanwanthri6
Driver Installation – Linux OS3
2
Browser Settings

Browser Settings
Step 1: Unblock the popup in the FirefoxBrowser.
-> Tools -> Options -> Content -> uncheck “Block pop-up windows”
3

Browser Settings
Step 2: Bypass the proxy settings in the Firefoxbrowser.
-> Advanced -> Settings
4
-> In ‘No Proxy For’ box, add “localhost”. Note: Also add acomma before localhost if box already contains some text

Browser Settings
5
Browser Settings are Completed.

Drivers Installation – Windows OS
6
Pre-requisite step: Download & Install .NET framework 3.5 SP1 software
a) If Windows 7 and above OS, then no need to install this pre-requirement software. Continue to next page.
b) If Windows Vista or XP, then download software from following link and install the dotnetfx35.exesetup
• << http://www.esic.in/InsuranceGlobalWebV5/Downloads/dotnetfx35.exe >>
Note: If file download is not completing due to network issue, then downloadit from following external link and install the dotnetfx35.exe setup
• << https://www.microsoft.com/en-in/download/details.aspx?id=25150 >>

Drivers Installation – Windows OS
Step 1: Download and installMFS100ClientService.exe
1) Download setup file from following link:
<< http://www.esic.in/InsuranceGlobalWebV5/Downloads/MFS100WindowsDrivers/MFS100ClientService.exe >>
2) Right click on setup file and select “Run as administrator”, as shown below:Note: To install MFS100 scanner drivers and necessary service, setup need to access system32folder.In this case setup need administratorprivileges.
7

Drivers Installation – Windows OS
Step 2: Welcome Wizard
8

Drivers Installation – Windows OS
Step 3: Destination Location
9
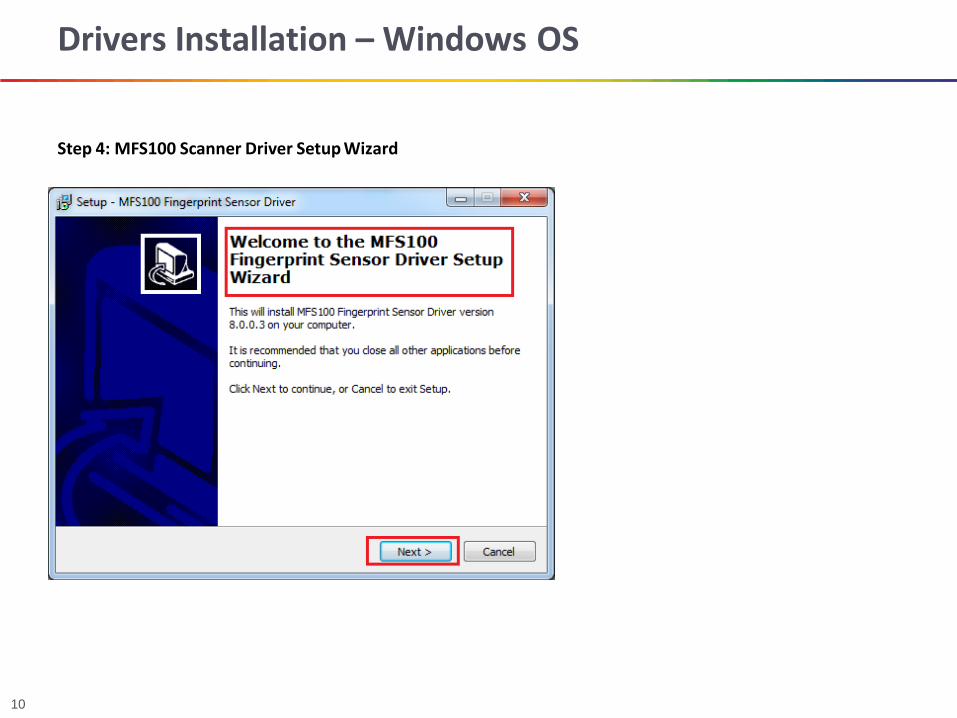
Drivers Installation – Windows OS
Step 4: MFS100 Scanner Driver Setup Wizard
10

Drivers Installation – Windows OS
Step 5: Driver Installation Directory
11

Drivers Installation – Windows OS
Step 6: Driver Start Menu Directory
12

Drivers Installation – Windows OS
Step 7: Driver Directories Confirmation
13

Drivers Installation – Windows OS
Step 8: Start Driver Installation
14

Drivers Installation – Windows OS
Step 9: Completing Driver Installation
15

Drivers Installation – Windows OS
Step 10: Finish Driver Installation
16

Drivers Installation – Windows OS
Step 11: Installing MFS100 Client Service
17

Drivers Installation – Windows OS
Step 12: Finish MFS100ClientService Installation
18

Drivers Installation – Windows OS
Step 13: Opening Certificate Installation Page
Firefox (Old version)
19

Drivers Installation – Windows OS
FireFox (Latest Version)
20

Drivers Installation – Windows OS
Step 14: Opening Test Page with below link (Click or Ctrl + Click)file:///C:/Program%20Files/Mantra/MFS100/MFS100ClientService/Test/MFS100ClientServiceTest.htm
21

Drivers Installation – Windows OS
Step 15: Capturing Finger
22

Drivers Installation – Windows OS
Step 16: Service Status (for troubleshooting purpose)
If you are facing problem in point 14 then please check service status shown as below figure.
23

Drivers Installation – Windows OS
24
Drivers Installation for Windows OS is completed.

Drivers Installation – Linux OS
Below steps will demonstrate that how to configure MFS100 device in LINUX SUSE 10.3 to work with ESIC application for AADHAAR Authentication purpose.Please note, you must have to root user privileges for configuring device in to your system.
Step 1: Download setup and prepare toinstallation1) Download/pickup setup “mfs100-1.4-4.i586.rpm” from following link and put on your “Desktop”
<< http://www.esic.in/InsuranceGlobalWebV5/Downloads/MFS100LinuxDrivers/mfs100-1.4-4.i586.rpm >>2) Do right click of mouse anywhere on your desktop screen and select the option of “Open Terminal”.3) Terminal windows will open as per below figure.
25

Drivers Installation – Linux OS
Step 2 : terminal and navigation
Login as “root” user in terminal and navigate to the path of “Desktop”4) Type “su” and hit enter5) If you have not rights of root user then terminal will ask for password, here enter your root user password.6) Type “cd Desktop” and hit enter to navigate to the path of “Desktop” where you have put setup in point 1.
(See below figure for more information)
26

Drivers Installation – Linux OS
Step 3 : Uninstall/Install Setup
Uninstall/Install Setup of mfs100-1.4-4.i586.rpm7) Type “rpm –e mfs100-1.4-4”and hit enter. If setup is already installed then this command will
remove it first.8) Type “rpm –ivh mfs100-1.4-4.i586.rpm” and hit enter. This will install the setup in your computer.
(See below figure for more information)
27

Drivers Installation – Linux OS
Step 4 : Verification of installation
Verification of installation9) After completion of installation, please verify logs shown in below figure.
28

Drivers Installation – Linux OS
29
Drivers Installation for Linux OS is completed.

Aadhaar Authentication and Verification Process
30

Aadhaar Authentication and Verification Process
Please select the link to proceed to
Aadhaar Verification &
Authentication
31

32
Aadhaar Authentication and Verification Process
Select the tab labelled “Using Insurance
Number”, provide the IP number and
click on “Submit” to view the details.
Using Insurance Number

Aadhaar Authentication and Verification Process
Select the IP number from
the displayed results.Click on “Biometric
Authentication” to authenticate
the aadhaar number of the IP
33
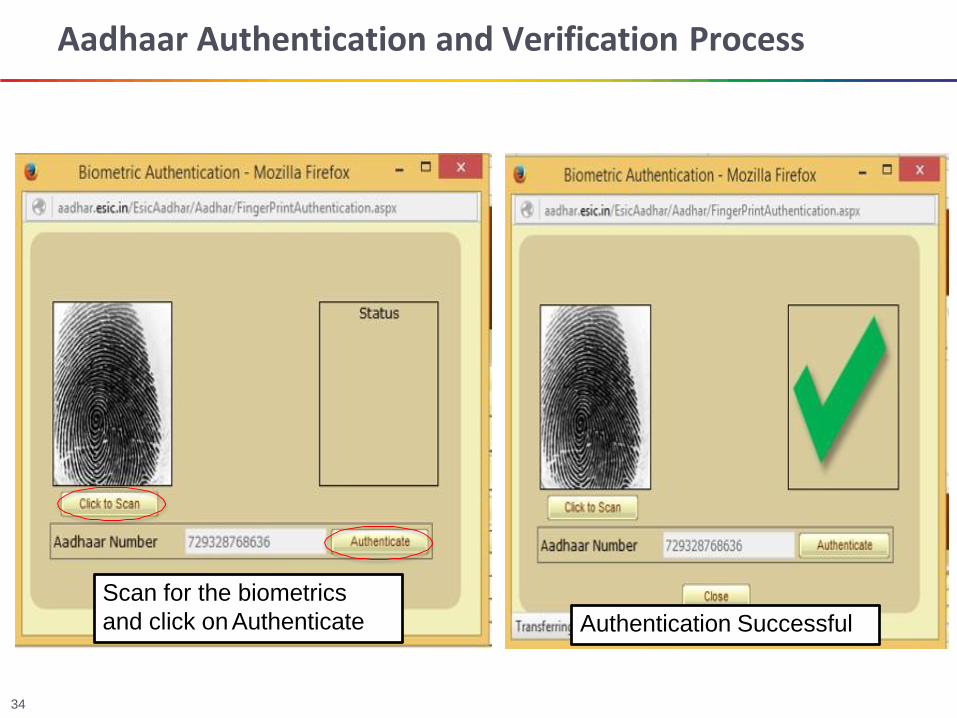
Aadhaar Authentication and Verification Process
Scan for the biometrics
and click on Authenticate Authentication Successful
34

Aadhaar Authentication and Verification Process
The authenticated IP status is changed to “Verified” and if same aadhaar
number is present against any other the status is updated to “Duplicate”.
35

Aadhaar Authentication and Verification Process
Trying to authenticate the
duplicate aadhaar record.
36

Aadhaar Authentication and Verification Process
Scan for the biometrics
and click on Authenticate
37
Authentication Failed

Aadhaar Authentication and Verification Process
Using Aadhaar Number
Provide the Aadhaar Number and
click on “Submit”.
38

Aadhaar Authentication and Verification Process
Select a record from the displayed results and proceed for authentication as
mentioned in above slides.
39

40
Edit Aadhaar Number – LDC/UDC
▪ The functionality to edit the aadhaar number is provided for the LDC/UDC alone.

Edit Aadhaar Number – LDC/UDC
Using aadhaar Number
Provide the Aadhaar Number and
click on “Get Details”.
41

Edit Aadhaar Number – LDC/UDC
Click on “Edit” to modify the
aadhaar number.
42

Edit Aadhaar Number – LDC/UDC
Edit the aadhaar number, provide the
reason for edit and click on “Submit”.
43

Edit Aadhaar Number – LDC/UDC
Please select “Demographics” to
authenticate demographics.
44

Edit Aadhaar Number – LDC/UDC
Demographics authentication failed.
45

Edit Aadhaar Number – LDC/UDC
Please select “Biometrics” for biometric
authentication.
46

Edit Aadhaar Number – LDC/UDC
Biometric authentication failed.
47

Edit Aadhaar Number – LDC/UDC
Using Insurance Number
Edit the aadhaar number and click
on “Submit”.
48

Edit Aadhaar Number – LDC/UDC
Please select “Biometrics” for biometric
authentication.
49

Edit Aadhaar Number – LDC/UDC
Biometric authentication Successful
and aadhaar number is updated.
50

Edit Aadhaar Number – LDC/UDC
Edit the aadhaar number and click
on “Submit”.
51

Edit Aadhaar Number – LDC/UDC
Please select “Demographics” to
authenticate demographics.
52

Edit Aadhaar Number – LDC/UDC
Demographics authentication successful
and aadhaar number is updated.
53

Aadhaar Authentication and Verification - Dhanwanthri
▪ Provide the user name and password and login to the application.
54

Aadhaar Authentication and Verification - Dhanwanthri
Select “Health Information System”
55

Aadhaar Authentication and Verification - Dhanwanthri
Select the location and facility and
click on Submit.
56

Aadhaar Authentication and Verification - Dhanwanthri
Select Patient Check-In/Registration
57

Aadhaar Authentication and Verification - Dhanwanthri
Enter the IP number and click on
Live List
58

Aadhaar Authentication and Verification - Dhanwanthri
On selecting the aadhaar number it will
be redirected to authentication screen.
59

Aadhaar Authentication and Verification - Dhanwanthri
Select the IP number from
the displayed results.Click on “Biometric
Authentication” to authenticate
the aadhaar number of the IP
Now the process is same as explained in initial slides.
60

THANK YOU
61