AAC player with Bluetooth Wireless Technology and FM/AM tuner DEH
103
Operation Manual Multi-CD control DSP High power CD/MP3/WMA/ AAC player with Bluetooth Wireless Technology and FM/AM tuner DEH-P9850BT English
Transcript of AAC player with Bluetooth Wireless Technology and FM/AM tuner DEH

Operation Manual
Multi-CD control DSP High power CD/MP3/WMA/AAC player with Bluetooth Wireless Technology andFM/AM tuner
DEH-P9850BT
English

Thank you for buying this Pioneer product.Please read through these operating instructions so you will know how to operateyour model properly. After you have finished reading the instructions, keep this man-ual in a safe place for future reference.
Before You StartAbout this unit 6
– Operating environment 6About this manual 6Features 6About WMA 7About AAC 7About Bluetooth 7Resetting the microprocessor 8Clearing all memory 8Protecting your unit from theft 8
– Removing the front panel 9– Attaching the front panel 9
About the demo mode 9– Reverse mode 9– Feature demo mode 10
Use and care of the remote control 10– Installing the battery 10– Using the remote control 10– FUNCTION button and AUDIO
button 10
What’s WhatHead unit 12Remote control 12
Basic OperationsTurning the unit on 14Selecting a source 14Loading a disc 14Adjusting the volume 15Turning the unit off 15
TunerListening to the radio 16Introduction of advanced tuner
operation 17Storing and recalling broadcast
frequencies 17Storing the strongest broadcast
frequencies 17
Selecting stations from the preset channellist 18
Tuning in strong signals 18
Built-in CD PlayerPlaying a CD 19Selecting a track directly 19Introduction of advanced built-in CD player
operation 20Repeating play 20Playing tracks in random order 20Scanning tracks of a CD 21Pausing CD playback 21Selecting the search method 21Searching every 10 tracks in the current
disc 21Using disc title functions 22
– Entering disc titles 22– Displaying disc titles 23
Using CD TEXT functions 23– Displaying text information on CD TEXT
discs 23– Scrolling text information in the
display 23– Selecting tracks from the track title
list 23
MP3/WMA/AAC/WAV PlayerPlaying MP3/WMA/AAC/WAV files 24Selecting a track directly in the current
folder 25Introduction of advanced built-in CD player
(MP3/WMA/AAC/WAV) operation 26Repeating play 26Playing tracks in random order 26Scanning folders and tracks 27Pausing MP3/WMA/AAC/WAV playback 27Selecting the search method 27Searching every 10 tracks in the current
folder 27
Contents
En2

Displaying text information on MP3/WMA/AAC/WAV disc 28– When playing back an MP3/WMA/AAC
disc 28– When playing back a WAV disc 28
Scrolling text information in the display 28Selecting tracks from the file name list 29Displaying jacket arts on CD-ROM discs 29
– Reading jacket arts 29– Selecting folders with jacket arts 30
Bluetooth TelephoneHands-free phoning with cellular phones
featuring Bluetooth wirelesstechnology 31
About the telephone source 32– Standby mode 32
Setting up for hands-free phoning 32Basic operation of hands-free phoning 33
– Making a phone call 33– Taking a phone call 34
Introduction of advanced hands-free phoningoperation 35
Connecting a cellular phone 35– Searching for available cellular
phones 36– Using a cellular phone to initiate a
connection 36Disconnecting a cellular phone 37Registering connected cellular phone 37Deleting a registered phone 37Connecting to a registered cellular
phone 38– Connecting to a registered phone
manually 38– Connecting to a registered phone
automatically 38Using the Phone Book 39
– Transferring entries to the PhoneBook 39
– Changing the Phone Book displayorder 40
– Calling a number in the PhoneBook 40
– Assign genres to phone numbers 40– Editing the name of a Phone Book
entry 41– Editing phone numbers 42– Selecting the icon of a Phone Book
entry 42– Clearing a Phone Book entry 43– Using preset numbers 43
Clearing memory 43Using the Call History 44
– Displaying the Call History 44– Calling a number from the Call
History 45– Assigning preset numbers 45
Making a call by entering phone number 45Echo canceling and noise reduction 46Changing the ring tone 46Setting the automatic rejecting 47Setting the automatic answering 47Selecting the icon for user phone 47Displaying BD (Bluetooth Device)
address 47– Displaying BD address of your cellular
phone 48– Displaying BD address of this unit 48
Displaying system version for repair 48
Bluetooth AudioListening to songs on BT Audio (Bluetooth
audio player) 49Setting up for Bluetooth audio player 49Connecting a Bluetooth audio player 50Function operation 51Playing songs on Bluetooth audio player 51Pausing a song 51Stopping playback 51Disconnecting a Bluetooth audio player 52
En 3
English
Contents
Displaying BD address of this unit 52Displaying system version for repair 52
Multi-CD PlayerPlaying a CD 53Selecting a track directly 5350-disc multi-CD player 54Introduction of advanced multi-CD player
operation 54Repeating play 55Playing tracks in random order 55Scanning CDs and tracks 55Pausing CD playback 56Using ITS playlists 56
– Creating a playlist with ITSprogramming 56
– Playback from your ITS playlist 56– Erasing a track from your ITS
playlist 57– Erasing a CD from your ITS playlist 57
Using disc title functions 57– Entering disc titles 57– Displaying disc titles 58– Selecting discs from the disc title
list 58Using CD TEXT functions 58
– Displaying text information on CD TEXTdiscs 59
– Scrolling text information in thedisplay 59
– Selecting tracks from the track titlelist 59
Playing songs on iPodListening to songs on your iPod 60Browsing for a song 60
– Searching for a song 61– Selecting a playlist 61
Displaying text information on iPod 61Introduction of advanced iPod adapter
operation 62
Repeating play 62Playing songs in a random order
(shuffle) 62Pausing a song 63
TV tunerWatching the television 64Introduction of advanced TV tuner
operation 65Storing and recalling broadcast stations 65Storing the strongest broadcast stations
sequentially 65Selecting stations from the preset channel
list 66
DVD PlayerPlaying a disc 67Selecting a disc 67Selecting a folder 67Introduction of advanced DVD player
operation 68Repeating play 68Pausing disc playback 69Playing tracks in random order 69Scanning tracks of a CD/MP3/WMA 69Using ITS playlist and disc title functions 69Using disc title functions 69
– Entering disc titles 70
Audio AdjustmentsAdjusting the audio easily 71Adjusting the audio finely 71Extra functions 71Introduction of audio adjustments 71Using the position selector 72Using balance adjustment 72Using the time alignment 73
– Adjusting the time alignment 73Using subwoofer output 74
– Adjusting subwoofer settings 74
Contents
En4

– Adjusting low pass filter attenuationslope 74
Using the high pass filter 75– Muting the speaker units (filters) 75– Setting the high pass filter for front
speakers 75– Setting the high pass filter for rear
speakers 76Using the auto-equalizer 76Using the equalizer 76
– Recalling equalizer curves 76– Adjusting equalizer curves 77– Adjusting 16-band graphic
equalizer 77Using BBE sound 78Using compression and BMX 78Adjusting loudness 79Adjusting source levels 79Using auditory user interface 79Auto TA and EQ (auto-time alignment and
auto-equalizing) 80– Before operating the auto TA and EQ
function 80– Carrying out auto TA and EQ 81
Initial SettingsAdjusting initial settings 83Selecting the display language 83Setting the date 83Setting the clock 84Setting the FM tuning step 84Setting the AM tuning step 84Switching the warning tone 85Switching the face auto open 85Switching the auxiliary setting 85Switching the dimmer setting 85Adjusting the brightness 85Correcting distorted sound 86Switching the sound muting/attenuation 86Switching the feature demo 86Switching the reverse mode 87
Switching the Ever Scroll 87Calibrating the RPMs 87Activating the BT Audio source 87Entering PIN code for Bluetooth wireless
connection 88Resetting the Bluetooth wireless technology
module 88
Other FunctionsTurning the clock display on or off 89Using the AUX source 89
– About AUX1 and AUX2 89– Selecting AUX as the source 89– Setting the AUX title 89
Using different entertainment displays 90– Setting the entertainment display 90– Setting the background display 91
Rewriting the entertainment displays and theicons for telephone functions 92
Additional InformationUnderstanding built-in CD player error
messages 93Understanding auto TA and EQ error
messages 93Understanding error message on rewriting
the entertainment displays 94CD player and care 94CD-R/CD-RW discs 94Dual Discs 95MP3, WMA, AAC and WAV files 95
– MP3 additional information 96– WMA additional information 96– AAC additional information 96– WAV additional information 97
About folders and MP3/WMA/AAC/WAVfiles 97
Terms 99Specifications 101
En 5
English
Contents
About this unit
CAUTION! Do not allow this unit to come into contact
with liquids. Electrical shock could result.Also, this unit damage, smoke, and overheatcould result from contact with liquids.
! Keep this manual handy as a reference for op-erating procedures and precautions.
! Always keep the volume low enough so thatyou can hear sounds from outside the vehicle.
! Protect this unit from moisture.! If the battery is disconnected or discharged,
the preset memory will be erased and must bereprogrammed.
! If this unit does not operate properly, contactyour dealer or nearest authorized Pioneer Ser-vice Station.
Operating environmentThis unit should be used within the tempera-ture ranges shown below.Operating temperature range: –10 °C to +60°C (14 °F to 140 °F)EN300328 ETC test temperature: –20 °C and+55 °C (–4 °F and 131 °F)
About this manualThis unit features a number of sophisticatedfunctions ensuring superior reception and op-eration. All the functions have been designedfor the easiest possible use, but many are notself-explanatory. This operation manual willhelp you benefit fully from this unit’s potentialand to maximize your listening enjoyment.We recommend that you familiarize yourselfwith the functions and their operation by read-ing through the manual before you beginusing this unit. It is especially important that
you read and observeWARNINGs and CAU-TIONs in this manual.
FeaturesCD playbackMusic CD/CD-R/CD-RW playback is possible.
MP3 file playbackYou can play back MP3 files recorded on CD-ROM/CD-R/CD-RW (ISO9660 Level 1/Level 2standard recordings).! Supply of this product only conveys a li-
cense for private, non-commercial use anddoes not convey a license nor imply anyright to use this product in any commercial(i.e. revenue-generating) real time broad-casting (terrestrial, satellite, cable and/orany other media), broadcasting/streamingvia internet, intranets and/or other net-works or in other electronic content distri-bution systems, such as pay-audio oraudio-on-demand applications. An inde-pendent license for such use is required.For details, please visithttp://www.mp3licensing.com.
WMA file playbackYou can play back WMA files recorded on CD-ROM/CD-R/CD-RW (ISO9660 Level 1/Level 2standard recordings).
AAC file playbackYou can play back AAC files recorded on CD-ROM/CD-R/CD-RW (ISO9660 Level 1/Level 2standard recordings).
WAV file playbackYou can play back WAV files recorded on CD-ROM/CD-R/CD-RW (Linear PCM (LPCM)/MSADPCM recordings).
Before You Start
En6
Section
01
Hands-free phoningThis unit realizes effortless hands-free phoningwith Bluetooth wireless technology.
Bluetooth audio player compatibilityWhen you use this unit with a Bluetooth audioplayer featuring Bluetooth wireless technol-ogy, you can control the Bluetooth audioplayer.
iPod® compatibilityWhen you use this unit with a Pioneer iPodadapter (CD-IB100), you can control an iPodwith Dock Connector.! iPod is a trademark of Apple Computer,
Inc., registered in the U.S. and othercountries.
About WMA
The Windows Media™ logo printed on the boxindicates that this unit can play back WMAdata.WMA is short for Windows Media Audio andrefers to an audio compression technologythat is developed by Microsoft Corporation.WMA data can be encoded by using WindowsMedia Player version 7 or later.Windows Media and the Windows logo are tra-demarks or registered trademarks of MicrosoftCorporation in the United States and/or othercountries.
Notes
! This unit may not operate correctly dependingon the application used to encode WMA files.
! Depending on the version of Windows MediaPlayer used to encode WMA files, albumnames and other text information may not becorrectly displayed.
! There may be a slight delay when startingplayback of WMA files encoded with imagedata.
About AACAAC is short for Advanced Audio Coding andrefers to an audio compression technologystandard used with MPEG 2 and MPEG 4.Several applications can be used to encodeAAC files, but file formats and extensions dif-fer depending on the application which isused to encode.This unit plays back AAC files encoded byiTunes® version 4.8 and earlier.iTunes is a trademark of Apple Computer, Inc.,registered in the U.S. and other countries.
About Bluetooth
Bluetooth is a short-range wireless radio con-nectivity technology that is developed as acable replacement for mobile phones, hand-held PCs and other devices. Bluetooth oper-ates in 2.4 GHz frequency range and transmitsvoice and data at speeds up to 1 megabit persecond. Bluetooth was launched by a specialinterest group (SIG) that comprises of EricssonInc., Intel Corp., Nokia Corp., Toshiba and IBMin 1998, and it is currently developed by nearly2 000 companies worldwide.
Before You Start
En 7
English
Section
01
! The Bluetooth word mark and logos areowned by the Bluetooth SIG, Inc. and anyuse of such marks by Pioneer Corporationis under license. Other trademarks andtrade names are those of their respectiveowners.
Resetting the microprocessorThe microprocessor must be reset under thefollowing conditions:! Prior to using this unit for the first time
after installation! If the unit fails to operate properly! When strange or incorrect messages ap-
pear on the display
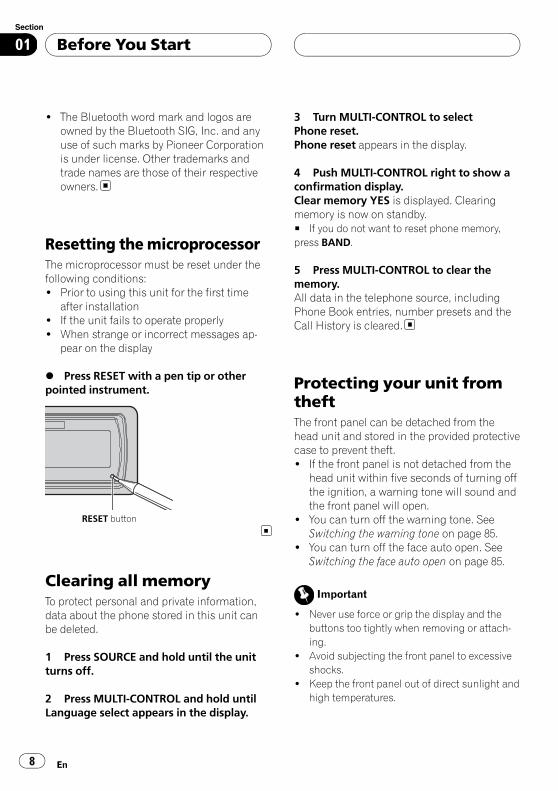
% Press RESET with a pen tip or otherpointed instrument.
RESET button
Clearing all memoryTo protect personal and private information,data about the phone stored in this unit canbe deleted.
1 Press SOURCE and hold until the unitturns off.
2 Press MULTI-CONTROL and hold untilLanguage select appears in the display.
3 Turn MULTI-CONTROL to selectPhone reset.Phone reset appears in the display.
4 Push MULTI-CONTROL right to show aconfirmation display.Clear memory YES is displayed. Clearingmemory is now on standby.# If you do not want to reset phone memory,press BAND.
5 Press MULTI-CONTROL to clear thememory.All data in the telephone source, includingPhone Book entries, number presets and theCall History is cleared.
Protecting your unit fromtheftThe front panel can be detached from thehead unit and stored in the provided protectivecase to prevent theft.! If the front panel is not detached from the
head unit within five seconds of turning offthe ignition, a warning tone will sound andthe front panel will open.
! You can turn off the warning tone. SeeSwitching the warning tone on page 85.
! You can turn off the face auto open. SeeSwitching the face auto open on page 85.
Important
! Never use force or grip the display and thebuttons too tightly when removing or attach-ing.
! Avoid subjecting the front panel to excessiveshocks.
! Keep the front panel out of direct sunlight andhigh temperatures.
Before You Start
En8
Section
01

! A few seconds after turning the ignitionswitch to on or off, the front panel automati-cally moves. When this happens, your fingersmay become jammed in the panel, so keepyour hands away from it.
Removing the front panel1 Press and hold EJECT to open the frontpanel.
2 Slide and remove the front panel to-ward you.Take care not to grip it too tightly or to dropthe front panel and protect it from contactwith water or other fluids to prevent perma-nent damage.
3 Put the front panel into provided pro-tective case for safe keeping.
Attaching the front panel1 Make sure the inner cover is closed.
2 Replace the front panel by clipping itinto place.
About the demo modeThis unit features two demonstration modes.One is the reverse mode, the other is the fea-ture demo mode.
Important
The red lead (ACC) of this unit should be con-nected to a terminal coupled with ignition switchon/off operations. If this is not done, the vehiclebattery may be drained.
Reverse modeIf you do not perform an operation withinabout 30 seconds, screen indications start toreverse, and then continue reversing every 10seconds. Pressing BAND when power to thisunit is turned off while the ignition switch isset to ACC or ON cancels the reverse mode.Press BAND again to start the reverse mode.
Before You Start
En 9
English
Section
01

Feature demo modeThe feature demo automatically starts whenpower to this unit is turned off while the igni-tion switch is set to ACC or ON. PressingDISPLAY during feature demo operation can-cels the feature demo mode. Press DISPLAYagain to start the feature demo mode. Remem-ber that if the feature demo continues operat-ing when the car engine is turned off, it maydrain battery power.
Use and care of the remotecontrolInstalling the batterySlide the tray out on the back of the remotecontrol and insert the battery with the plus (+)and minus (–) poles pointing in the proper di-rection.! When using for the first time, pull out the
film protruding from the tray.
WARNINGKeep the battery out of the reach of children.Should the battery be swallowed, immediatelyconsult a doctor.
CAUTION! Use only one CR2025 (3 V) lithium battery.! Remove the battery if the remote control is not
used for a month or longer.! Do not recharge, disassemble, heat or dispose
of the battery in fire.! Do not handle the battery with metallic tools.
! Do not store the battery with metallic materi-als.
! In the event of battery leakage, wipe the re-mote control completely clean and install anew battery.
! When disposing of used batteries, pleasecomply with governmental regulations or en-vironmental public institutions’ rules thatapply in your country/area.
Using the remote controlPoint the remote control in the direction of thefront panel to operate.! The remote control may not function prop-
erly in direct sunlight.
Important
! Do not store the remote control in high tem-peratures or direct sunlight.
! Do not let the remote control fall onto thefloor, where it may become jammed under thebrake or accelerator pedal.
FUNCTION button and AUDIO buttonYou can also select the desired mode byFUNCTION button and AUDIO button on theremote control. But operation of FUNCTIONbutton and AUDIO button on the remote con-trol differs from the operation ofMULTI-CONTROL on the head unit. When op-erating the remote control, switch through themodes as described below to select the mode.
FUNCTION button operation
% Press FUNCTION to select the desiredmode (e.g., built-in CD player).Press FUNCTION repeatedly to switch be-tween the following modes:
Before You Start
En10
Section
01

Play mode (repeat play)—Random mode(random play)—Scan mode (scan play)—Pause (pause)—Search mode (search meth-od)—Title Input (disc title input)—Jacket art(jacket art read)
Note
Refer to Introduction of advanced built-in CDplayer operation on page 20.
AUDIO button operation
% Press AUDIO to select the desiredmode.Press AUDIO repeatedly to switch betweenthe following modes:Fader (balance adjustment)—Position (posi-tion selector)—TA Mode (time alignment set-ting)—Time Alignment (time alignmentadjusting)—Loudness (loudness)—Powerful(graphic equalizer adjustment)—FREQ. (16-band graphic equalizer adjustment)—Subwoofer1 (subwoofer on/off)—Subwoofer2 (subwoofer cut-off frequency)—Subwoofer3 (subwoofer slope)—Front HPF(front high pass filter slope)—Front HPF FREQ. (front high pass filter cut-offfrequency)—Rear HPF (rear high pass filterslope)—Rear HPF FREQ. (rear high pass filtercut-off frequency)—BBE (BBE)—COMP/BMX(Compression and BMX)—Auto EQ (auto-equalizer on/off)—SLA (source level adjust-ment)—AUI sound level (auditory user inter-face)
Note
Refer to Introduction of audio adjustments onpage 71.
Before You Start
En 11
English
Section
01

Head unit1 EQ button
Press to select various equalizer curves.
2 Connection status indicatorLights up when your cellular phone is con-nected via Bluetooth wireless technology.
3 DISPLAY buttonPress to select different displays.
4 CLOCK buttonPress to change to the clock display.
5 PHONE buttonPress to select the phone as the source.While operating a phone source, press toend a call, reject an incoming call or cancelmaking a call.
6 MULTI-CONTROLMove to perform manual seek tuning, fastforward, reverse and track search controls.Also used for controlling functions.Turn to increase or decrease the volume.
7 LIST buttonPress to display the disc title list, track titlelist, folder list, file list or preset channel listdepending on the source.
8 RESET buttonPress to reset the microprocessor.
9 BAND buttonPress to select among three FM bands andone AM band and to cancel the controlmode of functions.
a SOURCE buttonThis unit is turned on by selecting a source.Press to cycle through all the availablesources.
b EJECT buttonPress to eject a CD from your built-in CDplayer.Press and hold to open or close the frontpanel.
Remote controlOperation is the same as when using the but-tons on the head unit.
c VOLUME buttonsPress to increase or decrease the volume.
d FUNCTION buttonPress to select functions.
222
888
6555
999bbb
333444 777
aaa
111
What’s What
En12
Section
02
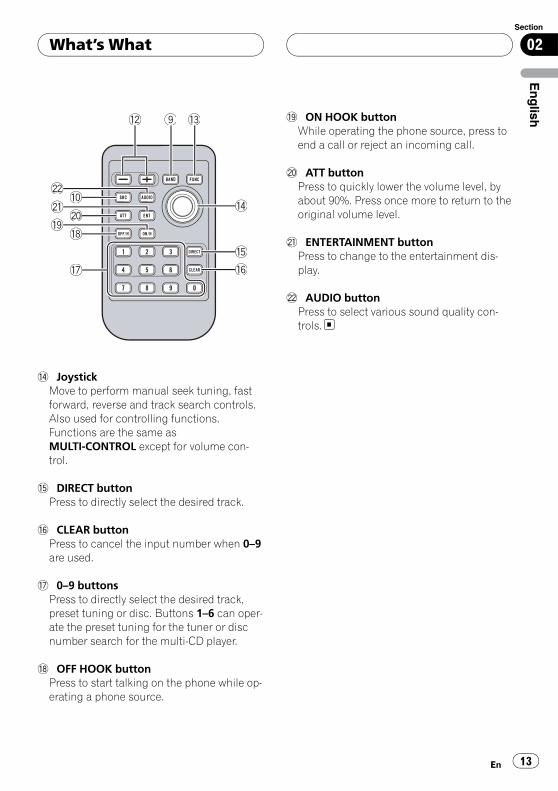
e JoystickMove to perform manual seek tuning, fastforward, reverse and track search controls.Also used for controlling functions.Functions are the same asMULTI-CONTROL except for volume con-trol.
f DIRECT buttonPress to directly select the desired track.
g CLEAR buttonPress to cancel the input number when 0–9are used.
h 0–9 buttonsPress to directly select the desired track,preset tuning or disc. Buttons 1–6 can oper-ate the preset tuning for the tuner or discnumber search for the multi-CD player.
i OFF HOOK buttonPress to start talking on the phone while op-erating a phone source.
j ON HOOK buttonWhile operating the phone source, press toend a call or reject an incoming call.
k ATT buttonPress to quickly lower the volume level, byabout 90%. Press once more to return to theoriginal volume level.
l ENTERTAINMENT buttonPress to change to the entertainment dis-play.
m AUDIO buttonPress to select various sound quality con-trols.
ccc 999 ddd
eee
fff
ggghhh
iii
kkkjjj
lllaaa
mmm
What’s What
En 13
English
Section
02
Turning the unit on% Press SOURCE to turn the unit on.When you select a source, the unit is turnedon.
Selecting a sourceYou can select a source you want to listen to.To switch to the built-in CD player, load a discin the unit (refer to page 19).
% Press SOURCE to select a source.Press SOURCE repeatedly to switch betweenthe following sources:Tuner—Television—DVD player/Multi-DVD player—Built-in CD player—Multi-CD player—iPod—External unit 1—Exter-nal unit 2—AUX1—AUX2—Telephone—BTAudio
Notes
! In the following cases, the sound source willnot change:— When there is no unit corresponding to the
selected source connected to this unit.— When there is no disc in the unit.— When there is no disc in the DVD player.— When there is no magazine in the multi-
CD player.— When there is no magazine in the multi-
DVD player.— When the AUX (auxiliary input) is set to off
(refer to page 85).— When the BTAudio source is set to off
(refer to Activating the BTAudio source onpage 87).
! External unit refers to a Pioneer product (suchas one available in the future) that, althoughincompatible as a source, enables control ofbasic functions by this unit. Two external unitscan be controlled by this unit. When two exter-nal units are connected, the allocation of
them to external unit 1 or external unit 2 isautomatically set by this unit.
! When this unit’s blue/white lead is connectedto the vehicle’s auto-antenna relay controlterminal, the vehicle’s antenna extends whenthis unit’s source is turned on. To retract theantenna, turn the source off.
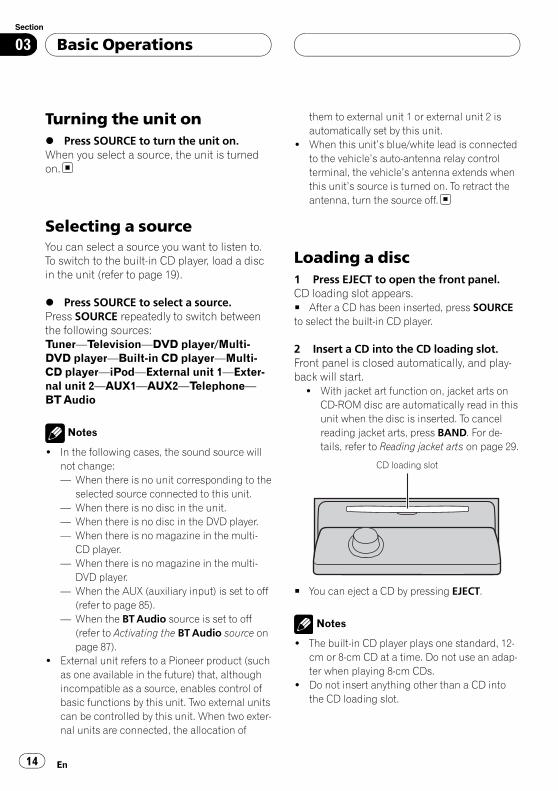
Loading a disc1 Press EJECT to open the front panel.CD loading slot appears.# After a CD has been inserted, press SOURCEto select the built-in CD player.
2 Insert a CD into the CD loading slot.Front panel is closed automatically, and play-back will start.
! With jacket art function on, jacket arts onCD-ROM disc are automatically read in thisunit when the disc is inserted. To cancelreading jacket arts, press BAND. For de-tails, refer to Reading jacket arts on page 29.
CD loading slot
# You can eject a CD by pressing EJECT.
Notes
! The built-in CD player plays one standard, 12-cm or 8-cm CD at a time. Do not use an adap-ter when playing 8-cm CDs.
! Do not insert anything other than a CD intothe CD loading slot.
Basic Operations
En14
Section
03

! There is sometimes a delay between startingup CD playback and the sound being issued.When being read, Format read is displayed.
! If you cannot insert a disc completely or ifafter you insert a disc the disc does not play,check that the label side of the disc is up.Press EJECT to eject the disc, and check thedisc for damage before inserting it again.
! When the CD loading or ejecting functiondoes not operate properly, you can eject theCD by pressing and holding EJECT whileopening the front panel.
! If an error message such as ERROR-11 is dis-played, refer to Understanding built-in CDplayer error messages on page 93.
Adjusting the volume% Use MULTI-CONTROL to adjust thesound level.With the head unit, turn MULTI-CONTROL toincrease or decrease the volume.With the remote control, press VOLUME to in-crease or decrease the volume.
Turning the unit off% Press SOURCE and hold until the unitturns off.
Basic Operations
En 15
English
Section
03

Listening to the radio
44443333 55552222111
666
These are the basic steps necessary to operatethe radio. More advanced tuner operation isexplained starting on the next page.
Important
If you are using this unit in North, Central orSouth America, reset the AM tuning step (seeSetting the AM tuning step on page 84).
1 Stereo (5) indicatorShows when the selected frequency isbeing broadcast in stereo.
2 LOC indicatorShows when local seek tuning is on.
3 Band indicatorShows which band the radio is tuned to, AMor FM.
4 Preset number indicatorShows which preset has been selected.
5 Frequency indicatorShows the frequency to which the tuner istuned.
6 Signal level indicatorShows the radio wave strength.
1 Press SOURCE to select the tuner.Press SOURCE until you see Tuner displayed.
2 Press BAND to select a band.Press BAND until the desired band (FM-1,FM-2, FM-3 for FM or AM) is displayed.
3 To perform manual tuning, pushMULTI-CONTROL left or right.The frequencies move up or down step bystep.
4 To perform seek tuning, push and holdMULTI-CONTROL left or right for about onesecond and release.The tuner will scan the frequencies until abroadcast strong enough for good reception isfound.# You can cancel seek tuning by pushingMULTI-CONTROL left or right.# If you push and holdMULTI-CONTROL left orright you can skip stations. Seek tuning starts assoon as you releaseMULTI-CONTROL.
Tuner
En16
Section
04

Introduction of advancedtuner operation
111
1 Function displayShows the function status.
1 Press MULTI-CONTROL to display themain menu.FUNCTION, AUDIO and ENTERTAINMENTappear on the display.
2 Use MULTI-CONTROL to selectFUNCTION.Turn to change the menu option; press to se-lect.The function name appears on the display.
3 Turn MULTI-CONTROL to select thefunction.TurnMULTI-CONTROL clockwise or counter-clockwise to switch between the functions inthe following order:BSM (best stations memory)—Local (localseek tuning)# To return to the frequency display, pressBAND.
Note
If you do not operate the function within about 30seconds, the display is automatically returned tothe frequency display.
Storing and recallingbroadcast frequenciesYou can easily store up to six broadcast fre-quencies for later recall.
1 When you find a frequency that youwant to store in memory press LIST toswitch to the preset channel list mode.
2 Use MULTI-CONTROL to store the se-lected frequency in memory.Turn to change the preset number; press andhold to store.The preset number you have selected willflash and then remain lit. The selected radiostation frequency has been stored in memory.# If you do not operate the list within about 30seconds, the preset channel list mode is can-celed automatically.
Notes
! Up to 18 FM stations, six for each of the threeFM bands, and six AM stations can be storedin memory.
! You can also store radio station frequenciesassigned to preset tuning numbers by press-ing and holding one of the preset tuning but-tons 1–6 on the remote control.
Storing the strongestbroadcast frequenciesBSM (best stations memory) lets you automa-tically store the six strongest broadcast fre-quencies under preset tuning buttons 1–6.Once stored you can tune in to those frequen-cies with the touch of button.
1 Use MULTI-CONTROL to select BSM inthe function menu.BSM appears in the display.
Tuner
En 17
English
Section
04

2 Press MULTI-CONTROL to turn BSM on.Searching is displayed. While Searching isdisplayed, the six strongest broadcast frequen-cies will be stored under preset tuning num-bers 1–6 in the order of their signal strength.When finished, the preset channel list ap-pears.# To cancel the storage process, pressMULTI-CONTROL.
3 Use MULTI-CONTROL to select the de-sired station.Turn to change the station; press to select.# You can also change the station by pushingMULTI-CONTROL up or down.
Note
Storing broadcast frequencies with BSM may re-place broadcast frequencies you have savedusing buttons 1–6.
Selecting stations from thepreset channel listThe preset channel list lets you see the list ofpreset stations and select one of them to re-ceive.
1 Press LIST to switch to the preset chan-nel list mode during the frequency display.
2 Use MULTI-CONTROL to select the de-sired station.Turn to change the station; press to select.# You can also change the station by pushingMULTI-CONTROL up or down.# If you do not operate the list within about 30seconds, the preset channel list mode is can-celed automatically.
Notes
! You can also recall radio station frequenciesassigned to preset tuning numbers by push-ingMULTI-CONTROL up or down during thefrequency display.
! You can also recall radio station frequenciesassigned to preset tuning numbers by press-ing one of the preset tuning buttons 1–6 onthe remote control.
Tuning in strong signalsLocal seek tuning lets you tune in only thoseradio stations with sufficiently strong signalsfor good reception.
1 Use MULTI-CONTROL to select Local inthe function menu.Local appears in the display.
2 Press MULTI-CONTROL to turn localseek tuning on.Local seek sensitivity (e.g., Level 2) appears inthe display.# To turn local seek tuning off, pressMULTI-CONTROL again.
3 Push MULTI-CONTROL left or right toset the sensitivity.There are four levels of sensitivity for FM andtwo levels for AM:FM: Level 1—Level 2—Level 3—Level 4AM: Level 1—Level 2The Level 4 setting allows reception of onlythe strongest stations, while lower settings letyou receive progressively weaker stations.
Tuner
En18
Section
04

Playing a CD
1111
333
2222
These are the basic steps necessary to play aCD with your built-in CD player. More ad-vanced CD operation is explained starting onthe next page.
1 Track number indicatorShows the track number currently playing.
2 Play time indicatorShows the elapsed playing time of the cur-rent track.
3 Disc title indicatorShows the title of the currently playing disc.! If no title has been entered for the cur-
rently playing disc, nothing is displayed.
1 Press SOURCE to select the built-in CDplayer.Press SOURCE until you see Compact Discdisplayed.# If no disc is loaded in the unit, you cannot se-lect Compact Disc (built-in CD player). Insert adisc in the unit. (Refer to page 14.)
2 To perform fast forward or reverse,push and hold MULTI-CONTROL left orright.# If you select Rough search, pushing and hold-ingMULTI-CONTROL left or right enables you tosearch every 10 tracks in the current disc. (Referto Selecting the search method on page 21.)
3 To skip back or forward to anothertrack, push MULTI-CONTROL left or right.Pushing MULTI-CONTROL right skips to thestart of the next track. PushingMULTI-CONTROL left once skips to the startof the current track. Pushing again will skip tothe previous track.
Note
When a CD TEXT disc is inserted, the disc titleautomatically begins to scroll in the display.When Ever Scroll is set to ON at the initial setting,the disc title scrolls continuously. Refer to Switch-ing the Ever Scroll on page 87.
Selecting a track directlyWhen using the remote control, you can selecta track directly by entering the desired tracknumber.
1 Press DIRECT.Track number input display appears.
2 Press 0–9 buttons to enter the desiredtrack number.# You can cancel the input number by pressingCLEAR.
3 Press DIRECT.The track of entered number will play.
Note
After entering the number input mode, if you donot perform an operation within about eight sec-onds, the mode is automatically canceled.
Built-in CD Player
En 19
English
Section
05

Introduction of advancedbuilt-in CD player operation
111
1 Function displayShows the function status.
1 Press MULTI-CONTROL to display themain menu.FUNCTION, AUDIO and ENTERTAINMENTappear on the display.
2 Use MULTI-CONTROL to selectFUNCTION.Turn to change the menu option; press to se-lect.The function name appears on the display.
3 Turn MULTI-CONTROL to select thefunction.TurnMULTI-CONTROL clockwise or counter-clockwise to switch between the functions inthe following order:Play mode (repeat play)—Random mode(random play)—Scan mode (scan play)—Pause (pause)—Search mode (search meth-od)—Title Input (disc title input)—Jacket art(jacket art read)# To return to the playback display, press BAND.
Notes
! When playing a CD TEXT disc, you cannotswitch to Title Input. The disc title will havealready been recorded on a CD TEXT disc.
! When playing audio data (CD-DA), it is not ef-fective even if you turn Jacket art on. (Refer topage 29.)
! If you do not operate the function within about30 seconds, the display is automatically re-turned to the playback display.
Repeating playThere are two repeat play ranges for the built-in CD player: Disc repeat (disc repeat) andTrack repeat (one-track repeat).
1 Use MULTI-CONTROL to selectPlay mode in the function menu.Play mode appears in the display.
2 Press MULTI-CONTROL to select the re-peat range.PressMULTI-CONTROL repeatedly until thedesired repeat range appears in the display.
! Disc repeat – Repeat the current disc! Track repeat – Repeat just the current
track
Note
If you perform track search or fast forward/re-verse during Track repeat, the repeat play rangechanges to Disc repeat.
Playing tracks in random orderRandom play lets you play back tracks on theCD in a random order.
1 Use MULTI-CONTROL to selectRandom mode in the function menu.Random mode appears in the display.
2 Press MULTI-CONTROL to turn randomplay on.Tracks will play in a random order.# To turn random play off, pressMULTI-CONTROL again.
Built-in CD Player
En20
Section
05

Scanning tracks of a CDScan play lets you hear the first 10 seconds ofeach track on the CD.
1 Use MULTI-CONTROL to selectScan mode in the function menu.Scan mode appears in the display.
2 Press MULTI-CONTROL to turn scan playon.The first 10 seconds of each track is played.
3 When you find the desired track pressMULTI-CONTROL to turn scan play off.The track will continue to play.# If the display has automatically returned tothe playback display, select Scan mode again byusingMULTI-CONTROL.
Note
After scanning of a CD is finished, normal play-back of the tracks will begin again.
Pausing CD playbackPause lets you temporarily stop playback ofthe CD.
1 Use MULTI-CONTROL to select Pause inthe function menu.Pause appears in the display.
2 Press MULTI-CONTROL to turn pauseon.Playback of the current track pauses.# To turn pause off, pressMULTI-CONTROLagain.
Selecting the search methodYou can switch the search method betweenfast forward/reverse and searching every 10tracks.
1 Use MULTI-CONTROL to selectSearch mode in the function menu.Search mode appears in the display.
2 Press MULTI-CONTROL to select thesearch method.PressMULTI-CONTROL until the desiredsearch method appears in the display.
! FF/REV – Fast forward and reverse! Rough search – Searching every 10
tracks
Searching every 10 tracks inthe current discIf a disc contains over 10 tracks, you cansearch every 10 tracks. When a disc containsmany tracks, you can roughly search for thetrack you want to play.
1 Select the search method Rough search.Refer to Selecting the search method on thispage.
2 Push and hold MULTI-CONTROL left orright to search every 10 tracks on a disc.# If a disc contains less than 10 tracks, pushingand holdingMULTI-CONTROL right recalls thelast track of the disc. Also, if the remaining num-ber of tracks after searching every 10 tracks isless than 10, pushing and holdingMULTI-CONTROL right recalls the last track ofthe disc.
Built-in CD Player
En 21
English
Section
05

# If a disc contains less than 10 tracks, pushingand holdingMULTI-CONTROL left recalls the firsttrack of the disc. Also, if the remaining number oftracks after searching every 10 tracks is less than10, pushing and holdingMULTI-CONTROL left re-calls the first track of the disc.
Using disc title functionsYou can input CD titles and display the title.The next time you insert a CD for which youhave entered a title, the title of that CD will bedisplayed.Use the disc title input feature to store up to48 CD titles in the unit. Each title can be up to10 characters long.! When playing a CD TEXT disc, you cannot
switch to disc title input display. The disctitle will have already been recorded on aCD TEXT disc.
Entering disc titlesYou can display the text information of anydisc that has had a disc title entered.
1 Play the CD that you want to enter atitle for.
2 Use MULTI-CONTROL to selectTitle Input in the function menu.Title Input appears in the display.
3 Press DISPLAY to select the desiredcharacter type.Press DISPLAY repeatedly to switch betweenthe following character types:Alphabet (upper case), numbers and symbols—Alphabet (lower case)—European letters,such as those with accents (e.g. á, à, ä, ç)—Numbers and symbols
4 Push MULTI-CONTROL up or down toselect a letter of the alphabet.Each timeMULTI-CONTROL is pushed up, al-phabet, numbers or symbols are displayed inascending order (A B C ...). Each timeMULTI-CONTROL is pushed down, letters aredisplayed in descending order.
5 Push MULTI-CONTROL right to movethe cursor to the next character position.When the letter you want is displayed, pushMULTI-CONTROL right to move the cursor tothe next position and then select the next let-ter. PushMULTI-CONTROL left to move back-wards in the display.
6 Move the cursor to the last position bypushing MULTI-CONTROL right after enter-ing the title.When you push MULTI-CONTROL right onemore time, the entered title is stored in mem-ory.
7 Press BAND to return to the playbackdisplay.
Notes
! Titles remain in memory, even after the dischas been removed from the unit, and are re-called when the disc is reinserted.
! After data for 48 discs has been stored inmemory, data for a new disc will overwrite theoldest one.
! If you connect a multi-CD player, you caninput disc titles for up to 100 discs.
! When a multi-CD player that does not supportdisc title functions is connected, you cannotenter disc titles in this unit.
Built-in CD Player
En22
Section
05

Displaying disc titlesYou can display the text information of anydisc that has had a disc title entered.
% Press DISPLAY.Press DISPLAY repeatedly to switch betweenthe following settings:: disc title—Simple display
Using CD TEXT functionsSome discs have certain information encodedon the disc during manufacture. These discsmay contain such information as the CD title,track title, artist’s name and playback timeand are called CD TEXT discs. Only these spe-cially encoded CD TEXT discs support thefunctions listed below.
Displaying text information onCD TEXT discsYou can display the text information of anydisc that has had a disc title entered.
% Press DISPLAY.Press DISPLAY repeatedly to switch betweenthe following settings:: disc title— : disc artist name— : track
title— : track artist name— : disc title and: disc artist name— : track title and :
track artist name—Simple display# If specific information has not been recordedon a CD TEXT disc, title or name is not displayed.
Scrolling text information inthe displayThis unit can display the first 24 letters of disctitle, disc artist name, track title and track ar-tist name. When the text information is longer
than 24 letters, you can scroll the text informa-tion as follows.! When the source icon is turned off, this
unit can display the first 30 letters of text in-formation.
% Press DISPLAY and hold until the textinformation begins to scroll through thedisplay.The titles scroll.
Note
When Ever Scroll is set to ON at the initial setting,text information scrolls continuously in the dis-play. Refer to Switching the Ever Scroll on page 87.
Selecting tracks from the tracktitle listTrack title list lets you see the list of track titleson a CD TEXT disc and select one of them toplay back.
1 Press LIST to switch to the track title listmode.
2 Use MULTI-CONTROL to select the de-sired track title.Turn to change the track title; press to play.# You can also change the track title by pushingMULTI-CONTROL up or down.# If you do not operate the list within about 30seconds, the track title list mode is canceledautomatically.
Built-in CD Player
En 23
English
Section
05

Playing MP3/WMA/AAC/WAV files
3333
666
44442222
555
1111
These are the basic steps necessary to play anMP3/WMA/AAC/WAV with your built-in CDplayer. More advanced MP3/WMA/AAC/WAVoperation is explained starting on page 26.
1 MP3/WMA/AAC/WAV indicatorShows the type of file currently playing.
2 Folder number indicatorShows the folder number currently playing.
3 Track number indicatorShows the track (file) number currently play-ing.
4 Play time indicatorShows the elapsed playing time of the cur-rent track (file).
5 Bit rate/sampling frequency indicatorShows the bit rate or sampling frequency ofthe current track (file).
6 Folder name indicatorShows the name of the currently playingfolder.
1 Press SOURCE to select the built-in CDplayer.Press SOURCE until you see Compact Discdisplayed.
# If no disc is loaded in the unit, you cannot se-lect Compact Disc (built-in CD player). Insert adisc in the unit. (Refer to page 14.)
2 Push MULTI-CONTROL up or down toselect a folder.# You cannot select a folder that does not havean MP3/WMA/AAC/WAV file recorded in it.# To return to folder 01 (ROOT), press and holdBAND. However, if folder 01 (ROOT) contains nofiles, playback commences with folder 02.
3 To perform fast forward or reverse,push and hold MULTI-CONTROL left orright.# If you select Rough search, pushing and hold-ingMULTI-CONTROL left or right enables you tosearch every 10 tracks in the current folder. (Referto Selecting the search method on page 27.)
4 To skip back or forward to anothertrack, push MULTI-CONTROL left or right.Pushing MULTI-CONTROL right skips to thestart of the next track. PushingMULTI-CONTROL left once skips to the startof the current track. Pushing again will skip tothe previous track.
Notes
! When playing discs with MP3/WMA/AAC/WAV files and audio data (CD-DA) such asCD-EXTRA and MIXED-MODE CDs, both typescan be played only by switching mode be-tween MP3/WMA/AAC/WAV and CD-DA withBAND.
! If you have switched between playback ofMP3/WMA/AAC/WAV files and audio data(CD-DA), playback starts at the first track onthe disc.
! The built-in CD player can play back an MP3/WMA/AAC/WAV file recorded on CD-ROM.(Refer to page 95 for files that can be playedback.)
MP3/WMA/AAC/WAV Player
En24
Section
06

! Playback is carried out in order of file number.Folders are skipped if they contain no files. (Iffolder 01 (ROOT) contains no files, playbackcommences with folder 02.)
! When playing back files recorded as VBR(variable bit rate) files, the play time will not becorrectly displayed if fast forward or reverseoperations are used.
! When playing back MP3 files recorded as VBR(variable bit rate) files, the bit rate value is notdisplayed even after switching to bit rate.(VBR will be displayed.)
! When playing back WMA files recorded asVBR (variable bit rate) files, the average bitrate value is displayed.
! There is no sound on fast forward or reverse.! When an MP3/WMA/AAC/WAV disc is in-
serted, folder name automatically begins toscroll in the display. When Ever Scroll is set toON at the initial setting, folder name scrollscontinuously. About Ever Scroll, refer toSwitching the Ever Scroll on page 87.
Selecting a track directly inthe current folderWhen using the remote control, you can selecta track directly by entering the desired tracknumber.
1 Press DIRECT.Track number input display appears.
2 Press 0–9 buttons to enter the desiredtrack number.# You can cancel the input number by pressingCLEAR.
3 Press DIRECT.The track of entered number will play.
Note
After entering the number input mode, if you donot perform an operation within about eight sec-onds, the mode is automatically canceled.
MP3/WMA/AAC/WAV Player
En 25
English
Section
06

Introduction of advancedbuilt-in CD player (MP3/WMA/AAC/WAV) operation
111
1 Function displayShows the function status.
1 Press MULTI-CONTROL to display themain menu.FUNCTION, AUDIO and ENTERTAINMENTappear on the display.
2 Use MULTI-CONTROL to selectFUNCTION.Turn to change the menu option; press to se-lect.The function name appears on the display.
3 Turn MULTI-CONTROL to select thefunction.TurnMULTI-CONTROL clockwise or counter-clockwise to switch between the functions inthe following order:Play mode (repeat play)—Random mode(random play)—Scan mode (scan play)—Pause (pause)—Search mode (search meth-od)—Jacket art (jacket art read)# To return to the playback display, press BAND.
Note
If you do not operate the function within about 30seconds, the display is automatically returned tothe playback display.
Repeating playFor MP3/WMA/AAC/WAV playback, there arethree repeat play ranges: Folder repeat (folderrepeat), Track repeat (one-track repeat) andDisc repeat (repeat all tracks).
1 Use MULTI-CONTROL to selectPlay mode in the function menu.Play mode appears in the display.
2 Press MULTI-CONTROL to select the re-peat range.PressMULTI-CONTROL repeatedly until thedesired repeat range appears in the display.
! Folder repeat – Repeat the current folder! Track repeat – Repeat just the current
track! Disc repeat – Repeat all tracks
Notes
! If you select another folder during repeat play,the repeat play range changes to Disc repeat.
! If you perform track search or fast forward/re-verse during Track repeat, the repeat playrange changes to Folder repeat.
! When Folder repeat is selected, it is not pos-sible to play back a subfolder of that folder.
Playing tracks in random orderRandom play lets you play back tracks in arandom order within the repeat range,Folder repeat and Disc repeat.
1 Select the repeat range.Refer to Repeating play on this page.
2 Use MULTI-CONTROL to selectRandom mode in the function menu.Random mode appears in the display.
MP3/WMA/AAC/WAV Player
En26
Section
06

3 Press MULTI-CONTROL to turn randomplay on.Tracks will play in a random order within thepreviously selected Folder repeat orDisc repeat ranges.# To turn random play off, pressMULTI-CONTROL again.
Scanning folders and tracksWhile you are using Folder repeat, the begin-ning of each track in the selected folder playsfor about 10 seconds. When you are usingDisc repeat, the beginning of the first track ofeach folder is played for about 10 seconds.
1 Select the repeat range.Refer to Repeating play on the previous page.
2 Use MULTI-CONTROL to selectScan mode in the function menu.Scan mode appears in the display.
3 Press MULTI-CONTROL to turn scan playon.The first 10 seconds of each track of the cur-rent folder (or the first track of each folder) isplayed.
4 When you find the desired track (orfolder) press MULTI-CONTROL to turn scanplay off.The track (or folder) will continue to play.# If the display has automatically returned tothe playback display, select Scan mode again byusingMULTI-CONTROL.
Note
After track or folder scanning is finished, normalplayback of the tracks will begin again.
Pausing MP3/WMA/AAC/WAV playbackPause lets you temporarily stop playback ofthe MP3/WMA/AAC/WAV.
1 Use MULTI-CONTROL to select Pause inthe function menu.Pause appears in the display.
2 Press MULTI-CONTROL to turn pauseon.Playback of the current track pauses.# To turn pause off, pressMULTI-CONTROLagain.
Selecting the search methodYou can switch the search method betweenfast forward/reverse and searching every 10tracks.
1 Use MULTI-CONTROL to selectSearch mode in the function menu.Search mode appears in the display.
2 Press MULTI-CONTROL to select thesearch method.PressMULTI-CONTROL until the desiredsearch method appears in the display.
! FF/REV – Fast forward and reverse! Rough search – Searching every 10
tracks
Searching every 10 tracks inthe current folderIf the current folder contains over 10 tracks,you can search every 10 tracks. When onefolder contains a lot of tracks, you can roughlysearch for the track you want to play.
MP3/WMA/AAC/WAV Player
En 27
English
Section
06

1 Select the search method Rough search.Refer to Selecting the search method on theprevious page.
2 Push and hold MULTI-CONTROL left orright to search every 10 tracks in the cur-rent folder.# If the current folder contains less than 10tracks, pushing and holdingMULTI-CONTROLright recalls the last track of the folder. Also, if theremaining number of tracks after searching every10 tracks is less than 10, pushing and holdingMULTI-CONTROL right recalls the last track ofthe folder.# If the current folder contains less than 10tracks, pushing and holdingMULTI-CONTROLleft recalls the first track of the folder. Also, if theremaining number of tracks after searching every10 tracks is less than 10, pushing and holdingMULTI-CONTROL left recalls the first track of thefolder.
Displaying text informationon MP3/WMA/AAC/WAV discText information recorded on an MP3/WMA/AAC/WAV disc can be displayed.
When playing back an MP3/WMA/AAC disc% Press DISPLAY.Press DISPLAY repeatedly to switch betweenthe following settings:
: folder name— : file name— : foldername and : file name— : artist name and
: album title— : artist name and : tracktitle— : comment and : file name—Sim-ple display# If specific information has not been recordedon an MP3/WMA/AAC disc, title or name is notdisplayed.
# Depending on the version of iTunes® used towrite MP3 files onto a disc, comment informationmay not be correctly displayed.# Depending on the version of Windows MediaPlayer used to encode WMA files, album namesand other text information may not be correctlydisplayed.
When playing back a WAV disc% Press DISPLAY.Press DISPLAY repeatedly to switch betweenthe following settings:
: folder name— : file name— : foldername and : file name—Simple display# If specific information has not been recordedon a WAV disc, name is not displayed.# You can only play back WAV files in the fre-quencies 16, 22.05, 24, 32, 44.1 and 48 kHz(LPCM), or 22.05 and 44.1 kHz (MS ADPCM). Thesampling frequency shown in the display may berounded.
Scrolling text informationin the displayThis unit can display the first 24 letters only offolder name, file name, track title, artist name,album title and comment. When the recordedinformation is longer than 24 letters, you canscroll the text to the left so that the rest of thetext information can be seen.! When the jacket art is turned off, this unit
can display the first 30 letters of text infor-mation.
% Press DISPLAY and hold until the textinformation begins to scroll through thedisplay.The text information scrolls.
MP3/WMA/AAC/WAV Player
En28
Section
06

Notes
! Unlike MP3, WMA and AAC file format, WAVfiles display only the folder name and the filename.
! When Ever Scroll is set to ON at the initial set-ting, text information scrolls continuously inthe display. Refer to Switching the Ever Scrollon page 87.
Selecting tracks from thefile name listFile name list lets you see the list of file names(or folder names) and select one of them toplayback.
1 Press LIST to select the file name listmode.Press LIST repeatedly to switch between thefollowing lists:Folder/file name list—jacket art list—playbackdisplay
2 Use MULTI-CONTROL to select the de-sired file name (or folder name).Turn to change the name of file or folder;press to play; push right to see a list of thefiles (or folders) in the selected folder.# You can also change the name of file or folderby pushingMULTI-CONTROL up or down.# To return to the previous list (the folder onelevel higher), pushMULTI-CONTROL left.# If the folder/file number is more than 100, last2-digit of the folder/file number is displayed.# Number of the folders/files in the currently se-lected folder will be indicated on the right side ofthe display.# If you do not operate the list within about 30seconds, the file name list mode is canceledautomatically.
Displaying jacket arts onCD-ROM discsIf jacket arts are recorded on CD-ROM disc,you can display them on this unit so you caneasily find a specific folder looking at the jack-et art.! Record jacket arts for folders on CD-ROM
in advance using your computer. For de-tails, please visit the following site:http://www.pioneer.co.jp/car/pclink4/index-e.html
! Jacket arts (max. 15 images) directly be-neath the ROOT folder can be read. Ifimages have been recorded on the lowertier than the ROOT folder, these images arenot displayed. In this case, preset imagesare displayed. Refer to About folders andMP3/WMA/AAC/WAV files on page 97.
Reading jacket artsWith this function on, jacket arts on CD-ROMdisc are automatically read in this unit whenthe disc is inserted.! Up to 15 jacket arts can be read in this unit.! Reading jacket arts can take approx. 40
seconds. If the disc is reloaded, this unitread jacket arts again from the beginning.
! Jacket arts are not displayed if MIXED-MODE CD or partial CD is inserted into thisunit.
! For other folders with no jacket arts re-corded, this unit automatically assigns pre-set images to them.
1 Use MULTI-CONTROL to selectJacket art in the function menu.Jacket art appears in the display.
2 Press MULTI-CONTROL to turn jacket artread on.# To turn jacket art function off, pressMULTI-CONTROL again.
MP3/WMA/AAC/WAV Player
En 29
English
Section
06

Selecting folders with jacket artsYou can display the list of folders that are al-ready assigned jacket arts and select one tostart playback.! In the jacket art list, this unit displays up to
15 folders with jacket arts.! For other folders with no jacket arts re-
corded, this unit automatically assigns pre-set images to them.
1 Press LIST to select the jacket art listmode.Press LIST repeatedly to switch between thefollowing lists:Folder/file name list—jacket art list—playbackdisplay
2 Push MULTI-CONTROL up or down tochange the group of jacket art.
3 Use MULTI-CONTROL to select jacket artof the desired folder.Turn to change the jacket art of folder; press toplay.# You can also change the jacket art of folder bypushingMULTI-CONTROL left or right.# If you do not operate the list within about 30seconds, the jacket art list mode is canceledautomatically.
MP3/WMA/AAC/WAV Player
En30
Section
06

Hands-free phoning withcellular phones featuringBluetooth wireless technology
5555111222 333 444
666777
If your cellular phone features Bluetooth wire-less technology, you can connect to this unitfor hands-free, wireless calls, even while driving.
Important
! Since this unit is on standby to connect withyour cellular phones via Bluetooth wirelesstechnology, using this unit without runningthe engine can result in battery drainage.
! When phone is selected as a source, no audioadjustments, except balance adjustment, arepossible.
1 Battery strength indicatorShows the battery strength of cellularphone.! Battery strength indicator may differ
from the actual battery strength.! If the battery strength is not available,
nothing is displayed in the batterystrength indicator area.
2 Signal level indicatorShows the signal strength of cellular phone.! Signal level indicator may differ from the
actual signal level.! Depending on the cellular phones featur-
ing Bluetooth wireless technology, radiofield intensity is not available. In this
case, the signal level indicator does notappear.
3 Automatic answering/Automatic reject-ing indicator
Shows AUTO when the automatic answer-ing function is on (for more details, refer toSetting the automatic answering on page47).Shows REF when the automatic rejectingfunction is on (for more details, refer to Set-ting the automatic rejecting on page 47).
4 Incoming call notice indicationShows when an incoming call has been re-ceived and not checked yet.
5 Device nameShows the device name of the cellularphone.
6 Calendar displayShows the date, and time.
7 User number indicatorShows the registration number of the cellu-lar phone.
Notes
! This unit’s phone call reception is on standbywhen ignition switch is set to ACC or ON.
! The line-of-sight distance between this unitand your cellular phone must be 10 meters orless for sending and receiving voice and datavia Bluetooth wireless technology. However,the transmission distance may become short-er than the estimated distance, depending onthe environment in use.
! In order to use Bluetooth wireless technology,devices must be able to interpret certain pro-files. This unit is compatible with the followingprofiles.— GAP (Generic Access Profile)— SDP (Service Discovery Protocol)
Bluetooth Telephone
En 31
English
Section
07

— OPP (Object Push Profile)— HSP (Head Set Profile)— HFP (Hands Free Profile)
! When phone is selected as a source, volumeand equalizer curve are automatically chan-ged to suitable settings for the phone source.When the source is returned to anothersource, volume and equalizer settings auto-matically return to the original setting.
About the telephone sourceStandby modeOnce connected via Bluetooth wireless tech-nology, this unit will remain on telephonesource standby in the background all thewhile the connection is sustained. This meansyou can freely use the other functions of thisunit, but still be ready to receive a call.
% Press SOURCE to select the telephone.Press SOURCE until you see Telephone dis-played.# You can also select the Telephone by press-ing PHONE.
Setting up for hands-freephoningBefore you can use the hands-free phoningfunction you will need to set up the unit foruse with your cellular phone. This entails es-tablishing a Bluetooth wireless connection be-tween this unit and your phone, registeringyour phone with this unit, and adjusting thevolume level.
1 ConnectionFor detailed instructions on connecting yourphone to this unit via Bluetooth wireless tech-
nology, refer to Connecting a cellular phone onpage 35.# Your phone should now be temporarily con-nected; however, to make best use of the technol-ogy, we recommend you register the phone tothis unit.
2 RegistrationRefer to Registering connected cellular phoneon page 37 for instructions on how to registeryour temporarily connected phone.
3 Volume adjustmentAdjust the earpiece volume on your cellularphone for comfort. When adjusted, the volumelevel is memorized in this unit as the defaultsetting.# Caller’s voice volume and ring volume mayvary depending on the type of cellular phones.# If the difference between the ring volume andcaller’s voice volume is big, overall volume levelmay become unstable.# Before disconnecting cellular phone from thisunit, make sure to adjust the volume to properlevel. If the volume has been muted (zero level)on your cellular phone, the volume level of yourcellular phone remains muted even after the cel-lular phone is disconnected from this unit.
Bluetooth Telephone
En32
Section
07

Basic operation of hands-free phoningThese are the basic operations to use hands-free phoning via Bluetooth wireless technol-ogy. More advanced hands-free phoning op-erations are explained starting on Introductionof advanced hands-free phoning operation onpage 35.
Making a phone callDial a numberThe most basic way to make a call is to simplydial the number.
1 Press DIRECT on the remote control anddial a phone number by pressing 0–9.
2 Press JOYSTICK on the remote controlto confirm the number.
3 Press OFF HOOK on the remote controlto call the number.# You can also dial a phone number in the func-tion menu.Refer toMaking a call by entering phone numberon page 45 for detailed instructions.
Calling a number in the Phone Bookor the Call HistoryRefer to Calling a number in the Phone Bookon page 40 and Calling a number from the CallHistory on page 45 for detailed instructions.
Preset numberNumbers that you dial frequently can be as-signed to presets for quick recall.Refer to Using preset numbers on page 43 forhow to assign a number to a preset.
1 Push MULTI-CONTROL up or down toselect a preset number.Preset numbers Dial preset 1–10 appear inthe display.# You can also recall preset numbersDial preset 1–10 by pressing 0–9 on the remotecontrol.# If the number is already in the Phone Bookthen the name is also displayed.# No data is displayed for preset numbers thathave not been assigned.
2 Press MULTI-CONTROL to make a call.# You can also perform this operation by press-ing OFF HOOK on the remote control.
Voice recognitionIf your cellular phone features voice recogni-tion technology, you can make a call by voicecommands.! Operation varies depending on the type of
your cellular phone. Refer to the instructionmanual that came with your cellular phonefor detailed instructions.
! This function can be operated only whenthe connection is established with HFP(Hands Free Profile).
1 Press BAND and hold until Voice dialappears in the display.Voice dial appears in the display. WhenVoice dial ON is displayed, voice recognitionfunction is now ready.# If your cellular phone does not feature voicerecognition function, No voice dial appears inthe display and opearation is not available.
2 Pronounce the name of your contact.For more details concerning the voice recogni-tion operation, refer to your cellular phone’sinstruction manual.
Bluetooth Telephone
En 33
English
Section
07

Taking a phone callAnswering an incoming callEven when a source other than Telephone isselected or when this unit itself is turned off,you can still answer incoming calls. If you setthis unit to automatically answering incomingcalls, refer to Setting the automatic answeringon page 47.
1 When a call comes in, pressMULTI-CONTROL.# You can also perform this operation by press-ing OFF HOOK on the remote control.# If the private mode is selected on the cellularphone, hands-free phoning may not be per-formed.
2 To end the call, press PHONE.The estimated call time appears in the display(this may differ slightly from the actual calltime).# You can also perform this operation by press-ing ON HOOK on the remote control.# You may hear a noise when you disconnectthe phone.
Rejecting an incoming callYou can reject an incoming call. If you want toset this unit to automatically rejecting all in-coming calls, refer to Setting the automatic re-jecting on page 47.
% When a call comes in, press PHONE.The call is rejected.# You can also perform this operation by press-ing ON HOOK on the remote control.# The rejected call is recorded in missed callhistory list. About the missed call history list,refer to Using the Call History on page 44.
Answering a call waitingIf while you are talking on the phone anothercall comes in, the number (or name if it is inyour phone book) of the new caller appears inthe display to signal that you have a call wait-ing. You can put the first caller on hold whileyou answer the call waiting, or you can chooseto reject the call, in which case the number islogged as a missed call.
1 Press MULTI-CONTROL to answer a callwaiting.# You can also perform this operation by press-ing OFF HOOK on the remote control.# PressingMULTI-CONTROL switches betweencallers on hold.
2 Press PHONE to end all calls.Pressing PHONE ends all calls including a callwaiting on line.# You can also perform this operation by press-ing ON HOOK on the remote control.# Except for switching between the calls on line,you cannot end each call waiting individually.Pressing PHONE ends all calls.
Rejecting a call waitingIf you would rather not interrupt your currentcall to answer a call waiting, you can reject itand have the number added to the missed callhistory list.! With some cellular phones, this feature
may not be possible.
% Press PHONE to reject a call waiting.# You can also perform this operation by press-ing ON HOOK on the remote control.
Bluetooth Telephone
En34
Section
07

Introduction of advancedhands-free phoning operation
111
1 Function displayShows the function status.
1 Press MULTI-CONTROL to display themain menu.FUNCTION, AUDIO and ENTERTAINMENTappear on the display.
2 Use MULTI-CONTROL to selectFUNCTION.Turn to change the menu option; press to se-lect.Function names for hands-free phoning ap-pear on the display.
3 Turn MULTI-CONTROL to change func-tions.TurnMULTI-CONTROL clockwise or counter-clockwise to switch between the functions.Function names that appear in the display aredifferent depending on your cellular phone’sconnection and registration status.If not connected yetSearch & connect (search and connect)—Connection open (connection open)—Connect phone (connect phone)—Delete phone (delete phone)—Phone book transfer (phone book transfer)—Refuse calls (automatic reject setting)—Auto answer (automatic answer setting)—Ring tone (ring tone select)—Auto connect(automatic connection setting)—Echo cancel(echo cancel)—Device INFO. (device informa-tion)
If connected but not registered yetDisconnect phone (disconnect phone)—Set phone (registering phone)—Delete phone (delete phone)—Phone book transfer (phone book transfer)—Number dial (call by entering number)—Refuse calls (automatic reject setting)—Auto answer (automatic answer setting)—Ring tone (ring tone select)—Auto connect(automatic connection setting)—Echo cancel(echo cancel)—Device INFO. (device informa-tion)If already connected and registeredDisconnect phone (disconnect phone)—Delete phone (delete phone)—Phone book transfer (phone book transfer)—Phone book name view (phone book nameview)—Clear memory (clear memory)—Number dial (call by entering number)—Refuse calls (automatic reject setting)—Auto answer (automatic answer setting)—Ring tone (ring tone select)—Auto connect(automatic connection setting)—Echo cancel(echo cancel)—Telephone icon (telephoneicon)—Device INFO. (device information)# Phone book name view andTelephone icon cannot be selected for cellularphone registered guest phone.# If cellular phone is connected to this unit viaBluetooth wireless technology with HSP (HeadSet Profile), Phone book name view,Clear memory, Number dial and Refuse callscannot be selected.# To return to the playback display, pressBAND.
Connecting a cellular phoneTo use a phone wirelessly with this unit, it isnecessary first to establish a connection usingBluetooth wireless technology. There are sev-eral ways you can do this.
Bluetooth Telephone
En 35
English
Section
07
! Connection is normally established by HFP,which gives you a full control of functionsavailable on the telephone source. How-ever, in some cases when you make con-nection from your cellular phone, theconnection may be made by HSP and sev-eral functions may not be available.
! A phone may be connected via Bluetoothwireless technology but not yet registeredwith this unit. In this case it is said to betemporarily connected, and the availablefeatures are limited. To take full advantageof all the features available, we recommendyou register your phone with this unit.Refer to Registering connected cellularphone on the next page for more on this.
Searching for available cellularphonesYou can have this unit search for any availablephones in the area that have Bluetooth wire-less technology, then select which you want toconnect to from a list displayed on-screen.
1 Use MULTI-CONTROL to selectSearch & connect in the function menu.Search & connect appears in the display.
2 Press MULTI-CONTROL to search foravailable cellular phones.While searching, Searching is displayed.When available cellular phones featuringBluetooth wireless technology are found, de-vice names or Name not found (if namescannot be obtained) are displayed.# If this unit fails to find any available cellularphones, Not found is displayed.
3 Push MULTI-CONTROL up or down toselect a device name you want to connect.
4 Press MULTI-CONTROL to connect theselected cellular phone.While connecting, Connecting is displayed.To complete the connection, please check thedevice name (Pioneer BTunit) and enter thelink code on your cellular phone. If the con-nection is established, Connected is dis-played.# The link code is set to 0000 as default. Youcan change this code in the initial setting. Referto Entering PIN code for Bluetooth wireless con-nection on page 88.
Using a cellular phone toinitiate a connectionPutting the unit in Connection open mode al-lows you to establish a Bluetooth wireless con-nection from your phone. You may need torefer to the operation manual that came withyour phone if you are unsure how to initiate aconnection from your phone.
1 Use MULTI-CONTROL to selectConnection open in the function menu.Connection open appears in the display.
2 Press MULTI-CONTROL to open the con-nection.Always waiting is displayed and the unit isnow on standby for connection from cellularphone.
3 Use cellular phone to connect to thisunit.# Operation varies depending on the type ofyour cellular phone. Refer to the instruction man-ual that came with your cellular phone for de-tailed instructions.# You may need to enter the link code on yourcellular phone to complete the connection.
Bluetooth Telephone
En36
Section
07

# The link code is set to 0000 as default. Youcan change this code in the initial setting. Referto Entering PIN code for Bluetooth wireless con-nection on page 88.
Disconnecting a cellular phoneWhen you are done using your phone with thisunit, you can close the Bluetooth wireless con-nection.
1 Use MULTI-CONTROL to selectDisconnect phone in the function menu.Disconnect phone, and device name of theconnected phone appear in the display.
2 Press MULTI-CONTROL to disconnect acellular phone from this unit.After the disconnection is completed,Disconnected is displayed.
Registering connectedcellular phoneYou can register a phone that is temporarilyconnected to this unit in order to take full ad-vantage of the features available with Blue-tooth wireless technology. A total of fivephones can be registered: three user cellularphones and two guest phones. When regis-tered as a user phone, all the possible func-tions are available for use. When registered asa guest phone, some functions are limited.
1 Use MULTI-CONTROL to selectSet phone in the function menu.Set phone appears in the display.
2 Push MULTI-CONTROL up or down toselect a registration assignment.Each timeMULTI-CONTROL is pushed up ordown, the registration assignment is switchedin the following order:Phone1 (user phone 1)—Phone2 (user phone2)—Phone3 (user phone 3)—Guest1 (guestphone 1)—Guest2 (guest phone 2)# As you select each assignment, you can seewhether or not a phone is already registeredthere. If the assignment is empty, No data is dis-played. If the assignment is already taken, the de-vice name appears. If you want to replace anassignment with a new phone, first delete thecurrent assignment. For more detailed instruc-tions, see Deleting a registered phone on thispage.# If you need to know the BD (Bluetooth Device)address of the phone, pushMULTI-CONTROL lefthere.
3 Press MULTI-CONTROL to register thecellular phone to this unit.When the registration is completed,Reg. completed is displayed.
Deleting a registered phoneIf you no longer need to use a registeredphone with this unit, you can delete it from theregistration assignment for another phone.! If a registered phone is deleted from this
unit, the Phone Book and other settings ofthat phone are cleared simultaneously.
1 Use MULTI-CONTROL to selectDelete phone in the function menu.Delete phone appears in the display.
Bluetooth Telephone
En 37
English
Section
07

2 Push MULTI-CONTROL up or down toselect a registration assignment.Each timeMULTI-CONTROL is pushed up ordown, the registration assignment is switchedin the following order:Phone1 (user phone 1)—Phone2 (user phone2)—Phone3 (user phone 3)—Guest1 (guestphone 1)—Guest2 (guest phone 2)# If the assignment is empty, No data is dis-played and the operation is not possible.# If you need to know the BD (Bluetooth Device)address of the phone, pushMULTI-CONTROL lefthere.
3 Push MULTI-CONTROL right to selectDelete YES.Delete YES is displayed. Deleting phone isnow on standby.
4 Press MULTI-CONTROL to delete thephone.After the phone is deleted, Deleted is dis-played.
Connecting to a registeredcellular phoneOnce your phone is registered with this unit itis a simple matter to establish a Bluetoothwireless connection, either manually by select-ing a registration assignment, or automaticallywhen a registered phone is within range.
Connecting to a registeredphone manuallySelect a phone from the registration assign-ments to connect to the phone manually.
1 Use MULTI-CONTROL to selectConnect phone in the function menu.Connect phone appears in the display.
2 Push MULTI-CONTROL up or down toselect a registration assignment.Each timeMULTI-CONTROL is pushed up ordown, the registration assignment is switchedin the following order:Phone1 (user phone 1)—Phone2 (user phone2)—Phone3 (user phone 3)—Guest1 (guestphone 1)—Guest2 (guest phone 2)# If the assignment is empty, No data is dis-played and the operation is not possible.# If you need to know the BD (Bluetooth Device)address of the phone, pushMULTI-CONTROL lefthere.
3 Press MULTI-CONTROL to connect theselected cellular phone.While connecting, Connecting is displayed.After the connection is completed, Connectedis displayed.
Connecting to a registeredphone automaticallyWhen Automatic Connection is active the unitwill automatically establish a connection witha registered phone when it comes into range.! This feature may not work with all phones.
If your registered phone fails to connectwith Automatic Connection, use the man-ual connection method explained in Con-necting to a registered phone manually onthis page.
! This feature is not possible if you are play-ing back songs on your Bluetooth audioplayer via Bluetooth wireless technology. Insuch case, stop the playback and switch toanother source for your cellular phone toconnect to this unit through this function.
! While you are operating in the functionmenu of Telephone source or BTAudiosource, this unit does not initiate an auto-matic connection to your registered phone.
! This feature cannot be set for each differentuser phone.
Bluetooth Telephone
En38
Section
07
1 Use MULTI-CONTROL to selectAuto connect in the function menu.Auto connect appears in the display.
2 Press MULTI-CONTROL to turn auto-matic connection on.ON appears in the display.If your cellular phone is set ready for Bluetoothwireless connection, the connection to thisunit will be automatically established.# To turn automatic connection off, pressMULTI-CONTROL again.
Note
Automatic connection is performed in the regis-tration number order.
Using the Phone BookThe Phone Book can store up to 500 namesand numbers. Use the Phone Book to browsefor numbers on the unit’s display and selectnumbers to call. Names and phone numbersstored in a registered user phone’s addressbook can be transferred to the Phone Book, al-lowing you to fill the Phone Book quickly andeasily with your contacts.
Transferring entries to thePhone BookThis function is available only for cellularphones registered to this unit as user. Phonebooks from guest phones cannot be transferredto this unit.To populate the Phone Book you can transferthe numbers in a registered user phone’s ad-dress book.The Phone Book can hold a total of 500 en-tries; 300 from User 1, 150 from User 2, and 50from User 3.
! With some cellular phones, it may not bepossible to transfer whole phone book at atime. In this case, transfer phone book en-tries one by one from your phone by usingyour cellular phone.
! Depending on the cellular phone con-nected via Bluetooth wireless technology,this unit cannot display the Phone Bookcorrectly. (Some characters may begarbled.)
! If the phone book in the cellular phone con-tains image data, phone book may not becorrectly transferred.
1 Use MULTI-CONTROL to selectPhone book transfer in the function menu.Phone book transfer appears in the display.
2 Press MULTI-CONTROL to enter in thephone book transfer standby mode.Transfer appears in the display.# With Telephone source selected, you canalso display the phone book transfer standbymode by pressing and holding PHONE.
3 Use cellular phone to perform phonebook transfer.Perform phone book transfer using the cellu-lar phone. For detailed instruction on this,refer to the instruction manual that came withyour cellular phone.# While transferring the phone book, hourglassicon is displayed.# The display indicates how many entries havebeen transferred and the total number to betransferred.
4 Data transferred is displayed andphone book transfer is completed.
Bluetooth Telephone
En 39
English
Section
07

Changing the Phone Bookdisplay orderYou can choose to display the Phone Booksorted alphabetically by first name or lastname.! With some cellular phones, this feature
may not be possible.
1 Use MULTI-CONTROL to selectPhone book name view in the functionmenu.Phone book name view appears in the dis-play.
2 Press MULTI-CONTROL to change thename view order.Inverted is displayed and the name vieworder is changed.Pressing MULTI-CONTROL repeatedlychanges the name view order between firstname and last name.
Calling a number in the PhoneBookAfter finding the number in the Phone Bookyou want to call, you can select the entry andmake the call.
1 Press LIST to display the Phone Book.
2 Push MULTI-CONTROL left or right toselect the first letter of the name you arelooking for.Each timeMULTI-CONTROL is pushed left orright alphabetical letters are changed.# TurningMULTI-CONTROL clockwise or coun-terclockwise can also perform the same opera-tion.
3 Press MULTI-CONTROL to display en-tries.The display shows the first three Phone Bookentries starting with that letter (e.g. “Ben”,“Brian” and “Burt” when “B” is selected).# If you want to go back and select another al-phabetical letter, pushMULTI-CONTROL left.
4 Push MULTI-CONTROL up or down toselect a Phone Book entry you want to call.Pushing MULTI-CONTROL up or downchanges Phone Book entries.
5 Push MULTI-CONTROL right to displaythe detailed list of the selected entry.The phone number, name and genre (if as-signed) of entries are displayed in the detailedlist.# You can scroll the name and phone numberby holding DISPLAY.# If several phone numbers are entered to anentry, select one by turningMULTI-CONTROL.# If you want to go back and select anotherentry, pushMULTI-CONTROL left.
6 Press MULTI-CONTROL to make a call.
7 To end the call, press PHONE.The estimated call time appears in the display(this may differ slightly from the actual calltime).
Assign genres to phone numbersIf there are a lot of entries in the Phone Book itcan be useful to assign them to specific gen-res (categories) for easier searching. There arefour preset genres that you can assign entriesto: Home, Mobile, Office and Others.
1 Press LIST to display the Phone Book.
Bluetooth Telephone
En40
Section
07

2 Use MULTI-CONTROL to display the de-tailed list of your desired Phone Bookentry.See step 2 to 5 on Calling a number in thePhone Book on the previous page for how todo this.
3 Press and hold MULTI-CONTROL to dis-play the genre input screen.Edit genre is displayed.
4 Push MULTI-CONTROL up or down toselect a genre.Each timeMULTI-CONTROL is pushed up ordown, the genres are switched in the followingorder:Home (home)—Mobile (mobile)—Office (of-fice)—Others (others)
5 Press MULTI-CONTROL to assign thegenre to the phone number.The selected genre is assigned to the phonenumber, and the display reverts to the detailedlist.
Editing the name of a PhoneBook entryYou can edit the names of Phone Book entries.Each name can be up to 40 characters long.
1 Press LIST to display the Phone Book.
2 Use MULTI-CONTROL to display the de-tailed list of your desired Phone Bookentry.See step 2 to 5 on Calling a number in thePhone Book on the previous page for how todo this.
3 Press and hold MULTI-CONTROL to dis-play the genre input screen.Edit genre is displayed.
4 Turn MULTI-CONTROL clockwise orcounterclockwise to switch to the nameinput screen.Turning MULTI-CONTROL switches inputscreens in the following order:Edit genre (genre input screen)—Edit name(name input screen)—Edit number (numberinput screen)—Edit icon (icon selectionscreen)—Clear memory (clear memoryscreen)
5 Press DISPLAY to select the desiredcharacter type.Each press of DISPLAY switches the charactertypes in the following order:Alphabet (upper case), numbers and symbols—alphabet (lower case)—numbers and sym-bols—European characters, such as thosewith accents (e.g., á, à, ä, ç) or Russian char-acters# Pressing and holding DISPLAY enables you toswitch character set between ISO8859-1 (Eur-opean characters) and ISO8859-5 (Russian char-acters) alternately.# European characters and Russian characterscan’t be mixed.
6 Push MULTI-CONTROL up or down toselect a letter.# To delete a character and leave a space, select“_” (underbar).
7 Push MULTI-CONTROL right to movethe cursor to the next character position.When the letter you want is displayed, pushMULTI-CONTROL right to move the cursor tothe next position and then select the next let-ter. PushMULTI-CONTROL left to move back-wards in the display.
8 Press MULTI-CONTROL to store the newname.After the name is stored, the display reverts tothe Phone Book entry list.
Bluetooth Telephone
En 41
English
Section
07
Editing phone numbersYou can edit the phone numbers of PhoneBook entries.
1 Press LIST to display the Phone Book.
2 Use MULTI-CONTROL to display the de-tailed list of your desired Phone Bookentry.See step 2 to 5 on Calling a number in thePhone Book on page 40 for how to do this.
3 Press and hold MULTI-CONTROL to dis-play the genre input screen.Edit genre is displayed.
4 Turn MULTI-CONTROL clockwise orcounterclockwise to switch to the numberinput screen.Turning MULTI-CONTROL switches inputscreens in the following order:Edit genre (genre input screen)—Edit name(name input screen)—Edit number (numberinput screen)—Edit icon (icon selectionscreen)—Clear memory (clear memoryscreen)
5 Push MULTI-CONTROL left or right tomove the cursor to the number you wantto change.
6 Push MULTI-CONTROL up or down tochange numbers.Repeat these steps until you have finishedchanging.
7 Press MULTI-CONTROL to store the newnumber.After the number is stored, the display revertsto the detailed list.
Selecting the icon of a PhoneBook entryYou can select the icon of Phone Book entries.When you make a call or answer an incomingcall, that icon is displayed.
1 Press LIST to display the Phone Book.
2 Use MULTI-CONTROL to display the de-tailed list of your desired Phone Bookentry.See step 2 to 5 on Calling a number in thePhone Book on page 40 for how to do this.
3 Press and hold MULTI-CONTROL to dis-play the genre input screen.Edit genre is displayed.
4 Turn MULTI-CONTROL clockwise orcounterclockwise to switch to the icon se-lection screen.Turning MULTI-CONTROL switches inputscreens in the following order:Edit genre (genre input screen)—Edit name(name input screen)—Edit number (numberinput screen)—Edit icon (icon selectionscreen)—Clear memory (clear memoryscreen)
5 Push MULTI-CONTROL left or right toselect an icon.Each timeMULTI-CONTROL is pushed left orright, the icons are switched in the followingorder:icon 1 (icon 1)—icon 2 (icon 2)—icon 3 (icon3)—icon 4 (icon 4)—icon 5 (icon 5)
6 Press MULTI-CONTROL to assign theicon to the Phone Book entry.The selected icon is assigned to the PhoneBook entry, and the display reverts to the de-tailed list.
Bluetooth Telephone
En42
Section
07

Note
You can rewrite icons of Phone Book entries.(Refer to Rewriting the entertainment displays andthe icons for telephone functions on page 92.)
Clearing a Phone Book entryYou can delete Phone Book entries in thePhone Book one by one.To clear all of your entries in the Phone Book,refer to Clearing memory on this page.
1 Press LIST to display the Phone Book.
2 Use MULTI-CONTROL to display the de-tailed list of your desired Phone Bookentry.See step 2 to 5 on Calling a number in thePhone Book on page 40 for how to do this.
3 Press and hold MULTI-CONTROL to dis-play the genre input screen.Edit genre is displayed.
4 Turn MULTI-CONTROL clockwise orcounterclockwise to switch to the clearmemory screen.Turning MULTI-CONTROL switches inputscreens in the following order:Edit genre (genre input screen)—Edit name(name input screen)—Edit number (numberinput screen)—Edit icon (icon selectionscreen)—Clear memory (clear memoryscreen)
5 Push MULTI-CONTROL right to show aconfirmation display.Clear memory YES is displayed.# If you do not want to clear memory that youhave selected, pushMULTI-CONTROL left. Thedisplay reverts.
6 Press MULTI-CONTROL to delete thePhone Book entry.Cleared is displayed.The Phone Book entry is deleted. The displayreturns to Phone Book entry list.
Using preset numbersAssigning preset numbersYou can assign up to ten frequently calledphone numbers to number presets(Dial preset 1–10).! To call the number you assigned to preset,
refer to Preset number on page 33.
1 Press LIST to display the Phone Book.
2 Use MULTI-CONTROL to display the de-tailed list of your desired Phone Bookentry.See step 2 to 5 on Calling a number in thePhone Book on page 40 for how to do this.
3 Press and hold one of 0–9 on the re-mote control to store the selected phonenumber in that preset.Press 1 to store in Dial preset 1; 4 to store inDial preset 4, etc. Press 0 to store in presetDial preset 10. Hold the button down untilyou hear a beep.# Up to 50 phone numbers (10 phone numbersfor each of the three registered phones and twoguest phones) can be stored in memory.
Clearing memoryYou can clear memory of each item; PhoneBook, dialed/received/missed call history listand preset phone number.
Bluetooth Telephone
En 43
English
Section
07
1 Use MULTI-CONTROL to selectClear memory in the function menu.Clear memory appears in the display.
2 Push MULTI-CONTROL up or down toselect an item.Each timeMULTI-CONTROL is pushed up ordown, the items are switched in the followingorder:Phone book (phone book)—Missed calls(missed call history)—Dialled calls (dialledcall history)—Received calls (received call his-tory)—Preset memory (preset phone num-bers)—All clear (delete all memory)# If you select All clear, all memory regardlessof items will be cleared.# If guest phone is connected to this unit viaBluetooth wireless technology, Phone book can-not be selected.
3 Push MULTI-CONTROL right to deter-mine the item that you want to deletefrom this unit.Clear memory YES is displayed. Clearingmemory is now on standby.# If you do not want to clear memory that youhave selected, pushMULTI-CONTROL left. Thedisplay reverts.
4 Press MULTI-CONTROL to clear thememory.Cleared is displayed and data on the selecteditem is cleared from this unit’s memory.
Using the Call HistoryThe ten most recent calls made (dialed), re-ceived and missed, together with their timesand dates, are stored in the Call History. Youcan browse the Call History and call numbersfrom it.
Displaying the Call HistoryThe Call History is divided into three groups:Missed calls, Dialed calls, and Received calls.You can see the time and date of the call, aswell as the number (and name if the numberis in the Phone Book).
1 Press LIST to display the list.Press LIST repeatedly to switch between thefollowing lists:PHONE BOOK (phone book)—MISSED(missed call)—DIALLED (dialled call)—RECEIVED (received call)# About the Phone Book list, refer to Using thePhone Book on page 39.# If no phone numbers have been stored in theselected list, No Data is displayed.
2 Turn MULTI-CONTROL to select a phonenumber.Turning MULTI-CONTROL clockwise or coun-terclockwise to change the phone numbersstored in the list.# If the number is already in the Phone Bookthe name is displayed.# You can also change the phone number bypushingMULTI-CONTROL up or down.
3 Push MULTI-CONTROL right to displaythe detailed list.Calling time and date, and phone number aredisplayed in the detailed list.# If the number is already in the Phone Bookthen the name is also displayed.# TurningMULTI-CONTROL clockwise or coun-terclockwise switches to the previous or nextphone number diplayed in the detailed list.# If you do not operate anything within about 30seconds, the list display is canceled automati-cally.
Bluetooth Telephone
En44
Section
07

Calling a number from the CallHistory1 Display the list and select a phone num-ber.Display the phone number you want to make acall.
2 Push MULTI-CONTROL right to displaythe detailed list.Calling time and date, and phone number aredisplayed in the detailed list.# If the number is already in the Phone Bookthen the name is also displayed.
3 Press MULTI-CONTROL to make a call.
4 To end the call, press PHONE.The estimated call time appears in the display(this may differ slightly from the actual calltime).
Calling an international numberfrom the Call HistoryWhen calling an international number storedin the Call History, proceed the country codewith a +.
1 With the detailed list displayed, pressMULTI-CONTROL and hold to add +.Pressing and holdingMULTI-CONTROL adds+ to the phone number.# + can only be added when the detailed list ofMissed call, Dialled call or Received call is se-lected.# Pressing and holdingMULTI-CONTROL againdeletes +.
2 Press MULTI-CONTROL to make a call.
3 To end the call, press PHONE.
Assigning preset numbersYou can assign up to ten frequently calledphone numbers to number presets(Dial preset 1–10).
1 Display the list and select a phone num-ber.Display the phone number you want to storein memory.
2 Push MULTI-CONTROL right to displaythe detailed list.Calling time and date, and phone number aredisplayed in the detailed list.
3 Press and hold one of 0–9 on the re-mote control to store the selected phonenumber in that preset.The selected phone number has been storedin memory. The next time you press the samepreset button, the phone number is recalledfrom memory.# Up to 50 phone numbers (10 phone numbersfor each of the three registered phones and twoguest phones) can be stored in memory.
Making a call by enteringphone numberYou can make a call by directly entering phonenumbers on this unit.
1 Use MULTI-CONTROL to selectNumber dial in the function menu.Number dial appears in the display.# You can also enter in this menu from thestandby display by pressing DIRECT on the re-mote control.
Bluetooth Telephone
En 45
English
Section
07

2 Push MULTI-CONTROL up or down toselect a number.Pushing MULTI-CONTROL up repeatedlychanges numbers in 0 1 2 ... 9 + # * _ order.Pushing it down changes in _ * # + 9 ... 2 1 0order.# You can also input numbers by pressing 0–9on the remote control.
3 Push MULTI-CONTROL right to movethe cursor to the next position.When the number you want is displayed, pushMULTI-CONTROL right to move the cursor tothe next position and then select the nextnumber. Push MULTI-CONTROL left to movebackwards in the display.# Up to 24 digits can be entered.
4 If you have completed entering thenumber, press MULTI-CONTROL.Call confirmation appears.
5 Press MULTI-CONTROL again to make acall.While dialing, Dialing appears in the display.
6 To end the call, press PHONE.The estimated call time appears in the display(this may differ slightly from the actual calltime).
Echo canceling and noisereductionWhen you are operating hands-free phoningin the vehicle, you may hear undesired echo.This function reduces the echo and noise andkeeps a certain sound quality.! This feature cannot be set for each different
user phone.
1 Use MULTI-CONTROL to selectEcho cancel in the function menu.Echo cancel appears in the display.
2 Press MULTI-CONTROL to turn echo can-celing on.ON appears in the display.# To turn echo canceling off, pressMULTI-CONTROL again.
Changing the ring toneThe unit offers you to turn the ring tone for in-coming calls on or off.! The ring tone you select for this unit has no
effect on the ring tone used by your phone.If you do not want your phone and this unitto ring at the same time, we recommendyou turn the ring tone of one or the otheroff.
1 Use MULTI-CONTROL to selectRing tone in the function menu.Ring tone appears in the display.
2 Push MULTI-CONTROL left or right toselect a ring tone.Each timeMULTI-CONTROL is pushed left orright, the ring tone is selected in the followingorder:OFF (ring tone off)—Ring tone1 (ring tone 1)—Ring tone2 (ring tone 2)—Ring tone3 (ringtone 3)
Note
Ring tone3 differs depending on the situation ofthe source (on or off).
Bluetooth Telephone
En46
Section
07

Setting the automaticrejectingIf this function is on, this unit automatically re-jects all incoming calls.! This feature cannot be set for each different
user phone.
1 Use MULTI-CONTROL to selectRefuse calls in the function menu.Refuse calls appears in the display.
2 Press MULTI-CONTROL to turn auto-matic call rejection on.ON appears in the display.# To turn automatic call rejection off, pressMULTI-CONTROL again.
Setting the automaticansweringIf this function is on, this unit automaticallyanswers all incoming calls.! This feature cannot be set for each different
user phone.
1 Use MULTI-CONTROL to selectAuto answer in the function menu.Auto answer appears in the display.
2 Press MULTI-CONTROL to turn auto-matic answering on.ON appears in the display.# To turn automatic answering function off,pressMULTI-CONTROL again.
Note
If both the automatic reject and automatic an-swer functions are set to ON, the automatic rejectis prioritized and all incoming calls are automati-cally rejected.
Selecting the icon for userphoneYou can select one of icons to be displayed fortelephone source.A different icon can be assigned for each dif-ferent user phone.
1 Use MULTI-CONTROL to selectTelephone icon in the function menu.Telephone icon appears in the display.
2 Push MULTI-CONTROL left or right toselect an icon.Each timeMULTI-CONTROL is pushed left orright, the icons are switched in the followingorder:icon 1 (icon 1)—icon 2 (icon 2)—icon 3 (icon3)—icon 4 (icon 4)—icon 5 (icon 5)
3 Press MULTI-CONTROL to assign theicon to the user phone.The selected icon is assigned to the userphone.
Note
You can rewrite icons for user phones. (Refer toRewriting the entertainment displays and theicons for telephone functions on page 92.)
Displaying BD (BluetoothDevice) addressEach device featuring Bluetooth wireless tech-nology is allocated a unique 48-bit device ad-dress. Each device address consists of a 12-digit of hexadecimal string.You can display the BD address of your cellu-lar phone and this unit.
Bluetooth Telephone
En 47
English
Section
07

Displaying BD address of yourcellular phone1 Use MULTI-CONTROL to selectDelete phone in the function menu.Delete phone appears in the display.
2 Push MULTI-CONTROL up or down toselect a registration assignment.Each timeMULTI-CONTROL is pushed up ordown, the registration assignment is switchedin the following order:Phone1 (user phone 1)—Phone2 (user phone2)—Phone3 (user phone 3)—Guest1 (guestphone 1)—Guest2 (guest phone 2)# If the assignment is empty, No data is dis-played and the operation is not possible.
3 Push MULTI-CONTROL left to switch tothe BD address.12-digit hexadecimal string is displayed.# PushingMULTI-CONTROL right returns to thedevice name.
4 Press BAND to return to the standbydisplay.
Displaying BD address of this unit1 Use MULTI-CONTROL to selectDevice INFO. in the function menu.The device name (Pioneer BTunit) of this unitappears in the display.
2 Push MULTI-CONTROL left to switch tothe BD address.12-digit hexadecimal string is displayed.# PushingMULTI-CONTROL right returns to thedevice name.
Note
When you pushMULTI-CONTROL down whilethe BD address (or the device name) of this unitis displayed, the system version of this unit ap-
pears. About the system version, refer to Display-ing system version for repair on this page.
Displaying system versionfor repairShould this unit fails to operate properly andyou consult with dealer for repair, you may beasked to indicate the system versions of thisunit and of Bluetooth module. You can displaythe versions and confirm them.
1 Use MULTI-CONTROL to selectDevice INFO. in the function menu.The device name (Pioneer BTunit) of this unitappears in the display.
2 Push MULTI-CONTROL down to switchto the system version of this unit.The system (microprocessor) version of thisunit is displayed.# PushingMULTI-CONTROL left displays theversion of the Bluetooth module of this unit.PushingMULTI-CONTROL right returns to thesystem version of this unit.
Bluetooth Telephone
En48
Section
07
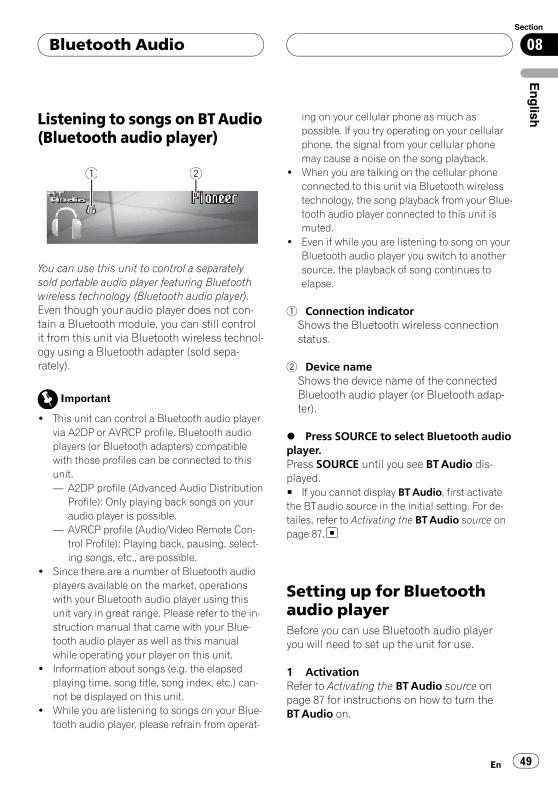
Listening to songs on BTAudio(Bluetooth audio player)
111 222
You can use this unit to control a separatelysold portable audio player featuring Bluetoothwireless technology (Bluetooth audio player).Even though your audio player does not con-tain a Bluetooth module, you can still controlit from this unit via Bluetooth wireless technol-ogy using a Bluetooth adapter (sold sepa-rately).
Important
! This unit can control a Bluetooth audio playervia A2DP or AVRCP profile. Bluetooth audioplayers (or Bluetooth adapters) compatiblewith those profiles can be connected to thisunit.— A2DP profile (Advanced Audio Distribution
Profile): Only playing back songs on youraudio player is possible.
— AVRCP profile (Audio/Video Remote Con-trol Profile): Playing back, pausing, select-ing songs, etc., are possible.
! Since there are a number of Bluetooth audioplayers available on the market, operationswith your Bluetooth audio player using thisunit vary in great range. Please refer to the in-struction manual that came with your Blue-tooth audio player as well as this manualwhile operating your player on this unit.
! Information about songs (e.g. the elapsedplaying time, song title, song index, etc.) can-not be displayed on this unit.
! While you are listening to songs on your Blue-tooth audio player, please refrain from operat-
ing on your cellular phone as much aspossible. If you try operating on your cellularphone, the signal from your cellular phonemay cause a noise on the song playback.
! When you are talking on the cellular phoneconnected to this unit via Bluetooth wirelesstechnology, the song playback from your Blue-tooth audio player connected to this unit ismuted.
! Even if while you are listening to song on yourBluetooth audio player you switch to anothersource, the playback of song continues toelapse.
1 Connection indicatorShows the Bluetooth wireless connectionstatus.
2 Device nameShows the device name of the connectedBluetooth audio player (or Bluetooth adap-ter).
% Press SOURCE to select Bluetooth audioplayer.Press SOURCE until you see BTAudio dis-played.# If you cannot display BTAudio, first activatethe BT audio source in the initial setting. For de-tailes, refer to Activating the BTAudio source onpage 87.
Setting up for Bluetoothaudio playerBefore you can use Bluetooth audio playeryou will need to set up the unit for use.
1 ActivationRefer to Activating the BTAudio source onpage 87 for instructions on how to turn theBTAudio on.
Bluetooth Audio
En 49
English
Section
08

2 ConnectionRefer to Connecting a Bluetooth audio playeron this page on how to connect your Blue-tooth audio player to this unit.# Once connected via Bluetooth wireless tech-nology, “Play”, “Stop” and “Pause” on Bluetoothaudio player can be operated in the BTAudiosource.# Before you can use audio players you mayneed to enter the PIN code into this unit. If yourplayer requires a PIN code to establish a connec-tion, look for the code on the player or in its ac-companying documentation. Enter the PIN codereferring to Entering PIN code for Bluetooth wire-less connection on page 88.
Connecting a Bluetoothaudio playerFor this unit to control your Bluetooth audioplayer it needs to establish a Bluetooth wire-less connection.This function initiates the connection via Blue-tooth wireless technology.
1 Press MULTI-CONTROL to display themain menu.FUNCTION, AUDIO and ENTERTAINMENTappear on the display.
2 Use MULTI-CONTROL to selectFUNCTION.Turn to change the menu option; press to se-lect.The function name appears on the display.
3 Turn MULTI-CONTROL to selectConnection open.
4 Press MULTI-CONTROL to open the con-nection.Always waiting is displayed. This unit is nowon standby for connection from Bluetoothaudio player.
5 Use your Bluetooth audio player toconnect to this unit.When the connection is successfully estab-lished, Connected is displayed.# Operation varies depending on the type ofyour Bluetooth audio player. Refer to the instruc-tion manual that came with your Bluetooth audioplayer for detailed instructions.
Bluetooth Audio
En50
Section
08

Function operation
111
1 Function displayShows the function status.
Once connected via Bluetooth wireless tech-nology, “Play”, “Stop” and other functions onBluetooth audio player can be controlled fromthis unit’s function menu.
1 Press MULTI-CONTROL to display themain menu.FUNCTION, AUDIO and ENTERTAINMENTappear on the display.
2 Use MULTI-CONTROL to selectFUNCTION.Turn to change the menu option; press to se-lect.The function name appears in the display.
3 Turn MULTI-CONTROL to select thefunction.TurnMULTI-CONTROL clockwise or counter-clockwise to switch between the functions inthe following order:Disconnect audio (disconnect audio)—Play(Play)—Stop (Stop)—Pause (pause)—Device INFO. (device information)# If a Bluetooth audio player is connected viaA2DP profile, only Disconnect audio andDevice INFO. appear in the function menu.# If a Bluetooth audio player has not been con-nected to this unit yet, Connection open andDevice INFO. appear in the function menu andother functions are not available.# To return to the playback display, press BAND.
Notes
! If you do not operate the function within about30 seconds, the display is automatically re-turned to the playback display.
! Depending on Bluetooth audio players con-nected to this unit, function operations maynot be correctly operated.
Playing songs on Bluetoothaudio player1 Use MULTI-CONTROL to select Play inthe function menu.Play appears in the display.
2 Press MULTI-CONTROL to startplayback.
Pausing a songPause lets you temporarily stop playback of asong.
1 Use MULTI-CONTROL to select Pause inthe function menu.Pause appears in the display.
2 Press MULTI-CONTROL to turn pauseon.Playback of the current song pauses.# To turn pause off, pressMULTI-CONTROLagain.
Stopping playback1 Use MULTI-CONTROL to select Stop inthe function menu.Stop appears in the display.
Bluetooth Audio
En 51
English
Section
08

2 Press MULTI-CONTROL to stop the play-back.Playback of the current song stops.
Disconnecting a Bluetoothaudio playerWhen you are done using your Bluetoothaudio player with this unit, you can close theBluetooth wireless connection.
1 Use MULTI-CONTROL to selectDisconnect audio in the function menu.Disconnect audio appears in the display.
2 Press MULTI-CONTROL to disconnectthe Bluetooth audio player.Disconnected is displayed. The Bluetoothaudio player is now diconnected from thisunit.
Displaying BD address ofthis unitEach device featuring Bluetooth wireless tech-nology is allocated a unique 48-bit device ad-dress. Each device address consists of a 12-digit of hexadecimal string.You can display the BD address of this unit.
1 Use MULTI-CONTROL to selectDevice INFO. in the function menu.The device name (Pioneer BTunit) of this unitappears in the display.
2 Push MULTI-CONTROL left to switch tothe BD address.12-digit hexadecimal string is displayed.# PushingMULTI-CONTROL right returns to thedevice name.
Note
When you pushMULTI-CONTROL down whilethe BD address (or the device name) of this unitis displayed, the system version of this unit ap-pears. About the system version, refer to Display-ing system version for repair on page 48.
Displaying system versionfor repairShould this unit fails to operate properly andyou consult with dealer for repair, you may beasked to indicate the system versions of thisunit and of Bluetooth module. You can displaythe versions and confirm them.
1 Use MULTI-CONTROL to selectDevice INFO. in the function menu.The device name (Pioneer BTunit) of this unitappears in the display.
2 Push MULTI-CONTROL down to switchto the system version of this unit.The system (microprocessor) version of thisunit is displayed.# PushingMULTI-CONTROL left displays theversion of the Bluetooth module of this unit.PushingMULTI-CONTROL right returns to thesystem version of this unit.
Bluetooth Audio
En52
Section
08

Playing a CD
2222
444
33331111
You can use this unit to control a multi-CDplayer, which is sold separately.These are the basic steps necessary to play aCD with your multi-CD player. More advancedCD operation is explained starting on the nextpage.
1 Disc number indicatorShows the disc number currently playing.
2 Track number indicatorShows the track number currently playing.
3 Play time indicatorShows the elapsed playing time of the cur-rent track.
4 Disc title indicatorShows the title of the currently playing disc.! If no title has been entered for the cur-
rently playing disc, nothing is displayed.
1 Press SOURCE to select the multi-CDplayer.Press SOURCE until you see Multi-CD dis-played.
2 Push MULTI-CONTROL up or down toselect a disc you want to listen to.# You can also select a disc by using 1–6 but-tons on the remote control.
! For discs 1 to 6, press the correspondingbutton number.
! For discs 7 to 12, press and hold the corre-sponding numbers, such as 1 for disc 7,
until the disc number appears in the dis-play.
3 To perform fast forward or reverse,push and hold MULTI-CONTROL left orright.
4 To skip back or forward to anothertrack, push MULTI-CONTROL left or right.Pushing MULTI-CONTROL right skips to thestart of the next track. PushingMULTI-CONTROL left once skips to the startof the current track. Pushing again will skip tothe previous track.
Notes
! When the multi-CD player performs the pre-paratory operations, Ready is displayed.
! If an error message such as ERROR-11 is dis-played, refer to the multi-CD player owner’smanual.
! If there are no discs in the multi-CD player ma-gazine, No Disc is displayed.
! When you select a CD TEXT disc on a CD TEXTcompatible multi-CD player, the disc title auto-matically begins to scroll in the display. EverScroll function is ON at the initial setting, thedisc title scrolls continuously. About EverScroll, refer to Switching the Ever Scroll onpage 87.
Selecting a track directlyWhen using the remote control, you can selecta track directly by entering the desired tracknumber.
1 Press DIRECT.Track number input display appears.
2 Press 0–9 buttons to enter the desiredtrack number.# You can cancel the input number by pressingCLEAR.
Multi-CD Player
En 53
English
Section
09

3 Press DIRECT.The track of entered number will play.
Note
After entering the number input mode, if you donot perform an operation within about eight sec-onds, the mode is automatically canceled.
50-disc multi-CD playerOnly those functions described in this manualare supported by 50-disc multi-CD players.This unit is not designed to operate disc titlelist functions with a 50-disc multi-CD player.About the disc title list functions, please referto Selecting discs from the disc title list onpage 58.
Introduction of advancedmulti-CD player operation
111
1 Function displayShows the function status.
1 Press MULTI-CONTROL to display themain menu.FUNCTION, AUDIO and ENTERTAINMENTappear on the display.
2 Use MULTI-CONTROL to selectFUNCTION.Turn to change the menu option; press to se-lect.The function name appears on the display.
3 Turn MULTI-CONTROL to select thefunction.TurnMULTI-CONTROL clockwise or counter-clockwise to switch between the functions inthe following order:Play mode (repeat play)—Random mode(random play)—Scan mode (scan play)—Pause (pause)—ITS play mode (ITS play)—ITS memory (ITS programming)—Title Input(disc title input)# To return to the playback display, press BAND.
Notes
! When playing a CD TEXT disc on a CD TEXTcompatible multi-CD player, you cannotswitch to disc title input. The disc title willhave already been recorded on a CD TEXTdisc.
Multi-CD Player
En54
Section
09

! If you do not operate the function within about30 seconds, the display is automatically re-turned to the playback display.
Repeating playThere are three repeat play ranges for themulti-CD player:Multi-CD repeat (multi-CDplayer repeat), Track repeat (one-track repeat)and Disc repeat (disc repeat).
1 Use MULTI-CONTROL to selectPlay mode in the function menu.Play mode appears in the display.
2 Press MULTI-CONTROL to select the re-peat range.PressMULTI-CONTROL repeatedly until thedesired repeat range appears in the display.
! Multi-CD repeat – Repeat all discs in themulti-CD player
! Track repeat – Repeat just the currenttrack
! Disc repeat – Repeat the current disc
Notes
! If you select other discs during repeat play,the repeat play range changes toMulti-CD repeat.
! If you perform track search or fast forward/re-verse during Track repeat, the repeat playrange changes to Disc repeat.
Playing tracks in random orderRandom play lets you play back tracks in ran-dom order within the repeat range,Multi-CD repeat and Disc repeat.
1 Select the repeat range.Refer to Repeating play on this page.
2 Use MULTI-CONTROL to selectRandom mode in the function menu.Random mode appears in the display.
3 Press MULTI-CONTROL to turn randomplay on.Tracks will play in a random order within thepreviously selected Multi-CD repeat orDisc repeat ranges.# To turn random play off, pressMULTI-CONTROL again.
Scanning CDs and tracksWhile you are using Disc repeat, the begin-ning of each track on the selected disc playsfor about 10 seconds. When you are usingMulti-CD repeat, the beginning of the firsttrack of each disc is played for about 10 sec-onds.
1 Select the repeat range.Refer to Repeating play on this page.
2 Use MULTI-CONTROL to selectScan mode in the function menu.Scan mode appears in the display.
3 Press MULTI-CONTROL to turn scan playon.The first 10 seconds of each track of the cur-rent disc (or the first track of each disc) isplayed.
4 When you find the desired track (ordisc) press MULTI-CONTROL to turn scanplay off.The track (or disc) will continue to play.# If the display has automatically returned tothe playback display, select Scan mode again byusingMULTI-CONTROL.
Multi-CD Player
En 55
English
Section
09

Note
After track or disc scanning is finished, normalplayback of the tracks will begin again.
Pausing CD playbackPause lets you temporarily stop playback ofthe CD.
1 Use MULTI-CONTROL to select Pause inthe function menu.Pause appears in the display.
2 Press MULTI-CONTROL to turn pauseon.Playback of the current track pauses.# To turn pause off, pressMULTI-CONTROLagain.
Using ITS playlistsITS (instant track selection) lets you make aplaylist of favorite tracks from those in themulti-CD player magazine. After you haveadded your favorite tracks to the playlist youcan turn on ITS play and play just those selec-tions.
Creating a playlist with ITSprogrammingYou can use ITS to enter and play back up to99 tracks per disc from up to 100 discs (withthe disc titles). (With multi-CD players sold be-fore the CDX-P1250 and CDX-P650, up to 24tracks can be stored in the playlist.)
1 Play a CD that you want to program.PushMULTI-CONTROL up or down to selectthe CD.
2 Use MULTI-CONTROL to selectITS memory in the function menu.ITS memory appears in the display.
3 Select the desired track by pushingMULTI-CONTROL left or right.
4 Push MULTI-CONTROL up to store thecurrently playing track in the playlist.Memory complete is displayed and the cur-rently playing selection is added to your play-list.
5 Press BAND to return to the playbackdisplay.
Note
After data for 100 discs has been stored in mem-ory, data for a new disc will overwrite the oldestone.
Playback from your ITS playlistITS play lets you listen to the tracks that youhave entered into your ITS playlist. When youturn on ITS play, tracks from your ITS playlistin the multi-CD player will begin to play.
1 Select the repeat range.Refer to Repeating play on the previous page.
2 Use MULTI-CONTROL to selectITS play mode in the function menu.ITS play mode appears in the display.
3 Press MULTI-CONTROL to turn ITS playon.Playback begins of those tracks from yourplaylist within the previously selectedMulti-CD repeat or Disc repeat ranges.# If no tracks in the current range are pro-grammed for ITS play, then ITS empty is dis-played.# To turn ITS play off, pressMULTI-CONTROLagain.
Multi-CD Player
En56
Section
09

Erasing a track from your ITSplaylistYou can delete a track from your ITS playlist ifITS play is on.If ITS play is already on, skip to step 2. If ITSplay is not already on, useMULTI-CONTROL.
1 Play the CD with the track you want todelete from your ITS playlist, and turn ITSplay on.Refer to Playback from your ITS playlist on theprevious page.
2 Use MULTI-CONTROL to selectITS memory in the function menu.ITS memory appears in the display.
3 Select the desired track by pushingMULTI-CONTROL left or right.
4 Push MULTI-CONTROL down to erasethe track from your ITS playlist.The currently playing selection is erased fromyour ITS playlist and playback of the next trackfrom your ITS playlist begins.# If there are no tracks from your playlist in thecurrent range, ITS empty is displayed and nor-mal play resumes.
5 Press BAND to return to the playbackdisplay.
Erasing a CD from your ITS playlistYou can delete all tracks of a CD from your ITSplaylist if ITS play is off.
1 Play the CD that you want to delete.PushMULTI-CONTROL up or down to selectthe CD.
2 Use MULTI-CONTROL to selectITS memory in the function menu.ITS memory appears in the display.
3 Push MULTI-CONTROL down to eraseall tracks on the currently playing CD fromyour ITS playlist.All tracks on the currently playing CD areerased from your playlist andMemory deleted is displayed.
4 Press BAND to return to the playbackdisplay.
Using disc title functionsYou can input CD titles and display the titles.Then you can easily search for and play a de-sired disc.
Entering disc titlesUse the disc title input feature to store up to100 CD titles (with ITS playlist) into the multi-CD player. Each title can be up to 10 charac-ters long.
1 Play the CD that you want to enter atitle for.PushMULTI-CONTROL up or down to selectthe CD.
2 Use MULTI-CONTROL to selectTitle Input in the function menu.Title Input appears in the display.
3 Press DISPLAY to select the desiredcharacter type.Press DISPLAY repeatedly to switch betweenthe following character types:Alphabet (upper case), numbers and symbols—Alphabet (lower case)—European letters,such as those with accents (e.g. á, à, ä, ç)—Numbers and symbols
Multi-CD Player
En 57
English
Section
09

4 Push MULTI-CONTROL up or down toselect a letter of the alphabet.Each timeMULTI-CONTROL is pushed up, al-phabet, numbers or symbols are displayed inascending order (A B C ...). Each timeMULTI-CONTROL is pushed down, letters aredisplayed in descending order.
5 Push MULTI-CONTROL right to movethe cursor to the next character position.When the letter you want is displayed, pushMULTI-CONTROL right to move the cursor tothe next position and then select the next let-ter. PushMULTI-CONTROL left to move back-wards in the display.
6 Move the cursor to the last position bypushing MULTI-CONTROL right after enter-ing the title.When you push MULTI-CONTROL right onemore time, the entered title is stored in mem-ory.
7 Press BAND to return to the playbackdisplay.
Notes
! Titles remain in memory, even after the dischas been removed from the magazine, andare recalled when the disc is reinserted.
! After data for 100 discs has been stored inmemory, data for a new disc will overwrite theoldest one.
Displaying disc titlesYou can display the text information of anydisc that has had a disc title entered.
% Press DISPLAY.Press DISPLAY repeatedly to switch betweenthe following settings:: disc title—Simple display
Selecting discs from the disctitle listDisc title list lets you see the list of disc titlesthat have been entered into the multi-CDplayer and select one of them to play back.
1 Press LIST to switch to the disc title listmode during the playback display.
2 Use MULTI-CONTROL to select the de-sired disc title.Turn to change the disc title; press to play.# You can also change the disc title by pushingMULTI-CONTROL up or down.# If no title has been entered for a disc,No D.Title will be displayed.# No Disc is displayed next to the disc numberwhen there is no disc in the magazine.# If you do not operate the list within about 30seconds, the disc title list mode is canceled auto-matically.
Using CD TEXT functionsYou can use these functions only with a CDTEXT compatible multi-CD player.Some discs have certain information encodedon the disc during manufacture. These discsmay contain such information as the CD title,track title, artist’s name and playback timeand are called CD TEXT discs. Only these spe-cially encoded CD TEXT discs support thefunctions listed below.
Multi-CD Player
En58
Section
09

Displaying text information onCD TEXT discs% Press DISPLAY.Press DISPLAY repeatedly to switch betweenthe following settings:: disc title— : disc artist name— : track
title— : track artist name— : disc title and: disc artist name— : track title and :
track artist name—Simple display# If specific information has not been recordedon a CD TEXT disc, title or name is not displayed.
Scrolling text information inthe displayThis unit can display the first 24 letters of disctitle, disc artist name, track title and track ar-tist name. When the text information is longerthan 24 letters, you can scroll the text informa-tion as follows.! When the source icon is turned off, this
unit can display the first 30 letters of text in-formation.
% Press DISPLAY and hold until the textinformation begins to scroll through thedisplay.The titles scroll.
Note
When Ever Scroll is set to ON at the initial setting,text information scrolls continuously in the dis-play. Refer to Switching the Ever Scroll on page 87.
Selecting tracks from the tracktitle listTrack title list lets you see the list of track titleson a CD TEXT disc and select one of them toplay back.
1 Press LIST to switch to the disc title listmode during the playback display.# If you want to display the track title list of thecurrently playing disc, pushMULTI-CONTROLright.
2 Use MULTI-CONTROL to select the de-sired disc title of CD TEXT.Turn to change the disc title; press to play.# You can also change the disc title by pushingMULTI-CONTROL up or down.# If no title has been entered for a disc,No D.Title will be displayed.# No Disc is displayed next to the disc numberwhen there is no disc in the magazine.
3 Push MULTI-CONTROL right to switchto the track title list.# Push MULTI-CONTROL left to return to thedisc title list.
4 Use MULTI-CONTROL to select the de-sired track title.Turn to change the track title; press to play.# You can also change the track title by pushingMULTI-CONTROL up or down.# If you do not operate the list within about 30seconds, the track title list mode is canceledautomatically.
Multi-CD Player
En 59
English
Section
09

Listening to songs on youriPod
333
22221111
You can use this unit to control an iPod adapter,which is sold separately.These are the basic steps necessary to operatean iPod adapter. More advanced iPod adapteroperation is explained starting on Introductionof advanced iPod adapter operation on page 62.
1 Song number indicatorShows the number of song played in the se-lected list.
2 Play time indicatorShows the elapsed playing time of the cur-rent song.
3 Album title indicatorShows the title of the currently playingalbum.
1 Press SOURCE to select the iPod.Press SOURCE until you see iPod displayed.
2 To perform fast forward or reverse,push and hold MULTI-CONTROL left orright.
3 To skip back or forward to anothersong, push MULTI-CONTROL left or right.Pushing MULTI-CONTROL right skips to thestart of the next song. PushingMULTI-CONTROL left once skips to the start
of the current song. Pushing again will skip tothe previous song.
Browsing for a songThe operation of this unit to control an iPod isdesigned to be as close to the operation of theiPod as possible for easy operation and songsearch.
1 Press LIST to switch to the top menu ofthe list search.
2 Use MULTI-CONTROL to select a cate-gory.Turn to change the category; press to select.Playlists (playlists)—Artists (artists)—Albums (albums)—Songs (songs)—Genres(genres)List from the selected category is displayed.# You can start playback throughout the se-lected category by pressing and holdingMULTI-CONTROL.# You can also change the category by pushingMULTI-CONTROL up or down.# You can also select the category by pushingMULTI-CONTROL right.# To return to the previous list, pushMULTI-CONTROL left.# To go to the top menu of the list search, pushand holdMULTI-CONTROL left.# If you do not operate the list within about 30seconds, the list search is cancelled automati-cally.
Playing songs on iPod
En60
Section
10

Searching for a song1 Press LIST to switch to the top menu ofthe list search.
2 Use MULTI-CONTROL to select a Genres,Artists, Albums or Songs from among thecategories.Turn to change the category; press to select.List from the selected category is displayed.
3 Use MULTI-CONTROL to select a song,album, artist or genre.Turn to change the item; press to select.List from the selected item is displayed.# If you select Songs (songs), playback starts in-stantly from the selected one.
4 Repeat step 3 to find a song you wantto listen to.
Selecting a playlistYou can select a playlist from your iPod play-list.
1 Press LIST to switch to the top menu ofthe list search.
2 Use MULTI-CONTROL to select aPlaylists from among the categories.Turn to change the category; press to select.List from Playlists (playlists) is displayed.
3 Use MULTI-CONTROL to select a play-list.Turn to change the playlist; press to select.Song list from the selected playlist is dis-played.# You can start playback throughout the se-lected playlist by pressing and holdingMULTI-CONTROL.
4 Use MULTI-CONTROL to select a songfrom the selected playlist.Turn to change the song; press to play.# If no songs have been stored in playlist, STOPis displayed and playback stops.
Displaying textinformation on iPodText information recorded on the iPod can bedisplayed.
% Press DISPLAY.Press DISPLAY repeatedly to switch betweenthe following settings:: album title— : song title— : artist name
— : artist name and : album title— :song title and : artist name— : song titleand : album title—Simple display# If the characters recorded on the iPod are notcompatible with this unit, those characters willnot be displayed.
Notes
! You can scroll to the left the text informationby pressing and holding DISPLAY.
! When Ever Scroll is set to ON at the initial set-ting, text information scrolls continuously inthe display. Refer to Switching the Ever Scrollon page 87.
Playing songs on iPod
En 61
English
Section
10

Introduction of advancediPod adapter operation
111
1 Function displayShows the function status.
1 Press MULTI-CONTROL to display themain menu.FUNCTION, AUDIO and ENTERTAINMENTappear on the display.
2 Use MULTI-CONTROL to selectFUNCTION.Turn to change the menu option; press to se-lect.The function name appears on the display.
3 Turn MULTI-CONTROL to select thefunction.TurnMULTI-CONTROL clockwise or counter-clockwise to switch between the functions inthe following order:Play mode (repeat play)—Shuffle mode (ran-dom play)—Pause (pause)# To return to the playback display, press BAND.
Note
If you do not operate the function within about 30seconds, the display is automatically returned tothe playback display.
Repeating playFor playback of the songs on the iPod, thereare two repeat play ranges: Repeat one (re-
peat one song) and Repeat all (repeat allsongs in the list).! While Play mode is set to Repeat one, you
cannot select the other songs.
1 Use MULTI-CONTROL to selectPlay mode in the function menu.Play mode appears in the display.
2 Press MULTI-CONTROL to select the re-peat range.PressMULTI-CONTROL repeatedly until thedesired repeat range appears in the display.
! Repeat one – Repeat just the current song! Repeat all – Repeat all songs in the se-
lected list
Playing songs in a randomorder (shuffle)For playback of the songs on the iPod, thereare two random play methods: Shuffle Songs(play back songs in a random order) andShuffle Albums (play back albums in a ran-dom order).
1 Use MULTI-CONTROL to selectShuffle mode in the function menu.Shuffle mode appears in the display.
2 Press MULTI-CONTROL to select your fa-vorite setting.PressMULTI-CONTROL repeatedly until thedesired setting appears in the display.
! Shuffle Songs – Play back songs in a ran-dom order within the selected list
! Shuffle Albums – Select an album ran-domly, and then play back all the songs in itin order
! Shuffle OFF – Cancel the random play
Playing songs on iPod
En62
Section
10

Pausing a songPause lets you temporarily stop playback of asong.
1 Use MULTI-CONTROL to select Pause inthe function menu.Pause appears in the display.
2 Press MULTI-CONTROL to turn pauseon.Playback of the current song pauses.# To turn pause off, pressMULTI-CONTROLagain.
Playing songs on iPod
En 63
English
Section
10

Watching the television
22221111 3333
You can use this unit to control a TV tuner,which is sold separately.For details concerning operation, refer to theTV tuner’s operation manual. This section pro-vides information on TV operations with thisunit which differs from that described in theTV tuner’s operation manual.
1 Band indicatorShows which band the TV tuner is tuned to.
2 Preset number indicatorShows which preset has been selected.
3 Channel indicatorShows which channel the TV tuner is tuned.
1 Press SOURCE to select the TV.Press SOURCE until you see Television dis-played.
2 Press BAND to select a band.Press BAND until the desired band is dis-played, TV-1 or TV-2.
3 To perform manual tuning, pushMULTI-CONTROL left or right.The channels move up or down step by step.
4 To perform seek tuning, push and holdMULTI-CONTROL left or right for about onesecond and release.The tuner will scan the channels until a broad-cast strong enough for good reception isfound.
# You can cancel seek tuning by pushingMULTI-CONTROL left or right.# If you push and holdMULTI-CONTROL left orright, you can skip broadcasting channels. Seektuning starts as soon as you releaseMULTI-CONTROL.
TV tuner
En64
Section
11

Introduction of advancedTV tuner operation
111
1 Function displayShows the function status.
1 Press MULTI-CONTROL to display themain menu.FUNCTION, AUDIO and ENTERTAINMENTappear on the display.
2 Use MULTI-CONTROL to selectFUNCTION.BSSM appears on the display.# To return to the channel display, press BAND.
Note
If you do not operate the function within about 30seconds, the display is automatically returned tothe channel display.
Storing and recallingbroadcast stationsYou can easily store up to 12 broadcast sta-tions for later recall.
1 When you find a station that you wantto store in memory press LIST to switch tothe preset channel list mode.
2 Use MULTI-CONTROL to store the se-lected station in memory.Turn to change the preset number; press andhold to store.The preset number you have selected willflash and then remain lit. The selected stationhas been stored in memory.# If you do not operate the list within about 30seconds, the preset channel list mode is can-celed automatically.
Notes
! Up to 24 stations, 12 for each of two TV bands,can be stored in memory.
! You can also store stations assigned to presettuning numbers 1–6 by pressing and holdingone of the preset tuning buttons 1–6 on the re-mote control.
Storing the strongestbroadcast stationssequentially1 Use MULTI-CONTROL and selectFUNCTION to display BSSM.
2 Press MULTI-CONTROL to turn BSSMon.Searching is displayed. While Searching isdisplayed, the 12 strongest broadcast stationswill be stored in order from the lowest channelup. When finished, the preset channel list ap-pears.# To cancel the storage process, pressMULTI-CONTROL.
3 Use MULTI-CONTROL to select the de-sired station.Turn to change the station; press to select.# You can also change the station by pushingMULTI-CONTROL up or down.
TV tuner
En 65
English
Section
11
# If you do not operate the list within about 30seconds, the preset channel list mode is can-celed automatically.
Note
Storing broadcast stations with BSSM may re-place broadcast stations you have saved usingP01–P12.
Selecting stations from thepreset channel listThe preset channel list lets you see the list ofpreset stations and select one of them to re-ceive.
1 Press LIST to switch to the preset chan-nel list mode during the channel display.
2 Use MULTI-CONTROL to select the de-sired station.Turn to change the station; press to select.# You can also change the station by pushingMULTI-CONTROL up or down.# If you do not operate the list within about 30seconds, the preset channel list mode is can-celed automatically.
Notes
! You can also recall stations assigned to presettuning numbers by pushingMULTI-CONTROLup or down during the channel display.
! You can also recall stations assigned to presettuning numbers 1–6 by pressing one of thepreset tuning buttons 1–6 on the remote con-trol.
TV tuner
En66
Section
11

Playing a disc
3333
555
444422221111
You can use this unit to control a DVD player ormulti-DVD player, which is sold separately.For details concerning operation, refer to theDVD player’s or multi-DVD player’s operationmanual. This section provides information onDVD operations with this unit which differsfrom that described in the DVD player’s ormulti-DVD player’s operation manual.These are the basic steps necessary to play aDVD video with your DVD player. More ad-vanced DVD video operation is explained start-ing on the next page.
1 DVD-V/VCD/CD/MP3/WMA indicatorShows the type of disc currently playing.
2 Disc number indicatorShows the disc number currently playingwhen using a multi-DVD player.
3 Title/Folder/Disc number indicatorShows the title (when playing DVD video),folder (when playing MP3 or WMA) or disc(when playing video CD or CD) of the selec-tion currently playing.
4 Chapter/track number indicatorShows the chapter (when playing DVDvideo) or track (when playing video CD, CD,MP3 or WMA) currently playing.
5 Play time indicatorShows the elapsed playing time of the cur-rent track.
1 Press SOURCE to select the DVD player/multi-DVD player.Press SOURCE until you see DVD displayed.
2 To perform fast forward or reverse,push and hold MULTI-CONTROL left orright.
3 To skip back or forward to anotherchapter/track, push MULTI-CONTROL left orright.
Selecting a disc! You can operate this function only when a
multi-DVD player is connected to this unit.
% Push MULTI-CONTROL up or down toselect the desired disc.
Selecting a folder! You can operate this function only when a
DVD player which is corresponding toMP3/WMA playback is connected to thisunit.
% Push MULTI-CONTROL up or down toselect a folder.
DVD Player
En 67
English
Section
12

Introduction of advancedDVD player operation
111
1 Function displayShows the function status.
1 Press MULTI-CONTROL to display themain menu.FUNCTION, AUDIO and ENTERTAINMENTappear on the display.
2 Use MULTI-CONTROL to selectFUNCTION.Turn to change the menu option; press to se-lect.The function name appears on the display.
3 Turn MULTI-CONTROL to select thefunction.TurnMULTI-CONTROL clockwise or counter-clockwise to switch between the functions inthe following order:During DVD video or Video CD playbackPlay mode (repeat play)—Pause (pause)During CD playbackPlay mode (repeat play)—Random mode(random play)—Scan mode (scan play)—Pause (pause)—ITS play mode (ITS play)—ITS memory (ITS input)—Title Input (disctitle input)During MP3/WMA playbackPlay mode (repeat play)—Random mode(random play)—Scan mode (scan play)—Pause (pause)# To return to the playback display, press BAND.
Note
When using this unit with multi-DVD player, youcan switch to ITS play mode, ITS memory andTitle Input.
Repeating play! During PBC playback of Video CDs, this
function cannot be operated.
1 Use MULTI-CONTROL to selectPlay mode in the function menu.Play mode appears in the display.
2 Press MULTI-CONTROL to select the re-peat range.During DVD video playbackPressMULTI-CONTROL repeatedly until thedesired repeat range appears in the display.
! Disc repeat – Repeat the current disc! Chapter repeat – Repeat just the current
chapter! Title repeat – Repeat just the current title
During Video CD or CD playbackPressMULTI-CONTROL repeatedly until thedesired repeat range appears in the display.
! Disc repeat – Repeat the current disc! Track repeat – Repeat just the current
trackDuring MP3/WMA playbackPressMULTI-CONTROL repeatedly until thedesired repeat range appears in the display.
! Disc repeat – Repeat the current disc! Folder repeat – Repeat the current folder! Track repeat – Repeat just the current
track
Notes
! If you select other discs during repeat play,the repeat play range changes to Disc repeat.
DVD Player
En68
Section
12

! During video CD or CD playback, if you per-form track search or fast forward/reverse dur-ing Track repeat, the repeat play rangechanges to Disc repeat.
! During MP3/WMA playback, if you select an-other folder during repeat play, the repeat playrange changes to Disc repeat.
! During MP3/WMA playback, if you performtrack search or fast forward/reverse duringTrack repeat, the repeat play range changesto Folder repeat.
Pausing disc playback1 Use MULTI-CONTROL to select Pause inthe function menu.Pause appears in the display.
2 Press MULTI-CONTROL to turn pauseon.Playback of the current track pauses.# To turn pause off, pressMULTI-CONTROLagain.
Playing tracks in random order! You can operate this function during CD/
MP3/WMA playback.
1 Use MULTI-CONTROL to selectRandom mode in the function menu.Random mode appears in the display.
2 Press MULTI-CONTROL to turn randomplay on.Tracks will play in a random order.# To turn random play off, pressMULTI-CONTROL again.
Scanning tracks of a CD/MP3/WMA! You can operate this function during CD/
MP3/WMA playback.
1 Use MULTI-CONTROL to selectScan mode in the function menu.Scan mode appears in the display.
2 Press MULTI-CONTROL to turn scan playon.The first 10 seconds of each track is played.
3 When you find the desired track pressMULTI-CONTROL to turn scan play off.The track will continue to play.# If the display has automatically returned tothe playback display, select Scan mode again byusingMULTI-CONTROL.
Using ITS playlist and disctitle functions! You can operate these functions only when
a multi-DVD player is connected to thisunit.
! This function differs slightly from ITS play-back with a multi-CD player. With multi-DVD player, ITS playback applies only to theCD playing. For details, refer to Using ITSplaylists on page 56.
Using disc title functionsYou can input CD titles and display the titles.Then you can easily search for and play a de-sired disc.! You can operate this function during CD
playback.
DVD Player
En 69
English
Section
12

Entering disc titlesDisc title input lets you input CD titles up to 10letters long into the DVD player. For detailsconcerning operation, refer to Entering disc ti-tles on page 57.! You can operate this function only when a
DVD player is connected to this unit.! When playing a CD TEXT disc on a CD TEXT
compatible DVD player, you cannot switchto disc title input. The disc title will have al-ready been recorded on a CD TEXT disc.
DVD Player
En70
Section
12

Adjusting the audio easilyThe following functions let you easily adjustyour audio system to match the car interioracoustic characteristics, which vary depend-ing on the type of car.! Recalling equalizer curves! Using the position selector (Position)! Adjusting equalizer curves
Adjusting the audio finelyBy carrying out the following settings/adjust-ments in the order shown, you can create a fi-nely-tuned sound field effortlessly.! Using the position selector (Position)! Using balance adjustment (Fader)! Using subwoofer output (Subwoofer1)! Adjusting subwoofer settings
(Subwoofer2)! Adjusting low pass filter attenuation slope
(Subwoofer3)! Setting the high pass filter for front speakers
(Front HPF, Front HPF FREQ.)! Setting the high pass filter for rear speakers
(Rear HPF, Rear HPF FREQ.)! Auto TA and EQ (auto-time alignment and
auto-equalizing)! Recalling equalizer curves! Adjusting equalizer curves! Adjusting 16-band graphic equalizer
(FREQ.)
Extra functionsThese functions are helpful in adjusting thesound to suit your system or your personalpreferences.! Using BBE sound (BBE)! Using compression and BMX (COMP/BMX)! Adjusting loudness (Loudness)! Adjusting source levels (SLA)! Using auditory user interface
(AUI sound level)
Introduction of audioadjustments
111
Important
When phone is selected as a source, no audio ad-justments, except balance adjustment, are possi-ble.
1 Audio displayShows the audio adjustment status.
1 Press MULTI-CONTROL to display themain menu.FUNCTION, AUDIO and ENTERTAINMENTappear on the display.
2 Use MULTI-CONTROL to select AUDIO.Turn to change the menu option; press to se-lect.The audio function name appears on the dis-play.
3 Turn MULTI-CONTROL to select theaudio function.TurnMULTI-CONTROL clockwise or counter-clockwise to switch between the audio func-tions in the following order:
Audio Adjustments
En 71
English
Section
13

Fader (balance adjustment)—Position (posi-tion selector)—TA Mode (time alignment set-ting)—Time Alignment (time alignmentadjusting)—Loudness (loudness)—Powerful(graphic equalizer adjustment)—FREQ. (16-band graphic equalizer adjustment)—Subwoofer1 (subwoofer on/off)—Subwoofer2 (subwoofer cut-off frequency)—Subwoofer3 (subwoofer slope)—Front HPF(front high pass filter slope)—Front HPF FREQ. (front high pass filter cut-offfrequency)—Rear HPF (rear high pass filterslope)—Rear HPF FREQ. (rear high pass filtercut-off frequency)—BBE (BBE)—COMP/BMX(Compression and BMX)—Auto EQ (auto-equalizer on/off)—SLA (source level adjust-ment)—AUI sound level (auditory user inter-face)# When selecting OFF in TA Mode, you cannotswitch to Time Alignment.# You can select Subwoofer2 andSubwoofer3 only when subwoofer output isturned on in Subwoofer1.# When tuner, television or AUX is selected as asource, you cannot select COMP/BMX.# When selecting the FM tuner as the source,you cannot switch to SLA.# To return to the display of each source, pressBAND.
Note
If you do not operate the audio function withinabout 30 seconds, the display is automatically re-turned to the source display.
Using the position selectorOne way to assure a more natural sound is toclearly position the stereo image, putting youright in the center of the sound field. The posi-tion selector function lets you automaticallyadjust the speakers’ output levels and insertsa delay time to match the number and posi-tion of occupied seats.
1 Use MULTI-CONTROL to select Position.Position appears in the display.
2 Push MULTI-CONTROL left, right, up ordown to select a listening position.
Direction Display Position
Left Front Left Front seat left
Right Front Right Front seat right
Up Front Front seats
Down All All seats
# To cancel the selected listening position, pushMULTI-CONTROL in the same direction again.
Using balance adjustmentYou can change the fader/balance setting sothat it can provide you an ideal listening envir-onment in all occupied seats.
1 Use MULTI-CONTROL to select Fader.Fader appears in the display.# If the balance setting has been previously ad-justed, Balance will be displayed.
2 Push MULTI-CONTROL up or down toadjust front/rear speaker balance.Each timeMULTI-CONTROL is pushed up ordown, the front/rear speaker balance movestowards the front or rear.
Audio Adjustments
En72
Section
13

Front 25 to Rear 25 is displayed as the front/rear speaker balance moves from front to rear.# Front/Rear 0 is the proper setting when onlytwo speakers are used.
3 Push MULTI-CONTROL left or right toadjust left/right speaker balance.Each timeMULTI-CONTROL is pushed left orright, the left/right speaker balance moves to-wards the left or right.Left 25 to Right 25 is displayed as the left/right speaker balance moves from left toright.
Using the time alignmentThe time alignment lets you adjust the dis-tance between each speaker and the listeningposition.
1 Use MULTI-CONTROL to selectTA Mode.TA Mode appears in the display.
2 Push MULTI-CONTROL left or right toselect the time alignment.Each timeMULTI-CONTROL is pushed left orright, time alignment is selected in the follow-ing order:Initial (initial)—Custom (custom)—Auto TA(auto-time alignment)—OFF (off)
! Initial is the factory supplied time align-ment.
! Custom is an adjusted time alignment thatyou can create for yourself.
! Auto TA is the time alignment created byauto TA and EQ. (Refer to Auto TA and EQ(auto-time alignment and auto-equalizing)on page 80.)
# Please set Auto TA appears. This indicatesthat you cannot select Auto TA if auto TA and EQhas not been carried out.
Adjusting the time alignmentYou can adjust the distance between eachspeaker and the selected position.! An adjusted time alignment is memorized
in Custom.
1 Use MULTI-CONTROL to selectTA Mode.TA Mode appears in the display.
2 Press MULTI-CONTROL to select a unitof distance.Each press ofMULTI-CONTROL selects theunit of distance in the following order:cm (centimeter)—inch (inch)
3 Use MULTI-CONTROL to selectTime Alignment.Time Alignment appears in the display.# Can't adjust TA. Set position FL/FR appearswhen neither Front Left nor Front Right is se-lected in the position selector mode (Position).# When selecting OFF in TA Mode, you cannotswitch to Time Alignment.
4 Push MULTI-CONTROL left or right toselect the speaker to be adjusted.Each timeMULTI-CONTROL is pushed left orright, the speaker is selected in the followingorder:
666
1111 2222
333444555
1 Front speaker left2 Front speaker right3 Rear speaker right4 Subwoofer right5 Subwoofer left6 Rear speaker left
Audio Adjustments
En 73
English
Section
13

Front speaker left—Front speaker right—Rearspeaker right—Rear speaker left—Subwooferleft—Subwoofer right# You cannot select subwoofer left and subwoo-fer right when the subwoofer output is off.
5 Push MULTI-CONTROL up or down toadjust the distance between the selectedspeaker and the listening position.Each timeMULTI-CONTROL is pushed up ordown, the distance increases or decreases.400.00cm to 0.00cm is displayed as the dis-tance is increased or decreased, if you haveselected centimeters (cm).160.0inch to 0.0inch is displayed as the dis-tance is increased or decreased, if you haveselected inches (inch).# You can adjust the distance for the otherspeakers in the same way.
6 Press BAND to cancel the time align-ment mode.
Using subwoofer outputThis unit is equipped with a subwoofer outputwhich can be turned on or off. When a sub-woofer is connected to this unit, turn the sub-woofer output on.The subwoofer output phase can be switchedbetween normal and reverse.
1 Use MULTI-CONTROL to selectSubwoofer1.Subwoofer1 appears in the display.
2 Press MULTI-CONTROL to turn subwoo-fer output on.ON appears in the display. Subwoofer outputis now on.# To turn subwoofer output off, pressMULTI-CONTROL again.
3 Push MULTI-CONTROL left or right toselect stereo or monaural.PushMULTI-CONTROL left to select monauraland MONO appears in the display. PushMULTI-CONTROL right to select stereo andSTEREO appears in the display.
Adjusting subwoofer settingsWhen the subwoofer output is on, you can ad-just the cut-off frequency and the output levelof the subwoofer.
1 Use MULTI-CONTROL to selectSubwoofer2.Subwoofer2 appears in the display.# When the subwoofer output is on, you can se-lect Subwoofer2.
2 Push MULTI-CONTROL left or right toselect cut-off frequency.Each timeMULTI-CONTROL is pushed left orright, cut-off frequencies are selected in thefollowing order:50—63—80—100—125—160—200 (Hz)Only frequencies lower than those in the se-lected range are outputted from the subwoo-fer.
3 Push MULTI-CONTROL up or down toadjust the output level of the subwoofer.Each timeMULTI-CONTROL is pushed up ordown, subwoofer level increases or decreases.+6 to –24 is displayed as the level is increasedor decreased.
Adjusting low pass filterattenuation slopeWhen the subwoofer output is on, you can ad-just the continuity of sound between speakerunits.
Audio Adjustments
En74
Section
13

1 Use MULTI-CONTROL to selectSubwoofer3.Subwoofer3 appears in the display.# When the subwoofer output is on, you can se-lect Subwoofer3.
2 Push MULTI-CONTROL up or down toselect the phase of subwoofer output.PushMULTI-CONTROL up to select normalphase and appears in the display. PushMULTI-CONTROL down to select reversephase and appears in the display.
3 Push MULTI-CONTROL left or right toselect slope.Each timeMULTI-CONTROL is pushed left orright, slopes are selected in the followingorder:–18— –12— –6 (dB/oct.)
Note
When slope of subwoofer and high pass filter are–12dB, and same cut-off frequency, the phase isreversed 180 degrees at the cut-off frequency. Inthis case, reversing the phase assures improvedsound continuity.
Using the high pass filterWhen you do not want low sounds from thesubwoofer output frequency range to playfrom the front or rear speakers, turn on theHPF (high pass filter). Only frequencies higherthan those in the selected range are outputtedfrom the front or rear speakers.
Muting the speaker units (filters)You can mute front and rear speaker units (fil-ters) separately. When speaker units (filters)are muted, no sound is outputted from thosespeakers.
! If you mute the selected speaker unit (fil-ter), MUTE ON is displayed and no adjust-ments are possible.
! Even if any speaker unit (filter) is muted,you can adjust the parameters for otherspeaker units (filters).
1 Use MULTI-CONTROL to selectFront HPF (or Rear HPF).Front HPF (or Rear HPF) appears in the dis-play.
2 Push and hold MULTI-CONTROL downto mute the selected speaker unit (filter).MUTE ON is displayed.# To cancel the muting, pushMULTI-CONTROLup.
Setting the high pass filter forfront speakers1 Use MULTI-CONTROL to selectFront HPF.Front HPF appears in the display.
2 Push MULTI-CONTROL left or right toselect slope.Each timeMULTI-CONTROL is pushed left orright, slopes are selected in the followingorder:–12— –6—Pass (0) (dB/oct.)# If you set the slope to 0 dB/oct. (Pass), theaudio signal bypasses the filter, so the filter doesnot have an effect.
3 Turn MULTI-CONTROL to selectFront HPF FREQ.Front HPF FREQ. appears in the display.
4 Push MULTI-CONTROL left or right toselect cut-off frequency.Each timeMULTI-CONTROL is pushed left orright, cut-off frequencies are selected in thefollowing order:
Audio Adjustments
En 75
English
Section
13

50—63—80—100—125—160—200 (Hz)Only frequencies higher than those in the se-lected range are output from the front speak-ers.
5 Push MULTI-CONTROL up or down toadjust the output level of the front speak-ers.Each timeMULTI-CONTROL is pushed up ordown, the level of the front speakers increasesor decreases. 0 to –24 is displayed as the levelis increased or decreased.
Setting the high pass filter forrear speakers1 Use MULTI-CONTROL to selectRear HPF.Rear HPF appears in the display.
2 Push MULTI-CONTROL left or right toselect slope.Each timeMULTI-CONTROL is pushed left orright, slopes are selected in the followingorder:–12— –6—Pass (0) (dB/oct.)# If you set the slope to 0 dB/oct. (Pass), theaudio signal bypasses the filter, so the filter doesnot have an effect.
3 Turn MULTI-CONTROL to selectRear HPF FREQ.Rear HPF FREQ. appears in the display.
4 Push MULTI-CONTROL left or right toselect cut-off frequency.Each timeMULTI-CONTROL is pushed left orright, cut-off frequencies are selected in thefollowing order:50—63—80—100—125—160—200 (Hz)Only frequencies higher than those in the se-lected range are output from the rear speak-ers.
5 Push MULTI-CONTROL up or down toadjust the output level of the rear speak-ers.Each timeMULTI-CONTROL is pushed up ordown, the level of the rear speakers increasesor decreases. 0 to –24 is displayed as the levelis increased or decreased.
Using the auto-equalizerThe auto-equalizer is the equalizer curve cre-ated by auto TA and EQ (refer to Auto TA andEQ (auto-time alignment and auto-equalizing)on page 80).You can turn the auto-equalizer on or off.
1 Use MULTI-CONTROL to select Auto EQ.Auto EQ appears in the display.# Please set Auto EQ appears. This indicatesthat you cannot turn the auto-equalizer on if autoTA and EQ has not been carried out.
2 Press MULTI-CONTROL to turn the auto-equalizer on.ON appears in the display.# To turn auto-equalizer off, pressMULTI-CONTROL again.
Using the equalizerThe equalizer lets you adjust the equalizationto match car interior acoustic characteristicsas desired.
Recalling equalizer curvesThere are seven stored equalizer curves whichyou can easily recall at any time. Here is a listof the equalizer curves:
Audio Adjustments
En76
Section
13

Display Equalizer curve
Powerful Powerful
Natural Natural
Vocal Vocal
Flat Flat
Custom1 Custom 1
Custom2 Custom 2
Super Bass Super bass
! Custom1 and Custom2 are adjusted equal-izer curves that you create. Adjustmentscan be made with a 16-band graphic equal-izer.
! When Flat is selected no supplement orcorrection is made to the sound. This isuseful to check the effect of the equalizercurves by switching alternatively betweenFlat and a set equalizer curve.
% Press EQ to select the equalizer.Press EQ repeatedly to switch between the fol-lowing equalizers:Powerful—Natural—Vocal—Flat—Custom1—Custom2—Super Bass
Adjusting equalizer curvesThe factory supplied equalizer curves, with theexception of Flat, can be adjusted to a fine de-gree (nuance control).
1 Use MULTI-CONTROL to select the gra-phic equalizer adjustment.Powerful appears in the display.# If the equalizer curve has been previously se-lected, the curve of that previously selected willbe displayed instead of Powerful.
2 Push MULTI-CONTROL left or right toselect an equalizer curve.Each timeMULTI-CONTROL is pushed left orright, equalizer curves are selected in the fol-lowing order:Powerful—Natural—Vocal—Flat—Custom1—Custom2—Super Bass
3 Push MULTI-CONTROL up or down toadjust the equalizer curve.Each timeMULTI-CONTROL is pushed up ordown, the equalizer curve increases or de-creases respectively.+6 to –6 is displayed as the equalizer curve isincreased or decreased.# The actual range of the adjustments are differ-ent depending on which equalizer curve is se-lected.# The equalizer curve with all frequencies set to0 cannot be adjusted.
Adjusting 16-band graphicequalizerFor Custom1 and Custom2 equalizer curves,you can adjust the level of each band.! A separate Custom1 curve can be created
for each source. (The built-in CD player andthe multi-CD player are set to the sameequalizer adjustment setting automati-cally.) If you make adjustments when acurve other than Custom2 is selected, theequalizer curve settings will be memorizedin Custom1.
! A Custom2 curve can be created commonto all sources. If you make adjustmentswhen the Custom2 curve is selected, theCustom2 curve will be updated.
1 Recall the equalizer curve you want toadjust.See Recalling equalizer curves on the previouspage.
Audio Adjustments
En 77
English
Section
13

2 Use MULTI-CONTROL to select 16-bandgraphic equalizer adjustment.FREQ. appears in the display.
3 Push MULTI-CONTROL left or right toselect the equalizer band to adjust.Each timeMULTI-CONTROL is pushed left orright, equalizer bands are selected in the fol-lowing order:20—31.5—50—80—125—200—315—500—800—1.25k—2k—3.15k—5k—8k—12.5k—20k (Hz)
4 Push MULTI-CONTROL up or down toadjust the level of the equalizer band.Each timeMULTI-CONTROL is pushed up ordown, the level of the equalization band in-creases or decreases.+6 to –6 is displayed as the level is increasedor decreased.# You can then select another band and adjustthe level.
5 Press BAND to cancel the 16-band gra-phic equalizer adjustment.
Using BBE soundWith BBE, playback very close to the originalsound can be obtained by correction with acombination of phase compensation andhigh-range boost for the delay of the high-fre-quency components and the amplitude devia-tion occurring during playback. This functionmakes it possible to reproduce the dynamicsound field as if you are listening to a live per-formance.With BBE sound processing technology, youcan adjust the level of BBE.
1 Use MULTI-CONTROL to select BBE.BBE appears in the display.
2 Press MULTI-CONTROL to turn BBE on.# To turn BBE off, pressMULTI-CONTROLagain.
3 Push MULTI-CONTROL up or down toadjust the level of BBE.Each timeMULTI-CONTROL is pushed up ordown, the level of BBE increases or decreases.+4 to –4 is displayed as the level is increasedor decreased.
Note
Manufactured under license from BBE Sound,Inc. The mark BBE is a trademark of BBE Sound,Inc.
Using compression and BMXUsing the COMP (compression) and BMXfunctions let you adjust the sound playbackquality of this unit. Each of the functions has atwo-step adjustment. The COMP function bal-ances the output of louder and softer soundsat higher volumes. BMX controls sound rever-berations to give playback a fuller sound. Lis-ten to each of the effects as you selectthrough them and use the one that best en-hances the playback of the track or CD thatyou are listening to.! When tuner, television or AUX is selected
as a source, you cannot selectCOMP/BMX.
1 Use MULTI-CONTROL to selectCOMP/BMX.COMP/BMX appears in the display.
2 Press MULTI-CONTROL to turn COMP/BMX on.# To turn COMP/BMX off, pressMULTI-CONTROL again.
Audio Adjustments
En78
Section
13

3 Push MULTI-CONTROL left or right toselect the desired setting.Each timeMULTI-CONTROL is pushed left orright, settings are selected in the followingorder:COMP 1—COMP 2—BMX 1—BMX 2
Adjusting loudnessLoudness compensates for deficiencies in thelow- and high-sound ranges at low volume.
1 Use MULTI-CONTROL to selectLoudness.Loudness appears in the display.
2 Press MULTI-CONTROL to turn loudnesson.ON appears in the display.# To turn loudness off, pressMULTI-CONTROLagain.
Adjusting source levelsSLA (source level adjustment) lets you adjustthe volume level of each source to prevent ra-dical changes in volume when switching be-tween sources.! Settings are based on the FM tuner volume
level, which remains unchanged.
1 Compare the FM tuner volume levelwith the level of the source you wish to ad-just.
2 Use MULTI-CONTROL to select SLA.SLA appears in the display.# When selecting the FM tuner as the source,you cannot switch to SLA.
3 Push MULTI-CONTROL up or down toadjust the source volume.Each timeMULTI-CONTROL is pushed up ordown, source volume increases or decreases.+4 to –4 is displayed as the source volume isincreased or decreased.
Notes
! The AM tuner volume level can also be ad-justed with source level adjustments.
! The built-in CD player and the multi-CD playerare set to the same source level adjustmentvolume automatically.
! External unit 1 and external unit 2 are set tothe same source level adjustment volumeautomatically.
Using auditory user interfaceAUI (auditory user interface) lets you adjustthe volume level of AUI sounds output whenoperating this unit. Depending on the opera-tions, different AUI sounds are output.! No AUI sounds are output when the
sources are off.! No AUI sounds are output when the level is
set to 0.
1 Use MULTI-CONTROL to selectAUI sound level.AUI sound level appears in the display.
2 Push MULTI-CONTROL up or down toadjust AUI sound level.Each timeMULTI-CONTROL is pushed up ordown, AUI sound level increases or decreases.Level 0 to Level 12 is displayed as AUI soundlevel is increased or decreased.
Audio Adjustments
En 79
English
Section
13
Auto TA and EQ (auto-timealignment and auto-equalizing)The auto-time alignment is automatically ad-justed for the distance between each speakerand the listening position.The auto-equalizer automatically measuresthe car interior acoustic characteristics, andthen creates the auto-equalizer curve basedon that information.
WARNINGTo prevent accidents, never carry out auto TA andEQ while driving. When this function measuresthe car interior acoustic characteristics to createan auto-equalizer curve, a loud measurementtone (noise) may be outputted from the speakers.
CAUTION! Carrying out auto TA and EQ under the follow-
ing conditions may damage the speakers. Besure to check the conditions thoroughly be-fore carrying out auto TA and EQ.— When speakers are incorrectly connected.
(e.g., When a rear speaker is connected toa subwoofer output.)
— When a speaker is connected to a poweramp delivering output higher than thespeaker’s maximum input power capabil-ity.
! If the microphone is placed in an unsuitableposition the measurement tone may becomeloud and measurement may take a long time,resulting in a drain on battery power. Be sureto place the microphone in the specified loca-tion.
Before operating the auto TAand EQ function! Carry out auto TA and EQ in as quiet a
place as possible, with the car engine andair conditioning switched off. Also cutpower to car phones or portable telephonesin the car, or remove them from the car be-fore carrying out auto TA and EQ. Soundsother than the measurement tone (sur-rounding sounds, engine sound, tele-phones ringing etc.) may prevent correctmeasurement of the car interior acousticcharacteristics.
! Be sure to carry out auto TA and EQ usingthe supplied microphone. Using anothermicrophone may prevent measurement, orresult in incorrect measurement of the carinterior acoustic characteristics.
! When front speaker is not connected, autoTA and EQ cannot be carried out.
! When muting the front speaker units, autoTA and EQ cannot be carried out. (Refer topage 75.)
! When this unit is connected to a poweramp with input level control, auto TA andEQ may not be possible if you lower poweramp input level. Set the power amp’s inputlevel to the standard position.
! When this unit is connected to a poweramp with an LPF, turn off the LPF on thepower amp before carrying out auto TA andEQ. In addition, the cut-off frequency forbuilt-in LPF of an active subwoofer shouldbe set to the highest frequency.
! The time alignment value calculated byauto TA and EQ may differ from the actualdistance in the following circumstances.However, the distance has been calculatedby computer to be the optimum delay togive accurate results for the circum-stances, so please continue to use thisvalue.— When the reflected sound within a vehi-
cle is strong and delays occur.
Audio Adjustments
En80
Section
13

— When delays occur for low sounds dueto the influence of the LPF on activesubwoofers or external amps.
! Auto TA and EQ changes the audio settingsas below:— The fader/balance settings return to the
center position. (Refer to page 72.)— The graphic equalizer curve switches to
Flat. (Refer to page 76.)— When a subwoofer is connected to this
unit, it will be adjusted automatically toboth subwoofer output and high pass fil-ter setting for rear speaker.
! If you carry out auto TA and EQ when a pre-vious setting of this already exists, the set-ting will be replaced.
Carrying out auto TA and EQ
CAUTIONNever use the microphone for hands-free phon-ing to operate the auto TA and EQ. Using the mi-crophone unfit for the auto TA and EQ maydamage the speaker. Be sure to connect theAUTO TA&EQ microphone into the microphoneinput jack.
1 Stop the car in a place that is as quietas possible, close all doors, windows andthe sun roof, and then turn the engine off.If the engine is left running, engine noise mayprevent correct auto TA and EQ.
2 Fix the supplied microphone in the cen-ter of the headrest of the driver’s seat, fa-cing forward, using the belt (soldseparately).The auto TA and EQ may differ depending onwhere you place the microphone. If desired,place the microphone on the front passengerseat to carry out auto TA and EQ.
3 Turn the ignition switch to ON or ACC.If the car’s air conditioner or heater is turnedon, turn it off. Noise from the fan in the airconditioner or heater may prevent correct autoTA and EQ.# Press SOURCE to turn the source on if thisunit is turned off.
4 Select the position for the seat onwhich the microphone is placed.Refer to Using the position selector on page72.# If no position is selected before you start autoTA and EQ, Front Left is selected automatically.
5 Press SOURCE and hold until the unitturns off.If anything is connected to the microphoneinput jack, disconnect it.
6 Press and hold EQ to enter the auto TAand EQ measurement mode.
7 Plug the microphone into the micro-phone input jack on this unit.
AUTO TA&EQ microphone
Audio Adjustments
En 81
English
Section
13

8 Press MULTI-CONTROL to start the autoTA and EQ.
9 Get out of the car and close the doorwithin 10 seconds when the 10-secondcount-down starts.The measurement tone (noise) is outputtedfrom the speakers, and auto TA and EQ be-gins.# When all speakers are connected, auto TAand EQ is completed in about six minutes.# To stop auto TA and EQ, pressMULTI-CONTROL again.# To cancel auto TA and EQ part way through,press BAND.
10 When auto TA and EQ is completed,Setup complete is displayed.When correct measurement of car interioracoustic characteristics is not possible, anerror message is displayed. (Refer to Under-standing auto TA and EQ error messages onpage 93.)
11 Press BAND to cancel the auto TA andEQ mode.
12 Store the microphone carefully in theglove compartment.Store the microphone carefully in the glovecompartment or any other safe place. If themicrophone is subjected to direct sunlight foran extended period, high temperatures maycause distortion, color change or mal-function.
Audio Adjustments
En82
Section
13

Adjusting initial settings
111
Using the initial settings, you can customizevarious system settings to achieve optimal per-formance from this unit.
1 Function displayShows the function status.
1 Press SOURCE and hold until the unitturns off.
2 Press MULTI-CONTROL and hold untilLanguage select appears in the display.
3 Turn MULTI-CONTROL to select one ofthe initial settings.TurnMULTI-CONTROL clockwise or counter-clockwise to switch between the functions inthe following order:Language select (language selection)—Calendar (calendar)—Clock (clock)—FM tuning step (FM tuning step)—AM tuning step (AM tuning step)—Warning tone (warning tone)—Face auto open (face auto open)—AUX1(auxiliary input 1)—AUX2 (auxiliary input 2)—Dimmer (dimmer)—Brightness (brightness)—Digital ATT (digital attenuator)—Mute(sound muting/attenuation)—Demonstration(feature demo)—Reverse mode (reversemode)—Ever-scroll (ever scroll)—Calibration(RPM calibration)—BTAUDIO (Bluetoothaudio)—Pin code input (pin code input)—Phone reset (phone reset)Use the following instructions to operate eachparticular setting.# To cancel initial settings, press BAND.
Selecting the display languageFor your convenience, this unit equips multi-ple language display. You can select the lan-guage best suited to your first language.
1 Use MULTI-CONTROL to selectLanguage select.Language select appears in the display.
2 Press MULTI-CONTROL to select the lan-guage.Each press ofMULTI-CONTROL selects lan-guages in the following order:English—Español—Português
Setting the dateThe calender display adjusted in this mode ap-pears when the telephone source is selectedor sources and the feature demo are off.
1 Use MULTI-CONTROL to selectCalendar.Calendar appears in the display.
2 Push MULTI-CONTROL left or right toselect the segment of the calendar displayyou wish to set.Pushing MULTI-CONTROL left or right will se-lect one segment of the calendar display:Day—Month—YearAs you select segments of the calendar dis-play the segment selected will blink.
Initial Settings
En 83
English
Section
14

3 Push MULTI-CONTROL up or down toset the date.Pushing MULTI-CONTROL up will increasethe selected day, month or year. PushingMULTI-CONTROL down will decrease the se-lected day, month or year.
Setting the clockUse these instructions to set the clock.
1 Use MULTI-CONTROL to select Clock.Clock appears in the display.
2 Push MULTI-CONTROL left or right toselect the segment of the clock display youwish to set.Pushing MULTI-CONTROL left or right will se-lect one segment of the clock display:Hour—MinuteAs you select segments of the clock displaythe segment selected will blink.
3 Push MULTI-CONTROL up or down toset the clock.Pushing MULTI-CONTROL up will increasethe selected hour or minute. PushingMULTI-CONTROL down will decrease the se-lected hour or minute.
Notes
! You can match the clock to a time signal bypressingMULTI-CONTROL.— If the minute is 00 to 29, the minutes are
rounded down. (e.g., 10:18 becomes10:00.)
— If the minute is 30 to 59, the minutes arerounded up. (e.g., 10:36 becomes 11:00.)
! Even when the sources are off, the clock dis-play appears on the display. Pressing CLOCKwhen the sources and feature demo are off,turns the clock display on or off.
Setting the FM tuning stepThe FM tuning step employed by seek tuningcan be switched between 100 kHz, the presetstep, and 50 kHz.
1 Use MULTI-CONTROL to selectFM tuning step.FM tuning step appears in the display.
2 Press MULTI-CONTROL to select the FMtuning step.Pressing MULTI-CONTROL repeatedly willswitch the FM tuning step between 50 kHzand 100 kHz. The selected FM tuning step willappear in the display.
Note
If seek tuning is performed in 50 kHz steps, sta-tions may be tuned in imprecisely. Tune in the sta-tions with manual tuning or use seek tuningagain.
Setting the AM tuning stepThe AM tuning step can be switched between9 kHz, the preset step, and 10 kHz. Whenusing the tuner in North, Central or SouthAmerica, reset the tuning step from 9 kHz (531kHz to 1 602 kHz allowable) to 10 kHz (530 kHzto 1 640 kHz allowable).
1 Use MULTI-CONTROL to selectAM tuning step.AM tuning step appears in the display.
Initial Settings
En84
Section
14

2 Press MULTI-CONTROL to select the AMtuning step.Pressing MULTI-CONTROL repeatedly willswitch the AM tuning step between 9 kHz and10 kHz. The selected AM tuning step will ap-pear in the display.
Switching the warning toneIf the front panel is not detached from thehead unit within four seconds of turning offthe ignition, a warning tone will sound. Youcan turn off the warning tone.
1 Use MULTI-CONTROL to selectWarning tone.Warning tone appears in the display.
2 Press MULTI-CONTROL to turn warningtone on.ON appears in the display.# To turn warning tone off, pressMULTI-CONTROL again.
Switching the face auto openFor theft protection, the front panel opensautomatically and easily detaches. Face autoopen is on as a default.
1 Use MULTI-CONTROL to selectFace auto open.Face auto open appears in the display.
2 Press MULTI-CONTROL to turn the faceauto open on.ON appears in the display.# To turn the face auto open off, pressMULTI-CONTROL again.
Switching the auxiliary settingAuxiliary equipments connected to this unitcan be activated individually. Set each AUXsource to ON when using. About connectingor using auxiliary equipments, refer to Usingthe AUX source on page 89.
1 Use MULTI-CONTROL to select AUX1/AUX2.AUX1/AUX2 appears in the display.
2 Press MULTI-CONTROL to turn AUX1/AUX2 on.ON appears in the display.# To turn AUX off, pressMULTI-CONTROLagain.
Switching the dimmer settingTo prevent the display from being too bright atnight, the display is automatically dimmedwhen the car’s headlights are turned on. Youcan turn the dimmer on or off.
1 Use MULTI-CONTROL to select Dimmer.Dimmer appears in the display.
2 Press MULTI-CONTROL to turn dimmeron.ON appears in the display.# To turn dimmer off, pressMULTI-CONTROLagain.
Adjusting the brightnessYou can adjust the display brightness. Initiallythis mode is set to 24.
1 Use MULTI-CONTROL to selectBrightness.Brightness appears in the display.
Initial Settings
En 85
English
Section
14

2 Push MULTI-CONTROL left or right toadjust the brightness level.Each timeMULTI-CONTROL is pushed left orright, brightness level increases or decreases.0 to 31 is displayed as the level is increased ordecreased.# When dimmer is functioning, the brightnesslevel can be adjusted 0 to 21.
Correcting distorted soundWhen listening to a CD or other source onwhich the recording level is high, setting theequalizer curve level to high may result in dis-tortion. You can switch the digital attenuatorto low to reduce distortion.! Sound quality is better at the high setting
so this setting is usually used.
1 Use MULTI-CONTROL to selectDigital ATT.Digital ATT appears in the display.
2 Press MULTI-CONTROL to select the di-gital attenuator level.Pressing MULTI-CONTROL repeatedly willswitch between High (high) and Low (low)and that status will be displayed.
Switching the soundmuting/attenuationSound from this system is muted or attenu-ated automatically when the signal from theequipment with mute function is received.! The sound is muted or attenuated, MUTE
or ATT are displayed and no audio adjust-ment is possible.
! Sound from this system returns to normalwhen the muting or attenuation is can-celed.
1 Use MULTI-CONTROL to select Mute.Mute appears in the display.
2 Press MULTI-CONTROL to select the de-sired setting.PressMULTI-CONTROL repeatedly to switchbetween the following settings:
! TEL mute – Muting! 10dB ATT – Attenuation! 20dB ATT – Attenuation (20dB ATT has a
stronger effect than 10dB ATT)
Switching the feature demoThe feature demo automatically starts whenpower to this unit is turned off while the igni-tion switch is set to ACC or ON.
1 Use MULTI-CONTROL to selectDemonstration.Demonstration appears in the display.
2 Press MULTI-CONTROL to turn the fea-ture demo on.ON appears in the display.# To turn the feature demo off, pressMULTI-CONTROL again.
Notes
! Remember that if the feature demo continuesoperating when the car engine is turned off, itmay drain battery power.
! You can also turn on or off feature demo bypressing DISPLAY while this unit is turned off.For more details, see Feature demo mode onpage 10.
Initial Settings
En86
Section
14
Switching the reverse modeIf you do not perform an operation withinabout 30 seconds, screen indications start toreverse, and then continue reversing every 10seconds.
1 Use MULTI-CONTROL to selectReverse mode.Reverse mode appears in the display.
2 Press MULTI-CONTROL to turn the re-verse mode on.ON appears in the display.# To turn the reverse mode off, pressMULTI-CONTROL again.
Note
You can also turn on or off reverse mode by press-ing BAND while this unit is turned off. For moredetails, see Reverse mode on page 9.
Switching the Ever ScrollWhen Ever Scroll is set to ON, CD text infor-mation scrolls continuously in the display. Setto OFF if you prefer the information to scrolljust once.
1 Use MULTI-CONTROL to selectEver-scroll.Ever-scroll appears in the display.
2 Press MULTI-CONTROL to turn the EverScroll on.ON appears in the display.# To turn the Ever Scroll off, pressMULTI-CONTROL again.
Calibrating the RPMsFollow the instructions below to measure theRPM of your vehicle and records them. Bydoing this, the tachometer of this unit canwork properly.! Tachometer of this unit cannot work if you
do not perform the RPM calibration.! In some vehicles, the tachometer may not
work properly even if you performed theRPM calibration.
1 Park your vehicle in a safe place and besure to apply the parking brake.
2 Use MULTI-CONTROL to selectCalibration.Calibration appears in the display.
3 Keep RPMs of the engine at 4 000 rpmand press MULTI-CONTROL.To measure the RPM of your vehicle properly,keep RPMs of the engine at 4 000 rpm for afew seconds.When the RPM calibration is completed,Completed is displayed.# Some vehicles have a rev limiter that kicks inearly (e.g., 3 000 rpm) while parking. In this case,perform RPM measurement at 2 000 rpm.# To switch between 4000 rpm and 2000 rpm,pushMULTI-CONTROL left or right.
Activating the BTAudio sourceYou need to activate the BTAudio source inorder to use a Bluetooth audio player.
1 Use MULTI-CONTROL to selectBTAUDIO.BTAUDIO appears in the display.
Initial Settings
En 87
English
Section
14
2 Press MULTI-CONTROL to turn theBTAudio source on.ON appears in the display.# To turn the BTAudio source off, pressMULTI-CONTROL again.
Entering PIN code forBluetooth wireless connectionTo connect your cellular phone to this unit viaBluetooth wireless technology, you need toenter PIN code on your phone to verify theconnection. The default code is 0000, but youcan change this in this function.! With some Bluetooth audio players, you
may be required to enter to this unit in ad-vance PIN code of your Bluetooth audioplayer, in order to set this unit ready for aconnection from your Bluetooth audioplayer.
1 Use MULTI-CONTROL to selectPin code input.Pin code input appears in the display.
2 Push MULTI-CONTROL up or down toselect a number.Pushing MULTI-CONTROL up or downchanges the number.
3 Push MULTI-CONTROL right to movethe cursor to the next position.When the number you want is displayed, pushMULTI-CONTROL right to move the cursor tothe next position and then select the nextnumber. Push MULTI-CONTROL left to movebackwards in the display.
4 After inputting PIN code (up to 16 di-gits), press MULTI-CONTROL.PIN code you entered is now standby to bestored in memory.
When you press MULTI-CONTROL again onthe same display, the PIN code you entered isstored in this unit.# PusingMULTI-CONTROL right in the confir-mation display returns you to the PIN code inputdisplay, and you can change the PIN code.
Resetting the Bluetoothwireless technology moduleShould you need to, you can reset the built-inBluetooth wireless technology module. Thiswill also clear all memories set in the tele-phone source, including Phone Book entries,number presets, registration assignments andthe Call History.For instruction on this operation, refer to Clear-ing all memory on page 8.
Initial Settings
En88
Section
14
Turning the clock displayon or offYou can turn the clock display on or off.
% Press CLOCK to turn the clock displayon or off.Each press of CLOCK turns the clock displayon or off.
Note
Even when the sources are off, the clock displayappears on the display. Pressing CLOCK whenthe sources and feature demo are off, turns theclock display on or off.
Using the AUX sourceThis unit can control up to two auxiliary equip-ments such as VCR or portable devices (soldseparately). When connected, auxiliary equip-ments are automatically read in as AUXsources and assigned to AUX1 or AUX2. Therelationship between AUX1 and AUX2sources is explained below.
About AUX1 and AUX2You have two methods to connect auxiliaryequipments to this unit.
AUX1 source:When connecting auxiliary equipment using astereo mini plug cable
% Insert the stereo mini plug into theAUX input jack on this unit.For more details, refer to the installation man-ual.The allocation of this auxiliary equipment isautomatically set to AUX1.
AUX2 source:When connecting auxiliary equipment using anIP-BUS-RCA Interconnector (sold separately)
% Use an IP-BUS-RCA Interconnector suchas the CD-RB20/CD-RB10 (sold separetely)to connect this unit to auxiliary equipmentfeaturing RCA output.For more details, refer to the IP-BUS-RCA Inter-connector owner’s manual.The allocation of this auxiliary equipment isautomatically set to AUX2.# You can only make this type of connection ifthe auxiliary equipment has RCA outputs.
Selecting AUX as the source% Press SOURCE to select AUX (AUX1 orAUX2) as the source.Press SOURCE until AUX appears in the dis-play.# If the auxiliary setting is not turned on, AUXcannot be selected. For more details, see Switch-ing the auxiliary setting on page 85.
Setting the AUX titleThe title displayed for each AUX1 or AUX2source can be changed.
1 After you have selected AUX as thesource, use MULTI-CONTROL and selectFUNCTION to display Title Input.
2 Press DISPLAY to select the desiredcharacter type.Press DISPLAY repeatedly to switch betweenthe following character types:Alphabet (upper case), numbers and symbols—Alphabet (lower case)—European letters,such as those with accents (e.g. á, à, ä, ç)—Numbers and symbols
Other Functions
En 89
English
Section
15

3 Push MULTI-CONTROL up or down toselect a letter of the alphabet.Each timeMULTI-CONTROL is pushed up, al-phabet, numbers or symbols are displayed inascending order (A B C ...). Each timeMULTI-CONTROL is pushed down, letters aredisplayed in descending order.
4 Push MULTI-CONTROL right to movethe cursor to the next character position.When the letter you want is displayed, pushMULTI-CONTROL right to move the cursor tothe next position and then select the next let-ter. PushMULTI-CONTROL left to move back-wards in the display.
5 Move the cursor to the last position bypushing MULTI-CONTROL right after enter-ing the title.When you push MULTI-CONTROL right onemore time, the entered title is stored in mem-ory.
6 Press BAND to return to the playbackdisplay.
Using differententertainment displays
2222
333
1111
You can change the entertainment display tobe displayed on all sources.
1 Entertainment display nameShows name of the currently selected enter-tainment display.
2 Background display nameShows name of the currently selected back-ground display.
3 Source iconShows which source has been selected.! Jacket art of current folder is displayed
when playing an MP3/WMA/AAC/WAVdisc.
Setting the entertainment displayYou can change the entertainment display andtext color.! When you select Vehicle Dynamics 1,
Vehicle Dynamics 2 orVehicle Dynamics 3, perform the RPM ca-libration. Refer to Calibrating the RPMs onpage 87.
1 Press MULTI-CONTROL to display themain menu.FUNCTION, AUDIO and ENTERTAINMENTappear on the display.
Other Functions
En90
Section
15
2 Use MULTI-CONTROL to selectENTERTAINMENT.Turn to change the menu option; press to se-lect.
3 Turn MULTI-CONTROL to select a de-sired entertainment display.TurnMULTI-CONTROL clockwise or counter-clockwise to switch between the displays inthe following order:Standard (standard)—Visualizer1 (visualizer1)—Visualizer2 (visualizer 2)—Visualizer3 (vi-sualizer 3)—Visualizer4 (visualizer 4)—Visualizer5 (visualizer 5)—VisualizerRDM(random visualizer)—LevelMeter (level meter)—Spectrum Analyzer (spectrum analyzer)—Vehicle Dynamics 1 (vehicle dynamics pro-cessor 1)—Vehicle Dynamics 2 (vehicle dy-namics processor 2)—Vehicle Dynamics 3(vehicle dynamics processor 3)—Movie(movie screen)—Clock (entertainment clock)—OFF (entertainment display off)# You can also switch between the entertain-ment display by pressing ENTERTAINMENT onthe remote control.# When Standard is selected, source icon canbe turned on or off by pressing DISPLAY.
4 Push MULTI-CONTROL up or down toselect a desired text color.Each timeMULTI-CONTROL is pushed up ordown, the text color changes. You can selectthe text color from among 11 colors.# When Vehicle Dynamics 1,Vehicle Dynamics 2 or Vehicle Dynamics 3 isselected, you can choose the color of gauge ap-pearance from among five color combinations.# Texts are not displayed onMovie and OFF set-ting.
5 Press MULTI-CONTROL to determinethe entertainment display and text colorsetting.The choices you made on the color and the en-tertainment display are stored in memory andthe display reverts.
Setting the background displaySome entertainment displays allow you tochange the backgrounds. Try different back-grounds and colors (if available) until you findthe desirable background display setting forthe selected entertainment display.
1 Select an entertainment display whosebackground can be changed.If the entertainment display you selected isavailable for the background setting, andare displayed on the left and right side ofFRONT. Refer to Setting the entertainment dis-play on the previous page.
2 Push MULTI-CONTROL right to switchto the background display selection mode.
3 Turn MULTI-CONTROL to select a de-sired background.TurnMULTI-CONTROL clockwise or counter-clockwise to switch between the displays inthe following order:BGV1 (background visual 1)—BGV2 (back-ground visual 2)—BGV3 (background visual 3)—BGV4 (background visual 4)—BGV5 (back-ground visual 5)—BGP1 (background picture1)—BGP2 (background picture 2)—BGP3(background picture 3)—BGP4 (backgroundpicture 4)—BGP5 (background picture 5)—BGP6 (background picture 6)—BGP7 (back-ground picture 7)—BGP8 (background picture8)—Slideshow (slideshow)—Texture1 (tex-ture 1)—Texture2 (texture 2)—Texture3 (tex-ture 3)—Texture4 (texture 4)—OFF(background display off)
Other Functions
En 91
English
Section
15
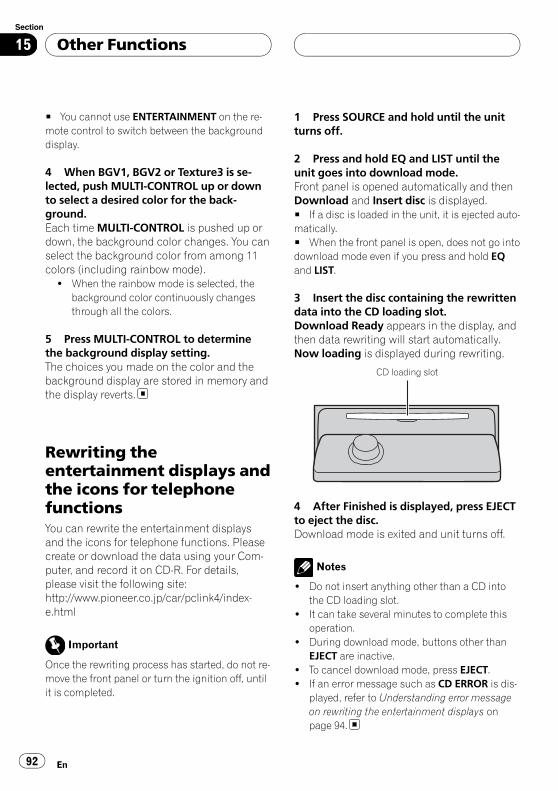
# You cannot use ENTERTAINMENT on the re-mote control to switch between the backgrounddisplay.
4 When BGV1, BGV2 or Texture3 is se-lected, push MULTI-CONTROL up or downto select a desired color for the back-ground.Each timeMULTI-CONTROL is pushed up ordown, the background color changes. You canselect the background color from among 11colors (including rainbow mode).
! When the rainbow mode is selected, thebackground color continuously changesthrough all the colors.
5 Press MULTI-CONTROL to determinethe background display setting.The choices you made on the color and thebackground display are stored in memory andthe display reverts.
Rewriting theentertainment displays andthe icons for telephonefunctionsYou can rewrite the entertainment displaysand the icons for telephone functions. Pleasecreate or download the data using your Com-puter, and record it on CD-R. For details,please visit the following site:http://www.pioneer.co.jp/car/pclink4/index-e.html
Important
Once the rewriting process has started, do not re-move the front panel or turn the ignition off, untilit is completed.
1 Press SOURCE and hold until the unitturns off.
2 Press and hold EQ and LIST until theunit goes into download mode.Front panel is opened automatically and thenDownload and Insert disc is displayed.# If a disc is loaded in the unit, it is ejected auto-matically.# When the front panel is open, does not go intodownload mode even if you press and hold EQand LIST.
3 Insert the disc containing the rewrittendata into the CD loading slot.Download Ready appears in the display, andthen data rewriting will start automatically.Now loading is displayed during rewriting.
CD loading slot
4 After Finished is displayed, press EJECTto eject the disc.Download mode is exited and unit turns off.
Notes
! Do not insert anything other than a CD intothe CD loading slot.
! It can take several minutes to complete thisoperation.
! During download mode, buttons other thanEJECT are inactive.
! To cancel download mode, press EJECT.! If an error message such as CD ERROR is dis-
played, refer to Understanding error messageon rewriting the entertainment displays onpage 94.
Other Functions
En92
Section
15
Understanding built-in CDplayer error messagesWhen you contact your dealer or your nearestPioneer Service Center, be sure to record theerror message.
Message Cause Action
ERROR-11, 12,17, 30
Dirty disc Clean disc.
ERROR-11, 12,17, 30
Scratched disc Replace disc.
ERROR-10, 11,12, 15, 17, 30,A0
Electrical or me-chanical
Turn the ignitionON and OFF, orswitch to a differ-ent source, thenback to the CDplayer.
ERROR-15 The inserted discdoes not containany data
Replace disc.
ERROR-23 The CD formatcannot be playedback
Replace disc.
NO AUDIO The inserted discdoes not containany files that canbe played back
Replace disc.
Track Skipped The inserted disccontains WMAfiles that are pro-tected by DRM
Replace disc.
PROTECT All the files onthe inserted discare secured byDRM
Replace disc.
Understanding auto TA andEQ error messagesWhen correct measurement of car interioracoustic characteristics is not possible usingthe auto TA and EQ, an error message may ap-pear on the display. If an error message ap-
pears, refer to the table below to see what theproblem is and the suggested method of cor-recting the problem. After checking, try again.
Message Cause Action
Check MICtype
Microphone isconnected to mi-crophone input.
Disconnect the mi-crophone.
MIC ERROR Microphone isnot connected.
Plug the suppliedmicrophone se-curely into thejack.
Front SpeakerERROR, Frontleft SpeakerERROR, Frontright SpeakerERROR, Rearleft SpeakerERROR, Rearright SpeakerERROR, Sub-wooferERROR, Sub-woofer LchERROR, Sub-woofer RchERROR
The microphonecannot pick upthe measuringtone of a speaker.
! Confirm that thespeakers are con-nected correctly.! Cancel mutingthe front speakerunits.! Correct the inputlevel setting of thepower amp con-nected to thespeakers.! Set the micro-phone correctly.
Noise ERROR The surroundingnoise level is toohigh.
! Stop your car ina place that is asquiet as possible,and switch off theengine, air condi-tioner or heater.! Set the micro-phone correctly.
Additional Information
En 93
English
Appendix
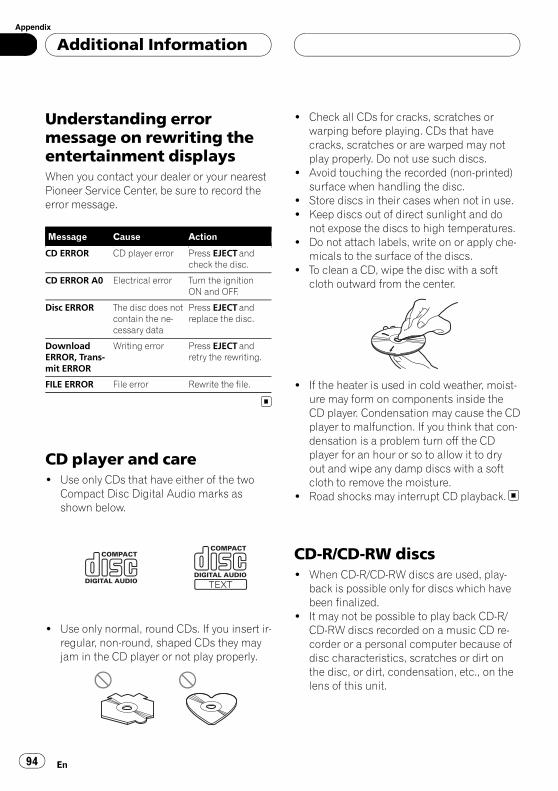
Understanding errormessage on rewriting theentertainment displaysWhen you contact your dealer or your nearestPioneer Service Center, be sure to record theerror message.
Message Cause Action
CD ERROR CD player error Press EJECT andcheck the disc.
CD ERROR A0 Electrical error Turn the ignitionON and OFF.
Disc ERROR The disc does notcontain the ne-cessary data
Press EJECT andreplace the disc.
DownloadERROR, Trans-mit ERROR
Writing error Press EJECT andretry the rewriting.
FILE ERROR File error Rewrite the file.
CD player and care! Use only CDs that have either of the two
Compact Disc Digital Audio marks asshown below.
! Use only normal, round CDs. If you insert ir-regular, non-round, shaped CDs they mayjam in the CD player or not play properly.
! Check all CDs for cracks, scratches orwarping before playing. CDs that havecracks, scratches or are warped may notplay properly. Do not use such discs.
! Avoid touching the recorded (non-printed)surface when handling the disc.
! Store discs in their cases when not in use.! Keep discs out of direct sunlight and do
not expose the discs to high temperatures.! Do not attach labels, write on or apply che-
micals to the surface of the discs.! To clean a CD, wipe the disc with a soft
cloth outward from the center.
! If the heater is used in cold weather, moist-ure may form on components inside theCD player. Condensation may cause the CDplayer to malfunction. If you think that con-densation is a problem turn off the CDplayer for an hour or so to allow it to dryout and wipe any damp discs with a softcloth to remove the moisture.
! Road shocks may interrupt CD playback.
CD-R/CD-RW discs! When CD-R/CD-RW discs are used, play-
back is possible only for discs which havebeen finalized.
! It may not be possible to play back CD-R/CD-RW discs recorded on a music CD re-corder or a personal computer because ofdisc characteristics, scratches or dirt onthe disc, or dirt, condensation, etc., on thelens of this unit.
Additional Information
En94
Appendix

! Playback of discs recorded on a personalcomputer may not be possible, dependingon the application settings and the environ-ment. Please record with the correct for-mat. (For details, contact the manufacturerof the application.)
! Playback of CD-R/CD-RW discs may be-come impossible in case of direct exposureto sunlight, high temperatures, or the sto-rage conditions in the vehicle.
! Titles and other text information recordedon a CD-R/CD-RW disc may not be dis-played by this unit (in the case of audiodata (CD-DA)).
! Read the precautions with CD-R/CD-RWdiscs before using them.
Dual Discs! Dual Discs are two-sided discs that have a
recordable CD for audio on one side and arecordable DVD for video on the other.
! Since the CD side of Dual Discs is not phy-sically compatible with the general CDstandard, it may not be possible to play theCD side with this unit.
! Frequent loading and ejecting of a DualDisc may result in scratches on the disc.Serious scratches can lead to playback pro-blems on this unit. In some cases, a DualDisc may become stuck in the disc loadingslot and will not eject. To prevent this, werecommend you refrain from using DualDisc with this unit.
! Please refer to the information from thedisc manufacturer for more detailed infor-mation about Dual Discs.
MP3, WMA, AAC and WAV files! MP3 is short for MPEG Audio Layer 3 and
refers to an audio compression technologystandard.
! WMA is short for Windows Media™ Audioand refers to an audio compression tech-nology that is developed by Microsoft Cor-poration. WMA data can be encoded byusing Windows Media Player version 7 orlater.
! AAC is short for Advanced Audio Codingand refers to an audio compression tech-nology standard.
! WAV is short for waveform. It is a standardaudio file format for Windows®.
! This unit may not operate correctly depend-ing on the application used to encodeWMA files.
! Depending on the version of WindowsMedia Player used to encode WMA files,album names and other text informationmay not be correctly displayed.
! There may be a slight delay when startingplayback of WMA/AAC files encoded withimage data.
! This unit allows playback of MP3/WMA/AAC/WAV files on CD-ROM, CD-R and CD-RW discs. Disc recordings compatible withlevel 1 and level 2 of ISO9660 and with theRomeo and Joliet file system can be playedback.
! It is possible to play back multi-sessioncompatible recorded discs.
! MP3/WMA/AAC/WAV files are not compati-ble with packet write data transfer.
! The maximum number of characters whichcan be displayed for a file name, includingthe extension (.mp3, .wma, .m4a or .wav), is64, from the first character.
! The maximum number of characters whichcan be displayed for a folder name is 64.
! In case of files recorded according to theRomeo file system, only the first 64 charac-ters can be displayed.
Additional Information
En 95
English
Appendix
! When playing discs with MP3/WMA/AAC/WAV files and audio data (CD-DA) such asCD-EXTRA and MIXED-MODE CDs, bothtypes can be played only by switchingmode between MP3/WMA/AAC/WAV andCD-DA.
! The folder selection sequence for playbackand other operations becomes the writingsequence used by the writing software. Forthis reason, the expected sequence at thetime of playback may not coincide with theactual playback sequence. However, therealso is some writing software which per-mits setting of the playback order.
! Some audio CDs contain tracks that mergeinto one another without a pause. Whenthese discs are converted to MP3/WMA/AAC/WAV files and burned to a CD-R/CD-RW/CD-ROM, the files will be played backon this player with a short pause betweeneach one, regardless of the length of thepause between tracks on the original audioCD.
Important
! When naming an MP3/WMA/AAC/WAV file,add the corresponding filename extension(.mp3, .wma, .m4a or .wav).
! This unit plays back files with the filename ex-tension (.mp3, .wma, m4a or .wav) as an MP3/WMA/AAC/WAV file. To prevent noise andmalfunctions, do not use these extensions forfiles other than MP3/WMA/AAC/WAV files.
MP3 additional information! Files are compatible with the ID3 Tag Ver.
1.0, 1.1, 2.2, 2.3 and 2.4 formats for displayof album (disc title), track (track title), artist(track artist) and comments. Ver. 2.x of ID3Tag is given priority when both Ver. 1.x andVer. 2.x exist.
! The emphasis function is valid only whenMP3 files of 32, 44.1 and 48 kHz frequen-cies are played back. (16, 22.05, 24, 32,44.1, 48 kHz sampling frequencies can beplayed back.)
! There is no m3u playlist compatibility.! There is no compatibility with the MP3i
(MP3 interactive) or mp3 PRO formats.! The sound quality of MP3 files generally be-
comes better with an increased bit rate.This unit can play recordings with bit ratesfrom 8 kbps to 320 kbps, but in order to beable to enjoy sound of a certain quality, werecommend using only discs recorded witha bit rate of at least 128 kbps.
WMA additional information! This unit plays back WMA files encoded by
Windows Media Player version 7, 7.1, 8, 9and 10.
! You can only play back WMA files in the fre-quencies 32, 44.1 and 48 kHz.
! The sound quality of WMA files generallybecomes better with an increased bit rate.This unit can play recordings with bit ratesfrom 48 kbps to 320 kbps (CBR) or from 48kbps to 384 kbps (VBR), but in order to beable to enjoy sound of a certain quality, werecommend using discs recorded with ahigher bit rate.
! This unit doesn’t support the following for-mats.— Windows Media Audio 9 Professional
(5.1ch)— Windows Media Audio 9 Lossless— Windows Media Audio 9 Voice
AAC additional information! This unit plays back AAC files encoded by
iTunes® version 4.8 and earlier.
Additional Information
En96
Appendix
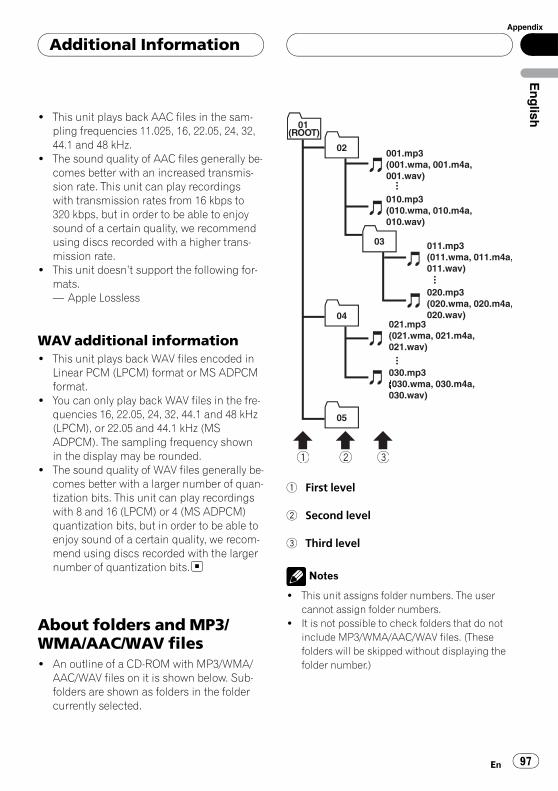
! This unit plays back AAC files in the sam-pling frequencies 11.025, 16, 22.05, 24, 32,44.1 and 48 kHz.
! The sound quality of AAC files generally be-comes better with an increased transmis-sion rate. This unit can play recordingswith transmission rates from 16 kbps to320 kbps, but in order to be able to enjoysound of a certain quality, we recommendusing discs recorded with a higher trans-mission rate.
! This unit doesn’t support the following for-mats.— Apple Lossless
WAVadditional information! This unit plays back WAV files encoded in
Linear PCM (LPCM) format or MS ADPCMformat.
! You can only play back WAV files in the fre-quencies 16, 22.05, 24, 32, 44.1 and 48 kHz(LPCM), or 22.05 and 44.1 kHz (MSADPCM). The sampling frequency shownin the display may be rounded.
! The sound quality of WAV files generally be-comes better with a larger number of quan-tization bits. This unit can play recordingswith 8 and 16 (LPCM) or 4 (MS ADPCM)quantization bits, but in order to be able toenjoy sound of a certain quality, we recom-mend using discs recorded with the largernumber of quantization bits.
About folders and MP3/WMA/AAC/WAV files! An outline of a CD-ROM with MP3/WMA/
AAC/WAV files on it is shown below. Sub-folders are shown as folders in the foldercurrently selected.
1 2 3
1 First level
2 Second level
3 Third level
Notes
! This unit assigns folder numbers. The usercannot assign folder numbers.
! It is not possible to check folders that do notinclude MP3/WMA/AAC/WAV files. (Thesefolders will be skipped without displaying thefolder number.)
Additional Information
En 97
English
Appendix

! MP3/WMA/AAC/WAV files in up to 8 tiers offolders can be played back. However, there isa delay in the start of playback on discs withnumerous tiers. For this reason we recom-mend creating discs with no more than 2tiers.
! It is possible to play back up to 99 folders onone disc.
Additional Information
En98
Appendix

TermsA2DPA2DP is short for Advanced Audio DistributionProfile. This profile allows the high qualityaudio data of either stereo or monaural to betransmitted via Bluetooth wireless technology.
AACAAC is short for Advanced Audio Coding andrefers to an audio compression technologystandard used with MPEG 2 and MPEG 4.
AVRCPAVRCP is short for Audio/Video Remote Con-trol Profile. This profile enables interoperabilitybetween audio and video features of the Blue-tooth device connected via Bluetooth wirelesstechnology.
Bit rateThis expresses data volume per second, or bps(bits per second) units. The higher the rate,the more information is available to reproducethe sound. Using the same encoding method(such as MP3), the higher the rate, the betterthe sound.
BluetoothBluetooth is a short-range wireless radio con-nectivity technology that is developed as acable replacement for mobile phones, hand-held PCs and other devices. Bluetooth oper-ates in 2.4 GHz frequency range and transmitsvoice and data at speeds up to 1 megabit persecond. Bluetooth was launched by a specialinterest group (SIG) that comprises of EricssonInc., Intel Corp., Nokia Corp., Toshiba and IBMin 1998, and it is currently developed by nearly2 000 companies worldwide.
GAPGAP is short for Generic Access Profile. This isa basic profile of Bluetooth wireless technol-ogy.
HFPHFP is short for Hands Free Profile. This profileis used for hands-free phoning with the de-vices featuring Bluetooth wireless technology.
HSPHSP is short for Head Set Profile. This profileis used for connecting headset and communi-cation terminal via Bluetooth wireless technol-ogy.
ID3 tagThis is a method of embedding track-relatedinformation in an MP3 file. This embedded in-formation can include the track title, the ar-tist’s name, the album title, the music genre,the year of production, comments and otherdata. The contents can be freely edited usingsoftware with ID3 Tag editing functions.Although the tags are restricted as to the num-ber of characters, the information can beviewed when the track is played back.
ISO9660 formatThis is the international standard for the for-mat logic of CD-ROM folders and files. For theISO9660 format, there are regulations for thefollowing two levels.Level 1:The file name is in 8.3 format (the name con-sists of up to 8 characters, half-byte Englishcapital letters and half-byte numerals and the“_” sign, with a file-extension of three charac-ters).Level 2:The file name can have up to 31 characters (in-cluding the separation mark “.” and a file ex-tension). Each folder contains less than 8hierarchies.Extended formatsJoliet:File names can have up to 64 characters.Romeo:File names can have up to 128 characters.
Additional Information
En 99
English
Appendix

Linear PCM (LPCM)/Pulse codemodulationThis stands for linear pulse code modulation,which is the signal recording system used formusic CDs and DVDs.
m3uPlaylists created using the “WINAMP” soft-ware have a playlist file extension (.m3u).
MP3MP3 is short for MPEG Audio Layer 3. It is anaudio compression standard set by a workinggroup (MPEG) of the ISO (International Stan-dards Organization). MP3 is able to compressaudio data to about 1/10th the level of a con-ventional disc.
MS ADPCMThis stands for Microsoft adaptive differentialpulse code modulation, which is the signal re-cording system used for the multimedia soft-ware of Microsoft Corporation.
Multi-sessionMulti-session is a recording method that al-lows additional data to be recorded later.When recording data on a CD-ROM, CD-R orCD-RW, etc., all data from beginning to end istreated as a single unit or session. Multi-ses-sion is a method of recording more than 2 ses-sions on one disc.
Number of quantization bitsThe number of quantization bits is one factorin the overall sound quality; the higher the“bit-depth”, the better the sound quality. How-ever, increasing the bit-depth also increasesthe amount of data and therefore storagespace required.
OPPOPP is short for Object Push Profile. This pro-file is used for transferring the phonebook
data, schedule data and so on between de-vices featuring Bluetooth wireless technology.
Packet writeThis is a general term for a method of writingon CD-R, etc., at the time required for a file,just as is done with files on floppy or harddiscs.
SDPSDP is short for Service Discovery Protocol.This protocol is to search for available servicesand service characteristics on other devicesfeaturing Bluetooth wireless technology.
VBRVBR is short for variable bit rate. Generallyspeaking CBR (constant bit rate) is morewidely used. But by flexibly adjusting the bitrate according to the needs of audio compres-sion, it is possible to achieve compression-priority sound quality.
WAVWAV is short for waveform. It is a standardaudio file format for Windows®.
WMAWMA is short for Windows Media™ Audioand refers to an audio compression technol-ogy that is developed by Microsoft Corpora-tion. WMA data can be encoded by usingWindows Media Player version 7 or later.Windows Media and the Windows logo are tra-demarks or registered trademarks of MicrosoftCorporation in the United States and/or othercountries.
Additional Information
En100
Appendix

SpecificationsGeneralRated power source ............... 14.4 V DC
(allowable voltage range:12.0 V to 14.4 V DC)
Grounding system ................... Negative typeMax. current consumption
..................................................... 10.0 ADimensions (W × H × D):
DINChassis ..................... 178 × 50 × 161 mmNose ........................... 188 × 58 × 23 mm
DChassis ..................... 178 × 50 × 166 mmNose ........................... 170 × 45 × 18 mm
Weight .......................................... 1.7 kg
Audio/DSPMaximum power output ....... 50 W × 4Continuous power output ... 22 W × 4 (50 Hz to 15 000
Hz, 5% THD, 4 W load, bothchannels driven)
Load impedance ...................... 4 W (4 W to 8 W allowable)Preout max output level/output impedance
..................................................... 5 V/100WLoudness contour ...................+10 dB (100 Hz), +6.5 dB
(10 kHz) (volume: –30 dB)Equalizer (16-Band Graphic Equalizer):
Frequency .......................... 20/31.5/50/80/125/200/315/500/800/1.25k/2k/3.15k/5k/8k/12.5k/20k Hz
Equalization range ........±12 dBAuto equalizer:
(Front & rear & subwoofer 16 band graphic)Frequency .......................... 20/31.5/50/80/125/200/315/
500/800/1.25k/2k/3.15k/5k/8k/12.5k/20k Hz
Equalization range ........+6 dB to –12 dBHPF (Front/rear):
Frequency .......................... 50/63/80/100/125/160/200Hz
Slope .................................... 0 (Pass)/–6/–12 dB/octGain ...................................... 0 dB to –24 dB/Mute
Subwoofer (stereo/mono):Frequency .......................... 50/63/80/100/125/160/200
HzSlope .................................... –6/–12/–18 dB/octGain ......................................+6 dB to –24 dB/MutePhase .................................. Normal/Reverse
CD playerSystem .......................................... Compact disc audio systemUsable discs .............................. Compact discSignal format:
Sampling frequency ..... 44.1 kHzNumber of quantization bits
........................................... 16; linearFrequency characteristics ... 5 Hz to 20 000 Hz (±1 dB)Signal-to-noise ratio ............... 100 dB (1 kHz) (IEC-A net-
work)Dynamic range ......................... 95 dB (1 kHz)Number of channels .............. 2 (stereo)MP3 decoding format ...........MPEG-1 & 2 Audio Layer 3WMA decoding format ......... Ver. 7, 7.1, 8, 9, 10 (2ch
audio)(Windows Media Player)
AAC decoding format ............MPEG-4 AAC (iTunes® en-coded only)
WAV signal format .................. Linear PCM & MS ADPCM
FM tunerFrequency range ...................... 87.5 MHz to 108.0 MHzUsable sensitivity ..................... 8 dBf (0.7 µV/75 W, mono,
S/N: 30 dB)50 dB quieting sensitivity ..... 10 dBf (0.9 µV/75 W, mono)Signal-to-noise ratio ............... 75 dB (IEC-A network)Distortion ..................................... 0.3 % (at 65 dBf, 1 kHz,
stereo)0.1 % (at 65 dBf, 1 kHz,mono)
Frequency response ............... 30 Hz to 15 000 Hz (±3 dB)Stereo separation .................... 45 dB (at 65 dBf, 1 kHz)
AM tunerFrequency range ...................... 531 kHz to 1 602 kHz (9 kHz)
530 kHz to 1 640 kHz (10kHz)
Usable sensitivity ..................... 18 µV (S/N: 20 dB)Signal-to-noise ratio ............... 65 dB (IEC-A network)
BluetoothVersion .......................................... Bluetooth 1.2 certifiedOutput power ............................+4 dBm Max.
(Power class 2)
Additional Information
En 101
English
Appendix

Profile ............................................ GAP (Generic Access Pro-file)SDP (Service Discovery Pro-tocol)HSP (Head Set Profile)HFP (Hands Free Profile)A2DP (Advanced Audio Dis-tribution Profile)AVRCP (Audio Video Re-mote Control Profile)OPP (Object Push Profile)
Infrared remote controlWavelength ................................. 940 nm ±50 nmOutput ........................................... typ; 12 mw/sr per Infrared
LED
Note
Specifications and the design are subject to pos-sible modifications without notice due to im-provements.
Additional Information
En102
Appendix

PIONEER CORPORATION4-1, MEGURO 1-CHOME, MEGURO-KU, TOKYO 153-8654, JAPAN
PIONEER ELECTRONICS (USA) INC.P.O. Box 1540, Long Beach, California 90801-1540, U.S.A.TEL: (800) 421-1404
PIONEER EUROPE NVHaven 1087, Keetberglaan 1, B-9120 Melsele, BelgiumTEL: (0) 3/570.05.11
PIONEER ELECTRONICS ASIACENTRE PTE. LTD.253 Alexandra Road, #04-01, Singapore 159936TEL: 65-6472-7555
PIONEER ELECTRONICS AUSTRALIA PTY. LTD.178-184 Boundary Road, Braeside, Victoria 3195, AustraliaTEL: (03) 9586-6300
PIONEER ELECTRONICS OF CANADA, INC.300 Allstate Parkway, Markham, Ontario L3R OP2, CanadaTEL: 1-877-283-5901
PIONEER ELECTRONICS DE MEXICO, S.A. de C.V.Blvd.Manuel Avila Camacho 138 10 pisoCol.Lomas de Chapultepec, Mexico, D.F. 11000TEL: 55-9178-4270
先鋒股份有限公司總公司 : 台北市中山北路二段44號13樓電話 : (02) 2521-3588
先鋒電子(香港)有限公司香港九龍尖沙咀海港城世界商業中心9樓901-6室電話 : (0852) 2848-6488
Published by Pioneer Corporation.Copyright © 2006 by Pioneer Corporation.All rights reserved.
Printed in Thailand
<CRB2179-A/N> ES<KMMZX> <06B00000>