
A1, A2, B1, B2, D2 60 Series 6 pin BP201DE All Dexter Cylinders Dexter/Master Master Door Locks...
28
www.pro-lok.com LIT-BP LIT-BP
Transcript of A1, A2, B1, B2, D2 60 Series 6 pin BP201DE All Dexter Cylinders Dexter/Master Master Door Locks...
www.pro-lok.com
LIT-BPLIT-BP

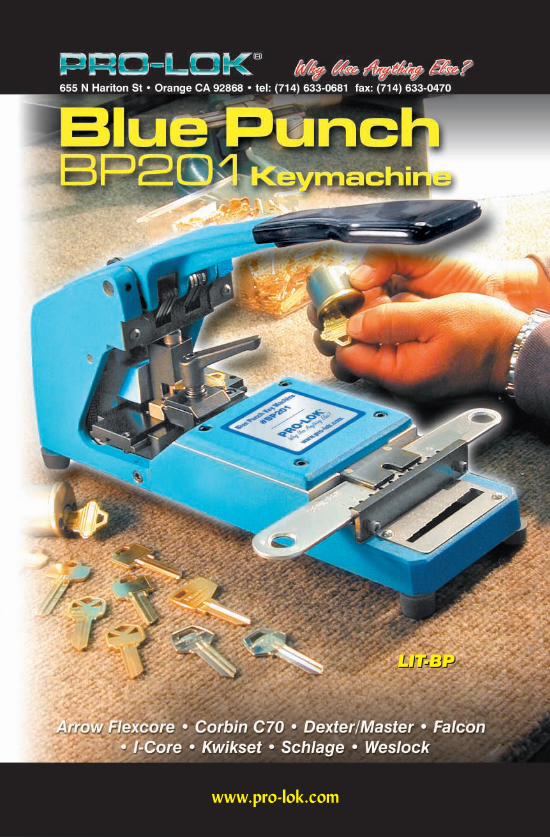
This Blue Punch Key Machine is heavy duty and built to last. Each machine is a dedicated punch machine designed to provide factory original keys. Creates keys with the speed of a duplicator. The Blue Punch is fast, extremely accurate and easy to use. The key machine is set up at the factory to provide automatic spacing and depth. The Blue Punch is an ideal key machine for the commercial locksmith, hotels, schools and other institutions. Fast and easy to use, this key machine is preci-sion machined to the tightest tolerances. Portable and dependable, hand-operated, no electrical outlet needed. The professional’s clear choice. The FASTEST and EASIEST punch machine on the market.
KURCHUNK! KURCHUNK! Any locksmith who has been in the business for any amount of time recognizes that sound. Punching a key with a bench-top code cutter produces a sound unique in our industry.
In fact, the familiar sound of the Blue Punch goes back to the 1960’s. Punching the cuts on a key instead of grinding is nothing new, but it’s a simple concept that has made a lot of locksmiths a lot of money.
At PRO-LOK, the idea of punching original code keys is alive and well. The company manufactures the Blue Punch Key Machine. As the leading manufacturer of bench-top punch machines, PRO-LOK knows why this concept is so popular - because it’s so simple. History proves the popularity.
The Blue Punch started out in the late 60’s as the Codemac 101 and later became famous as the Keymak. It eventually sold under the brand names Armbruster Key Punch, Automatic Security Machine (ASM), City Punch, Schlage 40126, Kwikset Keycutter #278, Falcon/Weiser 1214 and a few other labels. PRO-LOK bought all of the tooling, dies, castings, parts and pieces in late 1993 and began the detailed process of manufacturing this popular punch machine. Sold into the market for over 30 years, there are thousands of these machines out there in daily use and the demand contin-ues to be strong.
Although cosmetically the machine looks the same today as it did 30 years ago, countless technical improvements have been made to the original Blue Punch machine since the initial acquisition by PRO-LOK. All manufacturing is accomplished at PRO-LOK’s facility.
If you have one of the old Blue Punches needing service or repair, don’t just let it sit on a shelf. It’s a diamond in the rough. Call PRO-LOK for a Blue Punch Repair number. We repair and rebuild doz-ens of old Blue Punches each and every week. Any Blue Punch, by any name, is eligible and can be serviced at the PRO-LOK factory. Whether your punch machine needs a simple repair, complete rebuild, brand conversion, or simply cleaning and re-calibration/adjusting, we can do it. We’ll get your machine back to a productive status rapidly.
A Blue Punch is available to cut Schlage, Schlage Everest B, Schlage Everest C, Schlage Everest D, Schlage Reverse, Primus, Best/Falcon/Arrow IC-A2, IC-A3, IC-A4, Kwikset, Titan, Arrow-Flexcore, Falcon Standard (non-IC), Weiser, Master, Dexter, Weslock and Corbin System C70 keyways. Each Blue Punch machine is dedicated to cutting specific manufacturer’s brands. We have constant requests from both lock manufacturers and customers to build machines to punch other brands of keys. We are currently doing research to determine the feasibility of each request.
Most locksmiths own or have used a punch type key machine. Some have borrowed one and been reluctant to give it back to its rightful owner. Portable, compact and hand-powered, these machines can be operated in a shop, service vehicle or right at the customer’s door. Designed for the most common commercial and residential lock and key systems, these machines will punch out a key to factory specifications in a matter of just seconds. The ability to generate “original” keys (not duplicates) as needed allows you to issue your customer accurate, first generation keys on a simple rekey job. It also quickly generates extra original code keys for a master key system as you service each door on the job site.
THE BLUE PUNCH KEY MACHINE
1

Operation is amazingly simple. After the key blank is lightly clamped into the jaw, the machine is set to the first cut position and the key is firmly clamped. Choose the depth of the initial cut by sliding the code bar on the Blue Punch to the desired depth. Next, push the handle firmly down. Pushing firmly down on the handle does two things; it produces the familiar KURCHUNK sound while cutting through the blank, and it automatically advances the die carriage to the next cut position. Choose the second depth and push the handle down again. As you choose each succeeding depth, simply pushing the handle down advances it to the next position. In a matter of 5 to 10 seconds, an original code key has been generated. It’s quick, easy and accurate.
Once you get your hands on a PRO-LOK Blue Punch Machine you won’t want to ever let go. No more dead battery, no more extension cords. Position it, punch it and present it to your customer. Period.
No other punch machine on the market today comes close to the reliability, speed, accuracy, and durability that the PRO-LOK® Blue Punch offers you.
THE BLUE PUNCH KEY MACHINE
2

#BP-CASEBlue Punch Case
Protect your investment. Handy & Heavy-Duty carrying case. Provides easier and safer transportation for your Blue Punch Key Machine!
3
NEW!NEW!NEW!

BLUE PUNCH CLASSIFICATION
Blue Punch ClassificationBP201ARFC Arrow FlexcoreArrow Flexcore 51, 52, 53, 54, 61, 81, 83, 84 (Will cut A3 & A4 with purchase of code bar)
BP201C70 Most Popular Corbin System 70Corbin C70 59 Series A1, A2, B1, B2, D2 60 Series 6 pin
BP201DE All Dexter CylindersDexter/Master Master Door Locks
BP201FW Falcon Standard-non I/C (Will not cut 8 or 9 depths)Falcon Weiser All Weiser Cylinders
BP201IC A2 Standard I/C-Interchangeable Core I/C A2 System Best Small Format I/C A-R, TA-TE, W Falcon Small Format I/C A-R, TA-TE, W Arrow Small Format I/C 1A-4D Exclusions: Arrow Flexcore, Kaba Peaks, Insta-Key
BP201IC-A3 A3 System Interchangeable CoreI/C A3 System
BP201IC-A4 A4 System Interchangeable CoreI/C A4 System
BP201KW Kwikset StandardKwikset Titan (will not cut square first cut) Yale Residential
BP201SC Schlage Obverse key sections (including I/C)Schlage C, CE, E, EF, F, FG, G, H, J, K, L (L-aftermarket only)
Primus (same as obverse except a “P” is added)CP, CEP, EP, etc
Everest C (including I/C) C123, C124, C126, C135, C145 Everest Primus (uses same names)Exclusions: Numbered Key Sections, Quad Key Sections, Reverse KeySections, Everest B, Everest D
BP201SCEB Schlage Everest BSchlage Everest B B123, B125, B234, B235 and all others with a B+3 digits
(Will cut A3 & A4 with purchase of code bar)
BP201SCED Schlage Everest DSchlage Everest D D120, D123, D124, D134, D135, D145, D234, D235, D245, D345 and
all others with a D+3 digits
BP201SCRV Schlage Reverse Key SectionsSchlage Reverse D, DQ, Q, QS, S, T, U, V, W & Y
BP201WK All Weslock Cylinders Weslock
4

®
98
76
54
32
10
QUALITYTOOLS
BLUE PUNCH #BP201
PR
O-LO
K®
98
76
54
32
10
CODE BAR
DIE CARRIAGE
BOT OM JAW
DEPTH CUT NUMBER
FEET
COVER PLA TE
KEY GAUGE
HANDLE HANDLE
TOP JAW
PRO-LO
K TOO
S & ACCESSORIES
ORANG
E, CA 92868
T
BP201Diagram:
5

BP201ARFCArrow Flexcore
• Arrow Flexcore - A2 System 51, 52, 53, 54, 61, 81, 83, 84
INSTRUCTIONS
Note: A3 & A4 code bars are available for purchase. Depth adjustment will be necessary when changing code bars from A2 to A3 or A4.Note: For reliable bittings, you SHOULD USE factory original keyblanks or high quality blanks from reliable aftermarket manufacturers.If the machine is not cutting accurately, simple space and depth adjustments are outlined in this booklet. Call the PRO-LOK factory for further technical assistance.
1. Install Code Bar from left side of machine.2. With handle up, move Die Carriage to the far RIGHT.3. Loosen Top Jaw by turning “L” handle counter clock-
wise. 4. Place key in jaw from LEFT side. Locate top jaw in
Bottom Milled Groove of key. 5. Place the tip of the key against the tip stop on the
bottom jaw and tighten “L” handle. Note: Arrow Flexcore cuts tip to bow.6. To cut key, move Code Bar to Depth Cut Number
desired for the first position. Depress the handle all the way, in a quick, downward motion. Die Carriage automatically indexes to the next key cut position as the handle returns to the upright position.
7. Select depth of second position. Cut and repeat operation for each depth cut number required.
8. Remove key, check depth of each cut in Key Gauge. Test in cylinder.
Read all instructions carefully before cutting keys. This machine has been manufactured and machined to close tolerances. Adjustments should not be required as machine has been set to factory specifica-tions during assembly.
6

BP201C70CORBIN C70
• Most popular Corbin System 70 Keyways• 59 series A1, A2, B1, B2, D2 • 60 series 6 pin
INSTRUCTIONS
Note: For reliable bittings, you SHOULD USE factory original keyblanks or high quality blanks from reliable aftermarket manufacturers.If the machine is not cutting accurately, simple space and depth adjustments are outlined in this booklet Call the PRO-LOK factory for further technical assistance.
1. Install Code Bar from left side of machine.2. With handle up, move Die Carriage to the far LEFT.3. Loosen Top Jaw by turning “L” handle counter clock-
wise. 4. Place key in jaw from LEFT side. Locate top jaw in
Bottom Milled Groove of key.5. Place the Key Shoulder Stop against the die and
tighten “L” handle. Note: Corbin cuts bow to tip.6. To cut key, move Code Bar to Depth Cut Number
desired for the first position. Depress the handle all the way, in a quick, downward motion. Die Carriage automatically indexes to the next key cut position as the handle returns to the upright position.
7. Select depth of second position. Cut and repeat operation for each depth cut number required.
8. Remove key, check depth of each cut in Key Gauge. Test in cylinder.
Read all instructions carefully before cutting keys. This machine has been manufactured and machined to close tolerances. Adjustments should not be required as machine has been set to factory specifica-tions during assembly.
7

BP201DEDEXTER & MASTER
• All Dexter Cylinders • Master Door Locks
INSTRUCTIONS
Note: For reliable bittings, you SHOULD USE factory original keyblanks or high quality blanks from reliable aftermarket manufacturers.If the machine is not cutting accurately, simple space and depth adjustments are outlined in this booklet. Call the PRO-LOK factory for further technical assistance.
1. Install Code Bar from left side of machine.2. With handle up, move Die Carriage to the far LEFT.3. Loosen Top Jaw by turning “L” handle counter clock-
wise. 4. Place key in jaw from LEFT side. Locate top jaw in
Bottom Milled Groove of key.5. Place the Key Shoulder Stop against the stop on the
bottom jaw and tighten “L” handle. Note: Master/Dexter cuts bow to tip. 6. To cut key, move Code Bar to Depth Cut Number
desired for the first position. Depress the handle all the way, in a quick, downward motion. Die Carriage automatically indexes to the next key cut position as the handle returns to the upright position.
7. Select depth of second position. Cut and repeat operation for each depth cut number required.
8. Remove key, check depth of each cut in Key Gauge. Test in cylinder.
Read all instructions carefully before cutting keys. This machine has been manufactured and machined to close tolerances. Adjustments should not be required as machine has been set to factory specifica-tions during assembly.
8

BP201FWFALCON & WEISER
• All Weiser Cylinders• Falcon Standard (non I/C) *These key blanks are very thick and use very hard mate-rial. Cutting #8 and #9 depths will distort the key blank. A #8 or #9 depth can be achieved by cutting a #4 depth and then backspace to recut. Then, set the codebar at #8 or #9 depth for the desired cut. This avoids punching through too much material at one time.
INSTRUCTIONS
Note: For reliable bittings, you SHOULD USE factory original keyblanks or high quality blanks from reliable aftermarket manufacturers.If the machine is not cutting accurately, simple space and depth adjustments are outlined in this booklet. Call the PRO-LOK factory for further technical assistance.
1. Install Code Bar from left side of machine.2. With handle up, move Die Carriage to the far LEFT.3. Loosen Top Jaw by turning “L” handle counter clock-
wise. 4. Place key in jaw from LEFT side. Locate top jaw in
Bottom Milled Groove of key. 5. Place the Key Shoulder Stop against the stop on the
bottom jaw and tighten “L” handle. Note: Falcon/Weiser cuts bow to tip.6. To cut key, move Code Bar to Depth Cut Number
desired for the first position. Depress the handle all the way, in a quick, downward motion. Die Carriage automatically indexes to the next key cut position as the handle returns to the upright position.
7. Select depth of second position. Cut and repeat operation for each depth cut number required.
8. Remove key, check depth of each cut in Key Gauge. Test in cylinder.
Read all instructions carefully before cutting keys. This machine has been manufactured and machined to close tolerances. Adjustments should not be required as machine has been set to factory specifica-tions during assembly.
9

BP201ICA2 Standard
Interchangeable Core• Best small format I/C,
A thru R, TA thru TE, W• Falcon small format I/C
A thru R, TA thru TE, W• Arrow small format I/C, 1A thru 4D Note: A3 & A4 code bars are available for purchase. Depth adjust-ment will be necessary when changing code bars from A2 to A3 or A4. Dedicated ICA3 & ICA4 machines available also.
Specific Exclusions:Arrow Flexcore, Kaba Peaks, Insta-Key
INSTRUCTIONS
Note: For reliable bittings, you SHOULD USE factory original keyblanks or high quality blanks from reliable aftermarket manufacturers. If the machine is not cutting accurately, simple space and depth adjustments are outlined in this booklet. Call the PRO-LOK factory for further technical assistance.
1. Install Code Bar from left side of machine.2. With handle up, move Die Carriage to the far RIGHT.3. Loosen Top Jaw by turning “L” handle counter clock-
wise. 4. Place key in jaw from LEFT side. Locate top jaw in
Bottom Milled Groove of key. 5. Place the tip of the key against the tip stop on the
bottom jaw and tighten “L” handle. Note: I/C cuts tip to bow.
6. To cut key, move Code Bar to Depth Cut Number desired for the first position. Depress the handle all the way, in a quick, downward motion. Die Carriage automatically indexes to the next key cut position as the handle returns to the upright position.
7. Select depth of second position. Cut and repeat operation for each depth cut number required.
8. Remove key, check depth of each cut in Key Gauge. Test in cylinder.
Read all instructions carefully before cutting keys. This machine has been manufactured and machined to close tolerances. Adjustments should not be required as machine has been set to factory specifica-tions during assembly.
10

BP201KWKWIKSET
• Kwikset Standard• Yale Residential• Titan (will not cut Titan square 1st cut)
INSTRUCTIONS
Note: For reliable bittings, you SHOULD USE factory original keyblanks or high quality blanks from reliable aftermarket manufacturers.If the machine is not cutting accurately, simple space and depth adjustments are outlined in this booklet. Call the PRO-LOK factory for further technical assistance.
1. Install Code Bar from left side of machine.2. With handle up, move Die Carriage to the far LEFT.3. Loosen Top Jaw by turning “L” handle counter clock-
wise. 4. Place key in jaw from LEFT side. Locate top jaw in
Bottom Milled Groove of key. 5. Place the Key Shoulder Stop against the die and
tighten “L” handle. Note: Kwikset cuts bow to tip.
6. To cut key, move Code Bar to Depth Cut Number desired for the first position. Depress the handle all the way, in a quick, downward motion. Die Carriage automatically indexes to the next key cut position as the handle returns to the upright position.
7. Select depth of second position. Cut and repeat operation for each depth cut number required.
8. Remove key, check depth of each cut in Key Gauge. Test in cylinder.
Read all instructions carefully before cutting keys. This machine has been manufactured and machined to close tolerances. Adjustments should not be required as machine has been set to factory specifica-tions during assembly.
11

BP201SCSCHLAGE
• Schlage Classic (including IC) Obverse key sections only:C, CE, E, EF, F, FG, G, H, J, K
(L aftermarket blanks only)• Primus - Same key sections as obverse - add “P” e.g. CP,
CEP, EP, EFP, etc.• Schlage Everest C - (inlcuding IC) key sections e.g.
C123, C124, C126, C135, C145 and all other keys with C+3 digits
• Everest Primus - uses same namesExclusions: Numbered key section, Quad key sections, Reverse key sections, Everest-B key sections (B+3 digits), Everest-D key sections (D+3 digits)
INSTRUCTIONS
NOTE: For reliable bittings, you SHOULD USE Factory Original keyblanks or high quality blanks from reliable after-market manu-facturers are acceptable in some keyways. If the machine is not cutting accurately, simple space and depth adjustments are outlined in this booklet Call the PRO-LOK factory for further technical assistance.
1. Install Code Bar from left side of machine.2. With handle up, move Die Carriage to the far RIGHT.3. Loosen Top Jaw by turning “L” handle counter clock-
wise. 4. Place key in jaw from RIGHT side. Locate top jaw in
Bottom Milled Groove of key.5. Place the Key Shoulder Stop against the stop on the
bottom jaw and tighten “L” handle. Note: Schlage cuts bow to tip.6. To cut key, move Code Bar to Depth Cut Number
desired for the first position. Depress the handle all the way, in a quick, downward motion. Die Carriage automatically indexes to the next key cut position as the handle returns to the upright position.
7. Select depth of second position. Cut and repeat operation for each depth cut number required.
8. Remove key, check depth of each cut in Key Gauge. Test in cylinder.
Read all instructions carefully before cutting keys. This machine has been manufactured and machined to close tolerances. Adjustments should not be required as machine has been set to factory specifica-tions during assembly.
12
SCHLAGE BLUE PUNCH INFORMATION
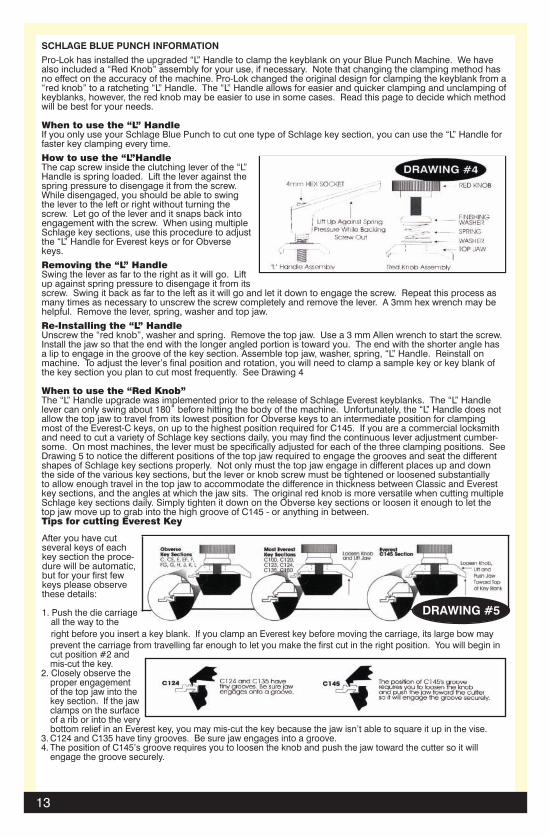
Pro-Lok has installed the upgraded “L” Handle to clamp the keyblank on your Blue Punch Machine. We have also included a “Red Knob” assembly for your use, if necessary. Note that changing the clamping method has no effect on the accuracy of the machine. Pro-Lok changed the original design for clamping the keyblank from a “red knob” to a ratcheting “L” Handle. The “L” Handle allows for easier and quicker clamping and unclamping of keyblanks, however, the red knob may be easier to use in some cases. Read this page to decide which method will be best for your needs.
When to use the “L” HandleIf you only use your Schlage Blue Punch to cut one type of Schlage key section, you can use the “L” Handle for faster key clamping every time.
How to use the “L”HandleThe cap screw inside the clutching lever of the “L” Handle is spring loaded. Lift the lever against the spring pressure to disengage it from the screw. While disengaged, you should be able to swing the lever to the left or right without turning the screw. Let go of the lever and it snaps back into engagement with the screw. When using multiple Schlage key sections, use this procedure to adjust the “L” Handle for Everest keys or for Obverse keys.
Removing the “L” HandleSwing the lever as far to the right as it will go. Lift up against spring pressure to disengage it from its screw. Swing it back as far to the left as it will go and let it down to engage the screw. Repeat this process as many times as necessary to unscrew the screw completely and remove the lever. A 3mm hex wrench may be helpful. Remove the lever, spring, washer and top jaw.
Re-Installing the “L” HandleUnscrew the “red knob”, washer and spring. Remove the top jaw. Use a 3 mm Allen wrench to start the screw. Install the jaw so that the end with the longer angled portion is toward you. The end with the shorter angle has a lip to engage in the groove of the key section. Assemble top jaw, washer, spring, “L” Handle. Reinstall on machine. To adjust the lever’s final position and rotation, you will need to clamp a sample key or key blank of the key section you plan to cut most frequently. See Drawing 4
When to use the “Red Knob”The “L” Handle upgrade was implemented prior to the release of Schlage Everest keyblanks. The “L” Handle lever can only swing about 180˚ before hitting the body of the machine. Unfortunately, the “L” Handle does not allow the top jaw to travel from its lowest position for Obverse keys to an intermediate position for clamping most of the Everest-C keys, on up to the highest position required for C145. If you are a commercial locksmith and need to cut a variety of Schlage key sections daily, you may find the continuous lever adjustment cumber-some. On most machines, the lever must be specifically adjusted for each of the three clamping positions. See Drawing 5 to notice the different positions of the top jaw required to engage the grooves and seat the different shapes of Schlage key sections properly. Not only must the top jaw engage in different places up and down the side of the various key sections, but the lever or knob screw must be tightened or loosened substantially to allow enough travel in the top jaw to accommodate the difference in thickness between Classic and Everest key sections, and the angles at which the jaw sits. The original red knob is more versatile when cutting multiple Schlage key sections daily. Simply tighten it down on the Obverse key sections or loosen it enough to let the top jaw move up to grab into the high groove of C145 - or anything in between.Tips for cutting Everest Key
After you have cut several keys of each key section the proce-dure will be automatic, but for your first few keys please observe these details:
1. Push the die carriage all the way to the right before you insert a key blank. If you clamp an Everest key before moving the carriage, its large bow may prevent the carriage from travelling far enough to let you make the first cut in the right position. You will begin in cut position #2 and mis-cut the key.
2. Closely observe the proper engagement of the top jaw into the key section. If the jaw clamps on the surface of a rib or into the very bottom relief in an Everest key, you may mis-cut the key because the jaw isn’t able to square it up in the vise.
3. C124 and C135 have tiny grooves. Be sure jaw engages into a groove.4. The position of C145’s groove requires you to loosen the knob and push the jaw toward the cutter so it will
engage the groove securely.
DRAWING #5
13

BP201SCEBSchlage Small Format
Everest B• Schlage Everest B Key sections: A2 System, B123, B125, B234, B235, and all other keys with B+3 digits
INSTRUCTIONS
Note: A3 & A4 code bars are available for purchase. Depth adjustment will be necessary when changing code bars from A2 to A3 or A4.NOTE: For reliable bittings, you SHOULD USE SCHLAGE Factory Original Keyblanks or high quality blanks from reliable aftermarket manufacturers are acceptable in some keyways.If the machine is not cutting accurately, simple space and depth adjustments are outlined in this booklet. Call the PRO-LOK factory for further technical assistance.
1. Install Code Bar from left side of machine.2. With handle up, move Die Carriage to the far LEFT.3. Loosen Top Jaw by turning “L” handle counter clock-
wise. 4. Place key in jaw from RIGHT side. Locate top jaw in
Bottom Milled Groove of key. 5. Place the Key Shoulder Stop against the stop on the
bottom jaw and tighten “L” handle. Note: Schlage Everest B cuts tip to bow.6. To cut key, move Code Bar to Depth Cut Number
desired for the first position. Depress the handle all the way, in a quick, downward motion. Die Carriage automatically indexes to the next key cut position as the handle returns to the upright position.
7. Select depth of second position. Cut and repeat operation for each depth cut number required.
8. Remove key, check depth of each cut in Key Gauge. Test in cylinder.
Read all instructions carefully before cutting keys. This machine has been manufactured and machined to close tolerances. Adjustments should not be required as machine has been set to factory specifica-tions during assembly.
14

15
BP201SCEDSchlage
Everest D• Schlage Everest D Key sections: D120, D123, D124, D134, D135, D145, D234, D235, D245,
D345 and all other keys with D+3 digits
INSTRUCTIONS
NOTE: For reliable bittings, you SHOULD USE SCHLAGE Factory Original Keyblanks or high quality blanks from reliable aftermarket manufacturers are acceptable in some keyways.If the machine is not cutting accurately, simple space and depth adjustments are outlined in this booklet. Call the PRO-LOK factory for further technical assistance.
1. Install Code Bar from left side of machine.2. With handle up, move Die Carriage to the far RIGHT.3. Loosen Top Jaw by turning “L” handle counter clock-
wise. 4. Place key in jaw from RIGHT side. Locate top jaw in
Bottom Milled Groove of key. 5. Place the Key Shoulder Stop against the stop on the
bottom jaw and tighten “L” handle. Note: Schlage Everest D cuts bow to tip.6. To cut key, move Code Bar to Depth Cut Number
desired for the first position. Depress the handle all the way, in a quick, downward motion. Die Carriage automatically indexes to the next key cut position as the handle returns to the upright position.
7. Select depth of second position. Cut and repeat operation for each depth cut number required.
8. Remove key, check depth of each cut in Key Gauge. Test in cylinder.
Read all instructions carefully before cutting keys. This machine has been manufactured and machined to close tolerances. Adjustments should not be required as machine has been set to factory specifica-tions during assembly.

BP201SCRVSCHLAGE REVERSE
• Schlage Reverse Sections: D, DQ, Q, QS, S, ST, T, U, V, W, & Y
INSTRUCTIONS
Note: For reliable bittings, you SHOULD USE Factory Original Keyblanks or high quality blanks from reliable aftermarket manufacturers are acceptable in some keyways.If the machine is not cutting accurately, simple space and depth adjustments are outlined in this booklet. Call the PRO-LOK factory for further technical assistance.
1. Install Code Bar from left side of machine.2. With handle up, move Die Carriage to the far LEFT.3. Loosen Top Jaw by turning “L” handle counter clock-
wise. 4. Place key in jaw from LEFT side. Locate top jaw in
Bottom Milled Groove of key.5. Place the Key Shoulder Stop against the stop on the
bottom jaw and tighten “L” handle. Note: Schlage Reverse cuts bow-to-tip 6. To cut key, move Code Bar to Depth Cut Number
desired for the first position. Depress the handle all the way, in a quick, downward motion. Die Carriage automatically indexes to the next key cut position as the handle returns to the upright position.
7. Select depth of second position. Cut and repeat operation for each depth cut number required.
8. Remove key, check depth of each cut in Key Gauge. Test in cylinder.
Read all instructions carefully before cutting keys. This machine has been manufactured and machined to close tolerances. Adjustments should not be required as machine has been set to factory specifica-tions during assembly.
16

BP201WKWESLOCK
• All Weslock Cylinders
INSTRUCTIONS
Note: For reliable bittings, you SHOULD USE factory original keyblanks or high quality blanks from reliable aftermarket manufacturers.If the machine is not cutting accurately, simple space and depth adjustments are outlined in this booklet Call the PRO-LOK factory for further technical assistance.
1. Install Code Bar from left side of machine.2. With handle up, move Die Carriage to the far LEFT.3. Loosen Top Jaw by turning “L” handle counter clock-
wise. 4. Place key in jaw from LEFT side. Locate top jaw in
Bottom Milled Groove of key.5. Place the Key Shoulder Stop against the die and
tighten “L” handle. Note: Weslock cuts bow to tip. 6. To cut key, move Code Bar to Depth Cut Number
desired for the first position. Depress the handle all the way, in a quick, downward motion. Die Carriage automatically indexes to the next key cut position as the handle returns to the upright position.
7. Select depth of second position. Cut and repeat operation for each depth cut number required.
8. Remove key, check depth of each cut in Key Gauge. Test in cylinder.
Read all instructions carefully before cutting keys. This machine has been manufactured and machined to close tolerances. Adjustments should not be required as machine has been set to factory specifica-tions during assembly.
17

Photo 4
Photo 3
Photo 2
Photo 1
Basic Operation1. Install code bar from left side of
machine (see photo 1).
2. Slide code bar to desired cut depth for first cut.
3. With handle up, move die carriage to the far:
a. RIGHT for Schlage and I/C b. LEFT for all others
4. Loosen top jaw by rotating the “L” handle counter-clockwise
5. Place the key in the jaw (see photo 2) from the:
a. RIGHT for Schlage and I/C b. LEFT for all others
6. Locate the key blank milling in the groove on the bottom side of the top jaw (see photo 3). Slide the key blank in as far as possible.
7. Tighten “L” handle by rotating clock-wise.
8. Depress the handle to cut the first cut (see photo 4).
9. Slide the code bar to next depth desired. Spacing is automatic.
10. Depress handle.
18

1. Remove the code bar from the ma-chine to allow adequate working room in the engine area.
2. Remove the “L” handle assembly (see photo #1) by inserting a 3mm Allen wrench in top screw to hold “L” handle screw. Rotate the “L” handle counter-clockwise to the 9 o’clock position. Remove Allen wrench and lift the “L” handle and return to the 3 o’clock position. Release the “L” handle and continue this process of rotating counter-clockwise, lifting, rotating clockwise, releasing until the “L” handle is removed from the ma-chine. Remember to remove the Allen wrench from screw on each clockwise rotation.
3. Remove top jaw. See photo #1.
4. Loosen the 2 Allen head cap screws (1 complete turn) (see photo #2) with a 5/32 Allen wrench on the bottom jaw in order to allow play in the bottom jaw to adjust.
5. Move the carriage all the way to the right for SC and IC, to the left for all others.
NOTE: There is a spacer shim under the bottom jaw. Be sure not to displace it. Make sure that the shim is not sticking out on either side of the bottom jaw. Adjust shim as neces-sary.
Photo 2
Photo 1
Spacing AdjustmentInstructions:
19
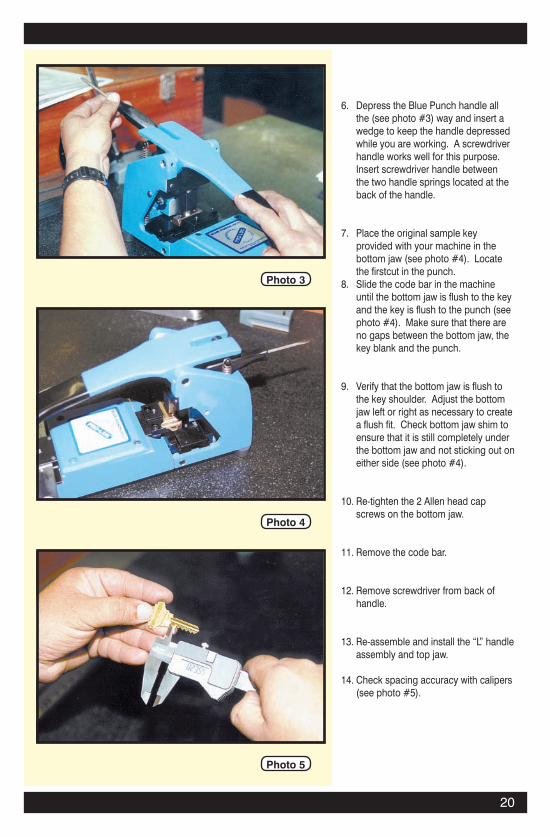
6. Depress the Blue Punch handle all the (see photo #3) way and insert a wedge to keep the handle depressed while you are working. A screwdriver handle works well for this purpose. Insert screwdriver handle between the two handle springs located at the back of the handle.
7. Place the original sample key provided with your machine in the bottom jaw (see photo #4). Locate the firstcut in the punch.
8. Slide the code bar in the machine until the bottom jaw is flush to the key and the key is flush to the punch (see photo #4). Make sure that there are no gaps between the bottom jaw, the key blank and the punch.
9. Verify that the bottom jaw is flush to
the key shoulder. Adjust the bottom jaw left or right as necessary to create a flush fit. Check bottom jaw shim to ensure that it is still completely under the bottom jaw and not sticking out on either side (see photo #4).
10. Re-tighten the 2 Allen head cap screws on the bottom jaw.
11. Remove the code bar.
12. Remove screwdriver from back of handle.
13. Re-assemble and install the “L” handle assembly and top jaw.
14. Check spacing accuracy with calipers (see photo #5).
Photo 3
Photo 4
Photo 5
20

1. Remove “L” handle assembly and top jaw from machine. Remove the “L” handle assembly by inserting a 3mm Allen wrench in top screw to hold “L” handle screw. Rotate the “L” handle counter-clockwise to the 9 o’clock position. Remove Allen wrench and lift the “L” handle and return to the 3 o’clock posi-tion. Release the “L” handle and continue this process of rotating counter-clockwise, lifting, rotat-ing clockwise, releasing until the “L” handle is removed from the machine. Remember to remove the Allen wrench from screw on each clockwise rotation. See photo #1.
2. Loosen the top right screw on the top plate. See photo #2.
3. Remove the three other screws on the top plate.
4. Rotate the top plate to the right 90o counter-clockwise. The bottom left corner of the top plate should be placed to that it is slightly overlapping the slide block. See photo #2.
5. Tighten the top right screw in the top plate to keep the top plate stationary while you work. See photo #2.
6. Advance the carriage 3 spaces.
7. Depress the Blue Punch handle all the way and insert a wedge to keep the handle depressed while you are working. A screw-driver handle works well for this purpose. Insert
Depth AdjustmentInstructions:
Photo 2
Photo 1
Photo 3
21

screwdriver handle between the two handle springs located at the back of the handle. See photo #3.
8. Insert the original sample key in the bottom jaw. Locate the 3rd cut at the punch. See photo #4.
9. Using a 1/8” Allen wrench, loosen the 2 screws on the depth adjustment plate 1/4 turn. See photo #4.
10. Re-insert the code bar to the depth cut #5. See photo #5.
11. Using a key blank head or a standard head screwdriver in the slot above the screws on the depth adjustment plate, lift the slide block to raise the key blank 3rd cut flush against the punch. See photo #5.
12. Using a 1/8” Allen wrench, re-tighten the 2 screws in the depth adjustment plate about 1/4 turn.
13. Remove the code bar. Remove the key blank. Remove the screwdriver from the back of the handle.
14. Loosen the top right top plate screw. Put top plate back in proper position. Re-install the 4 top plate screws.
15. Re-install the top jaw/handle assembly.
16. Check depth adjustment accu-racy with a micrometer (see photo #6).
Photo 6
Photo 5
Photo 4
22

USING THE “L” HANDLE ASSEMBLYPRO-LOK has installed the upgraded “L” handle to clamp the key blank on your Blue Punch ma-chine. The “L” handle assembly is a ratcheting handle. The “L” handle allows for easier and quicker key clamping and unclamping of key blanks than the old style red knob.
HOW TO USE THE “L” HANDLE1. The cap screw inside the clutching lever of the “L” handle is spring loaded.
2. Lift the lever against spring pressure to disengage it from the screw.
3. While disengaged, you should be able to swing the lever to the left or right without turning the screw.
4. Let go of the lever and it snaps back into engagement with the screw.
REMOVING THE “L” HANDLE1. Remove the “L” handle assembly by inserting a 3mm Allen wrench in top screw to hold “L” handle
screw.
2. Rotate the “L” handle counter-clockwise to the 9 o’clock position.
3. Remove Allen wrench and lift the “L” handle and return to the 3 o’clock position.
4. Release the “L” handle re-insert Allen wrench and continue this process of rotating counter-clock-wise, lifting, rotating clockwise, releasing until the “L” handle is removed from the machine. Remember to remove the Allen wrench from screw on each clockwise rotation.
RE-INSTALLING THE “L” HANDLE1. Install the top jaw so that the end with the longer angled portion is toward you. The end with the
shorter angle has a lip to engage in the milling of the key section.
2. Assemble the top jaw, washer, spring, “L” handle.
3. Place screw in position on the bottom jaw.
4. With the “L” handle lever to the right, use a 3mm Allen wrench to hold the screw in position.
5. Rotate the handle clockwise to tighten.
6. Remove Allen wrench.
7. Lift the “L” handle and rotate counter-clockwise.
8. Release “L” handle.
9. Rotate “L” handle clockwise to tighten.
10. Repeat until tight.
11. To adjust the “L” handle’s final position and rotation, you will need to clamp a sample key or key blank of the key section you plan to cut most frequently.
BLUE PUNCH “L” HANDLE ASSEMBLY
23

#BP-CASEBlue Punch Case Factory Service
Your machine comes with a full 90 day warranty parts & labor. Be sure to fill out and return your enclosed warranty card along with a copy of your invoice.Is your Blue Punch Key Machine not working accurately? Is it just not cutting as easily as it used to? Is your “cutter” dull? Did you lose or misplace your code bar? Does your machine need to be ad-justed for spacing or depth? If you are experiencing any of these problems, call PRO-LOK® for fac-tory service. Regardless of who manufactured your machine or how old it is, we can fix it up for you! Return your machine for a factory rebuild and get your machine back in almost like-new condition. See below for your choice of repair/upgrade options to choose from. Prior to returning your machine, call PRO-LOK® for a BPR# (Blue Punch Repair #). Be prepared to provide the Style of Machine, Se-rial # of Your Machine, and the Type Of Service You Are Requesting. Be sure to send your code bar with your machine. The machine cannot be adjusted without it.
BPSER - Basic ServiceIncludes: dis-assembly, cleaning, lubricating, sharpen punch & die if needed, finish hardware, re-adjustment to factory specifications and all labor. (Parts needing replacement will be at an additional price.)90 Day Warranty parts and labor.
BPCONV - ConversionWhen you need your machine converted from one manufacturer’s keyway to another (i.e.: SC to IC) send it in for a factory conversion. Includes: All parts normally required to convert from one style to another, top jaw/handle assembly upgrade, finish hardware, re-adjustment to factory specifications and all labor. Any repair or replacement of other parts will be at an additional charge. 90 Day War-ranty parts and labor.
BPRBLD - Factory RebuildIncludes: dis-assembly, cleaning, lubricating, a completely new engine, finish hardware, re-adjustment to factory specifications and all labor. (Does not include casted parts or code bar). This service is done on older Blue Punch machines regardless of who manufactured them or how they old are. 90 Day Warranty parts and labor.
ZBP500-ASSY - Top Jaw/Handle Assembly UpgradeNew improved adjustable ratchet lever handle design and installation hardware. Advantages of the upgrade include easier key clamping, clamps key tighter, and a heavy duty top jaw 3 times heavier than the old style. Available for all styles of Blue Punch Machines.
• ZBP500-ARFC-ASSY Top jaw / L handle assembly upgrade for BP201ARFC
• ZBP500-C70-ASSY Top jaw / L handle assembly upgrade for BP201C70
• ZBP500-FW-ASSY Top jaw / L handle assembly upgrade for BP201FW/KW
• ZBP500-IC-ASSY Top jaw / L handle assembly upgrade for BP201IC/DE/WK
• ZBP500-SC-ASSY Top jaw / L handle assembly upgrade for BP201SC
Contact PRO-LOK® for any service or technical questions at (714) 633-0681 or visit our website at www.pro-lok.com
BLUE PUNCH SERVICE
24

The Killer JigWhat makes the PRO-LOK Killer Jig so special?
PRO-LOK decided to design our new Killer Jig for many reasons. We felt that a profes-sional high quality jig was needed that was both light in actual weight while maintaining the high quality that professional installers expect. Also, versatility and speed were important qualities that we wanted to incorporate into our design. As a result, PRO-LOK is proud of our latest addition to our installation tool line of products.
25
#INJIG-KJ

Other Products...INJIG-MORT
INSTALLATION TEMPLATESWho can install a vertical rod panic bar and outside trim in less than 1 hour? You can … with the PRO-LOK® IN-Series Templates. Easy-to-Use, fast, precise and durable. We have assembled a group of installation templates that are all used with our Universal Clamp. You will get exacting accuracy and finished work in the same time as it takes others just to set up. Every time you use a PRO-LOK® template, your installation time will be faster, your installations more precise and professional looking. Time is money. The PRO-LOK® IN-Series Templates may be the best investment you ever make! *Reverse templates are available for the back side of the door. You can cut your time in half by not having to switch over when you are done with one side. Reverse templates also prevent splintering the back side of the door when drilling.
The new jig incorporates unique Quick Change Cutters which allow the cutters to be changed in seconds, without remov-ing the jig from the door. This means that both the full lock body and face-plate can be cut out with ease. The mortise hole is automatically centered on the door and accurate results are obtained every time. No other combination of tools can produce such fast and accurate mortise installations. The jig and its precision cutters will cut a mortise in hard wood, soft wood, composite doors and with the use of special cutters, aluminum doors as well, all in under five minutes!
Mortise Lock Installation Jig
#INCL
#INCLA
Cuts a lock mortise in under 5 minutes!
26
#INEXT5

©2007. ALL RIGHTS RESERVED. PRO-LOK® IS A REGISTERED TRADEMARK OF WEINRAUB ENTERPRISES, INC.