A Water Wall Intro - Build-It-Solar
29
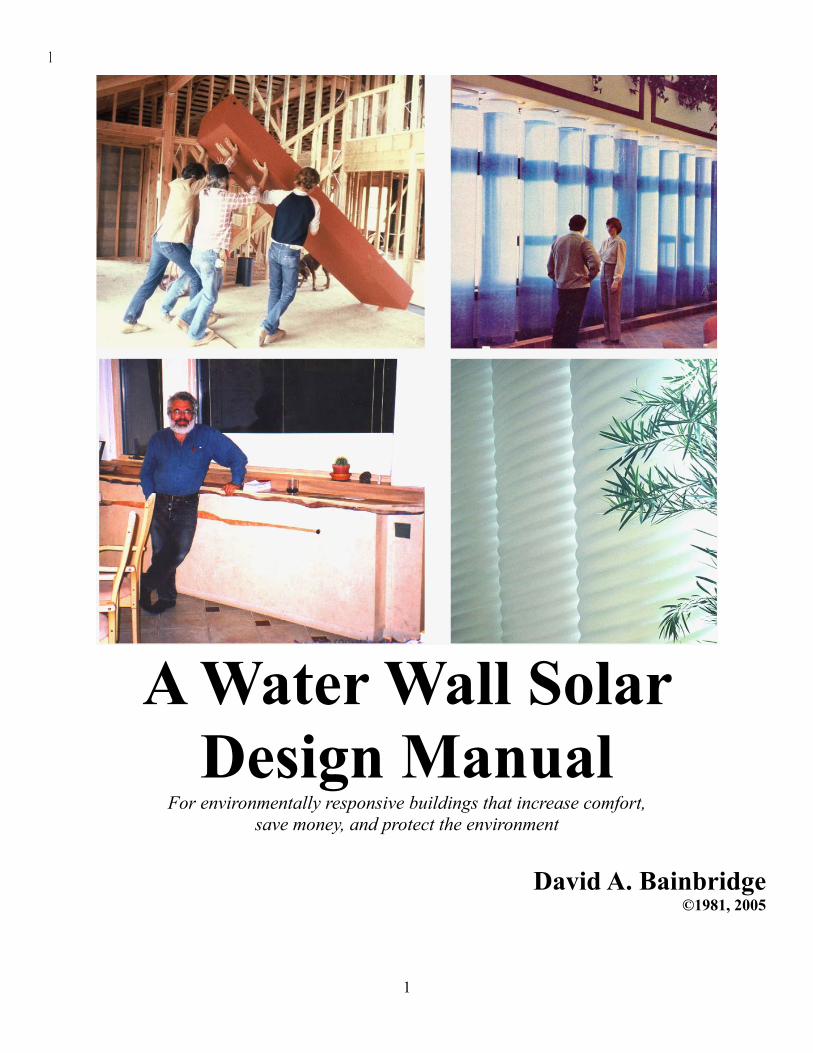
1 1 A Water Wall Solar Design Manual For environmentally responsive buildings that increase comfort, save money, and protect the environment David A. Bainbridge ©1981, 2005
Transcript of A Water Wall Intro - Build-It-Solar
1
1
A Water Wall Solar
Design Manual For environmentally responsive buildings that increase comfort,
save money, and protect the environment
David A. Bainbridge ©1981, 2005
2
2
TABLE OF CONTENTS
..............................................................................................................................................................................................................................................................1
A WATER WALL SOLAR .............................................................................................................................................................................................1
DESIGN MANUAL..............................................................................................................................................................................................................1 TABLE OF CONTENTS.............................................................................................................................................................................................................................................................................. 2 Build your own water wall home or office complex ............................................................................................................................................................................................................. 3
PREFACE ...................................................................................................................................................................................................................................3
Acknowledgements and apologies........................................................................................................................................................................................................................................................... 4
CHAPTER 1: WHY USE WATER WALL PASSIVE SOLAR SYSTEMS............................................................................5 Table 1. Thermal Mass Comparison................................................................................................................................................................................................................................................... 5
CHAPTER 2: A CAPSULE HISTORY OF WATER WALL SOLAR BUILDINGS......................................................7
CHAPTER 3: THE BASICS OF PASSIVE SOLAR DESIGN USING WATER WALLS ......................................19
Part I: An Energy Efficient Shell........................................................................................................................................................................................................................................................... 19 A. Orientation........................................................................................................................................................................................................................................................................................................ 19 Table 2. An Example: 40° N Solar Gain Btu/sf ............................................................................................................................................................................................................. 19 B. Insulation............................................................................................................................................................................................................................................................................................................ 19 C. Weatherization............................................................................................................................................................................................................................................................................................... 20 D. Shading................................................................................................................................................................................................................................................................................................................ 20 E. Modifying the Environment.............................................................................................................................................................................................................................................................. 20
Part II: Passive Solar Heating................................................................................................................................................................................................................................................................... 21 Six Rules for Low Cost Passive Heating ..................................................................................................................................................................................................................................... 21
Part III: Passive Cooling................................................................................................................................................................................................................................................................................. 22 Six Rules for Low Cost Passive Cooling..................................................................................................................................................................................................................................... 22
Part IV: Performance......................................................................................................................................................................................................................................................................................... 23 Table 3. Water Wall Performance in California...................................................................................................................................................................................................................... 23 Table 4. Nationwide Performance of the PSI Clerestory Water Wall House............................................................................................................................................... 23

3
3
Part V: Passive solar systems work well......................................................................................................................................................................................................................................... 26 Table 6. Water Wall Passive System Cost: 1977 dollars....................................................................................................................................................................................... 26
CHAPTER 4: WATER WALL CONSTRUCTION, NEW AND RETROFIT.......................................................................27
Part I: A New Home............................................................................................................................................................................................................................................................................................. 27 A WATER WALL SOLAR CLERESTORY FOR THE SUNBELT.................................................................................................................................................................... 28
Part II: A Remodel ................................................................................................................................................................................................................................................................................................ 28
Build your own water wall home or office complex Become a solar patriot – help wean America from her dangerous addiction to imported oil!
Preface In 1981 the price of energy was high and a sense of urgency was felt about reducing our dependence on non-renewable, imported energy. This soon faded and the interest in solar homes declined even as our understanding of how to make them work better increased. Some of the solar features were removed to get more interior space, solar water heaters were not maintained, shutter systems broke and were not repaired, and performance declined.

4
4
But it didn't matter, because oil was once again cheap and could be ignored, thanks to enormous subsidies (often $40 billion a year to coal, nuclear, and oil), two major wars for oil, and continued neglect of the very high external costs of non-renewable fuel use. These uncounted costs include Chernobyl ($400 billion), global warming (perhaps $40 billion a year today), nitrogen pollution, leading to the death of Swedish lake ecosystems and disruption of ecosystems around the world, adverse health impacts, and pollution of the world's oceans. This reissue of the first 4 chapters of the water wall book is in response to the deepening crisis brought about by increasing oil prices as we pass Hubbert's Peak of world oil production, the war over oil in the Middle East, and gathering evidence that global warming is accelerating and may soon spin out of control. My goals is to find the time to update and improve the rest of the book over the next two years. David Bainbridge, San Diego 2005
Acknowledgements and apologies This book was made possible by the kindness and support of many people in the late 1970s and early 1980s. They provided notes, photos, plans, interviews and at times food and a place to stay. My thanks to them all. I would especially like to thank Jon Hammond, who gave me my first solar job and was a original thinker and risk taker. Ken Haggard and Polly Cooper have kept my enthusiasm and support for ecological building alive for the last 20 years. Denny Long not only taught me most of what I know about construction and building, but also became a major water wall installer and fabricator. Marshall Hunt, Virginia Thigpen, John Hofacre, Jim Plumb, Tod Neubauer, Greg Acker, Bruce Maeda, David Springer, Dick Bourne, Scott Kelleher, Phil Niles, Betsy Bainbridge, Brock Wagstaff, Sue Rother, Tim Maloney, Mike and Judy Corbett, and many others also helped. Thanks to all, and those lost in the fog of time. Many pieces of the original book were missing and photos were not all as well identified as I would have hoped. After two decades some memories were less than crisp, so my apologies for any errors in credits or attribution. I am confident it will still prove useful, and that people who expressed an interest in my work after I received the American Solar Energy Society for the Passive Solar Pioneer Award in 2004 will have a better idea of my research interests and work. The ASES award provided the impetus to get this work together and out again – because water walls work so well yet are so little understood or appreciated.
Jon Hammond
5
5
Chapter 1: Why Use Water Wall Passive Solar Systems The rapid rise in energy prices around the country has once again encouraged designers, builders, and homeowners to return to renewable fuels and increased energy efficiency for heating and cooling their buildings. The most economical solution for most buildings and climates is passive solar design — using the elements of the building to collect and store solar energy for heating, and using climate resources for natural cooling. Passive solar systems are distinguished from the more widely recognized active solar systems by the following characteristics.
They use energy from the sun and climate resources to provide both heating, cooling, and ventilation.
They do not rely on auxiliary energy sources to function. Because there are no pumps or controls, they will work even if the power is off.
They are simple and relatively low in cost. They combine collection and storage. They have a long life and need little maintenance. They use energy-inexpensive materials. They can be built and installed by the regular construction trades without special
equipment. Water wall passive solar buildings are usually the most attractive type of passive solar home. The key element for a passive solar home is thermal mass — and water provides this mass at a lower cost than either concrete or phase change salts, as Table 1 indicates.
Table 1. Thermal Mass Comparison
Material Cost per 100,000 BTU Storage (1980) Water $ 9,612 Phase Change $10,918 Concrete $14,426
6
6
Water walls are attractive for a number of other reasons: they can be installed in new construction easily and economically they are more effective than masonry for heating and cooling, particularly in areas with
cool night temperatures they are more flexible than phase change storage because they work for cooling as well
as heating, and don't have a critical working temperature they can be easily disguised to become practically invisible they can be smaller than an equivalent masonry wall, avoiding the claustrophobic
sensation of full masonry walls they are extremely comfortable because of the large radiant surface exposed to the inside in many cases they can be retrofitted economically and easily.
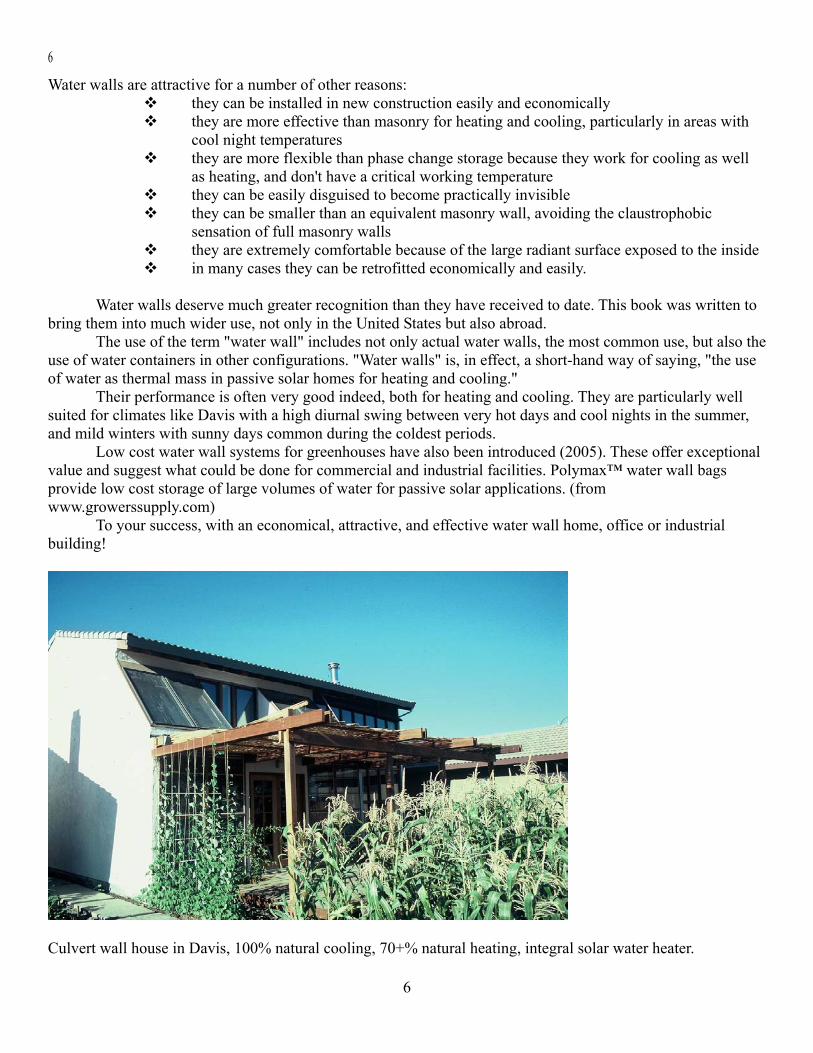
Water walls deserve much greater recognition than they have received to date. This book was written to bring them into much wider use, not only in the United States but also abroad. The use of the term "water wall" includes not only actual water walls, the most common use, but also the use of water containers in other configurations. "Water walls" is, in effect, a short-hand way of saying, "the use of water as thermal mass in passive solar homes for heating and cooling." Their performance is often very good indeed, both for heating and cooling. They are particularly well suited for climates like Davis with a high diurnal swing between very hot days and cool nights in the summer, and mild winters with sunny days common during the coldest periods. Low cost water wall systems for greenhouses have also been introduced (2005). These offer exceptional value and suggest what could be done for commercial and industrial facilities. Polymax™ water wall bags provide low cost storage of large volumes of water for passive solar applications. (from www.growerssupply.com) To your success, with an economical, attractive, and effective water wall home, office or industrial building!
Culvert wall house in Davis, 100% natural cooling, 70+% natural heating, integral solar water heater.

7
7
Chapter 2: A Capsule History of Water Wall Solar Buildings What was probably the first water wall in the world was built at the Massachusetts Institute of Technology in 1947 by Hoyt Hottel and his students. Their water wall used a full height array of one-and five-gallon cans, painted black and set behind double pane glass. The test facility was divided into seven cubicles to test different configurations. These water walls provided 38-48% of the heating demand. Poor design, including limited direct gain through windows, inadequate curtains between water wall and window glass, inadequate insulation (a problem until super-insulation was discovered in the 1980s) and the separation of the water mass from the room by curtains reduced performance to this level. Rather than continue with these experiments, with a very good performance for the cost, the investigators opted to return to costly and unreliable active solar systems. Some time later a school design incorporating a large water tank was apparently used in Mexico for a series of school buildings. Here the water storage was for drinking water for the teacher, who lived in the school, and the pupils. The buildings were reportedly very comfortable although, as far as I can tell, no one ever evaluated them. More details on these schools would be of considerable interest. Water walls emerged again in 1972 in New Mexico in a space-age design by Steve Baer. His Corrales house used stacked 55-gallon drums full of water to provide thermal mass for an innovative passive solar design. The south walls, glazed with single pane glass, have R-10 insulated, reflective covers that are lowered on sunny winter days and closed at night. The system worked very well, and despite modest insulation levels in walls and ceilings, only about one cord of wood is needed in the winter for backup heating. Steve Baer has gone on to use water walls in both residential and commercial projects.
Steve Baer interior
Steve Baer's work influenced many people, including Jon Hammond, who did an excellent water wall retrofit and a new solar office building on his farm in 1974-75; and influenced many people, like me, who were fortunate enough to work with him and his Living Systems design group. Jim Plumb, who also worked with Living Systems, helped develop the idea of culvert water storage.

8
8
I argued for, and eventually moved into what I believe is the first house with a steel water tank for mass. Tod Neubauer, a retired agricultural engineer and early solar pioneer, provided needed technical expertise on solar heating and cooling and also helped with research design and evaluation for seismic safety. He inspired us all with his energy and enthusiasm. Marshall Hunt, who was a partner at Living Systems, built the first culvert house. Greg Acker, who helped design it, has designed many solar in Oregon. Denny Long, who built many water wall steel tanks as Passive Solar Development, also worked with Living Systems on the development of water wall designs.
Culvert wall at Living Systems Office, Winters

9
9
Culverts installation for a day care center
Tim Maloney, of One Design, was also influenced by Baer's and Hottel's work. He tested and developed water wall module systems beginning in 1974. The first units consisted of plastic bags supported between sheet metal panels. Problems with this and subsequent systems led to the fourth-generation design of plastic stackable water tanks, approximately 2' x 8' x11/2', and the stud space module. The One Design houses using these systems were effective and attractive. A group of engineers at the Kalwall Corporation (now Solar Components) also realized the potential of water wall homes. Using their fiberglass technology they developed translucent cylinders for water storage. These tubes have been used in many solar buildings since their development. The Design group at Total Environmental Action located near Kalwall's factory, was among the first to use these tubes in their designs. Solar Components has also introduced many other products of value to the water wall builder, including high R value translucent panels.

10
10
Solar Components Water Wall
Wayne and Susan Nicols were also involved in early water wall development. They initially tried concrete tanks for water storage. The house provided about 70% of the heating with solar energy in the New Mexico highlands near Santa Fe. After returning to concrete mass walls for some time, they helped develop the Heat Wall™ water wall system of vinyl bags in an aluminum and stainless steel frame. I installed the first rectangular steel tank in my townhouse. The simplicity of the rectangular tanks led to a number of other installations and the formation of a water tank company by Denny Long. He became the expert of water wall construction and installation and did many installations in California, ranging from small low tanks to very large tanks.

11
11
Denny Long with triple tank installation
After many configurations were installed three candidates emerged as likely choices. These were low water walls that could have a cushion on top and be used as a seat, a counter type height tank, and massive wall height tanks for mega-thermal mass.

12
12
Low water wall tanks primed and ready to paint and install
Other groups were also involved in water wall development. Mike and Judy Corbett, the builders of a 220-unit solar project called Village Homes in Davis, California, did much to popularize water walls. Designer John Hofacre at Village Homes pushed the envelope with some very effective but large water walls. Marshall Hunt and Virginia Thigpen put in a large culvert wall home that worked very well.

13
13
Big water wall tank behind stove, Village Homes

14
14
Dick Bourne, another Davis area solar pioneer, developed the Suntainer™ and Sunbin™ low-cost water wall modules.

15
15
The Solar Applications .and Research Group in Vancouver, B.C., and the Water Wall Engineering Group in Ohio worked on thin steel wall tubes with plastic liners. And engineers at Ames Laboratory have done some interesting work on a glass-based waterwall. This is a very expensive system, but it is attractive and may be of value in some applications.
Plastic lined sheet metal tube water wall, BC
16
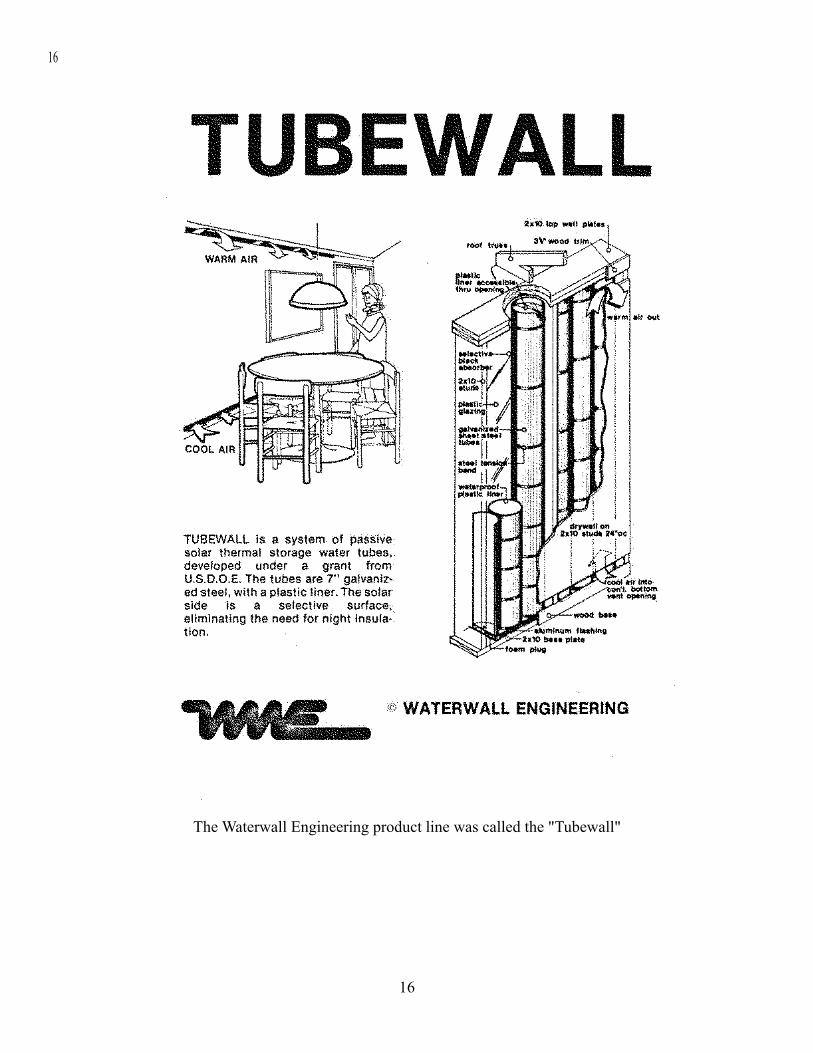
16
The Waterwall Engineering product line was called the "Tubewall"

17
17
A stud wall modular water system was offered by Sun Craft.
Although these were promising the decreasing cost of energy in the 1980s and 1990s led to an almost
complete halt in passive solar developments of all kinds and with the exception of Solar Components translucent tubes water walls fell out of the market.\ Ken Haggard and Polly Cooper have not only helped water wall development, in their own retrofit of an older home and their current straw bale solar home and architectural office; but in many of their designs over the last 30 years. They have probably designed more water wall homes than anyone else in the world. Phil Niles and Bruce Maeda provided critical help with thermal evaluation water wall building performance.
18
18
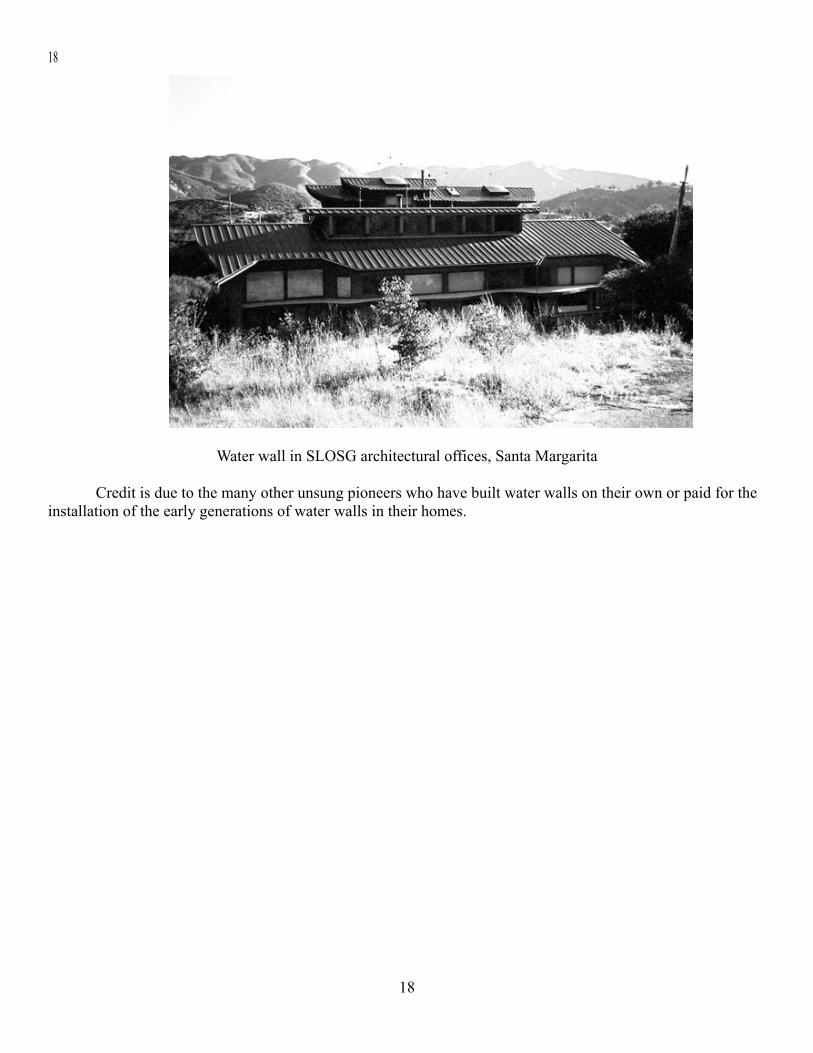
Water wall in SLOSG architectural offices, Santa Margarita Credit is due to the many other unsung pioneers who have built water walls on their own or paid for the installation of the early generations of water walls in their homes.

19
19
Chapter 3: The Basics of Passive Solar Design Using Water Walls
Part I: An Energy Efficient Shell The first step in passive solar design is improving the thermal performance of a house or building. Improving the energy efficiency beyond the standard level is remarkably easy. In most areas it is reasonable to expect at least a doubling in the energy efficiency of the house — with minor increases in cost. The following steps should be included: A) orientation, B) insulation, C) weatherizing, D) shading, and E) modifying the environment.
A. Orientation Good orientation is essential for an energy efficient building. The effects of bad orientation can be remedied to some extent — but doing so can be expensive. The best orientation is generally for the building to be longer east-west than it is north-south, with a major yard to the south, and a number of the windows facing south with few facing east or west. This orientation will maximize solar heating in winter and minimize summer overheating by making best use of the difference in sun path. Even a house with less than ideal shape can be made to work well if the glazing is predominantly on the south side. In very hot climates without winter heating requirements north window orientation may be more appropriate. In areas with cool summers more windows on the east can help. And when the view is to the east or west wise placement and solar control can minimize the problems caused by poor orientation.
Table. An Example: 40° N Solar Gain Btu/sf
South East West North January 21 1630 508 508 118 March 21 1384 961 961 224 June 21 622 1200 1200 484 Many people argue that a dome is the most energy efficient shape, but that is only true when the sun doesn’t shine. An Inuit igloo makes perfect sense, but in sunny climates a solar shape is important. Tod Neubauer’s research confirmed the value of traditional solar building designs from around the world.
B. Insulation The second step in building or remodeling for energy efficiency is reducing unwanted conductive heat loss (or gain). Insulation is the key — not only for the walls and ceilings, but also for the foundation or slab perimeter, windows, and doors. Insulated drapes or shutters are essential for windows in very cold or hot climaes. Skylights should generally be avoided because they are hard to control. A vertical clerestory window is much less likely to leak, can provide equally good lighting and deep penetration of solar energy for winter days. Solartubes or other sunlighting options may make more sense if the only goal is light. Insulation should be much better than most existing houses, and tragically, most new houses, have. No house should be built with less than R-30 walls, with R-40+ desirable. Minimum ceiling insulation levels for ceilings should be R-40+ with up to R-60+ desirable in colder climates. Foundation, slab perimeter, and floor insulation should also be much better than current practice. These high insulation values are easily achieved in

20
20
new construction, but can also be retrofit for existing houses in some cases. Straw bale walls offer an attractive and economical method of super-insulation, with R-values to 35+. Conductive heat loss through windows and doors must also be controlled. Insulated doors, R-15+, are available and should be used. Steel-skinned doors can allow use of magnetic weather-stripping for tighter seals, just like your refrigerator. Windows, skylights (minimal), and sunspaces should be at least double pane and should be fitted with movable insulation. Low e glass, Heat Mirror, argon filled windows and other high performance windows should be considered. Low cost double pane windows can be created by doubling up single pane windows, this eliminates the long term problem of double pane seal failure and gets better pane separation, which improves performance. Exterior insulated shutters or shades, to R-12+, are preferable where they can be worked into the design. Interior insulated shutters are also useful, but not quite as effective. Thermal shutters on the inside of plastic skylights can lead to early failure of plastics and seals. A range of commercial products for these tasks are now available, but you may choose to build your own.
C. Weatherization Infiltration losses are as important as conductive losses and careful weatherization is necessary. This includes both the obvious problems of weather-stripping doors and windows, and also the more general problems of caulking and sealing of building joints, access holes, and other areas where unwanted infiltration occurs. Infiltration may account for half of the heat loss in a well insulated but poorly weatherized house. The infiltration rate on older houses is often 1.5 air changes/hour or more. It can go up significantly if a high wind is blowing. However, with careful construction and use of vapor barriers and special details, this can be reduced to less than 0.2 air changes/hour. In colder and hotter areas air-to-air heat exchangers are desirable for ventilation. These warm incoming fresh air with warm stale outgoing air in winter, and cool incoming area with stale cool outgoing air in summer. A blower door test can help ensure the shell is tight and that ventilation will be controlled. Material choices and maintenance are critical in more tightly sealed homes to avoid problems with pollutants, mold, and moisture. Fresh air intakes for any combustion device, such as fireplaces or woodburnign stoves, are desirable.
D. Shading Shading or solar control is essential in areas with cooling loads. Solar control is relatively easy if the house is oriented properly. Overhangs and wing walls can shade south windows. The other windows can be shaded with a combination of landscaping, exterior shades and shade screens. The importance of shading is best illustrated with an example. In the Central Valley near Sacramento, 55 square feet of west-facing glass will add 55,000 BTU to a house during the afternoon. A ton of air conditioning will be required to offset this gain. And to run a typical air conditioner at this peak period of electrical demand requires more than a kilowatt of added generating capacity. This makes the cost of an unshaded window several thousand dollars to society.
E. Modifying the Environment Very substantial savings in energy use for heating or cooling can be realized by altering the environment with landscaping. Landscaping should reduce the impact of cold north winds and provide summer shade — yet not block winter sun. Arbors on the south are particularly helpful in reducing summer heat loads and if pruned before winter they still allow good solar access. Wire arbors are preferred because they allow more sun in. After improving the house, we can apply the following principles of passive solar design to make it a naturally heated and cooled house, office or industrial facility.

21
21
Part II: Passive Solar Heating Passive solar systems using water walls are very effective for heating. They differ widely in configuration, performance, and cost, but do have several features in common. These include: glazing to admit the sun's energy; glazing control (insulated drapes or shutters) to reduce unwanted heat loss or heat gain through glazing; and thermal mass, including water but also sheet rock, concrete, tile and other high mass materials, to store the sun's energy. The following rules apply to all passive solar heating systems.
Six Rules for Low Cost Passive Heating Make sure the house is weather tight and well insulated. Orient house properly, with a number of windows on the south. Use the minimum amount of glazing necessary for heating. Make glazing control simple, reliable, effective, and convenient to use. Use the simplest, smallest, and most economical method of providing needed thermal
mass. Consider cooling demand, integrate design to achieve lowest-cost heating and cooling.
In a new building, where super-insulation and super-tight design can be incorporated, sufficient collection area can be realized by putting windows equal to five to ten percent of the floor area, on the south side. The appropriate amount of water for each square foot of glass will vary depending on the climate, other mass in the building, and the primary goals – winter heating or summer cooling? Or both. A good rule of thumb is to add three to eight gallons per square foot of south facing glass for heating. For night ventilation cooling even more mass can be helpful if it is well exposed to cooling breezes from windows or fans. In a retrofit, when the shell of the house cannot be made as energy efficient as in new construction, more window area may be needed on the south. This can be accomplished by remodeling with new windows or by adding a sunspace or solar greenhouse (one way is to glass in a south facing porch). You may have to incorporate window area up to twenty percent of the floor area – but this brings the risk of summer overheating unless solar control is very good. Movable insulation and shading for summer should always be provided for this added window area. To store the sun's energy for heating, or to store coolness from nighttime air you need to add appropriate "thermal mass" in your retrofit. Water containers are the easiest way to incorporate this needed thermal mass. As much of this mass as possible should be directly in the sun for heating, but it can be distributed more for cooling. Water is better than concrete or stone because it is more dynamic and can gain heat in winter or shed heat in summer faster thanks to internal circulation.
22
22
Part III: Passive Cooling For passive cooling the house must emphasize different, though complementary features. These include reducing unwanted heat gain in summer with solar control, shading, light colors, and similar features. Cooling can be provided by night ventilation (with cool night air), night sky cooling (to space), or evaporation. The following rules apply to all passive cooling systems.
Six Rules for Low Cost Passive Cooling Orient house properly with most windows on the south and north, few on the east and
west. Provide solar control and shading for windows in summer (overhang, awning,
landscaping, shadescreen, etc.) Use light roof color (and walls as possible). Provide windows, vents, and fans (if necessary, for good ventilation and convective
cooling). Use water wall thermal mass to store nighttime cooling for use during the day. Consider heating demand as well, and integrate design to achieve the lowest possible
cost. Use landscaping effectively
In most areas a super-insulated water wall building with south window orientation and appropriate thermal mass will meet all, or almost all, of the yearly cooling demand. In very hot areas, or areas with limited night cool down, a more sophisticated passive system can be used to provide more cooling. This might be a cooling radiant panel system with fountain or evaporative cooler. Or a heat exchanger can be installed in water tanks and coupled to a cool water source, perhaps running cool groundwater through the tank on its way to lawn sprinklers. Or a very small PV powered evaporative cooler or a small air conditioner can be installed.

23
23
Part IV: Performance Many traditional building designs had excellent solar orientation, but were hampered by lack of insulation, poor windows, and inadequate working thermal mass. Classic Chinese home designs have the windows in the right places and good natural ventilation. They work pretty well – but with good insulation, improved windows and doors and working thermal mass the same designs would perform very well. Even a very simple passive solar house with moderate insulation and a fairly small water wall will perform well. A study conducted for the California Energy Commission by Davis Alternative Technology Associates (D.A.T.A.) showed the performance of a standard tract house with water wall in major growth areas of California.
Table 3. Water Wall Performance in California
Area Percent Heating Percent Cooling Sacramento 67 99 Los Angeles 87 100 San Jose 76 100 Riverside 95 95 San Diego 85 96 Contra Costa 79 100 Orange County 94 100 Calculated Experience in Davis suggests that these calculations are plausible. With better insulation and sealing, heating performance can often be increased 10-20%. Similar performance could be achieved in most of the other areas in the Sunbelt now experiencing rapid growth, as the D.A.T.A. evaluation of the Passive Solar Institute water wall house plan showed.
Table 4. Nationwide Performance of the PSI Clerestory Water Wall House
Location Percent heating Percent cooling Los Angeles 100 100 Sacramento 94 100 Medford, OR 72 100 Phoenix 100 50 Denver 82 100 Ft. Worth 100 30 Little Rock 89 37 Knoxville 75 100 Raleigh 99 43 Miami 100 57 Calculated The savings that could be realized with this house are also impressive. Assuming careful building and operation, substantial savings could be realized (assuming gas at $0.60/therm, and electricity at $0.10/kwh.) The
24
24
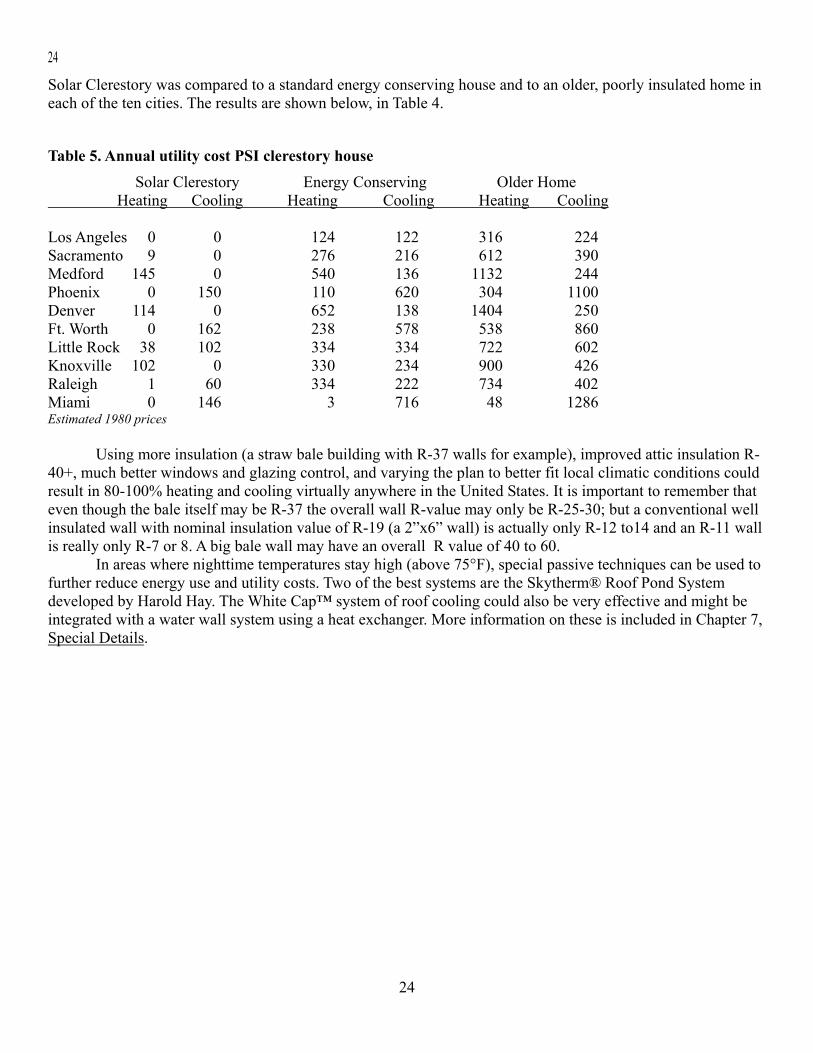
Solar Clerestory was compared to a standard energy conserving house and to an older, poorly insulated home in each of the ten cities. The results are shown below, in Table 4.
Table 5. Annual utility cost PSI clerestory house Solar Clerestory Energy Conserving Older Home Heating Cooling Heating Cooling Heating Cooling Los Angeles 0 0 124 122 316 224 Sacramento 9 0 276 216 612 390 Medford 145 0 540 136 1132 244 Phoenix 0 150 110 620 304 1100 Denver 114 0 652 138 1404 250 Ft. Worth 0 162 238 578 538 860 Little Rock 38 102 334 334 722 602 Knoxville 102 0 330 234 900 426 Raleigh 1 60 334 222 734 402 Miami 0 146 3 716 48 1286 Estimated 1980 prices Using more insulation (a straw bale building with R-37 walls for example), improved attic insulation R-40+, much better windows and glazing control, and varying the plan to better fit local climatic conditions could result in 80-100% heating and cooling virtually anywhere in the United States. It is important to remember that even though the bale itself may be R-37 the overall wall R-value may only be R-25-30; but a conventional well insulated wall with nominal insulation value of R-19 (a 2”x6” wall) is actually only R-12 to14 and an R-11 wall is really only R-7 or 8. A big bale wall may have an overall R value of 40 to 60. In areas where nighttime temperatures stay high (above 75°F), special passive techniques can be used to further reduce energy use and utility costs. Two of the best systems are the Skytherm® Roof Pond System developed by Harold Hay. The White Cap™ system of roof cooling could also be very effective and might be integrated with a water wall system using a heat exchanger. More information on these is included in Chapter 7, Special Details.

25
25
Straw bales -- the cheapest way to provide super-insulation
26
26
Part V: Passive solar systems work well In Davis, California, the construction cost of a simple passive house with well-designed water wall space conditioning can actually be less than that for a house with conventional mechanical systems. A study by Davis Energy Associates showed that proper solar orientation reduced the cost of construction and reduced seasonal heating and cooling demand 70% for a conventional tract home. This was first done on paper and computer and then actually built and validated. With a proper water wall the seasonal energy use could have been reduced much further. The first metal tank water wall townhouse cost about $28 sq.ft. to build in 1977. The cost of con-servation and solar measures was as follows:
Table 6. Water Wall Passive System Cost: 1977 dollars
Mass storage tank and water-filled 5 gallon cans 400 Solar glazing (window and skylights) 700 Added overhang for south window shading 400 Shutters and drapes 400 Fans (2-speed Casablanca fan, small ducts, fan) 200 Passive solar water heater 400 Perimeter slab insulation 100 2"x6" wall rather than 2"x4" 200 Added insulation 100 TOTAL: $2,900 California tax credit of 55% of cost: (1,595) NET COST: $1,305 By comparison, cost for a conventional non-solar house: Windows 700 Drapes 400 Forced air furnace and air conditioning 1,500 TOTAL $2,600 SAVINGS with Passive House and Tax Credit: +$1,295 ADDED COST for water wall without tax credit: $300 In 1978, with a very efficient (small) refrigerator, utility bills for this home averaged $5 per month, with 40 kwh of electricity. During the summer the solar water heater met all needs. In the winter use was about 3 therms a month of gas for cooking and hot water.

27
27
Chapter 4: Water Wall Construction, New and Retrofit Building a very effective water wall building is easy if you follow the rules described in Chapter 3. Remodeling is not always as easy, but it can usually be done equally well — although at higher cost.
Part I: A New Home For a new home to be a success it must not only work well as a solar house but must also be pleasant to live in, easy to maintain, and attractive for resale. My prescription for success is to build the following type of water wall house. Begin by developing a house description that meets both the local market demand for floor space, bedrooms and baths, kitchen/dining room area, living rooms, and the criteria of Chapter 3. Next, find a lot or subdivision with good solar access and proper lot orientation so your house can face south with a major side of the house. Now refine your floor plan, structural plan (engineering is often required to insure the weight of a large water wall is properly supported), and detailing so that the house has enough south-facing windows (typically about 5-10% of the floor area), super-insulation, and proper weatherization. A slab floor is not only cheap but is easy to modify to support water walls and adds desirable thermal mass to the house. Figure your water wall placement now, too. Directly in front of south windows is preferable; but other locations can also be workable, particularly if cooling is a major concern. I prefer specially made rectangular steel tanks for water walls, but the Solar Components fiberglass tubes are elegant and bright, and others have found other water containers that also meet consumer approval. Steel tanks might typically be 2' x 1.5' x 6' and are placed as a bench or seat in front of south windows in bedrooms and living rooms. For kitchen or dining rooms the tanks can be set at counter height. Windows should have a mullion or break at tank top height to make a smooth transition. In colder climates the tank should sit out far enough from the window for insulated drapes or shutters to slide behind them and to provide access to the windows for ventilation cooling. For larger mass or commercial buildings where kids are less likely to damage them, I would consider the Solar Components translucent water tanks as a first choice. These can provide excellent mass and delightful lighting. The mass walls can also help provide sound control between spaces or between a busy road and offices. After you have worked out a pleasing south window/mass placement and floor plan you can add special features to make the house work better and look more appealing. A set of operable clerestory windows at the top of a cathedral ceiling helps get heat to the north side of the house. It also improves summer ventilation, and it can make a small house feel larger. A Casablanca fan at the peak will not only bring heat down in the winter but will aid cooling in the summer. Other features you might consider are an air-tight wood stove for backup heating and consumer appeal, and an air-to-air heat exchanger to ensure fresh air. To help you design your own water wall house. I have included the plans for a three-bedroom, two-bath water wall house designed specifically for the Sun Belt. It is included in the following pages. In mild areas the 2" x 6" frame would be appropriate, but in hotter or colder areas, rigid foam exterior insulation should be added. Or if straw is available locally, consider starting with a straw bale wall system. In hotter climates, the flat south roof can become a roof pond for added cooling.
28
28
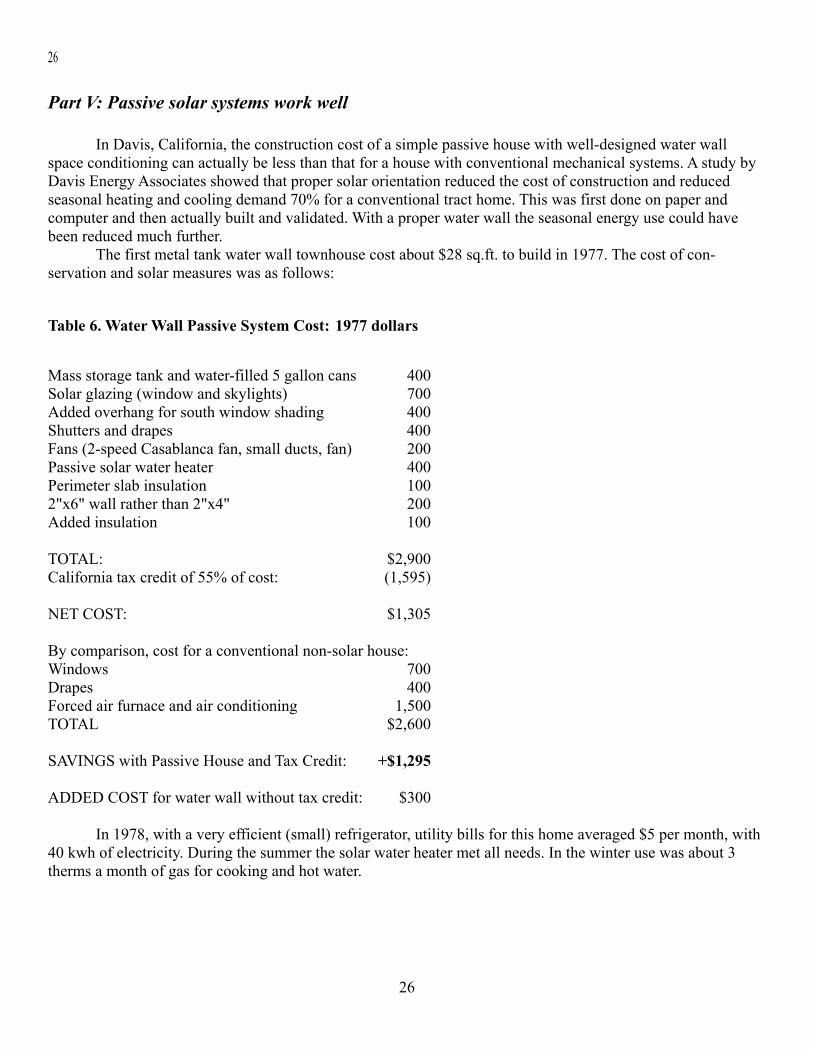
Solar clerestory water wall by John Hofacre for the Passive Solar Institute
A WATER WALL SOLAR CLERESTORY FOR THE SUNBELT To help builders and developers get started in Passive Solar building, the Passive Solar Institute commissioned John Hofacre to design a simple, three-bedroom, two-bath water wall house for the sunbelt. Drawing upon his experience of more than 40 passive solar houses he has designed and seen built I think John developed a very pleasing solar home. After the house plans and details were finalized, the Passive Solar Institute engaged Davis Alternative Technology Associates to evaluate the performance of this passive solar home in 10 cities in the areas of fastest growth in the U.S. The results (Table 3) were impressive and show very clearly what can be done without "radical" or expensive designs. Even better performance and greater savings could be achieved in a more sophisticated passive design. The flat roof on the south of the clerestory was included so that a more sophisticated cooling system could be installed without complete revision of the plan. A Skytherm™ system, Whitecap,™ or living roof could provide additional cooling in the hotter areas. The added mass of these systems would require revisions to the framing and ceiling and should be worked out with the system designer or a structural engineer.
Part II: A Remodel Your options may be more limited if you are remodeling, but with imagination you can do much to make the water wall passive solar system of the building successful. The first step is solar prospecting — or determining where the sun hits the house in the winter. This can best be done by inspection, i.e., taking notes as the winter passes. You can also determine solar exposure using a commercial solar site evaluator or the scratch built model described in Appendix 1. Once you know when the sun is available, design a remodel that will put windows or a sunspace there. Next determine how you will retrofit insulation for the ceiling (at least to R-30), the walls (to R-19, at least), floors, doors, and windows. Then seal the house as tight as possible by caulking, weatherstripping, and adding gaskets to outlets, pipes, and wire entries. My own preference for insulation strategy is as follows. Attic: add fiberglass roll or batt insulation to R-38 (12"). Run the first batt along rafters to fill the rafter space to top, then run a second level across rafters. Vapor barrier goes down on bottom layers, no VB on second and third layers. A second option is blown-in cellulose fiber; make sure it meets Federal specifications and use boron treated for fire safety not ammonia. For cathedral ceilings, a double roof or structural insulated panel may be needed to get sufficient insulation. In milder climates you might get by installing rigid insulation (R-30+) or equivalent before re-

29
29
roofing. You may find it easier to insulate on the inside with foil faced foam panels covered with sheet rock. Or install a new ceiling to cover thick fiberglass batts with sheet rock or wood covering. Walls are challenging but can be retrofit successfully. Use double-wall techniques for best results. If the exterior wall needs replacing, wrap the house in plastic and add a new exterior wall with fiberglass insulation in the old wall, the space between the walls, and the new wall. If the house interior is in need of repair and spaces are large, then strip walls, insulate, and add the new insulated wall inside. Homes have been successfully wrapped with straw bale walls to turn awful homes (concrete block, stone, brick) into stellar performers. Straw bale wraps would also be ideal for commercial buildings and tilt-up industrial space. If space is limited inside and the outside wall is in good condition, cut access holes either outside or (I prefer) inside and fill the wall with high quality cellulose insulation (boron fire proofing). In wet areas, I might use perlite instead. Use a heavy washer on a string to look for fireblocks and obstructions from the top hole. When the wall is full, patch holes and repaint, using a vapor barrier paint such as Glidden's Insul-Aid on the inside. It may be easier to add 1/4" sheetrock to resurface the interior wall, or a new skim coat on exterior stucco. The floor should be insulated if it is exposed, using fiberglass batts with reverse flange — or use spring strips or chicken wire to hold regular batts up. Perimeter slab edge and perimeter footings can best be insulated with waterproof foam, one or two inches thick. Flash properly, protect against termites, and protect foam with some sort of protective material — stucco, pressure-treated wood, etc. The Scandinavian style hot foundation can also be used, with rigid foam extending out horizontally from the footing. If doors are in poor shape, install new insulated doors in their place. Upgrade weather-stripping. If design allows add rigid foam to one side, covered with wood. Windows should be upgraded with added panes or storm windows. Insulated shutters or drapes should be planned for most if not all windows. If windows are in poor shape replace with high quality thermal pane wood windows. For cooling in summer all windows should be properly shaded, with overhangs, louvers, awnings, roll-down shades, or shadescreen. In addition, the window openings should be designed to facilitate ventilation — both of the house and the sunspace if you add one. A well built water wall should come close to the performance estimates in Table 2 and 3. Much always depends on the operation of the buildings. Opening and closing windows and shutters can make a big difference when conditions are extreme, but the beauty of a well insulated water wall is that most of the time conditions will be comfortable with no thought or effort and no use of fossil fuels! To your energy independence and security!