A step by step guide for using Seattle Technology’s ...
32
Manual (June 19, 2012) /32 Revisions by: Tom Vargo and Becca Holbrook First created by: Chris Thompson and Becca Holbrook A step by step guide for using Seale Technology’s Conference Programmer soſtware for conferences at Texas Tech University.
Transcript of A step by step guide for using Seattle Technology’s ...

Manual (June 19, 2012) /32
Revisions by: Tom Vargo and Becca Holbrook First created by: Chris Thompson and Becca Holbrook
A step by step guide for using Seattle Technology’s Conference Programmer software for conferences at Texas Tech University.
Manual (June 19, 2012) 2/32
Logging Into Conference Programmer
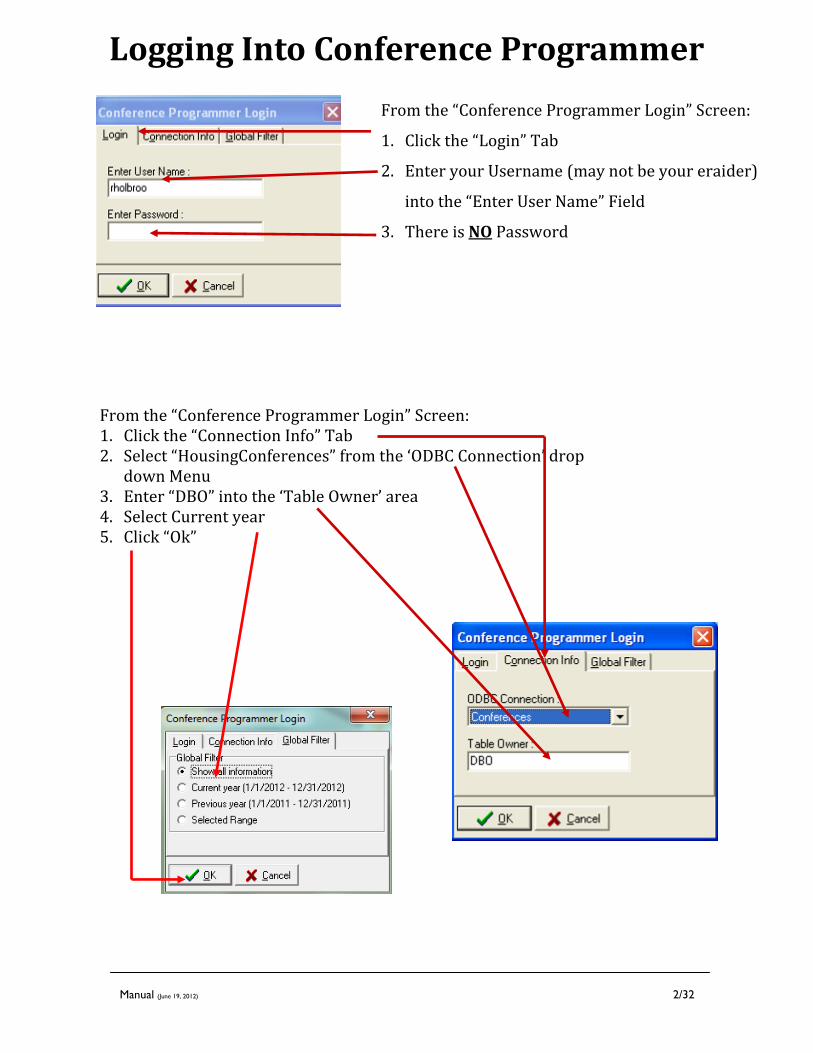
From the “Conference Programmer Login” Screen:
1. Click the “Login” Tab
2. Enter your Username (may not be your eraider)
into the “Enter User Name” Field
3. There is NO Password
From the “Conference Programmer Login” Screen: 1. Click the “Connection Info” Tab 2. Select “HousingConferences” from the ‘ODBC Connection’ drop
down Menu 3. Enter “DBO” into the ‘Table Owner’ area 4. Select Current year 5. Click “Ok”

Manual (June 19, 2012) 3/32
The Conference Programmer “Main Conference Screen:
Internal Notes about group. Anyone logging into CP and has access to the cover sheet can see this (ID Office, Housekeeping, Design Office, Hospitality, etc.! Be careful what you put in here!
General Information about the camp. All of this information will be shown on the Conference Cover sheet also.
Camp Contact Person Information
Manual (June 19, 2012) 4/32
Adding a Note
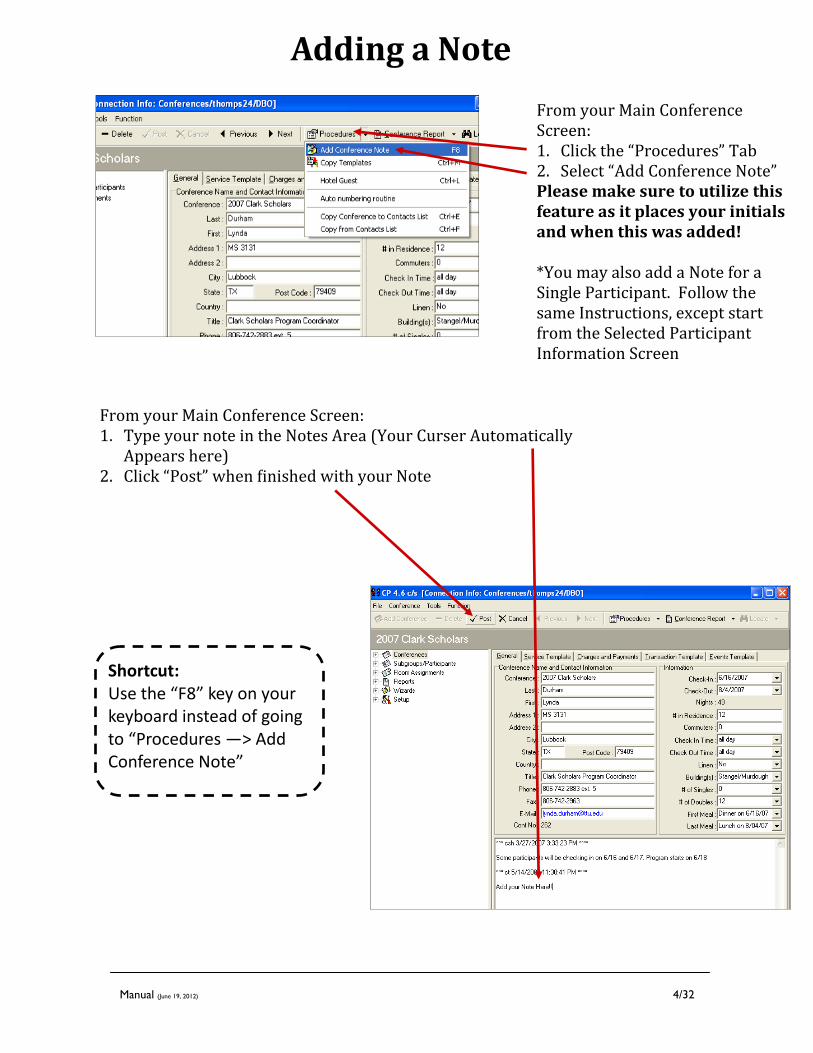
From your Main Conference Screen: 1. Click the “Procedures” Tab 2. Select “Add Conference Note” Please make sure to utilize this feature as it places your initials and when this was added! *You may also add a Note for a Single Participant. Follow the same Instructions, except start from the Selected Participant Information Screen
From your Main Conference Screen: 1. Type your note in the Notes Area (Your Curser Automatically
Appears here) 2. Click “Post” when finished with your Note
Shortcut: Use the “F8” key on your keyboard instead of going to “Procedures —> Add Conference Note”
Manual (June 19, 2012) 5/32
Selecting a Specific Conference
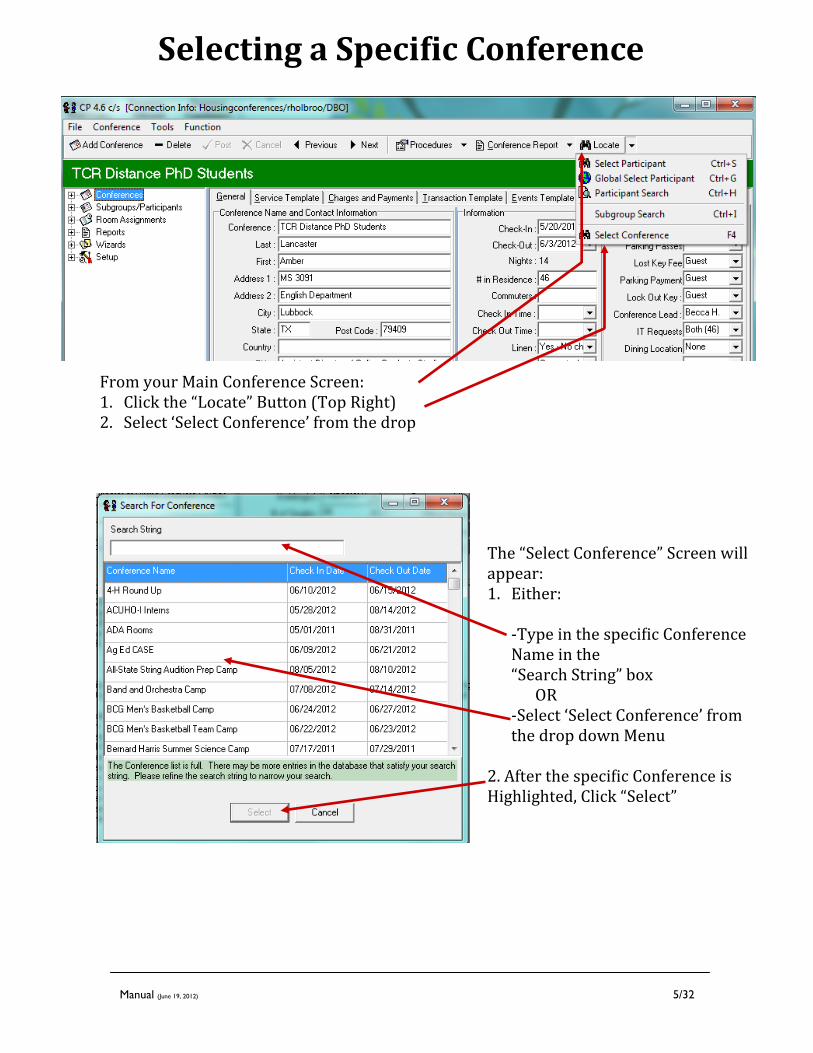
From your Main Conference Screen: 1. Click the “Locate” Button (Top Right) 2. Select ‘Select Conference’ from the drop
The “Select Conference” Screen will appear: 1. Either:
-Type in the specific Conference Name in the “Search String” box OR -Select ‘Select Conference’ from the drop down Menu
2. After the specific Conference is Highlighted, Click “Select”

Manual (June 19, 2012) 6/32
The Reservation Calendar
The “Reservation Calendar” Wizard will appear: 1. Change the “Range of Calendar View” to
include the dates you’d like to have access to 2. Select the buildings you’d like to have access
to in the “Select the Buildings to View” Area 3. Click “Next”
From your Main Conference Screen:
1. Select the Specific Conference
2. Click to expand “Room Assignments”
3. Click “Reservation Calendar”
Manual (June 19, 2012) 7/32
The Reservation Calendar
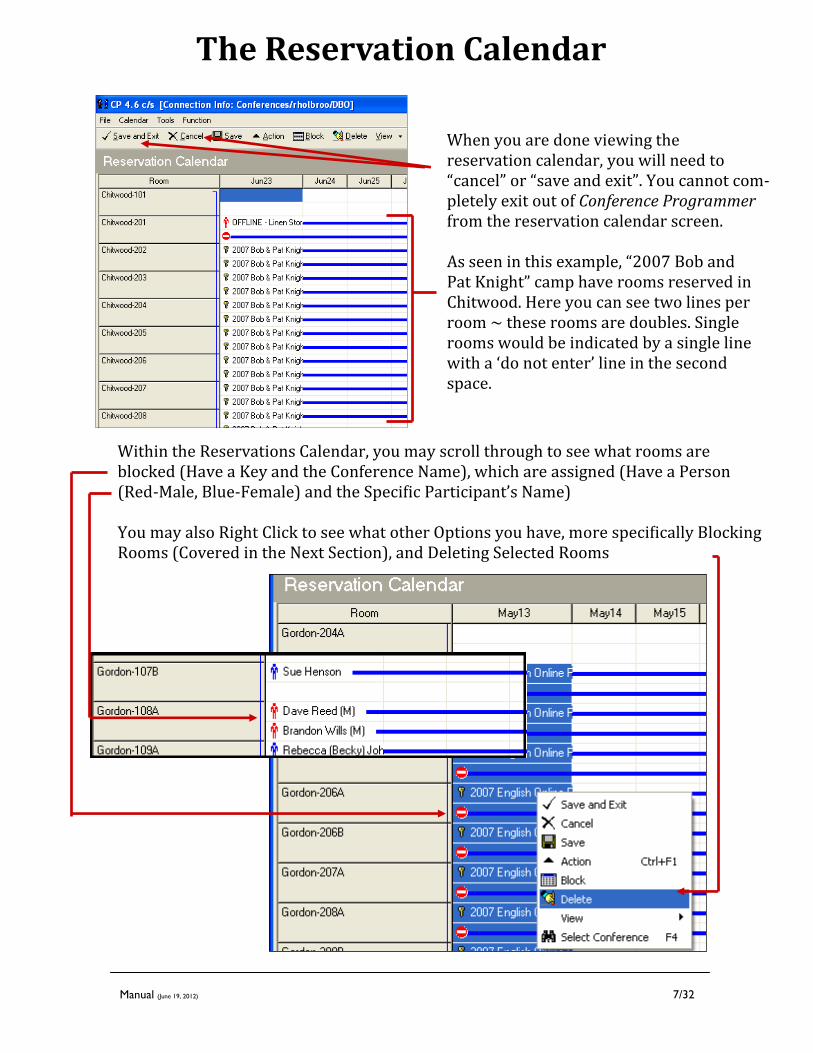
When you are done viewing the reservation calendar, you will need to “cancel” or “save and exit”. You cannot com-pletely exit out of Conference Programmer from the reservation calendar screen. As seen in this example, “2007 Bob and Pat Knight” camp have rooms reserved in Chitwood. Here you can see two lines per room ~ these rooms are doubles. Single rooms would be indicated by a single line with a ‘do not enter’ line in the second space.
Within the Reservations Calendar, you may scroll through to see what rooms are blocked (Have a Key and the Conference Name), which are assigned (Have a Person (Red-Male, Blue-Female) and the Specific Participant’s Name) You may also Right Click to see what other Options you have, more specifically Blocking Rooms (Covered in the Next Section), and Deleting Selected Rooms

Manual (June 19, 2012) 8/32
Blocking Rooms
From the “Reservation Calendar” Screen 1. Select the Rooms you’d like
to Reserve (Block) for a Conference
2. Right-Click and Select “Block”
The “Assign Participants” Screen will appear: 1. Make sure the appropriate sex is listed
in Subgroup. 2. Verify the Information is Correct 3. Click “Apply”
Blocking DOUBLE Rooms:
Manual (June 19, 2012) 9/32
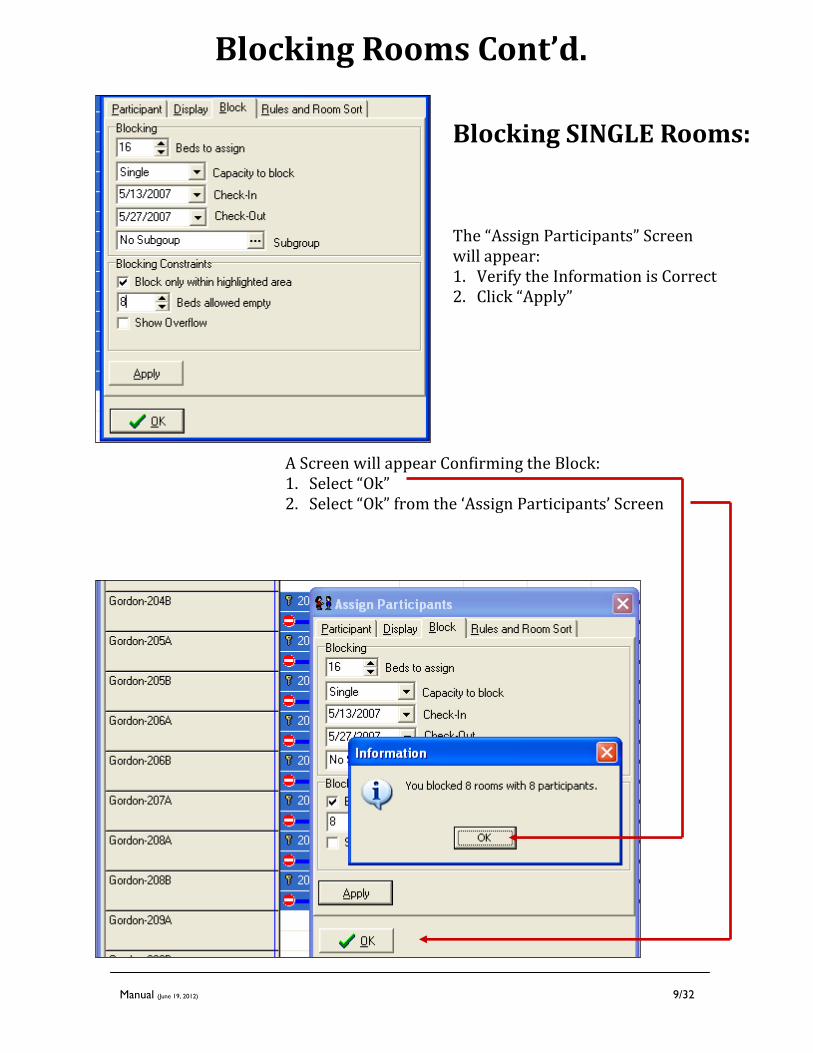
Blocking SINGLE Rooms:
The “Assign Participants” Screen will appear: 1. Verify the Information is Correct 2. Click “Apply”
Blocking Rooms Cont’d.
A Screen will appear Confirming the Block: 1. Select “Ok” 2. Select “Ok” from the ‘Assign Participants’ Screen
Manual (June 19, 2012) 10/32
Exporting a Rooming List
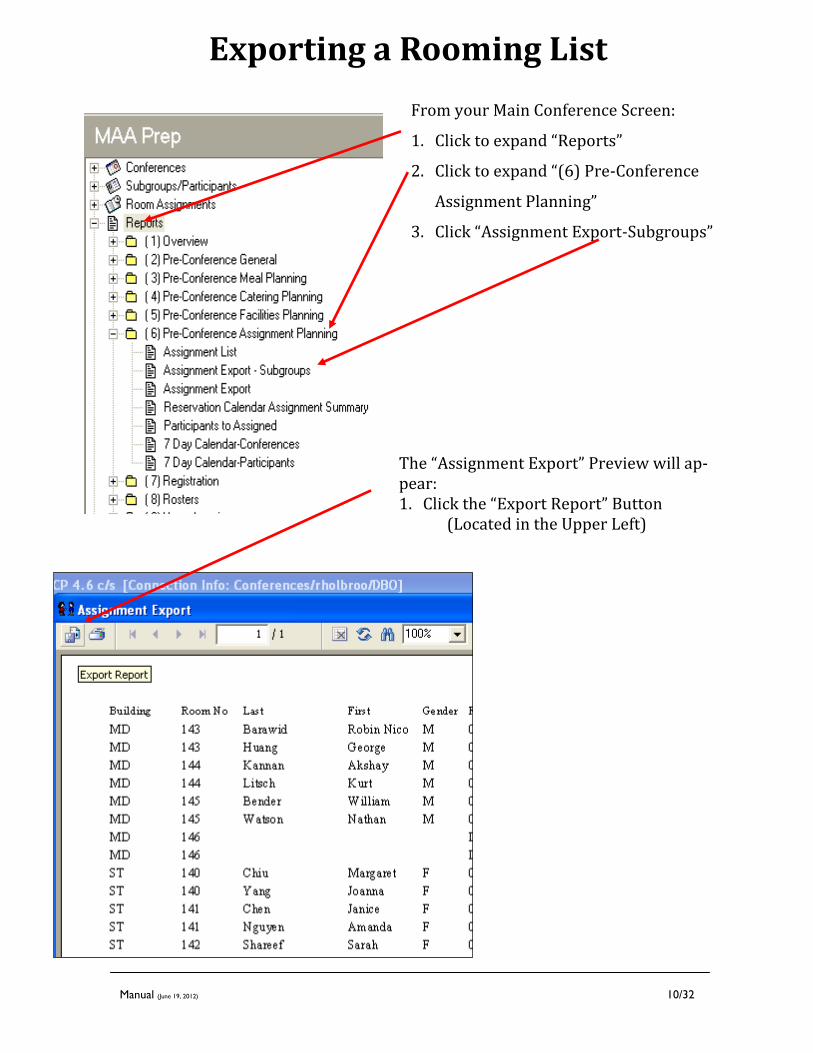
From your Main Conference Screen:
1. Click to expand “Reports”
2. Click to expand “(6) Pre-Conference
Assignment Planning”
3. Click “Assignment Export-Subgroups”
The “Assignment Export” Preview will ap-pear: 1. Click the “Export Report” Button (Located in the Upper Left)
Manual (June 19, 2012) 11/32
Exporting a Rooming List Cont’d.
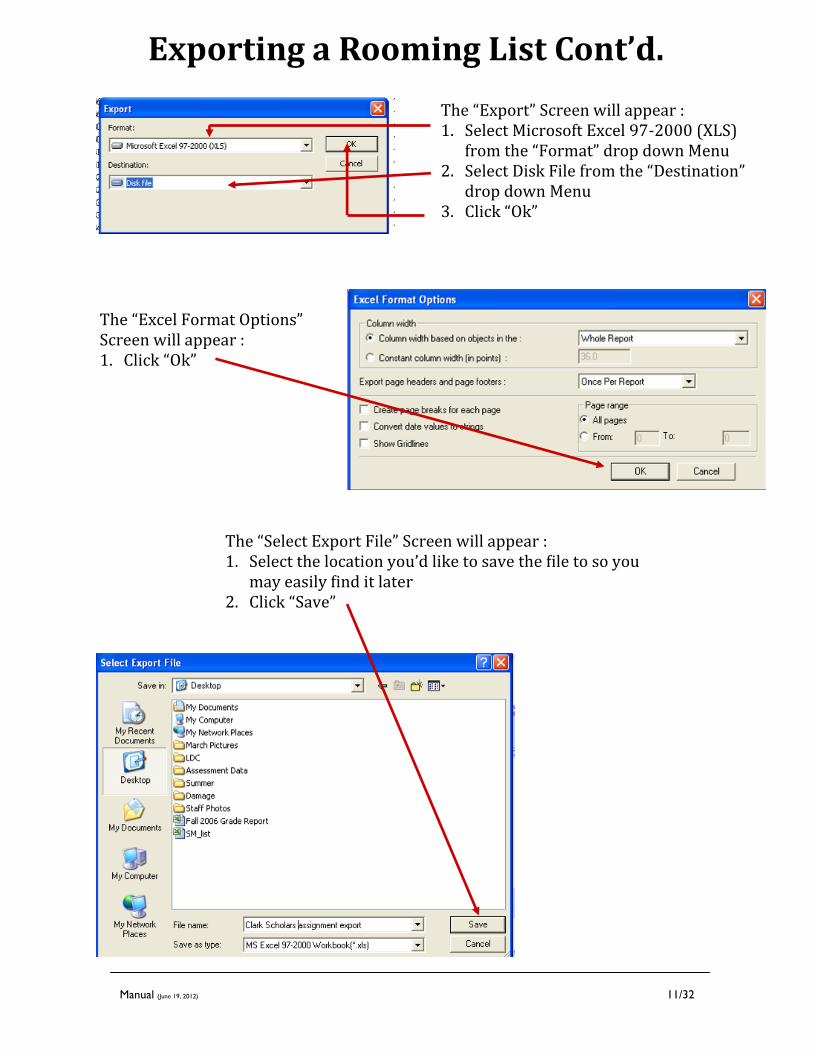
The “Export” Screen will appear : 1. Select Microsoft Excel 97-2000 (XLS)
from the “Format” drop down Menu 2. Select Disk File from the “Destination”
drop down Menu 3. Click “Ok”
The “Excel Format Options” Screen will appear : 1. Click “Ok”
The “Select Export File” Screen will appear : 1. Select the location you’d like to save the file to so you
may easily find it later 2. Click “Save”

Manual (June 19, 2012) 12/32
Preparing an Exported Rooming List to Send to Conference Contact
From Microsoft Excel (NOT Conference Programmer) 1. Select “Open” from the
“File” drop down menu 2. Locate and Select your
saved Exported Rooming List
3. Click “Open”
The Rooming List will appear: You may now manipulate the file to send to your Conference Contact. It is important to make the file easy to add to Participant information to, so it is suggested you color-code which rooms are blocked for Men (Blue), and which for Women (Pink). This year they are already identified as Men or Women if you select the proper report format as described on page 10. The Conference Contact will need to add Participants’ First and Last Names and Gender You will have the conference ID cards at this time, and their Meal Card Numbers must be added to the spreadsheet and imported at this time.
Manual (June 19, 2012) 13/32
Preparing a Roster to Import
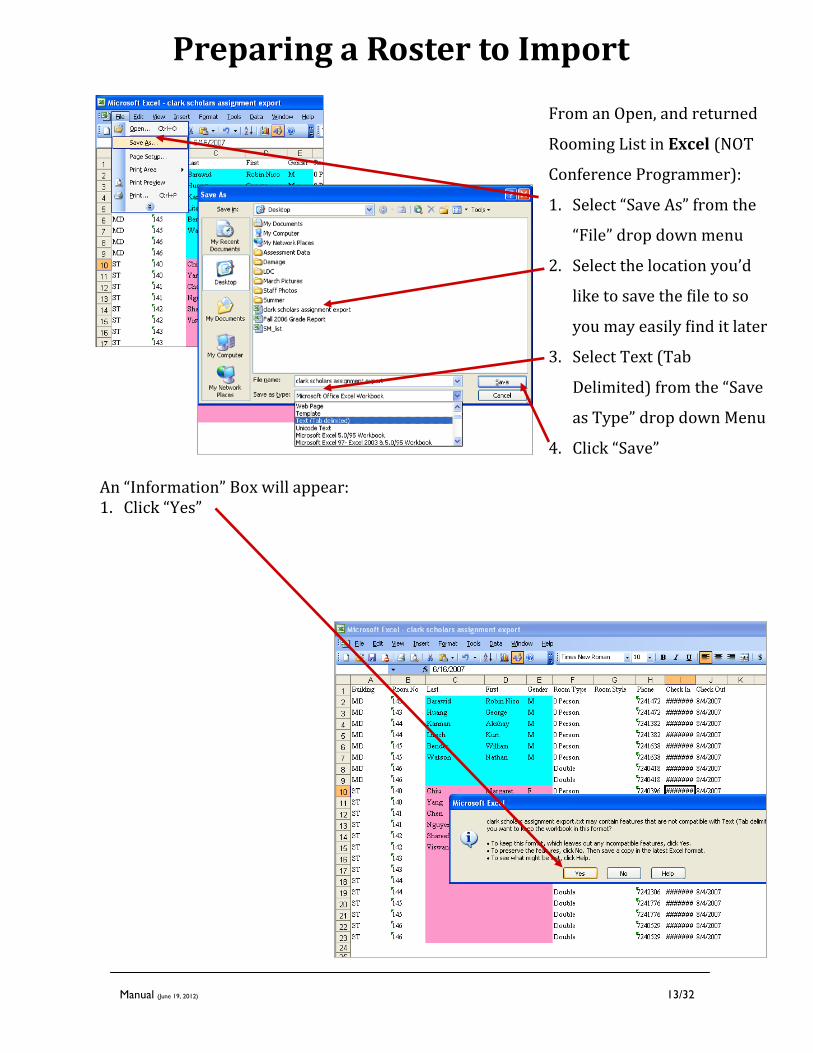
From an Open, and returned
Rooming List in Excel (NOT
Conference Programmer):
1. Select “Save As” from the
“File” drop down menu
2. Select the location you’d
like to save the file to so
you may easily find it later
3. Select Text (Tab
Delimited) from the “Save
as Type” drop down Menu
4. Click “Save”
An “Information” Box will appear: 1. Click “Yes”

Manual (June 19, 2012) 14/32
Importing Rosters
From your Main Conference Screen: 1. Select your Specific Conference 2. Click to expand the “Wizards”
Tab 3. Select “Import” A Wizard Screen will appear: 1. Click the Folder Icon
An “Open File” Screen will appear: 1. Select your Specific File 2. Click “Open”
The Wizard Screen will Reappear: 1. Click “Next”
Manual (June 19, 2012) 15/32
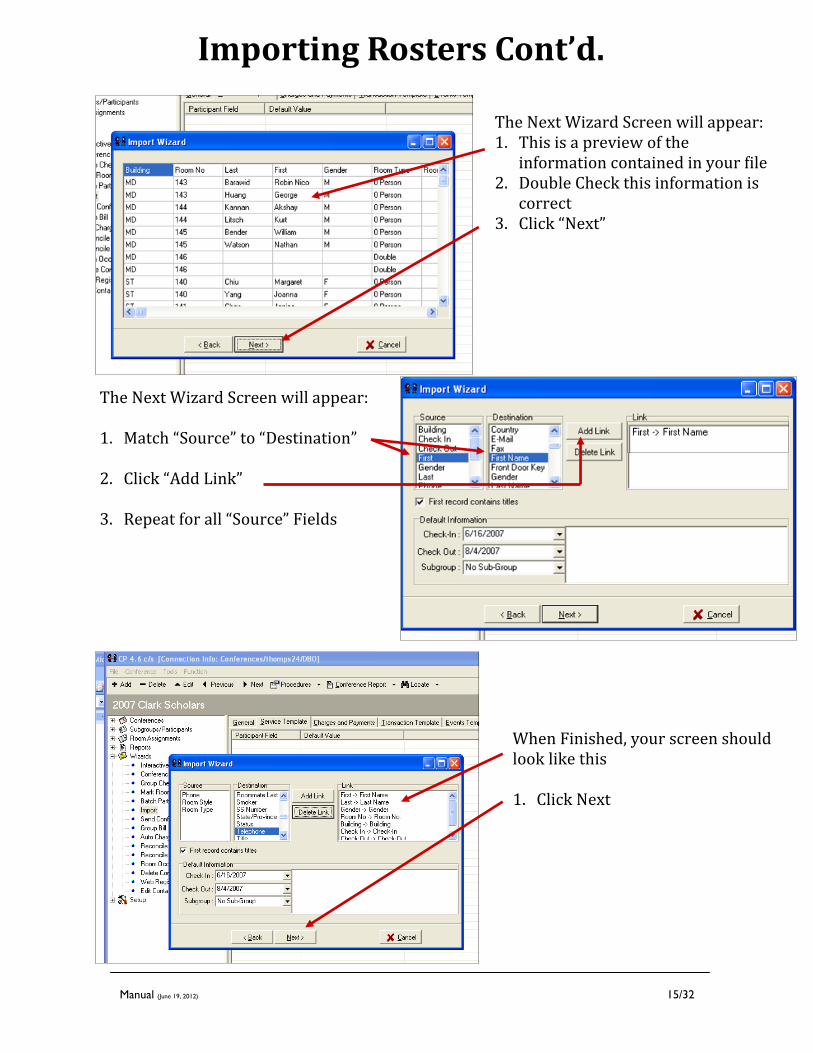
Importing Rosters Cont’d.
The Next Wizard Screen will appear: 1. Match “Source” to “Destination”
2. Click “Add Link”
3. Repeat for all “Source” Fields
The Next Wizard Screen will appear: 1. This is a preview of the
information contained in your file 2. Double Check this information is
correct 3. Click “Next”
When Finished, your screen should look like this 1. Click Next
Manual (June 19, 2012) 16/32
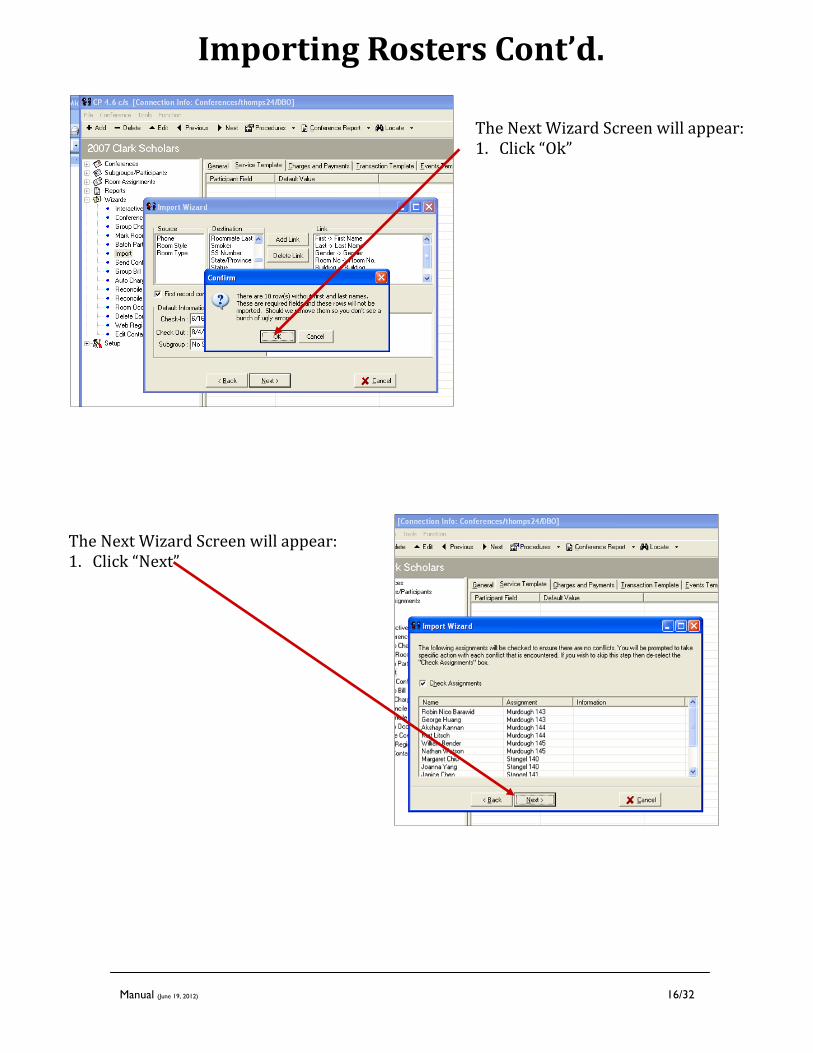
The Next Wizard Screen will appear: 1. Click “Ok”
The Next Wizard Screen will appear: 1. Click “Next”
Importing Rosters Cont’d.
Manual (June 19, 2012) 17/32
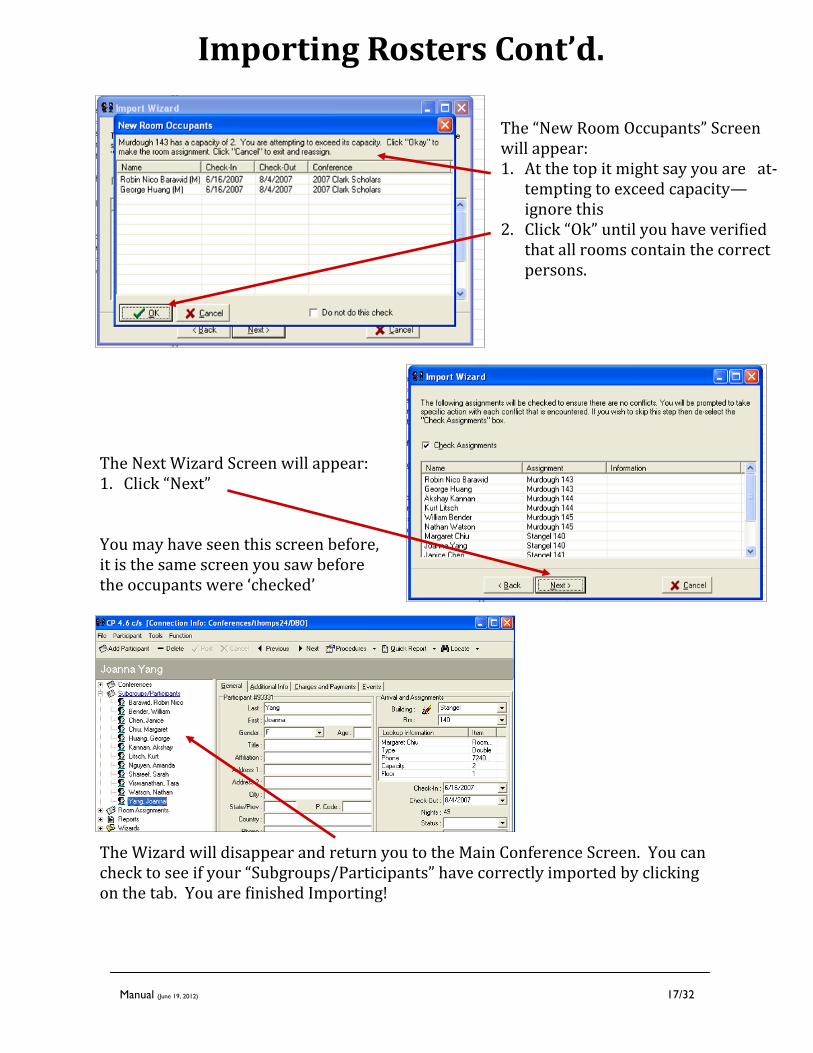
Importing Rosters Cont’d.
The “New Room Occupants” Screen will appear: 1. At the top it might say you are at-
tempting to exceed capacity—ignore this
2. Click “Ok” until you have verified that all rooms contain the correct persons.
The Next Wizard Screen will appear: 1. Click “Next” You may have seen this screen before, it is the same screen you saw before the occupants were ‘checked’
The Wizard will disappear and return you to the Main Conference Screen. You can check to see if your “Subgroups/Participants” have correctly imported by clicking on the tab. You are finished Importing!
Manual (June 19, 2012) 18/32
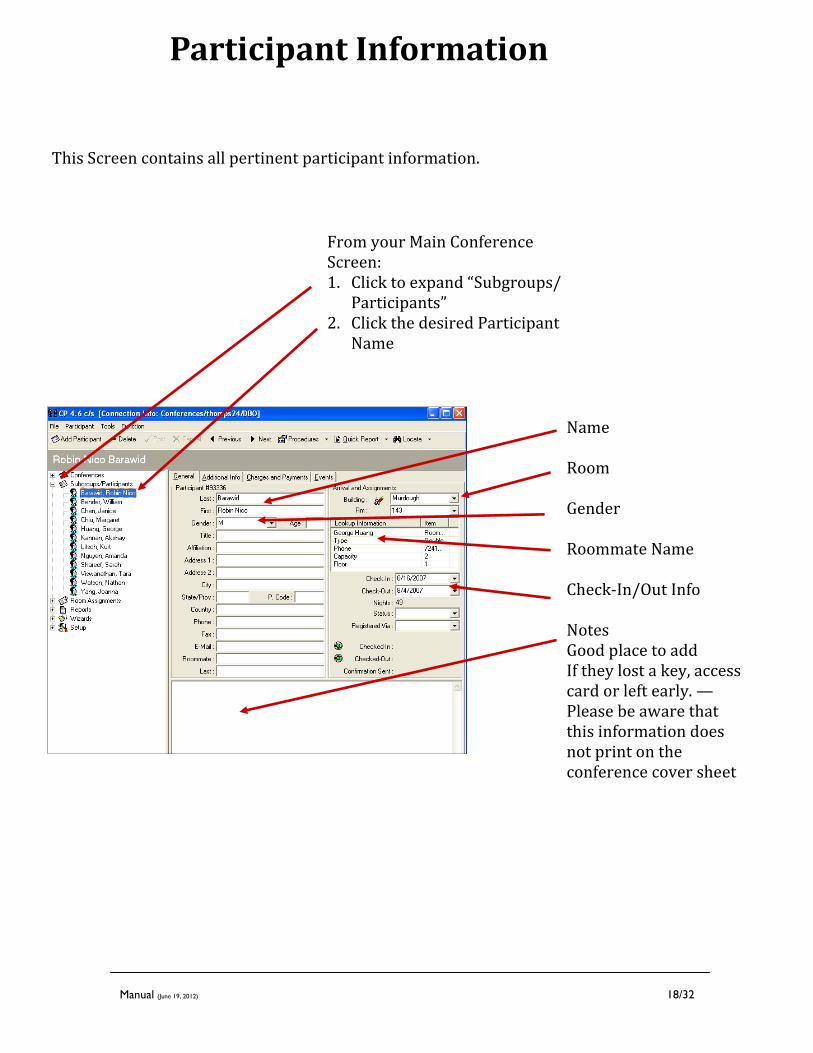
Participant Information
This Screen contains all pertinent participant information.
From your Main Conference Screen: 1. Click to expand “Subgroups/
Participants” 2. Click the desired Participant
Name
Name Room Gender Roommate Name Check-In/Out Info Notes Good place to add If they lost a key, access card or left early. — Please be aware that this information does not print on the conference cover sheet
Manual (June 19, 2012) 19/32
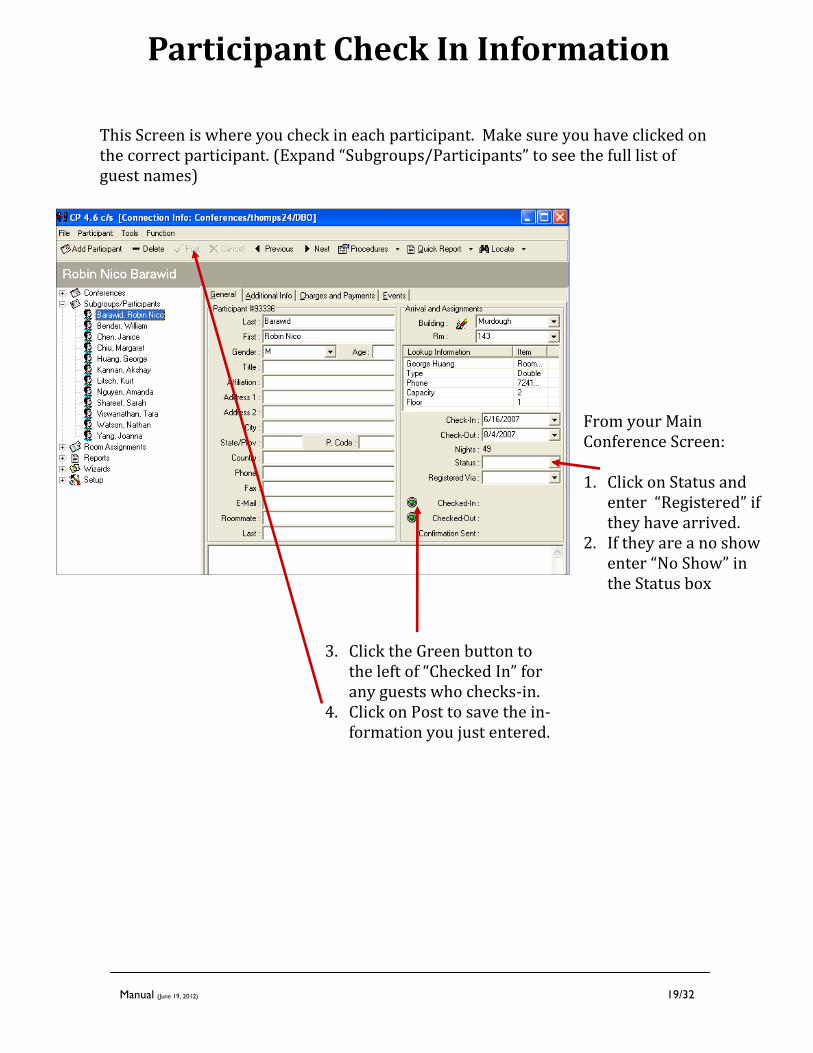
Participant Check In Information
This Screen is where you check in each participant. Make sure you have clicked on the correct participant. (Expand “Subgroups/Participants” to see the full list of guest names)
From your Main Conference Screen: 1. Click on Status and
enter “Registered” if they have arrived.
2. If they are a no show enter “No Show” in the Status box
3. Click the Green button to the left of “Checked In” for any guests who checks-in.
4. Click on Post to save the in-formation you just entered.
Manual (June 19, 2012) 20/32
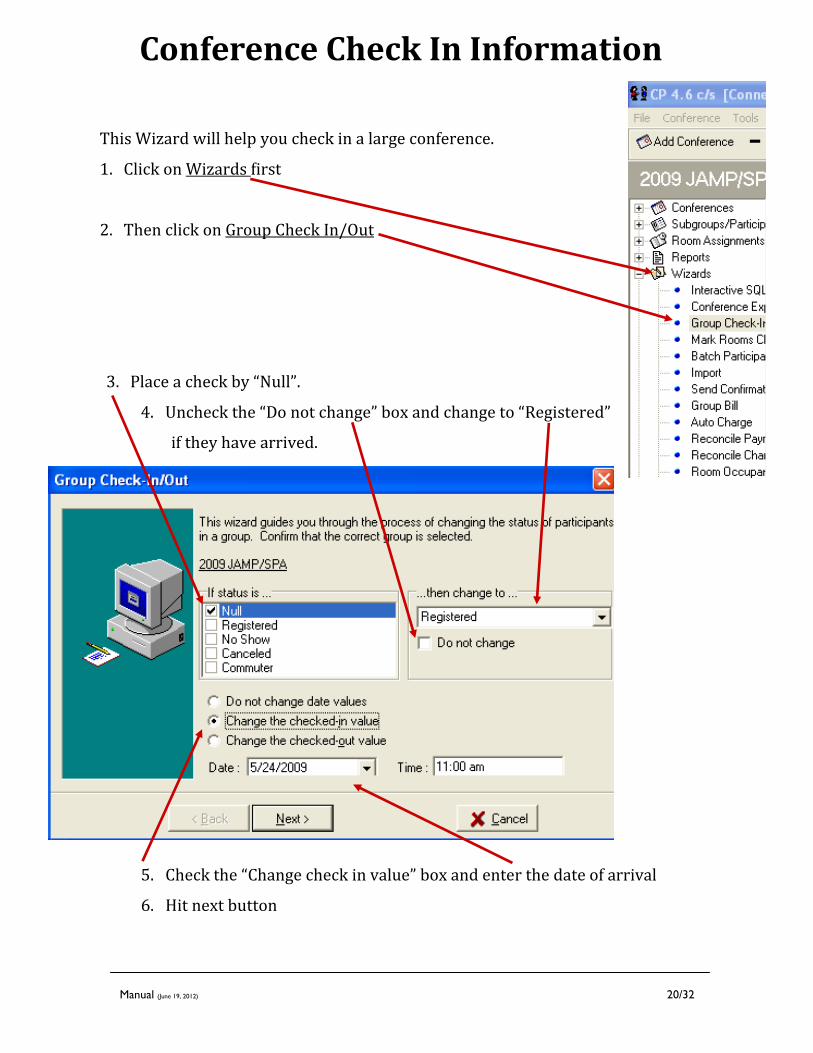
Conference Check In Information
This Wizard will help you check in a large conference.
1. Click on Wizards first
2. Then click on Group Check In/Out
5. Check the “Change check in value” box and enter the date of arrival
6. Hit next button
3. Place a check by “Null”.
4. Uncheck the “Do not change” box and change to “Registered”
if they have arrived.

Manual (June 19, 2012) 21/32
Conference Check In Information continued
5. Check the Adjust only those checking in button and enter the arrival date and hit Next.
6. Confirm everything is correct and click on Next and you are done. If they are a no show or cancellation uncheck that participant and you will have to update them by hand.
Manual (June 19, 2012) 22/32
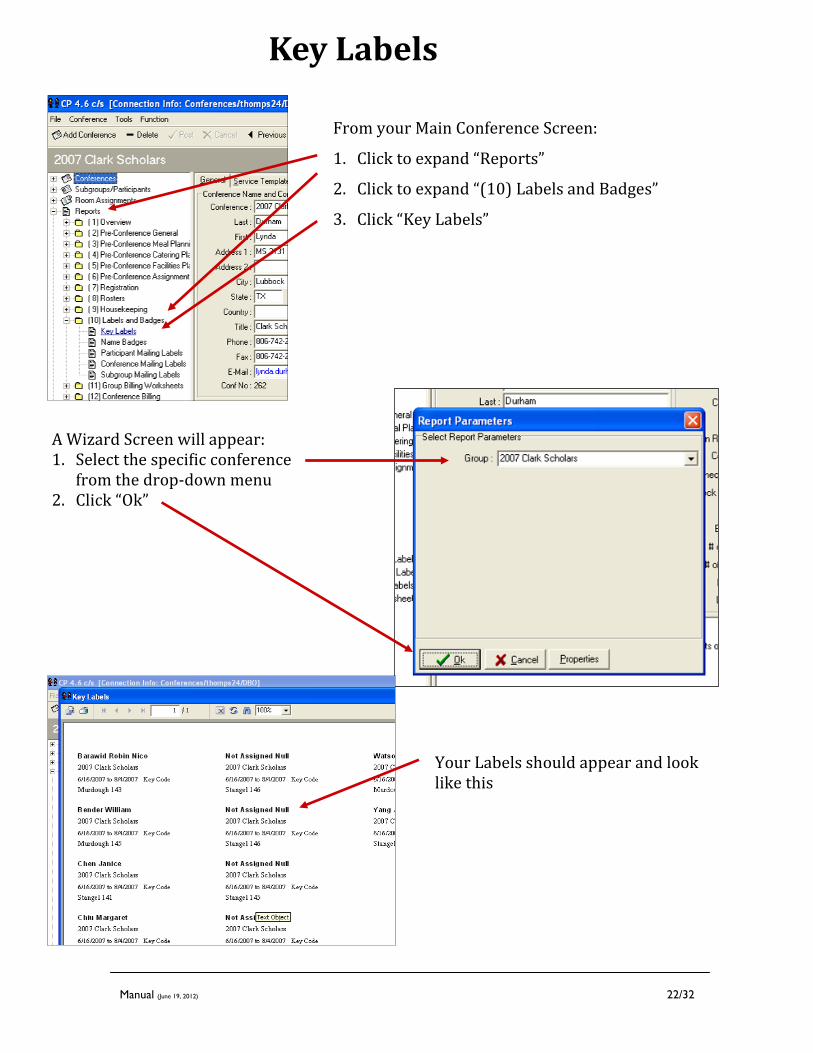
Key Labels
From your Main Conference Screen:
1. Click to expand “Reports”
2. Click to expand “(10) Labels and Badges”
3. Click “Key Labels”
A Wizard Screen will appear: 1. Select the specific conference
from the drop-down menu 2. Click “Ok”
Your Labels should appear and look like this
Manual (June 19, 2012) 23/32
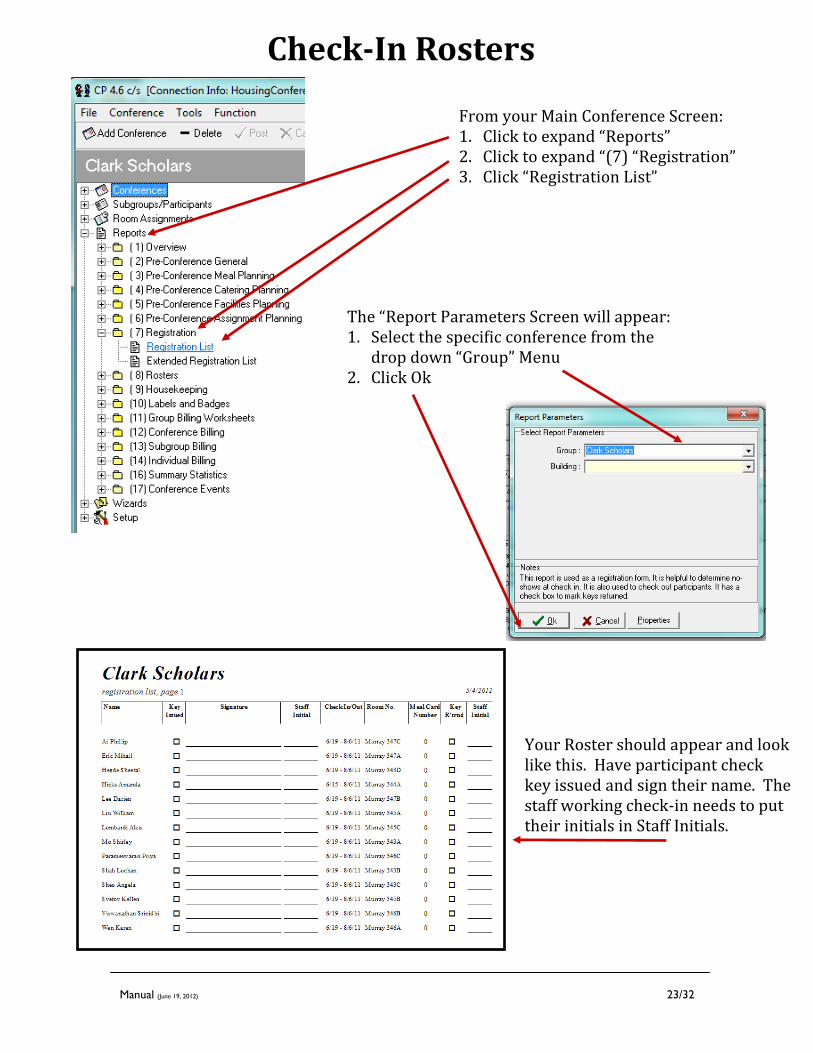
Check-In Rosters
From your Main Conference Screen: 1. Click to expand “Reports” 2. Click to expand “(7) “Registration” 3. Click “Registration List”
The “Report Parameters Screen will appear: 1. Select the specific conference from the
drop down “Group” Menu 2. Click Ok
Your Roster should appear and look like this. Have participant check key issued and sign their name. The staff working check-in needs to put their initials in Staff Initials.

Manual (June 19, 2012) 24/32
Room and Alpha Rosters
From your Main Conference Screen: 1. Click to expand “Reports” 2. Click to expand “(8) “Rosters” 3. Click “Roster by Conference”
The “Report Parameters Screen will appear: 1. Select the specific conference from the
drop down “Group” Menu 2. Select the specific building the conference
is housed in from the drop down “Building” Menu
3. Select if you’d like your roster sorted by Alpha Name (Last, First), or Room # (Building and Room) from the drop down “Sort” Menu
4. Click “Ok”
Your Roster should appear and look like this
Manual (June 19, 2012) 25/32
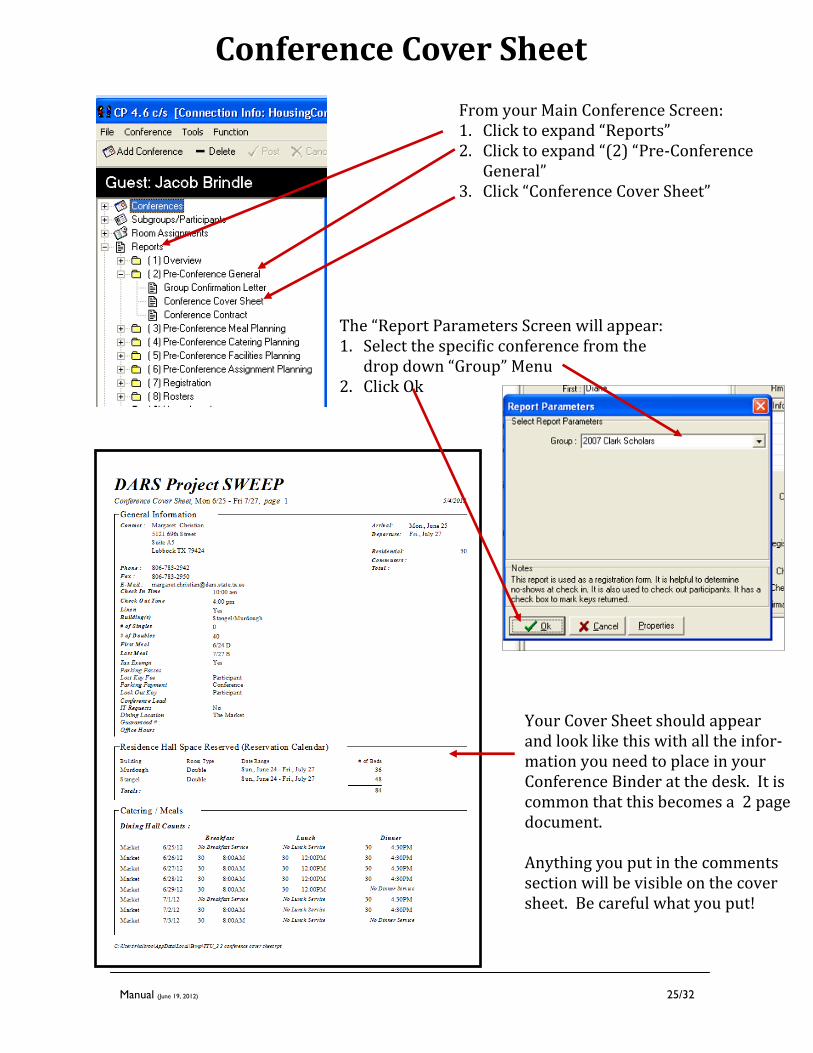
Conference Cover Sheet
From your Main Conference Screen: 1. Click to expand “Reports” 2. Click to expand “(2) “Pre-Conference
General” 3. Click “Conference Cover Sheet”
The “Report Parameters Screen will appear: 1. Select the specific conference from the
drop down “Group” Menu 2. Click Ok
Your Cover Sheet should appear and look like this with all the infor-mation you need to place in your Conference Binder at the desk. It is common that this becomes a 2 page document. Anything you put in the comments section will be visible on the cover sheet. Be careful what you put!

Manual (June 19, 2012) 26/32
Conference Calendar
From your Main Conference Screen: 1. Click to expand “Reports” 2. Click to expand “(1) “Overview 3. Click “Conference List by Date”
The “Report Parameters Screen will appear: 1. Select the date range you are looking for. 2. Click Ok
1. Change format to Microsoft Excel 97-2000
2. Click OK
1. Click OK
1. Determine location of where you want the file to go to.
2. Determine name of the file. 3. Click Save and find the file.
Manual (June 19, 2012) 27/32
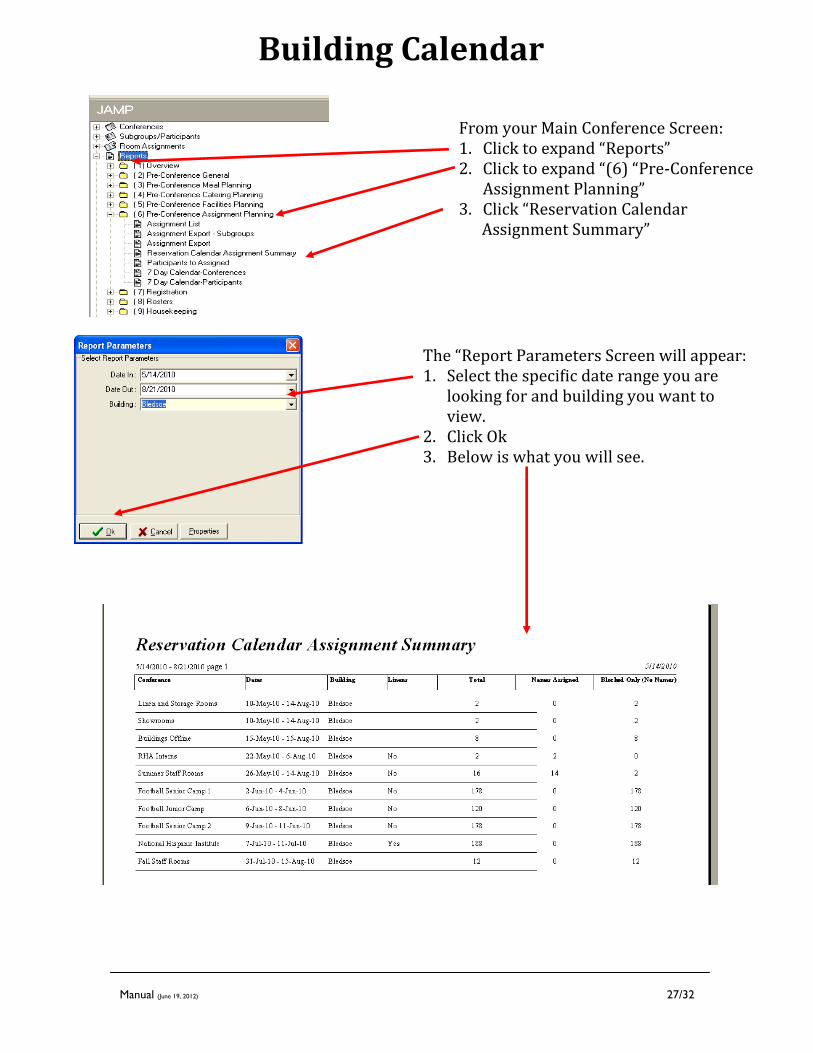
Building Calendar
From your Main Conference Screen: 1. Click to expand “Reports” 2. Click to expand “(6) “Pre-Conference
Assignment Planning” 3. Click “Reservation Calendar Assignment Summary”
The “Report Parameters Screen will appear: 1. Select the specific date range you are
looking for and building you want to view.
2. Click Ok 3. Below is what you will see.

Manual (June 19, 2012) 28/32
Updating Meal Numbers and Times
From your Main Conference Screen: 1. Click to expand “Conferences” 2. Click on Meals 3. Click on the date you need to change. 4. Make changes in box below
1. Hit OK when changes are made. You will have to do this step for each day individually.
2. You may only make changes to the Count and Time Fields! 3. Put note in notes section of main page that you have made changes. 4. Email the Manager for Conference Services with any changes.
Manual (June 19, 2012) 29/32
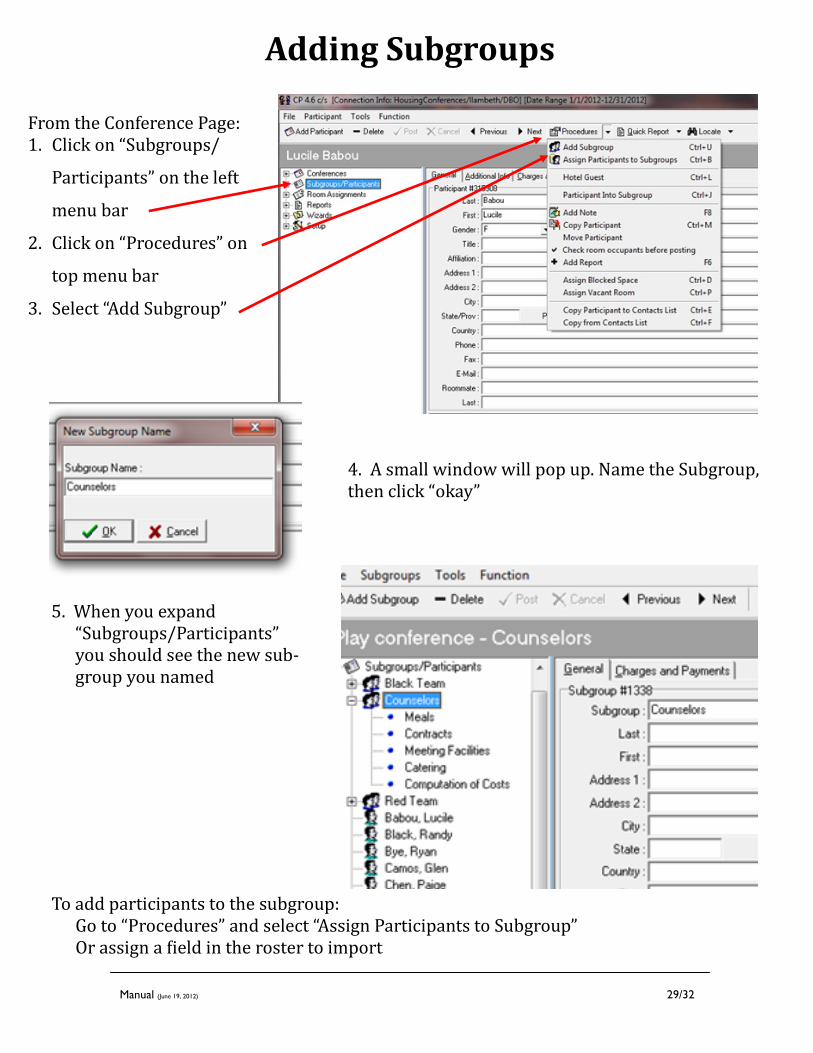
Adding Subgroups
From the Conference Page: 1. Click on “Subgroups/
Participants” on the left
menu bar
2. Click on “Procedures” on
top menu bar
3. Select “Add Subgroup”
5. When you expand “Subgroups/Participants” you should see the new sub-group you named
4. A small window will pop up. Name the Subgroup, then click “okay”
To add participants to the subgroup: Go to “Procedures” and select “Assign Participants to Subgroup” Or assign a field in the roster to import
Manual (June 19, 2012) 30/32
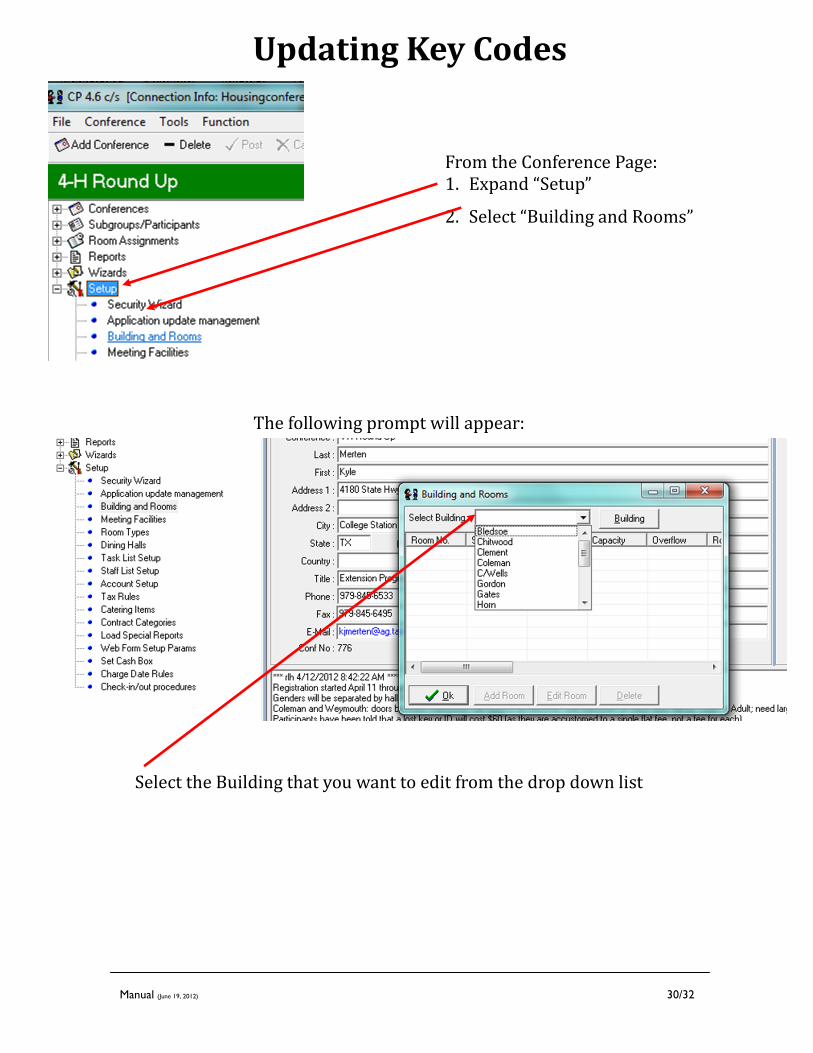
Updating Key Codes
From the Conference Page: 1. Expand “Setup”
2. Select “Building and Rooms”
The following prompt will appear:
Select the Building that you want to edit from the drop down list

Manual (June 19, 2012) 31/32
Updating Key Codes, continued
Once you select the building, a listing of all the rooms will appear. You can select the exact room number that needs to have the key code updated. Once you select the room, click “Edit Room”.
Another pop-up will appear with all the details about the room.
Under “additional information” you can edit the key code and then
click “ok” on the “Enter Room Information” screen.
The final step is to click “ok” on the “Building and Rooms” screen. Then the updated key code will now be displayed on all rosters, labels, and reports that list the data.

Manual (June 19, 2012) 32/32
Common Errors
Error Message Solution
“Invalid Pointer” In the CP login screen; choose the Connection Info Tab: The Cells should read: ODBC: HousingConferences Table Owner: DBO
I/O Error 32 If you are attempting to import a roster, check to make sure the original Excel spreadsheet and the Tab Delimited version are closed.