Zero- Zero ---Waste Composting: Waste Composting: How Food ...
Upload
duongnguyetCategory
view
219download
1
A simple guide to
Composting in your backyard
Recycle your yard trimmings and food scraps into a nutrient-rich compost.
Compost your kitchen scraps using an unlikely eating machine—worms!
Reduce food waste, plus save money and resources.
Put an end to the hassles and costs of bagging your grass clippings.


Backyard Composting pages 3–12By learning the basics of composting, you can recycle your yard trimmings and food scraps into a nutrient-rich compost.
Vermicomposting page 13Composting your kitchen scraps using an unlikely eating machine —worms!
Reduce Food Waste pages 14–20Save money and resources by following these handy tips.
Just Mow It pages 21–22Put an end to the hassles and costs of bagging your grass clippings.

Backyard CompostingComposting shrinks the amount of garbage going to the landfill while transforming old food scraps and yard trimmings into dark, nutrient-rich compost.
Compost is also sometimes called humus and is an important additive to reinvigorate your soil. Use compost by mixing it with your garden soil, as mulch, repotting plants or raking it into your lawn. A compost pile naturally breaks down organic material into compost right in your backyard, saving you the time and energy of bagging yard trimmings and then hauling them to the curb or drop-off site. Compost piles require a minimal amount of maintenance to create a product that any experienced gardener will tell you is valuable as organic compost loosens soil for better root penetration, improves soil capacity to hold water, and adds essential nutrients to soil.
You can compost with very little effort.
3

Pick a good spot Choose a composting site with plenty of room that is comfortable to work around and won’t interfere with your family’s lawn and garden activities. If you locate your compost pile near a tree or large shrub, make sure to move the pile at least once a year so the roots cannot establish in the pile.
Composting is easy!Composting can be as simple as throwing organic materials into a pile and letting nature do its work. Start with a mix of brown and green sources, such as leaves and grass then turn the pile once every month or two to keep the process going. This form of composting is simple and requires little effort, but it will take you a year or longer to produce compost.
For faster results, you just need to put in a little more effort. By building a bin, turning the pile every two to four weeks, and getting a good mix of carbon (browns) and nitrogen (greens), a compost pile can decompose very quickly. People who properly manage their piles can break down organic material into compost in three months or less.
4

Snow Fence BinBins made with snow fences are simple to make, move, and store. To build this bin, buy the appropriate length of prefabricated fencing and fasten two-by-fours as corner posts to the bottom to form a square.
Consider a compost binA compost bin is not required; however, many people use one to compost more quickly. A compost bin holds in moisture and heat, speeding up the decomposition process. Several models of plastic compost bins are available in stores locally. Building your own compost bin is easy and inexpensive with some readily available materials. When constructing your own compost bin, leave the bottom open to the soil underneath to allow micro-invertebrates, fungus, and other decomposers easy access to your compost pile.
Woven Wire BinThese bins are economical and easy to make. All you need is a length of woven galvanized wire (14-gauge wire). To determine the length needed, multiply the diameter of the bin desired by 3.2. Fasten the ends of the woven wire with four small chain snaps or plastic zip ties (available at any hardware store) to make a circle. The ideal diameter is three to five feet.
Block or Brick BinCompost bins can be made with bricks, cement blocks, and even rocks. These types of bins are sturdy, durable, and easily accessible. Just lay the blocks without mortar, leaving spaces between each block to permit aeration. Stack them to form three sides of a square container.
5

Wooden BinsConstruct a wooden bin with a removable front so materials can be easily turned. Old wooden pallets work well as the walls of the bin and fasten together easily with wood screws. Wire mesh can be substituted for wooden sides to increase the airflow in the compost pile. Covered wooden bins protect the pile from pests and heavy rain.
Turning BinsA turning bin is a series of two or three bins that allow you to make compost in a short time by turning the materials on a regular schedule. The first bin acts as a place to add new material. After a few weeks move the fresher material into the second bin and allow it to decompose while still adding new material to the first bin. This type of bin is perfect for people with lots of yard trimmings and kitchen scraps.
You can also turn material in your single compost bin by removing the bin from around the compost pile or organic material, setting the empty bin nearby, and shoveling the material back into the bin.
6

Compost Recipe
How to build a compost pile
Building a compost pile is similar to a pot of soup—collect a few ingredients, mix well, and allow to simmer.
When gathering materials to compost, remember that a good mix of carbon (“brown stuff”) and nitrogen (“green stuff”) is needed. Almost all natural, organic material will compost but not everything belongs in a compost pile.
* Always place food scraps in the middle of your compost pile to avoid odors and pests. It is also recommended to use a covered compost bin when composting food wastes to avoid pests.
What Can be Composted
Brown Stuff (Carbon) Green Stuff (Nitrogen) *
Brown leaves and brown grass Fruit scraps
Dead plants and flowers Vegetable scraps
Egg shells Old bread and pasta
Straw and pine needles Pizza crust
Saw dust, wood chips and shredded newspaper
Coffee grounds, paper filters and tea bags
Old brush, shrub trimmings and prunings Green grass and green plants
Wood ash and corn stalks Manure from animals that don't eat meat
7

* Fatty foods such as meat and bones should not be composted. They can attract rodents, raccoons and other pests and can cause odors in your compost pile. The manure of cats, dogs and raccoons can contain harmful pathogens that are not always killed by the heat of the compost pile.
Do Not Compost *
Butter or dairy products Oil and fats
Meat Grease
Bones Salad dressing
Diseased plants Dog or cat manure
Weed seeds Charcoal ash from briquettes
A properly made compost pile will reach a temperature of 90 – 140° F in four to five days. You can purchase a temperature probe or soil thermometer at garden and hardware stores or through the Internet. You will notice the pile settling—a good sign that it’s working!
8

Add soil to your pile. Add a few shovels of soil to further improve your compost pile’s effectiveness. This will introduce additional microorganisms into the pile. If you have a bin that is not open to the ground you should always add a few shovels of soil to get it started.
The composting basics—here’s what you need:Space: A minimum of 3 ft. x 3 ft. x 3 ft. of space is needed to maintain the proper volume for an active compost pile.
Bin: Placing organic material in a bin is recommended but not essential. The bin provides a controlled environment to contain the material.
Oxygen: Turn the pile and “fluff” to provide oxygen to the bacteria and other microorganisms doing the work.
Water: The pile should be moist like a damp sponge. In an open bin rain should keep the pile moist but during dry spells you may need to water the pile. Closed bins may require more watering as rain cannot reach the inside and they tend to heat up quicker.
Material or Food: The micro-organisms working to break down the pile need two types of food, carbon (for energy) and nitrogen (for reproduction).
9

Remember that a good mix of browns and greens are needed. Without a good mix, the pile will decompose slowly. For a typical backyard composter this means three times the amount of brown (by volume) than green.
For example, if a high-carbon material like dry leaves is being composted, you can add a high-nitrogen material like fruit and vegetable scraps to keep the pile decomposing quickly.
Size matters. The smaller the organics, the quicker they’ll breakdown into compost, so chop away!
Use the below tables to help you arrive at the best mix of carbon and nitrogen materials.
Typical Carbon Sources (Browns) Typical Nitrogen Sources (Greens)
Dead leaves and dry grass Fresh grass clippings
Straw and hay Fruit and vegetable scraps
Corn stalks Green leaves and plants
Dead plants Coffee grounds and tea bags
Browns Slower to Decompose Greens to Help Heat Your Pile
Sawdust Cow and horse manure
Twigs and sticks Rabbit manure
Viney plants Bloodmeal
Shredded cardboard and paper Urea
The carbon and nitrogen mix
10

Recipe for mixing compost for houseplants:
• 1 part compost • 2 parts potting soil
Benefits of mulching with compost:
• Reduces moisture loss from the soil surface • Helps control weeds • Helps maintain soil temperatures • Reduces soil erosion on slopes • Dark material beautifies planting area • Adds micronutrients • Reduces plants need for water
Benefits of incorporating compost into the soil:
• Loosens heavy clay soils • Aerates the rooting area • Improves soil capacity to hold water and nutrients • Attracts earthworms and other microbes that benefit gardens and flower beds • Provides valuable nutrients for plant growth • Reduces soil compaction
Harvesting and using finished compostCompost is ready to harvest when it is dark, crumbly, and earthy smelling. For best results, let the compost stabilize a few extra days and sift it through a one-half inch screen. If there are large fragments remaining, throw them back into your compost pile to continue decomposing.
There are a variety of uses for your finished compost. Annual use of compost will eventually reduce the need for fertilizer. Compost produced through the organic processes of a compost pile is ideal for gardens, flower beds, household plants, and trees. Gardeners recommend using compost as a mulch or mixing it into topsoil as a soil amendment.
11

Common problems and simple solutionsAnytime you try something new, problems can arise. Luckily, a compost pile is not too complicated and most problems are simple and can be easily remedied. Here are some of the usual trouble spots:
Symptom Situation SolutionPile has a bad odor Not enough air Turn the pile more
frequently
Material too wet Add dry material or leave off lid
Too much nitrogen Add carbon (leaves, newspaper, etc.)
Pile isn't decomposing quickly enough or isn't producing enough heat *
Too small Mix new ingredients into the pile (minimum volume requirements are 3 ft. x 3 ft. x 3 ft.)
Material too dry Moisten and turn the pile
Lack of nitrogen Add nitrogen source like fresh grass clippings or food scraps
Lack of oxygen Turn the pile more frequently
* Like us, the microorganisms in your compost pile need winter shelter. Do not turn your pile in winter. Simply layer your food scraps and leaves until the spring thaw.
If problems persist, visit HamiltonCountyRecycles.org or call the Recycling Hotline at 513-946-7766.
12
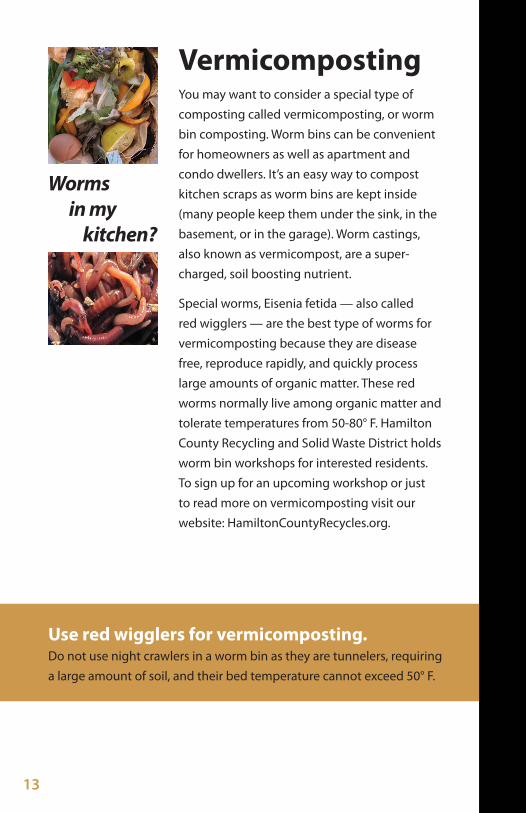
VermicompostingYou may want to consider a special type of composting called vermicomposting, or worm bin composting. Worm bins can be convenient for homeowners as well as apartment and condo dwellers. It’s an easy way to compost kitchen scraps as worm bins are kept inside (many people keep them under the sink, in the basement, or in the garage). Worm castings, also known as vermicompost, are a super-charged, soil boosting nutrient.
Special worms, Eisenia fetida — also called red wigglers — are the best type of worms for vermicomposting because they are disease free, reproduce rapidly, and quickly process large amounts of organic matter. These red worms normally live among organic matter and tolerate temperatures from 50-80° F. Hamilton County Recycling and Solid Waste District holds worm bin workshops for interested residents. To sign up for an upcoming workshop or just to read more on vermicomposting visit our website: HamiltonCountyRecycles.org.
Use red wigglers for vermicomposting. Do not use night crawlers in a worm bin as they are tunnelers, requiring a large amount of soil, and their bed temperature cannot exceed 50° F.
Worms in my kitchen?
13

Reduce Food WasteAccording to the U.S. EPA, “Food is the single largest type of waste going to landfills and incinerators. Americans disposed of approximately 33 million tons of food waste in 2010. When excess food, leftover food, and food scraps are disposed of in a landfill, they decompose and become a significant source of methane — a potent greenhouse gas. Much of the food that is discarded in landfills is actually safe, wholesome food that could have been used to feed people. So when you are thinking about making your family dinner, think about how you can reduce your food waste to save money, help communities, and protect the environment.”
Ways to Reduce Wasted Food• Shop your refrigerator first! Cook or eat what you already have at home before buying more.
• Plan your menu before you go shopping and buy only those things on your menu.
• Buy only what you realistically need and will use. Buying in bulk only saves money if you are able to use the food before it spoils.
• Be creative! If safe and healthy, use the edible parts of food that you normally do not eat. For example, stale bread can be used to make croutons and beet tops can be sautèed for a delicious side dish.
• Nutritious, safe, and untouched food can be donated to food banks to help those in need.
• Freeze, preserve, or can surplus fruits and vegetables – especially abundant seasonal produce.
• At restaurants, order only what you can finish by asking about portion sizes and be aware of side dishes included with entrees. Take home the leftovers and keep them for your next meal.
• At all-you-can-eat buffets, take only what you can eat.
• Compost food scraps rather than throwing them away.
14
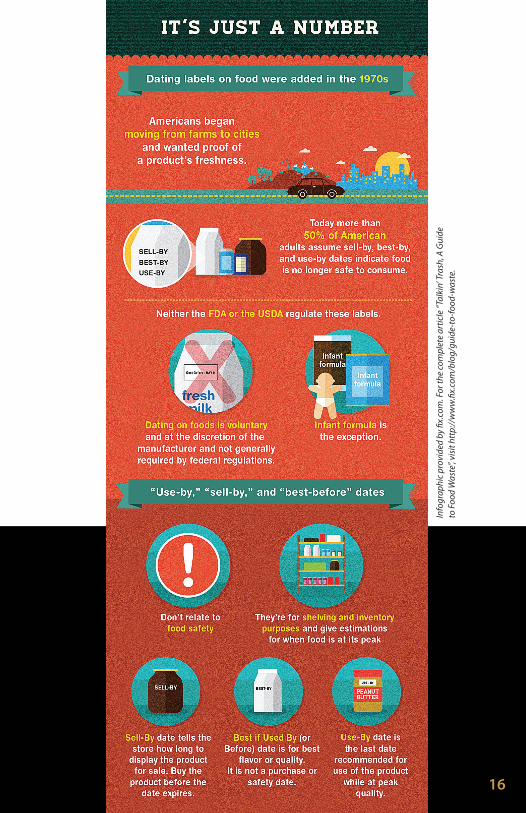
Safety after date expires Except for "use-by" dates, product dates don't always pertain to home storage and use after purchase. "Use-by" dates usually refer to best quality and are not safety dates. Even if the date expires during home storage, a product should be safe, wholesome and of good quality if handled properly. If product has a "sell-by" date or no date, cook or freeze the product according to the times on the chart found at www.fsis.usda.gov.
Foods can develop an off odor, flavor or appearance due to spoilage bacteria. If a food has developed such characteristics, you should not use it. When in doubt, throw it out.
If foods are mishandled, foodborne bacteria can grow and potentially cause foodborne illness — before or after the date on the package. For example, if hot dogs are taken to a picnic and left out several hours, they will not be safe if used thereafter, even if the date hasn't expired.
Other examples of potential mishandling are products that have been: • Defrosted at room temperature more than two hours • Cross contaminated • Handled by people who don't practice good sanitation
Follow the handling and preparation instructions on the label to ensure top quality and safety.
What do can codes mean? Cans must exhibit a packing code to enable tracking of the product in interstate commerce. This enables manufacturers to rotate their stock as well as to locate their products in the event of a recall. These codes aren't meant for the consumer to interpret as "use-by" dates.
Canned foods are safe indefinitely as long as they are not exposed to freezing temperatures, or temperatures above 90 ° F (32.2° C). If the cans look ok, they are safe to use. Discard cans that are dented, rusted, or swollen. High-acid canned foods (tomatoes, fruits) will keep their best quality for 12 to 18 months; low-acid canned foods (meats, vegetables) for two to five years.
Content on this page provided by U.S. Department of Agriculture, Food Safety and Inspection Service. For additional information, visit www.fsis.usda.gov.
15
Info
grap
hic
prov
ided
by
fix.c
om. F
or th
e co
mpl
ete
artic
le “T
alki
n’ T
rash
, A G
uide
to
Foo
d W
aste
”, vis
it ht
tp://
ww
w.fi
x.co
m/b
log/
guid
e-to
-food
-was
te.
16

Eat Me First! Buy a plastic bin or box to hold food in your refrigerater that should be eaten immediately. Label the box with "Eat Me First!" so that family members know to grab those food items before others.
Info
grap
hic
prov
ided
by
fix.c
om. F
or th
e co
mpl
ete
artic
le “T
alki
n’ T
rash
, A G
uide
to
Foo
d W
aste
”, vis
it ht
tp://
ww
w.fi
x.co
m/b
log/
guid
e-to
-food
-was
te.
17

Make a shopping list with meals in mind. • Think about how many meals you'll eat at home this week and how long before your next shopping trip.
• Next to fresh items on the list, note the quantity you need or number of meals you're buying for.
• Shop your kitchen first and note items you already have.
Info
grap
hic
prov
ided
by
fix.c
om. F
or th
e co
mpl
ete
artic
le “T
alki
n’ T
rash
, A G
uide
to
Foo
d W
aste
”, vis
it ht
tp://
ww
w.fi
x.co
m/b
log/
guid
e-to
-food
-was
te.
18

Fruit and vegetable storage guide
Inside the Fridge Outside the Fridge
Apples, berries, and cherries Bananas, mangos, papayas, and pineapples: store in a cool place
Grapes, kiwi, lemons, and oranges Potatoes and onions: store separately in a cool, dark place
Melons, nectarines, apricots, peaches, and plums (after ripening at room temperature)
Basil and winter squashes: store at room temperature—once cut, store squashes in fridge
Avocados, pears, tomatoes (after ripening at room temperature)
Almost all vegetables and herbs
Storage suggestions: • If you like your fruit at room temperature, take what you will eat for the day out of the fridge in the morning.
• Many fruits give off natural gases that hasten the spoilage of other nearby produce. Store bananas, apples, and tomatoes by themselves and store fruits and vegetables in different bins.
• Consider storage bags and containers designed to help extend the life of your produce.
• To prevent mold, wash berries just before eating.
Timing is important. Prepared food is often wasted because it is left out too long — over two hours. Refrigerate left-overs as soon as you are finished eating.
Content on this page provided by U.S. EPA. For additional information, visit www.usepa.gov.
19

Understand dates on egg cartons. Always purchase eggs before the "Sell-By" or "EXP" date on the carton. After the eggs reach home, refrigerate the eggs in their original carton and place them in the coldest part of the refrigerator, not in the door. For best quality, use eggs within 3 to 5 weeks of the date you purchase them. The "sell-by" date will usually expire during that length of time, but the eggs are perfectly safe to use.
Keep milk fresh. Store cartons or jugs of milk near the back of the fridge, not in the door. The door is the warmest area of the refrigerator and will not keep milk cold enough — causing it to spoil faster.
Is it hot or cold? Keep hot foods hot and cold foods cold while you are serving them. Allowing hot foods to cool down or cold foods to warm up leads to spoilage and may cause sickness.
Resources for additional information on food waste reduction:www.stilltasty.com www.usepa.gov www.fix.com www.fsis.usda.gov http://bit.ly/15fXwQd http://bit.ly/1c33nw5
Tips provided by U.S. EPA. For additional information, visit www.usepa.gov.
20

Tired of bagging your grass clippings? Then Just Mow It! Just Mow It! is the simple practice of leaving your grass clippings on the lawn.
It’s easy, fast, and good for your lawn.
Steps to Just Mow It!1. Proper mowing height
The appropriate mowing height for lawns in Ohio is three inches. Raise the cutting height slightly in the summer.
2. Mowing frequency
Never remove more than one-third of the leaf surface at any one time. Removing more than one-third weakens the grass plant, reduces or stops growth, and leaves significant clippings on the lawn surface. If the mowing height is three inches, the grass should not grow more than four inches before it is mowed. In real terms, this
Just Mow It—no bagging required!
Benefits of Just Mowing It! • Reduces work so you don’t have to bag or rake and dispose of your grass clippings.
• Reduces waste going to landfills.
• Feeds your lawn. Grass clippings contain nutrients that can generate up to ONE THIRD of your lawn’s total fertilizer needs, so you have the potential to reduce fertilizer costs.
• In addition to releasing nutrients to the soil, decomposing grass clippings may substantially enhance soil microbe activity.
21

means a lawn should ideally be mowed two times per week in spring (April–May) and two times per week in the fall (September–October), when the grass is growing actively.
3. Mow lawns when dry
Lawns should be mowed when dry so clippings won’t clump together on the lawn surface. Obviously, there will be times when rain makes it impossible to mow frequently. You can still leave clippings on the lawn if the clumps of grass are spread out evenly to allow them to readily decompose.
4. Any lawn mower can be used
While mulching mowers cut grass clippings into smaller pieces, you can still use non-mulching mowers. Have your mower blade professionally sharpened annually (most tool rental stores can provide this service).
5. Never sweep grass clippings into the road or storm drain.
Clippings (like all plant material) contain nutrients that can cause algal blooms if they get into rivers and lakes.
Leaving grass clippings on the lawnDOES NOT CREATE THATCH. Thatch is a tightly intermingled layer of living and dead stems, leaves and grass roots that develops between the green grass and the soil surface. Grass clippings are 75 to 85 percent water and decompose rapidly. Thatch is formed from grass parts more resistant to decomposition like roots, stems, etc.
Content provided by Ohio State University Extension Fact Sheets: Lawn Care Plans and Mowers and Mowing and reviewed by Pamela J. Sherratt, Sports Turf Specialist, Department of Horticulture and Crop Science, The Ohio State University. For additional information, visit http://ohioline.osu.edu/hyg-fact/1000/1190.html.
22

Hamilton County Recycling and Solid Waste District
250 William Howard Taft Road, Cincinnati, OH 45219
Tel: (513) 946-7766 Fax: (513) 946-7778
HamiltonCountyRecycles.org
confessionsofacomposter.blogspot.com
© 2015 Hamilton County Recycling and Solid Waste District