A Practical Guide to Vacuum Packing · Most bacteria associated with food spoilage need oxygen to...
46
A Practical Guide to VACUUM PACKING By Paul Newton & Andrew Gillespie www.lava-vacuum-packing.com & www.lava-europe.com
Transcript of A Practical Guide to Vacuum Packing · Most bacteria associated with food spoilage need oxygen to...
A Practical Guide to Vacuum Packing
By Paul Newton & Andrew Gillespie www.lava-vacuum-packing.com & www.lava-europe.com

general Food Safety
Vacuum packing is not a substitute for proper temperature control. All foods should be stored in the fridge or in a cool place even if they have been vacuum packed. If you are in any doubt about the correct
temperature to store a particular food at, then see the Food Standards Agency website at www.food.gov.uk.
copyright notice
No part of this book may be reproduced or transmitted in any form or by any means, electronic or mechanical, including photocopying, recording
or by information storage and retrieval system without specific permission in writing from the Authors.
Limits of Liability/Disclaimer of Warranty
This eBook is intended for educational purposes only. The authors make no representation or warranties with respect to the accuracy,
applicability, fitness or completeness of the contents. The authors shall in no event be held liable for any loss or other damages, including but not limited to, special, incidental, consequential or other damages. The authors specifically disclaim any liability that is incurred from the use or
application of the contents of this eBook.
a Practical guide to Vacuum Packing
© 2010 Paul newton & andrew gillespie. all rights reserved.www.lava-vacuum-packing.com & www.lava-europe.com
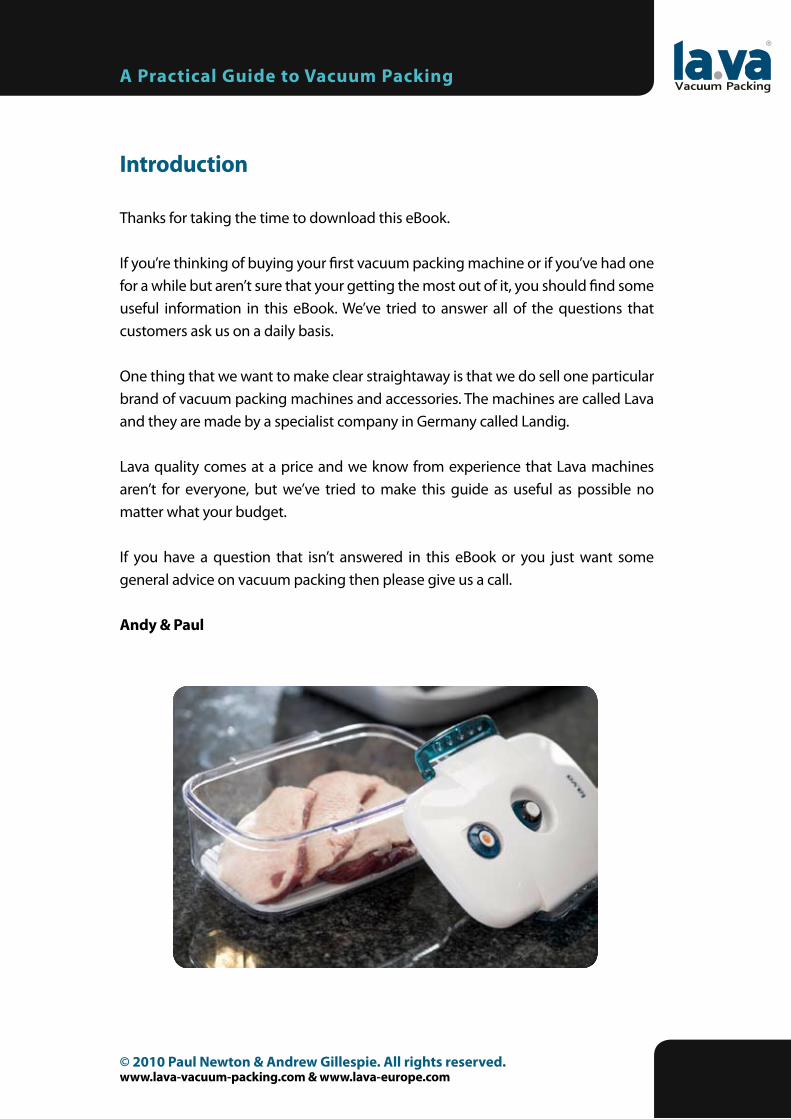
introduction
Thanks for taking the time to download this eBook.
If you’re thinking of buying your first vacuum packing machine or if you’ve had one for a while but aren’t sure that your getting the most out of it, you should find some useful information in this eBook. We’ve tried to answer all of the questions that customers ask us on a daily basis.
One thing that we want to make clear straightaway is that we do sell one particular brand of vacuum packing machines and accessories. The machines are called Lava and they are made by a specialist company in Germany called Landig.
Lava quality comes at a price and we know from experience that Lava machines aren’t for everyone, but we’ve tried to make this guide as useful as possible no matter what your budget.
If you have a question that isn’t answered in this eBook or you just want some general advice on vacuum packing then please give us a call.
andy & Paul

a Practical guide to Vacuum Packing
© 2010 Paul newton & andrew gillespie. all rights reserved.www.lava-vacuum-packing.com & www.lava-europe.com
1
Table of contents
What is a Vacuum? 2
How is a Vacuum Measured? 2
How Can I Tell if a Machine has ‘Enough’ Vacuum? 3
Vacuum Packing Food 3
Vacuum Packing Non-Food Items 5
Vacuum Packing in Bags 6
Vacuum Packing in Containers 8
Types of Vacuum Packing Machine 10
Choosing a Machine Type—Purchase Cost 12
Choosing a Machine Type—Bag Costs 13
The Pros and Cons of Vacuum Chamber Machines 15
The Pros and Cons of External Bag Machines 16
Vacuum Chamber or External Bag—Decision Time 17
How Much Money Should I Spend? 18
Vacuum Packing Machine Checklist 20
Vacuum Bags 22
Continuous Vacuum Packing Rolls 23
Acrylic Vacuum Containers 25
Stainless Steel Bowls 27
Vacuum Lids 28
Vacuum Packing Raw Meat 29
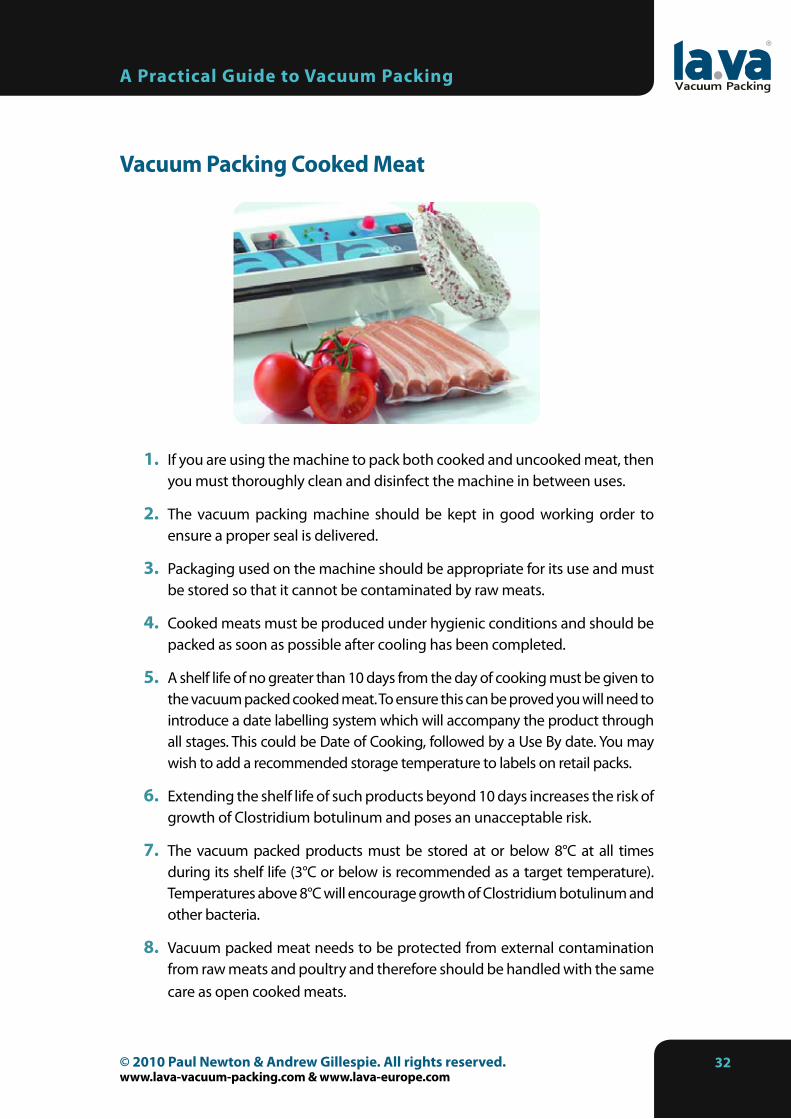
Vacuum Packing Cooked Meat 32
Vacuum Packing Sauces & Casseroles 33
Vacuum Packing Fish 35
Vacuum Packing Seafood 37
Vacuum Packing Vegetables 38
Vacuum Packing Fruit 40
Vacuum Packing Cheese 41
Food Storage Comparison Tables 42

a Practical guide to Vacuum Packing
© 2010 Paul newton & andrew gillespie. all rights reserved.www.lava-vacuum-packing.com & www.lava-europe.com
2
What is a Vacuum?A vacuum is simply the absence of air. We can create a vacuum in a plastic bag or container by sucking out all of the air and then sealing it to prevent air from leaking back in. The single most important reason for creating a vacuum is to remove oxygen from around the thing that we are going to store. This is because:
Air is made up of about 21% oxygen. Most bacteria associated with food spoilage need oxygen to grow. The less oxygen that is available, the slower bacteria will grow and the longer food will last before spoiling.
Oxygen is a highly reactive element and many of the organic compounds that give food its flavour will react with it and make the food taste stale.
There are some other things to consider and these are dealt with later in this eBook, but removal of oxygen is the most vital.
How is a Vacuum measured? Vacuum strength is important because the stronger the vacuum the more oxygen is removed. There are many different ways to measure a vacuum but the simplest is to use the ‘Bar’ unit.
In simple terms:
0 Bar equals normal air pressure.-1.0 Bar represents a perfect vacuum.
Whilst it is not practically possible to create a perfect vacuum, a good quality vacuum packing machine should be capable of creating a vacuum of at least -0.8 Bar.
One important point to note is that it gets much more difficult to create a vacuum the nearer you get to -1.0 Bar. So a machine that will produce -0.8 Bar is very much more powerful than one that produces only -0.7 Bar.
This has a practical effect too. Food stored at -0.8 Bar will last a LOT longer than food stored at -0.7 Bar. In fact, this is one of the main differences between high quality vacuum packing machines and ‘Discount Store’ ones. Even though the cheap machines may appear to remove the air, they don’t really create much of a vacuum.
1.
2.

a Practical guide to Vacuum Packing
© 2010 Paul newton & andrew gillespie. all rights reserved.www.lava-vacuum-packing.com & www.lava-europe.com
�
How can i Tell if a machine has ‘Enough’ Vacuum?All good quality vacuum packing machines will specify the strength of vacuum that they will produce. This should be at least -0.8 Bar. If a machine does not quote a vacuum pressure then don’t buy it because it won’t work. It may look like it is removing the air, but you could actually do that much yourself simply by squeezing the air out of the bag by hand.
There is a big difference between removing some of the air and creating a ‘proper’ vacuum.
Vacuum Packing FoodSealing foods under vacuum gives you the following benefits:
It eliminates oxidation
It preserves delicate flavours
It prevents freezer burn
It maintains natural moisture
It prevents moisture contamination
1. Eliminating oxidation
Once your food is in contact with the air it begins to lose its flavour and its appear-ance changes, for example banana and apple quickly show signs of oxidation by browning. This reaction affects all fresh foods to some extent, even if the effects are not immediately obvious. Vacuum packing eliminates contact with the air and therefore eliminates oxidation.
2. Preserving delicate flavours & oils
With increasing emphasis on increasing natural oils in our diets more of us are trying to eat fish which is rich in eicosapentaenoic (EPA) Oil and helps prevent cardiovas-cular disease. Fish Oils deteriorate and become rancid faster than the fat found in meat such as, beef, chicken, and pork. You can keep fish well wrapped in a fridge for 2-days and 2-months if frozen. By vacuum packing such foods you can preserve all its natural goodness and taste for 4-6 days in the fridge or frozen for 2-years.
1.2.�.�.5.

a Practical guide to Vacuum Packing
© 2010 Paul newton & andrew gillespie. all rights reserved.www.lava-vacuum-packing.com & www.lava-europe.com
�
�. Preventing freezer burn
Whilst freezing foods offers you greater flexibility it often is at a cost of texture and taste of your food. This is due to oxidation, dehydration, and slow bacterial growth which cause freezer burn, all need oxygen to occur. Vacuum packing eliminates oxygen and therefore freezer burn, so your food tastes and looks as good as the day you packed it.
�. maintaining natural moisture
One of the reasons we package or wrap food is to keep it from drying out; air causes moisture to evaporate. So by removing the air with vacuum packing the foods natural moisture is maintained along with all its flavour and texture. So you’ll no longer have to throw away the top slices of your loaf to find the soft one or have sliced meat curling up at the edges, everything will retain its own natural moisture.
5. Stopping moisture contamination
Keeping your cereals, muesli and crackers crisp and fresh is another problem, espe-cially if you buy in bulk to reduce costs. This is because dehydrated foods, unless they are kept in an airtight container quickly spoil as moisture in the air softens them. Vacuum packing these types of foods in useable quantities is far superior in maintaining the natural textures and flavours as it not only removes the air but the moisture it carries as well.
a Practical guide to Vacuum Packing
© 2010 Paul newton & andrew gillespie. all rights reserved.www.lava-vacuum-packing.com & www.lava-europe.com
5
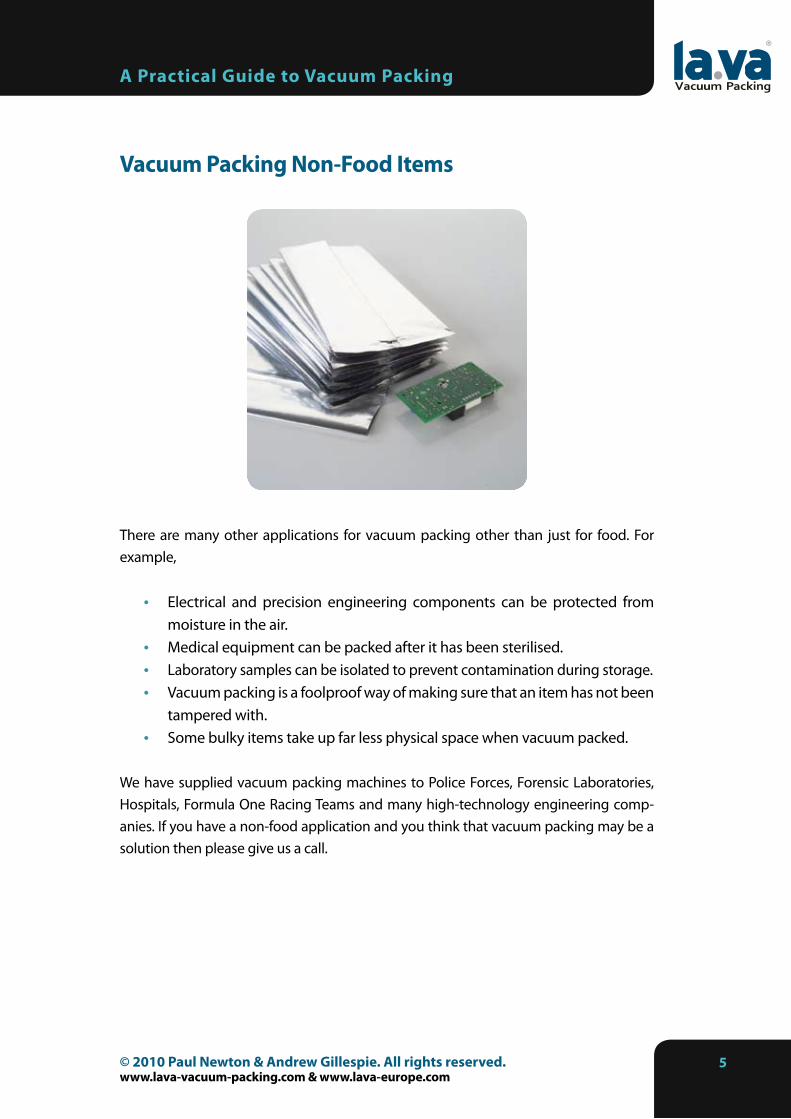
Vacuum Packing non-Food items
There are many other applications for vacuum packing other than just for food. For example,
Electrical and precision engineering components can be protected from moisture in the air. Medical equipment can be packed after it has been sterilised.Laboratory samples can be isolated to prevent contamination during storage. Vacuum packing is a foolproof way of making sure that an item has not been tampered with. Some bulky items take up far less physical space when vacuum packed.
We have supplied vacuum packing machines to Police Forces, Forensic Laboratories, Hospitals, Formula One Racing Teams and many high-technology engineering comp-anies. If you have a non-food application and you think that vacuum packing may be a solution then please give us a call.
•
•••
•

a Practical guide to Vacuum Packing
© 2010 Paul newton & andrew gillespie. all rights reserved.www.lava-vacuum-packing.com & www.lava-europe.com
�
Vacuum Packing in BagsThe technology behind vacuum packing is fairly straightforward. A vacuum is created in the bag surrounding the item being packed which is then heat-sealed to prevent the air from getting back in.
Once the air has been removed from the bag it needs to be sealed securely to prevent air from getting back in. This is done by making a heat seal. A heated surface presses the bag closed while applying sufficient heat to slightly melt the plastic of the bag. This melting is carefully controlled so that it creates an airtight seal that can’t be pulled apart. Once a vacuum bag has been sealed like this, the only way to reopen the bag is to cut it open beneath the seal.
If too much heat is used then the bag will be burned right through, if not enough heat is used then the bag will not be melted enough to form an air-tight seal.
A good air-tight seal depends on three things:
1. Bag Thickness
Thicker bags need more heat that thinner ones. A bag that is too thin may just burn through whereas one that is too thick will not seal properly.
2. Bag material
Vacuum bags are made from a polyamide (PA) air impenetrable exterior and a poly-ethylene (PE) food approved interior. The relative proportions of each will affect the amount of heat needed to make a good seal.
a Practical guide to Vacuum Packing
© 2010 Paul newton & andrew gillespie. all rights reserved.www.lava-vacuum-packing.com & www.lava-europe.com
�
�. number of Bags Being Sealed
If you are sealing a number of bags one after another then the bag sealer on the machine itself will heat up. This means that by the time you get to the second or third bag the machine may be too hot and just burn through the next bag.
One key feature that every good vacuum packing machine needs is means of control-ling the amount of heat that is applied to the seal. This is usually done by adjusting the time that the heat sealer is switched on.
Discount store vacuum packing machines won’t have this feature which means that they are very limited in the bags that they will work with. In addition, cheap machines will usually overheat after two or three bags and will need to be left to cool down before they can be used again.

a Practical guide to Vacuum Packing
© 2010 Paul newton & andrew gillespie. all rights reserved.www.lava-vacuum-packing.com & www.lava-europe.com
�
Vacuum Packing in containersMany vacuum packing machines also work on vacuum containers. These are hard plastic containers with special lids. By connecting a hose to the vacuum packing machine and to a special valve on the lid of the container you can suck out all the air. When the hose is removed, the valve on the top of the container stops the air from going in. To open the container you first need to release the valve to let the air back in. Vacuum Packing containers are reusable, and can be used in the dishwasher, microwave, fridge or freezer.
They are perfect for keeping salads, soft fruit and chopped vegetables in top condition for up to five times longer than they would normally keep.
Stainless steel vacuum bowls are very versatile and perfect for storing salads and soft food items which are not suitable for vacuum packing in pouches. They are also ideal for marinating. In fact, if you are marinating meat, you can achieve the same results in 20 minutes that it would normally take an overnight marinate to achieve.
a Practical guide to Vacuum Packing
© 2010 Paul newton & andrew gillespie. all rights reserved.www.lava-vacuum-packing.com & www.lava-europe.com
�
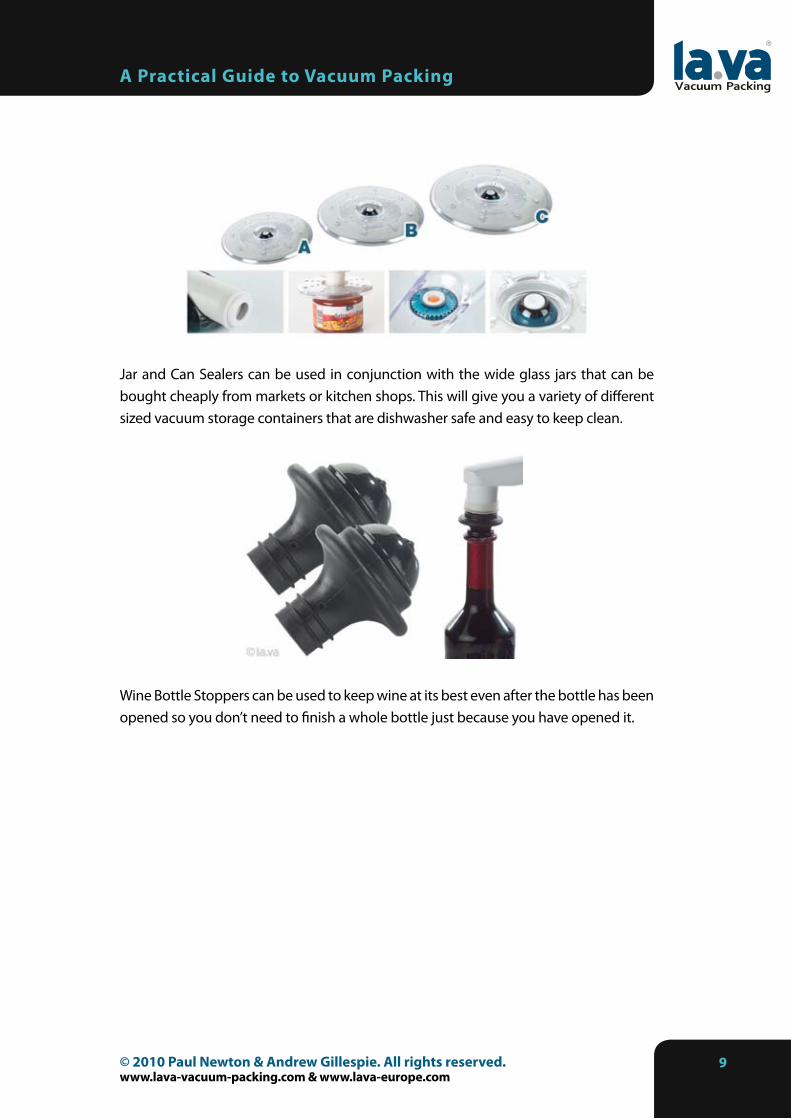
Jar and Can Sealers can be used in conjunction with the wide glass jars that can be bought cheaply from markets or kitchen shops. This will give you a variety of different sized vacuum storage containers that are dishwasher safe and easy to keep clean.
Wine Bottle Stoppers can be used to keep wine at its best even after the bottle has been opened so you don’t need to finish a whole bottle just because you have opened it.
a Practical guide to Vacuum Packing
© 2010 Paul newton & andrew gillespie. all rights reserved.www.lava-vacuum-packing.com & www.lava-europe.com
10
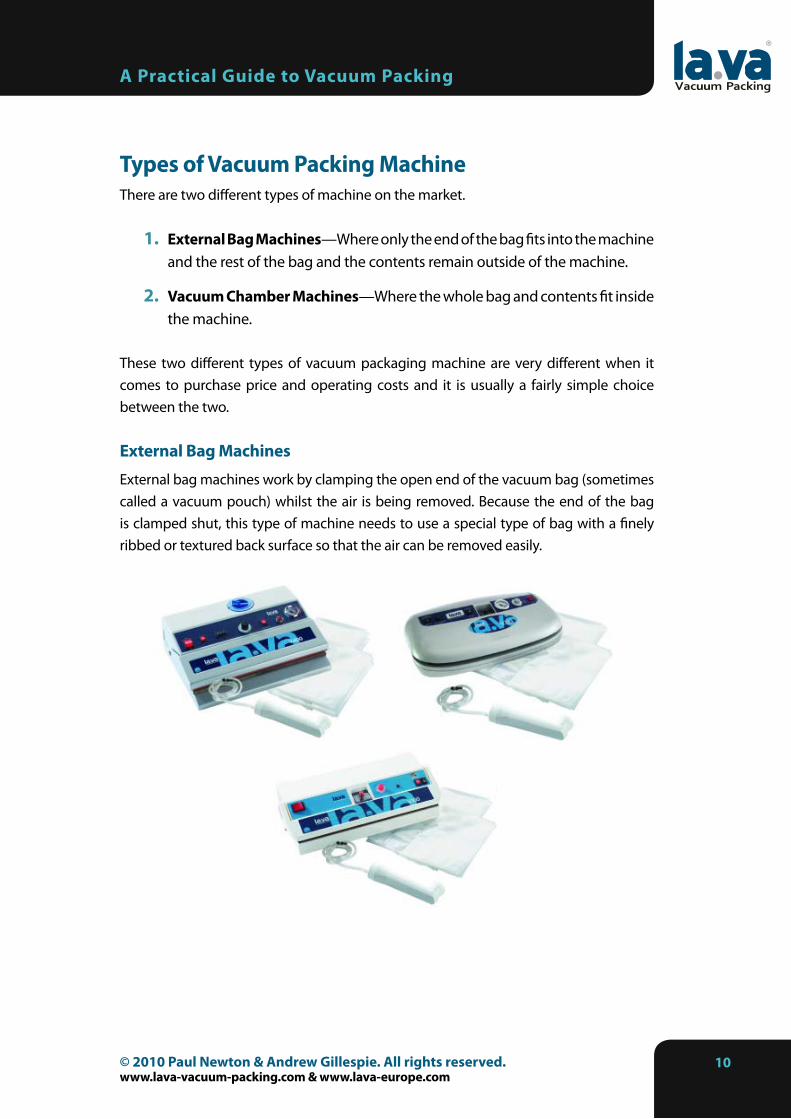
Types of Vacuum Packing machineThere are two different types of machine on the market.
External Bag machines—Where only the end of the bag fits into the machine and the rest of the bag and the contents remain outside of the machine.
Vacuum chamber machines—Where the whole bag and contents fit inside the machine.
These two different types of vacuum packaging machine are very different when it comes to purchase price and operating costs and it is usually a fairly simple choice between the two.
External Bag machines
External bag machines work by clamping the open end of the vacuum bag (sometimes called a vacuum pouch) whilst the air is being removed. Because the end of the bag is clamped shut, this type of machine needs to use a special type of bag with a finely ribbed or textured back surface so that the air can be removed easily.
1.
2.

a Practical guide to Vacuum Packing
© 2010 Paul newton & andrew gillespie. all rights reserved.www.lava-vacuum-packing.com & www.lava-europe.com
11
Some external bag machines (including Lava) also have an external vacuum port which allows you to use acrylic vacuum containers or stainless steel vacuum bowls with remov-able lids. These have the advantage of being reusable and are ideal for vacuum packing salads, soft fruit or anything which would be crushed if packed in a vacuum pouch.
External bag machines are the cheaper of the two types and prices range from about £40 to £1200. All vacuum packing machines need a high quality air pump and heat sealing mechanism and it is simply not possible to put high quality components into a cheap machine.
Vacuum chamber machines
These machines resemble a stainless steel box into which the vacuum pouch and contents are placed and the lid closed over them. The entire chamber is then vacuumed and the pouch is heat sealed. This type of machine does not need ribbed bags and consequently the vacuum pouches are cheaper than those which work best in the external bag machine. This type of machine costs from £1500 upwards depending on the physical size and speed of operation.
Vacuum chamber machines use an oil pump which will require regular servicing which is another factor which needs to be considered.
Because the vacuum bag and contents need to fit inside the machine, vacuum chamber machines are limited in the size of items that can be packed. They are ideal where large volumes of similar sized items are being vacuum packed and are widely used by the food packaging industry.
Gas Flush Chamber MachinesSome packaging applications need to have all of the air removed but cannot have a tight package that a vacuum normally produces—think of potato crisps and sandwiches. The solution is to remove the air and to replace it with something else which does not allow the product to oxidise. Carbon dioxide and nitrogen are both inert gasses which can be used to produce an environment where all of the air has been removed but where the packaging is not drawn down tight onto the product.
a Practical guide to Vacuum Packing
© 2010 Paul newton & andrew gillespie. all rights reserved.www.lava-vacuum-packing.com & www.lava-europe.com
12
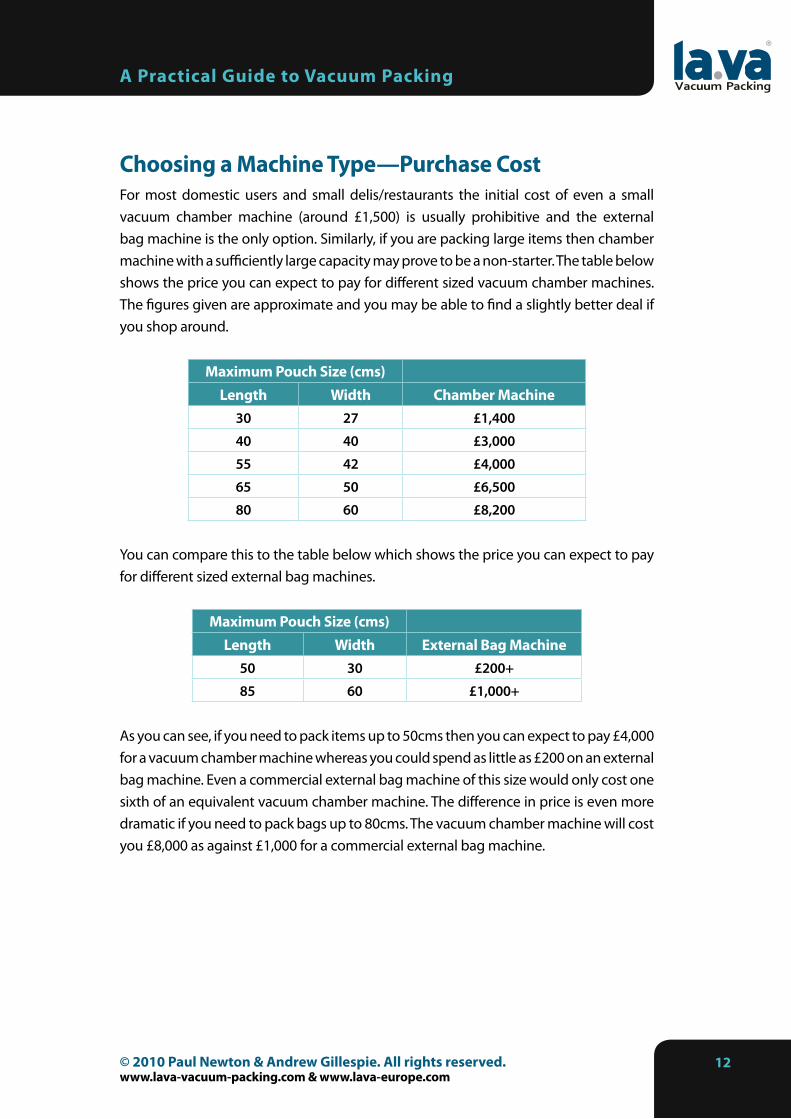
choosing a machine Type—Purchase costFor most domestic users and small delis/restaurants the initial cost of even a small vacuum chamber machine (around £1,500) is usually prohibitive and the external bag machine is the only option. Similarly, if you are packing large items then chamber machine with a sufficiently large capacity may prove to be a non-starter. The table below shows the price you can expect to pay for different sized vacuum chamber machines. The figures given are approximate and you may be able to find a slightly better deal if you shop around.
maximum Pouch Size (cms)Length Width chamber machine
30 27 £1,400
40 40 £3,000
55 42 £4,000
65 50 £6,500
80 60 £8,200
You can compare this to the table below which shows the price you can expect to pay for different sized external bag machines.
maximum Pouch Size (cms)Length Width External Bag machine
50 30 £200+
85 60 £1,000+
As you can see, if you need to pack items up to 50cms then you can expect to pay £4,000 for a vacuum chamber machine whereas you could spend as little as £200 on an external bag machine. Even a commercial external bag machine of this size would only cost one sixth of an equivalent vacuum chamber machine. The difference in price is even more dramatic if you need to pack bags up to 80cms. The vacuum chamber machine will cost you £8,000 as against £1,000 for a commercial external bag machine.

a Practical guide to Vacuum Packing
© 2010 Paul newton & andrew gillespie. all rights reserved.www.lava-vacuum-packing.com & www.lava-europe.com
1�
choosing a machine Type—Bag costsIf you are packing large numbers of items per week then you will need to consider the ongoing cost of the vacuum packing pouches as well as the up-front cost of the machine.
There is a significant difference in the cost of vacuum pouches suitable for use in vacuum chamber machines and external bag machines. This means that the decision of whether to buy an external bag vacuum packing machine or a vacuum chamber machine is usually dependent on the number of packing operations that you expect to do.
This can be illustrated using an example. Suppose that you need to pack items in 20x30cm vacuum pouches. A 20x30cm vacuum pouch will fit into the cheapest vacuum chamber machine (approx £1,400) and will also work with a good quality external bag machine costing £400. This represents an initial price difference of £1,000. So the question is;
Allowing for the difference in vacuum pouch prices (chamber machine pouches are cheaper), how many packing operations would be necessary to recoup the cost of the more expensive chamber machine?
One thousand vacuum pouches for a chamber machine cost about £45, whilst the same quantity of vacuum pouches for an external bag machine cost £160. This represents a difference of £115 per one thousand bags.
You would therefore need to use 8,700 vacuum pouches to recoup the additional cost of the vacuum chamber machine.
Whether or not this makes sense depends on the time it takes you to use that number of vacuum pouches. The table below shows the time that it would take to use 8,700 vacuum pouches depending on the number of packing operations per week.
Packing Operationsper Week
Time Taken to use�,�00 pouches
10 16 years
50 3 years
100 19 months
200 10 months
500 4 months
1000 2 months
a Practical guide to Vacuum Packing
© 2010 Paul newton & andrew gillespie. all rights reserved.www.lava-vacuum-packing.com & www.lava-europe.com
1�
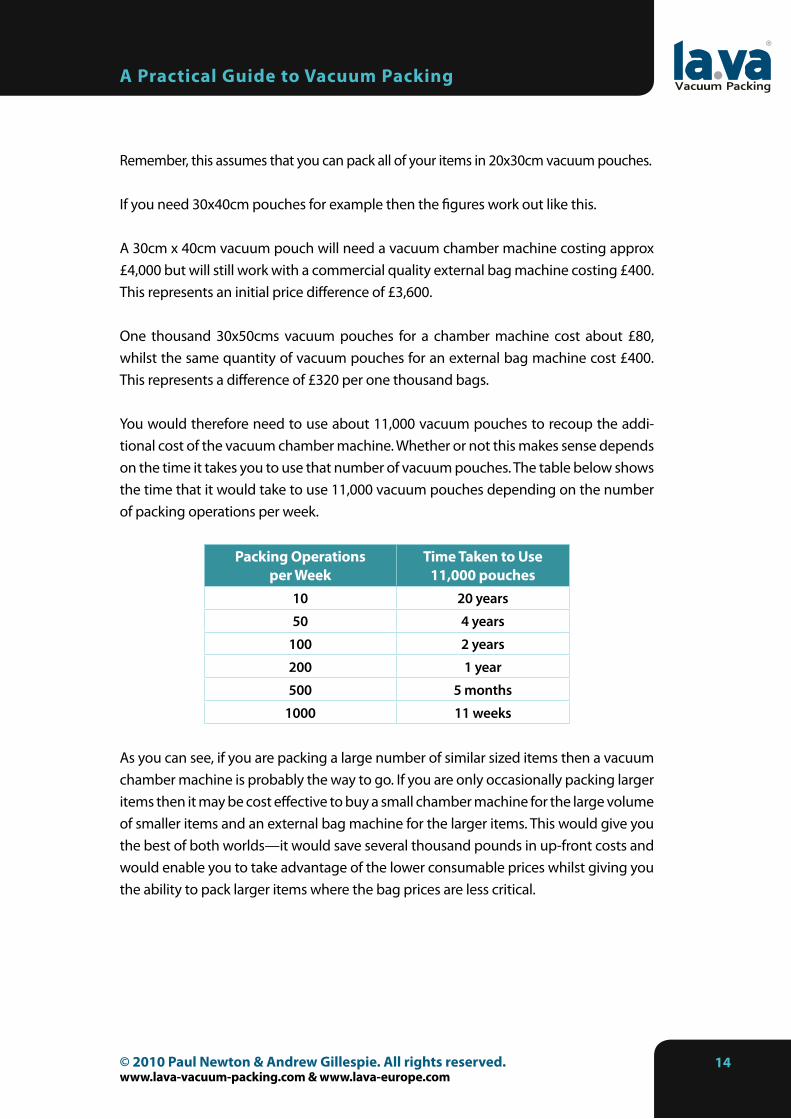
Remember, this assumes that you can pack all of your items in 20x30cm vacuum pouches.
If you need 30x40cm pouches for example then the figures work out like this.
A 30cm x 40cm vacuum pouch will need a vacuum chamber machine costing approx £4,000 but will still work with a commercial quality external bag machine costing £400. This represents an initial price difference of £3,600.
One thousand 30x50cms vacuum pouches for a chamber machine cost about £80, whilst the same quantity of vacuum pouches for an external bag machine cost £400. This represents a difference of £320 per one thousand bags.
You would therefore need to use about 11,000 vacuum pouches to recoup the addi-tional cost of the vacuum chamber machine. Whether or not this makes sense depends on the time it takes you to use that number of vacuum pouches. The table below shows the time that it would take to use 11,000 vacuum pouches depending on the number of packing operations per week.
Packing Operationsper Week
Time Taken to use11,000 pouches
10 20 years
50 4 years
100 2 years
200 1 year
500 5 months
1000 11 weeks
As you can see, if you are packing a large number of similar sized items then a vacuum chamber machine is probably the way to go. If you are only occasionally packing larger items then it may be cost effective to buy a small chamber machine for the large volume of smaller items and an external bag machine for the larger items. This would give you the best of both worlds—it would save several thousand pounds in up-front costs and would enable you to take advantage of the lower consumable prices whilst giving you the ability to pack larger items where the bag prices are less critical.

a Practical guide to Vacuum Packing
© 2010 Paul newton & andrew gillespie. all rights reserved.www.lava-vacuum-packing.com & www.lava-europe.com
15
The Pros and cons of Vacuum chamber machinesYou may need to take other factors into consideration when choosing between the two types of machine. For example, the chamber machines tend to be physically much bigger which may be a consideration if space is limited or the machine needs to be moved regularly.
In addition, with chamber machines you will need to check and change the oil used in the vacuum pump whereas external vacuum sealers use a dry piston pump which is maintenance free.
Vacuum chamber machine advantages Disadvantages
Lower Bag Cost Higher Initial Cost
Gas Flush Available Large Footprint/Bulky
Max Bag Size Limited
Hard to Move
Expensive to Maintain
Cannot Use Containers
As you can see from this table the vacuum chamber machine benefits from lower bag costs and the availability of gas flush systems. Set against this are a much higher purchase cost, limited bag size options, relatively high maintenance costs and the fact that these machines are physically large and very heavy.

a Practical guide to Vacuum Packing
© 2010 Paul newton & andrew gillespie. all rights reserved.www.lava-vacuum-packing.com & www.lava-europe.com
1�
The Pros and cons of External Bag machines
External bag machines do have numerous advantages over vacuum chamber machines, but the textured bags needed are more expensive. This may be the deciding factor, if you are packing hundreds of similar sized items every day.
External Bag machine advantages Disadvantages
Lower Initial Cost Higher Bag Cost
Small Footprint/Compact No Gas Flush
Can Use Big Bags
Easy to Move
Cheap to Maintain
Can Use Containers
As you can see from this table the external bag machine benefits from lower purchase cost, small physical size, much greater flexibility regarding bag sizes and a low mainte-nance cost. Set against this are higher bag costs and there is no gas flush available.
Which Type of Machine is Faster?There is not a great deal of difference between machine types in the time that it takes to pack something although external bag machines tend to be slightly faster. Assuming that the item to be packed is reasonably well matched to the vacuum bag size, the operation usually takes about 30 seconds. That is 10-20 seconds to remove the air from the bag and about 10 seconds to make the heat seal.
a Practical guide to Vacuum Packing
© 2010 Paul newton & andrew gillespie. all rights reserved.www.lava-vacuum-packing.com & www.lava-europe.com
1�
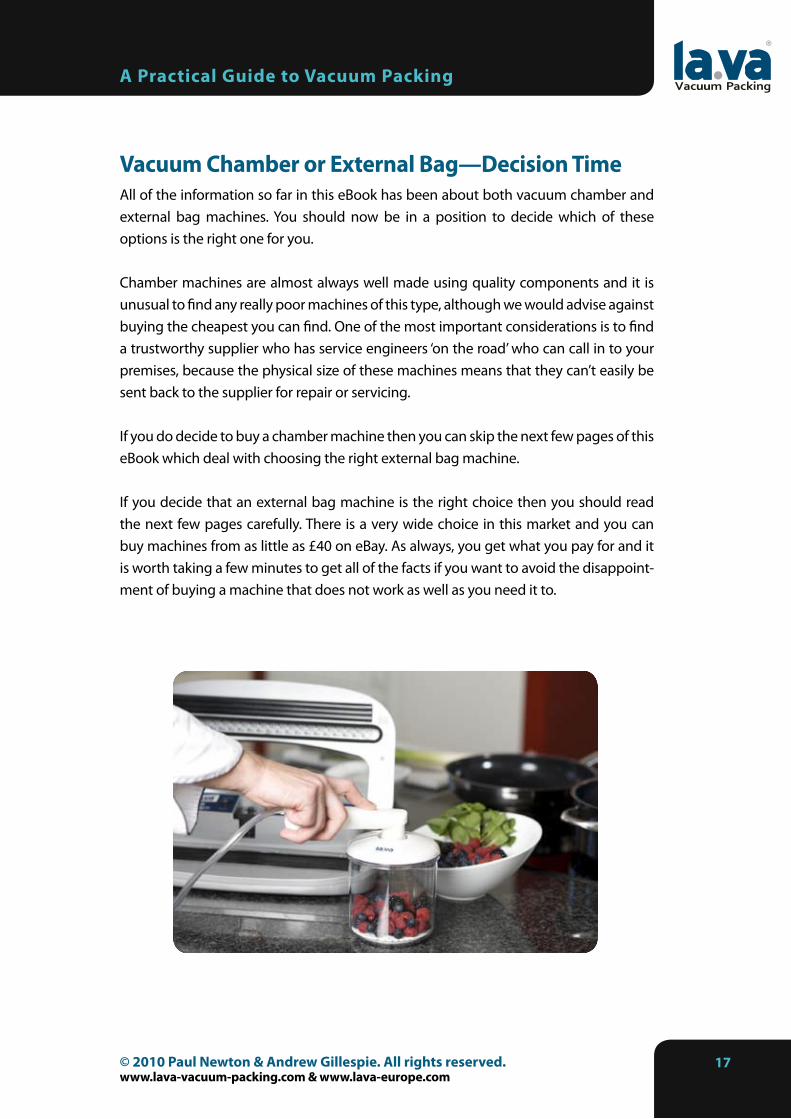
Vacuum chamber or External Bag—Decision TimeAll of the information so far in this eBook has been about both vacuum chamber and external bag machines. You should now be in a position to decide which of these options is the right one for you.
Chamber machines are almost always well made using quality components and it is unusual to find any really poor machines of this type, although we would advise against buying the cheapest you can find. One of the most important considerations is to find a trustworthy supplier who has service engineers ‘on the road’ who can call in to your premises, because the physical size of these machines means that they can’t easily be sent back to the supplier for repair or servicing.
If you do decide to buy a chamber machine then you can skip the next few pages of this eBook which deal with choosing the right external bag machine.
If you decide that an external bag machine is the right choice then you should read the next few pages carefully. There is a very wide choice in this market and you can buy machines from as little as £40 on eBay. As always, you get what you pay for and it is worth taking a few minutes to get all of the facts if you want to avoid the disappoint-ment of buying a machine that does not work as well as you need it to.

a Practical guide to Vacuum Packing
© 2010 Paul newton & andrew gillespie. all rights reserved.www.lava-vacuum-packing.com & www.lava-europe.com
1�
How much money Should i Spend? Most people who buy vacuum pacing machines start off with one specific requirement. This is usually something like packing meat for the freezer or packing vegetables from the garden. However, they often find that vacuum packing is saving them both money, because it can cut down on wasted food, and time because they can pre-prepare meals and then pack them in single servings. This being the case, it makes sense to buy a quality machine that is going to give you a few years of service. This leads us to the big question—How much money do you need to spend?
The price of external bag machines ranges from about £40 to £1,000. Whilst the very cheap machines (less than £200) may look tempting, they don’t work very well. The fact is that all vacuum machines need a high quality air pump and heat sealing mechanism and it is simply not possible to put quality components into a machine and sell it for less than £200.
The photograph above shows a pump from a cheap machine on the left and a pump from a Lava machine on the right. The pump on the left is based on a generic motor which is made in China and weights 270 grams. The Lava pump is made in Germany especially for Landig and weighs over 1200 grams.
The ‘factory gate’ price (which is what the manufacturer pays for the pump before it goes into the machine) is around 5 euros in the case of the cheap pump and around 60 euros in the case of the Lava pump. Although smaller price differences will apply to most of the other components in a vacuum packing machine, you will only get the quality that you pay for.
a Practical guide to Vacuum Packing
© 2010 Paul newton & andrew gillespie. all rights reserved.www.lava-vacuum-packing.com & www.lava-europe.com
1�
A significant number of our own customers are people who have bought one of these cheap machines from eBay, Lakeland or The Home Shopping Channel, discovered that the machine they have bought is virtually useless and are upgrading to a usable machine having just wasted between £40 and £150.
Who will use the machine?
Another consideration is, who is going to be using the vacuum packing machine and where? If the machine is going to be used in a busy commercial kitchen or factory type environment then you really need an all-metal machine. It is not reasonable to expect a machine designed for a domestic kitchen to survive for long in a hostile environment like a commercial kitchen where staff are often under intense time pressure and care of the equipment is not the top-priority.
Do i need an all-metal machine?
If you are doing less than 250 packing operations a week, the machine is going to be looked after and everything you pack will fit into a 30cm wide bag then you don’t need an all-metal machine.
If you are doing a lot of packing every day, the machine is being used by staff or you need to pack bags that are wider than 30cms, then an all-steel machine is recommended.
Whether you are using an all steel machine or not, there is not a great deal of difference between machines in the time that it takes to pack something. Assuming that the item to be packed is reasonably well matched to the vacuum bag size, the operation usually takes about 30 seconds. That is 10-20 seconds to remove the air from the bag and about 10 seconds to make the heat seal.
Bigger machines do work slightly faster but the real difference is in the build quality of the machine chassis. Also, steel machines may have a bigger motor, for example 800 watts as opposed to 400 watts. This speeds up the packing process a little, but the real difference is in the ability of the bigger machine to work continuously all day every day.

a Practical guide to Vacuum Packing
© 2010 Paul newton & andrew gillespie. all rights reserved.www.lava-vacuum-packing.com & www.lava-europe.com
20
Vacuum Packing machine checklistThere are a few things that you should consider when deciding which machine to buy and where to buy it as these factors will affect its usefulness and working life.
Vacuum PressureAll good quality vacuum packing machines will specify the strength of vacuum that they will produce. This should be at least -0.8 Bar. If a machine does not quote a vacuum pressure then don’t buy it because it won’t work properly. It may look like it is removing the air, but you could actually do that much yourself simply by squeezing the air out of the bag by hand.
Machine PowerAll machines will specify the amount of power that they use. This will be quoted in Watts and the higher the figure the better. Avoid anything less than 300 Watts.
Liquid TrapThe electric pump inside the machine which removes the air and creates the vacuum is an air pump, it is not a liquid pump. If liquid finds its way into the pump it will cause the pump to breakdown. This does not usually happen straightaway but it will reduce the life of the machine very considerably. Make sure the machine you buy has a liquid trap to prevent liquid from accidentally getting into the pump.
Wide, Double or Triple Sealing The width of the sealing strip plays an important part in the bag sealing process. A machine with a wide sealing strip will make a wide seal on the vacuum bag. This is important because small particles of food can end up in the path of the sealing wire. If this happens with a thin sealing strip, the result is gaps in the seal strip meaning that the bag will leak. A good quality machine will have a wide sealing strip or even better multiple sealing strips.
Variable Heat SealOne key feature that every good vacuum packing machine needs is means of controlling the amount of heat that is applied to the seal. If too much heat is used then the bag will be burned right through, if not enough heat is used then the bag will not be melted enough to form an air-tight seal.
a Practical guide to Vacuum Packing
© 2010 Paul newton & andrew gillespie. all rights reserved.www.lava-vacuum-packing.com & www.lava-europe.com
21
AccessoriesVacuum containers, bowls and jar lids add enormously to the usefulness of a vacuum packing machine. Make sure that the machine you buy is compatible with a large range of accessories and that these are readily available.
Spare Foam SealsIn order to create the vacuum, the area around the bag needs to be sealed when it is clamped under the lid of the machine. This is achieved by using foam rubber sealing strips on the bottom of the machine and on the lid. When they are new they make a perfect seal, but after a year or two of use, the seal becomes less effective as the foam rubber hardens with age. This can also happen if the seals are contami-nated with fat or oil. Once the seals are no longer airtight the machine can no longer create a vacuum. This is not a problem if the machine you buy has replaceable seals which can be bought ‘off the shelf’ otherwise it means that the machine is scrap.
Spare Heating StripsIn order to heat seal the bag without sticking to it, the heating element needs to be covered by a non-stick strip which is usually made of Teflon. This will usually last for at least a couple of years but may need replacing after that time. Once again, this is not a problem if the Teflon strip for your machine is readily available otherwise it means that the machine is scrap.
WarrantyDoes the seller offer a two-year warranty? All of our machines come with a two-year warranty which covers both parts and labour. If a machine is returned to us under warranty we guarantee to repair it within two working days and send it back to you by courier.
After Warranty ServiceWill the seller repair the machine at a reasonable cost even when the warranty has expired? Here at Lava, we carry a full range of spares and can replace any part including circuit boards and pumps. Our after warranty service means that your machine can still be repaired at a reasonable cost even if it is out of warranty. We will supply a new part for your machine at cost price and charge a maximum of one hour labour to fit it.
Telephone HelpCan you talk to the seller about any problems that you may have using the machine? Does the seller actually know anything at all about vacuum packing machines or are they just shifting as many kitchen appliances as possible?
a Practical guide to Vacuum Packing
© 2010 Paul newton & andrew gillespie. all rights reserved.www.lava-vacuum-packing.com & www.lava-europe.com
22
Vacuum BagsWhen working out which size of bag you need, remember that vacuum bags have a one centimetre seam down each side. This means that you will need to allow an extra two centimetres of three-quarters of an inch of width when choosing bag sizes. You will also need to allow five centimetres or two inches at the top of the bag for the heat seal.
The most widely used sizes are:
WxL (cms) WxL (inches) ideal for13 x 22 5 x 8 1 Chicken Breast, Single Portion of Sauce, etc
16 x 25 6 x 10 2 Chicken Breasts, Medium Steak, etc
20 x 30 8 x 12 6 Chicken Breasts, Large Steak, etc
25 x 40 10 x 16 Whole Chicken, Medium Joint, etc
30 x 50 12 x 20 Large Joint, etc
Ribbed vacuum bags are available in a variety of thicknesses and levels of quality. If you are storing food for human consumption then you should only use high quality certi-fied bags from a manufacturer who publishes the relevant data sheets for them.
Even if this data does not mean that much to you, at least you know that the manufac-turer has had the bags checked to make sure that they conform to all of the relevant food safety regulations.
It is possible to buy generic bags which are imported from China and these may be OK if you are storing something other than food. But you should be aware that you may be putting your family’s health at risk if you store food in bags that have not been properly tested and certified as suitable for food storage.
a Practical guide to Vacuum Packing
© 2010 Paul newton & andrew gillespie. all rights reserved.www.lava-vacuum-packing.com & www.lava-europe.com
2�
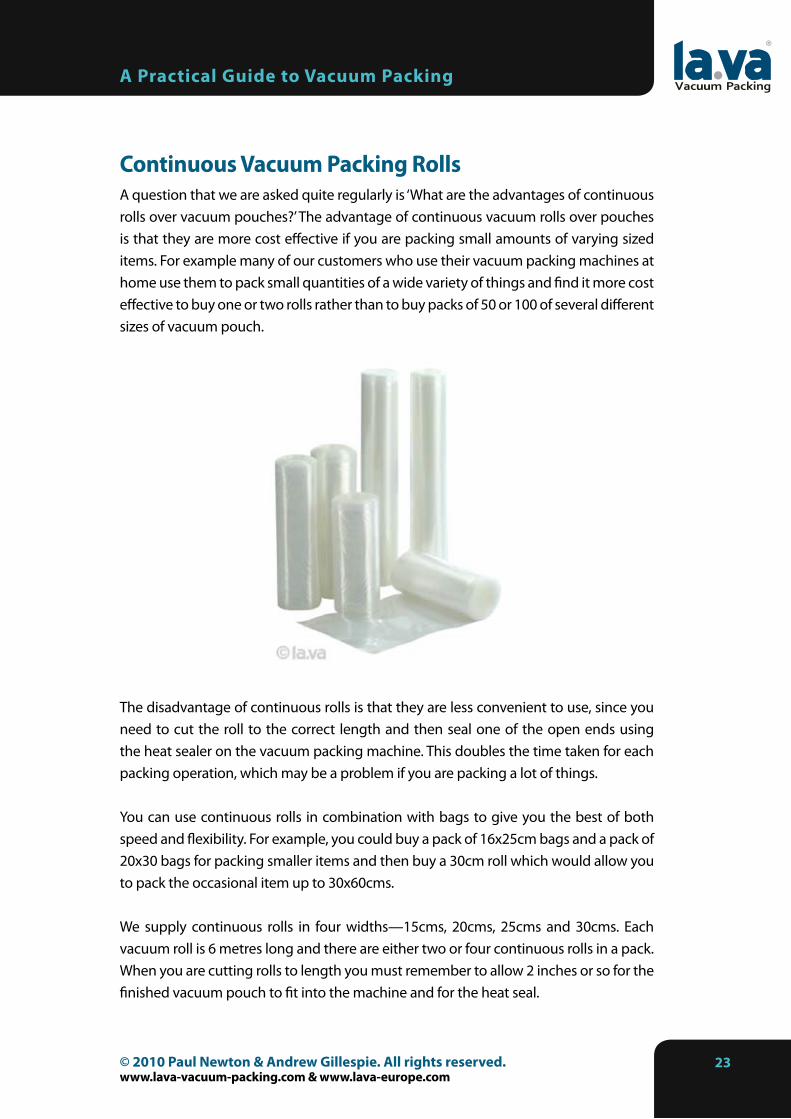
continuous Vacuum Packing RollsA question that we are asked quite regularly is ‘What are the advantages of continuous rolls over vacuum pouches?’ The advantage of continuous vacuum rolls over pouches is that they are more cost effective if you are packing small amounts of varying sized items. For example many of our customers who use their vacuum packing machines at home use them to pack small quantities of a wide variety of things and find it more cost effective to buy one or two rolls rather than to buy packs of 50 or 100 of several different sizes of vacuum pouch.
The disadvantage of continuous rolls is that they are less convenient to use, since you need to cut the roll to the correct length and then seal one of the open ends using the heat sealer on the vacuum packing machine. This doubles the time taken for each packing operation, which may be a problem if you are packing a lot of things.
You can use continuous rolls in combination with bags to give you the best of both speed and flexibility. For example, you could buy a pack of 16x25cm bags and a pack of 20x30 bags for packing smaller items and then buy a 30cm roll which would allow you to pack the occasional item up to 30x60cms.
We supply continuous rolls in four widths—15cms, 20cms, 25cms and 30cms. Each vacuum roll is 6 metres long and there are either two or four continuous rolls in a pack. When you are cutting rolls to length you must remember to allow 2 inches or so for the finished vacuum pouch to fit into the machine and for the heat seal.
a Practical guide to Vacuum Packing
© 2010 Paul newton & andrew gillespie. all rights reserved.www.lava-vacuum-packing.com & www.lava-europe.com
2�
To get the best performance from your vacuum packing machine and to pack things as economically as possible, you should always match the vacuum pouch size to the item being packed allowing as little waste as possible at the sides and only enough room at the top to make the heat seal.
Although you can deliberately add a few extra inches to the size of your bag if you plan to re-seal it. A good example of this would be for the storage of a hard cheese like Parmesan where you can open the bag, grate some of the cheese and then reseal the bag.
One tip that is worth remembering when you are putting items into the vacuum pouch is to turn the top of the pouch back on itself. This prevents the part of the vacuum pouch that is going to be heat sealed from coming into contact with the food. If this part of the bag gets food or liquid on it then it may prevent the machine from making a perfect seal.
a Practical guide to Vacuum Packing
© 2010 Paul newton & andrew gillespie. all rights reserved.www.lava-vacuum-packing.com & www.lava-europe.com
25
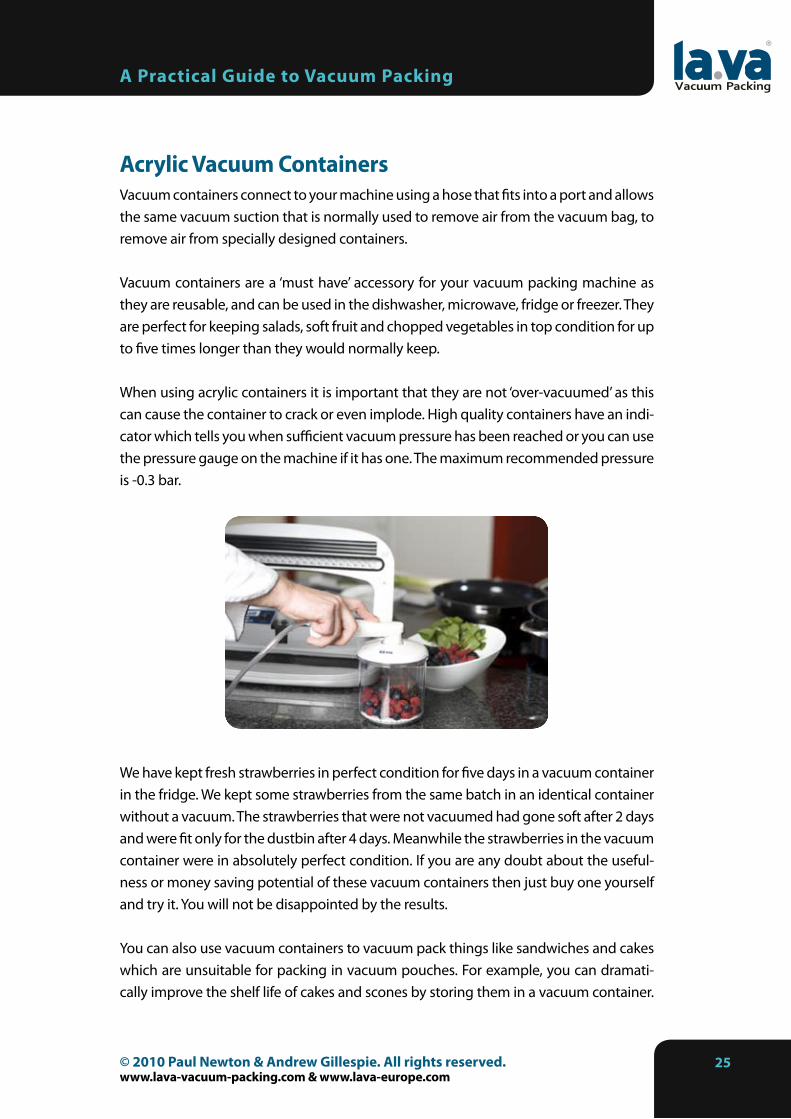
acrylic Vacuum containersVacuum containers connect to your machine using a hose that fits into a port and allows the same vacuum suction that is normally used to remove air from the vacuum bag, to remove air from specially designed containers. Vacuum containers are a ‘must have’ accessory for your vacuum packing machine as they are reusable, and can be used in the dishwasher, microwave, fridge or freezer. They are perfect for keeping salads, soft fruit and chopped vegetables in top condition for up to five times longer than they would normally keep.
When using acrylic containers it is important that they are not ‘over-vacuumed’ as this can cause the container to crack or even implode. High quality containers have an indi-cator which tells you when sufficient vacuum pressure has been reached or you can use the pressure gauge on the machine if it has one. The maximum recommended pressure is -0.3 bar.
We have kept fresh strawberries in perfect condition for five days in a vacuum container in the fridge. We kept some strawberries from the same batch in an identical container without a vacuum. The strawberries that were not vacuumed had gone soft after 2 days and were fit only for the dustbin after 4 days. Meanwhile the strawberries in the vacuum container were in absolutely perfect condition. If you are any doubt about the useful-ness or money saving potential of these vacuum containers then just buy one yourself and try it. You will not be disappointed by the results.
You can also use vacuum containers to vacuum pack things like sandwiches and cakes which are unsuitable for packing in vacuum pouches. For example, you can dramati-cally improve the shelf life of cakes and scones by storing them in a vacuum container.
a Practical guide to Vacuum Packing
© 2010 Paul newton & andrew gillespie. all rights reserved.www.lava-vacuum-packing.com & www.lava-europe.com
2�
You will need to re-vacuum the container every time you open it, but this only takes a few seconds. Storing cakes and scones in a vacuum container stops them from drying out and means that even the last slice of cake keeps its texture and moistness.
If the accessory hose supplied with you machine is not long enough then you can make your own using aquarium air hose from your local pet shop.
using containers to Vacuum Ordinary glass Jars
You can also use a vacuum container to vacuum pack ordinary glass jars placed inside them. This can save you a lot of money on expensive condiments that you don’t use very often.
You can do this by:
Loosening the lid of the jar a little
Put the jar inside a vacuum container
Put the lid on the vacuum container
Connect to the machine and create a vacuum in the container
Release the valve to allow the air back in to the container
Remove the container lid and remove the glass jar
You should notice that the top of the lid is now sucked down because the inside is under vacuum. This works because when you create a vacuum in the container that contains the glass condiment jar, the condiment jar also gets drawn under vacuum. Since the lid is loose, the air inside the condiment jar also gets sucked out. When you open the valve to allow air to rush back into the container, the lid of the condiment container gets sucked down. This vacuum seals the condiment jar.
1.2.�.�.5.�.
a Practical guide to Vacuum Packing
© 2010 Paul newton & andrew gillespie. all rights reserved.www.lava-vacuum-packing.com & www.lava-europe.com
2�
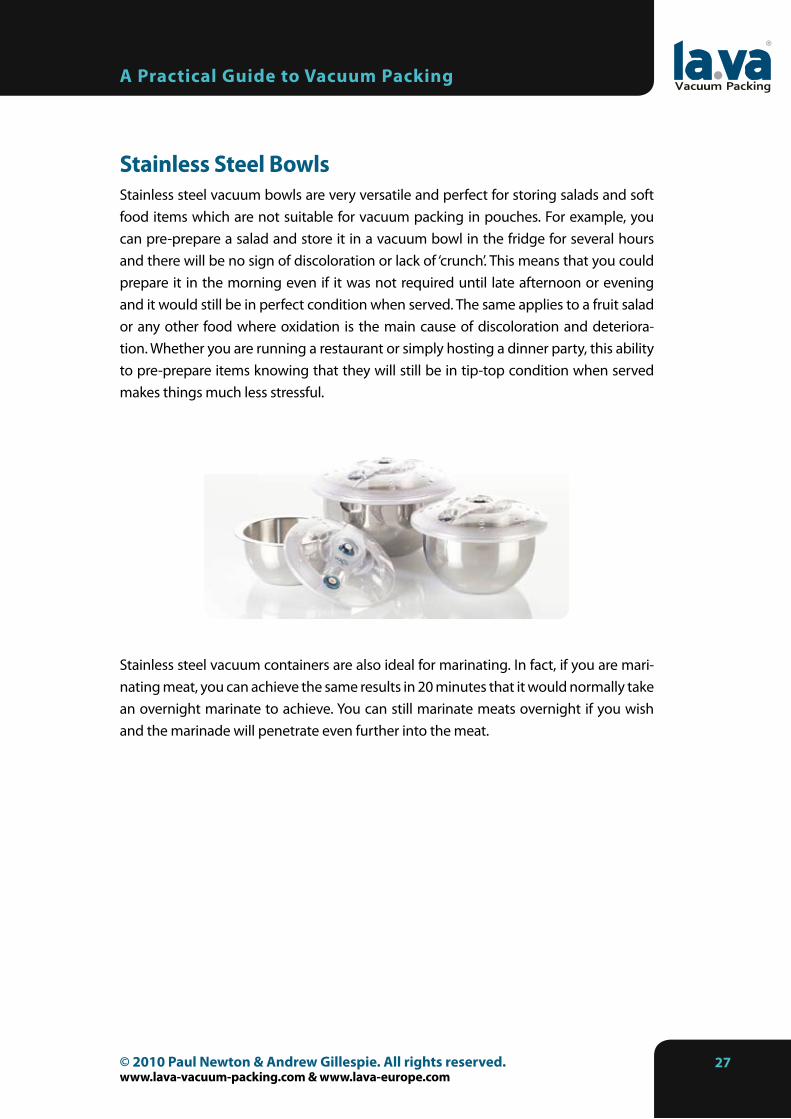
Stainless Steel BowlsStainless steel vacuum bowls are very versatile and perfect for storing salads and soft food items which are not suitable for vacuum packing in pouches. For example, you can pre-prepare a salad and store it in a vacuum bowl in the fridge for several hours and there will be no sign of discoloration or lack of ‘crunch’. This means that you could prepare it in the morning even if it was not required until late afternoon or evening and it would still be in perfect condition when served. The same applies to a fruit salad or any other food where oxidation is the main cause of discoloration and deteriora-tion. Whether you are running a restaurant or simply hosting a dinner party, this ability to pre-prepare items knowing that they will still be in tip-top condition when served makes things much less stressful.
Stainless steel vacuum containers are also ideal for marinating. In fact, if you are mari-nating meat, you can achieve the same results in 20 minutes that it would normally take an overnight marinate to achieve. You can still marinate meats overnight if you wish and the marinade will penetrate even further into the meat.

a Practical guide to Vacuum Packing
© 2010 Paul newton & andrew gillespie. all rights reserved.www.lava-vacuum-packing.com & www.lava-europe.com
2�
Vacuum LidsAlso known as jar and can sealers, these should be your first investment after you have bought your vacuum packing machine. You can use these in conjunction with the wide glass jars that can be bought cheaply from markets or kitchen shops. This will give you a variety of different sized vacuum storage containers that are dishwasher safe and easy to keep clean.
You can use them to store anything from biscuits to sauces and because they work out so cheap you can buy plenty of them.
Wine Bottle Stoppers
Opened wine can be stored under vacuum to prolong its flavour, so you don’t need to finish a whole bottle just because you have opened it.
Red wine stored under vacuum in its original bottle will keep its fresh taste for over a week.
a Practical guide to Vacuum Packing
© 2010 Paul newton & andrew gillespie. all rights reserved.www.lava-vacuum-packing.com & www.lava-europe.com
2�
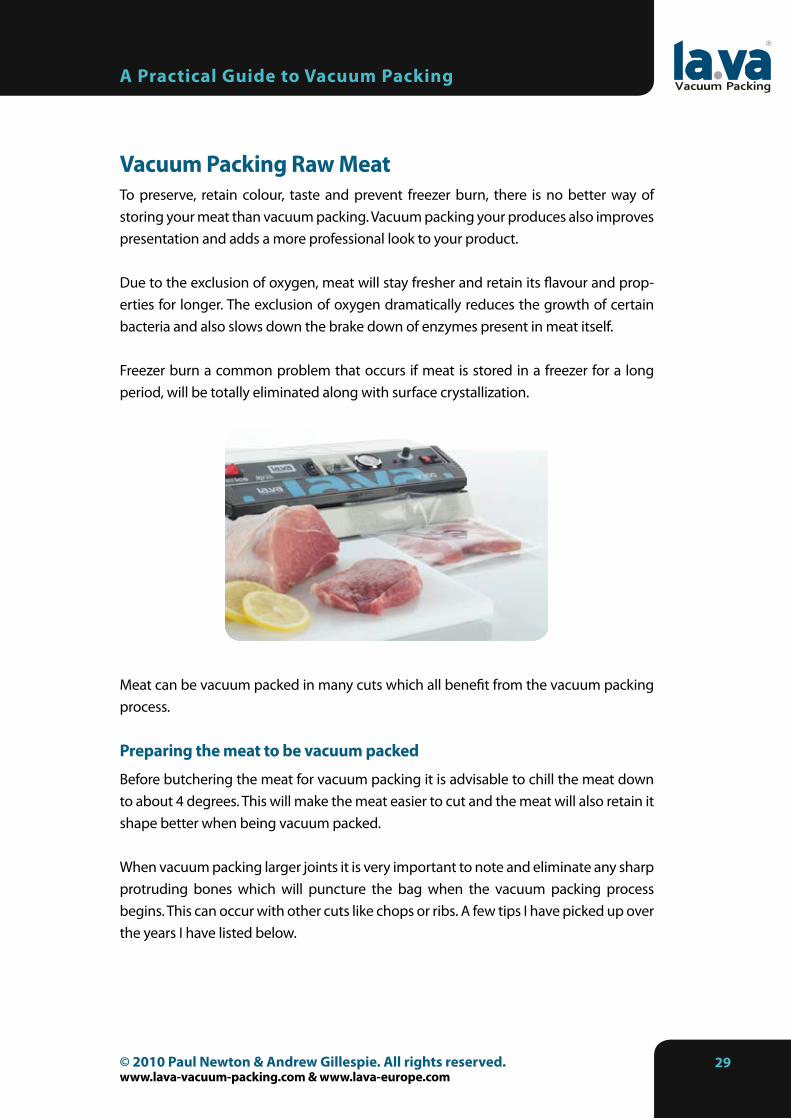
Vacuum Packing Raw meatTo preserve, retain colour, taste and prevent freezer burn, there is no better way of storing your meat than vacuum packing. Vacuum packing your produces also improves presentation and adds a more professional look to your product.
Due to the exclusion of oxygen, meat will stay fresher and retain its flavour and prop-erties for longer. The exclusion of oxygen dramatically reduces the growth of certain bacteria and also slows down the brake down of enzymes present in meat itself.
Freezer burn a common problem that occurs if meat is stored in a freezer for a long period, will be totally eliminated along with surface crystallization.
Meat can be vacuum packed in many cuts which all benefit from the vacuum packing process.
Preparing the meat to be vacuum packed
Before butchering the meat for vacuum packing it is advisable to chill the meat down to about 4 degrees. This will make the meat easier to cut and the meat will also retain it shape better when being vacuum packed.
When vacuum packing larger joints it is very important to note and eliminate any sharp protruding bones which will puncture the bag when the vacuum packing process begins. This can occur with other cuts like chops or ribs. A few tips I have picked up over the years I have listed below.
a Practical guide to Vacuum Packing
© 2010 Paul newton & andrew gillespie. all rights reserved.www.lava-vacuum-packing.com & www.lava-europe.com
�0
Vacuum Packing Haunches
For haunches it is advisable to pop both the knee and hip joint. This will leave you with no protruding sharp bones only smooth ball joints which will not puncture the bag when vacuum packing.
For whole rear legs, pop the hip joint , saw off the shin at an appropriate point then cover the sawn off bone end with a piece of protective material or you can buy a special plastic see through cup which you insert over the cut bone end for protection.
Vacuum Packing chops & Ribs
For chops and ribs which ultimately have many sharp edges it is advisable to pre wrap them in a good thick plastic food grate bag prior to placing them inside the vacuum packing bag. This should prevent any puncturing. If puncturing still occurs try reducing the vacuum pressure to half power.
Remember, sharp bones can pierce holes through the bag and cause problems. In some cases you may need to wrap the item in a thick non-ribbed bag first.
Vacuum Packing Steaks
To pack steaks, I place them on a small polystyrene tray then insert them into a vacuum packing bag. When vacuum packing, take note at what pressure the steaks begin to crush and set vacuum pressure accordingly.
Vacuum Packing cubed or minced meat
This can be vacuum packed with ease. The only point to look out for is to pack the meat a soon as you have cubed or minced it. If you leave cubed or minced meat for a long period in a container prior to vacuum packing you will find that the blood will leach from the meat and you are left with a messy slime. So vacuum pack it straight away.
Vacuum Packing Whole Saddles
These can be quite tricky to pack however if you place the saddle on a food grade board usual covered in silver or gold foil, this will prevent the cut-off rib ends from piercing the vacuum bag. The boards are usually used for smoked salmon and again can be purchased from a good catering supplier.
a Practical guide to Vacuum Packing
© 2010 Paul newton & andrew gillespie. all rights reserved.www.lava-vacuum-packing.com & www.lava-europe.com
�1
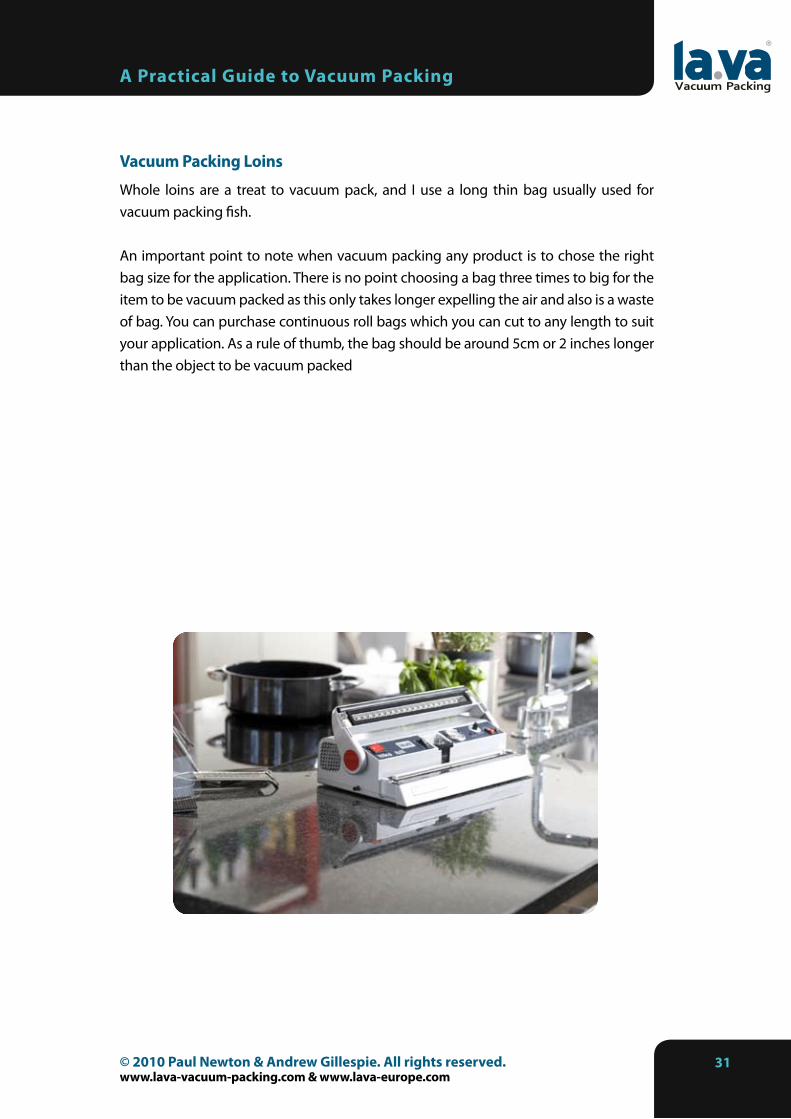
Vacuum Packing Loins
Whole loins are a treat to vacuum pack, and I use a long thin bag usually used for vacuum packing fish.
An important point to note when vacuum packing any product is to chose the right bag size for the application. There is no point choosing a bag three times to big for the item to be vacuum packed as this only takes longer expelling the air and also is a waste of bag. You can purchase continuous roll bags which you can cut to any length to suit your application. As a rule of thumb, the bag should be around 5cm or 2 inches longer than the object to be vacuum packed
a Practical guide to Vacuum Packing
© 2010 Paul newton & andrew gillespie. all rights reserved.www.lava-vacuum-packing.com & www.lava-europe.com
�2
Vacuum Packing cooked meat
If you are using the machine to pack both cooked and uncooked meat, then you must thoroughly clean and disinfect the machine in between uses.
The vacuum packing machine should be kept in good working order to ensure a proper seal is delivered.
Packaging used on the machine should be appropriate for its use and must be stored so that it cannot be contaminated by raw meats.
Cooked meats must be produced under hygienic conditions and should be packed as soon as possible after cooling has been completed.
A shelf life of no greater than 10 days from the day of cooking must be given to the vacuum packed cooked meat. To ensure this can be proved you will need to introduce a date labelling system which will accompany the product through all stages. This could be Date of Cooking, followed by a Use By date. You may wish to add a recommended storage temperature to labels on retail packs.
Extending the shelf life of such products beyond 10 days increases the risk of growth of Clostridium botulinum and poses an unacceptable risk.
The vacuum packed products must be stored at or below 8°C at all times during its shelf life (3°C or below is recommended as a target temperature). Temperatures above 8°C will encourage growth of Clostridium botulinum and other bacteria.
Vacuum packed meat needs to be protected from external contamination from raw meats and poultry and therefore should be handled with the same care as open cooked meats.
1.
2.
�.
�.
5.
�.
�.
�.

a Practical guide to Vacuum Packing
© 2010 Paul newton & andrew gillespie. all rights reserved.www.lava-vacuum-packing.com & www.lava-europe.com
��
Vacuum Packing Sauces & casserolesSauces and casseroles can both be vacuum packed. There are three reasons why you may want to do this.
To retain flavour and consistency of sauces. The absence of air and the consequent lack of oxidation mean that sauces will keep their flavour better than if they were stored in the fridge without being vacuum packed. They can then be reheated by being placed in a pan of hot water. Unlike reheating the sauce in a pan, no water is lost in evaporation and the sauce will retain its consistency. If you are working in a commercial kitchen then you can reheat several different sauces in the same pan of hot water which saves space on the range as well as the need to wash multiple pans.
To reheat casseroles while maintaining texture. Reheating casseroles in a vacuum pouch avoids the problem of drying out because there is no water lost in evaporation. In addition, the heat is applied from all sides so that you don’t need to stir the casserole during reheating. This prevents any cooked meat and vegetables from breaking up and means that the reheated food looks as good as it did when it was first made.
making larger quantities saves time and money. It makes a lot of sense economically to make sauces and casseroles in larger quantities. This is because the time and effort involved in purchasing the ingredients, preparing them and cleaning up afterwards is not greatly affected by the amount made. It is also usually cheaper to buy ingredients in larger quantities than in smaller ones.
Having made a casserole or sauce, you will need to chill it before vacuum packing it. This is done to make it more viscous (thicker) and to prevent any liquid from being drawn into the machine. You can also use liquid stop roll for this purpose. Decide what sized bags to use based on portion sizes. The table below shows the optimum bag size for different numbers of portions.
Portions Bag Size (cms)1 13 x 22
2 16 x 25
3-5 20 x 30
6-10 30 x 50
1.
2.
�.
a Practical guide to Vacuum Packing
© 2010 Paul newton & andrew gillespie. all rights reserved.www.lava-vacuum-packing.com & www.lava-europe.com
��
Having chilled the sauce or casserole down to about 4 degrees Celsius, you should turn down the top 5cms of the bags. This prevents the top portion of the bag from coming into contact with the food which can prevent a good heat seal from being made.
When it comes to pouring the sauce or casserole into the bag, there are two useful accessories that you can make yourself.
A large disposable coffee cup from a coffee chain or fast food restaurant makes an excellent funnel if you cut the bottom out of it. It also protects the bag where the heat strip will seal it. When you are finished with the cup, just place it in the dishwasher. This is much quicker than taking the time to fold over the edge of the bags.
A plastic plant pot from a garden centre can be used as bag stand. Simply turn the first couple of inches of the open end of the bag outside of the pot. This frees your hands up, and makes it easier to pour or spoon food into the bag.
It may be a good idea to raise the vacuum packing machine a few inches up off the work surface so that the vacuum pouches can be kept more upright. This, plus the chilling, should prevent any liquid from being drawn into the vacuum packing machine during the packing process. You should also remember that you do not need a very powerful vacuum inside the bag. The main reason for removing the air is to prevent the bag from bursting when the contents are reheated.
If you have a variable pressure machine then you could pack at a lower pressure (for example -0.1 Bar) or if you have a manual machine you could press the sealing switch as soon as it looks as though most of the air has been drawn out of the vacuum pouch.
When you pack at a lower pressure then you may find that the seal is less than perfect. This happens because both downward pressure from the machine lid as well as heat is required to make a good seal. You can overcome this problem by pulling the bag towards you so that it is clear of the foam seals and then packing on the automatic cycle with maximum pressure. This will not take any more air out of the bag (which is outside of the foam seals) but will give you a perfect seal an inch or so above the original imperfect seal.
When you come to reheat the sauce or casserole, place the vacuum pouch in a large pan of very hot but not boiling water. Do not puncture the vacuum pouch, if you have removed the air then it will not burst when reheated. You will need to make sure that the contents are thoroughly reheated before serving.
1.
2.

a Practical guide to Vacuum Packing
© 2010 Paul newton & andrew gillespie. all rights reserved.www.lava-vacuum-packing.com & www.lava-europe.com
�5
Vacuum Packing FishTo preserve, retain colour, taste and prevent freezer burn, there is no better way of storing your fish than vacuum packing it. To get the best results, it is important that the fish is as fresh as possible and that it has been kept chilled. The length of time that fish have been held on ice or in chilled storage greatly affects the storage time of the frozen product. This means that you should buy any fish you intend to freeze as fresh as possible and should keep them as cold as possible right up to the point at which they are put into the freezer.
Experiments have shown that lean fish held for two days on ice will last up to 12 months in a freezer before any loss in quality is noticeable. The same species of fish which have been held on ice for seven days can only be stored for 2 months in a freezer before a loss of quality is noticeable.
As a general rule, the ‘leaner’ the fish, the longer it can be stored in the freezer. However, this is complicated by the fact that different species of fish contain different types of fish oil. For example, Halibut, Sole and Flounder will keep for about three times as long as Trout and Salmon stored under identical conditions.
Whichever type of fish you are going to freeze, it is the exclusion of oxygen and mois-ture which dramatically reduces the speed of the breakdown of oils present in the fish itself. This is why it is so important to produce a good vacuum and to use good quality vacuum bags which are relatively impermeable.
There are very large differences between the permeability of packaging materials, with cellophane and polyethylene (used in cheap plastic bags) offering very little protection to seafood products compared to quality PVC vacuum bags.

a Practical guide to Vacuum Packing
© 2010 Paul newton & andrew gillespie. all rights reserved.www.lava-vacuum-packing.com & www.lava-europe.com
��
We supply a range of high quality vacuum bags which have been designed to pack fish. The smaller of these are ideal for Trout and fish weighing up to 1KG whilst the larger sizes are best suited to whole Salmon or similar sized fish.
It is possible to fillet fish before packing and storing and this is to some extent a trade-off between longevity in the freezer and convenience. As a general rule, whole fish will retain their flavour longer than filleted fish. If you do want to fillet fish first then the best way to pack them is with two fillets to a bag with the skin on the outside. This is less important if you are planning on eating the fish relatively soon, but if you plan to store the fillets for more than a couple of months then this method is recommended.
So far we have talked about packing fresh fish for the freezer. However, if the fish you have bought is already frozen then you can still extend its freezer life by vacuum packing it. Simply puncture a few holes in the existing wrapping, place the fish plus the wrap-ping into a vacuum bag and pack it as though it was a fresh fish. This will remove the air from the existing packaging.
It is not generally recommended to store fresh fish in the refrigerator for any length of time as (unlike meat) the ‘fresh’ flavour of fish deteriorates rapidly. Smoked or cured fish, for example smoked salmon or gravadlax will keep better in the fridge if it is vacuum packed as this prevents it from drying out which is the main problem with thin slices of cured fish. The best way to pack these is to place the items on a polystyrene tray or a foil fish board and then to slide the board into a vacuum bag before vacuuming and sealing as normal.
Remember that vacuum packing is not a substitute for proper temperature control. All fish products should be stored in the fridge or freezer even if they have been vacuum packed. The vacuum packing process will prevent loss of flavour and will improve the appearance of products which have been frozen.
a Practical guide to Vacuum Packing
© 2010 Paul newton & andrew gillespie. all rights reserved.www.lava-vacuum-packing.com & www.lava-europe.com
��
Vacuum Packing SeafoodYou should buy any seafood you intend to freeze as fresh as possible and keep them as cold as possible right up to the point at which they are put into the freezer. The length of time that seafood has been held on ice or in chilled storage greatly affects the storage time of the frozen product.
Clams and oyster will keep for 3-4 months and prawns and crab will keep for 9-12 months. This is dependent on how long the fresh seafood has already been kept on ice prior to vacuum packing and freezing. Experiments have shown that seafood held for two days on ice will last up to three times longer than the same items which have been held on ice for seven days.
Whichever type of seafood you are going to freeze, it is the exclusion of oxygen and moisture which improves the longevity of the frozen product. This is why it is so impor-tant to produce a good vacuum and to use good quality vacuum bags which are rela-tively impermeable.
There are very large differences between the permeability of packaging materials, with cellophane and polyethylene (used in cheap plastic bags) offering very little protection to seafood products compared to quality vacuum bags.
If the seafood that you buy has already been frozen then you can improve the longevity by re-packing it in smaller quantities in vacuum bags. Frozen prawns are a ideal for this. Simply re-pack them in suitable portions depending on how many people you usually cook for at a time. You will notice that they retain their flavour much better than prawns which have been left in a normal plastic bag in the freezer.
It is not generally recommended to store fresh seafood in the refrigerator for any length of time as (unlike meat) the ‘fresh’ flavour of seafood deteriorates rapidly.
Remember that vacuum packing is not a substitute for proper temperature control. All seafood products should be stored in the fridge or freezer even if they have been vacuum packed. The vacuum packing process will prevent loss of flavour and will improve the appearance of products which have been frozen.

a Practical guide to Vacuum Packing
© 2010 Paul newton & andrew gillespie. all rights reserved.www.lava-vacuum-packing.com & www.lava-europe.com
��
Vacuum Packing VegetablesVacuum packing fresh vegetable becomes especially useful if you grow your own. There will always be times during harvest when you will be overwhelmed with produce, most commonly runner beans, French beans and so on.
It is not advisable to just vacuum pack fresh vegetables for refrigeration for any length of period, the vegetable is still alive and may continue to ferment, it is much better to freeze. It is very important to blanch your vegetables prior to freezing, this will kill the vegetable and lock in colour, flavour and freshness.
With delicate vegetables like French and runner beans you need only simmer the vegetables for 30 seconds then quickly cool down with ice cold running water to arrest further cooking, then drain thoroughly and dry. You can then then split them up into portions, add a knob of butter and season to taste prior to vacuum packing.
A fast way to cook these vegetables is to microwave them in the bag for around two minutes depending on the power output of your microwave. Another easy way is to boil in the bag for around 5 minutes.
The beauty of both these methods, is that the produce is not diluted in water, which in turn intensifies the flavours. Root vegetables are treated in a similar way, but the blanching process is increased to around 5 minutes. It is important to cut the vegeta-bles to be vacuum packing in a uniform size so that they cook evenly. Root vegetables like carrots, potatoes, parsnip, beetroot and so on can benefit from this process. Do not be tempted to freeze your vegetables without blanching first.

a Practical guide to Vacuum Packing
© 2010 Paul newton & andrew gillespie. all rights reserved.www.lava-vacuum-packing.com & www.lava-europe.com
��
Vacuum Packing Frozen Vegetables
The benefits of vacuum packing produce prior to freezing is well acknowledged in the commercial catering world. By removing the air from around you’re produce, you also remove unwanted moisture, which when frozen will results in ice crystal formation and freezer burn. Removal of oxygen will also arrest the growth of most bacteria.
Another way of dealing with the seasonal glut is to fully cook your vegetables prior to vacuum packing and freezing. You can make up large batches of mash potatoes or dices carrots, most root vegetables will lend themselves to this process and will only require defrosting and reheating prior to eating, this can save you time and money, however with soft delicate vegetables it is better to blanch and freeze only as mentioned before, this is mainly due to the soft nature of the product which may become crushed when vacuum packed.
a Practical guide to Vacuum Packing
© 2010 Paul newton & andrew gillespie. all rights reserved.www.lava-vacuum-packing.com & www.lava-europe.com
�0
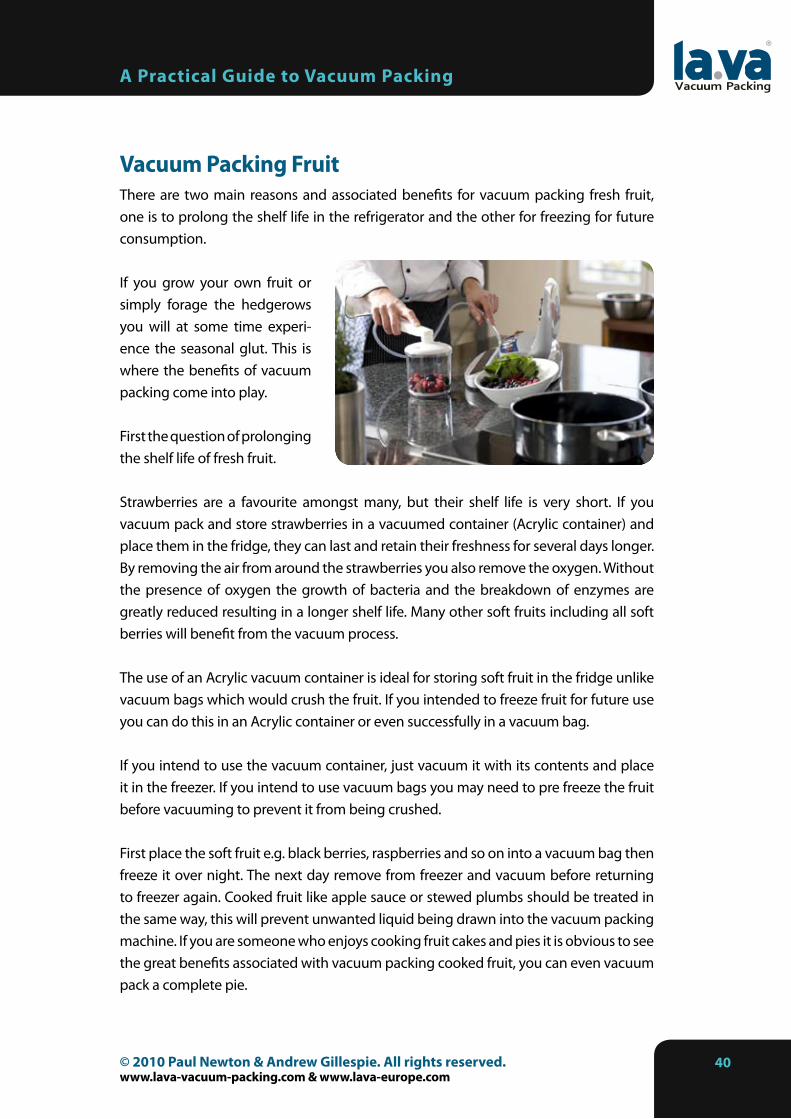
Vacuum Packing FruitThere are two main reasons and associated benefits for vacuum packing fresh fruit, one is to prolong the shelf life in the refrigerator and the other for freezing for future consumption.
If you grow your own fruit or simply forage the hedgerows you will at some time experi-ence the seasonal glut. This is where the benefits of vacuum packing come into play.
First the question of prolonging the shelf life of fresh fruit.
Strawberries are a favourite amongst many, but their shelf life is very short. If you vacuum pack and store strawberries in a vacuumed container (Acrylic container) and place them in the fridge, they can last and retain their freshness for several days longer. By removing the air from around the strawberries you also remove the oxygen. Without the presence of oxygen the growth of bacteria and the breakdown of enzymes are greatly reduced resulting in a longer shelf life. Many other soft fruits including all soft berries will benefit from the vacuum process.
The use of an Acrylic vacuum container is ideal for storing soft fruit in the fridge unlike vacuum bags which would crush the fruit. If you intended to freeze fruit for future use you can do this in an Acrylic container or even successfully in a vacuum bag.
If you intend to use the vacuum container, just vacuum it with its contents and place it in the freezer. If you intend to use vacuum bags you may need to pre freeze the fruit before vacuuming to prevent it from being crushed.
First place the soft fruit e.g. black berries, raspberries and so on into a vacuum bag then freeze it over night. The next day remove from freezer and vacuum before returning to freezer again. Cooked fruit like apple sauce or stewed plumbs should be treated in the same way, this will prevent unwanted liquid being drawn into the vacuum packing machine. If you are someone who enjoys cooking fruit cakes and pies it is obvious to see the great benefits associated with vacuum packing cooked fruit, you can even vacuum pack a complete pie.

a Practical guide to Vacuum Packing
© 2010 Paul newton & andrew gillespie. all rights reserved.www.lava-vacuum-packing.com & www.lava-europe.com
�1
Vacuum Packing cheeseThe main reason for vacuum packing cheese is to prevent it from drying out, devel-oping surface mould and losing its fresh flavour and appearance. As a general rule, hard cheeses vacuum pack better than soft cheeses. For example, un-grated Parmesan retains its fresh flavour for months when vacuum packed in a refrigerator. It is a good idea to cut a large piece of Parmesan into smaller portions and to vacuum pack these individually before storing them in the fridge. You will find that when grated onto a pasta dish the vacuum packed Parmesan will retain the clean and fresh taste which is normally lost as the cheese dries out.
It is possible to vacuum pack grated Parmesan but if you try grating a softer cheese, for example cheddar and then vacuum packing it, you will usually find that it sticks itself back together.
Medium hard cheeses such as Cheddar and Red Leicester are very prone to surface mould as well as drying out. The vacuum packing process prevents both of these from happening as well as helping to retain the full flavour of the cheese.
Softer cheeses, for example, Brie and Camembert can be vacuum packed, but these cheeses are usually better eaten at the point at which they naturally ripen.
To summarize, most cheeses vacuum pack very well and the storage time in the fridge is usually increased by around three to four times as shown in the table below.
Stored in the Refrigerator Regular Storage Vacuum StorageHard cheeses 12-15 days 50-55 days
Soft cheeses 15-7 days 13-15 days
Remember that vacuum packing is not a substitute for proper temperature control. All dairy products should be stored in the fridge or in a cool place even if they have been vacuum packed.
a Practical guide to Vacuum Packing
© 2010 Paul newton & andrew gillespie. all rights reserved.www.lava-vacuum-packing.com & www.lava-europe.com
�2
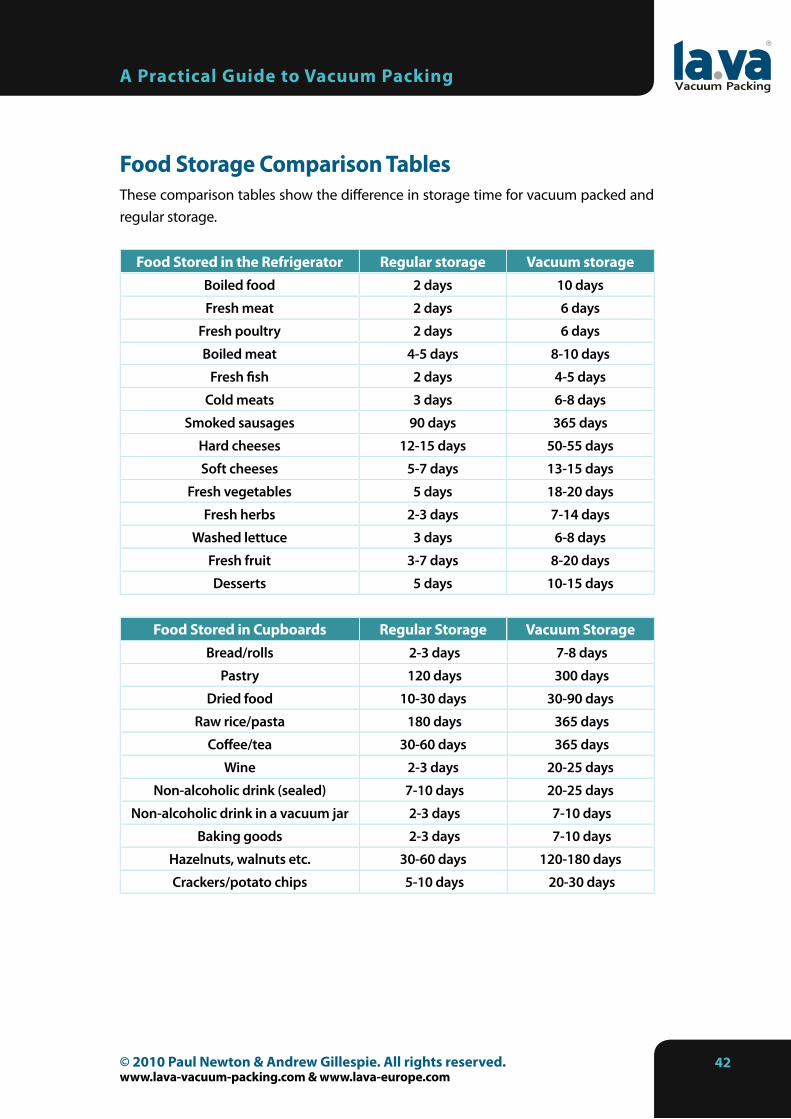
Food Storage comparison TablesThese comparison tables show the difference in storage time for vacuum packed and regular storage.
Food Stored in the Refrigerator Regular storage Vacuum storageBoiled food 2 days 10 days
Fresh meat 2 days 6 days
Fresh poultry 2 days 6 days
Boiled meat 4-5 days 8-10 days
Fresh fish 2 days 4-5 days
Cold meats 3 days 6-8 days
Smoked sausages 90 days 365 days
Hard cheeses 12-15 days 50-55 days
Soft cheeses 5-7 days 13-15 days
Fresh vegetables 5 days 18-20 days
Fresh herbs 2-3 days 7-14 days
Washed lettuce 3 days 6-8 days
Fresh fruit 3-7 days 8-20 days
Desserts 5 days 10-15 days
Food Stored in cupboards Regular Storage Vacuum StorageBread/rolls 2-3 days 7-8 days
Pastry 120 days 300 days
Dried food 10-30 days 30-90 days
Raw rice/pasta 180 days 365 days
Coffee/tea 30-60 days 365 days
Wine 2-3 days 20-25 days
Non-alcoholic drink (sealed) 7-10 days 20-25 days
Non-alcoholic drink in a vacuum jar 2-3 days 7-10 days
Baking goods 2-3 days 7-10 days
Hazelnuts, walnuts etc. 30-60 days 120-180 days
Crackers/potato chips 5-10 days 20-30 days

a Practical guide to Vacuum Packing
© 2010 Paul newton & andrew gillespie. all rights reserved.www.lava-vacuum-packing.com & www.lava-europe.com
��
Food Stored in the Freezer Regular Storage Vacuum StorageFresh meat 6 months 18 months
Ground meat 4 months 12 months
Poultry 6 months 18 months
Fish 6 months 18 months
Fresh Vegetables (*1) 8 months 24 months
Mushrooms (*2) 8 months 24 months
Herbs (*3) 3-4 months 8-12 months
Fruit 6-10 months 18-30 months
Cold meats 2 months 4-6 months
Baking goods 6-12 months 18 months
Coffee beans 6-9 months 18-27 months
Ground coffee 6 months 12-34 months
Bread/rolls 6-12 months 18-36 months
Only approximate time of duration is indicated in the tables, as it depends on the initial state (freshness) and way of preparing food. We have considered storage of food at +3 °C / +5°C in the refrigerator and at –18 °C in the freezer.
(*1) Blanch before freezing or wash food before storing it in the refrigerator. Chopped food containing a lot of water is not suitable for vacuum packaging (cucumbers, zucchini etc.).
(*2) Mushrooms: We strongly recommend “manual vacuum packing” function. Only hard, meaty and fresh mushrooms are suitable for vacuum packing and freezing. First wash and dry the mushrooms, then chop them with a fine knife and store them in small quantities. Almost all types of mushrooms should be blanched. We recommend that you put them in the freezer for half an hour before vacuum packing. Do not thaw the mushrooms before preparing them. Boil frozen mush-rooms in hot salty water or add them to sauces.
(*3) Herbs containing a high portion of essential oils, such as sage, thyme, rosemary or peppermint are not suitable for vacuum packaging unless pre-dried. Basil, tarragon, garden dill, parsley and chive should be frozen. If dried, they lose too much flavour.