A PRACTICAL GUIDE T O TYING SALMON AND SEA TROUT FLIESsolihullflydressers.co.uk/FlyTying/GW/a...
19
© Solihull Flydressers 2015 A PRACTICAL GUIDE TO TYING SALMON AND SEA TROUT FLIES Gary Welsher
Transcript of A PRACTICAL GUIDE T O TYING SALMON AND SEA TROUT FLIESsolihullflydressers.co.uk/FlyTying/GW/a...
© Solihull Flydressers 2015
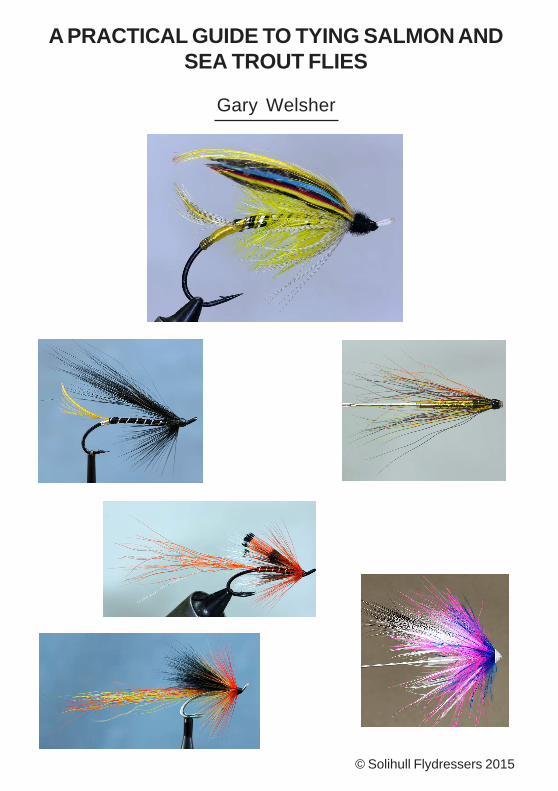
A PRACTICAL GUIDE TO TYING SALMON ANDSEA TROUT FLIES
Gary Welsher
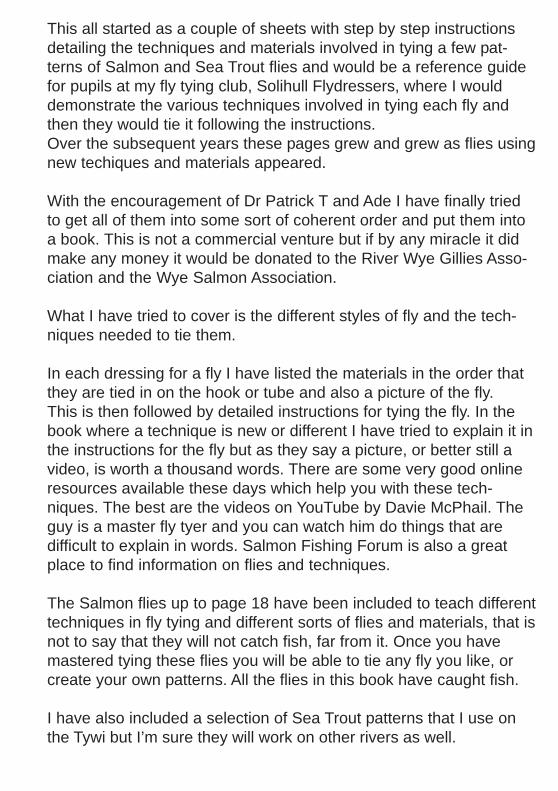
This all started as a couple of sheets with step by step instructionsdetailing the techniques and materials involved in tying a few pat-terns of Salmon and Sea Trout flies and would be a reference guidefor pupils at my fly tying club, Solihull Flydressers, where I woulddemonstrate the various techniques involved in tying each fly andthen they would tie it following the instructions.Over the subsequent years these pages grew and grew as flies usingnew techiques and materials appeared.
With the encouragement of Dr Patrick T and Ade I have finally triedto get all of them into some sort of coherent order and put them intoa book. This is not a commercial venture but if by any miracle it didmake any money it would be donated to the River Wye Gillies Asso-ciation and the Wye Salmon Association.
What I have tried to cover is the different styles of fly and the tech-niques needed to tie them.
In each dressing for a fly I have listed the materials in the order thatthey are tied in on the hook or tube and also a picture of the fly.This is then followed by detailed instructions for tying the fly. In thebook where a technique is new or different I have tried to explain it inthe instructions for the fly but as they say a picture, or better still avideo, is worth a thousand words. There are some very good onlineresources available these days which help you with these tech-niques. The best are the videos on YouTube by Davie McPhail. Theguy is a master fly tyer and you can watch him do things that aredifficult to explain in words. Salmon Fishing Forum is also a greatplace to find information on flies and techniques.
The Salmon flies up to page 18 have been included to teach differenttechniques in fly tying and different sorts of flies and materials, that isnot to say that they will not catch fish, far from it. Once you havemastered tying these flies you will be able to tie any fly you like, orcreate your own patterns. All the flies in this book have caught fish.
I have also included a selection of Sea Trout patterns that I use onthe Tywi but I’m sure they will work on other rivers as well.

This list of flies will cover you for the whole season and they haveprobably accounted for the vast majority of Salmon that have beencaught over the last 20 years.
Early SeasonWillie Gunn Gold Body - Tubes/ConesBlack and Yellow - Tubes/Cones/Doubles
Spring / Summer SeasonAllys Shrimp Normal and Gold - Doubles/Small TubesCascade - Doubles/Small Tubes
Late SeasonAll of the above plus something with Red in it
When you want to be differentSunray Shadow, Monkey, Collie Dog or Tadpole
Low WaterStoats Tail, Silver Stoat, Blue Charm - small Double/Single
But because we are Fly Tyers we like to tie the latest patterns andsome of these have become a must have in the fly box(es)Plus the fact it is fun to try new stuff.
Fly Tying is continually evolving as new materials appear. We startedwith simple feather wing flies and then went onto the full built wingtraditionals as new feathers arrived from around the globe. ThenHairwing flies using Bucktail arrived. Then soft hairs like Arctic Fox,Tanuki and Arctic Runner arrived. Since then there has been a torrent ofnew sorts of hairs and flash into the Salmon scene. Some of it is aworthwhile addition to your material store but a lot of it is a marketingexercise so do not immediately succumb to the latest trend.
Fly Tying is a hobby, a work of art by some better than me.So tie flies and enjoy it.
So what do we need to tie Salmon and Sea Trout flies?

TINSEL - Flat Medium in Gold, Silver and Pearl Oval in Fine and Medium in Gold and Silver Wire in Small and Medium in Gold and Silver
FLOSS - Floss in Black, Orange, Yellow and Red
HAIR - Bucktail in Black, Orange, Yellow, Red, and Teal Blue Arctic Fox in the same colours as above
Squirrel Tail bleached and dyed in the same colours Natural Grey Squirrel tail and dyed colours
Goat in Black
HACKLES - Cock hackles in Black, Orange, Yellow, Red, and Kingfisher Blue. Guinea Fowl dyed blue
THREAD - Black, Red and Fire Orange 6/0 or 8/0
FLASH - Silver, Pearl and Gold Krystal Flash and Angel Hair
FUR - Seals Fur in Black, Orange, Red and Yellow
FEATHERS - Golden Pheasant TippetsGolden Pheasant Toppings/CrestsGolden Pheasant Red BreastJungle Cock (if you can afford it)
TUBING - Mylar tube in Gold, Silver and Pearl Medium
VARNISH - Clear Cellire or Nail Varnish
SUPERGLUE - Loctite Easy Brush or Brush On
This selection of materials will allow you to tie a huge range of practi-cal Salmon and Sea Trout flies. It is not a large list but is still a sig-nificant financial outlay so don’t rush in and buy loads of stuff, try toborrow some from friends first to try themout.
MATERIALS

MATERIALS
Thread and Floss
Flash
Tinsel
Mylar Tube
Varnish
Bucktail
CockHackle
Squirrel Tail
Arctic Fox
Seals Fur
Golden Pheasant
Toppings/Crests Tippets

TOOLSThe normal collection of tools will suffice for Salmon Flies.
ViceBobbinHolder
ScissorsHacklePliers
BobbinThreader
Whip FinishTool
DubbingNeedle
Vice - Buy the best quality you can afford. Make sure that the angle ofthe head can be adjusted and rotated. I use Anvil vices but they are£100+ You can get a good vice for £30Scissors - Buy good quality, Dental scissors from Ebay are very goodfor £5. I use these http://www.ebay.co.uk/itm/170753543331Get two pairs. One for fine cutting and one for tinsels.Bobbin Holder - Ceramic lined ones last for ever. When you can affordit buy several for the different colours of thread .Hackle Pliers - Buy standard nose and size ones. Cover one of the tipswith silicon tube so you don’t cut the feathers,.Bobbin Threader - Saves lots of frustration and sucking.Dubbing Needle - Hundreds of uses.Wax - Use proper fly tying wax, not the tacky stuff, or Cobblers wax.Lighting - Make sure you have good lighting where you are tying. Ifpossible use Daylight bulbs or tubes.
Useful extras
Whip Finish Tool - Best way to make a neat head. There are variousdifferent shapes so choose one you get on with.Dubbing Brush - Used for brushing out dubbed bodies and combing outunderfur. Stick a piece of the hook side Velcro on a thin piece of wood orplastic.Toothbrush - Used for combing out hair wings and hackles.Hair Stacker - Used for lining up the tips of hair.

MATERIAL SUPPLIERS
If you need to buy online or you cannot find suitable materiallocally then I can recommend the following suppliers
McHardys (all material needs)http://www.mchardys.co.uk/Lakeland (all material needs)http://www.lakelandflytying.com/Pat Nolan (superb Badger and other capes and materials)email - [email protected] and tell him what you are afterFoxy Tails (the best source for Arctic Fox,other hairs and tubing)http://www.foxy-tails.co.uk/Lathkill (all material needs)http://www.lathkill.com/shop/index.phpFunky Flytying (all material needs)http://www.funkyflytying.co.uk/Flymakers (hook bargains and other stuff)www.flymakers.co.ukMistpool (all material needs)https://mistpool.com/index.phpRodgers (all material needs)http://www.rodgersfishingtackle.com/product-category/fly-tying-materials/Tom C Saville (all material needs)https://www.walkersoftrowell.com/fly-tying.html
The non UK suppliers offer excellent postal service.
INFORMATION SOURCES
Salmon Fishing Forumhttp://www.salmonfishingforum.com/forums/YouTubehttp://www.youtube.com/results?search_query=davie+mcphail&aq=0Inverness Angling Clubhttp://aquatyer.com/cms/articles.php?req=category&cat_id=3
These are just a few of the sources available. Use Google forothers.
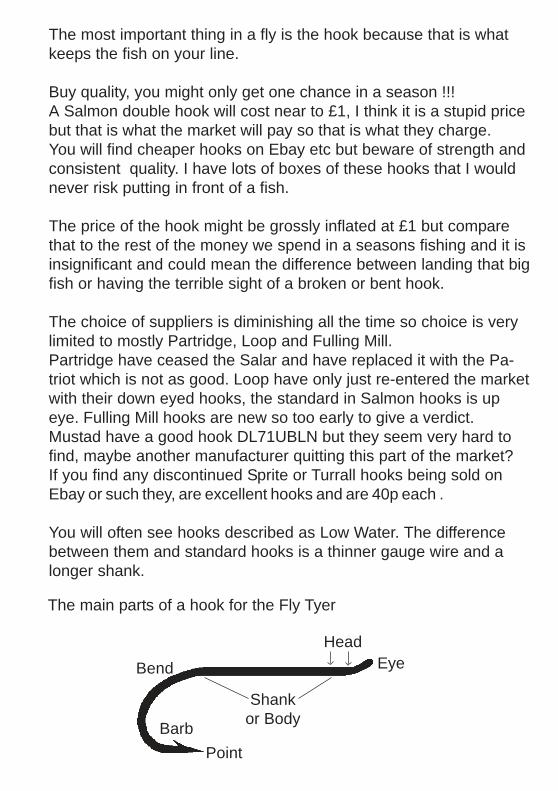
The main parts of a hook for the Fly Tyer
The most important thing in a fly is the hook because that is whatkeeps the fish on your line.
Buy quality, you might only get one chance in a season !!!A Salmon double hook will cost near to £1, I think it is a stupid pricebut that is what the market will pay so that is what they charge.You will find cheaper hooks on Ebay etc but beware of strength andconsistent quality. I have lots of boxes of these hooks that I wouldnever risk putting in front of a fish.
The price of the hook might be grossly inflated at £1 but comparethat to the rest of the money we spend in a seasons fishing and it isinsignificant and could mean the difference between landing that bigfish or having the terrible sight of a broken or bent hook.
The choice of suppliers is diminishing all the time so choice is verylimited to mostly Partridge, Loop and Fulling Mill.Partridge have ceased the Salar and have replaced it with the Pa-triot which is not as good. Loop have only just re-entered the marketwith their down eyed hooks, the standard in Salmon hooks is upeye. Fulling Mill hooks are new so too early to give a verdict.Mustad have a good hook DL71UBLN but they seem very hard tofind, maybe another manufacturer quitting this part of the market?If you find any discontinued Sprite or Turrall hooks being sold onEbay or such they, are excellent hooks and are 40p each .
You will often see hooks described as Low Water. The differencebetween them and standard hooks is a thinner gauge wire and alonger shank.
Point
Head
Bend Eye
Barb
Shankor Body
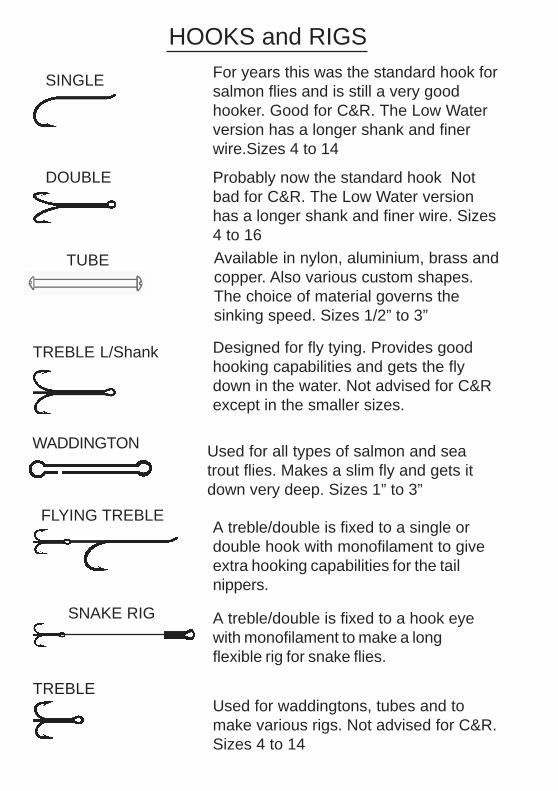
HOOKS and RIGSFor years this was the standard hook forsalmon flies and is still a very goodhooker. Good for C&R. The Low Waterversion has a longer shank and finerwire.Sizes 4 to 14
Designed for fly tying. Provides goodhooking capabilities and gets the flydown in the water. Not advised for C&Rexcept in the smaller sizes.
Used for all types of salmon and seatrout flies. Makes a slim fly and gets itdown very deep. Sizes 1” to 3”
Available in nylon, aluminium, brass andcopper. Also various custom shapes.The choice of material governs thesinking speed. Sizes 1/2” to 3”
A treble/double is fixed to a single ordouble hook with monofilament to giveextra hooking capabilities for the tailnippers.
A treble/double is fixed to a hook eyewith monofilament to make a longflexible rig for snake flies.
Used for waddingtons, tubes and tomake various rigs. Not advised for C&R.Sizes 4 to 14
Probably now the standard hook Notbad for C&R. The Low Water versionhas a longer shank and finer wire. Sizes4 to 16
WADDINGTON
SINGLE
DOUBLE
TUBE
FLYING TREBLE
SNAKE RIG
TREBLE
TREBLE L/Shank

TYPES OF TUBES
There are many different types of tubes.Plastic - You can buy them or make them from Cotton Bud stemsMetal - Aluminium/Brass/Copper/Tungsten You can buy them readymade and lined but the cheapest way to make Ali or Copper is tobuy lengths of tube from McHardys and cut your own. All metal tubesmust be lined with poly tube and need Silicon hook extension tubing.Shaped Tubes - There are lots of shapes and sizes by Eumer,Shumakov, Sean Stanton, Foxy etc. Look for Bottle Tubes on Ebaywhich are much cheaper and come in various similar shapes, butmake sure you have the correct size liner for the tubes.Tubing Systems - These have a liner that fits into the plastic outertube and can take a Conehead if required. They come in lots ofcolours. Foxy Tails stock the best. You can also get precut pieces ofUS metal tube in lots of lengths that fit the system.Cones - Buy cones that fit your tubing system. Most of the cheapEbay ones have holes that are too small. You can also get varioustypes of Discs which create turbulence.
Standard Tube - The chosen length of metal/plastic tube is lined with polytube. 2mm is left sticking out at each end and then burred over with aflame to hold it in place, check that the hole for the leader is clear.4mm of bare tube is left at the rear when dressing the fly for the hookextension tubing and then the rest of the fly is tied.
Balanced Tube - The construction is the same as above but the body ispart plastic and part metal. Decide on the length of the outer rear plasticand pull in the liner. Decide your front length of metal tube and slide on.Tie the fly as per a conehead above finishing the tying on the liner butfinish the fly with a normal head which helps you keep it small. The metalfront part adds weight and balances the fly so you do not need a coneunless you need extra weight.These tubes need to be tied on a needle oradapter to stop them flexing at the joint between the plastic and metal.This method of finishing on the liner tube can also be used with standardmetal/plastic tubes if you make your own.
System Tube - The chosen length of plastic tube is lined with polytube.The rear end of the liner is slightly burred over with a flame andthen pulled into the outer tube 4mm to leave a hook recess. Leave10mm of liner sticking out the front. The tail and body are now tied onthe outer tube starting where the hook recess is and then finished tightto the head of the outer tube. The thread is now taken onto the linertube and the wing and hackle are tied in and the fly finished. Aconehead is now pushed on the liner snuggly up to the hackle. The lineris now cut to leave 2mm and then burred over with a flame to hold it inplace. You do not have to add a cone the fly can be finished asnormal.Metal outer tube can be used for extra weight but the rear end is thenas per a standard tube and needs extension tubing for the hook.
L���� ����HookExtension
Outer Tube
Hackle
Wing
Head
12345123451234512345
HookRecess
L���� ����
PlasticOuter Tube
MetalOuter Tube
Wing
Hackle
Head
Wing
Hackle
Cone
HookRecess
L���� ����
Outer Tube
TUBE TYING VICES & ATTACHMENTS
If you are tying normal tube flies there are several methods to hold thetube in the vice. The cheapest is a large single hook with the eye cut off.If you slightly bend the shank of the hook the tube will be secure whenyou ram it on, you will need hooks with different wire gauges to fit differ-ent types of tube. Cost is £0Another option is to use a tapered needle designed for tying tubes.This fits in the vice jaws and you push the tube onto it until it issecure. The specialist needles sold are are about £7 - £20 each.Felting needles are the same design and cost about £1 each andcome in different sizes, Google or Ebay for them.
Another cheap alternative is to use a tube fly adapter. This has a lock-ing plate that fits in your normal vice jaws. You then put asuitable size mandrel, a set is supplied, through the tube and put thisthrough the hole in the locking plate and secure it. Cost £3 - 10This video shows how these adapters work.https://www.youtube.com/watch?v=-nhkkeRBSXg
The drawback with both these systems is that the tube is still inclined tospin on the hook/pin or the outer tube can spin on the liner withoutwarning and then the fly will unravel.The best attachment is made by HMH. The adapter fits in your nor-mal vice jaws but works by locking down on the rear of the tube sothat it cannot spin. Cost £25Watch it in use herehttp://www.youtube.com/watch?v=VQzUMsU-IkY
The best option, in my opinion, is a tube vice. They have a smallcollett head for holding the tube which gives space to work at the tailend of the tube. The hook cannot spin as it is clamped from theoutside.The second part of the above video shows how they work.Some like the HMH are expensive but a search on Ebay or Googleshould find a satisfactory one for £20.
Always make sure that the head of the vice head is at right angles tothe vice stem so that the tube is horizontal.

HINTS and TIPS
Buy good quality materials they make tying a fly much easier,especially good hackles with thin stems.If possible buy your hair and feathers from a shop so that you can see,feel and smell to check the quality.If you have not got a shop to visit use reliable mail order suppliers.I have already listed some suppliers that I use and recommend.
Check that feathers are nice and bright with minimal web and arelong enough in the barb for the size of flies you tie with fine stalks.Buy hackle capes. The packets of loose feathers are often rubbish.There are 3 main types of cape.Chinese - Large capes with lots of feathersIndian - Small capes with less feathersGenetic - Huge capes with masses of feathers and fine stemsGenerally you get what you pay for so if you can afford it go forgenetic capes as they have been specially bred for fly tying.
There are various types of hackle feathersCock/Rooster - Stiff and shiny fibresSaddle - Same as rooster but longer stem and shorter fibresSchlappen or Hen - Soft and thicker fibresGame - Soft fibres from Mallard, Teal, Guinea Fowl etc.
Look for hair that is long enough for the flies you want to tie and thecorrect amount of softness Check for an even colour in dyed hair,the guard hairs of soft hairs like Arctic Fox and Tanuki are alwayslighter than the underfur. Beware of crinkles from the dying process,especially on hair dyed black and hair that is bleached and thendyed, as it will make the hair brittle if it has been overcooked.
I have already listed the tools needed which are mostly the same asfor all types of fly tying. The 2 most important items are the vice andscissors. The vice needs to hold the hook firmly and preferably berotatable and the scissors need fine sharp tips for neat cutting. If thetips of your scissors are too thick you can use a fine file to carefullytaper them down.

The biggest problem beginners to Salmon flies find is that they runout of space at the head. A salmon hook might look large but therecan be four or five components to tie in this area so plan the headlength you need. Leave enough room to tie in the wing, hackle andall the other bits. It is always better to leave extra space until you getinto the swing than to find yourself cramped for, or even worse notenough space to tie everything in.Plan how many hackles and layers of wing need to be tied in tojudge how much space you need. On a simple fly with just 1 hacklethis could be 3mm but on a complex fly it will be at least 5mm.
When you are first starting any new form of fly tying do not try and tiea whole fly in one go. Practice each element of the fly separately. Puta hook in the vice and lay a bed of thread which will be the headarea. Practice the various elements like wing and hackle on theirown until you are happy that you can do it confidently each timebefore you try tying a full fly putting all the elements together. There isnothing worse than tying a perfect body, wing etc and then making abodge of the hackle.
The top priority when tying the fly is attaching the materials securelyto the hook/tube. Nobody minds a fly being ripped apart when a fishtakes it but if it falls apart after a couple of casts then something iswrong. This is generally always caused by loose turns of threadduring the tying. Always keep the thread under tension and wax thethread throughout the tying especially when you are tying in hardslippery hair like Squirrel, Goat or synthetic fibres. Your thread might beprewaxed but it is not enough. The wax gives a much firmer grip onmaterials and as a bonus if you should accidentally break the thread(and yes it still happens to us all) it will hold firmly in place allowing youenough time to tie the thread in again and carry on. If there seems tohave been any easing of the old thread strip the fly back to a securepoint and then re-tie the thread and carry on.
In most cases we are looking with a downwards angle at the hook inthe vice so you can get a false impression of the correct plane youare tying the materials in, especially the wing which is the mostcritical part. When you fix the hook in the vice rotate the head

away from you until you are looking directly 90o at the hook.If you do not tie in everything, but the wing especially, in the correctplane the fly will spin in the water like a Mepps. When you tie on a flyat the waterside always pull it through the water just in front of you tocheck it fishes correctly.
Varnish and Superglue etc have their place in fly dressing but do nottry and use them to overcome bad technique. When I recommend adrop of varnish on the trimmed wing roots it is a very small drop ofthinned Cellire type varnish just on the waste ends of the hair beforetying down firmly.Do not let the varnish/glue leech into the wing or hackle. If you do itwill make them brittle and after a couple of casts you will find that youhave only a body and tail left on your fly.
If you are applying varnish to a head use your dubbing needle andjust poke it into the varnish to get a small drop on the needle tip.Now apply it to the head of the fly in gentle strokes, rotating the fly asyou do it. When you run out of varnish on the needle, and if youdon’t before half of the head is done you have applied much toomuch, reload the needle and finish the head. If you apply too muchvarnish in one coat then it will sag downwards and create a fat bellybelow the head. Let normal varnish dry for several hours betweencoats.
When you are using any varnish or glue that comes supplied with abrush remember that those brushes were designed to build cars notflies. The first thing to do with these is to trim the bristles and leaveabout 10 in a nice flat line. You can now dab the varnish/glue onto thehead very precisely.
Originally I would finish a head with about 3 or 4 coats of thinnedCellire clear vanish and then maybe a final coat of black or red. Theystill have their place but with modern threads like Uni Fire Orangethe method I use these days is to coat the head with Loctite EasyBrush and then follow this with 1 or 2 coats of tough nail varnish.

An important part in tying a good fly is proportions, this is not just tolook good it will effect the way the fly swims. In the tying details forthe flies I have tried to give the proportions but if in doubt look at thepicture of the fly.
If I mention open turns of thread this is purely when you are justgetting the thread as quickly as possible to the next place of tying. Ifyou are securing a material always take close turns of thread. Do notcriss cross the thread as this builds more bulk than two layers ofclose turns.
Never waste a turn of thread as excess thread builds up bulk. Whenyou are taking the thread back down the hook try and tie in the riband body materials as you wind to save bulk.
When you are tying materials, tails and ribs etc, onto a hook/tubealways keep a smooth underbody for the final body material. Con-sider the type of fly you are tying. Has it a normal one part body or isit in two parts? If it is a one part body then when you have tied in thetail etc you would take the thread back up to the head binding downeverything tightly and then trim off the waste ends.If the body is in two parts then you would bind in the rear materials tothe mid point and trim off there. Then you tie in the front body materialand bind down to the head.When you trim off the waste ends at the head taper the cut back-wards so that you have not got an abrupt step to try and tie the nextmaterials onto. If you have a step the materials and thread will slip allover this, even with wax, like a ski slope.This is critical when tying a flat tinsel or floss body.
On a tinsel body brush a thin layer of superglue on the underbodyand then wind the tinsel over it when still wet for extra stength. If you thencover it with a coat of nail varnish it will be bomb proof.

To get a nice dense swept back hackle and keep a small head youmust ‘double it’ - this is essentially pulling the fibres backwards onthe stalk so they point in a V shape towards the rear of the hook.Then when you wind the hackle all the fibres will be naturally sweptbackwards in a nice shape.
Tie in the hackle firmly by the tip with the bright side of the hacklefacing towards the front. Hold the hackle taut and run your fingerstowards you up the stem to make the fibres stand out at right angles.Now run the back of your scissors towards you along the hackle oneach side of the stem to encourage the fibres to fold backwards.Next with your damp fingers stroke back the fibres even more untilthey are in a nice V shape, always stroke towards you to keep thefibres at 90o. You are then ready to start winding the hackle. As youwind each turn keep stroking back the hackle fibres backwards so thateach layer is tight up to the one below.
Here is a good video of the technique.
http://www.youtube.com/watch?v=hZnhb9Uasz4&feature=relatedI
Preparing a hackleStrip off the fluff andwebby fibres from thebase of the feather. Thenholding it by the tip strokethe barbs outwards andtowards the base so theystand out at 900 to thestem.
Hair - Fur ??As a rule of thumb Hair is used for wings and Fur is used for dubbingbodies. All hair has some short underfur but a lot of the popular softhairs like Fox have a long underfur. The longer stiffer parts of thehair are called guard hairs.To prepare a bunch of normal hair like Bucktail or Squirrel grip asuitable sized amount and pull it out at 90o to the skin, this will start toline up the hair. Cut this bunch off as close to the skin as possible.

Holding the tips of the bunch flick the base to remove any short hairs,they only add bulk to the head, and then tease out any underfur. Re-move any broken hairs. Now transfer your grip to the base of the bunchand grip loosely. From the tip pull out any long hairs and replace theminto the bunch to line up the tips. Repeat until the tips are fairly even.
To prepare Fox, Tanuki and other “soft” hairs the first step of selectingand cutting a section is the same. Now you need to decide what pro-portion of underfur and guard hairs you need to achieve the stiffness/softness required. The more underfur the softer the wing will be andvice versa. Hold the bunch of hair by the base to pull out the guard hairsor by the tips to remove the undefur.
O�� �� � �� �� � � �� ��� �� ���� �� ���� � �� ��
feather wing traditional flies tended to use one sort of hair in the wing,mainly Bucktail, and if there was more than one layer they would be tiedone on top of each other in bands. This is fine if you are tying in the“normal” style. Modern “Scandi” style hairwings can contain severaldifferent types of hair. These are all used for a reason. Generally thefirst layer will be stiff or bulky to support the layers above and try to stopthem wrapping around the hook. Subsequent layers will be softer andlonger so that they move in the water supported by the other layers.Each layer is spread around the hook slightly wider than the layerbelow to get a teardrop shape. Usually there is a soft flash material tiedin between the layers. The top layer is often a long hair like Goat, Nayatetc to achieve the final length of wing you want and provide a longflowing profile, this could be 8cm at least.
When you are tying a multi layered wing trim off each layer after youhave tied it in. Taper the cut backwards and bind down so that you havea smooth bed for the next layer. If you try to trim them all together it willbe difficult to get a smooth taper. You can end with an abrupt stepwhich is difficult to tie the hackle onto and produce a neat head.There are lots of different types of hair, In these flies I have mainly usedthe three principal ones Bucktail, Squirrel and Arctic Fox. Some otherhairs are Tanuki, Arctic Runner, Nayat, Goat, Bear, Coypu and Calf Tailto mention a few. The main criteria in choice of hair is length,stiffnessand translucence of fibres. Do not rush in and buy every type and colourbecause a new dressing calls for it.

A lot of hairs are very similar to each other Arctic Fox, Tanuki and ArcticRunner for example. So consider what properties this “new” hair hasand whether you already have something that will do the same job, thesame applies to the various flashes.A lot of this new must have stuff is just a marketing ploy.
Flash can be a killing addition to a fly but don’t use too much, 4strands is probably the maximum number.There are loads of types of flash but the 2 main sorts areRoundish crinkly stuff like Krystal FlashFlat fine soft stuff like Angel HairA very general rule of thumb is that you would use Krystal Hair as thefinal layer in a wing or tails and Angel Hair between layers of a wing.New versions of flash seem to come out daily. Some are useful andsome are just a slight variation with no extra killing power. Before yourush in and spend £3+ on the latest must have try and have a look atit first to see if it is very much different.
Most tyers use synthetic thread these days not silk. There are 2 mainsorts of construction.Twisted - UniFlat - UTCWhich one you use is a personal choice but Uni is the favourite. Bothtypes come in different thicknesses. The thicker the stronger.Starting at the thickest 3/0 (210 denier) - 6/0 (140) - 8/0 (70)I would recommend starting with 6/0 until you get used to it and thenmoving to 8/0. There are lots of colours in each range but Black andFire Orange will be the ones you mostly use.You can also get some very strong and extremely fine threads likeSemperfli Nano.
Oval tinsel seems expensive at £3+ a spool but beware of cheap stuff. Itcan be very loosely woven and fall apart when tying.Uni, UTC, Lagartun and Veniards are good brands.
My thanks to all the people who have helped me improve my tying skillsover the years and to Davie McPhail and Andrew McGall for permis-sion to include some of their videos on the DVD.

FISHING THE FLIES YOU HAVE TIED
For choice of patterns and size of fly for the river check out the localfavourites if you can, but don’t be afraid to experiment if the standardpatterns are not working on that day.
With Salmon fishing never say never and never say always
More often than not we can be obsessed with the pattern of the flyrather than concentrate on the presentation. All fly fishermen/womenwill have their own views but to me the most important elements aredepth and speed of the fly. The following are all generalisations.If the water is cold the fish will be deeper and lethargic so the flymust be at their depth and moving at the pace they will be interestedin, which is slower. When the temperature rises they will lie higher inthe water and move more freely to a faster fly. As long as the fly is inthe “ball park” for size and colour the fish will not look at it and rejecta Cascade because they want a Park Shrimp
Water temperature is important in choosing the fly size to use.There are some guidelines available about the fly size to use for thewater temperature, but these apply to normal water height.High water increase the size of the normal fly, low water decrease.
Always think what the water height/size/colour/speed are doing toconditions and choose a fly that you are confident will do the job. Infast water you need stiffer materials in the fly to compensate for thespeed and vice versa in slower water. This all might sound like aminefield with no map but the water will always give you a clue. Lookat it and try and think like a fish. Where will they be lying/resting atthis water height/speed etc. And it is a resting fish that is morevulnerable than a resident fish.
REMEMBER CONFIDENCE IS EVERYTHING.Believe in the fly that you are fishing and concentrate on fishing itcorrectly. Also remember that conditions will change throughout theday so be prepared to adjust your tactics accordingly. This alsoapplies to different pools and even different parts of the pool that isbeing fished so keep thinking and don’t be a robot.