A POLYCHROMATIC COMPOSITE LAYERING ... POLYCHROMATIC COMPOSITE LAYERING APPROACH FOR SOLVING A...
6
A POLYCHROMATIC COMPOSITE L AYERING APPROACH FOR SOLVING A COMPLEX CLASS IV/DIRECT VENEER/DIASTEMA COMBINATION: P ART II Newton Fahl, Jr, DDS, MS* Pract Proced Aesthet Dent 2007;19(1):17-22 17 Restoration of a Class IV defect in the aesthetic zone in combination with a direct resin veneer can be a considerable challenge for clinicians, especially when striv- ing to emulate the natural dentition. Shade-matching is a particular concern in achieving a natural-looking aesthetic result. Value enamels can also be used over selective areas of a Class IV restoration as needed to modify the perception of the chroma of underlying layers of artificial dentin and body enamel. This second and concluding part provides a discussion of how an advanced polychromatic com- posite layering technique can be used to meet the patient’s aesthetic expectations. Learning Objectives: This article discusses how an advanced polychromatic composite layering technique is used to restore a Class IV/direct veneer/diastema. Upon reading this article, the reader should: • Become familiar with how to properly select an opaquing agent, composite dentin, and enamel shades that elicit correct color value when performing a direct veneer on a discolored tooth substrate. • Be able to integrate a large Class IV restoration with a direct veneer while closing a midline diastema through multilayered polychromatic stratification. Key Words: adhesive, composite, conservative, veneer, Class IV, diastema FAHL JANUARY/FEBRUARY 19 1 * Private practice, Curitiba, Brazil. Newton Fahl, Jr, DDS, MS, Av. Visconde do Rio Branco, 1335, Suites 23/24, 80420-210 Curitiba, Brazil Tel: +55-41-3224-3008 • E-mail: [email protected]
Transcript of A POLYCHROMATIC COMPOSITE LAYERING ... POLYCHROMATIC COMPOSITE LAYERING APPROACH FOR SOLVING A...

A POLYCHROMATIC COMPOSITE LAYERING APPROACH
FOR SOLVING A COMPLEX CLASS IV/DIRECT
VENEER/DIASTEMA COMBINATION: PART IINewton Fahl, Jr, DDS, MS*
Pract Proced Aesthet Dent 2007;19(1):17-22 17
Restoration of a Class IV defect in the aesthetic zone in combination with a direct
resin veneer can be a considerable challenge for clinicians, especially when striv-
ing to emulate the natural dentition. Shade-matching is a particular concern in
achieving a natural-looking aesthetic result. Value enamels can also be used over
selective areas of a Class IV restoration as needed to modify the perception of the
chroma of underlying layers of artificial dentin and body enamel. This second and
concluding part provides a discussion of how an advanced polychromatic com-
posite layering technique can be used to meet the patient’s aesthetic expectations.
Learning Objectives:This article discusses how an advanced polychromatic composite layering technique is used to restore a Class IV/direct veneer/diastema. Upon readingthis article, the reader should:
• Become familiar with how to properly select an opaquing agent, compositedentin, and enamel shades that elicit correct color value when performing adirect veneer on a discolored tooth substrate.
• Be able to integrate a large Class IV restoration with a direct veneer whileclosing a midline diastema through multilayered polychromatic stratification.
Key Words: adhesive, composite, conservative, veneer, Class IV, diastema
FA
HL
JA
NU
AR
Y/
FE
BR
UA
RY
191
*Private practice, Curitiba, Brazil.
Newton Fahl, Jr, DDS, MS, Av. Visconde do Rio Branco, 1335, Suites 23/24, 80420-210Curitiba, BrazilTel: +55-41-3224-3008 • E-mail: [email protected]
4978_200701PPAD_Fahl.qxd 2/14/07 10:43 AM Page 17
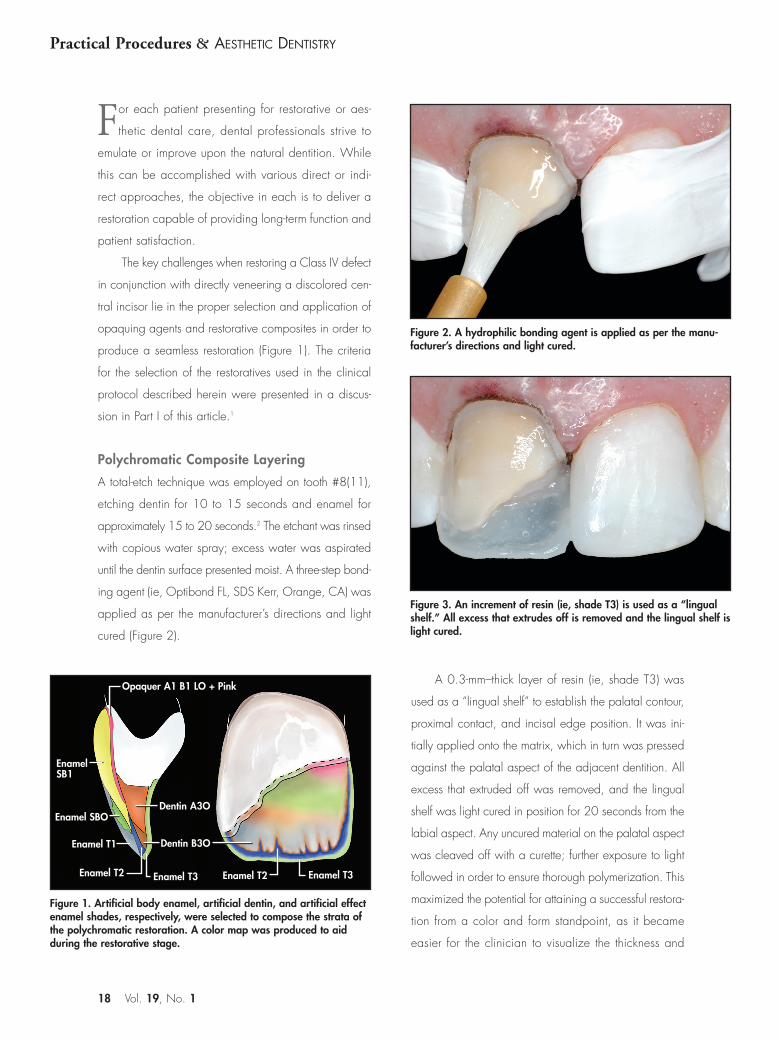
Figure 2. A hydrophilic bonding agent is applied as per the manu-facturer’s directions and light cured.
Figure 3. An increment of resin (ie, shade T3) is used as a “lingualshelf.” All excess that extrudes off is removed and the lingual shelf islight cured.
18 Vol. 19, No. 1
Practical Procedures & AESTHETIC DENTISTRY
For each patient presenting for restorative or aes-
thetic dental care, dental professionals strive to
emulate or improve upon the natural dentition. While
this can be accomplished with various direct or indi-
rect approaches, the objective in each is to deliver a
restoration capable of providing long-term function and
patient satisfaction.
The key challenges when restoring a Class IV defect
in conjunction with directly veneering a discolored cen-
tral incisor lie in the proper selection and application of
opaquing agents and restorative composites in order to
produce a seamless restoration (Figure 1). The criteria
for the selection of the restoratives used in the clinical
protocol described herein were presented in a discus-
sion in Part I of this article.1
Polychromatic Composite Layering
A total-etch technique was employed on tooth #8(11),
etching dentin for 10 to 15 seconds and enamel for
approximately 15 to 20 seconds.2 The etchant was rinsed
with copious water spray; excess water was aspirated
until the dentin surface presented moist. A three-step bond-
ing agent (ie, Optibond FL, SDS Kerr, Orange, CA) was
applied as per the manufacturer’s directions and light
cured (Figure 2).
A 0.3-mm–thick layer of resin (ie, shade T3) was
used as a “lingual shelf” to establish the palatal contour,
proximal contact, and incisal edge position. It was ini-
tially applied onto the matrix, which in turn was pressed
against the palatal aspect of the adjacent dentition. All
excess that extruded off was removed, and the lingual
shelf was light cured in position for 20 seconds from the
labial aspect. Any uncured material on the palatal aspect
was cleaved off with a curette; further exposure to light
followed in order to ensure thorough polymerization. This
maximized the potential for attaining a successful restora-
tion from a color and form standpoint, as it became
easier for the clinician to visualize the thickness and
Figure 1. Artificial body enamel, artificial dentin, and artificial effectenamel shades, respectively, were selected to compose the strata ofthe polychromatic restoration. A color map was produced to aid during the restorative stage.
Enamel T2 Enamel T3
Opaquer A1 B1 LO + Pink
Enamel T2 Enamel T3
Enamel T1
EnamelSB1
Enamel SBO
Dentin B3O
Dentin A3O
4978_200701PPAD_Fahl.qxd 2/14/07 10:43 AM Page 18
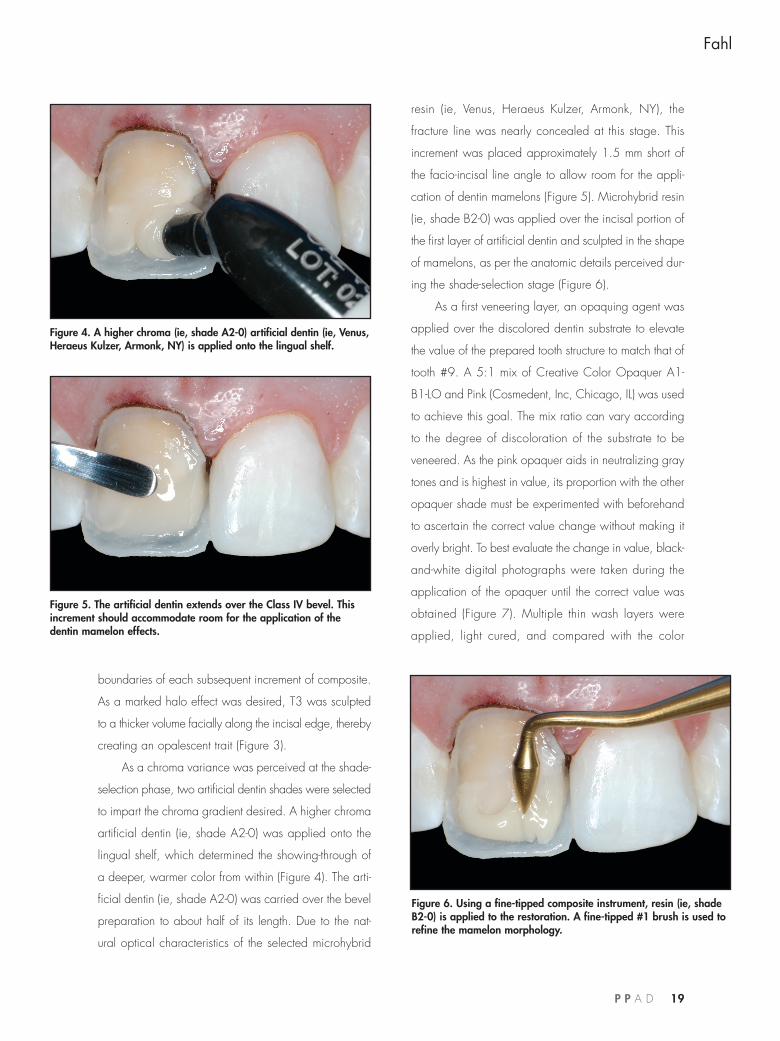
Figure 5. The artificial dentin extends over the Class IV bevel. Thisincrement should accommodate room for the application of thedentin mamelon effects.
Figure 4. A higher chroma (ie, shade A2-0) artificial dentin (ie, Venus,Heraeus Kulzer, Armonk, NY) is applied onto the lingual shelf.
Figure 6. Using a fine-tipped composite instrument, resin (ie, shadeB2-0) is applied to the restoration. A fine-tipped #1 brush is used torefine the mamelon morphology.
P P A D 19
Fahl
boundaries of each subsequent increment of composite.
As a marked halo effect was desired, T3 was sculpted
to a thicker volume facially along the incisal edge, thereby
creating an opalescent trait (Figure 3).
As a chroma variance was perceived at the shade-
selection phase, two artificial dentin shades were selected
to impart the chroma gradient desired. A higher chroma
artificial dentin (ie, shade A2-0) was applied onto the
lingual shelf, which determined the showing-through of
a deeper, warmer color from within (Figure 4). The arti-
ficial dentin (ie, shade A2-0) was carried over the bevel
preparation to about half of its length. Due to the nat-
ural optical characteristics of the selected microhybrid
resin (ie, Venus, Heraeus Kulzer, Armonk, NY), the
fracture line was nearly concealed at this stage. This
increment was placed approximately 1.5 mm short of
the facio-incisal line angle to allow room for the appli-
cation of dentin mamelons (Figure 5). Microhybrid resin
(ie, shade B2-0) was applied over the incisal portion of
the first layer of artificial dentin and sculpted in the shape
of mamelons, as per the anatomic details perceived dur-
ing the shade-selection stage (Figure 6).
As a first veneering layer, an opaquing agent was
applied over the discolored dentin substrate to elevate
the value of the prepared tooth structure to match that of
tooth #9. A 5:1 mix of Creative Color Opaquer A1-
B1-LO and Pink (Cosmedent, Inc, Chicago, IL) was used
to achieve this goal. The mix ratio can vary according
to the degree of discoloration of the substrate to be
veneered. As the pink opaquer aids in neutralizing gray
tones and is highest in value, its proportion with the other
opaquer shade must be experimented with beforehand
to ascertain the correct value change without making it
overly bright. To best evaluate the change in value, black-
and-white digital photographs were taken during the
application of the opaquer until the correct value was
obtained (Figure 7). Multiple thin wash layers were
applied, light cured, and compared with the color
4978_200701PPAD_Fahl.qxd 2/14/07 10:43 AM Page 19
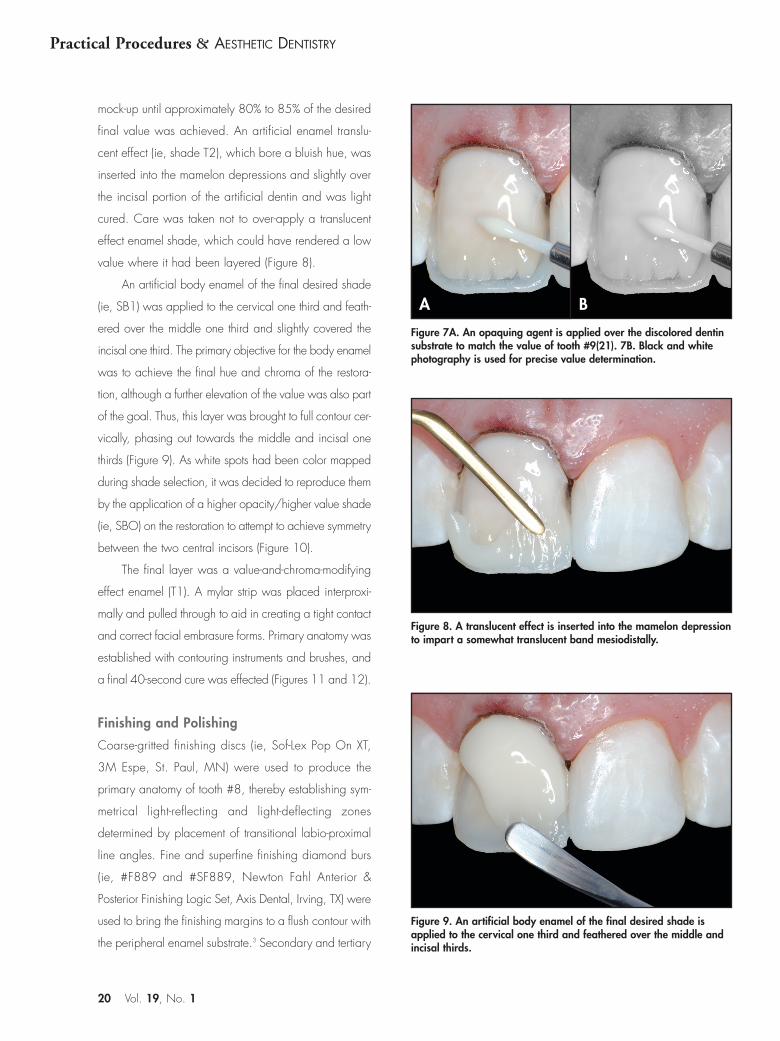
mock-up until approximately 80% to 85% of the desired
final value was achieved. An artificial enamel translu-
cent effect (ie, shade T2), which bore a bluish hue, was
inserted into the mamelon depressions and slightly over
the incisal portion of the artificial dentin and was light
cured. Care was taken not to over-apply a translucent
effect enamel shade, which could have rendered a low
value where it had been layered (Figure 8).
An artificial body enamel of the final desired shade
(ie, SB1) was applied to the cervical one third and feath-
ered over the middle one third and slightly covered the
incisal one third. The primary objective for the body enamel
was to achieve the final hue and chroma of the restora-
tion, although a further elevation of the value was also part
of the goal. Thus, this layer was brought to full contour cer-
vically, phasing out towards the middle and incisal one
thirds (Figure 9). As white spots had been color mapped
during shade selection, it was decided to reproduce them
by the application of a higher opacity/higher value shade
(ie, SBO) on the restoration to attempt to achieve symmetry
between the two central incisors (Figure 10).
The final layer was a value-and-chroma-modifying
effect enamel (T1). A mylar strip was placed interproxi-
mally and pulled through to aid in creating a tight contact
and correct facial embrasure forms. Primary anatomy was
established with contouring instruments and brushes, and
a final 40-second cure was effected (Figures 11 and 12).
Finishing and Polishing
Coarse-gritted finishing discs (ie, Sof-Lex Pop On XT,
3M Espe, St. Paul, MN) were used to produce the
primary anatomy of tooth #8, thereby establishing sym-
metrical light-reflecting and light-deflecting zones
determined by placement of transitional labio-proximal
line angles. Fine and superfine finishing diamond burs
(ie, #F889 and #SF889, Newton Fahl Anterior &
Posterior Finishing Logic Set, Axis Dental, Irving, TX) were
used to bring the finishing margins to a flush contour with
the peripheral enamel substrate.3 Secondary and tertiary
20 Vol. 19, No. 1
Practical Procedures & AESTHETIC DENTISTRY
Figure 8. A translucent effect is inserted into the mamelon depressionto impart a somewhat translucent band mesiodistally.
Figure 9. An artificial body enamel of the final desired shade isapplied to the cervical one third and feathered over the middle andincisal thirds.
Figure 7A. An opaquing agent is applied over the discolored dentinsubstrate to match the value of tooth #9(21). 7B. Black and whitephotography is used for precise value determination.
A B
4978_200701PPAD_Fahl.qxd 2/14/07 10:44 AM Page 20

anatomies were accomplished with a fine-grit, flame-
shaped finishing diamond bur (ie, #F888, Newton Fahl
Anterior & Posterior Finishing Logic Set, Axis Dental,
Irving, TX) on a 1:4 low speed increaser (ie, 2325LN,
Kavo, Lake Zurich, IL) for better operative control (Figure
13). A silver powder was applied onto the surfaces of
both central incisors to help visualize the light-reflective
and light-deflective areas, as well as secondary and ter-
tiary anatomy, and further morphological corrections were
ensued. Diamond finishing strips (ie, FlexiDiamond,
Cosmedent, Chicago, IL) and plastic strips (ie, Epitex,
GC America, Alsip, IL) were used for refining and pol-
ishing the interproximal areas. Extraneous texture was
removed by gentle buffing of the restoration with rubber
points and wheels (ie, PoGo, Dentsply Caulk, Milford, DE)
until the surface anatomy that mimicked the contralat-
eral tooth had been achieved. An aluminum oxide pol-
ishing paste (ie, Enamelize, Cosmedent, Chicago, IL)
was used on a felt buffing disc to polish into the stria-
tions created with the finishing bur and to bring the
restoration to a final natural gloss. Examined postoper-
atively, favorable integration of form and color were
evident, particularly when contrasted with the color mock-
up tab used as a reference from the beginning of the
procedure (Figures 14 and 15).
Discussion
There is no set rule for establishing the right value when
selecting opaquers because each system bears varying per-
centages of oxides, which causes the opaquing agent to
become of greater or lesser light reflectance. The clinician
should resort to black and white photography to ascertain
the changes in value during the opaquer application phase.
As all that is seen with a black and white photograph is
the value (ie, gray scale) of Munsel’s three-dimensional color
system, it becomes more predictable to visualize results if
hue and chroma are eliminated altogether. The natural
dentition dehydrates during the restorative phase and the
value is elevated, thus making it impossible to relate to
P P A D 21
Fahl
Figure 12. Finishing discs are used to achieve the geometric formand correct transitional line angle placement.
Figure 11. The final resin layer is a value-modifying effect enamel. Itcan partly conceal the underlying halo, mamelon, translucent, andrelated effects.
Figure 10. White spots (ie, shade SBO) noted during shade selectionare reproduced to achieve symmetry between the central incisors.
4978_200701PPAD_Fahl.qxd 2/14/07 10:44 AM Page 21

the adjacent teeth for value check. The color mock-up used
for initial shade assessment and material selection should
be used for achieving correct value at this point. There
would be no change in any of the three dimensions of
color due to the stability of the composite.
Regarding artificial enamel selection, value enam-
els can usually be of high, medium, or low intensity and
its selection will depend upon the brightness and degree
of translucency/opalescence that is intended over the
lobe areas and incisal one third. It may conceal the
underlying halo, mamelon, translucent, and characteri-
zation effects to a greater or lesser degree depending
on how much of it the clinician desires to be shown.
Value enamels can also be used over selective areas of
the Class IV/veneer restoration as needed to modify
the perception of chroma of underlying layers of artifi-
cial dentin and body enamel.
Conclusion
Composite resins remain one of the most important tools
in the clinician’s armament. Such systems can provide
reliable strength and a realistic aesthetic result. Part I of
this discussion presented a technique available to skilled
clinicians to meet patients’ expectations through the uti-
lization of a direct composite resin and partial closure
of a midline diastema on the maxillary central incisor.
This concluding part presented a means for restoring a
Class IV/direct veneer defect in the aesthetic zone.
Acknowledgment
The author declares that he receives financial compen-
sation from Axis Dental for the sale of the Newton Fahl
Anterior & Posterior Finishing Logic Set.
References1. Fahl N Jr. A polychromatic composite layering approach for
solving a complex class IV/direct veneer-diastema combination:Part I. Pract Proced Aesthet Dent 2006;18(10):641-645.
2. Fahl N Jr. The direct/indirect composite resin veneers: A casereport. Pract Periodont Aesthet Dent 1996;8(7):627-638.
3. Croll TP. Simulating irregular enamel surface texture in compos-ite resin restorations. Quint Int 1988;19(4):311-312.
22 Vol. 19, No. 1
Practical Procedures & AESTHETIC DENTISTRY
Figure 13. Fine and superfine, fine-tipped finishing diamond burs areused to contour the peripheral enamel substrate.
Figure 14. A 30-day postoperative view demonstrates a favorableintegration of form and color.
Figure 15. The attainment of correct color value is evident throughblack and white photography.
4978_200701PPAD_Fahl.qxd 2/14/07 10:44 AM Page 22