
A-EN-05802-00
32
INSTRUCTION MANUAL Dosing System MID-MDS Version 4 Startinputs, Individual starts Software VER 2.00 Hardware Housing MDS-30 Terminal connectors QB-173 QB-172 QB-170 Counter / Valve card LS-23 Master card DR-11 Converter card UV-12 Terminal ( Software ) V200 A-EN-05802-00A Bopp & Reuther Messtechnik GmbH Am Neuen Rheinhafen 4 D-67346 Speyer www.bopp-reuther.de
description
manual
Transcript of A-EN-05802-00

INSTRUCTION MANUAL
Dosing System MID-MDS
Version 4 Startinputs, Individual starts
Software VER 2.00
Hardware Housing MDS-30Terminal connectors QB-173
QB-172QB-170
Counter / Valve card LS-23Master card DR-11
Converter card UV-12
Terminal ( Software ) V200
A-EN-05802-00A
Bopp & Reuther Messtechnik GmbHAm Neuen Rheinhafen 4D-67346 Speyerwww.bopp-reuther.de

INSTRUCTION MANUAL
Installation and operation of the
MODULAR DOSING SYSTEM SERIES MID- MDS
1.Application:
The Modular Dosing System MID-MDS is used on both linear and rotating filling machines, where high accuracy/repeatability is required. The products must have a minimum conductivity of approx 1 µS/cm. The minimum dosing time achieved to date is approx. 0.1 sec.Magnetic Inductive Flow Meters series MID have no moving parts, and therefore do not apply any "work" to the product which could cause changes to the fluid structure. This also enables CIP/SIP procedures to be carried-out both easily and quickly.
2. The dosing system MID-MDS consists of the following components (Fig.1):
- magnetic inductive flow meter series MID with standard frequency field design, with integral pre-amplifier
- dosing control ( electronics ) series MDS:
* converter card type UV- 12 * master card type DR- 11 with integral pulse output
* counter/valve card type LS- 23 * LAUER operator terminal
* housing for card installation: panel housing type MDS-30 ( 30 TE ), or panel housing type MDS-49 ( 49 TE ), or 19" rack mounting type MDS-84 ( 84 TE )
1
12
TerminalLAUER
PC/SPS
12
34
5
6
24 VDC24 VAC
QB
-173
CONVERTERCONVERTER
CONVERTER CONVERTER
CONVERTER
meter 6
meter 1CONVERTERCARDUV-12
NAMURpulse inputs
cable with plug
cable with plug
CPU parallel input/output port
12 valve power modules dual-port-RAMCOUNTER/VALVE CARD LS-23
electronics MDS-30/49/84
selection of the counter/valve cards
parallel input/output port
serial 1 serial 2 optocouplers
MASTER CARD DR-11
QB-xxx
Input/Outputs
QB
-181
QB
-173
pre-
and
final
clo
sing
of th
e va
lve
QB
-172
QB = Adapter card

storage tank
start signal
valve signal
measuring cable
magneticinductiveflow metertype MID-MDS
dosing valve
receptacle
terminaltype LAUER
elektronicstype MID-MDS
v
tB CA
v
tB CA
excess volume
finalbatch volume
v= flow velocity ( m/sec )
v
tB CA
prebatch volume
finalbatch volume
excessvolume
v= flow velocity ( m/sec )
3. A filling system/installation generally consists of (Fig.2):
Fig.2
Systems with very short dosing times ( min. 0.1 to some sec. ) need a storage ( buffer ) tank-see Fig.2- the level of which must be kept more or less constant, e.g. by using a level control system, which automatically opens and closes the feed line to the storage tank. This arrangement supplies a dosing curve ( lapse ) as shown in (Fig.3):
1- stage valve closing
At time A the filling machine starts the batch process and thedosing valve opens. The magnetic flow meter measured theproduct; the sensed signal is send to the dosing control and alsoto the preset counter. At the end of the batch (B) the dosingvalve receives the signal to close. Because of delay time in thesystem ( mainly the valve ) a certain excess volume passes thedosing valve until it is closed and the batch process is finished(C).
2-stage valve closing
It is possible to decrease the excess volume if a 2-stage valveclosing is used. If the valve receives the prebatch signal ( B ),then the valve closes to a interposition.If the valve receives the finalbatch signal ( C ), then the valvecloses completely.These kind of valve closing should also be used if - the meter size is > DN 20 or - the batch is > 0.5 l / sec.- the velocity in the pipe is > 5 m/sec.

4. The components of a filling system should meet the following requirements:
a) storage tank ( no pressure, head of liquid only )
The tank dimension ( dia.,height ) should be such that a batch process ( one filling ) only causes a very small level variation ( decrease ). In the event of a large variation, the head ( gravity ) decreases rapidly, the excess volume is altered ( Fig.4) and both accuracy and reproducibility vary.
v
t
v
t
A B
batch end batch end
excessvolume excess-
volume
dosing time of 1.st filling dosing time of the following filling
start start
A B
Fig.4
Due to the decreasing head of liquid, the flow velocity and the flow rate decrease, resulting in the dosing time becoming longer and longer ! This effect should be avoided if the dosing time is to be kept constant.
To keep the filling times constant, the liquid level head should be kept within 5% .
At bigger meter sizes (> DN 15) theliquid level must be more then 30 cm.If the level < 30 cm, Vortex-effects arepossible and resulting accuracy vary. ( A ).
To prevent vortex effects a build -in straightener is advantageous.
Very important is the position of theproduct line in the tank. The outlet ofthe pipe must be under the liquid level (B ). In other case, air bubbles are in theproduct and resulting accuracy vary.
b) piping
Whenever possible rigid metallic piping between storage tank and dosing valve should be installed. If flexible hoses are used, hydraulic vibrations could disturb the batch processes. The piping should be of the same size( DN;inner dia. ) as the magnetic inductive flow meter in order that the system can be deaerated easily.

Hydraulic vibrations are be created, if e.g.diaphragm, hoses or buffer tanks areexisting.The energie in the liquid is decreasedwith the oscillation of the liquid.
If the velocity cross the creeping flow ( B ), the pulse output in the convertercard is switched off.
If a new start pulse is comming duringoscillation, the velocity in the pipeincreased ( C ).
A B
C
start
valve closes
creeping flow
start
If hoses are used, then the hoses must be metal cased.
c) dosing valve
The dosing valve is very important for the accuracy/reproducibility of the dosing system.Attention should be paid to the following parameters:
c1) closing time: the closing time of the valve has to be in a certain ratio to the dosing time ( A to B ); the shorter the dosing time the shorter the valve closing time.
Guideline:
<<< the valve closing time should be not more than 10% of the dosing time >>>
If it is more than 10%, the dosing control is only able to register the size of the excess volume, but will not be able to react to it ( i.e. compensate/correct it for the next filling ). This effect can only be avoided by using a
two-stage shut-off ( two valves ), where the 2.nd ( final ) stage can compensate/correct alterations of the 1.st ( pre- ) stage.
c2) power supply: whenever possible a DC supply should be used to avoid the influence of the shape of sine waves of the AC supply. This is especially if the valve closes with voltage; the valve starts to close when the sine wave has exceeded the starting voltage; in the worst case this can take 10 ms ( 50 Hz field ) and so cause variations of the batched quantity ( in accuracies ).
c3) dosing valve: it is important that only a small volume isdisplaced during the closing procedure. The displaced volumeis part of the measured quantity and thus influences theaccuracy and reproducibility of the complete dosing system. Itshould therefore be kept as constant as possible! An instabilityof the displaced volume can effect the accuracy of systemswhere small quantities are dosed. Diaphragm valves withmetallic body are recommended, where a diaphragm of asynthetic material ( plastic ) is oppressed onto a metallic edge.This design has another positive effect: fruit particles andsimilar solids to be dosed are squeezed off the valve seat.
Diaphragm valve type 625 ( GEMÜ )

5. Description of the components
a) magnetic inductive flow meter series MID has an integrated and detachable pre-ampifier. The coils for themagnetic field requires a 24 VAC power supply.the cable for interconnection of the meter and the converter card isapprox. 5 m long ( if a length of more than 5 m is required ( max. 200 m ), an extension cable of same type isadmissible ). In the event of a malfunction the pre-amplifier can be detached and replaced; no calibration of thereplacement is required! The pre-amplifier is connected via plug and socket. The meter can be installed eitherhorizontally or vertically. Vertical installation is preferred for better deaeration; and also depositsare less likely to betrapped in the meter. In the case of horizontal installation the electrodes must be in horizontal position, i.e. thepre-amplifier must be above or underneath-but not beside- the meter body. If the meter is used together with aconverter card UV-12 the flow direction ( right to left/left to right or from below to above or vice versa ) of the meteris insignificant. The UV-12 switches automatically to the given flow direction and measurement can be startedimmediately.
Cables for power and signalesIt´s not allowed to install the meter or the electronik in an area with strong magnetic fields. The Measuring cablemust be install separatly from cables with power or controlsignals. The best solution is the installation for themeasuring cable in a grounded pipe of metal.
A
B
C
D
E
Note : Other connectors on request

colour signal voltage corewhite measurement 0-50 mVAC
+/- 2 VDCshielded
brown reference voltage 2 hasta 4 VAC shieldedyellowgreen
power supply forpre-amplifier
+ 15 VDC- 15 VDC
unshielded
red and blue power supply forthe coils
24 VAC unshielded
Dimension of flow meter with sanitary connectors DIN 405
Note : Other connectors on request
Measuring cable
The measuring cable is a standard cable to DIN series LIYY- LIYCY) with two shielded and four unshielded
diameter connector A B C D E actual power current weightDN mm mm mm mm mm W A kg-----------------------------------------------------------------------------------------------------------------------------------------------------40 2" 120 190 80 75 185 5 0,4 7,5
diameter connector A B C D E actual power current weightDN DIN 405 mm mm mm mm mm W A kg------------------------------------------------------------------------------------------------------------------------------------------------------10 RD 28x1/8 80 150 60 60 155 4 0,3 3,515 RD 34x1/8 80 150 60 60 155 4 0,3 3,520 RD 44x1/6 80 150 60 60 155 4 0,3 3,525 RD 52x1/6 120 190 80 75 185 5 0,4 7,5
diameter connector A B C D E actual power current weightDN DIN 405 mm mm mm mm mm W A kg-----------------------------------------------------------------------------------------------------------------------------------------------------10/12 RD 27x1/10 80 150 60 60 155 4 0,3 3,5
Dimension of flow meter with steril connectors NAUE (ISO)
Dimension of flow meter with TRI CLAMP ISO 2852
Fuses for the meter ( mounted onto the terminal adapter QB-173)
------------------------------------------------------------------------------ meter size 24 VAC ----------------------------------------------------------------------------- DN 10 0.4 A DN 15 0.4 A DN 20 0.4 A DN 25 0.6 A DN 40 0.6 A -----------------------------------------------------------------------
Quick-operating fuses must not be used

Installation guideline for transmitter
Inlet/Outlet
For a optimum flow profile it must be installed flow straightener behind and in front of the meter.This can be berealized. with straight pipes in the upstream- and downstream pipework.The upstream pipework must be 5 x DN and the downstream pipework must be 3 x DN. It´s not allowed to installany kind of devices upstreames. It´s forbitten to install in front of the upstream pipework devices which producedeffects like spin or vortex, e.g. space bend, butterfly valves or slider. Any regulation devices must be installedbehind the meter. Inclinations must be rotational symetrical and the angle should be < 8 °.The upstream-,downstream pipework and the meter must have the same diameter !!
Length of the upstream-and downstream pipework for the meter ( mm ) :
DN upstream downstream
10 50 3015 75 4520 100 6025 125 7532 160 10040 200 120
Ground connection for the transmitter
The transmitter don´t need additional ground connections. Since the transmitter use the pipe potential asreference, the upstream-and downstream pipe must be on ground. The installation of the meter in plastic pipes is not allowed.
The power supply 24 VAC should be also on ground.
Mounting position of the transmitter
It must be insure, that the meter tube is allways completely filled during measuring and is protected againstasymetric formation of deposits. The vertical position is preverred, since it is simple to make the pipe airfree.
Is the meter is installed horizontal, then it must be insure, that the electrode axis is also horizontal.
Pipework must be supported adjacent to the meter and connections and provide 3° slope for draining..
If the electrode axis is vertikal, then air bubbles can be isolate the electrical connection between the electrodes and the product.In this case the output signal is undeclared
Laying of the measuring cable
It´s forbitten to install the meter in areas with strong magnetic fields. The measuring cable must be lay separatelyfrom power cables and control cables.To lay the measuring cable in grounded metal pipes is recommended. Measuring cables can be routed togetherwith other measuring cables.
D
flow direction
5D upstream pipework3D downstreampipework
Electrode axis

Installation guideline for the electronics
General:
It is forbitten to install the electronics in areas with strong magnetic fields. The wiring must be depending from thefunction of the cables :
cables for signals e.g. start, errorcables for control e.g. cable for control the diaphragm valvescables for measuring e.g. measuring cable between the meter and teh electronicscables for power e.g. 24 VDC, 24 VAC , power for motors
Cables for signals or cables for control can be routed together to a multiple cable.
Measuring cable must be routed with the same cable typ. It is not allowed to bring together several measuringcables to one shielded cable .
If it is necessary to lengthen the measuring cable, then the terminals for the measuring cable must be separatefrom terminals with power. In general the same prinziple as for the cable is valid: the terminals must also beseparate depending from their function.
Heat development
The produced energie from the electronics must be undisturbed left the housing. It must be insure, that aircirculation is possible. All about the housing ( excluding the front plate ) must be a distance of min. 10 cm to otherobjects. To take off any cable on the top of the housing is not permissible. If several housings are installed, then the same principle is valid.
If fans are used, the distance can be reduced.One fan is necessary for two housings. The width of the fanmodule should be the width of the housing.
If the fan is only installed for air circulation, then it is important toknow, that the temperature in the housing can be increased.
If the inside air is exchanged with the air outside of the housing,then a dry air is necessary. For air circulation with the outside air please ask a manufacturerabout special components for installation in a panel cabinet.
Power supply
The installation of the cable for power supply 24 VDC/ 24 VAC must be laid star-shaped to each terminalconnector card QB 172 ( see B 407.4-11 D page 1 ).
Note : The dimension of the wire cross section for 24 VDC must be considering also the current for the solenoid valves
10 cm
10 cm
10 cm
10 c
m
Installation of 2 panel housings in a cabinet

Technical data
Transmitter
General
Nominal diameter :DN 10, 15, 20, 25, 32, 40
Pressure max. in bar : Sanitary connector PN 10 Steril connector PN 16 Tri-Clamp PN 16 NEUMO flanges PN 16
Minimum Conductivity : 1µS/cm
Mounting position : vertical, if horizontal cannot be avoided, then the electrodes must be in horizontal position. The pipe must be completely filled with product.
Mounting length : DN 10 to 20 : 150 mm DN 25 to 40 : 200 mm
Measuring cable lenght : max. 250 m
Any extension of the cable built onto the transmitter is possible, but it must be of same type.
Type of measuring cable : LIYY- LIYCY
Material
Metering tube : 1.4571
Process connections : 1.4571
Lining : PTFE
Electrodes : Hastelloy C22
Housing : Preamplifier : Cast aluminium, plastic coated Housing : Polyurethane
Temperature/Humidity
Liquid temperature max. : 140 °C
Ambient temperature max. : 70 °C
Ambient humidity : < 75% on average, dew-formation permissible
Protection class : IP 67 according to EN 60 529
Power supply
Voltage : 24 V ± 10 % sine wave
Frequency : 50 Hz ±5% or 60 Hz ±5%
Distortion factor : max 1%
Other connectors on request

Technical data
Electronics
General
Housings : - Panel mounting or - 19" rack
Protection class : panel housing
front : IP 65 acc. to EN 60 529 connection : IP 20 acc. to EN 60 529
: 19" rack : IP 20 acc. to EN 60529
Power supply : 18 VDC to 36 VDC
Ripple : < 1%
Power consumption : depending on number of cards
Ambient temperature max. : 50 °C
Ambient humidity max. : mean < 50%, dew-formation not permissible
Converter card UV-12
Input : Measuring voltage and reference voltage from transmitter
Measuring range : 10 m/s standard 2.5 m/s option
Output : 0 to 50 kHz proportional to velocity in the pipe ( other frequencies on request ) see documentation UV-12
Counter/Valve card LS-23
Input : Frequency from converter card UV-12 Pulses from NAMUR-card QB- 181 ( option )
Output : valve driver for control of solenoid valves max. voltage : 36 VDCmax. current : 0.5 A
Master card DR-11
Inputs from QB-xxx : 24 VDC ± 15%High-level : > 10 VDCLow-level : < 5VDCInput resistance : 2.4 kOhm
Outputs to QB-xxx : 18 VDC to 36 VDC Output current max. : 10 mA

Error Limits
Reference conditions according DIN 19200 and VDI / VDE 2641
Fluid : water ( free of gas )Liquid temperature : + 25 °C ± 2 K
Ambient temperature : + 22 °C ± 2 K
Warm-up time : 30 min.
Installation acc. : up-stream section > 10 DNreference conditions : down-stream section > 5 DN
Error limits according reference conditons
Power supply for transmitter : 24 V ± 10 %Frequency : 50 Hz ±5% and 60 Hz ±5% respectively
Power supply for electronics : 18 V to 36 V DCRipple : < 1%
Pulse output : ± 0.5 % of measured value plus ± 0.01% FS
: FS = 50 kHz at 10 m/s
Repeatability : ± 0.1 % of measured value plus ± 0.005 % FS
Build-up time : 50 ms ( 10 % to 90 % FS )
Temperature drift during warm-up time = 30 min. : ±1% of measured value plus ± 0.1 % FS
Temperature influence onTransmitter and electronics : ± 0.1 % / 10 degr. C

6. Requirements for commissioning: a) the meter must be correctly installed
b) the pipe must be completely filled with product
c) the power supply for meters and dosing control must be switched on
d) the flow velocity must be absolutely zero:
before starting the dosing/filling machine a zero point setting must be carried out;this is done by pressing key F7 and F2: the zero point procedure is carried out commonly for all converter cards/meters connected to the system. Upon successful completion, the green LED´s on the front panal of the MDS-30; MDS-49 and BGT-84 are off. If not refer to chapter 7., fault finding !
e) the start release unit of the filling machine must be connected:
This is connected to the start input of the master card DR-11 via its terminal adapter; a 24 VDC pulses of at least 10 ms is necessary.To check the operation ( follow-up the dosing procedure ) the operator terminal should be in position F6 ! If there are any problems refer to chapter 7.,fault finding.
7. Fault finding
a) zero point setting is not possible:
assumptions: pipe is completely filled with liquid,power supply is switched on
a1) power supply of the meter via the 3 LED´s of the terminal adapter card QB-173:
24 VAC for the meter coilsUpper LED is off check if 24 VAC is present
check fuses on terminal adapter QB-173
+ 15 VDC of converter card and pre- amplifiercentre LED is off check if 24 VDC is present
fault of converter card: replace!
- 15 VDC of converter card and pre.amplifierLower LED is off check if 24 VDC is present
fault of converter card : replace!
a2) reference voltage:
assumption: 24 VAC is present ( upper LED is on )prüfen: measure the reference voltage between the
brown wire and the shield ( terminal adapter QB-173 ); it should be 2,5 to 3,5 VAC!
if this voltage cannot be received:
check reference cable ( brown wire and shield ) on cable break or short-circuit
if reference cable is o.k.:
replace meter ( meter defect )

a3) set of automatic zero point :
for checking the function of the zero point setting circuitry ( part of the converter card UV-12 ) the white wire must be removed from the terminal. Then install a short connection between both terminals from the white wire and the shield on QB-173.Now press key F7 of the operator terminal and after F2 ( for " yes" ).
zero point setting successfull ? ( "Yes" means : green LED is off)if "no" : replace converter cardif "yes" : replace meter
a4) oscillation zero point:
check:
- the whole system ( piping, meter, valve) must completely be filled with product and free of gas- are the valves closed?- the conductivity of the product must be > 1 µS/cm- the flow velocity must be > 0.25 m/sec v (m/sec) = ( Q x 1.273,2 ) : DN2
Q (l/sec) = ( v x DN2 ) : 1.273,2
b) alternating/oscillating batch quantities:
b1) alternating/oscillating actual quantities( volume/weight of the receptacle):
check:
- does the liquid level of the tank decrease filling by filling by more than 5% of its previous value? The excess volume may differ from filling to filling. Refer to chapter 4, section a)!
- if the dosing time is < 0.5 sec the closing time of the valve influences the accuracy of the batch volume. The closing time of the valve must not excess 10% of the dosing time.
Refer to chapter 4., section c)c1)!
b2) altern./oscill. counter quantities ( see operator terminal key F6):
- if the real/true quantities ( appearing in the display ) differ by not more than +/- 1ml compared with the set quantities, but the contents of the receptacles do ( i.e. show bigger differences compared to the set quantities ) then the valve outlet is dripping ( varying from filling to filling ) When the valve closes the product must cease lowing instantly!
Check design/construction of the valve outlet !

c) Function of LED on Master card DR-11 and Counter/Valve card LS-23
These cards have 2 LED in front
red CPU
This LED is ON, if the CPU in the system stand still. In this case, the system is automatically restarted.
Check following, If this is not sucessfull :
a) EPROM installed ?b) CPU or EPROM correct installed in the socket ?c) Quartz for CPU --> OK
If a) to c) --> OK, change card
yellow no function for dosíng application
This LED is used for showing information for our serviceman. Several software version used this LED for indication e.g. the startinput.

Electronics MDS-30 / 49 / 84
MDS 30 MDS 49
LS-2
3/1
DR
-11
LS-2
3/1
LS-2
3/2
DR
-11
LS-2
3/1
UV
-12
/ 1
UV
-12
/ 2
UV
-12
/ 3
UV
-12
/ 4
UV
-12
/ 5
UV
-12
/ 6
UV
-12
/ 1
UV
-12
/ 2
UV
-12
/ 3
UV
-12
/ 4
UV
-12
/ 5
UV
-12
/ 6
UV
-12
/ 7
UV
-12
/ 8
UV
-12
/ 9
UV
-12
/ 10
UV
-12
/ 11
UV
-12
/ 12
LS-2
3/1
LS-2
3/2
LS-2
3/3
DR
-11
MDS 84
UV
-12
/ 1
UV
-12
/ 2
UV
-12
/ 3
UV
-12
/ 4
UV
-12
/ 5
UV
-12
/ 6
UV
-12
/ 7
UV
-12
/ 8
UV
-12
/ 9
UV
-12
/10
UV
-12
/11
UV
-12
/12
UV
-12
/13
UV
-12
/14
UV
-12
/15
UV
-12
/16
UV
-12
/17
UV
-12
/18
Installation of the units in the housing
The elektronics is available in 3 different housings:
- MDS-30 for max. 6 channels- MDS-49 for max. 12 channels- MDS-84 for max. 18 channels
Max. built-in units:
MDS-30 MDS-49 MDS-84
converter card 6 12 18counter/valve card 1 2 3master card 1 1 1

MDS 30 MDS 49
MDS 84
QB
-181
QB
-172
QB
-xxx
QB
-xxx
QB
-181
/2Q
B-1
72/2
QB
-181
/1Q
B-1
72/1
QB
-173
/ 1
QB
-173
/ 2
QB
-173
/ 3
QB
-173
/ 4
QB
-173
/ 5
QB
-173
/ 6
QB
-173
/ 7
QB
-173
/ 8
QB
-173
/ 9
QB
-173
/ 10
QB
-173
/ 11
QB
-173
/ 12
QB
-173
/ 1
QB
-173
/ 2
QB
-173
/ 3
QB
-173
/ 4
QB
-173
/ 5
QB
-173
/ 6
QB
-173
/ 1
QB
-173
/ 2
QB
-173
/ 3
QB
-173
/ 4
QB
-173
/ 5
QB
-173
/ 6
QB
-173
/ 7
QB
-173
/ 8
QB
-173
/ 9
QB
-173
/ 10
QB
-173
/ 11
QB
-173
/ 12
QB
-173
/ 13
QB
-173
/ 14
QB
-173
/ 15
QB
-173
/ 16
QB
-173
/ 17
QB
-173
/ 18
QB
-181
/1Q
B-1
72/1
QB
-181
/2Q
B-1
72/2
QB
-181
/3Q
B-1
72/3
QB
-xxx
Installation of the terminal connector cards in the housing
View on the units
component sideView on the terminal connectorcard

240
35
144
A
A
MDS-30 MDS-49
192 288
Dimension MDS- 30/49
terminal connector cardfront
screw
Current consumption depending of the number of units ( only 24 VDC )
1 2 3 4 5 6
MDS 30 0,2A 0,3A 0,4 0,5A 0,6A 0,7A
7 8 9 10 11 12
MDS 49 0,85A 0,95A 1,05A 1,15A 1,25A 1,35A
13 14 15 16 17 18
MDS 84 1,5A 1,6A 1,7A 1,8A 1,9A 2A
240
57133
A
B
A
MDS-49 MDS-84
287 465B 305 483
Dimension MDS- 49 / 84

<<<<<< ATTENTION - ATTENTION - ATTENTION - ATTENTION <<<<<<
How to take action
1. before first commissioning, and
2. when replacing components.--------------------------------------------------------------------------------------------------------------------------------------------------
1. before first commissioning
a. Activate batteries on cards DR- 11 and LS- 23:
The built- on batteries will store the set data in case of power failure.
Batteries on cards supplied from stock arede- activated to avoid discharge during storage.
To activate the batteries the jumpers must be brought in position " ON ".For jumper position see following drawings:
- card DR- 11: draw. No. 2- 81- 14816.4- card LS- 23: draw. No. 2- 81- 14821.4.
b. Set (key- in) system data into the LAUER terminal:
For correct function of the dosing system the following data must be set:
F1 number of dosing lines e. g. 1
F2 size (DN) of flowmeter e. g. 10 mm
F3 batch quantity e. g. 100 ml
F5 max. permissible dosing time e. g. 1000 ms
c. When using a PLC (instead of a LAUER terminal):
All telegrams, containing the system data, must be sent to the dosing system.
d. Fill dosing line with liquid.
e. Set zero point by pressing key F7.
Now the dosing system is ready for operation!-------------------------------------------------------------------------------------------------------------------------------- ------------------
2. when replacing components
If a card DR- 11 (or LS- 23) must be replaced by a new one, first activate thebattery on the new card by bringing the jumper in position " ON "; see above!If the dosing system contains further cards DR- 11 (or LS- 23), which must notbe replaced, pull their battery jumpers and bring them back to position " ON ".
Replacement of cards only when power supply had been switched- off!
So, all stored system data are erased!Key- in system data as described above.

Batterie
OFF ON
Reset ( not change !!! )
LS-23
Batterie
OFF ON
DR-11
Adjustment from the batterie jumper

Functions
Number of fillers xDiameter of MID xPreset for all filler xMax. number of channels 4Start external/ manual / automaticmax. Dosingtime Output tolerance 2-step valve closing xTotalizator Dosingtime for each channel Overflowcorrection xK-FactorMultiproduct2-step dosing
Hardware necessary
QB-170 xQB-183
Magnetic inductive flowmeterType MID-MDSDosing system
Instruction Manual
Terminal Type LAUER

144
215
panal dimension depth =48 mm
filler
F 1 F 2 F 3 F 4 F 5 F 6 F 7 F 8
diameter
batch
overflow
maxtime
actual
zero/set
number of fillers : __
F 1 F 2 F 3 F 4 F 5 F 6 F 7 F 8
Menue
F1 Number of Fillers
i.e number of magnetic flowmeter
max. number of fillers = 4
only the valves at the registered fillers are activated
back to menue with F8
When power-supply is switched on,the main menu is showing
F1 number of fillersF2 diameter of the meterF3 batch quantityF4 overflow correctionF5 max. dosingtime ( no function with separat
start inputs )F6 actual valuesF7 zeropoint setting
filler
F 1 F 2 F 3 F 4 F 5 F 6 F 7 F 8
diameter
batch
overflow
maxtime
actual
zero/set
The key´s F1 to F8 are for setting the dosing parameters. After setting press ENTER.
90128
194207
4,5
panal cut-off

diameter of fillers : __
F 1 F 2 F 3 F 4 F 5 F 6 F 7 F 8
Menue
overflow correction : yes
F 1 F 2 F 3 F 4 F 5 F 6 F 7 F 8
Menueyes no
F2 diameter of fillers ( mm )
i.e. dia./DN of magnetic inductive flowmeter; this tells the counter and valve
card LS-23 which meter K-factor (stored in the counter-section) must be selected; there is no pulse standardization in the
converter card UV-12
The diameter are following:
10,15,20,25 32,40
back to the menue with F8
F3 batch quantity
batch quantity ..... ml: the quantity stored here is true for all fillers ( see F1 )
B open ..... % : valve B opening at x %; x = 0 % to 50 %B closed ..... % : valve B closing at x %; x =0% --> valve B allways closed
Save --> press ENTERCancel --> press MENUE
filler
F 1 F 2 F 3 F 4 F 5 F 6 F 7 F 8
diameter
batch
overflow
maxtime
actual
zero/set
filler
F 1 F 2 F 3 F 4 F 5 F 6 F 7 F 8
diameter
batch
overflow
maxtime
actual
zero/set
filler
F 1 F 2 F 3 F 4 F 5 F 6 F 7 F 8
diameter
batch
overflow
maxtime
actual
zero/setF4 Overflow correction " yes - no "
if " yes " : press key F2
an overflow correction is carried-out with each dosing process
if " no " : press key f4
there is no overflow correction
after having pressed F2 or F4 press key F8 to go back to the menue
batch quantity : _____ ml
F 1 F 2 F 3 F 4 F 5 F 6 F 7 F 8
MenueB open at : __ % B closed at : __ %

F5 max. time (max. 65 000 msec)
max. dosing time : ______ ms
Only one softwaretimer is present. This timer is reseted with each new start on any startinput. An emergency switch off for each channel is not possible.
filler
F 1 F 2 F 3 F 4 F 5 F 6 F 7 F 8
diameter
batch
overflow
maxtime
actual
zero/set
max. dosing time : _____ ms
F 1 F 2 F 3 F 4 F 5 F 6 F 7 F 8
F6 filler ..., set ...., real ..., ... t
two numbers must be keyed-in( only, if desired resp. in the case a certain filler should dose a quantity differing from that under F3); used the cursor:
" filler ": e.g. filler no. 2" set " : e.g. 125 ml
this is possible for all fillers, filler by filler!
under " real " the real/true quantity measured by the meter appears in the display (e.g. 124.96 ml)
filler
F 1 F 2 F 3 F 4 F 5 F 6 F 7 F 8
diameter
batch
overflow
maxtime
actual
zero/set
filler : __
F 1 F 2 F 3 F 4 F 5 F 6 F 7 F 8
Menue
set : _______ ml
real : _______ ml

F7 zero point ? " yes - no "
this makes possible to activate the zero point setting circuitry of the converter card UV-12 for to carry out an automatic zero point setting
yes
press key F2
zero point setting in process
when " zero point setting out " appears in the display this procedure is finished; acknowledge by pressing key F8
no
press key F8
back to the menue
filler
F 1 F 2 F 3 F 4 F 5 F 6 F 7 F 8
diameter
batch
overflow
maxtime
actual
zero/set
Total
F 1 F 2 F 3 F 4 F 5 F 6 F 7 F 8
no
zero point ?
yes
F 1 F 2 F 3 F 4 F 5 F 6 F 7 F 8
zero point settingzero point setting
F 1 F 2 F 3 F 4 F 5 F 6 F 7 F 8
zero point setting out
quit
F 1 F 2 F 3 F 4 F 5 F 6 F 7 F 8
no
zero point ?
yes
filler
F 1 F 2 F 3 F 4 F 5 F 6 F 7 F 8
diameter
batch
overflow
maxtime
actual
zero/set

Accuracy of Dosing Systems with Magnetic Flowmeters and ElectronicsSeries MID- MDS
-------------------------------------------------------------------------------------------------------------------------------- ----------------------
Introduction
Talking about accuracy of dosing systems series MID- MDS (also true for the system MID- NFD) means to talk about repeatability. The absolute accuracy, i. e. the difference between both the measured batch quantityand e. g. the weight, is not so important for dosing applications.All measuring (dosing) systems have inaccuracies. So, a dosing system consisting only of the magmeterand its dosing electronics (valve and nozzle/valve outlet are not included) has an absolute accuracy of
=< +/- 0.5 % of reading
within a velocity range of 0,5 to 10 m/sec.
This absolute (in-) accuracy is a constant quantity and can be eliminated by adjusting (changing) the presetvalue (batch quantity). With the new software (MDS) the calibration factor for each magmeter can bechanged individually and so the preset value (batch quantity) adjusted to an optimum.
But there is an additional uncertainty to be observed, the total repeatability R of the complete system:
Rtotal = repeatability of the complete systemRMDS = repeatability of the magmeter and dosing electronicsRvalve = repeatability of the dosing valveRnozzle = repeatability of the nozzle/valve outlet Rdensity = repeatability of the density of the liquid
RMDS = the repeatability of the magmeter and dosing electronics is=< 0.1 % of the batch quantity within a velocity range of 0,5 to 10 m/sec
Rvalve = the repeatability of the dosing valve is depending on the batch time; there is not yet any information known about the repeatability of e. g. GEMÜ valves.
According our experience with diaphragm valves: the repeatability is better than 1 % of the valve's delay time; the delay time of GEMÜ valves is approx. 70 millisec; afterthis time has gone the valve is closed. So, it is only important to know, which quantity passes the valve during this time!See two examples sheet 2!
Rnozzle = the repeatability of the nozzle(valve outlet) is very hard to be estimated; in general one must be sure , that always the same quantity passes the nozzle after the valve had been closed. No dripping is acceptable; if it is dripping, the number and the volume of the drops should be constant and cease quickly!
Rdensity = the influence of the density of the liquid is very important, too; it should be known as exact as possible; the liquid temperature should be kept as constant as possible during a machine shift to eliminate this influence!The density alteration of e. g. water is approx. 0.2 ml/degree centigrade.
RTOTAL = RMDS2 + RVALVE
2 + RNOZZLE2 + RDENSITY
2

Reference for determination of the meter size -------------------------------------------------------------------------------------------------------------------------------- ----------------------
It´s possible to fill up with one meter size a wide range of dosing quantities in the same time.
The table below shows, which meter size is recommended.
It shows the dosing quantity in relationship to the velocity in the meter pipe :
The velocity of 1 m/sec is ideal for high product care, accuracy and wear. If the velocity is higher, then the pressureshock increase if the valve is closing.. On the other hand, If the velocity is lower, then with several productsdeposits are possible..
Utilization for plastic pipes-------------------------------------------------------------------------------------------------------------------------------- ----------------------
It´s very important to know, that the dosing accuracy and the repeatablility are depending on the oscillation of theproduct in the pipe. A product oscillation is possible, if plastic pipes are installed within the product line. If the valveis closing, then the pressure increase and the plastic pipe works like a memory. If plastic pipes are required, thenthey must be metallcoated. A spiral from metal for reinforcement the plastic pipe is not adequate to guarantee therepeatability. The length of the plastic pipe must be as short as possible. Are the pipes are longer then 1 m, then a mechanicalsupport must be for prevent pipe oscillations, if pressure shocks are existing.
DN v = 0,5 m/s v = 1 m/s v = 2,5 m/s10 40 ml/s 80 ml/s 200 ml/s15 88 ml/s 176 ml/s 440 ml/s20 157 ml/s 314 ml/s 785 ml/s25 245 ml/s 490 ml/s 1225 ml/s32 402 ml/s 804 ml/s 2010 ml/s40 628 ml/s 1256 ml/s 3140 ml/s
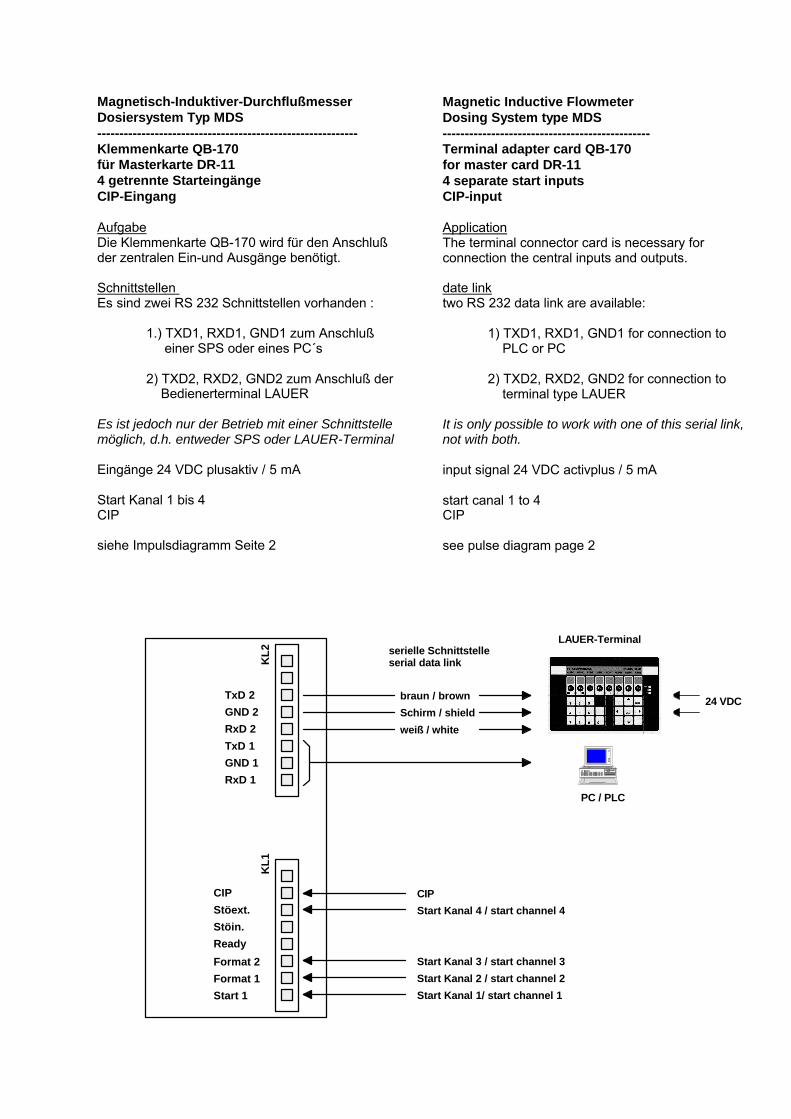
Magnetisch-Induktiver-DurchflußmesserDosiersystem Typ MDS-----------------------------------------------------------Klemmenkarte QB-170für Masterkarte DR-114 getrennte StarteingängeCIP-Eingang
AufgabeDie Klemmenkarte QB-170 wird für den Anschlußder zentralen Ein-und Ausgänge benötigt.
Schnittstellen Es sind zwei RS 232 Schnittstellen vorhanden :
1.) TXD1, RXD1, GND1 zum Anschluß einer SPS oder eines PC´s
2) TXD2, RXD2, GND2 zum Anschluß der Bedienerterminal LAUER
Es ist jedoch nur der Betrieb mit einer Schnittstellemöglich, d.h. entweder SPS oder LAUER-Terminal
Eingänge 24 VDC plusaktiv / 5 mA
Start Kanal 1 bis 4CIP
siehe Impulsdiagramm Seite 2
Magnetic Inductive FlowmeterDosing System type MDS-----------------------------------------------Terminal adapter card QB-170for master card DR-114 separate start inputsCIP-input
ApplicationThe terminal connector card is necessary forconnection the central inputs and outputs.
date linktwo RS 232 data link are available:
1) TXD1, RXD1, GND1 for connection to PLC or PC
2) TXD2, RXD2, GND2 for connection to terminal type LAUER
It is only possible to work with one of this serial link,not with both.
input signal 24 VDC activplus / 5 mA
start canal 1 to 4CIP
see pulse diagram page 2
Start Kanal 4 / start channel 4
Start Kanal 3 / start channel 3
Start Kanal 2 / start channel 2
Start Kanal 1/ start channel 1
braun / brown
Schirm / shield
weiß / white
24 VDC
LAUER-Terminalserielle Schnittstelleserial data link
PC / PLC
CIP
TxD 2GND 2RxD 2TxD 1GND 1RxD 1
Start 1Format 1Format 2
ReadyStöin.Stöext.CIP
KL1
KL2

CIP
Start 1
Start2
Start 3
Start 4
Ventil 1
Ventil 2
Ventil 3
Ventil 4
Dosieren / dosing
start 1
start 2
start 3
start 5
valve 1
valve 2
valve 3
valve 4
batch endDosierung beendet
CIP
Start 1
Start2
Start 3
Start 4
Ventil 1
Ventil 2
Ventil 3
Ventil 4
CIP
start 1
start 2
start 3
start 5
valve 1
valve 2
valve 3
valve 4

Magnetisch-Induktiver-DurchflußmesserDosiersystem Typ MDS-----------------------------------------------------------Klemmenkarte QB-172für Zähler/Ventilkarte LS-23
Aufgabe
Die Klemmenkarte QB-172 wird für den Anschlußder Hilfsenergie und der Ventile benötigt.Für 6 Messkanäle wird je eine Klemmenkartebenötigt.
Hilfsenergie:Bei zwei und mehr Klemmenkarten sollten dieAnschlüsse immer von der Karte zur Spannungs-versorgung verlegt werden ( siehe Seite 2 ).
Ventilausgänge:
Ausgang A :ist bei der Dosierung immer geöffnet
Ausgang B :kann bei zweistufigem Ventil zugeschaltet werden
Die Ventilausgänge sind plusschaltende Ausgänge.max. Spannung : 36 VDCmax. Strom : 0,5 A
Der Ausgang ist kurzschlußsicher und gegenÜberspannung beim Schalten von induktivenLasten geschützt.
Magnetic Inductive FlowmeterDosing System type MDS-----------------------------------------------Terminal adapter card QB-172for counter/ valve card LS-23
Application
The terminal connector card is necessary forconnection the power supplies and the valves.One terminal connector card is necessary for 6measuring channels.
Power supply:Are more then one terminal connector card installed,connection to the power supply should bestar-shaped ( see page 2).
Valve outputs:
Output A : allways open during batch
Output B : in addition to A if 2-stage-valves are used
The valve outputs switches + 24VDCmax. voltage : 36 VDCmax. current : 0,5 A
The outputs are short-circuit proof and over voltageprotected.
+ 24 VDC
Masse / ground
24 VAC , 50/60 Hz
Power supply for electronic
Hilfsenergie für die Elektronik
Hilfsenergie für AufnehmerPower supply for transmitter
V1A
V1B
V2A
V2B
V3A
V3B
V4A
V4B
V5A
V5B
V6A
V6B
Magnetventil solenoid valve
Masse 24 VDC
ground 24 VDC
V1A bis V6BV1A to V6B
Membranventil
diaphragmvalve
+24VDC
-24 VDC
24 VAC
24 VAC
V 1A
V 1B
V 2A
V 2B
V 3A
V 3B
V 4A
V 4B
V 5A
V 5B
V 6A
V 6B

2 4 V AC
2 4 V D C
Magnetisch-Induktiver-DurchflußmesserDosiersystem Typ MDS-----------------------------------------------------------Klemmenkarte QB-172für Zähler/Ventilkarte LS-23
Anschluß der Hilfsenergie 24 VAC und 24 VDC
Die Hilfsenergie sollte sternförmig von jederKlemmenkarte zur Stromversorgung angeschaltetwerden.
Magnetic Inductive FlowmeterDosing System type MDS-----------------------------------------------Terminal adapter card QB-172for counter/ valve card LS-23
Power supply 24 VAC and 24 VDC
the connection between the terminal connector cardand the power supply should be star-shaped.

Magnetisch-Induktiver-DurchflußmesserDosiersystem Typ MDS-----------------------------------------------------------Klemmenkarte QB-173für Eingangskarte UV-12Anschluß an Aufnehmer Typ MDS
Aufgabe
Die Klemmenkarte QB-173 wird zum Anschluß desMesskabels benötigt. Dieses Kabel stellt die Verbindung des Aufnehmerszur Eingangskarte her.Das Messkabel ist ein handelsübliches Kabel DIN Bezeichnung : LIYY- LIYCYMit diesem Kabel werden folgende Signaleübertragen:
- Versorgungsspannung 24 VAC für die Aufnehmerspulen- +/- 15 VDC für die Versorgung des Vorverstärkers- Referenzspannung- Meßspannung
Weiterhin befinden sich auf der Klemmenkarte:
- 2 Sicherungen 24 VAC ( 400 mA ) für die Aufnehmerspulen- 3 LED zur Anzeige von
- +/- 15 VDC- 24 VAC
Magnetic Inductive FlowmeterDosing System type MDS-----------------------------------------------Terminal adapter card QB-173for converter card UV-12Connection to transmitter type MDS
Application
The terminal connector card is necessary for themeasuring cable connection. This cable connectedthe transmitter and the converter card.
The trade mark of this cable is : LIYY-LIYCY
On this cable following signals are transmitted:
- power supply 24 VAC for the coils in the transmitter- +/- 15 VDC for the preamplifier- reference voltage- measuring voltage
Furthermore are installed on the card:
- 2 fuses 24 VAC ( 400 mA ) for the transmitter coils- 3 LED for indication of
- +/- 15 VDC- 24 VAC
blau / blue
rot / red
braun / brown
gelb / yellow
grün / green
Schirm / shield
weiß / white
Measuring cable to transmitter
Sicherungen 400 mA für Aufnehmer
fuses 400 mA for transmitter
24 VAC für Aufnehmer / 24 VAC for transmitter
Meßkabel zum Aufnehmer
+ 15 VDC für Vorverstärker / + 15 VDC for preamplifier - 15 VDC für Vorverstärker / - 15 VDC for preamplifier
LED