A Cheese Lover's Guide - RawFoodChef.comrawfoodchef.com/PDFs/LivingLightACheeseLoversGuide.pdf · A...
37
A Cheese Lover’s Guide Living Light Culinary Institute MAKING HEALTHY LIVING DELICIOUS!™ Raw Vegan Cheese, Yogurt and Kefir by Cherie Soria “MOTHER OF GOURMET RAW VEGAN CUISINE” $14.95 USD
Transcript of A Cheese Lover's Guide - RawFoodChef.comrawfoodchef.com/PDFs/LivingLightACheeseLoversGuide.pdf · A...

A Cheese Lover’s Guide
Living Light Culinary Institute
MAKING HEALTHY LIVING DELICIOUS!™
Raw Vegan Cheese, Yogurt and Kefir
by Cherie Soria “MOTHER OF GOURMET RAW VEGAN CUISINE”
$14.95 USD
A Cheese Lover’s GuideRaw Vegan Cheese, Yogurt and Kefir
By Cherie Soria, Mother of Gourmet Raw Vegan Cuisine

.......................................................................................A Cheese Lover’s GuideRaw Vegan Cheese, Yogurt and Kefir
A Cheese Lover’s Guide 2 RawFoodChef.com
Introduction................................................. 4Supplies ................................................................................................ 4
Using a High Performance Blender .................................................. 5
More Culinary "How-tos" .................................................................... 7
The Basics .............................................................................................. 8
The Recipes ........................................................10Rejuvelac ............................................................................................ 11
Basic Nut Kefir .................................................................................... 12
Coconut Kefir ...................................................................................... 12
Almond Maple Kefir ........................................................................... 14
Vanilla Cashew Kefir ......................................................................... 14
Strawberry Almond Kefir .................................................................. 15
Cacao Brazil Nut Kefir ....................................................................... 16
Vanilla Almond Yogurt with Blueberries ....................................... 17
A Cheese Lover’s Guide 3 RawFoodChef.com
Vanilla Strawberry Cashew Yogurt ................................................. 18
Coconut Yogurt with Fresh Berries ................................................ 19
Basic Cashew Cream Cheese ........................................................... 20
Sweetened Cashew Cheese .............................................................. 20
Basic Almond Cheese ........................................................................ 21
Almond Ricotta Cheese .................................................................... 21
Basic Macadamia or Hazelnut Cheese ............................................ 23
Pine Nut Parmesan ............................................................................ 24
Savory Cheeses: Almond, Cashew and Macadamia or Hazelnut ............................ 25
Gourmet Recipes .........................................26Herbed Macadamia Cheese Balls ................................................... 27
Shaved Pear and Beet Salad ............................................................ 28
Apricot and Nut Cheese Stuffed Figs with Red Wine Glaze ....... 29
Almond Cheese and Black Olive Tapenade Canapés ..................30
Layered Pesto Almond Cheese Torte ............................................. 32
Spinach Manicotti ............................................................................. 33
Béchamel Sauce ................................................................................. 34
Berry Delicious Coconut Yogurt Parfait ........................................ 35
Blueberry Cheesecake ...................................................................... 36
All Rights Reserved. Copyright © 2016 Living Light International, LLC. RawFoodChef.com
No part of this book may be reproduced or transmitted for resale or any other reason of use by any party. All other reproduc-tion or transmission, of any form or by any means, electronic or mechanical, including photocopying, recording or by any informational storage or retrieval system, is prohibited without express written permission from Living Light International.

As a vegetarian cooking teacher, I was aware that many of my students were allergic to dairy products and I was certain that both dairy cheeses and even yogurt, which was touted as a health food, were not health prompting foods for humans—yet I just couldn’t give them up! That is how addictive dairy is. To this day, if I eat a little cheese, I can spiral out of control; it’s best for me to stay away from cheese completely!
For years, as a vegan cooking teacher, I made the most of the vegan cheeses, but usually resorted to making my own cream cheese using tofu (which I made from scratch). It wasn’t until I went to the Ann Wigmore Institute in 1991 and tasted fermented seed pâté that I realized I could create a raw vegan nut cheese that was far better than any commercially produced vegan cheese I could buy, and every bit as good as many of the dairy cheeses I loved.
It all started with the fermented sunflower pâté. It was made with Rejuvelac, a fermented grain beverage, and “cultured” for a few hours. The color was an unappealing grey and the flavor was slightly sour with a bitter finish, but the idea of preparing fermented seed pâtés planted an idea that later inspired me to create a delicious variety of nut and seed cheeses. Every night I had dreams of the wonderful raw food recipes that would be possible if I could come up with tasty recipes for raw vegan cheeses. I experimented with every kind of nut, seed, and legume possible. Today’s commercial nut cheese products and nut cheese books were all born from this humble beginning and are now enjoyed by thousands of raw food enthusiasts
T here should be recovery groups for cheese-aholics. If there
were, it would not have taken me eight years to finally commit
to a vegan diet. My concern for animals—not my own health—
finally drove me to give up my addiction to cheese, in spite of the fact
that those nasty tasting, rubbery vegan cheeses tasted nothing like the
dairy cheeses I loved. If I had known at the time how easy it is to make
luscious, creamy raw nut and seed cheeses, I would have given up on
dairy cheese, yogurt and kefir drinks much earlier!
and dairy-sensitive cheese lovers.
Cultured nut cheeses, yogurt and kefir drinks are a terrific way to eat nuts, since it makes them far more digestible, as well as delicious. Nut cheeses are great on all kinds of raw food dishes, including pizza, enchiladas, burritos, burgers, sandwiches, desserts, and other foods that just don’t seem as good unless they include cheese. In fact, many
avowed cheese-aholics who couldn’t give up cheese to go vegan find it easy to go dairy-free once they learn how to make nut and seed cheeses!
There are a variety of techniques and ingredients that can be used to create particular flavors and textures. Since each kind of nut and seed already has its own unique flavor and texture, combining one or more different kinds of nuts creates an even better, less nut-distinctive flavor.
Introduction
SuppliesIn addition to your trusty blender, you need the following:» a rubber spatula» a strainer, colander or plastic berry basket» cheesecloth» a jar with a lid for water or grains to use as a weight» a dish to hold the cheese as it ferments
A Cheese Lover’s Guide 4 RawFoodChef.com

Using a High-Performance Blender
One need not invest in an expensive blender or food processor; in fact most recipes in this book
can be accomplished with relatively inexpensive equipment. Less expensive equipment may require making smaller batches in order to accomplish a smooth, satiny texture. While it is true that once you have had a high-performance blender and good quality food processor, it is easy to get spoiled. Don’t let money stop you; use whatever equipment you have and get started.
High-performance blenders, like Vitamix, Omega, or Blendtec, are highly regarded in the raw food kitchen. They can blend just about anything in large quantities, including thick mixtures—quickly and efficiently.
These are no ordinary blenders! They are faster, easier to use, more powerful than regular blenders and are workhorses in the home or commercial kitchen. They blend quicker, creating a smoother texture than any regular blender or food processor. The Vitamix has a 2 horsepower motor and the blades spin at up to 218 miles per hour, while the Blendtec offers a 3 horsepower motor and the blades spin at up to 330 miles per hour. Both ensure a perfectly smooth consistency with absolutely no graininess—even when making cheese.
The variable controls of the Vitamix and the Omega blender allow you to start the machine on low so the product does not jump up and hit the lid or cover the sides of the pitcher with bits of hard nuts that will then not be included in the blending. Starting slowly and keeping the nuts near the blades as you increase the speed reduces the need to stop the blender, open the lid, and scrape the sides with a spatula. When a proper vortex forms in the center of the mixture you may slowly increase the speed as the nut cream becomes thicker and more manageable, until the blender can be turned to high without the cream jumping to the top.
When blending anything hard that is mixed with
liquid to form a puree, cream, or milk, add as little liquid as possible at first, until the mixture is thick and smooth, and then add the amount of liquid you need to achieve the desired consistency. The purpose for this is to keep the hard material close to the blades, where it can be pulverized effectively.
A quality blender is essential for making cheese!
How to Maintain a Vortex or Whirlpool WhenBlending a Thick Mixture
When creating a thick mixture for a product like nut cheese, start with the nuts and just enough water to (almost) cover the nuts. Start the blender on low and turn it up slowly. When the vortex, or whirlpool, that forms in the center of the liquid begins to disappear and the mixture is no longer moving into the center vortex its own, remove the lid and, using a rubber spatula, carefully lift the mixture away from the sides, depositing it into the center where the vortex will pick it up and move it down through the blades. Be mindful during this process to avoid pushing the spatula into the blades or your entire mix will be ruined. Continue to fold the mixture away from the sides into the center until the product is completely smooth and creamy. If the machine begins to lug too much, or wants to spin around on the counter, add a few tablespoons of liquid, and continue working until the desired consistency has been achieved.
• More Blender Tips:
1. Always set the blender on a clean, dry, flat surface.
2. Do not use a scrub brush on plastic pitchers.
3. Put your hand on top of the lid when blending toensure that the pitcher stays seated on the motor.
A Cheese Lover’s Guide 5 RawFoodChef.com

Experience our world-renowned culinary and nutrition classes, no matter where you live! Let us help you create a healthier lifestyle and learn how to make incredible raw vegan recipes you can easily prepare at home.
Science IDrs. Rick and Karin Dina D.C. present peer-reviewed scientific knowledge in a fun and easy-to-understand format. Great for chefs, educators, and anyone interested achieving optimum health and understanding why raw food works!
Learning Opportunities
Hot Chefs, Cool KitchenLearn 24 gourmet raw vegan recipes from an incredible line-up of talented plant-based chefs who share secrets and culinary techniques for creating amazing gourmet dishes like Triple Berry Shortcake with Black Pepper Tarragon Syrup.
New Holiday TraditionsLearn to make delicious versions of yourfavorite holiday recipes. The perfect gift for you and your family—dozens of recipe demos for holiday dishes that are emotionally satisfying, healthy, and nourishing—create your own New Holiday Traditions!Holiday Traditions!
Sharpen Up Your Knife Skills OnlineCreate beautiful, professional looking cuts – everything from the basics to julienne, chiffonade, batonnet, and more. Now, you caneasily learn how to use a variety of knives safely, efficiently, and with confidence. Knife skills are efficiently, and with confidence. Knife skills are the foundation of all culinary arts.
In no time, you’ll be sprouting, dehydrating, juicing, making salad dressings, pâtés, nut cheeses, fermented foods, crackers, main dishes, and even delicious desserts at home in your own kitchen!
RawFoodChef.com/online
Online
Online ClassesWe’ve got more in the works!
FUNdamentals Online It’s the course that started a Raw Food Revolution!
FlavorMacadamias, peeled almonds, cashews, and pine nuts are especially good for making raw vegan cheese because they produce a visually attractive product that’s similar to cheese made with dairy. And, don’t be afraid to combine one or more different types of nuts or seeds to create unique flavors and textures. For example, using almond cream in place of water when making cashew cheese creates a thicker cream cheese that is more delicate in flavor. Pumpkin seeds make a green cheese with a delicious cheddar-like flavor, and walnut or hazelnut cheese is amazing in desserts.
For a more sour or tart flavor, double the probiotic powder, or ferment the mixture longer.
TextureThe amount of water used when blending will determine how thick or thin the product will be. For very thick cheese, use as little water as possible. For yogurt, use a little more water and for kefir, use more liquid when blending. There are other ways to alter the texture, too. Adding a weight on top of the cheese while it is fermenting and even after it has been refrigerated, will help remove more of the liquid and make the cheese denser.
Gelling and thickening agents alter the texture even more: agar agar and Irish moss will make cheese “sliceable” like the familiar “American cheese food,” Velveeta®. Adding psyllium husk powder or tapioca starch will give cream cheese a “gooey” cheese texture.
Always peel almonds prior to making almond cheese for a smooth texture and mouthfeel.
Partially dehydrating nut cheese after fermenting it produces a concentrated flavor and thick texture similar to sliced cheese; dehydrating it completely makes a flaky nut cheese that resembles shaved Parmesan.
ColorFor most recipes, a white cheese is most desirable and can be altered in flavor and color most easily. Almond, cashew, and macadamia nuts are versatile favorites.
Add a little carrot juice, peeled golden bell pepper, or turmeric to almond cheese to mimic the color of
cheddar cheese; minced herbs will give cashew cheese a Boursin-like color; and adding minced red or green jalapeño creates “jalapeño pepper cheese.” Swirls of spirulina create a blue cheese-like effect.
TimingThe amount of time it takes to ferment nut cheese depends on taste preferences and how warm the temperature is in the room where the cheese is fermenting. Ferment cheeses longer for a stronger flavored cheese, and be aware that the warmer the air, the faster your cheese will ferment.
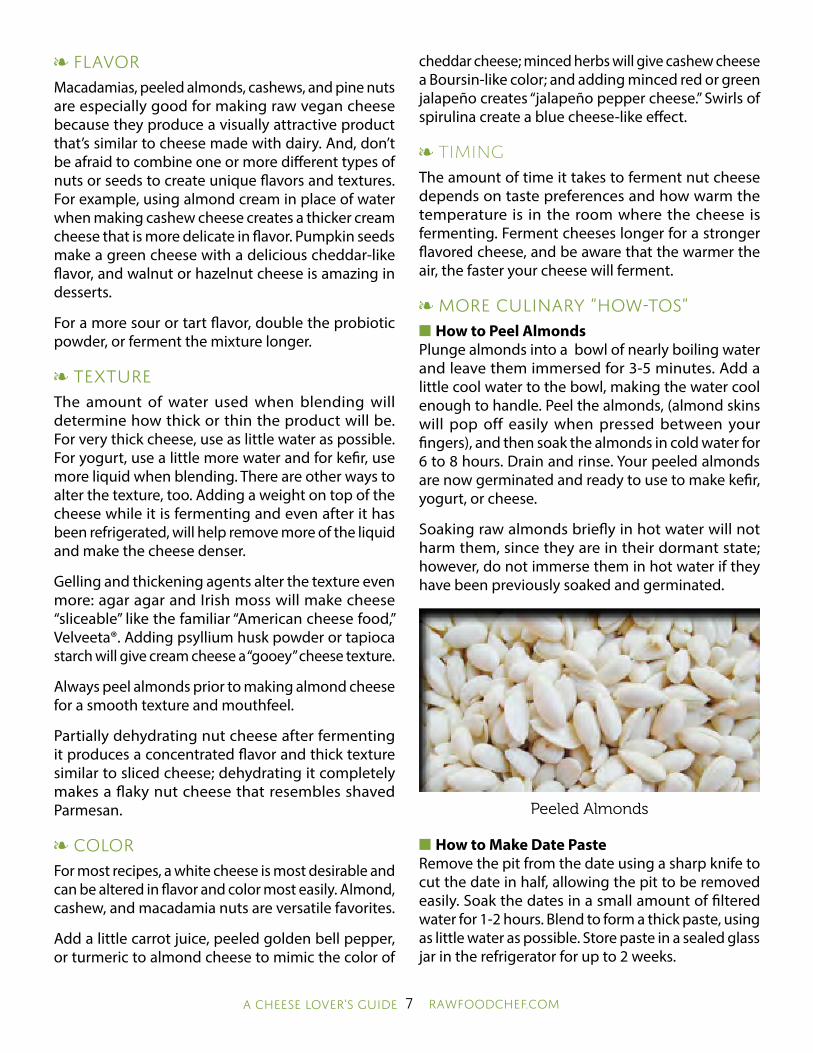
More Culinary “How-tos” How to Peel AlmondsPlunge almonds into a bowl of nearly boiling waterand leave them immersed for 3-5 minutes. Add alittle cool water to the bowl, making the water coolenough to handle. Peel the almonds, (almond skinswill pop off easily when pressed between yourfingers), and then soak the almonds in cold water for6 to 8 hours. Drain and rinse. Your peeled almondsare now germinated and ready to use to make kefir,yogurt, or cheese.
Soaking raw almonds briefly in hot water will not harm them, since they are in their dormant state; however, do not immerse them in hot water if they have been previously soaked and germinated.
Peeled Almonds
How to Make Date PasteRemove the pit from the date using a sharp knife tocut the date in half, allowing the pit to be removedeasily. Soak the dates in a small amount of filteredwater for 1-2 hours. Blend to form a thick paste, using as little water as possible. Store paste in a sealed glass jar in the refrigerator for up to 2 weeks.
A Cheese Lover’s Guide 7 RawFoodChef.com

The BasicsWhether you are making kefir, cheese, or yogurt, the same basic procedure applies:
» Soak your nuts (for almonds, hot soak and peelfirst) to germinate them and make them easier toblend into a creamy cheese. The amount of time isdetermined by the hardness of the nut: harder nutslike almonds require 8 hours of soaking time, whilecashews take only 6 hours and pine nuts take only4 hours.
» Nuts with brown skins need to be well rinsed aftersoaking to remove traces of bitterness. This includesalmonds, hazelnuts, walnuts, and pecans.
» Blend nuts until creamy, using as little liquid aspossible to achieve the desired texture. Use less water for thick cheese and more for yogurt and kefir drinks
» Add a starter: Rejuvelac is the perfect starter. Ifyou are using Rejuvelac, no probiotic powder willbe needed. (See Rejuvelac recipe on page 10.) Somestores carry it in their refrigerator sections. Just replace the water called for in the recipe with Rejuvelac.
» If using water, add a probiotic starter (1/4 to 1/2teaspoon per 2 cups of nuts)
» Put the mixture in the appropriate container (asdirected in the recipe) and allow it to sit in a warmplace until the desired amount of fermentation isaccomplished.
How to Extract Fresh Vanilla Seeds1. With a very sharp knife, cut the vanilla bean pod
in half lengthwise.
2. Using the tip of the knife, carefully scrape the inside of the bean pod to remove the tiny black stickybeans.
3. With a rubber spatula, scrape the beans off theknife and into your recipe.
4. Reserve the empty pod to use for tea and to flavorsmoothies, dressings, and other recipes.
To keep vanilla pods fresh, store the dried pod in a sealed glass jar in the pantry for up to 4 months. Keep the empty (used) pods in a separate jar to use in smoothies and tea.
» If you are making a thick cheese like almondcheese, macadamia cheese, or hazelnut cheese, acolander lined with cheesecloth is required, as well as a weight to help press out excess liquid. (See illustration, below.)
3. After 2 hours of fermenting, place a weight ontop of the cheese to press out excess liquid.
2. Line a small colander or small berry basket witha damp cheesecloth and set on a dish to catchliquid when mixture is poured into cheesecloth.Fold cheesecloth over cheese and place in awarm (not hot) location to ferment for 8 to 12hours.
1. Blend almonds, water and probiotic powder.
A Cheese Lover’s Guide 8 RawFoodChef.com
Illustrations by Michele Soria
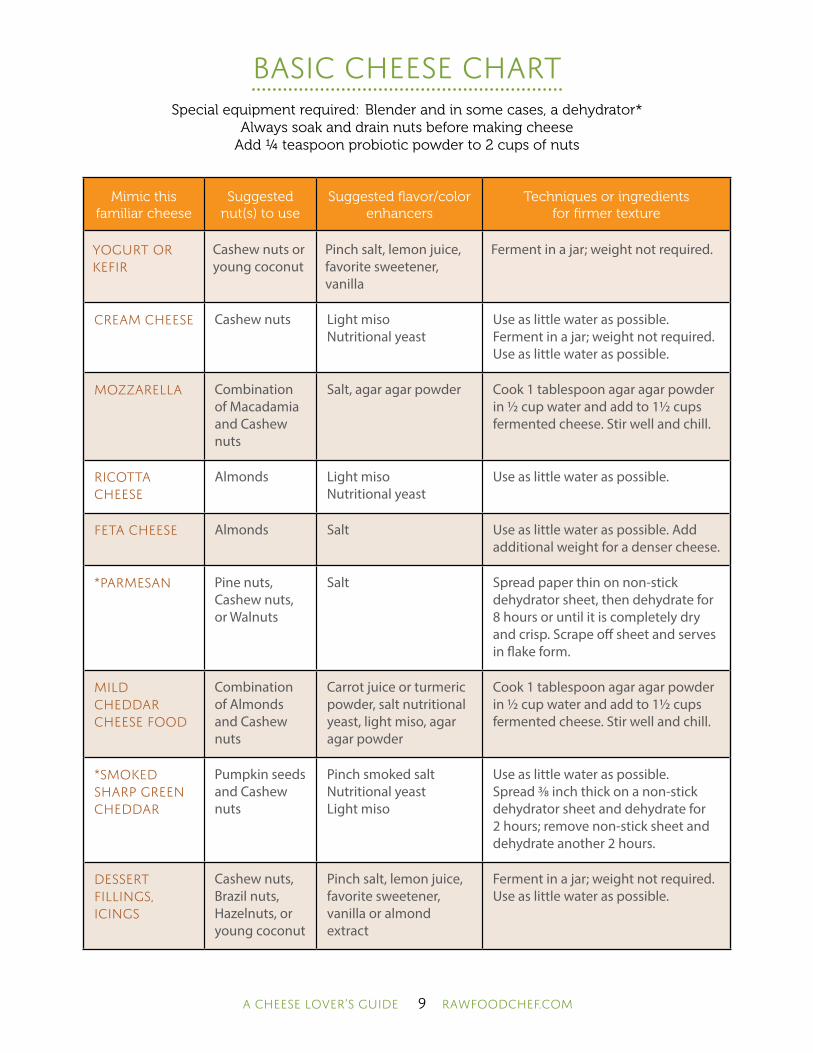
Basic Cheese ChartSpecial equipment required: Blender and in some cases, a dehydrator*
Always soak and drain nuts before making cheeseAdd ¼ teaspoon probiotic powder to 2 cups of nuts
Mimic this familiar cheese
Suggested nut(s) to use
Suggested flavor/color enhancers
Techniques or ingredients for firmer texture
Yogurt or kefir
Cashew nuts or young coconut
Pinch salt, lemon juice, favorite sweetener, vanilla
Ferment in a jar; weight not required.
Cream cheese Cashew nuts Light misoNutritional yeast
Use as little water as possible. Ferment in a jar; weight not required. Use as little water as possible.
Mozzarella Combination of Macadamia and Cashew nuts
Salt, agar agar powder Cook 1 tablespoon agar agar powder in 1/2 cup water and add to 11/2 cups fermented cheese. Stir well and chill.
Ricotta cheese
Almonds Light misoNutritional yeast
Use as little water as possible.
Feta cheese Almonds Salt Use as little water as possible. Add additional weight for a denser cheese.
*Parmesan Pine nuts, Cashew nuts, or Walnuts
Salt Spread paper thin on non-stick dehydrator sheet, then dehydrate for 8 hours or until it is completely dry and crisp. Scrape off sheet and serves in flake form.
Mild Cheddar Cheese Food
Combination of Almonds and Cashew nuts
Carrot juice or turmeric powder, salt nutritional yeast, light miso, agar agar powder
Cook 1 tablespoon agar agar powder in 1/2 cup water and add to 11/2 cups fermented cheese. Stir well and chill.
*SmokedSharp GreenCheddar
Pumpkin seeds and Cashew nuts
Pinch smoked saltNutritional yeastLight miso
Use as little water as possible. Spread 3/8 inch thick on a non-stick dehydrator sheet and dehydrate for 2 hours; remove non-stick sheet and dehydrate another 2 hours.
Dessert fillings, icings
Cashew nuts, Brazil nuts, Hazelnuts, or young coconut
Pinch salt, lemon juice, favorite sweetener, vanilla or almond extract
Ferment in a jar; weight not required. Use as little water as possible.
A Cheese Lover’s Guide 9 RawFoodChef.com
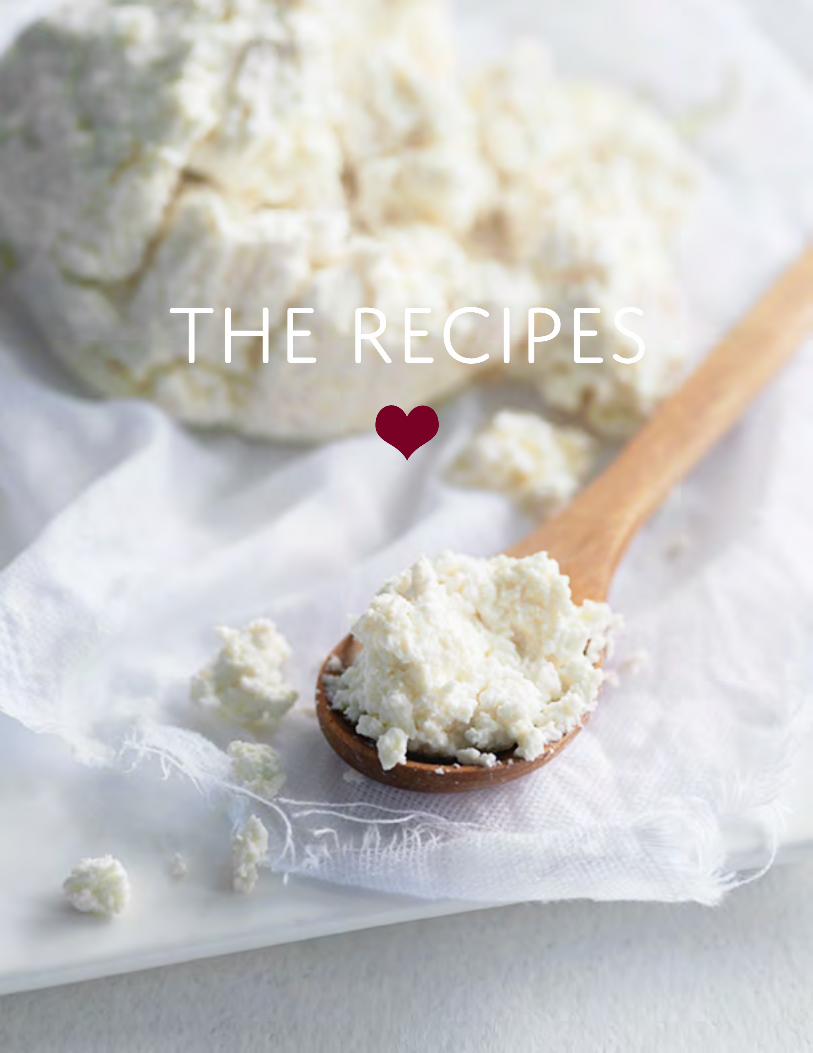
The Recipes

Rejuvelac is a fermented grain beverage that can also be used as a “starter” in culturing nut
and seed cheeses. It costs just pennies to make and is one of the most health-promoting drinks on the planet. It’s high in enzymes and contains important lactobacillus bifidus—necessary for good digestion and assimilation.
Rejuvelac is easy to make and well worth the two minutes, morning and night that it takes to rinse the sprouts. Other than grain, the only vital ingredient in this healthful beverage is purified water. (Chlorinated water will kill the precious bacteria you wish to cultivate and your beverage will smell rotten instead of cheese-like or whey-like.)
Expect the odor and flavor to change from day to
day—the first day being the strongest, with your second and third harvests becoming more tart and lemony. I suggest using second- or third-day Rejuvelac for making cheese, since it is milder in flavor.
If you want to have fresh Rejuvelac every day, begin sprouting a new batch of grain every three days. (This will require two large jars covered with plastic mesh and secured with rubber bands.
To make life easier, consider choosing two days a week, such as Wednesday and Saturday, to begin a new batch. This means stretching one batch to four harvests instead of three, but you will always know when to start your sprouts without having to calculate the days. Discard any leftover Rejuvelac after twenty-four hours of storage.
A Cheese Lover’s Guide 11 RawFoodChef.com
RejuvelacFrom Angel Foods: Healthy Recipes for Heavenly Bodies by Cherie Soria
Yield: 2 quarts each day for 3 days
1/4 cup soft wheat berries
1/4 cup whole rye
2 gallons purified water
1. Day #1: In the morning, combine the grains in a gallon jar, coverwith plastic mesh, and secure with a rubber band. Add at least 2quarts of water and soak 8 to 12 hours.
2. That evening, pour off soak water, rinse with tap water, and drainwell. Place jar in a cool, dark place and allow the grains to sprout.
3. Day #2: In the morning, rinse and drain again, and repeat thisprocess in the evening.
4. Day #3: In the morning, rinse once with tap water and drain well.Rinse again with purified water, drain, and add 2 quarts purifiedwater. Put jar in a cool, dark place and ferment 36 to 48 hours.(It will ferment sooner in hot weather.)
5. Day #5: In the morning, pour your first batch of fermented water(Rejuvelac) into a container and store in the refrigerator to drinkthat day. Pour 2 more quarts of purified water onto the sproutedgrains (do not rinse!) and allow to ferment another 24 hours.
6. Day #6: In the morning, repeat step #5.
7. Day #7: The final morning, pour your third batch into a containerand store in the refrigerator to drink that day. (To stretch yourharvest to a fourth day, repeat step #5.)
8. Day #8: Discard grains and wash jar well with soap and water.

Basic Nut Kefir
2 cups whole raw almonds,
peeled (see “How to Peel
Almonds” page 6)
—OR—
2 cups raw cashews
—OR—
2 cups raw macadamia or
hazelnuts
--------
3 cups Rejuvelac (or fi ltered
water with ¼ teaspoon
probiotic powder)
1. Soak nuts in 2 cups fi ltered water for 6-8 hours and drain.
2. Blend soaked and drained nut of choice, Rejuvelac (or water withprobiotic powder) in a blender, adding more liquid if necessary toachieve a smooth, creamy texture.
Storage Suggestion: Store in a sealed glass jar in the refrigerator for up to 1 week.
Yield: 1 quart
Note: If the Kefi r is not tart enough to
suit your taste, add 2-3 tablespoons of
lemon juice per cup.
Variations: For nut milk, omit the
Rejuvelac or probiotic powder; for nut
cream, use less water to create a thick
cream.
Coconut Kefir
2-3 cups fi rm young coconut
meat (see note below)
½ -1 cup fi ltered water or
coconut water (optional, see
note below)
¼ to ½ teaspoon probiotic
powder (depending how
tart you prefer the yogurt)
1. Blend the coconut meat, water, and probiotics in a blender,adding more water if necessary to achieve a smooth, creamytexture.
2. Put the coconut cream in a quart glass jar and put it in a warm(not hot) location to ferment for 8 to 12 hours. (Less fermentationtime is required in warmer weather).
Storage Suggestion: Store in a sealed glass jar in the refrigerator for up to 1 week.
Yield: 2-3 cups
Note: If the coconut fl esh is very soft,
use less water and more fl esh.
A Cheese Lover’s Guide 12 RawFoodChef.com

Feast, Lose Weight, Gain Energy, Feel Younger!
Learn From the Best!All culinary demos & ClassesTaught by Cherie Soria, “Mother of Gourmet Raw Vegan Cusine”
Interactive•Multimedia•Fun Infographics•Peer Forums•Q&A with Instuctors•Dozen of Tips and Tricks!

Vanilla Cashew Kefir
2 cups raw cashews, soaked
6-8 hours in 3 cups fi ltered
water, drained and rinsed
3 cups Rejuvelac (or fi ltered
water with ¼ teaspoon
probiotic powder)
2 tablespoons coconut nectar
or date paste (see "How to
Make Date Paste" page 6)
1 vanilla bean, scraped or 1
teaspoon vanilla extract
(see “How to Extract Fresh
Vanilla Seeds” page 7)
1. Put cashews and probiotic powder in a blender with enoughwater to cover, and blend until smooth and creamy. (Use as muchor as little water as necessary for desired consistency.)
2. Pour cashew cream into a glass jar and cover with a clean towel.Put it in a warm (not hot) place for 8 to 12 hours (depending upontemperature and desired tartness) and allow it to ferment.
3. Stir in coconute nectar or date paste and vanilla and enjoy!
Storage Suggestion: Store in a sealed glass jar in the refrigerator for up to 1 week.
Yield: 1 quart
Almond Maple Kefir
2 cups whole raw almonds,
peeled, soaked 6-8 hours in
fi ltered water, and drained
(see “How to Peel Almonds”
page 6)
3 cups Rejuvelac (or fi ltered
water with ¼ teaspoon
probiotic powder)
2 tablespoons pure maple
syrup or date paste (see
"How to Make Date Paste"
page 6)
1 teaspoon maple extract
(optional)
1. Blend the peeled, soaked and drained almonds, Rejuvelac (orwater with probiotic powder) in a blender, adding more liquid ifnecessary to achieve a smooth, creamy texture.
2. Pour cream into a glass jar and cover with a clean towel. Put itin a warm (not hot) place for 8 to 12 hours (depending upontemperature and desired tartness) and allow it to ferment.
3. Stir in maple syrup or date paste and optional maple extract andenjoy!
Storage Suggestion: Store in a sealed glass jar in the refrigerator for up to 1 week.
Yield: 1 quart
Note: If the Kefi r is not tart enough to
suit your taste, add 2-3 tablespoons of
lemon juice per cup.
Note: If the Kefi r is not tart enough to
suit your taste, add 2-3 tablespoons of
lemon juice per cup.j
A Cheese LA Cheese LA Cheese Loooververver’s Guide’s Guide’s Gui 14 RRRaaawFoodChefwFoodChefwFoodChef...cccomomom

11/2 cups whole raw almonds, peeled, soaked 6-8 hours in filtered water, and drained (see “How to Peel Almonds” page 6)
21/2 cups Rejuvelac (or filtered water with 1/4 teaspoon probiotic powder)
2 cups fresh or frozen chopped strawberries
2 tablespoons coconut nectar or date paste (see "How to Make Date Paste" page 6)
2 tablespoons lemon juice
1. Blend the peeled, soaked and drained almonds, Rejuvelac (orwater with probiotic powder) in a blender, adding more liquid ifnecessary to achieve a smooth, creamy texture.
2. Pour cream into a glass jar and cover with a clean towel. Put itin a warm (not hot) place for 8 to 12 hours (depending upontemperature and desired tartness) and allow it to ferment.
3. Put the kefir in a blender along with the strawberries, coconutnectar or date paste, and lemon juice and enjoy!
Storage Suggestion: Store in a sealed glass jar in the refrigerator for up to 3 days.
Yield: 1 quart
Note: If the Kefir is not tart enough to suit your taste, add 2-3 tablespoons of lemon juice per cup.
Strawberry Almond Kefir
A Cheese Lover’s Guide 15 RawFoodChef.com
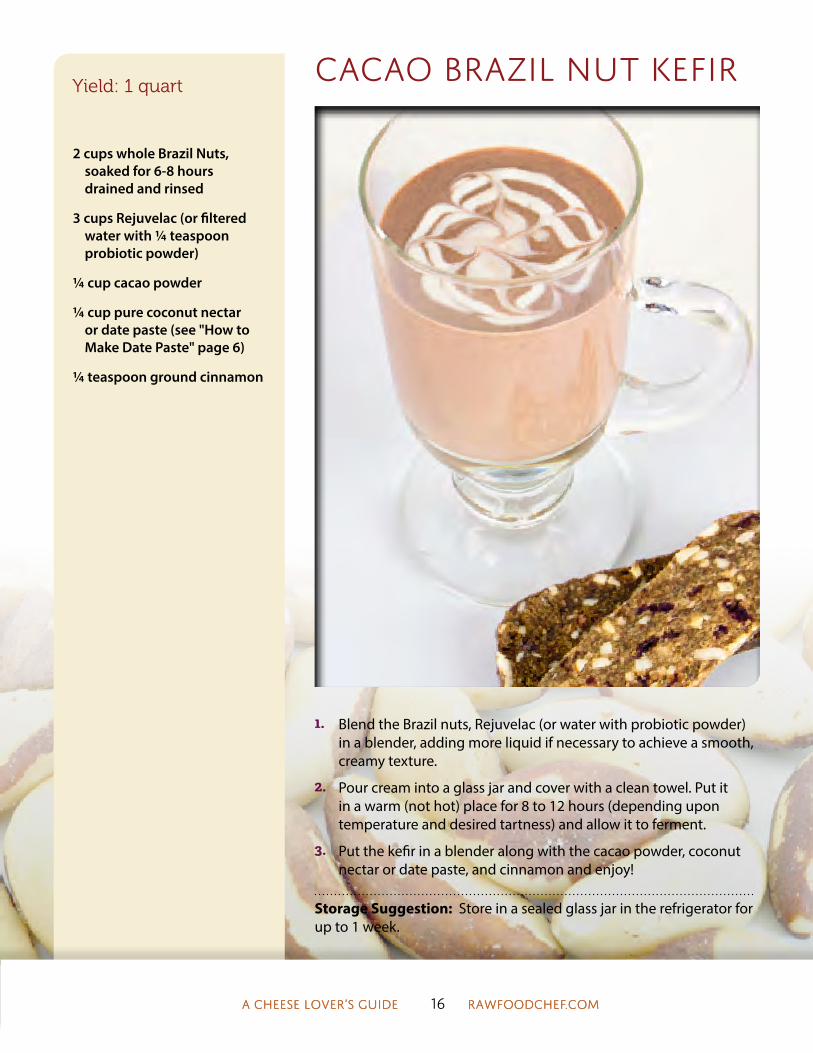
2 cups whole Brazil Nuts, soaked for 6-8 hours drained and rinsed
3 cups Rejuvelac (or filtered water with 1/4 teaspoon probiotic powder)
1/4 cup cacao powder
1/4 cup pure coconut nectar or date paste (see "How to Make Date Paste" page 6)
1/4 teaspoon ground cinnamon
1. Blend the Brazil nuts, Rejuvelac (or water with probiotic powder)in a blender, adding more liquid if necessary to achieve a smooth,creamy texture.
2. Pour cream into a glass jar and cover with a clean towel. Put itin a warm (not hot) place for 8 to 12 hours (depending upontemperature and desired tartness) and allow it to ferment.
3. Put the kefir in a blender along with the cacao powder, coconutnectar or date paste, and cinnamon and enjoy!
Storage Suggestion: Store in a sealed glass jar in the refrigerator for up to 1 week.
Yield: 1 quartCacao Brazil Nut Kefir
A Cheese LA Cheese Looverver’s Guide’s Guide 16 RRaawFoodChefwFoodChef..ccomom

2 cups whole raw almonds, peeled, soaked 6-8 hours in filtered water, and drained (see “How to Peel Almonds” page 6)
2 or more cups Rejuvelac (or filtered water with 1/4 teaspoon probiotic powder)
1/4 cup pure coconut nectar or date paste (see "How to Make Date Paste" page 6)
1 vanilla bean, scraped or 1 teaspoon vanilla extract (see “How to Extract Fresh Vanilla Seeds” page 7)
1 tablespoon lemon juice
2 cups fresh blueberries
1. Blend the peeled, soaked and drained almonds, Rejuvelac (orwater with probiotic powder) in a blender, adding more liquid ifnecessary to achieve a smooth, creamy texture.
2. Pour into a glass jar and place it in a warm (not hot) location for 8to 12 hours to ferment.
3. Add coconut nectar or date paste, vanilla, and lemon juice andblend well.
4. Stir 1 cup of blueberries into the yogurt and top each portion withthe remaining blueberries prior to serving.
Storage Suggestion: Store in a sealed glass jar in the refrigerator for up to 1 week.
Yield: 1 quartVanilla Almond Yogurt with Blueberries
A Cheese Lover’s Guide 17 RawFoodChef.com

Vanilla Strawberry Cashew Yogurt
2 cups raw cashews, soaked 6-8 hours in filtered waterand drained
11/2 or more cups Rejuvelac (or filtered water with 1/4 teaspoon probiotic powder)
2 cups strawberries, washed, stem removed, and diced
1/4 cup coconut nectar or date paste (see "How to Make Date Paste" page 6)
1 vanilla bean, scraped or 1 teaspoon vanilla extract (see “How to Extract Fresh Vanilla Seeds” page 7)
1. Put cashews, Rejuvelac (or water with probiotic powder) in ablender and blend until smooth and creamy, adding more water,if necessary to maintain a vortex. (See “How to Maintain a Vortex” page 5.)
2. Pour cream into a jar and place in a warm (not hot) location andallow it to ferment for 8 to 12 hours.
3. Add 1 cup strawberries, coconut nectar or date paste, and vanilla.Blend well.
4. Chop remaining strawberries and stir in prior to serving.
Storage Suggestion: Store in a sealed glass jar in the refrigerator for up to 1 week.
Yield: 1 quart
A Cheese LA Cheese Looverver’s Guide’s Guide 18 RRaawFoodChefwFoodChef..ccomom
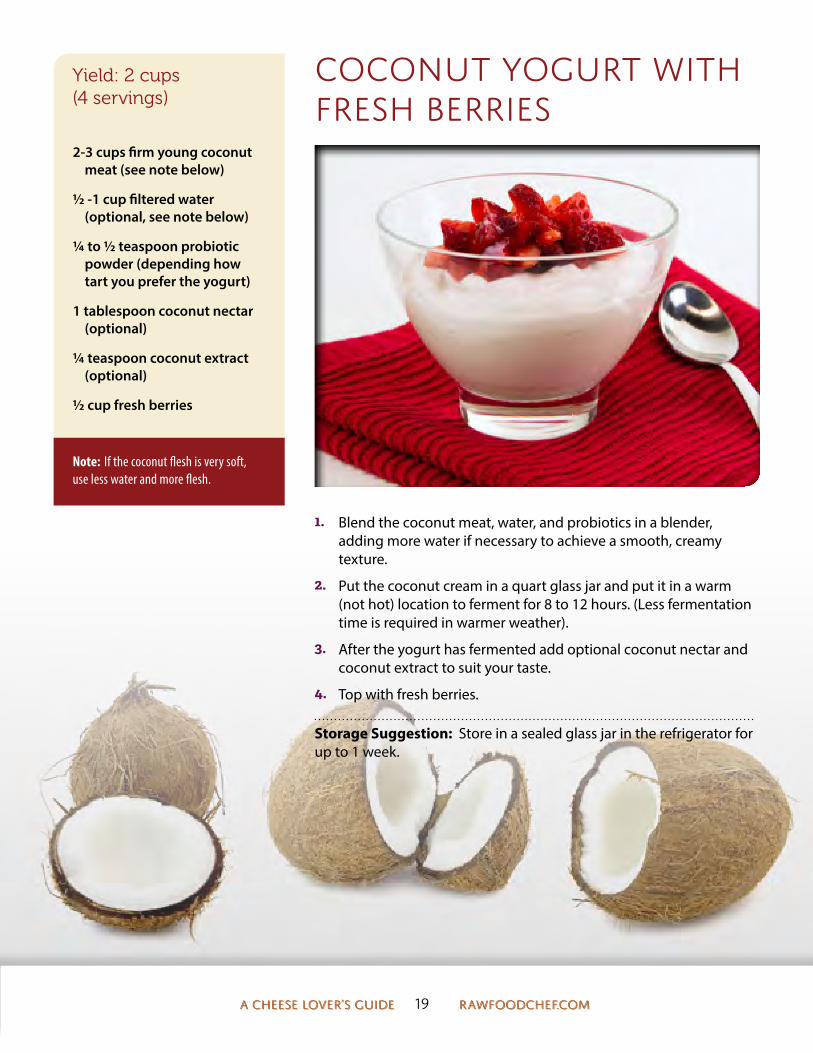
2-3 cups firm young coconutmeat (see note below)
1/2 -1 cup filtered water (optional, see note below)
1/4 to 1/2 teaspoon probiotic powder (depending how tart you prefer the yogurt)
1 tablespoon coconut nectar (optional)
1/4 teaspoon coconut extract (optional)
1/2 cup fresh berries
1. Blend the coconut meat, water, and probiotics in a blender,adding more water if necessary to achieve a smooth, creamytexture.
2. Put the coconut cream in a quart glass jar and put it in a warm(not hot) location to ferment for 8 to 12 hours. (Less fermentationtime is required in warmer weather).
3. After the yogurt has fermented add optional coconut nectar andcoconut extract to suit your taste.
4. Top with fresh berries.
Storage Suggestion: Store in a sealed glass jar in the refrigerator for up to 1 week.
Yield: 2 cups (4 servings)
Coconut Yogurt with Fresh Berries
A Cheese LA Cheese Looverver’s Guide’s Guide 19 RRaawFoodChefwFoodChef..ccomom
Note: If the coconut flesh is very soft, use less water and more flesh.

Basic Cashew Cream Cheese
2 cups raw cashews, soaked in 2 cups filtered water for 6-8 hours
1 cup filtered water, or more as needed
1/4 teaspoon probiotic powder
1. Blend the soaked and drained cashews, 1 cup water, and probioticpowder in a blender, adding a little more water if necessary toachieve a smooth, creamy texture.
2. Pour the cashew cream into a glass jar and put it in a warm (nothot) location to ferment for 8 to 12 hours or until the cheesereaches a pleasant “cheesy” flavor. The cream will become thickeras it ferments.
Storage Suggestion: Store in a sealed glass container in the refrigerator for up to 2 weeks.
Yield: 1-1/2 cups unseasoned
Variation: Use nut cream in place of water for a thicker, denser cream cheese (see Variations on page 11).
Sweetened Cashew Cheese
2 cups Cashew Cream Cheese (see above)
1/4-1/2 cup coconut nectar or date paste (see "How to Make Date Paste" page 6)
1 teaspoon vanilla extract (optional)
1. Combine all ingredients and mix well. Use in desserts or with fruitsalads.
Storage Suggestion: Store in a sealed glass jar in the refrigerator for up to 1 week.
Yield: 2 cups
A Cheese LA Cheese Looverver’s Guide’s Guide 20 RRaawFoodChefwFoodChef..ccomom
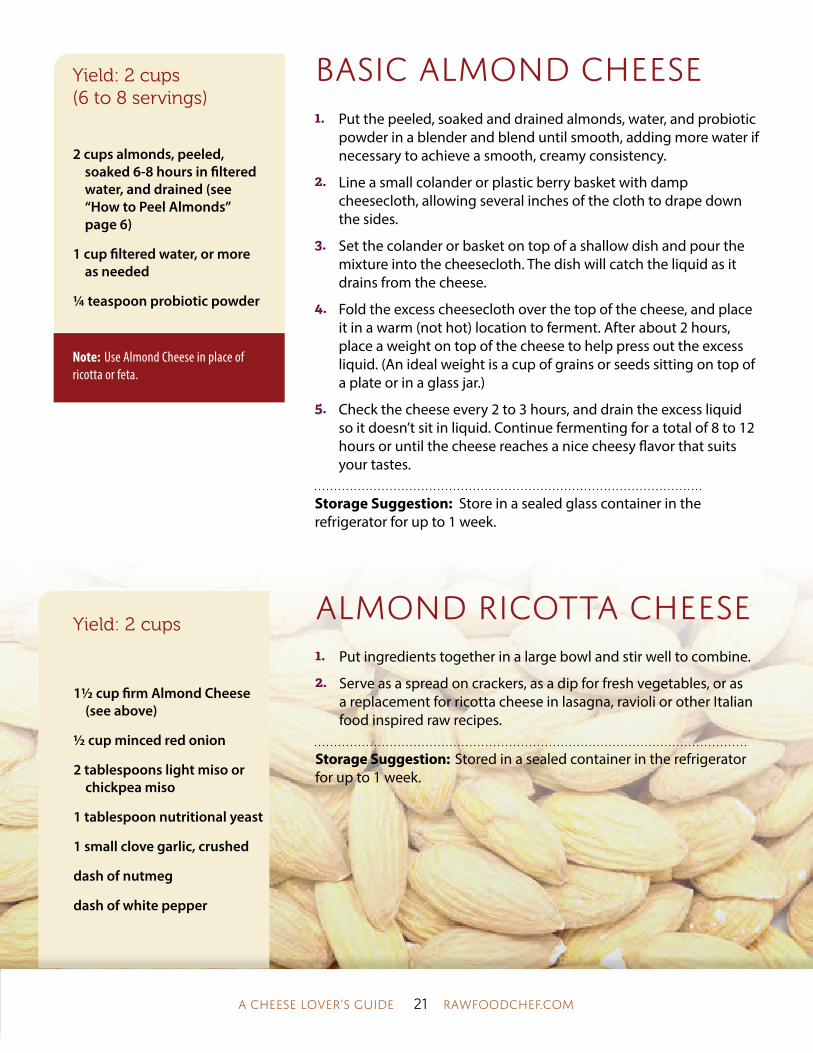
Basic Almond Cheese
2 cups almonds, peeled, soaked 6-8 hours in filtered water, and drained (see “How to Peel Almonds” page 6)
1 cup filtered water, or more as needed
1/4 teaspoon probiotic powder
1. Put the peeled, soaked and drained almonds, water, and probioticpowder in a blender and blend until smooth, adding more water ifnecessary to achieve a smooth, creamy consistency.
2. Line a small colander or plastic berry basket with dampcheesecloth, allowing several inches of the cloth to drape downthe sides.
3. Set the colander or basket on top of a shallow dish and pour themixture into the cheesecloth. The dish will catch the liquid as itdrains from the cheese.
4. Fold the excess cheesecloth over the top of the cheese, and placeit in a warm (not hot) location to ferment. After about 2 hours,place a weight on top of the cheese to help press out the excessliquid. (An ideal weight is a cup of grains or seeds sitting on top ofa plate or in a glass jar.)
5. Check the cheese every 2 to 3 hours, and drain the excess liquidso it doesn’t sit in liquid. Continue fermenting for a total of 8 to 12hours or until the cheese reaches a nice cheesy flavor that suitsyour tastes.
Storage Suggestion: Store in a sealed glass container in the refrigerator for up to 1 week.
Yield: 2 cups (6 to 8 servings)
Note: Use Almond Cheese in place of ricotta or feta.
A Cheese Lover’s Guide 21 RawFoodChef.com
Almond Ricotta Cheese
11/2 cup firm Almond Cheese (see above)
1/2 cup minced red onion
2 tablespoons light miso or chickpea miso
1 tablespoon nutritional yeast
1 small clove garlic, crushed
dash of nutmeg
dash of white pepper
1. Put ingredients together in a large bowl and stir well to combine.
2. Serve as a spread on crackers, as a dip for fresh vegetables, or asa replacement for ricotta cheese in lasagna, ravioli or other Italianfood inspired raw recipes.
Storage Suggestion: Stored in a sealed container in the refrigerator for up to 1 week.
Yield: 2 cups

RawFoodChef.com/knifeskills
Good knife skills are the foundation of all culinary art. The textures created by learning various cutting styles infulence the appearance, flavor and mouthfeel of foods. Sharpen Up Your Knife Skills Online is a course for all levels of expertise, from novice to professional chef.
Learn More Visit

Basic Macadamia or Hazelnut Cheese
2 cups raw macadamia or hazelnuts, soaked in 2 cups filtered water for 6-8 hours and drained
1 or more cups (additional) filtered water
1/4 teaspoon probiotic powder
Yield: 1-1/2 cups unseasoned
A Cheese Lover’s Guide 23 RawFoodChef.com
1. Blend the soaked macadamia or hazelnuts, 1 cup water, andprobiotic powder in a blender, adding a little more water ifnecessary to achieve a smooth, creamy texture.
2. Line a small colander or plastic berry basket with dampcheesecloth, allowing several inches of the cloth to drape downthe sides. Set the colander or basket on top of a shallow dish andpour the cheese batter into the cheesecloth. The dish will catchliquid that drains from the cheese, through the cheesecloth.
3. Fold excess cheesecloth over top of cheese and place cheese in awarm (not hot) location to ferment. After about 2 hours, place a jarof water of a cup of grains on top of the cheese to act as a weight.This will help press out the excess liquid and crate a firmer cheese.
4. Check the cheese every 2 to 3 hours and drain excess liquid fromthe plate. Continue fermenting for a total of 8 to 12 hours or untilthe cheese reaches a pleasant “cheesy” flavor that suits your taste.
Storage Suggestion: Store in a covered container in the refrigerator for up to 1 week.

Pine Nut Parmesan
11/2 cups pine nuts
3/4 cup filtered water, or more as needed
1/4 teaspoon probiotic powder
1 teaspoon Himalayan crystal salt
1. Put the pine nuts, water, and probiotic powder in a high-performance blender, and blend, adding more water if necessaryto achieve a smooth, creamy texture.
2. Add the salt and blend again briefly to mix.
3. Spread the pine nut mixture thinly onto dehydrator trays linedwith Paraflexx™ sheets and allow the mixture to ferment for 4hours at room temperature.
4. Dehydrate at 105 degrees for about 24 hours until completely dry.Scrape the dehydrated cheese off the Paraflexx™ sheet and crushby hand.
Storage Suggestion: Stored in a sealed glass jar in the refrigerator, Parmesan will keep for 3 months.
Yield: 2 cups (12 servings)
A Cheese LA Cheese Looverver’s Guide ’s Guide 24 RRaawFoodChefwFoodChef..ccomom

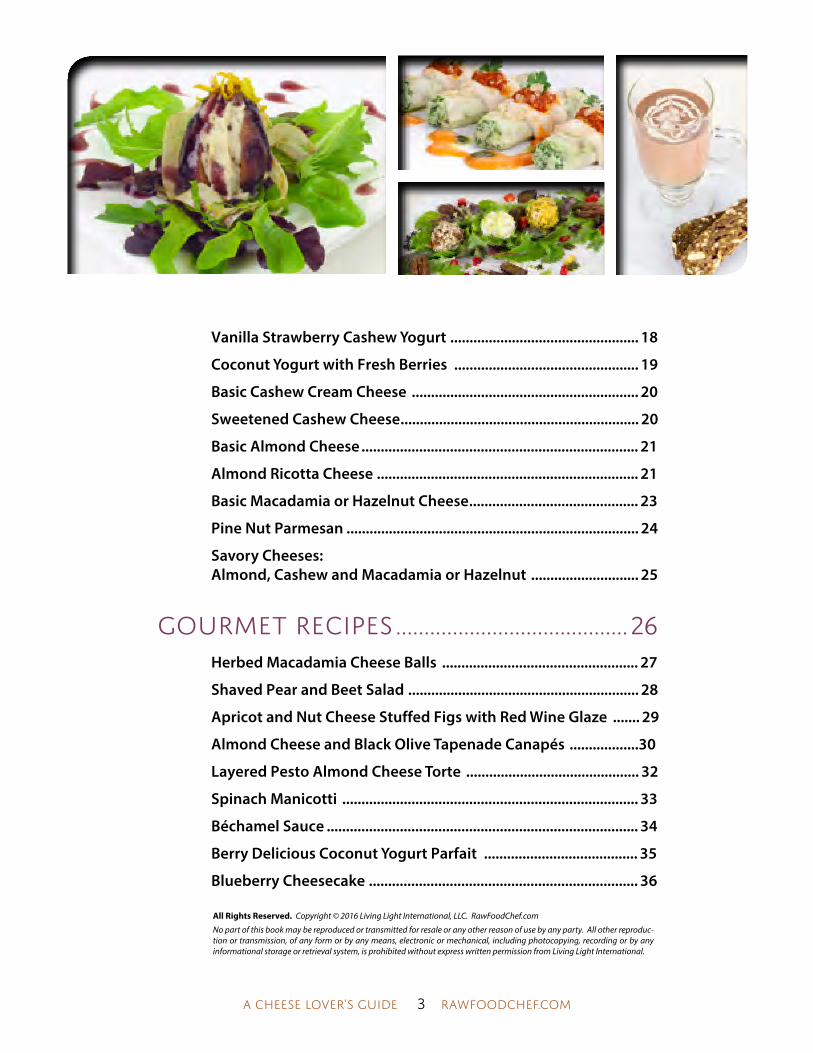
» Photos: Some Living Lightstudent creations using savorycheeses.
2 cups Basic Almond Cheese (see page 19)
—OR—
2 cups Basic Cashew Cheese (see page 18)
—OR—
2 cups Basic Macadamia or Hazelnut Cheese (see page 20)
--------
2 teaspoons unpasteurized light miso or chickpea miso
2 teaspoons nutritional yeast
dash of nutmeg
1. Combine nut cheese, miso, nutritional yeast, and nutmeg in amedium bowl and stir well.
Storage Suggestion: Store in a sealed glass jar in the refrigerator for up to 1 week.
Yield: 2 cupsSavory Cheeses:Almond, Cashew, andMacadamia or Hazelnut
Olive & Onion Flatbread with Cheese, Tomatoes & Arugula
Sweet & Spicy Almond Cheese Stuffed MushroomsCheesesticks with Marinara Sauce
A Cheese Lover’s Guide 25 RawFoodChef.com

go
ur
met
Rec
ipes

A Cheese Lover’s Guide 27 RawFoodChef.com
1 cup Basic Macadamia Cheese (see page 20)
2 tablespoons light mellow miso or chickpea miso
2 tablespoons coarsely chopped raw pine nuts
2 tablespoons finely minced red onion
1 tablespoon minced fresh parsley
2 teaspoons minced fresh dill weed
2 teaspoons finely minced green onion
2 teaspoons nutritional yeast
1/2 teaspoon pureed garlic (about 1 clove)
pinch of ground black pepper
1. Combine Macadamia Cheese, miso, pine nuts, onion, parsley,dill weed, green onion, nutritional yeast, garlic and pepper in amedium bowl and stir well.
Storage Suggestion: Store in a covered container in the refrigerator for up to 1 week.
Yield: 1-1/2 cupsHerbed Macadamia Cheese Balls
Serving Suggestion: Form into balls and roll each ball in herbs, chopped nuts or chopped leaks. Serve with spring mix garnished with sliced strawberries, figs, and pecans.
This luscious cultured nut cheese is as versatile as it is delicious and easy to make. Use it in both sweet and savory recipes; as a filling for cannelloni or ravioli; stuff it into cherry tomatoes or cucumber cups; form it into balls and roll in chopped nuts, parsley or crushed red peppercorns; stack it between slices of heirloom tomatoes and top with arugula sprouts; serve as a pâté, or use in any numbers of desserts that call for cream cheese or ricotta.

Note: A small hand-held ceramic mandoline is the perfect kitchen tool to thinly shave fruits and vegetables. »
A Cheese LA Cheese Looverver’’s Guides Guide 28 RRaawFoodChefwFoodChef..ccomom
Dijon Dressing
1/4 cup lemon juice
1 teaspoon mustard powder
1/4 cup olive oil
1/4 cup hazelnut oil, walnut oil, or flax oil
2 tablespoons finely minced red onion (about 1/4 of a small onion)
2 teaspoons coconut nectar or agave nectar
1 tablespoon Dijon mustard
1/2 teaspoon Himalayan crystal salt
1/2 teaspoon crushed garlic (about 1 clove)
pinch of pepper
Salad
1/2 pound baby arugula or spring mix
1 pear, thinly shaved (see note)
2 small beets, peeled and thinly shaved (see note)
1/4 cup thinly sliced celery or fennel bulb
1 orange, cut into segments and diced
Savory Hazelnut Cheese (see recipe page 22)
1. In a small bowl, whisk the lemon juice and mustard powder. Addthe oils, red onion, coconut nectar or agave nectar, Dijon mustard,salt, garlic, and pepper continue whisking until creamy. Set aside.
2. Place the baby arugula attractively on a platter and top withshaved pears and beets, sliced celery or fennel and dot with dicedoranges.
3. Drizzle with Dijon Dressing and serve with Savory HazelnutCheese and choice of bread or crackers.
Yield: 2-3 servingsShaved Pear and Beet Salad on Baby Arugula with Dijon Dressing and Hazelnut Cheese

A Cheese Lover’s Guide 29 RawFoodChef.com
Apricot and Nut Cheese Stuffed Figs with Red Wine Glaze Figs:
30 dried figs
3 drops orange oil
1 tablespoon coconut crystals or evaporated cane juice
Very warm water—just enough to cover figs
Wine Glaze:
2/3 cup red wine
4 tablespoons maple syrup
5/8 teaspoon xanthan gum
Cheese Filling:
11/4 cup ricotta cheese
4 tablespoons dried apricot, finely diced
1/4 cup walnuts, chopped medium fine
1 drop lemon oil
1 teaspoon mint, minced
Also:
1 bunch lettuce leaves
Zest of 1 orange
1. Cover figs with very warm water. Add orange oil and coconutcrystals or evaporated cane sugar.
2. Dehydrate at 135 degrees for 45 minutes.
3. Blend wine glaze ingredients in blender. Let sit 5-10 minutes tothicken.
4. Put wine glaze into squeeze bottle.
5. Mix cheese filling and put into piping bag.
6. Strain figs and slice one side to open like doors.
7. Using a pipe bag, squeeze filling into the figs.
8. Plate on a bed of leaves. Drizzle with wine glaze and garnish withorange zest.
Yield: 10 servings
Created by Living Light students

A Cheese Lover’s Guide 30 RawFoodChef.com
3 English cucumbers (cut into 1/2" rounds)
1 cup Savory Almond Cheese (see recipe page 22)
1 cup Black Olive Tapenade (see recipe, below)
36 small cherry tomatoes
Black OliveTapenade
(Yield: 1-1/2 cups)
1 cup pitted sun-dried olives
1/2 cup soaked and dehydrated walnuts
3 tablespoons capers
1 tablespoon olive oil
1 tablespoon lemon juice
1/2 teaspoon (2 medium cloves) pureed garlic
1/2 teaspoon dried oregano, crushed
1/2 teaspoon dried basil, crushed
1/4 teaspoon dried thyme,
1. To prepare the cucumber cups, use a small melon baller tocarefully scoop out a little of the cucumber flesh, creating anindentation in the center of each cucumber slice.
2. Use the melon baller to form scoops of the cheese and place onescoop on top of each olive tapenade-filled cucumber cup.
3. Press a small cherry tomato on top of the cheese and serve.
Black Olive Tapenade:
1. Put olives and walnuts into a food processor and process untilblended, but still slightly chunky.
2. Add remainder of ingredients and pulse to mix. Do not puree asthe mixture will become too smooth and homogeneous. It shouldstick together, but have texture.
Yield: 36 canapés (serves 12)
Almond Cheese and Black Olive Tapenade
Feast, Lose Weight, Gain Energy, Feel Younger!
Learn From the Best!All culinary demos & ClassesTaught by Cherie Soria, “Mother of Gourmet Raw Vegan Cusine”
Interactive•Multimedia•Fun Infographics•Peer Forums•Q&A with Instuctors•Dozen of Tips and Tricks!

EssentialsOnline
rawfoodchef.com/essentials-online

Note: If you want to make this torte ahead of time, you may store it in the refrigerator for 4 to 5 days. Keep it in the mold in an airtight container until you are ready to serve it.
A Cheese Lover’s Guide 32 RawFoodChef.com
Layered Pesto Almond Cheese Torte
Pesto:
2 cups packed fresh basil leaves
1/4 cup raw pine nuts
2 tablespoons extra-virgin olive oil
1 teaspoon pureed garlic (about 2 cloves)
1/4 teaspoon Himalayan crystal salt
1 cup SavoryAlmond Cheese(see recipe page 22)
1. In the bowl of a food processor, combine ingredients for thepesto. Process until the mixture begins to stick together but is stillslightly chunky.
2. To assemble the torte, drape a 2- to 3-cup mold (you can use asmall glass bowl) with damp cheesecloth. Evenly pack a third ofthe Savory Almond Cheese into the bottom of the mold, followedby half of the pesto. Press firmly to flatten before adding the nextlayer of cheese and another layer of pesto, firmly packing eachlayer into place.
3. Spread the remaining cheese on top of the pesto, and press firmly.Smooth the final layer into place.
4. Fold the excess cheesecloth liner over the top and chill in therefrigerator for 1 hour.
5. To serve this elegant appetizer, fold the cheesecloth back toexpose the cheese. Place the serving plate upside down on topof the torte-filled mold. Center the plate carefully. Holding theplate and the torte together, turn the plate over and remove thecheesecloth and the mold, exposing the beautiful torte, nowcentered on the serving plate. Arrange crudités, crackers, or otheraccoutrements attractively on the plate.
Yield: 6 servings

Note: You can make the manicotti ahead of time and store it in the refrigerator for up to two days. Don’t top with sauce though until you’re ready to serve it, or the noodles will weep and thin the sauce, resulting in less flavor.
A Cheese LA Cheese Looverver’s Guide’s Guide 33 RRaawFoodChefwFoodChef..ccomom
Spinach Manicotti
2 large zucchinis
6 cups chopped spinach
1 cup Basic Almond Cheese (see recipe page 19)
2 tablespoons minced and rinsed red onion
1 tablespoon extra-virgin olive oil
1 tablespoon chick pea or other light miso
1 teaspoon nutritional yeast
1 teaspoon pureed garlic (about 2 cloves)
1/2 teaspoon onion powder
1/2 teaspoon salt
dash nutmeg
pinch of ground white pepper
1 cup Béchamel Sauce (see recipe, page 30)
1/4 cup Pine Nut Parmesan (see recipe page 21) or substitute ground walnuts
2 tablespoons minced fresh parsley
1. Using a mandoline, shave the zucchini length-wise, creating long,wide strips. Cut the strips into pieces 3 inches long by 2 incheswide. You need at least 12 perfect wrappers. Lay them in a singlelayer on a clean towel and allow them to air dry while preparingthe remaining components.
2. Place spinach, Basic Almond Cheese, onion, olive oil, garlic, onionpowder, salt, and white pepper in a bowl and mix until all thecheese and spinach are integrated with the seasonings.
3. To assemble the manicotti, lay down one slice of zucchini in aglass baking dish that fits into your dehydrator and spread 2to 3 tablespoons of the filling in the center of the zucchini, ina horizontal line, from one end to the other. At one end, beginrolling the zucchini strip over the filing and continue until theseam is down. Repeat until all the manicotti are snugglingtogether without overlapping.
4. Place the baking dish in a dehydrator set at 125 degrees for 30minutes to warm.
5. Spoon warm Béchamel Sauce over the manicotti and top with asprinkle of Pine Nut Parmesan and parsley.
Yield: 6 servingsVariation on recipe from Raw Food For Dummies by Cherie Soria and Dan Ladermann

Béchamel Sauce
1 cup raw cashews
1 cup filtered water
2 teaspoons nutritional yeast
4 teaspoons unpasteurized light miso
1 teaspoon onion powder
1 teaspoon lemon juice
1/4 teaspoon garlic powder
1/4 teaspoon ground nutmeg
1/4 teaspoon ground white pepper
1/4 teaspoon salt
1. Put all the ingredients in a blender and blend until the mixture issmooth and creamy. The sauce should have a satiny finish.
2. Serve warm or chilled. To warm, put the mixture into a glass jarand place it in the dehydrator with the manicotti (for 30 minutesat 125 degrees).
Yield: 1 cup
A Cheese Lover’s Guide 34 RawFoodChef.com
(in conjunction with Spinach Manicotti recipe, page 29)
A Cheese LA Cheese Looverver’s Guide’s Guide 35 RRaawFoodChefwFoodChef..ccomom
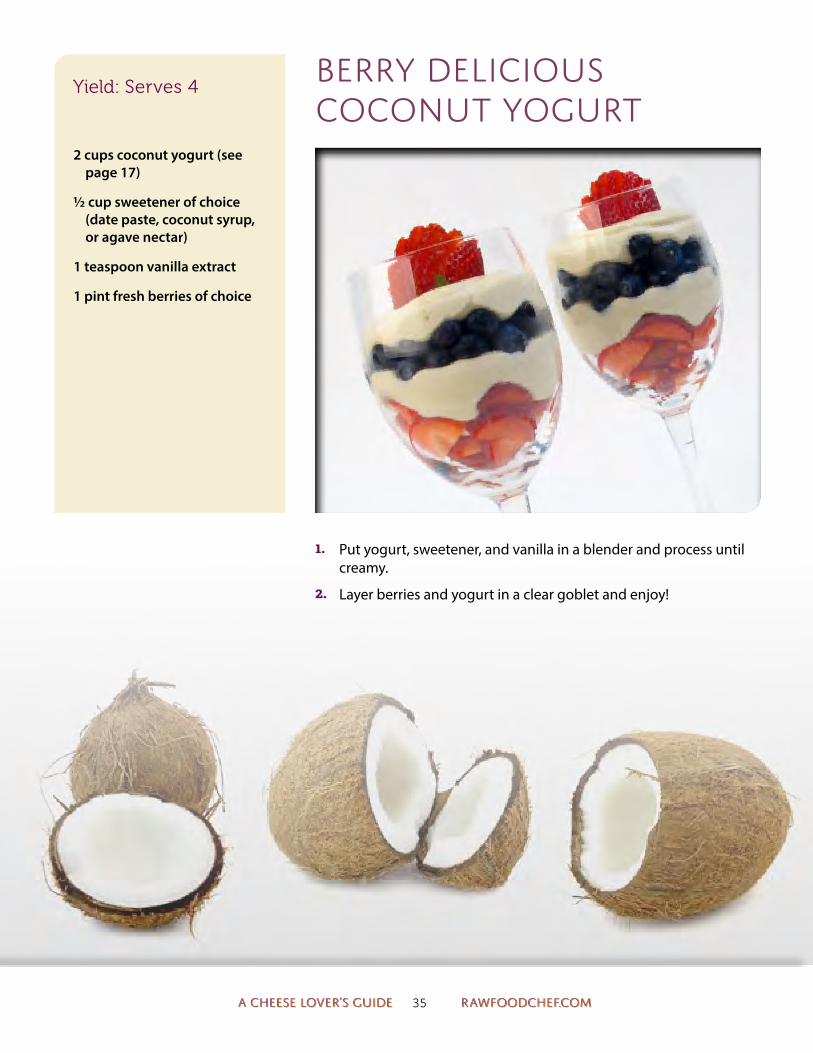
Berry Delicious Coconut Yogurt
2 cups coconut yogurt (see page 17)
1/2 cup sweetener of choice (date paste, coconut syrup, or agave nectar)
1 teaspoon vanilla extract
1 pint fresh berries of choice
1. Put yogurt, sweetener, and vanilla in a blender and process untilcreamy.
2. Layer berries and yogurt in a clear goblet and enjoy!
Yield: Serves 4

A Cheese LA Cheese Looverver’s Guide’s Guide 36 RRaAwFoodChefwFoodChef..ccomom
Blueberry Cheesecake
Crust
21/2 cups pecans, soaked for 8 hours, rinsed and dehydrated
1/4 cup coconut crystals
1/4 cup seedless raisins
Filling
3 cups Basic Cashew Cheese (see page 18)
1 cup date paste
1 cup coconut oil, warmed to liquid
1/2 cup lemon juice
2 tablespoons vanilla extract
4 tablespoons soy lecithin powder
Topping
1 pint blueberries
2 tablespoons coconut nectar
1. To make the crust: Put pecans, coconut crystals, and raisins in foodprocessor and process until it begins to stick together. Press crustmixture evenly in the bottom of an 8" springform pan.
2. To make filling, combine the filling ingredients in a food processorand process until smooth and creamy, removing the lid fromtime to time to scrape sown the sides, using a rubber spatula.Processing time will be approximately 6-8 minutes depending onthe power of your food processor.
3. To assemble the cheesecake, put the filling in the crust and spreadevenly.
4. Macerate the blueberries very lightly by sprinkling them withthe coconut nectar and massaging lightly (do not over massage– most of the berries should remain whole). Pour the blueberriesover the top of the vanilla cream mixture and press gently, so theyare slightly pressed into the cheesecake.
5. Refrigerate for at least 2-3 hours before serving.
Storage Suggestion: Cheesecake will last for 1 week, if properly stored in a covered container in the refrigerator. Freeze for longer storage.
Yield: 12 servings