A Beginner's Introduction to Typesetting With LaTeX
117
\title{formatting information} A beginner’s introduction to typesetting with L A T E X Peter Flynn Silmaril Consultants Textual Therapy Division v.3.2 March 2003
Transcript of A Beginner's Introduction to Typesetting With LaTeX
\title{formattinginformation}
A beginner’s introduction to typesetting with LATEX
Peter Flynn
Silmaril Consultants
Textual Therapy Division
v.3.2 March 2003
Acknowledgments
Thanks to all the people who sent me corrections and suggestions for improvement oradditions to earlier versions. As usual, the problem has been what to leave out, notwhat to include.
Some of the suggestions were well-intentioned but would have turned the book intoa higher-level mathematics treatise. One of my objectives was to omit all maths exceptfor a short example, as all the other books on TEX and LATEX already cover mathematicaltypesetting in finer and better detail than I am capable of.
Some of the suggestions would have taken me down pathways I prefer not to tread.Large software corporations are full of well-meaning, hard-working individuals whogenuinely believe that their products make life easier for users. Unfortunately, experi-ence shows that this is often only true in the first hot flush of using a new program:in the long run the winners are those whose data is secure, accessible, and reusable;whose documents can be reformatted at any time, on any platform, without penalty,financial or otherwise.
I make no apology for recommending Unix-like systems running LATEX as the plat-form of choice for document-processing applications — if you have a choice — and I’mhappy to welcome the Apple Macintosh to that family. Unfortunately, there are thosewhose circumstances at home or work require them to use something else, and I ampleased that LATEX can help them by being available on their platform as well.
I have incorporated all the remaining suggestions except where it would materiallydistort the objective of being a beginner’s booklet. It is very difficult for documentersto remember how they struggled to learn what is now a familiar system. So much ofwhat we do is second nature, and much of that actually has nothing to do with thesoftware, but more to do with the way in which you view and approach information,and the general level of knowledge of computing. If I have obscured something bymaking unreasonable assumptions about your knowledge of computing, please let meknow so that I can correct it.
Peter Flynn is author of The HTML Handbook and Understanding SGML and XML Tools,and editor of The XML FAQ.
Technical note
The text for this edition was edited into a customized version of DocBook from theoriginal RTFML format. XSLT was used to generate HTML (for the Web and plaintextversions) and LATEX (for PDF and PostScript).
This document is copyleft�
1999, 2000, 2001, 2002, 2003 by Silmaril Consultants under the terms ofwhat is now the GNU Free Documentation License.
Permission is granted to copy, distribute and/or modify this document under the terms of the GNU FreeDocumentation License, Version 1.2 or any later version published by the Free Software Foundation; withno Invariant Sections, no Front-Cover Texts, and no Back-Cover Texts. A copy of the license is included inthe section entitled The GNU Free Documentation License1.
You are allowed to distribute, reproduce, and modify it without fee or further requirement for consentsubject to the conditions in § A.4. The author has asserted his right to be identified as the author of thisdocument. If you make useful modifications you are asked to inform the author so that the master copycan be updated. See the full text of the License in Appendix A.
1FSF, (2003/02/10 23:42:49)
Contents
Introduction . . . . . . . . . . . . . . . . . . . . . . . . . . . . . . . . . . . . . 6Who needs this booklet? . . . . . . . . . . . . . . . . . . . . . . . . . . . . 6Skills needed . . . . . . . . . . . . . . . . . . . . . . . . . . . . . . . . . . 6Objectives of this booklet . . . . . . . . . . . . . . . . . . . . . . . . . . . 6Synopsis . . . . . . . . . . . . . . . . . . . . . . . . . . . . . . . . . . . . . 7Production note . . . . . . . . . . . . . . . . . . . . . . . . . . . . . . . . . 8
Foreword . . . . . . . . . . . . . . . . . . . . . . . . . . . . . . . . . . . . . . . 10Preface . . . . . . . . . . . . . . . . . . . . . . . . . . . . . . . . . . . . . . . . . 11
1 Where to get and how to install LATEX 13
1.1 Installation for Linux and Unix . . . . . . . . . . . . . . . . . . . . . . . . 141.2 Installation for Apple Mac . . . . . . . . . . . . . . . . . . . . . . . . . . . 141.3 Installation for Microsoft Windows . . . . . . . . . . . . . . . . . . . . . 14
2 Using your editor to create documents 152.1 Quick start for the impatient . . . . . . . . . . . . . . . . . . . . . . . . . 152.2 LATEX commands . . . . . . . . . . . . . . . . . . . . . . . . . . . . . . . . 16
2.2.1 Simple commands . . . . . . . . . . . . . . . . . . . . . . . . . . . 172.2.2 Commands with arguments . . . . . . . . . . . . . . . . . . . . . 172.2.3 White-space in LATEX . . . . . . . . . . . . . . . . . . . . . . . . . . 17
2.3 Special characters . . . . . . . . . . . . . . . . . . . . . . . . . . . . . . . . 182.3.1 Using the special characters . . . . . . . . . . . . . . . . . . . . . . 18
2.4 Quotation marks . . . . . . . . . . . . . . . . . . . . . . . . . . . . . . . . 182.5 Accents . . . . . . . . . . . . . . . . . . . . . . . . . . . . . . . . . . . . . 192.6 Sizes, hyphenation, justification, and breaking . . . . . . . . . . . . . . . 20
2.6.1 Specifying size units . . . . . . . . . . . . . . . . . . . . . . . . . . 202.6.2 Hyphenation . . . . . . . . . . . . . . . . . . . . . . . . . . . . . . 212.6.3 Unbreakable text . . . . . . . . . . . . . . . . . . . . . . . . . . . . 222.6.4 Dashes . . . . . . . . . . . . . . . . . . . . . . . . . . . . . . . . . . 222.6.5 Justification . . . . . . . . . . . . . . . . . . . . . . . . . . . . . . . 222.6.6 Languages . . . . . . . . . . . . . . . . . . . . . . . . . . . . . . . . 22
2.7 Mathematics . . . . . . . . . . . . . . . . . . . . . . . . . . . . . . . . . . 232.8 Editors . . . . . . . . . . . . . . . . . . . . . . . . . . . . . . . . . . . . . . 24
2.8.1 WinEdt . . . . . . . . . . . . . . . . . . . . . . . . . . . . . . . . . 242.8.2 GNU Emacs . . . . . . . . . . . . . . . . . . . . . . . . . . . . . . . 25
3 Basic document structures 263.1 The Document Class Declaration . . . . . . . . . . . . . . . . . . . . . . . 26
3.1.1 Document class options . . . . . . . . . . . . . . . . . . . . . . . . 273.2 The document environment . . . . . . . . . . . . . . . . . . . . . . . . . . 283.3 Titling . . . . . . . . . . . . . . . . . . . . . . . . . . . . . . . . . . . . . . 283.4 Abstracts and summaries . . . . . . . . . . . . . . . . . . . . . . . . . . . 303.5 Sections . . . . . . . . . . . . . . . . . . . . . . . . . . . . . . . . . . . . . 31
3.5.1 Section numbering . . . . . . . . . . . . . . . . . . . . . . . . . . . 323.6 Ordinary paragraphs . . . . . . . . . . . . . . . . . . . . . . . . . . . . . 333.7 Table of contents . . . . . . . . . . . . . . . . . . . . . . . . . . . . . . . . 34
4 Typesetting, viewing and printing 36
4.1 Typesetting . . . . . . . . . . . . . . . . . . . . . . . . . . . . . . . . . . . 364.1.1 Standard LATEX . . . . . . . . . . . . . . . . . . . . . . . . . . . . . 374.1.2 pdfLATEX . . . . . . . . . . . . . . . . . . . . . . . . . . . . . . . . . 374.1.3 Running LATEX from a command window . . . . . . . . . . . . . . 38
4.2 Error messages . . . . . . . . . . . . . . . . . . . . . . . . . . . . . . . . . 384.3 Screen preview . . . . . . . . . . . . . . . . . . . . . . . . . . . . . . . . . 40
4.3.1 Previewing DVI output . . . . . . . . . . . . . . . . . . . . . . . . 404.3.2 Previewing with PDF . . . . . . . . . . . . . . . . . . . . . . . . . . 404.3.3 Previewing with PostScript . . . . . . . . . . . . . . . . . . . . . . 41
Formatting information �����3
FORMATTING INFORMATION CONTENTS
4.4 Printer output . . . . . . . . . . . . . . . . . . . . . . . . . . . . . . . . . 41
5 The CTAN, packages, and online help 43
5.1 Packages . . . . . . . . . . . . . . . . . . . . . . . . . . . . . . . . . . . . . 435.1.1 Using an existing package . . . . . . . . . . . . . . . . . . . . . . . 435.1.2 Package documentation . . . . . . . . . . . . . . . . . . . . . . . . 44
5.2 Downloading and installing packages . . . . . . . . . . . . . . . . . . . . 455.3 Online help . . . . . . . . . . . . . . . . . . . . . . . . . . . . . . . . . . . 47
6 Other document structures 48
6.1 A brief note on structure . . . . . . . . . . . . . . . . . . . . . . . . . . . 486.2 Lists . . . . . . . . . . . . . . . . . . . . . . . . . . . . . . . . . . . . . . . 49
6.2.1 Itemized lists . . . . . . . . . . . . . . . . . . . . . . . . . . . . . . 496.2.2 Enumerated lists . . . . . . . . . . . . . . . . . . . . . . . . . . . . 506.2.3 Description lists . . . . . . . . . . . . . . . . . . . . . . . . . . . . 506.2.4 Inline lists . . . . . . . . . . . . . . . . . . . . . . . . . . . . . . . . 516.2.5 Reference lists and segmented lists . . . . . . . . . . . . . . . . . . 516.2.6 Lists within lists . . . . . . . . . . . . . . . . . . . . . . . . . . . . 52
6.3 Tables . . . . . . . . . . . . . . . . . . . . . . . . . . . . . . . . . . . . . . 536.3.1 Floats . . . . . . . . . . . . . . . . . . . . . . . . . . . . . . . . . . 536.3.2 Formal tables . . . . . . . . . . . . . . . . . . . . . . . . . . . . . . 536.3.3 Tabular matter . . . . . . . . . . . . . . . . . . . . . . . . . . . . . 546.3.4 Tabular techniques for alignment . . . . . . . . . . . . . . . . . . 55
6.4 Figures . . . . . . . . . . . . . . . . . . . . . . . . . . . . . . . . . . . . . . 566.5 Images . . . . . . . . . . . . . . . . . . . . . . . . . . . . . . . . . . . . . . 566.6 Verbatim text . . . . . . . . . . . . . . . . . . . . . . . . . . . . . . . . . . 58
6.6.1 Inline verbatim . . . . . . . . . . . . . . . . . . . . . . . . . . . . . 586.6.2 Display verbatim . . . . . . . . . . . . . . . . . . . . . . . . . . . . 58
6.7 Boxes, sidebars, and panels . . . . . . . . . . . . . . . . . . . . . . . . . . 596.7.1 Boxes of text . . . . . . . . . . . . . . . . . . . . . . . . . . . . . . 596.7.2 Framed boxes . . . . . . . . . . . . . . . . . . . . . . . . . . . . . . 616.7.3 Sidebars and panels . . . . . . . . . . . . . . . . . . . . . . . . . . 62
7 Textual tools 63
7.1 Quotations . . . . . . . . . . . . . . . . . . . . . . . . . . . . . . . . . . . 637.2 Footnotes and end-notes . . . . . . . . . . . . . . . . . . . . . . . . . . . . 647.3 Marginal notes . . . . . . . . . . . . . . . . . . . . . . . . . . . . . . . . . 657.4 Cross-references . . . . . . . . . . . . . . . . . . . . . . . . . . . . . . . . 65
7.4.1 Normal cross-references . . . . . . . . . . . . . . . . . . . . . . . . 657.4.2 Bibliographic references . . . . . . . . . . . . . . . . . . . . . . . . 66
7.5 Indexes and glossaries . . . . . . . . . . . . . . . . . . . . . . . . . . . . . 697.6 Multiple columns . . . . . . . . . . . . . . . . . . . . . . . . . . . . . . . . 70
8 Fonts and layouts 71
8.1 Changing layout . . . . . . . . . . . . . . . . . . . . . . . . . . . . . . . . 718.1.1 Spacing . . . . . . . . . . . . . . . . . . . . . . . . . . . . . . . . . 728.1.2 Headers and footers . . . . . . . . . . . . . . . . . . . . . . . . . . 73
8.2 Using fonts . . . . . . . . . . . . . . . . . . . . . . . . . . . . . . . . . . . 748.2.1 Changing the default font family . . . . . . . . . . . . . . . . . . . 748.2.2 Changing the font family temporarily . . . . . . . . . . . . . . . . 768.2.3 Changing font style . . . . . . . . . . . . . . . . . . . . . . . . . . 778.2.4 Font sizes . . . . . . . . . . . . . . . . . . . . . . . . . . . . . . . . 778.2.5 Logical markup . . . . . . . . . . . . . . . . . . . . . . . . . . . . . 788.2.6 Colour . . . . . . . . . . . . . . . . . . . . . . . . . . . . . . . . . . 79
8.3 Installing new fonts . . . . . . . . . . . . . . . . . . . . . . . . . . . . . . 808.3.1 Installing ������ ����� fonts . . . . . . . . . . . . . . . . . . . . . . 808.3.2 Installing PostScript fonts . . . . . . . . . . . . . . . . . . . . . . . 828.3.3 Installing the Type 1 Computer Modern fonts . . . . . . . . . . . 88
Formatting information �����4
FORMATTING INFORMATION CONTENTS
9 Programmability (macros) 899.1 Simple replacement macros . . . . . . . . . . . . . . . . . . . . . . . . . . 899.2 Macros using information gathered previously . . . . . . . . . . . . . . . 899.3 Macros with arguments . . . . . . . . . . . . . . . . . . . . . . . . . . . . 919.4 Nested macros . . . . . . . . . . . . . . . . . . . . . . . . . . . . . . . . . 919.5 Macros and environments . . . . . . . . . . . . . . . . . . . . . . . . . . . 929.6 Reprogramming LATEX’s internals . . . . . . . . . . . . . . . . . . . . . . . 93
9.6.1 Changing list item bullets . . . . . . . . . . . . . . . . . . . . . . . 94
10 Compatibility with other systems 9510.1 Converting into LATEX . . . . . . . . . . . . . . . . . . . . . . . . . . . . . . 9510.2 Converting out of LATEX . . . . . . . . . . . . . . . . . . . . . . . . . . . . 9610.3 Going beyond LATEX . . . . . . . . . . . . . . . . . . . . . . . . . . . . . . . 96
A GNU Free Documentation License
Version 1.2, November 2002 98
A.0 PREAMBLE . . . . . . . . . . . . . . . . . . . . . . . . . . . . . . . . . . . 98A.1 APPLICABILITY AND DEFINITIONS . . . . . . . . . . . . . . . . . . . . . . 98A.2 VERBATIM COPYING . . . . . . . . . . . . . . . . . . . . . . . . . . . . . 99A.3 COPYING IN QUANTITY . . . . . . . . . . . . . . . . . . . . . . . . . . . . 100A.4 MODIFICATIONS . . . . . . . . . . . . . . . . . . . . . . . . . . . . . . . . 100A.5 COMBINING DOCUMENTS . . . . . . . . . . . . . . . . . . . . . . . . . . 101A.6 COLLECTIONS OF DOCUMENTS . . . . . . . . . . . . . . . . . . . . . . . 102A.7 AGGREGATION WITH INDEPENDENT WORKS . . . . . . . . . . . . . . . 102A.8 TRANSLATION . . . . . . . . . . . . . . . . . . . . . . . . . . . . . . . . . 102A.9 TERMINATION . . . . . . . . . . . . . . . . . . . . . . . . . . . . . . . . . 103A.10FUTURE REVISIONS OF THIS LICENSE . . . . . . . . . . . . . . . . . . . . 103A.11ADDENDUM: How to use this License for your documents . . . . . . . . 103
B Configuring TEX search paths 104
C TEX Users Group Membership Information 105Becoming a TUG member . . . . . . . . . . . . . . . . . . . . . . . . . . . 105Membership fees . . . . . . . . . . . . . . . . . . . . . . . . . . . . . . . . 105TUG membership benefits . . . . . . . . . . . . . . . . . . . . . . . . . . . 105Delivery of benefits . . . . . . . . . . . . . . . . . . . . . . . . . . . . . . . 105
Formatting information �����5
FORMATTING INFORMATION INTRODUCTION
Introduction
This booklet originally accompanied a 2–day course on using the LATEX typesettingsystem. It has been extensively revised and updated and can now be used for self-study or in the classroom. It is aimed at users of Linux or Microsoft Windows but itcan be used with LATEX systems on any platform, including other Unix workstations,Apple Macs, and mainframes.
Who needs this booklet?
The audience for the original training course was assumed to be computer-literate andcomposed of professional, business, academic, technical, or administrative computerusers. The readers of the booklet (you) are mostly assumed to be in a similar position,but may also come from many other backgrounds. You are expected to have one ormore of the following or similar objectives:
• production of typesetter-quality formatting;
• formatting of long, complex, highly-structured, repetitive, or generated docu-ments2;
• save time and effort by automating common tasks;
• independence from specific makes or models of proprietary hardware, software,or file formats (portability);
• use of Open Source software (free of restrictions, sometimes also free of charge).
Skills needed
LATEX is a very easy system to learn, and requires no specialist knowledge, althoughsome familiarity with the publishing process is useful. It is, however, assumed that youare completely fluent and familiar with using your computer before you start. Specif-ically, effective use of this document requires that you already know and understandthe following thoroughly:
• how to run and use a good plain text editor (not a wordprocessor and not a toylike Notepad);
• where all 96 of the printable ASCII characters are on your keyboard and what theymean (and how to type accents and symbols, if you use them);
• how to create, open, save, close, rename, and delete files and folders (directories);
• how to use a Web browser or FTP program to download and save files from theInternet;
• how to uncompress and unwrap (unzip) downloaded files.
If you don’t know how to do these things yet, it’s probably best to go and learnthem first. Trying to become familiar with the fundamentals of using a computer atthe same time as learning LATEX is not likely to be as effective as doing them in order.
Objectives of this booklet
By the end of this booklet, you should be able to undertake the following tasks:
• use a plaintext editor to create and maintain your LATEX documents;
• add LATEX markup to achieve your formatting requirements;
• typeset LATEX documents, correct simple formatting errors, and display or printthe results;
2LATEX can easily be used for once-off or short and simple documents as well, but its real strength lies inconsistency and automation.
Formatting information �����6
FORMATTING INFORMATION INTRODUCTION
• identify, install, and use additional formatting packages (using the CTAN for down-loading where necessary);
• recognise the limitations of procedural markup systems and choose appropriategeneric markup where appropriate.
Synopsis
The original course covered the following topics as separate sessions, now representedin the booklet as chapters:
1. Where to get and how to install LATEX (teTEX and fpTEX from the TEX Live CD-ROM);
2. How to type LATEX documents: using an editor to create files (WinShell, WinEdt orEmacs);
3. Basic structures (the Document Class Declaration and its layout options; thedocument environment with sections and paragraphs);
4. Typesetting, viewing, and printing;
5. The use of packages and the CTAN to adapt formatting using standard tools;
6. Other document structures (lists, tables, figures, images, and verbatim text);
7. Textual tools (footnotes, marginal notes, cross-references, indexes and glossaries,and bibliographic citations);
8. Typographic considerations (white-space and typefaces; inline markup and fontchanges; extra font installation and automation);
9. Programmability and automation (macros and modifying LATEX’s behaviour);
10. Conversion and compatibility with other systems (XML, Word, etc).
A few changes have been made in the transition to printed and online form, but thebasic structure is the same, and the document functions as a workbook for the courseas well as a standalone self-teaching guide. It is important to note that the documentdoes not cover mathematical typesetting, complex tabular material, the design of large-scale macros and document classes, or the finer points of typography or typographicdesign, although it does refer to these topics in passing on a few occasions. There areseveral other guides, introductions, and ‘get-started’ documents on the Web and onCTAN. Among the more popular are:
• The (Not So) Short Guide to LATEX 2ε: LATEX 2ε in 95 Minutes3 is a good beginner’stutorial;
• A Gentle Introduction to TEX: A Manual for Self-Study4 is a classic tutorial on PlainTEX;
• Using imported graphics in LATEX 2ε5 shows you how to do (almost) anything withgraphics: side-by-side, rotated, etc;
• Short Math Guide for LATEX6 gets you started with the American Math Society’spowerful packages;
• A comprehensive list of symbols in TEX7 shows over 2,500 symbols available inLATEX.
(Taken from the CTAN search page.)
3Schlegl, (2001)4Doob, (undated)5Reckdahl, (1997)6AMS, (2001)7Pakin, (2002)
Formatting information !�"#7
FORMATTING INFORMATION INTRODUCTION
Production note
This document is written and maintained in XML, using a modified version of theDocBook DTD. Conversions were made to HTML and LATEX using XSLT scripts and theSaxon processor. The complete source, with all ancillary files, is available online athttp://www.ctan.org. If you want to try processing it yourself you must installJava and Saxon in addition to LATEX.
This document is published under the terms and conditions of the GNU Free Docu-mentation License. Details are in Appendix A.
Symbols and conventions
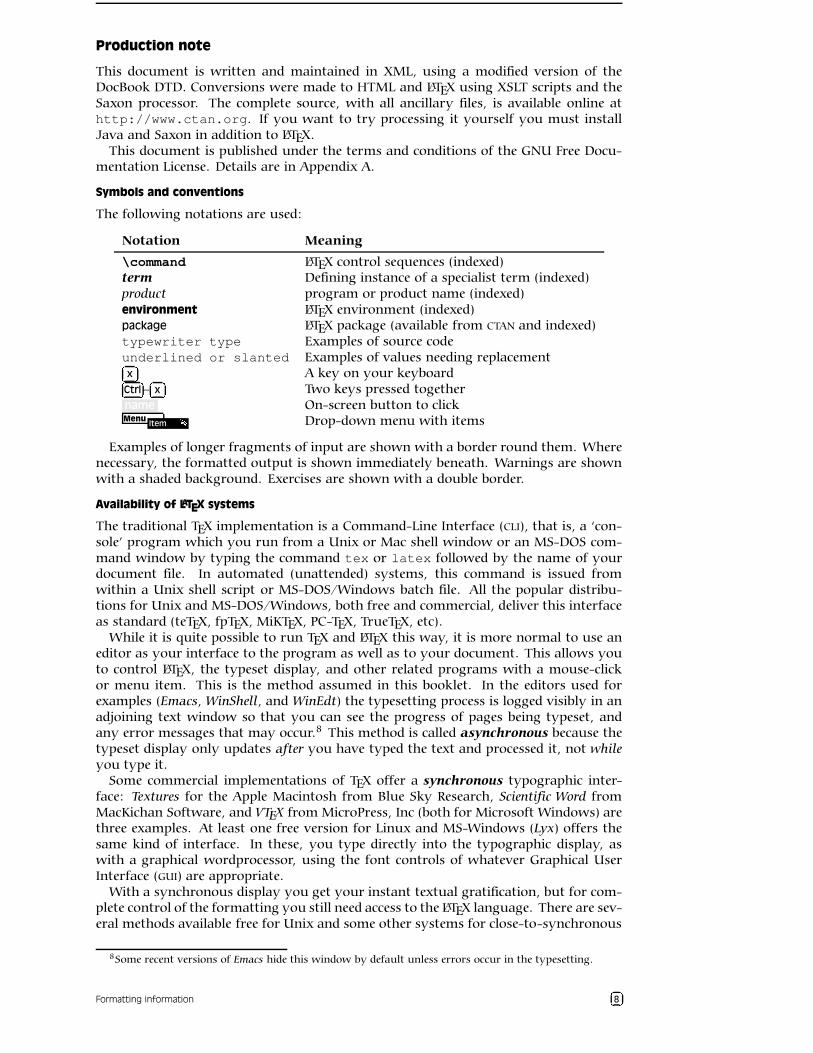
The following notations are used:
Notation Meaning
\command LATEX control sequences (indexed)term Defining instance of a specialist term (indexed)product program or product name (indexed)environment LATEX environment (indexed)package LATEX package (available from CTAN and indexed)typewriter type Examples of source codeunderlined or slanted Examples of values needing replacement$%'&(x A key on your keyboard$%)&(
Ctrl –$%*&(x Two keys pressed together
name On-screen button to clickMenu
Item + Drop-down menu with items
Examples of longer fragments of input are shown with a border round them. Wherenecessary, the formatted output is shown immediately beneath. Warnings are shownwith a shaded background. Exercises are shown with a double border.
Availability of LATEX systems
The traditional TEX implementation is a Command-Line Interface (CLI), that is, a ‘con-sole’ program which you run from a Unix or Mac shell window or an MS-DOS com-mand window by typing the command tex or latex followed by the name of yourdocument file. In automated (unattended) systems, this command is issued fromwithin a Unix shell script or MS-DOS/Windows batch file. All the popular distribu-tions for Unix and MS-DOS/Windows, both free and commercial, deliver this interfaceas standard (teTEX, fpTEX, MiKTEX, PC-TEX, TrueTEX, etc).
While it is quite possible to run TEX and LATEX this way, it is more normal to use aneditor as your interface to the program as well as to your document. This allows youto control LATEX, the typeset display, and other related programs with a mouse-clickor menu item. This is the method assumed in this booklet. In the editors used forexamples (Emacs, WinShell, and WinEdt) the typesetting process is logged visibly in anadjoining text window so that you can see the progress of pages being typeset, andany error messages that may occur.8 This method is called asynchronous because thetypeset display only updates after you have typed the text and processed it, not whileyou type it.
Some commercial implementations of TEX offer a synchronous typographic inter-face: Textures for the Apple Macintosh from Blue Sky Research, Scientific Word fromMacKichan Software, and VTEX from MicroPress, Inc (both for Microsoft Windows) arethree examples. At least one free version for Linux and MS-Windows (Lyx) offers thesame kind of interface. In these, you type directly into the typographic display, aswith a graphical wordprocessor, using the font controls of whatever Graphical UserInterface (GUI) are appropriate.
With a synchronous display you get your instant textual gratification, but for com-plete control of the formatting you still need access to the LATEX language. There are sev-eral methods available free for Unix and some other systems for close-to-synchronous
8Some recent versions of Emacs hide this window by default unless errors occur in the typesetting.
Formatting information$% &(8
FORMATTING INFORMATION INTRODUCTION
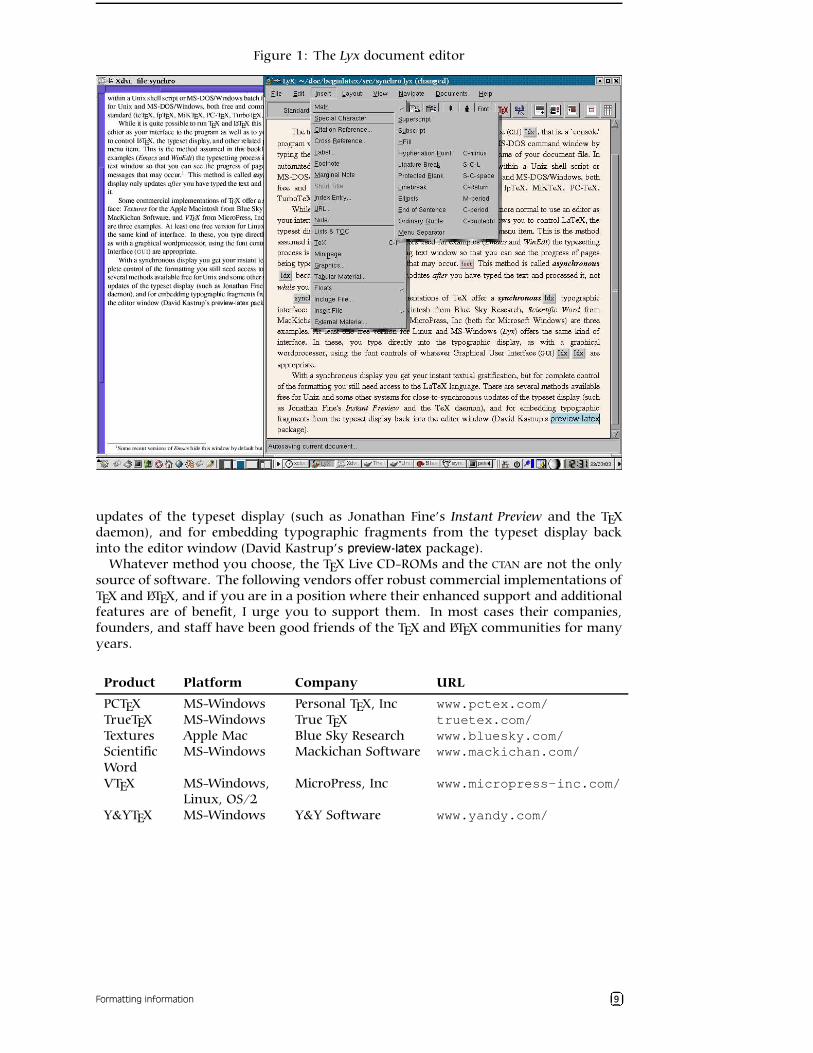
Figure 1: The Lyx document editor
updates of the typeset display (such as Jonathan Fine’s Instant Preview and the TEXdaemon), and for embedding typographic fragments from the typeset display backinto the editor window (David Kastrup’s preview-latex package).
Whatever method you choose, the TEX Live CD-ROMs and the CTAN are not the onlysource of software. The following vendors offer robust commercial implementations ofTEX and LATEX, and if you are in a position where their enhanced support and additionalfeatures are of benefit, I urge you to support them. In most cases their companies,founders, and staff have been good friends of the TEX and LATEX communities for manyyears.
Product Platform Company URL
PCTEX MS-Windows Personal TEX, Inc www.pctex.com/TrueTEX MS-Windows True TEX truetex.com/Textures Apple Mac Blue Sky Research www.bluesky.com/ScientificWord
MS-Windows Mackichan Software www.mackichan.com/
VTEX MS-Windows,Linux, OS/2
MicroPress, Inc www.micropress-inc.com/
Y&YTEX MS-Windows Y&Y Software www.yandy.com/
Formatting information ,-�./9
FORMATTING INFORMATION FOREWORD
Foreword
As noted in the Introduction, this document accompanied a 2–day introductory train-ing course (still does) which I run in UCC and elsewhere. It became obvious fromrepeated questions in class and afterwards, as well as from general queries on comp.text.tex that many people do not read the FAQ s, do not buy the books and manuals,do not download the free documentation, and instead try to get by using the train-ing technique known as ‘sitting by Nelly’, which involves looking over a colleague’sshoulder in the office, lab, library, or classroom, and absorbing all his or her bad habits.
In the summer of 2001 I presented a short proposal on the marketing of LATEX tothe annual conference of the TEX Users Group held at the University of Delaware,and showed an example of a draft brochure9 designed to persuade newcomers to tryLATEX for their typesetting requirements. As a result of questions and suggestions, itwas obvious that it needed to include a pointer to some documentation, and I agreedto make available a revised form of this document, expanded to be used outside theclassroom, and to include those topics on which I have had most questions from usersover the years.
It turned out to mean a significant reworking of a lot of the material, some of whichappears in almost every manual on LATEX but which is essential to the beginner andtherefore bears repetition. I took the opportunity to revise the structure of the trainingcourse in parallel with the booklet (expanding it from its original one day to two days),and to include a more comprehensive index. It is by no means perfect (in both senses),and I would be grateful for comments and bugs to be sent to me at the address givenunder the credits.
I had originally hoped that the LATEX version of the document would be processable byany freshly-installed default LATEX system, but the need to include font samples whichgo well beyond the default installation, and to use some packages which the new useris unlikely to have installed, means that this document itself is not really a simple pieceof LATEX, however simply it may describe the process itself.
However, as the careful reader will have already seen, the master source of the docu-ment is not maintained in LATEX but in XML. A future task is therefore to comparethe packages required with those installed by default, and flag portions of the docu-ment requiring additional features as effectivities so that an abbreviated version can begenerated which will guarantee to process even with a basic LATEX.
If you are just starting with LATEX, at an early opportunity you should acquire acopy of LATEX: A Document Preparation System10 which is the original author’s manual.More advanced users should get the The LATEX Companion11 or one of its successors. Inthe same series there are also the The LATEX Graphics Companion12 and the The LATEX WebCompanion13. Mathematical users might want to read Short Math Guide for LATEX14.
9http://www.silmaril.ie/documents/latex-brochure/leaflet.pdf10Lamport, (1994)11Samarin, (1993)12Mittelbach, (1997)13Sutor, (1999)14AMS, (2001)
Formatting information 0132410
FORMATTING INFORMATION PREFACE
Preface
Many people discover LATEX after years of struggling with wordprocessors and desktoppublishing systems, and are amazed to find that TEX has been around for nearly 25years and they hadn’t heard of it. It’s not a conspiracy, just ‘a well-kept secret knownonly to a few million people’, as one anonymous user put it.
Perhaps a key to why it has remained so popular is that it removes the need tofiddle with the formatting while you write. Although playing around with fontsand formatting is attractive to the computer newcomer, it is counter-productive forthe serious author or editor who wants to concentrate on writing. In response to abeginner’s concern about ‘learning to write in LATEX’, Re: New To (La)TeX... UnlearningBad Habits15 recently posted (in the comp.text.tex newgroup16):
No, the harder part might be writing, period. TEX/LATEX is actually easy, once yourelax and stop worrying about appearance as a be-all-and-end-all. Many peoplehave become ‘Word Processing Junkies’ and no longer ‘write’ documents, they ‘draw’them, almost at the same level as a pre-literate 3–year old child might pretend to‘write’ a story, but is just creating a sequence of pictures with a pad of paper andbox of Crayolas — this is perfectly normal and healthy in a 3–year old child whois being creative, but is of questionable usefulness for, say, a grad student writinga Master’s or PhD thesis or a business person writing a white paper, etc. For thisreason, I strongly recommend not using any sort of fancy GUI ‘crutch’. Use a plainvanilla text editor and treat it like an old-fashioned typewriter. Don’t waste timeplaying with your mouse.
Note: I am not saying that you should have no concerns about the appearanceof your document, just that you should write the document (completely) first andtweak the appearance later…not [spend time on] lots of random editing in the bulkof the document itself. Heller, Re: New To (La)TeX... Unlearning Bad Habits, (11 March2003)
Knuth originally wrote TEX to typeset mathematics for the second edition of hismaster-work The Art of Computer Programming17, and it remains pretty much the onlytypesetting program to include fully-automated mathematical formatting done theway mathematicians want it. Knuth generously placed the entire system in the publicdomain, so for many years there was no publicity of the commercial kind whichwould have got TEX noticed outside the technical field. Nowadays, however, there aremany companies selling TEX software or services, dozens of publishers accepting LATEXdocuments for publication, and hundreds of thousands of users using LATEX for millionsof documents.18
There is occasionally some confusion among newcomers between the two mainproducts, TEX and LATEX:
• TEX is a typesetting program, originally written by Prof Don Knuth (Stanford)around 1978. It implements a macro-driven typesetters’ programming languageof some 300 basic operations and it has formed the core of many other desktoppublishing (DTP) systems. Although it is still possible to write in the raw TEXlanguage, you need to study it in depth, and you need to be able to write macros(subprograms) to perform even the simplest of repetitive tasks.
• LATEX is a user interface for TEX, designed by Leslie Lamport (DEC) in 1985 toautomate all the common tasks of document preparation. It provides a simpleway for authors and typesetters to use the power of TEX without having tolearn the entire language. LATEX is the recommended system for all users exceptprofessional typographic programmers and computer scientists who want tostudy the internals of TEX.
See also the panel ‘Debunking the mythology’ on p.12.
15Heller, (11 March 2003)16news:comp.text.tex/[email protected], (1980)18A guesstimate. With free software it’s impossible to tell how many people are using it, but it’s a lot.
Formatting information 5637811
FORMATTING INFORMATION PREFACE
Both TEX and LATEX have been constantly updated since their inception. Knuth hasnow frozen development of the TEX engine so that users and developers can have avirtually bug-free, rock-stable platform to work with. Typographic programmingdevelopment continues with the New Typesetting System (NTS), planned as a successorto TEX. The LATEX3 project has taken over development of LATEX, and the current versionis LATEX2ε. Details of all developments can be had from the TEX Users Group (TUG) athttp://www.tug.org.
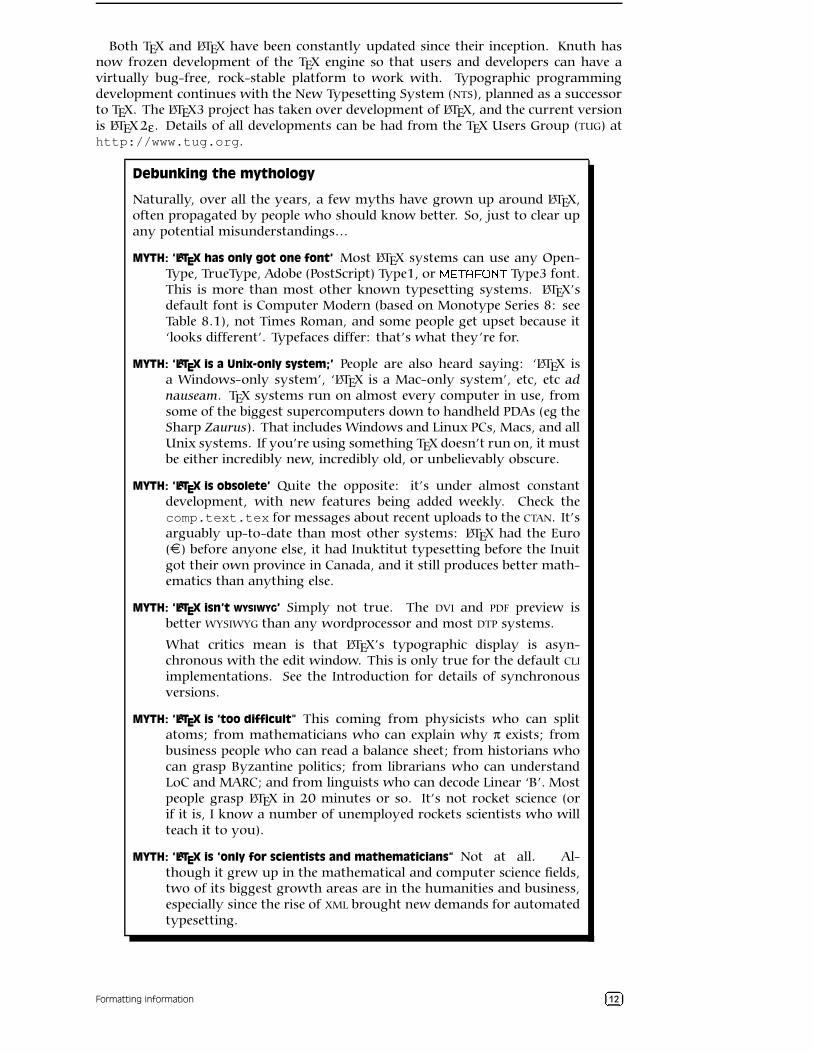
Debunking the mythology
Naturally, over all the years, a few myths have grown up around LATEX,often propagated by people who should know better. So, just to clear upany potential misunderstandings…
MYTH: ‘LATEX has only got one font’ Most LATEX systems can use any Open-Type, TrueType, Adobe (PostScript) Type1, or 9�:;�<�=�>�?�; Type3 font.This is more than most other known typesetting systems. LATEX’sdefault font is Computer Modern (based on Monotype Series 8: seeTable 8.1), not Times Roman, and some people get upset because it‘looks different’. Typefaces differ: that’s what they’re for.
MYTH: ‘LATEX is a Unix-only system;’ People are also heard saying: ‘LATEX isa Windows-only system’, ‘LATEX is a Mac-only system’, etc, etc adnauseam. TEX systems run on almost every computer in use, fromsome of the biggest supercomputers down to handheld PDAs (eg theSharp Zaurus). That includes Windows and Linux PCs, Macs, and allUnix systems. If you’re using something TEX doesn’t run on, it mustbe either incredibly new, incredibly old, or unbelievably obscure.
MYTH: ‘LATEX is obsolete’ Quite the opposite: it’s under almost constantdevelopment, with new features being added weekly. Check thecomp.text.tex for messages about recent uploads to the CTAN. It’sarguably up-to-date than most other systems: LATEX had the Euro(¤) before anyone else, it had Inuktitut typesetting before the Inuitgot their own province in Canada, and it still produces better math-ematics than anything else.
MYTH: ‘LATEX isn’t WYSIWYG’ Simply not true. The DVI and PDF preview isbetter WYSIWYG than any wordprocessor and most DTP systems.
What critics mean is that LATEX’s typographic display is asyn-chronous with the edit window. This is only true for the default CLI
implementations. See the Introduction for details of synchronousversions.
MYTH: ‘LATEX is ‘too difficult” This coming from physicists who can splitatoms; from mathematicians who can explain why π exists; frombusiness people who can read a balance sheet; from historians whocan grasp Byzantine politics; from librarians who can understandLoC and MARC; and from linguists who can decode Linear ‘B’. Mostpeople grasp LATEX in 20 minutes or so. It’s not rocket science (orif it is, I know a number of unemployed rockets scientists who willteach it to you).
MYTH: ‘LATEX is ‘only for scientists and mathematicians” Not at all. Al-though it grew up in the mathematical and computer science fields,two of its biggest growth areas are in the humanities and business,especially since the rise of XML brought new demands for automatedtypesetting.
Formatting information @A3BC12
SESSION I
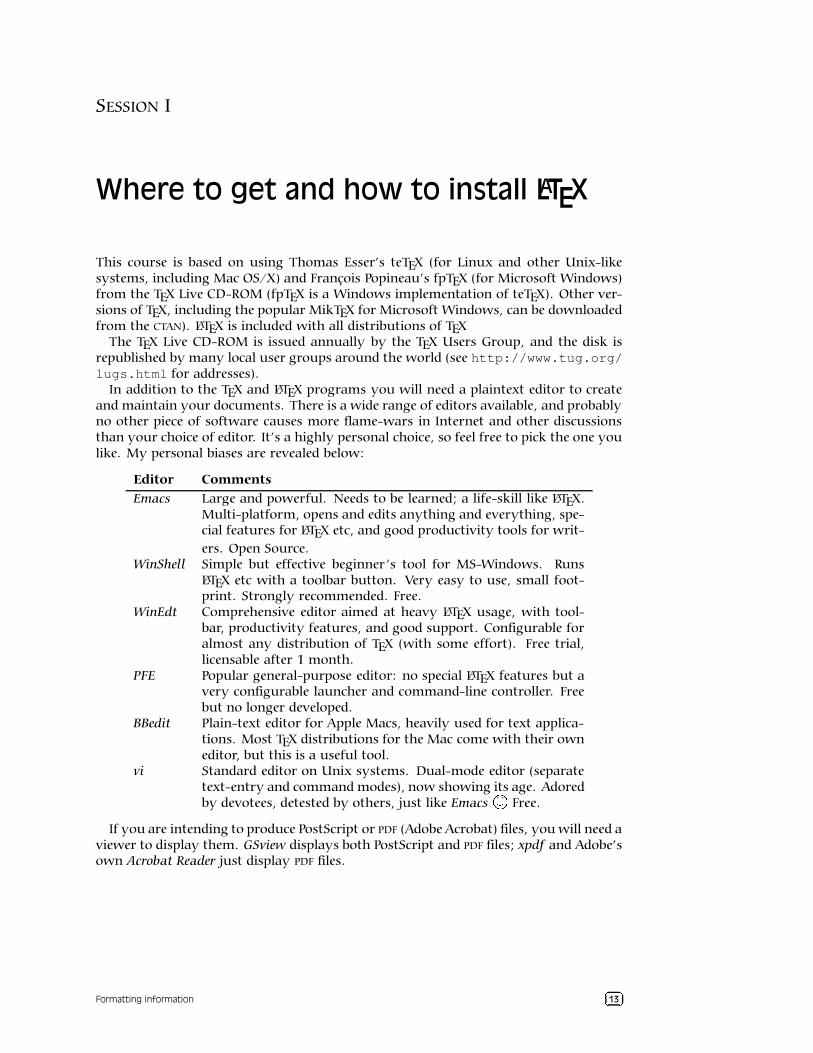
Where to get and how to install LATEX
This course is based on using Thomas Esser’s teTEX (for Linux and other Unix-likesystems, including Mac OS/X) and François Popineau’s fpTEX (for Microsoft Windows)from the TEX Live CD-ROM (fpTEX is a Windows implementation of teTEX). Other ver-sions of TEX, including the popular MikTEX for Microsoft Windows, can be downloadedfrom the CTAN). LATEX is included with all distributions of TEX
The TEX Live CD-ROM is issued annually by the TEX Users Group, and the disk isrepublished by many local user groups around the world (see http://www.tug.org/lugs.html for addresses).
In addition to the TEX and LATEX programs you will need a plaintext editor to createand maintain your documents. There is a wide range of editors available, and probablyno other piece of software causes more flame-wars in Internet and other discussionsthan your choice of editor. It’s a highly personal choice, so feel free to pick the one youlike. My personal biases are revealed below:
Editor Comments
Emacs Large and powerful. Needs to be learned; a life-skill like LATEX.Multi-platform, opens and edits anything and everything, spe-cial features for LATEX etc, and good productivity tools for writ-ers. Open Source.
WinShell Simple but effective beginner’s tool for MS-Windows. RunsLATEX etc with a toolbar button. Very easy to use, small foot-print. Strongly recommended. Free.
WinEdt Comprehensive editor aimed at heavy LATEX usage, with tool-bar, productivity features, and good support. Configurable foralmost any distribution of TEX (with some effort). Free trial,licensable after 1 month.
PFE Popular general-purpose editor: no special LATEX features but avery configurable launcher and command-line controller. Freebut no longer developed.
BBedit Plain-text editor for Apple Macs, heavily used for text applica-tions. Most TEX distributions for the Mac come with their owneditor, but this is a useful tool.
vi Standard editor on Unix systems. Dual-mode editor (separatetext-entry and command modes), now showing its age. Adoredby devotees, detested by others, just like Emacs
. . DE Free.
If you are intending to produce PostScript or PDF (Adobe Acrobat) files, you will need aviewer to display them. GSview displays both PostScript and PDF files; xpdf and Adobe’sown Acrobat Reader just display PDF files.
Formatting information FG3HI13
SESSION 1. WHERE TO GET AND HOW TO INSTALL LATEX 1.1. INSTALLATION FOR LINUX AND UNIX
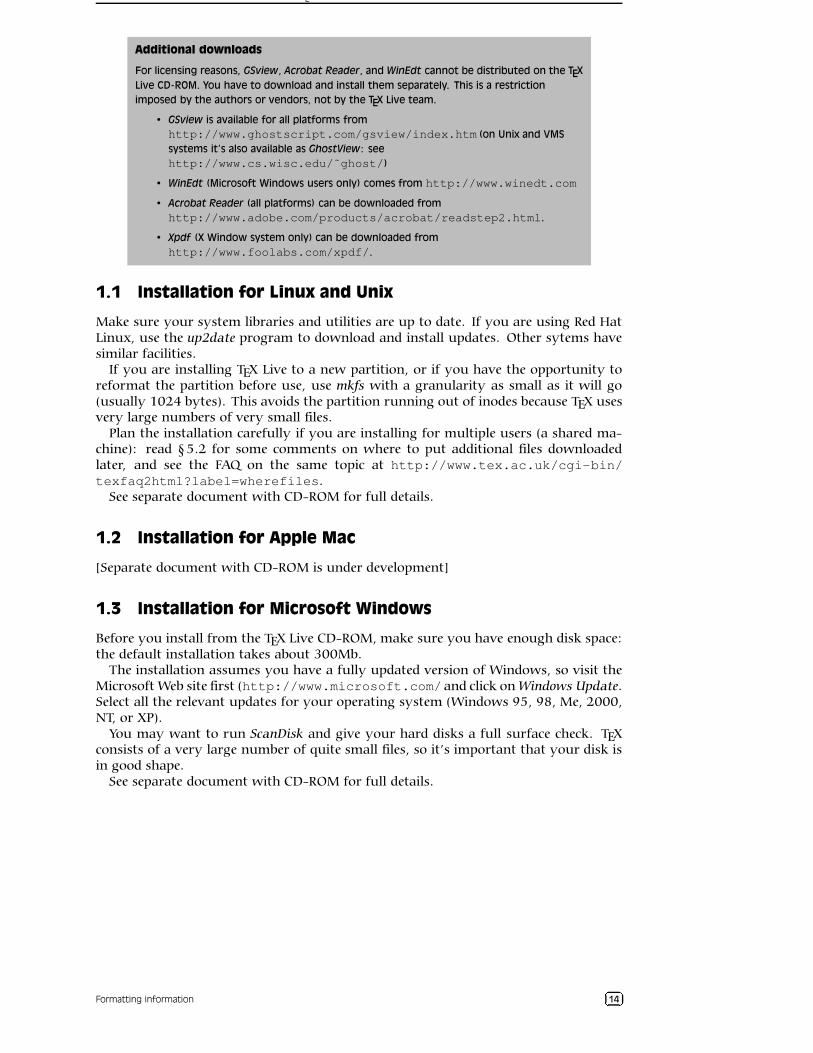
Additional downloads
For licensing reasons, GSview, Acrobat Reader, and WinEdt cannot be distributed on the TEX
Live CD-ROM. You have to download and install them separately. This is a restriction
imposed by the authors or vendors, not by the TEX Live team.
• GSview is available for all platforms from
http://www.ghostscript.com/gsview/index.htm (on Unix and VMS
systems it’s also available as GhostView: see
http://www.cs.wisc.edu/˜ghost/)
• WinEdt (Microsoft Windows users only) comes from http://www.winedt.com
• Acrobat Reader (all platforms) can be downloaded from
http://www.adobe.com/products/acrobat/readstep2.html.
• Xpdf (X Window system only) can be downloaded from
http://www.foolabs.com/xpdf/.
1.1 Installation for Linux and Unix
Make sure your system libraries and utilities are up to date. If you are using Red HatLinux, use the up2date program to download and install updates. Other sytems havesimilar facilities.
If you are installing TEX Live to a new partition, or if you have the opportunity toreformat the partition before use, use mkfs with a granularity as small as it will go(usually 1024 bytes). This avoids the partition running out of inodes because TEX usesvery large numbers of very small files.
Plan the installation carefully if you are installing for multiple users (a shared ma-chine): read § 5.2 for some comments on where to put additional files downloadedlater, and see the FAQ on the same topic at http://www.tex.ac.uk/cgi-bin/texfaq2html?label=wherefiles.
See separate document with CD-ROM for full details.
1.2 Installation for Apple Mac
[Separate document with CD-ROM is under development]
1.3 Installation for Microsoft Windows
Before you install from the TEX Live CD-ROM, make sure you have enough disk space:the default installation takes about 300Mb.
The installation assumes you have a fully updated version of Windows, so visit theMicrosoft Web site first (http://www.microsoft.com/ and click on Windows Update.Select all the relevant updates for your operating system (Windows 95, 98, Me, 2000,NT, or XP).
You may want to run ScanDisk and give your hard disks a full surface check. TEXconsists of a very large number of quite small files, so it’s important that your disk isin good shape.
See separate document with CD-ROM for full details.
Formatting information JK3LM14
SESSION II
Using your editor to create documents
This course assumes that users have either WinEdt (Windows only) orEmacs (any platform) installed. Both are discussed briefly in § 2.8 and themenus and toolbars for running LATEX are explained in Session 4.
LATEX documents are all plaintext files.1 You can edit them with any editor, and transferthem to any other computer system running LATEX and they will format exactly thesame. Because they are plain text they cannot corrupt your system, and they cannotbe used for virus infections like wordprocessor files can. Everything you can see is inthe file and everything in the file is displayed to you: there is nothing hidden or secretand no proprietary manufacturers’ ‘gotchas’ like suddenly going out of date with anew version.
In a LATEX document, you type your text along with markup which identifies theimportant parts of your document by name, for example ‘title’, ‘section’, ‘figure’, etc.LATEX does all the formatting for you automatically, using the markup to guide itsinternal rules and external stylesheets for typesetting.
You will usually hear this markup referred to as ‘commands’ or sometimes ‘control
sequences’ (which is the proper TEXnical term for them). For all practical purposes these
terms all mean the same thing.
You do not need to format any of your text by hand in your editor, because LATEX doesit all by itself when it typesets. You can of course regularise or neaten its appearancein your editor for ease of editing (for example, keeping each item in a list on a separateline), but this is not required.
2.1 Quick start for the impatient
If you already know all this stuff about editors and plaintext files and running pro-grams, and you know your system is already correctly installed (including your editor),you’d probably like to type something in and see LATEX do its job. If you don’t, thenskip forward to § 2.2 and read a bit more about LATEX first.
1. Install the software
Make sure you have a fully-installed LATEX system and a copy of a suitable editor(Emacs or WinEdt are recommended).
2. Create a demonstration document
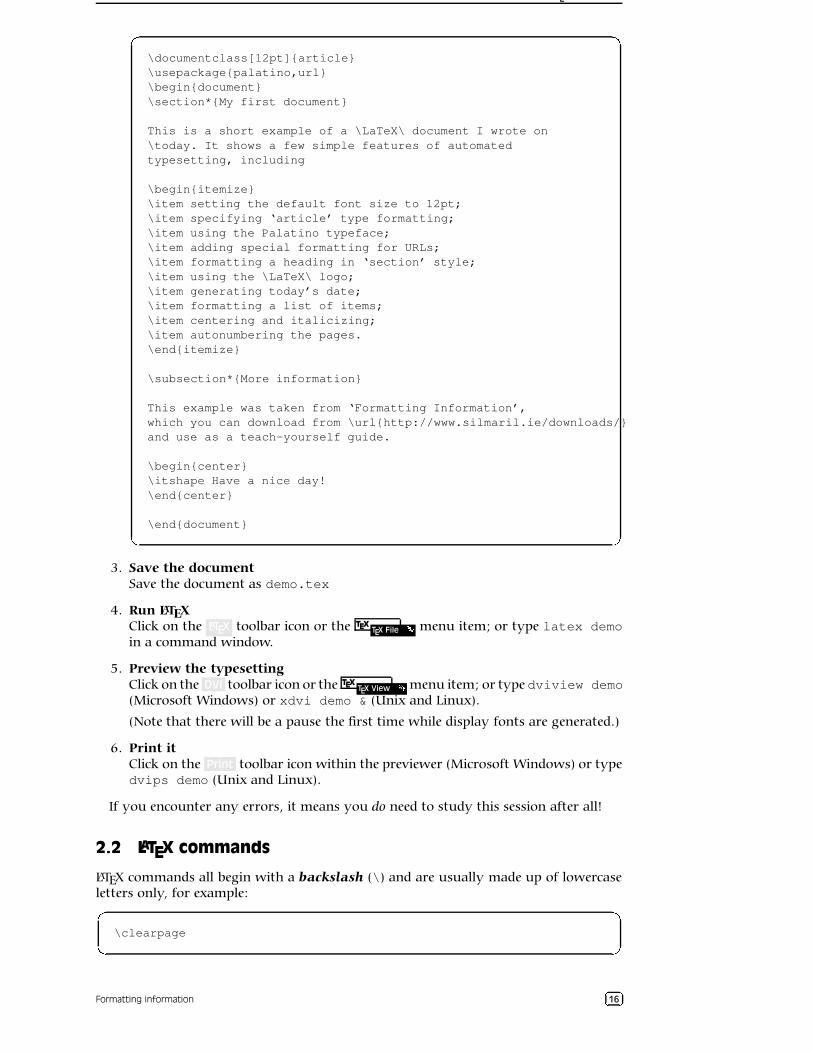
Open your editor and type in the following text exactly as given. Do not makeany changes or missing anything out or add anything different:
1‘Plaintext’ originally meant just the 96 printable characters of the American Standard Code for Infor-mation Interchange (ASCII) but now more commonly includes both these and the relevant 8–bit charactersfrom one (only) character set such as ISO-8859-1 (Western Latin–1) or ISO-8859-15 (Western Latin plus theEuro sign). These are international standard which work everywhere: try to avoid using manufacturers’proprietary character sets like Microsoft Windows–1252 or Apple Macintosh Roman–8, because they areunusable on some other systems.
Formatting information NOQPR15
SESSION 2. USING YOUR EDITOR TO CREATE DOCUMENTS 2.2. LATEX COMMANDS
S
T
U
V
\documentclass[12pt]{article}\usepackage{palatino,url}\begin{document}\section*{My first document}
This is a short example of a \LaTeX\ document I wrote on\today. It shows a few simple features of automatedtypesetting, including
\begin{itemize}\item setting the default font size to 12pt;\item specifying ‘article’ type formatting;\item using the Palatino typeface;\item adding special formatting for URLs;\item formatting a heading in ‘section’ style;\item using the \LaTeX\ logo;\item generating today’s date;\item formatting a list of items;\item centering and italicizing;\item autonumbering the pages.\end{itemize}
\subsection*{More information}
This example was taken from ‘Formatting Information’,which you can download from \url{http://www.silmaril.ie/downloads/}and use as a teach-yourself guide.
\begin{center}\itshape Have a nice day!\end{center}
\end{document}
3. Save the document
Save the document as demo.tex
4. Run LATEXClick on the LATEX toolbar icon or the TEX
TEX File W menu item; or type latex demoin a command window.
5. Preview the typesetting
Click on the DVI toolbar icon or the TEXTEX View W menu item; or type dviview demo
(Microsoft Windows) or xdvi demo & (Unix and Linux).
(Note that there will be a pause the first time while display fonts are generated.)
6. Print it
Click on the Print toolbar icon within the previewer (Microsoft Windows) or typedvips demo (Unix and Linux).
If you encounter any errors, it means you do need to study this session after all!
2.2 LATEX commands
LATEX commands all begin with a backslash (\) and are usually made up of lowercaseletters only, for example:ST
UV\clearpage
Formatting information XY3Z[16
SESSION 2. USING YOUR EDITOR TO CREATE DOCUMENTS 2.2. LATEX COMMANDS
Do not confuse the backslash (\) with the forward slash (/). They are two separatecharacters.
The \clearpage command is an instruction to the typesetter to start a new page.It’s actually quite rare — page-breaking is automatic in LATEX — but it makes a goodexample of a simple command.
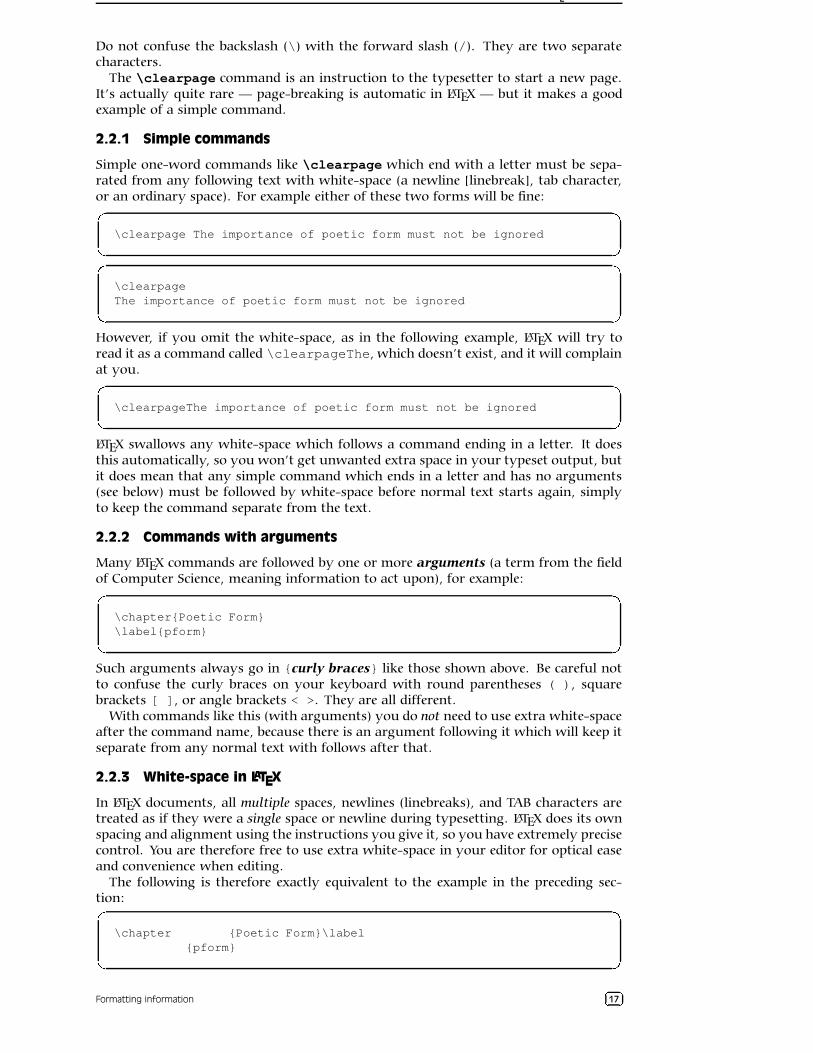
2.2.1 Simple commands
Simple one-word commands like \clearpage which end with a letter must be sepa-rated from any following text with white-space (a newline [linebreak], tab character,or an ordinary space). For example either of these two forms will be fine:\]
^_\clearpage The importance of poetic form must not be ignored
\]
^_
\clearpageThe importance of poetic form must not be ignored
However, if you omit the white-space, as in the following example, LATEX will try toread it as a command called \clearpageThe, which doesn’t exist, and it will complainat you.\]
^_\clearpageThe importance of poetic form must not be ignored
LATEX swallows any white-space which follows a command ending in a letter. It doesthis automatically, so you won’t get unwanted extra space in your typeset output, butit does mean that any simple command which ends in a letter and has no arguments(see below) must be followed by white-space before normal text starts again, simplyto keep the command separate from the text.
2.2.2 Commands with arguments
Many LATEX commands are followed by one or more arguments (a term from the fieldof Computer Science, meaning information to act upon), for example:\]
^_
\chapter{Poetic Form}\label{pform}
Such arguments always go in {curly braces} like those shown above. Be careful notto confuse the curly braces on your keyboard with round parentheses ( ), squarebrackets [ ], or angle brackets < >. They are all different.
With commands like this (with arguments) you do not need to use extra white-spaceafter the command name, because there is an argument following it which will keep itseparate from any normal text with follows after that.
2.2.3 White-space in LATEX
In LATEX documents, all multiple spaces, newlines (linebreaks), and TAB characters aretreated as if they were a single space or newline during typesetting. LATEX does its ownspacing and alignment using the instructions you give it, so you have extremely precisecontrol. You are therefore free to use extra white-space in your editor for optical easeand convenience when editing.
The following is therefore exactly equivalent to the example in the preceding sec-tion:\]
^_
\chapter {Poetic Form}\label{pform}
Formatting information `a3bc17

SESSION 2. USING YOUR EDITOR TO CREATE DOCUMENTS 2.3. SPECIAL CHARACTERS
That is, it will get typeset exactly the same. In general, just leave a blank line betweenparagraphs and a single space between words and sentences. LATEX will take care of theformatting.
2.3 Special characters
There are ten keyboard characters which have special meaning to LATEX, and cannot beused on their own except for these purposes:
Key Meaning
If you need the actualcharacter itself, type
this: Characterde'fghThe command character $\backslash$ id e fg
$ Math typesetting delimiter \$ $de fg% The comment character \% %de fgˆ Math superscript character \ˆ ˆde fg& Tabular column separator \& &de fg_ Math subscript character \_ _de fg˜ Non-breaking space \˜de fg# Macro parameter symbol \# #de'fgj
Argument start delimiter $\ k $ kd e'fglArgument end delimiter $\ m $ m
These were deliberately chosen because they are rare in normal text, with the excep-tion of $, #, &, and %, some of whose meanings were already established as metachar-acters (characters standing as symbols for something else) by the time TEX was written.
2.3.1 Using the special characters
Because of the special meaning LATEX uses for the dollar-sign on its own, if you want toprint $35.99 you type \$35.99.
(An unusual but interesting serif-font Euro sign n is got with the \texteuro com-mand from the textcomp package. The standard sans-serif ¤ needs the marvosym package
and is done with the \EUR command.2)If you want to print AT&T you need to type AT\amp T; if you want to print 45%
you need to type 45\%; and if you want a hash mark (the octothorpe or Americannumber or ‘pound’ [weight] sign ‘#’) you type \#. For a pound (sterling) sign £, nownearly obsolete except in the UK and some of its former dependencies, use your
de fg£ key
or type \pounds.The comment character (%) makes LATEX ignore the remainder of the line in your
document, so you can see it in your editor, but it will never get typeset, for example:op
qrToday’s price per Kg is £22.70 % get Mike to update this
2.4 Quotation marks
Do not use the unidirectional typewriter keyboardde fg
" key for quotation marks. Correcttypographic quotes are got with the
de fg‘ key and the
de fg’ key, doubled if you want double
quotes:
op
qrHe said, ‘‘I’m just going out.’’
sut�vxwzy|{~}������ ������v�������y������������ �2The European Commission has specified that everyone use the sans-serif design, even in serif text, but
this is amazingly ugly and most designers rightly ignore it.
Formatting informationde fg18
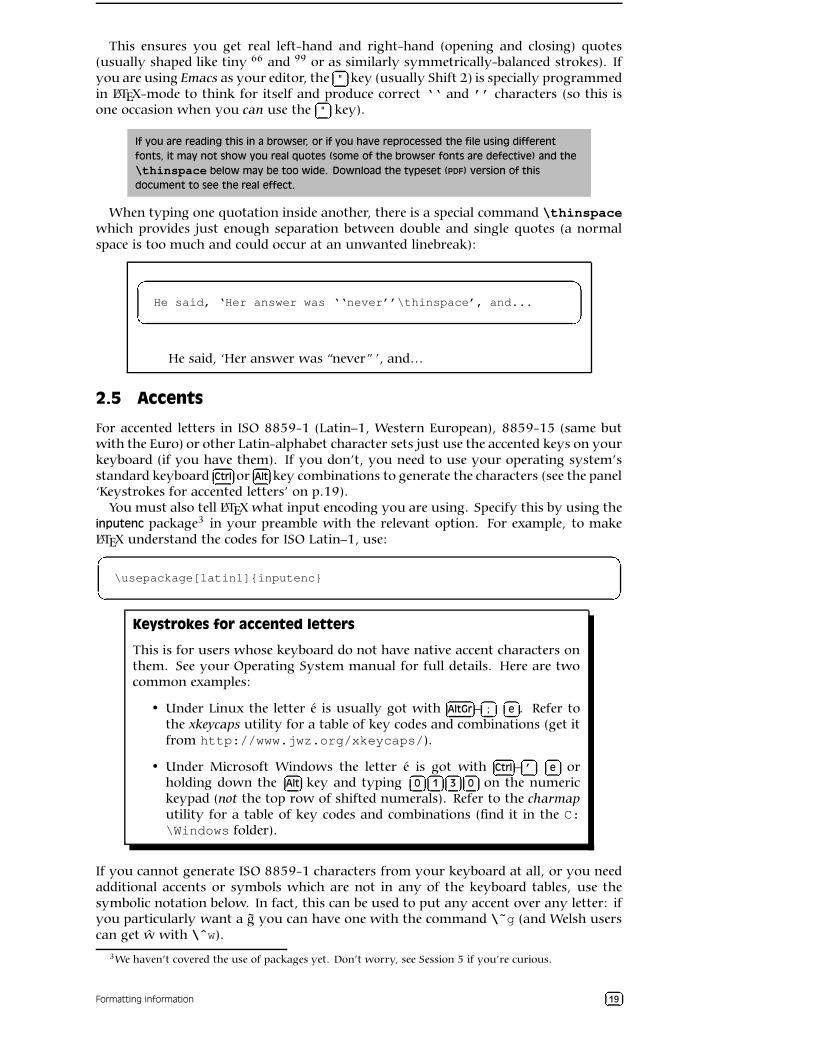
SESSION 2. USING YOUR EDITOR TO CREATE DOCUMENTS 2.5. ACCENTS
This ensures you get real left-hand and right-hand (opening and closing) quotes(usually shaped like tiny 66 and 99 or as similarly symmetrically-balanced strokes). Ifyou are using Emacs as your editor, the �����" key (usually Shift 2) is specially programmedin LATEX-mode to think for itself and produce correct ‘‘ and ’’ characters (so this isone occasion when you can use the �����" key).
If you are reading this in a browser, or if you have reprocessed the file using different
fonts, it may not show you real quotes (some of the browser fonts are defective) and the
\thinspace below may be too wide. Download the typeset (PDF) version of this
document to see the real effect.
When typing one quotation inside another, there is a special command \thinspacewhich provides just enough separation between double and single quotes (a normalspace is too much and could occur at an unwanted linebreak):
��
��He said, ‘Her answer was ‘‘never’’\thinspace’, and...
He said, ‘Her answer was “never” ’, and…
2.5 Accents
For accented letters in ISO 8859-1 (Latin–1, Western European), 8859-15 (same butwith the Euro) or other Latin-alphabet character sets just use the accented keys on yourkeyboard (if you have them). If you don’t, you need to use your operating system’sstandard keyboard �� ��Ctrl or �� ��Alt key combinations to generate the characters (see the panel‘Keystrokes for accented letters’ on p.19).
You must also tell LATEX what input encoding you are using. Specify this by using theinputenc package3 in your preamble with the relevant option. For example, to makeLATEX understand the codes for ISO Latin–1, use:��
��\usepackage[latin1]{inputenc}
Keystrokes for accented letters
This is for users whose keyboard do not have native accent characters onthem. See your Operating System manual for full details. Here are twocommon examples:
• Under Linux the letter é is usually got with �� ��AltGr –�����; ��'��e . Refer tothe xkeycaps utility for a table of key codes and combinations (get itfrom http://www.jwz.org/xkeycaps/).
• Under Microsoft Windows the letter é is got with �� � �Ctrl – �� ��’ �� � �e orholding down the �� ��Alt key and typing ��'��0 ��'��1 �����3 ��'��0 on the numerickeypad (not the top row of shifted numerals). Refer to the charmaputility for a table of key codes and combinations (find it in the C:\Windows folder).
If you cannot generate ISO 8859-1 characters from your keyboard at all, or you needadditional accents or symbols which are not in any of the keyboard tables, use thesymbolic notation below. In fact, this can be used to put any accent over any letter: ifyou particularly want a g you can have one with the command \˜g (and Welsh userscan get w with \ˆw).
3We haven’t covered the use of packages yet. Don’t worry, see Session 5 if you’re curious.
Formatting information �� ��19
SESSION 2. USING YOUR EDITOR TO CREATE DOCUMENTS 2.6. SIZES, HYPHENATION, JUSTIFICATION, AND BREAKING
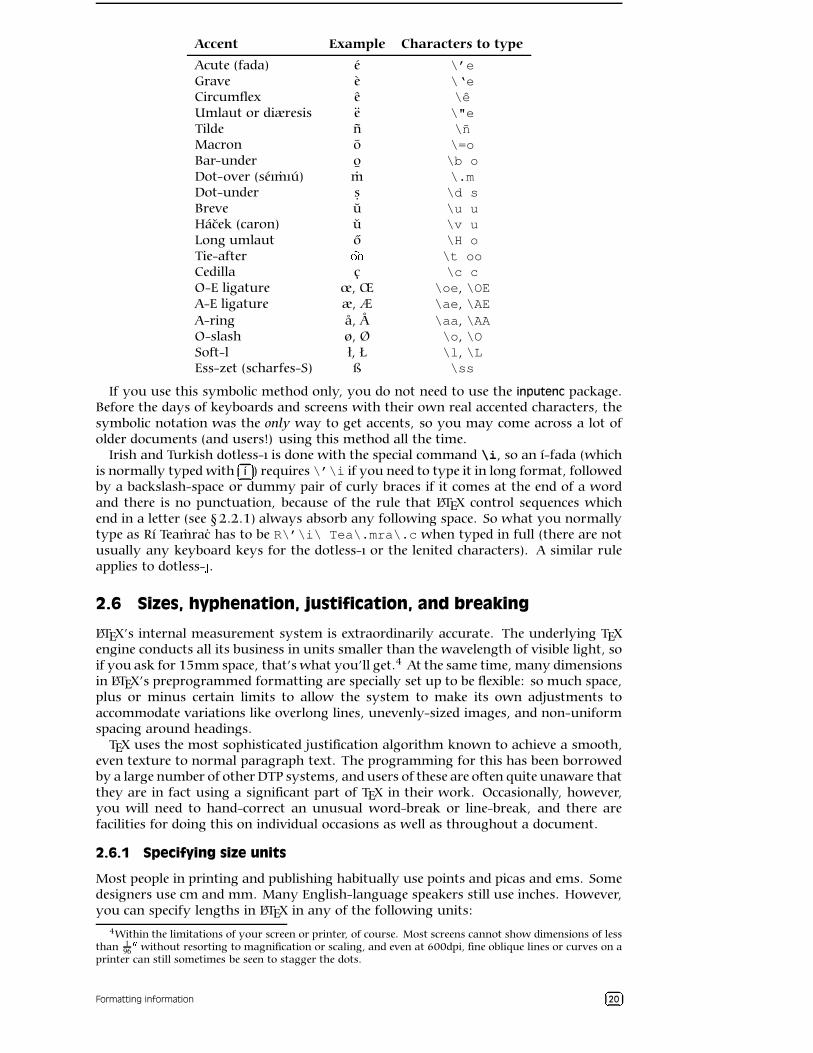
Accent Example Characters to type
Acute (fada) é \’eGrave è \‘eCircumflex ê \êUmlaut or diæresis ë \"eTilde ñ \ñMacron o \=oBar-under o
¯\b o
Dot-over (séımıú) m \.mDot-under s. \d sBreve u \u uHácek (caron) u \v uLong umlaut o \H oTie-after ¡¢�¢ \t ooCedilla ç \c cO-E ligature œ, Œ \oe, \OEA-E ligature æ, Æ \ae, \AEA-ring å, Å \aa, \AAO-slash ø, Ø \o, \OSoft-l ł, Ł \l, \LEss-zet (scharfes-S) ß \ss
If you use this symbolic method only, you do not need to use the inputenc package.Before the days of keyboards and screens with their own real accented characters, thesymbolic notation was the only way to get accents, so you may come across a lot ofolder documents (and users!) using this method all the time.
Irish and Turkish dotless-ı is done with the special command \i, so an í-fada (whichis normally typed with £¤*¥¦í ) requires \’\i if you need to type it in long format, followedby a backslash-space or dummy pair of curly braces if it comes at the end of a wordand there is no punctuation, because of the rule that LATEX control sequences whichend in a letter (see § 2.2.1) always absorb any following space. So what you normallytype as Rí Teamrac has to be R\’\i\ Tea\.mra\.c when typed in full (there are notusually any keyboard keys for the dotless-ı or the lenited characters). A similar ruleapplies to dotless-§ .2.6 Sizes, hyphenation, justification, and breaking
LATEX’s internal measurement system is extraordinarily accurate. The underlying TEXengine conducts all its business in units smaller than the wavelength of visible light, soif you ask for 15mm space, that’s what you’ll get.4 At the same time, many dimensionsin LATEX’s preprogrammed formatting are specially set up to be flexible: so much space,plus or minus certain limits to allow the system to make its own adjustments toaccommodate variations like overlong lines, unevenly-sized images, and non-uniformspacing around headings.
TEX uses the most sophisticated justification algorithm known to achieve a smooth,even texture to normal paragraph text. The programming for this has been borrowedby a large number of other DTP systems, and users of these are often quite unaware thatthey are in fact using a significant part of TEX in their work. Occasionally, however,you will need to hand-correct an unusual word-break or line-break, and there arefacilities for doing this on individual occasions as well as throughout a document.
2.6.1 Specifying size units
Most people in printing and publishing habitually use points and picas and ems. Somedesigners use cm and mm. Many English-language speakers still use inches. However,you can specify lengths in LATEX in any of the following units:
4Within the limitations of your screen or printer, of course. Most screens cannot show dimensions of lessthan 1
96 ¨ ¨ without resorting to magnification or scaling, and even at 600dpi, fine oblique lines or curves on aprinter can still sometimes be seen to stagger the dots.
Formatting information £¤ ¥¦20
SESSION 2. USING YOUR EDITOR TO CREATE DOCUMENTS 2.6. SIZES, HYPHENATION, JUSTIFICATION, AND BREAKING
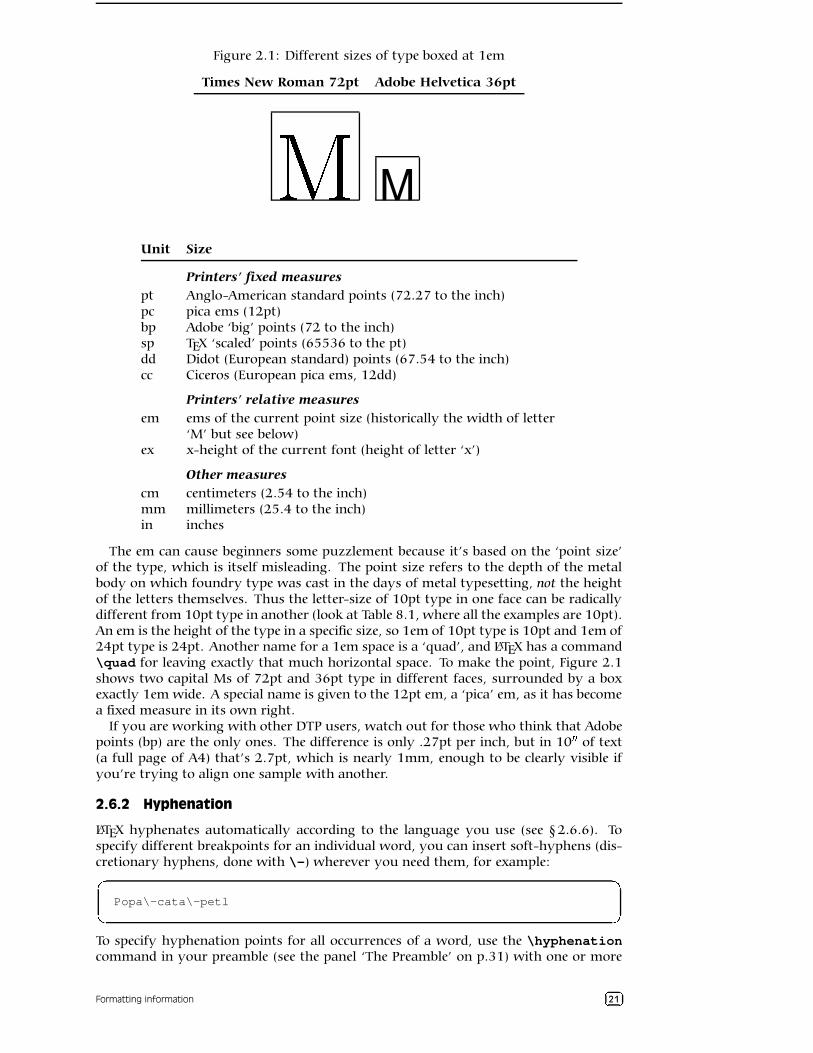
Figure 2.1: Different sizes of type boxed at 1em
Times New Roman 72pt Adobe Helvetica 36pt
MUnit Size
Printers’ fixed measures
pt Anglo-American standard points (72.27 to the inch)pc pica ems (12pt)bp Adobe ‘big’ points (72 to the inch)sp TEX ‘scaled’ points (65536 to the pt)dd Didot (European standard) points (67.54 to the inch)cc Ciceros (European pica ems, 12dd)
Printers’ relative measures
em ems of the current point size (historically the width of letter‘M’ but see below)
ex x-height of the current font (height of letter ‘x’)
Other measures
cm centimeters (2.54 to the inch)mm millimeters (25.4 to the inch)in inches
The em can cause beginners some puzzlement because it’s based on the ‘point size’of the type, which is itself misleading. The point size refers to the depth of the metalbody on which foundry type was cast in the days of metal typesetting, not the heightof the letters themselves. Thus the letter-size of 10pt type in one face can be radicallydifferent from 10pt type in another (look at Table 8.1, where all the examples are 10pt).An em is the height of the type in a specific size, so 1em of 10pt type is 10pt and 1em of24pt type is 24pt. Another name for a 1em space is a ‘quad’, and LATEX has a command\quad for leaving exactly that much horizontal space. To make the point, Figure 2.1shows two capital Ms of 72pt and 36pt type in different faces, surrounded by a boxexactly 1em wide. A special name is given to the 12pt em, a ‘pica’ em, as it has becomea fixed measure in its own right.
If you are working with other DTP users, watch out for those who think that Adobepoints (bp) are the only ones. The difference is only .27pt per inch, but in 10 © © of text(a full page of A4) that’s 2.7pt, which is nearly 1mm, enough to be clearly visible ifyou’re trying to align one sample with another.
2.6.2 Hyphenation
LATEX hyphenates automatically according to the language you use (see § 2.6.6). Tospecify different breakpoints for an individual word, you can insert soft-hyphens (dis-cretionary hyphens, done with \-) wherever you need them, for example:ª«
¬Popa\-cata\-petl
To specify hyphenation points for all occurrences of a word, use the \hyphenationcommand in your preamble (see the panel ‘The Preamble’ on p.31) with one or more
Formatting information ®¯3°±21
SESSION 2. USING YOUR EDITOR TO CREATE DOCUMENTS 2.6. SIZES, HYPHENATION, JUSTIFICATION, AND BREAKING
words in its argument, separated by spaces. This will even let you break ‘helico-pter’correctly.²³
´µ\hyphenation{helico-pter Popa-cata-petl im-mer-sion}
2.6.3 Unbreakable text
To force LATEX to treat a word as unbreakable (the opposite of hyphenation), use the\mbox command: \mbox{pneumonoultramicroscopicsilicovolcanoconiosis}.This may have undesirable results, however, if you change margins: pneumonoultramicroscopicsilicovolcanoconiosis…
To tie two words together with an unbreakable space (hard space), use a tilde (˜)instead of the space. This will print as a normal space but LATEX will never break theline at that point. You should make this standard typing practice for things like people’sinitials followed by their surname, as in Prof. D. E. Knuth: Prof.\ D.˜E.˜Knuth.
Note that a full point after a lowercase letter is treated as the end of a sentence, and
creates more space before the next word. Here, after ‘Prof.’, it’s not the end of a
sentence, and the backslash-space forces LATEX to insert just an ordinary word-space
because it’s OK to break the line after ‘Prof.’, whereas it would look wrong to have initials
separated with Prof. D.E. Knuth broken over a line-end.
2.6.4 Dashes
For a long dash — what printers call an ‘em rule’ like this — use three hyphens typedtogether, like˜--- this, and bind them to the preceding word with a tilde to avoidthe line being broken before the dash. It’s also common to see the dash printed withoutspaces—like that: the difference is purely æsthetic. Never use a single hyphen for thispurpose.
Between digits like page ranges (35–47), it is normal to use the short dash (whatprinters call an en-rule) which you get by typing two hyphens together, as in 35--47.If you want a minus sign, use math mode (§ 2.7).
2.6.5 Justification
The default mode for typesetting is justified (two parallel margins, with word-spacingadjusted automatically for the best optical fit). In justifying, LATEX will never add spacebetween letters, only between words. There is a special package called so (‘space-out’)if you need special effects like letter-spacing, but these are best left to the expert.
There are two commands \raggedright and \raggedleft which set ragged-right(ranged left) and ragged-left (ranged right). Use them inside a group (see the panel‘Grouping’ on p.76) to confine their action to a part of your text.These modes also exist as ‘environments’ (see § 3.2) called raggedright and raggedleft
which are more convenient when applying this formatting to a whole paragraph ormore, like this one.²
³
´
µ
\begin{raggedleft}These modes also exist as environments called raggedright andraggedleft which is more convenient when applying this formattingto a whole paragraph or more, like this one.\end{raggedleft}
2.6.6 Languages
LATEX can typeset in the native manner for several dozen languages. This affects hy-phenation, word-spacing, indentation, and the names of the parts of documents usedas headings (eg Table of Contents).
Most distributions of LATEX come with US English and one or more other languagesinstalled by default, but it is easy to add the babel package and specify any of thesupported languages or variants, for example:
Formatting information ¶·Q¸¹22
SESSION 2. USING YOUR EDITOR TO CREATE DOCUMENTS 2.7. MATHEMATICS
º
»
¼
½\usepackage[frenchb]{babel}...\selectlanguage{frenchb}
Changing the language with babel automatically changes the names of the structuralunits and identifiers like ‘Abstract’, ‘Index’, etc to their translated version. For example,using French as above, chapters will start with ‘Chapitre’.
2.7 Mathematics
As explained in the Preface, TEX was originally written to automate the typesettingof books containing mathematics. The careful reader will already have noticed thatmathematics is handled differently from normal text, which is why it has to be typesetspecially. This document does not cover mathematical typesetting, which is explainedin detail in many other books and Web pages, so all we will cover here is the existenceof the math mode commands, and some characters which have special meaning, sothey don’t trip you up elsewhere.
In addition to the 10 special characters listed in § 2.3, there are three more characterswhich only have any meaning inside mathematics mode:
Key Meaning¾¿'ÀÁ| Vertical bar¾¿'ÀÁ< Less-than¾¿ ÀÁ> Greater-than
If you type any of these in normal text (ie outside math mode), you will get veryweird things happening and lots of error messages. If you need to print these charac-ters, you must type them using math mode.
The hyphen also has an extra meaning in math mode: it typesets as a minus sign,so if you want to write about negative numbers you need to type the number in mathmode so the minus sign and the spacing come out right.
To use math mode within a paragraph, enclose your math expression in \( and \)commands. You can get the much-quoted equation E Â mc2 by typing \(E=mcˆ2\),and to get a temperature like -30° you need to type \(-30\)°.5
To typeset a math expression as ‘displayed math’ (centered between paragraphs),enclose it in the commands \[ and \].6
º
»
¼
½
\[\bar nˆ*_j(s)=\frac{\left\{s\sumˆk_{i=1}n_i(0)pˆ*_{i,k+1}(s)+Mˆ*(s)\right\}\sumˆk_{i=1}p_{0i}pˆ*{ij}(s)}{1-s\sumˆk_{i=1}p_{0i}pˆ*_{i,k+1}(s)}+\sumˆk_{i=1}n_i(0)pˆ*_{ij}(s)[j=1,2,\dots,k].\]
n à j Ä s ÅÆÂÇ
s∑ki È 1 ni É 0 Ê p Ëi Ì k Í 1 É s Ê|Î M Ë É s ÊÐÏ ∑k
i È 1 p0i p Ë i j É s Ê1 Ñ s∑k
i È 1 p0i p Ëi Ì k Í 1 É s Ê Ò ∑ki Ó 1 ni Ä 0 Å p Ãi j Ä s Å [j=1,2,…,k]
Displayed equations can be auto-numbered by using the equation environment in-stead of the \[ and \] commands.
5Bear in mind that the degree symbol is a non-ASCII character, so you must specify what input encodingyou are using if you want to type it: see the example of the inputenc package in § 2.5. If you don’t wantto use non-ASCII characters (or if you are using a system which cannot generate them), you can use thecommand \textdegree to get the degree sign.
6You will also see dollar signs used for math mode. This is quite common but deprecated: it’s what plainTEX used in the days before LATEX, and the habit got ingrained in many mathematicians. It still works as aconvenient shorthand like $x=y$, as do double-dollars for display-mode math like $$E=mcˆ2$$, but theyare only mentioned here to warn readers seeing them in other authors’ work that \(…\) and \[…\] arethe proper LATEX commands.
Formatting information¾¿ ÀÁ23
SESSION 2. USING YOUR EDITOR TO CREATE DOCUMENTS 2.8. EDITORS
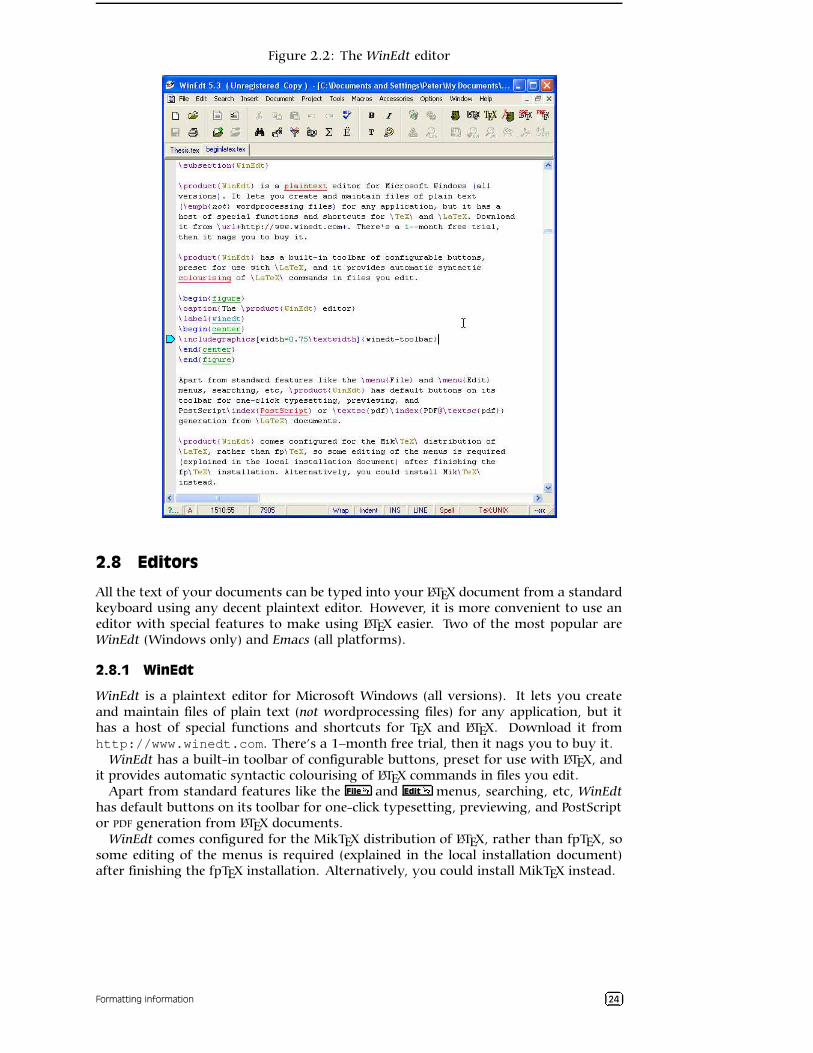
Figure 2.2: The WinEdt editor
2.8 Editors
All the text of your documents can be typed into your LATEX document from a standardkeyboard using any decent plaintext editor. However, it is more convenient to use aneditor with special features to make using LATEX easier. Two of the most popular areWinEdt (Windows only) and Emacs (all platforms).
2.8.1 WinEdt
WinEdt is a plaintext editor for Microsoft Windows (all versions). It lets you createand maintain files of plain text (not wordprocessing files) for any application, but ithas a host of special functions and shortcuts for TEX and LATEX. Download it fromhttp://www.winedt.com. There’s a 1–month free trial, then it nags you to buy it.
WinEdt has a built-in toolbar of configurable buttons, preset for use with LATEX, andit provides automatic syntactic colourising of LATEX commands in files you edit.
Apart from standard features like the File Ô and Edit Ô menus, searching, etc, WinEdthas default buttons on its toolbar for one-click typesetting, previewing, and PostScriptor PDF generation from LATEX documents.
WinEdt comes configured for the MikTEX distribution of LATEX, rather than fpTEX, sosome editing of the menus is required (explained in the local installation document)after finishing the fpTEX installation. Alternatively, you could install MikTEX instead.
Formatting information ÕÖ3×Ø24
SESSION 2. USING YOUR EDITOR TO CREATE DOCUMENTS 2.8. EDITORS
Figure 2.3: Emacs editing LATEX
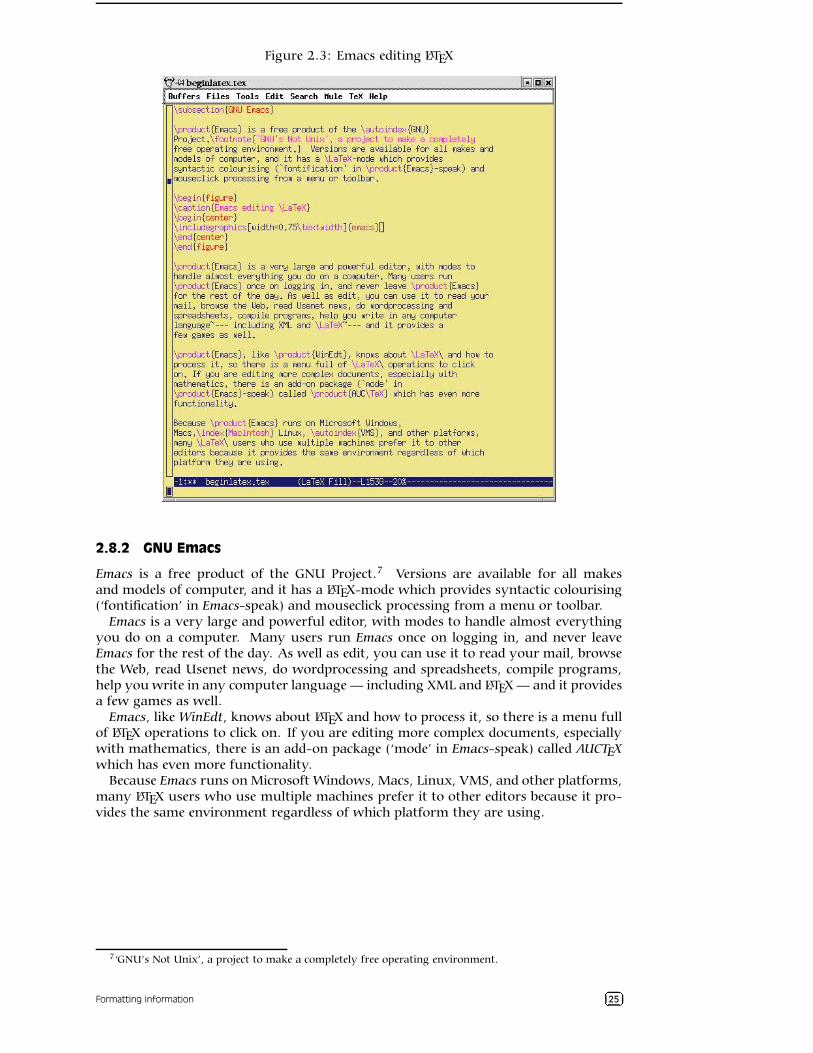
2.8.2 GNU Emacs
Emacs is a free product of the GNU Project.7 Versions are available for all makesand models of computer, and it has a LATEX-mode which provides syntactic colourising(‘fontification’ in Emacs-speak) and mouseclick processing from a menu or toolbar.
Emacs is a very large and powerful editor, with modes to handle almost everythingyou do on a computer. Many users run Emacs once on logging in, and never leaveEmacs for the rest of the day. As well as edit, you can use it to read your mail, browsethe Web, read Usenet news, do wordprocessing and spreadsheets, compile programs,help you write in any computer language — including XML and LATEX — and it providesa few games as well.
Emacs, like WinEdt, knows about LATEX and how to process it, so there is a menu fullof LATEX operations to click on. If you are editing more complex documents, especiallywith mathematics, there is an add-on package (‘mode’ in Emacs-speak) called AUCTEXwhich has even more functionality.
Because Emacs runs on Microsoft Windows, Macs, Linux, VMS, and other platforms,many LATEX users who use multiple machines prefer it to other editors because it pro-vides the same environment regardless of which platform they are using.
7‘GNU’s Not Unix’, a project to make a completely free operating environment.
Formatting information ÙÚ3ÛÜ25
SESSION III
Basic document structures
LATEX’s approach to formatting is to aim for consistency. This means that as long asyou identify each element of your document correctly, it will be typeset in the sameway as all the other elements like it, so that you achieve a professional finish withminimum effort.
Elements are the component parts of a document. The popular structure of parts,chapters, sections, subsections, subsubsections, paragraphs, lists, tables, figures, andso on is familiar to everyone from reading books, newspapers, magazines, reports,articles, and other classes of documents.
To achieve this consistency, every LATEX document must start by declaring whatdocument class it belongs to.
3.1 The Document Class Declaration
To tell LATEX what class of document you are going to create, you type a special firstline into your file which identifies it.1 To start a report, for example, you would typethe \documentclass command like this:ÝÞ
ßà\documentclass{report}
There are four default classes provided, and many others are available online:
report for business, technical, legal, academic, or scientific reports;
article for magazine or journal articles, reviews, conference papers, or research notes;
book for books and theses;
letter for letters.2
The Article class in particular can be used (some would say ‘abused’) for almost anyshort piece of typesetting by simply omitting the titling and layout (see below).
The default classes are normally only used for compatibility when exchanging docu-ments with other LATEX users, as they come with every copy of LATEX and are thereforeguaranteed to format identically everywhere. For most purposes, especially for publi-cation, you can download replacements or extensions of these classes:
• The memoir and komascript packages contain sophisticated replacements for all thedefault classes;
• Many academic and scientific publishers provide their own special class files forarticles and books (often on their Web sites for download).
1Readers familiar with SGML, HTML, or XML will recognize the concept as similar to the Document TypeDeclaration.
2The default Letter class is rather idiosyncratic: there are much better ones you can download and installyourself, such as the memoir and komascript packages.
Formatting information áâ3ãä26
SESSION 3. BASIC DOCUMENT STRUCTURES 3.1. THE DOCUMENT CLASS DECLARATION
• Conference organisers may also provide class files for authors to write papers forpresentation;
• Many universities provide their own thesis document class files in order to ensureexact fulfillment of their formatting requirements.
• Businesses and other organizations can provide their users with corporate style-sheets on a central server and configure LATEX installations to look there first forclass files and packages.
It is worth noting that some of the default document classes are intended for finalprinting on different sizes of paper than A4 or Letter. Books and journals are notusually printed on office-size paper, so printing them on standard office stationerymakes them look odd: the margins are too wide, or the positioning is unusual, or thefont size is too small. These default classes are adequate for drafts or for sending toanother LATEX user (because you know their system will understand them) but they arenot really sufficient for professional publishing purposes. For this you need a style filedesigned by the publisher to fit their series of publications (quite often based on thedefault classes, but looking very different). As noted earlier, the memoir and komascript
packages provide good facilities for helping design these.
3.1.1 Document class options
The default layouts are designed for US ‘Letter’ size paper.3 To create documents withthe correct proportions for standard A4 paper, you need to specify the paper size in anoptional argument in square brackets before the document class name, egåæ
çè\documentclass[a4paper]{report}
The other default settings are for: a) 10pt type (all document classes); b) two-sidedprinting (books and reports) or one-sided (articles and letters); and c) separate title page(books and reports only). These can be modified with the following document classoptions which you can add in the same set of square brackets, separated by commas:
11pt to specify 11pt type (headings, footnotes, etc get scaled up or down in proportion);
12pt to specify 12pt type (headings scale);
oneside to format one-sided printing for books and reports;
twoside to format articles for two-sided printing;
titlepage to force articles to have a separate title page.
draft makes LATEX indicate hyphenation and justification problems with a small blacksquare in the right-hand margin of the problem line so they can be located quicklyby a human.
There are extra preset options for other type sizes which can be downloaded sep-arately (10pt, 12pt, and 12pt between them cover probably 95% of all documenttypesetting). In addition there are hundreds of add-in packages which can automateother layout and formatting variants without you having to program anything byhand or even change your text.
3Letter size is 8½"x11", which is the trimmed size of the old Demy Quarto, still in use in North America.The other common US office size is ‘Legal’, which is 8¼"x14", a bastard cutting, but close to the old Foolscap(8¼"x13¼"). ISO standard paper sizes are still virtually unknown in North America.
Formatting information éê3ëì27
SESSION 3. BASIC DOCUMENT STRUCTURES 3.2. THE DOCUMENT ENVIRONMENT
EXERCISE 1
Create a new document
1. Use your editor to create a new document.
2. Type in the Document Type Declaration as shown above.
3. Add a font size option if you wish.
4. In North America, omit the a4paper option or change it to letterpaper.
5. Save the file (make up a name) ensuring the name ends with .tex.
3.2 The document environment
After the Document Class Declaration, the text of your document is enclosed betweentwo commands which identify the beginning and end of the actual document:í
î
ï
ð
\documentclass[11pt,a4paper,oneside]{report}
\begin{document}...\end{document}
(You would put your text where the dots are.) The reason for marking off the beginningof your text is that LATEX allows you to insert extra setup specifications before it (wherethe blank line is in the example above: we’ll be using this soon). The reason formarking off the end of your text is to provide a place for LATEX to be programmed to doextra stuff automatically at the end of the document. We’re not going to do either ofthem here yet, though.
A useful side-effect of marking the end of the document text is that you can storecomments or temporary text underneath the \end{document} in the knowledge thatLATEX will never try to typeset them.
This \begin…\end pair is an example of a common LATEX structure called an en-vironment. Environments enclose text which is to be handled in a specific way. Allenvironments start with \begin{...} and end with \end{...} (putting the nameof the environment in the curly braces).
EXERCISE 2
Add a document environment
1. Add the document environment to your file.
2. Leave a blank line between the Document Class Declaration and the
\begin{document} (you’ll see why later).
3. Save the file.
3.3 Titling
The first thing you put in the document environment (immediately after the opening\begin{document}) is almost always your document title, the author’s name, andthe date (except in letters, which have a special set of commands for addressing whichwe’ll look at later).
Formatting information ñòQóô28
SESSION 3. BASIC DOCUMENT STRUCTURES 3.3. TITLING
õ
ö
÷
ø
\documentclass[11pt,a4paper,oneside]{report}
\begin{document}
\title{Practical Typesetting}\author{Peter Flynn\\Silmaril Consultants}\date{December 2003}\maketitle
\end{document}
The \title, \author, and \date commands should be self-explanatory. The dou-ble backslash (\\) means a linebreak. You always finish the title block with the\maketitle command, otherwise the titling will never be typeset. The \maketitlecommand is reprogrammable so you can alter the appearance of titles on a consistentbasis.
EXERCISE 3
Adding the title block
1. Add a \title, \author, \date, and \maketitle command to your
file.
2. Use your own name, make up a title, and give a date.
3. Add two backslashes after your name and add your organisation or
department name.
4. The order of the first three commands is not important, but the
\maketitle command must come last.
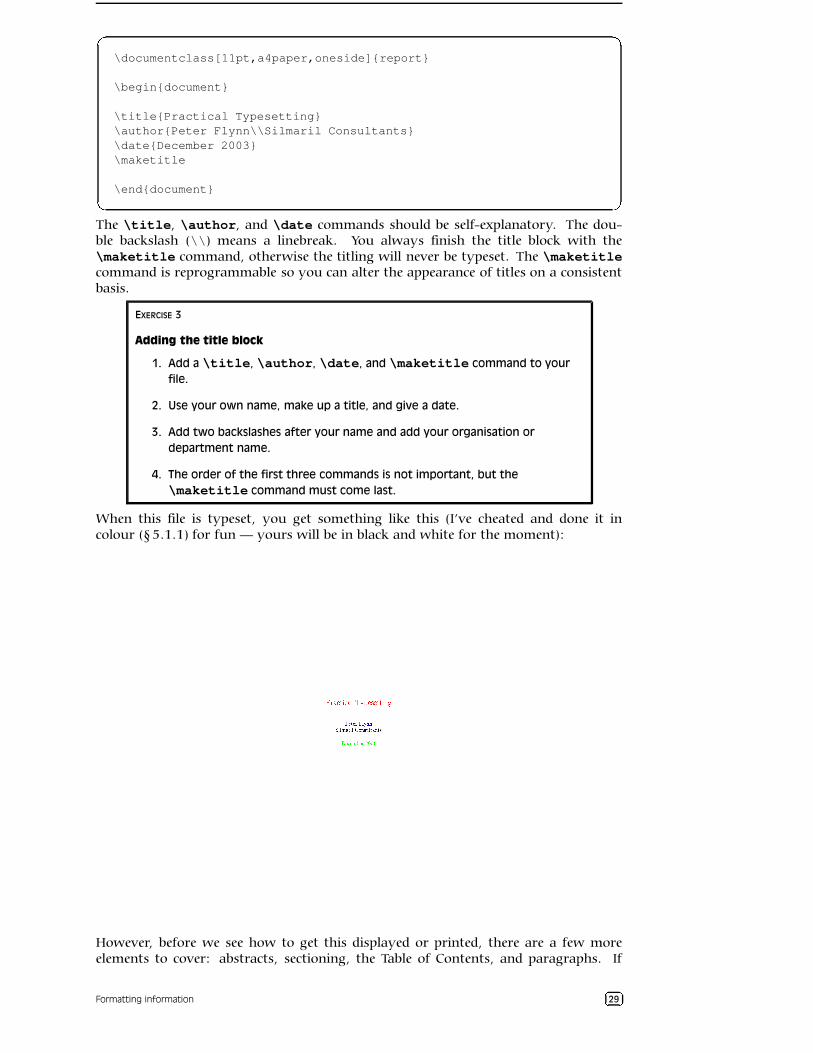
When this file is typeset, you get something like this (I’ve cheated and done it incolour (§ 5.1.1) for fun — yours will be in black and white for the moment):
ùûú üþý ÿ � ý ü�������� � ÿ ÿ � �� ��� � � ����� � � �� � � ��� � � � ��� � � � � � � � �!"� # � ��$ � ��% & & '
However, before we see how to get this displayed or printed, there are a few moreelements to cover: abstracts, sectioning, the Table of Contents, and paragraphs. If
Formatting information() *+29
SESSION 3. BASIC DOCUMENT STRUCTURES 3.4. ABSTRACTS AND SUMMARIES
you’re really impatient, though, refer to Session 4 to see how to typeset and display it.
3.4 Abstracts and summaries
In reports and articles it is normal for the author (you) to provide an Abstract orSummary, in which you describe briefly what you have written about and explain itsimportance. Abstracts in articles are usually only a few paragraphs long; Summariesin reports can run to several pages, depending on the length and complexity of thereport itself.
In both cases the Abstract or Summary is theoretically optional (that is, LATEX doesn’tforce you to have one), but almost always included. In practice, of course, you go backand type the Abstract or Summary after having written the rest of the document, butfor the sake of the example we’ll jump the gun and type it now.
Immediately after the \maketitle you can use the abstract environment, in whichyou simply type your Abstract or Summary, leaving a blank line between paragraphs(see § 3.6 for this convention).,
-
.
/
\documentclass[11pt,a4paper,oneside]{report}\usepackage[latin1]{inputenc}\renewcommand{\abstractname}{Summary}\begin{document}
\title{Practical Typesetting}\author{Peter Flynn\\Silmaril Consultants}\date{December 2001}\maketitle
\begin{abstract}This document presents the basic concepts of typesetting in aform usable by non-specialists. It is aimed at those who findthemselves (willingly or unwillingly) asked to undertake workpreviously sent out to a professional printer, and who areconcerned that the quality of work (and thus their corporateimage) does not suffer unduly.
The topics cover layout, the need for accuracy, the choice oftypeface, arrangement of the document, adherence tospecifications, and the production process. No foreknowledgeof printing or publishing is needed, but an eye for detail,a feeling for æsthetics, and some fluency with a computer isexpected.\end{abstract}
\end{document}
In business and technical documents, the Abstract is often called a Management Sum-mary, or Executive Summary, or Business Preview, or some similar phrase (see § 3.4).LATEX lets you change the name associated with the abstract environment to any kindof title you want, using the \renewcommand command to give the \abstractname anew value:,
-
.
/\renewcommand{\abstractname}{Executive Summary}
Notice how the name of the command you are renewing (\abstractname) goes in thefirst set of curly braces, and the new value you want it to have goes in the second setof curly braces. The environment you use is still called abstract (that is, you still type\begin{abstract}…\end{abstract}): what the \abstractname does is changethe name that gets displayed and printed, not the name of the environment you storethe text in.
Formatting information 0132430
SESSION 3. BASIC DOCUMENT STRUCTURES 3.5. SECTIONS
EXERCISE 4
Using an Abstract or Summary
1. Add the \renewcommand line given above to your Preamble.
The Preamble is at the start of the document, in that gap after the
\documentclass line but before the \begin{document} (remember
I said we’d see what we left it blank for: see the panel ‘The Preamble’ on
p.31).
2. Add an abstract environment after the \maketitle and type in a couple
of short paragraphs of text.
3. Save the file (no, I’m not paranoid, just careful).
If you look carefully at the example Abstract above, you’ll see I added an extra com-mand to the Preamble (\usepackage[latin1]{inputenc}). We’ll see later whatthis means (Brownie points for guessing it, though, if you read § 2.5).
The Preamble
Modifications which you want to affect a whole document go at the verystart of your LATEX file, immediately after the \documentclass line andbefore the \begin{document} line:5
6
7
8
\documentclass[11pt,a4paper,oneside]{report}\renewcommand{\abstractname}{Sneak Preview}\begin{document}...\end{document}
This position, between the Document Class Declaration and the beginningof the document environment, is called the preamble, and it is used forsmall or temporary modifications to the style and behaviour of the docu-ment. Major or permanent modifications should go in a .sty file and beinvoked with a \usepackage command.
3.5 Sections
In the body of your document, LATEX provides seven levels of division or sectioning foryou to use in structuring your text. They are all optional: it is perfectly possible towrite a document consisting solely of paragraphs of unstructured text. Even novelsare normally divided into chapters, although short stories are often made up solely ofparagraphs.
Two of these divisions, Parts and Chapters, are only available in the book and report
document classes, because they don’t have any meaning in articles and letters.4
Depth Division Command Notes
9 1 Part \part Only in books and reports0 Chapter \chapter Only in books and reports1 Section \section Not in letters2 Subsection \subsection Not in letters3 Subsubsection \subsubsection Not in letters4 Titled paragraph \paragraph Not in letters5 Titled subparagraph \subparagraph Not in letters
4It is arguable that chapters also have no place in reports, either, as these are conventionally divided intosections as the top-level division. LATEX, however, assumes your reports have chapters, but this is only thedefault, and can be changed very simply (see Session 9).
Formatting information :;3<=31
SESSION 3. BASIC DOCUMENT STRUCTURES 3.5. SECTIONS
In each case the title of the part, chapter, section, etc goes in curly braces after thecommand. LATEX automatically calculates the correct numbering and prints the title inbold. You can turn section numbering off at a specific depth: details in § 3.5.1.>
?
@
A
\section{New recruitment policies}...\subsection{Effect on staff turnover}...\chapter{Business plan 2004--2006}
There are packages5 to let you control the typeface, style, spacing, and appearance ofsection headings: it’s much easier to use them than to try and reprogram the headingsmanually. Two of the most popular are the ssection and sectsty packages.
Headings also get automatically put into the Table of Contents, if you specify one (it’soptional, and we haven’t done that yet: see § 3.7). But if you make manual stylingchanges to your heading, for example a very long title, or some special line-breaksor unusual font-play, this would appear in the Table of Contents as well, which youalmost certainly don’t want. LATEX allows you to give an optional extra version of theheading text for use only in the Table of Contents. This goes in [square brackets] beforethe curly braces:>
?
@
A
\section[Effect on staff turnover]{The effect of the revisedrecruitment policies on staff turnover at divisionalheadquarters}
EXERCISE 5
Start your document text
1. Add a \chapter command after your Abstract or Summary, giving the
title of your first chapter.
2. If you’re planning ahead, add a few more for chapters 2, 3, etc. Leave a few
blank lines between them to make it easier to add paragraphs of text later.
3. I shouldn’t need to tell you what to do after making significant changes to
your document file.
3.5.1 Section numbering
All document divisions get numbered by default. Parts get Roman numerals (Part I,Part II, etc); chapters and sections get decimal numbering, and Appendixes (which arejust a special case of chapters, and share the same structure) are lettered (A, B, C, etc).
You can change the depth to which section numbering occurs, so you can turn it offselectively. In this document it is set to 3. If you only wanted parts, chapters, andsections numbered, not subsections or subsubsections etc, you could change the valueof the secnumdepth counter using the the \setcounter command, giving the depthvalue from the table in § 3.5:>
?
@
A\setcounter{secnumdepth}{1}
A related counter is tocdepth, which specifies what depth to take the Table of Contentsto. It can be reset in exactly the same way as secnumdepth. The current setting forthis document is 2.
To get an unnumbered section heading which does not go into the Table of Contents,follow the command name with an asterisk before the opening curly brace:
5Details of how to use LATEX packages are in § 5.1.
Formatting information BCEDF32
SESSION 3. BASIC DOCUMENT STRUCTURES 3.6. ORDINARY PARAGRAPHS
G
H
I
J\subsection*{Shopping List}
All the divisional commands from \part* to \subparagraph* have this ‘starred’version which can be used on special occasions for an unnumbered heading when thesetting of secnumdepth would normally mean it would be numbered.
3.6 Ordinary paragraphs
After section headings comes your text. Just type it and leave a blank line betweenparagraphs. That’s all LATEX needs.
The blank line means ‘start a new paragraph here’: it does not (repeat: not) meanyou get a blank line in the typeset output. Now read this paragraph again.
The spacing between paragraphs is a separately definable quantity, a dimension orlength called \parskip. This is normally zero (no space between paragraphs, becausethat’s how books are normally typeset), but you can easily set it to any size you wantwith the \setlength command in the Preamble:G
H
I
J\setlength{\parskip}{1cm}
This will set the space between paragraphs to 1cm. See § 2.6.1 for details of the varioussize units LATEX can use. Leaving multiple blank lines between paragraphs in your sourcedocument achieves nothing: all extra blank lines get ignored by LATEX because the spacebetween paragraphs is controlled only by the value of \parskip. To change the spacebetween paragraphs, specify it with the command as shown above.
White-space in LATEX can also be made flexible (what LATEX: A Document PreparationSystem6 calls ‘rubber’ lengths). This means that values such as \parskip can havea default dimension plus an amount of expansion minus an amount of contraction.This is useful on pages in complex documents where not every page will be an exactnumber of fixed-height lines long, so some give-and-take in vertical space is useful.You specify this in a \setlength command like this:G
H
I
J\setlength{\parskip}{1cm plus4mm minus3mm}
Paragraph indentation can also be set with the \setlength command, although youwould always make it a fixed size, never a flexible one, otherwise you would have veryragged-looking paragraphs.G
H
I
J\setlength{\parindent}{6mm}
By default, the first paragraph after a heading follows the standard Anglo-Americanpublishers’ practice of no indentation. Subsequent paragraphs are indented by thevalue of \parindent (default 18pt).7 You can change this in the same way as anyother length:
In the printed copy of this document, the paragraph indentation is set to 10.0pt andthe space between paragraphs is set to 0.0pt plus 1.0pt. These values do not applyin the Web (HTML) version because not all browsers are capable of that fine a levelof control, and because users can apply their own stylesheets regardless of what thisdocument proposes.
6Lamport, (1994)7Paragraph spacing and indentation are cultural settings. If you are typesetting in a language other than
English, you should use the babel package, which alters many things, including the spacing and the namingof sections, to conform with the standards of different countries and languages.
Formatting information KL3MN33
SESSION 3. BASIC DOCUMENT STRUCTURES 3.7. TABLE OF CONTENTS
EXERCISE 6
Start typing!
1. Type some paragraphs of text. Leave a blank line between each. Don’t
bother about line-wrapping or formatting — LATEX will take care of all that.
2. If you’re feeling adventurous, add a \section command with the title of
a section within your first chapter, and continue typing paragraphs of text
below that.
3. Add one or more \setlength commands to your Preamble if you want
to experiment with changing paragraph spacing and indentation.
To turn off indentation completely, set it to zero (but you still have to provide units:it’s still a measure!)O
P
Q
R\setlength{\parindent}{0in}
If you do this, though, and leave \parskip set to zero, your readers won’t be ableto tell easily where each paragraph begins! If you want to use the style of having noindentation with a space between paragraphs, use the parskip package, which does itfor you (and makes adjustments to the spacing of lists and other structures which useparagraph spacing, so they don’t get too far apart).
3.7 Table of contents
All auto-numbered headings get entered in the Table of Contents (ToC) automati-cally. You don’t have to print a ToC, but if you want to, just add the simple com-mand \tableofcontents at the point where you want it printed (usually after the\maketitle command and before the Abstract or Summary.
Entries for the ToC are recorded each time you process your document, and repro-duced the next time you process it, so you need to re-run LATEX one extra time to ensurethat all ToC page-number references are correctly calculated.
We’ve already seen in § 3.5 how to use the optional argument to the sectioningcommands to add text to the ToC which is slightly different from the one printed in thebody of the document. It is also possible to add extra lines to the ToC, to force extra orunnumbered section headings to be included.
EXERCISE 7
Inserting the table of contents
1. Go back and add a \tableofcontents command after the
\maketitle command in your document.
2. You guessed.
The commands \listoffigures and \listoftables work in exactly the same wayas \tableofcontents to automatically list all your tables and figures. If you usethem, they normally go after the \tableofcontents command. The \tableofcontentscommand normally shows only numbered section headings, and only down to the leveldefined by the tocdepth counter (see § 3.5.1). But you can add extra entries, for ex-ample if you use an unnumbered section heading command to start a preliminary pieceof text like a Foreword or Preface:O
P
Q
R\subsection*{Preface}\addcontentsline{toc}{subsection}{Preface}
Formatting information ST3UV34

SESSION 3. BASIC DOCUMENT STRUCTURES 3.7. TABLE OF CONTENTS
This will format an unnumbered ToC entry for ‘Preface’ in the ‘subsection’ font style.You can use the same mechanism to add lines to the List of Figures or List of Tables bysubstituting lof or lot for toc.
Formatting information WX3YZ35
SESSION IV
Typesetting, viewing and printing
We’ve now got far enough to typeset what you’ve entered. I’m assuming at this stagethat you have typed some sample text in the format specified in the previous chapter,and you’ve saved it in a plaintext file with a filetype of .tex and a name of your ownchoosing.
EXERCISE 8
Saving your file
If you haven’t already saved your file, do so now (some editors and interfaces let
you typeset the document without saving it!).
Pick a sensible filename in a sensible directory. Names should be short enough
to display and search for, but descriptive enough to make sense.
Picking suitable filenames
Never, ever use directories (folders) or file names which contain spaces.Although your operating system probably supports them, some don’t,and they will only cause grief and tears.Make filenames as short or as long as you wish, but strictly avoid spaces.Stick to upper- and lower-case letters without accents (A–Z and a–z), thedigits 0–9, the hyphen (-), and the full point or period (.), (similar to theconventions for a Web URL): it will let you refer to TEX files over the Webmore easily and make your files more portable.
4.1 Typesetting
Typesetting your document is usually done with by clicking on a button in a toolbaror an entry in a menu. Which one you click on depends on what output you want.
• The standard (default) LATEX program produces a device-independent (DVI) filewhich can be used with any TEX viewer or printer driver on any make or modelof computer (there are dozens of these available: at least one of each (viewer andprinter driver) should have been installed with your distribution of TEX).
• The pdflatex program produces an Adobe Acrobat Portable Document Format (PDF)file which can be used with any suitable viewer, such as GSview, PDFview, theOpera browser, or Adobe’s own Acrobat Reader.
Depending on which one you choose, you may have to [re]configure your editor sothat it runs the right program. They can all do all of them, but they don’t alwayscome pre-set with buttons or menus for every possible option, because they can’t guesswhich one you want.
Formatting information [\3]^36
SESSION 4. TYPESETTING, VIEWING AND PRINTING 4.1. TYPESETTING
4.1.1 Standard LATEX
There are two ways of running LATEX: from the toolbar or menu, or from the commandline. Toolbars and menus are most common in graphical systems, and are the normalway to run LATEX. Command lines are used in non-graphical systems and in automatedprocesses where LATEX is run unattended (so-called ‘batch’ or ‘scripted’ processing).
EXERCISE 9
Running LATEX from the toolbar or menu
Run LATEX on your file according to which system you’re using:
• In WinEdt, click the LATEX toolbar icon;
• In Emacs, click the TEXTEX File _ menu item.
Your editor may suggest you save your file if you haven’t already done so. Do it.
Whichever way you run LATEX, it will process your file and display a log or record ofwhat it’s doing (see the example in Exercise 10: it looks the same no matter whatsystem you use). This is to let you see where (if!) there are any errors or problems.
Don’t panic if you see errors: it’s very common for learners to mistype or mis-spellcommands, forget curly braces, or type a forward slash instead of a backslash. Theyare easily spotted (lines in the log window beginning with an exclamation mark) andeasily corrected in your editor, and you can run LATEX again to check you have fixedeverything. § 4.2 describes some of the most common mistakes and suggests how tofix them.
When LATEX finds an error (a real one, not just a warning), it displays and errormessage and pauses. You must type one of the following letters to continue:
Key Meaning`abcx Stop immediately and exit the program.`
abcq Carry on quietly as best you can and don’t bother me with any
more error messages.`abce Stop the program but re-position the text in my editor at the
point where you found the error.`abch Try to give me more help.`
abci (followed by a correction) input the correction in place of the
error and carry on.
The log will also tell you if there were problems with overlong or underrun lines(unusual hyphenations, for example), pages running short or long, and other typo-graphical niceties (most of which you can ignore until later).
Unlike other systems, which try to hide unevennesses in the text — usually unsuc-cessfully — by interfering with the letter-spacing, LATEX takes the view that the authoror editor should be able to contribute. While it is certainly possible to set LATEX’s pa-rameters so that the spacing is sufficiently sloppy that you will almost never get awarning about badly-fitting lines or pages, you will almost certainly just be delayingmatters until you start to get complaints from your readers or publishers.
In WinEdt the log appears in a separate window and you have to press the`a
bcEnter key
to dismiss it after checking it. In Emacs, the log appears in the bottom half of the editwindow and can be dismissed with the Files
One Window _ menu or by pressing`a
bcCtrl –`abcX`abc1 .
If there were no errors, your file is ready for displaying or printing.
4.1.2 pdfLATEX
If you have configured your editor to generate PDF files direct instead of DVI files, byusing the pdflatex program instead of standard LATEX, then you click the pdfLATEX iconin WinEdt or type the pdflatex command in a terminal window (exactly the samemethod as shown above for standard LATEX). Emacs does not have a default menuconfigured for pdflatex.
Formatting information`a bc37

SESSION 4. TYPESETTING, VIEWING AND PRINTING 4.2. ERROR MESSAGES
4.1.3 Running LATEX from a command window
This is worth practising even if you normally use a graphical access system, so thatyou understand what it does.
EXERCISE 10
Running LATEX in a terminal
• If you are using a non-graphical system, then by definition you are already
using a command-line terminal.
• Under Linux or Unix (X Window systems such as KDE, Gnome, OpenWindows,
CDE, etc) you open a command (shell) window by clicking on the shell or
screen icon in the control panel at the bottom of your screen.
• Under Microsoft Windows you open a command window by clicking on theStart Programs MS-DOS d or Start Command Prompt d menu item.
When the command window appears, typee
f
g
hcd ˜/documents
Substitute the name of your document directory (folder) for documents in the
cd command, and your document filename for mybook in the latex command.
Remember to press the ij klEnter key at the end of each line.
You can run pdflatex in the same way by typing pdflatex instead of latex.
4.2 Error messages
Most error messages are self-explanatory, but because some errors can only be rightedby humans who can read and understand what it’s supposed to mean, they don’t getspotted by LATEX until much later, leading to several messages in a row.
Only a few common error messages are given here: those most likely to be encoun-tered by beginners. If you find another error message, and it’s not clear what youshould do, ask for help.
Fortunately it’s usually easy to find LATEX errors, as the layout of an error message isthe same all the time. Error messages begin with an exclamation mark at the start ofthe line in the log, and give a description of the error, followed by a line starting withthe line number in your document file where the error was spotted.
Formatting information mnEop38
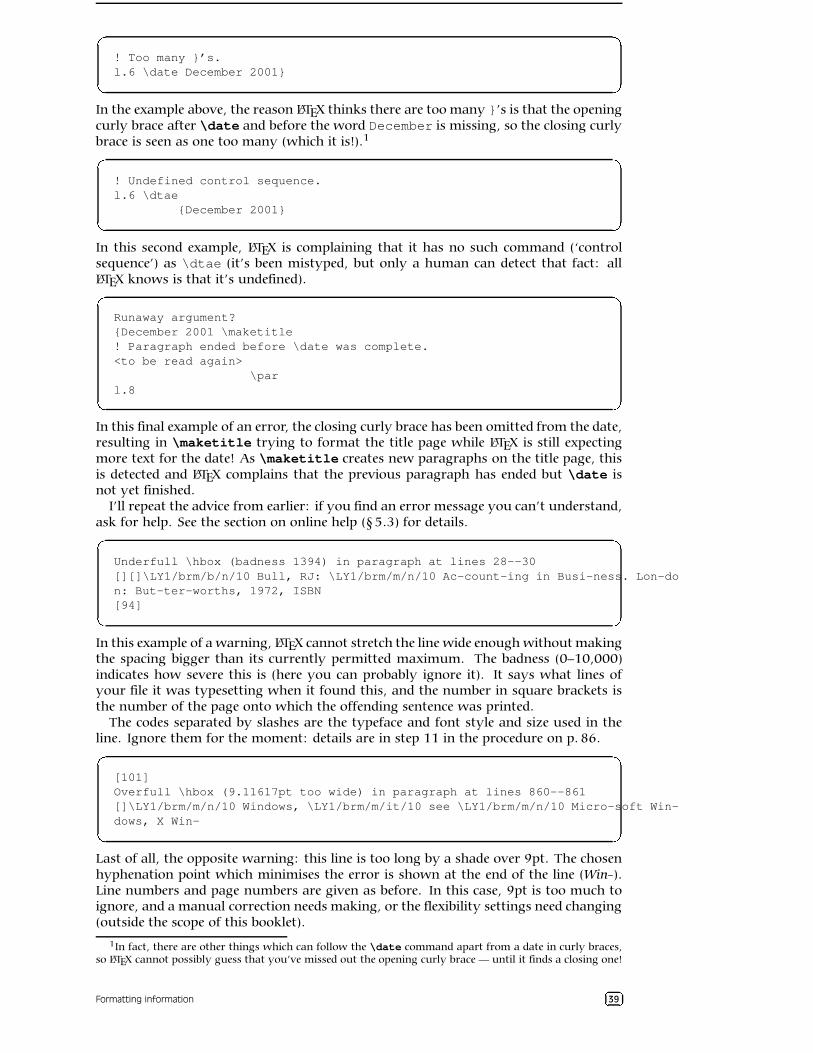
SESSION 4. TYPESETTING, VIEWING AND PRINTING 4.2. ERROR MESSAGES
q
r
s
t! Too many }’s.l.6 \date December 2001}
In the example above, the reason LATEX thinks there are too many }’s is that the openingcurly brace after \date and before the word December is missing, so the closing curlybrace is seen as one too many (which it is!).1q
r
s
t
! Undefined control sequence.l.6 \dtae
{December 2001}
In this second example, LATEX is complaining that it has no such command (‘controlsequence’) as \dtae (it’s been mistyped, but only a human can detect that fact: allLATEX knows is that it’s undefined).q
r
s
t
Runaway argument?{December 2001 \maketitle! Paragraph ended before \date was complete.<to be read again>
\parl.8
In this final example of an error, the closing curly brace has been omitted from the date,resulting in \maketitle trying to format the title page while LATEX is still expectingmore text for the date! As \maketitle creates new paragraphs on the title page, thisis detected and LATEX complains that the previous paragraph has ended but \date isnot yet finished.
I’ll repeat the advice from earlier: if you find an error message you can’t understand,ask for help. See the section on online help (§ 5.3) for details.q
r
s
t
Underfull \hbox (badness 1394) in paragraph at lines 28--30[][]\LY1/brm/b/n/10 Bull, RJ: \LY1/brm/m/n/10 Ac-count-ing in Busi-ness. Lon-don: But-ter-worths, 1972, ISBN[94]
In this example of a warning, LATEX cannot stretch the line wide enough without makingthe spacing bigger than its currently permitted maximum. The badness (0–10,000)indicates how severe this is (here you can probably ignore it). It says what lines ofyour file it was typesetting when it found this, and the number in square brackets isthe number of the page onto which the offending sentence was printed.
The codes separated by slashes are the typeface and font style and size used in theline. Ignore them for the moment: details are in step 11 in the procedure on p. 86.q
r
s
t
[101]Overfull \hbox (9.11617pt too wide) in paragraph at lines 860--861[]\LY1/brm/m/n/10 Windows, \LY1/brm/m/it/10 see \LY1/brm/m/n/10 Micro-soft Win-dows, X Win-
Last of all, the opposite warning: this line is too long by a shade over 9pt. The chosenhyphenation point which minimises the error is shown at the end of the line (Win-).Line numbers and page numbers are given as before. In this case, 9pt is too much toignore, and a manual correction needs making, or the flexibility settings need changing(outside the scope of this booklet).
1In fact, there are other things which can follow the \date command apart from a date in curly braces,so LATEX cannot possibly guess that you’ve missed out the opening curly brace — until it finds a closing one!
Formatting information uv3wx39
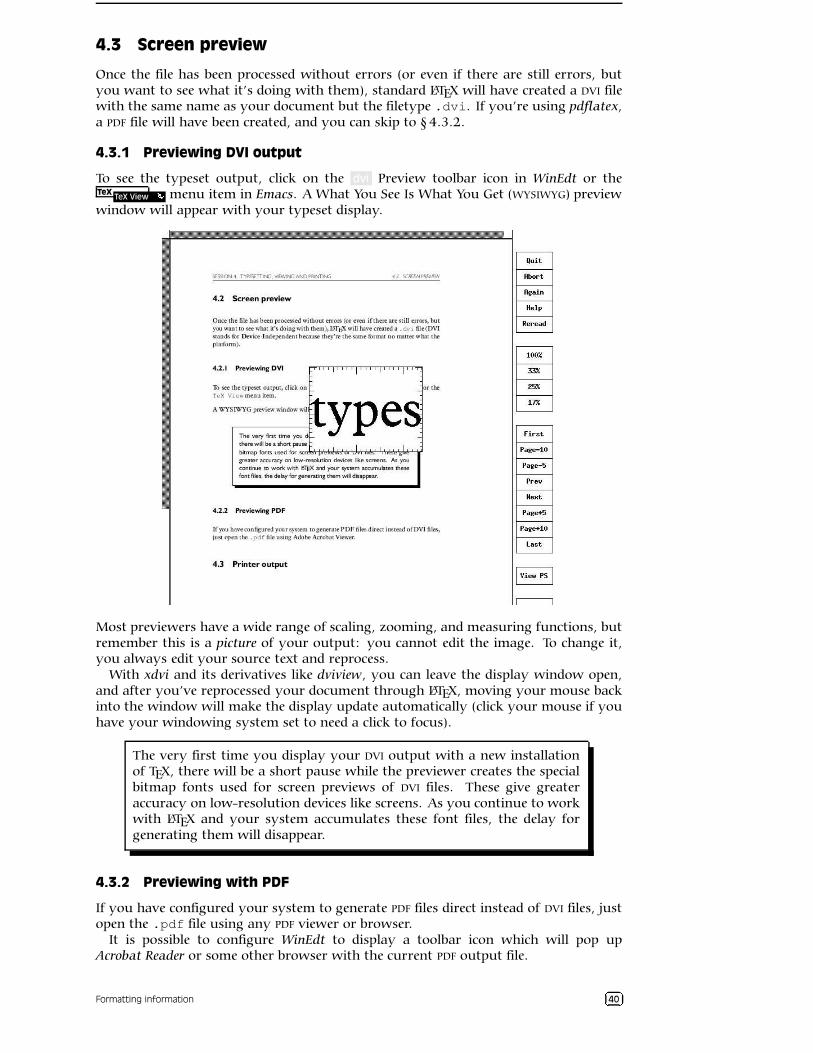
SESSION 4. TYPESETTING, VIEWING AND PRINTING 4.3. SCREEN PREVIEW
4.3 Screen preview
Once the file has been processed without errors (or even if there are still errors, butyou want to see what it’s doing with them), standard LATEX will have created a DVI filewith the same name as your document but the filetype .dvi. If you’re using pdflatex,a PDF file will have been created, and you can skip to § 4.3.2.
4.3.1 Previewing DVI output
To see the typeset output, click on the dvi Preview toolbar icon in WinEdt or theTeX
TeX View y menu item in Emacs. A What You See Is What You Get (WYSIWYG) previewwindow will appear with your typeset display.
Most previewers have a wide range of scaling, zooming, and measuring functions, butremember this is a picture of your output: you cannot edit the image. To change it,you always edit your source text and reprocess.
With xdvi and its derivatives like dviview, you can leave the display window open,and after you’ve reprocessed your document through LATEX, moving your mouse backinto the window will make the display update automatically (click your mouse if youhave your windowing system set to need a click to focus).
The very first time you display your DVI output with a new installationof TEX, there will be a short pause while the previewer creates the specialbitmap fonts used for screen previews of DVI files. These give greateraccuracy on low-resolution devices like screens. As you continue to workwith LATEX and your system accumulates these font files, the delay forgenerating them will disappear.
4.3.2 Previewing with PDF
If you have configured your system to generate PDF files direct instead of DVI files, justopen the .pdf file using any PDF viewer or browser.
It is possible to configure WinEdt to display a toolbar icon which will pop upAcrobat Reader or some other browser with the current PDF output file.
Formatting information z{3|}40
SESSION 4. TYPESETTING, VIEWING AND PRINTING 4.4. PRINTER OUTPUT
Adobe’s Acrobat Reader cannot automatically update the view if you reprocess yourdocument through pdflatex. You have to close the display with ~����Ctrl – ~����W and reload thefile with ~����Alt – ~����1 .
Bitmap fonts
Acrobat Reader is extremely poor at rendering Type3 bitmap fonts. If you are using these
(mostly old LATEX installations who have not upgraded to Type1), you will see very fuzzy
display at low magnifications. It will print perfectly, but Acrobat Reader’s display is
disappointing. The solution is to use a better viewer and to install and upgrade to the
Type1 versions of the CM fonts (see § 8.3.3), but there remain a few useful fonts which are
still only available in Type3 format. If you need to use them, you probably need to warn
your readers to expect a fuzzy display from Acrobat Reader (but good printout), and to
change to a better reader if they can.
4.3.3 Previewing with PostScript
PostScript is a page description language invented by Adobe and used in laser printersand high-end typesetters. It’s been the universal standard for electronically-formattedprint files for over a decade, and all printers and publishers are accustomed to usingthem. PDF is rapidly taking over, but PostScript is still extremely common, largelybecause it is very robust, and is usually an ASCII file, which makes it very portable andeasy to generate. The drawback is the large size of PostScript files, especially if theycontain bitmapped graphics.
The dvips program which comes with all TEX systems is used to generate PostScriptfiles directly from your DVI output. These .ps files can be viewed, printed, or sent to aplatemaker or filmsetter.
An alternative to viewing the DVI file direct is therefore to generate a PostScript file,especially if you’re going to have to do this for your publisher anyway, and manyeditors can be configured to do this by default. Look for a dvips toolbar icon or menuentry and click on it.
It’s very simple to do manually anyway: let’s assume your LATEX file was calledmydoc.tex, so processing it has created mydoc.dvi. Just type:�
�
�
�dvips -o mydoc.ps mydoc
in a command window (see Exercise 10 for how to get one) and dvips will createmydoc.ps which can be used both for previewing and printing.
To view a PostScript file, you need a PostScript previewer like GSview, which workswith the PostScript interpreter GhostScript, which should have been installed alongwith your whole TEX system (if not, install both now: GSview is separately licensed andcannot be distributed on the TEX Live CD-ROM, so you have to download it yourself).
GSview can be set to watch the PostScript file and automatically update the displayany time the file is changed, without you even having to click on the window.
4.4 Printer output
TEX systems print on almost anything from the simplest dot-matrix printers to thebiggest phototypesetters, including all the laser printers and a host of other devices inbetween. How you do it varies slightly according to how you do your typesetting andpreviewing:
If you are using PDF you can print directly from your PDF viewer (eg PDFview, Acrobat Reader,etc). Be careful never to click on the ‘Fit to page’ option in Acrobat Reader, other-wise it will change the size of your document so all your measurements becomewrong.
If you are using DVI and you have a previewer which has a print function configuredfor your printer, you can use that. If not, create a PostScript file and use that (seebelow).
Formatting information ~� ��41
SESSION 4. TYPESETTING, VIEWING AND PRINTING 4.4. PRINTER OUTPUT
If you are using PostScript use the print function in GSview.
If you have a real PostScript printer or you are using a system with built-in PostScriptprinting support (such as Linux), you can create and send PostScript outputdirectly from dvips to the printer without the need to open it in a previewer first.In Emacs, for example, this is what happens when you use the TEX
TEX Print � menuitem.
Non-PostScript printers You can create a PostScript file with dvips (see § 4.3.3) and useGSview to print it (GSview can print PostScript files to almost any make or modelof non-PostScript printer);
Or, if you want a non-PostScript/GhostScript solution install or configure a TEX print dri-ver for your printer (as supplied with your TEX installation, and there are dozenson CTAN: their names all start with dvi and are followed by an abbreviationfor the printer make or model like dvieps for Epson, dvihp for Hewlett-Packard,dvialw for Apple LaserWriters, etc). Configure the driver to print directly to theprint queue, or pipe it to the print queue manually. On Linux with a HP printer,for example, this would be
�
�
�
�dvihp mydoc | lpr
Microsoft Windows has no easy way to bypass the print spool, but you can do itfrom an MS-DOS command window with�
�
�
�dvihp mydoc -o mydoc.hpprint /b mydoc.hp
Read the documentation for the driver, as the options and defaults vary.
Both the dvips program and all the previewers that print tend to have facilities forprinting selected pages, printing in reverse, scaling the page size, and printing onlyodd or even pages for two-sided work. If you are using PostScript there are programsfor manipulating the output, for example to perform page imposition to get 4, 8, or16 pages to a sheet for making booklets.
EXERCISE 11
Print it!
Show that you have understood the process of typesetting, previewing, and
printing, by displaying your document and printing it.
Formatting information ��3��42
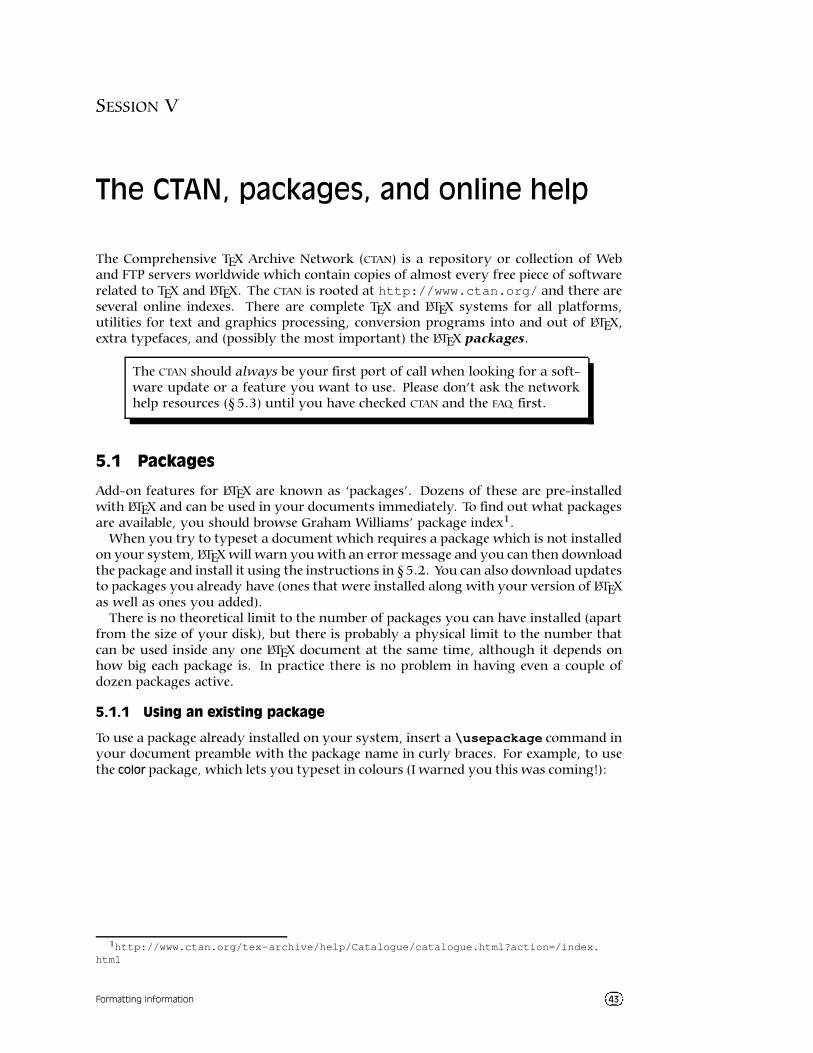
SESSION V
The CTAN, packages, and online help
The Comprehensive TEX Archive Network (CTAN) is a repository or collection of Weband FTP servers worldwide which contain copies of almost every free piece of softwarerelated to TEX and LATEX. The CTAN is rooted at http://www.ctan.org/ and there areseveral online indexes. There are complete TEX and LATEX systems for all platforms,utilities for text and graphics processing, conversion programs into and out of LATEX,extra typefaces, and (possibly the most important) the LATEX packages.
The CTAN should always be your first port of call when looking for a soft-ware update or a feature you want to use. Please don’t ask the networkhelp resources (§ 5.3) until you have checked CTAN and the FAQ first.
5.1 Packages
Add-on features for LATEX are known as ‘packages’. Dozens of these are pre-installedwith LATEX and can be used in your documents immediately. To find out what packagesare available, you should browse Graham Williams’ package index1.
When you try to typeset a document which requires a package which is not installedon your system, LATEX will warn you with an error message and you can then downloadthe package and install it using the instructions in § 5.2. You can also download updatesto packages you already have (ones that were installed along with your version of LATEXas well as ones you added).
There is no theoretical limit to the number of packages you can have installed (apartfrom the size of your disk), but there is probably a physical limit to the number thatcan be used inside any one LATEX document at the same time, although it depends onhow big each package is. In practice there is no problem in having even a couple ofdozen packages active.
5.1.1 Using an existing package
To use a package already installed on your system, insert a \usepackage command inyour document preamble with the package name in curly braces. For example, to usethe color package, which lets you typeset in colours (I warned you this was coming!):
1http://www.ctan.org/tex-archive/help/Catalogue/catalogue.html?action=/index.html
Formatting information ��E��43
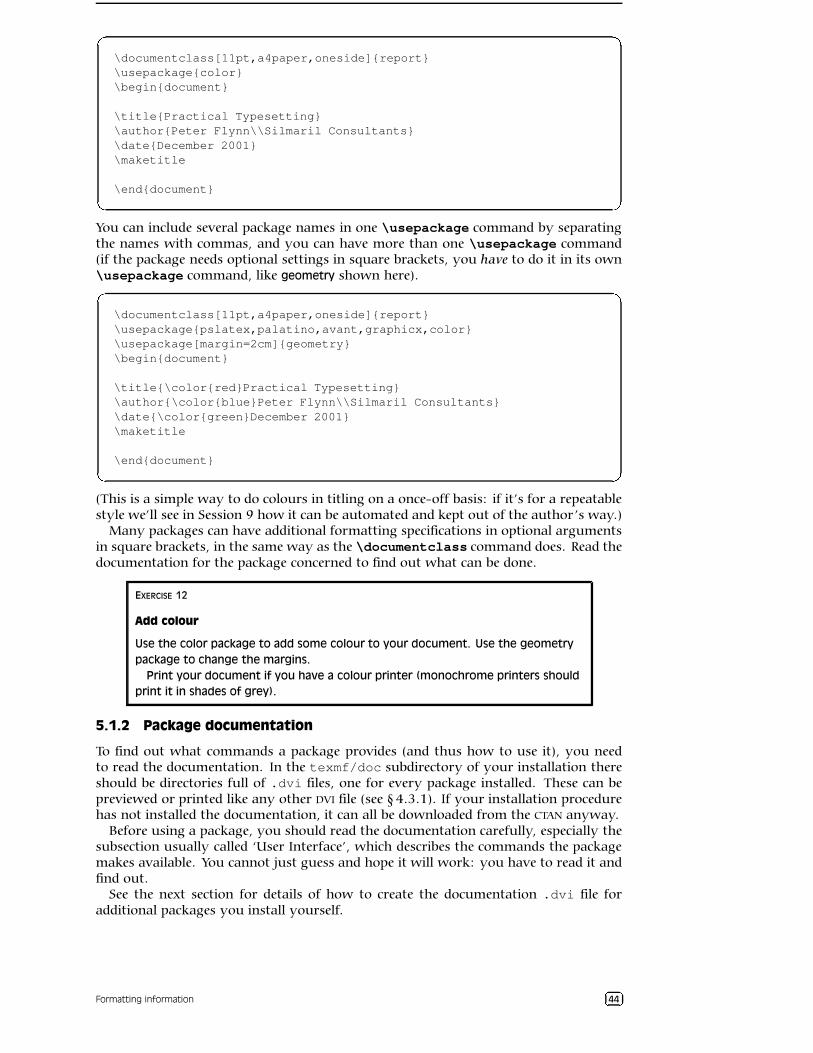
SESSION 5. THE CTAN, PACKAGES, AND ONLINE HELP 5.1. PACKAGES
�
�
�
�
\documentclass[11pt,a4paper,oneside]{report}\usepackage{color}\begin{document}
\title{Practical Typesetting}\author{Peter Flynn\\Silmaril Consultants}\date{December 2001}\maketitle
\end{document}
You can include several package names in one \usepackage command by separatingthe names with commas, and you can have more than one \usepackage command(if the package needs optional settings in square brackets, you have to do it in its own\usepackage command, like geometry shown here).�
�
�
�
\documentclass[11pt,a4paper,oneside]{report}\usepackage{pslatex,palatino,avant,graphicx,color}\usepackage[margin=2cm]{geometry}\begin{document}
\title{\color{red}Practical Typesetting}\author{\color{blue}Peter Flynn\\Silmaril Consultants}\date{\color{green}December 2001}\maketitle
\end{document}
(This is a simple way to do colours in titling on a once-off basis: if it’s for a repeatablestyle we’ll see in Session 9 how it can be automated and kept out of the author’s way.)
Many packages can have additional formatting specifications in optional argumentsin square brackets, in the same way as the \documentclass command does. Read thedocumentation for the package concerned to find out what can be done.
EXERCISE 12
Add colour
Use the color package to add some colour to your document. Use the geometry
package to change the margins.
Print your document if you have a colour printer (monochrome printers should
print it in shades of grey).
5.1.2 Package documentation
To find out what commands a package provides (and thus how to use it), you needto read the documentation. In the texmf/doc subdirectory of your installation thereshould be directories full of .dvi files, one for every package installed. These can bepreviewed or printed like any other DVI file (see § 4.3.1). If your installation procedurehas not installed the documentation, it can all be downloaded from the CTAN anyway.
Before using a package, you should read the documentation carefully, especially thesubsection usually called ‘User Interface’, which describes the commands the packagemakes available. You cannot just guess and hope it will work: you have to read it andfind out.
See the next section for details of how to create the documentation .dvi file foradditional packages you install yourself.
Formatting information ��3��44
SESSION 5. THE CTAN, PACKAGES, AND ONLINE HELP 5.2. DOWNLOADING AND INSTALLING PACKAGES
EXERCISE 13
Read all about it
Find and view (or print) the documentation on the geometry package you used in
Exercise 12.
Investigate one of the other package documentation files in the directory.
5.2 Downloading and installing packages
Once you have identified a package you need and haven’t already got (or you have gotit and need to update it), use the indexes on any CTAN server to find the directory wherethe package lives.
What you need to look for is always two files, one ending in .dtx and the other in.ins. The first is a DOCTEX file, which combines the package code and its documen-tation in a single file. The second is the installation routine (much smaller). You mustalways download both files.
If the two files are not there, it means the package is part of a much larger bundlewhich you don’t normally update unless you change version of LATEX. For example,there is no color.dtx and color.ins for the color package because it forms part ofthe graphics bundle. Such packages change very rarely, as they form part of the coreof LATEX and are very stable. In general you should not try to update them packages inisolation.
Some rare or unusual packages are still supplied as a single .sty file intended for thenow obsolete LATEX 2.09. You can try to use these if you wish but they are not guaran-teed to work, and have now almost all been replaced by LATEX2ε versions. Always lookfor the .dtx and .ins pair of files first.
Download both files to a temporary directory. Keep something like C:\tmp for thisin Windows; Linux systems already have a /tmp directory. There are four steps toinstalling a LATEX package:
1. Extract the filesRun LATEX on the .ins file. That is, open the file in your editor and process it as if itwere a LATEX document, or if you prefer, type latex followed by the .insfilenamein a command window in the temporary directory.
This will extract all the files needed from the .dtx file (which is why you musthave both of them present in the temporary directory). Note down or print thenames of the files created if there are a lot of them (read the log file if you wantto see their names again).
2. Create the documentation
Run LATEX on the .dtx file twice. This will create a .dvi file of documentationexplaining what the package is for and how to use it. Two passes through LATEXare needed in order to resolve any internal crossreferences in the text (a featurewe’ll come onto later). If you prefer to create PDF then run pdflatex instead. Viewor print this file in the usual manner (see § 4.3et seq).
3. Install the files
While the documentation is printing, move or copy the files created in step 1in the procedure on p. 45 from your temporary directory to the correct place[s]in your TEX installation directory tree. In an installation that conforms to theTEX Directory Structure (TDS), this would be suitably-named subdirectories oftexmf-local/tex/latex/. See the panel ‘Replicating the TDS’ on p.46 forwhere ‘the right place’ is.
Often there is just a .sty file to move but in the case of complex packages theremay be more, and they may belong in different locations. For example, newBIBTEX packages or font packages will typically have several files to install.
Formatting information � 3¡¢45
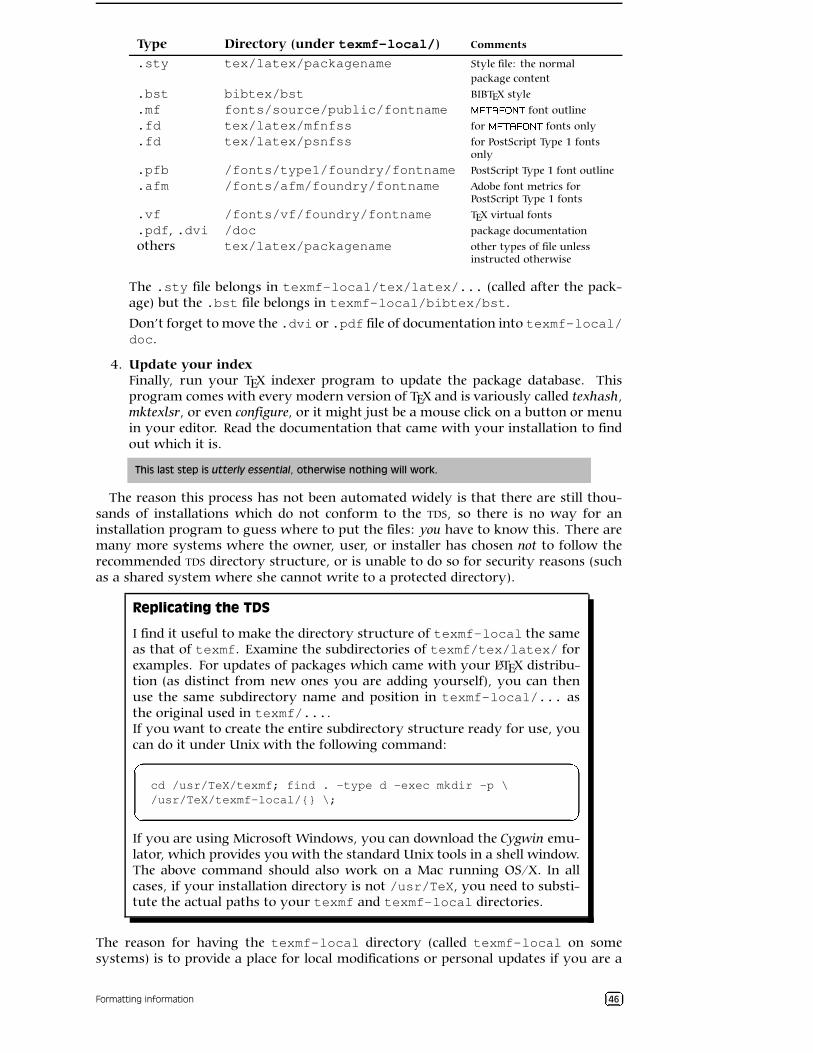
SESSION 5. THE CTAN, PACKAGES, AND ONLINE HELP 5.2. DOWNLOADING AND INSTALLING PACKAGES
Type Directory (under texmf-local/) Comments
.sty tex/latex/packagename Style file: the normalpackage content
.bst bibtex/bst BIBTEX style
.mf fonts/source/public/fontname £¥¤§¦©¨«ª¬¯®°¦ font outline
.fd tex/latex/mfnfss for £¥¤§¦©¨±ª²¬¯®°¦ fonts only
.fd tex/latex/psnfss for PostScript Type 1 fontsonly
.pfb /fonts/type1/foundry/fontname PostScript Type 1 font outline
.afm /fonts/afm/foundry/fontname Adobe font metrics forPostScript Type 1 fonts
.vf /fonts/vf/foundry/fontname TEX virtual fonts
.pdf, .dvi /doc package documentation
others tex/latex/packagename other types of file unlessinstructed otherwise
The .sty file belongs in texmf-local/tex/latex/... (called after the pack-age) but the .bst file belongs in texmf-local/bibtex/bst.
Don’t forget to move the .dvi or .pdf file of documentation into texmf-local/doc.
4. Update your indexFinally, run your TEX indexer program to update the package database. Thisprogram comes with every modern version of TEX and is variously called texhash,mktexlsr, or even configure, or it might just be a mouse click on a button or menuin your editor. Read the documentation that came with your installation to findout which it is.
This last step is utterly essential, otherwise nothing will work.
The reason this process has not been automated widely is that there are still thou-sands of installations which do not conform to the TDS, so there is no way for aninstallation program to guess where to put the files: you have to know this. There aremany more systems where the owner, user, or installer has chosen not to follow therecommended TDS directory structure, or is unable to do so for security reasons (suchas a shared system where she cannot write to a protected directory).
Replicating the TDS
I find it useful to make the directory structure of texmf-local the sameas that of texmf. Examine the subdirectories of texmf/tex/latex/ forexamples. For updates of packages which came with your LATEX distribu-tion (as distinct from new ones you are adding yourself), you can thenuse the same subdirectory name and position in texmf-local/... asthe original used in texmf/....If you want to create the entire subdirectory structure ready for use, youcan do it under Unix with the following command:³
´
µ
¶cd /usr/TeX/texmf; find . -type d -exec mkdir -p \/usr/TeX/texmf-local/{} \;
If you are using Microsoft Windows, you can download the Cygwin emu-lator, which provides you with the standard Unix tools in a shell window.The above command should also work on a Mac running OS/X. In allcases, if your installation directory is not /usr/TeX, you need to substi-tute the actual paths to your texmf and texmf-local directories.
The reason for having the texmf-local directory (called texmf-local on somesystems) is to provide a place for local modifications or personal updates if you are a
Formatting information ·¸3¹º46
SESSION 5. THE CTAN, PACKAGES, AND ONLINE HELP 5.3. ONLINE HELP
user on a shared system (Unix, Linux, NT, 2000, VMS, etc) where you do not havewrite-access to the main TEX installation directory tree. You can also have a personaltexmf subdirectory in your own login directory. Your installation must be configuredto look in these directories first, however, so that any updates to standard packageswill be found there before the superseded copies in the main texmf tree. All modern TEXinstallations should do this anyway, but if not, you can edit texmf/web2c/texmf.cnfyourself. There is an example in Appendix B.
EXERCISE 14
Install a package
Download and install the paralist package (which implements inline lists).
5.3 Online help
The indexes and documentation files on CTAN are the primary online resource for self-help and you should read these carefully before asking questions. You should mostespecially read the Frequently-Asked Questions (FAQ ) document so that you avoid wast-ing online time asking about things for which there is already an easily-accessibleanswer. The FAQ is at http://www.tex.ac.uk/faq/.
The Usenet newsgroup comp.text.tex is the principal forum for questions andanswers about LATEX. Feel free to ask questions, but please do not ask FAQ s: read thedocumentation instead. People who answer the questions do so voluntarily, unpaid,and in their own time, so don’t treat this as a commercial support service. To accessUsenet news, type the following URL into your browser’s ‘Location’ or ‘Address’ win-dow: news:comp.text.tex (if your browser doesn’t support Usenet news properly,change it for one that does, like Mozilla2).
You can also ask the TEX Users Group for assistance, but help is normally restrictedto Members (a good reason to join — see Appendix C!). Institutional members areexpected to provide local expertise for their users via their corporate or institutionalexperts or HelpDesks. Local Users Groups (LUGs) may also provide help, especiallyonline if they have a Web site or mailing list.
If you need commercial levels of support, such as 24–hour phone contact, or macro-writing services, you can buy one of the several excellent commercial versions of TEX,or contact a consultancy which deals with TEX (details on the TUG Web site).
EXERCISE 15
Use the source, Luke!
Visit comp.text.tex and see the kinds of messages and responses. Just
reading it is illuminating: the huge number and variety of people using LATEX is
matched only by the variety of applications they are using it for.
2http://www.mozilla.org/
Formatting information »¼3½¾47
SESSION VI
Other document structures
It is actually quite possible to write whole documents using nothing but section head-ings and paragraphs. As mentioned in § 3.5, novels, for example, usually consist just ofchapters divided into paragraphs. More commonly, however, you need other featuresas well, especially if the document is technical in nature or complex in structure.
It’s worth pointing out that ‘technical’ doesn’t necessarily mean ‘computer technical’or ‘engineering technical’: it just means it contains a lot of τηχνε (tekne), the specialistmaterial or artistry of its field. A literary analysis such as La Textualisation de MadameBovary1 (on the marginal notes in the manuscripts of Flaubert’s Madame Bovary2
manuscripts) is every bit as technical in the literary or linguistic field as the maintenancemanual for an Airbus 300D is in the aircraft engineering field.
This session covers the most common features needed in writing structured docu-ments: lists, tables, figures (including images), sidebars like boxes and panels, andverbatim text (computer program listings). In Session 7 we will cover footnotes, cross-references, citations, and other textual tools.
6.1 A brief note on structure
It’s very easy to sit down at a keyboard with a traditional wordprocessor and just starttyping. If it’s a very short document, or something transient or relatively unimportant,then you just want to type it in and make it look ‘right’ by highlighting with the mouseand clicking on font styles and sizes.
In doing so, you may achieve the effect you wanted, but your actions have left notrace behind of why you made these changes. As I said, this is unimportant for trivialor short-term documents, but if you write longer or more complex documents, orif you often write documents to a regular pattern, then making them consistent bymanual methods becomes a nightmare. LATEX’s facilities for automation are based onyou providing this ‘why’ information.
If you can tick any of the features below about your documents, then you havealready started thinking about structure.¿
The document naturally divides into sections (parts, chapters, etc).¿
The document is long.¿
There is lots of repetitive formatting in the document.¿
The document is complex (intellectually or visually).¿
There are lots of figures or tables (or examples, exercises, panels, sidebars, etc).¿
Accuracy is important in formatting the document.¿
A master copy is needed for future reference or reprinting.¿
This is a formal or official document needing special care and attention.
1Mac Namara, (2003)2Flaubert, (1857)
Formatting information ÀÁ3ÂÃ48
SESSION 6. OTHER DOCUMENT STRUCTURES 6.2. LISTS
ÄIt’s my thesis, book, leaflet, pamphlet, paper, article, etc. That’s why I care.
ÄThe document (or part of it) may need ongoing or occasional re-editing andrepublishing.
If you’ve got that far, you’re over half-way done. Using a structural editor —even a simple outliner — can make a huge difference to the quality of your thinkingbecause you are consciously organising your thoughts before setting them down. Andit can make just as big a difference to your formatting as well: more consistent, betterpresented, easier for the reader to navigate through, and more likely to be read andunderstood — which is presumably why you are writing the document in the firstplace.
6.2 Lists
Lists are useful tools for arranging thoughts in a digestible format, usually a smallpiece of information at a time. There are four basic types of list:
Random or arbitrary lists
(sometimes called ‘itemized’or ‘bulleted’ lists) where theorder of items is irrelevantor unimportant. The itemsare often prefixed with abullet or other symbol forclarity or decoration, but aresometimes simply left blank,looking like miniatureparagraphs (when they areknown as ‘simple’ or ‘trivial’lists).
Enumerated or sequential lists
where the order of items iscritical, such as sequences ofinstructions or rankings ofimportance. Theenumeration can be numeric(Arabic or Roman), orlettered (uppercase orlowercase), and can even beprogrammed to behierarchical (1.a.viii, 2.3.6,etc).
Descriptive or labelled lists
(sometimes called‘discussion’ lists), which arecomposed of subheadings ortopic labels (usuallyunnumbered buttypographically distinct),each followed by one ormore indented paragraphs ofdiscussion or explanation.
Inline lists which are sequential innature, just like enumeratedlists but are a) formattedwithin their paragraph; andb) labelled with letters, likethis example. The items areBoolean, with the final itemprefixed by ‘and’ or ‘or’.
There are actually two other types, segmented lists and reference lists, but theseare much rarer. The structure of lists in LATEX is identical for each type, but with adifferent environment name. Lists are another example of this LATEX technique (en-vironments), where a pair of matched commands surrounds some text which needsspecial treatment.
Within a list environment, list items are always identified by the command \item(followed by an item label in [square brackets] in the case of labelled lists). You don’ttype the bullet or the number or the formatting, it’s all automated.
6.2.1 Itemized lists
To create an itemized list, use the the itemize environment:
Formatting information ÅÆ3ÇÈ49
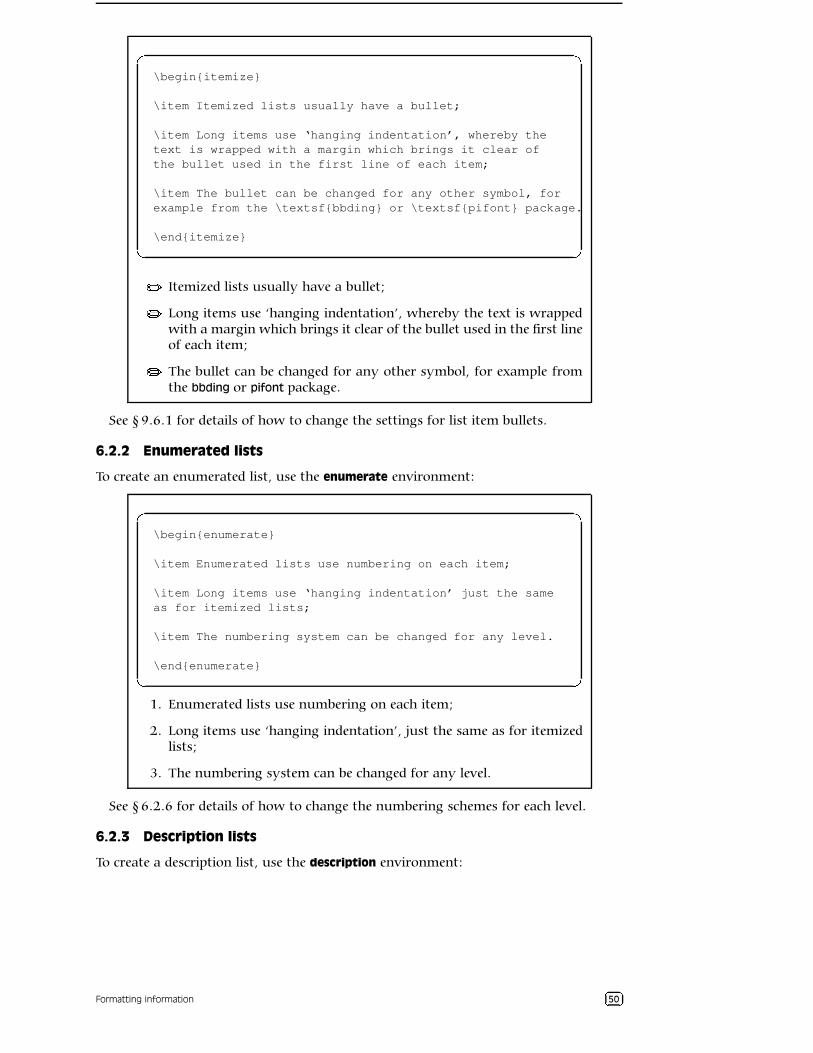
SESSION 6. OTHER DOCUMENT STRUCTURES 6.2. LISTS
É
Ê
Ë
Ì
\begin{itemize}
\item Itemized lists usually have a bullet;
\item Long items use ‘hanging indentation’, whereby thetext is wrapped with a margin which brings it clear ofthe bullet used in the first line of each item;
\item The bullet can be changed for any other symbol, forexample from the \textsf{bbding} or \textsf{pifont} package.
\end{itemize}
Í Itemized lists usually have a bullet;
Í Long items use ‘hanging indentation’, whereby the text is wrappedwith a margin which brings it clear of the bullet used in the first lineof each item;
Í The bullet can be changed for any other symbol, for example fromthe bbding or pifont package.
See § 9.6.1 for details of how to change the settings for list item bullets.
6.2.2 Enumerated lists
To create an enumerated list, use the enumerate environment:
É
Ê
Ë
Ì
\begin{enumerate}
\item Enumerated lists use numbering on each item;
\item Long items use ‘hanging indentation’ just the sameas for itemized lists;
\item The numbering system can be changed for any level.
\end{enumerate}
1. Enumerated lists use numbering on each item;
2. Long items use ‘hanging indentation’, just the same as for itemizedlists;
3. The numbering system can be changed for any level.
See § 6.2.6 for details of how to change the numbering schemes for each level.
6.2.3 Description lists
To create a description list, use the description environment:
Formatting information ÎÏ3ÐÑ50
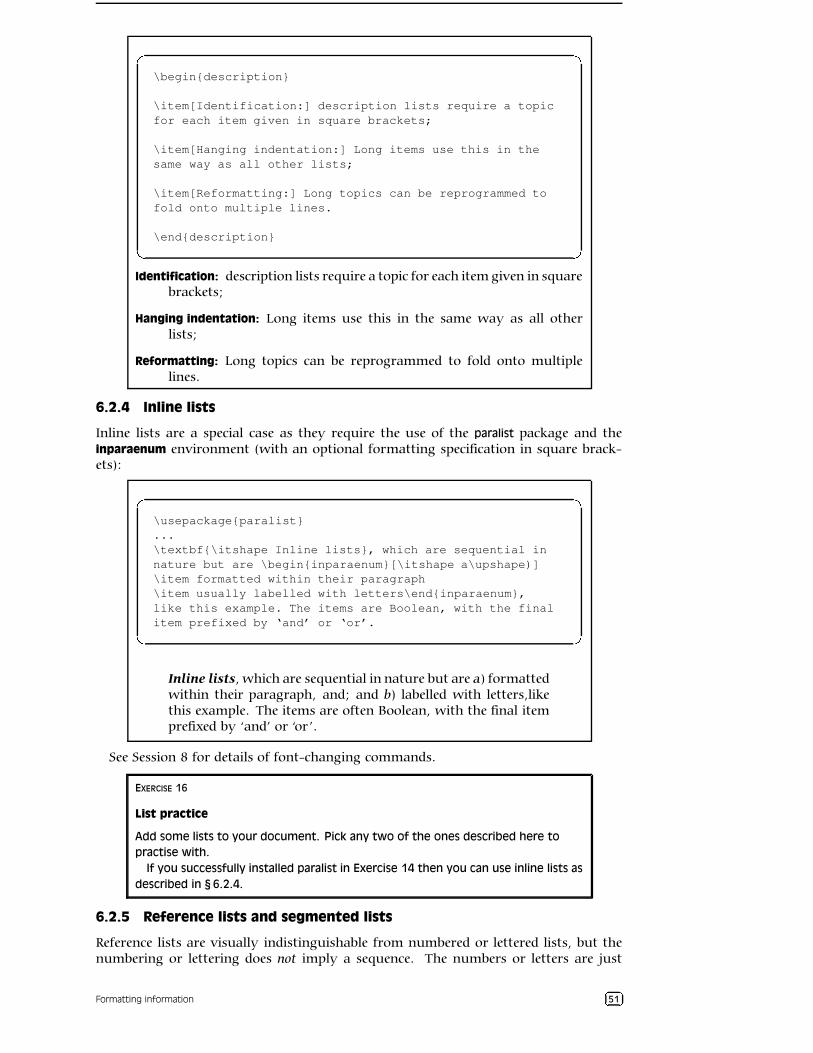
SESSION 6. OTHER DOCUMENT STRUCTURES 6.2. LISTS
Ò
Ó
Ô
Õ
\begin{description}
\item[Identification:] description lists require a topicfor each item given in square brackets;
\item[Hanging indentation:] Long items use this in thesame way as all other lists;
\item[Reformatting:] Long topics can be reprogrammed tofold onto multiple lines.
\end{description}
Identification: description lists require a topic for each item given in squarebrackets;
Hanging indentation: Long items use this in the same way as all otherlists;
Reformatting: Long topics can be reprogrammed to fold onto multiplelines.
6.2.4 Inline lists
Inline lists are a special case as they require the use of the paralist package and theinparaenum environment (with an optional formatting specification in square brack-ets):
Ò
Ó
Ô
Õ
\usepackage{paralist}...\textbf{\itshape Inline lists}, which are sequential innature but are \begin{inparaenum}[\itshape a\upshape)]\item formatted within their paragraph\item usually labelled with letters\end{inparaenum},like this example. The items are Boolean, with the finalitem prefixed by ‘and’ or ‘or’.
Inline lists, which are sequential in nature but are a) formattedwithin their paragraph, and; and b) labelled with letters,likethis example. The items are often Boolean, with the final itemprefixed by ‘and’ or ‘or’.
See Session 8 for details of font-changing commands.
EXERCISE 16
List practice
Add some lists to your document. Pick any two of the ones described here to
practise with.
If you successfully installed paralist in Exercise 14 then you can use inline lists as
described in § 6.2.4.
6.2.5 Reference lists and segmented lists
Reference lists are visually indistinguishable from numbered or lettered lists, but thenumbering or lettering does not imply a sequence. The numbers or letters are just
Formatting information Ö×3ØÙ51
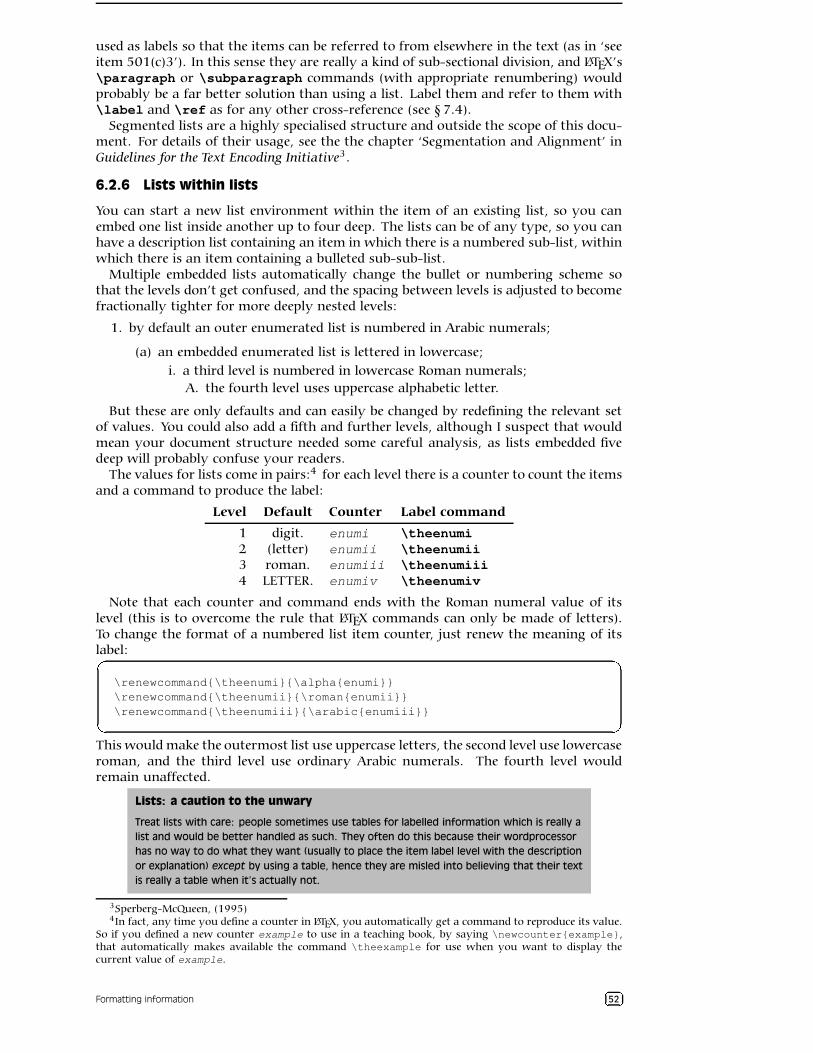
SESSION 6. OTHER DOCUMENT STRUCTURES 6.2. LISTS
used as labels so that the items can be referred to from elsewhere in the text (as in ‘seeitem 501(c)3’). In this sense they are really a kind of sub-sectional division, and LATEX’s\paragraph or \subparagraph commands (with appropriate renumbering) wouldprobably be a far better solution than using a list. Label them and refer to them with\label and \ref as for any other cross-reference (see § 7.4).
Segmented lists are a highly specialised structure and outside the scope of this docu-ment. For details of their usage, see the the chapter ‘Segmentation and Alignment’ inGuidelines for the Text Encoding Initiative3.
6.2.6 Lists within lists
You can start a new list environment within the item of an existing list, so you canembed one list inside another up to four deep. The lists can be of any type, so you canhave a description list containing an item in which there is a numbered sub-list, withinwhich there is an item containing a bulleted sub-sub-list.
Multiple embedded lists automatically change the bullet or numbering scheme sothat the levels don’t get confused, and the spacing between levels is adjusted to becomefractionally tighter for more deeply nested levels:
1. by default an outer enumerated list is numbered in Arabic numerals;
(a) an embedded enumerated list is lettered in lowercase;i. a third level is numbered in lowercase Roman numerals;
A. the fourth level uses uppercase alphabetic letter.
But these are only defaults and can easily be changed by redefining the relevant setof values. You could also add a fifth and further levels, although I suspect that wouldmean your document structure needed some careful analysis, as lists embedded fivedeep will probably confuse your readers.
The values for lists come in pairs:4 for each level there is a counter to count the itemsand a command to produce the label:
Level Default Counter Label command
1 digit. enumi \theenumi2 (letter) enumii \theenumii3 roman. enumiii \theenumiii4 LETTER. enumiv \theenumiv
Note that each counter and command ends with the Roman numeral value of itslevel (this is to overcome the rule that LATEX commands can only be made of letters).To change the format of a numbered list item counter, just renew the meaning of itslabel:Ú
Û
Ü
Ý
\renewcommand{\theenumi}{\alpha{enumi}}\renewcommand{\theenumii}{\roman{enumii}}\renewcommand{\theenumiii}{\arabic{enumiii}}
This would make the outermost list use uppercase letters, the second level use lowercaseroman, and the third level use ordinary Arabic numerals. The fourth level wouldremain unaffected.
Lists: a caution to the unwary
Treat lists with care: people sometimes use tables for labelled information which is really a
list and would be better handled as such. They often do this because their wordprocessor
has no way to do what they want (usually to place the item label level with the description
or explanation) except by using a table, hence they are misled into believing that their text
is really a table when it’s actually not.
3Sperberg-McQueen, (1995)4In fact, any time you define a counter in LATEX, you automatically get a command to reproduce its value.
So if you defined a new counter example to use in a teaching book, by saying \newcounter{example},that automatically makes available the command \theexample for use when you want to display thecurrent value of example.
Formatting information Þß3àá52
SESSION 6. OTHER DOCUMENT STRUCTURES 6.3. TABLES
EXERCISE 17
Nesting
Extend your use of lists by nesting one type inside a different one.
6.3 Tables
Tabular typesetting is the most complex and time-consuming of all textual features toget right. This holds true whether you are typing in plaintext form, using a word-processor, using LATEX, using HTML or XML, using a DTP system, or some other text-handling package. Fortunately, LATEX provides a table model with a mixture of defaultsand configurability to let it produce very high quality tables with a minimum of effort.
Terminology
LATEX, in common with standard typesetters’ practice, uses the word ‘Table’ to mean a
formal textual feature, numbered and with a caption, referred to from the text (as in ‘See
Table 5’). Sometimes you can get ‘informal’ tables, which simply occur between two
paragraphs, without caption or number.
The arrangement of information in rows and columns within either of these structures is
called a ‘tabulation’ or ‘tabular matter’.
It is important to keep this distinction firmly in mind for this section.
6.3.1 Floats
Tables and Figures are what printers refer to as ‘floats’. This means they are not partof the normal stream of text, but separate entities, positioned in a part of the page tothemselves (top, middle, bottom, left, right, or wherever the designer specifies). Theyalways have a caption describing them and they are always numbered so they can bereferred to from elsewhere in the text.
LATEX automatically floats Tables and Figures, depending on how much space is lefton the page at the point that they are processed. If there is not enough room on thecurrent page, the float is moved to the top of the next page. This can be changedby moving the Table or Figure definition to an earlier or later point in the text, or byadjusting some of the parameters which control automatic floating.
Authors sometimes have too many floats occurring too soon after one another,without any thought for how they are supposed to fit on the page and still leave roomfor text. In this case, LATEX stacks them all up and prints them together if possible, orleaves them to the end of the chapter in protest. The skill is to space them out withinyour text so that they intrude neither on the thread of your argument or discussion,nor on the visual balance of the typeset pages. But this is a skill few authors have, andit’s one point at which professional typographic advice may be needed.
There is a float package which lets you create new classes of floating object (perhapsExamples or Exercises).
6.3.2 Formal tables
To create a Table, use the table environment containing a \caption command whereyou type the caption, and the \label command to give the Table a label by which youcan refer to it.â
ã
ä
å
\begin{table}\caption{Project expenditure to year-end 2001}\label{ye2001exp}...\end{table}
Numbering is automatic, but the \label command must follow the \caption com-mand, not precede it. The numbering automatically includes the chapter number in
Formatting information æç3èé53
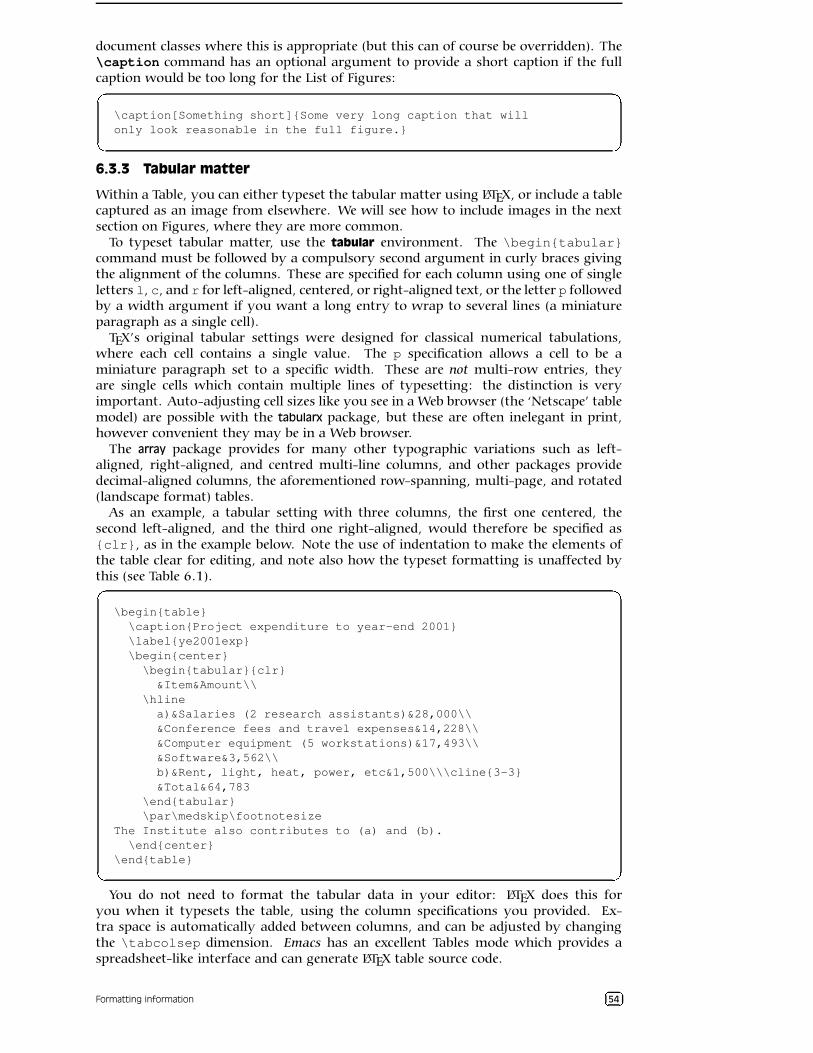
SESSION 6. OTHER DOCUMENT STRUCTURES 6.3. TABLES
document classes where this is appropriate (but this can of course be overridden). The\caption command has an optional argument to provide a short caption if the fullcaption would be too long for the List of Figures:ê
ë
ì
í\caption[Something short]{Some very long caption that willonly look reasonable in the full figure.}
6.3.3 Tabular matter
Within a Table, you can either typeset the tabular matter using LATEX, or include a tablecaptured as an image from elsewhere. We will see how to include images in the nextsection on Figures, where they are more common.
To typeset tabular matter, use the tabular environment. The \begin{tabular}command must be followed by a compulsory second argument in curly braces givingthe alignment of the columns. These are specified for each column using one of singleletters l, c, and r for left-aligned, centered, or right-aligned text, or the letter p followedby a width argument if you want a long entry to wrap to several lines (a miniatureparagraph as a single cell).
TEX’s original tabular settings were designed for classical numerical tabulations,where each cell contains a single value. The p specification allows a cell to be aminiature paragraph set to a specific width. These are not multi-row entries, theyare single cells which contain multiple lines of typesetting: the distinction is veryimportant. Auto-adjusting cell sizes like you see in a Web browser (the ‘Netscape’ tablemodel) are possible with the tabularx package, but these are often inelegant in print,however convenient they may be in a Web browser.
The array package provides for many other typographic variations such as left-aligned, right-aligned, and centred multi-line columns, and other packages providedecimal-aligned columns, the aforementioned row-spanning, multi-page, and rotated(landscape format) tables.
As an example, a tabular setting with three columns, the first one centered, thesecond left-aligned, and the third one right-aligned, would therefore be specified as{clr}, as in the example below. Note the use of indentation to make the elements ofthe table clear for editing, and note also how the typeset formatting is unaffected bythis (see Table 6.1).ê
ë
ì
í
\begin{table}\caption{Project expenditure to year-end 2001}\label{ye2001exp}\begin{center}\begin{tabular}{clr}
&Item&Amount\\\hline
a)&Salaries (2 research assistants)&28,000\\&Conference fees and travel expenses&14,228\\&Computer equipment (5 workstations)&17,493\\&Software&3,562\\b)&Rent, light, heat, power, etc&1,500\\\cline{3-3}&Total&64,783
\end{tabular}\par\medskip\footnotesize
The Institute also contributes to (a) and (b).\end{center}
\end{table}
You do not need to format the tabular data in your editor: LATEX does this foryou when it typesets the table, using the column specifications you provided. Ex-tra space is automatically added between columns, and can be adjusted by changingthe \tabcolsep dimension. Emacs has an excellent Tables mode which provides aspreadsheet-like interface and can generate LATEX table source code.
Formatting information îï3ðñ54
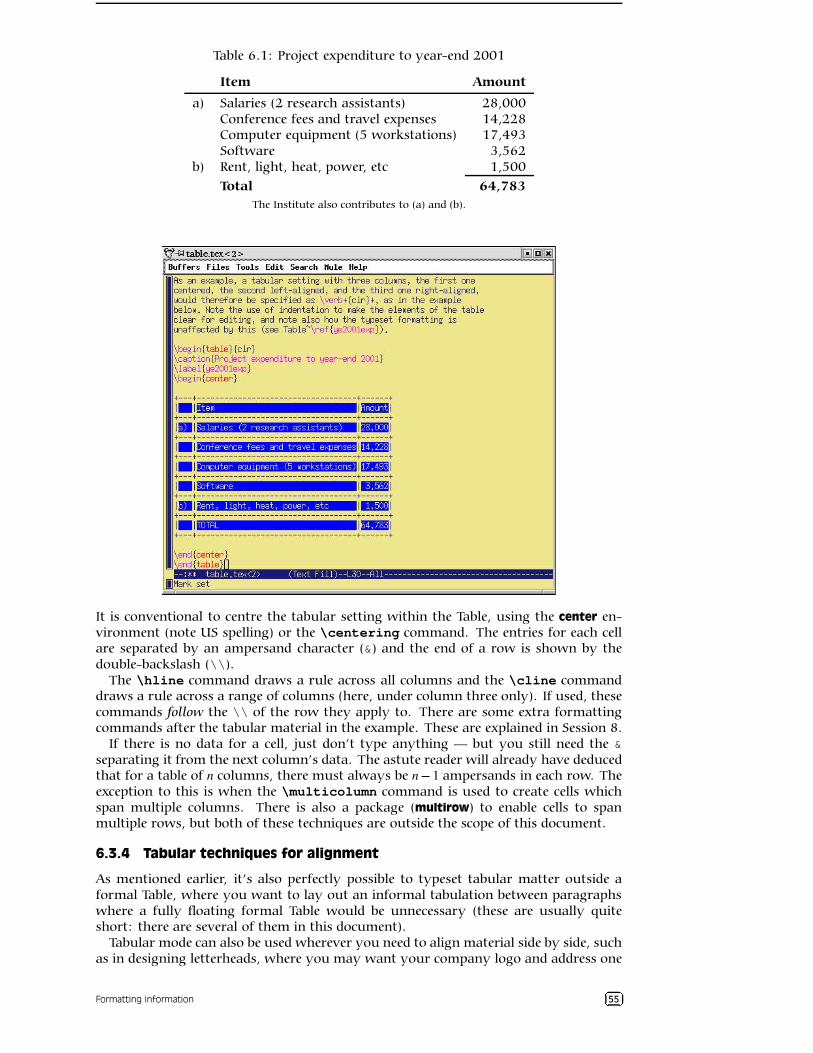
SESSION 6. OTHER DOCUMENT STRUCTURES 6.3. TABLES
Table 6.1: Project expenditure to year-end 2001
Item Amount
a) Salaries (2 research assistants) 28,000Conference fees and travel expenses 14,228Computer equipment (5 workstations) 17,493Software 3,562
b) Rent, light, heat, power, etc 1,500Total 64,783
The Institute also contributes to (a) and (b).
It is conventional to centre the tabular setting within the Table, using the center en-vironment (note US spelling) or the \centering command. The entries for each cellare separated by an ampersand character (&) and the end of a row is shown by thedouble-backslash (\\).
The \hline command draws a rule across all columns and the \cline commanddraws a rule across a range of columns (here, under column three only). If used, thesecommands follow the \\ of the row they apply to. There are some extra formattingcommands after the tabular material in the example. These are explained in Session 8.
If there is no data for a cell, just don’t type anything — but you still need the &separating it from the next column’s data. The astute reader will already have deducedthat for a table of n columns, there must always be n ò 1 ampersands in each row. Theexception to this is when the \multicolumn command is used to create cells whichspan multiple columns. There is also a package (multirow) to enable cells to spanmultiple rows, but both of these techniques are outside the scope of this document.
6.3.4 Tabular techniques for alignment
As mentioned earlier, it’s also perfectly possible to typeset tabular matter outside aformal Table, where you want to lay out an informal tabulation between paragraphswhere a fully floating formal Table would be unnecessary (these are usually quiteshort: there are several of them in this document).
Tabular mode can also be used wherever you need to align material side by side, suchas in designing letterheads, where you may want your company logo and address one
Formatting information óô3õö55

SESSION 6. OTHER DOCUMENT STRUCTURES 6.4. FIGURES
side and some other information on the other.By default, LATEX typesets tabular environments inline to the surrounding text, so if
you want your alignment displayed by itself, put it inside a positioning environmentlike center, flushright, or flushleft, or leave a blank line or \par before and after so itgets typeset separately.
There is much more to tabular setting for which there is no space here. Full detailsare in the manuals mentioned in the Foreword. One final note to remind you of theautomated crossreferencing features: because the example table is labelled, it can be ref-erenced from anywhere in the document as Table 6.1 just by using \ref{ye2001exp},regardless of how much the surrounding document or structure is moved or edited.
EXERCISE 18
Create a tabulation
Create one of the following in your document:
• a formal Table with a caption showing the number of people in your class
broken down by age and sex;
• an informal tabulation showing the price for three products;
• the logo YEAR2 0 0 0 (hint: § 6.7.2)
6.4 Figures
As explained in § 6.3.1, Figures and Tables float to a vacant part of the page, as theyare not part of the sequence of sentences making up your text, but illustrative objectsthat you refer to.
Figures can contain text, diagrams, pictures, or any other kind of illustration. Tocreate a figure, use the figure environment: like Tables, they automatically get num-bered, and must include a caption (with a label after the caption, if needed, exactly thesame as for Tables)÷
ø
ù
ú
\begin{figure}\caption{Total variable overhead variance (after
\citeauthor[p.191]{bull}}\label{workeff}\begin{center}\fbox{\includegraphics[width=.5\columnwidth]{diagram}}\end{center}\end{figure}
You can see that the structure is very similar to the table environment, but in thiscase we have a graphic included. Details of this command (\includegraphics) arein the next section. Details of the bibliographic citation mechanism are in § 7.4.2
The content of the Figure could of course also be textual, in the form of a list or a textdiagram. LATEX has a simple drawing environment called picture, which lets you createa limited set of lines and curves, but for a any diagram of complexity, you should usea standard vector drawing program like tkpaint or Corel Draw, for reasons we shall seein the next section.
6.5 Images
Images (graphics) can be included anywhere in a LATEX document, although in mostcases they will occur in Figures (see preceding section). To use graphics, you need touse the graphicx package in your preamble: \usepackage{graphicx}
Formatting information ûü3ýþ56
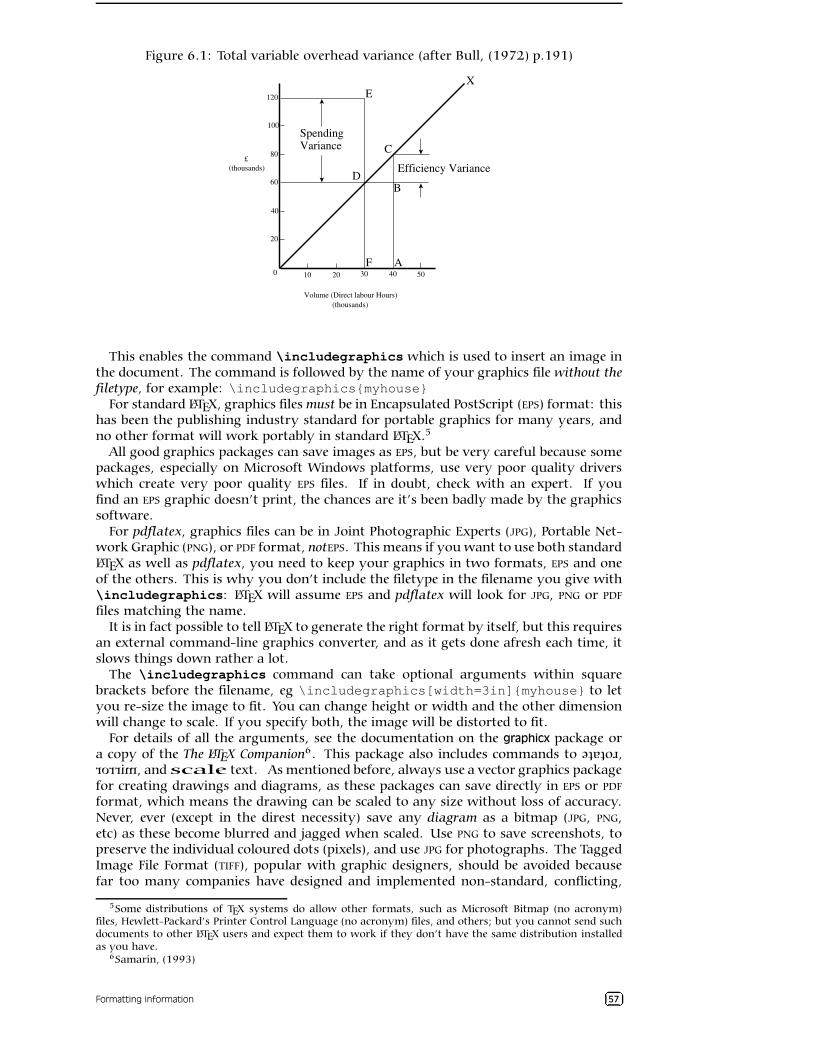
SESSION 6. OTHER DOCUMENT STRUCTURES 6.5. IMAGES
Figure 6.1: Total variable overhead variance (after Bull, (1972) p.191)
SpendingVariance
E
D
C
B
X
F A
Efficiency Variance
120
100
80
60
40
20
0 10 20 30 40 50
Volume (Direct labour Hours)(thousands)
£(thousands)
This enables the command \includegraphics which is used to insert an image inthe document. The command is followed by the name of your graphics file without thefiletype, for example: \includegraphics{myhouse}
For standard LATEX, graphics files must be in Encapsulated PostScript (EPS) format: thishas been the publishing industry standard for portable graphics for many years, andno other format will work portably in standard LATEX.5
All good graphics packages can save images as EPS, but be very careful because somepackages, especially on Microsoft Windows platforms, use very poor quality driverswhich create very poor quality EPS files. If in doubt, check with an expert. If youfind an EPS graphic doesn’t print, the chances are it’s been badly made by the graphicssoftware.
For pdflatex, graphics files can be in Joint Photographic Experts (JPG), Portable Net-work Graphic (PNG), or PDF format, notEPS. This means if you want to use both standardLATEX as well as pdflatex, you need to keep your graphics in two formats, EPS and oneof the others. This is why you don’t include the filetype in the filename you give with\includegraphics: LATEX will assume EPS and pdflatex will look for JPG, PNG or PDF
files matching the name.It is in fact possible to tell LATEX to generate the right format by itself, but this requires
an external command-line graphics converter, and as it gets done afresh each time, itslows things down rather a lot.
The \includegraphics command can take optional arguments within squarebrackets before the filename, eg \includegraphics[width=3in]{myhouse} to letyou re-size the image to fit. You can change height or width and the other dimensionwill change to scale. If you specify both, the image will be distorted to fit.
For details of all the arguments, see the documentation on the graphicx package ora copy of the The LATEX Companion6. This package also includes commands to rotate ,
mirror , and scale text. As mentioned before, always use a vector graphics packagefor creating drawings and diagrams, as these packages can save directly in EPS or PDF
format, which means the drawing can be scaled to any size without loss of accuracy.Never, ever (except in the direst necessity) save any diagram as a bitmap (JPG, PNG,etc) as these become blurred and jagged when scaled. Use PNG to save screenshots, topreserve the individual coloured dots (pixels), and use JPG for photographs. The TaggedImage File Format (TIFF), popular with graphic designers, should be avoided becausefar too many companies have designed and implemented non-standard, conflicting,
5Some distributions of TEX systems do allow other formats, such as Microsoft Bitmap (no acronym)files, Hewlett-Packard’s Printer Control Language (no acronym) files, and others; but you cannot send suchdocuments to other LATEX users and expect them to work if they don’t have the same distribution installedas you have.
6Samarin, (1993)
Formatting information ÿ� ��57
SESSION 6. OTHER DOCUMENT STRUCTURES 6.6. VERBATIM TEXT
proprietary extensions to the format, making it virtually useless for transfer betweencomputers (except in faxes, where it’s still used in a much stricter version).
EXERCISE 19
Adding pictures
Add the \usepackage{graphicx} to the preamble of your document, and
copy or download an image you want to include. Make sure it is a JPG, PNG, or
PDF image if you use pdflatex, or an EPS image if you use standard LATEX.
Add \includegraphics and the filename in curly braces (without the
filetype), and process the document and preview or print it.
Make it into a figure following the example in § 6.4.
Be aware that some DVI viewers are not able to display all types of graphics.
For best results, use PDF or PostScript preview.
6.6 Verbatim text
If you are documenting computer procedures, you probably need fixed-width type forexamples of programming or data input or output. Even if you are writing aboutcompletely non-computer topics, you may often want to quote a URL or email addresswhich needs to be typeset specially. It is particularly important in these two examplesto avoid hyphenating them if they have to break over a line-end, because the hyphenmight be taken by the user as a part of the address.
Standard LATEX includes two features for handling fixed-format text, and there aremany more available in packages.
6.6.1 Inline verbatim
To specify a word or phrase as verbatim text in typewriter type within a sentence, usethe special command \verb, followed by your piece of text surrounded by any suitablecharacter which does not occur in the text itself. This is a very rare exception to the rulethat arguments go in curly braces. I often use the plus sign for this, for example toshow a LATEX command, I type \verb+\includegraphics[width=3in]{myhouse}+in order to display \includegraphics[width=3in]{myhouse}, but sometimes I usethe grave accent (backtick or open-quote) when the phrase already has a plus sign init, like \verb‘\(y=a+2xˆ2\)‘ when illustrating the LATEX equation \(y=a+xˆ2\).
This command has the advantage that it turns off all special characters (see § 2.3)except the one you use as the delimiter, so you can easily quote sequences of charactersin any computer syntax without problems. However, LATEX will never break the argu-ment of \verb at a line-end when formatting a paragraph, even if it contains spaces,so if it happens to be long, and falls towards the end of a line, it will stick out into themargin.
The url package avoids this with by providing the command \url which works in thesame way as \verb, with the argument enclosed in a pair of characters, but performsa hyphenless break at punctuation characters, as in http://www.ucc.ie/doc/ucc/siteowner.xml. It was designed for Web URLs, so it understands their syntax andwill never break mid-way through an unpunctuated word, only at slashes and fullpoints. Bear in mind, however, that spaces are forbidden in URLs, so using spaces in\url arguments will fail, as will using other non-URL-valid characters.
6.6.2 Display verbatim
For longer (multiline) chunks of fixed-format text, use the verbatim environment:
Formatting information�����58
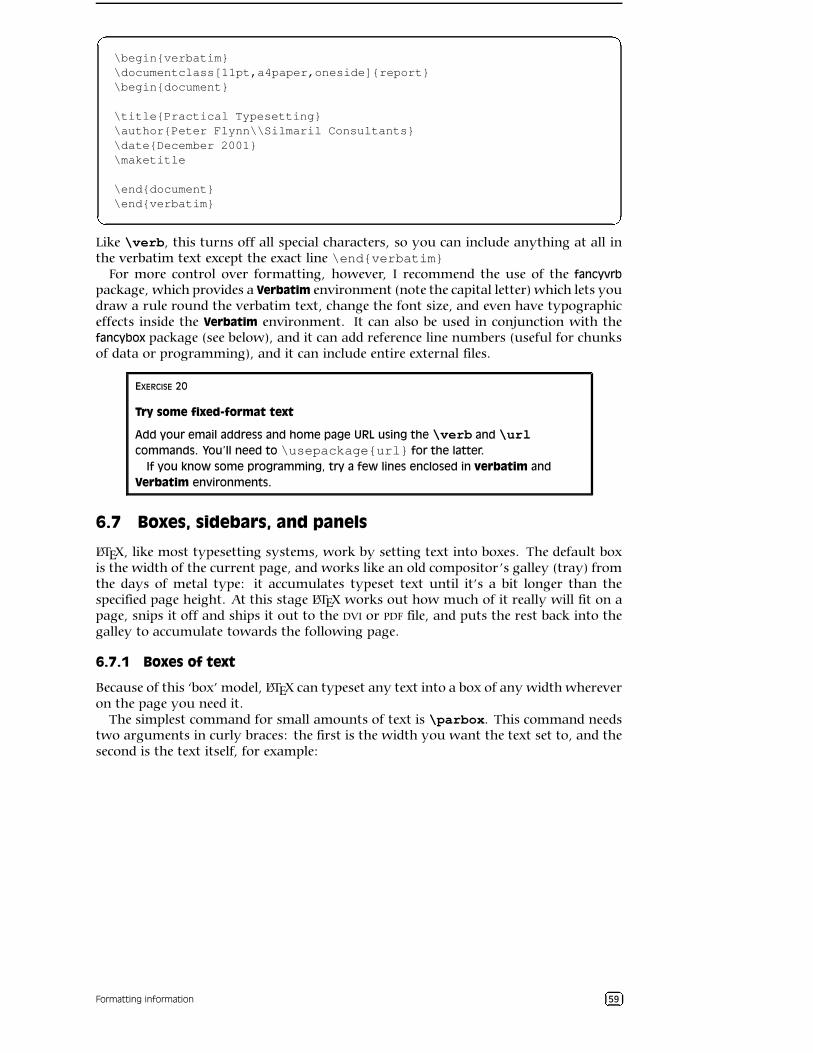
SESSION 6. OTHER DOCUMENT STRUCTURES 6.7. BOXES, SIDEBARS, AND PANELS
�
�
\begin{verbatim}\documentclass[11pt,a4paper,oneside]{report}\begin{document}
\title{Practical Typesetting}\author{Peter Flynn\\Silmaril Consultants}\date{December 2001}\maketitle
\end{document}\end{verbatim}
Like \verb, this turns off all special characters, so you can include anything at all inthe verbatim text except the exact line \end{verbatim}
For more control over formatting, however, I recommend the use of the fancyvrb
package, which provides a Verbatim environment (note the capital letter) which lets youdraw a rule round the verbatim text, change the font size, and even have typographiceffects inside the Verbatim environment. It can also be used in conjunction with thefancybox package (see below), and it can add reference line numbers (useful for chunksof data or programming), and it can include entire external files.
EXERCISE 20
Try some fixed-format text
Add your email address and home page URL using the \verb and \urlcommands. You’ll need to \usepackage{url} for the latter.
If you know some programming, try a few lines enclosed in verbatim and
Verbatim environments.
6.7 Boxes, sidebars, and panels
LATEX, like most typesetting systems, work by setting text into boxes. The default boxis the width of the current page, and works like an old compositor’s galley (tray) fromthe days of metal type: it accumulates typeset text until it’s a bit longer than thespecified page height. At this stage LATEX works out how much of it really will fit on apage, snips it off and ships it out to the DVI or PDF file, and puts the rest back into thegalley to accumulate towards the following page.
6.7.1 Boxes of text
Because of this ‘box’ model, LATEX can typeset any text into a box of any width whereveron the page you need it.
The simplest command for small amounts of text is \parbox. This command needstwo arguments in curly braces: the first is the width you want the text set to, and thesecond is the text itself, for example:
Formatting information � ���59
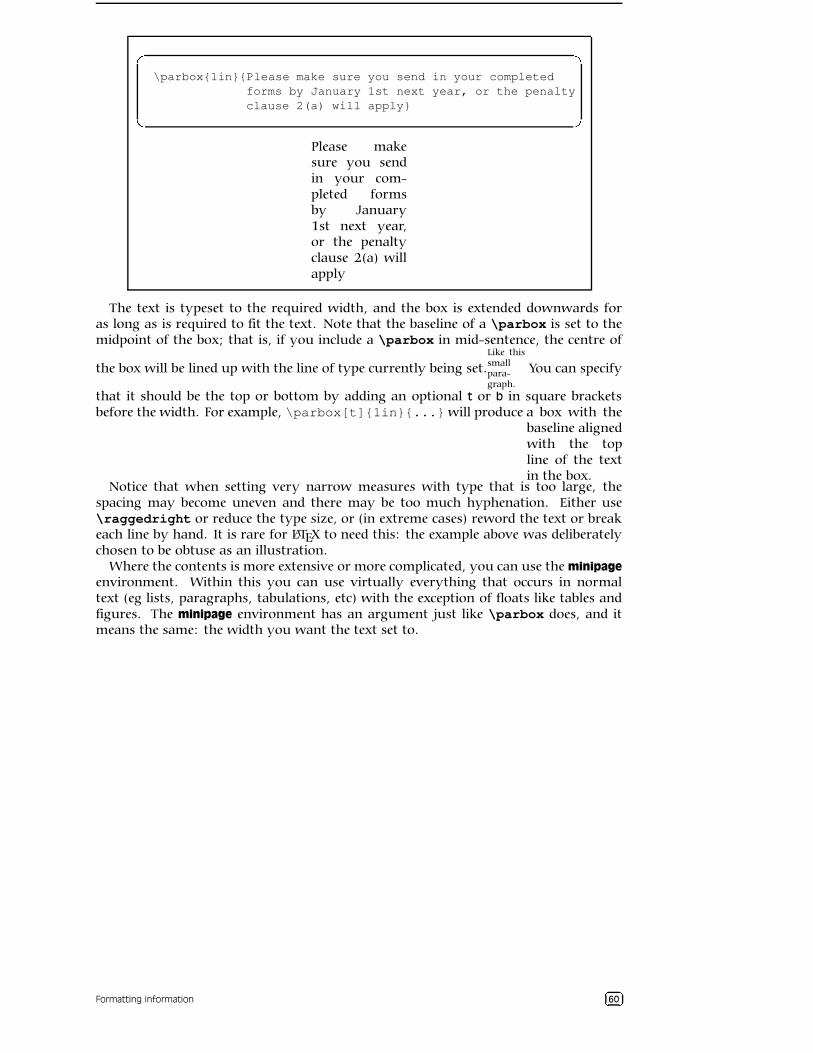
SESSION 6. OTHER DOCUMENT STRUCTURES 6.7. BOXES, SIDEBARS, AND PANELS
�
�
�
�
\parbox{1in}{Please make sure you send in your completedforms by January 1st next year, or the penaltyclause 2(a) will apply}
Please makesure you sendin your com-pleted formsby January1st next year,or the penaltyclause 2(a) willapply
The text is typeset to the required width, and the box is extended downwards foras long as is required to fit the text. Note that the baseline of a \parbox is set to themidpoint of the box; that is, if you include a \parbox in mid-sentence, the centre of
the box will be lined up with the line of type currently being set.Like thissmallpara-graph.
You can specify
that it should be the top or bottom by adding an optional t or b in square bracketsbefore the width. For example, \parbox[t]{1in}{...}will produce a box with the
baseline alignedwith the topline of the textin the box.
Notice that when setting very narrow measures with type that is too large, thespacing may become uneven and there may be too much hyphenation. Either use\raggedright or reduce the type size, or (in extreme cases) reword the text or breakeach line by hand. It is rare for LATEX to need this: the example above was deliberatelychosen to be obtuse as an illustration.
Where the contents is more extensive or more complicated, you can use the minipage
environment. Within this you can use virtually everything that occurs in normaltext (eg lists, paragraphs, tabulations, etc) with the exception of floats like tables andfigures. The minipage environment has an argument just like \parbox does, and itmeans the same: the width you want the text set to.
Formatting information �����60
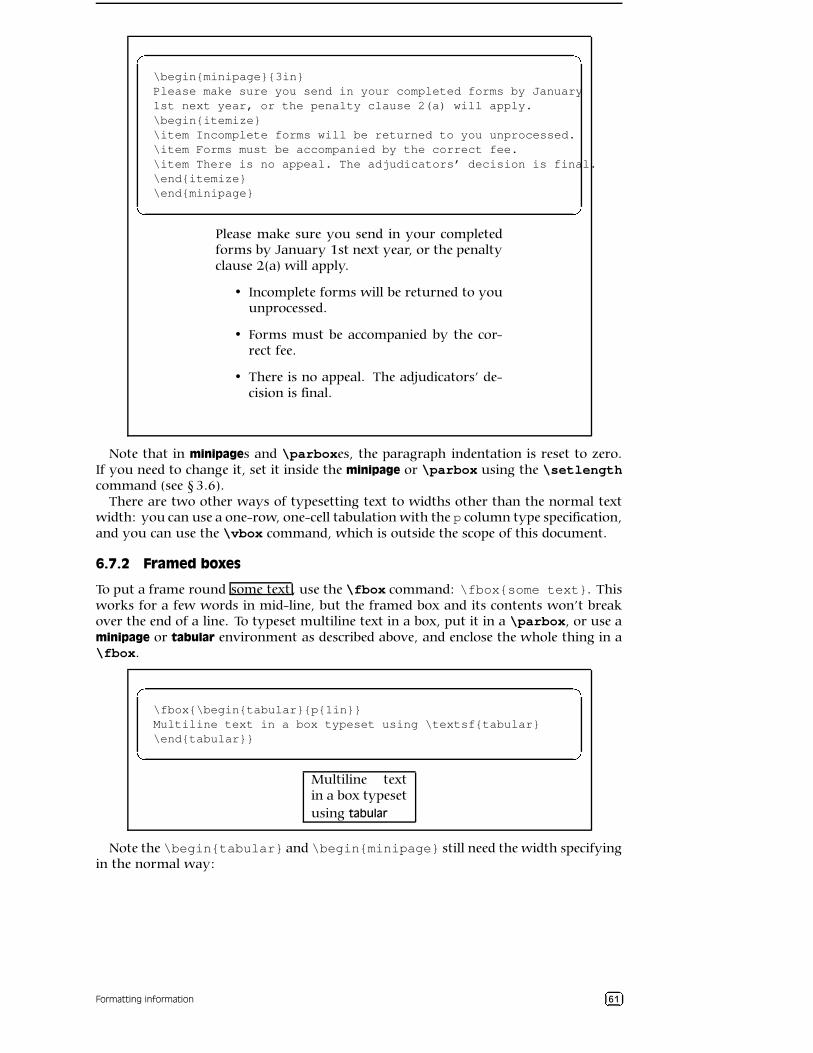
SESSION 6. OTHER DOCUMENT STRUCTURES 6.7. BOXES, SIDEBARS, AND PANELS
�
�
�
�
\begin{minipage}{3in}Please make sure you send in your completed forms by January1st next year, or the penalty clause 2(a) will apply.\begin{itemize}\item Incomplete forms will be returned to you unprocessed.\item Forms must be accompanied by the correct fee.\item There is no appeal. The adjudicators’ decision is final.\end{itemize}\end{minipage}
Please make sure you send in your completedforms by January 1st next year, or the penaltyclause 2(a) will apply.
• Incomplete forms will be returned to youunprocessed.
• Forms must be accompanied by the cor-rect fee.
• There is no appeal. The adjudicators’ de-cision is final.
Note that in minipages and \parboxes, the paragraph indentation is reset to zero.If you need to change it, set it inside the minipage or \parbox using the \setlengthcommand (see § 3.6).
There are two other ways of typesetting text to widths other than the normal textwidth: you can use a one-row, one-cell tabulation with the p column type specification,and you can use the \vbox command, which is outside the scope of this document.
6.7.2 Framed boxes
To put a frame round some text , use the \fbox command: \fbox{some text}. Thisworks for a few words in mid-line, but the framed box and its contents won’t breakover the end of a line. To typeset multiline text in a box, put it in a \parbox, or use aminipage or tabular environment as described above, and enclose the whole thing in a\fbox.
�
�
�
�
\fbox{\begin{tabular}{p{1in}}Multiline text in a box typeset using \textsf{tabular}\end{tabular}}
Multiline textin a box typesetusing tabular
Note the \begin{tabular} and \begin{minipage} still need the width specifyingin the normal way:
Formatting information ���� 61
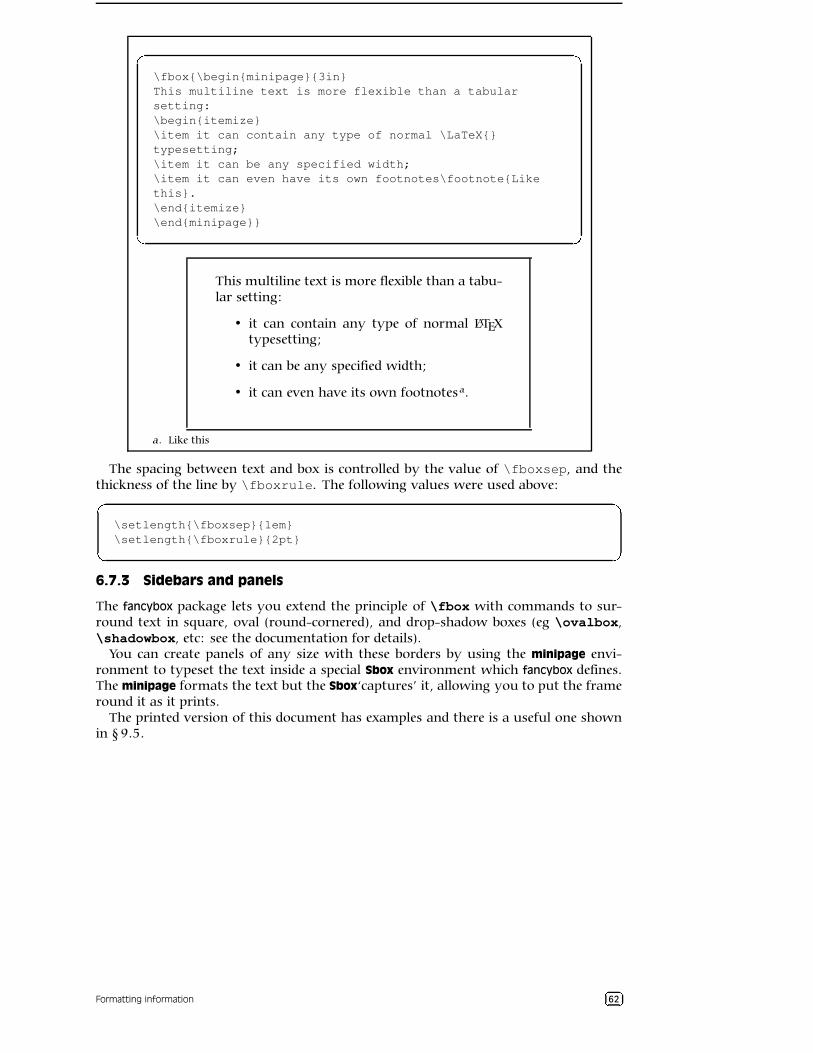
SESSION 6. OTHER DOCUMENT STRUCTURES 6.7. BOXES, SIDEBARS, AND PANELS
!
"
#
$
\fbox{\begin{minipage}{3in}This multiline text is more flexible than a tabularsetting:\begin{itemize}\item it can contain any type of normal \LaTeX{}typesetting;\item it can be any specified width;\item it can even have its own footnotes\footnote{Likethis}.\end{itemize}\end{minipage}}
This multiline text is more flexible than a tabu-lar setting:
• it can contain any type of normal LATEXtypesetting;
• it can be any specified width;
• it can even have its own footnotesa.
a. Like this
The spacing between text and box is controlled by the value of \fboxsep, and thethickness of the line by \fboxrule. The following values were used above:!
"
#
$\setlength{\fboxsep}{1em}\setlength{\fboxrule}{2pt}
6.7.3 Sidebars and panels
The fancybox package lets you extend the principle of \fbox with commands to sur-round text in square, oval (round-cornered), and drop-shadow boxes (eg \ovalbox,\shadowbox, etc: see the documentation for details).
You can create panels of any size with these borders by using the minipage envi-ronment to typeset the text inside a special Sbox environment which fancybox defines.The minipage formats the text but the Sbox‘captures’ it, allowing you to put the frameround it as it prints.
The printed version of this document has examples and there is a useful one shownin § 9.5.
Formatting information %&�'(62
SESSION VII
Textual tools
Every text-handling system needs to support a repertoire of tools for doing things withtext. LATEX implements many dozens, of which a small selection of the most frequentlyused is given here:
• quotations (sometimes called ‘block quotes’);
• footnotes and end-notes;
• marginal notes;
• cross-references, both normal ones and bibliographic citations;
• indexes and glossaries;
• typesetting multiple columns.
7.1 Quotations
Direct speech and short quotes within a sentence ‘like this’ are done with simple quota-tion marks as described in § 2.4. Sometimes, however, you may want longer quotationsset as a separate paragraph. Typically these are indented from the surrounding text,and often in a different font or size. LATEX has two environments for doing this:
The quote environment is for up to a line of text each per (short) quotation, with thewhole thing indented from the previous paragraph but with no additional inden-tation on each quote;
)
*
+
,
\begin{quote}Do, Ronny, Do. \textit{Nancy Reagan}
Da Do Ron Ron \textit{The Crystals}\end{quote}
Do, Ronny, Do. Nancy Reagan
Da Do Ron Ron. The Crystals
The quotation environment is for longer passages (a paragraph or more) of a singlequotation, where not only is the block of text indented, but each paragraph of italso has its own extra indentation on the first line.
Formatting information -.�/063
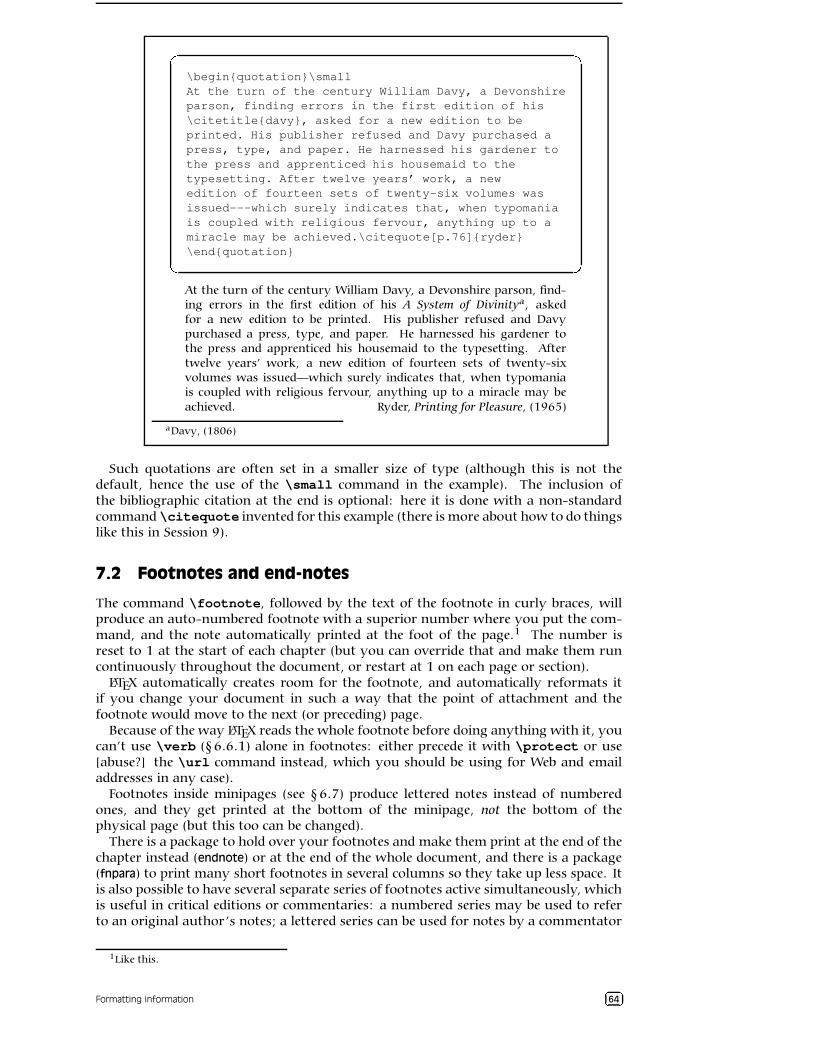
SESSION 7. TEXTUAL TOOLS 7.2. FOOTNOTES AND END-NOTES
1
2
3
4
\begin{quotation}\smallAt the turn of the century William Davy, a Devonshireparson, finding errors in the first edition of his\citetitle{davy}, asked for a new edition to beprinted. His publisher refused and Davy purchased apress, type, and paper. He harnessed his gardener tothe press and apprenticed his housemaid to thetypesetting. After twelve years’ work, a newedition of fourteen sets of twenty-six volumes wasissued---which surely indicates that, when typomaniais coupled with religious fervour, anything up to amiracle may be achieved.\citequote[p.76]{ryder}\end{quotation}
At the turn of the century William Davy, a Devonshire parson, find-ing errors in the first edition of his A System of Divinitya, askedfor a new edition to be printed. His publisher refused and Davypurchased a press, type, and paper. He harnessed his gardener tothe press and apprenticed his housemaid to the typesetting. Aftertwelve years’ work, a new edition of fourteen sets of twenty-sixvolumes was issued—which surely indicates that, when typomaniais coupled with religious fervour, anything up to a miracle may beachieved. Ryder, Printing for Pleasure, (1965)
aDavy, (1806)
Such quotations are often set in a smaller size of type (although this is not thedefault, hence the use of the \small command in the example). The inclusion ofthe bibliographic citation at the end is optional: here it is done with a non-standardcommand \citequote invented for this example (there is more about how to do thingslike this in Session 9).
7.2 Footnotes and end-notes
The command \footnote, followed by the text of the footnote in curly braces, willproduce an auto-numbered footnote with a superior number where you put the com-mand, and the note automatically printed at the foot of the page.1 The number isreset to 1 at the start of each chapter (but you can override that and make them runcontinuously throughout the document, or restart at 1 on each page or section).
LATEX automatically creates room for the footnote, and automatically reformats itif you change your document in such a way that the point of attachment and thefootnote would move to the next (or preceding) page.
Because of the way LATEX reads the whole footnote before doing anything with it, youcan’t use \verb (§ 6.6.1) alone in footnotes: either precede it with \protect or use[abuse?] the \url command instead, which you should be using for Web and emailaddresses in any case).
Footnotes inside minipages (see § 6.7) produce lettered notes instead of numberedones, and they get printed at the bottom of the minipage, not the bottom of thephysical page (but this too can be changed).
There is a package to hold over your footnotes and make them print at the end of thechapter instead (endnote) or at the end of the whole document, and there is a package(fnpara) to print many short footnotes in several columns so they take up less space. Itis also possible to have several separate series of footnotes active simultaneously, whichis useful in critical editions or commentaries: a numbered series may be used to referto an original author’s notes; a lettered series can be used for notes by a commentator
1Like this.
Formatting information 56�7864
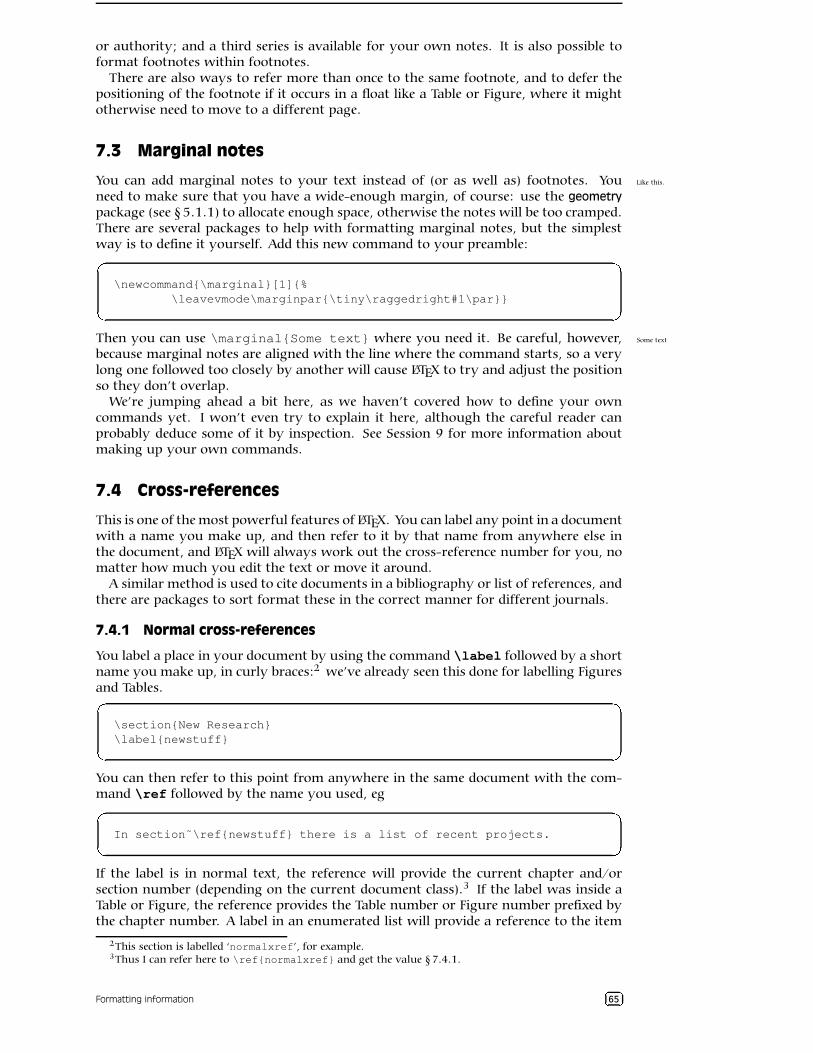
SESSION 7. TEXTUAL TOOLS 7.3. MARGINAL NOTES
or authority; and a third series is available for your own notes. It is also possible toformat footnotes within footnotes.
There are also ways to refer more than once to the same footnote, and to defer thepositioning of the footnote if it occurs in a float like a Table or Figure, where it mightotherwise need to move to a different page.
7.3 Marginal notes
You can add marginal notes to your text instead of (or as well as) footnotes. You Like this.
need to make sure that you have a wide-enough margin, of course: use the geometry
package (see § 5.1.1) to allocate enough space, otherwise the notes will be too cramped.There are several packages to help with formatting marginal notes, but the simplestway is to define it yourself. Add this new command to your preamble:9
:
;
<\newcommand{\marginal}[1]{%
\leavevmode\marginpar{\tiny\raggedright#1\par}}
Then you can use \marginal{Some text} where you need it. Be careful, however, Some text
because marginal notes are aligned with the line where the command starts, so a verylong one followed too closely by another will cause LATEX to try and adjust the positionso they don’t overlap.
We’re jumping ahead a bit here, as we haven’t covered how to define your owncommands yet. I won’t even try to explain it here, although the careful reader canprobably deduce some of it by inspection. See Session 9 for more information aboutmaking up your own commands.
7.4 Cross-references
This is one of the most powerful features of LATEX. You can label any point in a documentwith a name you make up, and then refer to it by that name from anywhere else inthe document, and LATEX will always work out the cross-reference number for you, nomatter how much you edit the text or move it around.
A similar method is used to cite documents in a bibliography or list of references, andthere are packages to sort format these in the correct manner for different journals.
7.4.1 Normal cross-references
You label a place in your document by using the command \label followed by a shortname you make up, in curly braces:2 we’ve already seen this done for labelling Figuresand Tables.9
:
;
<\section{New Research}\label{newstuff}
You can then refer to this point from anywhere in the same document with the com-mand \ref followed by the name you used, eg9
:
;
<In section˜\ref{newstuff} there is a list of recent projects.
If the label is in normal text, the reference will provide the current chapter and/orsection number (depending on the current document class).3 If the label was inside aTable or Figure, the reference provides the Table number or Figure number prefixed bythe chapter number. A label in an enumerated list will provide a reference to the item
2This section is labelled ‘normalxref’, for example.3Thus I can refer here to \ref{normalxref} and get the value § 7.4.1.
Formatting information =>�?@65
SESSION 7. TEXTUAL TOOLS 7.4. CROSS-REFERENCES
number. If there is no apparent structure to this part of the document, the referencewill be null. Labels must be unique (that is, each value must occur only once as a labelwithin a single document), but you can have as many references to them as you like.
Note the use of the unbreakable space (˜) between the \ref and the word before it.This prints a space but prevents the line ever breaking at that point, should it fall closeto the end of a line.
The command \pageref followed by any of your label values will provide the pagenumber where the label occurred, regardless of the document structure. This makes itpossible to refer to something by \ref number as well as \pageref number, which isuseful to readers in very long documents.
Unresolved references are printed as three question marks, and also cause a warningmessage at the end of the log file. There’s never any harm in having \labels youdon’t refer to, but using \ref when you don’t have a matching \label is an error.
7.4.2 Bibliographic references
The mechanism used for references to reading lists and bibliographies is almost identicalto that used for normal cross-references. Although it is possible to type the details ofeach citation manually, there is a companion program to LATEX called BIBTEX, whichmanages bibliographic references automatically, reduces the time needed to maintainand format them, and dramatically improves accuracy. Using BIBTEX means you onlyever have to type the bibliographic details of a work once. You can then cite it in anydocument you write, and it will get reformatted automatically to the style you specify.
7.4.2.1 Citing references
BIBTEX works exactly the same way as many other bibliographic databases: you keepdetails of every document you want to refer to in a separate file, using BIBTEX’s ownformat (see example below). Many writers make a habit of adding the details of everybook and article they read, so that when they write a document, these entries arealways available for reference. You give each entry a short label, just like you do withnormal cross-references (see § 7.4.1), and it is this label you use to refer to in your owndocuments when you cite the work using the \cite command:A
B
C
D...as has clearly been shown by Fothergill˜\cite{fg}.
By default, this creates a cross-reference number in square brackets [1] which is acommon style in the Natural Sciences (see § 7.4.2.5 for details of how to change this).There are dozens of alternative citation formats in extra packages, including the pop-ular author/year format:
A
B
C
D...as has clearly been shown by˜\citeauthoryear{fg}.
…as has clearly been shown by Fothergill, (1929).
To print the bibliographic listing (usually called ‘References’ in articles and ‘Bibliog-raphy’ in books and reports), add these two lines towards the end of your document,or wherever you want it printed, substituting the name of your own BIBTEX file andthe name of your chosen bibliography style:A
B
C
D\bibliography{mybib}\bibliographystyle{ieeetr}
• The \bibliography command is followed by the filename of your BIBTEX filewithout with .bib extension.
Formatting information EF�GH66
SESSION 7. TEXTUAL TOOLS 7.4. CROSS-REFERENCES
• The \bibliographystyle command is followed by the name of any of LATEX’ssupported bibliography styles, of which there are many dozens available fromthe CTAN4.
The styles plain and alpha are two common generic styles used for drafts: see belowfor others.
7.4.2.2 Running bibtex
When you run the bibtex program, the details of every document you have cited willbe extracted from your database, formatted according to the style you specify, andstored in a temporary bibliographic (.bbl) file with a label corresponding to the oneyou used in your citation, ready for LATEX to use. This is entirely automatic: all youdo is cite your references using the labels you gave the entries in your BIBTEX file, andrun the bibtex program.I
J
K
L$ bibtex mybook
After processing your file with LATEX, run BIBTEX on it by clicking on the BIBTEX toolbaricon (WinEdt) or the TeX
BIBTeX File M menu entry (Emacs) or by typing the commandbibtex followed by the name of your document (without the .tex extension). Whenyou run LATEX again it uses the .bbl file to print the references where you tell it to, andsubsequent runs of LATEX will format the correct citation numbers (or author/year, orwhatever format you are using).
Because of this two-stage process, you always get a warning message about an‘unresolved reference’ the first time you add a new reference to a previously uncitedwork. This will disappear after the next run of bibtex and LATEX.
7.4.2.3 BIBTEX format
The format for the BIBTEX file is specified in the BIBTEX documentation (see § 5.1.2 forhow to find and print it). You create a file with a name ending in .bib, and add yourentries, for example:I
J
K
L
@book{fg,title = {{An Innkeeper’s Diary}},author = {John Fothergill},edition = {3rd},publisher = {Penguin},year = 1929,address = {London}
}
There is a prescribed set of fields for each of a dozen or so types of document: book,article (in a journal), article (in a collection) chapter (in a book), thesis, report, paper (ina Proceedings), etc. Each entry identifies the document type after the ‘@’ sign, followedby the entry label that you make up, and then each field in the format:I
J
K
Lkeyword = {value},
Most TEX-sensitive editors have a BIBTEX mode which understands these entries. Emacsautomatically uses its bibtex-mode whenever you open a filename ending in .bib.When editing BIBTEX databases, the rules are simple:
• Omit the comma after the last field in the entry (only).
4The style shown in the example here provides formatting according to the specifications for Transactionsof the IEEE (revised).
Formatting information NO�PQ67
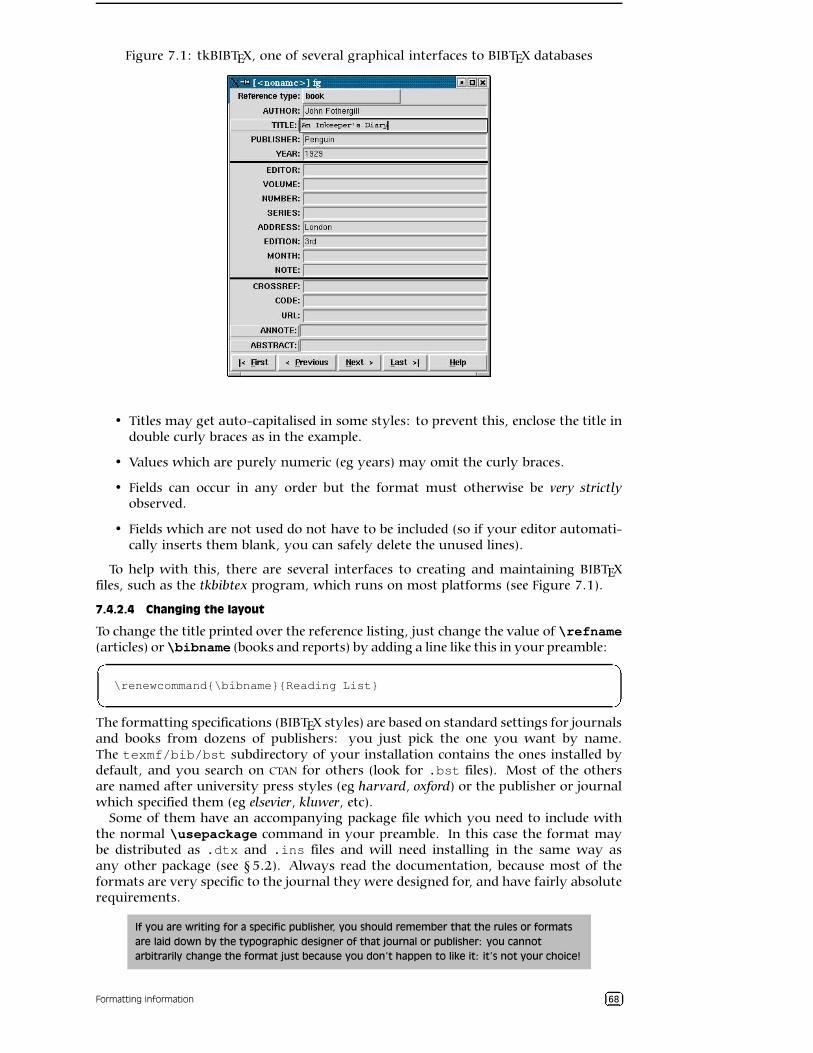
SESSION 7. TEXTUAL TOOLS 7.4. CROSS-REFERENCES
Figure 7.1: tkBIBTEX, one of several graphical interfaces to BIBTEX databases
• Titles may get auto-capitalised in some styles: to prevent this, enclose the title indouble curly braces as in the example.
• Values which are purely numeric (eg years) may omit the curly braces.
• Fields can occur in any order but the format must otherwise be very strictlyobserved.
• Fields which are not used do not have to be included (so if your editor automati-cally inserts them blank, you can safely delete the unused lines).
To help with this, there are several interfaces to creating and maintaining BIBTEXfiles, such as the tkbibtex program, which runs on most platforms (see Figure 7.1).
7.4.2.4 Changing the layout
To change the title printed over the reference listing, just change the value of \refname(articles) or \bibname (books and reports) by adding a line like this in your preamble:R
S
T
U\renewcommand{\bibname}{Reading List}
The formatting specifications (BIBTEX styles) are based on standard settings for journalsand books from dozens of publishers: you just pick the one you want by name.The texmf/bib/bst subdirectory of your installation contains the ones installed bydefault, and you search on CTAN for others (look for .bst files). Most of the othersare named after university press styles (eg harvard, oxford) or the publisher or journalwhich specified them (eg elsevier, kluwer, etc).
Some of them have an accompanying package file which you need to include withthe normal \usepackage command in your preamble. In this case the format maybe distributed as .dtx and .ins files and will need installing in the same way asany other package (see § 5.2). Always read the documentation, because most of theformats are very specific to the journal they were designed for, and have fairly absoluterequirements.
If you are writing for a specific publisher, you should remember that the rules or formats
are laid down by the typographic designer of that journal or publisher: you cannot
arbitrarily change the format just because you don’t happen to like it: it’s not your choice!
Formatting information VW�XY68

SESSION 7. TEXTUAL TOOLS 7.5. INDEXES AND GLOSSARIES
It is also possible to write your own BIBTEX (.bst) style files, although it uses alanguage of its own which really needs a computer science background to understand.However, this is rendered unnecessary in most cases: there is an extensive program(actually written in LATEX) called makebst, which makes .bst files by asking you a(long) series of questions about exactly how you want your citations formatted. Justtype latex makebst in a command window, but give it a dummy run first, becausesome of the questions are very detailed, so you need to have thought through howyou want your citations to appear before you start.
7.4.2.5 Other modes of citation
The method of citing a work by numeric reference is common in the Natural Sciencesbut is not used in the Humanities and Law. In these fields, citations are usually donewith short references (author/short-title/year) in a numbered footnote. Sometimesthey are actually called ‘footnotes’ to the exclusion of ordinary footnotes, althoughthey are really citations which happen by convention to be displayed as footnotes: animportant distinction rarely appreciated by authors until they come to need a normalfootnote.
The bibliography at the back of the document is then printed unnumbered in alpha-betic order of author, or perhaps chronologically if the time-frame is very large. Thisunnumbered format is why it is conventionally called ‘References’ rather than ‘Bibli-ography’: sufficient working citation has already been provided in the footnote, andthe list at the back is for reference purposes only; whereas in the Natural Sciences, thecitation is just a number, or possible an author and year only, so the full listing is calleda Bibliography.
The jurabib package (originally intended for German law articles but now extendedto other fields in the Humanities, and to other languages) has extensive features fordoing this style of citation and is very strongly recommended.
7.5 Indexes and glossaries
LATEX has a powerful, automated indexing facility which uses the standard makeindexprogram. To use indexing, use the package makeidx and include the \makeindexcommand in your preamble:Z
[
\
]\usepackage{makeidx}\makeindex
When you want to index something, using the command \index followed by theentry in curly braces, as you want it to appear in the index, using one of the followingformats:
Plain entry Typing \index{beer}will create an entry for ‘beer’ with the current pagenumber.
Subindex entry For an entry with a subentry use an exclamation mark to separatethem: \index{beer!lite}. Subsubentries also work to another level deep:\index{beer!lite!American}.
Cross-references ‘See’ entries are done with the vertical bar (one of the rare times itdoes not get interpreted as a math character): \index{Microbrew|see{beer}}
Font changes To change the typographic style of an entry, use the @-sign followed bya font change command: \index{Budweiser@\textit{Budweiser}}. Thisexample indexes ‘Budweiser’ and italicises it at the same time. Any of the standard\text... font-change commands work here: see § 8.2.3 for details. You can alsochange the font of the index number on its own, as for first-usage references, byusing the vertical bar in a similar way to the ‘see’ entries above, but substitutinga font-change command (without a backslash) such as textbf for bold-face text:\index{Budweiser|textbf} (see the index).
Formatting information ^_�`a69
SESSION 7. TEXTUAL TOOLS 7.6. MULTIPLE COLUMNS
Out of sequence The same method can be used as for font changes, just without thefont command: \index{beer@Bud} will place an entry for ‘Bud’ as if it wasspelled ‘beer’.
When the document has been processed through LATEX it will have created a .idxfile, which you run through the makeindex program by typing (for example):b
c
d
emakeindex mythesis
Some editors may have a button or menu entry for this. The program will look forthe .idx file and output a .ind file. This gets used by the command \printindexwhich you put at the end of your document, where you want the index printed. Thedefault index format is two columns.
Glossaries are done in a similar manner using the command \makeglossary in thepreamble and the command \glossary in the same way as \index. There are somesubtle differences in the way glossaries are handled: see the books by Lamport, (1994)and by Samarin, (1993).
7.6 Multiple columns
Use the multicol package: the environment is called multicols (note the plural form) andit takes the number of columns as a separate argument in curly braces:b
c
d
e
\usepackage{multicol}...\begin{multicols}{3}...\end{multicols}
LATEX has built-in supportfor two-column typeset-ting via the twocolumn op-tion in the standard Docu-ment Class Declarations,but it is relatively inflex-ible in that you cannotchange from full-width todouble-column and backagain on the same page,and the final page doesnot balance the columnheights. However, it doesfeature special figure* andtable* environments which
typeset full-width figuresand tables across a double-column setting.
The more extensible so-lution is the multicol pack-age, which will set up to10 columns, and allowsthe number of columns tobe changed or reset to onein mid-page, so that full-width graphics can still beused. It also balances theheight of the final page sothat all columns are thesame height, and you can
control the width of thegutter by redefining the\columnsep command toa new measurement (eg\renewcommand{\columnsep}{1cm}.
The package providesthe multicols environ-ment (note the extra‘s’) and you follow thebegin-environment com-mand with the num-ber of columns neededas a second argument:\begin{multicols}{5}.
Formatting information fg�hi70
SESSION VIII
Fonts and layouts
This is the session that most users want first, because they come to structured docu-ments from a wordprocessing environment where almost the only way to convey achange of information is to fiddle with the font and size drop-down menus.
As I hope you have seen, this is normally completely unnecessary in LATEX, whichdoes most of the hard work for you automatically. However, there are occasions whenyou need to make manual typographic changes, and this session is about how to dothem.
8.1 Changing layout
The design of the page can be a very subjective matter, and also rather a subtle one.Many organisations large and small pay considerable sums to designers to come upwith page layouts to suit their purposes. Styles in page layouts change with the years,as do fashions in everything else, so what may have looked attractive in 1989 maylook rather dated in 2003.
As with most aspects of typography, making the document readable involves makingit consistent, so the reader is not interrupted or distracted too much by apparentlyrandom changes in margins, widths, or placement of objects. However, there are anumber of different occasions where the layout usually does change, related to thefrequency with which the format appears.
• The title page (and the half-title, copyright page, dedication, and other one-pagepreliminaries if you use them) is usually designed individually, as the informationon it only occurs once in that format anywhere in the document.
• The table of contents and other related lists like figures and tables probably allneed to share one design.
• The prelims like Foreword, Introduction, and Preface should likewise follow thesame format between them.
• Chapter and Appendix start pages usually share a layout.
• Other (normal) pages have a single layout, but it may specify individual variationsto handle tables, lists, figures, sidebars, exercises, footnotes, etc.
If you are going to design a whole document, it’s probably a good idea to read a coupleof books on layout design first, to get a feel for the conventions which contribute tomaking the reader comfortable reading.
While unusual or radical layouts have an important role in attention-grabbing ormaking a socio-political statement (WIRED1 magazine is an obvious recent example),they are usually out of place in business reports, white papers, books, theses, andjournals. In ephemera, on the other hand, as in advertising, they are probably critical.
1Anderson, ()
Formatting information jk�lm71
SESSION 8. FONTS AND LAYOUTS 8.1. CHANGING LAYOUT
8.1.1 Spacing
We mentioned in § 7.3 and elsewhere the existence of the geometry package which letsyou change margins. It also lets you set the text-area height and width and a lot ofother layout settings: read the package documentation for details (see § 5.1.2 for howto read package documentation).n
o
p
q\usepackage[left=2cm,top=1cm,bottom=2cm,right=3cm,nohead,nofoot]{geometry}
The spacing around the individual textual components (headings, paragraphs, lists,footnotes, etc) can also be changed on a document-wide basis, as we saw with para-graph spacing and indentation in § 3.6.
Changing the spacing of section headings for the whole document can be done withthe sectsty package, designed to let you adjust section-head spacing without having toknow about the internal LATEX coding. The spacing for lists can be adjusted with themdwlist package. In both cases the user with highly specific requirements such as apublisher’s Compositor’s Specification should read the relevant sections in the The LATEXCompanion2 or ask for expert help, as there are many internal settings which can also echanged to fine-tune your design, but which need some knowledge of LATEX’s internals.
All the above are for automating changes so that they occur every time in a consistentmanner. You can also make manual changes whenever you need:
Flexible vertical space There are three preset commands \smallskip, \medskip, and\bigskip. These output flexible (dynamic, or ‘rubber’) space, approximately3pt, 6pt, and 12pt high respectively, but they will automatically compress orexpand a little, depending on the demands of the rest of the page (for exampleto allow one extra line to fit, or a heading to be moved to the next page withoutanyone except a typographer noticing the change). These commands can only beused after a paragraph break (a blank line or the command \par).
Fixed vertical space For a fixed-height space which will not stretch or shrink, use thecommand \vspace followed by a length in curly braces, eg \vspace{18pt}(again, this has to be after a paragraph break). Bear in mind that extra spacewhich ends up at a page-break when the document is formatted will get discardedentirely to make the bottom and top lines fall in the correct places. To force aspace to remain and be taken into account even after a page break (rare), use thestarred variant: \vspace*.
Double spacing Double-spacing normal lines of text is usually a bad idea, as it looksincredibly ugly. It is still, unfortunately, a requirement in some universities forthesis submission, a historical relic from the days of typewriters. Nowadays,11/3 or 1½ line spacing is considered acceptable, according to your font size. Ifyour institution still thinks they should have double line spacing, show them thisparagraph and explain that they need to enter the 21st century and adapt to thefeatures of automated typesetting. If they still insist, use the setspace packageand be prepared for some very ugly output.
Quite separately, there are some perfectly genuine and acceptable reasons forwanting wide line spacing, for example when typesetting a proof of a criticalor variorum edition, where editors and contributors are going to want to addnotes manually by writing between the lines, or where the text is going to beoverprinted by something else like Braille.
Horizontal space There is a horizontal equivalent to the \vspace command called\hspace, which works in the same way, so I can force a 1 r r space like thisin mid-paragraph. There are also some predefined (shorter) spaces available:
• \thinspace (1/12 em), which we saw between single and double quotes in§ 2.4, used mainly for fine adjustments;
2Samarin, (1993)
Formatting information st�uv72

SESSION 8. FONTS AND LAYOUTS 8.1. CHANGING LAYOUT
• \enspace (½em);
• \quad (1em); and
• \qquad (2em).
Beyond this, all horizontal space within paragraphs is automatically flexible, asthis is what LATEX uses to achieve justification. While it is possible to change this, itshould only be done by a typographer, as the settings are very subtle and beyondthe scope of this booklet.
This last point is the cause of much discussion, especially by users who are beingforced into using unnaturally wide line-spacing. The space between lines is definedby the length of \baselineskip multiplied by the value of \baselinestretch. Ingeneral, don’t meddle with \baselineskip at all, and with \baselinestretch onlyif you know what you are doing. (Both can, however, safely be used as reference valuesin commands like \vspace*{\baselineskip} to leave a whole line space.) The valueof \baselineskip changes with the font size (see § 8.2.4) but is conventionally set to1.2 times the current nominal font size. This is a value derived from long experience:only change it if you understand what it means and what effect it will have.
If you are still in a position where you have to do this, you can change the interlinespacing with the command \renewcommand{\baselinestretch}{nn}, where nn isa decimal number, with 1.0 being the current default. Set it to 1.5 to get line-and-a-halfspacing.
8.1.2 Headers and footers
LATEX has built-in settings to control the page style of its default page layouts. Theseare implemented with the \pagestyle command, which can take an argument ofERROR (page number centered at the bottom), ERROR (nothing at all), or ERROR (run-ning heads). An additional value, ERROR can be used if you want to reprogram thedefinitions of how \markright and \markboth are used, which control how chapterand section titles get into page headers. The command \thispagestyle (taking thesame arguments) can be used to force a specific style for the current page only.
The fancyhdr package lets you redefine the left-hand, centre, and right-hand pageheaders and footers for both odd and even pages (twelve objects in all). These areas cancontain a page number, fixed text, variable text (like the current chapter or section title,or the catch-words of a dictionary), or even a small image. They can also be used to dopage backgrounds and frames, by making one of them the top corner of an invisiblebox which ‘hangs’ text or images down over the whole page.
The settings for this document can be used as an example: for the whole story youhave to read the documentation.w
x
y
z
\pagestyle{fancy}\fancyhead{}\renewcommand\headrulewidth{.1pt}\fancyhead[LO,RE]{\footnotesize\sffamily\lite\leftmark}\fancyhead[LE,RO]{\footnotesize\sffamily\lite\itshape\rightmark}\fancyfoot[C]{}\fancyfoot[LE,RO]{\setlength{\fboxsep}{2pt}\ovalbox{\footnotesize\sffamily\thepage}}\fancyfoot[LO,RE]{\footnotesize\sffamily\lite\@title}\fancypagestyle{plain}{%
\fancyhf{}\fancyfoot[R]{\setlength{\fboxsep}{2pt}\ovalbox{\footnotesize\sffamily\thepage}}\fancyfoot[L]{\footnotesize\sffamily\lite\@title}\renewcommand{\headrulewidth}{0pt}}
This is probably more complex than most documents, but it illustrates some of themost common techniques:
1. Settings are prefixed by making the \pagestyle‘fancy’ and setting the \fancyheadto null.
Formatting information {|�}~73
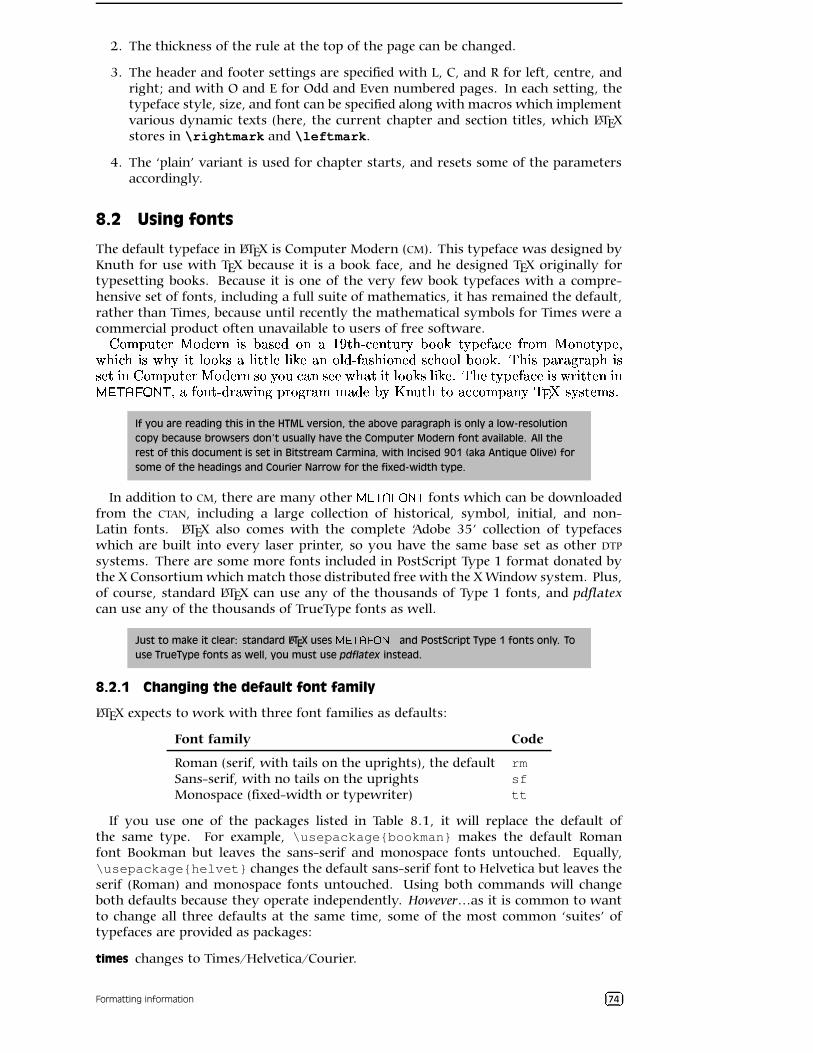
SESSION 8. FONTS AND LAYOUTS 8.2. USING FONTS
2. The thickness of the rule at the top of the page can be changed.
3. The header and footer settings are specified with L, C, and R for left, centre, andright; and with O and E for Odd and Even numbered pages. In each setting, thetypeface style, size, and font can be specified along with macros which implementvarious dynamic texts (here, the current chapter and section titles, which LATEXstores in \rightmark and \leftmark.
4. The ‘plain’ variant is used for chapter starts, and resets some of the parametersaccordingly.
8.2 Using fonts
The default typeface in LATEX is Computer Modern (CM). This typeface was designed byKnuth for use with TEX because it is a book face, and he designed TEX originally fortypesetting books. Because it is one of the very few book typefaces with a compre-hensive set of fonts, including a full suite of mathematics, it has remained the default,rather than Times, because until recently the mathematical symbols for Times were acommercial product often unavailable to users of free software.�����������������������������������������������¡ £¢¤��¥�¦¨§��©�ª������«¬����¯®°�±«²���³´�¯§©�µ³¶�����·�¸�����¯�±«¹�º�¯»¼ ¥��½§¾¥¸��� ¼ ¥ª«¸�¿�ÁÀ����¯®²�Â��À��¿����À½�ÃÀ��¿®��Ä�¯�¸��À���¦Å³Æ�¯��¥��½�������µ��§¾¥�����ÀÇ�º�²��®�ÈÂÉÊ¥����Ë���¤�¾��̯�¾�¤��¥���������Í�������������Î�����Ï�¸�²�������Ã���«����ħ©���Ð���©� ¼ ¥��¤�Í�¿�ÑÀ½�²��®²�ÒÀ��¿®��¯ÈÍÉÊ¥��Ó�Ô«²�º��³Æ�¯§��Õ�½� ¼ �¾�¿�������Ð���ÖØ×ÎÙÑÚÕÛ²ÜÞݺ٠»Î�ij´���¹�ߦ¨�Î�¾� ¼ ����ÌØ���¾��̯�¾�¯�à�á�¯���â�²«�ã��¹�Î�¾¥����ä�¯§©§����������ª«�É�å�æç�ß«²�������è��È
If you are reading this in the HTML version, the above paragraph is only a low-resolution
copy because browsers don’t usually have the Computer Modern font available. All the
rest of this document is set in Bitstream Carmina, with Incised 901 (aka Antique Olive) for
some of the headings and Courier Narrow for the fixed-width type.
In addition to CM, there are many other éÊêªë�ìºí¯îÑï�ë fonts which can be downloadedfrom the CTAN, including a large collection of historical, symbol, initial, and non-Latin fonts. LATEX also comes with the complete ‘Adobe 35’ collection of typefaceswhich are built into every laser printer, so you have the same base set as other DTP
systems. There are some more fonts included in PostScript Type 1 format donated bythe X Consortium which match those distributed free with the X Window system. Plus,of course, standard LATEX can use any of the thousands of Type 1 fonts, and pdflatexcan use any of the thousands of TrueType fonts as well.
Just to make it clear: standard LATEX uses ðÏñ�òªóÎôöõ÷¤ò and PostScript Type 1 fonts only. To
use TrueType fonts as well, you must use pdflatex instead.
8.2.1 Changing the default font family
LATEX expects to work with three font families as defaults:
Font family Code
Roman (serif, with tails on the uprights), the default rmSans-serif, with no tails on the uprights sfMonospace (fixed-width or typewriter) tt
If you use one of the packages listed in Table 8.1, it will replace the default ofthe same type. For example, \usepackage{bookman} makes the default Romanfont Bookman but leaves the sans-serif and monospace fonts untouched. Equally,\usepackage{helvet} changes the default sans-serif font to Helvetica but leaves theserif (Roman) and monospace fonts untouched. Using both commands will changeboth defaults because they operate independently. However…as it is common to wantto change all three defaults at the same time, some of the most common ‘suites’ oftypefaces are provided as packages:
times changes to Times/Helvetica/Courier.
Formatting information øù�úû74
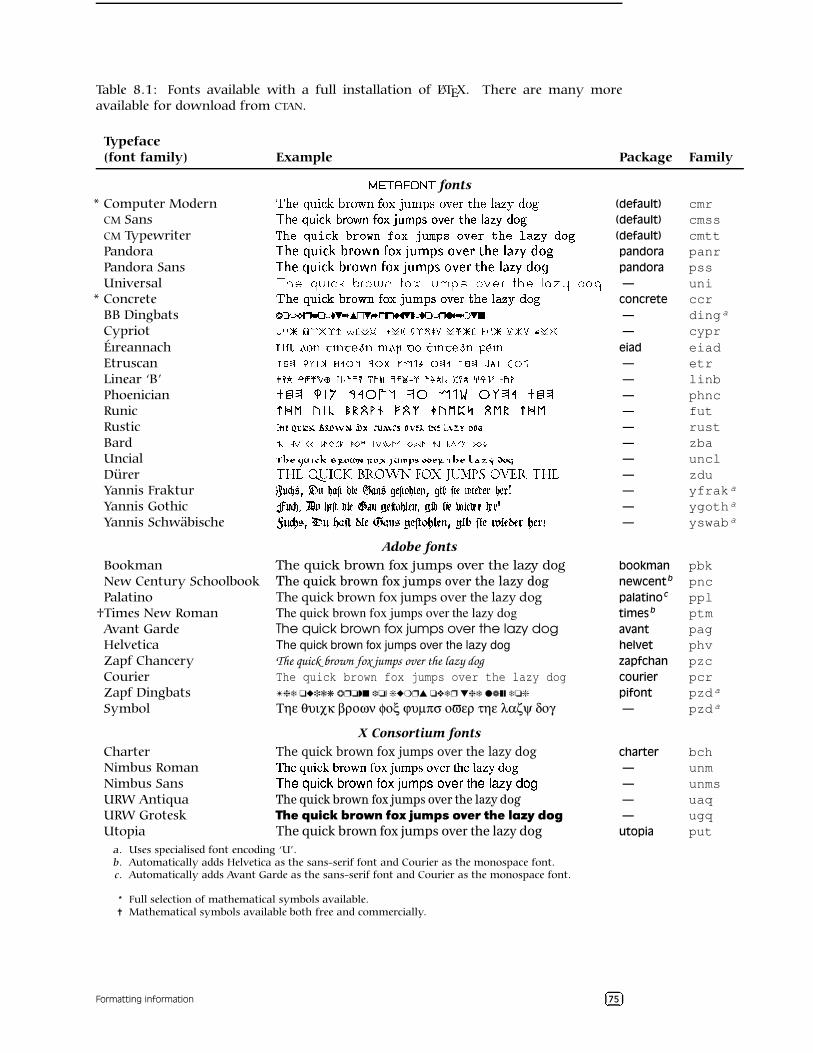
SESSION 8. FONTS AND LAYOUTS 8.2. USING FONTS
Table 8.1: Fonts available with a full installation of LATEX. There are many moreavailable for download from CTAN.
Typeface
(font family) Example Package Family
üÊý�þ�ÿ�������þfonts
* Computer Modern ������ ������������������ �"!# $&%('���)*+��,-�/.�02143�56�87 (default) cmrCM Sans 9;:=</>(?2@ A2B"C8DFE GIHKJ�E=LNM-?�O�P=Q�E8R=<8DTSU:=<WV X YUZW[8E*\ (default) cmssCM Typewriter ]�^(_a`*bdc*e�fag6hi8j�kml�i*npo2b8q(rtsui*v6_*hxw�^(_zy�{�|�}m~6i*� (default) cmttPandora �����&���d���+���t�U�6�&�����8�����T���t�K�6���������t�" ¢¡�£-¤�¥d��¦ pandora panrPandora Sans §©¨6ª"«T¬t¯®�°�±�²´³�µ&¶"·¸³�¹/º#¬t»�¼�½I³�¾6ª(²À¿4¨6ª�Á Â*ÃUÄ�Å�³�Æ pandora pssUniversal Ç�È�ÉËÊdÌ�ÍÏÎ�ÐaÑ�Ò¸Ó�Ô&Õ×ÖFÓ�ØÚÙ ÌÜÛ&Ý�Þ×Ótß�ÉÜÒáà´È�ÉËâ ã�ä�å×æ�Ó�ç — uni
* Concrete è�é�êìë*í�î¢ï�ð�ñ(òUó ô�õ�ö�ó=÷Wø#í(ù&útû�ó ü*êUò�ý�é�êKþ�ÿ������(ó�� concrete ccrBB Dingbats ���� � ����������������������� ��� !��"#�$�!% ��'&(�)!*�+'��, — dinga
Cypriot -�.�/10�2434576987:<;4=�>@?A;4B9CD24E�FDGH;4I�/4:HJD.�/1K�L4M�N<;4O — cyprÉıreannach PRQS�TVUWXZY�S[X\Y$] QU�X_^`U�acbdWfe$S�XgY�] QUX_h Q]S�X eiad eiadEtruscan ij�kml�n�o[prqsutwvyxt@z1n�{w|u}�twk�s�~j�ky�u����tw� — etrLinear ‘B’ �<�D�H�$�<�������D���<�������<�9�<�����D�9������� ���D�9¡<¢�£�¤D��¥ — linbPhoenician ¦4§©¨«ª ¬D¯®±°³²1´©µ·¶©² ¸1¹»º«²1¼©¨©°¾½4§©¨ — phncRunic ¿³À©Á«Â ÃDľŻƳǩȻÉËʻǩ̫ͳ©ΩϩÐÑÇ©Á©Æ¾¿»À©Á — futRustic Ò Ó�Ô�Õ×Ö�Ø ÙDÚHÛuÜÞÝDßRàâá Ý×ã äåÖçæâèêé»Ý×ë�Ô!Ü@ì Ó�Ôí î�ï<ð±ñÞÝDò — rustBard ó�ô9õ�ö7÷ øúù9û�üþý�ÿ�����ý���� ö�� �9ý��þôþü ó!ô����������ý�� — zbaUncial � �����! "$#&%('�)+*&,-�./*10324 658769*&:!�!)<;=����>6?+@�ACB&*1D — unclDürer EGFIHKJILIM�N<OQP�RGSGTVUXWYSGZ\[=LI]I^�_`SbacHdReEGFIH — zduYannis Fraktur f+gih6j!kmlbgon�prq<s1t uwvwpyx=jbz1u{q4|�nr} u{x~kwz1t ��� t uw�t u�syu���nru��y� — yfrak a
Yannis Gothic �o�=�������C���<�1� �����y���~� �r�y������������� �� � �m¡�� �£¢�¤m¥¦¤r§ — ygoth a
Yannis Schwäbische ¨8©«ª¬!®�¯�©(°�±!²´³~µ·¶w¸c±4¹�¬Cº+¶$²6»«°Y¼·¶$¹6®8º+µ·½c¾�µ·¶À¿bµ·¶ ³~¶$Á<°�¶$Ái — yswab a
Adobe fonts
Bookman The quick brown fox jumps over the lazy dog bookman pbkNew Century Schoolbook The quick brown fox jumps over the lazy dog newcent b pncPalatino The quick brown fox jumps over the lazy dog palatino c ppl
†Times New Roman The quick brown fox jumps over the lazy dog times b ptmAvant Garde The quick brown fox jumps over the lazy dog avant pagHelvetica The quick brown fox jumps over the lazy dog helvet phvZapf Chancery The quick brown fox jumps over the lazy dog zapfchan pzcCourier The quick brown fox jumps over the lazy dog courier pcrZapf Dingbats The quick brown fox jumps over the lazy dog pifont pzd a
Symbol Τηε θυιχκ βροων φοξ ϕυµπσ οϖερ τηε λαζψ δογ — pzd a
X Consortium fonts
Charter The quick brown fox jumps over the lazy dog charter bchNimbus Roman Ã�Ä+ÅÆ6Ç+È{ÉiÊ�Ë6ÌyÍ6Î�Ï�ÐrÍ/Ñ�Ò�Ç6ÓcÔ�Õ�Í×ÖÅiÌ�Ø�ÄÅÙ�Ú~Û�ÜoÝ+Í6Þ — unmNimbus Sans ß�àá�â�ã¦ä å�æcç8è£é�êIëcì�é�í�î�ã¦ï�ð�ñ(é�òá�è�ó�à+á`ô õ�ö/÷cødé�ù — unmsURW Antiqua The quick brown fox jumps over the lazy dog — uaqURW Grotesk The quick brown fox jumps over the lazy dog — ugqUtopia The quick brown fox jumps over the lazy dog utopia put
a. Uses specialised font encoding ‘U’.b. Automatically adds Helvetica as the sans-serif font and Courier as the monospace font.c. Automatically adds Avant Garde as the sans-serif font and Courier as the monospace font.
* Full selection of mathematical symbols available.† Mathematical symbols available both free and commercially.
Formatting information úûeüý75
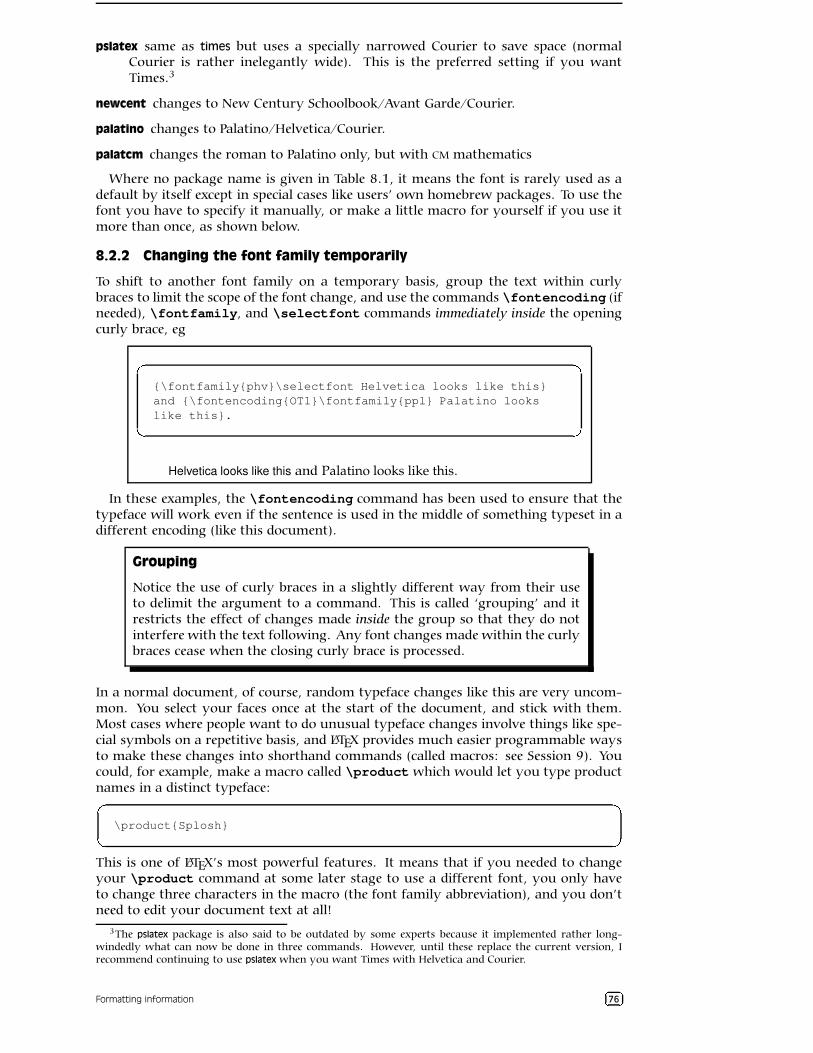
SESSION 8. FONTS AND LAYOUTS 8.2. USING FONTS
pslatex same as times but uses a specially narrowed Courier to save space (normalCourier is rather inelegantly wide). This is the preferred setting if you wantTimes.3
newcent changes to New Century Schoolbook/Avant Garde/Courier.
palatino changes to Palatino/Helvetica/Courier.
palatcm changes the roman to Palatino only, but with CM mathematics
Where no package name is given in Table 8.1, it means the font is rarely used as adefault by itself except in special cases like users’ own homebrew packages. To use thefont you have to specify it manually, or make a little macro for yourself if you use itmore than once, as shown below.
8.2.2 Changing the font family temporarily
To shift to another font family on a temporary basis, group the text within curlybraces to limit the scope of the font change, and use the commands \fontencoding (ifneeded), \fontfamily, and \selectfont commands immediately inside the openingcurly brace, eg
þ
ÿ
�
�
{\fontfamily{phv}\selectfont Helvetica looks like this}and {\fontencoding{OT1}\fontfamily{ppl} Palatino lookslike this}.
Helvetica looks like this and Palatino looks like this.
In these examples, the \fontencoding command has been used to ensure that thetypeface will work even if the sentence is used in the middle of something typeset in adifferent encoding (like this document).
Grouping
Notice the use of curly braces in a slightly different way from their useto delimit the argument to a command. This is called ‘grouping’ and itrestricts the effect of changes made inside the group so that they do notinterfere with the text following. Any font changes made within the curlybraces cease when the closing curly brace is processed.
In a normal document, of course, random typeface changes like this are very uncom-mon. You select your faces once at the start of the document, and stick with them.Most cases where people want to do unusual typeface changes involve things like spe-cial symbols on a repetitive basis, and LATEX provides much easier programmable waysto make these changes into shorthand commands (called macros: see Session 9). Youcould, for example, make a macro called \product which would let you type productnames in a distinct typeface:þ
ÿ
�
�\product{Splosh}
This is one of LATEX’s most powerful features. It means that if you needed to changeyour \product command at some later stage to use a different font, you only haveto change three characters in the macro (the font family abbreviation), and you don’tneed to edit your document text at all!
3The pslatex package is also said to be outdated by some experts because it implemented rather long-windedly what can now be done in three commands. However, until these replace the current version, Irecommend continuing to use pslatex when you want Times with Helvetica and Courier.
Formatting information �����76
SESSION 8. FONTS AND LAYOUTS 8.2. USING FONTS
8.2.3 Changing font style
Within each typeface or font family there are usually several different styles of type.LATEX distinguishes between font family, font shape, and font series:
Type style Command Example (using Computer Modern)
Upright (default) \upshape* ��� ������������������� �!�#"%$&��')(�*���+�,�.-��� /�021,3546��7Italic \itshape 8:9�;=<?>6@BA�CED?FHG�IKJML?GONQPR>6SUTWV%GYX#;,F Z!9�;\[^]O_,` a�G�bSlanted \slshape* cedWf%g6hYiBj&kml�nRo�pKqErso,tvuwhYx%y{zvo�|#f�n~}sdWfQ���Y�R���6ow�Small Capitals \scshape* � ���������!�W�����:�W�������:���R��� ��¡¢�:£����¥¤{���m¦2§e¨#©«ªe��¬Bold \bfseries† ¯®�°\±�²�³�´�µ�¶�·O¸�¹º¼»½¸#¾v¿�²�À=ÁWÂ�¸�Ã�°O·QÄÅ®�°\Æ�Ç�È,É5Ê6¸�ËBold Extended \bfseries* Ì%ÍeÎÐÏ{Ñ�ÒsÓwÔÖÕe×�ØÚÙ)ÛÝÜÞØÚß¼àOÑeáãâåä)ØÚæ�Î�×5çwÍ�Îéèsê�ëYì�í�ØWîSans-serif \sffamily ï�ð#ñ~ò�ó2ô õ�ö\÷2ø�ù#úQû ü!ùwý�þ�ó�ÿ�����ù��wñ2ø��Rð#ñ� ��� �2ù��Monospace \ttfamily ��������������� �"!�#%$'&)("#�*,+���-�.0/1#�2���!�3��4�)5�6�7�8)9"#�:
* Not all typefaces have all variants! Some only have bold and italics.† Some typefaces do not have both bold and bold extended: by default LATEX uses \bfseries for bold
extended.
These ‘shape’, ‘series’, and ‘family’ commands are commutative, so you can combinea shape with a series and/or a family, as in:;
<
=
>...{\bfseries\itshape\sffamily bold italic sans-serif type}...
This gives you bold italic sans-serif type, but beware of pushing your fontsbeyond their limits unless you are a typographer. It is not normally meaningful tocombine one shape or series class with another of the same class, such as trying toget slanted-italics. It’s an impossibility to combine one family with another (such asa seriffed sans-serif typeface!). Slanted plus italics, for example, doesn’t make sense,as italics are already slanted (although it is technically possible); and while sometypefaces may well possess italic small caps, they are not in common use. Sans-serifand monospace (typewriter) are different fonts, and often different typeface familiesentirely.4
There is an alternative syntax for the most common type shape and series commandswhich uses curly braces in the normal ‘argument’ manner:
Type style Command Example
Italic \textit{a few words} puts ]UL?;,I I¯G�F�a�V into italicsSlanted \textsl{a few words} puts �Mrsf�p p o#nO��z into slanted type*Small Capitals \textsc{a few words} puts §«���6� �)���{ª�¡ into small capsBold \textbf{a few words} puts ÇM»½°#¹�¹ ¸Y·wÊ� into bold typeSans-serif \textsf{a few words} puts \ü!ñ?ú�ú ùÚø?��� into sans-serif typeMonospace \texttt{a few words} puts 6)("�%$)$�#�!"9@/ into typewriter type
* If slanted is available separately from italics.
You can nest these inside one another too:;
<
=
>...\textbf{\itshape\textsf{bold italic sans-serif type}}...
8.2.4 Font sizes
LATEX has built into its defaults a set of predefined font size steps corresponding moreor less to the traditional sizes available to metal typesetters. This is deliberate, as thesesizes have grown up over 500 years of printing as those which go best together forbook-work, which is where TEX originated.
4Although if you’re a typographer wanting to experiment with typewriter typefaces with and withoutserifs, you can use ACBED�F'G�H�I�D to do exactly this kind of thing. But that’s outside the scope of this document.
Formatting information JKMLN77
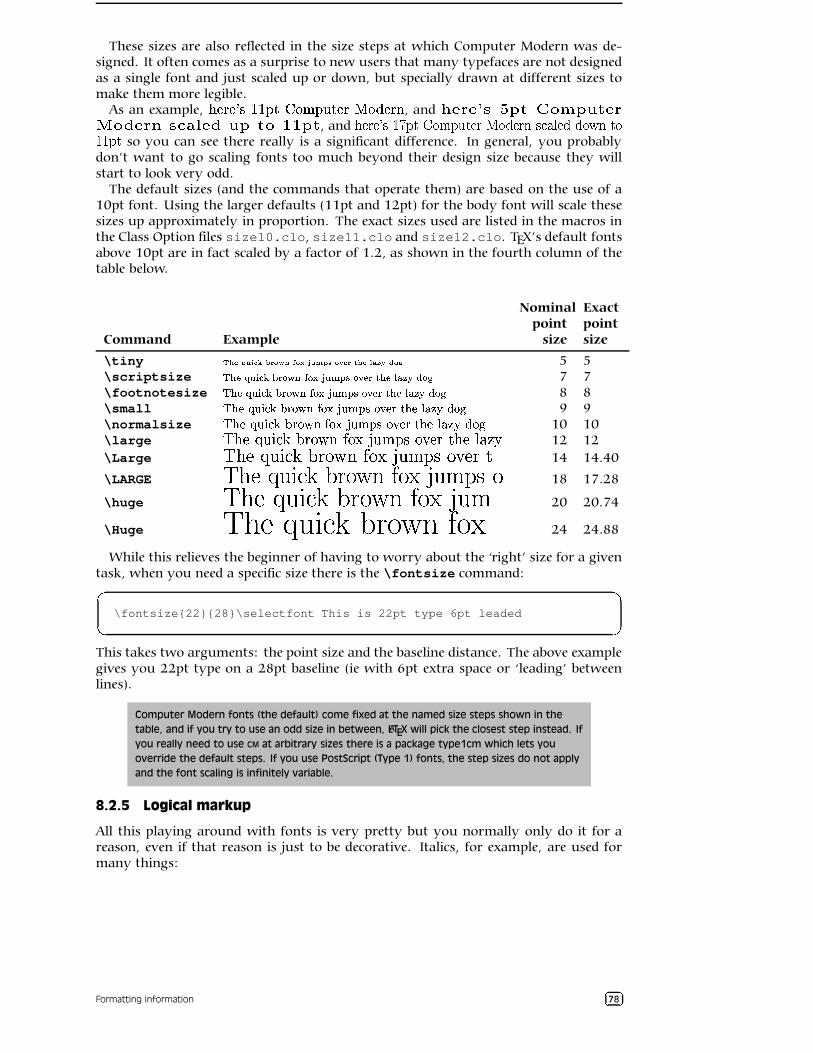
SESSION 8. FONTS AND LAYOUTS 8.2. USING FONTS
These sizes are also reflected in the size steps at which Computer Modern was de-signed. It often comes as a surprise to new users that many typefaces are not designedas a single font and just scaled up or down, but specially drawn at different sizes tomake them more legible.
As an example, O�P�QEP"RTSVU�U�WYX[Z]\�^_WY`�XaP�Qcb1\0d�P�Qae , and f�gihjglknmporq�sut v]wxqzy{s�gih| v�}~g�h0��m��i����gi}�yq�s�v��l��q�s , and �4�a����� �����%�����������4�4���a�����'�4�a��� ��¡�¢%£¤�a� �4��¥l�[������E��� so you can see there really is a significant difference. In general, you probablydon’t want to go scaling fonts too much beyond their design size because they willstart to look very odd.
The default sizes (and the commands that operate them) are based on the use of a10pt font. Using the larger defaults (11pt and 12pt) for the body font will scale thesesizes up approximately in proportion. The exact sizes used are listed in the macros inthe Class Option files size10.clo, size11.clo and size12.clo. TEX’s default fontsabove 10pt are in fact scaled by a factor of 1.2, as shown in the fourth column of thetable below.
Command Example
Nominal
point
size
Exact
point
size
\tiny ¦�§©¨�ª©«n¬ ¯®0°²±T³µ´%¶0· ³µ¸�¹º«²»@¼²½�³µ¾¿¨À±�Á§©¨�à ÄÆÅ?Ç�Ȳ³µÉ 5 5\scriptsize Ê@ËaÌYÍ�ÎEÏ ÐµÑ�ÒEÓÀÔ©ÕjÖ�׺ԩØCÙÆÎaÚÜÛaÝ@Ô©ÞßÌ©Ó4àÆËEÌYá âäãæåiçaÔäè 7 7\footnotesize é�ê�ëÜìaí�îðïæñ�ò�ó¿ônõYöl÷Âô�øiùµí�úrû�ü�ô�ý�ë²ó�þ¿ê�ëÜÿ���������ô� 8 8\small ��� �������������������! "�$#�%&��')(�*+�$,- .�+/��� 103254.687��59 9 9\normalsize :<;>=�?�@>ACB�DFE>G.H�I1JFKLH-MON�@>PRQTS�H�U�=VGXWY;>=)ZC[]\5^`_aHcb 10 10\large dfe�gihkjmlon�prq�s5tauFvxw�tzy|{5j�}�~��Fta��g�sF��e�g��&���c� 12 12\Large �������1�����T�����z�m�r������¡ ��£¢¥¤£¦��m§X�¨��© 14 14.40
\LARGE ª¬«�¯®`°�±5²´³¶µ�·�¸�¹»º½¼�¸�¾À¿k°�ÁÃÂ�Ĭ¸ 18 17.28
\huge ÅÇÆ�ȶÉ�ÊÌË�ͣΠÏÌÐÒÑfÓÃÔ ÕTÑRÖØ×ÒÊÌÙ 20 20.74
\Huge Ú ÛÝÜ Þ�ßáà�â�ã äáåRæèç é ê�æ�ë 24 24.88
While this relieves the beginner of having to worry about the ‘right’ size for a giventask, when you need a specific size there is the \fontsize command:ìí
îï\fontsize{22}{28}\selectfont This is 22pt type 6pt leaded
This takes two arguments: the point size and the baseline distance. The above examplegives you 22pt type on a 28pt baseline (ie with 6pt extra space or ‘leading’ betweenlines).
Computer Modern fonts (the default) come fixed at the named size steps shown in the
table, and if you try to use an odd size in between, LATEX will pick the closest step instead. If
you really need to use CM at arbitrary sizes there is a package type1cm which lets you
override the default steps. If you use PostScript (Type 1) fonts, the step sizes do not apply
and the font scaling is infinitely variable.
8.2.5 Logical markup
All this playing around with fonts is very pretty but you normally only do it for areason, even if that reason is just to be decorative. Italics, for example, are used formany things:
Formatting information ðñóòô78
SESSION 8. FONTS AND LAYOUTS 8.2. USING FONTS
Cause Example
Foreign words ex officioScientific names Ranunculus ficariaEmphasis must notTitles of documents The LATEX CompanionProduct names Corel’s WordPerfectVariables in maths E õ mc2
Subtitles or headings How to get startedDecoration FREE UPGRADE!!!
Humans usually have no problem telling the difference between these reasons, be-cause they can read and understand the meaning and context. Computers cannot (yet),so it has become conventional to use descriptive names which make the distinction ex-plicit, even though the appearance may be the same.
LATEX has some of these built in, like \emph, which provides emphasis. This has a spe-cial feature because when the surrounding text is already italic, emphasis automaticallyreverts to upright type, which is a normal practice for typesetting.ö
÷
ø
ùThis has a special feature because {\itshape when the surroundingtext is already italic, \emph{emphasis} automatically reverts toupright type, which is a normal practice for typesetting.
This sensitivity to logic is programmed into the definition of \emph and it’s not hardto make up other commands of your own which could do the same, such as \foreignor \product.
But why would you bother? In a short document it’s probably not important, but ifyou’re writing a long report, or a formal document like an article, a book, or a thesis,it makes writing and editing hugely easier if you can control whole groups of specialeffects with a single command, such as italicising, indexing, or cross-referencing toa glossary. If a format needs changing, you only have to change the definition, andevery occurrence automatically follows suit.
It also makes it possible to find and act on groups of meanings — such as makingan index of scientific names or product names (as in this document) — if they areidentified with a special command. Otherwise you’d spend weeks hunting manuallythrough every \textit command to find the ones you wanted. This is the importanceof automation: it can save you time and money.
In Session 9 we will see how to make your own simple commands like this.
8.2.6 Colour
You can typeset anything in LATEX in any colour you want using the color package.First, you need to add the command \usepackage{color} to your preamble (notethe US spelling of color!). This makes available a default palette of primary colours:red, green, and blue for the RGB colour model used for emitted light (television screens),and cyan, magenta, and yellow to go with black for the CMYK colour model used forreflected light (printing).
For the occasional word or phrase in colour, use the command \textcolorwith twoarguments, the colour name and the text: \textcolor{red}{like this}. There isa \color command as well, for use within groups:ö÷
øù...{\color{blue}some text in blue}...
If you have the PostScript printer driver dvips installed, you also get a separate 64–colour palette of predefined names (representing approximately the colours in the bigbox of Crayola colouring pencils much favoured by artists and designers). This adds anew colour model called named, so if you want the Crayola colour RubineRed, you cancreate a name of your own for it to use in colour-changing commands:
Formatting information úû`üý79
SESSION 8. FONTS AND LAYOUTS 8.3. INSTALLING NEW FONTS
þÿ
�
�\definecolor{myred}{named}{RubineRed}
RubineRed looks like this (\textcolor{myred}{like this}) if you’re reading thisin colour. However, to use these with pdflatex, you still need the numeric colour codes,as pdflatex doesn’t understand dvips colour names yet. You can look up the CMYK codesin the file texmf/tex/latex/graphics/dvipsnam.def and use cmyk as the colourmodel name, so for use with pdflatex you would say:þÿ
�
�\definecolor{myred}{cmyk}{0,1,0.13,0}
You can define any shade you want by giving it a name and providing the Red-Green-Blue (RGB) or Cyan-Magenta-Yellow-Black (CMYK) colour values expressed as decimals,using this \definecolor command. For example, an RGB shade given as (37,125,224)in decimal (#250FE0 in hexadecimal as used on the Web) needs to be given asþÿ
�
�\definecolor{midblue}{rgb}{0.145,0.490,0.882}
(divide each value by 255, the maximum for each of the hues in the Red-Green-Bluecolour model). The \definecolor command takes three arguments: the name youwant to refer to the shade by; the name of the color model (here rgb) and the set ofdecimal-fraction values separated by commas. You can then use \textcolor withyour new colour name: the midblue looks like this if you’re reading in colour.
The color package also provides a colour version of \fbox (see § 6.7.2) called \colorbox:
þÿ
�
�\colorbox{midblue}{\color{magenta}Magenta on midblue}
Magenta on midblue: you can see how careful you need to be with colours.
8.3 Installing new fonts
Different fonts come in a variety of packagings: the three most common used with TEXsystems are PostScript fonts, TrueType fonts, and ���������� �� fonts. How you installthem and where they go depends on how you installed LATEX: all I can deal with hereare the standard locations within the TDS.
Most typefaces come supplied as one or more font files. PostScript fonts are suppliedas a pair of files: an outline and a metric, as described in § 8.3.1 and § 8.3.2. A TrueTypefont combines these in a single file. For LATEX use you also need a style (.sty) file andfont definition (.fd), which can easily be created if they are not supplied.
The instructions here assume the use of the New Font Selection Scheme (NFSS) usedin LATEX2ε. If you are running the obsolete LATEX 2.09, upgrade it now.
8.3.1 Installing �������������� fonts
This is the simplest installation. When you download ���������� �� fonts from the CTAN,you’ll usually find a large number of Outline files (.mf files) and maybe some othertypes as well (see below).
1. Create a new subdirectory named after the typeface you’re installing in texmf-local/fonts/source/public/:
Formatting information ���� 80
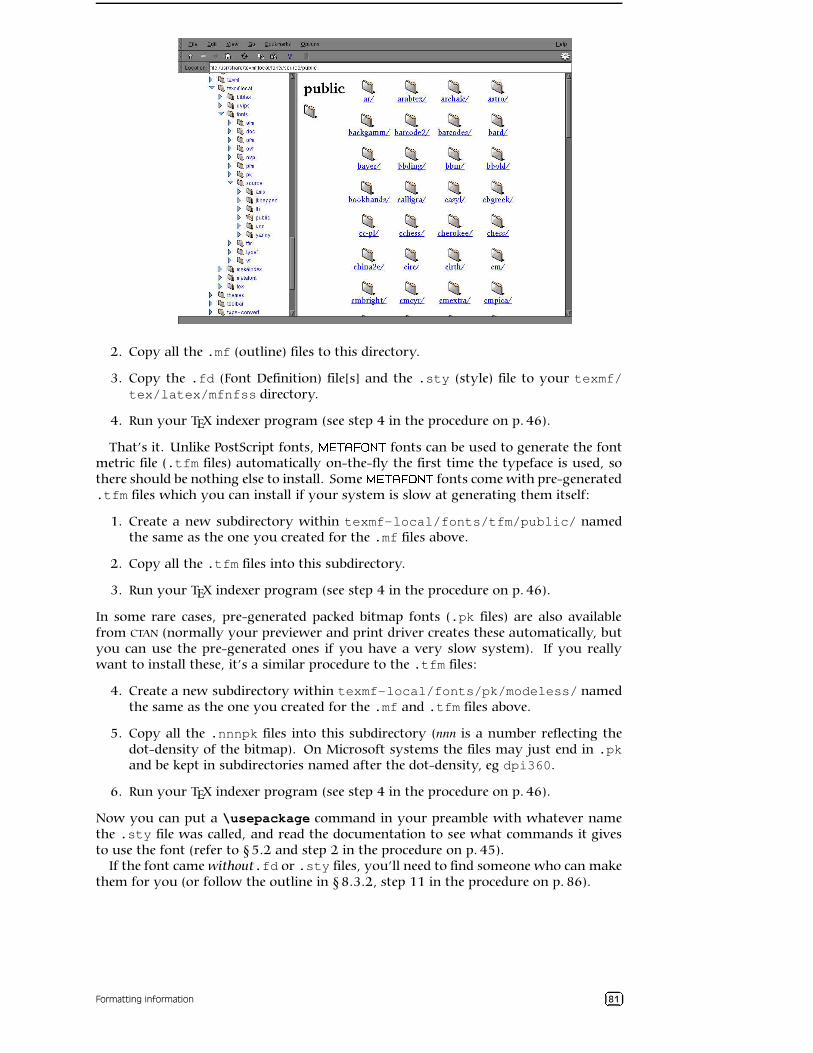
SESSION 8. FONTS AND LAYOUTS 8.3. INSTALLING NEW FONTS
2. Copy all the .mf (outline) files to this directory.
3. Copy the .fd (Font Definition) file[s] and the .sty (style) file to your texmf/tex/latex/mfnfss directory.
4. Run your TEX indexer program (see step 4 in the procedure on p. 46).
That’s it. Unlike PostScript fonts, !�"$#&%'�(�)�# fonts can be used to generate the fontmetric file (.tfm files) automatically on-the-fly the first time the typeface is used, sothere should be nothing else to install. Some !�"�#�%'�(�)�# fonts come with pre-generated.tfm files which you can install if your system is slow at generating them itself:
1. Create a new subdirectory within texmf-local/fonts/tfm/public/ namedthe same as the one you created for the .mf files above.
2. Copy all the .tfm files into this subdirectory.
3. Run your TEX indexer program (see step 4 in the procedure on p. 46).
In some rare cases, pre-generated packed bitmap fonts (.pk files) are also availablefrom CTAN (normally your previewer and print driver creates these automatically, butyou can use the pre-generated ones if you have a very slow system). If you reallywant to install these, it’s a similar procedure to the .tfm files:
4. Create a new subdirectory within texmf-local/fonts/pk/modeless/ namedthe same as the one you created for the .mf and .tfm files above.
5. Copy all the .nnnpk files into this subdirectory (nnn is a number reflecting thedot-density of the bitmap). On Microsoft systems the files may just end in .pkand be kept in subdirectories named after the dot-density, eg dpi360.
6. Run your TEX indexer program (see step 4 in the procedure on p. 46).
Now you can put a \usepackage command in your preamble with whatever namethe .sty file was called, and read the documentation to see what commands it givesto use the font (refer to § 5.2 and step 2 in the procedure on p. 45).
If the font came without.fd or .sty files, you’ll need to find someone who can makethem for you (or follow the outline in § 8.3.2, step 11 in the procedure on p. 86).
Formatting information *+�,-81
SESSION 8. FONTS AND LAYOUTS 8.3. INSTALLING NEW FONTS
8.3.2 Installing PostScript fonts
Lots of people will tell you that PostScript fonts and PostScript output are dead andthat TrueType fonts and PDF output are the way to go. While this is true for manycases, standard LATEX does not work with TrueType fonts. Only pdflatex does that, andthere are still many printers who prefer PostScript output to PDF, despite its biggerfile size. And operating system support for scalable fonts is still very poor on Unixsystems (including Linux), despite the advances in recent years.
PostScript (Adobe Type 1) fonts come in two halves, just like .�/�0�12�3�4�0 fonts: a FontMetric and an Outline. Unlike .�/$0&12�3�4�0 fonts, you must install both: you cannotcause the the metrics to be generated from the outline as you can with .�/�0�12�3�4�0 .
The two file types are .afm (Adobe Font Metric) and .pfb (PostScript Font Binary)files. You must have both for each font before you start. If you only have the near-obsolete.pfa (PostScript Font ASCII5) files, it is possible to generate the .pfb files using thet1binary program from the t1utils package (http://gnuwin32.sourceforge.net/packages/t1utils.htm). There are alas still some companies distributing Type 1fonts in .pfa format (Mathematica is one reported recently).
This way has worked perfectly for me for years. This is not the official way (that’s fontinst
but I have never managed to get it to work for me), and there is a recent problem (see
end).
I’ll repeat this: before you start, make sure you have all the .afm and .pfb filesfor the font you want. In the example below, I’m going to use an imaginary typefacecalled Foo, so I have foo.afm and foo.pfb files.
1. Put the files in your temporary directoryThis is /tmp on Linux, and should be C:\tmp or C:\temp or C:\Windows\tempon Microsoft Windows.
2. Find out or decide on the short font name to use inside LATEX.
This is not the full descriptive name (eg Baskerville Italic Bold Extended) but anencoded font name in a format fnnsseec devised by Karl Berry , which storesthe same information in no more than eight characters for compatibility withsystems which cannot handle long filenames.
Char Meaning Examples
f foundry b=Bitstream, m=Monotype, p=Adobe PostScriptnn typeface name ba=Baskerville, tm=Times, pl=Palatinoss series/shape r=roman, bi=bold italicee encoding 8a=default 8–bit ANSI, ly=Y&Y’s TEX’n’ANSIc [small]caps (this is a literal ‘c’ character, used only if needed)
The texmf/fontname directory in a full installation of LATEX has files per foundrygiving fully-formed names like these for common fonts (eg ptmr8a is [Adobe]Post-Script Times Roman in an 8–bit ANSI encoding; bgslly is Bitstream Gill SansLight in Y&Y’s TEX’n’ANSI encoding [LY1]).6 Read the documentation in Font-name: Filenames for TEX fonts7 to find out how to make up your own short namesif the foundry and font you want is not shown in the fontname directory.
In this example we’ll call our mythical example typeface ‘zork’ (standing forZfonts Ordinary Bookface) and we’ll assume it comes in the two files foo.afmand foo.pfb.
5As I finished this version, Karl Berry brought to my notice the wonderful PFAedit font editor (fromhttp://pfaedit.sourceforge.net), so they’re not near-obsolete at all.
6Confusingly, Bitstream fonts mostly have different names from the original fonts, so what they callHumanist 521 is actually Gill Sans. Until recently, US law only allowed the names of typefaces to becopyrighted, not the font designs themselves, leading to widespread piracy.
7Berry, (June 2001)
Formatting information 56�7882
SESSION 8. FONTS AND LAYOUTS 8.3. INSTALLING NEW FONTS
3. Decide on your encodingThis is what tripped me up the first few times until someone pointed me at Y&Y’sTEX’n’ASNI encoding which (to me) seems to be the only one that includes theglyphs I want where I want them. Your mileage may vary. This encoding isreferred to as LY1 within LATEX and the encoding file is in texmf/dvips/base/texnansi.enc. Encoding is needed because Adobe fonts store their characters indifferent places to the TEX standard.
Copy this file to the temporary directory where you’re doing all this stuff. Ifyou’re using the 8a or 8r encoding (or some other encoding), then copy that fileinstead.
4. Convert .afm files to .tfmThe afm2tfm program is a standard utility that should be in the bin directory ofyour TEX installation. If it’s not, update your installation.
In a command window, type:
9
:
;
<afm2tfm foo.afm -v zorkly.vpl -p texnansi.enc rzorkly.tfm >zork.id
This creates a special ‘raw’ TEX Font Metric file (hence the r prefix) that LATEX canuse, with a list of all its properties encoded with LY1 (the .vpl or Virtual PropertyList file). Many people will tell you that virtual fonts are dead and that this is thewrong way to do it, but no-one has ever shown me an alternative that works,so I stick with it.
5. Small caps (optional)
If you want a small caps variant faked up (perhaps because the typeface familydoesn’t have a special small-caps font), repeat the medicine like this:
9
:
;
<afm2tfm foo.afm -V zorklyc.vpl -p texnansi.enc rzorkly.tfm >>zork.id
Note the capital V option here. Yes, it does overwrite the rzorkly.tfm createdin the first command. Let it. And those are two of the ‘greater-than’ signs beforethe zork.id filename because we want to append to it, not overwrite it.
6. Create the virtual font
Turn the .vpl files into .vf and .tfm pairs. LATEX uses these to convert fromAdobe’s encoding to its own.
9
:
;
<vptovf zorkly.vpl zorkly.vf zorkly.tfmvptovf zorklyc.vpl zorklyc.vf zorklyc.tfm
Again, the vptovf program is a standard part of any TEX distribution.
7. Make directories to hold the filesUnder your texmf-local directory there should be a fonts directory, and inthere there should be afm, tfm, type1, and vf subdirectories. Create them ifthey do not already exist.
Formatting information =>�?@83
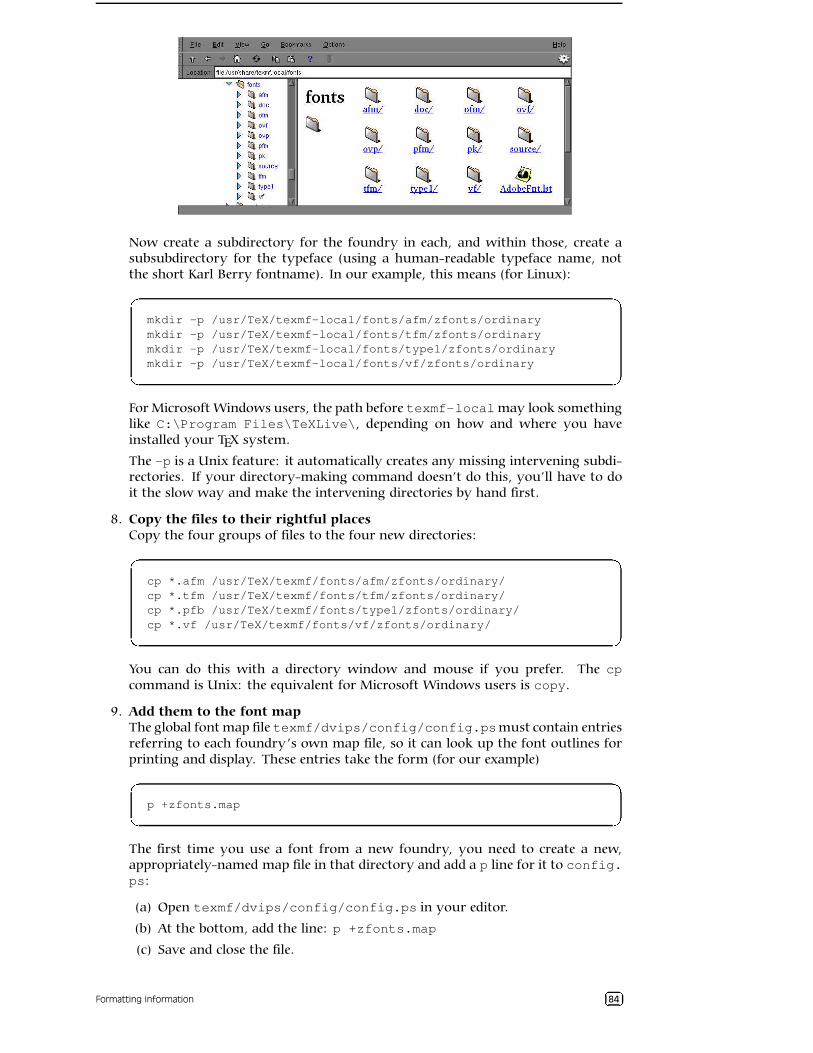
SESSION 8. FONTS AND LAYOUTS 8.3. INSTALLING NEW FONTS
Now create a subdirectory for the foundry in each, and within those, create asubsubdirectory for the typeface (using a human-readable typeface name, notthe short Karl Berry fontname). In our example, this means (for Linux):
A
B
C
D
mkdir -p /usr/TeX/texmf-local/fonts/afm/zfonts/ordinarymkdir -p /usr/TeX/texmf-local/fonts/tfm/zfonts/ordinarymkdir -p /usr/TeX/texmf-local/fonts/type1/zfonts/ordinarymkdir -p /usr/TeX/texmf-local/fonts/vf/zfonts/ordinary
For Microsoft Windows users, the path before texmf-localmay look somethinglike C:\Program Files\TeXLive\, depending on how and where you haveinstalled your TEX system.
The -p is a Unix feature: it automatically creates any missing intervening subdi-rectories. If your directory-making command doesn’t do this, you’ll have to doit the slow way and make the intervening directories by hand first.
8. Copy the files to their rightful places
Copy the four groups of files to the four new directories:
A
B
C
D
cp *.afm /usr/TeX/texmf/fonts/afm/zfonts/ordinary/cp *.tfm /usr/TeX/texmf/fonts/tfm/zfonts/ordinary/cp *.pfb /usr/TeX/texmf/fonts/type1/zfonts/ordinary/cp *.vf /usr/TeX/texmf/fonts/vf/zfonts/ordinary/
You can do this with a directory window and mouse if you prefer. The cpcommand is Unix: the equivalent for Microsoft Windows users is copy.
9. Add them to the font mapThe global font map file texmf/dvips/config/config.psmust contain entriesreferring to each foundry’s own map file, so it can look up the font outlines forprinting and display. These entries take the form (for our example)
A
B
C
Dp +zfonts.map
The first time you use a font from a new foundry, you need to create a new,appropriately-named map file in that directory and add a p line for it to config.ps:
(a) Open texmf/dvips/config/config.ps in your editor.
(b) At the bottom, add the line: p +zfonts.map
(c) Save and close the file.
Formatting information EF�GH84
SESSION 8. FONTS AND LAYOUTS 8.3. INSTALLING NEW FONTS
The alternative is to stuff everything into psfonts.map itself but that is a bitunwieldy, and liable to get overwritten when you upgrade. There is an updmapscript which is supposed to take care of all this but I haven’t tried it.
The font entries in our hypothetical zfonts.map will be one for raw and one forcooked, and each entry is on a single line to itself, with no wrapping. Each entrygives the short name of the font, the long (Adobe) name, the PostScript encodingparameters (in quotes), and then two filenames prefixed by input redirects (less-than signs): the encoding file and the PostScript outline file.
(a) Use your editor to open (create) zfonts.map in texmf/dvips/config/.
(b) Insert the two lines:
I
J
K
Lrzorkly Ordinary-Blackface "TeXnANSIEncoding ReEncodeFont" <texnansi.enc <foo.pfbzorkly Ordinary-Blackface "TeXnANSIEncoding ReEncodeFont" <texnansi.enc <foo.pfb
(c) Save and close the file.
You get the full font name needed in this last step (‘Ordinary-Blackface’) from thezork.id which was created back in step 4 in the procedure on p. 83 when weran afm2tfm. You must get this exactly right, because it’s the ‘official’ full nameof the font, and PostScript files using this font need to match it.
10. Create a style file
LATEX needs a style file to implement the interface to the font. Call it after thetypeface or something related; in this example we’ll call it foozork.sty. In itgo some details of the name and date we did this, what version of LATEX it needs,and any other command necessary to operate the font, like the font encoding andwhether it is to supersede the current default Roman font.
(a) Use your editor to open (create) foozork.sty in texmf-local/tex/latex/psnfss.
(b) Insert the following lines:
I
J
K
L
% foozork - created from foo for Zork\def\fileversion{1.0}\def\filedate{2002/12/03}\def\docdate{2002/12/03}\NeedsTeXFormat{LaTeX2e}\ProvidesPackage{foozork}[\filedate\space\fileversion\space
Zfonts Ordinary PSNFSS2e package]\RequirePackage[LY1]{fontenc}\renewcommand{\rmdefault}{zor}\endinput
Note the following:
• The first argument to \ProvidesPackage must be the same as thisstyle file name; and that the font family is referred to as zor, being thefoundry letter plus the fontname abbreviation. This acts as a prefix forany/all font variants (bold, italic, etc).
• If this is a typewriter font, make the renewed command \rmdefaultinto \ttdefault.
• If it’s a sans-serif font, make it \sfdefault instead.• Omit this command completely if you don’t want the style file to super-
sede the current defaults but simply to make the font available. If youdo this, you probably want to write a new command or two to use it,typically one for grouped use and one for argument use:
Formatting information MNPOQ85
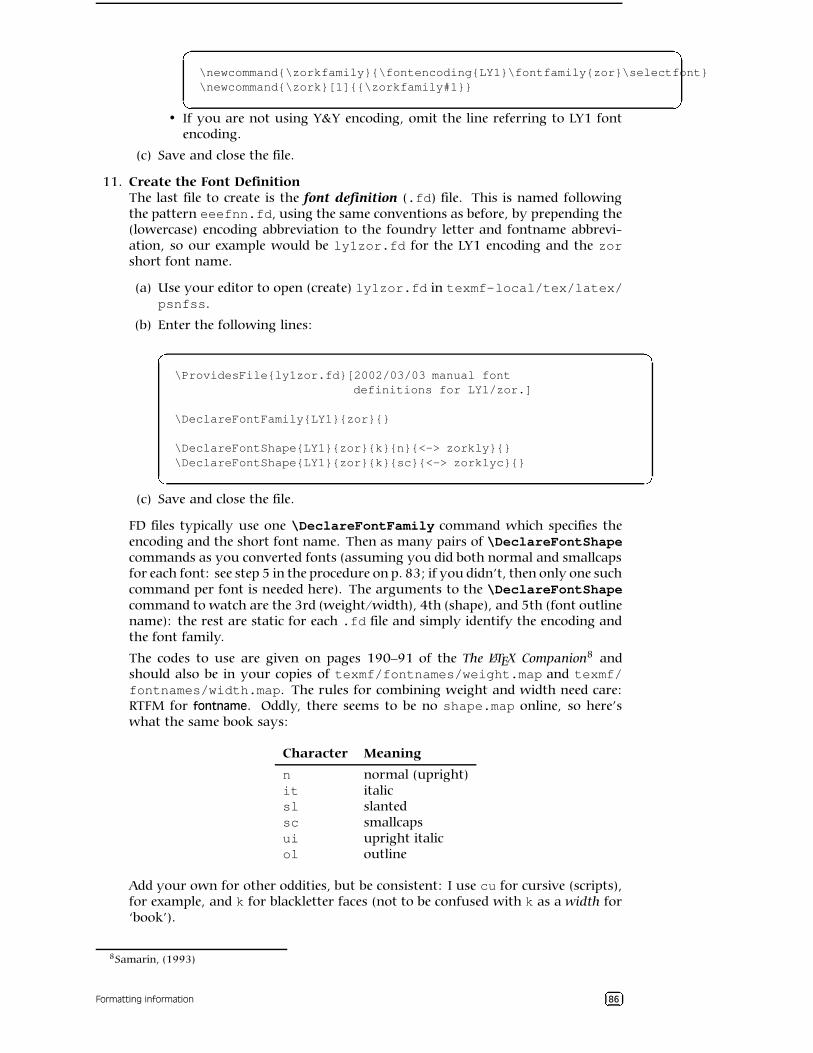
SESSION 8. FONTS AND LAYOUTS 8.3. INSTALLING NEW FONTS
R
S
T
U\newcommand{\zorkfamily}{\fontencoding{LY1}\fontfamily{zor}\selectfont}\newcommand{\zork}[1]{{\zorkfamily#1}}
• If you are not using Y&Y encoding, omit the line referring to LY1 fontencoding.
(c) Save and close the file.
11. Create the Font Definition
The last file to create is the font definition (.fd) file. This is named followingthe pattern eeefnn.fd, using the same conventions as before, by prepending the(lowercase) encoding abbreviation to the foundry letter and fontname abbrevi-ation, so our example would be ly1zor.fd for the LY1 encoding and the zorshort font name.
(a) Use your editor to open (create) ly1zor.fd in texmf-local/tex/latex/psnfss.
(b) Enter the following lines:
R
S
T
U
\ProvidesFile{ly1zor.fd}[2002/03/03 manual fontdefinitions for LY1/zor.]
\DeclareFontFamily{LY1}{zor}{}
\DeclareFontShape{LY1}{zor}{k}{n}{<-> zorkly}{}\DeclareFontShape{LY1}{zor}{k}{sc}{<-> zorklyc}{}
(c) Save and close the file.
FD files typically use one \DeclareFontFamily command which specifies theencoding and the short font name. Then as many pairs of \DeclareFontShapecommands as you converted fonts (assuming you did both normal and smallcapsfor each font: see step 5 in the procedure on p. 83; if you didn’t, then only one suchcommand per font is needed here). The arguments to the \DeclareFontShapecommand to watch are the 3rd (weight/width), 4th (shape), and 5th (font outlinename): the rest are static for each .fd file and simply identify the encoding andthe font family.
The codes to use are given on pages 190–91 of the The LATEX Companion8 andshould also be in your copies of texmf/fontnames/weight.map and texmf/fontnames/width.map. The rules for combining weight and width need care:RTFM for fontname. Oddly, there seems to be no shape.map online, so here’swhat the same book says:
Character Meaning
n normal (upright)it italicsl slantedsc smallcapsui upright italicol outline
Add your own for other oddities, but be consistent: I use cu for cursive (scripts),for example, and k for blackletter faces (not to be confused with k as a width for‘book’).
8Samarin, (1993)
Formatting information VW�XY86
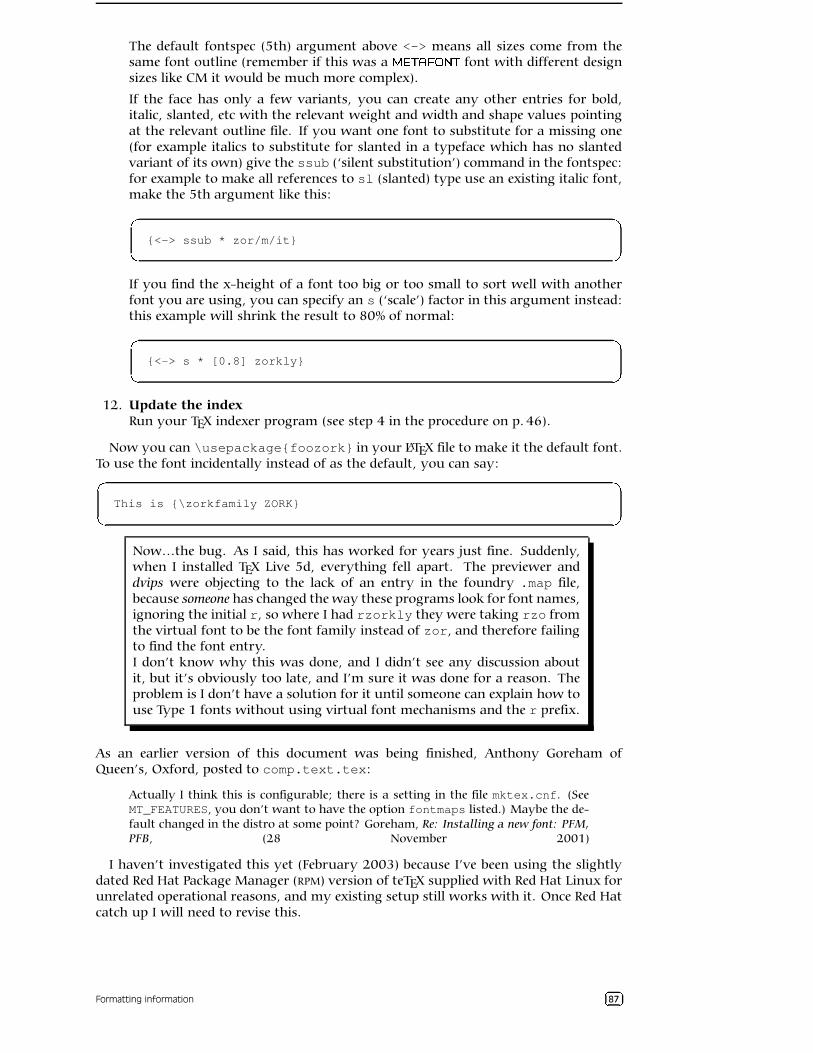
SESSION 8. FONTS AND LAYOUTS 8.3. INSTALLING NEW FONTS
The default fontspec (5th) argument above <-> means all sizes come from thesame font outline (remember if this was a Z�[�\�]^�_�`�\ font with different designsizes like CM it would be much more complex).
If the face has only a few variants, you can create any other entries for bold,italic, slanted, etc with the relevant weight and width and shape values pointingat the relevant outline file. If you want one font to substitute for a missing one(for example italics to substitute for slanted in a typeface which has no slantedvariant of its own) give the ssub (‘silent substitution’) command in the fontspec:for example to make all references to sl (slanted) type use an existing italic font,make the 5th argument like this:
a
b
c
d{<-> ssub * zor/m/it}
If you find the x-height of a font too big or too small to sort well with anotherfont you are using, you can specify an s (‘scale’) factor in this argument instead:this example will shrink the result to 80% of normal:
a
b
c
d{<-> s * [0.8] zorkly}
12. Update the index
Run your TEX indexer program (see step 4 in the procedure on p. 46).
Now you can \usepackage{foozork} in your LATEX file to make it the default font.To use the font incidentally instead of as the default, you can say:a
b
c
dThis is {\zorkfamily ZORK}
Now…the bug. As I said, this has worked for years just fine. Suddenly,when I installed TEX Live 5d, everything fell apart. The previewer anddvips were objecting to the lack of an entry in the foundry .map file,because someone has changed the way these programs look for font names,ignoring the initial r, so where I had rzorkly they were taking rzo fromthe virtual font to be the font family instead of zor, and therefore failingto find the font entry.I don’t know why this was done, and I didn’t see any discussion aboutit, but it’s obviously too late, and I’m sure it was done for a reason. Theproblem is I don’t have a solution for it until someone can explain how touse Type 1 fonts without using virtual font mechanisms and the r prefix.
As an earlier version of this document was being finished, Anthony Goreham ofQueen’s, Oxford, posted to comp.text.tex:
Actually I think this is configurable; there is a setting in the file mktex.cnf. (SeeMT_FEATURES, you don’t want to have the option fontmaps listed.) Maybe the de-fault changed in the distro at some point? Goreham, Re: Installing a new font: PFM,PFB, (28 November 2001)
I haven’t investigated this yet (February 2003) because I’ve been using the slightlydated Red Hat Package Manager (RPM) version of teTEX supplied with Red Hat Linux forunrelated operational reasons, and my existing setup still works with it. Once Red Hatcatch up I will need to revise this.
Formatting information ef�gh87
SESSION 8. FONTS AND LAYOUTS 8.3. INSTALLING NEW FONTS
8.3.3 Installing the Type 1 Computer Modern fonts
If your LATEX installation has installed the Type 3 ( i�j$k&lm�n�o�k ) versions of the ComputerModern typeface, you may want to switch to the Type 1 (PostScript) version if youare going to be using pdflatex instead of standard LATEX because Acrobat Reader makessuch a hames of displaying Type3 fonts.
To do this, [someone needs to investigate this section and get it right].
Formatting information pq�rs88
SESSION IX
Programmability (macros)
We’ve touched several times on the ability of LATEX to be reprogrammed. This is one ofits central features, and one that still, after nearly a quarter of a century, puts it wellabove many other typesetting systems, even those with macro systems of their own.It’s also the one that needs most foreknowledge, which is why this chapter is in thisposition.
LATEX is in fact itself just a collection of macros — rather a big collection — writtenin TEX’s internal typesetting language. These macros are little program-like sets ofinstructions with a name which can be used as shorthand for an operation you wishto perform more than once.
Macros can be arbitrarily complex. Many of the ones used in the standard LATEXpackages are several pages long, but as we will see, even short ones can very simplyautomate otherwise tedious chores and allow the author to concentrate on writing.
9.1 Simple replacement macros
In its simplest form, a LATEX macro can just be a straightforward text replacement of aphrase to avoid misspelling something each time you need it, egt
u
v
w\newcommand{\ef}{European Foundation for the Improvement of Living
and Working Conditions}
Put this in your preamble, and you can then use \ef in your document and it willtypeset it as the full text. Remember that after a command ending in a letter you needto leave a space to avoid the next word getting gobbled up as part of the command (see§ 2.2.1). And when you want to force a space to be printed, use a backslash followedby a space, egt
u
v
wThe \ef\ is an institution of the Commission of the European Union.
As you can see from this example, the \newcommand command takes two arguments:a) the name you want to give the new command; and b) the expansion to be performedwhen you use it, so there are always two sets of curly braces after \newcommand.
9.2 Macros using information gathered previously
A more complex example is the macro \maketitle which is used in almost everyformal document to format the title block. In the basic document classes (book, report,and article) it performs small variations on the layout of a centred block with the titlefollowed by the author followed by the date, as we saw in § 3.3.
If you inspect one of these document class files, such as texmf/tex/latex/base/report.clsyou will see \maketitle defined (and several variants called \@maketitlefor use in different circumstances). It uses the values for the title, author, and date
Formatting information xy�z{89
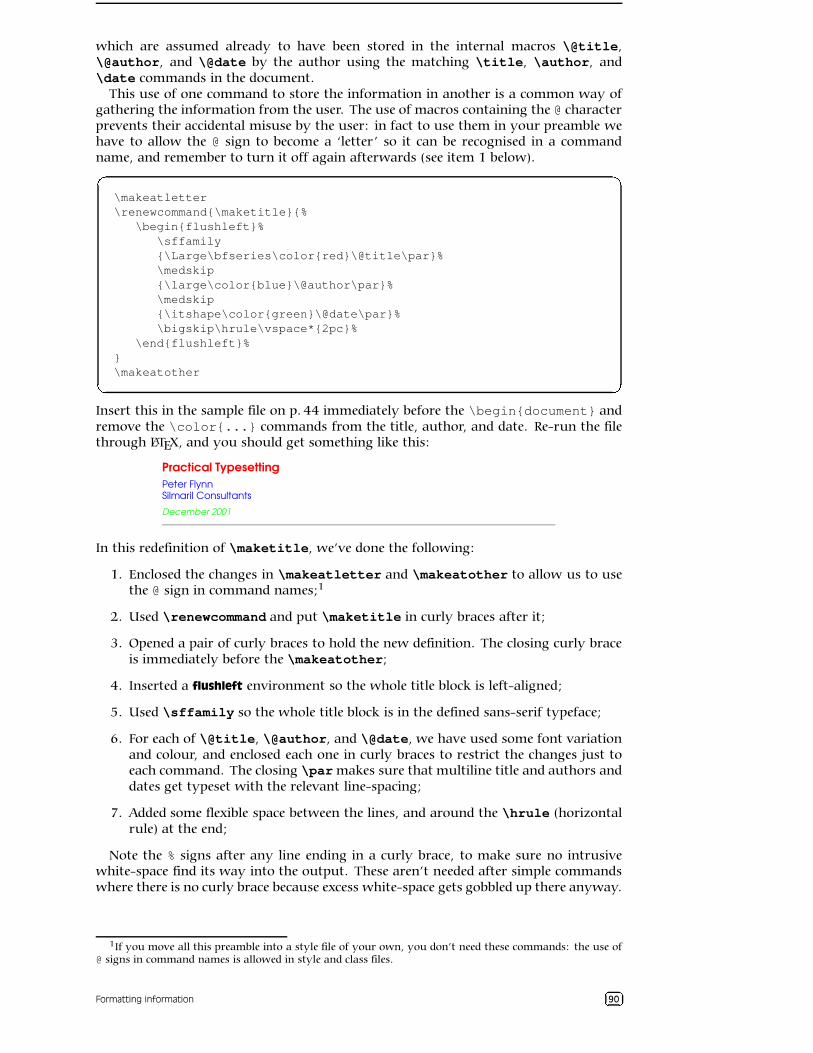
SESSION 9. PROGRAMMABILITY (MACROS) 9.2. MACROS USING INFORMATION GATHERED PREVIOUSLY
which are assumed already to have been stored in the internal macros \@title,\@author, and \@date by the author using the matching \title, \author, and\date commands in the document.
This use of one command to store the information in another is a common way ofgathering the information from the user. The use of macros containing the @ characterprevents their accidental misuse by the user: in fact to use them in your preamble wehave to allow the @ sign to become a ‘letter’ so it can be recognised in a commandname, and remember to turn it off again afterwards (see item 1 below).|
}
~
�
\makeatletter\renewcommand{\maketitle}{%
\begin{flushleft}%\sffamily{\Large\bfseries\color{red}\@title\par}%\medskip{\large\color{blue}\@author\par}%\medskip{\itshape\color{green}\@date\par}%\bigskip\hrule\vspace*{2pc}%
\end{flushleft}%}\makeatother
Insert this in the sample file on p. 44 immediately before the \begin{document} andremove the \color{...} commands from the title, author, and date. Re-run the filethrough LATEX, and you should get something like this:
Practical TypesettingPeter FlynnSilmaril Consultants
December 2001
In this redefinition of \maketitle, we’ve done the following:
1. Enclosed the changes in \makeatletter and \makeatother to allow us to usethe @ sign in command names;1
2. Used \renewcommand and put \maketitle in curly braces after it;
3. Opened a pair of curly braces to hold the new definition. The closing curly braceis immediately before the \makeatother;
4. Inserted a flushleft environment so the whole title block is left-aligned;
5. Used \sffamily so the whole title block is in the defined sans-serif typeface;
6. For each of \@title, \@author, and \@date, we have used some font variationand colour, and enclosed each one in curly braces to restrict the changes just toeach command. The closing \par makes sure that multiline title and authors anddates get typeset with the relevant line-spacing;
7. Added some flexible space between the lines, and around the \hrule (horizontalrule) at the end;
Note the % signs after any line ending in a curly brace, to make sure no intrusivewhite-space find its way into the output. These aren’t needed after simple commandswhere there is no curly brace because excess white-space gets gobbled up there anyway.
1If you move all this preamble into a style file of your own, you don’t need these commands: the use of@ signs in command names is allowed in style and class files.
Formatting information �����90

SESSION 9. PROGRAMMABILITY (MACROS) 9.3. MACROS WITH ARGUMENTS
9.3 Macros with arguments
But macros are not limited to text expansion. They can take arguments of their own,so you can define a command to do something with specific text you give it. This makesthem much more powerful and generic, as you can write a macro to do something acertain way, and then use it hundreds of times with a different value each time.
We looked earlier (§ 8.2.5) at making new commands to put specific classes of wordsinto certain fonts, such as product names into italics, keywords into bold, and so on.Here’s an example which also indexes the product name:�
�
�
�
\newcommand{\product}[1]{%\textit{#1}%\index{#1@\textit{#1}}%
}
If I now type \product{Velcro} then I get Velcro typeset, and if you look in the index,you’ll find this page referenced under ‘Velcro’. Let’s examine what this does:
1. The macro is specified as having one argument (that’s the [1] in the definition).This will be the product name you type in curly braces when you use \product.Macros can have up to nine arguments.
2. The expansion of the macro is contained in the second set of curly braces, spreadover several lines (see item 5 for why).
3. It prints the value of the first argument (that’s the #1) in italics, because that’show product names are often printed.
4. Finally, it creates an index entry using the same value (#1), making sure thatit’s italicised in the index (see the list on p. 69 in § 7.5 to remind yourself of howindexing something in a different font works).
5. Typing this macro over several lines makes it easier for humans to read. I couldjust as easily have typed
�
�
�
�\newcommand{\product}[1]{\textit{#1}\index{#1@\textit{#1}}}
but it wouldn’t have been as clear what I was doing.
One thing to notice is that to prevent unwanted spaces creeping into the outputwhen LATEX reads the macro, I ended each line with a comment character (%).LATEX normally treats newlines as spaces when formatting (remember § 2.3.1), sothis stops the end of line being turned into an unwanted space when the macro isused. LATEX always ignores spaces at the start of macro lines anyway, so indentinglines for readability is fine.
9.4 Nested macros
Here’s a slightly more complex example, where one macro calls another. It’s commonin normal text to refer to people by their forename and surname (in that order), forexample Don Knuth, but to have them indexed as surname, forename. This pair ofmacros, \person and \reindex, automates that process to minimize typing andindexing.�
�
�
�\newcommand{\person}[1]{#1\reindex #1\sentinel}\def\reindex #1 #2\sentinel{\index{#2, #1}}
Formatting information �����91
SESSION 9. PROGRAMMABILITY (MACROS) 9.5. MACROS AND ENVIRONMENTS
1. The digit 1 in square brackets means that \person has one argument, so youput the whole name in a single set of curly braces, eg \person{Don Knuth}.
2. The first thing the macro does is output #1, which is the value of what you typed,just as it stands, so the whole name gets typeset exactly as you typed it.
3. But then it uses a special feature of Plain TEX macros (which use \def insteadof LATEX’s \newcommand2): they too can have multiple arguments but you canseparate them with other characters (here a space) to form a pattern which TEXwill recognise when reading the arguments.
In this example (\reindex) it’s expecting to see a string of characters (#1) fol-lowed by a space, followed by another string of characters (#2) followed by adummy command (\sentinel). In effect this makes it a device for splittinga name into two halves on the space between them, so the two halves can behandled separately. The \reindex command can now read the two halves of thename separately.
4. The \person command invokes \reindex and follows it with the name youtyped plus the dummy command \sentinel (which is just there to signal theend of the name). Because \reindex is expecting two arguments separated by aspace and terminated by a \sentinel, it sees ‘Don and Knuth’ as two separatearguments.
It can therefore output them using \index in reverse order, which is exactly whatwe want.
A book or report with a large number of personal names to print and index couldmake significant use of this to allow them to be typed as \person{Leslie Lamport}and printed as Leslie Lamport, but have them indexed as ‘Lamport, Leslie’ with virtuallyno effort on the author’s part at all.
EXERCISE 21
Other names
Try to work out how to make this \person feature work with names like:
• Blanca Maria Bartosova de Paul
• Patricia Maria Soria de Miguel
• Arnaud de la Villèsbrunne
• Prince
• Pope John Paul II
Hints: the command \space produces a normal space, and one way around
LATEX’s requirements on spaces after command names ending with a letter is to
follow such commands with an empty set of curly braces {}.
9.5 Macros and environments
As mentioned in § 6.7.3, it is possible to define macros to capture text in an environmentand reuse it afterwards. This avoids any features of the subsequent use affecting theformatting of the text.
One example of this uses the facilities of the fancybox package, which defines a varietyof framed boxes to highlight your text, and a special environment Sbox which ‘captures’your text for use in these boxes.
By putting the text (here in a minipage environment because we want to changethe width) inside the Sbox environment, it is typeset into memory and stored in themacro \theSbox. It can then be used afterwards as the argument of the \shadowboxcommand (and in this example it has also been centred).
2Don’t try this at home alone, children! This one is safe enough, but you should strictly avoid \def fora couple of years. Stick to \newcommand for now.
Formatting information �����92
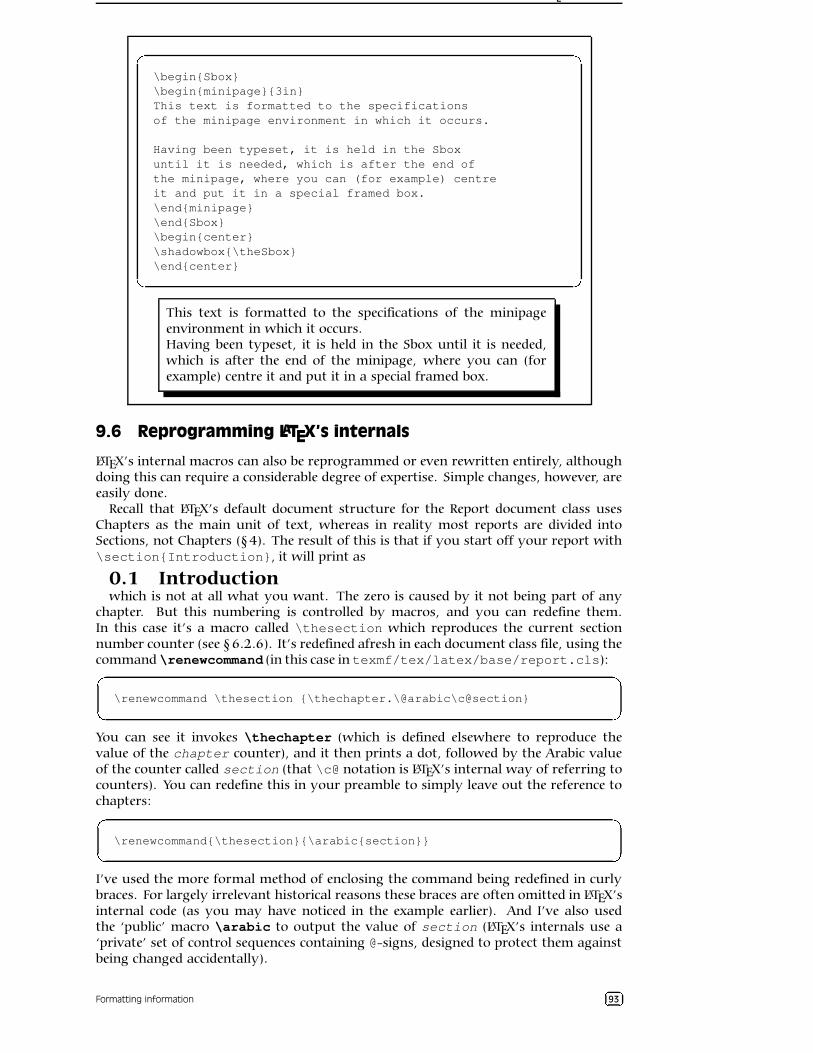
SESSION 9. PROGRAMMABILITY (MACROS) 9.6. REPROGRAMMING LATEX’S INTERNALS
�
�
�
�
\begin{Sbox}\begin{minipage}{3in}This text is formatted to the specificationsof the minipage environment in which it occurs.
Having been typeset, it is held in the Sboxuntil it is needed, which is after the end ofthe minipage, where you can (for example) centreit and put it in a special framed box.\end{minipage}\end{Sbox}\begin{center}\shadowbox{\theSbox}\end{center}
This text is formatted to the specifications of the minipageenvironment in which it occurs.Having been typeset, it is held in the Sbox until it is needed,which is after the end of the minipage, where you can (forexample) centre it and put it in a special framed box.
9.6 Reprogramming LATEX’s internals
LATEX’s internal macros can also be reprogrammed or even rewritten entirely, althoughdoing this can require a considerable degree of expertise. Simple changes, however, areeasily done.
Recall that LATEX’s default document structure for the Report document class usesChapters as the main unit of text, whereas in reality most reports are divided intoSections, not Chapters (§4). The result of this is that if you start off your report with\section{Introduction}, it will print as
0.1 Introductionwhich is not at all what you want. The zero is caused by it not being part of any
chapter. But this numbering is controlled by macros, and you can redefine them.In this case it’s a macro called \thesection which reproduces the current sectionnumber counter (see § 6.2.6). It’s redefined afresh in each document class file, using thecommand \renewcommand (in this case in texmf/tex/latex/base/report.cls):�
�
�
�\renewcommand \thesection {\thechapter.\@arabic\c@section}
You can see it invokes \thechapter (which is defined elsewhere to reproduce thevalue of the chapter counter), and it then prints a dot, followed by the Arabic valueof the counter called section (that \c@ notation is LATEX’s internal way of referring tocounters). You can redefine this in your preamble to simply leave out the reference tochapters:�
�
�
�\renewcommand{\thesection}{\arabic{section}}
I’ve used the more formal method of enclosing the command being redefined in curlybraces. For largely irrelevant historical reasons these braces are often omitted in LATEX’sinternal code (as you may have noticed in the example earlier). And I’ve also usedthe ‘public’ macro \arabic to output the value of section (LATEX’s internals use a‘private’ set of control sequences containing @-signs, designed to protect them againstbeing changed accidentally).
Formatting information �����93
SESSION 9. PROGRAMMABILITY (MACROS) 9.6. REPROGRAMMING LATEX’S INTERNALS
Now the introduction to your report will start with:
1 IntroductionWhat’s important is that you don’t ever need to alter the original document class
file report.cls: you just copy the command you need to change into your owndocument preamble, and modify that instead. It will then override the default.
9.6.1 Changing list item bullets
As mentioned earlier (§ 6.2.1), here’s how to redefine a bullet for an itemized list, witha slight tweak:�
�
�
�\usepackage{bbding}\renewcommand{\labelitemi}{\raisebox{-.25ex}{\PencilRight}}
Here we use the bbding package which has a large selection of ‘dingbats’ or little icons,and we make the label for top-level itemized lists print a right-pointing pencil (thenames for the icons are in the package documentation: see § 5.1.2 for how to get it).
In this case, we are using the \raisebox command within the redefinition because itturns out that the symbols in this font are positioned slightly too high for the typefacewe’re using. The \raisebox command takes two arguments: the first is a dimension,how much to raise the object by (and a negative value means ‘lower’: there is no\lowerbox command!); and the second is the text you want to affect. Here, we areshifting the symbol down by ¼ex (see § 2.6.1 for a list of dimensions LATEX can use).
There is a vast number of symbols available: see A comprehensive list of symbols inTEX3 for a comprehensive list.
3Pakin, (2002)
Formatting information �����94
SESSION X
Compatibility with other systems
As we saw in Session 2, LATEX uses plaintext files, so they can be read and written by anystandard application that can open text files. This helps preserve your information overtime, as the plaintext format cannot be obsoleted or hijacked by any manufacturer orsectoral interest, and it will always be readable on any computer, from your handheld(yes, LATEX is available for some PDAs) to the biggest supercomputer.
However, LATEX is intended as the last stage of the editorial process: formattingfor print or display. If you have a requirement to re-use the text in some otherenvironment — a database perhaps, or on the Web or a CD-ROM or DVD, or in Brailleor voice output — then it should be edited, stored, and maintained in something neutrallike XML, and only converted to LATEX when a typeset copy is needed.
Although LATEX has many structured-document features in common with SGML andXML, it can still only be processed by the LATEX program (and its sisters like pdflatex andConText). Because its macro features make it almost infinitely redefinable, processingit requires a program which can unravel arbitrarily complex macros, and LATEX and itssiblings are the only programs which can do that effectively. Like other typesettersand formatters (Quark XPress, Pagemaker, FrameMaker, Microsoft Publisher, 3B2 etc),LATEX is largely a one-way street leading to typeset printing or display formatting.
Converting LATEX to some other format therefore means you will unavoidably losesome formatting, as LATEX has features that others systems simply don’t possess, sothey cannot be translated. Similarly, converting other formats to LATEX usually meansediting back the stuff the other formats omit because they only store appearances, notstructure.
10.1 Converting into LATEX
There are several systems which will save their text in LATEX format. The best known isprobably the Lyx editor, which is a wordprocessor-like interface to LATEX for Windowsand Unix. Several maths packages like the EuroMath editor, and the Mathematica andMaple analysis packages, can also save material in LATEX format.
In general, most wordprocessors and DTP systems don’t have the level of internalmarkup sophistication needed to create a LATEX file, or any other kind of structureddocument, because they only store what the text looks like, not why it’s there or whatrole it fulfills. There are two ways out of this:
• Use the FileSave As… menu item to save the wordprocessor file as HTML, ratio-
nalise the HTML using Dave Raggett’s HTML Tidy1, and convert the resultingXHTML to LATEX with any of the standard tools (see below).
• Use a specialist conversion tool like EBT’s DynaTag (now available from Enigma, ifyou can persuade them to sell you a copy). It’s expensive and they don’t advertiseit, but for bulk conversion of consistently-marked Word files into XML it beatseverything else hands down. The Word files must be consistent, though, and mustuse named styles from a stylesheet, otherwise no system on earth is going to beable to guess what it means.
1http://tidy.sourceforge.net/
Formatting information ¡¢�£¤95
SESSION 10. COMPATIBILITY WITH OTHER SYSTEMS 10.2. CONVERTING OUT OF LATEX
There is of course a third way, suitable for large volumes only: send it off to thePacific Rim to be retyped into XML. There are hundreds of companies from India toPolynesia who do this at high speed and low cost. It sounds crazy when the document isalready in electronic form, but it’s a good example of the low quality of wordprocessormarkup that this solution exists at all.
You will have noticed that all the solutions lead to one place: SGML or XML. Asexplained above and elsewhere, these formats are the only ones devised so far capableof storing sufficient information in machine-processable, publicly-accessible form for adocument to be recreated in multiple output formats. Once your document is in XMLor SGML, there is a large range of software available to turn it into other formats,including LATEX. Processors in any of the common styling and processing languageslike DSSSL, XSLT, Omnimark, Metamorphosis, Balise, etc can easily be written to outputLATEX, and this approach is extremely common.
Much of this will be simplified when wordprocessors support native, arbitrary XMLas a standard feature. Sun’s Star Office and its Open Source sister, OpenOffice, have usedXML as their native Save format for several years, and there is a project at the Organi-sation for the Advancement of Structured Information Systems (OASIS) for developing acommon XML office file format based on those used by these two packages. WordPerfecthas also had a native SGML (and now XML) editor for many years, which will workwith any DTD (but not a Schema). Microsoft has had a half-hearted Save As…XMLfor a while, using an internal and largely undocumented Schema, but announced inDecember 2002 that the forthcoming Office 11 would have full support for arbitrarySchemas in Word and Excel.
When these efforts coalesce into generalised support for arbitrary DTDs and Schemas,it will mean a choice of editing interfaces, and the ability (using existing tools) toconvert reliably into LATEX for formatting.
10.2 Converting out of LATEX
This is much harder to do comprehensively. As noted earlier, the LATEX file formatreally requires the LATEX program itself in order to process all the packages and macros,because there is no telling what complexities authors have added themselves (what alot of this booklet is about!).
There is an excellent program on CTAN to do LATEX-to-Word conversion, but it onlyhandles a subset of the built-in commands of default LATEX, not packages or your ownmacros.
One easy route into wordprocessing, however, is the reverse of the procedures sug-gested in the preceding section: convert LATEX to HTML, which many wordprocessorsread easily. The LATEX2HTML and TEX4HT programs do this quite well, given the limitedformatting available in HTML.
If you have the full version of Adobe Acrobat, you can open a PDF file created bypdflatex, select and copy all the text, and paste it into Word and some other wordpro-cessors, and retain some common formatting of headings, paragraphs, and lists. Bothsolutions still require the wordprocessor text to be edited into shape, but they preserveenough of the formatting to make it worthwhile for short documents.
At worst, the detex program on CTAN will strip a LATEX file of all markup and leavejust the raw text, which can then be re-edited. There are also programs to extract theraw text from DVI and PostScript (PS) files.
10.3 Going beyond LATEX
The reader will have deduced by now that while LATEX is possibly the best programmableformatter around, the LATEX file format is not generally amenable to use in anythingexcept the LATEX program. LATEX was originally written in the mid-1980s, about thesame time as the Standard Generalized Markup Language (SGML), but the two projectswere not related. However, TEX and LATEX have proved such useful tools for formattingSGML that many users chose this route for their output, using conversions written inlanguages already mentioned such as Omnimark or Balise.
Formatting information ¥¦�§¨96
SESSION 10. COMPATIBILITY WITH OTHER SYSTEMS 10.3. GOING BEYOND LATEX
Unfortunately, when the rise of the Web in the early 1990s popularised SGML usingthe HyperText Markup Language (HTML), browser writers chose to encourage authorsto ignore the rules of SGML. Robust auto-converted formatting therefore became almostimpossible except via the browsers’ low-quality print routines.
Finally, in 1997, the Extensible Markup Language (XML) was devised, providing thestructural and descriptive power of SGML but removing all the complex and rarely-usedoptions which had made standard SGML so difficult to program for.
XML is now becoming the principal system of markup. Because it is based on theinternational standard (SGML), it is not proprietary, so it has been implemented on mostplatforms, and there is lots of free software supporting it as well as many commercialpackages. Like SGML, it is actually a meta-language to let you define your own markup,so it is much more flexible than HTML. The companion Extensible Stylesheet Language:Transformations (XSLT) makes translating to LATEX for high-quality formatting quitestraightforward.
[Short tutorial on how to do this: to be written]
Formatting information ©ª�«¬97
APPENDIX A
GNU Free Documentation License
Version 1.2, November 2002
Copyright (C) 2000,2001,2002 Free Software Foundation, Inc. 59 Temple Place, Suite330, Boston, MA 02111-1307 USA Everyone is permitted to copy and distributeverbatim copies of this license document, but changing it is not allowed.
A.0 PREAMBLE
The purpose of this License is to make a manual, textbook, or other functional and use-ful document "free" in the sense of freedom: to assure everyone the effective freedomto copy and redistribute it, with or without modifying it, either commercially or non-commercially. Secondarily, this License preserves for the author and publisher a wayto get credit for their work, while not being considered responsible for modificationsmade by others.
This License is a kind of "copyleft", which means that derivative works of the docu-ment must themselves be free in the same sense. It complements the GNU GeneralPublic License, which is a copyleft license designed for free software.
We have designed this License in order to use it for manuals for free software, becausefree software needs free documentation: a free program should come with manualsproviding the same freedoms that the software does. But this License is not limited tosoftware manuals; it can be used for any textual work, regardless of subject matter orwhether it is published as a printed book. We recommend this License principally forworks whose purpose is instruction or reference.
A.1 APPLICABILITY AND DEFINITIONS
This License applies to any manual or other work, in any medium, that contains anotice placed by the copyright holder saying it can be distributed under the termsof this License. Such a notice grants a world-wide, royalty-free license, unlimited induration, to use that work under the conditions stated herein. The "Document", below,refers to any such manual or work. Any member of the public is a licensee, and isaddressed as "you". You accept the license if you copy, modify or distribute the workin a way requiring permission under copyright law.
A "Modified Version" of the Document means any work containing the Document ora portion of it, either copied verbatim, or with modifications and/or translated intoanother language.
A "Secondary Section" is a named appendix or a front-matter section of the Documentthat deals exclusively with the relationship of the publishers or authors of the Docu-ment to the Document’s overall subject (or to related matters) and contains nothingthat could fall directly within that overall subject. (Thus, if the Document is in part atextbook of mathematics, a Secondary Section may not explain any mathematics.) Therelationship could be a matter of historical connection with the subject or with relatedmatters, or of legal, commercial, philosophical, ethical or political position regardingthem.
Formatting information ®�¯°98
APPENDIX A. GNU FREE DOCUMENTATION LICENSE
VERSION 1.2, NOVEMBER 2002 A.2. VERBATIM COPYING
The "Invariant Sections" are certain Secondary Sections whose titles are designated, asbeing those of Invariant Sections, in the notice that says that the Document is releasedunder this License. If a section does not fit the above definition of Secondary then it isnot allowed to be designated as Invariant. The Document may contain zero InvariantSections. If the Document does not identify any Invariant Sections then there are none.
The "Cover Texts" are certain short passages of text that are listed, as Front-CoverTexts or Back-Cover Texts, in the notice that says that the Document is released underthis License. A Front-Cover Text may be at most 5 words, and a Back-Cover Text maybe at most 25 words.
A "Transparent" copy of the Document means a machine-readable copy, representedin a format whose specification is available to the general public, that is suitable forrevising the document straightforwardly with generic text editors or (for images com-posed of pixels) generic paint programs or (for drawings) some widely available draw-ing editor, and that is suitable for input to text formatters or for automatic translationto a variety of formats suitable for input to text formatters. A copy made in an other-wise Transparent file format whose markup, or absence of markup, has been arrangedto thwart or discourage subsequent modification by readers is not Transparent. Animage format is not Transparent if used for any substantial amount of text. A copythat is not "Transparent" is called "Opaque".
Examples of suitable formats for Transparent copies include plain ASCII withoutmarkup, Texinfo input format, LaTeX input format, SGML or XML using a publiclyavailable DTD, and standard-conforming simple HTML, PostScript or PDF designed forhuman modification. Examples of transparent image formats include PNG, XCF andJPG. Opaque formats include proprietary formats that can be read and edited onlyby proprietary word processors, SGML or XML for which the DTD and/or processingtools are not generally available, and the machine-generated HTML, PostScript or PDFproduced by some word processors for output purposes only.
The "Title Page" means, for a printed book, the title page itself, plus such followingpages as are needed to hold, legibly, the material this License requires to appear in thetitle page. For works in formats which do not have any title page as such, "Title Page"means the text near the most prominent appearance of the work’s title, preceding thebeginning of the body of the text.
A section "Entitled XYZ" means a named subunit of the Document whose title eitheris precisely XYZ or contains XYZ in parentheses following text that translates XYZ inanother language. (Here XYZ stands for a specific section name mentioned below, suchas "Acknowledgements", "Dedications", "Endorsements", or "History".) To "Preserve theTitle" of such a section when you modify the Document means that it remains a section"Entitled XYZ" according to this definition.
The Document may include Warranty Disclaimers next to the notice which statesthat this License applies to the Document. These Warranty Disclaimers are consideredto be included by reference in this License, but only as regards disclaiming warranties:any other implication that these Warranty Disclaimers may have is void and has noeffect on the meaning of this License.
A.2 VERBATIM COPYING
You may copy and distribute the Document in any medium, either commercially ornoncommercially, provided that this License, the copyright notices, and the licensenotice saying this License applies to the Document are reproduced in all copies, andthat you add no other conditions whatsoever to those of this License. You may notuse technical measures to obstruct or control the reading or further copying of thecopies you make or distribute. However, you may accept compensation in exchangefor copies. If you distribute a large enough number of copies you must also follow theconditions in section 3.
You may also lend copies, under the same conditions stated above, and you maypublicly display copies.
Formatting information ±²�³´99
APPENDIX A. GNU FREE DOCUMENTATION LICENSE
VERSION 1.2, NOVEMBER 2002 A.3. COPYING IN QUANTITY
A.3 COPYING IN QUANTITY
If you publish printed copies (or copies in media that commonly have printed covers) ofthe Document, numbering more than 100, and the Document’s license notice requiresCover Texts, you must enclose the copies in covers that carry, clearly and legibly, allthese Cover Texts: Front-Cover Texts on the front cover, and Back-Cover Texts on theback cover. Both covers must also clearly and legibly identify you as the publisherof these copies. The front cover must present the full title with all words of the titleequally prominent and visible. You may add other material on the covers in addition.Copying with changes limited to the covers, as long as they preserve the title of theDocument and satisfy these conditions, can be treated as verbatim copying in otherrespects.
If the required texts for either cover are too voluminous to fit legibly, you should putthe first ones listed (as many as fit reasonably) on the actual cover, and continue therest onto adjacent pages.
If you publish or distribute Opaque copies of the Document numbering more than100, you must either include a machine-readable Transparent copy along with eachOpaque copy, or state in or with each Opaque copy a computer-network location fromwhich the general network-using public has access to download using public-standardnetwork protocols a complete Transparent copy of the Document, free of added mate-rial. If you use the latter option, you must take reasonably prudent steps, when youbegin distribution of Opaque copies in quantity, to ensure that this Transparent copywill remain thus accessible at the stated location until at least one year after the lasttime you distribute an Opaque copy (directly or through your agents or retailers) ofthat edition to the public.
It is requested, but not required, that you contact the authors of the Document wellbefore redistributing any large number of copies, to give them a chance to provide youwith an updated version of the Document.
A.4 MODIFICATIONS
You may copy and distribute a Modified Version of the Document under the conditionsof sections 2 and 3 above, provided that you release the Modified Version under preciselythis License, with the Modified Version filling the role of the Document, thus licensingdistribution and modification of the Modified Version to whoever possesses a copy ofit. In addition, you must do these things in the Modified Version:
A. Use in the Title Page (and on the covers, if any) a title distinct from that of theDocument, and from those of previous versions (which should, if there were any,be listed in the History section of the Document). You may use the same title asa previous version if the original publisher of that version gives permission.
B. List on the Title Page, as authors, one or more persons or entities responsible forauthorship of the modifications in the Modified Version, together with at leastfive of the principal authors of the Document (all of its principal authors, if it hasfewer than five), unless they release you from this requirement.
C. State on the Title page the name of the publisher of the Modified Version, as thepublisher.
D. Preserve all the copyright notices of the Document.
E. Add an appropriate copyright notice for your modifications adjacent to the othercopyright notices.
F. Include, immediately after the copyright notices, a license notice giving the publicpermission to use the Modified Version under the terms of this License, in theform shown in the Addendum (§ A.11) below.
G. Preserve in that license notice the full lists of Invariant Sections and requiredCover Texts given in the Document’s license notice.
Formatting information µ¶¸·¹100
APPENDIX A. GNU FREE DOCUMENTATION LICENSE
VERSION 1.2, NOVEMBER 2002 A.5. COMBINING DOCUMENTS
H. Include an unaltered copy of this License.
I. Preserve the section Entitled "History", Preserve its Title, and add to it an itemstating at least the title, year, new authors, and publisher of the Modified Versionas given on the Title Page. If there is no section Entitled "History" in the Document,create one stating the title, year, authors, and publisher of the Document as givenon its Title Page, then add an item describing the Modified Version as stated in theprevious sentence.
J. Preserve the network location, if any, given in the Document for public access toa Transparent copy of the Document, and likewise the network locations given inthe Document for previous versions it was based on. These may be placed in the"History" section. You may omit a network location for a work that was publishedat least four years before the Document itself, or if the original publisher of theversion it refers to gives permission.
K. For any section Entitled "Acknowledgements" or "Dedications", Preserve the Titleof the section, and preserve in the section all the substance and tone of each ofthe contributor acknowledgements and/or dedications given therein.
L. Preserve all the Invariant Sections of the Document, unaltered in their text andin their titles. Section numbers or the equivalent are not considered part of thesection titles.
M. Delete any section Entitled "Endorsements". Such a section may not be includedin the Modified Version.
N. Do not retitle any existing section to be Entitled "Endorsements" or to conflict intitle with any Invariant Section.
O. Preserve any Warranty Disclaimers.
If the Modified Version includes new front-matter sections or appendices that qualifyas Secondary Sections and contain no material copied from the Document, you may atyour option designate some or all of these sections as invariant. To do this, add theirtitles to the list of Invariant Sections in the Modified Version’s license notice. Thesetitles must be distinct from any other section titles.
You may add a section Entitled "Endorsements", provided it contains nothing butendorsements of your Modified Version by various parties–for example, statements ofpeer review or that the text has been approved by an organization as the authoritativedefinition of a standard.
You may add a passage of up to five words as a Front-Cover Text, and a passage of upto 25 words as a Back-Cover Text, to the end of the list of Cover Texts in the ModifiedVersion. Only one passage of Front-Cover Text and one of Back-Cover Text may beadded by (or through arrangements made by) any one entity. If the Document alreadyincludes a cover text for the same cover, previously added by you or by arrangementmade by the same entity you are acting on behalf of, you may not add another; butyou may replace the old one, on explicit permission from the previous publisher thatadded the old one.
The author(s) and publisher(s) of the Document do not by this License give permissionto use their names for publicity for or to assert or imply endorsement of any ModifiedVersion.
A.5 COMBINING DOCUMENTS
You may combine the Document with other documents released under this License,under the terms defined in section 4 (§ A.4) above for modified versions, providedthat you include in the combination all of the Invariant Sections of all of the originaldocuments, unmodified, and list them all as Invariant Sections of your combined workin its license notice, and that you preserve all their Warranty Disclaimers.
Formatting information º»¸¼½101
APPENDIX A. GNU FREE DOCUMENTATION LICENSE
VERSION 1.2, NOVEMBER 2002 A.6. COLLECTIONS OF DOCUMENTS
The combined work need only contain one copy of this License, and multiple identicalInvariant Sections may be replaced with a single copy. If there are multiple InvariantSections with the same name but different contents, make the title of each such sectionunique by adding at the end of it, in parentheses, the name of the original author orpublisher of that section if known, or else a unique number. Make the same adjustmentto the section titles in the list of Invariant Sections in the license notice of the combinedwork.
In the combination, you must combine any sections Entitled "History" in the variousoriginal documents, forming one section Entitled "History"; likewise combine any sec-tions Entitled "Acknowledgements", and any sections Entitled "Dedications". You mustdelete all sections Entitled "Endorsements".
A.6 COLLECTIONS OF DOCUMENTS
You may make a collection consisting of the Document and other documents releasedunder this License, and replace the individual copies of this License in the variousdocuments with a single copy that is included in the collection, provided that youfollow the rules of this License for verbatim copying of each of the documents in allother respects.
You may extract a single document from such a collection, and distribute it individ-ually under this License, provided you insert a copy of this License into the extracteddocument, and follow this License in all other respects regarding verbatim copying ofthat document.
A.7 AGGREGATION WITH INDEPENDENT WORKS
A compilation of the Document or its derivatives with other separate and independentdocuments or works, in or on a volume of a storage or distribution medium, is calledan "aggregate" if the copyright resulting from the compilation is not used to limit thelegal rights of the compilation’s users beyond what the individual works permit. Whenthe Document is included an aggregate, this License does not apply to the other worksin the aggregate which are not themselves derivative works of the Document.
If the Cover Text requirement of section 3 is applicable to these copies of the Docu-ment, then if the Document is less than one half of the entire aggregate, the Document’sCover Texts may be placed on covers that bracket the Document within the aggregate,or the electronic equivalent of covers if the Document is in electronic form. Otherwisethey must appear on printed covers that bracket the whole aggregate.
A.8 TRANSLATION
Translation is considered a kind of modification, so you may distribute translationsof the Document under the terms of section 4. Replacing Invariant Sections withtranslations requires special permission from their copyright holders, but you mayinclude translations of some or all Invariant Sections in addition to the original versionsof these Invariant Sections. You may include a translation of this License, and all thelicense notices in the Document, and any Warranty Disclaimers, provided that youalso include the original English version of this License and the original versions ofthose notices and disclaimers. In case of a disagreement between the translation andthe original version of this License or a notice or disclaimer, the original version willprevail.
If a section in the Document is Entitled "Acknowledgements", "Dedications", or "His-tory", the requirement (section 4) to Preserve its Title (section 1) will typically requirechanging the actual title.
Formatting information ¾¿¸ÀÁ102
APPENDIX A. GNU FREE DOCUMENTATION LICENSE
VERSION 1.2, NOVEMBER 2002 A.9. TERMINATION
A.9 TERMINATION
You may not copy, modify, sublicense, or distribute the Document except as expresslyprovided for under this License. Any other attempt to copy, modify, sublicense ordistribute the Document is void, and will automatically terminate your rights underthis License. However, parties who have received copies, or rights, from you under thisLicense will not have their licenses terminated so long as such parties remain in fullcompliance.
A.10 FUTURE REVISIONS OF THIS LICENSE
The Free Software Foundation may publish new, revised versions of the GNU FreeDocumentation License from time to time. Such new versions will be similar in spiritto the present version, but may differ in detail to address new problems or concerns.See http://www.gnu.org/copyleft/.
Each version of the License is given a distinguishing version number. If the Documentspecifies that a particular numbered version of this License "or any later version" appliesto it, you have the option of following the terms and conditions either of that specifiedversion or of any later version that has been published (not as a draft) by the FreeSoftware Foundation. If the Document does not specify a version number of thisLicense, you may choose any version ever published (not as a draft) by the Free SoftwareFoundation.
A.11 ADDENDUM: How to use this License for your documents
To use this License in a document you have written, include a copy of the License in thedocument and put the following copyright and license notices just after the title page:
Copyright (c) YEAR YOUR NAME. Permission is granted to copy, distribute and/ormodify this document under the terms of the GNU Free Documentation License,Version 1.2 or any later version published by the Free Software Foundation; with noInvariant Sections, no Front-Cover Texts, and no Back-Cover Texts. A copy of thelicense is included in the section entitled "GNU Free Documentation License".
If you have Invariant Sections, Front-Cover Texts and Back-Cover Texts, replace the"with...Texts." line with this:
with the Invariant Sections being LIST THEIR TITLES, with the Front-Cover Textsbeing LIST, and with the Back-Cover Texts being LIST.
If you have Invariant Sections without Cover Texts, or some other combination ofthe three, merge those two alternatives to suit the situation.
If your document contains nontrivial examples of program code, we recommendreleasing these examples in parallel under your choice of free software license, such asthe GNU General Public License, to permit their use in free software.
Formatting information ÂøÄÅ103
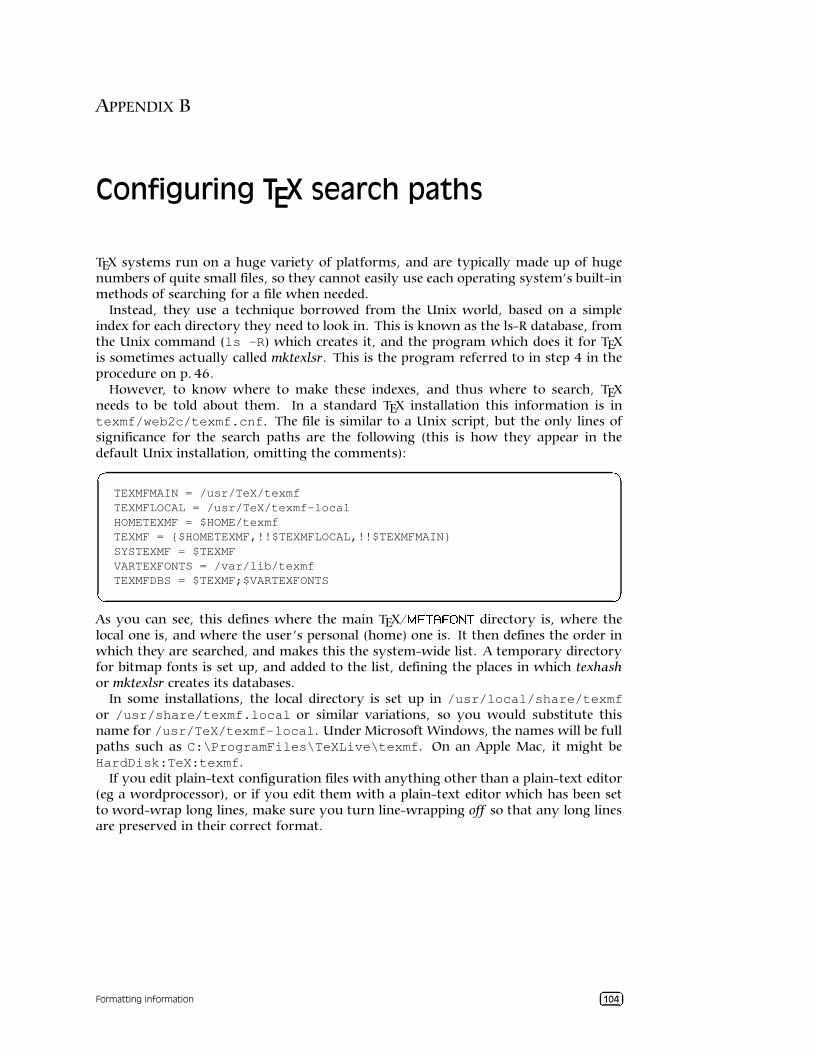
APPENDIX B
Configuring TEX search paths
TEX systems run on a huge variety of platforms, and are typically made up of hugenumbers of quite small files, so they cannot easily use each operating system’s built-inmethods of searching for a file when needed.
Instead, they use a technique borrowed from the Unix world, based on a simpleindex for each directory they need to look in. This is known as the ls-R database, fromthe Unix command (ls -R) which creates it, and the program which does it for TEXis sometimes actually called mktexlsr. This is the program referred to in step 4 in theprocedure on p. 46.
However, to know where to make these indexes, and thus where to search, TEXneeds to be told about them. In a standard TEX installation this information is intexmf/web2c/texmf.cnf. The file is similar to a Unix script, but the only lines ofsignificance for the search paths are the following (this is how they appear in thedefault Unix installation, omitting the comments):Æ
Ç
È
É
TEXMFMAIN = /usr/TeX/texmfTEXMFLOCAL = /usr/TeX/texmf-localHOMETEXMF = $HOME/texmfTEXMF = {$HOMETEXMF,!!$TEXMFLOCAL,!!$TEXMFMAIN}SYSTEXMF = $TEXMFVARTEXFONTS = /var/lib/texmfTEXMFDBS = $TEXMF;$VARTEXFONTS
As you can see, this defines where the main TEX/ ÊÌË$Í�ÎÏ�Ð�Ñ�Í directory is, where thelocal one is, and where the user’s personal (home) one is. It then defines the order inwhich they are searched, and makes this the system-wide list. A temporary directoryfor bitmap fonts is set up, and added to the list, defining the places in which texhashor mktexlsr creates its databases.
In some installations, the local directory is set up in /usr/local/share/texmfor /usr/share/texmf.local or similar variations, so you would substitute thisname for /usr/TeX/texmf-local. Under Microsoft Windows, the names will be fullpaths such as C:\ProgramFiles\TeXLive\texmf. On an Apple Mac, it might beHardDisk:TeX:texmf.
If you edit plain-text configuration files with anything other than a plain-text editor(eg a wordprocessor), or if you edit them with a plain-text editor which has been setto word-wrap long lines, make sure you turn line-wrapping off so that any long linesare preserved in their correct format.
Formatting information ÒÓ¸ÔÕ104
APPENDIX C
TEX Users Group Membership
Information
If you have questions or encounter any problems with the membership registration,please contact the TUG office.
Becoming a TUG member
Online: Fill out the secure online form and submit it (the Submit button is at the bottomof the form).
Paper mail: If you prefer to forego electronic submittal, you can alternatively print outthe PDF membership form or respectively renewal form and follow the instruc-tions on the form.
Membership fees
TUG membership for 2003 is $65 (USD) a year for individuals and $35 for studentsand seniors. Add $10 to the membership fee after May 31, 2003 to cover additionalshipping and processing costs.
The 2003 rate for non-voting subscription memberships (for libraries, for example)is $85. The 2003 institutional rate is $500, which includes up to seven individualmemberships.
TUG membership benefits
Members of TUG help to support and promote the use of TEX, ÖÌ×$Ø�ÙÚ�Û�Ü�Ø , and relatedsystems worldwide. All members receive TUGboat1, the journal of the TEX Users Group,the TEX Live CD set (a runnable TEX system), and the Dante CTAN CD set (containingmost of the CTAN archive). In addition, TUG members vote in TUG elections, and receivediscounts on annual meeting fees, student membership rates, and TUG-sponsoredcourses. More information is available on the Web site.
Delivery of benefits
All benefits are sent as soon as they are available. The TEX Live CDs are usually producedaround June, and the CTAN CDs around November. TUGboat2 issue production dependson the availability of material and is thus less predictable.
In addition, if you will be a new TUG member this year (welcome!), you may wishto order the previous year’s materials. Here is the information:
Item Cost
TeX Live 7 (2002) $5Dante CTAN CDs (2002) $10TUGboat volume 23 (2002) $45
1Beeton, (Since 1985)2Beeton, (Since 1985)
Formatting information ÝÞ¸ßà105
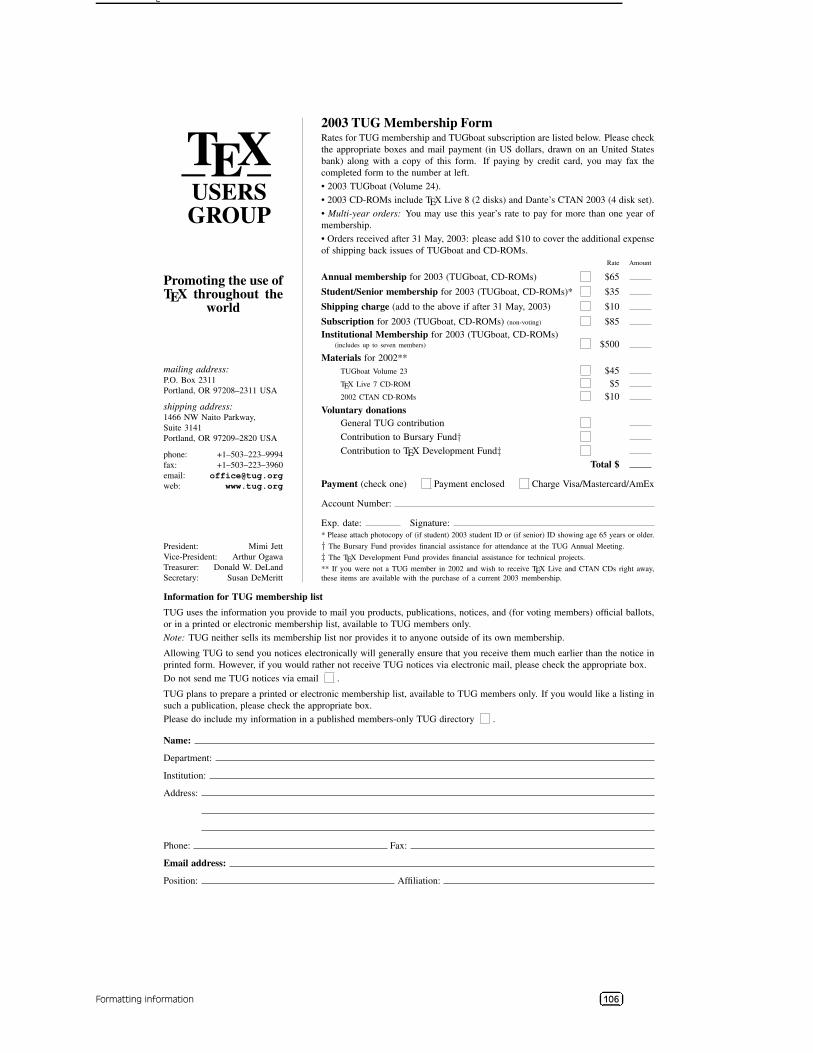
APPENDIX C. TEX USERS GROUP MEMBERSHIP INFORMATION
TEXUSERSGROUP
Promoting the use ofTEX throughout the
world
mailing address:P.O. Box 2311Portland, OR 97208–2311 USA
shipping address:1466 NW Naito Parkway,Suite 3141Portland, OR 97209–2820 USA
phone: +1–503–223–9994fax: +1–503–223–3960email: [email protected]: www.tug.org
President: Mimi JettVice-President: Arthur OgawaTreasurer: Donald W. DeLandSecretary: Susan DeMeritt
2003 TUG Membership FormRates for TUG membership and TUGboat subscription are listed below. Please checkthe appropriate boxes and mail payment (in US dollars, drawn on an United Statesbank) along with a copy of this form. If paying by credit card, you may fax thecompleted form to the number at left.• 2003 TUGboat (Volume 24).• 2003 CD-ROMs include TEX Live 8 (2 disks) and Dante’s CTAN 2003 (4 disk set).• Multi-year orders: You may use this year’s rate to pay for more than one year ofmembership.• Orders received after 31 May, 2003: please add $10 to cover the additional expenseof shipping back issues of TUGboat and CD-ROMs.
Rate Amount
Annual membership for 2003 (TUGboat, CD-ROMs) $65
Student/Senior membership for 2003 (TUGboat, CD-ROMs)* $35
Shipping charge (add to the above if after 31 May, 2003) $10
Subscription for 2003 (TUGboat, CD-ROMs) (non-voting) $85Institutional Membership for 2003 (TUGboat, CD-ROMs)
(includes up to seven members) $500Materials for 2002**
TUGboat Volume 23 $45TEX Live 7 CD-ROM $52002 CTAN CD-ROMs $10
Voluntary donationsGeneral TUG contributionContribution to Bursary Fund†Contribution to TEX Development Fund‡
Total $
Payment (check one) Payment enclosed Charge Visa/Mastercard/AmEx
Account Number:
Exp. date: Signature:* Please attach photocopy of (if student) 2003 student ID or (if senior) ID showing age 65 years or older.† The Bursary Fund provides financial assistance for attendance at the TUG Annual Meeting.‡ The TEX Development Fund provides financial assistance for technical projects.** If you were not a TUG member in 2002 and wish to receive TEX Live and CTAN CDs right away,these items are available with the purchase of a current 2003 membership.
Information for TUG membership listTUG uses the information you provide to mail you products, publications, notices, and (for voting members) official ballots,or in a printed or electronic membership list, available to TUG members only.Note: TUG neither sells its membership list nor provides it to anyone outside of its own membership.
Allowing TUG to send you notices electronically will generally ensure that you receive them much earlier than the notice inprinted form. However, if you would rather not receive TUG notices via electronic mail, please check the appropriate box.Do not send me TUG notices via email .
TUG plans to prepare a printed or electronic membership list, available to TUG members only. If you would like a listing insuch a publication, please check the appropriate box.Please do include my information in a published members-only TUG directory .
Name:
Department:
Institution:
Address:
Phone: Fax:
Email address:
Position: Affiliation:
Formatting information áâ¸ãä106
FORMATTING INFORMATION REFERENCES
References
1. Anderson, Chris, editor: WIRED. San Fracisco, CA: Condé Nast, ISSN1059–1028
2. Beeton, Barbara, editor: TUGboat. Portland, OR: TEX Users Group, Since1985, ISSN 0896–3207
3. Berry, Karl: Fontname: Filenames for TEX fonts. Portland, OR, June 2001 –Technical report å URL: http://www.tex.ac.uk/tex-archive/info/fontname/ æ4. Bull, RJ: Accounting in Business. London: Butterworths, 1972, ISBN0406706514
5. Davy, William: A System of Divinity. Lustleigh, Devon: Published by theauthor, 1806
6. Doob, Michael: A Gentle Introduction to TEX: A Manual for Self-Study.Portland, OR, undated – Technical report å URL:http://www.tex.ac.uk/tex-archive/info/gentle/ æ7. Flaubert, Gustave: Madame Bovary. Paris, 1857
8. Flynn, Peter: The HTML Handbook. London: International ThompsonComputer Press, 1995, ISBN 1–85032–205–8
9. Flynn, Peter: Understanding SGML and XML Tools. Boston: Kluwer, 1998,ISBN 0–7923–8169–6
10. Flynn, Peter: The XML FAQ. Cork, Ireland, January 2003 – Technical reportå URL: http://www.ucc.ie/xml/ æ11. Fothergill, John: An Innkeeper’s Diary. 3rd edition. London: Penguin, 1929
12. Foundation, Free Software: The GNU Free Documentation License. Boston,MA, 2003/02/10 23:42:49 – Technical report å URL:http://www.fsf.org/copyleft/fdl.html æ13. Goreham, Anthony: Re: Installing a new font: PFM, PFB. 28 November 2001,Nr. [email protected] (all pages) å URL: comp.text.tex æ14. Heller, Robert: Re: New To (La)TeX... Unlearning Bad Habits. 11 March 2003,Nr. [email protected] (all pages) å URL:comp.text.tex æ15. Knuth, Donald Erwin: The Art of Computer Programming. Volume 1,2nd edition. Reading, MA: Addison-Wesley, 1980, ISBN 0–201–89685–0
16. Lamport, Leslie: LATEX: A Document Preparation System. 2nd edition. Reading,MA: Addison-Wesley, 1994, ISBN 0–201–52983–1
17. Mac Namara, Matthew: La Textualisation de Madame Bovary. Amsterdam:Rodopi, 2003
18. Mittelbach, Michel GoossensSebastian RahtzFrank: The LATEX GraphicsCompanion. Reading, MA: Addison-Wesley, 1997, ISBN 0201854694
19. Pakin, Scott: A comprehensive list of symbols in TEX. Portland, OR, 2002 –Technical report å URL:http://www.tex.ac.uk/tex-archive/info/symbols/comprehensive/ æ20. Reckdahl, Keith: Using imported graphics in LATEX2ε. Portland, OR, 1997 –Technical report å URL:http://www.tex.ac.uk/tex-archive/info/epslatex.pdf/ æ
Formatting information çè¸éê107
FORMATTING INFORMATION REFERENCES
21. Ryder, John: Printing for Pleasure. London: English Universities Press, 1965,ISBN 666
22. Samarin, Michel GoossensFrank MittelbachAlexander: The LATEXCompanion. Reading, MA: Addison-Wesley, 1993, ISBN 0201541998
23. Schlegl, Tobias OetikerHubert PartlIrene HynaElisabeth: The (Not So)Short Guide to LATEX2ε: LATEX2ε in 95 Minutes. Portland, OR, 2001 – Technical reportëURL: http://www.tex.ac.uk/tex-archive/info/lshort/ ì
24. Society, American Mathematical: Short Math Guide for LATEX. Providence, RI:AMS, 2001
ëURL: http://www.ams.org/tex/short-math-guide.htm ì
25. Sperberg-McQueen, Lou BurnardMichael: Guidelines for the Text EncodingInitiative. Oxford, 1995 – Technical report
26. Sutor, Michel GoossensSebastian RahtzRoss MooreBob: The LATEX WebCompanion. Reading, MA: Addison-Wesley, 1999, ISBN 0201433117
Formatting information íî¸ïð108
Index
\ ñ , 18\ ò , 18\(, 23\), 23\-, 21\[, 23\#, 18\$, 18\%, 18\&, 18\ˆ, 18, 19\_, 18Acronyms, defined
ASCII, 15
CLI, 8
CM, 74CMYK, 80
CTAN, 43
DTP, 11DVI, 36
EPS, 57FAQ, 47
GUI, 8
HTML, 97JPG, 57
NFSS, 80
NTS, 12OASIS, 96
PDF, 36PNG, 57
PS, 96
RGB, 80RPM, 87
SGML, 96
TDS, 45TIFF, 57
TUG, 12WYSIWYG, 40
XML, 97
XSLT, 97\˜, 18, 19\], 2311pt, 2712pt, 273B2, 95
a4paper, 28abstract, 30, 31\abstractname, 30abstracts, 30accents, 19Acrobat, 96Acrobat Reader, 13, 14, 36, 40, 41afm2tfm, 83, 85alpha, 67
Apple Mac, 13\arabic, 93arguments, 17array, 54article, 26ASCII, 6, 15, 23, 41, 82asynchronous, 8\author, 29, 90
b, 60babel, 22, 23, 33backslash, 16\backslash, 18backtick, 58Balise, 96\baselineskip, 73\baselinestretch, 73bbding, 50, 94BBedit, 13beer, 69
lite, 69American, 69
Bud, 70\begin, 28Berry, Karl, 82, 84\bfseries, 77bibliographies, 66\bibliography, 66\bibliographystyle, 67\bibname, 68bibtex, 67\bigskip, 72book, 26, 31boxes, 59bp (big points), 20braces, see curly bracesBudweiser, 69Budweiser, 69
\caption, 53, 54cc (Ciceros), 20center, 55, 56\centering, 55\chapter, 31, 32chapter, 93charmap, 19\cite, 66\citequote, 64\clearpage, 17CLI, 8, 12\cline, 55CM, 74, 74, 75, 76, 78cm (centimeters), 20CMYK, 79, 80, 80
color, 43–45, 79, 80\color, 79
Formatting information óô¸õö109
FORMATTING INFORMATION INDEX
\colorbox, 80colour, 79columns, 70\columnsep, 70\command, 8Commands
\ ÷ , 18\ ø , 18\(, 23\), 23\-, 21\[, 23\#, 18\$, 18\%, 18\&, 18\ˆ, 18, 19\_, 18\˜, 18, 19\], 23\abstractname, 30\arabic, 93\author, 29, 90\backslash, 18\baselineskip, 73\baselinestretch, 73\begin, 28\bfseries, 77\bibliography, 66\bibliographystyle, 67\bibname, 68\bigskip, 72\caption, 53, 54\centering, 55\chapter, 31, 32\cite, 66\citequote, 64\clearpage, 17\cline, 55\color, 79\colorbox, 80\columnsep, 70\command, 8\date, 29, 39, 90\DeclareFontFamily, 86\DeclareFontShape, 86\def, 92\definecolor, 80\documentclass, 26, 31, 44\ef, 89\emph, 79\end, 28\enspace, 73\EUR, 18\fancyhead, 73\fbox, 61, 62, 80\fontencoding, 76\fontfamily, 76
\fontsize, 78\footnote, 64\footnotesize, 78\foreign, 79\glossary, 70\hline, 55\hrule, 90\hspace, 72\Huge, 78\huge, 78\hyphenation, 21\i, 20\includegraphics, 56–58\index, 69, 70, 92\item, 49\itshape, 77\label, 52, 53, 65, 66\LARGE, 78\Large, 78\large, 78\leftmark, 74\listoffigures, 34\listoftables, 34\makeatletter, 90\makeatother, 90\makeglossary, 70\makeindex, 69\maketitle, 29–31, 34, 39, 89,
90\markboth, 73\markright, 73\mbox, 22\medskip, 72\multicolumn, 55\newcommand, 89, 92\normalsize, 78\ovalbox, 62\pageref, 66\pagestyle, 73\par, 56, 72, 90\paragraph, 31, 52\parbox, 59–61\parskip, 33\part, 31\part*, 33\person, 91, 92\pounds, 18\printindex, 70\product, 76, 79, 91\protect, 64\ProvidesPackage, 85\qquad, 73\quad, 21, 73\raggedleft, 22\raggedright, 22, 60\raisebox, 94\ref, 52, 65, 66\refname, 68
Formatting information ùú¸ûü110
FORMATTING INFORMATION INDEX
\reindex, 91, 92\renewcommand, 30, 31, 90, 93\rightmark, 74\rmdefault, 85\scriptsize, 78\scshape, 77\section, 31, 34\selectfont, 76\sentinel, 92\setcounter, 32\setlength, 33, 34, 61\sfdefault, 85\sffamily, 77, 90\shadowbox, 62, 92\slshape, 77\small, 64, 78\smallskip, 72\space, 92\subparagraph, 31, 52\subparagraph*, 33\subsection, 31\subsubsection, 31\tableofcontents, 34\textcolor, 79, 80\textdegree, 23\texteuro, 18\textit, 79\thechapter, 93\theenumi, 52\theenumii, 52\theenumiii, 52\theenumiv, 52\theSbox, 92\thinspace, 19, 72\thispagestyle, 73\tiny, 78\title, 29, 90\ttdefault, 85\ttfamily, 77\upshape, 77\url, 58, 59, 64\usepackage, 31, 43, 44, 68, 81\vbox, 61\verb, 58, 59, 64\vspace, 72\vspace*, 72
comment character, 18commutative, 77configure, 46ConText, 95Corel Draw, 56Counters
chapter, 93enumi, 52enumii, 52enumiii, 52enumiv, 52example, 52
secnumdepth, 32, 33section, 93tocdepth, 32, 34
Crayola, 11, 79cross-references, 65CTAN, 7–9, 12, 13, 42, 43, 43, 44, 45,
47, 67, 68, 74, 75, 80, 81, 96,105
curly braces, 17Cygwin, 46
\date, 29, 39, 90dd (Didot points), 20\DeclareFontFamily, 86\DeclareFontShape, 86\def, 92\definecolor, 80description, 50detex, 96dimension, 20dimension, 33document, 28, 31document class, 26document class, 26\documentclass, 26, 31, 44double-spacing, see white-spacedraft, 27DTP, 11, 12, 74DVI, 12, 36, 37, 40, 41, 44, 59, 96dvialw, 42dvieps, 42dvihp, 42dvips, 41, 42, 79, 80, 87dviview, 40DynaTag, 95
editors, 24\ef, 89element, 26elsevier, 68em (relative measure), 20Emacs, 7, 8, 13, 15, 19, 24, 25, 37, 40,
42, 54, 67\emph, 79\end, 28endnote, 64\enspace, 73enumerate, 50enumi, 52enumii, 52enumiii, 52enumiv, 52environment, 49environment, 28environment, 8Environments
abstract, 30, 31center, 55, 56
Formatting information ýþ¸ÿ�111
FORMATTING INFORMATION INDEX
description, 50document, 28, 31enumerate, 50environment, 8equation, 23figure, 56figure*, 70float, 53flushleft, 56, 90flushright, 56inparaenum, 51itemize, 49minipage, 60–62, 92multicols, 70multirow, 55picture, 56raggedleft, 22raggedright, 22Sbox, 62, 92table, 53, 56table*, 70tabular, 54, 56, 61Verbatim, 59verbatim, 58, 59
EPS, 57, 57equation, 23Esser, Thomas, 13\EUR, 18�
, 18Euro symbol, 18EuroMath, 95ex (relative measure), 20example, 52Excel, 96
family, 77fancybox, 59, 62, 92fancyhdr, 73\fancyhead, 73fancyvrb, 59FAQ, 10, 43, 47, 47
\fbox, 61, 62, 80\fboxrule, 62\fboxsep, 62figure, 56figure*, 70figures, 56filenames, 36float, 53floats, 53, 56flushleft, 56, 90flushright, 56fnpara, 64font definition, 86\fontencoding, 76\fontfamily, 76fontinst, 82fontname, 86
fonts���������� ��, 74
changing temporarily, 76changing the default, 74colour, 79Computer Modern, 74encoding, 83examples, 75families, 74in general, 74installing, 80���������� ��
, 74PostScript, 74, 82sizes, 27, 77styles, 77TrueType, 74Type 1, 74
\fontsize, 78\footnote, 64footnotes, 64\footnotesize, 78\foreign, 79fpTEX, 7, 13FrameMaker, 95
geometry, 44, 45, 65, 72GhostScript, 41GhostView, 14glossaries, 69\glossary, 70GNU, 25Goreham, Anthony, 87graphics, 56graphics, 45graphicx, 56, 57grave accent, 58grouping, 76GSview, 13, 14, 36, 41, 42GUI, 8, 11
hard space, 22harvard, 68hash mark, 18help, 47H&J, see hyphenation, justification\hline, 55\hrule, 90\hspace, 72HTML, 26, 97, 97HTML Tidy, 95\Huge, 78\huge, 78hyphenation, 20\hyphenation, 21hyphens
discretionary, 22soft, 21
\i, 20
Formatting information �����112
FORMATTING INFORMATION INDEX
images, 56in (inches), 20\includegraphics, 56–58\index, 69, 70, 92indexes, 69Inline lists, 51inparaenum, 51inputenc, 19, 20, 23Instant Preview, 9\item, 49itemize, 49\itshape, 77
JPG, 57, 57
jurabib, 69justification, 20
kluwer, 68Knuth, Don, 11, 91komascript, 26, 27
\label, 52, 53, 65, 66Lamport, Leslie, 11, 92\LARGE, 78\Large, 78\large, 78LATEX2HTML, 96\leftmark, 74length, 33Lengths (Dimensions)
\fboxrule, 62\fboxsep, 62\parindent, 33\parskip, 33, 34\tabcolsep, 54
letter, 26letterpaper, 28Linux, 13\listoffigures, 34\listoftables, 34lists, 49
bulleted, 49description, 50discussion, 50enumerated, 50inline, 51itemized, 49numbered, 50
Lyx, 8, 9, 95
Mac OS/X, 13Macintosh, 25macros, 89macros, 89\makeatletter, 90\makeatother, 90makebst, 69\makeglossary, 70makeidx, 69
makeindex, 69, 70\makeindex, 69\maketitle, 29–31, 34, 39, 89, 90Maple, 95marginal notes, 65margins, 72\markboth, 73\markright, 73markup, 15marvosym, 18math characters, 23Mathematica, 95mathematics, 7, 23\mbox, 22mdwlist, 72\medskip, 72memoir, 26, 27metacharacters, 18��������������
, 12, 46, 74, 75, 77, 80–82,87, 88, 104, 105, 112
Metamorphosis, 96Microbrew, see beerMicrosoft Windows, 13MiKTEX, 13minipage, 60–62, 92mirror, 57mkfs, 14mktexlsr, 46, 104mm (millimeters), 20Mozilla, 47multicol, 70multicols, 70\multicolumn, 55multirow, 55
newcent, 76\newcommand, 89, 92NFSS, 80
\normalsize, 78Notepad, 6NTS, 12
OASIS, 96octothorpe, 18Office 11, 96Omnimark, 96oneside, 27OpenOffice, 96Opera, 36Options
11pt, 2712pt, 27a4paper, 28alpha, 67b, 60draft, 27letterpaper, 28oneside, 27
Formatting information ���� 113
FORMATTING INFORMATION INDEX
plain, 67t, 60titlepage, 27twoside, 27
options, see Class OptionsOS/X, 13\ovalbox, 62oxford, 68
package, 8Packages
array, 54article, 26babel, 22, 23, 33bbding, 50, 94book, 26, 31color, 43–45, 79, 80endnote, 64fancybox, 59, 62, 92fancyhdr, 73fancyvrb, 59fnpara, 64fontname, 86geometry, 44, 45, 65, 72graphics, 45graphicx, 56, 57inputenc, 19, 20, 23jurabib, 69komascript, 26, 27letter, 26makeidx, 69marvosym, 18mdwlist, 72memoir, 26, 27multicol, 70newcent, 76package, 8palatcm, 76palatino, 76paralist, 47, 51parskip, 34pifont, 50preview-latex, 9pslatex, 76quotation, 63quote, 63report, 26, 31sectsty, 32, 72setspace, 72so, 22ssection, 32tabular, 61tabularx, 54textcomp, 18times, 74, 76type1cm, 78url, 58
packages
documentation, 44downloading, 45installing, 45using, 43
packages, 43page size
margins, 72scaling, 42
Pagemaker, 95\pageref, 66\pagestyle, 73palatcm, 76palatino, 76panels, 59paper sizes, 27\par, 56, 72, 90\paragraph, 31, 52paralist, 47, 51\parbox, 59–61\parindent, 33parskip, 34\parskip, 33\parskip, 33, 34\part, 31\part*, 33pc (picas), 20PDF, 12, 13, 19, 24, 36, 37, 40, 41, 45,
57, 59, 96pdflatex, 36–38, 40, 41, 45, 57, 58, 74,
80, 82, 88, 95, 96PDFview, 36, 41\person, 91, 92PFAedit, 82PFE, 13picas, 20picture, 56pifont, 50plain, 67plaintext, 15PNG, 57, 57
points, 20Popineau, François, 13PostScript, 2, 12, 13, 24, 41, 42, 58, 74,
78–82, 85, 88, 99£, 18\pounds, 18preamble, 31preview, 40preview-latex, 9\printindex, 70printing, 36, 41
reverse order, 42selected pages, 42
product, 8\product, 76, 79, 91Products
3B2, 95Acrobat, 96
Formatting information !"�#$114
FORMATTING INFORMATION INDEX
Acrobat Reader, 13, 14, 36, 40, 41afm2tfm, 83, 85Balise, 96BBedit, 13bibtex, 67Budweiser, 69charmap, 19configure, 46ConText, 95Corel Draw, 56Crayola, 11, 79Cygwin, 46detex, 96dvialw, 42dvieps, 42dvihp, 42dvips, 41, 42, 79, 80, 87dviview, 40DynaTag, 95elsevier, 68Emacs, 7, 8, 13, 15, 19, 24, 25, 37,
40, 42, 54, 67EuroMath, 95Excel, 96fontinst, 82FrameMaker, 95GhostScript, 41GhostView, 14GSview, 13, 14, 36, 41, 42harvard, 68HTML Tidy, 95Instant Preview, 9kluwer, 68LATEX2HTML, 96Lyx, 8, 9, 95makebst, 69makeindex, 69, 70Maple, 95Mathematica, 95Metamorphosis, 96mkfs, 14mktexlsr, 46, 104Mozilla, 47Notepad, 6Office 11, 96Omnimark, 96OpenOffice, 96Opera, 36oxford, 68Pagemaker, 95pdflatex, 36–38, 40, 41, 45, 57, 58,
74, 80, 82, 88, 95, 96PDFview, 36, 41PFAedit, 82PFE, 13product, 8Publisher, 95ScanDisk, 14
Scientific Word, 8Star Office, 96t1binary, 82t1utils, 82texhash, 46, 104Textures, 8tkbibtex, 68tkpaint, 56up2date, 14updmap, 85Velcro, 91vi, 13Windows Update, 14WinEdt, 7, 8, 13–15, 24, 25, 37,
40, 67WinShell, 7, 8, 13Word, 7, 95, 96WordPerfect, 96xdvi, 40xkeycaps, 19Xpdf, 14xpdf, 13XPress, 95Zaurus, 12
\protect, 64\ProvidesPackage, 85PS, 96
pslatex, 76pt (points), 20Publisher, 95
\qquad, 73\quad, 21, 73quotation, 63quotation marks, 18quote, 63
raggedleft, 22\raggedleft, 22raggedright, 22\raggedright, 22, 60Raggett, Dave, 95\raisebox, 94\ref, 52, 65, 66references, 66\refname, 68\reindex, 91, 92\renewcommand, 30, 31, 90, 93report, 26, 31RGB, 79, 80, 80
\rightmark, 74\rmdefault, 85rotate, 57RPM, 87
Sbox, 62, 92scale, 57ScanDisk, 14Scientific Word, 8
Formatting information %&�'(115
FORMATTING INFORMATION INDEX
\scriptsize, 78\scshape, 77secnumdepth, 32, 33\section, 31, 34section, 93section numbering, 32sections, 26, 31sectsty, 32, 72\selectfont, 76\sentinel, 92series, 77\setcounter, 32\setlength, 33, 34, 61setspace, 72\sfdefault, 85\sffamily, 77, 90SGML, 26, 96, 96, 97\shadowbox, 62, 92shape, 77sidebars, 59\slshape, 77\small, 64, 78\smallskip, 72so, 22sp (scaled points), 20space, see white-space\space, 92spacing, see white-spacespecial characters, 18ssection, 32Star Office, 96\subparagraph, 31, 52\subparagraph*, 33\subsection, 31\subsubsection, 31summaries, 30synchronous, 8
t, 60t1binary, 82t1utils, 82\tabcolsep, 54table, 53, 56table of contents
adding manual entry, 34automated entries, 34
table*, 70\tableofcontents, 34tables, 53tabular, 54, 56, 61tabular, 61tabularx, 54TDS, 45, 46, 80temporary directory, 45term, 8teTEX, 7, 13texhash, 46, 104TEX Live, 7
\textcolor, 79, 80textcomp, 18\textdegree, 23\texteuro, 18\textit, 79Textures, 8\thechapter, 93\theenumi, 52\theenumii, 52\theenumiii, 52\theenumiv, 52\theSbox, 92\thinspace, 19, 72\thispagestyle, 73TIFF, 57
times, 74, 76\tiny, 78\title, 29, 90titlepage, 27titles, 28tkbibtex, 68tkpaint, 56tocdepth, 32, 34tools, 63\ttdefault, 85\ttfamily, 77TUG, 12
twoside, 27type1cm, 78typesetting, 36typographics, 71
units, 20Unix, 13up2date, 14updmap, 85\upshape, 77url, 58\url, 58, 59, 64\usepackage, 31, 43, 44, 68, 81
\vbox, 61Velcro, 91\verb, 58, 59, 64Verbatim, 59verbatim, 58, 59verbatim text, 58vi, 13viewing, 36VMS, 25\vspace, 72\vspace*, 72
white-space, 17double-spacing, 72hard, 22horizontal, 72vertical
disappearing, 72
Formatting information )*�+,116
FORMATTING INFORMATION INDEX
fixed, 72flexible, 72
Windows Update, 14WinEdt, 7, 8, 13–15, 24, 25, 37, 40, 67WinShell, 7, 8, 13Word, 7, 95, 96WordPerfect, 96WYSIWYG, 12, 40
xdvi, 40xkeycaps, 19XML, 12, 26, 97, 97
XML, 7Xpdf, 14xpdf, 13XPress, 95XSLT, 97
Zaurus, 12
Formatting information -.�/0117