
9781783287390_Mastering_Citrix®_XenServer®_Sample_Chapter
25
Free Sample
-
Upload
packt-publishing -
Category
Technology
-
view
147 -
download
0
Transcript of 9781783287390_Mastering_Citrix®_XenServer®_Sample_Chapter

Free Sample
In this package, you will find: • The author biography • A preview chapter from the book, Chapter 1 "Getting Started with
XenServer®" • A synopsis of the book’s content • More information on Mastering Citrix® XenServer®
About the Author Martez Reed is an IT professional with over 6 years of experience in designing, implementing, and supporting VMware/Citrix® VDI and server virtualization solutions. In addition to focusing on virtualization solutions, he has extensive experience in managing Windows environments as well as developing Puppet modules for automation.
I would like to thank God for giving me the opportunity to write this book and share my knowledge with others. I am truly thankful to my family (Mark Sr., Beverly, Marcia, Marshelle, Marquita, Mark Jr., Mario, Marvin, Marlan, and Marrick) for supporting and encouraging me in this arduous process, and I would also like to thank Tamika for continually pushing me to complete this book. I'd like to thank all those who have supported me in my endeavors and hope to continue sharing my knowledge with others.
Mastering Citrix® XenServer® As more and more companies move their workloads from physical hardware to virtualized servers, the decision regarding which hypervisor should be used for the deployment must be made by engineers and administrators. The latest version of the Citrix XenServer® hypervisor has made the deployment of a highly available and scalable virtualization solution simple and extremely affordable.
This book provides administrators with a good mix of the design and system administration knowledge necessary to deploy and maintain an optimized XenServer® deployment.
What This Book Covers Chapter 1, Getting Started with XenServer®, covers features that have been added, deprecated, and removed in the latest version of Citrix® XenServer®. We also covered installing and upgrading to the latest version of Citrix® XenServer®.
Chapter 2, Planning and Configuring XenServer® Networking, covers XenServer® networking concepts such as network bonds, jumbo frames, and dedicated IP storage networks.
Chapter 3, Planning and Configuring XenServer® Storage, covers XenServer® storage concepts such as Physical Block Devices (PBDs) and Virtual Disk Images (VDIs) as well as various storage repositories. We also covered how to manage the various types of storage repositories.
Chapter 4, Creating and Managing Virtual Machines, covers the virtual machine life cycle from its creation to deletion. We also covered topics such as VM snapshots, VM power states, vApps, as well as importing and exporting VMs.
Chapter 5, Ensuring Availability, covers XenServer® features for ensuring a highly available environment such as resource pools, XenMotion®, storage XenMotion®, and High Availability (HA).
Chapter 6, Business Continuity, covers restoring a XenServer® deployment following a disaster. The topics covered in this chapter are the methods for backing up and restoring VMs as well as hosts along with using the Citrix® XenServer® Disaster Recovery feature to restore entire sites following a disaster.
Chapter 7, Managing and Monitoring XenServer®, covers managing and monitoring a XenServer® deployment to ensure that the environment is running optimally. We also explained the process of installing system updates, monitoring system performance, configuring alerts, and setting up system logging.

Chapter 8, Securing XenServer®, covers securing a XenServer® deployment through the use of centralized authentication with Active Directory and role-based access control (RBAC). In this chapter, the techniques and methods for securing VMs, XenServer® hosts, and network storage access are explained to help prevent a compromise of the XenServer® deployment.
Chapter 9, Extending XenServer®, covers tools for automating a XenServer® environment to reduce manual administration such as the built-in CLI, Windows PowerShell as well as SDKs provided by Citrix®. It also covers integrating Citrix® XenServer® with Apache CloudStack to build Infrastructure as a Service (IaaS) private clouds. We also explained how to convert VMware VMs to XenServer®.

Getting Started with XenServer®
One of the most important technologies in the information technology fi eld today is virtualization. Virtualization is beginning to span every area of IT, including but not limited to servers, desktops, applications, network, and more. Our primary focus is server virtualization, specifi cally with Citrix XenServer 6.2. There are three major platforms in the server virtualization market: VMware's vSphere, Microsoft's Hyper-V, and Citrix's XenServer.
In this chapter, we will cover the following topics:
• XenServer's overview• XenServer's features• What's new in Citrix XenServer 6.2• Planning and installing Citrix XenServer• PXE installation• XenServer answer fi les• Standalone upgrades• Rolling pool upgrades

Getting Started with XenServer®
[ 8 ]
Citrix® XenServer®
Citrix XenServer is a type 1 or bare metal hypervisor. A bare metal hypervisor does not require an underlying host operating system. Type 1 hypervisors have direct access to the underlying hardware, which provides improved performance and guest compatibility. Citrix XenServer is based on the open source Xen hypervisor that is widely deployed in various industries and has a proven record of stability and performance.
Citrix® XenCenter®
Citrix XenCenter is a Windows-based application that provides a graphical user interface for managing the Citrix XenServer hosts from a single management interface.
Features of Citrix® XenServer®
The following section covers the features offered by Citrix XenServer:
• XenMotion/Live VM Migration: The XenMotion feature allows for running virtual machines to be migrated from one host to another without any downtime. XenMotion relocates the processor and memory instances of the virtual machine from one host to another, while the actual data and settings reside on the shared storage. This feature is pivotal in providing maximum uptime when performing maintenance or upgrades. This feature requires shared storage among the hosts.
• Storage XenMotion / Live Storage Migration: The Storage XenMotion feature provides functionality similar to that of XenMotion, but it is used to move a virtual machine's virtual disk from one storage repository to another without powering off the virtual machine.
• High Availability: High Availability automatically restarts the virtual machines on another host in the event of a host failure. This feature requires shared storage among the hosts.
• Resource pools: Resource pools are a collection of Citrix XenServer hosts grouped together to form a single pool of compute, memory, network, and storage resources that can be managed as a single entity. The resource pool allows the virtual machines to be started on any of the hosts and seamlessly moved between them.
• Active Directory integration: Citrix XenServer can be joined to a Windows Active Directory domain to provide centralized authentication for XenServer administrators. This eliminates the need for multiple independent administrator accounts on each XenServer host in a XenServer environment.

Chapter 1
[ 9 ]
• Role-based access control (RBAC): RBAC is a feature that takes advantage of the Active Directory integration and allows administrators to defi ne roles that have specifi c privileges associated with them. This allows administrative permissions to be segregated among different administrators.
• Open vSwitch: The default network backend for the Citrix XenServer 6.2 hypervisor is Open vSwitch. Open vSwitch is an open source multilayer virtual switch that brings advanced network functionality to the XenServer platform such as NetFlow, SPAN, OpenFlow, and enhanced Quality of Service (QoS). The Open vSwitch backend is also an integral component of the platform's support of software-defi ned networking (SDN).
• Dynamic Memory Control: Dynamic Memory Control allows XenServer to maximize the physical memory utilization by sharing unused physical memory among the guest virtual machines. If a virtual machine has been allocated 4 GB of memory and is only using 2 GB, the remaining memory can be shared with the other guest virtual machines. This feature provides a mechanism for memory oversubscription.
• IntelliCache: IntelliCache is a feature aimed at improving the performance of Citrix XenDesktop virtual desktops. IntelliCache creates a cache on a XenServer local storage repository, and as the virtual desktops perform read operations, the parent VM's virtual disk is copied to the cache. Write operations are also written to the local cache when nonpersistent or shared desktops are used. This mechanism reduces the load on the storage array by retrieving data from a local source for reads instead of the array. This is particularly benefi cial when multiple desktops share the same parent image. This feature is only available with Citrix XenDesktop.
• Disaster Recovery: The XenServer Disaster Recovery feature provides a mechanism to recover the virtual machines and vApps in the event of the failure of an entire pool or site.
• Distributed Virtual Switch Controller (DVSC): DVSC provides centralized management and visibility of the networking in XenServer.
• Thin provisioning: Thin provisioning allows for a given amount of disk space to be allocated to virtual machines but only consume the amount that is actually being used by the guest operating system. This feature provides more effi cient use of the underlying storage due to the on-demand consumption.
Getting Started with XenServer®
[ 10 ]
What's new in Citrix® XenServer® 6.2Citrix has added a number of new and exciting features in the latest version of XenServer:
• Open source• New licensing model• Improved guest support
Open sourceStarting with Version 6.2, the Citrix XenServer hypervisor is now open sourced, but continues to be managed by Citrix Systems. The move to an open source model was the result of Citrix Systems' desire to further collaborate and integrate the XenServer product with its partners and the open source community.
New licensing modelThe licensing model has been changed in Version 6.2, with the free version of the XenServer platform now providing full functionality, the previous advanced, enterprise, and platinum versions have been eliminated. Citrix will offer paid support for the free version of the XenServer hypervisor that will include the ability to install patches/updates using the XenCenter GUI, in addition to Citrix technical support.
Improved guest supportVersion 6.2 has added offi cial support for the following guest operating systems:
• Microsoft Windows 8 (full support)• Microsoft Windows Server 2012• SUSE Linux Enterprise Server (SLES) 11 SP2 (32/64 bit)• Red Hat Enterprise Linux (RHEL) (32/64 bit) 5.8, 5.9, 6.3, and 6.4• Oracle Enterprise Linux (OEL) (32/64 bit) 5.8, 5.9, 6.3, and 6.4• CentOS (32/64 bit) 5.8, 5.9, 6.3, and 6.4• Debian Wheezy (32/64 bit)• VSS support for Windows Server 2008 R2 has been improved
and reintroduced
Citrix XenServer 6.2 Service Pack 1 adds support for the following operating systems:
• Microsoft Windows 8.1• Microsoft Windows Server 2012 R2

Chapter 1
[ 11 ]
Retired featuresThe following features have been removed from Version 6.2 of Citrix XenServer:
• Workload Balancing (WLB)• SCOM integration• Virtual Machine Protection Recovery (VMPR)• Web Self Service• XenConvert (this has been replaced by XenServer Conversion Manager)
Deprecated featuresThe following features will be removed from the future releases of Citrix XenServer. Citrix has reviewed the XenServer market and has determined that there are third-party products that are able to provide the product functionality more effectively:
• Microsoft System Center Virtual Machine Manager SCVMM support• Integrated StorageLink
Planning and Installing Citrix® XenServer®
Installing Citrix XenServer is generally a simple and straightforward process that can be completed in 10 to 15 minutes. While the actual install is simple, there are several major decisions that need to be made prior to installing Citrix XenServer in order to ensure a successful deployment.
Selecting the server hardwareTypically, the fi rst step is to select the server hardware that will be used. While the thought might be to just pick a server that fi ts our needs, we should also ensure that the hardware meets the documented system requirements. Checking the hardware against the Hardware Compatibility List (HCL) provided by Citrix Systems is advised to ensure that the system qualifi es for Citrix support and that the system will properly run Citrix XenServer. The HCL provides a list of server models that have been verifi ed to work with Citrix XenServer.
The HCL can be found online at http://www.citrix.com/xenserver/hcl.
Getting Started with XenServer®
[ 12 ]
Meeting the system requirementsThe following sections cover the minimal system requirements for Citrix XenServer 6.2.
Processor requirementsThe following list covers the minimum requirements for the processor(s) to install Citrix XenServer 6.2:
• One or more 64-bit x86 CPU(s), 1.5 GHz minimum, 2 GHz or faster multicore CPU
• To support VMs running on Windows, an Intel VT or AMD-V 64-bit x86-based system with one or more CPU(s) is required
• Virtualization technology needs to be enabled in the BIOS
Virtualization technology is disabled by default on many server platforms and needs to be manually enabled.
Memory requirementsThe minimum memory requirement for installing Citrix XenServer 6.2 is 2 GB with a recommendation of 4 GB or more for production workloads.
In addition to the memory usage of the guest virtual machines, the Xen hypervisor on the Control Domain (dom0) consumes the memory resources. The amount of resources consumed by the Control Domain (dom0) is based on the amount of physical memory in the host.
Hard disk requirementsThe following are the minimum requirements for the hard disk(s) to install Citrix XenServer 6.2:
• 16 GB of free disk space minimum and 60 GB of free disk space is recommended
• Direct attached storage in the form of SATA, SAS, SCSI, or PATA interfaces are supported

Chapter 1
[ 13 ]
• XenServer can be installed on a LUN presented from a storage area network (SAN) via a host bus adapter (HBA) in the XenServer host
A physical HBA is required to boot XenServer from a SAN.
Network card requirements100 Mbps or a faster NIC is required for installing Citrix XenServer. One or more gigabit NICs is recommended for faster P2V, export/import data transfers, and VM live migrations.
Installing Citrix® XenServer® 6.2The following sections cover the installation of Citrix XenServer 6.2.
Installation methodsThe Citrix XenServer 6.2 installer can be launched via two methods as listed:
• CD/DVD• PXE or network boot
Installation sourceThere are several options where the Citrix XenServer installation fi les can be stored, and depending on the scenario, one would be preferred over another. Typically, the HTTP, FTP, or NFS option would be used when the installer is booted over the network via PXE or when a scripted installation is being performed. The installation sources are as follows:
• Local media (CD/DVD)• HTTP or FTP• NFS

Getting Started with XenServer®
[ 14 ]
Supplemental packsSupplemental packs provide additional functionality to the XenServer platform through features such as enhanced hardware monitoring and third-party management software integration. The supplemental packs are typically downloaded from the vendor's website and are installed when prompted during the XenServer installation.
XenServer® installationThe following steps cover installing Citrix XenServer 6.2 from a CD:
1. Boot the server from the Citrix XenServer 6.2 installation media and press Enter when prompted to start the Citrix XenServer 6.2 installer.
2. Select the desired key mapping and select Ok to proceed.3. Press F9 if additional drivers need to be installed or select Ok to continue.4. Accept the EULA.5. Select the hard drive for the Citrix XenServer installation and choose
Ok to proceed.
Chapter 1
[ 15 ]
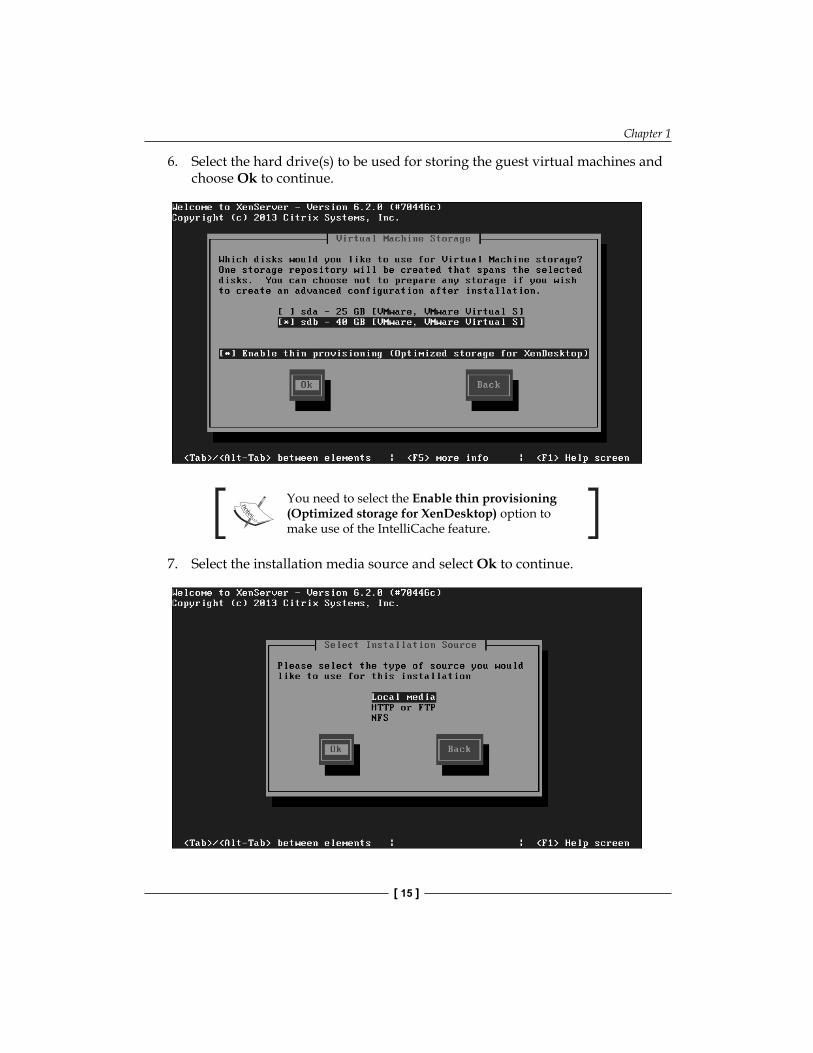
6. Select the hard drive(s) to be used for storing the guest virtual machines and choose Ok to continue.
You need to select the Enable thin provisioning (Optimized storage for XenDesktop) option to make use of the IntelliCache feature.
7. Select the installation media source and select Ok to continue.

Getting Started with XenServer®
[ 16 ]
8. Install supplemental packs if necessary and choose No to proceed.9. Select Verify installation source and select Ok to begin the verifi cation.
The installation media should be verified at least once to ensure that none of the installation files are corrupt.
10. Choose Ok to continue after the verifi cation has successfully completed.11. Provide and confi rm a password for the root account and select Ok
to proceed.12. Select the network interface to be used as the primary management interface
and choose Ok to continue.
Chapter 1
[ 17 ]
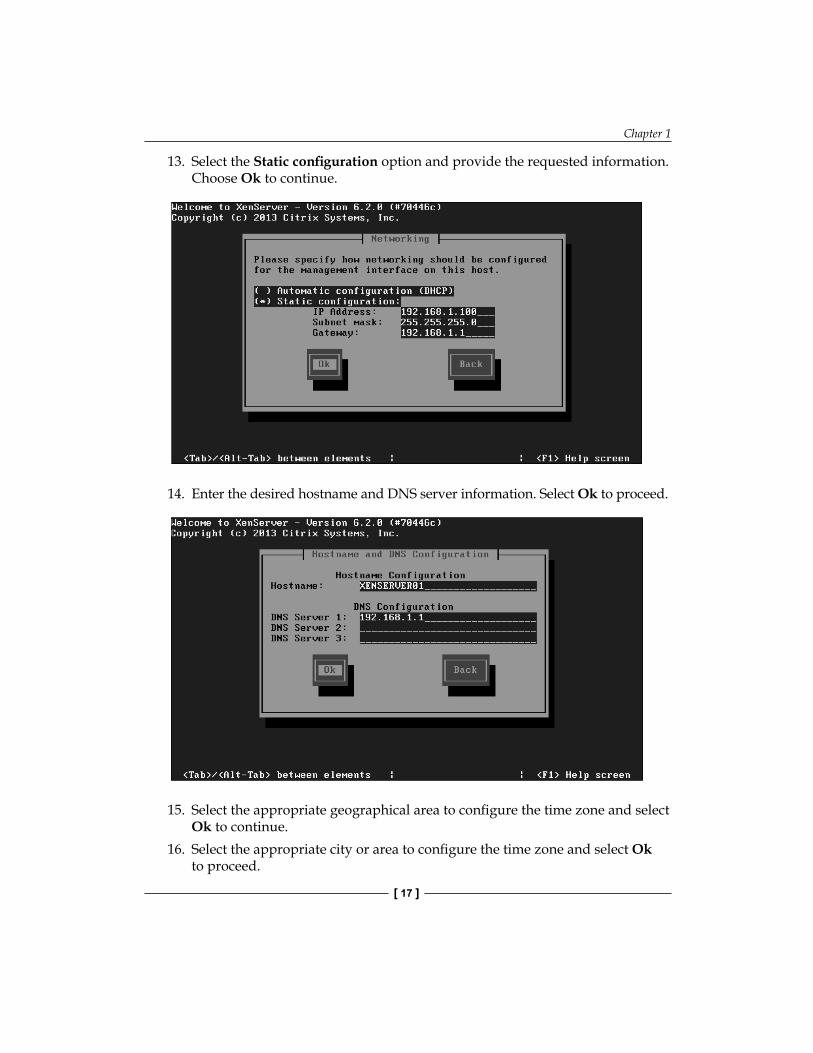
13. Select the Static confi guration option and provide the requested information. Choose Ok to continue.
14. Enter the desired hostname and DNS server information. Select Ok to proceed.
15. Select the appropriate geographical area to confi gure the time zone and select Ok to continue.
16. Select the appropriate city or area to confi gure the time zone and select Ok to proceed.
Getting Started with XenServer®
[ 18 ]
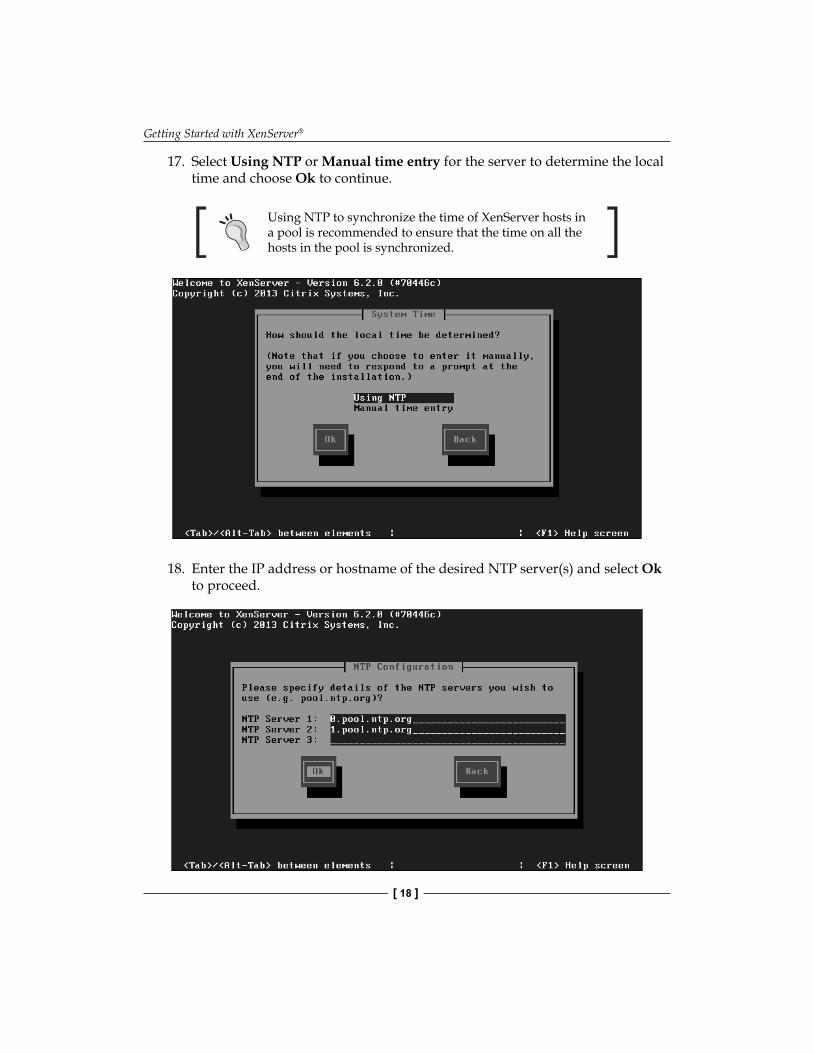
17. Select Using NTP or Manual time entry for the server to determine the local time and choose Ok to continue.
Using NTP to synchronize the time of XenServer hosts in a pool is recommended to ensure that the time on all the hosts in the pool is synchronized.
18. Enter the IP address or hostname of the desired NTP server(s) and select Ok to proceed.

Chapter 1
[ 19 ]
19. Select Install XenServer to start the installation.
20. Click on Ok to restart the server after the installation has completed. The following screen should be presented after the reboot:
Getting Started with XenServer®
[ 20 ]
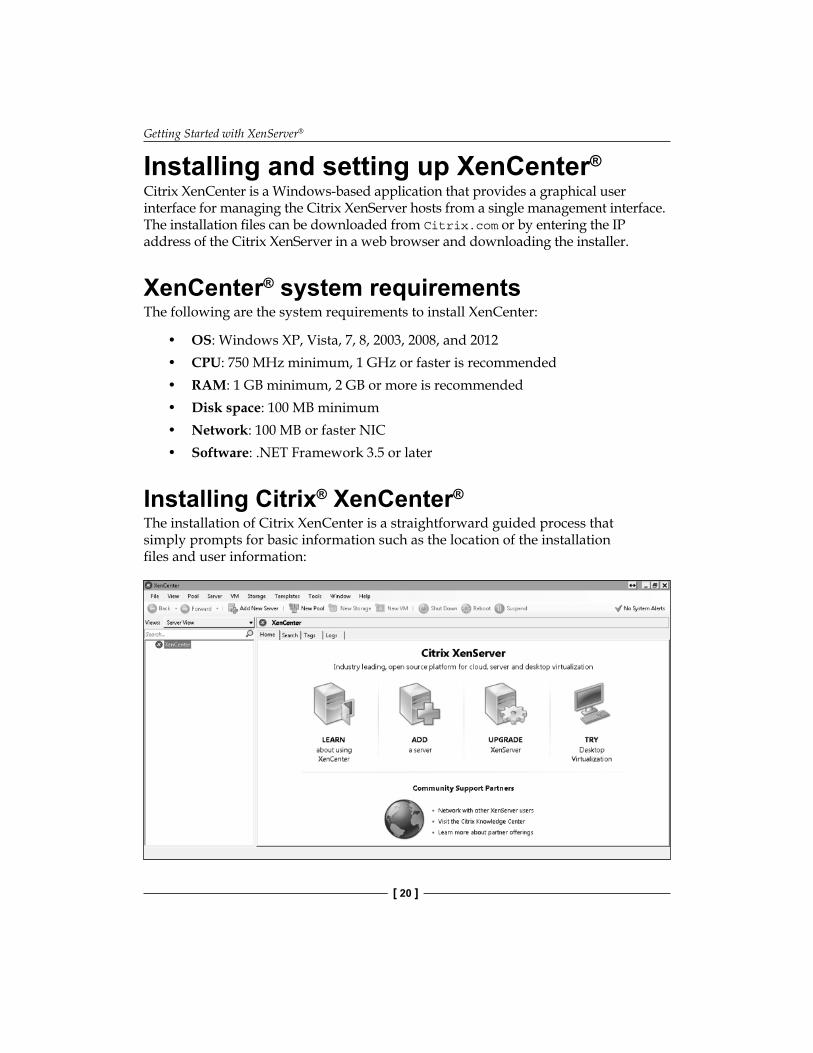
Installing and setting up XenCenter®
Citrix XenCenter is a Windows-based application that provides a graphical user interface for managing the Citrix XenServer hosts from a single management interface. The installation fi les can be downloaded from Citrix.com or by entering the IP address of the Citrix XenServer in a web browser and downloading the installer.
XenCenter® system requirementsThe following are the system requirements to install XenCenter:
• OS: Windows XP, Vista, 7, 8, 2003, 2008, and 2012• CPU: 750 MHz minimum, 1 GHz or faster is recommended• RAM: 1 GB minimum, 2 GB or more is recommended• Disk space: 100 MB minimum• Network: 100 MB or faster NIC• Software: .NET Framework 3.5 or later
Installing Citrix® XenCenter®
The installation of Citrix XenCenter is a straightforward guided process that simply prompts for basic information such as the location of the installation fi les and user information:
Chapter 1
[ 21 ]
After Citrix XenCenter has been installed, add the Citrix XenServer host to XenCenter by clicking on the Add New Server button and providing the requested credentials.
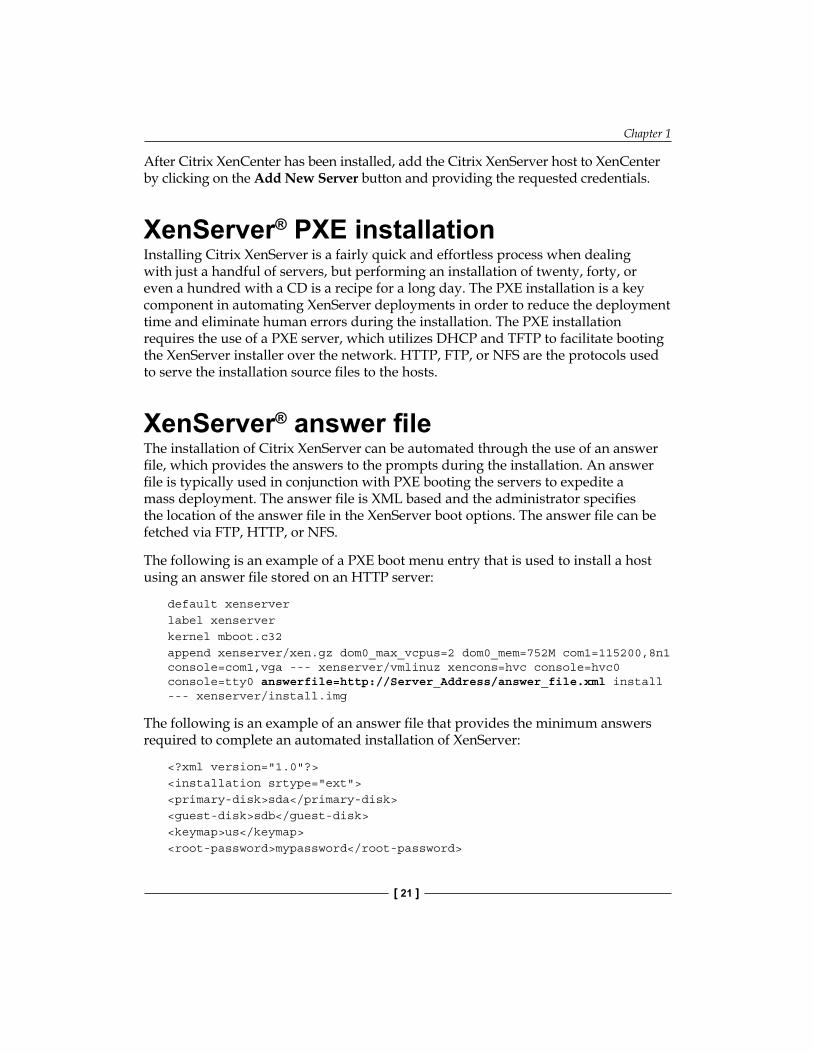
XenServer® PXE installationInstalling Citrix XenServer is a fairly quick and effortless process when dealing with just a handful of servers, but performing an installation of twenty, forty, or even a hundred with a CD is a recipe for a long day. The PXE installation is a key component in automating XenServer deployments in order to reduce the deployment time and eliminate human errors during the installation. The PXE installation requires the use of a PXE server, which utilizes DHCP and TFTP to facilitate booting the XenServer installer over the network. HTTP, FTP, or NFS are the protocols used to serve the installation source fi les to the hosts.
XenServer® answer fi leThe installation of Citrix XenServer can be automated through the use of an answer fi le, which provides the answers to the prompts during the installation. An answer fi le is typically used in conjunction with PXE booting the servers to expedite a mass deployment. The answer fi le is XML based and the administrator specifi es the location of the answer fi le in the XenServer boot options. The answer fi le can be fetched via FTP, HTTP, or NFS.
The following is an example of a PXE boot menu entry that is used to install a host using an answer fi le stored on an HTTP server:
default xenserverlabel xenserverkernel mboot.c32append xenserver/xen.gz dom0_max_vcpus=2 dom0_mem=752M com1=115200,8n1 console=com1,vga --- xenserver/vmlinuz xencons=hvc console=hvc0 console=tty0 answerfile=http://Server_Address/answer_file.xml install --- xenserver/install.img
The following is an example of an answer fi le that provides the minimum answers required to complete an automated installation of XenServer:
<?xml version="1.0"?><installation srtype="ext"><primary-disk>sda</primary-disk><guest-disk>sdb</guest-disk><keymap>us</keymap><root-password>mypassword</root-password>

Getting Started with XenServer®
[ 22 ]
<source type="url">http://pxehost.example.com/XenServer_/</source><admin-interface name="eth0" proto="dhcp" /> <timezone>Europe/London</timezone> </installation>
The following table explains the options used in the preceding answer fi le:
Element DescriptionInstallation srtype The srtype attribute sets the storage
repository type used during the installation
Primary-disk This determines the location of the control domain
Guest-disk This sets which disk(s) will be used to store the guest virtual machines
Keymap The name of the keymap used during the installation
Root-password This sets the password for the root account
Source type This defines where the installation files are located
Admin-interface name="eth0" proto="dhcp"
This sets the interface used for the host administration
Timezone This sets the host time zone
Additional options can be found in the Citrix XenServer installation guide.
Planning and upgrading Citrix® XenServer®
There are several reasons to upgrade to the latest version of Citrix XenServer whether it is for security, new features, or improved stability. Properly planning the upgrade can make the difference between a long weekend and a short one.

Chapter 1
[ 23 ]
Supported upgrade pathsThe following table breaks down the upgrade paths that can be taken to upgrade an existing XenServer installation to Version 6.2:
Version Supported or notXenServer 6.1.0 YesXenServer 6.0.2 YesXenServer 6.0 YesXenServer 5.6, 5.6 Feature Pack 1, 5.6 Service Pack 2
Yes
XenServer 5.5 No; you must first upgrade to XenServer Version 5.6 and then to version 6.2
The upgrade checklistUpgrading a XenServer deployment can be a diffi cult task that involves various moving parts and interdependencies that need to be accounted for, so having a checklist to work with can help make things easier. The following steps will walk you through some of the high-level tasks involved in the upgrade process:
1. Check the release notes for the new version on Citrix's website.
This may reveal known issues with the version and indicate what features have been added along with the issues resolved from previous versions.
2. Check the server hardware against the HCL for the new version of Citrix XenServer.
3. Check the server hardware vendor's website for new hardware drivers for the new XenServer version.
4. Check whether the currently hosted virtual machines are supported on the new XenServer version.
This is typically only an issue with support for older operating systems being deprecated in the newer version.

Getting Started with XenServer®
[ 24 ]
5. Identify and verify dependency support. Dependencies are typically third-party software that integrate with XenServer such as Citrix XenDesktop, CloudStack, OpenStack, and other management software.
6. Attempt an upgrade on test hardware if test hardware is available.7. Backup the host/pool confi guration.8. Backup the virtual machines.9. Migrate the virtual machines off the host to be upgraded by placing the
host into the maintenance mode. This operation requires multiple Citrix XenServer hosts.
10. Upgrade Citrix XenCenter to the latest version.11. Upgrade the host to the latest version of Citrix XenServer.12. Install the latest patches on the upgraded host.13. Create snapshots of the virtual machines.14. Migrate a test virtual machine(s) to the upgraded host to test functionality.15. Migrate noncritical virtual machines to the upgraded host fi rst.16. Upgrade Citrix xen-tools on the migrated virtual machines to the
latest version.17. Verify that the virtual machines are functioning properly.18. Remove the snapshots from the virtual machines after a successful
verifi cation.19. Migrate the remaining virtual machines and repeat steps 16 through 18.
Upgrading XenServer®
The following steps cover upgrading an existing installation of XenServer to Citrix XenServer 6.2:
1. Boot the server from the Citrix XenServer 6.2 installation media and press Enter when prompted to start the Citrix XenServer 6.2 installer.
2. Select the desired key mapping and choose Ok.3. Press F9 if additional drivers are needed or select Ok to continue.4. Accept the EULA.

Chapter 1
[ 25 ]
5. Select the upgrade option and choose Ok. The installer will display the currently installed version on the server.
6. Select Continue to proceed with the upgrade, as shown in the following screenshot:
7. Select the appropriate installation media location and select Ok to continue.8. Install supplemental packs if necessary.9. Select Verify installation source and select Ok to begin the verifi cation.

Getting Started with XenServer®
[ 26 ]
10. Choose Ok to continue after the verifi cation has successfully completed.11. Select Install XenServer to begin the upgrade process.
12. Choose Ok to restart the server to complete the upgrade.
In the event of an issue with the upgrade, the installation can be rolled back to the previous version if a backup was created.
Rolling pool upgradesRolling pool upgrades allow an environment to be upgraded to the latest version of Citrix XenServer without the need for downtime for the virtual machines. The rolling pool feature is managed within Citrix XenCenter, and provides a guided wizard for migrating the virtual machines from one host to another as the hosts are upgraded. This process continues until the entire pool is upgraded to the latest version of Citrix XenServer.
SummaryIn this chapter, we covered an overview of Citrix XenServer along with the features that were available. We also looked at the new features that were added in XenServer 6.2 and then examined installing XenServer as well as performing upgrades of existing installs.
In the next chapter, we will learn about Citrix XenServer networking.

Where to buy this book You can buy Mastering Citrix® XenServer® from the Packt Publishing website. Alternatively, you can buy the book from Amazon, BN.com, Computer Manuals and most internet book retailers.
Click here for ordering and shipping details.
www.PacktPub.com
Stay Connected:
Get more information Mastering Citrix® XenServer®


![Nutropin AQ [somatropin (rDNA origin) injection] Nutropin ... · Nutropin®®® [somatropin (rDNA origin) for injection] DESCRIPTION ® ®. ® in ® ® ® ® ®. •• ®](https://static.fdocuments.us/doc/165x107/5b8977fc7f8b9abe1e8db08f/nutropin-aq-somatropin-rdna-origin-injection-nutropin-nutropin.jpg)


