9.0 Results, Analysis, and Conclusions - COSGC...
36
Colorado Space Grant Consortium GATEWAY TO SPACE FALL 2011 DESIGN DOCUMENT Team Undefined Written by: Sam Bukowski, Emily Daugherty, Troy Hayes, Chris Lewin, Natalie Schaefer, Matt Vaninger
Transcript of 9.0 Results, Analysis, and Conclusions - COSGC...

Colorado Space Grant Consortium
GATEWAY TO SPACE FALL 2011
DESIGN DOCUMENT
Team Undefined
Written by: Sam Bukowski, Emily Daugherty, Troy Hayes, Chris Lewin, Natalie Schaefer,
Matt Vaninger
October 4, 2011Revision A/B

Gateway to Space ASEN/ASTR 2500 Fall 2011
Revision Log
Revision Description DateA/B Conceptual and Preliminary Design Review Oct. 4C Critical Design Review Nov. 5D Analysis and Final Report Dec. 3
Page 2 of 26 August 16, 2011Rev A

Gateway to Space ASEN/ASTR 2500 Fall 2011
Table of Contents
1.0 Mission Overview...............................................................................................................42.0 Requirements Flow Down..................................................................................................53.0 Design.................................................................................................................................64.0 Management.......................................................................................................................95.0 Budget...............................................................................................................................126.0 Test Plan and Results........................................................................................................137.0 Expected Results...............................................................................................................208.0 Launch and Recovery.......................................................................................................209.0 Results and Analysis10.0 Ready for Flight11.0 Conclusions and Lessons Learned12.0 Message to Next semester
Page 3 of 26 August 16, 2011Rev A

Gateway to Space ASEN/ASTR 2500 Fall 2011
1.0 Mission Overview Space is a dangerous and unpredictable environment. It is impossible for life to
exist unsupported in almost no atmosphere. Therefore humans have had to create space suits and living systems to be able to explore and survive. However, there have been many instances where these systems fail. In this case, back up capsules or escape pods can be important. Our mission is to create an inexpensive capsule to act as an emergency backup that can withstand the harsh environments of space. In our mission, we plan to create a small outer compartment made of a plastic vacuum resistant material. This will be the covering for the emergency capsule. In this capsule, we will be testing for radiation and pressure to try and sustain a viable living space for astronauts in an emergency. What we expect to happen with this space capsule is for it to be able to support life in space.
Also in the balloon sat part, or the main body, we will have another section that will be well insulated. In here we will test the temperature to see how well the basic insulation can withstand the temperatures outside. If this works we will know the material and the insulation method to cover the capsule part where the astronauts will actually be held during the short period of time before they get rescued. So not only will we have the box, classic balloon sat part, we will also have this miniature vessel on the side that will be testing for these three things. Also inside the main body of the balloon Sat we will have five tests for radiation. One will be outside of any material to get bases for the amount of radiation at 100,000 feet. The other three will be in rubber, and aluminum, and then a combination of rubber and aluminum. So in total there will be five radiation tests running, including the one inside of the capsule section of the balloon sat. These tests are so we can find the best material to shield the capsule from radiation. In doing all these we can see if it will be a viable option for astronauts in case of an emergency.
However, the reason for using such common everyday material is to see if we can find the cheapest materials that give the maximum benefits. The reason for this is because most spacecraft and emergency equipment are already very expensive and take up space. So if we can create a secondary backup capsule that is portable and inexpensive, but still keeps the crew safe for a time of around 30 minutes, then that would be very helpful to many stations and space craft.
A major historic event that greatly backs up the idea of this space capsule happened at the space station itself. At one point in its history a couple years ago, some space debris was headed right for the ISS at an incredible speed. If the debris had hit then the space station would have been destroyed and the crew would have been lost. However the astronauts did have a Russian capsule docked at the station that was acting as a lifeboat. They did manage to huddle inside of this capsule, called a Soyuz. The debris did not hit the space station and the crew was safe. However if the station had been hit then the crew would have had to rely solely on the shuttle to survive in and make it back to earth. The danger is that this capsule itself could have malfunctioned or when the debris hits the station. So as a secondary back up, it would have been good to have another inexpensive and portable alterative that the astronauts could take refuge in. This is where our idea of the space capsule comes in. That way if the worst does come to pass then there is always a last resort that is cheap and does not compromise any of the other
Page 4 of 26 August 16, 2011Rev A

Gateway to Space ASEN/ASTR 2500 Fall 2011
spacecraft and stations missions. NASA is also now putting a lot of resources in to creating safe safety measure like escape pods and ejection capsules from the rocket like in the new Orion project. It is for this reason also that a capsule would seem like a reasonable and good idea to test, now that so many safety measures are being put in place. We expect to find some evidence by using inexpensive materials to protect against the harsh conditions of space.
2.0 Requirements Flow DownThe table describes the requirements that are required for a successful mission.
The requirements are broken up into top requirements and lower requirements. All of the Top Requirements are derived from the mission statement. All of the lower requirements are derived from the top Requirements. The third set of requirements are derived from the lower requirements
Requirement Description Derived From
1.0 The Balloon Sat shall follow requirements given in the Balloon Sat user guide
Mission Statement
2.0 The Balloon Sat shall imitate a low cost space capsule
Mission Statement
3.0 The Balloon Sat shall test the radiation at about 30,000 meters
Mission Statement
Requirement Description
1.1 The Balloon Sat shall not exceed 850g
1.2 The Balloon Sat shall be launch to a height of approximately 30,000 meters by a balloon
1.3 The Balloon Sat shall have a flight string attached to it
1.4 The Balloon Sat shall have a camera in it.
1.5 The budget of the Balloon Sat shall not exceed $250
2.2 The Balloon Sat shall determine what materials are best suited for an emergency space capsule
2.2 The Balloon Sat shall test the pressure, and temperature outside the capsule at approximately 30,000 meters
3.1 The Balloon Sat shall test the radiation under aluminum, rubber, and a combination of both
Page 5 of 26 August 16, 2011Rev A

Gateway to Space ASEN/ASTR 2500 Fall 2011
Requirement Description
2.1.1 The Balloon Sat shall test the pressure outside of the main box in a bag that has been vacuum sealed
2.1.2 The Balloon Sat shall test the outside temperature outside of the main compartment with a thermal blanket for insulation
3.0 DesignThere are many different aspects that will be involved in completing our mission.
The first of which is the structure. We must make sure that the main body of the Balloon Sat, which is in the shape of a cube, will be strong enough to sustain the forces that will be put upon the Balloon Sat during the flight. The Balloon Sat must also be strong enough to maintain the internal and external tests that will be done during the flight. Once we know that our structure is capable of doing its task, we will move on to the tests outside of the Balloon Sat, the first of which being the temperature test. During the construction phase of our project we will be testing materials to find which are most efficient, and will use this information to design and build our temperature capsule that will be within the pressure test outside of the Balloon Sat.
On the inside, we will mount our radiation tests within the body of the Balloon Sat, and in the external bubble of the Balloon Sat. We have decided to test rubber, aluminum foil, and a combination of the two for this radiation test. We will also have a control radiation test so that we have something to compare the results from the other materials to. We will be using radiation testing stickers that will be placed inside small containers wrapped in the materials we have determined to use for the test. All of these containers will be attached to one of the inside walls of the Balloon Sat and within the external bubble of the Balloon Sat in order to allow all of the tests the same amount of exposure to radiation.
Also contained within the body of the Balloon Sat will be the HOBO data logger. We will be using this device to measure the internal and external temperature of the Balloon Sat, as well as the humidity in the air around the Balloon Sat. Prior to launch, we will be familiarizing ourselves with using the HOBO and will be testing the device to make sure that it is in working order. We will use the HOBO to keep track of the temperatures to make sure that all of the components stay at the appropriate temperature so that they do not fail. We can also use the HOBO for some trouble shooting during the building process. During the freeze test we can use the HOBO to keep track of the temperatures so that we will be able to see if more insulation is needed or if we have built a properly insulated balloon SAT and temperature test. Also housed within the external pressure test of the Balloon Sat will be an Arduino Uno which we will use to log the data that we will be recording from other sensors within the external pressure bag of the Balloon Sat.
Page 6 of 26 August 16, 2011Rev A

Gateway to Space ASEN/ASTR 2500 Fall 2011
Attached to the Arduino will be a barometric pressure sensor and some auxiliary thermometers to help aid in measuring the temperatures needed for the temperature test. The additional thermometers will be needed because the Arduino and the pressure, and temperature tests will be attached to the outside of the Balloon Sat, within the pressure test. Thus the HOBO cannot be used to measure the temperature for the temperature test and the additional thermometer will be need. The pressure sensor will be used for the pressure test which will be attached to the outside of the Balloon Sat. The pressure test will be done in the small bag that will be externally attached to the main body of the Balloon Sat. The pressure sensor will be placed inside of the bag with the Arduino, and will record the pressure of the external balloon throughout the flight. Also, in the Balloon Sat will be a camera that will be taking pictures throughout the duration of the journey. Although the pictures that will be taken will be interesting, they are not part of the tests or data that we will be trying to collect.
Each of these tests will be able to give us the data that we need for each part of our final mission. The radiation tests will tell us what material would be best to use to protect people from the radiation of space. The temperature test will tell us just how we should build the insulation for the craft so that it will stay warm enough to keep the occupants alive. Finally, the pressure test will be used to see if we can effectively keep pressure in our craft so that the passengers of our craft don’t end up exposed to the harsh vacuum of at 30km.
The design requirements that we have are to keep the craft above -10deg Celsius for the components of the Balloon Sat itself, for our temperature test we must keep the temperature at a minimum of 15deg Celsius. We must also make sure that the structure of the Balloon Sat will be able to survive the force of the burst and impact of hitting the ground. A limitation of the Balloon Sat is that it must weigh under 850g. Based on our calculations for the weight prior to our construction of the Balloon Sat, we have already satisfied this requirement.
For the most part all of the tests stand alone, so none of them need to be involved with one another. The HOBO is by itself and will take readings of the temperature and humidity on its own and only needs a battery to run. The Arduino would be connected to the barometer and the auxiliary thermometer for the temperature test; this whole system will require a battery and will be independent of the HOBO. The camera will also be separate from these two systems and will only need its own power and storage in order to take its pictures. The radiation tests do not require power and will simply be attached in their compartments, and then to the wall of the Balloon Sat.
*Based on our current design, all of the requirements listed in the RFP have been met.
The list of the parts that will be used build in the Balloon Sat include:
-HOBO with internal battery-Arduino with battery-Barometer (connected to Arduino)-Thermometer (connected to Arduino)-Materials for Rad. Tests
-Rubber
Page 7 of 26 August 16, 2011Rev A

Gateway to Space ASEN/ASTR 2500 Fall 2011
-Aluminum Foil-Radiation stickers -Cloth
-Building materials-Foam core-Insulation foam-Gold foil-aluminum tape-balloon-cloth
-Heater with battery-Camera with battery and memory card
*The Arduino and that Rad. Stickers were ordered from SparkFun, other materials were/will be ordered, and all of the rest are provided or available from the Gateway Store.Satellite Diagram:
Page 8 of 26 August 16, 2011Rev A

Gateway to Space ASEN/ASTR 2500 Fall 2011
Functional Block Diagram:
4.0 Management
The Team Manager is Natalie, who will be in charge of organizing the team meetings and making sure Team Undefined stays on schedule. The Budget Manager is Emily, who will be in charge of keeping track of the team’s budget and spending. Each team member will play a critical role in designing, constructing, and testing the satellite. Each team member is assigned a formal role, though each member will contribute to the integration and finalization of the satellite.
ScheduleThe following schedule is a detailed agenda for Group Undefined. The team’s schedule is expected to be affected by unforeseen conflicts and may be subject to change. However, the schedule will remain as close to the original as possible. If changes occur, schedule will remain accurate within three days; if a team member cannot make it to the event within the three days, other team members will proceed and the absent team member will be caught up to speed. Delays may occur, however, the satellite must be completely finished and ready to go by November 2, at the very latest. The biggest challenge to staying on-track will be all team members being available for each event. At least two team members must be present at any one event.
Event Tasks DateTeam Dinner HW #03, divide Proposal into sections,
assign job titlesSept 12 , 7:00 p.m.
Page 9 of 26 August 16, 2011Rev A

Gateway to Space ASEN/ASTR 2500 Fall 2011
Team Meeting Go over sections of proposals, work on mission ideas
Sept 14, 5:00 p.m.
Team Meeting Put together Proposal, establish mission idea
Sept 15, 8:00 p.m.
Team Meeting Finalize Proposal and mission idea Sept 16, 11:00 a.m. and 5:00 p.m.
Team Meeting Revise Proposal and Presentation Sept 17, 5:00 p.m.Team Meeting Practice Presentation Sept 19, 4:00 p.m.Present Proposal Present In Class Sept 20, 9:30 a.m.Team Meeting Discuss materials and hardware needed
and collectionSept 20, 9:00 p.m.
Team Meeting Discuss and work on Systems Final Sept 23, 5:00 p.m.Team Meeting Finish Systems Final and Finalize
Hardware order formsSept 26, 5:00 p.m.
Order Hardware Hardware order forms due Sept, 27, appointmentTeam Meeting Discuss progress, further modifications,
work on DD Rev A/B and CDR Sept 30, 5:00 p.m.
Team Meeting Finalize and Integrate DD Rev A/B and CDR
Oct 3, 6:00 p.m.
DD Rev A/B and CDR Due
Turn in Design Document Revisions A and B and Critical Design review
Oct 4, 7:00 a.m.
pCDR pre-Critical Design Review Oct 4 - Oct 5Team Meeting Begin Construction Oct 5, 4:00 p.m.Team Meeting Discuss progress Oct 6, 7:00 p.m.Testing Radiation stickers Oct 7, 4:00 p.m.Testing Drop Test, Whip Test, AND Roll Test Oct 8, 5:00 p.m.Testing/Team MeetingCooler Test, discuss materials testing and
other testingOct 10, 4:00 p.m.
Testing Vacuum Test for pressure component Oct 17, 1:00 p.m.Modification, Further Testing
Modify Prototype, as needed, discuss progress
Oct 5 - Oct 17
Mid-Semester Team Eval.
Mid-Semester Team Evaluations due in class
Oct 18, 9:30 a.m.
Team Meeting Begin integration of project Oct 19, 5:00 p.m.Finalization Integrating subsystems, final tests Oct 19 - Oct 24Finalization Complete Satellite Oct 24Pre-Launch InspectionInspect final satellite - bring all hardware
to classOct 25, 9:30 a.m.
In-Class Mission Simulation Test
Bring satellite “Ready to Go” Oct 27, 9:30 a.m.
Team Meeting Design Document Oct 28, 5:00 p.m.
Page 10 of 26 August 16, 2011Rev A

Gateway to Space ASEN/ASTR 2500 Fall 2011
Launch Readiness Review
LLR Presentation Nov 1, 7:00 a.m.
Design document C Design Document C Due Nov 4, 7:00 a.m.Weigh-in Weigh-in and Turn in Nov 4, by appt. 8:00
a.m. to 1:00 p.m.Launch Day Launch Satellites Nov 5, leave at 4:45
a.m.Presentations All presentations and Data due Nov 29, 4:00 p.m.Team Meeting Design Expo preparation Dec 2Design Expo ITLL Design Expo Dec 3, 9:00 a.m. - 4:00
p.m.Hardware Turn-in In class Dec 6, 9:30 a.m.Final Exam Discovery Learning Center 1B70 Dec 14, 4:30 - 7:00
p.m.
Organizational Chart:
Job Lead SecondaryManagement Natalie Schaefer Emily DaughertyBudget Emily Daugherty Natalie SchaeferDesign Sam Bukowski Chris LewinTechnical Chris Lewin Sam BukowskiTesting Troy Hayes Matt VaningerDocumentation Matt Vaninger Troy Hayes
Page 11 of 26 August 16, 2011Rev A

Gateway to Space ASEN/ASTR 2500 Fall 2011
5.0 Budget
The weight originally was expected to be 810 grams only having 40 grams of weight extra. Due to some changes in design the actual weight that flew was 100 grams less than the original estimate, only 712 grams and we were able to give weight to three different teams. The estimated cost of the hardware was originally $92. Because of unexpected expenses and ordering extra for testing the cost was increased to $136.89.
Page 12 of 26 August 16, 2011Rev A

Gateway to Space ASEN/ASTR 2500 Fall 2011
6.0 Test Plan and ResultsThere are several tests that we will be doing to get our Balloon Sat ready for its
trip into space. Each of the tests is specific to one aspect of the balloon SAT and the results of the tests will allow us to better our design and get the SAT ready for flying.
The first test we will be doing is the Drop test. This test will determine if the Balloon Sat is ready for its flight. There will be multiple parts to this test, the first of which involves dropping the Balloon Sat down a flight of stairs to simulate the impact of landing. For the second part of this test we will drop the Balloon Sat off of a height of two stories to simulate the impact of landing in a different way. During both stages of this test, we will use weights to simulate the mass of the balloon sat to achieve the most accurate results. We will use the results of this test to find out what parts of our Balloon Sat are structurally stable and which parts are not. We can then revise our design until the Balloon Sat is ready to fly.
The next test is the whip test. For this test we will attach a cord through the Balloon Sat and swing and jerk it around. The reason for this test is very similar to the drop test, and that is to determine of the attachment rod for the Balloon Sat will be strong enough to withstand the forces during the burst of the balloon and of the whipping around that the Balloon Sat will be doing during its ascent and descent. We will be able to take our results and apply them to our future designs of our Balloon Sat.
The next test we will be doing is the freeze/condensation test. We will do this test to determine if our internal components will continue to be operational in the extreme temperatures of near space, and to see if they will be damaged by possible condensation that may occur during the flight. To perform this test, we will place the balloon SAT in a cooler filled with dry ice for an amount of time similar to the estimated flight time, to simulate the cold temperatures of Near Space, and to test if condensation will be a problem for the internal components during the flight. This test is one of the most important tests we will be doing because if our components will not work when we get into near space because of the cold or condensation, we will not be able to run any of our tests and the whole flight will have been for nothing.
We will also be testing the sensors which we are using for our mission. We are using resources on the university campus to test the barometric pressure sensor, the temperature sensor, and the radiation stickers. We will make changes to our hardware as needed due to the results of the testing.
The next test will be the testing of the materials that will house the Arduino and pressure and temperature sensors within our external vacuum bag for our pressure and temperature test. For this test, we will take the materials that we think will best allow us to keep pressure in the external balloon when the Balloon Sat approaches near space, and make sure that they can actually handle those extreme conditions. We will do this to determine if the materials we have decided on are capable of the task we require of them. For this test we will use the resources on campus to determine if the materials we have decided on. Vacuum bags will be able to withstand the forces that will be put on it but the vacuum of space. Through the testing we have determined that the vacuum bags are capable of withstanding the extreme pressure.
Once we have the major tests done we will individually test the component to make sure that everything is working perfectly prior to launch. This is done so that we can iron out all our little problems before we put all of the components together in the
Page 13 of 26 August 16, 2011Rev A

Gateway to Space ASEN/ASTR 2500 Fall 2011
final Balloon Sat. We will do this to help better the chance of success when launching the Balloon Sat
The final test will be testing the balloon SAT after it has been fully built. We will do this to make sure that nothing went wrong when putting all of the components together. If something does go wrong we know that we have to fix it the launch. The test will also be done to make sure that everything will stay together when put under the forces of burst and descent back to earth. Once this final set of testing is done, we will have a sturdy working Balloon Sat that will be ready for launch.
Test ResultsDrop/Kick Test
The results that we got for the drop test showed that the structure for our Balloon Sat is strong enough to withstand the forces that it will experience during burst and impact. During the test we did get a crack in one of the seams of the Sat but that was because we initially put in much more weight than we should have, but the Sat still survived the test. For the kick test we threw the balloon down the stairs several times, of which the Balloon Sat survived every one.
The Whip Test
The whip test was successful and the Balloon Sat remained in-tact and strong.
Page 14 of 26 August 16, 2011Rev A

Gateway to Space ASEN/ASTR 2500 Fall 2011
The Cooler Test
The cooler test results were higher than we expected but we determined that this was because of the location of the HOBO during the test. For the internal temperature the HOBO was sitting right on top of the heater and so measured only the temperature of the heater. For the external temperature, the probe of the HOBO was very close to the insulation and so didn’t change very much during the test because of its location.
Cooler Test: HOBO External
Page 15 of 26 August 16, 2011Rev A

Gateway to Space ASEN/ASTR 2500 Fall 2011
Cooler Test: HOBO Internal
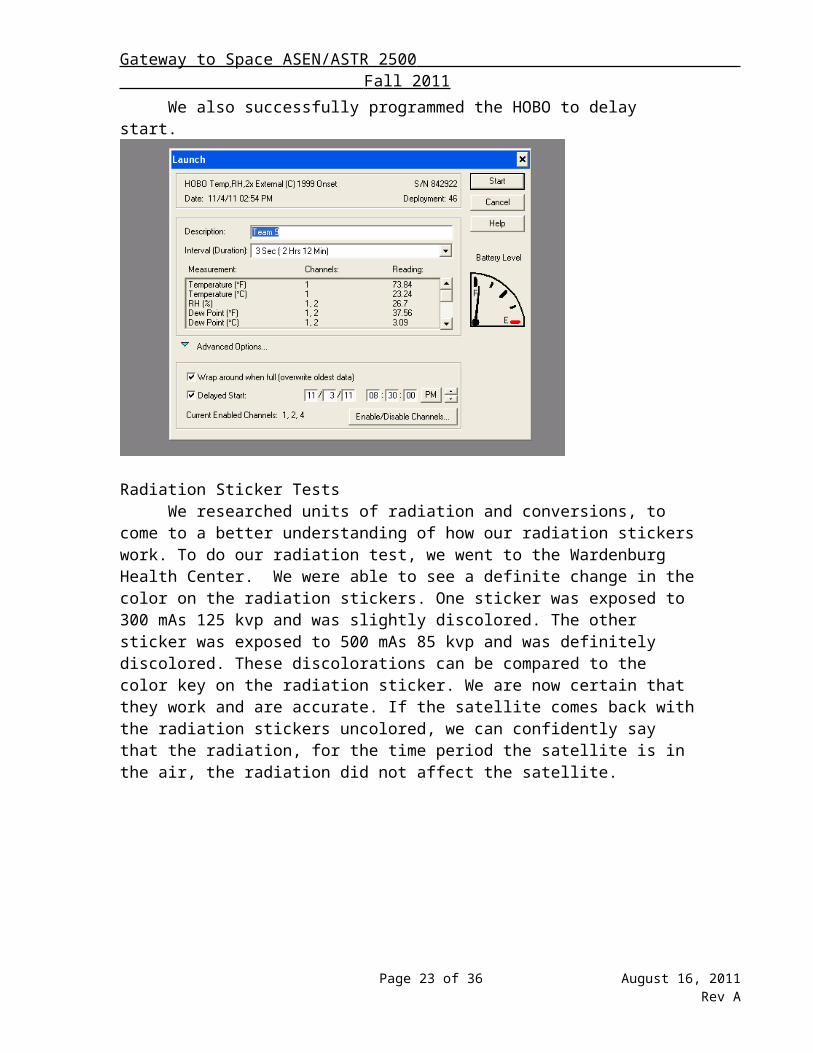
We also successfully programmed the HOBO to delay start.
Radiation Sticker TestsWe researched units of radiation and conversions, to come to a better
understanding of how our radiation stickers work. To do our radiation test, we went to the
Page 16 of 26 August 16, 2011Rev A

Gateway to Space ASEN/ASTR 2500 Fall 2011
Wardenburg Health Center. We were able to see a definite change in the color on the radiation stickers. One sticker was exposed to 300 mAs 125 kvp and was slightly discolored. The other sticker was exposed to 500 mAs 85 kvp and was definitely discolored. These discolorations can be compared to the color key on the radiation sticker. We are now certain that they work and are accurate. If the satellite comes back with the radiation stickers uncolored, we can confidently say that the radiation, for the time period the satellite is in the air, the radiation did not affect the satellite.
Mission Life TestFor the three hour mission simulation test, the bag was compressed (with air still
inside) to verify the functionality of the pressure sensor in normal and cooler temperatures at random points in the test. The pressure test held pressure, with no leaking air and the temperature and pressure sensor functioned correctly.
A portion of the Pressure data:
*The spikes in pressure in the pressure graph are points in time when the inflated bag was squeezed and pressure was applied.
Page 17 of 26 August 16, 2011Rev A

Gateway to Space ASEN/ASTR 2500 Fall 2011
The Balloon Sat passed the mission life test. All systems remained on and collected data for the duration of three hours. The camera took over eight hundred photos during the test, using almost 2 GB of memory on its 4 GB memory SD data card. The HOBO successfully collected the temperature for the full length of time. The heater worked as well, but with evidence collected by the HOBO, its effectiveness went down as the time increased. However, the temperature still remained well above room temperature throughout the test.
Pictures from inside the Satellite:
Page 18 of 26 August 16, 2011Rev A

Gateway to Space ASEN/ASTR 2500 Fall 2011
HOBO data:(Internal Temperature)
(External Temperature)
7.0 Expected ResultsOur team’s mission is to discover materials that could be used to make an
inexpensive space capsule. We are hoping for results that will lead to at least one or multiple materials that would be sufficient for supporting life in near space. We are
Page 19 of 26 August 16, 2011Rev A

Gateway to Space ASEN/ASTR 2500 Fall 2011
expecting varying radiation exposures under different materials. We predict that the radiation sticker with no cover will have the highest radiation level, the rubber will have the second highest radiation level, the aluminum foil will have the second lowest radiation level, and the combination of both rubber and tin foil will have the lowest radiation level. We made these predictions based on the characteristics of the materials. After recovery, we will take pictures of all of our radiation stickers so that we know the radiation measurement before they pick up any radiation back on the ground. We are also predicting that the thermal blanket and insulation can keep the inside of the pressure test heated for approximately 30 minutes. The pressure test should maintain a livable or steady pressure at 30 km altitude. We have tested our radiation stickers by taking them to Wardenburg to be exposed to x-ray radiation. We found that our radiation stickers do work, so we expect them to collect data during flight. We have also done a cooler test to test our temperature sensor, and we completed a pressure test to test our barometric pressure sensor. Both tests when smoothly and we are expecting all parts of our experiment to work.
8.0 Launch and RecoveryOn Sunday, November 6, 2011, Team Undefined will launch The Emergency
Man along with the other nine teams and their Balloon Satellites. Team Undefined will turn in the Balloon Sat on Saturday, November 5, 2011. Team Undefined will be carpooling in Sam Bukowski’s car along with Natalie Schaefer’s car. The Satellites will be arranged by weight on the flight string, the lightest at the top. The Emergency Man will be launched by the team leader, Natalie Schaefer. Sam Bukowski will drive during recovery along with the rest of the team members.
After recovery, The Emergency Man will be brought back to the University of Colorado at Boulder. The SD card from the Arduino will be plugged into a computer and the data from the pressure and temperature sensor will be collected, graphed and analyzed for drastic changes in pressure and how well the insulation and thermal blanket protected the pressure test. It has been verified by the pressure and temperature test, that this sensor works and will collect data accurately. The HOBO software is located on Sam Bukowski’s computer, so The HOBO device will also be hooked up to Sam’s computer. The data from the HOBO device will be collected, graphed, and analyzed for the inner temperature and outer temperature of the Balloon Sat throughout the duration of the flight. The HOBO device has been tested and successfully retrieves temperature data. The radiation stickers will carefully be removed from the radiation cover components and the radiation effects will be compared with the color key on the sticker itself. Any variations in the different stickers will be documented and analyzed. The radiation stickers have been tested b The radiation stickers have been tested b being exposed to radiation and do change in color when exposed to certain amounts of radiation.
9.0 Results, Analysis, and ConclusionsUpon landing, it was evident that the pressure test vacuum bag was open and
depressurized, the camera had shut off, and the radiation stickers had no evidence of radiation detection because they looked as they did before launch. Through visual indications on the devices, the HOBO and the arduino were still operational. Our predicted results were to see the most radiation blocked resulting in the least amount
Page 20 of 26 August 16, 2011Rev A

Gateway to Space ASEN/ASTR 2500 Fall 2011
of radiation detected by the radiation sticker to be by the combination of the aluminum foil and the rubber and the most radiation detected would be on the control on the outside of the cube. Because none of the radiation stickers detected anything, we cannot determine if these predictions were correct. Had burst been at a higher altitude as we were expecting, some radiation might have been detected because of the decreasing amount of ozone. But because the radiation stickers were not sensitive enough for the amount of radiation present at seventy two thousand feet, they did not detect any. As seen if figure 9.1, the radiation stickers are unchanged and have no indication of been exposed to radiation. The last picture the camera took indicates the camera failed during the descent phase of the flight. The time stamp on that picture was fifteen minutes before landing or twenty two minutes after burst. The Arduino logged the data from the pressure sensor attached to it successfully for the full flight. However, the flight data had some anomalies. Figure 9.3 shows the graph of the pressure data.
Failure Analysis:There is an approximate radiation level of 20 microsieverts per hour at 21 km.
The radiation stickers are able to detect a minimum of 25 microsieverts per hour. The radiation stickers might have detected radiation at a higher altitude (the predicted 30 km), being exposed to the radiation, also, for a longer period of time.. But because the radiation stickers were not sensitive enough for the amount of radiation present at seventy two thousand feet, they did not detect any.
Comparing the time which the camera shut off with the internal temperature taken by the HOBO, figure 9.2, the camera stopped taking pictures at the time when the lowest internal temperature occurred. When this time is compared with the external temperature, the shut down took place after the BalloonSat went through the tropopause on descent, indicated by the lowest temperature, which would be the roughest part of the flight. Therefore, the camera shut down was attributed to the cold and not to any stress or disconnection during the flight.
In a matter of about 5 seconds, pressure jumps from 20 kPa to 140 kPa. This cannot be accounted for by the vacuum bag depressurizing because that would have resulted in a lowering of pressure. The pressure sensor is to blame for this. To figure out why the pressure sensor took faulty data for the 32 minutes, we conducted a cold test because the two spikes in pressure occur at the two minimum points in temperature. However, this cold test was inconclusive. The Arduino did not shut off as a reaction to the cold. We then conducted a Vacuum test in the bell jar in Space Grant. In this test, the failure was repeated; the pressure reached as low as 20 kPa (as shown in Figure 9.4) just as it did during flight, and then immediately after, the pressure sensor recorded a much higher pressure.
After doing a little research on the pressure sensor that we used, we discovered that the pressure sensor is capable of recording accurate data between 50 kPa and 115 kPa. Though the sensor could record down to 20 kPa, this piece of hardware was not designed for the functionality which we tried to use it for.
However, the data the pressure sensor did accurately provide can show us that our Vacuum baggies did not keep pressure for very long in the flight. After only
Page 21 of 26 August 16, 2011Rev A

Gateway to Space ASEN/ASTR 2500 Fall 2011
approximately 20 minutes, the baggies become depressurized. This allows us to conclude that vacuum sealed baggies are not sufficient for the vacuum in near space.
Figure 9.1
Figure 9.2
Internal Temperature
Page 22 of 26 August 16, 2011Rev A
Gateway to Space ASEN/ASTR 2500 Fall 2011
External Temperature
Figure 9.3
Page 23 of 26 August 16, 2011Rev A

Gateway to Space ASEN/ASTR 2500 Fall 2011
Temperature Graph from Pressure Component:
Figure 9.4Bell Jar Data:
10.0 Ready for Flight
In order for our satellite to be ready to fly again, we must change most of the materials and hardware that we originally used. A water-sealed Tupperware container
Page 24 of 26 August 16, 2011Rev A

Gateway to Space ASEN/ASTR 2500 Fall 2011
would be used for the pressure test along with a new pressure sensor that can measure down to the predicted 3 hPA at the predicted 30 km. Another type of radiation detector would also have to be used. For a normal 30 km flight, the radiation stickers would have to detect at least 20 microsieverts per hour. The stickers would also have to react to this level of radiation within about 30 minutes in order to have been accurate with our flight. The new sensors would also have to be unaffected by extreme cold, a factor which we speculate that might also affect the original radiation stickers that we used. New radiation sensors, a new pressure sensor, a new pressure component, and some new batteries would create a new and updated version of our Emergency Man that would be ready to fly.
The radiation sensors must be stored in an environment protected from any radiation exposure so that they will be new and ready to go for flight.
To activate our payload, we would have a switch that turns on the new pressure sensor and then we would seal the sensor within the new pressure component. The new radiation sensors would be placed in the rubber, aluminum foil, and combination components. The satellite would then be sealed and launched.
11.0 Conclusions and Lessons LearnedConclusions:
Our flight data and flight failures have allowed us to conclude a few things about our experiment. A vacuum sealed baggy is not sufficient for holding pressure since our pressure data decreases within a matter of 20 minutes. The radiation stickers which we purchased are not sufficient for this specific satellite project. The radiation test we were hoping to conduct requires more sensitive and possibly more intricate sensors that can read lower radiation levels in a shorter amount of time than the radiation stickers. We have also concluded that our pressure sensor was not suited for this flight. We should have used a sensor that would sense as low as 3 hPa instead of a sensor that only measures as low as 500 hPa.
Lessons Learned:
The most important lesson learned from the building of the BalloonSat is to do more than you ever think that you have to for absolutely everything, especially research. We should research more into the hardware that we are planning to buy and how the hardware would function with the parameters of the experiment. The hardware used to record the data is the obviously the key component to the experiment because without it, no conclusive data is received and the mission would be inconclusive. The hardware that we purchased was not suited for the needs of the experiment. The radiation stickers were not sensitive enough to detect the radiation at the maximum altitude that we got to which was lower than we had expected and the pressure sensor only recorded accurate data between certain pressures and we were outside of its parameters. Testing a lot more before flight could have been very useful to prevent these failures. Although we did all of the required testing before launch, we should have tested the hardware more and put it through different tests, such as turning the Arduino on in the vacuum chamber. Other things that were learned throughout the design and building process is to not
Page 25 of 26 August 16, 2011Rev A

Gateway to Space ASEN/ASTR 2500 Fall 2011
procrastinate, use our time wisely, and to start early so that there is time to do more testing if needed.
12.0 Message to Next semester Make sure that you find a strong experiment and do a lot of research on your
experimental components and hardware. Work very hard and it will definitely pay off. Procrastinating is easy, but it can backfire on you very easily. Don’t let the due dates creep up too fast! Most importantly, work together as a team; teamwork is the key to success in this class. This is not an easy class, but it is fun as long as you are willing to put in the effort.
Page 26 of 26 August 16, 2011Rev A